

GE ATLAS GENTECH TSS308GE-A NZ, TSS308GE-A NZ User And Installation Manual

Mini-PBX
Telephone Switching System
User and Installation Guide
Model:
TSS308GE-A NZ
Imported, Distributed and Serviced by:
Atlas Gentech (NZ) Limited
87 Carbine Road
Mt Wellington
Auckland NZ
Ph: (09) 574-2700 Fax: (09) 574-2722

Contents Page
1 SAFETY MARKING LABEL ................................................ .... ... ........ .... .... ........ .... .... ....6
2 INTRODUCTION .............................................................................................................7
2.1 Features......................................................................................... .................................................................. ......... 7
2.1.1 Glossary of terms used............. .............................. ............................... .............................. .................................7
2.2 Specifications................................................................................................... ........................................................8
3 PARTS DIAGRAM...........................................................................................................9
4 INSTALLATION & CONNECTION..................................................................................9
4.1 Important Installation Information.............................................................................. ............................... ....... 10
4.2 Product Installation Recommendations........................... ............................................................... ...................10
4.2.1 Installation options................................................................................................................... ..........................10
4.3 Layout of the TSS308GE2-A NZ PABX........................................................... ..................................................11
4.4 Connection Procedures...................................... ................................................................................................... 11
4.4.1 Connecting external CO lines & internal extensions to the unit:....................... .. ... .. ..... .. .. ..... .. ... .. ..... .. .. ... ....... 11
4.4.2 Example of a full Installation.................................................. .. ..... .. .. ... .... ... .. .. ... .... ... .. ... .... ... ............................12
4.5 Door Phone & Door Lock ...................................... .. ... .... ... .. .. ... .... ... .. .. ..... .. ... .. ..... .. ... .. .. ..... .. ... ............................13
4.5.1 Connecting Door Phone & Door Lock to the unit............................................................................................. 13
4.6 Mains Power.............................................. .. .. ..... ... .. .. ..... .. ... .. ..... .. .. ..... .. ... .. ..... .. .. ... ..... .. ..... .............................. ..... 14
4.6.1 Check 230VAC power before connecting the MINI PBX:............................. .................................................. 14
4.6.2 Power Failure ................................................................................................................................................ ..... 14
5 OPERATING INSTRUCTIONS .....................................................................................15
5.1 Receiving an external call from the CO line.................................................. ....................................................15
5.1.1 Operator Attendant Mode ..................................................................................................................................15
5.1.2 Auto Attendant Mode...................................... .. ... .. ... .... ... .. .. ..... .. ... .. .. ..... .. ... .. ..... .. ... .. ..... .. .. ...............................15
5.2 Internal Call...................................................... .. ... .. ..... .. .. ..... .. ... .. ..... .. .. ..... .. ... .. ..... .. ... .......................................... 15
5.3 External Call............................................................................... ........................................................................... 16
5.3.1 Direct External Dialing...................................... .. ..... .. .. ... .... ... .. .. ..... .. ... .. ..... .. ... .. ..... .. .. ... .... ..... ..........................16
5.3.2 Making an external call by dialing 9................................... .............................................................................. 16
2

5.3.3 Making an external call by pressing the <flash Key> or by tapping the Hook Switch................................. ...17
5.3.4 Preferred Line Assignment---Outgoing....................................................................... ............................... ....... 17
5.4 Make an external CO call with the help of an operator or an Assistant........................................................18
5.5 External Call Waiting............................................. .............................. ................................................................18
5.6 Transfer an external Call to anoth er Extension................................................................................................19
5.7 Setting up a Conference call (3 Party).............................. .. ..... .. .. ... .... ... .. .. ... ..... .. .. ... .. ..... .. .. ... .. ... .......................20
5.8 Call Pick Up................................... .. ... .. ..... .. ... .... ... .. .. ..... .. ... .... ... .. .. ..... .. ... .... ... .. ... .... ... .......................................... 20
5.9 Call Forwarding.......................................... ..... .. ... .... ... .. .. ..... .. ... .... ... .. .. ..... .. ... .... ... .. ... .... ...................................... 20
5.9.1 Set up call forwarding................................ ... .. .. ..... ... .. .. ..... .. ... .. ..... .. .. ... .. ..... .. .. ... .... ... .. ... .. .................................20
5.9.2 Clear call forwarding......................... ............................... .............................. ................................. ................... 20
5.10 Priority Access........ .... ... .. .. ... .... .............................................................................................. ...............................21
5.11 Answering a call from the Door Phone...................................................... .........................................................21
5.11.1 Answering the Door Phone from a ringing extension..................................................................................21
5.11.2 Answering the Door Phone from a non ringing extension...........................................................................21
5.12 To open the Door Lock.........................................................................................................................................22
5.12.1 To open the door lock after answering t he d oor Phone............................................. ................................... 22
5.12.2 To open the door lock remotely................................................................ ....................................................22
6 SYSTEM PROGRAMMING...........................................................................................23
6.1 General Programming Instructions.............................................................................. ............................... ....... 23
6.1.1 Default Setting..................................... ..... .. ... .. ..... .. ... .. ..... .. .. ... .... ... .. ..... .. .. ... .... ... .. ... .... ... . ............................. ..... 23
6.1.2 Extension Used for Programming............................... .............................. .........................................................23
6.1.3 Before Programming...... ..... .. ... .. ..... .. .. ... .... ... .. ... .. ..... .. .. ... .... ... .. .. ... .... ... .. .. ..... .. ... .. ..... .. ... .. .. ...............................23
6.1.4 Program a system setting ........................... ... .. ..... .. ... .. ..... .. .. ... .. ..... .. .. ... .... ... .. .. ..... .. ... .. ... .... ... ............................23
6.1.5 After Programming a system setting ............................... .. .. ..... .. ... .. .. ..... .. ... .. ..... .. ... .. .. ..... .. ... .. .. ........................ 23
6.2 Password ................................. ............................................................................................................................... 24
6.2.1 Input the System Password................................................................................................................................24
6.2.2 Change the System Password ........................................................................ ....................................................24
6.3 Attendant Mode Assignment ................................................. ..... .. ... .. ..... .. .. ... .... ... .. ... .... ... .. .. ..... .. ........................24
6.3.1 Operator Attendant mode Assignment (default setting)................................... ............................................... 24
6.3.2 Auto Attendant mode Assignment with Outgoing Message (OGM)................................................................ 25
6.3.3 Auto Attendant mode Assignment w ith Outgoing Message (OGM) for designated CO lines..................... ...25
3

6.3.4 Operator No 1 Assignment for Auto Attendant mode ...................................................................................... 25
6.3.5 Operator No 2 Assignment for Auto Attendant mode ...................................................................................... 26
6.4 External Dialing Mode .................................................. ............................................................... ........................26
6.4.1 External Dialing Mode Assignment .................................. .. ... .... ... .. .. ... .... ... .. .. ..... .. ... .. ..... .. ... .. .. ..... .. ................. 26
6.4.2 Restore to default External Dialing Mode......................................................................................................... 27
6.5 External (CO) Line Connection Assignment....................... ..............................................................................27
6.6 Ringing extensions assignment................................ ............................................................................................28
6.6.1 Ringing extensions assignment for External (CO) Lines............................ ...................................................... 28
6.6.2 Ringing extensions assignment for Door Phone .................................. .. ..... .. .. ... .. ..... .. ... .. .. ..... .. ... .. .. ... ....... ....... 28
6.7 Call Restriction-Class Assignment..................................................................................... ................................. 29
6.7.1 Call restriction class Assignment for A Certain Extension. ... .... ... .. .. ... .... ... .. .. ..... ... .. .. ... .... ... .. .. ... .... ... .. .. ... ....... 29
6.7.2 Call restriction Class Assignment for All Extensions....................................................................................... 29
6.7.3 Restriction Group A for Local Call Assignment................................................................ ...............................30
6.7.4 Clear Restriction Group A for Local Call Assignment..................... ............................... .............................. ...30
6.7.5 Restriction Group B for Local Call Assi gnment............................. ............................................................. ..... 30
6.7.6 Clear Restriction Group B for Local Call Assignment ........................ .............................................................30
6.8 Special Dialing Numbers (Prefix).......................................... ... .. ..... .. .. ... .. ..... .. .. ... .. ..... .. ... .. .. ... ............................31
6.8.1 Special Dialing Numbers (Prefix) Assignment................... ................................................................ .............. 31
6.8.2 Clear Special Dialing numbers (Prefix) Assignment........................................................................................ 31
6.9 Restrict the Line’s Right to Use......................................... ..................................................................................32
6.9.1 Assign CO line to be exclusively accessed by designate d extension (s) for outgoing calls............................ 32
6.9.2 Assign Extension (s) to access only a Designated CO line for external calls.................................................. 33
6.10 Extension Number Assignment ........................................................................................................................... 33
6.10.1 Change Extension Number...........................................................................................................................33
6.10.2 Restore to default Extension Numbers............................................................ ............................................. 34
6.10.3 User Extension Number Confirmation.........................................................................................................34
6.11 Call duration limit.............................................. ... .. .. ..... .. ... .. ..... .. .. ... .... ... .. ..... .. ... .. ..... .. .. ......................................34
6.11.1 Limit Call Duration........................... .. ..... .. .. ... .... ... .. ..... .. ... .... ... .. ..... .. .. ... .... ... .. ..... .. ... .... ... ............................34
6.11.2 Clear Limited Call Duration ...................................................................................................... ................... 35
6.12 Outgoing Message (OGM) ....................... .. .. ..... .. ... .. ... .... ... .. .. ..... .. ... .. ..... .. .. ... .. ..... .. .. ... ..... .. .. ... .... ........................35
6.12.1 Recording of Out Going Message................................................................................................ ................. 35
6.12.2 Listen to Out Going Mesage............. .. .. ... .. .. ... .. ... ..................................... ....................................................36
6.13 Internal or External Music on Hold ..................................... ... .... ... .. .. ... .... ... .. .. ... .... ... .. ... .. ..... .. .. ........................36
4

6.13.1 Connecting External Music On-Hold.................. .........................................................................................36
6.13.2 Listen to Interna l or External Music On hold...............................................................................................36
6.14 Select system Line break Time Range for internal flash recognition................ ............................................. 37
6.15 Restore System Data Default Settings .................................. ... .... ... .. .. ..... .. ... .. ... .... ... .. .. ..... .. ... .. .. ........................37
6.16 Door Phone & Door Lock Accessories....................................... ......................................................................... 38
6.16.1 Door Phone................................................................................................ .................................................... 38
6.16.2 Door Lock...................................................... ................................................................................................ 38
7 SUMMARY OF SYSTEM OPERATION AND PROGRAMMING..................................39
8 MAINTENANCE & TROUBLESHOOTING.......... .... .... .... .... ........ .... ... .... ........ .... .... .... ..40
8.1 Outgoing calls can’t be made......... ... .. .. ... .... ... .. ... .................................................................... ............................40
8.2 External calls can’t be received.................... .. .. .................................................................... ...............................41
8.3 Intercom CALL can’t be made ...........................................................................................................................42
8.4 Warranty Information...................................................................................... ....................................................42
5
WARNING
THE SYSTEM MUST BE UNLOCKED BEFORE PROGRAMMING. USE EXTENSION
801 FOR UNLOCKING AND PROGRAM MING THE SYSTEM. THE SYSTEM WILL BE
AUTO LOCKED AF TE R PLAC ING THE HANDS E T BACK ONTO THE HOOK
SWITCH.
WHEN A FAILURE OCCURS WHICH RESULTS IN INTERNAL PARTS BECOMING ACCESSIBLE,
DISCONNECT THE POWER CORD IMMEDIATELY AND RETURN THE UNIT TO THE REPAIR
CENTRE.
DISCONNECT THE POWER BEFORE DISCONNECTING THE TELECOM CONNECTION PRIOR
TO RELOCATING THE EQUIPMENT. RECONNECT THE POWER LAST.
THE POWER SOCKET WALL OUTLET SHOULD BE LOCATED NEAR THIS EQUIPMENT AND
SHOULD BE EASILY ACCESSIBLE.
TO PREVENT FIRE OR ELECTRICAL SHOCK HAZARD, DO NOT EXPOSE THIS PRODUCT TO
RAIN OR ANY TYPE OF MOISTURE.
1 SAFETY MARKING LABEL
CAUTION: When using this equipment, there are basic safety instructions that should always be
followed. Refer to IMPORTANT SAFETY INSTRUCTIONS provided with this product and keep them
for future reference.
6

2 INTRODUCTION
This Mini-PBX is designed to provide a low cost professional telephone switching system.
Up to 3 external analogue telephone lines and up to 8 internal extensions can be connected.
2.1 FEATURES
• Operator Attendant Mode –allows an ‘operator’ or one designated extension to
answer all incoming calls
• Auto-Attendant Mode – allows the external caller to dial the desired extension or
operator directly.
• Call transfer – allows the extension to transfer an external call to another extension
• Call Pick Up – allows a non ringing extension to answer a call to another extension.
• Music on hold with internal or external source option
• External CO Line Ring assignment – any extension(s) can be assigned to ring when
there is an external call.
• Flexible numbering of extensions – any extension can be allocated any ‘extension
number’ in the range from 100 to 999.
• Seven levels of call restriction – controls what numbers an extension can dial – i.e.
no International calls without permission
• Call duration control – limits the time a person can be on a call
• Power failure transfer of external CO lines to fixed internal extensions – can still
make and receive calls in case of power outage (limited service)
• Three-way conference – an external caller can speak to two internal extensions at
the same time.
• Intercom communication – call from one extension to another (not using external
telephone network, so no charge)
• Multiple communication paths
• Call forwarding – a user can program their extension to forward an external or
internal call to another telephone extension.
• Door Phone and Door Lock Opener (optional)
• Computer interface for Call Accounting package (optional)
2.1.1 GLOSSARY OF TERMS USED
CO Central Office or Local telephone Exchange
DTMF Dual Tone Multi Frequency: Tones used for dialing.
DISA Direct Inward System Access to internal extensions
7
2.2 SPECIFICATIONS
• Capacity: 1 to 3 external CO Lines
• Exterior sockets: 3 for external CO lines,
• Transmission specification: Extension to extension ≤ 1.5dB
Extension to trunk line ≤ 2.0dB
• Ringing Voltage: 65VAC 50Hz
• Feeding current: 48v-60v/25mA
• Relative unbalance against ground: 300Hz-600Hz ≥ 40dB
Dialing mode: DTMF
Power supply: Input Voltage: 230VAC ±10% ~ 50Hz
Operational environment: Room Temperature
1 to 8 internal Extensions
8 for internal extensions,
1 for Door Phone and Door Lock (optional)
1 for external Music on Hold Source
1 for Computer with Call Accounting package (optional)
600Hz-3400Hz ≥ 46dB
Max power consumption: ≤20VA
Relative humidity ≤90% (non condensing).
Special Notes for New Zealand:
PTC200 General Warning
1. The grant of a Telepermit for any item of terminal equipment indicates only that Telecom
has accepted that the item complies with minimum conditions for connection to its
network. It indicates no endorsement of the product by Telecom, nor does it provide any
sort of warranty. Above all, it provides no assurance that any item will work correctly in
all respects with another item of Telepermitted equipment of a different make or model,
nor does it imply that any product is compatible with all of Telecom's network services.
8
PTC200 6.11.1 (3) All Customer Equipment (fail safe requirements)
2. Under power failure conditions this appliance may not operate. Please ensure that a
separate telephone, not dependent on local power, is available for emergency use.
PTC200 10.3.3 Fault Clearance (2) Secondary Fixed Wiring
3. In the event of any problem with this device, it is to be disconnected, and a CPE item
connected to one of its terminal ports may be connected directly in its place. The user
should then arrange for the product to be repaired. Should the matter be reported to
Telecom as a wiring fault and the fault is proven to be due to this product, a call out charge
will be incurred by the customer.
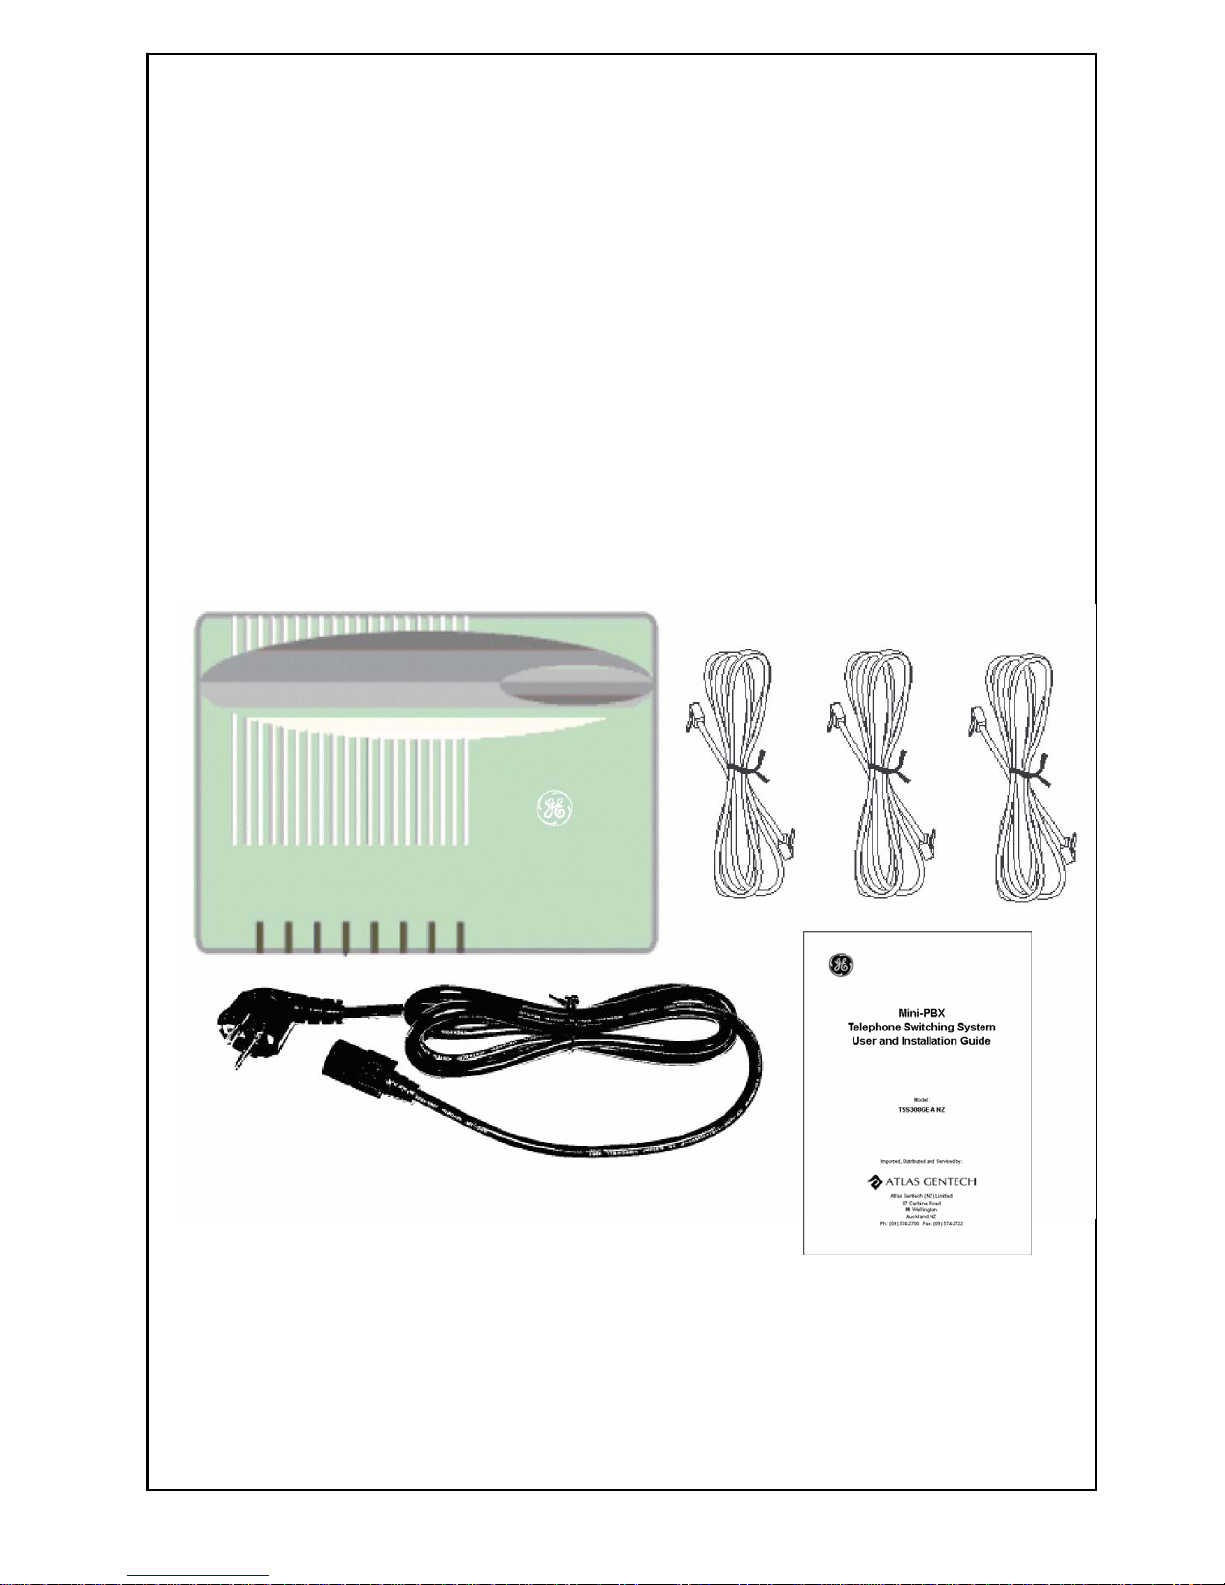
3 PARTS DIAGRAM
CHECK THAT THESE PARTS WERE IN THE BOX AS RECEIVED
4 INSTALLATION & CONNECTION
For easy and quick installation and connection, it is strongly recommended that you read and
follow these instructions carefully, so as not to damage the product accidentally by setting it up
incorrectly.
9
4.1 IMPORTANT INSTALLATION INFORMATION
• Never install telephone wires during an electrical storm (thunder and lighting)
• Never install telephone jacks in wet locations unless the jack is specifically designed for wet
locations
• Never touch un-insulated telephone wires or terminals unless the telephone line has been
disconnected at the network interface
• Use caution when installing or modifying telephone lines
4.2 PRODUCT INSTALLATION RECOMMENDATIONS
Caution: The Power Plug should be installed in a socket outlet which is close to the equipment
and easily accessible
The following places are not recommended for product installation:
• Avoid places where shock or vibration are present
• Avoid dusty places
• Avoid places where water or oil may come into contact with the product.
• Avoid places near high-frequency generating devices such as micro wave ovens,
sewing machines or electric welders
• Avoid places within 2 metres of television sets
• Avoid places where the environment is hot and where there is no air movement.
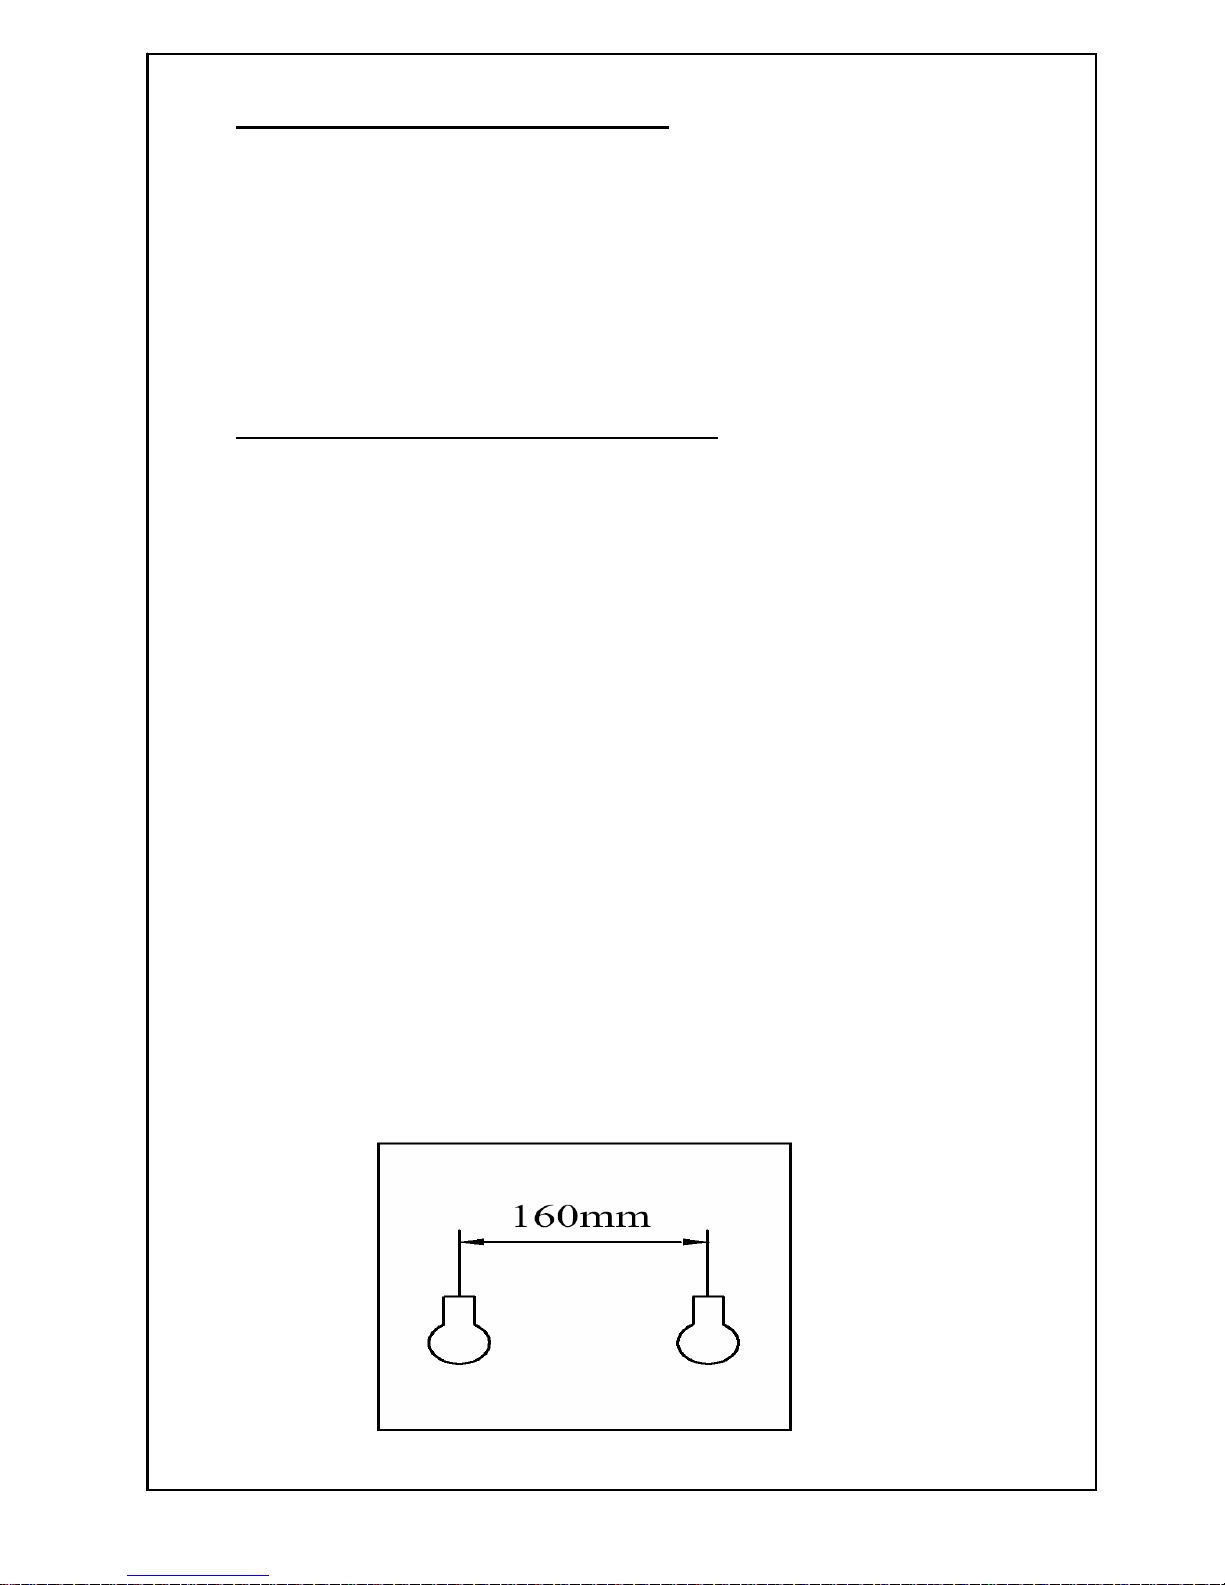
4.2.1 INSTALLATION OPTIONS
This product is designed for wall mounting or for sitting on a shelf.
If the unit is going to be wall mounted, you must drill two holes into the wall, 50mm deep and
160mm apart. After inserting two wall plugs of the correct diameter into the wall, you can screw
two screws into the two wall plugs. The unit can then be mounted on the wall.
10

4.3 LAYOUT OF THE TSS308GE2-A NZ PABX
4.4 CONNECTION PROCEDURES
4.4.1 CONNECTING EXTERNAL CO LINES & INTERNAL EXTENSIONS TO THE UNIT:
• Connect external CO lines to the corresponding CO line ports on the unit
• Connect internal extensions according to the indicated extension positions
• Take care not to make short circuits
11
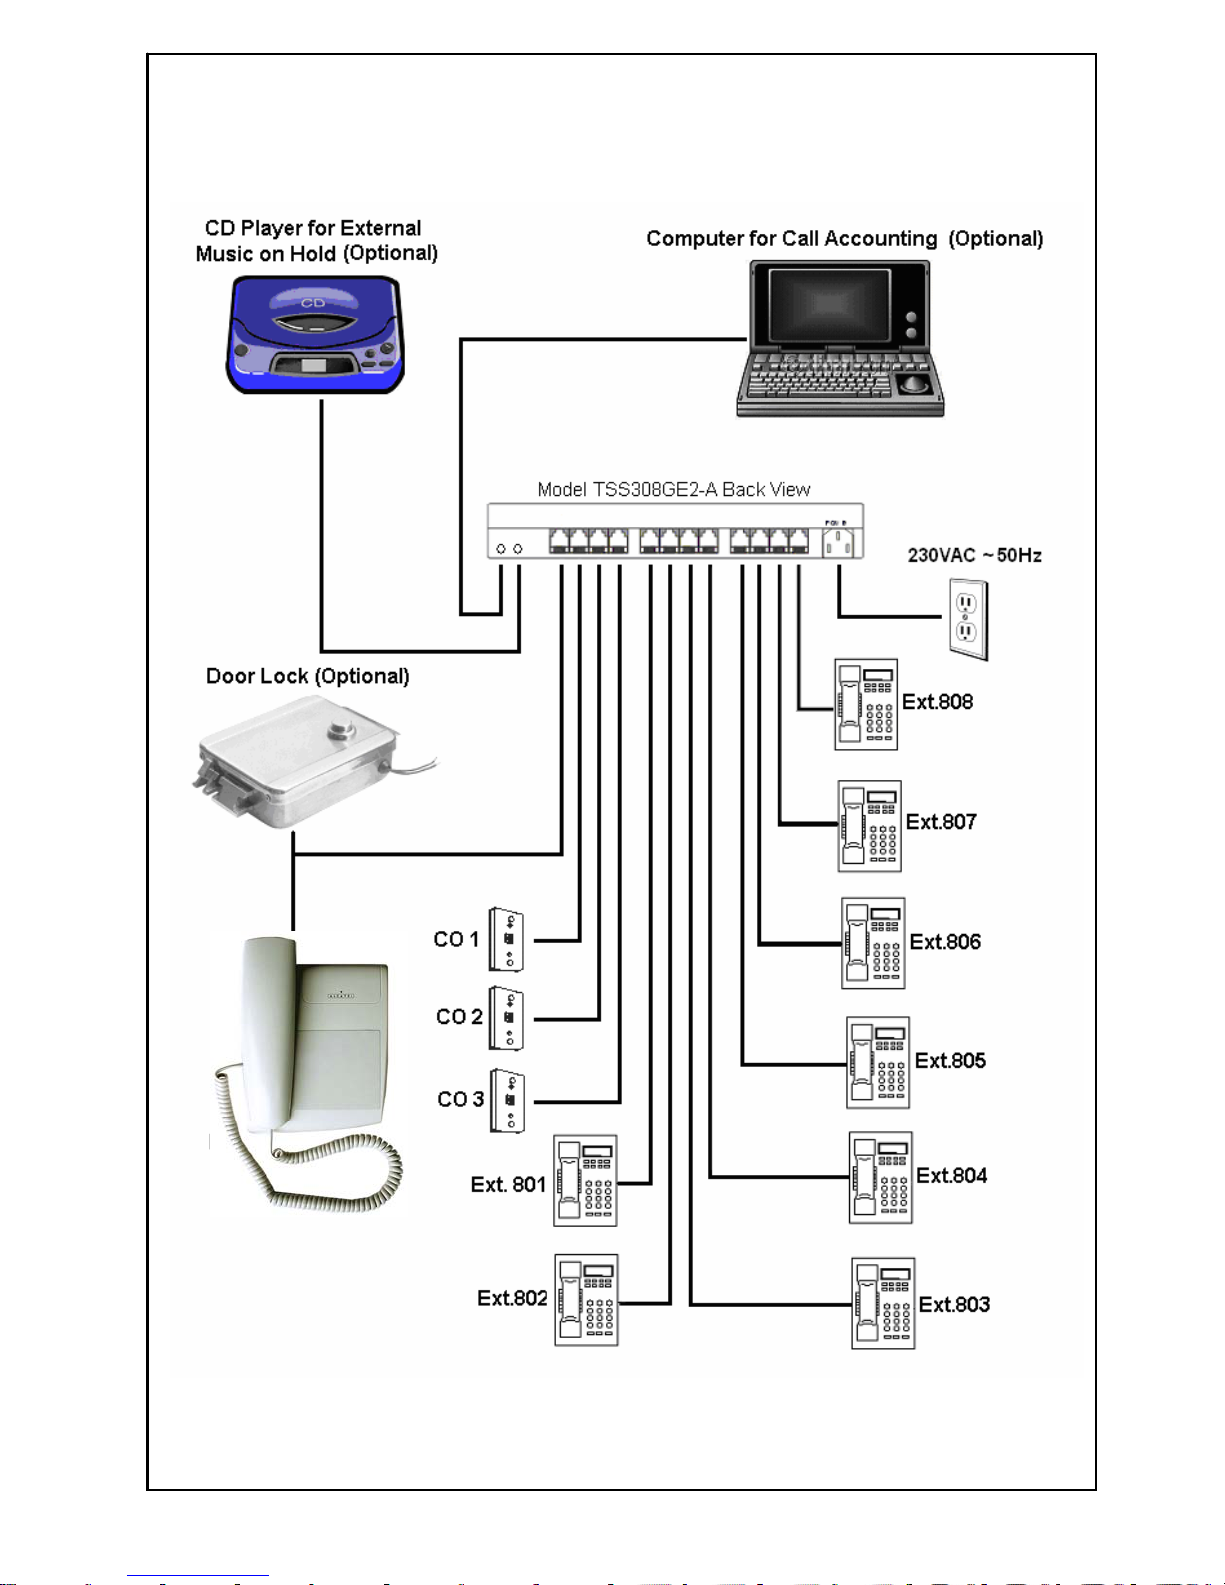
4.4.2 EXAMPLE OF A FULL INSTALLATION
Door Phone (Optional)
12
4.5 DOOR PHONE & DOOR LOCK
To meet the needs of our customers, two additional functions have been added
• TALK-BACK DOOR PHONE
• ELECTRICALLY CONTROLLED DOOR LOCK
These products are suitable for offices and villas.
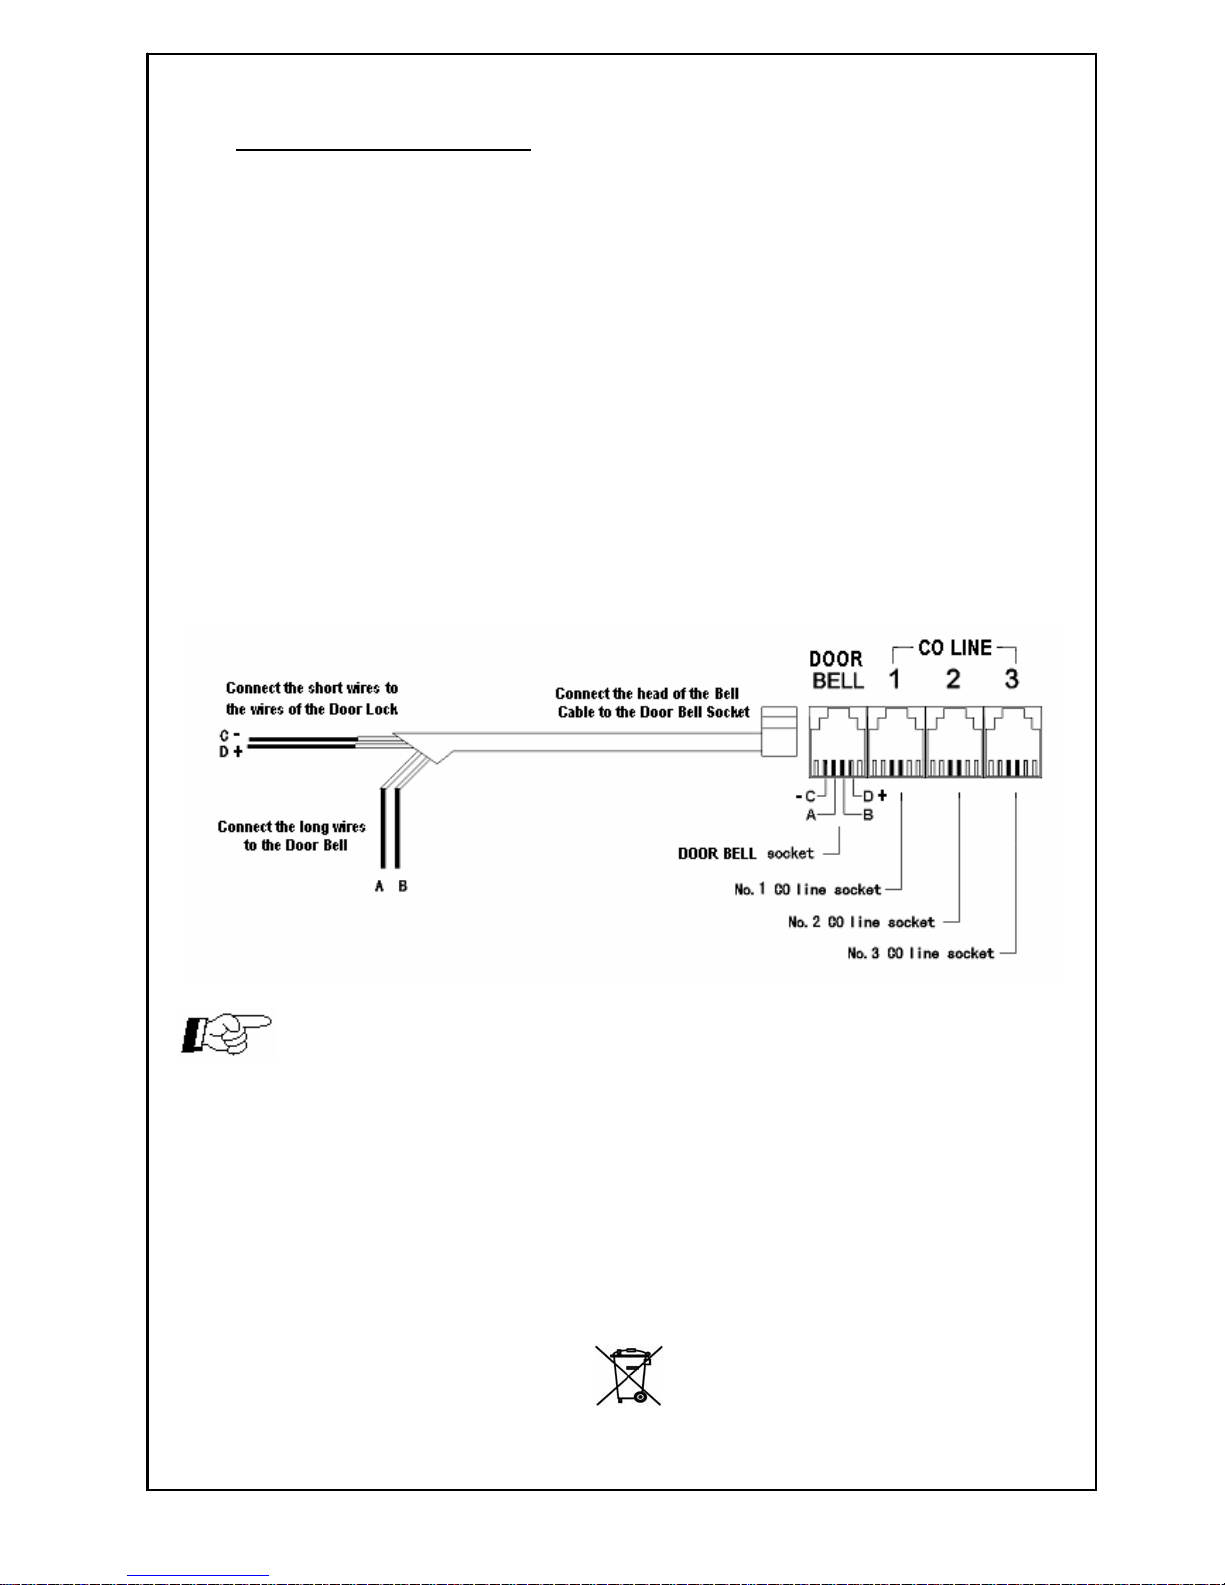
4.5.1 CONNECTING DOOR PHONE & DOOR LOCK TO THE UNIT
Connect the head of the bell cable coming from the Door Phone & Door Lock to the Bell socket
at the back of the PABX.
Connect the long cores of the bell cable (A&B) to the Door Phone or Mini Telephone.
Connect the short cores of the bell cable (C&D) to the electrically controlled lock.
(To open the Door Lock, the unit will send a short but strong electrical pulse)
Please refer to the schematic below.
• If a door phone is required it should be purchased seperatly.
• An electrically controlled Door Lock can be purchased from a lock shop or
electronics store.
Used equipment must be disposed of in compliance with current environmental protection
regulations. You should return it to your reseller or dispose of it at an approved recycling
centre.
Environment
13
 Loading...