

GE TFXA227F, TFXB27F User Manual
Refr@erator
Safe~
instructions .........................3
Problem
More questions
GE Answer Centera 80~626.2000
Operating Instructions, Tips
Energy-Saver System ....................................4
Energy-Saving
Food-Saver System . . . . . . . . . . . . . . . . . . . . . . . . . . . . . . . . . . . . . . 12
Food Storage Suggestions . . . . . . . . . . . . . 11
Storage Times . . . . . . . . . . . . . . . . . . . . . . . . . . . . . . . . . . . . . . . . . . . 11
Ice & Water Dispenser...........................6- 10
Icemaker ...................................................6
Refreshment Center ......................................5
Shelves . . . . . . . . . . . . . . . . . . . . 13, 14
Storage Drawers . . . . . . . . . . . . . . . . . . . . 12
Drawer and Cover Removal
Temperature Controls ...................................4
Tips.........................................2
–10
...................l6
❑
✎✌
g
Care and Cleaning
Cleaning–Inside and Outside . . . . . . . . . . . . . . . . . . . 15
Condenser . . . . . . . . . . . . . . . . . . . . . . . . . . . . . . . . . . . . . . . . . . . . . . . . . . . . .
Drawer and Cover Removal . . . . . . . . . . . . . . . . . . . . . . 16
Light Bulb Replacement . . . . . . . . . . . . . . . . . . . . . . . . . . . . . 17
.
16
Preparation
Adjustable Rollers . . . . . . . . . . . . . . . . . . . . . . . . . . . . . . . . . . . . . . . . 18
Base Grille . . . . . . . . . . . . . . . . . . . . . . . . . . . . . . . . . . . . . . . . . . . . . . . . . . . . .
Clearances . . . . . . . . . . . . . . . . . . . . . . . . . . . . . . . . . . . . . . . . . . . . . . . . . . . .
Location . . . . . . . . . . . . . . . . . . . . . . . . . . . . . . . . . . . . . . . . . . . . . . . . . . . . . . . . .
Vacation and Moving . . . . . . . . . . . . . . . . . . . . . . . . . . . . . . . . . . 18
Water Supply to
Installation
Adapter Plug . . . . . . . . . . . . . . . . . . . . . . . . . . . . . . . . . . . . . . . . . . . . . . . .
Electrical Requirements .............................19
Extension Cords . . . . . . . . . . . . . . . . . . . . . . . . . . . . . . . . . . . . . . . . . . . 19
Grounding . . . . . . . . . . . . . . . . . . . . . . . . . . . . . . . . . . . . . . . . . . . . . . . . . . . . .
Consumer Services ...................23
Appliance Registration ..................................2
Model and Serial Numbers ..........................2
Warranty ........................................Back Cover
Solver.......................2o-22
?...call
.
18
.
18
.
18
Icemaker
. . . . . . . . . . 18
.
19
.
19
GE Appliances
Models: TFXA27f
TFXW27F
TFXB27F
~LP
US
~LP
YOU...
Read this book
It is intended to help you
operate and maintain your new
refrigerator properly.
Keep it handy for answers to
your questions.
If you don’t understand something
or need more help, write (include
your phone number):
Consumer Affairs
GE Appliances
Appliance Park
Louisville, KY 40225
careftily.
Write down the model and
serial numbers.
You’ll see them on a label on the
wall beside the top drawer or at
the bottom, inside the fresh food
compartment door.
These numbers are also on the
Consumer Product Ownership
Registration Card that came with
your refrigerator.
Before sending in this card,
please write these numbers here:
Model Number
Serial
Number
Use these numbers in any
correspondence or service calls
concerning your refrigerator.
If you received a
damaged refrigerator...
Immediately contact the
(or builder) that sold you the
refrigerator.
deder
Save time and money.
Before you request
service...
Check the Problem Solver in the
back of this book. It lists minor
operating problems that you can
correct yourself.
● Location of your refrigerator is important. Avoid ● Be sure the doors are closed tightly. Before leaving
locating it next to your range, a heating vent or where the house or retiring for the night, check to be sure the
the sun will shine directly on it.
● Close the doors as soon as possible, particularly in
hot, humid weather. inside the refrigerator.
m
To obtain service, see the
Consumer Services page in the
back of this book.
We’re proud of our service and
want you to be pleased. If for some
reason you are not happy with the
service you receive, here are three
steps to follow for further help.
YOU
FIRST, contact the people who FINALLY, if your problem is
serviced your appliance. Explain
why you are not pleased. In most
cases this will solve the problem.
NEXT, if you are still not pleased,
write all the details—including
your phone number—to:
Manager, Consumer Relations
GE Appliances
Appliance Park
Louisville, KY 40225
~ED
doors haven’t been left open accidentally.
● Keep foods covered to reduce moisture buildup
SERWCE
not resolved, write:
Major Appliance Consumer
Action Panel
20 North
Chicago, IL 60606
Wacker
Drive
still
WA~~&Wh~n
A
appiiance, aiways
precautions, including
●
Use this appliance
using
this
exercise basic safety
the
following:
ordy
for
its
intended
as described in this Use and Care Guide.
●
This refrigerator must be properly
in
accord~ce
before
it is used.
with
See
the
Installation
grounding instructions and
the Instigation section.
.::: ::,
“:.
●
.;i::t~~ by Pulungon
,$’:’’’,:,,$
.
#
Never
grip plug
from the
*Repair or
service cords that
otherwise
crack
damaged. Do
or abrasion damage
either the plug
*When moving your refrigerator
—
the
waii,
be
the
power
cord.
unplug
your refrigerator
the power ~fi+ Always
fiily
and
pull
straight out
outiet.
repiace
immediately
all
electric
have become frayed or
not
use a cord that shows
aiong
its length or at
or connector end.
carefui not
to
rofl
over or damage
away from
purpose
instailed
btructions
*
D@n’t m~Hze fro~en
completely. The
Agriculture in Home and
foods
United
wMch have
States
Department
tiden
Bulletin
thawed
of
No, 69
says:
“,.. You
thawed if they
still
“.
,. Thawed ground meats,
any
should not
discarded. If the odor or
may
safely refreeze
fro2en
foods that have
still contain ice crystais
cold—below
40QF.
pouhry or fish
off-odor or off-color should
be
eaten.
Thawed
color
not
ice cream should
of any food is poor
or if
that have
be
refrozen
they
and
be
are
or questionable, get rid of it. The food maybe
dangerous to eat.
“Even partial thawing and refreezing reduces the
eating quality of foods, particularly
vegetables and prepared foods. The
of red meat is affected less than
foods.
Use refrozen foods as soon as possible to
their
save as much of
.
Unplug
mting
and
eating quality as you can.”
your refrigerator
repairs.
NOTE:
fmits,
eating quaiity
that
of many
before
cleaning
We strongly
other
recommend that any servicing be
performed by
aqudified
individual.
o m’
not
hang on
the shelves
aiiow chiidren
to climb,
stand
or
in the refrigerator. They
could damage the refrigerator and seriously
injure
themselves.
●
If
your
old refrigerator is still around
house
but not in use, be sure to
will
refri~rator
cold
surfaces in the freezer
is in operation,
reduce the
do
@
* After
your
not
touch the
the
remove the doors. This
possibility of danger to children.
compartment particularly when hands
are damp or
weL Stin may adhere
to
these
extremely cold surfaces.
* b
not
place
icema~g
pi~ed
moving
in. This
parts of
fingers or
mechanism
will prevent contact with
the
ejector mechanism, or with the
hands
on the
w~e
the refrigerator
automatic
is
the
heating element that releases the cubes.
*Do
not
aiiow
an
the
They
even
tip it
anyone to climb,
Ref~hment
could duage
over, G&using
Center Compartment
the refrigerator and
severe
si~
stand or hang
maybe
personai inj~.
door.
●
Before
replacing a burned-out light bulb,
unplug the refrigerator or turnoff power
circuit
with a
may
control to
bre&er
or fuse box in order to
iive
wire filament. (A burned-out light bulb
bre~
when
being replaced,)
OFF
position does not
NOTE:
remove
at the
avoid
contact
Turning
power
the light circuit,
*
W
mot
store or use
vapors
and liquids in
gasoiine
the
or
oth~r fi*mmahle
vicinity of this or any
other ap~liance.
SAW -SE
~S~UCTIONS
to
OPEMT~G
YOUR
REFWGEMTOR
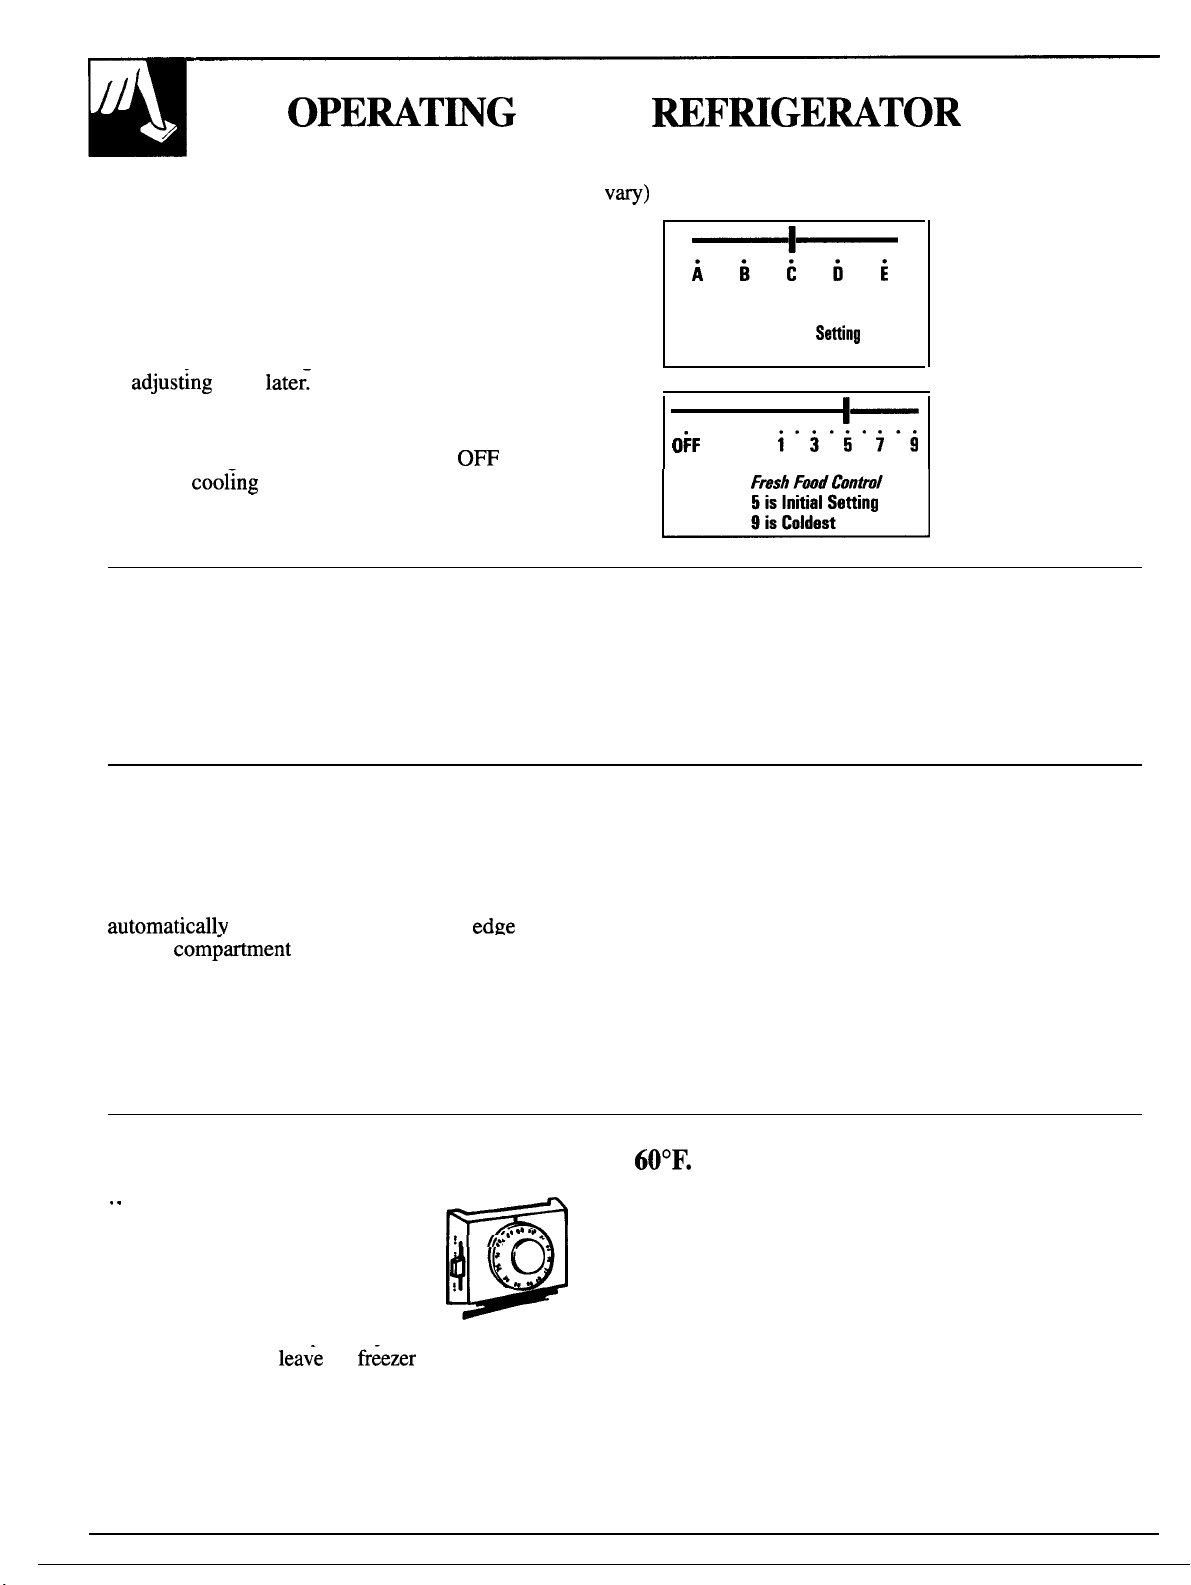
Set the Temperature Controls
Two controls let you regulate the temperature in the
fresh food and freezer compartments.
At first, set the fresh food control to “5” and the
freezer control to “C”.
Allow 24 hours for the temperature to stabilize,
whether you are setting the controls for the first time
or
adjust;ng
warmer temperatures in either compartment, adjust
the controls one step at a time.
Note: Moving the fresh food control to
turns off
food and freezer—but does not shut off power
to the refrigerator.
them
coofing
later:
Then, if you want colder or
in both compartments-fresh
(appearance ma
0~
How to Test Temperatures
Use the milk test for the fresh food compartment.
Place a container of milk on the top shelf in the fresh
food compartment. Check it a day later. If the milk is
too warm or too cold, adjust the temperature controls.
Vw)
y
—l—
Aitbi
Freezer Control
C
is Initial
E is Coldest
OkF
K
Use the ice cream test for the freezer compartment.
Place a container of ice cream in the center of the
freezer compartment. Check it after a day. If it’s too
hard or too soft, adjust the temperature controls.
Satting
,
l—
i.3”5. i.9
Automatic Energy-Saver System
You won’t find an “energy-saver” switch on this
refrigerator.
Warm liquid from the refrigerator’s condenser is
automaticdlv circulated around the front
freezer
forming on the outside of the refrigerator during
humid weather.
Many refrigerators use special electric heaters.
This refrigerator needs none. That’s why there is no
“energy-saver” switch.. there’s no need for it.
com~artment to help keep moisture from
edge
of the
If you turn your household thermostat below
. .
you may want to move the
freezer control one step colder.
Cooler temperatures in the house
may cause the compressor to
operate less frequently, thus
allowing the freezer compartment
to warm somewhat. To protect your
frozen food supply,
colder setting for the entire winter or for as long as you
keep your thermostat turned down.
lea;e
the
fr;ezer
setting at this
,,, “ ,,
!..
*
●
s
do
+.
@
No Defrosting
It is not necessary to defrost the freezer or fresh food
compartments. Although your refrigerator is designed
and equipped to defrost itself automatically, some
frost on packages is normal.
60°F.
at night...
Moving the freezer control to a colder setting should
have no effect on your fresh food compartment.
However, if freezing occurs, move the fresh food
control one step warmer.
When you stop turning the thermostat down, turn the
refrigerator’s controls back to their regular settings.
4
REFRESWNT
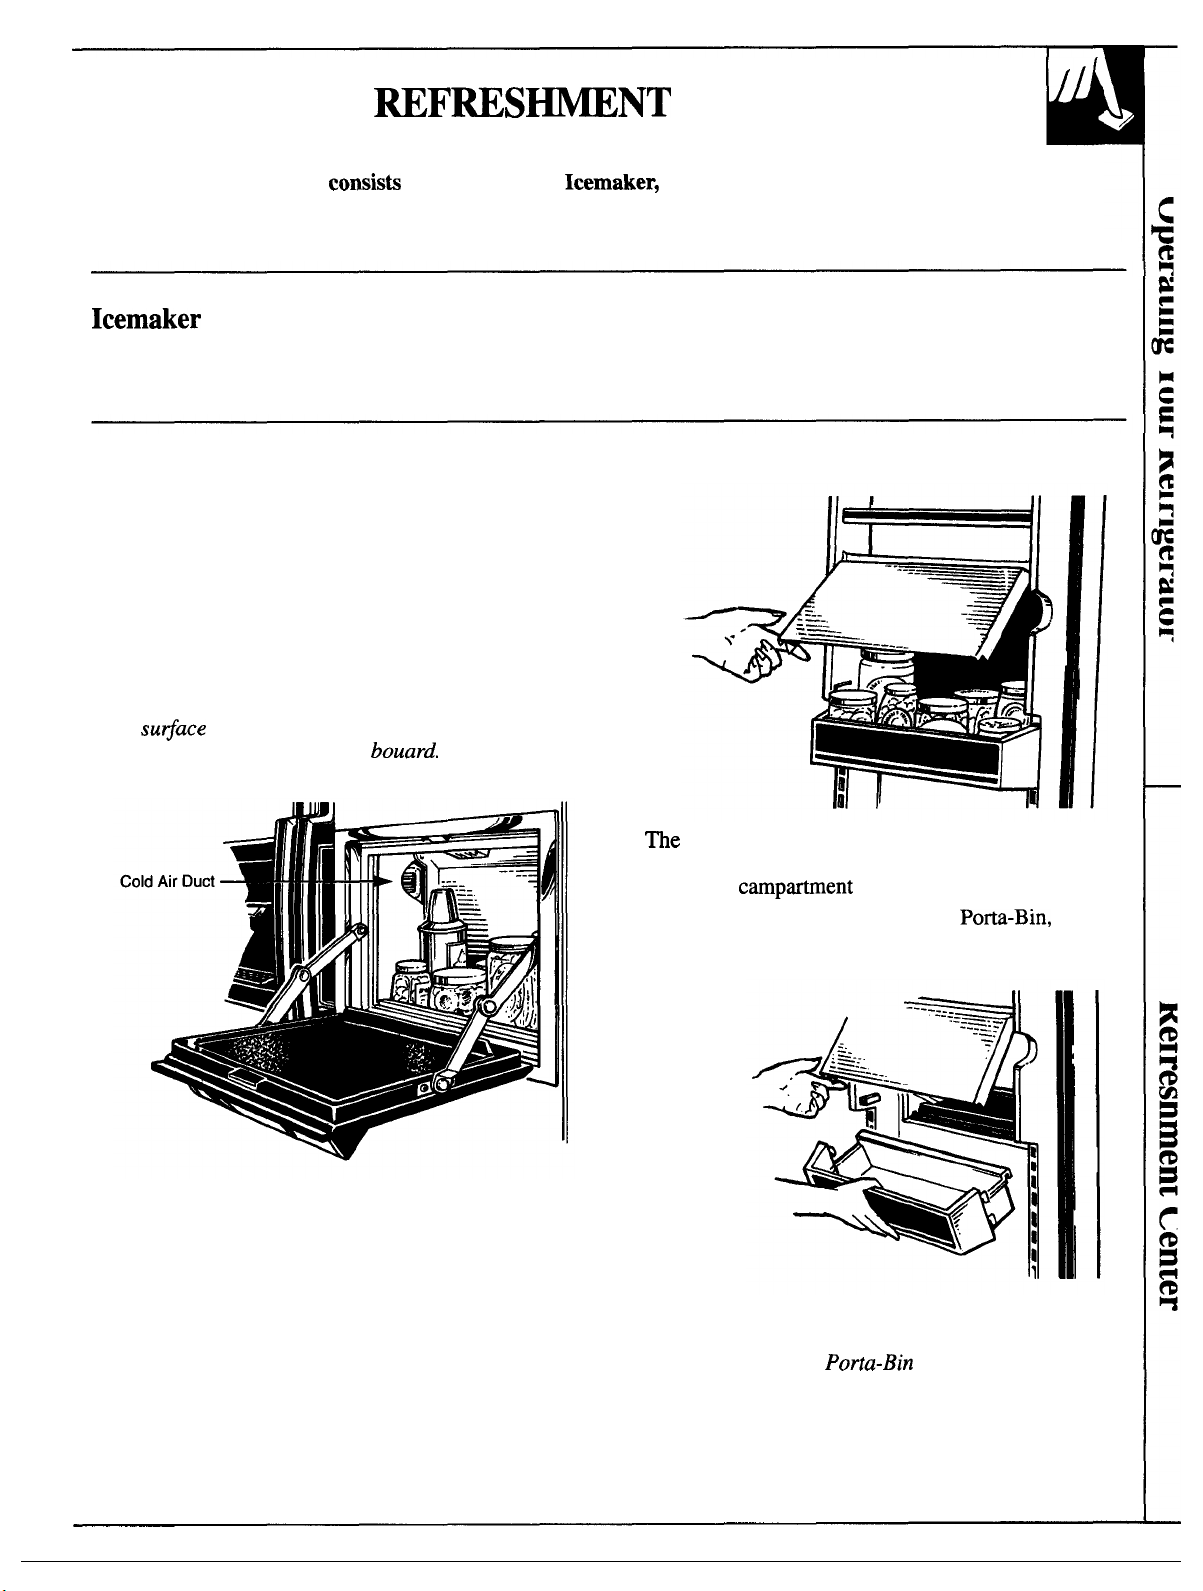
The Refreshment Center consisti of an Automatic Icemaker, an
Ice & Water Dispenser and a special Refreshment Center Compartment
with i@ own door that becomes a counter when you open it.
CENTER
Icemaker
It replaces the ice you use.. automatically.
Refreshment Center Compartment
It makes frequently used items stored on the fresh
food door readily accessible through the Refreshment
Center Compartment door without having to open the
main refrigerator door.
It provides an extra counter-high work surface with its
own light right at the refrigerator when the
Refreshment Center Compartment door is open. Close
the door after use.
Although durable, stain- and scratch-resistant, the
work
su$ace on the Refreshment Center counter
should not be used as a cutting
can damage it.
bouard.
Sharp utensils
Ice & Water Dispenser
It dispenses ice cubes, crushed ice and chilled water
through the freezer compartment door.
The Refreshment Center Compartment is also
accessible through a lift-up door on the inside of the
fresh food campartrnent door.
To remove the Refreshment Center Porta-Bin, open
the outer door to free the lip on the bin from the
overlapping door.
Cold air entering from the freezer compartment
keeps the temperature in the Refreshment Center
Compartment at proper food-keeping levels.
Then raise the inner door and lift the bin straight up
until hooks on bin come out of tracks on door.
Refreshment Center
its original position.
Porta-Bin must be replaced in
5
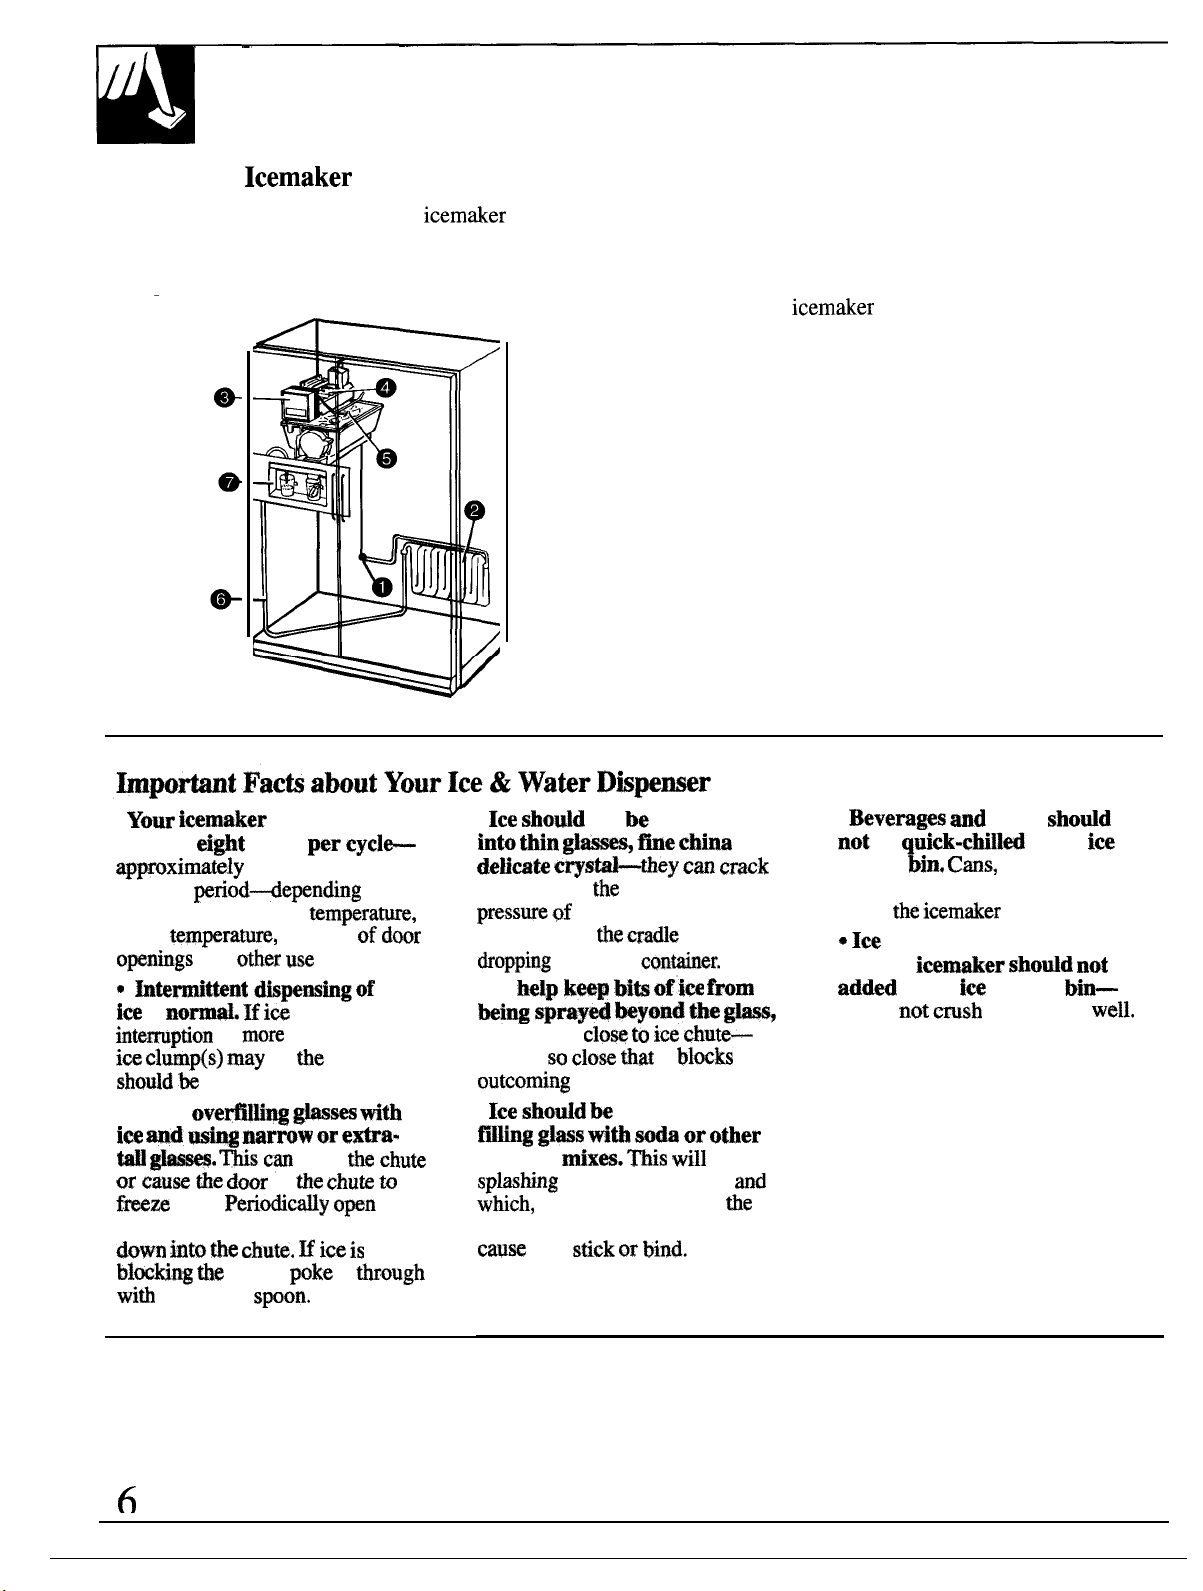
ICE & WATER DISPENSER
Automatic
Your refrigerator has an automatic icemaker and a
custom dispenser that dispenses chilled water, ice
cubes and crushed ice through the freezer
compartment door. Here’s how they work.
Icemaker
and Ice& Water Dispenser
Water flows from the household supply through a
(1) dual solenoid valve to the
(2) water reservoir and to the
(3) automatic
Water is frozen in the
(4) cube mold and ejected into the
(5) storage bin where a motor-powered auger moves
cubes forward into the dispensing unit. Cubes or
crushed ice, as selected, dispense through chute in
door when cradle is pressed.
When the switch is moved to CRUSHED, baffle in
housing channels cubes through the crusher and
crushed ice falls through chute into glass.
Water from reservoir flows through the
(6) tubing in the door and is dispensed when the
cradle is pressed.
(7) A light switch turns the night light in the
dispenser on and off.
icemaker as needed.
● Your icemaker will
produce
appximately
2&hour
freezer compartment
room
openkgs and
*
htetittent
i~
intemption
im
should be
*Avoid
im md, W glmm. ~s
or cause ti
freeze
ei~t
cubes
120 cubes in a
period+epending
ternperamre,
other use
dkpeming
is
M*.
clum~s)
is
may
If
more
removed.
ove@M~
-row or e-a-
c% jam
door
shut. Periodietiy
per cycle
tempera~~,
number of
conditions.
ico
flow
than
brief,
be
tie
cause and
g~ses tith
in
the chute to
opn
on
door
of
the chute
the
freezer compartment door and look
down h%o tie chute. H ice is
bl=ting tie
witi
a wooden
chute,
spon.
poke
it @uugh
● Ice shonid not be dispensed
into
thin gl~es, tie aim
delieate
or chip from
pressnre ~f
them against
tiOPP~ng
●
To
being apmyed
place glass
but not so
outcoming
●
Ice
~flMng -s tith SO* ar other
beverage
spbting
which,
C~Sti~y
the
combined
your hand pressing
the cradle
into the
blP
ka~ hits
cantainer.
#five
hymd tie m,
close to ice cbute—
close that
it blwks
ice.
shdd b~
dispersed before
dxes.
fiis will
which is annoying
if the splash reaches
or
can
crack
and ice
fFO~
prevent
md
the
ice
and water selector switch, could
cause
it to
stick or bind.
● Bevernges
not
be quick-chilled in the ice
storage
and
foods
bti.
Cms, bottles or food
shodd
packages in the storage bin may
the icem~er
cause
o Ice
other than that produced
by your
added to the ice storage bin—
it may
icemaker should not be
not cmsh or dispense
to malfunction.
well.
6
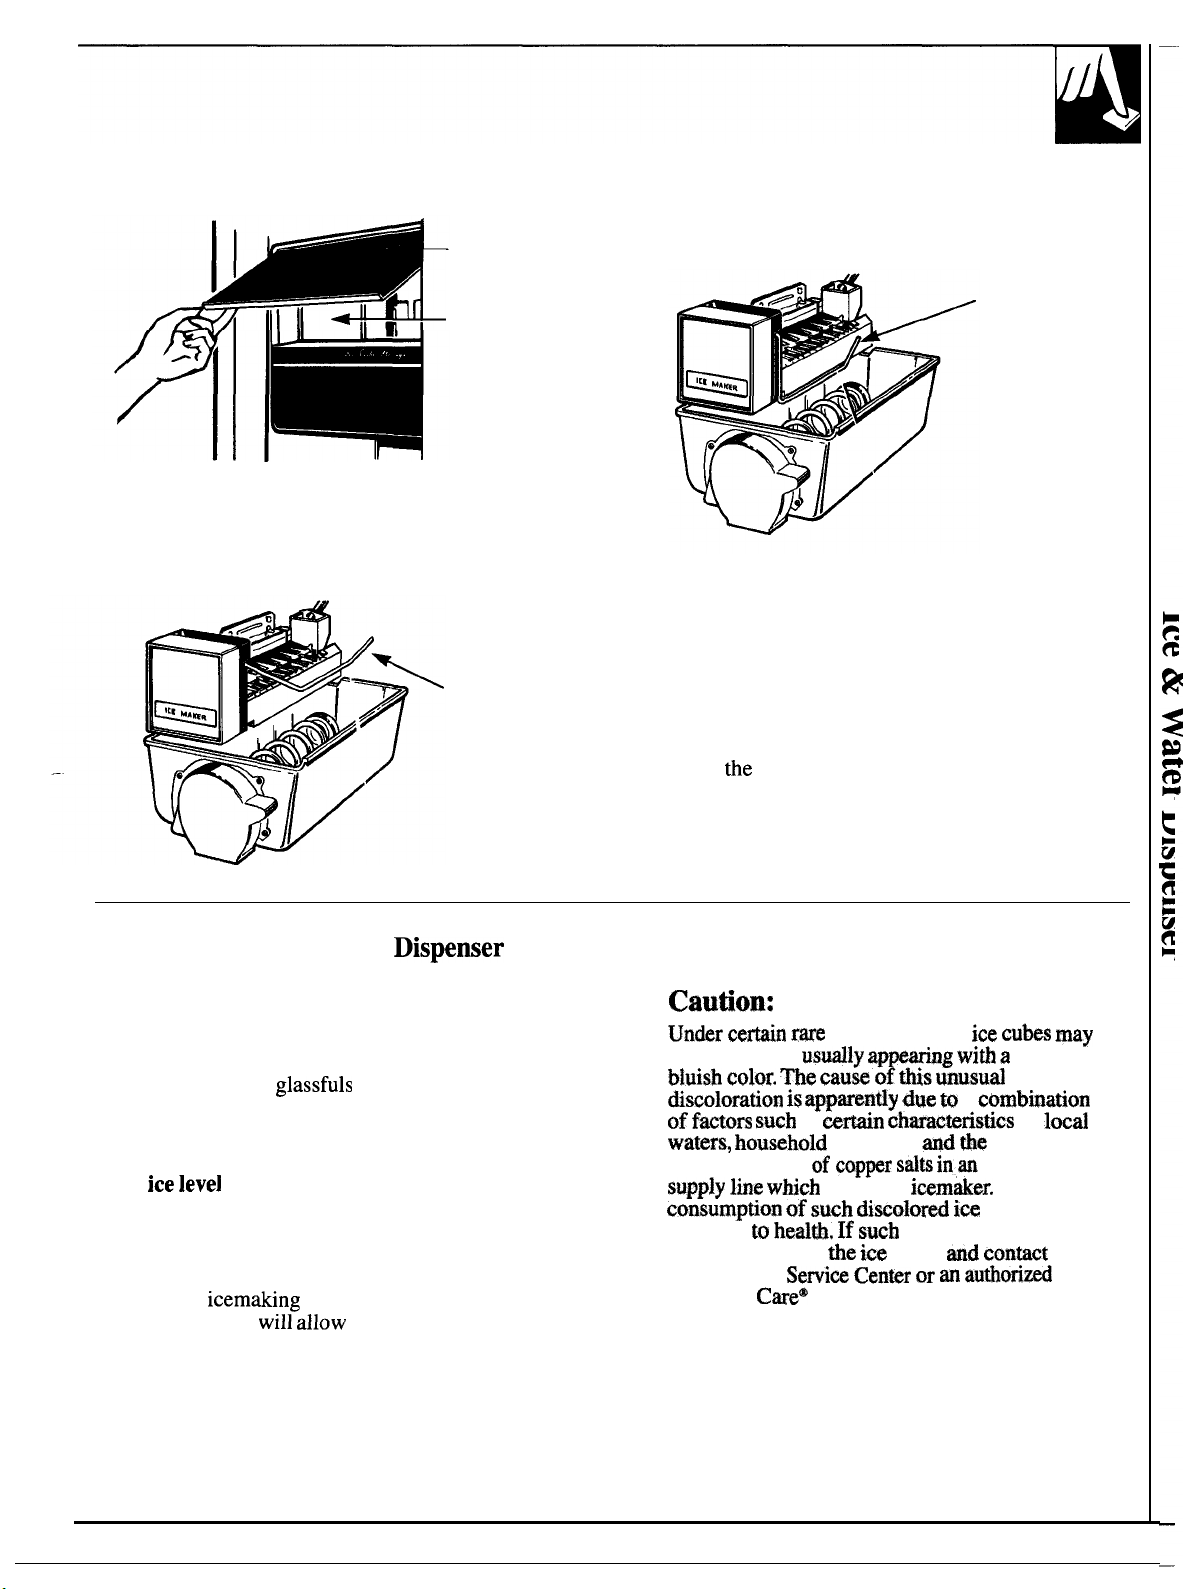
Before Using Your Icemaker and Dispenser
Ice access door
When water supply has been connected to icemaker,
move feeler arm to ON (down) position.
Icemaker
If you use your refrigerator before the water
connection is made, raise the ice access door and
make sure the icemaker feeler arm is in the STOP (up)
position as shown below.
Feeler arm
in
STOP (up)
position
Feeler arm
in ON
(down)
position
Depress water dispenser cradle for about two minutes
to remove trapped air from the water line and to fill
water reservoir automatically.
Ice cube mold automatically fills with water after
cooling to freezing temperatures. First cubes normally
freeze after several hours.
NOTE: With a newly-installed refrigerator, allow
about 24 hours for the freezer compartment to cool
down to
tie
proper ice-making temperature.
Once Your Icemaker and Dispemer Are in Operation
Throw away the first few batches of ice cubes
(16 or 24 cubes). This will flush away any impurities
in the water line. Do the same thing after vacations or
extended periods when ice isn’t used.
Discard
kitchen sink. This will eliminate the slight “plastic”
taste temporarily imparted to the water by the water
reservoir.
Keep ice
ejected into an empty storage bin will pile up close to
the icemaker and push the feeler arm up to the STOP
position prematurely when the bin is only partially observed, discard
full. Open the ice access door, reach in, level the cubes
by hand and
distributed evenly
enough ice to fill the bin to its maximum capacity.
—
the first six glassfuls of water in the
leveJ
to keep icemaker productive. Cubes
icemaking
will resume. Keeping cubes
will allow
the icemaker to produce
caution:
Under certain rme
be discolored,
bluish color.
discoloratiort is
of
factors such as
waters, h~usehold
accumulation of
supply Iin& which
consumption of such di*oJored i= cubes may be
injurious
GE
Factory
Customer
circumstances,
usuaJly ~p-g
The cause
appm~tiy
ofdds
wtin aharaeteristics
plumbing @d
copper salts
due go
ice cubes may
witi a
musuaJ
a
combtiation
tie
in,m
inactive
finds the icemker. Continued
to hed~. If such
the i~ cubes md contact your
discoloration is
Serviw Center or an authorized
Care$
Servicer.
(continued next page)
green-
of
loeaJ
water
7

ICE & WATER DISPENSER
To Dispense Ice and Water
For ice, set selector switch to
CUBED or CRUSHED. For water,
simply position glass beneath the
word “WATER.”
(continued)
Grip
glass or other container
gently near the rim and press rim
firmly against ice or water
dispenser cradle.
When Dispensing Ice...
Some crushed ice may be dispensed even
though you selected CUBED. This happens
occasionally when a few cubes accidentally get
channeled to the crusher.
Sometimes a mound of snow will form on the
door in the ice chute.
This condition is normal, and
usually occurs when you have dispensed crushed ice
repeatedly. The snow will eventually evaporate.
To Stop Dispensing
Release pressure from cradle and withdraw slowly
to catch last bits of ice or drops of water.
Some slight dripping may occur following dispensing
of crushed ice or water. If excessive, the spill should
be wiped dry immediately.
Do not pour water in spill shelf because it is not
self-draining-pour it in the
and its grille should be cleaned regularly according to
the Care and Cleaning section.
titchen
sifi.
The shelf
When Dispensing Water...
The water system provides approximately six
successive 6-ounce
hours must be allowed for replenished water reservoir
supply to cool. You probably will not drain
chilled water from the reservoir on a single occasion. “
The first
than the following ones. This is normal.
Dispensed water is cool, not iced. For colder
water, simply add crushed ice or cubes before
dispensing water.
glass of water dispensed maybe warmer
glassfuleafter
which several
dl
the
8
 Loading...