

GE TFX24VRSBWH, TFX24VRSBAD, TFX24VRSAWH, TFX24VRSAAD Owner’s Manual
I
I
Refr&erator
English Version . . . . . . . . . . . . . . . . . . . . . . . . . . . . . . . . . .
2
verSiOn franchise......................,... 23
Version en espafiol....... . . . . . . . . . . . . . . 45
Problem Solver . . . . . . . . . . . . . . . . . . . . .
Normal Operating Sounds . . . . . . . . . . . . . . . . . . . . . . . 17
More questions ?...ln the United States call
GE Answer
In Canada consult your local telephone
Safe~
instructions......., . . . . . . . . . . . . . . . .
3
tiiectory
for the Cameo
Preparation
Operating Instructions, Tips
Automatic
EnergV-Saving
Food Storage Suggestions . . . . . . . . . . . . . . . . . . . . . . . . . 8
Shelves . . . . . . . . . . . . . . . . . . . . . . . . . . . . . . . . . . . . . . . . . . . . . . . . . . .
Storage Drawers . . . . . . . . . . . . . . . . . . . . . . . . . . . . . . . . . . . . . . . . . . . 9
Temperature Controls . . . . . . . . . . . . . . . . . . . . . . . . . . . . . . . . .
Icemaker
Tips . . . . . . . . . . . . . . . . . . . . . . . . . . . . . . . . . . . . . . . 2
& Dispenser . . . . . . . . 5-7
.
9, 10
.
4
Clearances . . . . . . . . . . . . . . . . . . . . . . . . . . . . . . . . . . . . . . . . . . . . . . . . . . .
Level
ing............
. . . . . . . . . . . . . . . . . . . . . . . . . . . . . . . . . . . . . . . . . . . . .
Location . . . . . . . . . . . . . . . . . . . . . . . . . . . . . . . . . . . . . . . . . . . . . . . . . . . . .
Moving & Vacation . . . . . . . . . . . . . . . . . . . . . . . . . . . . . . . . . . . . . 13
Rollers . . . . . . . . . . . . . . . . . . . . . . . . . . . . . . . . . . . . . . . . . . . . . . . . . . . . . . . . . . .
Water Supply to Icemaker....... . . . . . . . . . . . . . . . . . 13
Installation
Care and Cleaning
Behind the Refrigerator . . . . . . . . . . . . . . . . . . . . . . . . . . . . . 11
Cleaning–Inside and Outside . . . . . . . . . . . . . . . . . . 11
Drawer and Cover Removal . . . . . . . . . . . . . . . . . . . . . 12
Light Bulb Replacement . . . . . . . . . . . . . . . . . . . . . . . .
Under Refrigerator . . . . . . . . . . . . . . . . . . . . . . . . . . . . . . . . . .
Water Filter
AccessorV
. . . . . . . . . . . . . . . . . . . . . . . . . . . .
.
12
.
11
.
7
installation... . . . . . . . . . . . . . . . . . . . . . . . . . . . . . . . . . . . . . . . . .
Adapter Plug . . . . . . . . . . . . . . . . . . . . . . . . . . . . . . . . . . . . . . . . . 14
Electrical Requirements . . . . . . . . . . . . . . . . . . . .
Extension Cord . . . . . . . . . . . . . . . . . . . . . . . . . . . . . . . . . . . . . . 14
Grounding . . . . . . . . . . . . . . . . . . . . . . . . . . . . . . . . . . . . . . . . . . . . . . . .
Water Line
Centerm 80~626.2000
Servjce
Center
Installation,...............,...
. 17-19
.
13
.
13
.
.
14-16
.
14
.
15, 16
13
.
13
14
GE Appliances
Consumer Services .................20
Appliance Registration . . . . . . . . . . . . . . . . . . . . . . . . . . . . . . 2
Model and Serial Numbers . . . . . . . . . . . . . . . . . . . . . . . . . 2
Warranty for Canadian Customers ........21
Warranty for U.S. Customers . . . . . . Back Cover
Models: SidebySide2Q2224and27
with Dispenser
HELP US HELP YOU...
Write down the model
and serial numbers.
You’ll sce
the
fresh food
These numbers are also
Product Ownership Registration Card that
came with your refrigerator.
Before sending in this card, please write these
numbers here:
Model Number
Serial Number
Use these numbers in any correspondence or
service calls concerning your refrigerator.
them on a
top
drawer or at the bottom, just inside the
compartment door.
ltibel
on the
on
the Consumer
wall beside
Read this book carefully.
It is
in[ended
maintain your new refrigerator
Keep it handy for answers [o
If you don’t
more help,
In the United States:
Consumer
GE
Appliance Park
Louisville, KY 40225
In Canada:
Manager Consumer Relations
2645 Skymark Ave.,
Mississauga, Ontario
Canada L4W 4H2
to help you
undcrst~nd son]c(hing or IIccd
write
(include
Al”fairs
Appliances
ENERGY-SAV~G
● Location of your refrigerator is important. Avoid locating it next to
your range, a heating vent or
●
Close the doors as soon as possible, particularly in hot, humid weather.
wbere
the sun will shine directly on it.
opcra[c
and
pI-OpCrly.
yoLIr clucs[itJIls.
y(mI pllt)nc Il~IIIIbcI):
Save
time and
Ilef’ore
(heck (hc
book.
you can correct yourself.
you request service...
Problem Solver section in this
It
lists minor operating problems that
money.
TWS
● Be sure the doors are closed tightly. Before leaving the house or
retiring for the night, check to be sure the doors haven’t been
open accidentally.
●
Keep foods covered to reduce moisture buildup inside the refrigerator.
left
To obtain service, see the Consumer Services
page in the back of this book.
We’re proud of our service and want you to
be pleased. If for some reason you are not
happy with the service you receive, here are
3
steps to follow for further help.
IF YOU NEED SERVICE
For Customers in the United States:
FIRST, contact the people who serviced your
appliance. Explain why you are not pleased.
In most cases this will solve
NEXT, if you are still not pleased, write
all the details—including your phone
number—to:
Manager, Consumer Relations
GE Appliances
Appliance Park
Louisville, KY 40225
FINALLY, if’ your problem is still not
resolved, write:
Major Appliance Consumer
Action Panel
20
North
Chicago, IL
Wacker
60606”
Drive
tbe
problem.
For Customers in Canada:
FIRST, contact the people who serviced your
appiiance.
In most cases this will solve the problem
NEXT.
the detai
Explain why you are
if you are still not pleased,
Is—includin&
Manager Consumer Relations
2645 Skymark Ave.,
Mississauga, Ontario
Canada L4W 4H2
not
pleased,
your phone number to:
write all
2
WORTANT SA~TY ~STRUCTIONS
Read W instructions
WARNIN&When
A
. Use this
o
always exercise basic safety precautions,
including the following:
appliance only for its intended purpose
as
described in this Use and Care Guide.
Q
‘Q-\”:~
?.+ -
This refrigerator must be properly
installed and located in accordance
with the Instillation Instructions
using this appliance,
before
before it is used.
●
Never unplug your refrigerator by
palling on the power cord.
plug
firmly
and pull straight out from
the
outlet.
●
Repair or replace immediately all electric
Always
grip-
service cords that have become frayed or
otherwise damaged.
shows cracks or abrasion damage along its length
or
at either the plug or connector end.
●
When moving your refrigerator away from the
wall, be
carefd
not to roll over or damage the
Do not use a cord that
power cord.
c
Do not allow children to climb, stand or
hang on the shelves in the refrigerator. They
could damage the refrigerator and seriously
injure themselves.
●
If your old refrigerator is still around
the house but not in use, be sure to
remove the doors.
a
c
After your refrigerator is in operation, do
possibility of danger to children.
This will reduce the
not touch the cold surfaces in the freezer
compartment, particularly when hands are
damp or wet.
cold
surfaces.
●
If your refrigerator has an automatic
avoid contact with the moving parts of the ejector
mechanism, or with the heating element that
releases the cubes. Do not place fingers or hands
on the automatic
refrigerator is plugged in.
Skin may adhere to these extremely
icemaker,
icemaking
mechanism while the
using
●
Don’t refreeze frozen foods which have thawed
completely.
Agriculture in Home and Garden Bulletin
No. 69 says:
“..
have thawed if they still contain ice crystals or if
they are still cold—below
“..
have any off-odor or off-color should not be
refrozen and should not be eaten. Thawed ice
cream should be discarded. If the odor or color of
any
food may be dangerous to eat.
“Even partial thawing and refreezing reduces the
eating quality of foods, particularly fruits,
vegetables and prepared foods. The eating quality
of red meats is affected less than that of many
other foods. Use refrozen foods as soon as
possible to save as much of their eating quality as
you can.”
ttis
appliance.
The United States Department of
.You
may safely refreeze frozen foods that
40°F, (4°C.).
.Thawed
food is poor or questionable, get rid of it. The
ground meats, poultry or fish that
●
Unplug your refrigerator before
cleaning and making repairs.
NOTE:
any servicing be performed by a
qualified individual.
●
Before replacing a burned-out light bulb, the
refrigerator should be unplugged in order to avoid
contact with a live wire filament. (A burned-out
light bulb may break when being replaced,)
NOTE:
not remove power to the light circuit,
●
Do not store or use gasoline or other flammable
Turning control to OFF position does
vapors and
We strongly recommend that
Iiquids
in the vicinity of this or any
other appliance.
SAW T~SE
~STRUCTIONS
3

OPEMT~G
YOUR
Set the Temperature Controls
The temperature controls let you regulate the temperature in the fresh
food and freezer compartments.
At
first,
set the Fresh Food control at “5” and the Freezer control at “C”.
Allow 24 hours for the temperature to stabilize, whether you are
setting the controls for the first time or adjusting them later. Then, if
you want colder or warmer temperatures in either compartment, adjust
the controls one step at a time.
NOTE: Moving the Fresh Food control to OFF turns off cooling in
both
compartments-fresb food and freezer—but does not shut off
power to the refrigerator.
How to Test Temperatures
Use the milk test for the fresh food compartment. Place a container
of milk on the
later. If the milk is too warm or too cold, adjust the temperature controls.
top
shelf in the fresh food compartment. Check it a day
REFMGEWTOR
Use the ice cream test for the freezer compartment. Place a
container of ice cream in the center of the freezer compartment. Check
it after a day. If it’s too hard or too soft, adjust the temperature controls.
Always
temperature you set.
allow
24 hours for the refrigerator to reach the
Automatic Energy Saver System
You won’t find an “energy saver” switch on this refrigerator.
Warm liquid from the refrigerator’s condenser is automatically
circulated around the front edge of the freezer compartment to help
keep moisture from forming on the outside of the refrigerator during
humid weather,
Marry
refrigerators use special electric heaters. This refrigerator needs
none. That’s why there is no “energy saver” switch.. there’s no need
for it.
If you turn your household thermostat below
,. you may want to move the freezer control one
step colder. Cooler temperatures in the house may
cause the compressor to operate less frequently,
thus allowing the freezer compartment to warm
somewhat. To protect your frozen food supply,
leave the freezer
tbe
entire winter or for-as long as you keep
thermostat tuined down.
setting
at this colder setting for
~our
#o
D
60°F. (16°C.)
,,. ,.
,.
! ,’
‘.
$
‘“
No Defrosting
It is not necessary to defrost the freezer or fresh food compartments.
Your refrigerator is designed and equipped to defrost itself automatically.
at night...
Moving the freezer control to colder setting should have no effect on
your fresh food compartment. However, if freezing occurs, move the
fresh food control one step warmer,
When you stop turning the thermostat down, turn the refrigerator’s
controls back to their regular settings.
4
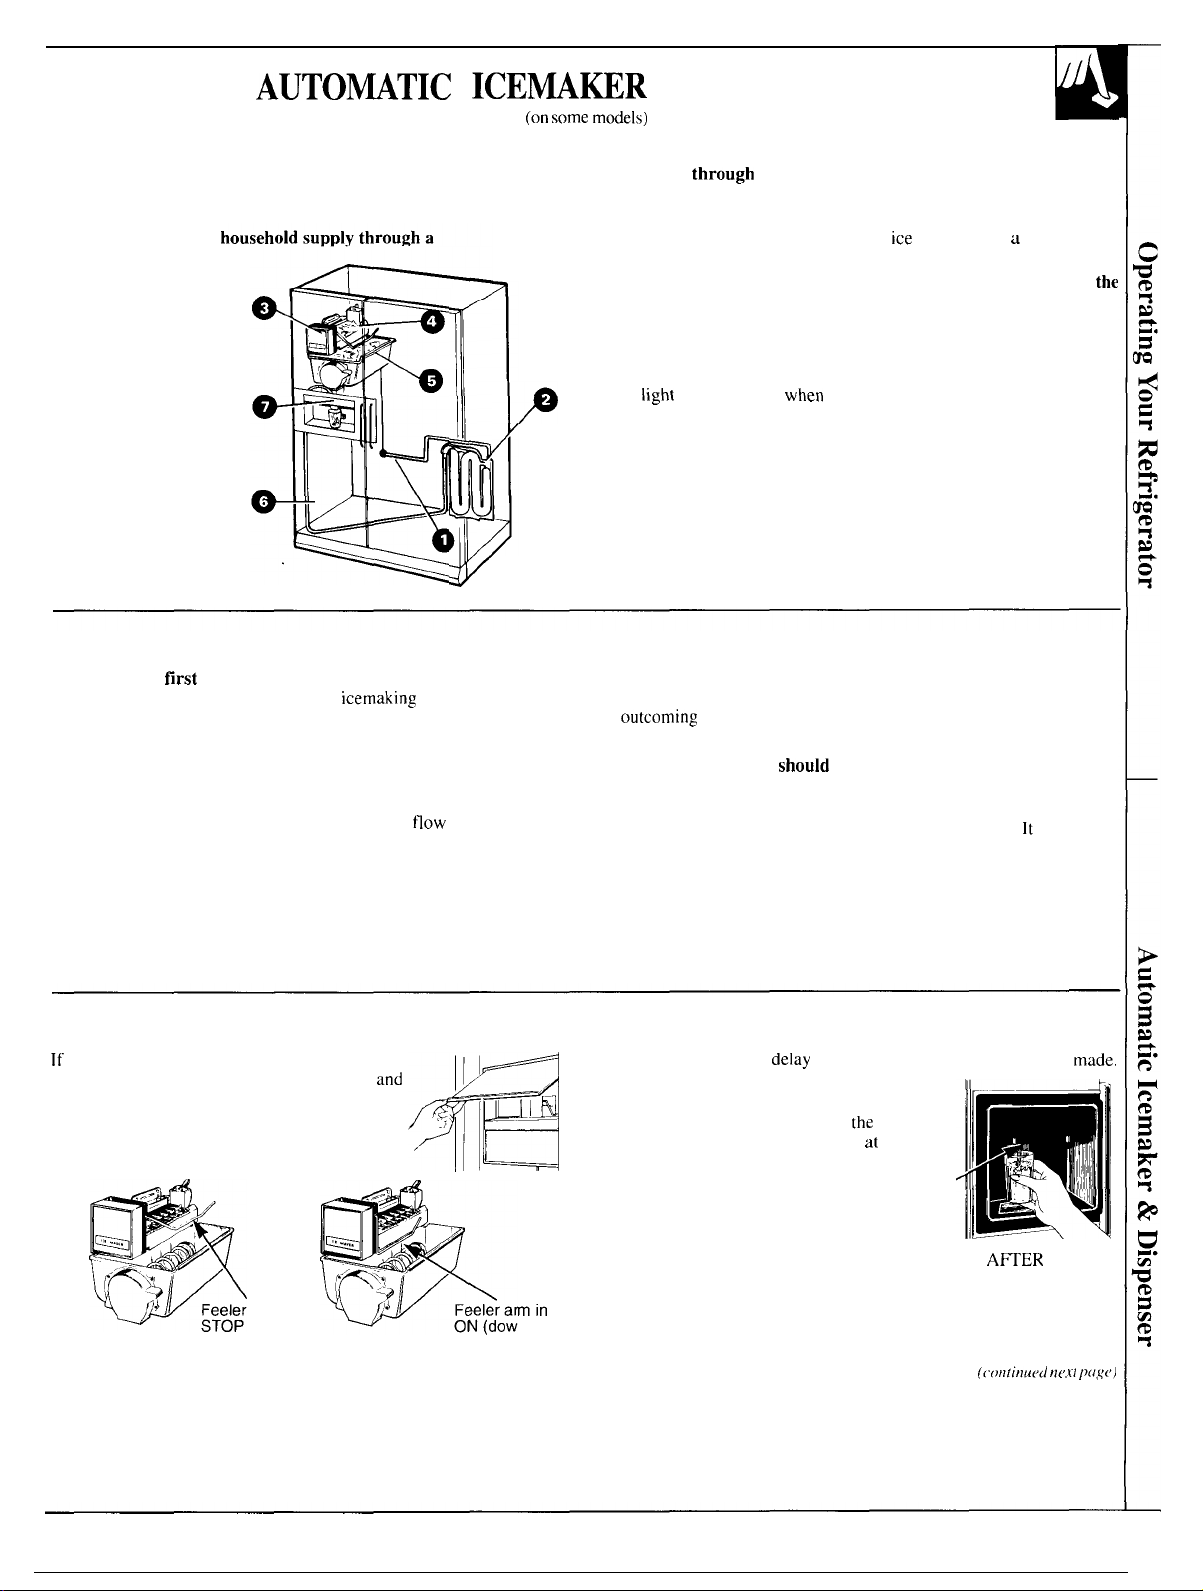
AUTOWTIC ICEW~R
(on some models)
How They Work
The automatic icemaker makes ice continually. The dispenser
dispenses water, ice
compartment door. Here’s how they work.
Water flows from the
(1)
dual solenoid valve
to the
(2) water tubing and
to the
(3) automatic icemaker
as needed.
Water is frozen in the
(4) cube mold and
ejected into the
storage bin where
(s)
a motor-powered
auger moves
cubes forward.
Important Facts about Your Ice & Water Dispenser
● If this is your first icemaker you’ll hear occasional sounds that
may be unfamiliar. These are normal
cause for concern.
● Your icemaker will produce 8 cubes per cycle—approximately
120 cubes in a 24-hour period—depending on freezer compartment
temperature. room temperature, number of door openings and other
use conditions.
● Intermittent dispensing of ice is normal. If ice
more than brief, ice clump(s) may be the cause and should be
removed following instructions in this section.
● Avoid overfilling glasses with ice and using narrow or extra-tall
glasses. This can jam the chute or cause the door in the chute to
freeze shut. Periodically open the freezer compartment door and look
down into the chute. If ice is blocking the chute, poke it through with
a wooden spoon.
cubes or crushed ice through the
icemaking
freezer
sounds and are not
flow
interruption is
& DISPENSER
Cubes fall
pad is pressed.
When CRUSHED is selected (on some models), a baffle channels
cubes through the crusher and crushed
the glass,
When WATER is selected, (on some models) water flows through
(6) tubing in the door and is dispensed when the dispenser
(7) A light switch (on some models) turns the night light in the
The
The light in the dispenser should be replaced with a 7 watt maximum
bulb when it burns out.
● To help keep bits of ice from being sprayed beyond the glass,
place the glass close to the ice chute—but not so close that it blocks
outcoming
● Fill glasses with ice before adding soda or other beverage mixes.
● Beverages and foods
storage bin. Cans, bottles or food packages in the storage bin may
cause the icemaker or auger to jam.
● Do not add ice from trays or bags to the storage bin.
crush or dispense well.
throtrgb
the chute in the door when the dispenser
pad is pressed.
dispenser on or off.
Iigbt
also comes on
ice.
ice
falls through J chute into
wben
the dispenser pad is pressed.
sbould
not be quick-chilled in the ice
It
may not
tbe
Before Using Your Icemaker and Dispenser
If you use your refrigerator before the water
connection is made, raise the ice access door
make sure the icemaker feeler arm is in the
STOP (up) position. When the water supply has
been connected to the icemaker, move the feeler
arm to ON (down) position.
arm in
(up)
position position
and
~
,
4
~!4
min
n)
At first there will be a
delay
before water is dispensed and ice is
On models with a water dispenser,
if no water is dispensed when the refrigerator is
first installed, there may be air in
system. Press the dispenser pad for
the
water line
at
least two
minutes to remove trapped air from the water
line and to fill the water system.
Push the dispenser pad
/
until the water line is filled.
The ice cube mold will automatically fill with water
A~ER
cooling
to freezer temperatures. The first cubes normally freeze after
several hours.
NOTE: With a newly-installed refrigerator, allow about 24 hours
for the freezer compartment to get cold enough to make ice.
(((ltll;llu(,(l ?1(,.1-[ [?[1,s<,)
made.
5
AUTOWTIC ICEWmR
(continued)
Once Your Icemaker and Dispenser are in Operation
Throw away the first few batches of ice cubes (16 or 24 cubes). This
will
flush away
after vacations or extended periods when ice isn’t used.
On models
the kitchen sink. The first water through the system picks up a slight
“plastic” taste from the water tubing.
To Dispense Ice and Water
any
impurities in the water line. Do the same thing
witb
a water dispenser, pour the first 6 glassfuls of water in
ect
CUBES, CRUSHED ICE
some
models)
Dispenser
pad
or WATER.
& DISPENSER
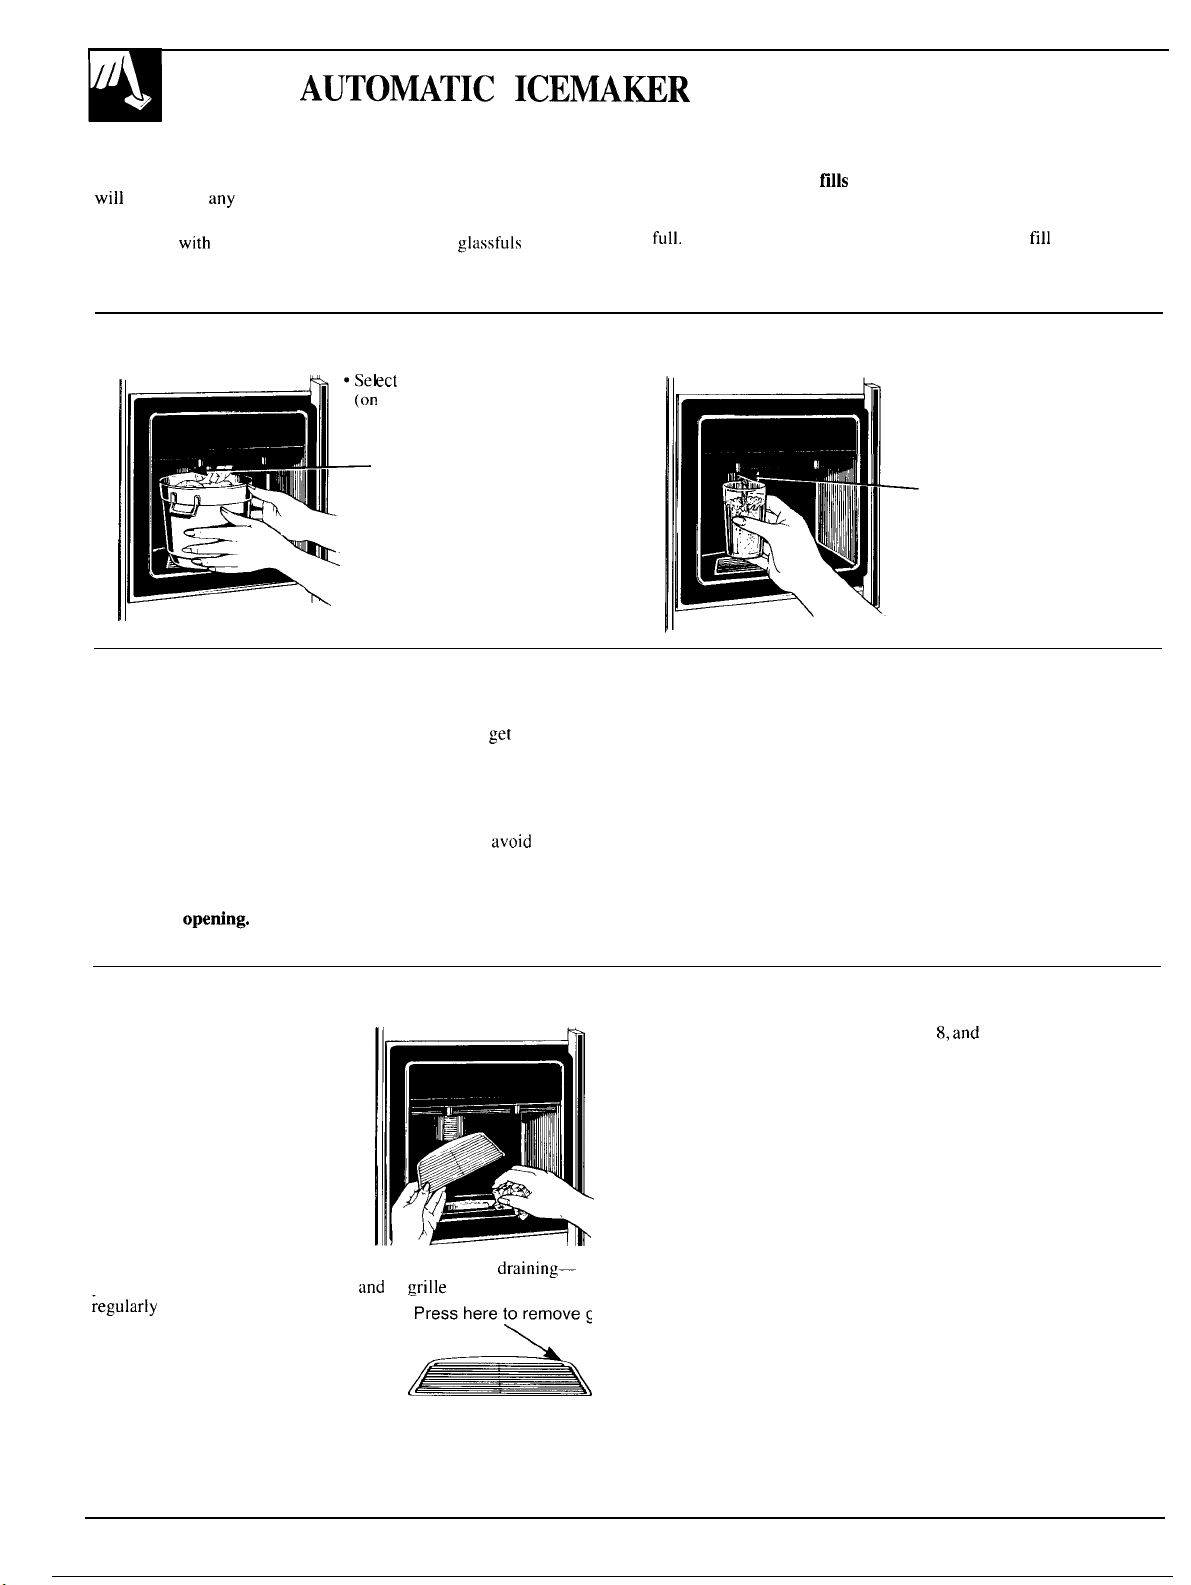
To make sure the bin
When cubes fall into tbe bin they may pile up close to the icemaker
and push the feeler arm to the STOP (up) position before the bin gets
full.
Keeping the cubes level allows the icemaker to
fills with ice, level the cubes occasionally.
fill
the bin.
● Grip tbe glass or other container
near the rim and press the rim
against the center of the dispenser
pad.
Dispenser
pad
When Dispensing Ice...
Some”crushed ice maybe dispensed even though you selected
CUBES. This happens occasionally when a few cubes
to the crusher.
Sometimes a mound of snow will form on the door in the ice chute.
This condition is normal, and usually occurs when you have dispensed
crushed ice repeatedly, The snow will eventually evaporate.
Sometimes crushed ice will spray beyond the glass. To
hold the glass up close to the chute.
CAUTION: Never put fingers or other objects into the
dispenser
opeting.
get
channeled
avoid
this,
To Stop Dispensing
Release pressure from the
dispenser pad and wait a few
seconds to catch the last bits of ice
or drops of water.
There may be some dripping after
dispensing crushed ice or water. If
there is a lot of dripping, the spill
should be wiped dry right away.
When Dispensing Water...
The first glass of water dispensed may be warmer than the
following ones. This is normal.
Dispensed water is cool, not iced. For colder water, simply add
crushed ice or cubes before dispensing water.
If Ice Clumps Form in the Storage Bin...
The icemaker ejects cubes in groups of 8,
cubes to be joined together. However, if you don’t use the
ice very often, ice clumps may form in the storage bin and can clog
the dispenser.
If this happens:
● Remove the storage bin from the freezer.
● Break up ice clumps with your hands, Throw away any clumps that
you can’t break up.
● Replace the bin before the remaining cubes melt and fuse together.
and
it is normal for several
Do not pour water in the spill shelf because it is not self draining—
pour it in the kitchen sink. The shelf
;egularly according to Care and Cleaning
instructions.
by pressing on the back right corner.
Tbe grille is easily removed
and
its
~rille
should be cleaned
Press here to remove grille
A
6
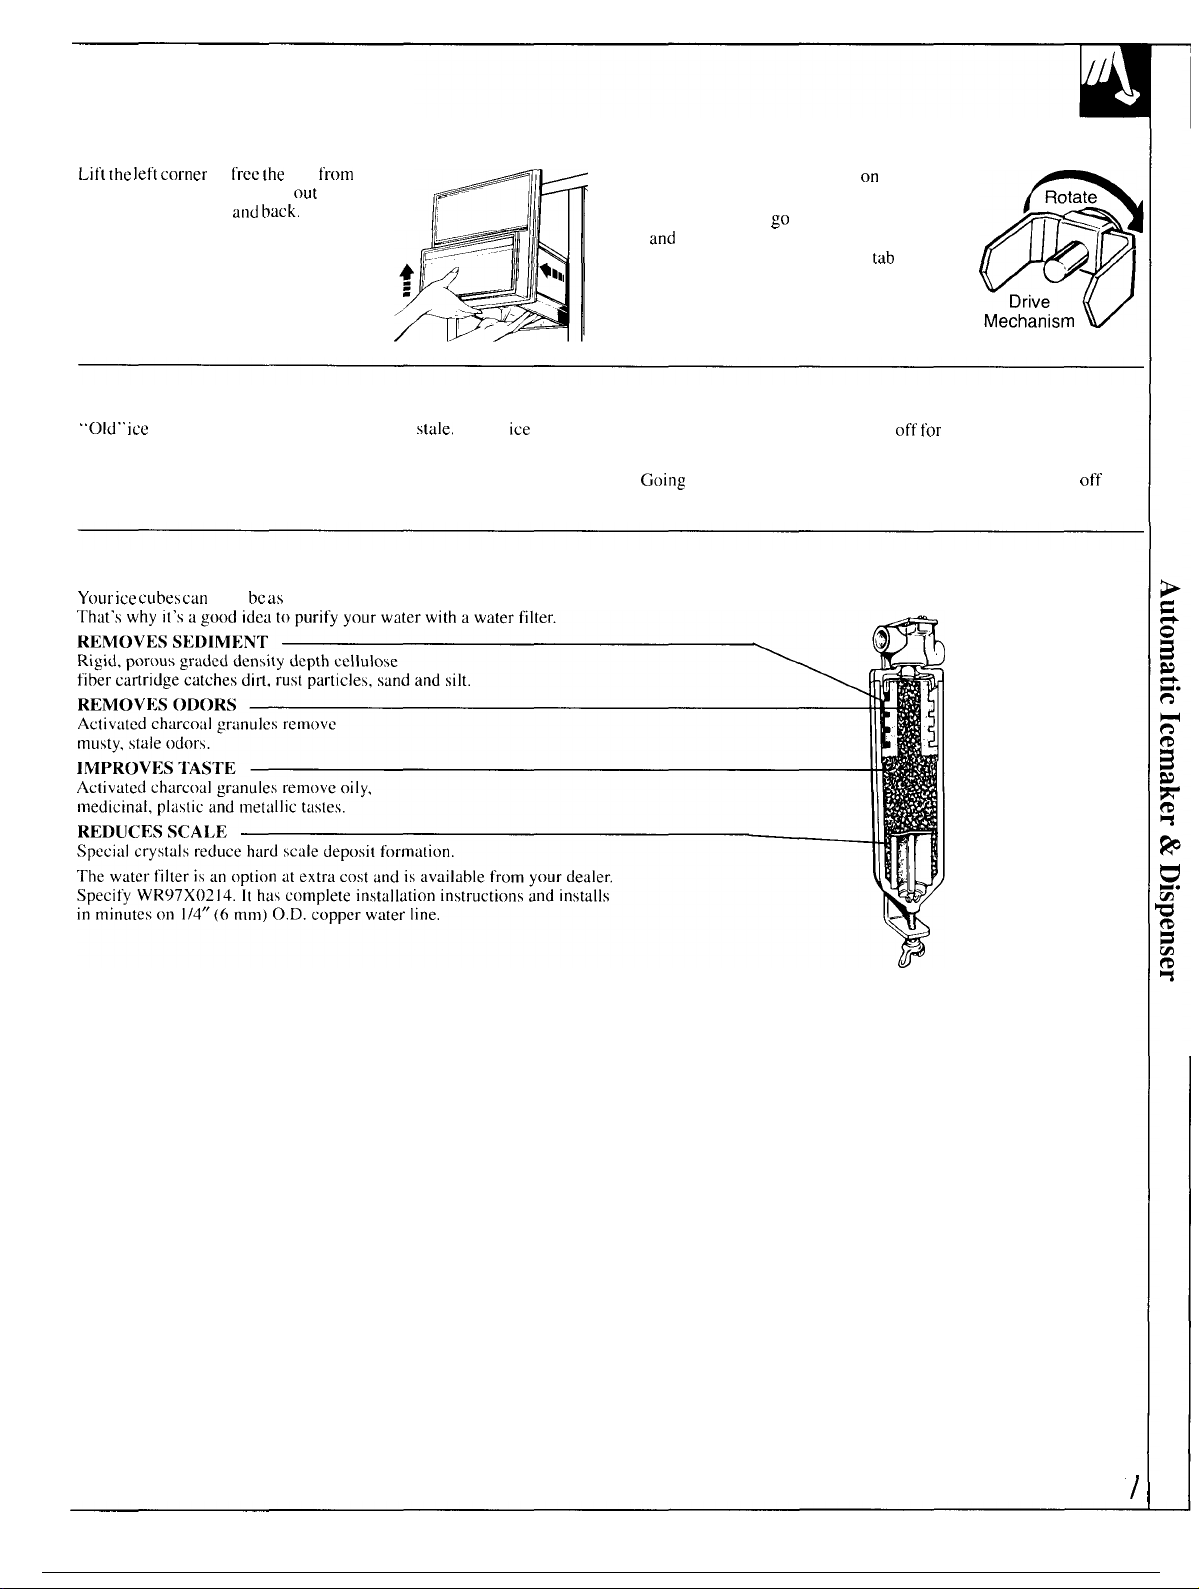
To Remove Ice Storage Bin
[.ift [he left
the shelf. Pull the bin straight
supporting it at front
corner to tree
and back.
the
bin
out
from
while
To Replace Ice Storage Bin
Slide
the bin back until the tab on the bin locks
into the slot in the shelf.
If the bin does not
it
and
turn the drive mechanism I/4 turn. Then
push the bin back again until the
bin locks into the slot in the shelf.
go
all the way back, remove
tab
on the
If Ice Is Not Used Often...
“Old’. ice
storage bin periodically and wash it in lukewarm water, Be sure to
allow storage bin to cool before replacing it—otherwise ice cubes will
stick to the metal auger.
cubes will become cloudy and taste
stale.
Empty
ice
Water Filter Accessory
Yout ice cubes can
only bc as fresh-tasting as the water that produces them.
Move Feeler Arm to STOP (up) Position when...
● Home water supply is to be turned off
● Ice storage bin is to be removed for a period of time.
●
Goin&
away on vacation, at which time you should also turn off the
valve in the water supply line to your refrigerator.
for
several hours,
/ I
FOOD
STOMGE
SUGGESTIONS
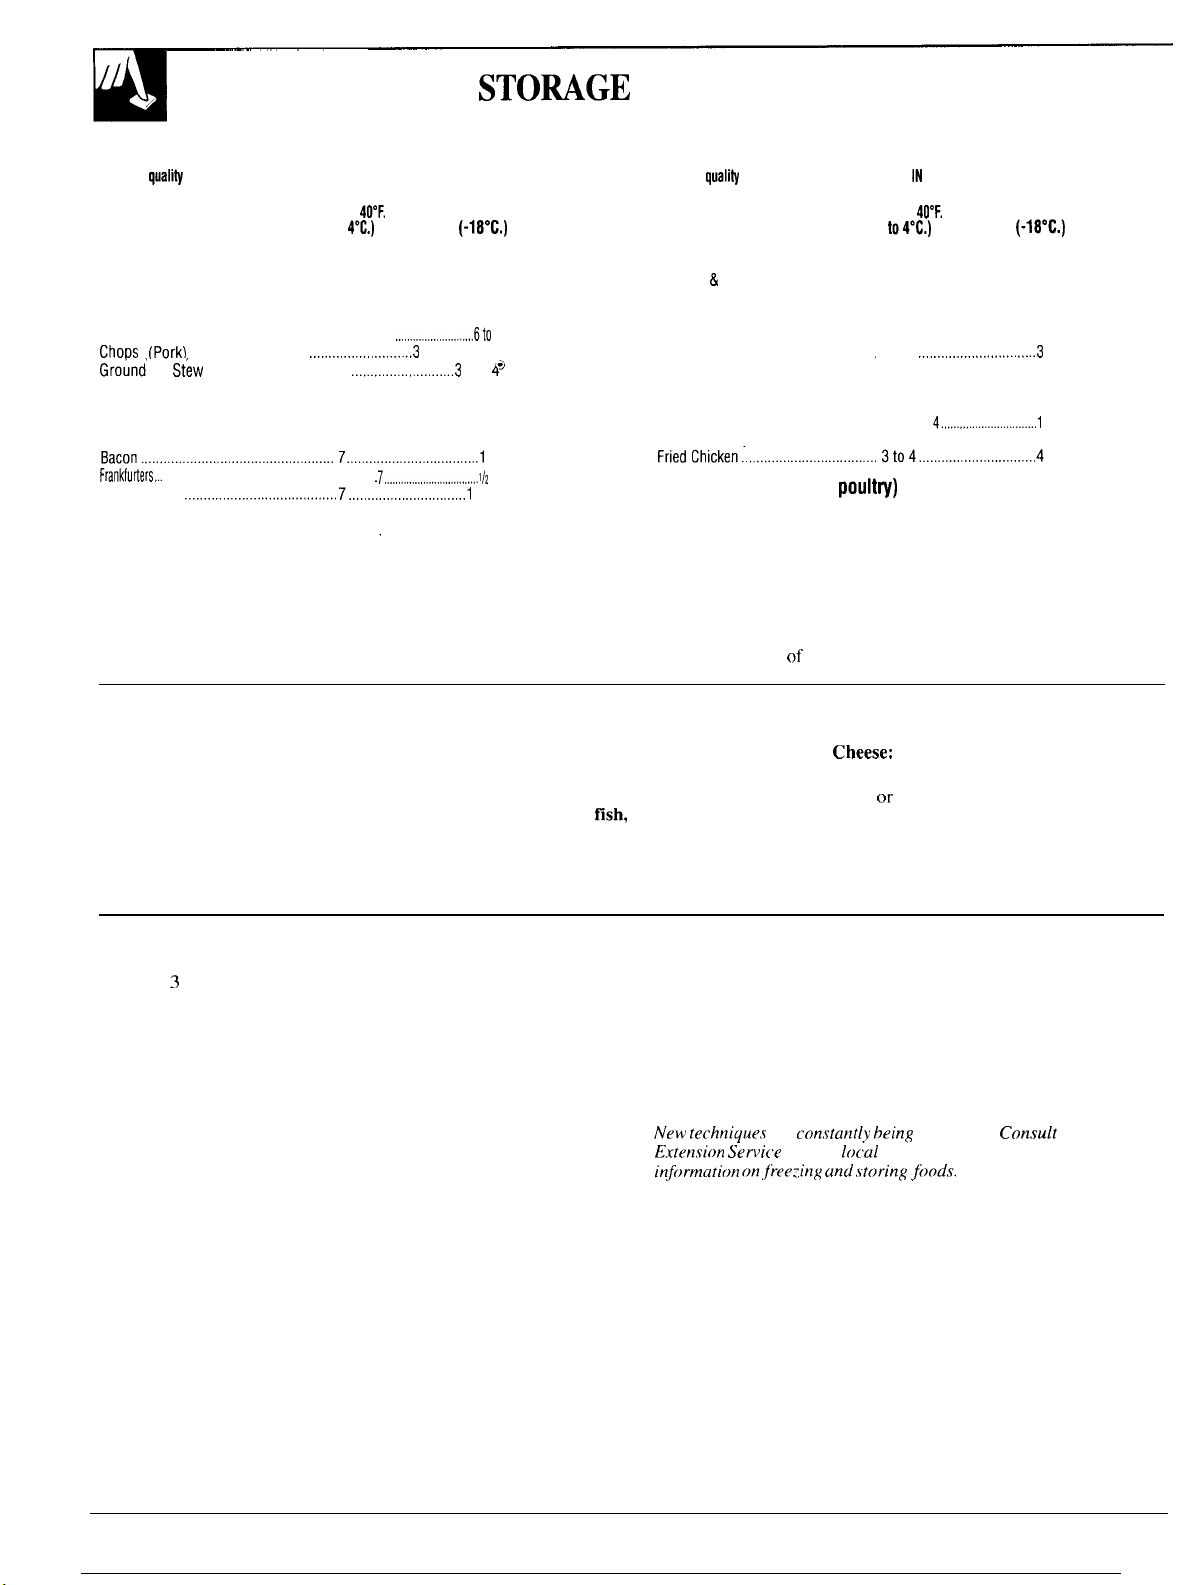
Suggested storage times for meat and poultry*
DAYS
Eating
quali~
drops after
time
shown
Fresh Meats
Roasts (Beef & Lamb) 3 to 5 6 to 12
Roasts (Pork & Veal) 3 to 5 ..,........................4 to 8
Steaks (Beef) . 3 to 5 6 to 12 Turkey (Pieces) 1 to 2 ...............................6
Chops (Lamb) . . . . . . . . . . . . . . . . . . . . . . . . . . . . . . . . . . . 3 to 5 ...........................6to 9
Choos
(Pork) 3 to 5
Ground &
Variety Meats 1 to 2 ...........................3 to 4
Sausage (Pork) 1 to 2 ...........................1 to 2
Stew
Meats . 1 to 2
Processed Meats
DAYS IN
REFRIGERATOR
AT 35° to
40°F.
(2° to
4“C.)
..........................,3
......,........,...........3
MONTHS IN
FREEZER
AT O“F.
(-18°c,)
to 4
to
Eating
quali~
drops after
REFRIGERATOR
time shown
Fresh Poultry
Chicken & Turkey
Chicken (Pieces) . . . . . . . . . . . . . . . . . . . . . . . . . . . . . . . 1 to 2 ,..............................9
Duck & Goose (Whole) . . . . . . . . . . . . . . . . . . . . . 1 to 2...............................6
4+
Giblets . . . . . . . . . . . . . . . . . . . . . . . . . . . . . . . . . . . . . . . . . . . . . .
Cooked Poultry
Pieces (Covered with Broth) ..............1 to 2................................6
Pieces (Not Covered) . . . . . . . . . . . . . . . . . . . . . . . . 3 to 4......,,.......................1
Cooked Poultry Dishes 3 to 4 ...........................4 to 6
(Whole) . . . . . . . . . . . . . . . . 1 to 2..............................12
IN
AT 35° to
(2°
.
to4°c.)
1 to 2
40”F.
....................,..........3
MONTHS IN
FREEZER
AT O“F.
(-18°C.)
Frankfutiers...
Ham (Whole)
Ham (Half) 3 to 5 ...........................1 to 2
Ham (Slices) . . . . . . . . . . . . . . . . . . . . . . . . . . . . . . . . . . . . . . . .
Luncheon Meats 3 to 5.......... Freezing not recommended.
Sausage (Smoked) . . . . . . . . . . . . . . . . . . . . . . . . . . . . . . . 7.............. Freezing not recommended.
Sausage (Dry & Semi-Dry) .............14 to 21 ........ Freezing not recommended.
Cooked Meats
Cooked Meats and Meat Dishes . . . . . . . . 3 to 4 ...........................2 to 3
Gravy & Meat Broth . . . . . . . . . . . . . . . . . . . . . . . . . . 1 to 2 ...........................2 to 3
. . . . . . . . . . . . . . . . . . . . . . . . . . . . . . . . . . . . . .
....................,......,,,......,,,. 7..,,,,.......,,................1
.
7..................................l/z
.
3...............................1 to 2
to 2
(Other than for meats& poult~)
Most fruits and vegetables ..........8-12 months
Lean fish .......................................6-8 months
Fatty fish, rolls and breads, soups, stew, casseroles .........2-3 months
Cakes, pies, sandwiches, leftovers (cooked),
ice cream (original carton) ......1 month max.
Meats, fish and poultry purchased from the store vary in quality and age;
consequently, safe storage time in your refrigerator will vary.
*U.S. Department of Agriculture
Fresh Food Storage Tips
To store vegetables:
● Use the vegetable drawers — they have
been designed to preserve the natural
moisture and freshness of produce. Unfrozen meats,
● Covering vegetables with a moist towel ● Always remove store wrappings.
helps maintain crispness.
● As a further aid to freshness,
prepackaged vegetables can be
stored in their original wrapping.
fish,
and poultry:
● Rewrap in foil, plastic wrap or wax paper
and refrigerate immediately.
Tips on Freezing Foods
There are 3 essential requirements for efficient home freezing.
1. Initial quality. Freeze only top-quality foods, Freezing retains
quality and flavor; it cannot improve quality.
2. Speed. The quicker fruits and vegetables are frozen after picking,
the better the frozen product will be. You’ll save time, too, with less
culling and sorting to do.
3. Proper packaging. Use food wraps designed especially
for freezing.
To freeze meat, fish and poultry, wrap well in freezer-weight foil (or
other heavy-duty wrapping material), forming it carefully to the shape
of the contents. This expels air. Fold and crimp ends of the package to
provide a good, lasting seal. Don’t refreeze meat that has been
completely thawed; meat, whether raw or cooked, can be frozen
successfully only once.
Fine-quality ice cream, with high cream content, will normally
require slightly lower temperatures than more “airy” already-packaged
brands with low cream content.
● It will be necessary to experiment to determine the freezer
compartment location and temperature control setting to keep your
ice cream at the right serving temperature.
● The rear of the freezer compartment is slightly colder than the front.
New
technique.r are
Exten.~ion
information on,tkeezirrg und .\toring ji)od.~.
Service or your
c~n.stantly
FREEZER
Cbeese:
● Wrap well with wax paper or aluminum
foil,
or
put in a plastic bag.
●
Carefully wrap to
expel air and help
prevent mold.
● Store prepackaged cheese in its own
wrapping if you wish.
being
local
developed.
Utility Company for the latest
Con.rult
the County
8
 Loading...