

GE TFX24F Use and Care Manual

o
Contents
0
Appliance Registration
Base Grille
Care and Cleaning
Condenser 18
Diagnostic Codes 6-9 Repair Service 23
Drawer and Cover Removal 15,16 Safety Instructions 3
Electric Monitor and Shelves
Diagnostic System
Door Alarm
System Check-Reset
W-Temperature
Energy Saver
Energy-Saving Tips , 2
Food Saver System 15
Food Storage Suggestions
Storage ‘Ilmes 14
Ice Dispenser
Icemaker
Installation 3,4
Adapter Plug
2
4
18
6-9
7
7,8 Vacation & Moving Tips 19
7 warranty
5 Water Filter Accessory 19
14
10-13
1o-13
4
Model and Serial Numbers 2
Ports-Bins
Problem Solver
Refreshment Center
Storage Drawers 15,16
Temperature Controls 5
10,17
20-22
16,17
Back Cover
10
UseandCareof
model
TFX24F
with
Refreshment
Center,
Electronic
Monitorand
Diagnostic
System
0
Adjustable Rollers
Clearances
Electrical Requirements 3,4
Extension Cord
Grounding
Location
Water Supply to Icemaker 4
Light Bulb Replacement 19
4
4
4
3
4
Your Direct Line to General Electric
The GE Answer Centef 800.626.2000
GENERAL@ ELECTRIC
Help us
help you...
Read this book carefdy.
It is intended to help you operate
and maintain your new refrigerator
properly.
Keep it handy for answers to your
questions.
If you don’t understand something
or need more help, write (include
your phone number):
Consumer Afbirs
General Electric Company
Appliance Park
Louisville, KY 40225
Write down the model and
serial numbers.
You’llsee them on a label at the
bottom, just inside the fresh food
compartment door.
These numbers are also on the
Consumer Product Ownership
Registration Card that came with
your refrigerator.
Before sending in this card, please
write these numbers here:
ModelNumber
SerialNumber
Use these numbers in any
correspondence or service calls
concerning your rdigerator.
If you received a damaged
refrigerator, immediately contact ‘
the dealer (or builder) that sold you
the refrigerator.
Save time and money.
Before you request service, check
the Problem Solver on pages 20
through 22. It lists causes of minor
operating problems that you can
correct yourself.
Energy-sating tips
● Location of your refrigerator is
important. Avoidlocating it next
toyour range, aheating vent or where
the sun will shine directly on it.
. Don’t open the doors more often
than necessary.
. Close the doors as soon as
possible, particularly in hot,
humid weather.
● Be sure the doors are closed
tightly. Before leaving the house or
retiring for the night, check to be
sure the doors haven’tbeen left
open accidentally.
● Store only those fds requiring
refrigeration in your refrigerator.
● Wipe moisture from bottles and
cartons before putting them in the
refrigerator.
c Keep fds covered to reduce
moisture buildup inside the
refrigerator.
● If you turn the Controk” to the
coldest position for quick chilling
or fi=eezing,be sure to turn them
back to regular settings.
. Don’tovercrowd your refrigerator.
Overcrowding can require extra
electrical energy to keep everything
cool.
2
IMPOKllWT
SAFETY INSTRUCTIONS
Read all instructions
before using this appliance.
w~~when using this
appliance, always exercise basic
safety precautions, including the
following:
● Use this appliance only for its
intended purpose as described in
this Use and Care Book.
● This refrigerator must be
properly installed in accordance
with the Installation Instructions
before it is used. See grounding
instructions below and on page4.
● Never unplug your refrigerator
by pulling on the power cord.
Always grip plug firmly and pull
straight out from the outlet.
● Repair or replace immediately
all electric service cords that
have become frayed or otherwise
damaged. Do not use a cord that
shows cracks or abrasion damage
along its length or at either the plug
or connector end.
● When moving your refrigerator
away from the wall, be careful
not to roll over or damage the
power cord.
● After your refrigerator is in
operation, do not touch the cold
surfaces, particularly when hands
are damp or wet. Skin may adhere
to these extremely cold surfaces.
● Do not place fingers or hands
on the automatic icemaking
mechanism while the refrigerator
is plugged in. This will prevent
contact with the moving parts of
the ejector mechanism, or with
the heating element that releases
the cubes.
● Do not allow anyone to climb,
sit, stand or hang on the
Refkednnent Center Compartment
door (see page 10).They could
damage the refrigerator and maybe
even tip it over, causing severe
personal injury.
● Don’t refreeze frozen fti
which have thawed completely.
The United States Department of
Agriculture in Home and Garden
Bulletin No. 69 says:
“.. .Youmay safely refreeze frozen
foods that have thawed if they still
contain ice crystals or if they are
still cold—below 40”F.
“.. .Thawed ground meats, poultry,
or fish that haveany off-odor or
off-color should not be refrozen
and should not be eaten. Thawed
ice cream should be discarded. If
the odor or color of any food is
poor or questionable, get rid of it.
The food may be dangerous to eat.
“Even partial thawing and refreezing
reduce the eating quality of foods,
particularly hits, vegetables and
prepared foods. The eating quality
of red meats is affected less than
that of many other ftis. Use
refrozen foods as soon as possible
to saveas much of their eating
quality as you cad’
● If your old refrigerator is still
around the house but not in use,
be sure to remove the doors. This
will reduce the possibility of
danger to children.
● Unplug your refrigerator.
A. Before making any repairs.
Note: Westrongly recommend
that any servicing be performed
by a qualified individual.
B. Before cleaning.
C Before replacing a burned-out
light bulb, the refrigerator should
be unplugged in order to avoid
contact with alive wire filament.
(A burned-out light bulb may
break when being replaced.)
Note: Thming control to OFF
position does not remove power
to the light circuit.
● Do not operate your refrigerator
in the presence of expIosive fumes.
SAW THESE
INSTRUCTIONS
Installation Requirements-IMPORTANT:
How to connect
electricityy
For personal safety,
this appliance must be
properly grounded.
The power cord of this appliance
is equipped with a grounding plug
which mates with a standard
grounded wall outlet (Fig. 1)to
minimize the possibility of electric
shock hazard from this appliance.
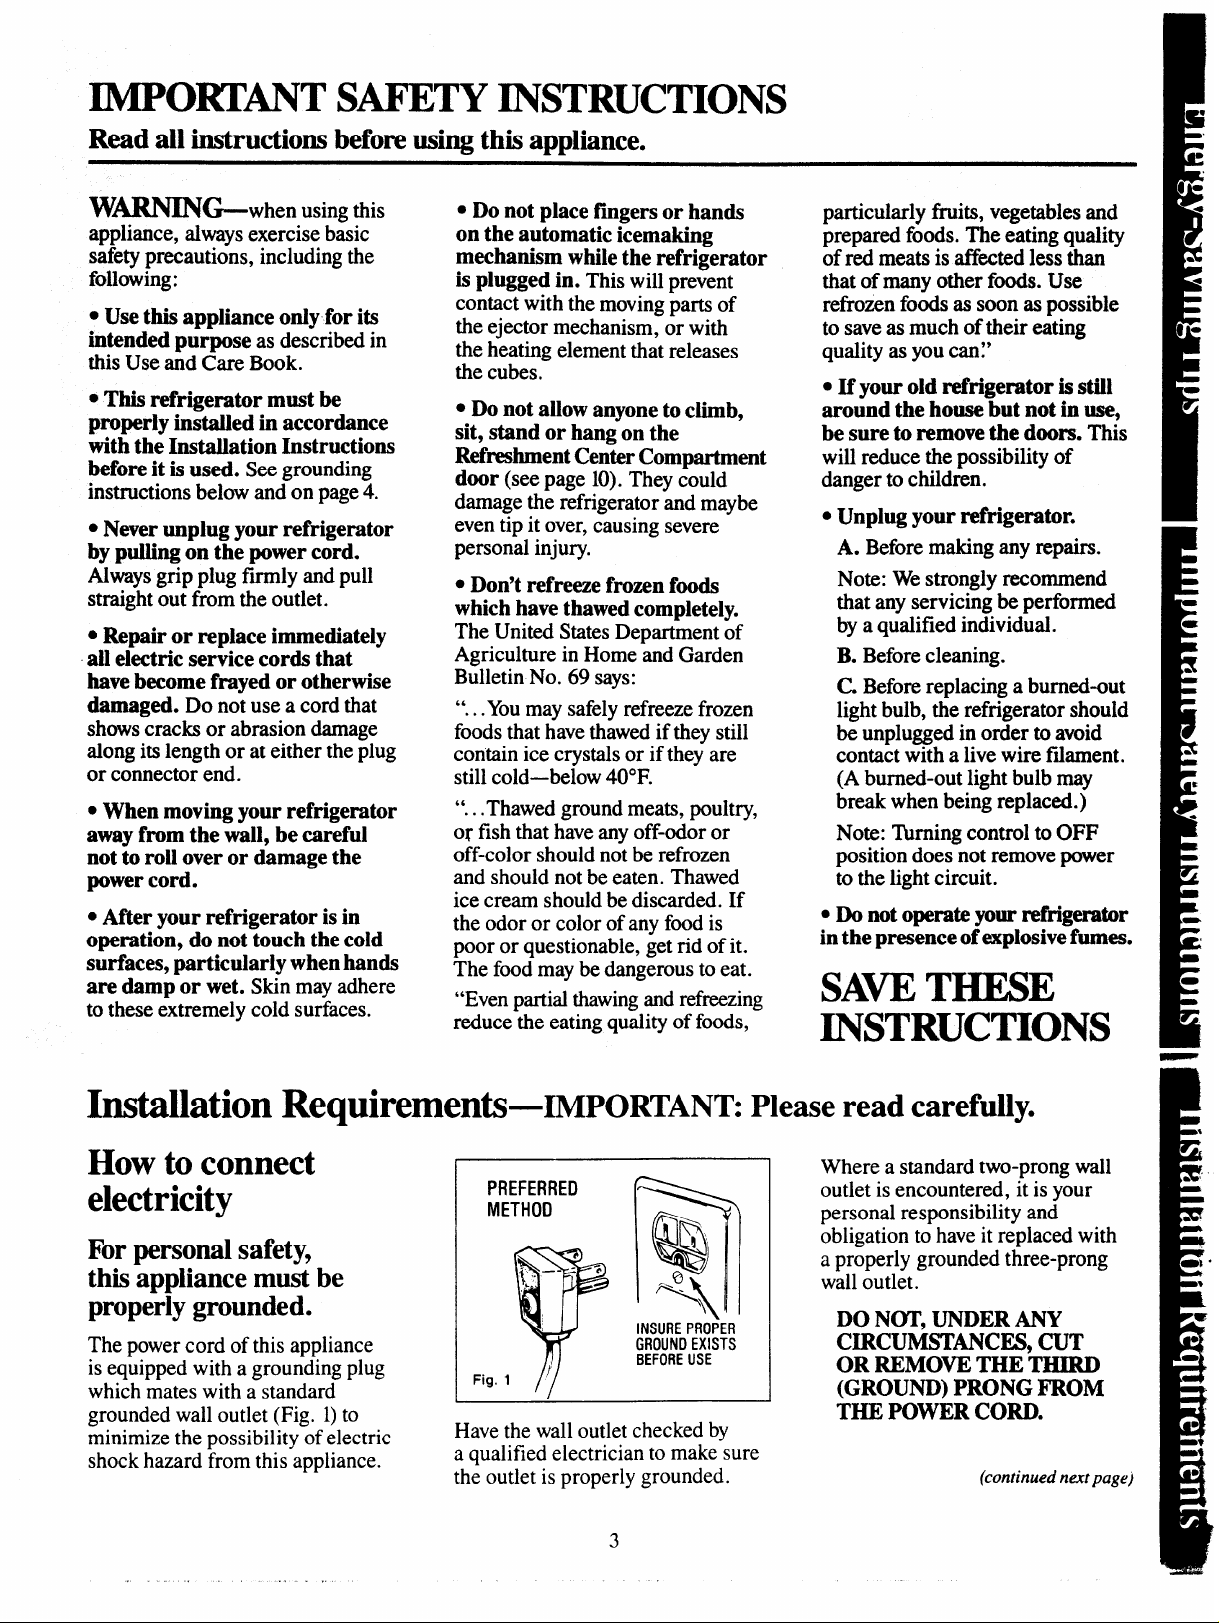
.. . ,
PREFERRED
METHOD
INSURE PROPER
GROUND EXISTS
BEFORE USE
Fig. 1
Havethe wall outlet checked by
a qualified electrician to make sure
the outlet is properly grounded.
3
Please read carefully.
Where a standard two-prong wall
outlet is encountered, it is your
personal responsibility and
obligation to have it replaced with
a properly grounded three-prong
wall outlet.
DO NOT, UNDER ANY
CIRCUMSTANCES, CUT
OR REMOVE THE THIRD
(GROUND) PRONG FROM
THE POWER CORD.
(continued nut page)

Installation Requirements (continued)-IMPORTANT. .. Please Read Carefully
Use of Adapter Plug
Because of potential safety hazards
under certainconditions, we strongly
recommendagainstuse of an adapter
plug. However,if you still elect to use
an adapter,where local codespermit,
a TEMPORARY CONNE~ION
rnqbemadeto apmperlygmunded
two-prong wall outlet by use of a
UL listed adapter (Fig. 2) available
at most local hardware stores.
TEMPORARY METHOD ~ ,
(ADAPTER PLUGS NOT
PERMITTEO IN CANAOA)
ALIGN LARGE
‘RONGs’sLOTs= ~ ‘;~- - 0 ‘-
Fig. 2
The larger slot in the adapter must
be aligned with the larger slot in the
walloutletto provide proper polarity
in the connection of the power cord.
CAUTION: Attaching adapter
ground terminal to wall outlet cover
screwdoes not ground the appliance
unless cover screw is metal, and not
insulated, and walloutlet is grounded
through house wiring. Youshould
havethe circuitcheckedbyaqualified
electrician to make sure the outlet
is properly grounded.
When disconnecting the power
cord from the adapter, always hold
the adapter with one hand. If this
is not done, the adapter ground
terminal is very likely to break
with repeated use.
Should the adapter ground
terminal break, DO NOT USE the
appliance until a proper ground
has again been established.
-cl
Wczn
@- fX’&%kYNNEcTION
Q
-> INSURE PROPER GROUND
t
Use of Extension Cords
Because of potential safety
hazardsunder certain conditions, we
strongly recommend against the
use of an extension cord. However,
if you still elect to use an extension
cord, it is absolutely necessary that
it be a UL listed 3-wire grounding
type appliance extension cord having
a grounding type plug and outlet
and that the electrical rating of the
cord be 15amperes (minimum) and
120volts. Such extension cords are
obtainable through your local
service organization.
The refrigerator should always
be plugged into its own
individual electrical outlet—
(115volt, 60 Hertz, single phase
AC). This is recommended for
best performance and to prevent
overloading house wiring circuits,
which could cause a fire hazard
from overheating wires.
Refrigerator Location
Donotinstallrefrigeratorwhere
temperature
because it will not run often enough
to maintain proper temperatures.
Do install it on a floor strong
enough to support a fully loaded
refrigerator.
Also see Energy-Saving Tips
regarding location.
will go below 60°F.
Clearances
Allow the following clearances
for ease of installation, proper air
circulation, and plumbing and
electrical connections:
Sides . . . . . . . . . . . . . . . . . . ..5/8°
Top . . . . . . . . . . . . . . . . . . . . . ..l”
Back . ... . . . . . . . . . . . . . . . . ..l”
Allow the following door clearance:
Sides . . . . . . . . . . . . . . . . . . ..3/4°
If refrigerator is installed in a
right-handcomer, allowthefollowing
clearance to prevent the refreshment
center compartment door handle
from hitting the wall when the fresh
food compartment door is opened:
Right Side . . . . . . . . . . . . . ..”2~”
Water Supply to Icemaker
Youwill need to connect your
icemakerto a cold waterline. A water
supply kit containing copper tubing,
shut-offvalve,fittingsand instructions
is available at extra cost from your
dealer.There shouldbeenough~bing
the cold water supply to the
from
icem~er to allow you to move the
refrigeratorout from the wall several
feet(approximately3coils of VI-inch
copper tubing that is at least 10
inches in diameter).
Rollers
Adjustable rollers, which enable
you to move your refrigerator away
fi-omthe wallforcleaning, are located
behind the base grille. They should
be set so the refrigerator is firmly
positioned on the floor and the
front is raised just enough that the
doorscloseeasilywhen openedabout
halfivay.Speciahy designed door
hinges lift both doors slightly when
opened. The force of gravity then
helps close the door automatically.
To adjust rollers, remove the base
grille bygrasping it at the bottom
and pulling it out.
Turn the roller
adjusting screws
clockwise to raise
the refrigerator,
counterclockwise
to lower it. Use adjustable wrench
(3/8”hex head bolt) or pliers.
Whenadjustingfimt rollersIbrpmper
door closure, we recommend that
the bottom front edge of the cabinet
be approximately5/8” from the floor.
To replace base grille, align prongs
on back of grille with clamps in
cabinet and push forward until
grille snaps into place.
I I v
\
1
. . . . .. . ,
4
Operating
YourRefrigerator
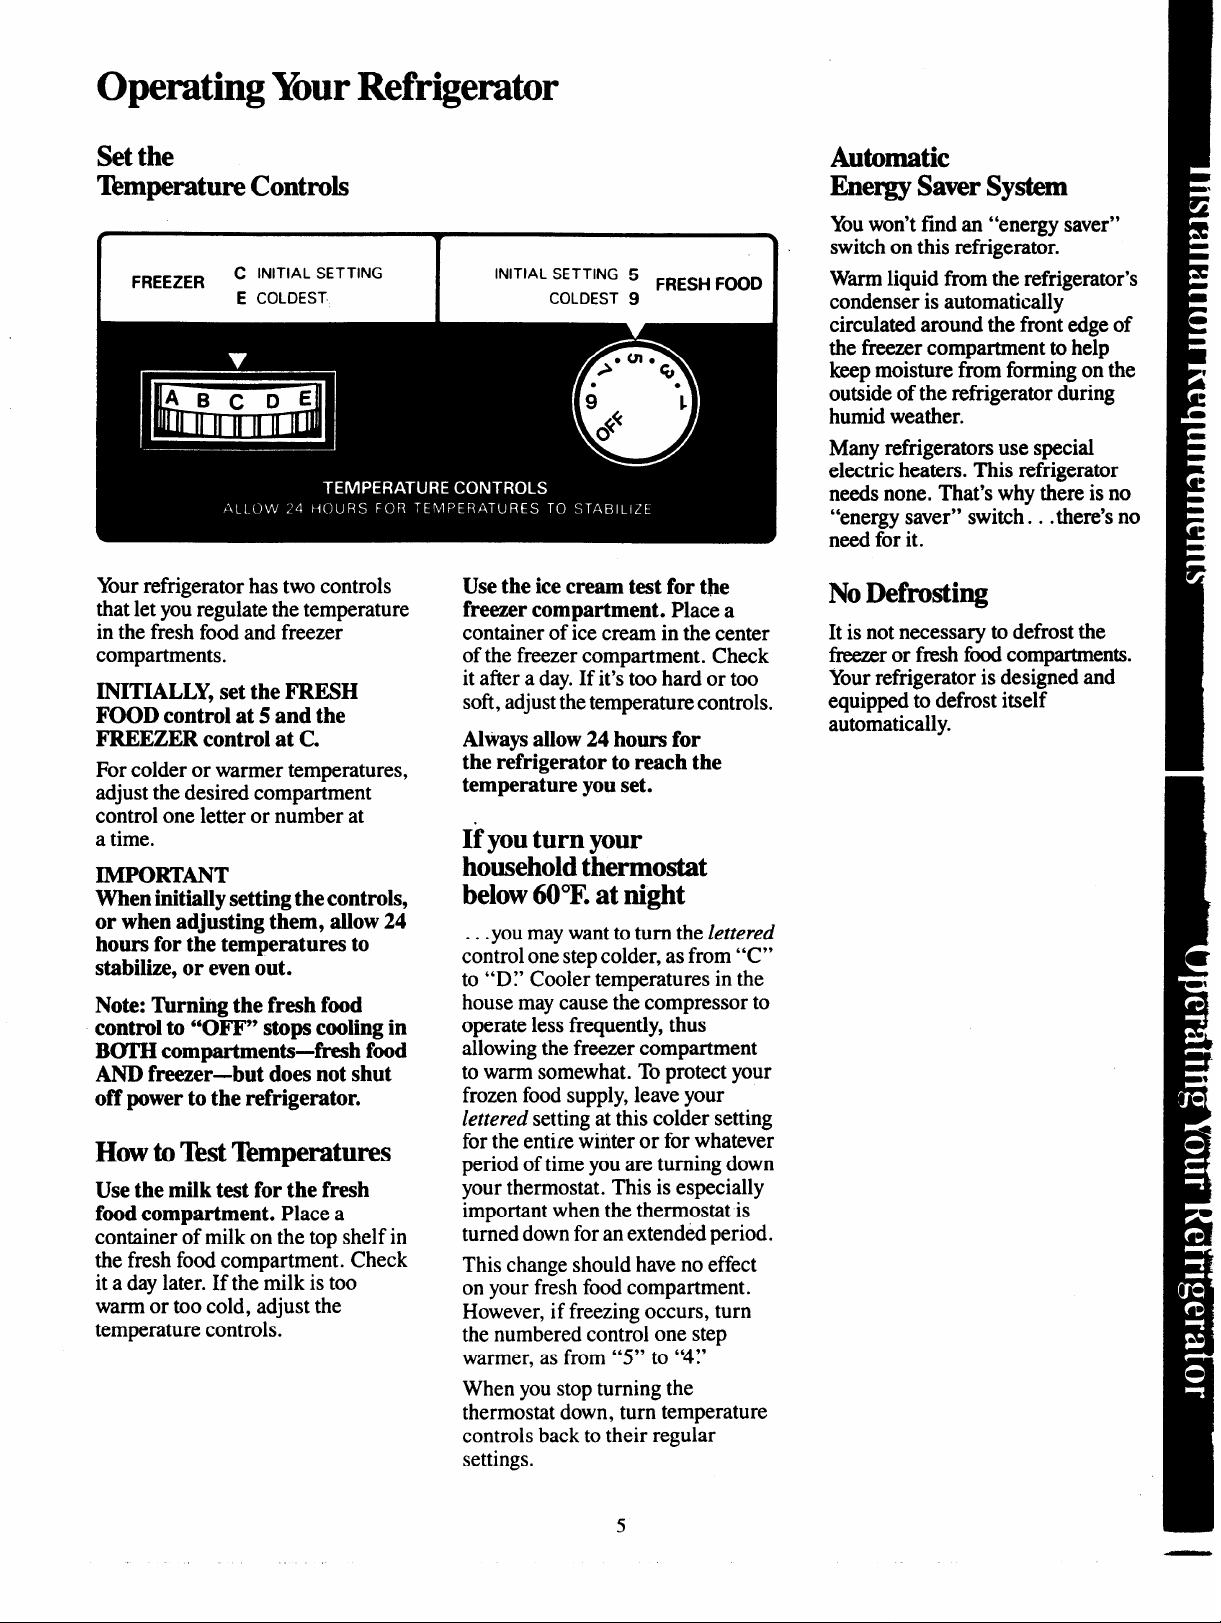
Set the
T13mperatureControls
P
C
FREEZER
Yourrefrigerator has two controls
that let you regulate the temperature
in the fresh food and freezer
compartments.
INITIALLY, set the FRESH
FOOD control at 5 and the
FREEZER control at C.
For colder or warmer temperatures,
adjust the desired compartment
control one letter or number at
a time.
IMPORTANT
When initially setting the controls,
or when adjusting them, allow 24
hours for the temperatures to
stabilize, or even out.
Note: ‘Ikrning the fresh food
control to “OFF” stops cooling in
BOTH compartments-fresh fmd
AND freezer-but does not shut
off power to the refrigerator.
INITIAL SETTING
E COLDEST
How toT&tTemperatures
Use the milk test for the fresh
food compartment. Place a
container of milk on the top shelf in
the fresh food compartment. Check
it a day later. If the milk is too
warm or too cold, adjust the
temperature controls.
w
‘N’T’AL ‘ETT’NG 5
COLDEST 9
Use the ice cream test for the
freezer compartment. Place a
container of ice cream in the center
of the freezer compartment. Check
it after a day. If it’stoo hard or too
soft, adjustthetemperature controls.
Always allow 24 hours for
the refrigerator to reach the
temperature you set.
FRESH FOOD
If you turn your
household thermostat
below 60”F.at night
you may wantto turn the lettered
...
control one step colder, as from “C”
to “DY Cooler temperatures in the
house may cause the compressor to
operate less frequently, thus
allowing the freezer compartment
to warm somewhat. To protect your
frozen food supply, leave your
lettered setting at this colder setting
for the entire winter or for whatever
period oftime you are turning down
your thermostat. This is especially
important when the thermostat is
turned down for an extended period.
This change should have no effect
on your fresh food compartment.
However, if freezing occurs, turn
the numbered control one step
warmer, as from “5” to “4Y
When you stop turning the
thermostat down, turn temperature
controls back to their regular
settings.
Automatic
Energy Saver System
\
Youwon’tfind an “energy saver”
switch on this refrigerator.
Wm liquid from the refrigerator’s
condenser is automatically
circulated around the front edge of
the fkeezercompartment to help
keep moisture from forming on the
outside of the refrigerator during
humid weather.
Many refrigerators use special
electric heaters. This refrigerator
needs none. That’s why there is no
“energy saver” switch. . .there’s no
need for it.
NoDefrosting
It is not necessary to defrost the
freezeror fresh fbod compartments.
Yourrefrigerator is designed and
equipped to defrost itself
automatically.
5
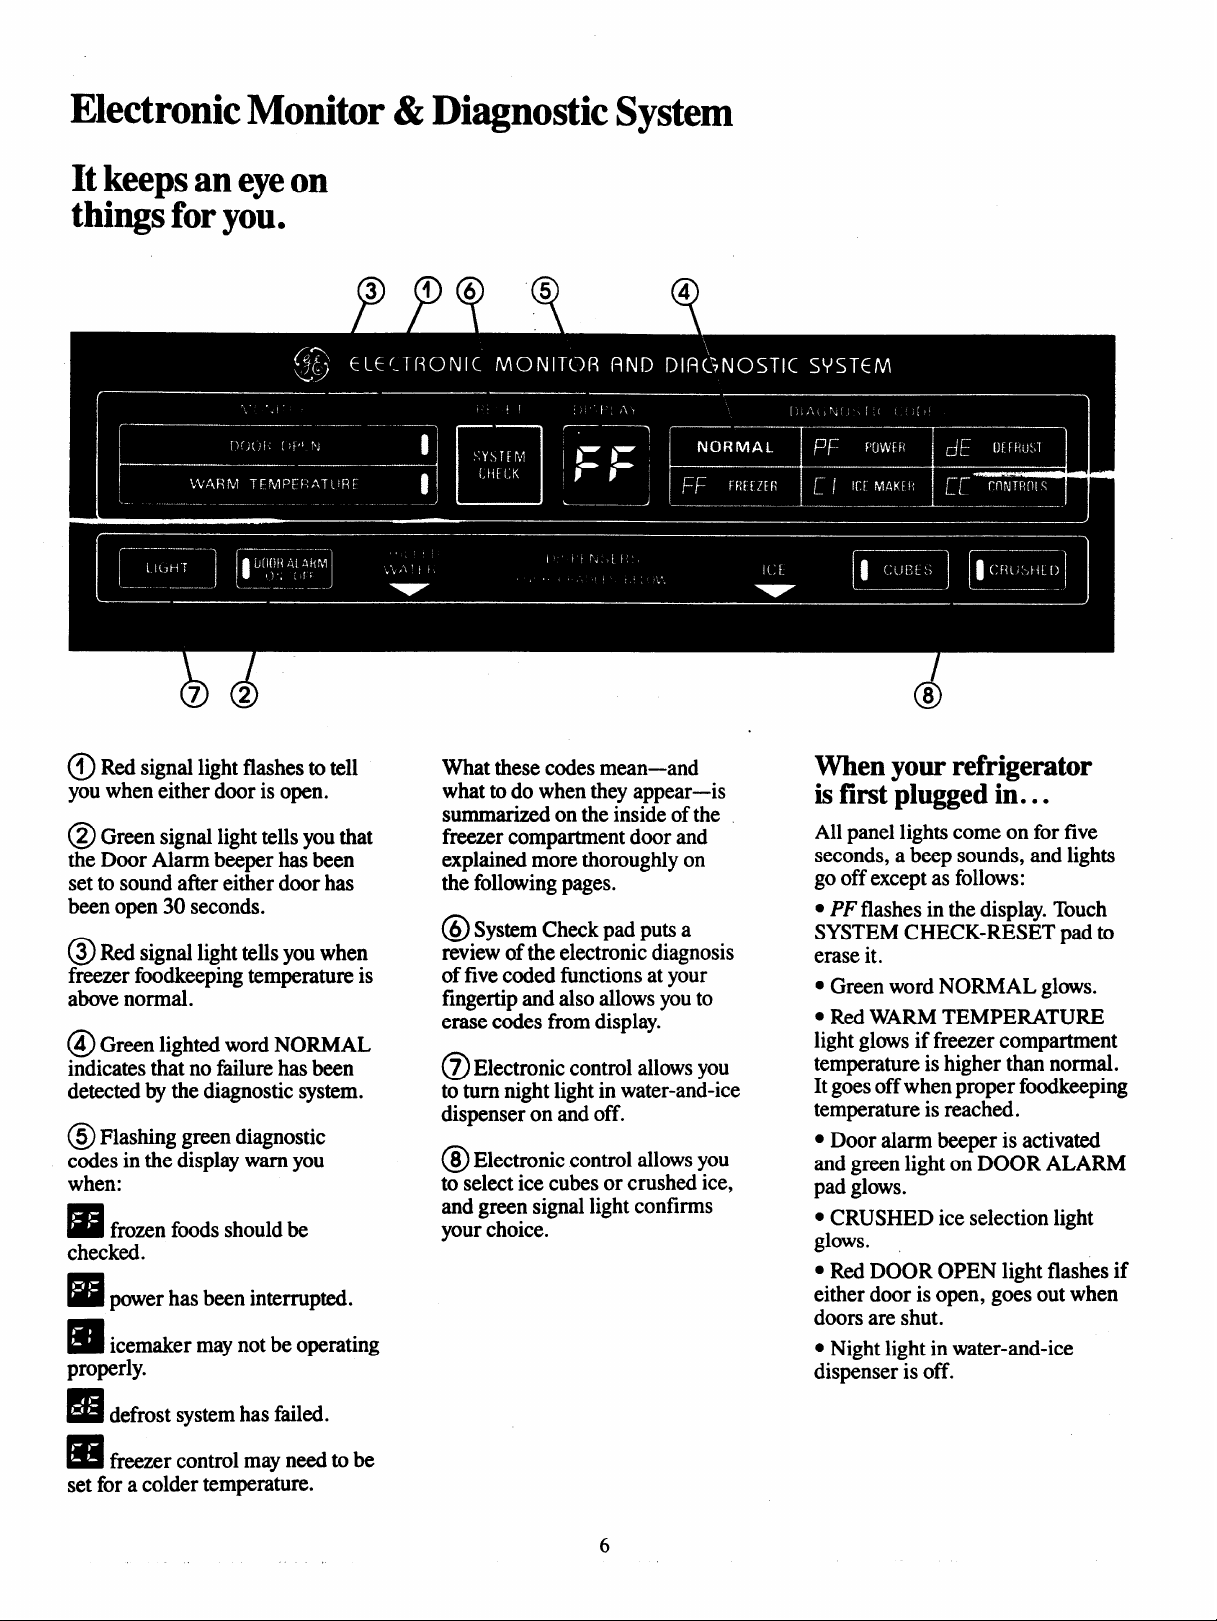
Electronic Monitor &Diagnostic System
keeps an eyeon
It
things for you.
4
Q
@ Red signal light flashes to tell
you when either door is open.
@G reen signal light tells you that
the Door Alarm beeper has been
set to sound afk either door has
been open 30 seconds.
@Red signal light tells you when
freezer foodkeeping temperature is
above normal.
@Green lighted word NORMAL
indicates that no failure has been
detected by the diagnostic system.
@Flashing green diagnostic
codes in the display warn you
when:
Is#frozen foods should be
checked.
power has been interrupted.
I#s
icemaker may not be operating
❑
properly.
What these codes mean—and
what to do when they appear—is
summarized on the inside of the
fkezer compartment door and
explained more thoroughly on
the following pages.
@System Checkpadputsa
review ofthe electronic diagnosis
of five coded fimctions at your
fingertip and also allows you to
erase codes fkomdisplay.
@Electronic control allows you
to turn night light in water-and-ice
dispenser on and off.
@Electronic control allows you
to select ice cubes or crushed ice,
and green signal light confirms
your choice.
When your refrigerator
is first plugged in...
All panel lights come on for five
seconds, a beep sounds, and lights
go offexcept as follows:
● PF flashes in the display. Touch
SYSTEM CHECK-RESET pad to
erase it.
● Green word NORMAL glows.
● Red WARM TEMPEIUXTURE
light glows if freezer compartment
temperature is higher than normal.
It goes offwhen proper foodkeeping
temperature is reached.
● Door alarm beeper is activated
and green light on DOOR ALARM
pad glows.
● CRUSHED ice selection light
glows.
● Red DOOR OPEN light flashes if
either door is open, goes out when
doors are shut.
● Night light in water-and-ice
dispenser is off.
defrost system has fhiled.
I#la
tieezer control may need to be
5
set for a colder temperature.
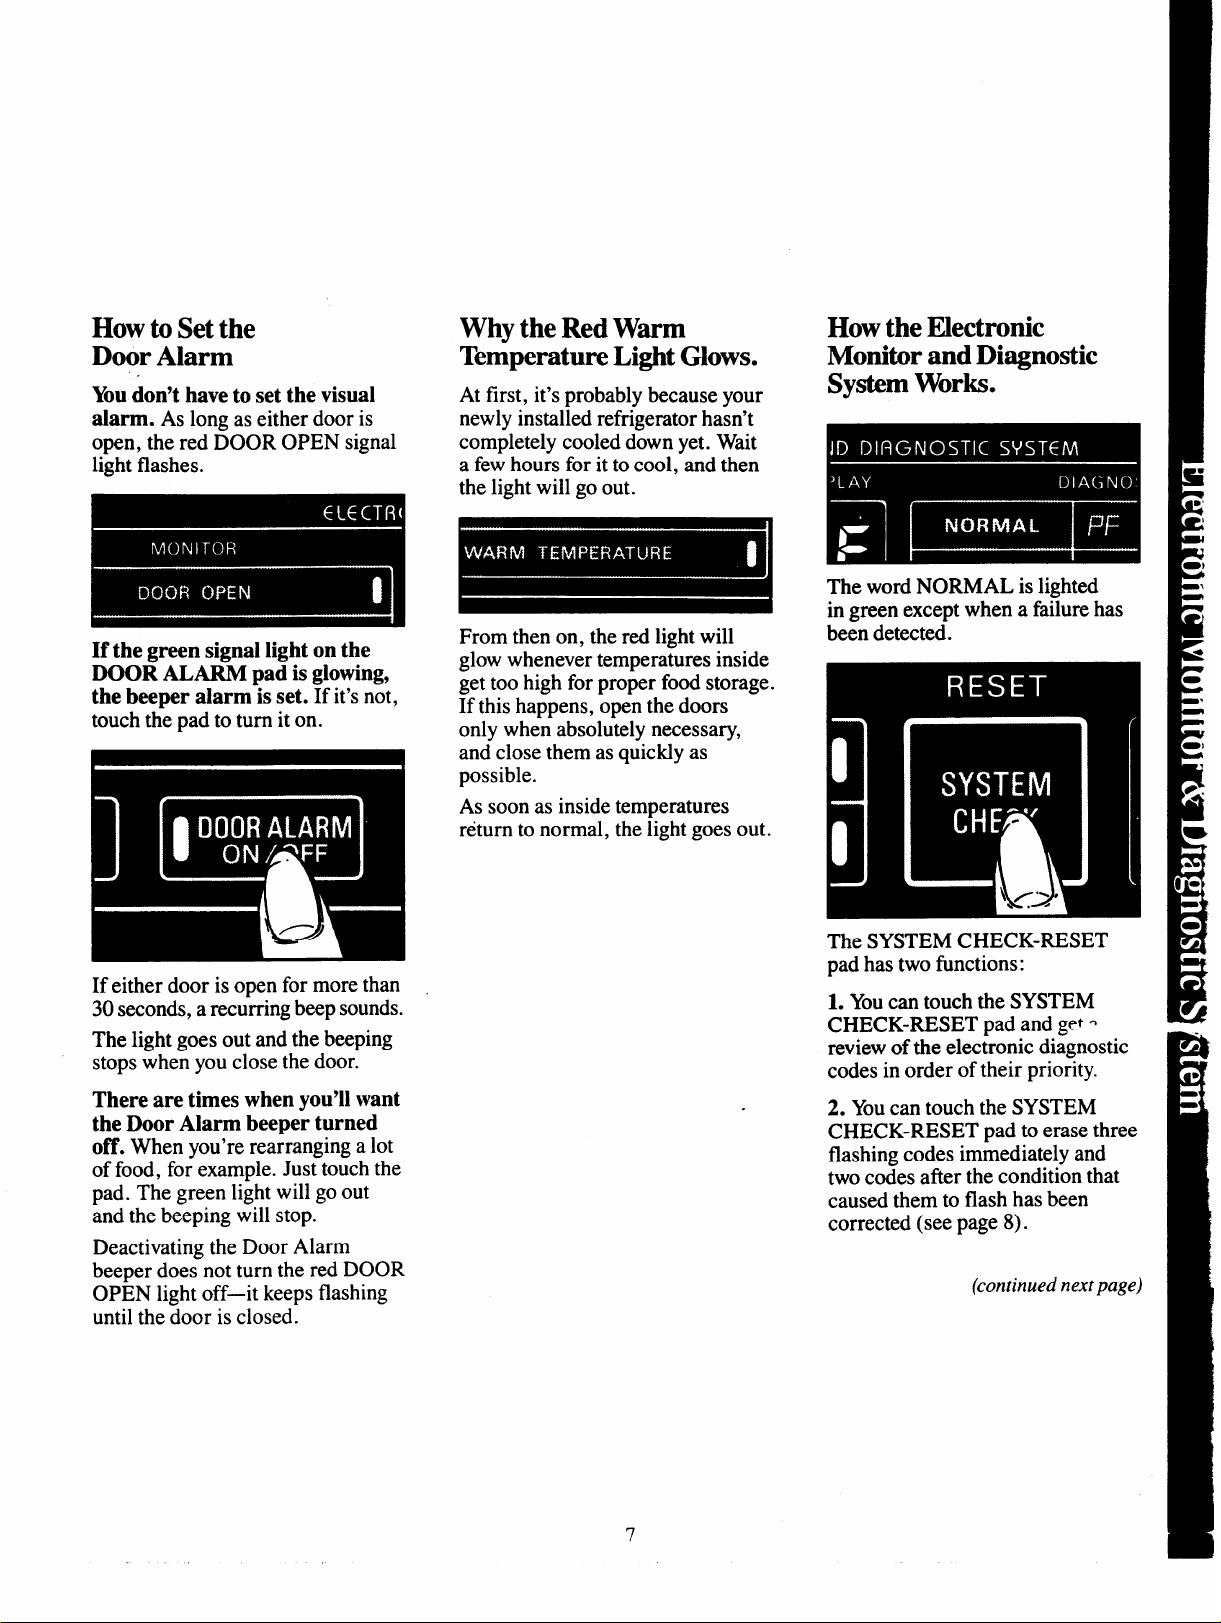
How to Set the
Door Alarm
You don’t have to set the visual
alarm. As long as either door is
open, the red DOOR OPEN signal
light flashes.
If the green signal light on the
DOOR ALARM pad is glowing,
the beeper alarm is set. If it’s not,
touch the pad to turn it on.
Why the Red Warm
TemperatureLight Glows.
At first, it’s probably because your
newly installed refrigerator hasn’t
completely cooled down yet. Wait
a few hours for it to cool, and then
the light will go out.
From then on, the red light will
glow whenever temperatures inside
get too high for proper food storage.
If this happens, open the doors
only when absolutely necessary,
and close them as quickly as
possible.
As soon as inside temperatures
return to normal, the light goes out.
How the Electronic
Monitor and Diagnostic
System Works.
The word NORMAL is lighted
in green except when a failure has
been detected.
If either door is open for more than
30 seconds, arecurring beep sounds.
The light goes out and the beeping
stops when you close the door.
There are times when you’ll want
the Door Alarm beeper turned
off. When you’re rearranging a lot
of food, for example. Just touch the
pad. The green light will go out
and the beeping will stop.
Deactivating the Door Alarm
beeper does not turn the red DOOR
OPEN light off—it keeps flashing
until the door is closed.
The SYSTEM CHECK-RESET
pad has two fimctions:
1.Youcan touch the SYSTEM
CHECK-RESET pad and get o
review ofthe electronic diagnostic
codes in order of their priority.
2. Youcan touch the SYSTEM
CHECK-RESET pad to erase three
flashing codes immediately and
two codes after the condition that
caused them to flash has been
corrected (see page 8).
(continued next page)
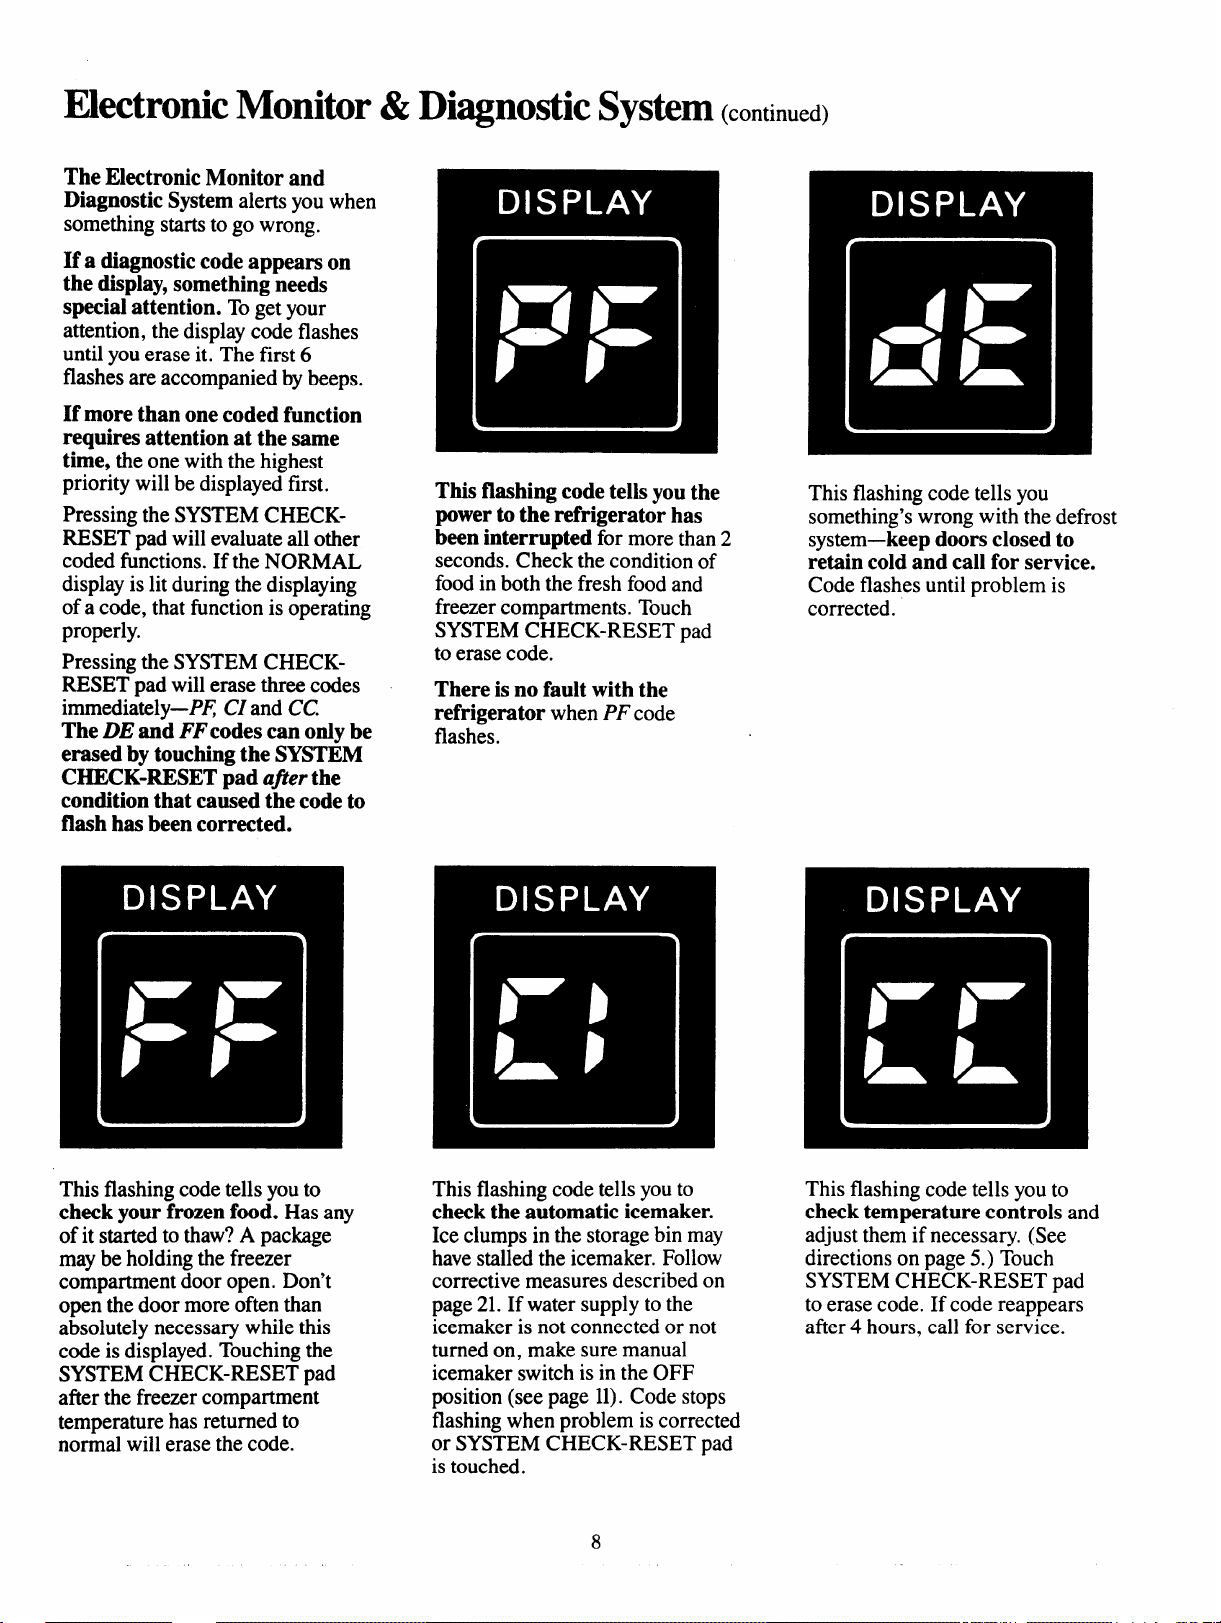
~ectronic Monitor&Diagnostic System (continued)
The Electronic Monitor and
Diagnostic System alerts you when
something starts to go wrong.
If a diagnostic code appears on
the display, something needs
special attention. Toget your
attention, the display code flashes
until you erase it. The first 6
flashes are accompanied by beeps.
If more than one coded function
requires attention at the same
time, the one with the highest
priority will be displayed first.
Pressing the SYSTEM CHECK-
RESET pad will evaluate all other
coded functions. If the NORMAL
display is lit during the displaying
of a code, that fi,mctionis operating
properly.
Pressing the SYSTEM CHECKRESET pad will erase three codes
immediately-~~ CZand CC
The DE and FFcodes can only be
erased by touching the SYSTEM
CHECK-RESET pad after the
condition that caused the code to
flash has been corrected.
This flashing code tells you the
power to the refrigerator has
been interrupted for more than 2
seconds. Check the condition of
food in both the fresh food and
freezer compartments. Touch
SYSTEM CHECK-RESET pad
to erase code.
There is no fault with the
refrigerator when PF code
flashes.
This flashing code tells you
something’s wrong with the defrost
system-keep doors closed to
retain cold and call for service.
Code flashes until problem is
corrected.
This flashing code tells you to
check your frozen food. Has any
of it started to thaw? A package
may be holding the freezer
compartment door open. Don’t
open the door more often than
absolutely necessary while this
code is displayed. Touching the
SYSTEM CHECK-RESET pad
after the freezer compartment
temperature has returned to
normal will erase the code.
This flashing code tells you to
check the automatic icemaker.
Ice clumps in the storage bin may
have stalled the icemaker. Follow
corrective measures described on
page 21. If water supply to the
icemaker is not connected or not
turned on, make sure manual
icemaker switch is in the OFF
position (see page 11).Code stops
flashing when problem is corrected
or SYSTEM CHECK-RESET pad
is touched.
8
This flashing code tells you to
check temperature controls and
adjust them if necessary. (See
directions on page 5.) Touch
SYSTEM CHECK-RESET pad
to erase code. If code reappears
after 4 hours, call for service.
 Loading...