

GE TFX24E Use and Care Manual
Contents
Appliance Registration 2
BaseGrille
Care and Cleaning
Condenser
Diagnostic Codes
Drawer &Cover Removal
Electronic Monitor and
Diagnostic System
Door Alarm
System Check—Reset
Warm Temperature
Enezzy Saver
Energy-Saving Tips
Fmd Saver System
Food Storage Suggestions
Sto~ Times 13
Ice Dispenser
Icemaker
Installation
Adapter Plug
Adjustable Rollers
Clearances
17,18
17 Safety Instructions
%9 Shelves
14,15 Storage Drawers
6-9 Vacation & Moving Tips
7,8
●
14
13
10-12
10=12
3,4
Model and Serial Numbers 2
4 Problem Solver
Repair Service
Temperature Controls
7
Warranty
Water Filter Accessory
7
5“
2
4
:
19.21
23
3
15,16
14,15
5
18
Back Cover
18
Electrical Requirements 3,4
18
4
3
4
6EAwwCW-
m-
,
,1
I
Grounding
Location
Water Supply to Icemaker 4
Light Bulb Replacement
Extension Cord
Model TFX24E
Help us
help you...
Read this book camfkdlye
Itishtendedtohelp youoperate
and maintain your new refrigerator
properly.
Keep it handy tbr answers to your
questions.
If you don’t understand something
or need mom help, write (include
your phone number):
Consumer AfMrs
GE Appliances
Appliance I%rk
Louisville, KY 40225
.-- .”...
Write duwnthemodeland
serial numbers.
You’llseethem on a label at the
bottom, just inside the * fbod
compartment door.
These numbers are also on the
Consumer Product Ownership
Registration Card that came with
X= ~r*
MXesendinginthisc ard,please
write these numbers here:
ModolNwnm
SerialNumber
Ifyoumcdwdadamaged
~, ~
the dealer (or builder) that sold you
the dripmtor.
Savetimeandmone!y.
kfOIY? you request - check
the Problem Solwz on pages 19
-21. It b a- of minor
-* ml- that you can
_correct youmdf.
“ ly contact *
Energy%avi.ngtips
● Location of your refrigerator is
important. Amid locating it next
toyourrange, aheatingventor
where the sun will shine directly
on it.
● Don’t open the doors mom ofkm
necemary.
than
● close the d~~ ~ -n ~
possible, particularly in hot,
humid weather.
•~s~the~rs~cl~
tightly. More leaving the house or
- fir the night, check to be
sure the doors lwven’tbeen M
open accidentally.
● storeonly those foods requiring
mfrigeratkm in your refrigerator.
● W@eall moisture from bottles
and cartons before putting them in
the refrigerator.
*KeepfbodscwXedto reduce
moisture buildup inside the
re&igerator.
● If ~ - controls to the coldest
positkmfbrquickchiuingorfreuing,
besuretoturnthem backtoregular
-@P*
● mn’t ov~ your refrigerator.
Overmwding can require extra
43~3cal energy to keep everything
●
thatofmany other fbods. Use
mfkozenf- as soon w possible
towweasrnuch oftieti=ting
quality as you can:’
qf~ old rdr@mtor k *
aroundthekmsebutnot
beslmto
will reduce the
.tochildren.
● unp@your refrigerator:
remove the doom
possibii of danger
imse,
Thk
● fin-v@ p refrigerator
,+:“
‘: away fkOmthew$dl, k*
,“. :-
;“>.,, ,
<>,‘~,
,>>
“..-
. ‘+:“
not to roll over or damage the
%
‘ “’ P=-rd”
: .~~~eratorisin
,-,
.,
operatkm, do not touch the cold
~ ~ particulariywhenhands
are damp or wet. Skinmay adhere
to these extremely cold surfhces.
“men pmth&V@-and mfmzing
reducetheeatingqualityd%ods,
Partictiv fruits,vegetablesand
P-=. The eatingq@ty
ofmdrneatsis~lU-
A. Beforemakingany
Note:W strongly recommend
thatany servicing be performed
byaq-ed individual.
B. Bet&e cleaning.
C Before replacing a burned-out
liAt bulb, the refiigemtor shouki &unplugged in or&rto avoid
contact with alive wim filament.
(A burned~ut light bulb may
break when being rephced.)
Note: ‘hrning control to OFF
position does not remove power
to the light circuit.
repairs.
SAW THESE
INSTR’U~ONS
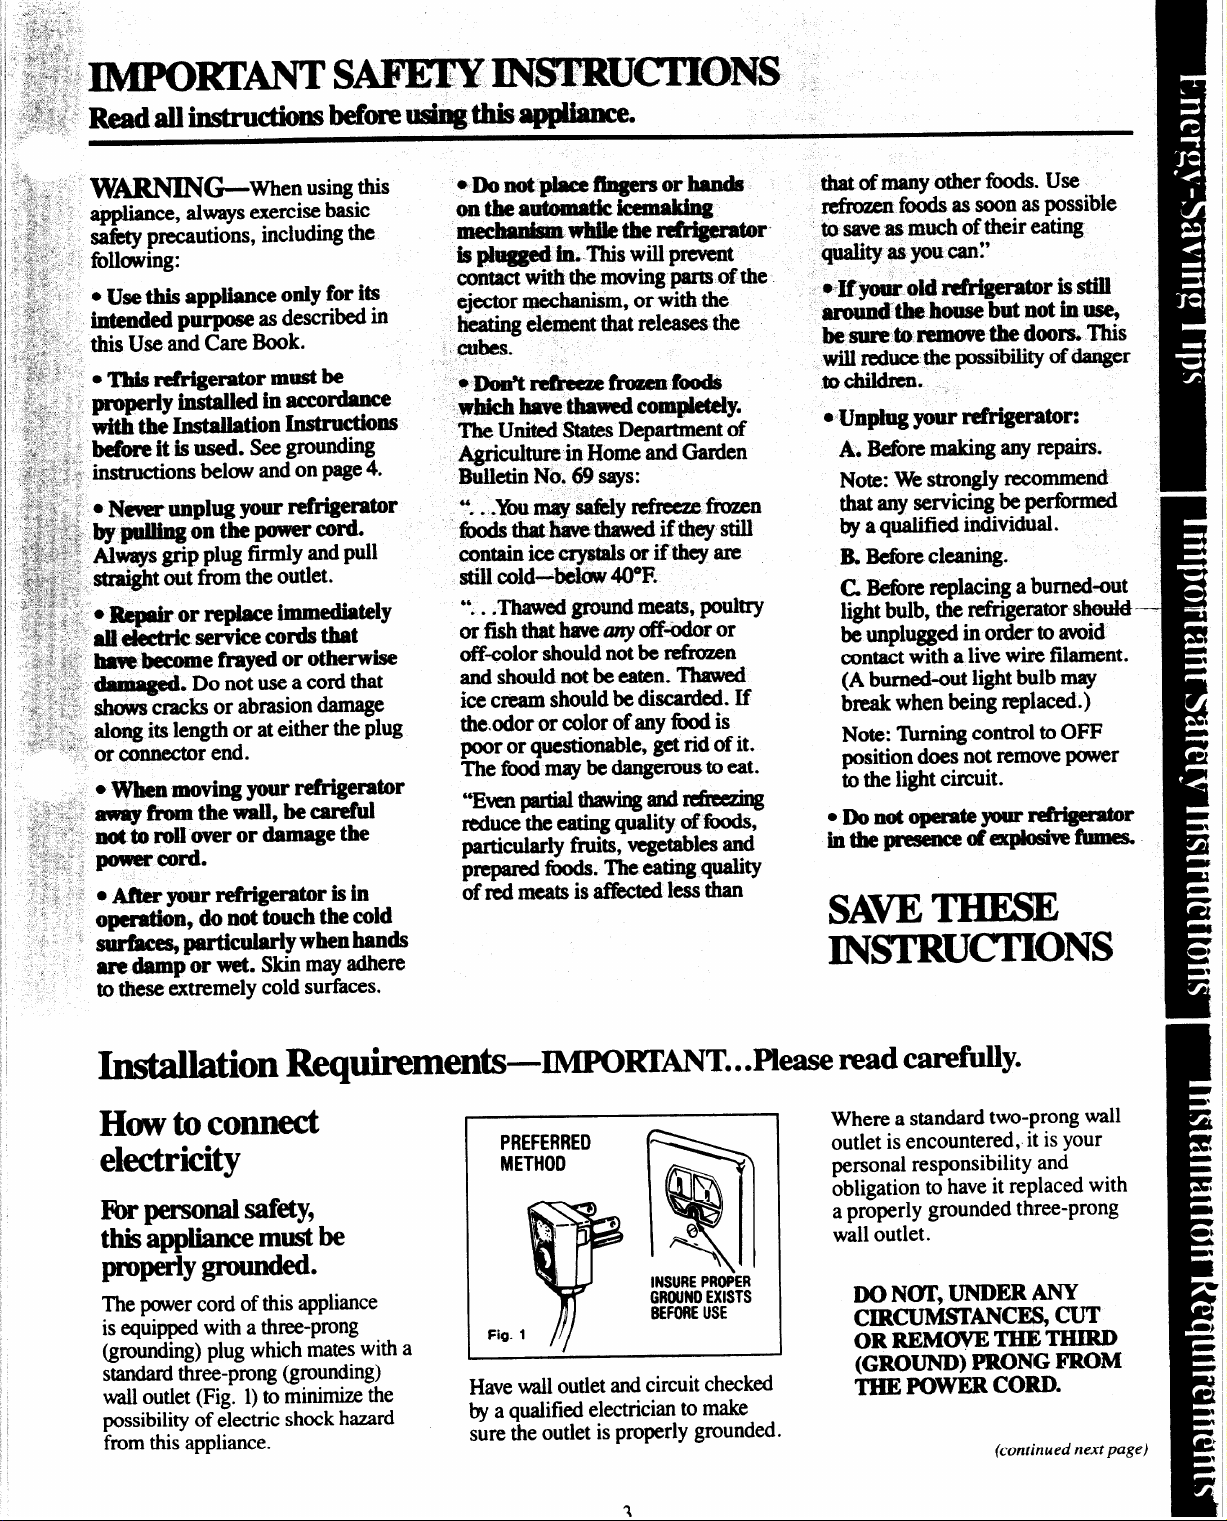
hstahtion kc@remenb-IMPO~NT...H~
HowtoCOIMWd
electricity
Fbrpemmal Safkty,
this appliancemustbe
,
I
/
!
I
m@Y -
The power cord of this appliance
is equipped with a three-prong
(grounding)plug which mates with a
standardthree-prong (grounding)
walloutlet (Fig. 1)6 minimizethe
possibility of electric shock hazard
from this appliance.
●
PREFERRED
METHOD
9
b
-0
.
“3
m
INSUREPROPER
GRMIMN;;:;STS
Fig. 1
T
riavewalloutlet and circuit checked
bya qualifid electricim to make
sure the outlet is properly grounded.
readmfblly.
Where a standard two-prong wall
outlet is encountered, it is your
personal responsibility and
obligation to have it replaced with
a properly grounded three-prong
wall outlet.
DO N(YI’,
UNDERW
cIRc’uMs’rANcmCUT
OR REMOVE
(GROUND)
THE POWER CORD.
THETHIRD
PROM~oM
(continued next page
Mation Requirements (continue+-~~.. .PI- R-d C=fdy
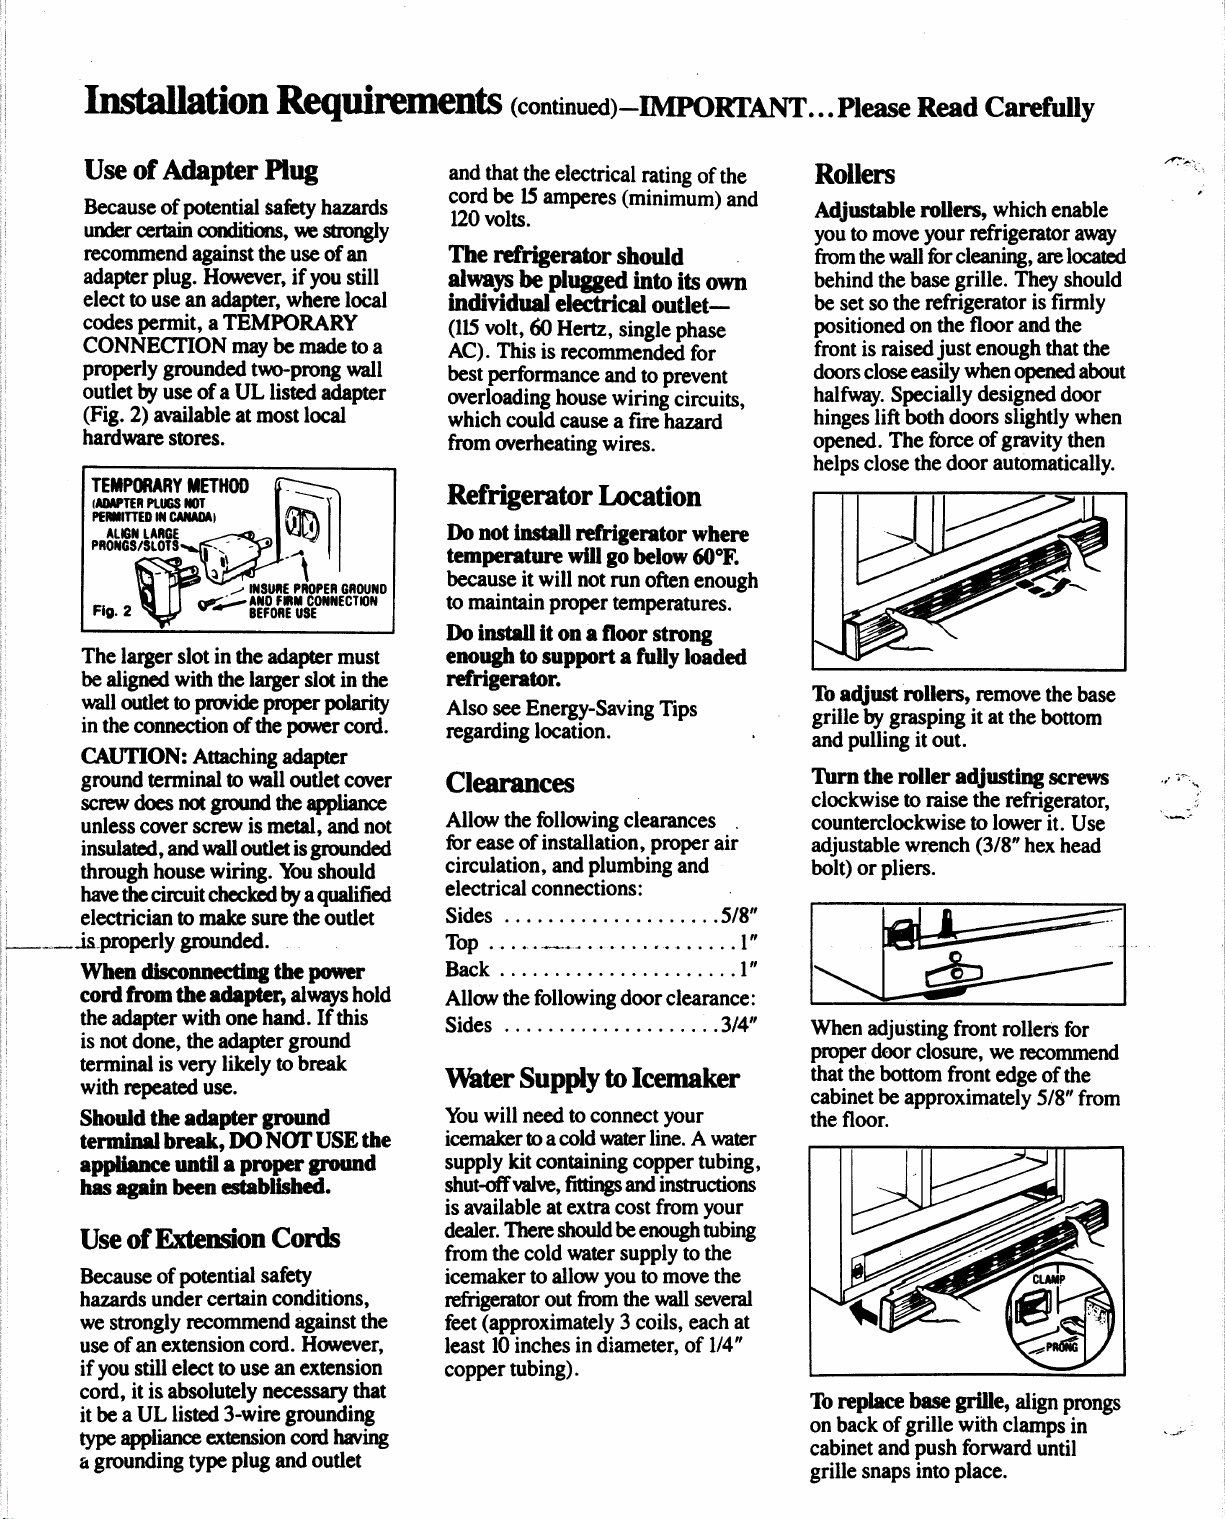
Use of Adapter Plug
Because of potential safety hazards
undercertaincm&ions
recommend against the use of an
adapter plug. However, if you still
elect to use an adapter, where local
codes permit, a TEMPORARY
CONNECI’ION maybe made to a
properly grounded two-prong wall
outlet by use of a UL listed adapter
(Fig. 2) available at most local
hardware stores.
TEMPORARYMETHOD ~
@MPTER PLUGS NoT
PEMITTED m CANAoA)
AIMNLARGE
PRONGS/SLOTS .,--- -~
Fig. 2
.W
$
a
d
>> INSURE PROPER GMII,NUD
‘= :::&:&~~NECTmN
The larger slot in the adapter must
be aligned with the lager slot in the
walloutlet to pxwvideproper polarity
in the connection of the powercord.
CAUTION: Attaching adapter
ground terminal to wall outlet cover
Scmwdoesnot gmundtheappliance
unless cover screw is metal, and not
insulated, and walloutlet isgrounded
through house wiring. Ya should
havethecimuit checked~ a qualified
electrician to make sure the outlet
_. —is properly grounded.
Whendkonnedingth epower
cord from the adapter, alwayshold
the adapter with one hand. If this
is not done, the adapter ground
terminal is very likely to break
with repeated use.
Should the adapter ground
terminal break, DO N(YI’USE the
applknce until
a properground
has again been establW.
Use of Extension Cords
Because of potential safety
hazards under certain conditions,
we strongly recommend against the
use of an extension cord. Huwever,
if you still elect to use an extension
cord, it is absolutely necessary that
it be a UL listed 3-wire grounding
type appliance extension cord having
a grounding type plug and outlet
, w strongly
,
t
m
\
and that the electrical rating of the
cord be 15amperes (minim~m) and
120volts.
The refrigerator should
alwaysbe plugged into its own
individual electrical outlet—
(115volt, 60 Hertz, single phase
AC). This is recommended for
best performance and to prevent
overloading house wiring circuits,
which could cause afire hazard
fkomoverheating wires.
Refrigerator Location
not install refrigerator where
h
temperature wilIgo below @“F.
because it will not run often enough
to maintain proper temperatures.
Do install it on a floor strong
enough to support a fully loaded
refrigerator.
Also see Energy-Saving Tips
regarding location.
clearances
Allow the following clearances .
fir ease of installation, proper air
circulation, and plumbing and
electrical connections:
Sides . . . . . . . . . . . . . . . . . ...5/8”
Top . . . ..+—.--- . . . . . . . . . . . . ..l”
Back . . . . . . . . . . . . . . . . . . . . ..l”
Allow the following door clearance:
Sides . . . . . . . . . . . . . . . . . . ..3i4°
VVhterSupply toIcexnaker
Youwill need to connect your
icernaker to a cold waterline. A water
supply kit containing copper tubing,
shutdvak, Wings and instructions
is available at extra cost from your
dealer.Themshouldbe enoughtubing
from the cold water supply to the
icemaker to allow you to move the
mfiigerator out fmm the wallseveral
f=t (approximately 3 coils, each at
least 10inches in diameter, of 1/4”
copper tubing).
Rollers
Adjustable rollers, which enable
you to move your refrigerator away
fromthewallfbrcleaning, arelocated
behind the base grille. They should
be set so the refrigerator is firmly
positioned on the floor amdthe
front is raised just enough that the
doorscloseeasilywhen opened about
halfway.Specially designed door
hinges lift both doors slightly when
optied.
helps close the door automatically.
Toa~ust rollers, remove the base
grille by grasping it at the bottom
and pulling it out.
‘Ibm the roller adjusting screws
clockwise to raise the refrigerator,
counterclockwise to lower it. Use
adjustable wrench (3/8” hex head
bolt) or pliers.
When adjusting front rollers for
proper door C1OS-, we recommend
that the bottom front edge of the
cabinet be approximately 5/8” from
the floor.
To replace base grille, align prongs
on back of grille witi clamps in .=
cabinet and push forward until
grille snaps into place.
The force of gmiity then
.,’ ~
,-
----
-,-
.“,
Operating YourRefrigerator
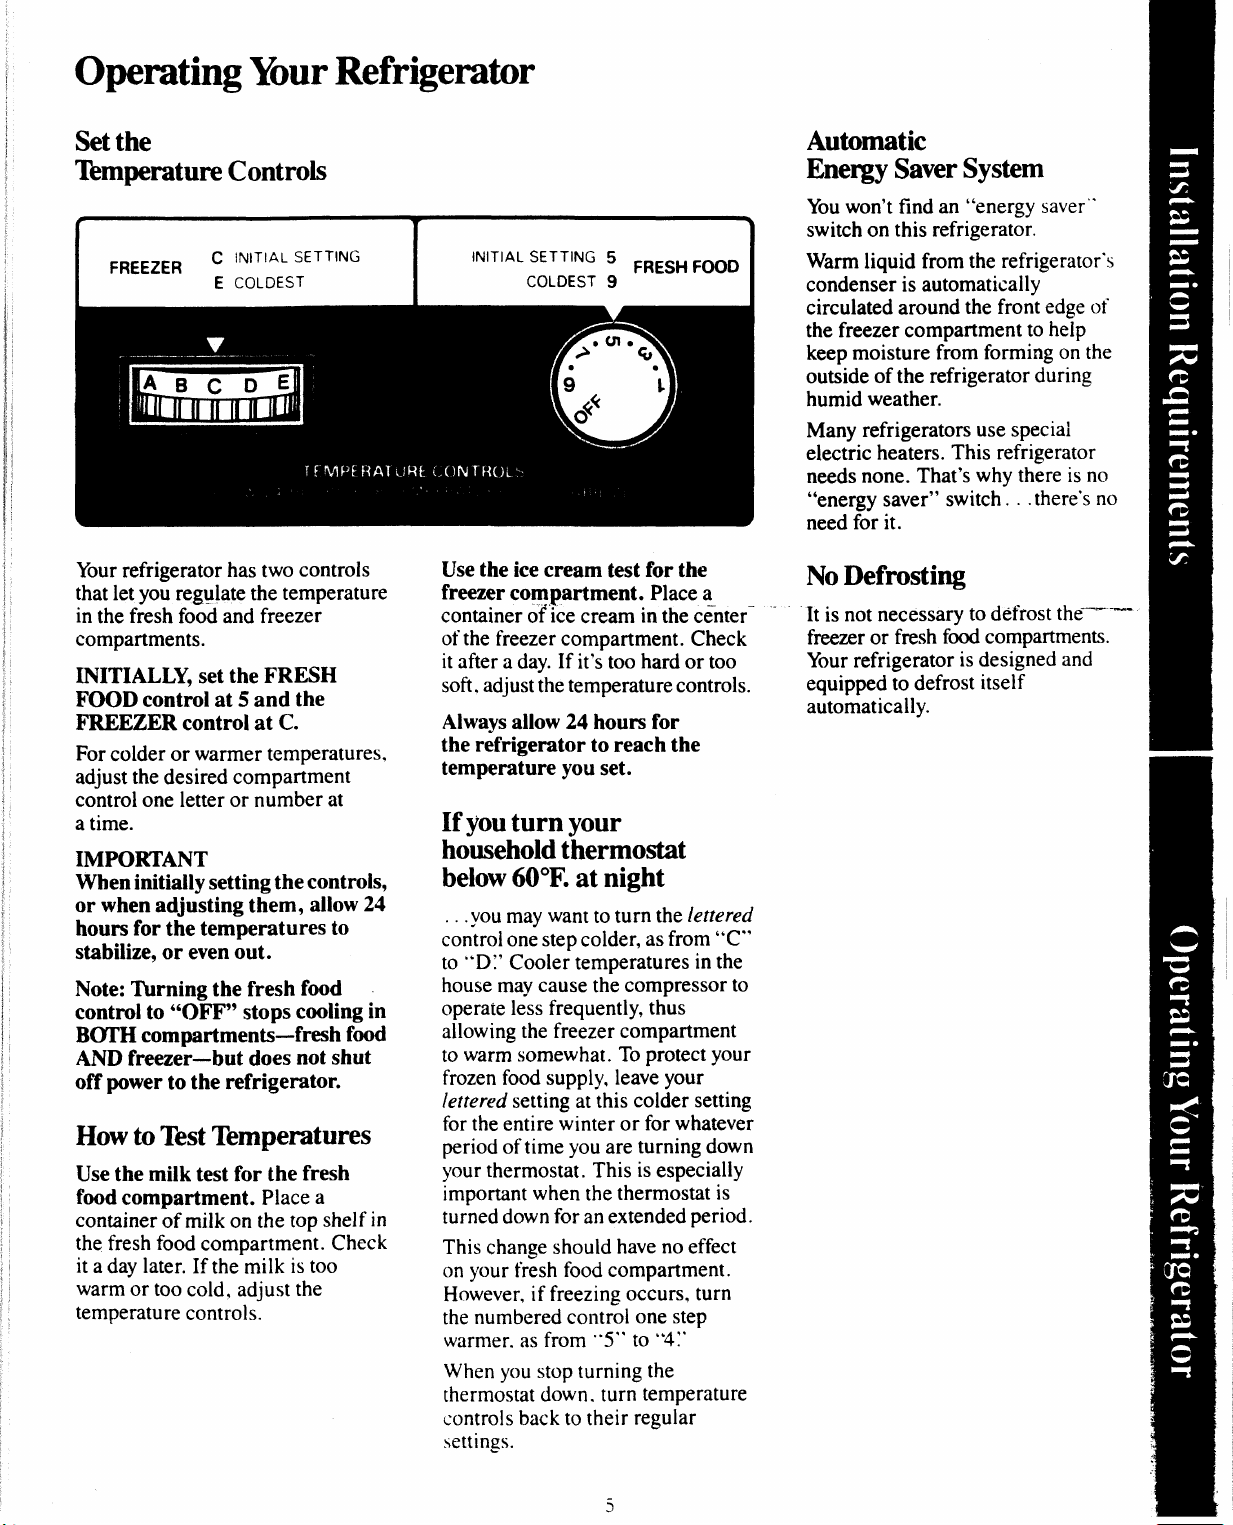
Setthe
TemperatureControls
Yourrefrigerator has two controls
that let you regulate the temperature
in the fresh food and freezer
compartments.
INITIALLY, set the FRESH
FOOD control at 5 and the
FREEZER control at C.
For colder or warmer temperatures.
adjust the desired compartment
control one letter or number at
a time.
IMPORTANT
When initially setting the controls,
or when adjusting them, allow 24
hours for the temperatures to
stabilize, or even out.
Note: Turning the fresh food
control to “OFF’”stops cooling in
BCYIIIcompartments-fresh food
AND freezer—but does not shut
off powerto the refrigerator.
HowtoTestTemperatures
Use the milk test for the fresh
food compartment. Place a
container of milk on the top shelf in
the fresh food compartment. Check
it a day later, If the milk is too
warm or too cold, adjust the
temperature controls.
Use the ice cream test for the
freezercompartment. Place a
container of ice cream in the centerofthe freezer compartment. Check
it after a day. If it’s too hard or too
soft. adjust the temperature controls.
Alwaysallow 24 hours for
the refrigerator to reach the
temperature you set.
If you turn your
household thermostat
below60*F.at night
you may want to turn the fettered
...
control one step colder, as from “C”
to “’D:’Cooler temperatures in the
house may cause the compressor to
operate less frequently, thus
allowing the freezer compartment
to warm somewhat. To protect your
frozen food supply, leave your
leftered setting at this colder setting
for the entire winter or for whatever
period of time you are turning
your thermostat. This is especially
important when the thermostat is
turned down for an extended period.
This change should have no effect
on your fresh food compartment.
However, if freezing occurs, turn
the numbered control one step
warmer. as from ““5”’to “41*
When you stop turning the
thermostat down. turn temperature
controls back to their regular
settings.
down
Automatic
Energy SaverSystem
Youwon’t find an “energy saver’switch on this refrigerator.
Warm liquid from the refrigerator’s
condenser is automatically
circulated around the front edge of
the freezer compartment to help
keep moisture from forming on the
outside of the refrigerator during
humid weather.
Many refrigerators use special
electric heaters. This refrigerator
needs none. That’s why there is no
“energy saver” switch. . .there’s no
need for it.
No Defrosting
It is not necessary to defrost the——
freezeror fresh fd compartments.
Yourrefrigerator is designed and
equipped to defrost itself
automatically.
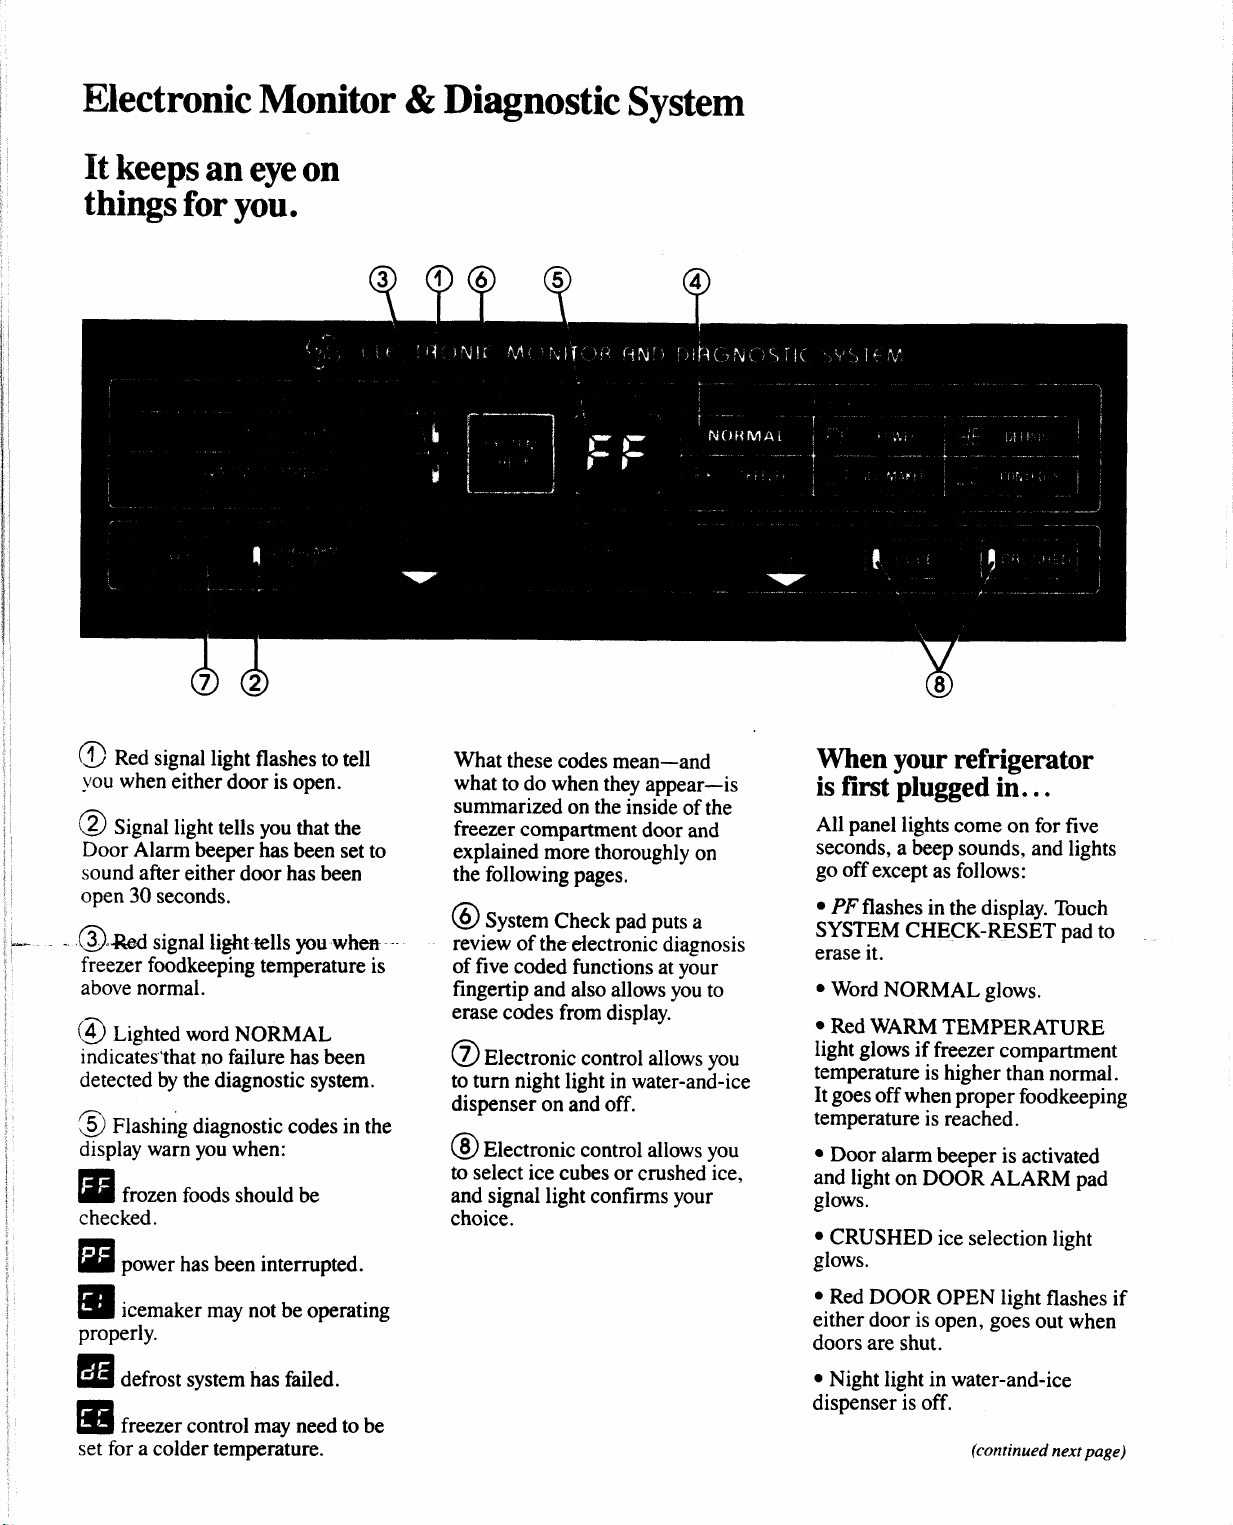
Electronie Monitor&Diagnostic
It keeps an eyeon
things foryou.
v???
System
4
Q
@@
@ Red signal light flashes to tell
you when either door is open.
@ signal Iightt.lls you thatthe
Door Alarm beeper has been set to
sound after either door has been
open 30 seconds.
-.@..Red signal lighttellsyouwheri
freezer foocikeepingtemperature is
above normal.
@ Lighted word NORMAL
indicates’that no failure has been
detected by the diagnostic system.
@ Flashing diagnostic codes in the
display warn you when:
frozen foods should be
❑
checked.
“ power has been interrupted.
la
icemaker may not be operating
m
properly.
What these codes mean—and
what to do when they appear—is
summarized on the inside of the
freezer compartment door and
explained more thoroughly on
the following pages.
@system Check pad puts a
review of the electronic diagnosis
of five coded functions at your
fingertip and also allows you to
erase codes from display.
@Electronic control allows you
to turn night light in water-and-ice
dispenser on and off.
@Electronic control allows you
to select ice cubes or crushed ice,
and signal light confirms your
choice.
When your refrigerator
is first plugged in...
All panel lights come on for five
seconds, a beep sounds, and lights
go off except as follows:
● PF flashes in the display. Touch
SYSTEM CHECK-RESET pad to
erase it.
● Word NORMAL glows.
. Red WARM TEMPERATURE
light glows if freezer compartment
temperature is higher than normal.
It goes offwhen proper foodkeeping
temperature is reached.
● Door alarm beeper is activated
and light on DOOR ALARM pad
glows.
● CRUSHED ice selection light
glows.
● Red DOOR OPEN light flashes if
either door is open, goes out when
doors are shut.
defrost system has failed.
❑
freezer control may need to be
5
set for a colder temperature.
● Night light in water-and-ice
dispenser is off.
(continued nextpage)
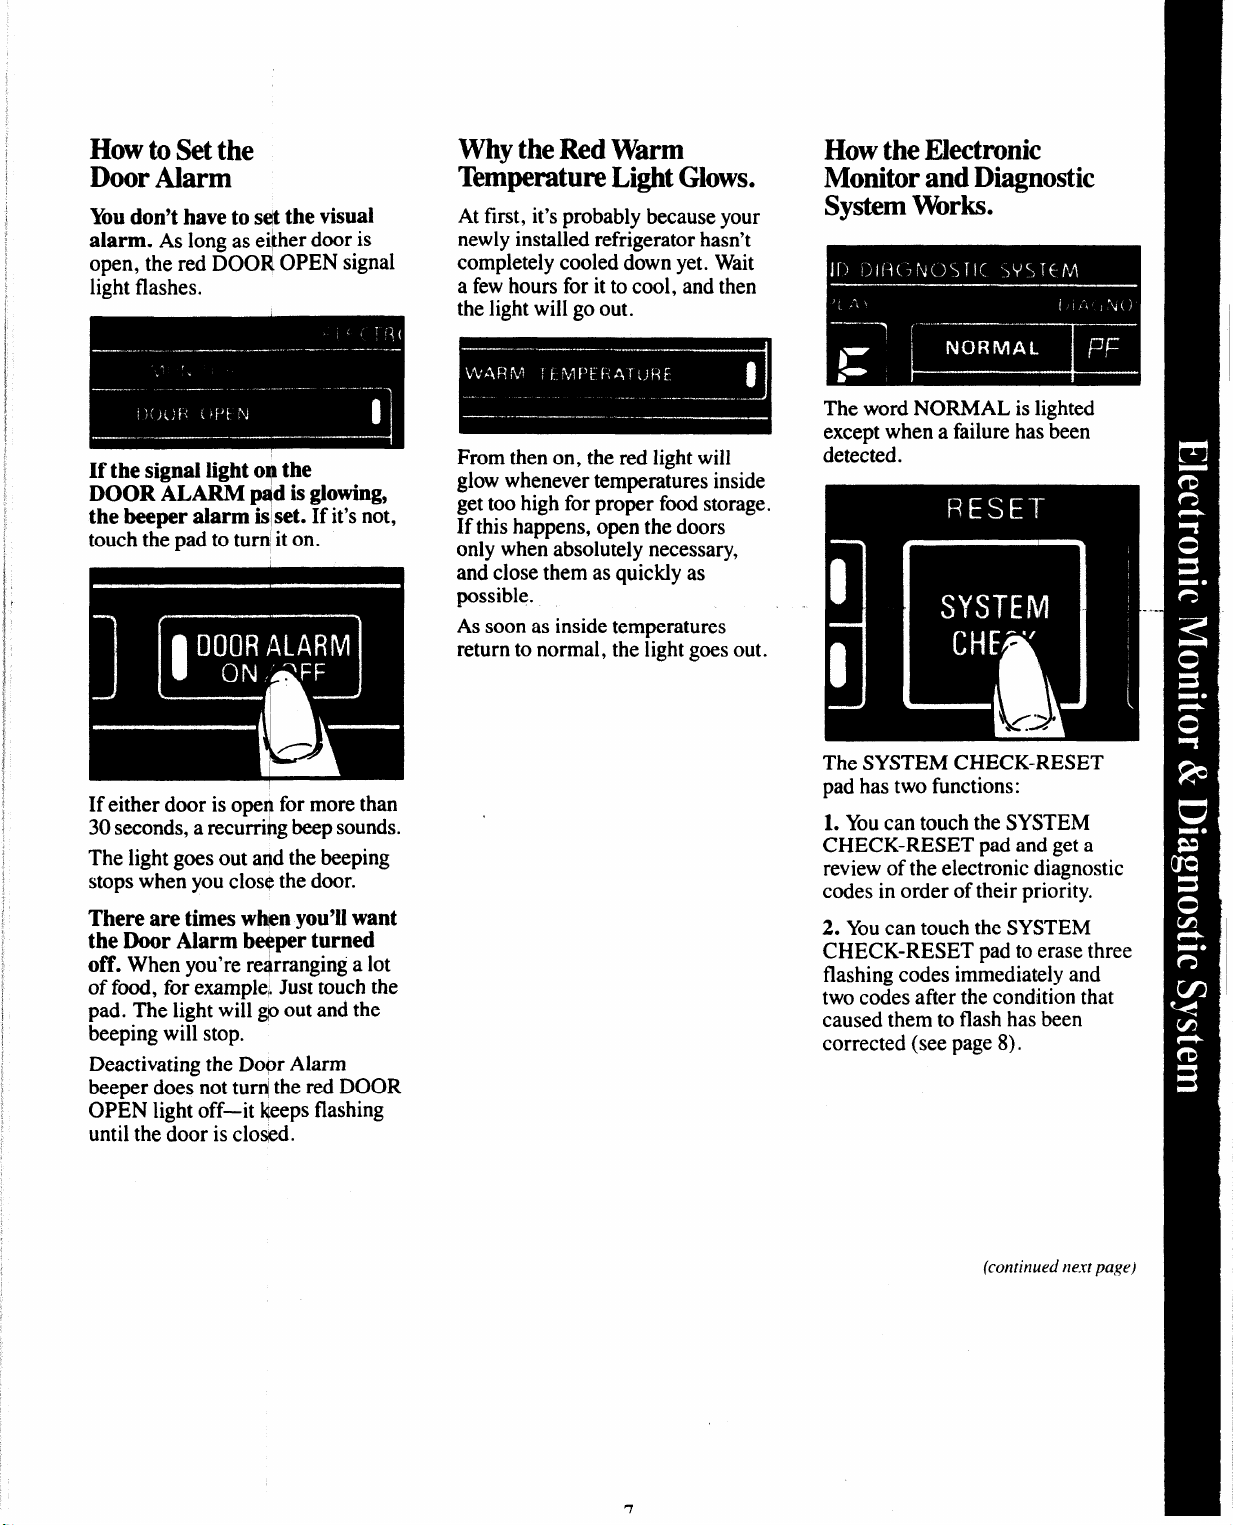
How to Set the
Door Alarm
Youdon’t have tos@ the visual
alarm. As long as ei~herdoor is
open, the red DOOR OPEN signal
light flashes.
If the signal light o? the
DOOR ALARM ~d is glowing,
the beeper alarm islset. If it’s not,
touch the pad to turn it on.
Why the Red Warm
TemperatureLight Glows.
At first, it’s probably because your
newly installed refrigerator hasn’t
completely cooled down yet. Wait
a few hours for it to cool, and then
the light will go out.
From then on, the red light will
glow whenever temperatures inside
get too high for proper food storage.
If this happens, open the doors
only when absolutely necessary,
and close them as quickly as
possible.
As soon as inside temperatures
return to normal, the light goes out.
How the Electronic
Monitor and Diagnostic
System Works.
The word NORMAL is lighted
except when a failure has been
detected.
If either door is open for more than
30 seconds, a recurriog beep sounds.
The light goes out aod the beeping
stops when you C1OS$the door.
There are times whpn you’ll want
the Door Alarm b~per turned
off. When you’re rearranging a lot
of fd, for example. Just touch the
pad. The light will go out and the
beeping will stop.
Deactivating the Door Alarm
beeper does not turd the red DOOR
OPEN light off—it keeps flashing
until the door is closed.
The SYSTEM CHECK-RESET
pad has two functions:
1. Youcan touch the SYSTEM
CHECK-RESET pad and get a
review of the electronic diagnostic
codes in order of their priority.
2. Youcan touch the SYSTEM
CHECK-RESET pad to erase three
flashing codes immediately and
two codes after the condition that
caused them to flash has been
corrected (see page 8).
(continued ne.rtpage)

ElectronicIWonitor& Diagnostic
The Electronic Moqitor and
Diagnostic System @ertsyou when
something starts to go wrong.
If a diagnostic cod appears on
the display, someth ng needs
special attention. Tbget your
attention, the display code flashes
until you erase it. The first 6
flashes are accompa~ied by beeps.
If more than one cdded function
requires attention qt the same
time, theone with tie highest
priority will be displhyed first.
Pressing the SYSTE$4 CHECK-
RESET pad will eva@ateall other
coded functions. If the NORMAL
display is lit during tbe displaying
of a code, that fhncti~n is operating
properly.
Pressing the SYSTEM CHECK-
RESET pad will erase three codes
irnmediately-.P’ Cl and CC.
The DE and FFcod@ can only be
erased by touching ~heSYSTEM
CHECK-RESET pa/dafier the
condition that causeldthe code to
flash has been corre@ed.
1
This flashing code tells you the
power to the refrigerator has
been interrupted for more than 2
seconds. Check the condition of
fbod in both the fresh food and
freezer compartments. Touch
SYSTEM CHECK-RESET pad
to erase code.
There is no fault with the
refrigerator when PF code
flashes.
System (continued)
This flashing code tells you
something’s wrong with the defrost
system-keep doors closed to
retain cold and call for service.
Code flashes until problem is
corrected.
This flashing code tells you to
check your frozen find. Has any
of it started to thaw? 4 package
may be holding the fr~ezer
compartment door own. Don’t
open the door more oxen than
absolutely necessary while this
code is displayed. TouPhing the
SYSTEM CHECK-R$SET pad
after the freezer comp@tment
temperature has retur@i to
normal will erase the @ode.
----
.-
This flashing code tells you to
check the automatic icemaker.
Ice clumps in the storage bin may
have stalled the icemaker. Follow
corrective measures described on
page 20. If water supply to the
icemaker is not connected or not
turned on, make sure manual
icemaker switch is in the OFF
position (see page 10). Code stops
flashing when problem is corrected
or SYSTEM CHECK-RESET pad
is touched.
This flashing code tells you to
check temperature controls and
adjust them if necessary. (See
directions on page 5.) Touch
SYSTEM CHECK-RESET pad
to erase code. If code reappears
after 4 hours, call for service.
 Loading...