

GE TFH22PRXFWW, TFH22PRXFAA, TFH22PRXDAA, TFH22PRXBWW, TFH22PRXBBB Owner’s Manual
...
GEAppliances
®
®
®
°I CY°_ " '
_,.i I_% ¸ _i
y
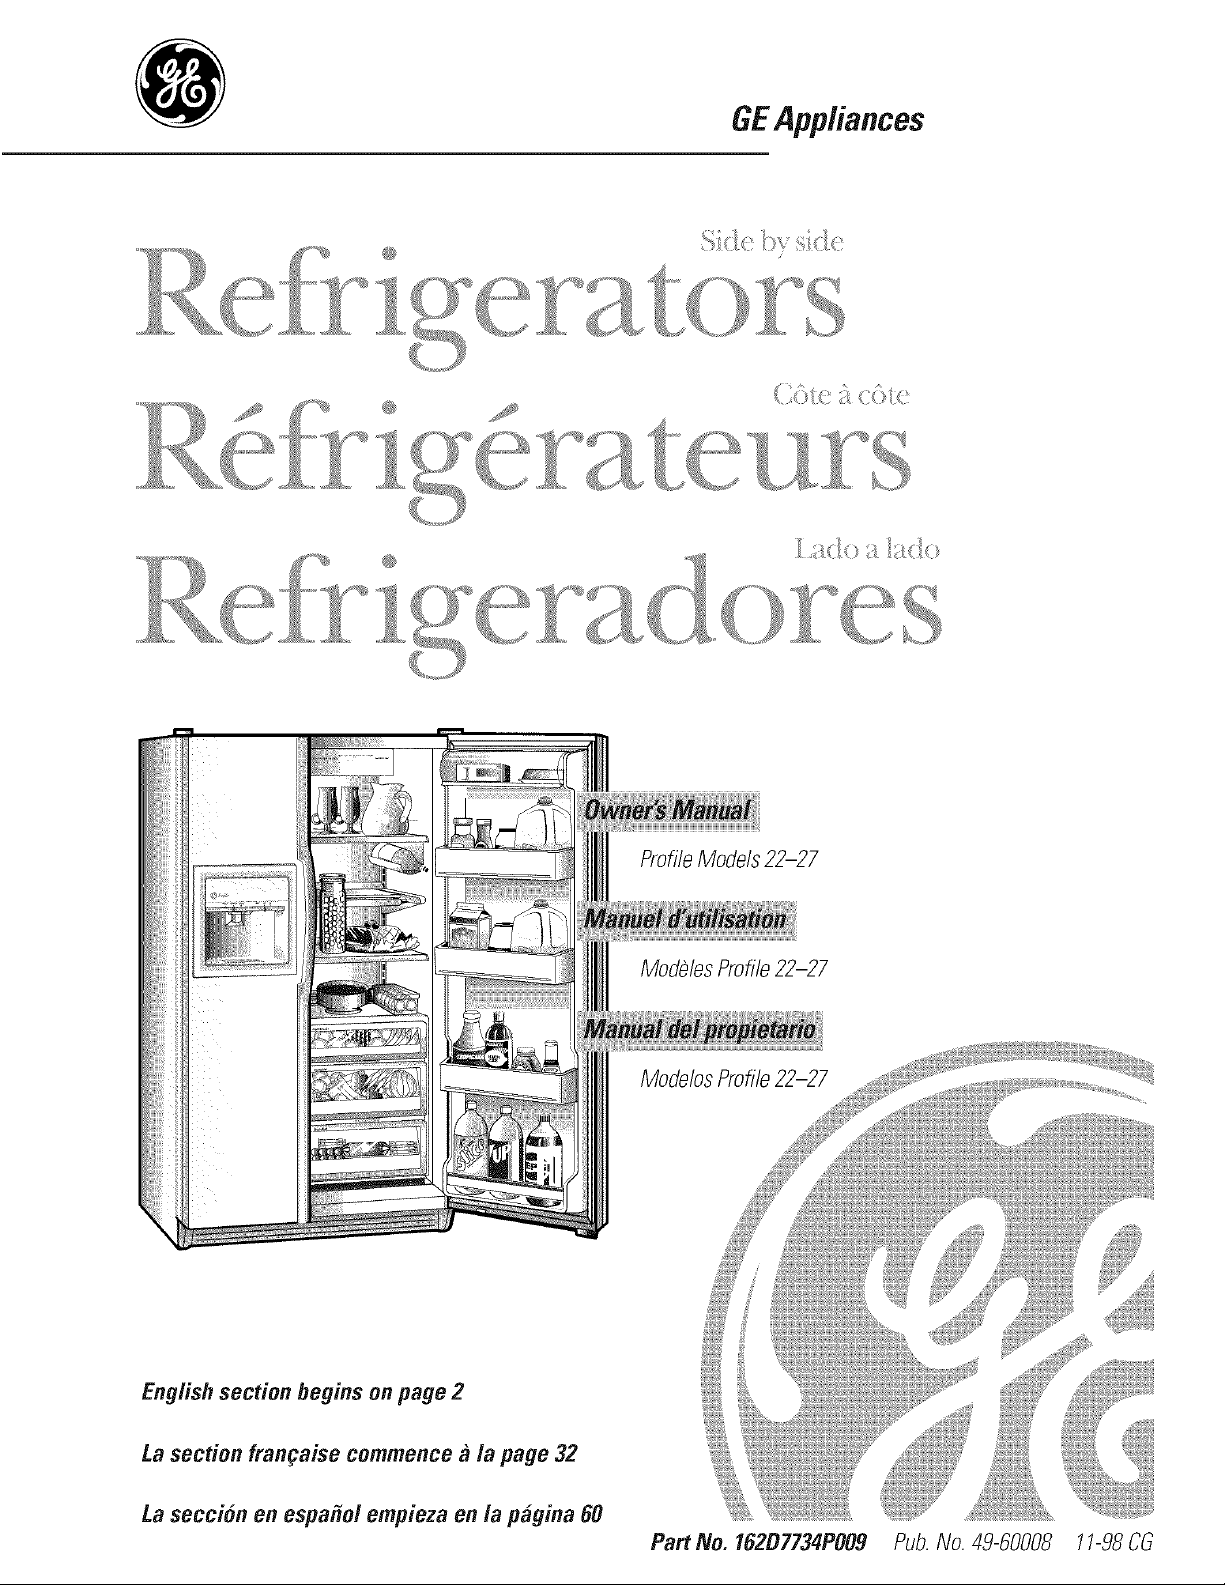
English section begins onpage 2
ProfileModels22-27
Moddes Profile22-27
La section fran_aise commence a la page 32
La seccion en espafio/ empieza en la pagina 60
Part No. 162D77MPOOg Pub.No. 49-60008 11-98CG

,g
,g
m
w
Safety Information
SafetyPrecautions........... 3
useofExtensionCorDs......... 3
HewtoConnectEfectrMt_...... 4
UseofAdapterPlugs........... 4
Operating Instructions
Controls................ 5-8
Features................ 9-11
IceService............... I2
IceandWaterDispenser.... IZ 13
2areandCleaning......... 14-16
Conwatulations!
YouAreNow PartoftheGEFamily.
Welcome to the GE tinnily. We're proud of our
quality pro&lets and we are committed to pr_Mding
dependable servi( e. You'll see it in this easy-to-use
Owner's Manual and you'll hear it in the tiiendly
voices of our (:ustomer service department.
Best of all, you'll experien( e these values each time
you use your refiigerator. That's important, be( arise
your new refiigel_ltor _dllbe part ofy_)ur _mnilyfi)r
many years. And we hope you xdll be part of ours ii)r
a long time to come.
7 , " • _ _ • J, .
_,\e thankyou fo_bu)ang ( ,_E\,\e app* eoate ),on,
pur( hase, and hope you ,,,,ill(ondmle to rely on us
whene', er you need quality applian( es for your home
GE& You,P ServicePartnership.
IMPORTANT!
w
,g
Qa
Installation Instructions
Preparin_re
InstalltheRefrigerator......... 17
1laterLineInstallation..... 18-20
Troubleshooting Tips
NormalOperatingSounds...... 21
BeforeYouCa//ForService..21-24
CustomerService
WarrantyforCanadianCustomer524
WarrantyforU.S.Customers.... 25
FXRCCartridge
PerformanceDataSheet...... 26
Stateof CaliforniaWater
TreatmentDeviceCemTicare.... 27
ProductRegistration.......... 29
ServiceTe/epnene
Numbers........... BackCover
2
Fill out and return the Consumer Product Registration Card that is
packed with this product. If,_,ou(armor find it please sendin the
dupli(ate (ard printed in the ba(k of this se( tioll.
FORYOURRECORDS
Write themodel and serial numbershere:
#
#
You (an find them on a label on the wall beside the top drawer
or at the bottom, just inside the flesh ii)od compartment door.
Staple sales slip or cancelled check here.
Proof of the original put( base date is needed to obtain service
under the warranty.
READTHISMANUAL
Inside you will find many helpflll hints on how to use and maintain
your retiigerator properly.Just a little preventive care on your part
can save you a great deal of time and money over the litb ofyour
retiigerator.
You'll find many answers to common problems in the Before You
Call For Service secdon. If you reviev, our (hart of Troubleshooting Tips
first, you may not need to call for service at all.
IFYOUNEEDSERVICE
If you do need service, you can rebLxknowing help is only a phone
tall away. A list of toll-iiee customer service numbers is inchlded in
the back secti(m. ()r, inthe U.8.,you can always call the GE Answer
Center: at 800.626.2000, 24 hours a day, 7 dws a week. In Canada,
(all 1-800-361-3400.
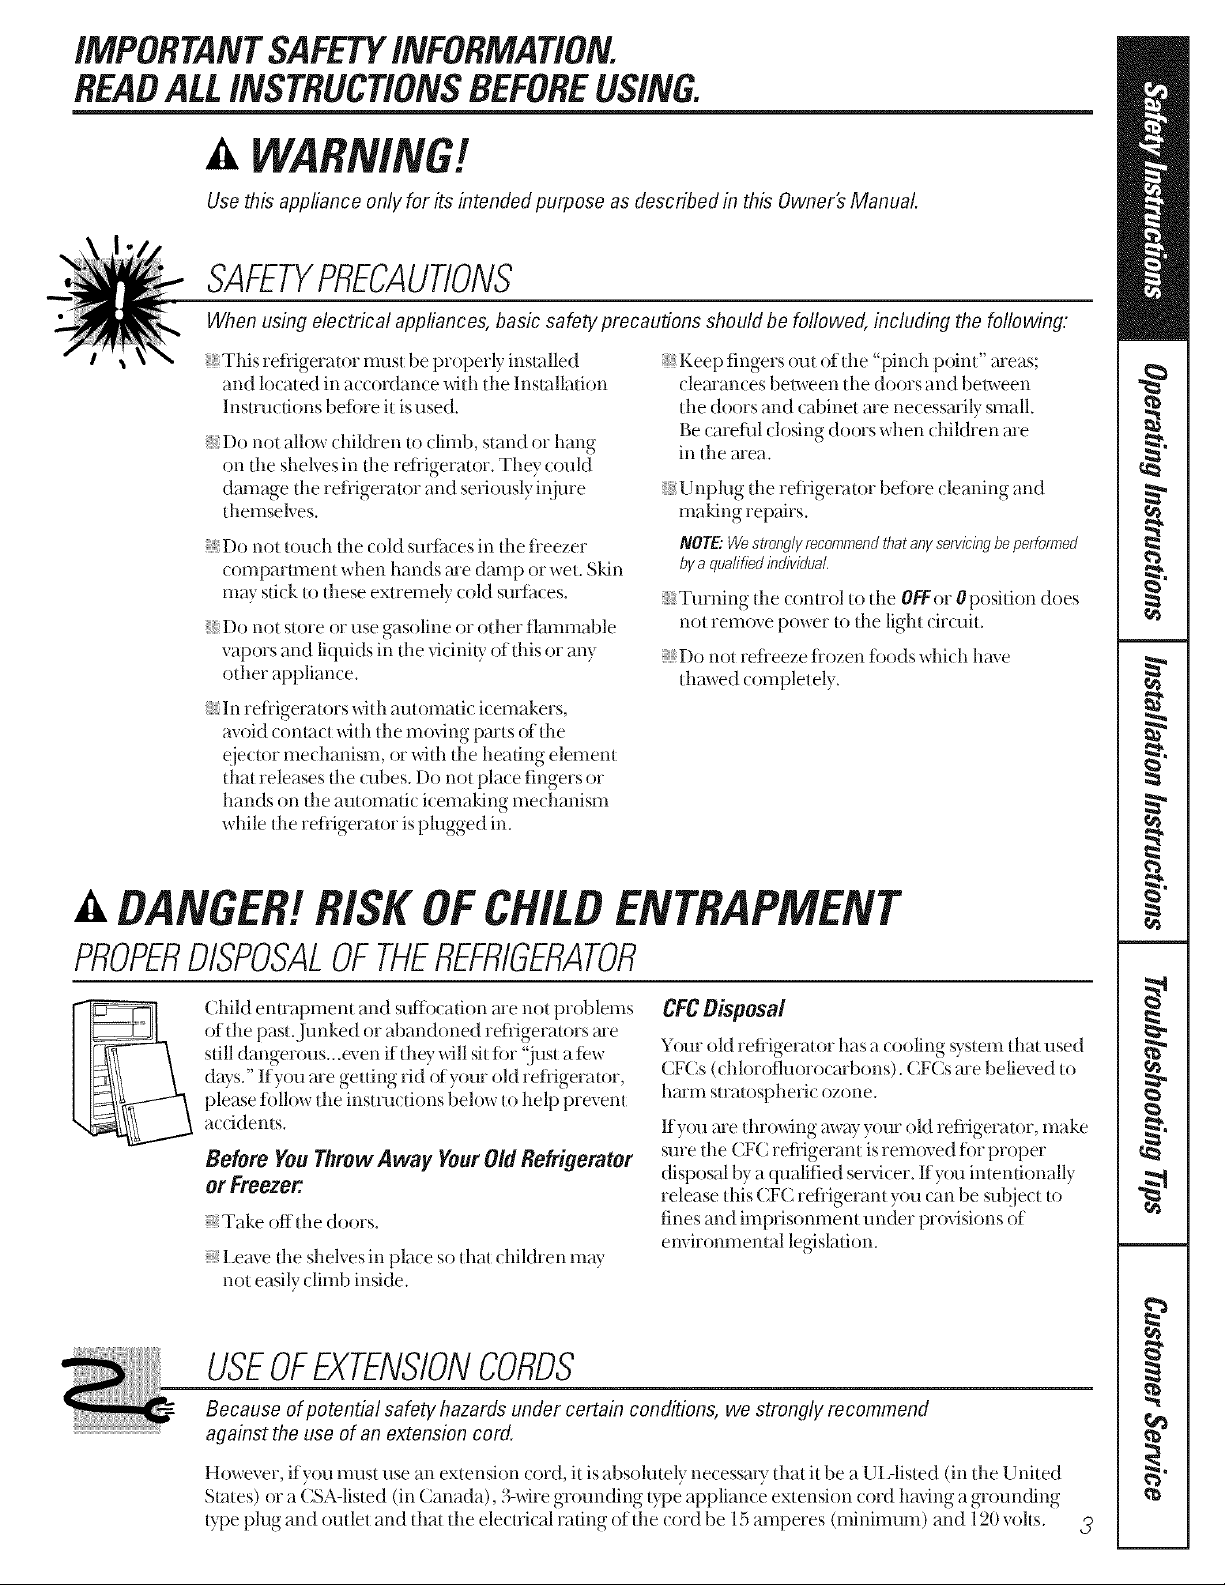
iMPORTANTSAFETYiNFORMATiON.
READALLiNSTRUCtiONSBEFOREUSING
A 'l
Use this appliance only for its intended purpose as described in this Owner's Manual.
SAFETYPRECAUTIONS
When using electrical appfiances, basic safety precaufions should be followed, including the following."
; Tllis refrigerator must be properly installed
and lo(ated in a(cordan(e whh tile hlstallation
Insuu(dons betbre it is used.
:Do not allow children to climb, stand or hang
on the sllel,,es in tile refrigerator. They (ould
damage the refrigerator and seriously injure
themselves.
Do not touch tile (old su[_i_t::esin the freezer
(ompartment wllen bands are damp or wet. S_n
may stick to these extremely (old su_lhces.
; Do not store or use gasoline or other flammable
vapors and liquids in tile _d(inity of this or anv,
other appliance.
iiln refrigerators _dth automati( icemakers,
avoid contact _dth the rot)ring parts of tile
ejector mechanism, or with the heating element
that releases the olbes. Do not place fingers or
bands on the automatic icemaldng mechanism
while tile refrigerator isphlgged in.
A OF
Keep fingers out of the "pinch point" areas;
(leman(es bet_veen tile doors alld betlveei1
the doors and (abinet are net essarily small
Be careflll closing doors when chikhen are
in the area.
::Unplug the refrigerator beti)re cleaning and
ma_ng repairs.
NOTE:Westronglyrecommendthatanyservicingbeperformed
bya qualifiedindividual,
;Turning tile control to the OFFor Oposition does
not remove power to tile light (ircuit.
:Do not refreeze frozen fi)ods which have
thawed (omplet ely,
PROPERDISPOSALOFTHEREFRIGERATOR
Cllild entrapment and tutti)cation are not problems
of the past.Junked or abandoned refligerators me
still dangerous...even ifthey _dll sit fi)r "just a tbw
days." If you are getting rid of your old refrigerator,
please tbllow the instnl( tions below to help prevent
ac(idents.
Before You ThrowAway YourOld Refrigerator
or Freezer:
Take ()ff the d()( )rs.
I_eave tile shelves in place so that chikhen may
not easily (limb inside.
CFCOisposa/
Yore old refiigerator has a cooling system dlat used
CFCs (chlorofluoro(arbons). CFCs are believed to
harm stratospheric ozone.
If you me throwing away your old refrigerator, make
sure the CFC refrigerant is rem()ved ti)r proper
disposal by a qualified se,Yicer. If you intentionally
release this CFC refrigerant you can be subject to
fines and imprisonment under pr_)visions of
environmental legislation.
USEOFEXTENSIONCORDS
Because of potential safety hazards under certain conditions, we strongly recommend
against the use of an extension cord.
However, if you must use an extension (ord, it isabsolutely ne(essary that it be a UI Aisted (in tile United
States) or a CSA-listed (in Canada), 3-xdre grounding type appliance extension cord haxing a grounding
type plug and outlet and that tim electrical radng of tim cord be 15 amperes (minimum) and 120 volts.
iMPORTANTSAFETYiNFORMATiON.
READALLiNSTRUCTiONSBEFOREUSING.
'!
HOWTOCONNECTELECTRICITY
Do not, under any circumstances, cut or remove the third (ground) prong from the power cord. For
personal safety this appliance must be properly grounded.
The pc)wet cord of this appliance is equipped xdth a
3-prong (groundhog) plug which mates xdth a
standard 3-prong (grounding) wall outlet to
minimize the possibility of e]e( tri( sho(k hazard
fiom this appliam e.
Have tile wall outlet and circuit checked by a
qualified elecuician to make sure the outlet is
properly grounded.
Where a standard 2-prong wall outlet is
encountered, it isyour personal responsibility and
obligation to have it replaced _dth a properly
grounded 3-prong wall outlet.
The refiigerat or shoukl always be plug,g,ed into its.
own individual electrical outlet which has a vohage
radng that matches tile radng plate.
This provides tile best pevlormance and also
prm ents overloading house xdring circuits which
(oukl cause a tire hazard from oxerheated x_res.
Never unplug your reflige_v_tor by pulling on tile
power (ord. Ahvays grip plug firmly and pull straight
out tiom the outlet.
Repair or replace immediately all power cords that
have become fiwed or otherxdse dmnaged. Do not
use a cord that shows cracks or abrasion damage
along its length or at either end.
When m()x4ng the refligerator away from the
wall, be (meflll not to roll over or damage tile
power (ord.
USEOFADAPTERPLUGS(Adapte_pl_g_notpermittedinCanada)
Because of potential safety hazards under certain conditions, we strongly recommend against
the use of an adapter plug.
However, if you must use an adapter, where local
(:odes permit, a temporaryconnectionmay be made
to a properly grounded 2-prong wall outlet by use
ofa UI Aisted adapter available at most lo(al
hardw;He stores.
Tile larger slot in the adapter must be aligned xx_th
the larger slot in tl_e wall outlet to provide proper
polarity in the (onnection of the power (ord
When disconnecting the power cord fiom the
adapter, ahvays hold the adapter in pla(e xdth one
hand while pulling the pc_wercord phlg with the
odmr hand. If this is not done, the adapter ground
terminal is veU likely to break _dth repeated use.
If the adapter ground terminal breaks, O0 NOTUSE
tile retiigerat or until a proper ground has been
established.
Attachingthe adaptergroundterminaltoa waftoutlet
coverscrewdoesnotgroundtheapplianceunlessthe
coverscrewis metal,andnot bsulated, andthewaft
outlet/s groundedthroughthe housewiring Youshould
havethe ckcuit checkedby aqualifiedelectricianto make
suretheoutlet b properlygrounde(_
Readandfollow thisSafetyInformationcarefully.
SAVETHESEINSTRUCTIONS
4
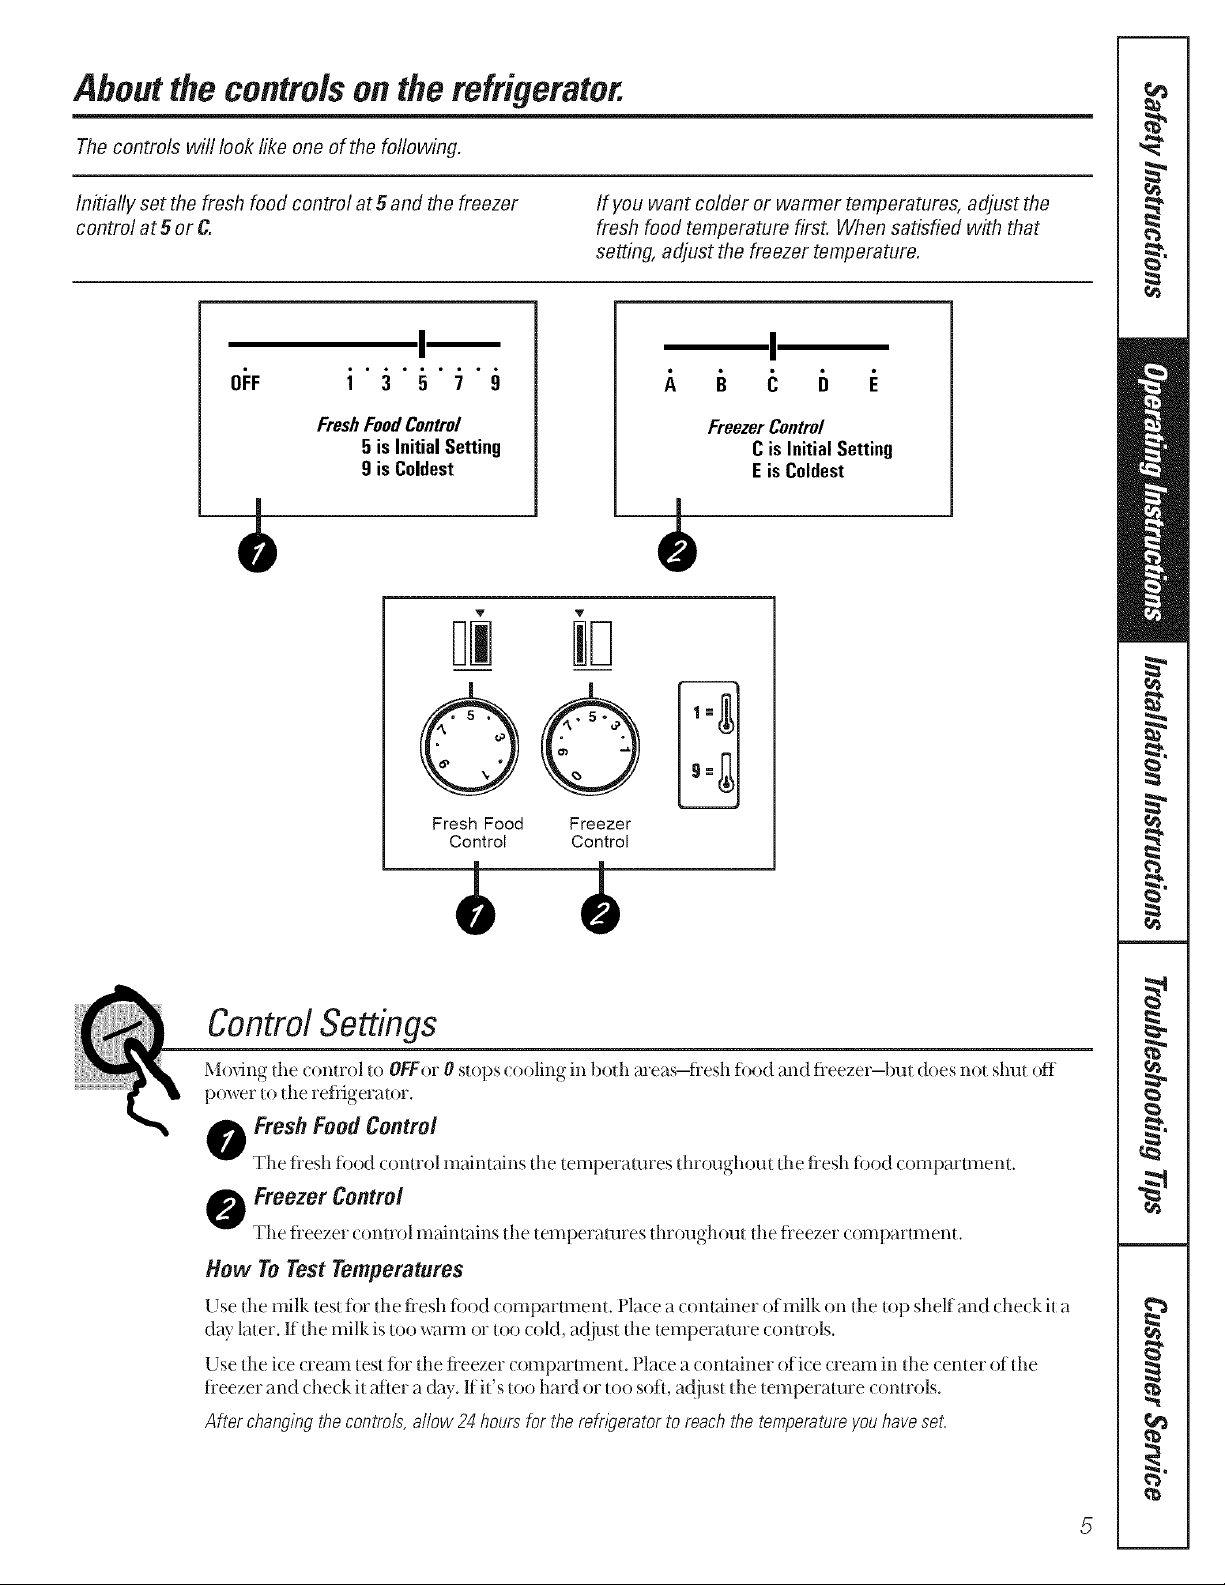
About the controls on the refrigerator.
The controls will look like one of the foflowing.
Initially set the fresh food control at 5 and the freezer If you want colder or warmer temperatures, adjust the
control at 5or C. fresh food temperature first. When satisfied with that
setting, adjust the freezer temperature.
O[:F
• • ° • • • • ° °
1 3 5 7 9
FreshFood Control
5 is Initial Setting
9 is Coldest
Fresh Food Freezer
I
FreezerControl
CisInitialSetting
EisColdest
Control Control
Control Settings
Mo_ing the control to OFFer 0 stops ( ooling in both areas--flesh l_od and freezer but does not shut off
power to die retiiger_tor.
oF reshFoodContre/
3the flesh fi)od _onm)l m_dm_dns die temperatures dlroughom d_e fiesh fi)od (omp_um_em.
OF reezerControl
Tile fleezer (onuol maim_dns tile temper_lmres d_roughout d_efleezer (()mpmlmem.
How To Test Temperatures
Use die milk test fi)r d_e fiesh ibod (:omp_trm_em. ! lace _tcontainer of milk on die mp shelf and (:he(:k it _
day later If the milk is too w_m_ or too (/)1(1, _djust tile temper_mlre (::onuols.
Use [he ice (ream tes[ fbr die fieezer comp_nti_el_[. Pl_tce a corn}liner of ire cream in d_e (enter of die
freezer _md check it _ffier _ day. If it's too hmd or too soft, _(ljust the temper_mre (:onuols.
After changing the centre/s, a//ow 24 hours for the refn_Teratorto reach the temperature you have set.
)
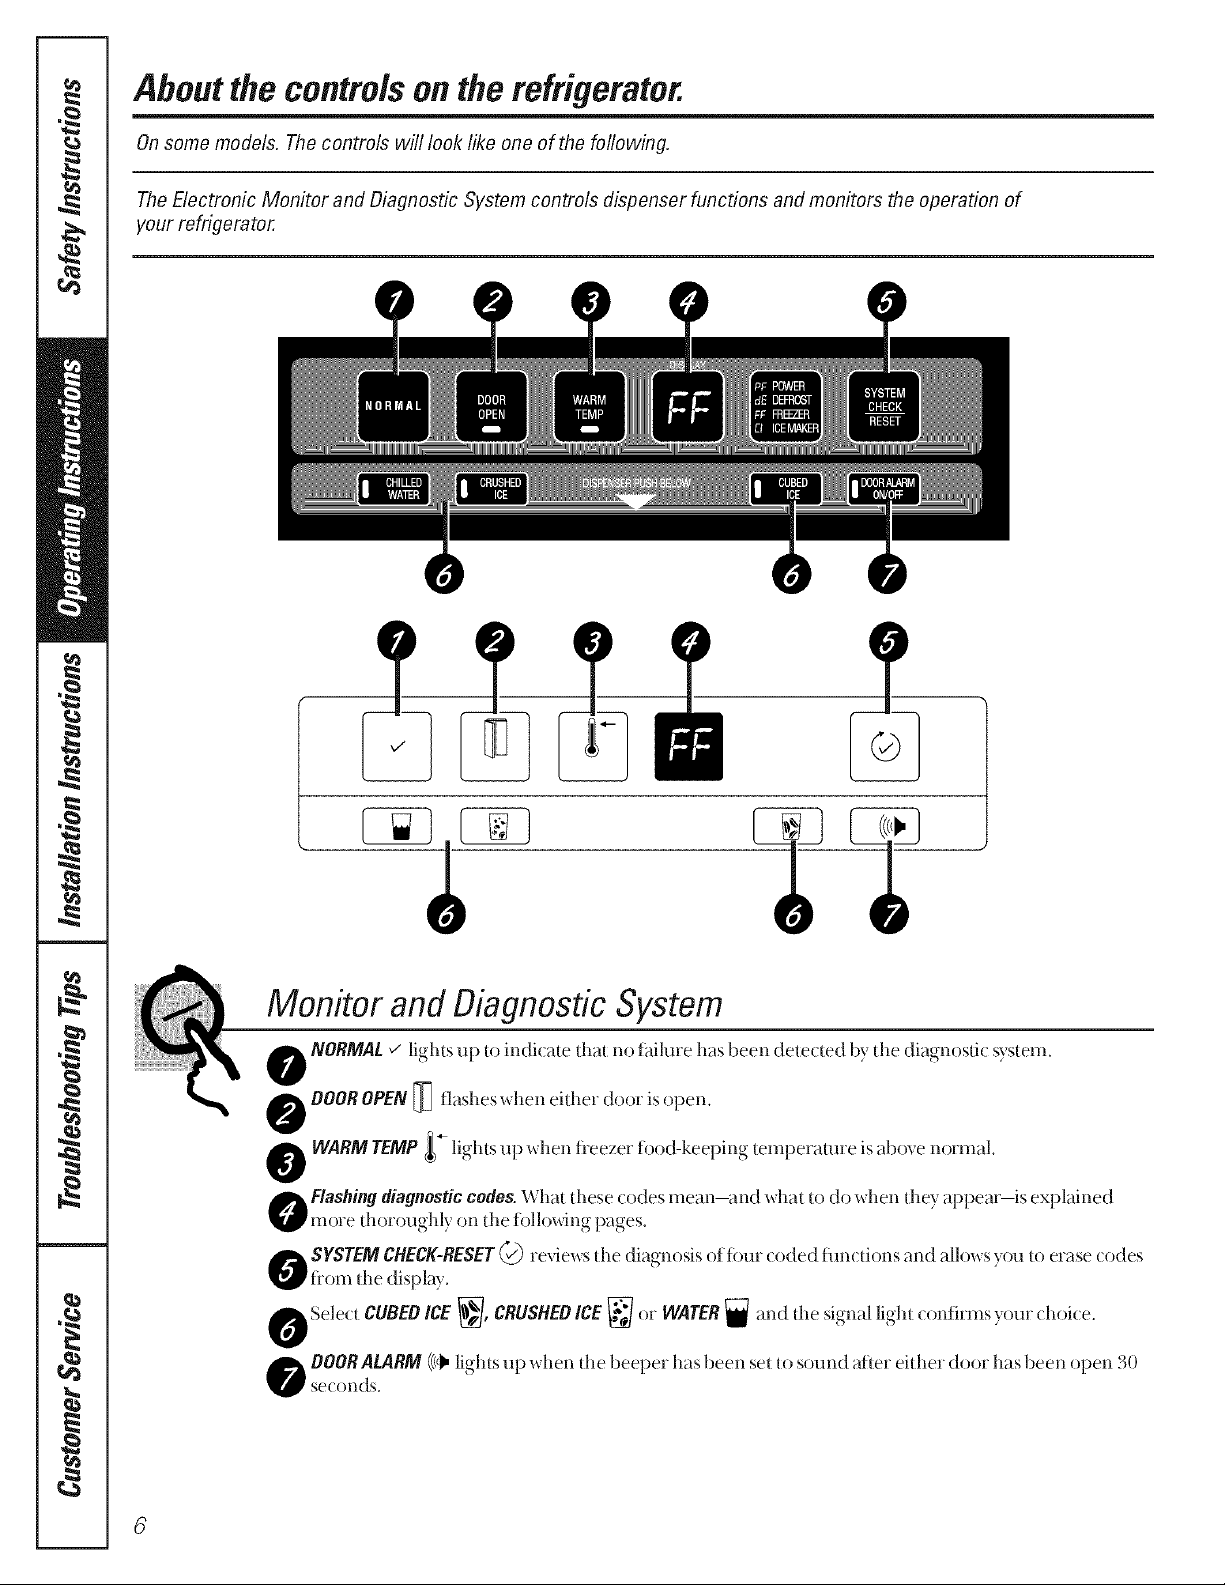
Aboutthe contre/sonthe refrigerator.
On some models. The controls will look like one of the following.
The Electronic Monitor and Diagnostic System controls dispenser functions and monitors the operation of
your refrigerator.
0
Monitor and Diagnostic System
o NORMAL _/lights up to indi( ;Jte their no ihilure h_ls been detected bv the di;lgnostic system.
O BOOR OPEN _ fl_M_es when either door is open.
O WARM TEMP _ lights up when fleezer _od-keeping temper_lture is _d)ove norm_d.
o F/ashing diagnostic codes. What these ( odes mean-and v41aI 1odo when [lie}, appear-is explained
)more thoroughly on the ibllowing p_ges
)SYSTEM CHECK-RESET_ reviews tile diagnosis of four coded tim(dons and allows you to erase codes
Ofrom tile dispkxy.
0 Sele( t CUBEDICE _, CRUSHEDICE _ (n WATER _ m_d the sign;d light (onfirms your ( hok e.
) BOOR ALARM ((<<i'lights up when tile beeper has been set to sound _dier either door has been open 30
e setonds.
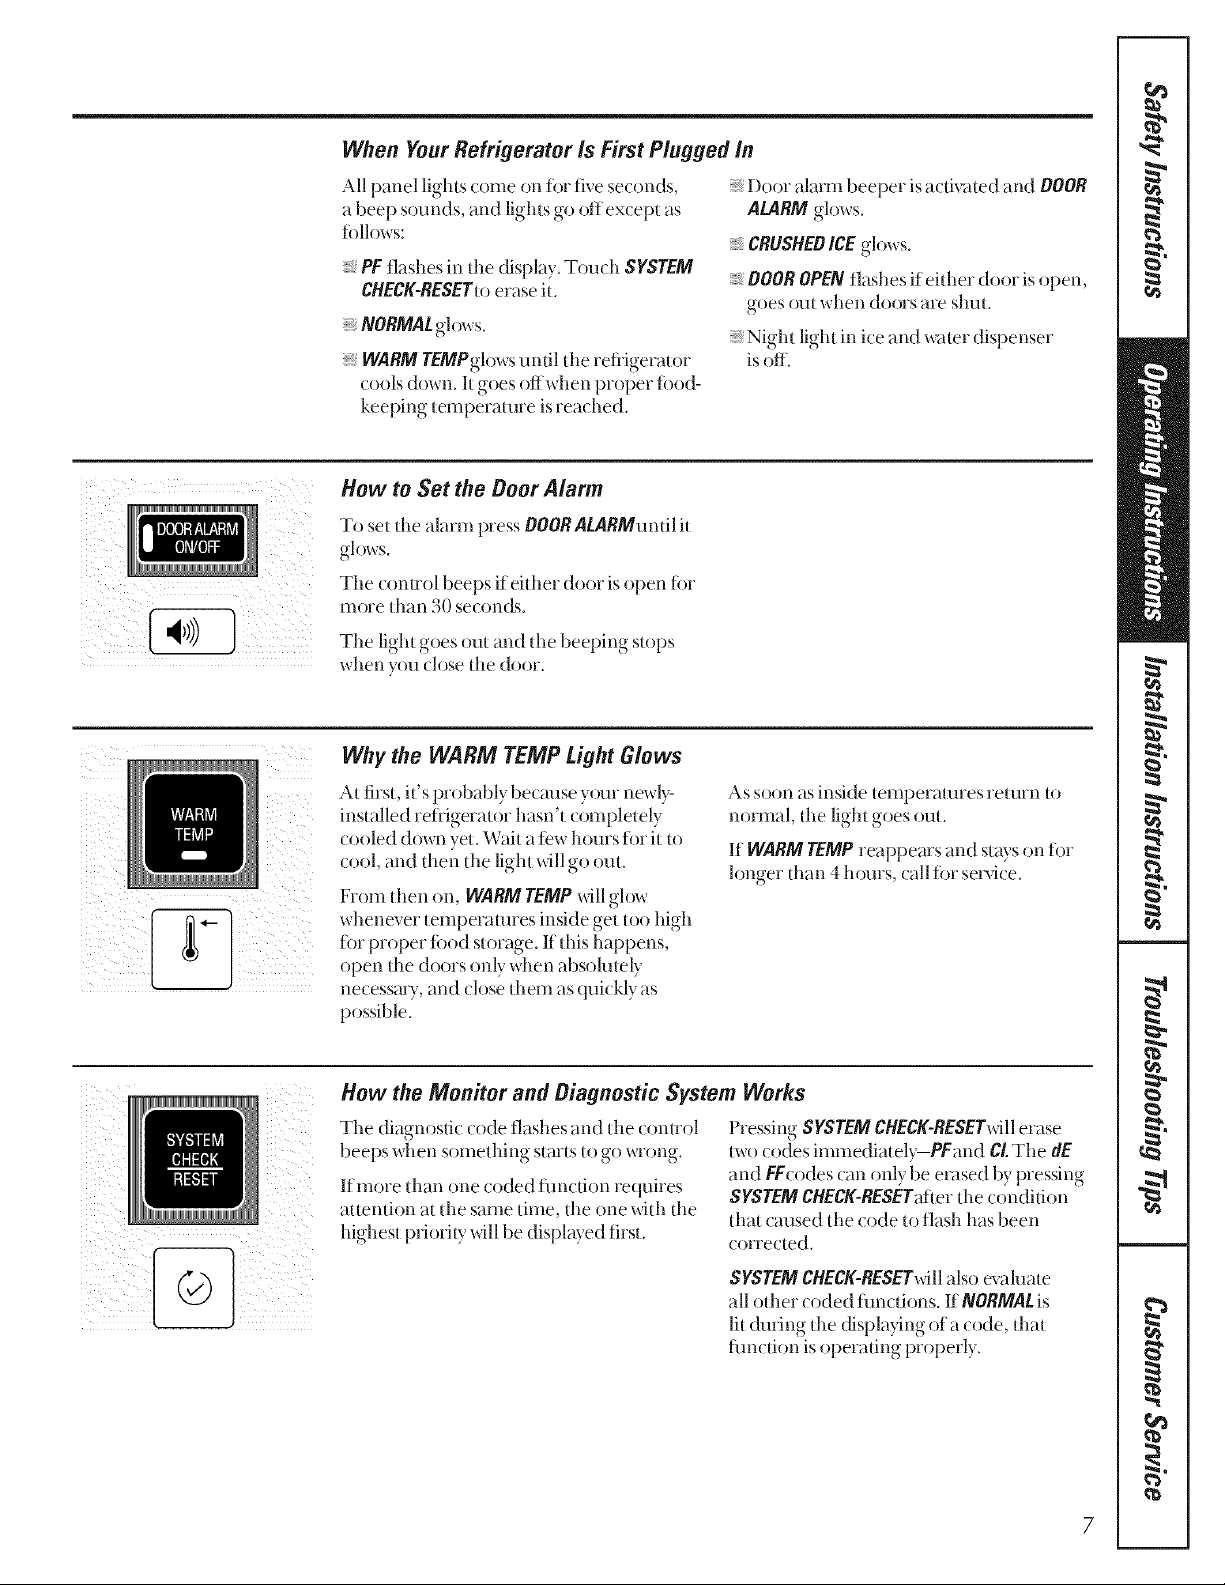
When YourRefrigerator Is First Plugged in
All panel lights come on fi)r fixe seconds,
a beep sounds, and lights go oftex(ept as
folh)ws:
;;;;;;_,PFflashes in the display Tou( h SYSTEM
CHECK-RESETu)eraseit.
;;;;;;_;NORMALglows.
WARM TEMPghrws until dm refiigeramr
tools down. It goes offwhen proper food-
keeping temperature is real bed.
How to Set the Door Alarm
To set fl_ealarm press DOORALARMuntilit
glows.
The conUol beeps if eidmr door is open fin.
more than 30 se( onds.
The light goes out and the beeping su)ps
when you close tile door.
Why the WARM TEMP Light Glows
;_ Door alarm beeper is activated and DOOR
ALARM glows.
_CRUSHEDICE glows.
_ DOOROPENflashes if either door is open,
goes out when doors are shut.
:, Night light in ice and water dispenser
is oft.
Z
i_ ii
At first, it's probably because your newly-
installed refligerator hasn't completely
cooled down yet. Wait aiew hours fi)r it to
cool, and titan dm liglu xdll go out.
As soon as inside temperatures return u)
normal, tl_e light goes out.
If WARMTEMPreappears and st;0,s on fin.
hmger than 4 horns, call for service.
From then on, WARMTEMPwill glo_
whenex er temperatures inside get too high
fin proper tbod storage. If this happens,
open the doors only x_ben absolutely
necessmy, and close fl_em as quickly as
possible.
How the Monitor and Diagnostic System Works
The diagnostic code flashes and tile conuol
beeps when something stuns u) go wrong.
If more titan one coded flm(tion requires
attention at the same time, the one widl tile
highest priority will be displayed first
Pressing SYSTEMCHECK-RESET_dllerase
two (;odes immediatel}_PFand CLTile dE
and FFcodes can only be erased by pressing
SYSTEMCHECK-RESELalerthe condition
tllat caused tile (;ode to flash has been
(orrected.
SYSTEMCHECK-RESETx_llalso exaluate
all oflmr coded flmcfions. If NORMALis
lit during tim displa?4ng of a code, fllat
tim( Lion is operating properly•
7
Aboutthe controlsontherefrigerator.
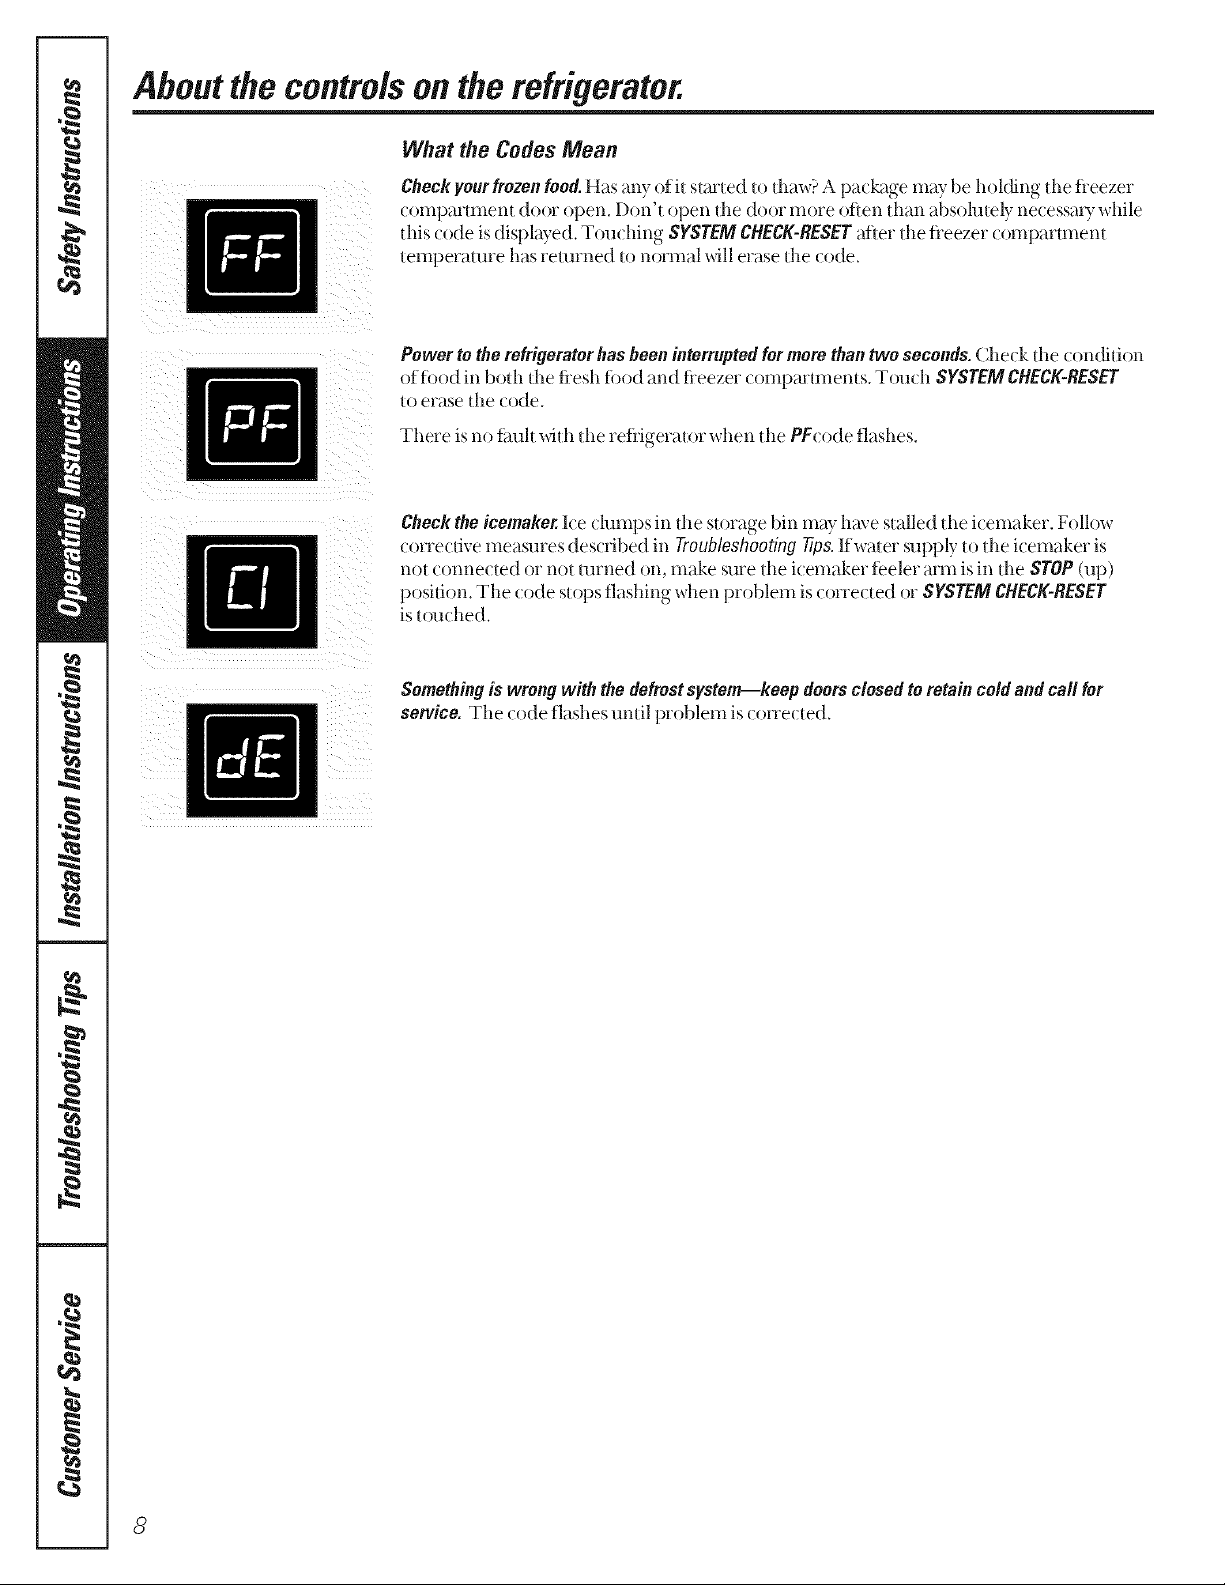
What the Codes Mean
Chockyourfrozenfood. Has any of it stmled to thaw? A package may be hoMing the fieezer
compartment door open. Don't open the door more often than absoMtely ne(essa_y while
this (ode is displayed. Touching SYSTEMCHECK-RESET"after the freezer (ompanment
temperature has returned to n()rmal _dll erase the code.
Power to the refrigerator has been interrupted for more than two seconds. Check fl_e con(fifion
of food in both fl_e fiesh food and fieezer ( omparm_ems. Tou(h SYSTEM CHECK-RESET
to erase the (ode.
There is no thuh wid_ die refligerau)r when d_e PFc ode flashes.
Check the icemaker. Ice cMmps in the storage bin may have stalled the icemaker. Follow
cone(five measures described in Troubleshooting Tips.If water supply to d_e icemaker is
not com_e( ted or not turned on, make sure the i(emaker teeler arm is in the STOP (tip)
position. The (ode stops flashing when problem is corrected or SYSTEM CHECK-RESET
is touched.
Something is wrong with the defrost system--keep doorsclosed to retain cold and call for
service. The code flashes until problem is conec ted.
8
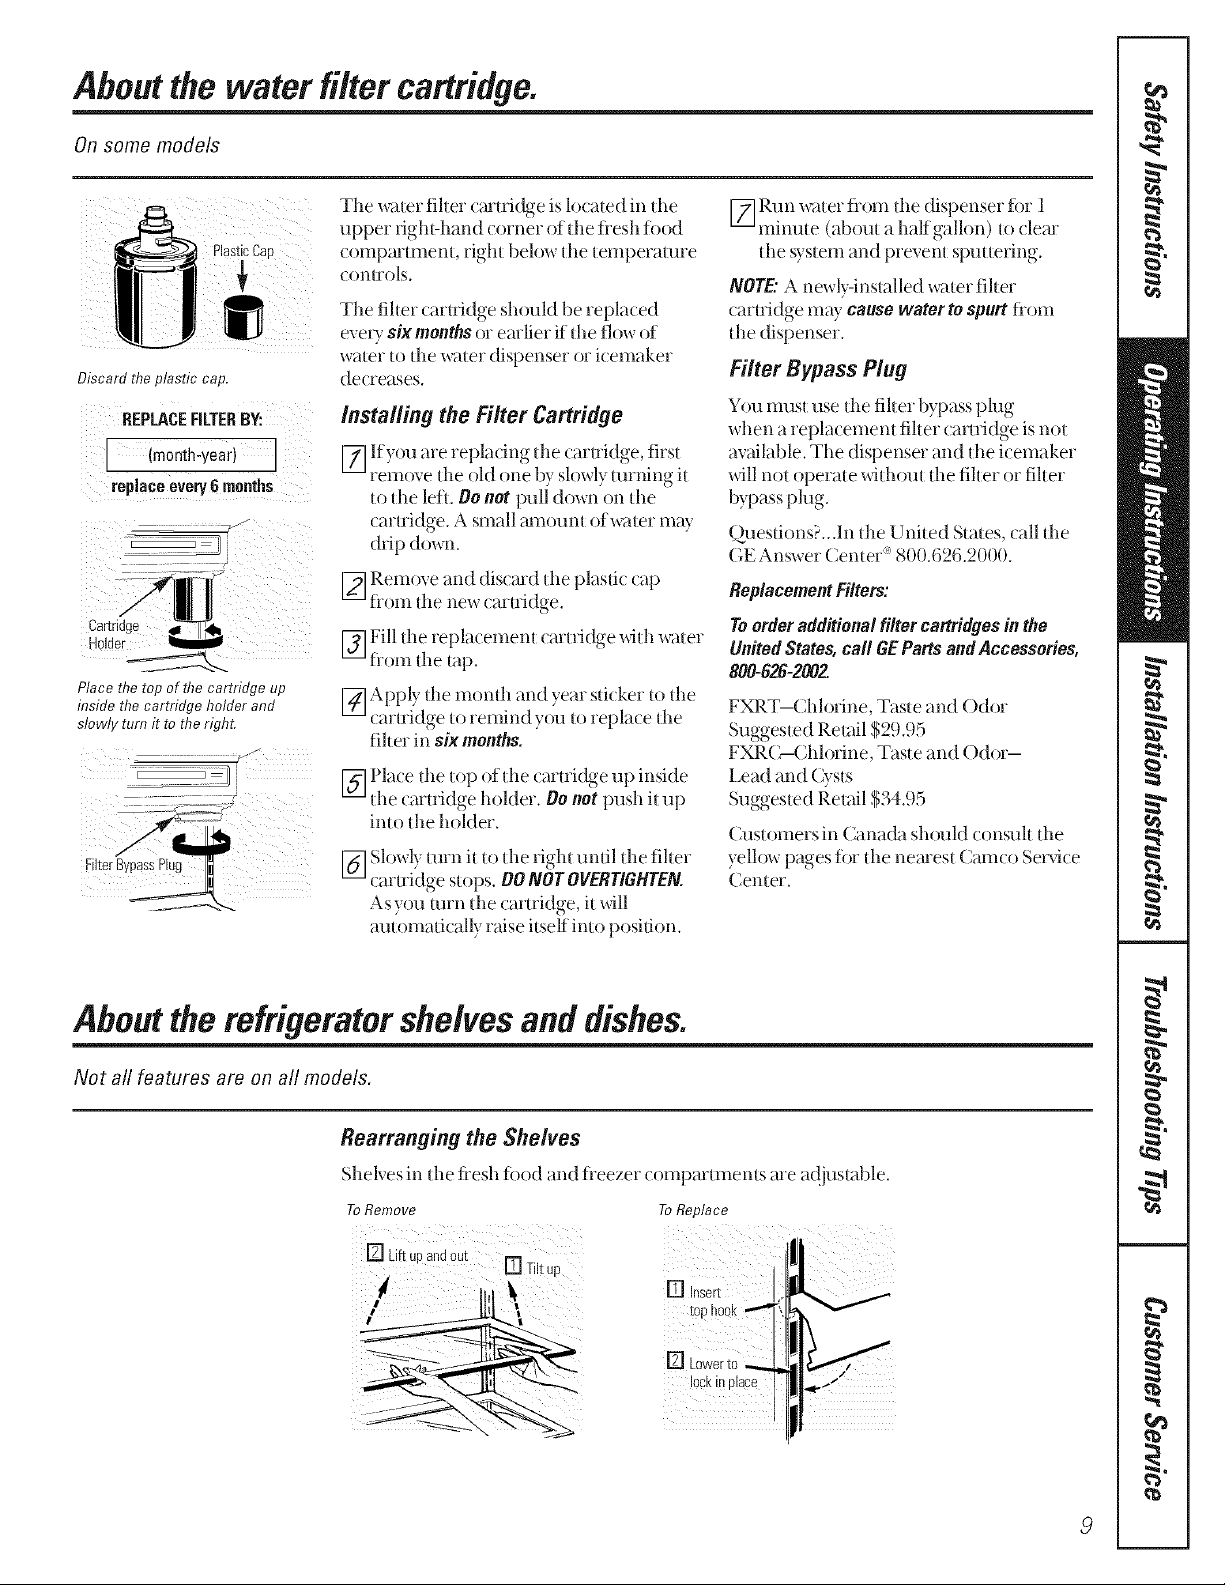
Aboutthe water filter cartridge.
On some models
Discard the plastic cap.
REPLACEFILTERBY:
I (month:Year)I
replaceevery6 months
Cartridge
Place the top office cartridge up
inside the cartridge holder and
slowly turn it to theright.
The water filler cartridge is located in tile
upper right=hand corner of dm flesh filed
compamnem, right below tlle temperature
controls.
Tile fiber caruidge should be replaced
exevv six months or earlier if dm flow of
water tO tile water dispenser or it emaker
de( reases.
Installing the Filter Cartridge
[_ If you are repla( ing tile (aruidge, first
re_no_ e tile old one by slowly tt'mling it
to dm left. De net pull down on tlle
cartridge. A small amount ofwmer may
drip down.
[E Remove and discard die plasuc cap
flom dm new caru:idge.
[_] Fill tile replacemem cam:idge widl water
from tlle rap.
[_ Apply tlle month and year sticker to tile
carui'dge to remind v()u u) replace die
filler in six months.
@Place tlle u)p of din cartridge up inside
tile (aruidge bolder. Be not push it up
imo dm bolder.
@Slowly turn it I() dm right undl dm fiber
(aruidge su)ps. OONOT OVERT/GHTEN.
AS yOtl [llrll tile cartridge, it will
auU)mafically raise itself inu) position.
[_Run water flom tlle dispenser tbr 1
minute (about a half gallon) u_ clear
d_e system and prevent spuuering.
NOTE."A newly-installed water fiber
(artridge may causewater tospurt flom
dm dispenser.
Filter Bypass Plug
You must use tlle fiher bypass phlg
when a replacement filter cartridge is not
available. The dispenser and dm icemaker
xdll not operate widlout tlle filler or filler
bypass plug.
Ouestions?...In tile United Stales, call tlle
(;E Answer Cemer': 800.626.2000.
ReplacementFilters:
Toorderadditional filtercartridges in the
UnitedStates,carl GEPartsandAccessories,
800-626-2##2
FXRT--Chlorine, Taste and Odor
Suggested Retail $29.95
FXR(_Chlorine, Taste and Odor-
I_ead and Cysts
Suggested Retail $34.95
Customers in Cana(L_ should consult tile
yellow pages ti)r tl_e nearest Camco Serdce
Cemer.
Aboutthe refrigeratorshelves and dishes.
Not all features are on all models.
Rearranging the Shelves
Shelves in dm iiesh food and fleezer ( omparmmms me adjustable.
To Remove
ToReplace
[] insert
[] Lowerto
topl
lock in place "/
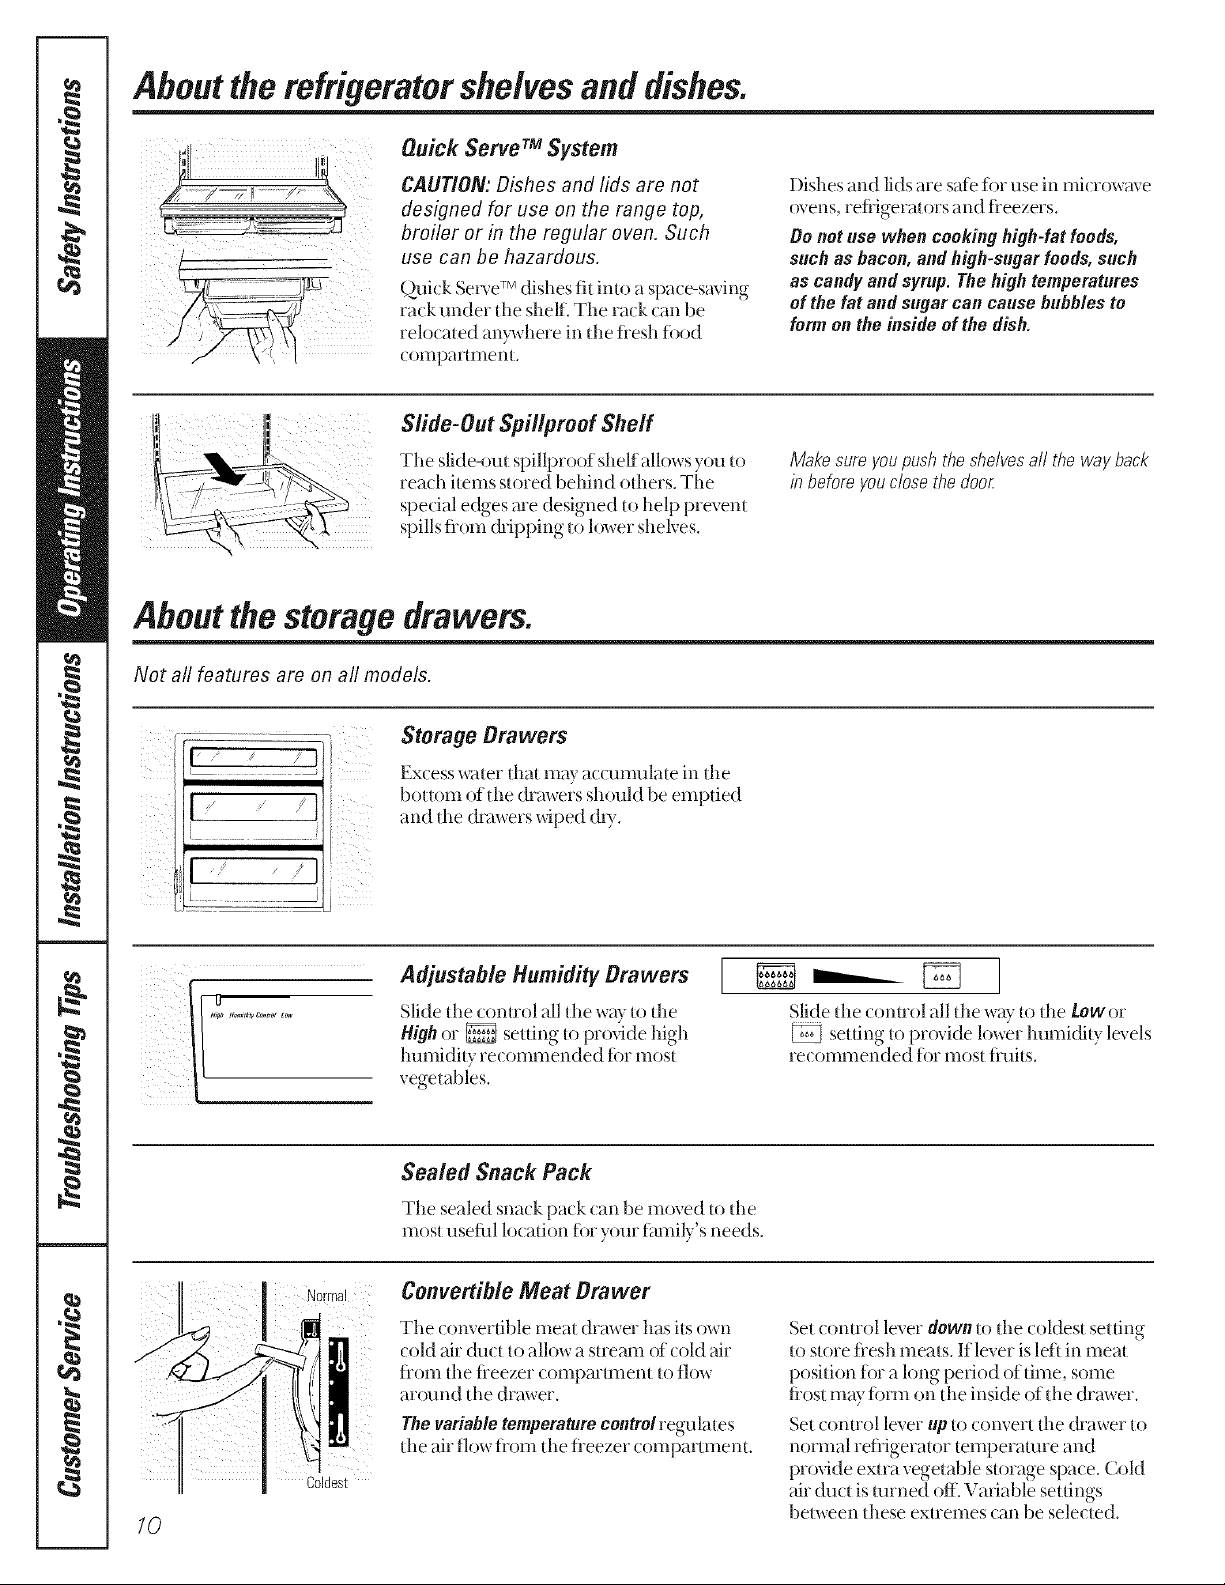
Abouttherefrigeratorshelvesanddishes.
Ouick Serve TM System
CAUTION: Dishes and lids are not
designed for use on the range top,
broiler or in the regular oven. Such
use can be hazardous.
()l]ick Seive TM dishes fit into a spare-saving
rack under tile shell Tile rack can be
relo( ated anywhere in tile flesh food
(ompartment.
Slide-Out Spillpmof Shelf
Tile slide-out spillproof shelf allows you to
reach items stored behind others, Tile
special edges are designed to help prevent
spills from dripping to lower shelves.
Aboutthe storage drawers.
Not all features are on all models.
Dishes and lids are saie %r use in micrt)wave
ovens, refiigerators and fleezers.
Be notuse when cooking high-fatfoods,
such as bacon,and high-sugarfoods,such
as candyand syrup. Thehightemperatures
of the fat and sugar can causebubblesto
formon the inside of the dish.
Makesureyoupushtheshe/yesa//the wayback
/bbeforeyouc/osethedoor.
Storage Drawers
Excess water that may a(( llllllllaIe ill tile
bottom of the drawers should be emptied
and tile (h_wers wiped (h) _
Adjustable Humidity Drawers [
Slide tile control all tile way to tile
Highor _ setting to proxtide high
humidity recommended for most
vegetables.
Slide tile conuol all the way to tile Low or
setting to proxide lox_er humidity lex els
recommended for most fhfits.
Sealed Snack Pack
Tile sealed sna(k pa(k (an be mo-_ed to tile
most usefill lo( alien for your family's needs.
Normal
Coldest
/0
Convertible Meat Drawer
Tile (onverfib]e meat drawer has its own
cold air &l(:t to allow a stream of told air
flom tile fieezer compartment to fit)w
arolmd tile drmver.
The variable temperature control regulates
the air flow flom the fleezer (ompartment,
Set conuol lever downto tile (:oldest setting
to store flesh meats. If lever is leii in meat
position fi)ra long period of time, some
frost m Wfi)rm on tile inside of tile drawer.
Set conuol lever up to convert tile &awer to
normal refligerator temperature and
provide exua vegetable storage spa( e. (',old
air &lct is turned off. Vmiable setdngs
between these extremes (all be sele( ted.
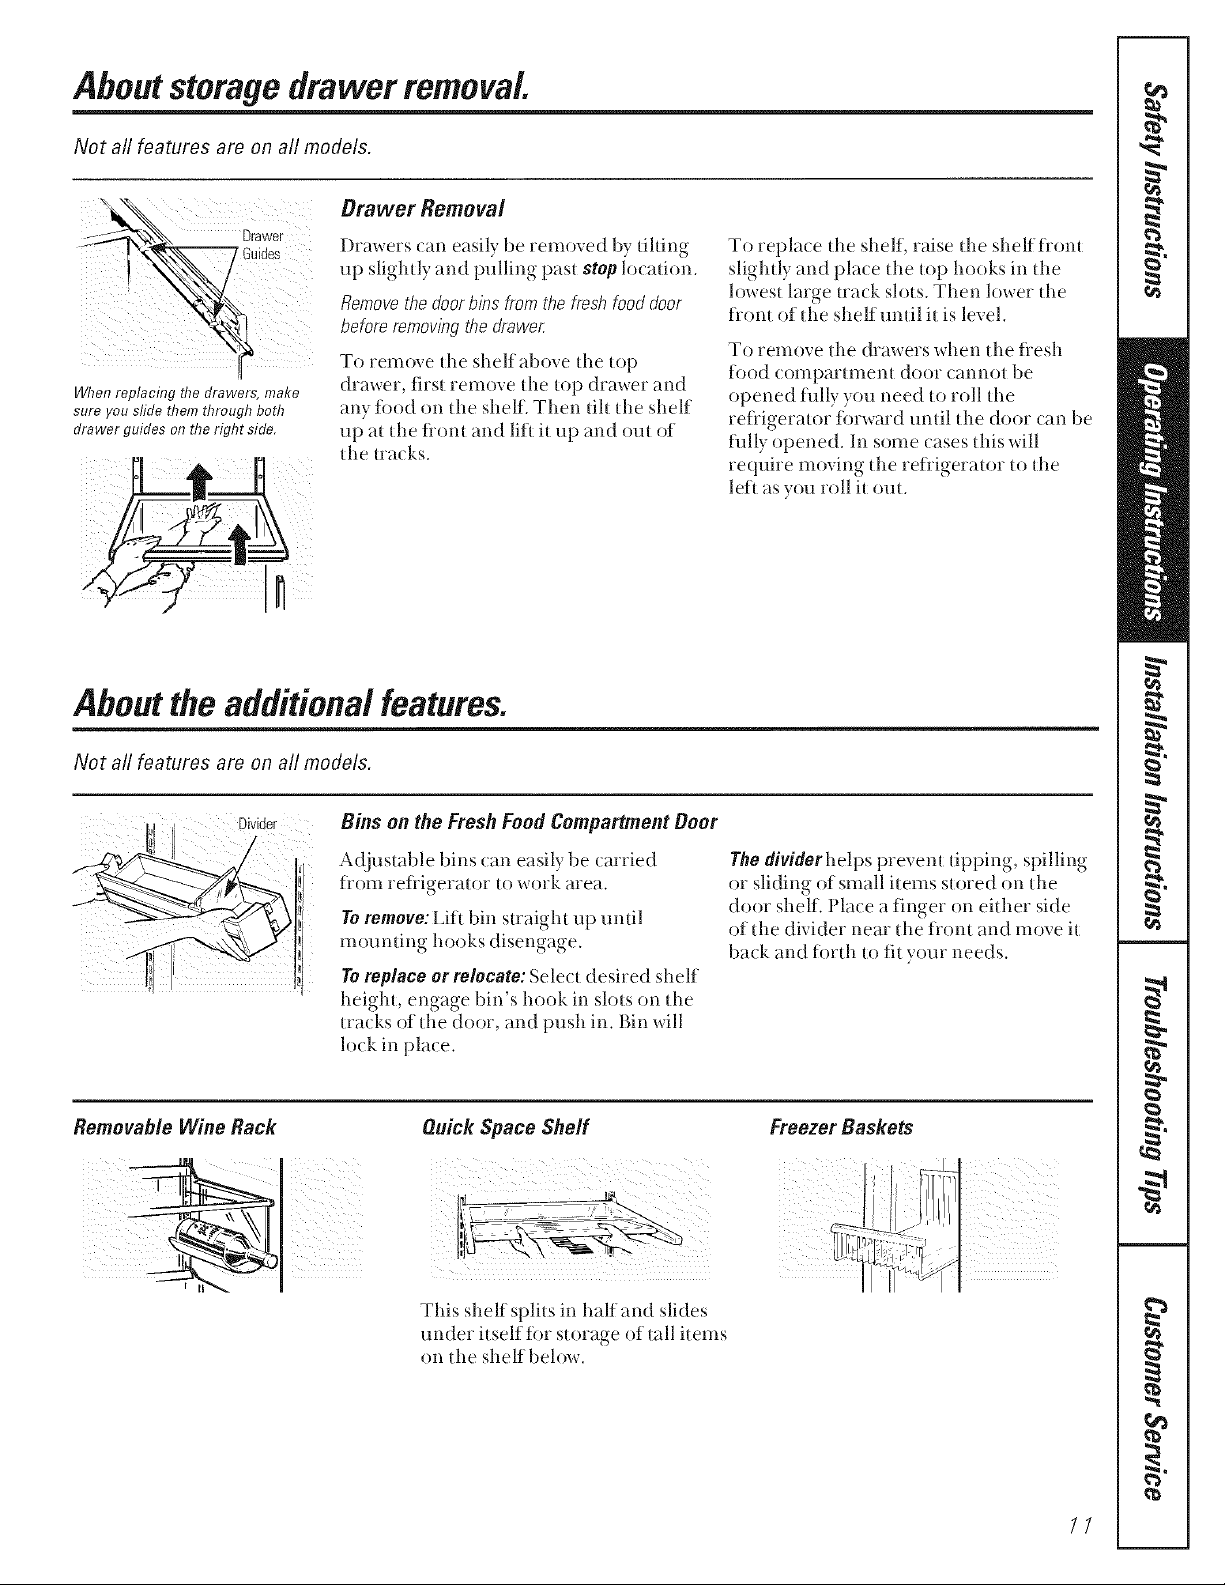
Aboutstorage drawer removal.
Not all features are on all models.
Drawer Removal
Drawers can easily be removed by tilting
tip slightly and pulling past stop location.
Removethedoorbibsfromthefreshfooddoor
beforeremov/bgthe drawer.
To remove tile shelf above the top
When replacing fl?edrawers, make
sure you slide them through both
drawer guides on theright side,
drawer, first remove tl_e top drawer and
any %od on the shelf. Then tilt tile shelf
up at the flont and lift it up and out of
the tracks.
Aboutthe additionalfeatures.
Not all features are on all models.
h' ' Divider
Bins on the Fresh Food Compartment Boor
To repla(e tl_e shelf, raise d_e shelfflont
slightly and pla( e tile top hooks in the
lowest large track slots. Then lower tile
front of tile shelf until it is lexeL
To remove the drawers when the flesh
food compartment door cannot be
opened flflly you need to roll the
refligerator fin:ward until the door can be
iiflly opened. In some cases this will
require moving the ret_igerator to tl_e
left as you roll it out.
Removable Wine Rack
I
Adjustable bins can easily be carried
flom refligerator to work area.
Toremove:Lift bin straight up until
moundng hooks disengage.
Toreplace or relocate: Select desired shelf
height, engage bin's hook in slots on the
tracks of tile door, and push in. Bin will
lotk in plate.
Ouick Space Shelf Freezer Baskets
This shelf splits in half and slides
under itself for storage of tall items
on tile shelf belo-w.
The d&iderhelps prevent tipping, spilling
or sliding of small items stored on d_e
door shell Place a finger on eid_er side
of d_e divider near d_e flom and move it
bark and fi)rdl to fit your needs.
//
About ice service.
On some models
ice Trays
To release i(e (ubes, turn the tray upside
down, hold it over a (olltainer, and txdst
both ends,
For only one or two ice tubes, leaxe the
tray. right-side up, twist both ends slightly,
aIld renlox e as nl}lIl} T (ubes as yoI1 v_rall[
Washicetraysin/ukewarn7wateronly--do not
put theminanautomaticdishwasher.
/eemaker Accessory Kit
If your refligerator did not come aheady equipped with an automatic icernaker, an
icernaker accesso U kit is axailable at extra (:()st. Check tile back of the refligerator for
the specific icernaker kit needed tbr your model.
Water Supp/y Kit
A kit containing copper tubing, shutoffvalve, fittings and instructions needed to
connect tile icemaker to your cold water lille is available at extra (()st flom your
dealer or flom Parts and Accessories, 800-626-2002.
See the Prepar&g to install the refrigerator section.
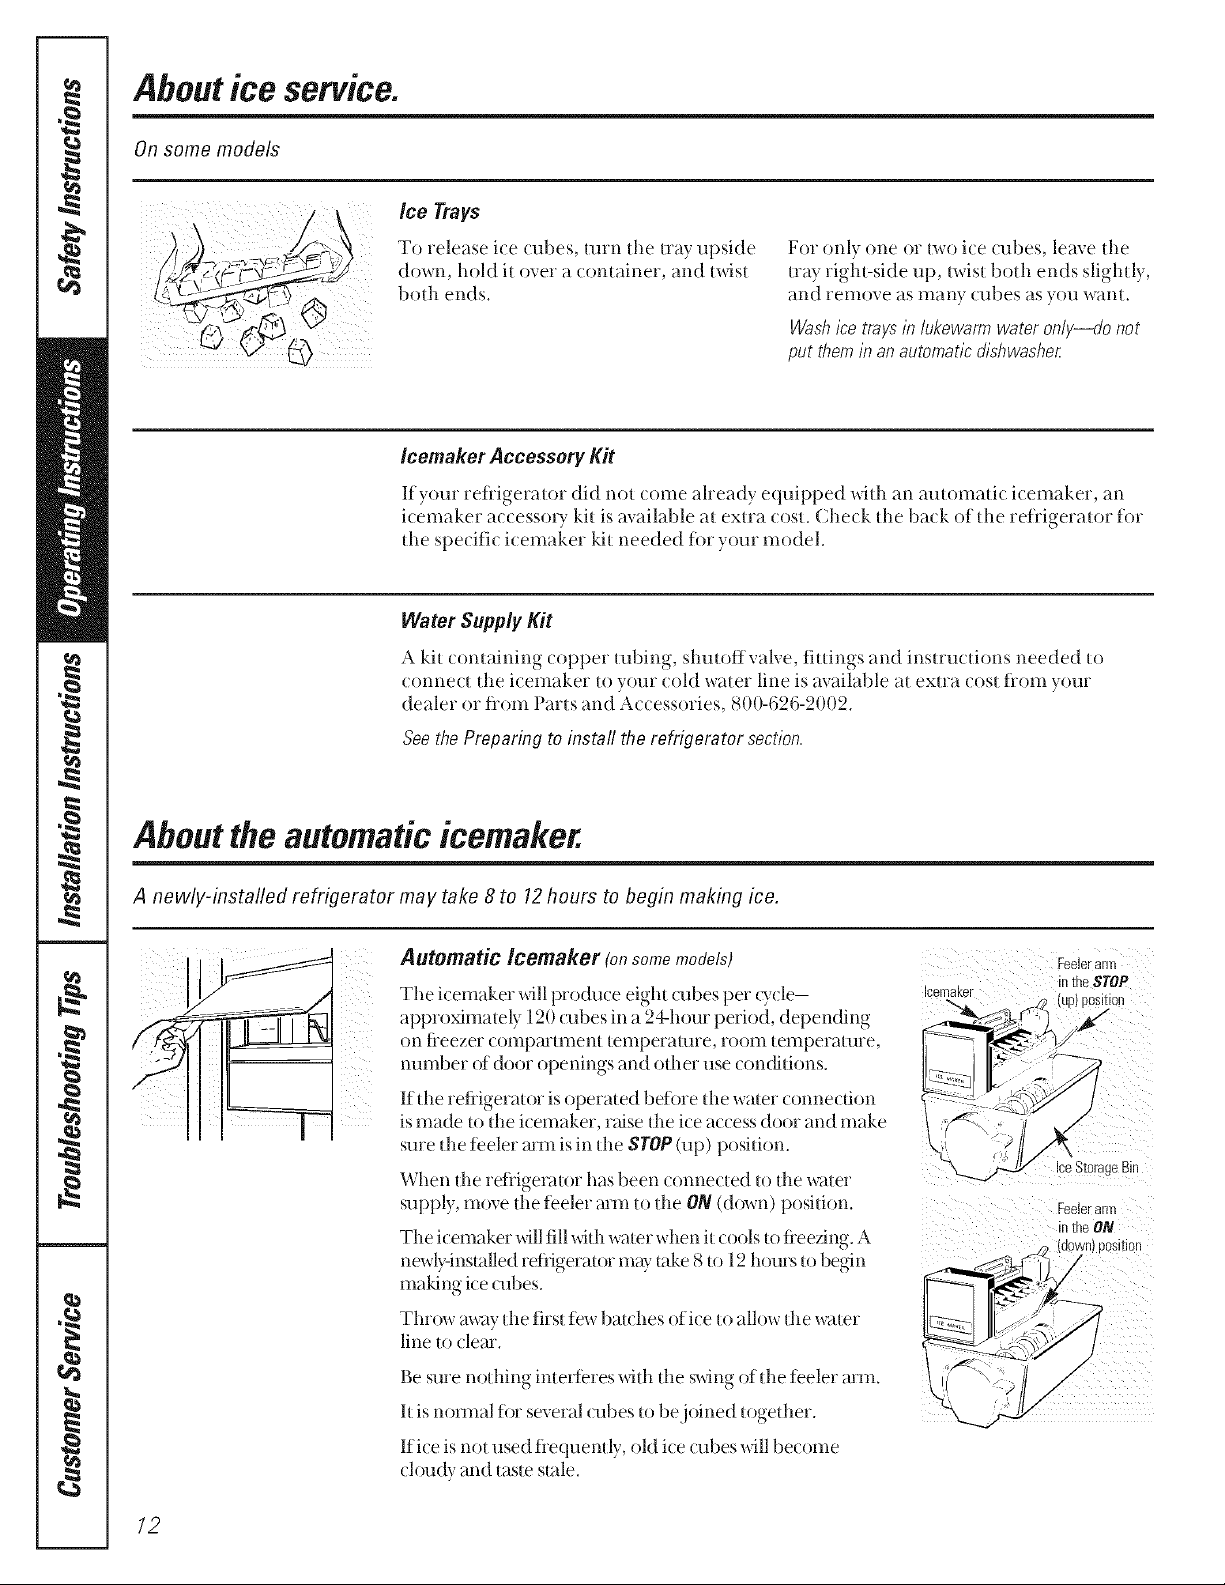
Aboutthe automaticicemaker.
A newly-installed refrigerator may take 8 to 12hours to begin making ice.
Automatic Icemakor (onsomemodels)
Tile icemaker will pro&me eight olbes per tycle--
approximately 120 cubes ill a 24-hour period, depending
on freezer coi-_lpar[illen[ temperatme, roolll temperatllre,
number d door openings and odler use conditions.
If die refiigermor is operated before tl_e water connection
il 51
is made to tile icemaker, raise the ice access door and make , ( I"/A_d"/
sure the R_eler arm is ill the STOP(up) position. ,.%
When tile refl'igemmr has been connected to tile water
SUl)l)ly,move tile feeler arm to the ON(down) position. Feelerarn
Tile icernaker willfill with water when it co()ls to fieezing. A
newl?qnstalled refligerator maytake 8 to 12hours to begin
ma_ng ice cubes.
Throw away tile first few batches of ice to allow the water
lille to clear.
Be sure nothing intevlbres with the s_dng of tile teeler arm.
It is nomlal tot several (:ubes to be joined togedmr.
cernaKer
Feelerarl
theSTOP
Ice'St0rage Bin
nme ON
n/posmo
12
If ice is not used flequently, old ice cubes will become
cloudy and taste stale.
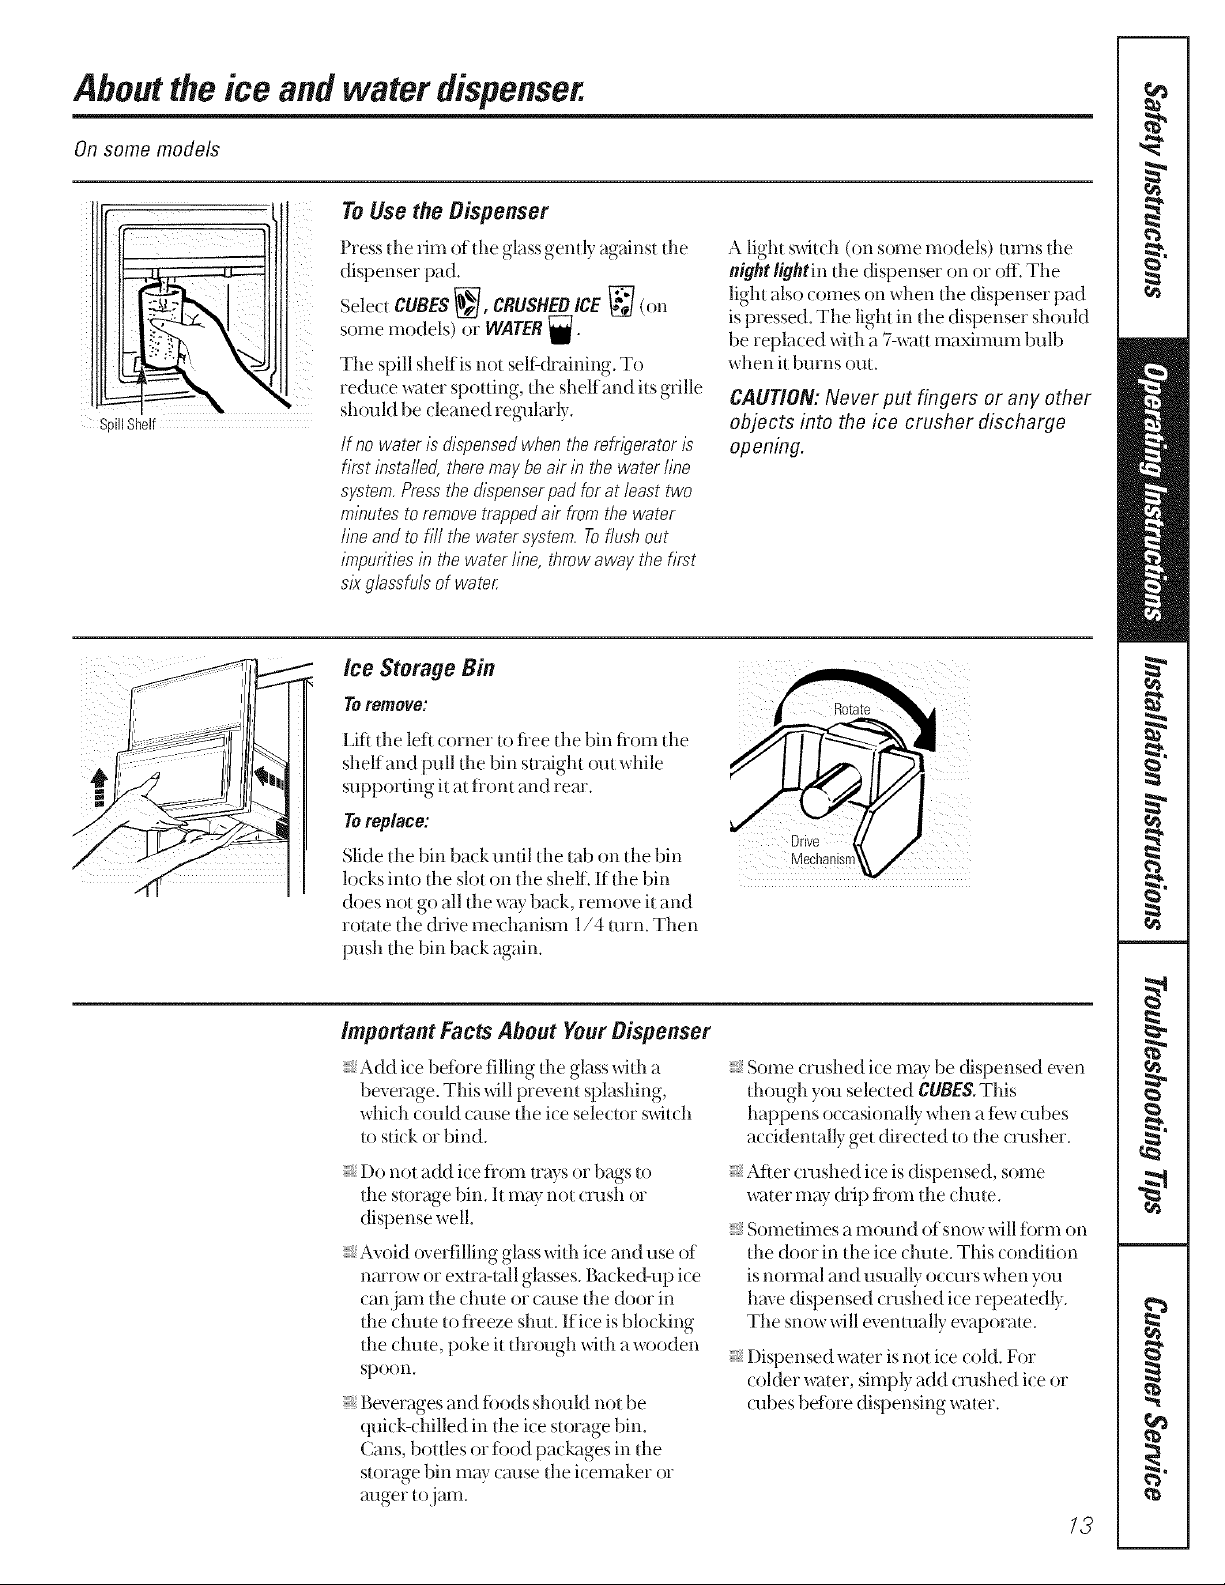
Aboutthe ice and water dispenser.
On some models
ToUsetheDispenser
SpillSiJeif
Press the rim ofd_e glass gemly against dm
dispenser pad.
Sele.cuBEs aus. lcE (,).
some models) or WATER_1_.
The spill shelf is not selfchaining. To
re(hi( e water spotting, fl_eshelf and its grille
should be (leaned regulmly.
If no wateris dispensedwhentherefn_Teratoris
first installed,theremaybe air in thewaterfine
system.Pressthedispenserpadforatleast two
minutesto removetrappedair fromthe water
fineandtofifl thewatersystem.Toflushout
impuritiesin thewaterfine, throwaway the first
sixglassfulsof water.
Ice StorageBin
Toremove:
I,ifi dm left corner to flee the bin from the
shelf and pull the bin smfight out while
supporting it at iiom and rear.
Toreplace:
Slide the bin ba(k until the mb on the bin
locks into tim slot on the shelf. If the bin
does not go all the way back, remove it and
rotate the drive me(:hanism 1/4 turn. Then
push fl_e bin back again.
A light switch (on some models) turns tl_e
night lightin the dispenser on or off. The
light also (Dines on when the dispenser pad
is pressed. The light in the dispenser should
be replaced whh a 7-watt maxinmm bulb
when it burns out.
CAUTION: Never put fingers or any other
objects into the ice crusher discharge
opening.
Important Facts About YourDispenser
;;;;;;_,Add ice betore filling the glass whh a
bexerage. This will prex ent splashing,
whi(h could cause fl_ei(e selector sMt(h
to stick or bind.
Do not add ice flom u:aysor bags to
dm storage bin It may not (rush or
dispense well.
:, Avoid overlilling glass with ice and use of
nmrow or exlrwtall glasses. Backed-up i(e
(an jmn d*e chute or cause the door in
dm chine to tieeze shut. Ifi(e is blocking
dm chute, poke it din)ugh wid_a wooden
spoon.
:, Beverages and tbods should not be
quick-chilled in the ice st_)rage bin.
Cans, bottles or fi)od paclctges in the
storage bin may (arise d_e icemaker or
auger to jam.
:, Some crashed ice may be dispensed even
fl_ough you selected CUBES.This
happens o( casionally when a ibw cubes
ac(idenmlly get directed to dm (rusher.
After crashed ice is dispensed, some
water may &ip tiom tl_e chute.
:, Sometimes a mound of snow will fi)rm on
the door in the ice chute. This condition
is normal and usually occurs when you
have dispensed crashed ice repeatedly.
The sm)w will eventually evaporate.
Dispensed water is not ice (old. For
colder water, simply add crashed i(e or
cubes betore dispensing water.
13

Cam and cleaningof therefrigerator.
Cleaning the Outside
rern0vegrille
Thedispenserwell (on some models),
beneath dm grille, sh_nfldbe_dped &y. Water
left in thewell may leavedeposits. Remove
tile deposits by adding undiluted vinegar to
the well. Soak until the deposits disappear
or become loose enough to rinse away.
The dispenser pad (on some models). Clean
Mth warm water and baking soda soMtion-
about a tablespoon (15 ml) of baking soda
to a quart (1 l) of water. Rinse thoroughly
and _dpe dU.
HINT'.Openthefreezerdoorpart waytoprevent
dlspenslbgof ice or water whencleaning.
The deer handles and trim. Clean xdth a
cloth dampened vdth soapy water. ][)_)_vdth
a soft cloth.
Clean&g the Inside
Thestainless steel panels and door handles
(on some models) can be cleaned Md_ a
commercially available stainless steel
cleaner using a clean, soft cloth.
Keep the outside clean. _,,\tpe_dth a clean
cloth lightly dampened Mth htchen
appliance wax or mild liquid dish detergent.
DU and polish _dth a clean, soft cloth.
Donot wipe theraffle?oratorwith a soileddish
cloth orwet towel Thesemay&avea residue
thatcanerodethepalbt.Donotusescouring
pads,powderedcleaners,bleachorcleaners
containingbleachbecausetheseproductscan
scratchandweakenthepaintfinish.
_ii I i
Tohelppreventodors,leave an open box of
baldng soda in tile flesh food and fieezer
(ompartments.
Unplugtherefrigeratorbeforecleaning.If this
is not practical, wring excess I_loisture out of
sponge or cloth when (leaning around
sMI(bes, lights or controls.
Use warm water and baking soda soMfion-
about a tablespoon (15 ml) of baking soda
to a quart (1 l) of water. This both (leans
and neumdizes odors. Rinse and wipe dU.
After cleaning tile door gaskets, apply a thin
layer ofpeuoleumjelly to the door gaskets
at tile hinge side. This helps keep tile
gaskets flom sdt king and bending out of
shape.
DrainepenimJinfreezercompartmentDuring
yemly cleaning, remove bottom freezer
basket and flush a soludon of baling soda-
1 teaspoon (5 ml) and 2 (:ups (500 ml) of
hot (not boiling) water-through the &ain
line with tile help of a meat baster. This will
help eliminate odor and re(hlce the
likelihood of a clogged drain line. If &ain
becomes clogged, use a meat baster and
baldng soda solution to torce tile (log
through the drain line.
Avoid cleaning cold glass shelves (on
some models) with hot water because
the extreme temperature difference may
cause them to break. Handle glass
shelves carefully. Bumping tempered
glass can cause # to shatter.
Donot washanyplasticrefr/_?eratorpartsin
thedishwasherexcept Quick Servedishes
and lids.
/4
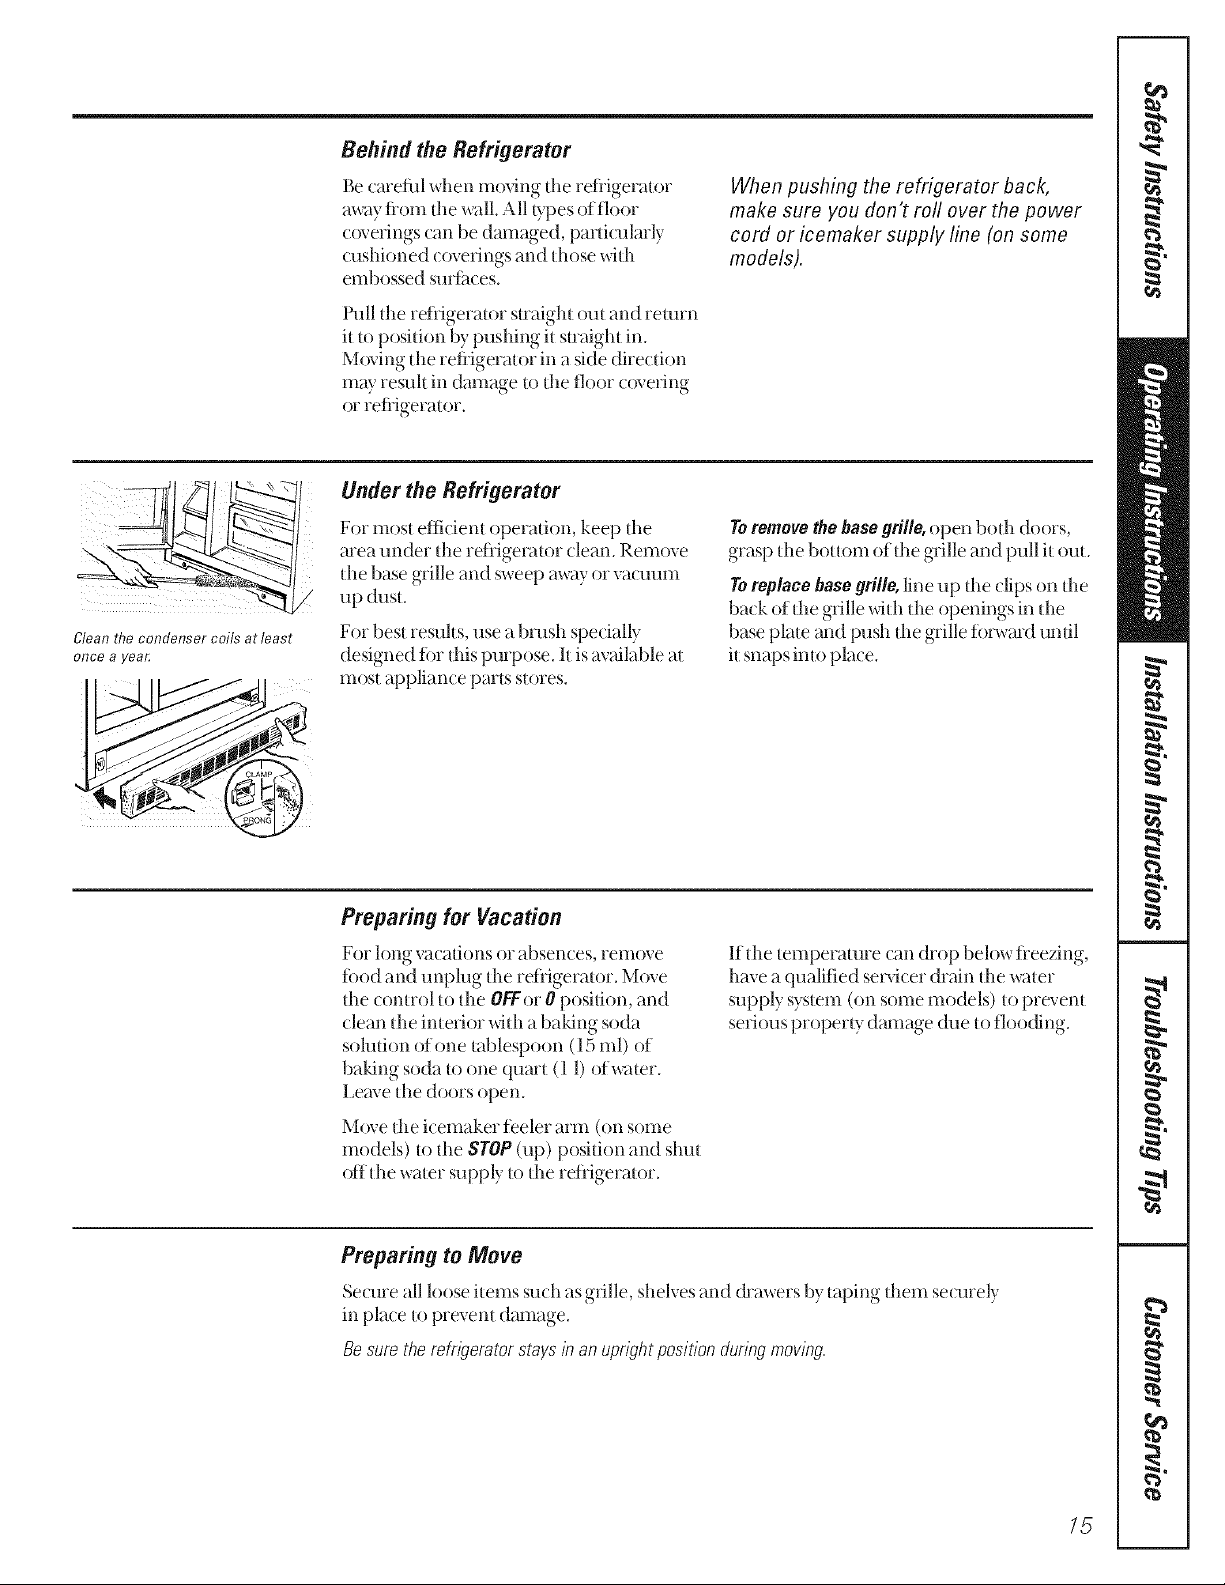
Behind the Refrigerator
Clean the condenser ceils at least
once a j/eaT,
Be carefill when m()_ing dm refligerator
away fiom the wall. All types of floor
(()verings can be damaged, particularly
cushioned (_)veringsand those with
embossed sufihces.
I'ull tile refligerator straight out and return
it to position by pushing it suaight in.
Moving tlle retiigerator in a side direction
may result in damage to die floor c_vering
or retiigerator.
Under the Refrigerator
For most efli( lent operation, keep tile
area under the refligel_ltor clean. Rem()ve
dm base grille and sweep away or vaomm
up &lst.
For best realhs, use a brash specially
designed %r Iris purpose. It is available at
most appliance parts stores.
When pushing the refrigerator back,
make sure you don't rofl over the power
cord or icemaker supply line (on some
models).
1"oremovethebasegrille,open bofll doors,
graspthe bottom of dm grille and pull it out.
1"oreplacebasegrille, line up tile clips on the
back of die grille x_itlltile openings in file
base plate and push tile grille fl)rward undl
it snaps into place.
Preparing for Vacation
For long vacations or absences, remove
%od and unplug tlle refligerator. M()ve
dm control to the OFFer 0 position, and
(:lean tlle interior whh a baldng soda
sohltion of one t_tblespoon (15 ml) of
baldng soda to one quart (1 1)of water.
I_eave the doors open.
M()ve the i(emaker ieeler arm (on some
models) to the STOP (up) position and shut
oif d_e water supply to tile refligerator.
If tlle temperature can drop below tieezing,
have a qualified servicer drain die water
supply system (on some models) to prevent
serious property damage due to flooding.
Preparing to Move
Secure all loose items such as grille, shelves and (hawers by taping dram securely
in place to prevent damage.
Besuretherefr/_leratorstays/n anupr/_lhtpositionduringmoving
/5
Replacingthefight bulbs.
Turning the control to the OFFor 0 position does not remove power to the light circuit.
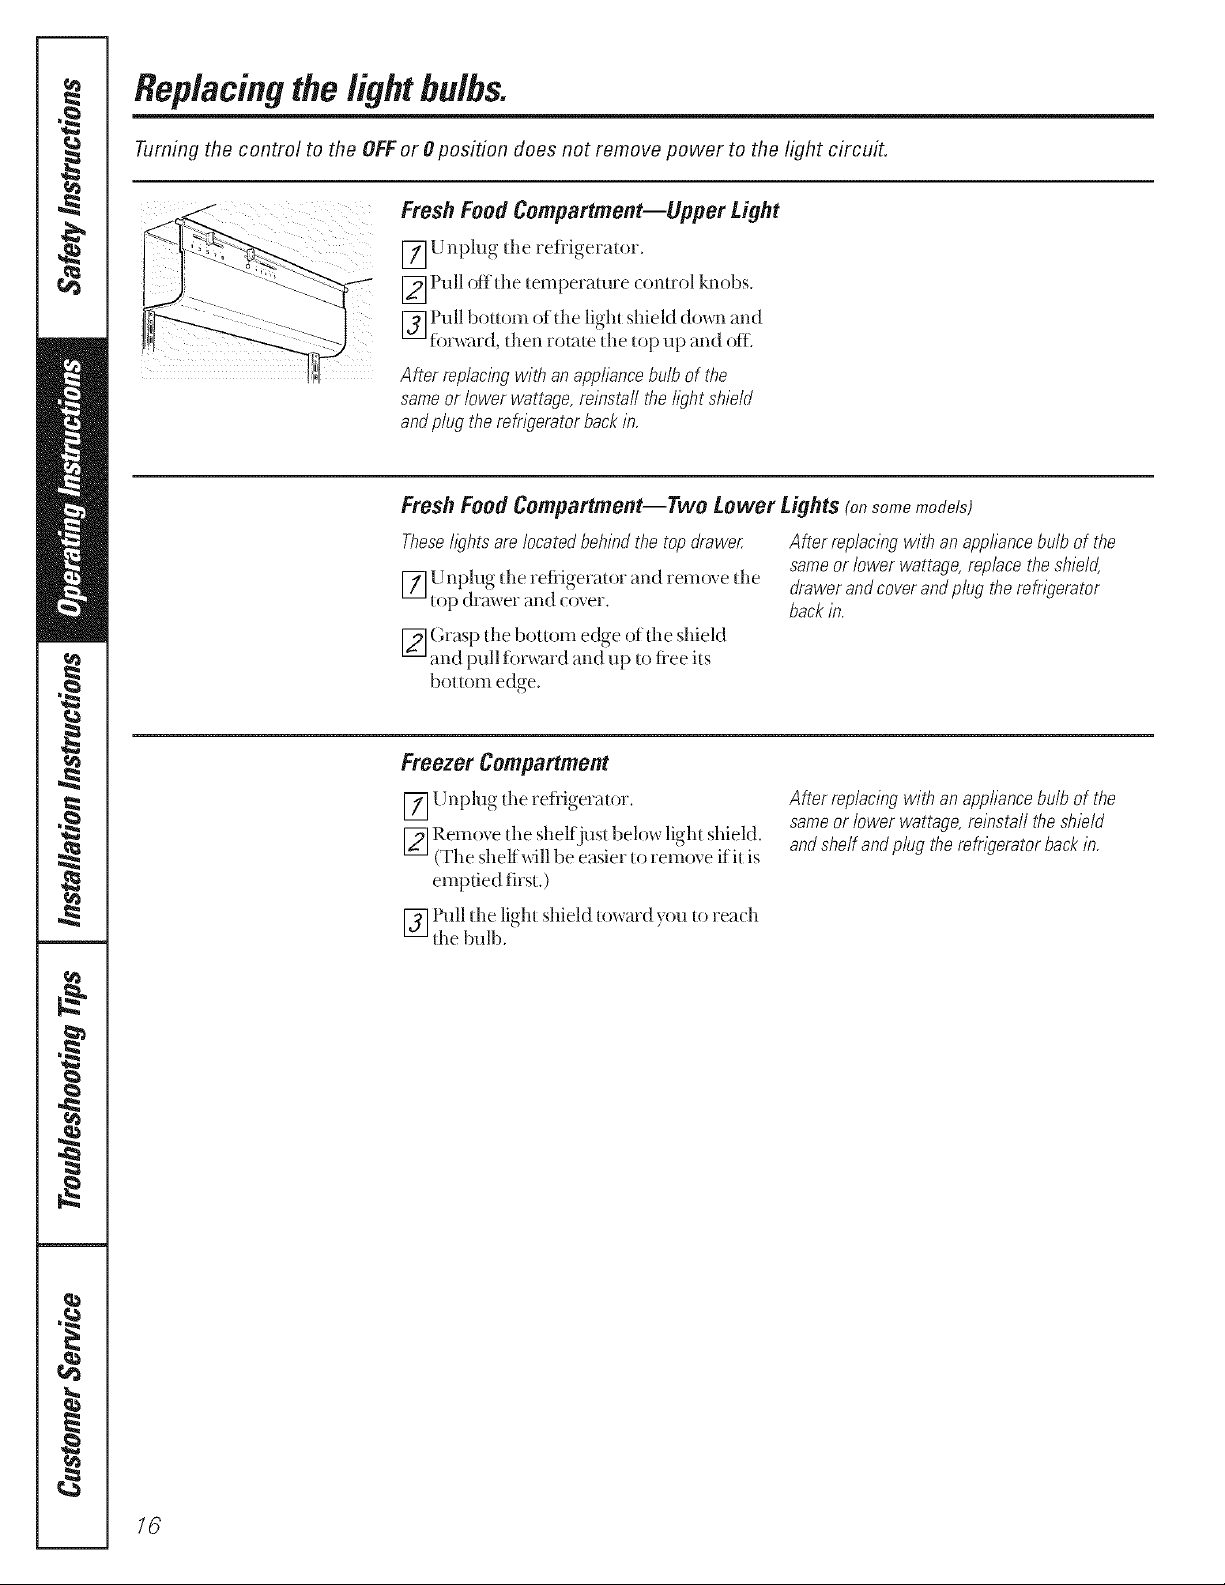
Fresh FoodCompartment--Upper Light
I_]U nplug d_e refiigerator.
[_ Pull offdm temperature ( omrol knobs.
Fff] Pull bottom ofd_e light shield down and
forward, then rotate the top up and ofl_
After replac/bg with an appliance bulb of the
same or lower wattage, reinstafl the/l_?htshield
andplug the refn_Teratorback in.
Fresh FoodCompartment--Two Lower Lights (onsomemodels)
These//_Thtsare located behind the top drawer
[_] Unplug the reiiigerator and remove the
lop drawer and (over.
[_ (;rasp dm bottom edge of the shield
and pull fi wward and up to fiee its
bottor_ edge.
After replacing with an appliance bulb of the
same or lower wattage, replace theshield,
drawer and cover and plug the refn_Terator
back in.
Freezer Compartment
[7] Unplug d_e reiiigerator.
[_ Remo,_e the sheliijust below light shield.
(The shelf will be easier to remove if it is
empded first.)
[_] !:'ull the light shield toward you to reach
the bulb.
After replacingwith anappliancebulbof the
sameor lower wattage,reinstall theshield
andshelfandplug therefngeratorbackin.
16
Preparingtoinstalltherefrigerator.
Read these instructionscompletely and carefully.
Water Supply to the Icemaker(o,somemo o s)
If the refiigerator has an k emaker, it _dll have to be
( onne( ted to a told water line.
RefrigeratorLocation
Do not install the refiigerator where the
temperature will go below 60°F (16°C)
because it will not run often enough to maintain
proper temperatures.
Clearances
Allow the following clearan(es _br ease of
installation, proper air circulation and
plumbing and elecuical (onne(tions:
Sides : "
Top l" (25ram)
If bullt-ln,allow 7/8" {22ram)forhingecovers.
Back l" (25 ram)
a/8 (15 ram)
A water supply kit (containing copper tubing,
shutoffwdve, fittings and instructions) is available
at extra cost flom your dealer or from Parts and
Ac( essories, 800-626-2002.
Install it on a floor strong enough to support it
fiflly loaded.
If the refiigerator is against a wall
on either side, allow the fi)llowing
door (learan(es for a 90 ° door
opening:
22'- 25'models 3/4" (19ram)
27 models 172"(38 nun)
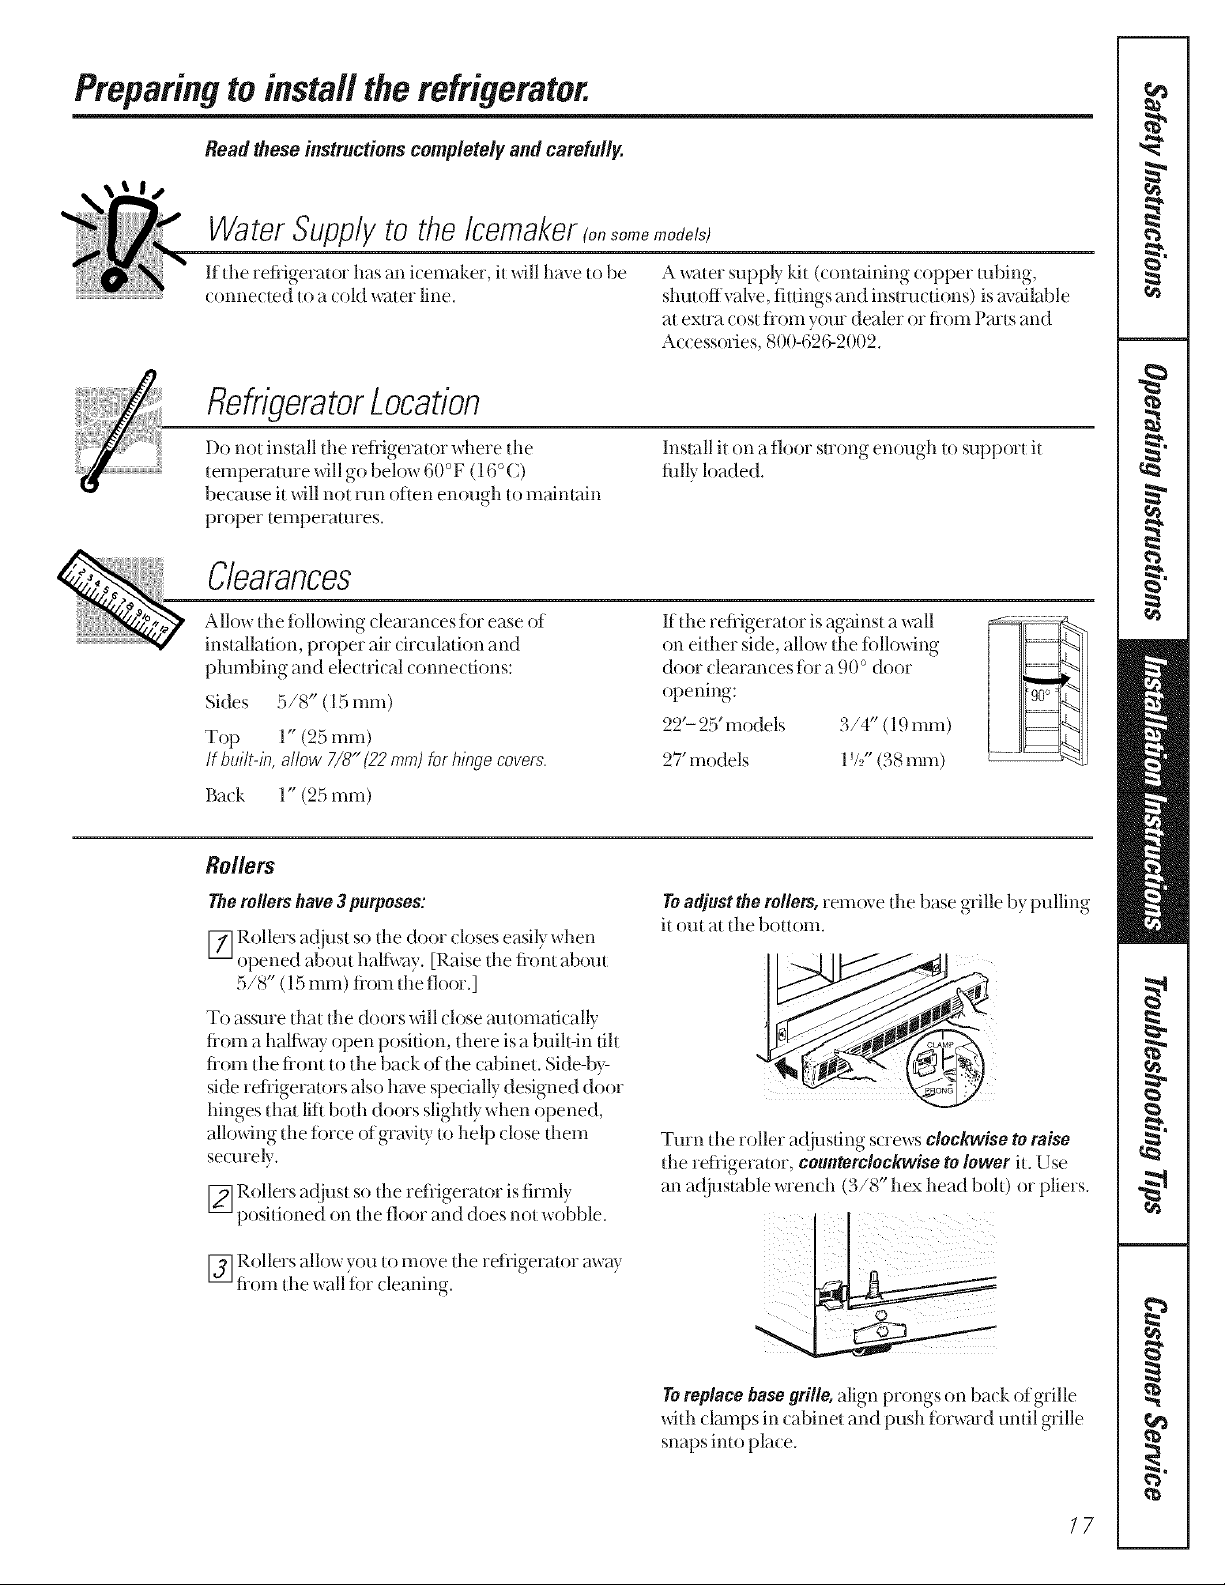
Rollers
The moors have 3 purposes:
I-_]Rollers adjust so the door closes easily when
opened about hal_k_,ay.[Raise tile fiont about
,)/8 (1,) ram) fiom thefloor.]
To assure that tim doors Mll close automatically
fiom a halt_vay open position, there is a buih-in tilt
from the iiont to the back of the cabinet. Side-by-
side refligerators also have spe( ially designed door
binges that lift both doors slightly when opened,
allowing the fi)rce of gxavity to help (lose them
seolrely.
[_ Rollers adjust so the refligerator is firmly
positione(i on the floor and does not w(_bble.
[_ Rollers allox_ you to move the retiigerator away
fi'om tile wall'for (leaning.
To adjust the milers, remove tl_e base grille by pulling
it oil, a! the bottonL
Turn the roller adjusting screws c/ockwisetoraise
the refiigerator, ceuntemlockwise to lower it. Use
an adjustable wrend_ (3/8" hex head boh) or pliers.
iiii :
Toreplace base grille, align prongs on back of grille
with d_unps in (abinet and push forward until grille
snaps into place.
/7
Installingthewater line.
Read these instructions completely and carefully.
BeforeYouBegin
If the water supply to the refrigerator is from a Reverse Osmosis Water Filtration
System and the refrigerator is equipped with a built-in filtration system, it is not
necessary to use the refrigerator's water filter. Use the refrigerator's Filter Bypass
Plug. Using the refrigerator's water filtration cartridge in conjunction with the RO filter
can result in hollow ice cubes and slower water flow from the water dispenser.
This water line instaflation is not warranted by the refrigerator or icemaker manufacturer.
Follow these instructions carefully to minimize the risk of expensive water damage.
Water hammer (water banging in the pipes) in house plumbing can cause damage
to refrigerator parts and lead to water leakage or flooding. Call a qualified plumber
to correct water hammer before installing the water supply line to the refrigerator.
Toprevent bums and product damage, do not hook up the water line to the
hot water line.
If you use your refrigerator before connecting the water line, make sure the
icemaker feeler arm is kept in the STOP (up) position.
Do not install the icemaker tubing in areas where temperatures fall below freezing.
When using any electrical device (such as a power drill) during installation, be sure
the device is insulated or wired in a manner to prevent the hazard of electric shock.
Aft installations must be in accordance with local plumbing code requirements.
18
WhatYouWillNeed
Todetermine how much copper tubing you need:
Measure the distance from the water valve on the back of the refrigerator to the water
supply pipe. Then add 8 feet (244 cm). Be sure there is sufficient extra tubing [about 8
feet (244 cm) coiled into 3 turns of about 10inches (25 cm) diameter] to aflow the
refrigerator to move out from the waft after installation.
_,A watersupplykit (containing copper robing, shutoffvalve and fitdngs listed below) is
available at exua (ost tiom your dealer or flom Parts and Accessories, 800-62d-2002.
;, Coldwater supply.The water pressure must be bet_veen 20 and 120 p.s.i. (1.4-8.2 bin) on
models _dd, out a water fher and between 40 and 120 p.s.i. (2.8-8.2 bar) on models _dd_
a water fher.
;_Powerdrill.
......_ • tt • - • )
.......,_Ceppertubmg,1/4 outex dl_nete, to (onne(t dm,efllgelatox to d_ewater supply. Be sure
bod_ ends of tlle robing are cut square.
Do not use plastic tubing or plastic fittings because the water supply line is under
pressure at all times. Certain types of plastic tubing may become brittle with age and
crack, resulting in water leakage.
;, Two I/4" outerdiametercompressionnutsand2ferrules(sleeves)--to (onne( t d_e( opper
robing to dm shuu)ffvalve and dm refiigerator water valve.
_,If your exisdng water line has a flmed fitdng at the end, you _dll need an adapter(av_fihble at
phm_bing supply stores) to conne( t the water line to the refligel_ltor ORyou(;an (xlt ofld_e
flared fiuing xdd_ a tubecutterand d_en use a compression fiuing.
_, Shutoff valve to connect to the cold water line. The shutoffvalve should have a water inlet
_dd_ a minimum inside diameter of 5/32" at tl,e point of connection to the COLBWATER
UNE.Saddle-upe shutoffvalves me included in many water supply kits. Betore pur( basing,
make sure a saddle-Upe valve ( omplies _dd_your lo(al plumbing (:odes.
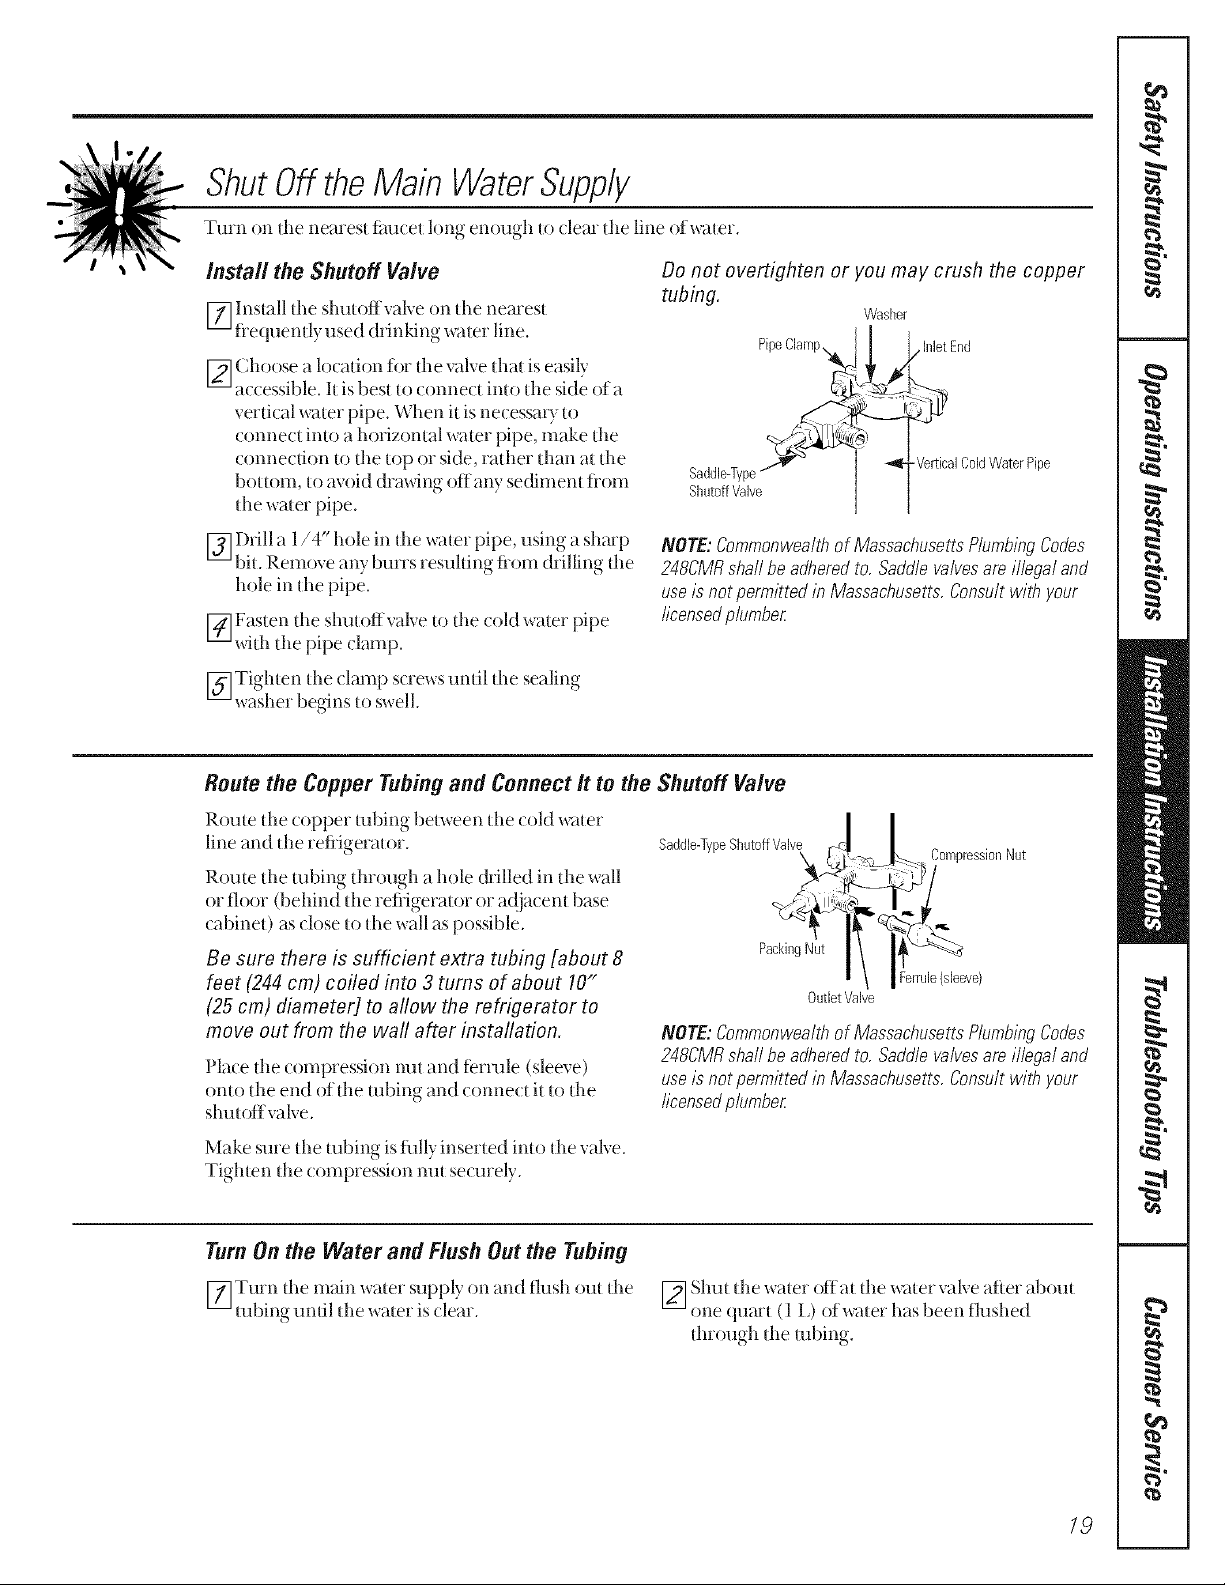
ShutOff theMain WaterSupply
Turn on die nearest fml(et long enough u) dear dm line ofwater.
Install the Shutoff Valve
Do not overtighten or you may crush the copper
tubing.
[_ Install the shutoffvalve on tile nearest
frequentlyused drin_ng water line
[_ Choose a location ti/r the valve d]at is easily
accessible. It is best t() connect into tile side of a
vertical water pipe. When it is necessary to
connect into a horizontal water pipe, make the
connection to the top or side, rather d]an at the
bottom, to avoid drawing offany se(fimem tiom
Saddle-Type
SllutoffValve
tile water pipe.
• /l • , , )
[] Drdl a 1/4 hole m tile water pipe, using a sharp
bit. Remove any burrs resuhing fiom drilling d_e
hole in tile pipe.
[_ Fasten the shumffvalve u) dm (old water pipe
NOTE:CommonwealthofMassachusettsPlumbingCodes
248CMRshaftbeadheredto.Saddlevalvesamillegaland
useis not permittedin Massachusetts.Consultwith your
licensedplumber.
wid_ die pipe (lamp.
@ Tiahten [lie clamp screws until tl]e sealing
washer begins u) swell.
Route the Copper Tubingand Connect it to the Shutoff Valve
Route the copper robing bem,een tile cold water
line and die refiigeraU)r.
Route the robing duough a hole drilled in the wall
or floor (behind tile refiigeramr or adja( ent base
cabineO as close u) tile wall as possible.
Be sure there is sufficient extra tubing [about 8
feet (244 cm) coiled into 3 turns of about IOH
(25 cm) diameter] to aflow the refrigerator to
move out from the waft after instaflafion.
Place tile compression nut and ferrule (sleeve)
omo the end of din robing and connect it t()die
shuu)ffvalve.
Saddle-TypeShutoffValve
PackingNut
NOTE:CommonwealthofMassachusettsPlumbingCodes
248CMRshaftbeadheredto.Saddlevalvesamillegaland
useis not permittedin Massachusetts.Consultwith your
licensedplumber.
Washer
inletEnd
.VerticalColdWaterPipe
Nut
_.. Compression
_ i_qr
:errule(sleeve)
Outlet Valve
Make sure tile robing isflflly inserted in/() tl]e valve.
Tighten dm( ompression nut set urely
Turn On the Water and Flush Out the Tubing
Fy]Turn [lie main water supply on and flush out tl]e
robing undl tile water is clear.
[_ Shut the water t)ffat the water valve after about
one quart (1 L) t)fwater has been flushed
d]rough die robing.
19
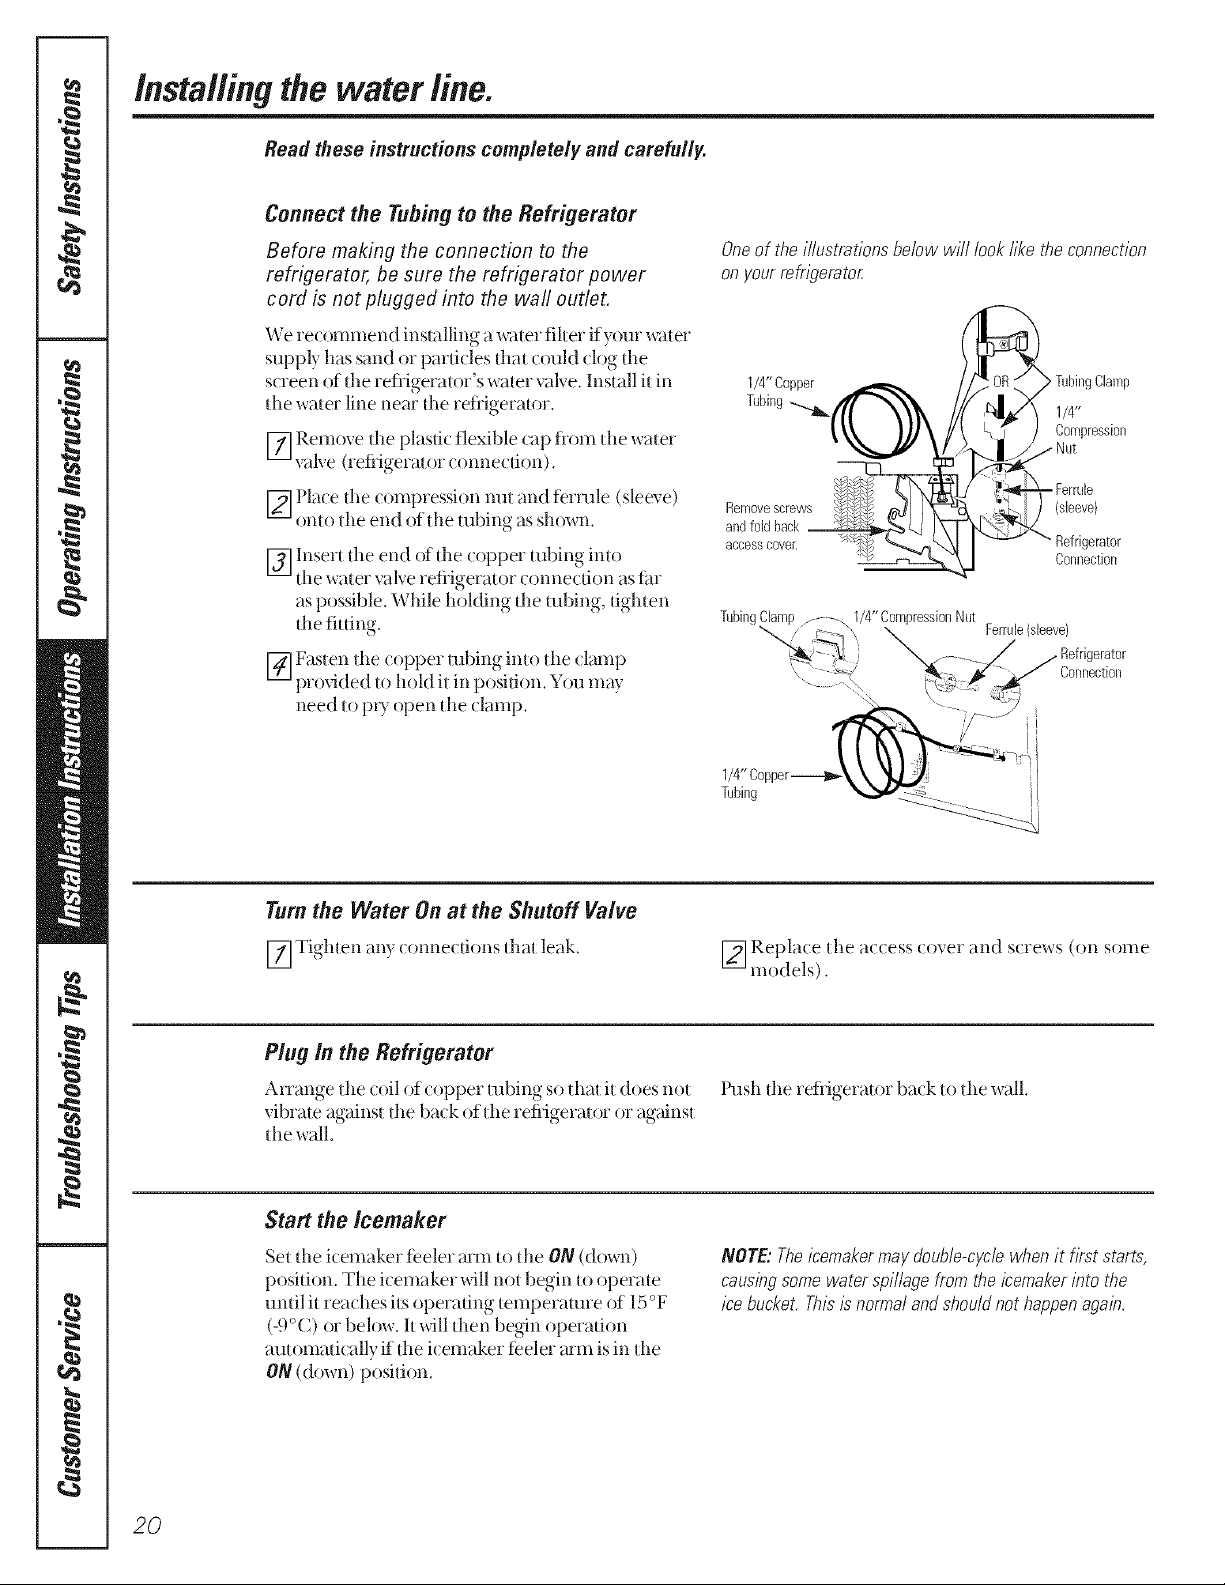
Installing thewater line.
Read these instructions completely and carefully.
Connect the Tubing to the Refrigerator
Before making the connection to the
refrigerator, be sure the refrigerator power
cord is not plugged into the wall outlet.
We re( ommend installing a water fiber if your water
supply has sand or parfi(les that could (log die
s(reen of die refiigerator's water valve. Install it in
die water line near [lie reiiigerator.
_] Remo_ e [lie plastic flexible cap flom [lie wa[er
_alve (refiigeramr (onne(don).
_ Place [lie compression nm and ferrule (slee_ e)
onto the end ({f[he [ubing as shown.
[_ Insert the end of the copper robing into
[lie wa[er _alve refiigerator ( onne( tiof_ as fhr
as possible. While holding [lie robing, dgh[en
[lie fiuing.
Oneof thei//ustrationsbe/owwi///ook/iketheconnection
onyourrefrigerator.
_ ubingClamp
1/4"
Compression
Nut
TubingClamp 1/4"CompressionNut
Ferrule(sleeve)
_] Fasten [lie copper robing into the damp
provided to hokI it in posidon. You may
need [(1 l)tT open [lie clamp.
Turn the Water On at the Shutoff Valve
_] Tigluen any (onne( dons dm[ leak
Plug In the Refrigerator
Arrange [lie coil of copper robing so tim[ it does not
vibrate agains[ [lie ba(k of din refiigeramr or agains[
[lie wall.
Start the Icemaker
Connectioll
Tubing
_ Repla( e [lie a((ess (over arid strews (oil soiTtle
models).
Push [lie refligeraU)r back [(1 [lie wall
20
Set the icemaker teeler arm to the ON(down)
position. The icemaker will not begin to operate
until it reaches its operating temperature of 15°F
(4)°C) or below. It will then begin operation
automatically if [lie i(emaker _eeler arm is in [lie
ON (down) position.
NOTE:Theicemakermaydoub/e-cyc/ewhenit hYststarts,
causingsomewaterspillagefromthe/2emakerintothe
icebucket.This/snormalandshouldnot happenaga/k
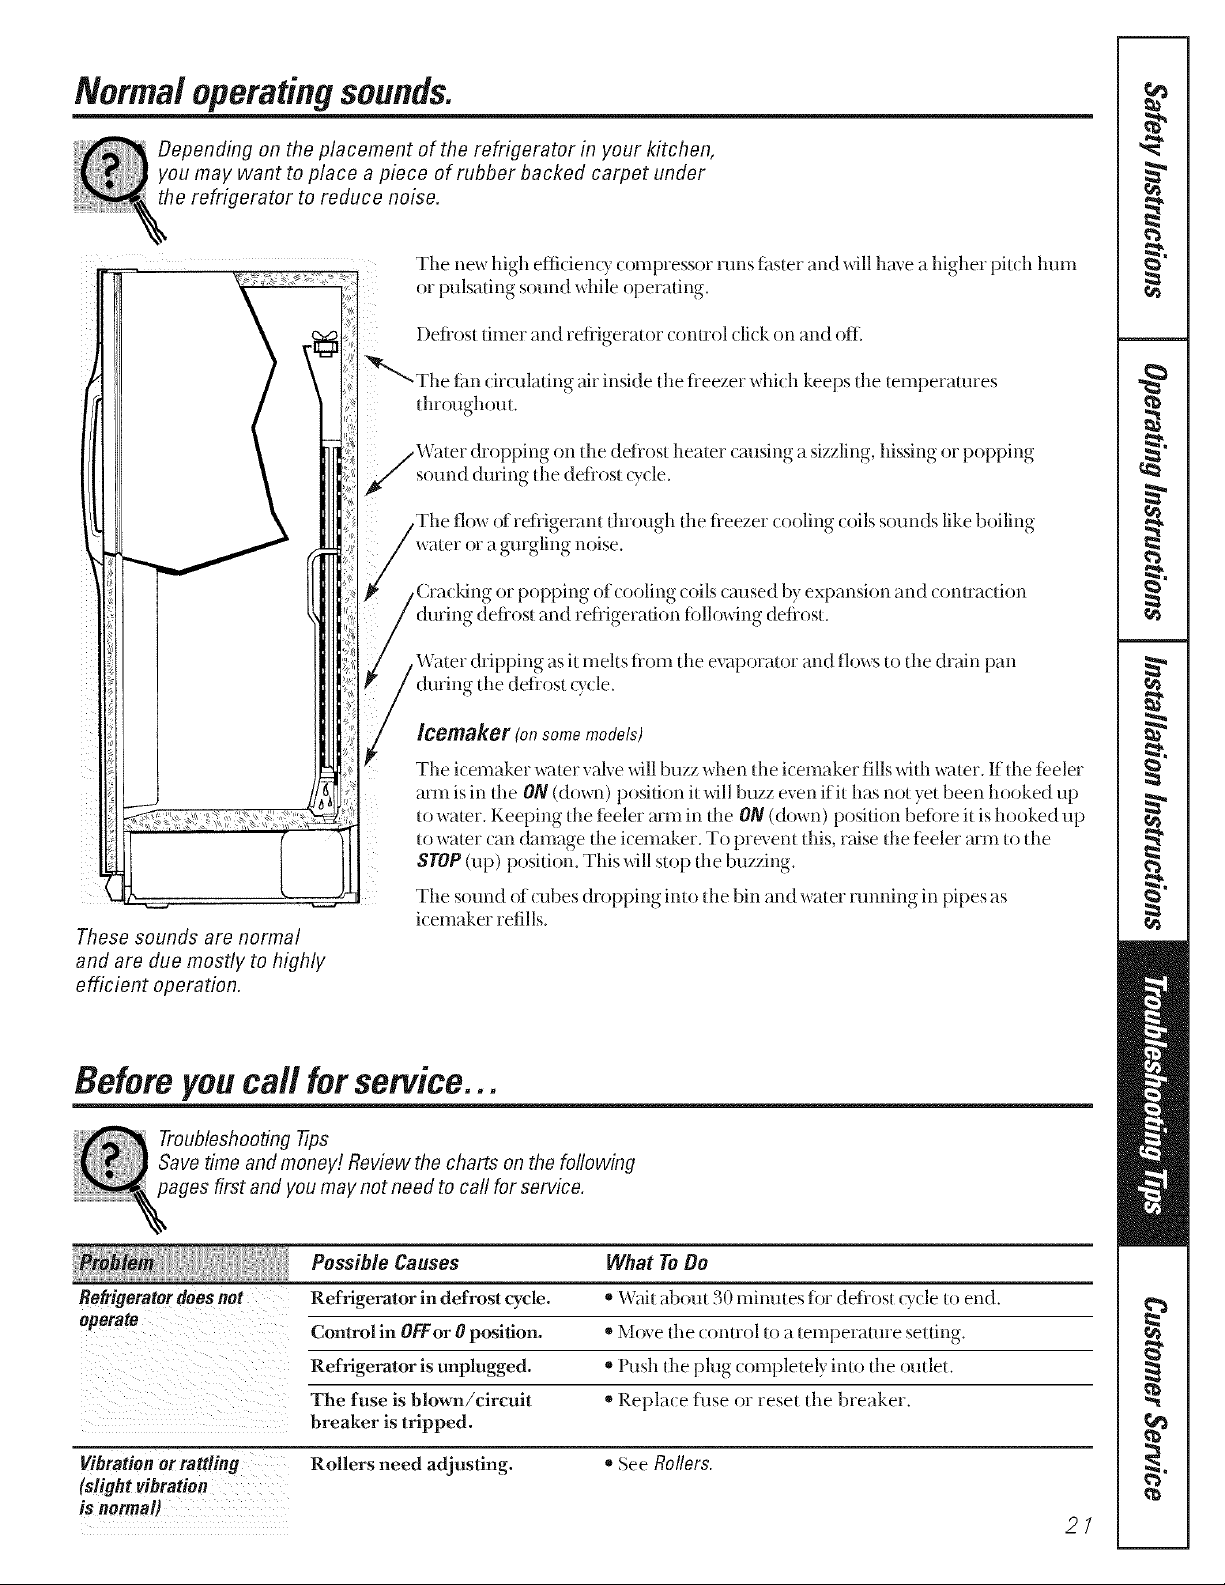
Normal operating sounds.
Depending on the placement of the refrigerator in your kitchen,
you may want to place a piece of rubber backed carpet under
the refrigerator to reduce noise.
Tile new high eflitiency ( ompressor rims tiJster and _dll have a higher pit(h hum
or pulsating sound while operating.
Defrost timer and refrigerator control clitk on and oK
_"'-The tim fir( ulathlg air inside tile fleezer whkh keeps tile temperatures
throughout.
/Water dropping on tile defiost heater ( allsing a sizzling, hissing or poppfilg
sound during tile deflost Q,( le.
Tile fl()w of reiiigeFant through tile freezer cooling coils sounds like boiling
&Mng defrost and reiiigeradon %llowing defrost.
Water dripping as it melts from tile evaporator and flows to the drain pan
or a gurgling noise.
;or popping of cooling coils cruised by expansion and conlrat lion
the defiost Q,cle.
[cemaker (onsome models)
Tile icemaker water valve will buzz when tile icemaker fills with water. If tile ibeler
mm is in tile ON (down) position it will buzz even if it has not yet been hooked up
to water. Keeping tile tb_eler arm in tile ON (down) position heft)re it is hooked up
to water tan damage tile i(emaker. To prevent this, raise tile feeler arm to tile
STOP (up) position. This will stop tile buzzing.
Tile sound of cubes dropping into tile bin and water running in pipes as
it emaker refills.
These sounds are normal
and are clue mostly to highly
efficient operation.
Beforeyoucall forservice...
Troubleshooting -tips
Save time and money! Review the charts on the following
pages first and you may not need to call for service.
Possible Causes
Refrigerator doesnot * \,\_fit about 30 minutes ii)r defiost Q,(le to end.
operate * Move the control to a temperature selting.
Refrigerator in defrost cycle.
Control in OFFor0 position.
Refrigerator is unplugged.
The fuse is blown/circuit
breaker is tripped.
What To Bo
®Push the plug completely into the outlel.
o Replace fllse or reset the breaker.
Vibration or rattling * See Rollers.
(slight vibration
is normal)
Rollers need adjusting.
21
Beforeyoucall forservice...
Possible Causes What ToDo
Motor operates for Normalwhen refrigerator \\ m124 hou_ s hn die reliigeralor Io (omplelely
long periods or cycles is first plugged in. cool down.
on and o# frequently.
(Modem mfrigemtom Often occurs when large * This is normal.
with more storage
space and a larger placed in refrigerator.
freezer require more Door left open. * Check Io see if pa(kage is holding door open.
operating time. They
start and stop often Hot weather or frequent *This is normal.
tomaintain even door opeuh_gs.
temperatures.) Temperature controls o See About the controls.
Fresh foodorfreezer Temperature control not set o See About the controls.
compartment too warm cold enough.
amounts of food are
set at the coldest setting.
Grille and condenser * See Care and cleaning.
need clemlhlg.
Warm weather or frequent o Set the temperature (oulrol one slop colder.
door opeulngs. See About the controls.
Door left open. * Check Io see if package is holding door open.
0 • " ( " "
Door left open. * Check 1o see if package is holding door open.
on frozen food
(frost within package Too frequent or too long
is normM) door opeuh_gs.
Dividerhetween fresh Automatic energT saver * This helps prevem (ondeusadou ou dw oulside.
food and freezer system circulates warm
compartments feels warm liquid around front edge
of freezer compartment.
Automatic icemake-r Icemaker feeler arm in * Move dw _eeler arm Io dw ON (down) position.
does not work the STOP (up) position, o Cubes may have filsed to d_e side ofthe mokL Move II_e
(onsome models) feeler ;ran to dw STOP (up) posiliou, d_en remove
d_ese cubes.
Water supply turned off or * See Installing the water line.
not connected.
Freezer compartment \\ m124 hem s hn II_e refligeralor Io ( omplelely
too warm. ('ool down.
Piled up cubes in the storage bin =I_evel cubes by hand.
cause the icemaker to shut off
Ice cubes have Ice storage bin needs cleaning. * Emply and wash bin. Discard old cubes.
odor/taste
Food transmitting odor/taste * Wrap fi)ods well.
to ice cubes.
Interior of refrigerator * See Care and cleaning,
needs cleaning.
Poor-tasting incomhlg water. * Inslall a waler filler.
Small or hollow cubes Water filter clogged, o Replace fiher carlridge _dd_ new cartridge or _dd_ plug.
Door not closing Door gasket on hinge side * Apply peuoleumjelly on th('e ofgaskel.
properly sticking or folding over.
Orange glow in Defrost heater is on. * This is normal.
the freezer
22
Possible Causes What ToDo
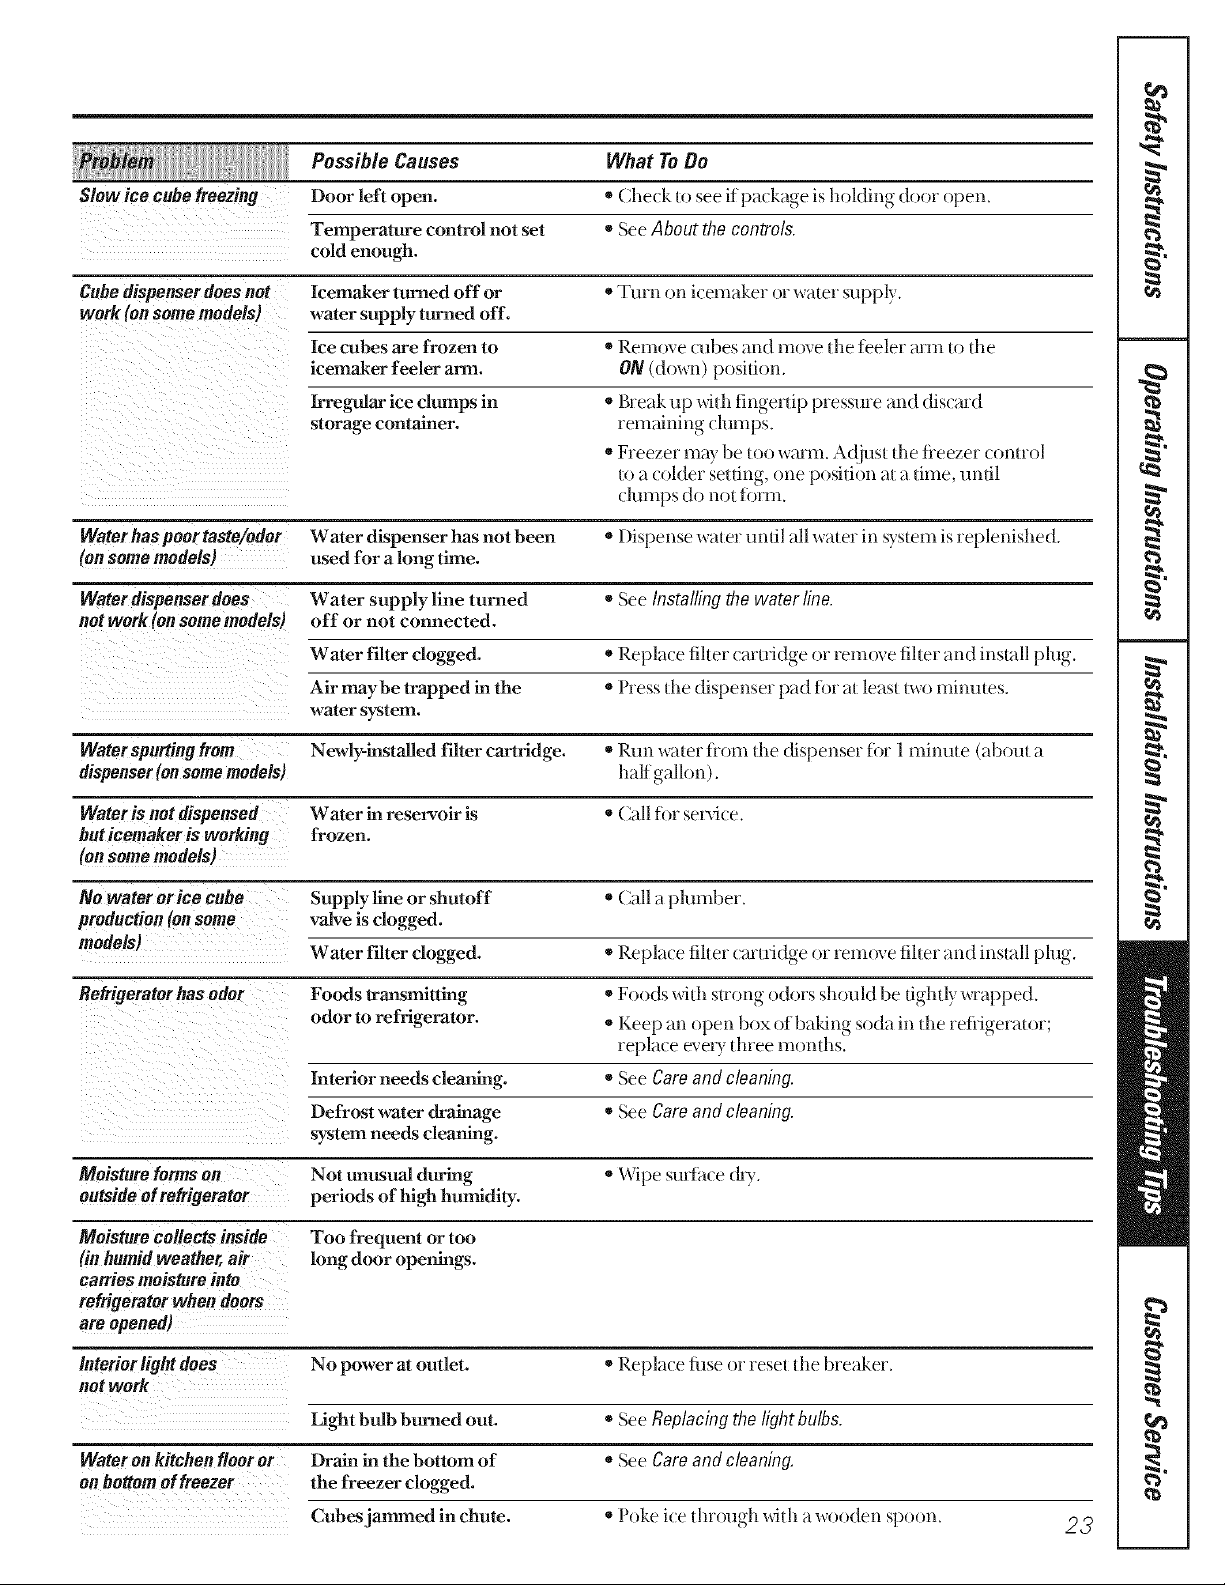
Slow ice cube freezing Door left open. * Che('k 1osee if package is holdiug door open.
Temperature control not set * See About the controls.
cold enough.
Cube dispenser does not Icemaker turned off or *Turn on icemaker or waler supply.
work (onsome models) water supply turned off.
Ice cubes are frozen to *Rein( we cubes and m( we Ihe feeler arm I() Ih e
icemaker feeler arm. ON(down) position.
Irregular ice clumps in
storage contahmr.
* Break up xdth fingertip pressure and dis( ard
remaining (::hm_ps.
"Freezer may be too wmm. A({just the fieezer comrol
to a colder setting, one position at a time, until
(:lumps do not fiwm.
Waterhaspoortaste/odor Water dlspenser has not been " Dispense waler until all waWr in system is replenished.
(on some models) used for a long time.
Water dispenser does Water supply line turned * See Installing the waterline.
not work (on somemodels) off or not connected.
Water filter clogged. * Replace fiher (arlfidge or remove fiber and JosiaH plug.
Air maybe trapped in the * Press die dispenser pad fi)r al leasl mo minules.
water system.
Water spurtino from Newly-installed filter cartridge. * Run water hom the dispenser fiw l mhmte (about a
dispenser(onsome models) half gallon).
Waterisnotdispensed Water in reservulr is * Call fi)r serxice.
but icemaker is working frozen.
(on some models)
No wa_ter or ice cube Supply llne or shutoff * (',all a plumber.
production (on some valve is clogged.
models) Water filter clogged. * Replace filler cmlridge or remove fiher and inslall plug.
Refrig_ odor Foods transmitting * Fo()(ls widi strong odors should be fight ly wrapped.
odor to refrigerator. * Keep an open box of baldng soda in the refiigeralor;
replace eve)) _dHee momhs
Interior needs cleaning. * See Care and cleaning.
Defrost water drainage * See Careand cleaning.
system needs cleauh_g.
Moisture forms on Not unusual during * Wipe suvlhce (hT.
outside ofm#igemtor periods of high humidity.
Moisture collects inside Too frequent or too
(in humid weather, air long door openings.
carries moisture into
refrigerator when doors
are opened)
Interior light does No power at outlet. *Replace fuse or resel 1he breaker.
network
Light bulb burned out. * SeeReplacing the light bulbs.
Water on kitchen floor or Drain in the bottom of * See Care and cleaning.
on be#ms of freezer the freezer clogged.
Cubes jammed in chute. * Poke ice dn'ough widl a wooden spoon. 23
Beforeyoucall forservice...
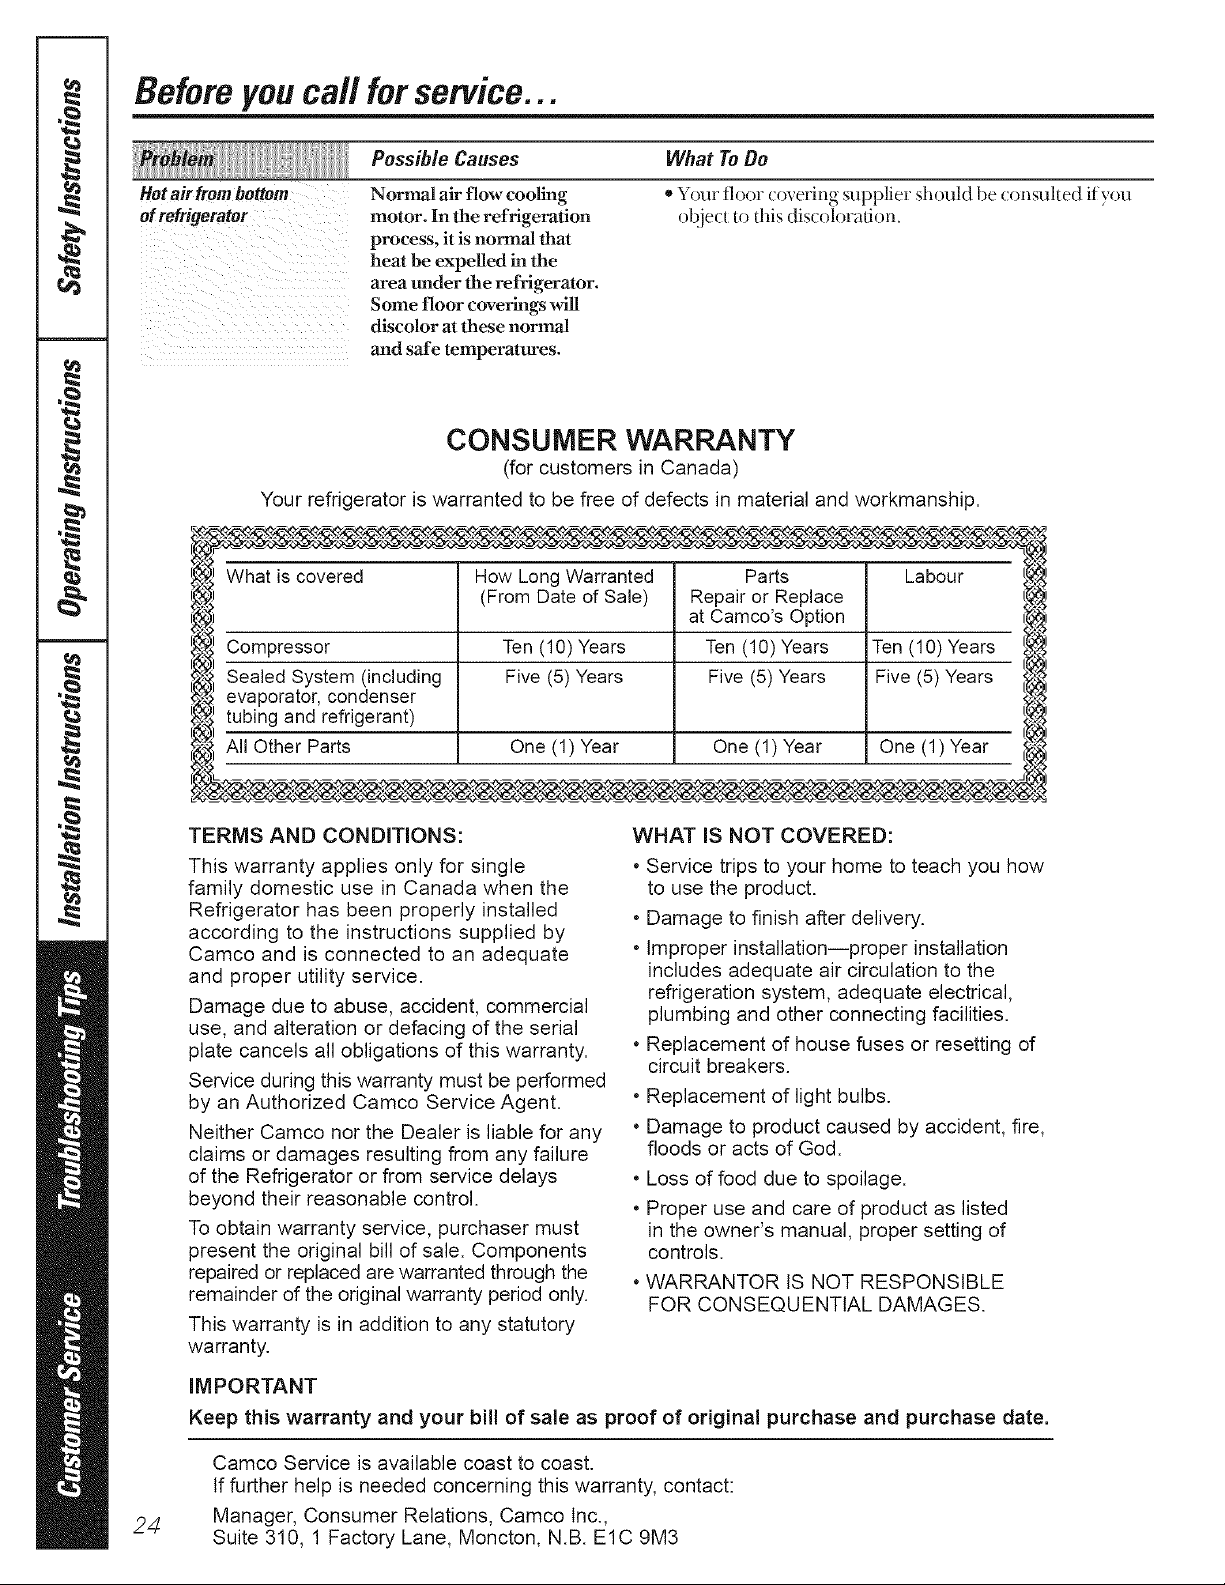
Possible Causes What ToDo
Hotair frombe#ore
ofrefrigerator
Your refrigerator is warranted to be free of defects in material and workmanship.
--_--_--_--_--_--_--_--_--_--_-- - - - - - - - - - - - - - - - - - - - - - - - -
What is covered How Long Warranted Parts Labour
Compressor Ten (10) Years Ten (10) Years Ten (10) Years
Sealed System (including Five (5) Years Five (5) Years Five (5) Years
evaporator, condenser
tubing and refrigerant)
All Other Parts One (1) Year One (1) Year One (1) Year
Normal air flow cooling
motor. In the refrigeration
process, it is normal that
heat be expelled in the
area under the refrigerator.
Some floor coverings will
discolor at these normal
and safe temperatures.
CONSUMER WARRANTY
(for customers in Canada)
(From Date of Sale) Repair or Replace
* Y()nr floor ct wering supplier should be cousuhed if you
obje( I Io dlis discoloration.
at Camco's Option
TERMS AND CONDITIONS:
This warranty applies only for single
family domestic use in Canada when the
Refrigerator has been properly installed
according to the instructions supplied by
Camco and is connected to an adequate
and proper utility service.
Damage due to abuse, accident, commercial
use, and alteration or defacing of the serial
plate cancels all obligations of this warranty.
Service during this warranty must be performed
by an Authorized Camco Service Agent.
Neither Camco nor the Dealer is liable for any
claims or damages resulting from any failure
of the Refrigerator or from service delays
beyond their reasonable control.
To obtain warranty service, purchaser must
present the original bill of sale. Components
repaired or replaced are warranted through the
remainder of the original warranty period only.
This warranty is in addition to any statutory
warranty.
IMPORTANT
Keep this warranty and your bill of sale as proof of original purchase and purchase date.
WHAT IS NOT COVERED:
. Service trips to your home to teach you how
to use the product.
* Damage to finish after delivery.
* Improper installation--proper installation
includes adequate air circulation to the
refrigeration system, adequate electrical,
plumbing and other connecting facilities.
* Replacement of house fuses or resetting of
circuit breakers.
. Replacement of light bulbs.
* Damage to product caused by accident, fire,
floods or acts of God.
. Loss of food due to spoilage.
* Proper use and care of product as listed
in the owner's manual, proper setting of
controls.
* WARRANTOR IS NOT RESPONSIBLE
FOR CONSEQUENTIAL DAMAGES.
24
Camco Service is available coast to coast.
If further help is needed concerning this warranty, contact:
Manager, Consumer Relations, Camco Inc.,
Suite 310, 1 Factory Lane, Moncton, N.B. E1C 9M3
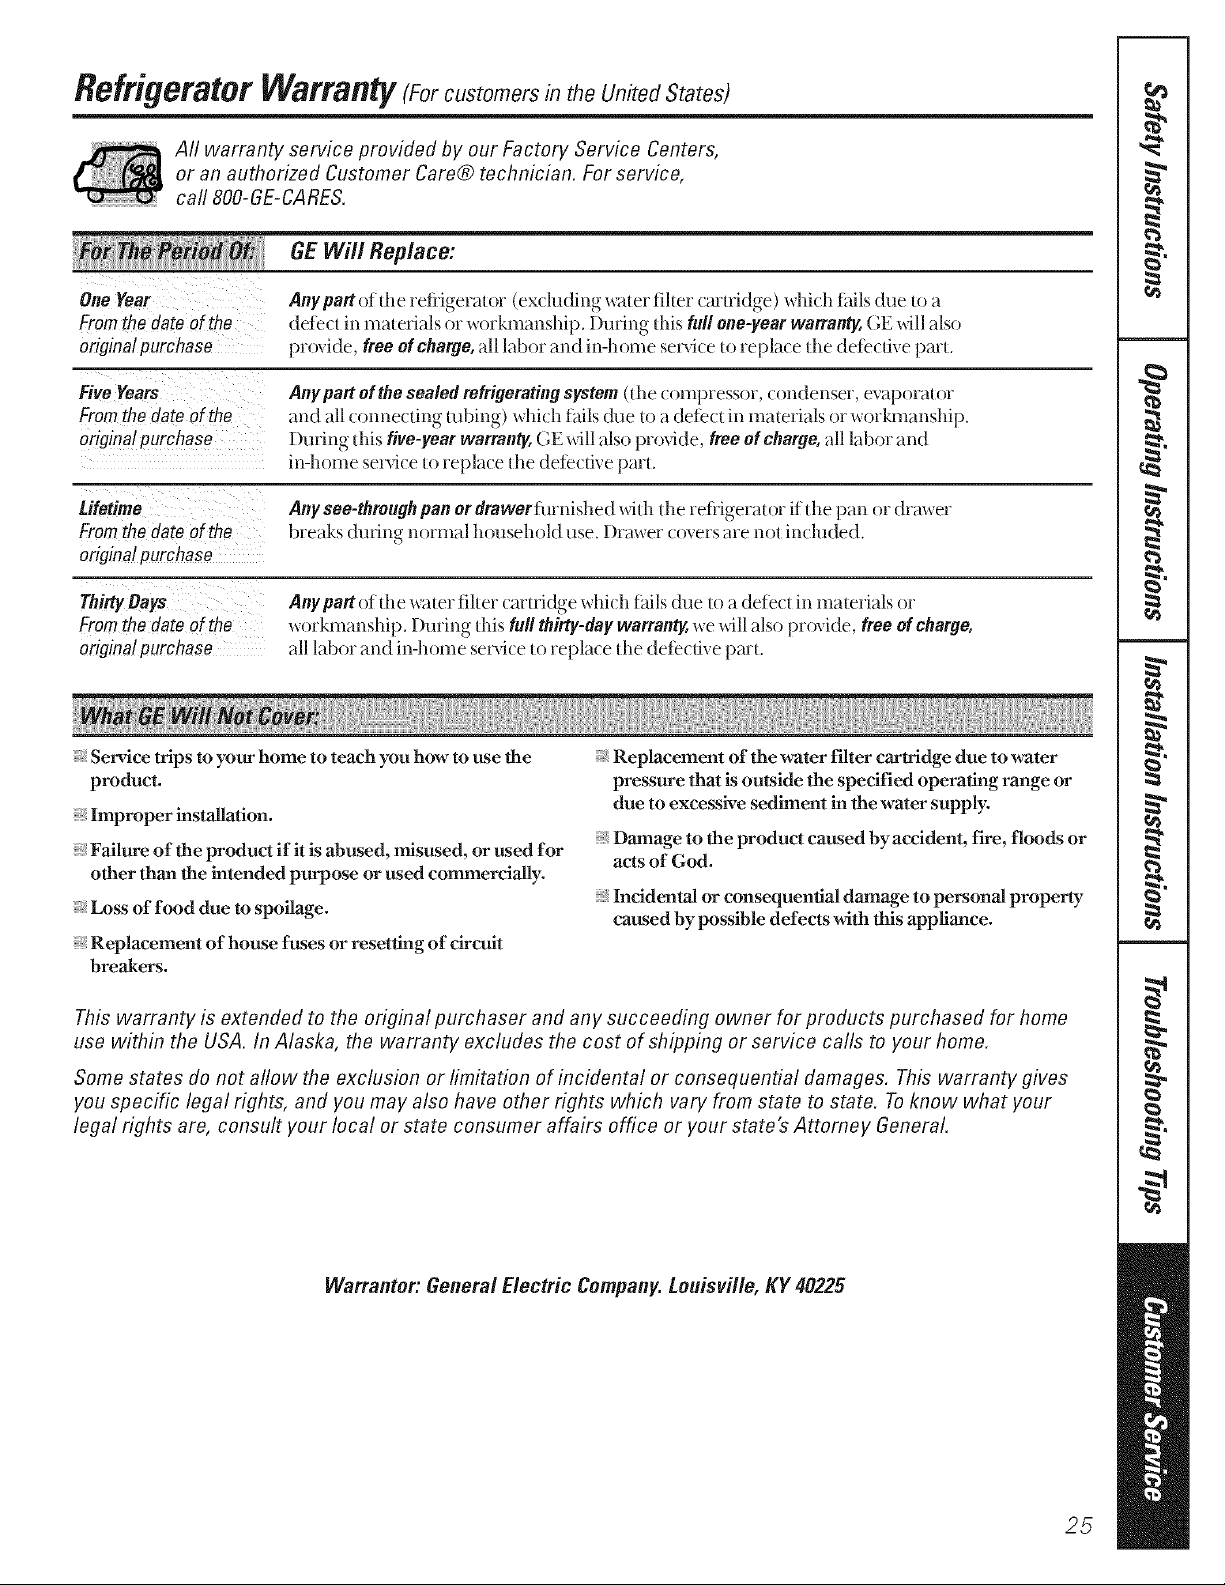
Refrigerator Warranty forcustomers;ntheU,i edStates
All warranty service provided by our Factory Service Centers,
or an authorized Customer Care® technician. For service,
call 800-GE-CARES.
GEWill Replace:
One Year Pnypartofdm refiigerator (excluding waler fiber cartridge) which fidls due to a
From the date of the defect in materials or workmauship. During dds full one-year warranty, (;Exdll also
originalpurchase provide, freeofcharge,all labor and in-home service1oreplace die defective pro1.
FiveYears Pnypartofthe sealedrefrigeratings_atemOhe ('oulpressor, condenser, evaporalor
From the date of the and all connecting robing) which tidls due to a delbcl in materials or worhnanship.
originalpurchase During this five-yearwarranty,(;E _dll alsopr_)xide, freeof charge,all labor and
in-home service Io replace d_e detbcdve pro1.
Lifetime Anysee-through pan ordrawerfinnished with the reliigerator if tile pan or drmver
From the date of the breaks during normal household use. Drawer (overs are nol in( luded.
originalpurchase
ThirqDays
Fromthedateof the
originalpurchase
:_ Service trips toyour home to teach you how to use the
product.
:_ Improper installation.
;, Failure of the product if it is abused, misused, or used for
other than the intended purpose or used commercially.
;_ Loss of food due to spoilage.
;, Replacement of house fuses or resetting of circuit
breakers.
This warranty is extended to the original purchaser and any succeeding owner for products purchased for home
use within the USA. In Alaska, the warranty excludes the cost of shipping or service calls to your home.
Some states do not aflow the exclusion or limitation of incidental or consequential damages. This warranty gives
you specific legal rights, and you may also have other rights which vary from state to state. Toknow what your
legal rights are, consult your local or state consumer affairs office or your state's Attorney General.
Anypart of tl_e water filter cmtridge which _ifilsdue to a deibct in materials or
workmanship. During this full thirty-day warran_ we will also pr_wide, free of charge,
all labor and in-home sel_ice to replace tl_e dete( dye pa*l.
:, Replacement of the water filter cartridge due to water
pressure that is outside the specified operating range or
due to excessive sediment in the water supply.
:, Damage to the product caused by accident, fire, floods or
acts of God.
:, Incidental or consequential damage to personal property
caused by possible defects with this appliance.
Warranter: General Electric Company. Louisville, KY 40225
25
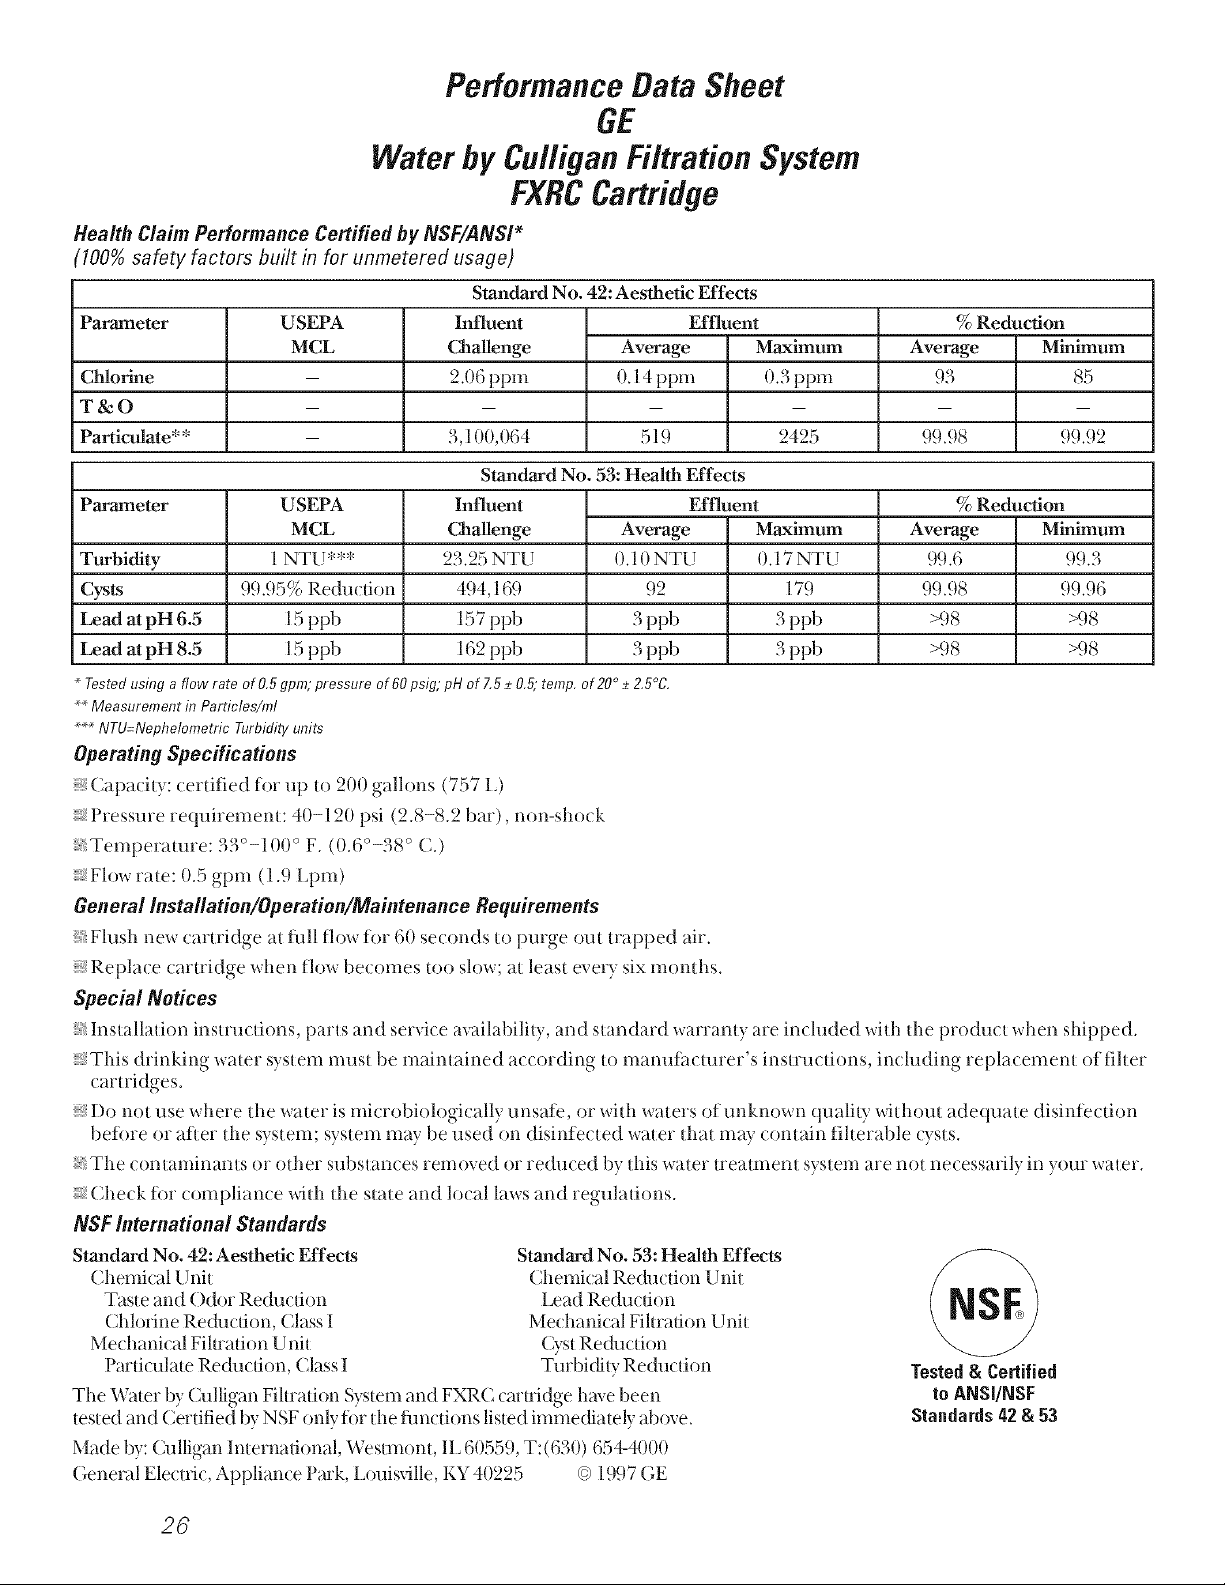
Performance Data Sheet
GE
Water by CMligan Filtration System
FXRCCartridge
Health Claim Performance Certified by NSF/ANSI*
'100%safety factors built in for unmetered usage)
Standard No. 42: Aesthetic Effects
Paranleter
Chlorine
T&O
Particulate** 99.98
Parameter
Turbidity
Cysts
Lead at pH 6.5
Lead at pH 8.5
Tested using a flow rate of 0,5gpm; pressure of60 psig; pH of Z5 +_0,5; temp, of 20° +_2,5°C,
** Measurement in Parficles/ml
*** NTU=Nephelometric Turbidity units
Operating Specifications
;;;;;;_,Capa(ity: (ertified for up to 200 gallons (757 L)
;_ Pressure requirement: 40-120 psi (2.8-8.2 bar), non-shock
Temperature: 33°-100 ° F. (0.60-38 ° C.)
:_Flow rate: 0.5 gpm (1.9 Lpm)
General Installation/Operation/Maintenance Requirements
Flush new cartridge at tUll flow for 60 seconds to purge out trapped air.
:_ Replace cartridge when flow becomes too slow; at least every six months.
Special Notices
Installation instru(tions, parts and servi(e a_filability, and standard warranty are included with the product when slfipped.
:_This drinking water system must be maintained according to manuthcmrer's instructions, including replacement of fiher
cartridges.
:, Do not use where the water is microbiologically unsafi% or with waters of unknown quality without adequate disintection
befiwe or afier the system; system may be used on disinfe(ted water that may contain filterable cysts.
The contaminams or other substances removed or reduced by this water ueatment system are not necessarily in your water.
:, Check fin compliance Mth the state and local laws and regulations.
NSF International Standards
Standard No. 42: Aesthetic Effects
Chemi(al Unit
Taste and ()dor Redu( fion
Clflorine Reduction, (;lass I
Mechani( al Fihration U nit
Partioflate Re&lcfion, (;lass I
The Water by Culligan Filtration System and FXRC cmtridge have been
tested and Certified by NSF only fin the fimctions listed imme(hately above.
Made by: Culfigan International, Westmont, IL 60559, T: (630) 654-4000
General Electric, Appliance Park, Louisville, KY 40225 O 1997 GE
USEPA
MCL
USEPA
MCL
1 NTU***
99.95% Re&l( tion
15 ppb
15 ppb
Influent
Challenge
2.06 ppm
Average
0.14 ppm
3,100,064
Standard No. 53: Health Effects
Influent
C_allenge
23.25 NTU
4(`)4,16(`)
157 ppb
162 ppb
Average
0.10 NTU
3 ppb
3 ppb
Standard No. 53: Health Effects
Chemical Re&lction Unit
I_ead Reduction
Mechanical Filtration Unit
Cyst Reduction
Turbidity Reduction
519
92
Effluent
Effluent
Maximum
0.3 ppm
2425
Maximum
0.17 NTU
179
3 ppb
3 ppb
% Reduction
Average
(`)3
%Reduction
Average
(`)9.6
(`)9.(.)8
>98
>98
Tested& Certified
to ANSI/NSF
Standards 42 & 53
Mhfimum
85
99.92
Mhfimum
(`)(`).3
(`)(`).(`)6
>98
>98
26
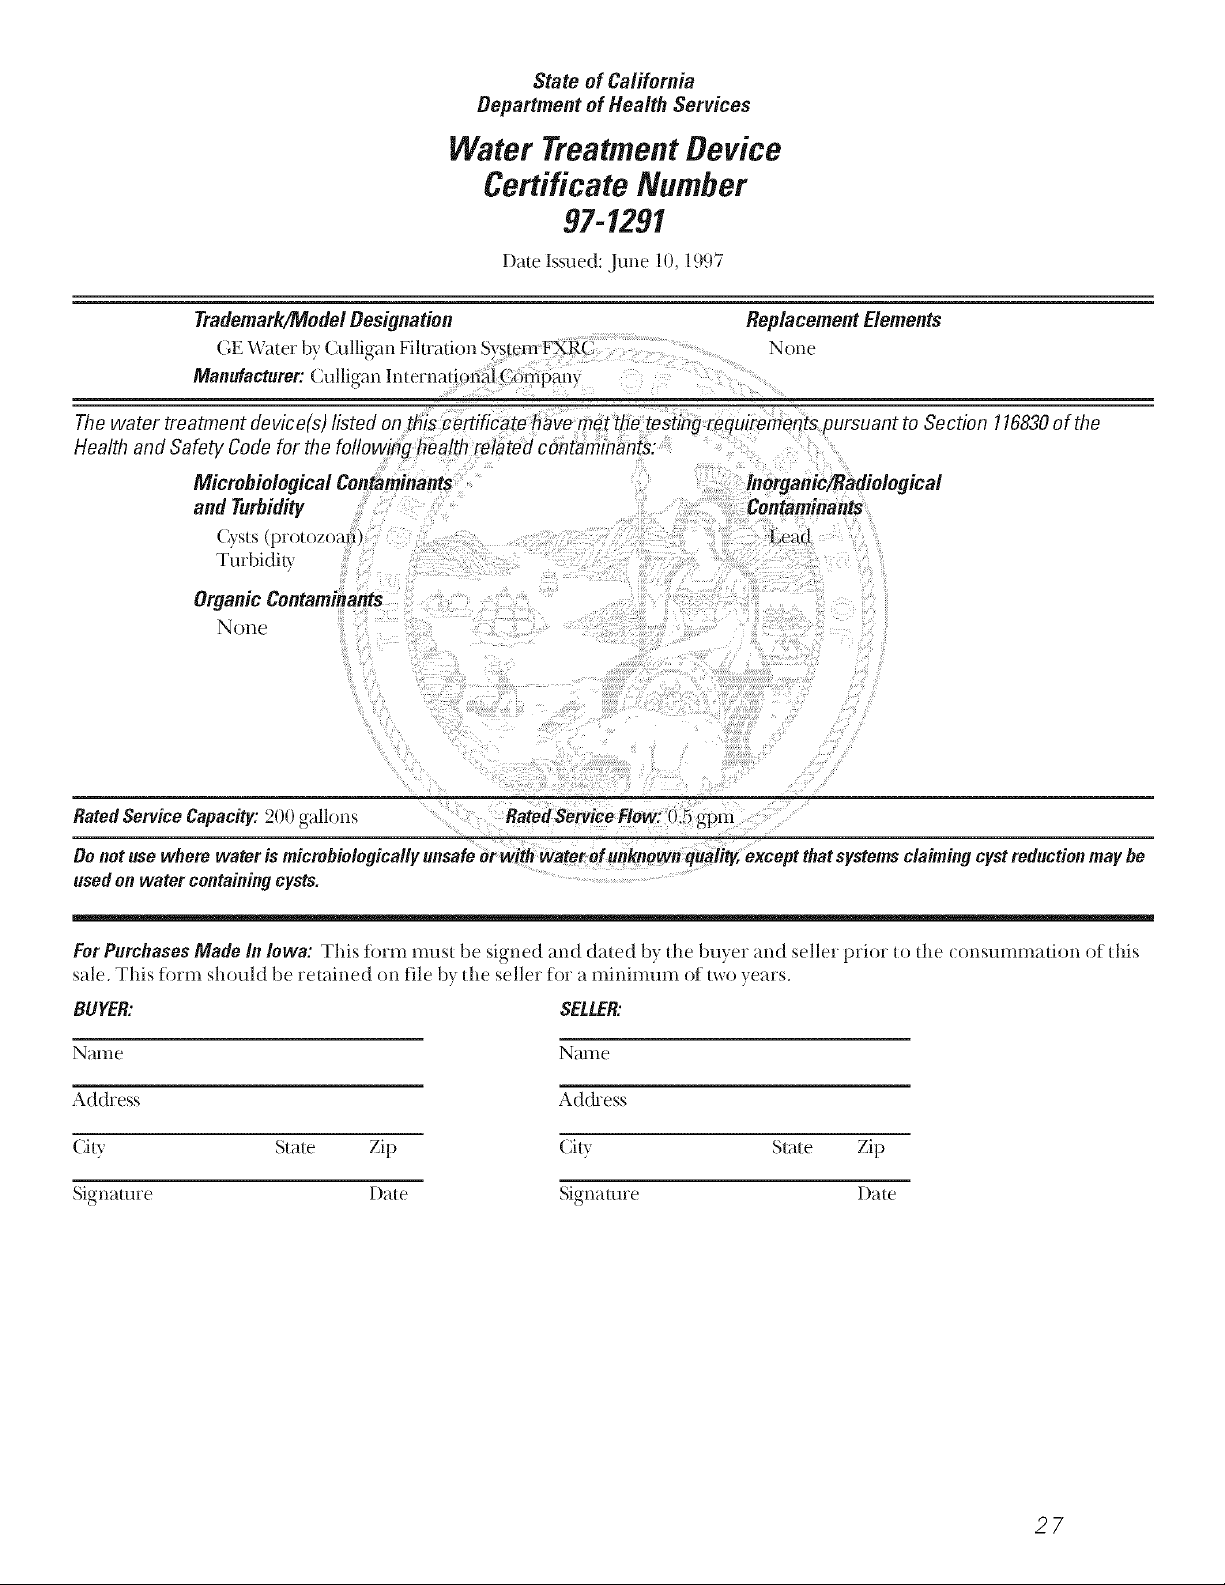
State of California
Department of Health Services
Water TreatmentDevice
Certificate Number
97-1291
Date Issued: June 1O, 1997
Trademark/Model Designation Replacement Elements
None
Manufacturer'. Culliuan Ii_ternational Company
The water treatment device(s) listed on this certificate nave met the testing requirements pursuant to Section 116830 of the
Health and Safety Code for the following health related contaminants:
Microbiological Contaminants
and Turbidity
cysts (pro/o×oanl
Turbidity
Organic Contaminants
None
Rated Service Capacity: 200 gallons Rated Service Flow'. 0.5 ,qq_)m
Bo not use where water is microhiologically unsafe or with water of unknown quali_ except thatsystems clahning cyst reduction may be
used on water containing cysts.
For Purchases Made In Iowa: This form must be signed and dated by the buyer and seller prior to the consummation of this
sale. This form should be retained on file by the seller for a minimum of two years
BUYER: SELLER:
Name
Name
Inorganic/Radio/ogica/
Contaminants
=ead
Address
(',it}' State Zip
Signature Date
Ad(hess
(',it}' State Zip
Signature Date
27
 Loading...