

GE TBX22RKBR, TBX22RKBL Owner’s Manual

Refrigerator
Contents
Appliance Registration 2 Model and Serial Numbers 2
Base Grille 4 Moving &Vacation Tips 13
Care and Cleaning 12, 13 Power Saver Switch 7
Drawer and Covers 11, 12 Problem Solver 14, 15
Energy-Saving Tips 2 Quick Serve System 9
Food Storage Suggestions 8 Quick Store 10
Ice Dispenser 5, 6 Repair Service 13
Icemaker 5, 6 Safety Instructions $
Installation 3, 4 Shelves 9
Adapter Plug 4 Temperature Controls 7
Adjustable Rollers 4 Warranty Back Cover
Clearances 4 Water Filter Accessory 6
Electrical Requirements 3, 4
Extension Cord 4
Grounding 3
Location 4
Water Supply to Icemaker 4 G--CA/_wm' C_
Light Bulb Replacement 13 800,_8_2008
Models TBX22R
TBX25R
TBXW25R
with Ice Dispenser
"[-T,_|n n_ k_iw_ =,,.,..
L_a v u_ ia_a v .yuu. • •
Rpstfl thi_ ll_r_k t._rwfi,llw
It is intended to help you operate
properly.
Keep it handy for answers to your
questions.
If you don't understand something
or need more help, Write (include
your phone number):
Consumer Affairs
GE Appliances
Appliance Park
l .nni_vill_ Id'V A¢199_
Wri_ dnwn the mndol sand
r _VAI _ _A_e_e
jv_a aa_€* L_Jtli_toJLfOg_l
serial numbers.
xou tt see mem on a lat3el at the
bottom, just inside the fresh food
compartment door.
These numbers are also on the
Congumer PrMtmt Oturt_rehin
Registration Card that came with
your refrigerator.
I_I_IVI U ])t_ilUIII]_ Ill UICI FU_l,_Lrll[lOll
card, please write these numbers
here:
Model Number
Serial Number
Use these numbers in any
correspondence or service calls
concerning vour r_fria_rntctr
If you received a damaged
IP_fl_atl_f'nr_ Jmm_tlJ_t_l,tr r*nntat,t
= =-_ a_tw_ _wva_ _aa_ax_,q.tAttWJLff _li,,.qlliil.r, llll*,,,,t
the dealer (or builder) that sold you
the refrigerator.
Save time and money.
Before you request service,
check the Problem Solver on pages
14 and 15.It lists causes of minor
vt._xguul_ i#iVl)lliil# Ul_t _UU t_ilIl
correct yourself.
To obtain a Spanish language
version of this book, call
GE Answer Center*
800.626.2000
rmergy-savmg zips
"_at!on o! your remgerator is
important. Avoid locating it next
toyour range, a heati_ _nt or whe_
the sun will shine directly on it.
• Don't o_n tSedoors mo_ oO n
thannecessary.
• Clct._ th_ dctnr_ t_ tnnn n_ .a_elhl_,
particularly in hot, humid weather,
• T,_'_t'_ I_,iultlll'* _ouA¢ mil, i#_l,I vii' ttlzl,
_tl_ J_vw_',_i lllll IWitlil ill Ull
left position unless moisture forms
on the outside of the refrigerator,
* Be sure the doors are closed
tightly. Betbre leaving the house
or retiring for the night, cheek to
be sure the doors haven't been left
UIJI,_JJ Illlq_ii_llllJiall_,
IS_re o_y _os¢ foods requ!ring
rcff]guI-dtton m your remgera[or.
• Wipe moisture from bottles and
cartons before putting them in the
refrigerator.
• Keep foods covered to reduce
moisture buildup inside the
Para obtener la versi6n en
espafiol de este manual,
llame a
%.1I/.:,t'i./lllWUI LUIILUI_"
sere,tie de informaci6n
para el consumidor,
teMfono 800.626.2000.
* If you turn the controls to the
_UiU_Dt [JUblUUU IOl qUIUK Idilllllllg
or freezing, be sure to turn them
back to regular settings.
* Don't overcrowd your refrigerator.
Overcrowdin_ can rennir_ _xtr_
electrical energy to keep everything
cool.
]"8,,JifPd"3h_A NJ'T _ A lffql_T'W,,r _TIJ)T Tf_'Td_Id_T_
..n._v._ _,..rJLl.ltZ"lk_ m k..grZ'l.L'Jl.t¢ m .It .I.Jt.'Wk,_PJtA'gkq,JIk.JlJUqLJH.N_
Read all instructions before using this appliance.
mut i,
WARNING--When using this
appliance, always exercise basic
safety precautions, including the
IV|LL/VV Jll_,
o Use this appliance only for its
in#andad nnrnn_a a_ t!_erlhad in
this Use and Care Book.
o This refrigerator must be
properlyinstalled inaccordance
with the Installation Instructions
_-_--- -" u,_eu.U¢lOl'4g It is .... :n _ ...... ,,
_ee grounolng
instructions below and on page 4.
by pulling on the power cord:
Always grip plugfirmly and pull
straight out from the outlet.
* Repair or replace immediately all
electric service cords that have
become frayed or otherwise
¢iflmflootl. F)n nnt zz_ m _'nrd that
shows cracks or abrasion damage
along its length or at either the plug
or connector end.
• Do not allow children to climb,
stand or hang on the shelves in
the refrigerator. They could
damage the refri_,erator and
seriously injure themselves.
After your refrigerator is in
operation, do not touch the cold
surfaces, particularly when hands
are damp or wet. Skin may adhere
to these extremely cold surfaces.
• Once you have removed the ice
cube storage container from your
refrigerator, do not place fingers
Uf IliliiUEi UII I,llU UUIUlll_ll|llg
icemaking mechanism while
the refrigerator is plugged in.
This will help protect you from
possible injury. It will also prevent
IIII,_II_I_IIUI_ WII, II 1,11_ IIlUVIlI_ _lgll t_
of the ejecto r mechanism , or with
the heating element that releases
the cubes.
• When moving your refrigerator
away from the wail, be careful not to
roll over or damage the power cord.
- uon't refreeze frozen foods which
have thawed completely. The
United States Department of
Agriculture in Home and Garden
Bulletin No: 69 says:
"...You may safely refreeze frozen
foods that have thawed if they still
L;Olltillll lld_ l:-.I,ySl.i:ll8 Uf 11 tll!iS_/ ill_
still cold--below 40°F.
or fish that have any off-odor or
off-color should not be refrozen and
should not be eaten. Thawed ice
cream should be discarded• If the
UUUl ul _UIUl Ul allff IUUU I_ puul UZ
questionable, get rid of it. The food
may be dangerous to eat.
"Even partial thawing and refreezing
reduce the eating quality of foods,
particularly fruits, vegetables and
InInNIn I l__£t tl__ .............
prepared foods. The eating quality
of red meats is affected less than
that of many other foods. Use
.._.it +...... _r, j___ ..... !LI- ._
re|rozen zoous as soon as posmme m
save as much of their eating quality
as you can','
• If your old refrigerator Is still
around the house but not in ume,
be sure to remove the doors. This
will reduce the possibility of
d_no_r tf_ ohildrtan
• ul_., i
• Unplug your refrigerator:
Note: We strongly recommend
that any servicing be performed
by a qualified individual.
B. Before cleaning.
C, Before replacing a burned-out
light bulb, the.refrigerator should
be unplugged in order to avoid
contact with a live wire filament.
(A hummed-ant light hnlh may
break when being replaced.)
Note: Turning control to OFF
position does not remove power
to the light circuit.
+ Do not operate your refrigerator
in the presence of explosive fumes.
SAVETHESE
INSTRUCTIONS
How toconnect
dectr dty
For personal safety,
properly grounded•
The power cord of this appliance
is equipped with a three-prong
_luuHUlllg} plug WIII_II IIIHtC_ Wltll
a standard three-prong (grounding)
wall outlet (Fig. !) to minimize the,
possibility of electric shock hazard
from this appliance.
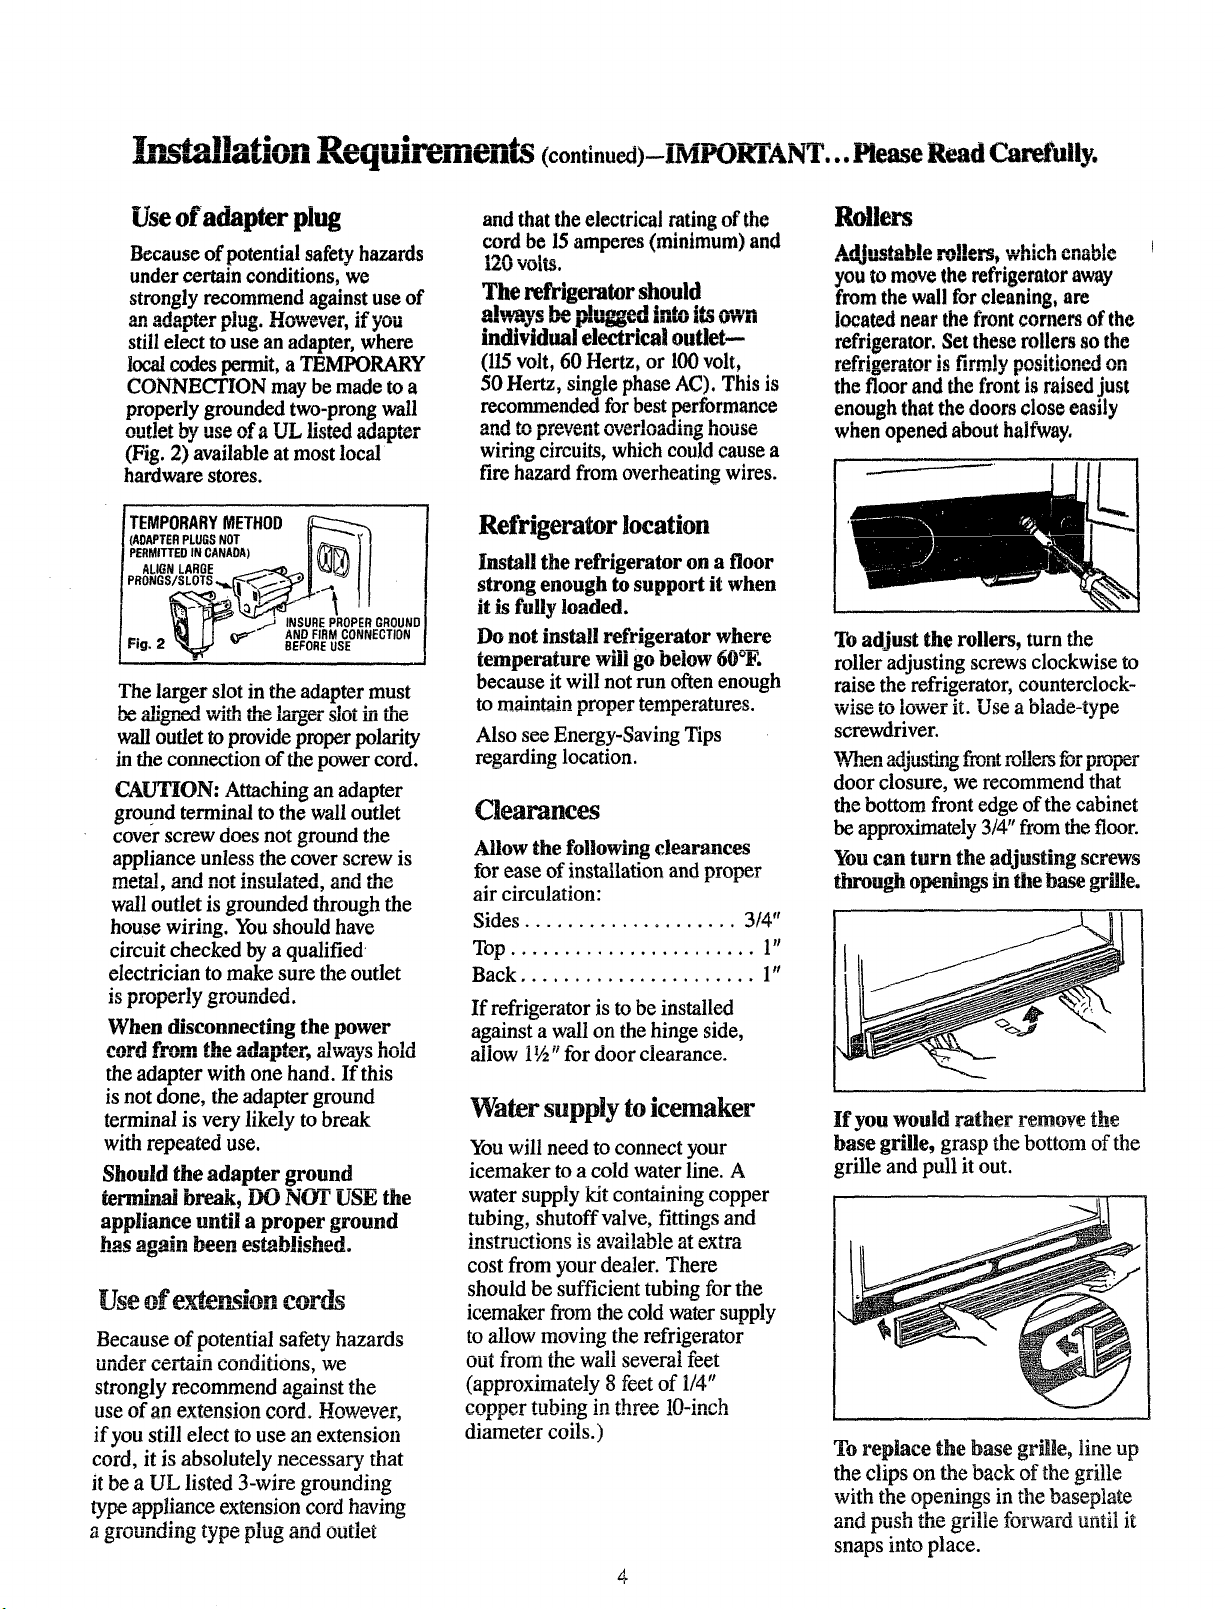
PREFERRED
METHOD
IEIqlIDI: DD_Dt'-D
lllOUmlh I llUl I,,,II
GROUNDEXISTS
Fig. 1
,/
BEFOREUSE
Have wall outlet and circuit checked
by a qualified electrician to make
sure outlet is properly grounded.
[][Yk ..... +-_-- ,_1 ^--.i 6, .............. tl
vv 11_1_ _'1 _iti:lllUHIU LWU-I)IUII g Wi_.ll
outlet is encountered, it is your
personal responsibility and
obligation to have it replaced with
a properly grounded three-prong
wail outlet.
DO NOT_ UNDER ANY
CIRCUMSTANCES, CUT
UK _EIVIUVE ]'H_ 'l'l-ll.tgD
(GROUND) PRONG FROM
(continued next page)
.aioqafion Requi ments (continued)-iMPOgTANT... Please Read Carefully.
Use of adapter plug
Because of potential safety hazards
under certain conditions, we
strongly recommend against use of
an adap_r plug. However, if you
still elect to use an adapter, where
local codes permit, a TEMPORARY
CONNECTION may be made to a
properly grounded two-prong wall
alztlPt by nee af_ TTT i;o*aA ,_An.,_-
(Fig. 2) available at most !ocal
hardware stores.
TEMPORARYMETHOD _ I
(AOAPterPLUOSNOt
pERM,_O,_CA.DA) II_ I I
ALIONLAROE _ _ 11_j | |
I_-_ _SURE PIROPEROROUNDI
-. - _t4 I I _ AND FIRMCONNECTIONI
t-lg. ;_ "_ • BEFORE USE {
, I
The larger slot in the adapter must
ah'gn_ v,'ith the '..... '-"1,atom_lut hathe
wall outlet to provide proper polarity
in the connection of the power cord.
CAUTION: Attaching an adapter
ground terminal to the wall outlet
cover screw does not ground the
appliance unless the cover screw is
wall outlet is grounded through the
house wiring. You should have
circuit checked by a qualified
electrician to make sure the outlet
Jo _zvlJ_,x,t y _tuuzlu_;u.
When disconnecting the power
t. Pt] tglm, _ha oxl.a'r.,t,_,.,.
.o ..... m ...... =t'-_,, always _'^_-_IIUIU
the adapter with one hand. If this
is not done, the adapter ground
terminal is very likely to break
with repeated use.
Should the adapter ground
terminal break, DO NOT USE the
appliance until a proper ground
ha_ again been est_b!Jshed.
Because of potential safety hazards
tlllUl_l L;K;EI21111 conoltlOnS, we
strongly recommend against the
use of an extension cord. However,
if you still elect to use an extension
cord, it is absolutely necessary that
it be a UL listed 3-wire grounding
type appliance extension cord having
a grou.um_ type pxug and outlet
and that the electrical rating of the
cord be 15amperes (minimum) and
I/.u VOlLg.
The refrigerator should
.= v*'.._ff _._ lu'_,¢ J[_lqbljJ_qbeU illtM.I llk_l I,I119"11
individual electrical outlet--
(115volt, 60 Hertz, or 100 volt,
50 Hertz, single phase AC). This is
recommended for best performance
...... z,','-,'.," ,.,v_,.uau.._ house
wiring circuits, which could cause a
fire hazard from overheating wires.
Refrigerator location
Install the refrigerator on a floor
strong enough to support it when
it is fully loaded.
Do not install refrigerator where
temperature will go below 60°E
because it will not run often enough
to maintain prover temo_-ratures.
Also see Energy-Saving Tips
regarding location.
Clearances
Allow the following clearances
for ease of installation and proper
air circulation:
Sides .................... 3/4"
Top ....................... 1"
Back ...................... 1"
If refrigerator is to be installed
against a wall on the hinge side,
allow i½" for door clearance.
Water supply to icemaker
You will need to connect your
icemaker to a cold water line. A
water supply kit containing copper
tubing, shutoff valve, fittings and
;nctrtv,f;ars¢ ;o a,tzo;1,ahla _ ,_-_'--
1al0_i _l.luaio 1o gVGLIIGUI_ _/.L _ALIO_
cost from your dealer. There
should be sufficient tubing for the
icemakerfromthecold watersupply
to allow moving the refrigerator
out_ffomthe wailseveralfeet
(approximately8feetof 1/4"
copper tubing in three !O-inch
diameter coils.)
4
Rollers
_mtab!e m!!e_, which enable
you W move the refrigerator away
from the wall for cleaning, are
locatednearthefrontcornersof the
refrigerator. Set these rollers so the
r frieeratcw i_ firmly nndtion_A an
the floor and the front is raised just
enough that the doors close easily
when opened about halfway.
To adjust the rollers, turn the
roller adjusting screws clockwise to
raise the refrigerator, counterclock-
wise to lower it. Use a blade-type
screwdriver.
When adjm_ng firontm_ers for proper
door closure, we recommend that
the bottom front edge of the cabinet
be approximately 3/4" from the floor.
You can turn the adjusting screws
through openings in the base grille.
If you would rather remove the
base grille, grasp the bottom of the
grille and pull it out.
I
To replace the base grille, line up
the clips on the back of the grille
with the openings in the baseptate
and push the grille forward until it
snaps into place.
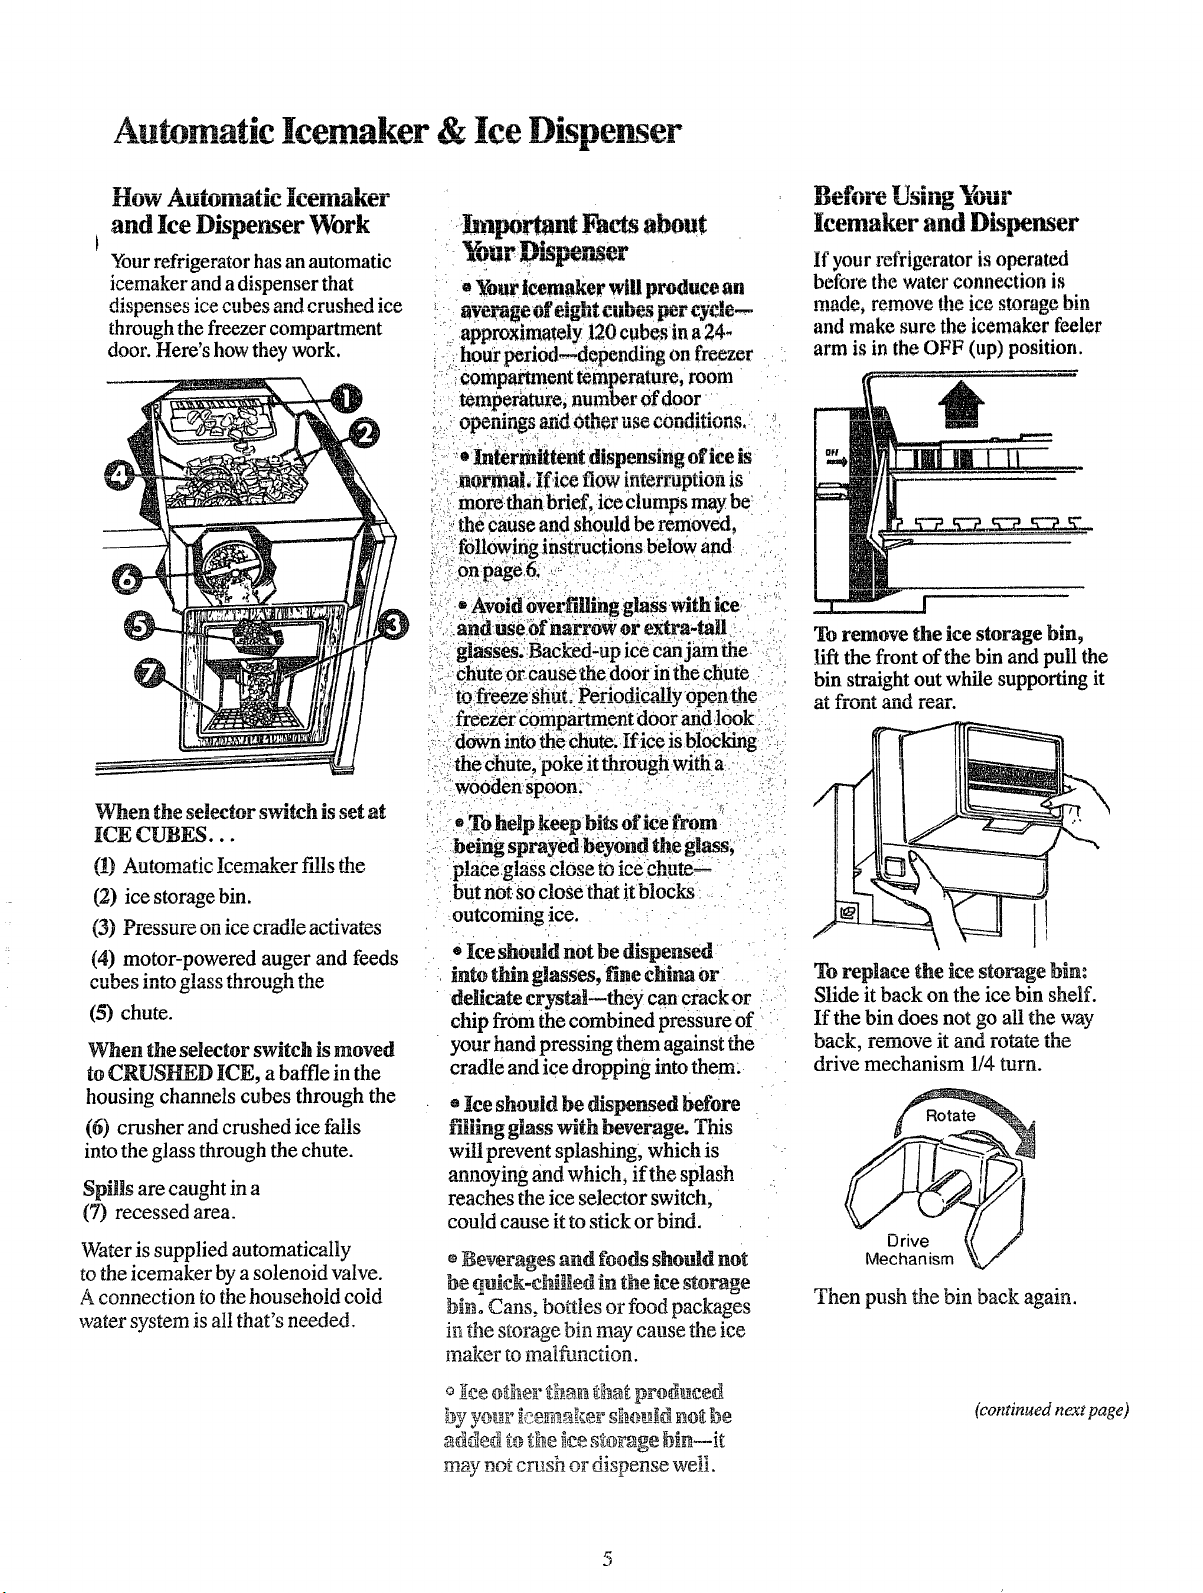
A.tmnntle Tcemaker & lee Di nen er
"E
110147 !'l.UlI.Uilllllll, llg iU_lllalil_l-
and Ice Dispenser Work
Your refrigerator has an automatic
icemaker and a dispenser that
rllcn_ne_ac io_ onh_ ,anti ornch_d it,_
through the freezer compartment
door. Here's how they work.
_A
git -Ttg
hnporianl Facts abom
Your icemaker wi!l produce an
uyu!TUgCUl _lllUt t:uu!_ l_l- _31_ai_-_"
. approx!m!tely 120 ubes in a 24-
-_hour periodI_idepending on freezer
i:eoml_arm_ent tethperattire, room
l_tJt_lllll_t t/$1tdt UIlIII tl_ tal, tllUll+lW!l_,
r ' "
'_ rlnierilttent dispensing of ice is
J!lormah!i'lce HOW lnterizupuon is
.=.',:,m0re thanbdef, ice clumps may be'
::_i,'the eaiise and should be removed,
:.: :following mstructmns below and
!i(.:i; AT:_iii:_verfillingglaiSw_il_ if:eL "1_r'/_
i:,:';;mad.uSe;iffnarrO_ or extra-iall L', :,
;., glasses, tmcl_ea-up ICecan jam me,
_!]..ehuteoreausethedo0r in thechute :
_:io ffe_ze: _hfat_Periodicaliv :oi_enthe
::i:d_ into th_ Chate; Ifice is bl_king
:::: the chute, poke atmrougn :wlm a: :,:::
i.r);woodeil:spoon:, • :.) . :., ,!, :
number of door
ltlllilqll !Ii 1.13111_ lldllll
Icemaker and Dispenser
if your refrigerator is operated
before the water connection is
made r_movfl the ice gtora_e hin
and make sure the icemaker feeler
arm is in the OFF (up) position.
,_& ............
I
To remove the lee storage bin,
lift the front of the bin and pull the
bin straight out while supporting it
ICE CUBES;...
(!) Automatic !cema_ker rials the
(2) ice storage bin.
_..)J l-l_;_Ll/t_; Ull ll.,_ g.,Ii:ILIIK; _btlval£9_
(4) motor-powered auger and feeds
(5) chute.
When the selector switch is moved
to CRUSHED ICE, a baffle in the
housing channels cubes through the
(6) crusher and crushed ice falls
into the glass through the chute.
Spills are caught in a
(7) recessed area.
Water is supplied automatically
to the icemaker by a solenoid valve.
A connection to the household cold
water system is all that's needed.
• To help keepbits of ice from : ;
being sprayed beyond the glass,
but not:so closethat itblocks --
outcoming ice. ' " '
e Ice should not be dispensed
into thin glasses, fine china or
delicate crystal-they can crack or
chip from the combined pressure of
your hand pressing them against the
cradle and ice dropping into them.
- Ice should be dispensed before
filling glass with beverage. This
will prevent splashing, which is
annovino and which if the gnlagh
...... d ---_ ..... 7 ...... 1-".....
reaches the ice selector switch,
could cause it to stick or bind.
_everages and foods shouM not
be quick-chilled in the lee storage
bin. Cans, bo_tes or food packages
in the storage bin may cause the ice
mal_er to malfunction.
gee other tha_ that produced
by y_ur _oe_ak_r _heuid not be
added to the _eestorage bin--it
may not crush or dispense well.
I
I
To replace the ice storage bin:
Slide it back on the ice bin shelf.
If the bin does not go all the way
Ll_l.¢..;g, lt:_lllOVt3 It _LIILI lOt2tU3 1.11t2,
drive mechanism 1/4 turn.
Urlve VMechanism
Then push the bin back again.
(continued next page)
 Loading...