

Page 1

GEAppliances
'7 ¸¸_ _ _ _ _' •
Al
_+ _t %+,, 7,7t 1;7__," }
Models 18, 79,
27,22, 24D25
Modeles 78,19,
21,22, 24D25
iT/
English section begins on page 2
La section franqaise commence a la page 28
La seccion en espa_ol empieza en la pagina 54
Part No. 162D7731PO05 Pub.No. 49-60005 6-98CG
Page 2
Safety Information
m
SafetyPrecautions.......... 3
UseofExtensionCords....... 3
HowtoConnectElectricity .... 4
UseofAdapterPluqs ..... 4
Congratulations!
YouAreNow PartoftheGEFamil2
Welcome to fl_e GE fhmily. We're proud of our
qualib_ produc_s and we m'e committed to providing
dependable service. You'll see it in this eas)_to-use
Owner's Manual and you'll hear it in the fliendly
voices of our customer selaice department.
Best of all, you'll experience these values each time
you use your refiigerator. That's important, becmme
your new refrigerator willbe part ofyour f:amilyfbr
ma W years. And we hope you will be part of ours for
Operating instructions
m
TemperatureControls 5
Features....... 6-9
AutomaticIcemaker .. 70
a long time to come.
We drank you ffw buying GE. We appreciate your
purchase, and hope you _ill condmle to rely on us
whenever you need qualib_ appliances for your home.
fceDispemer .... ]7
CareandCleaning. 72,73
.i
GE& You,A ServicePartnership.
FORYOURRECORDS
m
Installation instructions
Prepanngro
InstafttheRefrigerator.., I4
WaterLineInstallation.... 75-77
ReversinqtheDoorSwinq,, 78-27
h
m
Troubleshooting tips
_lormalOperatin9 Sounds..... 22
BeforeYou
CarlForService........... 22-24
w
m
m
w
Write the model and serial numbershere:
#
#
You can find them on alabel on the left side, near the top of the
flesh fbod compartment.
Staple sales slip or cancelled check here.
Proof ofthe original purchase date is needed to obtain sel_ice
under the warranb_.
READTHISMANUAL
Inside you will find ma W helpfld hints on how to use and maintain
your refligeramr properly.Just a little preventive care on your part
can save you a great deal ofdme and money over the life of your
refligeramr.
You'll find many answers to common problems in d_e Before You
Call For.Service section. If you review our chart of Troubleshooting
tips first, you may not need t() call %r sel_ice at all.
Customer Service
WarrantyForCanadian
?ustomers............... 25
WarrantyforU.SCustomers.... 26
ServiceTeleplTone
Numbers.......... BackCover
m
w
2
IFYOUNEEDSERVICE
If you do need service, you can relax knowing help is only a phone
call away. A list of toll-flee customer sela:ice nmnbers is included in
the back section. Or, in the O.S.,you can always call the GEAnswer
Center ®at 800.626.2000, 24 hours a day, 7 days a week. in Canada,
call 1-800-361-3400.
Page 3
IMPORTANTSAFETYINFORMATION.
READALLINSTRUCTIONSBEFOREUSING.
WARNING!
Use this appliance only for its intended purpose as described in this Owner's Manual
SAFETYPRECAUTIONS
When using electrical appliances, basic safety precautions should be followed, including the following:
This refiigerator must be properly installed
and located in accordance with the Installation
Instructions before it is used.
Do not allow chiMren to clilnb, stand or hang
on the shelves in the refrigerator. They couM
damage the refrigerator and seriously injure
thelnselves.
Do not touch the cold surfaces in the freezer
colnpartment when hands are damp or wet.
Skin In Wstick m these extrelnely coM surfhces.
Do not store or use gasoline or odmr flammable
vapors and liquids in the vicinity of this or aW
other appliance.
Keep fingers out of the "pinch point" areas;
clearances between the doors and between
the doors and cabinet are necessarily small.
Be carefid closing doors when chiMren are
in the area.
In refrigerators with automatic icelnakers,
avoid contact with the lnoving parts of the
ejector mechanism, or _4th the heating element
that releases the cubes. Do not place fingers or
hands on the automatic icelnaking mechanism
while the refrigerator is plugged in.
Unplug the refiigerator before cleaning and
making repairs.
NOTE:Westronglyrecommendthatanyservicingbe performed
bya qualifiedindividual
Turning dm conu'ol to dm OFFposition does
not relnove power to dm light circuit.
Do not refreeze frozen foods which have
thawed colnpletely.
IMPORTANT."PROPERDISPOSALOFTHEREFRIGERATOR
Child entrapment and suffbcation are not problems
of the past. Junked or abandoned refrigerators are
still dangerous...even if they _411sit far '_just a few
days." Ifyou are getting rid of your oM refiigeramr,
please follow the instructions below m help prevent
accident.s.
Before YouThrowAway YourOld Refrigerator
or Freezer:
Take off the doors.
Leave the shelves in place so that chil&en may
not easily climb inside.
CFCDisposal
Your old refrigerator has a cooling system that used
CFCs (chlorofluorocarbons). CFCs are believed m
harm stratospheric ozone.
Ifyou are fllro_4ng away your oM refiigerator, make
sure the CFC refrigerant is removed for proper
disposal by a qualified sets@er. If you intentionally
release this CFC refiigerantyou can be subject to
fines and imprisonment under provisions of
environmental legislation.
USEOFEXTENSIONCORDS
Because of potential safety hazards under certain conditions, we strongly recommend against the use
of an extension cord.
However, ifyou must use an extension cord, it is absolutely necessapy that it be a UL-listed (in the United
States) or a CSA-listed (in Canada), 3-_4re grounding type appliance extension cord having a grounding
type plug and outlet and that the electrical rating of the cord be 15 amperes (minimum) and 120 volts.
3
Page 4
IMPORTANTSAFETYINFORMATION.
READALLINSTRUCTIONSBEFOREUSING.
WARNING!
HOWTOCONNECTELECTRICITY
Do not, under any circumstances, cut or remove the third (ground) prong from the power cord.
For personal safety, this appliance must be properly grounded.
The power cord of this appliance is equipped wkh a
3-prong (,grounding) plug which mates with a
standard 3-prong (grounding) wall outlet m
minimize the possibilipy of electric shock hazaM
from this appliance.
Hm,e d_e wall outlet and circuit checked by a
qualified electrician to make sure the outlet is
properly _'ounded.
Where a standard 2-prong wall outlet is
encountered, it is your personal responsibiliey and
obligation to have it replaced wid_ a properly
grounded 3-prong wall outlet.
The refrigerator should always be plugged into its
o_1 indMdual electrical outlet which has a vohage
rating that matches the rating plate.
This provides the best perfbmmnce and also
prevents overloading house wMng circuits which
could cause a fire hazard from overheated wires.
Never unplug your refrigerator by pulling on the
power cord. Always ,grip plug firmly and pull straight
out from the outlet.
Repair or replace immediately all power cords that
have become frayed or othe_vise dmnaged. Do not
use a cord that shows cracks or abrasion dmnage
along its length or at eit|_er end.
When moving the refrigerator away from the
wall, be carefifl not to roll over or dmnage the
power cord.
USEOFADAPTERPLUGS(Ad_t_r_lug__ot_o_ittedi.C_,_d_
Because of potential safety hazards under certain conditions, we strongly recommend against
the use of an adapter plug.
However, ifyou must use an adapter, where local
codes permit, a temporaryconnectionmaybe made
to a properly,grounded 2-prong wall outlet 1)77use
ofa UL-listed adaptor available at most local
hardware stores.
The larger slot in d_e adapter must be aligned with
the larger slot in the wall outlet to provide proper
polafib7 in the connection of the power cord.
When disconnecting the power cord from the
adapter, always hold the adapter in place with one
hand while pulling the power cord plug wid_ tt_e
ott_er hand. If t|_is is not clone, the adapter ground
tem_inal isvel)7likely to break with repeated use.
If the adapter _'ound terminal breaks, DONOTUSE
the refrigerator until a proper ground has been
established.
Attachingthe adaptergroundterminaltoa walloutlet
coverscrewdoesnotgroundtheapplianceunlessthe
coverscrewis metal,andnot insulated,andthe wall
outlet isgroundedthroughthe housewiring,Youshould
havethe circuitcheckedby aqualifiedelectriciantomake
surethe outletisproperlygrounded,
Readandfollow thisSafetyInformationcarefully.
SAVETHESEINSTRUCTIONS
4
Page 5
Aboutthe controlsontherefrigerator.
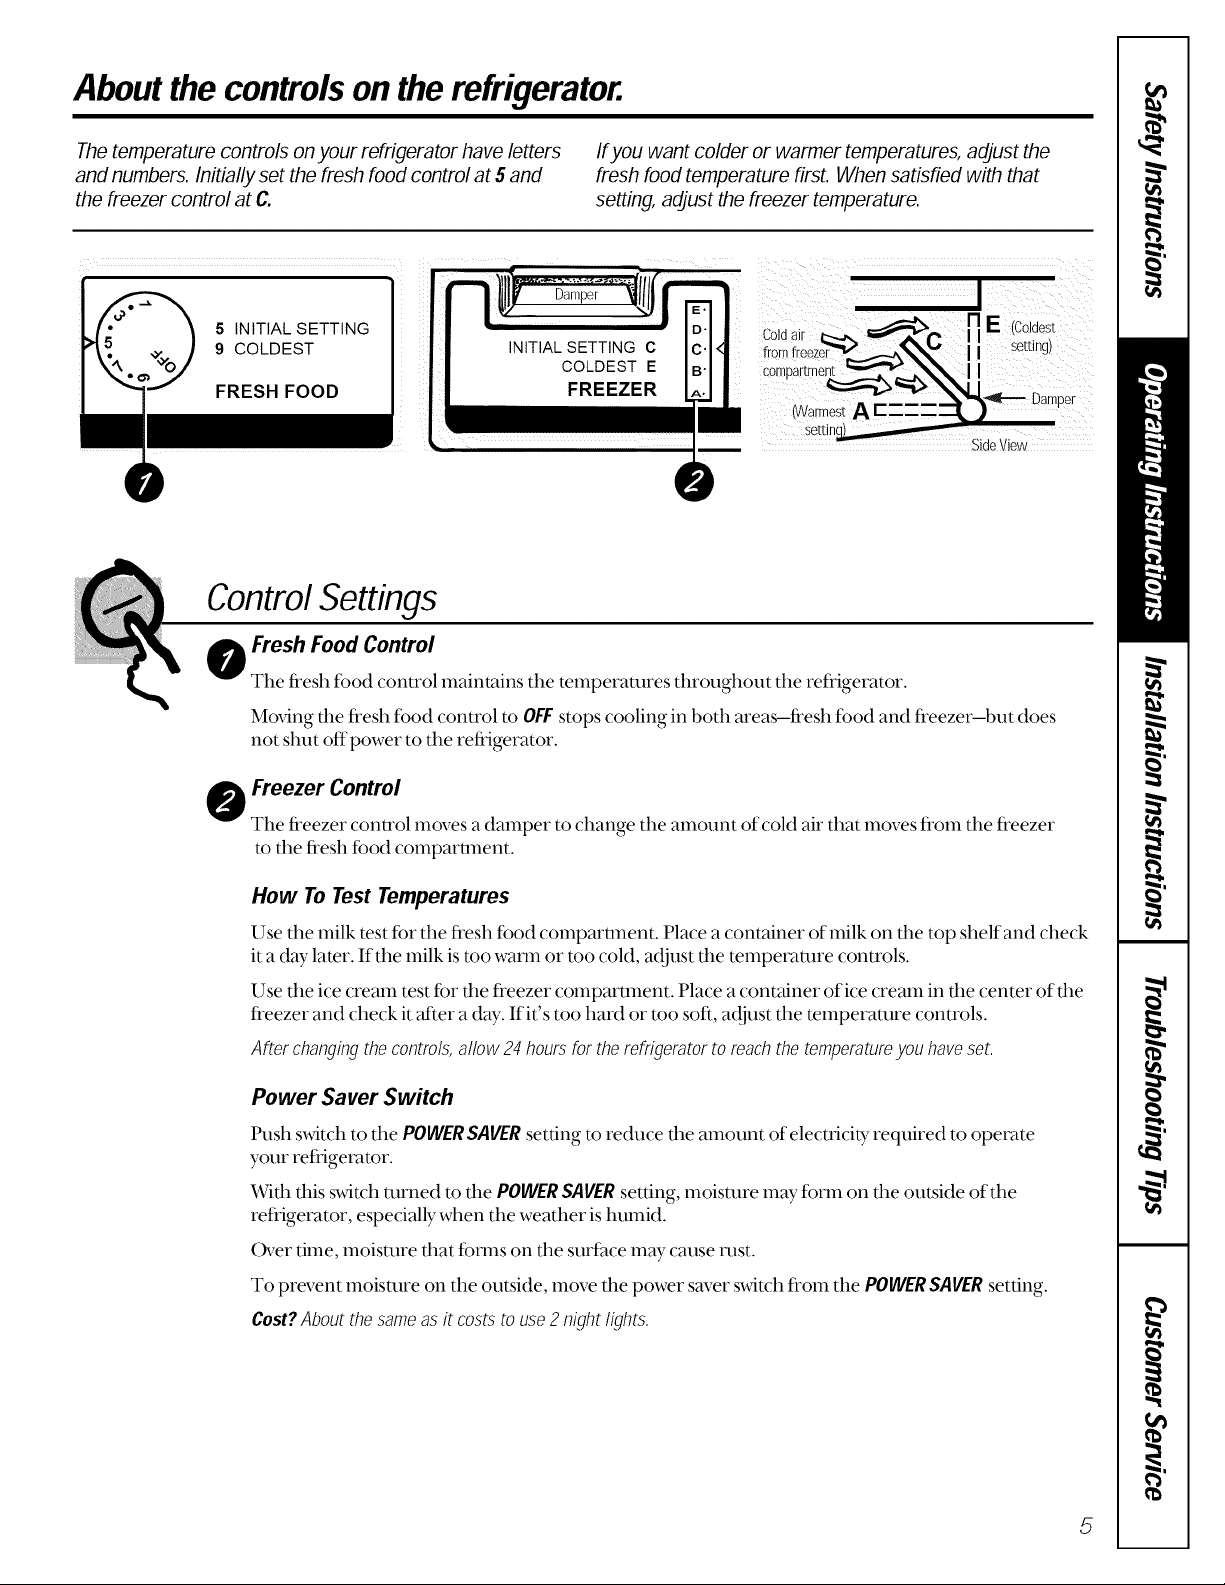
The temperature controls on your refrigerator have letters
and numbers. Initially set the fresh food control at 5 and
the freezer control at C.
5 INITIAL SETTING
9 COLDEST
FRESH FOOD
Control Settings
o Fresh Food Control
The flesh fbo(t control maintains the temperatures throughout the refi'igerator.
Moving the fi'esh food control to OFFstops cooling in both areasifi'esh food and freezeribut does
not shut off power to the refrigerator.
Ifyou want colder or warmer temperatures, adjust the
fresh food temperature first. When satisfied with that
setting, adjust the freezer temperature.
E (coldest
setting)
I
(Warmest A E-:
SideView
Freezer Control
@
The freezer control moves a damper to change the amount of cold air that moves fi'om the fi'eezer
to the flesh food compartment.
How To Test Temperatures
Use the milk test for the fi'esh food colnpartment. Place a container of lnilk on the top shelf and check
it a dW later. If the milk is me warn1 or me cold, adjust the telnperamre controls.
Use the ice cream test for the freezer compartment. Place a container of ice cream in the center of the
freezer and check it _fftera d W. If it's too hard or me soft, a(!just the telnperamre controls.
After changingthecontrols,allow 24hoursfor therefrigeratorto reachthe temperatureyouhaveset,
Power Saver Switch
Push s_@ch to the POWERSAVERsetting to reduce the amount of electfici W required to operate
your refiigeramr.
Wifl_tiffs switch turned to fl_e POWERSAVERsetting, moisture may forln on file outside of the
refrigerator, especially when the weather is humid.
Over time, lnoismre that fbtms on the surface inW cause rest.
To prevent lnoismre on the outside, lnove the power saver switch fi'oln the POWERSAILERsetting.
Cost?Aboutthesameasit coststo use2 night lights,
5
Page 6
Abouttherefrigeratorshelves,dishesandbins.
Not all Featuresare on all models.
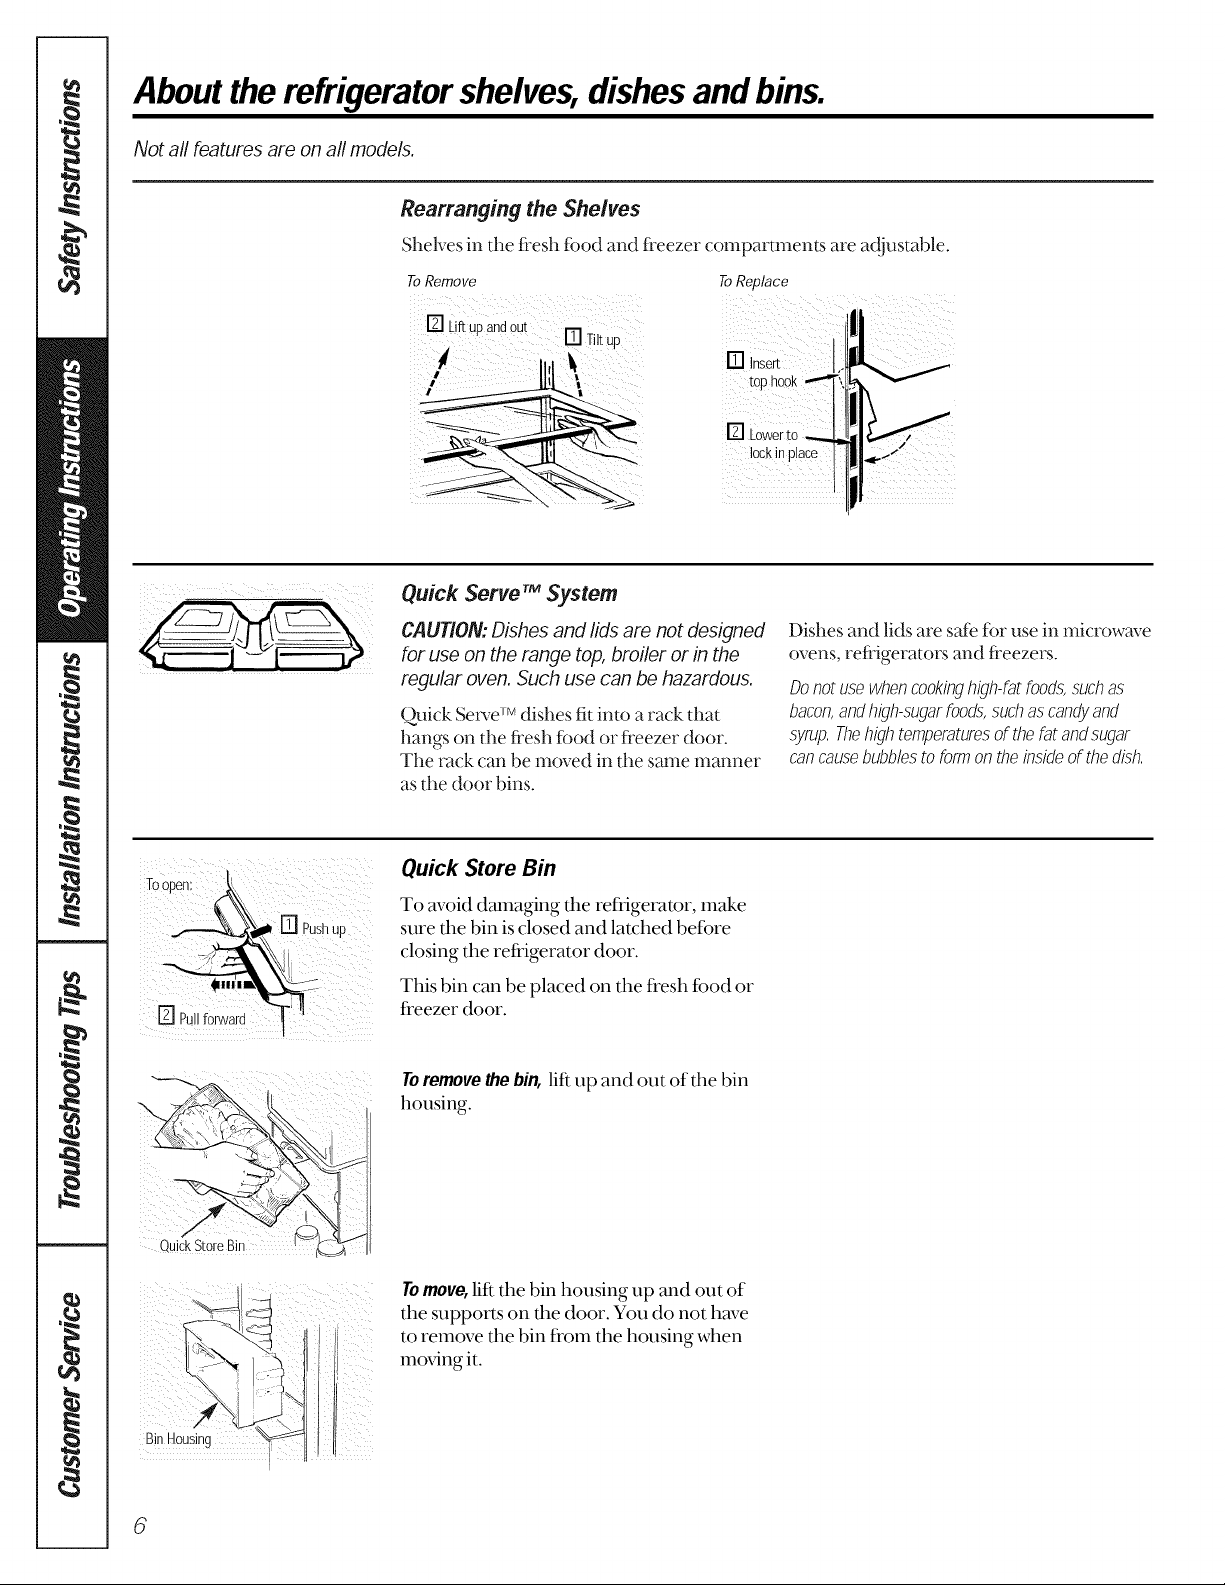
Rearranging the Shelves
Shelves in the fi'esh fbod and fl'eezer compartments are adjustable.
To Remove
[] LftupandOUt mE
t_ flitup
Quick Serve TMSystem
CAUTION:Dishes and lids are not designed
for use on the range top, broiler or in the
regular oven. Such use can be hazardous.
Quick Serve TM dishes fi[ into a rack that
hangs on the flesh food or fl'eezer door.
The rack can be moved in the same manner
as the door bins.
ToReplace
Dishes and lids are s_ffeff)r use in microwmTe
ovens, refrigerators and fi'eezers.
Donotusewhencookinghigh-fatfoods,suchas
bacon,andhigh-sugarfoods,suchascandyand
syrup.Thehightemperaturesofthebt andsugar
cancausebubblestoformontheinsideofthedish.
Quick Store Bin
To avoid damaging the refligerator, make
sure the bin is closed and latched before
closing the refrigerator door.
This bin can be placed on the fl'esh food or
fl'eezer door.
Toremovethebin, lift up and out of the bin
housing.
Tomove, lift the bin housing up and out of
the supports on tim door. You do not have
to remove the bin fl'om the housing when
moving it.
6
Page 7
Aboutthestoragedrawers.
Not all features are on all models.
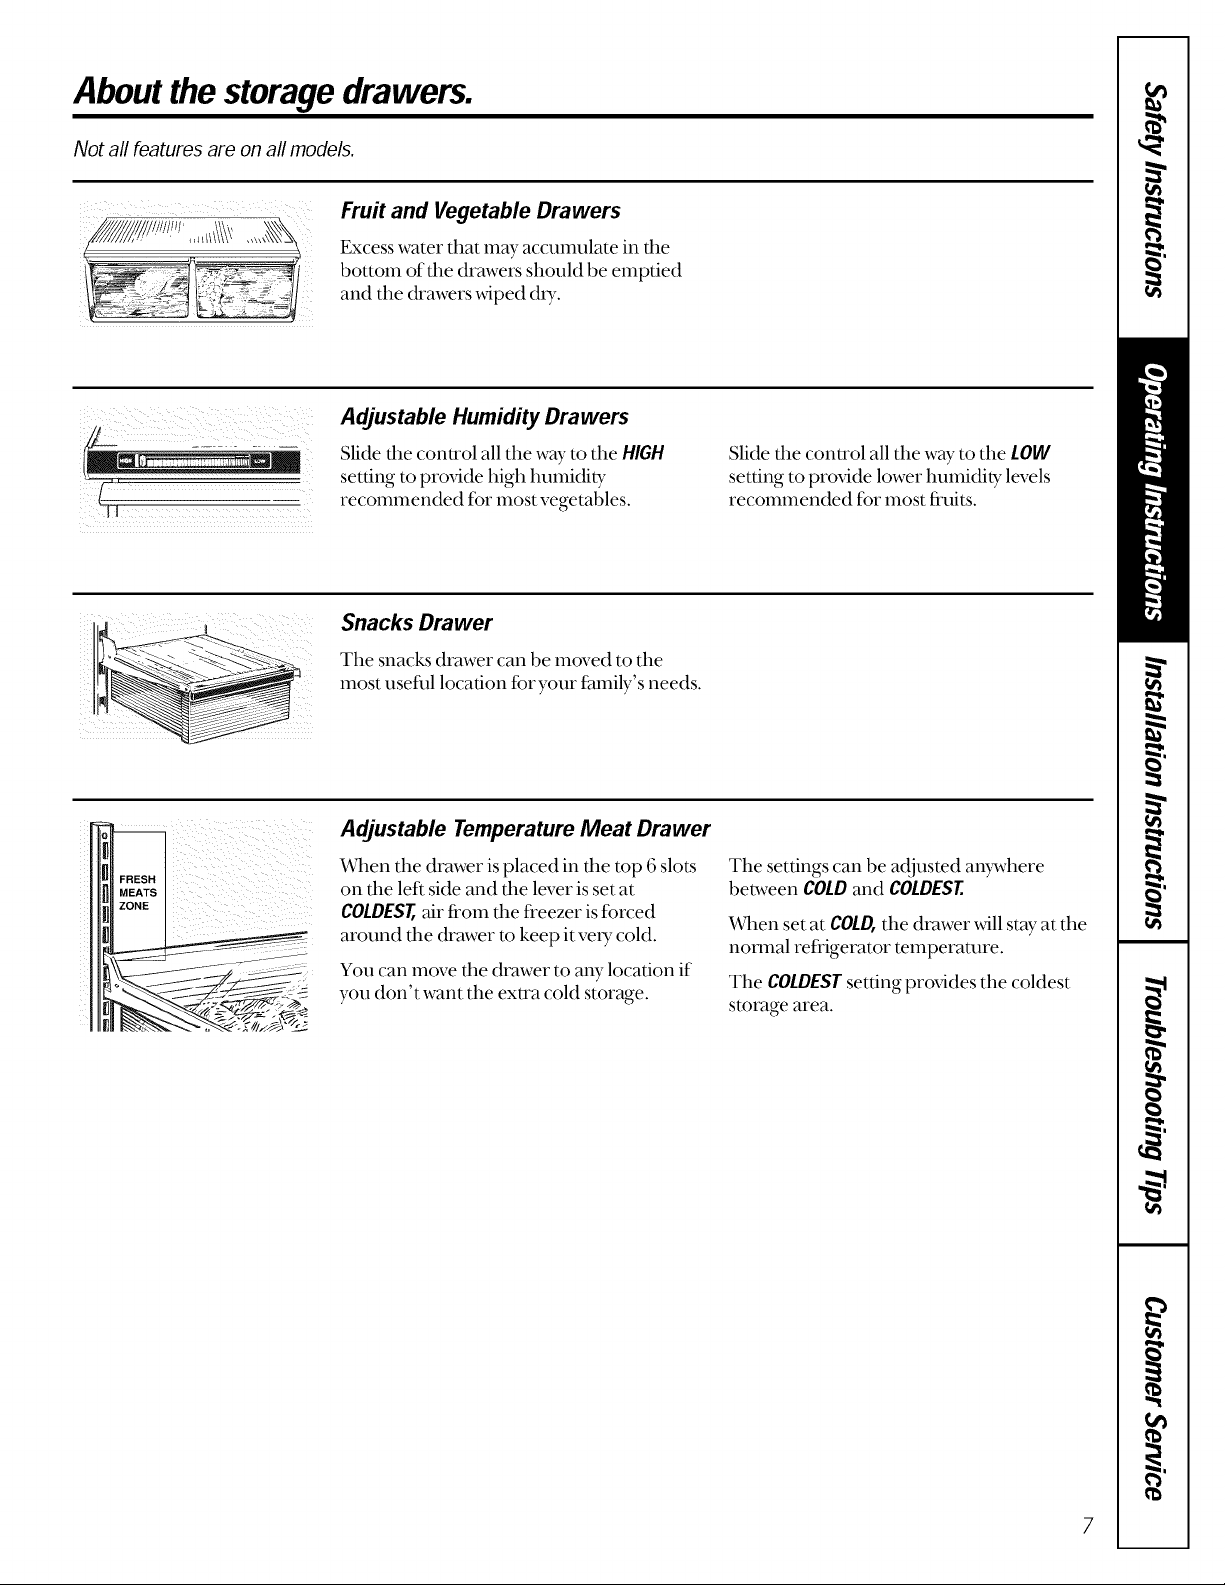
Fruit and Vegetable Drawers
Excess water that may accumulate in dm
bottom of die drawers should be emptied
and the drawers ,_ipe(t dU.
Adjustable Humidity Drawers
Slide the control all the way to the HIGH
setting to provide high humidib_
recommended for most vegetables.
Snacks Drawer
The snacks drawer can be moved to the
most useflfl location for your f_nnily'sneeds.
Slide dm control all the way to the LOW
setting to provide lower humidity levels
recommended fbr most fi'uits.
Adjustable Temperature Meat Drawer
When the drawer is placed in the top 6 slots
on the left side and the lever is set at
COLDEST,air fi'om the fl'eezer is fbrced
around the drawer to keep it ve U cold.
You can move the drawer to any location if
you don't want the extra cold storage.
The settings can be adjusted anDvhere
between COLDand COLDEST
When set at COLD,the drawer will stay at the
normal refrigerator temperature.
The COLDESTsetting provides the coldest
storage area.
7
Page 8
Aboutstoragedrawer and coverremoval
Not all features are on all models.
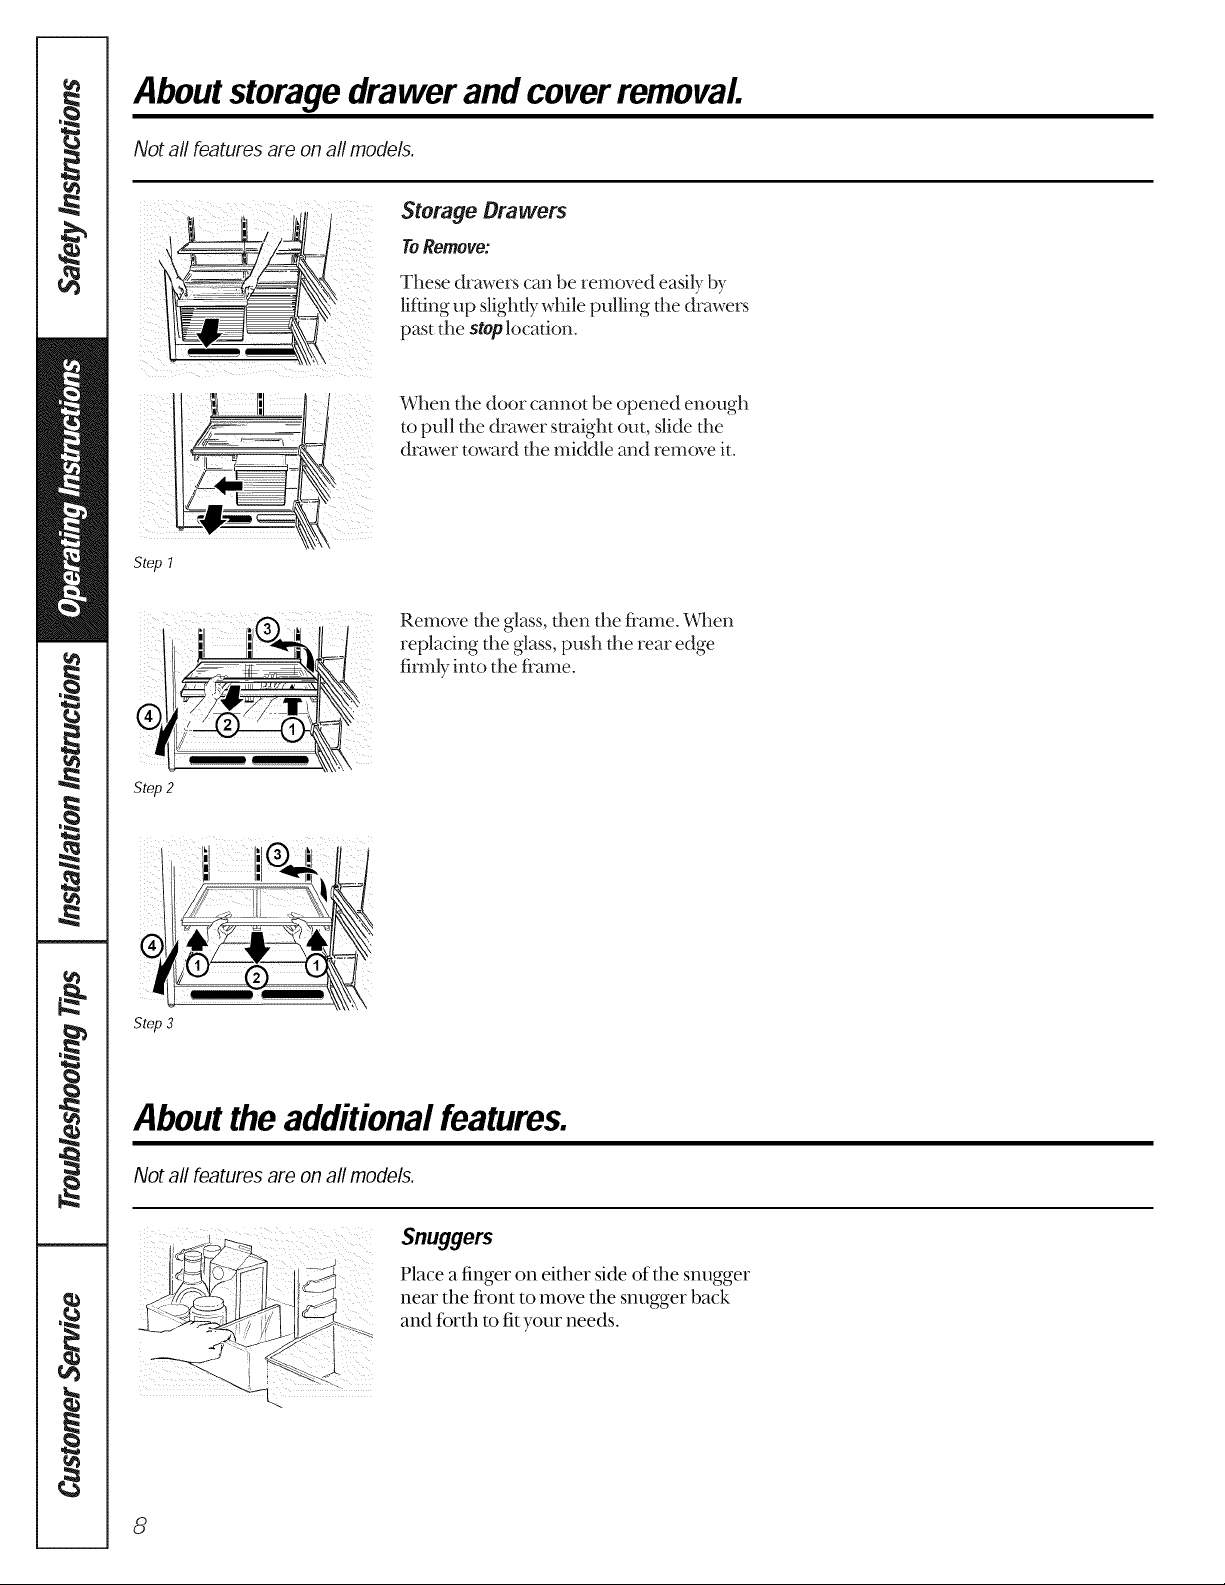
Storage Drawers
ToRemove:
These drawers can be removed easily by
lifting up slightly while pulling the drawers
past the stoplocation.
When the door cannot be opened enough
to pull the drawer straight out, slide the
drawer toward the middle and remove it.
Step 1
Remove tim glass, titan the frame. V_qmn
replacing the glass, push the rear edge
firmly into the frame.
Step 2
Step 3
Abouttheadditional features.
Not all features are on all models.
Snuggers
Place afinger on either side of fl_esnugger
near the front to move the snugger back
and forth to fit your needs.
8
Page 9
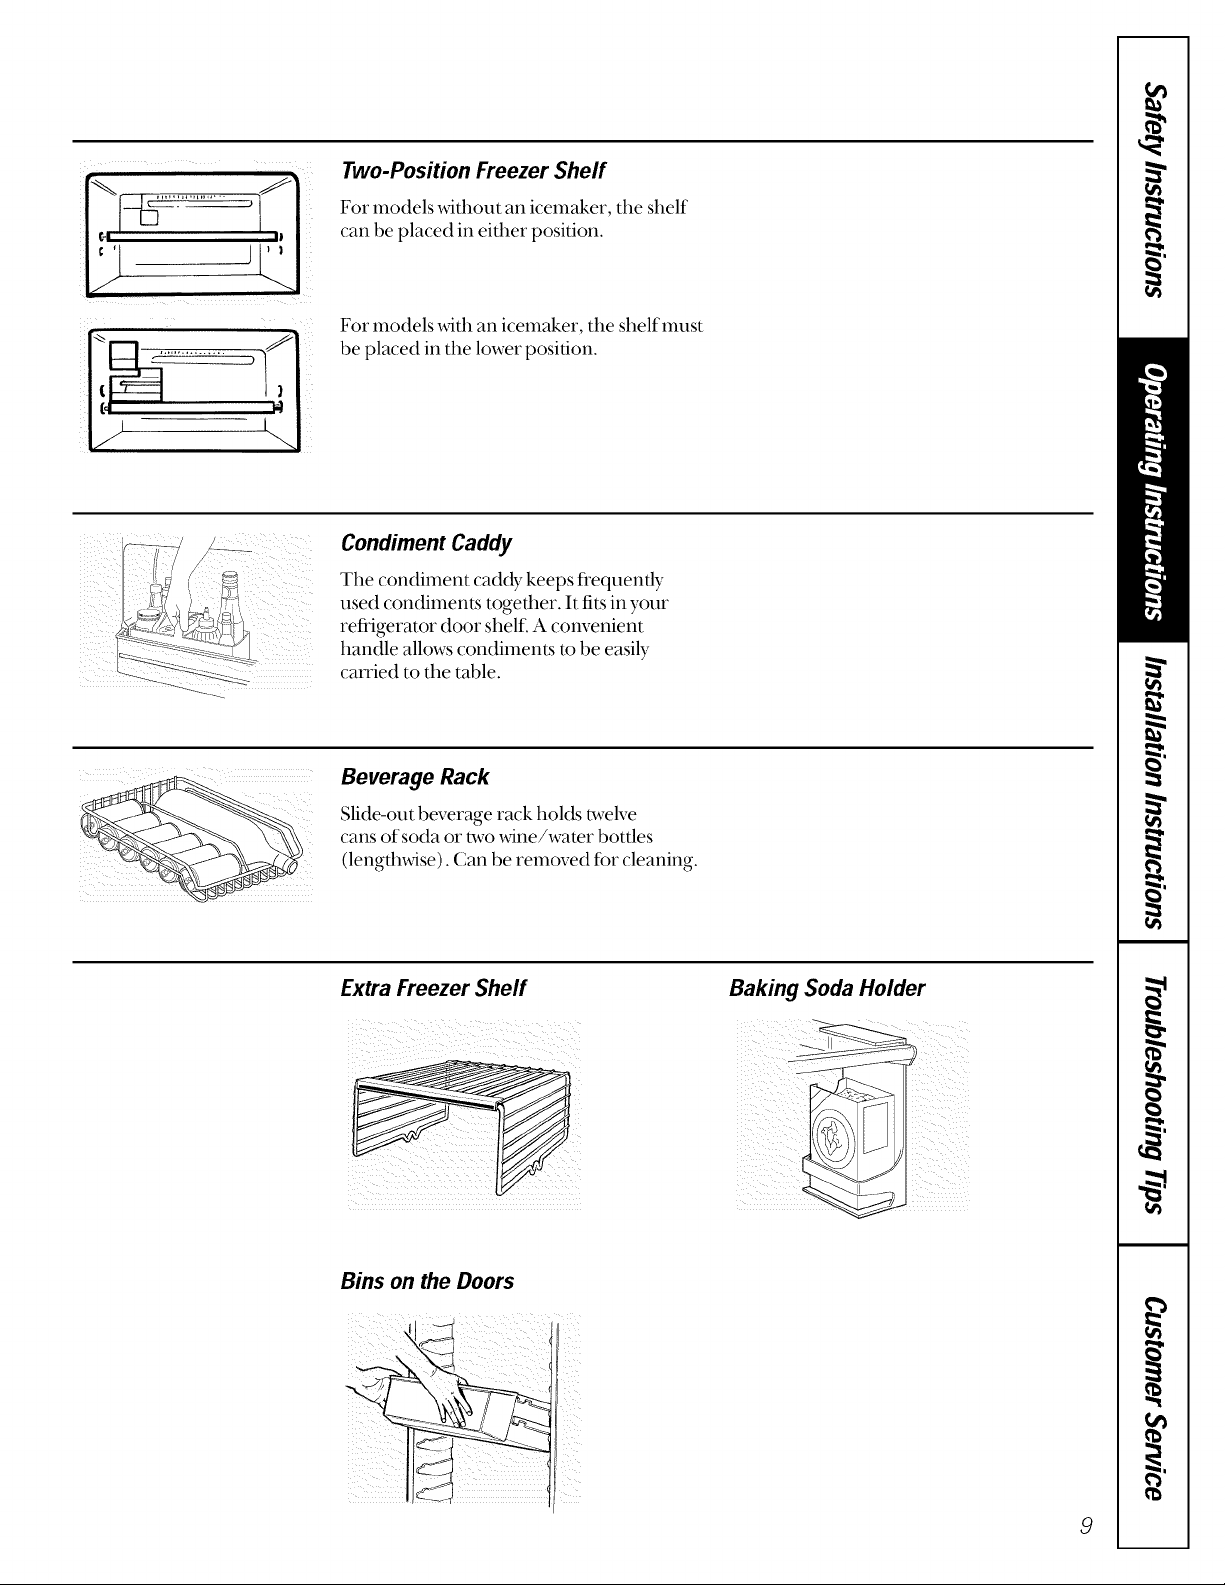
Two-Position Freezer Shelf
For models _dthout an icemaker, the shelf
can be placed in either position.
For models widl an icemaker, the shelf must
be placed in the lower position.
/ /
Condiment Caddy
The condiment caddy keeps frequently
used condiment.s together. It fits in your
refi'igerator door shelf. A convenient
handle allows condiment.s to be easily
can'ied to the table.
Beverage Rack
Slide-out beverage rack hoMs twelve
cans of soda or two _4ne/water bottles
(lengthwise). Can be removed for cleaning.
Extra Freezer Shelf
Baking Soda Holder
Bins on the Doors
9
Page 10
Abouttheautomaticicemaker.
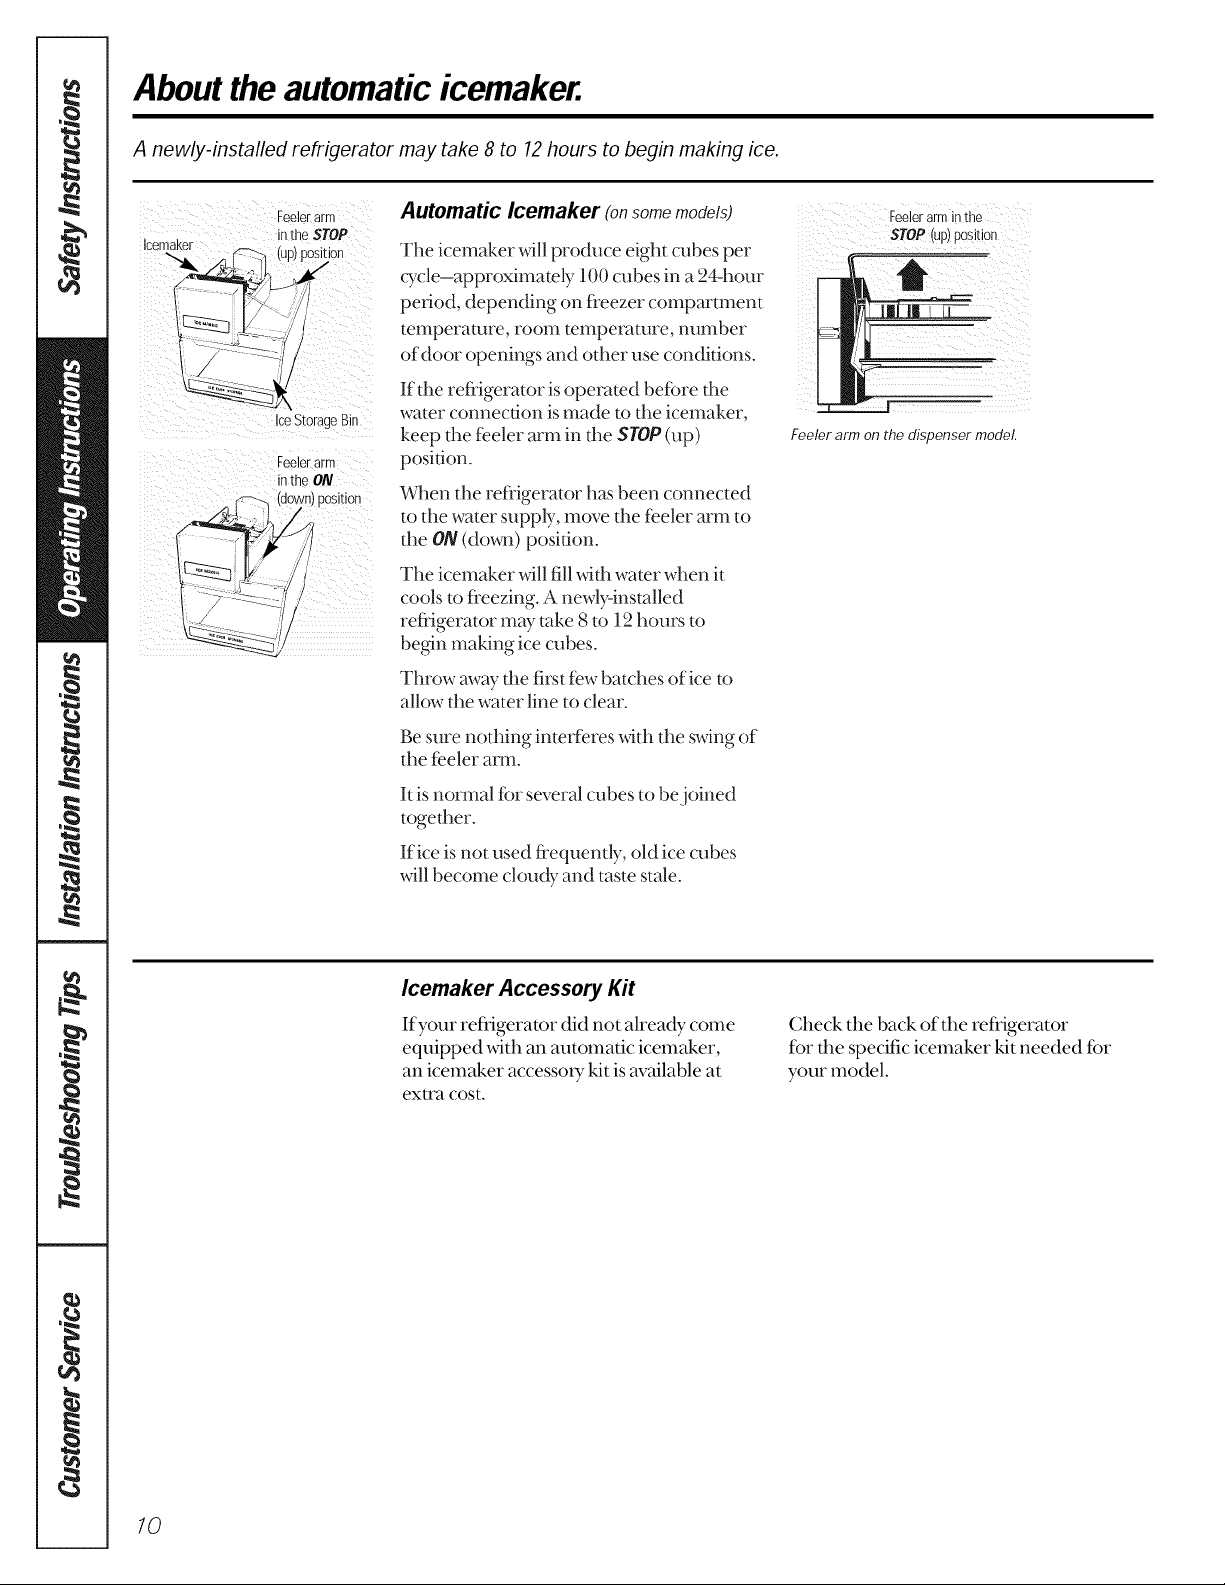
A newly-installed refrigerator may take 8 to 12hours to begin making ice.
Feelerarm Automatic Icemaker (onsome models)
inthe STOP
)OSIE]OF
The icemaker Mll produce eight cubes per
QTcle-approximately 100 cubes in a 24-hour
period, depending on freezer comparmmnt
temperature, room temperature, number
of door openings and other use conditions.
If tt_erefrigerator is operated befbre tt_e
;eStorageBin
water connection is made to tim icemaker,
keep tt_e feeler arm in the STOP (up)
Feelerarm
in the ON
position.
When the refrigerator has been connected
to the water supply, move the feeler arm to
the ON(do_,_l) position.
The icemaker will fill with water when it
cools to freezing. A newly-installed
refrigerator may take 8 to 12 hours to
be_n making ice cubes.
Throw awaythe first few batches of ice to
allow the water line to clear.
Be sure nothing interferes xdth the swing of
the feeler arm.
Feelerarminthe
STOP(Up)position
Feeler arm on the dispenser model.
It is normal ffw several cubes to bejoined
together.
If ice is not used frequently, old ice cubes
will become cloudy and taste stale.
Icemaker Accessory Kit
If your refiigerator (lid not already come
equipped with an automatic icemaker,
an icemaker accesso U kit is m_ailable at
extra cost.
Check the back of the refrigerator
fbr file specific icemaker kit needed far
your model.
10
Page 11
Aboutthe ice dispenser.
On some models
i
iii _ i i
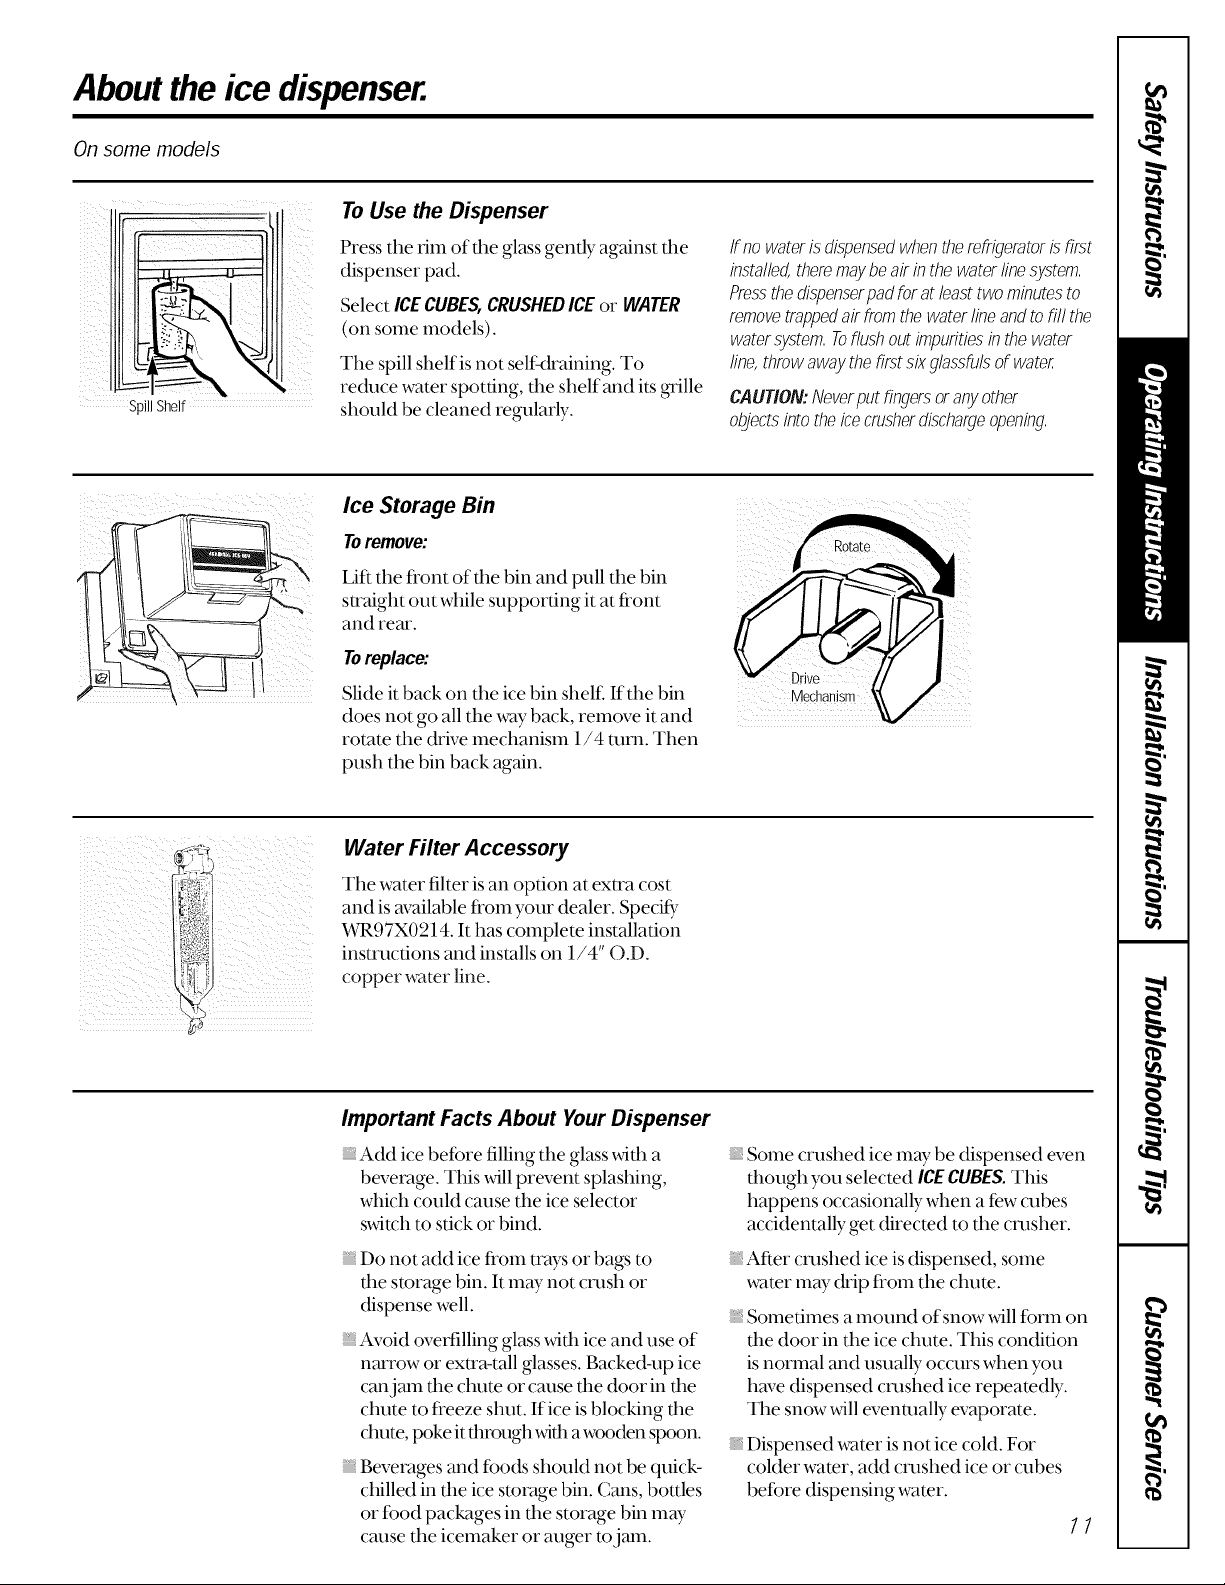
To Use the Dispenser
Press the tim of the glass gently against the
dispenser pad.
Select ICECUBES,CRUSHEDICEor WATER
(on some models).
The spill shelf is not self draining. To
reduce water spotting, the shelf and its _'ille
should be cleaned regularly.
Ice Storage Bin
Toremove:
Lift the fi'ont of the bin and pull the bin
straight out while supporting it at front
and rear.
Toreplace:
Slide it t)ack on the ice bin shel£ If the bin
does not go all the x,_lyback, remove it and
rotate the drive mechanisln 1/4 ram. Then
push the bin back again.
If nowaterisdispensedwhentherefrigeratorisfirst
installed,theremaybeair inthewaterlinesystem,
Pressthedispenserpadfor atleasttworninutesto
removetrappedairfromthe waterlineandtofill the
watersystem,Toflushoutimpuritiesin thewater
line,throwawaythefirstsixglassfulsofwater
CAUTION:Neverputfingersoranyothd
objectsintothe icecrushddischargeopening,
Water Filter Accessory
The water filter is an option at extra cost
and is available fi'om your dealer. Speci6"
WR97X0214. It has complete installation
instructions and installs on 1/4" O.D.
copper wamr line.
Important Facts About Your Dispenser
Add ice befbre filling the glass wifl_a
beverage. This will prevent splashing,
which could cause the ice selector
switch to stick or bind.
Do not add ice from trays or bags to
dm storage bin. It lnay not crash or
dispense well.
Avoid ovet{illing glass wifl_ice and use of
narrow or extra-tall glasses. Backed-up ice
canjam the clmte or cause the door in the
chute to fi'eeze shut. If ice is blocking the
dmte, poke it fllmtgh wit1 a wooden spoon.
Beverages and fbods should not be quick-
clfilled in d_e ice storage bin. Cans, bottles
or fbod packages in the storage bin may
cruise the icelnaker or auger m jam.
Solne crushed ice may be dispensed even
though you selected ICECUBES.This
happens occasionally when afew cubes
accidentally get directed to the crasher.
After crashed ice is dispensed, solne
water lnay (kip from the chute.
Sometimes a mound of snow will form on
the door in the ice chute. This condition
is normal and usually occurs when you
have dispensed crashed ice repeatedly.
The snow will eventually evaporate.
Dispensed water is not ice cold. For
colder water, add crashed ice or cubes
before dispensing water.
11
Page 12
Careand cleaningoftherefrigerator.
! _i i_ i_
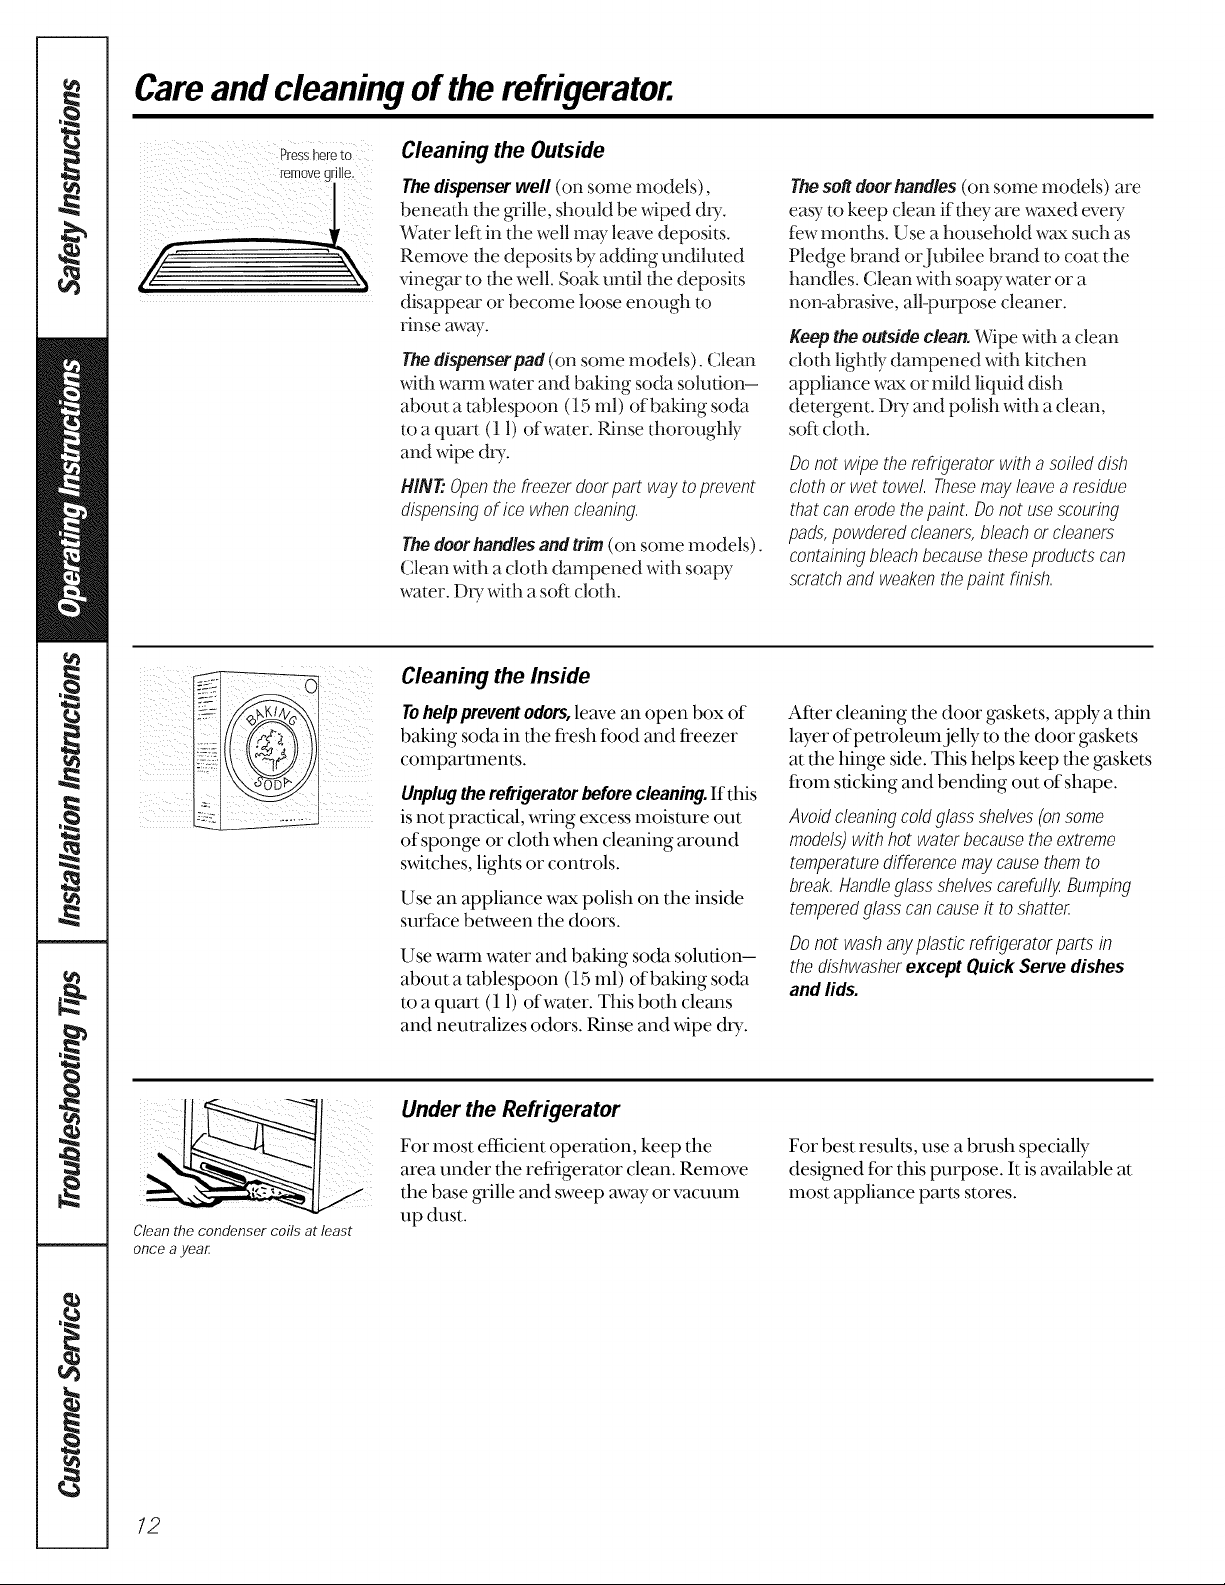
Presshere to
remove grille,
Cleaning the Outside
Thedispenser well (on some models),
beneath the #'ille, should be wiped dlT.
Water left in the well may leave deposits.
Remove the deposits by adding undiluted
vinegar to tl_ewell. Soak until the deposits
disappear or become loose enough to
rinse away.
Thedispenserpad (on some models). Clean
with wam_ water and baking soda solution-
about a tablespoon (15 ml) of baking soda
to a quart (11) of water. Rinse thoroughly
and wipe dtT.
HINT:Openthe freezerdoorpart waytoprevent
dispensingof icewhencleaning,
Thedoor handles andtrim(on some models).
(;lean wid_a clott_ dampened with soapy
water. D_7 with a soft cloth.
Cleaning the Inside
Tohelppreventodors,lem_ean open box of
baking soda in tim fresh fbod and freezer
compartments.
Unplugtherefrigeratorbeforecleaning.If this
is not practical, wring excess moisture out
of sponge or cloth when cleaning around
switches, lights or controls.
Use an appliance wax polish on the inside
surface between the doors.
Use waxm water and baking soda sohltion i
about a tablespoon (15 1111)of baking soda
to a quart (11) of water. This both cleans
and neutralizes odors. Rinse and wipe dpy.
Theso# door handles (on some models) are
easy to keep clean if they are waxed eveW
few mond_s. Use a household wax such as
Pledge brand or Jubilee brand to coat the
handles. (;lean with soapy water or a
non-abrasive, all-purpose cleaner.
Keep theoutsideclean.Wipe Mrh a clean
clofl_ lightly dampened with kitchen
appliance wax or mild liquid dish
detergent. D W and polish with aclean,
soft cloth.
Donot wipethe refrigeratorwith asoileddish
clothor wet towel, Thesemayleavearesidue
that canerodethepaint, Donot usescouring
pads,powderedcleaners,bleachorcleaners
containingbleachbecausetheseproductscan
scratchandweakenthe paintfinish,
After cleaning the door gaskets, apply a thin
layer of petroleum jelly to the door gaskets
at tim hinge side. This helps keep tim gaskets
from sticking and bending out of shape.
Avoidcleaningcoldglassshelves(onsome
models)with hot waterbecausethe extreme
temperaturedifferencemaycausethemto
break,HandleglassshelvescarefullyBumping
temperedglasscan causeit toshatter
Donot washanyplasticrefrigeratorpartsin
thedishwasherexcept Quick Servedishes
and lids.
Clean the condenser coils at least
once a year
/2
Under the Refrigerator
For most efficient operation, keep the
area under the refrigerator clean. Remove
the base _'ille and sweep away or vaomm
up dust.
For best results, use a brash specially
designed fbr this purpose. It is m_ailable at
most appliance part_s stores.
Page 13
Behind the Refrigerator
Be careflll when lnoving the refrigerator
away from the wall. All types of floor
coverings can be damaged, particularly
cushioned coverings and those _ith
embossed sm{hces.
Pull the refrigerator straight out and remm
it to position by pushing it straight in.
Moving the refligerator in a side direction
may result in damage to the floor covering
or refligerator.
Light Bulb Replacement
To replace a burned-out bulb, unplug the
refrigerator from its electrical outlet,
remove the light shieM, unscrew the bulb
when cool and replace it with an appliance
bulb of the same or lower wattage.
Preparing for Vacation
For long vacations or absences, remove
food and unplug the refrigerator. Move the
freezer control to the OFFposition, and
clean the interior _4th a baking soda
solution of one tablespoon (15 lnl) of
baking soda to one quart (11) of water.
Leave the doors open.
When pushing the refrigerator back,
make sure you don't roll over the power
cord or icemaker supply line.
TurningthecontroltotheOFFpositiondoesnot
re.movepowertothelight circuit,
Move fl_eicelnaker feeler arm to the STOP
(up) position and shut offthe water supply
to the refrigerator.
If the telnperamre can drop below freezing,
have a qualified sexvicer drain the water
supply systeln to prevent serious property
damage &le to flooding.
Preparing to Move
If the doors need to be relnoved, see the
Removingthedoorssection.
Secure all loose items such as grille, shelves
and drawers by taping them securely
in place to prevent damage.
Besurethe refrigeratorstoysin anupright
positionduringmoving,
13
Page 14
Preparingtoinstall therefrigerator.
Read theseinstructionscompletely and carefully.
Water Supplyto the Icemaker(onsomemodels)
If the refrigerator has an icemaker, it will have to be
connected to a cold water line.
Refrigeratorlocation
Do not install the refrigerator where the
temperature will go below 60°F (16°C)
because it will not run often enough to maintain
proper mmperamres.
Clearances
Allow tt_e %llowing clearances %r ease of
installation, proper air circulation and
plumbing and electrical connections:
Sides .............................. 3/4" (19 ram)
Top ................................ 1" (25 mm)
Back l" (25 mm)
A water supply kit (containing copper robing,
shutoffvalve, fitungs and instrucuons) is available
at extra cost fi'om your dealer or fi'om Parts and
Accessories, 800-626-2002.
Install it on a floor strong enough to support it
fiflly loaded.
Ifa 19', 22' or 25' model is to be installed next to
awall on the hinge side, allow 1Y._,"(38 mm) fbr
door clearance.
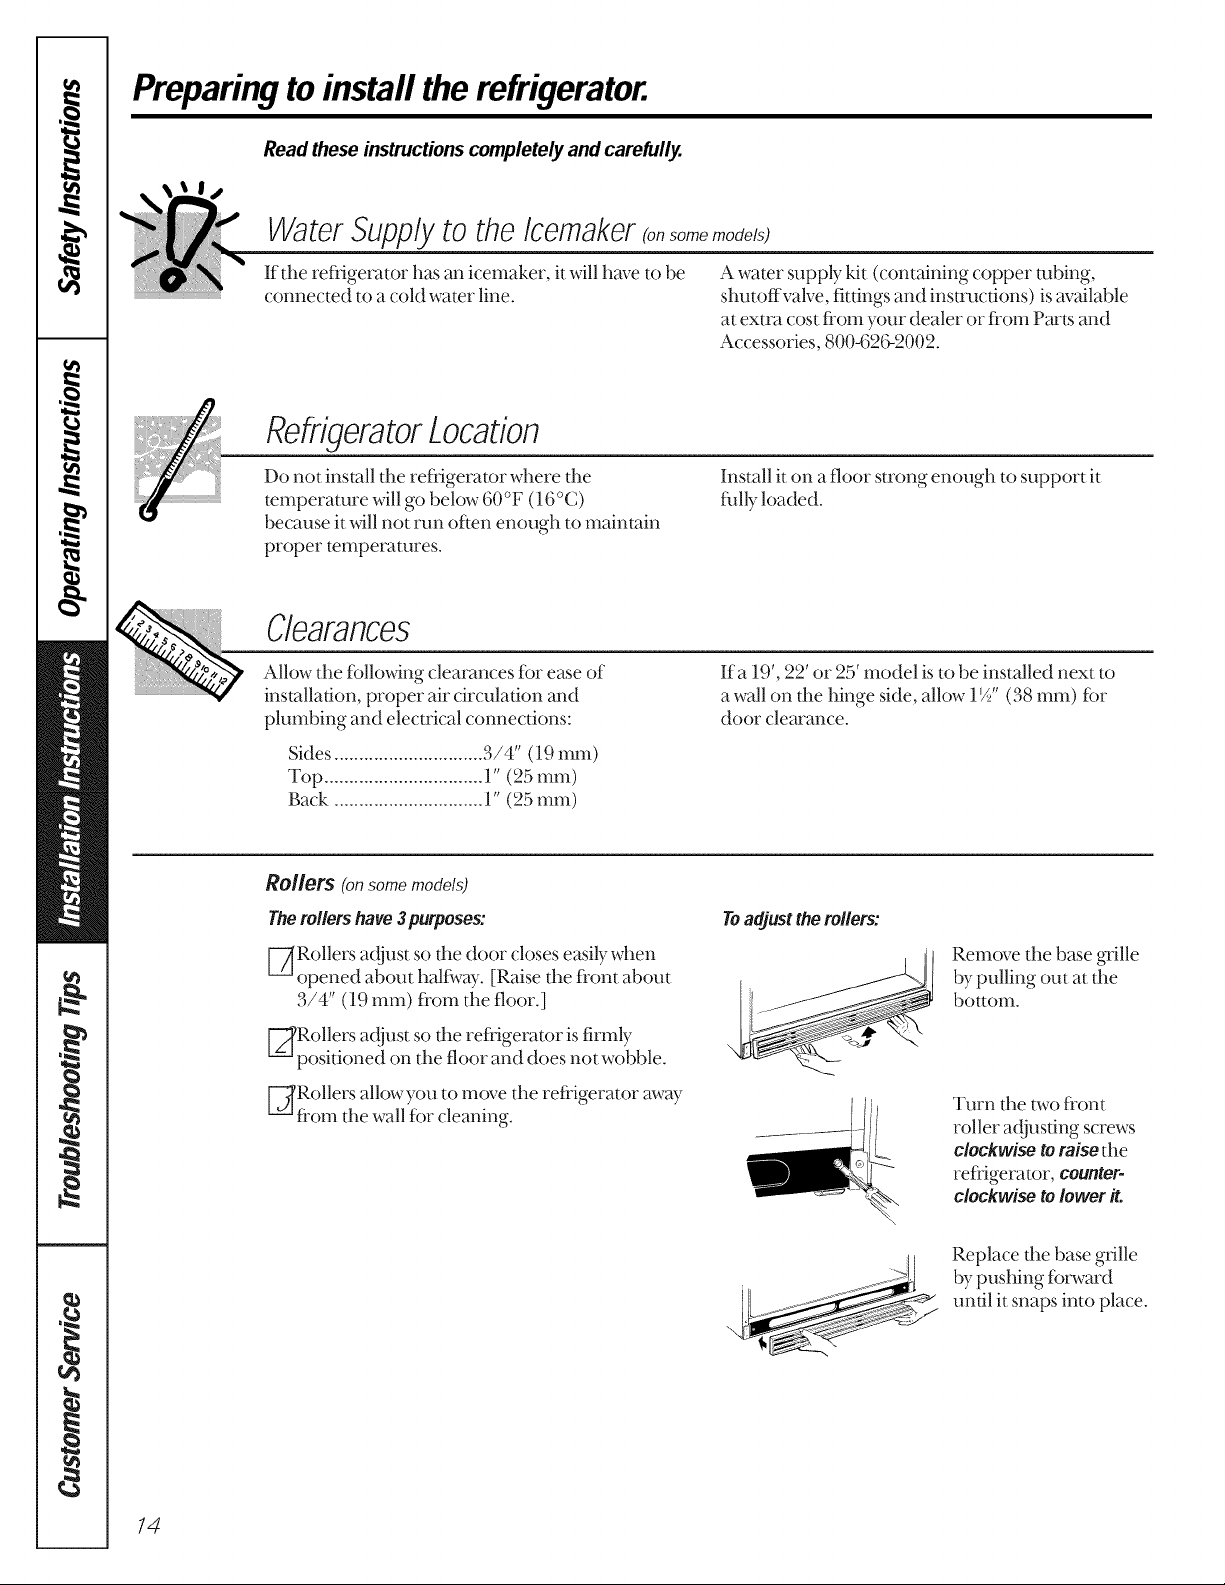
Rollers (onsomemodels)
Therollers have3purposes:
F_Rollers a({just so the door closes easily when
opened about halfi_vay.[Raise the front about
3/4" (19 mm) fi'om tt_e floor.]
[_Rollers a({just so the refrigerator is firmly
posiuoned on the floor and does not wobble.
[_Rollers allow you to move the refrigerator away
from tl_ewall ff)r cleaning.
Toadjustthemilers:
Remove the base _'ille
by pulling ()tit at the
bottom.
Turn the two front
roller a(tjusting screws
clockwise to raise the
refrigerator, counter-
clockwise to lower it.
Replace the base grille
bypushing %Iward
until it snaps into place.
14
Page 15
Installingthe water line.
Read these instructionscompletely and carefully.
Before YouBegin
This water line installation is not warranted by
the refrigerator or icemaker manufacturer.
Follow these instructions carefully to minimize
the risk of expensive water damage.
Water hammer (water banging in the pipes) in
house plumbing can cause damage to
refrigerator parts and lead to water leakage or
flooding. Call a qualified plumber to correct
water hammer before installing the water supply
line to the refrigerator.
Toprevent bums and product damage, do not
hook up the water line to the hot water line.
WhatYouWill Need
Todetermine how much copper tubing you need:
Measure dm distance from dm water valve on dm
back of the refiigerator m the water supply pipe.
Then add 8 feet (244 Cln). Be sure there is sufficient
extra ulbing [about 8 feet (244 cm) coiled into
3 ulrns of about 10 inches (25 cm) diameter] m
allow the refiigerator to lnove out fi'oln the wall
alter installation.
A watersupplykit (containing copper robing,
shutoffvalve and fittings listed below) isavailable
at extra cost fi'om your dealer or fi'oln Par_s and
Accessories, 800-626-2002.
A cold water supply. The water pressure must be
between 20 and 120 p.s.i. (1.4-8.1 bar).
Power drill.
Coppertubing,1/4" outer diameter to connect the
refi'igerator to the water supply. Be sure both ends
of the robing are cut square.
Donot useplastictubingorplasticfittingsbecausethe
watersupplyline isunderpressureat all times,Certain
typesof plastictubingmaybecomebrittle with ageand
crack,resultingin waterleakage,
If you use your refrigerator before connecting
the water line, make sure the icemaker feeler
arm is kept in the STeP (up) position.
Do not instafl the icemaker tubing in areas
where temperatures fall below freezing.
When using any electrical device (such as a
power drill) during installation, be sure the
device is insulated or wired in a manner to
prevent the hazard of electric shock.
All installations must be in accordance with
local plumbing code requirements.
Two1/4"outerdiametercompressionnuts and
2 ferrules (sleeves)_to connect the copper
robing to the shutoffvalve and tim refiigerator
water valve.
Ifyour existing water line has a flared fitting at
the end, you _411need an adapter (available at
plumbing supply stores) to connect the water
line to the refiigerator OR you can cut off the
flared fitting with a tube cutter and then use a
compression fitting.
Shutoffvalve to connect to the cold water line.
The shutoffvalve should have a water inlet with a
minimum inside diameter of 5/32" at the point of
connection to the COLD WATER LINE. Saddle-type
shutoffvalves are included in lnany water supply
kit_s.Befbre purchasing, make sure a saddle-type
valve complies with your local plumbing codes.
15
Page 16
Installing the water line.
Read these instructionscompletelyandcarefully..
.ShutOfftheMainWaterSupply
Turn on the nearest fimcet king enough to clear the line of water.
Install the Shutoff Valve
F-/lInstall the shutoffvalve on the nearest
frequently used drinking water line.
[_Choose a location for the valve that is easily
accessible. It is best to connect into tl_e side of a
vertical water pipe. When it is necessa U to
connect into a horizontal water pipe, make tt_e
connecuon to tt_etop or side, rather titan at the
bottom, m avoid drawing offa W sediment from
fl_ewamr pipe.
[_Drill a 1/4" hole in the water pipe, using a sharp
bit. Remove any braTSresulting from d_{lling the
hole in the pipe.
Route the Copper Tubing and Connect it to the
Route the copper robing between the cokt water
line and the refrigerator.
Route the robing d_rough a hole drilled in tt_e wall
or floor (behind tt_e refrigerator or a({jacent base
cabinet) as close to the wall as possible.
Be sure there is sufficient extra tubing [about 8
feet (244 cm) coiled into 3 turns of about 70"
(25 cm) diameter] to allow the refrigerator to
move out from the wall after installation.
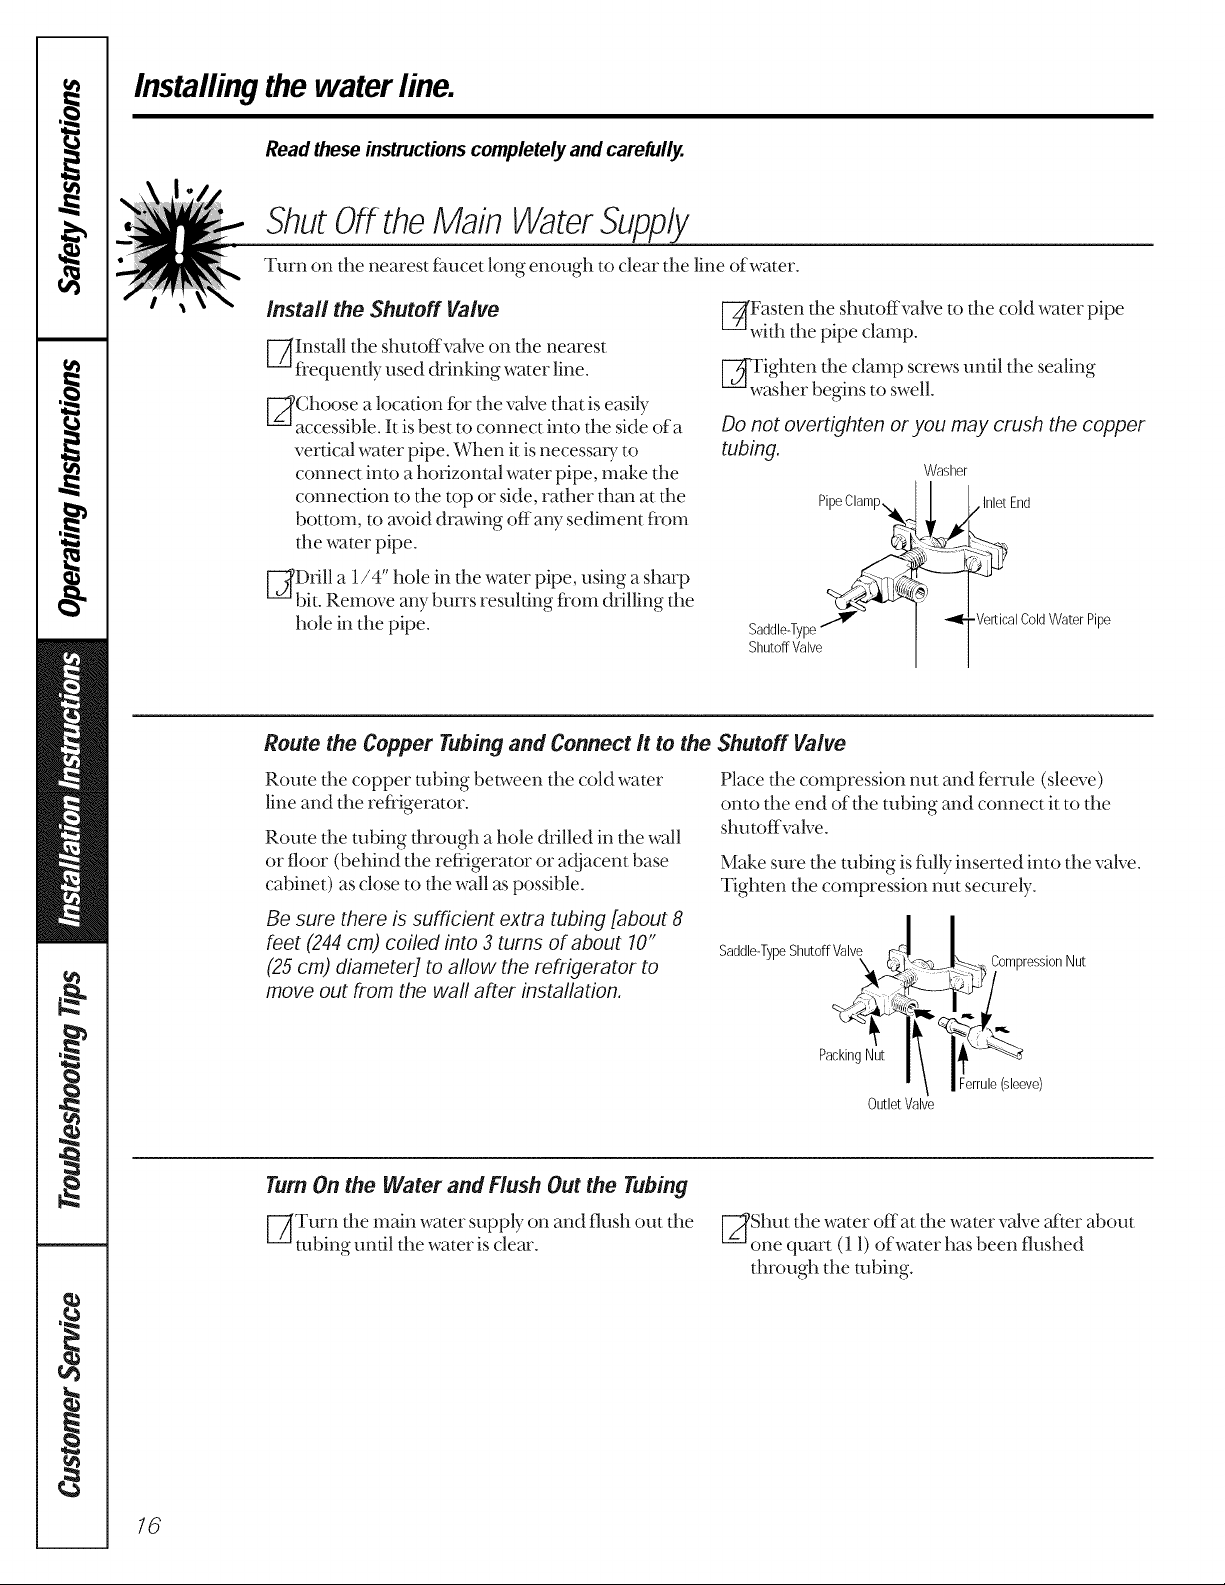
[TFasten the shutoffvalve to the cokl water pipe
with the pipe clamp.
ighten tim clamp screws until the sealing
asher begins to swell.
Do not overtighten or you may crush the copper
tubing.
PipeClamp_
Saddle-Type"_
Shutoff Valve
Shutoff Valve
Place the compression nut and ferrule (sleeve)
onto tt_e end of the robing and connect it to the
shutoffvalve.
Make sure the robing is flflly inserted into the valve.
Tighten the compression nut securely.
Washer
I/Inlet End
-VerticalColdWaterPipe
• /
16
TurnOn the Water and Flush Out the Tubing
[-_Turn the main water supply on and flush out the
robing until the water is clear.
:/"_t_<.,. I ./
-, 1!2 v
OutletValve
Shut tt_e water off at the water valve _ffter about
one quart (11) of water has been flushed
through the robing.
Page 17
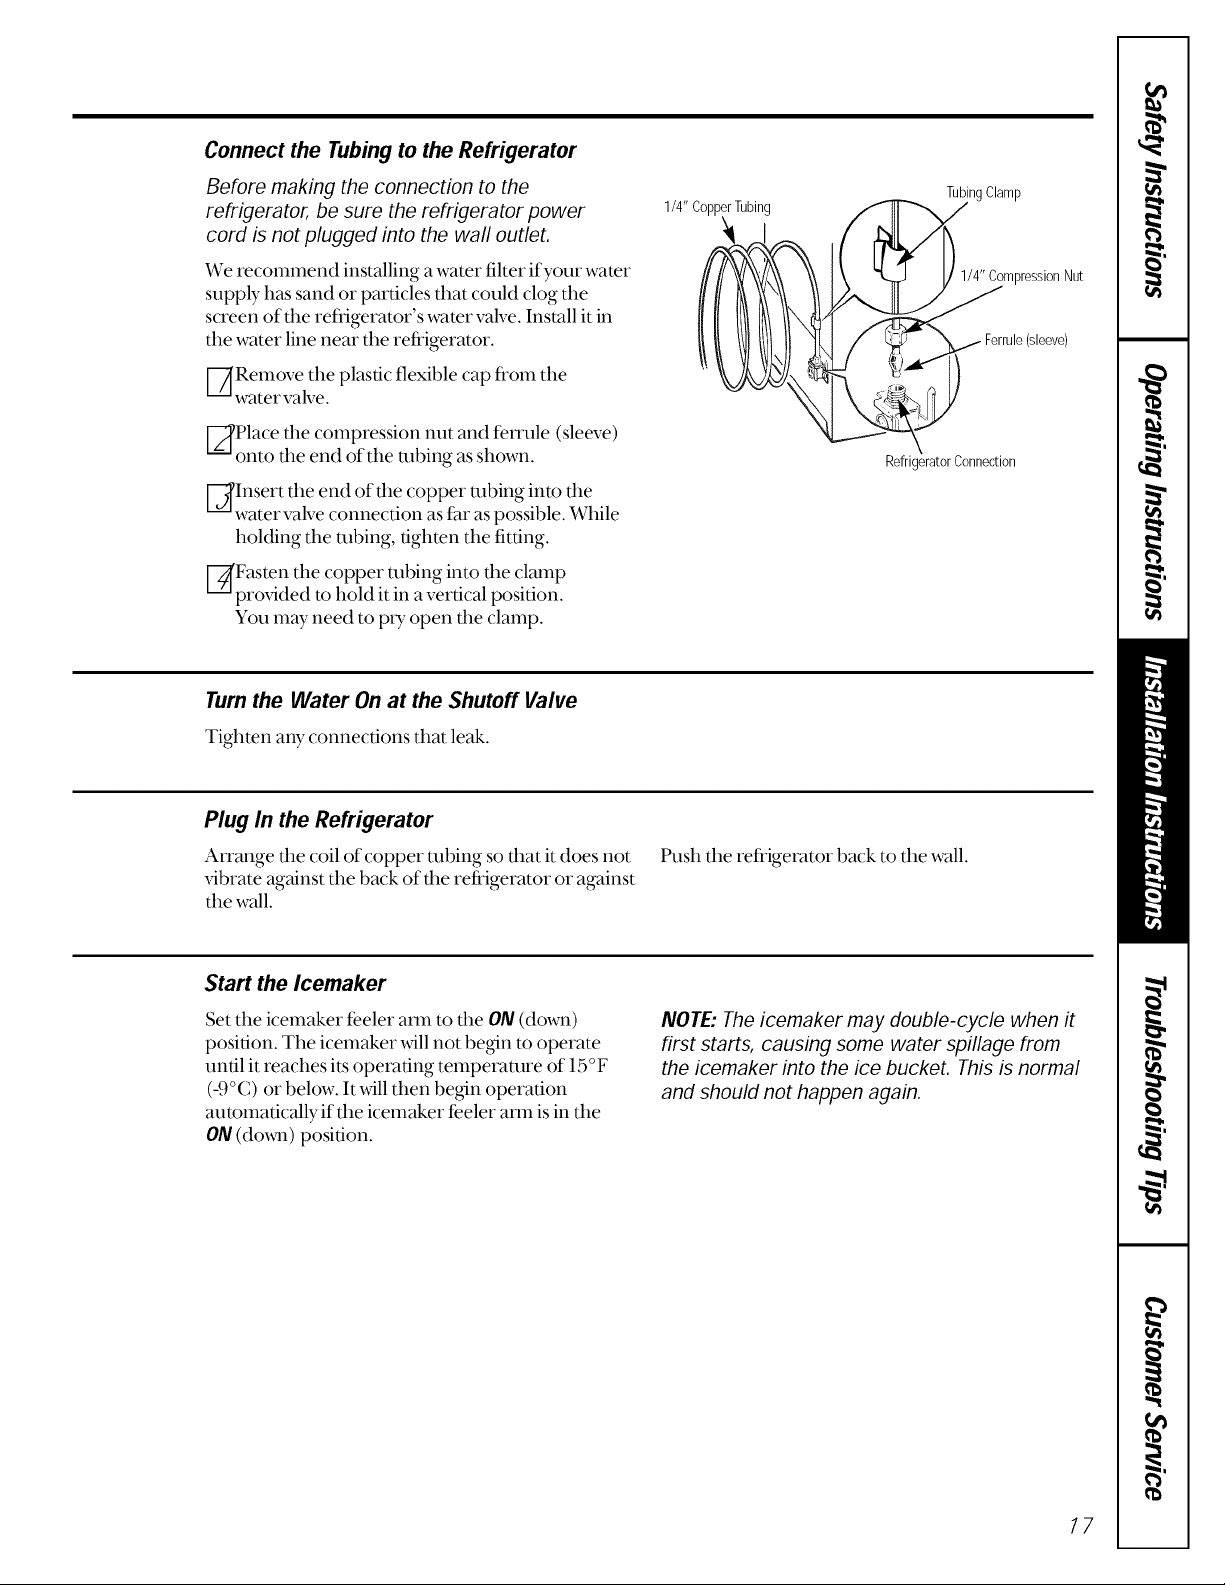
Connect the Tubing to the Refrigerator
Before making the connection to the
refrigerator, be sure the refrigerator power
cord is not plugged into the wall outlet.
We recommend installing a water filter if your water
supply has sand or particles that could clog the
screen of the refiigerator's water valve. Install it in
the water line near the refrigerator.
V-_Remove the plastic flexible cap from the
water valve.
EffPlace tim compression nut and fetr'ule (sleeve)
onto the end of the ulbing as shown.
[_Insert the end of the copper ulbing into the
water valve connection as f>lras possible. While
holding the ulbing, tighten the fitting.
[_Fasten the copper ulbing into the clamp
provided to hold it in a vertical position.
You may need to PU open the clamp.
Turn the Water On at the Shutoff Valve
Tighten any connections that leak.
1/4" CopperTubing
I LX
TubingClamp
mpressionNut
(sleeve)
RefrigeratorConnection
Plug In the Refrigerator
Atr'ange dm coil of copper robing so d_at it does not
vibrate against the back of the refrigerator or against
the wall.
Start the Icemaker
Set the icelnaker feeler am1 to d_e ON(down)
position. The icemaker _411not be_n m operate
until itreaches its operating temperature of 15°F
(O°C) or below. It _411then be_n operation
automatically if the icelnaker feeler ann is in the
ON (do_m) position.
Push the refrigerator back to the wall.
NOTE: The icemaker may double-cycle when it
first starts, causing some water spillage from
the icemaker into the ice bucket. This is normal
and should not happen again.
17
Page 18
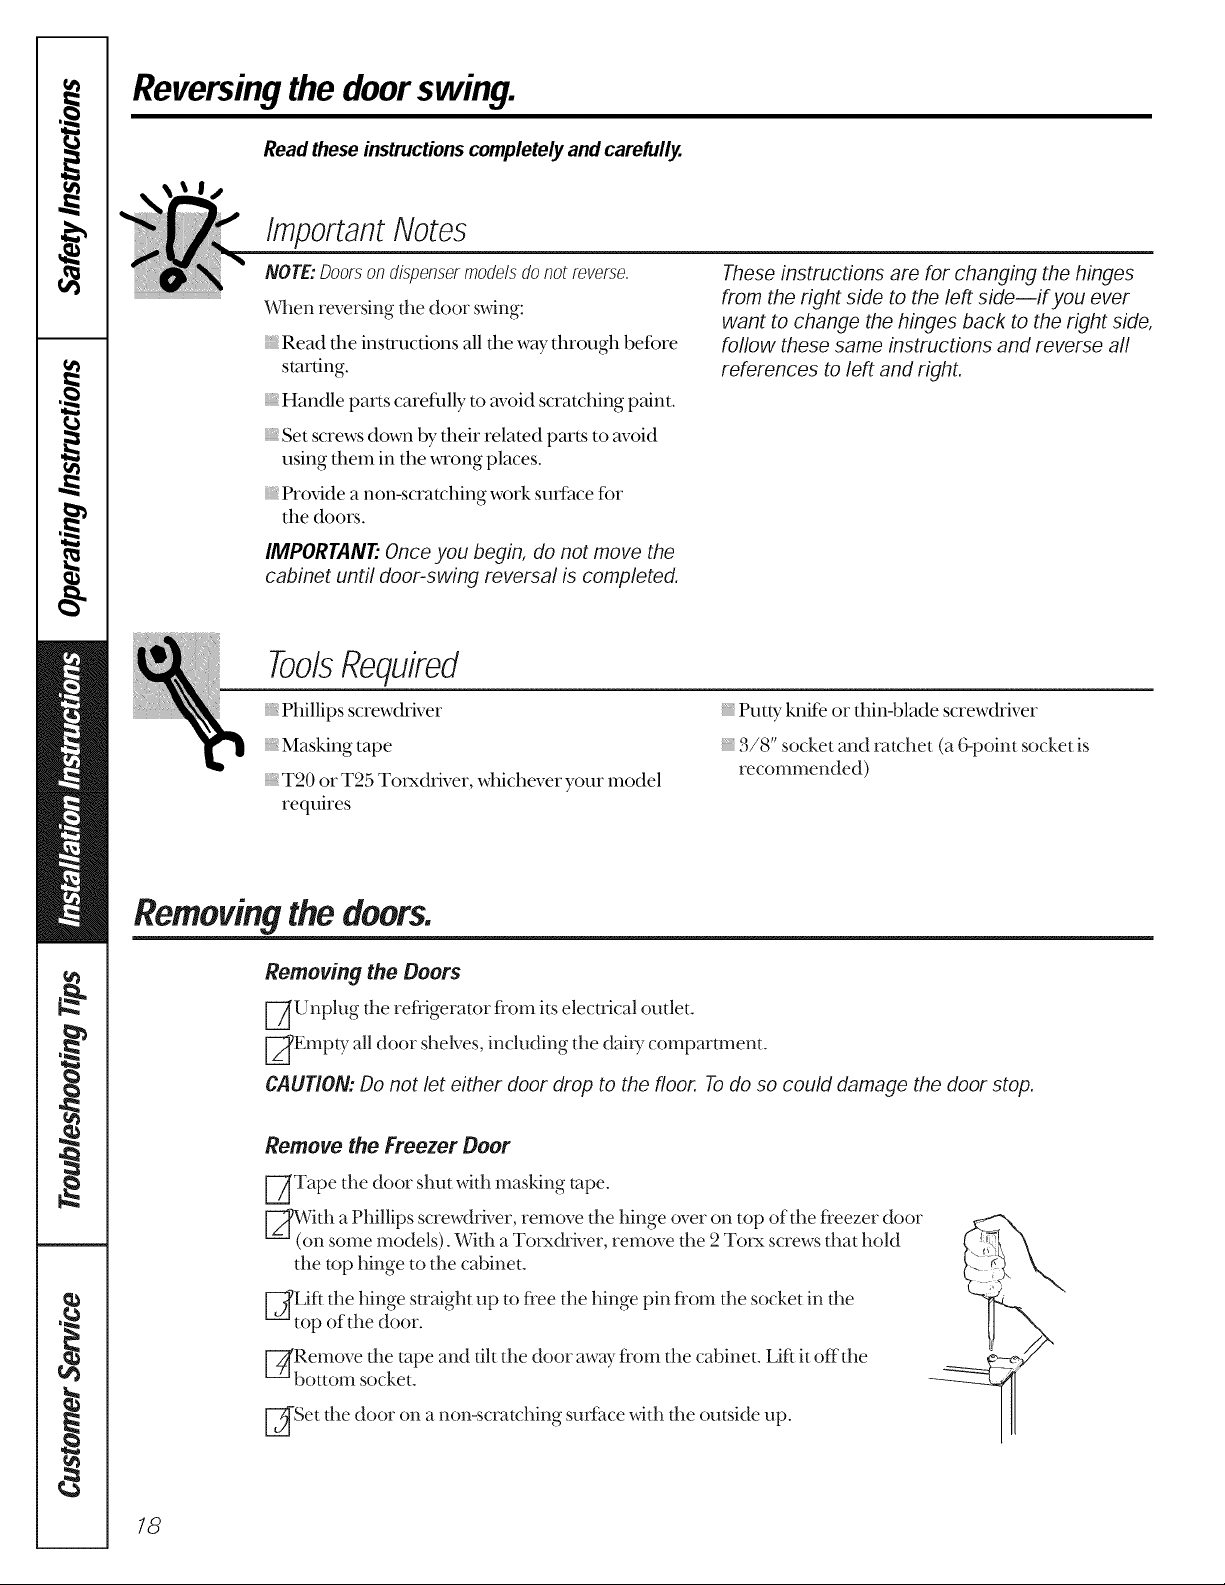
Reversingthe doorswing.
Read theseinstructions completely and carefully.
Important Notes
NOTE:Doorsondispensd modelsdonotreverse,
When reversing tim door swing:
Read the instructions all the way through befbre
starting.
Handle parts careflllly m avoid scratching paint.
Set screws down by their related part_sto avoid
using theln in the wrong places.
Provkte a non-scratching work surface fbr
the doors.
IMPORTANT..Once you begin, do not move the
cabinet until door-swing reversal is completed.
ToolsRequired
Phillips screwdriver
Masking rope
T20 or T25 Totxdfiver, whichever your model
requires
These instructions are for changing the hinges
from the right side to the leR side--if you ever
want to change the hinges back to the right side,
follow these same instructions and reverse all
references to left and right.
Put Wknife or thin-blade screwdriver
3/8" socket and ratchet (a (;-point socket is
recommended)
Removingthe doors.
Removing the Doors
[--_Unplug the refiigerator from its electrical outlet.
[_Ernpb7 all door shelves, including tt_e dai U compartment.
CAUTION: Do not let either door drop to the floor. Todo so could damage the door stop.
Remove the Freezer Door
[--_Tape tt_e door shut wid_masking tape.
[_With a Phillips screwdriver, remove dm hinge over on top of tt_efl'eezer door
n some models). With a Totxdriver, remove dm 2 Totx screws tt_at hold
dm top hinge to tt_e cabinet.
[_Lifl the hinge smlight tip to fi'ee tt_e hinge pin fi'om dm socket in dm
top of din d'_)or. '
[_Remove rim tape and tilt tt_e door away from tt_ecabinet. Lift it offdm
bottom socketl
-Set the door on a non-scratching suK_lce xdd_ the outside tip.
18
Page 19
Remove the Fresh Food Door
V-_Tape the door shut _ith masking tape.
[_Remove the hinge pin _ith a 3/8" socket and rat(:het.
E_Remove tape and tilt the door awW fi'Oln the cabinet. Relnove and save the washer on the hinge pin.
E_Lift the door straight up m fl'ee its bottom socket fl'Olnthe pin in the bottom hinge bracket.
E_-Set the door on a non-scratching suK_tce with the out_si(teup.
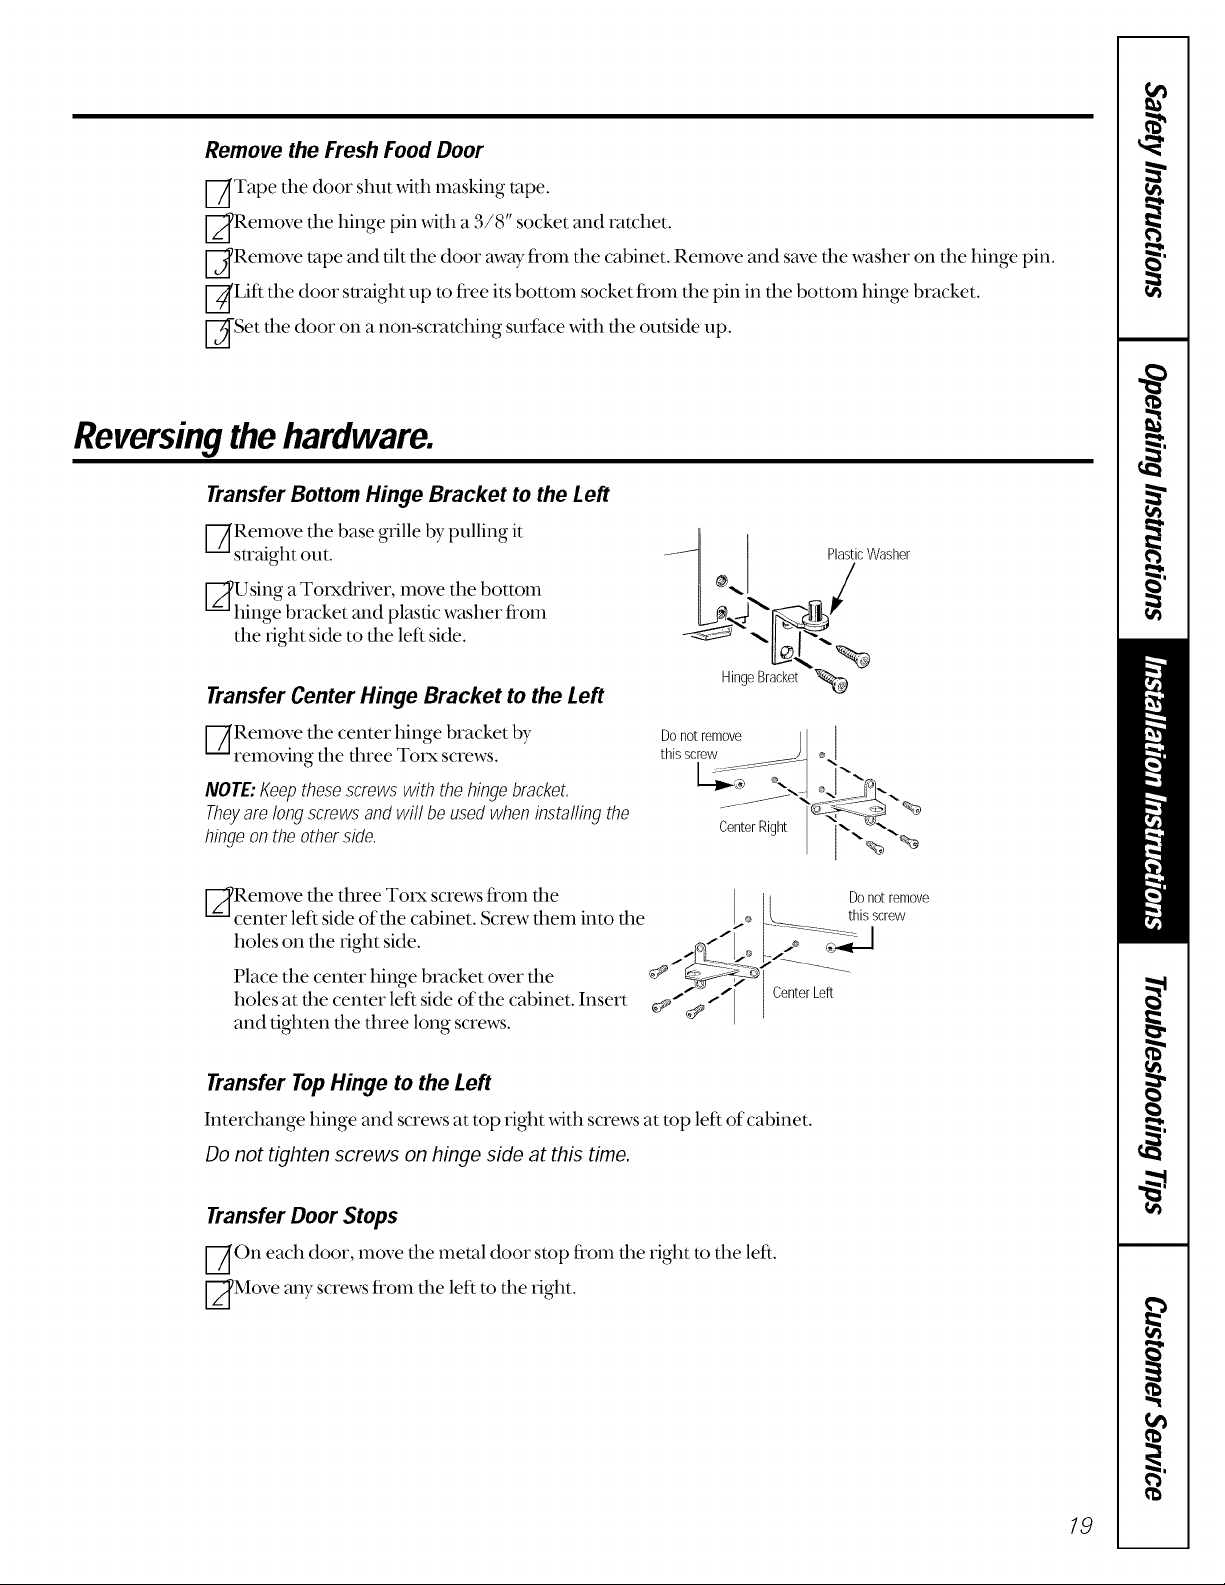
Reversingthe hardware.
Transfer Bottom Hinge Bracket to the Left
V_Remove the base grille by pulling it
straight out.
[_Using a Totxdriver, move the bottom
_ l PlasticWasher
I°. /
hinge bracket and plastic washer fi'om
the tight side to the left side.
Transfer Center Hinge Bracket to the Left
HingeBracket
V-_Remove the center hinge bracket t)y
removing the three Tot'S:screws.
Do notremove _ I
this sc[ew ........... _ _,,_t
NOTE:Keepthesescrewswith the hingebracket,
Theyare longscrewsandwill beusedwheninstallingthe
hingeon theotherside,
Remove dm three Totx screws from dm
center left side of din cabinet. Screw dram into dm
holes on dm right side.
Place the center hinge bracket over dm
holes at dm center left side of dm cabinet. Insert
and tighten tim three long screws.
CenterRight _._:_
Lo I Donotremove
}.____ this screw
Center [_eft
Transfer Top Hinge to the Left
Interchange hinge and screws at top right with screws at top left of cabinet.
Do not tighten screws on hinge side at this time.
Transfer Door Stops
WOn each (toot', move the metal (toot" stop fi'om the right to the lefL
[_Move any screws fi'om the left to the right.
19
Page 20
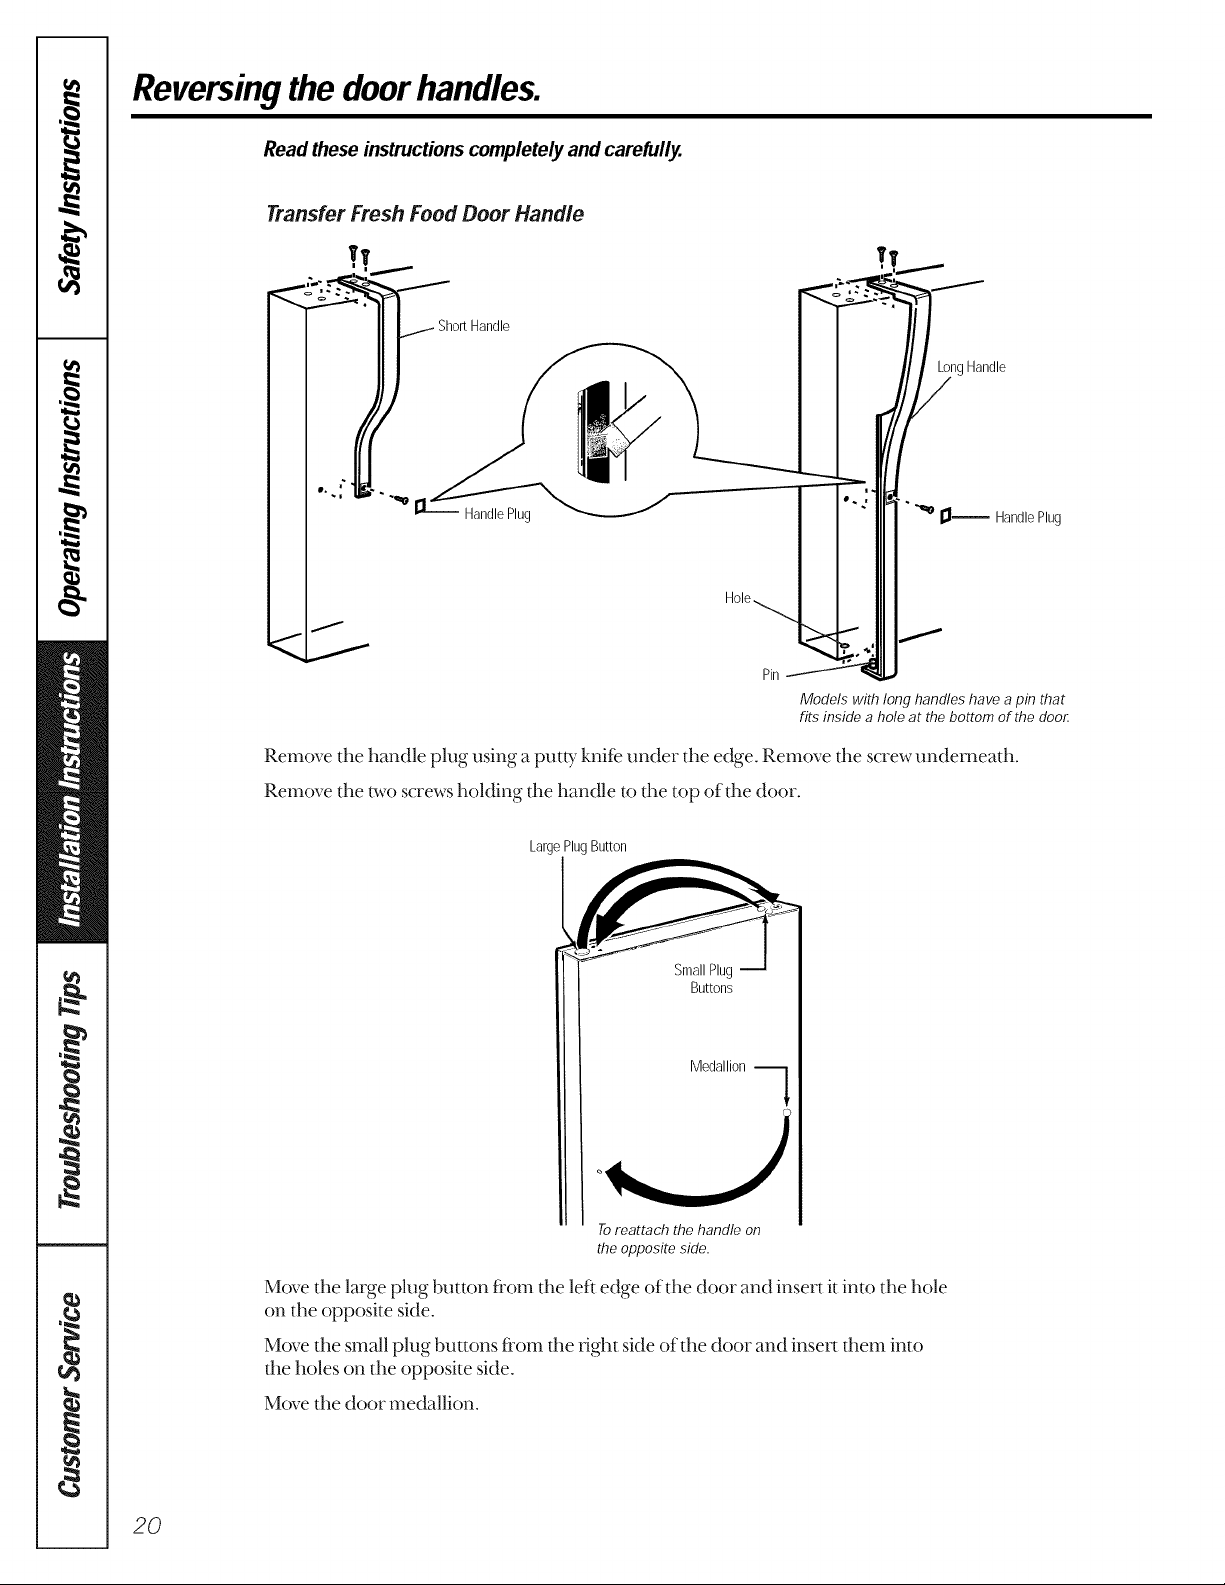
Reversingthe doorhandles.
Read theseinstructionscompletely and carefully..
Transfer FreshFoodDoor Handle
ffl
ShortHandle
HandlePlug _ I_ HandlePlug
J
LongHandle
Hole
Pin
Models with long handles have a pin that
fits inside a hole at the bottom of the doo_
Remove the handle plug using a putty knife under the edge. Remove the screw underneath.
Remove the m_oscrews holding the handle to the top of the door.
LargePlugButton
Buttons
Medallionq
Toreattach the handle on
the opposite side.
Move the large plug button from the left edge of the door and insert it into the hole
on the opposite side.
20
Move the small plug buttons from the fight side of the door and insert them into
the holes on the opposite side.
Move the door medallion.
Page 21
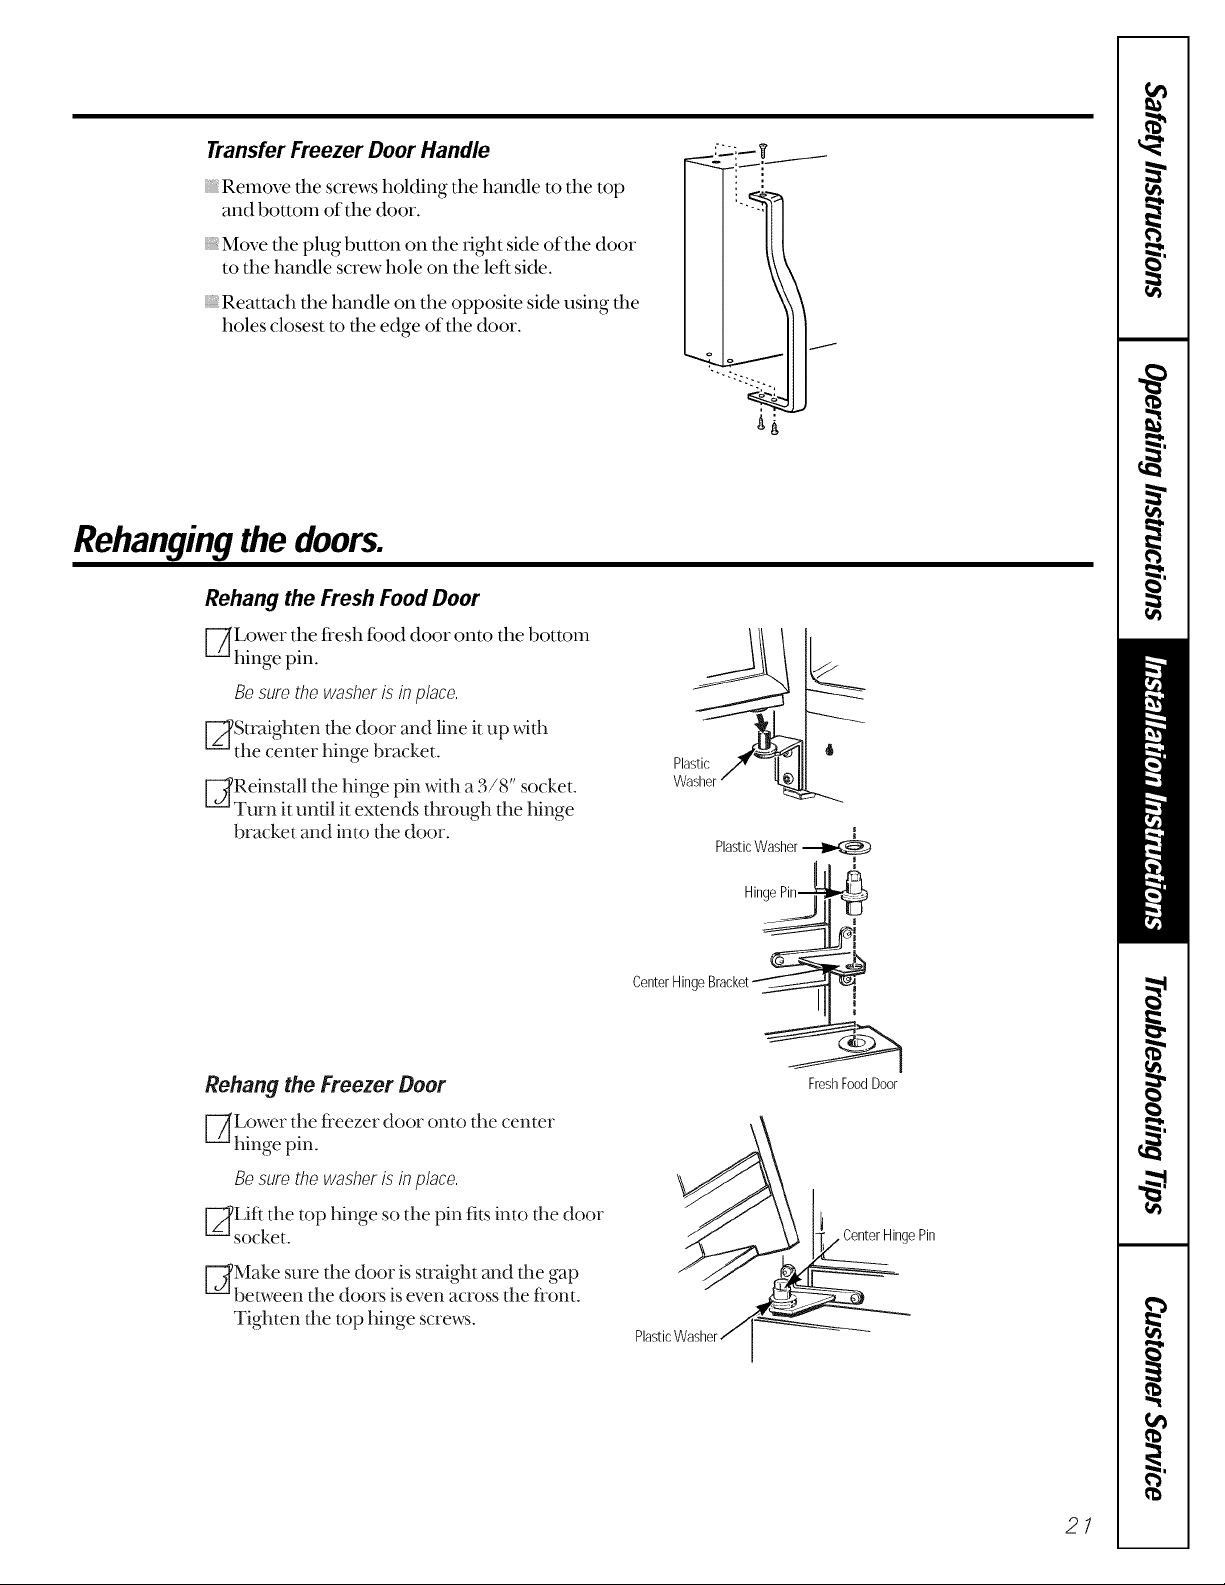
Transfer Freezer Door Handle
Remove the screws holding the handle to the top
and bottom of the door.
Move the plug button on the tight side of the door
to the handle screw hole on the left side.
Reattach the handle on the opposite side using the
holes closest m the edge of the door.
Rehangingthe doors.
Rehang the Fresh Food Door
F-/_Lower the flesh foo(t (toot" onto the bottom
hinge pin.
Besurethe washerisinplace,
° ili
[_Straighten the (loot" and line it up with
the (_enter hinge bracket.
[_Reinstall tt_e hinge pin wid_ a 3/8" socket.
Turn it until it extends through tt_e hinge
bracket and into the door.
Rehang the Freezer Door
--/Lower the fi'eezer door onto the center
hinge pin.
Besurethe washeris inplace,
[_Lifl tt_e top hinge so tt_e pin fits into tl_edoor
socket.
[_Make sure the door isstraight and the gap
between the doors is even ;_crossthe fi')mi.
Tighten the top hinge screws.
PlasticWasher
CenterHingeBracket_
}
1'
FreshFoodDoor
I
HingePin
21
Page 22
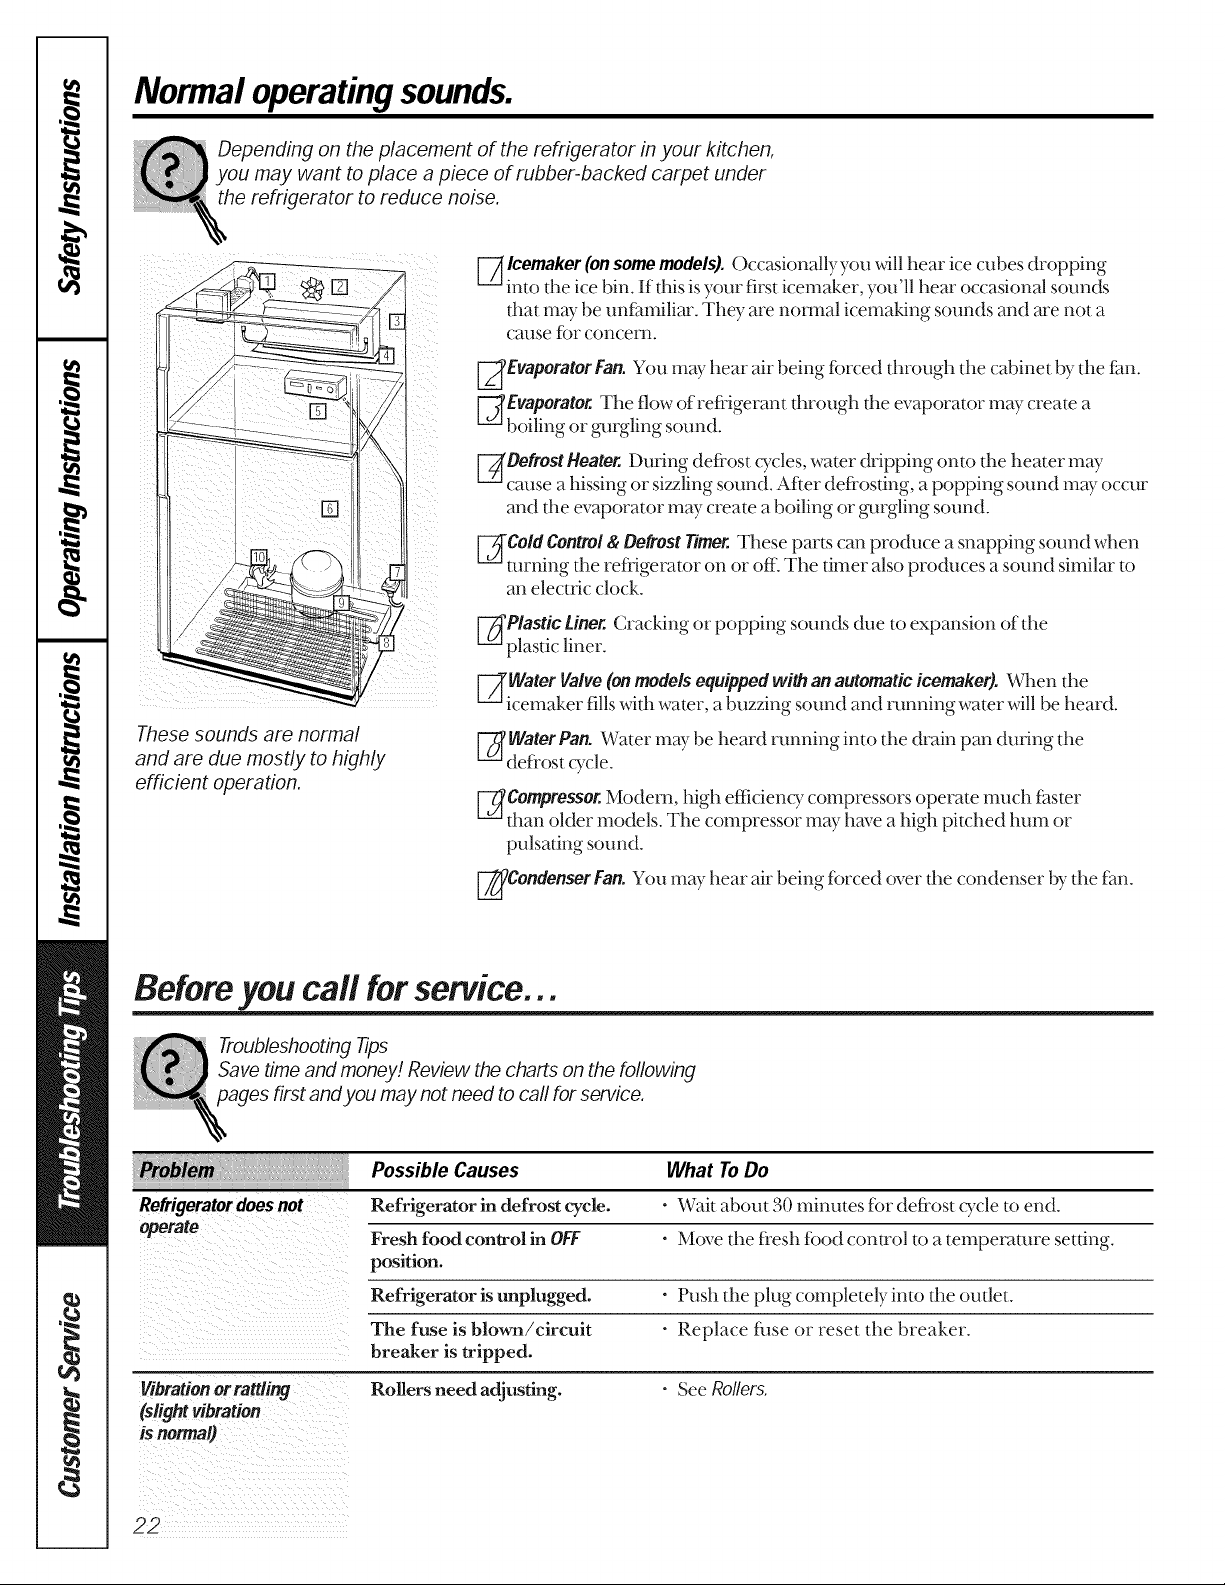
Normal operatingsounds.
Depending on the placement of the refrigerator in your kitchen,
you may want to place a piece of rubber-backed carpet under
the refrigerator to reduce noise.
[-_lcemaker (on some models). Occasionallyyou _11 hear ice cubes dropping
into the ice bin. If this is your first icernaker, you'll hear occasional sounds
E_Defrost Beater. During defrost QTcleswater dripping onto the hemer may
_Cold Control &Defrost rimer. These par_s can produce a snapping sound when
plastic liner.
tt_at may be unf:mniliar. They are nomml icemaking sounds and are not a
cause fbr concern.
£vaporatorFan. You may hear air being ff_rced fl_rough tt_ecabinet by tt_e tim.
Evaporator. The flow of refrigerant fl_rough tt_e evaporator may create a
boiling or gurgling sound. '
cause a hissing or sizzling sound. After defrosting, a popping sound may occur
and fl_eevapormor may create a boiling or gurgling sound.
turning the refiigerator on or off The dmer also produces a sound similar to
an electric clock.
Plastic Liner. (;racking or popping sounds due to expansion office
WaterValve(onmodelsequipped withanautomaticicemaker).When the
cemaker fills wifl_water, a buzzing sound and running water willbe heard.
These sounds are normal
and are due mostly to highly
efficient operation.
Troubleshooting Tips
Save time and money! Review the charts on the fofowing
pages first and you may not need to call for service.
Possible Causes What ToDo
Refrigerator does not Refrigerator in defrost cycle. • Wait about 30 minutes for defrost cycle to end.
operate Fresh food control in OFF • Move the flesh fbod control to a temperature setting.
position.
Refrigerator is unplugged. • Push tl_e plug completely into the outlet.
The fuse is blown/circuit • Replace fllse or reset the breaker.
breaker is tripped.
WaterPan.Water may be heard running into the drain pan during the
defrost QTcle.
Compressor. Modem, high ef[icienc 7 compressors operme much fi_ster
titan older models. The compressor may hm_e a high pitched hum or
pulsating sound.
CondenserFan.You may hear air being [brced over fl_e condenser 1))7the f_m.
Vibrationorrattling Rollers need adjusting. • See Rollers.
(slight vibration
isnormal)
22
Page 23

Possible Causes
What ToDo
Motor operates for
longperiods or cycles
on and offfrequently.
(Modern refrigerators
with more storage
space and a larger
freezer require more • (_heck to see if package is holding door open.
operatingtime. They
start and stop often • This is nomlal.
to maintain even
temperatures.) • See About the controls.
Freshfood orfreezer • See About the controls.
compartment too warm cold enough•
Frostor ice crystals Door left open. • Check to see if package is holding door open.
on frozen food
(frost within package Too frequent or too long
is normal) door openings•
Normal when refrigerator
is first plugged in.
Often occurs when large
amounts of food are
placed in refrigerator.
Door left open•
Hot weather or frequent
door openings•
Temperature controls
set at the coldest setting.
Grille and condenser
need cleaning.
Temperature control not set
Warm weather or frequent • Set tile telnperamre control one step colder.
door openings. See About the controls.
Door left open. • Check to see ifpackage is holding door open.
Package blocking air duct in • Check re see if package is blocking air duct in freezer
freezer compartment. COlnpamnent.
• Wait 24 hours for the refrigerator to COlnpletely
cool down.
• This is normal.
• See Care and cleaning.
Automatic icemaker
does not work
(onsomemodels)
Icemaker feeler arm in
the STOP(up) position.
• Move tile feeler axm to tile ON((to_a) position.
• Cubes nlay have fllsed to tile side of the mold. Move
tile feeler aI'li1[o tile STOP (up) position then relnove
tile cubes.
Water supply turned off or • See Installing the water line.
not connected•
Freezer compartment • Wait 24 hours for tile refi'igerator to COlnplerely
too warm. cool down.
Piled up cubes in the storage • Level cubes by hand.
bin cause the icemaker
to shut off•
Cubes too small Water shutoff valve connecting • Call tile plumber to clear tile valve.
refrigerator to water line may
be clogged.
Slow ice cube freezing Door left open. • Check to see if package is holding door open.
Temperature control not set • See About the controls.
cold enough.
Ice cubes have Ice storage bin needs cleaning. • Elnpb7 and wash bin. Discard old cubes.
odor/taste
Food transmitting odor/taste • Wrap fbo(ls well.
to ice cubes.
Interior of refrigerator • See Care and cleaning.
needs cleaning.
23
Page 24
Beforeyou call forservice...
Moistureformson
cabinetsurface
Possible Causes
Not unusual during
periods of high humidity.
What ToDo
• Wipe sm:fhce (hy and make sure the power saver switch
is not set at the POWER SAVERsetting.
betweenthedoors
Moisturecollects inside
(inhumidweather,air
Too frequent or too
long door openings.
carries moisture into
refrigeratorwhendoors
areopened)
Foodfreezing in Food too close to air vent. • Move the fbod away fl'om the air vent (near the controls).
therefrigerator
Fresh food control is set • Move the fl'esh food control to a warmer temperature.
too cold.
Door does not close Rollers need adjusting. • See Rollers.
byitself
Cube dispenser does not Icemaker turned off or • Turn on icemaker or water supply.
work (on some models) water supply turned off.
Ice cubes are frozen to • Remove cubes and move the feeler am_ to the
icemaker feeler arm. ON (down) position.
Irregular ice clumps in • Break up with fingertip pressure and discard
storage container, remaining clumps.
• Freezer may be too warm. Ac!jtlst the fl'eezer control
to a colder setting, one position at a time, until
clumps do not form.
Refrigerator has odor Foods transmitting • Foods with strong odors should be tightly xs_'appe(1.
odor to refrigerator. • Keep an open box of baking soda in the refligerator;
replace eveiy three months.
Interior needs cleaning. • See Care and cleaning.
Hotair frombottom
of refrigerator
Orangeglow in the
Normal air flow cooling
motor. In the refrigeration
process, it is normal that
heat be expelled in the
area under the refrigerator.
Some floor coverings will
discolor at these normal
and safe temperatures.
Defrost heater is on.
• Your floor covering supplier should be consulted if you
object to this discoloration.
• This is normal.
freezer
24
Page 25

CONSUMER WARRANTY
(for customers in 0anada)
Your refrigerator is warranted to be free of defects in material and workmanship.
What is covered
I(0t3]
[(0,9}
How Long Warranted
(From Date of Sale)
it_3/
1¢0_3]
Compressor Five (5) Years Five (5) Years Five (5) Years
[(#_3]
I¢X31
Sealed System (including Five (5) Years Five (5) Years Five (5) Years
[t'_/
evaporator, condenser
1¢'4_3J
tubing and refrigerant)
[PX3]
I(_z31
All Other Parts One (1) Year One (1) Year One (1) Year
[Co_31
!
TERMS AND CONDITIONS:
This warranty applies only for single family
domestic use in Canada when the
Refrigerator has been properly installed
according to the instructions supplied by
Camco and is connected to an adequate
and proper utility service.
Damage due to abuse, accident, commercial
use, and alteration or defacing of the serial
plate cancels all obligations of this warranty.
Service during this warranty must be
performed by an Authorized Camco
Service Agent.
Neither Camco nor the Dealer is liable for
any claims or damages resulting from any
failure of the Refrigerator or from service
delays beyond their reasonable control.
To obtain warranty service, purchaser must
present the original bill of sale. Components
repaired or replaced are warranted through the
remainder of the original warranty period only.
WHAT IS NOT COVERED:
• Service trips to your home to teach you
how to use the product.
• Damage to finish after delivery.
• Improper installation--proper installation
includes adequate air circulation to the
refrigeration system, adequate electrical,
plumbing and other connecting facilities.
• Replacement of house fuses or resetting
of circuit breakers.
®
Replacement of light bulbs.
®
Damage to product caused by accident,
fire, floods or acts of God.
®
Loss of food due to spoilage.
®
Proper use and care of product as listed
in the owner's manual, proper setting of
controls.
WARRANTOR IS NOT RESPONSIBLE
FOR CONSEQUENTIAL DAMAGES.
Parts
Repair or Replace
at Camco's Option
This warranty is in addition to any statutory
warranty.
Labour
IMPORTANT
Keep this warranty and your bill of sale as proof of original purchase and purchase date.
Camco Service is available coast to coast.
If further help is needed concerning this warranty, contact:
Manager, Consumer Relations
Camco Inc.
Suite 310
1 Factory Lane
Moncton, N.B.
E1C 9M3
25
Page 26
Refrigerator Warranty(.ForcustomersJntheUnitedStates)
Aft warranty service provided by our Factory Service Centers,
or an authorized Customer Card _'technician. For service,
call 800-GE-CARES.
GE Will Replace, At No Charge To You:
OneYear
Fromthe dateof the
originalpurchase
FiveYears
Fromthe dateof the
originalpurchase
Anypartof din refrigera[or which f:ailsdue [o a defec[ in materials or workmanship.
During this full one-yearwarranty,GE _dll also prox_(le, freeof charge,all labor
and in-home sel_i(:e to replace tim defective part.
Any part ofthe sealed refrigerating system (d_e compressor, condenser, evaporator
and all connecting robing) which fhils due to a defect in materials or workmanship.
Dunng d_is five-yearwarranty,GE will also provide, freeofcharge,all labor and
in-home sel_ice m replace the defective part.
Lifetime
From the date of the
original purchase
Service trips to your home to teach you how to use the
product.
Improper installation.
Failure of the product if it is abused, misused, or used for
other than the intended purpose or used commercially.
Loss of food due to spoilage.
Anysee-throughpan ordrawerflmflshed wid_ [t_erefrigerator if [t_e pan or drawer
breaks dining notTnal household use. Drawer covers are no[ included.
Replacement of house fuses or resetting of circuit
breakers.
Damage to the product caused by accident, fire, floods or
acts of God.
Incidental or consequential damage to personal property
caused by possible defects with this appliance.
This warranty is extended to the original purchaser and any succeeding owner for products purchased for home
use within the USA. In Alaska, the warranty excludes the cost of shipping or service calls to your home.
Some states do not allow the exclusion or limitation of incidental or consequential damages. This warranty gives
you specific legal rights, and you may also have other rights which vary from state to state. Toknow what your
legal rights are, consult your local or state consumer affairs office or your state's Attorney General
Warrantor: General Electric Company.Louisville, KY 40225
26
Page 27

Notes
h
A
hi
h
A
hi
w
h
A
hi
!
tan
27
Page 28

.g
m
w
w
w
Mesures de securite.
tVlesuresdesOcur/te.. .29
Cordonsprolonga_eurs......... 29
Raccordementdectrique....... 30
Fiched_dapcac/on 30
Fonctionnement
Commandes........ 37
Camcterisfiques....... 32-35
Machinea glaGons
aucomatique..... 36
Distributeurd'eau
etdeglagons.......... 37
Entretienet nettoyage...... 38,39
Felicitations!
Desormaisvous faitespattie de la famille GE.
Bienvenue dans la fitmille GE. Nous sommes tiers de
la qualit4 de nos pro&fits et de la fiabilit4 de notre
service apr&s-vente. Vous le consmterez dans le
prdsent manuel, f:acile"aufiliser, et dans lavoix
amicale de notre personnel (h.1sel_ice a la client_:le.
Mais, surtout, vous le constaterez chaque fbis que
vous vous se_irez de votre r4flig4rateur. C'est
important, car vou'e nouvem._ r4fligOrateur fera
parde de vou'e famille pendant des ann_3es. Et nous
esp4rons que vous ferez parde de la n6tre pendant
longtemps aussi.
Nous vous remercions de vou'e achat GE, et espdrons
qu'_'_l'm,enir vous penserez 5 nous chaque lois que
vous aurez besoin d'un dlectrom(_nager de qualitd.
GEet vous,tin partenariat deservice.
h
m
w
h
m
m
.g
installation
Preparation.......... 40
Installationdela
conduited'eau....... 41-43
InversiondeIouvertum
desportes. . . 44-47
Conseils dede.pannage
Bruitsdefonctionnemen_
normaux. .. 48
Avantd'appeler
unreparateur.... 48-51
k CONSERVERSOI6NEUSEMENT
Transcrivez losnumeros de modole et de serie ici.
#
#
Ils tigurent sur l'dtifluette flui se trouve 5 l'interieur du
compardment rdfl'ig4rateur.
Agrafez ici votre facture ou une copie de votre choque.
Pour b4ndticier de r4parations sous garande, il f:aut fbumir une
preuve de la (late d'achat d'origine.
LISEZVOTREMANUEL
Vous y trouverez de nombreux conseils pour l'utilisafion et
l'entretien de votre rdtiig4rateur. Ces quelques mesures pr&,entives
vous permem'ont d'(_conomiser du temps et de l'argent, et, ainsi, de
prolonger la xie de votre rdfiigdrateur.
Vous trouverez des solutions m_xprobl&mes courants que vous
pouniez rencontrer dans la section Avantd'appelerunreparateur.
Et, en consultant d'abord nos Conseilsdedepannage,vous pourrez
peut-_u'e &iter de fidre appel 5un r@arateur.
Service a la clientele
Garantiepour
ladientde auCanada .52
Numerosdeservice ......... 53
w
28
SI VOUSAVEZBESOINDESERVICE
Sivous avez besoin de se_ice, vous savez que vous n'avez qu'_'_nous
t41@honer. Vous trouverez a la tin du present manuel les num4ros
sans fl'ais du service a la clientele. Aux Etats-Unis,vous pouvez
appeler 24 heures parjour, 7jours par semaine au GE Answer
Cenmr ®,800.626.2000. At* Canada, appelez le 1-800-361-3400.
Page 29
MESURESDESECURITEIMPORTANTES.
LISEZD'ABORDTOUTESLESDIRECTIVES.
AVERTISSEMENT!
N'utilisez cet Olectromonager que pour I'usage auquel il est destinO,comme expliquo dans le prOsent manuel.
MESURESDESECURITE
Lorsque vous utilisez un appareil Olectrique, observez toujours les mesures de socurito de base,
y compris les suivantes.
Installez le rdffigdrateur confbrmdment aux
directives d'installation mTantde l'utiliser.
Ne laissez pas les enfants grimper, s'asseoir, se
tenir debout ni se pendre mix clwettes du
rdfiigdrateur. Ils pomx'aient endomlnager le
rdfiigdrateur et se blesser gravelnent.
Ne recongelez pas les aliments surgelds qui ont
compl?_tement ddgeld.
N'entreposez et n'utilisez pas d'essence ou autres
vapeurs et liquides inflammables "aproximitd de
cet appareil ou de tout autre appareil
dlectrolndnager.
{{{iiiiiiili
l_;loignez les doigts des parties du rdfiigdrateur off
l'on peut facilement se pincer : les espaces entre
les portes et entre les portes et les placards sont
toujours dtroits. Soyez prudent lorsque vous fetmez
les portes de l'appareil en prdsence des enfants.
Sivotre rdffigdrateur est dotd d'une machine "a
glaqons m_mmatique dvitez le contact avec les
pieces mobiles du lndcanisme Ojecteur, ou avec
l'dldment chauffant qui lib?_reles glagons. Ne
posez pas les doigt_sou les mains sur le mdcanisme
de la machine "aglagons pendant que le
rdfiigdrateur est branchd.
Ne touchez pas les surfaces ffoides du congdlateur
sivous m_ezles mains humides ou mouilldes : la
peau risque d'adhdrer "aces surfaces tr&sfi'oides.
Ddbranchez votre rdffigdrateur mTant de le
nettoyer ou de le rdparer.
REMAROUE: Nousvousrecommandonsvivementdeconfier
toutereparationauntechnicienqualifie,
Lorsque vous rdglez la commande sur OFF
(dteint), l'alimentation dlectfique de l'mnpoule
n'est pas coupde.
IMPORTANT: COMMENTVOUSDEBARRASSER
CONVENABLEMENTDEVOTREANCIENREFRIGERATEUR
Les etffhnt_spris au pihge ou morts d'asph}xie sont
toujours d'acmalitd. Les rdfiigdrateurs abandonnds
sont toujours aussi dangereux, m4me si on n'attend
que <<quelquesjours,, pour s'en ddbarrasser. Sivous
ne gardez pas votre ancien rdfiigdrateur, veuillez
sum'e les directives ci-dessous afin de pr&,enir les
accident.s.
Avant de volts debarrasser de votre ancien
refrigerateur ou congelateur :
Ddmontez les portes.
Laissez les clayettes en place afin d'elnpdcher les
e_ffhnts de gfimper "al'intdfieur.
Se debarrasser du CFC
Votre ancien rdffigdrateur a un systeme de
reffoidisselnent qui a utilisd les CFC
(chlorofluorocarbones). Les CFC sontjugds nocifs
pour l'ozone stratosphdrique.
Sivous vous ddbarrassez de votre ancien
rdffigdrateur, assurezwous que le fiigorig&ne avec
CFC soit enlevd cotr'ectement par un technicien
qualifid. Sivous libdrez intentionnellement ce
fiigorigOne avec CFC vous pouvez Otresounfis aux
contraventions et "al'elnprisonnelnent sous
provisions des lois sur l'environnelnent.
CORDONSPROLONGATEURS
Nous vous recommandons fortement de ne pas utiliser de cordons prolongateurs a cause des risques
potentiels qu'ils prOsentent dans certaines conditions.
Toutefiois sivous ddcidez d'utiliser tout de m&lne un cordon prolongateur, il est absolument ndcessaire
qu'il s'agisse d'un cordon "a3 ills avec lnise ala terre pour appareils dlectromdnagers homologud UL
(mkxEtats-Unis) ou holnologald CSA (au Canada), pouml d'une fiche et d'une prise lnises "ala tetr'e
de 15 amp&res (nfininmm) et de 120 volts.
29
Page 30

MESURESDESECUR/T£/MPORTANTES.
USEZD'ABORDTOUTESLESDIRECTIVES.
AVER'
RACCORDEMENTEIECTRIQUE
Ne coupez ni refirez en aucun cas la troisiOme broche (raise a la terre) de la fiche du cordon
d'afimentation. Pour votre securite, cet appareil doit 6tre correctement mis 8 la terre.
Le cordon d'alimentation tie cet appareil est muni
d'une fiche 5 3 broches (raise 5 la terre) qui se
branche dans une prise murale ordinaire 5 3
alvdoles (raise 5 la terre) pour rdduire au minimmn
les risques tie chocs dlectriques.
Faites examiner la prise tie courant et le circuit par
tin dlectricien qualifi_3pour vous assurer que laprise
est cotr'ectement raise 5la telTe.
Si la prise murale est du t)qoestandard 5 2 alvdoles, il
vous incombe de la faire remplacer par une prise 5 3
alvdoles correctement mise ;_la terre.
Le rdffig_3rateur doit toujours _tre branchd dans sa
propre prise de courant, dont la tension nominale est
idenuque 5 celle indiqude stir la plaque si_mldtique.
Cetm prdcaudon est recommandde pour garandr
un rendement optimum et dviter une surcharge ties
circuits dlectriques de la rdsidence, ce qui pourrait
crder tin risque d'incendie par surchauffe ties ills.
Ne ddbranchezjamais le r_3flJgdrateur en tirant stir le
cordon d'alimentadon. Saisissez fermement la fiche
du cordon et urez droit pour la redrer de la prise.
Rdparez ou remplacez imm(_diatement tout cordon
efIiloch(_ ou endommagd. N'utilisez pas un cordon
fendilld ou prdsentant ties signes d'usure.
Lorsque vous d@lacez votre rdfligdrateur du mur,
f:aitesattention de ne pas le 6dre rouler stir le cordon
d'alimentadon _din de ne pas l'endommager.
FICHEDADAPTATION
Nous vous recommandons fortement de ne pas ufiliser une fiche d'adaptafion a cause des risques
potenfiels qu'elle presente dans certaines circonstances.
Toutefbis, si vous ddcidez d'utiliser tout tie m_me
une fiche d'adaptation, vous pouvez ef_eculer un
raccordement temporaire, si les codes locaux le
pennettent, dans une prise tie courant ;_2 alvdoles
addquatement mise ;_la ten'e en utilisant une fiche
d'adaptation homologude UL, en vente dans la
plupart ties quincailleries.
La fente la plus longue tie la fiche doit _tre alignde
m,ec la fente la plus longue de la prise murale afin
d'assurer la polarit(_ appropride pour le
branchement du cordon d'alimentadon.
Si la borne tie mise 5la terre tie la fiche casse,
N'UYlUSEZPASl'appareil rant qu'une mise 5 la telTe
addquate n'aura pas dt(_rdtablie.
Lefait defixer la bornederaisea la termde la fiche
d'adaptationa laplaquedela prisedecourantn_ssure
pasautomatiquementla mise_ la termde I_ppamil.II
faut quela vissoit enmetal,nonisolee,etquelaprisede
courantsoit miseala termparI_ntremiseducablagede
la residence.Faitesverifierle circuitparundectricien
qualifiepour vousassurerquelapriseestadequatement
misea la term.
30
Lorsque vous ddbranchez le cordon d'alimentation
de la fiche d'adaptation, saisissez toujours la fiche
d'une main pendant que vous tirez sur la fiche du
cordon d'alimenmtion de l'autre. Sinon,
la borne de mise 5 la ten'e de la fiche d'adapmdon
risque de casser avec le romps.
Veuillezlife etsuivreattentivementcesmesuresdesecurite.
CONSERVEZ CES DIRECTIVES
Page 31
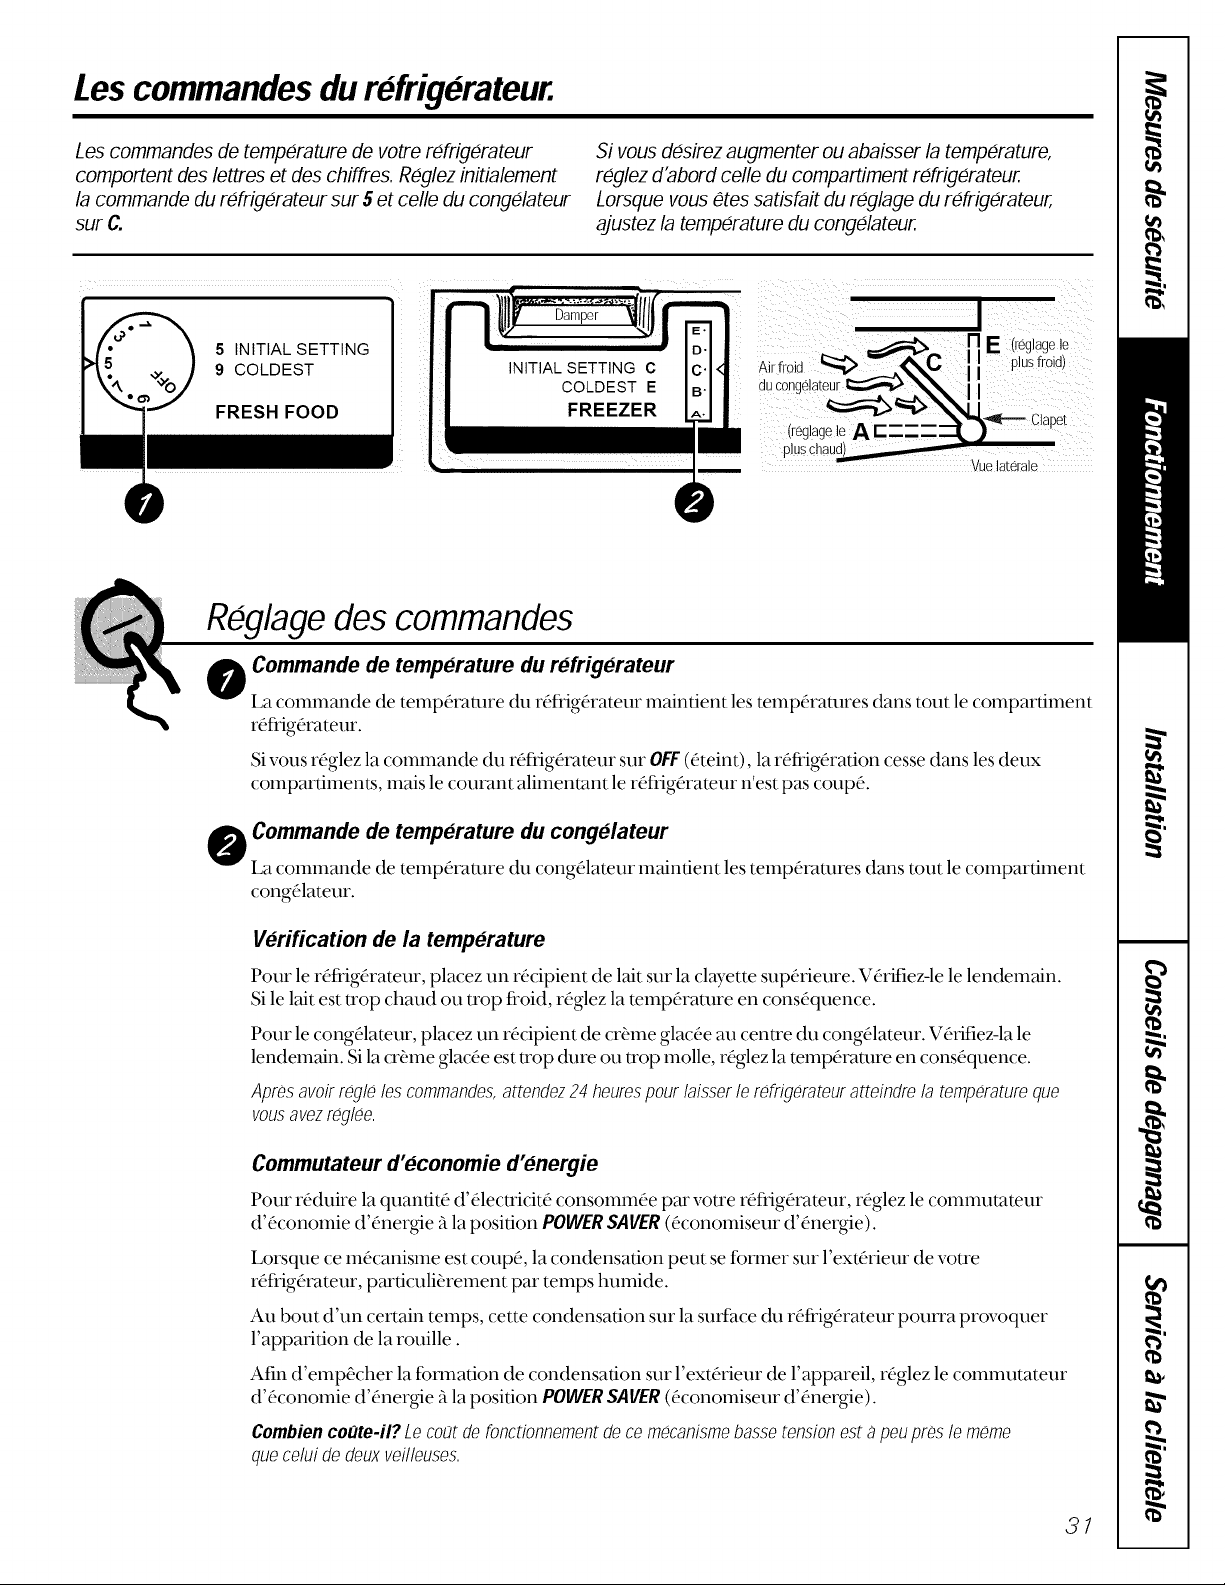
Lescommandesdurefrigerateur.
Les commandes de temperature de votre rOfrig6rateur
comportent des lettres et des chiffres. Reglez initialement
la commande durefrigerateur sur 5 et celle du congelateur
sur C.
5 INITIAL SETTING
9 COLDEST
FRESH FOOD
Roglage des commandes
o Commande de temp#rature du r#frig#rateur
La commande de temperature (hi rdfl'igdrateur lnaintient les temperatures dans tout le colnpartiment
refl'igerateur.
Si vous desirez augmenter ou abaisser la temperature,
reglez d'abord celle du compartiment refrigerateur.
Lorsque vous 6tes satisfait du reglage du refrigerateur,
a]ustez la temperature du congdateur.
E (mglagele
plusfroid)
(]
(reglagele Am-:
Sivous reglez la coInmande du refligerateur stir OFF(eteint), la refi'igeradon cesse dans lesdeux
coInpartimenLs, mais le courant alimentant le refligerateur n'est pas coupe.
Commando de temperature du congelateur
La commande de temperature du congdlateur maintient les temperatures dans tout le compartiment
congelateur.
Verification de la temp#rature
Pour le refi'igerateur, placez tin recipient de lair sur la clayette superieure. Verifiez-le le lendeInain.
Sile lait est trop chaud ou trop fi'oid, reglez la teInperamre en consequence.
Pour le congelateur, placez un recipient de cr&Ineglacee au centre du congelateur. Vefifiez-la le
lendemain. Si la cr&Ine glacee est trop (hire ou trop molle, reglez la temperaulre en consequence.
Apresavoirregloloscommandos,attondoz24 hourospourlaissorle rOfrigOrateurattoindrola temperatureque
vousavezreglOo.
Commutateur d"economie d"energie
Pour reduire la quantite d'ele(:tricite consommee par votre refligerateur, reglez le coIninutateur
d'economie d'energie "ala position POWERSAVER(economiseur d'eneNie).
Lorsque ce mdcanisme est coupe, la condensation petit se former stir l'exterieur de votre
refl'igerateur, particuli_reInent par temps humide.
Au bout d'un certain temps, cette condensation stir la suKhce (hi refi'igerateur poun'a provoquer
l'apparition de la rouille.
Afin d'empecher la formation de condensation stir l'exterieur de l'appareil, reglez le comInutateur
d'economie d'energie "ala position POWERSAVER(economiseur d'eneNie).
Combiencoute-il? Lecootdofonctionnementdocemecanismebassotensionestapeuproslememe
queceluidedeuxveilleuses.
31
Page 32

Lesclayettes,les r6cipients et lesbalconnets.
Toutes/es caract6ristiques ne sont pas disponib/es sur tous /esmode/es.
Mise en place des clayettes
Les clayettes du rdfiigdrateur et du congdlateur sent rdglables.
Pour retirer
Sou_evez _,
_et dogagez Poussez
Systeme Quick Serve TM
_, versle
III _ haut
Pou[ouvdr: L
ATTENTION: Cesrecipients et leurs
couvercles ne sent pas conqus pour Otre
utilises darts un four standard, sur une
cuisiniere ou darts une rOtissoire. Line telle
utilisation peut Otredangereuse.
Les rdcipients Quick Sen,e se rangent dans
un support qui s'accroche sur la porto du
r_fiig(_rateur ou du cong(_lateur. Le support
peut _tre ddplacd de la rn_?me rnani_re que
les balconnets.
Balconnet _Quick Store_
Pour &4ter d'endommager ]erdfiigdrateur,
assurez-vousflue ]e ba]connet estfbrmd et
verrouilld avant de fermer la porte du
rdfi'igdrateur.
Ce balconnet peut _tre positionnd sur la
porte du rdfiigdrateur ou du congdlateur.
Pourre#mrle balconnet,soulevez-le et sortez-
le de son boitier.
Les rdcipients et leurs couvercles peuvent
atre utilisds au four fi micro-ondes, au
rdfi'igdrateur, et m_congdlamur.
Nolosutilisezpaspourcuiredesalirnents_haute
teneurengraisse,cornrnelebacon,ouceuxqui
contiennentbeaucoupdesucre,cornrnelesbonbons
etlessirops,Leshautestemperaturesdesgraisses
etdessucresrisquentdeprovoquerlaformationde
bulles3I'interieurdurOcipient,
Boitierdu
balconnet
32
Pourrepositionner le balconnet, soulevez le
bolder du balconnet et sortez-le des
supports moulds sur la porte. Vous n'avez
pas firetirer le balconnet de son boitier lors
de son reposidonnement.
Page 33

Lesbacs derangement.
Toutesles caracteristiques ne sont pas disponibles sur tous les moddes.
Bacs a fruits et a legumes
Siune quantitd d'eau excessive s'accumule
clans le fbnd des bacs, videz-les et essuyez-les.
Bacs a humidite reglable
Raglez la commande sin"HIGH(aleva) pour
que le bac consetsTe un de_'6 d'humidit6
61ev6pour la consets_ation des legumes.
Bacs a collations
Le bac ficollations peut _tI'e transportd fi
l'endroit qui convient le mieux aux besoins
de votre fmnille.
Rdglez la commande sur LOW(abaissd)
pour abaisser le degrd d'humiditd clans le
bac pour la consets_ation des fi'uits.
Bac a viande a temperature variable
Lorsque le bac est mis dans les 6 Dntes
supdrieures sur le c6td gauche et que le
levier est rdgld sur COLDEST(le plus fl'oid),
l'air du cong61ateur circule autour chl bac
pour le lnaintenir tr& fl'oid.
Vous pouvez ddplacer le bac et le ranger
n'importe quel emplacement si vous
ne ddsirez pas utiliser cette consets_ation
trbs fi'oide.
Le levier du bac peut etre rdgld fi n'importe
quelle position entre COLD(fl'oid) et
COLDEST(le plus fl'oid).
Lorsque le levier est rdgld sur COLD(ffoid),
les temp6ratures nonnales du rdfi'ig6rateur
seront maintenues.
Lorsque le levier est r_3gl_3sur COLDEST(le
plus ffoid) la temp_3rature clans le bac est le
plus fl'oid possible.
33
Page 34

Enlevementdes bacsde
rangementet de leurscouvercles.
Toutes/es caracterisUques ne sont pas disponib/es sur tous /es mode/es,
Bacs de rangement
Enlevement:
Cesbacspeuvent _tre facilement enlevdsen
les inclinant ldg_rement puis en les tirant
au-del5 de leurs buteos.
Sivous ne pouvez pas ouvrir la porte
suffisamment pour enlever le bac et le tirer
droit vers vous, glissez-le vers le milieu et
enlevez-le.
Etape 1
Enlevez leverre et ensuite le cadre. Lots de
la remise en place du verre, poussez le bord
arriere fblTnement dans le cadre.
Etape 2
I1 I iI
i I,IQ:,I // 1
Iiii I,I "_"_t, IL _l
.. _
l
Etape 3
Autrescaracteristiques.
Toutesles caractoristiques ne sont pas disponibles sur tous les modoles.
S#.parateurs
Placez un doigt de chaque c6td du
sdparateur pros de l'avant et ddplacez-le en
fbnction de vos besoins.
34
Page 35

Clayette de congelateur a deux positions
Dans lesmodules sans machine fi gla_ons, la
clwette peut ?2treinstall_3e fil'une ou l'autre
des deux positions.
Dans lesmodieles dot& d'une machine fi
gla¢ons, la clayette doit ?2treinstall_3efi la
position infiFdeure.
/ /
Casier a condiments
Le casier ficondiments garde ensemble
les condiments dont vous vous set_ez
fl'aquemment. I1se range dans les
balconnet_s de la porte du rafl'igarateur.
Porte-boissons
Le porte-boissons coulissant peut contenir
jusqu'fi douze boites de boissons gazeuses
ou deux bouteilles de vin ou d'eau (dans le
sens de la longueur). I1s'enlieve pour le
nettoyage.
Clayette supplementaire
de congelateur
Une poignae commode vous pennet de
transporter vos condimentsjusqu'fi la table
facilement.
Casier a bicarbonate
de soude
Balconnets de porte
35
Page 36

Machine a glaqonsautomatique.
II faut prevoir entre 8 et 12heures avant qu'un refrig6rateur nouvellement installe commence aproduire des glaqons.
Machinea positionSTOP
Brasrogulateura l_ _/_achine a gla_ons automatique (surcertains modoles)
Brasregulateura la
positionON Bras regulateur du modde
_MARCHE--abaisse) distributeur
!
La machine _'/glaqons produira environ 8 Bras regulateur a ia position
glaqons par (.Tcle--soit environ 1O0glaqons STOP(ARRET_releve)
tomes les 24 heures-selon la temparamre !
du congalateur, la mmparature ambianm,
la fi'aquence d'ouvermre des porms et
d'auu'es conditions d'utilisadon.
Sivous mettez votre raffigarateur en
marche avant que la machine _'_glaqons ne
salt alimentae en eml, varffiez que le bras
rag-ulateur de la machine "aglaqons est a la
position STOP (ARRl_lT-releva).
Lorsque la conduite d'eau est raccordae au
rafi'igarateur, abaissez le bras ragMamur a la
position ON (MARCHE-abaissa).
La machine _'_glaqons se remplit d'eau
lorsqu'elle atteint le point de congalation.
I1f:aut pravoir entre 8 et 12 heures >Ivan[
qu'un rafligaramur nouvellement insmlla
commence a produire des glaqons.
Jetez les premiers lots de glaqons afin
d'aliminer les impuretas provenant de la
con&tim d'eau.
Assurezwous qua lien ne g_3nele
mouvement du bras ragulateur.
I1est normal que plusieurs glaqons soient
callas emre aux.
Lorsque vous n'utilisez pas souvent de
glaqons, les x4eux glaqons per(tent leur
transparence et prennent un gofit
dasa_'aable.
Necessaire de machine a glaqons automatique
Sivotre rafl'igarateur n'est pas (taj-a(Iota
d'une machine "aglaqons automatique,
tin nacessaire de machine "aglaqons est
Varifiez au (los (hi raffigarateur quel
ensemble spacifique est recommanda
pour votre modale.
disponible, inoyennant supplament.
36
Page 37

Le distributeurdeglaqons.
Sur certains rnodeles
Pour utiliser le distributeur
Bacdetrop-plein
/ii_iii/i /i_(/ill
Appuyez le bord du vexr'edoucelnent
contre la colnlnande de distribution.
Rdglez la manette sur ICECUBES(glacons),
CRUSHEDICE(glace concassde) ou WATER
[eau (sur certains modgAes) ].
Le bac tie trop-plein n'est pas muni d'un
sTst_lned'dcoulement. Le bac tie troI>plein et
sa _ille doivent etre nettoyds rdgulierelnent.
Bac a glagons
Retraitdubac:
Soulevez l'avant du bac et tirez-le droit vers
vous en soutenant le bac "al'avant et'a l'atriere.
Remise en place dubac :
Glissez le bacjusqu'ml fond tie la clayette
du bac _aglacons. Sile bac ne va pas
jusqu'au fond, redrez-le et donnez tin quart
tie tour au mdcanisme d'entrainement.
Glissez-le tie nouveau en place.
S'i/n'yapasd'eaudistribuOeIorsquelerefrigOrateur
estinitialernentinstalle,fly apeut-Otrede/_ir darts
laconduited_au,Appuyezsurla cornrnandede
distributionpendantdeuxminutesauminimumpour
expulsdI?_irdelaconduited_auetmrnplirle
reservoird_au,Afind_lirninerleseventuelles
irnpuretesprovenantdela conduited_au,jetez les
sixuerniersverresd_au,
ATTENTION:Nernettezjarnaislesdoigtsou
d_utresobjetsdarts/'ouverturededistributeu_
Tournez .............
Mecanisme
Filtre a eau
Offert'a titre d'accessoire lnoyennant
supplement, ce fihre "aeml est en vente
chez votre marchand sous le numdro
I1est foumi avec ties directives d'installadon
et s'installe sur une con&lite d'eau en
cuivre de 1/4 po de D.E.
WR97X0214.
Renseignements importants concernant votre distributeur
Ajoutez les glaqons avant tie relnplir
levexr'e tie liquide. Ceci dvite les
dclaboussures qui pourraient faire
coller ou plier la Inanette.
N'ajoutez pas dans le bac _aglacons ties
glacons non fhbriquds par votre machine
"aglaqons. Ils risquent d'etre difficiles "a
concasser ou "adistfibuer.
l_Mteztie trop remplir les verres tie
glaqons et d'utiliser ties vetr'es dtroi_s ou
tr& hauls. Le con&lit petit se bloquer et
levolet petit geler et coincer. S'il y a ties
glacons qui bloquent le conduit, faites-les
passer au moyen d'une cuill_re en bois.
L'eau venant du distributeur n'est pas
glacde. Si vous ddsirez tie l'eau plus
fi'oide, ajoutez tie la glace concassde ou
Apr& distribution tie la glace concassde,
tie l'eml petit s'dcouler thl conduit.
Ne placez pas tie boissons ou d'aliments
dans le bac "aglacons pour les rafi'aichir.
Les boites, bouteilles et paquets
alimentaires peuvent coincer la Inachine
"aglacons ou lavis sans fin.
MOlne sivous avez sdlectionnd ICECUBES
(glaqons), il est possible que tie la glace
concassde mmbe dans votre verre. Cela se
pro&lit tie temps "aautre lorsque plusieurs
glaqons sont acheminds vers le broyeur.
Un amas tie gix_'ese fbtme pmIbis stir le
volet du conduit'a glaqons. Ceci estnomlal,
et se produit gdndralement apr&s ties
distributions rdpdtdes tie glace concassde.
Le gix_'es'&_aporera apr& quelque temps.
ties glaqons dans votre verre avant tie le
reInplir d'eml.
37
Page 38

Entretienet nettoyagedurefrigerateur.
Appuyezici
pou[enlever
Nettoyage de I'ext#rieur
te bac de trop-pleindudistributeur(sur
cer[ains mod£1es), sim£ sous la _'ille,
devrai[ (_tresoigneusemem essuy_. Vous
pouvez (31iminer les (t(3p6[s calcaires laiss&
par lestaches d'eau en trempant le bac dans
du vinaigre non diluO. Laissez u'emper
jusqu"a ce que les d(3p6ts disparaissent ou
soient suftisamment ramollis pour (_tre
(_limin_s par rinqage.
ta commandededistribution(sur cermins
modules). Neuoyez-la au moyen d'une
solution d'eml riede et de bicarbonam de
sou(te-environ une cuillere a soupe (15 ml)
de bicarbonate de sonde par pinte (1 1)
d'eau. Rincez bien et essuyez.
SUGGESTION:Oardezlaporte ducongdateur
demi-ouverteafind_viter quede laglaceou de
I'eausoitdispenseeaucoursdunettoyage.
tes poignees de porte et leurgarniture (sur
cermins mod&les). Neuoyez-les an moyen
(Fun linge humect(3 d'eml savonneuse.
S(_chezavec un linge doux.
tes poignees souples (sur certains
mod&les) sont fitciles _'_nettoyer s'ils sont
cir(_esplusieurs %is par an. Appliquez une
cire de m(mage, telle que Pledge ouJubilee
sur les poignOes. Nettoyez avec de l'eau
savonneuse ou un produit de nettoyage
tout usage non abrasi£
GardezI'exterieurdu refrigerateur propre.
Essuyez-le avec un linge propre Kg&rement
humect_ de cire pour appareils
(_lecu'om(magers on d'un &3mrgent liquide
doux pour la wtisselle. S_chez et polissez
avec un linge doux et propre.
N_ssuyezpas lerefrigorateuravecunIinge
vaissellesaleouuneserviettehumide. i/s
pourraientlaisserunrOsiduquipourra
endommagerlapeinture.N'utilisezpasde
tampons_recurer,depmduitsnettoyantsen
poudre,dejavellisantsoudepmduitsnettoyants
contenantunjavellisant, carcesproduitspeuvent
egratignd lapeintureet la mndremoins
resistante.
(
Nettoyez les bobines du condenseur
au moins une fois par an.
38
Nettoyage de I'interieur
Poureviter lesmauvaisesodeurs,laissez
une boke ouverte de bicarbonate de soude
dans les comparfiments r4flig4rateur et
congt31ateur.
Debranchezle refrigerateuravantde le
nettoyer.S'il est trop ditticile de le fidre,
essorez bien votre linge ou votre (3ponge
pour enlever l'exc&s (t'eml lorsque vous
nettoyez autour des intermpteurs, des
lampes ou des COlnlnandes.
Appliquez une cire pour appareils
(31ectromt3nagers "al'intt3rieur des
contre-portes.
Udlisez une solution d'eau d&(te et de
bicarbonate de soude-environ une cuill&re
"asoupe (15 ml) de bicarbonate de soude
par pinte (1 1)d'eaulafin de nettoyer
tout en neutralisant les odeurs. Rincez et
essuyez bien.
Sous le refrigerateur
Pour un f()nctionnelnent plus efficace, vous
devez garder la zone sous le rafiigaramur
propre. Retirez la grille intbtieure et balwez
ou aspirez la poussiere.
Apras avoir nettoya lesjoin_s de porte,
appliquez une fine couche de vaseline sur
lesjoin_s (hi c6t(3 des charnieres pour
empecher lesjoints de coller et de se
(t(3fbtmer.
Evitezdenettoyerlesclayettesenverre(sur
certaimmoddes)encore,froidesavecde I'eau
chaudecarellesrisquentdesecassera causede
I_cart excessifdetempOrature.Manipulezles
clayettesenverreavecprudence.Si vouscognez
le verretrempO,ilpourrase briser
NelavezaucunepiOcedeplastiquedu
refrigOrateurau lavewaissellea I'exception des
recipientsQuickServe et leurscouvercles.
Pour de meilleurs rdsultats, utilisez une
brosse cono_e spdcialement'a cet eftet que
vous pouvez obtenir dans la plupart des
centres de pi&ces.
Page 39

Derriere le refrigdrateur
Prenez un soin particulier lorsque vous
dloignez le rdfi'igdrateur du lnur. Tousles
types de revetemen_s de sol peuvent etre
endommagds, particuli?_relnent ceux qui
sont coussinds ou dont la suKhce est gaufi'de.
Tirez le rdffigdrateur en ligne droite et,
lorsque vous le remettez en place, poussez-
levers lemur en ligne droite. Les
ddplacements latdraux du rdfi'igdrateur
pourraient endommager le revdtelnent
de sol ou le rdflJgdrateur.
Remplacement de I'ampoule electrique
Pour remplacer l'ampoule, ddbranchez le
rdfi'igdrateur de sa prise dlectrique, enlevez
le prot&ge-lumi#ere; ddvissez l'ampoule
lorsqu'elle est refi'oidie et remplacez-la par
une ampoule de la lnelne puissance ou de
puissance infbrieure.
Depart en vacances
Lorsque vous vous absentez pendant une
pdriode prolongde, videz et ddbranchez le
rdfi'igdrateur. Rdglez la commande de
temperature ch_colnpartiment
rdfi'igdrateur sur OFF(dteint) et nettoyez
l'intdrieur avec une solution d'eau et de
bicarbonate de soude, "araison d'une
cuillare "asoupe (15 ml) de bicarbonate
par pinte (11) d'eau. Laissez les portes
ouvertes.
Lorsque vous remettez le refrigorateur
en place en le poussant, veillez a ne
pas le faire muler sur le cordon
d'alimentation ou sur la conduite d'eau
de la machine a glagons (sur certains
modoles).
Lorsquevousroglezlacommandesur OFF
(Ote/nO,I'alimentationelectriquede I'ampoule
n'estpascoupee,
Rdglez le bras rdgulateur de la machine "a
glacons (sur certains modeles) "ala position
STOP (ARRl_2T--relevd) et fermez le
robinet d'an'4t de la conduite d'eau du
rdfi'igdrateur.
Sila telnpdramre risque de descen&e sous
le point de congdlation, delnandez "aun
rdparateur de vidanger la conduite d'eau
(sur certains modales) afin d'dviter les
(tdg_s sdrieux causds par lesinondations.
Demdnagement
Sivous avez besoin d'enlever les portes,
consultez la section Enlevementdesportes.
hnmobilisez tousles dldlnents amovibles,
tels que la _'ille, les clayettes et les bacs, "a
l'aide de ruban gommd pour dviter de les
endolnlnager.
Assurez-vousquele mfrigOrateurdemeure
deboutpendantsondemonagemenL
39
Page 40

Preparation.
_d
m.
w
m.
!
w
B _mm
H
M
N
m
N
m
H
Veuillez /ire toutes les directives attentivement.
Alimentation en eaude la machinea glaGons
Sivotre rdfi'ig4rateur est dotd d'une machine 'a
glaqons, la machine a glacons &fit _tre raccordde a
une con&rite d'eau fi'oide.
Un ndcessaire d'alimenmtion en eau (compremmt
un myau de cui_Te, un robinet d'arr_t, des raccords
et ties directives) est disponible moyennam
suppldment chez votre marchand ou mlpr_s (hi
Sel_ice ties pi_ces et accessoires, 800-626-2002.
Emplacementdu refrigerateur
N'insmllez pas le rdfiig_3rateur dans une pi&ce off la
mmpdramre ambiante risque d'etre inf_rieure 5
60 °F (16 °C) parce qu'il ne se mem'a pas en
marche suffisammem souvem pour maimenir les
mmpdramres convenables.
Installez le rdfiig4rateur sur un plancher
suffisamment solide pour le supporter lorsqu'il
est plein.
Degagements
Prdvoyez les d4gagemen_s suivants pour fimiliter
l'installation, assurer une circulation d'air addquate,
et permettre les raccordements tie plomberie et
d' dlectricitd •
C6t4s ............................ 3/4 po (19 mm)
Dessus .......................... 1 po (25 mm)
Amere .......................... 1 po (25 mm)
Siles mod&les tie 19, 22 et 25 pi doivent _tre insmllds
contre un tour du c6td des charni_res, prdvoyez un
ddgagemem tie 1V_,po (38 mm) pour l'ouvermre tie
la porto.
w
h
m
m
Roulettes de niveiiement (surcertainsmodeles)
Los roulettes de nivel/ementjouent trois roles:
[--_Elles peuvent _tre rdgldes pour que lesportes se
refennent automatiquement lorsqu'elles sont _'_
moitid ouverms. [Rdglez l'avam tie l'appareil 5
3/4po (19 mm) du sol.]
Pourreg/erlosroulettesdenivellement:
Enlevez lagrille
infdrieure en la
saisissant par le dessous
et en la tirant vers VOllS.
[_Elles peuvent _tre rdgldes tie mani_re "a
permem'e Al'appareil de reposer solidement
sur le sol et l'emp_cher ainsi de branler.
Toumez les vis des
roulettes avantvers la
[_Elles vous permettent d'dloi_mr le rdfiig_3rateur
du mur pour le nettoyage.
droite pour relever le
rdfiig_3rateur, et vers la
gauche pour l'abaisser.
Pour rdinsmller la grille
infdrieure, poussez-la
w
jusqu'a ce qu'elle
s'enclenche en place.
4O
Page 41

Installationde la conduited'eau.
Veuillez lire toutes les directives attentivemenL
Avantde commencer
L'installation de cette conduite d'eau n'est pas
garantie par le fabricant de la machine a
glagons ou du refrigorateur. Veuillez suivre ces
directives attentivement afln de reduire au
minimum les risques de dommages coOteux
causes par I'eau.
La presence d'un coup de befier (de I'eau qui
cogne dans les tuyaux) dans la plomberie de
votre residence risque d'endommager le
refrigerateur et provoquer des fuites et des
deg_ts d'eau. Faites corriger le probleme par un
plombier qualifle avant de raccorder la conduite
d'eau au refrigerateur.
N'installez pas le robinet d'arr6t sur la conduite
d'eau chaude. Ceci pourrait provoquer des
brOlures et endommager I'appareiL
Materielnecessaire
Pour calculer la Iongueur de tuyau de cuivre
necessaire :
Mesurez la distance entre l'dlectrovanne Al'ani6re
(Ill rafi'igarateur et la con(hfite d'eau. Ajoutez
ensuite 8 pieds (244 cm). Assurez-vous que la
longueur de tuyau supplamentaire est suffisante
[environ 8 pieds (244 cm) de ulyau enrould pour
limner trois boucles d'environ 10 po (25 cm) de
diamttre] pour que vous puissiez aloigner le
rafiigarateur (hi ulur aprts l'installation.
Unnecessaired'alimentationen eau comprenant le
Ulyau de cuix_'e, le robinet d'arrtt, et lesraccords
dataillas ci-dessous est disponible, moyennant
supplament, chez votre marchand ou mlprts (hi
Sets_icede pitces et accessoires m1800-626-2002.
Lineconduited'eaufroide.Lapression de l'eau doit
varlet entre 20 et 120 lix_'es/po2 (1.4-8.2 bar).
Perceuse electrique.
Tuyaudecuivrede 1/4 po de diamttre extarieur
pour raccorder le rafiigarateur "ala con&rite
d'eau. Assurez-vous que les extrdmitas (hi ulyau et
de la conduite sont coupaes "aangle droit.
N'utilisezpasdetuyauouderaccordonplastiquecarla
conduited'eauestconstammentsouspression,Deplus,
cdtains typesde tuyaudeplastiquepeuventcassd et
fendilleravecle temps,provoquantdesfuitesd'eau,
Si vous utilisez votre refrigerateur avant que la
conduite d'eau soit raccordee, assurez-vous que
le bras regulateur de la machine a glagons est a
la position STOP (ARRET--releve).
N'installez pas le tuyau de la machine a glagons
dans un endroit oo la temperature descendra
sous le point de congdation.
Lorsque vous utilisez un apparefl electrique
(comme une perceuse) Iors de I'installation,
assurez-vous qu'il est isole ou c_ble de fagon a
eviter tout risque de chocs electriques.
Toutes les installations doivent 6tre conformes
aux exigences du code de plomberie local en
vigueur,
Detkx acrous "acompression de 1/4 po de
diamttre extarieur et deux douilles de
raccordement-pour raccorder le ulyau de cuix_'e
au robinet d'an'tt et'a l'alectrovanne du
rafiigarateur.
Sivotre con(hfite d'eau est dotae d'un raccord
avasa Aune extramita, vous aurez besoin d'un
adaptateur (vendu clans toutes les bonnes
quincailleries) pour raccorder la conduite d'eau
ml rafiigarateur OU vous pouvez couper le
raccord avasa "al'aide d'un coupe-tubes et
ensuite utiliser tin raccord "acompression.
Robinetd'arrOtpour installation sur la con&rite
(t'eml fl'oide. Le robinet d'an'tt doit 6tre (Iota
d'un orifice d'entrae d'au moins 5/32 po de
diamttre intarieur au point de raccordement avec
la CONDUITED'EAUFROIDE.Bon nombre
d'ensembles de raccordement comprennent des
robinets d'arrtt "abrides. Avant (Fen faire l'achat,
assurez-vous que l'installation (Fun robinet "a
brides est conforme avec le code de plombefie
en vigueur dans votre ragion.
4/
Page 42

Installationde la conduited'eau.
Veuillezlire toutesles directives attentivemenL
m.
w
Fermezlerobinetdela conduited'eauprincipale
m.
Ouvrez le robinet le plus pros pour permem'e 5 la conduite d'eau de se vider.
Installez le rebinet d'arr_t
[_Fixez le robinet d'arr_t fila conduite d'eau
ffoMe a1 rode d une bride.
[--_Installez le robinet d'arr@ sur la conduite d'eau
potable ffdquemment utilsde la plus proche.
m
m.
m.
[_Choisissez pour le robinet un emplacement
fhcilement accessible. I1est preferable de
l'insmller sur le c6t(: d'une con&rite d'eau
ffoide verticale. Sivous devez le raccorder 5 une
[_rSerrez les vis de la bridejusqu'fi ce que la
on(Idle (t'(_tanch(_itd commence 5 gonfler.
No serrez pas de faqon excessive afin de no pas
ecraser le tuyau de cuivre.
Rondelle
con&rite d'eau hodzonmle, eftecmez le
w
w
raccordement sur le dessus ou le c6td plut6t
qu'an fbn(1 de la con&rite afin d'dviter la chum
tie sediments provenant tie la con&rite d'emL
I/Orifice d'entree
[_Percez un trou de 1/4 po dans la conduite (Feau,
5 l'aide d'un foret affCttd.Enlevez les bavures
produites lors du perqage de la conduite.
H
M
N
m
N
m
H
Faites passer le tuyau de cuivre et raccerdez-le au rebinet d'arr_t
Placez le tuyau de cuix_'eentre la conduite d'eau
ffoide et le rdfligdrateur.
Robinetd'arret/
8 brides
Installez l'dcrou fi compression et la douille de
raccordement fi l'extrdmit(_ du myau et raccordez-le
au robinet d'mT@.
-Conduited'eau
froide verticale
Faites passer le myau par un trou percd dans le
plancher ou lemur (den'i&re le rdfi'igdrateur ou _'_
proximitd de l'armoire) le plus pres possible du
rnllr.
w
Assurez-vous que la Iongueur de tuyau
supplementaire est suffisante [environ 8 pieds
h
m
m
(244 cm) forrnant 3 boucles d'environ 10po
(25 cm) de diametre] pour que vous puissiez
doigner le refrigerateur du rnur apres
I'installation.
Assurez-vous que le myau est bien insdrd fi
l'intdrieur du robinet. SelTez solidement l'(_crou fi
compression.
I
Robinetd'arret_brides _!
Ecroudeserrage
Orifice de sortie
Ecrou a compression
)ouille de raccordement
Ouvrez le rebinet et rincez le tuyau
[--_Ouvrez le robinet de la conduite d'eau
prmc@ale et rmcez le tuymuusqu ace que 1eau
soit propre.
w
[_Coupez l'eau au niveau de l'(_lecu'ovanne apr&s
m<)irf:4itcouler par le myau environ une pinte
(11) d'eau.
42
Page 43
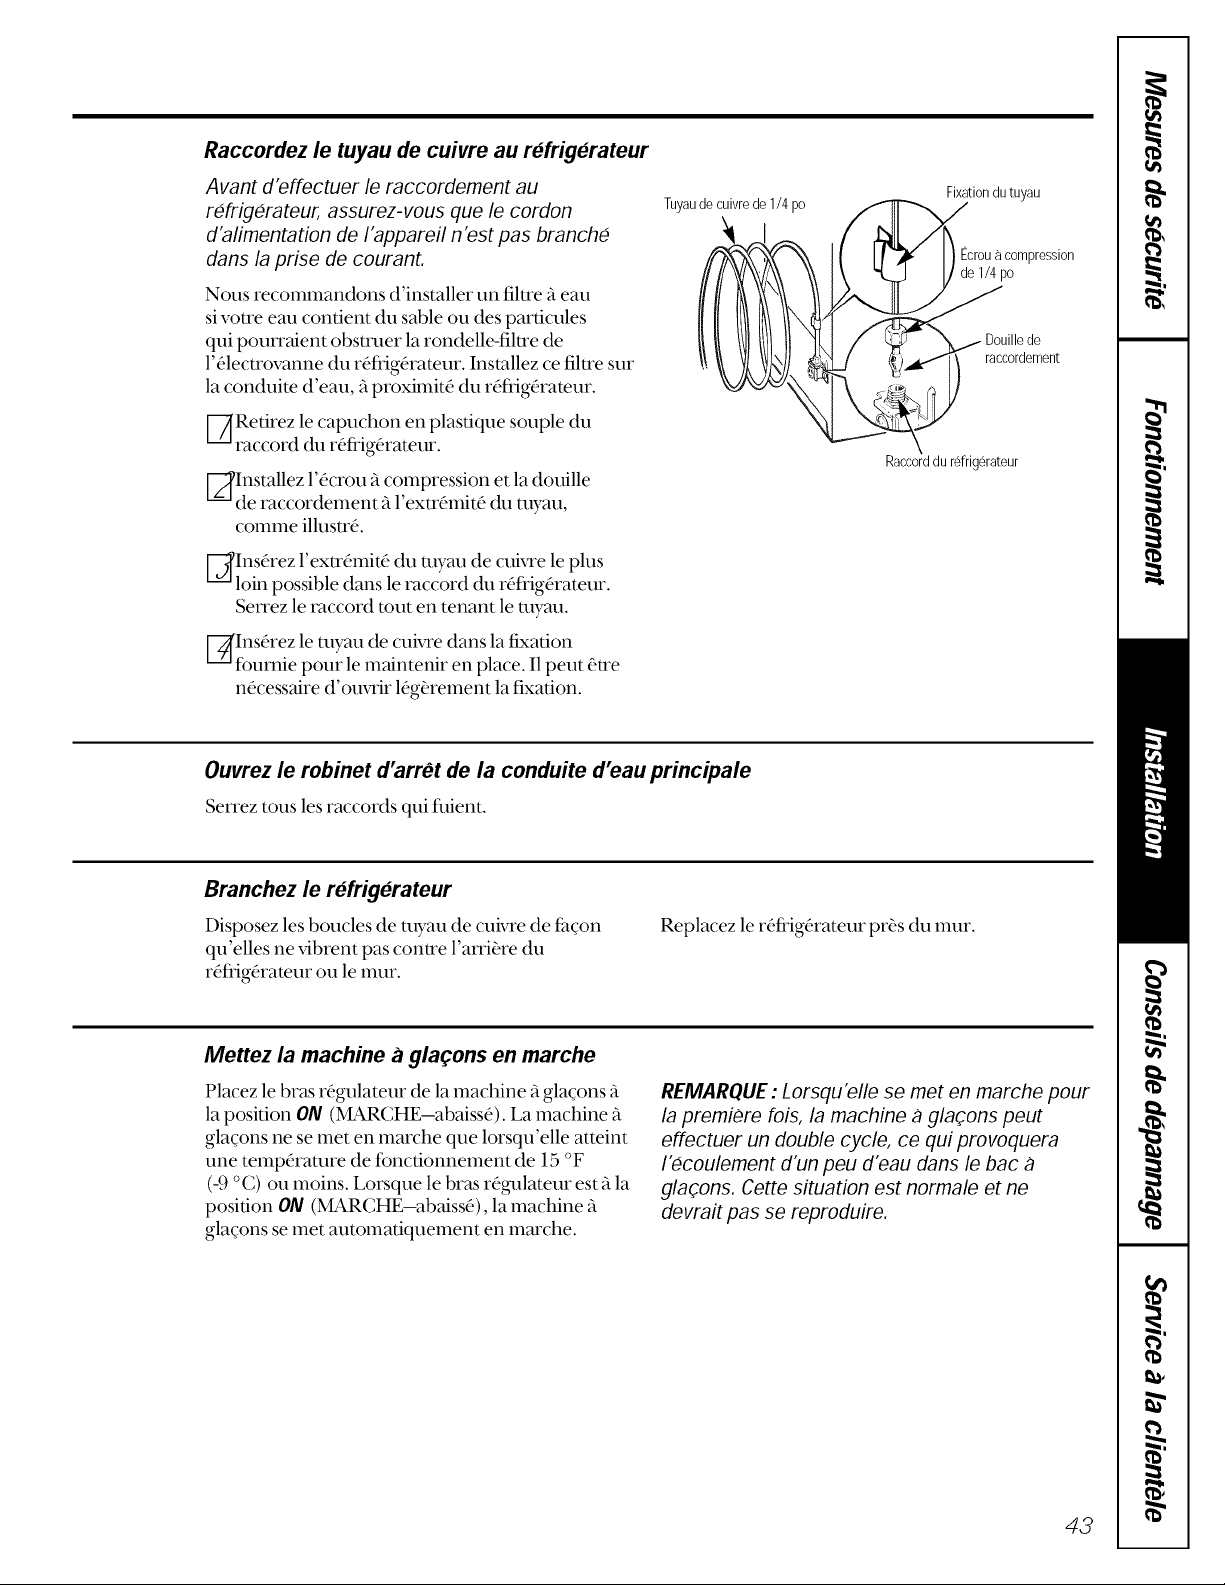
Raccordez le tuyau de cuivre au refrigerateur
Avant d'effectuer ie raccordement au
refrigorateur, assurez-vous que /e cordon
d'a/imentation de/'apparel/n'est pas branche
dans /a prise de courant.
Nous recolnlnandons d'installer un filtre a eau
si votre eml contient (Ill sable ou des particules
qui pomTaient obstmer la rondelle4iltre de
l'41ectrovanne (Ill r4fiJgarateur. Installez ce filtre sur
la conduite d'eau, _ proximita (Ill rafiigarateur.
--/[Retirez le capuchon en plastique souple (Ill
raccord(Ill r4fi'ig4rateur.
[_Installez l'dcrou _ compression etla douille
de raccordement _ l'extrdmitd (Ill tuyau,
comme illustr4.
EC_Ins_3rezl'extr_3mit_3(Ill myau de cuM'e le plus
loin possible dans le raccord (Ill r4fi'ig4rateur.
SeN'ez le raccord tout en tenant le myau.
[_Ins4rez le ulyau de cuM'e dans la fixation
fbumie pour le maintenir en place. I1peut #:tre
n4cessaire d'ouvrir 14gerement la fxation.
Tuyau de cuivre de 1/4 po
I
Fixationdutuyau
_ompression
raccordement
Raccorddurdrigerateur
Ouwez le robinet d'arrOt de la conduite d'eau principale
Serrez tolls les raccords qui fllient.
Branchez le refrigerateur
Disposez les boucles de tuyau de cuivre de fh_on
qu'elles ne vibrent pas contre l'aITi_re (Ill
r4fiig(3rateur oil le lnUr.
Replacez le r4ffig4rateur pr& (Illtour.
Mettez la machine a glaqons en marche
Placez le bras ragulateur de la machine _glagons a
la position 0/V (MARCHEiabaiss4). La machine
glagons ne se met en marche que lorsqu'elle atteint
une temp4raulre de fonctionnelnent de 15 °F
(O °C) oil moins. Lorsque le bras r4gulateur est _ la
position O/V (MARCHE--abaiss(3), la machine "a
glacons se met autolnatiquelnent en lnarche.
REMARQUE : Lorsqu'elle se met en marche pour
la premiere lois, la machine a glaqons peut
effectuer un double cycle, ce qui pmvoquera
I_coulement d'un peu d'eau dans le bac a
glaqons. Cette situation est normale et ne
devrait pas se repmduire.
43
Page 44

InversiondeI'ouverturedesporte&
_d
m.
w
m.
m
m.
m.
w
w
II
Veuillezlire toutesles directives attentivemenL
Remarques/mportantes
REMARQUE: Lesportesdesmodolesavecdistributeurde
glaGonsnesontpasreversibles.
Lorsquevousinversezle sonsd'ouverturedesportes:
Veuillez lire routes les directives avant de
commencer.
Manipulez les piieces m_ecsoin pour dviter
d'dgratigner la peinture.
Placez lesvis fic6td de leur pibce afin d'dviter de
les visser attx mauvais endroi_s.
Prdvoyez une surfhce de trm_ail douce afin de ne
pas d_'atigner les portes.
IMPORTANT: Line lois que vous avez
commenco I'oporation, ne doplacez pas la
carrosseriejusqu_ ce que I'inversion de
I'ouverture des portes est terminoe.
Les directives qui suivent vous indiquent de
quefle faqon transfOrer les chamieres du cOto
droit vers le cOto gauche. Sijamais vous dosirez
retransfOrer les charnieres du cOto droit, suivez
les mOmes directives--en remplagant
seulement le mot _,gauche,,par le mot _droib,.
M
N
m
N
m
H
B_
II
w
m
m
w
Outilsnecessaires
Tournevis Phillips
Ruban-cache
Tournevis <<Totx>>T20 ou T25, selon le mo(tiele
Enlevement des porte&
Avant d'enlever les portes
[-_Ddbranchez le rdffig_rateur.
[_Videz tous les balconnets de porte, y compris le casier 5 pro(hilts hiders.
ATTENTION: Evitez de laisser tomber los portes sur le plancher.
Vous pourriez endommager les butoes de porte.
EM#vement de la porte du cong#lateur
[--_Maimenez la porte fbrm_e au moyen de mban-cache.
[_ l'aide d'un tournevis Phillips, enlevez le coux2"e-ctmmi&re sired sur le haut de la
porte du congdlateur (sur cermins mod&les). A l'aide d'un toumevis <<To,x>>,
enlevez lesdeux vh qui retiennent la chami&re supdrieure 5 la carrosserie.
[_Soulevez la charni&re pour ddgager l'axe de chami&re de la douille simde sur le
dessus de la porte.
Couteau fimastic ou tournevis fi embout plat
Cld fidouille de 3/8 poet cliquet (une douille
polygonale est recommandde)
44
[_Enlevez le ruban-cache et dloignez la porte de la carrossene en l'inclinant. Soulevez
la porte et sortez-la de la douille infdrieure.
[_Couchez la porte sur sa contre-porte, sur une surface douce pour ne pas l'4_'ati_ler.
Page 45

Enlevement de la porte du refrigerateur
V-_Maintenez la porte ferm6e au moyen de mban-cache.
A 1 rode dune cld "adouille de 3/8 poet dun chque, enlevez 1axe de chami&re.
[_Enlevez le nil)an-cache et dloignez la porte de Áacarrossede en l'inclinant. Enlevez la rondelle
et mettez-la sur l'axe de charni&re.
_Soulevez Áaporte afin de la dagager de l'axe de la chamiere infi3rieure.
-Couchez la porte sur sa centre-porte, sur une surfhce deuce pour ne pas l'd_'ati_er.
Transfertdes charnieres.
Transfert de la charniere inferieure vers le cote gauche
[--_Enlevez la _'iÁle. Saisissez-la par le bas
et tirez-la vers vous.
[_J_, l'aide d'un tournevis <<To:x>>,transDrez la
"I_-I I Ron@lledeplasqque
I% J
chamiOre et la rondelle de plastique du c6td
inDrieur droitvers le c6td gauche de Á'appareil.
Transfert de la charniere intermediaire
vers le cote gauche
V_Ddvissez les trois vis <<To:x>,et enlevez
la charni&re intermOdiaire
N'enlevez pas _ I
cette vis _=. _____ ®.,/I
REMARQUE: Gardezcesvisavecla chamiOre,Cesvissent
longset semntutilisespour I'installationde la chamierede
I'autrecotedeI'appareil,
[_Enlevez les trois _4s <<Totx>,du milieu du
c6td gauche de Áacarrossede. Vissez-les
dans les trous laissOslibres du c6td droit.
Rdinstallez la charniiere intermddiaire dans les
_Au m eu_gauche
trous simds au milieu du c6td gauche de la
ca:rosserie. Insdrez et seN'ez Áestrois vis longues.
Transfert de la charniere superieure vers le cote gauche
Charniere
droite I % %
I/ N'enlevez
® [_ pas cette vis
Inversez la charni_re et les _4ssimdes en haut "adroit avec celles qui se trouvent sur le c6td gauche supddeur.
No serrez pas los vis situoes du cOto de la charniere pour le moment.
Transfertdes butees de porte
V-_Ddplacez la butde de porte mdtallique du c6td droitvers le c6td gauche.
[_Ddplacez toutes les vis situdes du c6td gauche vers le c6td droit.
45
Page 46

_r.e •
Transfertdespoigneesdeporte.
Veuillez lire toutes les directives attentivement
m.
w
m.
m
m.
m.
w
w
II
B ,_mmm
H
M
N
m
N
m
H
B_
Transfertde la poigne.e de la porte du compartiment refrigerateur
v,v, fl
Poigneecourte
PoigneeIongue
Emboutde la _ I_-- Emboutdela
poignee poignee
Trou
J
J
_J
Goul
Les modoles a poignOe Iongue possodent
une goupille qui s'insOre dans un trou a la
pattie inferieure de la porte.
Enlevez l'embout de la poignee en plaqant la lame d'un couteau ;_mastic recouverte de mban
gomm_ sous son rebord.
Retirez les deux x4squi retiennent la poignee sur le dessus de la porte.
II
w
h
m
m
.g
. ,lee_
w
. ,lee_
Capuchon grand
Medaillonq
Pourreinstallerla poigneedu
coteoppose.
Enlevez le capuchon _'an(1 sim_ sur le rebord gauche de la porte et ins_rez-le dans le trou du c@_ oppos&
Enlevez les pedts capuchons simmsau c@6 droit de la porte et ins_rez-les dans les u'ous du c@6 oppos&
Trandbrez le m6daillon de la porto.
46
Page 47

Transfertde la poigne.e de la porte
du congelateur
Enlevez les vis qui retiennent la poignde sin"le
dessus et ml bas tie la porte.
Enlevez le capuchon sired ml c6td droit tie la porte,
et insarez-le dans le trou tie vis tie la poignae all
c6t6 gmmhe.
Fixez la poignde tilt c6ta oppose en vous sets,ant
ties trous siulds le pills pries (hi bard tie la porte.
Reinstallationdesportes.
Reinstallation de la porte du refrigerateur
[--_Insmllez la porte du rdfiigdrateur sur l'axe tie
chami_re infbrieure.
Assumz-vousquelarondelleestonplace,
° ili
Ai
[_Redressez la porte et ali_mz-la avec la
chami_re intermadiaire.
[_Rdinstallez l'axe de chami&re 5 l'aide d'une cld 5
douille de 3/8 po. Tournez-lejusqu'5 ce qu'il
ddpasse la charni&re et salt enfoncd dans la porte.
Reinstallation de la porte du congelateur
[--/_Installez la porte du cong_31ateur sur l'axe tie
la charni&re intermd'diaire.
Assurez-vousquela rondelleestonplace,
[_Soulevez la charni_re supdfieure de fhqon
que l'axe de chami&re salt insdrd dans la
douille sous la porte.
[_Assurez-vous que laporte est bien droite et
que lejeu entre les deux portes est uniforme
sur le devant. Selx'ez les vis des chami&res
supdrieures.
)
1'
Rondelledeplastique
Axede charniere --
Charniere
intermediaire
PorteducompartimentrdrigOrateur
Axe de la charniere
plastique
I
47
Page 48

Bruitsdefonctionnementnormaux.
Selon I'emplacement durefrig6rateur darts votre cuisine,
vous aurez peut-6tre envie d'installer celui-ci sur un tapis
caoutchoute afln de reduire le bruit de I'appareil.
F_ Machinea gla_ons(surcertainsmodeles).Vous entendrez partbis ties glaqons
qui tombent dans le bac. S'il s'agit tie votre premiOre machine fi glaqons,
cermins bruits vous sembleront inhabimels. I1n'y a pas lieu de s'inquidter;
ce sent ties bruits notTnaux tie la f:ablicadon tie glaqons.
VentilateurdeI'evaperateur.Vous entendrez peut,_?tre tie l'air envoyd clans
l'appareil par le ventilateur.
Evaperateur.Le ffigorig6ne qui circule dans l'(_vaporateur peut produire un
bruit tie bouillonnement ou tie gargouillement.
Element de degivrage. Pendam les Q_clestie dd_Tage, tie l'eau qui s'(_gomte
sur l'dl(_ment tie dd_,_'age peut produire un tlr@itemem ou un siffle_nent.
Apres le dd_'age, tin bruit de craquement peru se produire et l'dvaporateur
peut produire un bruit tie bouillonnement ou tie gargouillement.
_ emmandedetemperatureetminuterie dedegivrage.Ces pi_ces peuvent
produire un bruit lorsque le rdffigdrateur se met en marche ou s'arr_?te.
La minuterie tie ddgi_Tage produit aussi un bruit similaire 5celui d'une
pendule (_lectfique.
Guveenplastique. Les bruits tie craquements sent tiffs fil'expansion tie
Ces bruits sont normaux et,
pour la plupart, imputables
au fonctionnement 8 haut
rendement de I'appareil.
l'intdrieur de plastique.
_ lectrovanne (surmodelesdotosd'unemachineaglaGons).Lorsque |a
machine 5glaqons se remplit d'eau, elle fbra du bruit et vous entendrez
de l'eau qui circule.
Plateaudedegivrage.On petit entendre tie l'eau qui s'd'goutte dans le plateau
de dd_xTage pendant le tTcle de ddgix_'age.
Cempmsseur. Les compresseurs modemes _'_rendement hautement efficace
fbncdonnent beaucoup plus rapidement que les modeles anciens et peuvent
produire un bourdonnement ou un bruit tie pulsauon.
Ventilateur du cendenseur. Vous entendrez peut,_?tre tie Fair envoyd au-dessus
tu condenseur par le ventilateur.
Avantd'appelerunreparateur...
Conseils de dopannage--Economisez du temps et de I'argent!
Consultez d'abord les tableaux qui suivent et vous pourrez peut-
6tre eviter de faire appel a un reparateur
Causes possibles
Lerefrigerateurne
fonctiennepas
Le cycle de di_givrage est en cours.
La commande est r_gl_e sur
Off (_teint 1.
Le r_frig_rateur est d_branch_.
Le disjoncteur ou le fusible
peut avoir saute.
Correctifs
• Attendez environ 30 mimltes _ffinque le tTcle tie
ddgi_'age puisse tenniner.
• Rdglez la commande tie mmpdramre sur un rdglage
tie temperature.
• Enfbncez la fiche de l'appareil dans la prise murale.
• Remplacez le fllsible ou rdenclenchez le disjoncteur.
48
Page 49

Correctifs
• Consultez Roulettes de nivellement.
Vibrationoubruit
metallique(unelegere
Causes possibles
Los roulettes doivent 6tre
r6gl6es.
vibrationestnormale)
Le moteurfonctionne
pendant de Iongues
periodes ou demarre et
s'arr_te fr(_quemment.
(Lesrefrigerateurs
modernes et leurs
congelateurs etant plus Porte laiss_e ouverte. • V('fifiez qu'il n'y a pas un paquet qui elnp?,che
grands, leur moteur doit la porte de ferlner.
fonctionner plus
Iongtemps. IIs dematrent Temps chaud ou ouverture • (?est natural.
et s'arr_nt afin de fr_quente des portes.
maintenir des Los commandos de temperature • Consuhez Los commandos.
temperatures uniformes.) ant 6t6 r_gl6es fi la temp6rature
Temperaturetrap elevee La commande de temperature • Consuhez los commandos.
dans le congelateur ou n'a pas 6t_ r6gl6e fi une
le refrigerateur temp6rature assez basso.
Ceci est normal lorsque le • Attendez 24 heures pour que le refiigOrateur reffoidisse
rSfrig6rateur vient d'6tre branch& complbtement.
Ceci arrive souvent lorsque
une grande quantit_ d'aliments
a 6t6 mise au r6frig6rateur.
la plus froide.
II faut nettoyer la _wille • Consuhez Entrotion ot nottoyago.
et le condenseur.
Temps chaud ou ouverture • Abaissez la commando de telnp(_ramre d'une position.
fr6quente des portes. Consuhez los commandos.
• C'est nonnal.
Porte laiss_e ouverte. • V('fifiez qu'il n'y a pas un paquet qui elnp?,che la
porte de ferlner.
Ily a un paquet qui bloque • V(,fifiez qu'il n'y a pas un paquet qui bloque le conduit
le conduit d'air dans le d'air (lans le COlnpartiment cong0lateur.
compartiment cong61ateur.
Giwe surlos aliments Porte laiss6e ouverte. • Vi, fifiez qu'il n'y a pas un paquet qui elnp?,che la
surgeles (il est normal porte de ferlner.
que du givre se forme
I'interieur dupaquet) Los portes ant _t6 ouvertes
La machine a gla_ons Le bras r_gulateur est it la • Abaissez le bras r(,gulateur _ la position ON
no fonctionne pas position STOP (ARRET--re|ev6). (MARCHE--abaiss(,).
(sur certains modeles)
trap souvent ou pendant trap
lon_emps.
I1y a peut-Otre des glacons coil& sur le cStO&l moule a
glaco_s. R(3glez le bras r(_gulateur a la posiuon STOP
(ARRET-rel&e) et reurez ces glacons.
L'atimentation en eau est coup6e • Consultez Installation de la conduite d'eau.
ou n'est pas raccord6e.
Le compartiment cong61ateur • Attendez 24 heures pour que latemperature du
est trop chaud, r&fl'ig(3rateur se smbilise.
Un amas de glagons dans |e bac • Nivelez les glacons a lamain.
provoque l'arr6t de la machine
g|agons.
Glacons trap petits
(sur certains modeles)
Le robinet d'arr6t qui retie le • Faites d(3boucher le robinet d'arr(_t par un plombier.
r6frig6rateur _ la conduite
d'eau est peut-6tre bouch6.
49
Page 50

Avant d'appeler un reparateur...
Causespossibles Correctifs
Formationlentedes
g/a_ons
Odeur/saveur I1faut nettoyer le bac/_ glaqons. • Videz et lavez le b3c _ glacons.Jetez les _ieux glacons.
anormaledes
g/a_ons
fly a de l'humiditestir Pas inhabituel pendant les • S0chez la surfhce mouillde et vdrifiez que le
la surface exterieure p6riodes de forte humidit6, comnmmteur d'0conomie d'dnergie n'est pas rdgld
durefrig_rateur,entre sur POWERSAVER(dconomiseur d'0nergie).
losportes
Dela condensation
s'accumulea i'intorieur
(par tempshumide,
I'ouverturedesportes
iaissecritter de I'humidite)
Lesaliments ranges Les aliments sent trop • l_3oignez les aliments du conduit
au r_frigerateur pros du conduit d'air d'air du congdlateur.
sont congeles du cong_lateur.
Laportenefetme Lesroulettes de nivellement • Consuhez Roulettes de nivellement
pasd'eile-meme avant ou les pieds de
to distributeur de La machine it glaqons est _teinte • Mettez en marche 13machine 5 glacons ou rdt3blissez
gla_ons no fonctionne ou l'alimentation en eau a _t_ l'31imenmtion en eml.
pas(stir certains couple.
modeles) Des glaqons sent coll6s au bras • Retirez les glaqons et r0glez 13machine _ glaqons 5 13
Ledistributeurdealt L'alimentation en eau est • Consuhez Installationde Io conduited'eau.
no fonctionne pas couple ou n'est pas raccord_e.
(sarcertains modeles) Le filtre/_ eau est bouch_. • Remplacez 13cartouche (lu fihre m_ecune nouvelle
Porte laiss_e ouverte.
La commande de temperature • Consuhez Los commandes,
n'est pas r_gl_e _ une temperature
assez froide.
Des aliments ont transmis leur • Emballez bien les31imems.
odeur/gofit aux glaqons.
I! faut nettoyer l'int_rieur du • Consuhez Entretien et nettoyage.
r_frig_rateur.
Les portes sent ouvertes trop
fr6quemment ou pendant trop
longtemps.
La commande de • Rdglez 13commande de temp(,raau'e du r(,ffig(,rateur
temp6rature du r6frig6rateur stir une ternpdranwe plus 01evde.
est r6gl6e a une temp6rature
trop froide.
l'appareil ont besoin
d'etre r_gl_s.
r_gulateur, position ON(MARCHE--3baissO).
Blocs de glace irr6gufiers dans • Brisez-en 3nmnt que possible 3vec yes doigts etjetez ceux
le bac/_ glaqons, qui restent.
• Vdrifiez qu'il n'y a pas un paquet qui empeche 13porte
de fermer.
• Le congdlateur est peut-_:tre trop chmM. Rdglez 13
commande du congdlateur sur une tempdramre plus
basse, en 3baissant la commande d'une position 513 fois
jusqu'fi ce que les blocs de glace disparaissent.
cartouche ou installez le bouchon du fihre.
5O
Ily a de Fair dans la conduite
d'eau.
• Appuyez stir la commande de distribution pendant ml
moins deux minutes.
Page 51

Odeurdans
lerefrigerateur
Air chaud a la base du
refrigerateur
Lueurorangedans
le congelateur
Causespossibles
Des aliments ont transmis
leur odeur au r6frig6rateur.
Correctifs
• Les aliments "aodeur fbrte doivent eue emball&
henn_3tiquelnent.
• Gardez une boite ouverte de bicarbonate de soude
dans le rafiigarateur.
I1faut nettoyer l'int_rieur. • Consultez Entretien et nettoyage.
I1faut nettoyer le syst_me • Consultez Entretien et nettoyage.
d'6vacuation de l'eau de d6givrage.
Courant d'air normal provenant
du moteur. Pendant le processus
de r6frig6ration, il est normal que
de la chaleur soit expuls_e fi la
base du r6frig_rateur. Certains
rev6tements de sol peuvent se
d6colorer sous l'effet de cette
temp6rature de fonctionnement
normale qui est sans danger.
Le cycle de d6_vrage est
en cours.
• Sivous voulez _3vitercette dc3coloration, consultez votre
foumisseur de rev_telnents de sol.
• C'est normal.
157
Page 52

GARANTiE DU CLIENT
(pour la clientele au Canada)
Votre refrigerateur est garanti contre tout defaut de materiau et de fabrication,
I_,X'3J
Ce que cette
II:O¢)J
garantie couvre
IP_¢31
I(O{3J
i(_:/
Compresseur Cinq (5) arts Cinq (5) arts Cinq (5) arts
I(PX3J
Systeme scelle (y Cinq (5) arts Cinq (5) arts Cinq (5) arts
I(0e31
compris I'evaporateur, la
I(O_3J
tuyauterie du condenseur
II_X31
et le frigorigene)
Toutes les autres pieces Un (1) an Un (1) an Un (1) an
I(0@l
TERMES ET CONDiTiONS :
La presente garantie ne s'apptique qu'a
I'utilisation domestique par une seule famille
au Canada, Iorsque le r6frigerateur a et6
installe conformement aux instructions
fournies par Camco et est alimente
correctement en eau et en electricit6.
Duree de garantie
(a partir de la
date d'achat)
EXCLUSIONS DE LA GARANTIE :
• Visites & domicile pour vous apprendre
vous servir de I'appareil.
• Dommages causes a la peinture ou
I'email apres livraison.
• Installation incorrecte--I'installation
Pieces
Reparation ou
remplacement au
choix de Camco
Main-d'oeuvre
correcte inclut la bonne circulation d'air
Les dommages dos & une utilisation
abusive, un accident, une exploitation
commerciale, ainsi que la modification,
I'enlevement ou I'alteration de la plaque
signaletique annulent la presente garantie.
L'entretien effectue dans le cadre de la
presente garantie doit I'etre par un
reparateur agree Camco.
Camco et le marchand ne peuvent etre
tenus pour responsables en cas de
reclamations ou dommages resultant de
toute panne du refrigerateur ou d'un
entretien retarde pour des raisons qui
raisonnablement echappent aleur contr61e.
L'acheteur dolt, pour obtenir un service
dans le cadre de la garantie, presenter la
facture originale. Les elements repares ou
pour le systeme de refrig6ration, des
possibilites de branchement aux circuits
electriques, d'alimentation en eau et autres.
• Remplacement des fusibles ou
rearmement des disjoncteurs.
• Remplacement des ampoules
electriques.
• Dommages subis par I'appareil a la suite
d'un accident, d'un incendie, d'inondations
ou en cas de force majeure.
• Perte des aliments doe & la deterioration.
• Utilisation correcte et entretien adequat
de I'appareil selon le manuel d'utilisation,
reglage correct des commandes.
• LE GARANT N'EST PAS RESPONSABLE
DES DOMMAGES INDIRECTS.
remplaces ne sont garantis que pendant le
restant de la periode de garantie initiale.
Cette garantie est en sus de toute garantie
statutaire.
iMPORTANT
Gardez cette garantie et votre facture originale comme preuve d'achat et preuve
de la date d'achat.
52
Camco vous offre ses services dans tout le pays. Pour de plus amples
renseignements sur la presente garantie, veuillez prendre contact avec :
Directeur, Relations avec les consommateurs
Camco Inc., Bureau 310
1 Factory Lane
Moncton, N.B.
E1C 9M3
Page 53

Numerosdeservice.
GEAnswerCenter_aux£tats-unis-800.626.2000
Notre selvk:e d'in[ommtion est ouvert 24 heures parjour, 7jours par semaine.
AuCanada,6crivez au Directeur, Relations m_ecles consommateurs, Cmnco Inc., Bureau 310,
1Facto U Lane, Moncton, N.B. El(; 9M3.
Reparations8 domicilea.x £tats-Unis "800-432-2737
Pour fidre rdparer votre (,qectrom(,'nager GE, il suftit de nous ff,qdphoner.
Au Canada, appelez le 1-800-361-3400.
Pourlesbesoinsparticuliersa.x Etats-unis:800.626.2000
Sur demande, GE peut fburnir une brochure sur l'am(,'nagement d'une cuisine pour les
personnes _'_mobiliff," re&rite. Aux£tats-Unis,appo/ezle800-TDD-GEAC(800-833-4322).
AuCanada,4cfivez au Directeur, Relations avec les consommateurs, Camco Inc., Bureau 310,
1Facto U Lane, Moncton, N.B. El(; 9M3.
Contratsd'entretiena.x Etats-unis"800-626-2224
Achetez un contrat d'entretien GE avant que votre garantie n'expire et b(mdficiez d'un rabais
substantiel. Ainsi le sel_ce apr&s-vente GE sera tot0ours la apr&s expiration de la garanue.
Au Canada, appelez le 1-800-461-3636.
Piecesetaccessoiresa.xEtats-Unis'800-626-2002
Ceux qui ddsirent rdparer eux-m#mes leurs dlectrom(_nagers peuvent recevoir pi#ces et
accessoires directement _'_la maison (cartes VISA, MasterCard et Discover acceptdes).
Lesdirectivesstipu/eesdartsle present manuelpouvent Ottoeffectueespar n'importequeluti/isateur.
LosautresreparationsdoiventgeneralementOtreeffectueespar untechnicienqualifie. Soyezprudent,
carunereparationinadequatepoutaffecterle fonctionnements_uritaire deI'appami/.
Les clients au CanadadexTaient consuher les pagesjaunes pour connahre la succursale Camco la
plus pri_s, ou appelez le 1-800-361-3400.
Unservicesatisfaisant
Sivous n'_?tespas sadsfilit du sewice apr?_s-vente dont vous m_ezb6ndficid •
PremJerement,communiquez m_ecles gens qui ont rdpard votre appareil.
Ensuite,si vous n'_tes toujours pas sadsfifit, aux P£tats-Unis,envoyez tons les (ldmils-num(_ro de
tdldphone cornpfis--au Manager, Consumer Relauons, GE Appliances, Appliance Park,
Louisville, KY 40225; ou, au Canada, au Directeur, Relauons mTecles consommateurs, Camco
Inc., Bureau 310, 1 Facto U Lane, Moncton, N.B. El(; 9M3.
Enfin,si votre probl&me n'est totoours pas rdsolu, dcrivez au :Major Appliance Consmner Acuon
Progrmn, 20 North Wacker Drive, Chicago, IL 60606 (l_tats-Unis uniquement).
Imprime aux Etats-Unis 53
Page 54

Infonnacion de
seguridad
Precaucionesdeseguridad..... 55
Cablesdeextension . .55
Coneccar/aelectnc/dad .56
Adaptadores...... 56
/nstrucciones de
operation
Controles...... 57
Caracteristicas.......... 58-67
Dispositivoautomatico
paraiTacern/do.. 62
Dispensadordehielo
y deagua.......... 63
Cuidadoy limp/eza.. .64.6'5
iFelicidades!
Ahora ustedesparte dela familiaGE.
Bienvenido a la fhmilia GE. Esmmos orgullosos de la
calidad de nuestros productos y creemos en el
sewicio confiable. Lo verfi en este manual f:,icilde
usar y lo escucharfi en las voces de nuestro
departamenm de se_a_icioal consumidor.
Lo mejor serfi que usted expefimenmrfi dstos valores
cada vez que use su refiigerador. Eso es impormnte
porque su refiigerador serfi parte de su fhmilia
durante un largo dempo. Y esperemos que usmd
serfi parte tie nuestra f:amilia por mucho tiempo.
Los a_'adecemos de comprar GE. Aprecimnos su
compra y espermnos que seguir_i confiando en
noson'os cuando neceske un aparato tie calidad en
su hogar.
GEy usted,unaasociacion de servicio.
lnstrucciones de
instalacien
Preparacionpara
instalarelrefrigerador......... 66
/nstalacionde
la Iineadeagua 67-69
e_a
Cambiard modode
m
aperturadela,ouerta....... 70-73
$olucionarproblemas
Sonidosnorma/es
de/aopemcion ..74
Antesde
solicitarunserv/cio........ 74-76
PARAGUARDARCOMOREFERENCIA
Anote aqui los numerosde modeloy de serie:
No.
No.
Usted los ver_ en una etiflueta en el interior del compartimiento
de alimentos fi'escos en la parte superior.
Engrape la factura de compra o el cheque cancelado aqui.
Se requiere prueba de la fecha de la compra (niginal para obtener el
sewicio cubierto b_go la garanda.
LEAESTEMANUAL
Este contiene insmmciones que le ayu(lar_i a usar y mantener de
manera correcta su refiigerador. Un poco de cuidado preventivo le
a?_.l(lar_ia ahorrar tiempo y dinero duranm la vida de su
refiigerador.
Encontrarfi en la secci0n de Antes do solicitar un servicio soluciones a
los problemas mils comunes. En revisar nuestra seccidn de
Solucionar problemas pfimero, tal vez no necesimrfi de solicitar un
sec_4cio.
Servicio a/ consumidor
6arantfaparaconsumidores
enlosEstadosbnidos ....... 78
Numerosdelservicio. . .79
54
SINECESITASERV/C/O
Sirequiere un sel_icio, puede sentirse relajado al saber que
la aF_.l(laestfi s61o a una llmnada de dismncia. Se incluye una
lista de nfimeros N'amitos de servicio al consumidor en la secci0n
trasera. O llame al GE Answer Center ®a1800.626.2000, las 24
horas del (t_a, los 7 (l_asde la semana.
Page 55

INFORMACIONES IMPORTANTES DE SEGURIDAD
LEA PRIMERO TODASLAS INSTRUCCIONES.
iADVERTENCIA!
Use este aparato solo para los fines que se describen en este Manual del propietario.
PRECAUCIONESDESEGURIDAD
Cuando use electrodomosticos, siga las precauciones basicas de seguridad, incluyendo las siguientes:
Antes de usarse, este refiJgerador deber_ estar
instalado y ubicado de acuerdo con las
instrucciones de instalaci6n.
No perlnita que los nifios se suban, se paren o se
cuelguen de las charolas del refiigerador. Podria
daft arse el refiigerador y causarles serias lesiones.
No toque las superficies ffias del congelador
cuando tenga las manos hOmedas o mojadas.
La piel se po(hia adherir alas superficies
extrelnadamente fi'ias.
No gavlrde ni use gasolina u otros vapores o liquidos
inflamables cerca de este o cualquier otto aparato.
Aleje los dedos fllera de las areas donde se puede
pinchar los dedos; los espacios entre las puertas y
entre las puertas y los gabinetes son
necesariamente estrechos. Cie_re las puertas con
cuidado en la presencia de los nifios.
Sisu refiigerador tiene un dispositivo mltolnatico
para hacer hielo, evite el contacm con laspartes
m6viles del mecanislno de expulsi6n, o con el
elemenm calefhcmr que desprende los cubos.
No ponga los dedos ni lasmanos en el mecanislno
mlmmatico para hacer hielo mientras el
refiigerador estd conectado.
Desconecte el ret_igerador antes de limpiarlo o
efecmar reparaciones.
NORA:Recomendamosenfaticamenteencargarcualquierservicio
aunpersonalcalificado,
E1colocar el control en posici6n OFF(apagado)
no quita la coNiente del circuito de la luz.
No _alelva a congelar los aliInentos congelados
una vez que se hayan descongelado.
IMPORTANTE:
DESHACERSEDEBIDAMENTEDESUREFRIGERADOR
E1atrapamiento y la sofocaci6n de los nifios no son
tin probleIna del pasado. Los refiigeradores
abandonados son un peligro...mmque sea s61o pot
"pocos dias." Si se deshace de su viejo refiigerador,
pot favor siga las instmcciones abajo para a?aldarnos
a prevenir algOn accidente.
Antes de deshacerse de su viejo
refrigerador o congelador:
Quite las puertas.
Deje los entrepafios en su sitio para que los nifios
no se sllban.
Deshacerse del CFC
Su antiguo refiigerador tiene tin sisteIna de
refiigeraci6n que us6 CFC (clorofluorocarbonos).
Se cree que los CFC son nocivos para el ozono
estratosfbrico.
Si se deshace del antigllo refiigerador, asegOrese de
que se deshaga del refiigerante con CFC
coN'ectamente por un tdcnico calificado. Si se libera
a prop6sim el refi'igerante con CFC puede estar
sujeto alas multas y al encarcelamiento bajo las
estipulaciones de la legislacidn ambiental.
USODECABLESDEEXTENSION
Debido a los accidentes potenciales que pudieran ocurrir bajo determinadas condiciones, se recomienda
estrictamente no usar cables de extension.
Sin embargo, si decidiera usarlos, es absolutalnente necesario que sea del tipo UL tfifilar para aparatos
y cuente con una clavija con conexidn a tierra y que el cable eldctfico sea de 15 alnperios (minimo) y
120 voltios.
55
Page 56

INFORMACIONE$IMPORTANTE$DESEGURIDAD.
LEAPRIMEROTODAI_$ INSTRUCCIONE$.
iA D VER
m
COMOCONECTARLAELECTRICIDAD
Bajo ninguna circunstancia debe cortar o quitar la tercera punta (fierra) de la clawja. Para su seguridad
personal, este aparato debera conectarse debidamente a fierra.
!
E1cable el_cuico tie este aparato estd equipado con
una clavija de u'es puntas (derra) que enchu6l en un
contacm estfindar tie pared tie tres salidas (fierra)
pm'a reducir al minimo la posibilidad tie dafios pot
tin choque el_cu'ico con este aparam.
Haga que un electficista calificado veritique el
enchufe de la pared y el circuito para asegurm'se
que la salida este conectada debidamente a tierra.
Donde se disponga s61o tie tin contacto tie pared con
saMa para dos puntas, es su responsabiMad persomd
y su obligaci6n reemplazm'lo pot un contacto
adecuado para u'es punms con conexi6n a derra.
E1reffigerador deberd conectm'se siempre en su
propio conmcto el_cuico indMdual que tenga
un vohaje que vaya tie acuerdo con la tabla tie
clasificaci6n.
Esto garanuza la mejor ejecuci6n y extra la
sobrecarga del circuko el4cuico de la casa y los
dafios a causa del sobrecalentamiento tie los cables.
Nunca desconecte el reffigeradorjalando el cable.
Tome siempre fim_emente la clmija y sdquela del
contacto sin doblarla.
Repare o reemplace inmediammente todos los
cables elOcuicos tie servicio que se hwan desgasmdo
o dafiado en alguna ou'a fbrma. No udlice cables
que muesu'en romras o dafios pot abrasi6n a lo
largo de _3steni en la cla%a o en alguno tie sus
extremos.
A1 alejar su reffigerador tie la pared, cuide que no
pase sobre el cable o lo dafie.
USODELOSADAPTADORES(No__Jt_._ _h.r__d_t_do_e_C_d_
Debido a los accidentes potenciales relacionados con la seguridad ba_jodeterminadas circunstancias,
recomendamos estrictamente no utilizar un adaptador para clavija.
Sin embargo, si se decidiera usar un adaptador
donde los c6digos locales lo pemlitan, es necesm{o
hacer una conexiontemporala un contacto tie pared
pm'a dos puntas debidamente conecmdo a uen'a
uulizando un adapmdor UL, mismo que puede
adquirirse en comercios locales especializados.
La punta rods larga del adapmdor se deberd alinem"
con la enu'ada lm'ga del conmcto con el tin tie tenet
la polaridad adecuada en la conexi6n tie la clm_ja.
A1 desconectar el cable del adapmdor, det_:ngalo
siempre con una mano drando a lavez el cable
el_cuico con la ou'a mano. De no hacerlo puede
causar que el adapmdor se rompiera despu_s tie
rmlcho tlso.
Si se rompiera la terminal a derra del adaptador,
NO USE el apm'ato hasm que se haya reesmblecido
la conexi6n a derra tie manera adecuada.
Laconexiondelaterminalde tierra deladaptadora la
salidadel contactodeparednoconectael apamtoatierra,
a noset queel tomillodelatapaseademetaly noesto
aisladoy queel contactodelaparedestoconectadoa
tierraa travOsdelcableadode la casa.Unelectricista
calificadodeberamvisarel circuitopareasegurarsede
queel contactoestodebidamenteconectadoa tierra.
Favordeleeryseguircuidadosamente/asprecaucionesdeseguridad.
GUARDEESTAS INSTRUCCIONES
56
Page 57

Loscontrolesdel refrigerador.
Los controles de temperatura en su refrigerador tienen
letras y nOmems. Coloque primem el control del
compartimiento de alimentos frescos en 5y el control del
congelador en C.
5 INITIAL SETTING
9 COLDEST
FRESH FOOD
Elajuste de los controles
O Control del compartimiento de alimentos frescos
E1control para los alimentos fi'escos mantiene las temperaturas en todas partes del comparumdento
de alimentos fi'escos.
Sl quiere temperaturas mas frias o mas calidas, a]uste
prlmero la temperatura del compartimlento de alimentos
frescos. Cuando esto satisfecho con Osta,ajuste la
temperatura del congelador.
Aimidedel I
compartimiento I
delcongelader _ E (PositiOnde
"" _C n,, m_ximofF_0)
_.'x\ Ii
(PosiciOndeA c=-==t )
m_ximocalor)
Vistadeperfil
La colocaci6n del control del COlnpartimiento de alimentos fl'escos en OFF(apagado) intermmpe el
enfi'iamiento en ambos compartimienms-el del alimentos fl'escos y el del congeladoripero no apaga
el refl'igerador.
Control del congelador
E1control para el congelador mantiene las temperatm'as en todas partes del congelador.
Come verificar las temperaturas
Haga la prueba de la leche para el compartimiento de alimentos fl'escos. Coloflue un recipiente (:on
leche en el enu'epa_o superior del comparfimiento para alimentos fl'escos. Verifique el dia siguiente.
Sila leche estfi demasiada tibia o demasiada fi'ia,ajuste los conu'oles de la temperamra.
Haga la prueba del helado para el congelador. Coloque un recipiente con helado en el cenu'o del
congelador. Vedfique el dia siguiente. Siest_ demasiado duro o demasiado suave, ajuste los conu'oles
de la temperatura.
OespuOsdecambiarloscontrole&permitaque transcurran24horasparaqueel refrigeradoralcancela
temperaturadeseada.
Interruptor para ahorrar electricidad
Ponga el intern@tot en la posici6n POWERSAVERpara reducir la cantidad de electncidad requedda
para el fhncionamiento del refi'igerador.
Con el inteN'mptor en la posicion de POWER SAVER,se puede formar humedad en el exterior del
refl'igerador, especiahnente si el tiempo es hOmedo.
Despu_3sde un largo tiempo, la humedad que seforma en la superficie puede cmlsar orin.
Para prevenir humedad en el exterior, gire el intermptor de ahorro de elecu'icidad fhera de la
posici6n POWERSAVER.
gCosto?Aproximadamenteel mismoquedeusar2 lucesde noche.
57
Page 58
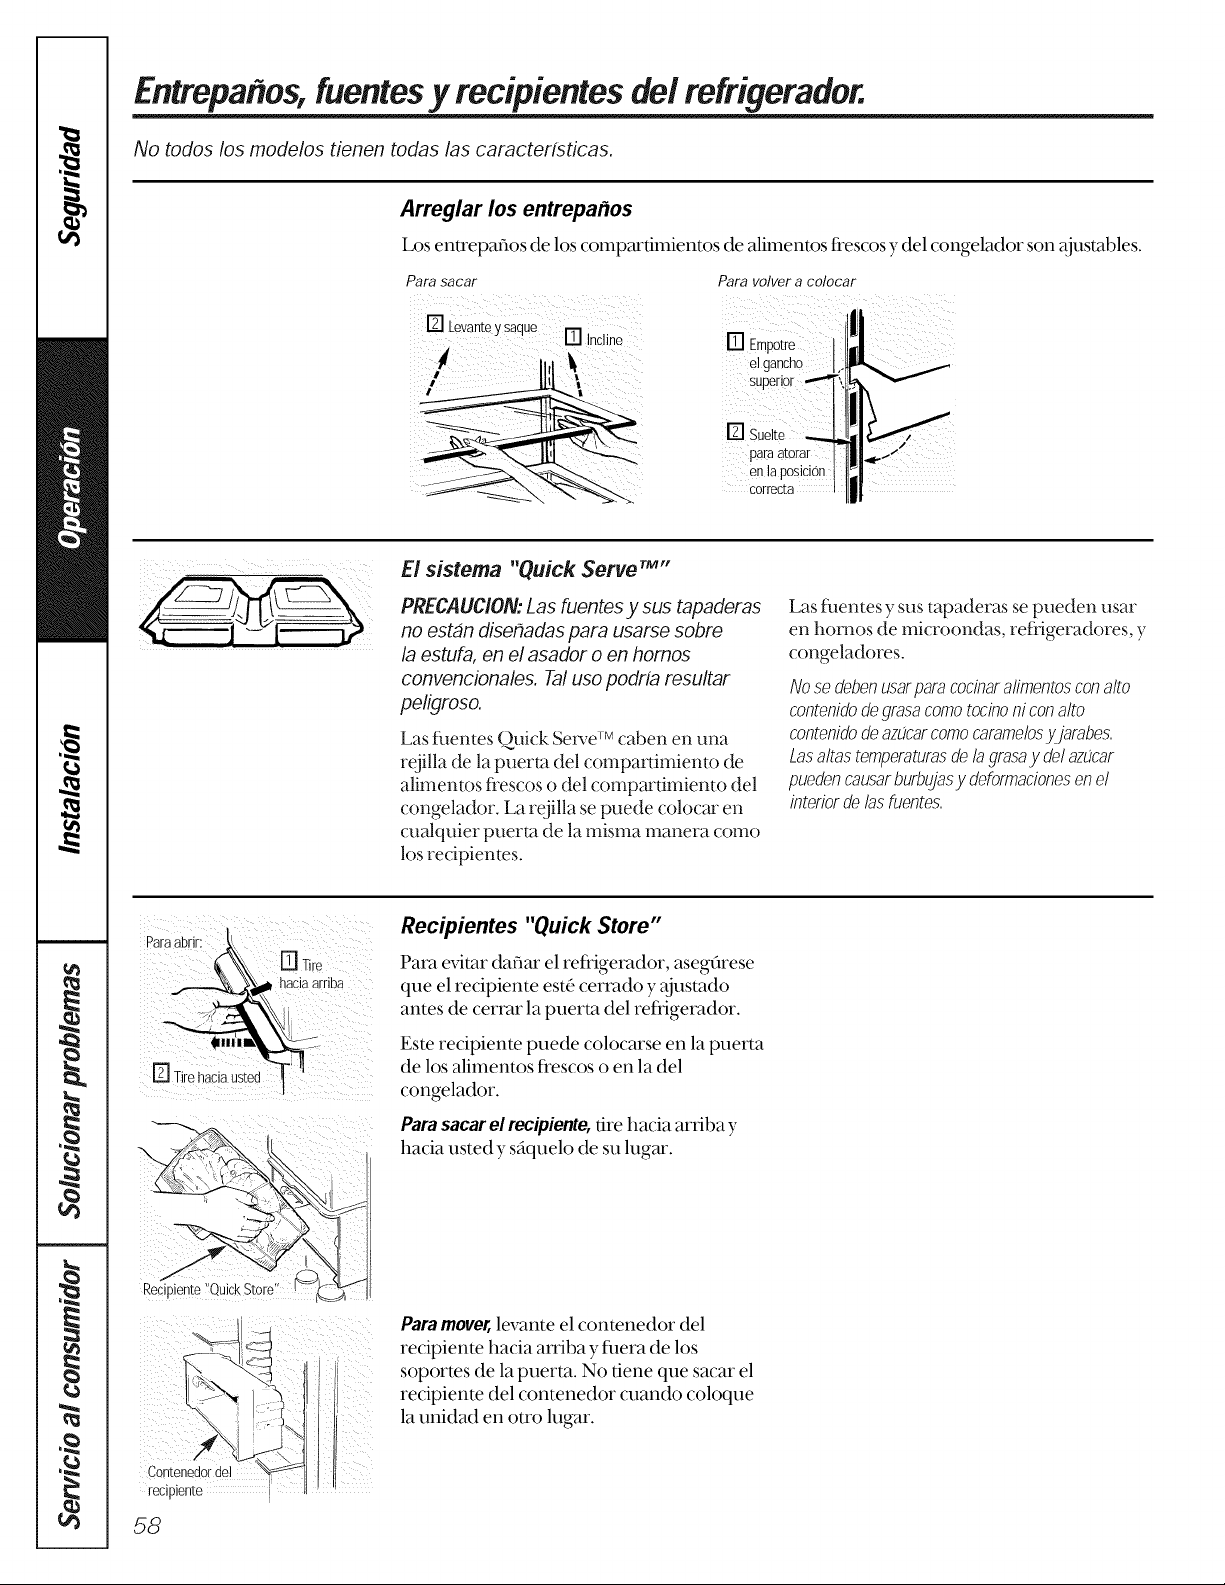
Entrepa os,fuentesy recipientes de/refrigerador.
No todos los modelos tienen todas las caracter/sticas.
Arreglar los entrepa_os
Los entrepafios de los compartimientos de alimentos fi'escos y del congelador son ajustables.
Para sacar
Para volver a colocar
[] LevanteYiaque i-r1
ILl ir/Cllne
[] Empotre
El sistema "Quick ServeTM"
PRECAUCION:Las ruentes y sus tapaderas
no estan diseOadaspara usarse sobre
la estufa, en el asador o en homos
convencionales. Taluso podrfa resultar
peligroso.
Las fllentes Quick Seis,eTM caben en una
rejilla de lapuerta del comparfimiento de
alimentos frescos o del compartimiento del
congelador. La rejilla se puede colocar en
cualquier puerta de la misma manera como
los recipiemes.
el gancho
en]aposiciOn
correcta
Las fl.lentes y sus mpaderas se pueden usar
en homos de microondas, refiigeradores, y
congeladores.
Nose debenusarparacocinaralimentosconalto
contenidodegrasacomotocinoni conalto
contenidodeaZL/Carcomocammelosyjarabes,
Lasaltastemperaturasdelagrasay delaZL/Car
puedencausarburbujasy deformadonesenel
interiordelasfuentes,
Contenedor del
recipiente
Recipientes "Quick Store"
Para evitar daft ar el reffigerador, asegOrese
que el recipiente est,3 cerrado yajustado
antes de cerrar la puerta del refiigerador.
Este recipiente puede colocarse en la puerta
de los alimentos fi'escos o en la del
congelador.
Para sacar el recipieme,tire hacia arriba y
hacia usted y s:_quelo de su lugar.
Paramover,levante el contenedor del
recipiente hacia axTibay fuera de los
soportes de la puerta. No tiene que sacar el
recipiente del contenedor cuando coloque
la unidad en otto lugar.
58
Page 59

Gavetaspara guardar.
No todos los modelos tienen todas las caracteristicas.
Gavetas para frutas y vegetales
E1exceso de agua que pueda acumularse en
el rondo de las gmTetasdeben set vaciado y
las gm_etas deben seTsecadas.
Gavetas con humedad ajustable
Deslice el control hasta llegar a la posici6n
HIGH(alto) para proporcionar el alto nivel
de humedad recolnendado para la lnayoria
de los vegetales.
Gaveta para bocadillos sellada
La gaveta se puede cambiar de lugar para el
lugar mas practico para su fmnilia.
Gaveta de came con temperatura ajustable
Cuando la gaveta se coloca en los 6
pfimeros espaciosielnpezando por alI'iba i
del lado izquierdo, y la palanca se pone en
la posicidn COLDEST(m'aximo fi'io), aire
proveniente del congelador es forzado a
moverse alrededor de la gaveta para
mantenerla InW fi'ia.
Puede poner la gm_eta en cualquier OtTO
lugar si no quiere este almacenaje muy ffio.
Deslice el control hasta llegar a la posici6n
LOW (ba]o)para proporcionar el nivel de
baja humedad recomendado para la
lnworia de las fmtas.
E1ajuste se puede colocar a cualquier punto
entre gOLD(fi'io) y COLDEST(m_iximo fi'io).
Cuando la palanca esta en la posici6n COLD
(fi'io), la gaveta se quedar5 a la telnperamra
normal del refiigerador.
E1@lste de COLDEST(m'aximo fi'io)
proporciona la firea de ahnacenamiento la
ln_s fi'ia.
59
Page 60

Sacar la gavetapara guardary la cubierta.
No todos los modelos tienen todas las caracteristicas.
Gavetas para guardar
Parasacar:
Pueden extraerse f_cilmente levantfindolas
ligeramente y urando de elias basra pasar el
punto donde se atrancan.
Cuando la puerto no se puede abrir lo
ii!7 i¸ £
_i_i_ii_i_I i!i_i_I_II_I
Paso 1
suficientemente para sacar la gmTeta,deslice
la gm_eta hacia el centro yretirla.
Saque el vidrio, y luego el marco. Cuando
vuelva a colocar elvi(hio empuje el borde
posterior dentro del marco con fimmza.
Paso 2
Paso 3
Caracteristicas adicionales.
No todos los modelos Uenen todas las caracterlsticas.
Separadores
Coloque un dedo en ambos lados del
separador por el fi'ente, ymudvalo hacia
adelante y hacia atrfis para que se acomode
a sus necesidades.
60
Page 61

Entrepa_o de posicion doble para el congelador
¸¸¸¸
Para los modelos sin dispositivo para hacer
hielo, el entrepaf_o se puede instalar en
cualquiera de las dos posiciones.
Para los modelos con dispositivo para hacer
hielo, el entrepaf_o se deber:_ instalar en la
parte inferior.
/ /
Cafita de condimentos
La (:_ir_ldecondimentos guardajuntos los
contimentos fi'ecuentemente usados.Se
encaje en el estante de puerta de su
refi'igerador.
Estante de bebidas
E1estante de bebidas puede contener doce
latas de soda o dos botellas de vino/agua
(a lo largo). Se puede quitar para limpiarlo.
Entrepa_o extra para
el congelador
Una asa pr_ctica le pennite de llevar los
condimentos fgcilmente a la mesa.
Soporte del bicarbonato
de sodio
Recipiente en las puertas
61
Page 62

Eldispositivoautomaticopara hacer hielo.
Unrefrigerador recion instalado puede tardar hasta 8 a 12horas antes de empezar a hacer hielo.
Brazoaetec_orer
Dispositivopara la posicionSTOP
nacerhJelo tPARADA--
_ilacla arrlba)
/ -_X,/ Recipiente
Brazodetectoren
laposiciOnON
/8/_ haciaabajo
_ACTIVADA--
,, , t2
_/" J/
Dispesitive automatice para hacer Brazo detectoren !a posicion
hJelo olg.nosmo os; SWP!PA ADA--haC!a r'ba!
E1dispositivo pm'a hacer hielo pro(tucir;_
ocho cubos por ciclo-aproximadamenm
100 cubos en un ciclo tie 24 horas,
dependiendo de la temperamra del
congelador, de la temperamra mnbiente,
del m_mero de veces que se abra la puerto y
de otras condiciones del uso.
Siel refl'igerador se usa anms de que se
haga la conexidn de agua al disposidvo para
hacer hielo, ponga el brazo detector en la
posici6n STOP (PARADA-hacia mTiba).
Cuando el refligerador est_ conectado al
suministro de agua, mueva el brazo
demctor basra la posici6n ON (ACTIVADA
-hacia abajo).
E1disposidvo para hacer hielo se llenarfi de
agua cuando la temperamra alcance el
punto de congelacidn. Un refiigerador
recidn instalado puede necesitar entre 8 y
12 horas para empezar ahacer hielo.
Deseche las primeras cargas de cubos de
hielo para permidr que la linea de agua se
limpie.
Brazo detector en elmodelo
con dispensado_
AsegSrese de que nada impide el
movimiento del brazo detector.
Es normal que algunos cubos salgan
pegados.
Sino se usa hielo con fi_ecuencia, los cubos
de hielo viejos se opacan y adquieren un
sabot rancio.
Juego de accesorios para el dispositivo automatico para hacer hielo
Sisu reffigerador no venia ya equipado
con un dispositivo autoln_tico para hacer
hielo, puede obtener, a costo adicional, un
Vdase la parte de arras de su reffigerador
para eljuego de dispositivo para hacer hielo
espedfico necesario para su modelo.
juego de accesorios para el dispositivo para
hacer hielo.
62
Page 63
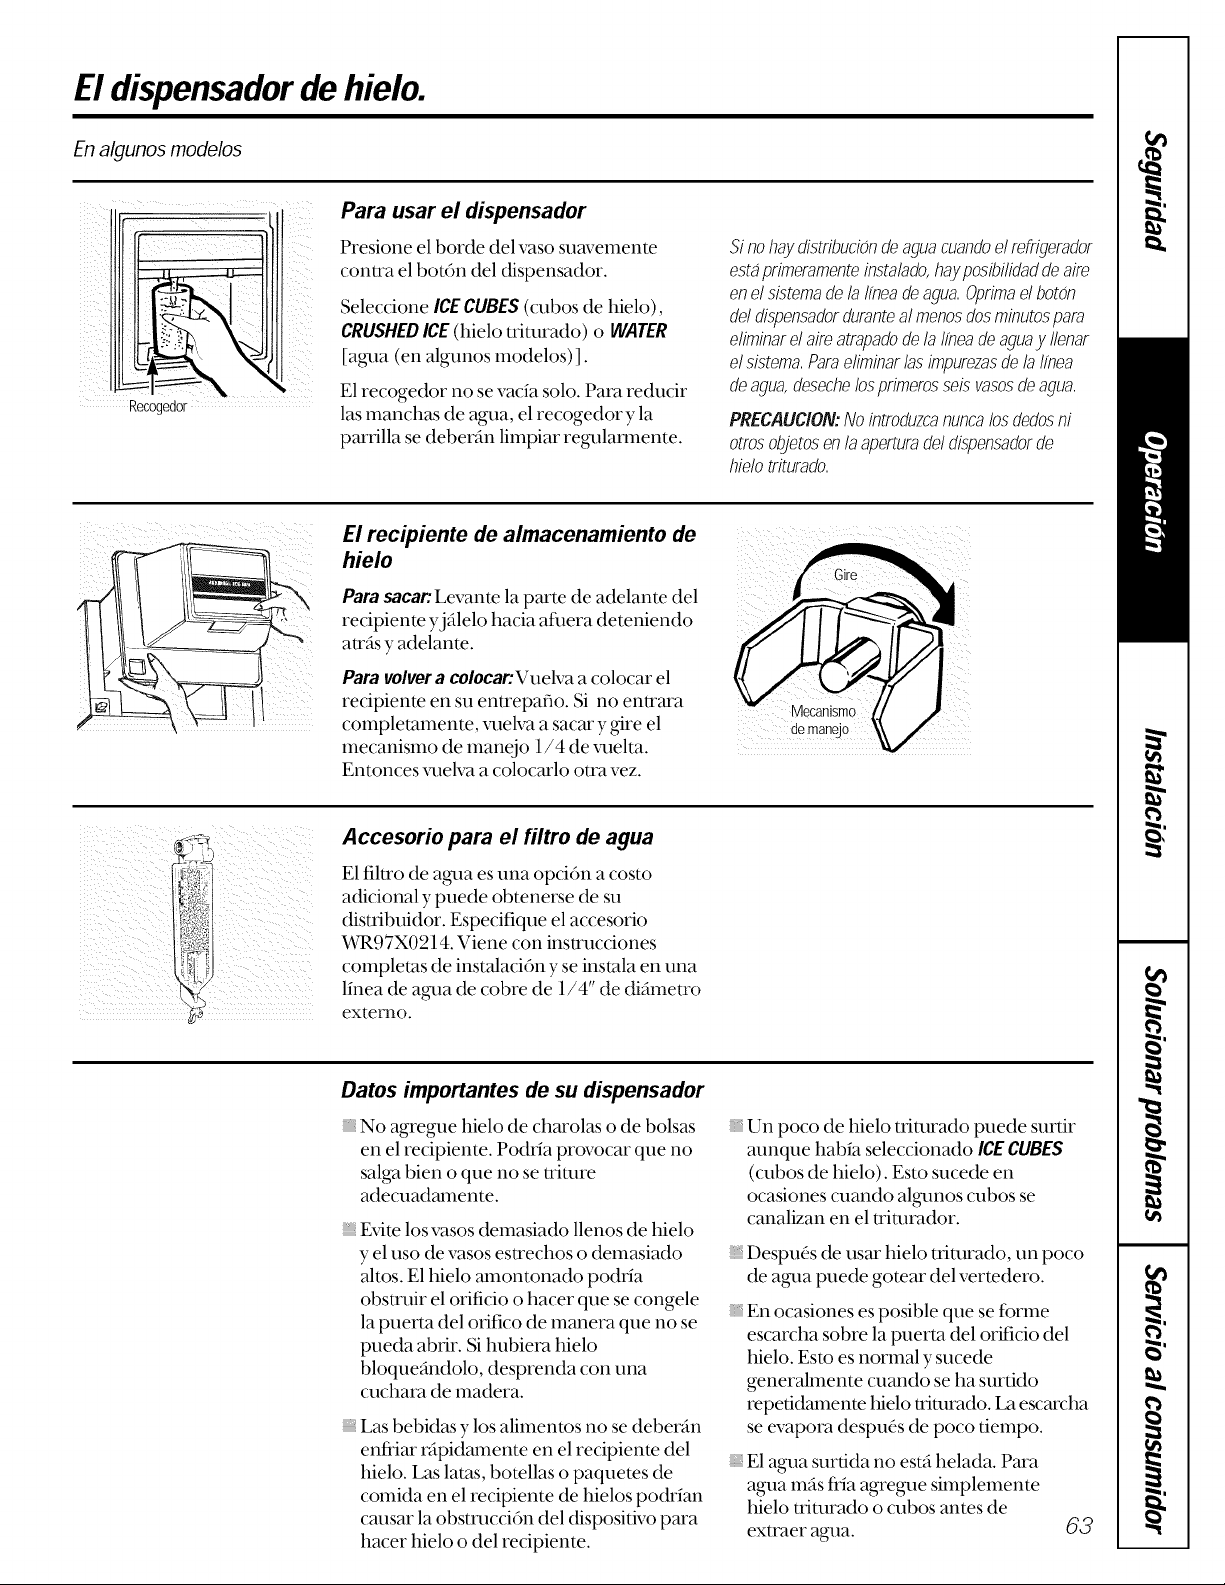
Eldispensadordehielo.
En algunos modelos
i
I i
Recogedor
¸¸¸¸¸:¸¸7:
i_iii _ i
Para usar el dispensador
Presione el borde del vaso suavemente
contra el bot6n del dispensador.
Seleccione ICECUBES(cubos de hielo),
CRUSHEDICE(hielo tfiturado) o WATER
[agua (en algunos modelos) ].
i I !i
E1recogedor no se vacia solo. Para reducir
las manchas de agua, el recogedor y la
partilla se deberAn limpiar regulannente.
El recipiente de almacenamiento de
hielo
Para sacar:Levante la parte de adelante del
recipiente yjalelo hacia afhera deteniendo
arras y adelante.
Para volvera colocar: Vuelva a colocar el
recipiente en su entrepafio. Si no entrara
completmnente, xalelva a sacar y_re el
mecanismo de manejo 1/4 de xalelta.
Entonces xa_elvaa colocarlo otra vez.
Si nohaydistributiondeaguacuandoelrefrigerador
est,)primeramenteinstalado,hayposibilidaddeaire
enelsistemadelaIfneadeagua,Optimaelboton
deldispensadordurantealmenosdosminutospare
eliminarelaireatrapadodela Ifneadeaguay Ilenar
elsistema,ParaeliminarlasimpurezasdelaIfnea
deagua,desechelosprimerosseisvasosdeagua,
PRECAUCION:No introduzcanunca losdedosni
otros objetosen /a aperturade/dispensadorde
h/do triturado,
Mecanismo
Accesorio para el filtro de agua
E1fihro de agua es una opci6n a costo
adicional y puede obtenerse de su
distfibuidor. Especifique el accesorio
WR97X0214. Viene con instrucciones
colnpletas de insmlaci6n y se instala en una
linea de agua de cobre de 1/4" de difimetro
extenlo.
Datos importantes de su dispensador
No agregue hielo de charolas o de bolsas
en el recipiente. Po(hia provocar que no
salga bien o que no se trimre
adecuadmnente.
Evite los vasos demasiado llenos de hielo
y el uso de vasos estrechos o demasiado
altos. E1hielo amontonado po(hia
obstruir el orificio o hacer que se congele
la puerta del otifico de manera que no se
pueda abfir. Si hubiera hielo
bloquefindolo, desprenda con una
cuchara de madera.
Las bebidas y los alimentos no se deber_n
enffiar r_pidamente en el recipiente del
hielo. Las latas, botellas o paquetes de
colnida en el recipiente de hielos po&ian
cmlsar la obstmcci6n del dispositivo para
hacer hielo o del recipiente.
Un poco de hielo tfimrado puede surtir
aunque habia seleccionado ICECUBES
(cubos de hielo). Esto sucede en
ocasiones cuando algunos cubos se
canalizan en el trimrador.
Despuds de usar hielo tfimrado, un poco
de agua puede gotear del vertedero.
En ocasiones es posible que se forme
escarcha sobre la puerta del orificio del
hielo. Esto es normal y sucede
generahnente cuando se ha surtido
repetidamente hielo tfimrado. Laescarcha
se evapora despuds de poco tielnpo.
E1agua surtida no estfi helada. Para
agua mas fi'ia agregue simplemente
hielo tfiturado o cubos antes de
extraer agua.
63
Page 64

Cuidadoy /impiezade/refrigerador.
Presshereto Limpiar el exterior
EIpozo de/dispensador(en alg_.mos
modelos), por deb_oo de la pan'ilia, se debe
mantener limpio y seco. E1ag_la que se
queda en el pozo puede dejar dep6sitos.
Quite los dep6sitos a_'egando vimNre sin
diluir al pozo. Remoje hasta que
desaparezcan los dep6sims o basra que se
desprendan lo suficiente para quitarlos.
Elboten de/dispensador (en algunos
modelos). Se limpia con una soluci6n de
again ubia y bicarbonato tie sodio--
aproximadarnente una cucharada (15 ml)
tie bicarbonato tie sodio por cada cuarto
(1 litro) tie agua. Enjuague completamente
con agua y seque.
CONSEJO:Abralapuertadelcongeladorunpoco
paraevitarquesalgahieloo aguadurantela
Iimpieza,
tas manijasdela puertay losornamentos(en
algunos modelos). Selimpian con un patio
humedecido con una soluci6n tie
detergente suave y agua. Seque con un
paf_o suave.
tas manijas suavesforradas(en algunos
modelos) son fiiciles tie mantener limpias si
se enceran regulammnte. Use una cera
dom_stica (pot ejemplo, Pledge oJubilee)
para encerar las manijas. Limpie con agua y
jab6n o un limpiador suave para redo uso.
Mantenga limpio el terminado.Limpie con un
patio limpio ligeramente humedecido con
cera para aparatos tie cocina o un
detergente suave y agua. Seque y pula con
un patio limpio y suave.
NoIimpieelrefrigeradorconunpar-7osuciopara
trastesniconunpar-7ohL/medo,Estospodrfanddar
residuosqueafectenalapintura,Nouseestropdos,
Iimpiadoresenpolvo,blanqueadoresniIimpiadores
quecontenganblanqueador,ya queestosproductos
podrfanrayary desprenderel terminadodepintura,
i_i i_i i_
_ _i_i iiiI_iii_iiiii!
Limpie las bobinas del condensador
a[ menos Una vez a! ai_o.
Limpiar el interDr
Para evitarolores,deje una caja abierta tie
bicarbonato tie sodio en los
compartimientos tie alimentos fl'escos ydel
congelador.
Desconecteel refrigeradorantesdelimpiarlo.
Sino fllera posible, exprima el exceso tie
humedad tie la esponja odel patio cuando
se lilnpie alrededor de bomnes, bolnbillas
o controles.
Use cera para electrodomdsticos en el
interior entre las puertas.
Use agua caliente y una soluci6n tie
bicarbonato tie sodio-aproximadamente
una cucharada (15 1111) tie bicarbonam tie
sodio por cada cuarto (1 litro) de agua. Esta
soluci6n lilnpia yneutraliza olores.
Enjuague y seque.
Debajo del refrigerador
Para la operaci6n mils eficiente, usted
necesita mantener limpia la regi6n debajo
del refl'igerador. Quite la rejilla tie la base y
barra o pase el aspirador.
Despuds tie limpiar lasjuntas tie las puertas,
aplique una capa delgada tie vaselina del
lado tie la bisa_'a. Esto a?_ltta a evitar que
lasjuntas se doblen o se peguen.
EviteIimpiarlosentrepaOosdevidrio(onalgunos
modelos)frfosconaguacaliente,ya quelaextrema
diferenciadetemperaturapuedehacerquese
quiebren,Mandelosentrepahosdevidriocon
cuidado,Chocarvidriotempladopuedehacerque
serompeenpedazos,
Nolavepartesplasticasdelreffigeradorenel
lavaplatos--exceptelasfuentesy tapasdel
sistema"Quick Serve."
Para obtener los mejores resultados, use un
cepillo para este prop6sim. Puede adquirir
uno en la lnayoria tie las tiendas tie
refhcciones para electrodomdsticos.
64
Page 65

Atras del refrigerador
Se deber5 tener cuidado al retirar el
reffigerador de la pared. Todos los tipos de
recubrimiento de pisos se pueden dafmr,
sobre redo los recubrimienms acojinados y
los que tienen supet{icies repujadas.
Jale el refligerador en fbnna recta yempuje
nuevamente para devolverlo a su posici6n.
Mover el refligerador en direcci6n lateral
puede causar (taYlosal recubtimiento del
piso o al refi'igerador.
Cambio de bombilla
AIempujarelrefrigeradorasulugar,aseguresede
nopasarsabreelcableelOctriconi sabrela Ifneade
alimentaciOndeldispositivoparahacerhielos(en
algunosmodelos),
Para reelnplazar una bombilla flmdida,
desenchufe el refligerador, saque la
pantalla de luz, desenrosque la bombilla
cuando estd fi'ia, y reelnpl_cela con una
bombilla nueva del lnislno tama_o o de
lilenos ratios.
Preparacion para vacaciones
En el caso de vacaciones o ausencias
prolongadas, quite los alimentos y
desenchute el refligerador. Mueva el
control del compartimiento de alimentos
fl'escos a la posici6n OFF(apagado) y limpie
el interior con soluci6n de bicarbonato de
una cucharada (15 ml) de bicarbonam por
un cuarto (1 litro) de agua. Deje abiertas
las puertas.
Mueva el brazo detector del dispositivo
para hacer hielo (en algamos lnodelos) a la
posici6n SlOP (PARADA-hacia mr'iba) y
desconecte el suministro de agua al
refi'igerador.
Elcolocarel controlenposicionOFF(apagado)
noquitalacorrientedecircuitode laluz,
Sila temperamra pueda llegar al punto de
congelaci6n, haya una persona calificada
para desaguar el sistelna del suministro de
agua (en algunos modelos) para evitar
daY_osala propiedad causados por
inundaci6n.
Encasodemudanza
Sise necesita quitar la puertas, vea la
secci6n Sacar las puertas.
Asegllre todos los elementos suehos COlllO
parrillas, entrepafios yrecipientes
pegandolos con cinta adhesiva en su lugar
para evitar daY_os.
AsegL/resedequeelrefrigeradorsecoloqueen
posicionverticaldurantelamudanza,
65
Page 66

Preparacienpara instalarel refrigerador.
Lea/as instrucciones completamente y debidamente.
Suministrode al
Sisu refiigerador dene tm disposidvo pm'a hacer
hielo, 4ste tendril que set conectado a una linea de
agua fi_a.
Ubicaciondelrefrigerador
No instale el reffigerador donde las temperamras
van debajo los 60 °F (16 °C), ya que no podr_
fimcionar bastante para mantener las temperamras
adecuadas.
Espaciosfibres
Deje suficiente espacio para fhcilitar la instalaci6n,
la circulaci6n adecuada de aire y las conexiones de
plomer_a y eldctficas.
Lados ............................ 3/4" (19 mm)
Parte superior 1" (25 mm)
Parte postelffor .............. 1" (25 mm)
parahacerhielo
Por un costo adicional, es posible adquirir de su
distribuidor o llamando a parms y accesorios al
800-626-2002, un paquete para el suministro de
agua (contiene los mbos de cobre, lavAlvula de
cierre, los dispositivos de _0usmy las instrucciones).
Instale sobre un piso suficientemente firme p_tra
sopormr un refiigerador completmnente lleno.
Siel modelo 19', 22' o 25' va a insmlarse en contra
de la pared, por el lado de la bisa_'a, deje un
espacio de 1'/_,"(38 mm) para que se puede abfir
la puerto.
Rodillos (ena/gunosmoddos)
Losmdi/Iostienen3propositos:
[--_Los rodillos se ajusmn para hacer que la puerto
se cierre con fhcilidad cuando estfi abierta
aproximadamenm en la mired. [Elevando el
frenm auna dismncia aproximada 3/4"
(19 mm) del piso.]
[_Los rodillos se @lsmn para que el refiigerador
sea firmemente posicionado en el piso y para no
mmbalearse.
[_Los rodillos permiten mover el refiigerador
para redrarlo de la pared para su limpieza.
Para ajustar las _edas:
Quite la panilla de
la base, drando hacia
afilera.
(;ire los tomillos de
_guste para las medas
en sentido de las
manecillas de/reloj para
elevarel refiigerador y
contra /asmane¢il/asde/
relojpara bajarlo.
Para volver a colocar
la parlilla de la base
empuje hasm que la
parrilla amre en su
lugar.
66
Page 67

Instalacionde la linea de agua.
Lea las instruccionescompletamentey debidamente.
Antesdequeempiece
Esta /nstalacion dela Iinea de agua no esta
garantizada ni por el fabricante de/refrigerador ni
por el del dispositivo para hacer hielo. Siga estas
instrucciones detenidamente para minimizar el
riesgo de producir dar_oscausados por accion del
agua, los cuales podrian resultar muy costosos.
El agua que estalla en la tuberia de la casa con un
ruido de martillo, puede causar dar_osen partes
del refrigerador y tambien fugas o inundacion.
I lame a un plomem califlcado para rectiflcar el
ruido de martillo en la tuberia antes de instalar la
Itnea del suministro de agua al refrigerador.
Para prevenir quemaduras y dar_osalproducto, no
instale la Iinea de agua a la tuberia de agua
caliente.
Loquesenecesita
Para determ/nar la cant/dad de tubo de cobre que
necesita:
Mida la d/stanc/a desde la valvula del agua detras
del refrigerador hasta el tubo de suministro de
agua. Despuos armada8pies (244cm). AsegOrese
de que haya suflciente tubo adicional 8pies (244
cm) doblado en forma de una gran espiral en 3
vueltas de 10" (24crn) de diametro para permitir
distanciar el refrigerador de la pared despues de la
instalacidn.
Unequipo de suministro de agua (contiene los
mbos de cobre, la v_Mda de cierre ylos
dispositivos de ajuste que aparecen en la lista
abajo) se puede adquirir, por un costo adicional,
de su distribuidor o por teldfbno para partes y
accesofios a1800-626-2002.
Abastecimientode aguafria.La presi6n del agua
debe oscilar entre 40 y 120 p.s.i. [libras por
pulgada cuadrada (1.4-8.2 bars) ].
Taladroelectrico.
S/ ut/I/zael refr/gerador antes de conectar la
tuberia de/agua, asegOrese de que el brazo
detector del dispositivo para hacer hielo
permanezca en la posicidn STOP (PARADA--
hacia arriba).
No instale el tubo de/d/spositivo para hacer hielo
en s/tios en donde la temperatura pudiera
descender por debajo del punto de congelacion.
6uando utilice un aparato eloctrico (como, por
ejemplo, un taladro electrico) durante la
instalacion, asegOrese de que dicho aparato este
electricamente aislado o conectado de tal manera
que no exista peligro de que se pmduzcan
descargas electricas.
Todas/as instalaciones deben apegarse a/as
normas vigentes en materia de obras de plomerta.
Dostuercasde compresioncondiametroexteriorde
1/4"2 dosferulas(mangas)mparaconectar el tubo
de cobre a la llave de paso y la v_hada del agua del
refiigerador.
Sila mberia del agua existente tiene en el extremo
un empahne apestafiado, para conectar la
mberia del agua al refiigerador se necesitara de
un adaptador(que se compra en las tiendas de
articulos de plomeria) O,puede cortar el
elnpahne apestafiado con un cortatubos y
enmnces usar un empahne de compresi6n.
Llave de paso para conectarse a la tuberia del agua
fi'ia. La entrada de agua de dicha llave habr_
de tenet un di_lnetro interior minimo de 5/32"
en el punm de conexi6n a la TUBERIADEAGUA
FRill.En muchos de losjuegos de accesotios para
el abastecimienm de agua se incluyen llaves de
paso tipo campana. Antes de comprarla,
asegflrese de que la llave de paso de tipo calnpana
se ajuste alas nonnas vigentes en materia de
plomeria.
Para la conexi6n entre el refiigerador y el
abastecilniento de agua es necesario un tubode
cobre de un (ti_lnetro exterior de 1/4". Asegflrese
de que alnbos extremos del mbo estdn corm(los a
precisi6n.
Noutilice tubosni empalmesdeplasticoya quela tuberfa
deabastecirnientodeaguasehallasiernprebdo presion,
Ademas,ciertostiposde tubosdeplasticopodrfan
debilitarseconel tiempoy agrietarse,ocasionandofugas
deagua,
67
Page 68

Instalaciondela lineadeagua.
Lea/as instruccionescompletamentey debidamente.
Corteelpasodeaguadelabastecimientoprincipal
Abra la llave rn_iscercano durame el tiempo suficieme para despejar la mberia del agua.
Instale la I/ave de paso
[_Una la llm,e de al mbo de ffia con la
abrazadera de mbo.
F_Instale la llave de paso en la mberia de agua
potable de uso frecuente rn_iscercana.
[_-Apriete los tornillos de la abrazadera basra que
la arandela obmradora empiece a dilatarse.
[_Coloque la llm,e en un lugar que tenga fiicil
acceso.Lomejorescolo&'laenell_{eralde
un mbo vertical. Si fimra necesario colocarla
No apriete demasiado pues podrfa quebrar el tubo
de cobre.
en un mbo horizontal, haga la conexi6n en la
parte superior o lateral, en vez de en la inferior,
para evimr la extracci6n de sedimentos
Abrazaderadeltubo.
presentes en el mbo.
[_Haga un aga.ljero de 1/4" en el mbo con un
taladro, usando una broca bien afilada. Elimine
las asperezas que pudieran haberse producido
al hacer el agloero con el taladro.
klavedepaso
tipocampana
Haga pasar el tube de cobre y conectelo a la /lave de paso
Haga pasar el mbo de cobre entre la mberia de agna
ffia y el reffigerador.
Haga pasar el mbo por un agtoero hecho en el suelo
(detrfis del refi'igerador o en la base del armmio
adyacente) lo m_is prdximo posible a la pared.
Asegurese de que haya suflciente tubo adidonal
8 pies (244cm) doblado en forma de una gran
Coloque la merca de compresi6n y la fdmla
(manga) en el extremo del mbo y condctek) a la
llm_ede paso.
Asegfirese de que el mbo est(_tomlmente metido en
la llm,e. Apriete bien la merca de compresi6n.
Llavedepaso I
tip()campana
espiral en 3 vueltas de 10"(25cm) de diametro
para permitir distanciar el refrigerador de la pared
despues de la instalacion.
TuercadepresiOn
paso
Wlvula de salida
agua
Arandela
L/Extremo de entrada
-Tubode agua de ffia vertical
TuercadecompresiOn
erula(manga)
68
Abra el abastecimiento de agua y deje cotter el agua per la tuberia
[--_Abra el abastecimiento principal del agua y deje [-_Cien'e el agua despuds de que haya pasado por
que (ratacorra por el interior del mbo l_asta que L_-aelmbo un litro, aproximadamente.
salga completmnente transparente.
Page 69

Conecte el tubo de cobre al refrigerador
Antes de efectuar la conexion al refrigerador,
asegOrese de que el cable eloctrico del
refrigerador no este enchufado a la toma de
corriente de la pared.
Yuberia de cobre
de1/4" / Abrazadera
I
.X/ del tub()
IJ Tuercade
Si su abastecimiento de agua contiene arena o
particulas que pudieran obstmir la criba de la
%hada del agua del refi'igerador, recomendamos
que instale un fihro para agua. Instfilelo en el ulbo
de agua cerca al refi'igerador.
f-_Retire el tap6n de plastico de la%hada de agua.
[_Coloque la merca de compresi6n y la fbrula
(manga) al extremo del tubo, tal como se indica
en la ilustraci6n.
[_Introduzca el extremo del mbo de cobre en la
entrada de la %hada del agua (lo mas posible).
A1mismo tiempo que sujeta el nit)o, apriete el
dispositivo de ajuste.
[_Sujete el mbo de cobre con la abrazadera que se
proporciona, de modo que quede en posici6n.
Es posible que tenga que abfir la abrazadera a
palanca.
Abra el agua en la Ilave de paso
Apriete todas las conexiones que tengan fugas
de agua.
y ._mpresiOn de 1/4"
(manga)
ConexiOnal refrigerador
Enchufe el cable ele.ctrico del refrigerador
Coloque el tubo de cobre en espiral para evitar la
vibraci6n contra la parte trasera del refiJgerador o
contra la pared.
Arranque el dispositivo para hacer hielo
Mueva el brazo detector hasta la posici6n ON
(activadalabajo). E1dispositivo para hacer hielo
no entrara en fimcionamiento hasta que hwa
alcanzado su temperamra de operaci6n de 15 °F
(O °C), o inDfior. En dicho momenta entrar_ en
flmcionamiento, si el brazo detector se encuentre
en la posici6n ON(ACTIVADA--hacia abajo).
Desplace el refiJgerador nuevamente contra
la pared.
NOTA:Eldis/oositivo/oarahaterhielo/oodrfahaterunddo
dobleal arrancar/oor/orimeravez,ocasionandocluesevierta
aguadeldis/oositivo/oarahaterhielosobrelacubitera,Esto
esnormal3/nodeberaocurrirunasegundavez,
69
Page 70

Cambiarel mode deaperturade la puerta.
Lea/as instrucciones completamente y debidamente.
Notss "
NOTA:LapuertasenmodelosdedisTaensadornopueden
cambiarsu mododeapertura,
Cuando cambie el mode de apermra de la puerta:
Lea las instmcciones per colnpleto antes de
elnpezar.
Maneje las partes con cuidado para evitar rascar la
pintura.
Sitfle los tornillos cerca de las partes que
coN'espondan para evitar utilizarlos en un lugar
incorrecto.
Provea un lugar de trabajo apropiado para que las
puertas no se rasquen.
Herramientasnecesarias
Destomillador Phillips
Cinta para off)fir (aislante)
Destomillador T20 o T25, segaSnel que necesite
su modelo
IMPORTANTE:Una vezhaya empezado, no mueva
la gaveta hasta que haya flnalizado el pmceso de
cambiar el rnodo de apertura de la puerta.
Estas instrucciones son para cambiar las bisagras
del lado derecho al /ado izquierdo--si usted quiere
volver a poner las bisagras denuevo en el lado
derecho, siga las mismas instrucciones
(sirnplemente carnbie todas las referencias
a izquierda y derecha).
Cuchillo de enmasillar o destomillador de hoja
delgada
LlmTede mercas de 3/8" (se recomienda una llmTe
de mercas de 6puntas)
Sacar las puertas.
Antes de sacar /as puertas
F_Desenchufb el refiigerador.
E_Vacie los entrepafios de las puertas, incluyendo el compardmiento de productos kicteos.
PRECAUCION: No deje que ninguna de las puertas se caiga al suelo.
Si esto ocurriera el ffeno de la puerta podrfa da_iarse.
Saque la puerta de/congelador
[--_Ponga cinm aislante ah'ededor de donde se cierra lapuerta.
[_Con un destornillador Phillips, saque la cabeza de la bisagra (en algtmos
modelos). (;on un destomillador T20 o T25, saque los tomillos que
ag-uantan la bisa_'a superior del compartimiento.
[_Levante la bisa_'a hacia arriba para liberar la clmija de la bisagra del
encaje en la pa;'te superior tie la puerta.
Saque la cinta aislante, incline la puerto hacia usted y le%ntela para
liberar el enc_ue inferior tie la clm4ja de la bisa_'a en el soporte central
de la bisagra.
[_SitOe la puerta en una superficie adecuada para que no se rasque,
con la parte exterior hacia mTiba.
70
Page 71

Saque la puerta de los alimentos frescos
F-_Ponga cint_l aislante ah'ededor de donde se cierra lapuerta.
[_Saque la clm4ja de la bisa_'a con una llmTede ulercas de 3/8".
E_Saque la cinta aislante e incline la puerta para sacarla del compartimiento. Saque la arandela de la
clm4ja de la bisa_'a ygufirdela.
E_Levante la puerta hacia arriba para liberar el encaje infbrior tie la clm4ja tie la bisagra en el soporte
infbrior tie la bisa_'a.
[_-SitOe la puerta en una superficie adecuada para que no se rasque, con la parte exterior hacia mr'iba.
Invertirla ferreteria.
Transfiera el soporte de la bisagra inferior a la izquierda
F-_ Qtdte la parrilla de la base, tirando
hacia a61era.
[_Usando un destomillador Totx, mueva
el soporte de la bisa_'a y la arandela tie
plfistico del lado derecho al lado izquierdo.
-"J_ Arandeladeplastico
/ °J /
Transfiera el soporte central de la bisagra
a la izquierda
F-_Saque el soporte de la bisa_'a de la parte
central derecha del coms_f'timiento sacando
los tres tornillos mils exteriores.
NOTA: Guarde estos tomillos con el soporte
de la bisagra. Estos tomillos son mas largos
y se usaran al instalar la bisagra del otro lado.
[_Saque los tres tornillos Totx de la parte
central izquierda del compartimiento.
Atornillelos en los odficios del lado derecho.
Ponga el soporte central tie la bisagra en
los orificios en la parte central izquierda
del COlnpartimiento, inserte y apriete los
tres tomillos largos.
Transfiera la bisagra superior a la izquierda
Imercambie ]abisagraytotal]los de ]aparm supedor derecha (:on lostomi]]os
de la parte superior izquierda del COlnpartimiento.
No apriete los tornillos a la bisagra en este momento.
Soportedela bisagra
Nosaque I
este tornillo __._._.J ®_1
L I/ Nosaque
"_ L_ ..... este tornillo
L.-°
/ // Centroizquierda
Transfiera los frenos de la puerta
F-_En cada puerta, saque los fi'enos tie metal, y cfimbielos del lado derecho al izquierdo.
[_Cambie cualquier tomillo del lado izquierdo al derecho.
71
Page 72

Invertirlas manijas de la puerta.
Lea/as instrucciones completamente y debidamente.
Transfiera la manija de la puerta de los alimentos frescos
v,v,I
Manijacorta
J
Manijalarga
Clav_a
Los modelos con man#as largas tienen una
clav#a que se encaje en un orificio en la
parte inferior de la puerta.
Saque el taco de la manija udlizando un cuchillo de emnasillar pot deb@) del reborde,
y saque el tornillo de (teb_go.
Saque los dos tomillos aguantando la manija por laparte superior.
Taco Grande
Tacospeq
Medallon q
Para reponer la man#a en
el lado opuesto.
Saque el mco _'an(te del lado izquierdo de la puerta e insdrtelo en el ofificio del lado opuesto.
Saque los tacos pequefios del lado derecho de la puerto e insdrmlos en los otificios del lado opuesto.
Mueva el medall6n de la puerta.
72
Page 73

Transfiera la manija de la puerta del
congelador
Saque los tomillos de la lnanija en la parte
superior y inferior de la puerta.
Mueva el taco en el lado derecho de la puerta al
otificio de la lnanija en el lado izquierdo.
Reponga la manija en el lado opuesto utilizando
los otificios m_s cercanos del reborde de la puerta.
Volvera colocarlaspuertas.
Volver a colocar la puerta de los alimentos frescos
[--_SitOe la puerta de los alimentos frescos en la
clm_ijade la bisa_'a inferior.
Aseguresedequelaarandelaestoonsu luga_
[_Enderece la puerr_l yalinee 4sta con el soporte
central de la bisa_'a.
[_llaxuelva a instalar la clm_ijade la bisa_'a con una
_ede mercas de 3/8" para que pase a trm_4sdel
orificio de la parte central del soporte de la parte
superior de la puerta.
° ili
Arandelade plastico
)
1'
I
Volver a colocar la puerta de/congelador
r-_Coloque la puerto del congelador en la
clm_ijade la bisagra cenm_i.
AsegOresedequalaarandelaestoansulugar
[_Levante la bisa_'a superior para flue la clav_a
entre en el soporte de la puerta.
[_AsegOrese de que la puerto sea recta y que
el espacio entre las puertas sea el mismo en
toda laparm del fl'ente. Apriete los tornillos
de la bisagra superior.
Clav_ade la bisagra -- _
Soportecentral
dela bisagra
Puerta de los alimentos frescos
Arandelade plastico
I
t Soportecentralde
bisagra
73
Page 74
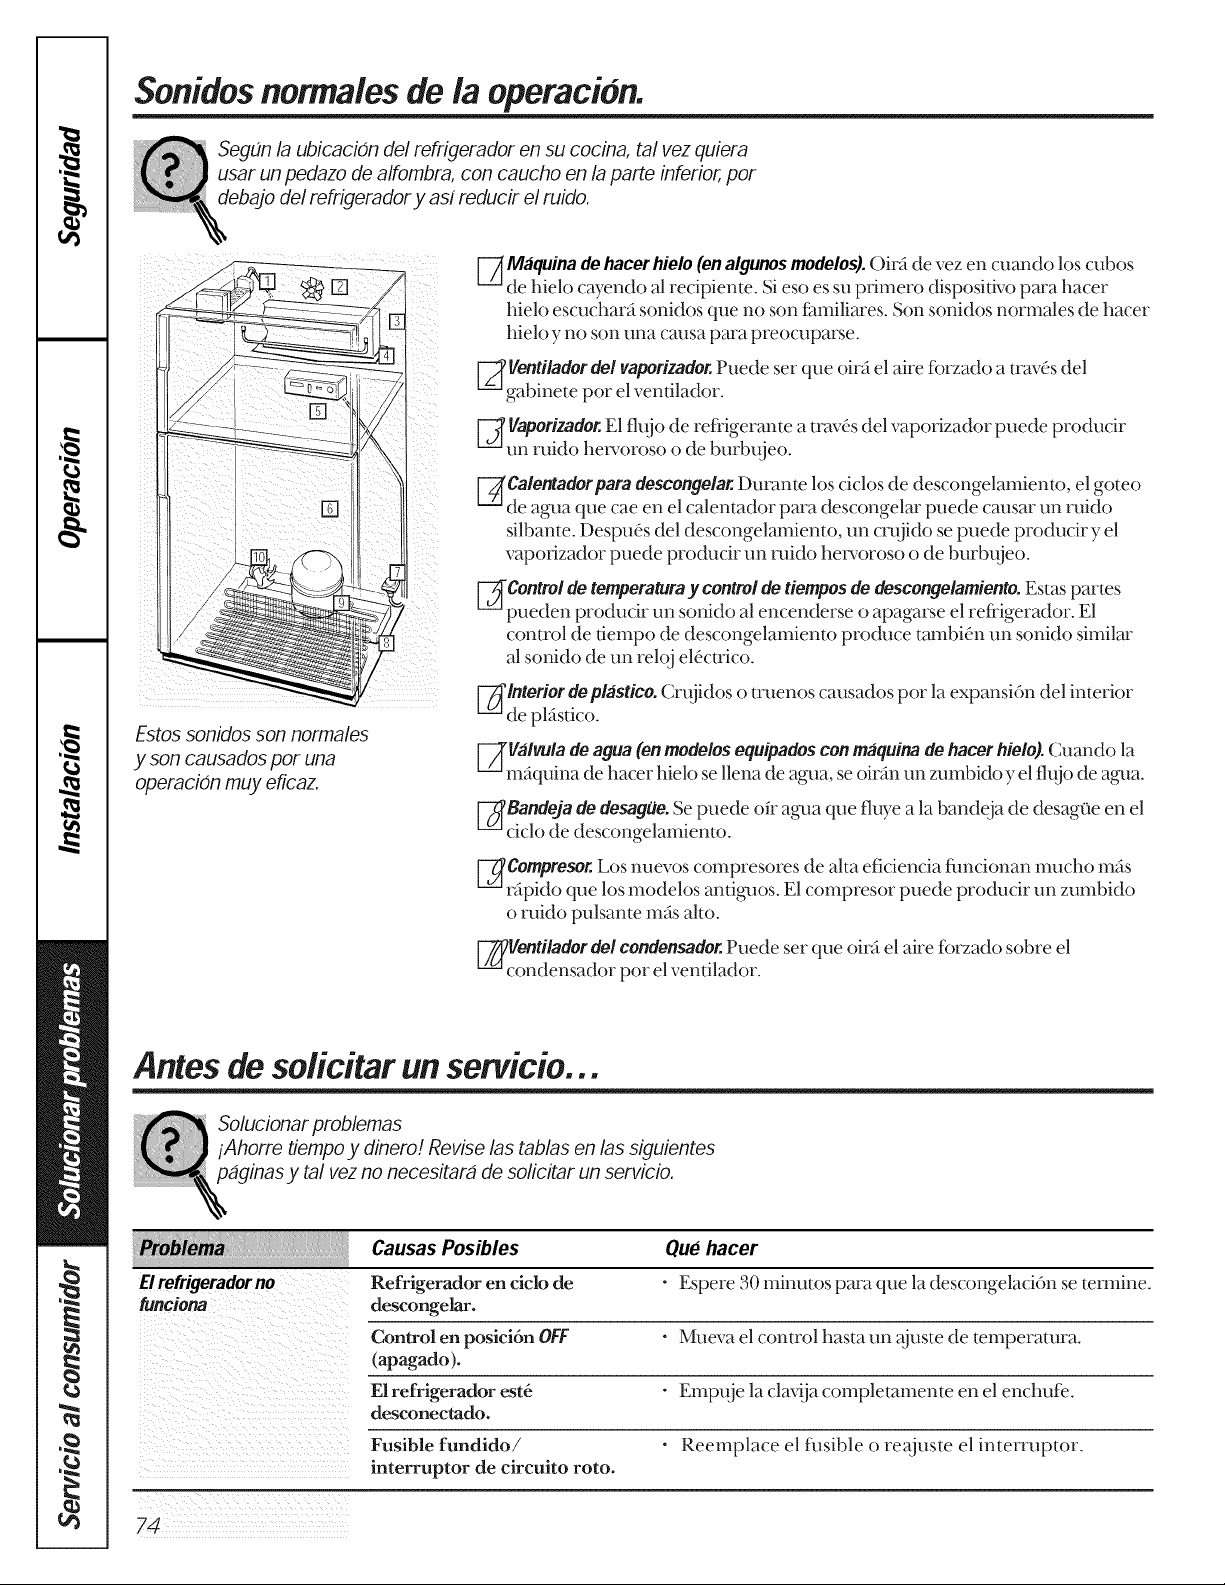
$onidosnormalesde la operation.
SegOn la ubicacion del refrigerador en su cocina, tal vez quiera
usar un pedazo de alfornbra, con caucho en la parte inferior,por
debajo del refrigerador y asf reducir el ruido.
[-_ Maquinadehacerhielo(enalgunosmodelos).Oirfi de vez en cuando los cubos
de hielo cayendo al recipiente. Si eso es su pfimero dispositivo para hacer
hielo escuchar_ sonidos que no son f:amiliares. Son sonidos normales de hacer
hielo y no son una causa para preocuparse.
Ventiladordel vaporizador.Puede set que oirfi el aire fbrzado a trm,ds del
gabinete por el ventilador.
gaporizador.E1flujo de refl'igerante a trm,ds del vapofizador puede producir
un ruido heworoso o de b_rb_eo.
[_Calentadorpara descongelar. Durante los ciclos de descongelmniento, el goteo
de agua que cae en el calentador para descongelar puede causar un ruido
silbante. Despuds del descongelamiento, un cmjido se puede producir y el
vapofizador puede producir un mido hervoroso o de burb_eo.
Controlde temperaturay control de tiemposde descongelamiento.Esmspartes
pueden producir un sonido al encenderse o apagarse el refi'igerador. E1
control de tiempo de descongelmniento produce tmnbidn un sonido similar
al sonido de un rel(_ eldctrico.
lnterior deplastico. Cr@dos o truenos causados por la expansi6n del interior
Estos sonidos son normales
y son causados por una
operacion muy eflcaz.
de plfistico.
galvulade agua (onmodelosequipadoscon maquinadehacer hielo).Cuando la
fifluina de hacer hielo se llena de agua, se oirfin un zumbido yel flt_o de agua.
Bandeja dedesagOe.Se puede oir agua que fluye a la bandeja de desagOe en el
ciclo de descongelamiento.
Compresor. Los nuevos compresores de aha eficiencia flmcionan mucho mils
rfipido que los modelos antiguos. E1compresor puede producir un zumbido
o ruido pulsante mils alto.
_cVenti/ador del condensador.Puede ser que oirfi el aire R)rzado sobre el
ondensador pot el ventilador.
Antes de selicitar tin servicio...
Solucionar pmblemas
iAhorre tiempo y dinem! Revise las tablas en las siguientes
paginas y tal vez no necesitara de solicitar un servicio.
Causas Posibles
E1refrigeradorno
funciona
Refrigerador en ciclo de
descongelar.
Control en posici6n OFF
(apagado).
E1refrigerador est8
deseoneetado.
Fusible fundido/
interruptor de circuito roto.
Oue hacer
• Espere 30 minutos para que la descongelaci6n se mmfine.
• Mueva el control basra un ajuste de mmperatura.
• Empuje la clavija complemmente en el enchufe.
• Reemplace el filsible o re@lste el interruptor.
74
Page 75

Causas Posibles Oue hacer
Vibracioneso sacudidas
(una vibracionligera
Los rodillos requieren • Vea Rodi//os
un ajuste.
es normal)
B motor opera durante Es normal cuando • Espere 24 horas para que el refi'igerador se enfi'ie
periodos prolongados o el refrigerador es reci6n coInpletalnente.
se arranca y se para con instalado en su casa.
ftecuencia. (Refrigeradores
modernos con mas espacio Ocurre cuando hay largas • Eso es nomlal.
de almacenamiento y un
congelador mas grande en el refrigerador.
requieren mas tiempo de Se dej6 abierta la puerta. • Revise si un paquete lnantiene la puerta abierta.
cantidades de alimentos
operacion. So arrancany
separan amenudopara Clima caluroso o aperturas • Eso es nom_al.
mantener temperaturas
uniformed) Controles de temperatura • Vea Los controles.
Compartimiento de E1control de temperatura • Vea los contro/es
alimentos frescos o no se fij6 bastante frio.
congelador demasiado
c,_lido Clima caluroso o aperturas • Fije el control de teInperatura tin paso iiiHs fi'io.
frecuentes de la puerta.
ajustados al pirate m_is frio.
Parrilla y condensador • Vea Cuidadoy/impieza.
requieren de limpieza.
frecuentes de la puerta. Vea Los controles
Se dej6 abierta la puerta. • Revise si hay tin paquete que mantiene la puerta abierta.
Un paquete est_i estorbando • Verifique que no hay paquetes estorbando el ducto
el ducto de aire en el del congelador.
congelador.
Escarcha o cristales Se dej6 abierta la puerta. • Revise si h W un paquete que mantiene la puerta abierta.
de hielo on alimentos
congelados (escarcha La puerta se abre con frecuencia
en paquete es normal) o per mucho tiempo.
Dispositivo automatico Braze detector en posici6n de • Mueve el braze en posici6n de ON (ACTIVADA-
para hacer hielo no STOP (PARADA-hacia arriba), hacia abajo).
funciona (en algunos • Tal vez unos cubos se pegan al lado del molde. Mueve el
modelos) brazo en posici6n de STOP (PARADA--hacia arfiba) y
luego quite estos cubos.
E1agua estfi cerrada o no estfi • Vea Instalar la I[nea de agua.
conectada.
E1compartimiento del • Espere 24 horas para que se enfi'ie el refiigerador.
congelador es muy c_ido.
Cubes apilados en el recipiente • Nivele los cubes con la Inane.
apaga el dispositivo para hacer
hielo.
Los cubes son La llave de paso que conecta • Elaine a tin ploInero para lilnpiar la llave de paso.
demasiados el refrigerador a la linea de
pequet_os agua puede ser atascada.
Formacion lenta del hielo Se dej6 abierta la puerta. • Revise si hay un paquere que inantiene la puerta abierta.
E1control de temperatura • Vea Los controles.
no es bastante frio.
75
Page 76

Antes de solicitar tin servicio...
Causas Posibles
Loscubestienenmal
olor/sabor
Se formahumedad
onla superficie de los
compartimientosentre
las puertas
Humedadonel interior
(enclimah_medoel aim
llevalahumedada!interior
delrefrigoradorcuandose
abrenlaspuertas)
Formacionlentadelhielo La puerta se dej6 abierta. • Rex4se si hay un paquete que manfiene la puerta abierta.
ta puerta no so cierra Las ruedas y paras • Vea Rodillos.
per simismo frontales requieren ajuste.
El recipiente para los
cubes necesita limpieza.
Alimentos transmifiendo • Enx_.mlvabien los alimentos.
o|or/sabor a los cubes.
El interior del refrigerador Vea Cuidadoy/impieza.
requiere limpieza.
No es extrafio durante
periodos de alta humedad
Se abre la puerta con
frecuencia o per touche
fiempo.
El control de temperatura • Vea Los controles.
no es bastante frio.
Que. hacer
• Vacie y limpie el recipiente. Deseche los cubos.
• Sequela superficie y asegurese que el interrupter
para ahorrar electricidad no esta fijado en la posici6n
de POWERSAVER.
E!disl_nsador de hieio Dispositivo de hielo apagado • Enciende el disposiuvo de hielo o el agua.
no funciona (onalgunos o el agua estfi apagado.
modelos)
Elrefrigeradorhuele Afimentos transmitiendo • Alimentos con olores fl_ertes deben estar tapados.
Aim cafiente a la base El aire fluye para enfriar el • Consulte su vendedor de recubrimientos de piso
dol refrigerador motor. En el proceso de si tiene alguna objecidn a esta descoloracidn.
Brilio anara_o
en el congelador
Los cubes estfin pegados • Remueve los cubes yponga el braze en ON
al braze detector. (ACT1VADA-hacia abajo).
Bloques irregulares de
hielo en el recipiente.
olores al refrigerador. • Guarde una caja de bicarbonate de sodio en el
E1interior requiere limpieza. • Vea Cuidadoy limpieza.
refrigeracidn es normal que
salga calor de la base del
refrigerador. Algunos
recubrimientos de piso se
descoloran a estas
temperaturas normales
y seguras.
Calefactor de descongelaci6n
encendido.
R6mpalos con los dedos y deseche los cubes restantes.
E1congelador puede ser muy caliente. Ajuste el control a
una posici6n mas tiia paso per paso hasm que no se
tbrmen bloques.
refl'igerador; c_mbiela cada u'es meses.
• Eso es normal.
76
Page 77
Notas
m
m
!
77
w
w
Page 78

Garantiadel Refrigerador(ParaconsumidoFes el7 JosEE,UU,)
Todos los servicios los proporcionaran nuestros centros de fabrica o
nuestros prestadores Customer Care_ autorizados. Para solicitar servicio,
Ilame 800-GE-CARES.
GE reemplazara sin costo:
Unario
A partir de la fecha
de compraoriginal
Cincearies
A partir de la fecha
de compraoriginal
Cualquierparte del refligerador que f_dle debido a un (tetecto en materiales o mano de obra.
Durante este arie de garantia cempleta, GE tambi_n proporcionar_ sin ceste, mano de obra y
sel_icio en su hogar para reemplazar las partes defecmosas.
Cua/quierparte de/sistemase//adede refrigeration,(compresor, condensador, evaporador y todas
mberias de conexi6n)que f_dle debido a un defecm en materiales o mano de obra. Duranm esm
cince aries de garantia, GE tambi4n proporcionar_ sin cesto, mano de obra yse_Mcio en su hogar
para reemplazar las partes defecmosas.
Per vida
A partir de la fecha
Cualquierrecipienteegavetatranspamntoproporcionada con el vefligeradov si se vompiera
durante el uso normal. Las tapaderas de las gavetas no son induidas.
de compraoriginal
Viajes de servicio a su hogar para ensefiarle c6mo usar el
producto.
Una instalaci6n incorrecta.
Fallas del producto si hay abttso, real uso, o uso para otros
prop6sitos que los propuestos, o uso para fines
comerciales.
: P6rdida de alimentos por averias.
Reemplazo de fusibles de su hogar o reajuste de
interruptores de circuito.
Dafio al producto causado por accidente, fuego,
inundaciones, o actos de Dios.
Dafio incidental o consecuencial a su propiedad causado
por posibles defectos con el aparato.
Esta garantta se extiende al comprador original y a cualquier propietario que Io suceda para el caso de pmductos
comprados para uso domestico normal en los Estados Unidos. En Alaska, usted tendra que pagar el flete del
pmducto o los costos de viaje del tecnico de servicio hasta su hogar.
Algunos estados no permiten la exclusion o Iimitacion de dar_os incidentales o consecuenciales. Esta garantta le
proporciona derechos &gales especfficos, y puede tener otros derechos que pueden variar de un estado a otro.
Para conocer los derechos &gales de su estado, consulte con su oflcina local de asuntos del consumidor o al
pmcurador general de su estado.
78
Garantidor: General Electric Company.Louisville, KY 40225
Page 79
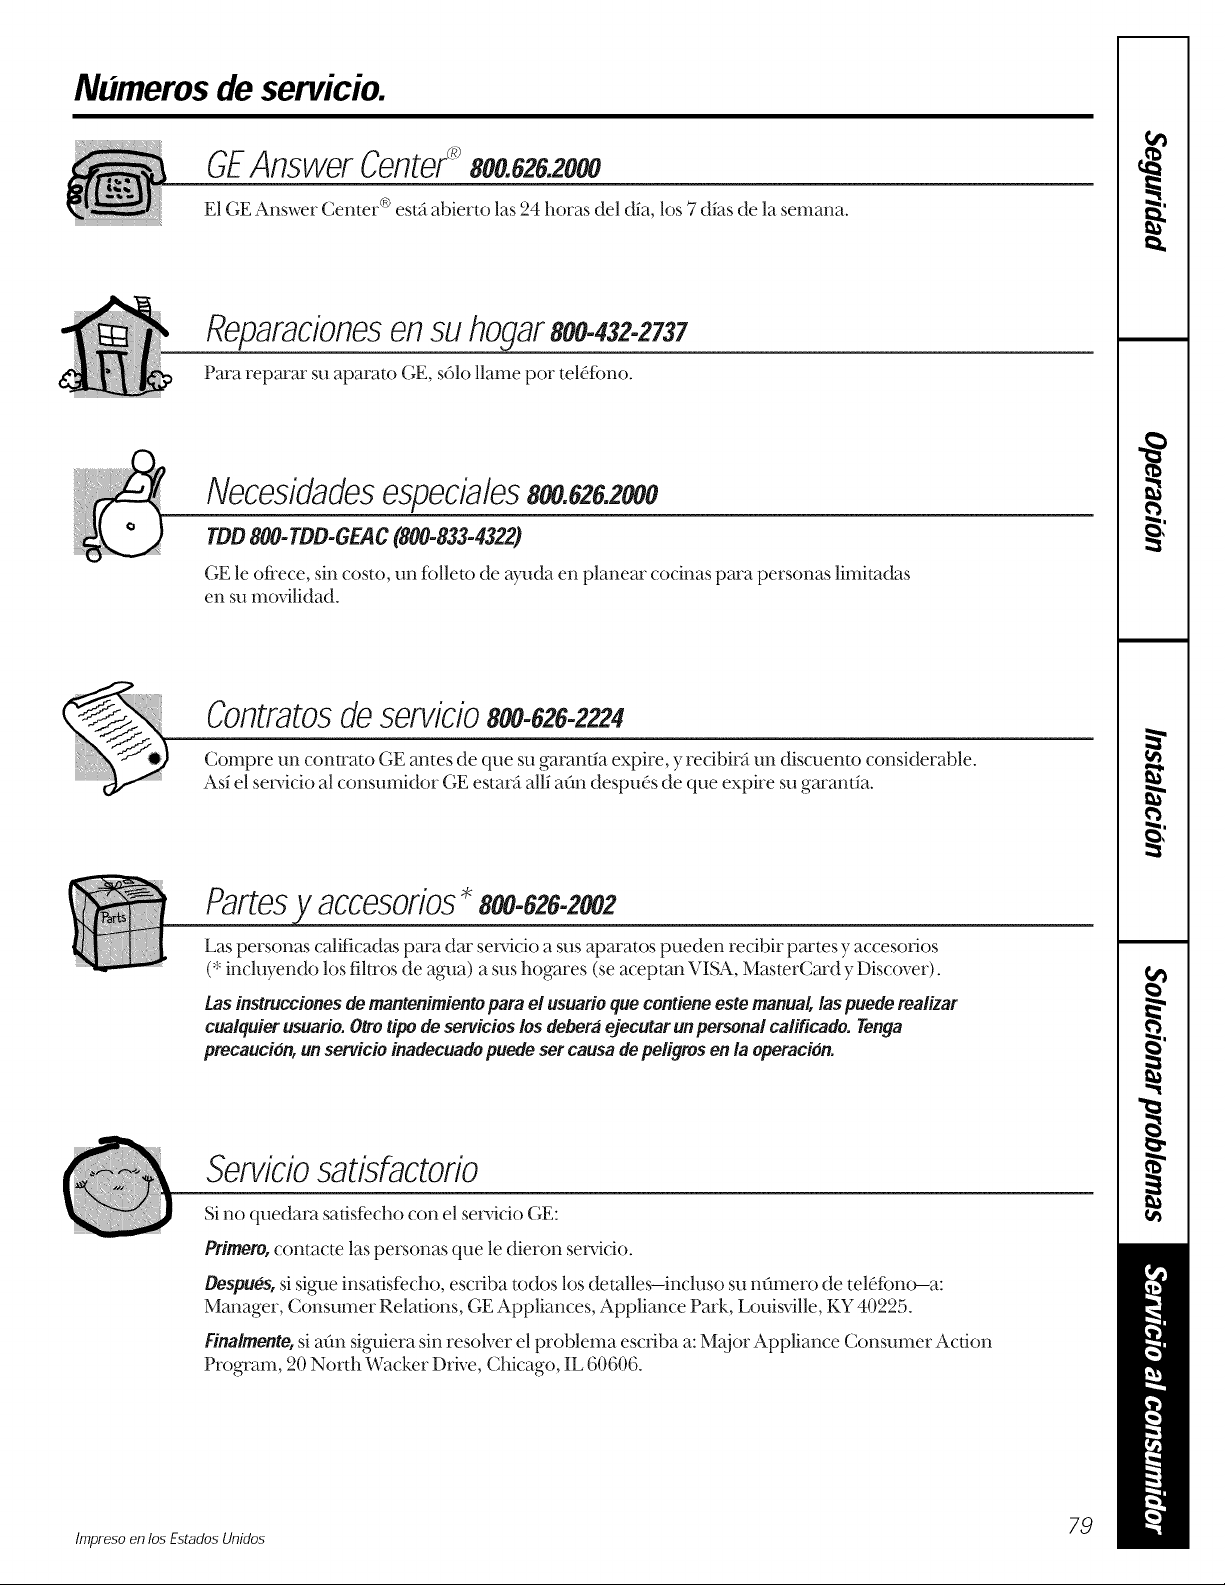
Numeros de servicio.
GEAnswerCenter_800.626.2000
E1GE Answer Center ®est_ abierto las 24 bores del dia, los 7 (tias de la semana.
Reparacionesensuhogar800-432-2737
Pare reparar su aparato GE, s61o llame per tel(_fbno.
Necesidadesespeciales800.626.2000
TDD800-TDD-GEAC(800-833-4322)
GE le ofi'ece, sin costo, un fblleto de aDMa en planear cocinas pare personas limitadas
en su mo_dlidad.
Contratosdeservicio800-626-2224
Compre un conu'ato GE antes de que su garant_a expire, yrecibir_ un discuento considerable.
Asi el sel_dcio al consumidor GE estarfi alli afro despuds de que expire su garamia.
Partes 800-828-2_2
Las personas caliticadas para dar seivicio a sus aparatos pueden recibir partes y accesofios
(*incluyendo los fihros de agua) a sus hogares (se acepmn VISA, MasmrCard y Discover).
tas instruccionesdemantenimientopara elusuarioque contiene estemanual,/as puede rea/izar
cua/quier usuario.Otto tipodeservicios losdeberaejecutar unpersonal ca/ificado. Tonga
precau¢ion, unservicio inadecuadopuede setcausadepeligros en la operacion.
Serviciosatisfactorio
Sino quedara sadsfecho con el se_Mcio GE:
Primate,contacte las personas que le dieron se_dcio.
Despues, si sigue insatisfecho, escliba redes los detalles-incluso su nftmero de teldfbno--a:
Manager, Consumer Relauons, GE Appliances, Appliance Park, Louisville, KY 40225.
Yinalmente, si aOn siguiera sin resolver el problema esc_iba a: M_0or Appliance Consumer Acdon
Program, 20 North Wacker Drive, Chicago, IL 60606.
Impreso en losEstados Unidos 7_
Page 80

Service TelephoneNumbers
GEAnswerCenter_mtheU.S.:800.626.2000
The GE Answer Center ®isopen 24 hours a day, 7days a week.
/n Canada,contact: Manager, Consumer Relations, Camco In(:., Suite 310, 1Facto U Lane,
Moncton, N.B. E1C 9M3.
/n-HomeRepairService/,theu.s.:800-432-2737
Expert GE repair ser_dceisonly aphone call away.
In Canada,call 1-800-361-3400.
SpecialNeedsServicemtheu.s.:800.626.2000
GE offers, fl'ee of charge, a brochure to assist in planning a barfier4i'ee kitchen for persons
xdth limited mobilipy. IntheU.S.,carl800-TDD-GEAC(800-833-4322).
In Canada,contact: Manager, Consumer Relations, Camco Inc., Suite 310, 1 Factory Lane,
Moncton, N.B. E1C 9M3.
ServiceContractsmmeu.s.:800-626-2224
Purchase a GE sel_dce contract while your walr'anty is still in effbct and you'll receive a
substantial discount. GE Consumer Sel_dce will still be there _ff_eryour warranpy expires.
/n Canada,call 1-800-461-3636.
PartsandAccessoriesmtheU.S.:800-626-2002
Indixdduals qualified to seisdce dmir oxs_lappliances can hm,e parts or accessories sent direcdy to
their homes (VISA, MasterCard and Discover cards are accepted).
Instructionscontainedin thismanualcoverprocedurestobeperformedbyanyuser.Otherservicing
generallyshouldbe referredtoqualifiedservicepersonnel. Cautionmustbeexercised,since
improperservicingmaycauseunsafeoperation.
Customers in Canada should consuh the yellow pages ff)r the nearest Cmnco sel_dce center.
ServiceSatisfaction
Ifyou are not satisfied with tim seladce you receive fl'om GE:
First,contact the people who sel_dced your appliance.
Next, ifyou are still not pleased, in the O.S.,X,_Timall the details-including your phone number-
m: Manager, Consumer Relations, GE Appliances, Appliance Park, Louisxdlle, KY 40225; or,
in Canada, to Director, Consumer Relations, Camco Inc., Suite 310, 1 Facto U Lane, Moncton,
N.B. El(; 9M3.
Finally,ifyour problem is still not resolved, _Tite Major Appliance Consumer Action Program,
20 North Wacker Drive, Chicago, IL 60606 (U.S. only).
80 Printed in the United States
 Loading...