

.
Howtosaveenergy– page1
owthe Energy-SaverSwitch
xxks—page3
d
i-lowlongcanyoustore
fo~ds?– page4
Youcan rearrangeyour
refrigerator’sshelves—page5
Youcanget allthe ice
youneed– page6
Savetimeandmoney.
Beforeyoucallforservice,
usethe ProblemSohmrpages9, 10,arid11
9
NIcdel
TBF22R
with
AutomaticIcemaker .
andCustom
Ice Dispenser
you.s II
——
G
‘.
Controls-..’.-......, ,-.. . . . :“: ;:.3
HOWto Use Energy-Saver ,-‘: ‘
Switch. ... . .. . . . . . .. . . .. . . . .. .3
Food Storage Suggestions. : ...4
How to Adjust Shelves.... .. ...5
Food-SaverSystem . . . .. . .. ..5,6
Automatic Icemaker and
Custom Dispenser. . . ........6-7
User Maintenance
Instructions. . . . . . . . . . . . .. . . . .8
Accessories. . . . ...........8,12
Problem Solver. . . . . . . .....9-11
Special Services. . .. . . . . . .Inside
Back Cover
Warranty. .. . .. . . . . . .Back Cover
Read thisbookcarefully.
It is designed to help you operate
and maintain your new refrigerator
properly.
Keep it handy for answersto your
questions.
If you don’t understand something
or need more help...
Cdl, toll-free:
The GE Answer Centern~
800.626.2000
consumer information service
or write (include your phone
number)
Consumer Affairs
General Electric Company
Appliance Park
Louisville, KY40225
Writedownthe modeland
serialnumbers.
You’llfind them ona label atthe
bottom, just inside the fresh food
compartment door.
These numbers arealso on the
Consumer Product Ownership
Registration card that came with
your refrigerator. Before sending
in this card, please write these
numbers here:
Model Number
Serial Number
Usethese numbers in any
correspondence or service calls
concerning your refrigerator.
If you received a damaged
refrigerator, immediately contact
the dealer (or builder) that sold you
the refrigerator.
Savetime and money.
Before you call for service, check –
the Problem Solver on pages9
through 11.It lists minor causesof
operating problems that you can
correct yourself. It could save you
an unnecessary service call.
.--.
—-,-m—-+-T-A==&.* .—
—.,..—
..— -
~- .
k.:-.%.....-.=
.
43!1instructkmsbeforeusingthisappliance.
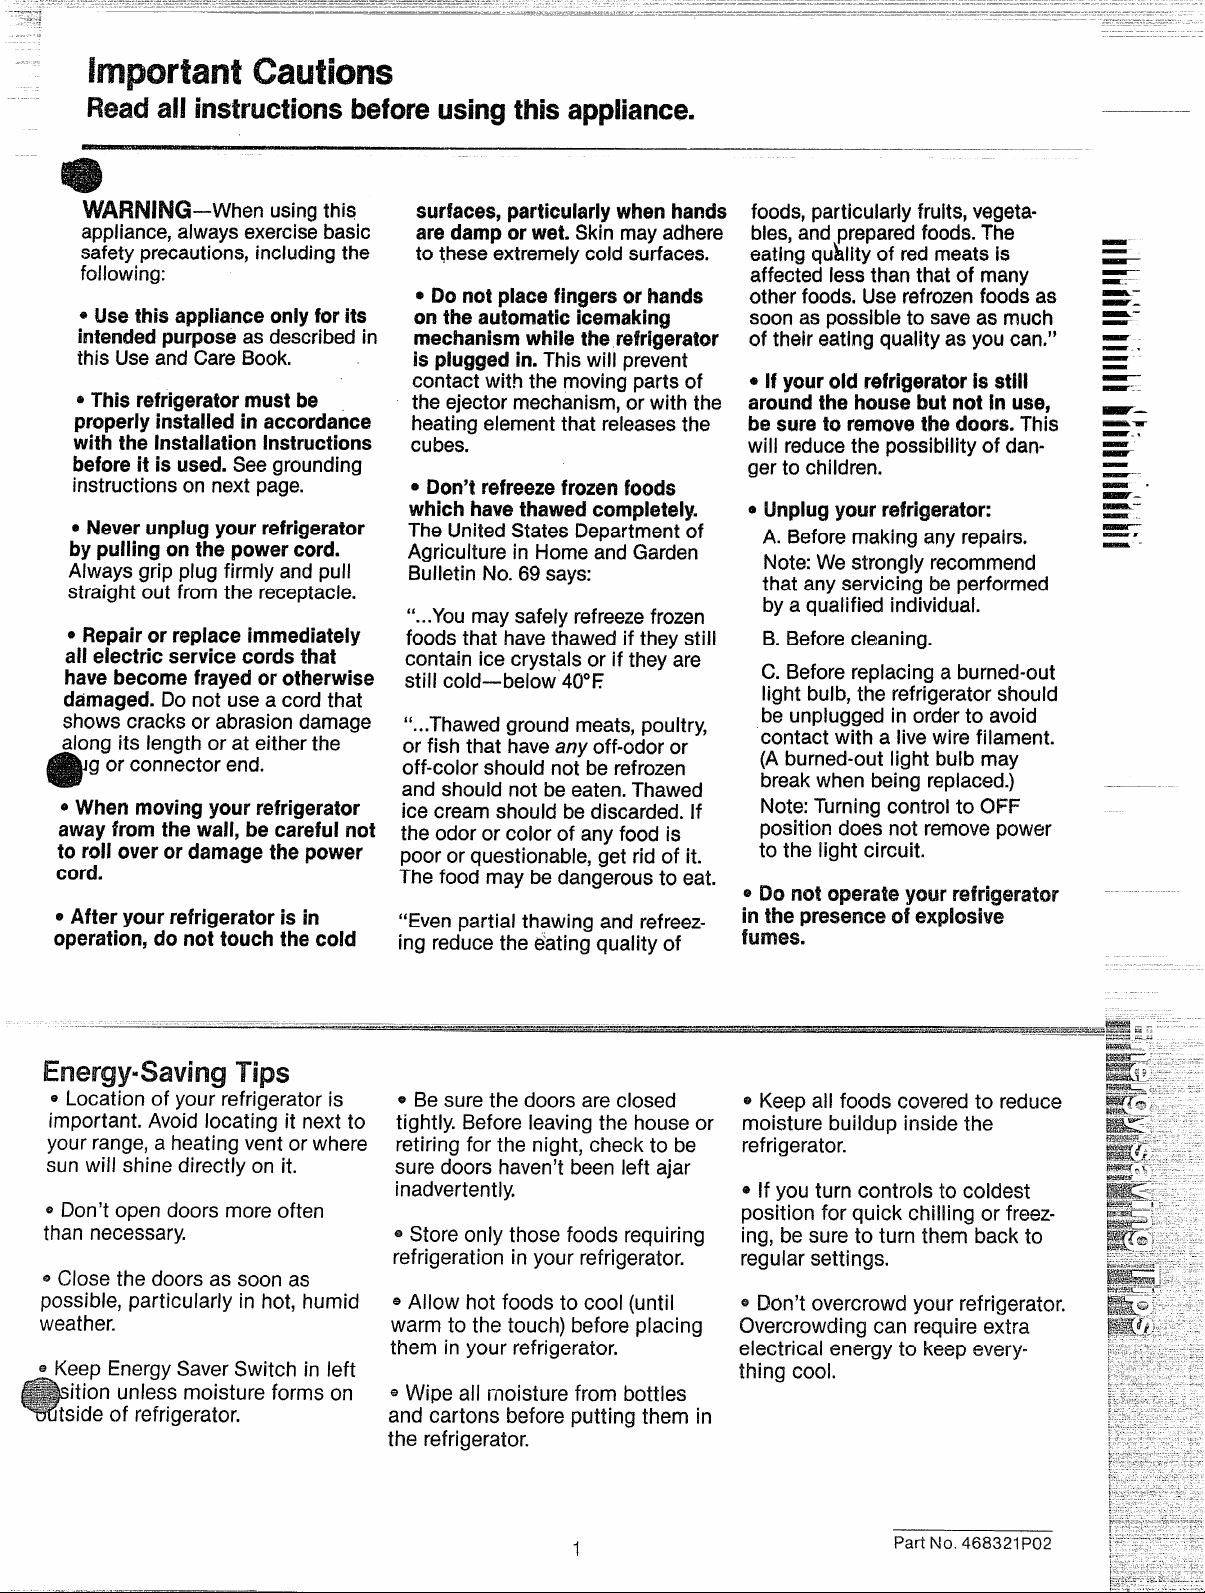
W~~~l~~–When using this
appliance, always exercise basic
safety precautions, including the
following:
@Use Mis appliance only for its
intendedpurposeas described in
this Use and Care Book.
* This refrigeratormust be
properlyinstalled in accordance
with the Installation Instructions
beforeit is used. See grounding
instructions on next page.
oNeverunplug your refrigerator
by pulling on the powercord.
Always grip plug firmly and pull
straight out from the receptacle.
oRepairor replace immediately
all electric service cords that
havebecome frayedor otherwise
damaged. Do not use a cord that
shows cracks or abrasion damage
along its length or at either the
Jgor connector end.
~When moving your refrigerator
away from the w4, be careful not
to roll overor damage the power
cord.
oAfter yourrefrigerator is in
operation,do not touch the cok!
surfaces, particularly when hands
are damp or wet. Skin may adhere
to these extremely cold surfaces.
* Do not place fingersor hands
on the automatic icemaking
mechanismwhile the refrigwwtor
is pkigged in. This will prevent
contact with the moving parts of
the ejector mechanism, or with the
heating element that releases the
cubes.
@Don’t refreezefrozenfoods
which havethawed completely.
The United States Department of
Agriculture in Home and Garden
Bulletin No. 69 says:
“...You may safely refreezefrozen
foods that have thawed if they still
contain ice crystals or if they are
still cold—below 40°E
“... Thawed ground meats, poultry,
or fish that have any off-odor or
off-color should not be refrozen
and should not be eaten. Thawed
ice cream should be discarded. If
the odor or color of any food is
poor or questionable, get rid of it.
The food may be dangerous to eat.
“Even partial thawing and refreez-
ing reduce the eiatingquality of
foods, particularly fruits, vegetables, and preparedfoods. The
eating qu)dity of red meats is
affected less than that of many
other foods. Use refrozenfoods as
soon as possible to save as much
of their eating quality as you cam”
* !f yourold refrigeratoris NH
aroundthe house but not In use,
be sure to removethe doors. This
will reduce the possibility of danger to children,
@Unplugyour refrigerator:
A. Before making any repairs.
Note: We strongly recommend
that any servicing be performed
by a qualified individual.
B. Before cleaning.
C. Before replacing a burned-out
light bulb, the refrigerator should
be unplugged in order to avoid
contact with a live wire filament.
(A burned-out light bulb may
break when being replaced.)
Note: Turning control to OFF
position does not remove power
to the !ight circuit.
~ Do not operate your refrigerator
in the presenceof explosive
fumes.
-———..-.
—————.
—.—.-——..-—-.——...——.—....-..—.—.-
.. ............ .. .......
.... ... .... .. ......—.—.—.-..”.
Tips
~ Location of your refrigerator is
important. Avoid locating it next to
your range, a heating vent or where
sun will shine directly on it.
@Don’t open doors more often
than necessary.
* Close the doors as soon as
possible, particularly in hot, humid
weather. &#@ ,-”---
@Keep Energy Saver Switch in left
ition unless moisture forms on
ide of refrigerator.
~ Be sure the doors are closed
tightly. Before leaving the house or
retiring for the night, check to be
sure doors haven’t been left ajar
inadvertently.
@Store only those foods requiring
refrigeration in your refrigerator.
~Allow hot foods to cool (until
warm to the touch) before placing
them in your refrigerator.
~Wipe all moisture from bottles
and cartons before putting them in
~ Keep alI foods covered to reduce
moisture buildup inside the
refrigerator.
~ If you turn controls to coldest
position for quick chilling or freezing, be sure to turn them back to
regular settings.
@Dcm’tovercrowd your refrigerator.
Overcrowding can require extra
electrical energy to keep everything cool.
ti –-.
,.---
=:- .-,--
PsE3Kl:. -:
~: ---- ------
.-—. .
&J%-&
=: ---——...
~~,e.~-
row-x”
E&&&-: .-
Wr:<
g;:; ::
!2G22:. .
.
~%1-: -:-,~~–.-
~m.;;=
the refrigerator.
1
Part No. 468321 P02
Forperwmd safety,
~
L
,.
?
.-.
E
~
i
this appkmtx mud be
The power cord of this appliance
is equipped with a three-prong
(grounding) plug which mates with
a standard three-prong (grounding)
wall receptacle (Fig. 1)to minimize
the possibility of electric shock
hazardfrom this appliance.
PREFERRED METHOD
\
.,x—.- *
?
yn
Fig. 1 ‘
Have the wall receptacle and
circuit checked by a qualified
electrician to make sure the
receptacle is properly grounded.
Where a standard two-prong wall
receptacle is encountered, it is the
personal responsibility and obligation of the customer to have it
replaced with a properly grounded
three-prong wall receptacle.
INSURE PROPERGROUND,
EXISTSBEFORE USE
Q
%
Q
2h\
\
J\,
useofadapterplug
Because of potential safety
hazards under certain conditions,
we strongly recommend against
the use of an adapter plug. However,if you still elect to use an
adapter, where local codes permit,
a TEMPORARY CONNECTION
may be made to a properly
grounded two-prong wall receptacle by the use of a UL listed
adapter (Fig. 2)which is available
at most local hardware stores.
TEMPORARYMETHOD
(ADAPTERPLUGS NOT
-
PERMITTEDINCANADA)
ALIGN LARGE
‘130NGs’sLOTs- I ‘~;- ‘-: “ -A -
/n
. Fig. 2
The larger slot in the adapter must
be aligned with the larger slot in
the wall receptacle to provide
proper polarity in the connection of
the power cord.
Q /
a’
~;”-~\\u:;;R:;;;;::;;D
BEFOREUSE
‘Y ,
\@
/
CAUTKMJ:Attaching adapter
ground terminal to wall receptacle
coverscrew does not ground the
appliance unless coverscrew is
metal, and not insulated, and wall
receptacle is grounded through
house wiring. Customer should
havethe circuit checked bya quaiified electrician to make surethe
receptacle is properly grounded.
Whendisconnectingthe power
cord from the adapter,always
hold the adapter with one hand.
If this is not done,the adapter
ground terminal is very likely to
breakwith repeated use.
Shouldthe adapterground
terminal break, DO NOT USEthe
appliance until a properground
has again beenestablished.
Ike ofextension cords
Because of potential safety hazards under certain conditions, we
strongly recommend against the
use of an extension cord. However,
if you still elect to use an extension
cord, it is absolutely necessary that
it be a UL listed 3-wire grounding
type appliance extension cord and
that the current carrying rating of
the cord be 15 amperes minimum.
Such extension cords are obtainable through your local service
organization.
The should
alwaysbe intoi!ts
own WixXricall
cmet-
(115volt, 60 Hertz, or 100volt, 50
Hertz, single phase AC.)
This is recommended for best
performance and to prevent overloading house wiring circuits,
which could cause a possible fire
hazard from overheating wires.
Do not i!nstail your refrigerator
where the temperature will go
below 60°E because it will not
operate frequently enough to
maintain proper temperatures.
Be sure
that
a fully loaded
Also see Energy-Saving Tips
regarding location.
minstail i%m a fklm
isSWm’J ‘erm.ughR)
2
Clearances
Allow 78”at each side, 1“overthe
top and 1“at rearfor ease of
installation,properair circulation
plumbingand electrical
connections.
water
There should be sufficient tubing
for the icemaker from the cold
water supply to allow you to move
the refrigerator out from the wall
severalfeet (approximately 3 coils
of ~d’tcopper tubing that measure
at least 10rfin diameter).
Rollers
Adjustable roHers,which enable
you to move your refrigerator away
from the wall for cleaning, are
located behind the base grille.
These rollers should be set so that
the refrigerator is firmly positioned
on the floor and the front is raised
just enough that the doors close
easily when opened about haifway.
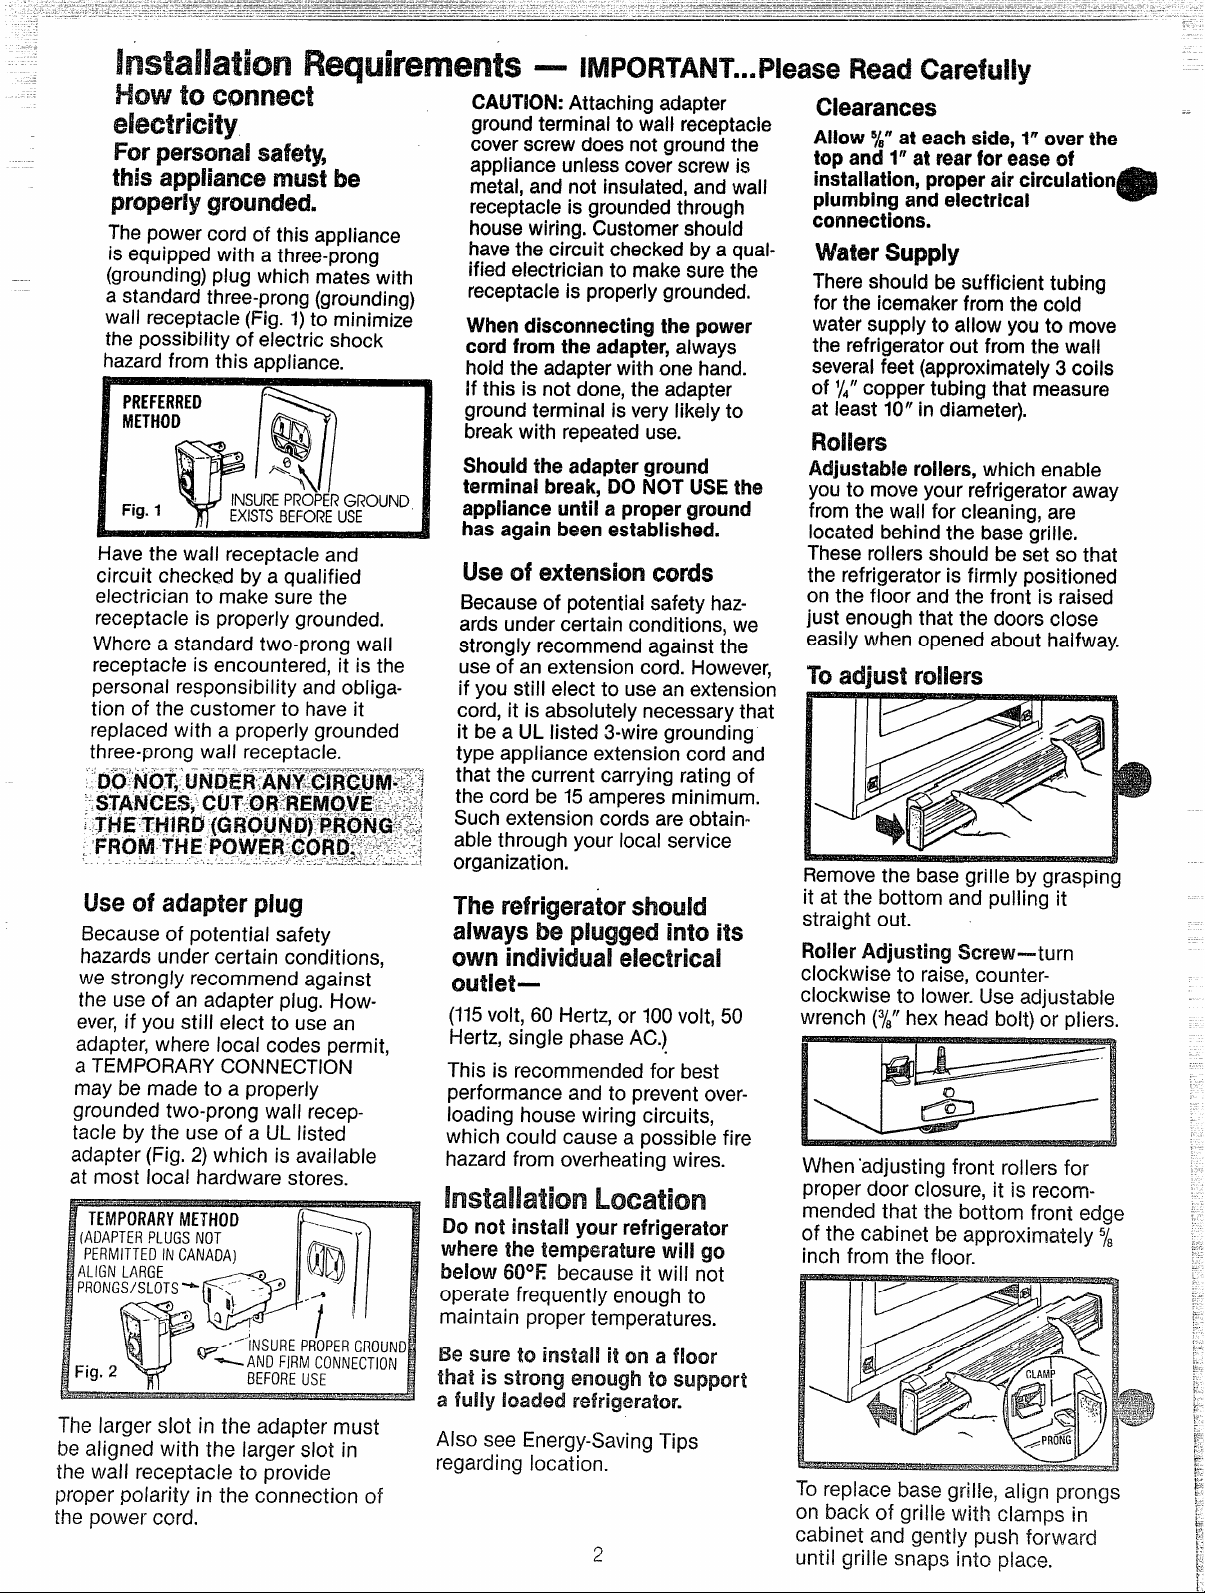
“Toac!liusil
Removethe base grille by grasping
it at the bottom and pulling it
straight out.
RollerAdjusting Screw—=-turn
clockwise to raise, counterclockwise to lower. Use adjustable
wrench (~~”hex head bolt) or pliers.
When ‘adjusting front rollers for
proper door closure, it is recom-
mended that the bottom front edge
of the cabinet be approximately ~a
inch from the floor.
To replace base grille, align prongs
on back of grille with clamps in
cabinet and gently push forward
until grille snaps into place.
supply
rollers
i
*
Set the
2EsEk!
—. .
T13VIPERATIJRE(X)NTRC)LS
t
FREEZER FRESHFOOD
INITIAL SETTING
4 c
COLDEST
E
.
ALLOW 24 HOURS FOR TEMPERATURES TO STABILIZE
.
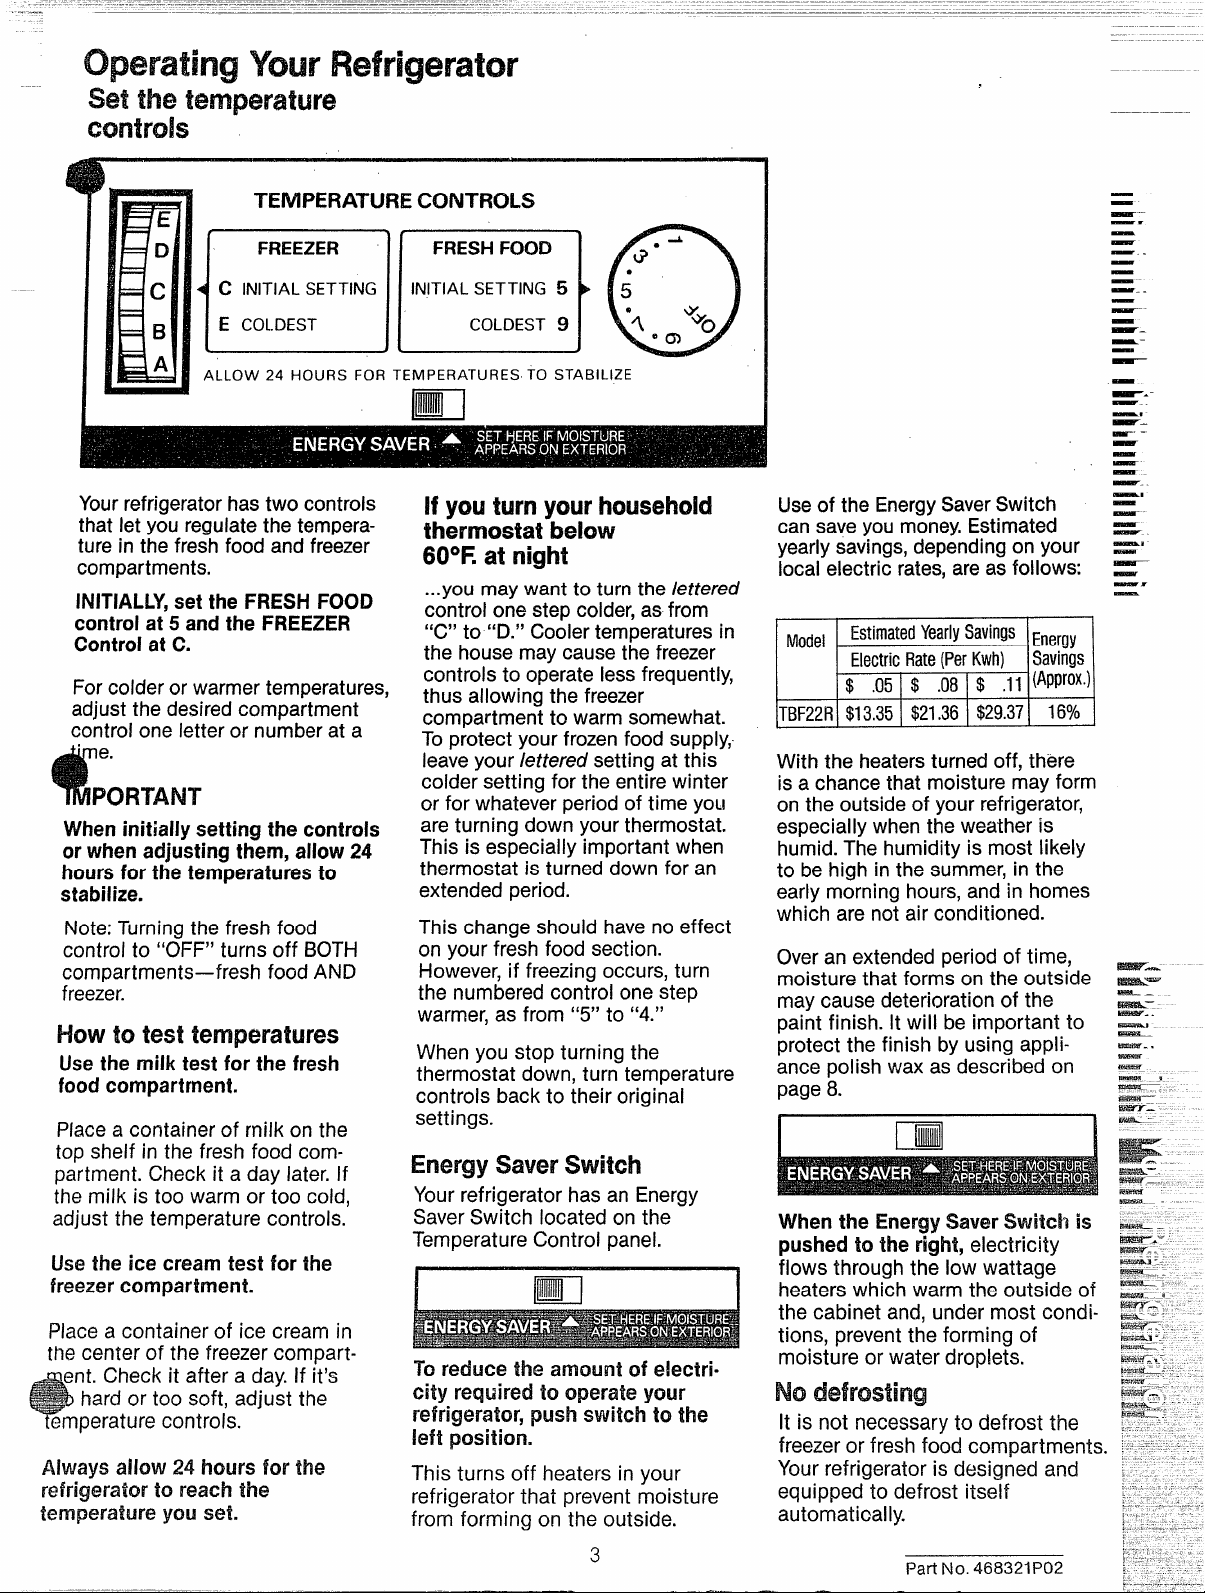
Yourrefrigerator has two controls
that let you regulate the temperature in the fresh food and freezer
compartments.
INITIALLY,set the FRESH FOOD
control at 5 and the FREEZER
Controlat C.
For colder or warmer temperatures,
adjust the desired compartment
controi one letter or number at a
‘ e.
FWrr’1’w
When initially setting the controls
or when adjusting them, allow 24
hoursfor the temperatures to
stabilize.
Note: Turning the fresh food
control to “OFF” turns off BOTH
compartments—fresh food AND
freezer.
Howtotesttemperatures
Use the milk test for the fresh
food cornpartrnent.
Place a container of milk on the
top shelf in the fresh food compartment. Check it a day later. If
the milk is too warm or too cold,
adjust the temperature controls.
lke the ice cream test for the
freezer compartment.
Place a container of ice cream in
the center of the freezer compart-
ment.Check it after a day. If it’s
hard or too soft, adjust the
emperature controls.
Always allow 24 hours for the
refrigerator to reach the
you set.
r
T
G*
INITIAL SETTING
&
1
m
COLDEST
5
9
i
“A ~**+5
If youturnyourhousehold
thermostat13ekww
60°Eatnight
...you may want to turn the /etterec#
control one step colder, as from
“C” to “D.” Cooler temperatures in
the house may cause the freezer
controls to operate less frequently,
thus allowing the freezer
compartment to warm somewhat.
To protect your frozen food supply,
leave your /ettered setting at this
colder setting for the entire winter
or for whatever period of time you
are turning down your thermostat.
This is especially important when
thermostat is turned down for an
extended period.
This change should have no effect
on your fresh food section.
However, if freezing occurs, turn
the numbered control one step
warmer, as from “5” to “4.”
When you stop turning the
thermostat down, turn temperature
controls back to their original
settings.
EnergySaverSwitch
Your refrigerator has an Energy
Saver Switch located on the
Temperature Control panel.
m
To reduce the amount of e!ectri=
city required to operate your
refrigerator, push switch to the
left position.
This turns off heaters in your
refrigerator that prevent moisture
from forming on the outside.
—
—
——
—.
4
Useof the IEnergySaverSwitch
can saveyou money.Estimated
yearly savings, depending on your
local electric rates, are as follows:
Model
EstimatedYearlySaViri9SEnergy
—
—
—.
—
—
—–
—. .
—
—-
-
~.
—–
—
—
~.-
—-.
—,
~—
_. -
-
-
—
--
—-
—n
—
—
—
—x
—
—
—r
TBF22R
With the heaters turned off, there
is a chance that moisture may form
on the outside of your refrigerator,
especially when the weather is
humid. The humidity is most likely
to be high in the summer, in the
early morning hours, and in homes
which are not air conditioned.
Overan extended period of time,
moisture that forms on the outside
may cause deterioration of the
paint finish. It will be important to
protect the finish by using appli-
ance polish wax as described on
page b.
I
When the EnergySaverSwitch is
pushed to the right, electricity
flows through the low wattage
heaters which warm the outside of
I
the cabinet and, under most condi-
tions, prevent the forming of
moisture or water droplets.
It is not necessary to defrost the
freezer or fresh food compartments.
Your refrigerator is designed and
equipped to defrost itself
automatically.
$13.35! $21.36I $29.37! 16%
m
IH%R%- ‘-
-.
-=
~“-
—. .
—
—
W2i59..
—
—
— -,
~:.
~
W&-Y--
3
Part No. 46832 flP02

Suggestedstoragetimes
...—— — —— .
formeatand
Eatingqualitydrops
aftertimeshown
FreshMeats
Roasts(BeefandLamb). . . .
Roasts(PorkandVeai).. .. .
Steaks(Beef) . .. . . . . . . . . 3 to 5
Chops(Lamb) .. . . . . . . . . . 3 to 5
Chops(Pork) . . . . . . . . . . . . 3 to 5
GroundandStew Meats, . . .
VarietyMeats . . . . . . . . . . .
Sausage(Pork) . . . . . . . . . .
ProcessedMeats
Bacon . . . . . . . . . . . . . . . . . 7
Frankfurters . . . . . . . . . . . . 7
fiam(Whoie) . . . . . . . . . . . . 7
fiam(Haif) . . . . . . . . . . . . . 5
i-fam(Siices) . . . . . . . . . . . . 3
Luncheon Meats . . . . . . . . .
Sausage(Smoked) . . . . . . . .7
Sausage
(Dryand Semi-Dry) . . . . . . . 14t021
CookedMeats
CookedMeats and
MeatDishes . . . . . . . . . . . .
Gravyand Meat Broth. . . . . .
FreshPoultry
Chicken and Turkey
(Whole), . . . . . . . . . . . . . . . lto2
Chicken(Pieces) ., . . . . . . .
Turkey (Pieces) ... , . . . . .
i)uckand Goose(Whole) . . .
Giblets . . . . . . . . . . . . . . .
CookedPoultry
Pieces(Covered with
Broth) , , , , , ... . . . . . .
Pieces(Not Covered) . . . . . .
CookedPoultry Dishes ... , .
FriedChicken . . . . . . .
(Otherthanfor meatsandpoultry)
L!OSIfruitsm(j
Leanfish, , , , , ., , . . . . .. ....,6- 8months
Fatly fish, rolls and breads,
soups, Stew, casseroles ., ., ., .. ...2- 3months
Cakes, pies, sandwiches,
leftovers (cooked),
Ice cream (original carton) . . ........1 month max.
New techniques are constantly
being developed. Consult the
College or County Extension
Service or your local Utility
Company for the latest information
on freezing and storing foods.
‘US. Department of Agriculture
Tostore unfrozen meats, fish anc.1
poultry.
Meats, fish and poultry purchased
from the store vary in quality and
age; consequently, safe storage
time in your refrigerator will vary.
oAlways remove store wrappings.
~ Rewrap in foil, film or wax paper
and refrigerate immediately.
vegetables, ., . ~•~~.. .8-12 months
pclldtry’
REFi!GER- FREEZER
ATORAT
35°-400E
DAYS
3to5
3to5
1 to 2
1 to 2
1 to 2
3 to 5
3 to 4
1 to 2
1 to 2
1 to 2
1 to 2
1 to 2
1 to 2
1 to 2
1 to 2
1 to 2
mended.
6
;
4
IN
o{;
MONTHS
6
tO 12
4 to 8
6 to 12
6 to 9
3 to 4
2 to 3
3 to 4
2 to 3
1
‘/2
1 to 2
1 to 2
1 to 2
Freezing
not
recom-
2 to 3
2 to 3
12
9
6
6
3
To store cheese wrap well with
wax paperor aluminum foil, or put
in a plastic bag.
* Carefully wrap to expel air and
prevent mold.
@Store pre-packagedcheese in its
own wrapping if you wish.
TOstore vegetables.Vegetable
drawers havebeen specially
designed to preservenatural moisture and freshness of produce.
s Crispness can be maintained by
covering vegetables with a moist
towel.
@As a further aid to freshness,
pre-packaged vegetables can be
stored in their original wrapping.
Fine=quality ice cream, with high
cream content, will normally
require slightly lower temperatures
than more “airy” already-packaged
brands with low cream content.
o It will be necessary to experiment to determine the location in
the freezer compartment and the
temperature control setting to
keep your favorite ice cream at the
right serving temperature.
@Also, the rear of the freezer compartment is slightly colder than the
front.
Tips on freezing foods.
There are three essential requirements for efficient home freezing.
1. Initial qua~ity.Freezeonly topquality foods. Freezing retains
quality and flavor; it cannot
improve quality.
2. Speed. The quicker fruits and
vegetables are frozen after picking,
the better the frozen product will
be. You’ll save time, too, because
less culling and sorting will be
necessary.
3. Proper packaging. Use food
wraps designed especially for
freezing; they’re readily available in
a wide selection at your favorite
store.
To freeze meat, fish & poultry
wrap well in freezer-weight foil (or
other heavy-duty wrapping material), forming it carefully to the shape
of the contents. This expels air.
4
Fold and crimp ends of the pack-
age to provide a good, lasting seal.
Don’t refreezemeat that has com-
pletely thawed; meat, whether raw
or cooked, can be frozen successfully only once.
Limit freezing of fresh (unfrozen)
meats or seafoods to number of
pounds at a time as follows:
TBF22. . . . . . . . ..
.. ...21 pounds
CMtgarah3yourfoodstorage
formnvenience.
~
Store all like things together.
This not only savestime, but
electricity—because you can find
foods faster.
e Place the oldest items up front
so they can be used up promptly.
. Usethe handy shelves on the
door for most frequently used
sauces and condiments.
saverncmeyinenergy
To
andfoodfxms.
@Place most perishable items such
as milk, creafi or cottage cheese
toward the rear of the top shelf as
they will stay coldest in this part
of the fresh food compartment.
~Cover moist foods with tight lids,
plastic film or foil.
~ Leaf vegetabks and fruits placed
in your Nloist’n Fresh or AdjustaFresh drawer will last longer when
stored in closed plastic containers
or wrapped in plastic film.
@Do not overload your fresh food
or freezer compartment with a lot
of warm food at once.
~ Open the door the fewest times
possible to save electrical energy.
@When going out of town for sev-
eral days, leave as few perishables
as possible in the refrigerator.
Move the icemaker manual switch
to “OFF” and shut off water to the
refrigerator.

Howto YourShelves.
Yournew refrigerator provides a
versatile shelf arrangement that
lets you rearrangeyour refrigerator
to fit your family’s food storage
needs. In addition, GE also
provides storage drawers at the
bottom which are designed to
maintain the proper levels of
humidities for a variety of fresh
foods.
Toremove shelves:13emoveshelf
by tilting up at front, then lifting up
and out of track on rear wall of
refrigerator.
M
Engage
top lug ;
J
4-
..
II
+“
/
/“
Lower to
lock into place
Toreplace shelves:Select desired
shelf height. With shelf front raised
slightly, engage top lugs in tracks
at rear of cabinet. Then lower front
of shelf until it locks into position.
J
Moist%FreshDrawer
...is designed to
keep unwrapped
foods fresh longer
by retaining the
natural moisture
content of foods
such as:
@Artichokes
e Asparagus
QIBeets, o Currants
topped
. Blueberries
@Carrots @Lettuce @Tomatoes,
a Celery
oCherries .
@Corn . Plums
● Greens, ~ Rhubarb
leafy * Spinach
~ Parsley
Peas,green
Q Radishes
ripe
As in any refrigerated storage area,
it is recommended that odorous
foods be stored wrapped—foods
such as:
o Broccoli ~ Cabbage
~ Brussels
sprouts
o Cauliflower
6 Green Onions
@Parsnips
@Turnips
Storage time will depend upon the
type of food and its condition
when placed in the drawer.
Excess water which may accumulate in the bottom of the Moist’n
Fresh drawer should be removed
and the drawer wiped dry.
The Moist’n Fresh drawer is partially sealed by gaskets attached
to the cover at the front and back
edges. Always replace it in this
cover andpush the drawer W the
way in.
AcijustaFreshDrawer
...has a second, inside cover.The
adjustable humidity control lets
you regulate the amount of cold air
entering the drawer.
mHE2.:
-—
——
-–
—
— ..
—T
-- =
-—
--
—
—=
—
—.
-
—
—.
-. —
—-
-. ..
—
—.
—.
-
—..
-
IMEsr-.
—r
-=
——E–
~—
~–
m
—
—
—
—
—
-,
—
—
imaw.
-–
—
—,
w.
-–
—s
-
—
m=–
tEwsssk-
twaw=–
mE$i%.—
—.
—-
-:
-..
-u
fm43--
=---
—
—
—x
—-
—.-—..-
.-
—
—
-.,-.-
-.-s...-
”&.———,a==—.. --—*
—~ .. .,
TBF22R
..—
—.
--- -=-.=--————
El
Slide the control all the way to the
right to the “VEGETABLES’ setting
and the cover closes fully to pro-
vide a high humidity storage area.
Slide the control all the way to the
left to the “FRUITS” setting and
the cover stays partially open to
provide a less humid storage area.
Various settings between “Fn.nits”
and “Vegetables” can be seketed
as user desires.
5
Part No. 468321P(I2

AdjwbTemp Drawer
...has an adjustable two-position
temperature control wh,ichlets you
regulate the amount of cold air
entering the drawer.
When control is all the wayto the
left at the “MEATS”setting, baffle
is fully open to provide coldest
storage area.
When control is all the way to the
right at the “FRUITS” setting,
baffle is fully closed to provide
normal refrigerator temperature.
SealedSnackPack
The Sealed Snack Pak—and the
shelf to which it is attached—can
be relocated within the Fresh Food
compartment. The sealeddrawer
retains high humidity for conven-
ient storage of unwrapped meats
and cheese, bacon, hors d’oeuvres,
spreads and snacks.
POrta”ixns
DrawerRemoval
Drawerswill stop before coming
all the way out of refrigerator to
he!p prevent contents from spilling
onto floor, Drawerscan usually be
removed by tilting up slightly and
pulling past “stop” location.
Toremovedrawers when the fresh
food compartment door cannot be
fully opened:
1.Removedrawer farthest from
door. Also remove center drawer.
(Lift covers up and pull out.)
—
.
II
I I —1
2. Slide remaining drawer and
cover to the middle.
3. Pull drawer out until it hits the
stops. Lift drawer slightly up and
out over the stops.
kxxnaker...
withCMstCmb
Yourrefrigerator has
icemaker-and a custom dispenser
that dispenses ice cubes and
crushed ice through the freezer
compartment door. Here’s how
they work:
Automatic icemaker (1)fills ice
storage container (2).
Pressure on ice cradle (3)activates -
motor-powered auger (4),feeds
cubes from storage container into
glass through chute (5)when selector switch is set at ICE CUBES.
Dispenser
an automatic
When switch is moved to
CRUSHED ICE, baffle in housing
Model TBF22R has two adjustable
Porta-Bins which can easily be
carried from refrigerator to work
area. A dozen eggs in their original
carton will fit securely in a PortaBin.
Under certain rare circumstances, ice cubes may be discolored,-usually appearin~ with.a gteenMuish hue. The cause cdIhis unusual discoloration is apparently due to a cotnbination of factors suah as
local waters of certain characteristics, household
inactive water line which feeds the icemaker. Continued consumption of such discolored ice cubes
may be
Electric Factory Service Center or a franchised Customer Care@servicer.
injurious tq health.!f such discoloration is observed,discard the icecubes and mnt~ct ycw General
4. Place hand on drawer cover and
pull out drawer.
5. Lift cover and remove it.
After cleaning, replace in reverse
order.
pkmbing and the accumulation of coppe~ saits In an
channels cubes through crusher
(6)and crushed ice falls into glass
through chute.
Spills are caught in a recessed
area (7).
Water is supplied automatically to
the icemaker by a solenoid valve.
A connection to household cold
water system is all that’s needed.
o
~
6

Before !Mng Your.hxmaker
andDkqWm?Lm
If refrigerator is operated Iwfore
ater connection
ce storage container and make
sure ON-OFF leveron icemaker is
in the QFF (up)position. (Lever
shown in orangeonly to help you
identify it.)
Toremove ice storagecontainer:
Press upward on tab under the
1.
bottom edge of the container.
is made,remove
is
OnceYourkxmaker
Isinoperation...
Throw away the first few batches
of ice cubes(10 or 15cubes).This
will flush away any impurities in
the water line.
Dothe same thing after vacations
or extended periodswhen ice isn’t
used.
To DispenseIce...
Set selector switch on front of
freezercompartment door to ICE
CUBESor CRUSHEDICE.
Grip glassware firmly near rim and
press gently but firmly against the
rubber-cushioned cradle. Container
must be below the chute.
Excessivespills should bewiped
dry immediately.
Boththe spill shelf and the gri!le
shouldbe cleaned regularly.
Water deposits can be removedby
following cleaning instructions on
page8.
-
if this is your first Icemaker: ==
You’ll hear occasional sounds that =:
may be unfamiliar. Theyare normal =-
icemaking sounds and are not ~-~
cause for concern,
When a largesupplyof ice will be ~
needed:
-. .
—
-.
Make an extra supply aheadof -=
time. Empty container, put cubes ~~
in plastic bags or containers and =store in the freezercompartment s
until the container refills.
—,
-
—
If ice is used infrequently,“old” cubeswill become cloudy and
taste stale.
Empty ice storage container
periodically and wash it in
lukewarm water.
Y~
-% \
2. Pull container strai~ht out while
supporting it at front
/
&d rear.
To replace ice storage container:
Slide it back until the tab latches.
If the container does not go all the
way back, remove it and rotate the
drive mechanism M turn.
Then push the container back
again until the tab latches.
When water supply has been
connected to
icmnakw:
Removeice storagecontainer,
move ORJ-OFFlever on icemaker
the ON position,and replace
to
container.
Ice cube mold automatically fills
with water after cooling to freezing
peratures. First cubes normally
ze after several hours,
P40te:With a newly-installed
refrigerator,allow about
for freezer to cool down to proper
ice-making temperature.
24 hours
Tostop dispensing:
Release pressure from cradle,
withdrawingslowly to
1[
last bits of ice.
When set for CRUSHED ICE:
Cubes will be channeled through
the crushing mechanism before
being dispensed.
When changing from CUBESto
CRUSHED ICE:
Expect a slight delay before the
operation begi’ns.
new
When changing from CRUSHED
ICE to
CUBES:
The next glassful may receive a bit
of crushed ice. (This may also
happen if irregular sized cubes or
ice chips are in storage container.)
When dispensing crushed ice:
Some slight dripping may follow.
Normal spills will be collected in
the recessed area below the spill
shelf grille.
7
catchthe
Infrequent usage of ice can also
cause ice clumps to form in the
storage container, resulting in
temporary malfunction of the
dispenser mechanism.
If ice clumps form in the storage
container:
@Removestorage container from
freezercompartment.
@Rotate auger one full turn and
discard clumps.
~ Replace container before
remaining cubes melt and fuse
together.
Turn icemaker CHW3FFlever to
OFF position:
@if home water supply is to be
turned off for several hours.
~ when ice storage container is to
be removed for a period of time.
o before going away on vacation,
at which time you should also turn
off the valve in the water supply
line to your refrigerator.
Part No. 468321P02
ZLW4%U
-
-–
w=Er=.-

ycwr
———-
..
Outside
Protect the paint finish. The finish
on the outside of the refrigerator
is a high quality, baked=onpaint
finish. With proper care it will stay
new-looking and rust-freefor years.
Apply a coat of appliance polish
wax when the refrigerator is new
and then at least twice a year.
Appliance Polish Wax & Cleaner
(Cat.No. WR97X216)is available
from GE/i-lotpoint Appl~anceParts
Marts.
Keepthe finishclean. Wipe with a
clean cloth lightly dampened with
appliance polish wax or mild liquid
clishwashing detergent. Dry and
polish with a clean, soft cloth. Do
not wipe the refrigerator with a
soiled dishwashing cloth or wet
towel. Do not use scouring pads,
powdered cleaners, bleach, or
cleaners containing bleach.
Clean both fresh food and freezer
compartments at least once a
year.It is recommended that the
refrigerator be unplugged before
cleaning. If this is not practical,
wring excess moisture out of
sponge or cloth when cleaning in
the vicinity of switches, lights or
controls.
Use warm water and baking soda
solution—about a tablespoon of
baking soda to a quart of water.
Rinse thoroughly with water and
wipe dry. Follow this same procedure for cleaning door gaskets,
meat and vegetable drawers, and
all plastic parts. Wash ice trays and
ice storage bin in lukewarm water
only. $30not use cleansing powders or other abrasive cleaners.
Behind
Care should be taken in moving
your refrigerator away from the
wall. All types of floor coverings
can be darnaged, particularly
cushioned coverings and those
with embossed surfaces. Pull the
refrigerator straight out and return
to position by pushing straight in.
Moving your refrigerator in a side
direction may result in damage to
your floor covering or refrigerator.
Beneath
For most efficient operation,
remove the base grille (see page 2)
and removethe defrost water pan,
then either sweep away oi vacuum
up dust that is readily accessible.
This easycleaning
operation should
be done at least,
once a year.
Defrost Rim
Pan behind base grille should be
cleaned at least once a year.When
reinstalling pan, firmly push pan
ALL THE WAY IN until it stops.
you
Disconnect power cord from wall
receptacle, remove all food and
clean and dry the interior.
Secure all loose items such as
grille, shelves, and storage pans by
taping them securely in place to
prevent damage.
Be sure refrigerator stays in
upright position only during actual
moving and in van. Refrigerator
must be secured in van to prevent
movement. Protect outside of
refrigerator with blanket.
Whenyougocmvacatkm
Forwtended vacatfms or
absaws, shut off power to
refdgeratol; turn the numbered
control OFfi clean interior with
baking soda soiution of one
tablespoon of soda to one quart of
water,Wipe dry,To prevent odors,
ieaveopen box of soda in refrig-
erator. Leavedoors open.
For shorter vacations, remove per-
ishable foods and ieavecontrois at
reguiar settings. However,if room
temperature is expected to drop
beiow 60°E foiiow same instruc”
tions as for extended vacations.
Move icemaker manuai switch to
OFF.position and be sure to shut
off water supply. ON-OFF switch is
the white iever iocated on the ieft
behind the ice storage container.
Quadra Kleen Water Filter
1
(optionai at extra cost)
instalis in minutes
on ~“ 0.D. copper
water iine.
Removes sediment:
Rigid, porous fiber cartridge catches dirt, rust
particies, sand, siit.
FiwmmresOdors: Activated charcoai removes
musty, stale odors from water.
improves Taste: Activated charcoai removes oiiy, medicinai,
plastic and metaliic tastes from
water.
Reduces Scale: Speciai crystais
reduce hard scaie deposit
formation.
Order VVR97X214from your GE
deaier.
u
f’
Y

-lbsaw’ -rimeand Money’—
youcdl
forservice,
heckthe $bb~
you havea problem, it maybe
mino~You may be able to correct
it yourself. Just use this Problem
RapidElectricalDiagnosis.
—
Yourrefrigerator is wired for accurate electrical diagnosis in your
home—takes only minutes to
check its entire electrical system
by a service technician. No need
Solverto locate your problem and to unplug, move or unload the re-
then follow the suggested
frigerator to make the diagnosis.
recommendations.
“me
Savetimeandnxmey.,.beforeyoucdl forservice,checkthefollowing:
MOTOR OPERATES
FOR LONG PERIODS
IPosmm CAUSEAND Fwwmw
-———
,, ,.,*’May’be in’de~rostcycia .w~en‘~btor does not operate for’about’ 35
;: -’rni~utes.,’,,,’, 4 ~
. ,<.-. , .~:
, ,,
.+,
~.
Te”m’p’erat.ur~,control in OFF positiin. L ,‘ ,}
~ o
, >., .
.,
,,:“- - ~,,
.),
r, ,.
,,
‘, ! ,
,,
,“
““. ‘~ If interior’jigiit is~no~’on, r~frige~ato~may not‘be plugged in at wall
receptacle.
~..’ ,1,
,.
‘~ ~If plug.is’$&ureand the r~frigeratorstill. fails ‘to operate, plug a {amp
,or‘aSmall applianb,eintb the same outlet to determine if there is a
tripped circuit ’breaker or bl.imed out’ fuse.
* Modern refrigerators with more storage space and larger freezer
compartment require more operating time.
* Normai when refrigerator is first delivered to your home—usualiy
requires 24 hours to completely cooi down.
@Large amounts of food placed in refrigerator to be cooled or frozen.
@Hot weather—-frequent door openings.
* Door left open.
@Temperature controls are set too cold. Refer to instructions for use of
TEMPERATURE CONTROLS on page 3.
@G[ilie and condenser need cleaning. Refer to page 8.
~ Check ENERGY SAVING TIPS on page 1,
MOTOR STARTS &.
STOPS FREQUENTLY
——
vli3RA-1-ic)NOR
RATTLING
* Temperature controi starts and stops motor to maintain even
temperatures.
* If refrigerator vibrates, more than likely it is not resting soiidly on the
floor and front roiier screws need adjusting or fioor is weak or uneven.
Refer to INSTALLATION on page 2.
* [f dishes vibrate on sheives, try moving them. Siight vibration is
normai,
Defrostwater pan rattiing, needs to be positioned properiy.
*
.-
9
~;rt No. 468321 P02
—..

PFKN3LEM
POSSIBLECAUSENW REMEDY
.-L t7~he high speed~o.rnprwsorrnwx ~fwujr~~toma~~t~~~near~~~~
,-
,temperatures in the’largefreezerfmmpw’tmentmayproducehigher
‘“~.,$oundkwels
,4
:,.‘ONormalfanairflow-one fanblows coldah’throughthe mfr@mMx
:,!and freeiercompartni@++m@her fancoolsthecomprwxmrmotor.
,’ ~oThese~CHvlALsoundswill ‘alsobeh~ardfromtires tQtl~e: ‘
:‘~,‘:”$
Defro$t timer switch clicks at defrost.
.,
,’ .,, ,,
* Defio$dwater dri~ping inta drain pan,
~oTem@erafurecontrol click$ ON or OFE ‘
!.
* Refrigerant boiling or gutgling!
@Cracking or popping of cooling coils caumd by expansion and
.contraction during defrost and refrigeratkm following defrost.
@The sound of cubes dropping into the bin and water running in plpos
as icemaker refills.
than yxrr.old refrigerator.
,,
7.
l+OT’AiR FROM
BOTTOM OF ~
REFRIGERATCWI
FRESH FOOD
OR FREEZER
COMPARTMENT
TEMPERATURE
TOO WARM
FOODS DRYOUT
4UTOMATIC KXMAKER
30ES NOT FUNCTION
XJBE DISPENSER
IOES NOT WORK
~ Normal air flow cooling motor. In the refrigeration process, it is normal
that heat be expelled in the area under the refrigerator. Some floor
coverings will discolor at these normal and safe operating temperatures,
Your floor covering supplier should be consulted if you object to this
discoloration.
@Temperature cont~ol not set c~ld enough. Refer to TEMPERATURE
CONTROLSon page 3.
* Warm weather—frequent door openings.
* Door left open for long time.
@Package may be holding door open.
@Package blocking air duct in freezer compartment.
@Foods not covered, wrapped or sealed properly.
~ ON-OFF control in OFF position.
~‘Watersupply turned off or not connected.
* Freezercompartment too warm.
$ cubes too small —water shut-off valve connecting refrigerator to home
water line may be clogged.
ice cubes. Remove storage container. if cubes are frozen to wire
~ No
arm, remove cubes.
@No ice cubes. Icemaker turned off or water supply turned off.
.— ..—
@Irregular ice ciumps in storage container. Remove container, rotate
auger and discard
clLJrnpspqrinstructions on pageZ
10

-.
— .—— ———— ... -h..>----- .- —
,’
ICECUBESHAVE
ODOR/TASTE
---–
-.
-.
—.
—,
MOISTURE
OhlOUTSIDEOF
REFRIGERATOR
I
FORMS
oNot unusualduringperiodof highhumidity.
6Movethe energysaverswitchto theright.
—–
-–.
Lfmi&.
-–
-—
EwJ&—
—.
—--
-–—:—
MOISTURE
COLLECTSIIWIDE
WATERON
THE FLOOR
REFRIGERATOR
HAS ODOR
@Too frequent and too long door openings,
~ In humid weather air carries moisture into refrigerator when doorsare
opened.
@Defrost water pan full, missing or not in position.
@Foods with strongodors should betightly covered.
@Checkfor spoiledfood.
@interior needscleaning. Referto page8.
@Defrostwater pan needscleaning,
QKeepopen boxof baking soda in refrigerator;replacemonthly.
—
11
Part No. 4&3321 P02

—.
——
if
In manycities, there’sa General
Electric Factory Service Center.
andaradio-dispatchedtruck
Call,
will cometo your home byappointment—morningor afternoon.Charge
the work, if you like. All thecenters
accept both MasterCardand Visa
Cards.Check the White Pagesfor
“GENERAL ELECTRICCOMPANY”
or“GENERAL ELECTRICFACTORY
SERVICE.”
Or look for General Electric fran-
chised Customer Care” servicers.
You’ll find them in the Yellow Pages
under “GENERAL ELECTRIC
CUSTOMER CARE@SERVICE” or
“GENERAL ELECTRIC-HOTPOINT
CUSTOMER CARE@SERVICE.”
If youneed serviceliterature,
partslists,partsoraccessories,
contact one of the Factory Service
Centers, a franchised Customer
Care@]servicer or your dealer.
If youaredissatisfiedwiththq
serviceyoureceived,hereare
threestepsyoushouldfollow:
FIRST,contact the people who
serviced your appliance. Explain
why you are dissatisfied. In most
casesthis will solve the problem.
NEXT,if you are still dissatisfied,
write all the details—including your
phone number–to:
Manager,Consumer Relations
General Electric Company
WCE-312
Appliance Park
Louisville, KY40225
FINALLY,[f your problem is still not
resolved, write:
Major Appliance Consumer
Action Panel
20 North Wacker Drive
Chicago, IL 60606
This panel, known asMACAP,is a
group of independent consumer
experts under the sponsorship of
several industry associations. its
purpose is to study practices and
advise the industry of ways to
improve customer service. Because
MACAP isfree of industry control
and influence, it is able to make
impartial recommendations, considering each case individually.
12
—

do
—-------.
—.-. -....—,—- ,-- - .--.,,=
to
Yournew appliance isa well
designed and engineered product.
Before it left the factory, it went
through rigorous tests, just to
makesure it wasas defect-free as
possible. And you have awarranty
to protect you against any manufacturing defects during the early
period of your appliance’slife.
Now you can have the same
trouble-free and surprise-free
service for as long asyou own
your appliance. Youcan buya
General Electric Service Contract.
For one low fee. ..
pennies a day..
usuallyjust
.General Electric
will take care of any repairs your
appliance needs—both parts and
labor.Youare protected for the
length of your contract. Even when
costsgo up, you pay nothing more.
Wantmoreinformation?There’s
noobligation.Youcan get infor-
tion on Service Contracts any
e. Just write your name and
address, date of installation, arid
the model and serial number of
your appliance and send to:
Manager, Service Contracts
General Elecric Company
WCE-315
Appliance Park
Louisville, KY 40225
If you’re the kind of person who
likes to do-it-yourself–or if you’re
interested in saving money on
out-of-warranty repairs—General
Electric nowoffers somereal help:
Step-by-StepRepairManual
Youcan usethis manualto solve
common repair problems. GE
makesit easybecauseyour manual
contains important do-it-yourself
information:
chartstohelpyoudiagnose
problems
easyto understandinstructions
step-by-stepphotoswithrepair
procedures
askilllevel index
therecommendedtoolsneeded
to performrepairs
ReplacementParts
Whenrepairing your appliance, be
sure to useauthorized GE replace-
ment parts.Each part ispackaged
in a color coded box with:
easy parts identification
~
~ estimatedtime of
o step-by-step instructions
recommendedtook
~
repairs
Whereto PurchaseStep-by-Step
RepairManualsand Parts
Youcan purchaseGE repair rrianuals and replacement partsfor your
appliance from authorized participating General Electric dealers.
Note:Of course, repairs should be
attempted only by individuals
possessingadequate backgrounds
of electrical, electronic and mechanical experience. Any attempt to
repair amajor appliance mayresult
in personal injury and property
damage.
Part No. 468321P02

1s
FLU C)NE.YEAF?WARRANTY
For one year from date of original
purchase,we will provide,free of
charge,parts and servicelabor in
your home to repairor replaceany
part of the refrigerator that fails
becauseof a manufacturing defect.
FLU FIVE=YEARWARRANTY
For five yearsfrom date of original
purchase,we will provide,free of
charge, parts and service labor in
your home to repair or replaceany
part of the sealed refrigerating
system (thecompressor,conden-
ser,evaporatorand all connecting
tubing) that fails becauseof a
manufacturing defect.
This warranty is extendedto the
originalpurchaserand any succeed-
ing owner for products purchased
for ordinary home use in the 48
mainland states, Hawaii and
Washington, D.C.In Alaska the
warranty is the sameexcept that it
is LIMITEDbecauseyou must pay
to ship the product to the service
shop or for the service technician’s
travel costs to yourhome.
All warrantyservicewill be provided
by our Factory ServiceCentersor
by our franchised CustomerCare”
servicersduring normalworking
hours.Checkthe White Pagesfor
GENERALELECTRICCOMPANY
or GENERALELECTRICFACTORY
SERVICE.Look in the Yellow
pages for GENERALELECTRIC
CUSTOMERCARE@SERVICEor
GENERALELECTRIC-HOTPOINT
CUSTOMERCARE@SERVICE.
llL
\: FJlm
,, =
,, - =
!!&”
— —.
llP——
 Loading...