

GE TBF18ZV Use and Care Manual

1. Temperature controls
2. Rollers (behind grille)
3. Defrost water pan
(behind grille)
4. Rating plate–record
model and serial numbers
here for future reference.
Model#
Serial#
Do not remove rating plate.
/zr—
II
(
(
‘———L———
L
IMPORTANT: PLEASE READ CAREFULLY
FOR PERSONAL SAFETY, THIS APPL1/fNNCE
1.
MUST BE PROPERLY GROUNDED.
The power cord of this appliance is equipped with
a three-prong (grounding) plug which mates
with a standard three-prong (grounding) wall receptacle (Fig. 1) to
minimize the possibilitv of electric shock
hazard from this appli-
ance. Have the wall
receptacle checked by
a qualified electrician
to make sure the receptacle is properly
grounded.
Where a standard two-prong wall receptacle is encountered, it is the personal responsibility and obligation of the customer to have it replaced with a
properly grounded three-prong wall receptacle.
DO tVC)~
REMOVE THE THIRD (GROUND) PRONG FROM
THE POWER CORD.
LJSAGE OF ADAPTER PLUG
Because of potential safety hazards under certain
conditions, we strongly recommend against the use
of an adapter plug. However, if you still elect to use
anadapter,where localcodes permit, aTEMPORARY
CONNECTION may be made to aproperly grounded
two-prong wall receptacle by the use of a UL listed
adapter which is available at most local hardware stores(Fig. 2).The
largerslot inthe adapter
must be aligned with
the larger slot in the
wall receptacle to provide proper polarity in
~h6?
COfIllWtiOn of the
power cord.
wall receptacle cover screw does not ground the
appliance unless cover screw is metal, and not insulated, and wall receptacle is grounded through
house wiring Customer should have the circuit
UNDER ANY CIF?CUIWS721NCES,CUT OR
t
Attaching adapter ground terminal to
PREFERREDMETHOD
%
Q
$- - .$
~i 1
Fig. ;
TEMPORARYfvIETtiOD
(ADAPTER PLUGS NOT PERMITTEO IN CANADA)
Fig. 2 BEFOREUSE
8‘,
%
Q
+X
INSUREPROPER
GROUNDEXISTS
BEFOREUSE
checked by a qualified electrician to make sure the
receptacle is properly grounded.
Whendisconnecting the power cord from the adapter, always hold the adapter with one hand. If this
is not done, the adapter ground terminal is very
likely to break with repeated use. Should this happen, DO NOT USE the appliance until a proper
,
ground has again been established.
2. THE REFRIGERATOR SHOULD ALWAYS BE
PLUGGED INTO ITS OWN INDIVIDUAL ELECTRICAL OUTLET (115 volt, 60 hertz, single phase AC).
This is recommended for best performance and to
prevent overloading house wiring circuits, which
could cause a possible fire hazard from overheating wires.
USE OF EXTENSION CORDS–Because of poten-
tial safety hazards under certain conditions, we
strongly recommend against the use of an exten-
sion cord. However, if you still elect to use an
extension cord, it is absolutely necessary that it be
a UL listed 3-wire grounding type appliance extension cord and that the current carrying rating of the
cord in amperes be 15amperes minimum. Such extensioncords areobtainablethrough your localservice
organization.
3.
Repair or replace immediately all ekxtrk sf3rvice cords that have become frayed or
damaged.
abrasion damage along its length or at either the
plug or connector end.
4.
Never unplug your refrigerator by pulling cm the
powercord.
out from the receptacle.
5. When
Iwali, be
power cord.
& After your is in do not
touch the cold surfaces,
are damp or wet. Skin may adhere to these extremely cold surfaces.
7. !30 not Operate your refrigerator in the p@%XZ%Q@
c9f‘explosive fumes.
Do not use a cord that shows cracks or
Alwaysgrip the plugfirmly and pullstraight
moving your refrigerator away from the
careful not to roll over or the
when
8.9.LJr@ugyour refrigerator:
Beforemakingany repairs–(NOTE:Westrongly
A.
recommend that artyservicing beperformed by a
qualified individual.)
ELBefore cleaning.
C. Before replacin
g a burned-out light bulb. (A
burned-out light bulb may break when being replaced. The refrigerator should be unplugged in
order to avoid contact with a live wire filament.)
Note: Turning control to OFF position does not
remove power to the light circuit.
H
vow old refrigerator is still around the house
but nbt in use, be sfire to remove the doors.
reduce the possibility of danger to children.
Note and follow ai[precaittiol~s contained iIIthis Use & Care Book.
Allow 5/8 inch at each side and top for ease
of installation. When building a new home,
consider providing water supply to refrig-
erator location. It will simplify connection
of optional automatic icemaker should you
wish to install one at a later date.
Your refrigerator should not be installed
where the temperature will go below 60°F.
bectiuse the refrigerator will not run frequently enough to maintain proper temperLures.
Be sure to install on :i floor strong enough
10slipport :i fully Ioiide(i refrigerator.
AdjLis[ubk rollers,which en~ibleyou [o move
yoLir refriger:itor :iw:iy from the w:ill for
c]e:ining,are Ioc:{tedbehind the grille. These
rollers sholil(i be set so [hiit the refrigerator is firmly positioned on the floor Eindthe
I’ron[ is riiised just enough [h:it the doors
close easily when opened iiboLith~iifway.
To adjust rollers
Remove the grilie by gr;isping at bottom
:ind ptilling up and out. (See
.
TiIrn roller :idjusting screws clockwise to
Fig. 3).
Fig. 3
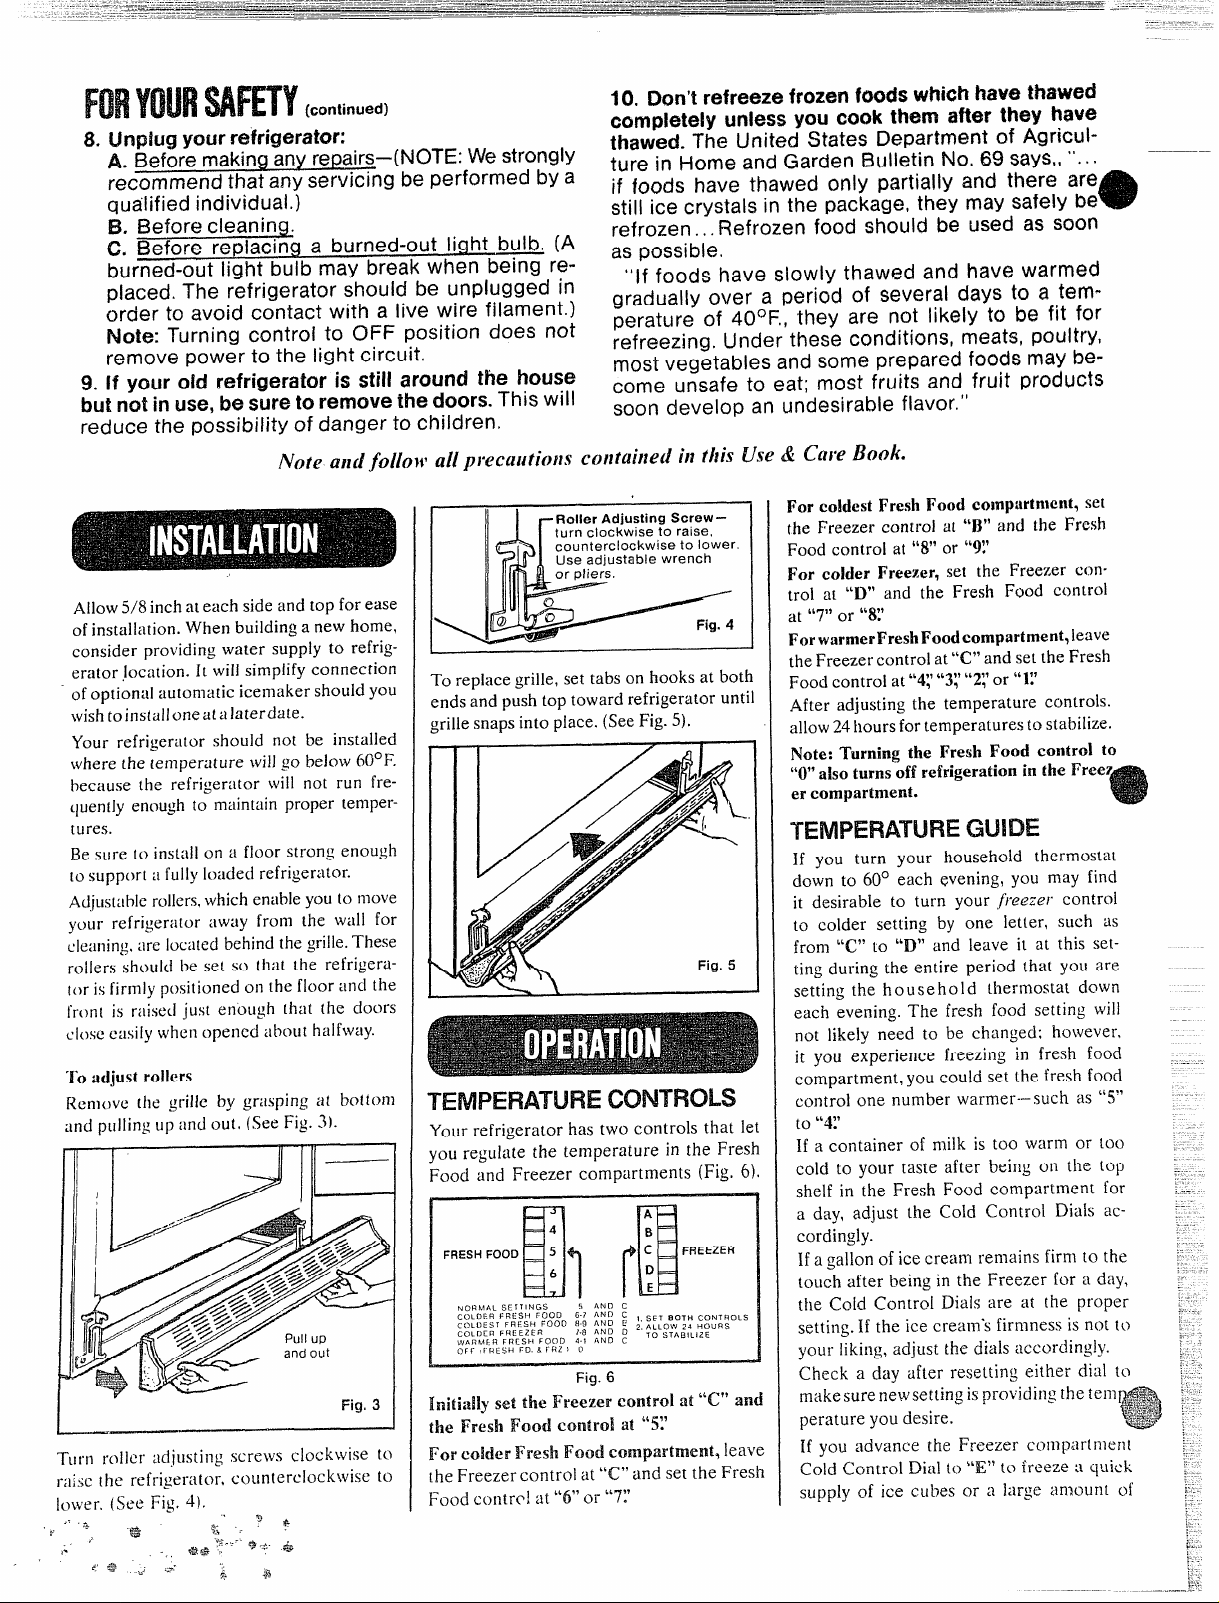
ro replace grille, set tabs on hooks at both
ends and push top toward refrigerator until
grille snaps into place. (See Fig. 5),
Your refrigerator has two controls that let
you regLiklte the teinperature in the Fresh
Food and
FRESH FOOD
NORMAL SL TTINGS
CO LDI- R PRESI+ FOOD
cOLUE ST FRESH Foon ;.: R:: : ~, ALL OVA za HOURS
COLDER FR[ EZE R
WAF7MFU Fi7CSli FO(ID 4 1 AND C
OFF ! u KS~ Fo. a ~F~Zb @
I
10. Don’t refreeze frozen foods which have thawed
completely unless you cook them after they have
thawed.
The United States Department of Agricul-
ture in Home and Garden 8u!ietin No. 69
if foods have thawed only partially and there are
still ice crystals in the package,they may safely be
refrozen .,. Refrozen food should be used as SC.XM
as possible.
“If foods have slowly thawed and have warmed
gradually over a period of several days to a tem-
perature of 40QF.,they are not likely to be fit for
refreezing. Under these conditions, meats, poultry,
mostvegetables and some prepared foods maybe-
This will
come unsafe to eat; most fruits and fruit products
soon develop an undesirable flavor.”
Freezercompartments(Fk. 6).
4
5
6
In
5 ANO C
‘“7 ‘No c I. SET eOTH CONTROLS
Fig. 6
A
B
c
FREEZER
D
E
ill
TO STABILIZE
say%”... -
For ccddestFresh Food compartment, set
the Freezei- control U[“B” arid the Fresh
Food control at “8” or “9!’
For colder Freezer, set the Freezer con-
trol at “D” and the Fresh Food control
~t LL71tor Lt8:?
For
warmerFresh Food ~o~P~r~~entl leave
the Freezer control at “C” and set the Fresh
Food control at “4:’“3; “27or “X’
After adjusting the temperature controls.
allow 24hours for temperatures to stabilize.
Note: Turning the Fresh Food control to
“(Y’also turns%ffrefrigeration in the Free?
er compartment.
GUIDE
If you turn your household thermostat
down to
it desirable to turn your ,/)-eezer control
to colder setting by one letter, such
from “C” to “D” :ind leave it at this setting during the entire period th:it you are
setting the h o use ho 1d Lherrnostat down
each evening. The fresh food setting will
not likely need to be changed: however.
it you experience freezing in fresh food
compartment, you could set the fresh food
control one number warmer-– such as “5”
to “4:’
If a container of milk is too w:irin or too
cold to your taste after being on the top
shelf in the Fresh Food compartment for
a day, adjust the Cold Control Diais accordingly.
if a gallon of ice cream remains firm to the
touch after being in the Freezer for a day,
the Cold Control Dials are :it (he proper
settii~g.If the ice creams firmness is not to
your liking, adjtist the dials accordingly.
Check a dtiy after resetting either diol to
make sure new setting is provid ing
peratui-e you desire.
lf you aciwince the Freezer compartmmt
Cold Control Dial [o “E” to freeze :i q~iick
supply of ice
60°eachweniwj,YOUmaY find
thetm-
cubesor a Iqe amount of
M
;&:$:
-“+_T-
~3
-+.-
,---
 Loading...