

GE TBF18B Use and Care Manual
--
—
-,
i
USAGE$1’I’UATI(3NSWHERE APPLIANCE’S
Adjushng screw
POWERCORDWILLIX KMW20NNECTE12
INFREQllENTL~
1.Frl[it and vegetable crispers
2 Detachable, slide-out meat p;in
3. Three adjustable cantilever shelves
4S 13utterstorage compartment
5. Storage compartment for small items
6. Bottle storage shelf
7. Tallbottle storage shelf
8. Freezer door package shelf
9. Ice storage bucket
10.Temperature controls (both fresh
food and freezer)
11.Power saver switch
12.Rollers (located behind grille)
13.Defrost water pan (behind grille)
14.Model and serial number-record these
numbers here for future reference.
Model# Serial#
Do not remove rating plate.
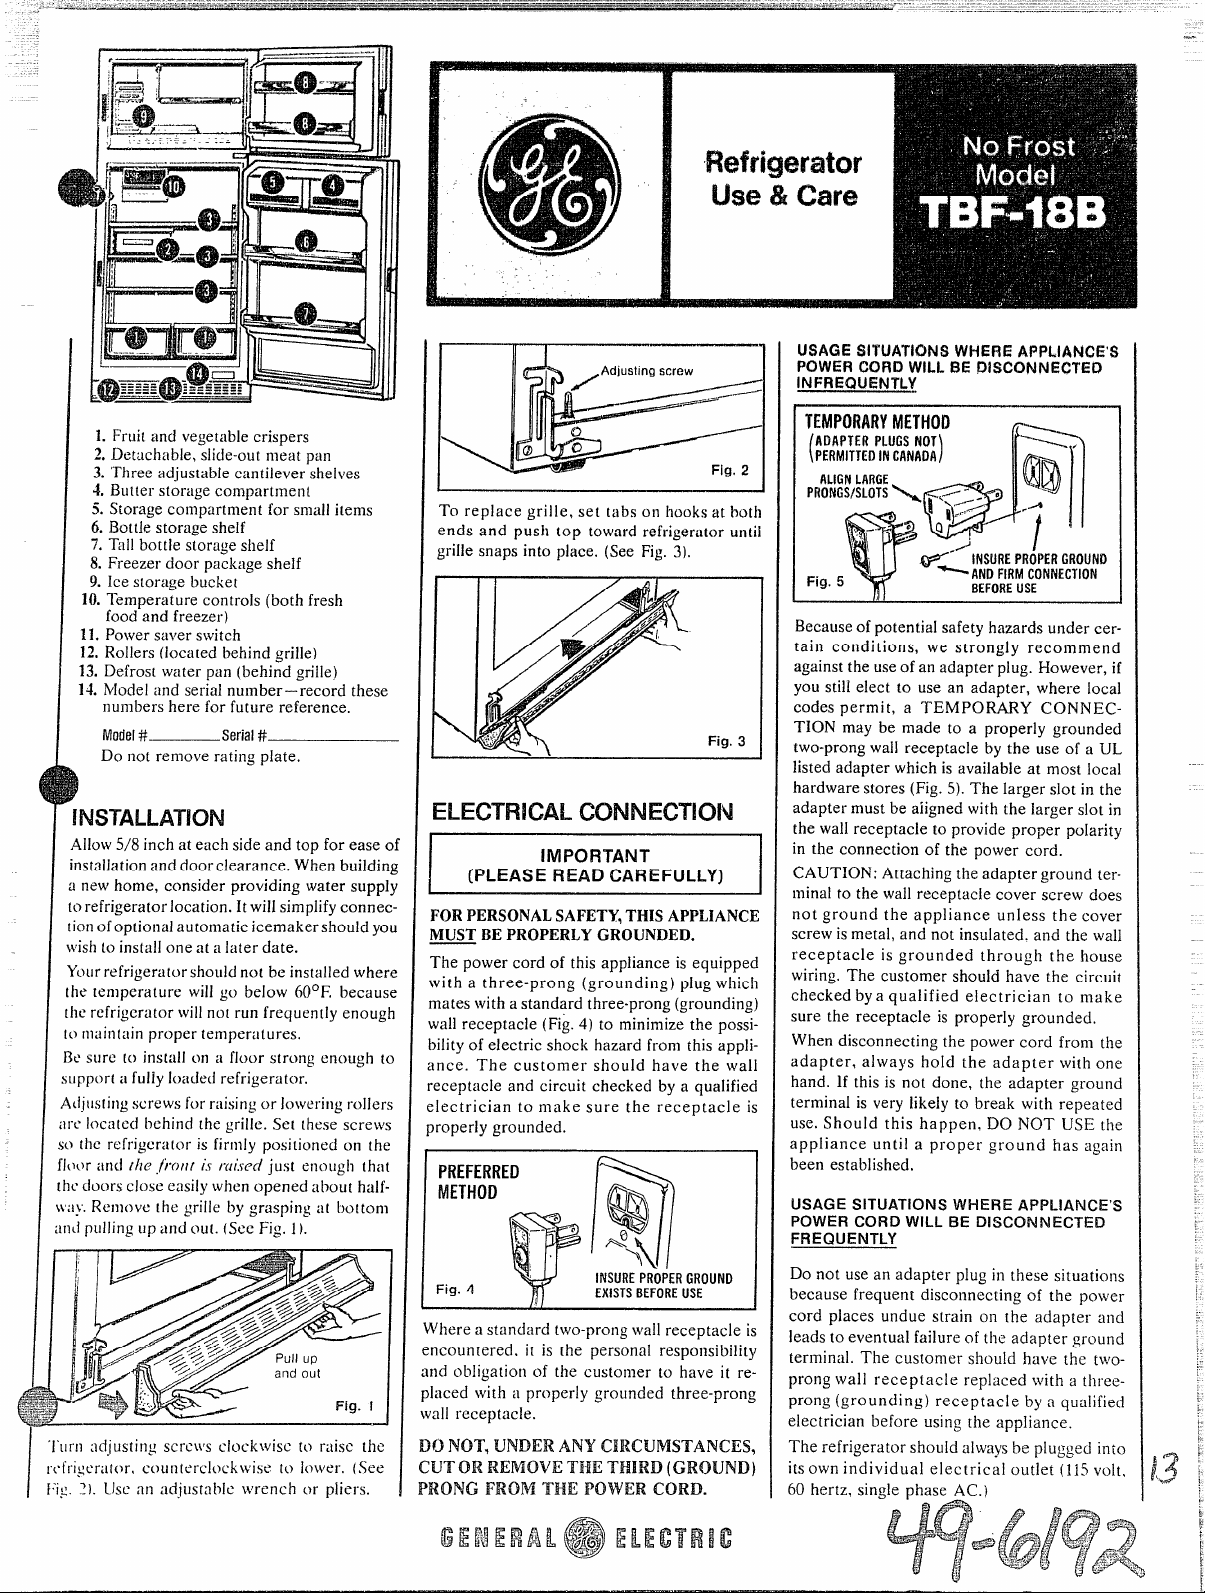
Allow5/8 inch at each side and top for ease of
installationand doorclearance. When building
a newhome, consider providing water supply
torefrigerator location. It willsimplifyconnectionofoptionalautomatic icemaker shouldyou
wishto install one at a later date.
Yourrefrigerator-should not be ins[alled where
[he temperature will go below 60°F. because
the refrigerator willnot run frequently enough
to main(ain proper temperatures.
Be sure (o install on a floor strong enough to
suppor( a fullyloaded refrigerator,
A~ijus[ingscrews for raising or loweringrollers
arc loca[ccibchinclthe grille. Set these screws
so the mfrigcrator is firmly positioned on the
ficl(~rand //Ic jkolr[
is raised just enollgh that
the doors close easily when opened about half-
w;i~”.Remove the grille by grasping a[ bottom
;Ind
PLIIIi tl~ Up il lld OU(. f See ~-i$ 1).
—
—
‘urnad~usting screws ciockwisc to raise [he
‘t’ri:eraior-,cc~Lltl[ercll>ck\\’iseto iower. (See
,,, ~) Ljs~:In XijUst:]biCwrench or
.-. - .
pii CI-S.
ADAPTERPLUGSNOT
PERMITTEDINCANADA
(
)
ALIGN1.8RGE
To replace grille, set tabs on hooks at bo
ends and push top toward refrigerator
u
grille snaps into place, (See Fig.3).
Fig.5
BEFOREUSE
Becauseof potential safety hazards under certain conditions, we strongly recommend
against the use of an adapter plug. However, if
you still elect to use an adapter, where local
codes permit, a TEMPORARY COPINECTION may be made to a properly grounded
two-prongwall receptacle by the use of a UL
listed adapter which is available at most local
hardware stores (Fig. 5). The larger slot in the
E
IMPORTANT
(PLEASE READ CAREFULLY)
FORPERSONALSAFETY,THISAPPLIANC
MUSTBE PROPERLYGROUNDED.
rhe power cord of this appliance is equippe
,vith a three-prong (grounding) plug whic
nates with a standard three-prong (groundinf
vail receptacle (Fi~.4) to minimize the poss
]ilityof electric shock hazard from this appl
ance. The customer shouId have the wa
receptacle and circuit checked by a qualifie
electrician to make sure the receptacle i
properly grounded.
adapter must be aiigned with the larger slot in
the wall receptacle to provide proper polarity
in the connection of the power cord.
CAUTION: Attaching the adapter ground ter-
minal to the wallreceptacle cover screw does
not ground the appliance unless the cover
screw is metal, and not insulated. and the wall
receptacle is grounded through the house
wiring. The customer should have the circuit
checked bya qualified electrician to make
sure the receptacle is properly grounded.
When disconnecting the power cord from the
adapter, always hold the adapter with one
hand. lf this is not done, the adapter ground
terminal is very likely to break with repeated
use. Should this happen. DO NOT USE the
appliance unti1a proper ground has ogain
PR
M
F 4
a
9
%
Q
+
D
INSUREPROPERGROUND
E B U
where ~standard two-prong wa]lreceptacle i
encountered, it is the personal responsibility
-lnd obligation of the customer [o have it r-e
placed with a properly grounded three-pron,
wall receptacle.
J
been established,
USAGE SITUATIONS WHERE APPL!ANCE’S
POWER CORD WILL BE DISCONNECTED
FREQUENTLY
Do not use an adapter plug in these situations
because frequent disconnecting of the power
cord places undue strain on the adapter and
leads to eventual failure of the adapter ground
terminal. The customer should have the twoprong wall receptacle replaced with a threeprong (grounding) receptacle by a qualified
electrician before using the appliance.
The refrigerator should alwaysbe plugged into
its own indi vidua] electrical outlet (1ISvolt,
60 hertz, single phase AC.)
.-
3“CCINTRCXS
——.—.—.-
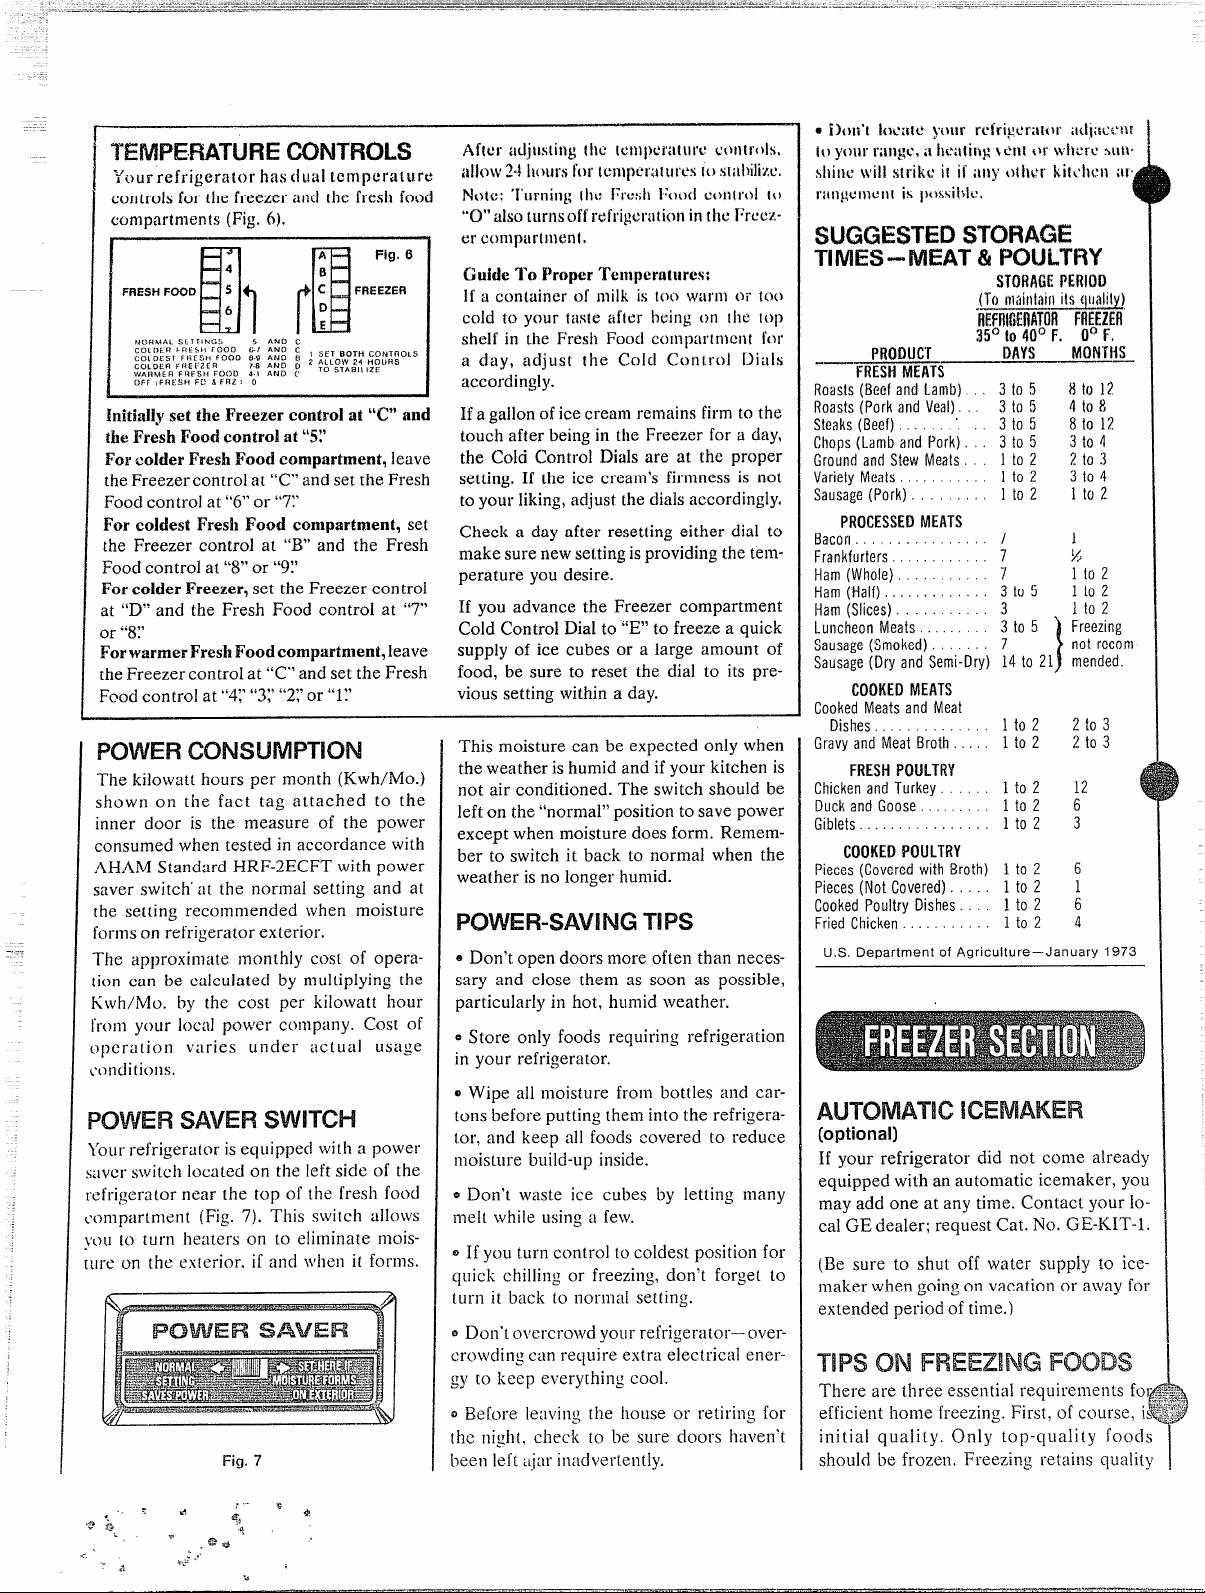
YOu rrefrigerator has (iua I tc mpcra1ure
controls for the freezer and the fresh food
compartments (Fig. 6),
ANO (’
A Fig.6
B
c
FREEZER
D
E
TO STABI1 IZF
4
FRESH FOOD 5
N[)HMAL S! 1 TINGS 5 AND C
COLDER GRESbI rooo
COL OCS1 F-E SIN FOOD 8.9 ANO H
CC)LD1. R F (4Et2E R
WAf7ME FI F RF S}+ FOOD 4.1
ofr I Ffi ESH Fi! 6
6
li(
c“’ ‘No c 1 SET BOTH CONT fiOLS
,.~ AND ~ 2 AL LoW 24 HC)LIFIS
FR2 I o
Initiallyset the Freezer control at W“ and
theFresh Food control at “5U
Forcolder FreshFood compartment, leave
the Freezer control at “C” and set the Fresh
Food control at “6” or “7Y
For coldest Fresh Food compartment, set
the Freezer control at “B” and the Fresh
Food control at ‘L8°or “9:’
Forcolder Freezer, set the Freezer control
a[ “I)” and the Fresh Food control at “7”
or “87
l?orwarrnerFreshFood compartment, leave
[he Freezer control at “C” and set the Fresh
Food control at “41’“3;’“2;’or “l:’
PCWVER
The kilowatt hours per month (Kwh/lvlo.)
shown on the fact tag attached to the
inner door is the measure of the power
consumed when tested in accordance with
AHAM Standard HRF-2ECFT with power
saver switch” at the normal setting and at
the setting recommended when moisture
forms on refrigerator exterior.
The approximate monthly COS[o~ operation can be calculated by multiplying the
Kwh/Mo. by the cost per kilowatt hour
from your local power company. Cost of
opc rati o n Y’aries uncier act ual usage
~’onditionso
Pcwvm SAVER Svwrra-t!
}’our refrigerator is equipped with a power
silver switch located on the left side of the
refrigerator near the top of the fresh food
compartment (Fig. 7). This switch allows
Lou 10 turn heaters on to eliminate mois-
urc on the ex[erior. if and when it forms.
-
F 7
Afwr adjwing [k
d low 24 lKW1’S
Im19mturL! c(mtr(ds,
ft}l’Iclllpcl”:ttUI’cs[0 s[itllili%c.
Note: ‘1’urning[hc Frc:;h I:ood c(mtrtd [t)
“O” also turns off refri~cra[ion inthc Freez-
er cornp; irlmenl.
Chide To Proper‘1’emperatnrcs:
If a container of milk is (OO
wi]tsm or too
cold to your tasle afler being on the lop
shelf in the Fresh Foocl colnpartrncnt for
a day, adjust the COICIControl Dials
accordingly.
If a gallon of ice cream renmins firm to the
touch after being in the Freezer for a day,
the Cold Control Dials are at the proper
setting. If the ice cream’s firmness is not
to your liking, adjust the dials accordingly.
Check a day after resetting either dial to
make sure new setting is providing the temperature you desire.
If you advance the Freezer compartment
Cold Control Dial to “E” to freeze a quick
supply of ice cubes or a large amount of
food, be sure to reset the dial to its previous setting within a day.
This moisture can be expected only when
the weather is humid and if your kitchen is
not air conditioned. The switch should be
left on the “normal” position to save power
except when moisture does form. Remember to switch it back to normal when the
weather is no longer humid.
TIPS
s Don’t open doors more often than necessary and close them as soon as possible,
particularly in hot, humid weather.
~ Store only foods requiring refrigeration
in your refrigerator.
~ Wipe all moisture from bottles and cartons before putting them into the refrigerator, and keep all foods covered to reduce
moisture build-up inside.
~ Don’t waste ice cubes by letting many
melt while using a few.
~ If you turn control to coldest position for
quick chilling or freezing, don’t forget to
turn it back to normal setting.
~ Don’t overcrowd yoLlrrefrigerator-overcrowd ng can require extra electrical energy to keep everything cool.
~ Before leaving the house or retirin: for
the night, check to be sure doors haven’t
L>ee{lleft ~Ljarinadvertently.
jTo mainfain its qimh~)
35° 1040QF. 0(>
P
‘ M
Roasts (Beef and Lamb)
Roasts (Pork and Veal). 3 to 5
Steaks (Beef) . ‘ 3 to 5
Chops (Lamb and Pork). . 3 to 5
Ground and Stew Meats 1 to 2
Variety Meats . . . . . . . . . . 1 to 2
Sausage(Pork) . . , 1 to 2
P M
Bacon . . . . . . . . . . . . . 7
Frankfurters . . . . 7
Ham (Whole). . 7
Ham (Half). . . ~ . . . . . . . . . 3 to 5
Ham (Slices) . . . . . . . . 3
Luncheon Meats . . . . . 3 to 5
Sausage(Smoked). ~. . . . . 7
Sausage(Dry and Semi-Dry) 14 to 21 mended.
C M
Cooked Meats and Meat
1
Dishes. . . . . . . . . . . . . . 1 to 2
Gravy and Meat Broth . . . . . 1 to 2
F P
Chicken and Turkey. . 1 to 2 12
Duck and Goose. . . . . . . . 1 to 2 6
Giblets. . . . . . . . . . . . . . 1 to 2 3
C P
Pieces (Covered with Broth) 1 to 2 6
Pieces (Not Covered). . . . 1 to 2
Cooked Poultry Dishes. 1 to 2
Fried Chicken ~. .. . . . . . . 1 to 2 4
U.S. Department of Agriculture–January 1S73
D M
3 to 5
fllFfZEfl
Hto 12’
4 to 8
8 to 12
3 to 4
2 to 3
3 to 4
1 to 2
1
v)
1 to 2
1 to 2
1 to 2
Freezing
not recoin -
}
2 to 3
2 to 3
k
(optional)
If your refrigerator did not come alread
equipped with an automatic icernaker, yo
may add one at any time. Contact your lC
cal GE dealer; request Cat. No. GE-KIT-!
(Be sure to shut off water suppiy to ict
maker when going on vacation or away fc
extended period of time. )
T ON
There are three essential requirements fo
efficient home freezing. First, of course, i
initial quality. Only top-quality foocl
should be frozen, Freezing retains qualit
F
.
I
w
 Loading...