

GE TBF16V Use and Care Manual
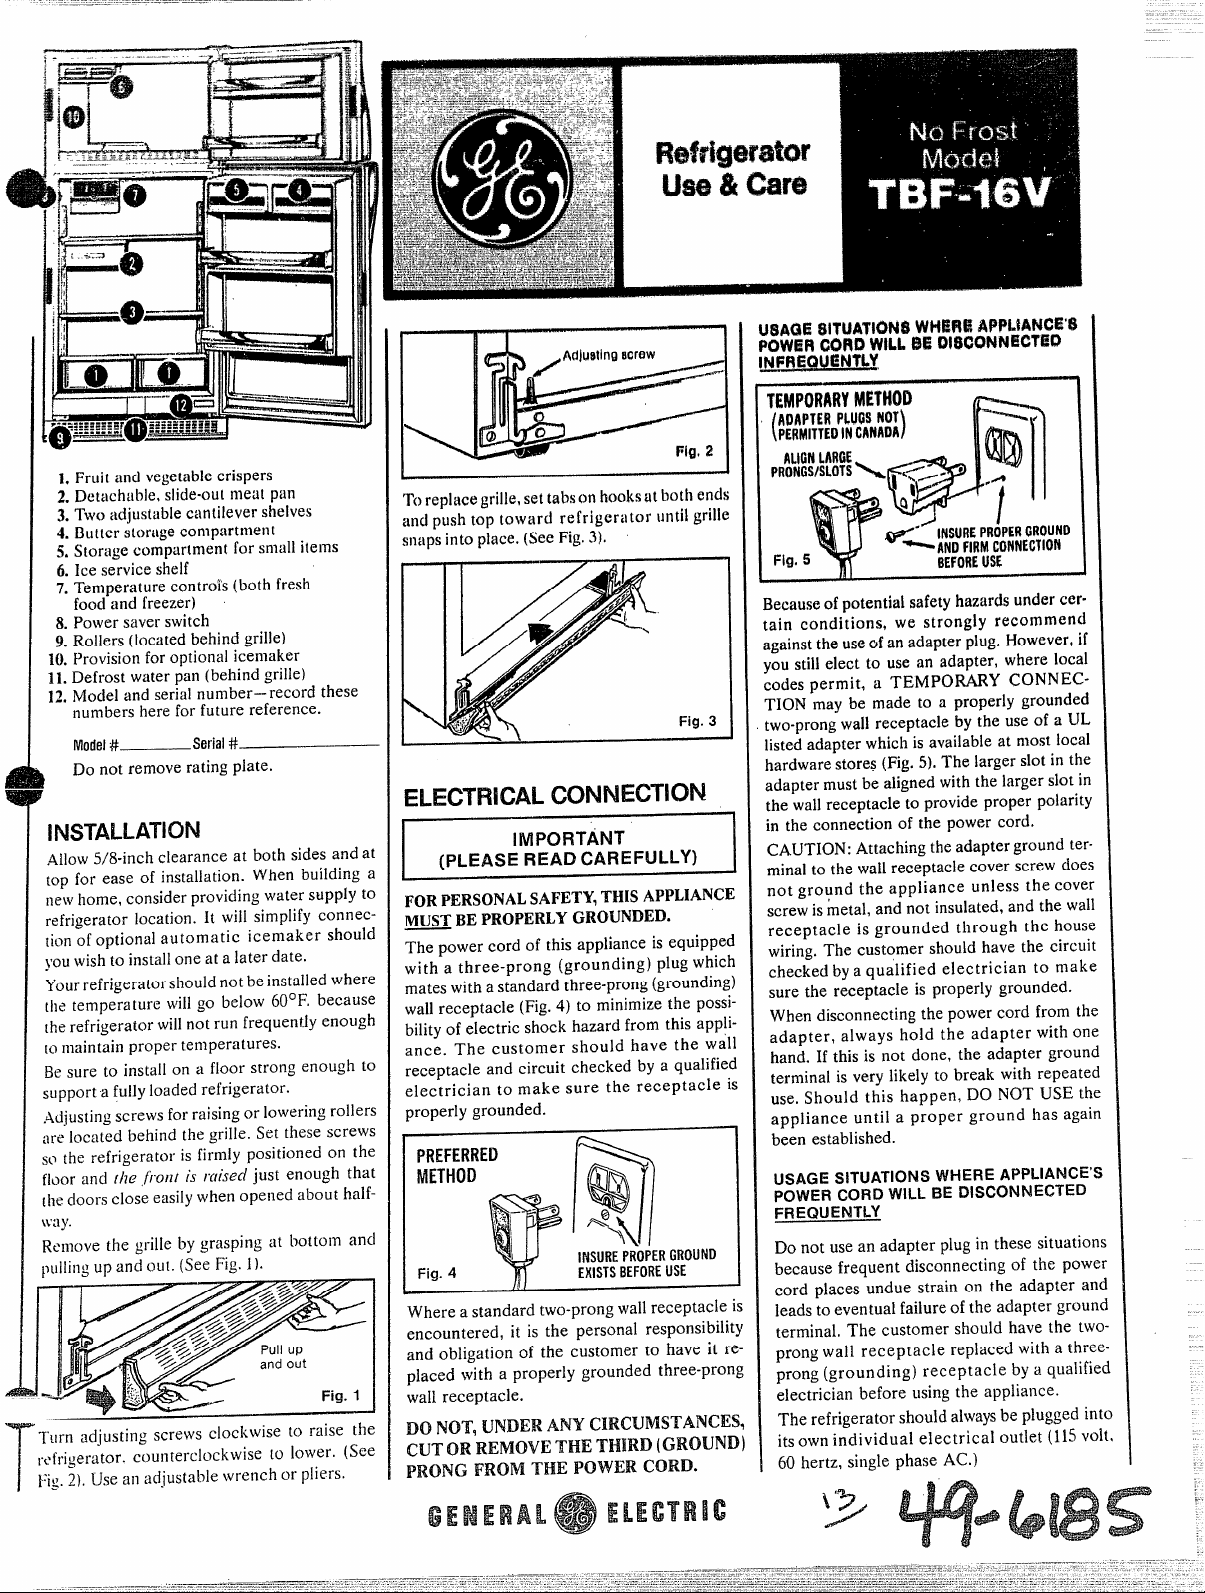
1 Fruitandvegetablecrispers
2.Detachable,slide-outmeatpan
3.TWOadjustablecantilevershelves
4.Butterstoragecon~partment
5.Storagecompwlrnent
for small items
6.Iceservice shelf
7. Temperature contro!s (both fresh
food and freezer)
8. Power saver switch
9. Rollers (located behind grille)
10.Provision for optional icemaker
11.Defrost water pan (behind grille)
12. Mo~ieland serial number–record these
numbers here for future reference.
Model#
Do not remove rating plate.
I
Serial#
H’WTALl-A~~~~
.4ilow5/8-inch clearance at both sides and at
top for ease of installation. When building a
newhome, consider providing water .SupplYto
refrigerator location.
tion of optional automatic icemaker should
!’OUwishto installone at a later date.
Yourrefrigerator shouldnot beinstalled where
the temperature will go below 60°F. because
the refrigerator willnot run frequently enough
to maintain proper temperatures.
Besure to install on a floor strong enough to
support a fully loaded refrigerator.
Adjustingscrews for raisingor lowering rollers
are located behind the grille. Set these screws
so the refrigerator is firmly positioned on the
floor and rhe jiont is raised just enough that
[hedoors close easily when opened about halfi\’ay.
Remove the grille by grasping at bottom and
IJullingup and OUI.
‘1’urnadjusting screws clockwise to raise the
refrigerator. counterclockwise [o lower. (See
Fig.2). Use an adjustable wrench or pliers.
T
it wiil simplify connec-
(SeeFig.1).
Toreplace grille, set tabson hooksat both ends
and push top toward refrigerator untilgrille
snaps into place. (See Fig.3).
ELECTFWN-CONNECTION
I IMPORTANT I
I (PLEASE REA~cAREF~LLy) I
\
FOR PERSONALSAFETY,THISAPPLIANCE
MUSTBE PROPERLYGROUNDED.
The power cord of this appliance is equipped
with a three-prong (grounding) plugwhich
mates with a standard three-prong (grounding)
wall receptacle (Fig.4) to minimize the possibility of electric shock hazard from this appliance. The customer should have the wall
receptacle and circuit checked by a qualified
electrician to make sure the receptacle is
properly grounded.
wWFHUMD
METHOD
Fig. 4
Where a standard two-prong wall receptacle is
encountered, it is the personal responsibility:
and obligation of the customer to have it re
placed with a properly grounded three-pronl
wall receptacle.
DON(YT,UNDERMW CHWUMS~A~~fi~
CUTORREMOVE
/!1/
PRONGFROM
Q
9
%
Q
r!
‘>\
INSUREPROPERGROUND
EXISTSBEFORE
USE
THETHIRD(GROIJND
THE POWER CORD.
TEMPORARYMfiTliOD
ADAPTER PLUGSNOT
PERMITTEDINCANADA)
(
III
lecause of potential safety hazards under cer-
ain conditions, we strongly recommend
,gainstthe useof an adapter plug. However, if
~oustill elect to use an adapter, where local
:odes permit, a TEMPORARY Connection may be made to a properly grounded
we-prongwall receptacle by the use of a LJL
isted adapter which is available at most local
lardware stores (Fig. 5). The larger slot in the
idapter must be aligned with the larger slot in
.hewallreceptacle to provide proper polarity
n the connection of the power cord.
CAUTION:Attaching the adapter ground ter-
u
minalto the wall receptacle cover screw does
not ground the appliance unless the cover
screwis metal, and not insulated, and the wall
receptacle is grounded through the house
wiring. The customer should have the circuit
checked by a qualified electrician to make
sure the receptacle is properly grounded.
When disconnecting the power cord from the
adapter, always hold the adapter with one
hand. If this is not done, the adapter ground
terminal is very likely to break with repeatec
use. Should this happen, DO NOT USE tht
appliance until a proper ground has agair
been established.
USAGE SITUATIONS WHERE APPLIANCE’S
PCMEF?CORD WILL BE DISCONN=T~D
w4EQUHWTLY
Do not use an adapter plug in these situations
because frequent disconnecting of the power
!
cord places undue strain on the adapter and
leads to eventual failure of the adapter ground
terminal. The customer should have the twoprong wall receptacle replaced with a threeprong (grounding) receptacle by a qualified
electrician before using the appliance.
The refrigerator should alwaysbe plugged into
its ownindividual electrical outlet (115volt.
60 hertz, single phase AC.)
.—-
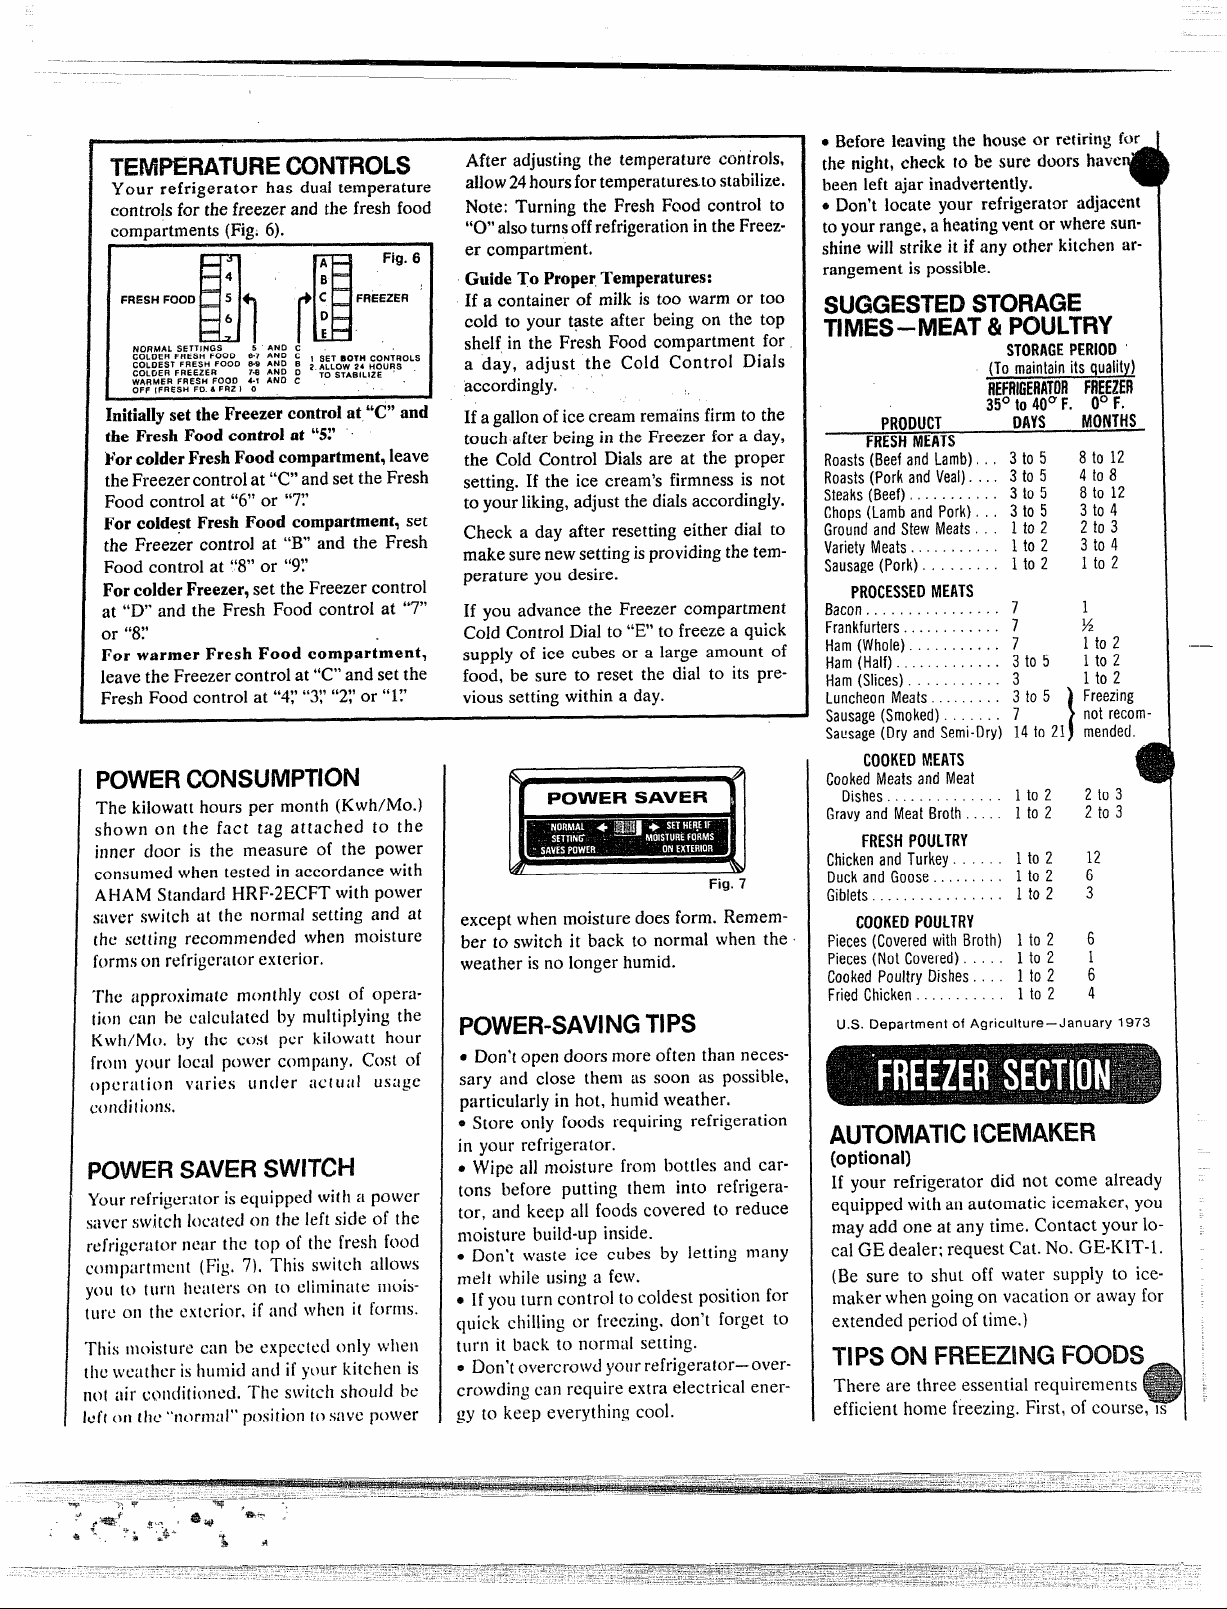
EMPERATLW3E CONTROLS
Your refrigerator has dual temperature
:ontrolsfor the freezerand the freshfood
:omoartments(Fig.6).
m FE!“’”’:
‘R’s”’”o”t=mI’lv$
NORMAL SETTINGS
COLDER FRESH FOOO
COLDEST FRESH FOOO ;: ::; : 2 ALLOW 24 HOIJRS
COLOER FREEZER
WARMER FRESH FOOD 4-1 AND C
OFF [FRESH FO & FRZ ) O
initiallyset the Freezer control at “C” and
]e Fresh Food control at “51’
or colder FreshFood compartment,
ml
! m
,AND
*7 AND c ~ SET BOTH cONTROLS
FREEZER
TO STASILIZE
leave
leFreezercontrolat “C”andset the Fresh
ood control at “6”or “7?
or coidest Fresh Food compartment, set
le Freezer control at “B”’and the Fresh
oodcontrol at “8”or “9?
)rcolder Freezer, set the Freezercontrol
“D’”and the Fresh Food control at “7”
6L99
8.
)r warmer Fresh Food compartment,
ive
the Freezercontrol at “C”and set the
FreshFood control at “4J’“3:’“2;’or “l:’
POWERCONSUMPTION
The kilowatthours per month (Kwh/Mo.)
shown on the fact tag attached to [he
inner cloor is the measure of the power
consumedwhen tested in accordance with
AHAMStandard HRF-2ECFTwith power
saver switch at the normal setting and at
[he setting recommended when moisture
formson refrigeratorexterior.
‘f’hcapproximate monthly cost of opera-
tion can be calculated by multiplyingthe
Kwh/Mo. by the cost pm kilowatt hour
from your local power cornpany$
(Jpcra[ion varies urider act ua
costof
usage
ct)ndilions.
POWERSAVERSWITCHI
Yourrefrigerator is equipped with:
mvcr swit;h located on the left sicje of the
wfrigcrtitor near the top of the fresh food
This switch allows
:on~partrncnt(Fig.
{ou to turn
7),
heaters cmto eliminate inois-
ure on the exterior, if an~iwhen i[ forms.
Hlis moisture can be expected only w’hen
hcweather ishumid and if j’uurkitchen is
lot air conditioned. The switch shoulcj be
Jf(on the “normal” position tosave power
power
After adjusting the temperature controls,
allow24hoursfortemperatures.tostabilize.
Note: Turning the Fresh Food control to
“O”alsoturnsoff refrigerationin the Freezer compartment.
Guide To Proper,Temperatures:
If a container of milk is too warm or too
cold to your taste after being on the top
shelf,in the Fresh Food compartment for
a day, adjust the Cold Control Dials
accordingly.
‘,
If a gallonoficecream remainsfirm to the
touch after beingin the Freezer for a
day,
the Cold Control Dialsare at the proper
setting. If the ice cream’sfirmness is not
to yourliking,adjust the dials accordingly.
Check a day after resetting either dial to
makesurenewsettingisprovidingthetemperature you desire.
If you advance the Freezer compartment
Cold Control Dial to
“E” to freeze a quick
supply of ice cubes or a large amount of
food, be sure to reset the dial to its previoussetting withina day.
I ~ POWER SAVER !i I
Fig 7
except whenmoisturedoes form. Remember to switch it back
to normal when the
weather is no longer humid.
POWER-SAVINGTIPS
. Don’topen doors moreoften than necessary and close them as soon as possible,
particularly in hot, humidweather.
* Store only foods requiring refrigeration
in your refrigerator.
● Wipe all moisture from bottles and car-
tons before putting them into refl”igerator, and keep all foodscovered to reduce
moisture build-up inside.
e Don’t waste ice cubes by let[ing many
melt while using a few.
~ Ifyou iurncontrol tocoldest position for
c~uickchijlillg or fr~ezing.don’t forget to
turn it back to normal setting.
Don’t overcrwwcl your refrigerator-over-
*
crowdingcan require extra electrical energy to keep everything cool.
● Beforeleavingthe house or retirin$ for
the night, cheek fo be sure doors ha~.e
been left ajar inadvertently.
oDon’tlocate your refrigerator adjacent
toyourrange,a heatingvent or wheresunshinewillstrike it if any other kitchen arrangementis possible.
SUGGESTEDSTORAGE
TIMES–MEAT &POULTRY
STORAGE PERIOD ‘
(To maintain its quality)
I
to 2 6
FREEZER
0° F.
MONTHS
8 to 12
4 to 8
8 to 12
3 to 4
2 to 3
3 to 4
to 2
1
1
%
1 to 2
1 to 2
1 to 2
Freezing
not recom-
2 to 3
2 to 3
:
RWIIGERATOR
35°to40°F.
PRODUCT
FRESH MEATS
Roasts (Beef and Lamb). . . 3 to 5
Roasts (Pork and Veal). . . . 3 to 5
Steaks (Beef) ~. . . . . . . . . . 3 to 5
Chops (Lamb and Pork) . . . 3 to 5
Ground and Stew Meats. . . 1 to 2
Variety Meats. . . . . . . . . . . 1 to 2
Sausage (Pork). . . . . . . . . 1
PROCESSED MEATS
Bacon. . . . . . . . . . . . . . . . 7
Frankfurters. . .. . . . . . . . . 7
Ham (Whole). . . . . . . . . . . 7
Ham (Half). . . . . . . . . . . . . 3 to 5
Ham (Slices). . . . . . . . . . . 3
Luncheon Meats . . . . . . . . . 3 to 5
Sausage (Smoked). . . . . . . 7
Sausage(Dry and Semi-Dry) 14 to 21 mended.
COOKED MEATS
Cooked Meats and Meat
Dishes. . . . . . . . . . . . . . 1 to 2
Gravy and Meal Broth . . . . . 1 to 2
FRESH POULTRY
Chicken and Turkey. . . . . . 1 to 2 :2
Duck and Goose. . . . . . . . . 1 to 2
Giblets. . . . . . . . . . . . . . . . 1 to 2 3
COOKED POULTRY
Pieces (Covered with Broth) 1
Pieces (Not Covered). . . . . 1 to 2
Cooked Poultry Dishes. 1 to 2
Fried Chicken. . . . . . . . . . . 1 to 2 4
U.S. Department of Agriculture–January 1973
DAYS
to 2
AUTOMATICKXMAKER
(optional)
If your refrigerator did not come already
equippedwithan automatic icemaker, you
mayadd one at any time. Contact your local GE dealer; request Cat. No. GE-KIT-1.
(Be sure to shut off water supply to ice-
makerwhengoingon vacation or away for
extended periodof time.)
TIPS ON FREEZING FOODS
There are three essential requirements
efficient home freezing. First, of course, 1s
.——
 Loading...