

Page 1

r %“’= ‘-’*V
?!
--1
i. Fruit and vegetable crispers
2. Egg storage bin
3, Detachable, slide-out meat pan
4. Two adjustable cantilever shelves
5. Butter storage compartment
6. Storage compartment for a variety
of smallitems
7. Bottle and jar storage shelf
8. Tall bottle storage shelf
9. Freezer door package shelf
10.Ice service shelf
11.Temperature controls (both fresh
food and freezer)
12.Powersaver switch
13.Rollers (located behind grille)
14.Defrost water pan (behind grille)
15.iModeland serial number-record these
numbers here for future reference.
Model#
Do not remove rating plate.
1!
Serial#
INSTALLATION
Wow 4 inches over top of refrigerator for ai
circulation and 5/&inch at both sides for eas
of installation. When building a new home
consider providingwatersupply to refrigerate
location. It willsimplifyconnection of optional
automatic icemaker should you wish to install
one at a later date.
Yourrefrigerator should not be installed where
tfle temperature willgo below 600F, because
the refrigerator willnot run frequently enough
to maintain proper temperatures.
Be sure to install on a floor strong enough to
support a fullyJoadecirefrigerator,
Adjustingscrews for raising or lowering rollers
arc Iocated behind the grille. Set [hese screws
so [he refrigerator is firmly positioned on the
floorand the
the doors close easily when opened about half-
wa~,Rcmove the grille by grasping a[ bottom
and pulling up and out. (See Fig.1).
Turn adjusting screws clockwise to raise the
refrigerator. counterclockwise to ]ower. (See
Fig.2). Use an adjustable wrench or pliers,
j)-otltisraisedjust enough that
,“
I
To replace grille, set tabs on hooksat both
ends and push top toward refrigerator until
~ri]le snaps into place. (See Fig. 3).
—
13ECTRICALCONNECTION
IMIWRTANJT
(PLEASE READ CAREFULLY)
FORPERSONALSAFETY,THISAPPLIANCE
VNJSTBEPROPERLYGROUNDED.
rhe power cord of this appliance is equipped
vith a th ree-prong (ground ing) plug which
nates witha standard three-prong (grounding)
vailreceptacle (Fig.4) to minimize the possi~ilityof electric shock hazard from this appli-
nce. The customer should have the wall
eceptacle and circuit checked by a qualified
Iectrician to make sure the receptacle is
roperly grounded.
PREFERRED
METHOD
x– : .
\.:
Ii/JjJn
Fig. 4
/here a s[andurd two-prongwallreceptacle is
lcountered, it is the personal responsibility
ld obligation of the customer to have it re-
aced with a properly grounded three-prong
al] rect?ptacle.
ONOT’, lJNDER ANY CIRCUMSTANCES,
LJTOR
?ONG FROM
1
~~~V~~~~ THR THIRD (GROUND)
TIIE POWER CORD.
Q
%
Q
‘h\
INSUREPROPERGROUND
EXISTSBEFOREUSE
‘-l1 *“
r
Use& Care
“-1
I
I
9’
I
USAGE$ITUATIONS WHERE APPLIANCE’S
POWERCORD WILL
INFREQUENTLY
.—
T13vlPORNlYiWTHOD
JWAPTERPLUGSNOT’
PERMITTEDINCANADA
(
ALIGNLARGE
Fig. 5
Becauseof potential safety hazards under certain conditions, we strongly recommend
against the use of an adapter piug, However, if
you still elect to use an adapter, where local
codes permit, a TEMPOR&Y CONNECTION may be made to a properly grounded
two-prongwall receptacle by the use of a UL
listed adapter which is available at most local
hardware stores (Fig.5), The larger slot in the
adapter must be aligrledwith :he larger slot in
the wall receptacle to provide proper polarity
in the connection of the power cord.
CAUTION: Attaching the adapter ground terminal to the wall receptacle cover screw does
not ground the appliance unless the cover
screw ismetal, and not insuiated, and the wall
receptacle is grounded through the house
wiring. The customer should have the circuit
checked bya qualified electrician to make
sure the receptacle is properly grounded.
When disconnecting the power cord from the
adapter, always hold the adapter with one
hand, If this is not done, the adapter ground
terminal is very likely to break with repeated
use. Shoulcl this happen, DO NOT USE the
appliance un(i1a proper ground has again
been established.
USAGE SITUATIONS WHERE APPLIANCE’S
POWER CORD WILL BE DISCONNECTED
FREQUENTLY
Do not use an adapter plug in these situations
because frequent disconnecting of the power
cord places undue strain on the adapter and
leads to eventual failure of the adapter ground
terminal. The customer should have the two-
prong wall receptacle replaced wi[h a threeprong (grounding) receptacle by a qualified
electrician before using the appliance.
The refrigerator should alwaysbe plugged into
its own individual electric al outlet (115volt.
(XJhertz, single phase AC.)
BE IXSCONNECTEO
J
BEFOREUSE
GENERAL@
Page 2
—
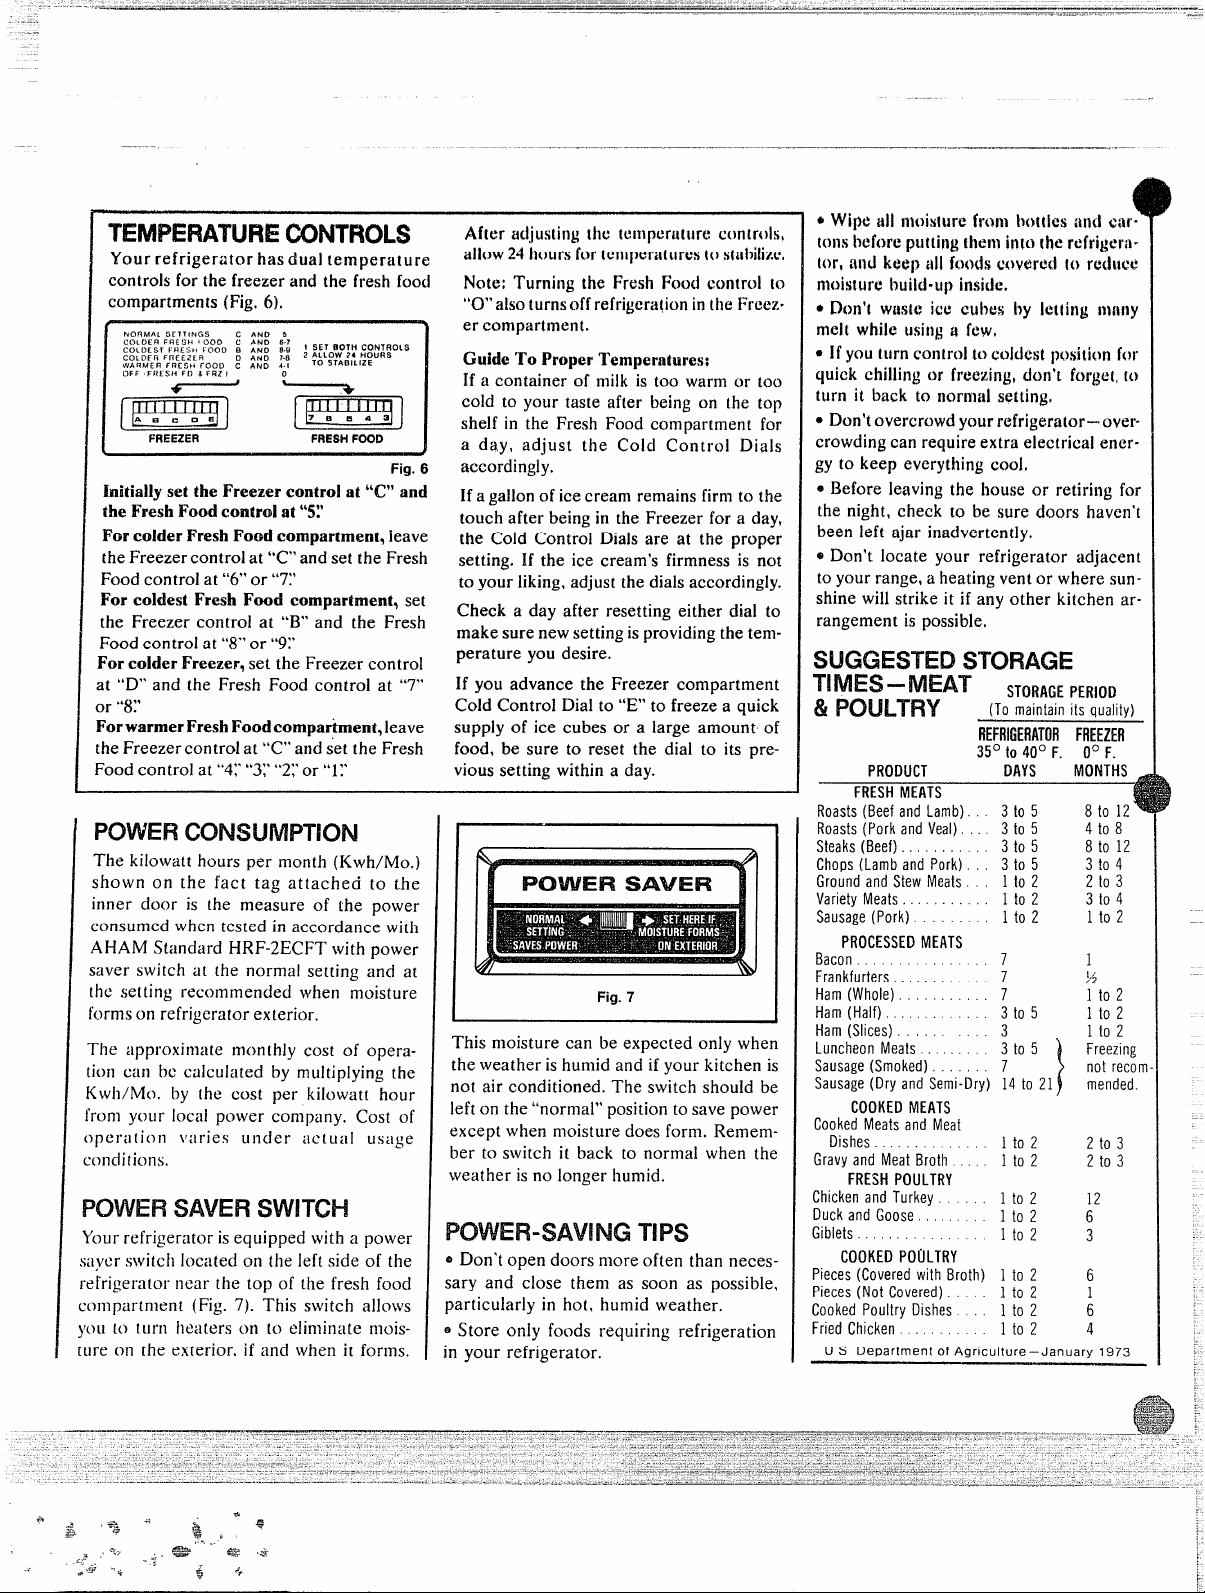
T’EWIPERA’TURE CONTROLS
Your refrigerator has dual temperature
controls for the freezer and the fresh food
compartments (Fig. 6].
FREEZER FRESHFOOD
(
Initially set the Freezer control at “C”and
the Fresh Food control at “5!’
Forcolder FreshFood compartment, leave
the Freezer control at “C” and set the Fresh
Food controi at “6” or “71’
For coldest Fresh Food compartment, set
the Freezer control at “B*’and the Fresh
Food control at “8” or “9:’
Forcolder Freezer, set the Freezer control
at “D” and the Fresh Food control at “7”
or
“8;’
ForwarmerFreshFoodcornparkent, leave
the Freezer control at “C” and set the Fresh
Food control at “4;’“3;’“2;’or”1 V
POWER CONSUMPTION
The kilowatt hours per month (Kwh/Mo.)
show n o n the fact tag at (ac heci to the
inner door is the measure of the power
consumed when tested in accordance with
AHAM Standard Hl?F-2ECFT with power
saver switch at the normal setting and at
the setting recommended when moisture
forms on refrigerator exterior.
The approximate monthly cost of opera-
tion can bc calculated by multiplying the
Kwh/Mo. by the cost per kilowatt hour
from your local
opc r;]tio n f’aries under ac [ual usage
conclitions.
Your refrigerator is equipped with a power
;aycr switcfl located on the left side of the
refrigerator near the top of the fresh food
compartment (Fig. 7). This switch allows
y(lu m turn heaters on to eliminate nloisture on the exterior. if and when it forms.
power company. Cost of
SAVER SWITCH
adjusting dw ten~pertimw controls,
After
24hours for temperu[urcs (o s{al~ilizc,
allow
Note: Turning the Fresh FcIodcontrol to
“O” also turns off refrigemlion in (he Frcez.
er compartment.
Guide To Proper Temperatures:
If a container of milk is too warm or too
cold to your taste after being on the top
shelf in the Fresh Food compartment for
a day, adjust the Cold Control Di~ls
J
Fig.6
accordingly,
If a gallon of ice cream remains firm to the
touch after being in the Freezer for a day,
the Cold Control Dials are at the proper
setting. If the ice cream’s firmness is not
to your liking, adjust the dials accordingly.
Check a day after resetting either dial to
make sure new setting is providing the tenlperature you desire.
If you advance the Freezer compartment
Cold Control Dial to “E” to freeze a quick
supply of ice cubes or a large amount of
food, be sure to reset the dial to its pre-
vious setting within a day.
Fig.7
This moisture can be expected only when
the weather is humid and if your kitchen is
not air conditioned, The switch should be
left on the “normal” position to save power
except when moisture does form. Remember to switch it back to normal when the
weather is no longer humid.
TIPS
o Don’t open doors more often than necessary and close them as soon as possible,
particularly in hot, humid weather.
*Store only foods requiring refrigeration
n your refrigerator.
● If you (urn control to coldest position for
quick chilling or freezing, don’t forget, to
turn it back to normitl setting,
● Don’t overcrowd your refrigerator— over-
crowding can require extra electrical energy to
keep everything cool,
e Before leaving the house or retiring for
the night, check to be sure doors haven’t
been left ajar inadvertently,
e Don’t locate your refrigerator adjacent
to your range, a heating vent or where sunshine will strike it if any other kitchen arrangement is possible,
SLJGGEiSTED STORAGE
~~~=-~~A~ STORAGEPERIOD
%! POULTRY
PRODUCT DAYS MONTHS ~
FRESH MEATS
Roasts(Beef and Lamb). . 3 to 5 8 to 12
Roasts (Pork and Veal). .. 3 to 5 4 to 8
Steaks (Beef). . . . . . . 3 to 5 8 to 12
Chops (Lamb and Pork). 3 to 5
Ground and Stew Meats. 1 to 2 2 to 3
Variety Meats ... ., 1 to 2
Sausage(Pork) 1 to 2 1 to 2
PROCESSEDMEATS
Bacon
Frankfurters : : : : : 7
Ham (Whole). 7
Ham (Half) . . . . 3 to 5
Ham (Slices) ., ., : : : : 3
Luncheon Meats . . . . . 3 to 5
Sausage(Smoked) 7
Sausage(Dry and Semi-Dry) 14 to 21
COOKEDMEATS
Cooked Meats and Meat
Dishes 1 to 2
Gravy and Meat Broth 1 to 2
FRESH POULTRY
Chicken and Turkey 1 to 2
Duck and Goose .,
Giblets ., .,
COOKEDPOtlLTRY
pieces (Covered with Broth) 1 to z 6
Pieces (Not Covered). 1 to 2
Cooked Poultry Dishes 1 to 2
Fried Chicken . . . 1 to 2
U S Department of Agriculture –January 1973
(To malntalnds quality)
REFillGEflATORFREEZER
35°to 40° F. 0° F.
3 to 4
3 to 4
7
1 to 2
1 to 2
}
1
)’$
1 to 2
1 to 2
1 to 2
Freezing
not recoin
mended.
2 to 3
2 to 3
12
6
3
1
6
4
. .
Page 3

!
.“
,’ ., .,- - ~ .
... ,,. ..
If your refrigera-torappears to have slop~d o&@ng (except during the defrOst be tumd ‘e ‘w ~ti[ion”
cycfewf+ndtemotOrand fanarcnorsrraIly
. shot off c6mpfeteIyfor the Ieng*,of the
-, ~cfe), makedresesimplet~rsbefOrg cali- ‘:- mgforservice: -
MO@re formaoa04stshfe-ofrefrfg~tOr
,Moiatrrrenot usrusuafduringperiods
switchto right
Mnfst&?@feetsirtaide
❑ Too-frequentandton-longdoor
openings
Hot-humidweatherincreasesrate of
frostbuild-upand internalsweating
C8bfriet”fua0d0r
‘Certainfrmdsproduceodor–should
becovered
IJ .lnte~o: needacleaning
Defrost-waterpanneedscleaning
,“
Refrfg&atorrmrstoo long
❑ Modemrefrigeratorsarelarger
andrun colder—requiremore
runningtime
❑ Oonrskeptopen too Iong
Temperaturecomrokset me cold
atrime ofinstaflaiionor after
Norrrraf
refrigeratorhasbeenturnedoff
Refrfgemtornmstoofrequentfy
: ❑ Requiredto provideeven
tem@ature
openings
-
..
,i. Checktemperaturecontrol disd.It may
~l~interior lightisrrot on. check to see if
refrige~torkphruedin ~tbffreceptacle.
3;lfplugissecore ~~ the refrigeratorstill sible troublespots.
!.
,.
Csbksetvibrates
❑ .Rofferscrewsneedadjusting
Checkforweak
Slowke mrbefreesfng
Q Freezerdoor mayhave been leftajar
Freshfoorftemperaturetoo wrmrs
❑ Temperaturecontrolnot set in cold
enoughposition
❑ Too-frequentand tomlongdoor
openings
❑ Packageholdingdooropen
Freshfoodsdryout
Food>should
Freshfsrndtemperaturetoocold
❑ Temperaturecontrol dialsetintoo
coldposition
Nofay
❑ NoiseIevelis slightlyhigheron
modern,larger refrigerators
❑ Fan air flow–-thisis-normal
❑ Defrost-waterpan
position
El Rollerscrewsneed adjusting
El Checkforweak floor
floor
be covered
not in correct
)., . . -.,
faik tcoperate. plug anolh$r appliance into the same outlet to determine if there is
a burned-out fuse.
.
4. Follow check list befow for orher pns-
Refrigeratordoesnot SSS0
❑ ,Temperaturecontrol in OFF position ~
❑ No poweratoutfet
Wateron ffnor
fnterforlightdoesnotlight
❑ No poweratoutlet
❑ Lightbulbneeds replacing
Freezertnowarm
❑ Freezerdoor mayhavebeenleft ajar
❑ Packagemaybe holdingdoor open
Froaton frozenfood
Frozenfendsdryout
❑ Packagesnot wrappedor sealed
in
Notplugged
House fuseblown
Defrost-waterpan full,missing,Or
not in position
Too-frequentand too-longfreezer
dnoropenings
Freezerdoormayhave been Ieftajar
properly
,. - -
Page 4

.,
~;,~..
,.ti. ,-
L-
This guide will help you to get the best use from your new refrigerator, offering ‘,~~-:--
~w:”k”+.,
-,$,.
money,time and energy saving tips. If YOUhave any further questions. contact ‘ ~,!.
-+.,l
the Consumer Coordinator near you whose number is available from your dealer !.:.
~“1!?”<’
,,..,;
——.
FULLONE-YEARWARRANTYGENERALELECTRICREFRIGERATOR
FromGeneralElectrfcto You-This warrantyis extendedby General
Electrictotheoriginalpurchaserandtoanysucceedirrgowneranrfapplies
toproductspurchasedin tbe UnitedStates,retainedwithinLhe48 contiguousStates,the Stateof Hawaii, or the District of Columbia and
employedin ordinaryhomeuse.
WbatWeWiflDo-If yourGeneralElectricRefrigeratorfailsbecauseof
ammrufacturingdefectwithinoneyearfromthedateof originalpurchase,
wewillrepairtheproductwithoutchargetoyou.Porkandservicelabor
areincluded.Servicewill be providedin the homein tbe 48 contiguous
States,in theStateof Hawaii,or intheDistrictof Columbia.
HOWTOObtarfnService-Servicewillbeprovidedbyour localCustomer
Cs emfactorysewiceorgmziztztimrorbyoneofour frmrchisedCustomer
Cureservicersduring normalbusinesshoursafteryounotifyus of the
rreedtorservice.Servicecanbearrangedbytelephone.Lookup’’General
ElectricCustomerCare Service”in theyellowpagesor writeIO[headdressgivenbelow.
NotCovered-This warrantydoesnotcoverthe failureof your
Whatfs
refrigcratorifitisdamagedwhileinyourpossession,usedforcommercial
purposes,orifthe failureiscausedbyunreasonableuseincludinguseon
housewiringnotin conformancewithelectricalcodes,lowpowervoltage,
andfailuretoprovidereasonableandnecessarymaintenance.inno event
shaUGenerrrIElectric beliablcfor consequentialdmmges. This warranty
doesnotapplyto the Stateof Alaska,nor to the VirginIslands,Guam,
AmericanSamoaortheCmralZmreortbeCommonwealthof PuertollicO.
SomeStatesdo not allow the exclusionor limitationof incidental
consequentialdamages,so that the precedinglimitationsor exclusion
maynotapplytoyou. Thiswarrantygivesyouspecificlegalrights,and
youmayalsohaveotherrightawbicbvaryfromstateto state.
or call or write me.Wewould like to hear from you.
.,-
,--
Consumers Institute, General Electric Company e .Appliance Park AP4 -119, Louisville, Ky.402.25 ,- ~-
~er..,.,
.,.....
-z
Sincerely yours,
~ J“” -;
9
Jane Butel, Manager
ADDITIONALFULLFOUR-YEARWARRANTY
ONTHESEALED
REFRIGERATINGSYSTEM
The sealedrefrigeratingsystem(compresser,condenser. evaporator turd
correcting tubing—see diagram)is
coveredin theabovefullwarranty.fn
additiontothatwarrronywewill repair
thissealedsysIemif it failsbeca”seof
amanufacturingdefectwithinthesecondthrougb fifth year after original purchase.Wewillbearthecostof hoth
park andlabor.
All other provisionsmx tbe same as
thosestatedintheabovefullwarranty.
LIMITEDWARRANTY
ApplicabletotheStateofAlaska
hrtheStateofAlask:!,freeserviceincludingpartswillbeprovidedtocorrect
manufacturingdefectsm our nearestserviceshoplocationor in your
home,but we do notcoverthe costof transportationof the product 10
theshopor for the travel costof a technicianto your borne. YOUare
responsiblefortbosecosts.All other provisionsof thislimitedwarranty
arethesameasthosestatedin theabovewarranties.
or
GENERAL 0 ELECTRIC
-- .
.i’s- “
, ,->,
~.\
~
w
REFRlfiEftATINGSWSM
GenemfElectricCompuny,Appliance Pnrk,Louisville,Ky. 40225
COOLMG
COILS
COllDMSIR
cONflccmlG
lUBING
20WRiSS0R
I I
Pub. No. 49-Z1204
If you wish further help or information concerning this warranty, contnct:
Mrsmsger-Customer Relations, General Electric Company
Appliance Park, WCE-Room 316c Louisville,Kentncky 40225
Dw’J.No.464854F’06
Page 5

AUK3MAliCi6EtUlkt3” “
[opffonal)
If your refrigeratordid not come afready
equippcciwithanautomaticicemaker,
add oneat any time. Contactyour lo-
may
caIGE deafer;requestCat-No. GE-KIT-1.
(Besure to shut off water supply to icemakerwhengoingon vacationor awayfor
extendedperiodoftime.)
TIPSONFREEZINGFOODS
Therearetfrreeeszentirdrequirementsfor
efficienthomefreezing.First,ofcourse,is
initial quality. Ordy top-quality foods
shouldbe frozen. Freezingretains quafity
aadffavor;it cmmotimproveqnrdity.Secondiaspeed. The quicker fruits and vegetablesarefrozenafterpicking,the better
thefrozenproductwiflbe.,You’ffsavetime,,
t~, bccaaaeIesscuUingandznrtingwilfbe
neccasary.The tbirdrequirementis proper
packaging.Usefoodwraps designedespeciallyforfreezing;they’rereadilyavailable
itsa wideselectionat your favoritestore.
Limitfreezingoffresh(unfrozen)meatsor
ssafoodzto14pmmds ata,time.
TOFREEZE MEAT,FiSH, POULTFfY
Wrapweflin freezer-weightfoil(orother
heavydutywrappingmateriaf),fnrmingit
carefullytotheshapeof the contents.This
expalssdr.l%ldandcrimpendsof tbepackageto provide a good, lasting seaf.Don’t
refreezemcatthat has completelythawed;
mea~whetherraworcooked,cmrbefrozen
Zucc*”frdfyoafyonce. “.
SUGGESTEDFREEZER
STORAGETIMES
(otherlfntnformeatandpoultry)
Mostfruitrrmdvegetzhles.............8.12 nronlh$
Lesnfish .... . . . ... . . . . . . . .. .......6.8 months
Fa!tyfish,rollsandbreads, -
soups,s!ew,casseroles... . . ... .... ....
Cakes,pies,sandwichas,lert.ove;s(cooked),‘ 1
icscream (onainalcmton) . . . .:. . . . . . . ...maximum
Newtechniques are constantly being developed. Consult
the State College or County Extension Service or your
local Utility Company for the latest information on
fmsdng and storing foods..
. .
?.
J . .
YOU
2-3months
month
“ ICECREAMSTORAGE .
Fine-quafityice cream, ,witfrhigh cream
content,wiffnormaffyrequire slightfylow-
‘
er temparaturaathan m-ore’’’airy”afreadypack~ brandswith’lowc-tiamcontent. It
wiUbe neceswy to experiment to determinethe exactsettingto keep your favoriteice cream at the rigbt serving’tempera:
ture.Afsn,drerearof the freezerissfightfy
colderthanthe front.
ICETRAYS
and twisttrayaat both ends to re-
fnvert
leasecubes(Fig.8).
Forordy 1or 2 cubes, leavethe tray right
side up, twistendsslightfyand pluck out
cubeswithease.
Washtraysin lukewarmwaterordy.Don’t
pIacein automaticdishwasher.
NODEFROSTING
You neverhave to defrost the freezer. It
has been pre-set at the factory to defrost
itself,automatically.
ADJUSTABLESHELVES .
Thismodelhas adjustableshelves.To ad-
Just,removeshelfbytiltingup at front then
liftingupandoutofslotsat rear (Fig.9).
Toreplace,selectdesiredshelfheight,with
..
shelf front raised slightly, engage top lug
on rear shelf with proper notches. then
lower front until shelf locks into position
(Fig.10).
into place-
D13ACHABLEMEATPAN
Detach and reIocate on any shelf to meet
storage, needs. Slide-out pan can be
removedand taken to sink or food preparationarea.
FOODSTORAGE
Meats, Fish and Poultry
Unfrozen
Meats.fishandpoultrypurchasedfromthe
storevaryinquali!yandage: consequendy,
safe stora~e time in your refrigerator wiIl
vary.Alwaysremove store wrapping from
meats,fishand poultry.Rewrapin foil.film
or wax paper and refrigerate irnmedia[ely.
Cheese
Cheeseshouldbe well wrappedwith wax
paper.aluminmrifoil or placed in a plastic
bag. Carefully wrap 10expel air and preventmold.Packagedcheesecan be stored
in its own wrapping.
Vegetables
Vegetabledrawers have heen speciallydesigned to preserve natural moisture and
freshness.Crispnesscan be maintained by
coveringvegetableswitha moist towel. As
a further aid to freshness, it is suggested
that pre-packaged vegetables be slored in
their originalwrapping.
CLEANING
Inside
Clean both refrigerator and freezer sectionsat least once ayear. It is recommended that the refrigerator be unpJugged
befo~ecleaning. if this iinot practical,
wringexcess moisture out of sponge or
cloth when cleaning in the vicinity of
switches,Iigbts,or controls. ‘
Usewarmwaterand baking soda soIution
Page 6

- about a tablespoon of baking soda to a
! -~artofwater.Rirrse*orOu~hlYwith~a~er
~-.
and wipe dry. FO11OWthis same procedure
for efcaning door gaskets, vegetable and
meat pans and aff plastic parts.
Outside
To clean and protect the finish, use liquid
polishorwaxsuitable foruseon appliances.
Never use oily furniture polish, cleaning
powders, or nfkalinesoaPs.
When movirrgrefrigeratOrtalwaysPUOcab-
inet straight out and return to position by
pushingstraight
a side direction can cause damage to floor
coveringbyrollers.
In the refrigeration process, it is normal
that heat be expelledin the mea under the
refrigerator.Somesyntheticfloorcoverings
whicharerelativelynewon the market will
discoloratthesenormalandsafeoperating
temperatures. Yourfloorcoveringsupplier
should be consulted if you object to this
discoloration.
DefrostWaterPan
Panlocatedbehind grilleshouldbecleaned
m least once a year.
NO DEFROSTING
not necesswy to defrost the fresh food
Itis
sectionof your refrigerator; it will defrost
itself automatically.
Ifyoushut off
ed vacations,removefood and clean interiorwithsoda solution using one tablespoon
of soda per eacb quart of water. Wipe dry.
To prevent formation of odor, place open
boxofsoda in refrigerator and leave doors
open.
If you Ieave for shorter absences, remove
perishable foods and leave control dials at
normalsetting.If,however,room tempemture is expected to go below 60°F., turn
control dials to OFF, remove food, clean
interior,Ieavedoors open and remove plug
from wail receptacle.
ffyou have an icemaker,flip manual switch
to OFF position and be sure to shut off
water supply to icemaker.(Ask installer to
point out location ofshut-off valveat time
of installation.) ,
the house power for extend-
-.
in. Moving refrigerator in
Disconnect power cord from wall receptacle. Remove all foods and clean interior.
Such loose items as grille. shelves. storage
pans. ice trays,covers and remo~’ableparts
should be protected or secured wi[h tape.
This pre~,entstheir coming loose and causingdamage. Your refrigermor ison wheels:
besureitis properly secured in movingvim
topreventrollingand damirge.Hmzdlewith
care; exterior should be protected with
covering.
blankel
The suggestions noted below apply to the
operation of your household electric refrigerator.The General Electric Compnny
recommends tbese safety precautions:
L If your old refrigerator isstill around the
housebutnotin use, be sure to remove the
doors. This will reduce the possibility of
danger to children.
2. Some refrigerators are equipped with
automatic icemakers. Do not place fingers
or hands on the automatic icemaking
mechanism whiIe the refrigerator is
pluggedin. This willprevent contact with
themovingparts of the ejector mechanism,
or with the heating elemeru that releases
the cubes.
3. The refrigerator should always be
plugged into its own individual electrical
outlet (115volt,60 cycle,single phase AC).
Thisisrecommended for best performance
and to prevent overloading house wiring
circuits, wbich could cause a possible fire
hnzard from overheating wires.
USE OF EXTENSION CORDS–Because
of potential safety hazards under certain
conditions,we strongly recommend against
the use of nn extension cord. However, if
you still elect to use an extension cord, it
isabsolutelynecessarythat it be a ULlisted
3-wiregrounding type appliance extension
cord and that the current carrying rating
of the cord in amperes be equal to or greater thzn the branch circuit size shown on
the rating namepiate of this appliance.
Such extension cords are obtainable
through your local service organization.
4. Repair or replace immediately all electric service cords that have become frayed
or otherwise damaged. Do not use a cord
that shows cracks or abrasion damage
alongitslength or at either the plug or connector end.
5. Never unplug your refrigerator by pullingonthe wire. Alwaysgrip the plug firmly
and pullstraight out from the receptacle.
6. Your refrigerator is equipped with rollers so that it can be easily moved out from
the wall. When rolling out the refrigerator
becareftd not to roll over the service cord.
7. Do not operate your refrigerator in the
presence of explosive fumes.
8. A burned-out light bulb might break
when being replaced. In order to avoid
contact with a live wire filament, it is recommended that the refrigerator first be unplugged when replacing a light bulb.
Note: Turning control to OFF position
does not remove power to the light circuit.
9. Always remove the power cord from
walloutlet before removing the base grille.
10.Don’t refreeze frozen foods which have
thawed completely unless you cook them
after they have thawed. The United States
Department of Agriculture in Home and
Garden Bulletin No. 69 says, “...if foods
have thawed only purtially and there are
still ice crystals in the package, they may
safelyberefrozen...Refrozen Food sbould
be used as soon as possible.
“If foods have slowly thau,ed and have
warmed gradually over a period of several
days to a temperature of 40°F., they are
not likely to be fit for refreezing. Under
these conditions, meats, poultry, most vegetables and some prepared foods may become unsafe to eat; most fruits and fruit
products soon deveIop an undesirable
flavor:’
Also note and follow otlzet. p).ecoz)tiol]s
contained in this Use & Cnre Book.
 Loading...