

Page 1
1
●
❑
Refrigerator/Freezer/lcemaker
Safety instructions.........................3
●
❑
Problem Solver . . . . . .
Morequestions?...call
GEAnswerCenter@8170.626.2(J00
..13-15
.
❑
IliH
ks
Operating Instructions, Tips
Freezer Door. . . . . . . . . . . . . . .......................4
lcemaker~..........~~...
Temperature Control. . . .
Water Fill Adjustment Screw .....................4
..
.,---.,
+;
Careand Cleaning
Cleaning–lnside and Outside ....................5
Defrosting._._fi ._-.. . . . . . . . .....................5
Drain Tube and
lntetior
Light.__.~~._...~~~~~ ..-..............5
Preparation
Attaching the Door Handle . .
Clearances . . . . . . . . . . . . . . ..........................6
lnsectingthe
Location=......~_=......
Removing the Cabinet Door .......................7
Reversing the Door Swing . . . . . . . ..11,12
Vacation and Moving . . ..
Water FilterAccessory . ..
..................... 4,5
............................4
FunneL......ti.
Door Panel. . . . .....................7
. . . . . . . 14
....................7
...........................6
.......,...................6
..................._._.6
IiiJll
Eila
Installation
Adapter Plug . . . . . . . . . . . . . . . . . . . . . . .
Electrical Requirements.........., -..........10
Extension Cords . . . . . . . .
Grounding . . . . . . . . . . . . . . . ...-................10
Water Line installation instructions.....8, 9
0
Consumer Services
Appliance Registration . . . . .
Model and Serial Numbers ........................2
Warran~........
ModeL
. . . . . . . . . . .
TM6
.10
.. . . . . . . . . . ..10
....................2
..Back
Cover
GE Appliances
Page 2
HELP US HELP YOU...
Read the guide carefully.
It is intended to help you operate and maintain your
new appliance properly.
Keep it handy for answers to your questions.
If you don’t understand something or need
more help,
Keep proof of original purchase date (such as your
sales slip or
establish the warranty period.
call:
GE Answer Center”
800.626.2000
24 hours-a day, 7 days a week
cancelled
check) with this guide to
If you received a damaged appliance...
Immediately contact the dealer (or builder) that sold
you the appliance.
Save time and money. Before you
request service . . .
Check the Problem Solver in the back of this guide.
It lists minor operating problems that you can
correct yourself.
Write down the model and
serial numbers.
You’ll see them on a plate either at the bottom, just
inside the door, or on the back of the cabinet.
These numbers are also on the Consumer Product
Ownership Registration Card that came with
your appliance.
Before sending in this card, please write these
numbers here:
Model Number
Serial Number
Use these numbers in any correspondence or service
calls concerning your appliance.
IF YOU NEED SERVICE
We’re proud of our service and want you to be
pleased. If for some reason you are not happy with the
service you receive, here are three steps to follow for
further help.
FIRST, contact the people who serviced your
appliance. Explain why you are not pleased. In most
cases this will solve the problem.
NEXT, if you are still not pleased, write all the
details-including your phone number—to:
Manager, Consumer Relations
GE Appliances
Appliance Park
Louisville, KY 40225
FINALLY, if your problem is still not resolved,
Major Appliance Consumer
Action
20 North Wacker Drive
Chicago, IL 60606
panel
write:
2
—
Page 3
Page 4
OPERATING YOUR REFRIGERATOR
Starting
1. Clean
2. Plug in the refrigerator.
the inside of the refrigerator with a mild
solution of baking soda and water (refer to the Care
and cleaning section).
Temperature
The temperature control dial is
located in the grille below the outer
door. A higher number setting
provides a cooler temperature.
Initially set the temperature control
dial at “3”.
If
the temperature control is turned off wait at least
five minutes before restarting. This allows the motor
control time to automatically reset.
After waiting two hours, adjust the temperature
control to the setting that is best suited to your needs.
NOTE:
“O” stops cooling but does not shut off power to
the refrigerator.
Turning the temperature control dial to
OPERATING YOUR FREEZER
Freezer Door
The inside freezer door separates the freezer section from the refrigerator
section, maintaining the correct temperature in each. The door has a spring
loaded, magnetic catch. To open, push gently. The latch will click and the
door will open. To close, push gently until the latch clicks.
ControI
Co(
*
OP+
\*\\
*
-=
~1
()}
+/
a
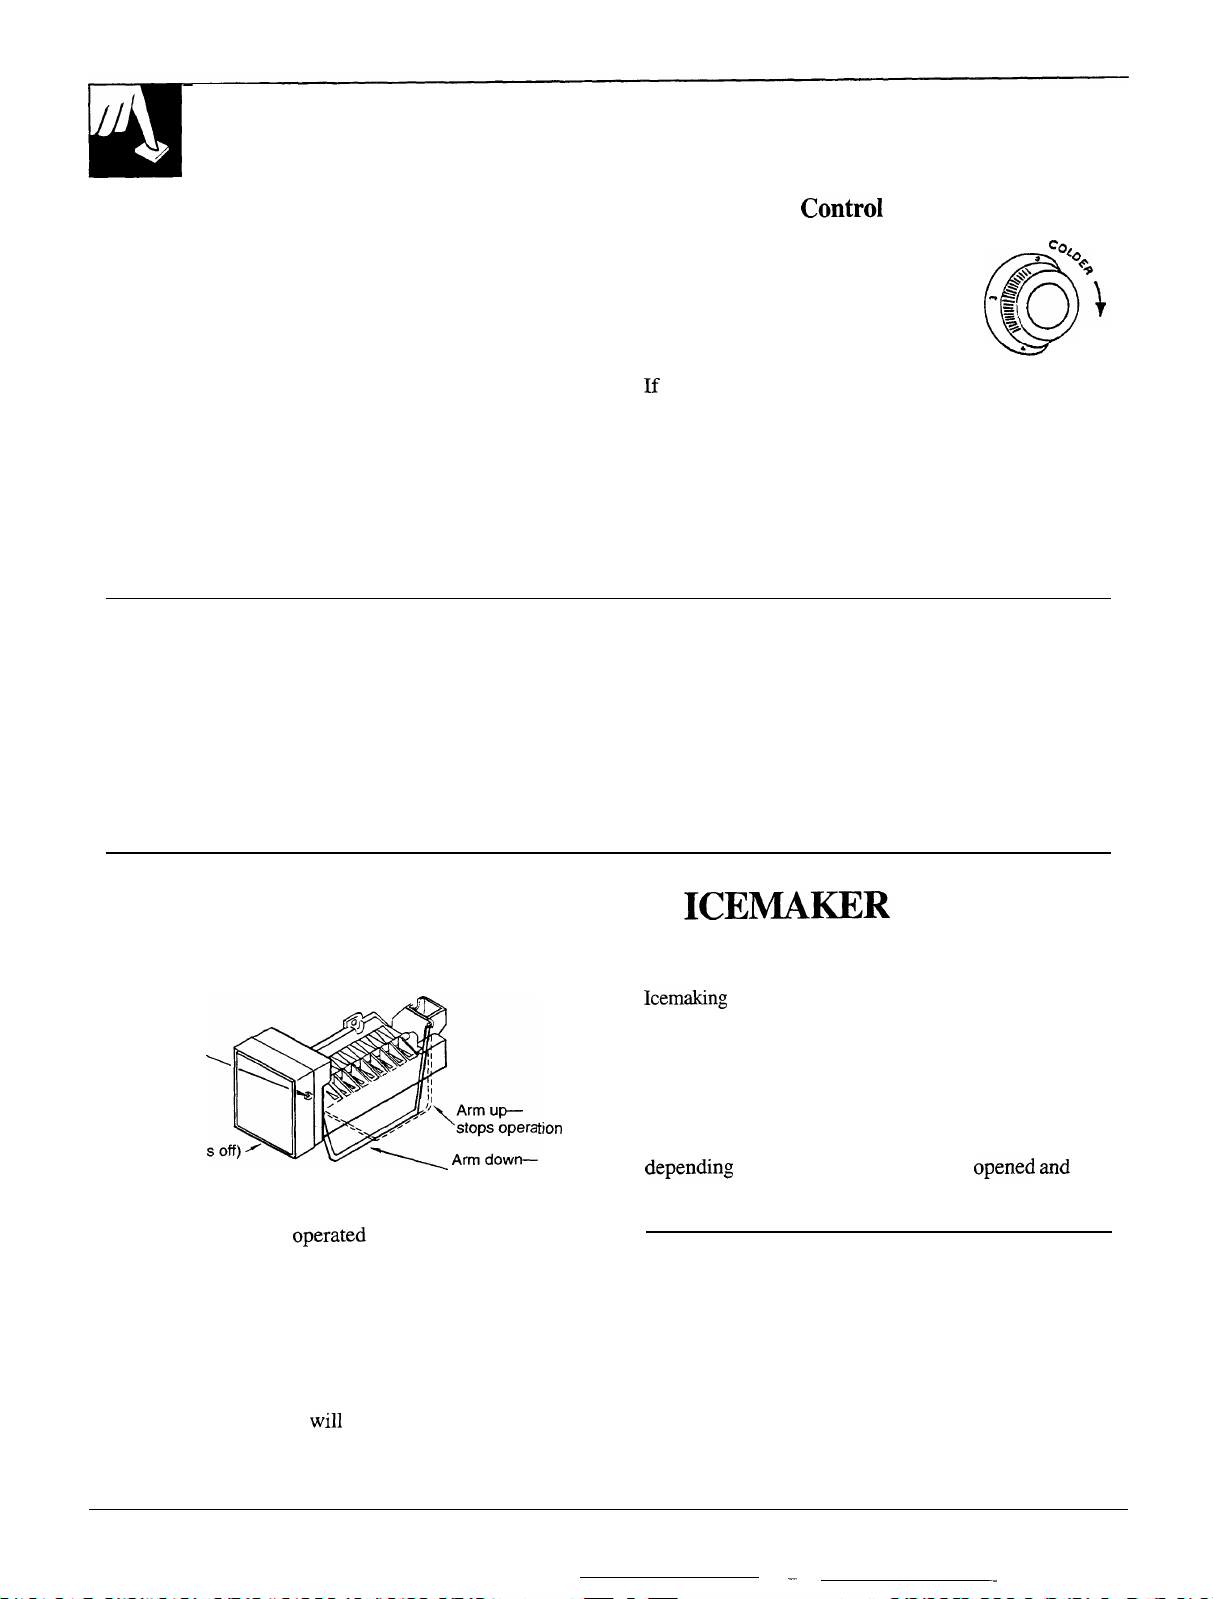
OPERATING YOUR
How it Works
Water
adjustment
screw
behind cover
on side of
housing
tion
Cover (pull
icemaker will
operate
If your refrigerator is
connection is made, make sure the icemaker feeler
arm is in the STOP (up) position. When the water
supply has been connected to the icemaker, move the
icemaker feeler arm to the ON (down) position.
The ice cube mold will automatically fill with water
after cooling to a freezing temperature, and first cubes
will normally freeze after several hours. When cubes
are solidly frozen, they
into the ice cube storage bin by means of a sweeper arm.
operated
before the water
will
be ejected from the mold
ICEIMAKER
Icemaking
the bin is full.
For maximum ice storage, level the stored cubes with
your hand occasionally. Be sure nothing interferes
with the swing of the feeler arm.
We suggest you stir ice in the bin at least once a week.
If you do not do this, the cubes may clump together,
depending
how much humidity is in the room.
Water Fill Adjustment Screw
There is a water-fill adjustment screw on the right
side of the icemaker behind the white front cover.
This allows adjustments for different water pressures.
To remove the cover, pull it forward. Turn the screw
clockwise to increase fill or counterclockwise to
decrease fill. Don’t turn it more than one full turn or
the control can be damaged.
will continue until the feeler arm senses that
on how often the freezer is
opened and
4
—
.—
Page 5
Once your icemaker is in operation
r
s
2
r
Throw away the first few batches of ice cubes. This
will flush away any impurities in the water line. Do
the same thing after vacations or extended periods
when ice isn’t used.
Move the icemaker feeler arm to the
STOP (up) position when...
Home water supply is to be off for several hours and
when going away on vacation. For long vacations it is
best to turn off the valve in the water supply line to
the icemaker.
If ice is used infrequently . . .
Old cubes will become cloudy and taste stale. Empty
the ice storage bin periodically and wash it in
lukewarm water.
Cleaning
Unplug the refrigerator before cleaning.
not practical, wring excess moisture out of a sponge
or cloth while cleaning in the vicinity of switches,
lights or controls. Wash the inside with a warm water
and baking soda solution using about two tablespoons
of baking soda to a quart of water. Then rinse and dry.
Do not use cleaners such as soaps, detergents,
scouring powders or spray cleaners on the inside
of the refrigerator
and damage the inside surfaces.
Wash the ice storage bin with a mild detergent
solution
Wipe the outside of the refrigerator with a clean,
soft cloth
Polish Wax Cleaner available from GE Appliance
Service and Parts Centers.
and dry it with a soft cloth.
dampened with soapy water or Appliance
because they may cause odors
If this is
If this is your first
You’ll hear occasional sounds that may be unfamiliar.
They are normal
cause for concern.
Use only mild, soapy water to clean the door gasket.
Never use boiling water, acids, chemical thinners,
gasoline, benzene or the like for cleaning any part of
the refrigerator. They may deform or damage plastic
parts and may lead to a safety hazard.
Do not wash any plastic ~arts from your
refrigerator
An open box of baking soda in the refrigerator will
absorb stale freezer odors. Change the box every
three months.
icemaking
in
your automatic dishwasher.
icemaker...
sounds and are not a
&
●
2
I
s
Defrosting
Defrosting takes place automatically after the
compressor has run about 12 hours. Food or ice
clogging the drip tray or the area under the drip tray
may affect the defrost operation. Remove anything
that gets into this area.
If the icemaker is turned off for a long time, it may
frost up and need to be defrosted by hand.
At the end of the defrost cycle, water droplets maybe
left on the evaporator and in the drip tray. This is
normal. They will refreeze and be removed in the next
defrost cycle.
Interior Light
To replace the bulb:
1.
Unplug the power cord from the wall.
2. Remove the three screws on the front face of the
light lens using a Phillips screwdriver.
3.
Remove the lens.
4.
Unscrew the existing bulb and replace with an
equivalent 15 watt, threaded intermediate base
appliance bulb. Do not replace with a bulb higher
than 15 watts.
5. Replace the cover and turn the power on.
:
51
Page 6
PREPARATION
Location
Do not install this appliance where the temperature
will go below 60° F. because it will not run often
enough to maintain proper temperatures.
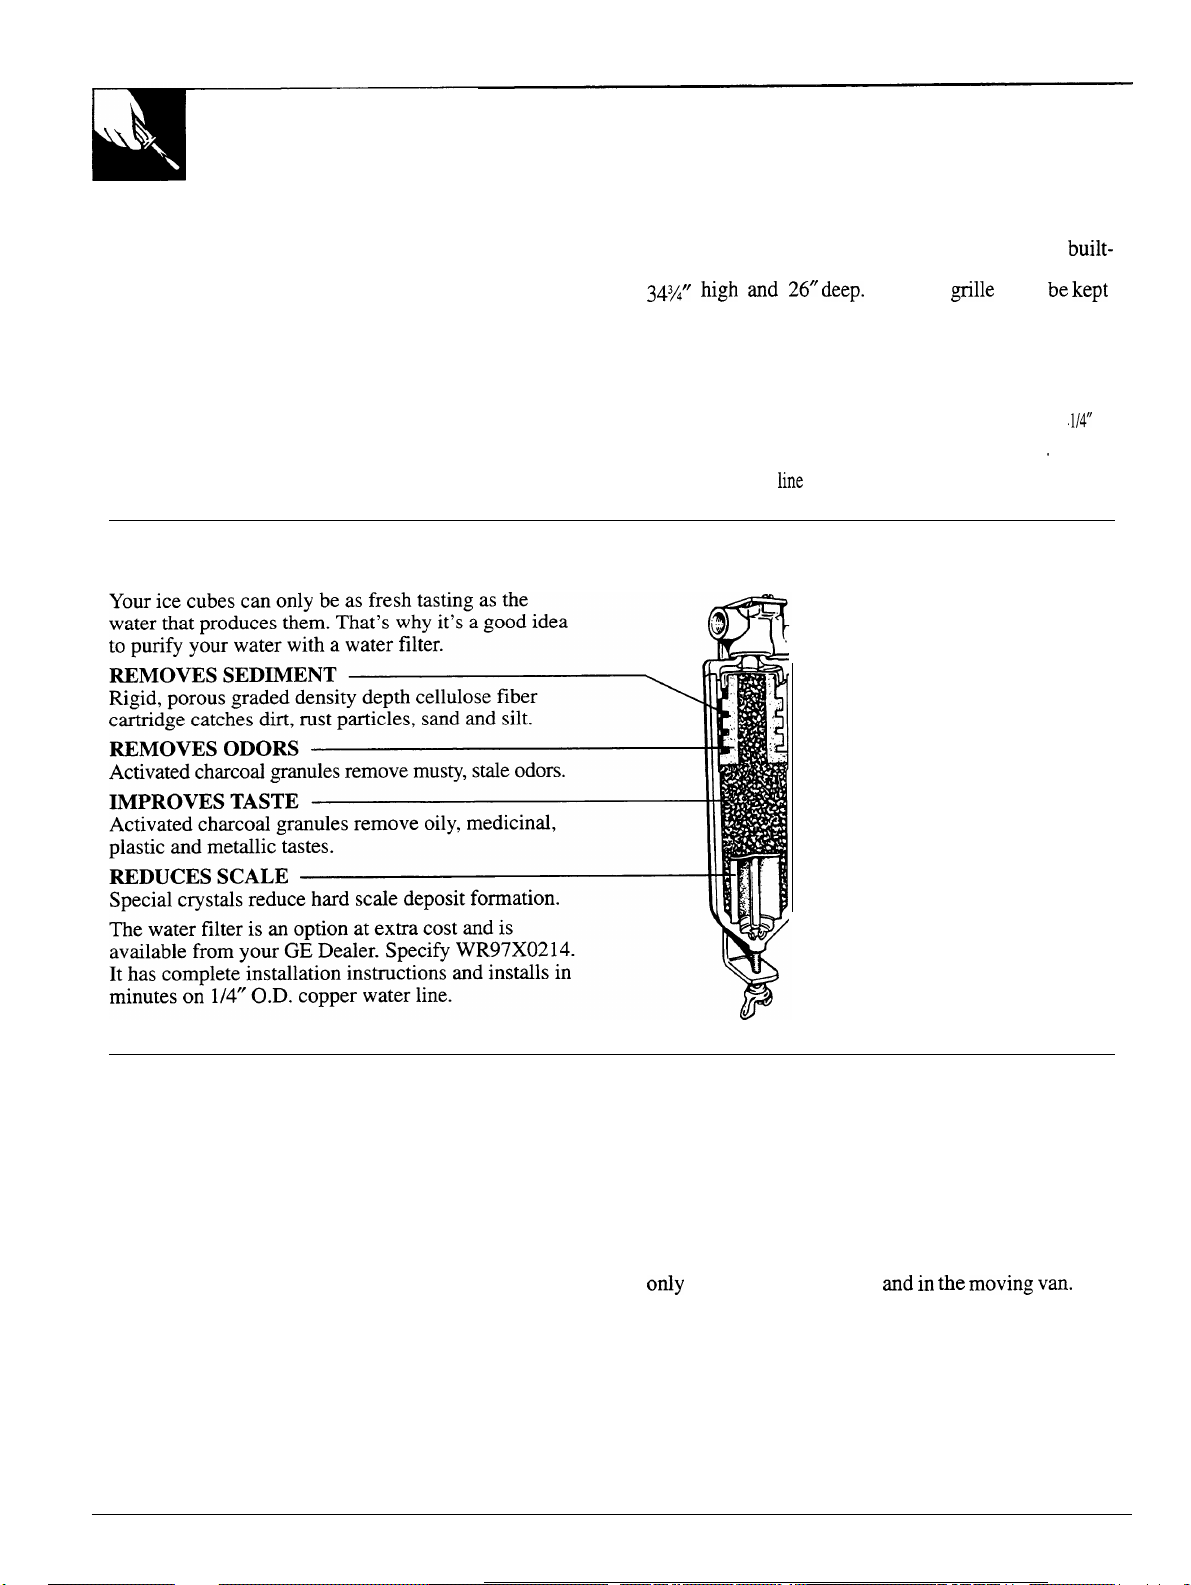
Water Filter Accessory
Clearances
This refrigerator is designed for free-standing or
in installation. Make the opening at least 24” wide x
34%”
high and 26”
clean for air movement. Allow space for wiring and
for installation ardor removal.
Allow the following clearances for ease of installation
and water line tubing:
Top . . . . . . . . . . . . . . . . . . . . . . . . . . . . . . . . . . . . . . . . . . . . . . . . . . . . . . . . . . . . . .
. . . . . . . . . . . . . . . . . . . . . . . . . . . . . . . . . . . . . . . . . . . . . . . . . . . . . . . . . . . .
Sides
Back (for water
deep.
The front
line
tubing) . . . . . . . . . . . . . . . . . . . . . . . . . 1/3”
grille
must be
1/4”
.
built-
kept
. 1/4”
Vacation
When going on vacation...
or absences, unplug the refrigerator and clean the
interior. To prevent odors, leave an open box of
baking soda inside the refrigerator and leave the
door open.
For shorter vacations...
and leave the control at the regular setting. However,
if room temperature is expected to drop below 40° F.
follow the same instructions as for extended
vacations. Move the icemaker feeler arm to the STOP
(up) position and be sure to shut off water supply to
the refrigerator.
For extended vacations
Remove perishable foods
6
Moving
When you move... Disconnect the power cord from
the wall outlet, remove the food and defrost the
refrigerator. Then clean and dry the interior.
Secure all loose items such as ice and drip trays by
taping them securely in place to prevent darnage.
Be sure the refrigerator stays in an upright position
only
during actual
The refrigerator must be secured in the van to prevent
actual movement. Protect the outside of the
refrigerator with a blanket.
moving
and in the moving van.
Page 7

Inserting the Door Panel
Tools required: Phillips Head Screwdriver
The refrigerator door is designed to accept an optional
decorative panel of your choice. The panel should be
no more than 1/4” thick and be 23%” wide x 30%” tall
with the corners chamfered 3/8”.
It takes two people to do this job.
1.
First remove the door. Remove the upper hinge pin
and, tilting the door slightly forward, lift the door
off the lower hinge pin. Take care not to pull the
top of the gasket.
2. Remove the two screws on each side of the bottom
section of the door.
3.
Carefully pull the magnetic gasket out of the slot on
the bottom section of the door trim across the
bottom. Pull from the bottom surface up and out,
making sure the trim is free from both comers. You
may need to pull firmly on the trim if it does not
easily separate from the foam inside the door.
4. Slide your new panel into the slot provided on the
door frame. If the panel thickness is somewhat
thinner than 1/4”, a piece of cardboard can be
inserted behind the panel for proper spacing.
5. Replace the bottom section of the door. Be sure that
the panel lines up properly with the slots on the
interior of the bottom section. Secure the bottom
with the screws on either side. Tighten down one
side at a time just until the bottom is secure before
reinserting the gasket. Doing this will keep the
bottom from falling out.
6.
Starting with the corner on one side, push down
from the top surface of the gasket into the slot on the
bottom section. Make sure that the arrows are aligned.
Run your finger across the gasket. At the comer,
push back a little the other way, then push down.
7. Set the door in place on the lower hinge pin, and
insert the upper hinge pin as before. Finish
tightening both screws, making sure not
tighten and strip the threads of the screws.
to over-
Attaching the Door Handle
Tools required: Phillips Head Screwdriver
The door handle, packed inside the refrigerator, can
be mounted on the top or the side of the refrigerator
door according to your preference.
1.
Place the handle on either the side or the top
outside surface of the door. Push gently inward
toward the door and the handle will snap into place.
2. Using the two screws provided, attach the
handle to the door frame by tightening the screws
until the tips of the screws touch the backside of
the door frame.
Removing the Cabinet Door
Tools required: 1/8” Allen Wrench and Pliers
1.
Support the side opposite the hinge so that the door
will not drop downward.
2. Remove the top hinge pin by turning
counterclockwise. Turn it several times until it is
loose but not stripped.
3. Gently grasp the top of the top hinge pin with the
pliers, taking care not to damage the screw threads,
and pull it free.
4. Set the top hinge pin aside for reassembly later.
—
7
—
Page 8

CAUTION:
Q
If
you use your refrigerator before connecting
the water line, make sure the icemaker feeler
arm is kept in the STOP (up) position.
●
Do not install the icemaker tubing in areas
where temperatures fall below freezing.
●
When using any electrical device (such
as a
power drill) during installation, be sure the
device is insulated or wired in a manner to
prevent the hazard of electric shock.
s
All installations must be in accordance with
local plumbing code requirements.
WHAT YOU WILL NEED
● A cold water supply is required for automatic
icemaker operation. The water pressure must be
20
between
●
Power
● Copper tubing, 1/4” outer diameter to
and 120 p.s.i.
MM,
unless you have a self-piercing valve.
connect the refrigerator to the water supply.
Be sure both ends of the tubing are cut square.
To determine how much copper tubing you
need: measure the distance from the water valve
on the back of the refrigerator to the water
supply pipe. Then add 8 feet. Be sure there is
sufficient extra tubing (about 8 feet coiled into
3 turns of about 10 inches diameter) to allow the
refrigerator to move out from the wall
tier
installation. Do not use plastic tubing or plastic
fittings because the water supply line is under
pressure at all times. Also, certain types of
plastic tubing may become brittle with age and
crack, resulting in water leakage.
● Shutoff valve to connect to the cold water
line. The shut-off valve should have a water inlet
with a minimum inside diameter of 5/32” at the
point of connection to the COLD WATER LINE.
Saddle-type shut-off valves are included in many
water supply kits. Before purchasing, make sure
a saddle-type valve complies with your local
plumbing codes.
● Two 1/4” outer diameter compression nuts
and 2 ferrules (sleeves)—to connect the
copper tubing to the shutoff valve and the
refrigerator water
. If
your existing water line has a
the end, you will need an
valve.
flared fitting at
adapter (available at
plumbing supply stores) to connect the water
line to the reiiigerator
OR—you can cut off the
flared fitting with a tube cutter and then use a
compression fitting.
WARRANTY INFORMATION
This water line installation is not
the refrigerator or icemaker
Follow these instructions
carefidly to minimim
warranted by
manufiicturer.
the risk of expensive water damage.
Turn on the nearest faucet long enough to clear
the line of
I
~
INSTALL THE SHUTOFF VALVE ON THE
NEAREST FREQUENTLY USED DRINKING
WATER LINE.
Typical ways to
Through floor
to basement
cold water pipe
a.
Choose a location for the valve that is easily
water.
conneet
Under sink
to cold utility room cold
water pipe
to water supply
Through wall to
water pipe
In crawl
space under
house
accessible. It is best to connect into the side of
a vertical water pipe. When it is necessary to
connect into a horizontal water pipe, make the
connection to the top or side, rather than at the
bottom, to avoid drawing off any sediment
horn
the water pipe.
b.
Drill a 1/4” hole in the water pipe, using a
sharp bit. Remove any burrs resulting from
drilling the hole in the pipe. (Do not drill a hole if
the valve is a self-piercing type.)
c. Fasten the
Pipe
Washer
shutoff valve to
the cold water
pipe with the
pipe clamp.
d. Tighten the
C’ampl
I
L
Inlet
end
clamp screws until
the sealing washer
begins to swell. Do
not over-tighten or
you may crush the
*
rtical
cold water
pipe
copper tubing.
8
-—
.
Page 9

❑
ROUTE THE COPPER
COLD WATER LINE AND THE REFRIGERATOR.
Route the tubing through a hole drilled in the
floor or wall (behind the refrigerator or adjacent
base cabinet) as close to the wall as possible. Be
sure there is sufficient extra tubing (about 8 feet
coiled into 3 turns of about 10” diameter) to
allow the refrigerator to move out from the
after installation.
❑
CONNECT THE COPPER TUBING TO THE
SHUTOFF
Place the
compression nut
and ferrule (sleeve)
onto the end of the
tubing and connect
it to the shutoff
valve. Make sure
the tubing is fully
inserted into the
valve. Tighten
the compression
nut securely.
VALVE.
TUBMG
BETWEEN THE
wall
E
CONNECT THE COPPER TUBING TO
THE REFRIGERATOR
Before making the connection to the
refrigerator, be sure the refrigerator power
cord is not plugged into the wall outlet.
We recommend installing a water filter (available
at service and parts centers) if your water supply
has sand or particles that could clog the screen
of the refrigerator’s water valve. Install it in the
water line near the refrigerator.
● Slip a 1/4-1/4
union nut (provided)
over both ends of the
copper tubing at the
rear of the refrigerator
and couple lines.
111
❑
TURN THE WATER ON AT THE
SHUTOFF VALVE.
Tighten any connections that leak.
B
/
❑
TURN OH
THE TUBING.
a.
Turn the main water supply on and flush out
the tubing until the water is clear.
b.
Shut the water off at the water valve after
about one quart of water has been flushed
through the tubing.
THE WATERMD FLUSH
OUT
❑
PLUG THE REFRIGERATOR POWER CORD
INTO A GROUNDED ELECTRICAL OUTLET.
❑
SET THE
(DOWN) POSITION.
The icemaker will not begin to operate until it
reaches its operating temperature of
below. It will then begin operation automatically
if the icemaker is in the ON (down) position.
NOTE: The icemaker may double-cycle when
first starts, causing some water spillage from the
icemaker into the ice bucket. This is normal and
should not happen again.
cubes should be thrown away, so that remaining
impurities in the waterline will be flushed out.
❑
MOVE THE REFRIGERATOR BACK TO
THE WALL
Arrange the coil of copper tubing so that it does
not vibrate against the back of the refrigerator or
against the wall.
lCEMAKERFEELERA~
The first few batches of
TO THE ON
15°E
or
it
9
Page 10

INSTALLATION
IMPORTANT... Please Read Carefully
How to Connect Electricity
REQIIIREMENTS
For personal safety, this appliance must
be properly grounded.
Plug the refrigerator into a grounded outlet(115 Volt,
60 Hertz single phase AC.—Some models are also
rated 100 Volt, 50 Hertz
Check the model and serial
number plate.)
The power cord of this
appliance
is equipped
with a three-prong
(grounding) plug which
mates with a standard
three-prong (grounding)
wall outlet to minimize
the possibility of electric
shock hazard from
Preferred Method
>–
~
4.
WR
Insure proper ground
exists before using.
P)
Q
9
%
0
.
“?
this appliance.
Use of Adapter Plug
Because of the
potential safety
hazards under
certain conditions,
we
strongly
recommend
against the use of
an adapter plug.
However, if you
still elect to use an
adapter, where
local codes permit,
a TEMPORARY CONNECTION may be made
to a properly grounded two-prong wall outlet by the
use of a UL-listed adapter available at most local
hardware stores.
Temporary Method
(Adapter plugs not
permitted in Canada)
Ali
connection
II
-
exits
before using.
I
firm
Have the wall outlet and circuit checked by a qualified
electrician to make sure the outlet is properly grounded.
If
you have only a
. .
standard
two-prong wall outlet,
.-
it is your personal responsibility and obligation to
have it replaced with a properly grounded
three-
prong wall outlet.
DO
NOT, UNDER ANY CIRCUMSTANCES,
CUT
OR REMOVE
PRONG FROM
THE
THE
POWER
THIRD (GROUNDING)
CORD.
The larger slot in the adapter must be aligned with the
larger slot in the wall outlet to provide proper polarity
in the connection of the power cord.
CAUTION: Attaching the adapter ground terminal to
the wall outlet cover screw does
not
ground the
appliance unless the cover screw is metal, and not
insulated, and the wall outlet is grounded through the
house wiring. You should have the circuit checked by
a qualified electrician to make sure the outlet is
properly grounded.
When disconnecting the power cord from the
adapter, always hold the adapter with one hand while
pulling the power cord with the other hand. If this is
not done, the adapter ground terminal is
very
likely to
break with repeated use.
Should the adapter ground terminal break, DO
NOT USE the appliance until a proper ground has
again been established.
Use of Extension Cords
Because of the potential safety hazards under certain conditions, we
strongly recommend against the use of an extension cord. However, if
you still elect to use an extension cord, it is absolutely necessary that it be a
UL-listed 3-wire grounding type appliance extension cord having a
grounding type plug and outlet and that the electrical rating of the cord
be 15 amperes (minimum) and 120 volts.
Plug the refrigerator into a grounded outlet, 115 Volt, 60
Hertz single
phase AC.
10
—
.—
Page 11

IMPORTANT: The door on your new
refrigerator can be installed to open from
the
left or
outer door and the freezer door both must
be reversed.
TOOLS REQUIRED
●
Medium-tip Phillips
screwdriver
●
Small-tip Phillips
born
the right. The swing of the
●
1/8”
Allen wrench
● Pliers
screwdriver
❑
REMOVE THE REFRIGERATOR DOOR
a.
While holding the door steady against the unit
to prevent the door from falling, remove the
top hinge pin with the Allen wrench and
gently pull the pin free with the pliers.
b.
Pull the top of the door toward you far enough
to clear the top hinge.
c. Pull the door upward with a slight jerking
motion to release it
horn the bottom
hinge pin.
d.
Remove the white nylon washer from the
lower hinge pin, if in place.
❑
REMOVE THE REFRIGERATOR DOOR HINGES.
a. Remove the upper hinge.
1.
Remove the three screws holding the
I
upper hinge to the cabinet.
2. Set aside the hinge; reinsert the three
screws in the same holes.
b. Remove the lower hinge.
1. Remove the three screws holding the
lower hinge.
2. Set aside the hinge; reinsert the three
screws in the same holes.
NOTE: When reinstalling the door hinges, the
bottom hinge will become the top hinge and the
top hinge will become the bottom hinge.
3. Remove the hinge pin from the LOWER
hinge. Insert it in the UPPER hinge
removed earlier. Insert the pin so that it
points upward when the hinge is later
of
installed at the bottom
the cabinet.
4. Place the white nylon washer on
this hinge pin, if used previously.
5. Set aside both hinges.
❑
REMOVE
a.
Remove the six mounting screws holding the
THE FREEZER
DOORAHD SPACER
freezer door and spacer to the inside wall of
tieezer.
the
b.
Set the freezer door, spacer and six
screws aside.
11
Page 12

❑
MOVE THE MAGNETIC FREEZER DOOR LATCH.
a.
Remove the four small screws from the
magnetic door latch on the inside of the
freezer wall.
b.
Place the door latch on the opposite side of the
freezer where there are four predrilled holes.
c. Line up the holes in the latch frame with
the holes in the freezer wall, making sure
the magnetic side of the latch is facing you.
d.
Insert the four screws to secure the latch.
❑
REIHSIWL
a.
Remove the six plastic plugs from the new
side of the fi-eezer.
b. Align
freezer’s side wall.
c. Align the freezer door hinge with the spacer.
d.
Insert the six plastic plugs in the six holes
opposite the hinge side of the freezer door.
NOTE: The magnetic latch should secure
the fi-eezer door when it is closed.
THE FREEZER
the spacer with the six holes in the
DOORAHD SPACER
❑
REINSTALL THE REFRIGERATOR DOOR
HINGES.
a. Install the lower hinge.
1.
Remove the three screws on the new side
of the cabinet at the bottom.
2. Using the hinge with the hinge pin and
nylon washer, install the lower hinge.
b. Install the upper hinge.
1.
Remove the three screws on the
❑
REINSTALL THE REFRIGERATOR DOOR
a.
With the door tilted slightly toward you to
clear the upper hinge, slip the hinge hole
on the bottom of the refrigerator door
over the bottom hinge pin.
b.
Straighten the door so that the upper corner
slides under the upper hinge and the upper
hinge hole aligns with the hinge pin hole.
c. Insert the upper hinge pin with
the Allen wrench.
❑
CHECK THE OPERATION OF THE DOORS
AHD
FREEZER LATCH.
a.
Open and close the freezer door to verify that
the magnetic latch is positioned properly.
b.
Open and close the refrigerator door to make
sure that the door gasket seals properly.
12
—
Page 13

QUESTIONS?
USE THIS PROBLEM SOLVER
PROBLEM
REFRIGERATOR DOES
NOT OPERATE
POSSIBLE CAUSE
●
Temperature control is in OFF position.
●
If
interior
Q
If
plug is
into the same
out fuse.
REFRIGERATOR STARTS
TOO FREQUENTLY
REFRIGERATOR
TOO
LONG
REFRIGERATOR
OPERAXES
I’EMPER.MLJRE TOO W-
Operating Characteristics:
. Package holding door open.
●
Door opened
c
Temperature control set on too high a number.
●
Package holding door
●
Door opened too frequently or too
*
Temperature control
c
Package holding door
●
Door opened too frequently or too
When your refrigerator is operating
correctly you should:
s
Be able to feel warm air leaving
the lower front of the refrigerator.
●
Be able to hear the high efficiency
compressor
You
mav
ice
bein”g
motor/fan motor.
-I
occasionally hear the sound of
ejected fro-m the ice-maker and
falling in the ice bucket.
THESE THINGS ARE NORMAL AND
DO NOT
INDICA~
A NEED FOR SERVICE.
light (on
secure and the freezer
some models) is not
outlet
to determine if there is a tripped circuit breaker or
too
frequently or too
open.
set on
too high a number.
open.
\
on,
freezer may not be plugged in.
still
fails to operate,
long.
long.
long.
plug a
small
appliance
burned
When Moving:
Secure all loose items such as ice and drip trays by
taping them securely in place to prevent damage.
Be sure the refrigerator stays in an upright position
only during actual moving and in the moving van.
The refrigerator must be secured in the van to prevent
actual movement. Protect the outside of the refrigerator
with a blanket.
—
(continued next page)
13
—
Page 14

THE PROBLEM SOLVER
(continued)
PROBLEM
FOODS TOO
OR
ITEMS IN
WARM
FREEZER COMPmTMENT
DEFROSTING
MOISTURE COLLECTING
ON OUTSIDE OF CABINET
INTERIOR
NOT LIGHT
LIGHT
DOES
(on some models)
DOOR WON’T FULLY
CLOSE BY ITSELF
SLOW STARTING
TIME
AFTER BEING OFF
AUTOMATIC ICEMAKER
DOES NOT WORK
POSSIBLE CAUSE
I
●
Blown
fuse or tripped circuit breaker.
●
Appliance not plugged in.
●
Temperature
●
Auto defrost system
●
Package holding door open.
*
Door opened too frequently or too
●
Extended hot, humid weather.
●
BlowrI
fuse or circuit breaker.
*
~pp~mce
●
Bulb burned out.
●
Refrigerator not leveled properly.
●
Package holding door open.
c
Built-in overload protection.
●
ON-OFF control is in the STOP (up) position.
●
Icerrmker
●
Water supply turned off or not connected.
●
Piled up cubes in storage bin
Wkh icernaker
control in OFF
ope~ating
not
p~ugg~
feeler arm is in
feeler arm in
position.
continuously.
~
.
the
STOP
may
the
long.
(up)
cause
icemaker to shut off prematurely.
STOP
(up)
by hand.
position.
position,
level
cubes in
bin
CUBES
TOO SMALL
ICEMAKER STOPS
MAKING ICE BEFORE
THE ICE
WA~R
THE FREEZER
THE
DURING
BIN IS
FULL
DRIPS FROM
INTO
KEFRIGERA3’OR
DEFROSTING
14
●
It
is
rmrmal
for this to happen occasionally.
●
Witer
shut-off valve connecting refrigerator to home waterline
●
Check to
. Check for a
●
Switch may be
●
The drain tube may
to the drain funnel. The
be disconnected when
see
if the feeler arm is in the ON {down) position.
cube
stuck in the ejector mechanism. Dislodge it with the ice
ikozen.
Empty the ice
nut
be connected
drah
tube must
the shelf
is
bin and
defrost the freezer.
relocated. Make sure it is reattached to
the fimnel.
may
be clogged.
scoop.
Page 15

I
●
●
w
PROBLEM
SLOW
ICE
CUBE FREEZING
POSSIBLE CAUSE
●
Door
may
have been left open.
●
Icemaker location too
icemaking
●
HOLLOW
K33
CUBES
ICE
HAYE
ODOWTASTE
CUBES
CLUMP TOGETHER
CUBES
It is normal for this to happen occasionally.
●
Old cubes
●
Ice storage bin
●
Unsealed packages in refrigerator may be transmitting odor/taste to ice
●
Interior of refrigerator needs cleaning.
c
Poor-tasting incoming water.
●
When
ice
is
This depends
in
the room.
●
Stir
the
cubes
. For extended periods of non-use, empty the ice
the
STOP (up)
If you need more help... call, toll free:
GE Answer Center”
800.626.2000
consumer information service
warm for
temperature.
need to be
not
to keep them
discarded.
needs to
wed
on
be emptied
for
a week or more, the cubes may
how often the drawer is
fiowing
position.
icemaker
Install
a water filter.
free.
to maintain proper
or washed.
opened
and how
bin
and raise the
clump
much
cubes.
together.
humidity is
feeler
arm to
—
15
—
Page 16

YOUR GE REFRIGERATOR
WARRANTY
WHAT IS COVERED
Staple sales slip or
here. Proof of original purchase date
is needed to obtain service
II
I
I
FULL ONE-YEAR WARRANTY
For one year
purchase, we
charge, parts and service labor in
your home to repair or replace
any part of the refrigerator
that fails because of a
manufacturing defect.
LIMITED ADDITIONAL
FOUR-YEAR WARRANTY
For the second through fifth year
from date of original purchase, we
will provide, free of charge, a
replacement compressor
compressor fails because of a
manufacturing defect. You pay for
any service labor charges.
from date of original
will provide, free of
if the
cancelled check
under warranty.
This warranty is extended to
the original purchaser and any
succeeding
purchased for use in the 48 mainland
states, Alaska, Hawaii and
Washington,
All warranty sewice will be provided
by GE Appliance Service and Parts
Centers or by our authorized
Customer
normal working hours.
Should your appliance need service,
during warranty period or beyond,
call 800-GE-CARES
(800-432-2737).
owner for products
D.C.
Car@
servicers during
WHAT IS NOT COVERED
● Service trips to your home to teach ●
you how to use the product.
your Use and Care material.
Read
If you then have any questions
about operating the product,
please contact your dealer or our
Consumer Affairs office at the
address below, or call, toll free:
GE Answer
800.626.2000
consumer information service
Some states do not allow the exclusion or limitation of incidental or consequential damages, so the above limitation or exclusion
may not apply to you. This warranty gives you specific legal rights, and you may also have other rights which vary from state to state.
To know what your legal rights are in your state, consult your local or state consumer affairs office or your state’s Attorney Generai.
Part No.
Center@
If further help is needed concerning this warranty, write:
Manager-Consumer Affairs, GE Appliances, Louisville, KY 40225
162 D3950POOI
Pub No. 49-6751
10-94 CG
Improper installation.
If you have an installation problem,
contact your dealer or installer.
You are responsible for providing
adequate electrical, plumbing and
other connecting facilities.
●
Replacement of house fuses or
resetting of circuit breakers.
Warrantor: General Electric Company
● Failure of the product if it is used
for other than its intended purpose
or used commercially.
c
Damage to product caused
by accident, fire, floods or acts
of God.
●
Loss of
WARRANTOR IS NOT
RESPONSIBLE FOR
CONSEQUENTIAL DAMAGES.
food
due to spoilage.
Printed in the United States
“
TAX6
 Loading...