

Page 1
vvwvv.GEAppliances.com
Safety Information
Adapter Plugs ................. 4
Electricity ..................... 4
Extension Cords ............... 3
Proper Disposal ................ 3
Safety Precautions .............. 2
Operating Instructions
Automatic Icemaker ............ 9
Controls ..................... 5
Crispers and Pans ............ 8, 9
Ice and Water Dispenser ........ 10
Shelves, Bins and Racks ........ 6-8
Water Filter Cartridge ........... 6
Models20,22 and25
OSte gtc6te
R frig&ateurs
Lasection fran_aisecommence_ la page 31
Care and Cleaning
Cleaning ................. 11, 12
Light Bulbs .................. 13
Installation Instructions
Preparing to Install
the Refrigerator ............ 14, 15
Water Line Installation .... 16-20
Troubleshooting Tips
Before You Call For Service . .22-24
Normal Operating Sounds ...... 21
Consumer Support
Consumer Support ..... Back Cover
Performance Data Sheet ........ 27
Product Registration ........ 29, 30
State of Cali_brnia Water
Treatment Device Certificate ..... 28
Warranty (Canadian) ........... 25
Warranty (U.S.) ............... 26
Lado a lado
Refrigeradores
La secci6n enespafiolempieza en la p6gina 59
Write yourmodeland serial numbershere:
Model #
Serial#
Find these numbers on a label inside
the refi'igerator compartment at the top
on the right side behind the controls.
197D3351PO05 49-60234 12-02JR
Page 2
IMPORTANTSAFETYINFORMATION.
READALLINSTRUCTIONSBEFOREUSING.
A WARNING!
Use this appliance only for its intended purpose as described in this Owner's ManuaL
SAFETYPRECAUTIONS
When using electrical appliances, basic safety precautions should be followed, including the following:
{This refrigerator must be properly installed
and located in accordance with the Installation
Instructions b@ore it is used.
{_Do not allow children to climb, stand or hang
on tile shelves in the reffigeraton They could
damage @e refrigerator and seriously injure
themselves.
{Do not touch @e cold surfaces in the freezer
compartment when hands are damp or wet. Skin
may stick to @ese extremely cold surfaces.
{_Do not store or use gasoline or other flammable
vapors and liquids in tile vicinity of this or any
other appliance.
{In refrigerators with automatic icemakers,
avoid contact with the moving parts of the
ejector mechanism, or with the heating element
located on the bottom of the icemaker. Do not
place fingers or hands on the automatic
icemaking mechanism while the refrigerator
is plugged in.
@Keep fingers out of the "pinch point" areas;
clearances between the doors and between
the doors and cabinet are necessarily small.
Be careful closing doors when children are
in the area.
_ Unplug the refrigerator before cleaning and
making repairs.
NOTE:Westronglyrecommendthatanyservicingbe
performedbya qualifiedindividual
(_Setting the freezer control to the 0 (off) position
does not remove power to the light circuit.
@Do not refreeze frozen foods which have
thawed completely.
2
Page 3
ww_.GEAppliances.com
A DANGER!RISKOFCHILDENTRAPMENT
PROPERDISPOSALOFTHEREFRIGERATOR
Child enn'apment and suffocation are not problems
of the past. ,Junked or abandoned refrigerators are
still dangerous...even if they will sit for 'just a few
days." @you are getting rid of your old refiigerato_;
please follow the insmmtions below to help prevent
accidents.
Before YouThrowA way YourOldRefrigerator
Refrigerants
All re@igeration products contain refrigerants,
which under federal law must be removed prior
to product disposal. If you are getting rid of an
old re@igeradon product, check with the
company handling the disposal about what
to do.
or Freezer:
@Take off the doors.
@Leave the shelves in place so that children may
not easily climb inside.
USEOFEXTENSIONCORDS
Because of potential safety hazards under certain conditions, we strongly recommend
against the use of an extension cord.
Howevm; if you must use an extension cord, it is absolutely necessary that it be a UL-listed (in the United
States) or a CNA-listed (in Canada), @wire grounding type appliance extension cord having a grounding
type plug and outlet and that the elecnical rating of the cord be 15 amperes (minimum) and 190 volts.
3
Page 4
IMPORTANTSAFETYINFORMATION.
READALLINSTRUCTIONSBEFOREUSING.
A WARNING!
HOWTOCONNECTELECTRICITY
Do not, under any circumstances, cut or remove the third (ground) prong from the power cord. For
personal safety, this appliance must be properly grounded.
The power cord of this appliance is equipped with
a 3-prong (grounding) plug which mates with a
standard 3-prong (grounding) w_l outlet to
minimize the possibility of electric shock hazard
from this appliance.
Have tile wall outlet and circuit checked by a
qualified electrician to make sure tile outlet is
properly grounded.
If the oudet is a standard 2-prong outlet, it is your
personal responsibility and obligation to have it
replaced with a properly grounded 3-prong w_ll
oudet.
The refrigerator should always be plugged into its
own individual electrical oudet which has a voltage
rating tllat matches the rating plate.
This provides tile best performance and also
prevents overloading house wiring circuits which
could cause a fire hazard from overheated wires.
Never unplug your refrigerator by pulling on the
power cord. _Mwaysgrip plug firmly and pull
sn'aight out from tile outlet.
Repair or replace immediately all power cords that
have become frayed or odmrwise damaged. Do not
use a cord tllat shows cracks or abrasion damage
along its lengtll or at eidmr end.
When moving dm refiigerator away from tile
wall, be careful not to roll over or damage the
power cord.
USEOFADAPTERPLUGS(Adapterpl,gsnotpermittedinCanada)
Because of potential safety hazards under certain conditions, we strongly recommend against
the use of an adapter plug.
Howevm; if you must use an adapter, where local
codes permit, a temporaryconnection may be made
m a properly grounded 2-prong wall outlet by use
era UL-listed adapter a'_ailable at most local
hardware stores.
The larger slot in tile adapter must be aligned witll
tile larger slot in dm wall outlet to provide proper
polarity in the connection of the power cord.
When disconnecting tile power cord from the
adapter, al,a-ayshold tile adapter in place with one
hand while pulling tile power cord plug with tile
other hand. If this is not done, tile adapter ground
terminal is very likely to break with repeated use.
If the adapter ground terminal breaks, DO NOT USE
tlle refrigerator until a proper ground has been
established.
Attachingtheadaptergroundterminaltoawaftoutlet
coverscrewdoesnotgroundtheapplianceunlessthe
coverscrewis metal,andnot insulated,andthe waft
outletisgroundedthroughthehousewiring. Youshould
havethecircuitcheckedby a quafifiedelectricianto make
surethe outlet isproperlygrounded.
READANDFOLLOWTHISSAFETYINFORMATIONCAREFULLY.
SAVETHESEINSTRUCTIONS
4
Page 5
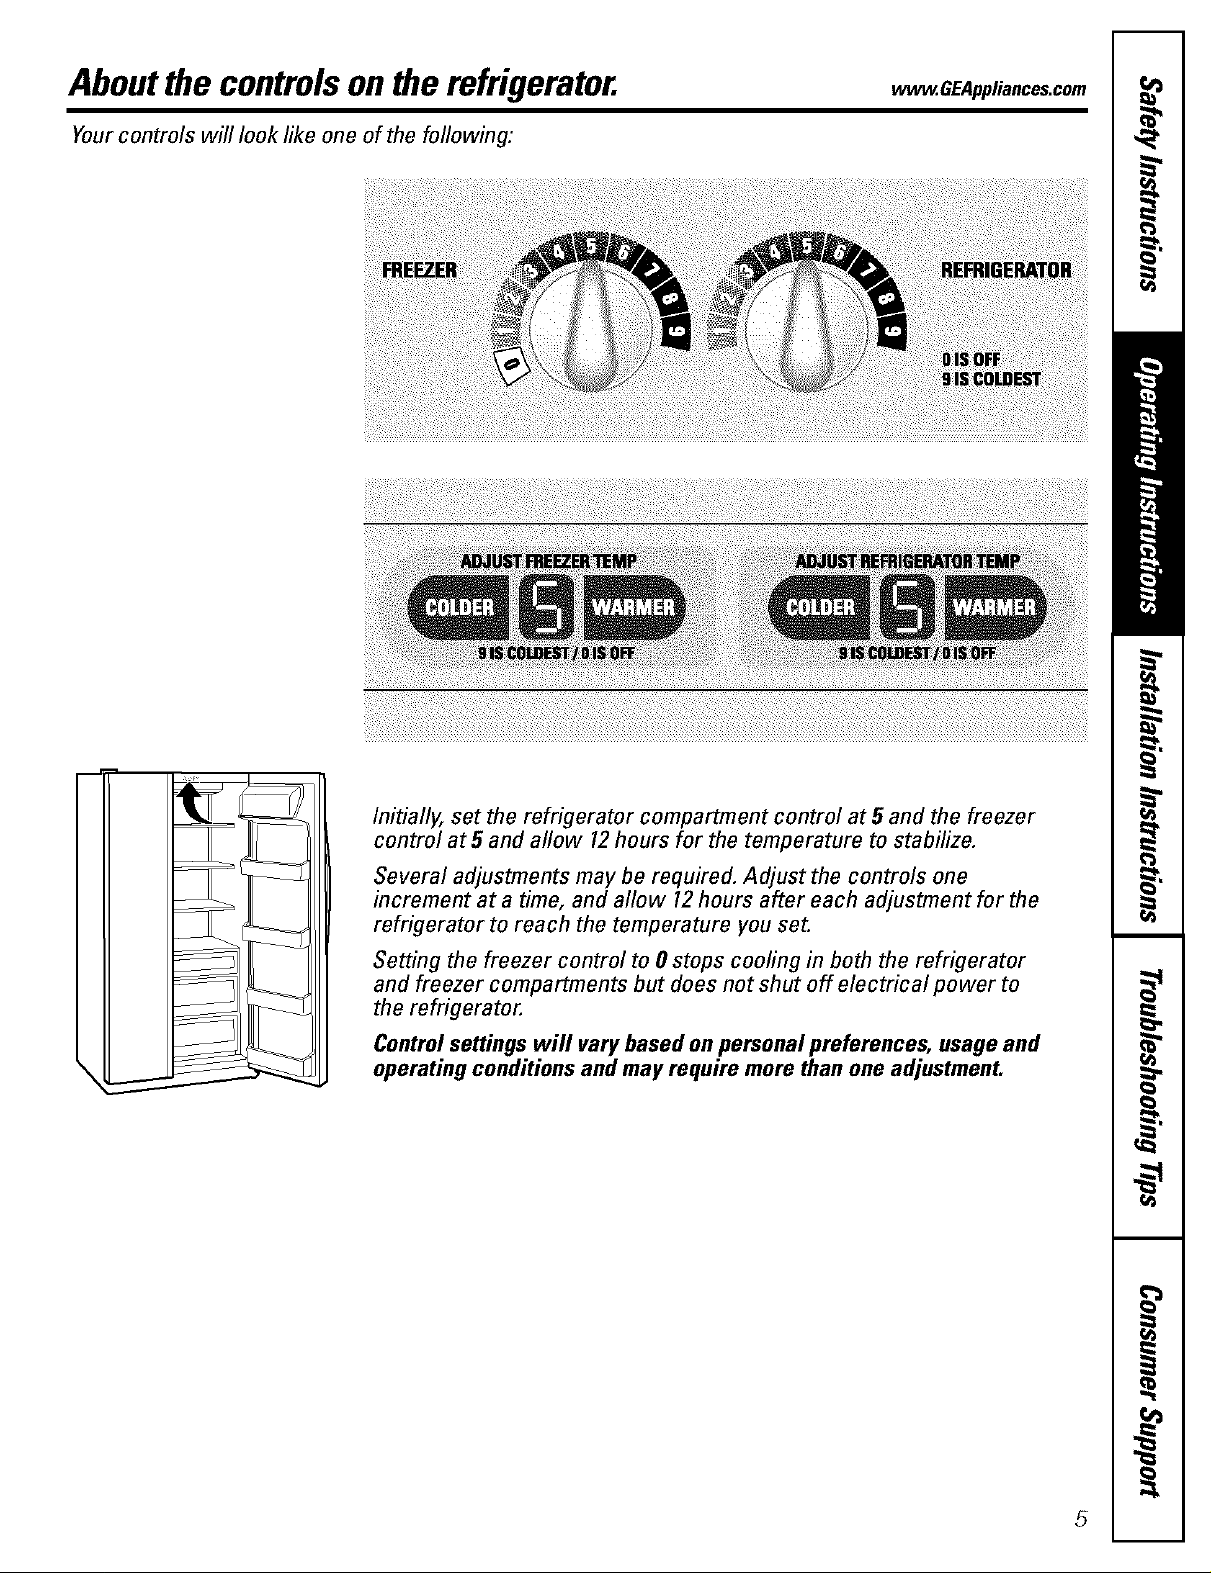
Aboutthe controlson the refrigerator.
Yourcontrols will look like one of the following:
ww_.GEAppliances.com
/nitially,set the refrigerator compartment control at 5 and the freezer
control at5 and allow 12hours for the temperature to stabilize.
Several adjustments may be required. Adjust the controls one
increment at a time, and allow 12hours after each adjustment for the
refrigerator to reach the temperature you set.
Setting the freezer control to 0 stops coofing in both the refrigerator
and freezer compartments but does not shut off electrical power to
the refrigerator.
Control settings will vary based on personal preferences, usage and
operating conditions and may require more than one adjustment.
5
Page 6
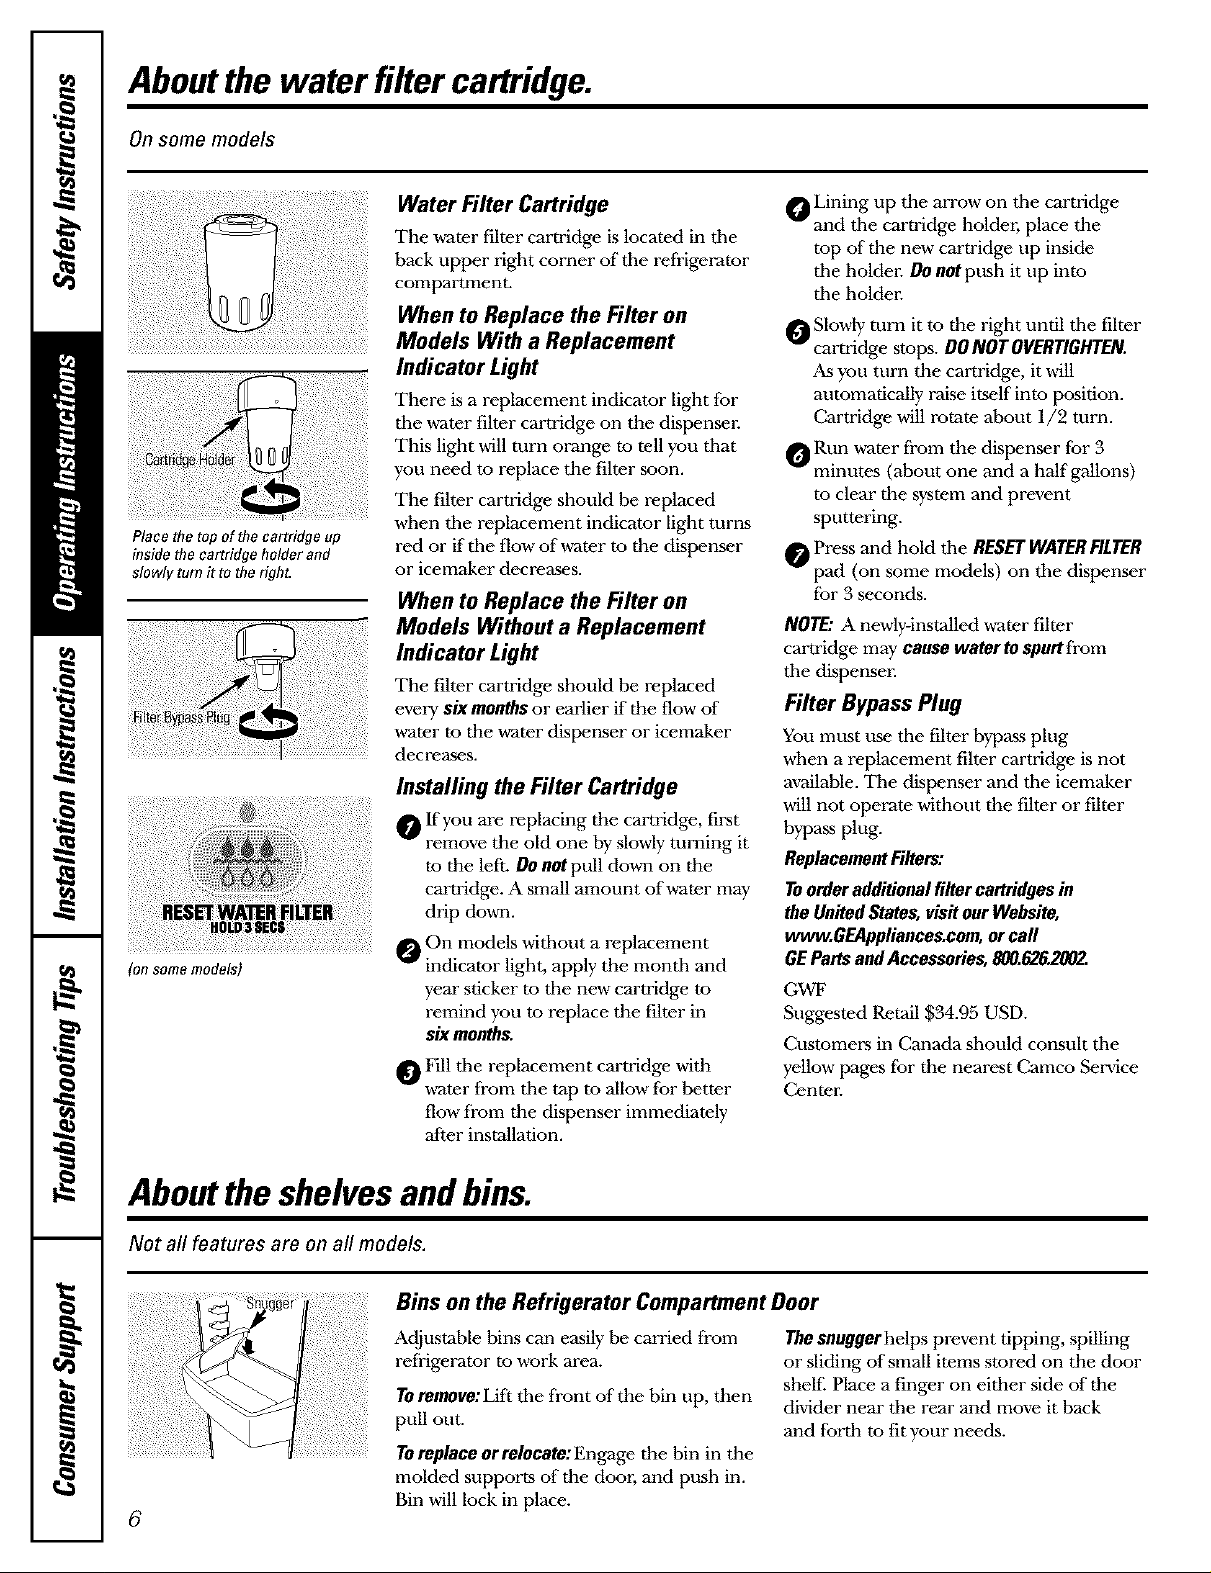
Aboutthe water filter cartridge.
On some models
Place the top of the cartridge up
inside the cartridge holder and
slowly turn it to the right.
(on some models)
Water Filter Cartridge
The water filter cartridge is located in tile
back upper right corner of tile refrigerator
compartment.
When to Replace the Filter on
Models With a Replacement
Indicator Light
There is a replacement indicator light for
tile water filter cartridge on the dispenser.
This light will turn orange to tell you tbat
you need to replace the filter soon.
The filter cartridge should be replaced
when tile replacement indicator light turns
red or iftbe flow of water to the dispenser
or icemaker decreases.
When to Replace the Filter on
Models Without a Replacement
Indicator Light
The filter cartridge should be replaced
evm 7 six monthsor earlier if the flow of
,a-ater to the water dispenser or icemaker
decreases.
Installing the Filter Cartridge
O If you are replacing the cartridge, first
remove the old one by slowly turning it
to the lefL DOnotpull do-an on the
cartridge. A small amount of water may
drip down.
O On models witbout a replacement
indicator light, apply the montb and
year sticker to tile new camidge to
remind you to replace the filter in
sixmonths.
_Fill tile replacement cartridge with
vcater from tile tap to allow for better
flow fi'om the dispenser immediately
after installation.
_ Lining up the arrow on tbe cartridge
and tbe carnidge holdm; place the
top of the new carnidge up inside
tbe holdm: DOnet push it up into
tbe holdm:
O Slowly turn it to the right until tile filter
cartridge stops. DONOTOVERTIGHTEN.
As you turn the cartridge, it will
automatically raise itself into position.
Cartridge will rotate about 1/2 turn.
Rt_n water from the dispenser for 3
minutes (about one and a half gallons)
to clear the system and prevent
sputtering.
_ Press and hold tile RESETWATERFILTER
pad (on some models) on tile dispenser
for 3 seconds.
NOTE: A newly-installed water filter
cartridge may cause water to spurt from
tbe dispenser.
Filter Bypass Plug
You must use tile filter bypass plug
when a replacement filter cartridge is not
available. The dispenser and tile icemaker
will not operate without tile filter or filter
bypass plug.
ReplacementFilters:
Toorderadditionalfilter cartridgesin
theUnitedStates,visitourWebsite,
www.GEAppliances.com,orcall
GEPartsandAccessories,800.626.2_2.
GWF
Suggested Retail $34.95 USD.
Customers in Canada should consult tile
yellow pages for the nearest Camco Serxdce
Center.
Abouttheshelvesand bins.
Not all features are on all models.
Bins on the Refrigerator Compartment Door
Adjustable bins can easily be carried from
refrigerator to work area.
TOremove:Lift tile front of tile bin up, then
pull out.
Toreplace orrelecate:Engage the bin in the
molded supports of the door, and push in.
Bin will lock in place.
6
The snugger helps prevent tipping, spilling
or sliding of small items stored on the door
shelf Place a finger on either side of the
divider near tbe rear and move it back
and forth to fit your needs.
Page 7
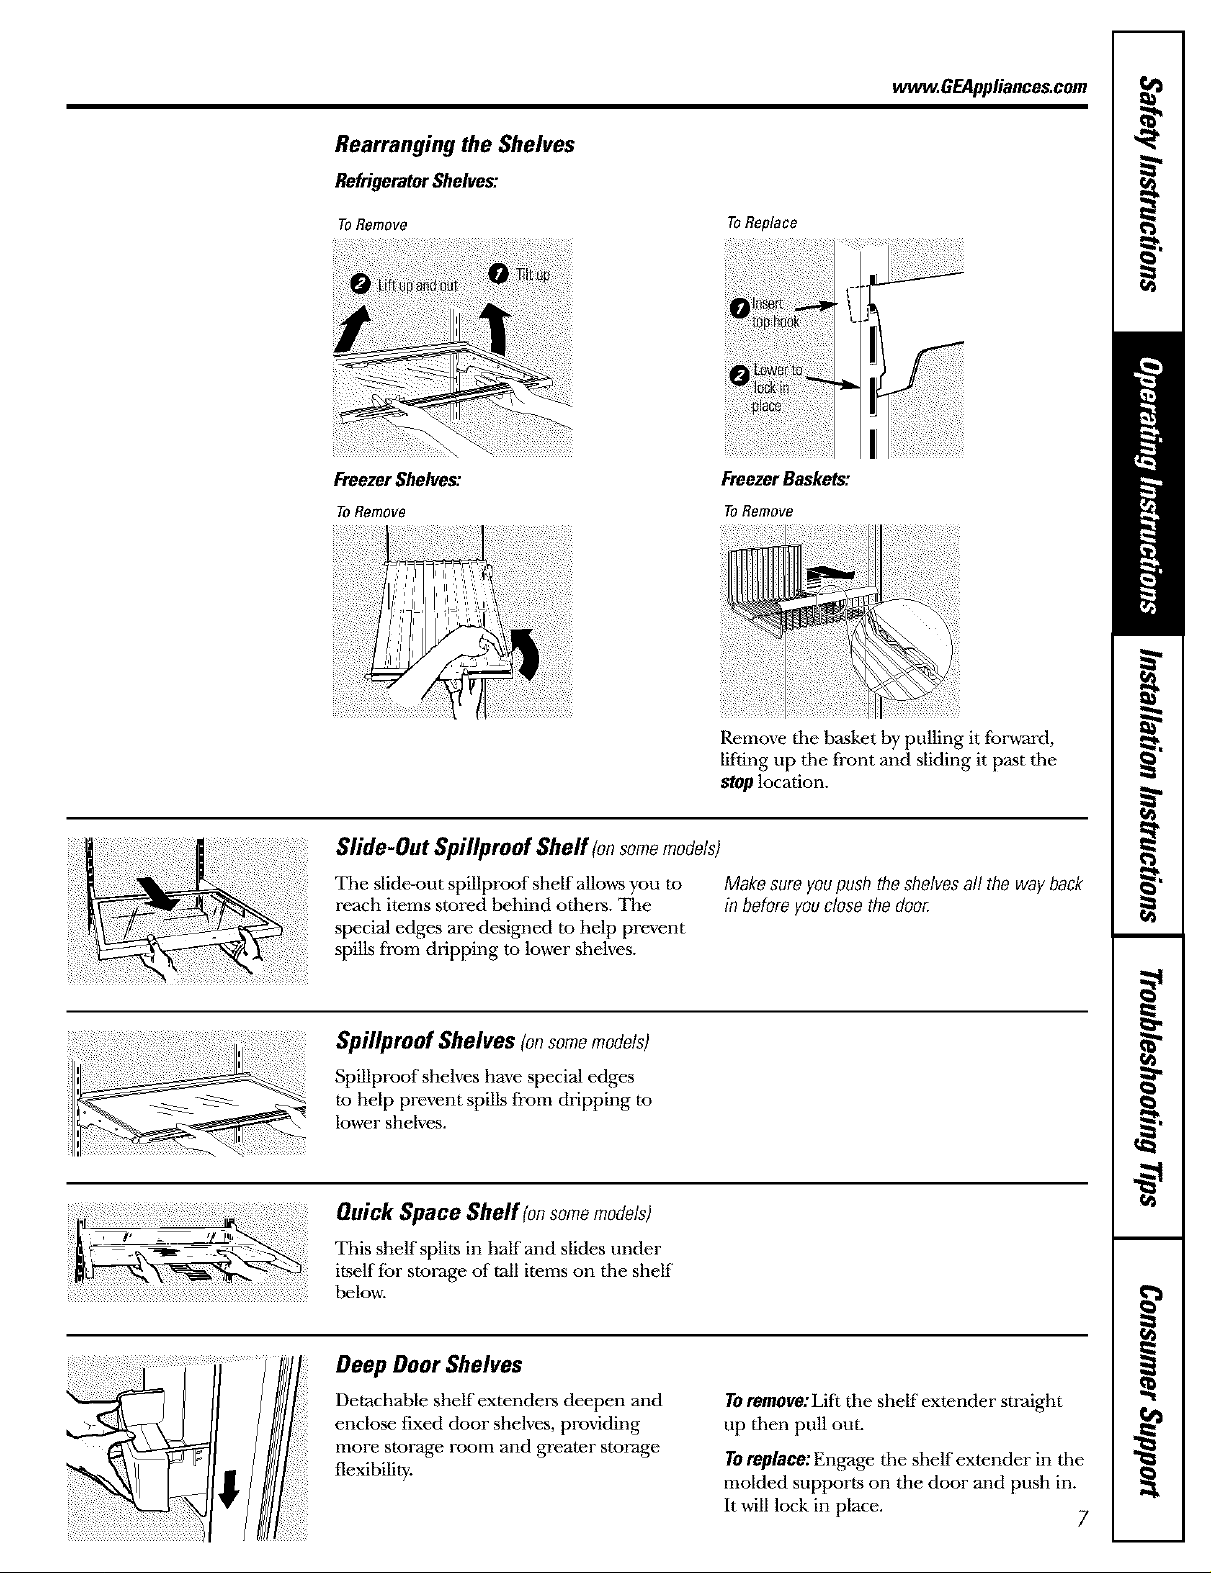
Rearranging the Shelves
RefrigeratorShelves:
ToRemove ToReplece
ww_.GEAppliances.com
Freezer Shelves:
ToRemove
Slide-Out Spillproof Sheff (onsomemodels)
The slide-out spillproof shelf allows you to
reach items stored behind others. The
special edges are designed to help prevent
spills fi'om dripping to lower shelves.
Spillproof Shelves fortsomemodels)
Freezer Baskets:
ToRemove
Remove tile basket by pulling it forward,
lifting up tile front and sliding it past tile
stop location.
Makesureyoupushtheshelvesall thewayback
in beforeyouclosetim doo_
Spillproof shelves have special edges
to help prevent spills from dripping to
lower shelves.
i!(¸ii_i)_iii!iii!ili_ii_i!_!!_i!iii_i!!i!!i!!!!_!:!i!!:!!!!i!_!i!iiii!!i!iil;!i}iii:i!_;ilS_iQuick Space Shelf (onsomemodels)
i}i , _, ._ 'L2_, !iii!i ¸¸
_.., -_-___r > This shelf splits in half and slides tinder
: iteelf fbr storage of tall items on tile shelf"
below.
Deep Door Shelves
Detachable shelf extenders deepen and
enclose fixed door shelves, providing
more storage rooln and greater storage
flexibilivy.
TOremove:Lift tile shelf extender straight
tip then pull out.
TOreplace:Engage the shelf extender in the
molded supports on the door and push in.
It will lock in place. 7
Page 8
Aboutthe additionalfeatures.
Not all features are on all models.
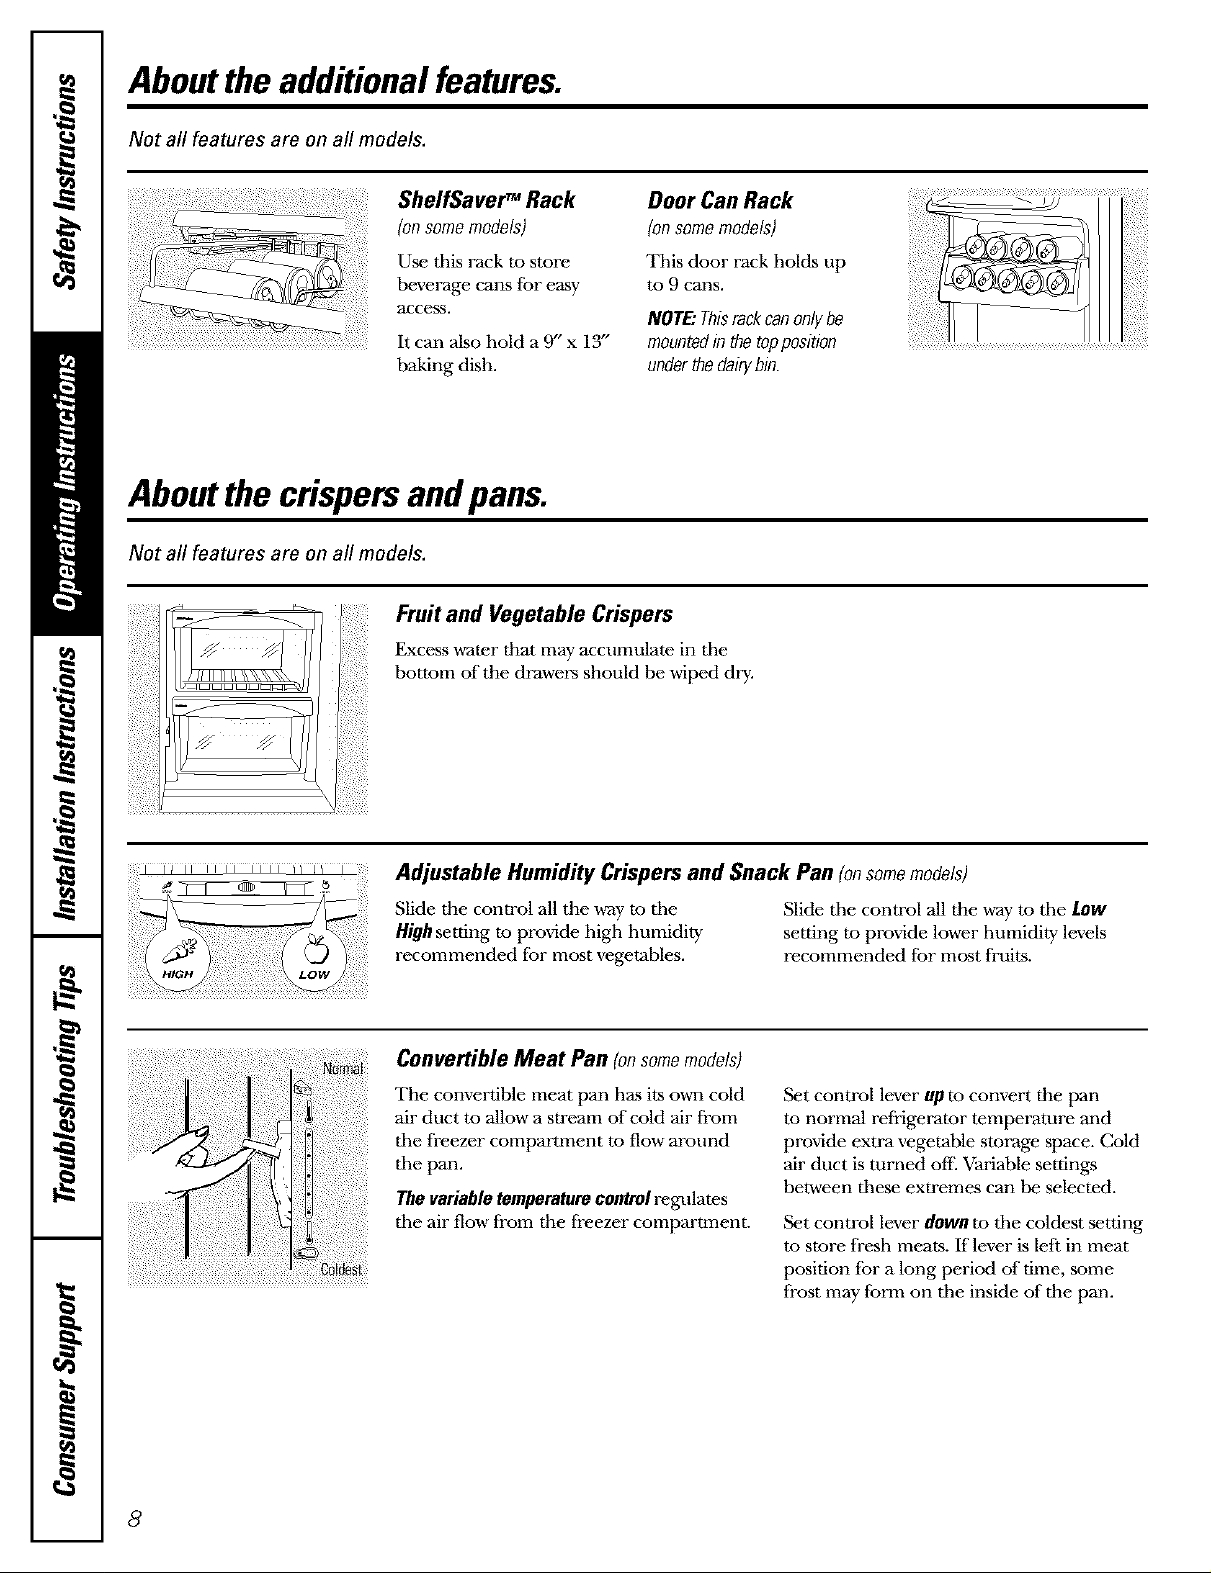
ShelfSaver TM Rack
(onsomemodels)
Use this lack to store
beverage cans for easy
access.
It can also hold a 9" x 13"
baking dish.
Aboutthe crispersandpans.
Not all features are on all models.
Fruitand Vegetable Crispers
Excess water that may accumulate in tile
bottom of the drawers should be wiped dry.
Door Can Rack
(onsomemodels)
This door rack holds up
to 9 cans.
NOTE:Thisrackcanonlybe
mountedinthetopposition
underthedairybin.
I
I
Adjustable Humidity Crispers and Snack Pan (onsomemodels)
Slide the control all the way m tile
Highsetting to proxdde high humidity
recommended for most vegetables.
Convertible Meat Pan (onsomemodels)
The convertible meat pan has its o_m cold
air duct to allow a stream of cold air from
tile freezer compamnent to flow around
tile pan.
The variable temperature control reglflates
tile air flow from the freezer compartment.
Slide tile control all the way to tile LOW
setting to provide lower humidity levels
recommended for most fruits.
Set control lever up to convert the pan
to normal refrigerator temperature and
provide extra vegetable storage space. Cold
air duct is turned ore Variable settings
between these extremes can be selected.
Set control lever downto tile coldest setting
to store fresh meats, ff lever is left in meat
position for a long period of time, some
fi'ost may form on tile inside of the pan.
8
Page 9
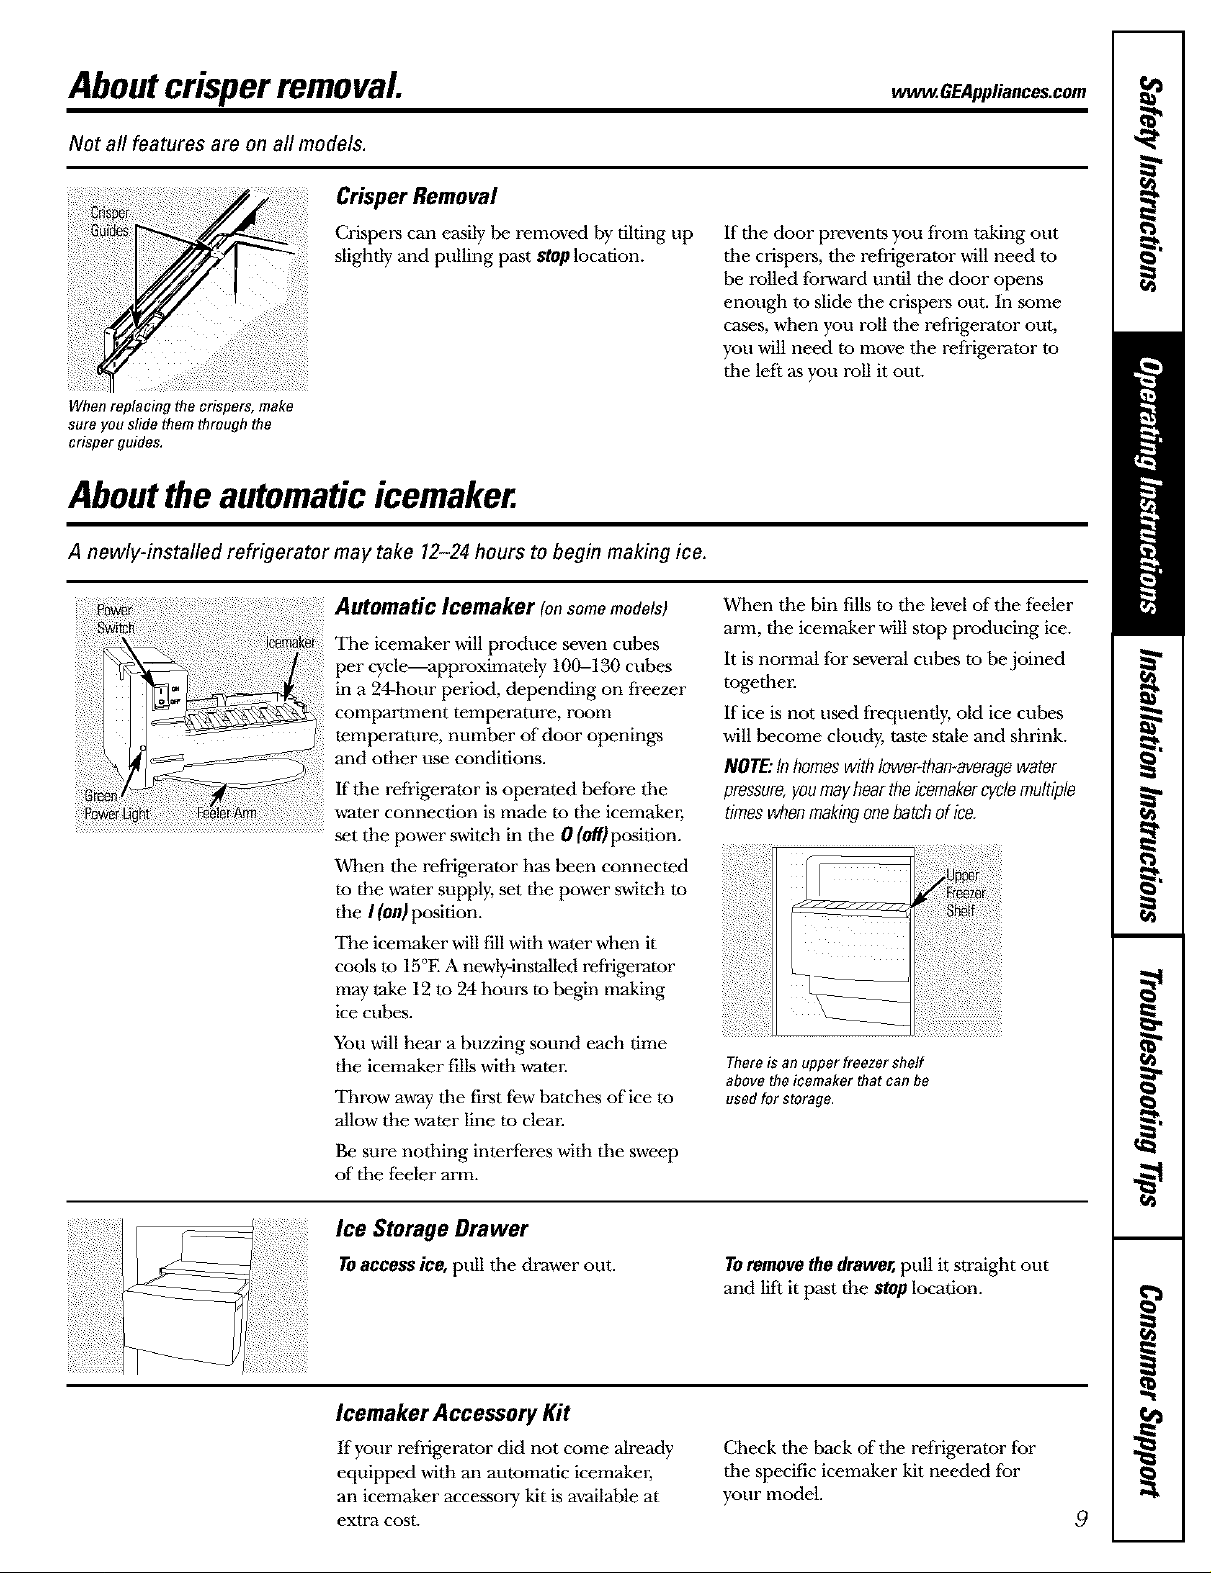
Aboutcrisperremoval ww_.GEAppliances.com
Not all features are on all models.
Crisper Removal
Crispers can easily Ix?removed by tilting up
slightly and pulling past stop location.
When replacing the crispers, make
sure you slide them through the
crisper guides,
Aboutthe automaticicemaker.
A newly-installed refrigerator may take 12-24 hours to begin making ice.
Automatic leemaker (onsomemodels)
The icemaker will produce seven cubes
per cycle_approximately 100-130 cubes
in a 24-hour period, depending on freezer
compartment temperature, room
temperature, number of door openings
and other use conditions.
If the refrigerator is operated before the
water connection is made to the icemakm;
set the power switch in the 0 (Off)position.
When the refrigerator has been connected
to the water supply, set the power switch to
the I (on)position.
The icemaker will fill with water when it
cools to 15°E A newly-installed refrigerator
may take 12 to 24 hom-s to begin making
ice cubes.
If the door prevents you from taking out
tile crispers, tile refrigerator will need m
be rolled forward until the door opens
enough m slide the crispers out. In .some
cams, when you roll tile refrigerator out,
you will need to move tile refrigerator to
tile left as you roll it out.
When the bin fills to the level of the fizeler
arm, the icemaker will stop producing ice.
It is normal for several cubes to be joined
together.
If ice is not used frequently, old ice cubes
will become cloudy, taste stale and shrink.
NOTE:Inhomeswithlower-than_averagewater
pressure,youmayheartheicemakercyclemultiple
timeswhet;makingonebatchofice.
V
You will hear a buzzing sound each time
the icemaker fills with water.
Throw away the first flew batches of ice to
allow the water line to clean
Be sure nothing interferes with the sweep
of the feeler arm.
Ice Storage Drawer
Toaccessice, pull the drawer out. Toremove tile drawer, pull it straight out
There is an upper freezer shelf
above the ieemaker that can be
used for storage,
and lift it past the stop location.
Icemaker Accessory Kit
lfyour refrigerator did not come already
equipped with an automatic icemakm;
an icemaker accessory kit is a'railable at
extra cost.
Check the back of the refrigerator for
the specific icemaker kit needed for
your model.
9
Page 10
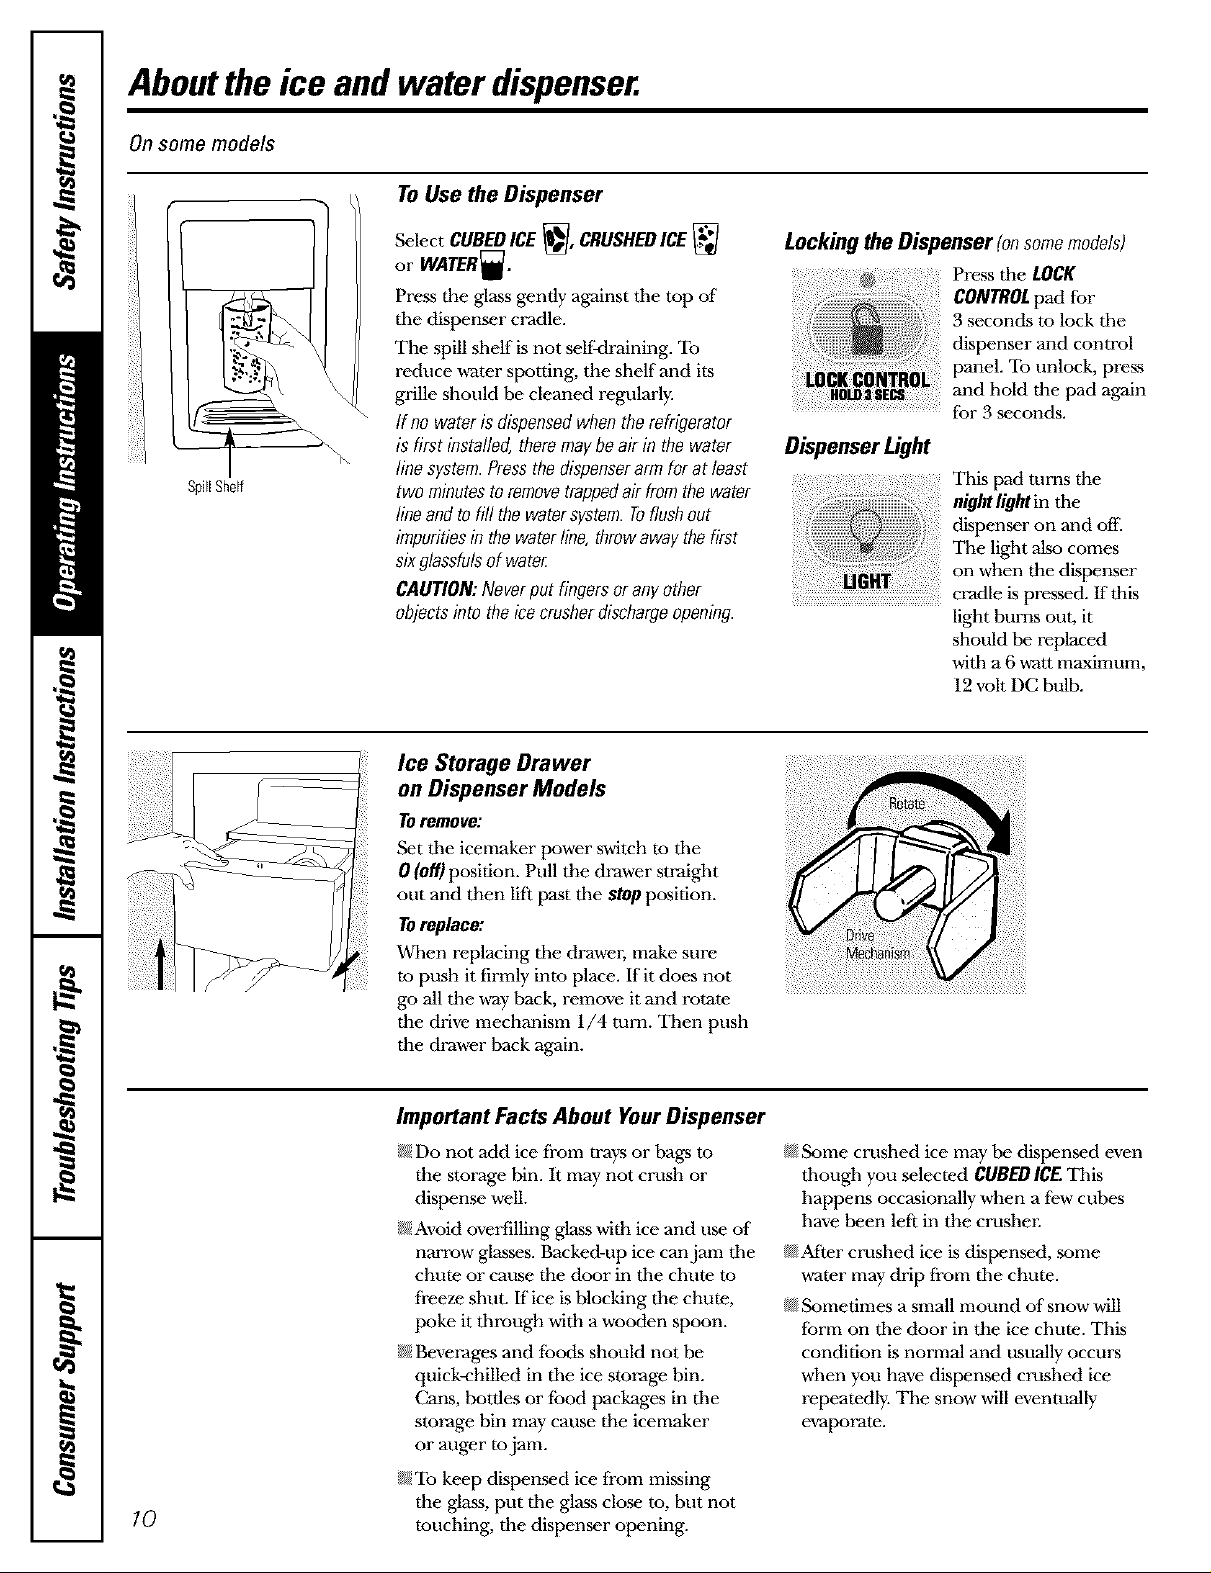
Aboutthe ice and water dispenser.
On some models
TOUse the Dispenser
SpiElSheEf
Select CUBEDICE _, CRUSHEDICE
or WATER_.
Press the glass gently against the top of
the dispenser cradle.
The spill shelf is not self<lraining. To
reduce rearer spotting, the shelf and its
grille should be cleaned regularly.
tf no waterisdispensedwhentherefrigerator
isfirst installed,theremaybeair in thewater
linesystem.Pressthedispenserarmfor at least
two minutestoremovetrappedair fromthe water
lineandtofill thewatorsystem.Toflushout
impuritiesin thewaterline,throwawaythefirst
sixglassfulsofwater
CAUTION:Neverput fingersoranyother
objectsinto the icecrusherdischargeopening.
Ice Storage Drawer
on Dispenser Models
Toremove:
Set tile icemaker power switch to tile
0 (off)position. Pull the drawer sn_ight
out and then lift past tile stop position.
TOreplace:
When replacing tile drawm; make sure
to push it firmly into place. If it does not
go all the way back, remove it and rotate
the drive mechanism 1/4 turn. Titan push
the drawer hack again.
Lockingthe Dispenser(onsomemodels)
Press the LOCK
CONTROLpad for
3 seconds to lock tile
dispenser and control
panel. To unlock, press
and hold tile pad again
for 3 seconds.
Dispenser Light
Tiffs pad turns tile
nightlight in tile
dispenser on and off.
Tile light also comes
on when tile dispenser
cradle is pressed. If this
light burns out, it
should be replaced
with a 6 watt maximum,
12 volt DC bulb.
10
Important Facts About YourDispenser
/}_5Do not add ice from trays or bags to
tile storage bin. It may not crush or
dispense well.
N Avoid overfilling glass with ice and use of
narrow glasses. Backed-up ice can jam tile
chute or cause the door in tile chute to
freeze shut. If ice is blocking tile chute,
poke it through with a wooden spoon.
N Beverages and fbods should not be
quick-chilled in the ice storage bin.
Cans, bottles or fbod packages in the
sturage bin may cause the icemaker
or auger to jam.
N To keep dispensed ice from missing
the glass, put tile glass close to, but not
touching, the dispenser opening.
_ Some crushed ice may be dispensed even
though you selected CUBEDICE.Tiffs
happens occasionally when a few cubes
have been left in the crusher.
_After crushed ice is dispensed, .some
water may drip from tile chute.
_ Sometimes a small mound of snow will
form on tile door in the ice chute. Tiffs
condition is normal and usually occurs
when you have dispensed crushed ice
repeatedly. The snow will eventually
e'_aporate.
Page 11
Careandcleaning ofthe refrigerator. . eEApp,ioncescom
Cleaning the Outside
Thedoorhandlesandtrim.Clean with a
cloth dampened with soapy wamn Dry
with a soft cloth.
Keep the outside clean. Wipe Mth a clean
cloth lightly dampened with kitchen
appliance w_axor mild liquid dish detergent.
Dry and polish with a clean, .soft cloth.
Donot wipetherefrigeratorwith a soileddish
cloth or wet towel Thesemayleavea residue
thatcanerodethepaint. Donot usescouring
pads,powderedcleaners,bleachorcleaners
containingbleachbecausetheseproductscan
scratchandweakenthepaint finish.
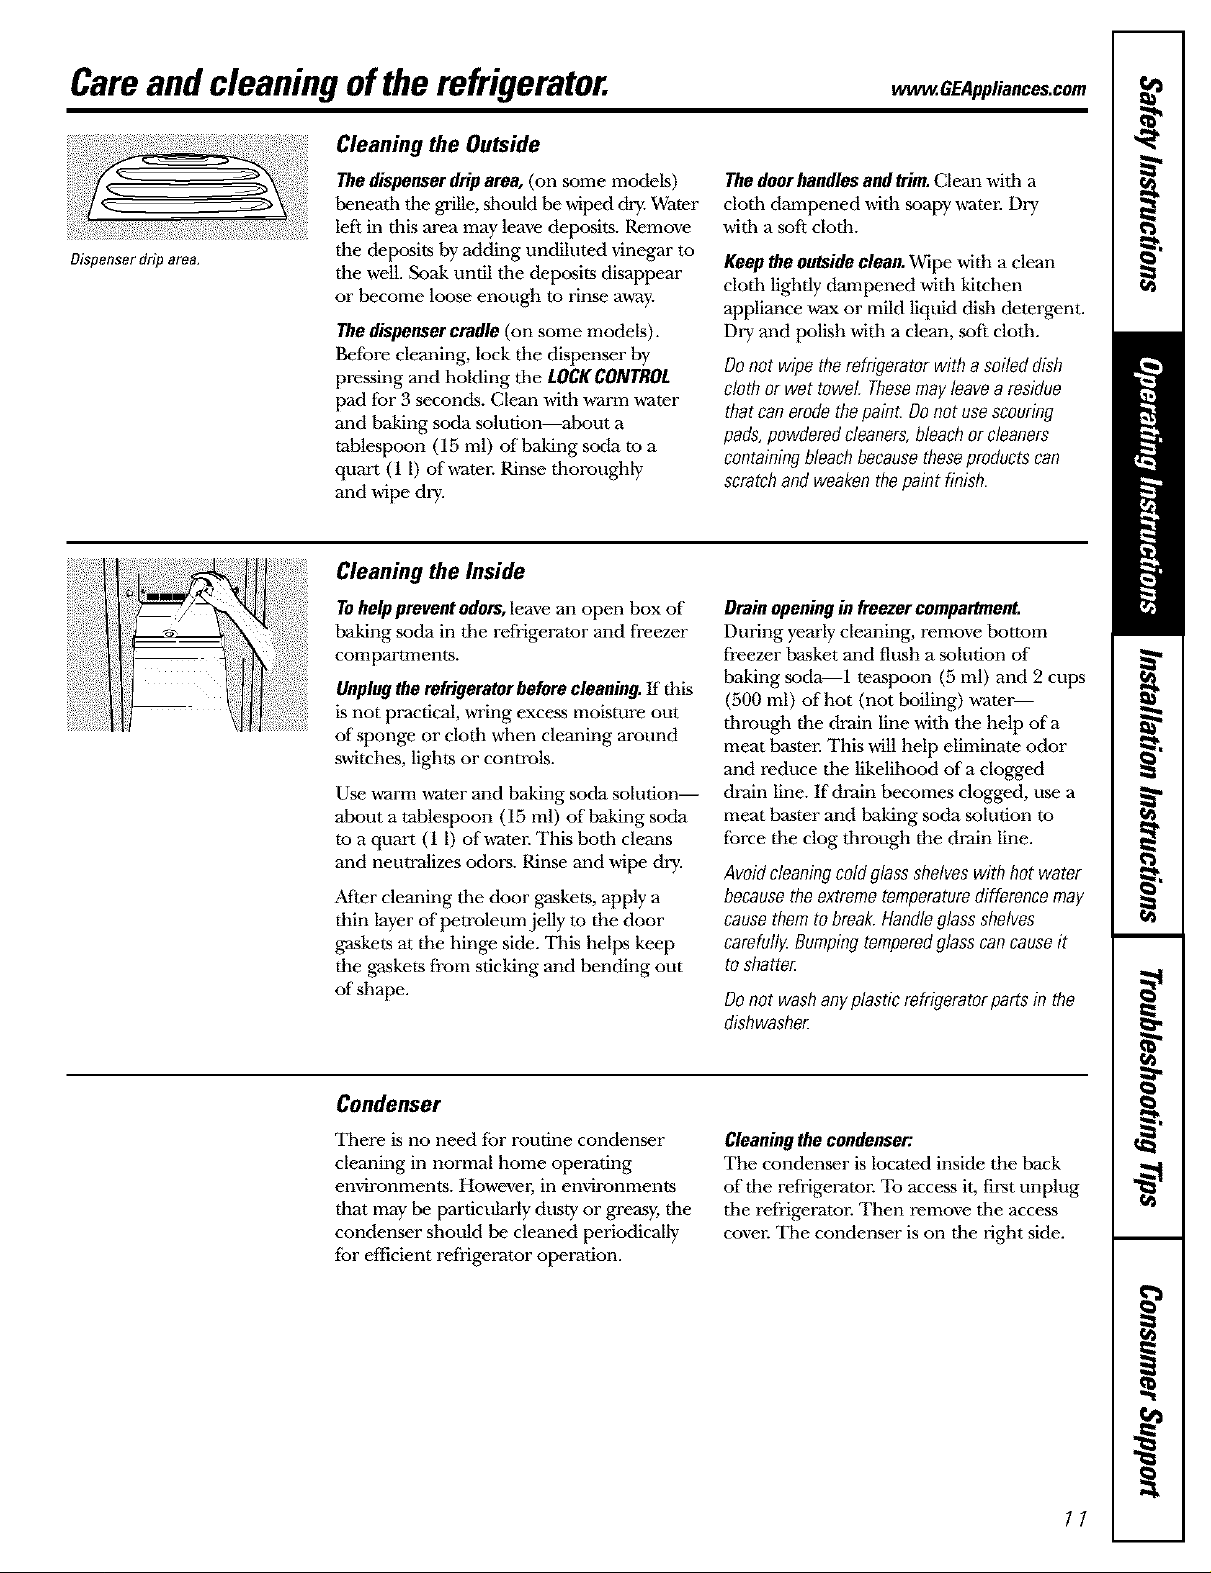
Dispenser drip area.
The dispenser drip area, (on some models)
heneath the grille, should be wiped dry. Water
left in this area may leave deposits. Remove
the deposits by adding undiluted vinegar to
the well. Soak until the deposits disappear
or become loose enough to rinse away.
The dispenser cradle (on some models).
Befbre cleaning, lock the dispenser by
pressing and holding tile LOCK CONTROL
pad for 3 seconds. Clean with w-arm water
and baking soda solution--about a
tablespoon (15 ml) of baking soda to a
quart (1 1) ofwatel: Rinse thoroughly
and wipe dry.
Cleaning the Inside
TOhelp prevent odors,leave an open box of
baking .soda in the refrigerator and freezer
compartments.
Unplugthe refrigerator before cleaning. If this
is not practical, wring excess moisture out
of sponge or cloth when cleaning around
switches, lights or controls.
Use warm water and baking soda solution--
about a tablespoon (15 ml) of baking soda
to a quart (1 1) of water. This both cleans
and neutralizes odors. Rinse and wipe dry.
After cleaning the door gaskets, apply a
thin layer of petroleum jelly m the door
gaskets at the hinge side. This helps keep
the gaskets from sticking and bending out
of shape.
Condenser
There is no need fbr routine condenser
cleaning in normal home operating
emdronments. Howevm; in emdronments
that may be particularly dusty or greasy, the
condenser should be cleaned periodically
for efficient refiigeratur operation.
Drainopeningin freezercompartment.
During yearly cleaning, remove bottom
freezer basket and flush a solution of
baking soda--f teaspoon (5 ml) and 2 cups
(500 ml) of hot (not boiling) ,a-ater--
through the drain line with the help of a
meat baster. This will help eliminate odor
and reduce the likelihood of a clogged
drain line. If drain becomes clogged, use a
meat baster and baking soda solution to
force the clog through the drain line.
Avoidcleaningcoldglassshelveswith hot water
becausetheextremetemperaturedifferencemay
causethemtobreak.Handleglassshelves
carefull}4Bumpingtemperedglasscancauseit
toshatter.
Donot washanyplasticrafrigeratorpartsin the
dishwasher
Cleaningthecondenser:
The condenser is located inside the back
of the refrigeratol: To access it, first unplug
the refiigeratu_: Then remove the access
cover. The condenser is on the right side.
11
Page 12
Careand cleaning ofthe refrigerator.
Behind the Refrigerator
Be careful when moving the refrigerator
away from the wall. All types of floor
coverings can he damaged, particularly
cushioned coverings and those with
embossed surfaces.
Pull the refrigerator straight out and return
it to position by pushing it sn'aight in.
Moving the refrigerator in a side direction
may result in damage to the floor covering
or refiigeraton
Preparing for Vacation
For long vacations or absences, remove
food and unplug the refffNeratol: Clean the
interior with a baking soda solution of one
tablespoon (15 ml) of baking soda to one
quart (1 1) ofwatel: Leave the doors open.
Set the icemaker power switch to the 0 (Off)
position and shut off the water supply to
the refiigeraton
Whenpushingtherefrigeratorback,makesure
youdon'traftoverthepowercordor icemaker
supplyline [onsomemodels].
If the temperature can drop below
freezing, have a qualified servicer drain the
water supply system (on some models) to
prevent serious propervy damage due to
flooding.
Preparing to Move
Secure all loose items such as grille, shelves and drawers by taping them securely
in place to prevent damage.
Be sure the refrigerator stagsin on upright position during moving.
12
Page 13
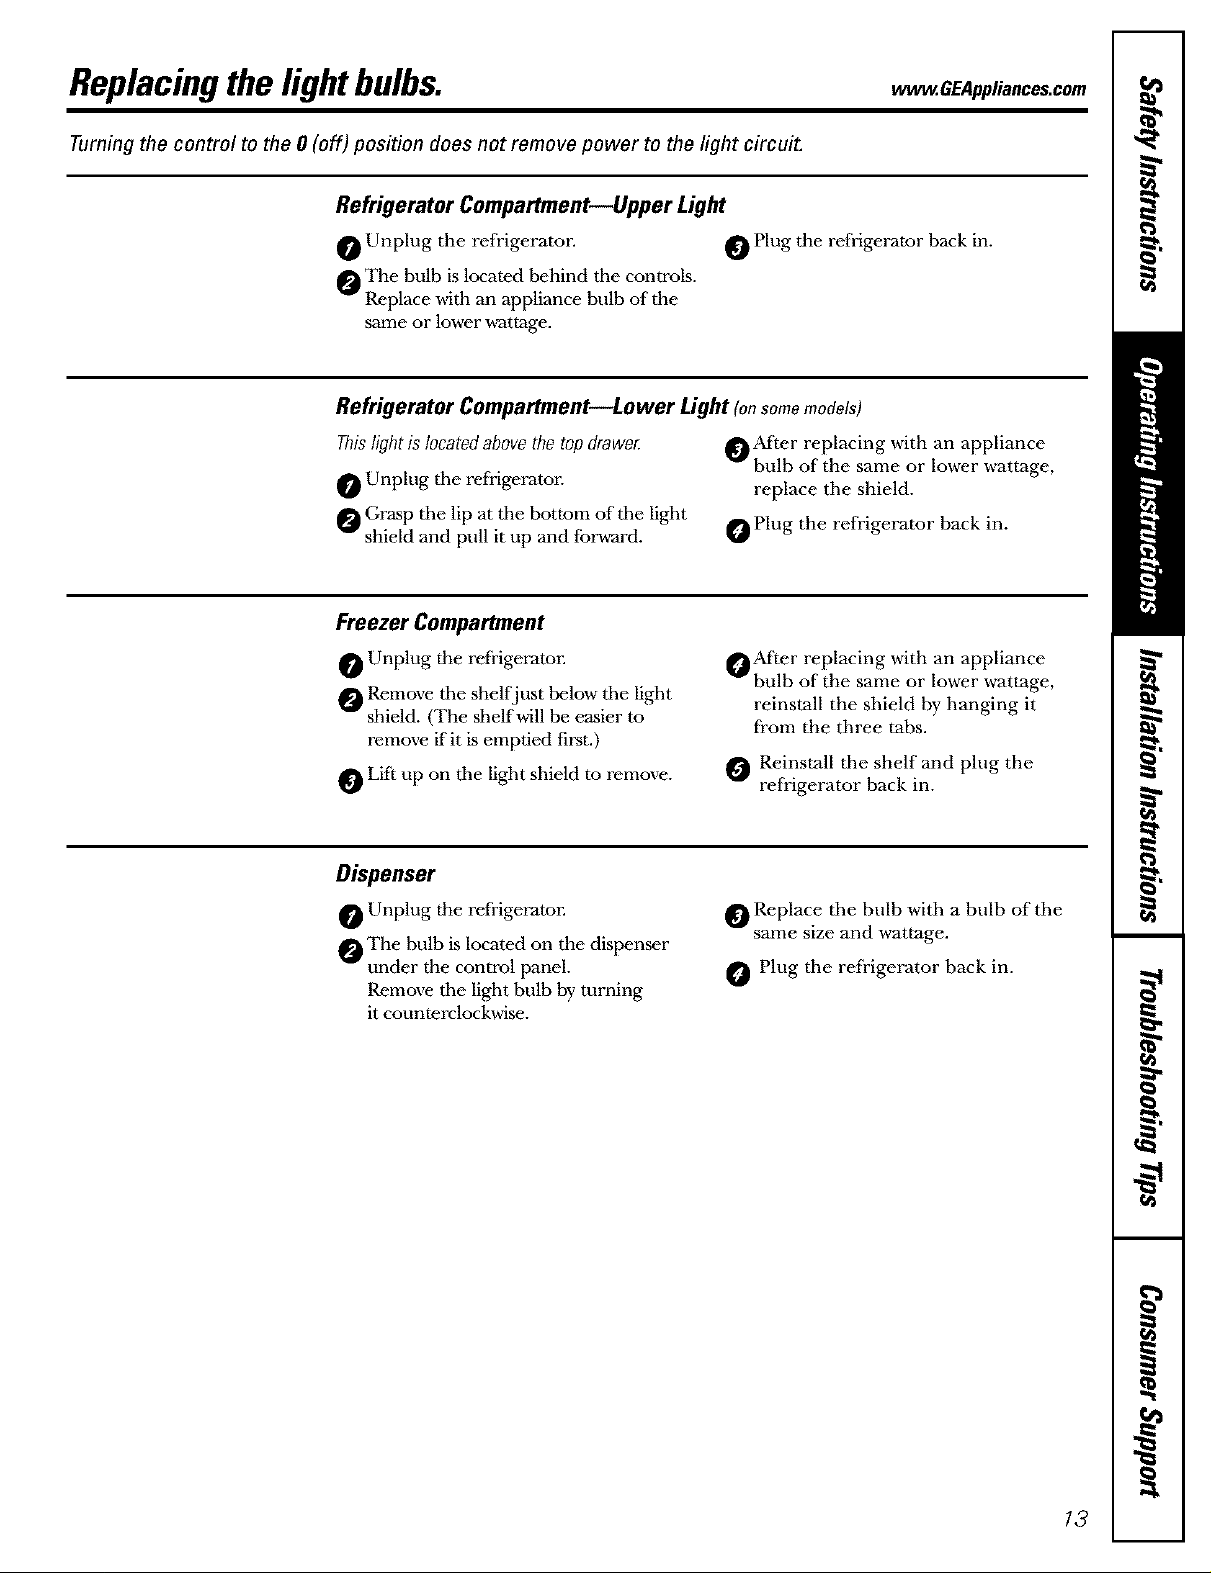
Replacingthelightbulbs. . GEA ,ia.coscom
Turning the control to the 0 (off) position does not remove power to the light circuit.
Refrigerator Compartment--Upper Light
O Unplug the refrigerator. O Plug the refrigerator back in.
_The bulb is located behind tbe controls.
Replace with an appliance bulb of the
same or lower wattage.
Refrigerator Compartment--Lower Light (onsomemodels)
Thislightis locatedabovethe topdrawe_ _ After replacing with an appliance
bulb of the same or lower wattage,
Unplug tile refrigerato_: replace the shield.
_ Grasp tile lip at tile bottom of tile light _ Plug the refrigerator back in.
shield and pull it up and forward.
Freezer Compartment
Unplug the refiigerator.
_ Remove tbe shelf just below tbe light
shield. (The shelf will be easier to
remove if it is emptied first.)
Lift up on tbe light shield to remove.
Dispenser
Unplug tim refiigerator.
_The bulb is located on the dispenser
under the control panel.
Remove tbe light bulb by turning
it counterclockwise.
_Afrer replacing with an appliance
bulb of the same or lower wattage,
reinstall the shield by hanging it
from the three tabs.
_ Reinstall tbe shelf and plug the
refrigerator back in.
Replace tbe bulb with a bulb of the
same size and wattage.
Plug tbe refrigerator back in.
13
Page 14
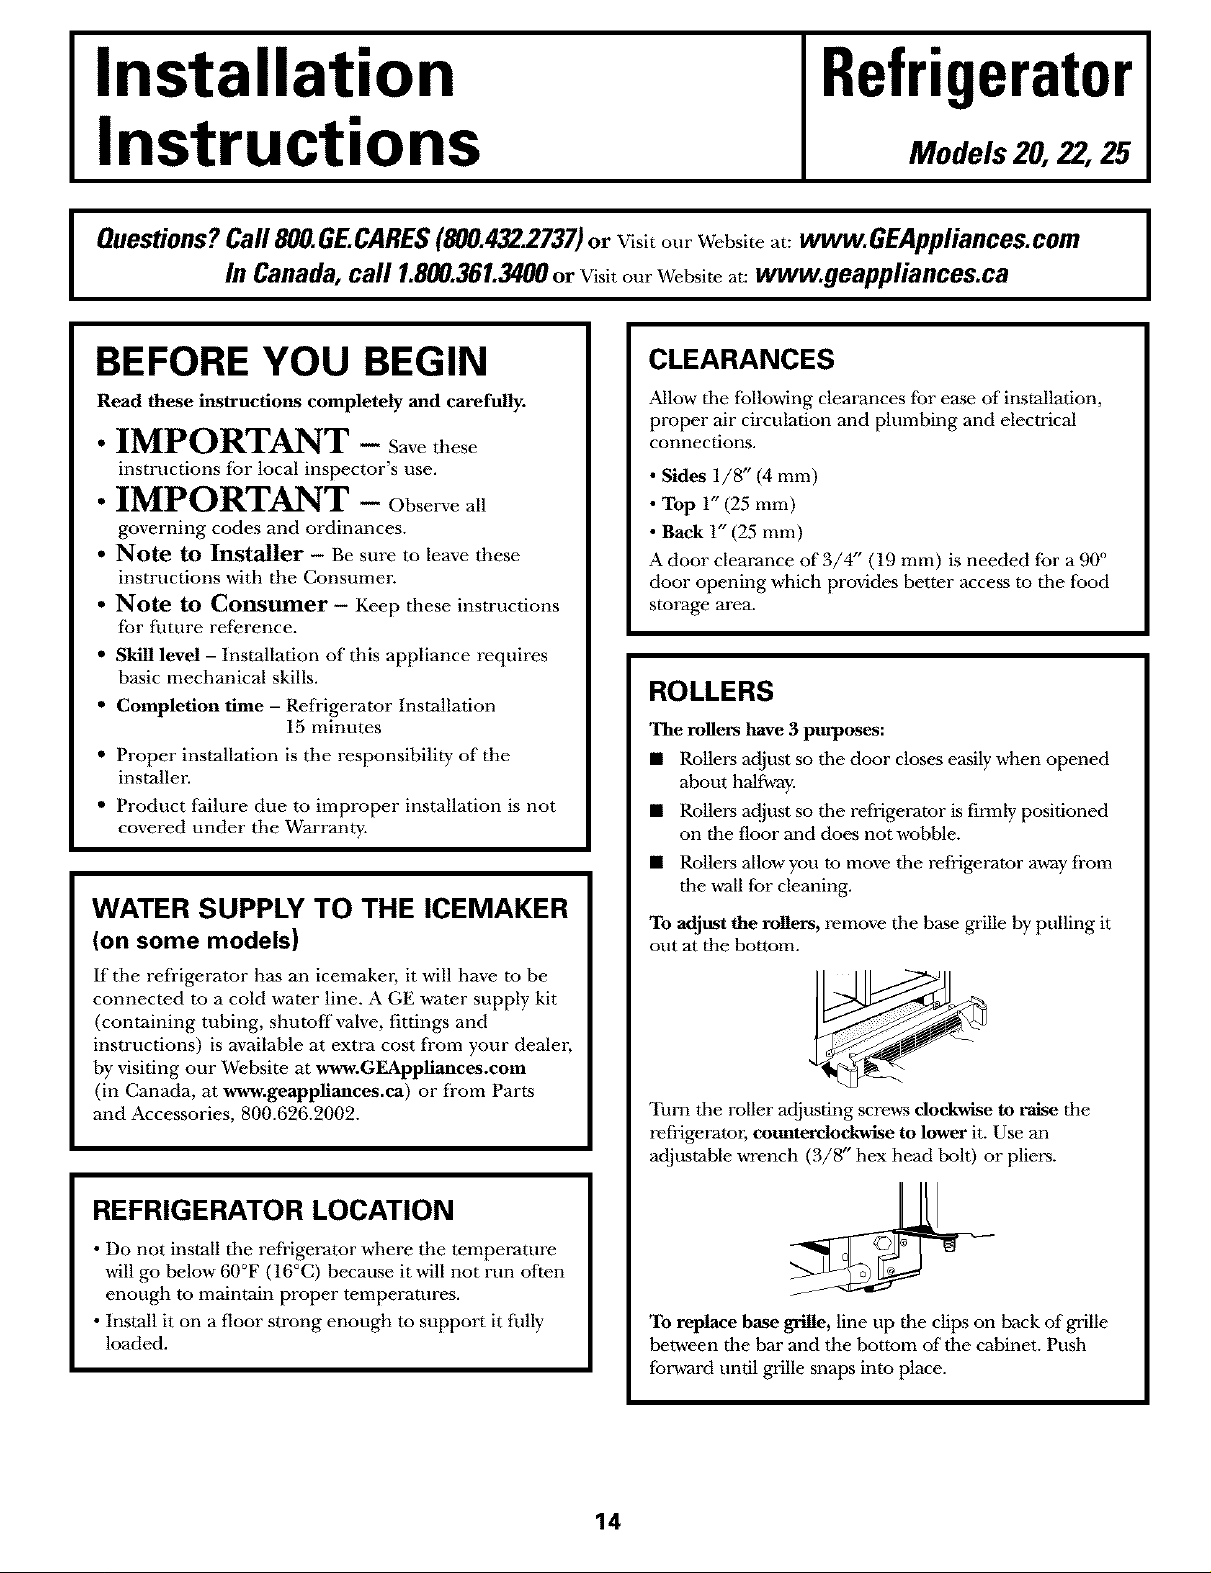
Installation
Refrigerator
Instructions
Questions?Call800.GE.CARES(800.432.2737)or Visitour Website at: www.GEAppliances.com
BEFORE YOU BEGIN
Read these instructions completely and carefully.
• IMPORTANT - gavetheso
instructions for local inspector's use.
• IMPORTANT - Obsorvoall
governing codes and ordinances.
• Note to Installer - Be sure to leave these
instructions with the Consumer.
• Note to Consumer - Keep these instructions
1or fllttlre reference.
• Skill level - Installation of this appliance requires
basic mechanical skills.
In Canada,call 1.800.361.3400orVisitourWebsiteat:www.geappliances.ca
CLEARANCES
Allow the following clearances tbr ease of installation,
proper air circulation and plumbing and electrical
connections.
• Sides 1/8" (4 mm)
• Top 1" (25 mm)
• Back 1" (25 mm)
A door clearance of 3/4" (19 rnm) is needed for a 90 °
door opening which provides better access to the food
storage area.
Models 20, 22,25
ROLLERS
• Completion time - Refrigerator Installation
• Proper installation is the responsibility of the
installer.
• Product failure due to improper installation is not
covered under the Warranty.
15 minutes
The rogers have 3 purposes:
• Rollers adjust so the door closes easily when opened
about halfu_y.
Rollers adjust so the refrigerator is firmly positioned
on the floor and does not wobble.
Rollers allow you to move the refrigerator a_a_yfrom
the wall for cleaning.
WATER SUPPLY TO THE ICEMAKER
(on some models)
If the refi'igerator has an icemakm; it will have to be
connected to a cold water line. AGE water supply kit
(containing tubing, shutoff valve, fittings and
instructions) is available at extra cost fi'om your dealm;
by visiting our Website at www.GEAppliances.eom
(in Canada, at www.geappliances.ea) or fi'om Parts
and Accessories, 800.626.2002.
To adjust the rollers, remove the base grille by pulling it
out at the bottom.
Turn the roller adjusting scre,a_ dockwise to raise the
refrigerator, counterclockwise to lower it. Use an
adjustable wrench (3/8" hex head bolt) or pliers.
I
REFRIGERATOR LOCATION
• Do not install tile refiigerator where the temperature
will go below 60°F (16°C) because it will not run often
enough to maintain proper temperatures.
• Install it on a floor strong enough to support it fully
loaded.
To replace base grille, line up the clips on back of grille
between the bar and the kuottom of the cabinet. Push
foYward until grille snaps into place.
14
Page 15
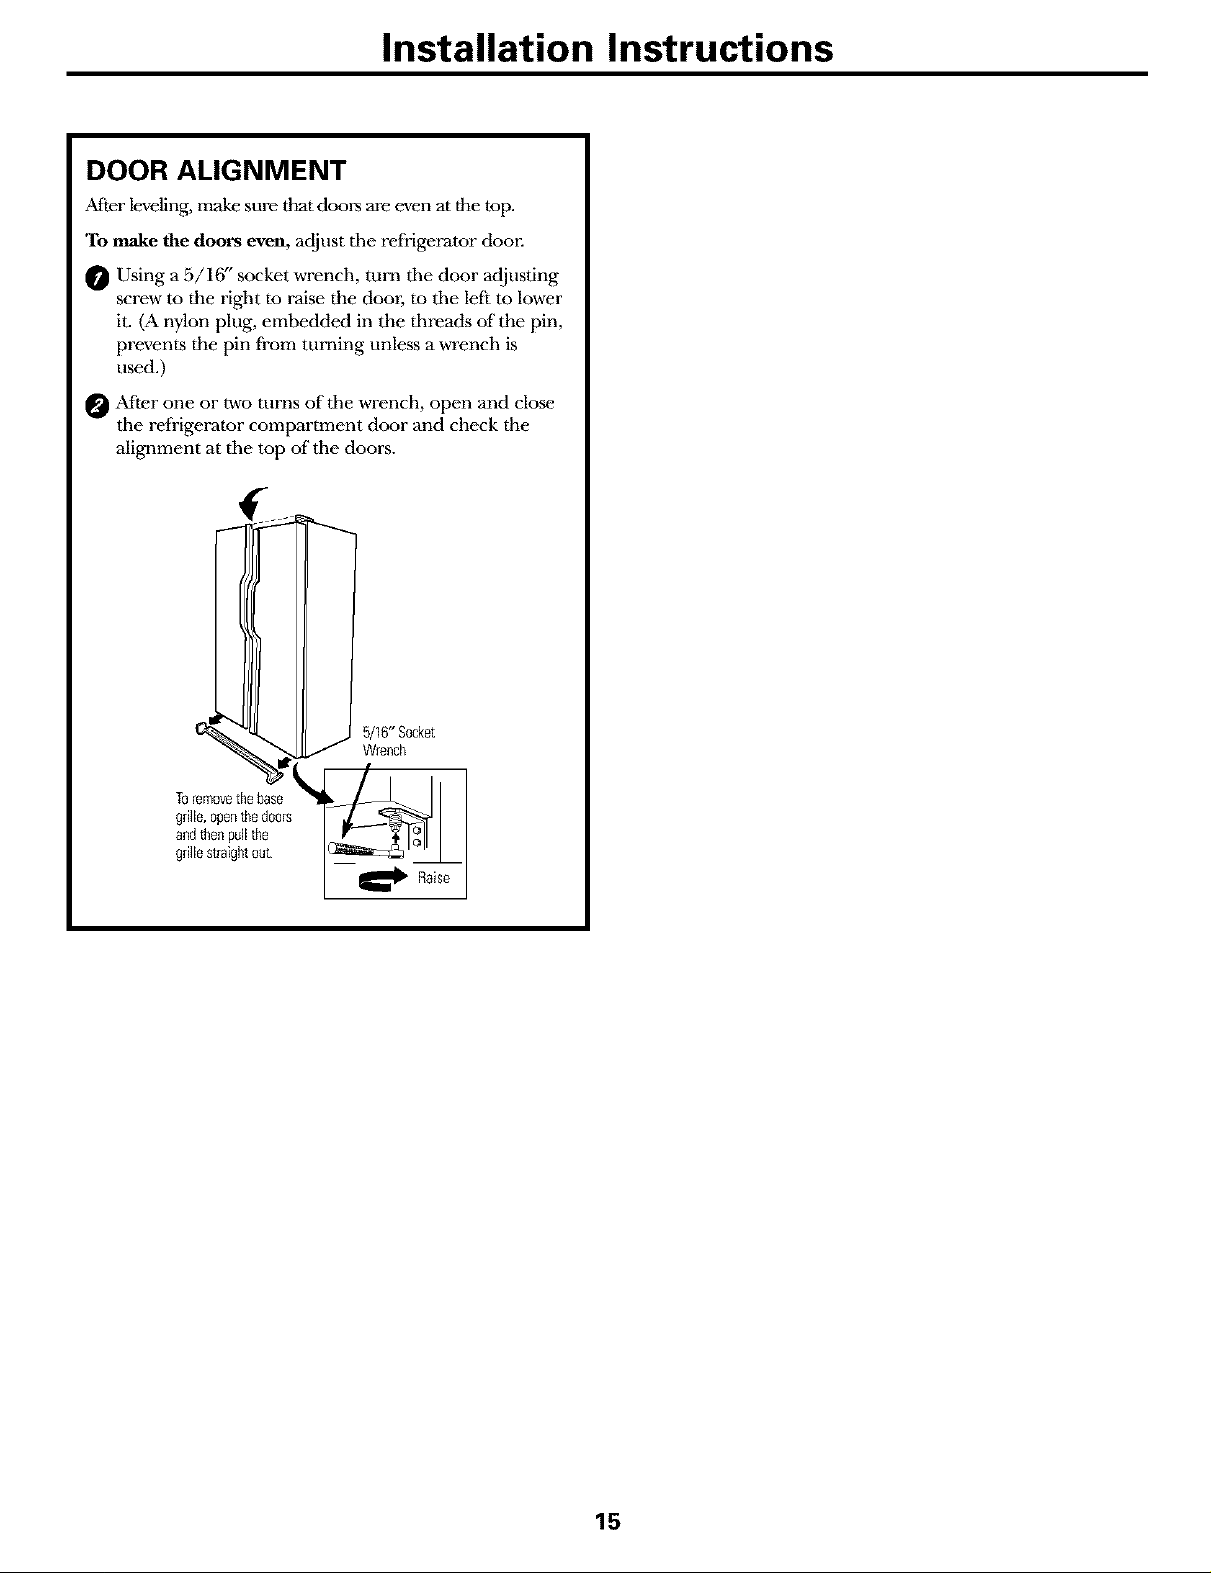
Installation Instructions
DOOR ALIGNMENT
After leveling, make sure that doors are even at the top.
To make the doors even, adjust tile refrigerator door.
O Using a 5/16" socket wrench, turn tile door adjusting
screw to the right to raise the door, to tile left to lower
it. (A nylon plug, embedded in the threads of the pin,
prevents the pin from turning unless a wrench is
used.)
O After one or two turns of the wrench, open and close
tile refrigerator compartment door and check the
alignment at tile top of tile doors.
Toremovethebase
gdlle,oDenthedoors
andthen pullthe
gdllestraightout
15
Page 16
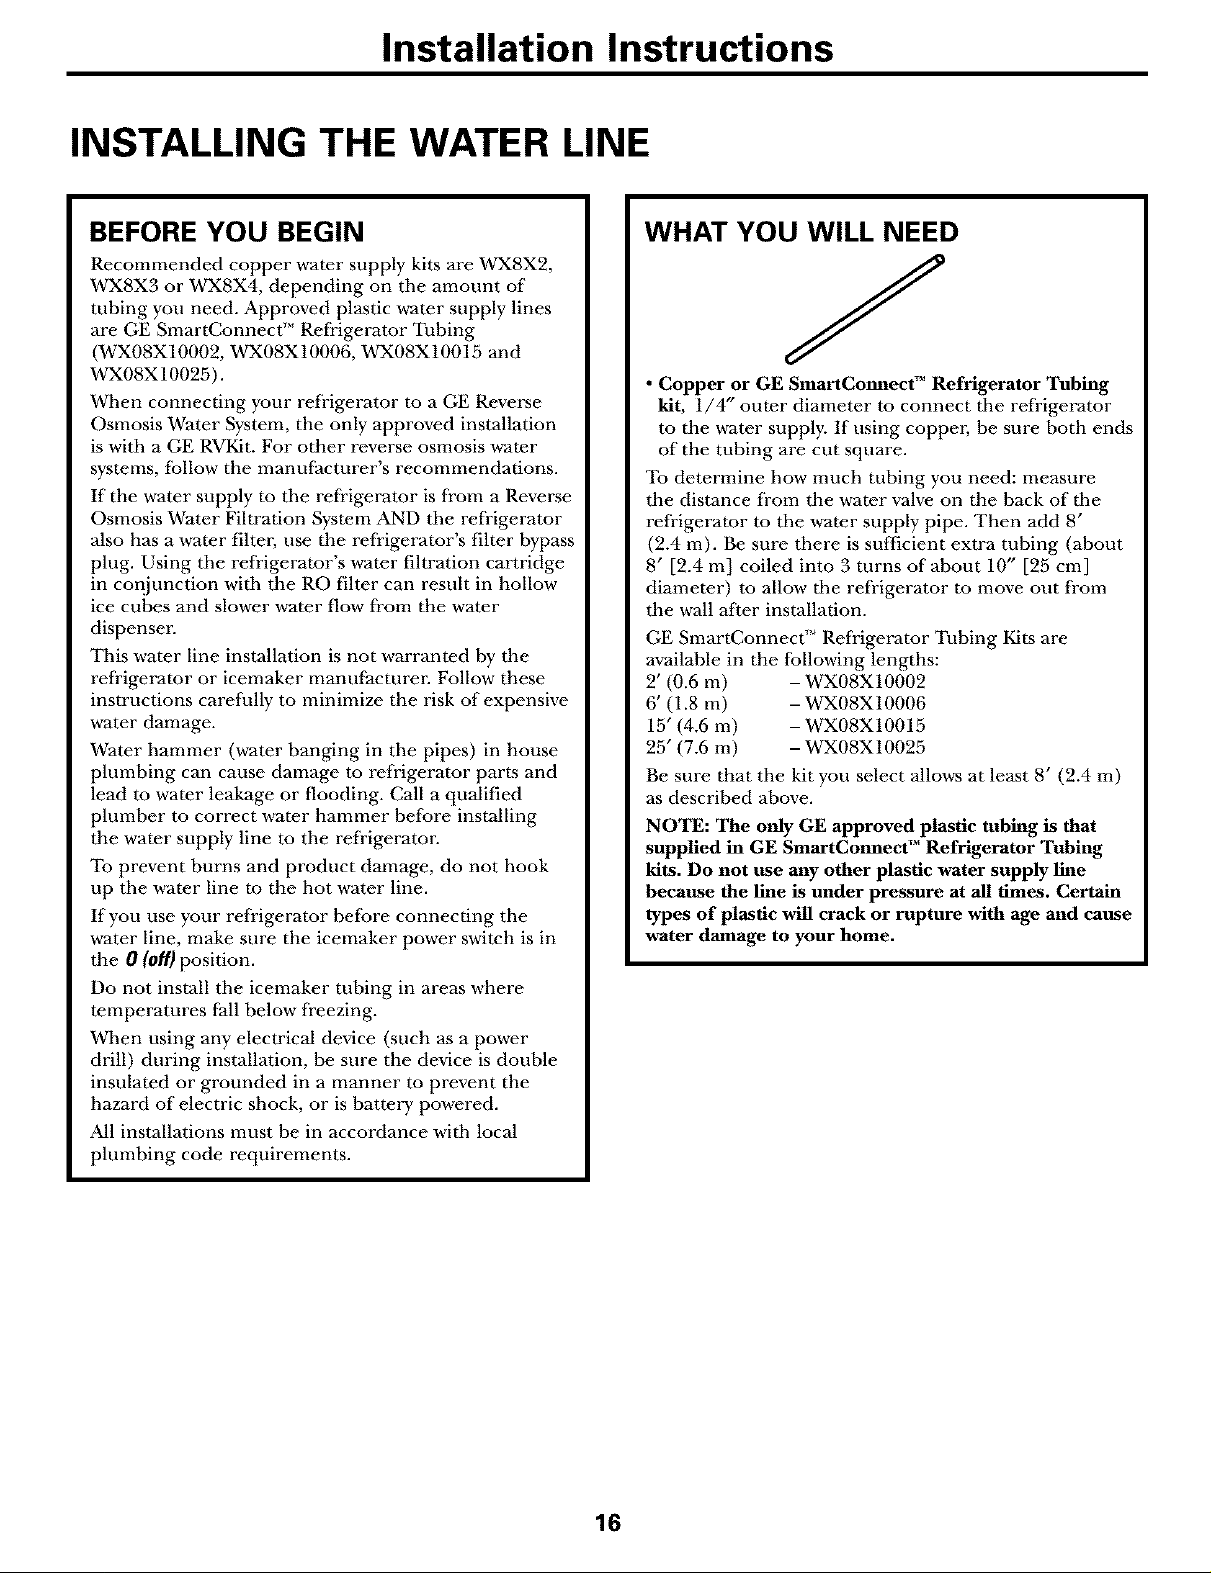
Installation Instructions
INSTALLING THE WATER LINE
BEFORE YOU BEGIN
Recommended copper water supply kits are WX8X2,
WX8X3 or WX8X4, depending on the amount of
tubing you need. Approved plastic ,a-ater supply lines
are GE SmartConnect '' Refiigeramr Tubing
(WX08X10002, WX08X10006, WX08X10015 and
WX08X10025).
When connecting your refrigerator to a GE Reverse
Osmosis Water System, the only approved installation
is with a GE RVKit. For other reverse osmosis ,a-ater
systems, follow the manufacturer's recommendations.
If the water supply to the refi'igerator is from a Reverse
Osmosis Water Filtration System AND the refi'igerator
also has a water filtm; use the refrigerator's filter bypass
plug. Using the refrigerator's water fihration cartridge
in coiljunction with the RO filter can resuh in hollow
ice cubes and slower water flow fi'om the water
dispensen
This water line installation is not warranted by the
refrigerator or icemaker manufacturen Follow these
instructions carefully to minimize the risk of expensive
water damage.
Water hammer (water banging in the pipes) in house
plumbing can cause damage to refrigerator parts and
lead to water leakage or flooding. Call a qualified
plumber to correct water hammer before installing
the water supply line to the refi'igeratol:
To prevent burns and product damage, do not hook
up the w-ater line to the hot water line.
If you use your refrigerator befbre connecting the
water line, make sure the icemaker power switch is in
the 0 (Off) position.
Do not install the icemaker tubing in areas where
temperatures fall below freezing.
When using any electrical device (such as a power
drill) during installation, be sure the device is double
insulated or grounded in a manner to prevent the
hazard of electric shock, or is batte W powered.
All installations must be in accordance with local
plumbing code requirements.
WHAT YOU WILL NEED
• Copper or GE SmartConnect TM Refrigerator Tubing
kit, 1/4" outer diameter to connect the refi'igerator
to the water supply. If using coppm; be sure both ends
of the tubing are cut square.
To determine how much tubing you need: measure
the distance fi'om the water valve on the back of the
refrigerator to the water supply pipe. Then add 8'
(2.4 m). Be sure there is sufficient extra tubing (about
8" [2.4 m] coiled into 3 turns of about 10" [25 cm]
diameter) to allow the refi'igerator to move out fi'om
the wall after installation.
GE SmartConnect ''_Refrigerator Tubing Kits are
available in the follovdng lengths:
2' (0.6 m) -WXO8XIO002
6' (1.8 m) -WXO8XIO006
15" (4.6 m) - WXO8XIOOf5
25" (7.6 m) - WXO8XlO025
Be sure that the kit you select allows at least 8' (2.4 m)
as described above.
NOTE: The only GE approved plastic tubing is that
supplied in GE SmartConnect TM Refrigerator Tubing
kits. Do not use any other plastic water supply line
because the line is under pressure at all times. Certain
types of plastic will crack or rupture with age and cause
water damage to your home.
16
Page 17
Installation Instructions
WHAT YOU WILL NEED (CONT.)
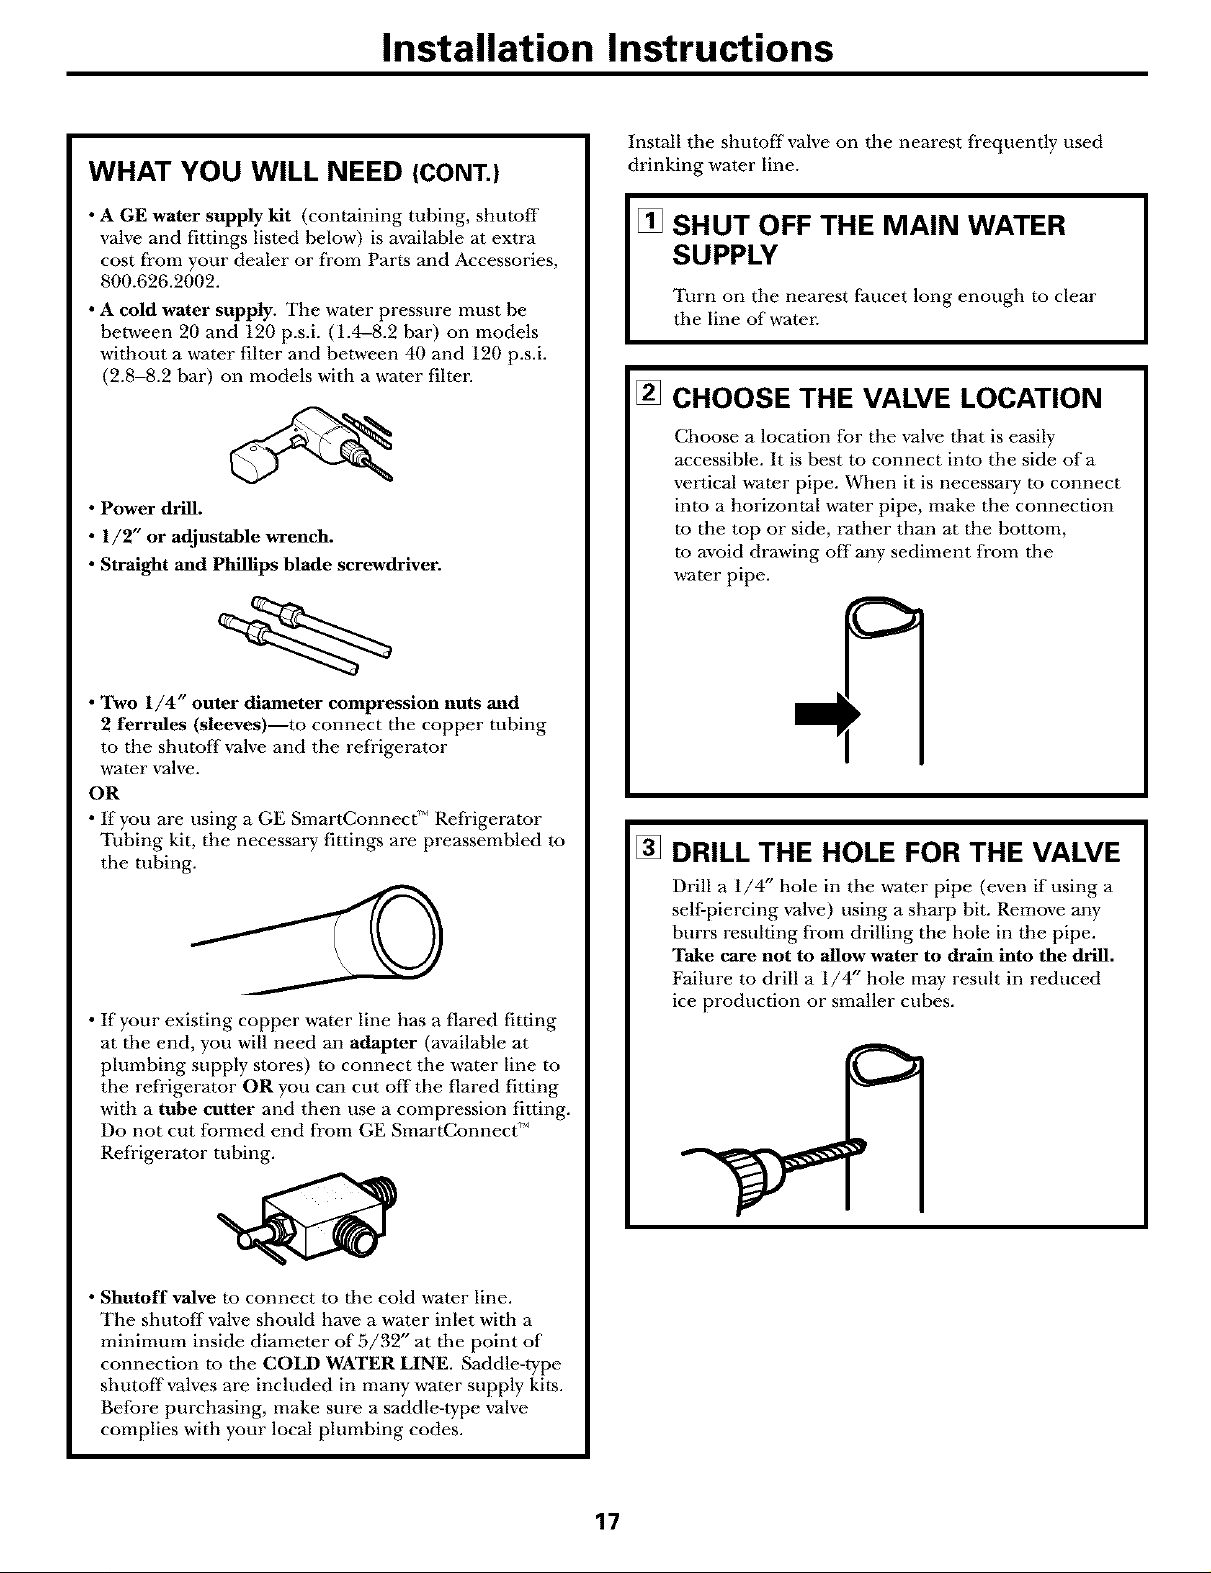
Install the shutoffvalve on the nearest frequently used
drinking water line.
• AGE water supply kit (containing tubing, shutoff
valve and fittings listed below) is available at extra
cost fi'om your dealer or fi'om Parts and Accessories,
800.626.2002.
• A cold water supply. The water pressure must be
between 20 and 120 p.s.i. (1.4_.2 bar) on models
without a water filter and between 40 and 120 p.s.i.
(2.8-8.2 bar) on models with a water filten
• Power drill.
• 1/2" or adjustable wrench.
• Straight and Phillips blade screwdriver.
• Two 1/4" outer diameter compression nuts and
2 ferrules (sleeves)--to connect the copper robing
to the shutoff valve and the refi'igerator
water valve.
OR
• K you are using a GE SmartConnecC' Refrigerator
Tubing kit, the necessary fittings are preassembled to
the tubing.
• If your existing copper water line has a flared fitting
at the end, you will need an adapter (available at
plumbing supply stores) to connect the water line to
the refrigerator OR you can cut off the flared fitting
with a tube cutter and then use a compression fitting.
Do not cut formed end from GE SmartConnect '_
Refi'igerator tubing.
[] SHUT OFF THE MAIN WATER
SUPPLY
Turn on the nearest faucet long enough to clear
the line of water.
[] CHOOSE THE VALVE LOCATION
Choose a location for the valve that is easily
accessible. It is best to connect into the side of a
vertical ,a-ater pipe. When it is necessary to connect
into a horizontal water pipe, make the connection
to the top or side, rather than at the bottom,
to avoid drawing offany sediment from the
,a_ater pipe.
[] DRILL THE HOLE FOR THE VALVE
Drill a 1/4" hole in the ,a-ater pipe (even if using a
self-piercing valve) using a sharp bit. Remove any
burrs resuhing from drilling the hole in the pipe.
Take care not to allow water to drain into the drill.
Failure to drill a 1/4" hole may resuh in reduced
ice production or smaller cubes.
• Shutoff valve to connect to tile cold water line.
The shutoff valve should have a water inlet with a
minimum inside diameter of 5/32" at the point of
connection to the COLD WATER LINE. Saddle-type
shutoffvalves are included in many water supply kits.
Before purchasing, make sure a saddle-type valve
complies with your local plumbing codes.
17
Page 18
Installation Instructions
INSTALLING THE WATER LINE (cont.)
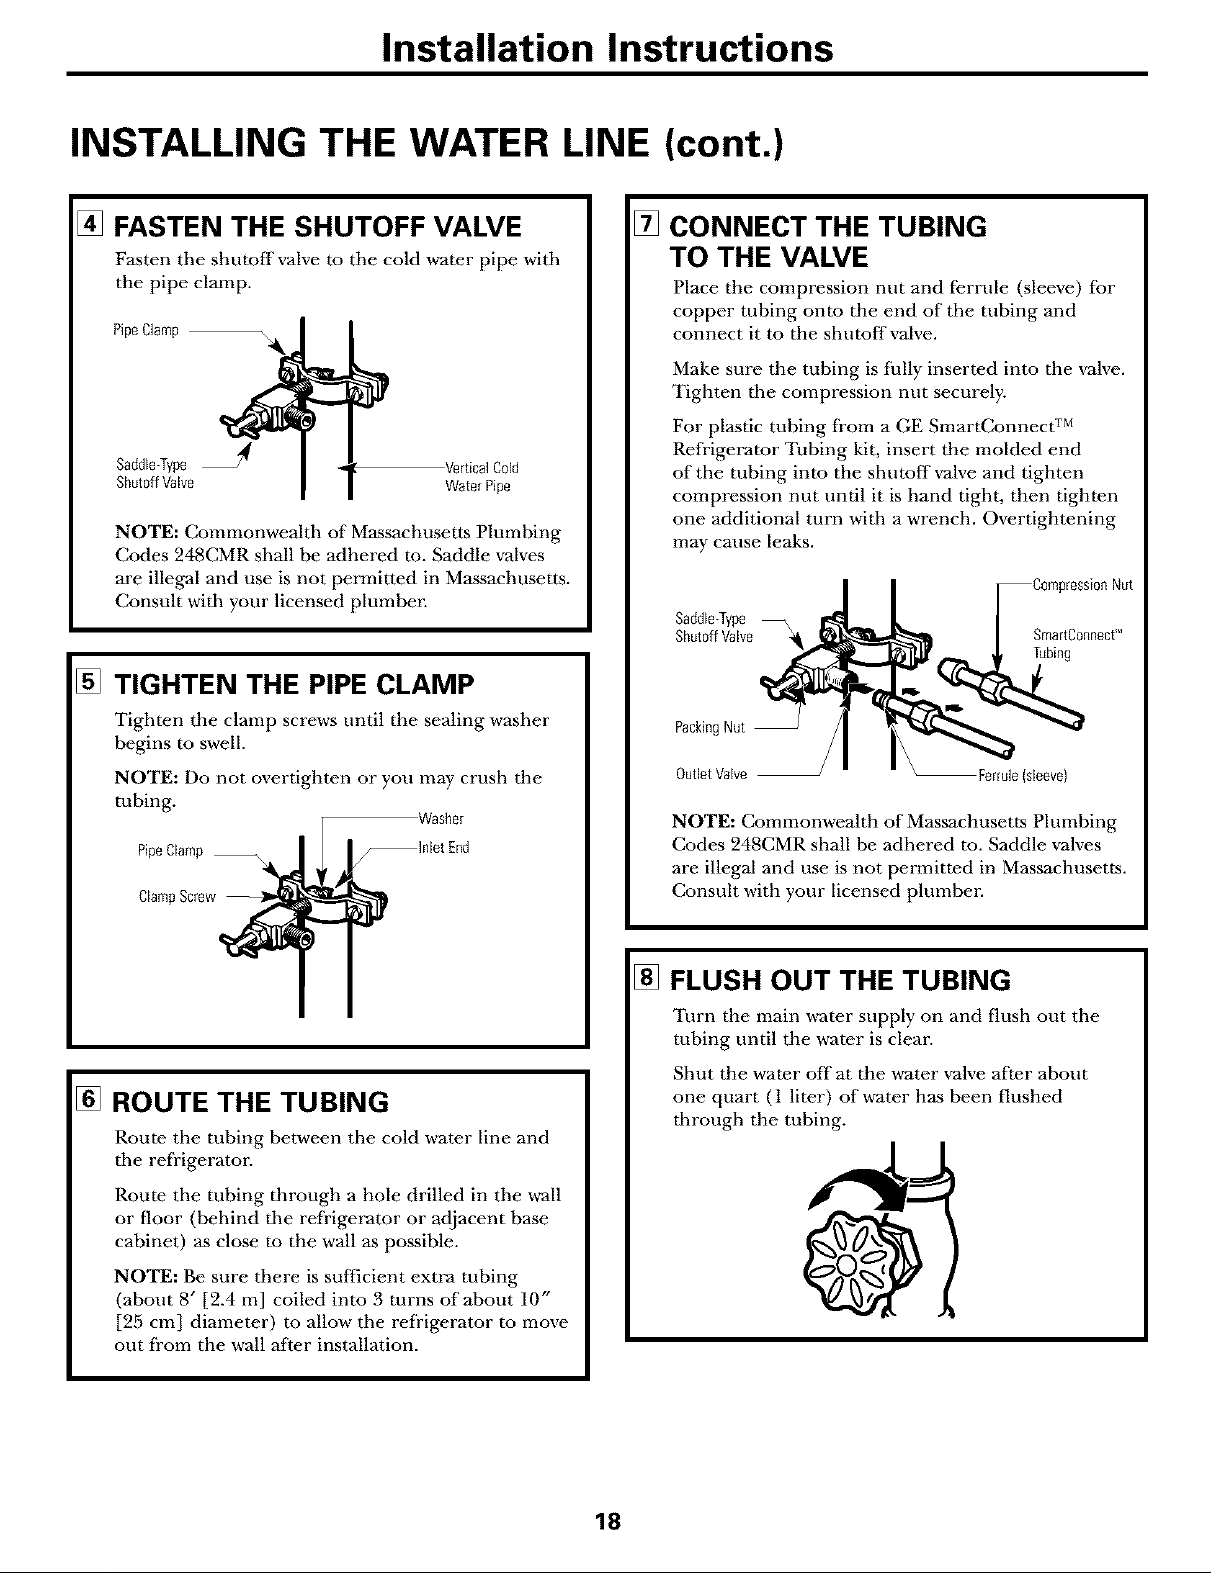
[] FASTEN THE SHUTOFF VALVE
Fasten the shutoffvah,e to the cold water pipe with
the pipe clamp.
PipeClamp
Saddle-Type _4 VerticalCold
ShutoffValve Water Pipe
NOTE: Commonwealth of Massachusetts Plumbing
Codes 248CMR shall be adhered m. Saddle valves
are illegal and use is not permitted in Massachusetts.
Consult with your licensed plumbm:
[] TIGHTEN THE PIPE CLAMP
Tighten the clamp screws until the sealing washer
begins to swell.
NOTE: Do not overtighten or you may crush the
tubing.
ClampScre
PipeCiamPw_ _lniet End
Washer
[]
CONNECT THE TUBING
TO THE VALVE
Place the compression nut and ferrule (sleeve) for
copper tubing onto the end of the tubing and
connect it to the shutoff valve.
Make sure the tubing is fhlly inserted into the valve.
Tighten tile compression nut securely.
For plastic tubing from a GE SmartConnect TM
Refrigerator Tubing kit, insert the molded end
of the tubing into the shutoff valve and tighten
compression nut until it is hand tight, then tighten
one additional turn with a wrench. Overtightening
may cause leaks.
SaddleType
ShutoffValve SmartConnectM
PackingNut
OutletValve
NOTE: Commonweahh of Massachusetts Plumbing
Codes 248CMR shall be adhered to. Saddle valves
are illegal and use is not permitted in Massachusetts.
Consult with your licensed plumben
\ Ferrule{sleeve)
Nut
Tubing
[] ROUTE THE TUBING
Route the tubing between the cold water line and
tile refrigerator.
Route the tubing through a hole drilled in the v_-all
or floor (behind tile refrigerator or adjacent base
cabinet) as close to the wall as possible.
NOTE: Be sure there is sufficient extra tubing
(about 8" [2.4 m] coiled into 3 turns of about 10"
[95 cm] diameter) to allow the refrigerator to move
out from the wall after installation.
[] FLUSH OUT THE TUBING
Turn the main w-ater supply on and flush out the
tubing until the water is clear.
Shut the water offat the water valve after about
one quart (1 liter) of water has been flushed
through the tubing.
18
Page 19

Installation Instructions
[] CONNECT THE TUBING TO THE
REFRIGERATOR
NOTES:
• Before making the connection to tile refrigeratol,
be sure tile refrigerator power cord is not
plugged into the wall outlet.
• If your refrigerator does not have a ,a-ater filtm,
we recommend installing one if your water supply
has sand or particles that could clog the screen of
the refrigerator's water valve. Install it in the
water line near the refrigeramn If using a GE
SmartConnect '_ Refrigerator Tubing kit, you
will need an additional tube (WX08X10002)
to connect the filmn Do not cut plastic tube
to install filtm:
Some models have the refrigerator connection at
the end of tubing located outside the compressor
compartment access coven On other models, the
compressor compamnent access cover must be
removed in order to access the refrigerator
connection at the water valve.
[]
CONNECT THE TUBING TO THE
REFRIGERATOR (CONT.)
Insert the end of tile tubing into the refrigerator
connection as far as possible. While holding the
tubing, tighten the fitting.
For plastic tubing from a GE SmartConnect
Refrigerator Tubing kit, insert the molded end of
the tubing into the refrigerator connection and
tighten the compression nut until it is hand tight,
then tighten one additional turn with a wrench.
Overtightening may cause leaks.
Fasten the tubing into the clamp provided as
shown to keep it in position. You may need to pry
open the clamp.
One of the illustrations below will look like the
connection on your refrigerator.
Clamp
1/4"
Compression
Nut
Tubing
On models using the refrigeration connection at
the water valve, remove the plastic flexible cap.
Place the compression nut and ferrule (sleeve)
Ohm the end of the tubing as shown. On a GE
SmartConnect Refrigerator Tubing kit, tile nuts
are already assembled to the tubing.
Ferrule
(sleeve}
1/4"
SmartConneet"
_SmartConnecU
Tubing
1/4"
Tubing
Connection
Clamp
Ferrule
(deeve)_
Connection Tubing
1_ TURN THE WATER ON AT THE
SHUTOFF VALVE
Tighten any connections tbat leak.
19
Reattach the access cover.
Page 20
Installation Instructions
INSTALLING THE WATER LINE (cont.)
[] PLUG IN THE REFRIGERATOR
Arrange the coil of tubing so that it does not vibrate
against the back of the refrigerator or against the
wall. Push the refl'igerator back to the wall.
START THE ICEMAKER
Set the icemaker power sudtch to the I (On}position.
The icemaker will not begin m operate until it
reaches its operating temperature of 15°F (-9°C)
or below. It will then begin operation automatically
if the icemaker power switch is in the ! (On}position.
NOTE: In lower water pressure conditions, the
water valve may turn on up to 3 times to deliver
enough water to the icemaker.
2O
Page 21
Normal operatingsounds, ww .GEAppliances.com
Newer refrigerators sound different from older refrigerators.
Modem refrigerators have more features and use newer
technology.
Do you hear what I hear? These sounds are normal
HUMMM...
WHOOSH...
• The new high efficiency compressor may run faster
and longer than your old refrigerator and you may
hear a high-pitched hum or pulsating sound while
it is operating.
• Sometimes the refrigerator runs for an extended period,
especially when the doors are opened frequently. This
means that the Frost Guan/" feature is working to
prevent freezer burn and improve food preservation.
• You may hear a whooshing sound when the doo_.'sclose.
This isdue to pressure equalizing within the refrigerator.
CLICKS, POPS,
CRACKS and CHIRPS
• You may hear cracking or popping sounds when the
refrigerator is first plugged in. This happens as the
refrigerator cools to the correct temperature.
• Electronic dampers click open and closed to provide
optimal cooling and energy savings.
• The compressor may cause a clicking or chirping
sound when attempting to restart (this could take
up to 5 minutes).
• The electronic control board may cause a clicking
sound when relays activate to control refrigerator
components.
• Expansion and contraction of cooling coils during
and after defrost can cause a cracking or popping
sound.
• On models with an icemakm; after an icemaking
cycle, you may hear the ice cubes dropping into
the ice bucket.
W//IR!
• You may hear the fans spinning at high speeds.
This happens when the refrigerator is first plugged
in, when the doors are opened frequently or when
a large amount of food is added to the refrigerator
or freezer compartments. The fans are helping to
maintain the correct temperatures.
If either door is open for over 3 minutes, you may
hear the fans come on in order to cool the light
bulbs.
The fans change speeds in order to provide optimal
cooling and energy savings.
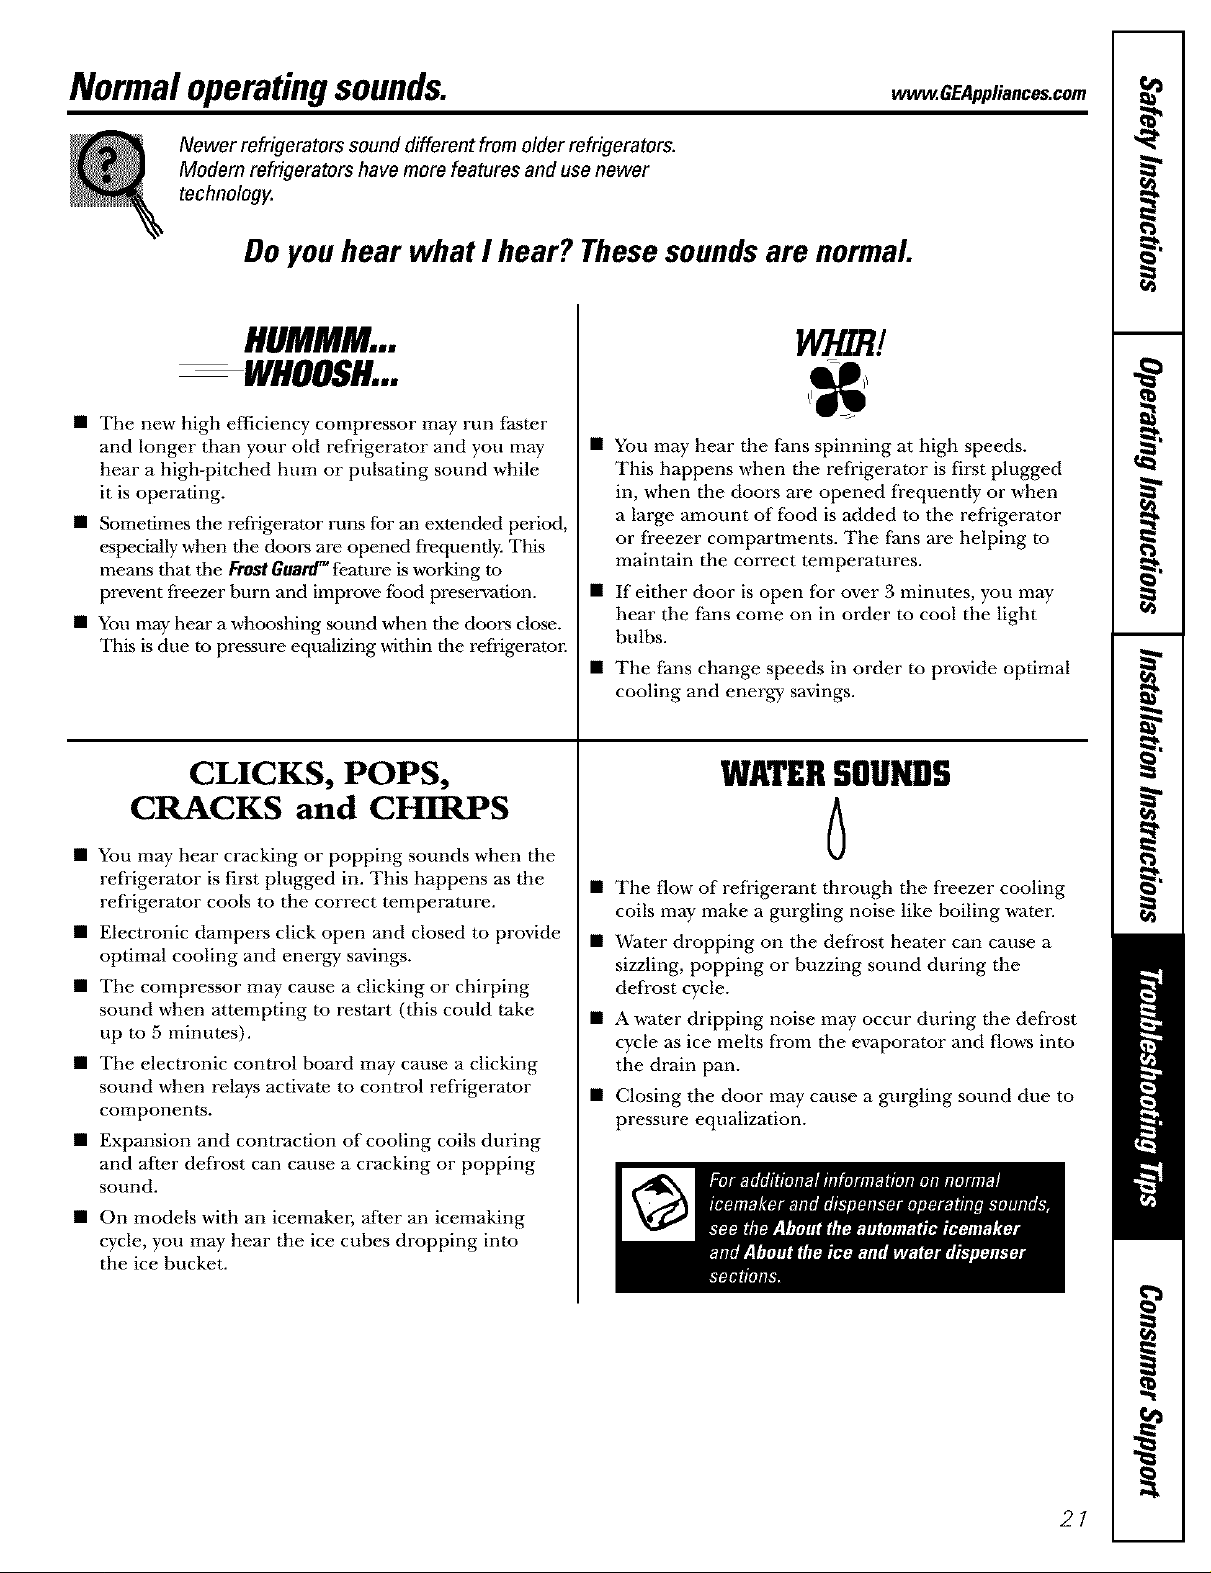
WATERSOUNDS
6
The flow of refrigerant through the freezer cooling
coils may make a gurgling noise like boiling water.
Water dropping on the defrost heater can cause a
sizzling, popping or buzzing sound during the
defrost cycle.
A w-ater dripping noise may occur during the defrost
cycle as ice melts from the evaporator and flows into
the drain pan.
Closing the door may cause a gurgling sound due to
pressure equalization.
21
Page 22
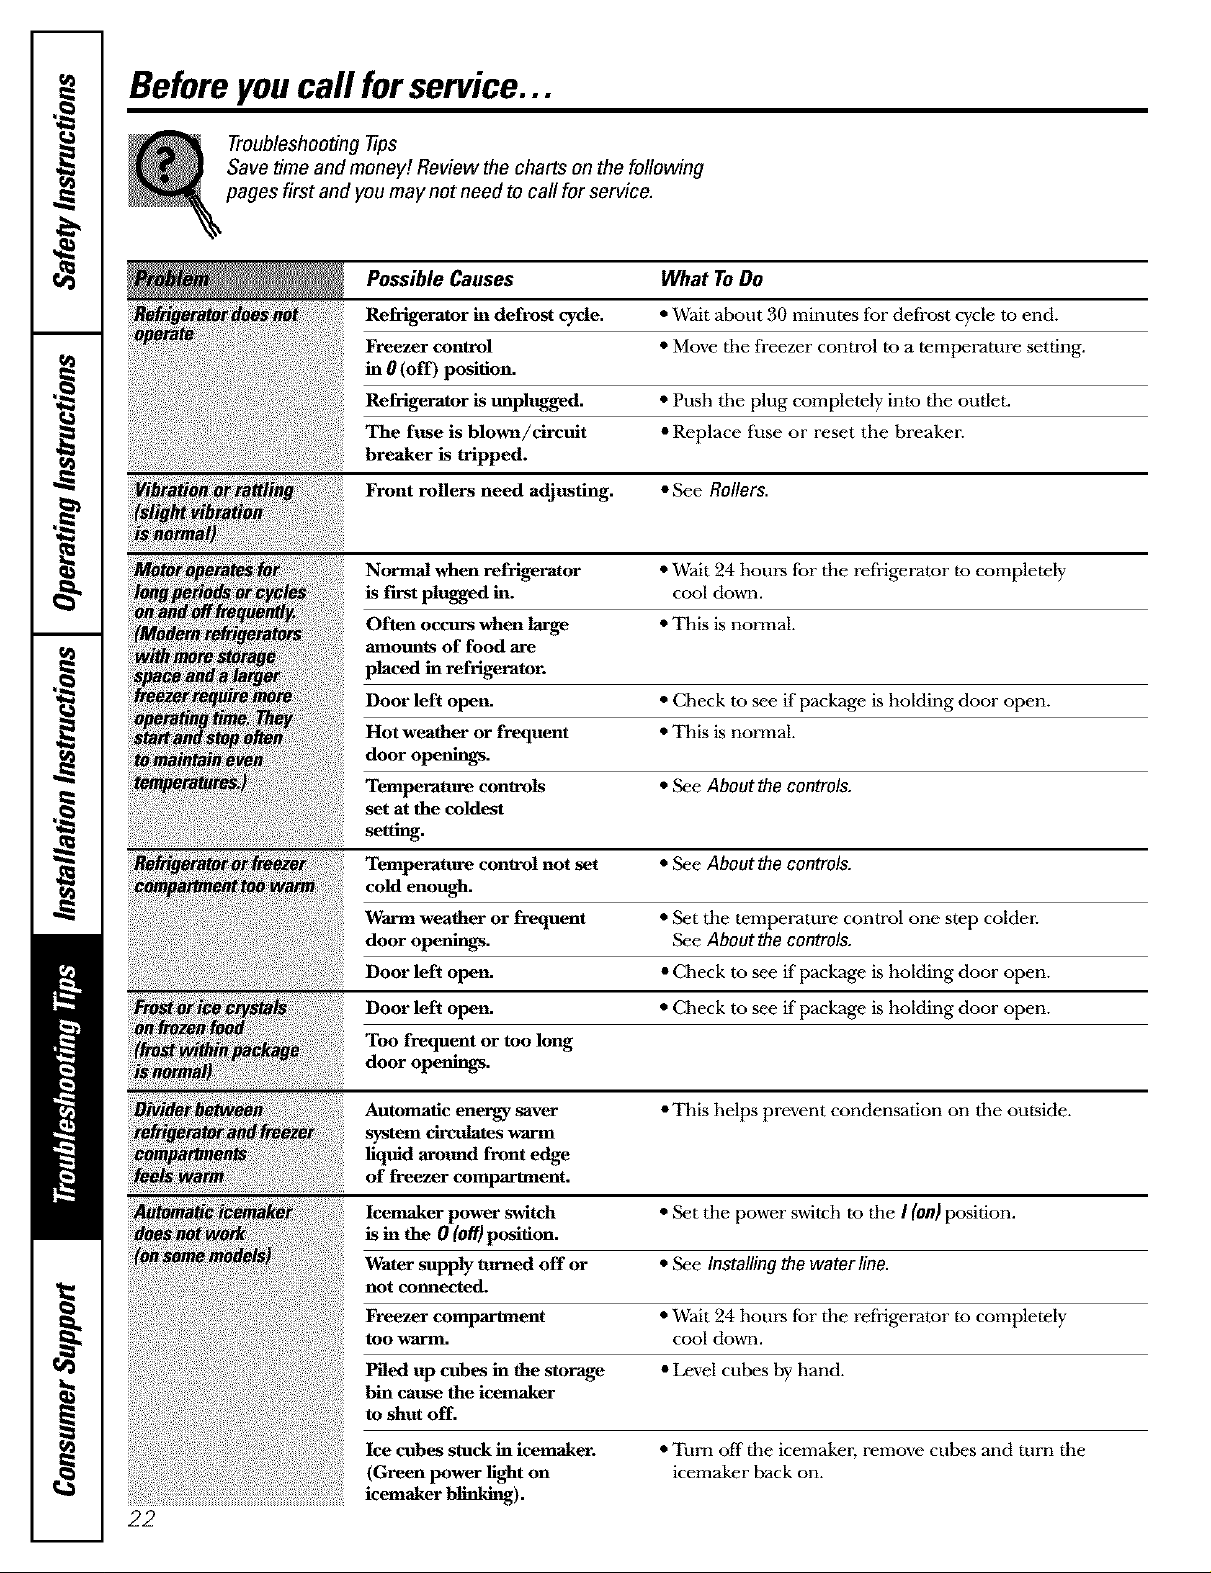
Before youcall forservice...
Troubleshooting tips
Save time and money! Review the charts on the following
pages first and you may not need to call for service.
Possible Causes What ToDo
Refrigerator in defrost cycle. * Wait about 30 minutes for defi'ost cycle to end.
Freezer control * Move the freezer control re a temperature setting.
in 0 (off) position.
Refrigerator is unplugged. * Push the plug completely into the outlet.
The fuse is blown/circuit • Replace fuse or reset the breaker.
breaker is tripped.
Front rollers need adjusting. • See Rollers.
Normal when refrigerator * Wait 24 hours for the refi'igerator re completely
is first plugged in. cool down.
Often occurs when large *This is normal.
amounts of food are
placed in refrigerator.
Door left open. * Check to see if package is holding door open.
Hot weather or frequent * This is normal.
door openings.
Temperature controls • See About the controls.
set at the coldest
setting.
Temperature control not set • See Aboutthe controls.
cold enough.
Warm weather or frequent • Set the temperature control one step colder:
door openings. See About the controls.
Door left open. • Check to see if package is holding door open.
22
Door left open. * Check to see if package is holding door open.
Too frequent or too long
door openings.
Automatic energy saver • This helps prevent condensation on the outside.
system circulates warm
liquid around front edge
of freezer comparUnent.
Icemaker power switch • Set the power switch re the I (On)position.
is in the 0 (Off)posltion.
Water supply turned off or • See Installing the water line.
not connected.
Freezer comparmaent • Wait 24 hours for the refi'igerator re completely
too warm. cool down.
Piled up cubes in the storage • Level cubes by hand.
bin cause the icemaker
to shut off.
Ice cubes stuck in icemaker.
(Green power light on
• Turn off the icemakeL remove cubes and turn the
icemaker back on.
icemaker blinking).
Page 23
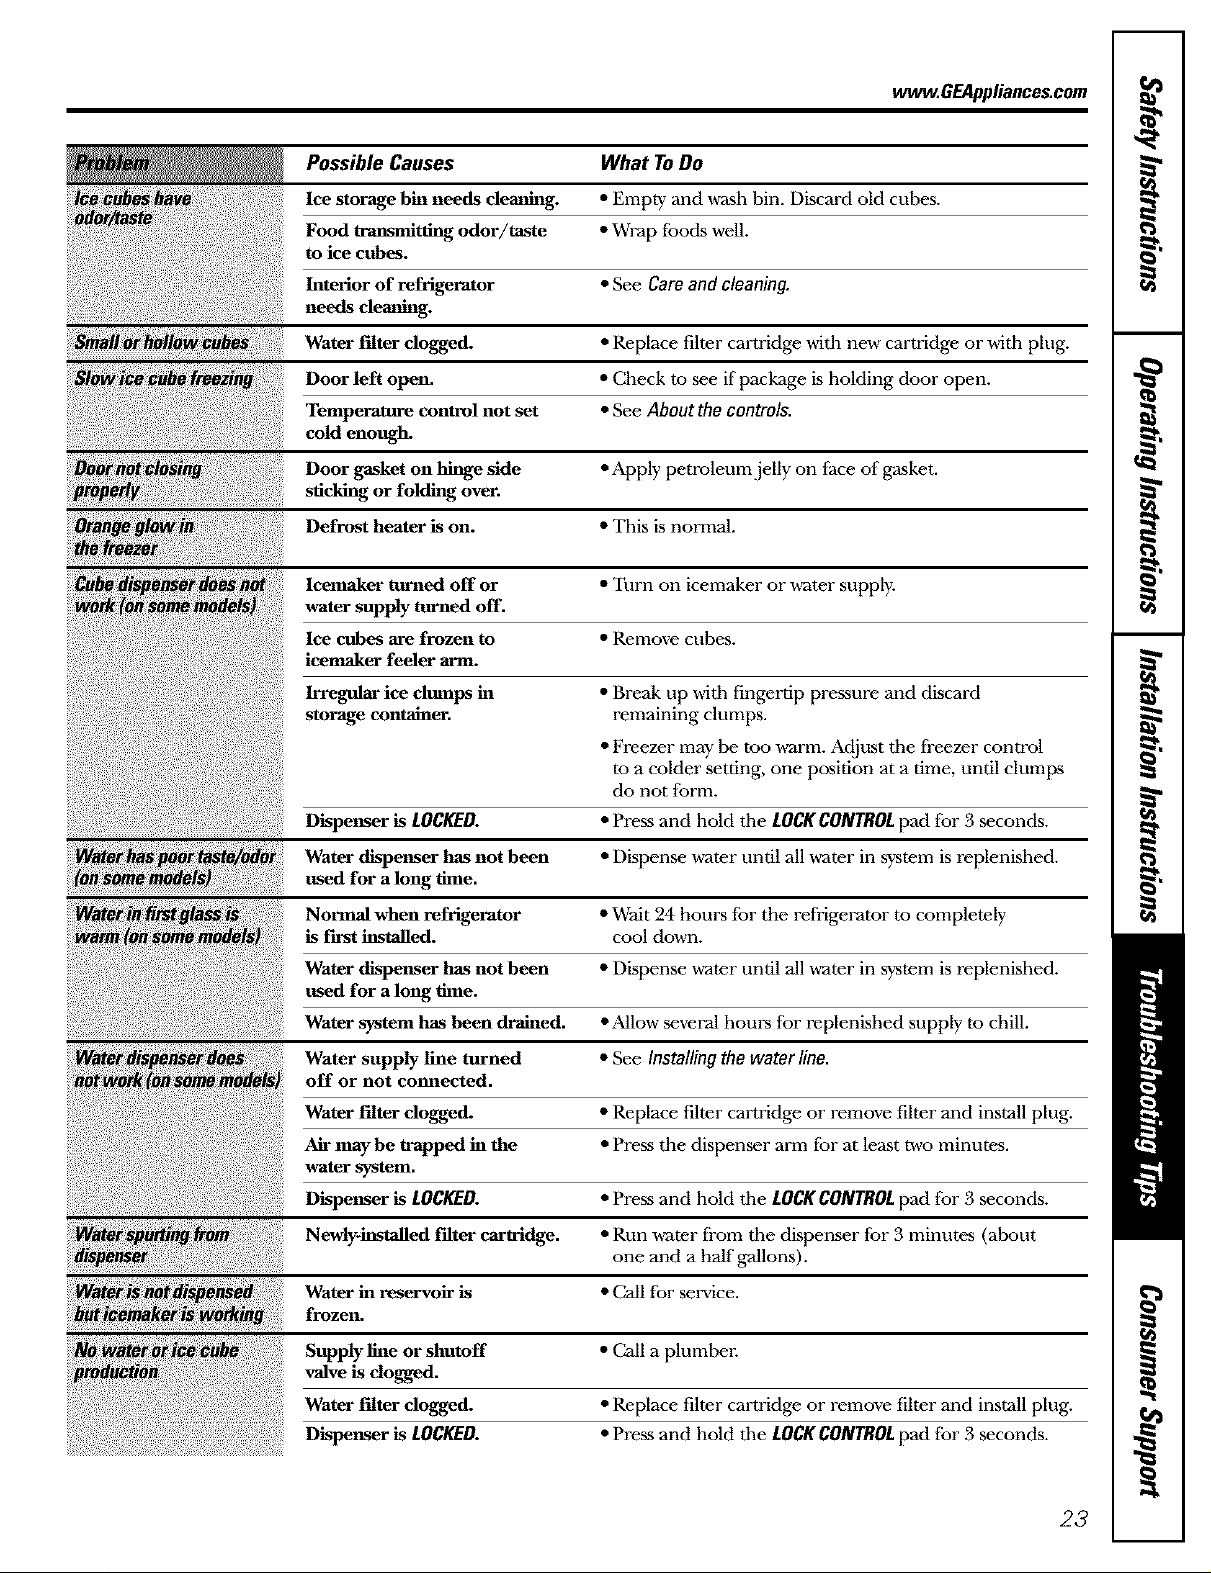
wwt_.GEAppliances.com
Possible Causes What To Do
Ice storage bin needs cleaning. • Empty and wash bin. Discard old cubes.
Food transmitting odor/taste • Wrap leeds well.
to ice cubes.
Interior of refrigerator • See Care and cleaning.
needs cleaning.
Water Filter clogged. • Replace filter cartridge with new cartridge or with plug.
Door left open. • Check to see if package is holding door open.
Temperature control not set • See About the controls.
cold enough.
Door gasket on hinge side • Apply petroleum jelly on lace of gasket.
sticking or folding over.
Defrost heater is on. • This is normal.
Ieemaker auaaed off or • Turn on icemaker or u_ter supply.
water supply turned off.
Ice cubes are frozen to • Remove cubes.
ieemaker feeler arm.
Irregular ice clumps in • Break up with fingertip pressure and discard
storage container, remaining clumps.
• Freezer may be roe warm. Adjust tile freezer control
re a colder setting, one position at a time, undl clumps
do not form.
Dispenser is LOCKED. • Press and hold the LOCKCONTROLpad for 3 seconds.
Water dispenser has not been • Dispense water until all water in system is replenished.
used for a long tlme.
Normal when refrigerator • Wait 24 hours tor the refrigerator to completely
is First installed, cool down.
Water dispenser has not been • Dispense water until all water in system is replenished.
used for a long tlme.
Water system has been drained. • :Ulow several hom_ for replenished supply re chill.
Water supply line turned • See Installing the water line.
off or not connected.
Water Filter clogged. • Replace filter cartridge or remove filter and install plug.
Air may be trapped in the • Press the dispenser arm for at least _,o minutes.
water system,
Dispenser is LOCKED. • Press and hold the LOCKCONTROLpad for 3 seconds.
Newlyinstalled Filter cartridge. • Run water from the dispenser for 3 minutes (about
one and a half gallons).
Water in reservoir is • Call tbr seiMce.
frozen.
Supply line or shutoff • Call a plumbel:
valve is dogged.
Water Filter clogged. • Replace filter cartridge or remove filter and install plug.
Dispenser is LOCKED. • Press and hold the LOCKCONTROLpad for g seconds.
23
Page 24
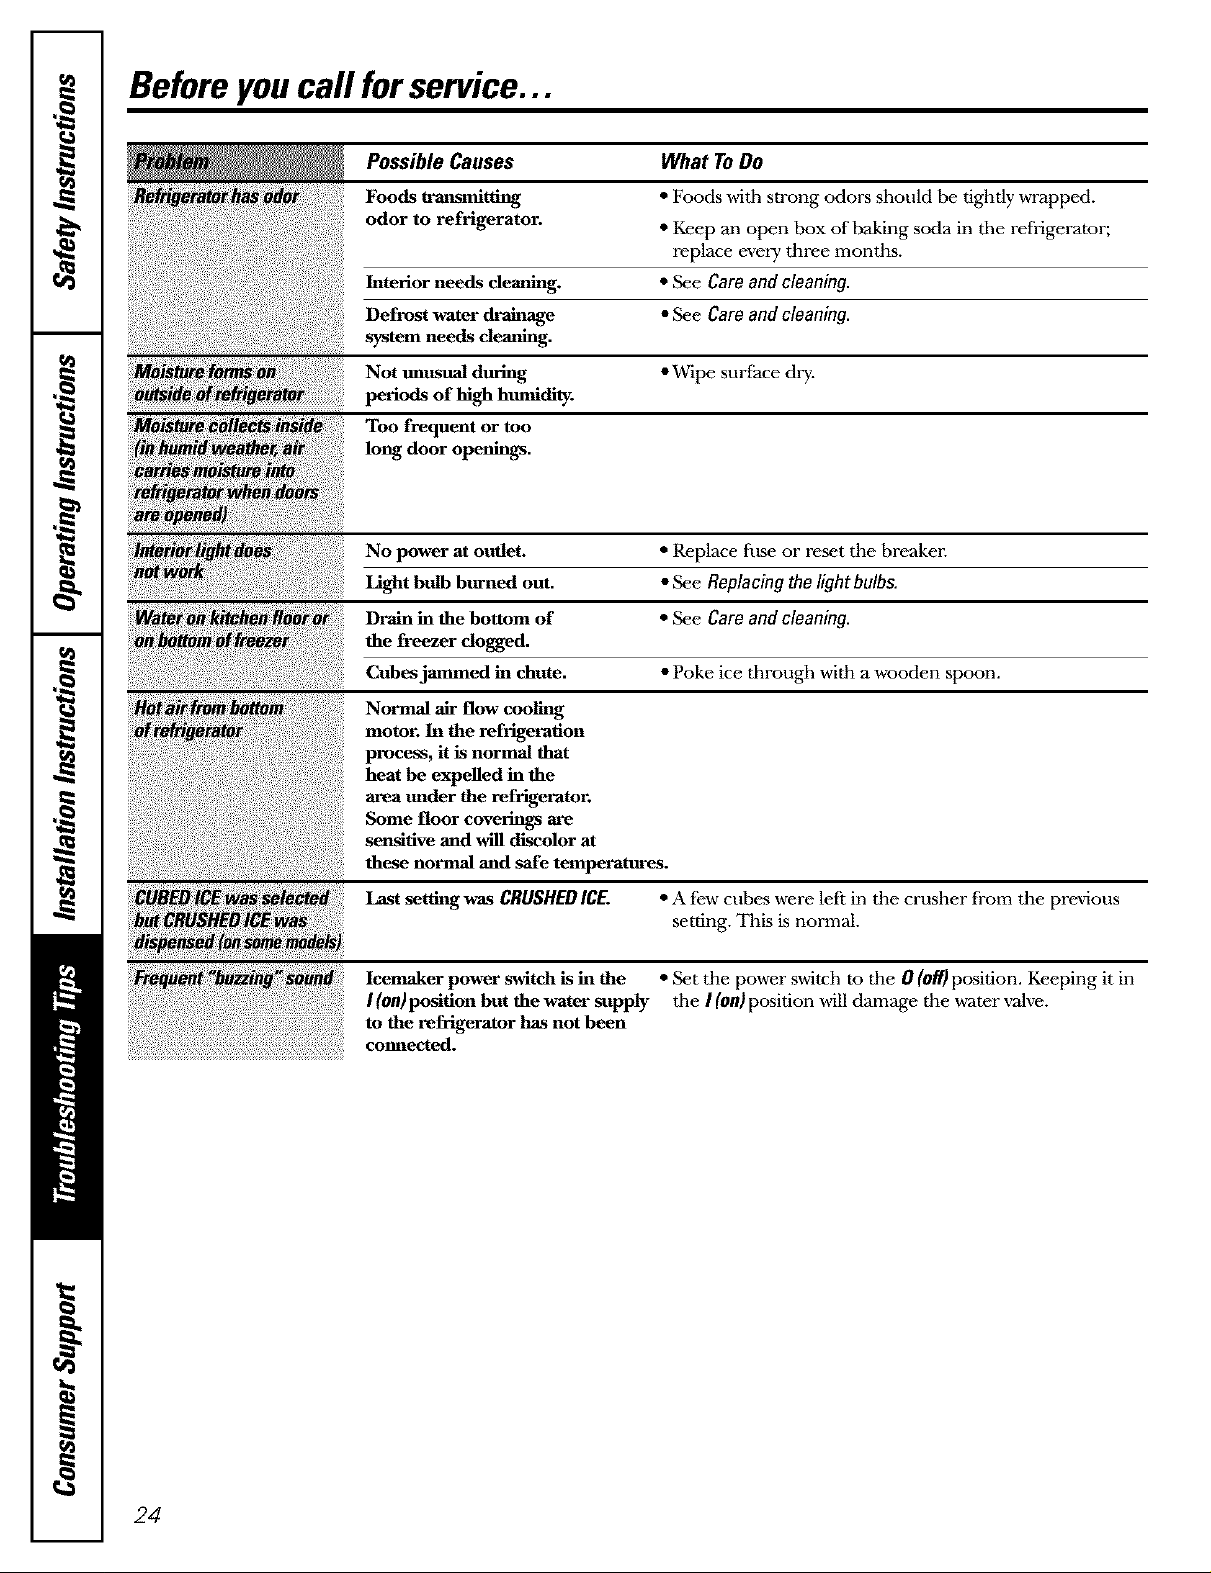
Before youcall forservice...
Possible Causes What To Do
Foods transmitting * Foods with strong odors should be tightly wrapped.
odor to refrigerator. * Keep an open box of baking soda in tile refrigerator;
replace every three months.
Interior needs cleaning. * See Care and cleaning.
Defrost water drainage • See Care and cleaning.
system needs cleaning.
Moisture Not tmzzsual dm'ing • Wipe surface dry.
:_ periods o f high humidity.
Too frequent or too
long door openings.
No power at outlet. • Replace fuse or reset the breakel:
Light bulb burned out. • See Replacing the light bulbs.
Drain in the bottom of • See Care and cleaning.
the freezer clogged.
Cubes jammed in chute. • Poke ice through with a wooden spoon.
Normal air flow cooling
moton In the refrigeration
process, it is normal that
heat be expelled in the
area under the refrigerator.
Some floor coverings are
sensitive and will discolor at
these normal and safe temperatures.
Last setting was CRUSHED ICE. • A few cubes were left in the crasher from the previous
setting. This is normal.
Ieemaker power switch is in the • Set the power switch to the 0 (Off)position. Keeping it in
I(on)position but the water supply the I (on) position will damage the water valve.
to the refrigerator has not been
connected.
24
Page 25
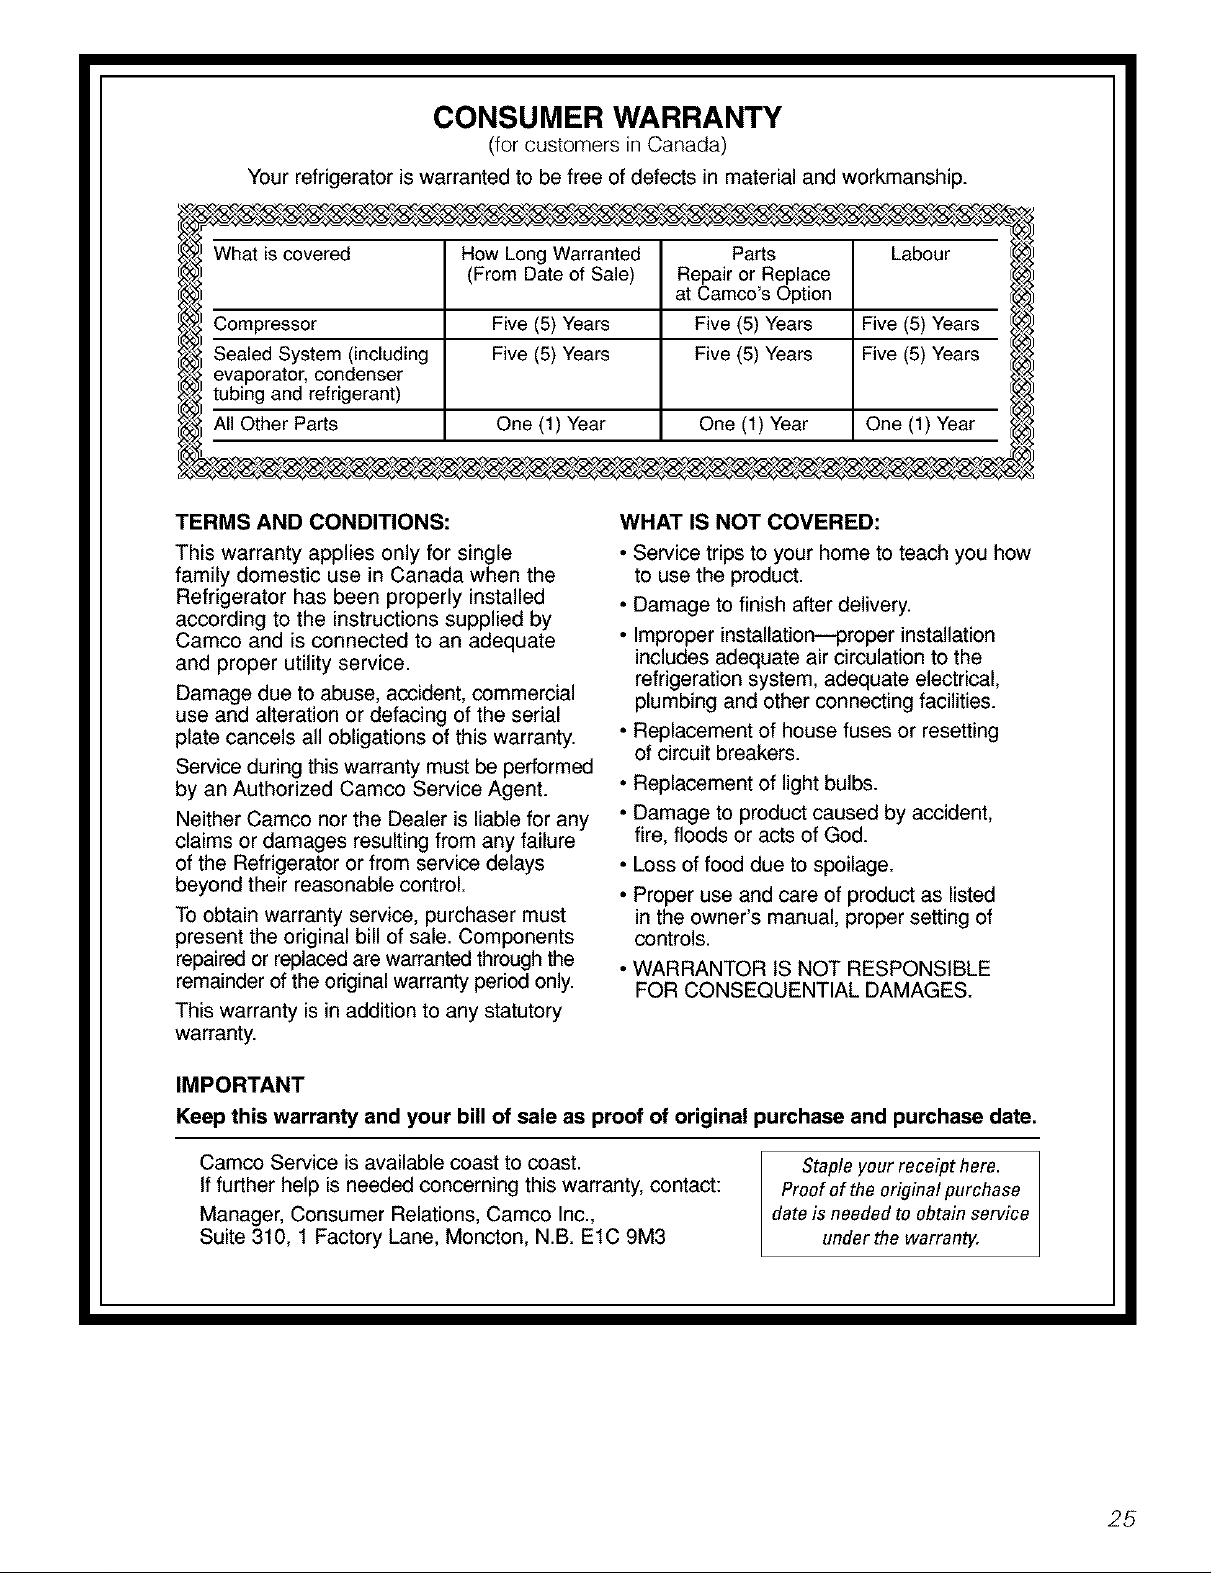
CONSUMER WARRANTY
(for customers in Canada)
Your refrigerator is warranted to be free of defects in material and workmanship.
What is covered How Long Warranted Parts Labour
(From Date of Sale) Repair or Replace
at Camco's Option
Compressor Five (5) Years Five (5) Years Five (5) Years
Sealed System (including Five (5) Years Five (5) Years Five (5) Years
evaporator, condenser
tubing and refrigerant)
All Other Parts One (1) Year One (1) Year One (1) Year
TERMS AND CONDITIONS:
This warranty applies only for single
family domestic use in Canada when the
Refrigerator has been properly installed
according to the instructions supplied by
Camco and is connected to an adequate
and proper utility service.
Damage due to abuse, accident, commercial
use and alteration or defacing of the serial
plate cancels all obligations of this warranty.
Service during this warranty must be performed
by an Authorized Camco Service Agent.
Neither Camco nor the Dealer is liable for any
claims or damages resulting from any failure
of the Refrigerator or from service delays
beyond their reasonable control.
To obtain warranty service, purchaser must
present the original bill of sale. Components
repaired or replaced are warranted through the
remainder of the original warranty period only.
This warranty is in addition to any statutory
warranty.
IMPORTANT
Keep this warranty and your bill of sale as proof of original purchase and purchase date.
WHAT IS NOT COVERED:
• Service trips to your home to teach you how
to use the product.
• Damage to finish after delivery.
• Improper installationiproper installation
includes adequate air circulation to the
refrigeration system, adequate electrical,
plumbing and other connecting facilities.
• Replacement of house fuses or resetting
of circuit breakers.
• Replacement of light bulbs.
• Damage to product caused by accident,
fire, floods or acts of God.
Loss of food due to spoilage.
Proper use and care of product as listed
in the owner's manual, proper setting of
controls.
• WARRANTOR IS NOT RESPONSIBLE
FOR CONSEQUENTIAL DAMAGES.
Camco Service is available coast to coast.
If further help is needed concerning this warranty, contact:
Manager, Consumer Relations, Carnco Inc.,
Suite 310, 1 Factory Lane, Moncton, N.B. ElC 9M3
Staple your receipt here.
Proofof the original purchase
date is needed to obtain service
under the warranty.
25
Page 26
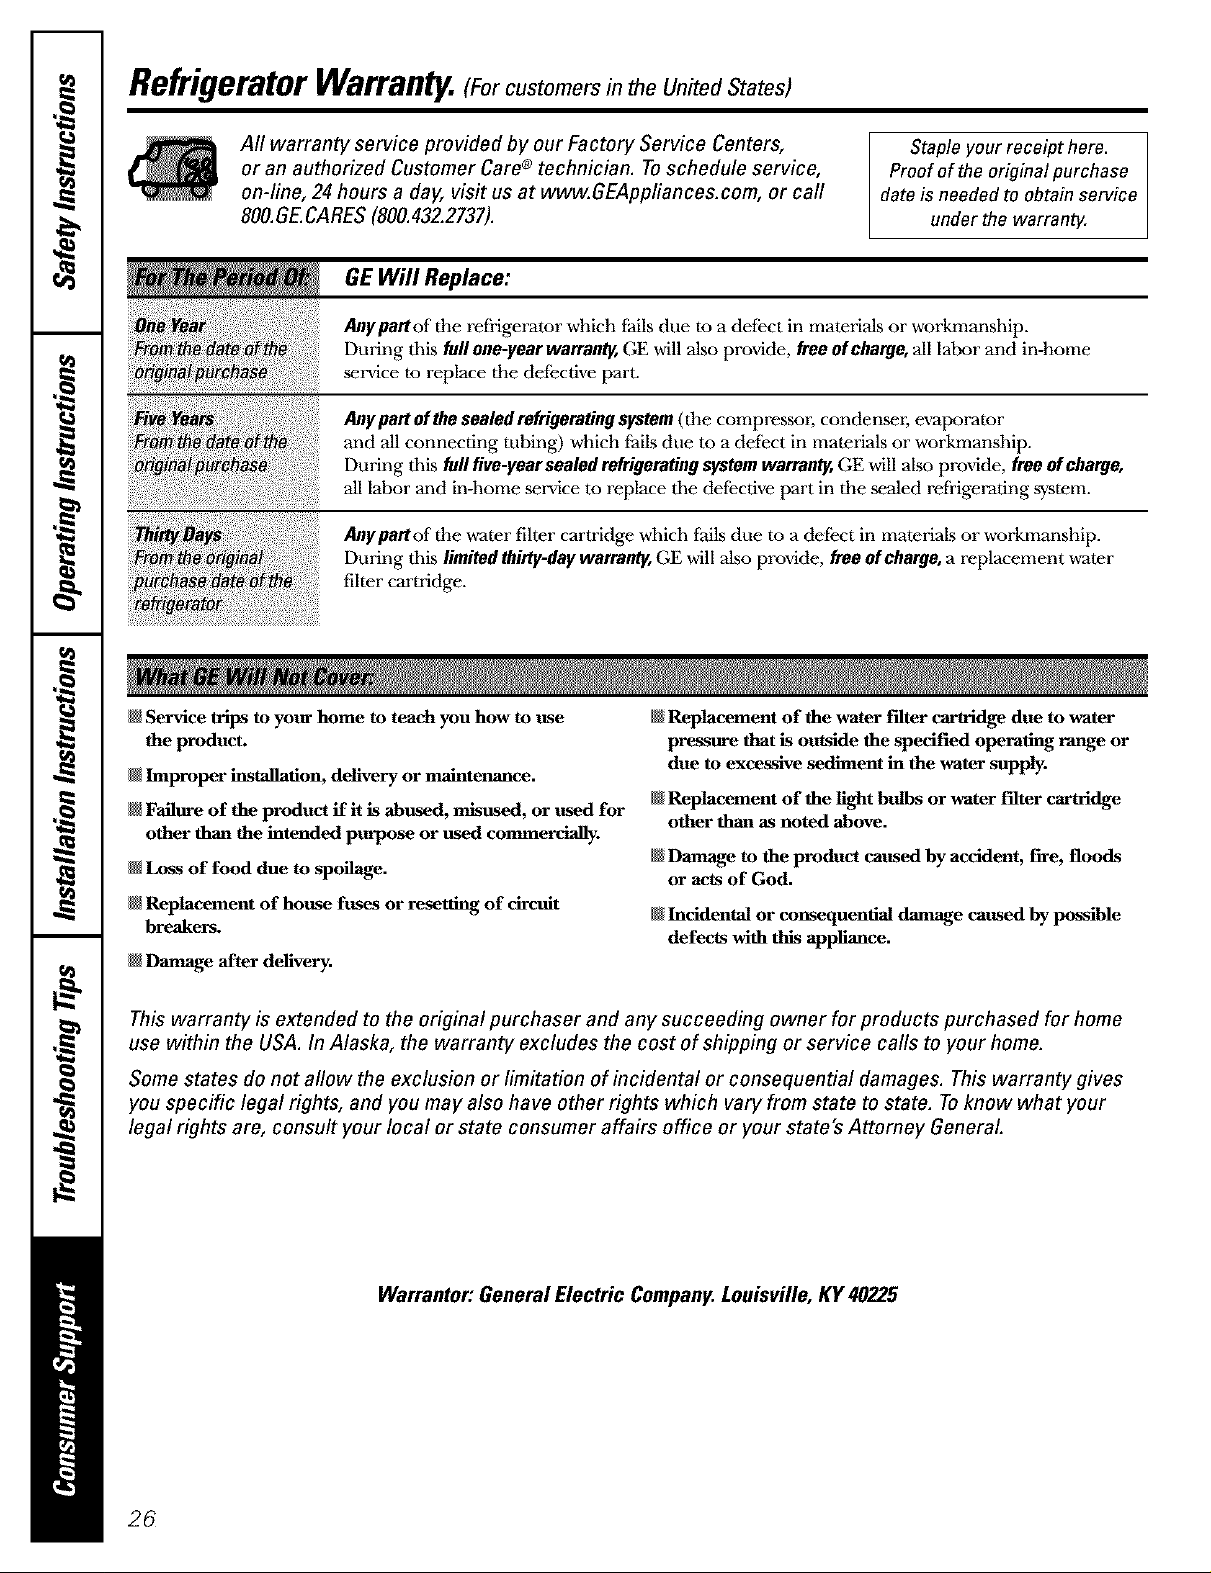
RefrigeratorWarranty.(Forcustomers in the United States)
All warranty service provided by our Factory Service Centers,
or an authorized Customer Care®technician. Toschedule service,
on-llnif 24 hours a day, visit us at www.GEAppliances.com, or call
800.GE.CARES (800.432.2737).
GE Will Replace:
Anypartof the refiigerator which Pailsdue to a defect in materials or workmanship.
During this full one-year warranty,,GE will also provide, free of charge, all labor and in-home
service to replace the defective part.
Any part of the sealed refrigerating system (the compressor, condensm; evaporator
and all connecting tubing) which fhils due m a defizct in materials or workmanship.
During this full five-year sealed refrigerating system warranty, GE will also provide, free of charge,
all labor and in-home service to replace the defective part in the sealed refiigerating system.
Anypartof the water filter cartridge which fails due to a defect in materials or workmanship.
During this limited thirty-daywarranty,GE will also provide, free ofcharge, a replacement water
filter cartridge.
@Service trips to your home to teach you how to use
the product.
N Improper installation, delivery or maintenance.
if Fiflure of the product if it is abused, misused, or used for
other than the intended purpose or used commercially.
if Loss of food due to spoilage.
if Replacement of house fuses or resetting of dictfit
breakers.
if Damage after delivery.
Staple your receipt here.
Proof of the original purchase
date is needed to obtain service
under the warranty.
if Replacement of the water filter cartridge due to water
p_ that is outside the specified operating range or
due to excessive sediment in the water supply.
if Replacement of the light bulbs or water filter cartridge
other than as noted above.
if Damage to the product caused by accident, fire, floods
or acts of God.
if Incidental or consequential damage caused by possible
defects with this appliance.
This warranty is extended to the original purchaser and any succeeding owner for products purchased for home
use within the USA. In Alaska, the warranty excludes the cost of shipping or service calls to your home.
Some states do not allow the exclusion or limitation of incidental or consequential damages. This warranty gives
you specific legal rights, and you may also have other rights which vary from state to state. Toknow what your
legal rights are, consult your local or state consumer affairs office or your state's Attorney General
Warrantor: General Electric Company.Louisville, KY 40225
26
Page 27
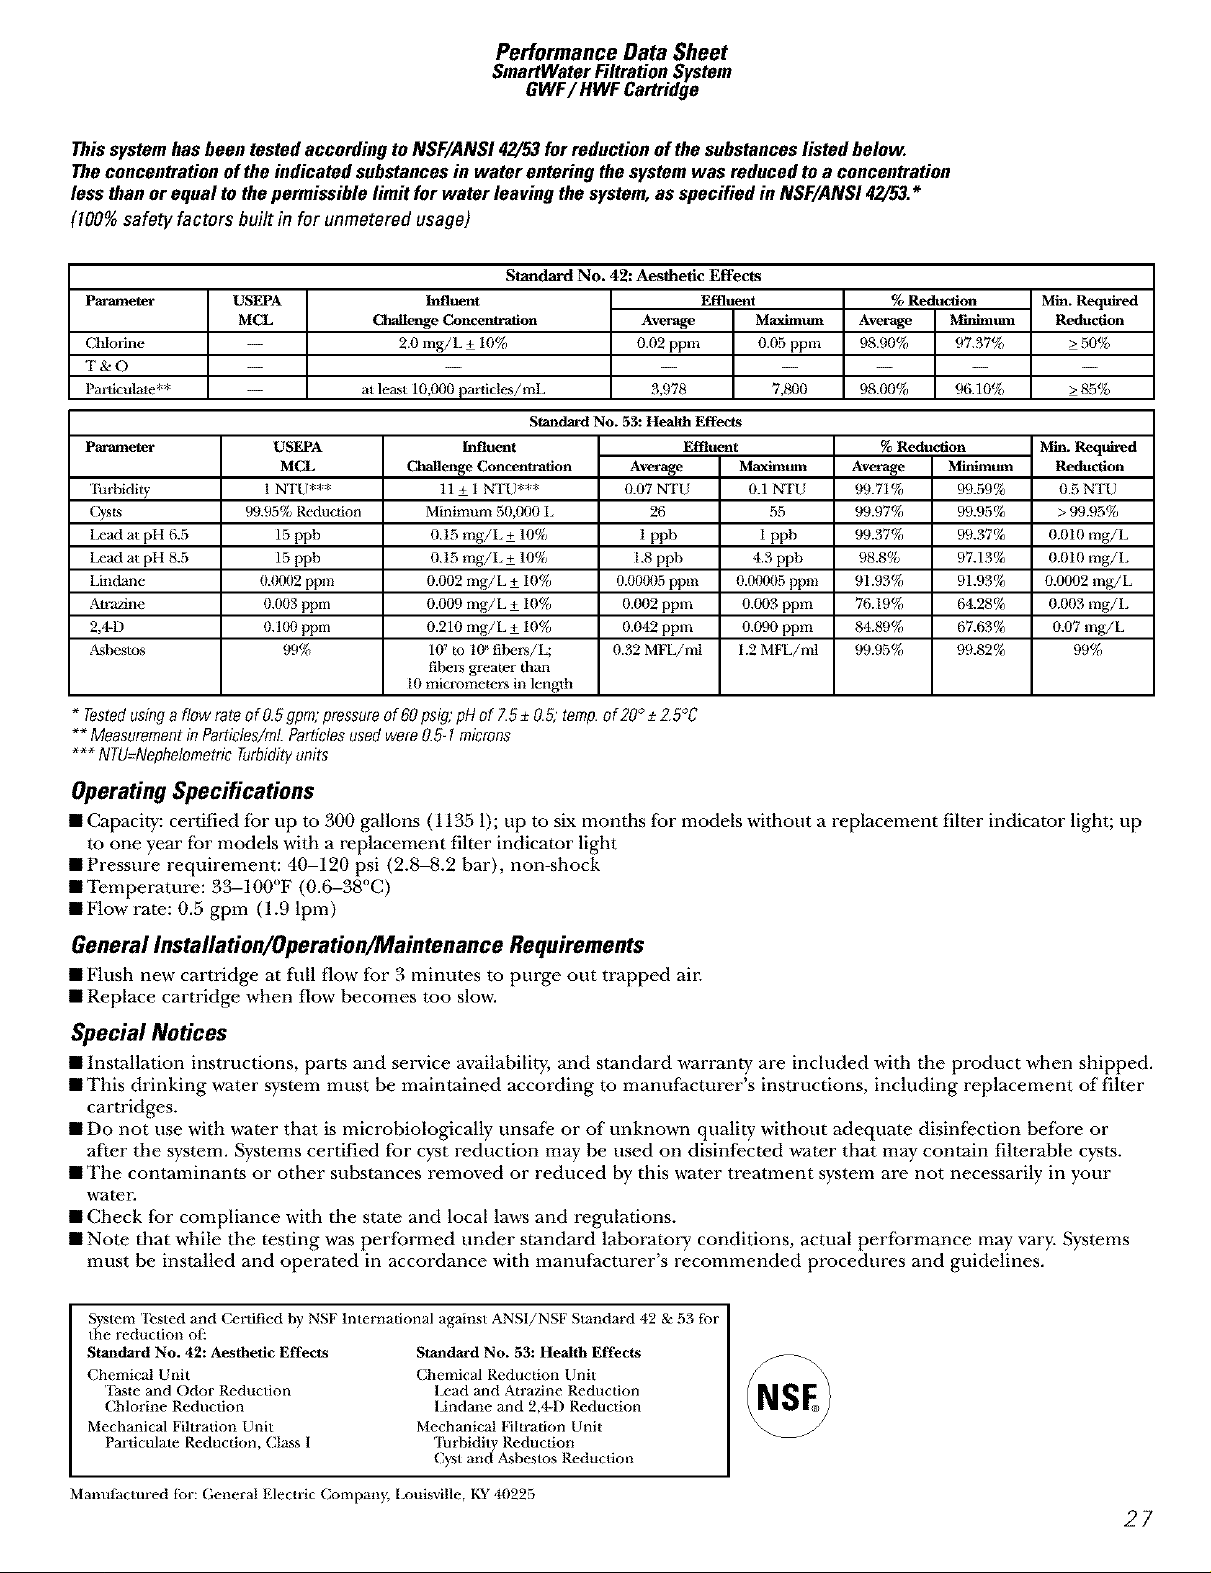
Performance Data Sheet
SmartWaterFiltrationSystem
GWF/ HWF Cartridge
Thissystemhasbeentested accordingtoNSF/ANS142/53forreductionof thesubstanceslisted below.
Theconcentrationof theindicatedsubstancesinwater enteringthesystemwas reducedto a concentration
lessthanor equaltothepermissiblelimitfor water leaving the system,asspecifiedin NSF/ANS142/53.*
(100%safety factors built in for unmetered usage)
Standard No. 42: Aesthetic Effects
Pm'ameter USEPA
MCL
Chlodne
T&O
Par ticulatc**
Pl_Reanleter
'lhrhidi W
Lead at pH 11.5
Lead at pH 8.5
Lindane
AtraTJne
2,4-D
,_bestos
USEPA
MCL
l NTU***
99.95% Reduction
15 ppb
15 ppb
0.0002 ppm
0.003 ppm
0.100 ppm
99%
at least 10,000 partides/mL 3,978 7,800
* Testedusinga flewrote of 0.5gpm;pressureof 60psig;pH of Z5 _ 0.5; temp.ofgo° +_Z5°C
** MeasurementinParticles/ml.Particlesusedwere0.5-1microns
*** NTU=NephelometricTurbidityunits
Influent Effluent
ChallengeConcenwation Average Maximum
2.0 mg/L + 10% 0.02 ppm 0.05 ppm
Standard No. 53: Health Effects
lnfluent
Challenge Concentration
11 + 1 NTU***
Minimum 50,000 L
0.15 rag/L+ 10%
0.15 rag/L+ 10%
0.002 mg/L+ 10%
0.009 mg/L+ 10%
0.210 mg/L+ 10%
lfY to 1@ fit_rs/L;
libra* greawr than
10 micromete*_ in lenglh
0.00(_)5 ppm 0.00005 ppm
0.32 MFL/ml 1.2 MFL/ml
Effluent
Average Maximum
0.07 NTU 0.1 NTU
26 55
l pph 1 ppb
1.8 pph 4.3 ppb
0.002 ppm 0.003 ppm
0.042 ppm O.fY)Oppm
% Reduction
Average Mi_fimmn
98.90% 97.37%
98.00% 911.10%
% Reduction
Average Minimum
99.71% 99.59%
99.97% 99.95%
99.37% 99.37%
98.8% 97.13%
91.93% 91.93%
76.19% 64.28%
84.89% 67.63%
99.95% 99.82%
Min. Required
Reduction
>50%
>85%
Min. Required
Reduction
0.5 NTU
> 99.95%
0.010 mg/L
0.010 mg/L
0.0002 mg/L
0.003 mg/L
0.07 mg/L
99%
Operating Specifications
• Capacity: certitied tbr up to 300 gallons (1135 l); up to six months for models without a replacement fiher indicator light; up
to one year tbr models with a replacement filter indicator light
• Pressure requirement: 40-120 psi (2.8-8.2 bar), non-shock
• Temperature: 33-100°F (0.6-38°C)
• Flow rate: 0.5 gpm (1.9 lpm)
General Installation/Operation/Maintenance Requirements
• Flush new cartridge at tull flow for 3 minutes to purge out trapped ai_:
• Replace cartridge when flow becomes too slow.
Special Notices
• Installation instructions, parts and smwice availability, and standard warranty are included with the product when shipped.
• This drinking water system must be maintained according to manufacturer's instructions, including replacement of filter
cartridges.
• Do not use with water that is microbiologically tmsati: or of unknown quality without adequate disinfection betore or
after the system. Systems certified 1or cyst reduction may be used on disinfected ,a_ater that may contain filterable cysts.
• The contaminants or other substances removed or reduced by this water treatment system are not necessarily in your
water.
• Check for compliance with the state and local la,a_ and regulations.
• Note that while the testing was performed under standard laboratory conditions, actual pertormance may vary. Systems
must be installed and operated in accordance with manufacturer's recommended procedures and guidelines.
8ysiem 'I_.,sted and Certified hy NSF international against ANSI/NSF Standard 42 & 53 tor
the reduction off
Standard No. 42: Aesthetic Effects
Chemical Unit
'Ihste and Odor Reduction
Chlorine Reduction
Mechanical Filtration Unit
Particulate Reduction, Class i
Stmadard No. 53: Health Effects
Chemical Reduction Unit
Lead and Atrazine Reduction
Lindane and 2,4-D Reduction
Mechanical Filtration Unit
Turbidily Reduction
(;)<st and ,_besms Reduction
Manutacmred for: General Electric Company, Louisville, KY 40225
27
Page 28

State of California
Department of Health Services
Water Treatment Device
Certificate Number
00-1434
Date Issued: May 30, 2000
Date Revised: February9,2001
Trademark/Model Desillnation
GE Smart
Manufacturer: : '
Cysts 1
fur
" bidi_
Lindane /
2,4-D
Replacement Elements
Rated Service Capacity: 300 gallons* Rated Service Flow: 0.5 gpm
* 500 gallons for models that include a replacement filter indicator light.
Do not use where water is microbiologically unsafe or with water of unknown quality, except that systems
claiming cyst reduction may be used on water containing cysts.
For Purchases Made In Iowa: This form must be signed and dated by the buyer and seller prior to the consummation of
this sale. This form should be retained on file by the seller for a minimum of two years.
BUYER: SEI.£ER:
Name Name
Address Address
City State Zip City State Zip
Signature Date Signature Date
28
Page 29

GE Service Protection Pht4 M
GE, a name recognized worldwide for quality and dependability, oilers you
Service Promction Plus "_' comprehensive protection on all your appliances--
No Matter What Brand! We'll CoverAnyAppliance.
Benefits Include:
• Backed by GE Anywhere.Anytime.*
• All brands covered
• Unlimited service calls
• All parts and labor costs included
• No out-of-pocket expenses
• No hidden deductibles
• One 800 number to call
You will be completely satisfied with our service protection or you may request your money back
on the remaining value of your contract. No questions asked, lt's that simple.
Protect your refrigerator; dishu-ashm; washer and drym; range, TV, VCR and much more--any brand!
Plus there's no extra charge for emergency smwice and low monthly financing is available. Even icemaker
coverage and food spoilage protection is offered. You can rest easy, knowing that all your valuable
household products are protected against expensive repairs.
Place your confidence in GE and call us in the U.S. toll-free at 800.626.2224
for more information.
* 9
All bi al_ds covel-ed, lip to _0 yea*_ old, irl tile continemal U.S.
nt here
Pleaseplacein envelopeand mailto:
General Electric Company
Warranty Registration Department
P.O. Box 32150
Louisville, KY 40232-2150
29
Page 30

Consumer Product Ownership Registration
Dear Customer:
Thank you for purch_ing our product and thank you tbr placing your confidence in us.
We are proud to have you as a customer!
Follow these three steps to protect your new appliance investment:
Complete and mail
your Consumer
Product Ownership
Registration today.
Have the peace of
mind of knowing we
can comact you in
the unlikely event of a
safety modification.
2
After mailing the
registration below,
store this document
in a sate place, it
comains inlbrmation
you will need should
you require sen, ice.
Our service number is
800.GE.GARES
(800.432.2737).
Model Number Serial Number
I I I I I I I I I I I IIIIIII
Important: If you did not get a registration card with your
product, detach and return the form below to
ensure that your product is registered, or register
online at www. GEAppliance s. com.
Consumer Product Ownership Registration
Read your Owner's
Manual carefully.
It will help you
operate your new
appliance properly.
_,,. Cut here
I I I I I I I I I I I I I I I I I
Model Number Serial Number
Mr. _ Ms. _ Mi's. _ Miss D
First ] I_tst ]
Name I I I I I I I I I Name I I I I I I I I I I I I
Street ]
Address I I I I I I I I I I I I I I I IIII I I I
Apt. # ] I I I I I I I E-mail Address*
ci_]llllllllllll
Date Pia_ ed
Month Dayl Phone'
* Please provide your e-mail address to recei\e, via e-mail, discounts, special offers and other important
communications fl-om GE Appliances (GEA).
Check here ityou do not want to recei,,e communications fl'om GEA's carefully selected parmers.
GEAppliances
GEConsumer prodects
General EIoc_ic Comp_
Lovi_ville, Kentucky
www.GEAppliances._om
Number ]
State I Code
Zip]
I I I I I
I I I
3O
Page 31

M_ures de s&_urit_
Comment vous d6barr_asser
convenablement de votre
ancien r_fiig6rateur .................. 33
Cordons prolongatems ................ 33
Fiche d'adaptation ................... 34
Mesures de s6curit6 ................... 32
Raccordement 61ectiique .............. 34
Fonctionnement
Bacs fi 16gumes ................... 38, 39
Carmuche du filtre fi eau .............. 36
(;layettes, bacs et casie*:s ............ 36-38
Le distlibuteur d'eau et de glacjons ...... 40
Les commandes ..................... 35
Machine it glagons aummatique ........ 39
Entraien et nettoyage
Nettoyage ........................ 41, 42
Remplacement des ampoules .......... 43
Insta_ation
Installation de la conduite d'eau ..... 46-50
Pr6pamtion ...................... 44, 45
Consei/sde d@annage
Avant d'appeler un r6parateur ....... 52-54
Bruits de normaux de t:onctionnement . .51
Service & la clientble
Feuillet de donn6es relatives _ la
performance de la cartouche ........... 57
G_ntie pour la clientele au Canada .... 56
Service fi la clientele .................. 58
t'B
t'B
m
m
K'B
31
m
m
i
Page 32

f f
MESURESDESECURITEIMPORTANTES.
LISEZD'ABORDTOUTESLESDIRECTIVES.
A AVERTISSEMENT!
N'utilisez cet 61ectrom#nager que pour fusage auquel il est destin#, comme expliqu# dans le pr6sent manuel.
MESURESDESE-CURIT¢L-
torsque vous utilisez un appareil filectrique, observez toujours les mesures de s6curit# de base,
y compris les suivantes.
N Installez le rdfiig4rateur conform_ment aux
directives d'installation a'_ant de l'utiliser.
N Ne laissez pas les enfants grimpm; s'asseoiJ; se
tenir debout ni se pendre aux clayettes du
rdfrig4ratem: lls pourraient endommager le
rdfrig4rateur et se blesser gravement.
@ Ne touchez pas les surfaces froides du
congdlateur si vous avez les mains humides ou
mouilldes : la peau risque d'adh4rer 'aces surt;aces
tr_s froides.
N N'entreposez et n'utilisez pas d'e_sence ou autres
vapeurs et liquides inflammables 'aproximit_ de
cet appareil ou de tout autre appareil
_lectrom4nagen
N Si votre rdfrigdrateur est dotd d'une machine 'a
glacons aummatique, _xdtezle contact avec les
pi&ces mobiles du m4canisme 4jectem; ou avec
l'414ment chauffi_nt situ_ 'ala pattie inf_rieure de
la machine _tglacons. Ne posez pas les doigts ou
les mains sur le m4canisme de la machine 'a
glacons pendant que le r4frigdrateur est branch4.
N l_loignez les doigts des parties du r4ffig&ateur o6
l'on pent tacilement se pincer : les espaces entre
les portes et entre les portes et lesplacards sont
tot_ours 4troits. Soyez prudent lolsque vous fi?rmez
les portes de l'appareil en pr4sence des enfhnts.
N Ddbranchez votre rdfrig4rateur avant de le
nettoyer ou de le rdparen
REMARQUE:Nous vousrecommandonsvivementde
confiertouter#paration,) untechnicienqualififi.
N Lol.'sque vous r4glez la commande sur 0 (arrg,t},
l'alimentation _lectrique de l'ampoule
n'est pas coup4e.
N Ne recongelez pas les aliments surgel4s qui ont
compl&tement d4gel4.
32
Page 33

ww_,electromenagersge.ca
DANGER!RISQUESPOURLESENFANTS
COMMENTVOUSDEBARRASSERCONVENABLEMENT
DEVOTREANCIENREFRIGERATEUR
Les enfhnts pris au pi&ge ou morts d'asphyxie sont
tot_ours d'actoalit4. Les r4frigdrateurs abandonn&
sont tot!jours aussi dangereux, m&me si on n'attend
que _,quelquesjours,, pour s'en ddbarrasser. Si vous
ne gardez pas vorre ancien r4frig&atem; veuillez
suivre les directives ci<lessous afin de pr4venir les
accidents.
Avant de vousd_barrasser de votre ancien
r_frig_rateur ou cong_lateur :
ND_montez les portes.
NLaissez les clayettes en place afin d'emp_cher les
enfimts de grimper 'a l'int_rieun
R_frig_rants
Tousles appareils de rdfrigdration contiennent
des r_fl'ig&ants qui, conform_ment aux lois
f_d_rales, doivent &tre enlev_s avant route
_liminarion de l'appareil. Si vous vous
ddbarrassez de vieux appareils de r_ffig&ation,
v_rifiez, aupr&s de la socidt_ qui s'occupe de
leur _limination, ce que vous devez faire.
CORDONSPROLONGATEURS
Nous vous recommandons fortement de ne pas utiliser de cordons prolongateurs _ cause des risques
potentiels qu'ils pr#sentent dans certaines conditions.
Toutefois si vous ddcidez d'utiliser tout de m_me un cordon prolongatem; il est abmlument n_cessaire
qu'il s'agisse d'un cordon 'a 3 ills avec mise 5.la terre pour appareils dlectromdnagers homologlld UL
(aux Etats-Unis) ou certifid CSA (au Canada), pourvu d'une fiche et d'une prise mises _tla terre
de 15 amp&res (minimum) et de 120 volts.
33
Page 34

f f
MESURESDESECURITEIMPORTANTES.
LISEZD'ABORDTOUTESLESDIRECTIVES.
AVERTISSEMENT!
RACCORDEMENTdLLECTRIOUE
Ne coupez ni retirez en aucun cas la troisiOme broche (mise _ la terre) dela fiche du cordon
d'alimentation. Pour votre s_curit_, cet appareil doit Otrecorrectement mis _ la terre.
Le cordon d'alimentation de cet appareil est muni
d'une fche 'a 3 broches (mise 'a la terre) qui se
branche dans une prise murale ordinaire 5-3
alv_oles (mise 5-la terre) pour r_duire au minimum
les risques de chocs dlectriques.
Faites examiner la prise de courant et le circuit par
un dlectricien qualifid pour vous assurer que la prise
est correctement mise 'a la terre.
Si la prise murale est du type standard 5-2 alvdoles,
il vous incombe de la d_ire remplacer par une prise
5-3 alvdoles correctement mise 5- la terre.
Le rdfrig&'ateur doit tot0ours _tre branch_ dans sa
propre prise de courant, dont la tension nominale
est identique 5-celle indiqu_e stir la plaque
sigmal_tique.
Cette prdcaution est recommandde pour garantir
un rendement optimum et dviter une surcharge des
circuits _lectriques de la r_sidence, ce qui pourrait
crier tin risque d'incendie par surchauffe des ills.
Ne d_bmnchezjamais le rdfrigdrateur en drant stir
le cordon d'alimentation. Saisissez J[brmement la
fiche du cordon et tirez droit pour la retirer de
la prise.
R_parez ou remplacez imm_diatement tout cordon
effloch_ ou endommag(_. N'utilisez pas un cordon
fendill_ ou pr_sentant des signes d'usure.
Lorsque vous d_placez votre r_f'igg_rateur du mm;
t:aitesattention de ne pas le f:aire rouler stir le
cordon d'alimentation afin de ne pas
l'endommager.
FICHED'ADAPTATION Ficl,o d' da tationnonperm,sesau Canada)
Nous vous recommandons fortement de no pas utiliser une fiche fl'adaptation _ cause des risques
potentiels qu'elle pr_sente clanscertaines circonstances.
Toutefbis, si vous dg_cidez d'utiliser tout de m&me
une fiche d'adaptation, vous pouvez effectuer un
raccordementtemporaire,si les codes locaux le
permettent, dans une prise de courant 'a 2 alv_oles
ad_quatement mise 5. la terre en utilisant une fiche
d'adaptation homologu_e UL, en vente dans la
plupart des quincailleries.
La fente la plus longlm de la fiche doit &tre align_e
avec la fiznte la plus longue de la prise murale afin
d'assurer la polarit_ appropride pour le
branchement du cordon d'alimentation.
Si la borne de mise 'a la terre de la fiche casse,
N'UI1LISEZPASI'appareil tant qu'une mise 5. la terre
addquate n'aura pa,s dtd rdtablie.
Le fait de fixer la borne de mise _ la terre de la fiche
d'adaptation _ la plaque de la prise de courant n'assure
pas automatiquement la mise _ la terre de I'appareiL fl
faut que la vis soit en m#tal, non isol#e, et que la prise de
courant soit raise _ la terre par fentremise du c_blage de
la r#sidence. Faites v#fifier le circuit par un #lectricien
quafifi# pour vous assurer que la prise est ad#quaternent
mise_ la terre.
34
Los.'sque vous d_branchez le cordon d'alimentation
de la fiche d'adaptation, saisissez tot0ours la fiche
d'une main pendant que vous tirez stir la fiche du
cordon d'alimentation de l'autre. Sinon, la borne
de mise 5.la terre de la fiche d'adaptation risque
de casser avec le temps.
VEUILLEZLIREETSUIVREATTENTIVEMENTCES
MESURESDESE-CURITbL.
CONSERVEZCESDIRECTIVES
Page 35

Lescommandes, ww_.electromenagersge.ca
Les commandes ressemblent _ I'une des illustrations suivantes :
Initialement, placez la commande de votre compartiment r#frig#rateur
en position 5 et celui de votre compartiment cong#lateur en position 5
et attendez 12heures que la temp#rature se stabilise.
flpeut #tre n#cessaire de faire plusieurs r#glages. R#glez les commandes
raison d'une graduation _ la fois et apr#s chacune d'elle, allouez une
p#riode de 12heures pour que la temp#rature du r#frig#rateur atteigne
la valeur command#e.
Le fait de placer la commande du cong#lateur sur 0 arr#te le
refroidissement de votre compartiment r#frig#rateur et de votre
compartiment cong#lateur, mais n'affecte pas I'alimentation #lectrique
du r#frig#rateur.
Le r#glage des commandes variera en fonction des pr#fdrences
I
J
personnelles, de I'usage et des conditions d'utilisation et pourront
n#cessiter plusieurs ajustements.
35
Page 36

La cartouchedufiltre a eau.
Sur certaines mod#les
Cartouche du filtre _ eau
La carmuche du filtre _ eau se trouve dans
le c_fmdroit arri&msup_rieur du comparfiment
r_frig_rateu_;juste aud_us des commandes
de temp4ramre.
Quand faut-il remplacer le filtre sur
les modules comportant un voyant
indicateur de remplacement du filtre
Une lumi?:reindique la n&essit_ de
remplacer la era'touche du tiltre _ eau sur le
distdbuteuE Cette lumi&re devient orange
pour vous avertlr de remplacer bient6t le
filtre.
InsOrezle dessusdelacartouche Vous devez remplacer la cartouche de tiltxe
dansteporte-cartoucheet toume-la quand la lumi&re de l'indicateur devient
lentementversladroito, rouge ou quand le ddbit de l'eau qui va au
distibuteur d'eau ou au distributeur de
Quand faut-il remplacer le filtre sur
i!i _ glace diminue.
les modules ne comportant pas de
voyantindicateurderemplacement
du filtre
Le filtre doit _tre remplac6 rousles sixmois
ou plus t6t si le debit d'eau an disn'ibuteur
d'eau ou fila machine fi gla{2onsd_crok.
Installation de la cartouche du filtre
eau
oS'il s'agit d'une cartouche de
remplacement, enlevez d'abord
(sur ¢ertaines mod#les)
l'ancienne en la rournant lentement
vers la gauche. Ne tirezpas stir la
cartouche. Un peu d'eau peut s'4couleE
o Sur les mod&les non 4quip& d'un voyant
indicateur de remplacement du filtre,
apposez l'4tiquette autocollante indiquant
le mois et l'ann4e pour vous rappeler de
remplacer le filtre apr_s six mois.
Remplissez la cartouche de
remplacement avec de l'ean du robinet
pour permettre un meilleur debit du
distributeur imm4diatement apr&
l'installation.
Clayettesetbacs.
En alignant la fl&che de la cartouche
_tcelle du support de cartouche, placez
le haut de la nouvelle cartouche _t
l'int4rieur du support. NOla poussez
pOSvers le haut dans le support.
_Wournez doucement vers la droite
jusqu'_t ce que la carmuche s'arr_te.
NESERREZPASTROREn mumant
la cartouche, vous l'am&nerez en
position automatiquement. La
cartouche doit tourner d'environ
1/2 tom:
_ Faites couler l'eau du disn'ibuteur
pendant 3 minutes (environ 6 litres)
afin de d4g_ger le syst&me et emp&her
le bredouillement.
Pressez et maintenez appuy_e la touche
RESETWATERFILTER(existant stir
certaines mod&les) (re-rdglage du
filtre fi eau) sur le distributeur pendant
3 secondes.
REMARQUE:Une cartouche de
remplacement qui vient d'etre installde
pe_fairejaillir l'eau du distributeur.
Bouchon de d_rivation du filtre
11faut utiliser le bouchon de delzlwation
du filtre lo_.'squ'une carmuche de
remplacement n'est pas disponible. Le
distributeur et la machine _tglagons ne
peuvent pas fonctionner sans le tiltre ou
sans le bouchon de d&ivation du tiltre.
Filtresderemplacement:
Pourcommanderdescartouches
supplementairesaux Etats-Unis,
visiteznotresiteWeba radresse
ww_.electromenagersge.ca,oueppelez
leServicedespieceset accessoiresGE
au1.88_.261305_.
GWF
Prix sugg&4 pour la vente au d4tail $34.95
USD.
Les clients au Canada devraient consulter
les pagesjannes pour connaRre la
succursale Cameo la plus pr&.
Toutes los caract#ristiques no sont pas disponibles sur tousles modOles.
Bacs sur la porte du compartiment r_frig_rateur
Ii est possible de tacilement transporter les
bacs d4montables du r4fi-ig4rateur
l'endroit de travail.
Pouren/ever: Soulevez l'avant du bac et tirez.
Pour replacer on re/oca/iser : Engagez le bac
dans les supports moul& de la porte puis
36
pous,sez vers l'intdrieuE Le bac sera
verrouill4 en place.
L'ergotaide _ emp&her que de petits
articles plac& sur la clayette de la porte se
renversent, coulent ou gli_sent. Mettez tin
doigt de chaque c6t4 de l'ergot pr& de
l'arri&re et _hites bouger la clayette vm.'s
l'm_nt ou vers l'arri&re selon vos besoins.
Page 37

R#arrangement des clayettes
Clayettesdurefrigerateur:
ww_.electromenagersge.ca
Paure_lawer
Clayettesducongelateur:
Pour elT[aver
Pour replacer
Paniersducongelateur:
Pour en[ever
Enlevez le panier en le tirant vers l'avant,
en soulevant la partie a'_ant et en le faisant
glisser au del_t de la butte.
Gfftce _tla clayette glissanteanti- Prenezsoindepousserlaclayettejusqu'aufond
ddversement, vous pouvez atteindre des pourrefermerlaporte.
articles plac& derri&re d'auwes. Ses bards
Clayettecoulissanteanti-d#versement fsurcertainsmodOles)
sp&iaux sont con{;us pour emp_cher tout
ddversement aux clayettes inf&ieures.
Clayettes anti-d#bordements (surcertainsmod_les)
Ces clayettes sont dotdes de rebords
sp&iaux afin de t:aciliter la prevention des
ddbordements sur les clayettes inf&ieures.
Clayette QuickSpace TM (surcertainsmodfiles)
Vous pouvez diviser en deux cette clayette pattie arri_re pour ranger des articles de
et t:aire coulisser sa pattie a'_ant sous sa haute mille sur la clayette du dessous.
Clayettes r_glables en profondeur
Ces clayettes d_mchables sont extensibles et
permettent de disposer de plus d'espace de
rangement avec une flexibilitd d'utilisation
accrue.
Jl ii!iiii!i iiiii!! ii i!
Pourenlever: Soulevez la partie extensible
de la clayette verdcalement puis tirez-la vers
l'extdriem:
Pour replacer: Engagez la partie extensible
de la clayette dans les supports moul& de
la porte et poussez vers l'int_rieur.
Ceci assurera le verrouillage.
37
Page 38

Clayettesetbacs.
Toutes les caract#ristiques ne sont pas disponibles sur tous les modules.
Casier ShelfSaver TM
(surcertainsmodges)
Utilisez ce casier pour y
ranger des canettes afin de
faciliter l'acc&s.
Le casier petit aussi smwir
pour ranger un plat de
cuisson an four mesurant
9" x 13".
R_telier de porte
boites Isurcertainsmodges)
Ce rS_telierde porte
contientjusqu"a 9 boites.
NOTE:Vousnepouvezmonter
cerOtelierqu"enpositionduhaut,
souslebac_produitslaitiers.
Bacs a I#gumes.
Toutes les caract#ristiques ne sont pas disponibles sur tousles modules.
Bacs _ fruits et I#gumes
Si une quantit4 d'eau excessive s'accumule
dans le fond des tiroirs, essuyez-les.
Bacs _ I#gumes _ humidit# r#glables et bac _ en-cas (surcertainsmodules)
le tiroir conser,,e un degrd d'humidit_ dlevd abaisser le degr_ d'humiditd dans le tiroir
R_glez la commande 'a High(haut)pour que R_glez la commande _tLOW(has)pour
pour la conservation des ldgumes, pour la conser,,ation des fruits.
Bac _ viande transformable (surco_oinsmodges)
Le bac _tviande n'ansformable a sa
propre arrivde d'air froid pour permettre
_ttin courant d'air en provenance du
compartiment cong_lateur d'arriver
au bac.
La commande de temperature r_glable permet
la rdgulation du d_bit d'air provenant du
compartiment du cong_lateun
Placez le levier sur hampour que la
temp&amre du bac soit _tla tempg_rature
normale du r_fiig&atem; assurant ainsi
la disponibilitd d'un espace suppl_mentaire
pour le rangement des ldgumes. Le dg_bit
d'air froid s'arr_te. 11est donc possible de
choisir entre ces deux extr&mes de
temp&ature.
Placez le levier sur hassur la position la
plus froide pour le rangement de xdandes
fralches. Sile lmder demeure longtemps stir
cette position, il est possible que du givre se
forme 'al'int4rieur du bac.
38
Page 39

Enl .vementdubacs b I#gumes. .o,eo omo,, e e.ca
Toutes les caract#ristiques ne sont pas disponibles sur tousles mod#les.
Enl#vement du bacs b I#gumes
II est facile de refirer les bacs en les
soulevant ldg&rement puis en les tirant au
del5-de la butde.
Si la porte du rdfrig_rateur emp&he le
retrait des bacs, il sera n_cessaire de
ddplacer cehfi-ci vers l'avantjusqu'5- ce qu'il
stir possible d'ouvrir la porte suffisamment
pour taire glis,ser les bacs fi_l'extdrieuE Dans
certains cas, il sera ng_cessaire de d_placer le
rdfi-ig_rateur vers la gauche au cours de
Lorsque vous remettez les bacs en
place, assurez-vous que vous les
gfissez dans tes guides.
cette op&ation.
Machine b gla ons automatique.
fl faut pr#voir entre 12et 24 heures avant qu'un r#frig#rateur nouvellement install# commence # produire des gla_ons.
Machine b gla_ons automatique
(surcortainsmodgos)
La machine 5.gla¢onsproduira environ
7 gla¢ons par cycle--salt environ 100-130
glagons mutes les 24 heures---selon la
temp&amre du congdlatem; la tempdramre
ambiante, la frdquence d'ouvet'tum des portes
et d'autres conditions d'utilisation.
Si vous mettez votre l_frig&ateur en marche
avant que la machine 5.gla_ons ne soit aliment&
en eau, mettez l'intermpteur d'alimentation 5.la
position 0 (afrO0.
Lot_que la conduite d'eau est t-accord&
au rdfiig&-atem; mettez l'intermpteur
d'alimentation 5.la position ,Ona_hoJ.
La machine 5.gla¢ons se remplira d'eau si
sa tempfitature baisse 5.-10°C (I5°F). IIfaut
pr&oir entre 12et 24 heures avant qu'un
t_frig&ateur nouvellement installd commence
5.produire des glaqons.
YBus entendrez un bourdonnement chaque lois
que la machine 5.gla¢ons se remplit d'eau.
,Jetez les premiers lots de glagons afin d'_liminer
les impureuas pmvenant de laconduite d'eau.
Assurez-vousque fien ne g_ne le mouvement
du bras r_agulatem:
Sile bac 5.gla¢ons est pleinjusqu'au niveau du
bras r_agulatem;la machine 5.gla_ons s'atv_t de
produire des gla¢ons.
II est nomlal que plusieurs gla_ons soient coil&
entre eux.
Loi*que ,.,artsn'utilisez pas souvent de gla¢ons,
lesvieux gla¢ons perdent leur transparence,
prennent un gofit d&agtx?ableet diminuent
de mille.
NOTE:Danslesmaisonsquiantunepressiond'eauplus
faiblequelamoyonne,vouspouvezentendrelamachine
#gla_onsrecommencerplusieursloissoncyclepour
produireunelivraisondegla#ons.
fly a erie clayette
de cong#lateur
duhaut au
dessus du
distributeur de
glace, que vous
peevez utigser
pour range_
Ttroir bglace
Pourobtonirde laglace, tirez le tiroir vers l'avant. Pourenleverle timir,tirez-ledmit et soulevez-le
au dels.de sa position d'atrOt
N_cessaire de machine b glagons
Sivotre r_;frig&ateur n'est pas d{js.dot_ d'une
machine 5.gla¢onsaummatique, un n&essaire
de machine 5.gla¢ons est disponible moyennant
V_fifiez sur l'_tiquette 5.l'arri_re du
r_frig&ateur quel est le n&essaire de machine
5.gla¢ons sp&ifique 5.votre mod_le.
suppldment.
39
Page 40

Le distributeurd'eau et de gla ons.
Sur certains modules
Pour utiliser le distributeur
S_lectionnez _ED ICE_ (glaqons),
CRUSHEDIICE,_J(glace concass_e) ou
WATER_ (eau).
Appuyez doucement le verre contre le
haut du bras de distribution.
La clayette de trop-plein n'est pas munie
d'un syst&me d'_coulement. Pour rdduire
les Laches d'eau, vous devez nettoyer
rdguli&rement la clayette et sa grille.
S71n'yapasd'eaudistribuOelorsquelerOfrigOrateur
estinitialementinstallfi,il yapeut-Otredefair clans
Bacdetro_plein
laconduited'eau.Appuyezsurlacommandede
distributionpendantdeuxminutesauminimumpour
expulserfair dela conduited'eauetremplirle
rOservoird'eau.Afind'#liminerles&entuelles
impuret#sprovenantdelaconduited'eau,jetezles
sixpremiersverresd'eau.
ArrENTION : Ne mettezjamais les doigts
ou d'autres objets darts I'ouverture du
distributeu_
Verrouillage du
distributeur (sur
certainesmodOles)
Appuyez sur la touche
LOCKCONTROL(r_glage
duverrouillage)
.......................................................................................................pendant 3 secondes
pour verrouiller le
distributeur et le
panneau de rdglage.
Pour d&errouillm;
appuyez sur la touche
et tenez-la enfoncde
pendant encore
3 secondes.
LumiOre du
distributeur
Cette touche allume
et _teint la lumi_redu
distributeur.Vous
allumez _galement la
lumi&re en appuyant
sur le bras de
distribution.
Si cette ampoule brflle,
vous devez la remplacer
pax-une ampoule d'au
maximum 6 watts.
4O
rlro# _ glace dans les modOles
distributeur de glace
Enl_vement:Mettez l'interrupteur du
distributeur de glace en position 0 (arr_t).
Tirez le tiroir droit, puis soulevez-le pour
ddpasser la position d'arrOt
Remise en place: Pour remetrre le tiroix,
prenez soin d'appuyer fort en place. S'il
n'entre pasjusqtFau fond, enlevez-le et
faites tourner le mdcanisme d'un quart
de tom: Poussez 'a nouveau le tiroir
jusqu'au fond.
Renseignements importants concernant votre distributeur
N N'ajoutez pa,s dans le bac _tglagons des
glaqons non fabriqu4s pax"votre machine
_tglagons. Ils risquent d'&re difficiles _t
concasser ou _tdisn'ibuer.
l_vitez de trop remplir les verres de
glaqons et d'utiliser des verres 4troits ou
tr& hauls. Le conduit petit se bloquer et
le volet peut geler et coincm: S'il y a des
glaqons qui bloquent le conduit, iCaites-les
passer au moyen d'une cuill&re en bois.
Ne placez pas de boissons ou d'aliments
dans le bac 'a glagons pour les rafraichiJ:
Les bokes, bouteilles et paquets
alimentaires peuvent coincer la machine
_tglagons ou la vis sans fin.
NAf'm que la glace distribu4e ne puisse
manquer le verre, placer le verre 'a
proximitd mais sans toucher l'ouvermre
du distributeur.
N M_me si vous avez sdlecdonnd CUBEDICE
(glagons), il est possible que de la glace
concassde rombe dans votre verre. Cela
se produit de temps _ autre lorsque
plusieurs glagons sont achemin_s vers
le broyeun
_Apr_s distribution de la glace concass_e,
de l'eau petit s'&ouler du conduit.
_Parfbis, tin peu de givre se forme stir le
volet du conduit _tglace. Ce ph_nom&ne
est normal etse produit en g6ndral apr&
des distributions r_pdt_es de glace
concassde. Le givre va &,enmellement
dvaporer.
Page 41

Entretienetnettoyagedur frig#rateur.
Nettoyage de rextdrieur
Bac de trop-plein du distributeu_
Le bac de trop-plein du distributour (stir
certains modules)devrait _tre soigneusement
essuy_. Vous pouvez _liminer les d_p6ts
calcaires laiss& par les taches d'eau en
trempant le bac dans du vinaigre non dilu£
Laissez tremperjusqu'_t ceque les d_p6ts
disparaissent ou soient suffisamment
ramollis pour &tre _limin& par ringage.
Le bras do distribution (stir certains
modules). Avant nettoyage, appuyez pendant
3 secondes sur la touche tOCKCONTROL
Nettoyez-la au moyen d'une solution d'eau
et de bicarbonate de soudc--environ une
cuill_re 'a soupe (15 ml) de bicartxmate de
soude par pinte (1 liter) d'eau. Rincez bien
et essuyez.
Nettoyage de I'int_rieur
Pour Ovitor los mauvoises odeurs,laissez une
bolte ouverte de bicarbonate de soude dans
les compartiments rdfrig_rateur et
cong_latem:
Debranchoz le refrigerateur avant do le
nettoyer.S'il est trap difficile de le faire,
essorez bien votre linge ou votre _ponge
pour enlever l'exc&s d'eau lo_._que vous
nettoyez autour des interrupteurs, des
lampes ou des commandes.
Utilisez une solution d'eau ti&de et de
bicarbonate de soude-environ une cuill&re
_tsoupe (15 ml) de bicarbonate de soude
par pinte (1 liter) d'eau_afin de nettoyer
tout en neutralisant les odeurs. Rincez
et essuyez bien.
Apr_s avoir nettoy_ lesjoints de porte,
appliquez une fine couche de waseline stir
lesjoints du c6td des charni&res pour
emp&her lesjoints de caller et de se
ddformer.
LespoignOesdeporteet leurgarniture.
Nettoyez-les au moyen d'un linge humectd
d'eau savonneuse. S&hez avec tin lingo
doux.
Gardezrexterieur durefrigerateurpropre.
Essuyez-le avec tin linge propre ldg&rement
humect_ de cim pour ap_ls
41ectmm4nagers ou d'un d4tergent liquide
doux pour la vaisselle. S4chez et polissez
avec tin linge doux et propre.
N'essuyozpaslerOfrig#rateuravecunlingo_vaissollo
saleouunosen/iottohumido:ilspourraiontlaisserun
r#siduquipourraendommagorlapointuro.N'utilisoz
pasdetampons_ r#curor,deproduitsnettoyantson
poudro,dejavollisantsoudeproduitsnettoyants
contonantunjavollisant,carcosproduitspouvont
Ogratignerlapeinturoetlarondromainsr#sistanto.
Orificedevidangeducompartimentdu
congelateugLots du nettoyage annuel,
retirez le panier inf_rieur du congdlateur et
faites pa&ser une solution de bicarbonate de
soude (1 cuiller_e ou 5 ml) et d'eau chaude
(pas bouillante) (2 _sses ou 500 ml) au
Wavers du tuyau de vidange _ l'aide d'une
pipette d'arrosage de sauces : ce m_lange
ihcilite l'dlimination des odeurs et la
rdduction des risques de bouchage du
myau d'_vacuation. Sile myau est bouch_,
utilisez la pipette et une solution de
bicarbonate de soude afin de forcer le
passage de la mati&re obstruante.
Evitezdenettoyerlosclayettesonverreencore
froidesdamdel'eauchaudocarollesrisquontdeso
casser#causedel'#cartexcossifdetempfiraturo.
Manipulozlosclayottoson verreavecprudence.Si
vouscognezleverretrempfi,ilpourrasobriser
Nolavozaucunepificedeplastiquodur#frigfirateur
aulavo-vaissollo.
Condensateur
Vous n'avez pas besoin de nettoyer le
condensateur dans un milieu familial
normal. Cependant, sile milieu est
particuli&rement poussi_reux ou gmisseux,
vous devez nettoyer p&iodiquement
le condensateur pour obtenir tin
fonctionnement efficient du rdfi-ig_mteur.
Nettoyage du condensateur:
Le condenseur est sim_ fi l'arri&re du
r_frigdrateun Pour y accddm; d_branchez
d'abord le r_fi'ig&ateur puis retirez le
panneau d'acc&s. Le condenseur se trouve
stir le c6td droit.
41
Page 42
Entretienetnettoyagedur frig&ateur.
Derriere le r_frig#rateur
Prenez un soin particulier lorsque vous
_loignez le r_fiig&ateur du mun Tousles
types de rev&tements de sol peuvent _tre
endommag_s, particuli_rement ceux qui
sont coussin_s ou dont la surface est gauff_e.
Tirez le r_frigdrateur en ligne droite et,
lorsque vous le remettez en place, poussez-
levers lemur en ligne droite. Les
ddplacements lat&aux du rdfrig_rateur
pourraient endommager le rev_tement
de sol ou le rdfrig_rateur.
D_part en vacances
Lorsque vous vous absentez pendant une
p&iode prolongde, videz les aliments et
ddbranchez le rdfrig_rateur. Nettoyez
l'int_rieur avec une solution d'eau et de
bicarbonate de soude, 5.raison d'une
cuill&re 'a soupe (15 ml) de bicarbonate par
pinte (1 L) d'eau. Laissez les portes
ouvertes.
Mettez l'interrepteur d'alimentation
de la machine _tglagons 'ala position
O(arrOt)et fermez l'alimenmtion d'eau au
rdfrigg:ratem:
Lorsquevousremettezle r#frig6rateurenplace
enlepoussant,veillez_nepasle &ire roulersur
le cordond'alimentationousurla conduited'eau
dela machine_gla_ons.
Si la temp&rature risque de descendre sous
le point de cong_lation, demandez 'a un
r_parateur de vidanger la conduite d'eau
afin d'dviter les ddgats s_rieux caus& par
les inondations.
D#m#nagement
Immohilisez tousles _l&nents amovihles, tels que les clayettes et les bacs, 'a l'aide de ruban
gomm_ pour &iter de les endommager.
Assurez-vousquelerOfrig_rateurdemeuredeboutpendantsond_mOnagemenL
42
Page 43

Remplacementdesampoules.
Lorsque vous r6glez la commande du cong#lateur sur 0 (arr#t), I'alimentation 61ectrique de fampoule n'est pas coup#e.
Compartiment r#frig#rateur--Eclairage sup#rieur
O D_branchez le r_frig&'atem: O Rebranchez le r_frig&'atem:
_L'ampoule est situde en arri&re des
commandes. Remplacez-la avec une
ampoule pour appareils m_nagers de
puissance _g'ale ou infdrieure.
Compartiment r#frig#rateur--Eclairage inf#rieur (st,rcertoinsmodOles)
Thislightis locatedabovethe topdrawe_
Ddbranchez le rdfrig_rateur.
_ Tenez le rebord se trouvant _tla partie
infdrieure du blindage de l'ampoule
puis tirez vers le haut et vers l'avant.
Apr&s avoir remplacd l'ampoule
par une ampoule d'appareil
_lectro-mdnager de m&me puissance
ou de puissance infdrieure, remettez
le pare-lumi_re et le bouton.
Rebranchez le rdfrig_rateur.
Compartiment cong#lateur
D4branchez le r4ffigdratetm
_ Enlevez la clayette qui se trouvejuste au
dessus du pare-lummre (xous pouvez
enlever cette clayette plus facilement
apr&s l'avoir vid4e).
_Pour le remplacement, soulevez
l'ampoule par son blindage.
*" 7
Distributeur
D4branchez le r4ffigdratetm
L'ampoule se trouve sur le disu'ibuteur
sous le panneau de r4glage.
Enlevez l'ampoule en la f:aisant murner
dans le sens oppos4 _tcelui des aiguilles
d'une moim'e.
OApr&s avoir remplacd l'ampoule
par une ampoule pour appareils
mdnagers de puissance dgale ou
inf_rieure, remettez le blindage en
place en le suspendant par les trois
languettes.
O Remontez la clayette et rebranchez
le r_fl'ig&ateur.
_Remplacez l'ampoule par une ampoule
de m&me mille et de m&me puissance.
Rebranchez le r46"ig4ratem:
43
Page 44
Instructions
Refrigerateur
d'installation
www.electromenagersge.ca
I Si vousavezdes questions,appelez le 1.800.361.3400o.visiteznotresiteWeb_tl'adresse:
AVANT DE COMMENCER :
Lisez ces instructions compl_tement et attentivement,
• IMPORTANT - Conser,,ezces
instructions pour utilisation _ventuelle par un
inspecteur local.
IMPORTANT - Respecte,tousles
codes et r{glements officiels.
• Note R l'installateuar - Assurez-vousde laisser
ces instructions au consommatem:
• Note au consommateur - Conservezces
instructions pour r_fdrence future.
• Niveau de connalssances - L'installation de cet appareil
requiert des connaissances de base en mdcanique.
• Temps requls - L'installation du rdfi'igdrateur
demande 15 minutes.
• L'insvallateur est responsable de l'insmllation
correcte du r_fi'ig_ratem:
• Toute panne de cet appareil causde par une installation
inaddquate n'est pan couverte par la garantie.
ALIMENTATION D'EAU A LA
DEGAGEMENTS
Pr_voyez les d_g'agements suivants pour faciliter
l'installadon, assurer une circulation d'air adequate, et
pemmttre les raccordements de plomberie et d'_lectricitd :
• C6t_s 1/8 po (4 mm)
• Dessns 1 po (25 mm)
• Arri_re 1 po (25 mm)
11est n&essaire de m6nager tin espace de 3/4 po (19 mm)
pour que la porte puisse _tre ouverte sur 90 °, ce qui
assure un meilleur acc_s aux compartiments de
rangement des aliments.
ROULETTES DE NIVELLEMENT
Les roulettes de nivellement jouent trois r61es :
• Elles peuvent &tre r6gl4es pour que les portes se
referment automatiquement lol_qu'elles sont fi moiti6
ouvertes.
• Elles peuvent &tre r6gl6es de mani&re fi permettre
l'appareil de reposer solidement stir le sol et
l'emp&her ainsi de branlen
• Elles vous permettent d'61oigmer le rdfrig&'ateur du
mur pour le nettoyage.
Modeles 20,22,25
MACHINE A GLA_ONS
(sur certains modeles)
Si le r4frigdrateur est 4quip4 d'une machine _tgla_;ons,
celle-ci devra _tre raccord4e _tune conduite d'eau froide.
Vous pouvez acheter une trousse d'alimentation d'eau GE
(contenant la myauterie, le robinet d'arr&, lesjoints et les
insmmtions) chez votre revendetn; ou en vous adressant 'a
notre site Web _tl'adre_e www.electromenagersge.ca
ou _tnotre service de Pi&ceset accessoires au num4ro
de tdl4phone 1.888.261.3055.
Pour r_gler la hauteur des roulettes, retirez la grille de la
base du r_fi'igdrateur en la tirant par le bas.
Pour _lever le r_frig_rateur, tournez les vis de r_glage
dans le sens horaire et pour l'abaisser, dan_s le sens anti-
horaire. Utilisez une clef Amolette pour _crous
hexagonaux de 3/8 po ou des pinces.
I
EMPLACEMENT DU RCFRIGCRATEUR
• N'installez paNle rdfiigdrateur dans une pi&ce off la
temperature ambiante risque d'etre inf&ieure _t
60 °F (16 °C) parce qu'il ne se mettra pan en marche
suffisamment souvent pour maintenir les temperatures
convenables.
• Installez le rg_fi'igg_rateurstir tin plancher suffisamment
solide pour le supporter lorsqu'il est plein.
Pour remettre la grille de la base, alignez ses attaches
arfi_re entre la barre et la partie inf6rieure de l'armoire.
PoussezjusquYt ce que la grille s'enclenche clans le
logement.
44
Page 45

Instructions d'installation
ALIGNEMENT DES PORTES
Aprhs avoir r4g14 les roulettes de nivellement, assurez-vous
que les portes sont bien align4es _tla partle sup4rieure.
Pour aligner lea tmrtes, r4glez la porte du compartiment
r4fi'igdrateur.
O A l'aide d'une c14'a douille de 5/16 po, murnez la xds
de r4glage de la porte vers la droite pour relever la
porte, ou vers la gauche pour l'abaisser. (Une douille
de nylon, encastr4e dam les filets de l'axe, emp&hera
celui-ci de tourner si l'on ne se sert pas d'une c14.)
Apr&s avoir tourn4 la cl4 une ou deux f;_is,ouvrez et
fermez la porte du compartiment r4frig4rateur et
v4rifiez l'alignement des portes 'ala partie sup4rieure.
Pourenleverla grille
dela basedu
rOfrigOrateur,ouvrez
lesportesetensuite,
tirezlagrille horsde
sonIogement.
CIO_douillede
/" 5/16po
Relevez
45
Page 46

Instructions d'installation
INSTALLATION DE LA CONDUITE D'EAU
AVANT DE COMMENCER
Nous recommandons les trous, ses d'alimentadon d'eau
en cuivre WXSX2, WXSX3, WXSX4, selon le montant de
conduite dont vous avez besoin. Nous approuvons les
conduites d'eau en mati&re plastique GE SmartConnect"
Regrigeramr Tubing (WX08X10002, WX08X10006,
WX08Xl0015 et WX08X10025).
Sivous insmllez un syst6me d'eau GE Reverse Osmosis
dans votre r_fi'ig&atem; la seule installation approuv_e
est celle de la trousse GE RVKIT. Pour les autres syst6mes
d'osmose de l'eau, suivez les recommandations du
t:abricant.
Si le r_frigdrateur est aliment_ en eau 5_partir d'un
syst_me de filtration d'eau par osmose inversde, et si
le r_fl-igdrateur comporte dgMement un filtre 'aeau,
utiliser le bouchon du circuit de d&iwatlon du filtre du
rdfi-ig_rateur. Si la carmuche de filtration d'eau du
rdlYig_rateur est utilisde en conjonction avec le syst_me
de filtration par osmose invers_e, on peut observer une
rdduction du ddbit d'eau au point de puisage, et la
production de cubes de glace creux.
Cette installation de conduite d'eau n'est pas garantie
par le t:abricant de rdfrig_rateur ou de machine 5_glagons.
Ntivez soigneusement ces instructions pour minimiser le
risque de dommages on&eux d'inondation.
Les coups de b_lier (eau qui donne des coups dans les
tuyaux) dans la tuyauterie de la maison peuvent
occasionner des dommages aux pi&ces de votre
rdfi'ig_ratem; ainsi que des flfites ou des inondations.
Appelez un plombier certifi_ pour corriger les coups de
b_lier avant d'installer la conduite d'eau de votre
rdfi'ig_rateur.
AVANT DE COMMENCER (SUITE)
Pour prdvenir toute brgflure et rout dommage 'avotre
rdfi'ig_ratem; ne branchezjamais la conduite d'eau 5_
une canalisatlon d'eau chaude.
Si vous utilisez votre rdfrig_rateur avant de brancher la
conduite d'eau, assurez-vous de laisser le commutateur
de la machine 5_gla¢on en position 0 (alrOt).
N'installezjamais les tuyaux de la machine 5.glacon dans
des endroits off la temperature risque de descendre en
dessous du point de cong_lation.
Si vous utilisez un outil dlectrique (comme une perceuse
dlectrique) pendant l'installation, assurez-vous que
l'isolement ou le cfiblage de cet outil emp_che tout
danger de secousse _lectrique.
Vous devez proc_der 5.toutes vos installations
con{brmdment aux exigences de votre code local de
plomberie.
46
Page 47

Instructions d'installation
CE DONT VOUS AUREZ BESOIN
• Tuyaux en cuivre ou rousse GE SmartCormect TM
Refrigerator Tubing, diam_tre ext_rieur de
1/4 po pour brancher le r_fligdrateur 5_l'alimentation
d'eau. Si vous utilisez tin tuyau en cuivre, assurez-vous
que les deux extrOmitds du tuyau soient coupOes bien
droit.
Pour trouver la longueur de tuyau dont vous aurez besoin :
mesurez la distance qui va du robinet d'eau sire6 derriere
le r_frigdrateurjusqu'au tuyau d'alimentation d'eau.
Ajoutez 2,44 m (8 pi). Assurez-vous qu'il y ait assez de
tuyau en trop (environ 2,44 m [8 pi] enroul& trois fois en
cercles d'environ 25 cm [10 po] de diam_tre) pour vous
permettre de dOcoller le rdfrig_rateur du mur apr_s
l'installation.
Les trousses GE SmartConnect '_'Refrigerator Tubing sont
disponibles dans les dimensions suivantes :
0,6 m (2 pi) -WX08X10002
1,8 m (6 pi) - WX08X10006
4,6 m (15 pi) -WX08X10015
7,6 m (25 pi) -WX08X10025
Assurez-vous que votre trousse air au moins 2,4 m (8 pi)
comme indiqud ci<lessus.
NOTE : Les seuls tuyaux en mati0re plastique approuv_s
par GE sont ceux qui font fournis dan_sles trousses
GE SmartConnect" Refrigerator Tubing. N'u"tllisez
jamais un autre tuyau en mati0re plasfique, car le tuyau
d'alimentation d'eau est tout le temps sous pression.
C.ermines categories de tuyaux en mati0re plasfique
peuvent devenir cassants avec l'_tgeet peuvent se fendre,
en occasionnant des dommages d'inondation dans
votre maisom
• Vous pouvez acheter une trousse d'alimentation d'eau GE
(contenant tin tuyau, un robinet d'arr_t et lesjoints
6num&'ds ci-dessous) chez votre distributeur local ou en
le commandant au service de pi&ces et accessoires, au
800.626.2002.
CE DONT VOUS AUREZ BESOIN
(SUITE)
• Une alimentafion d'eau froide. La pression de l'eau doit
&treentre 20 et 120 p.s.i. (1,4 et 8,2 bar) stir les mod&les
non dquip& de filtre _teau et entre 40 et 120 psi (2,8 et
8,2 bar) pour ceux qui le sont.
• Une perceuse 61ectrique.
• Une d0 de 1/2 po ou une d0 anglaise.
• Un tournevis it lame plate et un tournevis Phillips.
• Deux Ocrous it compression d'un diam0tre extOrieur
de 1/4 poet deux bagues (manchons)--pour brancher
le tuyau en cuivre au robinet d'arrOt et au robinet d'eau
du r61iigdrateuE
OU BIEN
• Si vous utilisez une trousse GE SmartConnect '_
Refrigerator Tubing, les garnitures nOcessaires sont ddjfi
montdes au myau.
• Si votre canalisadon d'eau actuelle a un raccord 6vas6 fi
une extrOmit6, vous aurez besoin d'un adaptatem" (que
vous n'ouverez dans votre magasin de mat&iel de
plomberie) pour brancher le tuyau d'eau au
rOfligdrateu_; OU BIEN vous pouvez couper le raccord
&asd 'a l'aide d'un coups-tube, puis utiliser un raccord fi
compression. Ne coupezjamais l'exU-dmit_ finie d'un
myau de la trousse GE SmartConnect ''_Refrigerator
Tubing.
• Un robinet d'arrOt pour brancher le tuyau d'eau froide.
Le robinet d'arrOt doit avoir une entrOe d'eau avec tin
diam&tre intdrieur minim'M de 5/32 po au point de
jonction avec LA CONDUITE D'KAU FROIDE. Des
robinets d'arr_t fi dtrier rant souvent inclus dans les
trousses d'alimentation d'eau, a'mnt d'achetet; assurez-
vous que le robinet 5_dn'ier se contorme fivos codes de
plomberie locaux.
47
Page 48

Instructions d'installation
INSTALLATION DE LA CONDUITE D'EAU (SUITE)
Installez le robinet d'arr_t sur la canalisation d'eau
potable la plus fi'_quemment utilis_e.
[] FERMEZ L'ALIMENTATION
PRINCIPALE D'EAU
Ouvrez le robinet le plus proche suffisamment
longtemps pour purger le tuyau.
[] FIXEZ LE ROBINET D'ARRI_T
Fixez le robinet d'arr& au tuyau d'eau froide 5_l'aide
du collier de serrage.
Collierde serrage
[] CHOISISSEZ L'EMPLACEMENT
DU ROBINET
Choisissez, pour le robiner, un emplacement
facilement accessible. 11vaut mieux le brancher de
c6td 5_un tuyau vertical. Si vous devez le brancher 5.un
myau horizontal, faites le branchement en haut ou de
c6td, plut6t qu'en bas du myau, pour &iter de recevoir
des s_diments du tuyau d'alimentation d'eau.
[] PERCEZ UN TROU POUR LE
ROBINET
Percez un trou de 1/4 po dans le tuyau d'eau,
l'aide d'un fbret dur. Enlevez mute barbure due au
perqage du trou dans le tuyau. FaRes attention de ne
pas laisser de l'eau couler dans votre perceuse
61ectrlque. Si vous ne percez pas un n'ou de 1/4 po,
vous obtiendrez une alimentation d'eau rdduite
et des glaqons plus petits.
Robinetd'arr_t _
6trier
NOTE :Vous devez vous confbrmer aux Codes
de plomberie 248CMR du Commonwealth of
Massachusetts. Les robinets d'arr& 'a(_trier sont
illdgaux et leur urilisation n'est pas aumris_e au
Massachusetts. Consultez votre plombier local.
,)
Tuyauvertical
d'eau fr0ide
[] SERREZ LE COLLIER DE SERRAGE
Serrez les vis du collier jusqu'_t ce que la rondelle
d'4tanch4it_ commence 5_enflen
NOTE : Ne serrez pas trop. Vous risquez d'&raser le
tuyau de cuivre.
Collierde serrage -- EntrOe
r •
Visdu collier
Rondelle
[] ACHEMINEZ LE TUYAU
48
Acheminez le tuyau du tuyau d eau fi'oide at
r_frigdrateun
Faites passer le tuyau par un trou perc_ dans lemur
ou le plancher (derri&re le r_fiig&ateur ou au niveau
de l'armoire de cuisine adjacente), aussi pr}s du mur
que possible.
NOTE :Assurez-vous qu'il y ait assez de tuyau en trop
(environ 2,44 m [8 pi] enroul& trois fois en cercles
d'environ 25 cm [10 po] de diam&tre) pour vous
permettre de d_coller le rdfi-ig_rateur du mur apr_s
l'installation.
Page 49

Instructions d'installation
[] BRANCHEZ LE TUYAU AU ROBINET
Placez un _crou de compression et une bague
(manchon) 'a l'extr_mitd du twau et branchez-les au
robinet d'arr&t.
z-kssurez-vous que le tuyau soit bien ins&r4 dans le
robinet. Serrez fort l'&rou de compression.
Pour le tuyau en mati&re plastique d'une trousse
GE SmartConnect" Refiigerator Tubing, ins4rez
l'extr4mitd moul4e du myau dans le robinet d'arr& et
serrez l'4crou de compression _ la main, puis serrez un
autre demi tour avec une cl&. Si vous serrez trop fort,
vous pouvez occasionner des fhites.
&r0ude
compression
%
Robinetdesortie
NOTE :Vous devez vous conformer aux Codes
de plomberie 248CMR du Commonwealtb of
Massachusetts. Les robinets d'arr&t fi &trier rant
illdgaux et leur udlisation n'est pas autoris_e au
Massachusetts. Consultez votre plombier local.
-- 8ague{manchon)
[] BRANCHEZ LE TUYAU A VOTRE
REFRIGERATEUR
NOTES :
• Avant de brancher le tuyau _tvotre r6frigdratem;
assurez-vous que le cordon d'alimentation 61ectrique
du r_fiigdrateur ne soit pas branch6 _ la prise
murale.
• Si votre rdfiig_rateur n'est pas dquip(_ d'un filtre 'a
eau, nous vous recommandons d'en installer tin si
votre alimentation d'eau contient du sable ou des
particules qui peuvent boucher la grille du robinet
d'eau de votre r_fiig&ateur. Installez-le stir la
conduite d'eau pros de votre rg_frig_ratem: Si vous
utilisez une trousse GE SmartConnect '_'Refrigerator
Tubing, vous aurez besoin d'un tuyau additionnel
(WX08X10002) pour brancher le filtre. Ne coupez
jamais tin tuyau en mati&re plastique pour installer
votre filtre.
Sur certains mod&les de r6fiig6rateurs, le raccord se
trouve _ l'_xtr_mit_ du tuyau situ_ _tl'extdrieur de
couvercle d'acc&s de compartiment du compressem:
Sur d'autres mod&les, le couvercle d'acc&s au
compartiment du compresseur doit &re retir6 pour
acc6der au raccord du r6frig&ateur au robinet
d'alimentadon d'eau.
[] PURGEZ LE TUYAU
Otwrez le robinet d'alimentation principale d'eau et
purgez le tuyaujusqu'_t ce que l'eau soit claire.
Fermez 1eat at niveau du robinet d'eau apr}s
_coulement d'environ 1 litre (1 quart) d'eau par le
tuyau.
Sur les mod&les dot& du raccord au robinet
d'alimentation d'eau, retirez le bouchon en
plastique flexible.
Placez l'6crou de compression et la bague (manchon)
l'extrdmit6 du tuyau comme l'indique l'illusn'ation.
Si vous utilisez une trousse GE SmartConnect _
Refrigerator Tubing, les _crous sont d_j_t assembl&
au myau.
49
Page 50

Instructions d'installation
INSTALLATION DE LA CONDUITE D'EAU (SUITE)
[] BRANCHEZ LE TUYAU A VOTRE
REFRIGERATEUR (SUITE)
lns6rez l'extr6mitd du tuyau dans le raccord du
r_fiigg_rateur le plus loin que possible. Tout en tenant
le myau, serrez le raccord.
Si vous utilisez tin tuyau en mati&re plastique d'une
trousse GE Smart.Connect"' Refrigerator Tubing,
ins&ez l'extr6mitd mouMe du myau dans le raccord
du r_fiigg_rateur et serrez l'dcrou de compression 5.la
main, puis serrez tin autre tour avec une cir. Si vous
serrez trop fort, vous pouvez occasionner des fuites.
Fixez le tuyau au collet foumi pour le tenir en
position verticale. 11est possible que vous ayez 5-
disjoindre le collet.
L'un des schemas ci-dessous sera simUaire au montage
du raccord de votre r_frig_rateur.
Colletk Tuyaude
tuyau "_'
Ecreude
compression
de1/4 po
[] FERMEZ L'EAU AU NIVEAU DU
^
ROBINET D'ARRET
Resserrez tout joint qui fhit.
Remettez en place le couvercle d'acc&s.
[] BRANCHEZ VOTRE
REFRIGERATEUR
Disposez la spirale de ruyau en cuivre de mani&re
5-ce qu'elle ne vibre pas contre l'arri&re de votre
rdfiig_rateur ou contre lemur. Mettez votre
rdfiig_rateur 5-sa place contre lemur en le poussant.
Collet
{manchon)
Branchement
aur6frigOrateur
Collet_ compression
tuyau "
Collet
Branchemenau rdng_raeur
Ecroude
de1/4 po
Smar_ConnectTM
Tuyaude
1/4po
Tuyaude
SmartConnectTM
METTEZ EN MARCHE LA
MACHINE A GLA(_ONS
Mettez le commutateur de la machine 5_glaqon en
position I(marche).h machine 5-glaqons ne se met
en marche que lorsqu'elle atteint une temperature
de fonctionnement de- 9°C (15°F) ou moins.
Elle commence immddiatement 5-fonctionner si le
commumteur de la machine 5-glaqons est en position
I (marche).
5O
NOTE :Si votre pression d'eau est trop faible, le
robinet petit se remettre en marchejusqu'_ trois lois
pour envoyer suffisamment d'eau 5-la machine 5-
glaqons.
Page 51

Bruitsnormauxdefonctionnement, ww .electromenagersge.ca
Les rdfrig&ateurs plus rdcents font des bruits diff&ents de ceux
des anciens. Lesrdfri@rateurs modemes pr6sentent plus de
fonctions et sont plus avanc6s sur leplan technologique.
Entendez-vousce quej'entends ?Cesbruitssont normaux.
HUMMM...
OUUCH....
• Le nouveau compresseur 'a rendement _lev_ petit
fonctionner plus longtemps et plus vite que votre
ancien r4fl'ig_rateur et vous pouvez entendre un son
moduld ou tin ronflement aigu pendant son
fonctionnement.
• Parfois le r4fi'ig&ateur fbnctionne pendant une p4riode
prolong4e, surtout lorsque les portes sont ouvertes
frdquemment. Cela signifie que la fonction Fr0st GuardTM
est active pour emp4cher la brfilure de cong41ation et
am41iorer la conservation des aliments.
• Vous pouvez entendre un siffiement lo_sque les portes
se ferment. Cela vient de l'4quilibrage de pression dans
le r4fiig4rateul:
CLICS, CLAQUEMENTS,
CRAQUEMENTS et
GRESILLEMENTS
• Vous pouvez entendre des craquements ou des
claquements lorsque le r4fi'ig4rateur est branch4
pour la premi&re lois. Cela se produit lorsque le
r4fl'ig4rateur se refl'oidit 5_la bonne temp4rature.
• Les registres 41ectroniques s'ouvrent et se ferment
pour assurer des 4conomies d'4nergie et tin
refl'oidissement optimaux.
• Le compresseur peut causer un clic ou tin
gr&illement lots de la tentative de red4marrage
(cela petit prendre 5 minutes).
• Le tableau de commande 41ectronique peut causer
tin clic lorsque les relais s'activent pour commander
les composants du r4frig4rateur.
• L'expansion et la contraction des serpentins de
refl'oidissement pendant et aprhs le d4givrage
peuvent causer un craquement on un claquement.
• Sur les mod&les 4quipds d'une machine 'a glaqons,
apr&s un cycle de fhbrication de glaqons, vous pouvez
entendre les glaqons tomber dans le bac.
OU/R !
Vous pouvez entendre les ventilateurs tourner
'a hautes vitesses. Cela se produit lorsque le
r4frig4rateur vient d'etre branch4, lorsque les portes
sont ouvertes fr4quemment ou lors de l'ajout d'une
grande quantit4 d'aliments dans les compartiments
cong41ateur ou r4frig4rateur. Les ventilateurs
permettent de maintenir les bonnes temp4ratures.
• Si une des portes est ouverte pendant plus de
3 minutes, vous pouvez entendre l'activation des
venrilateurs permettant de refl'oidir les ampoules.
• Les ventilateurs changent de vitesses pour assurer des
&onomies d'4nergie et un refi'oidissement optimaux.
BRUITS D'EAU
6
Le passage de l'agent fl'igorifique dans les serpentins
de refroidissement du congdlateur peut &tre
accompagn4 d'un gargouillement semblable 'a celui
de l'eau en 4bullition.
• L'eau tombant stir l'414ment chauit:ant de ddgivrage
peut faire un bruit de gr4sillement, de claquement
ou de bourdonnement pendant le cycle de
d4givrage.
• Un bruit de suintement d'eau peut &tre entendu
pendant le cycle de d4givrage lorsque la glace de
l'4vaporateur fond et tombe dans le bac de
r4cup4ration.
• Fermer la porte petit causer tin gargouillement
en raison de l'4quilibrage de pression.
51
Page 52

Avantd'appelerunr#parateur...
Conseils de d#pannage--E-conomisez du temps et de
I'argend Censultez d'aberd les tableaux qui suivent et vous
pourrez peut-Otre #viter de faire appel _ un r#parateur.
Causes possibles Correctifs
Le cycle de d6givrage oAttendez emdron 30 minutes afin que le cycle de
est peut_tre en eours, d6givrage puisse terminen
I_-,s commandes de temp6rature *R4glez les commandes de temp4rature sur un r4glage
sont r6gl_es sur 0 (6teint). de temp6rature.
Le r_frig6rateur est d_braneh6. *Enfbncez la fiche de l'appareil dans la prise murale.
Le disjoneteur ou le fusible • Remplacez le fiasible ou r6enclenchez le disjoncteul:
peut avoir saut&
Les roulettes de nivellement • Consultez Roulettes.
avant doivent _tre r_gt6es.
Ceci est normal lorsque le •Artendez 24 heures pour que le r_fiig&'ateur refroidisse
r6frlg_rateur vient d'6tre branch6, compl_tement.
Une grande quantit6 d'aliments • C'est normal.
a _t6 mise au r_f "rlg6rateur.
Porte laiss_e ouverte. • Vdrifiez qu'il n'y a pas un paquet qui emp&he
Temps chaud ou ouverture • C'est normal.
fr_quente des portes.
Les commandes de temp6ratme • Consultez Los commandos.
ont 6t6 r_gl_es h la temperature
la plus froide.
La commande de teml_rature • Consultez Los commandos.
n'a pas 6t6 r_glee h une
temperature assez basso.
Temps chaud ou ouverture • Abaissez la commande de temperature d'une position.
fr_quente des portes. Consultez Los commandos.
Porte laiss_e ouverte. •Vdrifiez qu'il n'y a pas un paquet qui emp&he la
Porte laiss_e ouverte. • Vdrifiez qu'il n'y a pas un paquet qui emp&he la
IL_"Sportes ont _t& ouvertes
trop souvent ou pendant trop
longtemps.
la porte de fcrmen
porte de fermen
porte de fermen
le:: d'6conomie d'6nergie far l'ext&ieur du r6frig4mteun
_ngOla_urestchaude::]: circuler du liqulde ehaud antour
Le syst_me automatique • Ceci emp_'che la formation de condensation st,,"
du rebord avant du eong_lateur.
11faut nettoyer le bac &gla_zous. • Videz et lavez le bac A glaqons. Jetez les xdeux glaqons.
Des aliments ont transmis leur • Emballez bien les aliments.
odeur/gofit aux gia_ous.
n faut nettoyer l'int6rieur du • Consultez Entrotion ot nottoyago.
r6frig6rateur.
Le filtre it eau est bouch6. • Remplacez la cartouche du filtre avec une nouvelle.
52
Page 53

ww_.electromenagersge.ca
Causes possibles Correctifs
Porte laiss_e ouverte. * V4rifiez qu'il n'y a pas un paquet qui emp&che la
porte de fermel:
La commande de temp6xature • Consultez Los commandos.
du cong_lateur n'est pas r_gl_e
5.une temp_ratme assez froide.
Le joint de la porte colle ou se • Appliquez un peu de waseline sur la suriZace du joint.
replie du c6t6 des charni_res.
Le cycle de d_givrage est • C'est normal.
en eours.
La machine 5.gla_:ons est _teinte • Mettez en marche la machine _ glaqons ou r4tablissez
ou l'alimentation en eau a _t_ l'alimentadon en eau.
eollpee,
Des gla_:ons sont eoll_s au bras • Redrez los gla_ons.
r_flateur.
Distributeur est VERROUILLE. • Appuyez et maintenez enJ[bnc_e la touche LOCK CONTROL
(r_glage du verrouillage) pendant 3 secondes.
Blocs de glaee irr_guliers dans • Brisez-en auVant que possible avec vos doigts etjetez ceux
le bae 5.gla{zons, qui restent.
• Le congd]ateur est peut_tre trop chaud. R_glez la
commando du cong41ateur sur une temperature plus
basso, en abaissant la commando d'une position _ la fois
jusqu'5, ce que los blocs de glace disparaissent.
Le distributeur d'eau n'a pas _t_ • Faites couler l'eaujusqu'5, ceque l'eau du syst6me soit
utilis_" depuis longtemps, remplac4e par de l'eau fraiche.
Normal lorsque le r_frig_.rateur • Attendez 24 heures pour que la temp&ature du
est inifialement installS, rdfrig&'ateur se stabilise.
Le distrlbuteur d'eau n'a pas _.t_. • Faites couler l'eaujusqu'5, ce que l'eau du syst6me soit
utilis_, depuis longtemps, remplac4e par de l'eau fraiche.
Le r_servoir d'eau ,dent • Attendez plusieurs heures pour que l'eau refroidisse.
d'etre vidang_.
L'alimentation en eau est • Consultez Installation de la conduito d'oau.
couple ou n'est pas raccord_e.
Le filtre 5. eau est bouch_. • Remplacez la cartouche du filtre avec une nouvelle
n y a de Fair dans la eonduite • Appuyez sur le bras de distribution pendant au
d'eau, moins deux minutes.
Distributeur est VERROUILLE. • Appuyez et maintenez enfbnc4e la touche LOCK CONTROL
La cartouche du Ftltre vient d'etre • Faites couler l'eau du distributeur pendant 3 minutes
insaall_e. (environ 6 litres).
L'eau du r_servoir est gel_e. • Appelez tin r4paratem:
La conduite d'eau ou le • Appelez tin plombim:
robinet d'arr_t est bouch_.
Le Ffltre it eau est bouch_. • Remplacez la cartouche du filtre avec une nouvelle
cartouche ou installez le bouchon du tiltre.
(r_glage du verrouillage) pendant 3 secondes.
cartouche ou installez le bouchon du filtre.
Distributeur est VERROUILLE. • Appuyez et maintenez enfbnc4e la touche LOCK
CONTROL (rdglage du verrouillage) pendant 3 secondes.
53
Page 54

Before youcall forservice...
Causes possibles Correctifs
Des aliments ont transmis • Les aliments 5_odeur forte doivent _tre emball6s
leur odeur au r6frig6rateur, herm6tiquement.
11faut nettoyer l'int6rieur. • Consultez Entretien et netteyage.
11faut nettoyer le systbme • Consul_z Entretien et netteyage.
d'6vacuation de l'ean de d "e_age.
Cela n'est pas inhabituel pendant • Essuyez bien la surface ext&ieure.
les p6riodes de forte humidit6.
Les portes sont ouvertes trop
fr6quemment ou pendant trop
longtemps.
11n'y a pas de courant an niveau • Remplacez le fflsible ou r_enclenchez le di_onctem:
de la prise.
L'ampoule est grill6e. • Consul_z Remplacement des ampeeles.
L'orifice d'6coulement an fond • Consultez Entretien et netteyage.
dn cong61ateur est peut-6tre
bunch6.
11y a des gla_:ons bloqu6s dans • Faites passer les glagons 5_l'aide d'une cuill&re en bois.
le conduit.
• Gardez une bore ouverre de bicarbonate de soude
dans le r6fi'ig4ratem:
Courant d'air normal provenant
du moteur. Pendant le processus
de re"frig6rafion, il est normal que
de la chaleur suit expuls6e it la
base du r6frig6rateur. Certains
rev6tements de sol sont sensibles
et peuvent se d6colorer sous
l'effet de cette temp6rature de
fonctionnement normale qui
est sans danger.
Le r6gtagepr6c6dent 6tait • Quelques cubes sont rest& et ont 6t4 concass6s 'a cause
CRUSHEDICE (glace concassee), du r4glage pr6c4dent. C'est normal.
Interrupteur d'alimentafion est • Mettez l'interrupteur _ la position I (marche).
it la position 0 (arr_t).
L'alimentation en eau est coup6e • Consultez Installatien de la cenduite d'eau.
on n'est pas raccord6e.
Le compardment cong61ateur • Attendez 24 heures pour que la temp6rature du
est trop chaud, rdfi'ig_rateur se stabilise.
Un areas de glagons dam le bae • Nivelez les glacons fi la main.
provoque l'arr6t de la machine
gla_ons.
Cubes de glace sont coinc6s dans • Arr_tez la machine _ gla_ons, retirez les cubes de glace
la machine it gla_ons. (La lumi_re et remettez la machine en marche.
d'alimentation verte clignote.)
L'interrupteur de marche de la
machine h glaqons est en position
I (marche) mais ralimentation en
ean du r6frig6rateur n'est pas
branch6e.
• Mettez l'intermpteur de marche en position 0 (arrOt].
Vous endommagerez le robinet d'eau en le conservant
en position I (marcho].
Page 55

Notes.
8:
m
._p.,
55
Page 56

GARANTIE DU CLIENT
(pour la clientele au Canada)
Votre refrigerateur est garanti contre tout defaut de mat6riau et de fabrication.
Ce que cette Dur6e de garantie Pi_ces Main-d'oeuvre
garantie couvre (& partir de la R6paration ou
date d'achat) rernplacernent au
Compresseur Cinq (5) ans Cinq (5) ans Cinq (5) ans
Syst_me scell6 (y Cinq (5) ans Cinq (5) ans Cinq (5) ans
compris I'_vaporateur, la
tuyauterie du condenseur
et le frigorig_ne)
Toutes les autres pi_ees Un (1) an Un (1) an Un (1) an
TERMES ET CONDITIONS : EXCLUSIONS DE LA GARANTIE :
La presente garantie ne s'applique qu'b,
I'utilisation domestique par une seule famille
au Canada, Iorsque le refrig_rateur a et_
installe conform_ment aux instructions
fournies par Camco et est alimente
correctement en eau et en electricit&
Les dommages d0s b, une utilisation
abusive, un accident, une exploitation
commerciale, ainsi que la modification,
I'enlevement ou I'alt_ration de la plaque
signaletique annulent la presente garantie.
L'entretien effectu_ dans le cadre de la
presente garantie doit I'_tre par un
reparateur agree Camco.
Camco et le marchand ne peuvent _tre
tenus pour responsables en cas de
reclamations ou dommages r_sultant de
toute panne du refrig_rateur ou d'un
entretien retard_ pour des raisons qui
raisonnablement echappent & leur contr61e.
L'acheteur doit, pour obtenir un service
dans le cadre de la garantie, presenter la
facture originale. Les _lements repar_s ou
remplaces ne sont garantis que pendant le
restant de la p_riode de garantie initiale.
Cette garantie est en sus de toute garantie
statutaire.
IMPORTANT
Gardez cette garantie et votre facture originale comme preuve d'achat et preuve
de la date d'achat.
choix de Camco
• Visites b,domicile pour vous apprendre &
vous servir de I'appareil.
• Dommages causes b, la peinture ou &
I'_mail apres livraison.
• Installation incorrecteil'installation
correcte inclut la bonne circulation d'air
pour le systeme de refrigeration, des
possibilit_s de branchement aux circuits
electriques, d'alimentation en eau et autres.
• Remplacement des fusibles ou
r_armement des disjoncteurs.
• Remplacement des ampoules
electriques.
• Dommages subis par I'appareil & la suite
d'un accident, d'un incendie, d'inondations
ou en cas de force majeure.
• Perte des aliments dt3e & la d_terioration.
• Utilisation correcte et entretien ad_quat
de I'appareil selon le manuel d'utilisation,
r_glage correct des commandes.
• LE GARANT N'EST PAS RESPONSABLE
DES DOMMAGES INDIRECTS.
56
Camco vous offre ses services dans tout le
pays. Pour de plus amples renseignements
sur la presente garantie, veuillez prendre
contact avec :
Directeur, Relations avec les consommateurs
Camco Inc., Bureau 310
1 Factory Lane
Moncton, N.B.
E1C 9M3
Agraphez votre re_u icL
Vousdevez feurnir la preuve de
I'achat original pour obtenir des
services envertu de la garantie.
Page 57

Feuillet de donn_es relatives _ la performance
CartoucheGWF/HWFdusystemede
Filtrationd'eau GESmartWater
Cesystemea et_ essayeselonles normesNSF/ANS142,/53pourune r_ductiondessubstancesenumer_esci-dessous.
LaconcentrationdessubstancesindiqueesdansI'eau quientre dansle syst_mea et_ reduitea uneconcentrationinf_rieure
ouegale a la limitepermisepour reau quittantle syst_me,telle queprecisee par la normeNSF/ANS142/53.*
'facteurs int_gr_s de s_curit_ _ 100%pour une utilisation sanscompteur)
Norme N ° 42 : Effets esth6tiques
Pva'ambtre USEPA
MCL
Chlore
T&O
Par ticules**
10.(K)0 par ticles/mL minimum 3.978
Qualit_ Effluent
influe_zt concenh'ation Moyetme
2,0 rag/L+ 10% 0,02 ppm
Maxil_tll_
0,05 ppm
7.800
Norme N° 53 : Effets de sant_
Pmami_tre
'lhrbidit6 0,1 NTU
Spores 55
Plomb au pH 6,5 1 ppb
Plomb au pH 8,5 4,3 ppb
Lindane 0,(_'1005ppm
AtraTJne 0,003 ppm
2,4-D 0,fY)0ppm
,_bestos 1,2 MFL/ml
USEPA
MCL
l NTU***
99,95% l_:duction
15 ppb
15 ppb
0,0002 ppm
0,003 ppin
0,100 ppin
99%
Qualilk
h_fluent concentration
11 + 1 NTU***
50.000 L minimum
0,15 rag/L+ 10%
0,15 rag/L+ 10%
0,002 rag/L+ 10%
0,009 mg/L+ 10%
0,210 rag/L+ 10%
Fibres/L de l& _ 1O_ ;
fibres plus grand que
10 micromhU'es de longueur
Moyemae
0,07 NTU
26
l ppb
1,8ppb
0,00005 ppm
0,002 ppm
0,042 ppm
0,32 MFL/ml
Effluent
M._,ltllll
*Test# utilisant un d#bit de 0,5gpm; une pression de60psig; un pH de 7,5+_0,5; et une temp. de 20 °C-+25 0(2
** Mesures en particules/mL LesparticulesutilisOs#taient de0,5--1micron.
*** NTU = unit#s de turbidit# n#ph#lom#trique
% R_luetion
Moyenne Minimmn
98,90% 97,37%
98,00% 96,10%
% R_luciion
Moyenne Minimum
99,71% 99,59%
99,97% 99,95%
99,37% 99,37%
98,8% 97,13%
91,93% 91,93%
76,19% 64,28%
84,89% 67,63%
99,95% 99,82%
R_luction
exJgeante rain.
>50%
>85%
R_lucilon
exJgeante rain.
0,5 NTU
> 99,95%
0,010 mg/L
0,010 mg/L
0,0002 mg/L
0,003 mg/L
0,07 mg/L
99%
Specifications d'op6ration
• Capacit4: certifig:ejusqu'fi maximum de 300 gallons (1135 l);jusqu'fi maximum de six mois pour les modhles non dol4s d'un voyant indicateur
de remplacement de fihre;jusqu"a maximum d'un an pour les modhles dot4s d'un voyant indicatcur de remplacement de filtre
• Exigence en mati{,re de pression : 2,8 "a8,2 bar (40 "a 120 psi), sans choc
• Tempg:rature : 0,6°-38 °C (33°-100 °F)
• D4bit : 1,9 lpm (0,5 gpm)
Exigences gdnerales d'installation/opdration/entretien
• Rincez la nouvelle cartouche fi plein d_bit pendant 3 minutes atin de lib4rer de l'ait_
• Rcmplacez la cartouche Iorsque le d4bit devient trop lent.
Avis speciaux
• Les directives d'installation, la disponibilit_5 de pi_ces et de service ainsi que la garantie standard sont exp_SdRSes
avec le produit.
• Ce syst{.me d'eau potable dolt 4tre entretenu contbrm4ment aux directives du fabricant, y compris le remplacement
des cartouches du filtre.
• N'utilisez pas lorsque l'eau pr4sente un danger micmbiologique ou lorsque l'eau est d'une qualit4 inconnue sans d_sint;ecter
ad4quatement le syst{.me awant ou apr{'s; le systhme peut servir pour de l'eau d4sinfk'ct_e qui pourrait contenir des spores filtrables.
• ges contaminants ou autres substances retir4es ou r4duites par ce syst{.me de traitement de l'eau ne sont pas n4cessairement dans
VotFe eau.
• V_rifiez pour vous assurer de vous conformer aux lois et r{.glements locaux et de l'_tat.
• Notez que bien que l'essai a eu lieu dans des conditions normales de laboratoire, mais que le rendement r4el peut warim:Les systhmes
doivent 4tre install4s et hmctionner confbrm4ment aux proc4dures et directives recommand4es par le fabricant.
'lbsl4e et cenifioe selon les normes 42 et 53 de ANSI/NSF pour la rdduction de :
Norme N° 42 : Effets esth_fiques Norme N° 53 : Effets de santa
Unitd chimique
Rdduclion d'odeur et de gofit
Rdduction de chlore
Unitd de filtration mdcmfique
Rdduction de particules, cat_gofie I
Unitd de rdducfion dfimique
Rt:duction de plomb et Atrazine
R&luction de iJndane et 2,4-D
Unit6 de filtration m6canique
RtZduction de spores
Rdduction de mrbidit4
Fabriqu4e pour :General Electric Company, Louisville,KY40225 5 7
Page 58

Servicea la clientele.
SiteWebappareils#lectrom#nagersGE www.electromenagersge.ca
Vous avez une question ou vous avez besoin d'aide pour votre appareil _lectrom&lager? Contactez-nous
pal"lnternet au site www.dectromenagersge.ca 24 heures par jour, tous lesjours de l'ann_e.
ServicederOparations
Service de r_paradons GE est tout pros de vous.
Pour faire r_parer vorre _lectrom_nager GE, ilsuiIit de nous tdl_phonen
1.800.361.3400
Studiodeconceptionr_aliste
Sur demande, GE peut fournir une brochure sur l'am4nagement d'une cuisine pour les personnes
_tmobilit_ rdduite.
l_crivez: Directem, Relations avec les consommateurs, Camco, Inc.
Bureau 310, 1 Factory Lane
Moncton, N.B. E1C 9M3
Prolongationdegarantie www.electromenagersge.ca
Achetez un contrat d'eim'eden GE avant que votre garantie n'expire et b_n_ficiez d'un rabais subsrantiel.
Ainsi le selMce apr&s-vente GE sera tot!jours l_tapr&s expiration de la g_rantie.
Visitez notre site Web ou appelez-nous au 1.800.461.3636.
PiOceset accessoires
v................._
v................._
v................._
Ceux qui d&irent r_parer eux-m&mes leurs dlectromdnagm.s peuvent recevoir pi_ces et accessoires
directement _tla maison (cartes VISA, MastmCard et Discover acceptdes).
Losdirectivesstipuleesdanslepresentmanuelpeuvent_tre effectueesparn'importequelutilisateur.Losautres
reparationsdoiventgeneralement_tre effectueesparun technicienqualifie.Soyezprudent,carunereparation
inadequatepeutaffecterle fonctionnementsecuritairederappareil.
Vous trouverez dans les pagesjaunes de votre annuaire le num_ro du Centre de service Camco le plus
proche. Autrement, appelez-nous au 1.888.961.3055.
Contactez-nous
Si vous n'Stes pas satisfait du service apr&s-vente dent vous avez bdndficid :
Premi_rement, communiquez avec les gens qui ont rdpard votre appareil.
EnsuRe, si vous n'Stes tot_ours pas satisfait envoyez musles ddtails--numdro de tdldphone compris_au
Directem; Relations avec les consommateurs, Camco, Inc.
Bureau 310, 1 Factory Lane
Moncton, N.B. E1C 9M3
Inscrivezvotreappareilfilectromfinager www.electromenagersge.ca
Inscrivez votre appareil 61ectrom6nager en direct, aussit6t que possible. Cela amdliorera nos
communications et non'e service apr_s-vente. Vous pouvez dgalement nous envoyer par la poste
le formulaire d'inscriptionjoint 'a votre documentation.
58
Page 59

Informaci6n de seguridad
Adaptadores ...................... 62
Cables de extensi6n ................ 61
Conectar la electlieidad ............. 62
Deshace_se debidamente
de su refiigerador .................. 61
Precauciones de seguridad .......... 60
Ins_ciones de operaci6n
Cartucho del filtro de agua .......... 64
Controles del refrigerador ........... 63
Dispensador de agua y de hielo ....... 68
Dispositivo autom_itico
para hacer hielo ................... 67
Entrepafios, recipientes y estantes.. 64-66
Gavetas de almacenamiento ...... 66, 67
Cuidado y limpieza
Limpieza ...................... 69, 70
Reemplazo de bombillas ............ 71
Ins_ciones de instalaci6n
Instalaci6n de la lfnea de agua .... 74-78
Prep_ci6n para
instalar el refiigerador ........... 72, 73
m
t_
m
Solucionar problemas
Antes de solicitar un se_wlcio ...... 80-83
Sonidos normales de la operaci6n .... 79
Servicio al consumidor
Garan6a para consumidores
en los Estados Unidos .............. 84
Hoja de dams de limcionamiento .... 85
Serwicio al consumidor .............. 87
_m
m
I
59
Page 60

INFORMACIONESIMPORTANTESDESEGURIDAD.
LEAPRIMEROTODASLASINSTRUCCIONES.
A iAD VERTENCIA!
Use este aparato sSIo para los fines que se describen en este Manual del propietario.
PRECAUCIONESDESEGURIDAD
Cuando use electrodom#sticos, siga las precauciones b#sicas deseguridad, incluyendo las siguientes:
NAntes de usarse, este refrigerador deberg esmr
instalado y ubicado de acuerdo con las
instrucciones de instNacidn.
N No permita que los nifios se suban, se paren o se
cuelguen de las charolas del refiigeradon PodrN
dafiarse el refiigerador y causarles serias lesiones.
N No toque las superficies fNas del congelador
cuando tenga las manos hfimedas o mojadas.
La pin se podrfa adherir alas superficies
extremadamente frfas.
N No gnarde ni use g'asolina u otros vapores o
lfquidos inflamables cerca de este o cualquier otro
aparato.
NAleje los dedos fuera de las greas donde se puede
pinchar los dedos; los espacios entre las puertas
y entre las puertas y los gabinetes son
necesariamente estrechos. Cierre las puer 'tas
con cuidado en la presencia de los nifios.
N Si su reNigerador tiene un dispositivo automgtico
para hacer hielo, exdte el contacto con las partes
mdviles del mecanismo de expulsidn, o con el
elemenm calet;acmr localizado en la parte inferior
del dispositivo para hacer hielo. No ponga los
dedos ni las manos en el mecanismo automgtico
para hacer hielo mientras el refrigerador esN
conectado.
N Desconecte el refrigerador antes de limpiarlo o
efecmar reparaciones.
NOTA:RecomendamosenfNicamenteencaNarcualquier
servicioa unpersonalcalificado.
N El colocar el control en posici6n 0 (apagado)no
quita la corriente del circuito de la luz.
N No vuelva a congelar los alimentos congelados
una vez que se hayan descongelado.
6O
Page 61

ww_.GEAppliances.com
A iPELIGRO!RIESGODE QUE
UN NINO PUEDAQUEDARATRAPADO
DESHACERSEDEBIDAMENTEDESUREFRIGERADOR
E1atrapamienm y la mfbcacidn de los nifios no
son un problema del pasado. Los refiigeradores
abandonados son un peligro...aunque sea s61opot
"pocos dfas." Si se deshace de su viejo refiigerado_;
pot favor sig-alas inswucciones abajo para
ayudarnos a prevenir algxin accidente.
Antes de deshacerse de su viejo refrigerador
ocongelador.
N Quite las puertas.
N Deje los entrepaflos en su sitio para que los niflos
no se sLlban.
Refrigerantes
Todos los aparatos de refrigeraci6n contienen
refrigerantes, los cuales se deben refirar antes de
la eliminacidn del producm de acuerdo con la ley
federal. Siva a desechar algxin aparato anfiguo
de refiigeracidn, consulte con la compaflia a cargo
de desechar el aparato para saber qud hacen
USODECABLESDEEXTENSION
Debido a los accidentes potenciales que pudieran ocurrir bajo determinadas condiciones, so recomienda
estrictamente no usar cables de extensi6n.
Sin embargo, si decidiera usarlos, es absolutamente necesario que sea del tipo UL trifilar para aparatos
y cuente con una clavija con conexidn a fierra y que el cable el&trico sea de 15 amperios (mfnimo) y
120 volfios.
61
Page 62

INFORMACIONESIMPORTANTESDESEGURIDAD.
LEAPRIMEROTODALASINSTRUCCIONES.
A iADVERTENCIA!
COMOCONECTARLAELECTRICIDAD
Bajo ninguna circunstancia debe cortar o quitar la tercera punta (tierra) de la clavija. Para su seguridad
personal, este aparato deber# conectarse debidamente a tierra.
E1cable el_ctrico de este aparato estg equipado con
una clavija de tres puntas (tierra) que enchut:a en
un contacm est:indar de pared de tres salidas
(tierra) para reducir al minimo la posibilidad de
daflos por un choque el&trico con este aparato.
Haga que un elecnicista calificado verifique el
enchufe de la pared y el circuito para asegurarse
que la salida estd conectada debidamente a tierra.
Donde se disponga s61o de un contacto de pared
con salida para dos puntas, es su responsaffflidad
personal y su obligaci6n reemplazarlo pot un
contacto adecuado para tres pumas con conexidn
a tierra.
E1 refrigerador deber_i conectm.'se siempre en su
propio contacto el&trico individual que teng-a
un voltaje que vaya de acuerdo con la tabla de
clasificacidn.
Esto garandzala mejor ejecucidn y evita la
sobrecarga del circuito el_cn'ico de la casa y los
dafios a causa del sobrecalemamiento de los cables.
Nunca desconecte el refrigerador jalando el cable.
Tome siempre firmemente la clavija y sgquela del
contacto sin doblarla.
Repare o reemplace inmediatamente mdos los
cables el&tricos de servicio que se hayan desgastado
o dafiado en alglma otra forma. No utilice cables
que muestren roturas o dafios pot abrasidn a 1o
largo de _ste ni en la clavija o en alguno de sus
extremos.
AI alejar su reffigerador de la pared, cuide que no
pase sobre el cable o lo dafie.
USODELOSADAPTADORESsepe iteusarenchufesadaptadoresenCanada)
Oebido a los accidentes potenciales relacionaflos con la seguridad bajo determinadas circunstancias,
recomendamos estrictamente no utilizar un adaptador para clavija.
Sin embargo, si se decidiera usar tin adaptador
donde los cddigos locales 1opermitan, es necesario
hacer una conexi_Jntemporalatin contacto de pared
para dos pumas debidamente conectado a tierra
utilizando tin adaptador UL, mismo que puede
adquirirse en comercios locales especializados.
La pun 'ta mAs larg_ del adaptador se deber_i alinear
con la entrada larga del contacto con el fin de tener
la polaridad adecuada en la conexi6n de la clavi.ja.
AI desconectar el cable del adaptado_; det_ng-alo
siempre con una mano tirando a la vez el cable
el&trico con la otra mano. De no hacerlo puede
causar que el adaptador se rompiera despu& de
mucho USO.
Si se rompiera la terminal a tierra del adaptado_;
NOUSEd aparato hasta que se haya tees 'tablecido
la conexidn a tierra de manera adecuada.
Laconexidnde la terminalde tierradeladaptadorala
salidadelcontactodeparednoconectaelaparatoa tierra,
a noserqueel tomillode la tapaseademetalynoest6
aisladoy clueel contactodela paredest#conectadoa
tierraa trav6sdelcab&adodela casa.Unelectricista
calificadodeber#revisarel circuitoparaasegurarsede
queel contactoestfidebidamenteconectadoa tierra.
62
FAVORDELEERYSEGUIRCUIDADOSAMENTELASPRECAUCIONES
DESEGURIDAD.
GUARDEESTASINSTRUCCIONES
Page 63

Loscontrolesdel refrigerador, ww .GEAppliances.com
Los controles tendr#n uno de los siguientes aspectos:
Inicialmente, fije el control del compartimiento del refrigerador en 5 y el
control del compartimiento del congelador en 5 y deje que transcurran
12horas para que la temperatura se estabilice.
Varios ajustes podrian ser necesarios. Ajuste los controles un incremento a
la vez,ypermita 12horas despu#s de cada ajuste para que el refrigerador
alcance la temperatura deseada.
Fijar el control del congelador en Ointerrumpe el enfriamiento en el
compartimiento del refrigerador yen el compartimiento del congelador,
pero no apaga la energia el#ctrica hacia el refrigerador.
Losajustes de los controles cambiar_n seg6n las preferencias
personales, la utilizaci6n y las condiciones de operaci6n ypudieran
I
necesitar m_sde unajuste.
63
Page 64

Elcartuchodelfiltrodeagua.
Enalgunosmodelos
Instalar el cartucho del filtro
E1cartucho del fihro de agua estg ubicado
en la esquina superior derecha n'asera del
compartimento del refi'igerado_:
Cuandoreemplazar el filtro en los
modelos con una luz indicadora de
reemplazo.
En el dispensador hay una luz de
indicacidn de recambio del cartucho del
filtm del agxla. Esta luz se volverg
anaraqjada papa advertMe que necesita
reemplazar el filrro pronto.
Ponga la parte superior del cartucho
hacia arriba dentro del soporte del
eartucho y girelo lentamente hacia
la derecha.
E1carmcho del filtro deberia reemplazarse
cuando la luz indicadora de recambio
se vuelva roja o si la salida de agua al
dispensador o al dispositivo para hacer
hielo disminuyera.
Cuando reemplazar el filtro on los
=o.o,os..... ,.z,o.,o..o,..o
reemplazo
o rtud.ode,f.trosedebereemp, ar
cada seis meses o antes si el flujo del agua
hacia el dispensador o mgquina de hielos
disminuye.
Instalar el cartucho del filtro
oSi est_ cambiando el cartucho, remueva
primero el viejo girgndolo lentamente
hacia la izquierda. Nojale el cartucho
directamente hacia abajo. Un poco de
(en algunos modelos)
aglla puede gotea_:
o En modelos sin una luz indicadora de
reemplazo, coloque un adhesivo con
el mes y el afio al nuevo cartucho papa
que le recuerde reemplazar el lilwo en
seismeses.
_ Llene el cartucho de reemplazo con
agxla del grifo pm'a permitir tin mejor
flt!jo del dispensador inmediammente
despu& de la instalaci6n.
_ Situando la flecha en el cartucho a la
ahura del soporte del mismo, coloque
la parte superior del nuevo cartucho
hacia arriba dentin del soporte. NO
emptoe el cartucho hacia arriba a
dentro del soporte.
_Gire el cartucho lenramente hacia la
derecha hasta que el cartucho se pare.
NOAPRETARMUYFUERTE.MientPas es_
girgndolo, el se alzarg por si mismo en
su posici6n. Carmcho girg cerca 1/2
revolucidn.
_Deje correr el agua desde el
dispensador por 3 minutos (aprox. 1½
g-alons) papa aclarar el sistema y papa
prevenir salpicaduras.
O Presione y mantenga presionado la
ahnohadilla papa RESETWATERFILTER
(REINICb\R EL FILTRO DE AGUA)
(en algunos modelos) en el dispensador
pop tres segundos.
NOTA:Un cartucho de filtm de aglla reci_n
instalado puede causarel aguade chorrear
del dispensadon
Tap6n de derivaci6n del filtro
Se debe usar el tap6n de derivacidn del
fihro cuando tin cartucho de filrro de
reemplazamiento no se puede encontrar.
El dispensador y el dispositivo papa hacer
hielo no pueden funcionar sin el fihro o
sin el tap6n de derivacidn del filtro.
Filtrosderecambio:
Parapedircartuchosadicionalesen los
EstadosUnidos,visitenuestrositioWeb,
www.GEAppliances.com,o Ilamea GE
parapartesyaccesoriosa1800.6_.2002.
GWF
Precio sugerido de venta al pfiblico
$34.95 USD.
Losentrepa os yrecipientes del ro#ioemdor.
No todos los modelos tienen todas las caracteristicas.
TapaDeslizante
64
Recipientes en la puerta del compartimiento del refrigerador
Los recipientes ajustables se pueden
rransportar fiicilmente desde el refi-igerador
hasta el _irea de rrabajo.
Para retirarlos:Levante el frente del caj6n y
despu& h_ilelo.
Para reemplazarlos o cambiarlos de lugar.
Encaje el caj6n en los soporms moldeados
de la puerto y empt!je hacia adenwo. E1
cajdn se ajustarg en su lug_l:
La tapa deslizante ayuda a prevenir que
un golpecito haga derramarse algo o que
las cosas pequefias guardadas en el interior
del entrepaflo de la puerta se caigan o
resbalen. Ponga un dedo en cada lado de
la tapa deslizante hacia la parte trasem y
mu&,ala hacia delante y hacia atP_iS papa
que se ajuste a sus necesidades.
Page 65

Reubicaci6n de los entrepa_os
Entrepa_osdelrefrigerador.
Para retirarlos Para reemplazarlos
w_a_.GEAppliances.com
Entrepa_osdelcongelador.
Pararetirarlos Pararetirarlas
Canastasdelcongelador.
Retire la canasta empqjgndola hacia el
frente, levantando el frente y deslizgndola
hasta pasar el punto de para_
Entrepa_o deslizable a prueba de derramamientos fena/gunosmode/os}
E1entrepafio deslizable permite alcanzar
arficulos gllardados ands de otros. Los
hordes especiales estgn disefiados para
ayudar a prevenir derramamientos o
goteos a los entrepafios que se encuentran
m',is abajo.
AsegOresede haberempujadolosentrepafios
hastael rondoantesde cerrarlapuerta.
Entrepa#os a prueba de derrames (ena/gunosmodelos)
Los entrepafios a prueba de derrames
tienen hordes especiales que ayudan a
evitar que los dermmes goteen hacia los
estantes siguientes.
Entrepafio QuickSpace lenalgunosmodeles)
Este entrepafio se divide en dos y la mitad artfculos muy altos ubicados en el
se desliza debajo de sfmismo pare gllardar entrepafio que se encuenn'a m_ abajo.
Extensores de entrepafios desmontables
,,, , profimdizan y rodean los entrepafios de la
puerta, brindando m_is espacio y mayor
flexibilidad para almacenamiento.
_]l Pararetirarlos:Le_ante el extensor del
entrepafio hacia arriba, despu4s h_ilelo.
Para reemplazarlo:Enganche el extensor del
entrepaflo en los soportes moldeados de la
puerta y emptijelo hasta que se asegure en
su lugar.
65
Page 66

Caracteristicasadicionales.
No todos los modelos tienen todas las caracteristicas.
Estante ShelfSaver"
(enalgunosmodelos)
Use esto estante para
almacenar latas de bebidas
para un fiicilacceso.
Tambidn puede mstener
un plato refractario de
9" x 13".
Estantepara latas en la
puerta (e,a/gunosmodelos)
Este estanm en la puer 'ta
puede almacenar hasta 9
latas.
NOTA:Esteestantesdlose
puedeinstalaren laposicidn
superiordebajodelcontenedor
deproductosl#cteos.
Sobrelasgavetas de almacenamiento.
No todos los modelos tienen todas las caracterfsticas.
Gavetas preservadoras de frutas y vegetales
E1exceso de agua que pueda acumularse
en el fbndo de las gavetas deben ser
secadas.
Gavetas preservadoras de humedad ajustable y bandeja de refrigerios
(enalgunosmodelos)
Deslice el control hasta llegar a la posici6n Deslice el control hasta lleg_r a la posici6n
High (aim) para proporcionar el aim nivel LOW(bajo) para proporcionar el nivel de
de humedad recomendado para la mayorfa baja humedad recomendado para la
de los vegetales, mayorfa de las fruras.
Contenedorconvertible para carnes (enalgunosmodelos)
Esro contenedor convertible para cames
tiene su propio conducto de refiigeraci6n,
el cual permite la circulacidn en dicha
contenedor de aire fifo proveniente del
congelador.
Elcontroldetemperaturavariableregula
el thgo de aire del compartimiento
del congeladon
F!je la palanca de control arriba(up) para
convertir el contenedor a la temperamra
normal del refiigerador y ofrecer espacio
adicional de almacenamiento para los
vegetales. El conducto del aire fifo se
apaga. Se pueden seleccionar diferentes
niveles entre estos extremos.
Fi.jela palanca de control abajo(down)
para la posici6n mAs frfa para almacenar
carnes frescas. Si la palanca se deja en la
posici6n de carnes pot un largo per/odo
de tiempo, se puede format algo de hielo
dentro del contenedor.
66
Page 67

Sobreretirar la gavetapreservadorade alimentos, www.GEAppliances.com
No todos Ins modelos tienen todas las caractedsticas.
Come sacar la gaveta preservadora de afimentos
Las gavetas se pueden retirar Ncilmente
inclingndolas levemente y emptogndolas
hasta pasar el punto de freno.
i'
Cuandose encuentre reomplazando
las gavetas, cerciSrese de
deslizarlas a Iolargo de las gufas.
Si la puerta le impide sacar las gavetas,
el refi'igerador tendrg que rodarse hacia
adelante hasta que la puerto se abra lo
suficiente para deslizar las gavetas hacia
afhera. En algunos cases, cuando ruede el
refrigerador hacia afuera deberg moverlo
hacia la izquierda mienn'as lo meda.
EldispositivoautomMicoparahacerhielo.
Un refrigerador reci#n instalado puede tardar hasta 12a 24 horas antes de empezar a hacer hielo.
EldispositivoautomMicoparahacerhielo
(enalgunosmodelos)
El dispositivo para hacer hielo pro&mira siete
cubes per cido---aproximadamente 100-130
cubes en un ciclo de 24 hotas, dependiendo
de la temperatura del eongeladot; de la
temperamra ambiente, del mimero de veces que
se abra la puet-tay de otras eondiciones del use.
Siel mfrigerador se usa antes de que se haga la
conexidn de agua al dispositivo para hacer hielo,
coloque el intetrapmr de alimentacidn el&trica
en la posici6n 0 (apagado).
Cuando el refrigerador est_conectado al
suministro de ag_aa,eoloque el intemlpmr de
alimentaci6n el&trica en la posici6n
I (encendido).
El dispositivo para hacer hielo se llenanl
de agua cuando la temperamra alcance 15°EUn
mfrigerador reci_n instalado puede necesitar
entre 12y 24 horas para empezar a haeer hielo.
Escuchanl un zumbido cada vezque el
dispositivopara hacer hielo se llene de agua.
Deshaga las pfimeras cargas de cubes de hielo
para penmitir que la lfnea de agua se limpie.
Asegfiresede que nada impide el movimienm
del braze deteeton
Cuaaldo el recipiente est_ lleno (al nivel
del braze deteetoO, el disposifivopara haeer
hielo no producir_i hielo.
Esnormal que algamoscnbos salganpegados.
Sino se usa hielo con frecuencia, Ins cubes
de hielo viejos se opacml, adquieren un saber
l_ncio y se contraen.
NORA:Enhogaresconpresidndeaguainferioral
promedio,espesiblequeeseueheeleielodeldispositivo
parahacerhielevariasveeesalhaceronloredehie&
un entrepaffo
en la parte
superior del
congelador por
eneima del
dispositivo para
hacer hielo que
puede usarse para
almaeenamiento.
Gavetadealmacenamientodehielo
Parateneraccesoalhielo,jale delagavetahacia
delante.
Kitaccesoriopara hielos
Sisn refriget-adorno viene equipado con un
dispositivopara hacer hielo, un kit accesorio
para hielos est_ disponible a un eosto adicional.
Parasacarlagaveta,jale de la misma hacia fuera
yImdntela hasta sobrepasar el punm donde se
atranca.
Consulte en la parte posterior del refriget-ador
el kit especffieo para hielos que su modelo
necesita.
67
Page 68

El dispensadorde agua yde hielo.
En algunos modelos
ToUse the Dispenser
Recogedor
Seleccione CUBEDICE _7 (cubos de hielo),
CRUSHEDICE_ (hielo_riturado) o
WATER_ (ag_).
Presione el vaso suavemente conwa el
brazo del dispensadol:
E1recogedor no se vacla solo. Para evitar
las manchas de agua, el recogedor y la
parrilla se deberfin limpiar regularmente.
Sinohaydistribuci6ndeaguacuandoelrefrigerador
est#primeramenteinstalado,hayposibilidaddeaire
enels_stemadela lfneadeagua.Oprimaelbrazo
deldispensadordurantealmenosdosminutospara
eliminarelaireatrapadodelalfneadeaguayIlenar
el sistema.ParaeliminarlasimpurezasdelaIfneade
agua,desechelosprimerosseisvasosdeagua.
PRECAUCION:Nointroduzcanuncalosdedosni
otrosobjetosenlaaperturadeldispensadordehielo
triturado.
Gaveta de almacenamiento
de hielo en modeloscon dispensador
Para bloquear el dispensador (en
a!gunosmodelos)
Presione la tecla LOCK
CONTROL(control
de bloqueo) durante
3 segundos para cerrar
el dispensador y el
panel de control.
Para desbloquearlo, presione la misma tecla
duranm 3 segundos nuewamenm.
Dispensertight (Luzdel dispensador)
Esm tecla enciende y
apaga la luznocturna
del dispensador. La luz
tambi_n se enciende al
presionar el brazo del
dispensador. Siesta
luz se funde deberfa
reemplazarse con una
bombilla de un m'd_ximo
de 6 vatios.
68
Para sacar: Ponga el interruptor de marcha
del dispositivo de hielo en la posicidn
0 (apagado)..]ale de la gaveta directamente
hacia fuera y luego levfintela hasta pasar
el punto donde se atranca.
Para devolver.A1 devolver la gaveta,
asegfirese de presionarla firmemente en
su sitio. Si no llega hasta el finN, vuelva a
sacarla y gire el mecanismo de manejo
1/4 de vuelta. Luego empuje de nuevo
el entrepafio.
Dates importantes de su dispensador
N No agregue hielo de charolas o de bolsas
en el recipiente. Podr/a provocar que no
salga bien o que no se tdture
adecuadamente.
N Evite los vasos demasiado llenos de hielo y
el uso de vasos estrechos o demasiado altos.
El hielo amontonado po&ia obstruir el
orificio o hacer que se congele la puetaa
del orifico de manera que no
se pueda abrii: Si hubiera hielo
bloqueSndolo, desprenda con una
cuchaca de madera.
N [as bebidas y los alimenms no se deberSn
enfiiar tgpidamente en el recipiente del
hielo. Las latas, botdlas o paquetes de
comida en el recipiente de hielos podrfan
causar la obstruccidn del dispositivo paca
hacer hielo o del redpiente.
N Para evitar que el hielo dispensado caig_
fiaera del xaso, ponga el xaso cerca, pero sin
mcai; la apertora del dispensadoi:
NUn poco de hielo _rimrado puede smlir
aunque habfa seleccionado CUBEDICE
(cubos de hielo). Esto sucede en ocasiones
cuando alg_anos cubos se canalizan en el
t_ituradon
N Despu& de usar hielo trimrado, un poco
de agua puede gotear del vertedero.
N A veces, se formac,i un pequefio montdn
de nieve en la salida del hielo situada en la
puet ta. Esto es normal }; pot regla general,
sucede cuando ha dispensado hielo picado
repetidamente. La nieve se evapomr_i por sf
mlsma.
Page 69

Cuidadoylimpiezadelrefrigerador. .O ,,,anoe,.oom
Limpiar el exterior
Area de goteo del dispensador
EIpozo del dispensador(en algunos
modelos), por debajo de la parrilla, se debe
mantener limpio y sect. El agua que se
queda en el pozo puede dejar dep6sitos.
Quite los dep6sims agregando xdnagre sin
diluir al pozo. Remoje hasta que
desaparezcan los dep6sitos o hasta que se
desprendan lo suticiente para quirarlos.
Elbrazedeldispensador(en algunos
modelos). 2rotes de limpim; oprima y
detenga la tecla LOCKCONTROL(control de
bloqueo) durante 3 segundos. Se limpia
con una soluci6n de agua tibia y
bicarbonam de sodi_aproximadamente
una cucharada (15 ml) de bicarbonato de
sodio por cada cuarm (1 litro) de agua.
Enjuague compleramente con agua y
seque.
Limpiar el interior
Paraevitarolores,deje una caja abierta
de bicarbonato de sodio en los
compartimientos del refiigerador
ydel congeladon
Desconecte el refrigerador antes de limldarlo.
Si no fimra posible, exprima el exceso de
humedad de la esponja o del patio cuando
se limpie alrededor de botones, bombillas
o controles.
Use agua caliente y una soluci6n de
bicarbonam de sodi_aproximadamente
una cucharada (15 ml) de bicarbonato de
sodio por carla cuarto (1 litro) de agua.
Esta soluci6n limpia y neutraliza olores.
Enjuague y seque.
Despu& de limpiar lasjuntas de las puertas,
aplique una capa delgada de vaselina del
lado de la bisagra. Esm ayuda a mdtar que
lasjuntas se doblen o se peglmn.
Orificio para drenaje en el compartimiento
del congelador, Durante la limpieza anual,
retire la canasta inferior del congelador
xderta una solucidn de bicarbonato de soda:
Lasmanijasdela puertay Its ornamentos.Se
limpian con un patio humedecido con una
soluci6n de detergente suave y agua. Seque
con un patio suave.
Mantengalimpioel terminado.Limpie con
un patio limpio ligeramente humedecido
con cera para aparatos de cocina oun
detergente suave y agua. Seque y pula
con un patio limpio y suave.
Nolimp&elrefrigeradorconunpatiosuciopara
trastesni conunpatiohOmedo.Estospodrfandejar
residuosqueafectena lapintura.Nouseestropajos,
limpiadoresenpolvo,blanqueadoresni limpiadores
quecontenganblanqueador,yaqueestosproductos
podrfanrayarydesprenderel term&adodepintura.
una cucharadita (5 ml) en dos 'tasKs
(500 ml) de agua caliente (que no estd
hiJMendo), en la lfnea de drenaje con la
ayuda de un desbasmdor de came. Esto
ayudarg a eliminar el olor y reducirg la
probabilidad de una obsmmci6n en la lfnea
de drenaje. Si el drenaje se obstruye, utilice
un desbastador de came y una solucidn de
bicarbonam de soda para eliminar la
obsrruccidn en la lfnea de drenaje.
Evitelimpiarlosentrepafiosdevidriofrfoscon
aguacaliente,yaquelaextremadiferenciade
temperaturapuedehacerClUesequiebren.Maneje
losentrepafiosdevidrioconcuidado.Chocarvidrio
templadopuedehacerqueserompeenpedazos.
Nolavepartespl#sticasdelrefrigeradorenel
lavaplatos.
Condensador
En ambientes de uso caseros normales la
limpieza mtinaria del condensador no es
necesaria. Sin embargo, en ambientes que
puedan ser particularmente grasienms o
con mucho polvo, el condensador deberfa
limpiarse de fbrma peri6dica para el buen
fimcionamiento del refiigeradon
C6molimpiar el condensador:
E1 condensador estfi ubicado al interior de
la parte posterior del refiigeradol: Para su
acceso, primero desconecte el reOigeradon
Despu_s retire la cubierm de accem. El
condensador se encuentra al lado derecho.
69
Page 70

Cuidadoylimpiezadelrefrigerador.
Atr_s del refrigerador
Se deberfi tener cuidado al retirar el
refrigerador de la pared. Todos los tipos de
recubrimienm de pisos se pueden dafiar,
sobre todo los recubrimientos acojinados y
los que tienen superficies repujadas.
Jale el refrigerador en forma recta y
empuje nue'gamente para devolverlo a su
posici6n. Mover el refrigerador en
direccidn lateral puede causar dafios al
recubrimiento del piso o al refiigeradon
Preparaci6n para vacaciones
En el caso de vacaciones o ausencias
prolong_das, quite los alimentos y
desenchufe el refiigeradon Limpie el
interior con solucidn de bicarbonato de
una cucharada (15 ml) de bicarbonato por
un cuarto (l litro) de agua. Deje abiertas
las puertas.
AIempujarelrefrigeradorasulugar,asegOresedo
nopasarsobreel cableelfictriconisobrela Ifneado
alimentaci6ndeldispositivoparahacerhielosfen
algunosmodelos).
Si la temperatura pueda llegar al punm de
congelaci6n, haya una persona calificada
para desaguar el sistema del suministro de
agua (en algunos modelos) pare evitar
dafios a la propiedad causados pot
inundaci6n.
Coloque el interruptor de alimentacidn
el4ctrica del dispositivo aummgtico para
hacer hielo en la posici6n 0 (apagadoJy
cierre el suministro de agua al refligerador.
Encaso de mudanza
Asegure todos los elementos sueltos como entrepafios y recipientes pegandolos con cinta
adhesi'_a en su lugar para evi'tar dafios.
AsegOresedoclueelrefrigeradorsocoloqueenposicidnvorticaldurantelamudanza.
70
Page 71

Reemplazodebombillas. .. .GEA,,,i,.cos.oom
Girar el control hacia la posici6n 0 (apagado) no interrumpe el fluido de corriente hacia el circuito de la luz.
Compartimiento del refrigerador--Luz superior
O Desenchufe el refrigeradon
La bombilla se localiza demls de los
controles. Reemplgcela con una
bombilla del mismo o de menor volraje.
_ Vuel),a a enchufhr el refrigerador a la
corrlente.
Compartimiento del refrigerador--Luz inferior lenalgunosmodelos)
Estaluzest_situadaporencimadela
gavetasuperior
Desenchufe el refiigeradon
_Tome el horde en la parte inferior del
protector de la luz y hglelo hacia arriba
y hacia adelante.
_ Despu& de reemplazar la
bombilla con una bombilla de
electrodom_sticos del mismo voltaje
o infi_riol; reemplace la cubierta y
el mango.
OVuelva a enchufhr el refrigerador a
la corriente.
Compartimiento del congelador
Desenchufe el refiigerador.
Retire el entrepafiojusto pot encima
de la cubierta de luz. (El entrepafio
serg mgs f_icilde quitar si se vacfa
primero.)
_Levante el protector para retirarla.
_Despu& de reemplazarla con una
bombilla del mismo voltaje o infbrior,
reinstale el protector colg_indolo de
las ires lengiietas.
OVuelva a instalar el entrepafio y
enchufi? el refl'igerador de nuevo.
Dispensador
Desenchufe el refiigerador.
_La bombilla estfi simada en el
dispensador bajo el panel de control.
()uite la bombilla girgndola en sentido
contrario alas agtoas del reloj.
_Cambie la bombilla por una bombilla
del mismo tamafio y voltaje.
_Vuelva a enchufar el refl'igerador a
la corriente.
71
Page 72

Instrucciones para
Refrigerador
Instalacion
Models 20, 22,25
Si tiene preguntas, Ilame al 1.800.GE.CARESobienvisitenuesWap_ginaWeb:www.GEAppliances.com [
ANTES DE EMPEZAR
Lea estas instrucciones completa y cuidadosamente.
• IMPORTANTE - C.ardeestas
insmlcciones para uso del inspector local.
• IMPORTANTE - Obse,- etodoslos
c6digos y 6rdenes de ley.
• Nota al instalador - Asegfirese de dejar estas
instrucciones con el consumidor.
• Nota al consumidor - Conserve estas
instrucciones para referencia futura.
• Nivel de destreza - La instalaci6n de este aparato
requiere de destrezas mecfinicas b_isicas.
• Tiempo de ejeeuei6n - lnstalaci6n del refi'igerador
(15 minutos)
• La insvalaci6n apropiada es la responsabilidad del
instalador.
• La falla del producto debido a una instalacidn
inadecuada no est_ cubierta pot la garantfa.
ESPACIOS LIBRES
Deje suficiente espacio para facilitm- la insmlacidn, la
circulacidn adecuada de aire y las conexiones de plomerfa
y eK_ctricas.
• Lados 1/8" (4 mm)
• Parte superior 1" (25 mm)
• Parte posterior 1" (25 mm)
Un espacio de 3/4" (19 mm) se necesita para abrir la
puerta de 90 ° lo que le ofrece tin mejor acceso al Area de
almacenamiento de los alimentos.
RODILLOS
Los rodillos fienen 3 pmp6sitos:
• Los rodillos se ajustan para hacer que la puerta se
cierre con facilidad cuando estg abierm
aproximadamente
en la mitad.
• Los rodillos se ajustan para que el refrigerador sea
firmemente posicionado en el piso y para no
tambalearse.
SOMINISTRO DE AGOA HACIA EL
DISPOSITIVO PARA HACER HIELO
(en algunos modelos)
Si el refrigerador tiene tin dispositivo para hacer hielo,
tendr_i que estar conectada a una lfnea de agua fi'fa.
Un kit de suministro de agua (contiene tuberfa, v_ilvulade
cierre, accesorios e instrucciones) est_ disponible con tin
costa adicional a tray& de su proveedo_; visitando nuestra
p_igina Web www.GEAppliances.com o bien a tray& de
Partes yAccesorios, 800.626.2002.
UBICACION DEL REFRIGERADOR
• No instale el reffigerador donde las temperamras "_an
debajo los 60 °F (16 °C), ya que no podrg funcionar
bastante para mantener las temperaturas adecuadas.
• lnstale sobre un piso suficientemente firme para
soportar un refrigerador completamente lleno.
• Los rodillos permiten mover el refrigerador para
retirarlo de la pared para su limpieza.
Para ajustar los rodillos, retire la rejilla de la base
emptogndola hacia abajo.
Gire los mrnillos de ajuste de los rodillos en el sentido de
las maneciBas del reloj para levantar el refi'igerador yen
sentido contrario alas manecillas del reloj para bajarlo.
Use una llave ajustable (tornillo de cabeza hexagonal de
3/8") o unas tenazas.
Para reemplazar la rejilla de la base, alinee los ganchos en
la parte posterior de la rejilla entre la barra y la parte
inferior del g_binete. Empt!je hacia adelante hasta que la
rejilla haga un chasquido al quedar en su lugar.
72
Page 73

Instrucciones para Instalacion
ALINEACI(_N DE LAS PUERTAS
Despu& de nivelar, asegfirese de que las puertas estdn al
mismo nivel en la parte superior.
Para emparejar las puertas, ajuste la puerta de los '_imentos
frescos.
0 Usando una llave de cubo de 5/16", gire el tornillo
de aiuste de la puerta hacia la derecha para elevar
la puerta; gfrelo hacia la izquierda para hacerla
descender. (Un tapdn de nylon estg enca, jado
en la rosca del pin para impedir que el pin gire
a menos de que se use una llave.)
Despu_s de una o dos vuel 'tas con la llave, abra
y cierre la puerta del compartimiento del refrigerador
y luego controle la alineacidn superior de las puer 'tas.
r
Uavedecubode
5/16"
tiredelapardlla [_ }1_1 I I
directamentehaciaafuera [_
73
Page 74

Instrucciones para la instalacion
COMO INSTALAR LATUBERiA DELAGUA
ANTES DE INIClAR
Los kits de cobre recomendados para el suministro de
agua son WX8X2, WX8X3 o WX8X4, dependiendo de
la cantidad de mberfa necesaria. Las mberfas pl_ticas
aprobadas para el suministro de agua son las tuberfas para
el refrigerador SmartConnec{ _'_de GE (WX08X10002,
WX08X10006, WX08X10015 y WX08X10025).
AI conectar su refiigerador a un Sistema de Aglla de
Osmosis lnvm.-sade GE, la tinica instalacidn aprobada es
con un kit de Osmosis Inversa de GE. Para otros sistemas
de agua de 6smosis inversa, riga las instrucciones del
tabricante.
Si la alimentacidn de agua a su refiigerador proviene de
un sistema de filtracidn de agua de 6smosis inversa Yel
refiigerador mmbi_n cuenta con un filtro de agua, use el
tap6n de derivacidn del filtro del refiigeradon El uso
conjunm del carmcho de filtracidn de aglla del
refiigerador con el filtro de RO (6smosis inversa) pudiera
resultar en la producci6n de cubos de hielo huecos yen
un caudal de agua mgs lento del dispensador de aglla.
Esm instalacidn de la mberfa del aglla no estfi garantizada
pot el fabricante del refiigerador o de la mgquina de
hielos. Sig-aestas insmmciones cuidadosamente para
minimizar el riesgo de tin dafio costoso debido al agua.
El martilleo del agua (aglla golpeando contra la mberfa)
en la mberfa de la casa puede causar dafios alas partes del
refiigerador y conducir a un goteo o inundaci6n por el
agua. Llame a tin plomero calificado para corregir el
martilleo del agua antes de instalar la tuberfa del agua al
refiigeradon
Para evitm-quemaduras y dafios con el producto, no
conecte la tuberfa del agua a la rubella del agua caliente.
Si usa el refiigerador antes de conectar la tuberfa,
asegdrese de que el interruptor de corriente de la
mgquina de hielos est_ en la posicidn 0 (apagado].
No instale la mberfa de la mgquina de hielos en lugares
donde la temperamra caiga por debajo del nivel de
congelamienm.
AI usar cualquier aparato el&trico (como tin taladro
el&nico) durante la instalacidn, asegxirese de que el
aparato estd aislado o conectado de manera que mdte el
peligro de una descarga eldcnica, o se opere pot baterfas.
Todas las instalaciones deben apegarse alas normas
vigentes en materia de obras de plomerfa.
QUE NECESITA
* Kit de tuberla de cobre para el refrigerador o
SmartConnect TM de GE, 1/4" de digmetro externo
para conectar el refiigerador al suministro de agua.
Si usa cobre, aseg6rese de que ambos extremos
de la tuberfa se corren uniformemente.
Para determinar la cantidad de tuberfa que necesita: mida
la distancia desde la vNvula del aglla en la parte posterior
del refrigerador hasta el mbo de suministro de agua.
Luego agregue 8" (2,4 m). Asegfirese de que haya
suficiente tuberfa adicional (unos 8" [2,4 m] enrollado
en tres vueltas de unas 10" [95 cm] de digmetro) para
permitir que el refiigerador se pueda mover de la pared
despu& de la instalacidn.
Los kits de mberi'a para el refiigerador SmartConnect _
de GE est_n disponibles en las sigllientes longitudes:
2" (0,6 m) -WX08X10002
6" (1,8 m) - WX08X10006
15' (4,6 m) - WX08X10015
25' (7,6 m) - WX08X10025
Asegxirese de que el kit que haya seleccionado permita al
menos 8' (9,4 m) como se describe arriba.
NOTA: La fmica tuberia de plfistico aprobada de GE es
la que viene provista con los kits de tuberia para d
refrigerador SmartConnect TM de GE. No use ninguna
otra tuberla plfistica para d _ministro del agua ya que la
tuberla est,6 bajo presi6n todo el tiempo. Ciertos tipos de
pklstico se fracturarAn o se rompexAn con el tiempo y
causarfin dafios en su casa debido al agua.
74
Page 75

Instrucciones para la instalacion
QUE NECESITA (CONT.)
Instale la vglvula de cierre en la tuberfa del agua de
consumo mgs ti'ecuentemente utilizada.
• 10n kit de stmalnistro de agua de GE (contiene mbe_{a,
vfilvula de cierre y accesorios enumerados abajo) estfi
disponible a un costo adicional en su tienda o por medio
de Partes y Acceso_ios, 800.626.2002.
• Un sumlnlstro de agua frla. La presidn del agua debe
estar entre 20 y 120 p.s.i. (1.4=8.2 bar) en modelos sin
filtro de agua y entre 40 y 120 p.s.i. (2.8-8.2 bar) en
modelos con filtros de agua.
• Taladro d6ctrico.
• Have de 1/2"o ajustable.
• Destornillador plano y de estrella.
• Dos tuercas de compresi6n de 1/4" de d_metro
exterior y 2 f6rulas (mangas)--para conectar la mberfa
de cobre a la vglvula de cierre y la vglvula del agua
del refi'igerado_:
O BIEN
• Si est5 usando un kit de tuberfa para el refiigerador
SmartConnect '_ de GE, los accesorios necesarios ya
vienen preinstalados en la tuberfa.
[] ClERRE EL SUMINISTRO
PRINCIPAL DE AGUA
Abra el grito m_ cercano por suficiente fiempo para
limpiar la tuberfa del aglm.
[] SELECClONE LA UBICAClON
DE LA VALVULA
Seleccione una ubicacidn para la vglvula que sea
Ncilmente accesible. Es mejor conectarla en el costado
de una mberfa vertical de agua. Cuando sea necesario
conectarla en una tuberfa horizontal de agua, haga
la conexi6n en la parte superior o al lado, en vez de
hacerlo en la parte de abajo, para evitar retirar
cualquier sedimento de la mberfa del agua.
PERFORE EL ORIFIClO PARA
LA VALVULA
• Si su tuberfa existente de cobre para el agua tiene un
accesorio con vuelo en el extremo, necesitaF_i un
adaptador (disponible en las tiendas de suministros de
plomerfa) para conectm" la lfnea del agua al refrigerador
O BIEN, podrfi cortar el accemrio con vuelo con un
cortador de tabos y luego usar un accesorio de
compresidn. No corte el extremo tormado de la rubella
para el retiigerador SmartConnect'" de GE.
• V_Nula de elerre para conectar a la lfnea del agua ti'fa.
La vfiivula de cierre deberg tener una entrada de agua
con un digmetro interno mfnimo de 5/32" en el
punto de conexidn a la TUBER_ DEL AGUA FR_
Las v_lvulas de apagado tipo silla vienen inchfidas en
muchos kits de suministro de agua. Antes de comprar,
asegfirese de que una vglvula tipo silla cumple con los
cddigos de plomerfa en su localidad.
Perfore un orificio de 1/4" en la mberfa del agua
(incluso si est5 usando una %lvula auto pertbradora),
usando una broca afilada. Retire cualquier sobrante
que resulte de pertorar el orificio en la tuberia. Tenga
cuidado de no permitir que se f'fltreagua hacia el
taladro. No pertbmr un orificio de 1/4" puede resultar
en menor producci6n de hielo o cubos m_s pequefios.
75
Page 76

Instrucciones para la instalacion
COMO INSTALAR LATUBERiA DELAGUA (CONT.)
[] INSTALE LA VALVULA DE CIERRE
Una la vglvula de cierre a la tuberfa de agua fi'faCOil la
abrazadera para el tubo.
Abrazadera_
paraeltubo
V_lvulade _
cierre tipo silla
NOTA: Se deberfin segldr los Cddigos 248CMR de
Plomerfa para el Estado de Massachusetts. _ vNvulas
tipo silla son ilegales y su uso no est5 permitido en
Massachusetts. Consulte con un plomero licenciado.
Tuber[avertical
deaguafrfa
[] APRIETE LA ABRAZADERA
DEL TUBO
Apriete los tornillos de la abrazadera hasta que la
arandela sellante empiece a hincharse.
NOTA: No apriete demasiado la tuberfa ya que podrfa
romperse.
Abrazadera_ _ Extremode entrada
del tubo
Tornillode la
abrazadera_
F
Arandela
[] CONECTE LA TUBERiA A LA
VALVULA
Coloque la tuerca de compresidn y fdrula para la
tuberfa de cobre (manga) en el extremo de la tuberfa
y condctela a la vglvula de cierre.
Asegxirese de que la tuberfa est_ completamente
insertada en la vglvula. Apriete la tuerca de compresidn
tirmemente.
Para mberfa de plgsdco de tin kit de mberfa para el
refrigerador SmartConnect '" de GE, inserte el extremo
moldeado de la mberfa en la v_ilvula de cierre y apriete
la merca de compresidn hasta que est_ firmemente
apretada a mano, hmgo apriete otto giro con una llave.
Aprerar demasiado puede causar fhgas.
Valvuladecierre --,
tipo silla Tubeda
Tuercadeempaque
V_lvulade salida
NOTA: Se debergn segldr los C6digos 248CMR de
Plomer_a para el Escado de Massachusetts. Las vglvulas
tipo silla son ilegales y su uso no est5 permitido en
Massachusetts. Consulte con tin plomero licenciado.
\' FOrula(manga)
compresi6n
SmartConnecU
[] DIRIJA LA TUBERiA
Dir_a la mbeffa entre la lfnea del agua frfa y el
refrigerador.
Dir_a la mberfa a trav& de un orificio perfbrado en
la pared o en el piso (detrgs del refrigerador o del
gabinete de la base adyacente) 1o m:is cerca posible
a la pared.
NOTA: Asegxirese de que haya suficiente mberfa
adicional (unos 8" [2,4 m] enrollada en tres vuelms
de alrededor de 10" [25 cm] de digmetro)
pare permitir que el refiigerador se pueda mover
de la pared despu& de la instalacidn.
[] LAVE LA TUBERiA
Abra el suministro principal de agua y lave la tuberfa
hasta que el aglla est_ limpia.
Cierre el agua en la v_ilvuladespu& de que un cuarto
(1 litro) de agua se haya eliminado pot la tuberfa.
76
Page 77

Instrucciones para la instalacion
[] CONECTE LA TUBERiA AL
REFRIGERADOR
NOTA_:
• Autes de hacer la conexidn al refrigeradoi; asegfirese
de que el cable de corriente del refrigerador no estd
conectado en el tomacorriente de la pared.
• Si su refi'igerador no tiene filtro de agua,
recomandamos la insmlacidn de uno si su suministro
de agua tiene arena o parffculas que podrfan obstmir
la malla de la v',ilvula de agua del refrigeradoi:
Insl5lelo en la mbeda del agua cerca al refrigeradol:
Si usa un kit de mberia para el refrigerador
SmartConnect '' de GE, necesitarfi un mbo adicional
(WX08X10002) para conectar el filtro. No corte la
mberfa plgstica para instalar el filtro.
Mgunos modelos tienen la conexidn del refrigerador al
final de la mberfa localizada en la parle exterior del
cobertor de acceso del compartimento del compresoi:
En otros modelos, el cobertor de acceso del
compartimiento del compresor debe ser removido para
tener acceso a la conexidn del refiigerador a la v',ilvula
de agua.
[] CONECTE LA TUBERiA AL
REFRIGERADOR (CONT.)
Inserte el extremo de la tuberi'a en la conexidn del
refi'igerador 1o m_ que se pueda. Mientras sostiene
la tuberi'a, apriete el accesorio.
Para mber_a de plSstico de un kit de mberfa para el
refiigerador SmartConnecC' de GE, inserte el
extremo moldeado de la tuberfa en la conexidn del
refiigerador y apriete la tuerca de compresidn hasta
que estd firmemente apretada a mano, luego apriete
ou'a vuelta con una llave. Apremr demasiado puede
causar _hgas.
Una la tuberfa a la abrazadera provista para sostenerla
en una posicidn vertical. QuizSs necesite apalancar la
abrazadera.
Una de has ilustraciones nuls abajo lucinl como la
conexi6n en su refrigerador.
Abrazadera
deltubo
de1/4"
Tuercade
compresi6n
de1/4"
\
En modelos que usan la conexidn de la v_ilvula de
agua, remove la tapa de pl_tico flexible.
Coloque la merca de compresidn y la fdrula (malaga)
en el extremo de la mberfa como se muesn'a. En el kit
de mberi'a para el refi'igerador SmartConnect '_ de GE,
las tuercas ya vienen armadas con la mberia.
F6rula
{manga}
Conexi6n Tuberiade
alrefrigerador Sma_Connect'_
Abrazadera compresi6n de1/4"
deltubo "
F6rula
(manga)
Conexi6nalre_igerador
Tuercade Tuberia
de1/4"
Tuberlade
SmartConnect'_
[] ABRA LA LLAVE DEL AGUA
EN LA VALVULA DE ClERRE
Apriete cualquier conexi6n que pueda presentar fugas.
77
Reemplace la cubierta de acceso.
Page 78

Instrucciones para la instalacion
COMO INSTALAR LATUBERJADELAGUA (CONT.)
_CONECTE EL REFRIGERADOR
O_ganice el cable de la tuberfa de manera que no vibre
contra la parte trasera del refrigerador o contra la
pared. Emptoe el re{i'igerador hacia la pared.
INICIE EL DISPOSITIVO
DE HIELO
Fije el interruptor del dispositivo de hielo en la posicidn
I(encendido).El dispositivo de hielo no empezai_ a
operar hasta que alcance su temperatura de operacidn
de 15°F (-9°C) o menor. Luego, empezar_ a operar
autom;iticamente si el interruptor del dispositivo de
hielo esr_ en la posicidn I (encendido).
I
NOTA: En condiciones de menor presi6n del agua,
la v_ilvula de agua puede encenderse hasta 3 veces para
suministrar suficiente agua al dispositivo de hielo.
78
Page 79

Sonidosnormalesdeoperacion, ww gGEAppliances.com
Los refrigeradores m_s nuevos producen sonidos diferentes a
los modelos m_santiguos. Losrefrigeradores modemos tienen
m_s funciones y usan tecnolog[a m_s reciente.
gUsted escucha Io que yo escucho? Estos sonidos son normales.
HMMMM...
WHOOSH....
• El nuevo compresor de alta eficiencia puede
fimcionar mgs r_ipido y durar m_is que el de su
refl'igerador anterior y puede escuchar un zumbido
de tono alto o un sonido pulsante mientras opera.
• A veces el refl'igerador flmciona por un perfodo
prolong-ado, especialmente cuando las puerCas se
abren continuamente. Esm significa que la fl.mci6n
FrOStGuard" esN en operacidn para impedir que el
congelador se queme y mejorar la presmwaci6n
de los alimentos.
• Puede escuchar un sonido de soplido cuando las
puertas se cierran. Esto se debe a que la presi6n se
est_ estabilizando dentro del refl'igeradm:
CHASQUIDOS,
ESTALLIDOS, CRUJIDO,
GORJEOS
iWHIR!
Puede escuchar los ventiladores movidndose a grail
velocidad. Esm pasa cuando el relYigerador se
conecta pot primera vez, cuando las puertas se abren
frecuentemente o cuando se guarda gran cantidad
de alimenms en el refl'igerador o en los
compartimienms del congelado_: Los ventiladores
estfin ayudando a mantener las temperamras
correcCas.
Si cualquiera de las puertas permanece abierta pot
mgs de 8 minutos, puede escuchar los ventiladores
para enfl'iar los focos de luz.
Los ventiladores cambian la velocidad para
suministrar enfriamiento 6ptimo y ahorrar energfa.
SONIDOSDEAGUA
6
• Puede escuchar sonidos como de crujido o
estallidos cuando el refl'igerador se conecm por
primera vez. Esto pasa a medida que el refl'igerador
se enfrfa hasta la temperatura correcm.
• Los reguladores electrdnicos se abren y se cierran
para ofrecer tin enfl'iamiento 6ptimo y ahorrar
energfa.
• El compresor puede causar un chasquido o un
goljeo cuando intenta volver a arrancar (esto
puede tomar hasta 5 minutos).
• El tablero de control electrdnico puede causar
tin sonido de chasquido cuando se activa el reid
para controlar los componentes del refrigeradm:
• Expansidn y contraccidn de las bobinas durante
o despuds del ciclo de descongelaci6n puede
causar sonidos como de crujido o estallidos.
• En modelos con dispositivo de hielo, despuds
de completar tin ciclo de hacer hielo, se pueden
escuchar los cubos de hielo cuando caen a la
bandeja de hielos.
El fluido del refrigerante a travds de las bobinas
puede producir tin sonido de borboteo como de
agua hirviendo.
El agua que cae en el calentador de descongelacidn
puede causar un chisporroteo, estallido o zumbido
durante el ciclo de descongelaci6n.
• Un ruido de agua cayendo se puede escuchar
durante el ciclo de descongelacidn a medida que el
hielo se derrite del evaporador y fluye hacia la
bandeja de drenaje.
• El cierre de las puertas puede producir tin sonido de
gorgoteo debido a la estabilizaci6n de la presi6n.
79
Page 80

Antes desolicitar unservicio...
Solucionar problemas
iAhorre tiempo y dinero! Revise las tablas en las siguientes
p_ginas ytal vez no necesitar_ de solicitar un servicio.
Causas Posibles Quehacer
Refrigerador en ciclo de • Espere 30 minutos para que la descongelacidn se termine.
descongelar.
Controles de temperatura • Muewa los controles de temperamra hasra un ajusre
en posici6n 0. de temperamra.
El refrigerador est_ • Empty• la clavija compleramente en el enchute.
desconectado.
Fusible fundido/ • Reemplace el thsible o reajuste el interrupton
interruptor de circuito roto.
Los rodillos requieren •Vea Rodillos.
un ajuste.
Es normal cuando • Espere 24 horas para que el reDigerador se enfrfe
el refrigerador es reci6n compleramente.
instalado en su casa.
Ocurre cuando hay largas • Eso es normal.
canfidades de alimentos
end refrigerador.
Se dej6 abierta la puerta. • Rexdse si un paquete mantiene la puerta abierta.
Clima caluroso o aperturas • Eso es normal.
frecuentes de la puerta.
Controles de temperatura • Vea Los controles.
ajustados al punto mils
frio.
El control de temperatura • Vea Los controles.
no se fij6 bastante frio.
Clima caluroso o aperturas • F!je el control de temperature un paso mils Dfo.
frecuentes de la puerta. Vea Los controles.
Se dej6 abierta la puerta. • Rexdse si hay un paquete que mantiene la puerta abierta.
Se dej6 abierta la puerta. • Rexdse si hay un paquete que mantiene la puerta abierta.
La puerta se abre con frecuencia
o por mucho tiempo.
• Eso ayuda prevenir la condensaci6n en el exterior.Ahorro autorrmfico de energla
circula llquido tibio en la
frente del congelador.
8O
Page 81

ww_.GEAppliances.com
Causas Posibles Qu6 hacer
E1 interruptor de alimentaci6n * Coloque el interruptor de alimentaci6n
dL,c_rica del disposifivo el4ctrica en la posicidn I (oncondido).
automfifico para hacer
hielo es_ en la posici6n 0
(apagado).
El agua estfi cerrada o no es_ .Vealnstalarlalineadeagua.
conectada.
E1 compartimiento dd • Espere 24 horas para que se enfrie el refiigeradoi:
congelador es muy c_lido.
Cubos apilados en d recipiente * Nivele los cubos con la mano.
apaga d dispositivo para hacer
hido.
Cubos de hielo atorados en *Apague el disposidvo de hielo, retire los cubos y vuelwa a
dispositivo para hacer hielo, poner el dispositivo en marcha.
(La luz verde de corriente en
dispositivo de hielo est_ destellando).
E1 recipiente para los • Vacfe y limpie el recipiente. Deseche los cubos.
cubos necesita limpieza.
Alimentos transmitiendo • Envuelva bien los alimentos.
olor/sabor a los cubos.
E1 interior dd refrigerador • Vea Cuidado y limpieza.
requiere limpieza.
Filtro de agua tapado. • Reemplace el carmcho del filtro con uno nuevo o
con el tapdn.
Se dej6 abierta la puerta. • ReVise si hay un paquete que mantiene la puerta abierta.
E1 conlrol de temperatura • Vea Los controles.
no es bastante frlo.
La junta en el lado de la bisagra • Aplique vaselina en la parm frontal de lajunta.
es_ pegada o doblada.
Calefactor de descongelacidn • Eso es normal.
encendido.
Dispositivo de hielo apagado • Enciende el dispositivo de hielo o el aglm.
o el agua est_ apagado.
Los cubos estfin pegados • Remueve los cubos.
al brazo detector.
Bloques irregulares de • Rdmpalos con los dedos y deseche los cubos restantes.
hielo en el recipiente. • E1 congelador puede ser muy caliente. Ajuste el conn'ol a
una posicidn m_s frfa paso por paso hasta que no se
J[brmen bloques.
E1 dispensador estfi • Presione la tecla LOCK CONTROL (Control de bloqueo)
BLOQUEADO(LOCKED). y mant_ng'ala presionada durante tres segundos.
El dispensador de agua no
se uso por mucho tiempo.
• Dispense el agua hasm que todo el sistema del agua se
llene de nuevo.
81
Page 82

Antes desolicitar unservicio...
Causas Posibles Que hacer
Eso es normal con un • Espere 24 hoi'as para que se enfi'_e el refrigeradol:
refrigerador reci6n instal,ado.
El dispensador de agua no • Dispense el agua hasta que todd el sistema del aglla se
se uso por mucho tiempo, llene de nuevo.
El sistema de agua se ha • Espere algunas horas para que se enfrfe el agua.
desaguado.
Suminislro de agua • Vea Instalar la linea de agua.
apagado o no conectado.
F'fltro de agua tapado. • Reemplace el carmcho del filrro o remueve el filn'o
Aire atrapado end sistema • Presione el brazo del dispensador por un par de
del agua. dos minutos.
El dispensador estfi • Presione la tecla LOCK CONTROL (Control de bloqueo)
BLOQUEADO(LOCKED), y mantdngMa presionada durante tres seglmdos.
Cartueho del filtro reci_n • Deje correr el agua desde el dipensador por 3 minutos
instalado. (aprox. 1½ gM6ns).
El agua en el dep6sito est_ • Llame para selMcio.
congelada.
y insrale el tap6n.
Estfi tapada la llnea de agua • Llame a tin plomero.
o la Rave de paso.
F'fltro de agua tapado. • Reemplace el carmcho del filrro o remueve el filn'o
y insrale el tap6n.
El dispensador estil • Presione la tecla LOCKCONYROL (Control de bloqueo)
BLOQUEADO (LOCKED) y mantdngMa presionada durante tres segundos.
Alimentos tr_msmifiendo • Alimentos con olores fuertes deben estm" Vapados.
olores al refrigerador. • Guarde una caja de bicarbonato de sodio en el
refiigerador; cgmbiela cada tres meses.
El interior requiere • Vea Cuidado y limpieza.
limpieza.
Limpie el s_tema de agua • Vea Cuidado y limpieza.
de descongelad6n.
Normal en periodos con • Seque la superficie.
alto grado de humedad.
Se abre la puerta con
frecuencia o por mucho
tiempo.
82
Page 83

ww_.GEAppliances.com
Possible Causes What To Do
No hay corriente en el contacto. • Reemplace el fusible o reajuste el interrupto_:
BomWdla fundida. • Vea Reemplazar las bombillas.
El desagiie en el rondo del • Vea Cuidado y limpieza.
congelador esul tapado.
Cubos atrapados en • Empuje los cubos en el vertedero con una cuchara
d orificio, de madera.
El aire fluye para enfriar d
motor. End proceso de
refrigeraci6n es normal que
salga calor de la base del
refrigerador. Algunos
recubrimientos de piso
estan sensitivos y se
descoloran a estas
temperaturas normales
y seguras.
La filtlma selecci6n fue
CRUSHEDICE(HIELOPICADO).
• Se quedaron unos cuamos cubos en el trimrador de la
seleccidn anterior. Esto es normal.
El interruptor de corriente del
dispositivo para hacer hielo est,q
en la posici6n I (encendido)pero
no se ha conectado la tuberla
de suministro de agua hacia el
refrigerador.
• Mue'ca el interruptor de corriente a la posici6n
0 (apagado).Mantenerlo en la posici6n I (encendido)
dafiar5 la v_ilvula(]el agua.
83
Page 84

6arantia del Refrigerador.(Para consumidores en los EE.UU.)
Todos los servicios los proporcionar#n nuestros centros de
f#brica o nuestros prestadores Customer Care®autorizados.
Para concertar una cita de servicio, en Ifnea, 24 horas al dfa,
p6ngase en contacto con nosotros en wvvw.GEAppliances.com,
o Ilame a1800.GE.CARES (800.432.2737).
GEreemplazar_:
Cualquierparte del refrigerador que fhlle debido a un defecto en materiales o mano de obra.
Durante este a_o de garantia completa, GE tambi_n proporcionar_i sin costo, mano de obra y
servicio en su hog_r para reemplazar las partes defectuosas.
Cualquier parte del sistema sellado de refrigeracion, (compreso_; condensadol; ewaporador y todas
tuberias de conexidn) que fhlle debido a un def_ecto en materiales o mano de obra. Durante este
cinco afios de garantia completa del sistema sellado de refrigeraci6n, GE tambi_n proporcionalvl,
sincosto,mano de obra y servicio en su hogar domicilio para reemplazar la pieza defecmosa
dentro del sistema de refiigeracidn sellado.
Cualquierparte del cartucho del fihro de agua que fhlle debido a defizctos en los
materiales o manufactura. Duranm esta garantia limitada de treinta dias, GE tambidn
proporcionar_i sin costo, un carmcho de filtro de agua de repuesro.
Grape aqu[su recibe.
Se requiere facilitar prueba de
la fecha de compra original
para obtener unservicio baje
la garantfa.
NViajes de servicio a su hogar para ensefiarle c6mo usar
d producto.
NUna instalaci6n incorrecta, entrega o mantenimiento.
N Fallas del pmducto si hay abuso, mal uso, o uso para
otros pmp6sitos que los propuestos, o uso para Fmes
comerciales.
N P6rdida de alimentos por averlas.
N Reemplazo de fusibles de su hogar o reajuste de
interruptores de circuito.
N Dafios despu6s de la entrega.
NReemplazo dd cartucho del filtro para agua debido
a presi6n de agua afuera de las limites de operaci6n
especificados o sedimento excesivo en el suministro
de agua.
N Reemplazo de las bomb'fllas o de los cartuchos de Ftltro
de agua diferente a como se especitlca anteriormente.
NDafio al producto causado por acddente, fuego,
inundaciones o actos de Dios.
NDafio incidental o consecuendal causado por posibles
defectos con d aparato.
Estagarantia so extiende al comprador original y a cualquier propietario que Io suceda para el caso de productos comprados
para uso dom6stico normalen los EstadosUnidos.EnAlaska, usted tendr# que pagar el flete del producto o los costos de viaje
del t6cnico de servicio hasta suhogar.
Algunos estadosno permiten la exclusiSn o limitaciSn de dafios incidentales o consecuenciales. Estagarantia le proporciona
derechos legales especificos, ypuede tener otros derechos que pueden variar deun estado a otro. Para conocer los derechos
legales de su estado, consulte con su oficina local de asuntos del consumidor o al procurador general de suestado.
Garantidor: General Electric Company.Louisville, KY 40225
Para ComprasHechasen Iowa:Este formulario debe ser firmado y fechado por el comprador y el vendedor antes de la conclusidn
de esta venta. Este formulario debe ser conservado en archivo por el comprador por un mfnimo de dos afios.
COMPRADOR: VENDEDOR:
Nombre Nombre
Direcci6n Direcci6n
Ciudad Estado Cddigo Postal Ciudad
Firma Fecha Firma
84
Estado
Cddigo Postal
Fecha
Page 85

Hoja de Datos de Funcionamiento
Sistema de Fdtracion GESmartVVater
Cartucho GVVF/HWF
Estesistemase ha sometidoalas pruebasNSF/ANS142,/53a fin de reducirlas sustanciaspresentadasa continuaci6n.
Se redujola concentraci6ndelas sustanciasindicadasenel agua queingresanenel sistemaa una concentraci6nmenor
oigualal limite permitidopara el agua quesale del sistema,comose especifica en NSF/ANS142/53.*
'Factoresde 100%incorporados para la utilizaciSnno medida)
Es_ndar No. 42: Efectos est_ticos
Partners US_A
M_
C]oro
T&O
Parti_ulas**
Par_netros Reducci6nCalidad del
'IhrNdez 99,59% 0,5 NTU
Qnistes 99,95% > 99,95%
Plomo a pH 6,5 99,37% 0,010 mg/L
Plomo a pH 8,5 97,13% 0,010 mg/L
Lindane 91,93% 0,0002 mg/L
Atrazine 64,28% 0,003 mg/L
2,4-D 67,63% 0,07 mg/L
Asbestus 99,82% 99%
USEPA
MCL
l NTLJ***
99,95% Reduccidn
15 ppb
15 ppb
0,01_)2 ppm
0,01t3 ppm
0,100 ppm
99%
* Probadoutilizandounatasade flujode 0,5gpm(1,8927I/rain.);presidnde 60psig(4,218Kg/cm2);pHde 7,5+_0,5;temp.de20°+-2,5°C
** Medicidnenpartfculas/mLLaspartfculasusadaserande0,5--1micrdn.
*** UnidadesdeturbidezNefelomOtrica--NTU
Calidad del
hlfluente concenlraci6n
2,0 mg/L + 10%
at le&st 10.000 particulas/mi.
EstAndar No. 53: Efectos Relativos a la Salud
influente concenlrad6n
11+1 NTU***
30.000 L mfnimo
0,15 mg/L+ 10%
0,15 mg/L+ 10%
0,002 mg/L + 10%
0,009 mg/L + 10%
0,210 mg/L + 10%
l& a 10 _fibras/litro;
las fibt_&s_)n mayores a
10 micrometros de longimd
Promedio lVlfixlmo
Effluent
0,02 ppm 0,05 ppm
3.978 7.800
Effluent
Promedio Mgximo
0,07 NTU 0,1 NTU
26 55
1 ppb l ppb
1,8 ppb 4,3 ppb
0,00005 ppm 0,00005 ppm
0,002 ppm 0,003 ppm
0,042 ppm 0,090 ppm
0,32 MFL/ml 1,2 MFL/ml
% de reducci6n
Promedio M'mimo
98,90% 97,37%
98,00% 96,10%
% de reducci6n
Promedio
99,71%
99,97%
99,37%
98,8%
91,93%
7/1,19%
84,89%
99,95%
Minimo minima necesarla
Reducci6n
m'minmnecesaria
> 50%
> 85%
Especificaciones de Operaci6n
• Capacidad: cerdticado para hasta 300 g-alones (l 135 litros ); hasta seis meses para los mrMel(_ssin hlz indicador'a de reemplazo dc filtro; hasta
un afio para los m(*lelos con luz indicadora de reemplaTx) de filtro
• Requerimientos de presi6n: 40-120 psi (2,8-8,2 bar), sin choqtm
• 'lbmperamra: 33°-l(RI°F (0,6 -38°C)
• 'l_sa de tlujo: 0,5 gpm (1,9 Ipm)
Requerimientos Generales de Instalaci6n/Operaci6n/Mantenimiento
• Lave el nuevo call.ucho a la tasa mfixima por 3 rtlinutos para sacar el aire atrapado.
• Reemplace el cml.ucho cuando el tlujo se haga muy lento.
Avisos Especiales
• Las insmlcciones de instalaci6n, las piez_s, la intbmmci6n sobre la disponibilidad de selMcio y la garantfa est_indar se inchlyen con el product()
al enviarh).
• Este sismma de agua potable del×. manteners_, confomm alas insmlcciones del fabricanm, incluyendo el reemplazo dc los cartuchos.
• No se utiliza en los sitios donde el agua es de calidad microbiol6gicamente dudosa, ni con aguas de calidad desconocida, sin una desinDcci6n
adecuada antes o despu_Ss del sistema; el sismma puede utilizarse con aguas desin:[bctadas que puedan conmner quistes filtrables.
• Los contaminantes u otr;_s substancias que este sistcma de tratamiento de agua puedc remover o reduci_; no es_in presentes, necesariamente,
en su agua.
• Verifiqlm el acatamienm de las leyes y reglamentos estatales y locales.
• Tome en cuenta que aunque las ptnaebas se realizaron bajo condiciones estfindar de laboratorio, el resnltado real puede variar. Los
sistemas se deben instalar y operar de acuerdo con los procedimientos y las pautas que recomienda el fi_bricante.
Probado y Cerdilcado segOn las normas ANSI/NSF 42 y 53 pava la reducci6n de:
Kstfindar No. 42: Efectos Est6ticos
Unidad qufmica
Reduccidn (tel sab(li" y olor
Reduccidn de clolr)
Unidad de tillmdo mecgnico
Reduccidn de partfiulas, Clam I
Kstfindar No. 53: Efectos sobre
la salud
Unidad de rcxlucci6n qufmica
Rednccidn del plomo y Atrazine
Rednccidn deS Lindane y 2,4-D
Unidad de filu_ado me(:_nico
Reduccidn de quistcs
Reduccidn de mi-bklez
Hecho por General Elecu-ic, Appliance Park, Louisville, KY40225
85
Page 86

Notas.
a=.
a=.
m
i
Page 87

Servicioal consumidor.
P#ginaWebdeGEAppliances www.GEAppliances.com
dTiene alguna pregunta sobre su electrodomdsdco? iPruebe la p_igina Web de GE Appliances 24 horas al
dfa, cualquier dia del afio! Para mayor conveniencia y servicio mils rfipido, ya puede descarg.ar los Manuales
de los Propietarios, pedir piezas o incluso hacer una cita en linea para que veng.an a realizar una
reparacidn. Tambidn puede "Ask Our Team of Experts _'' (Pregumar a nuestro equipo de expertos) sobre
cualquier cuestidn y mucho mil...
v................._
Soliciteunareparacidn
E1 servicio de experros GE estfi a tan sdlo un paso de su puerta, iEntre en lfnea y solicite su reparacidn
cuando le venga bien 24 horas al dfa cualquier dfa del afio! O llame al 800.GE.CARES (800.432.2737)
durante horas normales de oficina.
www.GEAppliances.com
RealLifeDesignStudio(Estudiodedisefioparalavidareal)www.GEAppliances.com
GE apoya el concepro de Disefio Universal--producros, servicios y anabientes que pueden usar genre de
todas las edades, tamafios y capacidades. Reconocemos la necesidad de disefiar para una gran g.ama de
habilidades y dificultades ffsicas y mentales. Para mil detalles cobre las aplicaciones de GE Disefio Unive_.'sal,
incluyendo ideas de disefio para la cocina para pe_.-sonas con discapacidades, mire nuestra pfigina Web hoy
mismo. Para personas con dificultades auditivas, tavor de llamar al 800.TDD.GEAC (800.833.4322).
Garantfasampliadas
Compre una garantia ampliada y obteng_ detalles sobre descuemos especiales disponibles mientras su
g.arant_a estfi afin activa. Puede comprarla en lfnea en cualquier momento, o llamar al 800.626.2224
durante horas normales de oficina. GE Consumer Home Services estar_i afin ahf cuando su garantfa
termine.
Piezasyaccesorios
www.GEAppliances.com
www.GEAppliances.com
v................._
v................._
Aquellos individuos con la calificacidn necesaria para reparar sus propios electrodom_sticos pueden
pedir que se les manden las piezas o accesorios directamente a sus hog'ares (aceptmnos las taljetas
VISA, MasterCard y Discover). Hag.a su pedido en linea hoy, 24 horas cada dfa o llamar por tel_fbno
al 800.626.2002 durante horas normales de oficina.
Lasinstruccionesdescritasen estemanualcubrenlosprocedimientosaseguirpar cualquierusuario.Cualquier
otrareparaci6ndeberia,porreglageneral,referirsea personalcalificadoautorizado.Debeejercerseprecaucion
yaquelasreparacionesincorrectaspuedencausarcondicionesdefuncionamientoinseguras.
POngaseoncontactoconnosotros www.GEAppliances.com
Si no estfi satisfecho con el servicio que recibe de GE, pdngase en contacto con nosotros en nuestra p_igina
Web indicando todos los detalles asf como su nfimero de teldfono o escr?oanos a:
General Manager, Customer Relations
GE Appliances, Appliance Park
Louis'ville, KY 40225
RegistresuelectrodomOstico www.GEAppliances.com
iRe_re su nuevo dectrodom_'tico en llnea--cuando usted prefiera! El regisn'ar su producto a dempo le
proporcionar_i, si surgiera la necesidad, una mejor comunicacidn y un servicio mils rfipido bajo los tdrminos
de su garantfa. Tambi_n puede em;lar su ra_jeta de registro preZlmpresa que se incluye en el material de
embalaje.
87
Page 88

ConsumerSupport.
GEAppliancesWebsite
Have a quesdon or need assistance with your appliance? Try the GE Appliances Website 24 hom.-s a day,
any day of the year! For greater convenience and fester service, you can now download Owner's Manuals,
order parts, catalogs, or even schedule service on-line. You can also "AskOur Team of Experts'"" your questions,
and so much more... In Canada: www.geapplianees.ca
In the U.S.: www.GEAppliances.com
ScheduleService 1,1theu.s.:www.GEAppliances.com
Expert GE repair service is only one step away from your dool: Get on-line and schedule your service at your
convenience 24 hours any day of the year! Or call 800.GE.CARES (800.432.2737) during normal business hours.
In Canada, call 1.800.361.3400
RealLifeDesignStudio In the U.S.: www.GEAppliances.com
GE supports the Universal Design concept--products, services and environments that can be used by people of all
ages, sizes and capabilities. We recognize the need m design for a wide range of physical and mental abilities and
impairments. For details of GE's Universal Design applications, including kitchen design ideas for people with
disabilities, check out our Website today. For the hearing impaired, please call 800.TDD.GEAC (800.833.4322).
In Canada, contact: Manages; Consumer Relations, Camco, Inc.
Suite 310, 1 Factory Lane
Moncton, N.B. E1C 9M3
ExtendedWarranties
In the U.S.: www.GEAppliances.com
Purchase a GE extended warranty and learn about special discounts that are a'cailable while your warranty is still
in effect. You can purchase it on-line anytime, or call 800.626.2224 during normal business hours. GE Consumer
Home Services will still be there after your warranty expires. In Canada, ear 1.888.261.2133
PartsandAccessories
Individuals qualified to service their own appliances can have parts or accessories sent directly to their homes
(VISA, MasterCord and Discover cards are accepted). Order ondine today, 24 hours every day or by phone at
800.626.2002 during normal business hours.
Instruaionscontainedin thismanualcoverprocedurestobeperformedbyanyuser.Otherservicinggenerallyshouldbe
referredtoqualifiedservicepersonnel.Cautionmustbeexercised,sinceimproperservicingmaycauseunsafeoperation.
Customers in Canada should consult the yellow pages 1or the nearest Camco service center, or call 1.888.261.3055.
ContactUs
If you are not sadsfied with the smMce you receive from GE, contact us on our Website with all the details
including your phone number, or write to: General Managm; Customer Relations
GE Appliances, Appliance Park
Louisville, KY 40225
In Canada: www.geappliances.ca, or write to: Director, Consumer Relations, Camco, Inc.
Suite 310, 1 Factory Lane
Moncton, N.B. E1C 9M3
In the U.S.: www.GEAppliances.com
In the U.S.: www.GEAppliances.com
RegisterYourAppliance In the U.S.: www.GEAppliances.com
Register your new appliance on-line---at your convenience! Timely product registration will allow 1or
enhanced communication and prompt service under the terms of your warranty, should the need arise.
You may also mail in the pre-printed registration card included in the packing material.
In Canada: www.geappliances.ca
_ Printedinthe UnitedStates
d PrintedonRecydefiPaper
 Loading...