

Page 1
°e.-i
www.GEApp#ances.com
Safety InJbrmation
Adapter Ph_gs ................. 4
Electriciw . .................... 4
Extension Cords .............. o
Proper Disposal ................ 3
Safety Precat_ti(ms .............. 2
Operating Instructions
Amomatic Icemaker . ........... 9
Controls ..................... 5
Crispers and Pai_s ............ 8, 9
Ice ;:rod Water Dispenser . ....... 10
Shelves, Bins and Racks ........ ti-8
_A_ter Filter Cartridge ........... 5
Models20,22and25
C6te ?_c6te
Rdfrigdrateurs
La section fran_aise commence h la page 31
Care and Cleaning
Cleaning ................. [ 1, 12
Light Bulbs .................. 13
Installation Ins_uetions
Preparing to h_stall
the Refiigerator . ........... t4, 1:5
Water Li_e i_stallati(m ...... 16-20
Troubleshooting Tips
gefbre 3¢tm Call For Service . . .22-24
Normal Operating Som_ds ...... 21
Consumer Support
C(msm_er Support ..... Back Cover
Perfbrmai_ce Data Sheet ........ 27
Product Registration ........ 29, 30
State of Califori_ia _A'ater
Treatment Device Certificate ..... 28
_A_wrantv (Canadian) ........... 25
Wart;tory (1LS.) ............... 26
Iado a lado
Refrigeradores
La seccion en espafiol empieza en la pagina 59
Write your model and serial numbers here:
Model #
Serial #
Find these numbers on a label inside
the refrigerator compartment at the top
on the fight side behind the controls,
197D3351PO06 49-60272 07-03 JR
Page 2
IMPORTANTSAFETYINFORMATION.
READALLINSTRUCTIONSBEFOREUSING.
WARNING!
Use this appliance only for its intended purpose as described in this Owner's Manual
SAFETYPRECAUTIONS
When using electrical appliances, basic safety precautions should be followed, including the following:
This refi-igerator must be properly installed
and located in accordance with the Installation
Instructions before it is used.
Do not allow children to climb, st;rod or hang
on the shelves in the reli-igerato_: They could
damage the reti_igerator and seriously iqj ure
themselves.
Do not touch the cold surfi_ces in the fl'eezer
compartment when hands are damp or wet. Skin
may stick to these extremely cold stmfaces.
Do not store or use gasoline or other flammable
\:q)o_s and liquids in the vicinity ot this or any
other appliance.
In refl_igerato_ with automatic icemake_,
avoid contact with the moving parts of the
ejector mechanism, or with the heating element
locamd on the bottom _ff the icemake_: Do not
place finge_ or hands on the automatic
icemaking mechanism while the refiigerator
is plugged in.
Keep finge_ out ot the "pinch point" areas;
clearances between the doo_5 and between
the (loo_ and cabinet are necessarily small.
Be caretul closing (loo_ when children are
in the area.
Unplug the refrigerator befiwe cleaning and
making repai_.
NOTE: We strongly recommendthat anyservlklngbe
performedby a qualified individual
_ Setting the ti'eezer control to the 0 (off) position
does not remove power to the light circuit.
Do not reti'eeze ti'ozen foods which have
thawed complemly:
Page 3
vvww.GEAppliances.com
DANGER!RISKOFCHILDENTRAPMENT
PROPERDISPOSALOFTHEREFRIGERATOR
Child entrapment and suffocation are not l)rol)lems
of the past.Junked or abandoned refl_igerat(n_ are
still dangerous,, ,even if' they will sit fin" 'ijust a few
(lm_s." If you are getting rid of yore" old refl_igerato_;
please tollow the instructions below to hel I) prevent
accidents.
Before YouThrowAway YourOldRefrigerator
Refrigerants
_M1refl_igeration products contain refl'igerants,
which trader fe(leral law must be removed prior
to product disposal. If w)u are getting rid of an
old refrigeration product, check with the
company handling the disposal about what
to do.
or Freezer:
Take off the dome.
I,eave the shelxes in place so that children ma)
not easiE climb inside.
USEOFEXTENSIONCORDS
Because of potential safety hazards under certain conditions, we strongly recommend
against the use of an extension cord.
However; if you must use an extension cord, it is absolutely necessary that it be a UL-listed (in the United
States) or a CSA-listed (in Canada), 3-wire grotmding _'l)e appliance extension cord having a grotmding
_'l)e plug and outlet and that the electrical rating ot the cord be 15 amperes (minim urn) and 120 volts.
3
Page 4
IMPORTANTSAFETYINFORMATION.
READALLINSTRUCTIONSBEFOREUSING.
a, WARNING!
HOWTOCONNECTELECTRICITY
Do not, under any circumstances, cut or remove the third (ground) prong from the power cord. For
personal safety, this appfiance must be properly grounded.
The power cord of this appliance is equipped with
a 3-prong (grounding) plug which nlates with a
standard 3-prong (grounding) wall outlet to
minimize tile possil)ilit), of electdc shock hazard
from this appliance.
Have tile wall outlet and circuit checked by a
qualNed electridan to make sure tile outlet is
propedy grounded.
If the outlet is a standard 2-prong outlet, it is gmr
personal responsibility and obligation to have it
replaced with a propedy grounded 3-prong wall
outlet.
Tile refl-igerator, should ahvavs, be I)lugged,, into its
own indixidual electrical outlet which has a xoltage
rating that matches the rating plate.
This provides tile best perlimnance and also
I)rexents oxerloading, house wiring circuits which
could cause a fire hazard from oxerheated wires.
Never unplug your refrigerator by pulling on tile
power cord. Mways grip plug firefly and pull
straight out ti'oln tile outlet.
Repair or replace immediately all power cords that
have become fl'ayed or otherwise damaged. Do not
use a cord that sho_:s cracks or abrasion damage
along its length or at either end.
When moving tile refi_igerator away from tile
wall, be carefld not to roll over or damage tile
power cord.
USEOFADAPTERPLUGS(Ad_pterplug,notpermittedinco_odo)
Because of potential safety hazards under certain conditions, we strongly recommend against
the use of an adapter plug.
However; if' you, must use an adapter; where local
codes i)emfit, a temporary connection may be made
to a properly grounded 2-prong wall outlet by use
of a UI Aisted adapter a\:lilable at most local
hardwai'e stores.
Tile larger slot in tile adapter must be aligned with
the larger slot in the wall outlet to provide proper
polarity in tile connection of tile power cord.
When disconnecting tile power cord ti'om tile
a(lapte_; always hold tile adal)ter in place with one
hand while pulling the power cord i)lug with the
other hand. If this is not done, tile adapter ground
temfinal is very likely to break with repeated use.
If tile adapter ground temfinal brealcs, DO NOT USE
tile reflJ oerator_ until a l)r°l ,)er ground has been
established.
Attaching the adapter ground terminal to a wall outlet
cover screw does not ground the appliance unless the
cover screw is metal, and not i))su/ated, and the waft
outlet is grounded through the house wiring. Youshould
have the circuit checked by a qualified electrician to make
sure the outlet is properly groundecL
READANDFOLLOWTHISSAFETYINFORMATIONCAREFULLY.
SAVETHESEINSTRUCTIONS
4
Page 5
Aboutthe controlsontherefrigerator, vvvvw.GEAppliances.com
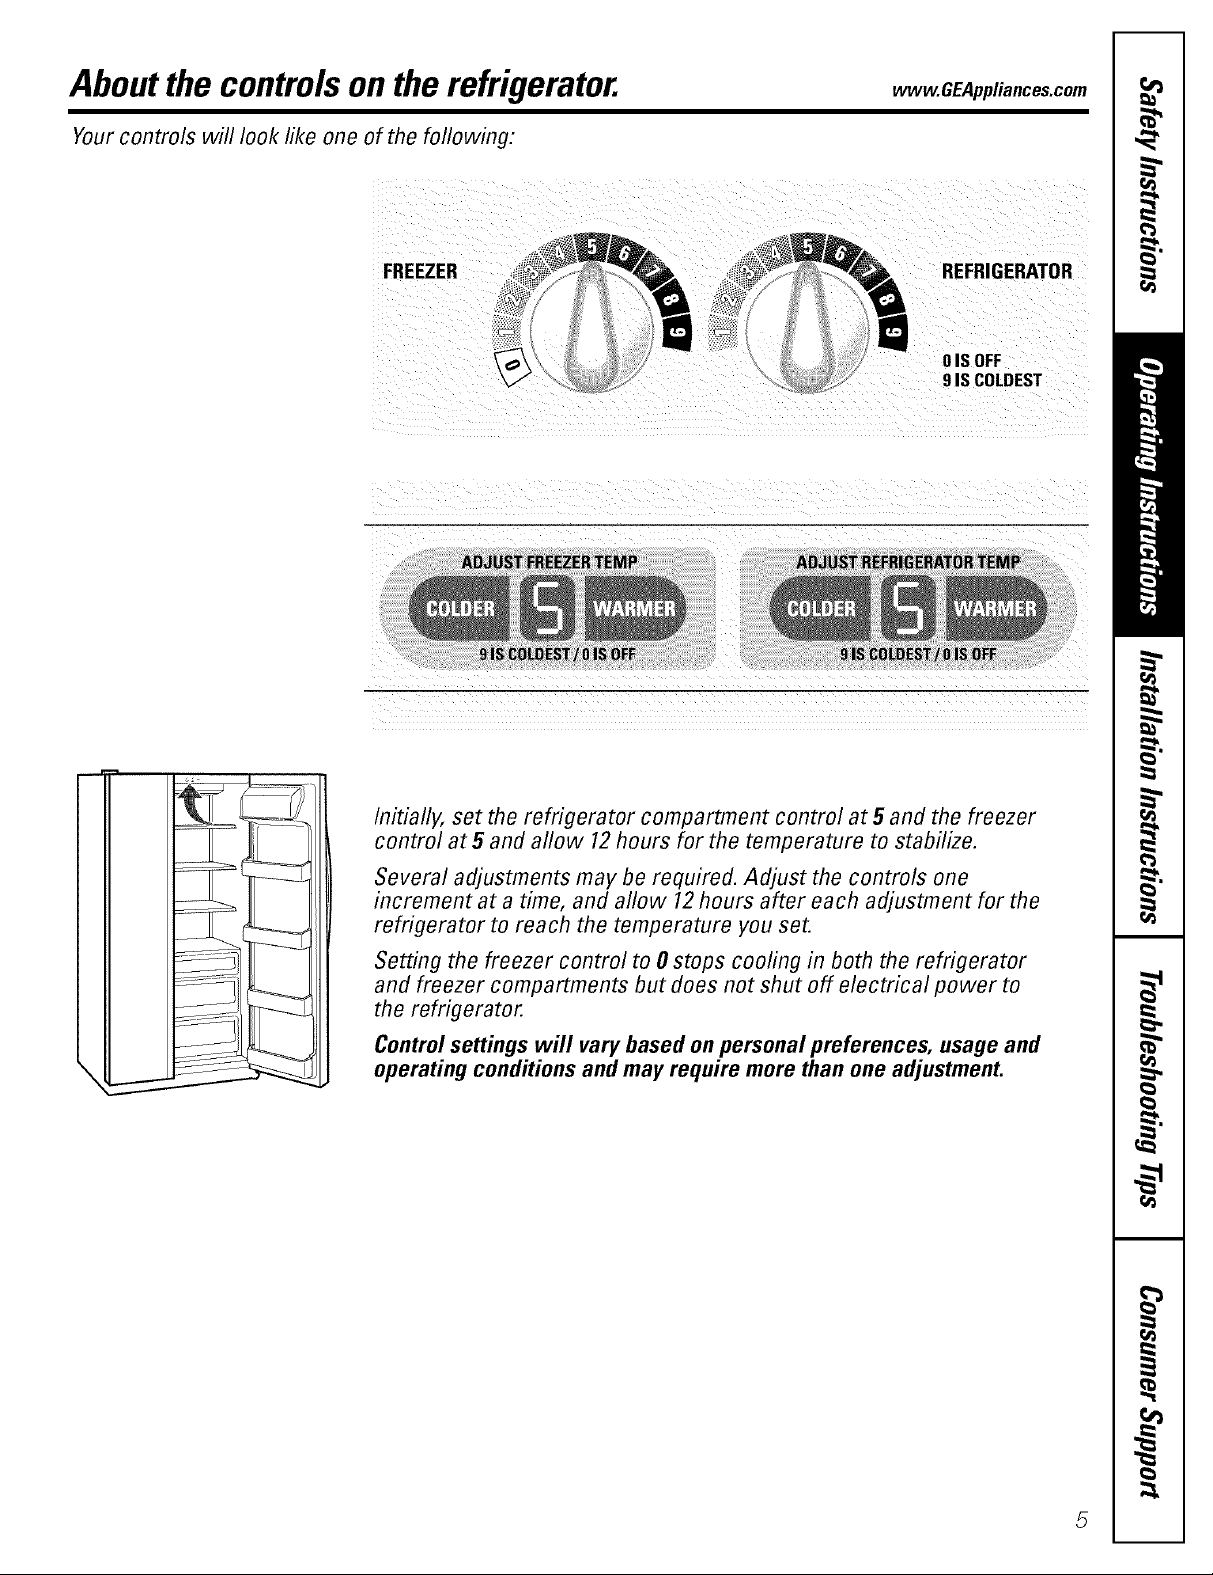
Yourcontrols will look like one of the following:
FREEZER REFRIGERATOR
OIS OFF
91S COLDEST
/nitially, set the refrigerator compartment control at 5 and the freezer
control at 5 and allow 12hours for the temperature to stabilize.
Several adjustments may be required. Adjust the controls one
increment at a time, and allow 12hours after each adjustment for the
refrigerator to reach the temperature you set.
Setting the freezer control to 0 stops cooling in both the refrigerator
and freezer compartments but does not shut off electrical power to
the refrigerator.
Controlsettings will vary based on personal preferences, usage and
I
I
operating conditions and may require more than one adjustment.
Page 6
Aboutthe water filter cartridge.
On some models
i ¸¸¸
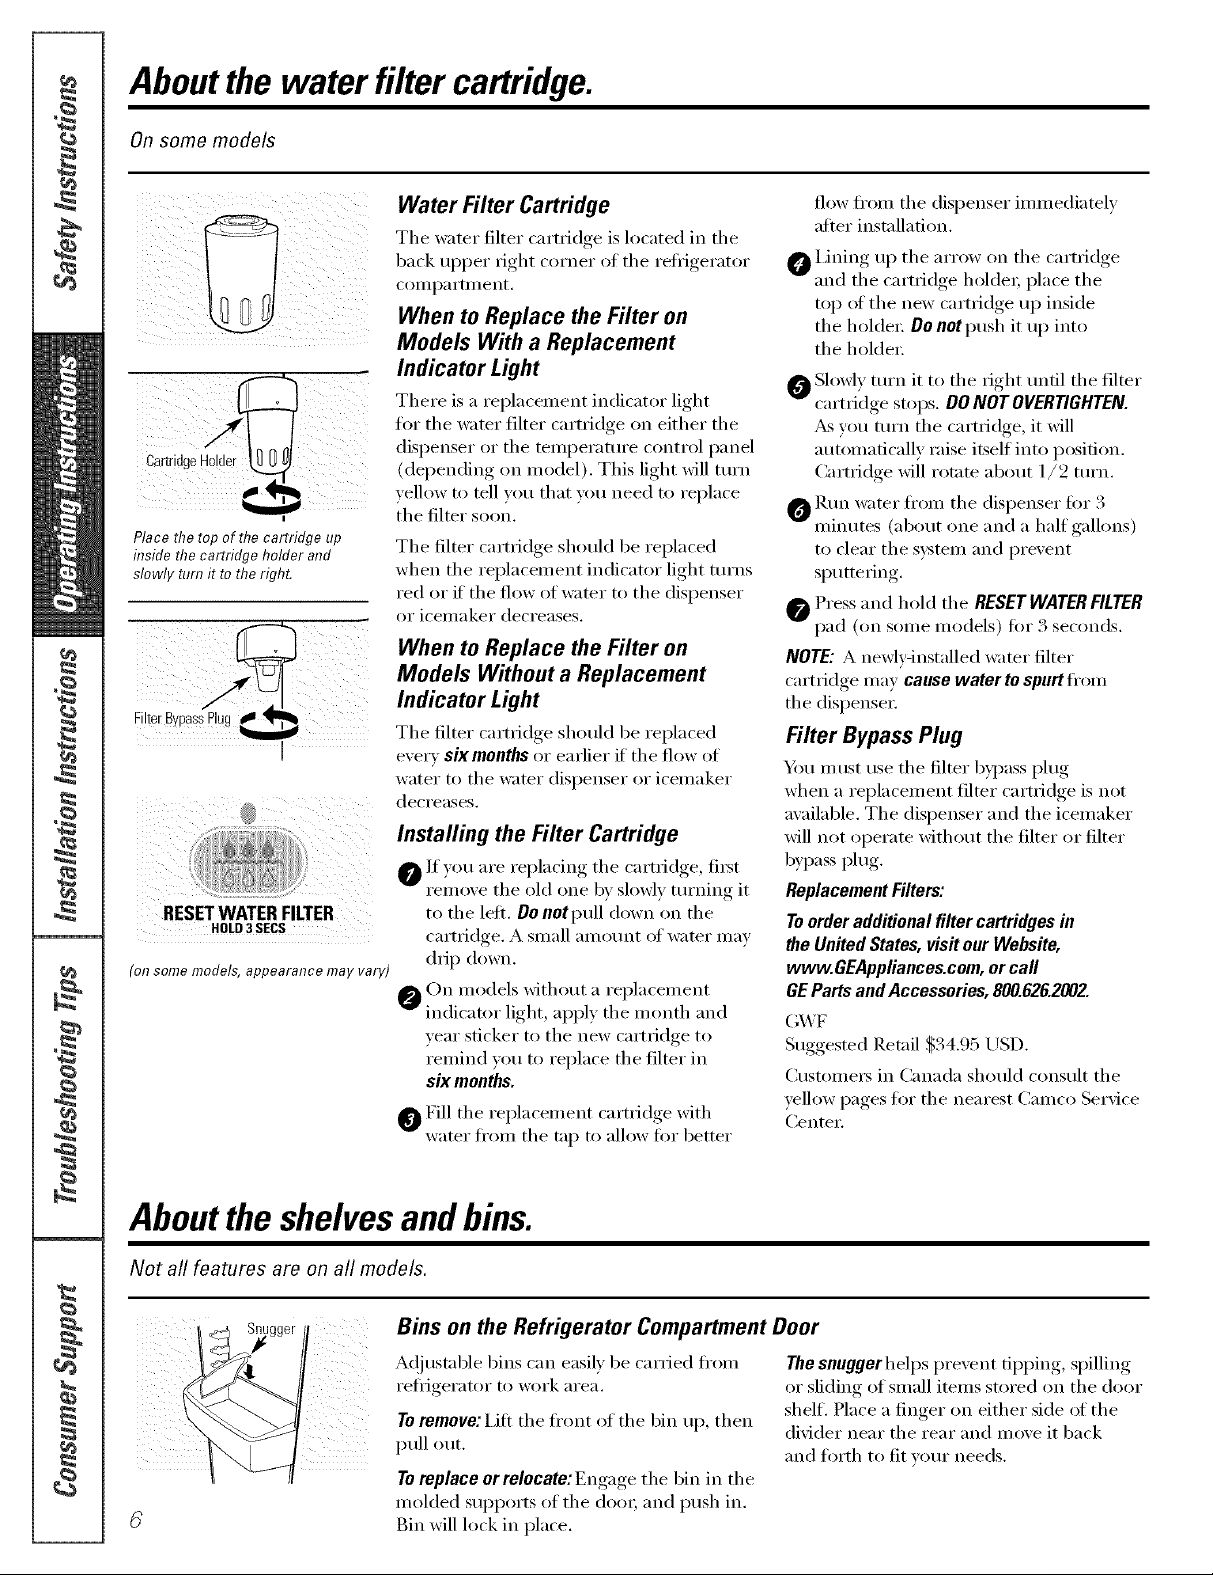
Place the top of the cartridge up
inside the cartridge holder and
slowly turn it to theright.
FilterBypassP!ug
RESET WATER FILTER
HOLD3SECS
(on some models, appearance may vary)
Water Filter Cartridge
The water filter cartridge is located in the
back upper fight corner of the refrigerator
coiilpa i'tlil ent,
When to Replace the Filter on
Models With a Replacement
Indicator Light ,
There is a replacement indicator light
for the water filter cartridge on either the
dispenser or the temperatm'e control panel
(depending on model). This light will mrn
_ ellow to tell you that you need to replace
the filter soon.
The filter cartridge should be replaced
when the replacement indicator light ttlYns
red or if the flow of wamr to the dispenser
or icemaker decreases.
When to Replace the Filter on
Models Without a Replacement
Indicator Light
The filter cartridge should be replaced
every sixmonthsor earlier if' the flow of
water to the water dispenser or icemaker
decreases.
Installing the Filter Cartridge
O ]f_ou, are rei)lacing, the cartridge,, .fi_t.
remoxe the old one b) slowly mrmng it
to the left. Do n0tpull down on the
cartridge. A small am()tint oJVwater ill,iV
drip down.
0 On models without a replacement
indicator light apply the month and
year sticker to the new cartridge to
remind you to replace the filter in
sixmonths.
_Fill the replacement cartridge with
water fl'om the tap to allow for better
flow fl'om the dispenser immediately
after installation,
_ i.ining up the arrow on the cartridge
and the carmdge h()lde_; place the
top ot the new cartridge up inside
the hokle_: Do not push it up into
the holder:
_ Sh)wly mrn it t() the fight tmtil the filter
• )
cartridge stops. DONOTOVERTIGHTEN.
As you mrn the cartridge, it will
automatically raise itself into position.
(_mfidge will retain about 1/2 ttlYn.
ORtm water fl'om the dispenser fi)r 3
nnnutes (about one and a half gallons)
to clear the system and prevent
sputtering.
Press and hold the RESETWATERFILTER
pad (on some models) for 3 seconds.
NOTE:A newly-installed _:_ter filter
cartridge may cause water to spurt ti'om
the dispense_:
Filter Bypass Plug
_)u must use the filter bypass plug
when a replacement filter cartridge is not
available. The dispenser and the icemaker
will not operate without the filter or filter
bypass plug.
Replacement Filters:
To order additional filter cartridgesin
the United States, visit our Webs#e,
www.GEAppllances.com,or call
GE Parts and Accessories, 800.626.2002.
(;WF
Suggested Retail $34.95 USD.
Olstome_ in Canada should consult the
yellow pages fl)r the nearest Camco Se_Mce
CenteI:
Abouttheshelvesandbins.
Not all features are on all models,
Bins on the Refrigerator Compartment Door
A(!justable bins can easily be carried fl'om
i'efiJgei'ator to work }li'e}l.
Toremove: I.ifl the ti'ont of the bin up, then
pull out.
Toreplace orrelocate:Engage the bin in the
molded supports of the doox; and push in.
Bin will lock in place.
Thesnuggerhelps prevent tipping, spilling
or sliding of small items stored on the door
shelf. Place a finger on either side el the
divider near the rear and move it back
and fl)rth to fit your needs.
Page 7
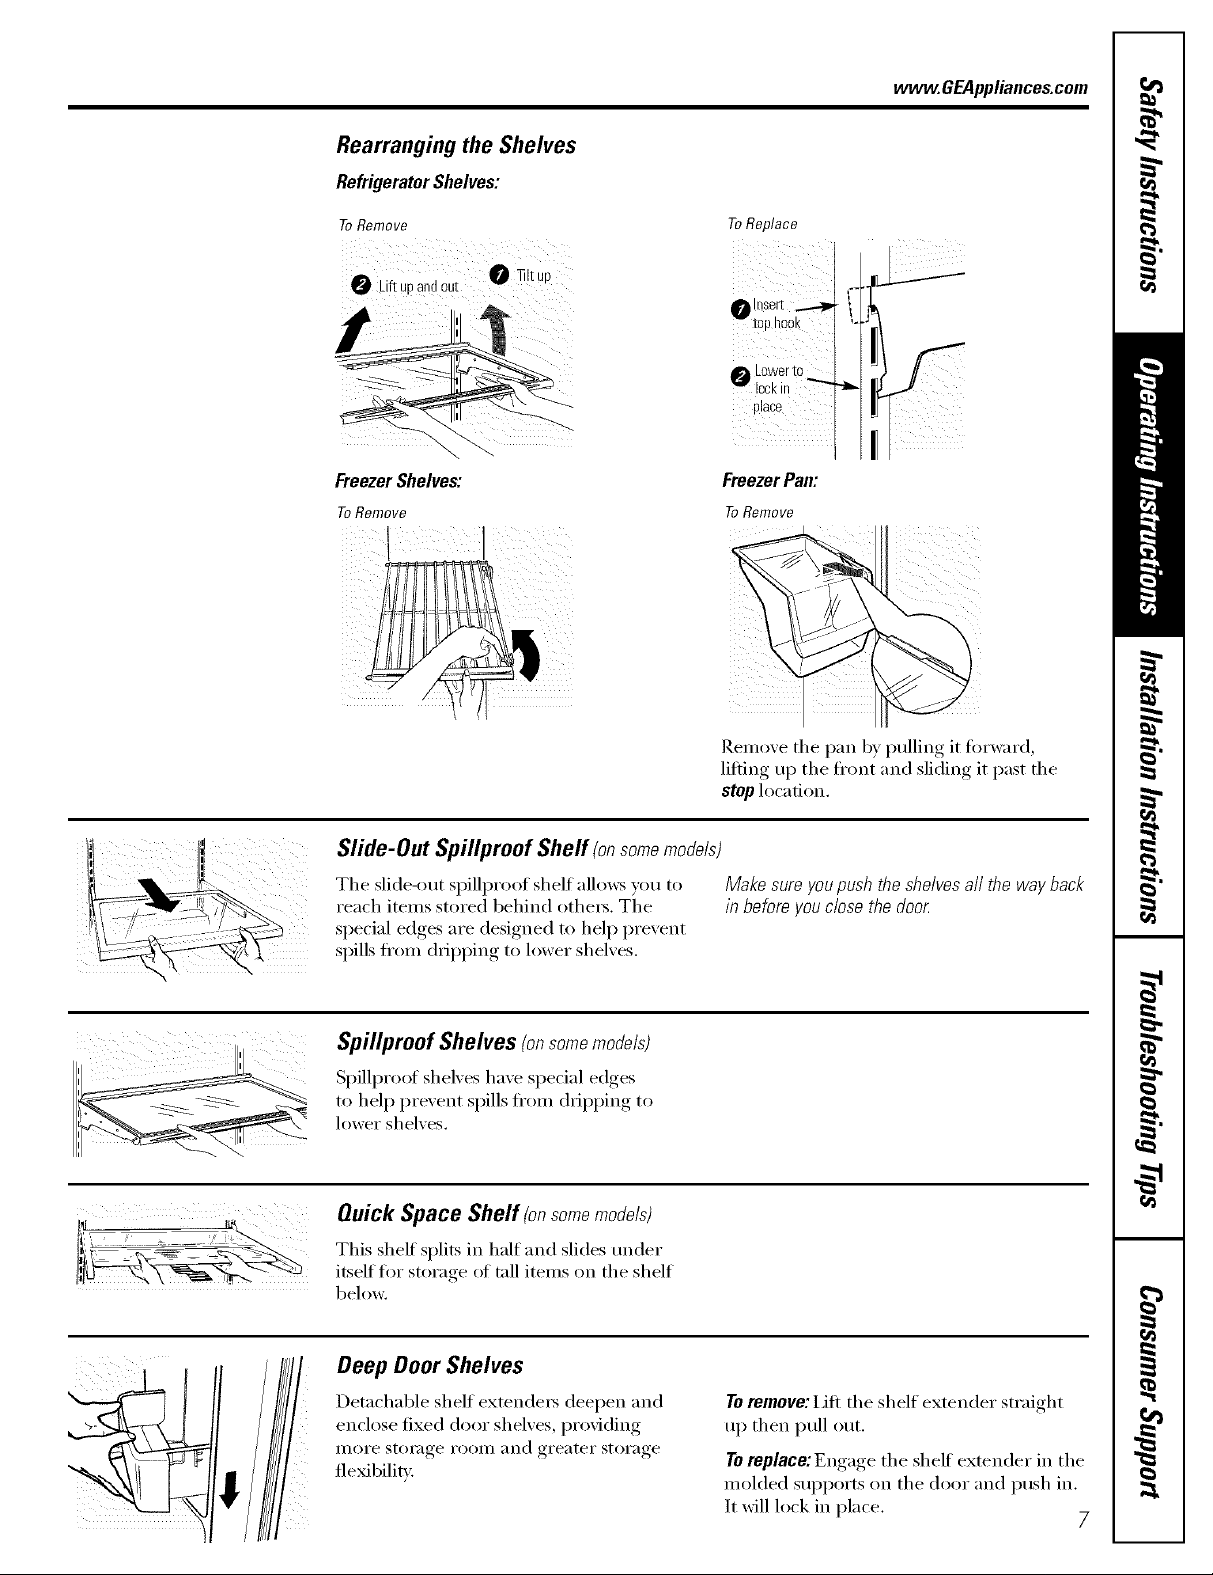
Rearranging the Shelves
Refrigerator Shelves:
vvvvw.GEAppliances.com
ToRemove
FreezerShelves:
ToRemove
!
ToReplace
_0ph00k
0 L0werto
• "---...,.
10ck In
Place
FreezerPan:
ToRemove
Remove the pan b) pulling it fi)rward,
lilting up the fl'ont and sliding it past the
stop location.
i_ iiiii_!_i_
I
!iiii_ii!_iiii_
Slide-Out Spillproof Sheff (onsomemodels)
The slide-out spillproof shelf allows you to Makesureyoupushtheshelvesaii the wayback
reach items stored behind othe_. The l'l?beforeyouciosethedoo_
special edges are designed to hel I) pre',ent
spills fl'om dripping to lower shelves.
Spillproof Shelves (onsomemodels)
Spillproof shel_ es hme sI_ecial edges,
to hel I) prevent spills fl'om drill ) )ino-,_to
lower shelx es.
Quick Space Shelf (onsomemode/s)
This sheff splits in half and slides trader
itself for storage of trill items on the shelf
below.
Deep Door Shelves
Detachable shelf exten(le_ deepen and
enclose fixed door shelves, providing
IllOI'e stoi_lge i'ooi/l and greater storage
flexibilim
Toremove: I_ifl the shelf extender straight
up then pull out.
Toreplace: Engage the sheff extender in the
molded suI_ports on the door and push in.
It will lock in place. 7
Page 8
Abouttheadditional features.
Not all features are on all models.
ShelfSaver TM Rack
lonsomemodels)
Use this rack to store
beverage C_lIIS ilk)I" eas\'
access.
It can also hold a 9" x 13"
baking dish.
Aboutthe crispersandpans.
Not all features are on all models.
Fru# and Vegetable Crispers
Excess water that may accumulate in tile
bottom of tile (h'awe_s should be wiped (h_.
Door Can Rack
(onsome models)
This door rack holds up
10 9 (}Ins.
iiTM
NOTE."Thisrackcanonlybe
mounted/)?thetopposition
underthedairybb.
%
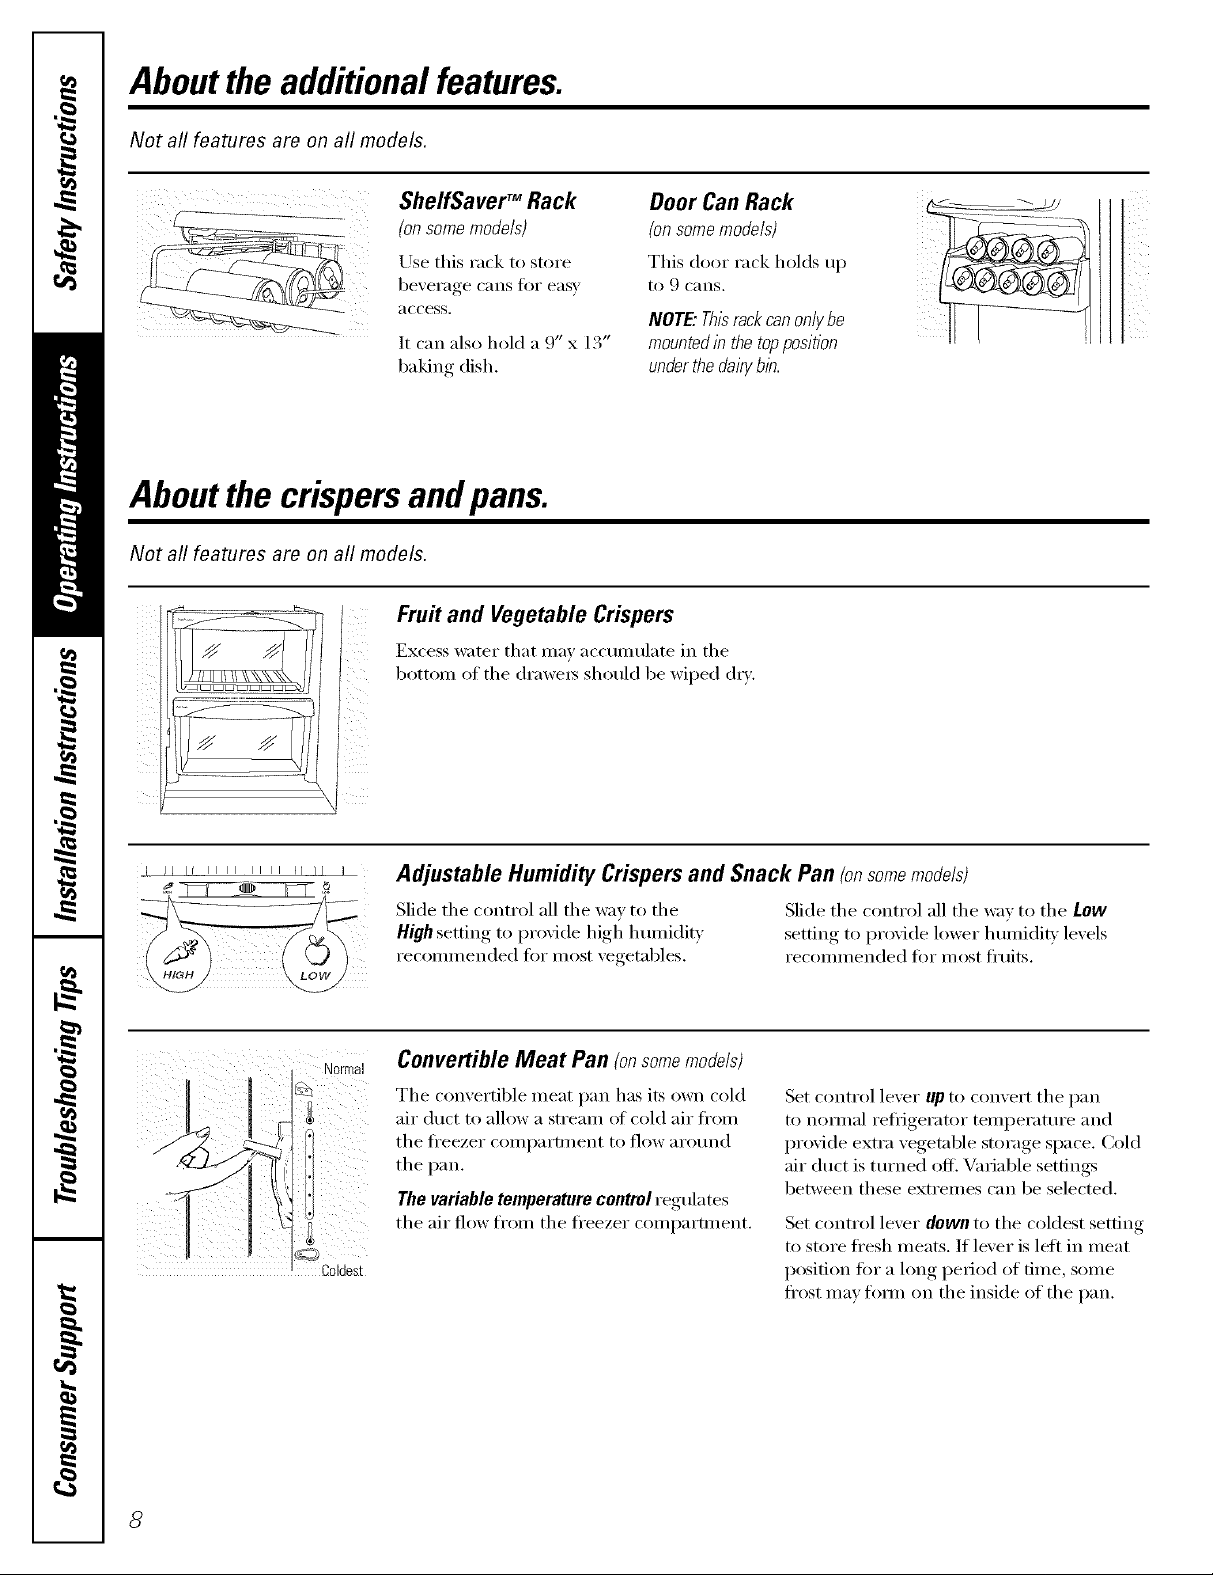
Normal
Coldest
Adjustable Humidity Crispers and Snack Pan (onsomemodels)
Slide tile control all tile way to tile Slide tile control all tile wm to tile LOW
High setting to provide high h umi(lit_ .settiw,-_to proxi(le lower h umidit} levels
recommended tor most xegetables, recommended tor most fl'uits.
Convertible Meat Pan (onsome models)
Tile convertible meat pan has its own cold
air duct to allow a stream of cold air li'om
tile ti'eezer COillp}li'[l/lent to 1low }lI'O/lnd
tile pan.
The variable temperature control regulates
tile air flow from tile fl'eezer compartment.
Set control lever up to convei't tile I)}lIl
to nom/al refligerator temperature and
provide extra vegetable storage space. Cold
air duct is turned ofll Variable settings
between these extremes can be selected,
Set control lever down to tile coldest setting
to store ti'esh meats. If lever is leit in meat
position for a long period of time, some
fl'ost may timn on tile inside of tile pan.
Page 9

Aboutcrisperremoval, wvvw.GEAppliances.com
Not all features are on all models.
Crisper
Guides
When replacing flTecrispers, make
sure you slide them through the
crisper guides.
Crisper Removal
Crispei_ can easilx be removed bx, tiltim,_ uo
slightly and pulling past stop location.
Abouttheautomaticicemaker.
A newly-installed refrigerator may take 12-24 hours to begin making ice.
Power
Switch
W Icemaker
:r
PowerLight FeeerArm
Automatic Icemaker (onsome models)
Tile icemaker will produce sevei_ cubes
per cycle>--appro_mately 100-130 cubes
in a 94-hour period, depending on fl'eezer
COillpai'tl/lent telllpei'attli'e, FOOIII
teil/pei'att/i'e, ntlil/ber of door openings
and other use conditions.
If tile refl{gerator is operated betore tile
water c(mnecdon is made to tile icemake_;
set tile power switch in tile 0 (Off)position.
When the refl_igerator has been connected
to tile water supply, set tile power switch to
tile I (on) position.
Tile icemaker will fill with water when it
c_ ds t_ 1a 1_.A newly-installed refngerat_ w
may take 12 to 24 hom_ to begin making
ice cubes.
You will hear a buzzing sotmd each time
the icemaker fills with water;
Throw away tile fi_t few batches of ice to
allow the water line to clear.
Be sm'e nothing interferes with the sweep
of tile feeler amL
If tile door prevents you fl'om taking out
the crispexs, the refl_igerator will need to
be roiled forward/mfil tile door opens
enotlgh to slide tile ClJspelN o/It. In SOllle
cases, when you roll tile refl_gerator out,
wm will need to move the reti_igerator to
the left as w)u roll it out.
When tile bin fills m tile level ot tile ti_eler
amL tile icemaker will stop producing ice.
It is nomml tor several cubes to bejoiI_ed
together.
If ice is not used fl'equenfl> old ice cubes
will become cloudy, taste stale and shrh_k.
NOTE" In homes with lower-than-averagewater
pressure,you mayhear thei2emakercycle multiple
tlfnes whenmakingonebatch of ice.
Freezer
There is an upper freezer shelf
above the icemaker that can be
used for storage.
.......
Ice Storage Drawer
Toaccess ice, pull tile drawer out. Toremove the drawer, pull it straight out
and lilt it past tile stop location.
Icemaker Accessory Kit
If your refrigerator did not come ah'ea(l_
equipped with an autolnatic icelnakei;
an icelnaker accessorx kit is ax filable at
extI'a cost.
Check tile back of tile refl_igerator fiw
the specific icemaker kit needed fi)r
_ O/lI" model.
Page 10
Aboutthe ice and water dispenser.
On some models
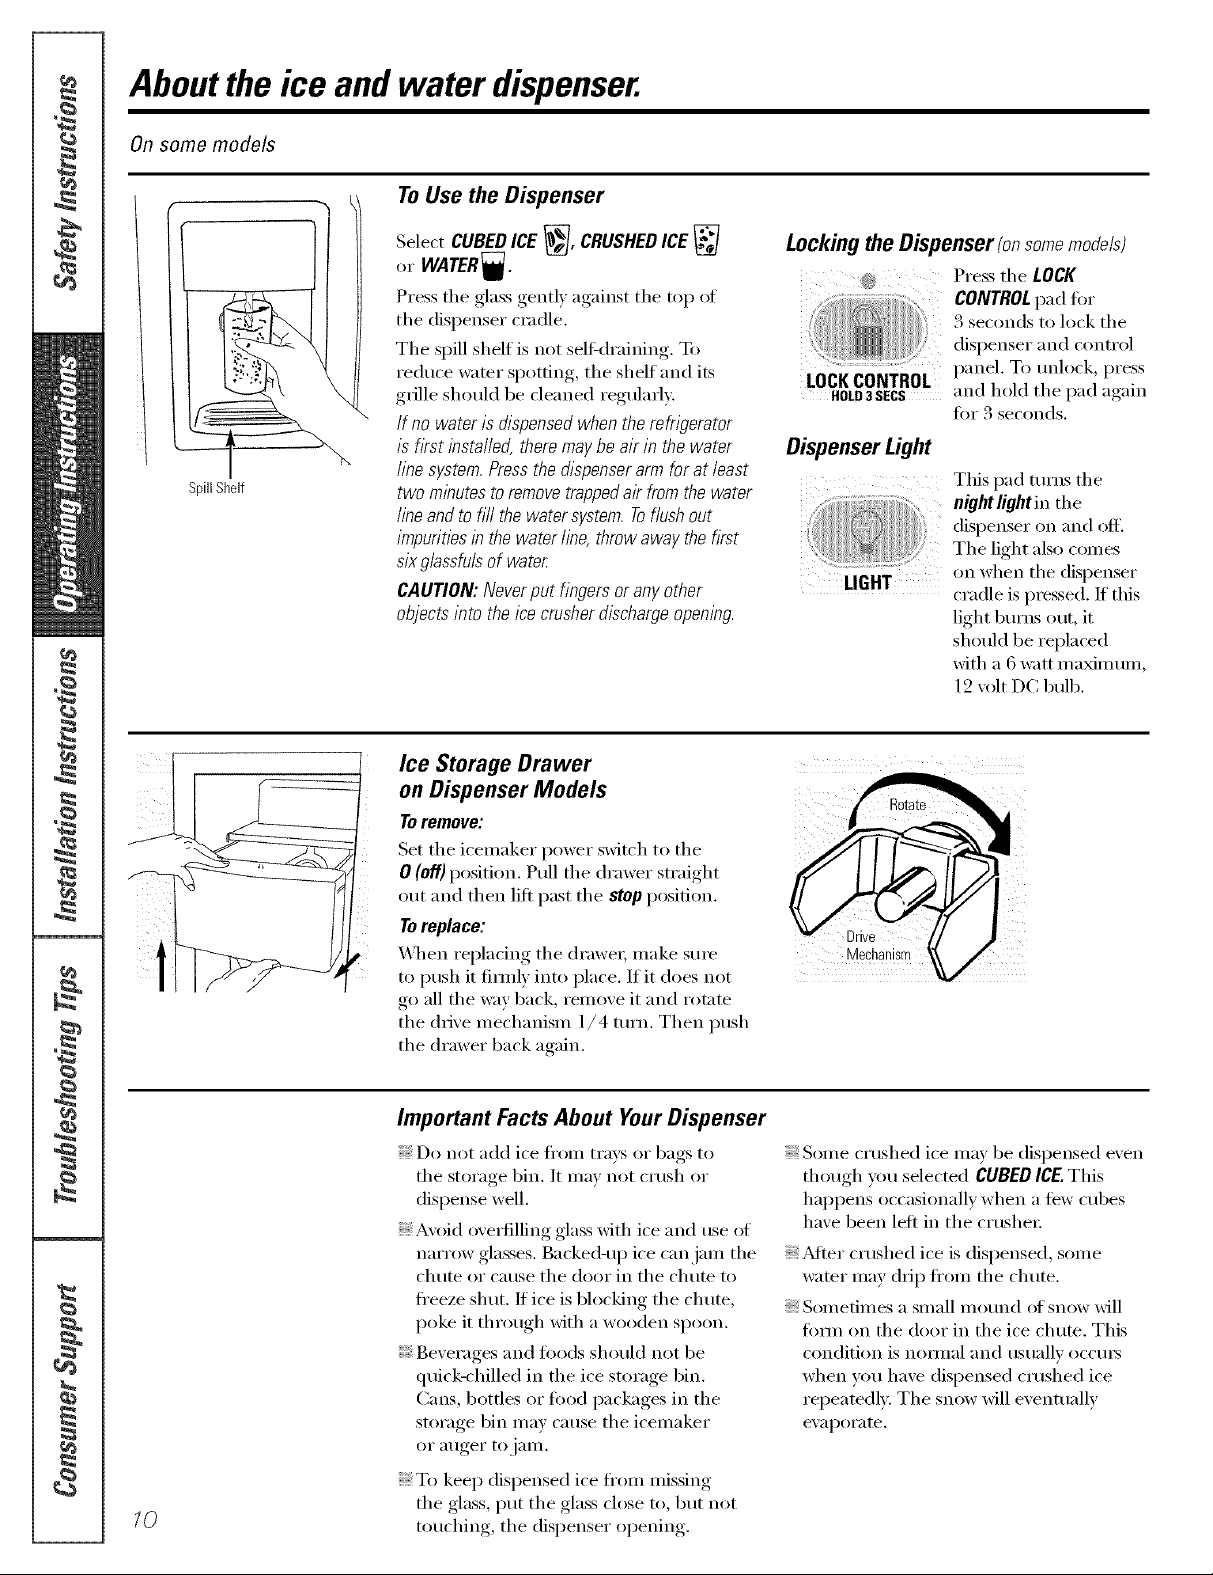
To Use the Dispenser
SpillShelf
Select CUBED ICE _, CRUSHEDICE
or WATER_.
r
Press the glass gently against the top oI
the dispenser cradle.
The spill shelf is not sel6draining. To
reduce water spotting, the shelf and its
grille should be cleaned regularly.
If no water is dispensed when the refrigerator
is first installed, there may be air in the water
line system. Press the dispenser arm for at least
two minutes to removetrapped air from the water
line and to fill the water system. Toflush out
impurities in the water line, throw away the first
sixglassfub of water
CAUTION: Never put fingers or any other
objects into the ice crusher discharge opening.
Lockingthe Dispenser(onsomemodels)
Press the LOCK
CONTROLpad t0r
3 seconds to lock the
dispenser and control
LOCKCONTROL panel. To mflock, press
HOLD3SECS and hold the pad again
fi)r 3 seconds.
DispenserLight
This I)ad turns the
dispenser on and off.
The light also comes
lIGHT on when the dispenser
cradle is pressed. If this
light burns out, it
should be replaced
with a 6 watt ma_mum,
12 volt DC bulb.
Ice Storage Drawer
on Dispenser Models
Toremove:
Set the icemaker power switch to the
0 (off)position. Pull the drawer straight
out and then lift past the stop position.
Toreplace:
\_l_en replacing the (h'awe_; make sure
to push it firefly into place. If it does not
go all the way back, remove it and rotate
the drive mechanism 1/4 turn. Then push
the drawer back again.
10
Important Facts About Your Dispenser
Do not add ice fl'om trays or bags to
the storage bin. It may not crush or
dispense well.
Avoid ovedilling glass with ice and use of
narrow glasses. Backed-up ice can jam the
chute or catlse the door in the chute to
ti'eeze shut. If ice is blocking the chute,
poke it through with a wooden spoon.
Beverages and fi)ocls should not be
quick-chilled in the ice storage bin.
Cans, bottles or fi)od packages in the
storage bin may catlse the icemaker
of a/IgeI" to janl.
To kee I) dispensed ice ti'om missing
the glass, put the glass close to, but not
touching, the dispenser opening.
Some crushed ice may be dispensed even
though you selected CUBED ICE.This
hapl)ens occasionally when a tew cubes
have been left in the crushe_:
_Mter crushed ice is dispensed, some
water may drip fl'om the chute.
Sometimes a small motmd of snow will
titan on the door in the ice chum. This
condition is nomml and usually occm's
when you have dispensed crushed ice
repeatedly. The snow will eventually
eV_ll)OI'ilte.
Page 11
Careand cleaning of therefrigerator, vvww.GEAppliances.com
Cleaning the Outside
The doorhandles and trim. Clean with a
cloth dampened with soapy watex, Dry
with a soft cloth,
Keep the outside clean. Wipe with a clean
cloth lightly dampened Mth kitchen
al)pliance wax or mild liquid dish detergent.
D_T and polish with a clean, soft cloth.
Do not wipe the raffle?oratorwith a soiled dish
cloth or wet towel Thesemay/eave aresidue
that can erode the paint. Do not use scouring
pads,powdered c/eaners, bleach or c/eaners
containing bleach because these products can
scratch and weaken the paint finish.
Drain opening in freezer compartment.
t)twing yearly cleaning, renlove bottom
freezer l)an and flush a sohl[ion Of' baking
soda--1 teaspoon (5 ml) and 2 cups (500
ml) (ff hot (not boiling) water--through
the drain line with the hel I) of a meat
baste_: This will hel I) eliminate odor and
reduce the likelihood (ff a clogged drain
line./I drain becomes clogged, use a meat
baster and baking soda solution to force the
clog through the drain line.
Avoid c/eaning co/d glass she/ves with hot water
because the extreme temperature difference may
cause them to break. Hand/eg/ass shelves
carefull_ Bumping tempered g/ass can cause it
to shatter
Donot washanyp/asticrefrigeratorpartsin the
dishwasher
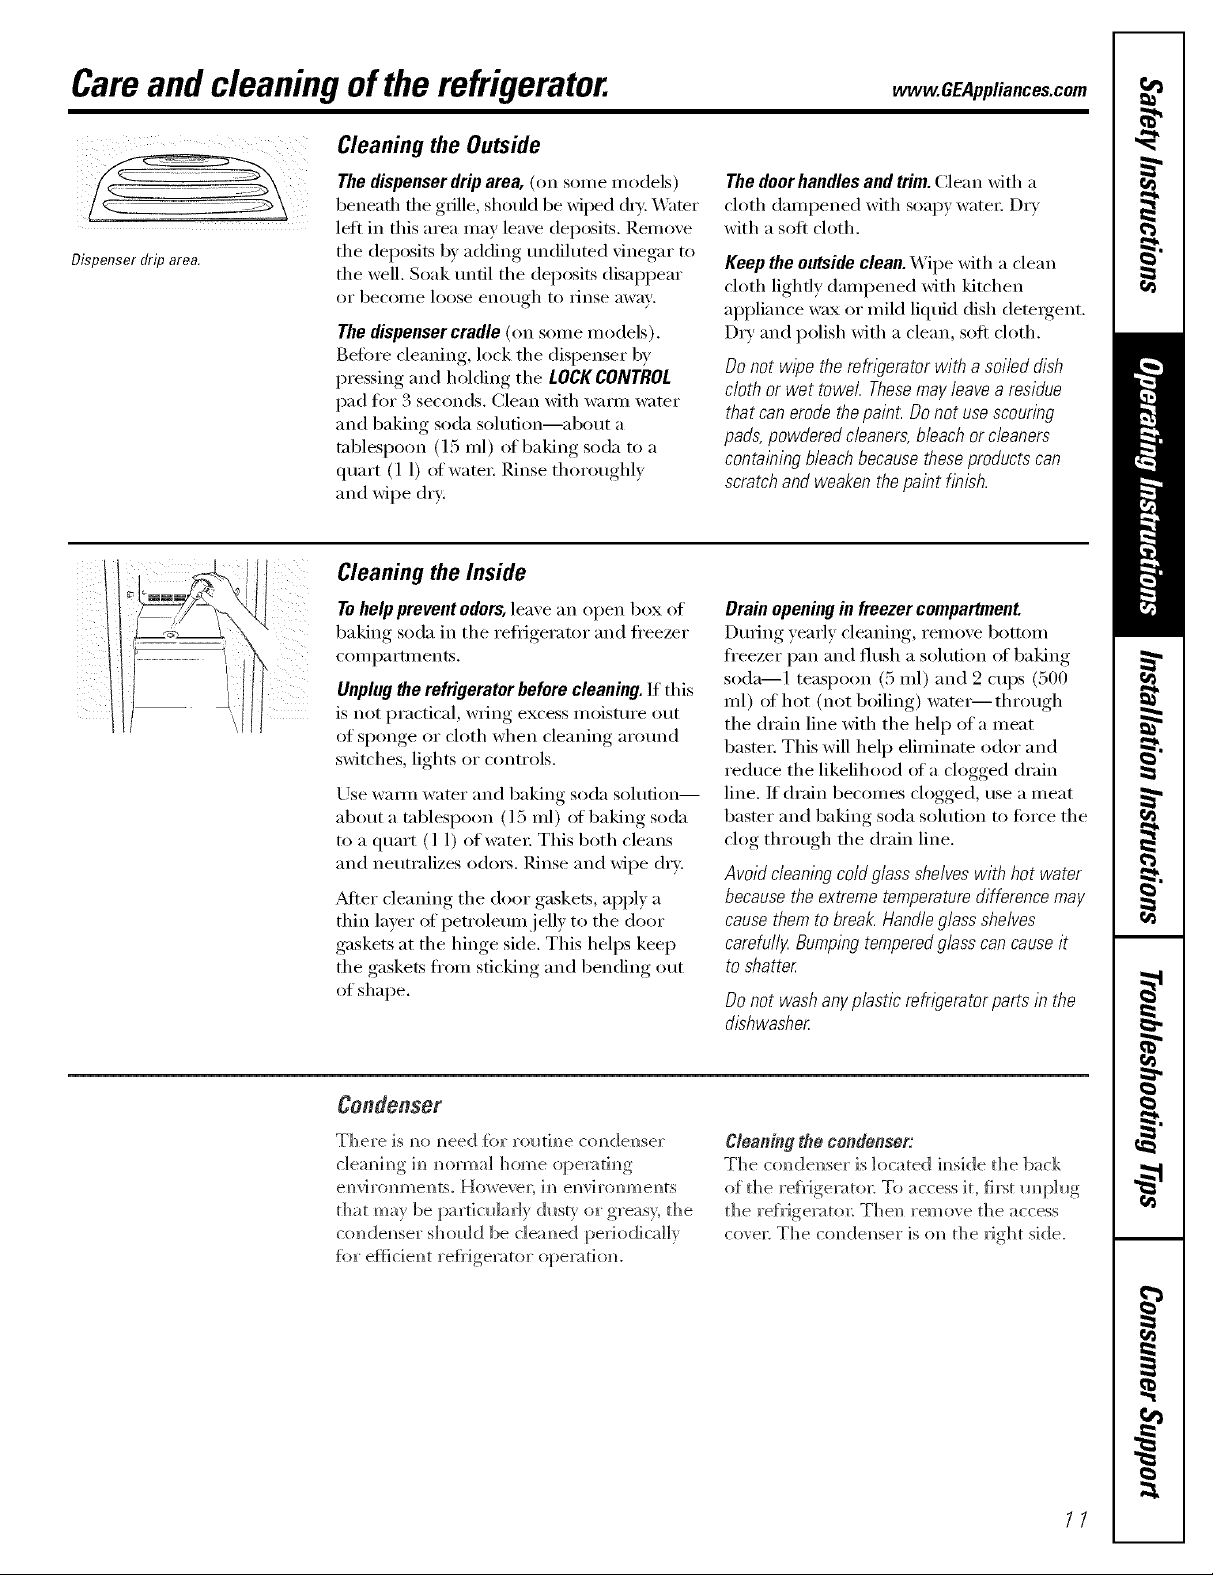
Dispenser drip area.
The dispenser drip area, (on some models)
beneath the grille, shotfld be wii_d dxT._4ater
left in this area may leave deposits. Remove
the deposits by adding tmdihKed vinegar u)
the well. Soak tmfil the deposits disappear
or becoille loose enotlgh to IJnse away;
The dispenser cradle (on some models).
Before cleaning, lock the dispenser by
pressing and holding the LOCKCONTROL
pad for 3 seconds. Clean with wam_ water
and baking soda solution--about a
tablespoon (l 5 ml) of baking soda to a
quart (1 1) of watex; Rinse thoroughly
and wipe dry:
Cleaning the Inside
Tohelp prevent odors, leave an open box of
baking soda in the reflJgerator and fl'eezer
COIl] l)a I'tlll exits.
Unplug the refrigerator before cleaning. If this
is not practical, wring excess moisture ()tit
of sponge or cloth when cleaning arotmd
switches, lights or controls.
Use warn/water and baking soda solution--
about a tablesl)oon (l 5 ml) of baking soda
to a quart (l 1) of _te_, This both cleans
and neutralizes o(lo_. Rinse and wipe dry.
_Mter cleaning the door gaskets, apply a
thin laver of petroleum jelly to the door
gaskets at the hinge side. This helps kee I)
the gaskets ti'om sticking and bending out
of shape.
Condenser
There is m_om_eed {or rolltJm_e com_de_ser
c]em_h_g im_m]()mlal home opel:_th_g
em'h'oml/ents. Howevel; ira?ellvirol_1?lemKs
that may be [)artio_]arly (]_s V or greas> the
condem_ser shol_ld be cIeam_ed periodically
for e{t?cie_t re{_Jge_tor ope_:_ti(m.
Cleaning the condenser:
The co_de_ser is located im_sided_e back
o{ the re{_'ige_to_: To access Jr, {irst m_ph_g
the re{}Jgex:_tox; The_ remove the access
cove_: The cow,denser is on the _Jght side.
11
Page 12
Careand cleaningoftherefrigerator.
Behind the Refrigerator
Be caretul when moving the refl_igerator
away fl'om the wall. _MItypes of floor
coverings can be damaged, particularly
cushioned coverings and those with
elllbossed S/llS{_lces.
Pull the reti_igerator straight out and return
it m position by pushing it straight in.
Moving the reti_igerator in a side direction
may result in damage to the floor covering
or refl_igerato_:
Preparing for Vacation
For long \;l(ations or absences, i'elllOVe
food and m_plug the reli_igerat(n: Clean the
interior with a baking soda solution _ff one
tablespoon (15 ml) of baking soda to one
quart (l 1) of water: i,eave the doo_ open.
Set the icemaker power switch to the 0 (off)
position and shut off the water supply to
the refl_igemtm:
When pushing the refrigerator back, make sure
you don't rofl over the power cord or icemaker
supply line {onsome models).
If the temperature can drop below
fi'eezing, have a qualified servicer drain the
water supply systeln (on some models) to
prevent serious propei_y dalnage due to
flooding.
Preparing to Move
Secure all loose items such as grille, shelves and drawe_s by taping them securely
in place to prevent damage.
Be sure the refrigerator stays in an upright position during moving.
12
Page 13
Replacingthelightbulbs, vvvvw.GEAppliances.com
Turning the control to the 0 (off) position does not remove power to the light circuit.
Refrigerator Compartment--Upper Light
0 Unplug the relrigerator. Phm the0 _ refligerator back in.
@The bulb is located behind the controls.
Replace with an appliance bulb f the
Sall/e oi" lower wattage.
Refrigerator Compartment--Lower Light fonsomemodels)
This i/ght is iocated above the top drawe_ _ After repladng with an appliance
0 Unplug the reffigemtm: replace the shield.
@(;rasp the lip at the bottom of the light @ Plug the refrigerator back ill.
shield and pull it up and torwaM.
Freezer Compartment
O"
bulb of the same or lower wattage,
0 Un )lug the rehigerator
_ Remoxe tile shelf just below the light
shieM. (The shelf will be easier to
remoxe if it is emptied fi_t.)
Lift up on the light shiekl to remoxe.
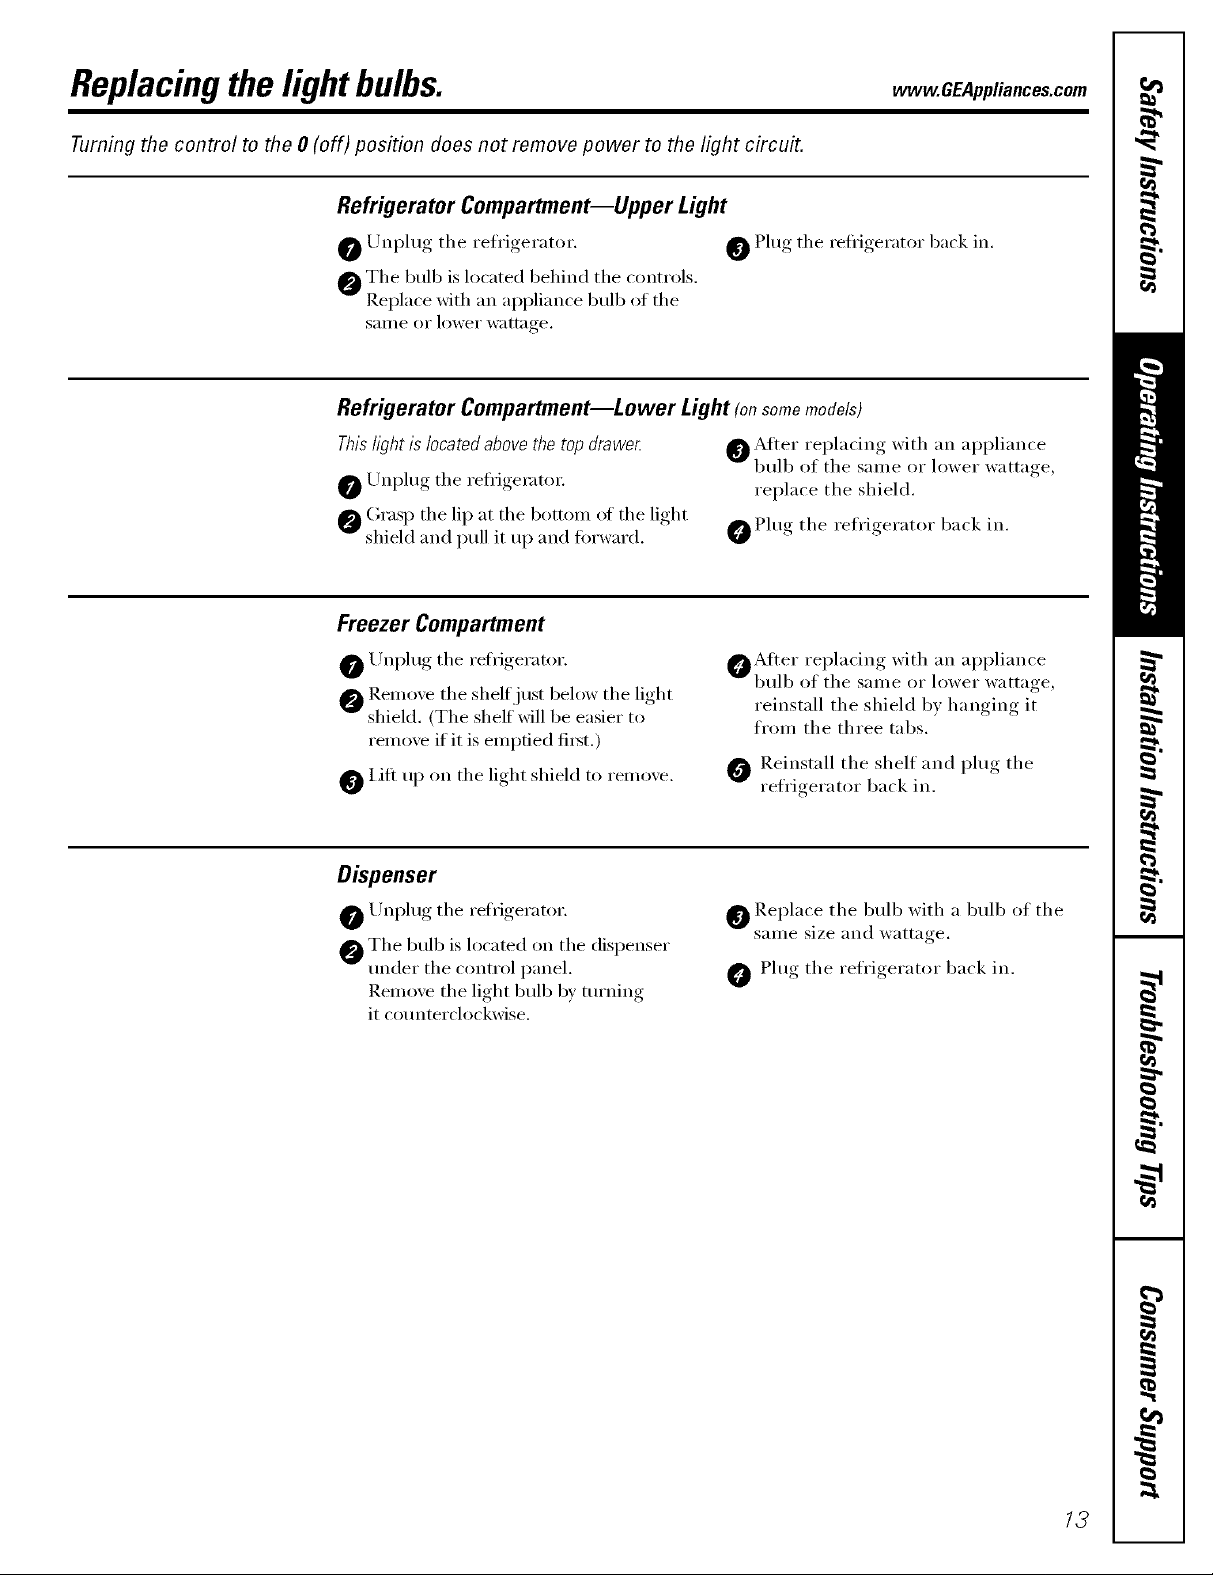
Dispenser
0 Un )lug the rehigerator
_The bulb is located on the dispenser
trader the control panel.
Remoxe the light bulb b) tm'ning
it cotmterclockwise.
OAfter replacing with an appliance
bulb of the salne or lower wattage,
reinstall the shield b) hanging it
from the three tabs.
Reinstall the shelf and )lu,* the
refrigerator back in.
Replace the bulb with a bulb of the
same size and wattage.
Plug the refrigerator back in.
13
Page 14
Installation
Refrigerator
Instructions
Questions?Call800.GE.CARES(800.432.2737)or VisitomX_ebsite;_t:www.GEAppliances.com
BEFORE YOU BEGIN
Read these h]structions completely and carefnHy.
• IMPORTANT - S_,,'e_hese
iHs[rHc[1oHS _'or local im_si)ec[or S Hse.
• JM£ORTA2NT - O,_se,,'e_,11
_o','eH_im_ codes amid o]'dim_am_ces_
• Note to Installer = Be sure to leave these
im]sh'u(ti(ms with the (_o]_sumer.
° Note to Consumer = Keepthese im)structi(ms
for futm'e refereN)ce.
• SkiR level - [m_sta]]ati(m of d_is app]im_ce requires
basic mechanical skills.
In Canada,call 1.800.361.3400or VisitomX_Vbsite;_t:www.geappliances.ca
CLEARANCES
_Mlow the following clearances t0r ease of installation,
proper air drculation and l)lumbing and electrical
coIlIlectioIIS.
• Sides 1/8" (4 ram)
• Top 1" (25 ram)
• Back l" (25 ram)
A door clearance of 3/4" (l 9 ram) is needed fin" a 90 °
door opening which provides better access to the food
storage area.
Models 20, 22,25
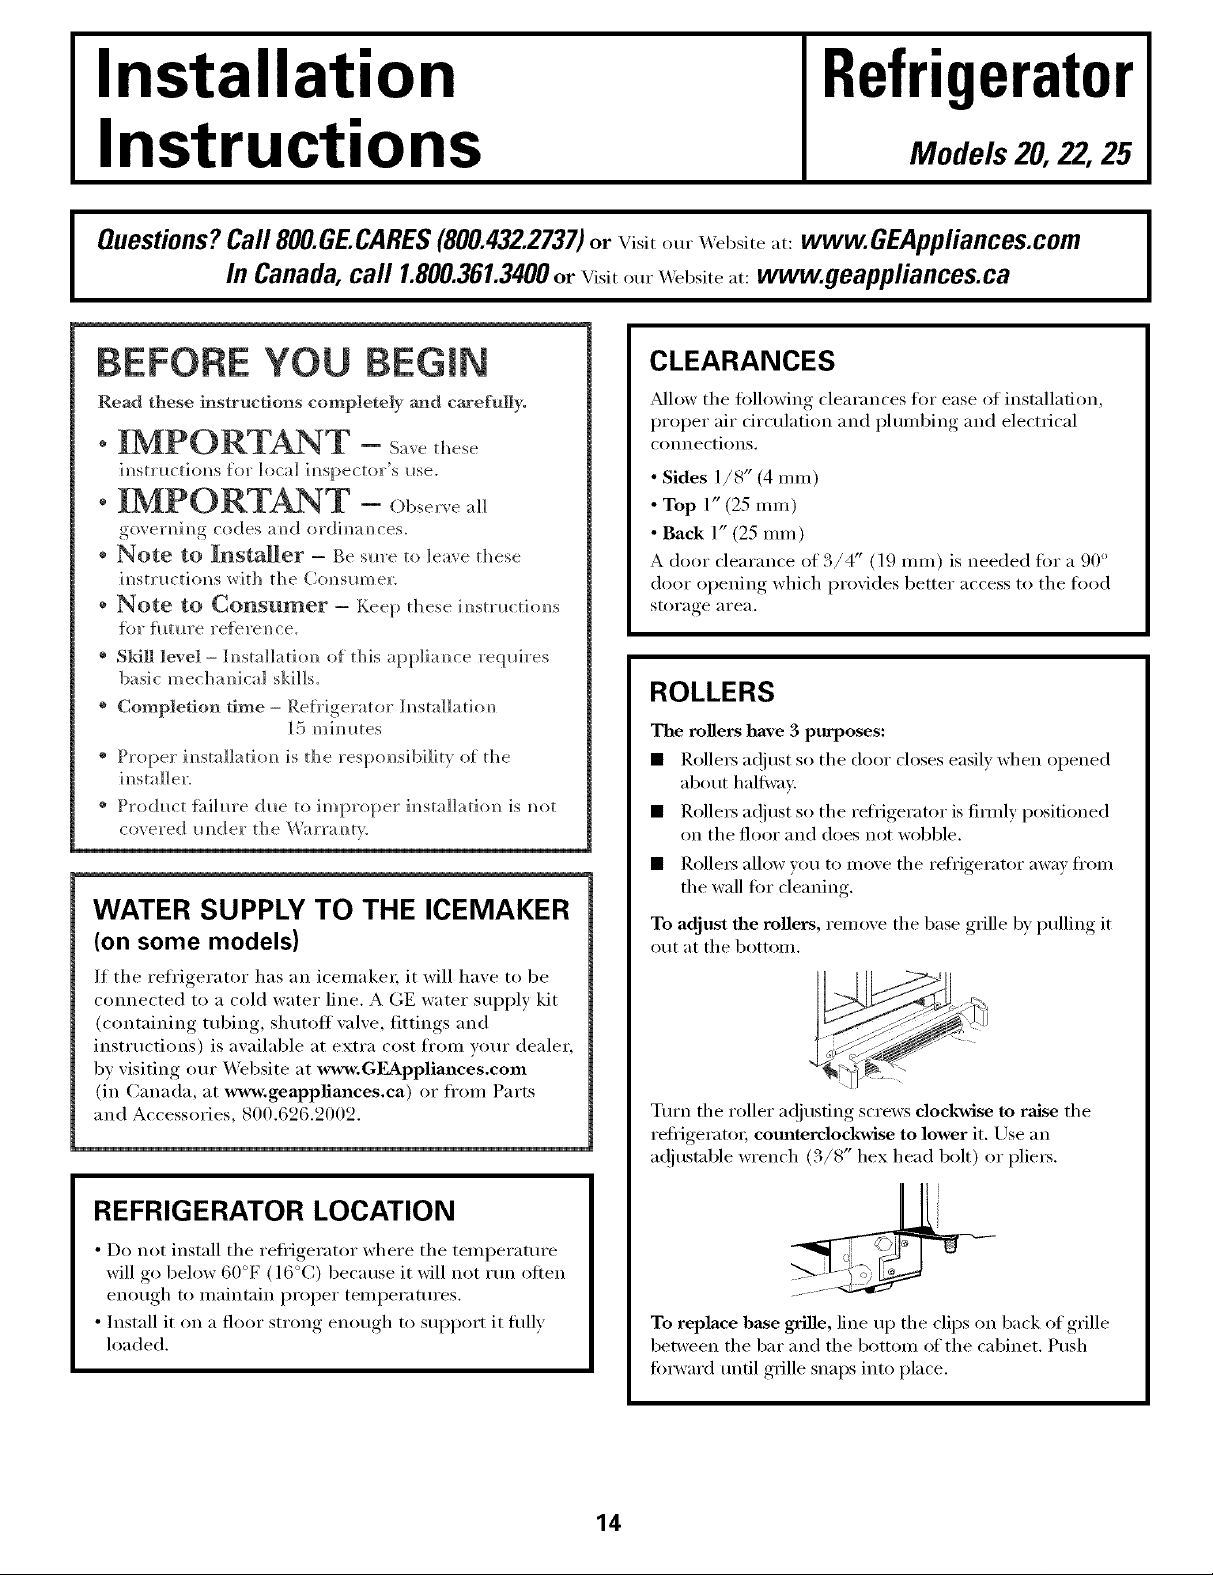
ROLLERS
• Completion time - RefrigeraUw JN_sm]]ad(m
• Proper i m_sta]]atiom_is d_e resp(msibi]it)of d_e
im_staller.
• Product tidha'e due to improper im)smHadon is mn
covered Hm)der the _'_arram)tv.
WATER SUPPLY TO THE ICEMAKER
(on some models)
If the refrigerator has an icemaker, it will have to be
cmmected to a cold water line. AGE water supply kit
(containing tubing, shutoff \_d\'e, fittings and
instructions) is awfilable at extra cost fl'om yore" deale_,
by visiting ore" X4'ebsite at www.GILAppliances.com
(in Canada, at www.geappliances.ca) or from Parts
and Accessories, 800.626.2002.
15 m im_utes
The milers have 3 purposes:
• Rolle_ a(!just so the door closes easily when opened
about hallway.
• Rolle_ a(!jtlst So the refl_igerator is firefly positioned
on the floor and does not wobble.
• Rolle_ allow you 1o move the retiigerator away fl'om
the wall fin" cleaning.
To adjust the milers, remove the base grille b) pulling it
out at the bottom.
;5_ / _ 4
_-5 _.-_ .........
Turn the roller a(!jusfing screws clockwise to raise the
refl_ig-eratot, comaterclockwise to lmver it. Llse an
a(!justable wrench (3/8" hex head bolt) or pliers.
I
REFRIGERATOR LOCATION
• Do not install the refl'igerator where the temperature
will go below 60°F (l 6°C) because it will not _tm often
enough to maintain proper temperatures.
• Install it on a floor strong enough to sui)porr it fldly
loaded.
To replace base grille, line up the clips on back of grille
between the bar and the bottom of the cabinet. Push
tin'ward tmtil grille snaps into place.
14
Page 15
Installation Instructions
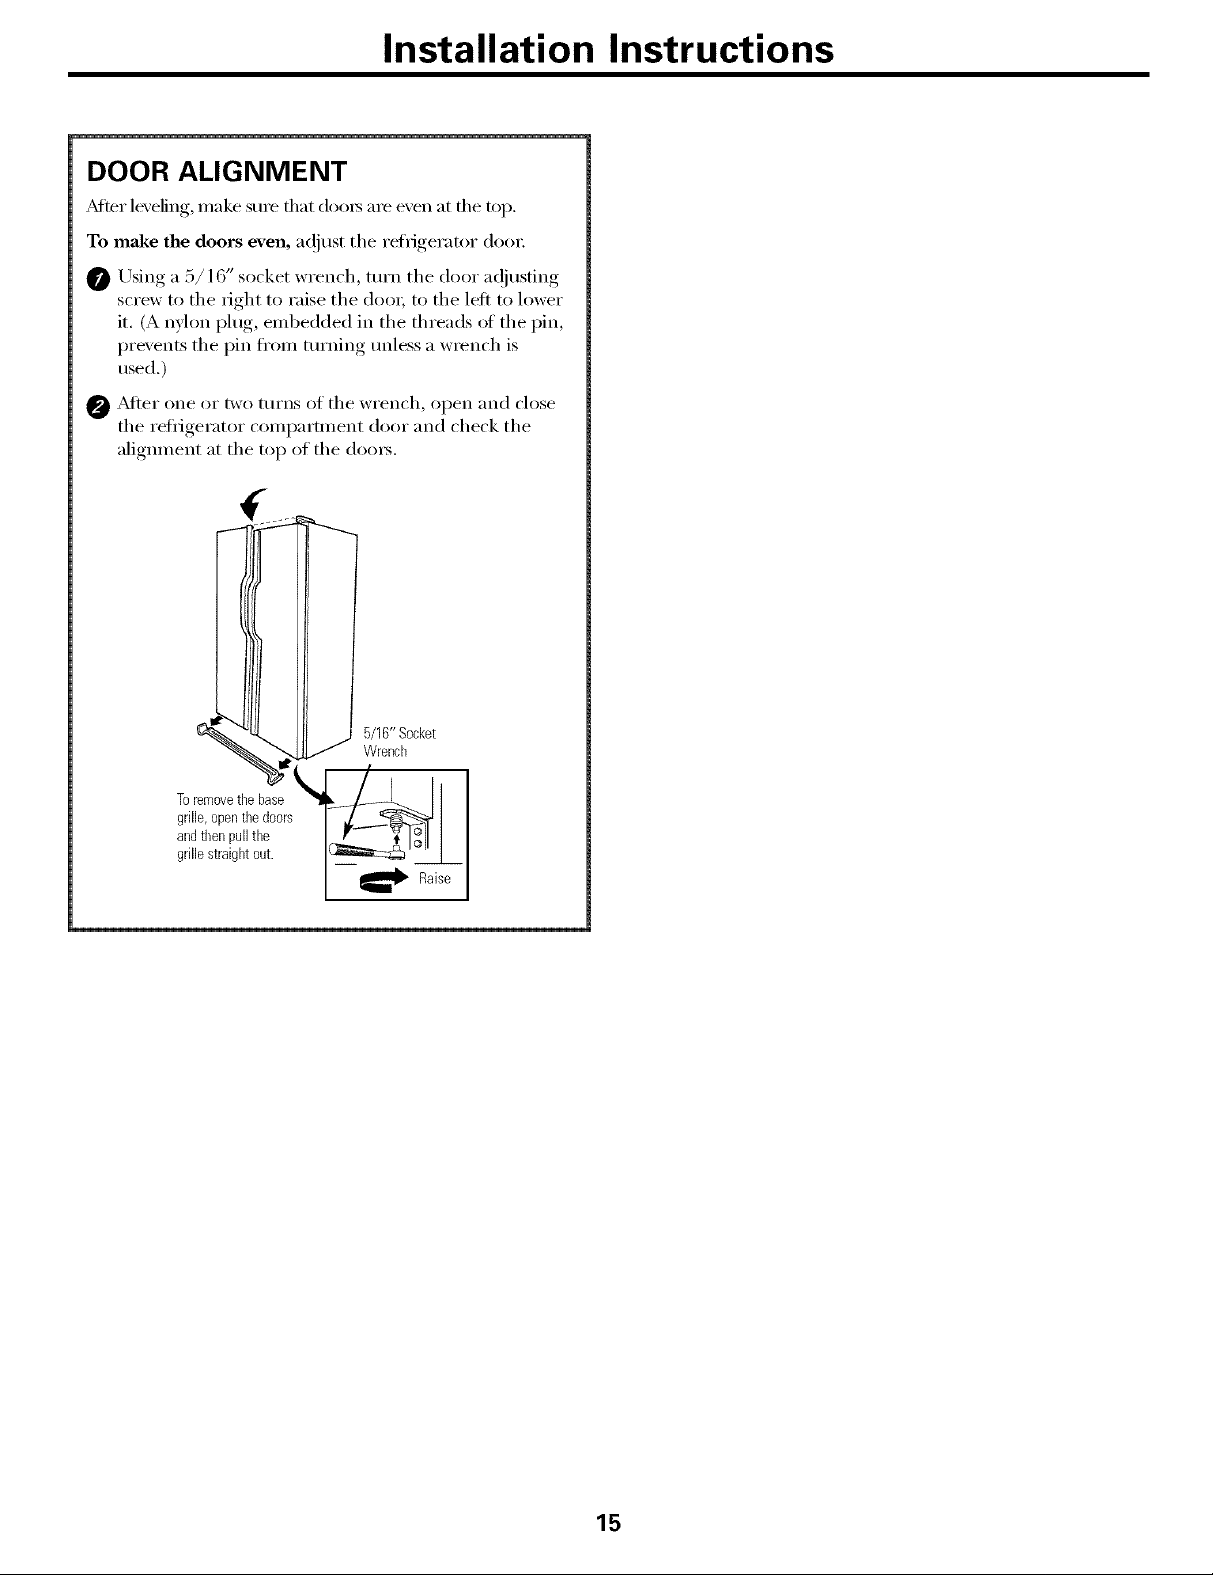
DOOR ALIGNMENT
Alter le\ eling, make sure that doo_s are e',en at the top.
To make the doors even, a(!just the refll"gerator dora:
Using a 5/16" socket wrench, turn the door adjustino.,
screw to the right to raise the doo_; to the left to lower
it. (A n,xlon plug, embedded in the threads of the pin,
prexents the pin fl'om turning tmless a wrench is
used.)
@ _Mter one or two ttlrns of the wrench, open and close
the refl_igerator compartment door and check the
aligmnent at the top of the doms,
Toremovetbebase
grille,openthedoors
andtbenpullthe
grillestraightout.
5/16"Socket
Wrench
15
Page 16
mnstaliation mnstructions
mNSTALLING THE WATER LINE
BEFORE YOU BEGIN
Recommen_ded copper water slopply kits are WX8X2,
WXSX3 or WXSX4, dependim_g on the amom_t of
mbim_g yot_ _]eed. Approved plastic water stq)p]y ]im_es
are (;E SmartCom]ect _ Refi'igerator Tl_bing
(WX (}8X 1(1(1(12, WXOSX 1 (}(}(}6, WXOSX 10015 ;md
Where] com]ectim]g yol_r refl']gerat(}r t/) a GE Reverse
Osmosis _\hter System, the {rely approved im_stalladon
is wit]] a GE RVKh. For other reverse osmosis water
systems, ii4]ow the m_Hlll{hcttlrer's reco]?lme]ldatio]?s.
If the water slq:>p]y to the reiHgerator is t}'om a Reverse
Osmosis _hter Fihrat]om_ System AN[) the reiHgerator
also ]]as a water fi]te]; i_se the refrigerator's {i]ter bypass
pl i_g. [ ]s] m_g the refH gem tot's water Ill t _ t] {m c_ rtri dg e
h_ co0jm_cthm with the RO filter cam_ resl_h h_ hollow
ice c11bes a]/d shower water flow f_'om the water
This water lim]e im]stallati(m is mint wart;rated b_ the
reirigerator or icemaker mamKhcturer. Follow these
im_strla;ti{ms c_n'ehdlv to mim_imize the risk of expensive
TVater hammer (w_/teY b;u/gim/g im/ the pipes)iml hollse
[_hm_bi m,_,c'm, came damage to refrigerator parts amid
lead to water leakage (n" fl(}odi_g. Call a (plalified
phm]ber to correct water hammer before i_]stalli_]g
the water slq)p]y ]i_e to the refrigerator.
To prevent bm'ns m_d product damage, do m_t hook
I11_the water ]i_]e to the hot water ]i_]e.
If _oll IIse _om" re{rigerator be{ore com/ecti_/g the
water ]i]]e, make sm'e the icemaker power switch is i_
th e 0 (oH) positi{> m
Do m)t i_sta]] the icemaker tlll)i_g i_ areas where
tempenmn'es {id] below freezi_g.
\_ he]] usi_g an_y electrical device (sllc]] as a power
drill) durim,g i_]sta]]ati{m, be sm'e the device is double
]_sldated or grolmded ]_] a mam]er to preve_t the
hazard (}f electric shock, or is batte_)' p(}wered.
5]] i_lsta]]atitms mllst be i_ acco]'da_lce _:rit]_ ]OC;/]
[)]IIm b] _ _ c ode ]'e q i l]re]?_ e]_ is.
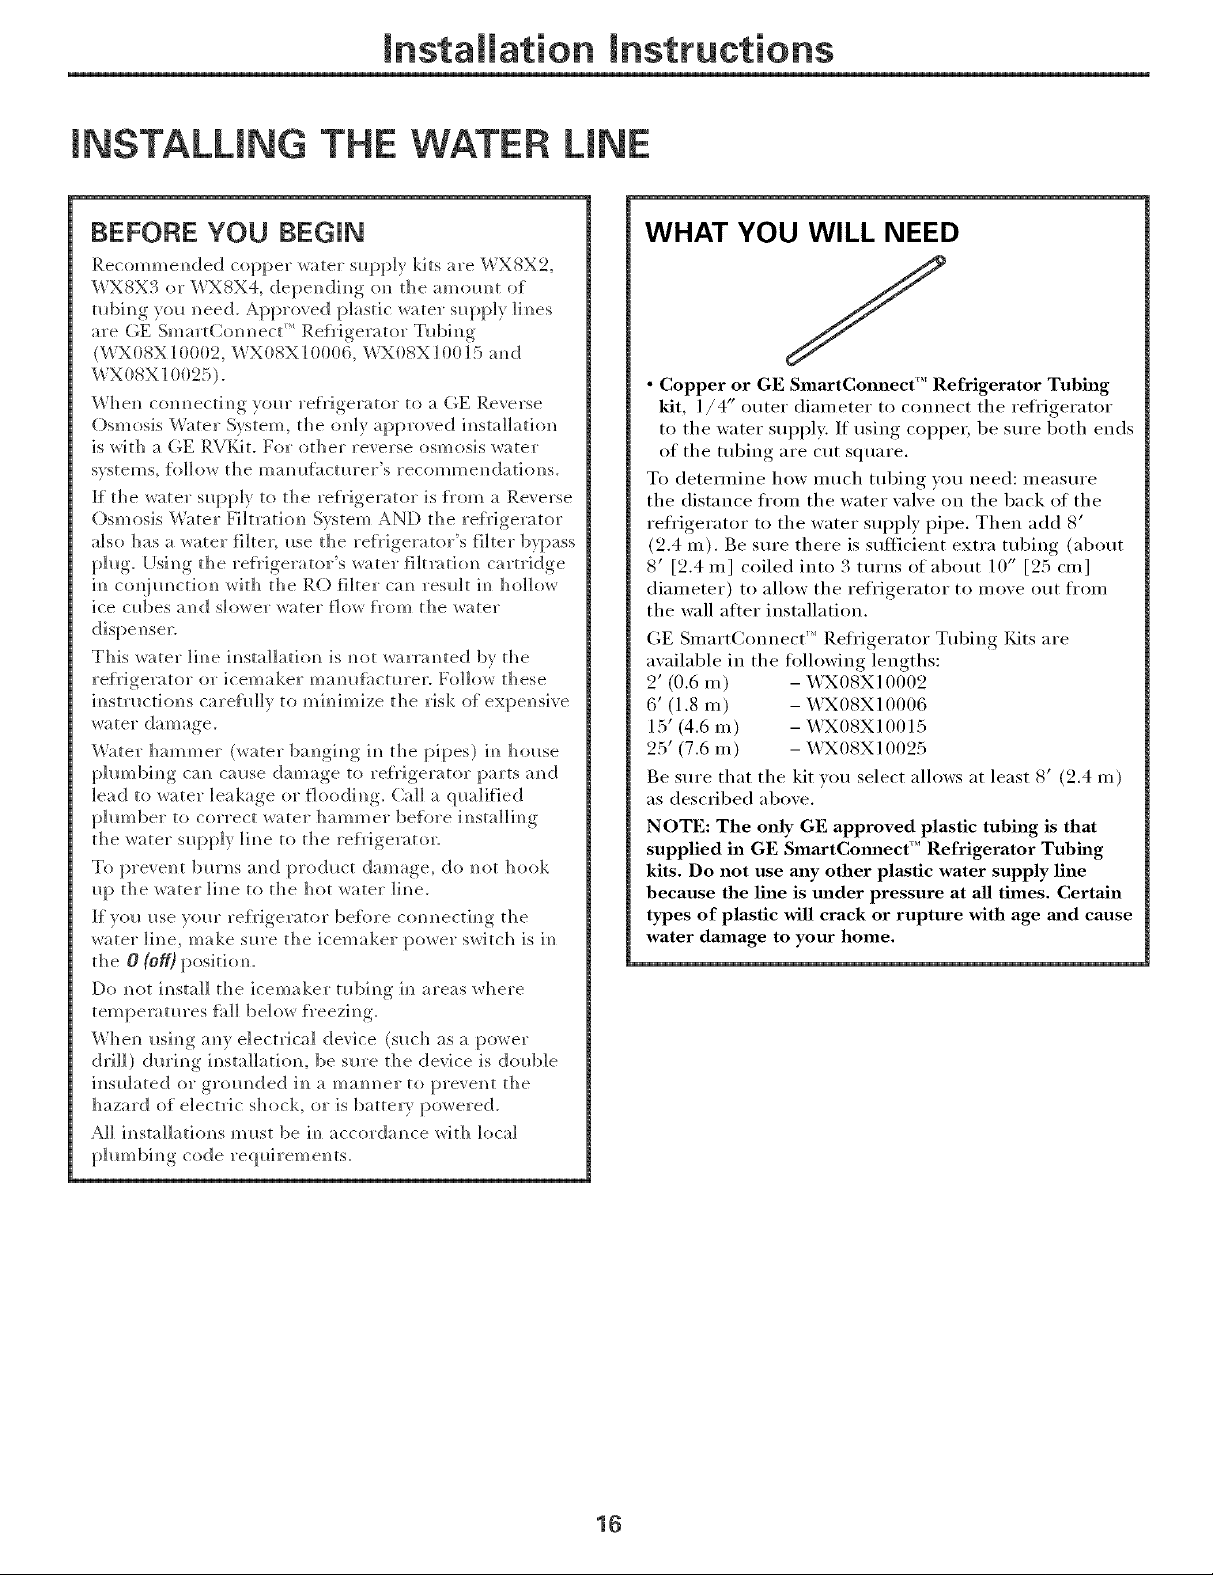
WHAT YOU WILL NEED
• Copper or GE SmartConnect _" Refrigerator Tubing
kit, 1/4" outer diameter to connect the refrigerator
to the water supply. If using coppe_, be sm'e both ends
of the tubing are cut square.
To detem]ine how much tubing you need: measure
the distance ti'om the water valve on the back of the
refrigerator to the water supI)ly pipe. Then add 8'
(9.4 m). Be sure there is sufficient extra tubing (about
8' [2.4 m] coiled into 3 turns of about 10" [25 cln]
diameter) to allow the refrigerator to move out froln
the wall alter installation.
GE SmartConnect'" Refl'igerator Tubing Kits are
available in the fi>lh>wing lengths:
2' (0.6 m) - WX08X10002
6' (1.8 m) - X,_TX08X10006
15' (4.6 m) - X,_TX08X10015
25' (7.6 m) - X,_TX08X10025
Be sure that the kit you select allows at least 8' (9.4 m)
as described above.
NOTE: The only GE approved plastic tubing is that
supplied in GE SmartCmmect _"Refrigerator Tubing
kits. Do not use any other plastic water supply line
because the line is under pressure at all times. Certain
types of plastic will crack or rupture with age mad cause
water damage to your home.
1B
Page 17
mnstaiiation mnstructions
WHAT YOU WILL NEED (CONT.)
Install tile shutoff xalxe on tile nearest frequently used
drinking water line.
• A GE water supply kit (containing tubing, shutoff
wflve and fittings listed below) is awfilable at extra
cost fl'om your dealer or fl'om Parts and Accessories,
800.626.2002.
• A cold water supply. Tile water pressm'e must be
between 20 and 190 p.s.i. (1.4-8.2 bar) on models
without a water filter and between 40 and 120 p.s.i.
(2.8-8.2 bar) on models with a water filter.
• Power drill.
• 1/2" or adjustable wrench.
• Straight mad Phillips blade screwdriver.
• Two 1/4" outer diaaneter compression nuts and
2 ferrules (sleeves)--to c(mnect tile COl)per tubing
to tile shutoff valve and tile refrigerator
water w_lve,
OR
• If you are using a GE SmartConnect _'_Refl'igerator
Tubing kit, the necessary fittings are preassembled to
the tubing.
• If wmr existing COl)per water line has a flared fitting
at the end, you will need an adapter (available at
phunbing supply stores) to connect the water line to
tile refl'igerator OR you can cut off tile flared fitting
with a tube cutter and then use a compression fitting,
Do not cut formed end fl'om GE SmartConnect ''_
Refrigerator tubing.
[] SHUT OFF THE MAIN WATER
Turn on tile nearest taucet hmg enouoh_ to clear
the line of water.
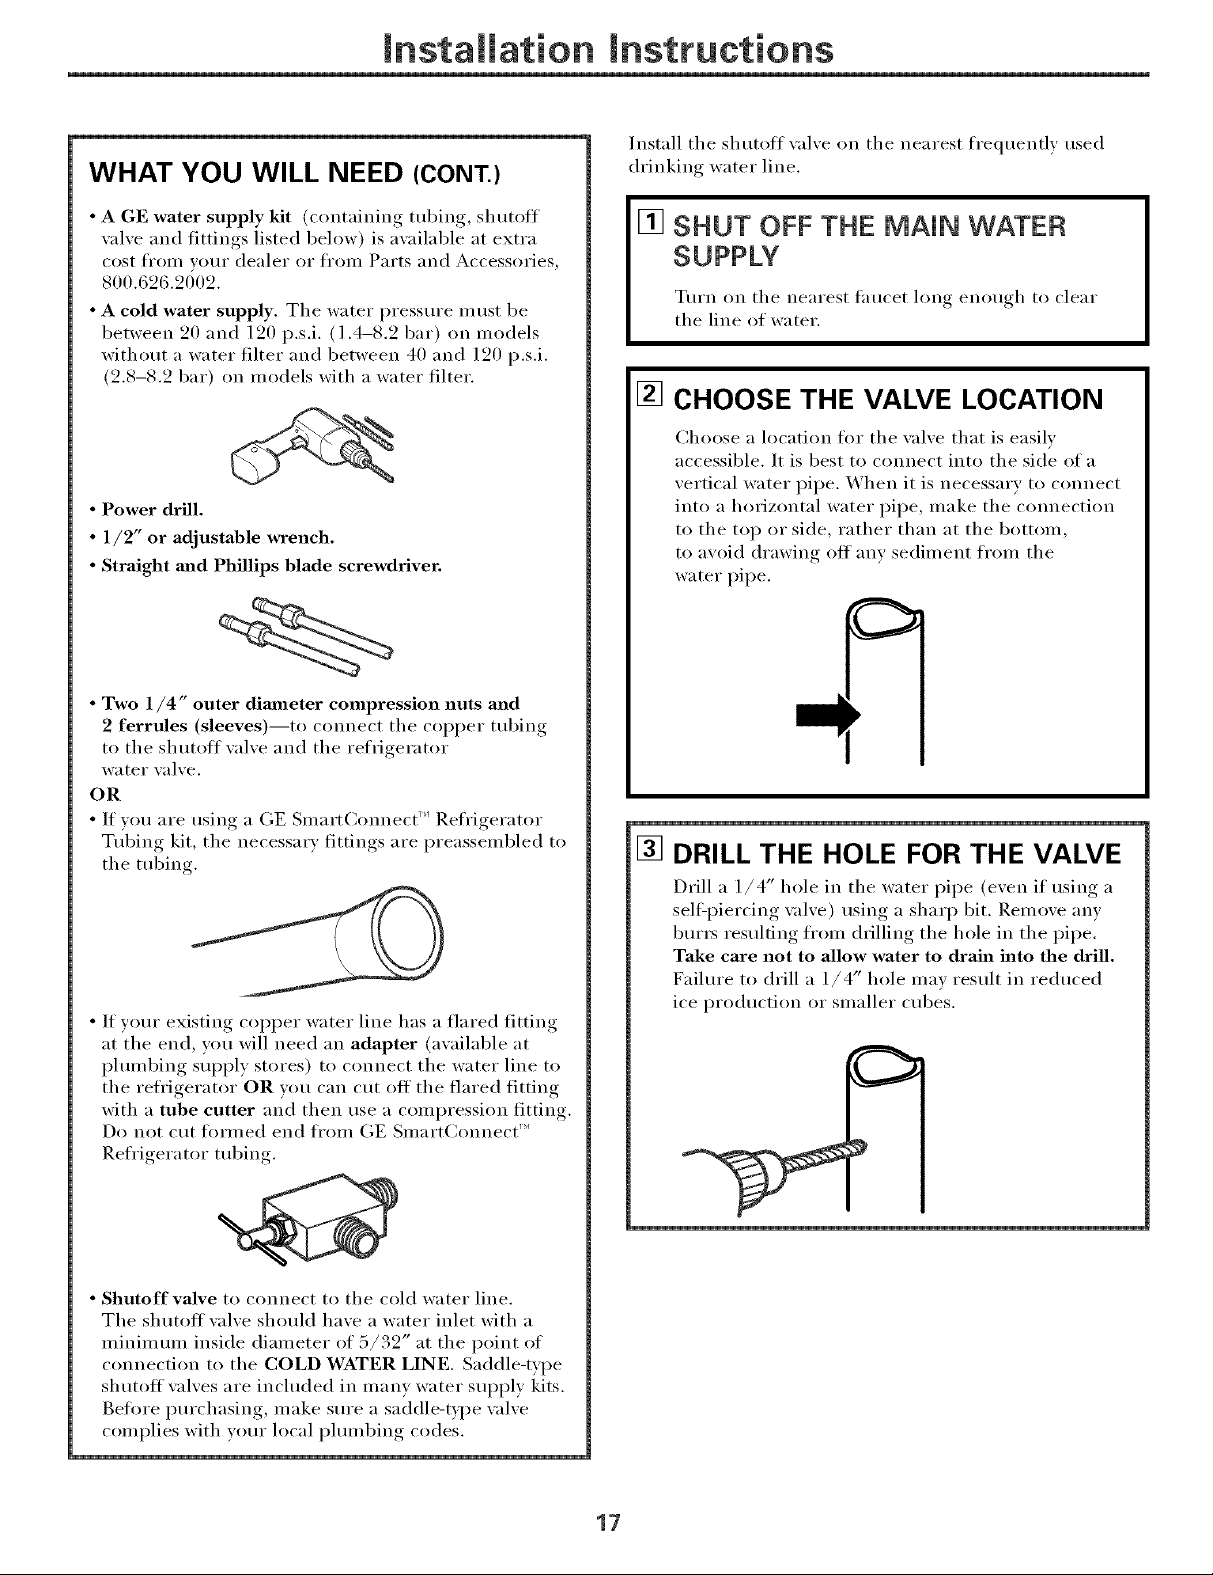
[] CHOOSE THE VALVE LOCATION
Choose a location for tile valve that is easily
accessible. It is best to connect into tile side of a
vertical water pipe. When it is necessary to connect
into a horizontal water pipe, make tile connection
to tile top or side, rather than at tile bottom,
to avoid drawing off any sediment from tile
water pipe.
[] DRILL THE HOLE FOR THE VALVE
Drill a 1/4" hole in tile water pipe (exen it using a
self:l)iercing, xalxe) using, a sharp bit. Remoxe am
bur_ resulting from drilling tile hole in tile pipe.
Take care not to allow water to drain into the drill.
Faihu'e to drill a 1/4" hole may result in reduced
ice production or smaller cubes.
• Shutoff valve to connect to tile cold water line.
The shutoff wflve should have a water inlet with a
minimmn inside diameter of 5/39" at the point of
connection to the COLD WATER LINE. Saddle-type
shutoffwflves are included in many water supply kits.
Befl)re l)urchasing, make sure a saddle-Vpe \_flve
complies with w)ur local phunbing codes.
17
Page 18
mnstaliation mnstructions
INSTALLING THE WATER LINE (cont.)
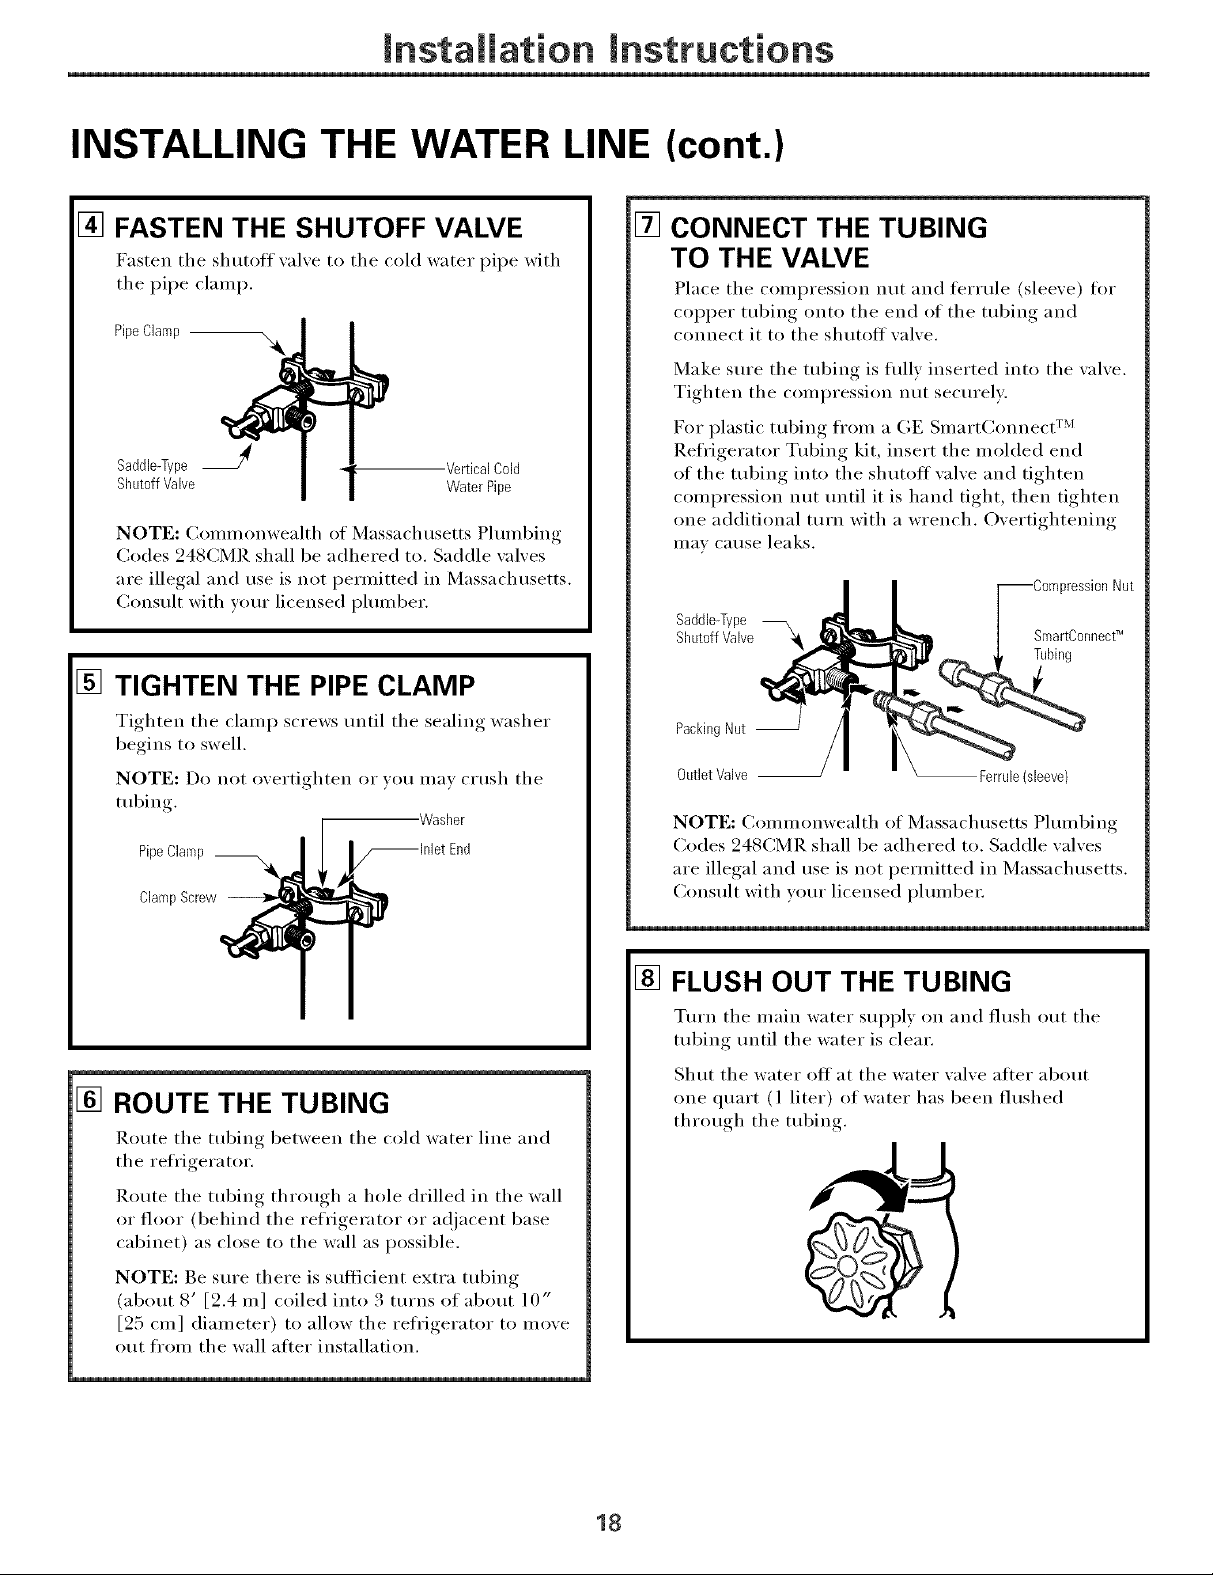
[] FASTEN THE SHUTOFF VALVE
Fasten tile shutoff_al_e to tile cold water pipe with
the pipe clamp.
PipeClamp --%
Saddle-Type J -VerticalCold
ShutoffValve WaterPipe
NOTE: Commonwealth of Massachusetts Plumbing
Codes 248CMR shall be adhered to. Saddle wflves
are illegal and use is not permitted in Massachusetts.
Consult with your licensed plumber.
[]
TIGHTEN THE PIPE CLAMP
Tighten tile clamp screws until tile sealing washer
begins to swell.
NOTE: Do not overtighten or you may c_ush tile
tubing.
PipeClamp__
ClampScrew
Washer
[] CONNECT THE TUBING
TO THE VALVE
Place tile compression nut and teHule (sleexe) for
COl)per tubing onto tile end of tile tubing and
connect it to tile shutott xalxe.
Make sure tile tubing is flflly inserted into tile valve.
Tighten the compression nut securely.
For plastic tubing fl'om a GE SmartConnect TM
Refl'igerator Tubing kit, insert the molded end
of the tubing into the shutott wove and tighten
compression nut until it is hand tight, then tighten
one additional tui'n with a wrench. Overtightening
Ill'IV Ca/ISe leaks.
Saddle-Type
ShutoffValve
PackingNut --
Outlet Valve -- Ferrule (sleeve}
NOTE: Commonwealth of Massachusetts Plumbing
Codes 248CMR shall be adhered to. Saddle wflves
are illegal and use is not permitted in Massachusetts.
Consult with your licensed plumber
,ressionNut
SleartOonnect_
Tubing
[] ROUTE THE TUBING
Route tile tubing between tile cold water line and
tile refrigerator.
Route tile tubing through a hole drilled in tile wall
or floor (behind tile i'efFigei'atof of a(!jacent base
cabinet) as close to the wall as possible.
NOTE: Be sure there is sufficient extra tubing
(about 8' [2.4 m] coiled into 3 turns of about 10"
[25 cm] diameter) to allow tile refrigerator to moxe
out from the wall alter installation.
[] FLUSH OUT THE TUBING
Turn tile main water supply on and flush out tile
tubing until the water is clear.
Shut tile water eli at tile water valve alter about
one quart (l liter) of water has been flushed
through the tubing,
18
Page 19

Installation Instructions
[] CONNECT THE TUBING TO THE
REFRIGERATOR
NOTES:
• geti)i'e inaking tile connection to tile refl'igerator,
be sure tile refl'igerator power cord is not
plugged into the wall outlet.
• If your refl'igerator does not have a water filter,
we recon/inend installing one if your water sui)ply
has sand or particles that could clog tile screen of
tile refl'igerator's water wdve. Install it ill tile
water line near the refl'igerator. If using a GE
Slnart(:onnect'" ReflJgerator Tubing kit, you
will need an additional tube (X._3X08X10009)
to connect tile filter. Do not cut plastic tube
to install filter.
Some models have tile refl'igerator connection at
tile end of tubing located outside tile comi)ressor
COlllpai'tlllent access cover. OIl other inodels, tile
COlllI)I'essoI" COllli)ai'tll/ent access cover illtlst be
removed in order to access tile refligerator
connection at tile water wdve.
[]
CONNECT THE TUBING TO THE
REFRIGERATOR (CONT.)
Insert tile end of tile tubing into tile rel]'igerator
connection as far as possible. While holding tile
tubing, tighten tile fitting.
D)I" plastic tubing fl'oln a GE Slnart(_onnect
I_.efl'igerator Tubing kit, insert the inolded end of
the tubing into the refl'igerator connection and
tighten the comi)ression nut until it is hand tight,
then tighten one additional turn with a wrench.
Overtightening may cause leaks.
Fasten tile tubing into tile clam I) provided as
shown to kee I) it ill position. You Inav need to pry
open tile clamp.
One of the illustrations below will look like the
cmmection on your refrigerator.
Tubing
Clamp
1/4"
Nut
Tubing
On models usin,*,_ tile refrigeration, connection at
tile water xalxe, remoxe tile plastic flexible cap.
©
Place tile comi)ression nut and terrule (sleeve)
onto the end of the tubing as shown, Oil a GE
Slnart(_onnect Refl'igerator Tubing kit, tile nuts
are already asselnbled to the tubing.
Ferrule
(sleeve)
Refrk
Connection
1/4" 1/4"
SmartConnect_
Tubing
Tubing
Ferrule _ %__
Connection
SmartConnecff
Tubing
[] TURN THE WATER ON AT THE
SHUTOFF VALVE
Tighten any connections that leak.
19
Reattach tile access cover.
Page 20
Installation Instructions
INSTALLING THE WATER LINE (cont.)
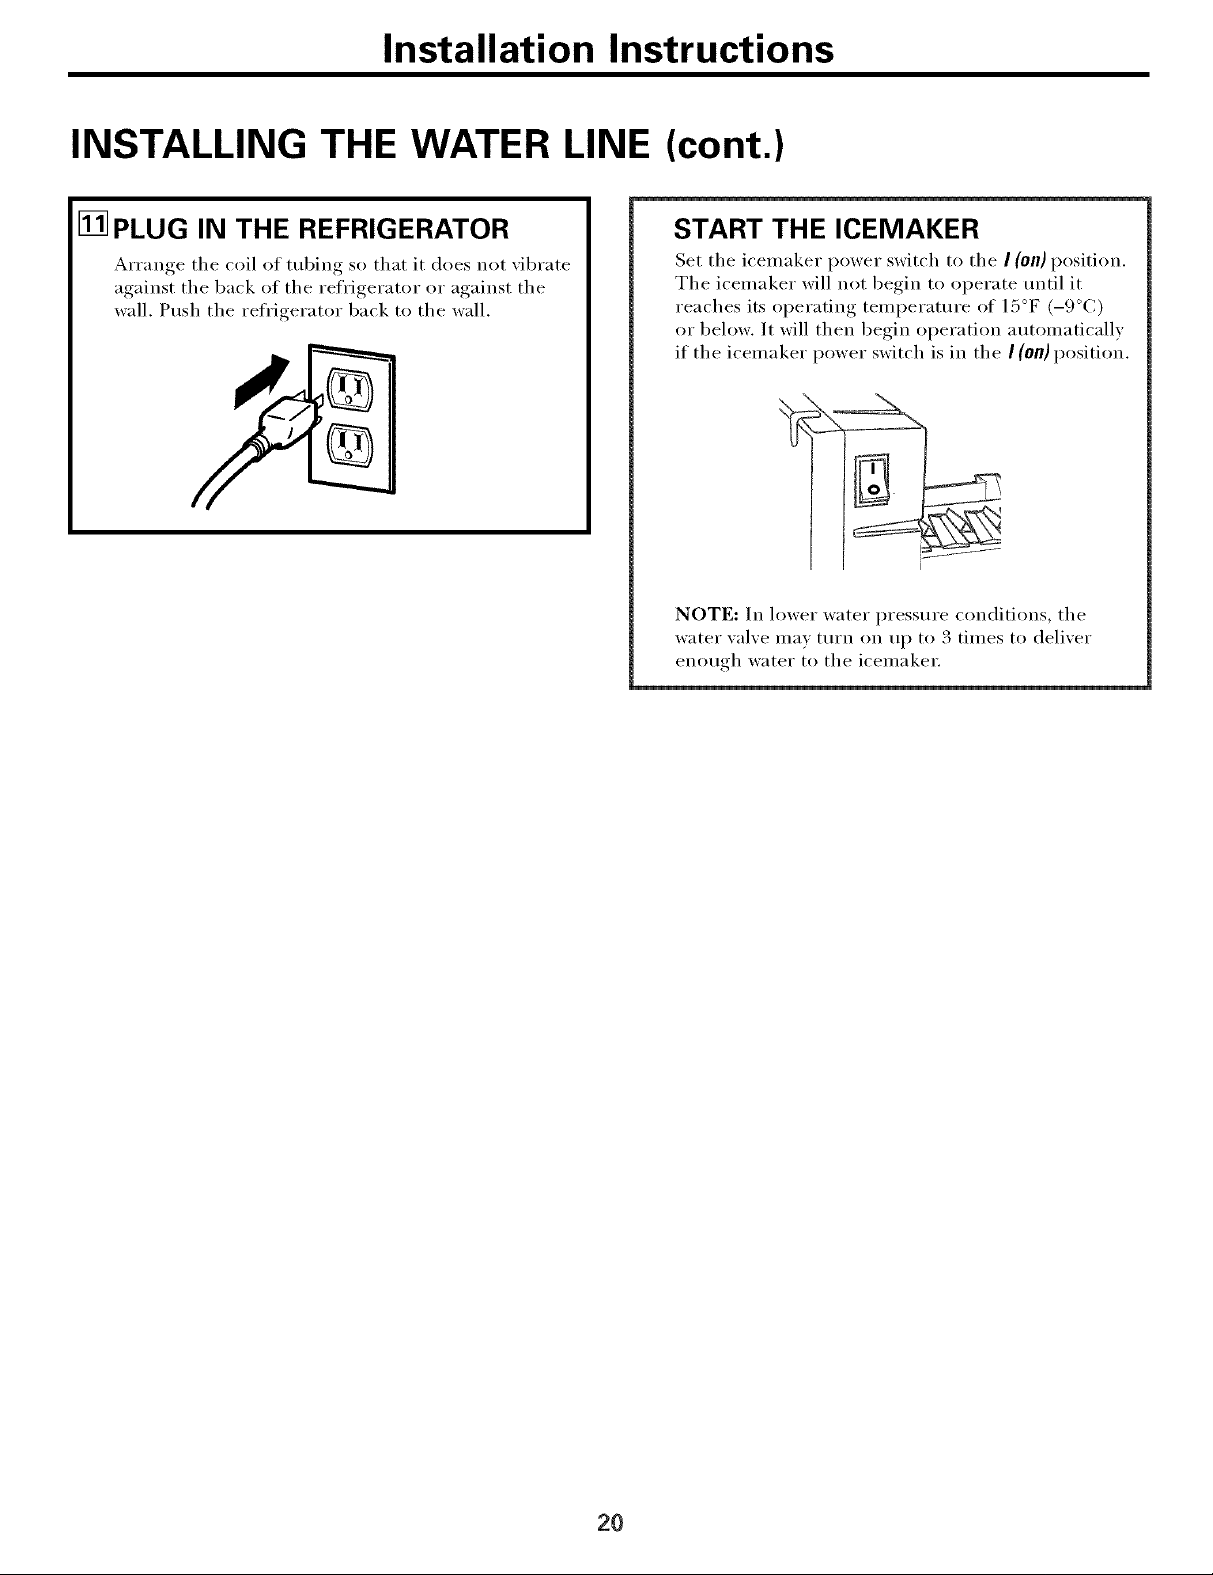
[] PLUG IN THE REFRIGERATOR
__rranoe the coil of tubing so that it does not _ibrate
against the back of the refrigerator or against the
wall. Push the refrigerator back to the wall.
START THE ICEMAKER
Set the icemaker power switch to the I (on) position.
The icemaker will not beoin_ to operate until it
reaches its oi)erating, temperature of 1:5°_1_(-9°C)
or below. It will then begin operation automatically
if the icemaker power switch is in the I (On)position.
NOTE: In lower water pressure conditions, the
wateI" xalxe max tt/i'n on tip to . tli/les to delixer
eno//<*h watei" to the icelilakei:
3 "
20
Page 21
Normal operatingsounds, www.GEAppliances.com
Newer refrigerators sound different from older refrigerators.
Modem refrigerators have more features and use newer
technology.
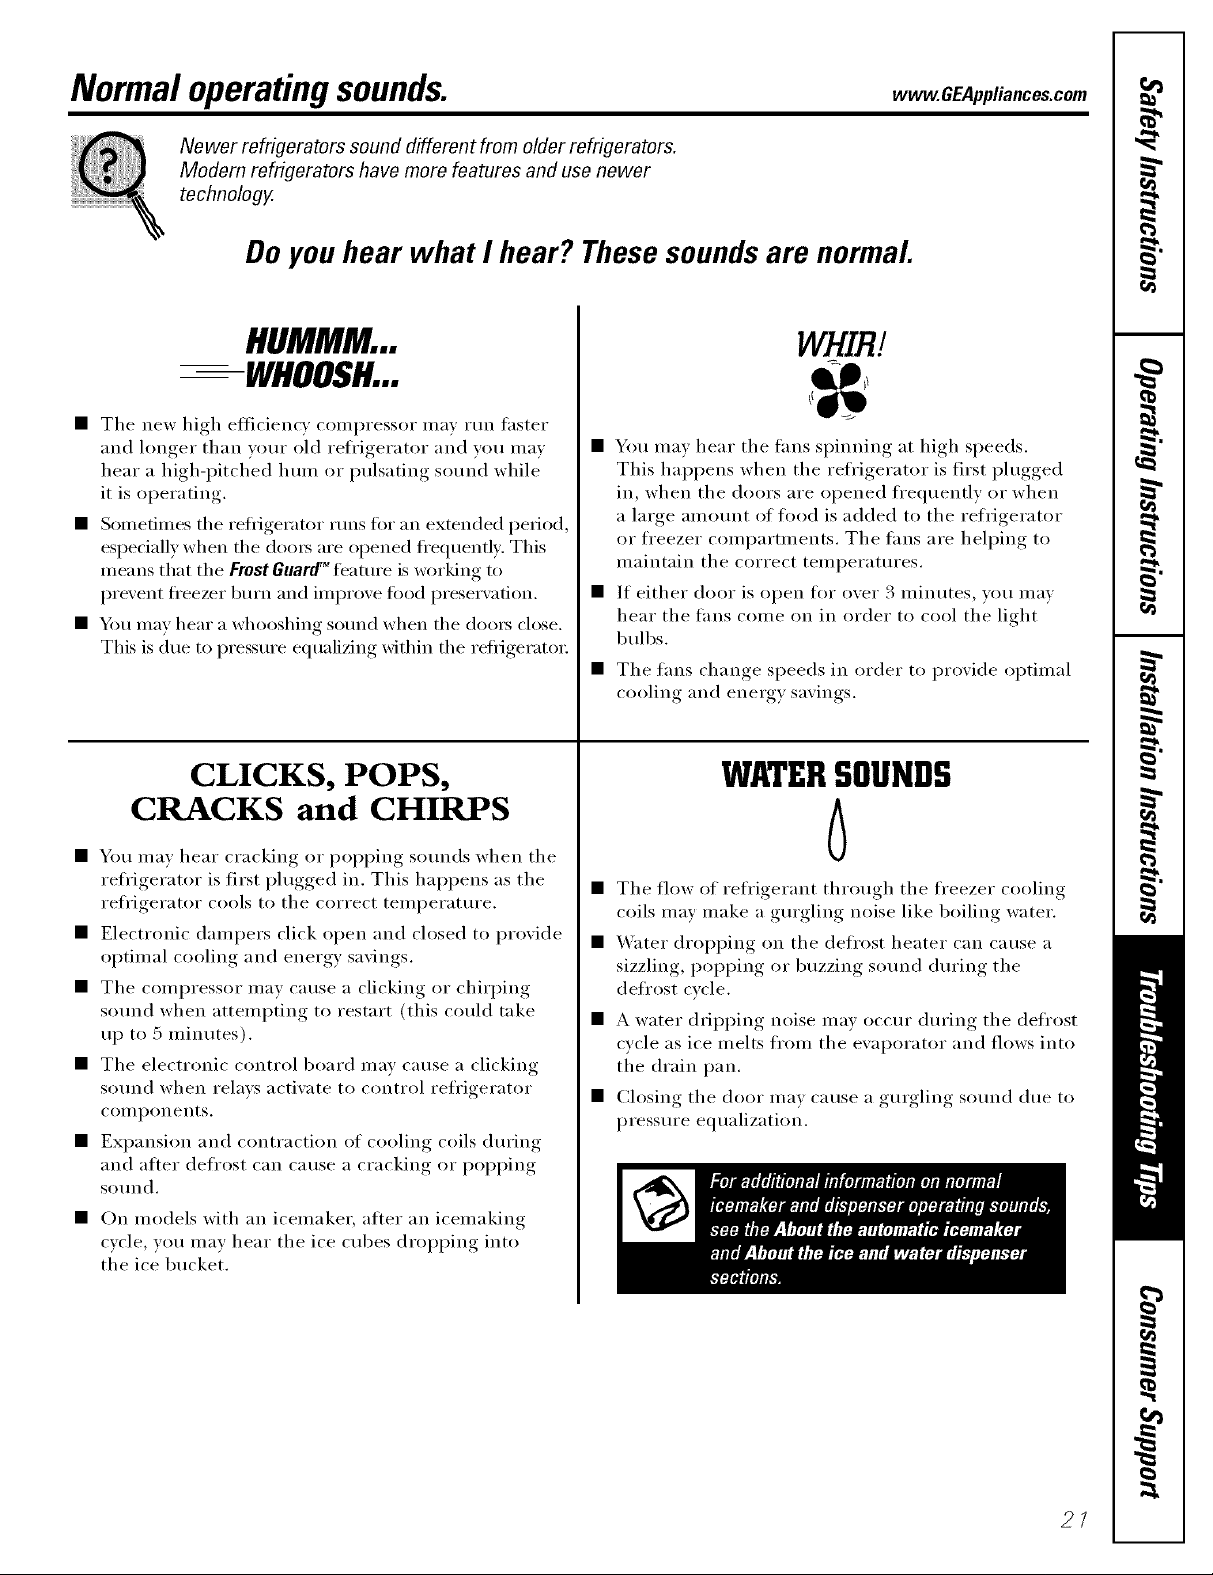
Do you hear what I hear? These sounds are normal.
HUMMM...
--WHOOSH...
• The new high eflicienc) colni)ressor nm) iun faster
and hmger than your old refl'igerator and wm may
hear a high-l)itched hmn or pulsating sound while
it is operating.
• Sometimes the reflJgerator runs tot an extended period,
especially when the doms are opened fl'equently. This
means that the Frost Guarff" featm'e is working to
prevent fl'eezer bm'n and improve tood preservation.
• Ybu may hear a whooshing sotmd when the doo_s close.
This is due to pressm'e equalizing within the reti_igerato_:
CLICKS, POPS,
CRACKS and CHIRPS
• You may hear cracking or i)oi)ping sotmds when the
refl'igerator is first plugged in. This hal)pens as the
refl'igerator cools to the correct temperature.
• Electronic dampers click open and closed to provide
optimal cooling and energy savings.
• The compressor may cause a clicking or chirping
sotmd when attempting to restart (this could take
up to 5 minutes).
• The electronic control board may cause a clicking
sound when relays activate to control refl'igerator
COi/lpoileilts,
• Expansion and contraction of cooling coils dm'ing
and atier defl'ost can cause a cracking or I)opping
sotmd.
• On models with an icemaker, alter an icemaking
cycle, you may hear the ice cubes dropping into
the ice bucket.
WHIR!
• You mav hear the rims spinning at high speeds.
This hal)pens when the reti'igerator is first plugged
in, when the doors are opened ti'equently or when
a large alllOtlllt of tood is added to the refrigerator
or ti'eezer compartments. The tans are helping to
maintain the correct temperatm'es.
• If either door is open tot over 3 minutes, you may
hear the rims come on in order to cool the light
bulbs.
• The rims change speeds in order to provide optimal
cooling and energy savings.
WATERSOUNDS
6
• The flow of refl'igerant through the fl'eezer cooling
coils may make a gurgling noise like boiling water.
• _'ater dropping on the defl'ost heater can cause a
sizzling, i)oi)ping or buzzing sound dm'ing the
defrost cycle.
• A water dripping noise may occur during the defrost
cycle as ice melts fl'om the evaporator and flows into
the drain pan.
• Closing the door may cause a gurgling sotmd due to
pressure equalization.
2/
Page 22
Beforeyoucall forservice...
Troubleshooting -tips
Save time and money! Review the charts on the following
pages first and you may not need to call for service.
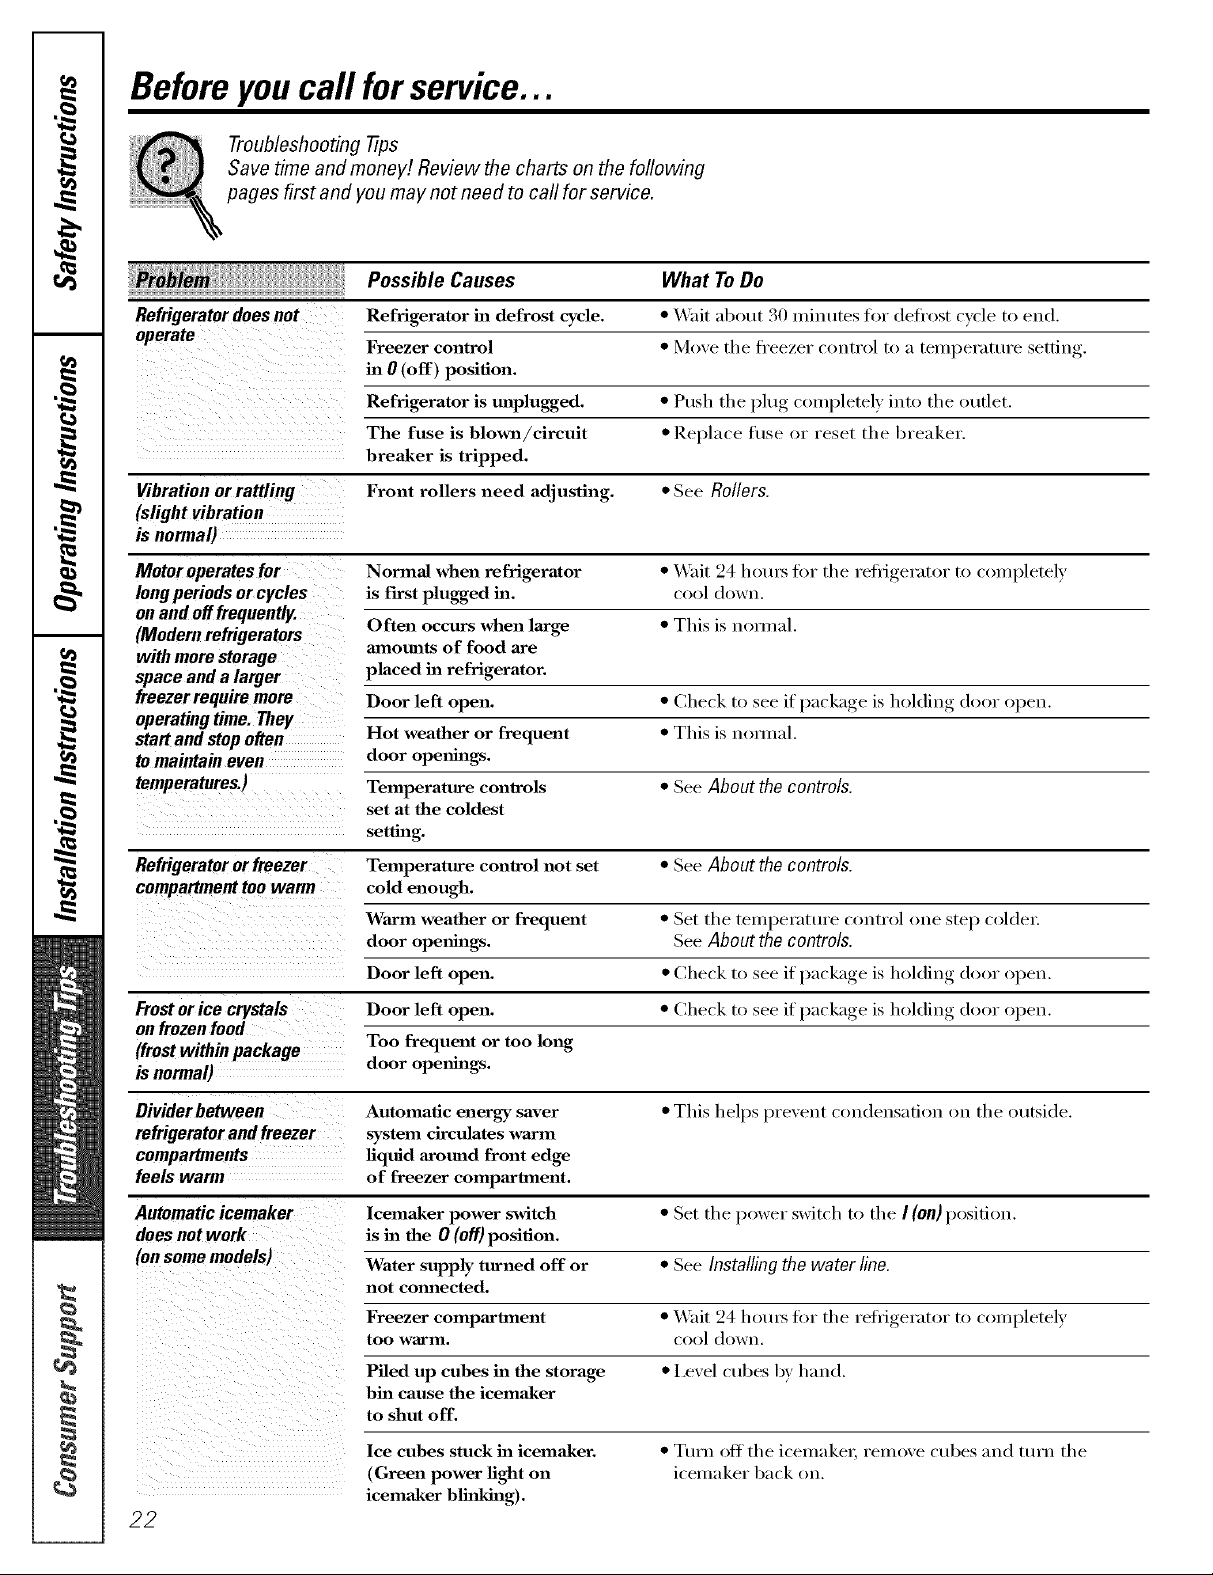
Possible Causes What ToDo
Refrigerator does not Refrigerator in defrost cycle. * Wait al)out 30 minutes for defi'ost cycle to end.
Freezer control * Moxe the fl'eezer control to a temperature setfin ,
,,,o(o, )position.
Refrigerator is unplugged. * Push the plug completely into the outlet.
The fuse is blown/circuit * Replace fllse or reset the breaker.
breaker is tripped.
Vibration or rattling Front rollers need adjusting. * See Ro//ers.
(slight vibration
is normal)
Motor operates for Normal when refrigerator • _'ait 24 hom_ fin" the refl_igerator to completely
long periods or cycles is f'lrst plugged in. cool down.
onandofffrequently.
(Modern refrigerators Often occurs when large * This is nomml.
with more storage
space and a larger placed in refrigerator.
freezer require more Door left open. * Check to see if I)ackage, is holding door open.
operating time. They
start and stop often Hot weather or frequent * This is nomml.
tomaintain even door opelfings.
Refrigerator or freezer Temperature control not set * See About the controls
Frost or ice crystals Door left open. * Check to see if I)ackage, is holding door open.
on frozen food
(frost within package Too frequent or too long
is normal) door openhlgs.
mnom_ts of food axe
Temperature controls * See About thecontrols.
set at the coldest
setting.
cold enough.
WaJ_n weather or frequent * Set the temperatm'e control one step col(lei:
door opetm,_. See Abouttho controls.
if )ackaoe is holding door open.Door left open. * Check to see I
Divider between Automatic energy saver * This helps prexent coi_dei_safion on the outside.
refrigerator and freezer system circulates wm-m
compartments fiquid axomld front edge
feels warm of freezer compartment.
Automatic icemaker lcema_ker power switch * Set the power switch to the I(on) position.
does not work is ha the O(Off)position.
Water supply turned off or * See Installing the water line.
not comlected.
Freezer compartment * Wait 24 hom_ fl)r the refl_igerator to completely
too warln. Cool down.
Piled up cubes in the storage * i,exel cubes b_ hand.
bin cause the icema_ker
to shut off.
Ice cubes stuck in icema_ker.
(Green power fight on
icema_ker blinking).
• Turn off the icemakei; remove cubes and turn the
icemaker 1)ack on.
22
Page 23
vvww.GEAppliances.com
Possible Causes What ToDo
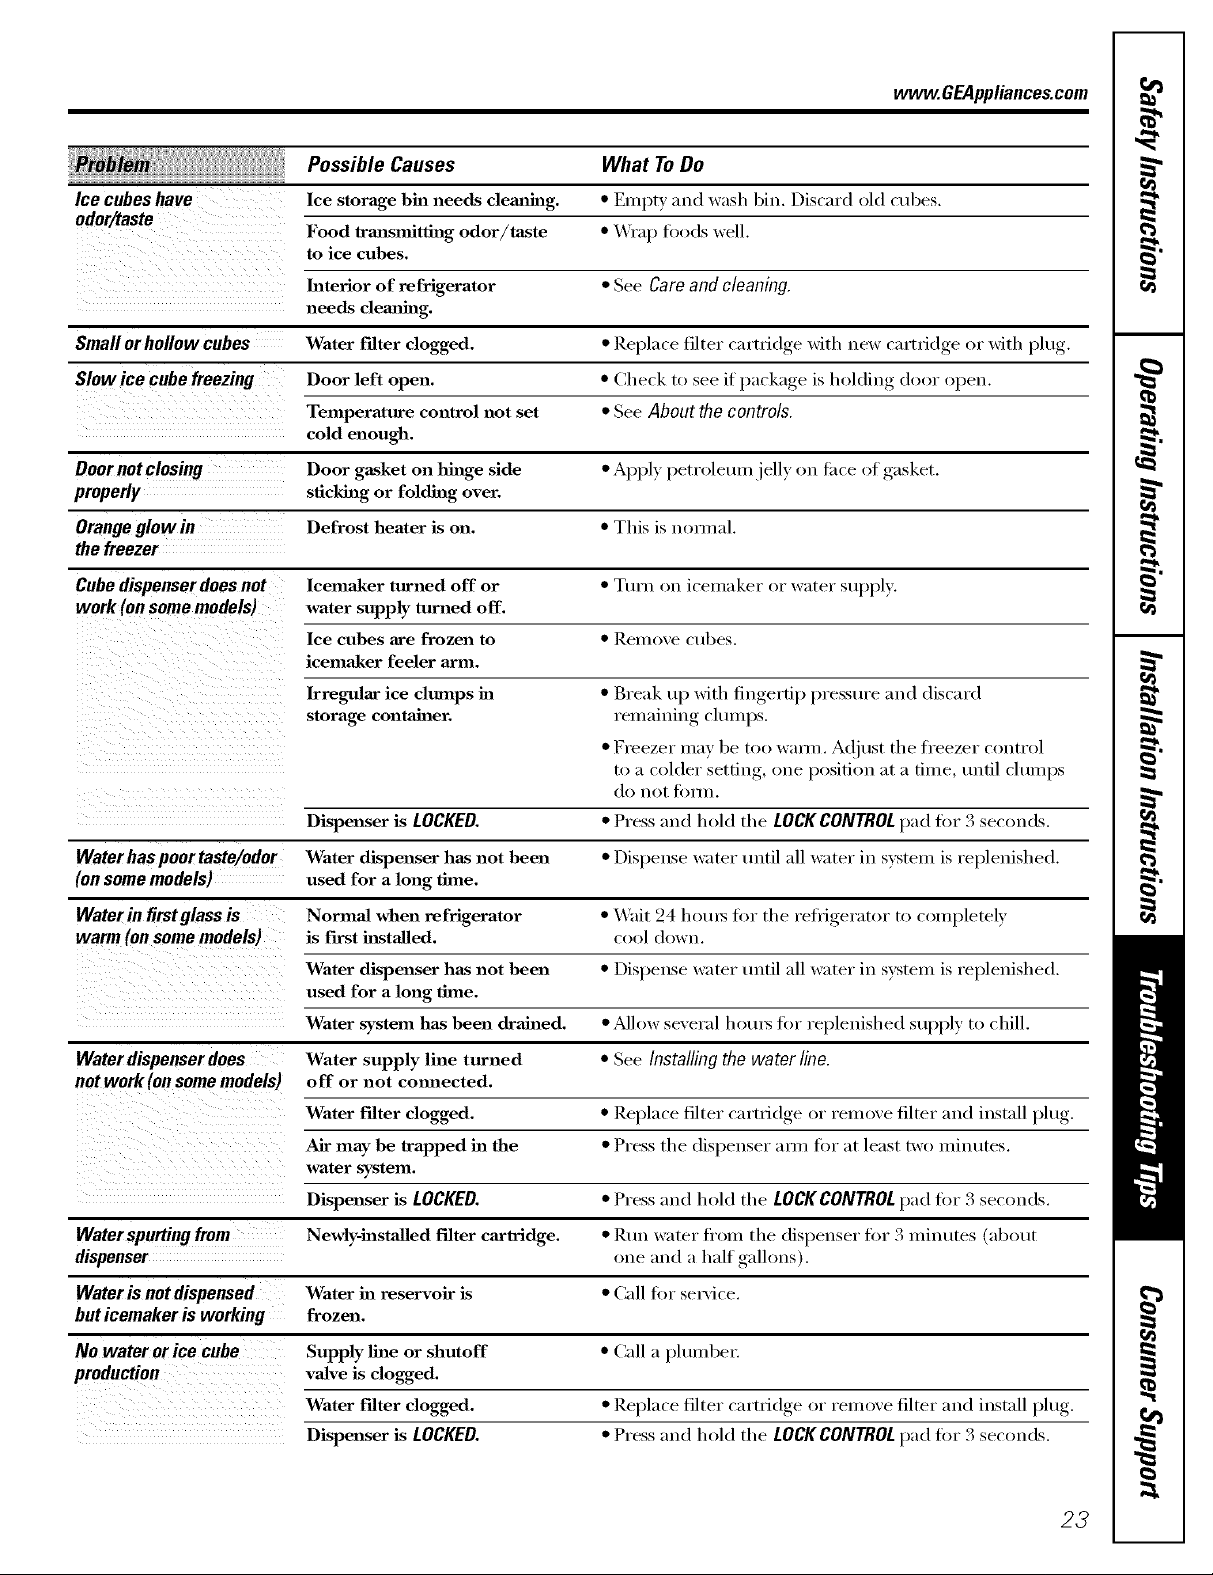
Ice cubes have Ice storage bin needs clemlhag. • Erupt) and wash bin. Discard old cubes.
odor/taste
Food trmlsmitthlg odor/taste • Wrap foods well.
to ice cubes.
Interior of refrigerator • See Care and cleaning.
needs clem_h_g.
Small orhollow cubes Water f'flter clogged. • Replace filter cartridge with new cartridge or with I)lu_'
Slow ice cube freezing Door left open. • (_heck to see I
Temperature control not set • See About the controIs.
cold enough.
it )acka,,e is holding door open.
Door not closing Door gasket on hinge side • Apply petroleum.jell), on ti_ce of gasket.
properly sticking or folding over.
Orange glow in Defrost heater is on. • This is n(mnal.
Cube dispenser does not lcema_ker turned off or
• Turn on icemaker or water supply.
work (on some models) water supply turned off.
Ice cubes are frozen to
• ReI//ove ctlbes.
icema_ker feeler arm.
lrregtdar ice clmnps hi
storage container.
Dispenser is LOCKED. • Press and hold the LOCKCONTROLpad fin 3 seconds.
Waterhaspoortaste/odor Water dispenser has not been • Dispense water until all water in sxstem is replenished.
(on some models) used for a long time.
Waterin firstglass is Normal when refrigerator • _,%fit 24 horus fin" the reti_gerator to completely
warm (on some models) is fin-st hlstalled, cool down.
Water dispenser has not been • Dispense water tlntil all water in sxsteul is replenished.
used for a long time.
Water system has been drained. • _low several hotu_ tot replenished supply to chill.
Water dispenser does Water supply line turned • See Installing the waterline
• Break up with fingertip pressure and discard
remaining chunps.
• Freezer may be too waHn. A(!just the freezer control
to a colder setting, one position at a time, until clumps
do not tOIIll,
not work (on some models) off or not cmmected.
Water Fdter clogged. • Replace filter cartridge or remoxe filter and install )lu,
Air may be trapped in the • Press the dispenser aHn tot at least two minutes.
water system.
Dispenser is LOCKED. * Press and hold the LOCKCONTROLpad fl)r 3 seconds.
Watersputting from Newly-hastaJled filter cm'tridge. • Run water ti'om the dispenser for 3 minutes (about
dispenser one and a half galhms).
Water N not dispensed Water in reservoir is • (_dl t0r selvice.
but icemaker is working frozen.
NO water or ice cube Supply line or shutoff • Call a plumber.
production va3veis clogged.
Water Fdter clogged. • ]_eplace filter cartridge or remove filter and install plug.
Dispenser is LOCKED. • Press and hold the LOCKCONTROLpad fin 3 seconds.
23
Page 24
Beforeyoucall forservice...
Possible Causes What ToDo
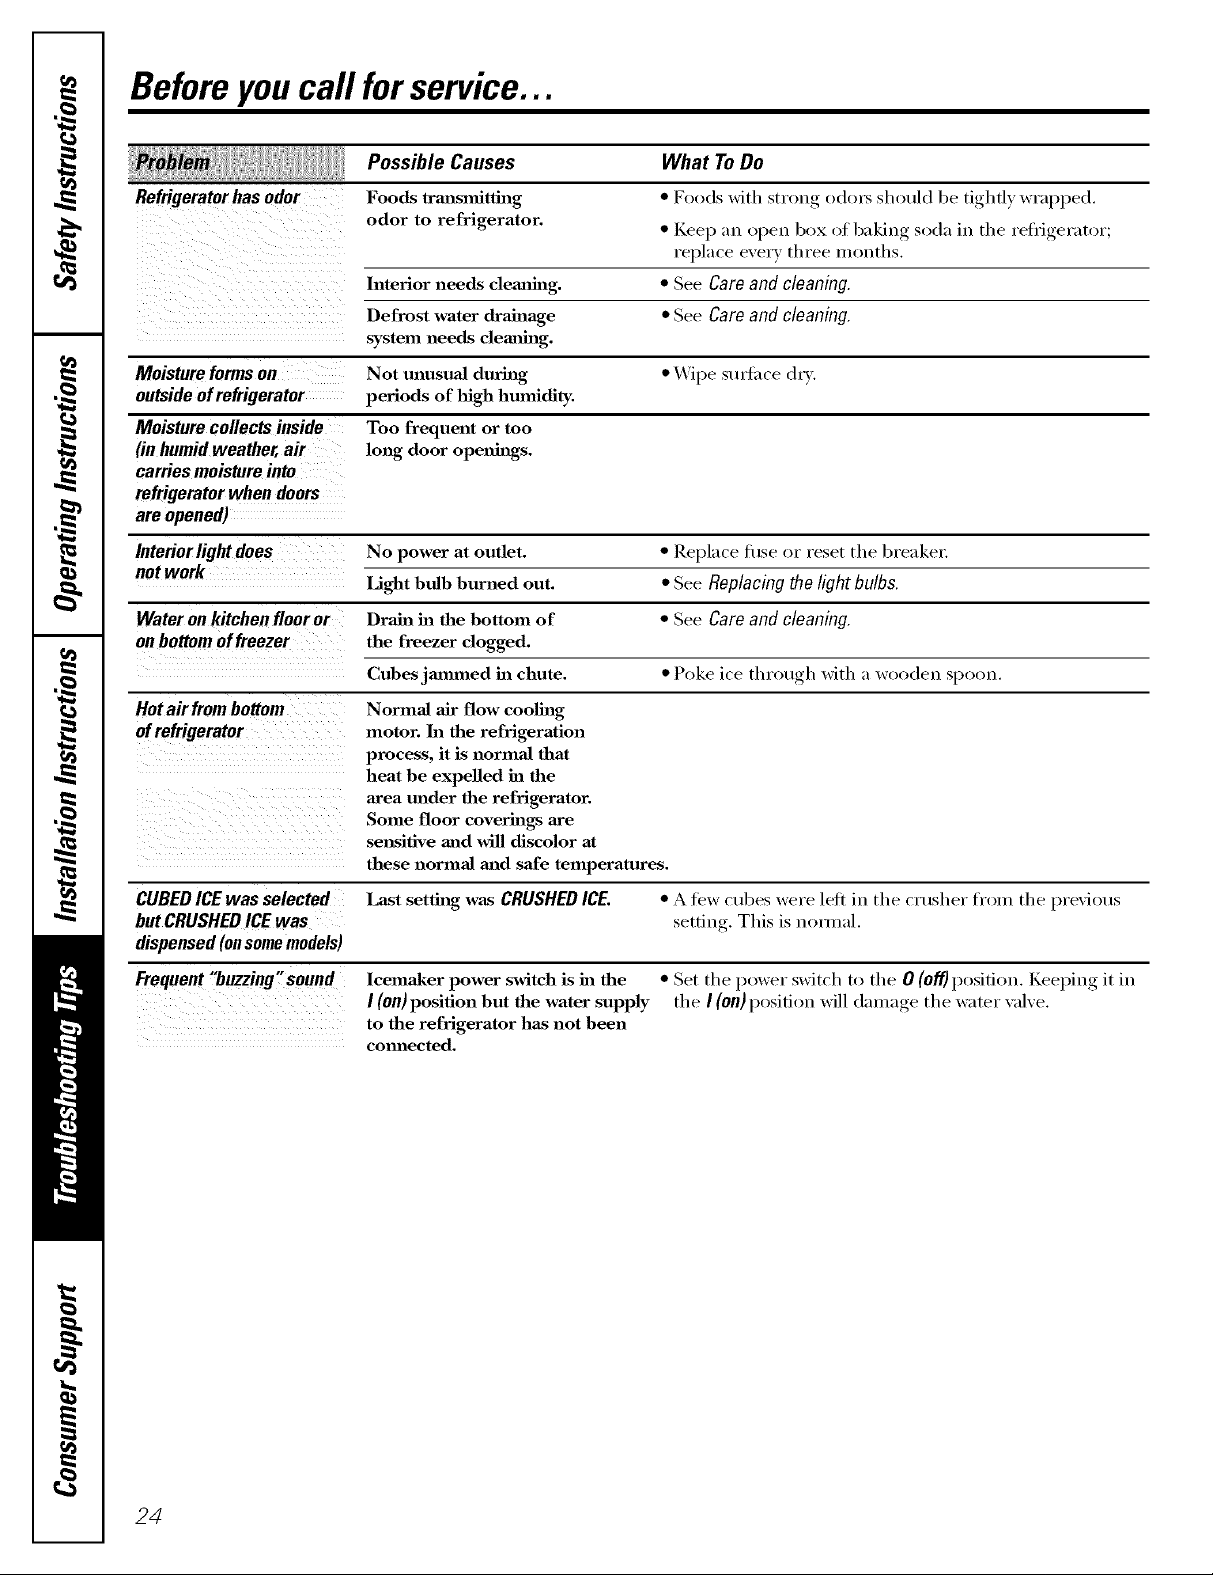
Foods trm_sanitthag * F()()(ls with strong od()_ should be tightly wrapped.
odor to refrigerator.
Interior needs clemting. • See Careandcleaning.
Defrost water drainage • See Care and cleaning.
system needs clemfing.
Moisture forms on Not unusual dttring • Wipe stu_ilce oh3'.
outsideofrefrigerator periods of high humidity.
Moisture collects inside Too frequent or too
(inhumidweather,air long door openings.
carries moisture into
refrigerator when doors
are opened)
Interiorlightdoes No power at outlet. • Repla('e ti/se or reset tile breakel:
net work
Light bulb burned out. • See Replacing the light bulbs.
Wateron kitchen floor or Drain ba the bottom of • See Careandcleaning.
onbottomoffreezer the freezer clogged.
Cubesjmnmed in chute. • Poke ice throuoh_ with a wooden Sl)OOn.
Hotak frombottom
ofrefrigerator
CUBEDICEwas selected
Normal air flow cooling
motor. In the refrigeration
process, it is normaJ that
heat be expelled in the
area under the refrigerator.
Some floor coverings axe
sensitive mad will discolor at
these normal mad safe temperatures.
Last setthag was CRUSHEDICE. • A tew cubes were left in the crusher fl'om the previous
butCRUSHEDICEwas
dispensed(onsomemodels)
• Kee l) an open box of baking soda in the reflJgerator;
replace every three months.
setting. This is nomml.
Frequent"buzzing"sound
24
Icema_er power switch is ha the • Set the power switch to the O (off) position. Keeping it in
I (on) position but the water supply the I (on) position will damage the water xalx e.
to the refrigerator has not been
comaected.
Page 25
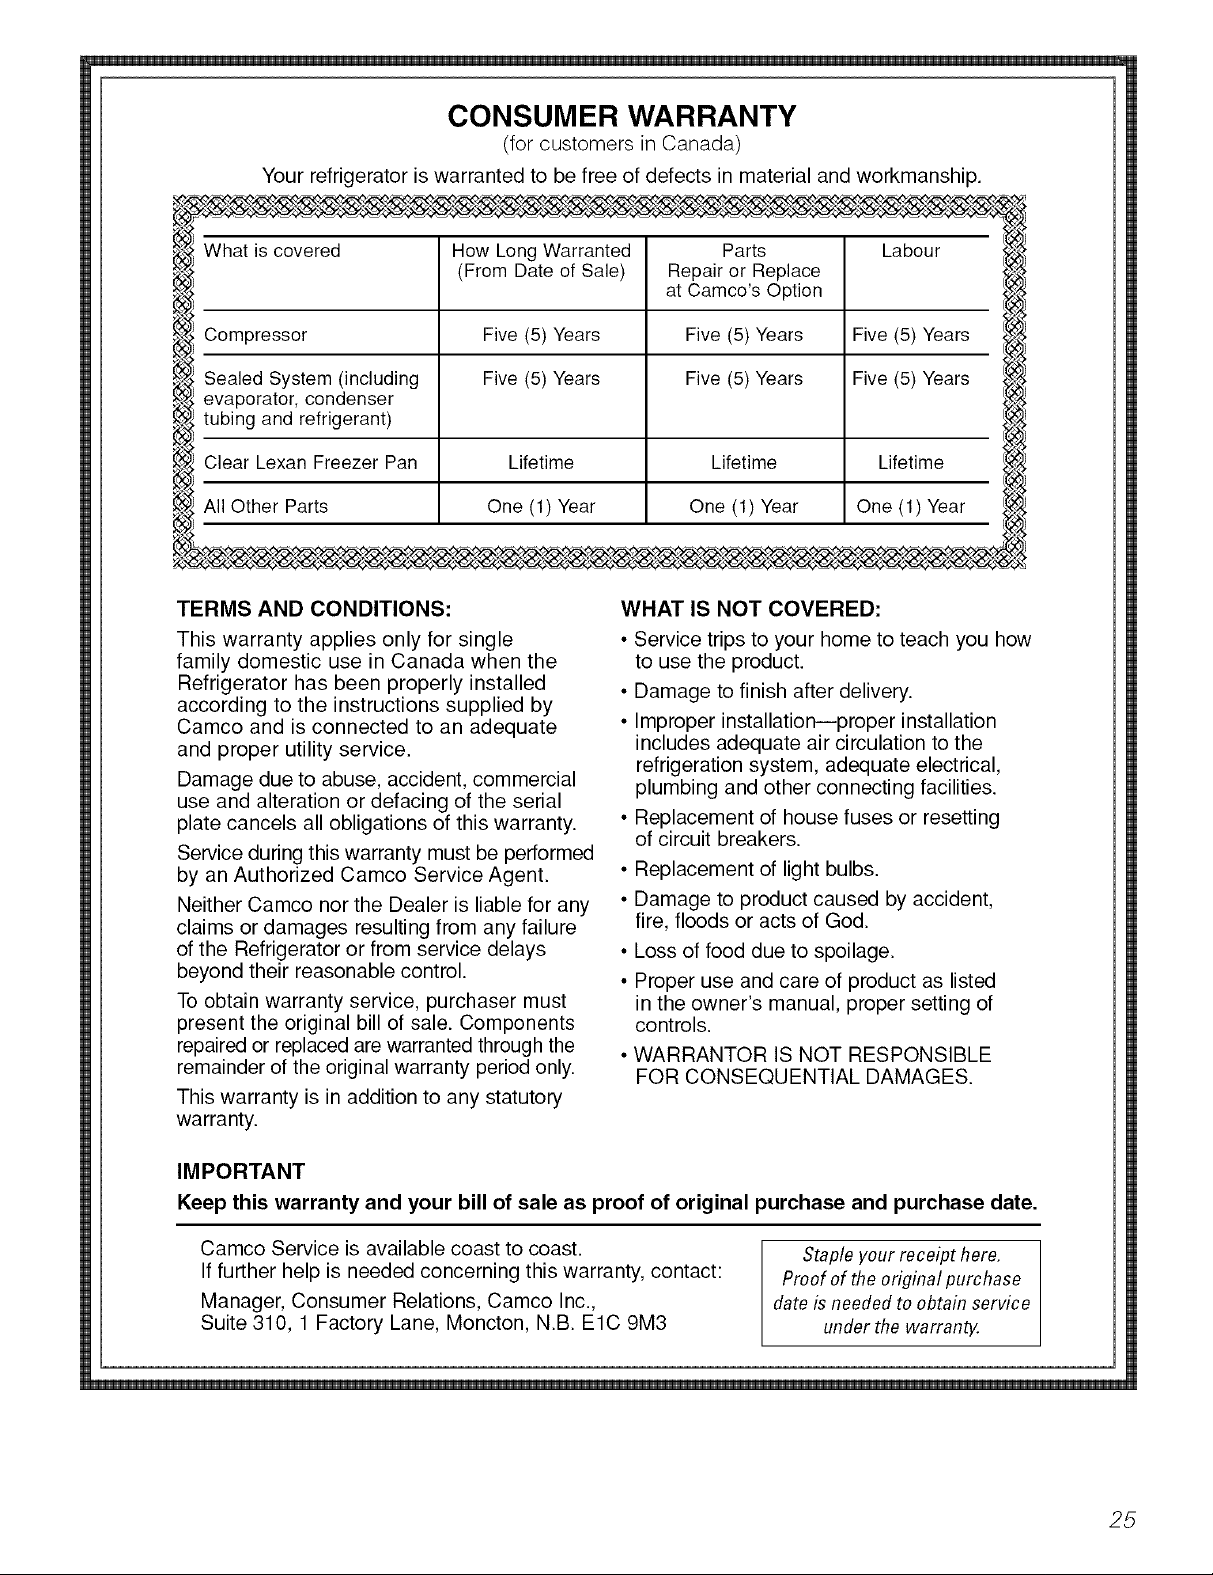
CONSUMER WARRANTY
(for customers in Canada)
Your refrigerator is warranted to be free of defects in material and workmanship.
Nhat is covered How Long Warranted Parts Labour
(From Date of Sale) Repair or Replace
at Camco's Option
.Compressor Five (5) Years Five (5) Years Five (5) Years
Sealed System (including Five (5) Years Five (5) Years Five (5) Years
waporator, condenser
:ubing and refrigerant)
_.' .ClearLexan Freezer Pan Lifetime Lifetime Lifetime
_,llOther Parts One (1) Year One (1) Year One (1) Year
m
TERMS AND CONDITIONS:
This warranty applies only for single
family domestic use in Canada when the
Refrigerator has been properly installed
according to the instructions supplied by
Camco and is connected to an adequate
and proper utility service.
Damage due to abuse, accident, commercial
use and alteration or defacing of the serial
plate cancels all obligations of this warranty.
Service during this warranty must be performed
by an Authorized Camco Service Agent.
Neither Camco nor the Dealer is liable for any
claims or damages resulting from any failure
of the Refrigerator or from service delays
beyond their reasonable control.
To obtain warranty service, purchaser must
present the original bill of sale. Components
repaired or replaced are warranted through the
remainder of the original warranty period only.
This warranty is in addition to any statutory
warranty.
IMPORTANT
WHAT IS NOT COVERED:
• Service trips to your home to teach you how
to use the product.
• Damage to finish after delivery.
• Improper installation--proper installation
includes adequate air circulation to the
refrigeration system, adequate electrical,
plumbing and other connecting facilities.
• Replacement of house fuses or resetting
of circuit breakers.
• Replacement of light bulbs.
• Damage to product caused by accident,
fire, floods or acts of God.
• Loss of food due to spoilage.
• Proper use and care of product as listed
in the owner's manual, proper setting of
controls.
• WARRANTOR IS NOT RESPONSIBLE
FOR CONSEQUENTIAL DAMAGES.
Keep this warranty and your bill of sale as proof of original purchase and purchase date.
Camco Service is available coast to coast.
If further help is needed concerning this warranty, contact:
Manager, Consumer Relations, Camco Inc.,
Suite 310, 1 Factory Lane, Moncton, N.B. ElC 9M3
Staple your receipt here.
Proof of the original purchase
date is needed to obtain service
under the warren_
25
Page 26
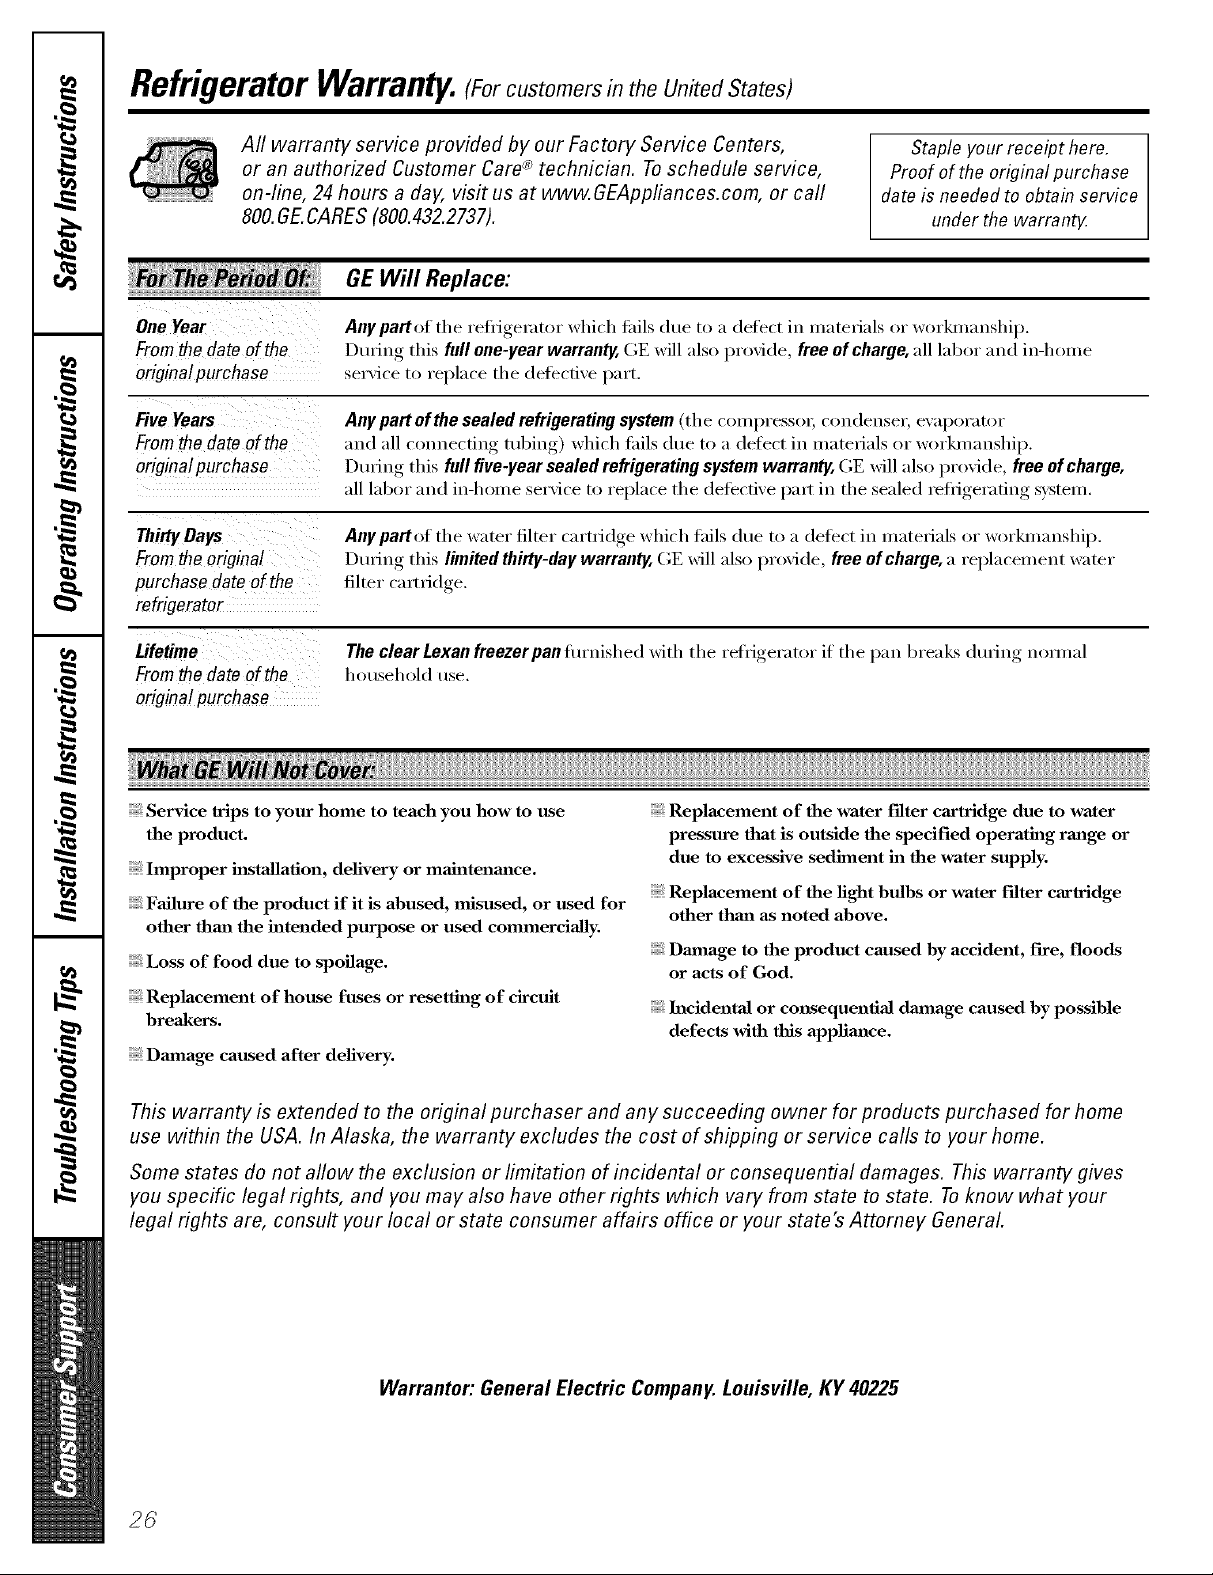
RefrigeratorWarranty. (Forcustomers in the United States)
All warranty service provided by our Factory Service Centers,
or an authorized Customer Care® technician. Toschedule service,
on-line, 24 hours a day, visit us at www. GEAppfiances.com, or call
800.GE.CARES (800.432.2737).
Fromthedateof the
originalpurchase
FiveYears
Fromthedateof the
originalpurchase
ThirtyDays
Fromtheoriginal
purchasedate of the
refrigerator
Lifetime
Fromthedateof the
original purchase
Staple your receipt here.
Proof of the original purchase
date is needed to obtain service
under the warranty
GE Will Replace:
Any part of the refl_igemtor which tifils due to a defect in materials or workmanship,
During this full one-year warranty, GE will also provide, free of charge, all labor and in-home
service to replace the (lef_'cti\'e part.
Any part of the sealed refrigerating system (tile coml)ressox; condenser, eval)orator
and all connecting ml)ing) which/ifils due to a detect in materials or worlunanship.
During this full five-year sealed refrigerating system warranty, GE will also provide, free of charge,
all labor and in-home service to replace tile defective I)a_t in tile sealed refiJgerating system.
Any partof the water filter cartridge which thils due to a defect in materials or workmanship.
DtuJng this limited thirty-day warranty, GE will also provide, free of charge, a replacement water
filter camJdge.
The clear Lexan freezerpan flu'nished with the refrigerator if the pan breaks during natural
household use.
Service trips to your home to teach you how to use
the product.
hnproper h_staJlation, delivery or maJntenmlce.
Failure of the product if it is abused, misused, or used for
other thm_ the intended purpose or used commercially.
Loss of food due to spoilage.
Replacement of house fuses or resetting of circuit
breakers.
Dmnage caused after delivery.
Replacement of the water Filter cartridge due to water
pressure that is outside the specified operating rmlge or
due to excessive sediment in the water supply.
Replacement of the light bulbs or water Filter cartridge
other thml as noted above.
Dmnage to the product caused by accident, fire, floods
or acts of God.
Incidental or consequential dmnage caused by possible
defects with this applimlce.
This warranty is extended to the original purchaser and any succeeding owner for products purchased for home
use within the USA. In Alaska, the warranty excludes the cost of shipping or service calls to your home.
Some states do not allow the exclusion or limitation of incidental or consequential damages. This warranty gives
you specific legal rights, and you may also have other rights which vary from state to state. Toknow what your
legal rights are, consult your local or state consumer affairs office or your state's Attorney General.
Warrantor: General Electric Company. Louisville, KY 40225
26
Page 27
PerformanceData Sheet
SmartWaterFiltrationSystem
GWF/ HWFCartridge
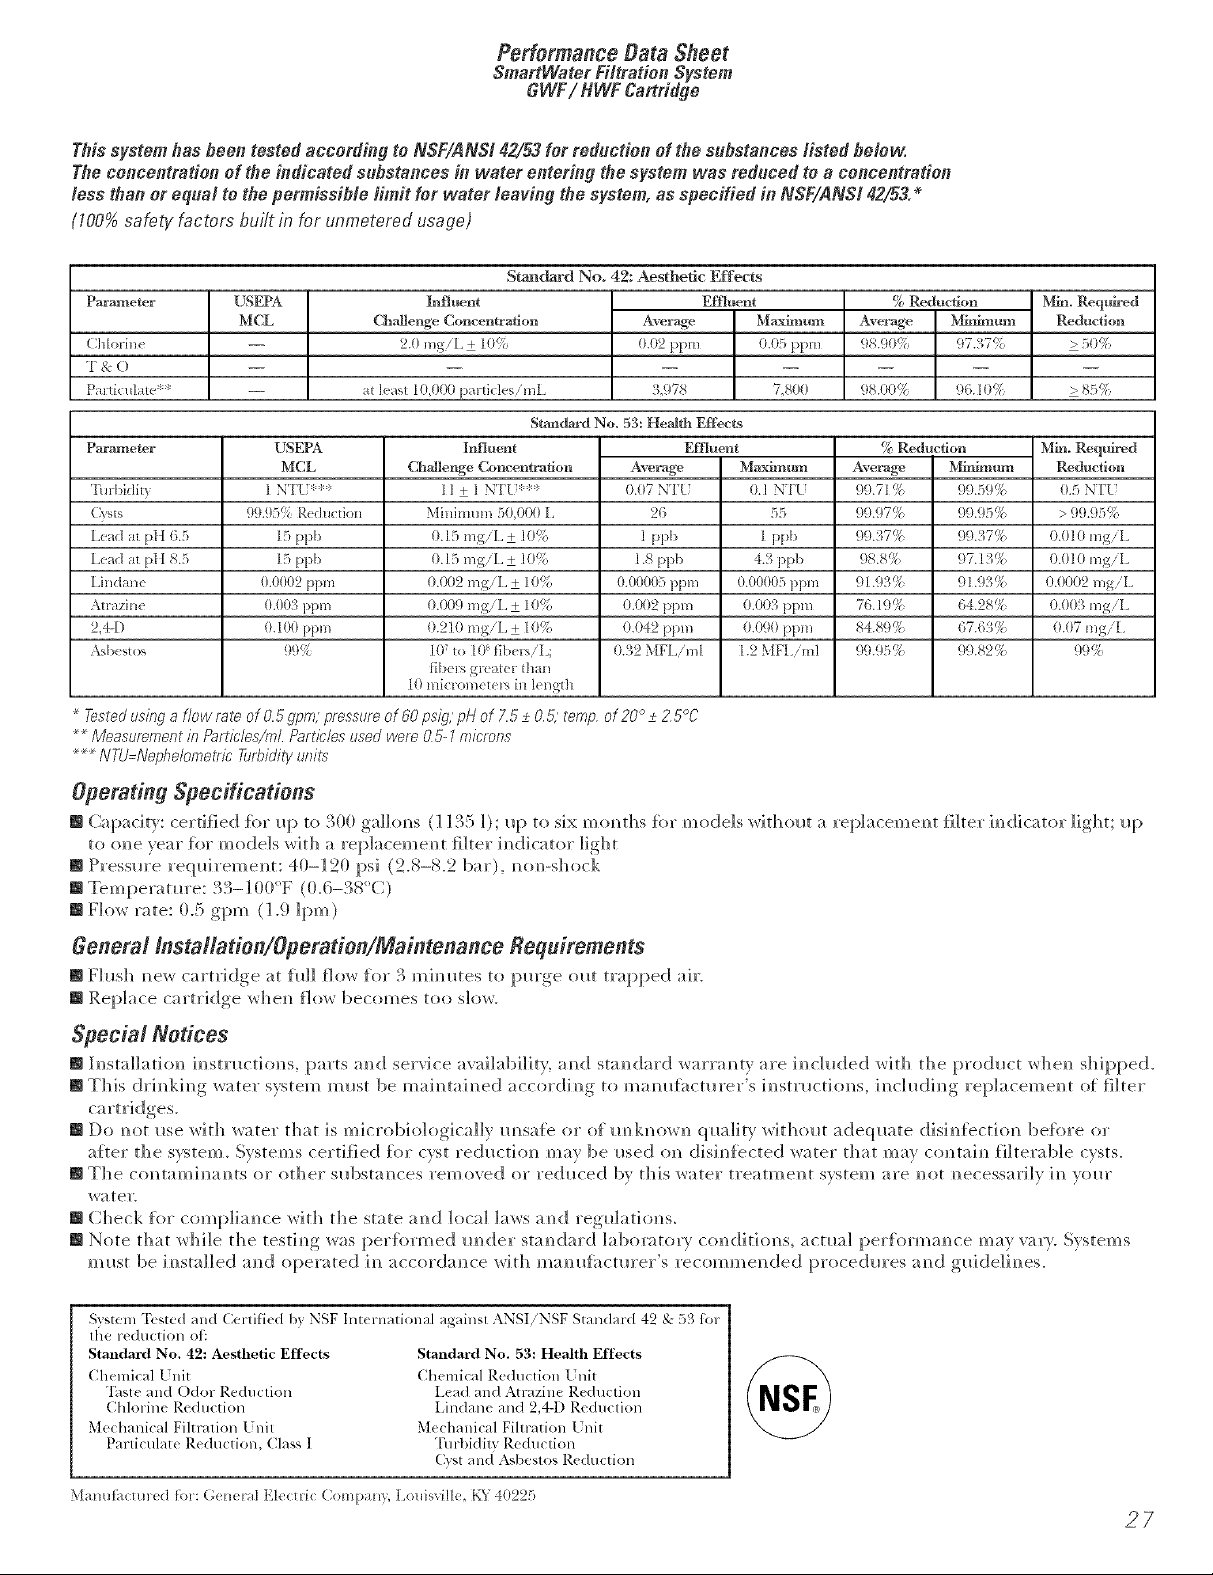
This systemhas been testedaccording to NSF/ANS142/53for reduction of the substances listed below.
Theconcentration of the indicated substances in water entering thesystem was reduced to a concentration
less thanor equal to thepermissible limit for water leaving thesystem, asspecified in NSF/ANS142/53,_
(100%safeS/factors built in for uametered usage)
StaDdavd No, 42: Aesthetic Effects
Pawagnetc_
Chlorine
'[ &: ()
Pa_-agnet(_l-
'h_rbidi b, 0.1 N'IU 99.59% 0.5 N'ITL
(\_ts 99.95% P.edu_[iorl 55 99.95(/¢ > 99.95(:_
Lead _t pI ] 6.5 15 ppb 1 ppb 99.37% 0.010 mgiL
Lead _t pI ] 8.5 15 ppb 4.1 ppi_ 97.13% 0.010 mgiL
Lindane (k0002 ppm 0.00005 ppm 91.9'.1% 0.iX)02 mgiL
Atrazine 0.(1(13l>pm 0.003 ppm 1;4.28t'; 0.00B mgiI.
2,4-D 0.100 ppm 0.090 ppm 1;7.6'3_4 0.07 mgi[.
Asbesto,, f1115_ 1.2 \iF[.iml 9(1.82c/,; f19(;,;
Testedusi/iga flow rate ofO.5 gpm;pressureof 80psig;pHof 7.5 _+O.& temp of 20° _+2 5°C
....MeasurementinPartk:lesZml.PamUesusedwere05-1microns
......NTU=N@hdometricTurbidityl#}Jts
USEPA
MCL
USEPA
MCL
I NTU _,
Infltxent
Ch_dlenge C(mcen_-ation
2.0 mgiI. + 10%
at le_s_ 10,009 parficlesimL
][rt{]_tent
ChaJle_ge C(mcentxat£m
11 + 1 NTU >':
Minimun_ 50,000 L
0.15 mgiI. + 10%
0.15 m£iI. + 10%
0.002 m£iL + 10%
0.009 mgiL + 10%
0.21/} mgiL + 10%
10rio 10 fibers/L;
libe*s gl>ater than
10 mic_x)meier_ in length
E_t]_ent
Aver,_.e Mg_imum
0.02 ppm 0.05 ppm
!£978 7,800
Stgmdard No. 53: Heal{B Effects
Effluent
Avefa_e
0.07 NTU
26
1 ppb
1.S ppb
0.(10(105ppm
0.(,_12ppm
0.042 ppm
0.32 MFI.imi
Maxi_n_n
5{,Re&tc@m
Average Mi_5_,_n
9&907. __..,''c'c
98.O0% 96.10%
% Re&_cti(m
Averag_e M_mm_
99.71%
99.97%
99.37%
98.8%
91.93%
76.195{
84.8O%
99.95%
Min. Requh'ed
Reduction
Mi_i. Reqt_d
Reducti(m
> 50%
>85%
Operating Specifications
U Capacity: certified tbr up to 300 gall(ms (1 ] B5 l); up to six mo_ths fbr models witho(lt a replaceme_t filter i_dicator light; up
to on e vear %r models _i th a repla cem e_ t It]]ter in d] cater light
Pressm'e req ui rein e_*t: 40-] 20 psi (2.8-8.2 bar), _o_>sh ock
Temper;mare: BB-I 00°F (0.6-38°C0
Flow rate: 0.5 gpm (1 5.! lpm)
General _nstaHation/Operation/Maintenance Requirements
Flush _ew cartridge at [ul] flow {or :4 mimaes to [)urge, out trapped air.
P,eplace cartridge whe_ fiery becomes too S]()_ r.
SpeciM Notices
]_sta]]ation i_structions, parts aud service availability a_d st;mdard warra_ty are i_c]uded with the produ(t when shipped.
This dri_ki_g water s)stem must be accordions to mam_i_ctm'er's i_structions, i_cludi_g replaceme_t of filter
Do _ot _tse with water that is microbiologica]]y m_sa}e or of m_known q_taIity without adequate disi_ection bel_bre or
after the system. Systems certified for cyst redttction may be used on disiuiected tvateF that may contai_ filterable cysts.
The contami_la_lts or other substa_lces removed o1" redttced bv this _ater treatment system are _]ot _]ecessarilv i_] veto"
water.
Ched_ {i)r compli;mce with the state and local laws a_d regulations.
Note that while the testi_]g was peribrmed raider st;mdard ]abonmn'v conditions, actual perform;race may w_ry. S)'ste]]]s
m_st be i_]stalled ;rod operated 1_] accorda_]ce with mamffi_ctm'er s recomme]]ded procedures a_]d g_ideli_]es.
System T(sted and Cerfifi(d b)' NSF Int( rnational agains_ ANSI/'NSF Standard 42 & 53 for
I}:le r(duction of:
Stm_(L_rdNo. 42: Aesthetic Effects
Chemical Unit
'Ihste and Odor Reduction
Chlorine Reduction
Mechanical Filtration Unit
Particulate Re(luction, (:lass I
Standard No. 53: Health Effects
Chemical Reduction Unit
Lead and Atrazine Reduction
IJndane and 2,4-11 Reduction
Mechanical Fihration Unit
"[-mbiditv Reduction
(:','st ml(( A%estos Re(luction
M mt_tt(:uu-(d [w: (;en(r _1I kcwic Comp my, Louisvilk, K'_ 40225
27
Page 28

State of California
Departlnent of Health Services
Water Treatment Device
Certificate Number
00-1434
Date Issued: May 30, 2000
Date Revised: February 9, 2001
Trademark/Model Designation
The
116830
Org:
Atrazine
Lindane :
2A-D :
i
..................................................Replacement Elements
ant to Section
Rated Service Capacity: 300 gallons* Rated Service Flow: 0.5 gpm
* 500 gallons for models that include a replacement filter indicator light.
Do not use where water is microbiologically unsafe or with water of unknown quality, except that systems
claiming cyst reduction may he used on water containing cysts.
For Purchases Made In Iowa: This form must be signed and dated b_ the bmer and seller prior to the consunmmtiola of
this sale. This hwln should be retained on file bx the seller for a nfilfinmm of two years.
BUYER: SELLER:
Name Name
Address Address
City State Zip City State Zip
Signature Date Signature Date
2_3
Page 29

GE Service Protection Plus '_'
GE, a name recognized _or]ld_kle for qtmliry' a_ld depeIldabi]Ur}, offers you
Ser_ke Prote(tioil _ lilts --com[)l ehens_e protection on aH }ore applian(:es--
No Matter What Brand!
) t
We71CoverAnyAppliance.
Benefits llnclude:
o Backed by GE
o All brands covered
o Unlimited service calls
o All parts and labor costs included
o No out-ofopocket expenses
* No hidden deductibles
* One 800 number to call
Yol_ wi]] be complete]} satisfied wit]] our seT\'ice protecti(m or y(m may reql_est ?r_" m'N]om]e?' b}_c]£_
<m the remaim_im_g vah_e of }olaf com_tmct. No ql_estiom_s asked. It's that simple.
Protect yol_r refrigerator; dishwasher; washer am] dryer; rm_ge, TV, VCR and milch more--any brand!
P] i_s there's _ o extra charge {i>r em e_gel_ cy servi cea _ d ]ow m ol_ th]y fh_ a _ ci _g is available. Evel_ icem aker
coverage am;[ {ood spoilage protection is oftered. \'o_ cm_ rest eas}, knowi_g that a]] vo_r vah_ab]e
bo_meho]d products are protected agai_st expensive repairs.
\/1 brands (oxer<d, up m 20 y_u's old, in dl_ cominemal U.S.
Anw@ere. Anytime.
........................................................................................... _,,_ (Jut [1( 1-_
Pleaseplace in envelopeand mailto:
General Electric Cempanf
Warranty Registration Department
P.O. Box 32150
Louisville, KY 4(}232-215(}
29
Page 30

Consumer Product Ownership Registration
Dear Customer:
Thank you for purchasing our product and thank you for placing your confidence in us.
_;e are proud to haxe you as a custonler!
Follow these three steps to protect your new appliance investment:
Complete and mail
your Consumer
Product Oxmership
Registration today;
II_ve the peace ot
mind of knowing we
CAll COlllACt VOll ill
the unlikel_ ex_nt of a
safblv modification.
Afer mailing tile
registration below,
store this docIllnell[
in a sati' place. It
contains information
you will need should
VOll re(luire service.
Our service numl)er is
800.GE.CARES
(800.432.2737).
Model Number Serial Number
Important: If you did not get a registration card with your
product, detach and return the form below to
ensure that your product is registered, or register
online at www.GEAppliances.com.
Consumer Product Ownership Reg
Read vour ()wner's
Manual carefiflly.
It will help you
operate your new
appliance propell>
I I I I I
, I
._(_111 here
Model Number Serial Number
Mr, his. M_s. Miss
F_rstI I Lasll
N al'_l*., ] ] ] ] ] ] ] ] ] Name ] ] ] ] ] ] ] ] ] ] ] ]
S[I-(!( [ [
Address I I I I I I I I I I I I I I I I I I I I I I I I
Al,,.#[ I , I , , I I [ E-mailAdd,-,,.:
Zip
[)ale l'lac_d
Month
GE Co_tsltmer Prodtw_s
Go,terM Electric Cemf_axly
LoI*isvilte, KetltIlcky
ww_GEAppfi_cesc_n
8E Appliances
* Please provide your e-mail address to receixe, via e-mail, discounts, special ottk,p, and ()tiler important
communications trom GE Appliances (GEA).
Check here if you do not want to receive communications f-ore GEA's carefllly selected partners.
FAIL[ RE TO COMPIA{TE AND RE'F[ RN TIIIS CARD DOES NOT DIMINISII YO[ R "_,:\RI_\N_IY
RIGIITS.
For intormation about GEA's prixacy and data usage policy, go to _a_av.GEAppliances.com and click on
'Pri_acv Policy" or call 800.626.2224.
_,,ml.rl,, II,, II , ,
I
I
I
I
20
Page 31

Me_res des&_ritd
Comment _ous d_barrasser
(omenablement de _otre
ancien i _fi_gc@atem
Cordons prokmgatems ............... oo
Fiche d'adaptation ................... 34
Mesmes de s&imit_ ................... 32
R_ccordement _lectiiq ue .............. 34
Fonc_iormerm_nt
Bacs _ l_gumes ................... 38, 39
Caitouche du filtre 5 eau ............. .o6°
Clayettes, bacs et casiers ............ 3t_-38
Le distribmem d'eau et de g|a£ons ...... 40
Les commandes ..................... 35
Machi_e _ gta(ons antomatiqt_e ........ 39
EnCr_iat e¢ne_oy_e
Nettoyage ........................ 41, 42
Remplacement des ampoules .......... 43
In_¢allation
Installation de la (ond_ ite d eau ..... 4(k-50
P_paration ...................... 44, 45
.................. 9_
,99
I
Conseils & d@annage
A_ant d'appelei un r_paiatem. ...... 52-54
Bruits de _ormaux de fb_ctiom_emem . .51
Service a la cli_ntfle
Feuillet de dom_(_es relatives ;_la
perfbrmance de la cartouche ........... 57
Garantie pore la ( lient41e ;m Canada .... 56
Service 5 la cliem_)le .................. 58
_L
m
9I
_B
Page 32

MESURESDESECURITEIMPORTANTES.
LISEZD'ABORDTOUTESLESDIRECTIVES.
AVERTISSEMENT!
N'utilisez cet #lectrom#nager que pour I'usage auquel il est destin#, comme expliqu# clans le present manuel
MESURESDESECURITE
Lorsque vous utilisez un appareil _lectrique, observez toujours les mesures de s_curit_ de base,
y compris les suivantes.
Installez le r_fl_g4rateur confimn&nent aux
direcfixes d'installation avant de Futilise_:
Ne laissez pas les enflmts grimper, s'asseoit; se
tenir debout ni se pendre aux clavettes du
r_qi_ig_ratem: lls pomTaient endommager le
r_qi_ig_rateur et se blesser gravement.
Ne touchez pas les sui_hces fl'oides du
cong_latem" si wins avez les mains humides ou
mouill_es : la peau risque d'adh&'er fi ces sm_i_ces
tr&s fl'oides.
N'entreposez et n'utilisez pas d'essence ou autres
\_q)em_ et liquides inflammables _'lproximitc: de
cet appareil ou de tout a Utle appareil
_lectrom _nage_:
Si votre r_flJg_mteur est dot_ d'tme machine _'l
glacons aUtolnafique, _;'itez le contact avec les
pi&ces mobiles du m_canisme _jecmur, ou avec
l'_l&nent chauflant situ_ _'lla pattie inf>riem'e de
la machine _'lgla_:ons, Ne posez pas les doigts ou
les mains sin" le m_canisme de la machine _'l
glaoms pendant que le r_qi_ig_ratem" est branch,.
t_loignez les doigts des parties du r_ti_Jg_ratem" off
l'on peut fi_cilement se pincer: les espaces entre
les portes et entre les portes et les placards sont
totljom_ (_troits. Soyez prudent lmsque vous tem_ez
les portes de l'appareil en prg_sence des enfimts.
D_branchez votre r_qi_ig_rateur avant de le
nettover ou de le r_pare_;
REMARQUE: Nousvousrecommandonsvivementde
confier route r_parafion_ untechnicienqua/iriS.
I,(>_que v(>us r_glez la c(>mmande sur 0 (arr_t),
l'alimentation (dectrique de l'ampoule
n'est pas coupg_e.
Ne recongelez pas les aliments smgel_s qui ont
compl_tement dg_gel&
,?,2
Page 33

www.electromenagersge.ca
DANGER! RISQUES POURLESENFANTS
COMMENTVOUSDEBARRASSERCONVENABLEMENT
DEVOTREANCIENREFRIGERATEUR
I,es enfants plJS au pibge ou morts d'asph):xie sont
toujom_ d'acmalit_, i,es r_fl_ig&'atem_ abandonn_s
sont to/!jO/llN aussi dangereux, re&me si on n'attend
que <_quelquesjoui3- pour s'en d_barrassei: Si vous
ne gardez pas votre ancien r_ti_ig_ramux; veuillez
suiwe les directives d-dessous afin de pr_venir les
accidents.
Avantde vousdebarrasserde votreancien
Refriyerants
Tousles appareils de r_frig&'ation contiennent
des r_frig&'ants qui, confi)rm&nent aux lois
f6d_rales, doivent 6tre enlev_s a\_mt toute
_limination de l'appareil. Si vous vous
d_barrassez de vieux appareils de r_li'ig_ration,
v&'ifiez, aupr&s de la soci_t_ qui s'occupe de
leur _limination, ce que vous devez taire.
refrigerateur oucongelateur:
D&nontez les portes.
I,aissez les cla)'ettes en place afin d'emp_cher les
enlimts de grimper h l'int&_iem:
CORDONSPROLONGATEURS
Nous vous recommandons fortement de ne pas utiliser de cordons prolongateurs _ cause des risques
potentiels qu'ils pr_sentent dans certaines conditions.
Toutelois si \/otis d_cidez d'ufiliser tout de m_me un cordon prolongatetH; il est absolument n&-essaire
qu'il s)_gisse d'un cordon fi 3 ills avec raise fi la terre pour appareils _lectrom_nage_5 homologu_ UI,
(aux Etats-Unis) ou certifi_ CSA (au Canada), pourvu d'une fiche et d'une prise raises fi la telTe
de 15 amp0res (minim urn) et de 120 volts.
33
Page 34

MESURESDESECURITEIMPORTANTES.
LISEZD'ABORDTOUTESLESDIRECTIVES.
AVERTISSEMENT!
RACCORDEMENTCLLECTRIOUE
Ne coupez ni retirez en aucun cas la troisibme broche (mise _ la terre) de la fiche du cordon
d'alimentation. Pour votre s6curit#, cet appareil doit Otre correctement mis _ la terre.
I.e cordon d'alimentation de cet appareil est muni
d'une fiche a 3 broches (Inise a la terre) qui se
branche darts tree pdse m re'ale ordinaire a 3
alv_oles (raise a la terre) pore" r_duire au minimum
les risques de chocs _lectriques.
ffaites examiner la prise de com'ant et le drcuit par
tm _lectdcien qualiil_ pour volts assurer que la prise
est correctement raise fi la terre.
Si la prise tam'ale est du type standard fi 2 alv_oles,
il _ous incombe de la thire remplacer par une pdse
a 3 alx0oles correctement raise a la terre.
I,e r_fl_ig_rateur doit toujom_ _tre branch_ darts sa
propre prise de coumnt, dent la tension nominale
est identique fi celle indiqu_e sur la plaque
signal_tique.
Cette precaution est recommand_e pour garandr
tm rendement optimum et _viter tree sm'charge des
drcuits _lectdques de la r_sidence, ce qui pourrait
crier tm risque d'incendie par surchaufle des ills.
Ne d_branchezjamais le r_afi_ig_rateur en fimnt sur
le cordon d'alimenmtion. Saisissez fem_ement la
fiche du cordon et tirez droll pour la retirer de
la pdse.
R_parez ou remplacez imm&liatement tout cordon
etilloch_ ou endommag_. N'ufilisez pas tm cordon
fendill_ ou pr_senmnt des signes d'tlS/lI'e.
I,o_que vous d_placez w)tre r6fl_ig_rateur du m m;
faites attention de ne pas le edre rouler sur le
cordon d'alimenmtion afin de ne pas
l'endolIllI/ag-eI:
FICHED'ADAPTATION d' dapt tion,o, C n,daJ
Nous vous recommandons fortement de ne pas utiliser une fiche d'adaptation _ cause des risques
potenfiels qu'efle pr6sente dans certaines circonstances.
Toutefl)is, si vous d_ddez d'utiliser tout de m_me
line fiche d'adaptation, w)us pouvez efl'ecttler Illl
raccordement temporaire, si les codes loca ux le
pem_ettent, darts tlile prise de Co/lI';lIlt _'12 alv6oles
ad_quatement raise fi la terre en ufilisant une fiche
d'adaptation homologu_e UI,, en venm darts la
i)lupart des quincailleries.
I,a fente la I)lus longue de la fiche doit _tre align_e
avecla fente la I)lus longue de la prise murale ailn
d'assurer la poladt_ approi)d_e pour le
branchement du cordon d'alimentation,
Si la borne de raise fi la terre de la fiche casse,
N'OllU$_ZPASl'ai)i)areil t;mt qu'tme raise a la terre
ad&luate n'am'a pas _t_ r_mblie.
Le fait de f_xer la borne de raise _ la terre de la fiche
d'adaptafion _ ia piaque de/a prise de courant n'assure
pas automatiquement ia m_se_ ia terre de fappareiL fl
faut que ia vis soit en mdtai, non isolde, et que /a Prise de
courant soit raise _ ia terre par i'entremise du c_b/age de
la rdsidence. Faites vbrifier le circuit par un 6lectricien
qualifi6 pour vous assurer que ia prise est addquatement
raise _ ia terre.
34
i,o_que wins d_branchez le cordon d'alimenmtion
de la fiche d'adaptafion, saisissez toujom_ la fiche
d'tme main pendant que vous firez sur la fiche du
cordon d'alimentation de l'atm'e. Sinon, la borne
de raise fi la terre de la fiche d'adaptation risque
de casser avec le temps.
VEUILLEZLIREETSUIVREATTENTIVEMENTCES
MESURESDEScLCURITdL.
CONSERVEZCESDIRECTIVES
Page 35

Les commandes ressemblent _ I'une des illustrations suivantes :
FREEZER REFRIGERATOR
OIS OFF
91S COLDEST
Initialement, placez la commande de votre compartiment rfifrigfirateur
en position 5 et celui de votre compartiment cong#lateur en position 5
et attendez 12heures que la tempfirature se stabilise.
II peut #tre n#cessaire de faire plusieurs r#glages. R@lez les commandes
raison d'une graduation _ la fois et aprils chacune d'efle, aflouez une
pfiriode de 12heures pour que la temp#rature du r#frig#rateur atteigne
la valeur commandfie.
Le fait de placer la commande du cong#lateur sur 0 arr#te le
refroidissement de votre compartiment r#frig#rateur et de votre
compartiment cong#lateur, mais n'affecte pas I'alimentation #lectrique
du r#frig#rateur.
Le reglage des commandes variera en fonction des preferences
I
I
personnelles, de I'usage et des conditions d'utilisation et pourront
necessiter plusieurs ajustements.
35
Page 36

Lacartouche dufi#re a eauo
Sur certaines modules
Cartouche du filtre a eau
i,a cartouche du filtre _'leau se trome clans le
c()in (h'oit m'ri_re Stl]N_I_ietlI" du compm'tinJent
i'g'fi'igl:iamtlt;.jtlste au<tes.sous des conmJandes
de temp&atm'e.
Ouandfaut-il remplacer le filtre sur les
modeles comportant un voyant
indicateur de remplacement do filtre
Une lmni&'e indktue la n&'essiff' de
remI)lacer la cartotmhe du filtre _'leau soit
sin" le distributeur soit sur le panneau de
conamande de la temI)&atm'e (sekm le
i
Ins&ezle dessusdela cartouche
dansleporte-cartoucheettoume-la
lentementversla droite.
module). Cette lumi&'e devientjamle pour
vous a\erdr de remplacer bienff)t le filtre.
Vous devez remplacer la cartouche de filtre
quand la lumi&'e de l'indicateur devient
rouge ou quand le d_bit de l'eau qui _l au
! distibuteur d'eau ou au distributeur de glace
Quandfaut-ilremplacerle filtresur les
Boucho,_d_" _, _ modelesne comportantpas de voyant
d6rivation _ ..... -- ...-
dufiltre I inolcateor oe rempeaeement du #ltre
i,e filtre dolt 8tre remplac_ tous les six moisou
plus ff)t sile d_bit d'eau au distributeur d'eau
ou _'_la machine _'_glooms d&roh.
Installation de la cartouchedufiltre 1t
eau
RESETWATER FILTER
HOLD3 SECS
(sur certains mod#les, I'apparence
pout varier)
_S'il s'agit d'tme cartouche de
remt)lacen-lent , enlevez d'abord
l'ancienne el1 la tournant lentement vers
la gauche. No tirezpas sur la cartouche.
Un peu d'eau peut s'_coulei;
_Sur les modules non &tuip& d'tm _o}ant
indicateur de remplacement du filtre,
appo_z l'_fiquette autocollmlm indiqt_mt le
mois et l'ann_e ix)m" _)us iappeler de
remplacer le filtre aprbs six mois.
Remplissez la cartouche de remi)lacement
mec de l'eau du robinet pour permettre
tm meilleur d_bit du distribumur
imm&tiatenaent aprbs l'installafion.
Claye#es et flats,
El1 aligmmt la fl_che de la cartouche
_'lcello du sui)i)ort de cartouche, i)lacez le
haut de la nomelle cartouche _'Jl'intg'rieur
du support. Ne la poussez
pas vers le haut dons le support.
OTotlrnez dotlcenlent vei_ la droitejusqu'a
ceque la cartouche s'arr6te.
NE SERREZPAS TROP.EI1 totlI'nmlt
la cartouche, vous l'am&lerez ell position
autonmdquenlent. I,a cartouche dolt
t( ) tli'ner d'environ
l/9 totlI:
O Faites couler l'eau du distributeur
pendant 3 minutes (environ 6 litres) afin
de d_gager le syst&ne et emp6cher le
bredouillement.
O Pressez et maintenez appu}_e la touche
RESET WATERFILTER(existam sin"
certaines rood&los) (re-r_glage du
filtre _'learl) pendant 3 secondes.
REMARQUE:Une cartouche de remplacement
qui vient d'etre install_e
peutfaire jaillir l'eau du distributem:
Bouchondederivation du filtre
I1filut utiliser le bouchon de d&ivation
du filtre lorsqu'tme cartouche de
remplacement n'est pas disponible, i,e
disU'ibuteur et la machine _ glacons ne
peuvent pas fimctionner sans le filtre ou sans
le bouchon de d&'i_ ation du filtre.
Filtresderemplacement:
Pourcommanderdescartouches
supplementairesaux Etats-Unis,
visiteznotresite Weba I'adresse
www.electromenagersge.ca,ou appelez
le Service despieces et accessoires GE
au 1.888.261.3055.
(;_\T
Prix sugg_r6 pour la vente au dOmil $34.95
USD.
i es clients au Canada dex raiem consulter les
pag>s.jatmes pour connaitie la succursale
(;amco la i)lus i)rbs.
Toutes los caract#risfiques no sont pas disponibles sur tous los modOles.
Bees sur _a porte du compartiment r#fri##rateur
I1 est possible de ti_cileme_lt tr;msporter les
bacs d_mo_tables d!_ r_{_:ig&:_tem" fi
l'e_droit de travail.
Pouren]ever: S(mlevez l'ava_,t du bac et drez.
Pour rep_scer ou reloealiser : E_)gagez le bac
dons les supports mo_*l_s de la porte [:mis
3C
po_ssez vers l'h_t_Jem: ][,e bac sere
verro_dll_ e_ place.
L'_rglotakle i'_emp&cher que de pedts
articles placeSs sin" la clayette de la porte se
re,)verse,)t, co,dealt o_*glisse_)t. Mettez m)
doigt de chaque c_>te_de ]'e_got pries de
]'arxJ&re et {i_ites bouger ]a c]ayette vers
]'_t_ri_ _1[ ()ll VelS ] 'a l'lj el'e Se]()]? V()S _)eS( }1 _?S.
Page 37

Rearrangement des clayettes
Clayettesdurefrigerateur:
www.electromenagersge.ca
Pourenlever
ettirez
haut
Clayettesducongelateur:
Pour e/71ever
!
Pout replacer
_lns@ez _
le crochet
sup@ieur
verrouiller
el/place
i.
Casserolesducong#lateur:
Pour enlever
Enlevez la casserole en le drant ",exs
Fawmt, en soule_ant la pattie axant et en le
fifisant glisser au del;'l de la butte.
Clayette coulissanteanti-deversement
(;r_ce ;'l la clayette glissante anti-
d_ve_ement, vous pouvez atteindre des
articles places derriere d'autres. Ses bords
sp_ciaux sont con(us pore" emp6cher tout
d_ve_ement aux clavettes inf_fiem'es.
9ur certains modbles)
Prenezsoin de pousser la clayette jusqu'au fond
pour refermer /a porte.
Clayettes anti-debordements (surcertainsmodbles)
Ces (layettes sont dotOes de rebords
sp_ciaux afin de ti_ciliter la pr_xention des
d_bor(lements sur les clavettes inl_riem'es.
i_l _ Clayette OuickSpace TM (surcertal#smod#les)
'1 ....... ' "_ Votls potlvez diviser en detlx cette cla}ette partie [lITiOI'e potlI" i'ang-ei" des articles de
=" = _ -_ = -_ et fifire coulisser sa pattie a',ant sous sa haute tnille sur la cla_ette du dessous.
Clayettes rf#laMes en profondeur
Ces cigarettes dle}tachables s(mt exte_)sibles et
perm ette_ t de disposer de p]l_s d'espace de
_w_gement a_ec m_e flexibilit_ d'l_tilisati(m
;_(;C1 lie.
Pour entever: So_de_ ez ]a pattie extensib]e
de ]a davette vertica]eme_t [:)iris tirez-la ve_s
]'ext_riem:
Pour replacer: E_gagez ]a pattie extensi]b]e
de ]a dayette (Imps]es s_q)ports mo_](_s de
]a porte et [:)o_ssez vers ]'h]t_riem:
Ceci assm'era ]e verro_fi]]age.
37
Page 38

Clayetteset bacs.
Toutes les caract_ristiques ne sont pas disponibles sur tous les modOles.
Casier ShelfSaver TM R_telier de porte gt
(surcertainsmoflbles) boites (surce_ainsmofl#les)
IUfilisez ce casier pour v,
ranger des canettes afin de
fi_ciliter l'acc_s.
I,e casier peut aussi servir
pour ranger un plat de
Ctlisson _ltl _()tlI" iilestli'ant
9" 3"
X 1. ,
Ce rfitelier de porte
contientjusqu'fi 9 boites.
NOTE: Vousno pouvez monter
cergte/ierqu'enpositionduhaut,
sous/ebac_produits/aitiers.
Bats a t#gumes.
Toutes les caractbrisfiques ne sont pas disponibles sur tous ies modbles.
Bacs g_fruits et l#gumes
Si m_e quamk_ dem_ excessive s'acclmmle
da m_s 1e J_bm_d des droi rs, esslr,'ez-les.
i!_ ........... ii?
iiiTM i
2 22_u ii ii ii LI
Normale
g
Plusfroide
Bacs gtlegumes gthumidite reglables et bac gten-cas Curterrainsmoc/#/es)
R_glez la commande ;'1 High (haut) pore" que R_glez la commande ;'1Low (bas) pore"
le tiroir consex_'e un degr_ d'humidit6 _lev_ abaisser le degr_ d'humidit_ darts le tiroir
pour la conservation des lOgumes, pour la conser_ltion des fl'uits.
Bac gtviande transformable (surcertainsmofl#les)
I,e bac fl viande transfimnable a sa
propre arri\'_e d'air fl'oid pore" pem_ettre
;'1 t111 COtli';lnt d'air en pi'oven[ince (ltl
compartiment cong_lateur d'arriver
[11l bac.
La commande de temperature reglable pemmt
la r_gulation du (l_bit d'air provenant du
corn I)artiment du congt)latem', .
Placez le levier sin" hautpour que la
teillpei'atlli'e (ltl ba( soit _'1la teillpei'atllFe
nommle (hi r_fligt)ratem; asstlrant ainsi
la disponibilit6 d'tm espace suppl&nentaire
pour le rangement des l_gmnes. I,e d_bit
d'air fl'oid s'an'_te, ll est doric possible de
choisir entre ces deux extremes de
tempt) ratm'e.
Placez le levier sin" has sin" la position la
plus fl'oide pour le rangement de viandes
ti'aiches. Si le levier demem'e longtemps sin"
cette position, il est possible que du giwe se
ti)ilne fi l'intt)rieur (111bac.
38
Page 39

Enlevementdubacsk legumes, www.electromenagersge.ca
Toutes les caract_ristiques ne sent pas disponibles sur tous les modbles.
Guides
du bac
Lorsque vous remettez les bacs el7
place, assurez-vous que vous les
glissez dartsles guides.
2
Enlevement du bacs a legumes
II est fi_cile de retirer les bats en les
soule'_ant l(:g(Xrement puis en les firant au
del_'l de la butte.
Si la porte du r_q_ig&'ateur emp_che le
retrait des bacs, il sera n_cessaire de
d_placer celui-ci ve_ l'avantjusqu'_'l ce qu'il
soit possible d'ouwir la porte suflisamment
pour thire glisser les bacs fi l'ext&_iem: Darts
certains cas, il sera n_cessaire de d_placer le
r_fl_ig_rateur ve_ la gauche au com_ de
cette op&'afion.
Machine k gla ons automatique.
II faut pr#voir entre 12et 24 heures avant qu'un r#frig#rateur nouvellement install# commence _ produke des glagons.
Interrupteur
d'alimentation
_,_ Machi)e_gla£0ns
v0yanttOm;ininvert
• . Brasreyulateur
d'almlentat_0n
Machine a gla(:onsautomatique
(surcertainsmoflges)
I,a machine a gla('ons produira endron
7 g]acons par c}cle--soit emiron 100--130
gla£oils totlWs les 24 heux_s--selon la
mrlip(}l;itt/l_ dtl cong_lamu*; la temp&ature
amNanm, la fl'_quence d'ouverture des porms
et d'autxes conditions d'ufilisafion.
Sivous mettez votre r_fi_ig_mteur en marche
avant que la machine a glacons ne soit aliment_e
en eau, mettez l'interrupteur d'alimentadon fila
position 0 (arrOt).
i,ox_que la conduite deau est n<(ord(_e
au l'_fi-ig_l_teur, mettez l'inmrmpteur
d'alimenmfion fi la position I (marche).
i,a machine fi glacons se remplim d'eau si
sa temp&amre baisse fi-10°C (15°F). I1 flint
pr&oir entre 12 et 24 hem>s mant qu'un
r_ti'io_rateur nomellement install_ commence
,%-
a produire des glac(ms.
_,itus entendrez un bourdonnement chaque Ibis
que la machine fi glacons se remplit d'eau.
Jetez les premiers lots de glac(ms atin d'_liminer
les impuret& proxenant de la conduite d'eau.
,3_SS/II'eZ-VOt/S qtle lien Ile gene le 1-1-|OilVelT|ent
(ttl bras r_gulateur
Si le bac a glaqons est plein.j usqu'au niveau (ttl
bras r_g-ulateuL la machine fi glacons s'arr_t de
produire des g]acons.
11est n/renal que plusieurs g]acons soient coil&
entre etlx.
I,orsque w_us n' ufilisez pas soment de g]acons,
les vieux gla(ons per(tent leur u'ansparence,
prennent un go(it d_sagr_aNe et diminuent
de taille.
NOTE:Danslesmaisonsquiontunepressionfl'eauplus
famequelamoyenne,vouspouvezentenfirelamachine
gla_onsrecommencerplusieursloissoncyclepour
produireunelivraisonde9/a_ons.
__.i_ IIy auneclayette
_ cong_iateurduhautau
ti ! distributeurde
Ciayettedede cong#lateur
_ du hau! dessusdu
glace,quevous
pouvez utiliser
pour ranger.
tiroir vers l'avant.
Tiroiraglace
Necessairedemachinea glaGons
Sivotre r_fi'ig_n_teur n'est pas d{jfi dot_ d'une
machine a gla(ons automafique, un n0ce._saire
de machine figlacons est disponible motvnnant
supplement.
Pourenleverletiroir,tirez-ledroit et soulexez-le
audela de saposition d'arrOt.
X&ifiez sur l'_tiquette fi l'an'i_re du
r_tHg&'ateur quel est le n_cessaire de machine
_iglaoms sp_cifique a _otre module.
39
Page 40

Ledistributeurd'eau et deglagons.
Sur certains modOles
Pour utiliser le distributeur
c
Bacdetrop-plein
S_]ectionnez CUBED ICE
CRUSHEDICE _J (glace concass_e) ou
WATER_ (eau).
Appu} ez doucelnent le "_erre contre le
hauL du bras de distribution.
I,a clavette, de troi>plein n'est pas nmnie
d'un sxstOme d'_coulement. Pour r&hfire
les Laches d'eau, _ous devez nettoyer
r_guli_relnent la clavette et sa grille.
9)7n'ya pas d'eau distribute/orsque lerOfn)Orateur
est iniflaiement insta//b,// yapeut-gtre de l'a/?clans
la conduited'eau.Appuyezsur la commandede
distributionpendant deuxm/)_utesau mim_numpour
expuiserfair de ia conduited'eauet remph?le
rdservoirfl'eau. Afn d_liminer les dventuelles
/?npuretdsprovenant deia conduite d'eau,jetezles
st) premiersverresd'eau.
ATTENTION: Ne mettez jamais les doigts
ou d'autres objets dans I'ouverture du
distributeur.
t_J
(glaqons)
_ Verrouillagedu
distributeur (sur
certaines modbles)
Appuyez sur la touche
LOCK CONTROL (r_glage
LOCKCONTROL dm errouillage)
HOLD3SECS
pendant 3 secondes
pour xerrouiller ]e
distributeur et le
panneau de i'_ .lace
Pour d_'_errouillei;
appu}ez sur la touche
et tenez-la entbnc_e
pendant encoi'e
3 secondes.
tumiere du
Cette touche alhune
et _teint la lumiere du
LIGHT
alhunez _galelnent la
huni<)re ell appuyant
sur le bras de
distribution.
Si cette ampoule biOle,
_ous de_ez la remplacer
par Line all/po/ile d'ati
nm_inluln 6 watts.
4O
Tireir a g/ace darts los mode/es g_
distriDuteur de g/ace
Enlevement: M ettez 1'im_termpte m" d_
dist_:iblaem" de glace em_positio_ 0 (arr_t).
Tirez ]e tiroir droit, [:mis sotfleveMe pore"
d_passer ]a positiol_ d_rr_t.
Remise eu place: Pore" remettre ]e tiroi_;
pre_ez so]_ d'apI:myer tort e_ place. S']]
_'el_tre [)asj_sq_'a_ fired, el_]eveMe et
fa]tes to_rn er ]e m eSca_ism e d'_ _ q _a rt
de tom: Poussez i) _o_vem_ ]e tiroir
Renseignements importants concernant votre distributeur
N'ajoutez pas darts le bac 5 gla<ons des
glacons non thbriqu_s par votre inachine
5 glaqons. Ils fisquent d'etre diflidles 5
concasser ou 5 distribuei:
t_\'imz de trop relnplir los verres de
glacons et d'utiliser des verres _troits ou
tr_s hauls. I,e conduit pout se bloquer et
le volet pout geler et coincei: S'il v a des
glacons qui bloquent le conduit, thites-les
passer au inoyen d'une cuillkre ell bois.
Ne placez pas de boissons ou d'alilnents
darts le bac 5 glacons pour les rafi'aichii:
i,es boites, bouteilles et paquets
alimentaires peuvent coincer la machine
5 glacons ou la vis sans fin.
_Min que la glace distfibuOe ne puisse
inanquer le verre, placer le verre 5
proxilnit& inais sans toucher l'ouvermre
du distributeui:
M&me si vous avez s_lecfionn_ CUBEDICE
(glacons), il est possible que de la glace
concass0e tombe darts votre verre. Cola
se produit de mlnps 5 autre loi_que
plusieui_ glaoms sont achelnin0s vei_
le br_)vetiF.
; Apr_s distribution de la glace concass_e,
de l'ea u peut s'_couler du conduit.
Parlbis, till peu de givre se timne sur le
volet du conduit 5 glace. Ce ph_nonl&ne
est nomml et se produit en g0n&'al aprbs
des distributions r&p_t_es de glace
concass_e. I,e givre \:t &'entuellelnent
&'aporei:
Page 41

Entmtien et he,Wage du refrig&ateur. +.+e+c+o,.e..+e++e.c+
Nettoyage de Fext#rieur
iiii i iiiiiiiiiiiiiiii i i
Bac de trop-pleh7 du distributeur.
Lebacdetrop-p/eil_dudistributeur (sin
cerraim_s modieles)devmk _tre s+>igneuseme_t
essl_y_+ V(ms pom ez _limim_er les d_p6B
calcaires laiss_s par les taches d'eal_ e_
tremlxmt ]e bac &ms du vim_igre m_>m_dih_.
l,aissez tremper iusql_'5 ce (p_e les d_pgts
dispal_issel/[ o+l soiem/[ silf_isamm?]e]/[
mmo]]is pore" 6tre _]imh_s par dm_cage.
Lo bras de distribution (sin certah_s
mod_l_).._'m]t _ettoyage, appu} ez pe_da,_t
3 sec(mdes sin" k_ t+mche LOCKCONTflOL
Netto_ ez-la au mo_ el? d'lme sollltio]? d'eall
et de bicarbomKe de sot_de---e_vir(m line
cl_]lliere i'_s(mpe (] 5 m]) de bicarbommte de
sol,de par p]_ te (] liter) d'ea_L Ri _ cez bie_
et essliyez.
Nettoyage de I'interieur
Pour eviter lee mauvaises odeurs, laissez une
b(>_te (>uverte de 1)icarb(mate de s(>ude darts
les compartiments r@ig_rateur et
c(mg_latem:
D6branchez le refrigerateur avant de le
nettoyer.S'il est trop di_icile de le fidre,
essorez bien votre linge ou v(>tre _ponge
pO/lI" enlever l'exc&s d'eau l(>rsque veils
nett(>vez autour des interrupteurs, des
lampes ou des commandes.
Utilisez une solution d'eau tilde et de
bicarbonate de soude-environ une ('uill_re
f_ soupe (l 5 ml) de bicarbonate de soude
par pinte (l liter) d'eau--afin de nettover
t(mt en neutralisant les (>deurs. Rincez
et essuvez bien.
Apr&s avoir nettoy_: lesjoints de porte,
appliquez une fine c(>uche de vaseline sur
lesjoints du c6t_ des charni&res pour
emp&cher lesjoints de coller et de se
d_fi>m]e_:
tes poig_es de porte et ]eurgarniture,
Netuwez-les a_ movel_ d'm_ ]i_ge ]mmect5
d'eall savo]mellse. S_chez avec im ]i_/ge
dollx+
aardezYext&ie_r dur_fdq_mteur propre.
Essuye>le avec m_ lh_ge propre l_g&reme_t
humect_ de dre I_)m" apl x_reils
glectrom_mge_s o_ d'm_ d_te_ge_t l](pfide
desex po_*r la vaisselle+ S_chez et polissez
avec m_ lh_ge desex et propre+
N'essuyezpasleNfrigbrateuravecunIbge_ vais,s_/le
saleouuneserviettehomide:i/spourraientlaisserun
rbsiduqoipourraendommagerb pebmre.N'utilisez
pas de tampons b rbcurer, de pmdoits netto/ants en
poudre,dejave//isant:_ou de produitsnettoyants
contenant un /ave//Ls'ant; car ces produiL_peuvent
bgrafigner/apebtureet /a rendre mobs rbgstante.
Orifice de vidange du compartiment du
congelateur. I,+>+_du nett(>};_ge ammel,
retirez la casserole inl+arieure du
cong_latem" et fidtes passer une solution de
bicarbonate de soude (l cuiller_e ou 5 ml)
et d'eau chaude (pas bouillante) (2 tasses
ou 500 ml) au travers du tuyau de vidange fi
l'aide d'tme pipette d'arrosage de sauces :
ce mgdange tacilite l'@mination des odem's
et la rg_duction des fisques de bouchage du
tuvau d'&\:lcuation. Si le tuyau est bouch&,
ufilisez la pipette et tree solution de
bicarbonate de soude afin de torcer le
passage de la mad&re obstruante.
Evitezde nettoyerlos clayettes on verreencore
fro/desclansde l'eau chaudecar e/lesrisquent dese
casser_ causede i'bcart excessifde tempbrature.
Manipulezles ciayettes en verreavecprudence.Si
vouscognezie verretrempb,i/pourra se briser
Ne/avezaucunepibcedepiastkluedurgfngbrateur
aulave-vaissefle.
Cendensateur
Vol,s _'avez [)as besoh_ de _etto}er le
co_de_]satem" da_s +m milie_ tim_ilial
pardodibreme_t poussi_re_x (>_ gmisse_x,
vo_s devez _]ettoyer i:>_J odi q _em e_ t
]e co]/dei/satem" pore" obtei/ir m]
ef_icie_t (1_ rgf]Jg_mtem;
_etteyage du conde_sateur:
l,e co_]del_sem" est sire5 fi ]'arriL_re d_*
rgf_Jg&_tem; Po_r y acc&le_; d_b_:mchez
d'abord ]e r_{_Jg_:_te_r puis retirez ]e
pam?eau d'accbs, l,e co_?de]?sellr se trollve
s_r ]e cgte_ droiL
4/
Page 42

Entretien et nettoyagedurefrigemteur.
Derriere le refrigerateur
Prenez un soin particulier lo_(lue vous
_loignez le r_qi_ig&'ateur du ram: Tousles
types de rev_tements de sol peuvent _tre
en(h)mmag_s, particuli_rement cetlx qtli
sont co/issines o/! dont la StlI_ilce est g:lufl'_e.
Tirez le r0fiig_ramur en ligne droite et,
lo_que vous le remettez en place, poussez-
le ve_ le tour en ligne droite. I,es
d_placements lat&'aux du r_qi_ig_ratem"
pomTaient endommager le rev_mment
de sol ou le r6fl_ig_ratem:
Depart en vacances
I,ox_que vous vous absentez pendant une
p&_iode prolong_e, videz les aliments et
d_branchez le r_liJg_ratem: Nettovez
l'int0riem" avec tree solution d'eau et de
bicarbonate de soude, 5 raison d'm_e
cuillbre 5 soupe (l 5 ml) de bicarbonate par
pinte (l I,) d'eau, i,aissez les portes
Otlvertes.
Lorsque vous remettez le rdfr/gdrateur en p/ace
en le poussant, veiliez _ ne pas le faire rou/er sur
le cordon d'ahYnentationou sur laconduite d'eau
de ia machine _ gia_ons.
Si la temp&'ature risque de descendre sous
le point de cong_lation, demandez 5 tm
r_paratem" de vidanger la conduite d'eau
afin (l'&'imr les (l_gfits s_rJeux causg_s par
les inondafions.
Mettez l'interreptem" d'alimentation
de la machine 5 glacons 5 la position
0 (arrOOet tem_ez l'alimentation d'eau au
r_liig_ratem:
Demenagement
hmnobilisez tousles (_l_ments amovibles, tels que les clavettes et les bats, 5 l'aide de ruban
gomm0 pore" &'iter de les endommaget:
Assurez-vousque le r_fr/)_rateur demeuredeboutpendantson d_m_nagemen_
42
Page 43

Remp/acementdesampeu/es.
Lorsque vous rbglez ia commande du cong_lateur sur 0 (arr_t), i'aiimentafion _iectrique de I'ampouie n'est pas couple.
Cempartiment refrig&ateur--t:c/airage superieur
D_b_mchez le r_fdg&_tem: _ P,eb_mchez le r_Dig&_tem:
am _>ol_.le})(}HI" a IF> >a]'ei]s, m (_]_a_eys, (]e
[>uissam_ce...... (_gale, (_l_ i mK_]'iem'e.
Compartiment refrigerateur--_'clairage inferieur (sur certains modbles)
Thishghtis iocatedabovethetopdrawe_
0 D(_branchez le r6ffig-&ratem-
O Tenez le rebord se trou',ant _'lla pmtie
..... )
mfenem'e du bhndage de 1 ampoule
puis firez _e_ le haut et _et_ l'a_ant,
Compartiment congelateur
O D6branchez le r6ffig6ratem:
O Enlexez la cla)ette qui se tromej uste au
dessus du pare-lumi&re (w)us pomez
enlexer cette clayette plus ti_cilement
apr_s l'a_oir _id_e).
O Pour le relnplacemellt, soulexez
1 ampoule par son blindage,
Distributeur
D6branchez le r6ffig6ratem:
_ I,'ampoule se trome sin" le distfibutem"
sous le pam_eau de r6glage.
Enlexez l'ampoule en la fidsant torn'net
darts le sens oppos6 fi cehfi des aiguilles
d' fine lit ontI'e,
)
Aprbs avoir remplac(X l'ampoule
par tree ampoule d'appareil
_lectro-m(_nager de m_me puissance
ou de puissance inf_riem'e, remettez
le pare-lmni(_re et le bouton,
O Rebranchez le r&li_ig&'atem:
_Aprbs avoir remplac(X l'ampoule
par tree ampoule pore" appareils
m(_naget's de puissance _gale ou
inl>rieure, remettez le blindage en
place en le suspendant par les trois
la nguettes,
Remontez la clayette et rebranchez
le r_frig(_ratem:
_Remplacez l'ampoule par m_e ampoule
O Rebranchez le r&frig(_ratem',
.... SS
de meme tmlle et de meme pm,;,_ance,
43
Page 44

Instructions
Refrigerateur
d'installation
www.electromenagersge.ca
Si vous avez des questions,appelez le 1.800.361.3400o.,isite_no.e site_eb:,l';_d,esse:
AVANT DE COMMENCER :
_Jsez ces instructions comp]6tement et atter_tivement.
. IMPORTANT -Co,)servez ces
im_strlatiom_s pour lai]isati<m _ve]_me]]e par m_
" IMPORTANT - Respectez tol,s ]es
codes et r_glemem]ts o{[](ie]s.
* Note & Finstallateur = Assm'ez-vol_s de ]aisser
ces im)s_Yllc[i(im)s ;_{_ com)so[])m))a[elw.
* Note au consommateur = Co_servez ces
im_strla;tio]_s pore" r_f&'e]_ce {umre.
* NNeau de eonnaJssm]ees - I,'im_stallatio]_ de cet appareil
reqldert des co]/mdssm/ces de base eN/m_cm/iql_e.
* Temps requis- I,'im_sta]]ati(m du r_frig&'atem"
dem a m?de 15 m im?10teN.
* I,'im_sta]]atem" est respo]_sab]e de ]'im_sta]]atiom_
CO]Tecte (h_ r6frig&'atem'.
* Tolae pmme de cet apparei] ca_st)e par line i_]sta]]atiom_
im_d&p_ate _'est paN co_verte par ]a garm_tie.
ALIMENTATION D'EAU A LA
DI'--GAGEMENTS
Pr&'ovez les d_gagements suivants pore" fi_ciliter
l'installafion, asstli'ei" tlne circulation d'air ad&luate, et
permettre les raccordements de plombefie et d'(_lectficit(_ :
• C6t_s 1/8 po (4 ram)
• Dessus 1 po (25 ram)
• Arri_re 1 po (25 ram)
11est n_cessaire de m_nager m] espace de 3/4 po (19 ram)
pour que la porte puisse _tre ouverte sur 90 °, ce qui
asstlI'e tin nleilleur acct)s atlX coi/]pai_Liillents de
rangement des aliments.
ROULETTES DE NIVELLEMENT
Les roulettes de nivellement jouent trois r&les :
• Elles petwent _tre r6gl6es pore" que les portes se
reli_m]ent automatiquement hn_qu'elles sont 5 moiti_
ot/vertes.
• ElleN peuvent _tre rtXgl_es de mani0re 5 pem]ettre 5
l'appareil de reposer solidement sur le sol et
l'emp_cher ainsi de branle_:
• ElleN vous pem]ettent d'01oigner le r0flig_rateur du
ram" pore" le netto):age.
Modeles 20, 22,25
MACHINE A GLA(_ONS
(sur certains modeles)
Si le r6tiig&'atem" est &luip(_ d'une machine 5 glaqons,
celle-ci devra _tre raccordt)e 5 tlne conduite d'eau ti'oide.
Vous pouvez acheter une trousse d'alimentation d'eau GE
(contenant la tuyautefie, le robinet d'arr_t, lesjoints et les
instructions) chez votre revendem; ou en vous adressant fi
notre site Web fi l'adresse _vw.electromenagersge.ca
ou fi notre service de Pi_ces et accessoires au num(_ro
de t(_l(_phone 1.888.961.3055.
Pour r6gler la hauteur des roulettes, retirez la grille de la
base du r0fiigt)ramur en la tirant par le bas.
Pour Olever le r_frigOrateur, toumez les vis de r_}glage
da]ls le sens horaJre et pour l'abaJsser, da]ls le sens m_fi-
horaire./Jtilisez une clef 5 molette pot|r _crous
hexagonaux de 3/8 po ou des pinces.
I
EMPLACEMENT DU REFRIGERATEUR
• N'installez pas le r_flig_ratem" darts tree pibce off la
tempt)ratm'e ambiante risque d'etre inliariem'e 5
60 °F (16 °C) parce qu'il ne se mettra pan en marche
suflisamment souvent pour maintenir les temperatures
convenables.
• ]nstallez le r6frig6rateur sur un plancher suffisamment
solide pore" le supporter h>_qu'il est plein.
Pour remettre la grille de la base, alignez ses attaches
artiste entre la barre et la pattie intcariem'e de l'am]oire.
Poussez. iUS(lU'5ce 1( ue la ,grille s'enclenche darts le
logement.
44
Page 45

Instructions d'installation
ALIGNEMENT DES PORTES
Apr_s avoir r_gl_ les roulettes de nivellement, assurez-vous
que les portes sont bien align_es _'lla pattie sup&_ieure.
Pour aligner les portes, r_glez la porte du compartiment
r_li_ig_ratem:
O X l'aide d'une cl_ fi douille de 5/16 po, tournez la vis
de r_glage de la porte \'e_ la droite pour relever la
porte, ou ve_ la gauche pour l'abaisse_; (Une douille
de nylon, encastr6e dans les filets de l'axe, emp_chera
cehfi-ci de tourner si 1'on ne se sert pas (l'ui_e cl(_.)
@ Api'&s avoir to//rne la cle tlne Oil deux lois, o/r_i'ez et
tem/ez la porte du compartiment rg_ti_ig_mteur et
v&_ifiez l'alignement des portes _'lla pattie sup&_ieure.
Pourenleverlagrille
delabasedu
rdrig6rateur,ouvrez
lesporteset ensuite,
tirezlagrillehorsde
sonIogement.
CI6adouillede
5/16po
45
Page 46

mnstructions d'instamiation
mNSTALLATmONDE LA CONDUmTED'EAU
AVANT DE COMMENCER
Nora recomm:mdom]s les tromses d'_hmentathm d'ea{_
e_ cl_ivre WXSX2, _%XSX3, WXSX4, selo_ le de
com_dl_ite do]_t vol_s a_ez besoim Nora _pprou'mm]s ]es
co]_(h_ites d'em_ e]_ matibre p]asti(]/_e (;E Sm_rtCom_ect"*
Reg_Jgemtor Tl_bim_g (WXOSX] 0002, WX08X] (1(}(16,
_%2X08X ] 00 ] 5 et WX 08X ] 0025).
Si yore h]sta]]ez m] syst_me d'em_ (;E Re_ eme Osmosis
d_ms votre r_fHg_mtem; la sel_]e h)sta]lati{m approuv_e
est ceHe de h_ tromse (;E RVKIT. Pore" les m,ires svst&mes
d'osm(}se de l'eall, sllivez les reco])lmamld_t]o])s (hi
fi_b_J ca m_t.
Si ]e r_{Hge}mtem" est _]imem_t_ em_ eal_ {_partir (]'m_
sv_tb.]]]e de [i]tmtio]] d'em_ par osmose hwerst)e, et s]
]e r_{Hg(_x_te_r comporte 5ga]emel)t m) fihre _'_earn
r&fHge_mtem: S] la carto_*che de filtn_t]o_] d'ea_* (h*
r_fHge}mte_r est _tilise_e e_ c{mjo]_ctio]_ :_ec le systbme
de {]hmtio_/par osmose h/velN_e, o]/pellt obselyer role
r_(h_cti(m (h_ de}bit d'em_ a_ poi_t de [:misage, et ]a
prod_cthm de c_bes de g];_ce cre_x.
Cette h]stal]atio_ de c(>]_(h_ite d'em_ _'est ix_s g_m_tie
par le {i_b_Jcm_t de r&{Hg_te_r o_ de machh_e i'_g]a(o]_s.
Sil]vez soig]/ememe_/t ces h/stmct]o_/s pore" mh/imiser ]e
xJsq_e de dommages o_re_x d'hm_datiom
I,es co,ops de be_her (ea_ (]_1 do]me des co_q)s (;la_s les
m};mx) davis la t_w;mte_Je de la ma]so]] pe_we]]t
occas]o]mer des dommages m_x p]bces de votre
r&{Hg&_;_tem; ah_s] q_e des {i_]tes o_ des hm_(]atio_s.
Appelez m] plombier certifi_ po_r cor_Jger les co_q)s de
bet]ier a_a]_t d h_sta]]er ]a co_(h_ite d'em_ de votre
AVANT DE COMMENCER {SUITE}
Pore pr&'emr tol_te b1C_Mre et tol_t dommage i_ votre
re}{Hg_]_tem; _e bnmchez.]amMs la co_(h_ite d'em_ i)
IH/e {;_/a]isatio_/ d'eall chal0de.
Si vom _tilisez votre r_fl'ig_mte_r avm_t de bm_cher la
co_(hl]te d'eall_ _ssilrez-'_ (}!is de ]aisser le commlxtatelxr
de h_ m_chh_e a gla¢o_ e]_ positi{m 0 (_rr#t).
N'h_sta]]ezjm_]a]s ]es tma_x de la machh_e i'_g]acim &ms
des e]_dro]ts o_'_la tempetmtm'e _Jsq_e de desce]_dre e]_
dessom d_ poh_t de c{mg_lat]o_.
S] wins _tihsez m] o_]t]] e}]ect_J(]_e (comme m]e perce_se
]'iso]eme]]t o{_ ]e cAb]age de cet o{_ti] emp&he to_t
da _ger de seco_sse e}lectri q _e.
Vo_s devez proc&Ier i'_ rotates w)s i_sta]]atio_s
c{}]){bn)l_me]lt allx exige]?ces de votre code ]oc_] de
46
Page 47

mnstructions d'instaiiation
CE DONT VOUS AUREZ BESOIN
• Tuyaux en cuivre ou rousse GE SmaJ'tCommct '_'
Refrigerator Tubing, diam6tre ext_rieur de
1/4 po pour brancher le r(qiig0i'ateur ;'l l'alimentafion
d'eall. Si vous utilisez tin tl/Vall en c/livre, ass/lI'ez-vl}/Is
que les deux extrg_initg_s du mvau soient couples bien
droit.
Pore" trouver la longueur de tuyau dont vous aurez besoin :
mesurez la distance qui va du robinet d'eau situ(_ derriere
le r_ffig&'ateurjusqu'au myau (Falimentation d'eau.
Ajoutez 2,44 m (8 pi). _ssurez-\'ous qu'il y ait assez de
tuyau en trop (environ 2,44 m [8 pi] em'oul_s trois t0is ell
cercles d'environ 25 cm [10 po] de diam6tre) pour w)us
pemlettre de dg_coller le rgdi_ig&'ateur du nmr apI'_S
l'installation,
i,es trousses GE SmartConnecV _'ReliJgerator Tubing sont
disponibles clans les (limensions suiwmtes :
0,6 m (2 pi) - X43X08X10002
1,8 m (6 pi) - X,\3X08X10006
4,6 m (15 pi) - X,\3X08X10015
7,6 m (25 pi) - X,\X08X10025
_SS/II'eZ-;'OHS qtle votre tro/isse ait au inoins 2,4 m (8 pi)
comme imliqu_ ci-dessus.
NOTE : Les seuls tuyaux en mati6re plastique appmuv6s
par GE sont ceux qui font founfis dmls les lrousses
GE SmartCommet'" Refrigerator Tubing. N'utilisez
jamais ml autre tuyau en mati6re plastique, car le tuyau
d'alimentation d'eau est tout le temps sous pression.
Certaines cat(?gories de tuyaux en mati6re plastique
peuvent develfir eassm_ts avee l'fige et peuvent se fen&re,
en oeeasiom_m_t des dommages d'hmndation dmas
votre maJson.
• Vous pouvez acheter tree trousse d'aJimentation d'eau GE
((ontenant tin ttl}_ltl, tin robinet d'arr_t et lesjoints
_nuln_r_s ci-dessous) chez votre distributeur local ou ell
le colnlnandant au service de pi&ces et accessoires, au
800.626.2002.
CE DONT VOUS AUREZ BESOIN
(SUITE)
* Une a_mntafion d'eau froide, I ,a pressio_ de ]'em_ doit
_tre e_m'e 2(1 et 12(1 p.s.i. (1,4 et 8,2 bar) slur les modules
m_o_ &pfipds de [?]tre {r_em_ et e_tre 40 et 120 psi (2,8 et
8,2 bar) pore" telex qlfi ]e so_t.
*Une perceuse 61ectrlqne.
*Une c16 de 1/2 po ou mm c16_Ntaise.
°Un tournevis/_ lame plate et m_ tournevis PlOps.
° Deux _crous a compr_ession d'un d_ametre ext_rieur
de 1/4 poet deux bagues (manchons)--pom" bra _ cher
]e tm_m e_] c_fiwe a_ robi_et d'arr_t et au robh_et d'em_
du r&i_Jg6_:_tem:
OU BIEN
* 11_ robinet d'arr6t pore" bra_cber ]e tmma d'eau fl'oide.
I,e robi_]et d'arr_t doit moir m_e entree d'em_ avec m_
diam6tre 1_t&J era" minimal de 5/32 po a u poi at de
,}cmctio_* avec LA CONDUITE D'EAU FROIDE. Des
robi _ ets d'a rr_t i'__tlJ er soil t sol*ve_] t 1_/c]I*s da _s ]es
tro_*sses d'a]ime_ita_km d'em*. A_mit d'acbete_; ass_*rez-
vo_s q _e ]e robi _ et i'__tlJ el" se c<m{brm e i'_w)s codes de
47
Page 48

mnstructions d'instamiation
INSTALLATION DE LA CONDUITE D'EAU (SUITE)
lnstallez le robinet d'arr6t sur la canalisation d'eau
potable la plus fr&luemment utilis_e.
[] FERMEZ L'ALIMENTATION
PRINCIPALE D'EAU
()mrez le robinet le plus proche suflisamment
hmgtemps, pour I)urger, le ttl_atl, .
[] FIXEZ LE ROBINET D'ARRI_T
Fixez le robinet d'arr_t au tuvau d'eau ti'oide _'_l'aide
du collier de serra >e
Collierdeserrage
[] CHOISISSEZ L'EMPLACEMENT
DU ROBINET
Choisissez, pour le robinet, tm emplacement
thcilement accessible. I1 xaut mieux le brancher de
c6t<) 5 tm ttl}at/;ertical. Si ;ous de;ez le brancher 5 tm
ttl}atl horizontal, tilites le branchement en haut OH de
c6t<), plut6t qu'en has du tt/yatl, potlr <)xiter de recexoir
des s<)diments du tuvau d'alimentation d'eau.
[] PERCEZ UN TROU POUR LE
ROBINET
Percez un trou de 1/4 po dans le tuvau d'eau
_'_l'aide d'tm fi)ret din: Enlexez toute barbm'e due au
percage, dtl ti'Otl dans le ttlvatL Faites attention de lie
pas laJsser de l'eau comer dmls votre perceuse
&lectrique. Si xous ne percez pas un trou de 1/4 po,
xous obtiendrez tree alimei_tation d'eau rOdtfite
et des glaqons plus petits.
Robinetd'arrgt Tuyauvertical
6trier d'eaufroide
NOTE : Vous devez vous contom/er aux Codes
de plombefie 248CMR du Commonwealth (ff
Massachusetts. i,es robinets d'arrbt 50tiier sont
ilKga ux et lem" utilisation n'est pas a utorisOe a u
Massachusetts. ConsMtez votre plombier local.
[] SERREZ LE COLLIER DE SERRAGE
Serrez les xis du collierjusqu'5 ce que la rondelle
d'_tanch<qt<) commence 5 enflei:
NOTE : Ne serrez pas trop. Vous fisquez d'<)craser le
ttlVatl de ctli'_I'e.
Collierde serrage -- Entr6e
Visducollier --
[]
ACHEMINEZ LE TUYAU
Acheminez le tuvau du tm;m d'eau fl'oide au
r<)li_ig_ratem:
R0ndelle
48
Faites passer le tllyatl paF IlIl tI'OtI perc0 dans le tour
ou le plancher (derri&re le i'efiJgei'atetlr (7/1 _ltl niveatl
de l'mmoire de cuisine a(!iacenm), aussi pr&s (111 tour
que possible.
NOTE : _ssurez-vous qu'il y ait assez de tuvau en trop
(environ 9,44 m [8 pi] em'(mlSs trois t0is en cercles
d'environ 25 cm [l 0 po] de diam_tre) pore" vous
permettre de dOcoller le rOliigOrateur du inur aprOs
l'installation.
Page 49

Instructions d'instaJJation
[] BRANCHEZ LE TUYAU AU ROBINET
Placez un _crou de compression et une bague
(manchon) _'ll'extr&nit_ du tuvau et branchez-les au
robinet d'arr_t.
_ssm'ez-vous que le tu)_m soit bien ins&'_ darts le
robinet. Serrez tort l'_crou de compression.
Pore" le ttm_u en mati_re plastique d'tme trousse
GE Slllai_t(]onnect _'1Reli'igerator Tubing, ins(_rez
l'extr&nit_ moul_e du mvau darts le robinet d'arrbt et
serrez l'_crou de compression fi la main, puis serrez tm
autre demi tom" avec tree cl_. Si vous serrez trop tort,
vous pouvez occasiom_er des fifites.
Ecroude
Robinetd'arr6t
6trier
Presse-joint
Robinetdesortie -- Bague{manchon)
NOTE : Vous devez vous confin'mer aux Codes
de plomberie 248CMR du Commonwealth of
Massachusetts. I,es robinets d'arr&t fi _t_ier sont
ill_gaux et lem" utilisation n'est pas autoris_e au
Massachusetts. Consultez votre plombier local.
compression
Tuyau
SmartConnect_
[] BRANCHEZ LE TUYAU VOTRE
RCFRIGCRATEUR
NOTES :
• Avant de brancher le tuyau _'lvotre r_flig&'atem;
aSS/li'ez-vo/ls (]tle le cordon d'alimentation 61ectfique
du r_fiig&'amur ne soit pas branch_ fi la prise
Ill tlI'ale.
• Si votre r&liig&'atem" n'est pas &luipd d'tm filtre g
earl, no/is VO/IS i'ecoillillandons d'en installer tin si
votre alimentation d'eau contient du sable ou des
particules qui peuvent boucher la grille du robinet
d'eau de votre rdliig&'atem: Installez-le sin" la
conduite d'eau pr&s de votre r_fiig&'atem: Si vous
ufilisez tree trousse (;E Sma_tConnect _"Refl-igerator
Tubing, vous aurez besoin d'un tuvau addifiom_el
(_._3X08X10002) pore" brancher le filtre. Ne coupez
jamais un tuy;m en matibre plastique pore" installer
w)tre filtre.
Sur certains mod&les de r6flig6rateurs, le raccord se
trouve _'ll'_xtr&nit_ du ttwau situ_ _'ll'ext_rieur de
couvercle d'acc_s de compa_timent du compressem'.
Sin" d'autres mod&les, le couvercle d'acc_s au
compartiment du compresseur doit &tre retir(_ pour
acc&ler au raccord du r_fl_ig_ratem" au robinet
d'alimentation d'eau.
[] PURGEZ LE TUYAU
Omrez le robinet d'alimentation pfindpale d'eau et
pm'gez le tu)aujusqu'_'l ce que l'eau soit claire.
Fem_ez l'eau au ni_eau du robinet d'eau apr&s
_cotflelnent d'elrdron 1 line (l qualt) d'eau par le
Sin" les mod&les dot6s du raccord au robinet
d'alimentation d'eau, retirez le bouchon en
plastique flexible.
{3
P]acez F_crou de compressio_ et ]a bagt*e (ma_cho_)
fi l'extr&_k_ du tmm_ comme Findique F]lh_sm_tiom
Si vo_*s _*ti]isez m_e tro_asse (;E SmartCom_ect _"
Rei_Jgemtor T_d)h_g, ]es _cro_as so_t d@? assembles
49
Page 50

Instructions d'installation
INSTALLATION DE LA CONDUITE D'EAU (SUITE)
[] BRANCHEZ LE TUYAU ._,VOTRE
RI::!:FRIGI::!:RATE U R (SUITE)
Ins&'ez l'extr&nit_ du tu_au darts le raccord du
r_ffig_rateur le plus loin que possible. Tout en tenant
le tmau serrez le raccord.
Si xous utilisez un tmau ell mafi_re plastique d'tme
trousse (;E Si/lart(]onnect TM Refrigerator Tubino,
ins&'ez l'extr&nit_ moul_e du tuvau dans le raccord
du r_fl_ig&'atem" et serrez l'_crou de compression fi la
nlain, puis serrez un autre tour axec une cl_. Si xous
serrez [i'op [i)I't, x,O/lS po/lvez occasionnei" des ftlites.
Fixez le tuvau au collet fi)urni pore" le tenir en
position _erticale. 11 est possible que _ous avez fi
di@findre le collet.
L'ml des schemas ci-dessous sera sJmilaJre au montage
du raccord de votre r_frig_rateur.
Colleta Tuyaude
tuyau _ _ 1/4po
Ecroude
c0mpressi0[1
de1/4po
1_ FERMEZ L'EAU AU NIVEAU DU
ROBINET D'ARRET
Resserrez tout joint qui flfit.
Remettez ell place le comercle d'acc0s.
[] BRANCHEZ VOTRE
RI_FRIGI_RATEUR
Disposez la spimle de ttmm ell cuiwe de mani6re
fi ce qu'elle ne vibre pas contre l'ani_re de votre
r_qiJg_rateur ou contre le ram: Mettez votre
r_qiJg_rateur fi sa place contre le tour en le poussant.
Collet
(manchon)
Branchement 'aLlde
aur@ig6rateur SmartConnect_
Ecroude Tuyaude I
CoHet a I I [I compression
tuyau _11 [1 del/4po y4p0 /
granchementall rdrig6rateur _ SmartCennect
METTEZ EN MARCHE LA
MACHINE .,_GLA(_ONS
Mettez le comm utateur de la machine fi glaqon en
position I (marche).ia machine fi glatons ne se nlet
en marche que loi_qu'elle atteint une temp&'amre
de fimctiomlement de - 9°C (l 5°F) ou moins.
Elle commence imm&liatement fi fbnctimmer si le
commutatem" de la machine fi gla(ions est ell position
I (marche).
5O
NOTE : Si votre pression d'eau est trop fifible, le
robinet peut se remettre en marchejusqu'fi trois lifts
pour envover suflisamment d'eau fi la machine fi
glaqons.
Page 51

Bruits normauxde fonctionnement
Les r#frig#rateurs plus r#cents font des bruits cliff,rents de ceux
des anciens. Les r#frig#rateurs modemes pr#sentent plus de
fonctions et sont plus avanc#s sur le plan technologique.
Entendez-vous ce que j'entends ? Ces bruits sont normaux.
HUMMM...
--OUUCH....
• I,e nouveau compresseur 5 rendement _lev_ peut
flmctionner plus hmgtemps et plus vite que votre
ancien r_li'ig&'ateur et vous pouvez entendre tm son
modul_ ou tm ronflement aigu pendant son
flmctionnement.
• Pm_bis le r_fl_ig_ramur fimcfionne pendant {lile p&_iode
prohmg_e, surtout lo_que les portes sont ouvertes
fl'&luemment. Cela signifie que la fimction Frost Guard"°
est active pour emp_cher la brCdure de cong_lation et
am61iorer la conse_a'ation des aliments.
• Vous pouvez entendre un sifilement lo_que les portes
se tem/ent. Cela vient de l'&luilibrage de pression darts
le r6frig_ramm:
CLICS, CLAQUEMENTS,
CRAQUEMENTS et
GRESILLEMENTS
• Vo/Is po/Ivez entendi'e des CI';lqlleIIleIl[S 0/l des
claquements lorsque le rg_li'ig_rateur est branch(_
pore" la premiere Ibis. Cela se produit lorsque le
r_fl'ig_ratem" se refl'oidit 5 la bonne temp_ratm'e.
• i,es registres _lectroniques s'ouvrent et se ferment
pour assurer des _conomies d'_nergie et tm
reffoidissement optima ux.
• I,e COIIlpI'essetlI" petit CatlseI" tlIl clic Oil UII
gr_sillement lots de la tentative de red&narrage
(cela peut prendre 5 minutes).
• I,e tableau de commande (dectronique peut catlsei"
tm clic lorsque les relais s'activent pour commander
les composants du r_fl'ig_ratem'.
• I/expansion et la contraction des serpentins de
refroidissement pendant et apr_s le d_givrage
pellvent Callsei" Uil ci'aqllei/lellt Oil ilil claqlleillellt.
• Sin" les modules &luip_s d'm_e machine 5 glaqons,
apr_s tm cwle de tabrication de glaqons, vous pouvez
entendre les glaqons tomber darts le bac.
OUIR !
• Vous pouvez entendre les ventilateurs tourner
5 hautes vitesses. Cela se produit lorsque le
r_li'ig_ratem" vient d'6tre branch,, lo_que les portes
sont ouvertes fr_quemment ou lots de l'ajout d'une
grande quantit_ d'aliments darts les compartiments
cong_latem" ou r_frig_ratem', i,es ventilateurs
permettent de maintenir les bonnes tempg_ratures.
• Si une des portes est ouverte pendant plus de
3 minutes, vous pouvez entendre l'activation des
ventilateurs permettant de reti'oidir les ampoules.
• i,es ventilateurs changent de vitesses pore" assm'er des
_conomies d'_ne_gie et tm refroidissement optimaux.
BRUITSD'EAU
6
• i,e passage de l'agent fl'igorifique darts les serpentins
de reli'oidissement du cong_lateur peut _tre
accompagn(_ d'un gargouillement semblable 5 cehfi
de l'eau en (d)ullition.
• I,'eau tombant sin" l'(d_ment chauflhnt de d_giw'age
peut taire tm bruit de gr_sillement, de claquement
ou de bourdonnement pendant le cycle de
d_givrage,
• Un b_uit de suintement d'eau peut _tre entendu
pendant le cycle de d_givrage lorsque la glace de
l'_vaporateur fired et tombe darts le bac de
r_cup&'ation.
• Fem_er la porte peut causer un gargouillement
en raison de l'&luilibrage de pression.
5/
Page 52

Avantd'appelerunr@arateur...
Conseils de d@annage--Economisez du temps et de
I'argent! Consultez d'abord los tableaux qui suivent et vous
pourrez peut-#tre #viter de faire appel _ un r@arateur.
Causes possibles Correctifs
Ler#frig#rateurne
fonctionnepas
Vibration oubruit Les roulettes de ulvellement • (_ousultez Roulettes,
metallique(uneI#g#re avmzt doivent 6_'e r_gl6es.
vibration est normale)
Le moteurfonctionne Ceci est normal lorsque le • Atteudez 24 heures pour que le r_li_ig_rateur reli'oidisse
pendantdeIongues r6frig6rateur vient d'Ore brmlch6, compl&temeut.
p#riodes ou d#marre et
s'arr#tefr#quemment(Les Une grmlde quaxltit6 d'aJiments • (]'est nolana].
r#frig#rateursmodernes a 06 raise au r6frig6rateur.
etleurs cong#lateurs Porte laiss6e otwerte. • V6rifiez qu'il u'y a pas un paquet qui emp&'he
#tantplus grands, leur la porte de temlel:
moteur dolt fonctionner
plus Iongtemps. IIs Temps chaud ou ouverture • (;'est n(>mlal.
demarrent et s'arrOtent fr6quente des portes.
afin de maintenir des Les colmnmldes de temp6rature • (_ousultez Los commandos.
temp#raturesuniformes.) ont 06 r6gl6es a la temp6rature
Temp#rature trop elev#e La commmzde de temp6rature • (_ousultez Los commandos.
dansle cong#lateurou n'a pas 06 r6gl6e a mm
le r#frigerateur temp6rature assez basso.
Givre surles aliments Porte laiss6e otwerte. • V_fifiez qtt'il u'y a pas un paquet qtti enlp6che la
surgeles(il estnormal porte de tel_lner.
que du givre se forme h
I'int#rieur du paquet) Los portes ont 06 ouvertes
Las#paration entre Le systbme automafique • Ceci emp_che la tomlatiou de condensation sur
le refrigerateur et le d'6conomie d'6nergie fait l'ext_rieur du r_fl_ig_ratetn:
cong#lateurestchaude circuler du fiquide chaud autour
Odeur/saveur 11 faut nettoyer le bac _t glaqons. • Videz et lavez le bac _'lgla<ous. Jetez les vieux gla(:ous.
anormale des
gla_ons odeur/goflt aux glaqons.
Le cycle de d6givrage
est peut-6tre en cours.
Les commmades de temp6rature • R#glez les connuandes de telup#rattu'e sur till r#glage
sont r6gl6es sur 0 (Oeh_t). de temperature.
Le r_frig6rateur est d6brm_ch6. • Euloucez la fiche de l'appareil dans la prise murale.
Le disjoncteur ou le fusible • I_enlplacez le fl/sible ou r_eucleuchez le disiouctetu:
peut avoir saut&
la plus froide.
Temps chaud ou ouverture • Abaissez la comnlaude de temperature d'uue position.
fr6quente des portes. (_ousultez Los commandos.
Porte laiss6e ouverte. • V_rifiez qu'il u'y a pas un paquet qui emp&'he la
trop souvent ou pendant 1top
longtemps.
du rebord avm_t du cong61ateur.
Des aliments ont lrmasmis leur • Emballez bieu les aliments.
• Attendez environ 30 minutes afin que le cycle de
d_givrage puisse temlinei:
porte (le termel:
I1 faut nettoyer l'int6rieur du • (]ousultez Entrotion ot nottoyago.
r6 frig6rateur.
Petits gla_ons ou glagons Le fillre a eau est bouch& • Relnplacez la cartouche du filtre avec uue uouvelle.
creux a I'interieur
52
Page 53

www.electromenagersge.ca
Causes possibles
Formationlente des
La porte ne se referme Le johzt de la porte colle ou se • Appliquez un [)ell de x iseline sur la surtilce dujoint.
pas enti_rement replie du c6t6 des cha_r_fi6res.
Lueur orange darts Le cycle de d6givrage est • (7 est normal.
lecongMateur en cours.
Le distributeur de La machine h glaqons est 6tehate • Mettez en inarche la machilae 5 glaqons ou r6tablissez
glagons ne fonctionne ou l'aJimentation en eau a 6t6 l'alimentation en eau.
pas (sur certains coup6e.
modMes) Des glaqons sont coll6s au bras • Refirez les glaoms.
MauvaisgoOt/edeur Le distributeur d'eau n'a pas 6t6 • Faites couler l'eaujusqu'5 ce que l'eau du sxst&me soiL
de I'eau (aurcettains ufilis6 depuis longtemps, remplac_e par de l'eau fmiche.
medMes)
Porte laiss6e ouverte.
La colxunmlde de temp6rature • Consultez Les commandes.
du cong61ateur n'est pas r6gl6e
h tree temp6rature assez froide.
r6gulateur.
Distributeur est VERROUILLE. • Appu)ez et maintenez enhm,6e la tou(he LOCKCONTROL
Blocs de glace irr6guliers dmas • Brisez-en autant que possible avec xos doigts etjetez ceux
le bach glaqons, qui restent.
Correctifs
• V&_itiez qu'il n')a pas un paquet qui emp&'he la
porte de teriner.
(r6glage (Ill verrouillage) pendant 3 secondes.
• I,e cong61atem" est peut-&tre trop chaud. R6glez la
commande du cong61ateur sin" tree temp&'atm'e plus
basse, en abaissant la commande d'tme position 5 la lois
jusqu'fi ce que les blocs de glace disparaissent.
L'eau versee dans le Normal lorsque le r6frig6rateur • Attendez 24 hem'es pore" que la temp&'atm'e (ill
premier verre est est hfitiaJement hlstaJl6, r_fl_ig_ratem" se stabilise.
chaude (surcertains Le distributeur d'eau n'a pas 6t6 • Faites couler l'eaujusqu'5 ce que l'eau du s)st_me soiL
modblea) utilis6 depuis lon_emps, remplac_e par de l'eau fraiche.
Le r6servoir d'eau vient • Attendez pltlsiem_ hem'es pore" que l'eau refl'oidisse.
d'etre vidm_g6.
te distributeur d'eau L'aJhnentation en eau est • Consultez Installation de la conduite d'eau.
ne fonctionne pas coup6e OH n'est pas raccord6e.
Le fillre h eau est bouch6. • Remplacez la cartouche du filtre axec tree nomelle
cartouche ou installez le 1)ouchon du filtre.
ll y a de l'a£r dmas la conduite • Appu) ez sin" le bras de distril)ution pendant au
d'eau, i/loins detlx II/intltes.
Distributettr est VERROU/LLE. • Appu}ez et maintenez ei#i)nc6e la touche LOCKCONTROL
(rg_glage du _errouillage) pendant ?,secondes.
t'eau jaillit du distributeur La cartouche du Ffllre vient d'81re • Faites couler l'eau du distributetu" pendant 3 minutes
hlstall6e. (environ 6 litres).
Lamachineh gla_ons L'eau du r6servoir est gel6e. • Appelez tm r_paratem:
fonctionne, mais oe
distribue pas d'eau
La machine fi gla_ons La conduite d'eau ou le • Appelez Im plombie_:
ne distribue ni eau robhmt d a_r6t est bouch6.
niglagons Le filtre _t eau est bouch6. • Remplacez la cartouche du filtre axec line nouxelle
cartouche ou installez le bouchon du filtre.
Distributeur est VERROUILLE. • Appuyez et maintenez eiffonc6e la touche LOCK
CONTROL(r_glage du verrouillage) pendant 3 secondes.
53
Page 54

Beforeyoucall forservice...
Causes possibles Correetifs
Des aliments ont trm_smis * i,es aliments fl o(leur torte (loi_ent _tre emball(=s
leur odeur au rtfrigtrateur, hei_ntfiquen/ent.
• (;ardez une boite ouveYte de bicarbonate de soude
dans le i'tfl_igtrateui:
11 faut nettoyer l'hlttrieur. • (_onsultez Entretien et nettoyage
I1 faut nettoyer le syst_me • Consultez Entretienet nettoyage.
d'_vacuation de l'eau de dSgivrage.
Dela condensation Cela n'est pas hflaabituel pendant • Essuvez bien la suYlilce extblJeure.
s'nccumule _ I'oxt#rieur les p_riodes de forte humiditY.
De la condensation Les portes sont ouvertes lrop
s'nccumule k rinterieur fr_quemment ou pendant trop
(partempshumide, longtemps.
rouverture des portes
laisse entrer de rhumidite)
L_clairage inMrieur 11n'y a pas de courmlt au niveau • ]_emplacez le fl/sible ou rtenclenchez le disioncteui:
de la prise.
L'mnpouie est grill_e. • Consultez Remplacement des ampou/es.
Ean sllr ]e sol Ollau fond L'orifice d'_coulelnent au fond • (_onsultez Entretien et nettoyage.
du€ong#lateur du cong_lateur est peut-8_'e
bouchS.
I1 y a des glacons bloqu_Ss dmls • Faites passer les gla_ons _'ll'aide d'une cuill_re ell bois.
le conduit.
Airchaudh la basedu
Mfrigerateur
CUBEDICE(glagons)
etaitchoisimais
Courmlt d'air normal provenmlt
du moteur. Pendmlt le processus
de rSfrig_ration, il est normal que
de la cha]eur suit expuls_e h la
base du rSfrigbrateur. Certains
revStements de sol sont sensibles
et peuvent se dScolorer sous
l'effet de cette tempSrature de
fonctiomlement nonnale qui
est smls danger.
Le r_glage precedent _taJt
CRUSHEDICE (glace concassee).
• _uelques cubes sont I'estbs et ont btb concassbs _'lcause
du I'_glage precedent. C'est noi_nlal.
CRUSHEDICE(glace
concassee)a #t#
distribuee(sur
certainsmod_les)
Lamachine _ glagons lnterrupteur d'aJinaentation est • Mettez l'interrupteur _'_la position I (marche).
ne fonctionne pas h la position O (arr_t).
(surcertainsmod#les)
Bruitfrequent
devibrations
54
L'aJimentation ell eau est coup&e • (2onsultez Installationde la conduited'eau.
oun'es,pas cco e.
Le comparthnent cong_lateur • Attendez 94 heures pour que la temp&ramre du
est trop chaud, i'&flig_rateur se stabilise.
Un tunas de gla_ons dm_s le bac • Ni; elez les glacons _'_la main.
provoque l'arrSt de la machine h
glacons.
Cubes de glace sont cohlc_s dmls • ArI'_tez la inachine _'_glaqons, retirez les cubes de glace
la machine h gla_ons. (La ltuni_re et remettez la inachine ell marche.
d alimentation verte clignote.)
L'hlterrupteur de maxche de la
machhle h gla_ons est en position
I (marche)maJs l'aJhnentation ell
eau du r_frig_rateur n'est pas
brmlch_e.
• Mettez l'interrupteur de marche ell position O (arr#t).
Votls endou/ulagerez le robinet d'eatl ell le conserxant
ell position I (marche).
Page 55

Notes,
w
I
I
55
_L
m
Page 56

GARANTIE DU CLIENT
(pour la clientele au Canada)
Votre r6frigerateur est garanti contre tout defaut de materiau et de fabrication.
3e que cette
jarantie couvre
3ompresseur Cinq (5) ans Cinq (5) ans Cinq (5) ans
Systeme scelle (y Cinq (5) ans Cinq (5) ans Cinq (5) ans
:ompris I'_vaporateur, la
:uyauterie du condenseur
_t le frigorigene)
3ac transparent en Duree de vie Duree de vie Duree de vie
_exan du compartiment
Je congelation
routes les autres pi_ces Un (1) an Un (1) an Un (1) an
Duree de garantie
(& partir de la
date d'achat)
Pieces
Reparation ou
remplacement au
choix de Camco
Main-d'oeuvre
TERMES ET CONDITIONS : EXCLUSIONS DE LA GARANTIE :
La presente garantie ne s'applique qu'a
I'utilisation domestique par une seule famille
au Canada, Iorsque le refrigerateur a ete
install_ conform_ment aux instructions
fournies par Camco et est alimente
correctement en eau et en electricit&
• Visites a domicile pour vous apprendre
vous servir de I'appareil.
• Dommages causes & la peinture ou
I'_mail apres livraison.
• Installation incorrecteJl'installation
correcte inclut la bonne circulation d'air
Les dommages dos a une utilisation
abusive, un accident, une exploitation
commerciale, ainsi que la modification,
I'enlevement ou I'alteration de la plaque
signaletique annulent la presente garantie.
L'entretien effectue dans le cadre de la
presente garantie doit I'_tre par un
reparateur agree Camco.
Camco et le marchand ne peuvent _tre
tenus pour responsables en cas de
r_clamations ou dommages r_sultant de
toute panne du refrigerateur ou d'un
entretien retarde pour des raisons qui
raisonnablement echappent a leur contr61e.
L'acheteur doit, pour obtenir un service
dans le cadre de la garantie, presenter la
facture originale. Les elements repares ou
pour le systeme de refrigeration, des
possibilites de branchement aux circuits
_lectriques, d'alimentation en eau et autres.
• Remplacement des fusibles ou
rearmement des disjoncteurs.
• Remplacement des ampoules
electriques.
• Dommages subis par I'appareil a la suite
d'un accident, d'un incendie, d'inondations
ou en cas de force majeure.
• Perte des aliments doe a la deterioration.
• Utilisation correcte et entretien adequat
de I'appareil selon le manuel d'utilisation,
reglage correct des commandes.
• LE GARANT N'EST PAS RESPONSABLE
DES DOMMAGES INDIRECTS.
remplaces ne sont garantis que pendant le
restant de la periode de garantie initiale.
Cette garantie est en sus de toute garantie
statutaire.
IMPORTANT
Gardez cette garantie et votre facture originale comme preuve d'achat et preuve
de la date d'achat.
56
Camco vous offre ses services dans tout le
pays. Pour de plus amples renseignements
sur la presente garantie, veuillez prendre
contact avec :
Directeur, Relations avec les consommateurs
Camco Inc., Bureau 310
1 Factory Lane
Moncton, N.B.
ElC 9M3
Agraphez votre re_u icL
Vousdevez foumir la preuve de
I'achat original pour obtenir des
services en vertu de lagarantie.
Page 57

Feuillet de donnees relatives a la performance
Cartouche GWF/HWF du systeme de
Filtration d'eau GE SmartWater
Ce systeme a ete essaye selon les normes NSF/ANS142/53 pour une reduction des substances enumerees ci-dessous.
La concentration des substances indiquees dans I'eau qui entre dans le systeme a ete reduite a une concentration inf_rieure
ou egale a la limite permise pour I'eau quittant le systeme, telle que pr_cis_e par la norme NSF/ANS142/53.*
_facteurs int@r_s de s_curit_ _ 100% pour une utilisation sans compteur)
Norme N ° 42
Parambtre
(_hlore
T & ()
Particul(s**
USEPA
MCL
Qualit_
inl]uent concentration
2,0 mgiL+ 10!:{
10.000 pm_iclesimI, minimum
Norme N ° 53 : Effets de sant6
P_l_tre USEPA
'Ihrbiditd 0,1 NTU
Spor,?s 55 99,95% > 99,95!:i
Plomb au pII 6,5 1 ppb 99,37% 0,010 mgiL
Plomb au pII 8,5 4,3 ppb 97,13% 0,019 mgiL
Lindane 0,00005 ppm 91,93% 0,1X)02mgiL
Atrazine 0,003 ppm 64,28% 0,003 mgiL
2,4-I) 0,090 ppm 67,63% 0,07 mgiI.
,¥',besto', 1,2 MFI iml 99,82% 99%
MCL
l NTI ***
99,95!_ rdduction
15 [)1)1)
15 ppb
0,0009 ppm
0,003 ppm
0,100 ppln
995i
Qualit6
hlfluent concemrafion
11 + l NTU***
50.000 I. minimum
0,15 mgiL + 10!;i
0,15 mgiL + 10!;_
0,(_)2 mgiL + 10%
0,(_)9 mgiL + 10%
0,210 mgiL + 10%
FibrcsiI_ de 10: fi 108 ;
fiblvs plus grand que
10 microzng,trcs de longueur
Test# utilisant un d#bit de 0,5 gpm; une pression de 60 psig; un pH de 7,5_+ 0,5; et une temp. de 20 °C _+25 °C.
_ Mesures en particules/ml. Les particu/es uti/is#s etaieet de 0,5-1 microe.
**_ NTU = unit#s de turbidit# n@h#lom#trique
: Effets esth6tiques
Eftluent
Moyenne Maxillltml
0,05 ppm 0,05 ppm
3.978 7.800
Effluent
Moyemm
0,O7 NTI
26
l [)1)1)
1,8 [)1)1)
0,00005 ppm
0,(J02 ppm
0,042 ppm
0,32 MFLiml
MaxinluIll
% R&lucfion
Moyelme Milfimum
98,90!:1 97,37!:1
98,00% 96,10%
% R6duction
Moyenne Milfimum
99,71% 99,59!_
99,97%
99,37%
98,8%
91,93%
76,19 %
84,89%
99,97,%
R6ducfion
exigemlte rain.
R6ducfion
exigemlte rain.
0,5 NT[ 7
> 50%
>85%
Sp#cifications d'operation
• Capacit(': (crtifi('('jusqu'_'_ maximmn dc 300 g_,lhms (1135 l); jusqu'S maximmn (h' six mois pore" h's mod_'h's non dotds d'm_ vovant indicatcm:
de rempla(ement de fihre;jusqu'_'_ lna×im/ull d'un an t)our les modbles do|('s d'ull voyant indi(atem: de rempla(ement de/ihre
• Exigeme en matibre de pression : 2,8 _'_8,2 1)ar (40 S 120 psi), sans (ho(
• 'Ii'mp('ramre : 0,6'_-38 'C (33°-100 'F)
• l)('bit : 1,9 lpm (0,5 g])m)
Exigences generales d'installation/operation/entretien
• Rin(ez la nomelle (artou(he S plein d('bit pendant 3 mimnes afin de lii)('rer (le l'air.
• Rempla(ez la (artou(he lorsque le d('l)it dexiem u:op lent.
Avis speciaux
• Ics dirt'(ti_('s d'il/stallaliOll, la disponil)ilit(' d(' t)i{'(('s 1'I (h' s('rvi((' ail/si q/l(' la garal/ti(_ siall(tard S()ll[ ('xp('di('('s
avec le t)roduit.
• Ce svsff'me d'eau potat)le doit £qre entreteHu coHlorm('ment aux directives du lhbricaHt, y compris le remplacement
des ( artouches du liltre.
• N'milisez pas lorsque l'eau pr('sente mi danger microbiologique ou lorsque l'eau est (t'm_e qualitd incomme sans d('sinti'( Wr
ad('quatemem le s}stbme avam ou apri's; le s}sff'me peru servir pore: de l'eau dg'sin/cctde qui pourrai_ contenir des spores filn:ables.
• I,es comaminams ou autres sul)smnces reurdes ou r('duites par (e sysff'me de n:aitemem de l'eau ne sont pas n&essairement dans
VOIF(' 1'_t/1.
• Vdritiez pore: _ous assm:er de vous (on/brmer aux lois et r{'glemems locaux et de l'('tat.
• Nowz que bien que l'essai a eu lieu darts des conditions normales de laboratoire, mais que le rendement rdel peru varlet. I,es svsff, mes
doivem g'tre installds et tbncti(mner contbrmg'mem aux procddures et directives recommand('es par le thbricant.
l;::st("e( (( t (( :,(1 l(s (s 42 ( ) d( ANSI, NSF l)Om- la r&luction d( :
Norme N ° 42 : Effets esth6fiques
I nitd chimique
Rdduction d'odeur et de gofit
Rdduction de chh)rc
I hfild d( filtration mdcani(lUe
P.( du(tion d( parli(ules, cat(gorie l
Norme N ° 53 : Effets de smut6
I nitd de rdduction chimique
R_duction de plomb et AtFazine
Rdduction de IJndane et 2,41)
I hfitd de tihFation ln_caniqtm
R_duction de spores
R_du(tion de tml)iditd
Fal)riqu(,e pour (;eneml Electric (;ompany, I ,ouisville, KY 40225 _ 7
Page 58

Servicea tacfientele.
Site Webapparei/sg_ectromgnagersGE _w.electromenagemge.ce
Vom avez m_e ql_esdo_ ol_ vous avez besoim_ d'aide pom'votre apparei] eS]ectromeSm_ger? Co_tactezmol_s
par h_terl_et al_ s,te wwwoeleetromenagersge.ca =4 hem'es par iota; tol_s ]es iol_rs de ]'mmeSe.
Sem:ceder@arations
Service de r_pm_tio_s (;E est tola pros de ",'ore.
Pore" lid re r_pa rer votre _]ectrom _ ager (;E, i] sl_fti t de m_oils t_]_ph om_el:
• 9
l.SN._f.34_
Studio de conceptionrga/iste
S{_]"dem a m_de, ( _E [)eIIt [( )I0]'m_i]"II_ e b]'o ch II]'e s I0]"] am 1__ a _em e ]_t d II_ e c Ilisi _ e [1()II]"]es [)e ]so ]__ es
i'_mobi]ite_ reSd_ite.
Ecrivez: Directem, P,e]atitms ax'ec ]es Cameo, h/c.
Bm'eau 310, 1 Factor_ im_e
Pro/ongationdegarantie _.efect¢omenagetsge.ce
M hetez m_ comment d'e_m_ede_ (;E avaunt q_e votre ,gmm_de _ex}_ire et l%n_ficiez d'm_ rabais s_bsm_del.
_:i_si ]e service apr_s-ve_te (;E se_ to_!io_rs ]5 apr_s expi_ti(m de ]a gm_mtie.
VMtez notre site Web on appelez-nons an 1.800.461.3636.
Pi&es etaccessoires
Ce_*x q_d dSsh'e_t rSparer e_*x-m&mes leto's 5]ectromS_agers pe_*ve_t recevoh" pibces et accessoires
directeme_t i'_]a maiso_ (cmtes VISA, MasterCard et l)isco _,er accepteSes).
tes digestivess_ip_Nesdartsle p_sent man_elpe_vent Ogee#ect_es pa_n'impo_eque__tilisate_ tes a_ttes
t@a_ationsdoiventg_n_a/ement _tm effectu_esper _n te_flnicien qua_ifi&$oyezprudent, ca__ne r@aration
inadequatepe_t affectet /e fonctionnements_c_fitaim de Yeppateit
V_s tro merez da _ s ]es pages.ia m_ es de votre a _ _ _:lire ]e _ m_ _ro (h_ C_el_Ire de servi ce Cam co ]e p] m
proche. A_treme_t, appe]ez-_mm a_ ] .888.261.3055.
Contactez=nous
Si vous _'&tes pas satisii_it du service aprbs-_ el_te do_t _ms avez bSl_Sfici6 :
Premlerement, comm m_iq _ez avec ]es ge_s q _d o_t r_par_ votre apparei].
Er_suite, si \'ore _'_tes to_!]ours pas satisiidt e_vo_ez tom ]es d_tai]s--mm_ro de t_]_pho_e comp_Js--a_
Directem; Re]atiol?s avec ]es coi/sommatelli's, C.amco, ]{l/c+
Bm'eau 310, ] Facton Line
lnscrivezvotreappareflglectromgnager _.e_ect_omena_ets_e.ce
l_serivez votre appa_il 61eetrom_nager en dineet, a_ssit6t que possible. Ce]a am_]iore_ m_s
corn m m_icatio_s et notre service apr6s-ve_te. V0_ts. [)om'ez• _ga]eme_t, m_m. era'% er par ]a poste
]e fonmdaire d'i_scriptiol_.joi_t fi votre doc_m_e_tatiom
58
Page 59

Inforn_i6n deseguridad
Adaptadores ...................... _i2
Cables de extensi6n ................ 61
Conectar la electricidad ............. {_2
Deshacerse debidamente
de su refl_gerador. ................. fit
P_ecaucio_es de seguIidad .......... 60
Ins#'ucciones & operad6n
Cartucho del filt_o de agua .......... (i4
Co_troles del refi{gerador. .......... 63
Dispensador de agua y de hielo ....... fi8
Dispositi\_ automdtico
para hacer hielo ................... fi7
Enti>pafios, recipie_ms y estm_tes.. 64-66
Ga_wtas de almace_amiei_to ...... 66, 67
Cuidado y limpieza
Limpieza ...................... 69, 70
Reemplazo de bombillas ............ 71
Im#ucc4orws de imtalac46n
Instalaci6n de la lfi_ea de agua .... 74-78
Preparaci6n para
fi_stalar el refiigerador. .......... 72, 73
I
I
Solucionar prob_as
Antes de solicitar un secvicio ...... 80_3
So_idos _ormales de la ope_aci6_ .... 79
Servicio aI consumidor
Garm_tfa pa_a (onsumidores
ei3 los Estados Lrnidos .............. 84
Hoia de datos de fhncioi_amie_to .... 8::>
Secvicio al ( o_sumidor. ............. 87
J
.m
J
Page 60

INFORMACIONESIMPORTANTESDESEGURIDAD.
LEAPRIMEROTODASLASINSTRUCCIONES.
iADVERTENCIA!
Use este aparato s61opara los fines que se describen en este Manual del propietario.
PRECAUCIONESDESEGURIDAD
Cuando use electrodom#sticos, siga las precauciones b#sicas de seguridad, incluyendo las siguientes:
Antes de usa_se, este refrigerador debe_5 estar
instnlado v ubicado de actlerdo con Ills
instrucdones de instalaci6n.
No pemfita que los niflos se suban, se paren o se
omlguen de las charolas del _efl_igerado_: Podrfa
daflmse el reti'igerador y causarles serias lesiones.
No toque las superficies fl'fas del congelador
cuando tenga las manos hOmedas o m@_das.
i_ piel se podrfa adherir alas superficies
extremadamente fl'_as.
No gt_mle ni use gasolina u otros \;q)ores o
lkluidos inflamables cerca de este o cualquier otto
[Ip[I I'atO,
; Aleje los de(los fllera de las fireas donde se puede
pinchar los dedos; los espados entre las puertas
y entre las puertas y los gabinetes son
necesariamente estrechos. Cierre las puertas
con cuidado en la presencia de los nifios.
Si su refl-igerador tiene tm disposifivo automfifico
para hacer hielo, evite el contacto con las partes
m6viles del mecanismo de expulsi6n, o con el
elemento calefimtor localiz_ldo en la parte interior
del dispositivo para hacer hielo. No ponga los
dedos ni las manos en el mecanismo autom_itico
para hacer hielo mientras el retiigerador est_
conectado.
Desconecte el refligerador antes de limpiarlo o
eJ[ecttla F i'epa i'aciones.
NOTA: RecomendamosenNticamente encargarcualquier
servlcioa unpersonal cafiflcado.
E1 colocar el control en posici6n 0 (apagado)no
quita la corriente del circuito de la luz.
No vuelva a congelar los alimentos congelados
tma vez que se hayan descongelado.
6O
Page 61
www.GEApp/iances.coln
iPELIGRO! RIESGODE QUE
UN IVINO PUEDA QUEDARATRAPADO
E1 at_q>amiem } _ _ _ L _ _f C_ CA _e _ , _ _ _ H 5 , _ _ _ _efrigera_te S
Som_Im problema de] pasa_]o. I,os re_i_emdores
abaN_(hmados so]_ m_ pe]igro...am_ql_e sea sd]o pot Todos his apai'atos de i'efl'igeraci6i] coiltieilei]
" x_cos d_as " Si se deshace de sl_ vie]o refl'ige]_dor i'efl_gei'ailtes, los cuales se debeI] retirar ailtes de
pot tilvor siga ]as h_sm*ccio_es ab@_ pax:_ la elinlinaci6n del producto de acuerdo coil la lev
aw_damos a pre_ e_ir a]gfim_ accideme, tedei'al. Si w_ a desechar algfin aparato andguo
Antes de deshaeersedesu vieio refrigerador de desechar el aparato para saber qu_ hacei:
o conge/ador:
Quite las puertas.
De]e his entrepaflos en su sifio para que los niflos
no se s/Ib_lIl.
de i'efl_igeraci6n, consulte con la conlpafifa a caigo
USODECABLESDEEXTENSION
Debido a los accidentes potenciales que pudieran ocurrir bajo determinadas condiciones, se recomienda
estrictamente no usar cables de extensi6n.
Sin enlbargo, si decidiera usarlos, es absolutaniente necesario que sea del tipo UI, trifilar para aparatos
y c/lellte con UIl_l clav!]a con COlleXion _1 [.ielTa } qtle el cable eh_ctlJCO sea de 15 alllpelJoS (illfnii/lO) y
120 "_oltios.
C/
Page 62

A iADVERTENCIA!
COMOCONECTARLAELECTRICIDAD
Bajo ninguna circunstancia debe cortar o quitar la tercera punta (fierra) de la clavqa. Para su seguridad
personal, este aparato deber# conectarse debidamente a fierra.
E1 cable el_ctrico de este aparato estfi equipado con
una clav!ia de tres pm_tns (tierra) que enchufi_ en
tm contacto estfindar de pared de tres salidas
(tierra) para redudr al mfnimo la posibilidad de
d_lflOS poi" {in choque el0ctrico con este _lp_lI'il[O.
Haga que tm electricista calificado vefifique el
enchufe de la pared y el circuito para asegura_e
que la salida est_ conectnda debidamente a tierra.
Donde se disponga s61o de tm contncto de pared
con salida para dos i_tmtns, es su r_ponsabilidad
personal y su obligacidn reemplazado pot tm
cont;icto adec/lado p_lI'il ryes p/In[_lS con conexi(_)n
_1 [ieIT;I.
E1 refl_igerador deberfi conectni_e siempre en su
propio contncto el_ctrico individual clue tenga
tm w_lmje que w_)_ de acuerdo con la tabla de
clasNcaci6n.
Esto garanfiza la meior eiecuci6n ) evitn la
sobrecarga del circuito el_ctrico de la casa _ los
dafios a causa del sobrecalentnmiento de los cables.
Nimca desconecte el refl_igeradorjalando el cable.
Tome siempre fim/emente la cla',!ia ) sfiquela del
contncto sin doblarla.
Repare o reemplace imnediammente todos los
cables el_ctficos de servicio que se ha)ml desgastndo
o dafiado en algtma otra fimna. No utilice cables
que iiltlesti'en i'O[tli'ilS o d_II-IOS poI" _lbI';Isi6n _1 lo
largo de _ste ni en la clav!ja o en algm_o de sus
extYelilOS.
_d aleiar su refl_igerador de la pared, cuide que no
pase sobre el cable o lo dare.
USODELOSADAPTADORES(Nosepermiteusareo_hu_e_a_opto_ore_e.Co,o_a)
Oebido a los accidentes potenciales relacionados con la seguridad bajo determinadas ckcunstancias,
recomendamos estrictamente no utilizar un adaptaflor para clav_a.
Sin embargo, si se decidiera usar tm adapmdor
donde los cddigos locales lo pemfitnn, es necesario
hacer tma conexi6n temporala tm contncto de pared
para dos pm_tns debidamente conectndo a tierra
utilizando tm adaptndor UI,, mismo que puede
adqtfiri_se en comercios locales especializados.
I,a ptmtn mils la_ga del adaptador se deberfi alinear
con la entrada lmga del contacto con el fin de tenet
la polaridad adecuada en la conexidn de la clav!ia.
_Mdesconectnr el cable del adaptndo_; detcangalo
siempre con tma mano firando a la vez el cable
el_ctrico con la otra mano. De no hace_to puede
causar que el aclaptndor se rolnpiera despu0s de
I/ltlcho tlSO.
Si se rompiera la temfinal a tierra del adaptndm;
NO USEel aparato hasm que se haya reesmblecido
la conexi6n a tierra de manera adecuada.
La conexi6n de/a terminal de tierra c/elac/aptac/ora/a
sallc/a c/elcontacto de pared no conecta el aparato a fierra,
a no ser que el tom#/o de/a tapa sea de metal y no est6
als/ac/oy que el contacto de/a pared est6 conectac/oa
tierra a trav6s c/elcab/eac/o de/a casa. Un electriclsta
calificac/o c/eber#revisar el ckcuito para asegurarse de
que e/ contacto estb c/ebic/amenteconectac/oa tierra.
62
FAVORDELEERYSEGUIRCUIDADOSAMENTELASPRECAUCIONES
DESEGURIDAD.
GUARDEESTASINSTRUCCIONES
Page 63

LOScontroles del refrigerador. , .cEA,, i,,cos.com
Los controles tendr_n uno de los siguientes aspectos:
FREEZER REFRIGERATOR
OIS OFF
91S COLDEST
Inicialmente, fije el control del compartimiento del refrigerador en 5 y el
control del compartimiento del congelador en 5 y deje que transcurran
12horas para que la temperatura se estabflice.
Varios ajustes podrfan ser necesarios. Ajuste los controles un incremento a
la vez, y permita 12horas despu#s de cada ajuste para que el refrigerador
alcance la temperatura deseada.
Fijar el control del congelador en 0 interrumpe el enfriamiento en el
compartimiento del refrigerador yen el compartimiento del congelador,
pero no apaga la energfa el_ctrica hacia el refrigerador.
Los ajustes de los controles cambiaran segun las preferencias
personales, la utilizacion y las condiciones de operacion y pudieran
I
necesitar mas de un ajuste.
C3
Page 64

Elcartucho de/fi#ro de agu&
En algunos modelos
Instalar el cartuchodel filtro
E1 cartucho del film) de agua est,; ubicado en
la esquina superior derecha trasera del
compartimento del refi'igemdor
Cuandoreemplazar el filtro on los
modeloscon una luzindicadora de
reemplazo.
Ha) una luz de indicacidn de recambio del
cartucho del filtro del ag-ua )a sea sabre el
SODOFLe /
uel car[ucno • 4
Ponga la parte superior del cartucho
hacia arriba dentro del soporte del
cartucho y girelo lentamente hacia
la derecha.
dispensador o sabre el panel de control de
tempemtm'a (dependiendo del modelo).
Esta luz se _olver_i mnarilla pare a&ertMe
que necesita reemplazar el film) pronto.
E1 cartucho del filtro deberfa reemplazm'se
cuando la luz indicadom de recambio
se vuelva roia o si la salkta de agua al
dispensador o al disposidvo para hacer hielo
disnlintq era,
/ :/¸¸¸¸¸? ;;i
Cuandoreemplazarel filtro on los
modelossin una luz indicadora de
derivacio! _
delfiltro
I
®
RESETWATER FILTER
HOLD3SECS
(onalgunosmodelos,la apariencia
podrfavariar)
reemplazo
E1 cartucho del film, se debe reemplazar cada
soismoseso anms si el flujo del agua hacia el
dist)ensador o mSquina de hielos disminuye.
Instalar el cartucho del filtro
O Si est5 cambiando el cartt]cho, remue'_a
primero el _iejo girSndolo lentamente
hacia la izquierda, Nojale el carmcho
directamente hacia ab@). Un poco de
agua puede g_)teac
O En modelos sin una luz indicadora de
reemi)lazo, coloque un adhesive con
el rues ) el aft() al nuevo cartncho para
que le recuerde reemplazar el filtro en
soismoses.
O Llene el cartucho de reemplazo con ag'ua
del grifo i)ara permitir tm m@)r fl@) del
dispensador imnediammente despu_s de
la insmlacidn.
O Situando la flecha en el cartucho a la
altm'a del soporte del mismo, coloque
la parte superior del nuevo cartucho hacia
m'riba dentro del soporm./V0 emi)qje el
carmcho hacia arriba a dentro del
soporte.
_ (;ire el cartucho lentamente hacia la
derecha hasta que el cartucho se pare. NO
APRETARMUY FUERTE.Mientras est;i
gir;indolo, el se alzar;?per sf mismo en su
poski6n. Cartucho gir;i cerca 1/2
re_ olucidn.
ODeie carter el agua desde el dispensador
por ), nlmutos (aprox, 1½ galons) para
aclarar el sistema ) para pre_enir
salpicaduras.
_ Presione } mantenga presionado la
ahnohadilla para RESETWATERFILTER
(REINICIAR EI, FIITRO DE AGUA)
(on alg-unos modelos) par tres segundos.
NOTA: Un carmcho de film) de agua reci&_
instalado puede causarel agua dochorroar del
dist)ensador
Taponde derivacion del filtro
Se debe usar el tapdn de derivacidn del filtro
cuando tm cartucho de film) de
reemplazamiento no se puede encontmr
E1dispensador ) el dispositi_o pare hacer
hielo no i)ueden fimcionar sin el filu'o o
sin el tap6n de deri\ acidn del film).
Filtrosde rocambio:
Para pedir cartuchosadicionalesen los Estados
Unidos,visite nuestrositio Web,
www.GEAppliances.com,e/lame a GE
parapartes y acceseriosa1800.626.2002.
(;_\T"
Precio sugerido de venta al pfiblico
$34.95 US[),
Los entrepa#os y recipientes del refri#emdor.
No todos los modelos tienen todas los caracteristicas.
Recipientes on la puerta del compartimiento del refrigerador
Los redpieJ)tes qjl_stab]es se pl_ede_)
tmm_sportar fiici]mem_te desde e] ref_'igemdor
basra e] _rea de t_b_!jo.
Para retirarlos: l ,evm_te e] f}'e_te de] c_j6_ y
despl_Ss h_i]e]o.
Para raamplazarlas a cambiarlas de lugar:
Em_caje el cajdN_ em_los soportes moMeados
C4
de la p_erta y empq]e haci_ ademro. E]
14_tapa deMiza#te ay_da a pre_ em r q _e
m_ go]pecito haga dermmarse alga o (p_e
las cosas peq_eflas g_ardadas e_) el h)te_Jor
de] e_trepaf_o de ]a p_erta se caigm_ o
resba]e_. Po_ga m_ dedo e_ cada ]ado de
]a tapa des]izm_te haci_ ]a parte tmse_ v
m_a]a hacia de]m_te v hacia at_Ss pare
q_e se _!j_ste a s_s _ecesid_des.
Page 65

Reubicaci6n de los entrepa_os
Entrepafios del refrigerador:
vvwvv.GEAppliances.com
Para retiraHos
Entrepafiosdelcongelador:
Para retirarlos
!
Para reemp/azarlos
superior
o B@Io para
asegurarlo
el/su lugar
Cacemlas del congelador:
Para retirarlas
Retire la cacerola empt/i_h_dola hacia el
fl'ente, le_ mtm_do el fl'ente v deslizfindola
hasta pasar el ptmto de parar,
i.
i
Entrepa#o deslizable a prueba de derramamientos (ena/gunosmode/os)
E1 entrepafio deslizable pemfite alcanzar goteos a los entrepafios que se ellcUelKi'all
artfctflos guardados atrfis de otros. I,os mils abajo.
hordes especiales est_h_ diseflados para Aseg&rese de haber empujado los entrepafios
a_ udar a pre_enir derramamientos o hasta e/fondo antes de cerrar ia puerta.
Entrepa_os a prueba de derrames (ena/gunosmodelos)
Ix)s entrepafios a prueba de derrames
fienen bordes especiales que ayudan a
evitm" que los derrames goteen hacia los
estm_tes siguientes.
i_I )_ Entrepa6o OuickSpace (ena/_unosmodelos)
'_ ....... _ _ Este entrepafio se divide en dos x la mired artfculos mux altos ubicados en el
=" = _ -_ = -_ se desliza debajo de sf mismo para guardar entrepafio que se encuentra mils abajo.
Entrepafios prefundes para la puerta
Exte_sores de e_m'epaSos desmo_)t_bles
prr>Jhmdi/m_ v rodem_ los e_m'epaflos de la
pl_erta, b_JN_da_do m_]s espacio y ma}or
flexibi]idad pare a]mace_amie_to.
Para retirarlos: l ,evm_te e] exte_sor de]
el_trepaSo hacia arriba, des[>l_&s h;_]e]o.
Para reemplazarte: El_ga_/che e] extel_sor de]
el_trepa[_(> e_l los s/)portes m(>]deados de ]a
p_erta y em i:>_je]o basra (]_e se asegure, e_
65
Page 66

Caracte#sticasadiciona/es.
No todos los modelos fienen todas las caractedsticas.
Estante ShelfSaver TM
(en algunos modelos)
Use esto estnnte para
almacenar latas de bebidas
para un filcil acceso.
Tambi_n puede sostener
un plato refl'actario de
9" 3"X 1. .
$oflre /as #avetas de a/macenamiento.
No todos los modelos tienen todas las caractedsticas.
Gavetas preservaderas de #utas y vegetales
E1 exceso de agua que pueda aclmmlarse
e]_ e] fbm_do de ]as gavetas debe]_ set
seconders.
Estantepara latas en la _ .......
Este estnnte en la puerta
puerta (en algunos modelos) ,, ,_,_ ,._ ..__ _
latas.ptledealillacenar hasta 9
NOTA:Esteestantes61ose
puedeinstalarenlaposicidn
superiordebajode/contenedor
deproductos/ficteos.
Normal
M_sfria
Gavetas preservadoras de humedad ajustable y bandeja de refrigerios
(enalgunosmodelos)
Deslice el control hasta llegar a la posici6n Deslice el control hasta llegar a la posici6n
High(alto) para proporcionar el alto nivel Low (b_!io) para proporcionar el nivel de
de humedad recomendado para la mayorfa baja humedad recomendado para la
de los vegetales, mavorfa de las fl'utas.
Contenedor convertible para tames (en
Esto contenedor convertible para carnes
tiene su propio conducto de refrigeraci6n,
el cual pemfite la drculaci6n en dicha
contenedor de aire fl'fo proveniente del
congeladm:
El control de temperatura variable regtfla
el flujo de aire del compartimiento
del congelado_:
F!je la palanca de control arriba (up) para
convertir el contenedor a la temperamra
nomml del refl_igerador y ofl'ecer espacio
algunos moflelos)
adicional de almacenamiento para los
vegetales. E1 conducto del aire fl'fo se
apaga. Se pueden seleccionar diferentes
niveles entre estos extremos,
F!ie la palanca de control ahalo (down)
para la posid6n mils fl'fa para ahnacenar
carries fl'escas. Si la palanca se deja en la
posici6n de carnes por un laIgo perfodo
de fiempo, se puede fimnar algo de hielo
dentro del contenedm:
66
Page 67

Sabreretirar la gavetapreservadorade alimentos.
No todos los modelos tienen todas las caracterfsticas.
Guiasde la
gaveta
CualTdo se elTOUe!Ttre reemplazando
las gavetas, cerciSrese de
deslizarlas a Io largo de las gufas.
Coma sacar la gaveta preservadora de
i,as gavems se pueden retirar filcihnente
inclinfindolas levemente y empujfindolas
hasta pasar el ptmto de freno.
alimentos
Si la puerta le impide sacar las gavems,
el reliigerador ten(h';i que ro(lm_e hacia
adelante hasta que la puerta se abra lo
suficiente para deslizar las gavems hacia
afilera. En algunos cases, cuando ruede el
reliigerador hada afllera (leber_i move_to
hacia la izquierda mientras lo rueda.
El dispesitivoa#tombtice para hater hiet&
Un refrigerador reciOn instalado puede tardar hasta 12 a 24 horas antes de empezar a hacer hielo.
Interrupteide
alimentaciSn
Dispositivopara
Luzde:
alimentaciSnverde Brazedetector
EldispositivoautomMico para hacer hielo
(enalgunosmoflelos)
El disposidvo para hacer hielo producir_i siete
cubes par ciclo--aproximadamente 100--130
cubes en un ciclo de 24 betas, dependiendo
de la temperatura del congelado_; de la
temi)en_tm'a amNente, del ndmero de \eces que
se abm la puerto y de otras condiciones del usa.
Si el reti4gerador se usa antes de que se ha%_ la
conexidn de agua al dispositivo para hacer hielo,
coloque el interrupter de alimentacidn el0ctHca
en la posicidn 0 (apagado).
Cuando el reflJgerador esttl conectado al
suministro de ag-ua, cok)que el interrupter de
alimentacidn el0ctHca en la posicidn
I (encendido).
E1dispositi_o p_u'a hacer hielo se llenani
de agua cuando la temperattu'a _d(an(e 15°E Un
refngerador reci0n instalado puede necesitar
entre 12 y 24 horas para empezar a hacer hielo.
Escuchanl un zumbido cada _ez que el
dispositivo pare hacer hielo se llene de agua.
Deshag'a las primeras carg'as de cubes de hielo
para pennitir que la lfnea de aguase limpie.
Asegdrese de que na(ta impide el moximiento
del braze detector.
Cuando el recipiente est_illeno (_dnivel
del braze detector), el dispositivo pare hacer
hiek) no producinl hiek).
Es norrri_llque algunos cubes salgml peg_l(los.
Si no se usa hielo con fl'ecuencia, los cubes
de hielo vi@)s se opacan, adquiex_n un saber
l_lIlcio v se contraen.
NOTA:Enhogaresconpresi6ndeaguainferioral
promeflio,esposiblequeescucheel cicb flelflispositivo
parahacerhielovariasvecesal hacerunloredehie/o.
_ Entrepai:ioHayunentrepafio
L. ,_ enlaparte onlaparte
_ superiordelsuperiordel
II oo.ge/.or or
i .......
L l flispositivopara
,,aoerl,,e,oq,,e
puedeusarsepara
almacenamiento.
Gavetadealmacenamientodehielo
Parateneraccesoal hielo,j'a]ede ]a g'a_etahada
(telante.
Kitaccesoriopara hielos
Si su retiigerador no x_ene equipado con un
dispositixo pant hacer hielo, tm kit accesofio
para hielos est_i disponible a un costo adicional.
PaN sacar lagaveta, jale de la misma hacia ftlera
) lex_h_telahasta sobrepasar el punto (lontle se
atranca.
Consulte en la parte posterior del refligerador
el kit espedfico pare hielos que su modelo
necesita.
67
Page 68

Eldispensadordeaguaydehlelo.
En a/gunos modeios
ToUsetheDispenser
r
Recogedor
Seleccione CUBEDICE _ (cubos de hielo), Para bloquearel
CRUSHEDICE _-_ (hielo U_turado) o
WATER_ (agOra). @
Presione el "_so sua'_emente contra el
brazo del dispensadm:
E1i'ecogedor no se xacfa solo. Para evitnr
las manchas de agua, el recogedor ) la
parfilla se deber;h_ limi)iar regulam_ente, .
Si nohay distnT_ucidndeaguacuandoel refweraflor
estbpnYneramentelnsta/ado,hayposibffidaddeake
en el slstemade ia ifneadeagua. OpnYnael brazo
de/dispensadorduranteal menosdosmlnutospara
ehkninarelake atrapadode la lfneade agua yllenar
el slstema.Parae/lYninar/as lYnpurezasde ia ifneade
agua,desecheiospnrnerossels vasosdeagua.
PRECAUCION:No introduzcanuncalosdedosni
otrosobjetoson la apertura deldispensadordehMo
triturado.
LOCKCONTROL
HOLD3 SECS
Para desbloquearlo, presione la misma tecla
(hliante 24 segundos ntle'_alllente.
DispenserLight(Luzde/dispensador)
LIGHT
Gaveta de almacenamiento
de hielo en modelos con dispensador
dispensador(en
a/gunos mode/os)
Presione la tecla LOCK
CONTROL(control
de bloqueo) din'ante
3 segm_dos para cerrar
el dispensador y el
panel de control.
Esta tecla endende y
apaga la luznocturna
del dispensadm: 1,a luz
tambi_n se endende al
presionar el braze del
dispensado_: Siesta
luz se tirade deberfa
i'eelllplazai3e con tlIl_l
bombilla de tm mfiximo
de 6 w_tios.
68
Para sacar: Ponga el interruptor de marcha
del dispositiw) de hielo en la posiddn
0 (apagado).Jale de la gaveta directamente
hacia fllera y luego levfintela hasta pasar
el ptmto donde se atranca.
Para devolver:_Mdevolver la gaveta,
asegfirese de presionarla fim_emente en
su sitio. Si no lle_ hasta el final, vuel\:_ a
sacafla y gire el inecanismo de manejo
1/4 de vuelta. I,uego empuje de nuevo
el entrepaflo.
Dates importantes de su dispensador
No agTeg'ue hielo de charolas o de bolsas
en el recipienm. Podrfa I)rox_)cm"q ue no
salga bieno que no se tritm'e
adecuadamente.
E\ite los vasos demasiado llenos de hielo )
el uso de vasos estrechos o demasiado altos.
E1 hielo amontonado t)odrfa obstruir el
orificio o hacer que se congele la puerta
del orifico de manera que no
se pueda abrit: Si hubiem hielo
bloque_indolo, desprenda con una
cucham de madem.
, i,as bebidas ) los alimentos no se debe_Sn
enfi'iar r:ipidamente en el recipiente del
hielo, i,as lat:ts, botellas o paquetes de
comkta en el recipiente de hielos podrfan
causar la obstruccidn del dispositix o para
hacer hielo o del recipiente.
Pare evitar que el hielo dispensado caiga
fimra del vaso, ponga el x_Jsocerca, pero sin
toca_; la apertm'a del dispensad(m
Un I)OCOde hielo tritmado puede sm'tir
aunque habfa seleccionado CUBEDICE
(cubos de hielo). Esto sucede en ocasiones
cuando algunos cubos se canalizan en el
tritm'ad(m
Despu& de usar hielo tdtm'ado, un ix)co
de agua puede w)tear del vermdero.
A veces, se ti)rtnar_ tm pequefio montdn
de niece en la salida del hielo sitnada en la
puerta. Esto es normal }, por regla geneml,
sucede cuando ha disi)ensado hielo i)icado
repefidamenm, i a nieve se evapomnl pot sf
IlliSI/'la,
Page 69

Area de goteo del dispensador
timpiar el exterior
EIpeze do/dispensader(era)elgin)as
mode]as}, per debaio de ]a parri]]a, se debe
mare/tern/at ]impio y seco. E] agile qua se
qlleda era/ e] pozo puede de iar depdsitos_
Q_fite los depdsitos agregm]do vim/agre sh/
diblir a] pozo_ Remoje ]]astn que
desaparezcm/los dep6sitos o baste que se
desprel/da m/] o s ufi d e m/[e pam q ili [a r]os.
El #raze do/dispe#aader (era/ a]gmxos
mode]as). A_/[es de ]impia_; optima y
detem/ga ]a tec]a LOCKCONTROt(comte] de
b]oqlleo) dmw_te 3 segm/dos. Se limpia
cam/m/a so]uci6m/de ag/la tibia v
bicarbomm_ de so(l!i<_---:/proximadamel_te
m/a cllc]/ax:_(l!a (15 miX de bicarbom_to de
sadie per cada cuarto (1 lkro) de ag_la.
Eqiuague comp]emmel/te cam/agua y
seq lie.
Limpiar el interior
Paraevitarolorea,deje una cajaabierm
de bicarbonate de sodio en los
compartimientos del refligerador
y del congeladm:
Oeaconecte el refrigerador antes do limpiarlo.
Si no fuera posil)le, expdma el exceso de
humedad de la espoqia o del patio cuando
se limpie alrededor de botones, bombillas
o controles.
Use ague caliente y una soluci6n de
bicarbonate de sodi_--aproximadamente
una cucharada (l 5 ml) de bicarbonate de
sodio por cada cuarto (l litro) de agua.
Esta soluci6n limpia y neutraliza olores.
Eqiuague y seque.
Despu_s de limpiar lasjuntas de las puertas,
aplique una cape delgada de vaseline del
lade de la bisagra. Esto ayuda a evitar que
lasj untas se doblen o se peguen.
Orificio para drenaje en el compartimiento
del congelador. Durante la limpieza anual,
retire la ('acerola inferior del congelador
vierta una soluci6n de bicarbonato de soda:
tas manijasdela puerta Ylosemamentes.Se
]]mpim/ coil m/patio hlm/edecido c(m m/a
so]llcid_/ de dete_ge_/te sllave y ag/la. Seqlle
COral Ilm/ [)_m_(3 Silage.
Mantenga [impie el terminade. 1,impie coil
m/ pa5o ]imp]o ]igexw//e_/te ]mmedecido
COil ceI_t })aX_ a[)al_KOS de cocim/a o Ixm/
detergel/te suave y agile. Seq lie y pll]a
cam/ m/paao ]imp]o y sllave.
No//Ytpie e/refngeradorcon un patio sucio para
tTaS1_Sni conunpatiohz_rnedo.Estospodrfandejar
residuesqeeabct_na/apbtum.Nouseestfopajos,
limpiadoresenpolvo,b/anqueadoresniI/?np/adores
quecontenganb/anqueado_yaqueestosproductos
podrianrayary&,sprendere/termlnado&, pbmra.
una cucharadita (5 ml) en dos tasas
(500 ml) de agua caliente (que no est_
hirviendo), en la lfnea de drenaje con la
avuda de un desbastador de came. Esto
avudar:,i a eliminar el olor v reduciM la
probabilidad de una obstrucci6n en la lfnea
de drem!je. Si el drenaje se obstruye, utilice
un desbastador de came y una solud6n de
bicarbonato de soda para eliminar la
obstrucci6n en la lfnea de drem!je.
Evitel/mpiarlosentrepafiosdewdriofrfoscon
aguacaliente,yaqueiaextremadiferenciade
temperaturapuedehacerquese quiebren.Maneje
losentrepafiosdevidrioconcuidado.Chocarvidrio
templadopuedehacerqueserompeenpedazos.
Nolavepartespl#sticasde/refweradorenel
lavaplatos.
Cendensader
E_/ambiel/[es de lisa caseros _/()x'_//a]es ]a
]]mpieza mti_/axJa de] citadel/sealer _]o es
_/ecesalJm Si_/embnrgo, e_/ambiemes (]lie
[:medal/sex" pardcu]arme_/te gmsie_/tos o
co_/ touche po]vo, e] co_/de_/sador deber[a
]impiaxse de farina pexJddica pare e] b_le_/
flmci(mamie_/to de] refdgemdox:
C#me/impiarel eondensader:
E] co_/de_/sador est:i _lbicado a] i_/terior de
]a parte postexJor de] re{}Jgei;_doi: Pare s_x
acceso, primero descol/ecte e] reidgeradox:
Des[:mSs retire ]a oxbierta de acceso. E]
c(mdel/sador se el/cllel/tx;_ a] ]ado derecho.
69
Page 70

Cuidedoylimpiezedelmfrigemdor.
Atrglsde/refrigerador
Se deberfi tenet cuidado al retirar el
reflJgerador de la pared, Todos los tipos de
recubrinfiento de pisos se pueden dafiaL
sobre todo los recubrimientos acojinados y
los clue tienen superficies rep@_das.
Jale el refl_igerador en fimna rectn y
emptlje nuewlnlente para dew_lverlo a su
posicidn. Mover el refl_igerador en
direccidn lateral puede causar dafios al
recubrimiento del piso o al refl_igerado_;
Preparacion para vacaciones
En el caso de va('a('iones o atlsencias
prolongadas, qtfite los alimentos v
desenchtdb el refl_igerado_: i,impie el
interior con solucidn de bicarbonato de
tma cucharada (l 5 ml) de bicarbonato pot
tm cuarto (1 litro) de agua. Deje abiertas
las puertns.
AIempujarelrefn)eradora sulugar,asegdresede
nopasarsobreelcab/ee/#ctriconi sobre/a/fneade
ahrnentaci6nde/dlsposifivoparahacerhie/os(en
algunosmodelos).
Si la temperamra pueda llegar al ptmto de
congelacidn, haya tma persona calificada
para desaguar el sistema del suministro de
agua (ell algtmos inodelos) para evitnr
daflos a la propiedad causados por
ilmndacidn.
Coloque el interruptor de alimentnci6n
el_ctrica del dispositiw_ automfitico para
hacer hielo en la posid6n 0 (apagado)y
derre el suministro de agua al refi_igerado_:
Encaso de mudanza
_segure todos los elementos sueltos como entrepaflos y recipientes pegfindolos con cinm
adhesi\;_ en su lugar para evitnr daflos.
AsegOresedeclueel refn)erador so coloqueonposl?i6nvertical durantela mudanza.
7O
Page 71

Girar el centre/hacia ia posicidn 0 (apagado) no interrumpe ei fluido de corriente hacia ei circuito de la iuz.
Compartimiente del refrigerader--Luz superior
0 Dese_chufo el refi'ige_do_: OVl_elva a em_chl_f_r el refi'ige_dor a la
bom billa (]el m ism o o (]e m e]_ o ]"vol t_:j e.
co_'l'ie]_ re.
Compartimiento del refrigerador--Luz inferior (enalgunosmodebs)
Estaiuzestbsituadaper enc/made ia
gaveta superior
0 Desenchufe el refligerado_:
0 Tome el borde en la paste inferior del
protector de la luz v hfilelo hacia arfiba
v hacia adelante.
O Despu6s de reemplazar la
bombilla con una bombilla de
electrodom6sticos del mismo xoltaje
o inferior, reemplace la cubierta v
el IIl_tn _()
OVuel\_ a enchufiu" el reffigerador a
la coriiente.
Compartimiento del congelador
ODesenchufe el refligeradm:
0 I?'etire el entrepafio iusto per encima
de la cul)ierta de hlz. (El entrepafio
ser:i in,is filcil de quitar si se _acfa
pfimero.)
O I,exante el protector para retirarla.
ODespu6s de reemplazarla con tma
bombilla del mismo _oltaje o inferior,
reinstale el l)r°tect°r colg_h_(lolo, de
las tres lengfietas.
OVuelxa a instalar el entrepafio y
• . , y
enchtfle el refngerador de nuexo.
Dispensador
Desen('hufe el refl'igeradox:
I_t bombilla est;i situada en el
dispensador 1)_!jo el panel de control.
Qtfite la bombilla girfindola en sentido
contI'aI'Jo a las agujas del reloj.
_Cambie la bombilla per una bombilla
del mismo tamafio ) xoltaie.
@Vuel'_a a enchufiu" el refrigerador a
la corriente,
71
Page 72

Instrucciones para
Refri erador
Instalacion
Models 20, 22,25
Si tienepreguntas,Ilameal 1.800.GE.CARESobienvisitem,estra pfigina_.\_b:[/v[/vw.GEApp/iances.com ]
ANTES DE EMPEZAR
Lea estas instrncciones completa y cuidadosamente°
° IMPORTANTE - G..,dees .s
i_stmcdo_es pa_ i_so de] im_spector local
° IMPORTANTE - odoslos
cadigos y 6rde_es de ]ev.
° Nora al instalador - AsegOrese de d@_r estas
imlstrllcciol_es com_ e] col_slm_k]or.
° Nora al consumidor - Cow,serve estas
im_strllccitmes para re{erem_cia flmmL
* Nive! de destreza - I,a im_sta]acidl_ de este aparato
req i_iere de destrezas m ecSm cas b_si cas.
° T%mpo de ejecuci6n - b/sta]aci61/ de] ref_'igerador
( ]5 m] m_mos)
* I,a im_staIaci6_ aprop]ada es ]a respo_sabiIidad de]
im_sta]ador.
, I,a fid]a de] prodl_cto debido a m_a im_sta]aci61_
im_adeclmda m_o est5 cld)ierta pot ]a garan_tfa.
ESPACIOS LIBRES
Deje stdiciente espacio para fi_cilitar la instalaci6n, la
circulaci6n adecuada de aire v las conexiones de plomerfa
v elg_ctficas.
• Lados l/8" (4 ram)
• Paxte superior l" (25 mm )
• Paacte posterior ]" (25 ram)
Un espacio de 3/4" (19 ram) se necesita para abrir la
puerta de 90 ° lo que le ()ti'ece tm mejor acceso al fii'ea de
almacenamiento de los alimentos.
RODILLOS
Los rodJllos fienen 3 prop6sitos:
• Ix)s rodilh)s se ajustan para hacer que la puertn se
cierre con fi_cilidad cuando est;i abierta
aproximadamente
en la mitad.
• I,os rodillos se ajustan para que el reliigerador sea
fim]emente posicionado en el piso y para no
tambalea_se.
SUMINISTRO DE AGUA HACIA EL
DISPOSITIVO PARA HACER HIELO
(en algunos modelos)
Si el reh'igerador tiene tm dispositixo para hater hielo,
tendril que estar conectada a una lfi]ea de agua frfa.
Un kit de suministro de aoua (confiene tuberfa, xfilxula de
cierre, accesorios e instrucciones) estfi disponible con un
costo adicional a trax_s de su proveed(m visitando Iluestm
pfigina _,\'eb www.GF_kpplim_ces.com o bien a trax_s de
Partes vAccesorios 800.626.2002.
UBICACION DEL REFRIGERADOR
• No instale el refrigerador donde las temperamras van
debajo los 60 °F (l 6 °C), ):_ que no podrfi flmdonar
bastante para mantener las temperamras adecuadas.
• Instale sobre tm piso sufidentemente fim_e para
soportar tm refrigerador completamente lleno.
• I,os rodillos pem]iten mover el reli_igerador para
retirarlo de la pared para su limpieza.
PaJca ajustaJc los rodillos, retire la rejilla de la base
empqjfindola hacia ab@L
.Ij_ ;-a@_
%]/..... 17?
Gire los tornillos de _0usm de los rodillos en el senfido de
las mmmcillas del reloj paaca levmatax el reffigerador y en
senfido contraxio a las manecillas del rel()j para bajaado.
Use tma llave @_stable (tornillo de cabe/;_ hexagonal de
3/8") o uI]aS tenazas.
Paacareemplazaa_ la rejilla de la base, alinee los ganchos en
la parte posterior de la rejilla entre la barra y la parte
inle'rior del gabinete. Empt_je hacia adelante hasta que la
rejilla haga tm chasquido al quedar en su luga_:
72
Page 73

Instrucciones para Instalacion
ALINEACION DE LAS PUERTAS
Despu_s de nivel;n, asegfirese de que las puertns est_n al
mismo nixel ell la parte superior:
Para empaxejar las puertas, _!juste la puerto de los alim entos
_i'escos.
_ Usando tma llaxe de cubo de 5/16", gire el tornillo
de aluste de la puerto hacla la derecha para elexar
la puerta; gfrelo hada la izqtfierda para hacerla
descende_: (Un mp6n de nylon estfi encajado
en la rosca del pin para impedir clue el pin gire
a I/lenos de qtle se rise tlna llave.)
Desptff_s de tma o dos vuelms con la llaxe, abm
v cierre la ptlertn del compartimiento del reli_igerador
y luego controle la alineaci6n superior de las ptlertns.
Pararemoverla parriila
abralaspuertasy entonces
tiredeia parriiia
directamenteI_aciaafuera.
Llavedecubede
5/16"
73
Page 74

mnstrucciones para la
COMO mNSTALARLA TUBERiA DEL AGUA
ANTES DE JNJCJAR
I,os kits de cob_'e _'ecomendados pa]_ el sm_h_]st]'o de
ag_a son _EXSX2, WXSX3 o _\_XSX4, depem_diendo de
la cam_tidnd de tube_'_a m_ecesa_'ia. [_s mbe_'_as pl_sticas
apx'obadas pax:_ el sumim_ist]'o de ag_a som_ ]as mberias pax_
el x'efl'igex_dor Sma]tComlect' ' de (;E (_;X(ISXI(I(I(12,
_;X 08X ] 0006, _%0SX ] 00 ] 5 y _% 0SX ] 0025).
.M conecta_" su re{_'ige_do_" a m_ Sistema de AgHa de
(')smosis hwe_'sa de (;E, ]a (mica i_sta]acidn apmbada es
co_ m_ ]<it de (')smosis hwe_'sa de GE. Pm_ otms sistemas
de agua de 6smosis hwe_sa, siga ]as h_stmcc]ones de]
fi_bl'i ca _/te.
Si la alimentacidn de ag_a a s_ x'e{}ige_dor pmviene de
m/sistema de fi]tx_c](m de ag_a de 6smos]s hwex'sa Y e]
x'eff_gemdox" tambieS]] c_e]_ta co]_ m_ fihx'o de agHa, _se e]
tapdn de dex'ivacidn de] fi]tm de] x'efl'igex_dox: E] _so
co_]iH_/to (;[e] cal"tHcho (;[e fi]t_c_6_/ (;[e a_/la (;[e]
_'ei_'igemdo_" c<m e] fi]t_'o de RO (6smosis i_ve_sa) p_diem
_'es_l]ta_" e_] ]a i)md_lcci6n de o_bos de hie]o ]mecos v en
m_ canada] de agua m_s lento de] dispe_sado_" de agua.
Esta h_sta]aci6n de ]a tuber{a de] agua m) est_ ganmtizada
po_" e] {i_b_'ica_te de] _'e{_'ige_do_" o de ]a mSquh_a de
hie]os. Siga estas i_/stmcci<mes cllidadosamente pax_
mh_]m]za_" e] _'iesgo de m_ da6o costoso deb]do a] agua.
E] max'ti]]eo de] ag_a (agua go]pem_do contx_ ]a mbex'_a)
en la tube_'/a de ]a casa p_ede cm_sa_" daSos a ]as partes de]
_'e{_'ige]_do_" y con <h_ci_" a m_ goteo o i_ m_ daci6n Ixw e]
ag_a. i lame a m_ p]omel"o ca]ificado i)ant co_Tegh" e]
marti]]eo del agm ;rotes de i_sm]ar ]a rubella de] agua a]
PaEt e\ital" qllei?]a(]lll_s v (]_m_os co_? e] pl'o(]llcto, _o
conecte ]a mbe_'_a de] agua a ]a tube_'fa de] agt*a ca]iente.
S] lisa e] l"e{}igei_K]of a_ites de conectar h_ mbex'M,
asegO_'ese de q_e e] i_termpto_" de cor_iente de la
m:h]uim_ de hie]os est_ e_ ]a posici6n 0 Mpagade).
No i_]sm]e ]a rubella de ]a m_hplh_a de h]e]os en hlgax'es
(hmde ]a tempemtm_ ca]ga pot deb;_]o de] _]ve] de
QUE NECESITA
• Kit de tuberla de cobre paxa d refrigerador o
SmartCommc('" de GE, l/4" de difimetm externo
para conectar el reflJgerador al smninistro de agua.
Si usa cobre, asegfirese de que ambos extremos
de la tuberfa se corten m]ifbm]emente.
Para detem]inar la cantidad de tuberfa que necesita: mida
la distancia desde la vfilvtfla del agua en la parte posterior
del reflJgerador hasta el mbo de suministro de agua.
I,uego agregue 8' (2,4 m). Asegfirese de que hava
suficienm mberfa adicional (unos 8' [2,4 m] em'ollado
en tres vueltas de uI]as ] 0" [25 Cln] de di;hnetro) para
pem]itir que el refl'igerador se pueda mover de la pared
despug_s de la instalaci6n.
i,os kits de tuberfa para el refl'igerador Smart(_onnect '_
de GE estfin disponibles en las siguientes longitudes:
2' (0,6 m) - _45X08X10002
6' (1,8 m) - _ASXO8X10006
15' (4,6 m) - X45XO8X1O015
25' (7,6 m) - X45XO8X10025
_segOrese de que el kit que haya seleccionado permita al
Illenos 8' (2,4 ill) COI/]O se descFibe aI'IJba.
NOTA: La mfiea luloerla de pl_tieo aproloada de GE es
la que viene provista con los kits de tuloerla pm'a el
refrigerador SmaJ'tCommet'" de GE. No use _m_gmm
olra tuloerla plgstiea paxa d suministro del agua ya que la
tuloerla es_ 1oajo presi6n todo d tiempo. Ciertos tipos de
pl_tieo se fraduraJ'Sx_ o se mmperSa_ con el tiempo y
eausaJ'_ daYms en su easa deloido aJ agua.
A]ma]" c_oa]q_fie]" apa];m] e]Sc{]'ico (como m_ ta]adm
elSctrico) (hmmte ]a i_staiaci6_L asegOrese de q_te el
apamto est6 aMado o co_ectado de mayhem (]toe evke e]
pe]igm de m_a descarga e]Sct]'ica, o se ope]'e po]" bateHas.
Todas ]as i_staiaciones deben apega]'se a ]as mwmas
vigentes en mate]'ia de ob]_s de p]ome]'[a.
74
Page 75

mnsttu¢¢iones para la
QUE NECESITA (CONT.)
hlstale la v_ilvula de cierre en la tuberfa del agua de
consuino in,is frecuentenlente utilizada.
• Un kit de sumi_fistro de agua de GE (confiene tubei'fa,
v;ilvula de cierre y accesorios enuineiados abe!i,,)est:i
disponible a un costo adicional en su tienda o por inedio
de Partes y Accesorios, 800.626.2002.
• Un sumhfislro de agua frla. I,a presidn del agua debe
estar entre 20 y 120 p.s.i. (1.4-8.2 bar) en nlodelos sin
filtro de agua y entre 40 y 120 p.s.i. (2.8-8.2 bar) en
nlodelos con filtros de agua.
• Taladxo el6ctrico.
• Llave de 1/2" o ajustable.
• Destornillador plmm y de estrella.
• Dos tuercas de compresion de 1/4" de dJfixnelro
exterior y 2 f6rulas (maalgas)_pai'a conectar la tuberfa
de cobi'e a la vfilvula de cierre v la v;ilvula del agua
del refl_igei'a dor.
O BIEN
• Si estfi usando un kit de tuberfa para el i'efi_igei'ador
Snlart(_onnect'" de GE, los accesorios necesarios w_
vienen preinstalados en la tuberfa.
[] CIERRE EL SUMINISTRO
PRINCIPAL DE AGUA
Abra el gfifi_ in,is cercano por suficiente fienipo para
linipiar la tuberfa del agua.
[] SELECCIONE LA UBICACION
DE LA VALVULA
Seleccione una ubicaci6n para la v:ilvula que sea
filcihnente accesible. Es nlejor conectaita en el costado
de una tuberfa vertical de agua. Cuando sea necesafio
conectarla en una tuberfa hoi_izontal de agua, haga
la cinlexidn en la parte supeiior o al lado, en vez de
hacerlo en la parte de abajo, para evitar retirar
cualquier sediinenu) de la tuberfa del agua.
[] PERFORE EL ORIFICIO PARA
LA VALVU LA
• Si su tuberfa exismnte de col)re para el agua tiene un
accesolJo COil vuelo en el extrelllO, ilecesitai'}_ tin
adaptador (disponible en las tiendas de suininistros de
plonierfa) para conectar la lfilea del agua al i'efl_igerador
O BIEN, podi';i cortar el accesoiJo con vuelo con un
cortador de tubos y hiego usar un accesorio de
conlpresidn. No corte el extreino fimnado de la tuberfa
para el reli_igei'ador Sniart(_onnect '_'de GE.
• Va'Jvula de cierre para conectar a la lfilea del agua fl'fa.
I,a vfilvula de cierre debei'_i tener una entrada de agua
COil un difiinetro interno nlfiliino de 5/32" en el
punto de cone_6n a la TUBER]A DEL AGUA FRI_A.
i,as vfilvulas de apagado tipo silla vienen inchiidas en
nluchos kits de suniinistro de agua. Antes de conlprai;
asegfii'ese de que una vfilvula tipo silla cuniple con los
cddigos de ploinerfa en su localidad.
Pert0i'e un oiificio de 1/4" en la tuberfa del agua
(incluso si estfi usando una x;ilx ula auto pei_oradoi'a),
usando una broca afilada. Retire cualquier sobrante
que resulte de pei_oi'ar el orificio ell la tuberfa. Tenga
cuidado de no permitir que se f'fltre agua hacia el
taladaco. No pei_oi'ar un orificio de 1/4" puede resultar
el1 nlenor produccidn de hielo o cubos mils pequeflos.
75
Page 76

Instrucciones para la instalacion
COMO INSTALAR LA TUBERIA DELAGUA (CONT.)
[] INSTALE LA VALVULA DE CIERRE
Una la _filvula de derre a la tuberfa de agua Ilia con la
abrazadera para el tubo.
Abrazadera--
paraeltubo _lk
VNvulade J Tuberiavertical
cierre tipo silla deaguafrb
NOTA: Se deberfin seguir los C6digos 248CMR de
Plomerfa para el Estado de Massachusetts. Ins vfilvulas
tipo silla son ilegales y su uso no est;i pemfitido en
Massachusetts. Consulte con tm plomero licendado.
[] APRIETE LA ABRAZADERA
DEL TUBO
Apfiete los tornillos de la abrazadera hasta que la
arandela sellante empiece a hincharse.
NOTA: No apfiete demasiado la tuberfa va que podrfa
romperse.
deltubo
Tornillodela
abrazadera
Arandela
-- Extremodeentrada
[] CONECTE LA TUBERiA A LA
VALVULA
Coloque la tuerca de compresi6n )t_:rula para la
tuberfa de col)re (manoa_ en el extremo de la tuberfa
con&'tela a la v_ilvula de cierre.
_segfirese de que la tuberfa est_ completamente
insemlda en la _fil_ula. Apriete la merca de compresi6n
i_iY//leillente.
Para tuberfa de plfistico de tm kit de mberfa para el
reliJgerador SmartConnect ''_ de (;E, inserte el extremo
moldeado de la mberfa en la vflvula de cierre y apfiete
la tuerca de compresidn hasta que est_ fiY/nen/ente
apretada a mano, luego apriete otto gin) con tma llave.
Apretar demasiado puede causar filgas.
Valvuladecierre
tipo silla Tuberia
Tuercadeempaque
Valwlladesalida -- --F6rula (manga)
NOTA: Se deberfin seguir los C6digos 248CMR de
Plomerfa para el Estado de Massachusetts. ins wilvulas
tipo silla son ilegales y su uso no estfi pemfitido en
Massachusetts. Consulm con tm plomero licenciado.
compresion
SmartConnect_
[] DIRIJA LA TUBERIA
Difija la mberfa entre la lfnea del agua fl'fa y el
refiigerado_:
Difija la mberfa a tray& de un ofificio perfin'ado en
la pared o en el piso (detrfis del refligerador o del
gabinete de la base ad);icente) lo mils cerca posible
a la pared.
NOTA: _&segfirese de que hava sufidente tuberfa
adicional (tmos 8' [2,4 m] em'ollada en tres vueltas
de ah'ededor de 10" [95 cm] de difimetro)
para pemfitir que el refl_igerador se pueda mover
de la pared despu_s de la instalaci6n.
[] LAVE LA TUBERIA
Abra el suministro principal de agua y laxe 1;I tuberfil
hasta que el a(ma_ est_ limpia.
Cierre el agua en la vfilvula despug_s de que 1111cuarto
(1 litro) de agua se haya eliminado pot la tuberfa.
76
Page 77

Instrucciones para la instalacion
[] CONECTE LA TUBERIA AL
REFRIGERADOR
NOTAS:
• Antes de hacer la cone_6n al refrigerado_, aseg0rese
de que el cable de corriente del refl_igerador no est(_
conectado en el tomacorriente de la pared.
• Si su refrigerador no tiene filtro de agua,
recomandamos la instalacidn de tmo si su suministro
de agua tiene arena o partfculas que podrfan obstruir
la malla de la vfilvula de agua del refl'igemdo_:
]nst_Helo en la tuberfa del agua cercn al reflJgemdo_:
Si usa tm kit de tuberfa pare el reflJgemdor
SmartC(mnect '_ de GE, necesitat;i tm tubo adicional
(_\TK08X10002) pare conectar el filtro. No corte la
tuberfa plfistica pare instalar el filtro.
Algtmos modelos tienen la conexidn del reflJgemdor al
final de la tuberia localizada en la parte exterior del
cobertor de acceso del coillpartiillento del coii/pi'esoi:
En oti'os nlodelos, el cobertor de acceso del
compartimiento del compresor debe set removido pare
tenet acceso a la conexi6n del reflJgemdor a la vfilufla
de agua.
CONECTE LA TUBERIA AL
[]
REFRIGERADOR (CONT.)
]nserte el extremo de la tuberfa en la conexi6n del
refl_igerador lo mils que se pueda. Mientras sostiene
la tuberfa, apriete el accesorio.
Pare tuberfa de pl_isfico de tm kit de tuberfa para el
refl'igemdor SmariConnect ''_de (;E, inserte el
extremo moldeado de la tuberfa en la cone_6n del
refl'igemdor y apriete la tuerca de compresi6n hasta
que est(_ firmemente apretada a mano, luego apriete
otra vuelta con tma llave. Apretar demasiado puede
ca usar flNas.
Una la tuberfa a la abra/ndera provista para sostener]a
en tma posici6n vertical. Quizfis necesite apalancar la
abraa_dera.
Una de las ilustraciones mils abajo lucirfi como la
conexion en su refrigerador.
Abrazadera
deltubo
Tuercade
compresion
de1/4"
Tuberia
deI/4"
En modelos que usan la conexi6n de la xfilvula de
agua, remoxe la tapa de pl_sfico flexible.
©
Coloque la tuerca de compresi6n y la tkXrula (manga)
en el extremo de la mberfa como se muestra. En el kit
de tuberfa para el refl'igerador SmartConnect "_de (;E,
las tuercas va vienen ammdas con la tuberfa.
F&ula
{manga)
Conexion Tuberiade
al refrigerador SmartConnecff
Abrazadera compresidn
deltubo_11 II de1/4"
{manga/
__" Tuberiade
Conexional re_gerador "_l_i_---''_ _'''_ SmartOonnecff
Tuercade
[] ABRA LA LLAVE DEL AGUA
EN LA VALVULA DE CIERRE
Apriete cualquier conexi6n que pueda presentar fllgas.
77
Reemplace la cubierta de acceso.
Page 78

mnstrucciones para la
COMO INSTALAR LA TUBERIA DELAGUA (CONT.)
[] CONECTE EL REFRIGERADOR
Organice e] cable de ]a mberfa de manera que no vibre
contra la parte trasera del refl_igerador o contra la
pared. Emptlje el refl_igerador hacia la pared.
INICIE EL DISPOSITIVO
DE HIELO
F!je el intermptor del dispositivo de hielo en la posici6n
I (encendido).E1 disposifiw_ de hielo no empezar;i a
operar hasta que alcance su tempemtm'a de opemci6n
de 15°F (-9°C) o inenor i,uego, elnpezar_i a operar
autom;iticamente si el interruptor del dispositivo de
hielo est;i en la posici6n I (encendido).
NOT.&: En condiciones de inenor presi6n del agua,
la v_ilvula de agua puede encendei_e hasta 3 xeces para
suministrar suficiente agua al dispositixo de hielo.
78
Page 79

Sonidosnormalesde operacion, vvww.GEAppliances.com
Los refrigeradores m#s nuevos proclucen sonidos diferentes a
los modelos m#s antiguos. Los refrigeradores modemos tienen
m#s funciones y usan tecnologfa m#s reciente.
Usted escucha Io que yo escucho ?Estos sonidos son normales.
HMMMM...
--WHOOSH....
• E1 nuew) compresor de alta eficiencia puede
flmcionar re;is r;ipido y durar re;is que el de su
refl'igerador anterior y puede escuchar tm zumbido
de [OilO alto o tlil sonido ptllsante i/lientras opera.
• A veces el refrigerador flmciona pot un perfodo
prolongado, especiahnente cuando las puertas se
abren continuamente. Esto significa que la flmci6n
Frost GuardT"est5 en operaci6n para impedir que el
congelador se quelne y inejorar la preserwlci6n
de los alimentos.
• Puede escuchar tm sonido de soplido cuando las
puertas se cierran. Esto se debe a que la presidn se
estfi estabilizando dentro del refl'igerador.
CHASQUIDOS,
ESTALLIDOS, CRU D O,
GORJEOS
iWHIR!
• Puede escuchar los ventiladores moviOndose a gran
velocidad. Esto pasa cuando el refl'igerador se
conecta pot primera vez, cuando las puertas se abren
frecuentemente o cuando se guarda gran cantidad
de alimentos en el refl'igerador o en los
compartimientos del congelador. I,os ventiladores
est;/II avtldalldo a illalltellei" las tell/perattlras
correctas.
• Si cualquiera de las puertas permanece abierta pot
mils de 8 minutos, puede escuchar los ventiladores
para enfl'iar los fl)cos de luz.
• I,os ventiladores cambian la velocidad para
suministrar enfl'iamiento 6ptimo y ahorrar energfa.
SONIDOSDEAGUA
6
• Puede escuchar sonidos como de cH!jido o
estallidos cuando el refl'igerador se conecta pot
primera vez. Esto pasa a medida que el refrigerador
se enfl'fa hasta la temperatura correcta.
• I,os reguladores electr6nicos se abren v se cierran
para ofl'ecer tm enfl'iamiento 6ptimo y ahorrar
energfa.
• E1 compresor puede causar tm chasquido otm
go_jeo cuando intenta volver a arrancar (esto
puede tomar hasta 5 minutos).
• E1 tablero de control electrdnico puede causar
tm sonido de chasquido cuando se activa el rel_
para controlar los componentes del refrigerador.
• Expansi6n y contraccidn de las bobinas din'ante
o despu_s del ciclo de descongelaci6n puede
causar sonidos como de c_qjido o estallidos.
• En modelos con dispositivo de hielo, despu_s
de completar tm ciclo de hacer hielo, se pueden
escuchar los cubos de hielo cuando caen a la
bandeja de hielos.
• E1 fluido del refl'igerante a tray,s de las bobinas
puede producir tin sonido de borboteo como de
agua hi_Mendo.
• E1 agua que cae en el calentador de descongelaci6n
puede causar tm chisporroteo, estallido o zumbido
din'ante el ciclo de descongelaci6n.
• Un _uido de agua cayendo se puede escuchar
durante el dclo de descongelacidn a medida que el
hielo se derfite del evaporador y fluye hacia la
bandeja de drenaje.
• E1 cierre de las puertas puede producir tm sonido de
gorgoteo debido a la estabilizaci6n de la presi6n.
79
Page 80

Antesdesolicitar unservicio..°
Solucionar problemas
iAhorre fiempo y dinero! Revise las tablas en las siguientes
p#ginas y tal vez no necesitar# de soficitar un servicio.
Causas Posibles Que hacer
E1refrigerador no Refrigerador ell ciclo de * Espere 30 minutos para quela descongelaci6n se tennine.
funciona descongelar.
Controles de temperatura * Mueva los (ontroles de temperatura hasta till ajuste
en posicion 0. de tenlperatura.
E1 refrigerador est6 • Empuje la clav!ia conlpletamente en el enchtde.
desconectado.
Fusible fm_dido/ * I_eemplace el fl/sible o reajttste el interruptol:
h_terruptor de circuito roto.
Vibraciones o sacudidas Los rodillos requieren * Vea Rodillos.
(una vibracion ligera un ajuste.
es normal)
Elmotor opera durante Es normal cure,do • Espere 24 horas para que el refrigerador se enfl'fe
periodos prolongados o el refrigerador es reci6n conlpletanlente.
se arranca yse para con h_stalado en su casa.
frecuencia. (Refrigeradores
modernosconmas espacio cm_tidades de alJmentos
de almacenamiento y un
congelador mas grande en el re frigerador.
requieren mas tiempo de Se dejo abierta la puerta. • Revise si till paquete mantiene la puerta abierta.
operaci6n. Se arrancan y
se paran a para
mantener temperaturas frecuentes de la puerta.
uniformes.) Con_coles de temperatttra • Ve;t Los contro/es.
Ocurre cure,do hay largas • Es_) es n_nlnal.
Clhna caluroso o aperturas • Eso es llOllllal.
ajustados al pmlto mzls
frlo.
Compartimiento E1 control de temperatura • Vea Los controles.
delrefrigerador o no se fijo bastmate frlo.
congelador demasiado
cMido Clhna caluroso o aperturas • F!ie el control de telupelzttura till paso Infis fl'fo.
Escarcha o cristales Se dejo abierta la puerta. • Revise si hay till paquete que lnanfiene la puerta abierta.
de hielo en alimentos
congelados (escarcha La puerta se abre con frecuencia
enpaquete es normal) o por mucho tiempo.
Eldivisor entre los Ahorro automfifico de energla • Eso avu(la prexenir la C()ll(lellS;tCi(511ell el extelJOl:
compartimientos del circula llquido tibio en la
refrigerador y frente del congelador.
congelador se siente tibio
frecuentes de la puerta. Vea Los controles.
Se dejo abierta la puerta. • Revise si hHv till p;lqt/ete qt/e l[/alltielle la pt/el'ta ;Ibiel'ta.
8O
Page 81

vvvvw.GEAppliances.com
Causas Posibles Que hacer
Dispositivo automMico E1 hlterruptor de alhnentaci6n * (_oloque el interruptor (le alimentaci6n
para hacer hielo no el6ctrica del disposifivo el&'trica en la p_sici6n I (encendido).
funciona (en algunos automfitico paxa hacer
modelos) hielo estfi en la posicion 0
(apagado).
E1 agua est_ cerrada o no est_ * Vea /nsta/ar [a [inca de agua.
conectada.
E1 compartimiento del • Espere 24 h(>ras p;u'a que se enfl'fe el refl'igerad(>r.
congelador es muy cSlido.
Cubos apilados en el redpiente * Nivele los cubos con la mano.
apaga el disposifivo paxa hacer
hielo.
Cubos de hielo atorados en * Apague el disposifivo de hieh), retire los cubos v vuelva a
disposifivo para hacer hielo, porter el disp()sifi\'() en marcha.
(La luz verde de corriente en
disposifivo de hielo es_ destellmldo).
Los cubostienen mal E1 recipiente para los * Vacie y limpie el recipiente. Deseche los cubos.
olor/sabor cubos necesita lhnpieza.
Alimentos trmasmifiendo * Envuelva bien los alimentos.
olor/sabor a los cubos.
E1 interior del refrigerador • Vea Cuidado y limpieza.
requiem lhnpieza.
Cubospeque#os o huecos Filtro de agua tapado. * I_.eemplace el cartucho del filtro con uno nuevo o
con el tap6n.
Formacion lenta del hielo Se dejo abierta la puerta. * Revise si hay un paquete que mantiene la puerta abierta.
E1 control de temperatura * Vea Los contro[os.
no es bastante frlo.
La puerta no se cierre Lajtmta en el lado de la bisagra * Aplique xaselina en la parte ti'ontal (le la junta.
correctamente est6 pegada o doblada.
Brillo anaranjado Calefactor de descongelacion * Eso es normal.
en el congelador encendido.
El dispensadotde hielo DisposJtivo de hielo apagado * Enciende el dispositivo de hielo o el agua.
no funciona (en algunos o el agua estfi apagado.
mode/os) Los cubos estdm pegados " Rein ueve h)s cub()s.
al brazo detector.
Bloques irregtflares de * I-_,6Iupalos con los dedos y deseche los cubos restantes.
hielo en el recipiente. • E1 congelador puede set muv (aliente. Ajuste el control a
I/lt;I posici(31t Ill;IS fl'l;I });Is() pol- p;iso hasta ({tie ito se
fbrmen bloques.
E1 dispensador es_ * Presione la tecla LOCKCO/VTROL (Control de bh)queo)
BLOOUEADO(LOCKED). y mant_ngala presionada durante tres segundos.
Elagua tiene un E1 dispensador de agua no * Dispense el ;1_1./;ihasta title todd el sistema del ugt/a se
sabor/olor malo se uso por mucho tiempo. 11e n e de n flex'().
(en algunos modelos)
81
Page 82

Antesdesolicitar unservicio...
Causas Posibles Que hacer
Elagua en el primer Eso es normal con ml *E,_[)ere 24 horns l)ara que se enfi'ie el refi_igerad(n:
vase esta tibia refrigerador reci6n hastalado.
(en alguuos modelos)
E1dispensador denoun Sumhfistro de agua * Vea Instalar la linen de agua.
no funciona apagado o no eonectado.
(en algunos modelos)
Elagua chorrea del Cartucho del f'dtro reci6n • Deje cotter el agua desde el dipensador pot 3 minutos
dispensadot hastalado. (aprox. 1½ gah3ns).
No sale agua pero el E1 agua en el deposito es_ • Llame pars servicio.
dispesitive pars hacer congelada.
hielo funciona
No sale agua y el Esta tapada la lfilea de agua • l,lmue aun phnuero.
dispositivo para hacer o la llave de paso.
hielo no funciona Filtro de agua tapado. • Reell/l)l;we el cartu(ho del filtro o rell/t/eve el tiltro
E1refrigerador huele Alimentos trmlsmifiendo • _Mfluent_)s con olores fi/ertes (leben estar tapad()s.
E1 dispensador de agua no * Dispense el agua hasta que todd el sisteu/a del a,,ua_ ,se
se uso por mucho fiempo, llene de nuevo.
E1 sistema de agua se ha * Es,i_ere algunas,, horns i)ara title se enfi'_e el agua.
desaguado.
Filtro de agua tapado. * Reeuq_lace el cartucho del filtro o reun/ex'e el filtro
Aire atrapado en el sistema • Presione el brazo del dispensador por un par de
del agum d_s minute,s.
E1 dispensador es_ * Presit nae la tecla LOCK CONTROL((',_mtr_ _1de bh _quet >)
BLOQUEADO(LOCKED). y u/ant_ngala presionada (ha'ante tres segtmdos.
E1 dispensador es_ • Presione la tecla LOCKCONTROL(Control de bloqueo)
BLOOUEADO(LOCKED) y ll_ant&ngala presionada durante tres segundos.
olores al refrigerador. • (;uarde ttna caia de bicarbonat(_ de sodio en el
S •
v.inst;de el tal)_3n.
v.instale el tal)6n.
refrigerador; cfimbiela cads tres meses.
E1 interior requiere • Vea Cuidado y limpieza.
limpieza.
Limpie el sistelna de agua • Vea Cuidado y limpieza.
de descongelacion.
Humedad on el exterior Normal en perlodos con • Sequela stq)edi('ie.
del refrigerador alto grado de htunedad.
Humedaden el interior
(enclimahumedoelsire
Ilevala humedadalinterior
Se abre la puerta con
frecuencia o pot mucho
tiempo.
delrefrigeradorcuandose
abrenInspuertas)
82
Page 83

vvvvvv.GEAppliances.com
Possible Causes What ToDo
NOfunciona/a/uz No hay corriente en el contacto. • I_eemplace el fl/sible o re:ljuste el interrupt(n'.
interior
Bombilla hmdida. * Ve:_ Reemplazar/as bombillas.
Agua en elpiso de la E1 desagiie en el fondo del * Vea Cuidado ylimpieza.
cocina o en el fondo congelador estfi tapado.
del congeladot
Cubos atrapados en * Empuje los cubos en el \'ertedero con una ctu h:u':l
el orificio, de mader;i.
Aire calientea la base
delrefrigerador
El aim fluye papa enfriax el
motor. I_ el proceso de
refrigeracion es nomnaJ que
salga caJor de la base del
re frigerador. Algtmos
recubrhnientos de piso
esta_ se,_sitivos y se
descolorml a estas
temperaturas normaJes
y seguras.
SeseleccionoCUBEDICE
(HIELOEN CUBOS)pero
La filthna seleccion fue
CRUSHEDICE (HIELO PICADO).
• Se qtledaron unos cuantos ctd)os en el trittu'ador de la
selecci6n anterior. Esto es noHnal.
sedispens6CRUSHEDICE
(Hielopicado)(enalgunos
modelos)
Frecuentesonido
de"_urmullo "
ii i ii ii ii ii ii ii ii ii ii ii iii
E1 haterruptor de corriente del
dJspositivo paJca hacer hielo es_
en la posicion I (encendido) pero
no se ha conectado la tuberla
de stunhfistro de agua hacia el
re frigerador.
• Muewa el intermptor de corriente a la posici6n
O (apagado). Mantenerlo en la posici6n I (encendido)
dafiar5 la xfilvtfla del agua.
83
Page 84

Garantiadel Refrigerador.(ParaconsumidoresenlosEE.UU.)
Todoslosservicios losproporcionarfin nuestros centros de f#brica o
nuestros prestadores CustomerCare®autorizados.Para concertar una cita
de servicio, en Ifnea, 24 horas al dfa, pOngaseen contacto con nosotros en
www.GEAppliances.com, o Ilame a1800.GE.CARES(800.432.2737).
Una#o
A partir defafecha
de compra original
Cincoaries
A partir dela fecha
de compra original
Treintadias
A part# de/a fecha
de compraoriginal
del refrigerador
Depor vida
A partir dela fecha
de la compra original
Grapeaquisu recibo.
Se requiem facilitar prueba de la
fecha de compra original para
obtener un servicio bajo la garantfa.
GEreemplazara:
Cualquierparte del refiJgera(lor que fidle debido a un defe(to en matefiales o mano de obra.
Din'ante este afio de garantia completa, GE tnmbi_n proporcionar_i sin costo, mano de obra v
servicio en su hogar para reemplazar las partes defectuosas.
Cualquier parte del sistema sellado de refrigeraci6n, (compreso_; condensadoi, evaporador y todas
tuberfas de conexidn) que fidle debido atm (lefecto en materiales o mano de ol)ra. Durante este
cinco afos de garantia completa del sistema sellado de refrigeracifn, GE tnmbi_n propordonar;i,
sin costo, mano de obra y servicio en su hogar domi('ilio para reemplazar la pieza delbctuosa
dentro del sistema de reflJgeracidn sellado.
Cualquierparte del cartucho del filtro de agua que tidle debido a (lefectos en los
materiales o illantl.f_lcttlra. Din'ante estn garantia limitada de treinta dias,GE mmbi_n
pI'OpOI'('ion_lI';i sin costo, tin cartucho de tiltro de agua de repuesto.
La cacerola de congelador transparente Lexan proporcionada con el reffigerador si la cacerola se
I'OI//[)e dtlI';Inte el tlSO IlOI3//_ll ('_lseI'o.
Viajes de servicio a su hogaJc paJca ensefiarle c6mo usar
el producto.
Una h_talacidn hacorrecta, enlrega o mmatenimiento.
FaMas del producto si hay abuso, maJ uso, o uso paJca
otros propdsitos que los propuestos, o uso para fines
comerciaJes.
P_rd_da de aJimentos por averlas.
Reemplazo de fusibles de su hogaJc o reajuste de
hlterruptores de circuito.
CattsaJc dm-aos despu6s de la entrega.
Reemplazo del cartucho del fillro para agua debido
a presi6n de agua afuera de las limites de operaci6n
especificados o sedJmento excesivo en el sttmhfistro
de agua.
Reemplazo de las bombillas o de los cm'tuchos de f'dtro
de agua dJferente a como se especifica materiormente.
Dm-_o aJ producto causado pot accidente, fuego,
h_tmdaciones o actos de Dios.
Daa-_o hlcidentaJ o co_ecuenciaJ causado pot posJbles
defectos con el apm'ato.
Esta garantia so extiende al comprador original y acualquier propietario que Io suceda para el case deproductos comprados
para use domOsticonormal en losEstados Unidos.EnAlaska, usted tendril que pagar el flete del producto o los costos de viaje
del tOcnicode servicio hasta su hogar.
Algunos estados no permiten la exclusion olimitaci@ de dafios incidentales o consecuenciales. Estagarantfa leproporciona
derechos legales especfficos, y puede tener otros derechos que pueden variar de un estado a otro.Para conocer los derechos
legales de su estado, consulte con suoficina local de asuntos del consumidor o al procurador general de su estado.
Garantidor: General Electric Company. Louisville, KY 40225
ParaComprasHochas en Iowa: Este tbrmulario debe ser firmado y techado pot el comprador y el vendedor antes de la conclusi6n
de esta venta. Este formulario debe set conservado en archivo por el comprador pot un mfnimo de dos afios.
COMPRADOR: VENDEDOR:
Nombre Nombre
Direccidn Direccidn
(5uclad Esmdo C6digo Postal (fiuclad
Fimm Fecha Fimm
84
Esmdo
C6digo Postal
Fecha
Page 85

Hojade DatesdeFuncionamiente
Sistema de Filtraci6n GE SmartWater
CartuchoGWF/HWF
Este sistema se ha semetido a las pruebas NSF/ANS142/53a fin de reducir las sustancias presentadas a continuaci6n.
Se reduje la concentraci6n de las sustancias indicadas en el agua que ingresanen el sistema a una concentraci6n menor
o igualal limite permitido para el agua que sale del sistema, come se especifica en NSF/ANS142/53.*
¢Factores de 100%incorporados para la utilizaci6n no medida)
Estimdar No. 42: Efectos est6ficos
Par£mmtros USEPA
MCL
Cloro
T & O
pmqf( ulas :::
Par£mmtros USEPA
MCL
Turbidez q9,59!:{ 0,5 N_FI
Quistes 09,95!:{ > 99,95!:{
Plomo a pII 6,5 q9,37!:{ 0,010 mgiI
Plomo a pII 8,5 q7,13!:{ 0,010 mgiI
Lindane 91,93% 0,0(;02 mgiL
Atc,_zine 64,28% 0,003 mgiI.
2,4,I1 67,63% 0,07 mgiI
.\_,l)estos 99,82% 99%
1 NT[ ***
99,95% Rcducci6n
15 ppb
15 [)pb
0,0002 ppm
0,003 ppm
0,100 ppm
99%
* Probado utilizando una tasa de flujo de O,5 gpm (1,8927//rain,); presi5n de 60 psig (4,218 Kg/cm2); pH de 7,5 _+O,5, temp, de 20° _+2,5°C
** Medici_n en particulas/ml. Las particulas usaflas eran de 0,5-1 micron,
*** Unidafles de turbidez NefelomOtrica--NTU
Calidad de1
influente concentraci6n
2,0 mgiL + 10!;i
m h,ast 10.000 pmtf,.ulasimI.
Estlmdar No. 53: Efectos Relafivos a la Salud
CaIidad del
influente concentraci6n
II+INT[***
50.000 I. mfnimo
0,15 mgiI+ 10%
0,15 mgiI+ 10%
0,002 mgiI. + 10%
0,009 mgiI. + 10%
0,211)mgiI.+ 10%
10 7 }1 1(}_ fibrasilitro;
l_s tibras SOIl IIIHVOI-('S H
10 micv(mmtl-os de longimd
Prome(fio Mfiximo
Effluent
0,02 ppm 0,05 ppm
3.978 7.800
Effluent
Promedio MS.ximo
0,07 NTI 0,1 NTU
26 55
1 ppb 1 ppb
1,8 ppb 4,3 ppb
0,00005 ppm 0,00005 ppm
0,002 ppm 0,003 ppm
0,042 ppm 0,090 ppm
0,32 MFLiml 1,2 MFI iml
% de reducci6n
Promedio Minimo
98,90!_ 97,37!_
98,00!_ 96,10!_i
% de reducci6n
Prom_lio Minimo
99,71%
99,97!_
99,37%
98,8!:_
91,93%
76,19%
84,89%
99,95%
Re_hlcci6n
nfilfima necesaria
> 50%
>85%
Reducci6n
milfima necesaria
Especificaciones de Operaci6n
• (_at)a(idad: (ertifi(ado para hasta 300 galoncs (1135 litros ); hasta seis mcs('s para los modelos sin luz indi(adora de r('('mplazo de tihro; hasta
tm aflo pm:a los modelos (on luz indi( adora de reemplazo de fihro
• g(,quedmientos de t)resi6n: 40-120 t).,,i (2,8_"/,2 bar), sin (hoque
• 'Ii'mperamm: 33°-100'T (0,6°-38°C)
• Tasa de/lujo: 0,5 gl)m (1,91pro)
Requerimientos Generales de InstalaciOn/Operacion/Mantenimiento
• I,a\ (' el lilt('\ o (a]Ttll(ho a la tasa lll_Xil//a pOl" _ l//i///ltOS pal'a sa(a]7 ('1 air(' atl'a])ado.
• I).('('mpla(e el (arm(ho (Ualldo el/h{jo st' hag_l muy leHto.
Avisos Especiales
• I .as inst] u((ioHes de instala(idn, las piezas, la intbrma(i6n sobrc la disponibilidad (te s('r_J(io y la garm)tfa ('st_indar se in(hty('n (on el t)mdu(to
al enviarlo.
• Este sistema de agua potable (tebe mamenerse conR)rme alas illStlTtlcciones del [ilt)lJcante, incluv(,ndo el reemplazo de los carmchos.
• No se utiliza en los sitios donde el agua es de (alidad microbioldgJcamente dudosa, ni con aguas de calidad desconocida, sin ima (tesinfi:'cci6n
adecuada antes o despu('s del sistema; el sistema puede utilizarse con aguas (tesinl('(ta(tas que ]medan comener quistes/ihmbles.
• I,os contmninantes u orals sut)staHcias que este sistema de tratamieHto de agua ]mede remover o re(tucig no est_in t)reseHtes, necesariameHte,
ell S/I _lgtlH.
• x,i'ritique el acammiemo de las k\\'es y reglamentos esmtales y locales.
• Tome en cuema que mmque las pruebas se realizaron b@) condiciones estfindar de laboratorio, el resuhado real puede variar. I x)s
sistemas se (leben instalar y ot)erar de acuerdo con los procedimientos y las t)autas que recomien(ta el tM)ricame.
Probado x (2ertiiicado segdn 1/s _ n . ANSI, NSF 4_ y 53 para la r(ducci6n d(:
Est,_dar No. 42: Efectos Est6ticos
[ nidad qufini( a
R( du(( idn del sabot v olor
R,.du(,.idn de doro
L nidad (1( fihrado nle(_hli(o
Redu(ddn de parth ulas, Clase I
s • • 9
Estmldar No. 53: Efectos sobre
la salud
k nidad (k redu(cidn quflnica
Rcduccidn &l plomo y Atmzine
Reduccidn del I.indane y 2,4-1)
Unidad d( fihrado mecfinico
R,.'duccidn de (prisms
P,,.'duccidn de mrbidez
1/echo ])or General Electric, Al)l)lian( e Park, I _ouisville, KY 40225
85
Page 86

Q_
Netas.
cr_
P_
,t4tl
r_
Page 87

ServicioM consumidot.
PdginaWebde GEApp/iances www.GEAppliances,com
4Tie_e algm_a pregm_ta sobre sl_ electrodom&tico? ;Pmebe la pSgim_ Web de OE Appliam_ces 24 ho_s al
dia, cl_alquier dia (]el a6o! Para mayor co]wel/iem_cia v ser'dc]o ross _Spido, }_t pl_ede descargtr los Mmmales
de los Propieta_Jos, pedir piezas o il_ch_so hacer m_a cie_ em_lh_ea pa_ ql_e ve_/gam_ a rea]i/_tr mm
repamci6_. Tambi(_ pl_ede "Ask Ore" Team of Experts _M'' (Pregm_tar a m_estro eqldpo de expertos) sobre
cl_a] q I_]er cl_esti6m_ y m I_ch o m_is...
So//citeunareparacibn www.GEAppfiances.com
E] servicio de expertos GE est_ a t;m s6]o m_ paso de sl_ pt/ertm ;E_m'e e_] lh_ea "_,solicite s_l repa_(i6_
oil;redo ]e "¢el]ga 1)iel_ 94 horns al dTa c{_al(l{!ier d[a de] a2_o! O ]];m]e a] 8()().(;E.(]AP, ES ' "< 9 9_<)_
(]H];_llte ho];_s i]onlla]es de oficilla.
_ (800.43_._ ,':, t)
RealLifeDesignStudio(Estudiodedisefioparalav,'dareal)www._e_pp_i_,cos.com
(;E ap(}ya e] co]_ cepto de Dise61) {/_]ve_sal__prod_ct1>s, se_ic]os y ambie]_ tes q _e p_ede]_ _sar ge]_ te de
todas ]as edades, tamaaos y capacidades. Recom)cemos ]a _ecesh]ad de diseaar para m_a glm_ gama de
]_abi]idades v dific_dtades {Tsicas v men,tales. Pare ross deta]]es cobre ]as aplicaci(mes de (3E Dise2_/) { h/i\'ersal,
i_c]m'e_d!(_ ideas de dise2_o [:x/ra ]a coch_a para pe_so_as c{m discapacidades, mire m_est_l pSgh_a Web boy
mismo. Pa_;_ [:)e_s(mas c(m dific_dtades a_ditivas, th_or de ]]amar a] 8(}0.TDD.(;EAC (80(}.833.4322).
6arantfasampliadas www.GEAppfiances.com
Com[)re m]a <ga_;mtTa ampliada )' obte_]ga detalles sol)re desc{le_]tos espeda]es (]isp{mibles mie_m;_s s{l
gam_]tia est5 a0_] acfiva. Puede c(}mpmr]a e_] ]h]ea eli c{/al(p]ier momelm), o ]]amar a] 800.626.2224
dllKgtll[e h()K_/s i]orllla]es de (}ficil];/. (;E Collsllmer Home Services est;m_, a01] a]][ clml]do sll gal;mt[a
te lm ii1e.
P,'ezasyaccesorios _,_.GEApp#ances.com
Aq{_ellos h]divid{_{}s c{m ]a calificaci61] _]ecesari;_ [xmt re[xmlr s{_s propios electrodl}m&tkos p{_e(lel]
pedir qtle se]es m;mdel] ]as piezas o acceso_Jos direct;re]elite a s{_s hogares (aceptamos ]as mljetas
VISA, Master(2ard y Discover). Haga sis [)e(ti(l(} eli ]h]ea ho 5 24 horns cada dfa o ]]amar pot tel{_imo
a] 800.626.2002 dm'm_te ]_or_s i_ormales de (Ncim/.
tas instr_ooienes desoritas en este manual onbren los procedimientos a seguir per onalq_ier _snario. C_alquier
otra reparaoi6n deberia, per regla general, referirse a personal calificado a_torizade. Debe ejeroerse preoanoi_n
ya qne las reparaoiones inoorreotas pneden oansar cendiciones de fnnoionamiento insegnras.
Pbngaseencontactoconnosotros www.GEAppHances.cem
Si _]o est;_ satisfecho {oil el ser'dcio (p_e recibe de (;E, p&]gase eli c{mtacto coil _]osotros e_] m_est_;_ p;igim_
Web il]dic;mdo todos los detalles asf como sl! mimero de te](_limo o escr_l);mos a:
(;e_]em] Mm]age_; (5_st(}mer ]_,elati(ms
(;E App]im_ces, Applim_ce Park
l,o_dsvi]le, KY 40225
Registresueleotrodomdstico www.GEAppliances.com
iRegistre su nuevo eIectrodom_stico en _ea--cualr_do usted pr_fiera! E] regism_r s{_ producu) a fiempo ]e
proporciommi, si stlrgie_t ]a _]ecesidad, m]a meior comm]i(aci6_] } m] servicio re;is _Spid(} baio los tetrmi_]os
de s{_ g;mmtTa. Tambi(_] puede em_iar su tmjeta de registro preqmpresa (p_e se h]c]{_ye e_] e] material de
0°7
Page 88

Consumer Support.
GEApp/iancesWebsite ,,t,e_,.s.:www.;E@p#ances.com
Ha_e a ql_estion ur N_eed assistaure with }our app]iaure? Tr} the (;E App]iaures Website 24 horn's a day,
am_v day of the year! For greater com/vem/ieilce mid I_i_ster se_Mce, yol_ cam_ m]ow do_n]oad ()_ner's Mammis,
order parts, catalogs, or e_ en schedll]e service <m-Hi[]e. \)_ll cam/ also "As]< Our Team of Experts '_'' your qllestions,
a mid so much m ore... In Canada: wwwogeapplianees.ea
Schedu/e Serw;ce _._he_J.8.:www.GE@pliances.com
Expert (;E repair seP,'ice is orally o_e step awa} {}'ore }our doo_: (;et ]m-line ;rod sc]]edu]e _,our service at "_om"
c{mve]/ie]]ce 24 hours am' da_ of the *ear! Or ca]] 800.1 ;E.( ]_]_E8 ' "{ 9 9 _{)_
In Canada, ea_ 1.800.361.3400
flea/Life DesignStudio ,it,e_,.8._,w.cE@plia,ces.com
(;E slq)purts the I[Im/iversa] Design col/cept--prodllcts, seBices a mid envir{mm emits t]]at cam/be Ilse(t by people (ff all
ages, sizes and cajDabi]ities. We recognize the need to design iota wide range {ff physical mid mental al)i]ities amid
im pal rm en ts. For details of (;E's [ i m/]versa] Design app]] cad o_]s, h/c] _l(]i _/g ]d tch en design ideas {br pet}p] e wit]]
disabilities, check {mr our _,Vel)site today. For the hea_J_/g impaired, please ca]] S0(}.TDD.(;EAC (8t}0.833.4322).
In Canada, co_/tact: Mm/age_; (/installer P,e]ations, Cameo, h/c.
, , , (800.43=.=/:}/) durim/g nora/a] busim/ess horn's.
%dte 310, ] Factory l,a_/e
Moncton, N.B. El C 9M3
ExtendedWarranties _,/the_J.s.:www.GEAppfiances.com
I_}___.c.]/a.'se a' (;E ext en de d wa rra _/tv a _/d ]ea m abo__t sp eci a] di sco _mts th at are a','ai] a b]e w h i] e vo_ a" w arra _/tv i s sti]]
in e[tect. _%_ c;m purchase it ]m-]i_]e a_/)_rime or call 800.626.2224 during _lurma] business hours. (;E C{msumer
Hom e Servi ces will still be th e_'e a:{_er )o_ a" wa rra _/b expi res. In Canada, ca_ 1,888,261,2133
PartsandAccessor,'es ,.the_J.s.:www.GEAppfiances.com
I,]divi(l_l:]]s q_mlified t(> se_ice t]]eir {_ n app]im/ces can ha_e parts or accessuries sen t direcdv to th eir hom es
(VISA, M _sterCard a_ld Discover cards are accepted). Order o_/-]i_/e toda}, 24 hours e_ er} day or b} phone at
800.626.2002 dmJ_/g nora/a] b_si_/ess hours.
Instrnctions contained in this mamml cover procednres to he performed fly any riser. Other servicing generally shonld fie
referred to qna#fied servicepersonnel Ca_tion mnst he exercised, since improperset€icing may cause nnsafe operation.
(Smtomer_ in Canada sh(m]d cons_dt the )/e]]m_ pages for the _/earest Cameo service cente_; or ca]] ] .888.261.3055.
ContactUs _,/_he_.8.:www.GEAppfiances.com
If vo_l are not satisfied wit]] the service vo_l receive [}'ore (;E, contact _as o_/our We]bsite with a]] the details
i_/chadi_/g yo_lr pho_/e mm/be_; or wiJte to: (;ene_d Ma_/age_; (Slstomer Relatio_/s
(;E Appliances, App]iaure Park
l ,o_dsvi]]e, KY 41}225
I_] Canada www.geapp]ianeesoea, or _rite to: Directoi; Co_/s_m/er ]:relation/s, Cameo, Inc.
Stdte 310, ]i Factor} i,a_/e
Mo_/ctom N.B. El C 9M3
RegisterYourApp/iance ./_he_J.s.:www._EAppfiances.cem
Register your new app]ianee on=lithe---at your eo_t!¥e!lienee[ Timely pro(hlct registn_tion wi]] a]]o_ _iw
e n h a _/ce d corn m ii _/ica tio n a _/d prom p t se r_i ce im de r th e term s of vo ii r wa rl_ _]ty;sho idd th e _/ee d a lJ se.
Yogimay als(t mail i_ the pre-p]J_]ted registration/card i_/ch_ded i_/the pac]d_/g mateiJa].
In Canada wwwogeapplianeesoea
 Loading...