

Page 1

Installation
Instructions
Instructions en franqais : ................ 4
Instrucciones en espa5ol: ............... 8
Pedestal Models
White Pedestal SPSD157JWW
Metallic Gold SPSD157JMG
Metallic Vermillion SPSDI57JMV
For Washer Model: WPDH8800
For Drger Models: DPVH880EJ, DPVH8800GJ
BEFORE YOU BEGIN
Read these instructions completelg
and cerefullg.
• IMPORTANT - Savetheseinstructions
for local inspector's use.
• IMPORTANT-Observeallgoverning
codes and ordinances.
• Note to Consumer - Keep these instructions
with gour Owner's Manual for future reference.
• Completion time - i to 2 hours
• Proper installation is the responsibilitg
of the installer.
• Product failure due to improper installation is not
covered under the Warrantg.
_, CAUTION - Duetothesizeandweight
of these products, and to reduce the risk of
personal injury or damage to the product, TWO
PEOPLEARE REQUIRED FORPROPERINSTALLATION.
• See washer and drger installation instructions for
additional installation requirements and guidelines.
TOOLS YOU WILL NEED
PhillipsHead
Screwdriver
9/16" Open End Wrench
or Adjustable Wrench
8 mm Socket Wrench
INSTALLATION PREPARATION
Remove the packaging.
The Drawer divider is taped at the top of the
shipping carton. Remove the divider and set aside
for final installation.
Flatten the product carton to use as a pad
to lag the washer or drger down on its side.
Continue using the carton to protect the finished floor
in front of the installation location.
KIT CONTENTS
4 Support Pads
4 Mounting Screws
Drawer Divider
[] REMOVE THE LEVELING LEGS
[] Carefullg lag the washer or drger on its side
to access the leveling legs on the bottom
of the appliance.
IMPORTANT: Do not leg the washer or drger
on its back! Do not remove the shipping bolts
on the back side of the washer. The bolts must
remain in place until the washer is returned
to on upright position.
[] Use an open-end wrench to remove the
washer or drger leveling legs.
1
Page 2

Installation Instructions
[] PREPARE THE PEDESTAL
[] Pull the
drawer out
as far as it
will go.
] Remove screws
from drawer
slides. Slide
drawer out of
the base and
set aside.
\
FOR DRYERSONLY:
[] Locate the 4 support pads from the parts
package. Each pad has 2 protrusions that fit
into the holes on top of the pedestal. Press
the rubber pads into each set of corner holes
on the top of the pedestal as shown.
ii
@
INSTALL THE PEDESTAL
[]
TO THE WASHER OR DRYER
Place the pedestal against the bottom
[]
of the unit. Check to be sure the drawer front
is at the front of the unit.
Align the holes in the pedestal with the
[]
holes in the bottom of the unit. Use a Phillips
screwdriver to install the 4 screws through the
pedestal and into the unit-do not tighten.
[] Slide the pedestal toward the unit, until it is
aligned front to back. Use an 8 mm socket
wrench to securelu tighten the screws.
NOTE: The support pads should be installed on
the dryer onlg. DO NOT INSTALL THESE PADS ON
THE WASHER PEDESTAL.
2
Page 3

Installation Instructions
[] LEVEL THE WASHER OR DRYER
[] Locate the 4 legs from the parts package
and install.
[] Stand the washer or druer upright, love it
close to its final location.
[] Make sure that the washer or dryer is level
bu placing a spirit level on top. Check side
to side and front to back.
[] Use an open
ended wrench to
adjust the legs
in and out.
Tighten the lock
nut against the
bottom of
the pedestal.
NOTE:
• To minimize vibration, the locking nuts must
be tight.
• To reduce vibration, ensure that all four rubber
leveling legs are firmlg touching the floor. Push
and pull on the back right and then the back
left of gour washer or drger.
[] REMOVE SHIPPING SCREWS
Removethe 4 shipping screwson the back side
of the unit.
[] FINALIZE THE INSTALLATION
Refer to the washer or druer Installation Instructions
to complete the installation.
[] REINSTALL THE DRAWER
[] Check to
be sure the
slides are
closed.
[] Slide the
drawer
into the Drawer ,o /
opening.
Align the J
drawer
supports to the
slides on each
side.
[] Reinstall the original screws into each drawer
slide. Tighten both screws.
[] Open the drawer fullu. Slide drawer divider
into slots in the center of the drawer. The
drawer should slide smoothlu when Uou push
it closed.
SPECIFICATIONS SUBJECT TO CHANGE WITHOUT NOTICE
3
Page 4

Instructions
d'installation
ModUles du pi_destol
Pi_destel blonc SPSD157JWW
Pi_destol d'or m_tollique SPSD157JMG
Pi_destel vermilion m_tollique SPSD157JMV
Pour le module de Ioveuse : WPDH8800
For les modules de s_cheuses : DPVH880EJ, DPVH8800GJ
AVANT DE COMMENCER
Lisez attentivement et en entier toutes
ces instructions.
• IM PORTANT - Conservezces
instructions _ utiliser por I'inspecteur IocGI.
• IMPORTANT - Observeztousiescodes
et ordonnclnces en cours.
• Note au consommateur - Conservez ces
instructions ovec votre monuel du propri_tGire
titre de r_f_rence.
• D_loi d'ex6cution - 1 5 2 heures
• Une bonne instollotion est Io responsobilit_
de I'installateur.
• Toute d_faillance du produit suite _ une
mouvoise instolk]tion n'est pos couverte sous
la garantie.
_kMISE EN GARDE-6causedela
taille et du poids de ces produits, et pour r_duire
le risque de blessures personnelles ou de
dommages au produit, IL FAUT DEU× PERSONNES
POUR UNE BONNE INSTALLATION.
• Reportez-vous oux instructions d'instollotion
de la laveuse et de IGs_cheuse pour les directives
et exigences suppl_mentaires d'installation.
OUTILS DONT VOUS AUREZ BESOIN
TournevisPhillips
CI_ouverte de 9/16 po
ou cl_ r_glable
Cl_ _ douille de 8 mm
PRI_PARATION DE L'INSTALLATION
Retirez I'embulluge.
Le s_poroteur de tiroir est colle dons le hout du
corton d'exp_dition. Retirez le s_puroteur et mettez-le
de c6t_ pour I'instullution finale.
Defoites le carton du produit pour I'utiliser comme
coussin oO d&poser lu Ioveuse ou lu s_cheuse sur le
c6t& Continuez _ utiliser le carton pour prot_ger le
ploncher fini devont le site d'instullution.
CONTENU DE LA TROUSSE
4 coussinetsdesupport __,
4 vis de montage
S6poroteur de tiroir
4
Page 5

Instructions d'installation
[] RETIREZ LES PATTES
DE NIVELLEMENT
[] D&posez avec soin la laveuse ou la s_cheuse sur
le c6t_ pour acceder aux pattes de nivellement
au bas de I'appareil.
IMPORTANT: ne d_posez pus la laveuse ou la
s_cheuse sur le dos ! Ne retirez pas les boulons
d'exp_dition 6 I'arri_re de la laveuse. Les boulons
doivent rester en place jusqu'6 ce que la laveuse
revienne en position verticale.
[] Utilisez une cle ouverte pour retirer les pattes
de nivellement de la laveuse ou de la s_cheuse.
[] PRI_PAREZLE PII_DESTAL
[] Tirez le tiroir
aussi loin que
possible.
[] Retirez les vis
glissieres de tiroin
Glissez et sortez
le tiroir de la base
et mettez de
c6t_.
POUR LES
SI_CHEUSESSEULEMENT :
[] Trouvez les/4 coussinets de support dans
le paquet de pi@ces.Chaque coussinet a
2 protub@ances qui s'ajustent clans les trous
sur le dessus du pi6destaL Pressez tous les
coussinets de caoutchouc dans chaque
ensemble de trous dans les coins sur le dessus
du pi@destal tel qu'indiqu6.
des
REMARQUE: les cousslnets de support doivent _tre
install_s seulement sur la s_cheuse. N INSTALLEZPAS
CESCOUSSINETSSUPLE PII_DESTALDE LA LAVEUSE.
t
5
Page 6

Instructions d'installation
[] INSTALLEZ LE PII_DESTAL/_
LA LAVEUSE OU LA SI_CHEUSE
[] Placez le pi@destal contre le bas de I'appareik
V_rifiez pour vous assurer que le devant du tiroir
est 6 I'avant de rappareil.
[] Alignez les trous du pi@destal avec les trous
au bas de rappareiL Utilisez un toumevis Phillips
pour installer les 4 vis 6 travers le pi@destal et
dans I'appareil-ne resserrez pas trop.
[] Glissez le pi&destal vers I'appareil jusqu'6 ce
qu'il s'aligne d'avant 6 I'arri_re. Utilisez une cl@
6 douille de 8 mm pour bien resserrer les vis.
[] METTEZ LA LAVEUSE ET
LA SI_CHEUSE/_ NIVEAU
[]
Trouvez les a pattes dans le paquet de pi@ceset
installez.
[]
Relevez la laveuse ou la s&cheuse. Rapprochez
I'appareil de sa position finale.
[]
Assurez-vous que la laveuse ou que la s@cheuse
soit 6 niveau en pla_ant un niveau 6 bulle d'air
sur le dessus. V@ifiez d'un c6t@6 I'autre et
d'avant vers rarri@re.
[] Utilisez une cl@
ouverte pour
ajuster les pattes
vers I'int&rieur et
vers I'ext@ieur.
Resserrez le
contre-_crou
contre le bas
du piedestal.
REMARQUE :
• Pour r_duire la vibration, les contre-_crous
doivent _tre serr_s.
• Pour r_duire les vibrations, assurez-vous que les
quatres pattes de nivellement en caoutchouc sont
fermement en contact avec le plancher. Poussez
et tirez sur la droite arri_re puis sur la gauche
arri_re de votre laveuse.
6
Page 7

Instructions d'installation
[] RI:!INSTALLEZ LE TIROIR
vous assurer
que les glissi_res
sont ferm_es. - )
[] Glissez
] V&rifiez pour
le tiroir dans
I'ouverture. S@arateur
Alignez les
supports du I J
tiroir avec les
glissi_res de
chaque c6t@.
[] R@installezles vis
originales dans chaque glissiere de tiroir.
Resserrez les deux vis.
[] Ouvrez enti_rement le tiroir. Glissez le separateur
de tiroir dans les fentes au centre du tiroir. Le
tiroir devrait alors glisser en douceur Iorsque
vous le poussez pour le fermer.
[] RETIREZ LES VIS D'EXPI:!DITIONRetirez les 4 vis d'exp_dition _ I'arri_re de I'appareil.
[] FINALISEZ L'INSTALLATION
Reportez-vous aux instructions d'installation de la
laveuse ou de la s@cheusepour terminer I'installation.
SPI::!CIFICATIONS SUJETTES _, CHANGEMENT SANS PRI:!AVIS
7
Page 8

Instrucciones
para la
instalaci6n
Modelos de pedestal
Pedestal blanco SPSDIS7JWW
Pedestal dorado met61ico SPSDISTJMG
Pedestal bermejo met61ico SPSDISTJMV
Pare modelo de lavadora: WPDH8800
Pare modelos de secadora: DPVH880EJ, DPVH8800GJ
ANTES DE COMENZAR
Lea atenta g completamente todas
los instrucciones.
• IM PORTANTE - Guardeestas
instrucciones poro que el inspector local puedo
usarlos.
• IM PORTANTE - cumplocon todos
los c6digos Uordenanzas correspondientes.
• Nota para el consumidor - Guorde estos
instrucciones con el Manual del propietorio
par(] consultorlas en el futuro.
• Tiempo de instalaci6n - 1 o 2 horos
• Lo correct(] instaloci6n es responsubilidad
del instoludon
• Lo folio del producto debido a uno instolaci6n
incorrecto no est6 cubiertu por lu Gurontiu.
A,PRECAUCI6N - Debido al tamai_o g
peso de estos productos g para reducir el riesgo
de lesiones personales o daffos al producto, SE
REQUIEREN DOS PERSONAS PARA SU CORRECTA
INSTALACION.
• Consulte las instrucciones de instoloci6n
de la Iovadora g Io secodora paro ver los
requisitos g pautas de instalaci6n adicionales.
HERRAMIENTAS NECESARIAS
Destornilladorcon
cobezaPhillips
Llave de extremo o
ajustoble de 9/i6"
Llave de cubo de 8 mm
PREPARACION PARA LA INSTALACION
Retire el envoltorio.
Eldivisor de coj6n est6 precintado en la parte
superior del cart6n de embalaje; quitelo g d@jeloa un
lado para montarlo al final del trabajo de instalaci6n.
Aplane la caja de cart6n del producto para utilizarla
como protecci6n para apogar la lavadora o secadora
de lado. ContinQe utilizando la cajo para proteger el
piso acabado frente al punto de instalaci6n.
CONTENIDO DEL KIT
4 planchuelasde soporte
4 tornillos de montaje
Divisor de caj6n
8
Page 9
Instrucciones para la instalaci6n
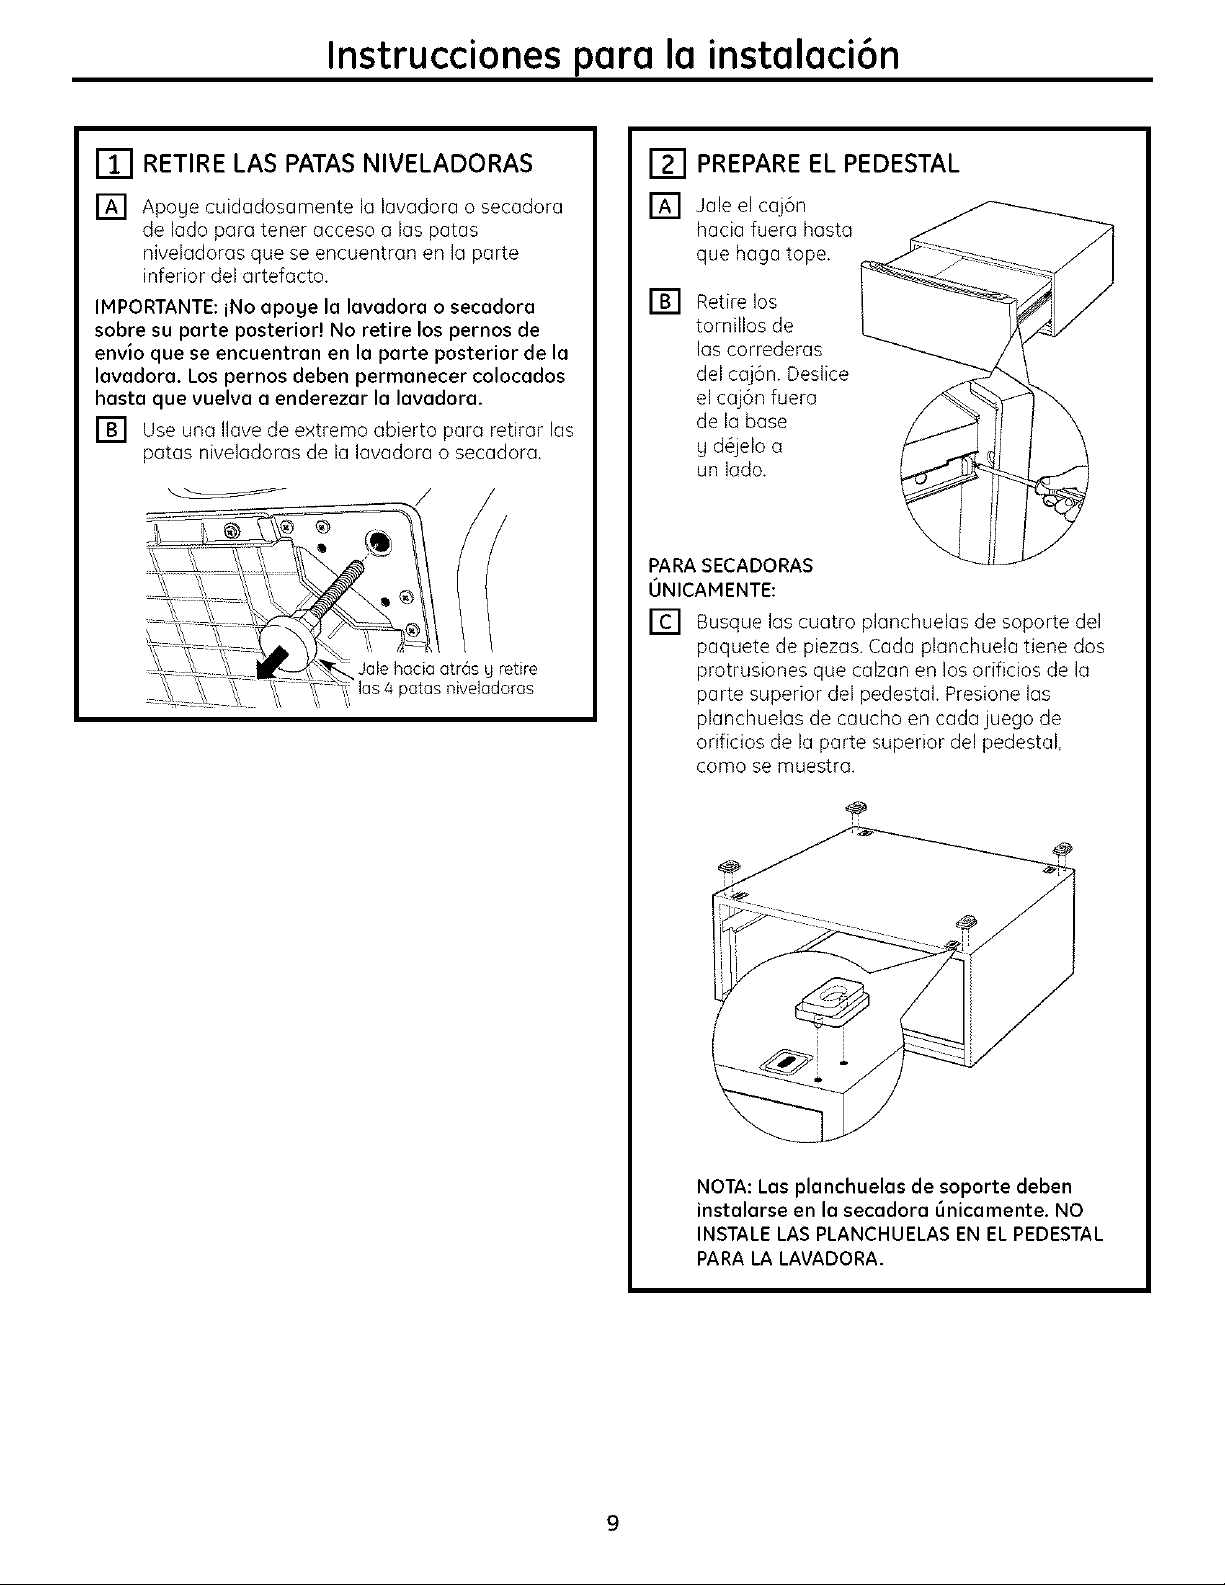
[] RETIRE LAS PATAS NIVELADORAS
[] Apoye cuidadosamente la lavadora o secadora
de lado para tener acceso a las patas
niveladoras que se encuentran en la parte
inferior del artefacto.
IMPORTANTE: iNo apoge la lavadora o secadora
sobre su parte posterioH No retire los pernos de
envio que se encuentran en la parte posterior de la
lavadora. Los pernos deben permanecer colocados
hasta que vuelva a enderezar la lavadora.
[] Use una Ilave de extremo abierto para retirar las
patas niveladoras de la lavadora o secadora.
[] PREPARE EL PEDESTAL
[] gale el caj6n
hacia fuera hasta
que haga tope.
Retire los
[]
tornillos de
las correderas
del caj6n. Deslice
el caj6n fuera
de la base
y d_jelo a
un lado.
PARASECADORAS
ONICAMENTE:
[] Busque las cuatro planchuelas de soporte del
paquete de piezas. Cada planchuela tiene dos
protrusiones que calzan en los orificios de la
parte superior del pedestal. Presione las
planchuelas de caucho en cada juego de
orificios de la parte superior del pedestal,
como se muestra.
NOTA: Las planchuelas de soporte deben
Jnstalarse en la secadora OnJcamente. NO
INSTALE LASPLANCHUELAS EN EL PEDESTAL
PARA LA LAVADORA.
9
Page 10

Instrucciones para la instalaci6n
[] INSTALE EL PEDESTAL EN
LA LAVADORA O SECADORA
[] Coloque el pedestal contra la parte inferior de la
unidad. Verifique que el frente del caj6n quede
hacia el frente de la unidad.
[] Alinee los orificios del pedestal con los orificios
en la parte inferior de la unidad. Use un
destornillador Phillips para instalar los 4 tornillos
a trav@s del pedestal e introducirlos en la
unidad. No los apriete.
[] Deslice el pedestal hacia la unidad hasta que
quede alineado en direcci6n de adelante hacia
atr6s. Use una Ilave de cubo de 8 mm para
apretar firmemente los tornillos.
[] NIVELE LA LAVADORA
O SECADORA
[]
Busque las cuatro patas del paquete
de piezas e inst61elas.
[]
Enderece la lavadora o secadora. Ac_rquela
a su lugar de instalaci6n definitivo.
[]
AsegQrese de que la lavadora o secadora est@
nivelada colocando un nivel de burbuja sobre ella.
Verifique que est@nivelada de lado a lado U
del frente hacia atr6s.
Use una Ilave de
[]
extremo abierto
para ajustar los
patas hacia
adentro U
hacia fuera.
Apriete la tuerca
de seguridad
contra la parte
inferior del
pedestal.
NOTA:
• Para minimizar la vibracJ6n, las tuercas de
seguridad deben estar apretadas.
• Para reducJr la vibraci6n, asegSrese de que las
cuatro patas nJveladoras de goma est_n tocando
el suelo fJrmemente. PresJone y tire en la parte
trasera derecha y luego en la parte trasera
Jzquierda de su lavadora.
/
10
Page 11

Instrucciones para la instalaci6n
[] VUELVA A INSTALAR EL CAJON
[] Verifique que las
correderas est_n
cerradas.
[] Deslice el caj6n
en la abertura.
Alinee los
soportes del
caj6n con las Divisor
correderas
de cada lado.
[] Vuelva a instalar 1_
los tornillos
originales en
cada una de las correderas del caj6n. Apriete
ambos tornillos.
[] Abra el caj6n pot completo. Deslice el divisor
de caj6n a traves de las muescas que se
encuentran en el centro del caj6n. Cierre el
caj6n g pruebe que se deslice suavemente.
[] RETIRELOSTORNILLOS
DE ENVJO
Retire los 4 tornillos de envio en la parte posterior
de la unidad.
[] FINALICE LA
Consulte las Instrucciones de instalaci6n de la
lavadora o secadora para completar la instalaci6n.
INSTALACION
ESPECIFICACIONES SUJETAS A CAMBIO SIN PREVIO AVISO
11
Page 12

49-90344
175D1807P612 12-07 JR
Printed in China
Imprim# en Chine
Impreso en China
12
 Loading...