

Page 1
As an ENERGY STAR®partner,
GE has determined that this
product meets the E
NERGY STAR
®
guidelines for energy efficiency.
ge.com
Pedestals
Profile SmartDispense
™
175D1807P610 49-90342-1 03-08 JR
La section française commence à la page 25
La sección en español empieza en la página 45
Safety Instructions . . . . . . . . . . . . . . 2, 3
Operating Instructions
Control Panel . . . . . . . . . . . . . . . . . . . . . . . . . . 4
Features . . . . . . . . . . . . . . . . . . . . . . . . . . . . .5–8
Using the SmartDispense
™
Pedestal . . . . . . . . . . . . . . . . . . . . . . . . . . . . . . . .9
Installation Instructions . . . . . .12–14
Attach Hose Connectors and
Electric Connectors . . . . . . . . . . . . . . . . . . . .14
Finalize the Installation . . . . . . . . . . . . . . . .14
Install the Pedestal
to the Washer . . . . . . . . . . . . . . . . . . . . . . . . .13
Level the Washer . . . . . . . . . . . . . . . . . . . . . .13
Prepare the Pedestal . . . . . . . . . . . . . . . . . .13
Preparing to Install Your Pedestal . . . . . .12
Reinstall the Drawer . . . . . . . . . . . . . . . . . . .13
Remove the Leveling Legs . . . . . . . . . . . . .12
Remove Shipping Screws . . . . . . . . . . . . . .13
Troubleshooting Tips . . . . . . . . . .15–16
Consumer Support
Product Registration (Canada) . . . . . 19, 20
Product Registration (U.S.) . . . . . . . . . 17, 18
Service Telephone Numbers . . Back Cover
Warranty (Canada) . . . . . . . . . . . . . . . . . . . 22
Warranty (U.S.) . . . . . . . . . . . . . . . . . . . . . . . 21
Piédestals
Profile SmartDispense
™
Pedestales
Profile SmartDispense
™
Model SPBD880
Write the model and serial
numbers here:
Model # __________________
Serial # __________________
You can find them on a label on the side of
the washer.
Owner’s Manual &
Installation Instructions
Manuel d’utilisation
et d’installation
Manual del propietario
e instalación
Page 2
■ Install or store where it will not be exposed
to temperatures below freezing or exposed
to the weather, which could cause permanent
damage and invalidate the warranty.
■ Properly ground washer to conform with all
governing codes and ordinances. Follow details
in Installation Instructions.
■ This appliance must be grounded. In the event
of malfunction or breakdown, grounding will reduce
the risk of electric shock by providing a path of
least resistance for electric current. The washer
is equipped with a cord having an equipmentgrounding conductor and a grounding plug.
The washer plug must be plugged into an
appropriate outlet that is properly installed
and grounded in accordance with all local
codes and ordinances.
WARNING: Improper
connection of the equipment-grounding conductor
can result in a risk of electric shock. Check with a
qualified electrician or serviceman if you are in doubt
as to whether the appliance is properly grounded.
IMPORTANT SAFETY INFORMATION.
READ ALL INSTRUCTIONS BEFORE USING.
WARNING!
For your safety, the information in this manual must be followed to minimize the risk
of fire or explosion, electric shock, or to prevent property damage, personal injury, or
loss of life.
The instructions in this manual and all other literature included with this washer are
not meant to cover every possible condition and situation that may occur. Good, safe
practices and caution
MUST be applied when installing, operating, and maintaining
any appliance.
WATER HEATER SAFETY
Under certain conditions, hydrogen gas may be produced in a water heater that has not been used for two weeks
or more. Hydrogen gas can be explosive under these circumstances.
If the hot water has not been used for two weeks or more, prevent the possibility of damage or injury by turning
on
all hot water faucets and allowing them to run for several minutes. Do this before using any electrical
appliance
which is connected to the hot water system. This simple procedure will allow any built-up hydrogen
gas to escape. Since the gas is flammable, do not smoke or use an open flame or appliance during this process.
PROPER INSTALLATION
This pedestal must be properly installed and located in accordance with the Installation Instructions before it is used.
■ Keep the area underneath and around your
appliances free of combustible materials such as
lint, paper, rags and chemicals.
■ Do not leave the washer door open. An open door
could entice children to hang on the door or crawl
inside the washer.
■ Close supervision is necessary if this appliance is
used by or near children. Do not allow children to
play on, with or inside this or any other appliance.
YOUR LAUNDRY AREA
2
Consumer Support
Troubleshooting Tips
Operating Instructions
Safety Instructions
Installation
Instructions
Page 3

3
Consumer Support
Troubleshooting Tips
Operating InstructionsSafety Instructions
Installation
Instructions
■ Do not wash articles that have been previously
cleaned in, washed in, soaked in or spotted
with gasoline, dry-cleaning solvents or other
flammable or explosive substances, as they give
off vapors that could ignite or explode.
■ Do not add gasoline, dry-cleaning solvent or other
flammable or explosive substances to the tanks.
These substances give off vapors that could ignite
or explode.
■ Never reach into drawer while the washer is
moving. Wait until the machine has completely
stopped before opening the drawer.
■ Do not store liquid chlorine bleach in tanks.
Use manual flow-through dispenser on the
washing machine for dispensing chlorine bleach.
■ Do not refill tanks with different brands or
concentrations of liquid HE (High Efficiency)
detergents and concentrated liquid fabric
softeners, as this could cause the fluids
to congeal and lead to blockage of
the SmartDispense system.
■ Remove and wash tanks thoroughly before
using a different brand or concentration
of liquid HE (High Efficiency) detergent
and concentrated liquid fabric softener.
■ Do not slam the pedestal drawer closed. This
could result in damage to the SmartDispense
system.
■ Never attempt to operate this appliance
if it is damaged, malfunctioning, partially
disassembled, or has missing or broken parts,
including a damaged cord or plug.
■ To minimize the possibility of electric shock,
unplug this appliance from the power supply
or disconnect the washer at the building’s
distribution panel by removing the fuse
or switching off the circuit breaker before
attempting any maintenance or cleaning.
NOTE: Pressing the power button does NOT
disconnect the appliance from the power supply.
■ Do not tamper with controls.
■ Do not repair or replace any part of the appliance
or attempt any servicing unless specifically
recommended in the owner’s manual or in
published user-repair instructions that you
understand and have the skill to carry out.
WHEN USING THE SMARTDISPENSE™PEDESTAL
READ AND FOLLOW THIS SAFETY INFORMATION CAREFULLY.
SAVE THESE INSTRUCTIONS
Use this
appliance
only for its
intended
purpose as
described in
this Owner’s
Manual.
ge.com
Page 4
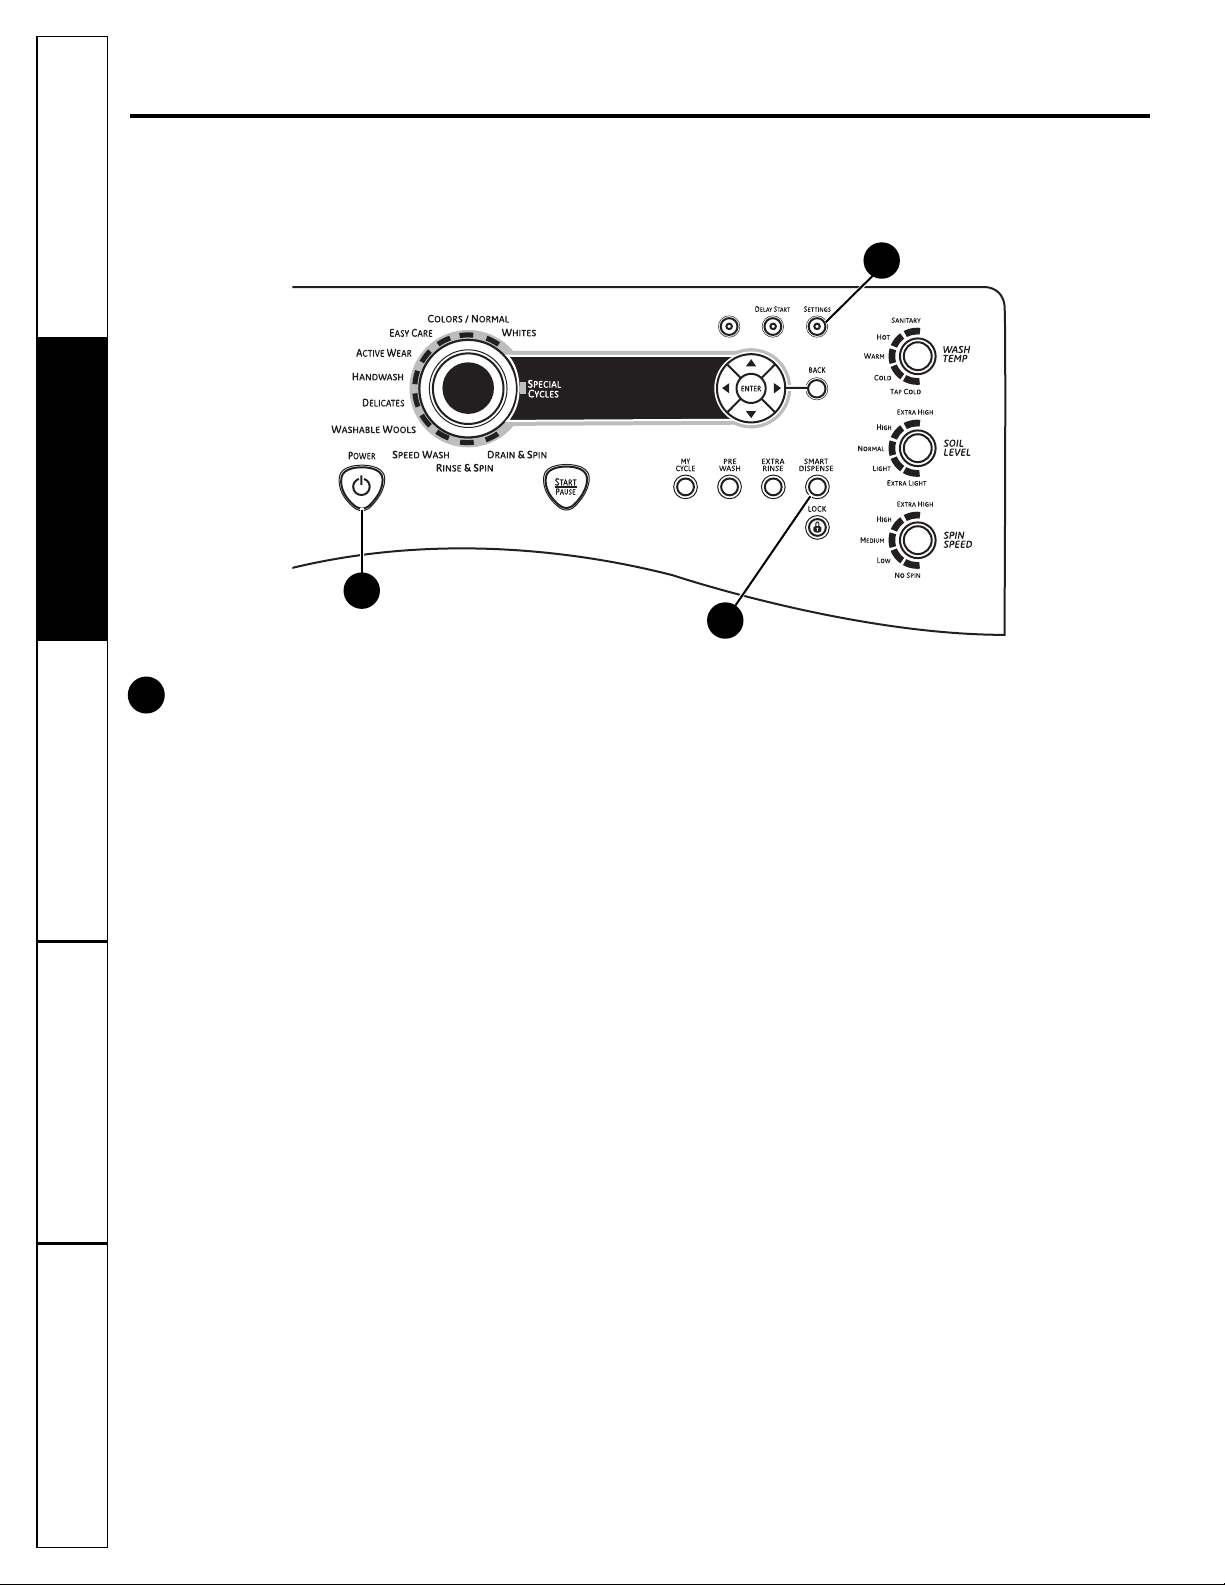
About the washer control panel.
4
You can locate your model number on a label on the side of the washer.
When you use SmartDispense, it will automatically distribute detergent and fabric softener according to the soil level,
water hardness and load size detected.
Consumer Support
Troubleshooting Tips
Operating Instructions
Safety Instructions
Installation
Instructions
1
1
Power
Press to turn on the display. If the display is active, press to put the washer into standby mode.
NOTE: Pressing POWER does not disconnect the appliance from the power supply.
2
3
Page 5

Consumer Support
Troubleshooting Tips
Operating Instructions
Safety Instructions
Installation
Instructions
About the SmartDispense™pedestal features. ge.com
SmartDispense
The SmartDispense feature allows you to set your liquid
HE (High Efficiency) detergent and/or softener dispensing
preferences for your load. This feature can be used with
any wash cycle, except for Rinse & Spin, Drain & Spin and
Washer Cleaning cycles.
To use SmartDispense:
1. Select your desired Wash Cycle.
2. Press the SMART DISPENSE button
(button will light up when it is on).
3. Use the left and right arrows to select
which tank your liquid HE (High Efficiency)
detergent is located in (or choose “off” if
you do not want to dispense detergent).
4. Press ENTER to select liquid HE
(High Efficiency) detergent container.
5. Use the left and right arrows to select
liquid HE (High Efficiency) detergent
concentration (located on your liquid
HE [High Efficiency] detergent bottle).
6. Press ENTER to select detergent
concentration.
7. Use the left and right arrows
to select how much liquid HE
(High Efficiency) detergent you
would like to dispense (“Norm”
corresponds to a standard dose).
NOTE: When you use SmartDispense, it will
automatically distribute detergent and fabric
softener according to the soil level, water
hardness and load size detected.
8. Press ENTER to select liquid HE
(High Efficiency) detergent dispense level.
9. Use the left and right arrows
to select whether you would like
to use fabric softener.
10. Press ENTER to select softener.
11. Use the left and right arrows to select how
much softener you would like to dispense
(“Norm” corresponds to a standard dose).
12. Press ENTER to select softener dispense
level.
13. The screen will show SMART DISPENSE ON.
14. Press START to start the cycle.
15. During your wash cycle, the display will
show the current status and options for
SmartDispense.
NOTE: To turn off SmartDispense, press
SMART DISPENSE again; to select different
dispense options, press SMART DISPENSE
twice.
2
5
Page 6
6
About the SmartDispense™ pedestal features.
Consumer Support
Troubleshooting Tips
Operating Instructions
Safety Instructions
Installation
Instructions
Setting Your Water Hardness Level
The SmartDispense feature allows you to input
the hardness of your water into the control panel.
This helps optimize the performance of your
SmartDispense unit.
3
SmartDispense™Detergent Dispenser
Water Hardness Calibration
Prior to the first use, the washer needs
to be calibrated for water hardness. Please
follow directions below to calibrate the washer
to the hardness of your tap water.
Determine the Hardness of Your
Tap Water
In the bag that contained these instructions,
you should find a water hardness test strip
package. Read the instructions on the
package, remove the test strip and follow
the instructions to determine the hardness
level of your tap water. You will use this
information to calibrate your washer to
dispense the optimal amount of detergent.
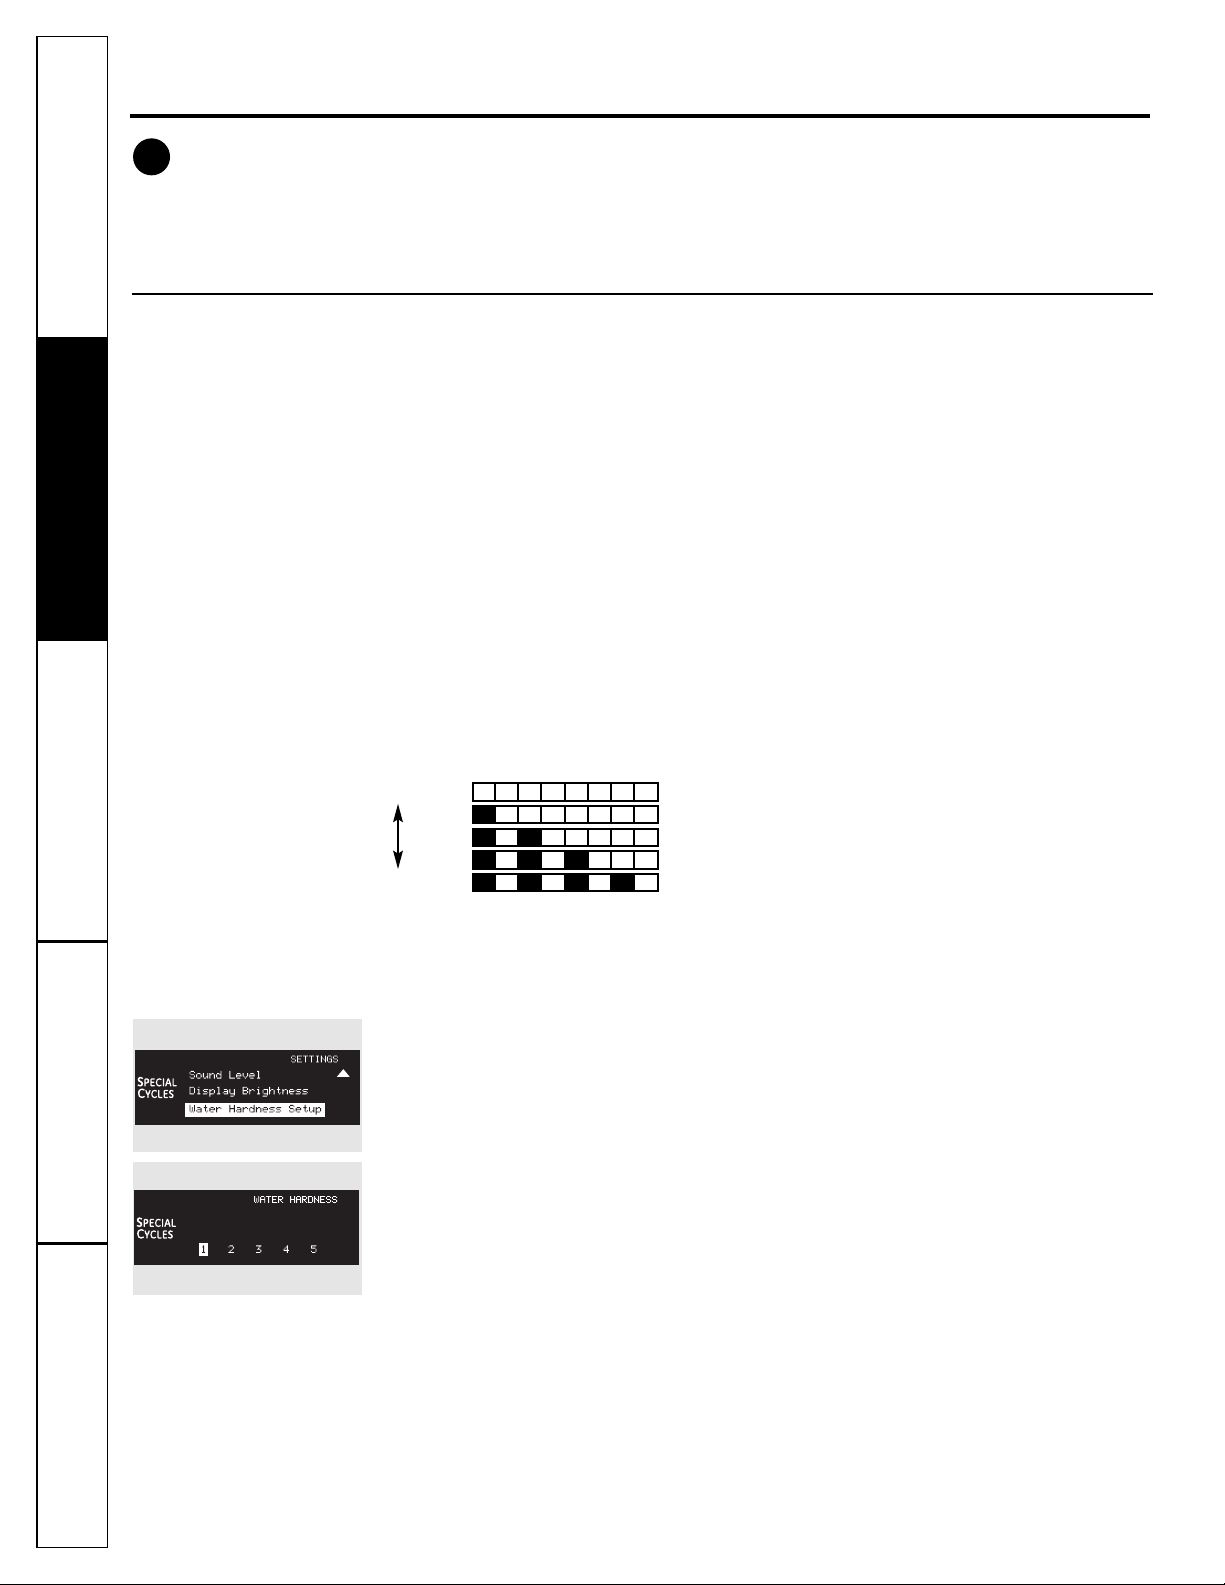
Water Hardness Test Strip Indication
To calibrate your water hardness:
1. Press the POWER button.
2. Press the SETTINGS button.
3. Use the down arrow to select the WATER
HARDNESS SETUP, and press the ENTER
button.
4. The display will show numbers 1 to 5.
The washer defaults to setting 3.
5. Use the left and right arrows to select
the number determined with the test strip
from the table above, and press the ENTER
button.
SOFT
HARD
Value to Enter
into Washer
1
2
3
4
5
0 RED
1 RED
2 RED
3 RED
4 RED
Page 7

Consumer Support
Troubleshooting Tips
Operating Instructions
Safety Instructions
Installation
Instructions
7
ge.com
The Instruction Panel
Press the tabs on the sides of the instruction
panel. Slowly rotate the instruction panel
toward you until it stops. Finally, slide the panel
down in front of the tanks into the slot
available.
After adding laundry product, lift the panel
out of its resting position; then rotate the panel
closed until it snaps into its horizontal position.
NOTE: The drawer will not fully close
if the panel is in its open position.
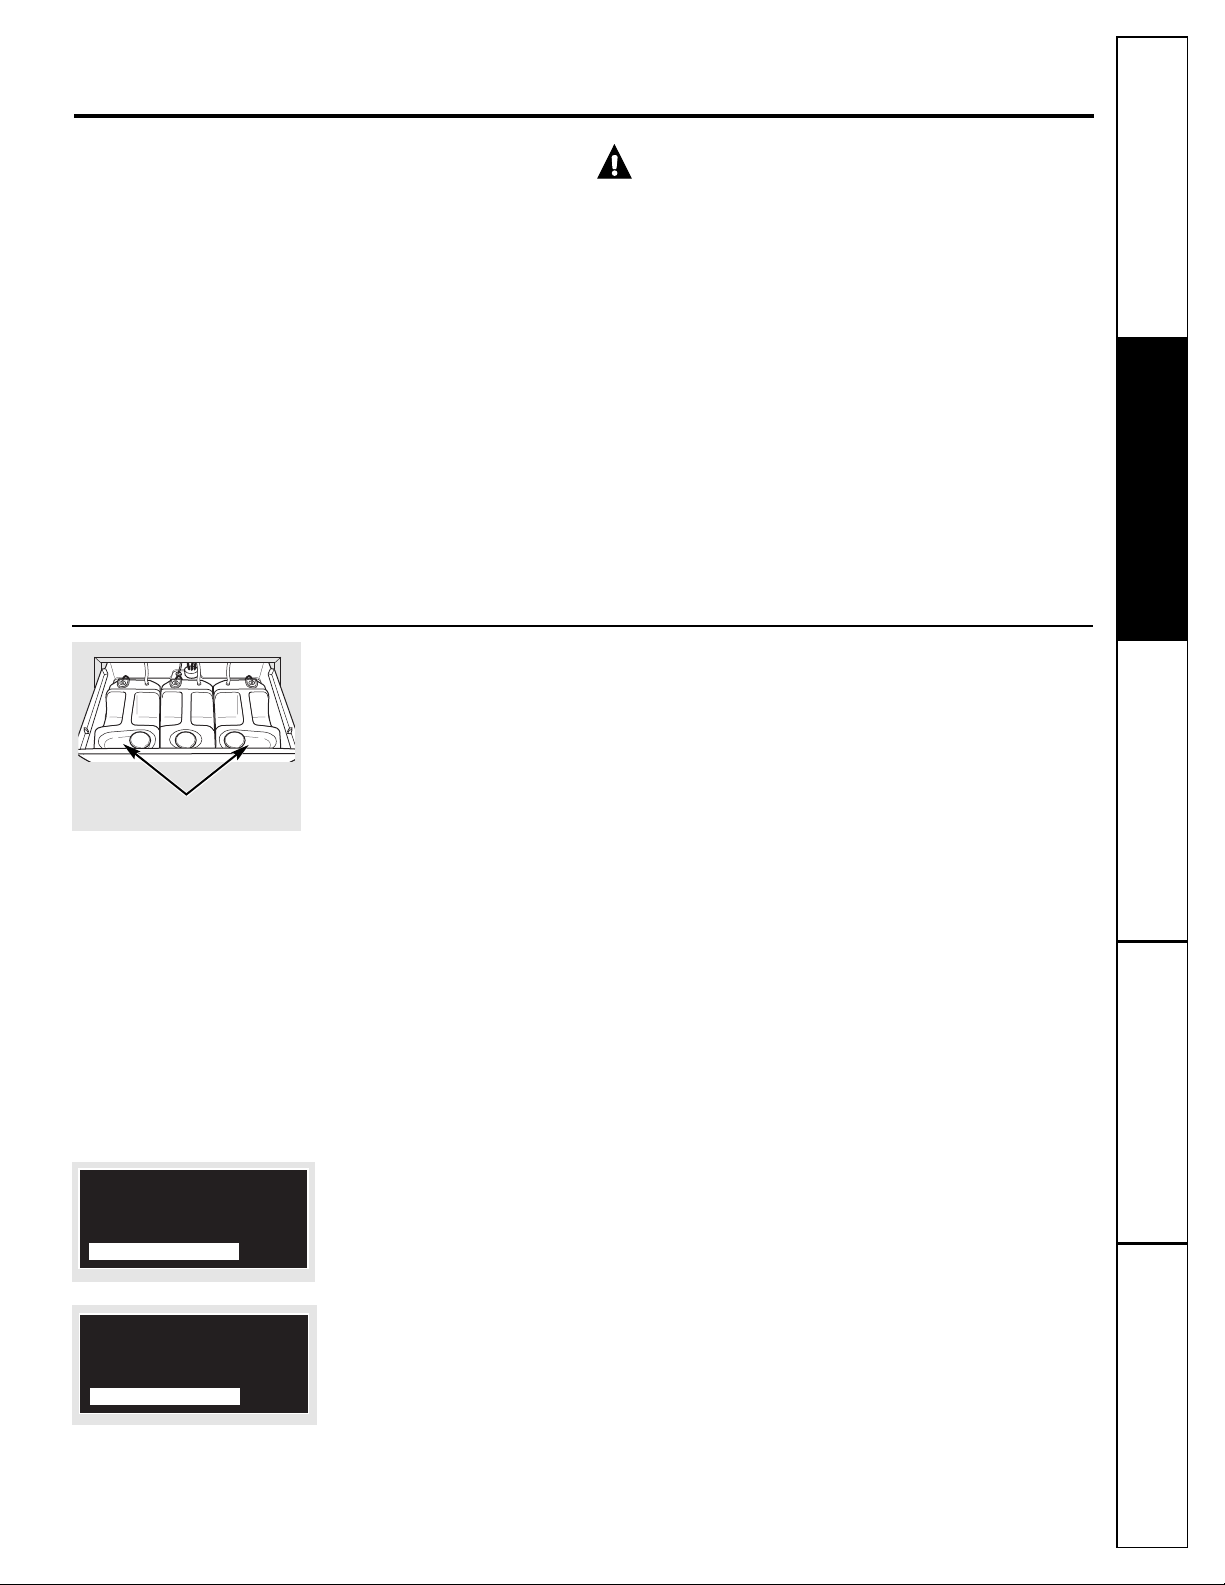
The Detergent Tanks
To remove either of the two outer tanks,
grasp the sensor at the rear of the tank, using
the grip provided, and pull the sensor straight
up. Loosen the supply tube by rotating
1/4 turn the tube and fitting until the tube
can be pulled straight up.
• Each tank can hold 350 ounces of liquid
HE (High Efficiency) laundry detergent—
approximately 100 washes of regular
concentration detergent. The system
requires that at least 100 ounces of new
detergent must be added to the tank
to recognize that it has been filled.
• Detergent is pumped to the washer
at the beginning of the wash cycle.
• Do not put any other substance
into the tanks besides liquid
HE (High Efficiency) detergent.
• Do not fill the tank while it is removed from
the drawer.
• The SmartDispense™system determines
how much detergent to supply to the
washer, depending on the load size,
soil level and water hardness.
• Do not dilute with water.
NOTE: Use only
HE (High Efficiency)
detergent.
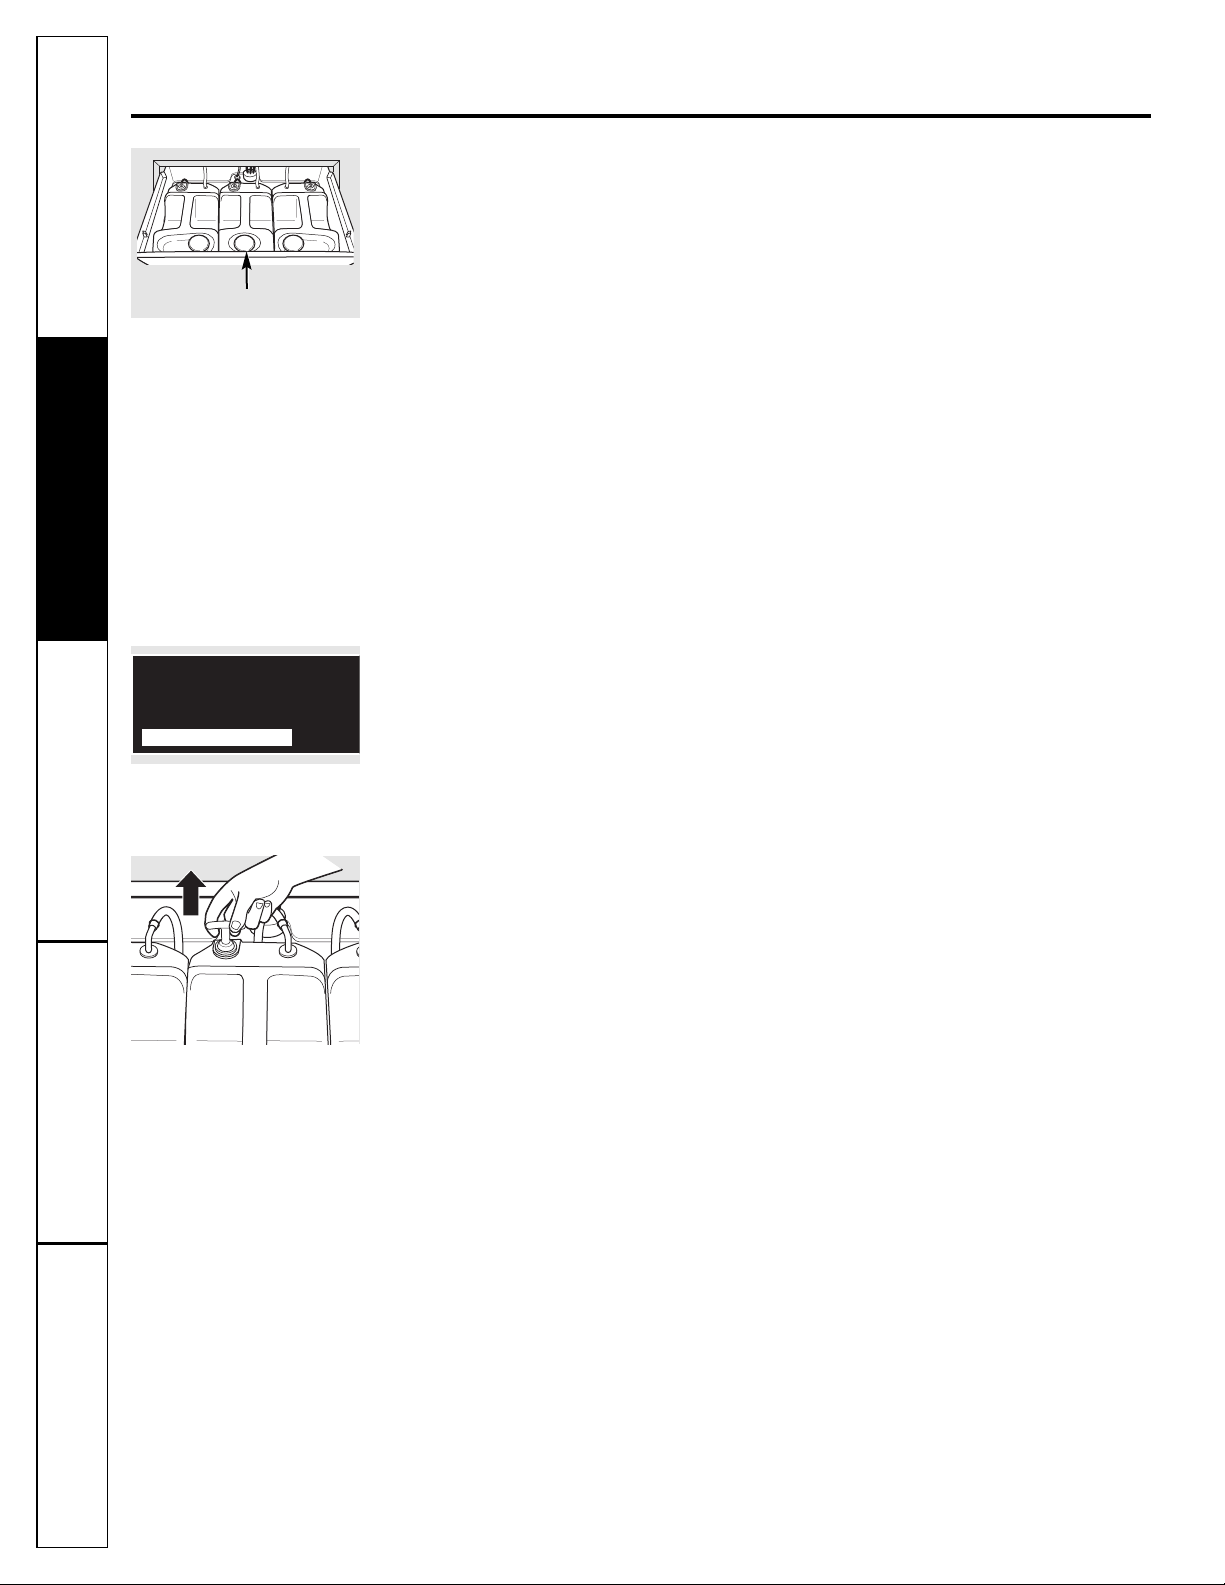
The Fabric Softener Tank
To remove the center tank, grasp the sensor
at the rear of the tank, using the grip provided,
and pull the sensor straight up. Loosen the
supply tube by rotating 1/4 turn the tube and
fitting until the tube can be pulled straight up.
Remove the tank by tilting slightly toward the
washer and pulling straight up.
• Each tank can hold 95 ounces of
concentrated liquid fabric softener, enough
for approximately 75 loads of concentrated
liquid fabric softener.
• Do not dilute with water.
• If desired, concentrated liquid fabric softener
is pumped to the washer at the correct time
in the wash cycle.
• Do not put any other substance into the tank
besides concentrated liquid fabric softener.
• The SmartDispense
™
system determines
how much softener to supply to the washer,
depending on user inputs for the wash cycle.
NOTE: Use only concentrated liquid fabric
softener.
Instruction panel
Detergent tanks
Fabric softener tank
Page 8
8
Consumer Support
Troubleshooting Tips
Operating Instructions
Safety Instructions
Installation
Instructions
About the SmartDispense™ pedestal features.
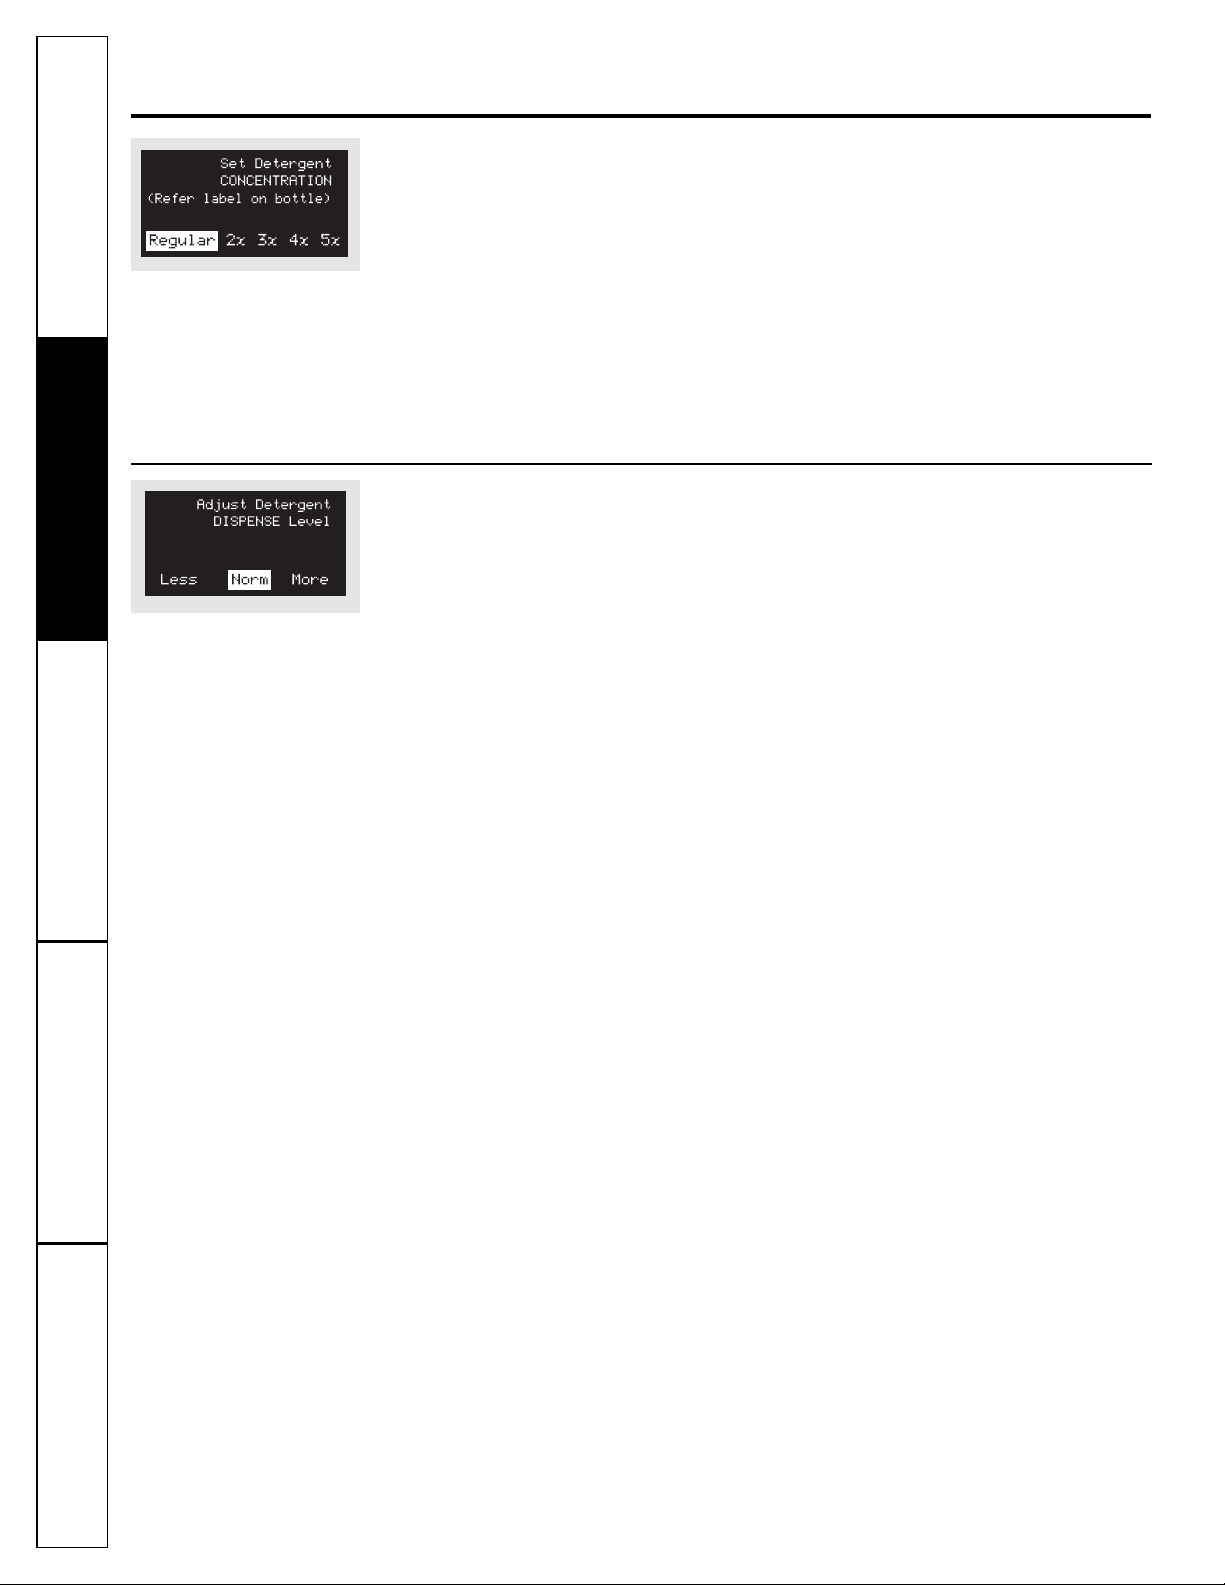
Concentration Level
SmartDispense™can use any liquid
HE (High Efficiency) detergent, regardless
of its concentration level.
Many liquid HE (High Efficiency) detergents
can be found in a concentrated form, meaning
that it has more active ingredients in each
drop, taking up less space as it uses less
fluid per wash.
• The concentration level can usually
be found on the label or cap of the liquid
HE (High Efficiency) detergent bottle.
• You can select the concentration of
your detergent every time you change
the settings for the SmartDispense feature.
• If the concentration is not explicitly
identified on the bottle, select “Regular”
as the concentration level when setting
the SmartDispense™ options.
Dispense Level
SmartDispense™can dispense a little more
or less liquid HE (High Efficiency) detergent or
concentrated liquid fabric softener, depending
on your preferred washing habits.
• You can adjust the dosage level
every time you change the settings
for the SmartDispense feature in order to
customize it to the way you normally wash
your clothes.
• A dispense level of “Norm” corresponds
to a standard dose, as recommended by
the liquid HE (High Efficiency) detergent
and concentrated liquid fabric softener
manufacturers.
• A dispense level of “More” will add 50% more
liquid HE (High Efficiency) detergent or 100%
more concentrated liquid fabric softener
than a standard dose.
• A dispense level of “Less” will use 25% less
liquid HE (High Efficiency) detergent or 25%
less concentrated liquid fabric softener than
a standard dose.
.
Page 9
Consumer Support
Troubleshooting Tips
Operating InstructionsSafety Instructions
Installation
Instructions
Using the SmartDispense™ pedestal. ge.com
The SmartDispense™Pedestal automatically dispenses liquid
HE (High Efficiency) detergent and/or concentrated liquid
fabric softener into each cycle based on load size, soil level
and water hardness.
To utilize the SmartDispense Detergent Dispenser, it must
first be filled. Although any liquid HE (High Efficiency) laundry
detergent and concentrated liquid fabric softener can be used
in the SmartDispense system, all liquid HE (High Efficiency)
detergents and concentrated liquid fabric softeners are not
the same.
Do not mix any liquid HE (High Efficiency) detergents of
unlike brands, concentrations or scents within the detergent
tanks, as this could cause the detergents to congeal and
lead to blockage of the SmartDispense system. Do not mix
any concentrated liquid fabric softeners of unlike brands or
scents within the fabric softener tank. Do not mix any liquid
HE (High Efficiency) detergents with concentrated liquid
fabric softeners in any of the tanks. Remove and wash
tanks thoroughly before using a different brand,
concentration or scent of liquids.
CAUTION! Absolutely do not store liquid
chlorine bleach, powder detergent, non-HE (High Efficiency)
liquid detergent, nonconcentrated liquid fabric softener or other
laundry additives in any of the three tanks. Use only liquid HE
(High Efficiency) detergent, which has been specifically
designed for use in front-load washers.
To open the SmartDispense™Pedestal for filling, slide
open the pedestal drawer to the maximum possible distance.
Open the instruction panel by pressing the tabs at the sides
of the panel, rotate the panel toward you and slide it down
in the slot available.
NOTE: The first time your washer recognizes that
the SmartDispense system has been activated, it will
automatically fill the supply lines with detergent and/or
fabric softener for all active tanks. This process will
last approximately two minutes and will only occur
at the beginning of the first cycle that uses
the SmartDispense system.
To Fill Your Detergent Tank:
1. Select which of the two outer tanks you
wish to fill. Open the tank for filling by
turning the cap counterclockwise until
the cap is loose. Lift the cap off.
NOTE: Do not fill the tank while it is
removed from the drawer. Fluid may
be lost while reattaching the tank
to the SmartDispense system.
2. Aim the detergent bottle at the opening in
the tank and begin to fill. Each detergent
tank will hold 350 oz. of liquid HE (High
Efficiency) detergent (the largest available
detergent bottle is 300 oz.). The system
requires that at least 100 ounces of new
detergent must be added to the tank
to recognize that it has been filled.
3. When full, replace the cap and turn
clockwise until tight to ensure proper
sealing. If residue is left on the tank, wipe
clean with a moist cloth, using a mild soap.
4. An indicator will appear on the washer
control panel to notify you when the
dispenser needs to be filled again. After
filling the tank, the warning message will
turn off when the washer is powered on
for the next cycle. A full tank using
regular concentrated detergent
will last approximately 3 months
for the average user.
Detergent tanks
9
0:48
LEFT Detergent LOW
0:48
LEFT Detergent EMPTY
Page 10
10
Consumer Support
Troubleshooting Tips
Operating Instructions
Safety Instructions
Installation
Instructions
Using the SmartDispense™ pedestal.
To Fill Your Fabric Softener Tank:
1. Open the tank for filling by turning the cap
counterclockwise until the cap is loose. Lift
the cap off.
NOTE: Do not fill the tank while it is
removed from the drawer. Fluid may
be lost while reattaching the tank
to the SmartDispense system.
2. Aim the fabric softener bottle at the
opening in the tank and begin to fill.
The fabric softener tank will hold 95 oz.
of concentrated liquid fabric softener.
The system requires that at least
30 ounces of new fabric softener
must be added to the tank to
recognize that it has been filled.
3. When full, replace the cap and turn
clockwise until tight to ensure proper
sealing. If residue is left on the tank, wipe
clean with a moist cloth, using a mild soap.
4. An indicator will appear on the washer
control panel to notify you when the
dispenser needs to be filled again. After
filling the tank, the warning message
will turn off when the washer is powered
on for the next cycle. A full tank using
concentrated liquid fabric softener
will last approximately 3 months
for the average user.
NOTE: The fabric softener sensor should be
wiped clean every time the tank needs to be
refilled. To remove the fabric softener sensor
while the drawer is fully opened, grasp the
sensor at the rear of the tank, using the grip
provided, and pull the sensor straight up.
Wipe the surface of the sensor, using a moist
cloth with a mild soap; then replace the
sensor back in its original position.
Fabric softener tank
0:48
FABRIC SOFTENER LOW
Page 11
Consumer SupportTroubleshooting TipsOperating InstructionsSafety Instructions
Installation
Instructions
ge.com
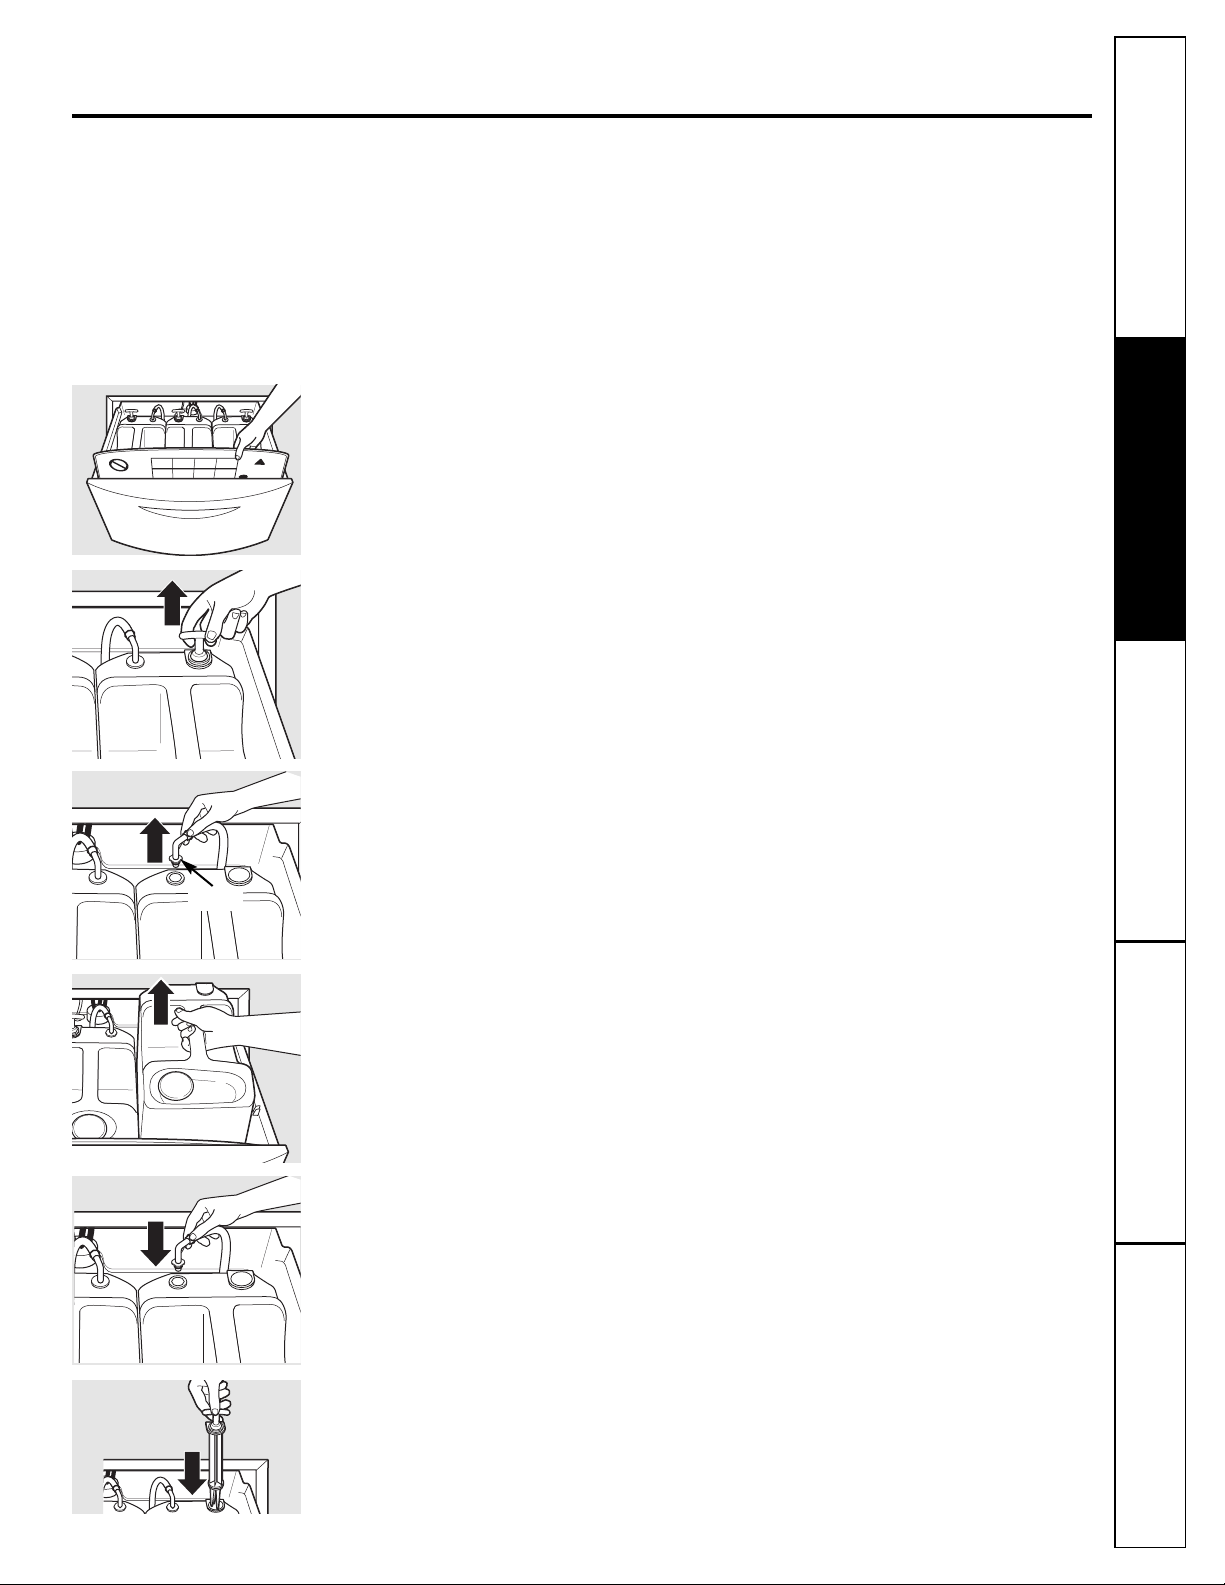
Cleaning the SmartDispense
™
Detergent and Fabric Softener
Tanks:
Detergent and fabric softener may build up
in the bottom of the SmartDispense tanks
or on the fluid sensors. Residue should be
removed before refilling tanks.
1. Open the pedestal drawer to the maximum
possible distance.
2. Press the tabs on the sides of the
instruction panel. Slowly rotate the
instruction panel until it stops. Then, slide
the panel down in front of the tanks into
the slot available.
3. Select the tank that you wish to remove
for cleaning. Grasp the sensor at the rear
of the tank, using the grip provided, and
pull the sensor straight up.
4. Wipe the surface of the sensor, using
a moist cloth with a mild soap; then place
the sensor on the back surface of the
drawer or an adjacent tank.
5. Loosen the supply tube by rotating
the fitting 90° until the tube can be pulled
straight up.
6. Wipe the surface of the tube and place it
on the back surface of the drawer or an
adjacent tank.
7. Remove the tank by tilting it slightly toward
the washer and pulling straight up.
8. Rinse the inside of the tank, using hot
water only to remove the residue.
9. Once the tank has been rinsed thoroughly,
replace the tank in the drawer before
refilling the tank.
10. Reattach the supply tube by inserting it
into the tank and tightening the fitting
by rotating toward the back.
11. Replace the sensor by inserting it into
the tank in its original position.
12. Open the tank cap and refill with
the desired detergent or fabric softener.
13. Close the information panel and the
pedestal drawer.
14. Adjust the setting in the SmartDispense
menu if any changes were made
to the concentration of the detergent
selected or to the location of the tank
that is being used.
11
Fitting
Page 12
BEFORE YOU BEGIN
Read these instructions completely and carefully.
•
IMPORTANT –Save these instructions
for local inspector’s use.
•
IMPORTANT –Observe all governing
codes and ordinances.
• Note to Consumer – Keep these instructions
with your Owner’s Manual for future reference.
• Completion time – 1 to 2 hours
• Proper installation is the responsibility of the installer.
• Product failure due to improper installation is not
covered under the Warranty.
CAUTION – Due to the size and weight
of these products, and to reduce the risk of personal
injury or damage to the product, TWO PEOPLE ARE
REQUIRED FOR PROPER INSTALLATION.
• See washer installation instructions for additional
installation requirements and guidelines.
Installation Pedestal
Instructions
Model SPBD880
If you have any questions, call 800.GE.CARES (800.432.2737) or visit our Website at: ge.com
In Canada, call 1.800.561.3344 or Visit our Website at: www.geappliances.ca
12
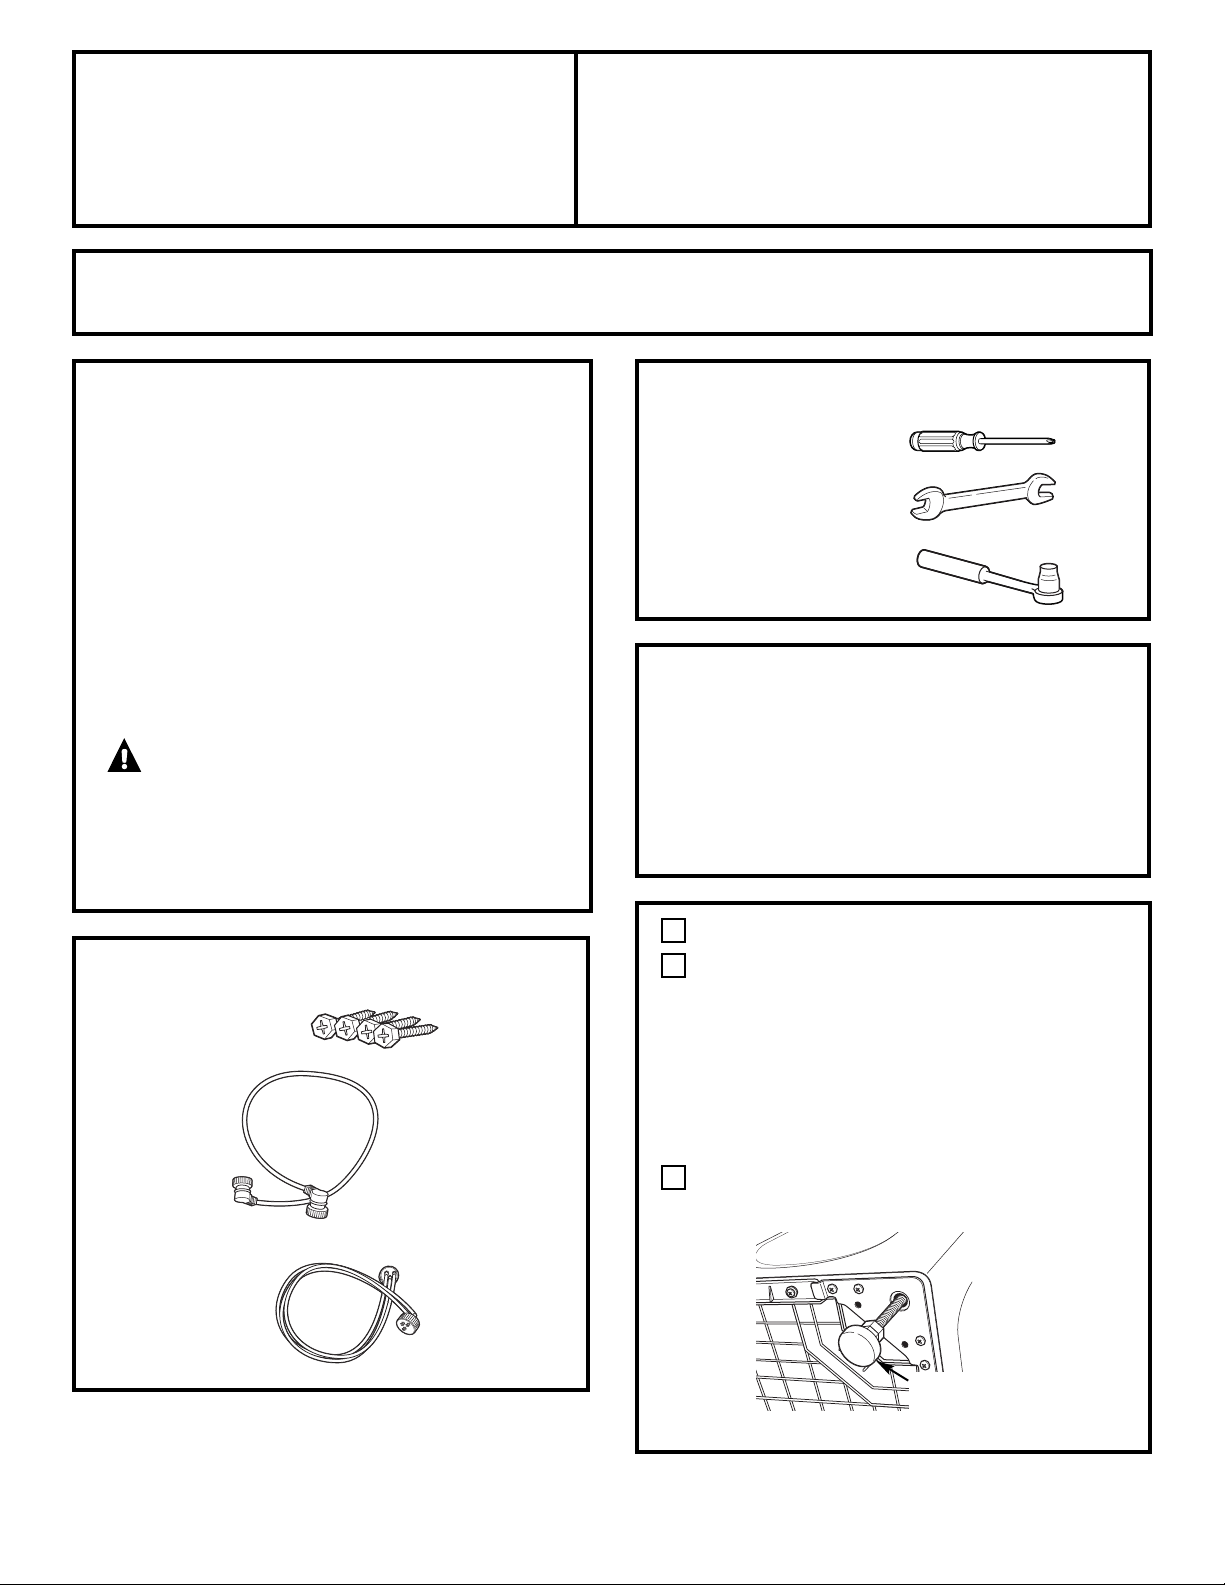
TOOLS YOU WILL NEED
KIT CONTENTS
4 Mounting Screws
Electric Cord
Phillips Head Screwdriver
9/16″ Open-End Wrench
or Adjustable Wrench
8 mm Socket Wrench
INSTALLATION PREPARATION
Remove the packaging.
The Installation Kit is taped at the top of the shipping
carton. Remove the kit and set aside for final installation.
Flatten the product carton to use as a pad to lay
the washer down on its side. Continue using the carton
to protect the finished floor in front of the installation
location.
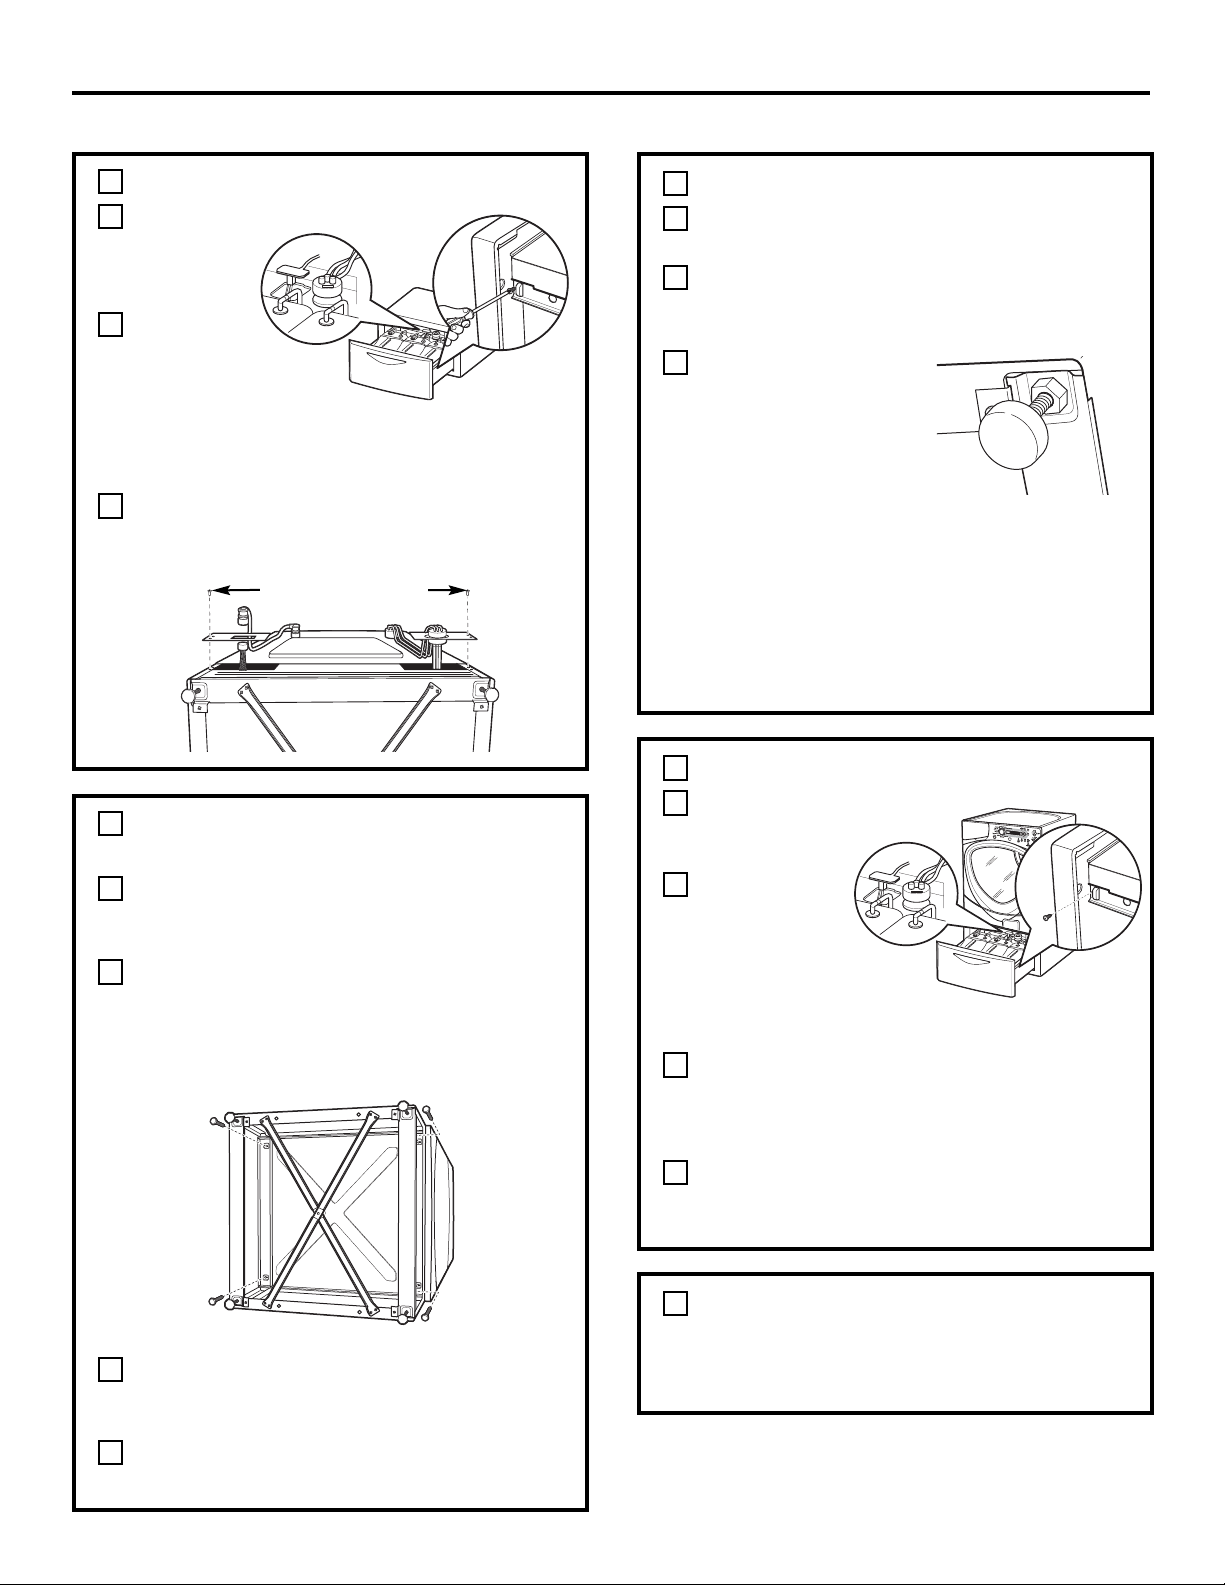
REMOVE THE LEVELING LEGS
Carefully lay the washer on its side to access
the leveling legs on the bottom of the
appliance.
IMPORTANT: Do not lay the washer on its
back. Do not remove the shipping bolts on
the back side of the washer. The bolts must
remain in place until the washer is returned
to an upright position.
Use an open-end wrench to remove
the washer leveling legs.
1
A
B
Back out and
remove all
4 leveling legs
Quick Connect Hose
Page 13
Installation Instructions
PREPARE THE PEDESTAL
Pull the
drawer out
as far as it
will go.
Remove
the screws
from the
drawer
slides. Detach the wiring connector and the
hose connector at the back of the drawer.
Slide the drawer out of the base and set aside.
Remove the screws from the service panels at
the rear of the pedestal and place the panels
within the pedestal.
2
A
B
13
C
INSTALL THE PEDESTAL TO THE WASHER
Place the pedestal against the bottom
of the unit. Check to be sure the drawer front
is at the front of the unit.
Align the holes in the pedestal with the holes
in the bottom of the unit. Use a Phillips
screwdriver to install the 4 screws through
the front of the pedestal and through the rear
panels and into the unit—do not tighten.
Slide the pedestal toward the unit, until it is
aligned front to back. Use an 8 mm socket
wrench to securely tighten the screws.
Replace the service panels on the back
and tighten the screws.
3
A
B
C
D
LEVEL THE WASHER
Stand the washer upright. Move it close to its
final location.
Make sure that the washer is level by placing
a spirit level on top. Check side to side and
front to back.
Use an open-ended
wrench to adjust
the legs in and out.
Tighten the locknut
against the bottom
of the pedestal.
NOTES:
• To minimize vibration, the locking nuts must
be tight.
• To reduce vibration, ensure that all four
rubber leveling legs are firmly touching
the floor. Push and pull on the back right
and then back left of your washer.
A
B
C
4
REINSTALL THE DRAWER
Check to be
sure the slides
are closed.
Slide the
drawer into
the opening.
Align the
drawer
supports to
the slides on each side.
Open the drawer fully. Reattach the hose
connector and wiring connector at the rear
of the drawer. Make sure both connections
are secure.
Reinstall the original screws into each drawer
slide. Tighten both screws. The drawer should
slide smoothly when you push it closed.
A
B
C
D
5
Connectors
REMOVE SHIPPING SCREWS
Remove the 4 shipping screws, plastic support
tubes and rubber grommets on the back side
of the washer.
6
Remove screws from
service panels
Connectors
Page 14
Installation Instructions
14
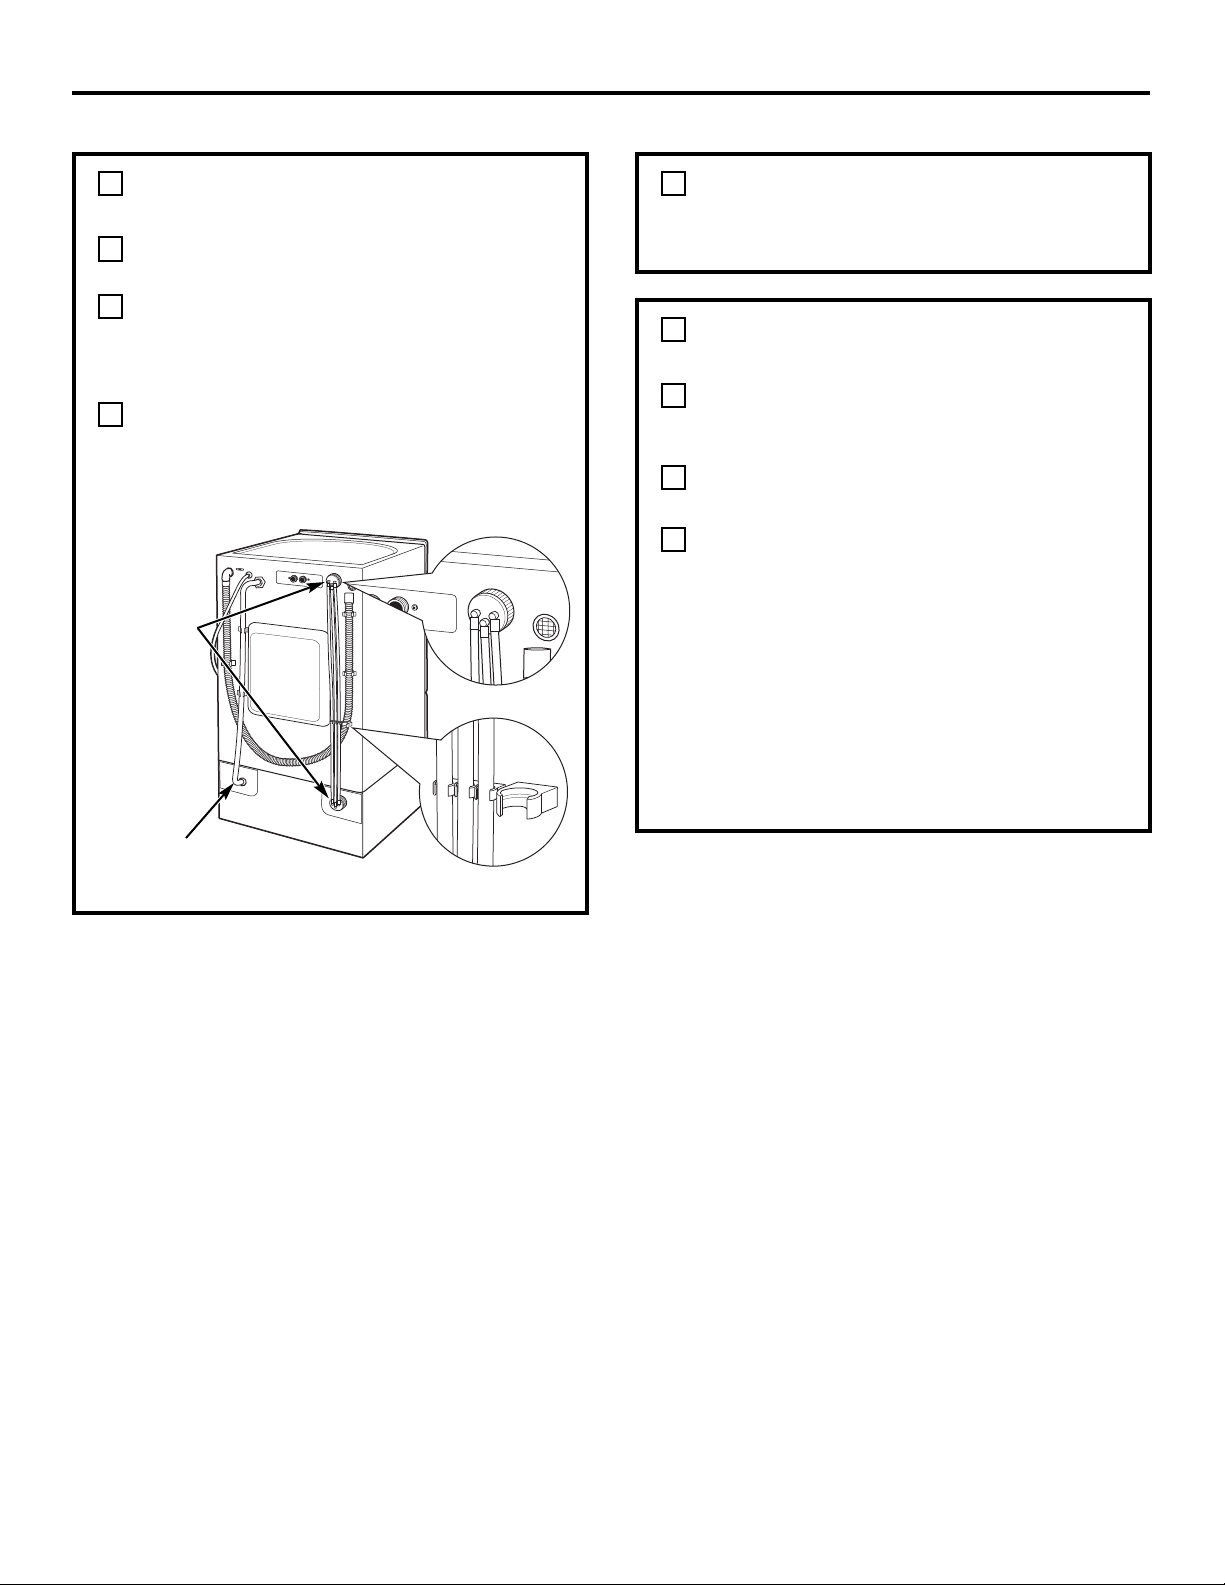
ATTACH THE HOSE CONNECTORS
AND ELECTRIC CONNECTORS
Remove 4 protective caps from the rear
of the washer and SmartDispense
™
Pedestal.
Attach the electric connector to the rear
of the washer and the rear of the pedestal.
Press the cord into the protective holders
along the back of the washer.
Attach the hose connector to the rear
of the washer and the rear of the pedestal.
Press all three tubes into the three protective
holders along the back of the washer.
A
B
C
7
FINALIZE THE INSTALLATION
Refer to the washer Installation Instructions
to complete the installation.
8
SPECIFICATIONS SUBJECT TO CHANGE WITHOUT NOTICE
Connect the
Quick Connect
Hose to the
back of the
washer
Attach electrical
connector cord
PREFERRED CONFIRMATION
OF INSTALLATION
Fill your detergent tank with liquid HE (High
Efficiency) laundry detergent and softener
tank with concentrated liquid fabric softener.
Set your SmartDispense settings (see page 5
of the Owner’s Manual).
Run a Speed Wash. This will fill your
SmartDispense supply lines with detergent
and/or fabric softener for all active tanks
selected in Step B.
NOTE: If the machine could not run a Speed
Wash, check the following:
1. Screw the hose and electrical connectors in
tightly on the back of the washer and pedestal.
2. Make sure all 3 sensors are plugged into
the connector on the back of the drawer
inside the pedestal.
A
B
C
9
Protective holders
Page 15
Consumer Support
Troubleshooting Tips
Operating Instructions
Safety Instructions
Installation
Instructions
Before you call for service… ge.com
Troubleshooting Tips
Save time and money! Review the charts on the following
pages, or visit ge.com (in U.S.) or www.geappliances.ca
(in Canada). You may not need to call for service.
Problem Possible Causes What To Do
Low Detergent/Fabric The SmartDispense™system has • Fill the SmartDispense reservoir with liquid
Softener message is on approximately 10 cycles worth HE (High Efficiency) detergent/concentrated liquid fabric
of liquid HE (High Efficiency) softener if using the same brand and concentration
detergent/concentrated liquid of liquid HE (High Efficiency) detergent/
fabric softener left in the concentrated liquid fabric softener. If using a different
SmartDispense pedestal brand or concentration of liquid HE (High Efficiency)
(20 cycles of 2x liquid detergent/concentrated liquid fabric softener, follow
HE [High Efficiency] detergent, the steps to remove and rinse the tank and clean fabric
30 cycles of 3x liquid softener sensor before refilling. After filling the tanks,
HE [High Efficiency] adjust the SmartDispense settings if changes were made
detergent, etc.) to the detergent concentration. The Low indicator will turn
OFF the next time the controls are powered.
SmartDispense system was • Adjust the SmartDispense settings to draw from
incorrectly set to draw from the correct tank. The Low Indicator will turn OFF
an empty tank the next time the controls are powered.
SmartDispense system was • Add additional liquid HE (High Efficiency) detergent
filled with less than 100 ounces to the tank. The Low Indicator will turn OFF the next time
of concentrated liquid the controls are powered.
HE (High Efficiency) detergent
Cycle will not start and The SmartDispense system has • Fill the SmartDispense reservoir with liquid HE (High
Empty Detergent/Fabric no usable cycles worth of liquid Efficiency) detergent/concentrated liquid fabric softener
Softener message is on HE (High Efficiency) detergent/ if using the same brand and concentration of liquid
concentrated liquid fabric softener HE (High Efficiency) detergent/concentrated liquid fabric
left in the SmartDispense pedestal. softener. If using a different brand or concentration
Some residual liquid of liquid HE (High Efficiency) detergent/concentrated liquid
HE (High Efficiency) detergent/ fabric softener, follow the steps to remove and rinse
concentrated liquid fabric the tank and clean fabric softener sensor before refilling.
softener will remain in the bottom After filling the tanks, adjust the SmartDispense settings
of the tank to prevent air from if changes were made to the detergent concentration.
entering the SmartDispense The Empty indicator will turn OFF the next time the controls
supply lines are powered.
SmartDispense system was • Add additional liquid HE (High Efficiency) detergent to
filled with less that 100 ounces the tank. The Empty Indicator will turn OFF the next time
of concentrated liquid the controls are powered.
HE (High Efficiency) detergent
“SmartDispense pedestal Hose and electrical connectors • Make sure the 2 hose and electrical connections on the
not connected” message not installed correctly on the back back of the washer and pedestal are made. Remove and
appears on screen of the machine reinstall each connection if needed, making sure to tighten
the connector down as much as possible.
Sensor connections are not made • Make sure all 3 sensors are plugged securely into the
connector at the rear of the drawer inside the pedestal.
Lift up on the sensor cover at the rear of the drawer to
make sure these connections are made.
Washer waits two Washer is priming the lines • The first time your washer recognizes that the
minutes before adding of the SmartDispense system SmartDispense system has been activated, it will
water at the beginning automatically fill the supply lines with detergent and/or
of the first cycle fabric softener for all active tanks. This process will last
approximately two minutes and will only occur at the
beginning of the first cycle that uses the SmartDispense
system.
Washer starts to spin Washer is sensing the size • The washer will spin for a short time at the beginning
at the beginning of the of the load in the basket of every cycle when SmartDispense has been selected.
wash cycle before water By sensing the size of the load in the basket, the washer
is added will be able to determine how much liquid HE (High
Efficiency) detergent/concentrated liquid fabric softener
to dispense.
15
Page 16
Consumer Support
Troubleshooting Tips
Operating Instructions
Safety Instructions
Installation
Instructions
Before you call for service…
Troubleshooting Tips
Problem Possible Causes What To Do
Suds in the washer The SmartDispense system • Use only liquid HE (High Efficiency) detergents to avoid
detergent tanks were filled with sudsing. Tide 2x HE Laundry Detergent has been
non-HE detergents approved for use in all GE washing machines and
laundry SmartDispense systems.
• Follow the steps to remove and rinse tank before
refilling. After filling the tanks, adjust the SmartDispense
setting if changes were made to the detergent
concentration.
Manual washer dispenser was filled • Use only liquid HE (High Efficiency) detergents to
with non-HE detergent avoid sudsing. Any HE (High Efficiency) Laundry
Detergent has been approved for use in all GE washing
machines and laundry SmartDispense systems.
Clothes are not clean Not enough detergent • Adjust the SmartDispense™settings to increase
after a cycle the amount of detergent dispensed during each cycle.
Check that the selected detergent concentration matches
the concentration of the detergent in the tank.
Not using liquid • Use liquid HE (High Efficiency) detergent.
HE (High Efficiency) detergent
Tanks have been filled with • Use only liquid HE (High Efficiency) detergent.
powder detergent Follow the steps to remove and rinse the tank before
refilling.
Manual washer dispenser was • Turn off the SmartDispense system if you want
filled with a different detergent to use a different detergent in the manual dispenser.
than is in the selected tank Additional detergent may be stored in the second
detergent tank, but SmartDispense settings must
be adjusted before a cycle to select the desired tank.
SmartDispense system detergent • Follow the steps to remove and rinse the tank
tanks were filled with two different before refilling. After filling the tank, adjust
liquid HE (High Efficiency) the SmartDispense settings if changes were
detergents made to the detergent concentration.
SmartDispense system detergent • Follow the steps to remove and rinse the tank
tanks were filled with a liquid before refilling. After filling the tank, adjust
HE (High Efficiency) detergent the SmartDispense settings if changes were
and a concentrated liquid made to the detergent concentration.
fabric softener
Clothes do not feel soft Not enough fabric softener • Adjust the SmartDispense settings to increase
after a cycle in which the amount of concentrated liquid fabric softener
concentrated liquid during each cycle.
fabric softener dispense
SmartDispense system fabric • Follow the steps to remove and clean fabric softener
was enabled
softener tank was filled with sensor and rinse softener tank before refilling with
nonconcentrated fabric softener concentrated liquid fabric softener.
SmartDispense system • Follow the steps to remove and clean fabric softener
detergent tanks were filled sensor and rinse softener tank before refilling with
with two different concentrated concentrated liquid fabric softener.
liquid fabric softeners
SmartDispense softener sensor • Follow the steps to remove and clean fabric softener.
has developed a film of dried
fabric softener
16
Page 17

17
General Electric Company
Warranty Registration Department
P.O. Box 32150
Louisville, KY 40232-2150
GE Service Protection Plus
™
GE, a name recognized worldwide for quality and dependability together with Assurant
Solutions, offers you Service Protection Plus
™
—comprehensive protection on your appliances.*
Benefits Include:
• Prompt, reliable service from GE Authorized Servicers
• Convenient hours designed to suit your busy schedule
• Quality replacement parts
• The dependability of GE, a name recognized and trusted worldwide
• Ask about our interest-free payment plans
With Service Protection Plus you can expect:
• An extended service plan that limits unexpected repair bills
• Service coverage for most major brands
• Unlimited service calls for the length of your contract, or credit toward a replacement product
• Service coverage for covered operating parts and labor on appliances and home electronics that fail during
normal single family household use
• Your satisfaction is our goal. We strive to provide you with excellent service in a professional and timely
manner.
Place your confidence in GE and call us in the U.S. toll-free at 1.800.626.2224 for more information.
*Most brands covered up to 15 years old in the continental U.S.
SPP is a trademark of General Electric Company.
Please place in envelope and mail to:
✁
Cut here
Page 18
18
Consumer Product Ownership Registration
Important
Mail
Today!
GE Consumer & Industrial
Appliances
General Electric Company
Louisville, KY 40225
ge.com
First
Name
Mr. ■■ Ms. ■■ Mrs. ■■ Miss ■■
Street
Address
City
State
Date Placed
In Use
Month
Day
Year
Zip
Code
Apt. #
Last
Name
Phone
Number
_
_
Consumer Product Ownership Registration
Dear Customer:
Thank you for purchasing our product and thank you for placing your confidence in us.
We are proud to have you as a customer!
Follow these three steps to protect your new appliance investment:
Important: If you did not get a registration card with your
product, detach and return the form below to
ensure that your product is registered, or register
online at ge.com.
1
23
Model Number Serial Number
✁
Cut here
Complete and mail
your Consumer
Product Ownership
Registration today.
Have the peace of
mind of knowing we
can contact you in
the unlikely event of
a safety modification.
After mailing the
registration below,
store this document
in a safe place. It contains
information you will need
should you require
service. Our service
number is 800.GE.CARES
(800.432.2737).
Read your Owner’s
Manual carefully.
It will help you
operate your new
appliance properly.
Model Number Serial Number
E-mail Address*
* Please provide your e-mail address to receive, via e-mail, discounts, special offers and other important
communications from GE Appliances (GEA).
■■ Check here if you do not want to receive communications from GEA’s carefully selected partners.
FAILURE TO COMPLETE AND RETURN THIS CARD DOES NOT DIMINISH YOUR WARRANTY RIGHTS.
For more information about GEA’s privacy and data usage policy, go to ge.com and click on
“Privacy Policy” or call 800.626.2224.
Page 19

19
Please place in envelope and mail to:
Veuillez mettre dans une enveloppe et envoyez à :
OWNERSHIP REGISTRATION
P.O. BOX 1780
MISSISSAUGA, ONTARIO
L4Y 4G1
(FOR CANADIAN CONSUMERS ONLY)
Page 20
20
Page 21

21
Consumer Support
Troubleshooting Tips
Operating Instructions
Safety Instructions
Installation
Instructions
For The Period Of: We Will Replace:
GE SmartDispense™Pedestal Warranty. (For customers in the United States)
All warranty service provided by our Factory Service Centers,
or an authorized Customer Care
®
technician. To schedule service,
on-line, visit us at ge.com, or call 800.GE.CARES (800.432.2737).
Please have serial number and model number available when
calling for service.
■ Service trips to your home to teach you how to use
the product.
■ Improper installation, delivery or maintenance.
■ Failure of the product if it is abused, misused, or used for
other than the intended purpose or used commercially.
■ Damage after delivery.
■ Replacement of house fuses or resetting of circuit
breakers.
■ Damage to the product caused by accident, fire, floods
or acts of God.
■ Incidental or consequential damage caused by possible
defects with this appliance.
■ Product not accessible to provide required service.
What Is Not Covered (in the United States):
Staple your receipt here.
Proof of the original purchase
date is needed to obtain service
under the warranty.
This warranty is extended to the original purchaser and any succeeding owner for products purchased for
home use within the USA. If the product is located in an area where service by a GE Authorized Servicer is
not available, you may be responsible for a trip charge or you may be required to bring the product to an
Authorized GE Service location for service. In Alaska, the warranty excludes the cost of shipping or service
calls to your home.
Some states do not allow the exclusion or limitation of incidental or consequential damages. This warranty
gives you specific legal rights, and you may also have other rights which vary from state to state. To know
what your legal rights are, consult your local or state consumer affairs office or your state’s Attorney General.
Warrantor: General Electric Company. Louisville, KY 40225
EXCLUSION OF IMPLIED WARRANTIES—Your sole and exclusive remedy is product repair as provided
in this Limited Warranty. Any implied warranties, including the implied warranties of merchantability
or fitness for a particular purpose, are limited to one year or the shortest period allowed by law.
One Year Any part of the SmartDispense pedestal which fails due to a defect in materials or
From the date of the workmanship. During this limited one-year warranty, GE will also provide, free of charge,
original purchase all labor and related service costs to replace the defective part.
Page 22

For The Period Of: We Will Replace:
One Year Any part of the SmartDispense pedestal which fails due to a defect in materials or
From the date of the workmanship. During this limited one-year warranty, GE will also provide, free of charge,
original purchase all labor and related service costs to replace the defective part.
GE SmartDispense™Pedestal Warranty. (For customers in Canada)
All warranty service provided by our Factory Service Centers or an authorized
technician. For service, call 1.800.561.3344. Please have serial number and model
number available when calling for service.
■ Service trips to your home to teach you how to use
the product.
■ Improper installation, delivery or maintenance.
■ Failure of the product if it is abused, misused, or used for
other than the intended purpose or used commercially.
■ Damage after delivery.
■ Replacement of house fuses or resetting of circuit
breakers.
■ Damage to the product caused by accident, fire, floods
or acts of God.
■ Incidental or consequential damage caused by possible
defects with this appliance.
■ Product not accessible to provide required service.
What Is Not Covered (in Canada):
Warrantor: MABE CANADA INC.
WARRANTORIS NOT RESPONSIBLE FOR CONSEQUENTIAL DAMAGES.
22
Consumer Support
Troubleshooting Tips
Operating Instructions
Safety Instructions
Installation
Instructions
EXCLUSION OF IMPLIED WARRANTIES—Your sole and exclusive remedy is product repair as provided
in this Limited Warranty. Any implied warranties, including the implied warranties of merchantability
or fitness for a particular purpose, are limited to one year or the shortest period allowed by law.
This warranty is extended to the original purchaser and any succeeding owner for products purchased for home use within Canada.
In home warranty service will be provided in areas where it is available and deemed reasonable by Mabe to provide.
Page 23

23
Consumer Support
Troubleshooting Tips
Operating Instructions
Safety Instructions
Installation
Instructions
Notes.
Page 24

Notes.
Consumer Support
Troubleshooting Tips
Operating Instructions
Safety Instructions
Installation
Instructions
24
Page 25

En qualité de partenaire ENERGY
STAR®, GE a trouvé que ce produit
rencontre les directives d’ENERGY
STAR®en matière d’efficience
énergétique.
Mesures de sécurité . . . . . . . . . . . 26, 27
Fonctionnement
Caractéristiques . . . . . . . . . . . . . . . . . . .29–32
Panneau de contrôle . . . . . . . . . . . . . . . . . . 28
Utilisation du piédestal
SmartDispense
™
. . . . . . . . . . . . . . . . . . .33–35
Installation . . . . . . . . . . . . . . . . . . . . .36–38
Fixer les connecteurs de tuyau
et les connecteurs électriques . . . . . . . . .38
Installer le piédestal
sur la laveuse . . . . . . . . . . . . . . . . . . . . . . . . .37
Niveler la laveuse . . . . . . . . . . . . . . . . . . . . .37
Préparation à l’installation du piédestal .36
Préparer le piédestal . . . . . . . . . . . . . . . . .37
Réinstaller le tiroir . . . . . . . . . . . . . . . . . . . .37
Retirer les pieds de support . . . . . . . . . . .36
Retirer les vis de transport . . . . . . . . . . . . .37
Terminer l’installation . . . . . . . . . . . . . . . . .38
Conseils de dépannage . . . . . . .39–41
Soutien au consommateur
Garantie . . . . . . . . . . . . . . . . . . . . . . . . . . . . . . 43
Numéros de téléphone
du service . . . . . . . . . . . . . . . . . . . . . . . . . . . . 44
Inscrivez ici les numéros
de modèle et de série :
Modèle # ________________
Série # ________________
Vous les trouverez sur une etiquette placée
du côté de la laveuse.
25
Soutien au
consommateur
Conseils de dépannageFonctionnementMesures de sécurité Installation
Page 26

26
Soutien au
consommateur
Conseils de dépannage
Fonctionnement
Mesures de sécurité
Installation
■ Installez ou placez votre piédestal dans un endroit
où elle n’est pas exposée à des températures
inférieures à zéro degré centigrade ou à du mauvais
temps. Cela risque de causer des dommages
permanents et d’annuler la garantie.
■ Mettez bien à la terre la laveuse, conformément
à tous les codes et les ordonnances en vigueur.
Suivez tous les détails des instructions d’installation.
■ Cet appareil doit être raccordé à la terre.
En cas de dysfonctionnement ou de panne,
la mise à la terre permettra de réduire le risque
d’électrocution en fournissant un intervalle de
moindre résistance pour le courant électrique.
La laveuse est équipée d’un cordon disposant
d’un conducteur de mise à la terre ainsi qu’une fiche
de mise à la terre. La fiche de la laveuse doit être
introduite dans la prise appropriée et correctement
installée et mise à la terre conformément aux codes
et normes locales.
AVERTISSEMENT :
Une connexion erronée du conducteur de mise
à la terre de l’appareil peut déboucher sur
un risque d’électrocution. Contactez un électricien
ou un réparateur qualifié en cas de doutes
concernant la mise à la terre de l’appareil.
RENSEIGNEMENTS IMPORTANTS EN MATIÈRE DE SÉCURITÉ.
LISEZ TOUTES LES INSTRUCTIONS AVANT D’UTILISER.
AVERTISSEMENT!
Pour votre sécurité, vous devez suivre les instructions contenues
dans ce manuel, pour réduire le danger d’incendie ou d’explosion,
de secousse électrique et pour empêcher les dommages matériels,
les blessures corporelles ou les pertes de vie humaine.
Les instructions contenues dans ce manuel et dans tous les autres
documents qui accompagnent la laveuse ne couvrent pas toutes
les situations ou conditions possibles qui peuvent se produire. Vous
devez faire preuve de prudence et utiliser des méthodes sécuritaires
pour installer, faire fonctionner et entretenir tout appareil
électroménager.
SÉCURITÉ DU CHAUFFE-EAU
Dans certaines conditions, un chauffe-eau peut produire de l’hydrogène gazeux si on ne l’a pas utilisé pendant plus
de deux semaines. Dans ces conditions, l’hydrogène gazeux peut exploser.
Si vous n’avez pas utilisé le chauffe-eau pendant deux semaines ou plus, empêchez tout dommage ou blessure
possible en ouvrant tous les robinets d’eau chaude et en les laissant couler pendant plusieurs minutes. Faites
cela avant d’utiliser tout appareil électroménager branché au système d’eau chaude. Cette procédure simple
permet à toute accumulation d’hydrogène gazeux de s’échapper. Comme ce gaz est inflammable, ne fumez
jamais ou n’utilisez jamais de flamme vive ou d’appareil électroménager pendant cette procédure.
BONNE INSTALLATION
Vous devez bien installer et placer ce piédestal, conformément aux instructions d’installation, avant de l’utiliser.
■ Ne conservez aucun materiau combustible, comme
de la charpie, du papier, des chiffons ou des produits
chimiques, en dessous ou à proximité de votre
laveuse.
■ Ne laissez jamais la porte de la laveuse ouverte.
Une porte ouverte est, pour des enfants,
une invitation à se pendre à la porte ou
à se cacher dans la laveuse.
■ Vous devez surveiller constamment votre laveuse
si vous l’utilisez à proximité d’enfants ou si des
enfants l’utilisent. Ne permettez jamais à des
enfants de jouer avec, ou dans cet appareil,
ou avec tout autre appareil électroménager.
VOTRE AIRE DE LESSIVE
Page 27

27
Soutien au
consommateur
Conseils de dépannageFonctionnementMesures de sécurité Installation
■ Ne lavez pas d’articles ayant été au préalable
nettoyés, lavés, plongés dans ou aspergés
d’essence, de solvants de nettoyage à sec ou
d’autres substances inflammables ou explosives,
car ils dégagent de la vapeur susceptible
d’exploser.
■ N’ajoutez pas d’essence, de solvant de nettoyage
à sec ou d’autres substances inflammables ou
explosives dans les réservoirs. Ces substances
dégagent de la vapeur susceptible d’exploser.
■ Ne manipulez pas le tiroir pendant que
la machine tourne. Patientez jusqu’à ce que
la machine se soit complètement arrêtée avant
d’ouvrir le tiroir.
■ Ne stockez pas d’agent chloré liquide dans
les réservoirs. Utilisez le distributeur manuel
de la laveuse pour verser de l’agent chloré.
■ Ne remplissez pas les réservoirs avec
d’autres marques ou d’autres concentrations
de lessives liquides HP (haute performance) et
des adoucissants liquides, au risque de congeler
les liquides et provoquer l’obstruction du système
SmartDispense.
■ Retirez et lavez soigneusement les réservoirs
avant d’utiliser une autre marque ou une autre
concentration de lessive liquide HP (Haute
performance) et d’adoucissant de liquide
concentré.
■ Ne claquez pas le tiroir du piédestal. Vous
risqueriez d’endommager le système
SmartDispense.
■ Ne faites jamais fonctionner cet appareil s’il
est endommagé, ne fonctionne pas correctement,
est en partie démonté, ou si des pièces manquent
ou sont cassées, un cordon ou une prise par
exemple.
■ Afin de réduire le risque d’électrocution,
débranchez la machine de l’alimentation secteur
ou débranchez la laveuse du tableau de
distribution en retirant le fusible ou en éteignant
le disjoncteur avant de procéder à toute
maintenance ou à tout nettoyage.
REMARQUE : Si vous appuyez sur le bouton
d’alimentation, vous NE débranchez PAS l’appareil
de l’alimentation secteur.
■ Ne manipulez pas les commandes.
■ Ne réparez et ne remplacez aucune pièce
de l’appareil ou n’essayez pas de réparer sauf
indication spécifique figurant dans le manuel
d’utilisation ou dans les instructions de réparation
destinées à l’utilisateur que vous comprenez
et sachez mettre en oeuvre.
LORS DE L’UTILISATION DU PIEDESTAL SMARTDISPENSE
™
N’utilisez
votre
appareil
qu’aux fins
prévues
décrites
dans ce
manuel
d’utilisation.
www.electromenagersge.ca
LISEZ ET SUIVEZ SOIGNEUSEMENT CES
RENSEIGNEMENTS EN MATIÈRE DE SÉCURITÉ.
CONSERVEZ CES INSTRUCTIONS
Page 28

Le panneau de contrôle de votre laveuse.
Vous trouverez votre numéro de modèle sur
une etiquette placée du côté de la laveuse.
Lorsque vous utilisez SmartDispense, il répartira automatiquement la lessive et l’adoucissant selon le niveau du saleté,
la dureté de l’eau et la taille de charge détectée.
Soutien au
consommateur
Conseils de dépannage
Fonctionnement
Mesures de sécurité
Installation
1
1
Power (Alimentation)
Appuyez pour allumer l’écran. Si l’écran est actif, appuyez pour mettre la laveuse en mode veille.
REMARQUE : Si vous appuyez sur le bouton POWER, vous ne débranchez pas l’appareil de l’alimentation secteur.
2
3
28
Page 29

Soutien au
consommateur
Conseils de dépannage
Fonctionnement
Mesures de sécurité Installation
À propos des fonctions du piédestal SmartDispense™.
SmartDispense
La fonction SmartDispense vous permet de régler
les préférences en matière de versement de lessive liquide
HP (Haute performance) et/ou d’adoucissant pour votre
charge. Cette fonction peut être utilisée pour tout cycle
de lavage, sauf pour les cycles de rinçage et d’essorage,
de vidange et d’essorage, et de nettoyage à l’eau.
Pour utiliser SmartDispense :
1. Sélectionnez le cycle de lavage.
2. Appuyez sur le bouton SMART DISPENSE
(le bouton s’allumera une fois sur on).
3. Utilisez les flèches gauche et droite
pour sélectionner le réservoir dans lequel
la lessive liquide se trouve (ou sélectionnez
« off » si vous ne souhaitez pas verser
de lessive).
4. Appuyez sur ENTER pour sélectionner
le récipient de lessive liquide.
5. Utilisez les flèches gauche et droite pour
sélectionner la concentration de lessive
liquide (figurant sur la bouteille de lessive
liquide).
6. Appuyez sur ENTER pour choisir
la concentration de lessive.
7. Utilisez les flèches gauche et droite
pour choisir la quantité de lessive liquide
que vous souhaitez verser (« Norm »
correspond à une dose standard).
REMARQUE : Lorsque vous
utilisez SmartDispense, il répartira
automatiquement la lessive et l’adoucissant
selon le niveau du saleté, la dureté de l’eau
et la taille de charge détectée.
8. Appuyez sur ENTER pour sélectionner
le niveau de versement de lessive liquide.
9. Utilisez les flèches gauche et droite
pour indiquer l’utilisation ou non
d’un adoucissant.
10. Appuyez sur ENTER pour choisir
l’adoucissant.
11. Utilisez les flèches gauche et droite pour
choisir la quantité d’adoucissant que vous
souhaitez verser (« Norm » correspond
à une dose standard).
12. Appuyez sur ENTER pour choisir le niveau
de versement d’adoucissant.
13. L’écran affichera SMART DISPENSE ON.
14. Appuyez sur START pour lancer le cycle.
15. Pendant le cycle de lavage, l’écran
affichera le statut et les options
de SmartDispense.
REMARQUE : Pour désactiver
SmartDispense, appuyez sur SMART
DISPENSE à nouveau; pour sélectionner
les options de versement, appuyez
sur SMART DISPENSE deux fois.
2
29
Page 30

30
À propos des fonctions du piédestal SmartDispense™.
Soutien au
consommateur
Conseils de dépannage
Fonctionnement
Mesures de sécurité
Installation
Régler le niveau de dureté de l’eau
La fonction SmartDispense vous permet de régler
la dureté de l’eau dans le tableau de commande.
Ceci vous permet d’optimiser les performances
de votre SmartDispense.
3
Distributeur de lessive SmartDispense
Calibrage de la dureté de l’eau
Avant de l’utiliser pour la première fois,
la dureté de l’eau de la laveuse doit être
calibrée. Veuillez suivre la procédure
ci-dessous pour calibrer la laveuse sur
la dureté de l’eau du robinet.
Déterminer la dureté de l’eau du robinet
Dans le sachet qui contient les instructions,
vous trouverez un kit de test de dureté de l’eau.
Lisez les instructions du kit, retirez la bande
réactive et suivez les instructions afin de
déterminer la dureté de l’eau du robinet.
Vous utiliserez ces informations pour calibrer
votre laveuse afin de distribuer la quantité
de lessive adéquate.
Indication de la bande de test de la dureté
de l’eau
Pour calibrer la dureté de l’eau :
1. Appuyez sur POWER.
2. Appuyez sur SETTINGS.
3. Utilisez la flèche du bas pour sélectionner
WATER HARDNESS SETUP, et appuyez sur
ENTER.
4. L’écran affichera les numéros 1 à 5.
La machine est réglée par défaut sur 3.
5. Utilisez les flèches gauche et droite pour
sélectionner le numéro déterminé à l’aide
de la bande réactive à partir du tableau
ci-dessus, et appuyez sur ENTER.
DOUX
DUR
Valeur à saisir
dans la laveuse
1
2
3
4
5
0 ROUGE
1 ROUGE
2 ROUGE
3 ROUGE
4 ROUGE
Page 31

Soutien au
consommateur
Conseils de dépannage
Fonctionnement
Mesures de sécurité Installation
31
www.electromenagersge.ca
Le tableau d’instructions
Appuyez sur les languettes situées sur
les côtés du tableau d’instruction. Pivotez
lentement le tableau d’instruction vers vous
jusqu’à ce qu’il s’arrête. Enfin, abaissez
le tableau face aux réservoirs dans
la rainure disponible.
Après avoir ajouté un produit de lavage,
soulevez le panneau de sa position à l’arrêt,
puis pivotez le panneau fermé jusqu’à ce qu’il
s’encastre dans sa position horizontale.
REMARQUE : Le tiroir ne se fermera
complètement que si le panneau est
en position ouverte.
Les réservoirs à lessive
Pour retirer l’un des réservoirs extérieurs,
attrapez le capteur situé à l’arrière du réservoir,
à l’aide d’une anse et tirez le capteur. Relâchez
le tuyau d’alimentation en pivotant le tuyau
et le raccord à l’aide d’une rotation d’un quart
de tour jusqu’à ce que le tuyau puisse être
retiré.
• Chaque réservoir peut contenir 9 L (350 oz.)
de lessive liquide (Haute performance),
soit environ 100 lavages de détergent
de concentration normale. Il faut ajouter
3,0 L (100 oz.) supplémentaire de lessive
dans le réservoir pour remplir le système.
• La lessive est pompée vers la laveuse
au début du cycle de lavage.
• Ne versez aucune substance dans
les réservoirs à lessive liquide.
• Ne remplissez pas le réservoir tant qu’il n’est
pas installé dans le tiroir.
• Le système SmartDispense™détermine
la quantité de lessive qui sera versée dans
la laveuse en fonction de la taille de charge,
le niveau de saleté et la dureté de l’eau.
• Ne diluez pas dans l’eau.
REMARQUE :
N’utilisez que
du lessive liquide
Haute performance.
Le réservoir à adoucissant
Pour retirer le réservoir central, attrapez
le capteur situé à l’arrière du réservoir, à l’aide
d’une anse et tirez le capteur. Relâchez
le tuyau d’alimentation en pivotant le tuyau
et le raccord à l’aide d’une rotation d’un quart
de tour jusqu’à ce que le tuyau puisse être
retiré. Retirez le réservoir en inclinant
légèrement vers la laveuse en le retirant.
• Chaque réservoir peut contenir
2,8 L (95 oz.) d’adoucissant liquide concentré,
suffisamment pour environ 75 charges
d’adoucissant liquide concentré.
• Ne diluez pas dans l’eau.
• L’adoucissant liquide concentré est pompé
vers la laveuse au moment adéquat au cours
du cycle de lavage.
• Ne versez aucune substance dans
le réservoir à côté de l’adoucissant liquide
concentré.
• Le système SmartDispense™détermine
la quantité d’adoucissant qui sera versée
dans la laveuse en fonction des saisies
de l’utilisateur pour le cycle de lavage.
REMARQUE : N’utilisez que de
l’adoucissant liquide concentré.
Tableau d’instructions
Réservoirs à lessive
Réservoir à adoucissant
Page 32

32
Soutien au
consommateur
Conseils de dépannage
Fonctionnement
Mesures de sécurité
Installation
À propos des fonctions du piédestal SmartDispense™.
Niveau de concentration
SmartDispense peut utiliser toute lessive
liquide, indépendamment du niveau
de concentration.
Il est possible de trouver de nombreuses
lessives liquides sous forme concentrée,
ceci signifiant qu’ils possèdent des ingrédients
plus actifs dans chaque goutte, moins
encombrants car elles utilisent moins
de liquide par lavage.
• Le niveau de concentration est
généralement mentionné sur l’étiquette ou
le bouchon de la bouteille de lessive liquide.
• Vous pouvez choisir la concentration de votre
lessive lorsque vous changez les paramètres
de la fonction SmartDispense.
• Si la concentration n’est pas mentionnée
sur la bouteille, choisissez « Regular »
comme niveau de concentration lors
du réglage des options de SmartDispense.
Niveau de distribution
SmartDispense peut distribuer une quantité
plus moins importante de lessive liquide ou
d’adoucissant liquide concentré, en fonction
de vos habitudes de lavage.
• Vous pouvez régler le niveau de dosage
lorsque vous changez les paramètres
de la fonction SmartDispense afin
de la personnaliser en fonction
de votre habitude de lavage.
• Un niveau de distribution « Norm »
correspond à la dose standard comme
le recommandent les fabricants de la lessive
liquide et de l’adoucissant liquide concentré.
• Un niveau de distribution « More »
ajoutera 50 % de lessive liquide ou 100 %
d’adoucissant liquide concentré à la dose
standard.
• Un niveau de distribution « Less » utilisera
25 % en moins de lessive liquide ou 25 %
de moins d’adoucissant liquide concentré
que la dose standard.
Page 33

Soutien au
consommateur
Conseils de dépannageFonctionnementMesures de sécurité Installation
Utilisation du piédestal SmartDispense™. www.electromenagersge.ca
Le piédestal SmartDispense distribue automatiquement de la lessive
liquide HP et/ou de l’adoucissant liquide concentré dans chaque
cycle reposant sur la taille de charge, le niveau de saleté et la dureté
de l’eau.
Pour utiliser le distributeur de lessive SmartDispense,pensez d’abord
à le remplir. Bien que toute lessive liquide et adoucissant liquide
concentré puissent être utilisés dans le système SmartDispense,
toutes les lessives et les adoucissants liquides concentrés ne sont pas
les mêmes.
Ne mélangez pas des lessives liquides HP de plusieurs marques,
concentrations de ou odeurs dans les réservoirs à lessive,
au risque de congeler les liquides et provoquer l’obstruction
du système SmartDispense. Ne mélangez pas plusieurs
adoucissants liquides concentrés de marques, odeurs différentes
dans le réservoir à adoucissant. Ne mélangez pas les lessives avec
des adoucissants liquides concentrés dans aucun des réservoirs.
Retirez et lavez les réservoirs soigneusement avant d’utiliser
une autre marque, concentration ou odeur.
MISE EN GARDE !
Ne stockez pas d’agent chloré, de lessive en poudre, de lessive
liquide, d’adoucissant liquide non concentre ou d’additifs de lavage
dans l’un des trois réservoirs. N’utilisez que de la lessive liquide Haute
performance, spécialement conçue pour les machines à chargement
frontal.
Pour ouvrir le piédestal SmartDispense à des fins de remplissage,
faites coulisser le tiroir piédestal sur la distance la plus grande
possible. Ouvrez le panneau d’instruction en appuyant sur les
languettes des deux côtés du panneau, pivotez le panneau vers vois
et faites le glisser dans la rainure disponible.
REMARQUE : La première fois que votre laveuse reconnaît
que le système SmartDispense a été activé, elle remplira
automatiquement les tuyaux d’alimentation de lessive et/ou
d’adoucissant pour les réservoirs actifs. Ce processus durera deux
minutes environ et ne se produira qu’au début du premier cycle
qui utilise le système SmartDispense.
33
Pour remplir le réservoir à lessive :
1. Sélectionnez le réservoir que vous souhaitez
remplir. Ouvrez le réservoir pour le remplir
en tournant le bouchon dans le sens inverse
des aiguilles d’une montre jusqu’à ce qu’il soit
desserré. Retirez le bouchon.
REMARQUE : Ne remplissez pas le réservoir
tant qu’il n’est pas installé dans le tiroir. Il se peut
que du liquide se perde pendant que vous fixez
le réservoir au système SmartDispense.
2. Visez la bouteille de lessive à l’ouverture dans
le réservoir et commencez à verser. Chaque
réservoir à détergent contiendra 9 L (350 oz.)
de lessive liquide (la bouteille de lessive la plus
grande contient 8 L [300 oz.]). Le système
requiert le versement de 3,0 L (100 oz.) de lessive
supplémentaire dans le réservoir pour être
considéré comme plein.
3. Une fois plein, replacez le bouchon et vissez
dans le sens des aiguilles jusqu’à ce qu’il soit
étanche. Si vous trouvez des résidus dans
le réservoir, essuyez à l’aide d’un chiffon
humide et de savon doux.
4. Un indicateur apparaîtra sur le panneau
de commande de la laveuse afin de vous
notifier lorsque le distributeur doit être à
nouveau rempli. Après avoir rempli le réservoir,
le message d’avertissement s’éteindra lorsque
la laveuse est alimentée pour le cycle suivant.
Un réservoir plein utilisant un détergent
concentré garantit une autonomie de 3 mois.
Réservoirs à lessive
0:48
LEFT Detergent LOW
LEFT Detergent EMPTY
0:48
Page 34

34
Soutien au
consommateur
Conseils de dépannage
Fonctionnement
Mesures de sécurité
Installation
Utilisation du piédestal SmartDispense™.
Pour remplir le réservoir
à adoucissant :
1. Ouvrez le réservoir pour le remplir en
tournant le bouchon dans le sens inverse
des aiguilles d’une montre jusqu’à ce qu’il
soit desserré. Retirez le bouchon.
REMARQUE : Ne remplissez pas
le réservoir tant qu’il n’est pas installé dans
le tiroir. Il se peut que du liquide se perde
pendant que vous fixez le réservoir
au système SmartDispense.
2. Visez la bouteille d’adoucissant à
l’ouverture dans le réservoir et commencez
à verser. Le réservoir d’adoucissant peut
contenir environ 2,8 L (95 oz.) d’adoucissant
liquide concentré. Le système requiert
le versement de 0,9 L (30 oz.)
supplémentaires d’adoucissant
dans le réservoir pour être considéré
comme plein.
3. Une fois plein, replacez le bouchon et vissez
dans le sens des aiguilles jusqu’à ce qu’il
soit étanche. Si vous trouvez des résidus
dans le réservoir, essuyez à l’aide d’un
chiffon humide et de savon doux.
4. Un indicateur apparaîtra sur le panneau
de commande de la laveuse afin de vous
notifier lorsque le distributeur doit être
à nouveau rempli. Après avoir rempli
le réservoir, le message d’avertissement
s’éteindra lorsque la laveuse est alimentée
pour le cycle suivant. Un réservoir plein
utilisant un adoucissant liquide concentré
garantit une autonomie de 3 mois.
REMARQUE : Le capteur d’adoucissant
doit être nettoyé chaque fois que le réservoir
doit être ravitaillé. Pour retirer le capteur
d'adoucissant pendant que le tiroir est
complètement ouvert, attrapez le capteur
situé à l’arrière du réservoir, à l’aide d’une
anse et tirez le capteur. Essuyez la surface
du capteur à l’aide d’un chiffon humidifié
de savon doux. Puis replacez le capteur
dans sa position d’origine.
Réservoir à adoucissant
0:48
FABRIC SOFTENER LOW
Page 35

Soutien au
consommateur
Conseils de dépannageFonctionnementMesures de sécurité Installation
www.electromenagersge.ca
Nettoyer les réservoirs
à adoucissant et à lessive
de SmartDispense
™
:
De la lessive et de l’adoucissant peuvent
s’accumuler au fond des réservoirs ou des
capteurs de liquide SmartDispense. Retirez
les résidus avant de remplir les réservoirs.
1. Ouvrez le tiroir du piédestal sur la distance
la plus grande possible.
2. Appuyez sur les languettes situées sur
les côtés du tableau d’instruction. Pivotez
lentement le tableau d’instruction vers vous
jusqu’à ce qu’il s’arrête. Enfin, abaissez
le panneau face aux réservoirs dans
la rainure disponible.
3. Sélectionnez le réservoir que vous
souhaitez retirer pour le nettoyer. Attrapez
le capteur situé à l’arrière du réservoir,
à l’aide d’une anse et tirez le capteur.
4. Essuyez la surface du capteur à l’aide
d’un chiffon humidifié de savon doux.
Puis replacez le capteur sur la surface
du tiroir ou un réservoir situé à proximité.
5. Relâchez le tuyau d’alimentation en
pivotant le raccord 90° jusqu’à ce que
le tuyau puisse être retiré.
6. Essuyez la surface du tuyau
et placez-le sur la surface arrière
du tiroir ou un réservoir adjacent.
7. Retirez le réservoir en inclinant légèrement
vers la machine en le retirant.
8. Rincez l’intérieur du réservoir à l’eau
chaude pour ne retirer que les résidus.
9. Dès lors que le réservoir a été
soigneusement rincé, replacez le réservoir
dans le tiroir en ravitaillant le réservoir.
10. Raccordez le tuyau d’alimentation en
l’insérant dans le réservoir et en serrant
le raccord en la pivotant à l’arrière.
11. Replacez le capteur en l’insérant dans
le réservoir dans sa position de départ.
12. Ouvrez le bouchon du réservoir et ajoutez
la quantité de lessive ou d’adoucissant
souhaitée.
13. Fermez le panneau d’information et le tiroir
du piédestal.
14. Ajustez le paramètre dans le menu
de SmartDispense si la concentration
de lessive sélectionnée ou l’emplacement
du réservoir utilisé ont été modifiés.
35
Raccord
Page 36

AVANT DE COMMENCER
Lisez ces instructions entièrement et soigneusement.
•
IMPORTANT –Conservez ces instructions
pour l’inspecteur local.
•
IMPORTANT –Observez tous les codes
et les ordonnances en vigueur.
• Note au consommateur – Conservez
ces instructions à titre de référence.
• Temps d’installation – 1-2 heures
• L’installateur est responsable de bien installer
cet appareil.
• Toute panne de produit due à une mauvaise
installation n’est pas couverte par la garantie.
MISE EN GARDE – En raison
de la taille et du poids de ces produits et afin de
réduire le risque de blessure ou de dommage,
L’ INSTALLATION DOIT ÊTRE EFFECTUÉE PAR
DEUX PERSONNES.
• Voyez les instructions d’installation de la laveuse pour
tout complément d’information.
Instructions Piédestal
d’installation
Modèle SPBD880
Des questions? Appelez le 1.800.561.3344 ou Visitez notre site Web à l’adresse : www.electromenagersge.ca
36
OUTILS NÉCESSAIRES POUR INSTALLER
LE PIEDESTAL
CONTENU DU KIT
4 vis d’assemblage
Cordon d’alimentation
Tournevis cruciforme
Clé à extrémité ouverte
9/16 po ou clé réglable
Clé à douille 8 mm
PRÉPARATION A L’INSTALLATION
Retirez l’emballage.
Le kit d’installation est recouvert de ruban adhésif
sur le dessus du carton. Retirez le kit et laissez-le
à l’écart pour l’installation.
Aplatissez le carton pour l’utiliser comme coussin
pour coucher la laveuse sur le côté. Continuez à utiliser
le carton pour protéger le sol en face du lieu choisi pour
l’installation.
RETIRER LES PIEDS
Couchez avec précaution la laveuse
sur le côté pour accéder aux pieds au bas
de l’appareil.
IMPORTANT : Ne couchez pas la laveuse
sur le côté. Ne retirez pas les boulons de
transport de la partie arrière de la laveuse.
Les boulons doivent rester en place jusqu’à
ce que la laveuse est remise dans sa
position verticale.
Utilisez une clé à extrémité ouverte pour
retirer les pieds de la laveuse.
1
A
B
Extraite et
démontez
les 4 pieds
Tuyau à raccord rapide
Page 37

Instructions d’installation
PRÉPARER LE PIEDESTAL
Tirez le tiroir
au maximum.
Retirez les vis
des glissières du
tiroir. Détachez
le connecteur
de câblage
et le connecteur
de tuyau à l’arrière du tiroir. Faites coulisser
le tiroir hors de la base et laissez-le de côté.
Retirez les vis des panneaux de service
à l’arrière du piédestal et placez les panneaux
dans le piédestal.
2
A
B
C
INSTALLER LE PIEDESTAL
SUR LA LAVEUSE
Placez le piédestal contre le bas de l’appareil.
Veillez à ce que l’avant du tiroir soit placé
sur le devant de l’appareil.
Alignez les trous du piédestal sur ceux situés
au bas de l’appareil. Utilisez un tournevis
cruciforme pour installer les 4 vis sur l’avant
du piédestal et sur les panneaux arrière et
dans l’appareil. Ne vissez pas.
Glissez le piédestal envers l’appareil jusqu’à
ce qu’il soit aligné de l’avant vers l’arrière.
Utilisez une clé à douille de 8 mm pour serrer
solidement les vis.
Remplacez les panneaux de service à l’arrière
et serrez les vis.
3
A
B
C
D
NIVELER LA LAVEUSE
Placez la laveuse à la verticale. Placez-la
proximité de l’endroit où vous avez prévu
de l’installer.
Assurez-vous que la machine ne soit pas
de travers en plaçant un niveau à bulle
dessus. Vérifiez le niveau horizontalement
et verticalement.
Utilisez une clé
à extrémité ouverte
pour régler les pieds
de la laveuse. Serrez
le contre-écrou situé
au bas du piédestal.
REMARQUES :
• Afin de réduire le niveau de vibration,
les contre-écrou doivent être serrés
au maximum.
• Pour réduire le niveau de vibration,
assurez-vous que les quatre pieds en
caoutchouc sont en contact avec le sol.
Poussez et tirez sur la droite et sur la gauche
de votre laveuse.
A
B
C
4
RÉINSTALLER LE TIROIR
Vérifiez que
les glissières
soient fermées.
Faites coulisser
le tiroir dans
l’ouverture.
Alignez les
supports du
tiroir sur les glissières de chaque côté.
Ouvrez complètement le tiroir. Rattachez
le connecteur de câblage et le connecteur
de tuyau à l’arrière du tiroir. Assurez-vous que
les deux raccords soient bien étanches.
Réinstallez les vis dans chaque glissière de
tiroir. Vissez les deux vis. Le tiroir doit coulisser
lentement lorsque vous l’enfoncez.
A
B
C
D
5
Connecteurs
RETIRER LES VIS DE TRANSPORT
Retirez les 4 vis de transport, les tuyaux
de support en plastique et les passe-fil en
caoutchouc de la partie arrière de la laveuse.
6
37
Connecteurs
Retirez les vis des
panneaux de service
Page 38

Instructions d’installation
38
FIXER LES CONNECTEURS DE TUYAU
ET LES CONNECTEURS ÉLECTRIQUES
Retirez les 4 capuchons protecteurs
de l’arrière de la machine et du piédestal
SmartDispense
™
.
Fixez le connecteur électrique à l’arrière
de la laveuse et à l’arrière du piédestal.
Enfoncez le cordon dans les supports de
protection à l’arrière de la laveuse.
Fixez le connecteur de tuyau à l’arrière
de la laveuse et à l’arrière du piédestal.
Enfoncez les trois tuyaux dans les trois
supports de protection à l’arrière de
la laveuse.
A
B
C
7
TERMINER L’INSTALLATION
Reportez-vous aux Consignes d’installation pour
terminer l’installation.
8
LES SPECIFICATIONS PEUVENT FAIRE L’OBJET
DE CHANGEMENT SANS PRÉAVIS
Raccordez
le tuyau
à raccord
rapide
à l’arrière
de la
laveuse
Ajoutez un cordon
de connecteur
électrique
CONFIRMATION D’INSTALLATION
Remplissez votre réservoir à lessive avec
de la lessive haute performance et le réservoir
à adoucissant avec de l’adoucissant liquide
concentré.
Réglez les paramètres de SmartDispense
(voir la page 29 du manuel d’utilisation).
Lancez un lavage rapide. Ceci permettra
de remplir les tuyaux d’alimentation
de SmartDispense de lessive et/ou
d’adoucissant pour tous les réservoirs
actifs sélectionnés lors de l’étape B.
REMARQUE : Si la machine n’a pu lancer
un lavage rapide, vérifiez ce qui suit :
1. Vissez les connecteurs de tuyau et électrique
situés à l’arrière de la laveuse et du piédestal.
2. Veillez à ce que les 3 capteurs soient raccordés
au connecteur à l’arrière du tiroir dans
le piédestal.
A
B
C
9
Supports de protection
Page 39

Soutien au
consommateur
Conseils de dépannage
Fonctionnement
Mesures de sécurité Installation
Avant d’appeler un réparateur… www.electromenagersge.ca
Conseils de dépannage—Économisez du temps et de l’argent!
Consultez d’abord les tableaux qui suivent
ou visitez
www.electromenagersge.ca.
Vous pourrez peut-être
éviter de faire appel à un réparateur.
Problème Causes possibles Correctifs
Le message
Low Le système SmartDispense
™
• Remplissez le réservoir SmartDispense de lessive liquide
Detergent/Fabric dispose de 10 cycles de lessive haute performance/adoucissant liquide concentré si vous
Softener liquide haute performance/ utilisez la même marque et la même concentration de
(Faible niveau
d’adoucissant liquide concentré lessive liquide haute performance/d’adoucissant liquide
de lessive/adoucissant) dans le piédestal SmartDispense concentré. Si vous utilisez une autre marque ou une autre
vide apparaît (20 cycles de 2x lessive liquide, concentration de lessive liquide haute performance/
30 cycles de 3x de lessive liquide d’adoucissant liquide concentre, suivez les étapes pour
haute performance, etc.) retirer et rincer le réservoir et nettoyer le capteur
d’adoucissant avant de ravitailler. Après avoir rempli
les réservoirs, réglez les paramètres de SmartDispense
si la concentration de lessive a été modifiée. L’indicateur
Low (Bas) s’éteindra lorsque les commandes seront
allumées à nouveau.
SmartDispense a été réglé • Réglez les paramètres de SmartDispense afin qu’il
incorrectement afin qu’il s’alimente s’alimente du réservoir adéquat. L’indicateur Low (Bas)
du réservoir vide s’éteindra lorsque les commandes seront allumées
à nouveau.
SmartDispense a été rempli avec • Ajoutez de la lessive liquide haute performance
moins de 3,0 l (100 oz.) de lessive au réservoir. L’indicateur Low (Bas) s’éteindra lorsque
liquide concentré haute performance
les commandes seront allumées à nouveau.
Le cycle ne démarrera pas
Le système SmartDispense • Remplissez le réservoir SmartDispense de lessive liquide
et le message Empty ne peut utiliser de cycles haute performance/adoucissant liquide concentré si vous
Detergent/Fabric de lessive liquide/d’adoucissant utilisez la même marque et la même concentration de
Softener (Réservoir liquide concentré dans le piédestal lessive liquide haute performance/d’adoucissant liquide
à lessive/adoucissant) SmartDispense. Une certaine concentré. Si vous utilisez une autre marque ou une autre
vide apparaît quantité de résidus de lessive concentration de lessive liquide haute performance/
liquide ou d’adoucissant restera d’adoucissant liquide concentre, suivez les étapes pour
au fond du réservoir afin d’éviter retirer et rincer le réservoir et nettoyer le capteur
que l’air s’infiltre dans les tuyaux d’adoucissant avant de ravitailler. Après avoir rempli
d’alimentation de SmartDispense les réservoirs, réglez les paramètres de SmartDispense
si la concentration de lessive a été modifiée. L’indicateur
Empty (Vide) s’éteindra lorsque les commandes seront
allumées à nouveau.
SmartDispense a été rempli avec • Ajoutez de la lessive liquide haute performance
moins de 3,0 l (100 oz.) de lessive au réservoir. L’indicateur Empty (Vide) s’éteindra lorsque
liquide concentré haute performance
les commandes seront allumées à nouveau.
Le message Les connecteurs de tuyau et • Assurez-vous que les 2 raccords électrique et de tuyau
“SmartDispense électrique ne sont pas installés à l’arrière de la laveuse et du piédestal ont été effectués.
pedestal not connected” correctement à l’arrière Retirez et réinstallez chaque raccord si nécessaire
(le piédestal de la machine en veillant à serrer le connecteur au maximum.
SmartDispense
Les raccords du capteur ne sont pas • Veillez à ce que les 3 capteurs soient branchés au
n’est pas connecté)
effectués connecteur à l’arrière du tiroir à l’intérieur du piédestal.
s’affiche à l’écran
Soulevez le couvercle du capteur à l’arrière du tiroir
afin de vous assurer que ces branchements ont été
effectués.
39
Page 40

Soutien au
consommateur
Conseils de dépannage
Fonctionnement
Mesures de sécurité
Installation
Avant d’appeler un réparateur…
Conseils de dépannage
Problème Causes possibles Correctifs
Le lave-linge attend deux Le lave-linge alimente les tuyaux • Lorsque votre lave-linge détecte pour la première fois
minutes avant d’ajouter du système SmartDispense
™
que le système SmartDispense a été activé, il remplira
de la lessive au début automatiquement les tuyaux d’alimentation de lessive
du cycle de lavage et/ou d’adoucissant pour les réservoirs actifs. Ce processus
durera deux minutes environ et ne se produira qu’au début
du premier cycle qui utilise le système SmartDispense.
Le lave-linge commence Le lave-linge détecte la taille • Le lave-linge tournera pendant un bref laps de temps au
à tourner au début de la charge de linge dans début de chaque cycle dès lors que SmartDispense est
du cycle de lavage avant le panier sélectionné. En détectant la taille de la charge de linge
que de l’eau ne soit dans le panier, le lave-linge pourra déterminer la quantité
ajoutée de liquide haute performance/d’adoucissant liquide
concentré à verser.
Émulsions dans Les réservoirs à lessive • N’utlisez que de la lessive liquide haute performance
la laveuse du système SmartDispense afin d’éviter toute émulsion. La lessive Tide 2x haute
ont été remplis de lessives performance a été certifiée conforme pour une utilisation
non haute performance avec les laveuses GE et les systèmes de lavage
SmartDispense.
• Suivez la procédure pour retirer et rincer le réservoir avant
de remplir à nouveau. Après avoir rempli les réservoirs,
réglez les paramètres de SmartDispense si la concentration
de lessive a été modifiée.
Le distributeur manuel de la laveuse • N’utilisez que de la lessive liquide haute performance
a été rempli de lessive non haute afin d’éviter toute émulsion. Toute lessive haute
performance performance a été certifiée conforme à une utilisation
avec les laveuses GE et les systèmes
SmartDispense.
Le linge n’est pas propre La quantité de lessive n’est pas • Réglez les paramètres SmartDispense pour augmenter
suffisante la quantité de lessive distribuée lors de chaque cycle.
Vérifiez que la concentration de lessive choisie correspond
à la concentration de lessive du réservoir.
Vous n’utilisez pas de lessive • N’utilisez que du détergent liquide Haute performance.
liquide haute performance
Les réservoirs ont été remplis • N’utilisez que de la lessive haute performance.
de lessive en poudre Suivez la procédure pour retirer et rincer le réservoir
avant de remplir à nouveau.
Le distributeur de lessive manuel • Éteignez le système SmartDispense si vous souhaitez
de la machine a été rempli utiliser une autre lessive que celle du distributeur
d’une autre lessive que celle manuel. Une quantité supplémentaire de lessive peut
qui a été versée dans le réservoir être stockée dans le second réservoir à lessive mais
sélectionné les paramètres SmartDispense doivent être réglés
avant un cycle afin de sélectionner un réservoir.
Les réservoirs à lessive • Suivez la procédure pour retirer et rincer le réservoir
de SmartDispense ont été remplis avant de le remplir à nouveau. Après avoir rempli
de deux lessives liquides différentes le réservoir, réglez les paramètres de SmartDispense
si la concentration de lessive a été modifiée.
Les réservoirs à lessive • Suivez la procédure pour retirer et rincer le réservoir
de SmartDispense ont été remplis avant de le remplir à nouveau. Après avoir rempli
de lessive liquide haute le réservoir, réglez les paramètres de SmartDispense
performance et d’adoucissant si la concentration de lessive a été modifiée.
liquide concentré
40
Page 41

41
www.electromenagersge.ca
Problème Causes possibles Correctifs
Le linge n’est pas doux La quantité d’adoucissant • Réglez les paramètres SmartDispense pour augmenter
après un cycle dans n’est pas suffisante la quantité d’adoucissant liquide concentré versée lors
lequel le versement de chaque cycle.
d’adoucissant liquide
Le réservoir à lessive • Suivez la procédure pour retirer et nettoyer le capteur
concentré a été activé
SmartDispense a été rempli d’adoucissant et rincez le réservoir à adoucissant avant
d’adoucissant liquide non concentré
de le remplir à nouveau d’adoucissant liquide concentré.
Les réservoirs à lessive • Suivez la procédure pour retirer et nettoyer le capteur
de SmartDispense ont été remplis d’adoucissant et rincez le réservoir à adoucissant avant
de deux différents adoucissants de le remplir à nouveau d’adoucissant liquide concentré.
concentrés
La capteur d’adoucissant • Suivez la procédure pour retirer et nettoyer l’adoucissant.
SmartDispense a développé
une pellicule d’adoucissant séché
Soutien au
consommateur
Conseils de dépannage
Fonctionnement
Mesures de sécurité Installation
Page 42

42
Soutien au
consommateur
Conseils de dépannage
Fonctionnement
Mesures de sécurité
Installation
Notes.
Page 43

43
Soutien au
consommateur
Conseils de dépannage
Fonctionnement
Mesures de sécurité Installation
EXCLUSION DE GARANTIES IMPLICITES—Votre seul et unique recours est la réparation du produit selon
les dispositions de cette Garantie limitée. Toutes les garanties implicites, incluant les garanties de
commercialité et d’adéquation à un usage spécifique, sont limitées à une année ou à la période la plus
courte autorisée par la législation.
Cette garantie s’applique à l’acheteur original et à tout propriétaire successif pour les produits achetés pour un usage domestique
au Canada. Les services d’entretien prévus par la garantie seront fournis dans les régions dans lesquelles il sera possible pour Mabe
d'assurer leurs prestations.
Garantie de piédestal GE SmartDispense™.
Tout le service sous garantie est fourni par nos Centres de service de fabrique ou par
un technicien autorisé. Pour le service, appelez le 1.800.561.3344. Veuillez vous munir
du numéro de série et du numéro de modèle lorsque vous appelez l’assistance.
■ Les frais de déplacements à votre maison pour vous
apprendre à utiliser votre produit.
■ Une mauvaise installation, livraison ou entretien.
■ Une panne du produit si celui-ci est maltraité, mal utilisé
ou utilisé à des fins autres que celles auxquelles il est
destiné, ou utilisé commercialement.
■ Des dommages après la livraison.
■ Le remplacement de fusibles de la maison ou la remise
en marche d’un disjoncteur.
■ Des dommages au produit causés par un accident,
un incendie, une inondation ou une catastrophe naturelle.
■ Tout dommage indirect ou consécutif causé par
des pannes possibles de cet appareil électroménager.
■ Le service s’il est impossible d’avoir accès au produit
pour ce faire.
Ce qui n’est pas couvert :
Garant : MABE CANADA INC.
LE GARANT N’EST PAS RESPONSABLE DES DOMMAGES INDIRECTS.
Pour une période de : Nous remplacerons :
Un an Toute pièce du piédestal SmartDispense qui tombe en panne à cause d’un vice de matériau
À partir de la date ou de main-d’œuvre. Pendant cette année de garantie limitée, GE fournit également,
de l’achat original gratuitement, tous les frais de main-d’œuvre et de services connexes pour remplacer
la pièce défectueuse.
Page 44

44
Imprimé en Chine
Soutien au consommateur.
Site Web appareils électroménagers GE
www.electromenagersge.ca
Vous avez une question ou vous avez besoin d’aide pour votre appareil électroménager? Contactez-nous par
Internet au site www.electromenagersge.ca 24 heures par jour, tous les jours de l’année.
Service de réparations 1.800.561.3344
Service de réparations GE est tout près de vous.
Pour faire réparer votre électroménager GE, il suffit de nous téléphoner.
Studio de conception réaliste
Sur demande, GE peut fournir une brochure sur l’aménagement d’une cuisine pour les personnes
à mobilité réduite.
Écrivez: Directeur, Relations avec les consommateurs, Mabe Canada Inc.
Bureau 310, 1 Factory Lane
Moncton, N.B. E1C 9M3
Prolongation de garantie www.electromenagersge.ca
Achetez un contrat d’entretien GE avant que votre garantie n’expire et bénéficiez d’un rabais substantiel.
Ainsi le service après-vente GE sera toujours là après expiration de la garantie.
Visitez notre site Web ou appelez-nous au 1.888.261.2133.
Pièces et accessoires
Ceux qui désirent réparer eux-mêmes leurs électroménagers peuvent recevoir pièces et accessoires
directement à la maison (cartes VISA, MasterCard et Discover acceptées).
Les directives stipulées dans le présent manuel peuvent être effectuées par n’importe quel utilisateur.
Les autres réparations doivent généralement être effectuées par un technicien qualifié. Soyez prudent,
car une réparation inadéquate peut affecter le fonctionnement sécuritaire de l’appareil.
Vous trouverez dans les pages jaunes de votre annuaire le numéro du Centre de service Mabe le plus proche.
Autrement, appelez-nous au 1.800.661.1616.
Contactez-nous
Si vous n’êtes pas satisfait du service après-vente dont vous avez bénéficié :
Premièrement, communiquez avec les gens qui ont réparé votre appareil.
Ensuite, si vous n’êtes toujours pas satisfait envoyez tous les détails–numéro de téléphone compris–au
Directeur, Relations avec les consommateurs, Mabe Canada Inc.
Bureau 310, 1 Factory Lane
Moncton, N.B. E1C 9M3
Inscrivez votre appareil électroménager www.electromenagersge.ca
Inscrivez votre appareil électroménager en direct, aussitôt que possible. Cela améliorera nos
communications et notre service après-vente. Vous pouvez également nous envoyer par la poste
le formulaire d’inscription joint à votre documentation.
Page 45

Escriba aquí los números
de modelo y serie:
N.º de modelo ____________
N.º de serie ____________
Puede encontrarlos en una etiqueta
situada en el costado de la lavadora.
Como socio de Energy Star®,
GE ha confirmado que este
producto cumple las directrices
de Energy Star®relativas
al rendimiento energético.
Instrucciones de seguridad . . . 46, 47
Instrucciones de funcionamiento
Cómo usar el pedestal
SmartDispense
™
. . . . . . . . . . . . . . . . . .53–55
Funciones . . . . . . . . . . . . . . . . . . . . . . . .49–52
Panel de control . . . . . . . . . . . . . . . . . . . . . 48
Instrucciones
de instalación . . . . . . . . . . . . . . . . .56–58
Cómo prepararse para
instalar el pedestal . . . . . . . . . . . . . . . . . . .56
Finalice la instalación . . . . . . . . . . . . . . . . .58
Instale los conectores
de la manguera y los conectores
eléctricos . . . . . . . . . . . . . . . . . . . . . . . . . . . .58
Instale el pedestal en la lavadora . . . . .57
Nivele la lavadora . . . . . . . . . . . . . . . . . . . .57
Prepare el pedestal . . . . . . . . . . . . . . . . . . .57
Reinstale la gaveta . . . . . . . . . . . . . . . . . . .57
Retire las patas de nivelación . . . . . . . . .56
Retire los tornillos del envío . . . . . . . . . . .57
Consejos para la solución
de problemas . . . . . . . . . . . . . . . . . .59–61
Soporte al consumidor
Garantía . . . . . . . . . . . . . . . . . . . . . . . . . . . . 62
Soporte al consumidor . . . . . . . . . . . . . . .63
Soporte al consumidor
Consejos para la
solución de problemas
Instrucciones
de funcionamiento
Instrucciones
de seguridad
Instrucciones
de instalación
45
Page 46

INFORMACIÓN DE SEGURIDAD IMPORTANTE.
LEA TODAS LAS INSTRUCCIONES ANTES DEL USO.
46
Soporte al consumidor
Consejos para la
solución de problemas
Instrucciones
de funcionamiento
Instrucciones
de seguridad
Instrucciones
de instalación
■ Instale o almacene la lavadora en un lugar donde
no esté expuesta a temperaturas bajo cero ni
a las inclemencias climáticas, ya que esto puede
provocar daños irreversibles e invalidar la garantía.
■ Conecte correctamente a tierra la lavadora de
conformidad con todos los códigos y ordenanzas
regulatorias. Siga la información de Instrucciones
de instalación.
■ Este aparato debe estar conectado a tierra
en el caso de una falla en el funcionamiento o
ruptura para reducir el riesgo de choque eléctrico
y permitir una ruta de menor resistencia para
la corriente eléctrica. La lavadora viene equipada
con un cable que tiene un conductor de conexión
a tierra para aparatos y un enchufe de conexión
a tierra. El enchufe de la lavadora debe conectarse
en un tomacorriente adecuado que esté
correctamente instalado y conectado a tierra,
según todos los códigos y ordenanzas locales.
ADVERTENCIA:
La conexión incorrecta del conductor de conexión
a tierra del equipo puede resultar en un riesgo
de choque eléctrico. Consulte con un electricista
calificado o proveedor de servicios si usted tiene
dudas respecto a la correcta conexión a tierra
del aparato.
¡ADVERTENCIA!
Para su seguridad, siga la información de este manual con el fin de
minimizar el riesgo de incendio, explosión o descarga eléctrica, así como
para evitar daños materiales, lesiones o la muerte.
Las instrucciones de este manual, así como el resto de la documentación
que se incluye con la lavadora, no cubren todas las situaciones o
estados posibles que pueden producirse. El usuario DEBE adoptar
procedimientos correctos, seguros y prudentes al instalar, utilizar
y realizar el mantenimiento de cualquier electrodoméstico.
SEGURIDAD DEL CALENTADOR DE AGUA
En determinadas condiciones, en un calentador de agua que no se haya utilizado durante un mínimo
de dos semanas se puede producir gas hidrógeno. El gas hidrógeno puede resultar explosivo en determinadas
circunstancias.
Si el agua caliente no se ha utilizado por dos semanas o más, prevenga la posibilidad de sufrir daños o lesiones
abriendo todos los grifos de agua caliente y dejándola correr durante varios minutos.
Realice este proceso antes
de utilizar cualquier electrodoméstico que se conecte al sistema de agua caliente.
Este sencillo procedimiento
le permitirá liberar todo el gas hidrógeno acumulado. Debido a que el gas es inflamable, no fume ni utilice ninguna
llama o electrodoméstico durante el proceso.
INSTALACIÓN CORRECTA
El pedestal se debe instalar y colocar correctamente de acuerdo con las instrucciones de instalación, antes de utilizarla.
■ Mantenga las zonas debajo
de los electrodomésticos y en torno a ellos
sin materiales combustibles como pelusa,
papel, trapos y productos químicos.
■ No deje la puerta de la lavadora abierta. Si la puerta
está abierta, puede hacer que los niños se cuelguen
de ella o se introduzcan en la lavadora.
■ Es necesario vigilar con atención a los niños
si utilizan la lavadora o se encuentran
en las proximidades. No deje que los niños
jueguen sobre éste u otro electrodoméstico,
con él o en su interior.
ZONA DE LAVADERO
Page 47

47
■ No lave artículos que hayan sido previamente
limpiados, lavados, embebidos o rociados con
gasolina, disolventes para lavado en seco u otras
substancias inflamables o explosivas, ya que
éstos emiten vapores que podrían prenderse
o explotar.
■ No agregue gasolina, disolventes para lavado en
seco u otras sustancias inflamables o explosivas
a los tanques, ya que éstos emiten vapores que
podrían prenderse o explotar.
■ Nunca intente alcanzar al interior de la gaveta
mientras la lavadora está en movimiento. Espere
hasta que la máquina haya parado por completo
antes de abrir la gaveta.
■ No almacene limpiadores líquidos con cloro
en los tanques. Use el dispensador de flujo
manual en la lavadora para dispensar
el blanqueador con cloro.
■ No rellene los tanques con diferentes marcas
o concentraciones de detergentes líquidos
de alta eficiencia (HE) y suavizantes líquidos
concentrados para la ropa, ya que podrían
causar que los fluidos se solidifiquen y resultar
en el bloqueo del sistema SmartDispense.
■ Retire y lave a fondo los tanques antes
de usar una marca o concentración diferente
de detergente líquido de alta eficiencia
o suavizante líquido concentrado para la ropa.
■ No cierre con fuerza la gaveta del pedestal.
Esto podría resultar en daños al sistema
SmartDispense.
■ Nunca intente operar este aparato si está
dañado, fallando, desarmado parcialmente,
o tiene partes faltantes, incluso si se trata
de un cable o enchufe dañado.
■ Para reducir la posibilidad de choque eléctrico,
desconecte este aparato del suministro de
corriente o desconecte la lavadora en el panel
de distribución de la edificación al retirar el fusible
o interruptor del cortacircuitos antes de intentar
cualquier mantenimiento o limpieza.
NOTA: Oprimir el botón de encendido NO
desconecta el aparato del suministro eléctrico.
■ No altere el funcionamiento de los controles.
■ No repare ni remplace ninguna parte del aparato
ni intente realizar algún servicio a menos que
se recomiende específicamente en el manual
del propietario o en unas instrucciones publicadas
de reparación para usuarios que usted entienda
y posea la habilidad para llevar a cabo tal
reparación o servicio.
AL USAR EL PEDESTAL SMARTDISPENSE
™
Utilice este
electrodoméstico
sólo para
el uso que
se describe
en este
manual del
propietario.
ge.com
Soporte al consumidor
Consejos para la
solución de problemas
Instrucciones de
funcionamiento
Instrucciones
de seguridad
Instrucciones
de instalación
GUARDE ESTAS INSTRUCCIONES
LEA DETENIDAMENTE Y SIGA LA INFORMACIÓN
DE SEGURIDAD.
Page 48

El panel de control de la lavadora.
48
Puede encontrar el número de modelo en una etiqueta situada en el costado de la lavadora.
Cuando use el SmartDispense, éste distribuirá automáticamente el detergente y el suavizante para la ropa según
el nivel de suciedad, dureza del agua y tamaño de carga detectados.
1
1
Power (Encendido)
Oprima para activar los controles. Si los controles están activos, oprima para colocar la lavadora en modo
“standby”.
NOTA: Oprimir POWER no desconecta el aparato del suministro eléctrico.
2
3
Soporte al consumidor
Consejos para la
solución de problemas
Instrucciones
de funcionamiento
Instrucciones
de seguridad
Instrucciones
de instalación
Page 49

Acerca de las funciones del pedestal SmartDispense™. ge.com
SmartDispense
Las funciones de SmartDispense le permiten configurar
las preferencias para el dispensado del detergente líquido
de alta eficiencia y/o suavizante para la carga de lavado.
Esta función se puede usar con cualquier ciclo
de lavado, excepto para Rinse & Spin (enjuague y
escurrido), Drain & Spin (drenaje y escurrido) y los ciclos
de limpieza de la lavadora.
Para usar el SmartDispense:
1. Elija su ciclo de lavado deseado.
2. Oprima el botón SMART DISPENSE
(el botón se iluminará cuando se encienda).
3. Use las flechas izquierda y derecha
para elegir en cuál tanque se encuentra
localizado su detergente líquido de alta
eficiencia (o elija “off” si no desea dispensar
detergente).
4. Oprima ENTER para elegir el contenedor
de detergente líquido de alta eficiencia.
5. Use las flechas izquierda y derecha para
elegir la concentración de detergente
de alta eficiencia (localizado en el frasco
de detergente líquido de alta eficiencia).
6. Oprima ENTER para elegir la concentración
de detergente.
7. Use las flechas izquierda y derecha para
elegir cuánto detergente líquido de alta
eficiencia le gustaría dispensar (“Norm”
corresponde a una dosis estándar).
NOTA: Cuando use SmartDispense,
se distribuirá detergente y suavizante para
la ropa automáticamente según el nivel
de suciedad, la dureza del agua y el tamaño
de la carga que se detecte.
8. Oprima ENTER para elegir el nivel
de dispensado de detergente líquido
de alta eficiencia.
9. Use las flechas izquierda y derecha para
elegir si a usted le gustaría usar suavizante
para la ropa.
10. Oprima ENTER para elegir el suavizante.
11. Use las flechas izquierda y derecha para
elegir cuánto suavizante desea dispensar
(“Norm” corresponde a una dosis estándar).
12. Oprima ENTER para elegir el nivel
de dispensado de suavizante.
13. La pantalla mostrará SMART DISPENSE
ON, lo que indica que el sistema está
activo.
14. Oprima START para iniciar el ciclo.
15. Durante su ciclo de lavado, la pantalla
mostrará el estado actual y las opciones
del SmartDispense.
NOTA: Para apagar el SmartDispense,
oprima SMART DISPENSE de nuevo; para
elegir diferentes opciones de dispensado,
oprima SMART DISPENSE dos veces.
2
49
Soporte al consumidor
Consejos para la
solución de problemas
Instrucciones
de funcionamiento
Instrucciones
de seguridad
Instrucciones
de instalación
Page 50

50
Acerca de las funciones del pedestal SmartDispense™.
Cómo configurar el nivel de dureza del agua
La función SmartDispense le permite definir la dureza
del agua en el panel de control. Esto ayuda a optimizar
el desempeño de la unidad SmartDispense.
3
Calibrado de la dureza del agua
para el dispensador de detergente
SmartDispense
™
Antes del primer uso, la lavadora debe
calibrarse en cuanto a la dureza del agua.
Siga las siguientes instrucciones para calibrar
la lavadora según la dureza del agua del grifo.
Determine la dureza del agua del grifo
En la bolsa que contiene estas instrucciones
encontrará un paquete con una tira de prueba
de dureza del agua. Lea las instrucciones que
vienen en el paquete, retire la tira de prueba y
siga las instrucciones para determinar el nivel
de dureza del agua del grifo. Usted usará esta
información para calibrar la lavadora para que
dispense la cantidad óptima de detergente.
Indicación de la tira de prueba
para la dureza del agua
Para calibrar la dureza del agua:
1. Oprima el botón POWER (encendido).
2. Oprima el botón SETTINGS (configuración).
3. Use la flecha hacia abajo para seleccionar
la CONFIGURACIÓN DE LA DUREZA
DEL AGUA, y oprima el botón ENTER.
4. La pantalla indicará los números del 1 al 5.
La lavadora trae un valor predeterminado
de 3.
5. Use las flechas izquierda y derecha para
elegir el número determinado con la tira
de prueba de la tabla anterior, y oprima
el botón ENTER.
SUAVE
DURA
Valor
a marcar
en la lavadora
1
2
3
4
5
0 ROJO
1 ROJO
2 ROJO
3 ROJO
4 ROJO
Soporte al consumidor
Consejos para la
solución de problemas
Instrucciones
de funcionamiento
Instrucciones
de seguridad
Instrucciones
de instalación
Page 51

51
ge.com
El panel de instrucciones
Oprima las lengüetas en los lados del panel
de instrucciones. Rote lentamente el panel
de instrucciones en dirección suya hasta que
pare. Finalmente, deslice el panel hacia abajo
al frente de los tanques en la ranura
disponible.
Después de agregar producto para lavar,
saque el panel de su posición de apoyo;
luego rote el panel cerrado hasta que encaje
en su posición horizontal.
NOTA: La gaveta no cerrará completamente
si el panel está en la posición abierta.
Los tanques de detergente
Para retirar cualquiera de los dos tanques
exteriores, agarre el sensor en la parte
posterior del tanque, usando el agarre que
se suministra, y hale el sensor directamente
hacia arriba. Afloje el tubo de suministro
rotando el tubo y el cierre 1/4 hasta que
el tubo se pueda halar directamente hacia
arriba.
• Cada tanque tiene capacidad para
350 onzas de detergente líquido de alta
eficiencia – aproximadamente 100 lavadas
de detergente con concentración regular.
El sistema requiere que al menos 100 onzas
de detergente nuevo se agreguen al tanque
para que reconozca que se ha llenado.
• El detergente se bombea hacia la lavadora
al inicio del ciclo de lavado.
• No coloque ninguna otra sustancia
en los tanques además del detergente
líquido de alta eficiencia.
• No llene el tanque mientras se saca
de la gaveta.
• El sistema SmartDispense™determina
cuánto detergente suministrar a la lavadora
dependiendo del tamaño de la carga, el nivel
de suciedad y la dureza del agua.
• No diluya con agua.
NOTA: Use
únicamente
detergente
de alta eficiencia.
El tanque de suavizante
para la ropa
Para retirar el tanque central, agarre el sensor
en la parte posterior del tanque, usando
el agarre que se suministra, y hale
el sensor directamente hacia arriba. Afloje
el tubo de suministro rotando el tubo y
el cierre 1/4 hasta que el tubo se pueda halar
directamente hacia arriba. Retire el tanque
al inclinarlo ligeramente hacia la lavadora
y halándolo directamente hacia arriba.
• Cada tanque tiene capacidad para 95 onzas
de suavizante líquido concentrado para
la ropa, suficiente para aproximadamente
75 cargas de suavizante líquido concentrado
para la ropa.
• No diluya con agua.
• Si se desea, el suavizante líquido para la ropa
se bombea hacia la lavadora en el momento
correcto del ciclo de lavado.
• No coloque ninguna otra sustancia
en los tanques además del suavizante
líquido para la ropa.
• El sistema SmartDispense™determina
cuánto suavizante suministrar a la lavadora
dependiendo del nivel indicado por el usuario
para el ciclo de lavado.
NOTA: Use únicamente suavizante líquido
concentrado para la ropa.
Panel de instrucciones
Tanques de detergente
Tanque de suavizante
para la ropa
Soporte al consumidor
Consejos para la
solución de problemas
Instrucciones
de funcionamiento
Instrucciones
de seguridad
Instrucciones
de instalación
Page 52

52
Acerca de las funciones del pedestal SmartDispense™.
Nivel de concentración
El sistema SmartDispense™puede usar
cualquier detergente líquido de alta eficiencia,
sin importar su nivel de concentración.
Muchos detergentes líquidos de alta eficiencia
se encuentran en forma concentrada, lo que
significa que tienen más ingredientes activos
en cada gota, y ocupan menos espacio ya
que se usa menos fluido por lavada.
• El nivel de concentración por lo general se
encuentra en la etiqueta o la tapa del frasco
del detergente líquido de alta eficiencia.
• Usted puede elegir la concentración
de su detergente cada vez que cambie
la configuración de la función
SmartDispense.
• Si la concentración no se identifica
explícitamente en el frasco, elija “Regular”
como el nivel de concentración al configurar
las opciones del SmartDispense.
Nivel de dispensado
SmartDispense™puede dispensar un poco
más o menos de detergente líquido de alta
eficiencia o suavizante líquido concentrado
para la ropa dependiendo de sus hábitos
de lavado.
• Usted puede ajustar el nivel de la dosis cada
vez que usted cambie la configuración para
la función SmartDispense con el fin de
adaptarlo a la manera en que usted
normalmente lava su ropa.
• Un nivel de dispensado “Norm” corresponde
a una dosis estándar, según lo recomiendan
los fabricantes de detergente líquido de
alta eficiencia y suavizantes líquidos
concentrados para la ropa.
• Un nivel de dispensado de “Más” agregará
50% más de detergente líquido de alta
eficiencia o 100% más de suavizante líquido
concentrado para la ropa que una dosis
estándar.
• Un nivel de dispensado de “Menos” usará
25% menos de detergente líquido de alta
eficiencia o 25% menos de suavizante líquido
concentrado para la ropa que una dosis
estándar.
Soporte al consumidor
Consejos para la
solución de problemas
Instrucciones
de funcionamiento
Instrucciones
de seguridad
Instrucciones
de instalación
Page 53

Cómo usar el pedestal SmartDispense™. ge.com
El pedestal SmartDispense™dispensa automáticamente detergente
líquido de alta eficiencia y/o suavizante líquido concentrado para la
ropa en cada ciclo según el tamaño de la carga, el nivel de suciedad
y la dureza del agua.
Para utilizar el Dispensador de Detergente SmartDispense, primero
se debe llenar. Aunque se puede usar cualquier detergente líquido
de alta eficiencia y suavizante líquido concentrado para la ropa
en el sistema SmartDispense, no todos los detergentes líquidos
de alta eficiencia y suavizantes líquidos concentrados para la ropa
son iguales.
No mezcle ningún detergente líquido de alta eficiencia de marcas,
concentraciones o aromas diferentes dentro de los tanques
de detergente, ya que esto podría causar que los detergentes
se endurezcan y bloqueen el sistema SmartDispense. No mezcle
ningún suavizante líquido concentrado para la ropa de diferentes
marcas o aromas dentro del tanque de suavizante para la ropa.
No mezcle ningún detergente líquido de alta eficiencia con
suavizantes líquidos concentrados para la ropa en ninguno
de los tanques. Retire y lave los tanques a fondo antes de usar una
marca, concentración o aroma diferentes de líquidos.
¡PRECAUCIÓN! De ninguna
manera almacene blanqueador líquido con cloro, detergente en polvo,
detergente líquido que no sea de alta eficiencia, suavizante líquido
para la ropa que no sea concentrado u otros aditivos para lavado
en ninguno de los tres tanques. Use únicamente detergente líquido
de alta eficiencia que haya sido específicamente diseñado para uso
en lavadoras frontales.
Para abrir el pedestal SmartDispense para llenado, deslice hasta
abrir la gaveta del pedestal a la distancia máxima posible. Abra
el panel de instrucciones al presionar las lengüetas en los lados
del panel, rote el panel en dirección suya y deslícelo hacia abajo
en la ranura disponible.
NOTA: La primera vez la lavadora reconoce que el sistema
SmartDispense ha sido activado, llenará automáticamente las líneas
de suministro con detergente y/o suavizante para la ropa para todos
los tanques activos. Este proceso durará aproximadamente dos
minutos y sólo ocurrirá al inicio del primer ciclo que use el sistema
SmartDispense.
53
Para llenar el tanque
de detergente:
1. Elija cuál de los dos tanques exteriores usted
desea llenar. Abra el tanque para llenarlo
girando la tapa en el sentido contrario del reloj
hasta que la tapa quede suelta. Levante para
quitar la tapa.
NOTA: No llene el tanque mientras se saca
de la gaveta. Se podría perder fluido mientras
el tanque se vuelve a instalar al sistema
SmartDispense.
2. Apunte el frasco del detergente en la abertura
del tanque y empiece a llenar. Cada tanque
de detergente tiene capacidad para 350 onzas
de detergente líquido de alta eficiencia (el frasco
de detergente más grande es de 300 onzas).
El sistema requiere que al menos 100 onzas
de detergente nuevo se agreguen al tanque
para que reconozca que se ha llenado.
3. Cuando esté lleno, vuelva a colocar la tapa
y gire en el sentido del reloj hasta que quede
apretada para asegurar un sellado correcto.
Si quedan residuos en el tanque, limpie con
un paño húmedo y un jabón suave.
4. Aparecerá un indicador en el panel de control
de la lavadora para notificarle cuando se debe
llenar el dispensador de nuevo. Después
de llenar el tanque, se apagará el mensaje
de advertencia cuando la lavadora se encienda
para el siguiente ciclo. Un tanque lleno con
un detergente concentrado regular durará
aproximadamente 3 meses para el usuario
promedio.
Tanques de detergente
Soporte al consumidor
Consejos para la
solución de problemas
Instrucciones
de funcionamiento
Instrucciones
de seguridad
Instrucciones
de instalación
0:48
LEFT Detergent LOW
0:48
LEFT Detergent EMPTY
Page 54

54
Soporte al consumidor
Consejos para la
solución de problemas
Instrucciones
de funcionamiento
Instrucciones
de seguridad
Instrucciones
de instalación
Cómo usar el pedestal SmartDispense™.
Para llenar el tanque de suavizante
para la ropa:
1. Abra el tanque para llenado al girar la tapa
en el sentido contrario al reloj hasta que
la tapa quede suelta. Levante la tapa.
NOTA: No llene el tanque mientras
se saca de la gaveta. Se podría perder
fluido mientras el tanque se vuelve
a instalar al sistema SmartDispense.
2. Apunte el frasco de suavizante para
la ropa en la abertura del tanque y
empiece a llenar. El tanque de suavizante
para la ropa tiene capacidad para
95 onzas de suavizante líquido
concentrado para la ropa. El sistema
requiere que al menos 30 onzas de
suavizante nuevo para la ropa se agreguen
al tanque para que reconozca que se ha
llenado.
3. Cuando esté lleno, vuelva a colocar la tapa
y gire en el sentido del reloj hasta que esté
apretada para asegurar un sellado
correcto. Si quedan residuos en el tanque,
limpie con un paño húmedo y un jabón
suave.
4. Aparecerá un indicador en el panel
de control de la lavadora para notificarle
cuando sea necesario llenar el dispensador
nuevamente. Después de llenar el tanque,
el mensaje de advertencia se apagará
cuando la lavadora se encienda para
el siguiente ciclo. Un tanque lleno que
use suavizante líquido concentrado
para la ropa durará aproximadamente
3 meses para el usuario promedio.
NOTA: El sensor del suavizante para la ropa
debe limpiarse cada vez que el tanque
se vuelva a llenar. Para retirar el sensor
del suavizante para la ropa mientras
la gaveta esté completamente abierta,
agarre el sensor en la parte posterior
del tanque, usando el agarre que
se suministra y hale directamente hacia
arriba. Limpie la superficie del sensor
usando un paño húmedo con un jabón
suave; luego reemplace el sensor
de nuevo en su posición original.
Tanque de suavizante
para la ropa
FABRIC SOFTENER LOW
0:48
Page 55

ge.com
Soporte al consumidor
Consejos para la
solución de problemas
Instrucciones
de funcionamiento
Instrucciones
de seguridad
Instrucciones
de instalación
Cómo limpiar los tanques
de detergente y suavizante
para la ropa del SmartDispense
™
:
Se podrían acumular detergente y suavizante
para la ropa en el fondo de los tanques
SmartDispense o en los sensores de fluido.
Se debe retirar el residuo antes de volver
a llenar los tanques.
1. Abra la gaveta del pedestal a la distancia
máxima posible.
2. Oprima las lengüetas en los lados
en el panel de instrucciones. Lentamente
rote el panel de instrucciones hasta que
pare. Luego, deslice el panel hacia abajo
al frente de los tanques en la ranura
disponible.
3. Elija el tanque que usted desee retirar
para limpieza. Agarre en sensor en la parte
posterior del tanque, usando el agarre
que se suministra, y hale el sensor
directamente hacia arriba.
4. Limpie la superficie del sensor usando
un paño húmedo con un jabón suave;
luego coloque el sensor en la superficie
posterior de la gaveta o en un tanque
adyacente.
5. Afloje el tubo de suministro al rotar
el cierre 90° hasta que se pueda sacar
directamente hacia arriba.
6. Limpie la superficie del tubo y colóquelo
en la superficie posterior de la gaveta
o en un tanque adyacente.
7. Retire el tanque inclinándolo ligeramente
hacia la lavadora y halándolo
directamente hacia arriba.
8. Enjuague el interior del tanque usando
agua caliente sólo para retirar el residuo.
9. Una vez que el tanque se haya enjuagado
a fondo, vuelva a colocar el tanque
en la gaveta antes de volver a llenarlo.
10. Vuelva a instalar el tubo de suministro
al insertarlo en el tanque y apretar
el cierre rotándola a la parte posterior.
11. Reemplace el sensor al insertarlo
en el tanque en su posición original.
12. Abra la tapa del tanque y vuelva
a llenar con el detergente o suavizante
para la ropa deseado.
13. Cierre el panel de información y la gaveta
del pedestal.
14. Ajuste la configuración en el menú de
SmartDispense si se hizo algún cambio
a la concentración del detergente
seleccionado o a la ubicación
del tanque que se está usando.
55
Cierre
Page 56

ANTES DE COMENZAR
Lea detenidamente todas las instrucciones.
•
IMPORTANTE –Guarde estas
instrucciones para uso del inspector local.
•
IMPORTANTE –Cumpla todos
los códigos y ordenanzas regulatorias.
• Nota al usuario – Guarde estas instrucciones
para consultas futuras.
• Duración – de 1 a 2 horas
• La instalación adecuada es responsabilidad
del instalador.
• La garantía no cubre fallas producidas por
la instalación inadecuada del producto.
¡PRECAUCIÓN! Debido al tamaño
y peso de estos productos, y para reducir el riesgo
de lesiones o daños personales al producto,
SE NECESITAN DOS PERSONAS PARA
LA INSTALACIÓN CORRECTA.
• Consulte las instrucciones de instalación
de la lavadora para requisitos y pautas
de instalación adicionales.
Instrucciones
Pedestal
de instalación
Modelo SPBD880
Si tiene alguna pregunta, llame a 800.GE.CARES (800.432.2737) ovisite nuestro sitio Web en: ge.com
56
HERRAMIENTAS NECESARIAS PARA
LA INSTALACIÓN DEL PEDESTAL
CONTENIDO DEL KIT
4 tornillos de montaje
Cable eléctrico
Destornillador de estrella (Phillips)
Llave abierta o llave
ajustable de 9/16″
Llave de tubo de 8 mm
PREPARACIÓN PARA LA INSTALACIÓN
Retire el empaque.
El kit de instalación viene pegado con cinta en la parte
superior de la caja de envío. Quite el kit y coloque
a un lado para la instalación final.
Aplane la caja de cartón del producto para usar como
base para colocar la lavadora de un lado. Continúe
usando la caja de cartón para proteger el piso
terminado al frente de la ubicación de la instalación.
RETIRE LAS PATAS DE NIVELACIÓN
Con cuidado, coloque la lavadora
en un costado para tener acceso a las patas
de nivelación en la base del aparato.
IMPORTANTE: No coloque la lavadora sobre
la parte posterior de la misma. No retire
los pernos de envío en la parte posterior
de la lavadora. Los pernos deben
permanecer en su lugar hasta que
la lavadora se regrese a su posición vertical.
Use una llave abierta para retirar las patas
de nivelación de la lavadora.
1
A
B
Afloje y retire
las cuatro patas
de nivelación
Manguera de
conexión rápida
Page 57

Instrucciones de instalación
PREPARE EL PEDESTAL
Hale la gaveta
hacia fuera lo
más que pueda.
Retire los tornillos
de los correderas
de la gaveta.
Suelte
el conector de cables y el conector
de la manguera en la parte posterior
de la gaveta. Deslice la gaveta hacia
fuera de la base y coloque a un lado.
Retire los tornillos de los paneles de servicio
de la parte posterior del pedestal y coloque
los paneles dentro del pedestal.
2
A
B
C
INSTALE EL PEDESTAL EN LA LAVADORA
Coloque el pedestal contra la base
de la unidad. Revise para confirmar
que el frente de la gaveta quede al frente
de la unidad.
Alinee los orificios en el pedestal con
los orificios en la base de la unidad. Use
un destornillador de estrella (Phillips) para
instalar los 4 tornillos a través del frente
del pedestal y a través de los paneles
y dentro de la unidad—no apriete.
Deslice el pedestal hacia la unidad, hasta
que esté alineado desde el frente y hacia
atrás y apriete los tornillos.
Vuelva a colocar los paneles de servicio
en parte posterior y apriete los tornillos.
3
A
B
C
D
NIVELE LA LAVADORA
Coloque la lavadora en su posición vertical.
Muévala cerca a su posición final.
Cerciórese de que la lavadora esté nivelada
colocando un nivel de burbuja encima. Revise
de un lado al otro y de adelante hacia atrás.
Use una llave abierta
para ajustar las patas
adentro y afuera.
Apriete la tuerca de
bloqueo contra la base
del pedestal.
NOTAS:
• Para minimizar la vibración, las tuercas
de bloqueo deben estar apretadas.
• Para reducir la vibración, cerciórese de que
todas las cuatro patas de nivelación de goma
estén firmemente tocando el piso. Empuje y
hale la derecha posterior y luego la izquierda
posterior de su lavadora.
A
B
C
4
REINSTALE LA GAVETA
Revise que
los correderas
estén cerrados.
Deslice
la gaveta
en la abertura.
Alinee los
soportes
de la gaveta
con las correderas en cada lado.
Abra la gaveta por completo. Vuelva a instalar
el conector de la manguera y el conector
de cables en la parte posterior de la gaveta.
Verifique que ambas conexiones estén firmes.
Reinstale los tornillos originales en cada
corredera de la gaveta. Apriete ambos
tornillos. La gaveta debe deslizarse
suavemente cuando se cierra.
A
B
C
D
5
RETIRE LOS TORNILLOS DEL ENVÍO
Retire los cuatro tornillos del envío, los tubos
plásticos de soporte y las arandelas de goma
en la parte posterior de la lavadora.
6
Conectors
57
Conectors
Retire los tornillos de
los paneles de servicio
Page 58

Instrucciones de instalación
58
INSTALE LOS CONECTORES DE LA MANGUERA Y LOS CONECTORES ELÉCTRICOS
Retire las 4 tapas protectoras de la parte
posterior de la lavadora y el pedestal
SmartDispense
™
.
Instale el conector eléctrico a la parte
posterior de la lavadora y del pedestal.
Presione el cable dentro de los soportes
protectores a lo largo de la parte posterior
de la lavadora.
Instale el conector de la manguera en
la parte posterior de la lavadora y del
pedestal. Presione los tres tubos dentro
de los soportes protectores a lo largo
de la parte posterior de la lavadora.
A
B
C
7
FINALICE LA INSTALACIÓN
Consulte las instrucciones de instalación
de la lavadora para completar la instalación.
8
LAS ESPECIFICACIONES ESTÁN SUJETAS
A CAMBIO SIN NOTIFICACIÓN
Conecte
la manguera
de conexión
rápida
a la parte
posterior
de la lavadora
Agregue el cable
del conector
eléctrico
CONFIRMACIÓN PREFERIDA
DE INSTALACIÓN
Llene el tanque de detergente con detergente
líquido de alta eficiencia y el tanque
de suavizante con suavizante líquido
concentrado para la ropa.
Define sus niveles en el SmartDispense
(ver la página 49 del Manual del propietario).
Realice una lavada rápida (Speed Wash).
Esto llenará las líneas de suministro
del SmartDispense con detergente
y/o suavizante para la ropa para todos
los tanques activos seleccionados
en el Paso B.
NOTA: Si la máquina no pudo realizar una lavada
rápida, revise lo siguiente:
1. Atornille los conectores eléctricos
y de la manguera firmemente en la parte
posterior de la lavadora y el pedestal.
2. Verifique que los 3 sensores estén
insertos en el conector en la parte posterior
de la gaveta al interior del pedestal.
A
B
C
9
Soportes protectores
Page 59

Antes de llamar al servicio de asistencia técnica… ge.com
Consejos para la solución de problemas
¡Ahorre tiempo y dinero! Consulte primero las tablas de las páginas siguientes o visite ge.com y quizás
no necesite llamar al servicio de asistencia técnica.
Problema Causas Posibles Qué hacer
Mensaje de Low El sistema SmartDispense
™
• Llene el depósito SmartDispense con detergente líquido
Detergent/
Fabric Softener
tiene aproximadamente 10 ciclos de alta eficiencia/suavizante líquido concentrado para
(nivel bajo
de detergente/
de detergente líquido de alta la ropa si está usando la misma marca y concentración
suavizante)
eficiencia/suavizante líquido de suavizante líquido concentrado para la ropa. Si usa
concentrado para la ropa una marca o concentración diferente de detergente líquido
restantes en el pedestal de alta eficiencia/suavizante líquido concentrado para
SmartDispense (20 ciclos 2x la ropa, siga los pasos para eliminar y enjuagar el tanque
de detergente líquido de alta y limpie el sensor del suavizante para la ropa antes de
eficiencia, 30 ciclos 3x volver a llenarlo. Después de llenar los tanques, ajuste
de detergente líquido los niveles del SmartDispense si se hicieron cambios
de alta eficiencia, etc.) a la concentración de detergente. El indicador que señala
un nivel bajo se apagará la próxima vez que los controles
se enciendan.
El sistema SmartDispense • Ajuste la configuración del SmartDispense para que
se configuró incorrectamente se supla del tanque correcto. El indicador que señala
para suplirse de un tanque vacío un nivel bajo se apagará la próxima vez que se enciendan
los controles.
El sistema SmartDispense • Agregue más detergente líquido de alta eficiencia.
se llenó con menos de 100 onzas El indicador que señala un nivel bajo se apagará la próxima
de detergente líquido concentrado vez que se enciendan los controles.
de alta eficiencia
El ciclo no inicia El sistema SmartDispense • Llene el depósito de SmartDispense con detergente
y muestra el mensaje no tiene ciclos restantes para líquido de alta eficiencia/suavizante líquido concentrado
Empty Detergent/ uso de detergente líquido de alta para la ropa si usa la misma marca y concentración
Fabric Softener eficiencia/suavizante líquido de detergente líquido de alta eficiencia/suavizante líquido
(el tanque de detergente/ concentrado para la ropa concentrado para la ropa. Si usa una marca o
suavizante para la ropa en el pedestal SmartDispense. concentración diferente de detergente líquido de alta
está vacío) Queda algo de detergente líquido eficiencia/suavizante líquido concentrado para la ropa,
de alta eficiencia/suavizante siga los pasos para quitar y enjuagar el tanque y limpiar
líquido concentrado para el sensor del suavizante para la ropa antes de volver
la ropa en el fondo del tanque a llenarlo. Después de llenar los tanques, ajuste
para evitar que entre aire la configuración del SmartDispense si hubo cambios
a las líneas de suministro en la concentración de detergente. El indicador de “vacío”
del SmartDispense (empty) se apagará la próxima vez que se enciendan
los controles.
El sistema SmartDispense • Agregue más detergente líquido de alta eficiencia
se llenó con menos de 100 onzas al tanque. El indicador de “vacío” (empty) se apagará
de detergente líquido concentrado la próxima vez que se enciendan los controles.
de alta eficiencia
Aparece el mensaje La manguera y los conectores • Verifique que se hagan las dos conexiones
en pantalla eléctricos no se instalaron de las mangueras y cables eléctricos en la parte posterior
“SmartDispense pedestal correctamente en la parte de la lavadora y el pedestal. Retire e instale cada conexión
not connected” posterior de la máquina de ser necesario, verificando que aprieta el conector
(el pedestal SmartDispense
al máximo.
no está conectado)
No se hicieron las conexiones • Verifique que los 3 sensores estén conectados
de los sensores firmemente en el conector de la parte posterior
de la gaveta al interior del pedestal. Levante la tapa
del sensor en la parte posterior de la gaveta para
verificar que las conexiones se hayan realizado.
59
Soporte al consumidor
Consejos para la
solución de problemas
Instrucciones
de funcionamiento
Instrucciones
de seguridad
Instrucciones
de instalación
Page 60

Antes de llamar al servicio de asistencia técnica…
Consejos para la solución de problemas
Problema Causas Posibles Qué hacer
La lavadora espera La lavadora está preparando • La primera vez que la lavadora reconoce que
dos minutos antes de las líneas del sistema el sistema SmartDispense se ha activado, llenará
agregar agua al inicio SmartDispense
™
automáticamente las líneas de suministro con
del primer ciclo detergente y/o suavizante para la ropa para todos los
tanques activos. Este proceso durará aproximadamente
dos minutos y sólo ocurrirá al inicio del primer ciclo que
usa el sistema SmartDispense.
La lavadora empieza La lavadora está calculando • La lavadora girará por un momento breve al inicio
a girar al inicio el tamaño de la carga en de cada ciclo cuando se haya seleccionado
del ciclo de lavado la cesta el SmartDispense. Al calcular el tamaño de la carga
antes de agregar agua en la cesta, la lavadora podrá determinar cuánto
detergente líquido de alta eficiencia/suavizante
líquido concentrado debe dispensar.
Hay espuma Los tanques de detergente • Use únicamente detergentes líquidos de alta eficiencia.
en la lavadora del sistema SmartDispense El detergente Tide 2x HE Laundry Detergent está aprobado
se llenaron con detergentes para uso en todas las lavadoras GE y sistemas
que no son de alta eficiencia SmartDispense.
• Siga los pasos para retirar y enjuagar el tanque antes
de volver a llenarlo. Después de llenar los tanques, ajuste
la configuración del SmartDispense si se hizo cambios
a la concentración de detergente.
El dispensador manual • Use únicamente detergente líquido de alta eficiencia
de la lavadora se llenó con para evitar la espuma. Cualquier detergente de alta
un detergente que no es de alta eficiencia está aprobado para uso en todas
eficiencia las lavadoras GE y sistemas SmartDispense.
La ropa no se limpia No hay suficiente detergente • Ajuste la configuración del SmartDispense para
después de un ciclo aumentar la cantidad de detergente dispensado durante
cada ciclo. Revise que la concentración de detergente
seleccionada coincida con la concentración de detergente
en el tanque.
No se está usando detergente • Use detergente líquido de alta eficiencia.
líquido de alta eficiencia
Los tanques se llenaron con • Use únicamente detergente líquido de alta eficiencia.
detergente en polvo Siga los pasos para sacar y enjuagar el tanque antes
de volver a llenarlo.
El dispensador manual • Apague el sistema SmartDispense si desea usar
de la lavadora se llenó con un detergente diferente en el dispensador manual.
un detergente diferente Se puede guardar detergente adicional en el segundo
al del tanque seleccionado tanque de detergente, pero el SmartDispense se debe
ajustar antes de un ciclo para seleccionar el tanque
deseado.
Los tanques de detergente • Siga los pasos para retirar y enjuagar el tanque
del sistema SmartDispense antes de volver a llenarlo. Después de llenar el tanque,
se llenaron con dos diferentes ajuste el SmartDispense si se hicieron cambios
detergentes líquidos de alta en la concentración de detergente.
eficiencia
Los tanques de detergente • Siga los pasos para retirar y enjuagar el tanque
del sistema SmartDispense antes de volver a llenarlo. Después de llenar el tanque,
se llenaron con un detergente ajuste el SmartDispense si se hicieron cambios
líquido de alta eficiencia en la concentración de detergente.
y un suavizante líquido
concentrado para la ropa
60
Soporte al consumidor
Consejos para la
solución de problemas
Instrucciones
de funcionamiento
Instrucciones
de seguridad
Instrucciones
de instalación
Page 61

61
ge.com
Soporte al consumidor
Consejos para la
solución de problemas
Instrucciones
de funcionamiento
Instrucciones
de seguridad
Instrucciones
de instalación
Problema Causas Posibles Qué hacer
La ropa no se siente No hay suficiente suavizante • Ajuste el SmartDispense para aumentar la cantidad
suave después para la ropa de suavizante líquido concentrado para la ropa durante
de un ciclo en el cual cada ciclo.
se dispuso
El tanque de suavizante para • Siga los pasos para retirar y limpiar el sensor
un dispensado
la ropa del sistema SmartDispense del suavizante para la ropa y enjuague el tanque
de suavizante líquido
se llenó con suavizante líquido de suavizante antes de llenarlo nuevamente con
concentrado para
no concentrado para la ropa suavizante líquido concentrado para la ropa.
la ropa
Los tanques de detergente • Siga los pasos para retirar y limpiar el sensor del
del sistema SmartDispense suavizante para la ropa y enjuague el tanque de
se llenaron con dos diferentes suavizante antes de llenarlo nuevamente con suavizante
suavizantes líquidos concentrados líquido concentrado para la ropa.
para la ropa
El sensor del suavizante • Siga los pasos para retirar y limpiar el suavizante
del SmartDispense desarrolló para la ropa.
una película seca de suavizante
para la ropa
Page 62

62
Soporte al consumidor
Consejos para la
solución de problemas
Instrucciones
de funcionamiento
Instrucciones
de seguridad
Instrucciones
de instalación
Período: Se sustituirá:
Garantía del pedestal SmartDispense™GE.
Todos los servicios de garantía se ofrecen a través de nuestros
centros de asistencia técnica o un técnico autorizado de Customer
Care
®
. Para programar servicio de asistencia técnica, en línea,
visite la página ge.com o llame al 800.GE.CARES (1.800.432.2737).
Cuando llame para solicitar servicio, por favor tenga a mano
el número de serie y el número de modelo.
Esta garantía se extiende al comprador original y cualquier comprador posterior de productos comprados para uso
residencial dentro des Estados Unidos. Si el producto está situado en un área que no dispone de servicio por parte
de un proveedor de servicio autorizado de GE, podría tener que hacerse cargo de los costes de envío o bien podría
solicitársele que lleve el producto a una centro de servicio de GE autorizado para realizar la reparación. En Alaska,
la garantía excluye el costo de envío o las visitas de servicio a su casa.
Algunos estados no permiten la exclusión o las limitaciones de daños incidentales o consecuenciales. Esta garantía
da derechos legales específicos, y usted podría tener otros derechos que variarán de estado a estado. Para saber
cuáles son sus derechos legales, consulte a la oficina de asuntos del consumidor local o la oficina del Prucurador
(Attorney General) en su localidad.
■ Visitas de servicio a domicilio para mostrarle cómo
utilizar el producto.
■ Instalación, envío o mantenimiento incorrectos.
■ Fallas del producto por manipulación, uso incorrecto
o distinto al destinado o previsto comercialmente.
■ Daños tras la entrega.
■ Sustitución de los fusibles de la vivienda
o restablecimiento de los interruptores.
■ Daños causados por accidentes, incendios, inundaciones
o fenómenos naturales.
■ Daños emergentes o fortuitos causados por posibles
defectos del electrodoméstico.
■ Producto no accesible para facilitar el servicio requerido.
Exclusiones de la garantía:
Garante: General Electric Company. Louisville, KY 40225
Engrape el recibo aquí.
Se necesita el comprobante
con la fecha de compra original
para que la garantía cubra
los servicios.
Un año Cualquier pieza del pedestal SmartDispense que falle debido a un defecto en los materiales
A partir de la fecha de o la fabricación. Durante este garantía limitada de un año, GE correrá además, sin cargo
adquisición original alguno, con todos los gastos de mano de obra y reparación relacionados para sustituir
la pieza defectuosa.
EXCLUSIÓN DE GARANTÍAS IMPLÍCITAS—Su único y exclusivo derecho es la reparación del producto,
tal y como se indica en esta Garantía limitada. Cualquier garantía implícita, incluyendo las garantías
implícitas de comerciabilidad o adecuación para un fin determinado, están limitadas a un año
o el período de tiempo más breve permitido por la ley.
Page 63

63
Soporte al consumidor.
Página Web de GE Appliances
ge.com
¿Tiene alguna pregunta sobre su electrodoméstico? ¡Pruebe la página Web de GE Appliances 24 horas al día,
cualquier día del año! Para mayor conveniencia y servicio más rápido, ya puede descargar los Manuales
de los Propietarios, pedir piezas o incluso hacer una cita en línea para que vengan a realizar una reparación.
Solicite una reparación ge.com
El servicio de expertos GE está a tan sólo un paso de su puerta. ¡Entre en línea y solicite su reparación cuando
le venga cualquier día del año! O llame al 800.GE.CARES (800.432.2737) durante horas normales de oficina.
Real Life Design Studio (Estudio de diseño para la vida real)
ge.com
GE apoya el concepto de Diseño Universal—productos, servicios y ambientes que pueden usar gente de todas
las edades, tamaños y capacidades. Reconocemos la necesidad de diseñar para una gran gama de habilidades
y dificultades físicas y mentales. Para más detalles cobre las aplicaciones de GE Diseño Universal, incluyendo
ideas de diseño para la cocina para personas con discapacidades, mire nuestra página Web hoy mismo. Para
personas con dificultades auditivas, favor de llamar al 800.TDD.GEAC (800.833.4322).
Garantías ampliadas ge.com
Compre una garantía ampliada y obtenga detalles sobre descuentos especiales disponibles mientras su garantía
está aún activa. Puede comprarla en línea en cualquier momento, o llamar al (800.626.2224) durante horas
normales de oficina. GE Consumer Home Services estará aún ahí cuando su garantía termine.
Piezas y accesorios ge.com
Aquellos individuos con la calificación necesaria para reparar sus propios electrodomésticos pueden
pedir que se les manden las piezas o accesorios directamente a sus hogares (aceptamos las tarjetas
VISA, MasterCard y Discover). Haga su pedido en línea hoy, 24 horas cada día o llamar por teléfono
al 800.626.2002 durante horas normales de oficina.
Las instrucciones descritas en este manual cubren los procedimientos a seguir por cualquier usuario. Cualquier
otra reparación debería, por regla general, referirse a personal calificado autorizado. Debe ejercerse precaución
ya que las reparaciones incorrectas pueden causar condiciones de funcionamiento inseguras.
Póngase en contacto con nosotros ge.com
Si no está satisfecho con el servicio que recibe de GE, póngase en contacto con nosotros en nuestra
página Web indicando todos los detalles así como su número de teléfono o escríbanos a:
General Manager, Customer Relations
GE Appliances, Appliance Park
Louisville, KY 40225
Registre su electrodoméstico ge.com
¡Registre su nuevo electrodoméstico en línea—cuando usted prefiera! El registrar su producto a tiempo le
proporcionará, si surgiera la necesidad, una mejor comunicación y un servicio más rápido bajo los términos de
su garantía. También puede enviar su tarjeta de registro pre-impresa que se incluye en el material de embalaje
o recorte y use el formulario de este Manual del Propietario.
Page 64

Consumer Support.
GE Appliances Website
In the U.S.: ge.com
Have a question or need assistance with your appliance? Try the GE Appliances Website, 24 hours a day, any day of
the year! For greater convenience and faster service, you can now download Owner’s Manuals, order parts or even
schedule service on-line. In Canada: www.geappliances.ca
Schedule Service In the U.S.: ge.com
Expert GE repair service is only one step away from your door. Get on-line and schedule your service at your
convenience any day of the year! Or call 800.GE.CARES (800.432.2737) during normal business hours.
In Canada, call 1.800.561.3344
Real Life Design Studio In the U.S.: ge.com
GE supports the Universal Design concept—products, services and environments that can be used by people of all
ages, sizes and capabilities. We recognize the need to design for a wide range of physical and mental abilities and
impairments. For details of GE’s Universal Design applications, including kitchen design ideas for people with disabilities,
check out our Website today. For the hearing impaired, please call 800.TDD.GEAC (800.833.4322).
In Canada, contact: Manager, Consumer Relations, Mabe Canada Inc.
Suite 310, 1 Factory Lane
Moncton, N.B. E1C 9M3
Extended Warranties In the U.S.: ge.com
Purchase a GE extended warranty and learn about special discounts that are available while your warranty is still
in effect. You can purchase it on-line anytime, or call 800.626.2224 during normal business hours. GE Consumer Home
Services will still be there after your warranty expires. In Canada, call 1.888.261.2133
Parts and Accessories In the U.S.: ge.com
Individuals qualified to service their own appliances can have parts or accessories sent directly to their homes
(VISA, MasterCard and Discover cards are accepted). Order on-line today, 24 hours every day or by phone at
800.626.2002 during normal business hours.
Instructions contained in this manual cover procedures to be performed by any user. Other servicing generally
should be referred to qualified service personnel. Caution must be exercised, since improper servicing may cause
unsafe operation.
Customers in Canada should consult the yellow pages for the nearest Mabe service center, or call 1.800.661.1616.
Contact Us In the U.S.: ge.com
If you are not satisfied with the service you receive from GE, contact us on our Website with all the details including your
phone number, or write to: General Manager, Customer Relations
GE Appliances, Appliance Park
Louisville, KY 40225
In Canada: www.geappliances.ca, or write to: Director, Consumer Relations, Mabe Canada Inc.
Suite 310, 1 Factory Lane
Moncton, N.B. E1C 9M3
Register Your Appliance In the U.S.: ge.com
Register your new appliance on-line—at your convenience! Timely product registration will allow for enhanced
communication and prompt service under the terms of your warranty, should the need arise. You may also
mail in the pre-printed registration card included in the packing material. In Canada: www.geappliances.ca
Printed in China
 Loading...