

Page 1
m
How to get
the best
fromyOUr
Spacemaker”Laundr
I
Contents
Appliance Registration
2
Repair Service
26
Care and Cleaning 25 Safety Instructions
3,4
Cautions 16 User Maintenance Instructions 25
Controls Setting Guide 8,9
VacationTips
25
Dryer
Warranty
Back Cover
Automatic Drying
7 Washer
Controls 7 Agitator 25
Dryness Selections
7 Controls
6
End-of-Cycle Signal 7
Detergents,Other Additives 11-15
Energy-Saving Tips 7 Energy-Saving Tips 7
Q
Knits Drying Tips
7
Hard Water 14
Lint Filter
7 Limestone Deposits
12
Operating Instructions 7 Lint Filter
6,25
Perm. Press Drying Tips
7,23 Loading Clothes
6
Sorting 5 Operating Instructions
6
TlmedDrying
7 Sorting
5
Energy-Saving Tips
10 Stains
16
FrontAccessPanel
25 StainRemovalGuide
17
ModelandSerial Numbers
2
Problem Solver
18-24
UseandCareof
model
WSM2000H
~
YourDirect Line to General Electric
The GE Answer Centef 800.626.2000
@
k
A Quality Product of GENERAL ELECTWC COMPANY
W-95X5
Page 2
Helpus
helpyou...
Before using your
Spacemaker~ Laundry,
read this book carefully.
It is intended to help you operate
and maintain your new appliance
properly.
Keep it handy for answers to your
questions.
If you don’t understand something
or need more help, write (include
your phone number):
Consumer Affairs
General Electric Company
Appliance Park
Louisville, KY40225
If you received a
damaged
appliance ...
Immediately contact the dealer
(or builder) that sold you the
appliance.
Save time and money.
Before you request service ...
check the Problem Solver on
pages 18through 24. It lists causes
ofminor operating problems that
you can correct yourself.
Write down the model
and serial numbers.
You’llfind them on alabel on the
inside of the door or the rating plate
on top ofthe dryer.
These numbers are also on the
Consumer Product Ownership
Registration Card that came with
your appliance. Beforesending in
this card, please write these
numbers here:
Model Number
Serial Number
Use these numbers in any
correspondence or service calls
concerning your appliance.
FORYOURSAFETY
Do notstoreoruse
gasolineorother
flammablevaporsand
liquidsinthevicinity
ofthisoranyother
appliance.
FORYOURSAFETY
electricalswitches:
“Don’ttum electric switches
on w off because sparks may
ignitethegaei” -
All washing and drying instruction terms in this book conform to the
Care Labeling Rule established bythe Federal TradeCommission. January 1984.
.
,
.
Page 3

IIMPORIANTSAFETY
Read all instructions
before
using
INSTRUCTIONS
this appliance.
W~G-To reduce the risk
of fire, electricshock, or injury to
pmons whenusing yourappliance,
follow basic precautions,
including the following:
. Use this appliance only for ik
intended purpose as described in
this Use and Care Book.
● This appliance must be
properly installed and located in
accordance with the Installation
Instructions before it is used. If
you did not receive an Installation
Instructions sheet with your
appliance, you can obtain one by
contacting the service location
nearest you.
–Properly ground to conform
with all governing codes and
ordinances. Follow details inInstallation Instructions.
–Locate where the temperature is
above 50”F.(10”C.)for
satisfactory operation of the
control system. Do not install or
store the appliance where it will
be exposed to the weather.
–Comect to a properly rated,
protected and sized power-supply
circuit to avoidelectrical overload.
—Exhausting to the outside is
STRONGLY RECOMMENDED
toprevent large amounts of
moisture and lint from being blown
into the room. Carefhlly follow the
details in the Installation
Instructions. If your appliance is
notvented to the outside, see
special instructions on page 25.
. Turn off wa~r fauce~ when the
washer is not in use to relieve
,’; .pressure on hoses and valves, and
‘yw’;’s*t&’&i~i~zeleakage if a hose or
valve should break or rupture.
a
● When disconnecting this appli-
. .
ante pull by the plug rather than
Make sure that the cord is located
so that it will not be stepped on,
tripped overor otherwise subjected
to damage or stress.
● Do not repair or replace any
part of the appliance or attempt
any servicing unless specifically
recommendedinthis Use and Care
Book or in published user-repair
instructions that you understand
and have the skills to carry out.
To minimize the possibility
of injury:
● Do not mix chlorine bleach with
ammonia or acids such as vinegar
and/or rust remover. Mixing can
produce a toxic gas which may
cause death.
● Do not wash or dry articles
that havebeen cleaned in, washed
in, soaked in, or spotted with
combustibleorexplosivesubstances
(such as gasoline, degreasers,
dry-cleaning solvents, kerosene,
etc.) which may give off vapors
that could ignite or explode.
Do not add these substances to the
wash water,and do not use these
substances around your washer
and dryer during operation.
. ~DROGEN GAS is produced
by the chemical action within
your waterheater and the gas can
accumulate in the water heater
ador water pipes if hot waterhas
not been used for a period of two
weeksorlonger.HYDROGENGAS
CANBE EXPLOSIVE UNDER
THESE CIRCUMSE4NCES.So to
preventthe possibility of damage
or injury, if you have not used hot
water for two weeks or more, or
moveinto a residence in which the
hot water system may not have
been used for some time, turn on
allhot water faucets and allow
them to run forseveral minutes
before using any electrical
appliance which is connected to
the hot water system. This will
allow any hydrogen gas to escape.
Since the gas is flammable, do not
smoke or use an open flame or
appliance during this process.
● Never reach into washer while
it is moving. Before loading,
unloading or adding clothes, push
the cycleselector knob in, then
wait until the machine has
completely stopped before
opening the lid.
● Never reach into the dryer
while the drum is moving. Before
loading, unloading or adding
clothes, wait until the drum has
completely stopped.
I
● Close supervision is necessary
if this appliance is used by or near
children. Do not allow children
to play inside, on or with this
appliance or any discarded
appliance. Dispose of discarded
appliances and shipping or
packing materials properly.
Before discarding a washer or
dryer or removing them from
service, remove the lid or door.
c Keep all laundry aids (such as
detergents,bleaches, fhbnc softeners,
etc.) out of the reach of children,
prefemblyinalockedcabinet.Observe
all warnings on container labels to
avoidpersonal injury.
● Keep the floor around your
appliances clean and dry to redu,ce
the possibility of slipping. -“’”
“?/
I
(continued nextpage)
>1
the cord to avoidd~age to the
cord or junction of cord and plug.
Page 4

IMPORTANT SAFEI’Y INSTRUCTIONS (...tied)d)
● To minimize the possibility
of electric shock, unplug this
appliance from the power supply
before attempting any maintenance
.’
or cleaning (except the removal and
cleaning of the dryer lint filter).
NOTE: Pushing the washer cycle
selector knob in or turning the
dryer cycle selector to OFF does
NOI’disconnect the appliance
from the power supply.
.
DO not tamper with controls.
● Do not operate this appliance
if it is damaged, malfunctioning,
partially disassembled, or has
missing or broken parts, including
a damaged cord or plug.
● Never climb on or stand on the
washer or dryer top.
● Do not wash or dry fiberglass
articles in your appliance. Skin
irritation could result from the
remaining particles that may be
picked up by clothing during
subsequent use of the appliance.
To minimize the possibility
of a fire hazard:
● Do not use heat to dry articles
containing rubber, plastic, or
similar materials (such as
padded bras, tennis shoes,
galoshes, bath mats, rugs, bibs,
baby pants, plastic bags, etc.) as
these materials may melt or
burn. Also, some rubber
materials, when heated, can
under certain circumstances
produce fire by spontaneous
combustion.
● Garments labeled “Dry Away
From Heat” (such as lifejackets
containing Kapok) must not be put
in your dryer—fire hazard could
result.
:.. +,.:’1 ,., .
.
..”,
. . . .
● Do not wash or dry articles
For‘%is~erOp&&iOn“’ @
that have been cleaned in,
s Do not leavewasher lid up during:
washed in, soaked in, or spotted
cycle. This will stop the spin action
with combustible or explosive
and preventcompletion of-tie qcle..
substances(such as gasoline, ~ ~ ~~~: A,- ~~~. . ~. ;+;,~.,... ~ .-
degreasers, drycleaning solvents,
Dryer-applied
kerosene, etc.) which may give
fabric softeners or
off vapors that could ignite or
explode. Do not add these ‘
anti-static conditioners
substances to the wash water,and
do not use these substances
around your appliance during
operation.
● Any article on which you have
used a cleaning solvent, or which
contains flammable materials
(such as cleaning cloths, mops,
towels used in beauty salons,
restaurants or barber shops, etc.)
must not be placed in or near the
dryer until all traces of these
flammable liquids or solids and
their fumes have been removed.
There are many highly flammable
items used in homes such as:
acetone, denatured alcohol,
gasoline, kerosene, some
household cleaners, some spot
removers, turpentines, waxes, wax
removers and products containing
petroleum distillates.
● Clean the dryer lint filter
before each load to prevent lint
accumulation inside the dryer or
in the room. DO NOT OPERATE
THE DRYER WITHOUT THE
LINT FILTER IN PLACE.
s The interior of the machine
and the exhaust duct connection
inside the dryer should be
cleaned periodically by a
qualified individual.
● Keep area around and
underneath your appliance free
from the accumulation of
combustible materials, such as
lint, paper, rags, chemicals, etc.
Youmaywish to soften your
laundered fabrics or reducethe
staticelectricity in them. We
recommendyou use eithera
fabricsoftener in the wash cycle,
according to the manufacturer’s
instructions for those products, or
try a dryer-added product for
whichthe manufacturer gives
writtenassurance on the package
thattheir product can be safely
used in your dryer.
Service or performance problems
caused bythe use ofthese products
arethe responsibility of the
manufacturers of those products
and are not covered bythe warranty
@
ofthis appliance.
SAW THESE
INSTRUCTIONS
● The laundry process can reduce
the flame retardancy of fabrics. To
avoid such a result, the garment
manufacturer’s care instructions
should be followed very carefully.
4
Page 5
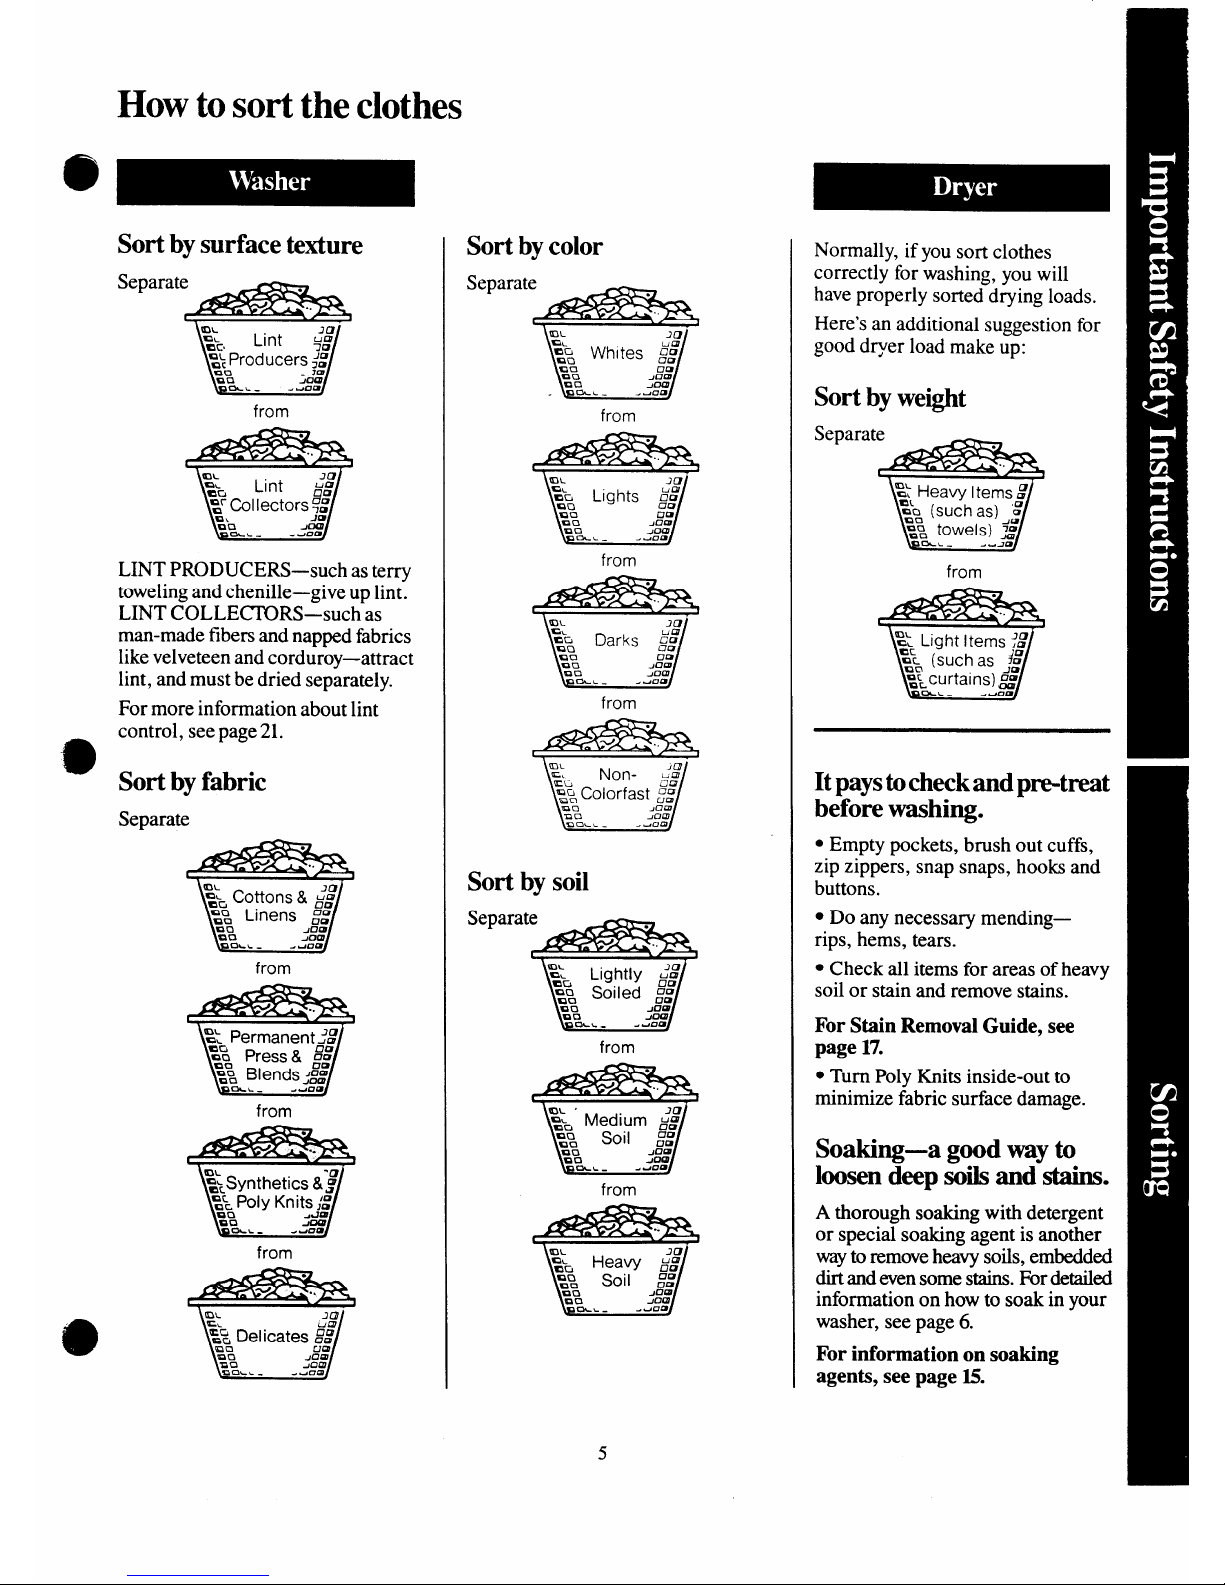
How to sort the clothes
Sort by surface texture
Separate
from
LINT PRODUCERS—such as terry
towelingand chenille—give up lin~
LINT COLLECl_ORS-such as
man-made fibers and napped fabrics
likevelveteen and corduroy—attract
lint, and must be dried separately.
For more information about lint
control, see page21.
Sort by fabric
Separate
from
from
from
w
Sort by color
Separate
from
w
from
from
Sort by soil
Separate
from
from
Normally, if you sort clothes
correctly for washing, you will
haveproperly sorted drying loads.
Here’san additional suggestion for
good dryer load make up:
Sort by weight
Separate
from
Itpaystocheckandpre-treat
before washing.
● Empty pockets, brush out cuffs,
zip zippers, snap snaps, hooks and
buttons.
c Do any necessary mending—
rips, hems, tears.
● Check all items for areas of heavy
soil or stain and remove stains.
For Stain Removal Guide, see
page 17.
● Turn Poly Knits inside-out to
minimize fabric surface damage.
Soaking-a good way to
loosen deep soils and stains.
A thorough soaking with detergent
or special soaking agent is another
wayto removeheavysoils, embedded
dirtand evensome stains.Fordetailed
information on how to soak in your
washer, see page 6.
Forinformation on soaking
agents, see page 15.
5
Page 6
How tooperateyour clothes washer
W~G—To reduce the risk of fwe, electric shock, or injury to persons,
read the IMPORTANT SAFETY INSTRUCTIONS before operating this appliance.
Load the washer properly
● Add accurately-measured
detergent to empty tub. Seepages
11through 13.
● Load clothes loosely. Dry clothes
level should be no higher than the
top row of circular holes in the wash
tub. Do not put clothes on top of the
agitator or wind them around it.
For best results, mix large items
with small ones. When washing a
single heavy item, such as a shag
rug or bedspread, add one or two
other pieces to balance the load.
Large items should be no more
than one-half ofthe total load.
Here is a typical full load:
2 double sheets 2 long-sleeve
3 boxer shorts
shirts
3 T-shirts
4 standard
2 pair trousers
pillowcases
● Tobleach the load, measure
liquid bleach accordingto directions
on container. Afl.erwasherhas fdled
and agitatedfor severalminutes, add
diluted bleach to the wash water.
How to use powdered bleach,
fabric softenemand other laundry
products is explained on page 15.
● Close lid. Washerwill fill and
agitate but will not spin with lid
open. This washer has a Safety Lid
Lock. As a safety measure the lid
will be automatically locked during
the spin portion of each cycle. The
lid will automatically unlock about
30 seconds after the end of the spin
cycle. Toopen lid during spin cycle,
push Cycle Selector IN and wait for
lid lock to release, about 30 seconds,
before opening.
Foryour personal safety, never
reach into washer while parts are
moving. Alwaysstop washer to
load, unload, add forgotten items
or additional laundry aids.
washing temperature
o
water level
PULL STAR
Q
00
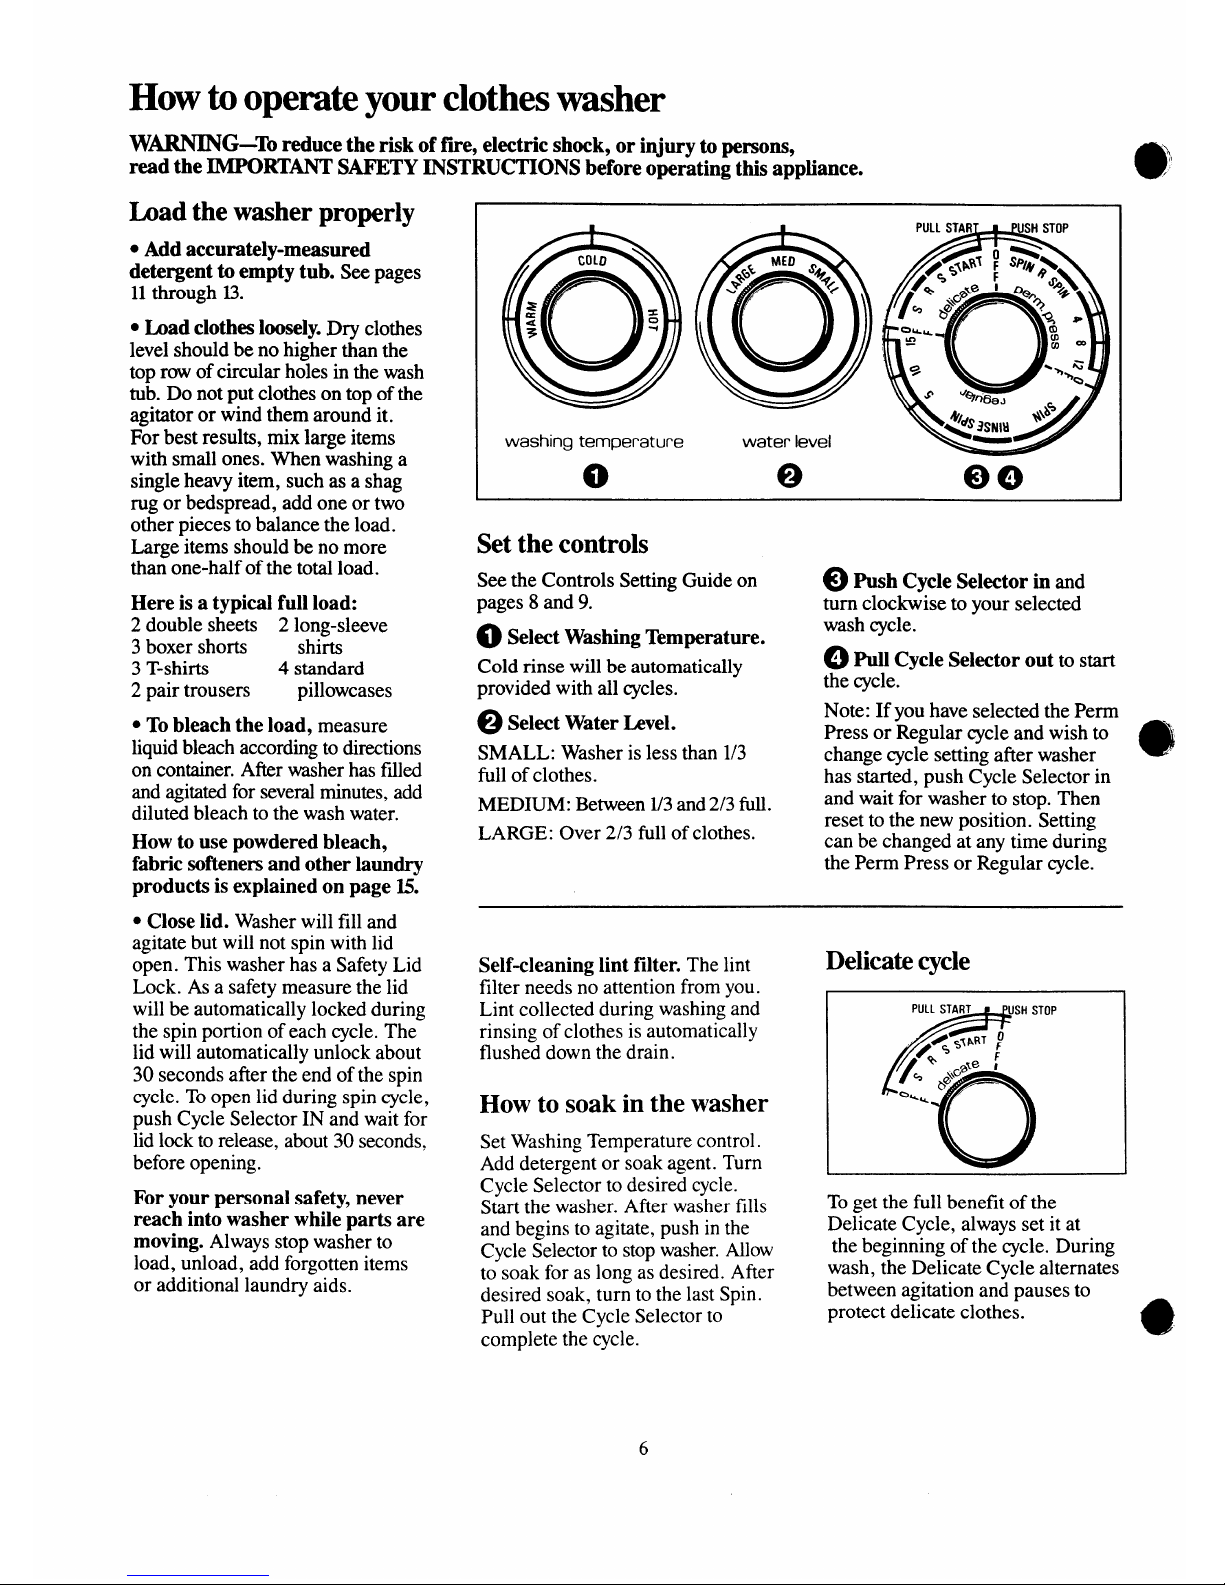
Set the controls
See the Controls Setting Guide on
@ Push Cycle Selector in and
pages 8 and 9. turn clockwise to your selected
~ Select WmhingTempemture.
Cold rinse will be automatically
provided with all cycles.
~ Select WaterLevel.
SMALL: Washer is less than 1/3
fill of clothes.
MEDIUM: Between 1/3and 2/3 full.
LARGE: Over 2/3 full of clothes.
wash cycle.
~ Pull Cycle Selector out to start
the cycle.
Note: If you have selected the Perrn
@
Press or Regular cycleand wish to “’
change cycle setting after washer
has s-wed, push Cycle Selector in
and wait for washer to stop. Then
reset to the new position. Setting
can be changed at any time during
the Perm Press or Regular cycle.
Self-cleaning lint filter. The lint
filter needs no attention from you.
Lint collected during washing and
rinsing of clothes is automatically
flushed down the drain.
How to soak in the washer
Set Washing Temperature control.
Add detergent or soak agent. Turn
Cycle Selector to desired cycle.
)elicate cycle
S~artthe washer. After washer fills
Toget the full benefit of the
and begins to agitate, push inthe
Delicate Cycle, always set it at
Cycle Selector to stop washer.Allow
the beginning of the cycle. During
to soak for as lorw as desired. After
wash, the Delicate Cycle alternates
desired soak, tur; tothe last Spin.
between agitation and pauses to
Pull out the Cycle Selector to
protect delicate clothes.
complete the cycle.
Page 7
How to operateyour dryer
W&ING-To reduce the risk of fire, electric shock, or injury to persons,
read the IMPORTANT SAF’ETYINSTRUCTIONS before operating this appliance.
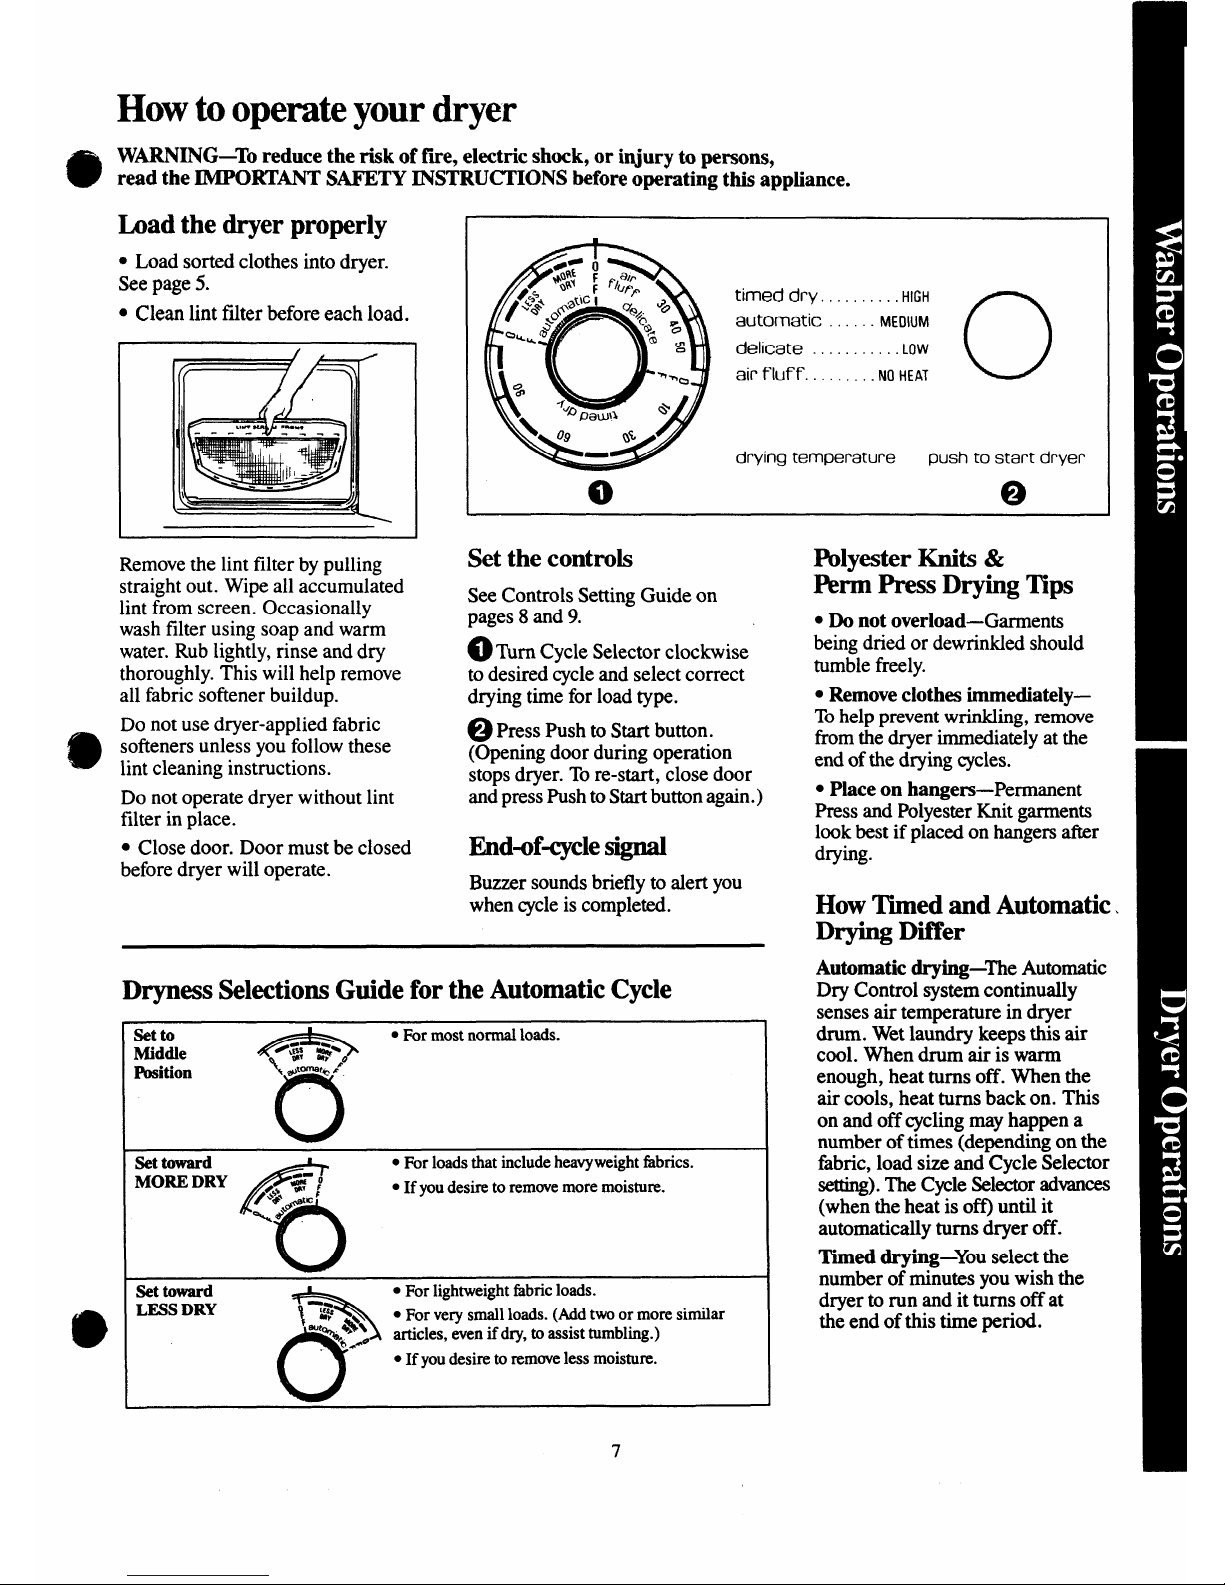
Load the dryer properly
● Load sorted clothes into dryer.
See page 5.
● Clean lint filter before each load.
Remove the lint filter by pulling
straight out. Wipe all accumulated
lint from screen. Occasionally
wash filter using soap and warm
water. Rub lightly, rinse and dry
thoroughly. This will help remove
all fabric softener buildup.
Do not use dryer-applied fabric
softeners unless you follow these
lint cleaning instructions.
Do not operate dryer without lint
filter in place.
ti
alpV
f+ ,
timed dry . . . . . . . . .. HlGH
\\
automatic . . . . . . rvIEc)wM
A)
delicate . . . . . . . . . ..LOw
L
air fkIff. . . . . . . . . NOHEAT
u
4 :“
3ati\l
a
drying temperature push to start dryer
o
Set the controls
See Controls Setting Guide on
pages 8 and 9.
OTur@cle Selector clo&wise
to desired cycleand select correct
drying time for load type.
~Press Push to !hrtbutton.
(Opening door during operation
stops dryer. Tore-start, close door
andpress Push to Start button again.)
● Close door. Door must be closed
before dryer will operate.
when cycleis compl&ed. “
End-of-cycle signal
Buzzer sounds brieflv to alert you
Dryness Selections Guide for the Automatic Cycle
setto
&
● For most normal loads.
Middle
Pbsition
\
#umat*/0
u
Set
toward
f
● kr loads thatinclude heavyweight fabrics.
MORE DRY
#w
,$33 ‘g /
c
If you desiretoremovemoremoisture.
o
\&+
Settoward
T
.
For lightweight fhbric loads.
LESS DRY
\
-*
k?
.
For very small loads. (Add two or more similar
h
“%~~>e articles, even if dry, to assist tumbling.)
● If p desire to remove less moisture.
Fblyester Knits&
~rm
h3SS Drying T@
● Do not overload—Garments
beingdriedordewrinldedshould
tumblefreely.
● Removeclothes immediately—
Tohelp prevent wrinkling, remove
from the dryer immediately at the
end ofthe drying cycles.
● Place on hangers-Permanent
Press and Polyester Knit garments
look best if placed on hangers after
drying.
How Timed and Automatic.
Drying
Dfler
Automatic drying-’e Automatic
Dry Control system continually
senses air temperature in dryer
drum. Wetlaundry keeps this air
cool. When drum air is warm
enough, heat turns off. When the
air cools, heat turns back on. This
on and off cycling may happen a
number oftimes (depending on the
fabric, load size and Cycle Selector
*).
TheCycle Seleetoradvances
(when the heat is off’)until it
automatically turns dryer off.
Timed drying-You sekxt the
number of minutes you wish the
dryer to run and it turns off at
the end of this time period.
7
Page 8
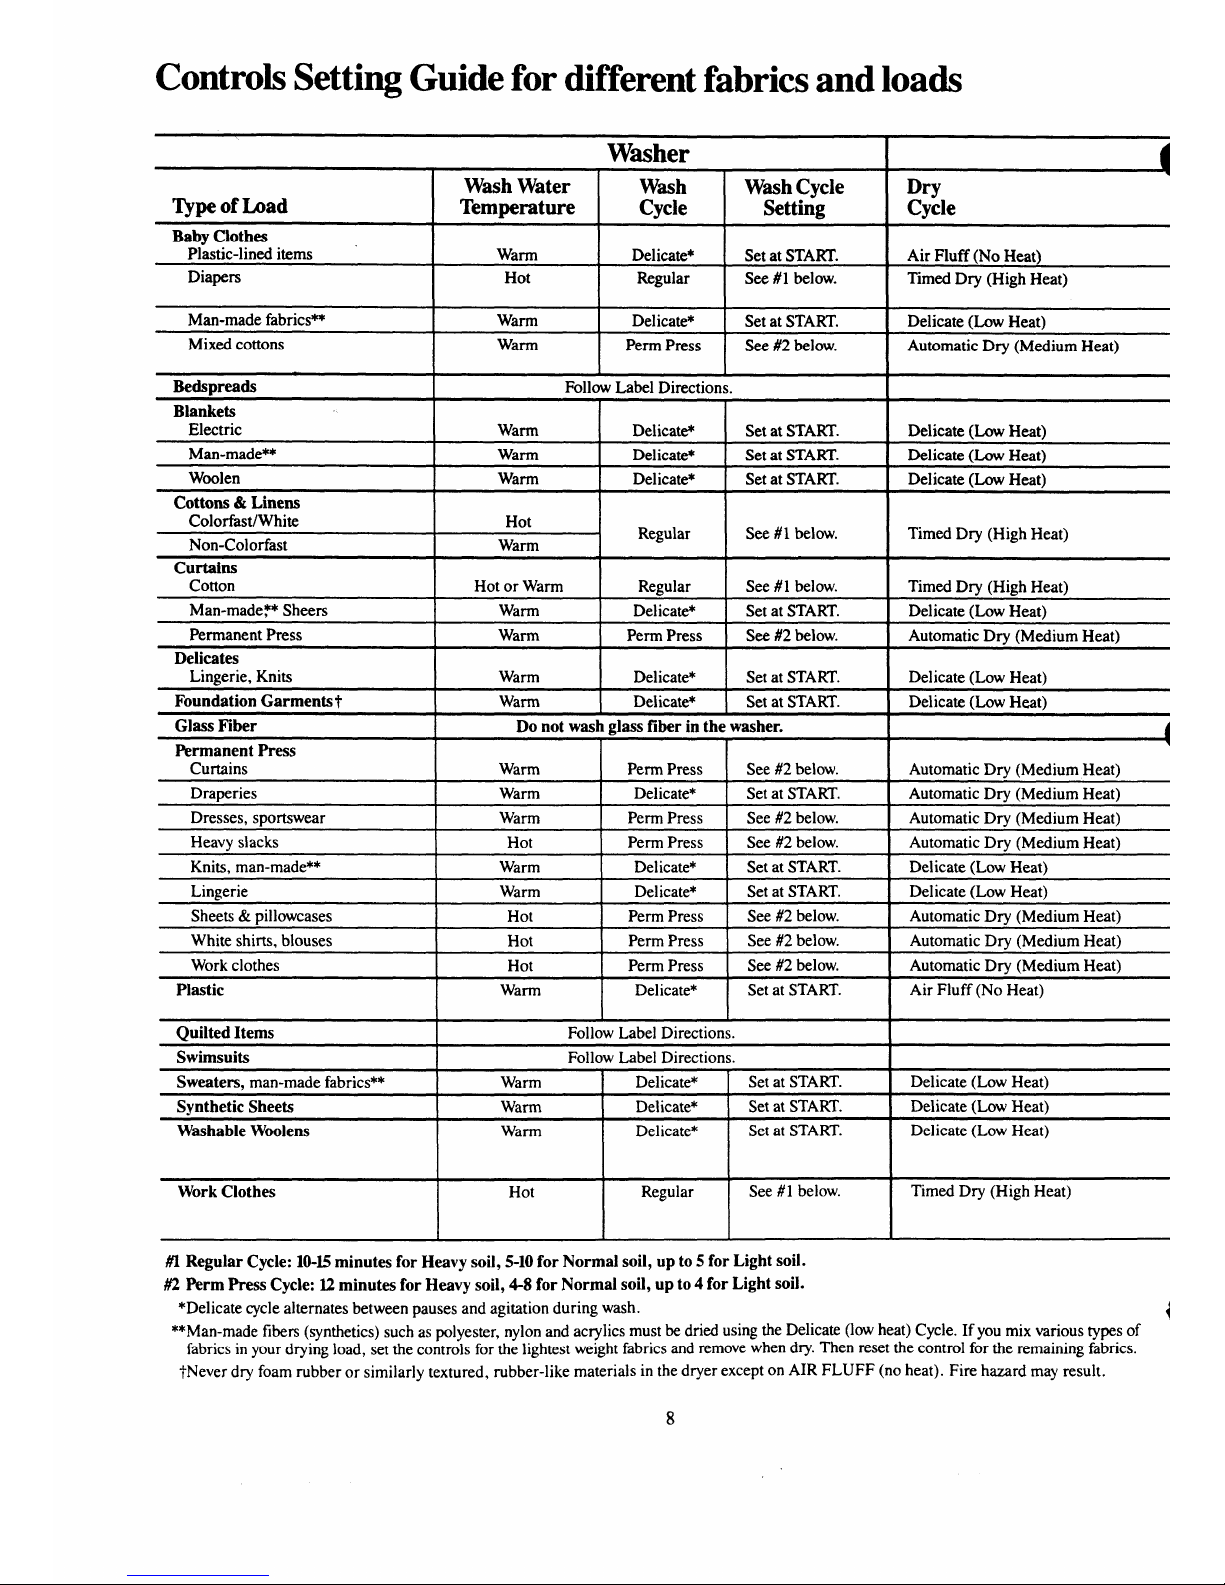
ControlsSetting Guide for different fabrics and loads
W=her
Wash Water
W-h
WashCycle
Dry
~pe of Load
Temperature
Cycle
Setting
Cycle
Baby Clothes
Plastic-lined items
Warm
Delicate*
Set at START.
Air Fluff (No Heat)
Diapers
Hot Regular See #1 below. Timed Dry (High Heat)
Man-made fabrics~ Warm Delicate*
Set at START.
Delicate (Low Heat)
Mixed cottons Warm Perm Press
See #2 below.
Automatic Dry (Medium Heat)
Bedspreads
I
Follow Label Directions.
I
Blankets
Electric Warm
Delicat&
Set at START.
Delicate (Low Heat)
Man-made** Warm Delicate*
Set at START.
Delicate (Low Heat)
Woolen Warm Delicate*
Set at START.
Delicate (Low Heat)
Cottons /k Linens
Colorfast/White
Hot
Regular
I
See #1 below.
I
Timed Dry (High Heat)
Non-Colorfast
Warm
Curtains
Cotton Hot or Warm
Regular See #1 below.
Timed Dry (High Heat)
Man-made?* Sheers Warm Delicate*
Set at START.
Delicate (Low Heat)
Permanent Press
Warm
Perm Press see#2 below.
Automatic Dry (Medium Heat)
Delicates
Lingerie, Knits Warm Delicate*
Set at START.
Delicate (Low Heat)
Foundation Garmentst
I
Warm
! Delicate*
I Set at START.
! Delicate
(LOW Heat)
Glass Fiber
I
Do not wash glass fiber in the washer.
I
m
%-rnanent Press
I
I I I
w
Curtains
Warm
Perm Press See #2 below. Automatic
Drv [Medium Heat)
. —-J .- -- —-—--- --- —-,
Draperies
I
Warm
I
Delicate*
[
Set at START.
I
Automatic Dry (Medium Heat)
Dresses, sportswear
I
Warm
I
Perrn Press See #2 below.
I
Automatic Dry (Medium Heat)
Heavy slacks
I
Hot
I
Perrn Press
I
See #2 below.
I
Automatic Dry (Medium Heat)
Knits, man-made** Warm Delicate* Set at START.
Delicate (Low Heat)
Lingerie Warm Delicate* Set at START.
Delicate (Low Heat)
Sheets & pillowcases
Hot
Perm Press See #2 below.
Automatic Dry (Medium Heat)
White shirts, blouses
Hot
Perrn Press See #2 below.
Automatic Dry (Medium Heat)
Work clothes
Hot
Perm Press See #2 below.
Automatic Drv (Medium Heat)
Plastic
I
Warm
I
Delicate*
I
Set at START.
I
Air Fluff (No Heat)
ouilted Items
I
Follow Label Directions.
I
Swimsuits
I
Follow Label Directions.
I
Sweaters. man-made fabrics**
I
Warm
I Delicate*
] Set at START. I Delicate (Low Heat)
Synthetic Sheets
I
Warm
I
Delicate*
I
Set at START.
I
Delicate (Low Heat)
Washable Woolens Warm
Delicate*
Set at START.
Delicate (Low Heat)
Work Clothes Hot
Regular
See #1 below.
Timed Dry (High Heat)
#l Regular Cycle: 10-15minutes for Heavy soil, 5-10 for Normal soil, up to 5 for Light soil.
#2 Perm Press Cycle: 12 minutes for Heavy soil, 4-8 for Normal soil, up to
4 for Light soil.
*Delicate cycle alternates between pauses and agitation during wash.
e
**Man-made fibers (synthetics) such as polyester, nylon and ac~lics must be dried using the Delicate (low heat) Cycle. If you mix various types of
fabrics in your drying load, set the controls for the lightest weight fabrics and remove when dry. Then reset the control for the remaining fabrics.
fNever dry foam rubber or similarly textured, rubber-like materials in the dryer except on AIR FLUFF (no heat). Fire hazard may result.
8
Page 9
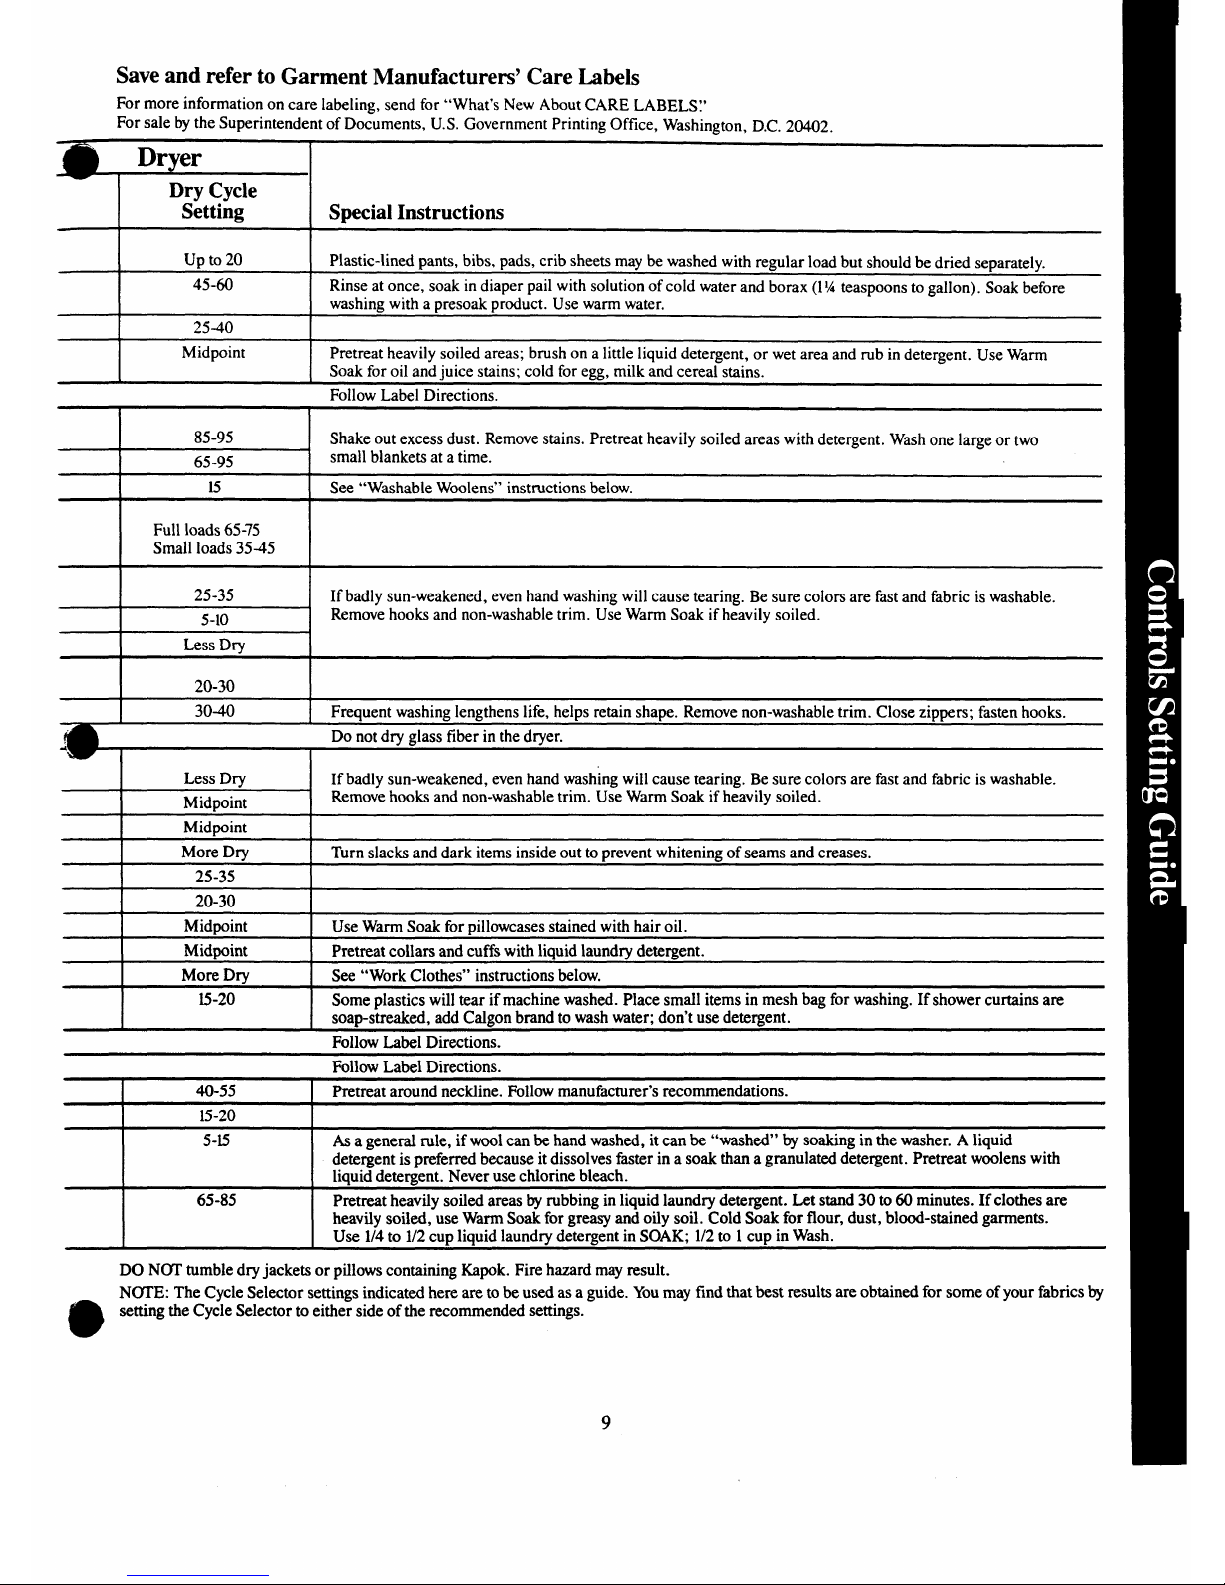
Save and refer to Garment Manufacturers’ Care Labels
For more information on care labeling, send for “What’s New About CARE LABELS:’
For sale by the Superintendent of Documents, U.S. Government Printing office, Washington, D.C. 20402.
Dryer
I
Dry Cycle
Setting
I
25-40
Midpoint
I
85-95
I
65-95
I
15
I
Full loads 65-75
Small loads 35-45
25-35
5-1o
I
Less Drv
I
20-30
I
30-40
Special Instructions
Plastic-lined pants, bibs, pads, crib sheets may be washed with regular load but should be dried separately.
Rinse at once, soak in diaper pail with solution of cold water and borax (1% teaspoons to gallon). Soak before
washing with a presoak product. Use warm water.
Pretreat heavily soiled areas; brush on a little liquid detergent, or wet area and rub in detergent. Use Warm
Soak for oil and juice stains; cold for egg, milk and cereal stains.
Follow Label Directions.
Shake out excess dust. Remove stains. Pretreat heavily soiled areas with detergent. Washone large or two
small blankets at a time.
See “Washable Woolens” instructions below.
If badly sun-weakened, even hand washing will cause tearing. Be sure colors are fast and fabric is washable.
Remove hooks and non-washable trim. Use Warm Soak if heavily soiled.
Frequent washing lengthens life, helps retain shape. Remove non-washable trim. Close zir.mers;fasten hooks.
. .
Do not dry glass fiber in the dryer.
Less Dry
If badly sun-weakened, even hand washing will cause tearing. Be sure colors are fast and fabric is washable.
Midooint
Remove hooks and non-washable trim. Use Warm Soak if heavily soiled.
I
Midpoint
I
I
More Dry
I
Turn slacks and dark items inside out to prevent whitening of seams and creases.
I
25-35
I
I
20-30
I
I
Midpoint
I
Use Warm Soak for pillowcases stained with hair oil.
I
Midpoint
I
Pretreat collars and cuffs with liquid laundry detergent.
I
More DrY
I See “Work Clothes” instructions below.
15-20
Some plastics will tear if machine washed. Place small items in mesh bag for washing. If shower curtains are
soap-streaked, add Calgon brand to wash water; don’t use detergent.
Follow Label Directions.
Follow Label Directions.
I
40-55
I
Pretreat around neckline. Follow manufacturer’s recommendations.
I
15-20 I
5-15 As a general rule, if wool can be hand washed, it can be “washed” by soaking in the washer. A liquid
detergent is preferred because it dissolves faster in a soak than a granulated detergent. Pretreat woolens with
liquid detergent. Never use chlorine bleach.
65-85
Pretreat heavily soiled areas by rubbing in liquid laundry detergent. Let stand 30 to 60 minutes. If clothes are
heavily soiled, use Warm Soak for greasy and oily soil. Cold Soak for flour, dust, blood-stained garments.
Use 1/4to 1/2cup liquid laundry detergent in SOAK; 1/2to 1cup in Wash.
DO N(YI’tumble dry jackets or pillows containing Kapok. Fire hazard may result.
N~E: The Cycle Selector settings indicated here are to be used as a guide. Youmay find that best results are obtained for some of your fabrics by
e
setting the Cycle Selector to either side of the recommended settings.
9
Page 10

Energy=sa* tips
If your clothes and household items
don’tlook clean and fish after
washing, you will probably re-wash
them... and that means you’ll waste
energy. Remember to sort your
clothes carefblly, and load them
properly, select correct cycles, use
enough detergent and choose a
water temperature warm enough to
release and get n“d
ofsoil.
● Use H~ wash—140°F.(60°C.)—
on a regularbasis ordywhen washing
heavily soiled articles-such as
work and play clothes.
● Under normal soil conditions,
wash in water above 80°F. (27°C.).
This generally means using the
WARMwash temperature setting
on your washer—temperatures
approximately 95°F. (35°C.). If you
notice that soil has accumulated
after several consecutive washings,
use H(YI’wash occasionally, if safe
for fabrics.
● Alwaysrinse in COLD water.
The temperature of the rinse does
not affect cleaning.
● Try to wash less often. Save
articles of the same type of fabric
until you have a full load.
● If you must wash smaller loads,
adjust the amount of water. Small
loads should have lower water
levels.
● Washin off-peak utility hours.
Yourlocal utility can tell you which
are the off-Deskhours.
● Sortclothesbyweightso youwon’t
haveto run an extra cyclefor one or
twoheavier, slower-drying items.
● Do not overload dryer. The drum
should be no more than half full of
wetarticles. For efficient drying,
clothes need to tumble freely.
Overloading prolongs drying time
andproduces unevendrying.
● Use Automatic Drying Cycle
whenever possible to help prevent
overdrying and saveenergy.
● Tohelp prevent ironing, remove
garments immediately at end of
drying cycleand place on hangers.
● Dry your clothes in consecutive
loads. Using a “warm” dryer will
saveenergy.
. Cl-lint filtereachtimeyoudry.
● Clean dryer exhaust ducting
atleast once ayear. A partially
clogged exhaust canlengthen
drying time.
10
Page 11

Factorsto consider
in selecting detergentsand soap
Products
PhosphatePowdered
Detergents
Non-PhosphatePowdered Detergents
Liquid Detergents
Soaps
Advantages
Perform well inhard or softwater
Washall types of fabrics well.
Can be used in hot, warm, or
cold water.
Perform satisfactorily in soft
or moderately hard water.
In some areas only non-phosphate
products are available.
Perform wellin soft water.
Offer better performance in
hard waterthan powdered
non-phosphate types.
Cleans synthetics and fabric
blends well.
Are excellent asconcentrates
forremoving spots.
Completely dissolve evenin
cold water.
Perform well insoft water.
Disadvantages
Are not available in some areas.
Generally do not clean well in
hard water.
Maybe difficult todissolve,
especially in cold water.
Should not be used in cool water.
Those containing sodium
carbonate as an ingredient may
cause harmful limestone deposits
on clothes and washer when
combined with hard water.
(Seepage 12.)
Maynot perform as well as
powdered phosphate products
when diluted inwash water.
Generally do not clean well in
medium-hard or hard water.
May combine with water
hardness minerals to form
sticlg soap curd.
11
Page 12

The resultsof continued use of carbonate
Is your water hard? If it is, and
washer surfaces. The hardness
if you use a carbonate type non-
ofyour water and your washing
phosphate detergent, you will
frequency will determine how
most probably notice limestone*
rapidly the limestone will build
depo;its on your clothes and
up. Ifyour water is VERY HARD
detergents
@
}
(11or more grains) and if you wash ‘
just a few lo~ds a week, you may
see limestone buildups in just a few
months.
Ef’kctson clothes
Although limestone buildup occurs
more rapidly on cotton, it will
eventually affwt various fabrics in
the following ways:
● Gives a stiff, harsh, rough feel to
fabrics such as toweling.
c Causes colors to fade and become
dull and dingy.
● Causes graying of fabrics.
● Leaves a white, powdery residue
on dark-colored items.
● Causes spot-fading of bright
colors as a result of direct contact
with detergent.
● Reduces wrinkle-resistance of
permanent press fabrics.
● Destroys effectiveness of flame-
retardant finishes on cottons such
as children’s sleepwear.
● Increases fabric wear because
of the scrubbing action between
limestone deposits on the fabrics
during washer agitation.
llffects
onwasher
● Unsightly buildup on all washer
surfaces exposed to the wash
solution.
● Mat-like, crusty formations caused
by lint adhering to the sticky
limestone deposits.
● Increased service calls because
of limestone deposits in the pump,
recirculation water hoses, filters
and other washer parts.
c Reduced useful life of washer.
Recommended methods to
reduce limestone buildups
● Use a powdered phosphate
detergent or a liquid detergent if
these are available in your area.
● Install a home water softener.
This will significantly reduce
limestone buildup.
● Use a packaged non-precipitating
water softener, such as Calgon
brand with phosphate.
Good washing practices
may delay limestone damage
to clothes
The following recommendations
will temporarily delay the effects
of limestone on your clothes.
These are generally good washing
practices and will give better soil
removal whether or not youhave
hard water or use carbonate
detergent.
● Use hotter wash water, for
example up to 150°F.for cottons.
This also improves oily-soil
removal.
. If you wash in cooler water to
saveenergy, use more detergent to
promote better washing. Also be
sure to use bleach on bleachable
fabrics. Use hot water whenever
possible.
● Add detergent and allow washer
to fill and agitate for three or four
minutes to dissolve detergent
before adding clothes.
● Increaseamount of detergent.
Seeguide on opposite page for
recommended detergent amounts
in relation to water hardness.
● Increaseuse of bleaches, preso~,
packagedwaterconditioned, prewash
soil and stain removers to help in
removing stubborn soils and stains.
● Use greater care in sorting loads.
Washvery dirty loads separately
and increase detergent to help keep
dirt from redepositing on less
soiled items. Washdelicate items
separately to prevent damage from
heavy, sturdy clothes.
● Wash smaller loads to increase
cleaning action of washer.
● Use fabric softener to counteract
stiffness or harshness in clothes.
How to partially restore clothes
Once clothes have developed
@
deposits, they may be partially
restored by soaking in a solution
of two cups of vinegar in one gallon
of hot tap-water for-15minute;.
USE A PLASTIC CONTAINER.
Then wash clothes in the washer
using detergent.
CAUTIONS:
● Vinegar soak solution may
reduce the wrinkle-resistance
ofpermanent press fabrics.
● Vinegar soak may damage
the dyes in some fabrics.
*LIMESfONE-technically calledCALCIUMCARBONATE—is caused bythe
reactionof the calciumin the hard
waterwiththesodiumcarbonatein the detergent.
12
Page 13

How much detergentshould you use?
The use of a sufficient amount
If the recommended amount of
of detergent is one of the most
detergent produces too many suds,
important things you can do to
switch to a low sudsing detergent
make sure your wash comes out
brand, and follow instructions on
clean.
package. Excess suds are not
Amount required varies
accordhw to:
necessary to get clothes clean
and can hamper wash action.
0
1. Waterhardness
Usingtoolittledetergentis acommon
2. Amount of soil
‘cause of laundry problems. Always
3. Size of load
measure detergent in a standard
4. Type of detergent
measuring cup.
5. Washtemperature
Use more detergentif
1.
2.
3.
4.
5.
you have. . .
Hard water
Large loads
[[la
Greasy or oily soils
Lower wash temperature
Low phosphate detergent.
y
\
k—
\
I
How to use granular or powdered
detergent.
For best results, put the detergent
in the washer before the clothes
have been loaded.
If your detergent doesn’t dissolve
well, pre-dissolve the detergent in
hot water and put it in the washer
before clothes are added.
Recommended amount of detergent for average soil load
I I
Water Level Setting
I
Water
Hardness
LARGE MEDIUM SMALL
VERY
HARD
1Y2 cups
1%cups
% cup
10-20Gr.
?
POWDERED
HARD
DETERGENTS 4-10 Gr.
1%cups
1
cup
%cup
SOFT
O-4Gr.
?4cup
V2 cup
‘Acup
CONCENTRATES
AND
0-20
Grains
FOLLOW PACKAGE DIRECTIONS
LIOUIDS
1. Use recommended amount of
detergent for your load and water
hardness as shown in guide.
2. When using other detergent
types-low andnormal suds,powde~,
liquids, non-phosphate powders—
followrecommendations onpackage.
3. For hard water treatment, see
page 14.
13
Page 14
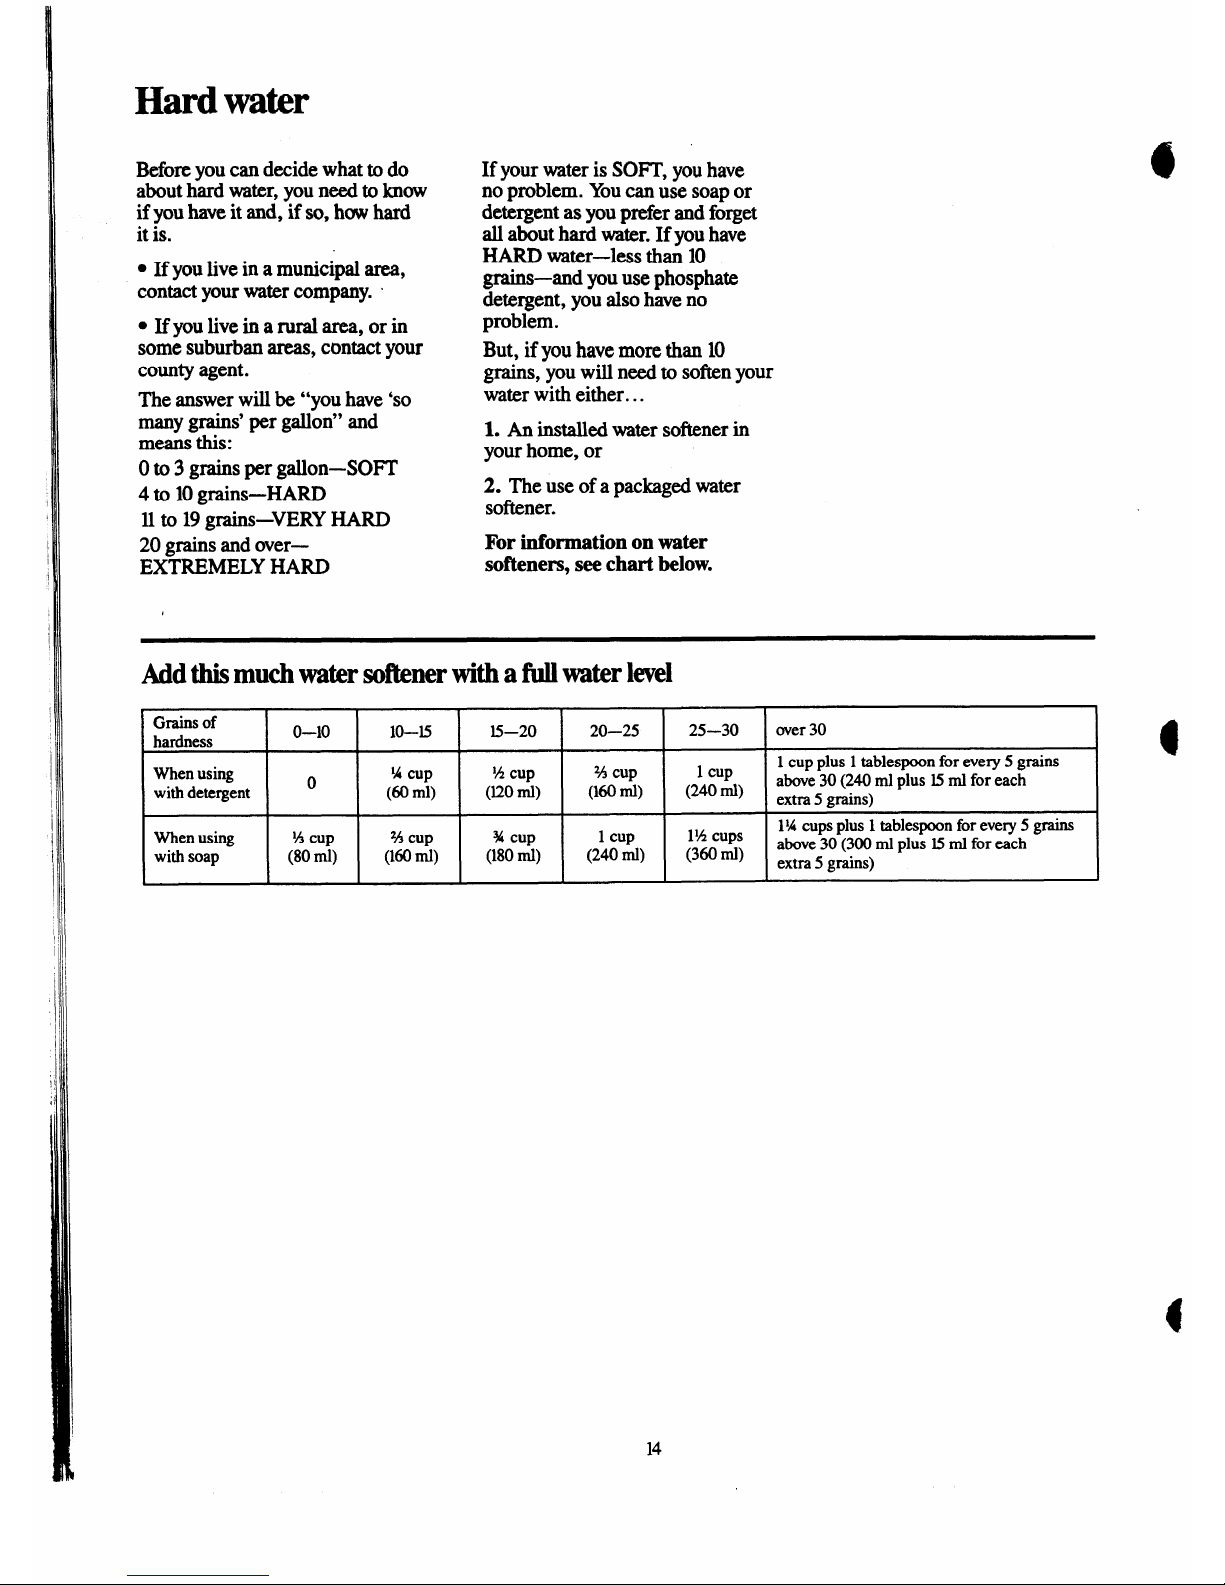
Hard water
Before you can decide what to do
about hard water, you need to know
if you be it and, if so, hcw hard
it is.
● If you live in a municipidarea,
contactyourwatercompany. ~
● Ifyoulive inaruralarea, or in
some suburbanareas,contactyour
countyagent.
Theanswerwill be “you have ‘so
many grains’ per gallon” and
means this:
Oto 3 grainspergallon-SOFT
4 to 10grains-HARD
11to 19grains-VERY HARD
20 grainsandover—
EXTREMELY HARD
If yourwateris SOFT,you have
no problem. Youcanuse soapor
detergent as you prefer and forget
all about hard water. If you have
HARD water-less than 10
grains-and you use phosphate
detergent, you also have no
problem.
But, if you have more than 10
grains, you will need to soften your
water with either...
1. An installed water softener in
your home, or
2. The use of a packaged water
softener.
For information on water
softeners, see chart below.
Addthis much watersoftenerwith a fullwaterlevel
Grains of I
hardness
o–lo lo–15
15-20
20–25
25–30
over 30
When using
‘Acup
%cup
% cup 1cup
1cup plus 1 tablespoon for every 5 grains
o
with detergent
(60 ml)
(120 ml)
(160 ml)
(240 ml)
above 30 (240 ml plus 15ml for each
extra 5 grains)
1%cups plus 1 tablespoon for every 5 grains
When using 1%cup
% cup
% cup 1cup
1%cups
above 30 (300 ml plus 15ml for each
with soap
(80 ml)
(160ml)
(180ml) (240 ml)
(360 ml)
extm 5 grains)
14
Page 15

Other
laundry
@
Laundry
Product & Type
BLEACH
Chlorine liquid
such as Clorox~ brand
Non-chlorine such as
Clorox
2“”brand
FABRIC SOFTENERS
Rinse additive such
as Downy~ brand
Wash additive
such as Rain Barrel~
brand
SANITIZER
Chlorine bleach, such
as Cloroxm brand
$
WATERSOFTENER
Non-Precipitating
such as Calgorf” brand
Precipitating such as
Borax~ brand
SOAKAGENT
Such as Biz’”brand
PRETREATING
ST~ AND SMX
REMOVERS
Such as
Spray ‘n Wash”
and K2R” brands
TINTS AND DYES
Wwdered such as
Rit” and Tintex” brands
products—
How touse it
Dilute one cup bleach with at least one
quart (0.96 liter) water and add after
wash action has started and detergent
is dissolved.
Follow package directions.
Put bleach into washer with detergent.
Mix recommended amount with
one cup
(240 ml)
water and add at start of rinse
cycle.
Follow package directions.
Add during wash cycle.
Use in case of infection and
contagious disease.
See under Bleach above.
Follow package directions.
Add at start of wash cycle.
Follow package directions.
Use with detergent or soap in
wash cycle.
Follow package directions for grass,
perspiration, egg, baby formula,
blood, mud and other stains.
Follow package directions. Treat
only heavily soiled areas. Check
garment’s hang tag for instructions.
Follow package directions.
N~E: Tinted garments may not be
colorfast. Wash separately.
Special Instructions
1) Do not pour undiluted liquid chlorine bleach directly
into washer or on dry clothes.
2) Some of today’s washable fabrics should not be chlorine
bleached such as: 100%cotton flame-retardant children’s
sleepwear, silk, wool, mohair, spandex, leather, or non-fast
colors. Dilute bleach before using on any fabric.
3) Check manufacturer’s hang tags for special instructions.
1) Maybe used on all kinds of fabrics.
2) Is most effective in hot water.
1) Helps make clothes fluf~ and soft.
2) Reduces static electricity.
3) Use carefully. Tbo much may cause staining on some
clothes.
4) Do not use with other laundry additives.
5) Do not pour directly on the clothes.
Use carefully. Too much may cause staining on some
clothes.
Guards against infection by killing most bacteria
and viruses?
Suspends hardness minerals in solution, keeping
water clear.
Combines with water hardness minerals to form
precipitate which gives cloudy or milky appearance
to water.
Do not use with chlorine bleach as chlorine stops the stain
removal action of enzyme soak agents.
CAUTION: Control panel and finishes may be damaged by
some laundry pretreatment soil and stain remover products
if such products are sprayed on or have direct contact with
the washer and/or dryer. Apply these pretreatment products
away from the appliance. The fabric may then be washed
normally. Damage to your appliance caused by pretreatment
products is not covered by your
warranty.
Clean washer to avoid discoloration of next load. Go
through complete cycle (5-rein. wash) using hot water,
l/2 cup (120ml) detergent, 1cup (240 ml) bleach. Wipe
exterior parts. Caution: Tinting may discolor plastic in
washer. Subsequent washings will reduce discoloration
but may never eliminate it.
*Formoreinformationonsanitizers,sendforGovernmentBulletin#57B, “SanitationinHomeLaundering?
Writeto:
ConsumerInformationCenter,Pueblo,Colorado81009.
ls
Page 16

Howto removestains
1. Try to remove stains as soon as
possible. The fresher the stain, the
easier it is to remove.
2. Before attempting to remove
any stain, take these steps:
. Find the fabric and the finish in
the guide on the next page, and use
only recommended methods.
. Check the care label instructions
that came with the garment.
● Test stain removal product on a
hidden inside seam or on a sample
of the material.
. Avoiduse of hot water on
unknown stain. It can set some
stains.
3. Follow stain removal with a
thorough rinsing.
4. Washwith recommended
amount of soap or detergent.
Stain removal hint—
Using chlorine bleach for
white and bleachable fabrics.
Mix 1/4cup (60 ml) chlorine
bleach with one gallon (3.8liter) of
cool water—approximately 80”F.
(Z7°C.)-in a sink or pan. Soak
stained area for 5 minutes and
launder in washer.
TheCaseof the “~~ible” Stain.
Food or cooking OiIS on your
synthetic g~en~
my cause stainS
which are virtu~ly invisible and
which you may not notice as
YOU
put
your clothes into the washer.
If these stains are not completely
removed in the wash, the oily spots
may pick up dirt horn the wash
water. Then they will become very
visible and you
may think they were
caused by the wash cycleitself.
Once these spots become visible,
how can you removethem?
. Rub in undiluted liquid detergent
and let stand 30 minutes.
● Re-washusing hottest waterthe
fabric can stand.
How can you prevent these
“After-.ou-Wmh}>smim?
● Increase the amount of detergent
normally used.
● Increase water temperature where
fabric will permit.
● Wash synthetic garments more
often.
Important Cautions
● NEVER PUT HIGHLY VOLATILE
SUBSTANCES LIKE GASOLINE,
KEROSENE, OR NAPTHA INK) A
WASHER OR DRYER.
NEVER PUT WASHABLE ARTICLES
THAT HAVE GASOLINE, KEROSENE,
NAPTHAOR (YT’HERHIGHLYWLATILE
SUBSTANCES ON THEM INA WASHER
OR DRYER. FAILURE ~ COMPLY
WITH THESE WARNINGSCOULD
RESULT IN A FIRE, EXPLOSION OR
SERIOUS BODILY INJURY.
All items
with volatile substances on them
shouldbe HAND washedthoroughly
with a detergent sothat no trace of
volatile substance remains. The
articlescanthen be machine washed.
Only after thorough hand washing
and machine washing should the
article be placed in the dryer.
Do not use these substances around
your washer and/or dryer during
operation.
*Because cleaning fluids tend to
be toxic, be sure you are in a well
ventilated room when using them.
No cleaning fluid should be used
unless user is familiar with the
limitations and required cautions
(usually printed on label). Use
extreme caution with flammable
compounds. Under no circumstances
should fhbricscontainingflammable
materials (waxes, cleaning fluids,
etc.) be washed in washer.
**Donot mix chlorine bleach with
ammonia or acids such as vinegar
and/or rust remover. Mixing can
produce atoxic gas which may
cause death.
See next page for
Stain Removal Guide.
For more complete information on
stain removal, request government
bulletin, “Removing Stains From
Fabrics;’ 054D. Toobtain a copy
write to: Consumer Information
Center, Pueblo, Colorado 81009.
Availableat low cost.
16
—
Page 17

Swn remOValguide Savea.drefertoG.rmentManufacturers’ Car. Instructions.
stain
White and Bleachable Fabrics
See
Wmhing Guide,Bleachon page15
Other Wxhable Fabrics
Sameas white and bleachable fabrics.
Adhesives
(Chewing Gum, etc.)
Rubwith ice or immerse in very cold water. Use dull tool to
carefilly scmpe ofas much adhesive or gum as possible.
Sponge
with a safe dry cleaning fluid,* then launder.
Anti-perspirants,
Deodorants
Apply undiluted liquid detergent. Rinse. If stain remains, bleach
according to Stain Removal Hint on opposite page. If color has
changed, you may be able to restore it by sponging with
ammonia7* Rinse thoroughly.
Same as white and bleachable fabrics
exceptuse non-chlorine bleach.
Spongeor soak in cool water, then launder.
Blood
Soak in cold water, then launder in warm water. If stain remains,
bleach according to Stain Removal Hint on opposite page, launder.
Chocolate, Cream,
Ice Cream and Milk
Soak in cold water. Treat stain with a safe dry cleaning fluid*;
Apply undiluted liquid detergent, launder, dry. Bleach according
to Stain Removal Hint on opposite page, launder and dry.
Soak in cold water. Sponge with a safe dry
cleaning fluid.* Apply undiluted liquid
detergent. Launder in warm water.
Coffee and Tea Wkhout cream: Bleach according to Stain Removal Hint on
opposite page. Launder. Wh.hcream; Follow guide directions for
cream.
Sponge with warm water. If stain remains,
apply warm glycerine, let stmd 30 minutes
and rinse well, or sponge with a safe dry
cleaning fluid.* Launder.
Cosmetics: Eye Shadow,
Lipstick, Mascara, Liquid
or Pancake Makeup, Rouge,
Powder; Crayon; Grease,
Oil, Tar, Cod Liver Oil.
Treat stain with safe dry cleaning fluidY Apply undiluted liquid
detergent; launder and dry. Bleach according to Stain Removal
Hint on opposite page.
Sponge with a safe dry cleaning fluid.*
Then launder in warm detergent water.
Fresh Fruit, Fruit Juices,
Wine, Vegetables, or Food
Coloring
Soak stain in cool water. If stain remains, bleach according to Stain
RemovalHint on opposite page, launder.
Sponge with warm water. Bleach remaining
stain with non-chlorine bleach.
Sponge with warm water. Apply
undiluted
liquid dete~ent.
Bleach remaining stain
with non-chlorine bleach, then launder.
Old mildew stains can seldom be removed.
Scorch can seldom be removed.
Same as white and bleachable fhbrics
except launder using non-chlorine bleach.
Grass, Foliage, Flowers,
Mildew, Scorch
Apply undiluted liquid detergent. Launder. (Treat mildew spots
while they are fresh, before mold has a chance to weaken fhbric.) If
either type stain remains, bleach according to Stain Removal Hint
on opposite page, launder. (Severe scorch cannot be removed.)
Fresh stains: Place stain face down on an absorbent towel and
sponge with dry cleaning fluid? or use spray cleaner. Apply
undiluted liquid detergent. Old stains; bleach according to Stain
Removal Hint on opposite page.
Ink, Ballpoint
Same as white and bleachable fabrics.
Paint and Varnish Soften with oil, lard or Vaseline, then sponge with turpentine or
banana oil. Launder in warm water.
Launder in warm water. Rinse well. Bleach
with non-chlorine bleach.
Perspiration Apply undiluted liquid detergent and launder in warm water. If
color has changed you may be able to restore it by treating with
ammonia or vinegars If any stain remains, treat with safe dry
cleaning fluid* or bleach according to Stain Removal Hint on
opposite page, launder and dry.
Apply rust remover,= using manufacturer’s directions. Rinse and
launder.
Same as white and bleachable ihbrics.
Rust
17
Page 18

~
Questions?
Use This Problem Solver
~
PROBLEM POSSIBLE CAUSEAND REMEDY
..
,...
.,%.
“.*.$,..
‘<#>*if.:!&-..c
WASHEROR DRYER
● Make sure controls are p~prly ‘Set‘~d ~&er cycleselectoris pulled out or dryer ~~.
WON’TSTART
STARTbutton is pushed. . . ,,, ,.$&,, => ~~~~,
.;‘%2‘f.;.!..
%,
● Applimce unplugged. Make sure Cordis firmly plugged into electrical outlet.
● NOpower toappliance. Check f&es ndiircuit breakers to make sure appliance is
getting current.
. . . ...
.-.~.;
,,..<”?
~y:”%-
.:.”
----. Dryer door is open. Dryer will not ~ wi~’’d~’~~pen. Make sure washer lid k+C]O&d.
Washerwill fillbut will not spin with lid o~n::. -, ~
. .&.~.,:. .+
. Make sure bo~ hot and ~ld ~uce$&&&&&”~-~h~T:~.~~ ;‘~
.’, .
:..-i .+
2-.
.,
.“”...
.,’:?...
.<
WON’TDRAIN
. Kinked or pinched hose. Check and correct.
● Topofdrain outlet should be less than 8 feetabovethe floor.
WATERLEAKS
● Make sure hose connections are tight at faucets.
● Make sure end ofdrain hose is correc~y insefied into and secured to drain facility.
WASHERWON’T
● Lid not closed. Washerwill not progress through spin cyclewith lid up. Make sure lid
SPIN AND isclosed. Lid will be automatically locked during spin portion for safety.
COMPLETE CYCLE
CL~HES ARE
● Load mayhavebeen excessive y out of balance. Redistribute clothes and rerun through
ABNORMALLY
final spin.
WET AFTER SPIN
APPLIANCE IS
● Me~llic “clicks” heard astimer advances during operation are normal.
NOISY
● Unevenfloor. Make sure appliance is level ad fkm to floor.
● Heavi]y unbalanced loads can cause the washer to vibrate excessively during spin, and
maycause it to move from its original position. In extreme cases, (usually occurs when
washing a single, heavy item or a small load when water level is set higher than
necessary) the spin basket may strike tie outer tub, creating aloud but harmless noise.
Tocorrect, open the lid and redistribute the load evenly about the wash basket. Close the
lid and restart.
WATERDOES NOT
. Faucets turned off. Make sure faucetsare on and adjusted coITectly.
ENTER OR ENTERS
SLOWLY
● Hoses kinked. Check and correct.
● clogged screen in water valve. Unscrew fill hose from washer and clean screen if
necessary. When reassembling, make hand tight PIUS1/3turn with pliers.
18
Page 19

PROBLEM POSSIBLE CAUSEAND REMEDY
WATER
● Faucets not adjusted to give desired temperature. Readjust them.
TEMPERATURE
INCORRECI’
● Household waterheater not set to deliver correct temperature—140°to 150°F.
(60° to 66°C.). Reset it.
● Water valve screens may be stopped up. Remove inlet hoses from water valve. Clean
the screens and reinstall the hoses.
QMake sure selector controls are properly set.
● Make sure hoses are connected to correct faucets-hot to hot, cold to cold.
WASHER PAUSES
● Washer normally pauses about 1/2minute in progressing from one portion of its cycle
IN CYCLE
to the next.
● Alternate pauses in the agitation are normal in the delicate wash cycle. Agitation will
resume in 1-2 minutes.
GREASY OR OILY These are sometimes called “Invisible Stains” because you may not notice them before
STAINSON washing clothes. However, if oily soils are not completely removed in wash cycle, the
LAUNDERED
oily spots may pick up dirt from the wash water. The spots will then be very visible.
GARMENTS They are not caused by the washer. Wash synthetic garments as soon as possible after
wearing. Use more detergent than normal and hottest water fabric can stand. If spots
appear, rub in undiluted liquid detergent, let stand 30 minutes and rewash with extra
detergent using hottest water fabric can stand.
YELLOWED
. Incomplete removalof body soil due to constant use of insufficient detergent. Check
CL~HES
hem of T-shirt or pillow case. If they are white and center is yellow, it contains body
oil. Restore whiteness following procedures on “Grayed Clothes;’ page 20.
● Chlorine bleach may yellow some fabrics with resin finishes. Use oxygen bleach
(such as Clorox 2 brand). Refer to garment manufacturers’ care instructions. Restore
color using color remover (such as Rit or Tlntex brands), follow package directions.
● Iron or manganese in water may cause overall yellowing or yellow spots.
L Use extra detergent plus a non-precipitating water softener dissolved in water
before adding clothes. Use non-chlorine bleach.
2. Havea speciaI filter or chemic~ feeder installed in your home to remove iron and
manganese horn water.
3. Run hot water for a few minutes to clean iron residue buildup in lines; drain water
heater occasionally.
4. Toremove spots: spread stained portion over pan ofboiling water and squeeze
lemon juice through stain. To remove overall yellow, use a commercially available
rustscale remover,followingpackageinstructions.
19
Page 20

The Problem Solver(continued)
PROBLEM
POSSIBLE CAUSE AND REMEDY
BLUE 0~ GRAY
● Improper use of iiibric softener. Never pour fhbric softener directly cm clothes;
COLOR STAINS ...
alwaysdilute before adding to rinse water.,’lonmxmmes@@ dampen-stained area and
I $+.‘
.;:,.,8%.,
;.$,4?,“.”(,.,%: .“,.<.’;
~
,-..,~f+
$
...
;$)8
rub with undiluted liquid detergent. Rewash, using chlorine bleach if safk for fabric.
“.
.,
. .
GRAYE~
● Insufficient detergent. Youmay need to increase the amount of detergent used, if the
CL(YI’HES
load is larger than normal, if soil is hemier than average(especially oily soil), if water
level is high, or if water hardness is above average.
● Water is not hot enough for type of load. Make sure water heater is set to deliver hot
water at the washer 140°-150°F.(60°- 66°C.). Do not wash when other hot water
needs-such as dishwashing or family baths-are heavy.
● Poor or inferior detergent (or use of soap in hard water). Change to phosphate
‘r
,,
.
detergent if possible.
Follow these steps:
● Use water conditioner (such as Calgon brand).
. Use hottest water possible.
● Pretreat stains.
● Use bleach where possible.
● Use presoak aids.
● Install water softener.
. Washer overloaded. Clothes cannot move freely to loosen and remove soil, causing
gray appearance. Follow correct loading procedures for size of load.
c Improper soaking, with insufficient detergent. Usually a 30-minute soak is
sufficient. However, when using extended soaks for heavily soiled garments, you may
need to use twice the recommended amount of detergent.
s Washing too long may result in increased soil redeposition. Use shorter wash time for
smaller loads.
● De&rgent dissolves too slowly. It is important that detergent be present in the wash
solution at the start of wash agitation.
Torestore grayedclothes—
Most grayed clothes can beat least partially restored by the following procedure:
(a) Put clothes in washer.
(b) Fill with H~ water. Check manufacturers’ hang tags to determine if hot water is
suitable for garment.
(c) Add a non-precipitating type of water softener such as Calgon brand with
phosphate. Use 2% times as much as you need for normal water softening.
(d) Do not add soap or detergent.
(e) Allow clothes to go through complete cycle.
(f) Repeat, if necessary.
(g) If you prefer to soak clothes, use water so~ner in place of soak agent or pre-wash
detergent and allow clothes to soak for about 20 minutes.
————
Page 21

PROBLEM POSSIBLE CAUSEAND REMEDY
HEAVILYSOILED . Pretreat with liquid detergent.
AREAS such as
collars and cuffs
LINT OR RESIDUE
● Incorrect sorting of clothes. Separate lint-producers (such as terry towelsand chenille)
ON CLOTHES
with lint-receivers (such as man-made fabrics, velveteen, corduroy).
. Washing too long, especially for smaller loads. For normal soil, use 1minute per
pound of dry clothes.
● Use of non-phosphate detergents which combine with hardness minerals in water to
form a precipitate which can be mistaken for lint.
● Use phosphate detergent or liquid detergent; use warmer wash water or soften water
with an installed mechanical softener or apackaged water softener.
● Undissolved granular detergent mayleavepowdery residue on fabrics which can be
mistaken for lint.
(a) Seepage 13forrecommendations on how to add detergent to speed up complete
dissolving.
(b) Use a liquid or special cold water detergent.
(c) Predissolve granular detergent in hot water, or make sure detergent is dissolved
completely in wash water before adding clothes.
(d) Make certain clothes haveample room to move in washer.
(e) Use a warmer wash water.
● overloading ofwasher will cause abrasion which creates excessive lint. Washfewer
items in each load. Make sure water levelis correct for size of load.
. Too much bleach. Over-bleached items, such as towels, will shed excessive lint. Use
correct amount ofbleach according to package directions.
● Not enough detergent. Enough detergent must be used to hold lint in suspension during
washcycle. Increase amount ofdetergent used. Amount is determined bywater
hardness, size of load, degree of soil and amount of water. Seepage 13.
● Incorrect use of fabric softener. If used in wash cycle, many softeners may react with
detergent to create a white deposit. Use fabric softeners only in rinse cycle, unless
package specifies adding to washcycle.
● Pilling, usually on polyester-cotton blends, is caused by normal wear and may look like
lint. Turning clothes inside out may help.
● Stitic electricity caused by Overdying will cause attraction. Use fabric softener h
rinse cycle.
Tocorrect—
All of the abovecauses of residue except pilling can usually be removed from garments
through use of correct laundry procedures.
Page 22

The Problem Solver(continu~)
PROBLEM
POSSIBLE CAUSEAND REMEDY
SNAGS,HOLES, :: ~“’
.,
..
‘*Pinsong&n&ntsorsharpobjectsleftinpockets.Removeallpins, checkpock&sofall .
‘w;msoR@&~~,L
;? “
_befbmputtingin washer. Also checkwaskrto seeifany objects remairiedin; ~~
=WW’!WW%i. :’
“.,-q*~:: .,,;-’ - ,“ ‘ - ., “ “ “ ‘ , :% . <:
.L
17u7eis rwsokion once
● Snaps, hook, sharp buttons, belt buckles, zippers.Make sure all hooks, S-repsand” ‘
this tjpe ofdbnwgehas “ buttonsarefhstened.Removesharpbuttonsandbeltbuckles. ‘IMsisvery important
occurred.
whenwashingknits,which snageasily.‘Ihrnknitsinsideout.
● Improperuseof chlorinebleach. Holes mayhaverandomsquareshape;yellow
discoloration,fabricwill be weakatedges of hole.
(a) Use only correct,measuxedamountofbleach,
(b) Neveraddundilutedbleachto washertubnorallowclothes tocome in contactwith
undiluted bleach. Do not wipe upbleach spills with clothes.
(c) Damage from chemicals such as hair preparations (bleach, dye, home permanent
solution), battery acid, some toilet bowl cleaners. Immediately rinse thoroughly towels
and other articles which havecome in contact with these chemicals before putting them
in washer.Avoidcontaminating items ofclothing with such chemicals.
● Small, umotic~ holes, km or fiP@ S-S may enlarge during washing. Check
garments carefully before loading washer and mend all rips and tears.
● ~ ~mment press gmen~ age, they may show fraying at COllarSad cuffs. This is
dueto the weakening of the fibers bythe permanent press process. It is not caused by the
washer.Youcan slowthis process by washing small permanent press loads with a large
waterlevel. Do not washheavy items such as towels with permanent press. When
possible, removecollar stays.
● Roughness or bums on agi~tor due to d~age incurred by heavy belt buckles, etc.
Examine agitator for roughness or burrs and smooth by filing if necessary.
● Maybe using wrong cycle for delicate fabfics. Use delicate cycle. Referto garment
manufacturer’s care instructions.
● G~ents we~ened by aging, or by sun or atmosphere. This is an inevitable process
and isnot caused by the washer. Youmay slowdown process byuse of delicate cycle.
● Toolittle water in washer or too large a load. Load washer only with the number of
itemsthat will move freely. Select correct water level.
Page 23

PROBLEM
POSSIBLE CAUSEAND REMEDY
WRINKLING IN
● Leaving clothes in dryer after tumbling stops. Immediately after dryer stops
PERMANENT PRESS
tumbling, remove clothes and place them on hangers.
AND “NO-IRC)N”
ITEMS
● Too many items in dryer. Dry only one washer load at a time. Do not combine loads.
● Too few items in dryer. If drying only one article, add two or more similar articles,
even if dry, to insure proper tumbling.
● Improper loads. Avoidlaundering heavy permanent press items, such as work
clothes, with lighter permanent press items such as shirts or blouses. Also do not wash
or dry permanent press items with regular laundry.
● Too many items in washer. Items must haveroom to move freely. Permanent press
loads should alwaysbe smaller than regular loads.. .no more than medium loads.
● Use of incorrect wash and dry cycles. Use permanent press wash cyclewhich
provides a cool-down rinse to minimize wrinkling. Also, use automatic dry cycle.
● Incorrect water level. Use large level for medium load; medium level for small load.
● Repeated washing in too hot water. Wash in cold or warm water with plenty of ‘
detergent.
● Accumulation of lime scaledue to use of carbonate detergents. If a non-phosphate
detergent must be used, avoidthe use of a carbonate-built detergent.
QFailure to use fabric sofhmer. Proper use of fabric softener will minimize wrinkling.
Toremove stubborn wrinkles—
1. Retumble on automatic dry setting with small load.
2. Rerinse and dry on automatic dry setting.
3. If unsuccessful, retumble on high heat for 10-12minutes and hang immediately.
4. Iron carefully.
5. Send to cleaners for pressing.
6 Some wrinkles may remain which cannot be removed?
*N- ~ you~11~goodwry
proca~ @ pe&nent pressclothesstillcomeoutWfiIlkkd,the
finishmay notbe good quality.Also,inpermanent
press synthetidcottonblends,thecottonportionof
thefabric can eventually wear awayleaving only the synthetic. Since the mtton has resin ftish that
imparts the memory, a loss or decrease of permanent press performance will result.
23
Page 24

The Problem solver (continued)
PROBLEM
SHRINKAGE,
GENERAL ~
*
SHRINKAGE,
KNITS
CL~HES TAKE
TDO LONG TO DRY
DRYER MAKES
“THUMPING”
NOISE
POSSIBLE CAUSE AND REMEDY
● Some fabrics will shrink whether washed in a ~her orby h~d; oth~~ IIMYk%l,.: .
safely washed but will shrink in”adryer. Follti garment manufacturers* care
instructions exactly.If in doubt, do not machine wash or dry.
● Relaxation shrinkage can occur in knit fiibricsthathavebeen improperlystretched
andelongatedby the manufacturer.Whenthis occurs, garmentmaybe pressedback
intoshape aftereach wash anddrycycle.
● Progressive or delayed shrinkage is caused when starchor sizing (in some fhbrics)
is graduallyremovedby laundering.Maybe noticed in older garmentsthathavebeen
washedmanytimes withoutpreviousshriribge. Treat as for RelaxationShrinkageabove.
● Shriige caused by overheating occursin certainknit fabricsthathavebeenheat-
shaped.When washing, dryingor ironingtemperaturesexceed the temperaturesused
to shapeset, shrinkagemayoccur. This cannotbe corrected,butit can be preventedby
washingin cool or warmwater;dryingon low ordelicate heat.
● Controls improperly set. Check all controls to make sure they are correctly set for
the load you want to dry.
c Improper ducting. Make sure dryer is ducted in accordance with Installation
Instructions.
● Obstruction in exhaust ducting. Make sure ducting is clean and free of obstruction,
make sure damper in outside wall cap operates easily. If metal flexible ducting is used,
be sure it is not kinked and is installed according to Installation Instructions.
● Blown fuses or tripped circuit breakers. Check household fuses or circuit breakers.
Most electric dryers use two. It is possible for one to be blown or tripped, and the dryer
to still tumble without heat.
● Improper sorting. Do not mix heavy, hard-to-dry items with lightweight articles.
● Toomany items in dryer. Dry only one washer load at a time. Do not combine loads.
● Too few items in dryer. If drying only one article, add two more similar articles, even
if dry, to insure proper tumbling.
● If your dryer is operating on a 208-volt circuit, longer drying times can be expected.
● Clothes were excessively wet when they were put into the dryer.
I
s Temporary start-up sound. Dryer drum is mountd on four specially compounded
rubber wheels. After extended storage and exposure to extreme temperatures, a
thumping noise may occur when dryer is first startd. This will soon disappear.
I
If you need more help... call, toll free:
The GE Answer Center@
800.626.2000
consumer information service
24
Page 25

Careand Cleaning
*
USER MAINTENANCE
INSTRUCTIONS
. Wipe the cabinet with a damp
cloth. Occasionally wash it with
mild soap and water and then apply
a light coat of appliance polish to
help preserve the finish.
● Keep the area around and
underneath your appliance free from
the accumulation of combustible
materials such as lint, paper, rags,
chemicals, etc.
c Keep the floor around your
appliance clean and dry to reduce
the possibility of slipping.
● For long vacations, be sure
water supply is shut off at faucets.
Drain all water from hoses if the
appliance will be exposed to
freezing weather.
● Winterizing instructions:
The washer cannot be operated in
freezing temperatures. Before you
8
store the appliance, remove water
from all parts of the washer.
.
1. Turn off water supply faucets.
(The front access panel between
washer and dryer may have to be
removed. See procedure at right.)
Disconnect hoses from faucets
and drain.
2. Add 1gallon of non-toxic RV
antifreeze (available from the
hardware or recreational vehicle
store) to the washer tub.
3. Push the timer knob in, turn the
knob to the right to SPIN and pull
the knob out.
4. Let the washer spin for 1or 2
minutes to let all water drain out.
Some but not all of the RV
antifreeze will be expelled.
5. Push in the timer knob, dry
the tub interior, disconnect the
electrical plug, close the lid.
6. Store the appliance in an upright
position.
7. Before reusing washer, after
o
storage, run was~er through a cycle
to rinse out the antifreeze.
.
. Lint filter. The self-cleaning lint
filter needs no attention from you.
c Washbasket. After each use,
leavethe lid open to allow moisture
to evaporate. Clean thoroughly with
nonabrasive household cleanser to
removedeposit leftby heavily soiled
clothes. Do not use harsh cleansers.
./
● Agitator.Removethe agitator at
regular intervals—about4 to 6
months—and removeany lint that
mayhaveaccumulated. After
removing the front access panel, as
shownat right, unscrew the agitator
cap, grasp the agitator with both
hands, and pull it up and out of the
washbasket.
The slotted section at the top of the
metal shaft has a light coating of
lubricant to prevent parts from
stickingtogether.If this area appears
to be dry, apply a light coat of
grease or petroleum jelly around
the shaft before replacing the
agitator. Do not overgrease. Excess
grease may get into the clothes load.
When replacing the agitator,
carefully lower it straight down
onto the agitator support block and
replace the cap securely.
Dryer
If your dryer is exhausted to the
outside, inspect and clean the dryer
exhaust ducting at least once a
year.
How to reduce the possibility of
a fire hazard, if your dryer is not
exhausted to the outside:
Aclothesdryerproducescombustible
lint. When the dryer is not exhausted
to the outside, this lint is more apt
to accumulatein and near the dryer,
which could create a fire hazard.
25
● Clean the lint filter before every
load. See page 7.
● Inspect the area behind the front
access panel at least once a year
and clean out any lint that may have
accumulated. Wipe or vacuum, being
careful not to di~turb any electrica[
or mechanical connections.
How to remove the front
access panel between the
washer and dryer
Magnet assembly
Take out 2 screws holding the
magnet assembly and remove
the magnet assembly.
Then take out 2 screws at top
corners of access panel and lift
access panel up until tabs at bottom
of panel slip out of slots at rear of
washer.
I!!I!J
The washer lid can now be opened
enough to allow you to remove the
agitator, and the dryer exhaust
ducting is accessible for inspection
and cleaning.
To replace the front access panel,
fit tabs on panel into slots at rear of
washer, push panel back in place
and replace screws and magnet
assembly.
Page 26

If YouNeed Service
,.
Toobtain service, see your
~w
on the back page of this book.
We’reproud of our service and
A f ,--.,
, ,.- $+?>,.
want
youto,@ pleased. !f for some
reasonyou arenothappywiththe
serviceyou receive,herearethree
stepsto follow forfhrtherhelp.
FIRST, contact the people who
serviced your appliance. Explain
why you are not pleased. Inmost
cases, this will solve the problem.
NEXT, if you are still not pleased,
write all the details-including
your phone number-to:
Manager, Consumer Relations
General Electric Company
Appliance Park
Louisville, Kentuclg 40225
FINALLY, if your problem is still
not resolved, write:
%,.
Major Appliance
Consumer Action Panel
20 North Wacker Drive
Chicago, Illinois 60606
26
Page 27

9
Page 28

YOUR GENERAL ELECTRIC SpAmMAKERm LAUNDRY
WARRANTy
Save proof of original purchase date such as your sales sliporcancelledchecktoestablish warranty period.
4
WHAT IS COVERED
FULL ONE-YEAR WARRA~TY ~,
This warranty is extended to
Fo~one year from date of ori9inal - the original purchaser and any
purchase, we will provide, free of
succeeding owner for products
charge, parts and service labor
purchased for ordinary home use
in your home to repair or replace
inthe 48 mainland states, Hawaii
any pati of the Spacemakerm
and Washington, D.C. In Alaska the
/auncfry that fails because of
warranty is the same except that it is
a manufacturing defect.
LIMITED because you must pay to ship
the product to the service shop or for
LIMITED ADDITIONAL the sewice technician’s travel costs to
FOUR-YEAR WARRANTY
your home.
For the second through fifth year
All warranty service will be provided
from date of original purchase, by our Factory Sewice Centers or
we will provide, free of charge,
by our authorized Customer Care@
replacement parts for any part servicers during normal working
of the washer transmission that
hours.
fails because of a manufacturing
Look in the White or Yellow Pages
defect. You pay for the service trip
to your home and service labor
of your telephone directoy for
GENERAL ELE~RIC COMPANY,
charges. Or, ifyou desire, we
GENERAL ELECTRIC FAClORY
will provide a completdy
SERVICE, GENERAL ELECTRIC-
reconditioned tmnsmission.
You pay for the shop reconditioning
H~POINT FAClORY SERVICE or
labor,the service trip to your home
GENERAL ELE~RIC CUSlOMER
and service labor charges.
CARE@SERVICE.
WHAT IS NUT COVERED youhowtousethe~rodud
● Setvice trips to your home to teach
. Replacement of house fuses or
.
resetting of circuit breakers.
Read your Use and Care material.
If you then have any questions
● Failure of the product if it is used
for other than its intended purpose
about operating the product,
please contact your dealer or
or used commercially.
our Consumer Affairs office at the
● Damage to product caused
address below, or call, toll free:
by accident, fire, floods or acts
The GE Answer CenteF
of God.
800.626.2000
consumer information service
WARRANK)R IS NOT RESPONSIBLE
FOR CONSEQUENTIAL DAMAGES.
● Improper installation.
If you have an installation problem,
contact your dealer or installer.
You are responsible for providing
adequate electrical, plumbing,
exhausting and other connecting
facilities.
Some states do not allow the exclusion or limitation of incidental or consequential damages, so the above limitation or exclusion
may not apply to you. This warranty gives you specific legal rights, and you
mayalsohaveotherfights which vary from state to state.
To know what your
legal rights are in your state, consult your local or state consumer affairs ofice or your state’s Attorney General.
Warrantor: General Electric Company
If further help is needed concerning
this warmnty, write:
Manager—Consumer Affairs, General
Electric COmPanY, Appliance park, Louisville, KY 40225
4
Part No. 141558
Pub. No. 49-9525
WSM2000H
8-87
 Loading...