

Page 1
Spacemaker@Mic~we
Oven
Contents
Adapter Plugs
29
Minute/Second Timer
11
Aluminum Foil
4
Model and Serial Numbers
2
Appliance Registration
2
Oven Shelf
30,31
Auto Cook
12-23
Power Levels
8-11
Auto Defrost
26
Precautions
3
Auto Roast
24,25
Problem Solver
32,33
Auto Simmer
25
Repair Service
35
Care and Cleaning
28,29
Safety Instructions
3,4
Control Panel 6,7
Temperature Cook
10
Conversion Guide
26
Temperature Probe
10,24,25
Cooking Complete Reminder 5
Time Cook
8
Delayed Cooking
11
Time Defrost
9
Exhaust Fan
6,27 Warranty
Back Cover
Extension Cords
29
Features
5
Grease Filter
27
Grounding Instructions
29
Hold Time
11
Light Bulb Replacement
29
GE-w&M@
Microwaving Tips
2
8@.W.2~
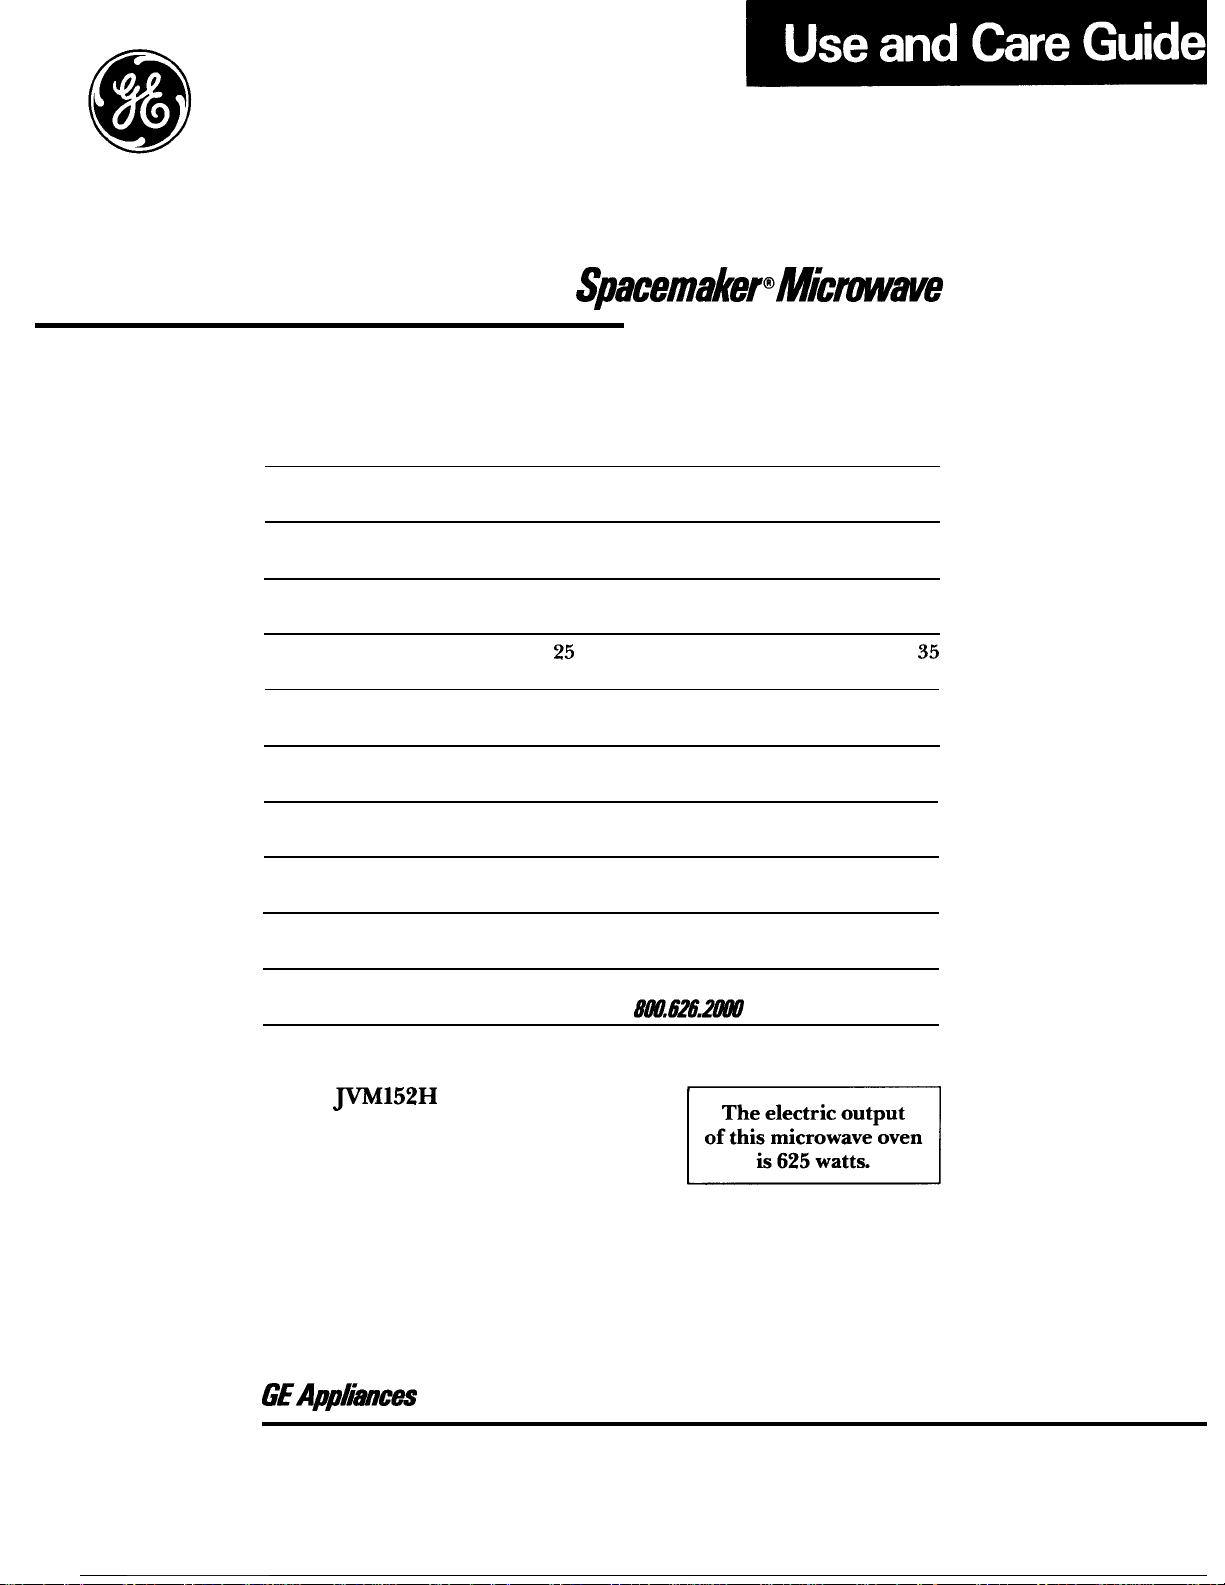
Model
~152H
E
GEAppRmm
Page 2
Help whelp you...
Before using your oven,
read this book carefully.
It is intended to help you operate
and maintain your new microwave
oven properly.
Keep it handy for answers to your
questions.
If you don’t understand something
or need more help, write (include
your phone number):
Consumer Affairs
GE Appliances
Appliance Park
Louisville,
KY40225
Write down the model
and serial numbers.
You’ll find them on a label inside
the oven on the upper left side.
These numbers are also on the
Consumer Product Ownership
Registration card that came with
your microwave oven. Before
sending in this card, please write
these numbers here:
Model Number
Serial Number
Use these numbers in any
correspondence or service calls
concerning your microwave oven.
Be sure your microwave
oven
is
registered.
It is important that we know the
location of your oven should a need
occur for adjustments.
Your supplier is responsible for
registering you as the owner.
Please check with your supplier
to be sure he has done so; also send
in your Consumer Product Ownership
Registration Card. If you move, or
if you are not the original purchaser,
please write to us, stating model
and serial numbers.
This appliance must be registered.
Please be
certiin
that it is.
Write to:
GE Appliances
Range Product Service
Appliance Park
Louisville,
KY40225
If you received a
damaged oven . . .
Immediately contact the dealer
(or builder) that sold you the
microwave oven.
Save time and money.
Before you request service . . .
check the Problem Solver on
pages 32 and 33. It lists causes of
minor operating problems that you
can correct yourself.
Microwaving
~ps
●
Make sure all cookware used in
your microwave oven is suitable for
microwaving. Most glass casseroles,
cooking dishes, measuring cups,
custard cups, pottery or china
dinnerware which does not have
metilic
trim or
glm
with a
metilic
sheen can be used. Some cookware
is labeled “suitable for microwaving?’
If you are unsure, use this dish test:
Measure 1 cup water in a glass cup.
Place in oven on or beside dish.
Microwave 1-1% minutes at High. If
water becomes hot, dish is
rnicmve
safe. If dish heats, it should not be
used for microwaving.
. Paper towels, wax paper, and
plastic wrap can be used to cover
dishes in order to retain moisture
and prevent spattering.
●
Some microwaved foods require
stirring, rotating, or rearranging.
Check your cookbook.
c
Steam builds up pressure in foods
which are tightly covered by a skin
or membrane. Pierce potatoes, egg
yolks and chicken livers to prevent
bursting.
=
UL listed for installation over
Ml
th=e
things are normal with your microwave oven:
*
Steam or vapor escaping from
●
Dull thumping sound while
around the door. oven is operating.
● Light reflection around door or
●
Some TV-Radio interference
outer case.
might be
noticd
while using your
●
Dimming oven light and change
microwave oven. It’s similar to the
in blower sound may occur while
inte*rence
caused by other small
operating at power levels other
appliances and does not indicate a
than high.
problem with your oven.
2
Page 3

PwCAUTIONS
TOAVOD
POSSIBLE
EXPOSURE
~
ExcEssm
ENERGY
(a) Do Not Attempt
to operate
this oven with the door open since
open-door operation can result in
harmful exposure to microwave
energy. It is important not to
defeat or tamper with the safety
interlocks.
(b) Do Not Place
any object
between the oven front face and
the door or allow soil or cleaner
residue to accumulate on sealing
surfaces.
(c) Do Not Operate the
oven
if it is damaged, It is particularly
important that the oven door close
properly and that there is no
damage to the:
(1) door (bent)
(2) hinges and latches
@roken
or
loosened)
(3) door seals and sealing surfaces.
(d) The Oven Should Not
be
adjusted or repaired by anyone
except properly qualified service
personnel.
This microwave oven is
UL
listed
for instigation over electric and gas
ranges.
Optional
Acessow
available at extra cost from
your GE supplier.
~M
Charcoal Filter Kit for
non-vented
insta~ation.
— ● This microwave oven is
specifically designed to heat or
cook food, and is not intended
for laboratory or industrial use.
~POmANT SmTY
INSTRU~IONS
Read all
instmctions
before wing this
appfiance.
When using electrical appliances
basic safety precautions
shodd
be
followed, including the following:
WARNING–To reduce
the risk of burns, electric shock,
fire, injury to
pemons
or exposure
to excessive microwave energy:
●
Use this appliance ody
fo;-its
intended use as described in this
manual.
●
Read and follow the specific
“PRECAUTIONS
~
AVOID
POSSIBLE EXPOSURE
~
EXCESSNE
MICROWAVE
ENERGY” at left.
●
This appliance must regrounded.
Connect
ofly
to properly grounded
outlet. See “GROUNDING
INSTRU~IONS”
on page 29.
●
For best operation,
piug-this
appliance into its own electrical
outlet, to prevent flickering of
lights, blowing of fuse or tripping
of circuit breaker.
●
Install or locate this appliance
ody in accordance with the
provided installation instructions.
●
Do not cover or block any
openings on the appliance.
●
Do not use outdoors.
●
Do not immerse power cord or
plug in water.
●
Keep power cord away from
heated surfaces,
●
Do not let power cord hang over
edge of table or counter.
●
DO
not
operate
this
appliance if it
has a damaged power cord or plug,
if it is not working properly, or if
it has been damaged or dropped.
●
See door surface cleaning
instructions on page 28.
●
This appliance should be
serviced
ody
by qualified service
personnel. Contact nearest
authorized service facility for
examination, repair or adjustment.
●
As
with any appliance, close
supervision is necessary when
used by children.
3
●
To
reduce
the
risk
of
fire in
the oven cavity:
–Do
not overcook
tbod, Ctifly
attend
appfiance
if paper, plastic,
or other combustible materials are
placed inside
the
oven to
factiitate
cooking.
—Remove wire twist-ties from
paper or plastic bags before
placing bags in oven,
—Do not use your microwave
oven to dry newspapers.
–~per
towels, napkins and
wax paper.
Recycled paper
products can contain metal flecks
which may cause arcing or ignite.
Paper products containing nylon
or nylon filaments should be
avoided, as they may
dso ignite.
–Do
not pop
popcorn in your
micmve
oven tires in a
specti
microwave popcorn accessory or
udess
you use popcorn labeled
fir
use in microwave ovens.
–Do
not
operate the oven
whiie
empty to avoid damage to the
oven and the danger of
fire.
If
by accident the oven should run
empty a minute or two, no harm
is done. However, try to avoid
operating the oven empty at
W
times—it saves energy and
prolongs the life of the
oven.
–Do
not overcook potatoes.
They could dehydrate and catch
fire, causing damage to your oven.
–If materials inside oven should
ignite,
kmp
oven door closed, turn
oven off, and disconnect power
cord, or shutoff power at the fuse
or circuit breaker panel.
Q
Some products
such
as whole
eggs
and
sealed containers-for
example, closed glass jars—may
explode and should not be heated
in this oven.
●
Avoid
heating baby food in
glass jars, even without their lids;
especially meat and egg mixtures.
Page 4

mPORTmT
SAFETY INSTRUCTIONS
(continued)
*
Don’t
defrost
frozen
beverages in narrow necked
botties (Qspecidly
carbonated
beverages), Even if the container
is opened, pressure can
butid
up.
This can
cause
the container to
burst, resulting in injury.
●
Use meti o~y
as
direeted in
cookbook.
TV dinners maybe
microwaved in foil trays less
tian
3/4” high;
remove
top foil cover
and return
tray
to box. When
using
metal
in the microwave
oven,
keep metal (other than
mti shel~
at least 1
inch
away from sides of
oven.
Q
Cooking utensils may become
hot
because of heat transferred
from the heated food.
Pot
holders
may
be needed to handle the
utensil.
* Sometimes, the oven
floor
can
become
too
hot
to touch.
Be
careful
touchi~g
the floor during
and
akr
cooking.
*
Foods cooked in liquids (such
as pasta) may tend to boil over
mom mpi~y
than
fti
containing
less
moisture.
Shotid
this occur,
refer to page 28 for instructions on
how to clean the inside of the oven.
@
Thermometer—Do not use
a thermometer in food you are
microwaving
udess the
thermometer is designed or
recommended for use in the
microwave
oven.
* Remove the
temperature
p~~
from
the
oven
when
not
using it
to cook with. If you
leave
the
probe
inside the
oven without
inserting it in food or liquid, and
turn on microwave energy,
it
can
create electrical arcing in the
oven and damage oven walls,
@ Phtic utens&-Plastic utensfls
designed for microwave cooking
are very useful, but should be
usti carefi~y.
Even microwave
plastic may not be as tolerant of
ovetiking
conditions as are
@ass
or
ceramic materials and
may
sofien
or char if subjected to short
periods of overcooking. In longer
exposures to overcooking, the
fd
and utensils could ignite, For
these reasons: 1) Use microwave
plastics
ordy
and use them in strict
compliance with the utensil
manuticturer’s
recommendations.
2) Do not subject empty
utensfls
to
microwaving. 3) Do not permit
children to use plastic utensils
without complete supervision.
●
When cooking pork, follow
our directions exactly and always
cook the meat to an internal
temperature of at least
l~°F.
This assures that, in the remote
possibility that trichina may be
present in the meat, it will be
tiled
and meat will be safe to eat.
Q
Boiling eggs is not
recommended
in a microwave
oven. Pressure can
bufld
up
inside egg yolk and may cause
it to burst, resulting in injury.
●
Foods with unbroken
outer
“skin”
such as potatoes,
sausages, tomatoes, apples,
chicken livers and other giblets,
and egg yolks (see previous
caution) should be pierced to
allow steam to escape during
cooking.
.
g$Boilab~e”
cooking
~uch~
and tightly
closed plastic bags
should be slit, pierced or vented
as directed in cookbook. If they
are not, plastic could burst during
or immediately after cooking,
possibly resulting in injury.
Mso,
phtic
storage containers
shodd
be
at least
partidy
uncovered because
they form a tight seal. When
cooking with containers tightly
covered with plastic wrap, remove
covering
carefu~y
and direct steam
away from hands and face.
●
SPntineous
boiling—under
certain special circumstances,
liquids may start to boil during or
shortly after removal from the
microwave oven. To prevent burns
from splashing liquid, stir the
4
liquid
briefly before removing the -
container
fmm
the microwave
oven,
Q
Use of the shelf accessory.
—Remove the shelf from oven
when not in use.
–Do not store or cook with shelf
on floor of oven. Product damage
may result.
–Use pot holders to
handle
shelf
and utensils, They may be hot.
—Do not use microwave browning
dish on shelf; the shelf could
overheat. Do not use shelf with
Automatic Cooking feature.
THE
~~UST
HOOD
●
Have it installed and properly
grounded by a
qtied instier,
See the
spccid
initiation
bootiet
packed with the microwave oven.
●
The exhaust fan in your oven
W
operate
automatidy
under
certain conditions (see Automatic
Fan Feature, page 6). While the -
fan is operating, caution is
required to prevent the starting
and spreading of
accidenti
cooking fires
whtie
the exhaust
fan is in use. For this reason:
–Never leave surface units
unattended at high
hat
settings.
Bodovercausessmoking
and greasy
sptioversthat
may ignite and spread
if exhaust fan is operating, To
mi-
automatic M operation,
use adequate sized utensils and
use high heat ody when necessary.
—In
the event of a grease
fire,
smother flaming pan on surface
unit by covering pan completely
with well-fitting lid, cookie sheet
or flat tray.
–Never flame foods under
the oven with the exhaust fan
operating because it may spread
the flames.
–Keep hood and grease
fiiters
clean, according to instructions on
_
pages ~ and 29, to maintain good
venting and avoid grease fires.
SAVE THESE
INSTRUCTIONS
Page 5
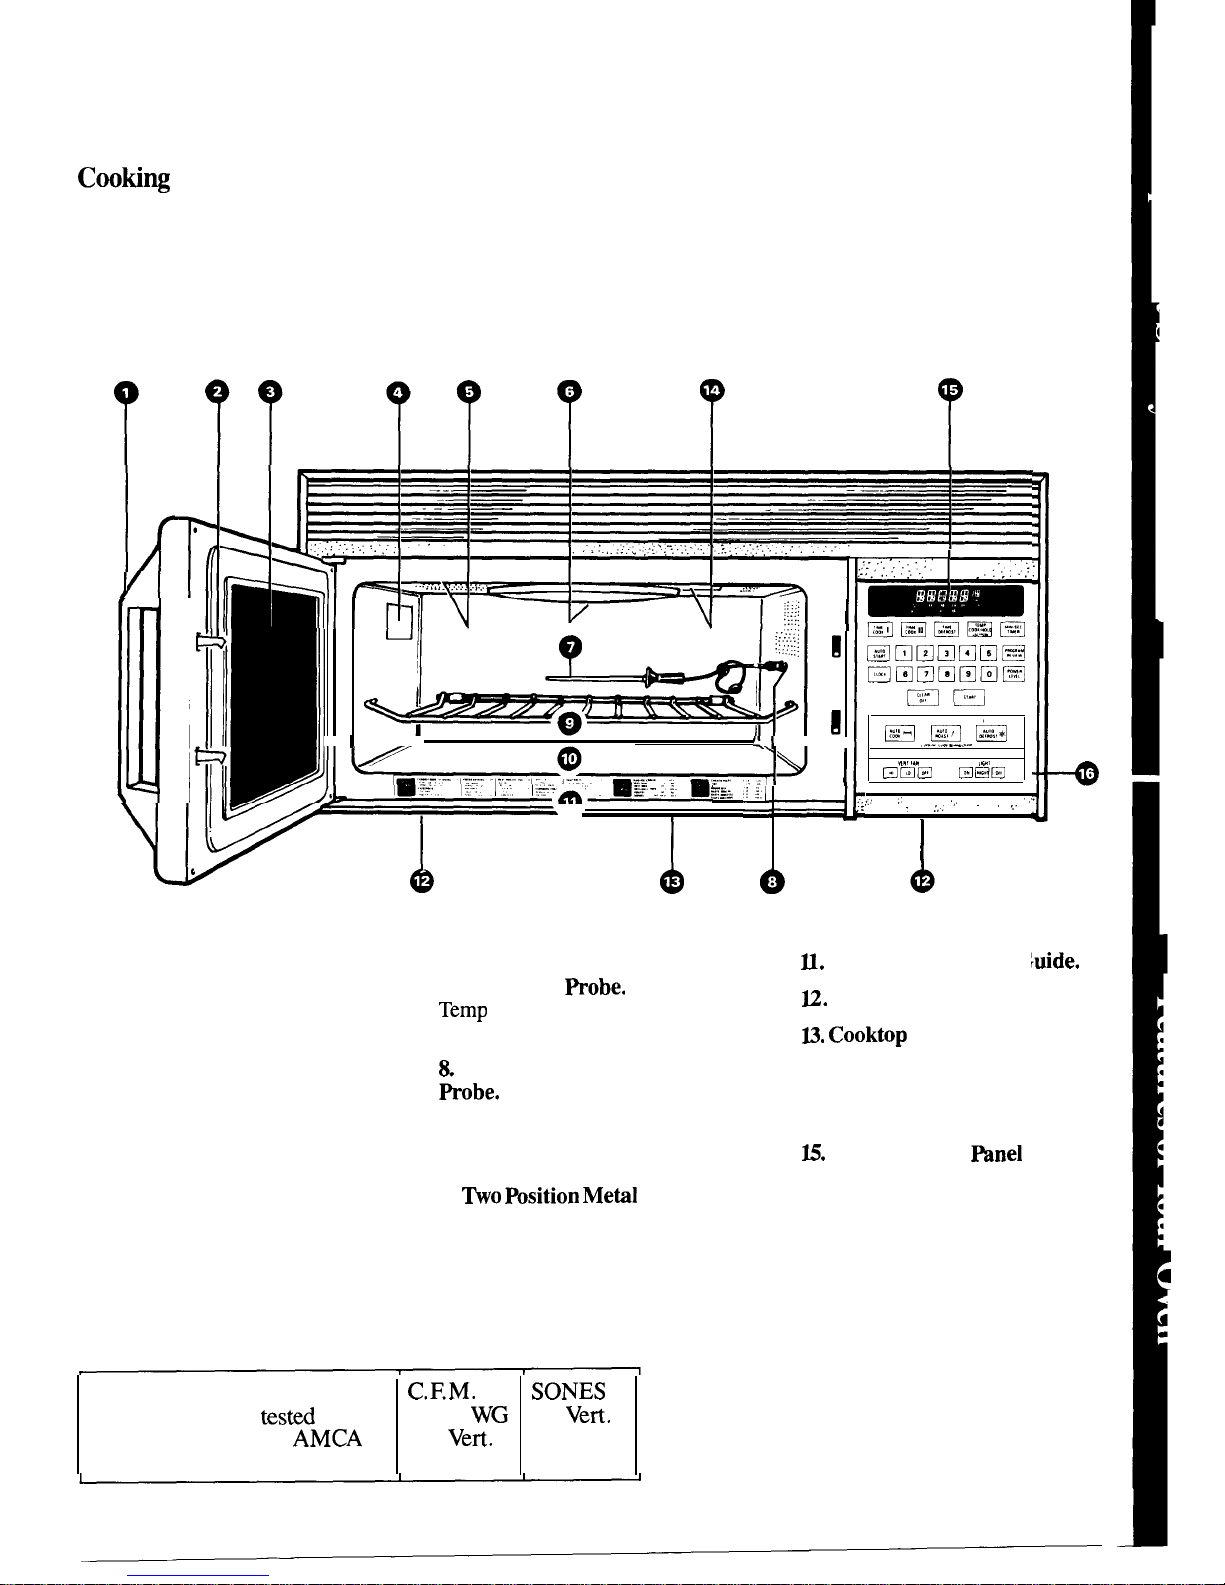
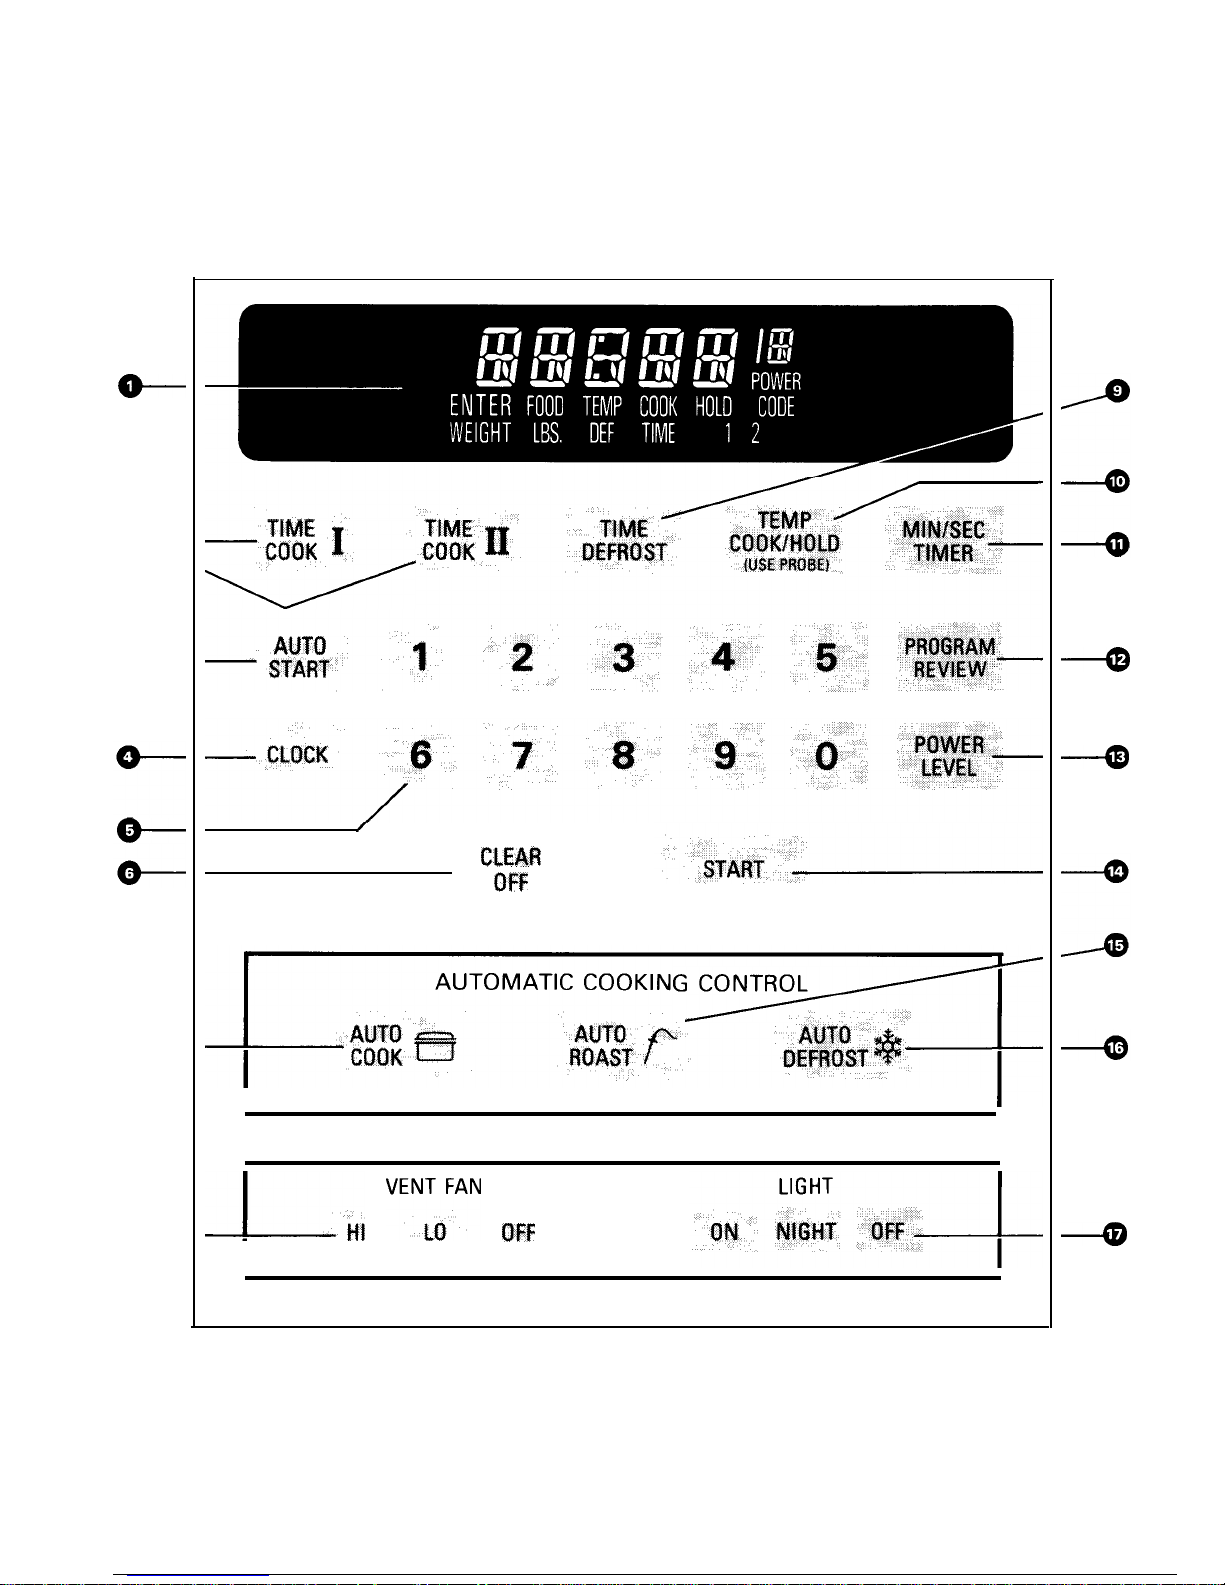
Features of Your Microwave Oven
CootiW
Complete Reminder
(For TIME COOK and DEFROST cycles)
To remind you that you have food in the
oven, the oven will display “End” and beep
once a minute until you either open the oven
door or touch the CLEAR/OFF pad.
T
T
T
I
Ill
I
‘:
I
I I
I
mmmmmmm
Emmmmmm
mm
. . . . . . . . . . . . . . . . .
.
B,,,.=-,,,.
E
.,s,..
mmm
‘“’
m=m
-
-
,.:,.
. .
..:
,
.,.
., . .
.
. . .
.,
. . . . .:
.,...,
. . . : .
,..
,
4
I
w
i
‘Zi “~
d
1. Door Handle. Pull to open
7. MicroThermometer’
M
U. Automatic Cooking G
door. Door must be securely
latched for oven to operate.
2. Door Latches.
3. Window with Metal Shield.
Screen allows cooking to be viewed
while keeping microwaves confined
in oven.
4. Model and Serial Numbers.
5.
Oven Vent.
6.
Mode Stirrer Cover.
Protects
the microwave energy distributing
system. Do not remove the cover.
You will damage the oven.
Temperature
fiobe.
Use with
Temp
Cook/Hold and Auto Roast
functions only.
&
Receptacle for Temperature
Robe.
Probe must be securely
inserted into receptacle before oven
will start any temperature or Auto
Roast cooking.
9. No
~sition Metal
Shelf.
Doubles the oven capacity when
reheating or cooking smaller food
items. (For complete use of shelf,
see pages 30 and 31.)
10. Oven Floor.
luide.
U.
Grease Filters.
U.
Cooktop
Light.
14. Oven Light.
Light comes on
when door is opened or when oven
is operating in any function.
H.
Touch Control Wnel and
Digital Display.
For detailed
information on each feature,
see pages 6 and 7.
16.
Hood Controls.
Fan. Press HI, LO or OFF.
Light. Press ON, NIGHT or OFF.
This is to certify that
C,F.M.
SONES
this unit has been
testd
at 0.10
WG 5.5 Vert,
in conformance with
AMCA
230
Vert.
6.7 Her.
Bulletin No. 210
237 Her.
5
Page 6
Your Touch Control
Wnel
The touch control panel allows you to set the oven
controls electronically with the touch of a finger. It’s
designed to be easy to use and understand. With your
microwave oven, you have the option of using your
automatic cooking control pads for quick and easy
convenience cooking. Or you may make your own
programs to suit your individualized cooking style.
When You
PIw
in the Oven
The display panel displays five 8’s, 18 POWER, and
all of the oven functions. After 15 seconds, all lights
disappear and “RESET” appears in the upper portion.
Touch the CLEAR/OFF pad, set the CLOCK, and
oven is ready for use.
If power is disrupted at any time, the above sequence
recurs, and you must reset CLOCK after touching
CLEAR/OFF.
“Error”
Appea~
on
Dkplay:
. When using Temp Cook/Hold, you have entered a
temperature less than
90°F.
or more than
199°F.
●
When using Auto Defrost, the food weight you
enterd
did not correspond with the code number entered.
●
Door is opened during “AUTO” cycle of Auto Cook.
Close door and touch START.
“Probe”
Appeam
on
Dkplay:
Q
Probe has been forgotten when Auto Roast or Temp
Cook/Hold are being used.
●
Probe is not securely seated in oven wall receptacle.
1. Display Panel.
Displays time of day, time or
temperature during cooking functions, power level
being used, cooking mode and instructions.
2.
Time Cook I and Time Cook II.
Microwave for a
preset amount of time using automatic power level 10
or change power level after setting time. (See page 8.)
3.
Auto
S@rt.
Allows you to program your oven to
begin cooking at a preset time of day—up to a 12-hour
delay. (See page 8.)
4. Clock. Touch this pad to enter time of day or check
time of day while microwaving. To set clock, first
touch CLOCK pad and then enter time of day. For
example, if time is
1:30,
touch number pads 1, 3, and O
and
“1:30”
will appear on display. “START” will flash,
directing you to touch START, thus setting the clock.
If you wish to reset or change time, simply repeat
above process.
5. Number Pads. Touch these pads to enter cook time,
food temperature, power level, Auto Cook codes, Auto
Roast codes or Auto Defrost code numbers and food
weight.
6
6. Clear/Off. When touched, it stops the oven and
erases all settings except time of day.
7.
Auto Cook.
Touch this pad and then number pad
for desired code number, and oven automatically
microwaves at pre-programmed power levels and
determines the proper amount of cooking time until the
food is done and oven shuts off. (See pages 12 and 13.)
8. Exhaust Fan. Press HI, LO or OFF for fan speed.
9. Time Defrost. Gentle thawing at automatic power
level 3, or change power level after entering time.
(See page 9.)
10. Temp Cook/Hold. Use the temperature probe to
cook by using a preset temperature. When internal
food temperature reaches
90°F., oven shows
temperature until preset temperature is reached
and holds temperature for up to one hour. (Seepage 10. )
U. Min/Sec
Timer.
This feature uses no microwave
energy while it functions as both a kitchen timer or as a
holding period between defrost and time or temperature
cooking. (See page 11. )
U.
Program Review.
Touch this pad to display your
cooking program.
U.
Power Level.
Touch this pad before entering
another power level number if you want to change
from automatic power level 10 (High) for cooking or
power level 3 (Low) for defrosting.
14. Start. Touch this pad to begin any function.
15. Auto Roast. Insert probe, touch this pad, and
desired number pad for code to slow-cook or
temperature cook meat with automatic preset
program. (See pages 24 and 25.)
16. Auto Defrost. Touch this pad, then code number
and food weight. The oven automatically sets power
levels and defrosting time. (See page 26.)
17. Light. Touch desired pad to illuminate counter or
to turn on night
light.
AUTOMATIC FAN
FEATU~
Cooking appliances installed under the oven might,
under some heavy usage conditions, cause temperatures
high enough to overheat some internal parts of the
microwave oven.
To prevent overheating from taking place, the exhaust
fan is designed to automatically turn on at low speed if
excessive temperatures occur. Should this happen,
the fan cannot be manually turned off, but it will
automatically turn off when the internal parts have
cooled. The fan may stay on up to approximately 30
minutes
afier the range and microwave oven controls
have been turned off.
Page 7
/
CLEh8
OFF
I
COOKING GUIDE BEHIND DOOR
L,,
‘EN::AN
,,,
I
7
Page 8
CooHng
by
~me
The time cooking feature allows
you to preset the cooking time.
The oven shuts off automatically.
Power level 10 (High) is
recommended for most cooking,
but you may change this for more
flexibility. See your cookbook.
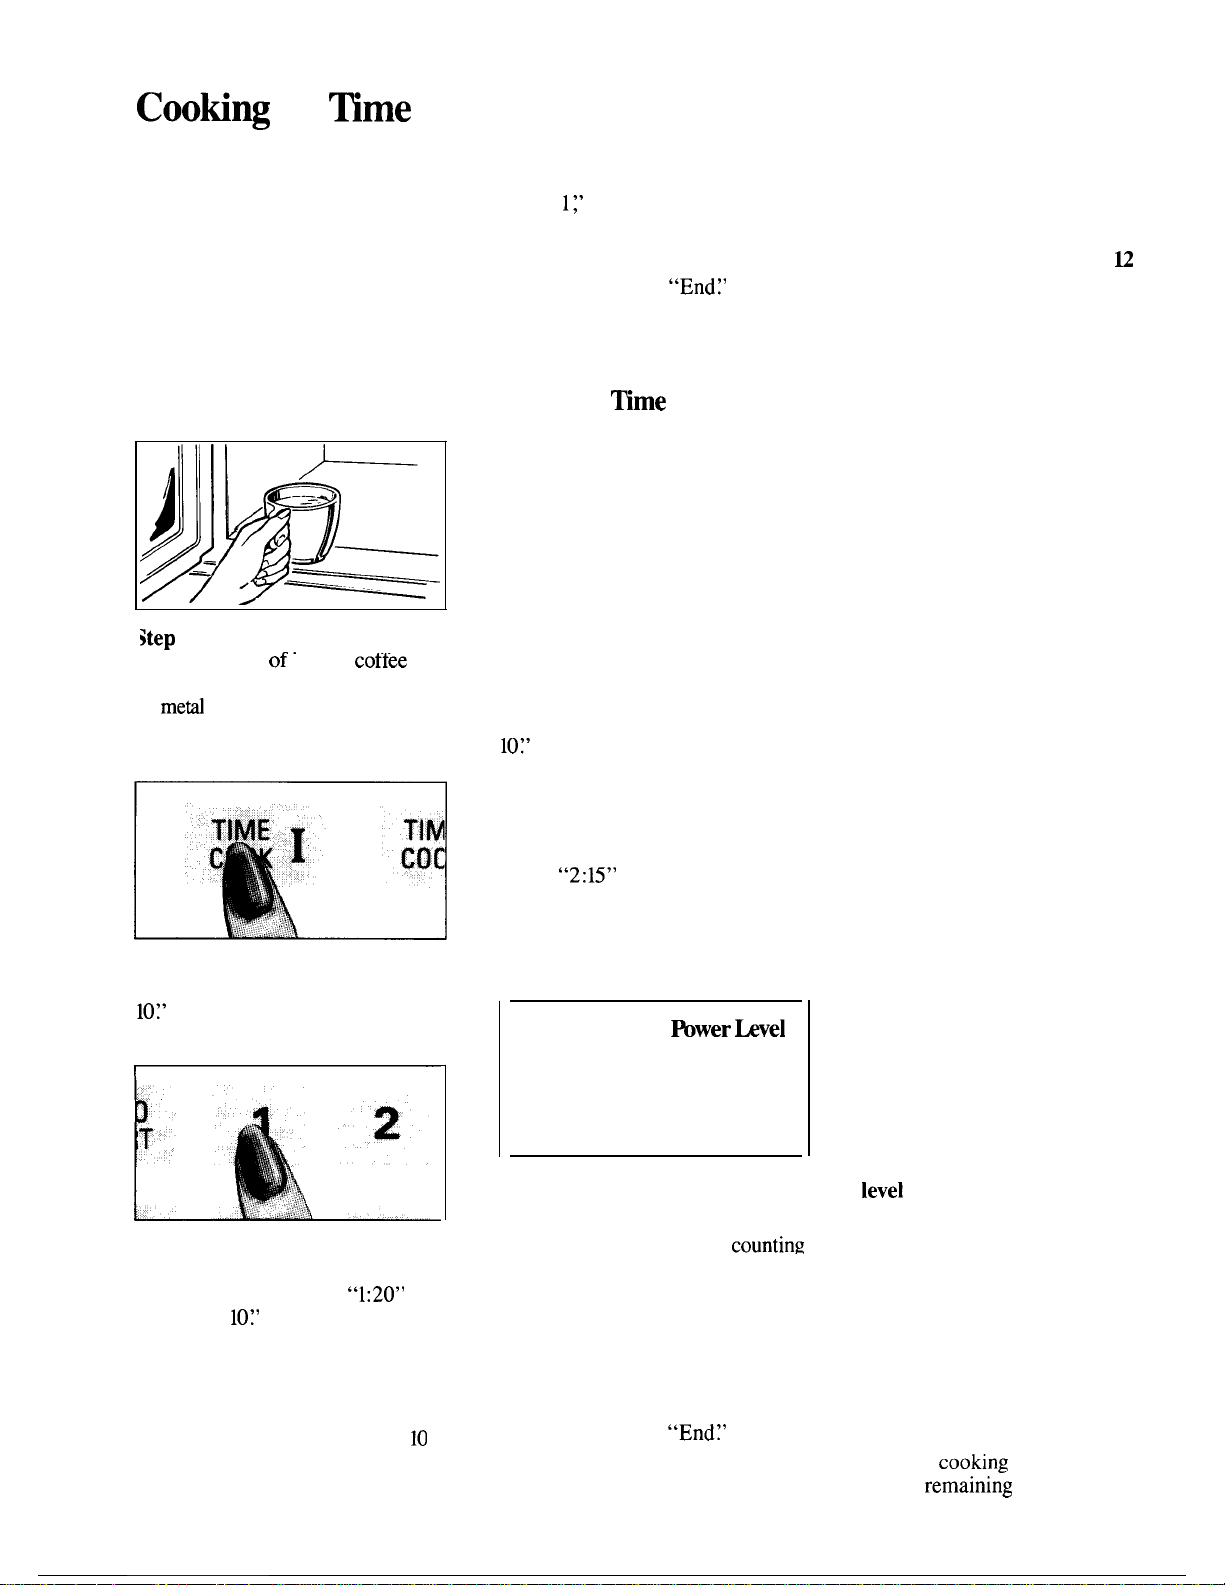
To become better acquainted with
time cooking, make a cup of coffee
by following the steps below.
Step 4:
Touch START. “COOK
TIME
1;’ “POWER 10” and time
counting down show on display.
Step 5:
When time is up, the oven
signals and flashes
“End~’
Oven,
light and fan shut off.
Step 6:
Open the door.
Using the
~me
Cook II
Feature
The Time Cook II feature lets you
set two time cooking functions
within one program. This is ideal
when you want to change power
levels during your cooking
operations. Here’s how to do it.
Step 1:
Place food in oven in
microwave-safe container and close
How to Use Auto Start
Auto Start allows you to program
your oven to begin cooking at a
preset time of day—up to a
U
hour delay.
To Use Auto Start
Step 1:
Enter your desired cooking
program.
Step
2: Touch AUTO START pad
(instead of START pad).
Step 3:
Enter the time you want
the oven to start. (Be sure your
microwave oven clock shows the
correct time of day. )
Step
4: Touch START pad. The
oven will automatically start at
the desired time.
ltep 1:
Fill a cup 2/3 full of water,
-.
--
add 1 teaspoon
of”
instant cotlee and
the door.
Questions and Answers
stir to dissolve. Use a cup that has
no
meti
decoration and is microwave
Step 2:
Touch TIME COOK I pad.
Q. I set my oven for the time
safe (see Microwaving Tips on page
Display shows “: O“ and “POWER
called for in the recipe, but at the
2).
Place cup in oven and close door.
10:’
“ENTER COOK TIME 1“
end of the time allowed, my food
flashes.
wasn’t done. What happened?
Step 3:
Select your cooking time. For
A. Since house power varies due
example, touch 2, 1 and 5 for two
to time or location, many time
minutes and 15 seconds. Display
cooking recipes give you a time
shows
“2:15”
and “POWER 10”
range to prevent overcooking. Set
“COOK TIME 1“ flashes.
the oven for minimum time, test the
food for doneness, and cook your
Step
4: Touch TIME COOK II pad.
food a little longer, if necessary.
Step 2: Touch TIME COOK I.
Step
5: Set your cooking time.
Display shows “: O“ and “POWER
10:’
“ENTER COOK TIME 1“
flashes.
Step 3:
Select your time. Touch
1,2 and O for a minute and 20
seconds. Display shows
“1:20”
and
“POWER
10:’
“COOKTIME 1“
flashes.
Because automatic power level 10
is recommended for this cup of
coffee, there is no need to change
the power level. (If power level
10
is not appropriate, see “How to
Change Power Level” at right.)
How to Change
hwer bvel
After setting cooking time,
touch POWER LEVEL pad,
then touch desired number for
new power level.
Q. I touched the number pads
and selected my power level. When
I touched START, however, my
oven didn’t come on. Why not?
A. The TIME COOK I or II pad
must be touched before setting the
number pads or else your oven will
not begin cooking.
Q. I want to cook on a power
level
other than High. What do I
need to do?
Step
6: Touch START.
Step
7: “POWER 10” is displayed
and Cook Time 1 is shown
counting
A. To change the power level,
down.
touch the POWER-LEVEL pad,
Step 8:
At the end of Cook Time 1,
then touch desired number for new
the second power level is displayed
power level.
and Cook Time 2 is shown counting
Q. Can I interrupt Time Cook to
down.
check the food?
Step
9: When time is up, the oven
A. Yes. To resume cooking,
signals and flashes
“End~’
The
simply close the door and press
the START pad. The timer must be
oven, light and fan shut off.
reset for
cooking to resume unless
Step 10:
Open the door.
time is
remaini;g
on timer.
8
Page 9
Defrosting by
~me
Time Defrost is designed for
speedy thawing of frozen food
and is one of the great advantages
of a microwave oven.
Use Time Defrost to quickly
thaw foods such as bread, rolls,
vegetables, fruits and frozen
dinners. Auto Defrost is preferred
for meat and poultry because the
oven sets the defrosting time and
power levels for you.
●
Power level 3 is automatically set
for defrosting, but you may change
this for more flexibility.
●
See your cookbook for defrosting
help.
To become better acquainted with
Time Defrost, defrost a 1O-OZ.
package of frozen strawberries by
following the steps below.
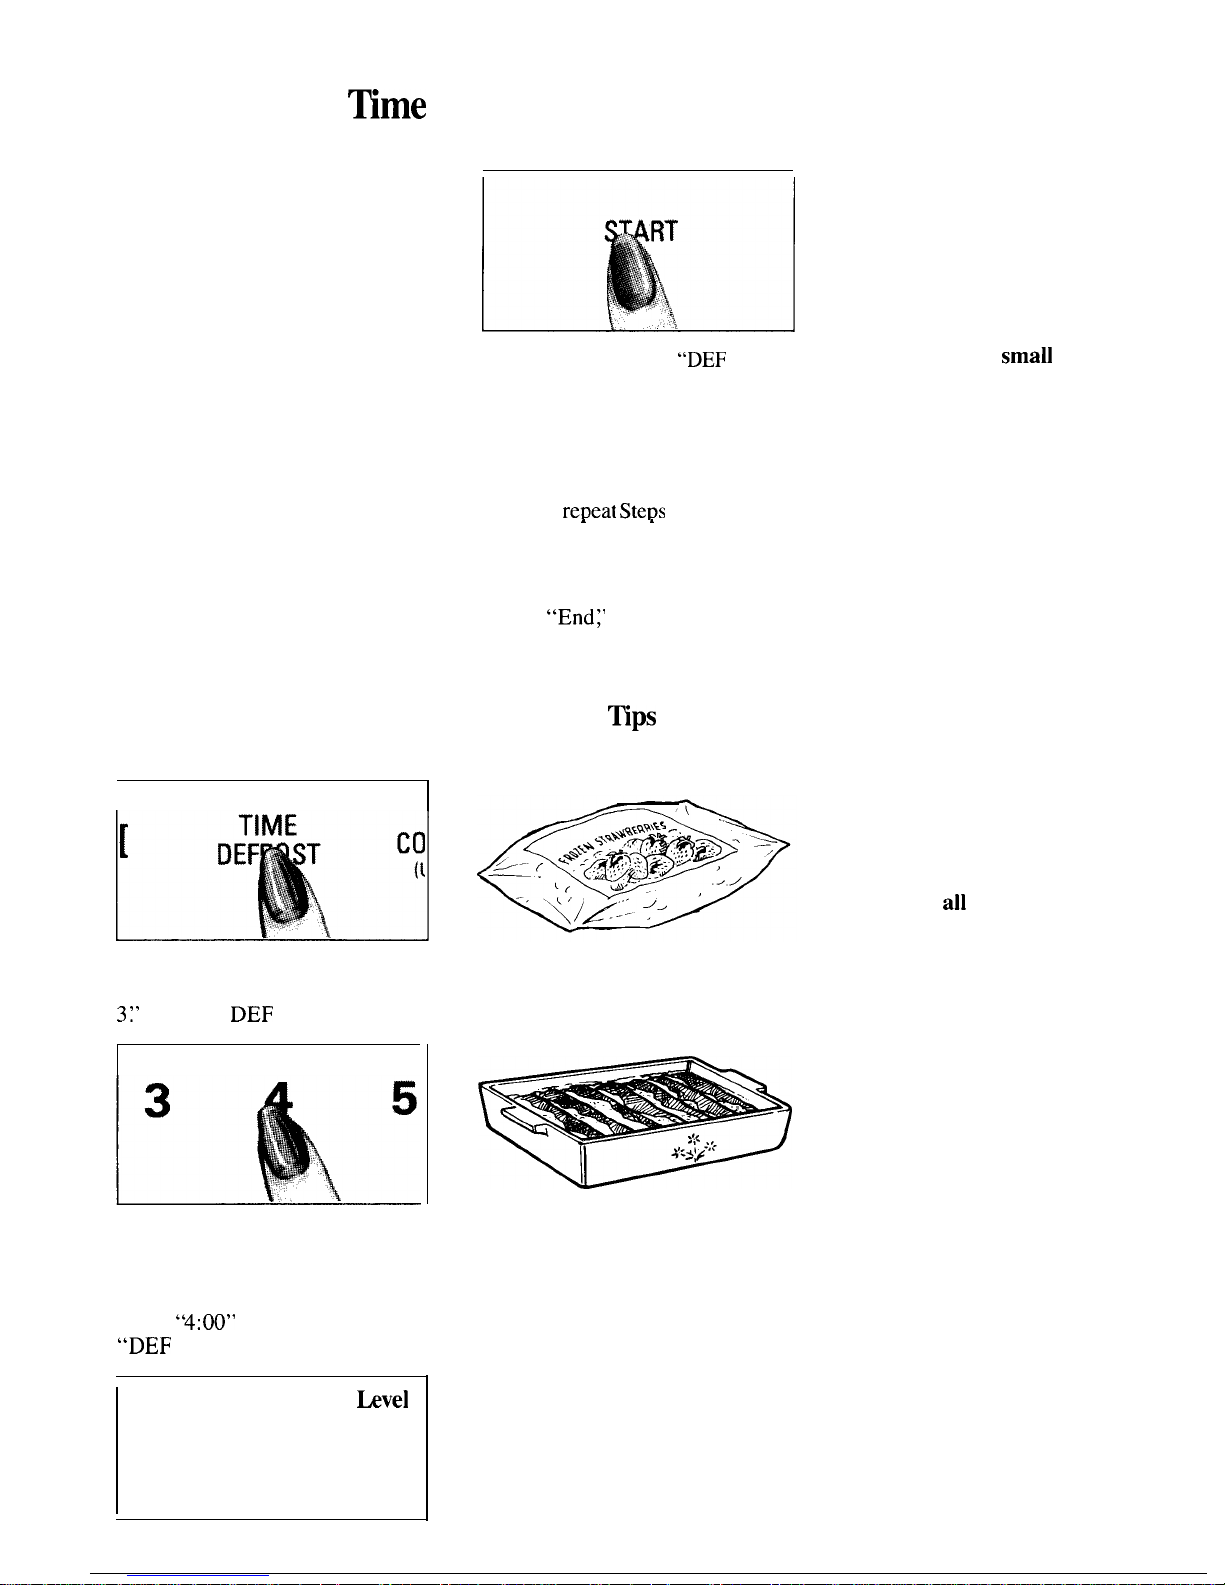
Step 1:
Place package of frozen
strawberries in the oven and close
door. Be sure package contains
no metal.
Step
2: Touch TIME DEFROST.
Display shows “: O“ and “POWER
3:’
“ENTER DEF TIME” flashes.
Step
3: Select one half of the total
defrosting time recommended in
your cookbook. For example, touch
4, 0 and O for 4 minutes. Display
shows
“4:00” and “POWER 3.”
“DEF TIME” flashes.
How to Change Power
hvel
After setting defrosting time,
touch POWER LEVEL pad,
then touch desired number for
new power level.
Step 4:
Touch START. “DEF TIME”
shows and time counts down on
display. When cycle is completed,
the oven signals and flashes “End,”
then automatically shuts off.
Step
5: Turn package over, close
door and
re~eat
Steps
2 and 3 to set
. .
remaining half of defrosting time
and touch START.
Step 6:
When oven signals and
flashes
“End:’ open door, remove
package and separate strawberries
to finish defrosting.
Defrosting
~ps
● Foods frozen in paper or plastic
can be defrosted in the package.
●
For even defrosting, some foods
need to be broken up or separated
part of the way through the
defrosting time.
● Family-size pre-packaged
frozen entrees can be defrosted and
microwaved. If the food is in a foil
container, transfer it to a microwave
safe dish.
● Check your cookbook for other
defrosting tips.
9
Questions and Answers
Q. When I press START, I hear
a dull thumping noise. What is it?
A. This sound is normal. It is
letting you know the oven is using a
power level lower than 10 (High).
Q. Can I defrost
small
items in
a hurry?
A. Yes, but they will need more
frequent attention than usual. Raise
the power level after entering the
time by touching the desired power
level pad. Power level 7 cuts the
total defrosting time about in 1/2;
power level 10 cuts the total defrosting
time to approximately 1/3. During
either, rotate or stir food frequently.
Q. Why don’t the defrosting
times in the cookbook seem right
for my food?
A. Cookbook times are averages.
Defrosting time can vary according
to the temperature in your freezer.
Set your oven for the time indicated
in your cookbook. If your food is
still not completely thawed at the
end of that time, reset your oven
and adjust the time accordingly.
Q. Should
all
foods be
completely thawed before
cooking?
A. Some foods should not be
completely thawed before cooking.
For example, fish cooks so quickly
it is better to begin cooking while it
is still slightly frozen.
Q. Can I open the door during
Time Defrost to check on the
progress of my food?
A. Yes.
You may open the door at
any time during microwaving. To
resume defrosting, close the door
and press START. The oven begins
operating if time is left on timer.
If not, reset timer.
Page 10

Cooking by Temperature
Internal temperature is the best
test of doneness for many foods.
Temp Cook/Hold takes the
guesswork out of cooking because
the oven automatically switches
to Hold setting after reaching
the preset food temperature and
maintains that temperature for up
to one hour or until you touch the
CLEAR/OFF pad.
The Temperature Probe
HANDLE
I
CABLE
t
END
\
#
SENSOR
-
CLIP
The temperature probe is a food
thermometer that gauges the
internal temperature of your food;
it must be used when using Temp
Cook/Hold or Auto Roast. To
utilize your probe properly, follow
directions for use and insertion in
this book in the Automatic
Roasting section.
Howto Temp Cook a Rolled
Beef Rib Roast to Medium
Step 1:
Insert temperature probe
and attach probe securely in oven
wall.
Close the door.
Step 2: Touch TEMP COOK/
HOLD. The display panel shows
“F” and “POWER 10.” “ENTER
TEMP” flashes.
Step 3: Touch 1,2,5 for
125°F.
“TEMP COOK” flashes. “125F”
and “POWER 10” show on display.
Step 4: Touch POWER LEVEL
pad.
“ENTER POWER” flashes.
Touch 5 for medium power.
“TEMP
COOK:’
“125F” and
“POWER 5“ show on display.
Step 5: Touch START. If internal
temperature of the roast is less than
90°F., display will show “COOL” or
if temperature is 90°F. or above,
display shows temperature
counting up.
Step 6: When
125°F.
is reached,
the oven will sound and display
“HOLD”. The oven will then hold
the temperature.
Step
7: Touch the CLEAR/OFF
pad to stop the cycle.
Step 8: Remove probe and food
from the oven.
Cooking Tips
●
Use a lower power level; it will
heat more evenly even though
requiring more time.
. Be sure frozen food has been
completely defrosted before inserting
probe. Probe may break off if used
in frozen foods.
c
Use the clip to keep the probe in
place while heating.
●
Cover foods loosely for moisture
control and quick, even heating.
Questions and Answers
Q. After I followed the steps
and touched the START pad,
“ERROR” flashed in the display
and a signal sounded. What’s
wrong?
A. “ERROR” flashes if you set
the temperature either below 90°F.
or above
199°F.
The oven tells you,
between the flashing of “ERROR,”
what incorrect entry was made. To
re-enter,
touch CLEAR/OFF pad
and begin again.
Q.
Are there any foods I can’t
Temp Cook?
A. Yes.
Delicate butter icings, ice
cream, frozen whipped toppings,
etc. soften rapidly at warm
temperatures. Batters, doughs and
frozen foods are also difficult to
cook precisely with the probe. It’s
best to time cook these foods.
Q. Why did “PROBE” flash on
the display after I touched the
START pad?
A. “PROBE” will flash if you
don’t seat the cable end of the probe
securely into the receptacle in the
oven
wall
or if you touch the TEMP
COOK/HOLD pad and forget to
use the probe.
Q.
Can I leave my probe in the
oven if it’s not inserted in food?
A.
No,
if it touches the oven
wall,
you may damage the oven.
Q.
Can I Temp Cook different
portions of food at different
temperatures?
A. Yes.
The temperature probe
gives you the freedom to cook
different portions of food at
different temperatures to suit
individual eating styles. Simply
place probe in food and change
temperature setting as needed.
10
Page 11
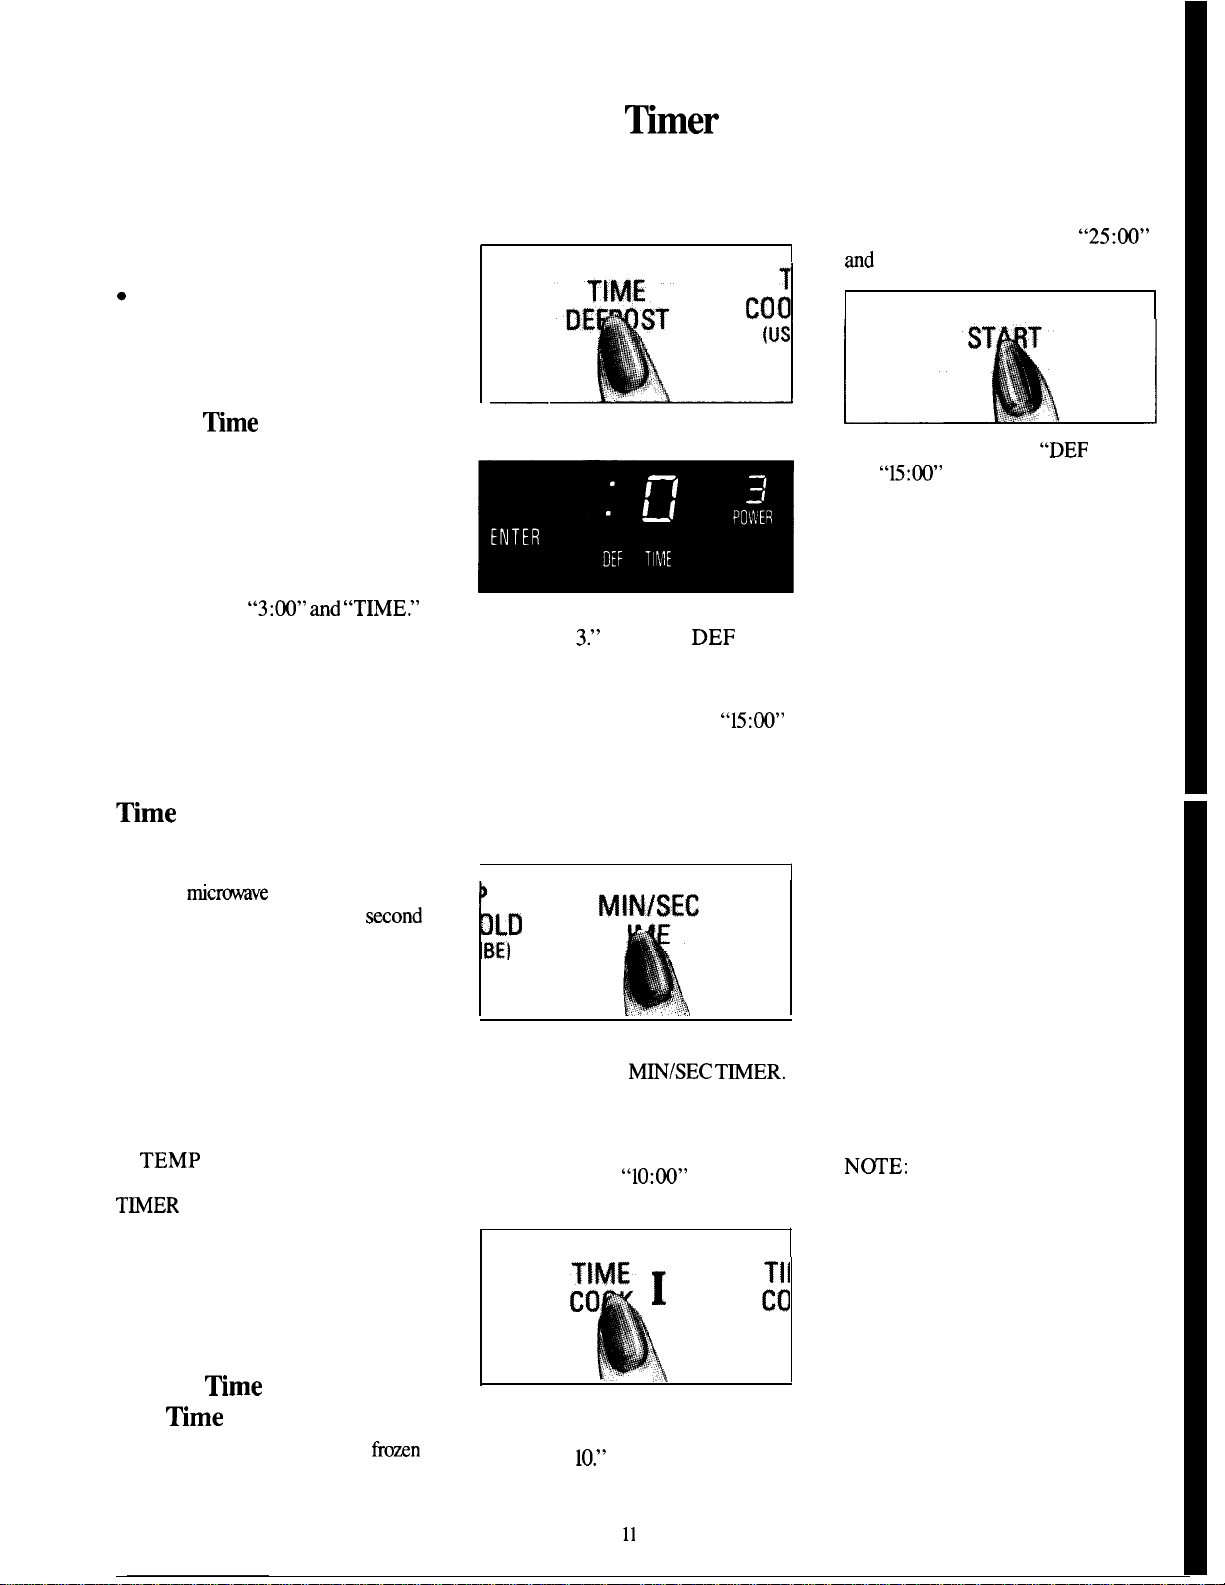
How to Use the Minute/Second
~mer
The MIN/SEC TIMER has three
timing functions:
●
It operates as a minute timer.
. It can be set to delay cooking.
Q
It can be used as a hold setting
after defrosting.
The MIN/SEC TIMER operates
without microwave energy.
How to
~me
a 3-Minute
Phone Call
1. Touch MIN/SEC TIMER pad.
The display shows “: O“ and
“ENTER TIME” flashes.
2. Touch number pads 3,0 and O
(for 3 minutes and no seconds).
Display shows
“3:00”
and
“TIME:’
3. Touch START. Display shows
time counting down.
4. When time is up, oven signals,
flashes “End,” and display shows
time of day.
Programming a Holding
~me
The Minute/Second Timer can also
be used to program a holding time
between
rnicmve
cooking functions.
The time can range from one
saond
to 99 minutes and 99 seconds. A
holding or standing time maybe
requested in some of your own
recipes or cookbook.
Programming Delayed
Cooking
To delay cooking up to 99 minutes
and 99 seconds, touch TIME COOK I
or TEMP COOK/HOLD and enter
cook time or temp. Touch MIN/SEC
T~ER
and enter number of minutes
to delay cooking. Touch START.
Timer will count down to zero and
cooking will begin. When delaying
temperature cooking, be sure that
probe is in food before pressing
START.
How to
~me
Defrost, Hold
and
~me
Cook
Let’s say you want to defrost a
fromn
casserole for 15 minutes, hold for
10 minutes and then Time Cook for
25 minutes. Here’s how to do it:
Step 1:
Take casserole from freezer
and place in oven.
Step
2: Touch TIME DEFROST pad.
The display shows “: O“ and
“POWER
3V’
“ENTER DEF
TIME” flashes.
Step 3: Touch pads 1,5,0 and O for
15 minutes defrosting time.
“15:00”
appears on display. (Defrosting is
automatically set on power level 3
but can be changed by touching
the POWER LEVEL pad and the
desired power level.)
LO
MIN/SEC
BE)
T
::::
R
..,...:::.....,
Step
4: Set holding or standing
time by touching
M~/SEC T~ER.
The display shows “: O“ and
“ENTER TIME” flashes.
Step
5: Touch 1,0,0 and O to hold
for ten minutes.
“10:00’7
appears on
display and “TIME” flashes.
Step
6: Touch TIME COOK I pad.
The display shows “: O“ and
“POWER
10V’
“ENTER COOK
TIME 1“ flashes.
Step 7: Touch 2,5,0 and O for
twenty-five minutes of cooking time.
“COOK TIME 1“ flashes, “25:00”
and
“POWER 10” appear on display.
Step
8: Touch START. “DEF TIME”
and
“U:OO”
counting down show on
display. As each function is
automatically performed, oven
display shows instructions entered
and the function.
Step
9: When time is up, the
oven signals, flashes “End” and
shuts off.
Questions and Answers
Q. What will happen if I
accidentally reverse my defrost,
hold and cook instructions?
A.
The oven will automatically
rearrange your program. Defrosting
will always come first, then hold,
and then the cooking function.
Q.
Can I defrost and hold only?
A. Yes.
Sometimes you may only
want to defrost a food, hold it, and
cook it later. All you need to do is
program in Time Defrost and
amount of time. Then program a
holding time (example in steps 4
and 5 at left). Be sure to put the
thawed dish in the refrigerator
promptly.
N~E:
Let foods remain at room
temperature only as long as safe.
Times will vary.
Q.
I programmed my oven for
a specific defrosting time but it
defrosted longer than necessary.
What happened?
A. When instructions conflict,
the oven carries out the last
instruction. You may have set the
oven to Defrost for 4 minutes,
Hold/Time for 2 minutes, and then
Defrost for 6 minutes. In this case, the
oven would Defrost for 6 minutes
and Hold/Time for 2 minutes.
Page 12

Automatic Cooking
The AUTO COOK feature may be
used to eliminate your need to look
up cooking time in the cookbook or
guess how long to set cooking time.
By actually sensing the steam
that escapes as food microwaves,
this feature automatically adjusts
the oven’s cooking time to various
types and amounts of food.
Because most cooking containers
must be covered during automatic
cooking, this feature is best with
foods that you want to steam or
retain moisture. See page 15 for
containers and covers recommended
for automatic cooking.
Note:
Use of the wire shelf with
Automatic Cooking is
N~
recommended.
Wsy to Use
Simply touch three control
pads—
AU~
COOK, desired CODE, and
START. The word “AUTO” appears
on the display and the sensor is
activated to sense steam from food.
Keep Door Closed
Do not open the oven door while
the word “AUTO” is
displayed—
steam escaping from the oven can
affect cooking performance. If the
dmr
is opened, the word “ERROR”
appears. Close the door and touch
START immediately.
Foods Recommended
A wide variety of foods including meats, fish casseroles, vegetables, leftovers
and convenience foods can be Auto Cooked.
Foods Not Recommended
I
Foods that must be cooked uncovered, foods that require constant attention,
foods that require addition of ingredients during cooking, and foods calling
for a dry look or crisp surface after cooking should not be Auto Cooked. It is
best to Time Cook them.
Foods that microwave best using the temperature probe should be
Temp
Cooked or Auto Roasted.
12
Page 13

Automatic
Cooting
Codes
Automatic Cooking Codes 1
through 9 are designed to give you
easy automatic results with a
number of foods.
CODE 1, designed for reheating
foods quickly, turns the oven off
automatically as soon as the sensor
detects steam from the foods.
When CODES 2 through 9 are
selected, the oven determines how
much additional cooking time is
needed after steam has been sensed,
automatically switches to TIME
COOK, signals, and the word
“AU~”
on the display is replaced
by countdown numbers indicating
remaining cooking time. When the
signal is heard, the oven door may
be opened for stirring, turning or
rotating food.
A guide behind the oven door lists
cooking codes for frequently prepared
fresh or uncooked foods and
appropriate codes are recommended
in the recipes and cooking guide on
pages 16 through 23.
HowtoMj@A~
C~k
Example:
Codes To Suit Your Taste
By simply adding a 1 after any
AU~
COOK code number from
2
through 9, you can set the oven to
cook for 20% less time than the
code would regularly provide.
For example, if CODE 4 cooks
your seafood more done than you
Place covered food in oven. Touch
AU~
COOK pad. “AUTO
COOK” appears on display and
“ENTER CODE” flashes.
1
3
Touch number pad for desired code.
“COOK” and “CODE 2“ shows
and “START” flashes. Touch
START.
Word “AUTO” shows on display,
indicating steam sensor is activated.
DO NOT OPEN DOOR. OPENING
DOOR MAY AFFECT COOKING
PERFORMANCE.
Beep sounds when steam is sensed
and “AUTO” is replaced by cook
time. Rotate or stir food, if necessary.
When done, oven beeps and stops,
and displays “End”.
like it, set CODE 41 next time and
you’ll get 20% shorter cooking
timt
If you want a longer cooking time
than a code provides, add a 9
afier
the code.
For the seafood in the example
above, CODE 49 would provide
20% longer cooking time than the
regular CODE 4 would provide.
Example:
Touch AUTO COOK pad.
“AU~
COOK” is displayed and “ENTER
CODE” flashes.
Touch number pads 4 and 1 in that
order. “COOK” and “CODE 47’
are displayed and “START”
flashes.
13
Touch START. “AUTO COOK”
and “CODE 2“ show on display.
DO
N~
OPEN DOOR until first
oven signal, then rotate dish 1/2
turn if necessary. Close door and
touch START to finish cooking.
Page 14

Quetiiom &
Amwem
Q. Why
dmmyovenautomatidy
cut off after the Auto cycle when
using Auto Cook Control Code 1
when it does not for other settings?
A. When using Code 1, there is no
second phase of minutes counting
down. All the cooking is completed
in the first phase or Auto.
Q. If my food is not completely
cooked after using the suggested
Code, what should I do?
A. Use Time Cook I and Power
Level 10 for a few minutes until
completion.
Q. Do d
fmh
or frozen
vegetabl~
require a standing period after
cooking with Auto Cook?
A.
Most vegetables are cooked to
a crisp state during Auto Cook,
just as in regular microwaving.
Therefore, it is recommended that
you let the vegetables stand for up
to 5 minutes depending on size and
density of pieces. This standing
time also enhances the overall
flavor and appearance of most
vegetables.
Q. What if I
don’t fully
cover the
dish in Auto Cook?
A. Oven senses steam too quicHy
which shortens the cooking time
thus leaving undercooked food.
Cover tightly and reset Auto Cook.
Q. Do the shapes and sizes of
food make a difference when
using Auto Cook?
A. Yes, in some cases, larger
pieces will require additional
Time Cooking. Be sure to check
suggested arrangement of pieces in
the dish, since proper arrangement
is often a successful tip in regular
microwaving.
Q. Do fresh or frozen vegetables
require water when using Auto
Cook?
A. Yes. Add water as recommend
on guide to the vegetables and
cover well for even, complete
cooking.
Q. Should I use Auto Cook to
cook pudding or sauces?
A. Most pudding and sauce recipes
require stirring many times during
cooking; therefore, Time Cook is
recommended.
Q. My scalloped potatoes were
not completely cooked when I
removed the dish after Auto
Cook. What is wrong?
A. If you prepared the sauce in the
oven prior to combining the sauce
with potatoes, there may have been
too much remaining moisture in
the oven. Make sure you dry the
oven completely before using Auto
Cook since this function operates
properly by sensing steam in the
oven. Also, starting Auto Cook
with hot foods creates steam in the
oven too soon, and decreases the
first sensing cycle.
Q. Are there any other foods
which are best Time Cooked,
rather than Auto Cooked?
Q. Would my plastic containers
with very tight fitting lids be
appropriate for Auto Cook?
A. No, most types of plastic
storage dishes, butter tubs, etc.
with tight fitting lids are not
recommended for microwaving.
Also tight fitting plastic lids may
prevent adequate steam from
escaping and food may not cook
properly during Automatic
Cooking.
Q. I tried to warm some chow
mein noodles using Auto Cook.
Why didn’t this work?
A.
Food must have some moisture
in order to create steam which
helps the auto sensor function.
Extremely dry foods such as chow
mein
noodles, potato chips and
other such foods do not have
enough moisture.
Q. May I use Auto Cook when I
am cooking many foods in more
than one dish or casserole?
A. No, because of different food
densities, attention needed during
cooking, and food amounts, it is
best to use Time Cook when
cooking many foods.
A. Bakery foods, candies, melted
chocolate or foods when a dry or
crisp surface is desirable, are
cooked best by Time Cook.
14
Page 15

Automatic Cooting Containers& Covers
Containers and covers
Appropriate containers and coverings
help assure good cooking results.
●
Always use microwave-safe
containers and cover them with
lids, wax paper or plastic wrap.
Wonder if it’s microwave safe? Put
it to the test described in your
cookbook.
●
Never use tight-sealing plastic
covem—they
can prevent steam
from escaping and cause food to
overcook.
● Match the amount of food to
the size of the container.
Fill
containers at least half full.
●
Be sure the outside of the
cooking
contiiner
and the inside
of the microwave oven are dry
before placing food in the oven.
Beads of moisture turning into
steam can mislead the sensor,
● Stir or rotate some foods after
a beeping signal. See Automatic
Cooking Control Guide and
reci~
on the following pages.
Use microwave-safe casseroles or
bowls for entrees and vegetables.
Cover with lids that fit. If lids are
not available, use plastic wrap or
wax paper. Plastic wrap should be
loose over fd to
tiow
for expansion.
Seal by pressing plastic wrap
firrrdy
around edges.
For frozen entrees in paperboard
trays, remove tray from box but do
not remove film over tray. Thick
entrees may take longer to
cook—
see guide on page 16.
For frozen foods in metal trays,
remove foil covering and baked
goods, reinsert tray into box and
close ends of box.
Use oblong or square containers for
chicken or corn on the cob. Plastic
wrap covering should be loose over
food to allow for expansion.
Sed
by
pressing plastic wrap
fifiy
around
edges.
Paper plates—while they may be
used for Time and Temperature
Cooking
and
Defrostin~,
do not use
them
w;th
automatic
;&king.
Use microwave-safe plates or bowls
for reheating. Cover with plastic
wrap or wax paper.
Follow Automatic Cooking Control
Guide setting for casseroles. Cover
casserole meat and vegetables with
I
I
sauce. Cool hot
ingredients
or sauces.
Slit plastic pouches 1 inch as shown
If they are not
co~l,
use TIME
above. Break food up thoroughly
COOK.
after oven signals.
15
Page 16

Automatic Cooting Control Guide
●
Do not open oven door during
Auto cycle. Door may be opened
after oven beeps and the countdown
time is displayed.
c
Match the amount of food
to the size of the container. Fill
containers at least 1/2 full.
●
Add 1/4-1/2 cup water to fresh
vegetables.
●
Most foods should be covered
with lid, wax paper or plastic wrap
to prevent spattering to keep oven
clean. Spareribs, pot roasts and
meat loaf should be covered tightly
to ensure even cooking.
. Be sure outside of container and
inside of oven are dry.
●
If food needs additional cooking,
return to oven and use Auto Cook
code 1.
. Add a “l” or “9” to code number
to adjust cook times to suit your
individual tastes. See page 13.
● Use of Automatic Cooking
feature with wire shelf is not
recommended.
N~E:
Oven will not accept Auto Cook code if the oven is hot. You must cool the oven before using
Auto Cook or you may choose to use time or temperature microwave
cooking.
Auto
Cook
Food
Code
Container
Approx.
Time
Comments
Canned Foods
Thin foods
such as
1
Microwave-safe
2-3 min./cup
Cover with lid to dish or wax paper.
soup, broth, gravy.
container matched to
size of food.
Thick foods such as
2
Microwave-safe
4 min.lcup
Cover with lid to dish or wax paper.
canned ravioli,
container matched to
chunky soups, beef
size of food.
stew,
all
canned
vegetables.
hftovers
2
Microwave-safe
4 min./cup
Cover with lid to dish or wax paper.
container matched to
size of food.
TV Dinners
5
Cook in container
8-10 min.
If foil tray is no more than 3/4” deep,
(except for those (see comments).
remove foil top, return to original box and
with pasta)
reclose box. If tray is more than 1“ deep,
Frozen Entrees
5
Cook in container
17-20 min.
remove food and place in microwave-safe
Such as lasagna, (see comments).
depending
dish and cover. If dinner is in paper board
meat & potatoes.
on size
container, remove from box and cook in
original container.
TV Dinners
3
Cook in container
8-10 min.
With pasta such as
If dinner has cake or brownies, remove
(see comments).
before cooking. When oven signals, rotate
macaroni in a white
tray or dish 1/4 turn.
sauce such as tuna
noodle casserole,
turkey
tetrazzini.
Casseroles
With precooked 4
2-3 qt. casserole with
12-16 min.
ingredients in a white lid to dish.
sauce such as tuna
noodle casserole,
turkey
tetrazzini.
All others with
5
2-3 qt. casserole with
18-22 min.
precooked ingredients
lid to dish.
such as franks and
beans, chow
mein.
With raw ingredients
6
2-3 qt. casserole with
16-24 min.
such as hamburger lid to dish.
patty stew, scalloped
potatoes, seafood
casseroles.
Chili
9
3-qt.
casserole with
25-40 min.
lid to dish.
16
Page 17

Auto Cook
Approx.
Food
Code Container
Time
Comments
Meats and Seafood
Chicken pieces (up to 3 lbs.)
6
12 x 8 x 2-in. glass 8-20 min. Cover with wax paper to prevent
dish spatters.
Fish fillets (1 lb.)
5
12 x 8 x 2-in. glass
6-9 min.
Cover with wax paper to prevent
dish
spatters.
Meat loaf (1% lbs.)
8
9-in. pie plate
25-30 min. Cover tightly with plastic wrap
to cook evenly.
Hamburger patties (4-5)
3
12 x 8 x 2-in. glass
7-9 min.
Cover with wax paper. When
dish oven signals, rotate dish 1/2 turn.
Sausage patties (1 lb.)
6
12 x 8 x 2-in. glass
7-9 min.
Cover with wax paper. When
dish
oven signals, rotate dish 1/2 turn.
Pork chops (4-1” thick)
8
12x 8 x 2-in. glass
22-25 min. Baste with barbecue sauce.
dish
Cover with wax paper tucking
ends securely under dish.
Spareribs (up to 3 lbs.)
7
13 x 9 x 2-in. glass
1 hr. 30
min.-
Cover tightly with plastic wrap
dish
1 hr. 45 min. to cook evenly. When oven
signals, rearrange ribs.
Swiss steak
(1%
lbs.)
7
3-qt.
casserole
60-65 min.
with lid
Chuck roast (up to 5 lbs.)
7
13 x 9 x 2-in. glass
65-90 min. Place in cooking bag with 1/2
dish
cup water. Slit bag 1“.
Shrimp (up to 1 lb.)
2
1
%-qt.
glass dish
4-6 min.
Cover tightly to ensure even
with lid cooking.
Rice
Regular, raw, 1 cup
6
2-qt. casserole
21-28 min.
Follow instructions on rice
with lid
package.
[nstant,
1 cup
2
2-qt. casserole
5-8 min. Follow instructions on rice
with lid
package.
Vegetables
Fresh such as carrots, artichokes,
4
2-qt. casserole
10-15 min.
Add 1/4 to 1/2 cup water.
cauliflower, broccoli, brussels
with lid
sprouts (1 lb. )
Baking potatoes 2-4
6
None
8-16 min.
Pierce with fork and place on
depending
oven floor in a circular
on number
arrangement.
Frozen block such as peas, green
2
1
%-qt.
casserole
8-10 min.
Add 2 tablespoons water.
beans, spinach, broccoli
with lid
Lima beans
3
1
Y2-qt.
casserole
12-13 min.
Add 1/4 cup water.
with lid
Frozen pouch such as broccoli in
3
Lay
pouch on
7-9 min.
Make 1“ slit in pouch. Stir well
:heese sauce, corn, peas
microwave-safe
before serving.
dish.
Fruit
Baked apples—4
2
2-qt. casserole
12-14 min.
Core apples and fill with butter
with lid
and brown sugar.
If after completion of Auto Cook cycle food needs additional warming,
simply
re<over food and use Auto Cook code 1.
17
Page 18

Automatic Cooking Meats and Main Dishes
Meat,
~h
& Poultry
For meat and fish loaves use
either the round or loaf
microwave-
safe containers. Fish loaves made
with precooked or canned fish use
Auto Cook code 4.
Beef loaf uses
Auto Cook code 8. Cover with
plastic wrap.
Chicken
breasb
and pieces, or
turkey parts should be placed in a
microwave-safe square or oblong
dish. Cover with wax paper.
If
cooking bag is used for whole
chicken, shield breast bone with
small strip of foil. Microwave
using Auto Cook code 6.
Wrk
Chops
automatically cook
well in 12 x 8 x 2-in. dish. Cover
with wax paper, tucking ends
securely under dish. Add barbecue
sauce or other sauce on each chop.
Microwave using Auto Cook code 8.
Fish fillets, whole fish or seafood
pieces should be in single layer
in flat pie plate or oblong dish to fit.
Cover with plastic wrap or wax
paper.
Use Auto Cook code 5 for
fillets and Auto Cook code 2 for
seafood pieces.
Chuck roasts
should be placed in
a microwave-safe dish with 1/2 cup
water. Cover with plastic wrap,
venting one corner. Use Auto
Cook code 7.
Spare ribs and brisket
should be
automatically cooked in an oblong
glass container. Cover with plastic
wrap. Make sure liquid covers meat.
Microwave using Auto Cook code 7.
How to
AApt
Microwave
Casserole Recipes
To adapt your casserole recipes for
Automatic Cooking.
1: Select recipes that do not
require adding ingredients at
different stages during cooking or
recipes that require extra attention,
stirring or rotating.
2: Use microwave-safe containers
that are appropriate in size to the
food amount. Use
3-qt.
containers
or smaller.
3: For saucy casseroles, cover
container with lid or wax paper (no
vents). For cheese or crumb-topped
casseroles, remove cover after oven
signals and add topping, then
continue cooking uncovered.
4: Allow precooked ingredients
or hot sauces to cool slightly before
adding other ingredients.
5: Meats and vegetables should be
submerged in liquid.
18
Page 19

Meat or Main Dish Recipes
Mexican Meatball
Casserole
Auto Cook Code 6
Approx. Cooking Time—27 min.
Makes 6 to 8 Servings
1 lb. ground chuck
1/2 cup dry bread crumbs
1/8
teaspoon pepper
112
teaspoon salt
1 teaspoon chili powder
3 tablespoons dry minced onions
1 egg
3 tablespoons ketchup
1/2 cup
instint
rice
1 can (15% oz.) kidney beans,
undrained
1 can
(141A
oz.) tomatoes,
chopped and undrained
1 tablespoon chili powder
In large mixing bowl, place meat,
bread crumbs, pepper, salt, chili
powder, onion, egg and ketchup.
Mix well and form into 12 balls.
Arrange balls in a circle in
2-qt.
casserole. Set aside.
In small mixing bowl, place rice,
beans, tomatoes and chili powder.
Mix well and pour in center of
casserole and over meatballs.
Cover. Microwave on Auto Cook
code 6.
Sweet Tart
~nks
Auto Cook Code 2
Approx. Cooking Time—10 min.
Makes about 80 hors d’oeuvres
1 jar (10 oz.) currant jelly
1 jar (6 oz.) prepared mustard
2 Ibs. frankfurters, cut into
l-in. pieces
In
3-qt.
casserole, stir together jelly
and mustard until well blended.
Add frankfurters, stirring to coat
each piece. Cover. Microwave on
Auto Cook code 2. When oven
signals, stir frankfurters.
Chicken Teriyaki
Auto Cook Code 9
Approx. Cooking Time—32 min.
Makes 4 Servings
1/4 cup soy sauce
1/3
cup honey
1/3 cup orange juice
1 whole chicken (about 3
lbs.)
1 tablespoon water
2 tablespoons cornstarch
In small cooking bag, mix soy
sauce, honey and orange juice. Add
chicken to bag and tie with plastic
tie. Turn chicken on its side in
12 x 8 x 2-in. dish. Marinate 1
hour on each side. Place bird breast
side up in dish. Slash bag near
closure. Microwave on Auto Cook
code 9. When oven signals, remove
chicken and prepare Teriyaki
sauce. In
l-pt.
glass measuring cup,
stir together water and cornstarch.
Cut off one corner of cooking bag
with scissors and drain juices into
cup. Microwave at High (10) 2
minutes. Remove chicken from bag
to serving platter. Pour sauce over
chicken just before serving.
Classic Ham
baf
Auto Cook Code 8
Approx. Cooking Time—36 min.
Makes 6 Servings
1 lb. ground cooked ham
1/2 lb. ground fresh pork
1/2 cup soft bread crumbs
1/2
cup water
2 tablespoons instant minced
onion
1/4 teaspoon pepper
Mix ground ham and pork
thoroughly with crumbs, water,
onion and pepper. Mold into flat
loaf in 9-in. pie plate. Cover with
plastic wrap. Microwave on Auto
Cook code 8.
Chicken and Rice
Auto Cook Code 9
Approx. Cooking Time—25 min.
Makes 6 Servings
1 can
(lOIA
oz.) condensed
cream of mushroom soup
1-1/4 cups milk (1 soup can full)
3/4 cup instant rice
1 can (4 oz.) mushrooms,
stems and pieces, drained
1 pkg.
(1V2
oz.) dry onion
soup mix
1 cutup chicken (about 3 Ibs.)
In small mixing bowl, mix soup
and milk; reserve 1/2 cup of the
mixture. Blend remaining soup
mixture, rice, mushrooms and half
of the onion soup mix. Pour into a
12 x 8 x 2-in. glass dish.
Place chicken pieces on rice
mixture, arranging with meatiest
pieces to outside of dish. Pour
reserved soup mixture over chicken
and sprinkle with remaining soup
mix. Cover with wax paper and
tuck securely under dish.
Microwave on Auto Cook code 9.
Swiss Steak
Auto Cook Code 7
Approx. Cooking Time—65 min.
Makes 6 Servings
1-1/2 Ibs. round steak, l/2-in.
thick, tenderized or
pounded with meat mallet
1/4 cup flour
1-1/2 teaspoons salt
1/8
teaspoon pepper
1 medium onion, sliced thin
1 can
(141A
oz.) tomatoes
Cut meat in 6 pieces and coat with
mixture of flour, salt and pepper.
Place in
3-qt.
casserole. Cover
with onion. Break up tomatoes
with fork and pour over top. Cover.
Microwave on Auto Cook code 7.
19
Page 20

Automatic Cooking Vegetables
Fresh or Canned
Vege@bles
Whole or large halves of
vegetables such as cauliflower or
squash use Auto Cook code 4. Use
round or square container close to
size of vegetable. Add 1/2 cup
water. Cover with lid or plastic
wrap.
Frozen Vegetables
Block or loose pieces of frozen
vegetables should be placed in
suitable size container (at least
half
full) and
covered with lid or plastic
wrap. Add 1 or 2 tablespoons
water. Microwave on Auto Cook
code 2. See Auto Cook Guide for
lima beans.
Pieces or slices of vegetables
Precooked/canned vegetables
require 1/4 to 1/2 cup of water. Use
should be placed in round
appropriate size covered container.
container similar in size to amount
Microwave on Auto Cook code 4.
being cooked (at least half full).
Dry root vegetables like carrots
Microwave on Auto Cook code 2.
may need to be stirred after oven
Stir before serving.
signals and time remaining appears
on display.
Re-cover
and touch
START to finish cooking.
Pouches of frozen vegetables
should be slit 1/2” in center before
placing directly on oven floor.
Microwave on Auto Cook code 3.
20
Page 21

Vegetible
Recipes
Stir
fiy
Vegetables
Auto Cook Code 31
Approx. Cooking Time—u min.
Makes 4 Servings
1 tablespoon oil
1 tablespoon soft butter
3 medium onions, quartered
1 small green pepper,
cut in l/4-in. wide strips
2 cups thinly-sliced cabbage
2/3 cup carrots, sliced in thin
diagonal slices
1/4 cup sliced green onions
1
cup broccoli flowerefi
1 cup cauliflower flowerets
2
stilks
celery, sliced
diagonally
Toss vegetables with oil and butter
in
2-qt.
microwave-safe casserole.
Cover. Microwave on Auto Cook
code 31, stirring well when oven
signals and time remaining appears
on display. Serve immediately.
Summer Garden Stew
Auto Cook Code 6
Approx. Cooking Time—34 min.
Makes 6 to 8 Servings
1 medium zucchini, cubed
2 large potatoes, peeled and
cubed
2 large carrots, coarsely grated
1 small
onion, cut in pieces
1/4 small head of cabbage, sliced
1 can
(103A
oz.) cream of
mushroom soup
1 block (8 oz.) pasteurized
processed cheese, cubed
1 can (4 oz.) mushroom pieces
1/2 pound smoked sausage, sliced
in l-inch pieces
In a
3-qt.
casserole dish, mix all
ingredients together until well
blended. Cover. Microwave on
Auto Cook code 6.
Corn
~dding
Auto Cook Code 3
Approx. Cooking Time—u min.
Makes 4 Servings
1 egg
1/2 cup milk
1 tablespoon sugar
1 can (16 oz.) cream-style corn
3/4 cup crushed crackers
2 tablespoon butter, cut
in pieces
paprika
Place egg in Iti-qt. casserole and
beat well with fork. Stir in milk,
sugar, corn, crackers and butter.
Cover. Microwave on Auto Cook
code 3. When done, center will be
just barely set. Sprinkle with
paprika before serving.
~plant Italiano
Auto Cook Code 5
Approx. Cooking Time—18 min.
Makes 4 to 6 Servings
1 medium eggplant
2 cans (8 oz. each) tomato
sauce
1 to 2 teaspoons oregano
1/2 cup shredded sharp
cheddar cheese
1 pkg. (6 oz.) Mozzarella
cheese slices
Peel eggplant; slice l/8-in. thick.
Spread 2 tablespoons tomato sauce
in bottom of
2-qt.
casserole. Layer
half of eggplant, 1 can tomato
sauce, half of oregano and half of
shredded cheese. Repeat layers.
Cover. Microwave on Auto Cook
code 5. Add Mozzarella cheese
and microwave at High (10) 1 to 2
minutes, until cheese has melted.
Green Rice
Auto Cook Code 6
Approx. Cooking Time—16 min.
Makes 4-6 Servings
1 pkg. (10 oz.) frozen
chopped spinach, thawed
and well drained
1-1/2 cups cooked rice
1/4 cup butter, melted
114
cup finely chopped onion
1-1/3 cups milk
1 egg, beaten
1/2 teaspoon salt
1 cup shredded cheddar
cheese
To cooked rice, add spinach,
butter, onion, milk, egg, salt and
cheese. Mix well. Cover and
microwave on Auto Cook code 6.
Let stand 5 minutes, covered,
before serving.
Country Style Yellow Squash
Auto Cook Code 5
Approx. Cooking Time—23 min.
Makes 4 to 6 Servings
1 teaspoon salt
2 pounds yellow squash, diced
1/4 cup onion, chopped
1/4 cup butter, melted
1/4 teaspoon pepper
1/4 teaspoon basil
3 slices fresh bread, cubed
1/2 cup shredded cheddar cheese
1 cup sour cream
8
strips crisply cooked,
crumbled bacon
In 2-qt. glass dish, mix together all
ingredients, using 1/2 of crumbled
bacon. Sprinkle top with remaining
bacon. Cover. Microwave on Auto
Cook code 5.
21
Page 22

Automatic
fiuik
Cooking
fiuik
and Desserts
Hneapple Casserole is a tangy
dessert or meat accompaniment.
In 12 X 8 x 2-in. dish, spread
2 cans (20 oz. ea.) draind pineapple
chunks,
1 cup sugar and 1/2 cup
flour. Top with mixture of 2 cups
buttery-flavored cracker crumbs
and 1/2 cup melted butter. Cover
with
wax
paper and cook on Auto
Cook code 6.
Baked Apples automatic cook
well
using Auto Cook code 2.
Match number of apples to size of
microwave-safe covered container.
Use Auto Cook code 2 for baked
pears also.
Stewed Fruit and Fruit Compotes
should be stirred well before
microwaving, especially if sugar is
added. Cover; use Auto Cook code
2 and stir once or twice after oven
signals and time appears on display.
Touch START and finish cooking.
Desse*
&
Bream
Nut Topped Cakes are easy to
cook automatically. Grease bottom
and
sides of microwave-safe fluted
cake container and sprinkle bottom
evenly with 1/3 cup chopped nuts
or coconut. Carefully pour batter
from one box (2-layer size) cake
mix over nuts, cover with wax
paper. Microwave on Auto Cook
code 69. When oven signals, rotate
dish 1/2 turn. Let stand 15 minutes
before inverting to cool.
Caramel Biscuit Ring: Spread
1/4
cup melted butter and 1/2 cup
brown sugar in 8-in. round
glass
dish. Sprinkle with cinnamon and
1/2 cup chopped nuts if desired.
Arrange 1 can (10 oz. ) refrigerated
biscuits around edges and place
drinking glass, open end up, in
center. Cover with plastic wrap.
Microwave on Auto Cook code 3.
Invert onto serving plate, letting
dish stand over ring a few minutes
before removing.
Q
..-’’ ’-—”-. .
.
.,
/
,... .,.
‘\,
...—,
--
,.
7
‘j
{;..<
.:--””/.::.’
.,,
,:.
<’:,,
----
.,&&<~~:y;:!:ti~
Bacon and Cheese Topped
Cornbread: Distribute 1/2
cup
chopped crisp fried bacon and
1 tablespoon Parmesan cheese in
greased 8-in. round glass dish.
Carefully pour batter from 1 pkg.
(8-1/2 oz.) cornbread mix over above
ingredients. Cover with wax paper.
Microwave on Auto Cook code 3.
Let stand 5 to 10 minutes before
inverting.
22
Page 23

Dessert Recipes
~sy
Chocolate Cake
Auto Cook Code 69
Approx. Cooking Time—14 min.
Makes 1 (lO-in.) Tube Cake
1 pkg. (2-layer size)
Devil’s
Food cake mix
3 eggs
1/2 cup cooking
oil
1-1/3 cups water
1/4 cup finely chopped pecans
In large bowl, place cake mix,
eggs, oil and water. Follow package
recommendations for mixer speed
and time.
Lightly grease a 16-cup plastic
microwave fluted or straight-sided
ring mold. Sprinkle chopped nuts
evenly over bottom. Pour batter
over nuts.
Cover with wax paper tucked under
dish and microwave on Auto Cook
code 69. When oven signals, rotate
dish
1/2
turn. Let stand in dish 5
minutes before inverting.
Cherry Cobbler
Auto Cook Code 3
Approx. Cooking Time—n min.
Makes 6 to 8 Servings
1 can
(20-22 oz.)
prepared
cherry pie filling
2
cups dry yellow or white
cake mix (1 pkg. [9 oz.] or
1/2 pkg. [17
OZ.])
1/4 cup melted butter
1/2 cup coarsely chopped nuts
1
teaspoon ground cinnamon
In 8-in. square dish, spread pie
filling.
In small bowl, mix together cake
mix, butter, nuts, and cinnamon
until crumbly. Sprinkle evenly
over cherries or in three rows so
cherries are visible. Cover with
wax paper and tuck under dish.
Microwave on Auto Cook code 3.
Mexican Bread Pudding
Auto Cook Code 59
Approx. Cooking Time—n min.
Makes about 6 servings
4 cups bread cubes, lightly
packed into cup
1/2
cup brown sugar
1/2 teaspoon cinnamon
1/4 teaspoon salt
1/2 cup raisins
1/4 cup chopped walnuts
1/4 cup slivered almonds
1/4 cup Jack cheese, cubed
1/2 chopped apple (3/4 to 1 cup)
1-314
cups milk
1/4 cup butter
2 eggs, beaten
Spread bread cubes evenly in
8-inch round dish. Mix sugar,
cinnamon, salt, raisins, walnuts,
almonds, cheese and apple
together. Sprinkle evenly over
bread cubes.
Measure milk into
l-qt.
measuring
cup. Add butter. Microwave at
High (10) 4 minutes, until butter is
melted. Rapidly stir in eggs with a
fork and mix well. pour over bread
mixture. Cover with wax paper.
Microwave on Auto Cook code 59.
Streuseled
Apples
Auto Cook Code 2
Approx. Cooking Time—10 min.
Makes 6 to 8 Servings
6 cups sliced, peeled apples
3/4
cup brown sugar
1/2 cup all-purpose flour
1/3 cup brown sugar
1/3
cup quick-cooking oats
1/4 cup butter
1/2
teaspoon cinnamon
In 8-inch square dish place apples
and
3/4
cup sugar.
With pastry blender mix flour,
1/3 cup sugar, oats, butter and
cinnamon until crumbly. Sprinkle
over top of apples. Cover with
plastic wrap. Microwave on Auto
Cook code 2.
Pineapple Upside
Down Cake
Auto Cook Code 69
Approx. Cooking Time—8 min.
Makes 1 (8-in. round) Cake
1/4 cup butter
1/3
cup brown sugar
1 can (8-1/4 oz.) pineapple
slices
4 maraschino or candied
cherries, cut in half
3/4 cup all-purpose flour
1/2
cup sugar
1-1/2 teaspoons baking powder
1/4 teaspoon salt
1/4 cup soft shortening
1 egg
1/3 cup liquid from pineapple
3/4 teaspoon vanilla extract
In 8-in. round dish place butter.
Microwave at High (10) 1 minute
until melted. Sprinkle sugar over
butter. Drain pineapple (save
liquid) on paper towels and arrange
in dish. Decorate with cherries.
Place a glass, open side up, in
center of dish.
In small mixer bowl, place flour,
sugar, baking powder, salt,
shortening, egg, liquid and vanilla.
Beat 3 minutes on lowest mixer
speed, scraping bowl constantly
first 1/2 minute. Carefully spread
batter over fruit in dish. Cover with
plastic wrap. Microwave on Auto
Cook code 69.
23
Page 24

Automatic Roasting
Auto Roast uses the temperature
probe to cook to the desired
serving temperature. Unlike
Temp
Cook/Hold, which uses a
single power level, Auto Roast
=
up to 3 power settings which
automatically switch during
roasting, thus providing even,
tender cooking resulb without
overcooking.
Just as in conventional
roastin~,
—
2. At 90°F., display switches to
show meat’s internal temperature.
only tender roasts should be
A~to
Place pork roast in cooking bag
Roasted until specified internal
and place in microwave-safe dish.
temperatures are reached. Less
tender roasts should be microwaved
by time, according to the cookbook
m
@
which comes with your oven.
Reparing Roas&
for
Auto Roasting
Place tender beef roast in cooking
bag on trivet in microwave-safe
dish. (Refer to manufacturer’s
instructions for proper use of
cooking bag.)
Inse~
probe through
cooking bag horizontally into the
center meaty area not touching
bone or fat. Make sure the handle
does not touch the food or top or
sides of the oven.
3.
Rice
during cooking program
oven will signal and
“TURn”
will
flash if codes 1 through 5 have been
selected. Open the door and turn
the meat over. The probe may be
disconnected from the receptacle
for easier turning of the meat
Place meat in oven with probe to
without interrupting the program.
the
right.
Insert cable end of
probe
(Remember tore-insert the probe.)
u
,
COOKING GUI
:“”; ~D DOOR
1.
Touch
AU~
ROAST pad.
“AUTO” appears on display and
“ENTER CODE” flashes. Touch
number pad 2. “CODE 2“ appears
on display and “START” flashes.
Touch START. Display shows
temperature and “CODE
2:’
display. Oven monitors internal
food temperature; automatically
switching to lower power as meat’s
temperature rises. This helps
prevent toughening or overcooking.
5. After find temperature is reached,
oven switches to Hold
temp
for up
to 1 hour, then shuts off.
24
4
Page 25

Auto
Romt
Guide
●
Use containers and coverings as directed at left. Place probe correctly in roast before cooking.
c
When oven beeps and flashes
“TURN1’
turn meat over.
●
Recommended codes are also shown inside oven on Auto Roast Guide.
Final
Approx.
Time
Hold*
Food
Code
Temp
(Min. per lb.)
Minutes
Beef
Tender Roast
Rare
1
130°
12-14
5-1o
Medium
2
140°
14-16
10-15
Well
3
165°
17-18
30
Wrk
Loin Roast
4
175°
18-20
20
Poultry
Whole Chicken (3
lbs.)
5
190°
13-15
20
Turkey Breast
4
175°
13-15
20
(Insert probe horizontally into meatiest area.)
*Recommended standing time before serving.
Automatic Simmer
(Auto Roast code 6)
Your cookbook has information
on automatic simmering, including
guides and recipes.
Total time includes time to bring
food to 180°F. and hold at that
temperature until done.
Set Automatic Simmer like Auto
Roast, example at left. Display
shows “COOL” until food is
90°F.,
then switches to show
food temperature until 180°F.
Automatic Simmer
(Auto Roast code 6)
Oven switches to Hold at 180°F.,
until you remove food and turn off
oven. If stirring is recommended,
you can reset oven by retouching
START. Touch CLEAR/OFF
after cooking.
Approx.
Food
Time/Hrs.
Beef
Pot Roast*
6-8
Stew
6-8
Chili
11-13
*For frozen, add 2 to 3 hours.
25
Page 26

Automatic
Defrosting
With the Auto Defrost feature,
the oven automatically sets the
defrosting time and power levels
for you. You choose the appropriate
code number from 1 to 6 for the
food you are defrosting, then enter
the fd weight in pounds and tenths
of a pound (See Conversion Guide
below) and touch START. The oven
calculates the defrosting time and
changes power levels during
defrosting to give even defrosting
results.
When the oven reaches approximately
half of the total defrosting time, the
display flashes
“TURN;’
telling
you to turn food over and will not
continue defrosting until door is
opened and START is touched
again.
After defrosting time is complete,
the oven automatically goes into a
holding period as shown on the
Automatic Defrosting Guide on
this page. This holding period is
necessary to finish the defrosting
of the interior
of the food.
How to Set Auto Defrost
N~E:
Before you begin, check
the Auto Defrost
code guide located
at the bottom of the oven when you
open the door. This guide shows
minimum and maximum food
weights for each code number.
You will need to know your food
weight and corresponding code
before beginning.
N~E:
If “ERROR” appears after
entering food weight, check the
Auto Defrost code guide to make
sure that weight corresponds to the
code number entered.
Step 1:
Remove frozen meat from
package and place in
microwave-
safe dish. Place in oven and close
door.
Step
2: Touch Auto Defrost pad.
“ENTER CODE” flashes on display.
3
5
Step 3: Touch number
pad4.
“CODE
4“
~nd “LBS.”
shows-on display.
“ENTER WEIGHT” flashes.
2
4
Step 4: Touch number pad 3 and
O for weight of 3
lbs.
Display shows
“3.01’ “CODE 4“ and “START”
flashes.
Step
5: Touch START pad. Defrost
time begins counting down on
display.
Automatic
Defrosti~
Guide
MIN.-MAX. HOLD
CODE WEIGHT
TIME*
1
.5–4.9 Ibs.
none
2
.5–3,9 Ibs.
none
3
.5–5.9 Ibs.
none
4
3.0–5.9
Ibs.
5
20
min.
3.0—5.9
Ibs.
20
min.
6
.5—3.9
Ibs.
none
Step
6: When 1/2 the defrosting
time is completed, the oven signals
and “TURN” flashes on display
instead of time counting down.
Open door and turn package over.
Step 7: Close door and touch the
START pad. Display shows remaining
defrosting time counting down.
Step 8: When defrosting time is
completed, oven automatically
switches
to a Hold period of 20
minutes for code 4. Hold time
counting down shows on display.
When holding time is finished oven
signals,
“End” flashes, and oven
turns off.
Conversion Guide
If the weight is stated in pounds
and ounces, the ounces must be
converted to tenths (.1) of a pound.
Ounces
Pounds
1-2
.1
3
.2
4-5
.3
6-7
.4
8
.5
9-1o
.6
11
.7
12-13
.8
14-15
.9
RECOMMENDED
FOOD
Chicken
pieces
+
* In Auto Defrost. it is
Fish “
I necessarvtoallow
the
I
Ground Beef
meat to stand during
Roasts, Bone in
bolding
time. You may
Roasts, Boneless
mke
the meat out of the
Steaks and Chops oven if you prefer,
26
Page 27

The Exhaust Feature
I
MEiAL
METAL
FILTER
FILTER
COOnOP/NIGHT
LIGHT
The exhaust hood
feature on your
microwave oven is equipped with
two metal filters which collect
grease. When the fan is operated,
air is drawn up through the filters
and is then discharged through the
provided venting to the outside.
The hood also has a light for
illuminating the counter space.
When NIGHT LIGHT pad is
touched, the hood light operates
at a lower intensity for use as
a night light.
To remove grease filter, grasp the
“finger hold” on the filter and
slide
to the rear.
Then pull filter downward and to
the front. The filter will drop out.
To replace grease filter, slide the
filter in the frame slot on the back
of the opening.
\-
Pull
filter
upward and to the front
to lock into place.
n
To clean grease filter, soak, then
agitate filter
in hot detergent
solution. Don’t use ammonia or
other alkali because it will darken
metal. Light brushing can be used
to remove embedded dirt. Rinse,
shake and remove moisture before
replacing.
Filters should be
cleaned at least once a month.
Never operate your hood without
the
filter in place.
In situations
where flaming might occur on
surfaces below hood, filter will
retard entry of flames into the unit.
Page 28

Care and Cleaning
Your new microwave oven is
a valuable appliance. Protect
it from misuse by following
these rules:
●
Keep your oven clean and
sweet-smelling. Opening the oven
door a few minutes after cooking
helps air-out the interior. An
occasional thorough wiping with a
solution of baking soda and water
keeps the interior fresh.
● Don’t use sharp-edged utensils
with your oven.
The inside and
outside oven walls can be scratched.
The control panel can be damaged.
● Don’t remove the mode stirrer
cover at the top of the oven
(microwave feature 6 on page 5).
You will damage the oven.
BE CERTAIN POWER IS OFF
BEFORE CLEANING ANY
PART OF THIS OVEN.
How to Clean the Imide
Walls, floor and mode stirrer
cover. Some spatters can be
removed with a paper towel, others
may require a damp cloth. Remove
greasy spatters with a sudsy cloth,
then rinse with
a damp cloth. Do not
use abrasive cleaners on oven walls.
NEVER USE A COMMERCIAL
OVEN CLEANER ON ANY PART
OF YOUR MICROWAVE OVEN.
Door (inside). Window: Wipe
up spatters daily and wash when
soiled with a damp cloth. Rinse
thoroughly and dry.
Metal and plastic parts on door:
Wipe frequently with a damp
cloth to remove all soil. DO
NW
USE ABRASIVES, SUCH AS
CLEANING POWDERS OR
STEEL AND PLASTIC PADS.
THEY WILL MAR THE
SURFACE.
Special note when using
Brown ‘N Sear Dish:
If grease
is present, high heat generated on
bottom of a Brown ‘N Sear dish
may cause the grease to burn onto
the oven floor. This may be removed
with a cleanser such as Bon
Ami@
brand cleanser.
After using this cleanser, rinse
and dry thoroughly, following
instructions on can. Do not use it
on the painted surfaces such as the
walls—it may scratch the paint.
Automatic Temperature Probe.
Probe is sturdy, but care should be
@ken
in handling. Do not twist or
bend; avoid dropping temperature
probe.
Clean as soon after using as possible.
To clean, wipe with sudsy cloth, then
rub lightly with plastic scouring
ball if necessary. Rinse and dry.
(Or wash in dishwasher.)
Shelf Accessory.
Your shelf
accessory is designed for use in a
microwave oven only; do not use in
a conventional oven. Do not use a
browning dish with the shelf.
Arcing could occur.
Clean shelf with mild soap and
water or in the dishwasher.
Do not
clean in a self-cleaning oven.
How to Clean the Outiide
Case.
Clean the outside of your
oven with soap and damp cloth,
rinse with a damp cloth and then
dry. Wipe the window clean with a
damp cloth. Chrome trim is best
wiped with a damp cloth and then
with a dry towel.
Control Panel.
Wipe with a damp
cloth. Dry thoroughly. Do not use
cleaning sprays, large amounts of
soap and water, abrasives, or sharp
objects on the panel—they can
damage it.
Door Surface. When cleaning
surfaces of door and oven that
come together on closing the door,
use only mild, non-abrasive soaps
or detergents applied with a sponge
or soft cloth.
Power Cord. If the cord becomes
soiled, unplug and wash with damp
cloth. For stubborn
spots, sudsy
water may be used, but be certain
to rinse with a damp cloth and dry
thoroughly before plugging cord
into outlet.
28
Page 29

Cooktop
Li@t/Ni@t Li@t
Oven Li@t
REMOVE SCREW
To replace combination
cooktop
light/night light,
first
disconnect
power at main fuse or circuit
breaker panel or pull plug.
To
replace
your oven light, first
disconnect power at main fuse
or circuit breaker or
pull
plug.
Remove screw on right side of light
Remove the top grill by
taking
out
compartment cover and lower cover
3 screws that hold it in place.
until it stops.
Be sure bulbs to be replaced are
cool before removing. Break the
adhesive seal by gently unscrewing
the bulbs. Replace with 40-watt
incandescent bulbs
(WB2X4253)
available from your GE supplier.
High intensity 40-watt bulbs
(40SllN/1) which are available in
supermarkets and hardware stores
may also be used for replacements.
Raise light compartment cover and
replace screw. Connect electrical
power to microwave oven.
I
Next, remove the single screw
located above door near center of
oven that secures light housing.
Replace burned-out bulb with a
30-watt GE bulb
(WB2X4235)
available from your GE supplier.
GROUNDING
INSTRUCTIONS
This appliance must be grounded.
In the event of an electrical short
circuit, grounding reduces the risk
of electric shock by providing an
escape wire for the electric current.
This appliance is equipped with a
power cord having a grounding
wire with a grounding plug. The
plug must be plugged into an outlet
that is properly installed and
grounded. (Fig. 1)
wARNING-Improper
use of the grounding plug can result
in a risk of electric shock.
-~
QQ
%
/
%
INSURE PROPER
GROUND EXISTS
Fig. 1
BEFORE USE
Consult a qualified electrician or
service technician if the grounding
instructions are not completely
understood, or if doubt exists as to
whether the appliance is properly
grounded.
Where a standard two-prong wall
receptacle is encountered, it is
detergent solution. About 1
tablespoon of ammonia may be
added to the water. Take care not
to touch the filters and enameled
surfaces with this. Ammonia will
tend to darken metal.
Clean
off the grease and dust on
your’ personal responsibility and
hood surfaces often. Use a warm
obligation to have it replaced with
a properly grounded three-prong
wall receptacle.
Do not under any circumstance
cut or remove the third (ground)
prong from the power cord.
Do not use an adapter plug with
this appliance.
Do not use an extension cord with
this appliance.
29
Page 30

Guide to Use of the Oven Shelf
●
Do not store or cook with metal
shelf on floor of oven. Product
damage may result.
●
Use pot holders when handling
metal shelf and cookware.
They may be hot.
●
Do not store or use microwave
browning dish on metal shelf.
●
Use of shelf with Automatic
Cooking is not recommended.
The two position wire shelf is
specifically designed for added
capacity heating and reheating in
your
Spacem&er@
microwave oven.
More than one food may be heated
or reheated and ready to serve at
the same time.
When microwaving with the oven
shelf, some techniques will differ
from the cookbook which came
with your oven. It is important to
arrange foods properly, and this is
shown on the next page. Cookware
size is important; select from
among the suggestions at right.
Also, food size should be
considered; foods over 31A inches
high, or 3 pounds are not
recommended for shelf cooking.
Batters and dough foods and also
uncooked foods which need to be
prepared from scratch should be
cooked without the oven shelf,
following cookbook directions.
(
1)
Y
Y
Use pot holders when handling
foods heated together with your
oven shelf, especially when heating
larger amounts of food in 8-inch
square or other 2-quart size
Cookware for Shelf
Heating and Reheating
Before placing food in the dishes,
check to see that they will
fit
together
on or under the shelf. Also, be sure
cookware is microwave safe.
;ookware
for heating or reheating
include 1 cup measu~ng cup,
-
8x4x3-inch loaf dishes, 9x5
x3-
inch
Ioafdishes or 9-inch pie plates.
Leftovers may be placed in small
individual ceramic or plastic bowls
or divided plates.
casseroles. Extra
s~eam
generated
Use wax paper or plastic wrap
from multiple food cooking may
instead of
lids
on casseroles. Lids
make cookware hotter than with
may add too much height to dish.
regular microwaving.
Positioning the Shelf
To insert shelf, tip the back slightly
and fit the shelf support guides
onto
the support guides located on each
side of rear oven wall.
Next, lower the front until the shelf
support guides fit
onto
the support
guides located at each side of the
oven in the front.
When properly positioned, the shelf
should-fit
snugly
in place.
Shelf has two positions. Use in low
position when heating two casseroles
or reheating frozen TV dinners or
entrees.
The high shelf position more evenly
spaces the area above and below the
shelf. Use this position for heating
plates of leftovers.
When properly positioned, the
shelf
should fit snugly in place,
be level and not touch the back
wall of the oven.
If arcing occurs when using the
shelf to cook more than one food
at the same time, turn the oven off.
Make sure the shelf is positioned
right-side-up on all four shelf
supports and not touching oven
walls.
30
Page 31

How to Heat or Reheat
Similar~pes
of Food
Two plates of leftovers
maybe
reheated together. Arrange thick
or
dense foods to outside edges of
plate and cover with plastic wrap.
Microwave at High (10) for 2 to 3
minutes. Reverse position of plates
(top to bottom) and rotate 1/2 turn.
Continue microwaving at High (10)
for 2 to 3 minutes. Continue
heating, if necessary, until hot.
Reheating two casseroles (height
should be less than 3 ‘h inches) is
possible. Cover with plastic wrap.
Use staggered arrangements of
food, placing
food on right side of
shelf and left side of floor. Refer to
Heating or Reheating Guide in
cookbook for suggested microwave
time per casserole and add the
times together. Microwave at High
(10) reversing position of foods (top
to bottom) after half of time. Also,
heat several small bowls of
leftovers this way, stirring and
reversing positions after half of time.
How to Reheat Several Different
~pes
of Foods Together
When heating several different
types of food together,
foods which
should be served hot must be placed
on the oven shelf, while foods
which are only warmed should be
placed on the floor. This is because
microwave energy enters the oven
from the top only. Also, it is
important to remember that foods
absorb microwave energy at
different rates. Rates can be affected
by the size of the food, and its
starting temperature.
Because of the varying rates, you
may need to start reheating a large
or dense food a few minutes ahead
of time, then add other smaller or
less dense foods. Alternately, if
one of the foods you are heating
seems undercooked but the others
are heated satisfactorily, let the
underheated
food continue cooking.
Heat or reheat different types of
food at High (10). To determine
heating times, add times for all
foods together. (See heating guide
in cookbook. ) After half of time,
stir or rearrange foods (do not
reverse positions). Check foods (top
shelf especially) after 3/4 of
total
time and remove any which are
done. Continue cooking others.
Two frozen individual entrees
(5 to 7 oz. each) or two TV dinners
(10 to U oz. each) are both ready to
serve at the same time. Remove
trays of food from their boxes and
turn back one corner of the plastic
cover to vent. If there are any foil
covers, remove them and return the
trays
of food to their boxes. (Batter
foods should be removed from the
trays and cooked conventionally. )
Place in oven with one TV dinner on
right shelf and the second dinner on
left floor. Microwave at High (10)
for 7 minutes. Reverse positions
(top to bottom) and rotate foods 1/2
turn. Continue microwaving at
High (10) for 7 minutes. Check
dinners for heating. If one dinner
seems less done than desired,
return it to the box and continue
heating on shelf 1 to 2 more minutes.
Place on shelf large or dense
foods
which need the most heating,
such as
lefiover
fried chicken,
casseroles of canned or leftover
vegetables, rice or pasta. Place on
oven floor those foods which need
only be warmed, such as bakery
pies, rolls, muffins or breads.
31
Page 32

-
m
Questiom?
-~’
Use This Roblem Solver
~
PROBLEM
POSSIBLE CAUSE AND REMEDY
OVEN
WILL
N~
●
A
fuse in your
home
may be blown or the circuit breaker tripped. Replace fuse or
COME ON
reset circuit breaker.
●
Make sure 3-prong plug on
oven
is fully inserted into wall receptacle.
CONTROL PANEL
●
Door not securely closed,
LIGHTED, YET OVEN
●
START must be touched
after
entering cooking selection.
WILL
N~ STA~
Q
Another selection entered already in oven and CLEAR/OFF
not
touched to cancel it.
●
Make sure you have entered cooking time
afier
touching
TIME
COOK I or
11.
●
CLEAR/OFF was touched accidentally. Reset cooking program and touch START.
●
Temperature probe not inserted properly or
not
being used during Auto Roast or
Temp Cook.
●
Make sure you have entered a desired finished temperature after touching TEMP
COOK/HOLD.
Make sure you entered a code number after touching
AU~
functions.
FOODS
ARE EITHER
●
Cooking times may vary because of starting food temperature, food density
OVERCOOKED OR
or amount of foods in oven. Touch TIME COOK I or II and additional cooking
UNDERCOOKED
time for completion.
●
Incorrect power
level
entered. Check cookbook for recommended power
level, or changing levels during cooking if necessary.
●
Dish was
not
rotated, turned or stirred. Some dishes require specific instructions.
Check cookbook or recipe for instructions.
●
Too many dishes in oven at same time. Cooking time must be increased
when cooking more than one food item. Check cookbook for recommendation on
increased time.
Q
Dish
not
completely covered as directed during Auto
Cook.
Q
Previous microwaving left humidity or moisture in oven, thus lessening
the
cooking
time in Auto Cook function.
*
Most vegetables are cooked to a crisp
stite
during Auto Cook, just as in regular
microwaving. Therefore, it is recommended that you let the vegetables stand for up to
5 minutes depending on size and density of pieces.
. Oven door was opened during
“AU~”
cycle of Auto Cook function.
●
Probe not inserted properly into meat or dish when using Temp Cook or
Auto Roast functions. Check cookbook or Auto Roast section of this book
for specific instructions.
32
Page 33

I
PROBLEM
I
POSSIBLECAUSEANDREMEDY
I
“ERROR” APPEARS
ON DISPLAY
*When
using
Temp Cook/Hold, a temperature less than
W°F.
or more than
199”F. has
been
entered.
*
Door is opened during “AUTO”
cycle
of Auto
Cook
function. Close door and touch
START.
* Weight
is incorrect for Auto Defrost code on guide, It is necessary to reset
oven.
●
When using
Clock,
you
have
not entered a valid clock time.
“PROBE” APPEARS
*
Probe has been forgotten or not seated properly in oven wall when using Temp
ON DISPLAY
Cook/Hold or Auto Roast functions.
~
these things are
normal
with
your
microwave oven:
.
●
Steam or vapor escaping from
●
Dull, thumping sound while
●
Some
TV-fidio
in~rference
around
the
door.
oven is operating,
might be noticed
while
using your
●
Light reflection around door or
* Dimming
oven
fight
and
chaage
microwave oven. It’s similar to the
outer case. in blower sound may occur while
interference caused by other
small
operating at power levels
other
appliances
and
does not indicate a
than
high.
problem with your oven.
If
you need more help.. call, toll free:
The GE Answer Center”
800.626.2000
consumer information service
33
Page 34

34
.
Page 35

If You Need Service
To obtain service, see your warranty
on the back page of this book.
We’re proud of our service and
want you to be pleased. If for some
reason you are not happy with the
service you receive,
here are three
steps to follow for further help.
FIRST, contact the people who
serviced your appliance. Explain
why you are not pleased. In most
cases, this will solve the problem.
NEXT, if you are still not pleased,
write all the details-including
your phone number—to:
Manager, Consumer Relations
GE Appliances
Appliance Park
Louisville, Kentucky 40225
FINALLY, if your problem is still
not resolved, write:
Major Appliance
Consumer Action Panel
20 North
Wacker
Drive
Chicago, Illinois 60606
35
Page 36

YOUR GENERAL ELECTRIC MICROWAVE OVEN
WARRANTY
Save
proof of original purchase date such as your sales slip or
cancelled
check to establish warranty period.
WHAT IS COVERED
FULL ONE-YEAR WARRANTY
For one year from date of original
purchase, we will provide, free of
charge, parts and service labor
in your home to repair or replace
any
part of
the
microwave
oven
that fails because of a
manufacturing defect.
LIMITED ADDITIONAL
NINE-YEAR WARRANTY
For the second through tenth
year from date of original purchase,
we will provide, free of charge, a
replacement magnetron tube if
the magnetron tube fails because
of a manufacturing defect. You pay
for the service trip to your home
and service labor charges.
This warranty is extended to
the original purchaser and any
succeeding owner for products
purchased for ordinary home use
in the 48 mainland states, Hawaii
and Washington,
D.C.
In Alaska the
warranty is the same except that it is
LIMITED because you must pay to
ship the product to the service shop
or for the service technician’s travel
costs to your home.
All warranty service will be provided
by our Factory Service Centers or
by our authorized Customer Care”
servicers during normal working
hours.
Look in the White or Yellow Pages
of your telephone directory for
GENERAL ELECTRIC COMPANY,
GENERAL ELECTRIC FACTORY
SERVICE, GENERAL
ELECTRICHOTPOINT FACTORY SERVICE or
GENERAL ELECTRIC CUSTOMER
CARE@ SERVICE.
WHAT IS N~ COVERED
● Service trips to your home to
teach you how to use the product.
Read your Use and Care material.
If you then have any questions
about operating the product,
please contact your dealer or our
Consumer Affairs office at the
address below, or call, toll free:
GE Answer Center”
800.626.2000
consumer information service
● Replacement of house fuses or
resetting of circuit breakers.
,.
● Failure of the product if it is used
for other than its intended purpose
or used commercially.
. Damage to product caused
by accident, fire, floods or acts
of God.
WARRAN~R
IS
NOT
RESPONSIBLE
FOR CONSEQUENTIAL DAMAGES.
● Improper installation.
If you have an installation problem,
contact your dealer or installer.
You are responsible for providing
adequate electrical, gas, exhausting
and other connecting facilities.
Some states do not allow the exclusion or limitation of incidental or consequential damages, so the above limitation or exclusion
may not apply to you. This warranty gives you specific legal rights, and you may also have other rights which vary from state to state.
To know what your legal rights are in your state, consult your local or state consumer affairs office or your state’s Attorney General.
Warrantor: General Electric Company
If further help is needed concerning this warranty, write:
Manager—Consumer Affairs, GE Appliances, Louisville, KY 40225
Part No. 164 D2092P112
JVM152H
[
“-””-””-”“-
‘----” -
I
Pub.
No.
49-8084
Printed in
Kore:
2-90
CG
 Loading...