

Page 1
SpacemakefMicwwe
Oven
Contents
Adapter Plugs
29
Microwaving Tips
3
Aluminum Foil
4
Minute/Second Timer
9
Appliance Registration
2
Model and Serial Numbers
2
Auto Cook
19-24
Oven Shelf
5,26,27
Auto Defrost
16, 17
Power Levels
9-12
Auto Reheat
14, 15
Precautions
2-5
Auto Roast
12, 13
Problem Solver
Auto
Stirt
11
Recipes, Cooking Tips
21-::
Auto Simmer
Safety Instructions
2-5
Care and Cleaning
28,
;:
Temperature
C;ook
11
Consumer Services
31
Temperature Probe
11-13
Control Panel 6.7
Time Cook
10
Cook ‘N Watch
10
Time Defrost
18
Cooking Complete Reminder 8
Warranty
Back Cover
Delayed Cooking
9
Exhaust Fan
6,29
Extension Cords
29
Features
8
Grease Filter
29
Grounding Instructions
29
Hold Time
9
GEAmw W@
Light Bulb Replacement
28
8~.~2W
GEAppianc~
Page 2
Help us help you...
Before using your oven,
read this book carefully.
It is intended to help you operate
and maintain your new microwave
oven properly.
Keep it handy for answers to your
questions.
If you don’t understand something
or need more help, write (include
your phone number):
Consumer Affairs
GE Appliances
Appliance Park
Louisville, KY40225
Write down the model
and serial numbers.
You’ll find them on a label inside
the oven.
These numbers are also on the
Consumer Product Ownership
Registration Card that came with
your microwave oven. Before
sending in this card, please write
these numbers here:
Model Number
Serial Number
Use these numbers in any
correspondence or service calls
concerning your microwave oven.
Be sure your microwave
oven is registered.
It is important that we know the
location of your microwave oven
should a need occur for adjustments.
Your supplier is responsible for
registering you as the owner.
Please check with your supplier to
be sure he has done so; also send in
your Consumer Product Ownership
Registration Card. If you move, or
if you are not the original purchaser,
please write to us, stating model
and serial numbers.
This
apphance
must be registered.
Please be
certiin
that it is.
Write to:
GE Appliances
Range Product Service
Appliance Park
Louisville,
KY40225
If you received a
damaged oven . . .
Immediately contact the dealer (or
builder) that sold you the oven.
Save time and money.
Before you request service...
check the Problem Solver on page 30.
It lists causes of minor operating
problems that you can correct yourself.
All these things are normal
with your microwave oven.
● Steam or vapor escaping from
around the door.
c
Light reflection around door or
outer case.
●
Dimming oven light and change
in blower sound may occur while
operating at power levels other
than high.
●
Dull thumping sound while oven
is operating.
●
Some TV-Radio interference
might be noticed while using your
microwave oven. It’s similar to the
interference caused by other small
appliances and does not indicate a
problem with your oven.
If you need service . . .
To obtain service, see the
Consumer Services page in the
back of this book.
We’re proud of our service and
want you to be pleased. If for some
reason you are not happy with the
service you receive, here are three
steps to follow for further help.
FIRST, contact the people who
serviced your appliance. Explain
why you are not pleased. In most
cases, this will solve the problem.
2
NEXT, if you are still not pleased,
write all the details-including
your phone number–to:
Manager, Consumer Relations
GE Appliances
Appliance Park
Louisville, Kentucky 40225
FINALLY, if your problem is still
not resolved, write:
Major Appliance
Consumer Action Panel
20 North
Wacker
Drive
Chicago, Illinois 60606
PRECAUTIONS
TO AVOID
POSSIBLE
EXPOSURE
~
EXCESSIVE
ENERGY
(a) Do Not Attempt
to operate
this oven with the door open since
open-door operation can result in
harmful exposure to microwave
energy. It is important not to
defeat or tamper with the safety
interlocks.
~)
Do Not Place
any object
between the oven front face and
the door or allow soil or cleaner
residue to accumulate on sealing
surfaces.
(c)
Do Not Operate
the oven
if it is damaged. It is particularly
important that the oven door close
properly and that there is no
damage to the:
(1) door (bent)
(2) hinges and latches (broken or
loosened)
(3) door seals and sealing surfaces.
(d) The Oven Should Not
be
adjusted or repaired by anyone
except properly qualified service
personnel.
Page 3
Microwaving Tips
●
Make sure all cookware used in
your microwave oven is suitable
for microwaving.
Most glass
casseroles, cooking dishes,
measuring cups, custard cups,
pottery or china dinnerware which
does not have metallic trim or glaze
with a metallic sheen can be used.
Some cookware is labeled “suitable
for microwaving.”
If you are not sure if a dish is
microwave-safe, use this test:
Place in the oven both the dish you
are testing and a glass measuring
cup filled with one cup water—set
the measuring cup either in or next
to the dish. Microwave 1 minute at
high. If the dish heats, it should not
be used for microwaving. If the dish
remains cool and only the water in
the cup heats, then the dish is
microwave-safe.
s Hper
towels, wax paper and
plastic wrap
can be used to cover
dishes in order to retain moisture
and prevent spattering. Be sure to
vent plastic wrap so steam can
escape.
●
Some microwaved foods
require stirring,
rotiting
or
rearranging.
Check the cookbook.
● Steam builds up pressure in
foods which are tightly covered
by a skin or membrane. Pierce
potatoes, egg yolks and chicken
—
livers to prevent bursting.
I~OmNT
S~ETY
INSTRUCTIONS
Read all
imtructions
before
us~
this appliance.
When using electrical appliances,
basic safety precautions should be
followed, including the following:
WARNING–To reduce
the risk of burns, electric shock,
fire, injury to persons or exposure
to excessive microwave energy:
●
Use
this appliance only for its
intended use as described in this
manual.
. Read and follow the
specific
“PRECAUTIONS ~ AVOID
POSSIBLE EXPOSURE
~
EXCESSIVE MICROWAVE
ENERGY” on page 2.
●
This appliance must be
grounded. Connect
ody
to
properly grounded outlet. See
“GROUND~G~STRU~ONS”
on page
294
●
This microwave oven is
specifically designed to heat or
cook food, and is not intended
for laboratory or industrial use.
*
For best operation, plug this
appliance into its
own
electrical
outlet, to prevent flickering of
lights, blowing of fuse or
tripping of circuit breaker.
. Install
or
locate this
appliance
only in accordance with the
provided
htition btructions.
●
Do
not cover or block any
openings on the appliance.
●
Do not use outdoors.
Q
Do not immerse power cord
or plug in water.
●
~ep
power cord away from
heated surfaces.
●
Do not let power cord hang
over edge of table or counter.
●
Do
not operate this
apptice
if
it has a damaged power cord or
plug, if it is not working properly,
or if it has been damaged or
dropped,
3
—
●
See door surface cleaning
instructions on page 28.
.
This
appliance should be
serviced
ody
by
q~ed
service
personnel.
Contact nearest
authorized service facility for
examination, repair or adjustment,
. k
with
any appliance
close
supervision is necessary
when
used by children.
●
TO reduce the risk of f~e in
the oven cavity:
–Donot overcook food,
CareMy
attend appliance if paper, plastic,
or other combustible materials are
placed inside the oven to
Qcditate
cooking.
–Remove wire twist-ties from
paper or plastic bags before
placing bags in
oven.
–Do
not
use your microwave
oven
to
dry newspapers.
–Do not use recycled paper
products, Recycled paper towels,
napkins and wu paper can
contain metal flecks which may
cause arcing or ignite,
Paper
products containing nylon or
nylon filaments should be
avoided, as they may also ignite.
–Do not
pop
popcorn in your
microwave oven
udess
in a special
microwave popcorn accessory or
udess
you use popcorn labeled for
use in microwave ovens.
–Do not operate the
oven while
empty to avoid damage to the
oven and the danger of
fire.
If
by accident
the
overt
should run
empty a minute or two, no harm
is done. However, try to avoid
operating the oven empty at all
times—it saves energy and
prolongs the life of
the
oven.
–Do not overcook potatoes.
They could dehydrate and catch
fire, causing damage
to your oven.
Page 4
IMPORTANT
SWETY
INSTRUCTIONS
(continued)
o
Ifm~t~~~~
i~ide
ov~~
sh~uld
~@
k~p
oven door clew,
mm
oven
off, and disconnect power
cord, or shutoff power at the fise
or
circuit breaker
panel.
●
Some
products
such
as whole
*S
and sealed containers-for
example,
closed
jm—w~
e~lode
and should
not be heated in this
microwave oven. Such
use
of
the
microwave
oven could
result in
injury+
Q Avaid
heating
baby
food in
glass
jars,
even
without their lids;
especially meat and egg mixtures.
o
~~)t
debt -~
beverages
in narrow
necked
botties (espocidy
carbonated
beverages). Even if the container
is o~ned,
pressure can buildup.
This can cause
the
container to
burst, possibly
resulting in injury,
*
Use
rneti
ordy
as
directed in
this book and the cookbook
provided.
TV dinners maybe
microwaved in
foii trays
less
than
3/4” high; remove top
foil
cover
and return
tray
to
box. Wben
using
rneti
in
the
microwave
oven,
keep
meti
(other than
metal
shel~
at
least
1
inch
away from
sides of oven.
●
Cookware
may borne hot
because of
heat
transferred from
the
heated
food. Pot holders may
,be nded
to handle the cookware.
*
Sometimes,
the
oven floor can
become too
hot
to touch.
Be
carefil
touching the
fioor
during
and
a%r
cooking.
* Foods
cooked in liquids
(such
as pasta) may tend to boil over
more
mpidiy
than-containing
less moisture. Should this occur,
tier to page
28
for instructions on
how to clean the inside of the oven.
●
Thermometer—Do not use
a thermometer in food you
are
microwaving
urdess
the
thermometer is designed or
recommended for use in the
microwave oven.
.
Remove the
temperature
pm~
from the oven when not using it
to cook with.
If you leave the
probe inside the oven without
inserting
h
in food or liquid, and
turn on microwave energy, it
can
create electrical arcing
in
the
oven and damage oven walls.
●
Plastic cookware-Plastic
cookware designed for microwave
cooking is very useful, but should
be used
carefilly.
Even
micmve-
safe plastic may not be as tolerant
of overcooking conditions as are
glass or ceramic materials and
may
sofien or
char if subjected to
short periods of overcooking. In
longer exposures to overcooking,
the food and cookware could
ignite. For these reasons: 1) Use
microwave-safe plastics
ordy
and
use them in strict compliance
with
the
cookware manufacturer’s
recommendations. 2) Do not
subject empty cookware to
microwaving. 3) Do not permit
children to use plastic cookware
without complete supervision.
*
men
cooking pork, follow
the directions exactly and always
cook the meat to an internal
temperature of at least
170°F.
This assures that, in the remote
possibility that trichina may be
present in the meat, it
wfil
be
killed and meat
wi~
be safe to eat.
●
Do
not
boii
eggs in
a microwave
oven.
Pressure
WM budd
up inside
egg yolk and
wfll
cause it to burst,
possibly resulting in injury.
4
●
Foods with unbroken outer
“skin”
such as potatoes, sausages,
tomatoes, apples, chicken livers
and other giblets, and egg yolks
(see previous caution) should be
pierced to allow steam to escape
during cooking.
.
Not all
plastic wrap
is suitable
for use in microwave ovens.
Check the package for proper use.
.
~~Boilable” cwking
pouches
and tightly closed plastic bags
should be slit, pierced or vented
as directed by package. If they are
not, plastic could burst during
or immediately after cooking,
possibly resulting in injury. Also,
plastic storage containers should be
at least
partMy
uncovered because
they form a tight seal. When
cooking with containers tightly
covered with plastic wrap, remove
covering
carefi~y
and direct steam
away from hands and face.
*
Spontaneous boiling—Under
certain special circumstances,
liquids may start to boil during or
shortly
afier
removal from the
microwave oven. To prevent burns
from splashing liquid, stir the
liquid briefly before removing the
container from the microwave oven.
Page 5
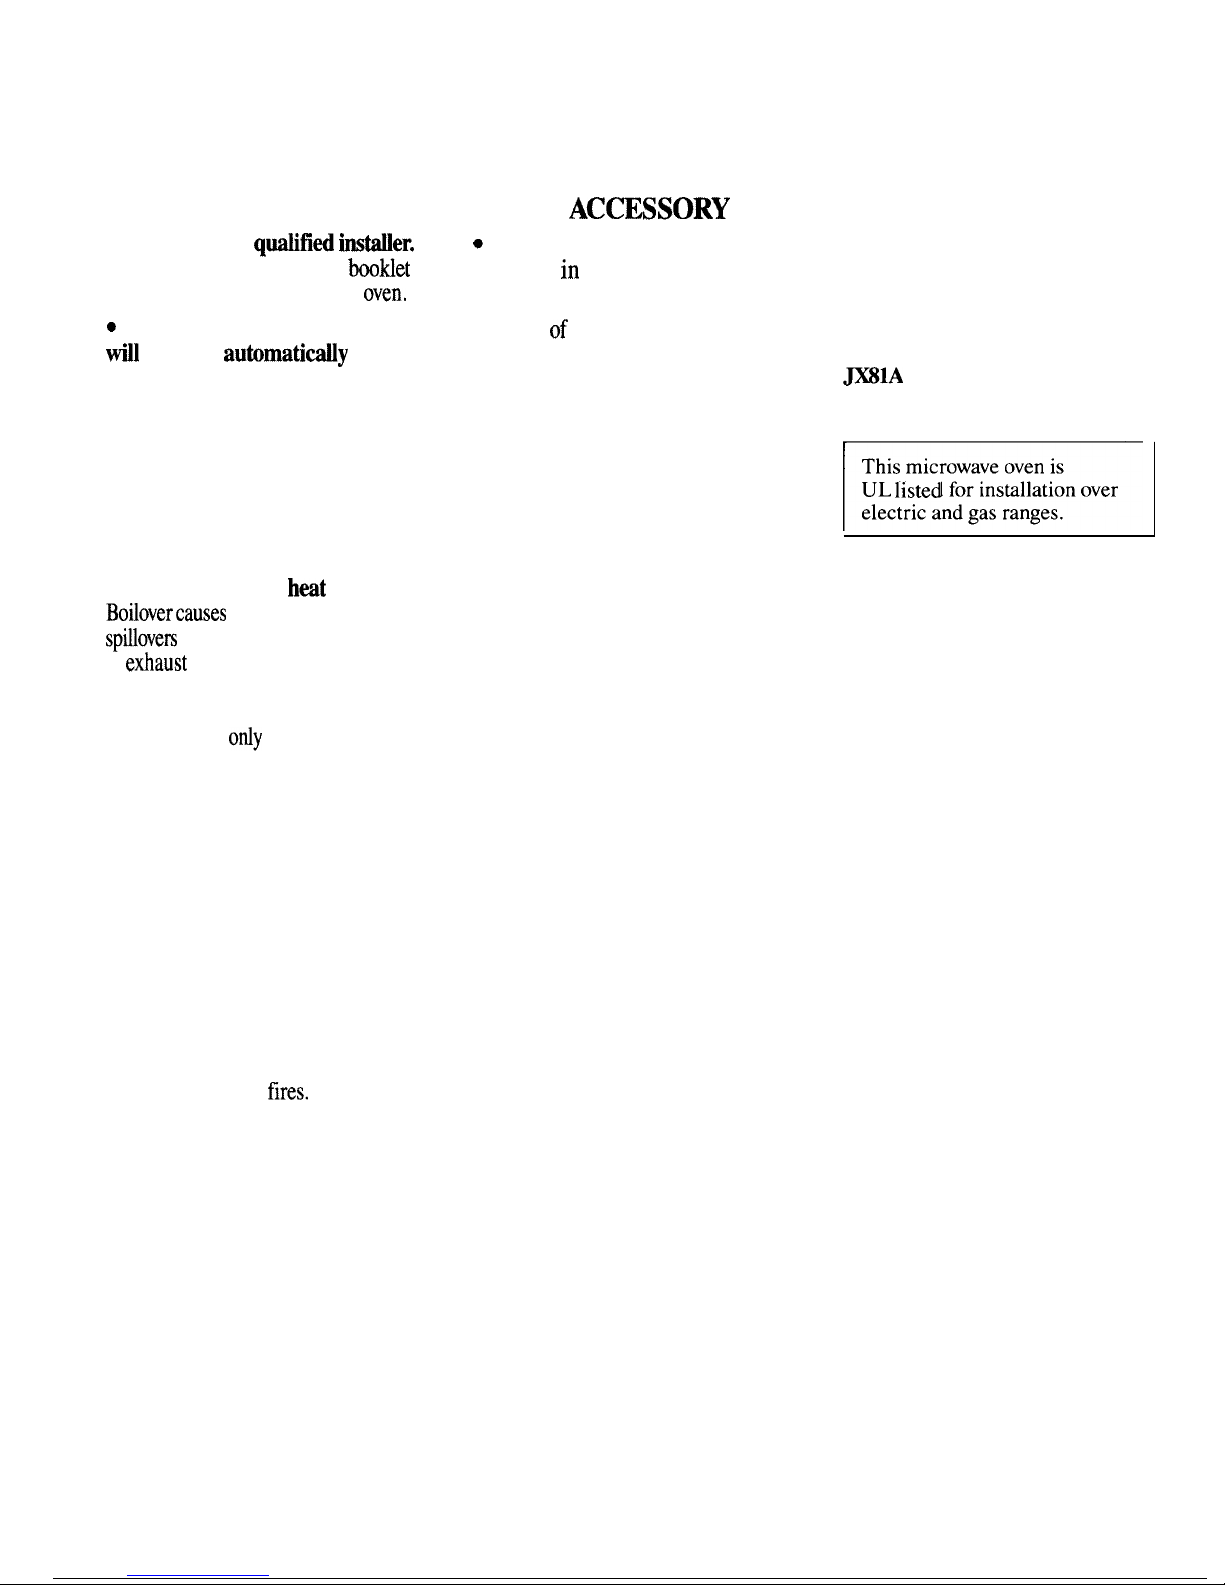
THE EXHAUST HOOD
●
Have
it installed and properly
grounded by a
qtified instier.
See the special initiation
boo~et
packed with the microwave
oven,
s
The exhaust fan in the oven
til
operate
automatidy
under
certain conditions (see Automatic
Fan Feature, page 6). While the
fan is operating, caution is
required to prevent the starting
and spreading of accidental
cooking fires while the exhaust
fan is in use. For this reason:
–Never leave surface units
unattended at high
h~t
settings.
Boilovercauses
smoking and greasy
spdlovers
that may ignite and spread
if efiaust fan is operating. To
minimize automatic fan operation,
use adequate sized cookware and
use high heat
ordy
when necessary.
—In the event of a grease fire,
smother flaming pan on surface
unit by covering pan completely
with well-fitting lid, cookie sheet
or flat tray.
–Never flame foods under
the oven with the exhaust fan
operating because it may spread
the flames.
–Keep hood and grease filters
clean, according to instructions on
page 29, to maintain good venting
and avoid grease
fires.
USE OF THE OVEN
SHELF
AC~SSORY
c
Remove the shelf from oven
when not
in
use.
●
Do
not store or cook with shelf
on floor of oven. Product damage
may result.
●
Use potholders to handle shelf
and cookware. They may be hot.
●
Do not use microwave browning
dish on shelf; the shelf could
overheat.
Do not
use shelf with
Automatic Cooking feature.
SAVE THESE
INSTRUCTIONS
Optional Accessory
Available at extra cost from your
GE supplier.
~lA
Charcoal Filter Kit
for
non-vented installation.
r
UL
llsted
for Installation over
5
Page 6

Your Touch Control
Wnel
The Touch Control Panel allows you to set the oven
controls electronically with the touch of a finger.
It’s
designed to be easy to use and understand.
When You Plug in the Oven
The display panel displays five 8’s, 18 POWER and all of
the oven functions.
Afier 15 seconds, all lights disappear
and “RESET” appears in the upper portion. Touch the
CLEAR/OFF pad, set the CLOCK and oven is ready
for use.
If power is disrupted at any time, the above sequence
recurs, and you must reset CLOCK
afier touching the
CLEAR/OFF pad.
“Error” Appears on the Display:
● During Auto Cook or Auto Reheat program,
the door was opened before steam could be detected.
“PRObE” Appears on the Display
●
Probe has been forgotten when Auto Roast or
Temp
Cook/Hold function is being used.
●
Probe is not securely seated in oven wall receptacle.
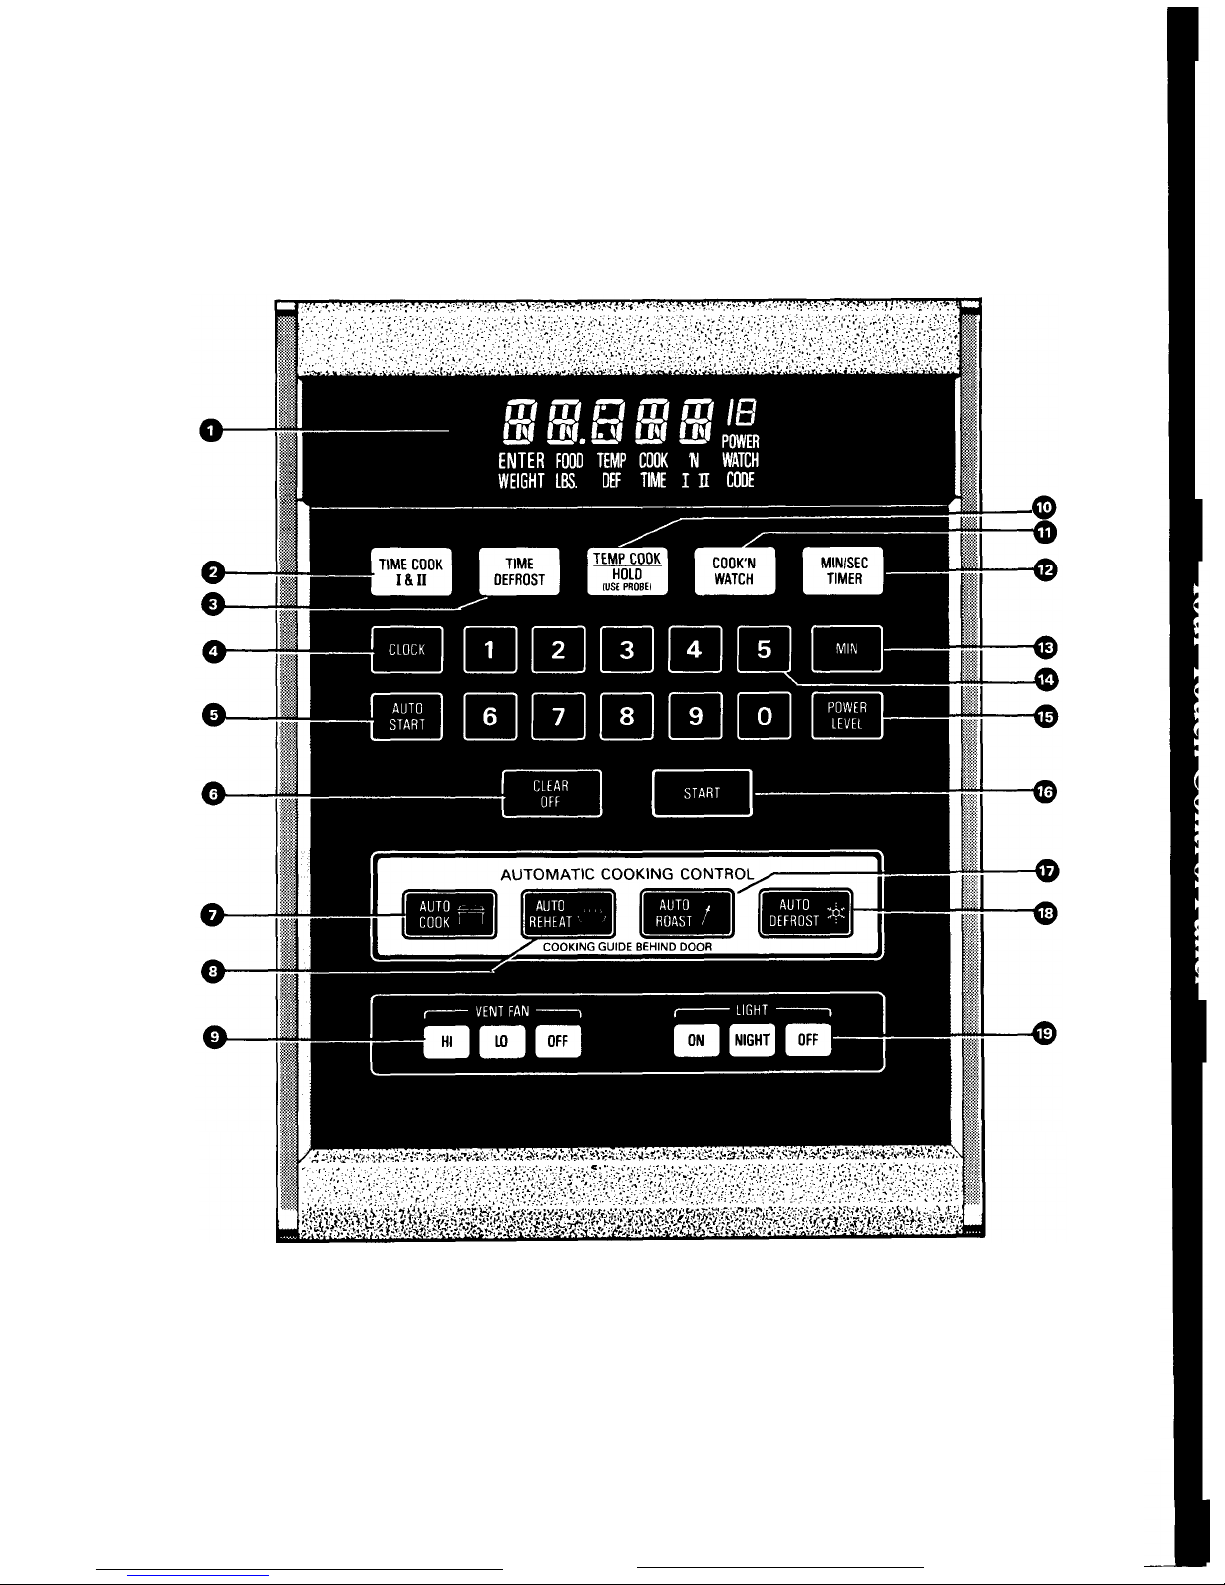
1. DISPLAY.
Displays time of day, time or temperature
during cooking functions, power level being used,
cooking mode and instructions.
2. TIME COOK I & II. Microwave for a preset amount
of time using automatic power level 10. (If desired, you
may change power level after entering cooking time. See
page 10.)
3. TIME DEFROST.
Gentle thawing at automatic power
level 3 (Low). (If desired, you may change power level
after entering defrosting time. See page 18. )
4. CLOCK.
Touch this pad to enter time of day or check
time of day while microwaving. To set clock, first touch
CLOCK pad and then enter time of day. For example, if
time is
1:30,
touch number pads 1, 3 and O and
“1:30”
will appear in display. Then touch START pad. To reset
or change time, simply repeat above process.
5.
AUTO START.
Allows you to program your oven to
begin cooking at a preset time of day—up to a 12-hour
delay. (See page 11.)
6.
CLEAR/OFF.
When touched, it shuts off the oven
and erases all settings (except time of day).
7. AUTO COOK.
Touch this pad and then number pad
for desired code number. The oven automatically
microwaves at pre-programmed power levels, determines
the proper amount of cooking time until the food is done
and shuts off. (See page 19. )
9. EXHAUST FAN. Press HI, LO or OFF for the
different fan speeds.
10. TEMP COOK/HOLD. Use the temperature probe to
cook by using a preset temperature. Once food reaches
preset temperature, oven switches to HOLD setting and
maintains that temperature until you touch the
CLEAR/OFF pad. (See page 11.)
U.
COOK ‘N WATCH.
Use this pad for short-term
cooking which automatically turns oven off after 3
minutes. (See page 10.)
U.
MIN/SEC TIMER. This feature uses no microwave
energy. It functions as either a kitchen timer, as a holding
period after defrost or as a delay timer before time or
temperature cooking. (See page 9.)
~.
MIN. Use with number pads to enter whole minutes.
For example, for 4 minutes touch 4 and MIN.
14.
NUMBER PADS.
Touch these pads to enter cooking
time, defrosting time, time of day, temperature, power
level, Auto Codes or food weights for Auto Defrost.
15.
POWER LEVEL.
Touch this pad before entering
another power level number if you want to change from
automatic power level 10 (High) for cooking or power
level 3 (Low) for defrosting.
16.
START.
After all selections are made, touch this pad
to start the oven.
17.
AUTO ROAST.
Insert probe, touch this pad and then
number pad for desired code number to slow-cook or
temperature cook meat with automatic preset program.
(See pages 12 and 13.)
18.
AUTO DEFROST.
Touch this pad and food weight.
The oven automatically sets power levels and defrosting
time. (See page 16.)
N.
LIGHT.
Touch desired pad to illuminate counter or
to turn on night light.
AUTOMATIC FAN
FEAT=
Cooking appliances installed under the oven may,
under some heavy usage conditions, cause temperatures
high enough to overheat some internal parts of the
microwave oven.
To prevent overheating from taking place, the exhaust
fan is designed to automatically turn on at a low speed if
excessive temperatures occur. Should this happen, the fan
can not be manually turned off, but it will automatically
turn off when the internal parts have cooled. The fan may
stay
on
up to approximately 30 minutes after the range
and microwave oven controls have been turned off.
8.
AUTO REHEAT.
Touch this pad, Code 1 or 2 and
START for quick reheating of prepared foods. (See pages
14 and 15.)
6
Page 7
7
Page 8
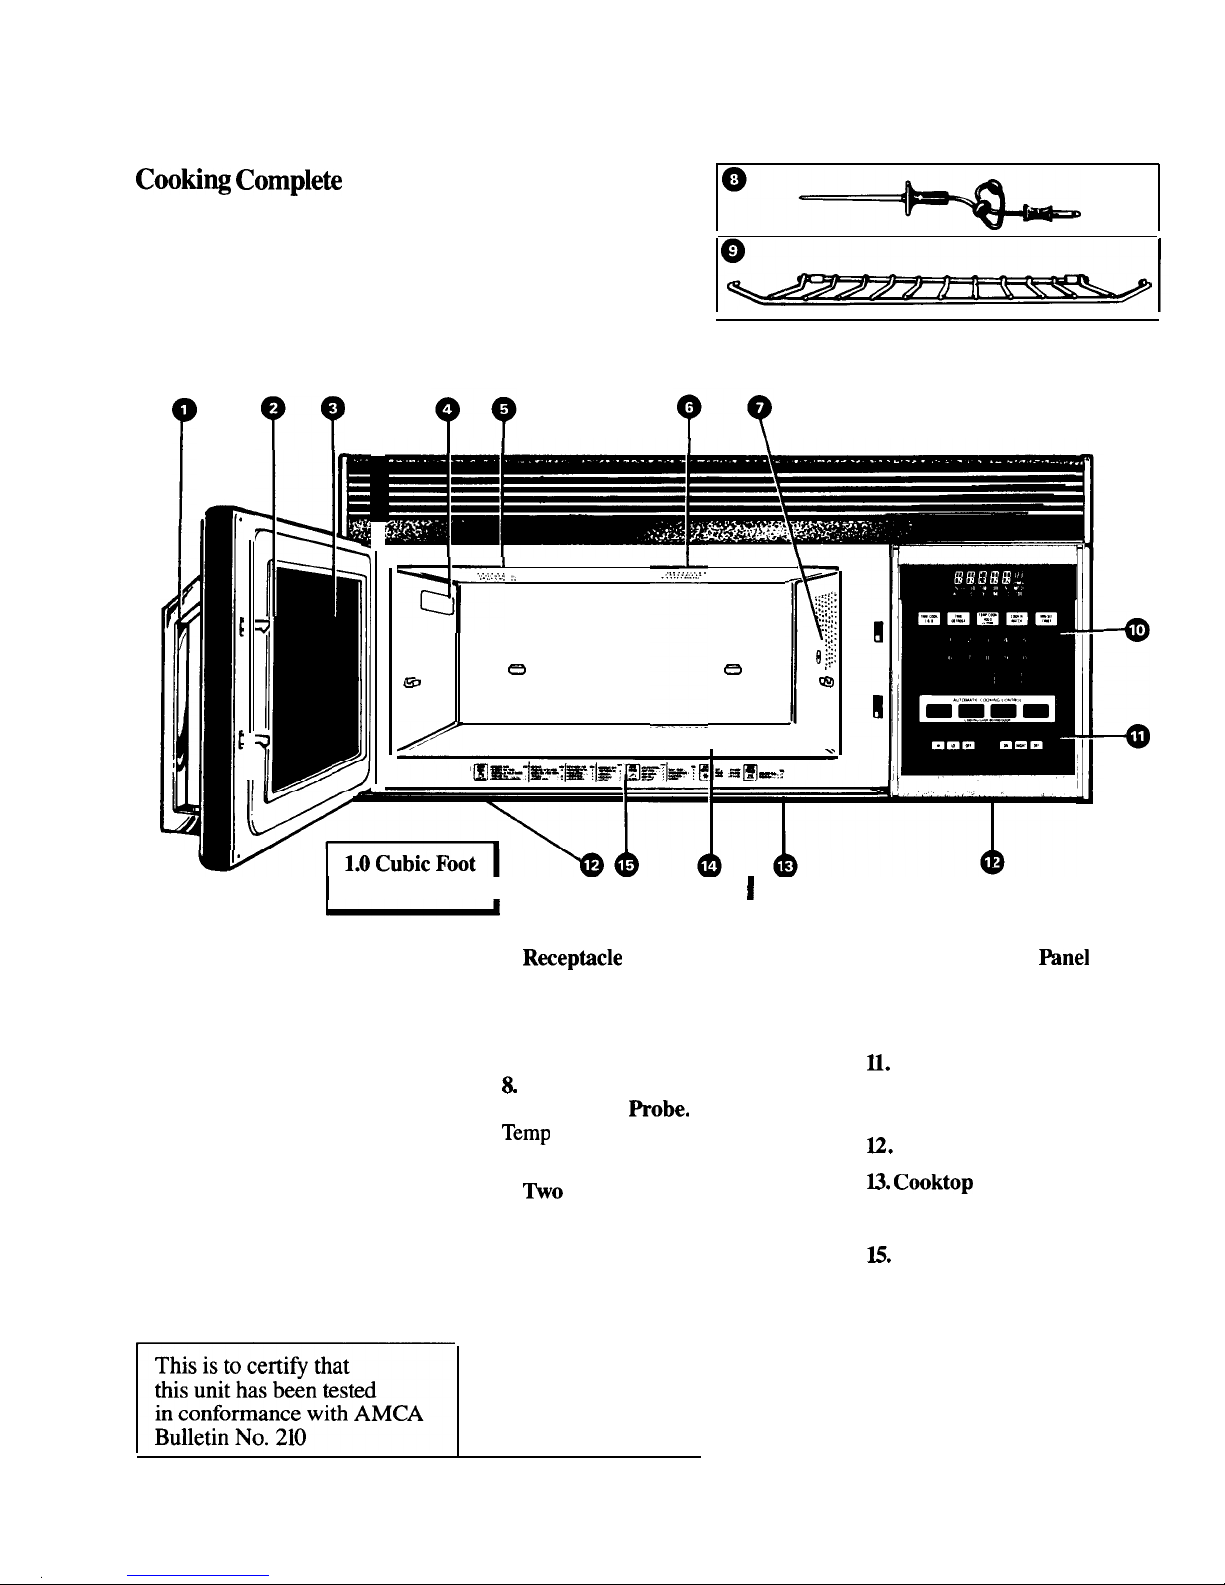
Features of Your Microwave Oven
CootiW
Complek Reminder
(For all cooking features except Auto Roast Code 4.)
‘~
To remind you that you have food in the
oven, the oven will display “End” and beep
once a minute until you either open the oven
door or touch the CLEAR/OFF pad.
??
II
%]’
.,:,,
i,.,,,.:,:,,.:.:.
..,
...
,
..:
::.,..,
T
m
e
@
....’.-
I
,.,:,:,
:;:::;;
;::::;
:::!.
;:~:
a:;;
a
r--s\
I
Oven Interior
I
- -
1. Door Handle. Pull to open
door. Door must be securely
latched for oven to operate.
2. Door Latches.
3. Window with Metal Shield.
Screen allows cooking to be viewed
while keeping microwaves confined
in oven.
4. Model and Serial Numbers.
5. Oven Vent.
6. Oven Light. Light comes on
when door is opened or when oven
is operating in any function.
F
7.
Rwepticle
for Temperature
Probe.
Probe must be securely
inserted into receptacle before oven
will start any temperature or Auto
Roast cooking.
&
MicroThermometer
TM
Temperature
Robe.
Use with
Temp
Cook/Hold and Auto Roast
functions only.
9. ~o Position Metal Shelf.
Doubles the oven capacity when
reheating or cooking smaller food
items. (For complete use of shelf,
see pages 26 and 27.)
w
10. Touch Control Wnel and
Digital Display.
For detailed
information on each feature,
see pages 6 and 7.
U. Hood Controls.
Fan. Press HI, LO or OFF.
Light. Press ON, NIGHT or OFF.
D.
Grease Filters.
U.
Cooktop
Light.
14. Oven Floor.
H. Automatic Cooking Guide.
8
Page 9
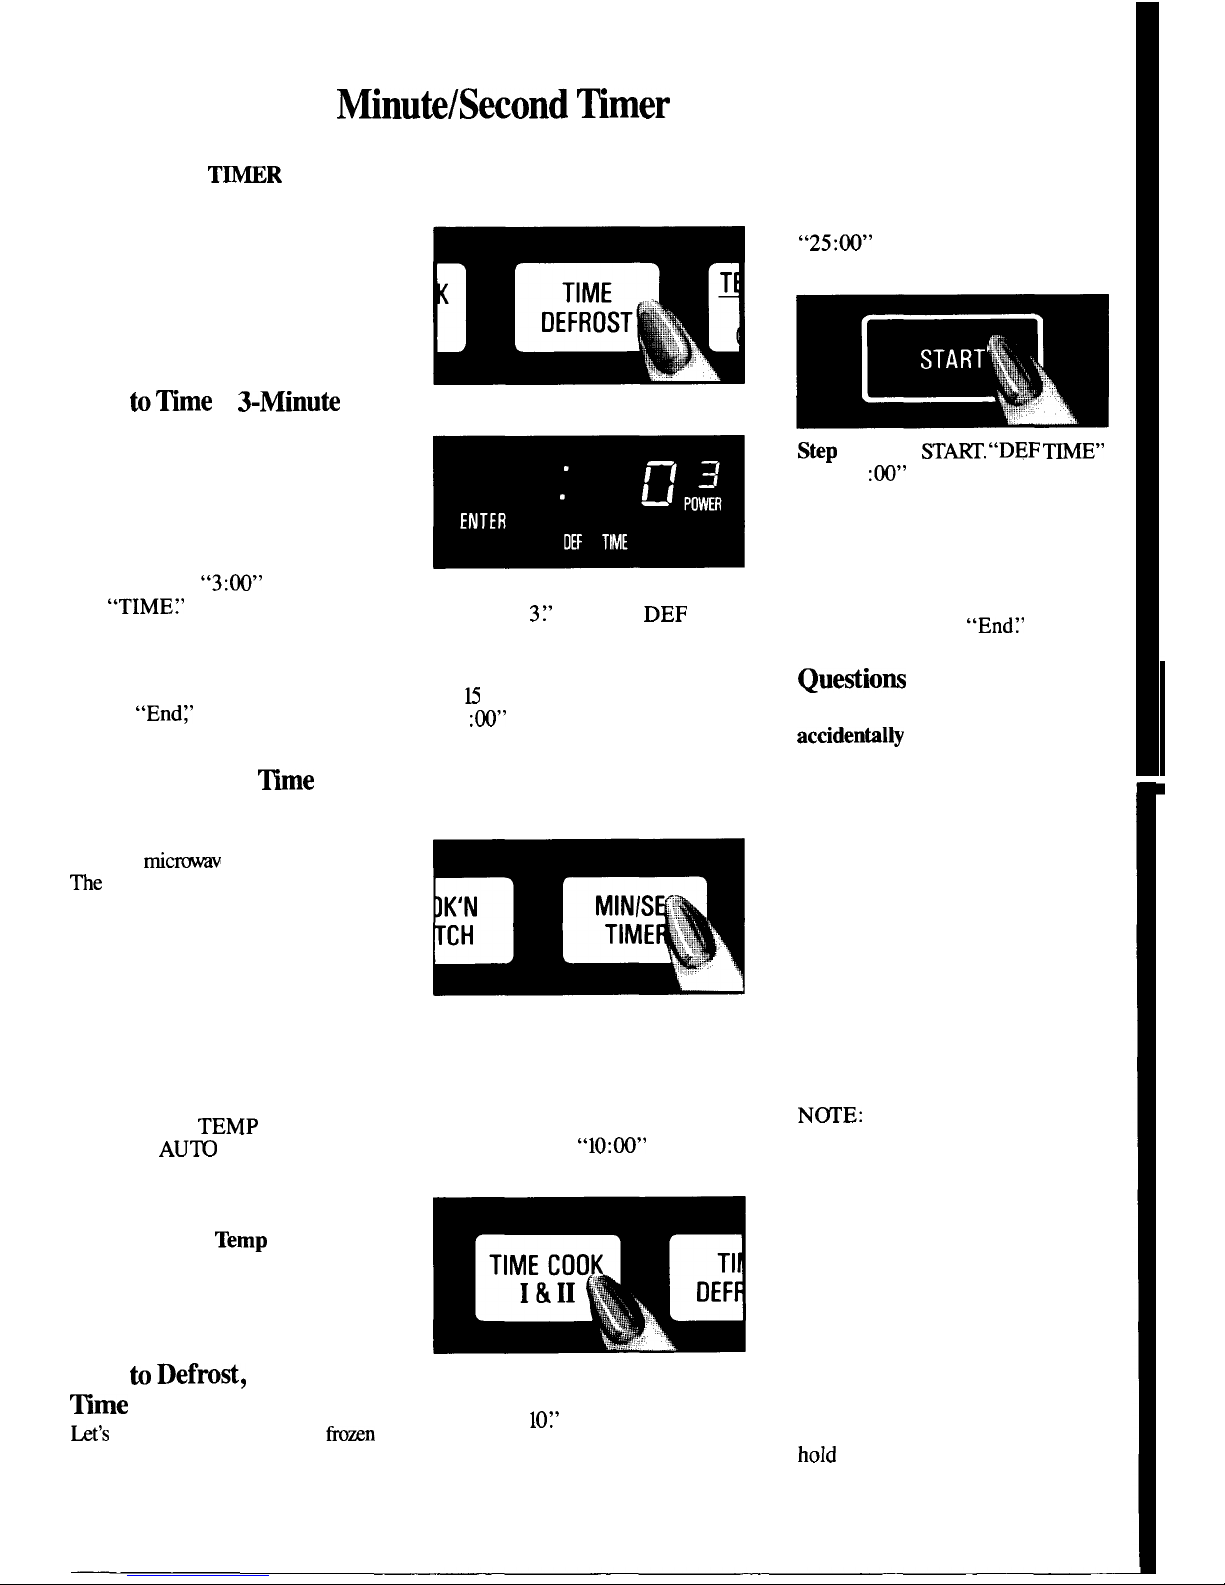
How to Use the
~nute/Second ~mer
The MIN/SEC
T~R
has three
timing functions:
● It operates as a minute timer.
. It can be set to delay cooking.
● It can be used as a hold setting
after defrosting.
The MIN/SEC TIMER operates
without microwave energy.
How
time
a
3-Minuti
Phone Call
1. Touch MIN/SEC TIMER pad.
The display shows “: O“ and
“ENTER TIME” flashes.
2. Touch number pads 3 and MIN
(for 3 minutes and no seconds).
Display shows
“3:00”
and
“TIME:’
3. Touch START. Display shows
time counting down.
4. When time is up, oven signals,
flashes
“Endl’ and display shows
time of day.
Using a Holding
We
The Minute/Second Timer can also
be used to program a “holding time”
between
rnic~
e cooking functions.
The
time can range from one second
to 99 minutes and 99 seconds. A
holding or standing time maybe
found in some of your own recipes
or in the cookbook supplied.
Programming Delayed
Cooking
To delay cooking up to 99 minutes
and 99 seconds, touch either TIME
COOK I & II,
TEMP COOK/
HOLD or
AU~
ROAST and enter
cook time, temperature or code.
Touch MIN/SEC TIMER and enter
number of minutes to delay cooking.
When delaying
Temp
Cook/Hold
or Auto Roast cooking, be sure
probe is in food.
Touch START.
Timer will count down to zero and
cooking will begin.
How h
Defro*,
Hold and
~me
Cook
ht’s
say you want to defrost a
tizen
casserole for 15 minutes, hold for
10 minutes and then Time Cook for
25 minutes. Here’s how to do it:
Step 1:
Take casserole from freezer
and place in oven.
Step
2:
Touch TIME DEFROST.
The display shows”: O“ and
“POWER
3?’
“ENTER DEF
TIME” flashes.
Step 3: Touch pads 1,5, and MIN
for E minutes defrosting time.
“15
:00”
appears on display.
(Defrosting is automatically set on
power level 3 but can be changed
by touching the POWER LEVEL
pad and the desired power level.)
Step
4: Set standing or hold time
by touching MIN/SEC TIMER.
The display shows “: 07’ and
“ENTER TIME” flashes.
Step 5: Touch 1,0 and MIN to hold
for ten minutes.
“10:00”
appears
on display and “TIME” flashes.
Step
6: Touch TIME COOK I & II
pad. The display shows “: O“ and
“POWER
10?’
“ENTER COOK
TIME” flashes.
9
Step 7: Touch 2,5 and MIN
for twenty-five minutes of cooking
time. “COOK TIME” flashes and
“25:00” and “POWER 10” appear
on display.
Step
8: Touch
ST~.
“DEF
ME”
and “15
:00”
counting down show
on display. As each function is
automatically performed, oven
display shows instructions entered
and the function.
Step
9: When time is up, the oven
signals and flashes
“End~’
Que*ions and Answers
Q. What will happen if I
accidenblly
reverse my defrost,
hold and cook instructions?
A. The oven will automatically
rearrange your program. Defrosting
will always come first, then hold,
and then the cooking function.
Q.
Can I defrost and hold only?
A. Yes.
Sometimes you may only
want to defrost a food, hold it, and
cook it later. All you need to do is
program in defrost and amount of
time. Then program the hold time
and the amount of cooking time. Be
sure to put the thawed dish in the
refrigerator promptly.
N~E:
Let foods remain at room
temperature only as long as safe.
Times will vary.
Q. I programmed my oven for
a specific defrosting time but it
defrosted longer than necessary.
What happened?
A. When instructions conflict,
the oven carries out the last
instruction. You may have set the
oven to defrost for 4 minutes, hold
for 2 minutes, and then defrost for
6 minutes. In this case, the oven
would defrost for 6 minutes and
hoId
for 2 minutes.
Page 10
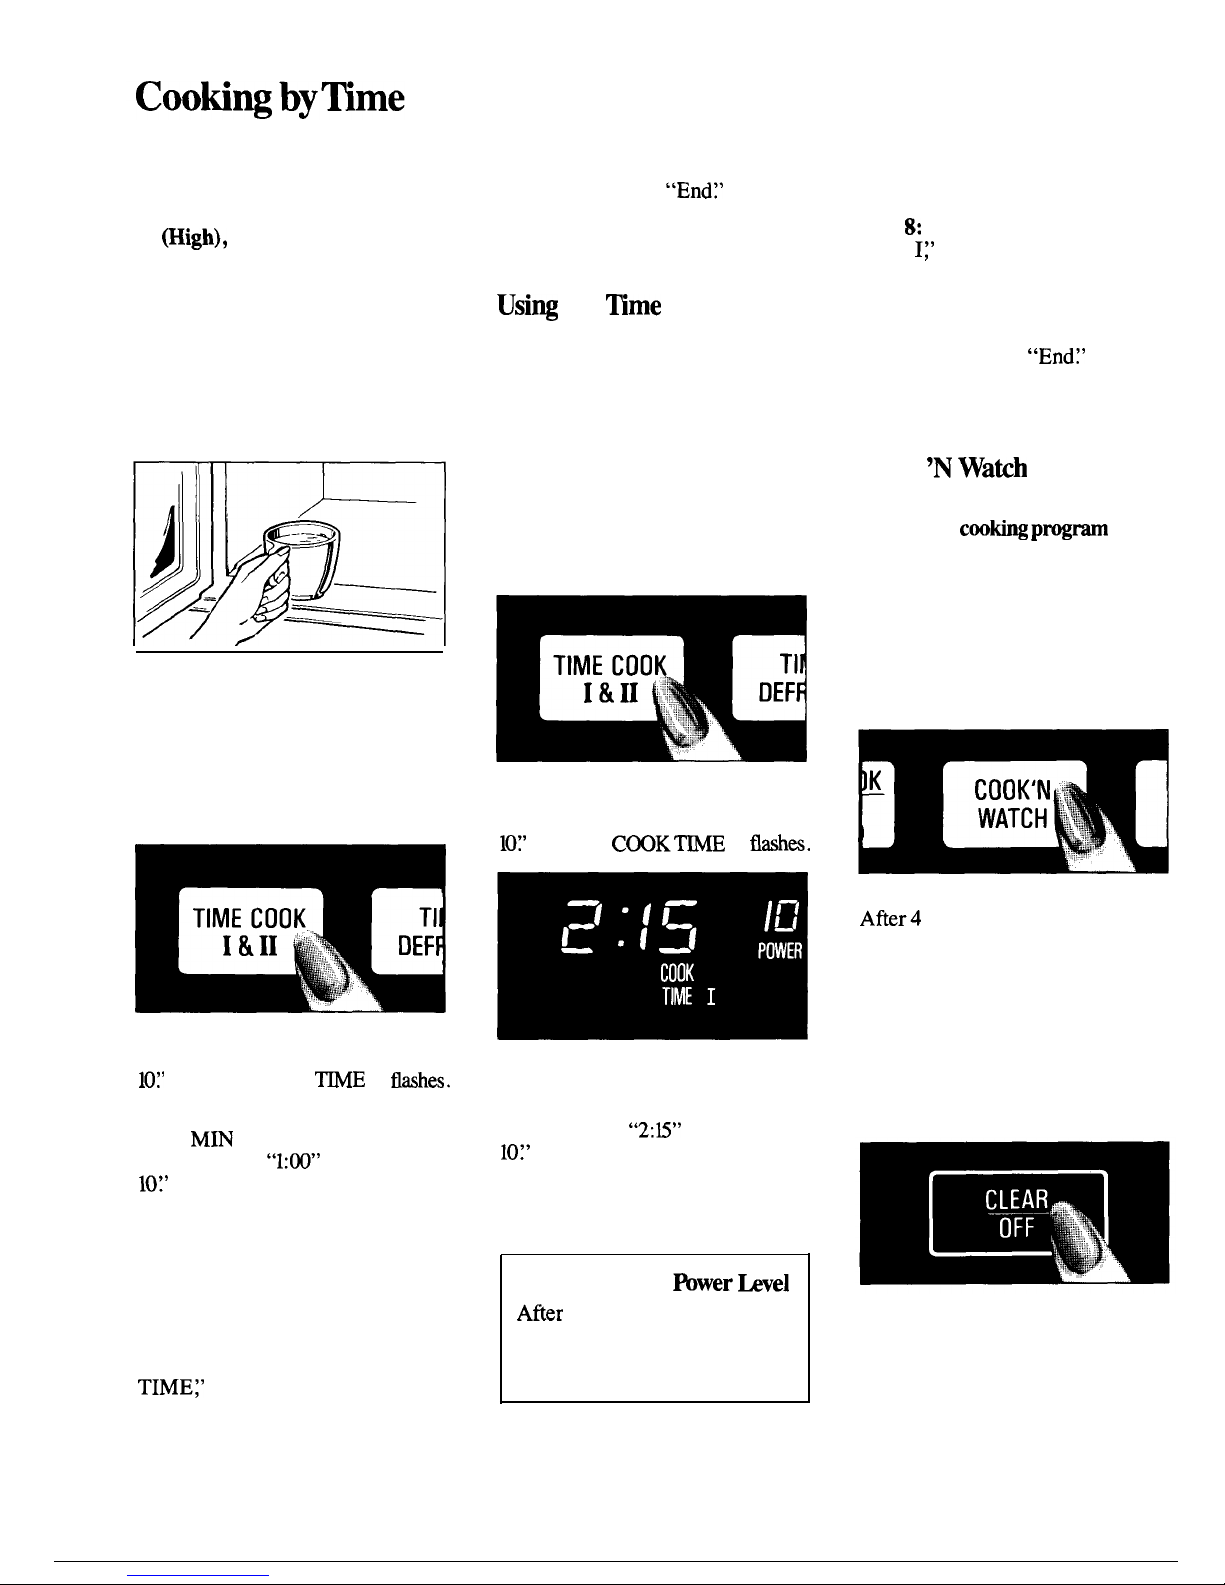
Time Cook I &II allows you to
microwave for a preset amount of
time using automatic power level
10
~igh),
or change power level
automatically.
Power level 10 (High) is
recommended for most cooking,
but you may change this for more
flexibility. See the cookbook.
To become better acquainted with
time cooking, make a cup of coffee
by following the steps below.
Step 1:
Fill a cup
2/3
full of
water, add 1 teaspoon of instant
coffee and stir to dissolve. Use a
cup that has no metal decoration
and is microwave-safe (refer to
Microwaving Tips on page 3).
Place cup in oven and close door.
Step 2: Touch TIME COOK I & II.
Display shows “: O“ and “POWER
10?’
“ENTER COOK
~E
I“
tihes.
Step 3:
Select your time. Touch
1 and
MIN pad for one minute.
Display shows
“1:00”
and “POWER
10?’
“COOK TIME I“ flashes.
Because automatic power level 10
is recommended for this cup of
coffee, there is no need to change
the power level. (If power level 10
is not appropriate, see “How to
Change Power Level” at right.)
Step 4:
Touch START. “COOK
TIMEJ’
“POWER 10” and time
counting down show on display.
Step 5:
When time is up, the oven
signals and flashes
“End~’
Oven,
light and fan shut off.
Step
6: Open the door.
Usi~
the
~me
Cook II
Feature
The Time Cook II feature lets you
set two time cooking functions
within one program. This is ideal
if you want to change power levels
during your cooking operations.
Here’s how to do it.
Step 1:
Place food in oven in
microwave-safe container and close
the door.
Step 2: Touch TIME COOK I & II.
Display shows “:
O“ and “POWER
10:’
“ENTER
COOKM
I“
ties.
Step
3: Select your cooking time.
For example, touch 2, 1 and 5 for
two minutes and 15 seconds.
Display shows
“2:U”
and “POWER
10~’
“COOK TIME I“ flashes.
Step
4: Touch TIME COOK I & II.
Step
5: Set your cooking time.
How to Change Wwer
hvel
After setting cooking time,
touch POWER LEVEL pad,
then touch desired number for
new power level.
Step
6: Touch START.
Step
7: “POWER 10” is displayed
and “COOK TIME I“ counts down.
Step
8:
At the end of “COOK
TIME
I:’
the second power level is
displayed and “COOK TIME II”
is shown counting down.
Step
9: When time is up, the oven
signals and flashes
“End~’
The
oven, light and fan shut off.
Step 10:
Open the door.
Cook ‘N
Watih
The Cook ‘N Watch feature is a
short-term
COO~ p~~
which
automatically turns the oven off
after 3 minutes. It’s ideal for
melting cheese on food or other
quick cooking operations where
you want to stop cooking at just
the right time.
To Use Cook ‘N Watch
Step 1:
Touch COOK ‘N WATCH.
After4 seconds, “START” flashes
on display.
Step
2: Touch START. “COOK ‘N
WATCH” and time counting up to 3
minutes are displayed. Power level
10 is automatically set in oven but
another power level can be selected
either during programming or
during cooking.
Step
3: Open the door or touch the
CLEAR/OFF pad to stop cooking.
The oven will automatically signal,
flash “End” and shut off at the end
of 3 minutes.
10
Page 11

CooH~
by
Tempemture
Internal temperature is the best
test of doneness for many foods.
Use Temp Cook/Hold to cook a
variety of foods to the
dmired
finished food temperature. The
Time Cook I &II setting is
recommended for batters,
doughs, frozen foods and foods
which are difficult to cook
precisely with the probe.
Temp Cook/Hold takes the
guesswork out of cooking, because
the oven automatically switches
to “Hold” setting after reaching the
preset food temperature and
maintains that temperature for up to
one hour or until you touch the
CLEAR/OFF pad.
Note: Oven automatically switches
to “Hold” when preset food
temperature is reached.
The Temperature Probe
Sensor
~
Clip”
The temperature probe is a food
thermometer that gauges the
internal temperature of the food;
it must be used when using Temp
Cook/Hold or Auto Roast. To use
the probe properly, follow
directions on page 12.
Howto Temp Cook a Rolled
Beef Rib Roast to Medium
Step 1:
Insert temperature probe
and attach probe securely in oven
wall. Close the door.
Step 2: Touch TEMP COOK/
HOLD. The display panel shows
“F” and “POWER
10~’
“ENTER
FOOD TEMP” flashes.
Step 3: Touch 1,6,0 for
160°F.
“FOOD TEMP” flashes and
“160F”
and “POWER 10” show
on display.
Step 4: Touch POWER LEVEL
pad. “ENTER POWER” flashes.
Touch 5 for medium power.
“TEMP;’
“160F”
and “POWER 5“
show on display.
Step 5:
Touch START. If internal
temperature of the roast is less
than
90°F.,
display will show
“COOL”; if temperature is
90°F.
or above, display shows
temperature counting up.
Step 6: When
160°F.
is reached,
the oven will sound and display
“Hold~’
The oven will then hold
the temperature.
Step 7: Touch the CLEAR/OFF
pad to stop the cycle.
Step 8:
Remove probe and food
from the oven.
How to Use Auto
Stirt
The Auto Start feature allows you
to program your oven to begin
cooking at a preset time of
day—
up to a
V-hour
delay.
To Use Auto Start
Step 1:
Touch
AU~
START pad
(instead of START pad).
Step
2: Enter the time you want
the oven to start. (Be sure your
microwave oven clock shows the
correct time of day. )
Step 3:
Enter your desired cooking
program.
Step
4: Touch START pad. The
oven will automatically start at the
desired time.
cooki~
Tips
● Use a lower power level; it will
heat more evenly even though
requiring more time.
● Be sure frozen food has been
completely
defrosti
before inserting
probe. Probe may break off if used
in frozen foods.
● Cover foods loosely for moisture
control and quick, even heating.
Questions and Answers
Q. Are there any foods I can’t
Temp Cook?
A. Yes.
Delicate butter icings, ice
cream, frozen whipped toppings,
etc. soften rapidly at warm
temperatures. Batters, doughs and
frozen foods are also difficult to
cook precisely with the probe. It’s
best to Time Cook these foods.
Q. Why did “PRObE” flash on
the display after I touched the
START pad?
A. “PRObE” will flash if you
don’t seat the cable end of the probe
securely into the receptacle in the
oven wall or if you touch the TEMP
COOK/HOLD pad and forget to
use the probe.
Q. Can I leave my probe in the
oven if it’s not inserted in food?
A. No,
if it touches the oven wall,
you may damage the oven.
Q. Can I Temp Cook different
portions of food at different
temperatures?
A. Yes. The temperature probe
gives you the freedom to cook
different portions of food at
different temperatures to suit
individual eating styles. Simply
place probe in food and change
temperature setting as needed.
11
Page 12

Automatic Roasting
Auto Roast uses the temperature
probe to cook to the desired
serving temperature. Unlike
Temp
Cook/Hold, which uses a
single power level, Auto Roast
B
up to 3 power settings which
automatically switch during
roasting, thus providing even,
tender cooking results without
overcooking.
Just as in conventional roasting,
only tender roasts should be Auto
Roasted until specified internal
temperatures are reached. Less
tender roasts should be microwaved
by time, according to the cookbook
which comes with your oven.
~paring
Roasts for
Auto Roasting
Place tender beef roast in cooking
bag on trivet in microwave-safe dish.
(Refer to package instructions for
proper use of cooking bag.) Insert
probe through cooking bag
horizontally into the center meaty
area not touching bone or fat.
Make sure the handle does not
touch the food or top or sides
of the oven.
I
I
Place pork roast in cooking bag
and place in microwave-safe dish.
I
Place meat in oven with probe to
the right. Insert cable end of probe
firmly into receptacle on oven wall.
How to Auto Roast
Beef Roast to
Mefium
I
I)
OKING
CONTROL
1.
Touch AUTO ROAST pad.
“ROAST” appears on the display
and “ENTER CODE” flashes.
Touch number pad 1. “l” and the
selected doneness code—in this
case,
“MEd’~
appear on the display.
“CODE” flashes. After 4 seconds,
“START” flashes on the display.
Touch START. (See “Auto Roast
Guide” on page 13 for complete
list of recommended codes.)
Note: By touching the
AU~
ROAST pad during cooking, the
meat’s internal temperature will be
displayed. (“COOL” will be
displayed until meat reaches
90°F.)
When pad is released, doneness
code reappears on the display.
2. When you select Auto Roast
codes 1 or 2, the oven signals with
4 beeps and “TURn” flashes on the
display when it’s time to turn the
roast over.
Afier you turn the roast,
close the door and touch START.
(Note: Oven continues to cook
after the signal whether or not
roast is turned over. )
3. After a pre-programmed food
temperature is reached, oven beeps
4 times and “HOLd” appears on
the display.
4. Food will be held at this
temperature for 60 minutes. The
oven then beeps 4 times and “End”
appears.
12
Page 13

Auto Roast Guide
●
Place meats in a cooking bag in microwave-safe dish. (Refer to package
instructions for proper use of cooking bag. )
●
Recommended codes are also shown on guide behind door, on front of oven.
. Insert probe as described on page 12.
Automatic Simmer
(Auto Roast Code 4)
Your cookbook has information on
Automatic Simmering, including
guides and recipes.
Total time includes time to bring
food to 180°F., and hold at that
temperature until done.
Set Auto Simmer like Auto Roast
as explained on page 12. Display
shows “SIM” and “CODE
4?’
Oven switches to Hold at 180°F.,
and continues holding at 180°F.
until you remove food and turn off
oven. If stirring is recommended,
you can reset oven by touching the
START pad again. Touch
CLEAR/OFF pad after cooking.
T
Final
;ode
Temp.
1
160°F.
2
170°F.
2
170°F.
3
185°F.
Approx.
Time
minutes
per pound)
Hold*
Minutes
o
5-1o
loneness
Display
MEd
WELL
Food
Beef (5 pound
max.)
Tender Roast
Medium
Well
13-15
15-17
Pork (5 pound max.)
Loin Roast
Poultry (6 pound max.)
Turkey Breast
(Insert probe horizontally
into meatiest area. )
10
WELL
15-19
17-20
10-15
WELL
re
serving.
Automatic
Simmer
Guide
(Auto Roast Code 4)
*Recommended
stinding
time
befo
Final
Temp.
Approx.
rime/Houm
loneness
Display
SIM
SIM
Food
Comments
Beef
Pot Roast
180°F.
180°F.
180°F.
180°F.
5-7
5-8
Add enough liquid to just cover
meat. If adding vege~bles make
sure they are completely covered
by liquid.
Precook meat. Place probe 1 inch
from top surface. Stir after 3
hours, if possible.
Chili
Chicken
Stewing
4-6
3-4
SIM
SIM
Add 4 cups liquid. Insert probe
into meatiest area of inner thigh
from
below
end and parallel to
leg.
Turn over after 1/2 of time.
Same procedure as above.
Broiler/Fryer
Ham or Pork
Roast
Add 4 cups liquid.
180°F.
4-6 SIM
soup
Stock/Vegetable
SIM
SIM
Make sure that vegetables and
meat are covered by liquid. Stir
every 3 hours.
Add enough liquid to cover peas at
least 2 inches. Stir after 3 hours.
180°F.
180°F.
7-1o
5-7
Split
Pea
13
Page 14

Auto Reheat
Auto Reheat lets you touch just 3
pads to bring previously prepared
foods to serving temperature. With
many leftovers, there is no need to
look up reheating times in the
cookbook or rely on guesswork.
By actually sensing the steam
that escapes as food heats, this
feature automatically adjusts the
oven’s heating time to various
types and amounts of pre-cooked
food.
Because all cooking containers
must be covered during automatic
reheating, this feature is best with
foods you want to steam or retain
moisture.
E
Foods Recommended
A wide variety of previously
cooked foods, including
lefiovers,
can be Auto Reheated. Auto Reheat
is recommended for single-servings
of food. For reheating plates of
leftovers, it is best to use Time
Cook. See the cookbook.
Foods Not Recommended
Bread products, foods that must be
reheated uncovered, foods that
require constant attention and foods
calling for a dry look or crisp
surface after reheating should not
be Auto Reheated. It is best to use
Time Cook.
Easy
to Use
Simply touch REHEAT pad,
desired code and START pad.
Keep Door Closed
Do not open the oven door while
the words “ROOM T“ or “CHILL”
are displayed—steam escaping
from the oven can affect reheating
performance. If the door is opened,
close the door and touch the
START pad immediately.
Auto Reheat Codes
Automatic Reheating codes 1 and 2
are designed to give easy automatic
reheating results with foods that are
either chilled in the refrigerator or
are at room temperature.
CODE
~
Foods at room
temperature
CODE
2
Foods at refrigerator
temperature
Example:
AU I
UMA
I IL
LUUKI[
Place covered food in oven. Touch
REHEAT pad.
“RHEAT” shows on display and
“ENTER CODE” flashes.
Touch number pad 1 or 2 for
desired code For example, touch
number pad 2 to reheat food that
1s
at refrigerator temperature
Display shows “CHILL” and
“CODE 2“
After 4 seconds, “START” flashes
on display Touch START pad
“RHEAT” and “CODE 2“ are
displayed
Beep sounds when steam
1s
sensed
and “RHEAT” 1s replaced by cook
tme
Rotate or stir food lf necessary
Close door and touch START pad
to
fimsh
heating When done, oven
displays “End” and beeps every
minute until door
1s
opened or
CLEAR/OFF pad 1s touched
14
Page 15

Containers and Covers
Appropriate containers and coverings
help assure good reheating results.
● Always use microwave-safe
con~iners
and cover them with
lids, wax paper or plastic wrap.
Wonder if the container is
rnicrowave-
safe? Put it to the test described on
page 3.
●
Never use tight-sealing plastic
lids—they can prevent
steam from
escaping and cause poor reheating
results.
. Match the amount of food to
the size of the
contiiner. Fill
containers at least half full for best
results.
● Be sure the
oukide
of the
cooking
contiiner
and the inside
of the microwave oven are dry
before placing food in the oven.
Beads of moisture turning into
steam can mislead the sensor.
● Stir or rotate some foods after
the beeping signal (if required).
Use microwave-safe casseroles or
bowls. Cover with lids that fit. If
lids are not available, use plastic
wrap or wax paper. Plastic wrap
should be loose over food to allow
for escaping steam. Seal by pressing
plastic wrap firmly around edges.
Questions & Answers
Q. If my food is not completely
reheated after using the suggested
code, what should I do?
A. Use Time Cook I and power
level 10 for 30-second increments
until the desired temperature is
reached. An acceptable temperature
for reheating most foods is 160°
to
165°F.
Q. What if I don’t fully cover the
dish in Auto Reheat?
A. Oven senses steam too
quic~y,
which shortens the reheating time
and leaves food too cool. Cover
tightly and reset Auto Reheat.
Q. Do the shapes and sizes of
food make a difference when
using Auto Reheat?
A. Yes, in some cases, larger
pieces will require additional
Time Cooking. Be sure to check
suggested arrangement of pieces in
the dish, since proper arrangement
is often a successful tip in regular
microwaving.
Q. Are there any other foods
which are reheated best using
Time Cook, rather than Auto
Reheat?
A. Bakery
foods, candies, melted
chocolate or foods when a dry or
crisp surface is desirable, are
reheated best by using Time Cook.
Q.
Would my plastic containers
with very tight fitting lids be
appropriate for Automatic
Reheating?
A. No, most types of plastic
storage dishes, butter tubs, etc.
with tight fitting lids are not
recommended for microwaving.
Tight fitting plastic lids may
prevent adequate steam from
escaping and food may not heat
properly during Auto Reheat.
15
Q. I tried to warm some chow
mein noodles using Auto Reheat.
Why didn’t this work?
A. Food must have some moisture
in order to create steam which
helps the auto sensor function.
Extremely dry
foods, such as chow
mein noodles, potato chips and
other such foods, do not have
enough moisture.
Q.
May I use Auto Reheat when I
am reheating many foods in more
than one dish or casserole?
A. No. Because foods may vary in
density and amount and in attention
needed during reheating, it is best
to use Time Cook when reheating
many foods.
Page 16

Auto Defrost
With the Auto Defrost feature,
the oven automatically sets the
defrosting times and power levels
for you.
Use the Auto Defrost guide on the
following page. Enter the food
weight in pounds and tenths of a
pound (see Conversion Guide at
right). Then touch the START pad.
The oven calculates defrosting time
and changes power levels during
defrosting to give even defrosting
results.
How to Set Auto Defrost
Before you begin, check the guide
located at the front of the oven,
visible when you open the door. It
shows minimum and maximum
food weights for a variety of foods.
You will need
to know your food’s
weight before setting Auto Defrost.
1. Remove food from package,
place in oven on microwave-safe
dish and close door.
2. Touch
AU~
DEFROST pad.
“LBS” and “DEF” are displayed
and “ENTER WEIGHT” flashes.
3. Enter weight. For example, touch
number pads 1 and 2 for a weight
of 1.2 pounds (1 pound, 3
ounces;
see Conversion Guide at right).
Display shows
“1.2:’ “WEIGHT~’
“LBS” and
“DEF~’
After 4 seconds,
“DEF”
is displayed and “1.2” is
replaced by “START”, flashing.
4. Touch START pad. Display
shows defrost time counting down.
mice
during defrosting, the
oven beeps 4 times and “TURn”
flashes on the display.
“TURn”
flashes until you open the door,
attend your food (see guide on next
page), close the door and touch the
START pad.
When defrosting time is completed,
“End” flashes and oven beeps 4
times. “End” remains on display
and oven beeps every minute until
door is opened or CLEAR/OFF
pad is touched.
When using the Auto Defrost
feature, it is necessary to allow
the food to stand in order to finish
defrosting the interior. You may
tie
the food out of the oven if you wish.
Stand time recommendations are
given in the guide on the next page.
Conversion Guide
If weight of food is stated in
pounds and ounces, the ounces
must be converted to tenths (.1)
of a pound.
Ounces
Pounds
1-2
.1
3
.2
4-5
.3
6-7
.4
8
.5
9-1o
.6
11 .7
12-13 .8
14-15
.9
16
Page 17

Auto Defrost Guide
~COMMENDED
MIN.-MAX.
FOODS WEIGHT
FINT
SIGNAL SECOND SIGNAL
STAND TIME
I
I I
I
I
Chops 0.1 -5.0 lbs.
Turn over.
Separate and shield
5 minutes
where necessary.
Frankfurters, Sausage
0.1 -5.0 lbs. Separate.
Remove defrosted
2 minutes
pieces.
Ground Meat
0.1 -5.0 lbs.
Turn over.
Remove defrosted
5 minutes
areas and break apart.
Beef Patties
0.1 -5.0 lbs.
Turn over.
Separate patties.
5 minutes
Roast
0.1 -5.0 lbs. Turn over and Shield if necessary. 90 minutes
shield.
Ribs
0.1 -5.0 lbs. Turn
over,
Remove defrosted
10 minutes
pieces. Shield if
necessary.
Steak 0.1 -5.0 lbs.
Turn over.
Stew
0.1 -5.0 lbs. Turn over and
separate.
5 minutes
Separate and remove 5 minutes
I
I
defrosted pieces.
Whole Chicken
0.1 -5.0 lbs.
Turn over and
shield.
Turn over and shield.
10 minutes;
run cold water
in cavity.
I I
I
I
I
Turkey Breast
0.1 -5.0 lbs.
Turn over.
Shield where 20 minutes in
(breast side
UP)
necessary. refrigerator
I
I
I I
I
Chicken Pieces 0.1 -5.0 lbs.
Turn over.
Separate and remove 5 minutes
defrosted pieces.
Cornish hens (whole) 0.1 -5.0 lbs.
Remove wrapper
and turn over.
10 minutes;
run cold water
in cavity.
I I
Cornish hens (split) 0.1 -5.0 lbs.
Turn over.
I
5 minutes
I
I
Fish fillets
0.1 -3.0 lbs.
Turn over.
Shrimp, scallops 0.1 -3.0 lbs. Separate.
I I
Separate and remove 5 minutes
defrosted pieces.
I I
Separate and remove 5 minutes
defrosted pieces.
Whole fish 0.1 -3.0 lbs. Turn over and
shield
tiil
and
head.
Hold under
cold running
water.
Edges or thin areas of meat will defrost more rapidly than other areas. After first or second signal, shield warm areas
with small pieces of foil.
17
Page 18

Defrosting by
~me
The Time Defrost setting is
designed for speedy thawing of
frozen food and is one of the great
advantages of a microwave oven.
Use the Time Defrost setting to
quic~y
thaw foods such as
br-d,
rolls, vegetables, fruits and frozen
dinners. The Auto Defrost setting
is preferred for meat and poultry
because the oven sets the defrosting
time and power levels for you.
●
Power level 3 is automatically set
for defrosting, but you may change
this for more flexibility.
●
See your cookbook for
defrosting help.
To become better acquainted with
the defrost function, defrost a 1O-OZ.
package of frozen strawberries by
following the steps below.
Step 1:
Place package of frozen
strawberries in the oven and close
door. Be sure package contains
no metal.
I
I
How to
Chage ~wer hvel
After setting defrosting time,
touch POWER LEVEL pad,
then touch desired number for
new power level.
Step 5:
Turn package over, close
door and repeat Steps 2 and 3 to set
remaining half of defrosting time
and touch START.
Step 6: When oven signals and
flashes
“End:’
open door, remove
package and separate strawberries
to finish defrosting.
Defrosting
~ps
●
Foods frozen in paper or plastic
can be defrosted in the package.
●
For even defrosting, some foods
need to be broken up or separated
part of the way through the
defrosting time.
● Family-size, pre-packaged
frozen dinners can be defrosted
and microwaved. If the food is in a
foil container, transfer it to a
microwave-safe dish.
● Check your cookbook for other
defrosting tips.
18
Questions and Answers
Q. When I press START, I hear a
dull, thumping noise. What is it?
A. This sound is normal. It is
letting you know the oven is using a
power level lower than 10 (High).
Q. Can I defrost
small
items in
a hurry?
A. Yes,
but they will need more
frequent attention than usual. Raise
the power level after entering the
time by touching the desired power
level pad. Power level 7 cuts the
total defrosting time in about 1/2;
Power level 10 cuts the total
defrosting time to approximately
1/3. During either, rotate or stir
food frequently.
Q. Why don’t the defrosting
times in the cookbook seem right
for my food?
A. Cookbook times are averages.
Defrosting time can vary according
to the temperature in your freezer.
Set your oven for the time indicated
in your cookbook. If your food is
still not completely thawed at the
end of that time, reset your oven
and adjust the time accordingly.
Q.
Should all foods be completely
thawed before cooking?
A. Some foods should not be
completely thawed before cooking.
For example, fish cooks so quickly
it is better to begin cooking while it
is still slightly frozen.
Q. Can I open the door during
defrosting to check on the
progress of my food?
A. Yes.
You may open the door at
any time during microwaving. To
resume defrosting, close the door
and press START. The oven begins
operating if time is left on timer.
If not, reset timer.
—
Page 19

Automatic
Cooting
The Auto Cook feature eliminates
your need to lookup cooking times
in the cookbook or guess how long
to set cooking time. By actually
sensing the steam that escapes as
food microwaves, this feature
automatically adjusts the oven’s
cooking time to various types and
amounts of food.
Because most cooking containers
must be covered during automatic
cooking, this feature is best with
foods that you want to steam or
retain moisture.
Note:
Use of the metal shelf with
Automatic Cooking is
N~
recommended.
Foods Recommended
A wide variety of foods, including
meats, fish casseroles, vegetables,
leftovers and convenience foods,
can be Auto Cooked.
Foods Not Recommended
Foods that must be cooked
uncoveti,
foods that require constant attention,
—
foods that require addition of
ingredients during cooking and
foods calling for a dry look or crisp
surface after cooking should not be
Auto Cooked. It is best to Time
Cook them.
Foods that microwave best using
the temperature probe should be
Temp
Cooked or Auto Roasted.
Easy
to
Use
Simply touch three control
pads—
AUTO COOK, desired CODE and
START. The word “AUTO” appears
on the display and the sensor is
activated to sense steam from food.
Keep Door Closed
Do not open the oven door while
the word
“AU~”
is
displayed—
steam escaping from the oven can
affect cooking performance. If the
door is opened, close the door and
touch START immediately.
Automatic Cooking Codes
Automatic cooking codes 1 through
8 are designed to give you easy
automatic results with a number
of foods.
Code 1, designed for reheating
foods
quic~y,
turns the oven off
automatically as soon as the sensor
detects steam from the foods.
When codes 2 through 8 are
selected, the oven determines how
much additional cooking time is
needed after steam has been sensed,
automatically switches to TIME
COOK and signals. The word
“AU~”
on the display is then
replaced by cooking time, counting
down. When the signal is heard,
the oven door may be opened for
stirring, turning or rotating food.
A guide behind the oven door lists
cooking codes for frequently prepared
fresh or uncooked foods and
appropriate codes are recommend
in the recipes and Automatic
Cooking Control Guide on pages
22 and 23.
Example:
AUTOM
\
cod
Place covered food in oven. Touch
AU~
COOK pad. “ENTER COOK
CODE” flashes on display.
Touch number pad for desired code.
“CODE 2“ shows. After 4 seconds,
“START” flashes on display.
Touch START pad.
The word
“AU~”
shows on display,
indicating steam sensor is
activatd.
DO
N~
OPEN DOOR.
OPEN~G
DOOR MAY AFFECT COOKING
PERFORMANCE.
Beep sounds when steam is sensed
and “AUTO” is replaced by
cooking time, counting down.
Rotate or stir food, if necessary.
When done, oven beeps every
minute until door is opened or
CLEAR/OFF pad is touched.
19
Page 20

How to Adjust
Auto Cook Codes to
Suit Your
~ste
By simply adding a 1 after any Auto
Cook code number, you can set the
oven to cook for 20% less time than
the code would regularly provide.
For example, if code 4 cooks your
chicken more done than you like it,
set code 41 next time and you’ll get
20% shorter cooking time.
If you want a longer cooking time
than a code provides, add a 9 after
the code.
For the chicken in the example
above, code 49 would provide 20%
longer cooking time than the regular
code 4 would provide.
Enmple:
AUTOM
Touch
AU~
COOK pad.
Touch number pads 4 and 1 in
that order.
“CODE4”
shows.
Afir4
seconds,
“STA~”
flashes on display.
Touch START. “AUTO” shows on
display. DO N~ OPEN DOOR
until first oven signal, then rotate
dish 1/2 turn if necessary. Close
door and touch START to finish
cooking.
Questiom
&
Amers
Q. Whydoesmyovenautomatidy
cut off after the Auto cycle when
using Auto Cook code 1, when it
does not for other settings?
A. When using Code 1, there is no
second phase of minutes counting
down. All the cooking is completed
in the
first phase or Auto.
Q. If my food is not completely
cooked after using the suggested
code, what should I do?
A. Use Time Cook I and power
level 10 for a few minutes until
completion.
Q Do d fmh
or frozen
vegetablm
require a standing period after
cooking with Auto Cook?
A. Most vegetables are cooked to
a crisp state during Auto Cook,
just as in regular microwaving.
Therefore, it is recommended that
you let the vegetables stand for up
to 5 minutes depending on size and
density of pieces. This standing
time also enhances the overall
flavor and appearance of most
vegetables.
Q.
What if I don’t fully cover the
dish in Auto Cook?
A. Oven senses steam too quic~y,
which shortens the cooking time
and leaves food undercooked.
Cover tightly and reset Auto Cook.
Q. Do the shapes and sizes of
foods make a difference when
using Auto Cook?
A. Yes, in some cases, larger
pieces will require additional
Time Cooking. Be sure to check
suggested arrangement of pieces in
the dish, since proper arrangement
is often a successful tip in regular
microwaving.
Q. Do fresh or frozen vegetables
require water when using Auto
Cook?
A. Yes.
Add water to the vegetables
as recommended on guide and cover
well for even, complete cooking.
Q.
Should I use Auto Cook to
c;ok
pudding or sauces?
A. Most pudding and sauce recipes
require stirring many times during
20
cooking; therefore, Time Cook is
recommended.
Q. My scalloped potatoes were
not completely cooked when I
removed the dish after Auto
Cook. What is wrong?
A. If you prepared the sauce in the
oven prior to combining the sauce
with potatoes, there may have been
too much remaining moisture in
the oven. Make sure you dry the
oven completely before using Auto
Cook since this function operates
properly by sensing steam in the
oven. Also, starting Auto Cook
with hot foods creates steam in the
oven
too
soon, and decreases the
first sensing cycle.
Q. Are there any other foods
which are best Time Cooked,
rather than Auto Cooked?
A. Bakery foods, candies, melted
chocolate or foods when a dry or
crisp surface is desirable are
cooked best by Time Cook.
Q. Would my plastic containers
with very tight fitting lids be
appropriate for Automatic
Cooking?
A. No, most types of plastic
storage dishes, butter tubs, etc.
with tight fitting lids are not
recommended for microwaving.
Also, tight fitting plastic lids may
prevent adequate steam from
escaping and may keep food from
cooking properly during Automatic
Cooking.
Q. I tried to warm some chow
mein noodles using Auto Cook.
Why didn’t this work?
A. Food must have some moisture
in order to create steam which
helps the auto sensor function.
Extremely dry foods such as chow
mein noodles, potato chips and
other such foods do not have
enough moisture.
Q. May I use Auto Cook when I
am cooking many foods in more
than one dish or casserole?
A. No. Because of different food
densities, attention needed during
cooking and food amounts, it is
-
best to use Time Cook when
cooking many foods.
Page 21

Automatic
CooHng ~ps
Containers and Covers
●
Always use microwave-safe
containers and cover them with
lids or vented plastic wrap.
●
Never use tight-sealing plastic
covers. They can prevent steam
from escaping and cause food to
overcook.
● Match the amount of food to
the size of the container. Fill
containers at least half full for best
results.
. Be sure the outside of the
cooking container and the inside
of the microwave oven are dry
before placing food in the oven.
Beads of moisture turning into
steam can mislead the sensor.
● Stir or rotate some foods after
a beeping signal, if required. See
Automatic Cooking Control Guide
and
recip
on the folloting pages.
How
to Adapt Microwave
Casserole Recipes
c
Select recipes that do not require
adding ingredients, stirring or
rotating at different stages during
cooking.
●
Use microwave-safe containers
that are appropriate in
size
to the
food amount.
● For saucy casseroles, cover
container with lid or plastic wrap.
For cheese or crumb-topped
casseroles, remove cover after oven
signals and add topping, then
continue cooking uncovered.
●
Allow precooked ingredients or
hot sauces to cool slightly before
adding other ingredients.
. Meats and vegetables should be
submerged in liquid.
Use microwave-safe casseroles or
bowls for entrees and vegetables.
Cover with lids that fit. If lids are
not available, use plastic wrap.
Plastic wrap should be vented over
food to allow for escaping steam.
Seal by pressing plastic wrap
firmly around edges.
For frozen entrees in paperboard
trays, remove tray from box but do
not remove film over tray.
For frozen entrees with foil covering
and plastic lids, remove foil cover
and
re-cover with plastic lid.
Use oblong or square containers for
foods, such as chicken, spareribs,
chops, chuck roasts and corn on the
cob:
Plastic wrap covering should
be vented over food to allow for
escaping steam. Seal by pressing
plastic wrap firmly around edges.
Wper
plates
should not be used
for automatic cooking. Use
microwave-safe plates or bowls for
reheating. Cover with plastic wrap.
.
Fish
fillek,
whole fish or seafood
pieces should be in single layer
in flat pie plate or oblong dish to fit
Slit plastic pouches 1 inch as shown
Cover with plastic wrap.
above. Break food
up thoroughly
after oven signals.
Whole or large halves of
vegetables, such as cauliflower or
squash, should be placed in round
For meat and fish loaves, use
or square container close to size of
either the round or loaf
microwave-
vegetable. Add
1/2
cup water.
safe
containers. Cover with plastic
Cover with lid or plastic wrap.
wrap.
21
Page 22

Automatic
Cooting
Control Guide
●
Do not open oven door during
Auto cycle. When oven signals and
time, counting down, is displayed,
door may be opened for stirring,
turning or rotating food. To resume
cooking, close door and touch
START pad.
●
Match the amount of food
to the size of the container. Fill
containers at least 1/2 full.
●
Add 1/4 to 1/2 cup water to fresh
vegetables.
●
Foods should be covered with lid
. To adjust cook time to suit
to dish or plastic wrap to prevent
individual tastes, add a “l” or “9”
spattering and keep oven clean.
to code number when entering
Spareribs, pot roasts and meat loaf
Auto Cook code. See page 20 for
should be covered tightly to ensure
instructions.
even cooking.
● Use of Auto Cook feature with
●
Be sure outside of container and
oven shelf is not recommended.
inside of oven are dry.
●
After completion of Auto Cook
cycle, if food needs additional
cooking, return food to oven and
use Time Cook to finish cooking.
Auto
Cook
Food
Code
Container
Approx.
Time
Comments
Canned
Foods
Thin—water and
1
Microwave-safe 3 to 4 min.
Cover with lid to dish or plastic wrap.
milk-based
soups,
container matched to
per cup
sauces, gravies
amount of food.
Thick—chili, beef
2
Microwave-safe 3 to 4 min.
Cover with lid to dish or plastic wrap.
stew, ravioli,
container matched to
per cup
spaghetti, chunky
amount of food.
soups
Vegetables-8 to 16
2
Microwave-safe
4 to 8 min.
Cover with lid to dish or plastic wrap.
ounces
container matched to
amount of food.
hftovers
2
Plate or microwave-
2
to 4 min. per
Cover with lid to dish or plastic wrap.
safe container
serving
matched to amount of
food.
Convenience
Foods
Frozen dinners
4
Package tray or plate
6 to 10 min.
Cover with plastic lid to plate or
leave
(with entree and 2
plastic covering in place on tray.
vegetables or
vegetable and pasta)
Frozen dinner
If tray
has foil cover, replace with
entree (individual)
plastic wrap.
Pouch
3
Pouch
3 to 6 min.
Tray
5
Tray
8 to 11 min.
Frozen dinner
5
Tray
18 to 22 min.
If tray has foil cover, replace with
entree
plastic wrap.
(2 to 3 servings)
Frozen breakfast
3
Package wrap or tray
3 to 5 min.
entrees
Grocery-Shelf
3
Package
3 to 5 min.
dinner entrees
22
Page 23

Food
Casseroles
Pre-cooked
ingredients in
sauce, such as
tuna noodle, turkey
tetrazzini, and
franks and beans
Uncooked
ingredients, such as
scalloped potatoes,
hamburger patty
stew
Meats, Poultry,
Seafood
Chicken pieces
(Up to 2
%
lbs.)
Whole chicken
(Up
to
3
Ibs.)
Fish fillets (1 lb.)
Meat loaf
(lfi
lbs.)
Hamburger patties
(4)
Sausage patties
(12 oz.)
Pork chops
(4, % to %-in. thick)
Shrimp (up to 1 lb.)
Vegetables
Frozen,
1O-OZ.
block
Frozen,
1O-OZ.
pouch
Baking potatoes
(4, 6 to 8 oz. each)
Cubed potatoes
(Up to 2 lbs.)
Fresh vegetables,
such as carrots,
brussels
sprouts,
broccoli,
cauliflower,
summer and winter
squash, green beans
Fruit
Baked apples,
pears
(4)
Auto Cook
Code
6
7
5
8
3
6
3
3
8
2
2
3
4
4
4
2
Container
lM-
to
3-qt.
casserole
with lid
1%- to
3-qt.
casserole
with lid
2-qt. oblong glass
baking dish
2-qt. oblong glass
baking dish
2-qt. oblong glass
baking dish
9x5x3-in. loaf dish
8-in. square dish
2-qt. oblong glass
baking dish
2-qt. oblong glass
baking dish
2-qt. oblong glass
baking dish
l-qt.
casserole
with lid
Pouch on
microwave-
safe plate
8-in. square dish
2-qt. casserole
with lid
lM-
to 2-qt. casserole
with lid
2-qt. casserole
with lid
23
Approx. ~me
20 to 30 min.
40 to 55 min.
8 to 24 min.
30 to 40 min.
7 to 10 min.
24 to 28 min.
7 to 9 min.
7 to 9 min.
30 to 35 min.
4 to 7 min.
7 to 10 min.
8 to 10 min.
12 to 16 min.
20 to 30 min.
13 to 15 min.
12 to 14 min.
Comments
When oven signals, stir if necessary.
When oven signals, stir if necessary.
Cover with plastic wrap.
Place in cooking bag; cut slits in bag as
directed on package.
Cover with plastic wrap.
Cover with plastic wrap.
Cover with plastic wrap.
When oven signals, turn patties over.
Cover with plastic wrap.
Cover with plastic wrap.
Add amount of water recommended on
package.
Cut slits in pouch as directed on
package.
Pierce skin with fork. Arrange around
sides of dish; cover with plastic wrap.
Add 1 to
1%
cup water.
Add 1/4 to 1/2 cup water. When oven
signals, stir if necessary.
Add 2 tablespoons water per piece of
fruit to dish.
Page 24

Automatic
CooHng
Meat and Main
Mexican Meatball
Casserole
Auto Cook Code 6
Approx. Cooking Time—27 min.
Makes 6 to 8 Servings
1 lb. ground chuck
1/2 cup dry bread crumbs
3 tablespoons dry minced onions
1 teaspoon chili powder
1/2 teaspoon salt
1/8 teaspoon pepper
1 egg
3 tablespoons ketchup
1/2 cup instant rice
1
(151A
oz.) can kidney beans,
undrained
1 (141A
oz.) can tomatoes,
chopped and undrained
1 tablespoon chili powder
In large mixing bowl, combine
meat, bread crumbs, onion, chili
powder, salt, pepper, egg and
ketchup. Mix well and form into 12
balls. Arrange balls in 2-qt.
casserole. Set aside.
In small mixing bowl, combine
rice, beans, tomatoes and chili
powder. Mix well and pour over
meatballs. Cover. Microwave on
Auto Cook code 6.
Sweet Tart
finks
Auto Cook Code 2
Approx. Cooking Time-10 min.
Makes about 80 hors d’oeuvres
1 (10 oz.) jar currant jelly
1 (6 oz.) jar prepared mustard
2
Ibs.
frankfurters, cut into
l-in. pieces.
In 2-qt. casserole, stir together jelly
and mustard until well blended.
Add frankfurters, stirring to coat
each piece. Cover. Microwave on
Auto Cook code 2. When oven
signals, stir frankfurters.
Dish Recipes
Chicken Teriyaki
Auto Cook Code 8
Approx. Cooking Time—45 min.
Makes 4 Servings
1/4
cup soy sauce
1/4 cup honey
1/3 cup orange juice
1 whole chicken (about 3
lbs.)
1 tablespoon water
2 tablespoons cornstarch
In small cooking bag, mix soy
sauce, honey and orange juice. Add
chicken to bag and tie with plastic
tie. Turn chicken on its side in 2-qt.
oblong glass baking dish. Marinate
1 hour on each side. Place chicken
breast-side-up in dish. Slash bag
near closure. Microwave on Auto
Cook code 8. When oven signals,
remove chicken and prepare
Teriyaki Sauce. In
l-pt.
glass
measuring cup, stir together water
and cornstarch. Cut off one corner
of cooking bag with scissors and
drain juices into cup. Microwave at
High (10) 2 minutes. Remove
chicken from bag and place on a
serving platter. Pour sauce over
chicken just before serving.
Classic Ham
baf
Auto Cook Code 8
Approx. Cooking Time—36 min.
Makes 6 Servings
1
lb.
ground cooked ham
1/2 lb. ground fresh pork
1/2 cup soft bread crumbs
1/2
cup water
2 tablespoons
instint
minced
onion
1/4
teaspoon pepper
Mix ground ham and pork
thoroughly with crumbs, water,
onion and pepper. Mold into flat
loaf in 9-in. pie plate. Cover with
plastic wrap. Microwave on Auto
Cook code
8. When oven signals,
rotate dish 1/4 turn.
SamWe-Wild
Mce
Casserole
Auto Cook Code 6
Approx. Cooking Time—20 min.
Makes 6 to 8 Servings
1 lb. hot bulk sausage
1/2 cup celery, chopped
1/2 cup onion, chopped
1/2 cup mushrooms, sliced
1/2
cup green pepper, chopped
llA
cups water
1 (10%
oz.) can cream of
mushroom soup
1 (8 oz.) pkg. long grain and
wild rice with seasoning
packet
1 cup Cheddar cheese,
shredded
1/2 teaspoon salt
1/4
teaspoon pepper
Brown sausage, celery, onion,
mushrooms and green pepper
together until well browned. Drain
thoroughly.
In 2-qt. casserole, combine meat
mixture, water, soup, rice, cheese,
salt and pepper. Cover. Microwave
on Auto Cook code 6. Stir mixture
when oven signals.
Swiss
Steak
Auto Cook Code 7
Approx. Cooking Time—65 min.
Makes 6 Servings
lYZ Ibs.
round steak, l/2-in.
thick, tenderized
1/4 cup flour
llA
teaspoons salt
1/8
teaspoon pepper
1 thinly sliced medium onion
1 (14V2
oz.) can tomatoes
Cut
meat in 6 pieces and coat with
mixture of flour, salt and pepper.
Place in
3-qt. casserole. Cover
with onion. Break up tomatoes
with fork and pour over top. Cover.
Microwave on Auto Cook code
7.
24
Page 25

Automatic
Cooting
Vegetable and fruit Recipes
Zsty
Squash and
Tomatoes
Auto Cook Code 3
Approx. Cooking Time—15 min.
Makes 4 Servings
1/4 cup butter, melted
1/8 teaspoon garlic powder
1 teaspoon oregano
1/2 teaspoon basil
1/2 teaspoon seasoned salt
1/8 teaspoon pepper
2 medium zucchini, thinly
sliced
1 medium yellow squash, thinly
sliced
2 small tomatoes, each cut into
4 wedges
In 2-qt. casserole, combine butter,
garlic powder, oregano, basil,
seasoned salt and pepper. Add
zucchini and yellow squash. Toss to
coat. Cover. Microwave on Auto
Cook code 3.
Country-StyleYeUow
Squash
Auto Cook Code 5
Approx. Cooking Time—23 min.
Makes 4 to 6 Servings
1 teaspoon salt
2 pounds yellow squash, diced
1/4 cup onion, chopped
1/4 cup butter, melted
1/4 teaspoon pepper
1/4 teaspoon basil
3 slices fresh bread, cubed
1/2 cup cheddar cheese, shredded
1 cup sour cream
8 strips crisply cooked bacon,
crumbled
In 2-qt. glass dish, mix together all
ingredients, using
1/2 of crumbled
bacon.
SprinHe top with remaining
bacon. Cover. Microwave on Auto
Cook code 5.
Corn
~ddi~
Auto Cook Code 3
Approx. Cooking
Time-u
min.
Makes 4 Servings
1 egg
1/2 cup milk
1 tablespoon sugar
1 (16 oz.) can cream-style corn
3/4 cup crushed crackers
2 tablespoons butter, cut in
pieces
Paprika
Place egg in
11/2-qt.
casserole and
beat well with fork. Stir in
miIk,
sugar, corn, crackers and butter.
Cover. Microwave on Auto Cook
code 3. When done, center will be
just barely set. Let stand 5 minutes.
SprinMe
with paprika before
serving.
@plant Itiliano
Auto Cook Code 5
Approx. Cooking Time—14 min.
Makes 4 to 6 Servings
1 medium eggplant
2 (8 oz.) cans tomato sauce
2 teaspoons oregano
1/2 cup sharp cheddar cheese,
shredded
1 (6 oz.) pkg. mozzarella cheese,
shredded
Peel eggplant; slice l/8-in. thick.
Spread 2 tablespoons tomato sauce
in bottom of 2-qt. casserole. Layer
half of eggplant, 1 can tomato
sauce, half of oregano and half of
shredded cheese. Repeat layers.
Cover. Microwave on Auto Cook
code 5.
SprinHe
with mozzarella
cheese and microwave at High (10)
1 to 2 minutes until cheese has
melted.
Hneapple Casserole
Auto Cook Code 6
Approx. Cooking Time—21 min.
Makes 6 to 8 Servings
2 (20 oz.) cans pineapple
chunks, drained
1 cup sugar
1/2 cup flour
2 cups buttery-flavored cracker
crumbs
1/2 cup butter, melted
Spread pineapple chunks evenly in
2-qt. oblong glass baking dish.
Combine sugar and flour; sprin~e
over pineapple. Top with cracker
crumbs and drizzle melted butter
over crumbs. Cover with vented
plastic wrap. Microwave on Auto
Cook code 6.
Spicy Apple Cobbler
Auto Cook Code 3
Approx. Cooking Time—n min.
Makes 6 to 8 Servings
1 (22 oz.) can prepared apple
pie filling
1 (9 oz.) box yellow cake mix
1/2 cup peanuts, coarsely
chopped
1/4 cup butter, melted
1/2 teaspoon cinnamon
1/4 teaspoon ginger
1/8 teaspoon nutmeg
In 8-in. square dish, spread pie
filling.
In small bowl, mix together cake
mix, peanuts, butter, cinnamon,
ginger and nutmeg until crumbly.
SprinHe evenly over apples. Cover
with plastic wrap. Microwave on
Auto Cook code 3.
25
Page 26

How to Use the Oven Shelf
Positioning the Shelf
●
Do not store or cook with
shelf on floor of oven.
Roduct
damage may result.
. Use potholders when handling
metal shelf and cookware.
They may be hot.
●
Do not store microwave
browning dish on
metil
shelf.
I
●
Use of shelf with Auto Cook
or Auto Reheat is not
recommended.
The two position wire shelf is
specifically designed for added
c~pacity
heating-and reheating in
Cookware for Shelf
Heating and Reheating
Before placing food in the dishes,
check to see that they will
fit
together
on or under the
sheif.
Also, be–sure
cookware is microwave-safe.
1
your Spacemak~r@ microwav~
oven.
More than one food may be heated Cookware for heating or reheating
or reheated and ready to serve at the include 1 cup measuring cup,
same time. 8x4x3-inch loaf dishes, 9x5x3-inch
When microwaving with the oven
loaf dishes or 9-inch pie plates.
shelf, some
techni~ues
will differ
from the cookbook which came
with your oven. It is important to
arrange foods properly, and this is
shown on the next page. Cookware
size is important; select from
among the suggestions at right.
Also, food size should be
considered; foods over 31/2 inches
high, or 3 pounds are not
recommended for shelf cooking.
Batters and dough foods and
Leftovers may be placed in small
uncooked foods which need to be
individual ceramic or plastic bowls
prepared from scratch should be
or divided plates.
cooked without the oven shelf.
following cookbook directions.
Use
pot
holders when handling
food; heated together with
yo~r
oven shelf, especially when heating
Use wax paper or plastic wrap
larger amounts of food in 8-in.
instead of lids on casseroles. Lids
square or other 2-quart size
may add too much height to dish.
To position the shelf,
tiptheback
slightly and fit the shelf support
guides
onto
the support guides
located on each side of the oven in
the rear.
Next, lower the front until the shelf
support guides fit
onto
the support
guides located at each side of the
oven in the front.
When properly positioned, the shelf
should fit snugly in place, be level
and not touch the back or sidewall
of the oven.
If arcing occurs when using the
shelf to cook more than one food
at the same time, turn the oven
off. Make sure the shelf is
positioned right-side upon
all
four shelf supports and not
touching oven walls. To prevent
arcing, remove the shelf when you
are not using it.
casseroles. The
ex~ra
steam
generated from multiple food
cooking may make cookware hotter
than with regular microwaving.
26
Page 27

How to Heat or Reheat
Similar
~pes
of Food
Two plates of leftovers maybe
reheated together. Arrange thick
or dense foods to outside edges of
plate and cover with plastic wrap.
Microwave at High
(10) for 2 to 3
minutes. Reverse position of plates
(top to bottom) and rotate 1/2 turn.
Continue microwaving at High (10)
for 2 to 3 minutes. Continue
heating, if necessary, until hot.
Reheating two casseroles (height
should be less than 3 Y2 inches) is
possible. Cover with plastic wrap.
Use staggered arrangements of
food, placing food on right side of
shelf and left side of floor. Refer to
Heating or Reheating Guide in
cookbook for
su~ested
microwave
time per
casseroie-and
add the times
together. Microwave at High (10)
reversing position of foods (top to
bottom) after half of time. Several
small bowls of leftovers may be
heated in the same way, stirring and
reversing positions after half of time.
Two frozen individual entrees
(5 to 7 oz. each) or two TV
dinners (10 to
U
oz. each) are
both ready to serve at the same
time. Remove trays of food from
their boxes. If there are foil covers,
Because of the varying rates, you
may need to start reheating larger or
more dense foods a few minutes
~
ahead
oftirne,
then add other
smaller or less dense foods.
Alternately, if one of the foods you
are heating seems undercooked but
the
ol:hers
are heated satisfactorily,
let the
underheated food continue
cooking.
Heat or reheat different types of
food at High (10). To determine
heating times, add times for all
foods together. (See Heating Guide
remove them and return the trays of
food to their boxes. (Battered foods
in
cooktiook.
) After half
of~ime,
stir or rearrange foods (do not
should be removed from the trays
reverse positions). Check foods
and cooked conventionally. ) Place
(especially those on oven floor)
in oven with one TV dinner or
after 3/4 of total time and remove
entree on right side of shelf and the
any which are done. Continue
second dinner or entree on left side
of floor. Microwave at High (10) for
cooking others.
7 minutes. Reverse
positi~ns
(top to
bottom) and rotate foods 1/2 turn.
Continue microwaving at High (10)
for 7 minutes. Check dinners for
heating. If one dinner seems less
done than desired, return it to the
box and continue heating on floor
1 to 2 more minutes.
Place on floor larger or more
How to Reheat Several
dense foods which need the most
Different
~pes
of Foods
heating, such as
lefiover
fried
Together
chicken, casseroles of canned or
leftover vegetables, rice or pasta.
When heating several different
Place on oven shelf those foods
types of food together, foods which
which need only be warmed, such
should be served hot must be
Dlaced
as bakery pies, rolls, muffins or
o-nthe”oven
floor, while
foods’which
breads.
are
ordy
warmed should be placed on
Pop popcorn on the microwave
the shelf. This is because microwave
energy enters the oven from the
oven floor only. Popcorn placed on
bottom only. Also, it is important
the oven shelf will not pop properly.
Use a special microwave popcorn
to remember that foods absorb
microwave energy at different rates.
accessory or popcorn labeled for
Rates can be affected by the size of
use in microwave ovens.
the food and its starting temperature.
n
Page 28

Care and
C1eani~
Your new microwave oven is
a valuable appliance. Protect
it from misuse by following
these rules:
● Keep your oven clean and
sweet-smelling. Opening
the
oven
door a few minutes
afier
cooking
helps air out the interior. An
occasional thorough wiping with a
solution of baking soda and water
keeps the interior fresh.
● Don’t use sharp-edged utensils
with your oven. The inside and
outside oven walls can be scratched
and the control panel can be
damaged.
BE CERTAIN POWER IS OFF
BEFORE CLEANING ANY
PART OF THIS OVEN.
How to Clean the
Imide
Walls and floor.
Some
spatters can
be removed with a paper towel,
while others may require a damp
cloth. Remove greasy spatters with
a
sudsy
cloth, then rinse with a
damp cloth. Do not use abrasive
cleaners on oven walls. NEVER
USE A COMMERCIAL OVEN
CLEANER ON ANY PART OF
YOUR MICROWAVE OVEN.
Door (inside).
Window: Wipe
up spatters daily and wash when
soiled with a damp cloth. Rinse
thoroughly and dry.
Metal and plastic parts on door:
Wipe frequently with a damp
cloth to remove all soil. DO
NW
USE ABRASIVES, SUCH AS
CLEANING POWDERS OR
STEEL AND PLASTIC PADS.
THEY WILL MAR THE
SURFACE.
Special note when using
Brown ‘N Sear dish:
If grease
is present, high heat generated on
bottom of a Brown ‘N Sear dish
may cause the grease to burn onto
the oven floor. This may be removal
with a cleanser such as Bon
Ami@
brand cleanser.
After using Bon
Ami”
brand
cleanser, rinse and dry thoroughly,
following instructions on can. Do
not use Bon
Ami@
brand cleanser
on the painted surfaces such as the
walls. It may scratch the paint.
Automatic Temperature Probe.
Probe is sturdy, but care should be
taken in handling. Do not twist or
bend; avoid dropping temperature
probe.
Clean as soon&r using as possible.
To clean, wipe with
sudsy
cloth, then
rub lightly with plastic scouring
ball if necessary. Rinse and dry or
wash in dishwasher.
Shelf Accessory. Your shelf
accessory is designed for use in a
microwave oven only; do not use in
a conventional oven. Do not use a
browning dish with the shelf.
Arcing could
occur.
Clean shelf with mild soap and
water or in the dishwasher.
Do not
clean in a self-cleaning oven.
How to Clean the
Oufiide
Case.
Clean the outside of your
oven with soap and a damp cloth,
rinse with a damp cloth and then
dry. Wipe the window clean with a
damp cloth. Chrome trim is best
wiped with a damp cloth and then
with a dry towel.
Control Panel.
Wipe with a damp
cloth. Dry thoroughly. Do not use
cleaning sprays, large amounts of
soap and water, abrasives or sharp
objects on the panel—they can
damage it.
Door Surface. When cleaning
surfaces of door and oven that
come together on closing the door,
use only mild, non-abrasive soaps
or detergents applied with a sponge
or soft cloth.
Power Cord.
If the cord becomes
soiled, unplug and wash with a
damp cloth. For stubborn spots,
sudsy
water may be used, but be
certain to rinse with a damp cloth
and dry thoroughly before plugging
cord into outlet.
28
Cooktop
Li@t/Ni@t Li@t
REMOVE SCREW
To replace
combination cooktop
light/night light, first
disconnect
power at main fuse or circuit
breaker
panel
or pull
plug.
Remove screw on right side of light
compartment cover and lower cover
until it stops.
Be sure bulbs to be replaced are
cool before removing. Break the
adhesive seal by
gentlv
unscrewing
the bulbs.
Repiac~ wi~h
40-watt
-
incandescent bulbs (WB02X4253)
available from your GE supplier.
High-intensity, 40-watt bulbs
(40SllN/1), which are available in
supermarkets and hardware stores,
may also be used for replacements.
Raise light compartment cover and
replace screw. Connect electrical
power to microwave oven.
Oven Li@t
I
To replace
your oven light, first
disconnect power at main fuse
or circuit breaker or
pull
plug.
Remove the top grill by taking out
2 screws that hold it in place,
Page 29

Next, remove the single screw
located above door near center of
oven that secures light housing.
Replace burned-out bulb with a
30-watt GE bulb
(WB02X4235)
available from your GE supplier.
I
.,
I
Clean off the grease and dust on
hood surfaces often. Use a solution
of warm water and detergent.
About 1 tablespoon of ammonia
may be added to the water. Take
care not to touch the filters and
enamel surfaces with this solution;
ammonia will darken metal.
The
Exhamt
Feature
I
ME+AL
METAL
FILTER
FILTER
COO~P/NIGHT
LIGHT
The exhaust hood
feature on your
microwave oven is equipped with
two metal
fiIters
which collect
grease. When the fan is operated,
air is drawn up through the filters
and is then discharged through the
—
provided venting to the outside.
The hood also has a light for
illuminating the counter space.
When NIGHT LIGHT pad is
touched, the hood light operates
at a lower intensity for use as
a night light.
.
and to the front The filter will
drop out.
II
Never operate your hood without
the filter in place.
In situations
where flaming might occur on
surfaces below hood, filter will
retard entry of flames into the unit.
GROUNDING
INSTRUCTIONS
This appliance must be grounded.
In the event of an electrical short
circuit, grounding reduces the risk
To remove grease filter,
grasp the
of electric shock by providing an
“finger hold” on the filter and slide to
escape wire for the electric current.
the rear. Then pull filter downward
This appliance is equipped with a
power cord having a grounding
wire with a grounding plug. The
plug must be plugged into an outlet
that is properly installed and
grounded. (Fig. 1)
To replace grease filter,
slide the
filter in the frame slot on the back
of the opening.
Pull filter upward and to the front
to lock into place.
To clean grease filter, soak,
then
agitate filter in a solution of hot
water and detergent. Don’t use
ammonia or other alkali because it
will darken metal. Light brushing
can be used to remove embedded
dirt. Rinse, shake and remove
moisture before replacing.
Filters
should be cleaned at least once a
wARNING-Improper
use of the grounding plug
~an ~esult
in a risk of electric shock.
n
-,@
%
INSURE PROPER
GROUNO
EXISTS
Fig. 1
BEFORE USE
Consult a qualified electrician or
service technician if the grounding
instructions are not completely
understood, or if doubt exists as to
whether the appliance is properly
grounded.
Where a standard two-prong wall
receptacle is encountered, it is
your personal responsibility and
obligation to have it replaced with
a properly grounded three-prong
wall receptacle.
Do not under any circumstance
cut or remove the third (ground)
prong from the power cord.
Do not use an adapter plug with
this appliance.
month.
Do not use an extension cord with
this appliance.
29
Page 30

-
m
Questiom?
Use This
Woblem
Solver
v
-
PROBLEM
POSSIBLE CAUSE AND REMEDY
OVEN WILL
N~
o
A
fise
in
your
home may be
blown or~e circuit
breaker tripped.
Replace fuse or reset
COME ON
circuit breaker,
●
Unplug your
microwave oven, then plug it back in.
●
Make sure 3-prong plug on oven is fully inserted into
wdl
receptacle.
CONTROL PANEL
●
Door not securely closed.
LIGHTED, YET OVEN
WILL
N~ ST~T
●
START must be touched
afier
entering cooking
SelWtiOn.
●
~other
selection
en~red
~ready in oven
and
cLEAR/oFF
not
touched to cancel it.
●
Make sure you
have
entered cooking time after touching
TIME
COOK I & II.
●
CLEAR/OFF was
touch~
acciden~lly,
Reset
cooking
program
and touch
START.
●
Make sure you have entered a temperature after touching TEMP COOK/HOLD.
●
Make sure you entered a code number after touching
AUTO COOK,
AU~
ROAST,
AU~
DEFROST
orAU~
REHEAT.
FOODS ARE EITHER
●
Cooking times may vary because of starting food temperature, food density or amount
OVERCOOKED OR
of foods in oven. Touch TIME COOK I & H and
additiond
cooking time for completion.
UNDERCOOKED
o
Incorrect power
level
entered. Check cookbook for recommended power
level.
o
Dish ~s not
~~~,
turned or
stirr~.
Some dishes require specific instructions.
Check cookbook or recipe for instructions.
G
Too many dishes in oven at same time. Cooking time must be increased when cooking
more than one food item. Check cookbook time recommendations.
●
Dish not completely covered as directed during Auto Cook.
● previous
micro~ving lefihu~idi~ or
moistum in oven,
thUS
lessening the cooking
time
in Auto Cook
finction.
o Cemin
vege~bles need a s~ding time after
using Au@
Cook.
Ch~k
Automatic
Cooking Control Guide.
o
probe not insefied
properly
into
meat or dish
when using Temp C~WHold or Auto
Roast functions. Check cookbook for specific instructions.
“PRObE”
APPEARS
*
Probe has been forgotten or not seated properly in oven wall when using Temp
ON DISPLAY
CooWHold
or Auto Roast.
“Error” APPEARS
o
During
Auto
c~kor
Auto
Reheat
program,
the door was opened before SW could
ON DISPLAY
be detected.
Ml
these things are normal with your microwave oven:
●
Steam or vapor escaping from
. Dimming oven light and change
●
Some TV-Radio interference
around the door.
in blower sound
may occur while
might be noticed while using your
● Light reflection around door or
operating at power levels other
microwave oven. It’s similar to the
outer case.
than high.
interference caused by other small
● Dull thumping sound while oven
appliances and does not indicate a
is operating.
problem with
your oven.
If you need more help... call, toll free: GE Answer
Center@
/800.6262000/ consumer information service
30
Page 31

Wdll
Be There
With the purchase of your new GE appliance, receive
tie
assurance
fiat
if you ever need information or assistance
from GE, we’ll be there.
Ml
you have to do is cdl—toll-free!
GEAnswer Centera
In-Home
Repak
Service
8flo-GE-cAREs
AGE Consumer Service professional
wtil
provide expert repair service,
scheduled at a time that’s convenient
for you. Many GE Consumer Service
company-operated locations offer you
service today or tomorrow, or at your
convenience
(7:00
a.m. to
7:00
p.m.
weekda~ 9:00
a.m. to
2:00
p.m. Saturdays). Our factory-trained technicians
know your appliance inside and
out—
so most repairs can be
handed
in just
one visit.
Whatever your question about any GE
major appliance, GE Answer
Cente@
information service is available to
help. Your
cdl—and your question—
will be answered
prompdy and
courteously. And you can
cdl
any
time. GE
~swer
Cente@ service is
Service Contracts
open 24 hours a day 7 days a week.
800-626-~4
You can
have the secure feeling that
GE Consumer Service
wfll still
be
there after your warranty expires. Purchase a GE contract while your warranty is still in effect and you’ll receive
a substantial discount. With a
mdtiple-
year contract, you’re assured of future
service at today’s prices.
Pam andAccesories
800-626-2002
Telecommunication
Detice
for the Deaf
I
I
‘“
‘Lg
. .
J
Sm,
m
A*
k -— - . . .
.
,.l ---- -.
.,-. —. ..- - -—... ~., . ,.,
IE
7
hdividu& qutiled
to
setice
their
own appliances can have needed
For Customers
Wfih ~
-.
par~
or accessories sent direcdy to
their home, free of shipping charge!
S~cialNeeds...
The GE parts system provides access
80&D&2000
to over
47,000
parts.. and dl GE
Genuine
Reneti
Parts are fully
Upon request, GE will provide
Braflle
.
warranted.
WSA,
MasteKard and
controls for a variety of GE
a~~liances,
I
Discover cards are accepted.
User maintenance instructions
contained in this
boo~et cover
p~
dures
intended to be performed by
any
user. Other servicing
genedy
shodd
be referred to
qutiled
service personnel. Caution must be
exercised, since improper servicing
may
uuse
unsafe operation.
IL
and a brochure to assist in planning a
barrier-free kitchen for persons with
limited
mobflity
To
obtain these items,
free of charge,
cdl
800.626.2000.
Consumers with impaired hearing
or speech who have access to a
TDD
or a conventional teletypewriter may
cdl 800-TDD-GEAC
(800-833-4322)
to request information or service.
Page 32

YOUR GE MICROWAVE OVEN
WARRANTY
Save
proof of original purchase date such
as your sales slip or
cancelled
check to establish warranty period
WHAT IS COVERED
FULL ONE-YEAR WARRANTY
For one year from date of original
purchase, we will provide, free of
charge, parts and service labor
in your home to repair or replace
any
part of
the microwave
oven
that fails because of a
manufacturing defect.
LIMITED ADDITIONAL
NINE-YEAR WARRANTY
For the second through tenth
year from date of original purchase,
we will provide, free of charge, a
replacement magnetron
tube
if
the magnetron tube fails because
of a manufacturing defect. You pay
for the service trip to your home
and service labor charges.
This warranty is extended to
the original purchaser and any
succeeding owner for products
purchased for ordinary home use
in the 48 mainland states, Hawaii
and Washington,
D.C.
In Alaska the
warranty is the same except that it is
LIMITED because you must pay to
ship the product to the service shop
or for the service technician’s travel
costs to your home.
All warranty service will be provided
by our Factory Service Centers or
by our authorized Customer
Care@
servicers during normal working
hours.
Look in the White or Yellow Pages
of your telephone directory for
GENERAL ELECTRIC COMPANY.
GENERAL ELECTRIC FACTORY ‘
SERVICE, GENERAL
ELECTRIC-
HOTPOINT
FACTORY SERVICE or
GENERAL ELECTRIC CUSTOMER
CARE@ SERVICE.
WHAT IS NOT COVERED
● Service trips to your home to
teach you how to use the product.
Read
your Use and Care material.
If you then have any questions
about operating the product,
please contact your dealer or our
Consumer Affairs office at the
address below, or call, toll free:
GE Answer
Center@
800.626.2000
consumer information service
● Improper installation.
If you have an installation problem,
contact your dealer or installer.
You are responsible for providing
adequate electrical, gas, exhausting
and other connecting facilities.
. Replacement of house fuses or
resetting of circuit breakers.
● Failure of the product if it is used
for other than its intended purpose
or used commercially.
. Damage to product caused
by accident, fire, floods or acts
of God.
WARRANTOR IS NOT RESPONSIBLE
FOR CONSEQUENTIAL DAMAGES.
Some states do not allow the exclusion or limitation of incidental or consequential damages, so the above limitation or exclusion
may not apply to you. This warranty gives you specific legal rights, and you may also have other rights which vary from state to state.
To know what your legal rights are in your state, consult your local or state consumer affairs office or your state’s Attorney General.
Warrantor: General Electric Company
If further help is needed concerning this warranty, write:
Manager—Consumer Affairs,
GE
Appliances, Louisville, KY 40225
Part No. 164 D2092P131
[
JVM150!
Pub.
No.
49-8101
Printed in
Kore
4-90
CG
 Loading...