

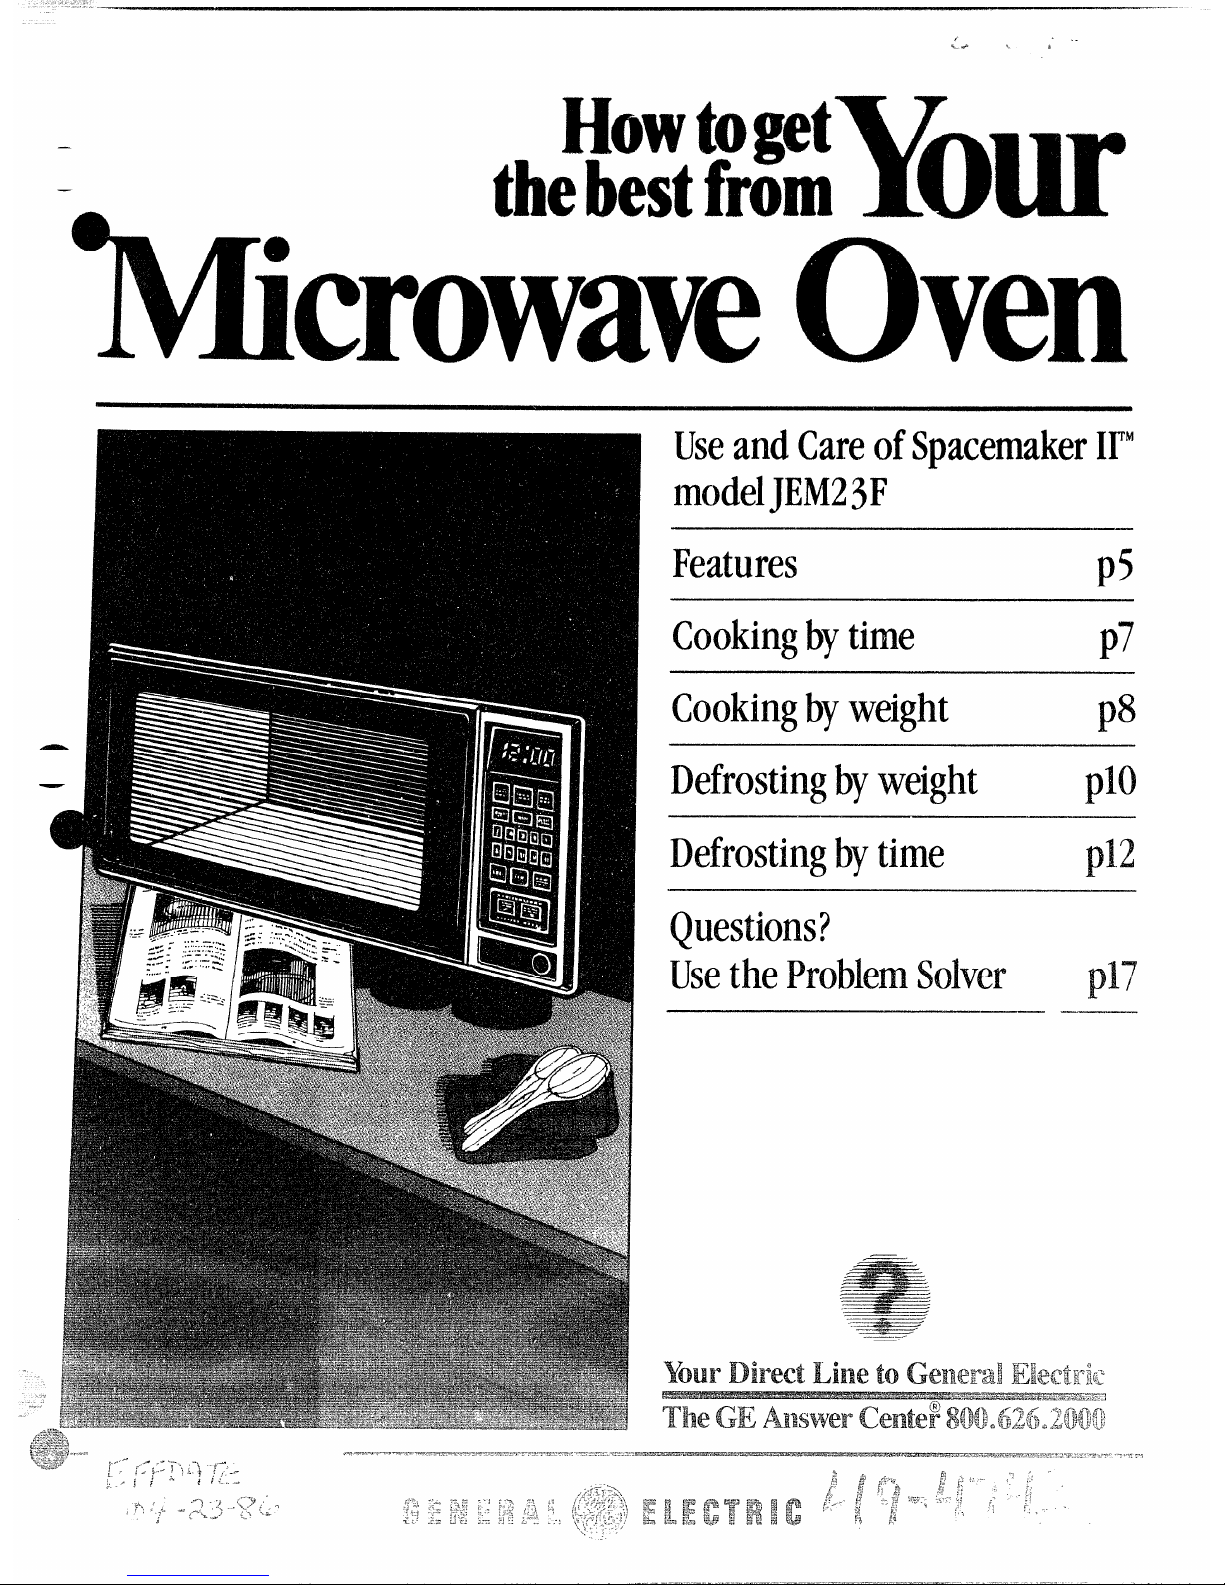
Page 1
—
Y
.
Ove
UseandCareofSpacemaker1~
modelJEM23F
Features
p
Cookingbytime
p
Cookingbyweight
p
Defrostingbyweight
Defrostingbytime
Usethe
-.
=
-——
———.,
—=—~
.. ...
—-——.
Page 2
BeforeUsingYbtirOven .. .....2
SafetyInstructions . ‘. .......3,4
Featuresof’Yburoven ., . . . . .
s .
Y)urTouchControlPanel .. ....6
CookingbyTime . . . . . ........7
CookingbyWeight. . ........8,9
DefrostingbyWeight+, .. ...10, 11
Defrostingby Time. . . . . . .. ...12
Minute/SecondTimer. . . . .. ...13
Care and Cleaning ... ,.. .....14
GroundingInstructions . . . . . ..15
lb F&movetheOven
fromCabinetMm.mt. .......16
The ProblemSolver . . . . . . . . ., 17
If YouNeed Service . . . . +.. ...19
Warranty . . . . . . . . . . -BackCover
T
o
Make sure all cookwareused in
yourmicrowaveovenissuitablefor
microwaving.Most glasscasseroles,
cookingdishes, measuringcups.
custardcups, potteryor china
dinnerware which doesnothave
metaliictrimor glazewitha metallic
sheencan be used. Some cookware
islabeled“suitableforMicrowaving:’
Ifyouare unsure, use~hisdish test:
lMcasur(’1cup water in a glass cup.
Pluceinovenon or besidedish.
Microwavel-lfi minutesatHIGH. If
waterbecomeshot,dishismicrowave
s:~fic.Ifdish heats. itshould not be
used fi)rmicrowaving.
@[):ipcrtowels,wax paper, and
j“)lilSl ic wrap can bc
( int)rdcr to retain moisturc
iiIKl pf-ck ml spattering.
@,Sonlct]]i(’rowavcd
fiwis rqu i rc
~1iII-in:, rof:~t i IIg. or rc:~ rrang
in~.
(‘ht_’Lk)()[1r (‘()()kh()(~k.
* ,S(l.’ill)}!?[1ild‘-l
L!/?[1~%’%11n.! in foods”
;I,I1 ILII ;IK [
igll[l~ i.xn t’rcd 17j a skin
()r []]L’1)1h[-:111L’. Pjcrc’(’p(ml[( ~L’s. L’::
. .
j {I!1.\ ;k(~i.i{.</~1{1, ~vl /i\ I.’:’; 1{) ;)[ (’; ~’r}g
/~1ii“,i 1!1:!.
Helpus WW.
*
I u v o
.
r t b Lw
1
isintcn~lcdto tl~’lpy{mt)pL*ratc
iiIN-I
I iI i1)y{)111’lWW’Mic1’()
oven pl”opcrly.
K(xpith t LIIISWC!I>Stoy(Ml-
qucstit)ns,
If’youdon’t
U something
or needmore help,wri[c(inclu(ic
yOUrphone
nt!i]]b~r):
Consumer Af’ta~rs
General Electric Comptiny
AppiiancePark
Louisville,KY40225
W d t m
a s nu
YLM’lifind themon a label inside
theoven.
These numbers are also on the
Consumer product~wncrship
RegistrationCard that came with
yourMicrowaveOven. Before
sendingin thiscard, piease write
thesenumbers here:
—.
Model Number
——— —
Serial Number
Use these numbers in any
correspondence or service calls
concerningyour Microwaveoven.
1
The electric output of’this
microwaveoven is 600 watts.
B s y
i
Itis important (hut we know the
loc:ition of”your Microumw Ovcn
dlollid :1 II(33] OCCL1l.for W@StIllClltS.
l{~~gistr:l(it)ll[ ‘;llti. II }(WIllovt.’.or
if’yoU
iil”C1101tht.’ol”igilliliilllt L’lMkL’1”
j)lL!iiSC
wrilcto Llh,htiltill~III(KIL’I
i W iill l)Li I i It%’ 1%, ‘i’hi!+t~l@ii]I14’L’
musfk rcgistmd. Plwuwhcwrtttin
thtilit is.
Wri[c(():
General Eicctric
C
RangeProduc[Service
AppliancePark
Louisvi]ic,KY40225
H
y r a
d o ...
Immediatc]ycontactthe dealer (or
buiider) that sold you theOven.
S t a m
BeforeymJrequestservice...
checktheProblemSolveronpage 17. —
It listsminor causes of operating
problems thatyoucan correct —
yourself.
o A
available at extra cost from yoL!r
General Electric supplier.
JX8F
Kit converts this
ovento a built--inwalloven.
WM8F Kit allowsthis
ovento be mountedon a wall.
when your
microwaveoven .
. you
should find
an installationpackagethat contain:;
installation instructions, a tcnlplatcq
i installa!ionhardware for uI~dcr-
(hc-cabinetmounting. If mis~ing.
contactyour sLipplier.
—
Page 3
—
TOAVOID
.
POSSIBLE
g EXPOSUR.ETO
EXCESSIVE
MICROWAVE
ENERGY
{a)DoNotAttemptto operatethis
ovenwiththe door open since
opendoor operationcan resultin
harmfulexposureto microwave
energy.Itis importantnotto
defeator ~amperwith thesafety
interlocks.
(b)110Not Place any object
betweenthe ovenfront faceand
[hedoor or allowsoi!or cleaner
residueto accumulateon sealing
surfaces.
(c)DONotOperatethe oven
ifit isdamaged. It is particularly
importantthatthe ovendoor close
properly and thatthere is no
damageto the:
[2)hingesand latches (brokenor
loosened)
[.3)door sealsand sealingsurfaces.
(d)‘l’heoven Should Not be
:~ci.justedor repaire~iby anyone
exceptproperly qwdified service
personnel.
R a inb w t
Whenusingelcctricalappliances
basicsafetyprecautionsshouldbe
followed,includingthefidk) wing:
WARNI.NG--T()reduce
theriskofburns,electricshock,
fire,injurytopersonsorexposure
toexcessivetnicrowavcenergy:
@Usethisapplianceonlyforits
intendeduseasdescribedinthis
manual.
*Readandfollowthespecific
“PRECAUTIONS‘K)AVOID
POSSIBLEEXPOSURETO
EXCESSIVEMICROWAVE
ENERGY”atk.%.
~Thisappliancemustbegrounded.
Connectonlytoproperlygrounded
outlet.See“GROUNDING
INSTRUCTIONS”onpage15.
QForbestoperation,plugthis
applianceintoitsownelectrical
outlet,topreventflickeringof
lights,Mowingoffuseortripping
ofcircuitbreaker.
oInstallorlocatethisappliance
onlyinaccordancewiththe
providedinstallationinstructions.
@Be
certainto placethefront
surfaceofthedoorthreeinchesor
morebackfromthecountertop
edgeto avoidaccidental
ofthe innormalusage.
(Musedoncountertop.)
@
Donotcoverorblockany
openingson/heappliance.
@!!30notuseoutdoors.
$Donotimmersepowercordor
plug
in waFcr.
e KU!ppower COI-daway from
hcaicd SUr[’:wt:s”
@]){)~~()~i~~pow’cr(.’ordll;ing(wer
~${j~OL~~?fj:~~]~~)r~:[}~lnttr.
L
* Donoto thisapplianw
ilithasiidamagedpowercordor
plug,ifitisnotworkingproperly,
orif’itIMsbeendamagedor
droppwi,
● Sec(ioorsurfkxcleaning
instructionsonpage14.
*Thisapplianceshouldhe
servicedonlybyqualifiedservice
personnel.Chntactnearest
authorizedservicefacilityfi)r
examination,repairorad+justnmnt,
@Aswithanyappliance,close
supervisionisnecessarywhen
usedbychildren,
*TO
reducetheriskof firein
theovencavity:
–Do
notovercookfood.Carefully
attendapplianceifpaper,plastic,
orothercombustiblematerialsarc
placedinsidetheoventofacilitate
cooking.
—Removewiretwist-tiesfrom
paperorplasticbagsbefore
placingbaginoven.
—Donotuseyourmicrowave
oventodrynewspapers.
–Paper towels, and!
waxpaper.Recycled
paper
productscancontainmetalflecks
whichmaycausearcingorignite.
Paperproductscontainingnylon
ornylonfilamentsshouldbe
avoided,astheymayalsoignite,
–Do
notoperatethe oven
emptyto avoid to
ovenandthe of fire.If
byaccidenttheoven run
emptyaminuteortwo,noharm
isdone.However,{rytoavoid
operatingtheovenemptyatall
times-ii savesenergyand
prolongs the life Qf[IN oven.
-—------–----r’\
L
(cot2&inll&’d
He-z-i’J%TJVI
-lV’”
.
Page 4
SAFETY fLWIIliFNW~~
–-Donotpoppopcorninyour
microwaveovenunlessinaspecial
microwavepopcornaccessoryor
unlessyouusepopcornlabeledfor
useinmicrowaveovens.
--Ifmaterialsinsideovenshould
ignite,keepovendoorclosed,turn
ovenoff,anddisconnectpower
cord,orshutoffpoweratfuseor
circuitbreakerpanel.
@Someproductssuchaswhole “
eggsandsealedcontainers-for
example,closedglassjars—may
explodeandshouldnotbeheated
inthisoven.
@Avoidheatingbabyfoodin
glassjars,evenwithouttheirlids;
especiallymeatandeggmixtures.
@
Don’tdefrostfrozenbeverages
innarrowneckedbottles(especially
carbonatedbeverages).Evenifthe
containerisopened,pressure
canbuildup.Thiscancausethe
containertoburst,resultingin
injury.
@Use
rneta!onlyasdirectedin
Cookbook.
Foilstripsasusedon
meatroastsarehelpfulwhenused
asshowninCookbook.
TVdinnersmaybemicrowaved
inFailtrayslessthan3/4”high;
rcmovetopfbilcoverandreturn
[raytobox.Whenusingmetalin
themicrowaveoven,keepmetal
atleast1inchawayfromsides
of’Oven.
*Cookingutensilsmtiybecome
hotbecauseofheattransfcrrmi
fromtheheatedf(x)d,Pothokkws
maybcneededtohandlethe
utensil.
@
Sot o f
c
becometoohottotouch.Be
carefulwhentouchingthefloor
duringandaftercooking.
● Foodsc i liquids(such
aspasta)maytendtoboilover
morerapidlythanfbodscontaining
lessmoisture.Shouldthisoccur,
refertopage14forinstructionson
howtocleantheinsideoftheoven.
oThermometer—Donot
useathermometerinfoodyou
aremicrowavingunlessthe
thermometerisdesignedor
recommendedforuseinthe
microwaveoven.
ePktsticutensils-Plasticutensils
designedformicrowavecooking
areveryuseful,butshouldbe
usedcarefully.Evenmicrowave
plasticmaynotbeastolerantof
overcookingconditionsasareglass
orceramicmaterialsandmay
softenorcharifsubjectedtoshort
periodsofovercooking.Inlonger
exposurestoovercooking,thefood
andutensilscouldignite.For
thesereasons:1)Usemicrowave
plasticsonlyandusetheminstrict
compliancewiththeutensil
manufacturer’srecommendations.
2)Donotsubjectemptyutensilsto
microwaving.3)Donotpermit
childrentouseplasticutensils
withoutcompletesupervision.
ourdirdcti(msWwtl}andalways
.
cookthemeatMatk:as[170(’F,
Thisassuresthat,intherctnotc
@
possibi~itythuttrichinamaybe
presentintherecut,itwillbe
killedtindmetitwilllx safetoCM.
oBoilingeggsisnot
recommendedinamicrowave
oven,Pressurecanbuildup
insidetheeggyolkandmaycause
ittoburst,resultingininjury.
*Foodswithunbrokenouter
%kin”suchaspotatoes,sausages,
tomatoes,apples,chickenlivers
andothergiblets,andeggyolks
(seepreviouscaution)shouldbe
piercedtoNowsteamtoescape
duringcooking.
a f~~oi]a~le”cookingpouchef$
andtightiyclosedplasticbags
shouldbeslit,piercedorvented
asdirectedinCookbook.Ifthey
arenot,plasticcouldburstduring
-
orimmediatelyaftercooking,
possiblyresultingininjury.Also, —
plasticstoragecontainersshouldbe
atleastpartiallyuncoveredbecause
theyformatightseal.When
cookingwithcontainerstightly
coveredwithplasticwrap,remove
coveringcarefullyanddirectsteam
awayfromhandsandface.
~
certainspecialcircumstances,
liquidsmaystarttoboilduringor
shortiyafterremovalfromthe
microwaveoven.Topreventburns
fromsplashingliquid,stirthe
liquidbrieflybeforeremovingthe
containerfromthe oven.
Page 5
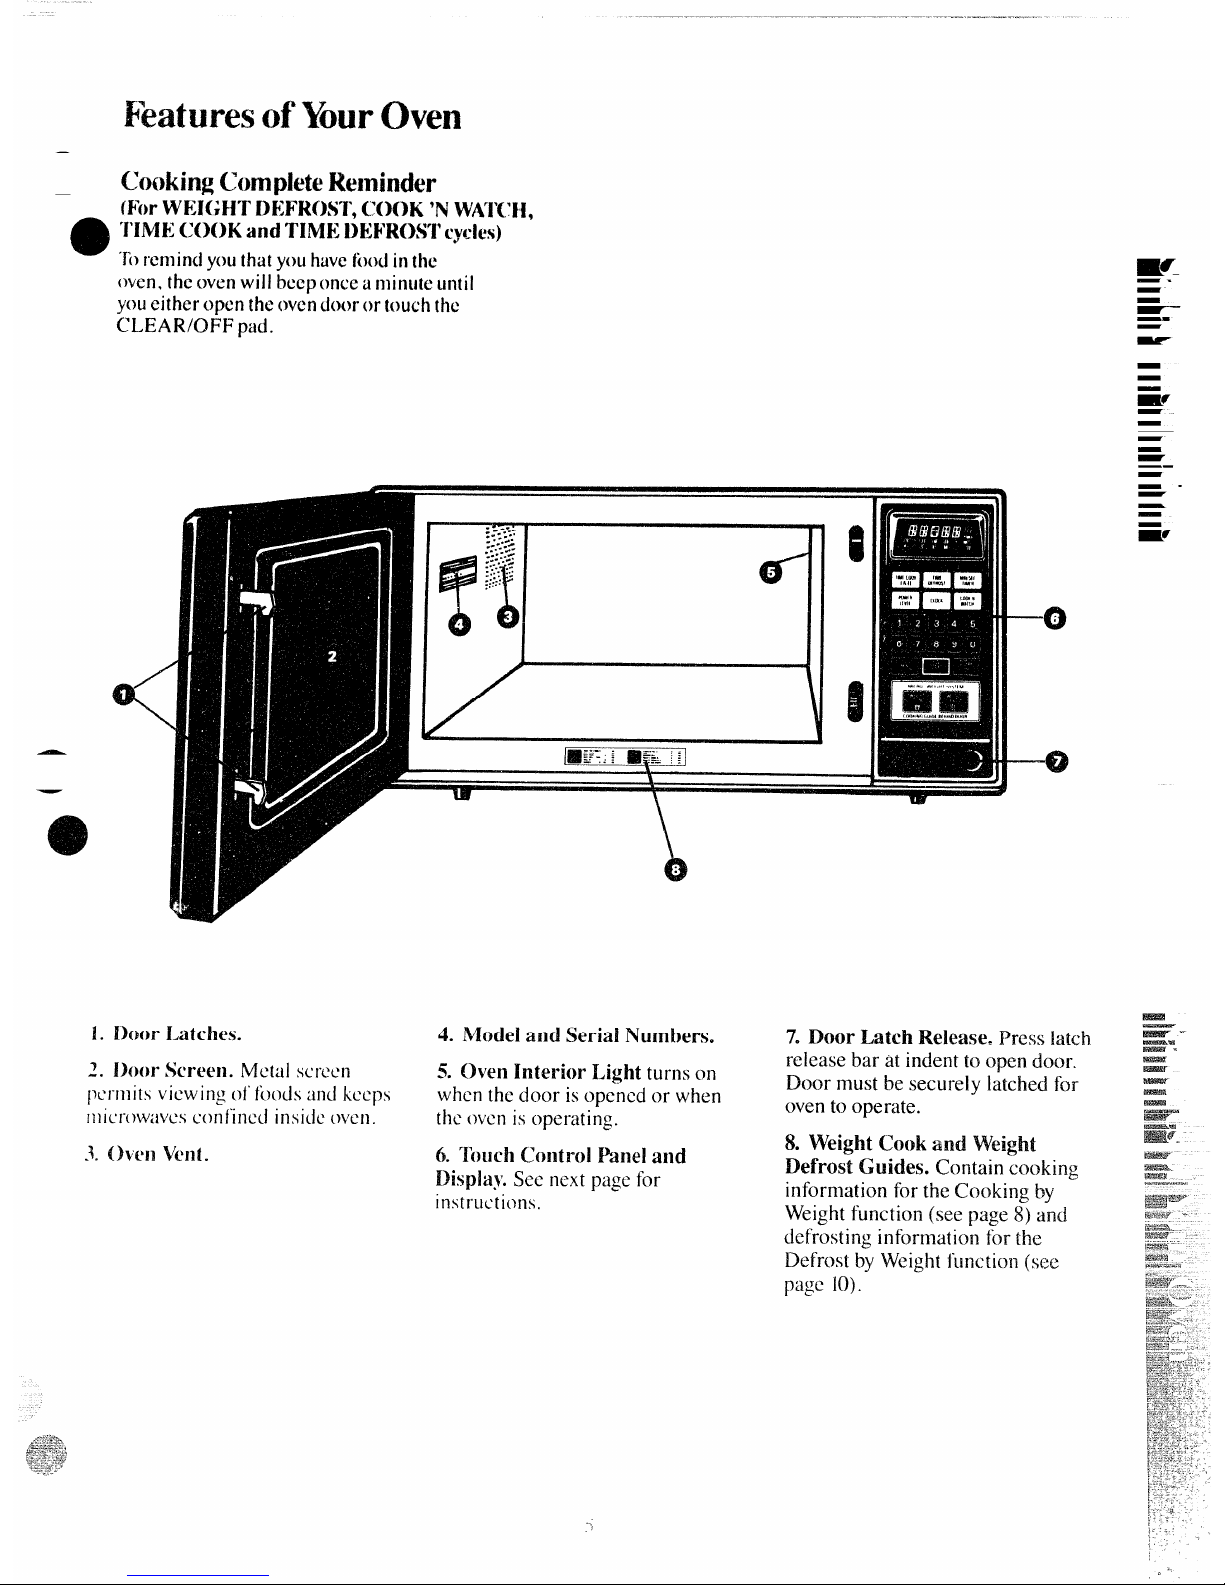
of YourOven
—
(hChRe
—
{ForWEI(;HTDEFROST,COOK‘NWATCH,
o
TIMECOOKandTI,MEDEFROSTcycles)
‘lbremindyouthatyouhavefiredinthe
oven,theovenwillbeeponceuminuteuntii
youeitheropentheown dooror touchthe
CLEAR/OFF pad.
1. Door Latchm.
4. Model and Serial Numhers.
2. Door ,Smwn. Metal
scrwn
5.
Oven Interior light turns on
permits viewing of foodsand keeps
when the door is opened or when
11]ic’rt)wuvcsconfined insidc(wcn.
theovenisoperating.
3. OV’QEIVcr]t.
6. Touch(lmtml Paneland
Displaj’.See next page for
instructions.
8
II
-
—.
—
-
—
-
--
0
7. Door Latch Release=Press latch
release bar at indent to open door.
Door must be securely latched for
ovento operate.
8. WeightCook and
Defrost Guides. Contain cooking
information for the Cooking t~y
Weightfunction (see page 8) and
defrosting informaticmfor the
Defrost byWeight function (see
page 10).
W
-
0
Page 6
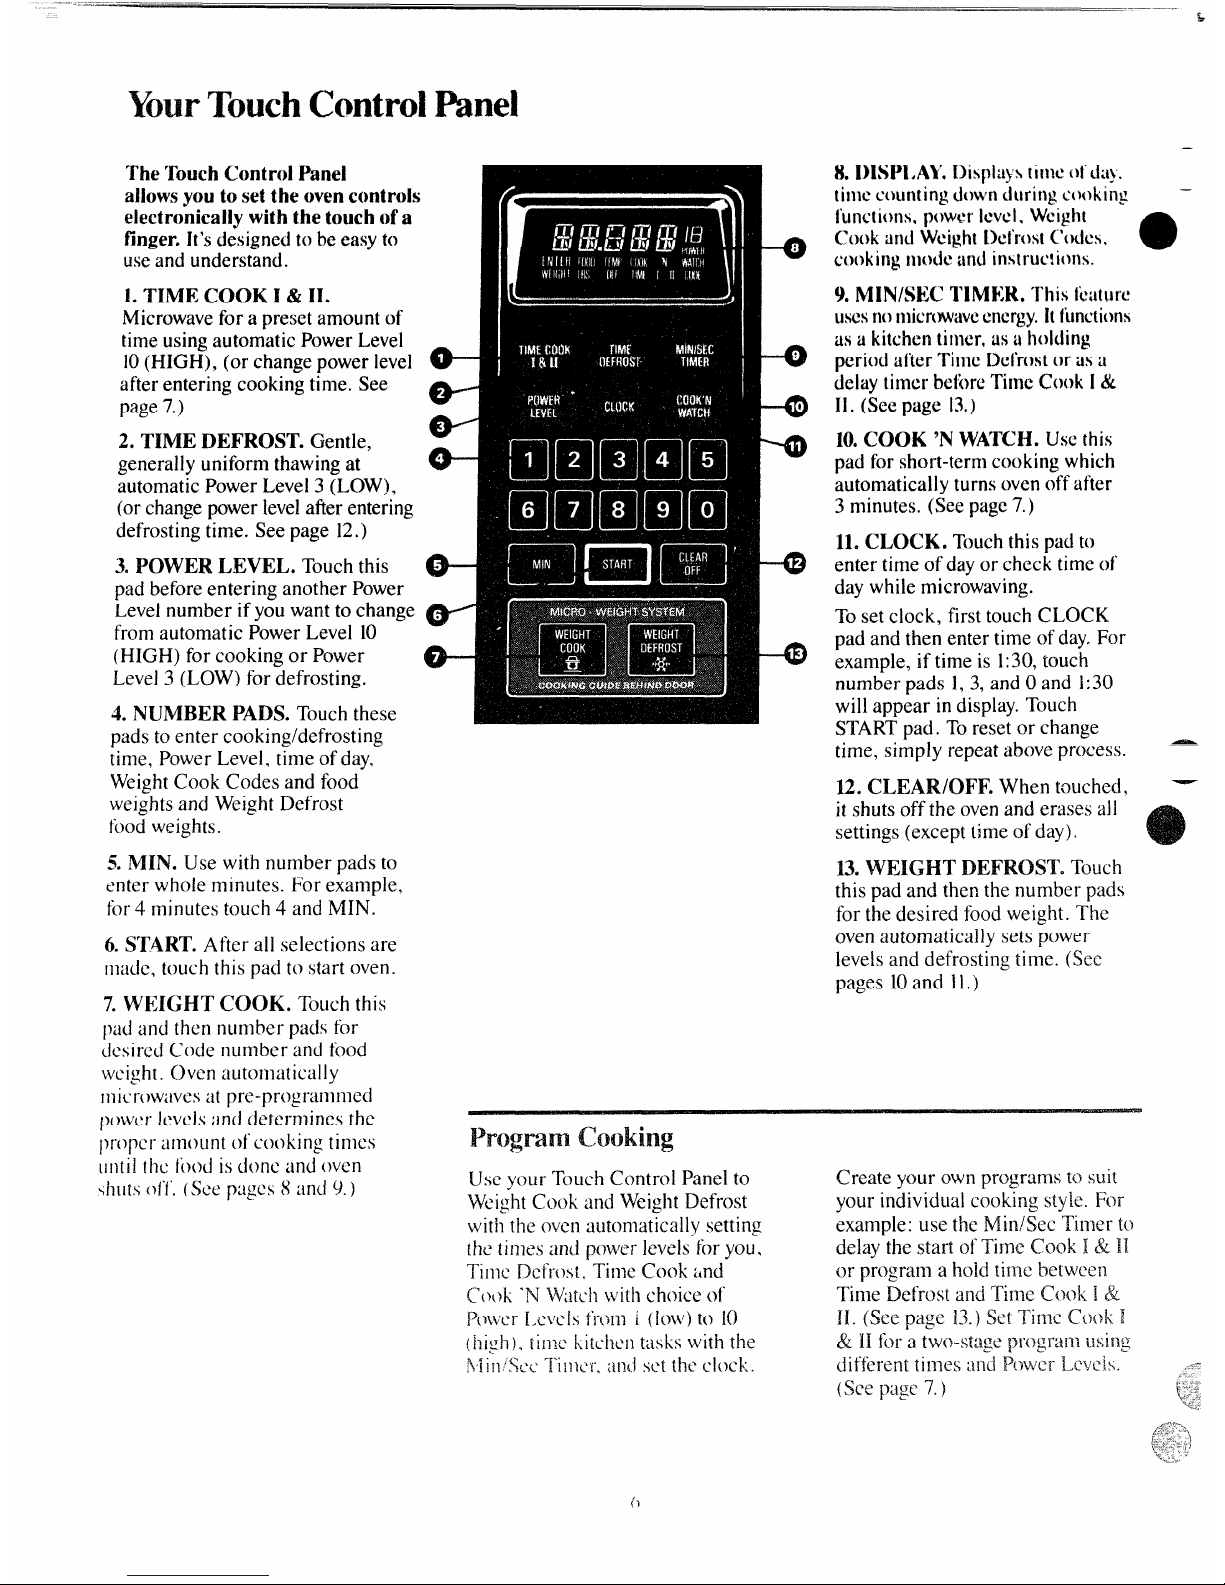
TouchControlPanel
TheTouchControlPanel
allowsyoutosetthe ovencontrols
electronicallywith the touchof a
finger.It’sdesignedto beeasyto
useand understand.
L TIME COOK I & II.
Microwavefora preset amountof
timeusingautomaticPowerLevel
10(HIGH), (or changepowerlevel
afterenteringcookingtime. See
page7.)
2. TIMEDEFROST.Gentle,
generallyuniformthawingat
automaticPowerLevel3 (LOW),
(orchange powerlevelafterentering
defrostingtime. See page 12.)
3.POWER LEVEL. Touchthis
pad beforeentering another Power
Levelnumber ifyou wantto change
fromautomaticPowerLevel 10
(HIGH) forcookingor Power
Level3 (LOW)fordefrosting, -
4. NUMBER PADS.Touchthese
padsto enter cooking/defrosting
time, PowerLevel, time of day.
WeightCook Codes and food
weights and Weight Defrost
foodweights.
5. MIN. Use with number pads to
enter whole minutes. For example,
fbI- 4 minutes touch 4 and MIN.
6. START. After all selectionsare
made, touchthis pad to startoven.
7.WEIGHT COOK. Touchthis
pad and then number pads for
dcsirmiCode number and food
weight. oven automatically
Inicr(jwavcsat pre-pr(Jgl-:~lllllleCi
p(nverJCVCJSand determines the
prt~pcramount oi cooking times
un[i1the Iimi is done and (wcn
~htlis(~ff”.(See ptiges 8 and 9.)
8. I)lSPI.Al’. Displa>s[imco?d+.
timccountingdownduring c(xking
functions. powerImwl.Weight
CookamiWeightDefrostC(dcs,
cookingmtxicand instructions.
9. MIN/SEC TIMER. This tcuturc
usesnon]icrowavcenergy.1[functions
as a kitchen timer, M a holding
period
afterTime Defrostor as u
deltiytimer bdbrc Time Cook [ &
11.
( page 13.)
10.COOK ‘NWATCH. Use this
pad forshell-term cookingwhich
automaticallyy turnsovenoffafter
3 minutes. (See page7.)
11,CLOCK.Tbuchthispad to
enter timeof dayor check time of’
daywhilemicrowaving.
Toset clock, firsttouch CLOCK
pad and then entertime ofday.For
example,if time is 1:30,touch
numberpads 1,3,and Oand 1:30
willappear in display.Touch
STARTpad. Toreset or change
time, simply repeataboveprocess.
12.CLEAR/OFF. When touched,
itshutsoff the ovenand erases all
settings(excepttimeof day).
13. WEIGHT DEFROST. Touch
thispad and then the number pads
for the desired foodweight. The
ovenautomaticallysets power
levelsand defrostingtime. (See
pages 10and 11.)
—..—
-—
k
—
.
e
—
—
Create your own programs to sui[
your individualcookingstyle. For
example:use the Min/SecTimer to
delaythe stall ofTime Cook 1& 1]
or program a hold time between
Time Defrostand Time Cook 1&
Il. (See page 13.) SetTime Cook 1
& Hfora two-stagepr(?gramusing
differenttimes ;.mdPower I_,c}wik.
(See page ‘7.)
Page 7

—
—
o
byT!me
TIMECOOK I & 11works
wellfor mostfoods. Itallows
youto microwavefora preset
amountoft ime using automatic
PowerLevel10,or changePower
Levelautomatically.
WEIGHT COOK maybepreferred
forroastsand poultry because
ovensets cookingtime andpower
levelfor you (see page8).
PowerLevel 10(HIGH) is
recommendedfor most cooking,
butyoumaychangethis formore
flexibility.See yourCookbook.
Tobecomebetteracquaintedwith
timecooking, makea cupofcoffee
byfollowingthe steps below.
—
—
Step 1:Fillti cup 2/3 full of
waterand add 1teaspoonofinstant
coffeeand stirto dissolve. Use a
that has no metaldecoration
Jnd is mi~rowavcsafe(referto
Microwwing Tipson page 2).
I?lacecup in ovenand closedoor.
Ifantxhcr powerlevelisdesirwl.
touch padand
desirednumber.althoughPower
Level 10(HIGH) ispreferredfotthiscup of coffcc.
Step4: TouchSTART.“COOK
TIMEJ’“POWER lo;”and time
countingdownshowon display.
Step5: When timeisup, theoven
signal and flashes “End!’ Oven,
lightand fan shutoff.
$@ 6: Open thedoor.
U t T C U
Fe
Withthe Time Cook11feature, you
can settwo time cookingfunctions
withinone program. This would be
idealifyoudesiredtochangepower
levelsduringyourcookingoperations.
The followingisan exampleofhow
to changepower levelsusingTime
Cook H.
Step 1:Repeat Steps 1,2 and 3.
$@ 2:Touch TIME COOK I & 11.
Step 3: Set yourtime.
Step 4: Tochange the power level.
touch POWER LEVEL pad and
desirednumber for newpowerievd.
Step 5: Touch START.
Step6: “POWER 10”isdisplayed
and “COOK TIME 1“countsdown.
$@ 7:At the end of “COOK
TIME 1“ the nextselected power
ICVC1isdisplayed and “COOK
TliME11”is showncounting down.
$Nep8: When time isup. the oven
$ignalsand flashes “End?’ The
ok’cn, 1i:hi and ii]?
s o
s d ,
$ .
J:{){)~;- ~=1 s“i?.,: : ~jQ
# , al;LLs:.,
*~ { ‘ ~ ‘7 ~ f f ~
,, . . ‘r
“y]g]g<j~yz W’hkh
~ ~ ~
<“-.
, ‘
, ~ . o
,~!,{“.. t;; ~::J-3,- J
:3i. f,?ra:... . .. u JP+, .
-
y,(?
~ ,{~#~~.;::~($f..c;+~,
.. . -.
, ; f
:’:j$~;:!f,;<:
, -:,>-.,. ., ..-1
‘: [
,s. B, e~
quickcookingoperationswhere
youwantto stopcookingd just
the righttime.
‘Ihuse Cook ‘NW’atch
Step 1:Touch
arcdisplayedand
Ilasllcs!
step 2: “IlouchSTART.“CCX)K’N
WATCH” and time counting up
to 3 minutes are displayed. Power
Level10isautomatically set in
oven but another power levelcan
be selected.
Step3: Open thedoor or touchthe
CLEAR/OFF pad tostopcooking.
The ovenwillautomaticallysignal,
flash “End” and shut of-fat the cnd
of3 minutes.
Q a A
Q. I set my ovenfor the time
calledfor in the recipe, but at the
end of the time allowed, my food
wasn’tdone. Whathappened?
A. Since house power variesdue
to time or location many Time
Cook recipes giveyou a time range
to preventovercooking.Set the
ovenfor minimumtime, test the
foodfor doneness, and cook your
fooda little longer, if necessary.
Q. Xtouched the number pads
andselectedmypowerlevel.
I touched START,however,my
ovendidn’tcome on. Why not?
A. The TIME COOK ‘i& 11pad
must be touched before settingthe
number pads or else your ovenwill
not begin cooking,
Q. I want to cook on a
levelother than do
I need to do?
A. Tbchange the power level,
touch the LEVEL pad.
“ENTER POWER”
f
display pane]. Enler new numhcr.
Q. can 1 my Time
Cook t[lCki’!kthe f’md?
A. Y(x.To re>umecooking.
simply Ciosethed(lol”ancipress
~%~eSTARTpad. The fimcr musl h
I-csclIi}rcmlkingto rcsurncl.lnlcs~
1imc is rt-nn:~ining {lnIim(=r.
Page 8

byWeight
Withthe WeightCookfeature,
theovenautomaticallysets
cookingtimesand powerlevels
forvarious typesand amounts
ofmeat.
Usethe Cook-By-Weightguide on
page9. Youchoosetheappropriate
Code Number from 1to 8 for the
foodyouare cooking. Enterthe
FoodWeight(in poundsandtenths
ofa pound-–see ConversionGuide
on page9). Then touchtheSTART
pad. The ovencalculatesthe
cookingtime and power level
foryou.
Justas in conventionalroasting,
only tender roastsshouldbe
cooked usingthe WeightCook
feature.Less tender roastsshould
bemicrowavedbytime, according
todirections in the Cookbookthat
came withyour oven. It contains
complete informationfor preparing
roastsformicrowaving.
When cooking roastsbyweight,
theyshould be completely thawed
and be at refrigeratortemperature
for bestresults.
kk)W to s WeightC
Bctk youbegin,checkthe Weight
CookGuide locatedat Ix)ttomof
theovenwhenyouopenthedoor, It
showsminimumand maximumFwti
Weightsforeach Code Nuudwr.
Youwillneed to knowyourFood
WeightandcorrespondingCocic
beforesettingWeightCook,
1. Place roast inc)venon
microwave-safedishand close
ovendoor,
2. TouchWEIGHT COOK pad.
“AUTO WEIGHT COOK”
S
and “ENTER CODE” flashes on
display.
3. Enter selected code from guide.
For example-,well-done beef calls
f(M.Code 3.
4. Enterweight.Forexample,
touchNumber Pads2 and 5 ftw
weightof 2,5 pounds(2 pounds,
8ounces, See ConversionGuide
on page9.)
Display shows “2.5;’ “WEIGHT
LBS” “COOK” and “CODE 3:’
After 4 seconds, “2.5’7is replaced
by “START” flashing.
5. TouchSTARTpad.
“COOK TIME” and “CODE 3“
showon displayand cooking Ii]llc
countsdown,
Page 9

—
WhenyouseiectWeightCook
Code8, the ovencookswithout
interruptionunlessyouopenthedoor
or touchtheCLEAWOFF pad.
~ weight
;onversionGuide
—
If weight of’foodisstatedin
poundsandounces, theounces
Whenyouselect WeightCook
Codes1through ‘7,the oven
signalsyouwith4 beepsand “Turn”
flashingon the displaywhen it’s
timeto turnthe roast over.After
youturn theroast, closethe door
andtouchSTART.Cookingresumes
andremainingCookingTimecounts
hmstbe convertedtotenths(,1)
ofa pound.
Ounces
Pounds
1-2 .1
3
.2
4-5 .3
6-7
.4
8 .5
Regardlessof theWeightCook
Codeyouselect, when cookingis
completed,
“End” flashesorR
display,ovenbeeps4 timesand
oven,lightand fan shutoff.
“End” willremain on the display
until you open the door.
downon thedisplay.
9-10 .6
11
.7
12-13 .8
14-15 .9
~
Guide
‘i
.
llECOiVIIMENDEI)
FOODSCODE
1
2
3
4
5
6
NllN.-MAX.
SUGGESTIONS
Beef - Rare
Beef- Medium
Beef- Well
Lamb - Medium
Lamb - Well
0.1-6.0 lbs.
0.1-6.0 lbs.
0.1-6.0 lbs.
0.1-6.0 lbs.
0.1-6.0 lbs.
Place on trivet fator cut side down. Coverwith
waxpaper.Whenovensignals,turnover.Re-cover
and continue microwaving.
Pork
0.1-6.0 lbs.
Place roastfat side down on trivet. Add 1/4cup
waterto dish and cover with plastic wrap. After
half of time. turn roast fat side up. I@-coverand
continue microwaving.
7
Ham, Prccookd
0.1-6.0 lbs. Shield edgeof ham with l-inch wide strip of foil.
Place meat in dish. Add 1/4cup water to dish,
Cover with plastic wrap. When oven signals, turn
over.Re-cover and continue microwaving.
Place whole poultry breast side up on trivet. For
larger birds, shield ends of legs, wing tips and
skin over neck cavity with small pieces [?f
aluminun] foil. Cover with wax paper. Piacc
poultry pieces in dish skin side up. Cover with
wax paper.
——.—.———.....—...
—
o i- It-)s.8 R
Page 10

byWeight
WiththeWeightDefrost.feature,
the ovenautomaticallysetsthe
defrostingtimesand powerlevels
foryou.
IJsetheDefrost-By-Weightguideon
page H. Enterthe FoodWeight(in
poundsaridtenthsofa pound—see
ConversionGuideat right).Then
touchSTARTpad.
The ovencalculatesdefrostingtime
andchangespowerlevelsduring
defrostingtogiveevendefrosting
results.
H t s WeDe
Beforeyoubegin, checkthe guide
locatedat bottomof ovenwhen
youopenthe door.Itshows
minimumandmaximumFood
Weightsfora varietyoffoods.You
will needto knowyourFoodWeight
beforesettingWeightDefrost.
1. Removefoodfrompackage,
place in ovenon microwave-safe
dish, and closedoor.
2. ~bl]~hWEIGHT DEFROSTpad.
3. Enterweight.Forexample,touch
Number Pads 1and 2 for weightof
1.2pounds(1pound, 3 ounces. See
ConversionGuideat right.)
Displayshows“1.2:’ “WEIGHT;’
“LBS” and “DEFVAfter4 seconds,
“DEF” isdisplayedand “1.2” is
replaced by “START” flashing.
4. Touch STARTpad. Display
showsDefrost Timecountingdown.
S T
When usingtheWeightDefrost
feature,itis necessarytoallow
meatto standinorder to finish
defrostingthe interior.You maytake
themeatout of’theovenifyouwish.
Standtime recommendationsare
givenin the guideon the nextpage.
C G
If weightof food is statedin
poundsand ounces, the ounces
mustbe convertedtotenths(.1)
ofa pound.
Chnces
Pounds
1-2
.1
3
.2
4-5
.3
I
6-7 I .4
—
—
o
12-13
.8
14-15
.9
—
Twice during defrosting, the oven
beeps 4 times and “turn” flashes.
“Turn” flashes until youopen the
cioor,attcrd your food (see guide
on nextpage), close the door and
touch START.
Wlkmdefrostingtime is completed,
“End” Nwhcs and oven beeps 4
times. “End” mnzins on display
;;R(!~MeIIim:ps every
min~k until
ii@li.is Op!md or
pi is 1~.wchcd.
I
Page 11

..—
Guide
—
SECONDSIGNAL
RECOMMENDED
FOODS
Meat
MIN.-MAX,
WEIGHT
STANDTIME
Separateand turn over.–
1
Chops
l
Turn over,separate,
Shieldwherenecessary.
5 to 10minutes
—.
5 to 10minutes
5 to 10minutes
Shieldwherenecessary.
F
Frankfurters,
Sausage
GroundMeat
Separateand remove
defrostedPieces.
0 Turnover.Separate.
Removedefrosted
areas.
Removedefrostedareas
and break apart.
0
0
Separate.Turnover. Separateand remove
defrostedpatties.
5 to IOminutes
I
BeefPatties
20 to60 minutes
Roast
0 Turn overand shieldif
necessary.
Turn overand shieldif
necessary.
Turn overand
separate.
Turn overand
separate.
Turn overand
separate.
Turn over and shieldif
necessary.
Turn overand shieldif
necessary.
Turn over and shield if
necessary.
Turn overand shieldif
necessary.
20 to 60minutes
i
Lamb Roast 0
Separateand turn over.
Shieldwhere necessary.
5 to 10minutes
5 to 10minutes
5 to 10minutes
I
Ribs
0
Turn overand remove
defrostedpieces.Shield.
0
Turn over. Shield.
Steak
Stew
0
Separateand remove
defrostedpieces.
‘ l-+==
10to 15minutes;
run cold waterin
cavity,if necessary.
Turn over and shield.
0
—
I
I
a
TurkeyBreast
/
Turn overand shield.
20 to60 minutes
0
I
Chicken Pieces
5 to 15minutes
10to 15minutes;
run cold water in
cavity,if necessary.
0
Separate and remove
defrosted pieces.
r
C’ornishHens 3 Turn overand shield if
necessary.
Turn over and shieldif
necessary.
Turn overand shield.
‘ (whole)
Turn over and shield.
5 to 10minutes
f
Cornish Hens
(split )
~fi)od
1
.-——
Fish Fillets
0
5 to 10minutes
o1-2.() Separate and remove
defrosted pieces.
Separate and remove
defrosted pieces.
Turn over.
5
to10minutes
().1-2.0
%paratc.
rll rn over.
5 to 10minutes;hc31d
oi-2.()
Turn over and shield
_
!____ -
Page 12

—
byTime
TheTimeDefrostsettingis
designedforspeedythawingof
frozenfoodandisoneofthegreat
advantagesofa microwaveoven.
UsetheTimeDefrostsettingto
quicklythawfoodssuchas
bread,rolls,vegetables,fruits
andfrozendinners.The Weight
Defrostsettingis preferredfor
meatandpoultrybecausethe oven
setsthedefrostingtimeandpower
levels foryou.
@PowerLevel3 isautomatically
set fordefrosting,butyoumay
changethisformoreflexibility.
e SeeyourCookbookfordefrosting
help.
Tobecomebetter acquaintedwith
thedefrostfunction,defrosta 1O-OZ.
packageoffrozen strawberriesby
followingthestepsbelow.
Step 1:Placepackageof frozen
strawberriesin the ovenand close
door. Besure packagecontains
no metal.
Step 2: Tbuch TIME DEFROST.
Displayshows :0 and “POWER 3:’
‘“ENTERDEF TIME” flashes.
Step4:TouchSTART.“DEFTIME”
showsand timecountsdownon
display.Whencycleis completed,the
ovensignals and flashes “End~’then
automaticallyshutsoff.
Step5: Turn packageover,close
doorand repeat Steps2,3 and4.
Step6: Opendoor,removepackage
andseparatestrawberriestofinish
defrosting.
DeT
@Foodsfrozen inpaper or plastic
can be defrosted inthe package.
* Ftimily-size,pre-packaged
frozendinners can be defrostedand
microwwmcooked. Removefrom
foiicontainer and place food in
a microwave-safedish.
—
Q a A .
Q. WhenI pressSTART,Ihear a
dull, thumping noise. Whatis it?
e
A. This sound isnormal. It is
lettingyouknowtheoven isusing a
powerlevellowerthan 10(HIGH).
Q. Can I defrostsmallitems in
a hurry?
A. Yes,but they will need more
frequentattentionthan usual. Raise
the power levelafterenteringthe
time by touchingthedesired power
levelpad. PowerLevel7 cuts the
time about in 1/2;Power Level
10cutsthe timeto approximately
1/3.During either, rotateor stir
food frequently.
Q. Why don’tthe defrosting
times inthe Cookbook seem right
tor my food?
A. Cookbook timesare average.
Defrostingtime can vary according
to the temperature in your freezer.
Setyouroven for the time indicated —
inyourCookbook. If yourfood is —
stillnotcompletelythawedat the
end of thattime, reset youroven
and adjustthe time accordingly.
Q. Shouldall foodsbe
thawed before cooking?
A. Some foods should not be
completely thawedbeforecooking.
For example, fish cooks so quickly
it is better to begin cooking while it
is still slightly frozen.
Q. Can I open the door
defrosting to check on the
progressof my food?
A. Yes.Youmay open the door al
any time during microwaving, To
resume defrosting, close the door
and press START.The ovenbegins
operating if time is left on timer.
If not. reset timer.
Page 13

toUsetheMinute/SecondTimer
TheMIN/SECTIMERhas three
timingfunctions:
* Itoperatesasa minutetimer.
@Itcan beset todelaycooking.
* Itcan be usedas a holdsetting
afterdefrosting.
The MIN/SEC TIMER operates
withoutmicrowaveenergy.
H t T a3-
PhC
1. TouchMIN/SEC TIMER pad.
.
Thedisplayshows:0 and “ENTER
TIME” flashes.
2. Touchnumberpad 3 and MIN
(for3 minutesand no seconds).
Displayshows3:00and “TIME”
flashes.
3. TouchSTART.Display shows
“*TIME”and time countingdown.
4. When time is up, ovensignals,
flashes “Endl’ and display shows
timeofday.
ProaH
T
The Minute/Second Timer can also
be used to program “hold time”
betweenmicrowavecooking
t’unctions.The time can rangefrom
(mcsecond to 99 minutes and 99
seconds. A HOLD, or “standing”
[inwmay be found in someof your
L)WIIrecipes or Cookbook.
Step1:Takecasserolefromfreezer
and placein oven.
Step2: TouchTIMEDEFROSTpad.
The displayshows:0 and
“POWER 37’“ENTER DEF
TIME” flashes.
Step3: Touchpads 1,5 and MIN
for 15minutesdefrostingtime. 15:00
appearson display. (Defrostingis
automaticallyseton PowerLevel3
butcan be changedbytouchingthe
POWERLEVEL pad and the
desired powerlevel.)
Step 4: Set standingor hold time
bytouching MIN/SEC TIMER.
The displayshows :0 and “ENTER
TIME” flashes.
Step 5: Touch 1,0 and MIN to hold
forten minutes. 10:00appears on
displayand “TIME” flashes.
Step7:Touch2,5 and MIN for
twenty-fiveminutesofcookingtime.
“COOKTIME” flashesand 25:00
and“POWER10”appearondisplay.
Step8:TouchSTART.“DEFTIME”
and 15:00countingdownshow
on display.Aseach functionis
automaticallyperformedoven
displayshowsinstructionsentered
and the function.
Step9: When timeis up, the oven
signalsand flashes “End;’
Q a A
Q
Whatwill happen if’1
accidentallyreversemy defrost,
holdand cook instructions?
A. The oven will automatically
rearrangeyour program. Defrosting
willalwayscomefirst, then hold,
and then the cookingfunction.
Q. Can I defrostand holdonly?
A. Yes.Sometimes you may only
wantto defrost a food, hold it, and
cook itlater. Allyou need to do is
program in Defrost and amount of
time. Then program Hold and the
amount of time. 13esure to put the
thaweddish in the refrigerator
promptly.
NOTE: Let foods remain at room
temperature only as long as safe.
Times willvary.
Q. I myoven for a
specific defrosting time but it
longer
A. When instructions conflict,
the ovencarries out the _last
instruction. Youmayhave set the
ovento Defrost for 4 mh~utes,
Hold/Time for 2 minutes, and then
Defrost for 6 minutes. In this case,
theovenwouldDefrostkw6 ~nim~te:;
and. for 2 mirlul.m!.
Page 14

CareandCleaning
YournewMicrowaveOvenis
a valuableappliance. Protect
itfrom misuseby following
theserules:
* Keepyourovenclean and
sweet-smelling.Openingthe oven
door a fewminutesafter cooking
helps “air-out” the interior.An
occasionalthoroughwipingwith a
solutionofbaking sodaandwater
keepsthe interior fresh.
@Don’tuse sharp-edged utensils
onyouroven. The insideand
outsideovenwallscan be scratched.
The controlpanelcan bedamaged.
BE CERTAIN POWER IS OFF
BEFORE CLEANING ANY
PARTOF THLSOVEN.
H t C t I
Wallsandfloor.Becausethere is
littleheatexceptinthe food,or
sometimesinthe utensils,spills
and spattersare easyto remove.
Somespatterscan be removedwith
a paper towel, othersmayrequirea
dampcloth. Removegreasyspatters
witha sudsycloth, then rinsewith
a damp cloth. Do notuse abrasive
cleanerson ovenwalls.NEVER
USE A COMMERCIAL OVEN
CLEANER ON ANY PARTOF
YOURMICROWAVEOVEN.
Door (inside). Window:Wipeup
spattersdaily,washwhen soiled,
with a minimumofsudsy,warm
water.Rinse thoroughlyanddry.
Metaland plasticparts on door:
Wipefrequently with a damp
cloth to removeallsoil. DO NOT
USE ABRASIVES, SUCH AS
CLEANING POWDERSOR
STEEL AND PLASTIC PADS.
THEY WILL MAR THE
SURFACE.
Special note whenusing
Brown ‘N Sear Dish:If grease is
present, high heatgenerated on
bottomof a Brown ‘N Sear dish
maycause the grease to burn onto
the oventloor. This may be
removedwith a cleanser such as
Bar Keepers Friend@Cleanser by
SerVaasLaboratories, Inc.
After using Bar Keepers Friend@
Cleanser, rinse and dry thoroughly,
followinginstructionson can. Do
not use Bar Keepers Friend@
Cleanser on the painted surfaces
such as the walls. It may scratch
the paint.
Bar Keepers Friend@>Cleanser is
sold inmany grocery, hardware,
and department stores.
H t C t O
Case.Cleantheoutside of your
ovenwithsoapanddampcloth,then
rinseand dry.Wipethewindow
cleanwitha dampcloth. Chrome
trim isbestwipedwitha damp
clothand then with a dry towel.
ControlPanel.Wipewith a dtimp
cloth. Dry thoroughly.Do notuse
cleaningsprays,largeamountsof
soapandwater,abrasives,or sharp
objectson the panel—theycan
damageit.
DoorSurface.Whencleaning
surfacesofdoor and oventhat
come togetheronclosingthedoor,
useonlymild, nonabrasivesoaps
or detergentsappliedwith a sponge
or softcloth.
PowerCord. If the cord becomes
—
.
0
soiled, unplugand wash with damp
cloth. For stubbornspots, sudsy
watermaybe used,but be certain
to rinse and dry thoroughlybefore
~
pluggingcord intooutlet.
—
W L
First unplugthe oven.Then ren~~ve
lamp compartmentcoverby
removingscrew which holds cover
in place. Cover is locatedon the
back of the outercase.
I
—
Page 15

—
Thisappliancemustbe grounded.
—
Inthe eventofan electricalshort
circuit, groundingreducesthe risk
ofelectric shock byprovidingan
escapewire fortheelectriccurrent.
Thisapplianceis equippedwitha
powercord havingagrounding
wire witha groundingplug. The
piugmustbe pluggedintoan outlet
thatisproperly installedand
grounded. (Fig. 1)
WARNING-improper
useof the groundingplugcan result
ina risk of electric shock,
i
Fig.1
~
Consulta qualified electrician or
service technician if the grounding
instructionsare not completely
understood, or if doubt existsas to
whether the appliance is properly
grounded,
Where a standard two-prongwall
receptacle isencountered, it is
yourpersonal responsibilityand
~~bligation to haveit replaced with
iiprt~pcrlygrounded three-prong
wail rwxptacle.
Do
n under any circumstances
cut or remove the third
prong from the power cord.
U o A P
U siw
app c w
b diin
Becauseof potentialsafetyhazards
undercertain conditions,we
strongly recommendagainstthe
useof anadapterplug. However,
ifyoustillelectto usean adapter,
where localcodespermit, a
TEMPORARYCONNE~lON
maybemadetoa properlygrounded
two-prongwallreceptaclebytheuse
ofa UL listedadapter (Fig.2)
whichis availableat mostlocal
hardwarestores.
TEMPORARYMETHOD
(ADAPTERPLUGSNOT
PERMITTEDC
A L
m m
P “
~
R
Fig.
The largerslotinthe adaptermust
bealignedwith the larger slotin the
wallreceptacleto provideproper
polarity inthe connectionof the
powercord.
Caution: Attachingtheadapter
ground terminal to the wall
receptaclecoverscrew does not
ground the appliance unless the
coverscrew ismetal, and not
insulated, and the wallreceptacle
isgrounded through the house
wiring. Youshould havethe circuit
checked bya qualified electrician
to make sure the receptacle is
properly grounded.
U s w
a p c w w
bef =
D
notuseanadapterplugin these ‘~
situationsbecausedisconnectingof -.
thepowercord placesunduestrain =
on the adapterand leadstoeventual =
failureoftheadaptergroundterminal. =
Youshouldhavethe two-prongwall ~~
receptaclereplacedwitha three- ==
prong(grounding)receptacleby a =”
qualifiedelectricianbeforeusing =
theappliance.
-=
~.:
U o E C
Becauseofpotentialsafetyhazards
under certain conditions,westrongly
recommendagainstthe use of an
extensioncord. However,ifit is
necessaryto usean extensioncord,
useonly a 3-wireextension cord
thathas a 3-bladegroundingplug,
and a 3-slotreceptaclethat will
acceptthe plugon the appliance.
The marked ratingof the extension
cord shallbe equal to or greater
than the electrical ratingof the
appliance(15amperes).
Suchextensioncords are obtainable
throughGeneral Electric service.
If’you do use an extensioncord
with your microwaveOven$[he
interior lightmay flicker and the
blowersound mayvary when oven
isin use. Cook times may be longer
as well.
Page 16

—
—.
ToRemovetheoven fromCabinetMount
Step 1:Replacethe rubberfeet.
Step2: Fullysupportthe
microwavewith somethingsturdy.
Forexampleusetelephonebooks
or encyclopedias,stackedevenly
andcloseenoughto balancethe
weightoftheoven.
Step3: Open your cabinetand with
your screwdriver,beginto remove
the screwsholdingthe microwave
ovenin place byturning them
counterclockwise.
(Alternatebetween screwsso that
ovenis loosenedas evenlyas
possible. )
Note: Beforefinal removalofthe
screws, check to be sure thatthe
microwateoven is being suitably
supportedto preventit from falling
or s~iding.
—
—
—
—
Page 17

..
—.
..
—-
.————
.
--
.—
— ...
E Questions?
—
—.
‘-< Uie Thisproblem$Jolver
-.—...
—
-=*=’
~—;=
i
i CONTROL PANEL
~ LN3HTED,YETOVEN
~ WILLNOTSTART
: FC)ODSAREEWHER
OVERCOOKEDOR
UNDERCOOKED
——....— -—--
. . -
— , . - --- - . - — . -
POSSIBLItCAUSEAND REMEDY
.-
—.——. .—.
*
Afuseinyourhomemaybebk]wnorthe circuitbretikertripped.Replacefuseor
resetcircuitbreaker.
~Makesure3-prongplugonovenis fullyinsertedintowallI*eceptack!.
——
*Doornot securelyclosed.
QSTARTmustbetouchedafterenteringcookingselection.
e Anotherse]ecti~nentered
a o ~ touchedt(.)cance]it.
@
MakesureyQuhaveenteredcookingtimeaftertouchingTIMECOOK1&2.
@CLEAR/OFF wastouchedaccidentally.Resetcookingprogramand touch START.
* Cookingtimes
mayvarybecauseofsta]lingfoodtemperature,fooddensityor
amountoffoodsinoven.
TouchTIME COOK 1& 2 and aciditionalcookingtime for
completion.
@Incorrect powerlevelentered. Check Cookbook for recommendedpower hwelor
changinglevels during cookingif necessary.
s Dish was not rotated, turned or stirred. Some
dishesrequirespecificinstructions.
CheckCookbookor recipefortheseinstructions.
e Toonlany~dishesinovenat sametilme.
~ t m increasedwhen cooking
more than one fooditem. Check Cookbook for recommendation on
increasingtime.
.4!1These ThingsAre Normal
~%ithJ’OurMicrowave Oven:
* Skim or \’LIporcscapingfrom
.lroundthe
d(N) J”.
Page 18

—
—
e
NeedService
‘roobtainservice, seeyourwarranty
on the back pageofthisbook,
We’reproud ofour w-vice and
wantyouto be pleased. Iffor some
reasonyouare nothappywith the
serviceyoureceive,here are three
stepsto followfor furtherhelp.
FIRST,contactthe peoplewho
servicedyourappliance.Explain
whyyouare notpleased,In most
cases, this will solvetheproblem.
NEXT, ifyouare still notpleased,
writeall the details—including
yourphone number-to:
Manager,Consumer Relations
General Electric
AppliancePark
Louisville,Kentucky40225
FINALLY,ifyourproblemis still
notresolved, write:
Major Appliance
Consumer Action Panel
Z()North w~~ker Drive
Chicago. Illinois60606
—
—
—
Page 19

—
~ YOURGENERALELECTRIC OVEN
WAR
—
—
—
—
1
=
.
.
i
o p as c e
.
,
WHATISCOVERED
F W
Forfiveyearsfrom
p p freeof
charge,partsandservicelaborto
repairor refdaceanypart of the
microwaveoventhatfails because
ofa manufacturingdefect. Toavoid
anycharges,youmust takethe
microwaveovento a General
Electric FactoryServiceCenteror
a GeneralElectric CustomerCare@
servicerand pick it upfollowing
service.In-homeserviceisalso
available,but youmust payforthe
servicetechnician’stravel costs
to your home.
rd[ WHAT~~ e~mProPerinstal~ation
ji[
If you havean installation problem,
P
,
contact yourdealer or installer.
Youare responsible for providing
adequate electrical, exhausting
and other connecting facilities.
. Replacement of housefuses or
resetting of circuit breakers.
Thiswarrantyisextendedto
the original purchaserandany
succeedingownerforproducts
purchasedforordinaryhomeuse
inthe 48 mainland
states,Alaska,
HawaiiandWashington,DC.
All warrantyservicewill beprovided
byour FactoryServiceCentersor
byour authorizedCustomerCare(k)
servicersduring normalworking
hours.
Lookin the White orYellowPages
ofyourtelephone directoryfor
GENERAL ELECTRICCOMPANY,
GENERALELECTRICFACTORY
SERVICE,GENERALELECTRICHOTPOINTFACTORYSERVICEor
GENERAL ELECTRICCUSTOMER
CARE@SERVICE
@Failureof the product if it is used
forother than its intended purpose
or usedcommercially.
. Damage to productcaused
byaccident, fire,floods or acts
of God.
WARRANTORISNOTRESPONSIBLE
FORCONSEQUENTIAL
Some states do not allow the exclusion or limitation of incidental or consequential datmages,sothe above limitation or exclusion
may not apply to you. This warranty gives you specific legal rights, and you may also have other rights which vary from stateto state.
1]-&-gi
Toknowwhat your legal righls are in your state,consult your local or state consumer affairs office or your state’sAttorney Cleneral.
Electric
!><.%“
H help is this
KY
... ...—”.——.———.—-—————..... ...-...-.-.————-——-
—.—,.)...
 Loading...