

Page 1
Contents
AdapterPlugs
11
ApplianceRegistration
2
Care and Cleaning
10
ControlPanel
6
CookingCompleteReminder 5
Defrosting
8
DelayedCooking
9
ExtensionCords
11
Features
5
GroundingInstructions
11
Hold Time
9
LightBulb Replacement
10
MicrowavingTips
2
Minute/SecondTimer
9
The
electricOU@ut
Of’thisBnim’owaveoven
is600watts.
Model and SerialNumbers
2
Precautions
3
Problem Solver
13
PI”ogI”amCooking
6
Repair Service
15
ShfetyInstructions
3,4
Time Cook
7,9
T{)Rcm(wcfromCabinetMount 12
.—
Wtirranty
Back Covel”
I
!
——~-—
——.-c- .——
—.—.—
—,———
-~-—=.
-:-
——
—--
——
—,—
~-
Mw”DirectLinetoGa-ledlllmxtrk
--.1.
;
...
. .. ..
— —.-—
.....--—.—
———..-.
.. ..——---———----..—--
*
. ...
Page 2

i
.!#. J.4.—.—————
,
.
.
..
Beforewingym.lr Ovti-ap
readthisbookcarefully.
It is intendedto help youoperate
and maintain your newmicrowave
ovenproperly.
Keepit handy for answersto your
questions.
If youdon’tunderstand something
or need more help, write (include
yourphonenumber):
ConsumerAfftirs
GeneralElectric Company
AppliancePark
Louisville,KY40225
writedown themodel
andserialnumbers.
You’Hfindthem on a labelinside
the oven.
These numbers are also on the
Consumer’Product Ownership
RegistrationCard thatcame with
your microwaveoven. Before
sendingin this card, pleasewrite
these numbershere:
Model Nwmber
Serial Number
Usc t[,esc numbers in any
corrcsponcienceor servicecalls
concerning your microwave~vcn.
BeS1.iweyour
Wwm k
It is important that wc knowthe
Iocationof your microwaveoven
shouldn needoccur for adjustments.
Ybursupplier is responsible for
rqgistcringyou as the owner.
Pleasecheckwith your supplierto
be surehe has doneso; also sendin
your ConsumerProductOwnership
RegistrationCard. If youmove,or
ifyouare nottheoriginalpurchaser
pleasewrite to us, statingmodel
andserialnumbers.This appliance
Imlstberegisteti. mast?becertain
that itis.
Writeto:
GeneralElectric Company
RangeProduct Service
AppliancePark
Louisville,KY40225
If youreceiveda
damaged
ovensse
Immediatelycontactthe dealer (or
builder)that sold you the oven.
savetimeandmoney.
Before you request service...
checktheProblemSolveronpage13.
It listscauses of minor operating
problemsthatyoucancorrectyourself.
Awessories
Availableat extra cost from your
General Electric supplier.
JX8G Installation
Kitconverts
this ovento a built-in wall oven.
JWV18Ghstdlatio~l Kit allows
this ovento be mounted on a wall.
when Unpackingyour
microwavewm.. you shouldfind
an instaHationpackagethat contains
installationinstructions, a template,
and installationhardware for
under-the-cabinet mounting. If
missing, contact your supplier.
Tips
@Make sureall cookwareused in
yourmicrowaveovenis suitablefor
microwaving.Mostglasscasseroles,
cooking dishes, measuringcups,
custardcups, potteryor china
dinnerwarewhichdoesnothave
metallictrimor glazewitha metallic
sheencanbe used. Somecookware
islabeled“suitableformicrowavirig~’
If youare unsure,use thisdishtest:
Measure 1cup water in a glasscup.
Place inovenon or besidedish.
Microwavel-l% minutesatHIGH. If
waterbecomeshot,dishismicrowave
safe.If dishheats, it shouldnotbe
usedfor microwaving.
~Papertowels,wax paper, and
plasticwrap canbe used tocover
—
dishesin order to retainmoisture
andpreventspattering.
~Somemicrowavedfoodsrequire
stirring, rotating,or rearranging.
Check yourcookbook.
~Steambuildsup pressure in foods
which are tightlycoveredby a skin
or membrane. Pierce potatoes, egg
yolks and chicken livers to prevent
bursting.
.
.
Page 3

,.
(a)DoNot’Atiemptioopti8tiis‘;’
OWIIwith thedoorqxm sincer ‘ .
open
door o~erationcan miult in ~
harmfid exposureto microwave
energy.Uis importantriot to
defeatOrtimprwit~~~~af*
interlocks.
(33)N Not Place ‘by object
betweenthe mm front face ml
thedoor or allowsoil or cleaner
residueto accwmdak on sealing
sufiaces.
:2)hirlgesad Mdws (bKkenor’
kmemd)
:3)
door seals and sealingstwfam%.
–Do riotWE ymlr microwave
oventodry
–Paper md
wax Recychxipaper
‘pI”odwts (XMILxm4.iriInetdfkxks
which
maycausearcingor ignite.
Paper@xxhwtS nylon
orIlykmfikmms shouldbe
avoided,asthey
may also ignite.
–Do not o~mte the Q+venwhil*
tomid to$!+243
Wellandthe d fire.If
by
&xkkmttheovenshouldrun
emptya ortwo,no!l’mrm
is(km. H(NW3’TW,trytoavoid
(pra$illgtheWmemptyatd
times-it !HW2sCmxgyMM
pdmgs theMeofthtioven.
,
i
1
11
!.
---
.. ...
.’
Page 4

–-mlMatpop ill yin!’
ownunlessinaspecial
microwavepopcornaccessoryor
unlessyouusepopcornM@edfor
useinmicrowaveovens.
–-’DonotWWXWk@MMS.
Theycoulddehydrateandcatch
fire,causingdamagetoyouroven.
–If materialsinsideovenshould
igtite,keepovendoorclosed,
turnovenoff,anddisconnect
powercord,01shutoffpowerat
fiseorcircuitbreakerpaneL
@~~~e suchas
whole
eggsandseakxl
containers-for
example,closedglassjars—may
expludeandshouldnotbeheated
inthisoven.
~ heatiqgbabyfoodin
~las~
jars, even witiouttheir lids;
especially meat and egg mixtures.
e &oz~~ ~e~~~ag~~
innarrownecked botdes (es~ially
carbonatedbevemges).Evenifthe
container
is opened, pressure
can build up. ‘1.’’h~scan cause the
contai~er @burst, resulting in
injury.
s Use mewl only as in
Fojl Sh+s as used On
nmat roas& are helpftd when used
M
SiiQWll in cookbaok.
TV dinners maybe microwaved
in foil tmy~leSS~hfin
3/4’}high;
renlovGtop foil cover and return
[ray 10box. Usingmetal in
t!wlnim%?&Ncoven, keep
N .k%st1 inch away si[ies
of’+]y&jE*
Be ~
&mMwhentmwhjagthelloor
dnringanda~ercoqkihg. . ~
@~&-J* h ($llch
aspasta)maytendtoboilover
nlol’erapidlytimnfwdscontaining
lessrnoistnre.Slmukithisoccur,
refertopageKIforinstructionson
howtockantheinsideuftheoven.
a nOt
use a thermomete~ in food you”
are
microwavingunlessthe
thermometerisdesignedor
recommendedforwin the
microwaveoven.
49 utens~
designedformicrowavecooking
areveryusefid,butshouldbe
usedcarefully.Evenmicrowave,,
plasticmaynotbeastolerantof
overcookingconditionsasareglass
orceramicmaterialsandmay
softenorcharifsubjectedto
short
periodsofovercooking.Inlonger
exposurestoovercooking,thefood
andutensilscouldignite.For
thesereasons:1)Usemicrowave
plasticsonlyandusetheminstrict
compliancewiththeutensil
numufacturer’srecommendations.
2)Doriot
subject fallptyWerlsi.lsto
microwaviri~.
3)Donotpemit
chikbmtouseplasticutensils
withoutcompletesupervision.
*
and Cklfwd bags
shouldbeslit,piercedof vented
asdi~eqtedincookbook.Ifthey
arenot,.plastic
couldburstdwi-ng
orimmediatelyaftercooking,
possiblyresukiiigininjury.Also,
plasticstomgecontiers shouldbe atleastpartkdlyuncoveredbemuse
theyformatightseal.llkn
cookingwithcontainerstightly
coveredwith
plastic wrap, yemcwe
tXweringWfully and direct stem
away from ham%and.face.
@
i
certainspecial
liquidsmaystarttoboil or
:.
;
shortlyafterremovalfromthe
microwaveoven.Topreventburns
fromsplashingliquid,stirthe
liquidbrieflybefore the
containerfromthe oven.
,.
—. ..
-.
..-
.
Page 5
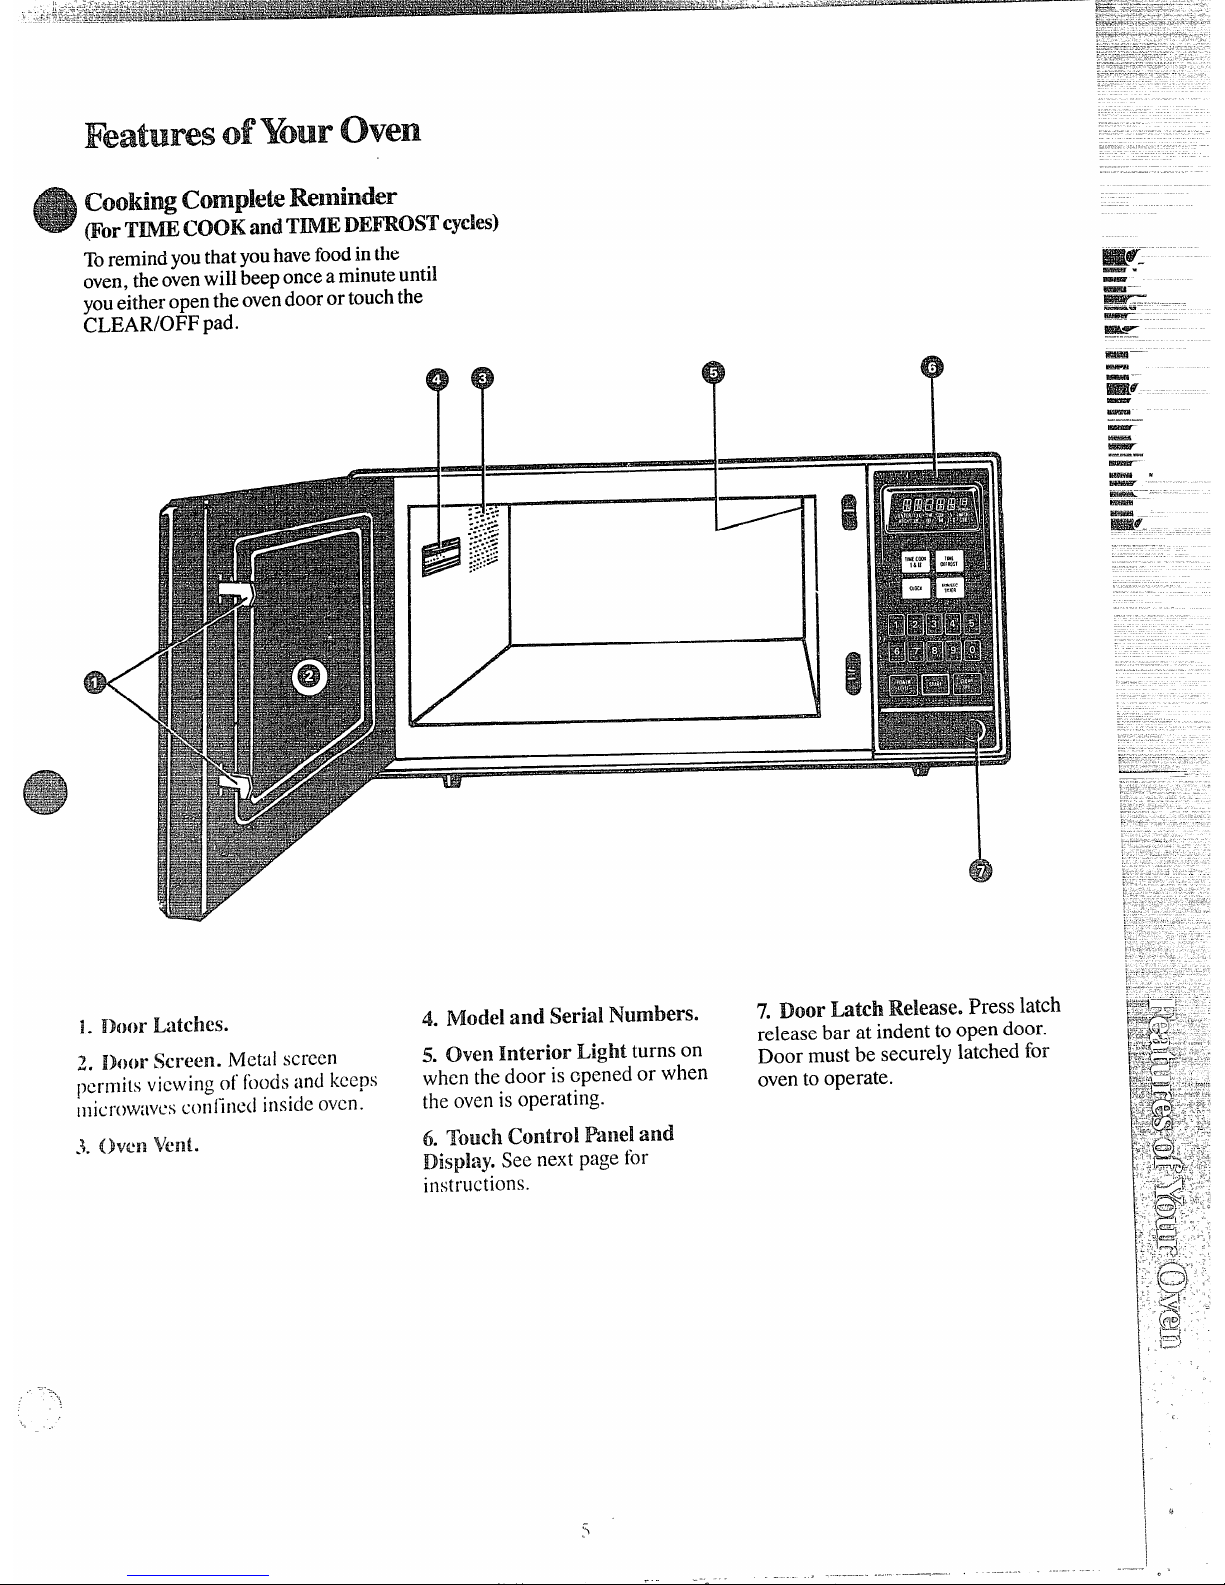
Cdiing Etemindw
@’tn-Tm~~~~~~~
‘mv.mDEFR’OSTCYCM
Toremindyou thatyouhavefoodinthe
oven,theovenwillbeeponcea minuteuntil
you.eitheropentheoven doorortouchthe
CLEAR/OFF pad.
<
L“
--l
:“e- ;---
.-
:::.:>
-------
-.-.::.-<
:.-.....%
:::-:..:...
..- .
....:*
::..
1. mm-Latches.
2,
i!hm’$krew. Metal SC1”Cf31~
permits viewingd hods and keeps
microwmwsconiird insideoven.
3. Oven vent.
.,---
“’1,
*=====?%
4. Model and Serial Numbers.
!3.OvenInteIfiOrLight turns on
when the door is cpened or when
the ovenis operating.
6. Touch Controi Panel and
Dispky. Seenext page for
instructiOllS.
7. Door LatchRelease. Press latch
release bar at indent toopen door.
Door must be securelylatched for
ovento operate.
=$4.—. ..-—
-
-.-—.—
—
-
!$23ET
—.
—
-.
—
—
-
-...
0
Page 6

The Touchcorm-d IP!md
allowsyouto setthe W-’enUmtr’ds
ekctronkal~ywiththe touchof a
finger.It’s designedto beeasy
touse and understand.
L DISPLAY.Displays time ofday,
timecountingdown duringcooking
functions,power level,cooking
modeand instructions.
2. TI1’V.fECOOK I & II.
Microwavefor a preset amountof
timeusingautomaticPowerLevel
10(HIGH), (or changepowerlevel
after enteringcookingtime. See
page7.)
3. CLOCK. Touchthispad to enter
timeof day or check time ofday
whilemicrowaving.
Tosetclock, first touch CLOCK
pad andthen enter time of day.For
example,if time is 1:30,touch
numberpads 1,3, and Oand 1:30
will appear in display.Touch
STARTpad. Toreset or change
time, simplyrepeat aboveprocess.
4. PADS Touchthese
padsto enter cooking/defrosting
time, power leveland time ofday.
5. POWER LEVEL. Touchthis
pad beforeentering another power
&
:
levelnumber ifyou wantto change
from automaticPowerLevel 10
(~~G~) for cookingor Power
Level3 (LOW) for defrosting.
*
●
☛
-$3
.
6.TIME DEFEtOSTeGentle
thawingat automaticPowerLevel3
(LCNV).If desired, youmaychange
powerlevel after enteringdefrosting
time. Seepage 8.)
7.N41N/SECTlli4ER. This feature
usesno microwaveenergy.It
functions as a kitchentimer, as a
holding period afterdefrostor as a
delaytimer beforetime cooking.
(Seepage 9.)
8. START.After all selectionsare
made, touchthispad to start oven.
9. CLEAI?/OFE’.When touched, it
shutsoff the ovenand erases all
settings(excepttime ofday).
r. .
,. .-
~:.
J
~.-.
I?Togmnfbdtil-g
~:.
;!.
Use your Touch Control Panel to
Create your ownprograms
to
Defrostand Cook by time using
suityour individualcocking style.
yourchoice ofpower levels from
For example: use the Min/Sec
1(warm) to 10(high), time kitchen
Timer to delay the start of cobking
taskswith the Min/Sec Timer, and
or program a hold time between
Setthe ChXk.
defrostingand cooking.(Seepage 9.)
SetTime Cook I &11for a -twostageprogram usingdifferent times
and power levels. (See page ‘7.)
Page 7

The TIME ICOOKI & 11feature
allowsyou
tomkmvave fora
presetWnmnt
oftimeusing
automaticpowerlevel10(HKXO,
or changepowerlevel
automatically.
Powerlevel 10(HIGH) is
recommendedfor mostcooking,
butyoumay changethisfor more
flexibility.Seeyourcookbook.
Tobecome betteracquaintedwith
time cooking,make a cupof coffee
by followingthe steps below.
Step 1:Fill a cup 2/3 full of
water andadd 1teaspoon of instant
coffeeand stir to dissolve.Use a
cup that hasno metaldecoration
and is microwavesafe (referto
MicrowavingTips on page2).
Place cup in oven and closedoor.
Step2:TouchTIME COOK I & 11
pad. Displayshows: Oad “POWER
lo:”“ENTERCOOK TIME” flashes.
If anotherpowerlevelisdesired,
touchPCNVERLEVEL pad and
desirednumber,althoughPower
Level10(HIGH)ispreferredfor
thiscupof coffee.
Step 4: TouchSTART.“COOK
TIME;’ “POWER IO;’andtime
counting down showon display.
Step 5: When time isup, theoven
signalsand flashes “End~’Oven,
lightand fan shutoff.
Step 6: Open the door.
IJshgtheTimecook n
Feature
Withthe TimeCook 11feature,you
can settwo time cookingfunctions
withinone program. This would
be idealif youdesired to change
powerlevelsduringyourcooking
operations.
The followingis an example of how
to changepower levelsusingTime
Cook II.
Step 1:Repeat Steps 1,2 and3.
Step 2: TouchTIME COOK I & H.
“ENTER COOK TIME II” flashes.
Step 3: Set yourtime.
Step 4: To changethe power level,
touch POWER LEVEL pad and
desirednumberfor newpowerlevel.
Step 5: Touch START.
Step 6: “POWER 10”is displayed
and “COOK TIME I“ countsdown.
Step 7:At the end of “COOK
TIME 1“the nextselected power
levelisdisplayed anci“COOK
TIME H“ is shown counting down.
Step 8: When time isup, the oven
SigIM!S and flashes “End ~’The
oven, light and fan shut off.
p<.,>,%Q,<jp~~~the door.
i>~L :5 ,-e
/
..
Q. I setmy ovenforthe time
called for in themcipe9butat the
endof thetime dkwwd,
myf~~~
wasn’tdone. what happened?
A. Sincehousepowervariesdue
totime or locationmanyTime
Cook recipesgive you a time range
to prevent overcooking.Setthe
ovenfor minimum time, testthe
foodfordoneness, andcookyour
fooda littlelonger,ifnecessary.
Q. pads
and selectedmy powerMA Il%en
~~ouChedSTART,hQWeV@~9my
ovendidn% lcm’lleon. why not?
A. The TIME COOK I & 11pad
mustbe touchedbeforesettingthe
numberpads or elseyour ovenwiH
notbegin cooking.
Q. Iiwant to cook on a power
Bevelother than HIGH. What do
I need.to do?’
A. Tochangethe powerlevel,
touchthe POWER LEVEL pad.
“ENTER POWER” flashes on the
displaypanel. Enter newnumber.
Q. can I interrupt my Time
cook function to check the food?
A. Yes.Toresume coohng,
simplyclose the door and press
the STARTpad. The timer mustbe
reset for cookingto resume unless
time is remainingon timer.
!
-, —., .—,———— .-—- —— --—---- .---——
—..
-“ -—. = - ,,
0
Page 8

The defrostsettingisdesigned
forspeedythawingof frozenfood
andis one of the greatadvantages
da microwaveoven.
@Powerlevel3 is automaticallyset
fordefrosting,but you may change
thisfor more flexibility.
@Seeyour cookbookfor defrosting
help.
Tobecomebetter acquaintedwith
thedefrost fi.mction,defrostfrozen
pork chopsby followingthe steps
below.
Step 1:Placea l-lb. packageoffi-ozen
chopsin the ovenand close door.
Step 2: TouchTIME DEFROST
Displayshows :Oand “POWER 3~’
“ENTER D13FTIME” flashes.
Step 3: Select one half of the total
defrosting time recommended in
your cookbook. For example,touch
4,0 and Ofor4 minutes. Display
shows4:00 and “POWER 3.”
“MN?TIME” flashes.If youwish to
change power level, touch POWER
LE~E1..pad and then new number.
Step 4: TouchSTART.“DEF
TIME” shows and timecounts
downon display.Whencycleis
completed,the ovensignalsand
flashes “EndJ’then automatically
shutsoff.
Step 5: Turnpackageover,close
door and repeat Steps2 and 3 to set
remaininghalf ofdefrostingtime
and touchSTART.
Step 6: When ovensignalsand
flashes “End~’opendoor, remove
packageand separatechopsto
finishdefrosting.
Tips
~Foods frozenin paper or plastic
can be defrostedin the package.
@For evendefrosting, some foods
need to be broken up or separated
part of the waythrough the
defrosting time.
~f7am~~~size,pre-packageci
frozen dinners can be defrosted
~llld~-]i~r(>waved.If [he foodis in
a foil container, transfer it to a
microw;ave-safedish.
Q. WhenI
pressSTART’,Iheara
dull,thmping misee Whatisit?
A. Thissoundis normal. It is
letting youknowthe ovenis usinga
powerlevellowerthan 10(HIGH).
Q. CanI defrostsmall items in
a hurry?
A. Yes,buttheywill needmore
frequentattentionthan usual. Raise
thepowerlevelafterenteringthe
timebytouchingthe desired power
level pad. Powerlevel7 cutsthe
totaldefrostingtime about in 1/2;
powerlevel 10cutsthe total
defrostingtime to approximately
1/3.During either,rotateor stir
foodfrequently.
Q.
Whydon’tthe defrosting
times
inthe cookbook seemright
for myfood’?
A. Cookbooktimesare averages.
Defrostingtime can vary according
to thetemperaturein your freezer.
Setyourovenfor the time indicated
in yourcookbook. If yourfood is
stillnotcompletelythawedat the
end ofthat time, reset your oven
and adjustthe timeaccordingly.
Q.
Shouldallfoodsbeeomplete!y :-
lthirwedbefore Cooking”?
A. Somefoods shouldnot be
completelythawedbefore cooking. ;
For example,fish cooks so quickly ‘it is better to begin cooking while it
i.
i
is stillslightlyfrozen.
3.-
;;,
Q. Canhptmthi!
door‘during ;:
defrostingtocheckm.the
i.
~.
profy’essofmy food’?
\
;:
~
A. Yes.Youmayopen the door at
If
any time during microwavifig.To
i
resume defrosting, close the door
and press START.The ovenbegins
1
operating if time is left on timer.
If not, reset timer.
I
L
,.,
Page 9

.. ..
-’h
.
iibUiW
Tk mkwc TIMERiw wee
timing
fiimtions:
@It
operatesas aminute timer.
@It can beset to delaycooking.
* It can be used as a holdsetting
after defrosting.
TheMIN/SEC TIMER operates
withoutmicrowaveenergy.
How to mme a
Phonecdl
1. TouchMIN/SEC TIMER
pad. The displayshows: Oand
“ENTER TIME” flashes.
2. Touchnumber pads3,0 andO(for
3 minutesand no seconds).Display
shows3:00 and “TIME” flashes.
3. TouchSTART.Displayshows
“TIME” and timecountingdown.
4. When time is up, oven signals,
flashes “End~’and displayshows
time ofday.
alHOLD
TIME
The Minute/SecondTimer can also
beused to program “hold time”
between microwavecooking
functions. The time can rangefrom
one second to 99 minutesand 99
seconds. A HOLD, or “standing”
time may be foundin some ofyour
own recipes or cookbook.
choking
Step 1:Takecasserolefromfreezer
andplace inoven.
Step 2: TouchTlIW3DEFROSTpad.
Thedisplayshows: Oand“IWWER
3“ “ENTER DEF TIME” flashes.
Step 3: Touchpads 1,5,0 andOfor
15minutesdefrostingtime. 15:00
appears ondisplay.(Defrostingis
automaticallyseton powerlevel3
but can bechanged by touchingthe
POWER LEVEL pad and the
desired powerlevel.)
Step 4: Set standing or hold time
bytouching MIN/SEC TIMER.
The displayshows : Oand
“ENTER TIME” flashes.
Step 5: Touch 1,0,0 and Oto ~old
for ten minutes. 10:00appears on
displayand “TIME” flashes.
Step 7:Touch2,5,0 andOfor
twenty-fiveminutesofcookingtime.
“COOK TIME” flashesand 25:00
and “POWER10”appearon display.
$%ep$:TouchST~. “DEFTIME”
and 15:00 counting down show
ondisplay. As each functionis
automaticallyperformed oven
displayshowsinstructionsentered
and thefunction.
Step9:Whentimeisup,theoven
signalsandflashes“End~’
Q. What will happen if I
amident-diyreversemy defrost9
hold andcook imstruetions?
A. The ovenwill automatically
rearrange yourprogram. Defrosting
will alwayscome first, then hold,
and.thenthe cooking function.
Q.
amIiMrostand hdd only?
A. Yes.Sometimesyou mayonly
wantto defrost a food, hold.it, and
cook it later. All youneed to do is
program in Defrost and amount of
time. Then program Hold and the
amount oftime. Be sure to put
the
thaweddish in the refrigerator
promptly.
INOTE:Let foods remain at room
temperature only as long as safe.
Times will vary.
Q, I my
tiwe!ni fora
specificde’fmstingtimebut it
defmstm!.!kmgerthan necessary.
what
A. When.
instructions conflict,
the ovencarries out the last
instruction. You.mayhave set the
ovento Defrost for 4 minutes,
Hold/Time for 2 minutes, and then
Defrost for 6 minutes. In this case,
theoven.wouldDefrostfor 6 minutes
and Hold/Time for 2 minutes.
—.
J ~,
—-. .. ———- ...-.—-
—————.—. ..——
Page 10

Mm newMicrowaveOvenis
a valuableappliance.Protect
itfrom misuseby fohvhg
theserules:
~ Keep yourovencleanand
sweet-smelling.Openingthe oven
doora fewminutesaftercooking
helpsair out the interior.An
occasionalthoroughwipingwitha
solution ofbaking soda and water
keepsthe interior fresh.
~ Don’tusesharp-edgedutensils
cmyouroven. The insideand
outsideovenwallscan be scratched.
The controlpanel can be damaged.
BE
CERTAIN POWER 1SOFF
BEFORE CLEANING ANY
PARTOF THIS
OVEN.
How to ckan theInside
Wailsandfloor.Somespatters
can beremovedwith a paper towel,
othersmayrequire a damp cloth.
Removegreasyspatters with a
sudsycloth, thenrinse with a damp
cloth. Do not use abrasivecleaners
on ovenwalls. NEVER USE A
COMMERCIALOVENCLEANER
ON ANY PARTOF YOUR
MICROWAVEOVEN.
Door (inside).Window:Wipeup
spattersdaily andwashwhen soiled
witha dampcloth.Rinsethoroughly
and dry.
Metal andplastic parts on door:
Wipefrequentlywith a damp
cloth toremoveall soil. DO ld~
USE ABRASIVES, SUCH AS
CLEANING POWDERSOR
STEEL AND PLASTIC PADS.
THEY WILL MAR THE
SURFACE.
Special notewhen using
Brown ‘NSear Dish: If grease
ispresent, high heat generated on
bottomof a Brown ‘NSear dish
may causethe grease to burn onto
theovenfloor.Thismaybe removed
with a cleansersuch asBon Arni@
brand cleanser.
After usingBon Ami@brand
cleanser,rinse and dry thoroughly,
followinginstructions on can. Do
notuse BonAmi@brandcleanser
on thepainted surfacessuch as the
walls.It may scratchthe paint.
Howtoman‘the’Chntside
Case. Cleanthe outsideofyour
ovenwithsoapand damp cloth,
rime with damp clothand thendry.
Wipethe windowcleanwith a
dampcloth. Chrometrim isbest
wipedwith a dampclothandthen
witha dry towel.
Control JI%me].Wipewith adamp
cloth.Dry thoroughly.Do notuse
cleaningsprays, large amountsof
soapand water, abrasives,or sharp
objects on the panel—theycan
damageit.
DoorSurface. Whencleaning
surfacesofdoor and oventhatcome
together on closingthe door,use
onlymild, nonabrasive soapsor
detergentsappliedwith a sponge
or softcloth.
l?mverCord. If thecord becomes
soiled,unplugand wash witha
damp cloth. For stubborn spots,
sudsywater maybe used, butbe
certainto rinse withdamp clothand
dry thoroughlybeforepluggingcord
intoout~et.
OV~~ h~
Firstunplugthe oven.Then remove
lampcompartmentcoverbyremoving
screw which holds cover in place.
Cover islocated on the back ofthe
outer case.
Replacewith 20-wattappliancebulb.
(It is availablein drug and hardware
stores.) Replacecompartment cover.
Plug in the oven.
“~
[?
-J
Page 11

....,,, ..
———..—...—
----—-——— —
*A. —
.-T.-.-
—
Thisappliancemustbe grounded.
Inthe eventof an electricalshort
use‘ofAdapterPhlgs
usagesituationswhere
Zq@iance’spowercordwill
bedisammc’ted
Becauseofpotentialsafetyhazards
undercertainconditions,we
stronglyrecommendagainstthe
useof an adapterplug.However,
ifyoustillelect to usean adapter,
wherelocal codes permit, a
TEMPORARYCONNECTION
maybemadetoa properlygrounded
usage where
bedisconnected
circuit, groundingreducestherisk
ofelectricshock by providingan
escapewire for theelectriccurrent.
Thisapplianceis equippedwitha
powercordhavinga grounding
wire withagroundingplug. The
plugmustbe pluggedintoan outlet
thatis properlyinstalledand
grounded. (Fig. 1)
BFsz7.
Donot use an adapter pluginthese
situationsbecausedisconnectingof
thepowercord placesunduestrain
onthe adapterand leadsto eventual
hike oftheadaptergroundterminal.
Youshouldhavethetwo-prongwall
receptaclereplaced witha threeprong(grounding)receptaclebya
qualifiedelectricianbeforeusing
the appliance.
_–
E?sm3–
_— -
Bi3w.
useof the grounding plugcan result
two-prongwallreceptaclebytheuse
ofa UL listedadapter(Fig.2)
in a risk o~electric ~hock.
whichisavailable-atmostlocal
hardwarestores.
Fi
use Om’demioncords
Becauseof potentialsafetyhazards
undercertainconditions,westrongly
recommendagainstthe use of an
extension cord. However,if it is
necessa~yto usean extensioncord,
useonly a 3-wireextensioncord
thathas a 3-bladegroundingplug,
anda 3-slot receptaclethat will
acceptthe plug on the appliance.
The marked ratingof the extension
cord shallbe equalto or greater
thanthe electrical rating of the
appliance(15amperes).
TEMPORARYMETHOD
(ADAPTERPLUGSNOT
PERMlllED INCANADA)
F
m
f
ALIGN LARGE
H
PRONGSISLCJTS>-
WT
I
M II
/
DAND
Fig.
Consulta qualified electrician or
service technicianif the grounding
instructionsare notcompletely
p INSUREPROPER
-..--..— -—
I-J
FIRMCONNECT\OhI
BEFOREUSE
understood, or if doubtexistsas to
whether the appliance is properly
grounded.
Where a standard two-prongwall
rcccptac]eis encountered, it is
your personal responsibilityand
obligationto haveit replaced with
LIproperly grounded three--prong
M411receptacle.
!)0 not my
cut or NXmlvethe third
pr(]ilg fi”omtile pwel” CoI”’d.
The largerslot in the adaptermust
be alignedwith the larger slotin the
wallreceptacle to provideproper
polarity in the connection ofthe
powercord.
Suchextensioncords are obtainable
throughGeneral Electric service.
If you do use anextensioncord
with yourmicrowaveoven, the
interior lightmay flicker and the
blowersound mayvary when oven
isin use. Cook times may be longer
as well.
Caution: Attachingthe adapter
ground terminal to the wall
receptacle coverscrew does not
ground the appliance unlessthe
coverscrew is metal, and not
insulated, and the wallreceptacle
isgrounded through the house
wiring. Youshould havethe circuit
checked by a qualified electrician
to make sure the receptacle is
properly grounded.
----
j
. .
I
1.
il
Page 12

To the
Step 1:Replacethe rubberfeet.
Step 2: Fully support the
microwavewithsomethingsturdy.
Forexampleusetelephone books
or encyclopedias,stackedevenly
andcloseenoughto balancethe
weightoftheoven.
Step 3: Open yourcabinet andwith
yourscrewdriver,begin to remove
the screwsholdingthe microwave
ovenin placeby turningthem
counterclockwise.
(Alternatebetween screwsso that
ovenis loosenedas evenlyas
possible.)
Note: Beforefinal removalof the
screws, check tobe sure that the
microwaveovenis being suitably
supportedto prevent it from falling
or sliding.
12
Page 13

I
PROBLEM POSSIBLE CAUSEAND REMEDY
OVENWILLNCYI’
e~ fi~einy~ur~~memaybeblownortieCircuit
breakert.ripped.~ep~~~efUSeOrreset
C0k4E0N
circuit breaker.
. .
/
,
~Unplugyourmicrowaveoven,then
plugitbacki~~
e~ak~sure
s-prongplugon~~enisfilly insertedintowallreceptacle,
CONTROLPANEL
sDoornot
securelyCIOStXi~
LIGHTED,YETOIVEN
WILLN~ST~T
~ST~ ~us~&to~ck~@er
entirhg cooking seiecti$m.
4~o~erse~ection ~n~r~ ~ready
inoveilaridCLIMR/OFFnottodwdtocance~k. ‘“
@
~&es~eyoU~aveente~ cooHngttiea&rtOUCWg TIMECXXK18LIL .
a ~~https://manualmachine.com/~FF ~s to~ch~
ac~idenally.Resetcooking program~d touchSTW.
FOODSARE EITHER
5 ~oo~g ~fies my vq ~Ca~se ofSting mod ternperatum,fooddensityor ttmouIN
OVERCOOKED
OR offmdsin oven.TouchTIME C.00K1& ZIandadditionAc~bgttieforcomp~et~~n.
UNDERCCX3KED
~Incomect
pow~r~ev~l en~red. cheek ccwkbookforrecommended~wer ~eve~,Or
changing-levelsduring cookingifnecessary.
e Dishwasnot r~~t~, turned or stined. Somedishes require specificinstructions.
Checkcookbookor recipeforinstructions.
eT~
many dishes in oven at same time. Codc@gtimemust be increasedwhencooking
morethan onefood item.Check cookbooktime recommendations.
M
TheseTI-lillgs AmNormal
with your lwawwwe oven:
~Steamor vaporescaping from
around thedoor.
~Lightreflectionaround door or
outercase.
@Dimmingovenlightand change
inblowersound may occur while
opcratingat powerlevelsother
thanhigh.
Q hif thumpingsound whi]eoven
isopcrating.
*SomeTV-Racliointeri-crcnce
mightbeno~icedwhi[cusingyour
in icrowavcmm. It’ssimilar tothe
in(crfbrcmxcausui byother small
qq]iianccs anddocs not indicatea
Page 14

,1,<
-...—.. -—
.—
:
Need
Toobtainservice,seeyourwarranty
ontheback pageof this book.
We’reproudofour serviceand
wantyouto bepleased. If forsome
reasonyouare nothappywiththe
serviceyoureceive,here arethree
stepsto followfor furtherhelp.
FIRST,contactthepeoplewho
servicedyour appliance.Explain
whyyouare notpleased. In most
cases,this willsolvethe problem.
NEXT, ifyouare stillnot pleased,
writeall thedetails-including
yourphonenumber—to:
Manager,Consumer Relations
GeneralElectric
AppliancePark
Louisville,Kentucky40225
FINALLY,if yourproblemis still
notresolved, write:
Major Appliance
Consumer ActionPanel
20 North WackerDrive
Chicago.Illinois60606
, - -. —.
-—.-—.......
... , -.—. —..
---——— ----
1
,-
E-
l’
[
1
.’
Page 15

Saveproofoforiginalpurchasedatesuchasyoursalesslip orcancelledchecktoestablishwarrantyperiod.
IS
FULLTHREE-YEARWARRANTY
Forthreeyearsfrom dateoforiginal
purchase,wewill provide,free of
charge,partsandservicelabor
inyour hometo repairor replace
anypaft of the microwaveoven
thatfailsbecauseofa manufacturing
defect.
LIMITEDADDITIONAL
TWO-YEAR
Forthe fourth andfifth vearfrom
dateof original purcha~e,we
will provide,free ofcharge,a
replacementmagnetrontube if
the magnetrontube fails because
of a manufacturing defect. Youpay
for the servicetrip toyour home
andservice labor charges.
This warrantyis extendedto
the original purchaserand any
succeedingownerfor products
purchasedfor ordinary home use
inthe
48 mainlandstates,Hawaii
andWashington, D.C.InAlaskathe
warrantyisthe same exceptthat it is
LIMITEDbecauseyou must payto
shipthe product to the serviceshop
orfor the servicetechnician’stravel
coststo your home.
All warrantyservice will be provided
byour FactoryService Centersor
byour authorized CustomerCare@
servicersduring normalworking
hours.
Lookhthe White orYellowPages
of yourtelephone directoryfor
GENERAL ELECTRICCOMPANY,
GENERAL ELECTRICFACTORY
SERVICE,GENERAL ELECTRIC-
HOTPOINTFACTORYSERVICEor
GENERAL ELECTRICCUSTOMER
CARE@SERVICE.
1s ese~i’etripstoyourhometo
~ Replacement of housefuses or
(
teach you howto usethe product.
resetting of circuit breakers.
Readyour Useand Carematerial.
Ifyou then have any questions
@Failureof the product if it is used
for other than its intended purpose
about operating the product,
pleasecontact your dealeror our
or used commercially.
Consumer Affa;rsoffice at the
@Damage to product caused
address below,or call, toll free:
by accident, fire, floods or acts
The GE Answer Cente@
of God.
800,626.2000
consumer information service
1=1Improper installation.
Ifyou have an installation problem,
contact your dealer or installer.
Youare responsible for providing
adequate electrical, exhausting
and other connecting facilities.
WARRANTORISNOTRESPONSIBLE
FORCONSEQUENTIAL DAMAGES.
Some states do not allow the exclusion or limitation of incidental or consequential damages, sothe above limitation or exclusion
may not apply to you. This warranty gives you specific legal rights, and you may also have other rights which vary from stateto state.
Toknow what your legal rights are in your state, consult your local or state consumer affairs office or your state’s Attorney General.
,1 . .———
— ————
 Loading...