

Page 1

SmartCom Room Station
Pocket Guide
g
Page 2

Copyright Copyright © 2007 GE Security. All rights reserved.
Disclaimer The information in this document is subject to change without
Tradema rks
and patents
FCC compliance This equipment has been tested and found to comply with the
Software
license
agreement
This document may not be copied in whole or in part or otherwise reproduced without prior written consent from GE Security
except where specifically permitted under US and international
copyright law.
Document number/revision: 1059040A (February 2007).
notice. GE Security (“GE”) assumes no responsibility for inaccuracies or omissions and specifically disclaims any liabilities,
losses, or risks, personal or otherwise, incurred as a consequence, directly or indirectly, of the use or application of any of
the contents of this document. For the latest documentation,
contact your local supplier or visit us online at www.gesecu-
rity.com.
This publication may contain examples of screen captures and
reports used in daily operations. Examples may include fictitious names of individuals an d companies. Any similarity to
names and addresses of actual businesses or persons is entirely
coincidental.
GE and the GE monogram are regist ered trademarks of General
Electric Company.
Other trade names used in this document m ay be trademarks or
registered trademarks of the manufacturers or vendors of the
respective products .
limits for a Class B digital device, pursuant to part 15 of the FCC
Rules. These limits are designed to provide reasonable protection against harmful interference when the equipment is operated in a residential environment . This equipment generates,
uses, and can radiate radio frequency energy and, if not
installed and used in accordance with the instruction manual,
may cause harmful interference to radio communications.
You are cautioned that any changes or modif ications not
expressly approved by the party responsible for compliance
could void the user’s authority to operate the equipment.
Important: This end-user license agreement (“Agreement”) is a
legal agreement between GE and You. Read the following terms
and conditions carefully before installing or using this software.
This agreement provides a license from GE to use the software.
It also contains warranty information, disclaimers, and liability
limitations. Installing and/or using the software confirms Your
agreement to be bound by these terms and conditions. If You
do not agree with these terms and conditions, do not install or
use the software or, if already installed, immediately cease all
use of the software and promptly uninstall all components of the
software.
Page 3

1. Definitions. The following definitions apply to this document:
a. “GE”, with respect to title to or warranty of the Soft-
ware, means GE Security Inc., a Delaware corporation.
b. “Software” means, the executable software or firm-
ware programs and accompanying documentation
installed on the GE products, plus any upgrades,
modified ver sions, updates, additions, and copies of
the software furnished to Customer during the term
of the license granted herein.
c. “Documentation” means all associated media,
printed materials, and electronic documentation
accompanying the Software.
d. “Licensed Product” means the Software and Docu-
mentation.
e. “Customer” means the person or organization, or
parent or subsidiary thereof, who uses the Software
for its intended purposes, and excludes distributors,
authorized resellers, value-added resellers and original equipment manufacturers. Customer may be
referre d to as You or Yo ur, wheth er an indiv idual or a
business entity of any kind.
f. “Machine” means the computer, workstation,
terminal, or other hardware product on which the
Software is installed.
2. License. All rights to and in the Licensed Product,
including, but not limited to, copyrights, patents, trademarks, and trade secrets, belong to GE, and GE retains title
to each copy of the Software. You agree that GE at any
time, upon reasonable notice, may audit Your use of the
Software for compliance with the terms and conditions of
this Agreement. Subject to the terms and conditions of this
Agreement, GE grants You a nonexclusive license to u se
the Software, but only in the country where acquired,
provided that You agree to the following:
You ma y:
a. install and use the Software on a single Machine at one
time, unless You have purchased additional copies of the
Software, in which case You may install the software on
the number of Machines for which You have purchased
copies of the Software;
b. use the original copy of the Software provided to You for
backup purposes.
iii
Page 4

SmartCom Room Station
iv
Pocket Guide
You may not:
a. transfer or distribute the Licensed Product to others, in
electronic format or otherwise, and this Agreement shall
automatically terminate in the event of such a transfer or
distribution;
b. use the Software over a computer network;
c. sell, rent , lease, or sublicense the Software;
d. copy or modify the Licensed Product for any purpose,
including for backup purposes.
3. License. In this Agreement, you, the purchaser of the
rights granted by this Agreement, are referred to as You or
Your, whether an individual or a business entity of any kind.
Subject to the terms and conditions of this Agreement, GE
Security, Inc., a Delaware corporation, (“GE”) grants You a
nonexclusive license to use the accompanying software
(including any upgrades, modified versions, updates, additions and copies of the so ftware furnished to You during the
term of the Agreement) (“Software”), and all associated
media, printed materials, and electronic documentation
accompanying the Software (“Documentation”), but only in
the country where acquired from your supplier and/or
authorized reseller (“Supplier”). In this Agreement, the Software and Documentation are referred to as the Licensed
Product.
All rights to and in the Licensed Product, including, but not
limited to, copyrights, patents, trademarks, and trade secrets,
belong to GE, and GE retains title to each copy of the Software.
You may only install and use the Software on a single computer,
workstation, or terminal (“Computing Device”) at one time,
unless You have purchased additional copies of the Software, in
which case You may install the software on the number of
Computing Devices for which You have purchased copies of the
Software. You may not use the Software over a computer
network. You may not transfer or distribute the Licensed
Product to others, in electronic format or otherwise, and this
Agreement shall automatically terminate in the event of such a
transfer or distribution. You may not sell, rent, lease, or sublicense the Software. You may not copy or modify the Licensed
Product for any purpose, including for backup purposes.
You may use the original copy of the Software provided to You
for backup purposes. You agree that GE at any time, upon
reasonable notice, may audit Your use of the Software for
compliance with the terms and conditions of this Agreement.
Page 5

4. Term. This Agreement is effective until terminated. You
may terminate this Agreement by uninstalling all components of the Software from all Computing Devices and
returning the Licensed Product to GE. GE may terminate
this Agreement if You breach any of these terms and conditions. Upon termination of this Agreement for any reason,
You agree to uninstall all components of the Software and
return the Licensed Product to GE. All provisions of this
Agreement relating to (i) disclaimer of warranties; (ii) limitations on liability, remedies, and damages; and (iii) GE’ s
proprietary rights, shall survive termination of this Agreement.
5. Object code. The Software is delivered in object code
only. You may not alter, merge, modify, adapt, or translate
the Software, nor decompile, disassemble, reverse-engineer, or otherwise reduce the Software to a human-perceivable form, nor create derivative works or programs based
on the Software.
6. Limited warranty. GE warrants that for one (1) year from
the date of delivery of the Licensed Product (Software
Warranty Period), the functions contained in the Software
will be fit for their intended purpose as described in the
applicable Documentation from GE, and will conform in all
material respects to the specifications stated in such Documentation.
GE does not warrant that the operation of the Software will be
uninterrupted or error-free. GE does warrant that the media on
which the Software is furnished will be free from defects in
materials and workmanship under normal use for a period of
thirty (30) days from the date of delivery (Media Warranty
Period). Except as specifically provided therein, any other software and any hardware furnished with or accompanying the
Software is not warranted by GE. Your exclusive remedy under
this limited warranty for nonco nforming Software shall be repair
or replacement of the Software, in the sole discretion of GE. To
obtain a repair or replacement of nonconforming Software,
contact GE Customer Service toll free at 888-GESECURity or
online at www.gesecurity.com during the Software Warranty
Period. Your exclusive remedy under this limited warranty for
defective media is replacement of the defective media. To
receive replacement media under this limited warranty, return
the defective media to Supplier during the Media Warranty
Period, with proof of payment.
Except as expressly provided above, the licensed product is
provided “as is” without warranty of any kind, either expressed
or implied, including, but not limited to, implied warranties of
merchantability or fitness for a particular purpose and, except
as expressly provided above, you assume the entire risk as to
the quality and performance of the licensed product.
v
Page 6

SmartCom Room Station
vi
Pocket Guide
Intended use Use this product only for the purpose it was designed for ; refer
7. Limitation of liability. GE’s sole obligation or liability
under this agreement is the repair or replacement of
nonconforming software and/or defective media accord ing
to the limited warranty above. In no event will GE be liable
for any damages, whether consequential, incidental, or
indirect, nor for any loss of data, loss of profits, or lost
savings, arising out of use of or inability to use the software
or documentation (or any hardware furnished wi th the software), even if GE has been advised of the possibility of such
damages, nor for any claim by any third party.
8. General. Any hardware provided to You by GE shall not
be exported or reexported in violation of any export provisions of the United States or any other applicable jurisdiction. Any attempt to sublicense, assign, or transfer any of
the rights, duties, or obligations hereunder shall be void.
This Agreement shall be governed by and interpreted under
the laws of the State of New York, United States of America,
without regard to conflicts of law provisions. You hereby
consent to the exclusive jurisdiction of the state and federal
courts located in Multnomah County, Oregon, to resolve
any disputes arising under or in connection with this Agreement, with venue in Portland, Oregon.
9. Restricted rights legend. The Licensed Product is
provided with restricted rights. In the event the United
States Government or an agency thereof is granted a
license, the following additional terms apply: Restricted
Computer Software, as defined in the Commercial
Computer Software–Restricted Rights clause at Federal
Acquisition Regulations 52.227-19, and the restrictions as
provided in subparagraphs (c)(1) and (c)(2) thereof; and as
applicable, the Government’s rights to use, modify, reproduce, release, perform, display, or disclose the Software
also are restricted as provided by paragraphs (b)(2) and
(b)(3) of the Rights in Noncommercial Technical Data and
Computer Software–Small Business Innovative Research
(SBIR) Program clause at DFARS 252.227-7018.
You acknowledge that you have read and understand this
agreement and agree to be bound by its t erms. You further
agree that this agreement is the complete and exclusive
statement of the agreement between you and GE, and
supersedes any proposal or prior agreement , oral or
written, and any other communication relating to the
subject matter of this agreement.
to the data sheet and user documentation. For the latest
product information, contact your local supplier or visit us online
at www.gesecurity.com.
Page 7

Contents
Preface . . . . . . . . . . . . . . . . . . . . . . . . . . . . . . . . . . . . . .xi
Conventions used in this document. . . . . . . . . . xii
Safety terms and symbols. . . . . . . . . . . . . . . . . . xiii
Chapter 1. Introduction . . . . . . . . . . . . . . . . . .1
Product overview . . . . . . . . . . . . . . . . . . . . . . . . . . . . . 2
SmartCom audio system . . . . . . . . . . . . . . . . . . . . .3
SmartCom intercom system. . . . . . . . . . . . . . . . . .3
SmartCom room station. . . . . . . . . . . . . . . . . . . . . . . 5
Selection knob . . . . . . . . . . . . . . . . . . . . . . . . . . . . . . .6
Music control buttons . . . . . . . . . . . . . . . . . . . . . . . .7
Intercom control buttons. . . . . . . . . . . . . . . . . . . . .8
Advanced set up programming. . . . . . . . . . . . . 10
Chapter 2. Music controls . . . . . . . . . . . . . . .11
Music button . . . . . . . . . . . . . . . . . . . . . . . . . . . . . . . . 12
Selecting a music source . . . . . . . . . . . . . . . . . . . 12
Setting music volume . . . . . . . . . . . . . . . . . . . . . . 13
Master mode special feature . . . . . . . . . . . . . . . 14
Menu button . . . . . . . . . . . . . . . . . . . . . . . . . . . . . . . . 15
Screen timeout . . . . . . . . . . . . . . . . . . . . . . . . . . . . 16
Backlight timeout . . . . . . . . . . . . . . . . . . . . . . . . . . 16
Backlight level on . . . . . . . . . . . . . . . . . . . . . . . . . . 17
vii
Page 8

SmartCom Room Station
viii
Pocket Guide
Backlight level off . . . . . . . . . . . . . . . . . . . . . . . . . . 17
LED level on. . . . . . . . . . . . . . . . . . . . . . . . . . . . . . . . 18
LED level off. . . . . . . . . . . . . . . . . . . . . . . . . . . . . . . . 18
Contrast level . . . . . . . . . . . . . . . . . . . . . . . . . . . . . . 19
Go back. . . . . . . . . . . . . . . . . . . . . . . . . . . . . . . . . . . . 19
Mute button . . . . . . . . . . . . . . . . . . . . . . . . . . . . . . . . 20
On/off button . . . . . . . . . . . . . . . . . . . . . . . . . . . . . . . 20
All zones off. . . . . . . . . . . . . . . . . . . . . . . . . . . . . . . . 20
Chapter 3. Intercom controls . . . . . . . . . . . . 21
Intercom button. . . . . . . . . . . . . . . . . . . . . . . . . . . . . 22
Selecting a station to call . . . . . . . . . . . . . . . . . . . 23
Making intercom calls . . . . . . . . . . . . . . . . . . . . . . 24
DND button. . . . . . . . . . . . . . . . . . . . . . . . . . . . . . . . . 29
Calling room station DND alert. . . . . . . . . . . . . . 30
Listen button . . . . . . . . . . . . . . . . . . . . . . . . . . . . . . . 31
Listen mode. . . . . . . . . . . . . . . . . . . . . . . . . . . . . . . . 31
Monitor mode. . . . . . . . . . . . . . . . . . . . . . . . . . . . . . 32
Door button . . . . . . . . . . . . . . . . . . . . . . . . . . . . . . . . 33
Chapter 4. Setup menu . . . . . . . . . . . . . . . . . 35
Setup menu. . . . . . . . . . . . . . . . . . . . . . . . . . . . . . . . . 36
Room station address . . . . . . . . . . . . . . . . . . . . . . 37
Display settings . . . . . . . . . . . . . . . . . . . . . . . . . . . . 38
Intercom settings . . . . . . . . . . . . . . . . . . . . . . . . . . 39
Page 9

Audio settings . . . . . . . . . . . . . . . . . . . . . . . . . . . . . 42
Door enabled . . . . . . . . . . . . . . . . . . . . . . . . . . . . . . 45
System information . . . . . . . . . . . . . . . . . . . . . . . . 45
Restore defaults . . . . . . . . . . . . . . . . . . . . . . . . . . . 45
Chapter 5. Support. . . . . . . . . . . . . . . . . . . . . .47
Contacting technical support. . . . . . . . . . . . . . . 48
Online publication library. . . . . . . . . . . . . . . . . . . 49
ix
Page 10

SmartCom Room Station
x
Pocket Guide
Page 11

Preface
This is the GE SmartCom Room Station Pocket
Guide for model CC-SCRS01. This document
includes an overview of the product and detailed
instructions explaining how to operate the room
station.
There is also information describing how to
contact technical support if you have questions
or concerns.
Read these instructions and all ancillary
documentation entirely before
operating this product. The most current
versions of this and related documentation may
be found on our website. Refer to Online
publication library on page 49 for instructions on
accessing our online publication library.
Note: A qualified service person, complying with all
applicable codes, should perform all required
hardware installation.
installing or
xi
Page 12

SmartCom Room Station
xii
Pocket Guide
Conventions used in this document
The following conventions are used in this
document:
Bold Menu items and buttons.
Italic Emphasis of an instruction or point;
special terms.
File names, path names, windows,
panes, tabs, fields, variables, and
other GUI elements.
Titles of books and various
documents.
Blue italic (Electronic version.) Hyperlinks to
cross-references, related topics, and
URL addresses.
Monospace Text that displays on the computer
screen.
Programming or coding sequences.
Page 13
Safety terms and symbols
These terms may appear in this manual:
CAUTION: Cautions identify conditions or
practices that may result in damage to the
equipment or other property.
WARNING: Warnings identify conditions or
practices that could result in equipment
damage or serious personal injury.
xiii
Page 14

SmartCom Room Station
xiv
Pocket Guide
Page 15

Chapter 1 Introduction
This chapter provides a product overview
and basic information on how to use the
room station.
In this chapter:
Product overview . . . . . . . . . . . . . . . .2
SmartCom audio system . . . . . . .3
SmartCom intercom system. . . . .3
SmartCom room station. . . . . . . . . . .5
Selection knob . . . . . . . . . . . . . . .6
Music control buttons . . . . . . . . .7
Intercom control buttons . . . . . . .8
Page 16

SmartCom Room Station
2
Pocket Guide
Product overview
SmartCom is an audio/intercom system for
multiple rooms. A typical SmartCom system
configuration consists of the following
SmartCom components:
• The SmartCom audio hub, model
SCAMP4 and left/right speakers in each
zone
• The SmartCom intercom hub, model
SCHUB8
• One or more SmartCom room stations,
model SCRS01 (up to eight on one
intercom hub)
• One or two SmartCom door stations,
model SCDOR1
• Connection Center
The system can be expanded to two intercom
hubs (16 intercom zones total) and three
additional audio expansion hubs, model
SCAMPX (16 audio zones total).
Page 17

Chapter 1
Introduction
SmartCom audio system
The SmartCom audio system is a four-zone/foursource audio system for multiple rooms. You can
expand the system to 16 zones of audio. Each
room station provides for on/off, mute, source
selection, and music volume control.
SmartCom intercom system
The SmartCom intercom system consists of the
SmartCom intercom hub and one to eight
SmartCom room stations. You can expand the
system to 16 room stations by adding another
intercom hub.
The intercom function provides room to room or
room to all rooms (all stations) intercom
communications. In addition, one or two door
stations can be used to annouce doorbell tones in
all rooms and provide for door to room station
communications.
3
When used in conjuction with the SmartCom
audio system, the intercom system uses the audio
system’s room speakers for voice
communications and doorbell tones. The audio
Page 18

SmartCom Room Station
4
Pocket Guide
system music is automatically muted during
intercom or door station communications.
The intercom system provides flexible userselected room settings for do not disturb (DND)
and listen-in modes.
Optional door control can be used to open
electric locks.
Page 19
Chapter 1
Introduction
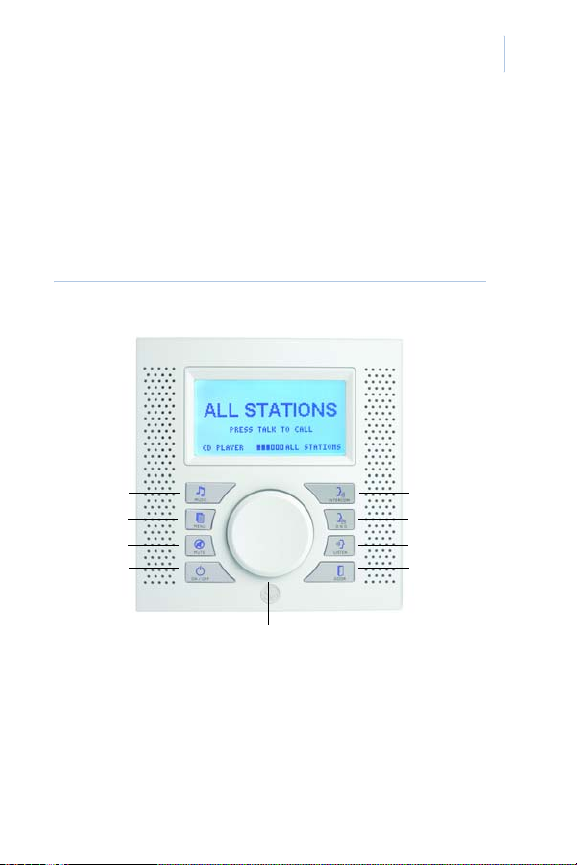
SmartCom room station
5
The SmartCom room station (
Figure 1
) provides a
single, convenient graphical LCD keypad to control
the SmartCom audio and intercom systems.
Figure 1. SmartCom room station
Music
controls
Music
Menu
Mute
On/off
Selection knob
Intercom
controls
Intercom
DND
Listen
Door
Page 20

SmartCom Room Station
6
Pocket Guide
Selection knob
The selection knob has the following functions:
• Rotate and press to adjust volume
control in music mode.
• Rotate and press for room selection in
intercom mode.
• Press to talk for intercom system.
• Rotate and press for intercom volume
during intercom calls.
Page 21

Chapter 1
Introduction
Music control buttons
SmartCom music control buttons (Figure 1 on
page 5) include:
Music. Press to cycle through all four music
source inputs (see Music button on page 12).
Menu. Press to display user setup settings
of the LCD screen (see Menu button on
page 15).
Mute. Press to mute music volume (see
Mute button on page 20).
On/off. Press to turn on or turn off music
(see On/off button on page 20).
To listen to music, do the following:
1. Press the On/Off button to turn on the
zones’s audio amplifier.
7
2. Press the Music button to select the
desired source.
3. Turn the knob to adjust the music
volume.
Page 22

SmartCom Room Station
8
Pocket Guide
Intercom control buttons
SmartCom intercom control buttons (Figure 1 on
page 5) includes:
Intercom. Press to select room or all rooms
to call (see Intercom button on page 22).
DND. Press to prevent door bell and
intercom calls from being heard in the room
(see DND button on page 29).
Listen. Press to place a room station into
listen or monitor mode to allow rooms to be
monitored (see Listen button on page 31).
Door. Optional door strike control. Press to
open a door (see Door button on page 33).
To make an intercom call, do the following:
1. Press the Intercom button to switch to
intercom mode and select the last station
called.
2. Press the knob to call a station and hold
to talk. If you want all stations or another
room, turn the knob to select the station
you want.
Page 23

Chapter 1
Introduction
3. Turn the knob to adjust the intercom
volume during an intercom session.
To answer an intercom call, do the following:
• For all stations calls, press and hold the
knob to talk, release the knob when you
are done.
• For station to station calls, talk hands
free after the call tone.
9
Page 24

SmartCom Room Station
10
Pocket Guide
Advanced set up programming
The technician who installs your system will use
the Setup menu to set display, intercom, and
audio functions for your system. You can adjust
some of these functions to update your system or
to set your preferences. Some of the functions in
the Setup menu, such as the room station address
setting, should only be changed by your
installation technician. See Setup menu on
page 36 for more information.
Page 25

Chapter 2 Music controls
This chapter provides information on how
to use the room station music controls.
In this chapter:
Music button. . . . . . . . . . . . . . . . . . .12
Menu button . . . . . . . . . . . . . . . . . . .15
Mute button . . . . . . . . . . . . . . . . . . .20
On/off button . . . . . . . . . . . . . . . . . .20
Page 26

SmartCom Room Station
12
Pocket Guide
Music button
Press the Music button at any time to display the
Music screen (Figure 2).
Figure 2. Music screen
Source
selected
Music
source
Selecting a music source
When the Music screen is displayed, press the
Music button to cycle through the music sources.
You can also press and rotate the knob to cycle
through the source selections and press the knob
to select one.
SOURCE 1
SOURCE 1
Music volume level
ALL STATIONS
Page 27

Chapter 2
Music controls
Setting music volume
When the Music screen is displayed, rotate the
knob to change the music volume. The display
will change to show the current music volume (0
to 78) and change as you rotate the knob
(Figure 3). The status bar will also show the
volume level in the bar graph.
Figure 3. Volume screen
Music mode
indicator
VOLUME:32
SOURCE 1
Music volume level
MUSIC
ALL STATIONS
13
Page 28

SmartCom Room Station
14
Pocket Guide
Master mode special feature
You can set a room station into a master mode
that will make that room station a master
controller for all other music zones. All other
zones will follow (be set the same as) the master
for source selection, volume level, mute, and on/
off control.
To set the room station into master mode, press
and hold the Music button for three seconds,
Master on is displayed on the screen. To
until
exit master mode, press and hold the Music
button for three seconds until
displayed on the screen.
Master off is
Page 29

Chapter 2
Music controls
Menu button
Press the Menu button to show a Display
settings screen. This screen provides options for
setting user preferences for display settings for
the following:
• Screen timeout on page 16
• Backlight timeout on page 16
• Backlight level on on page 17
• Backlight level off on page 17
• LED level on on page 18
• LED level off on page 18
• Contrast level on page 19
• Go back on page 19
15
Page 30

SmartCom Room Station
16
Pocket Guide
Screen timeout
The Music screen is the default display screen.
Anytime you are in another display screen, the
display will timeout after a selected interval (30
seconds default) and go back to the Music screen.
To change the timeout interval, press the knob to
select Screen timeout and rotate the knob to
select the time interval desired (0 to 60 seconds).
Setting the interval to 0 will defeat the screen
timeout and the display will stay on the last
screen selected until changed. Press the knob
again to select the interval.
Backlight timeout
You can set the display backlight to stay on all
the time (default setting of 0 keeps the backlight
on) or set a timeout interval, after which, the
backlight will timeout and go off. Rotate the
knob to select Backlight timeout and press to
select. Rotate the knob again to select the time
desired and press to select.
Note: Pressing any key on the room station will turn
on the backlight (if it was off).
Page 31

Chapter 2
Music controls
Backlight level on
You can set the display Backlight on brightness
from 0 to 100% in 5% increments (default set to
100%). Rotate the knob to select Backlight level
on and press to select. Rotate the knob again to
select the level desired and press to select the
level. The backlight brightness will change as
you change the settings to show you the selected
brightness.
Backlight level off
You can set the display backlight off brightness
from 0 to 100% in 5% increments (default set to
0%). Rotate the knob to select Backlight level off
and press the knob to select. Rotate the knob
again to select the level desired and press to
select the level. The backlight brightness will
change as you change the settings to show you
the selected brightness.
17
Page 32

SmartCom Room Station
18
Pocket Guide
LED level on
Y ou can set the keypad button backlight LEDs on
brightness from 0 to 100% in 5% increments
(default set to 100%). Rotate the knob to select
LED level on. and press the knob to select.
Rotate the knob again to select the level you
want and press the knob to set your setting. The
keypad button brightness will change as you
change the settings to show you the selected
brightness.
LED level off
You can set the keypad button backlight LEDs
off brightness from 0 to 100% in 5% increments
(default set to 100%). Rotate the knob to select
LED level off and press the knob to select. Rotate
the knob again to select the level you want and
press the knob to set your selection. The keypad
button brightness will change as you change the
settings to show you the selected brightness.
Page 33

Chapter 2
Music controls
Contrast level
You can change the contrast level of the display
for optimum viewing. To change the contrast
level, rotate the knob to move the selection arrow
to Contrast level. Press the knob to select. Rotate
the knob to change the contrast level (0 to 10).
As you adjust the setting, the contrast will
change on screen to allow you to select the best
viewing. Press the knob to set your selection.
Go back
When you are done setting your preferences for
the room station display settings, rotate the knob
to select Go back and press the knob to return to
the Music mode screen.
Note: You can press the Music button anytime in the
Display settings screen to exit and return to the
Music mode screen.
19
Page 34

SmartCom Room Station
20
Pocket Guide
Mute button
Anytime the music is on, you can mute the music
by pressing the Mute button.
be displayed on the screen.
Music muted will
On/off button
If the display screen shows Music off, press the
On/Off button to turn on the zone music. To turn
off the zone music, press the On/Off button
again.
All zones off
You can turn off all the SmartCom music zones
by pressing and holding the On/Off button for
several seconds until you see
on the screen.
All off displayed
Page 35

Chapter 3 Intercom
controls
This chapter provides information on how
to use the room station intercom controls.
In this chapter:
Intercom button . . . . . . . . . . . . . . . .22
DND button . . . . . . . . . . . . . . . . . . .29
Listen button. . . . . . . . . . . . . . . . . . .31
Door button . . . . . . . . . . . . . . . . . . .33
Page 36

SmartCom Room Station
22
Pocket Guide
Intercom button
Press the Intercom button to switch the room
station’s graphical display to the Intercom
control screen (Figure 4). The screen will show
the last station called or All stations.
Figure 4. Intercom control screen
Room station
called
ALL STATIONS
PRESS KNOB TO CALL
SOURCE 1
ALL STATIONS
Page 37

Intercom controls
Selecting a station to call
To select a station to call, do one of the
following:
Last station called. Press the Intercom
button and the last station called will display
on the screen. If you want to call this room
again, press the knob.
Room station selection. If you want to call
another room station, rotate the knob to
sequence through all available room stations
until the room you want is displayed and
then press the knob.
All station selection. To call all stations,
rotate the knob until you see the All stations
option on the screen and press the knob. You
can also press the Intercom button twice to
automatically go to the All stations selection.
Chapter 3
23
Page 38

SmartCom Room Station
24
Pocket Guide
Making intercom calls
You can make intercom calls to all stations or
from station to station.
Making all station calls
Select All stations with the knob, then press and
hold the knob. Three quick tones will sound in
each room that is not in do not disturb (DND)
mode. Continue to press and hold the knob and
after the tones end begin speaking. When done,
release the knob.
The Calling room station intercom screen will
show Waiting for reply after the call is made
(Figure 5).
Figure 5. Calling room station Intercom screen
Room station
called
ALL STATIONS
WAITING FOR REPLY
SOURCE 1
ALL STATIONS
Page 39

Chapter 3
Intercom controls
Note: If no station replies within ten seconds, the call
will end.
Replying to an all stations call
You can answer an All stations call from any
room station by pressing the knob to talk back to
the calling station. The Called room station
intercom screen (Figure 6) will automatically be
displayed.
Figure 6. Called room station Intercom screen
Calling room
station
STATION 1 CALLING
PRESS KNOB TO REPLY
SOURCE 1
ALL STATIONS
25
Page 40

SmartCom Room Station
26
Pocket Guide
Making station to station calls
To make a station to station call, select the room
station, and then press and hold the knob. A tone
will sound in the room called (if the room is not
in DND mode). Continue to press and hold the
knob and after the tone ends begin speaking.
When done, release the knob.
The Calling room station intercom screen will
show Waiting for reply after the call is made
(Figure 7).
Figure 7. Calling room station Intercom screen
Room station
called
STATION 1
WAITING FOR REPLY
SOURCE 1
ALL STATIONS
Note: If there is no response, the call will
automatically end after ten seonds.
Page 41

Chapter 3
Intercom controls
Replying to station to station calls
Station to station calls permit the called station to
talk back hands free. Once you hear the call alert
tone, just start talking to answer the call. The
Called room station intercom screen (Figure 8)
will automatically be displayed.
Figure 8. Called room station intercom screen
Calling room
station
STATION 1 CALLING
HANDS FREE ANSWER ON
SOURCE 1
ALL STATIONS
27
Page 42

SmartCom Room Station
28
Pocket Guide
Intercom call volume control
Once you have initiated an intercom call, you can
adjust the intercom volume (0 to 32) by turning
the knob. The knob only controls the intercom
volume while you are on the call. Once the call
ends, the music will come back on and turning
the knob will adjust the music volume. Figure 9
shows the screen display for intercom volume
control.
Figure 9. Volume control Intercom screen
Selected
volume
SOURCE 1
VOLUME:25
INTERCOM
ALL STATIONS
Page 43

Chapter 3
Intercom controls
DND button
Press the DND button (do not disturb) to prev ent
any intercom calls or door station calls from
being heard in the room. The intercom screen
will display
will appear at the top of all display screens
(Figure 10).
Figure 10. Do not disturb screen
Do Not Disturb and a DND icon
29
DO NOT DISTURB
DND
DND icon
SOURCE 1
ALL STATIONS
To exit the DND mode, press the DND button
again.
Note: If you press the Intercom button on a room
station in DND mode (to make an intercom call)
the DND mode will be canceled.
Page 44

SmartCom Room Station
30
Pocket Guide
Calling room station DND alert
If a room station selects a room that is in DND
mode, the calling station will see a Do not
disturb alert on the Calling room station screen
(Figure 11). Calls to rooms in DND mode are
inhibited.
Figure 11. Calling room station DND alert screen
STATION 2
SOURCE 1
DO NOT DISTURB
STATION 2
Page 45

Chapter 3
Intercom controls
Listen button
The Listen button allows you to listen in on
another room, but only if that room is in monitor
mode. This feature allows you to monitor babies
or the sick and elderly.
Listen mode
To use the listen mode, you must first go to the
room to be monitored and place that room’s
station into monitor mode.
To place the room station into listen mode, press
the Listen button once and
displayed on the screen (Figure 12).
Figure 12. Room station in listen in mode screen
Listen will be
31
SOURCE 1
LISTEN
STATION 2
Page 46

SmartCom Room Station
32
Pocket Guide
Monitor mode
To place a room station into monitor mode and
allow other room stations to listen in to that
room, press the Listen button twice until
Monitor is displayed on the screen (Figure 13).
Rooms in monitor mode display
flashing and an
Open microphone alert on the
room station.
Figure 13. Room station in monitor mode screen
SOURCE 1
MONITOR
OPEN MICROPHONE
To exit listen or monitor mode, press the Listen
button until OFF is displayed on the screen.
Monitor
STATION 2
Page 47

Chapter 3
Intercom controls
Door button
The Door button is an optional feature of the
SmartCom intercom system. Pressing the Door
button will trigger a relay on the intercom hub to
activate an electric door strike.
The Door button is normally disabled in the
room station setup to prevent unathorized
opening of doors. You must enable any room
stations that you want to have access to this
feature.
See Door enabled on page 45 for instructions on
enabling the door button.
33
Page 48

SmartCom Room Station
34
Pocket Guide
Page 49

Chapter 4 Setup menu
This chapter provides information on how
to use the Setup menu to change display,
audio, and intercom settings.
In this chapter:
Setup menu. . . . . . . . . . . . . . . . . . . .36
Room station address. . . . . . . . . . . .37
Display settings . . . . . . . . . . . . . . . .38
Intercom settings . . . . . . . . . . . . . . .39
Audio settings. . . . . . . . . . . . . . . . . .42
Door enabled . . . . . . . . . . . . . . . . . .45
System information. . . . . . . . . . . . . .45
Restore defaults . . . . . . . . . . . . . . . .45
Page 50

SmartCom Room Station
36
Pocket Guide
Setup menu
You can use the Setup menu to adjust display,
audio, and intercom settings. The menu includes
some options that are provided for the technician
that installed your system and these options
should not be changed.
To access the Setup menu, press the top two
control buttons on the room station (Music and
Intercom) simultaneously. The Setup menu will
display (Figure 14).
Figure 14. Setup menu screen
ROOM STATION ADDRESS 2
DISPLAY SETTINGS
INTERCOM SETTINGS
AUDIO SETTINGS
SET UP MENU
Page 51

Chapter 4
Setup menu
The Setup menu options include:
• Room station address
• Display settings on page 38
• Intercom settings on page 39
• Audio settings on page 42
• Door enabled on page 45
• System information on page 45
• Restore defaults on page 45
• Exit menu
Rotate the knob to navigate to an option and
press the knob to select the option.
Room station address
The room station address is set by your system
installer. Do not change this setting.
37
WARNING: Do not change the room station
address or the system will not
operate properly.
Page 52

SmartCom Room Station
38
Pocket Guide
Display settings
When you select the Display settings option, the
Display settings screen appears. This is the same
screen that displays when you press the Menu
button. This screen provides options for setting
preferences for display settings for the following:
• Screen timeout on page 16
• Backlight timeout on page 16
• Backlight level on on page 17
• Backlight level off on page 17
• LED level on on page 18
• LED level off on page 18
• Contrast level on page 19
• Go back. Return to the Setup menu
screen.
Page 53

Chapter 4
Setup menu
Intercom settings
Select the Intercom settings option to access the
the Intercom settings screen. This screen allows
you to change the following intercom settings:
• Edit station name. Access the Edit
station name screen on page 40.
• Talk timeout. Sets the length of the
intercom call before the call is
automatically ended (10 to 120 seconds).
• Hand free enabled. Enable (Yes) or
disable (No) the hands free function.
• Call blocking. Access the Call blocking
screen on page 41. Allows calls to
selected stations to be blocked.
• Chime volume. Set the chime volume
value.
• Go back. Return to the Setup menu
screen.
39
Page 54

SmartCom Room Station
40
Pocket Guide
Edit station name screen
The Edit station name screen allows you to
create a custom name for the room station or edit
an existing name.
Select the Edit station name menu item and press
the knob to go to the main edit screen. This
screen shows the current station name.
To enter a new station name, do the following:
1. Select New name and press the knob.
The edit station name text screen will be
displayed with the old name deleted.
2. To select text for the new name, rotate
the knob until the desired character is
highlighted and press the knob to enter
the character.
3. Repeat the process to spell out the new
station name. Use special characters for
blank, backspace (BKSP) or shift
(change case).
4. Select Done to apply the new name.
Page 55

Chapter 4
Setup menu
To edit an existing station name, do the
following:
1. Select Edit name and press the knob. The
edit name text screen will be displayed
with the existing name entered.
2. Edit as desired and select Done to apply
the edits.
To return to the Setup menu, select Go back.
Call blocking screen
The Call blocking screen allows you to block
calls to selected room stations. This may be
needed if the room stations are too close to one
another and cause feedback, or to lock out calls
from selected stations.
To set call blocking, do the following:
41
1. Select the Call blocking menu item and
press the knob. The current entry will
flash.
2. Turn the knob to change the entry as
desired (Y es or No) and pr ess the knob to
apply the setting.
Page 56

SmartCom Room Station
42
Pocket Guide
Audio settings
Select the Audio settings option to access the
Audio settings screen. This screen allows you to
change the following audio settings.
• Master mode enabled. Disabled (No) or
enabled (Yes). Allows the master mode
to be set permanently to enabled.
• Volume limit. Sets the maximum volume
for the room (0 to 78).
• Intercom over speakers. Allows (Yes)
intercom audio to be heard over the
room speakers in addition to the room
station speaker or not (No).
• Edit sources. Access the Edit sources
screen on page 43.
• Go back. Return to the Setup menu
screen.
Page 57

Chapter 4
Setup menu
Edit sources screen
The edit sources screen allows you to edit source
names and enable/disable them.
To edit a source, scroll to the source to be edited
and press the knob to select it. The source
settings screen will be displayed.
Rotate the knob to select the item to edit and
press the knob to select the item.
To create a new source name, do the following:
1. Select New name and press the knob.
The edit source name text screen will be
displayed with the old name deleted.
2. To select text for the new name, rotate
the knob until the desired character is
highlighted and press the knob to enter
the character.
43
3. Repeat the process to spell out the new
station name. Use special characters for
blank, backspace (BKSP) or shift
(change case).
4. Select Done to apply the new name.
Page 58

SmartCom Room Station
44
Pocket Guide
To edit an existing source name, do the
following:
1. Select Edit name and press the knob. The
edit name text screen will be displayed
with the existing name entered.
2. Edit as desired and select Done and press
the knob to apply the edits.
You can enable or disable a source input in the
source list. Sources enabled will show up in the
sequence of source selection when pressing the
Music button. Disable sources that you do not
use or want to show up in this list.
To enable or disable a source, do the following:
1. Select Source type and press the knob.
2. Rotate the knob to select enabled or
disabled and press the knob.
Page 59

Chapter 4
Setup menu
Door enabled
The room station door button can control a door
relay on the intercom hub to operate a door strike
to open a door. For security, this is default set to
disabled (No). Each room station that you want
to enable the door button must be individually set
to enabled (Yes).
System information
Select this option to view system information
including hardware and software revision
numbers.
Restore defaults
This option is used by your system installation
technician to restore factory defaults. Do not
select this setting.
45
Page 60

SmartCom Room Station
46
Pocket Guide
Page 61

Chapter 5 Support
This chapter provides information on how
to contact technical support.
In this chapter:
Contacting technical support. . . . . .48
Online publication library . . . . . . . .49
Page 62

SmartCom Room Station
48
Pocket Guide
Contacting technical support
For assistance operating this product, refer to this
document and any other documentation
provided. If you still have questions, you may
contact the installation company for your
product.
Page 63

Chapter 5
Support
Online publication library
Another great resource for assistance with your
GE product is our online publication library. To
access the library, go to our website at the
following location:
http://www.gesecurity.com
In the Customer Support menu, select the
Resource Library link. After you register and
log on, you may search through our online
library for the documentation you need.
1
49
1. Many GE documents are provided as PDFs (portable
document format). To read these documents, you
will need Adobe Reader, which can be downloaded
free from Adobe’s website at www.adobe.com.
Page 64

SmartCom Room Station
50
Pocket Guide
 Loading...