

Page 1
Sedona Series
Family Radio Service
User's Guide
We bring good things to life.
Sedona Series
15393460 (Rev. 1 E/S)
98-40
Printed in Philippines
P.O. Box 1976, Indianapolis, IN 46206
© 1998 Thomson Consumer Electronics, Inc.
Trademark(s) ® Registered
Marca(s) Registrada(s)
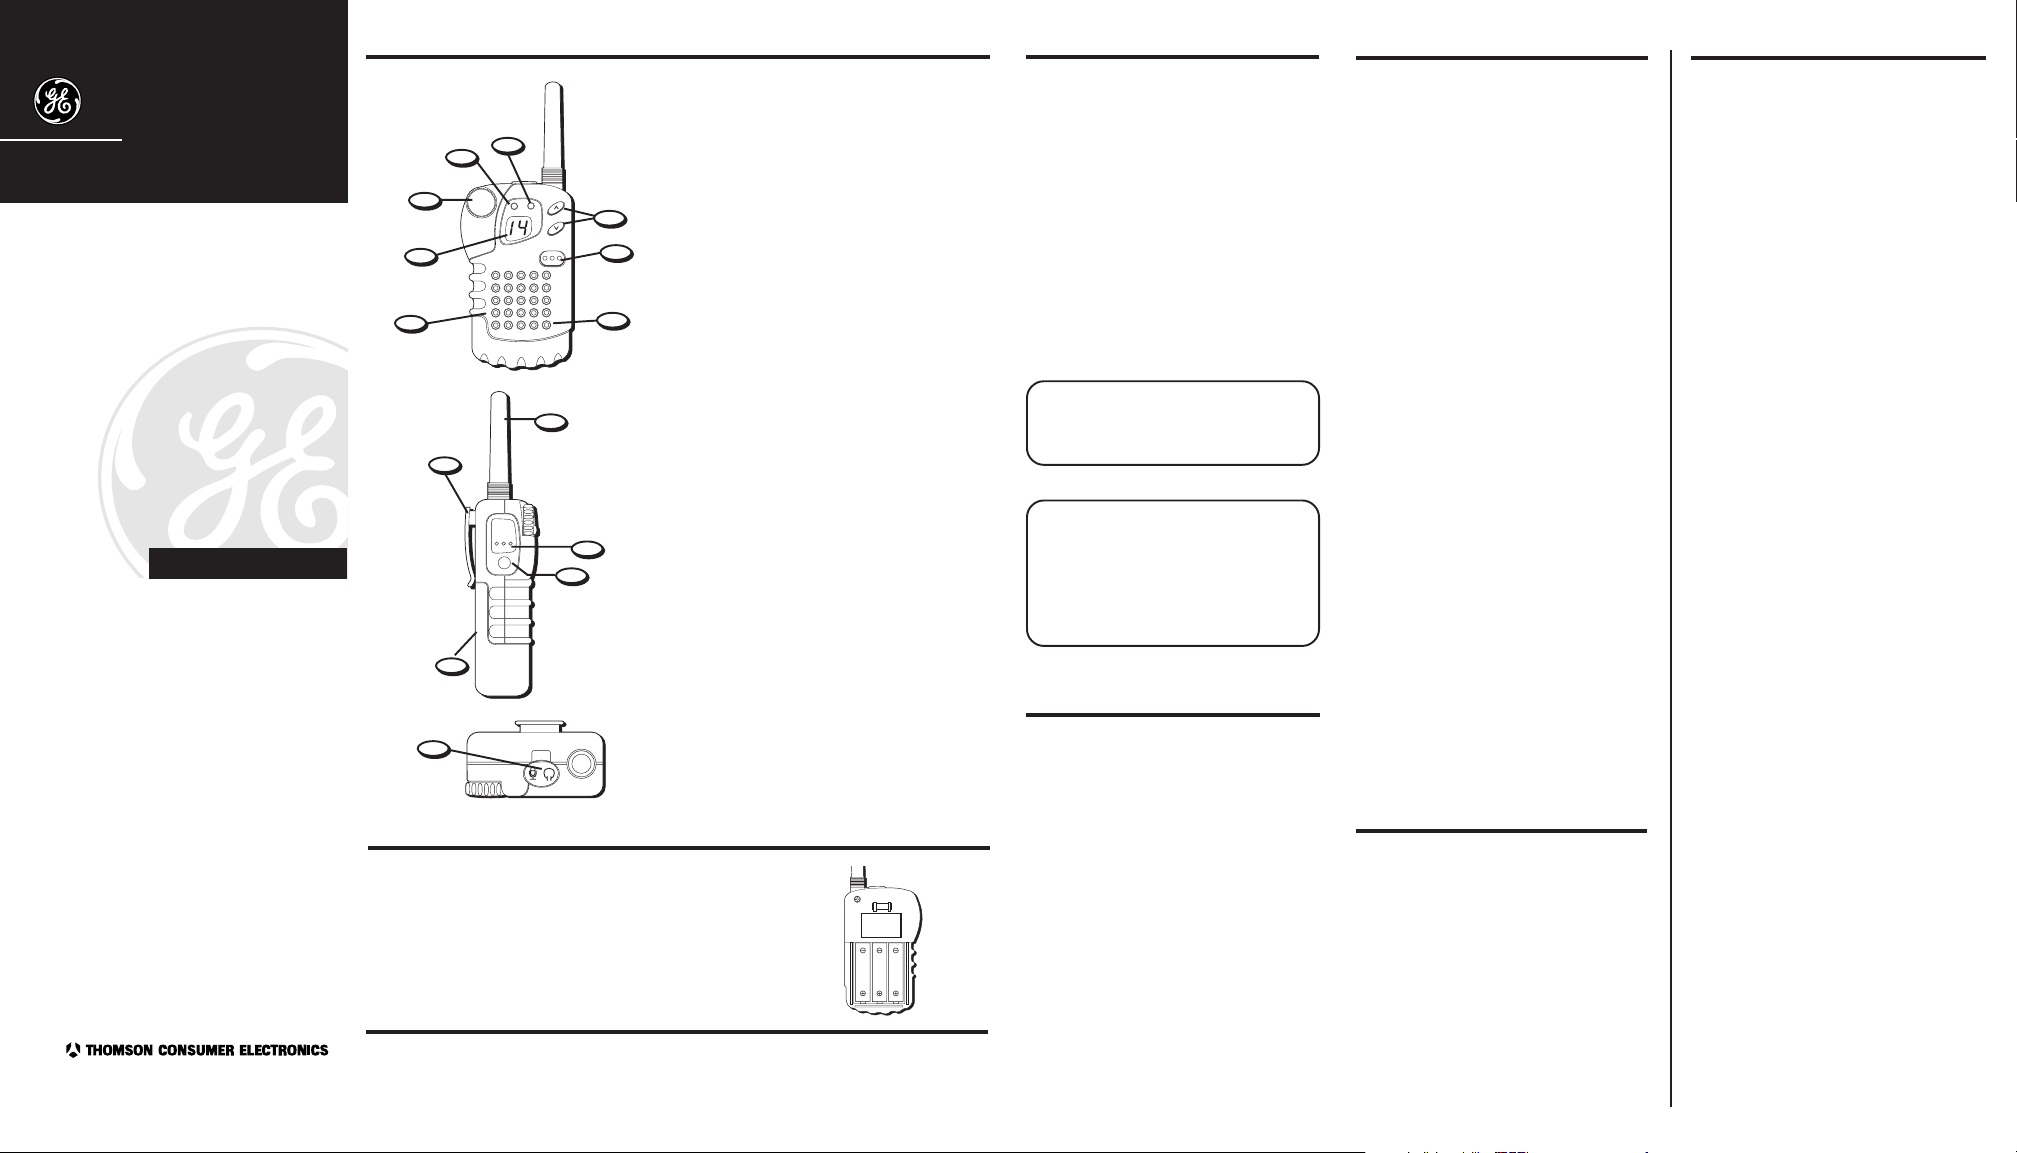
BUTTONS AND CONTROLS
1. Channel up and down buttons - Pressing
advances/decreases 1 channel. Holding
continuously advances/ decreases channels
until button is released.
8
7
6
5
VOLUME
TX LO BATT
OFF
PAGE
2. PAGE - Sends a tone to other GE Sedona
Series Family Radios tuned to the same
channel. To send a page, hold the PAGE
1
2
button.
3. MIC - Microphone
4. Speaker
5. Channel display
6. OFF-VOLUME control -Turn clockwise to
4
MIC
3
turn ON and to increase listening volume.
Turn counter-clockwise to decrease volume
and turn power OFF.
7. TX LED - This light indicates when the unit
is transmitting.
9
13
8. LO BATT LED - This light indicates when
the batteries are nearly drained.
9. Antenna
10. PTT (PUSH-TO-TALK) - Press to transmit,
release to receive.
PTT
M
10
11
11. M (Monitor) - Press and hold the MONITOR
button to deactivate the automatic squelch
feature to temporarily listen to the current
channel. Release MONITOR to return to
standby.
12. Battery compartment
13. Belt clip
12
14. MIC/ EAR jack - Eventually this product will
offer an optional speaker/microphone or
headset.
NOTE: A standard audio headset will not
14
operate with this unit.
IMPORTANT:
To page ALL radios tuned to the same channel
irrespective of brand, hold the PTT button and
press PAGE simultaneously. The page tone will
BATTERY INSTALLATION
1. Remove the battery compartment door by sliding it down
from the unit.
2. Install 3 AA-size alkaline batteries (not included) into the
battery compartment. Make sure to follow the + and symbols in the compartment. Installing the batteries
incorrectly can damage the unit.
continue until the PAGE button is released.
BELT CLIP INSTALLATION AND REMOVAL
• To install the belt clip, line up the grooves on the clip with the grooves on the back of
the unit. Place your thumb at the bottom of the clip and push upward until it snaps into
place.
• To remove the belt clip, release the snap with your finger or a tool while firmly pushing
the top of the clip downward.
USING YOUR FAMILY RADIO
1. Turn on power.
2. Set to desired channel.
3. Adjust volume to comfortable level.
TO TRANSMIT
Press the PUSH-TO-TALK (PTT) button.
Speak slowly and clearly 2-3 inches from
the microphone.To avoid cutting off the
first part of your transmission, pause
slightly after pressing the PTT button
before you start talking.
TO RECEIVE
When finished talking, release the PUSHTO-TALK (PTT) button to listen to the
transmission.
NOTE: Remember if several family
radios are in use, they must all be on
the same channel to communicate.
NOTE: If none of the buttons on the
unit are touched after 5 seconds, the
unit will enter “sleep mode” to
conserve battery power and will
appear to be off. The display will
become active again after a short
delay once the PTT button is pressed
or a transmission is received. This is
IMPORTANT BATTERY INFORMATION
• Alkaline batteries are recommended
for longer play. Carbon-zinc or nickel
cadmium rechargeable batteries can
substantially reduce play time.
• If you’re not going to use your radio
for a month or more, be sure to
remove batteries because they can
leak and damage the unit.
• Dispose of batteries in the proper
manner, according to federal, state,
and local regulations.
• Any battery may leak electrolyte if
mixed with a different battery type, if
inserted incorrectly, if all batteries are
not replaced at the same time, if
disposed of in fire, or if an attempt is
made to charge a battery not intended
to be recharged.
• Discard leaky batteries immediately.
Leaking batteries can cause skin burns
or other personal injury.
FCC INFORMATION
This device complies with Part 15 of the
FCC Rules. Operation is subject to the
following two conditions: (1) This device
may not cause harmful interference, and
(2) this device must accept any
interference received, including
interference that may cause undesired
operation.
In accordance with FCC requirements,
changes or modifications not expressly
approved by Thomson Consumer
Electronics could void the user’s authority
to operate this product.
This device generates and uses radio
frequency (RF) energy, and if not installed and
used properly, this equipment may cause
interference to radio and television reception.
If this equipment does cause interference
to radio or television reception (which you
can determine by turning the equipment
off and on), try to correct the interference
by one or more of the following measures:
• Reorient the receiving antenna (that is,
the antenna for the radio or television
that is “receiving” the interference).
• Move the unit away from the equipment that is receiving interference.
If these measures do not eliminate the
interference, please consult your dealer or
an experienced radio/television technician
for additional suggestions. Also, the
Federal Communications Commission has
prepared a helpful booklet, “How To
Identify and Resolve Radio TV Interference
Problems.” This booklet is available from
the U.S. Government Printing Office,
Washington, DC 20402. Please specify
stock number 004-000-00345-4 when
ordering copies.
SERVICE INFORMATION
This product should be serviced only by
those specially trained in appropriate
servicing techniques. For instructions on
how to obtain service, refer to the warranty
included in this guide or call 1-800-448-0329.
Attach your sales receipt to the booklet for
future reference, or jot down the date this
product was purchased or received as a
gift. This information will be valuable if
service should be required during the
warranty period.
Purchase Date__________________________
Name of Store__________________________
LIMITED WARRANTY
What does your warranty cover?
• Any defect in material or workmanship.
For how long after the original purchase?
• One year.
• The warranty for rental units begins with
the first rental.
What will we do?
• Provide you with a new, or at our option,
a refurbished unit.
• The exchange unit is warranted for the
remainder of your product’s original oneyear warranty period.
How do you make a warranty claim?
• Properly pack your unit. Include any
cables, etc., which were originally
provided with the product.
• Include a copy of the sales receipt or
other evidence of date of original
purchase. If the unit was a gift, provide a
statement specifying the date received.
Also, print your name and address, and a
description of the defect.
• Ship the unit standard UPS or its
equivalent to:
Thomson Consumer Electronics, Inc.
Product Exchange Center
11721 B Alameda Ave.
Socorro, Texas 79927
• Pay any charges billed to you by the
Exchange Center for service not covered
by the warranty.
• A new or refurbished unit will be shipped
to you prepaid freight.
What does your warranty not cover?
• Customer instruction. Your Use and Care
Guide provides information regarding the
operating instructions and user controls.
For additional information, ask your
dealer.
• Installation and set-up service
adjustments
• Batteries
• Damage from misuse or neglect
• Products that have been modified or
incorporated into other products.
• Product purchased or serviced outside
the USA.
• Acts of God, such as but not limited to
lightning damage.
How does state law relate to this warranty?
• This warranty gives you specific legal
rights, and you may also have other
rights which vary from state to state.
What if you purchased your product outside
of the United States?
• This warranty does not apply. Contact
your dealer for warranty information.
 Loading...