

www.GEAppliances.com
Advantium
Adva_ltium Quffk Start . . . lO, l l
Cooki,g conhvh ........... 14
Custom#r i@.mation ........ 8
Oven ./Dltums .......... 13, 14
Saji)O, .................. 2- 7
H/Ymti._Adva,ltium ? ......... 9
Speedcooking
Coold,g tip._ .............. 16
{;u.s'tom .qwed(ook _'(i[)(<s'. . . 19, 20
Custom .qwed(ook *_'('ipelog, .... 2 l
Manual speedcook .......... 18
Pmvo" bqml ............... 17
Repeat last ............... 16
I¢_<s'umejDltuw ............ 16
Speedco& co&waw ......... 18
speed(ook menu gwide ....... 12
5y,e('dcool_-._qf!)cookwaw ....... 5
77_ing_ that a_" normal ...... 22
U_ir_g"a /m'._et.qwedcool_m_mu . . . 15
Microwaving
Baki,g .................. 23
Cooking tips .............. 27
Custom micwwave _,<ip(_s. . .27, 28
Custom microwave ,_)<ipe1%, . . .28
D@_z_'t-Au to .............. 29
l)@r)st- 7_me .............. 29
D@r)sti,g t@s ............. 30
Micw Expr'(<_:s............. 26
Mic*vwave powo" lrveh ....... 27
Micwwave-._qf!" (ool_wa'n, ...... 6
t%(autiorrs to avoid
pas:sible _:vpas'ur_"to
excevsive micwwave <,nogy ..... 2
&msor cool'i_lg .......... 31, 32
Tking_, that at(" normal ...... 33
7_me co& ................ 26
Udng pr>set
micwwave selg,ctions ......... 26
Dhrming and _H,,ating . . .2< 25
Other Features
Auto nigkt ligkt ........... 34
Automatic jhn ............ 37
B*_]wrvolume ............. 34
C/tiM lockout ............. 36
Clod" ................ 10, 34
Disp[(O' ON/OFF ........... 34
HHp ................... 35
I?emi,dcr . ............... 37
Revirw .................. 34
Sooll .qwed ............... .?4
Su@we ligkt .............. 36
Timo" . ................. 36
_4"ntjhn ................. 36
Care and Cleaning
Cleaning tile i_lside ...... 38, 39
Cleaning the outside ........ 40
Filto:_ ............... 4 l, 42
Optiorml kil._ .............. 42
R(Jdaci_lg light._ ........... 41
Troubleshooting
Problem Solver. ......... 43, 44
Consumer Support
Consumer Sup/tort .... Back Cover
Customo" h{/brmation ........ 8
Product I¢egistration ...... 45, 46
H/hrranly ................ 47
SCA I O00
SCA l O0 l
,,,-,,,-,,,.g,,.(/*,,.,,_i..,..,,,, 3828W5A3663 164D3370P330 49-40401-1 08-03JR
IMPORTANT SAFETY INSTRUCTIONS
ze ze 7e. ,q'¢ a d _ a H [i it Ill. C0 Ill
PRECAUTIONS TO AVOID POSSIBLE EXPOSURE
TO EXCESSIVE MICROWAVE ENERGY
(a) Do Not Attempt to operate this oven with the
door open since open-door operation can
result in ham/fill exposure to microwave
energy. It is important not to deteat or
tamper with tile safety interlocks.
(b} Do Not Place any object between tile oven
front tace and tile door or allow soil or cleaner
residue to accmnulate on sealing sm'thces.
(C] Do Not Operate tile oven if it is damaged. It is
particularly important that tile oven door close
properly and that there is no damage to tile:
(l) door (bent),
(9) hinges and latches (broken or loosened),
(3) door seals and sealing sm'thces.
(d) The Oven Should Not be ac!iusted or repaired
by anyone except properly qualified service
personnel.
IMPORTANT SAFETY INSTRUCTIONS
ztJztJZtLif'("a d _ a ?? [ il? ill, ( 0 lIt
A WARNING.t
To reduce the risk of burns, electric shock, fire, injury to persons,
or exposure to excessive microwave energy:
SAb 2 TY Pt 2CA UTYONS
• Read all instructions before using
this appliance. When using electrical
appliances, basic safety precautions
should be followed, including the
following:
Read and follow the specific precautions in
)3_, i_,( r,
the [ ld/,AL lY )NS TO AVOII) POSSIBLE
LXt )SLId_ 11 t_XCLSS]IT_ M1CI_OWAI,I:.
FA'Td¢GYsection on page 9.
Be sure your appliance is properly
installed _and grounded by a qualified
technician in accordance with the
proxided installation instructions.
Install or locate tiffs appliance only
in accordance with the proxided
installation instructions.
Some products such as whole eggs and
sealed containers--for example, closed
jars--are able to explode and should not
be heated in this oven. Such use of the •
oven could result in injni T.
Do not mount this appliance oxer
a sink.
• This oxen is not approxed or tested for
nlarine nse.
This oxen is UL listed tbr installation
oxer electric and gas ranges.
This oven was designed %r use over
ranges no wider than 36 inches. It may
be installed over both gas and electric
cooking equipment.
Do not operam this appliance if it has
a damaged power cord or plug, if it is
not working properly, or if it has been
damaged or dropped. If the power cord is
damaged, it must be replaced by General
Electric Service or an authorized service
agent using a power cord available from
General Electric.
As with any appliance, close superxision is
necessa U when used by children.
Use this appliance only for its intended
use as described in this manual.
• Do not use corrosixe chemicals or xapors
in this appliance.
This oxen is specifically designed to heat,
d W or cook food, and is not intended for
lal)oratot T or industrial use.
This appliance should be serviced only
by qualified service personnel. Contact
nearest authorized service facility for
examination, repair or adjustment.
Do not coxer or block any openings on
the appliance.
Do not store this appliance outdoors.
Do not use this product near water--
for example, in a wet basement, near
a swimming pool, near a sink or in
similar locations.
Kee I) power cord away flom heated
snrfaces.
Do not immerse power cord or plug
in water.
See door surface cleaning instructions in
the (;are and Cleaning of the Oxen
section of this manual.
To reduce the risk of fire in the oxen
caxitv:
- Do not overcook food. Careflflly attend
appliance when paper, plastic or other
coml)ustil)le materials are placed inside
the oven while cooking.
- Remoxe wire twist-ties and metal handles
flom paper or plastic containers 1)etbre
placing them in the oxen.
- Do not use the oxen for storage
purposes. Do not leaxe paper products,
cooking utensils or food in the oxen
when not in rise.
- If materials inside the oven ignite, kee I)
the oven door closed, turn the oven off
and disconnect the power cord, or slmt
off power at the filse or circuit breaker
panel. If the door is opened, the fire
may spread.
- Do not use the Sensor Features twice in
succession on the same food portion.
If food is undercooked after the first
countdown, use TIME COOK for
additional cooking time.
IMPORTANT SAFETY INSTRUCTIONS
WARNING.t
SAbT27"Y PI 2CA U770NS
Do not operate tile oxen without tile
oxen rack (turntable) ill place. The oxen
rack (turntable) must be unrestricted so
it call turn.
During and after use, do not touch, or
let clothing or other flammable mamrials
contact ally interior area of tile oven;
allow sufficient time for cooling first.
Do nnt store anything directly on top
of the oxen surface when the oxen is
ill operation.
Cook meat and poulu T thoroughly--
meat to at least all INTERNAL
temperature of 160°F, and poulu T to at
least an INTERNAL temperautre of 180°E
Cooking to these temperaunes usually
protects against foodborne illness.
Kee I) tile oxen flee from grease bnildup.
Potentially hot surfaces include tile
oxen door, floor, walls and oxen rack
(turntable).
ARCING
TIJE
FENT
bXN
Arcing cart occur during botlt .q)_edcooking and micmTvave cookir_g. [/ you ._e a'_ring, [)'_._ tlte
CIJ'2A R/OFF pad an d (:o_"_+ct th_ /)_vbhm.
Arcing is tile microwme term for sparks ill
the oxen. Arcing is caused by:
• Metal or foil touching the side of the
oxen.
• Foil not molded to food (upturned edges
act like antennas).
• Metal cookware used dnring either
speedcook or microwme cooking (except
for the pans proxided with the oxen).
• Tile fan will operate atttomafically under •
certain conditions (see tile Automatic Fan
section). Take care to prevent tile starting
and spreading of accidental cooking fires
while tile vent fail is ill use.
Clean tile underside of tile oxen often.
Do not allow grease to build up on the
oxen or the fan filters.
Ill tile event of a grease fire on tile
surface units below the oven, smother
a flaming pan on the surface unit by
covering tile pan complemly with a lid,
a cookie sheet or a flat tray.
• Metal, such as twist, ties, poulu y pins,
or gold-rfinmed dishes, ill the oxen.
• Recycled paper towels containing small
metal pieces being used ill tile oxen.
• Use %il only as recommended in
this guide.
Use care when cleaning tile xent t:an
filters. Corrosixe cleaning agents, such
as lye-based oxen cleaners, may damage
the filters.
X_'hen preparing flaming %ods under the
oxen, turn the xent fail on.
Never leave surface units beneath your
oven unatmnded at high heat setfi}lgs.
Boilovers cause smoking and greasy
spillovers that may ignite and spread if
tile oven vent fan is operating. To
minimize atttomatic fan operation, use
adequam sized cookware and use high
heat on surface units only when
necessary.
A WARNING/
IMPORTANT SAFETY INSTRUCTIONS
7tJTtJTtL l{"_ a d T_a 7t I i II lit. (:0 lit
FOODS
When microwaxing, place all tbods
and containers on tile glass microwaxe
tray.
Do not pop popcorn ira your o_en
unless ira a special microwme popcorn
accessol\v or unless you use popcorn
labeled for use in microwaxe o_ens.
Do not boil eggs in this oven. Pressure
will build up inside egg yolk and will
cause it to burst, possibly resulting
irainjury.
Do not operate tile oxen without food
inside. This may cause damage to the
oxen. It increases the heat around tile
magnetron and can shorten tile life of
tile o_en.
Foods with unbroken outer "skin"
such as potatoes, hot dogs, sausages,
tomatoes, apples, chicken livers and
other giblets, and egg yolks should
be pierced m allow steam to escape
during cooking.
• SUPERHEAT?ED WATER
Liqui&, .such a_ wato c@_( or lea an abb to
/w ovotwaled l)_yond ltw l)oili_g point wilhout
a/qwari_lg lo lw /)oiling. Vidble bubbling or
/)oili,g wh(', ltw (vmtai_lo" is _,mln_M,f!om ltw
mig_)wmu, ore, is'not aN_@s pms'('_lt. THIS
COUIJ) 1¢I_2SULTIN Iq_21¢Y HOT LIQUII )S
SUI)I)I_2NI_YB()IIJN(; Oiq_iR 1"_7fENTHE
CON7kL\q_R IS DLS'7Y.,_t_I_2I)OR A
St'OON OR OTHEI? U77;NSTL IS
INST_I?TI_21)L\:TD THE LIOUII).
To reduce the risk of inju U to persons:
-- Do not overheat the liquid.
-- Stir the liquid both before and halfway
through heating it.
-- Do not use straight,sided containers _ith
naITOW necks.
-- After heating, allow tile container to
stand in the microwme oxen for a short
time before removing the container.
-- Use extreme care when inserting a
spoon or other utensil into tile
container
0 7
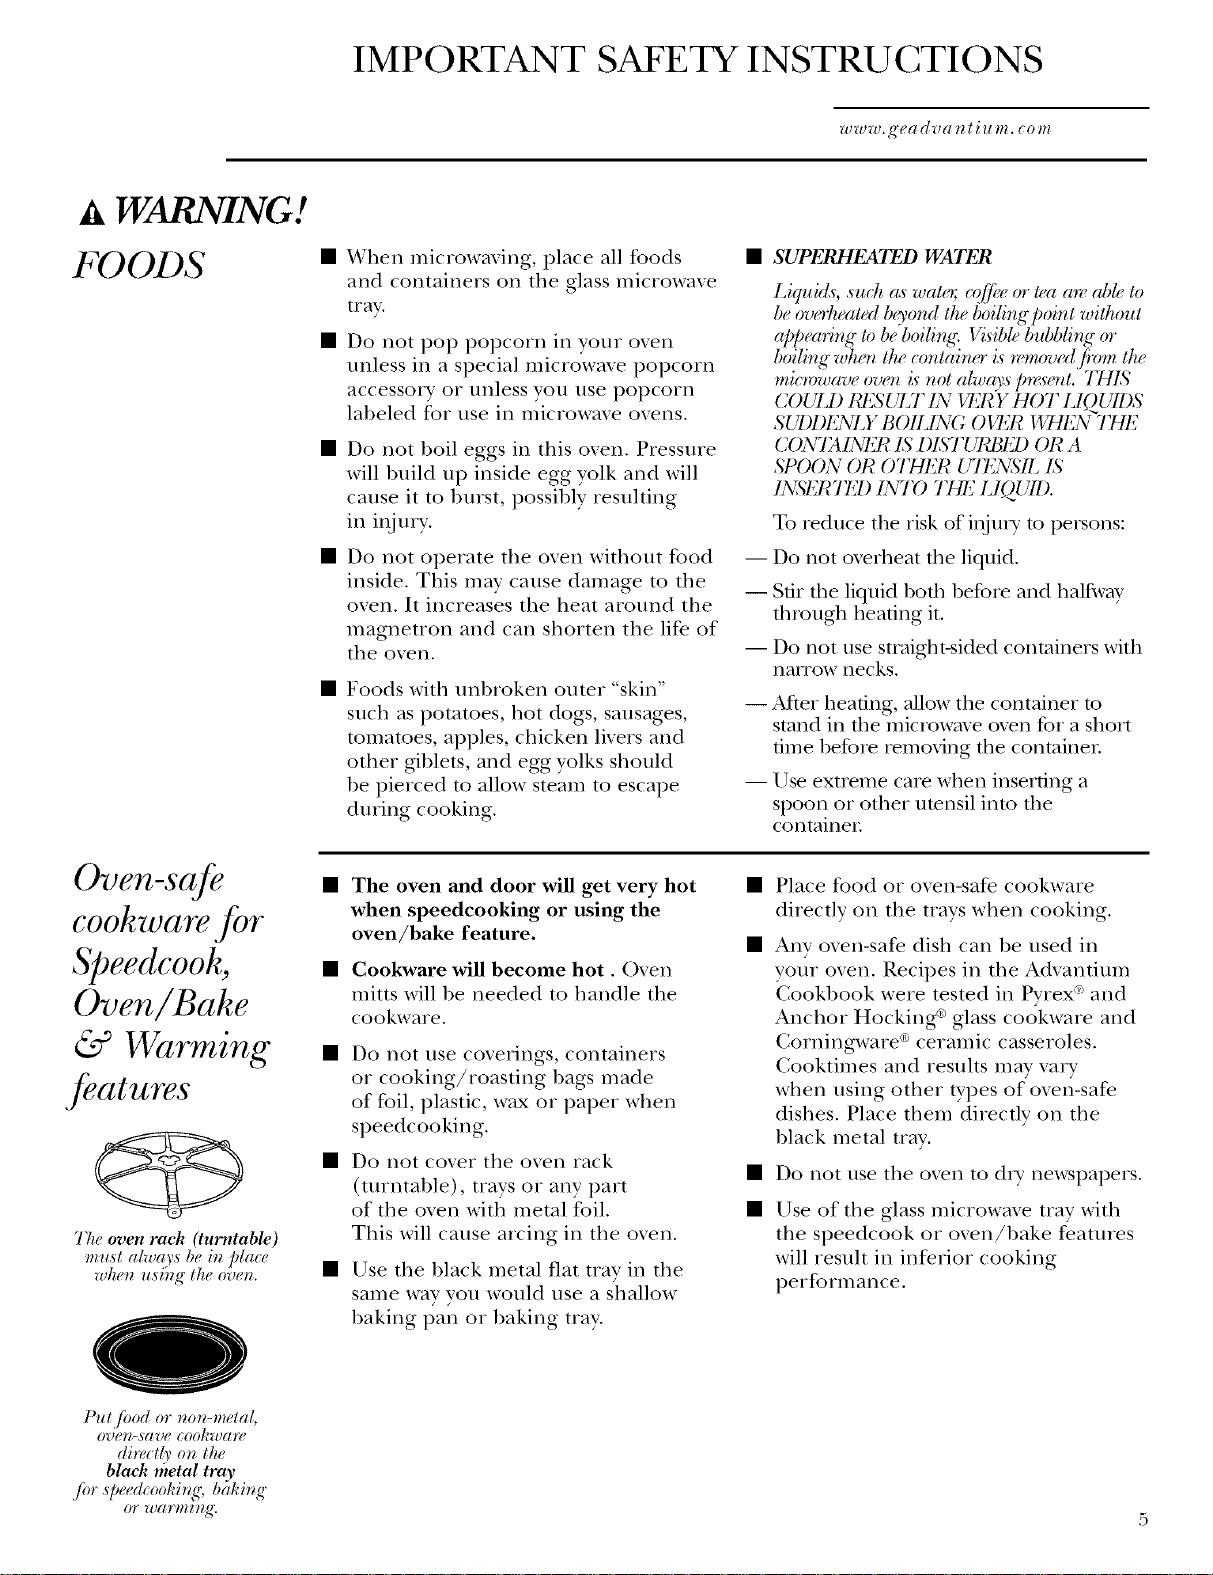
Ovgn-safg
coohware for
Speedcooh,
Oven/Babe
& Warming
features
The oven rack (turntable)
must alwa_'s be i_ place
whe_ u si_g" the ove_.
PlaJbod or ,on-metal,
over_-save cookware
directly' o_ lhe
black rhetal tray
Jbr speedcookir_g; bakir_g"
or warmz_g"
The oven and door will get very hot
when speedcooking or using the
oven/bake feature.
Cookware will become hot. Oxen
mitts will be needed to handle tile
cookware.
Do not use coverings, containers
or cooking/roasting bags made
of foil, plastic, wax or paper when
speedcooking.
Do not coxer the oxen rack
(turntable), trays or any part
of tile oxen with metal foil.
This will cause arcing in tile oxen.
Use the black metal fiat tray in tile
same way you would use a shallow
baking pan or baking tray.
Place food or oxen-safe cookware
directly on tile trays when cooking.
Any oven-safe dish can be used in
vonr oven. Recipes ira the Advantium
Cookbook were tested ira Pyrex _>and
Anchor Hocking _ glass cookware and
Corningware ¢_ceramic casseroles.
Cooktimes and results may va W
when using other types of oven-safe
dishes. Place them directly on tile
black metal tray.
Do not use tile oxen to dlT newspapers.
Use of tile glass microwave tray with
the speedcook or oven/bake features
will resuh in inferior cooking
performance.
WARNING.t
IMPORTANT SAFETY INSTRUCTIONS
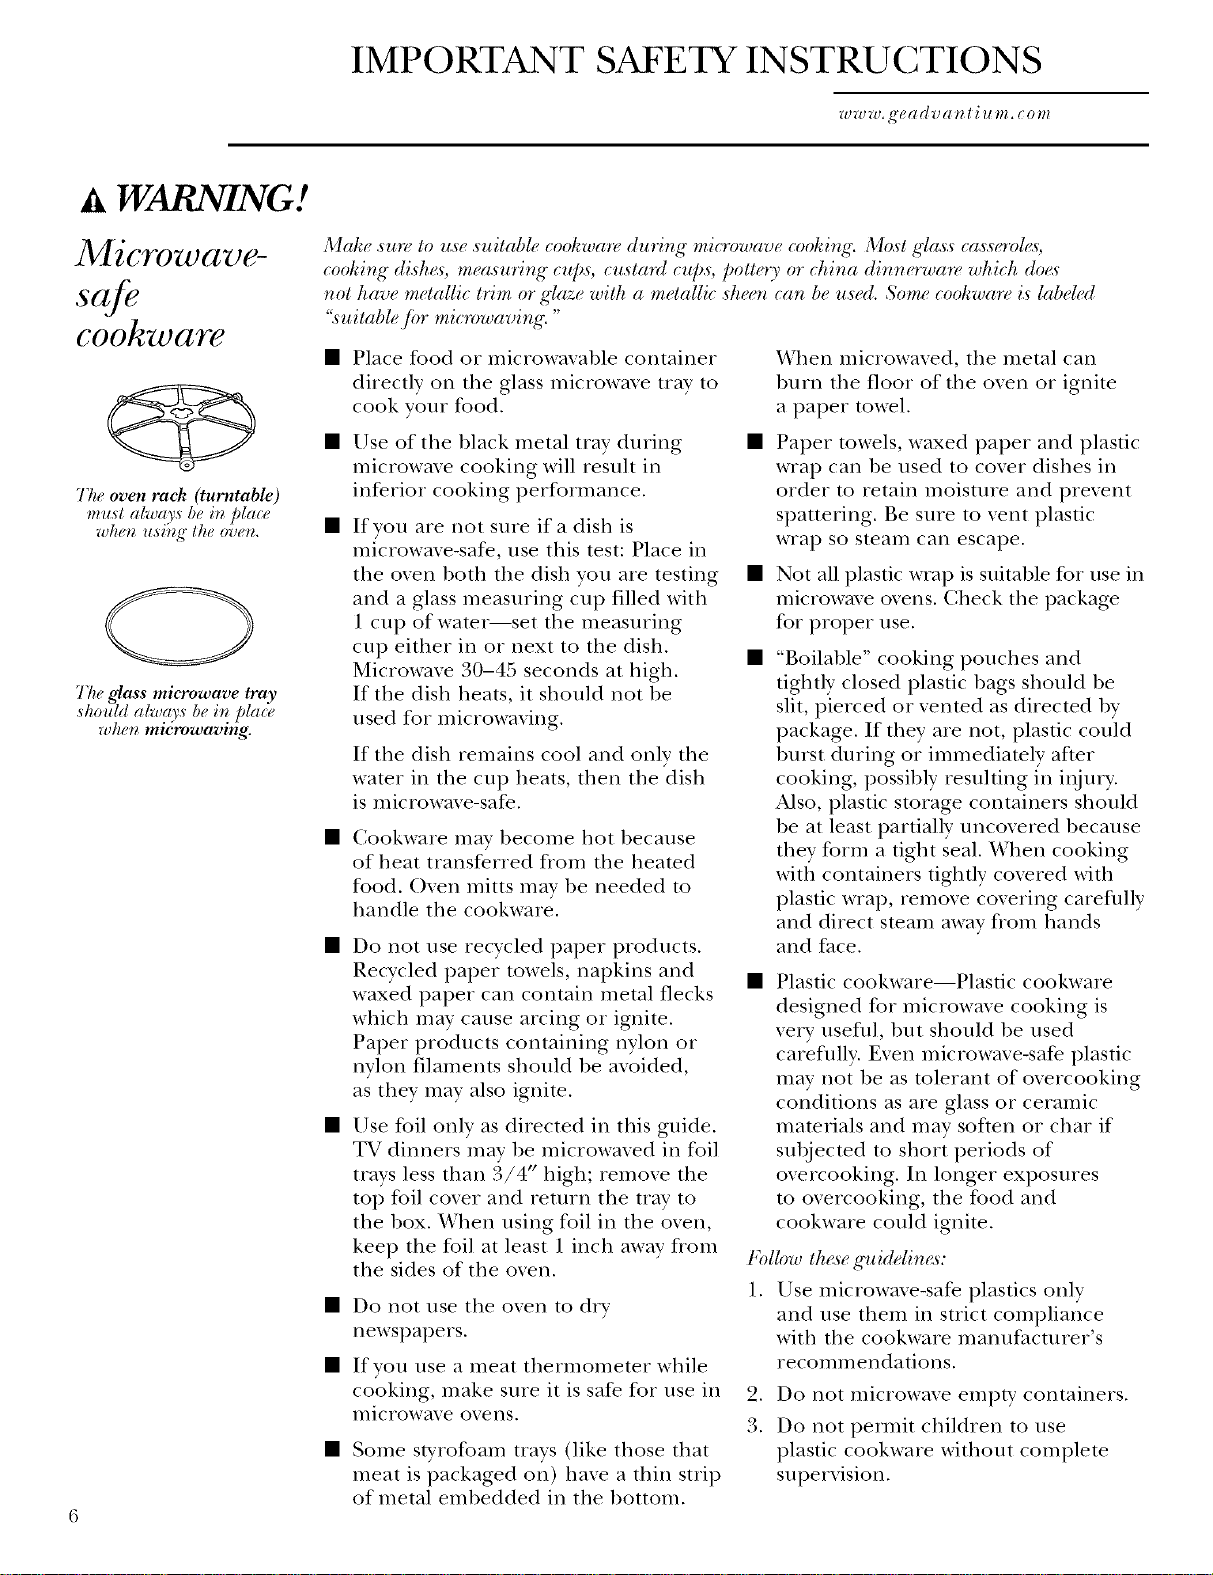
Microwave-
cookzoare
The oven rach (turntable)
must alwa_'s be i¢_place
wke_ u,si_g lke oser_.
Tke glass microwave tray
skould alwa_'s be it_ place
wker_ mi{rowaving.
Make ,_mz, to u,se,_uitable cookwa,_z_during microwave cooki_lg. Most gla,_s (-a,_eroli_;
cooking dishe_; measuring cups; cu,_ta'_d cups, pottery or china dinnerwa'_z, which doc_
not have metallic him or glaze with a metallic shee_l can be u,_ed. Some cookware is labeled
",_uitable ji_r microwaving. "
Place food or microwmable container
directly on the glass microwme tray to
cook your food.
• Use of the black metal tray during •
microwme cooking will resuh in
inferior cooking performance.
If you are not sure if a dish is
microwave-safe, use this test: Place in
tile oven both the dish you are testing
and a glass measuring cup filled with
l cup of wamr_set the measuring
cup either in or next to tile dish.
Microwave 30-45 seconds at high.
If the dish heats, it should not be
used t_r microwaving.
If tile dish remains cool and only tile
water ill the cup heats, then the dish
is microwm e-safe.
Cookware may become hot because
of heat transferred flom the heated
food. Oxen mitts may be needed to
handle the cookware.
Do not use recycled paper products.
Recycled paper towels, napkins and
waxed paper call contain metal flecks
which may cause arcing or ignite.
Paper products containing nylon or
nylon filaments should be avoided,
as they may also ignim.
Use foil only as directed ill this guide.
TV dinners may be microwaved ill foil
trays less than 3/4" high; remove the
top tbi] cover and return tile tray to
tile box. When using foil in the oven,
kee I) the foil at least 1 inch away flom
the sides of tile oven.
• Do not use the oxen to dry
newspapers.
• If yon use a meat thermometer while
cooking, make sure it is safe for use ill
lnicrowax e oxens.
Some styrofoam trays (like those that
meat is packaged on) haxe a thin strip
of metal embedded ill the bottom.
When microwaxed, tile metal can
burn tile floor of the oxen or ignite
a paper towel.
Paper towels, waxed paper and plastic
wrap call be used to covet dishes ill
order to retain moistnie and prevent
spattering. Be sure to vent plastic
wrap so steam call escape.
Not all plastic wrap is suitable for use ill
microwme oxens. Check the package
for proper use.
"Boilable" cooking pouches and
tightly closed plastic bags should be
slit, pierced or venmd as direcmd by
package. If they are not, plastic could
burst during or immediamly after
cooking, possil)ly resulting ill iIIjuI T.
Also, plastic storage containers should
be at least partially uncovered 1)ecause
they form a tight seal. When cooking
with containers tightly coxered with
plastic wrap, remove covering careflflly
and direct smam away flom hands
and face.
Plastic cookware--Plastic cookware
designed for microwave cooking is
ve_y usefifl, but should be used
carefiflly. Even microwave-safe plastic
may not be as tolerant of overcooking
conditions as are glass or ceramic
mamrials and may soften or char if
subjected to short periods of
overcooking. In longer exposures
to overcooking, tile food and
cookware could ignite.
Follow lt,<se g_uidelim<s:
1. Use microwaxe-safe plastics only
and use them ill strict compliance
with tile cookware mamlfacturer's
recommendations.
.
Do not microwave empty containers.
3.
Do not permit children to use
plastic cookware without complete
supervision.
IMPORTANT SAFETY INSTRUCTIONS
WARNING.t
SAH_27"YPt_2CA UTYONS
Z_JZ_JZ_J.,4"(_a d _ a _ I i It IlL C0 _/I
Don't deflost flozen beverages in •
narrow-necked bottles (especially
carbonamd beverages). Even if the
container is open, pressure can build
up. This can cause the container to
burst, possibly resulting in i,_jm T.
Foods cooked in liquids (such as
pasta) may tend to boil more rapidly
than foods containing less moisutre.
Should this occur, refer to the Ca'_,
arid (,'l_,a,d_lg q/ lhe ove_l section for
instructions on how to clean the
inside of the oxen.
Hot foods and steam can cause
burns. Be carefltl when opening any
containers of hot food, including
popcorn bags, cooking pouches
and boxes. To prevent possible injm T,
direct steam away flom hands
and face.
Do not oxercook potatoes. They could
dehydrate and catch fire, causing
damage to vonr oxen.
Avoid heating baby food in glass jars,
even with the lid off. Make sure all
infant food is thoroughly cooked. Stir
tBod to distribute the heat evenly. Be
carefltl to prevent scalding when
warming fornmla. The container may
feel cooler than the formula really is.
Always rest the fornmla before feeding
the baby.
Do not attempt to deep fry in the
oxen.
SAVE THESE INS TR UCTIONS
Customer Infbrmafion
www, g'eadvaut iu m, corn
lntrvduction
Prvduct
registration
Write
down the
model &
serial
n !l fl_tb_s
Congratulations! You are now part of the cooking revolution!
As part of the vision to help consumers live better, easier lives, GE Appliances introduces
the revolutionary GE Advantium oven with Speedcook technology. This new oven roasts,
grills, bakes, browns and broils, just like your conventional oven--only faster--and with
delicious results. You also save time because Advantium requires no preheating.
The information on the %llowing pages will help you operate and maintain your new
Advantium oven. _:e appreciate your purchase, and hope you will continue to rely on us
whenever you need quality appliances for your home. _A:ethank you for buying GE.
Fill out the Consumer Product Registration Card.
Two Easy Ways _b Register Your Appliance. t
• Through the internet at _v.GEAppliances.com.
• Complete and mail the enclosed Product Registration Card.
You can find them on a label, behind the
open oven door, on the flont face.
These numbers are also on the Consumer
Product Ownership Registration Card
packed separately with your oven.
Proof of the original purchase date is
needed to obtain service under the
warranty.
For future reference, please write these
numbers here:
Model Number
Serial Number
Read this
17_tan !lal
If you need
sovice
Inside you will find many helpflfl hints
on how to use and maintain your oven
properly. Just a little preventive care on
You'll find many answers to common
problems in the B_fim, You Call Fro"Sowice
section. If you review our chart of
7}oublg<shooting 7_ps first, you may not
need to call for service at all. Or, visit
the GE Appliances website at
xx,ww.GEApplia nces.c ore.
your part can save you a great deal of time
and money over the lifb of vonr oven.
If you do need service, you can relax
knowing help is only a phone call away.
A list of toll-flee customer service numbers
is included in the back section.
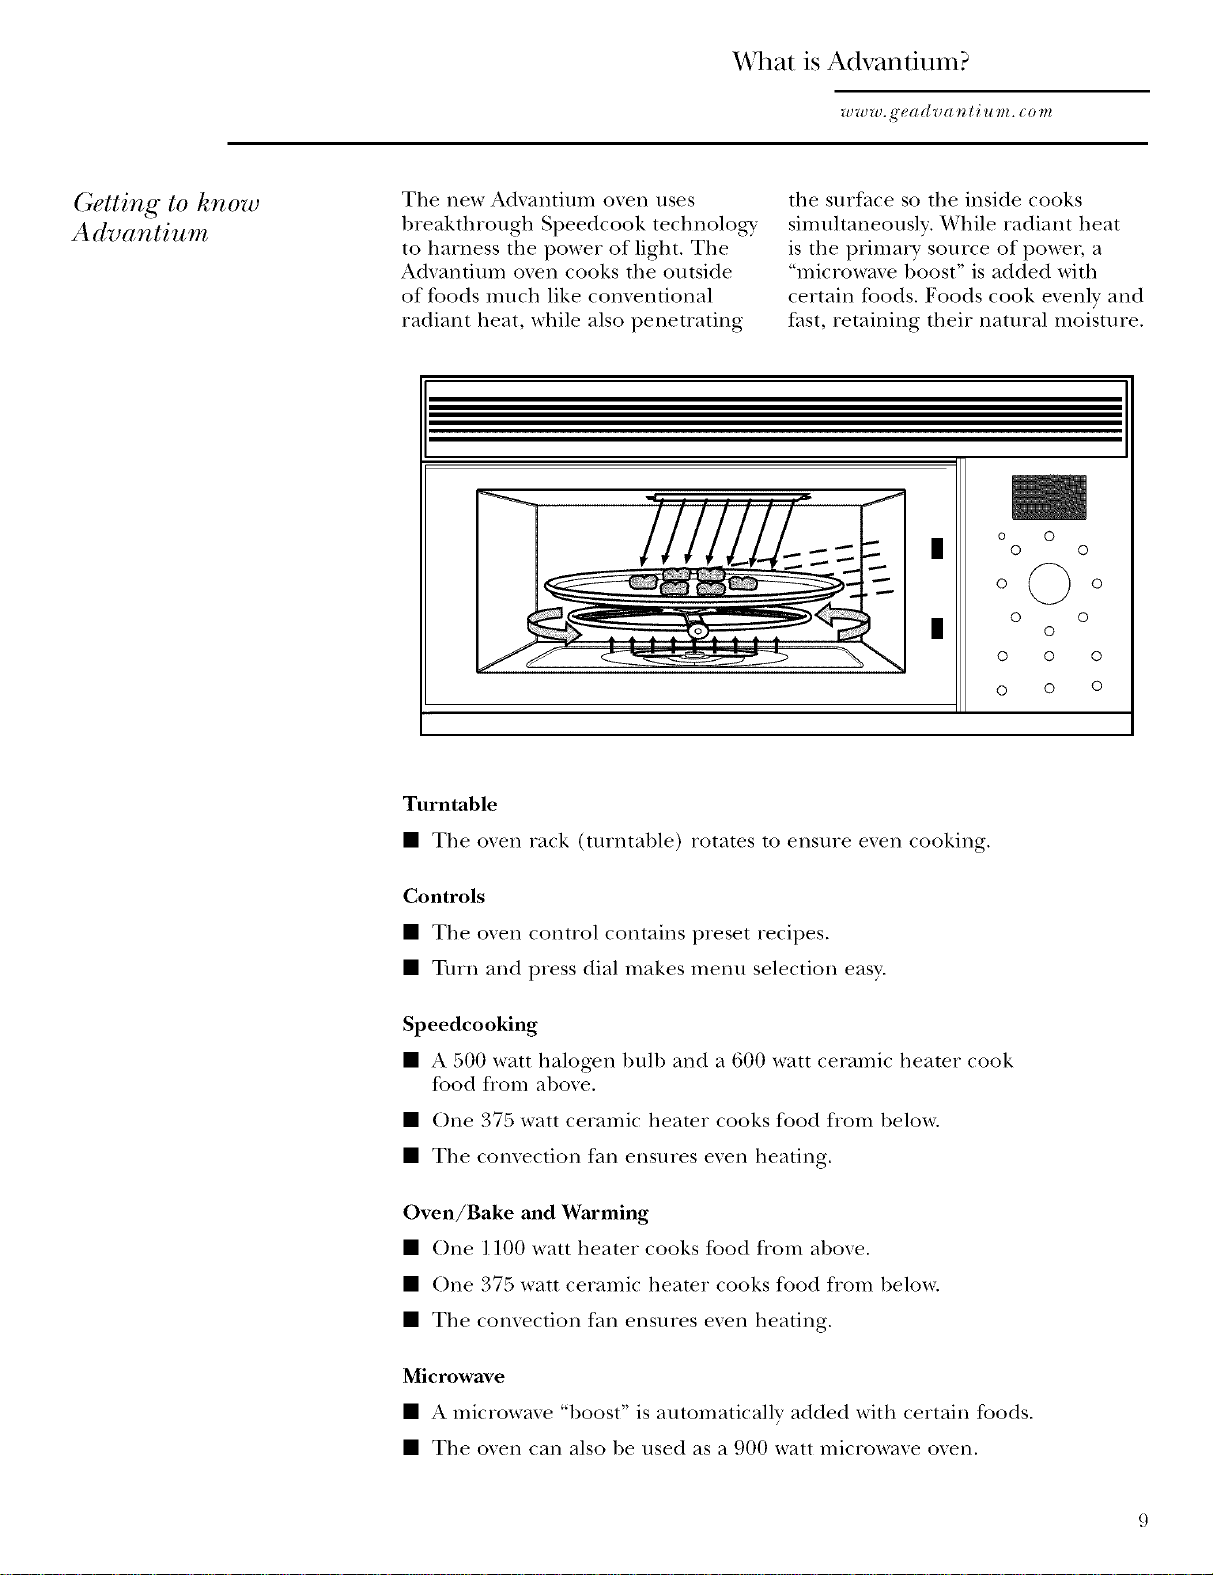
¼qhat is Advantium?
7_J7_J7_J.g"t_tl ([ _;tl _ [ _ II 172. C0 _?_
Getting to know
Advantium
Tile new Adxantium oxen uses
breakthrough Speedcook technolog-y
to harness tile power of light. The
Adxantium oven cooks tile outside
of foods much like comentional
radiant heat, while also penetrating
tile surface so the inside cooks
simuhaneouslv. While radiant heat
is the primm T source of power, a
"microwme boost" is added with
certain foods. Foods cook exenly and
fast, retaining their natural moisture.
o 0
1
_,_
1
0 0
o@o
© ©
©
© © ©
o 0 0
Turntable
• The oxen rack (turntable) rotates to ensure exen cooking.
Controls
• The oxen control contains preset recipes.
• Turn and press dial makes menu selection easy.
Speedcooking
• A 500 watt halogen bull) and a 600 watt ceramic heater cook
food flom above.
• One 375 watt ceramic heater cooks food flom below.
• The convection fan ensures even heating.
Oven/Bake and Warming
• ()he ] 100 watt heater cooks food from aboxe.
• One 37a x_att ceramic heater cooks food from below.
7
• The comection fall ensures exen heating.
Microwave
• A microwme "boost" is automatically added with certain foods.
• The oxen can also be used as a 900 watt microwaxe oxen.
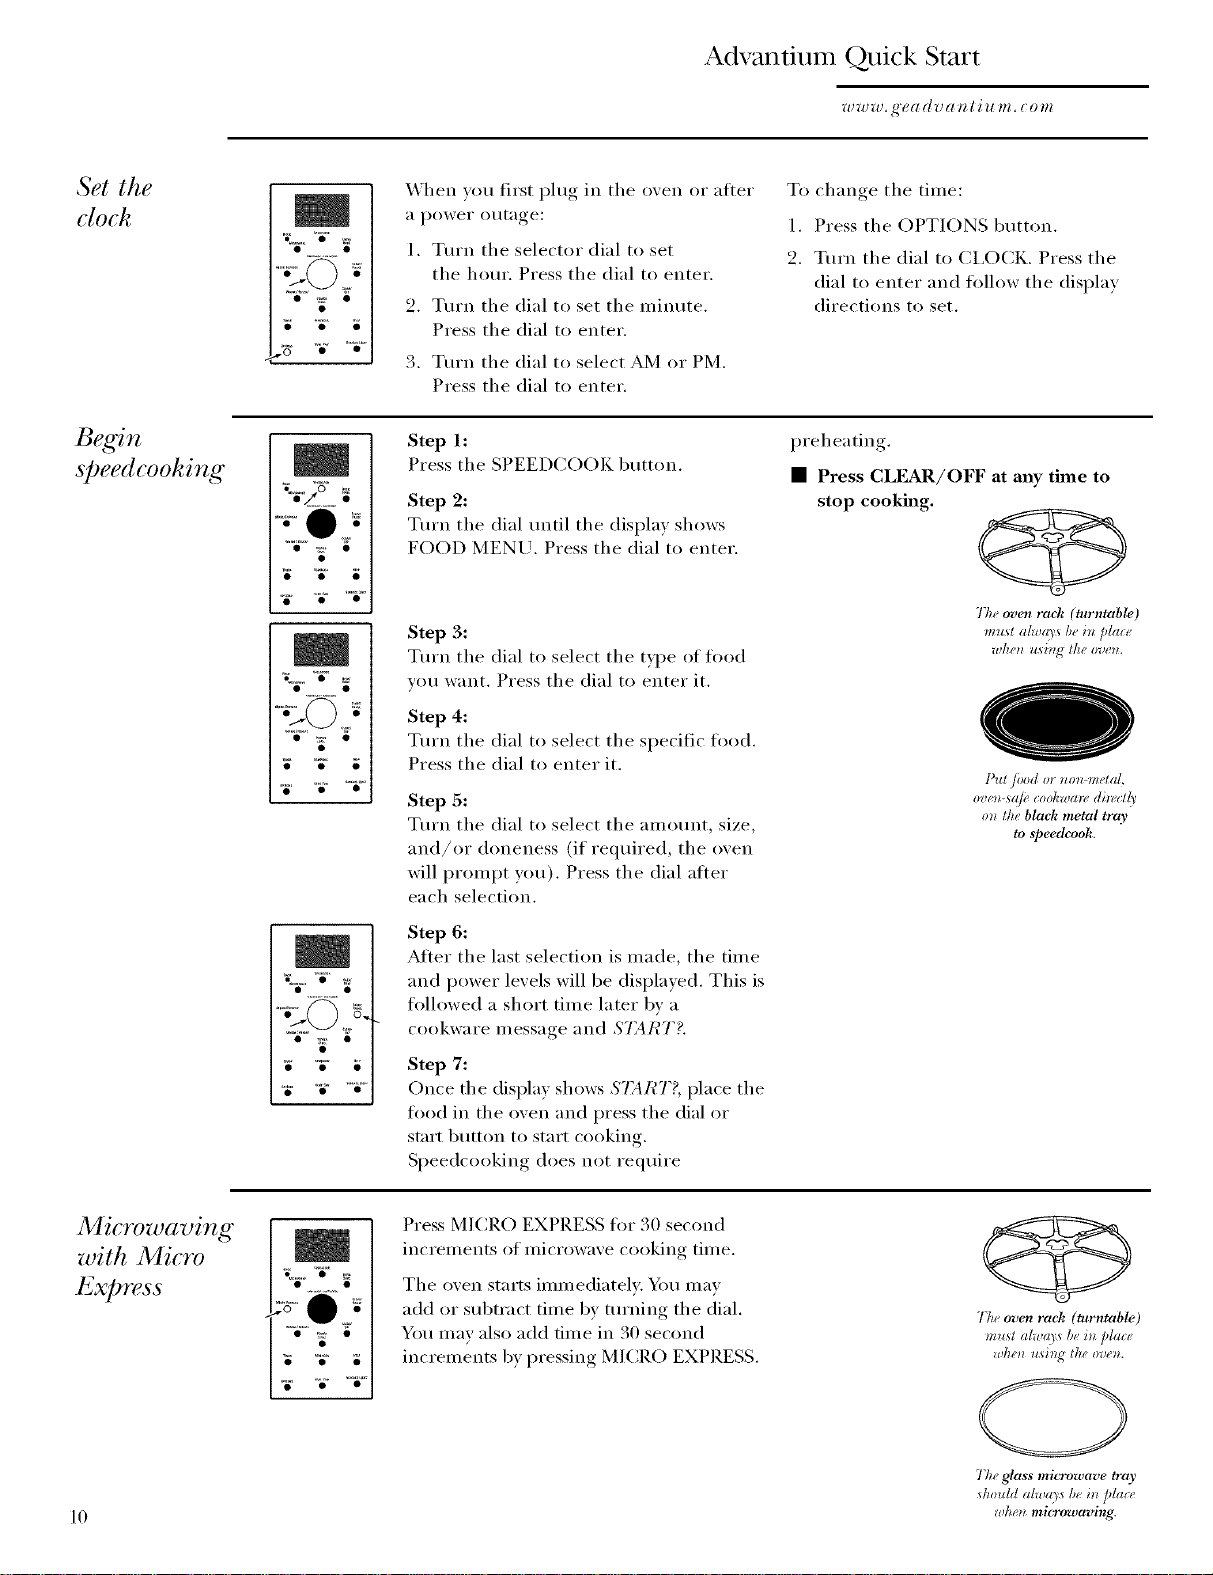
Advantium Quick Start
Set the
clock
speedcoohing
• -g •
m
°i¢ "F"
• g •
When you first plug in the oven or after
a power o/Itage:
1. Turn the selector dial to set
the hour. Press the dial to enter.
2. Turn the dial to set the minute.
Press the dial to enter.
3. Turn the dial to select AM or PM.
Press the dial to enter.
Step h
Press the SPEEDCOOK button.
Step 2:
Tm'n the dial tmtil the displa) shows
FOOD MENU, Press the dial to enter,
Step 3:
Turn the dial to select the t)])e of food
you want. Press the dial to enter it.
Step 4:
Turn the dial to select the specific food.
Press the dial to enter it.
Step 5:
Turn the dial to select the amount, size,
and/or doneness (if required, the oven
will prompt you). Press the dial atier
each selection,
To change the time:
1. Press the OPTIONS button.
2. Turn the dial to CI,OCK. Press the
dial to enter and follow the display
directions to set.
preheating.
• Press CLEAR/OFF at any thne to
stop cooking.
The oven rack (turntable)
must (tlw(o's be in place,
rt,fl#_ u_b_g Ihe oven.
Put/hod ornon metal,
ova,n-sail coohwa_*, di_*,ctly
on lke black metal trr(},
to speedcook.
Microwaving
with Micro
Express
10
• _o'•
Step 6:
After the last selection is made, the time
and power levels will be displayed. This is
tollowed a short time later by a
cookware nlessage and $7_41¢T?.
Step 7:
Once the display shows $7_ HT?, place the
tood in the oven and press the dial or
start button to start cooking.
Speedcooking does not require
Press MICRO EXPRESS fin" 30 second
increments of microwave cooking time.
The oven starts imm ediateh'. Ybu may
add or subtract time by turning the dial.
You may also add time in 30 second
increments by pressing MICRO EXPRESS.
77woven rack (turntable)
must alwm s.bein place,
wtl('ll using the, oven.
The glass microwave tray
should alwa3s b+i_ Sac+
wlu n mi_owaving.
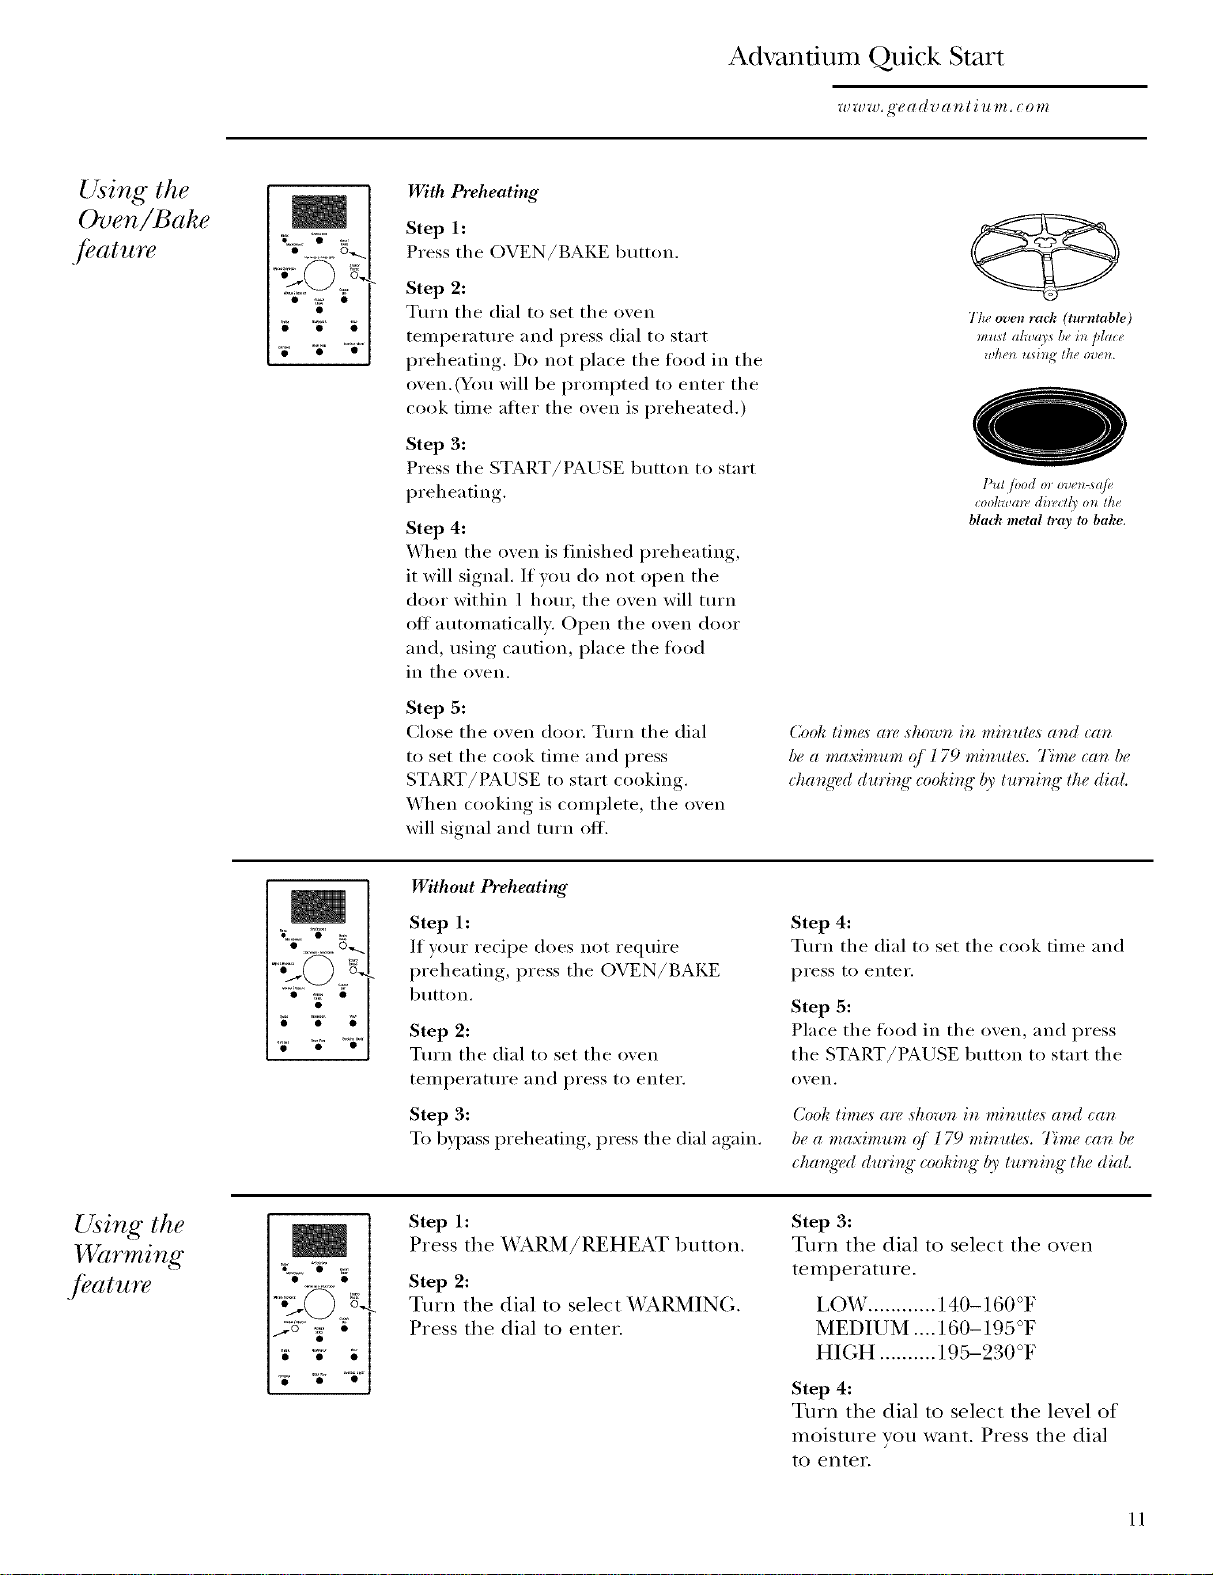
Advantium Quick Start
7e 7e _e, g'¢ a d _ a _ I i It _IL e o _l_
Using the
Oven/Bake
f#gltztre
• 0
o_ o
With Preheating
Step 1:
Press tile OVEN/BAKE button.
Step 2:
Turn tile dial to set tile oven
temperature and press dial to start
preheating. Do not place the fi)od in the
oven.(You will be prompted to enter tile
cook time atter the oven is preheated.)
Step 3:
Press tile START/E_USE button to start
I) re h ea ti n ,g.
Step 4:
When tile oven is finished preheating,
it will signal. If wm do not open the
door within 1 horn', tile oven will turn
off automatically. Open the oven door
and, using caution, place tile fired
in the oven.
Step 5:
Close tile oven door. Turn tile dial
to set tile cook time and press
START/PAUSE to start cooking.
When cooking is complete, the oven
will signal and turn off.
7'tit oven rack (turntable)
must alwa3 s be in pla_ ¢,
wtl#llusing the,oven.
Pu¢/ood m oven *q/,
cookwaw diwcll) on the
bla(:k metal tray to bake.
Cook limes are shown in minules and can
be a maximum (?/179 minute,_. Time can be
ehanwd during" cooking" by turning" the dial.
Using the
VVarming
./# (i t_ r(?
°"_" o
g 'W 'q¢'_
Without Preheating
Step 1:
If wmr recipe does not require
preheating, press tile OVEN/BAKE
button.
Step 2:
Turn tile dial to set tile oven
teillperattlYe and press to enter.
Step 3:
To bypass preheating, press tile dial again.
Step 1:
Press the WARM/REHEAT button.
Step 2:
Turn tim dial to select WARMING.
Press the dial to enter.
Step 4:
Turn tile dial to set tile cook time and
press to enter.
Step 5:
Place tile fi>od in tile oven, and press
tile START/PAUSE button to start tile
o_en.
( ook limes a*v shown in minules and can
be a maxinmm o/ 179 minule,s. 7"ime can be
_ hang'ed during" _ooking" by lurning lhe dial.
Step 3:
Turn the dial to select the over]
temperature.
L()_4' ............ 140-160°F
MEDIUM .... 160-195°F
HIGH .......... 195-930 OF
Step 4:
Turn the dial to select the level of
moisture you want. Press the dial
to enter.
11
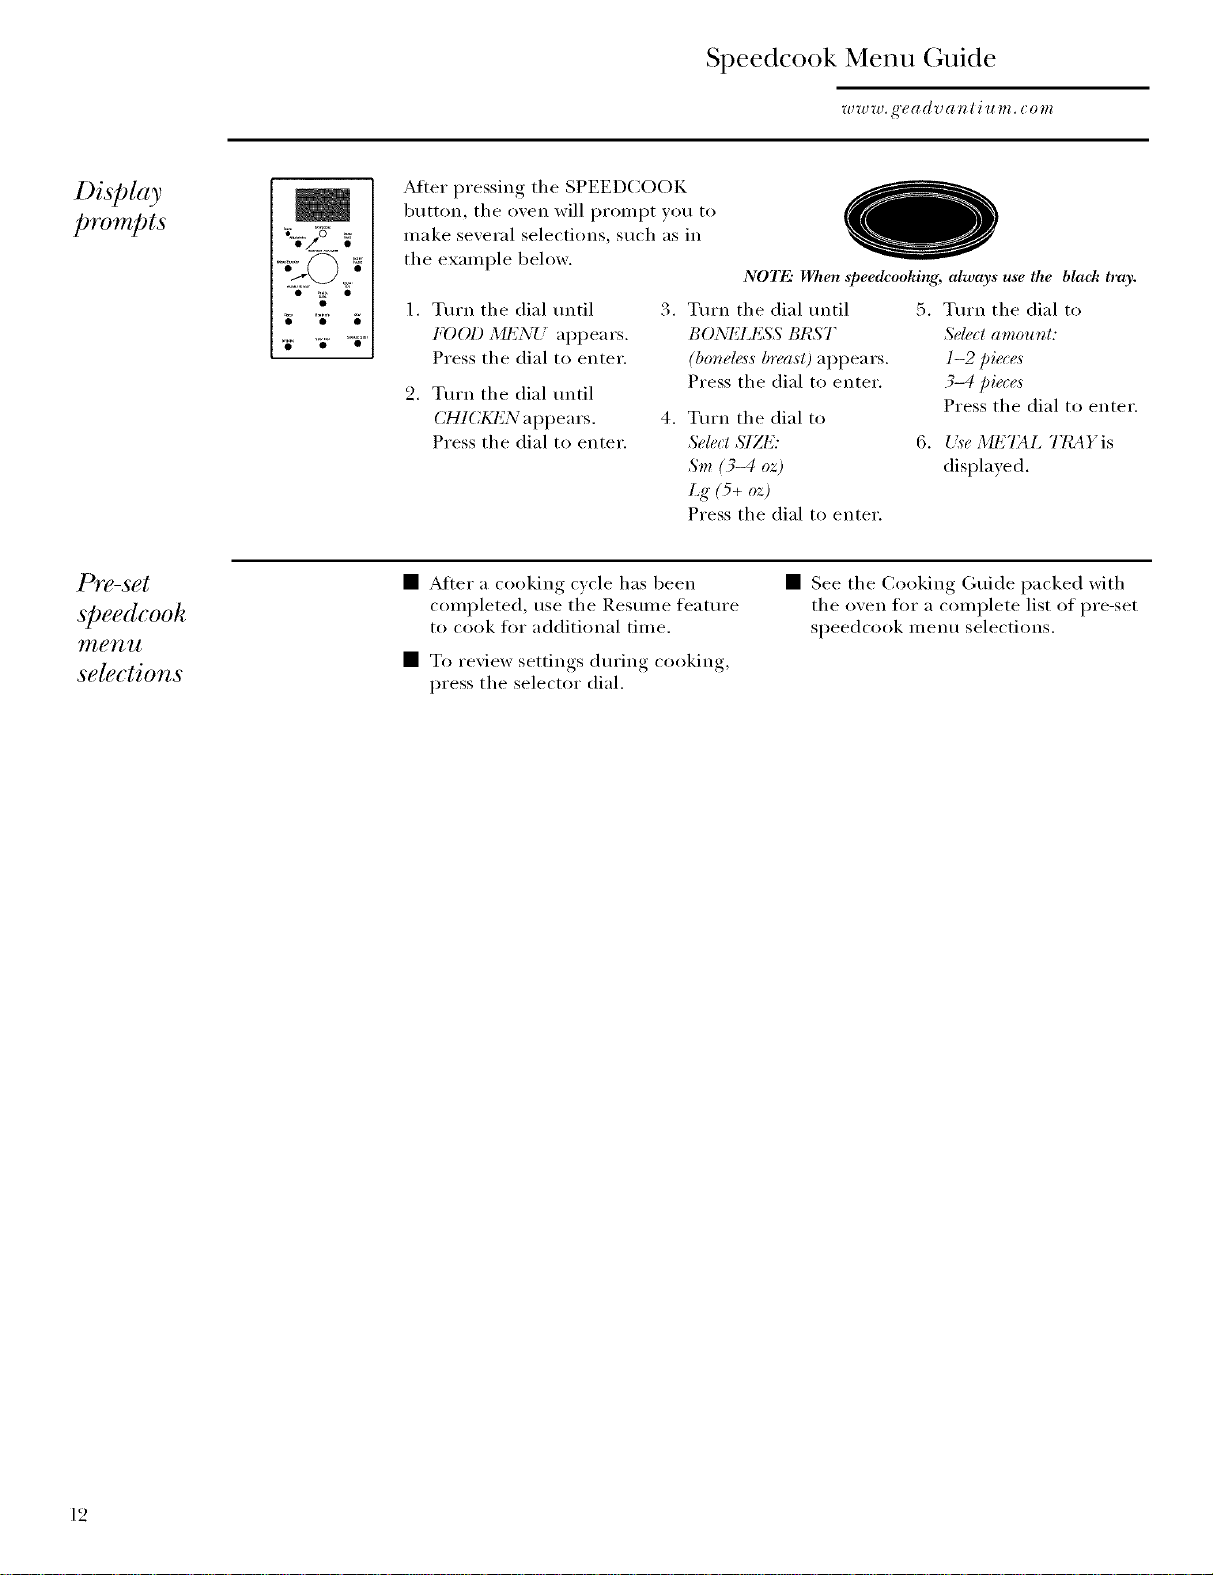
Speedcoo Menu Gmde
k _ "
Display
prompts
PI'g?-sgt
speedcook
Yl'lgTl gt
selections
%v/_
Atter pressing the SPEEDCOOK
button, the oven will womi)t you to
make several selections, such as in
the example below.
1. Turn the dial tmtil
FOOl) MENU ai)i)ears.
Press the dial to enter.
2. Turn the dial tmtil
CHICKl_N appears.
Press the dial to enter.
3. Tm'n the dial tmtil
BONI_LESS BHST
(bonele,s,sbrea,sO appears.
Press the dial to enter.
4. Tm'n the dial to
Select MZE:
Sm (3-4 oz)
/g" (5+ oz)
Press the dial to enter.
• _Mter a cooking o'cle has been
completed, use the Resmne feature
to cook for additional time.
• To rexiew settings during cooking,
press the selector dial.
NOTE."When speedcoohing, always use the black tra),.
5. Tm'n the dial to
_'t'[¢¢gt rl_lZOlllgl:
1-2/)iaes
7_<tpie( e,s
Press the dial to enter.
6. U,seMETAL THAYis
displayed.
• See the Cooking Guide packed with
the oven for a complete list of pre-set
speedcook menu selections.
12
Oven Features
o 0 @
{}
m
J
_,:_,:w. g'eadz_an Ii _gm. c0m
0
0
@
0
Oven Rack (7)l_w, table)
The oven rack (turntable) must
always be in place, on the oven
floor, for all cooking. Be sure the
oven rack (turntable) is seated
securely over the hub in the center
of the oven.
Black Metal 7}'ay/Baking Sheet
Put food or appropriate cookware
directly on the black metal tray and
place on the oven rack(turntable)
when using the speedcook,
oven/bake or warming features.
Glass Mic_vwave 7)'ay
Center the tray on the oven rack
(turntable) when using the microwave
features. The tray will not lock
Ohm the cenmr hub. Place food or
microwave-safe cookware directly on
the tray.
L_per Heaters
Operate when using the speedcook,
oxen/bake or warming features.
Window
Allows food to be xiewed while
keeping microwaxes confined in
the oxen.
0
l o o© ©
1 o oo
o o o
o o o
Door Handle
Pull to open the door. The door
nmst be securely latched for the
oven to operate.
Door Latches
l,}nt Fan
Press the VENT FAN button to
remoxe steam and other xapors
flom surface cooking.
Lower Ceramic Heater
Operates when using the speedcook,
oven/bake or warming features.
Cookt@ Light
Press the SURFACE LIGHT button to
turn the cooktop light on and off'.
Control Panel
The buttons used to operate the oxen
are located on the control panel.
Hub
The hub turns the oxen rack. Make
sure the hub is always firmly in place
in the bottom of the oven.
0
13
Overl Features
Cooking
controls
With your Adva*_tium overl, you ca*_cook with high-irm_nsity hal%_erzligllts, ceramic heate_:_
and/or (onverl.tional mi('mwave energy.
SPEEDCOOK
Press this button to access the speedcook
menu or to set your own speedcook
program. Press and hold %r 3 seconds to
repeat the last cooking selection.
SELECTOR DIAL-7)_rn to sd_.ct, Push to e_m.r
First turn then press the dial to make
selections. Also use the dial to increase
_ACK _PEEO00OK
• • OVEN,
MICROWAVE BAKE
(turn clockwise) or decrease (turn
counterclockwise) cooking times or
temperatures.
MICROEXPRESS
START/
PAUSE
START/PA USE
Press this 1)utton to start or pause any
cooking flmction.
CLEAR/OH,"
Press this button to cancel ALL oven
WARM ! REHEAT OFF
• POWER •
LEVEr
CtEAR/
programs except the clock, auto night light,
timer and reminden
TIMER REMINDER HELP
POWER LEVEL
Press this button and turn/press the
selector dial to chang_ the speedcook or
OPTIONS VENT FAN SURFACE LIGHT
microwave power levels, or the oven/bake
temperature before and during cooking.
7IMER
Press this 1)utton to set the minute timer.
MICROWAVE
Press this button to access the microwme
nlenn or to set yonr o_vn lnicrowa'_e
program.
MICRO EXPRESS
Press for 30 seconds of microwave cooking
time. Each time the button is pressed adds
an additional 30 seconds to the remaining
cooking time. The oven starts immediately.
BACK
On certain features, press this button to
return to the prmious step.
OVEN/BAKE
Press this 1)utton to bake foods using
comentional oxen cooking.
VENT FAN
Press this 1)utton to remme steam and
other xapors fiom surface cooking.
REMINDER
Can be used like an alarm clock and can be
used at any time, exen when the oxen is
operating. It can be set to beep at a certain
time, up to 24 honrs later.
OPJIIONS
Press this button to set the Clock and access
the Beeper Volume, Clock Display ON/OFIb;
Display So'oil Speed, Delayed Start and Night
Light features.
HELP
Press this button to find out more about
VO/lr oxen's featnres.
WARM/REHEAT
Press this button to operate the warming
and reheating features. Kee I) hot, cooked
tbods at serving temperature, or reheat
SURFACE LIGHT
Press this button to turn the cooktop light
on and off.
servings of previously cooked foods.
14
Speedcooking
Using
speedcooh
features
7b use a
pre-set
speedcooh
_t_eTFll
CAUTION: When usqng speedcook programs, remember that the oven, door and
dishes will be veo_ hot!
[5ior to tke first use q/your oven ttu clock must be set. &_ ttu Advantium Quick
Sta'_t .s_ction.
Be/i,_ you begin, make ,su_ eke oven rack (turntable) is in place.
Us_ el, black m_tal tray (baking ._tuet), at all tim(a_wker_ .q),_dcookir_g.
77u oven retch (turntable) must always
be i_t [dace wken usi_g the overt.
Advantium is ahea@ p_v-set to cook over
1O0popular dishes.
1. Press the speedcook button.
1/ no .selection i.smade within
l5 .secon&; the display will rz,vert
_"
back to the time of day.
2. Turn the selector dial to FOOD
MENU. Press the dial to enter.
3. Turn the selector dial to select the
type of food categ_iy you want.
Press the dial to enter.
4. Turn the selector dial to select the
specific food (menu selection).
Press the dial to enten
5. Turn the selector dial m select
amount, size and/or doneness
(if required, the oven will prompt
yon.) Press the dial after each
selection.
lha ibod orm.z-.z_m[, ov_>_q/,
coohwal_ (til_cll3 ()Ittin blad_ metal
trro,,to speedcook.
6. Once the display shows:
STAI¢T? either press start or the
selector dial to start cooking.
For cereal, jbods_, turu the jbod over whr,_
lbe oven sig_a£ TUI?N FOOl) OVER.
tS_s:_S7_RT to r_sume cooki,g.
For cr,'lain./bods_, the ore, will ,sig',al
(;HECK/br D();\q:,_\q:\%',. Cbeck to ,seei/
Nejbod i.s done to your" liki,g. 73e oven
will continue to cook jbr several minute, s.
Take thejbod out wh(m it is done to your
liki,g.
7b review .settings du',Jng cooking;
p_z<s.sthe ._elector dial.
{/you e,t_, an undr_si'_vdself'orion at arO,
tim_, simply p'r_s:sthe BACK button to
rvtur, to the pr(q_ious ._tep, or p_z<_'sthe
CLI_AI¢/OFF button and r*'-entcr lbe
d*<dr*'d.selections.
• Earl? in a ,q)eedcook p'mgram, you will
.seeOtUTMIZL\:(; COOK TIME i,_ the
di.qday. 77_eov(,n automatically .s(,n.s(_s
lbe electr{cal voltagv, l(q_el in ),our home
and adjusts the co&ing time up or"
down jot proper cooking.
• [/the door is o/)e,_ du'*Jng cooki,g,
the ore, will stop and t_ALZS'I_2will
appear in the di.qday. Close the door
and pr(<s:_the START/PAUSE button
to r>_ume cooking.
• At aro,time during cooki,g you can
turw the sel_,ctor dial to change the
co&ing time. gou can cbar_g(, powo
leve£ by p'_za_:si,gPOVVER i ,EVEI,.
• 7b as.stay consi.s'te, t cooki.g _z_s'ulls,
the oven may rvduce powo leveL, {/ the
ow,, is hot at lbe beginning q/ a
pr.g_ram.
• At the e.d ((odd.g, tbe automatic
.fiw may conti, ue to ru, jbr a ,short
time to cool int_,',al compom',ls.
• 7b (wokjbr additional time ({rio" a
cooking (ycl_"has bee. compld_'d,
use the ,_<_ume,f!,atu'_z,.
15

Speedcooking
Cooking rids
jbr ,great
tasting results
7b (nsu*z_eonsi._tent and even browning
wtur_ (ooki,_gjbods dbz_ctly on lk_ blad_
nutal tray a.rrang_ jhod as skown below.
Circular pa(ler_
(Example." biscuits, cookie_, meal_)
Singlela3er
&2xa.!ple:appetiae_:O
Foods can touch but shouM not overlap.
Spokepalt(_n_
(Example:cr('_ce_l(_vlL_,br('adslicks)
Repeat last
"iZ_o,.a
• g •
"i °g' _1
?.
Fm_k meat ekieken .fisk or seqf!)od tkat kas been.f!vzen skould be thawed befi_re
cooking (tke mioowave dqf!,**tji_atu,_ can be used). For otke,.f!,,zer,, p,_J,admg,d
.f!_ods jollow packag_ dir_(tions.
{Aethis time savingfl_alu'_</_wcooking
"_z,petitiveitems like (ooki(<_or appetize_:_.
I. Press and hold the SPEEDCOOK
1)utton {or al)out 3 seconds.
2. The last pre-set %od will
be displayed.
I.
If your food needs to cook a bit
longer, you can restart the oxen
by pressing the START 1)utton
or selector dial.
.
I?LS{ _ IL COOKING will be
displayed and the oxen will
restart immediately at 10%
of the original time.
NOTE: 77,_ last program used is ,sto_z_d
./i,r two kou'_:s.
3. Press the START/PAUSE button or
the selector dial to start cooking.
The program stays in memoty tbr
3 minums. After that you will need
to begin the program again. See
7b u._ea p_z,-sets/wed(ool" m_'r_u.
16

Speedcooking
_V_V_V.g7¢ tl d "g_tl _; I i II I?l .C0 I?_
Speedcooh
power level
Advantium uses power flom a
high intensity halogen light, ceramic
heaters, and microwaves to cook
food flom the rap, bottom, and
inmrior simultaneously to seal ira
n_oistnre and flavor.
When using the pre-set speedcook
recipes on the food menu, the power
levels are already selecmd for you.
However, these power levels can be
adjusted before or during cooking.
Also, the manual cook feature allows
you to speedcook items not on the
we-set food menu by selecting your
own cook time and power level
settings.
Each power lmel gkes you heater
power and microwaxe energ T %r a
certain percentage of the time.
UPPEI? POI'_7_R (U) controls both the
upper heater and microwave power.
A higher UPPEI? tY)t+7?I? setting will
utilize more upper heater power,
browning food faster on top. A lower
Ut'PEI? PODJ_R setting utilizes more
microwave power, causing food to
cook more evenly throughout. Select
a higher setting for foods such as
pizza and baked goods. Select a
lower setting for foods such as
casseroles, meat and fish.
. Press the SPEEDCOOK button
and turn the dial to select FOOD
MENU or MANUAL COOK. Press
the dial to enter.
2. Follow instructions flom 7b u.s_
a pre-._t sp_ed(ooh m_r_u or Man ual
Cooh.
).
To change the power lexel when
prompted by the display, turn the
dial clockwise to increase or
counterclockwise to decrease the
upper power lmel. Press the dial
to enter.
4. Turn the dial to change the lower
power lmel. Press the dial to
enter.
5. Press the START/PAUSE button
or the selector dial to start
cooking.
/,/'you do not wa*zt to ctm*zg_ or_ q/the
.s_tlings ,iust/)'*_s.s' th_ dial to move to ttu
next ,sdegtion.
NOTE: Be (:a'_J)d when a((]u.stirlg power
levels so tirol you do not ove_ or
urlde_ ooh jood.
LOI'_7_R POI'_7_R (L) controls the
lower heater. Select a higher setting
to brown foods more on the bottom.
Select a lower setting for less
browning on the bottom.
17

Speedcooking
www.g'ea dva*_li um. com
Speedcooh
€OOk_U(IFP
• Follow cookwa_ .suggr<s'tior_.son tke
oven displa3! or in tke Cookbook or
Cooldng Guide.
• Cookwa'_ will become kot. (h_en mitl:_
will be needed Io kar_dle Ike coohwa'_.
• Placejbod or oven-sqf!_ cookware
db_ctly or_Ike black Iray wken
(ool_ing.
U_e tke black metal tray in the .same
way you would use a ._hallow bakirl.g
pa,_ or bakir_g Iray.
l_l addition lo the cookware provided,
yo,i can *IS(" HOH-)}_()I(ll ((l,q, sg*)D[( _
dishes_, pie plates and other heal-s@"
cookwm_'. Place them db_,ctly on the
black metal tray.
Be .su,_ to ._dect a siz_ lkal will
,r_IaI_ easily.
[qace lke black m(tal tray di'_zctly on
Ike over_ rack (tur,mlble).
• l)o not u._ecookwa'*v or coverings
made q/pa[)e_ plaslic orji_il wken
cooking durir_g a .q)eedcook O_de.
• 77,_ black metal tray must be in place
durirlg tk e speedcook _,berations.
Marzual
speedcooh
_o- "ii" '%=
Adxantium gixes you the flexibiliw to
cook your fmorite dishes.
If you want to cook a food item that
is not among the pre-set selections,
use manual speedcook.
I. Press the SPEEDCOOK button.
.(f no entrie,s are made witkir_, 15 secor_&
lke dLqday will ,weft back to the time
(J"day.
2. Turn the selector dial to
MANUAL COOK.
3. Turn the selector dial to select the
cooking time. Press the dial to
enter.
77u display will prompt you to sd,:t
(:[ [LR [ )I1!Lt_ arid LOI:I/7_2R
PODT_R.
, Turn the dial clockwise to increase
or counterclockwise to decrease
the upper power lmel. Press the
dial to enter.
,
Turn the dial to change the lower
power lexel. Press the dial to enter.
6.
Press the START/PAUSE
1)utton or press the selector
dial to start cooking.
For power l(q_eland cooking tim(
.su_*g_s'tior_s',u.s'(your cooking guid(
or cook book.
18

Speedcooking
Speedcooh
recipe--to
enter and
s(l_Te
• _o_o_
Create up to 30 of your own
Speedcook recipes, or customize
an existing custom recipe to suit
your tastes. Once it's done, your
food cooks just the way you want it
every time!
1. Press tile SPEEDCOOKbutton.
2. Turn the dial until MY IHg/;H_ES
appears. Press the dial to enter.
3. Turn the dial until <emph,>
appears. Press the dial to enter.
4. SELECT COOK TIME app_,a'_:_.
Turn the dial to select the
cooking time. Press the dial to
enter
77_edisplay will prompt you to sdect
r)); )( ,_?
{:[_t_I.R [ )I1iI.R and LOI:I/J_R POI'I/J_R.
5. Turn the dial clockwise to
increase or counterclockwise to
decrease the upper power lexel.
Press the dial to enter.
6. Turn the dial to change the lower
power lexel. Press the dial to enter.
.
Spell out the food name by
turning the selector dial to
advance through the available
characters. Press the dial to enter
a characmn When you have
entered the entire name, press
START/PAUSE. You may change
previously enmred characmrs by
pressing the BACK button.
.
IHiC1PIi ADI)EI) appears. To begin
cooking, press the START/
PAUSE button. To store the
recipe without cooking, press
the CI,EAR/()FF button.
For power levd a,_d cooking time
.su_g_s'tior_s',use your (ookir_g gmide
or cook book.
Speedcooh
recipe--to
.find and use
_a._
To find and use stored custom
speedcook recipes:
1. Press the SPEEDCOOKbutton.
2. Turn dial to MY ICF.CHq_Sand
press to enter.
3. FOOl) NAME and the recipe
names you have previously
entered will appear
.
T/lin dial until the recipe you
want is displayed and press the
dial to enter.
.
Press the START/PAUSE button
or press the selector dial to start
cooking.
19

Speedcooking
Speedcooh
re(iDe--to
adjust or
change
"7" o
To adjttst or change stored cttstom
speedcook recipes:
I. Press tile SPEEDCOOKbutton.
2. Turn tile dial until MY ICECItY_2S
appears. Press the dial to enter.
3. Turn the dial to the recipe you
want to change. Press the dial
to enter.
4. Press tile OPTIONS button.
5. Turn the dial to select CHANGE
RECIPE. Press the dial to enter.
.
Tile display will prompt you to
SELECT COOK TIME, then
select UPtq_R POI'_T;.I_, LOD7_21¢
tY)I'I/J_2Rand FOOl)NAME. Turn
tile dial and press to enter the
appropriate settings.
(For more detailed instructions,
tbllow steps 4 through 7 in tile
section speedcook recipe--to en to
a,_d save.)
.
1¢I_2CIPEAI)I)FJ) appears. To begin
cooking press the START/PAUSE
button. To store tile recipe
without cooking, press the
CLEAR/OFF button.
For power l(qml and cooking tim(
sugw_stions, useyour cooking guide
or (ook book.
Speedcooh
re(iDe--to
delete
':,'202a
To delete stored cttstom speedcook
recipes:
I. Press tile SPEEDCOOKbutton.
2. Turn tile dial until _4Y RL(,HLS
appears and press the dial
tO enter.
3. T/li'n dial to the recipe you
want to delete and press the
dial to enter.
.
Press tile OPTIONS button.
5.
Turn the dial to select DELETE
RECIPE, and press tile dial to
enten This delems tile recipe.
You may now enmr and save a
new recipe or press (;I,EAR/OFF
to return to the clock display.
2O

Speedcooking
Custom
speedcook
rg€l[)eS
Custom Recipe
Name
Cook Power Level
Time U L
Comments
21

Speedcooking
Things that
(IF(? noF_l_al
during
speedcoohing
Cooking Times
• When speedcooking preprogrammed •
foods, you may see OtY-17MIZIN(; COOK
TIME in the display several seconds after
you press START. The oven automatically
senses the electrical voltage level in your
home and adjusts the cooking time up or
down for proper cooking. •
Fan/Vent
The fan will come on during cooking. •
At the end of cooking, the automatic fan
will continue m run for a short time, and
the display will read Ov_,_,is CooS,_g. The
thn will automatically shut off when the
internal parts of the oven have cooled. Sounds
The exhaust fan may come on
automatically if the cooktop is in use.
The oxen xent will emit warm air while
tile oxen is on.
Lights
• When the o_en is on, light may he _isihle
around the door or outer case.
Heaters
No preheating is required. The oxen
begins cooking immediately.
The door and inside of the oxen will be
xerv hot. Use caution when opening the
door and remoxing food.
Do not use cookware or coxerings made
of paper, plastic or foil when cooking
during a speedcook cycle.
When cooking %r an exmnded period
of time, the oven may automatically
reduce the power levels to maintain
the appropriate level of oven heat.
• (:licks and a fan hlowing are normal
sounds during cooking. The relay hoard
is turning components on and off.
• The heaters will dim and cycle on and off
during a speedcook cycle, sometimes even
at flfll power levels. This is normal. The
oven senses the heat level and adjusts
automatically.
22

Baking
Baking
@
771_I oven rad_ (turntable)
must alw_9s b_ i_ plaa
Putjood orova>s@
blad_ metal tray to bahe.
Bake with
preheat
Baking allows you to cook %ods the same
way as a conventional oven, using a beating
element to raise the temperature of the air
inside the oven. Any oven temperature flom
250°F to 450°F may be set. A fan gently
circulates this heamd air throughout the
oven, over and around the food, producing
golden brown exteriors and rich, moist
interiors.
Because the heated air is kept constantly
moving, not permitting a layer of cooler air
to develop around the tbod, some tbods
cook slightly faster than in regular oven
cooking.
I.
Press the oven/bake button.
2.
When using the OVEN/BAKE
mode to cook baked goods such
/*'@ ....
as cakes, brownies, cookies, pies,
rolls, etc., reduce the oven
temperature 25_'F-40_T flom the
recipe to prevent overbrowning
of baked goods.
Turn the dial to set the oven
temperature and press dial to start
preheating. Do not place the fbod in
the oven. (You will be prompted to
enter the cook time, after the oven is
preheated.)
.
Press the start/pause button to start
preheating.
4.
When the oven is finished
preheating, it will signal. If xou do
not open the door within
Before you begin, make sure the oxen rack
(turntai)le) is in place. Use the black metal
tray at all times when baking.
Caution: When baking, remember that the oven,
door and dishes will be very hot!
1 hotH, the oven will turn off
automatically. Open the oven door
and, using caution, place the food in
tile oven.
. Close the oven door Turn the dial to
set the cook time and press
START/PAUSE to start cooking.
When cooking is complete, the oven
will signal and turn off]
)bu may cha_g'ethe ove_lemiwmtm_, during
p_heating b.ypm_sing the power lt_el button
and lu_,i_q the dial to select the new
lem/_emtu_,.
ljthe oven door is @ened duri_t¢ coohi_tg;
1_4U57_will a/_pear i_ the displ_O. Clme the
door a_Tdpwss ,slartllmuse.
Cook limes are ,shown i_ misrules a_d ca_ be
a maximum (!]179 minutes. Time cas_be
cha_ged duri_g cookb_g by lur_b_g the dial.
Bake
without
preheat
If )our recipe does not require
preheating, press the oven/bake
button.
2.
When using the OVEN/BAKE
mode to cook baked goods such
as cakes, brownies, cookies, pies,
rolls, etc., reduce the oven
temperature 25_'F-40_'F flom the
recipe to prevent overbrowning
of baked goods.
Turn the dial to set the oven
temperature and press to enter
To bxpass preheating, press the
dial again. 23
4. Turn the dial to set the cook time
and press to enter:
5. Place the food in the oven, and press
the Start/pause button to start the
ove n.
[[the overt door is @e_tedduring" cookbtg;
PAUSF__ ill a/q*_<xri_ lh_ displa3. Close the
door a_d press 5'Z4R T/t{4 USE.
Cook times are ,show_ i_ mi_ute,s a_d ca_ be
a maximum 4179 mi_ule.s. Time ca_ be
_ha_gvd duri_g _oohb_g by lur_i_g the dial.
I 9 9

Wamfing and Reheating
Warming
The warmint_'ji:ature will ke@ hot, cooked
Jbods at serving" temperature. Always start
with hot/hod. Ii,_eeookwa*_:and utensil,_ that
_an withstand tempemture,_ up to 23001 :.
1. Press the WARM/REHEAT
button.
4. Turn the dial to select the lmel of
moisture you want. Press the dial
to enter.
I] :tze oven door is Opened during warming;
[{4 (,'S1_will appear in the disJ:l:O'. ( lo,se the
door and press STA R 7"/1{4USE.
2. Turn the dial to select WARMING.
Press the dial to enter.
3. Turn the dial to select the oven
temperature.
LO_A'. ............................. 140-160°F
MEDIUM ...................... 160-195°F
HIGH ............................ 195-230°F
Temperature and Moisture Selection Chart
Food Type Control Setting Moisture Setting
B*wM, hard roll,_ MEI)IUM ( HISP
B*_,ad, sg_flrolls MEI)IUM MOIST
Ca,sse*_de,_ MEI)IUM MOIST
t+ied,/bods HIGH ( RISP
Meats* and jT,sh MEI)IUM ( RISP
Pancakes, wr(]jle,_ HIGH ( RISP
Pizza HIGH ( RISP
I'otatoe,_, baked HIGH ( HISP
Potatoe,_, ma,shed MEI)I('M MOIST
Poultry HIGH MOIST
7brtilla ( hip,s LOW ( HISP
_q'etable,_ MEI)I( 'M MOIST
* {'SI)A/I_SISwcommends an inter_ml:r,mperatm_,q] 145_f"as the minimum donen_sfiw be{,/_{ '_ea portable
meal tlu'rmonleterlocheck internal temp_'ratum_.
Tips fi, r Crisp Foods:
• Leave food uncovered.
• Do not use plastic containers or
plastic wrap.
• Preheat prior m use according to
recommended times.
Tips fi, r Moist Foods:
• Cover food with lid or aluminum
foil.
• Do not i)ut wamr in file warming
pan.
• Do not use plastic containers or
plastic wrap.
• Preheat prior m use according to
recommended times.
lb CJ_sp Stale Items
• Place food or dishes directly on
the black metal tray.
• Check crispness after 45 minutes.
Add time as needed.
• Preheat on L()X4' setting and
select CRISP.
24

Microwa fing
7 med
Reheat
Using the
mi(ro_o(173#
.fi,atures
The Timed RHu,at feature reheats
servings of previously cooked %ods
or a plato of leftovers.
7_med Reheat uses a combination
of heaters and microwave powen
A microwave-only reheat feature is
also available in the MICROWAVF.
selections.
1. Press the WARM/REHEAT
button.
2. Turn the dial to select REHEAT.
Press the dial to enter.
3. Turn the dial to set the reheat
time and press to enmr
4. Press the START/PAUSE button
to start the oven.
Make sm_ the oven rack (turntable) and glass mic_vwave tray a_ in place.
Place jbod or mic_vwavable container diwctly on the glass mic_vwave m 9,
to cook your food.
Center the tray on the oven rack (tm_,table). The tray will not lock onto the
center hub.
[/ the over_ door i.s oi!)__ed duri_,g cookir_g,
PAL_SF. will appear i_ the di.qday. Clo._e
the door a_d p',_<,._STAR T/PA {J[S'E.
4Po j ,odji,,,,,theove,,, ¢
po._:db& to event out the t_'mp_'rature. {/
thejbod is not hot er_ough, reheat f_r mo_z"
time. RH_eated jbods may have wide
va'_Jations in temperatuw. Some awas q/
./hod mc9, be ex#eme/y hot.
Place thej3od ir_ a two-metallic container
o_ the blaH_ metal tray. 77_e_oohware
will g_t hot.
Us_ coohware and uler_sih ttml ea,_
withstand lemperatn'_<s up to 2 75 o 1"7
T/te oven ra& (turntable) must alwa U be in
/din,, when usiw., the oven.
Cookware
• Make sure that cookware is suitable
for microwaving.
MICROWAVE PRE-SET FOOD SELECTIONS:
• Bacon
• Beverage
• Defrost (Auto and
77me)
• My Redpes
• Popcorn
• Reheat (one serving)
77ze glass mi_,_wave tray _houht alwgg s
be i_ /dace when mi_owaving.
• Place food or microwaxable container
direcfl) on the glass microwaxe tray to
cook VO/II" l()()d.
• So.p
• 77me cook
• Vegetables (fresh,
frozen, canned)
25

Microwaving
_V_VW, g'(" a ([ _ gl H 11 It Itl, (:0 _tl
I-low to Igse
pre-set
microwave
seh?ctions
7Vine Cooh
f_.O ............. •
...a¢@ ....
o_...
1. Press the MICROWAVE button.
1/ no ,selection it made witkir_ 15 ,seconds
tke display will _'vert back to tke time of
day.
2. Turn the dial to find the food
you want to cook. Press the dial
to enter.
If required, the oxen will pron_pt
you to select amount, weight or
size. Turn the dial and press after
each selection.
4. Press the dial or the START/
PAUSE button to start cooking.
7b review settings during (ooking, p_s._
lke selector dial.
Us_ Tim_ Cook to mic'mwave f!)od tkat is
not in ttu _(i[)_ se(tiom
• The power lexel is automatically
set at high, but you can change it
for more flexibiiity.
1. Press the MICRO_A.AVE button.
l/ lke door is @em,d during cooking; the
oven will .st@ and t'A L(S'F.will appear
in the di._play. Cbzse the door a,ld /m<s:_
START/PAUSE lo r(a_mne cooking.
l/you enter an und_Mred ,selection at a, O,
tim(5 ,simply p'_<s.;the BACK butlon to
"_z,turnto the p_ious .step, or p_<s:sthe
CI,EAR/OFF butlon and w-_,nter the
d_M'_z'dselections.
4. To change the power lexel if you
don't want flfll power, press the
PO_¥ER LEVEL button. Turn
the dial to select. Press the dial
to enter.
5. Press the dial or the START/
PAUSE 1)utton to start cooking.
Micro
l'2xpress
"_' "F %=
2. Turn the dial to TIME C )OK
_( •
and press the dial to enter.
3. Turn the dial to set the time
and press the dial to enter.
Press MICRO EXPRESS for
30 second increments of microwaxe
cooking time. Oxen starts
immediately.
_m may open the door during TIME
COOK to (t.(:l_ tl, ji_od. Clo,s_ tt, door
arid [)'_z_.sSTART to rr_um_ cooking.
You may add or subtract time by
turning the dial. You may also add
time in 30 second increments by
pressing MICRO EXPRESS again.
26

Microwaving
7V 7V_V, g'(" a d _ gl H I i It III, (:0112
Microwave
power level
Coohing tips
.I,vO ....... •
First, follow directions for TIME
C )()K, TIME DEFROST or
MICRO EXPRESS.
.
Press tile POWER LEVEL button.
3.
Turn tile dial clockwise to increase
and counterclockwise to decrease
the power lmel. Press the dial
tO enter.
4. Press the dial or the
START/PAUSE button to start
cooking.
• You can cka_ge tke powo h,vd b@m,
or during a cooking p_g'ram.
• When cooking bacon, layer strips
on a plate. Coxer each laver with a
paper towel.
• When cooking xegetables,
/lse a microwme-safe casserole
or 1)owl. Coxer with a lid or
xented plastic wrap.
various power h,ve£:
High 10: Fish, bacon, xegetables,
boiling liquids.
Med-High 7: Gentle cooking of meat
and pouhry; baking casseroles and
reheating.
Medium 5: Slow cooking and
tenderizing tBr stews and less
tender cuts of meat.
Low 2 or 3: Deflosting; simmering;
delicate sauces.
Warm 1: Keeping food warm;
softening butter.
• For flozen xegetables, follow
the package instructions for
adding water.
• For flesh xegetables, add
two tablespoons of water for
each serxing.
Microwave
recipe--to
enter and
save
Microwave
recipe--to
.find and use
70 •
Create and store up to 10 of your
own microwave recipes.
I. Press the MICROWAVE button.
2. Turn dial until _4Y ICLCItLS
appears. Press the dial to enter.
3. Turn dial until <_mpty> appears.
Press the dial to enter.
. ,;, ;.... ()-
SLLLC 1 C )( K 77ME appears.
Turn the dial to select the
cooking time you want. Press
the dial to enter.
5. Turn the dial to change the power
lmel and press to enter.
To find and ttse stored cttstom
microwave recipes:
1. Press the MICROWAVE button.
9. Turn dial to MY HECItq?S and
press the dim to enter.
.
Spell out the food name by
turning the selector dial to
advance through the available
characters. Press the dial to enter
a characmn When you have
entered the enOre name, press
START/PAUSE. Yon may change
previously enmred characters by
pressing the BACK button.
.
1¢I_2CIPEADI)FJ) appears. To begin
cooking, press the START/PAUSE
button or press the (:I,EAR/OFF
1)utton to store the recipe without
cooking.
4. Turn dial to your recipe and press
the dial to enter.
5. Press the START/PAUSE 1)utton or
the selector dial to start cooking.
3. FOOl)NAMF_ and the recipe
names you entered will appear.
27

Microwa fing
Custo" _
microwave
recipes
Microwave
reciDe--to
acljust or
change
Custom Recipe
Name
Cook Microwave
Time Power Level
To adjttst or change stored custom
microwave recipes:
I. Press the MICROWAVE button.
2. Turn dial to MY I_ECHq'2S and
press the dial to enmn
3. Turn the dial to the recipe you
want to change. Press the dial
to enter.
4. Press the OPTIONS button.
Comments
.
Turn the dial to select the cook
time and press the dial to enter.
7.
Turn the dial to select the POI:_7_R
LFA'TJ_ and press the dial to enter.
8.
I?FX21t_I'2ADDED appears. To beg-in
cooking, press the START/PAUSE
button or press the CI,EAR/OFF
button to store the recipe
without cooking.
Microwave
recipe--to
delete
28
./- "0 ............... •
5. Turn the dial m select CHANGE
RECIPE. Press the dial m enten
To delete stored cttstom microwave
recipes:
I. Press the MICRO_A.AVE 1)utton.
2. Turn dial to MY RF_Cltq:_Sand
press the dial to enter.
3. Turn the dial to the recipe you
want to delete. Press the dial
tO enter.
4. Press the OPTIONS 1)utton.
5. Turn the dial to select DELETE
RECIPE, and press the dial to
enten This delems the recipe.
You may now enter and save a
new recipe or press CI,EAR/OFF
to return to the clock display.

Microwaving
Auto de_}ost
.....,vO ........... •
.--a" 0 .....
Auto Defrost automatically sets the
defiosfing times and power levels to
give even defiosfing resuhs for meats,
poultty and fish weighing up to six
pounds.
I. Remoxe %od flom the package
and place it on a microwme-safe
dish.
2. Press the MICROWAVE button.
3. Turn the dial to Dt'_FROST:AUTO.
Press the dial to enter.
.
Turn the dial to the food weight,
using the Conversion Guide
at right. For example, dial 1.2 for
1.2 pounds (1 pound, 3 oz.)
Press the dial to enten
5. Press the dial or START/PAUSE
button to start deflosting.
6. Turn the food oxer when the oxen
signals TURN FOOD )I, LR.
• Rfmove dqfi'osl_d m_at or .Jzidd warm
at, as with .,mall [)ie(,_ q/J_,il f!,, ev_
d@rz_tirzg.
• After d@vstir_g, most m_at._ r_ted to
.stand 5 mir_ut_<s'to complete d@ostir_g.
La W, roasts should standjiw about
30 mir_ut_.
Conversion Guide
,51the ,,eig/,toL! ,o l. tate l
and ou_(_s [be ou_(_s )_zn,gt be (onz)o'ted
to ter_ths (. 1) of a poured.
Weightof lbbod Enter Food Weight
in Our_.es (tenthsof a pound)
1-2 .1
7 .2
4-5 .3
6-7 .4
8 .5
9-10 .6
ll .7
12-13 .8
14-15 .9
7_me de¢rost
Use Time l)@rzst to @r)st jot a .selected
l(mglh qf time.
1. Press the MICROWAVE button.
2. Turn the selector dial to
DEFI¢OSTZ TIME. Press
the dial to enter.
3. Turn the dial to select the time you
want. Press the dial to enmr.
4. Press the dial or START/PAUSE
button to start defrosting.
5. Turn the food over when the oven
signals 7"URN FOOl) OIT:,R.
Powo" ltq:el is automatically ._etat 3,
but can be changed. 7b eha*_ge the powo"
lrve£:, ._eelbe Microwave Pmvo" L(_el
section. Fou can dq/h_._t.small items
quiehly by rai.si_g the pow#r l_el qfier
_'r_te_J_gthe time. Pow#r level 7 cuts the
total d@vsti_g time i_ about hal,/,"powo"
lrvel 10 cuts the total time to about lZ3.
1"_!7_e_d@o.sti_g at higt_ pow_,r lrve£:,
,f!)od will need mo_z'ji'equent atler_lion
than usual.
29

Microwa fing
Use I)t_FI?OST:A UTOjbr meat poult U
and.f!_k. (.s( I)1,7"ROSl- ITML ._)_ m ),st
other,fi_)zen ,fi)ods.
Foods frozen in paper or plastic
can be time deflosted in the
package, but foods should be
taken out of the package when
using DI_iFI¢OSJ:AUTO. Closed
packages should be slit, pierced or
vented after food has partially
deflosted. Plastic storage
containers should be partially
UllCovered.
Family-size, prepackaged fiozen
dinners can be deflosted and
microwaved. If the food is in
a foil container, transfer it to
a microwave-safe dish.
Foods that spoil easily should not
be allowed to sit out for more
than one hour after defrosting.
Room temperature promotes the
growth of harmfld bacteria.
• For more even deflosting of
larger foods, such as roasts, use
DEFI¢OS'7:A UTO. Be sure large
meats are completely deflosmd
before cooking.
• _A'hen defrosted, tbod should be
cool 1)ut softened in all areas.
If still slightly icy, return to the
microwave ve W briefly, or let
it stand a few minutes.
3O

Microwa fing
Microwave
SeT_lsor
cooking
77_ese_lsorj;,atu_z_ ddects the imJz,a._ing
humidily _4ea.sed during cookklg. 77_e
ow,_l automatically ad_u._ls the cooking
t,, a,. l
Do not use the Sensor Features
twice in succession on the same food
portion--it may resuh in severely
overcooked or burnt food. If food
is undercooked after the first
countdown, use TIME COOK for
additional cooking time.
The proper eontain_'s and covers are
essential fi_r best sensor cooking.
• Always use microwave-safe
containers and cover them with
lids or vented plastic wrap.
Never use tight sealing plastic
containers--they can prevent
swam flom escaping and cause
food to overcook.
• Be sure the outside of the cooking
containers and the inside of the
oxen are d U before placing food
in the oxen. Beads of moisture
turning into steam can mislead
the sensor.
Covewd
i,_mted
l)'r)_off di.sh_<s.w tkey don't
" _Tslead tke ._._o'_:
• Beverages are best heated
uncovered.
MICROWAVE SENSOR PROGRAMS:
• Beverage
• Popcorn - Prepaekaged microwave popcorn, 1.5 oz. to 3.5 oz.
• Reheat- Single servings (4 to 6 oz.) of lefiove)_.
• Soup
31

Microwaving
7b use all
se_zsor
programs
Advantium's microwave mode fl,atur_<_
.s_,_sorcooldng. 77_eow,n automatically
.s_,_.se_wh_,_ ,f!Jod is done and ._huls itsd/
qffmelimi_ati_g the n(ed to program
cooktime_ and power h_eL_.
1. Press the MICROWAVE button.
2. Turn the dial to select the food
yon want. Press the dial to enter.
3. Press the dial or press the START/
PAUSE button to start cooking.
Do not open the oven door until
time is counting down in the display.
If the door is opened, close it and
press START/PAUSE immediamly.
If the food is not done enough, use
TIME COOK in the microwave
selector to cook for more time.
NOTE: Do not use the Sensor
Features twice in succession on the
same food portion--it may resuh in
sexerely oxercooked or burnt food.
• If you have been speedcooking or
baking and the oven is aheady
hot, it may indicate that it is too
hot for sensor cooking. Of course,
yon can always continue with the
non-sensor functions.
• Drinks heated with the BtB7217A(',' ;:L
feature may be xel T hot. Remoxe
the container with care.
• If you open the door while sensor
cooking, SI'_NS'OI7ERROI7 will
appear. Close the door, press
START to begin again.
Notes about the Reheat pro wam:
Reheated foods may haxe wide
xariations in temperature. Some
areas may be extremely hot.
For improved reheating quality
on crisper foods, use file TIMF2)
REHEAT feature found by pressing
V_.ARM/ REHEAT.
It is best to use 7YME COOK and not
REHEAT for these foods:
• Bread products
• Food that must be reheated
unco'_ ered.
• Foods that need to be stirred
or turned.
• Foods calling for a d U look or
crisp surface after reheating.
To shorten or lengthen the
cook time, wait until the time
countdown shows in the display.
Then turn the dial to add or
subtract time.
32

Microwa ing
Interference
• TV/radio interference migilt be
noticed while using tile microwme.
Similar to the interference caused by
other small appliances, it does not indicate
a problem with the microwme. Move
the radio or TV as far away flom the
microwave as possible, or check the
position of the TV/radio antenna.
Oven Heat
• Cookware may become [lot because of
heat transferred from the heated food.
Oxen mitts may be needed to handle
the cookware.
• Steam or xapor may escape flom around
the door
Sounds
• You may hear a dull thumping sound while
the oxen is operating.
33

To remind you that you have food
in tile oven, tile oven will display
FOOD IS READY and beep once a
minute nnfil you either open the
oven door or press the CLEAR/OFF
button.
Other Advantium Features
BACK $PEE_COOI(
• • ovE.,
MICROWAVE BAK_
l'),atures
under the
OPTIONS
button
Clock:
77_edod_ must be set &:fim_you _an u._e
you," over, f!,," the f!,:st time (see Quid"
Sla.rl Jor in.situations).
I. To change the clock time, press
tile OPTIONS pad and turn the
dial to CLOCK. Press the dial
to enter.
2. Turn the dial to set hours.
Press tile dial to enter.
3. WHrn the dial to set minutes.
Press tile dial to enter.
4. Turn the dial to select AM or PM.
Press the dial to enter.
Clock Display ON/OI_T:
Use this feature to turn your
clock display on or off. Press tile
OPTIONS button, turn the dial to
select CL )CK I)LS[ LAY Turn the
dial to select ONor OFF. Press the
dial to enter.
Auto Night Light:
Use this feature to i)rogram the on-
off time for an automatic night light.
Press tile OPTIONS button, usrn
tile dial m select NIGHT LIGHT;
press the dial to enter and follow
the display directions.
Beeper Volume:
Use this feature to adjust tile volume
of tile beeper. Yon can even turn it
off. Press the OPTIONS button, turn
tile dial to select BEI:7OI_I?VOLUME,
press the dial to elates and follow the
display directions.
&*oil Speed:
Is the message scroll too slow or
too fast? Change it! Press the
OPTIONS button, turn tile dial to
select DIStqAY SPI_I?D, press tile
dial to enter, and follow the display
directions.
Delayed Start:
Delayed Start allows yon to set
the oven to delay cooking up to
24 honrs. Press the OPTIONS
button, tnrn tile dial to select
I)EIAYEI) START and press the
dial to elates. Follow tile display
directions to set the Delayed Start
time and feature you wish to delay.
Pa?view
34
T • • 9
L's_ this.flatu*_ to rrview the cur'_nt
cooking sd_ctions you have set.
Press tile selector dial at any time
during cooking.

Other Advantium Features
Help
o,._¢_
U_e tkis,f!_atmv to,find out more about
your oven, and its ji_atu'*_<s'.
1. Press tile HELP button.
9. Turn the dial to select the feature
name. Press the dial to enter.
t;_at,ozaL/imnd in tk_ Hl'JLP,f!tnction.
Adjust
Back
B(g(Orl
Beeper _,)_hone
Bg'wo'age
Child ko&out
cl,,.r/c!l/
Clock
D(;f!_,_t(Auto)
l)qf!_,,_t(7_me)
Ddayed Start
Display ,S'/w_,d
Food Mg,nu
Hg'al/t _wr'/7)m/)
Hdp
Man,_al Cool"
Mic'mwave
Micro Expr(_s's
Micro Powo"
My l?f'gip(_
The display will show a description
tbr the program you haxe chosen.
Nigd_t Light
()ption,_
Ov(nJBahe
t'o/,cor'.
Powg'r Lrvel
I?et.'al- l S('_wi_g"
Remimtcr
I?(Jwat Last
I{gs_l}ng
Review
Soup
,S_)eedcool_
Start/t_au.,e
Su_#ce Light
Time Co&
7WHOOn/Off
l"_'g_g'tabk*(Canned)
i')'getabl(_' (Frozen)
l:_'nt Fan
35

Other Advantium Features
Child
lockout
Vent J_tn
°'20 :
_, ',_i- _,_,-
'°2@:
Fou may lock the conhvl panel to/.went
tke over_.f!'om b_ir_g a( (ider_tally started
or used by (kildr_n.
Press and hold CLEAR/OFF tbr
about 3 seconds to lock and unlock.
Use to ligkt you, cookt@.
Press the SURFACE LIGHT 1)utton
m select the proper setting.
Continue pressing m change fiom
1)right to nightlight to off'.
77_event jhn _vmow<_steam and otho
va/)o_:Lf!r)m su@we cooking.
Press the VENT FAN 1)utton to select
the fan speed.
When the control panel is locked,
Conhvl Prmel LOC_I) will be
displayed briefly anytime a button
or dial is pressed.
7_mer
,%..,._ g
I
Continue pressing to change fiom
high to low to off'.
{h_ lkisjbaturt a_ytim_ you r.ed a
ger,*ral [)u,po.s_ lime,: It (a,_ ever_ be
used wkil_ cool'i_g i_ tke over_.
I. Press the TIMER 1)utton.
2. Turn the dial to select the
minutes. Press the dial to enter.
3. Turn the dial to select the seconds.
Press the dial to enter.
7b pause. [,_<_.sTIMER. 7b ,_<_tart[,_<s.s
TIMER agair_.
7b carwel [)r_a_:s'and kold ttu TIMER
buttor_ dowr_,firr about 3 secor_ds'.
36

Other Advantium Features
_*J_*J_*_,g'¢ a (1%_gl ?_I i IIIll, #0 712
t_minder
_, _ _,_
Use this feature like an alarm clock
to help you kee I) up Mth things
to do.
1. Press the REMINDER button and
select reminder time. Follow the
directions in the display:
A. 7_crn the dial to set hou,:s.
P_>_:sflu dial to ente,:
B. 7_z,n flu dial to ._t minut_<s.
P_>s:sllu dial to ente,:
C. 7_crn the dial to select AM or
PM. [_<_.sthe dial to enter:
An automatic fan feature protects
tile oven flom too much heat rising
fiom the cooktop below it and fiom
mo much heat inside the oven cavity.
It automatically turns on at low speed
if it senses too much heat.
7b bri_jly display the _minder time
p,_<_sthe REMINDER button.
7b cancel p_z<s.sand hold the
REMINDER button jbr about
3 ,seconds.
If you have turned tile fan on you
may find that you cannot tnrn it off'.
The fan will automatically turn off"
when the inmrnal parts are cool. It
may stay on for .9,0minutes or more
after the cooktop and oven controls
are turned off'.
./

Care and Cleaning
www, g'+,advanlilzm,com
HelH:ul
hints
How to
ch?an the
inside
An occasional thorough wiping with
a solndon of baking soda and wamr
keeps the inside flesh.
Be certain the oven control is turned
off before cleaning any part of
this oven.
Some spatters can be removed with
a paper towel, others may require
a damp soapy cloth. Remove greasy
spatters with a damp sudsy cloth,
then rinse with a damp cloth.
Do not spray or splash liquids
directly into the heater areas.
Do not use abrasive cleaners or
sharp utensils on overa walls.
Never ttse a commercial oven
cleaner on any part of your oven.
Do not clean the inside of the overa
with metal scouring pads. Pieces can
break off the pad, causing electrical
shock.
Wal£_, t:loo'_;Izrdd_, Window, Metal
and Plastic l+a'rt,_on the Door
Pu?movable
o_uen Y(IC]_
(turntable)
Some food or liquids may fall into
the heater areas. The heaters will
cook most of the food away. Any
remaining residue will not aft>ct
cooking.
The area underneath the oven rack
(turntable) should be cleaned
Dequently to avoid odors and
smoking during a cooking cycle.
The overa rack (turntable) can be
broken if dropped. ¼'ash carefldlv
ira warm, sudsy wamr.
DtT completely and replace.
To replace the overa rack (turntable),
place its center over the hub ira the
center of the overa and turn it until it
seats into place.
Oven l?ack (7)trntable)
Do not use the oven without the
ow,n rack (turntable) in place.
38

Ca_re and Cleaning
Baking sheets
(cooking trays)
To prexent breakage, allow the trays
to cool completely befBre cleaning.
Wash carefldly in warm, sudsy water
or in the dishwasher.
A soap-filled scouring pad can also be
used to clean the black metal tray.
Do not use abrasixes, as they may
damage the finish.
Black metal troy
39

re and (;leaning
How to clean
the outside
We recommend against using eleaners
with ammonia or alcohol, as they can
damage the appearance of the
microwave oven. If you ehoose to use a
common household eleaner, first app{y
the eleaner directly to a elean cloth, then
wipe the soiled area.
Case
Clean the outside with a sudsy cloth.
Rinse and then di T. Wipe the window
clean with a damp cloth.
Glass" Door (on some models)
Wipe with a clean damp spong_.
DW thoroughly. Do not use cleaning
sprays, large amounts of soap and
watez; abrasives or sharp objects on
the panel--they can dan]age it.
Stainless Steel Control Panel and Door
(on some models)
Do not u._e a s't_'elwool pad; it will scratch
the su@ue.
To clean the stainless steel surface,
use a hot, dan] I) cloth with a mild
detergent suitable for stainless steel
surfaces. Use a clean, hot, damp cloth
to remove soap. Dry with a dry, clean
cloth.
After cleaning, use a stainless steel
polish, such as Stainless Steel Magic c'',
Revere CoI)per and Stainless Steel
Cleaner <'_or V_,enol All Purpose
Metal Polish '_).Follow the product
instructions for cleaning the stainless
steel sniface.
Bottom
Clean off the grease and dust on the
bottom often. Use a solution of warn]
water and detergent.
Vent Grill
Use warn] soapy wamr and a dishcloth
to wipe off file grill. If desired, use
cotton swabs to get in between the
grill loux_rs.
Door lb)'ame
It's important to kee I) the area clean
where the door seals against the
oven. Use only mild, non-abrasive
demrg_nts applied with a clean
sponge or soft cloth. Rinse well.
IIII M
The vent
fan
If %od soil remains, try a general
kitchen cleaner, such as Fantasfik ¢'_,
Sin]pie Green ¢'_or Formula 409¢_
For hard-to-clean soil, use a standard
stainless smel cleaner, such as
Bon-Amf '_'or CameoC'!
Apply cleaner with a dana I) sponge.
Use a clean, hot, damp cloth to
remove cleaner. Dry with a dry, clean
cloth. Always scrub lightly in the
direction of the grain.
The xent fan has 2 metal reusable
xent filters.
()xens configured to recircnlate air
back into the room should also use
a charcoal filter.
Charcoal Filter (on some mode£)
40 Reusable Vent Filters (on all mod( t 9

re and (;leaning
Co&toplight/
nightlight
To replace the cooktop light/
night light, first disconnect the
power at the main fllse or circuit
breaker panel.
Remoxe the screw from the
.
side of the light compartment
coxer and lower the coxer until
it stops.
3. Be sure the bulb to be replaced is
cool before remoxing. Gently pull
the bulb flom the receptacle.
Re[dace with 120 roll, 20 watt (max.)
halogen bulb. O'_ler WB36X102 l 3,f!om
your (;E ._ul)pli_,_:H_,&-int_,nsil_, 20 watt
bulbs, available in su/wrma'd'el._ and
hardware ._to_>_;may a£o be u._edjbr
?gJ) l(l('('llZ('ll, g5.
4. Raise the light coxer and replace
the screw. Connect electrical
power to the oxen.
Pu?usable vent
.filters
Removing and
cleaning the
filters
The metal filmrs trap grease released
by foods on the cooktop. They also
prevent flames from foods on the
cookmp flom damaging the inside
of the oven.
To remove, slide them to the rear
using the tabs. Pull down and ont.
To clean the vent filters, soak them
and then swish around in hot wamr
and demrgent. Don't use ammonia
or ammonia products because
they will darken the metal. Light
brushing can be used to remove
embedded dirt.
Rinse, shake and let d_w before
replacing.
For this reason, the filters must
always be in place when the hood
is used. The xent filters should be
cleaned once a month, or as needed.
To replace, slide the fihers into the
flame slots on the back of each
opening. Press up and to the front
to lock into place.
41

re and (;leaning
Charcoal filto
(lX81A)
7b remove the
charcoal filter
7b install the
charcoal filto
77,3 eha'reoal,f!ller cannot be (:leaned.
It must be _Jda(ed. O'_ger Part No.
WB2X9883 ,firmz your Gt g.supplie_:
If the model is not xented to the
outside, the air will be recirculated
through a disposable charcoal filter
that helps remoxe smoke and odors.
To remoxe the charcoal fiher, first
disconnect power at the main fuse.
Remoxe the top grille by remoxing
the 9 screws that hold it in place.
You may n_ed to Open the cabinet doo_:sto
,groove the .f('r(.ws.
Slide the filter towards the flont of
the oxen and remoxe it.
To install a new fiher, remoxe plastic
and other outer wrapping from the
new filter.
Insert the fiher into the top opening
of the oven as shown maneuvering it
behind the plastic grille until it fits
squarely into place.
The charcoal filter should be
replaced when it is noticeably dirw
or discolored (usually after 6 to
19 months, depending on usage).
Remove 2 grille .wr_,w.sto
"_zmzov(the g,rilh.
/
IIIIIIIIIIIIIIIIIIII
IIIIIIIIIIIIIIIIIIII li
Optional hits
It will rest at an angle 1)ehind the
plastic grille on two side support tabs
and in flont of the right rear tab.
Replace the grille and 9 screws.
Reconnect power at the main fllse.
Available at _<gtraeast,f!rmz your GIg.supplie*:
Iqller Panel Kits Filter Kits
• ,[X4OC7_Bisque
• ,[xqowH 1"_Tlite
• ,[x4 l--I_/ael_
When replacing a 36" range hood,
filler panel kits fill in the additional
width to provide a custom built-in
appearance.
For installation between cabinets
only; not for end-of-cabinet
installation. Each kit contains
two 3" wide filler panels.
Y) • r
• ,/X81Aml¢.:iwulatir_g Chawoal tqllg'r
Kit
Filter kits are used when the oxen
cannot be xented to the outside.
42

Troubleshooting
7,:7,:w. g'ead z_a _ Ii tgm. c0m
Questions ? Use this problem solver or visit the GE website at www. GEAppliances.com
Problem Possible Causes What To Do/Explanation
LIGHTS
Light during a This is normal. • This is normal. The oven senses tile
speedcook cycle Power level has been heat level and adjusts automatically.
dims and cycles on atlmmafically reduced
and off, even at full because the oven is hot.
power levels
Light visible around This is normal. • _A'hen the oven is on, ligilt may
the door and outer be visible around the door and
case while outer case.
speedcooking
E4N
Fan continues to run The oven is cooling. • The fall will automatically shut off
after cooking stops when the internal parts of the oven
have cooled.
Oven vent emits warm This is normal.
air while oven is on
Fan comes on This is normal. • If tile cooktop gets too hot, the vent
automatically when fan comes on.
oven not in use
Fan comes on This is normal. • If tile microwave is used after
automatically when speedcook and the oven senses
ttsing the microwave that it is too hot, tile vent fan comes
COOKING
The oven makes Clicks and falls blowing " These sounds are normal
unttsuaJ sounds are normal. The relay
while cooking board is turning the
components on and off.
Smoke comes out Food is high in fat • Smoke is normal when cooking high-
of the oven when content. Aerosol spray fat tbods, Use vegetable oil or olive
I open the door used on the pans. oil on tile meat itself instead of
Food is not fully Programmed times • Increase or decrease time tbr
cooked or browned may not match tile size doneness or adjust the upper or
at the end of a or amount of food you lower lamps for browning.
cooking program are cooking.
on to cool the oven.
coating the entire pan.
43

Troubleshooting
_v_v_v. g'ea gl_ a ?? t i lt m. corn
Questions ?
Use this
probDm
solvJeI"
Problem Possible Causes What To Do/Explanation
DISPIAY
The display is blank Tile clock display has • Check tile OPTIONS menu fox clock
been turned off. display settings. Turn the display oil.
"ControlPanel Tile control has • Press and hold CI,EAR/()FF for about
LOCKED'appears been locked. 3 seconds to unlock the control.
in display
Control display is
lighted yet oven
will not start
Clock is not set. • Set the clock.
Door *lot securely closed. • ()pen the door and close securely.
START/PAUSE button • Press START/PAUSE.
not pressed after entering
cooking selection.
Another selection already • Press CLEAR/OFF.
entered in oven and
CLEAR/OFF button not
pressed to cancel it.
Size, quantity, or cooking • Make sure you have entered cooking
time ,lot entered after time after selecting.
selecting Iq_GETABIJ_S
(FRI'_SH, FI_OZEN, CANNEl)),
BA CON, I)EFI? OS7: T1A I]'_
or TIME COOK.
CLEAR/OFF was pressed • Reset cooking program and press
accidentally. START/PAUSE.
Food weight not entered • Make sure you have entered food
after selecting weight after selecting DEFROST-
DEFROST-AUTO. AUTO.
OTHER PROBLEMS
The door and inside Tile heat lamps • This is normal.
of the oven feels hot produce intense heat • Use oven mitts to remove food when
ill a small space, when ready.
Floor of the oven is Tile cooktop light is • This is normal.
warm, even when locamd below the oven
the oven has not floor. When tile light
been ttsed is oil, tile heat it produces
may make the oven floor
get warm.
Oven will not start A flxse ill your home
• Replace flxse or reset circuit breaker.
may be blown or tile
circuit 1)reaker tripped.
Power snigP. • Unplug the oven, then plug it back ill.
Plug not flflly inserted
into wall outlet.
• Make sure the ping oil the oven is
flflly insermd into wall outlet.
Glass microwave
tray does not lock
44
into center hub.
• This is normal. Center the tray oil the
oven rack (turntable).

GE Service Protection Plus rM
GE, a name recognized worldwide _br quality and dependability; oflers y'ou
Service Protection Plus'"--comprehensive protection on all y'our appliances--
No Matter What Brand!
Benefits Include:
• Backed by GE
• All brands covered
• Unlimited service cars
• All parts and labor costs included
• No out-of-pocket expenses
• No hidden deductibles
• One 800 number to call
You will be c()mpletel,_ satisfied with our serxice protection or you may request }our inonev back
on tile remaining xalue of _o/u" contract. No questions asked. It's that simple.
Protect vom" refl_igerat(m dishwasher; washer and (hTe_; range, TV, VCR and much more--any brand!
Plus there's iso extra charge tot eulergency ser;'ice and low monthly financing is available. Even icemaker
coverage and tood spoilage protection is offered. You can rest eas> knowing that all vom" valuable
household products are protected against expensive repairs.
Place your confidence in (;E and call us in tile Ij.S. toll-free at _tlU._)Z_).ZZZ/-]:
for inoi'e infoi'u/ation,
*-M1lmmds cov<_<d, up Io 20 ?'<a_ old, in Ih< <onlinental U.S.
We71CoverAnyAppliance.
Anywhere. Anytime.*
__ _C/_ll'h__2e............
Please place in envelope and mail to:
General Electric Company
Warranty Registration Department
EO. Box 32150
Louisville, KY 40232-2150
45

Keep this portion for your records.
Ret/lill your completed Product
_'atTantv Registration Card below and
store this section wifl] your important
documents. You will need m refer to
this infot_nafion if your appliance
should need service.
Product:
Model No.:
Serial No.:
Your GE Service Number
1.800.GE.(;ARES
(1.800.432.2737)
It's Important!
Prompt product registration helps in more ways than one.
• Enhanced communication should you need service
• Ownership verificaOon for insurance purposes
• NouficaOon of product modificauon
Consumer [ induct Ownership Reg_istration
D
Staple receipt here
for your records
Important: If you did not get a registration card with your
product, detach and return the form below to
ensure that your product is registered, or register
online at www.GEAppliances.com.
_,,,_ Cut here
Consumer Product Ownership Registration
Model Number Serial Number
his. Mrs. Miss
Name I I I I I I I I I Nam_ I I I I I I I I I I I I
Street [
Address I I I I I I I I I I I I I I I I I I I I I I I I
Apl. # I I I I I I I I I E-lllail Address'::
Da{e Placed
InUsel I I I)av I_ N_arl I I Nil Ill X_F I-I,, II , ,
Monlh I I
* Please provide your eqnail address to receive, via eqnail, discounts, special otl;_rs and other
iml)ortant communications ti-om GE Appliances ((;EA).
Check here if vou do not want to receixe communications t]-om GEA's carefully selected partners.
GEAppliances
GEConsumer Products
General Elecl_'icCompany
Louisville,Kentacky
www, GEApplianees, com
46
FAILI JRE TO C()MPLETE AND RETI JRN "FillS CARD DOES NOT DIMINISt t Y()I JR
WARK \N'I_ _RIGttTS.
For more int)mnation about GFA's privacy and data usage poliQ; go to _xavw.GEAppliances.com and
click on "Prixacy Policy" or call 801).626.2224.
Phone

Advantium Oven Warranty
www.g'+,<_(/v<_tium, corn
All wa_'anty se_wice p_vvided @ an authorized Customer Ca_'e®
technician. 7b schedule se_wice, online, 24 hom_ a day, contact us at
www. GEA[gpliances.com, or call 800. GE. CA RES.
For The Period Of:
One Year
From the dale _/ lhe
or_q'i_zalput<ha,s*€
GE Will Replace:
An), part of the oven which thils due to a detect in materials or
workmanship. During this full one-year warranty, GE will also provide,
free of charge, all labor and related service costs to replace the
detective part.
Second through
Third Year
From the &_le q/'the
o__q'inal pu_ ha,_,
Second through
Tenth Year
I:_om the &He q/'the
7he heating system, if any heater or lamp tails due to a defect in
materials or workmanship. During this full three-year warrant),, GE will
also provide, free ofcharg'e, all labor and related se_wice costs to replace
the detective part.
The magnetron tube, if the magnetron tube tails due to a defect in
materials or workmanship. During this additional nine-year limited
warrant); you will be responsible fi>r any labor or related service costs.
o_mal pu_cha,s_
What GE Will Not Cover:
• Service trips to your home to teach you how
to use the product.
• Improper installation, delivery or
maintenance.
• Failure of the product if it is abused,
misused, or used for other than the
intended purpose or used commercially.
• Replacement of house fuses or resetting of
circuit breakers.
• Replacement of the cooktop light bulbs.
• Damage to the product caused by accident,
fire, floods or acts of God.
• Incidental or consequential damage caused
by possible defects with this appliance.
• Damage caused after delivery.
77fis warran(_, is exte_Med to the original puwhaso and a, O,.su(zeegli_g owno',fiw pmduet.s
pur<ha._e<l ji_r home use within the {_S'A. 1_ Alasl'a, the warranly exeluchas the cost <?/.shi[,pi_lg or
._*_viee calh to you, home. tSv<?/<?/ the original pu,whase date is neede<l to obtain servi<v_ under
[be 717a'Flan[y.
Some stat(<sdo not allow the exclusion or limitation <?/ineicle_tal or (onse<lue_tial (lamag(<s. 77fis
warranly giw<_you ._;!)egif!elegal riffbts, and you m(O,aho have oth_*rrigbl._ which va O,./ir)m state to
state. 7})know what your l<'galr_ffbt._a'_z5consult your lo<-alor state <-onsumer <{[]hir_<?ffi<-<,or your
state k Atlorn O, (/e¢+oal.
Warrantor: General Electric Company. Louisville, KY 40225
47

Consuiner Suppo t
GE Appliances Website www.GEAppliances.com
Have a question or need assistance with veto _appliance? Try the GE Appliances _'ebsite 24 hom_ a day,
any (lay of the year'. For greater convenience and taster service, you can now download Owner's Manuals,
order parts, catalogs, or even schedule service on-line. Y_)u can also "_sk Ore" Team of EN)e_*s'"" yore"
questions, and so much more...
F
Schedule Service
Expert GE repair se_sice is onh one step away from )ore" doo_: Get on-line and schedule veto" service at
_our con'_enience 24 hom_ am' (la_ of the year! Or call 800.GE.CAI/ES 800.432.2737) during n{mnal
business hom_.
www. GEApp liances, com
Real Life Design Studio www.GEAppliances.com
(;E suI)ports the Universal Design concept--products, services and enwromnents that can be used by
people ot all ages, sizes and capabilities. We recognize the need to design fin" a wide range of ph):sical and
mental abilities and impaimmnts. For details of GE's Universal Design applications, including kitchen
design ideas tot people with disabilities, check out our Websim today. For the heating impaired, please
call 800.TDD.GEAC (800.833.4322).
Extended Warranties www.GEAppliances.com
Purchase a GE extended _arrant_ and learn about special discotmts that are axailable _dfile _om" _arrant_
is still in effect. You can i)m'chase it on-line an} time, or call 800.626.2224 dining nomml business hom_.
GE Consmner Home Serxices will still be there after yore" warrant} expires.
Parts and Accessories www.GEAppliances.com
Individuals qualified to se_'ice their own appliances can have parts or accessories sent directly to their
homes (VISA, MasterCard and Discover cards are accepted). Order on-line today, 24 hom_ eveI'_' day or
by phone at 800.626.2002 dining nomml business hom_.
Instructionscontained in this manual cover procedures to be performed by any user.Other servicing generally
should be referred toqualified service personnel. Cautionmust be exercised, since improper servicing may cause
unsafe operation.
Contact Us www. GEAppliances.com
If you are not satisfied with the service w)u receive fl'om GE, contact us on our _4'ebsite with all the details
including yore" phone ntlI/lbeI; or write to: General Manage_; Customer ]),elations
GE Apl)liances, Appliance Park
I,ouisville, KY 40225
Printed in (Stina
 Loading...