

Page 1
Asa?ss&
.-..-,
—
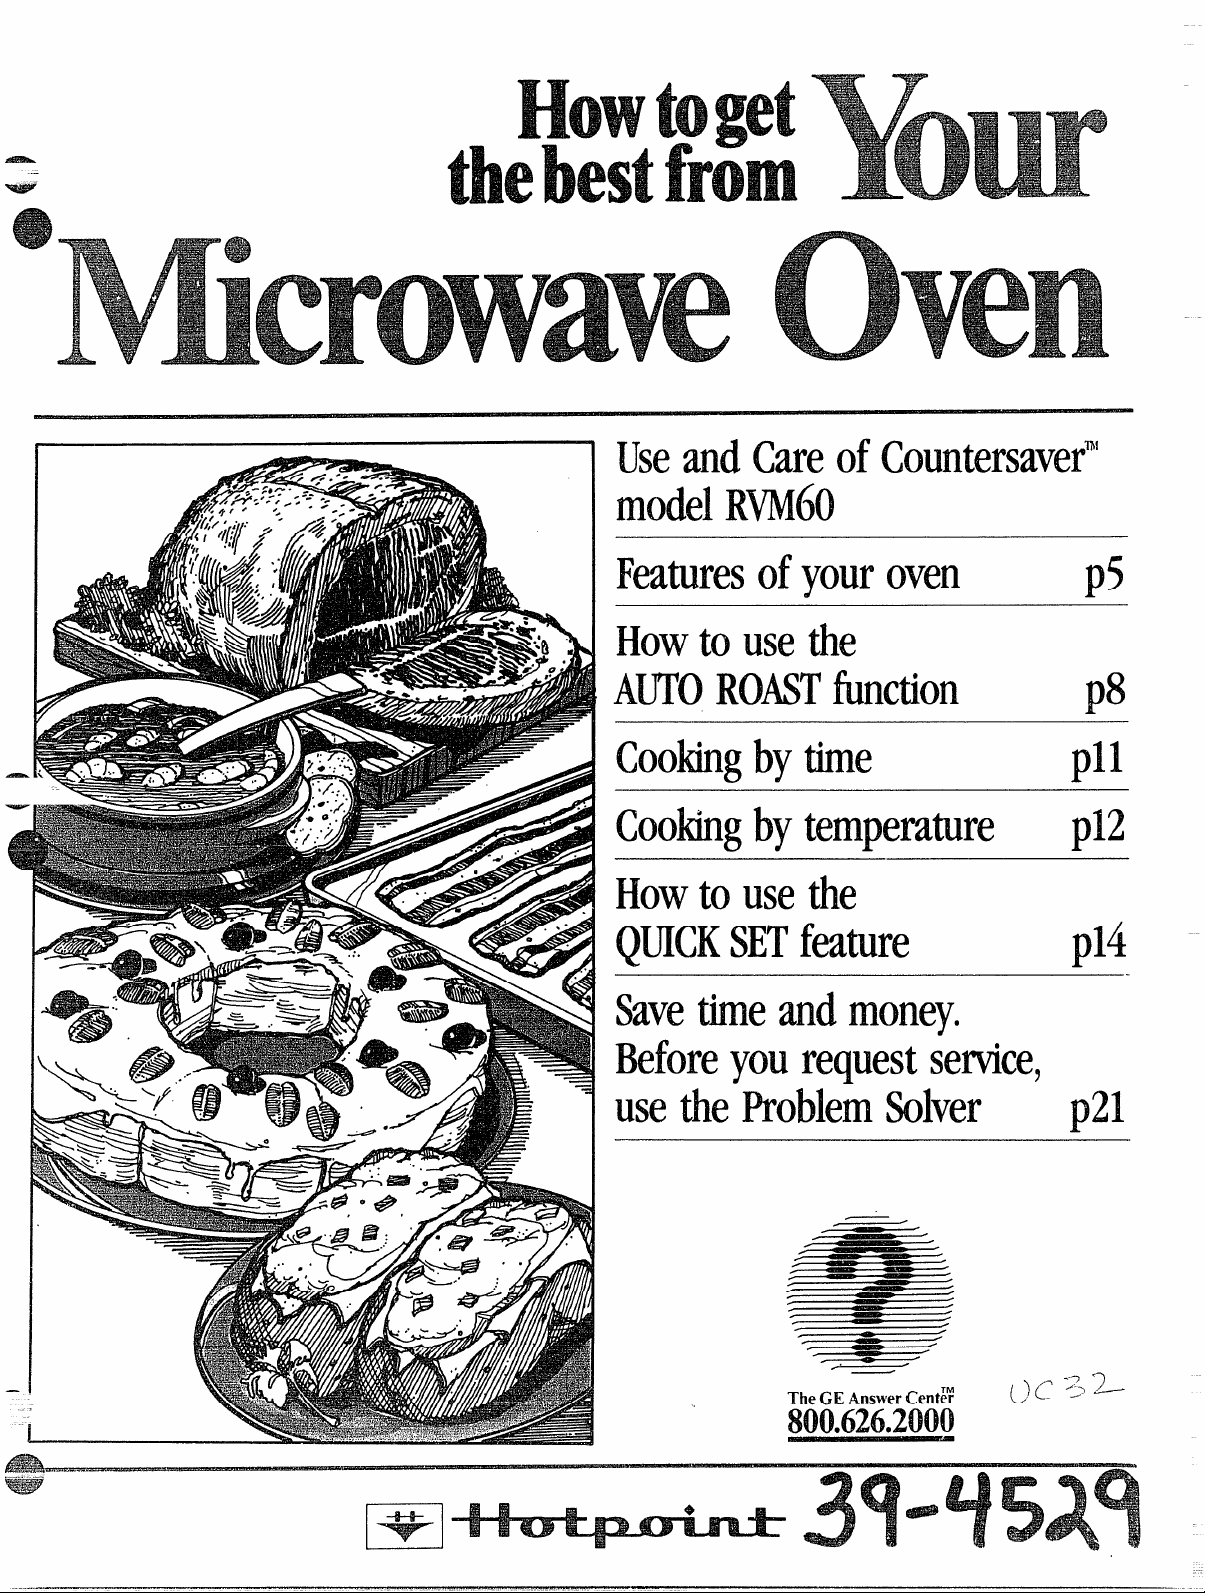
UseandCareofCountersaver”
modelIWN160
Featuresofyouroven
p5
Howtouse the
AUTOROMTfhnction
p8
Cookingbytime
-
Cookingbytemperature
p12
Howtousethe
QUICKSETfeature
p14
Savetimeandmoney.
Beforeyourequestservice,
use thel?roblemSolver -p21
—
The GE AnswerCent#
Page 2
TO
Readthisbook
It will help you operate and maintain your new Microwave
properly.
Keep it handy for answersto your
questions.
If you don’t understand something
or need more help. . .
Call, toll free:
The GE Answer CenterTM
800.626.2000
consumer information service
or write: (include your phone
number);
Consumer Affairs
Hotpoint
Appliance Park
Louisville, KY 40225
oven
writeCtww”ime!l?wddand
serialrtmlbers.
You’llfind them on a label inside
the oven on the upper left side.
These numbers are also on the
Consumer Product Ownership
Registration Card that camewith
your Microwave Oven. Before
sending in this card, pleasewrite
these numbers here:
Model No.
Be sure y(x.w
Oven
It is important that we, the manufacturer, know the location of your
Microwave Ovenshould a need
occur for adjustments.
Your supplier is responsible for
registering you asthe owner.
Pleasecheck with your supplier to
besure he has done so; also send
in your Consumer Product Ownership Registration Card. If you move,
or if you are not the original purchaser pleasewrite to us,stating
model and serial numbers. This
appliancemustbe registered.
P!easebecertainthat itis.
Write to:
Hotpoint
Range Product Service
Appliance Park
Louisville, KY 40225
is rfegk?ered.
If you receiveda damaged
oven.. .
immediately contact the dealer (or
builder) that sold you the Microwave Oven.
Savetimeand money.
Beforeyourequestserwice,check
the ProblemSolveron page 21. It
lists minor causes of operating
problems that you can correct
yourself.
TO
(a) DONot Attemptto operate this
oven with the door open since open
door operation can result in harmful
exposure to microwave energy. It is
important not to defeat or tamper
with the safety interlocks.
(b) Do Not Placeany object
between the oven front face and the
door or allow soil or cleaner residue
to accumulate on sealing surfaces.
(c) Do Not Operatethe oven if it is
damaged. It is particularly important
that the oven door close properly
and that there isno damageto the:
(1) door (bent)
(2) hinges and latches (broken or
loosened)
(3) door seals and sealing surfaces.
(d) The OvenShouldnot be
adjusted or repaired by anyone
except properly qualified service
personnel.
-:-
Serial No.
Usethese numbers in arty
correspondence or service calls
concerning your Microwave Oven.
This microwave oven is UL listed for installation over electric
and gas ranges.
Available at extra-cost from your Hotpoint supplier.
JX80 Ciwwcoa!17WterKit
Add for non-vented installation.
2
Page 3
-
Before Microwaving . . . .. . .. .. . . 2
– Safety Instructions . ...........3-4
— Featuresof YourOven . . . . . . . .. . 5
ooking Complete Reminder. . .. 5
et the Clock . . . . . . . . . . . . . . . . . . 6
Touch Control Panel . .......,.6-7
Automatic Roasting&Chart ....8-9
Defrosting . . . . . . . . . . . . . . .. . . . . 10
Time Cook . .. . . . .. . . . . . . . . . . . 11
Temp Cook/Hold .. . . . .. . . . .. . 12
MIN/SEC Timer.. . . . . .. . . . . . . . 13
QUICK SET Control . . . . . . . . .. . 14
QUICK SET Control Guide . . .. . 15
Careof Your Oven . .. . .. ....17-18
The Exhaust Feature . .. .. . . . .. 19
Grounding Instructions . . . . . .. . 20
The Problem Solver . . . . . .. . . . . 21
Consumer Services. . . . .. . .. . . . 23
Warranty . . .. . . . .. . . . . Back Cover
@Makesureall utensils used in
your microwave oven are labeled
“suitableforrnicrowaving”. Check
your Cookbook forspecific test
~odetermine ”microwave-safe”
-,1-
,,.,,.
e Papertowels, wax paper, and
plastic wrap can beused tocover
dishes in orderto retain moisture
and prevent spattering.
e Some microwaved foods require
stirring, rotating, or rearranging.
Check your Cookbook forspecific
instructions.
e Somefoodssuch as unshelled
eggsand hot dogs must be pierced
toallow steamto escape during
cooking.
—
—
Readall instructionsbeforeusingthisappliance.
When using electrical appliances
basic safety precautions should
be followed, including the
following:
WARNING—TOreduce the risk
of burns, electric shock, fire,
injury to persons or exposure to
excessivemicrowave energy:
IS Use this appliance only for its
intended useas described in this
manual.
e Read and follow the specific
“PRECAUTIONS TO AVOID
POSSIBLE EXPOSURETO
EXCESSIVEMICROWAVE
ENERGY” found on page 2.
e This appliance must be
grounded. Connect only to
properly grounded outlet. See
“GROUNDING INSTRUCTIONS”
found on page 20.
e For bestoperation, plug this
appliance into its own electrical
outlet, to prevent flickering of
lights, blowing of fuse or tripping of circuit breaker.
e Install or locate this appliance
only in accordance with the pro-
vided installation instructions.
e Do not cover or block any
openings on the appliance.
e Do not use outdoors.
e Do not immerse power cord
or plug in water.
e Keep power cord away from
heated surfaces.
e Do not let power cord hang
over edge of table or counter.
e Do not operate this appliance
if it has a damaged power cord
or plug, if it is not working properly, or if it has been damaged
or dropped.
e This appliance should be serviced only by qualified service
personnel. Contact nearest
authorized servicefacility for
examination, repair or
adjustment.
e As with any appliance, close
supervision is necessarywhen
used by children.
a See door cleaning instructions on page 17. ~
u
IS To reduce the risk of fire in
the oven cavity:
—Do not overcook food. Care-
fully attend appliance if paper,
plastic, or other combustible
materials are placed inside the
oven to facilitate cooking.
—Removewire twist-ties from
paper or plastic bags before
placing bag in oven.
—Do not useyour microwave
oven to dry newspapers.
—Paper towelsand napkins,
wax paper.Recycled paper
products can contain metal
flecks which may cause arcing
or ignite. Paper products containing nylon or nylon filaments
should be avoided, as they may
also ignite.
—Do not pop popcorn in your
microwaveovenunless in a spe-
cial microwave popcorn accessory or unless you use popcorn
labeled for use in microwave
ovens.
—Do not operatetheovenwhile
emptyto avoiddamageto the
ovenand the dangerof fire.If by
accident the oven should run
empty a minute or two, no harm
is done. However, try to avoid
operating the oven empty at all
times—it savesenergy and pro-
longs life of the oven.
—If materials inside the oven
should ignite, keep oven door
closed, turn oven off, and disconnect the power cord, or shut
off power at the fuse or circuit
breaker panel.
e Some products such as
whole eggs and sealed containers—for example, closed
glass jars—may explode and
should not be heated in this
oven.
e Avoidheatingbaby food in
glass jars, even without their
lids; especially meat and egg
mixtures.
(continued next page)
~-
—
~
—
—
—
——
—r
—.
—–
—.
-.
—.
iiiik
—
—
R#rr-
-
— –—
m
~–
—,
—,
~x
—t!si3ax-
—.
—
—
—.
—
Eiik
—
—
--
—r
—
-–
—
--–
-
-—
-—.
-–
—
-—
—–
—
—
—,
r
Page 4
(continued)
Don’t defrostfrozenbever-
s
agesin narrow necked bottles;
especially carbonated ones.
Evenif the container is opened,
pressure can build up, This can
causethe container to burst,
resulting in injury.
e Use
Cookbook.
on meat, roasts are helpful when
used as shown in Cookbook.
TV dinners may be cooked in
metal trays. However, when
using metal in microwave oven,
keep metalat leastl-inch away
from
e Cooking utensils may
become hot
transferred from the heated
food. This is especially true if
plastic wrap has been covering
the top and handles of the
utensil. Potholders may be
needed to handle the u ensil.
69Sometimes,the ovenfloor
can become too hot totouch.
Be careful touching the floor
during and after cooking.
e Do not useany thermometer
in food you are microwaving
unless that thermometer is
designed or recommended for
use in the microwave oven.
e Removethe
probe from the ovenwhen not
usingitto cook with. If you leave
the probe inside the ovenwithout
inserting it in food or liquid, and
turn on microwave energy, it can
create electrical arcing in the
oven, and damage oven walls.
metal only as directed in
Metal strips as used
sides of oven.
because of heat
/
temperature
e Plastic Utensils—Plastic
utensils designed for microwave
cooking are very useful, but
should be used carefully. Even
microwave plastic may not be as
tolerant of overcooking conditions as are glass or ceramic
materials and may soften or
char ifsubjected to short periods
of overcooking. In longer exposures to overcooking, the food
and utensils could ignite. For
these reasons: 1) Use microwave plastics only “and use
them” in strict compliance with
the utensil manufacturer’s
recommendations. 2) Do not
subject empty utensils to microwaving. 3) Do not permit children
to use plastic utensils without
complete supervision.
e
When cooking pork follow
our directions exactly and
always cook the meatto at least
170°. This assuresthat, in the
remote possibility that trichina
may be present in the meat, it
will be killed and meatwill be
safe to eat.
e Boilingeggs (in and out of
shell)isnot recommendedfor
microwave cooking. Pressure
can build up inside egg yolk and
may cause it to burst, resulting
in injury.
e Foodswith unbrokenouter
“skin”such as potatoes, hot
dogs or sausages,tomatoes,
apples, chicken livers and other
giblets, and eggs (seeabove)
should be pierced to allow
steam to escape during cooking.
e “Boilable”cookingpouches
and tightlyclosedplasticbags
should be slit, pierced or vented
as directed in Cookbook. Ifthey
are not, plastic could burst during or immediately after cooking,
possibly resulting in injury. Also,
plastic storage containers should
be at least partially uncovered
becausethey form atight seal.
When cooking with containers
tighi!y covered with plastic wrap,
remove covering carefu!!y and
direct steam away from hands
and face.
-n-E HOOD:
e Haveit installedandproperly
groundedbya qualifiedinstaller.
Seethe special installation book-
let packed with the microwave
oven.
e The ventfan inyourCountersaver’Movenwilloperateautomatically undercertainconditions
(seeAutomaticFanFeature,page
7). Whilethefan isoperating
cautionis requiredto prevent
the startingandspreadingof
accidentalcookingfireswhile
the ventfan isin use.Forthis
reason:
—Never leavesurfaceunits
unattendedat highheatsettings.
Boilover causes smoking and
greasy spillovers that may ignite
and spread if vent fan is operating. To minimize automatic fan
operation, useadequate sized
utensils and usehigh heat settings only when necessary.
—In the eventof a greasefire,
smother flaming pan on surface
unit by covering pan completely
with well-fitting lid, cookie sheet
or flat tray.
—Neverflamefoodsunderthe
ovenwiththe ventfan operating
because it may spread the
flames.
—Keephood and greasefilters
clean,according to instructions
on pages 18and 19,to maintain
good venting and avoid grease
fires.
Page 5
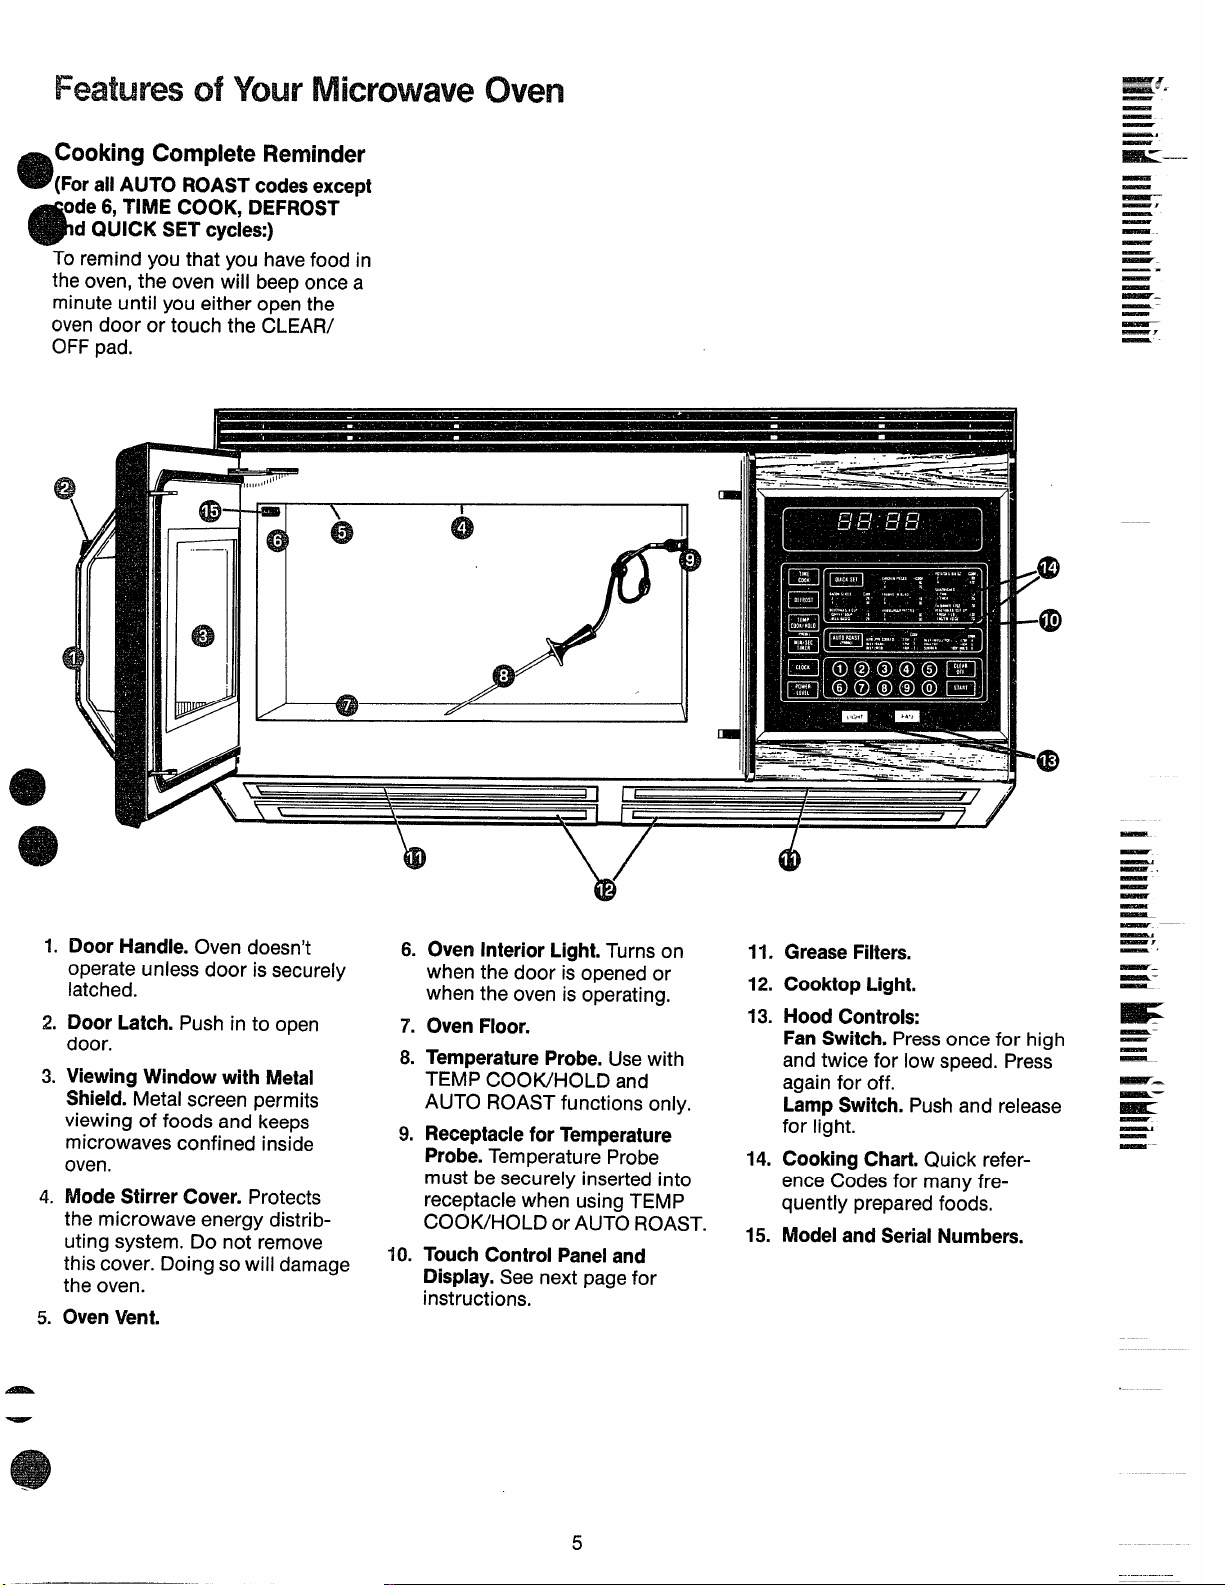
FeaturesofYour MicrowaveOven
-—
CookingCompleteReminder
e
(Forall AUTO ROAST codesexcept
ode 6, TIME COOK, DEFROST
d QUICK SET cycles:)
To remind you that you havefood in
the oven, the oven will beeponce a
minute until you either open the
oven door or touch the CLEAR/
OFFpad,
—
—
—
m“—-
—
—
—
—r
—
—
—
—
—
—
—.
—
—
~–
—-
—
-r
—
Door Handle. Oven doesn’t
operate unless door is securely
latched.
Door Latch. Push in to open
door.
ViewingWindowwith Metal
Shield.Metal screen permits
viewing of foods and keeps
microwaves confined inside
oven.
Mode Stirrer Cover. Protects
the microwave energy distrib-
uting system. Do not remove
this cover. Doing so will damage
the oven.
OvenVent.
\/
6.
OvenInteriorLight.Turnson
when the door is opened or
when the oven is operating.
OvenFloor.
?’.
TemperatureProbe.Usewith
8.
TEMP COOWHOLD and
AUTO ROAST functions only.
ReceptacleforTemperature
9.
Probe.Temperature Probe
must be securely inserted into
receptacle when using TEMP
COOK/HOLD or AUTO ROAST.
TouchControlPaneland
10.
Display.See next page for
instructions.
GreaseFilters.
11.
CooktopLight.
12.
13.
Hood Controls:
FanSwitch.Pressonce for high
and twice for low speed. Press
again for off.
LampSwitch.Push and release
for light.
CookingChart.Quick refer-
14.
ence Codes for many frequently prepared foods.
Modeland SerialNumbers.
15.
—
—
—
—. .
—
—
—
—
—
——
—
—r
—,
——–
—
E
—–
—
—
—
~..
~—
—
—
—
—-
Page 6
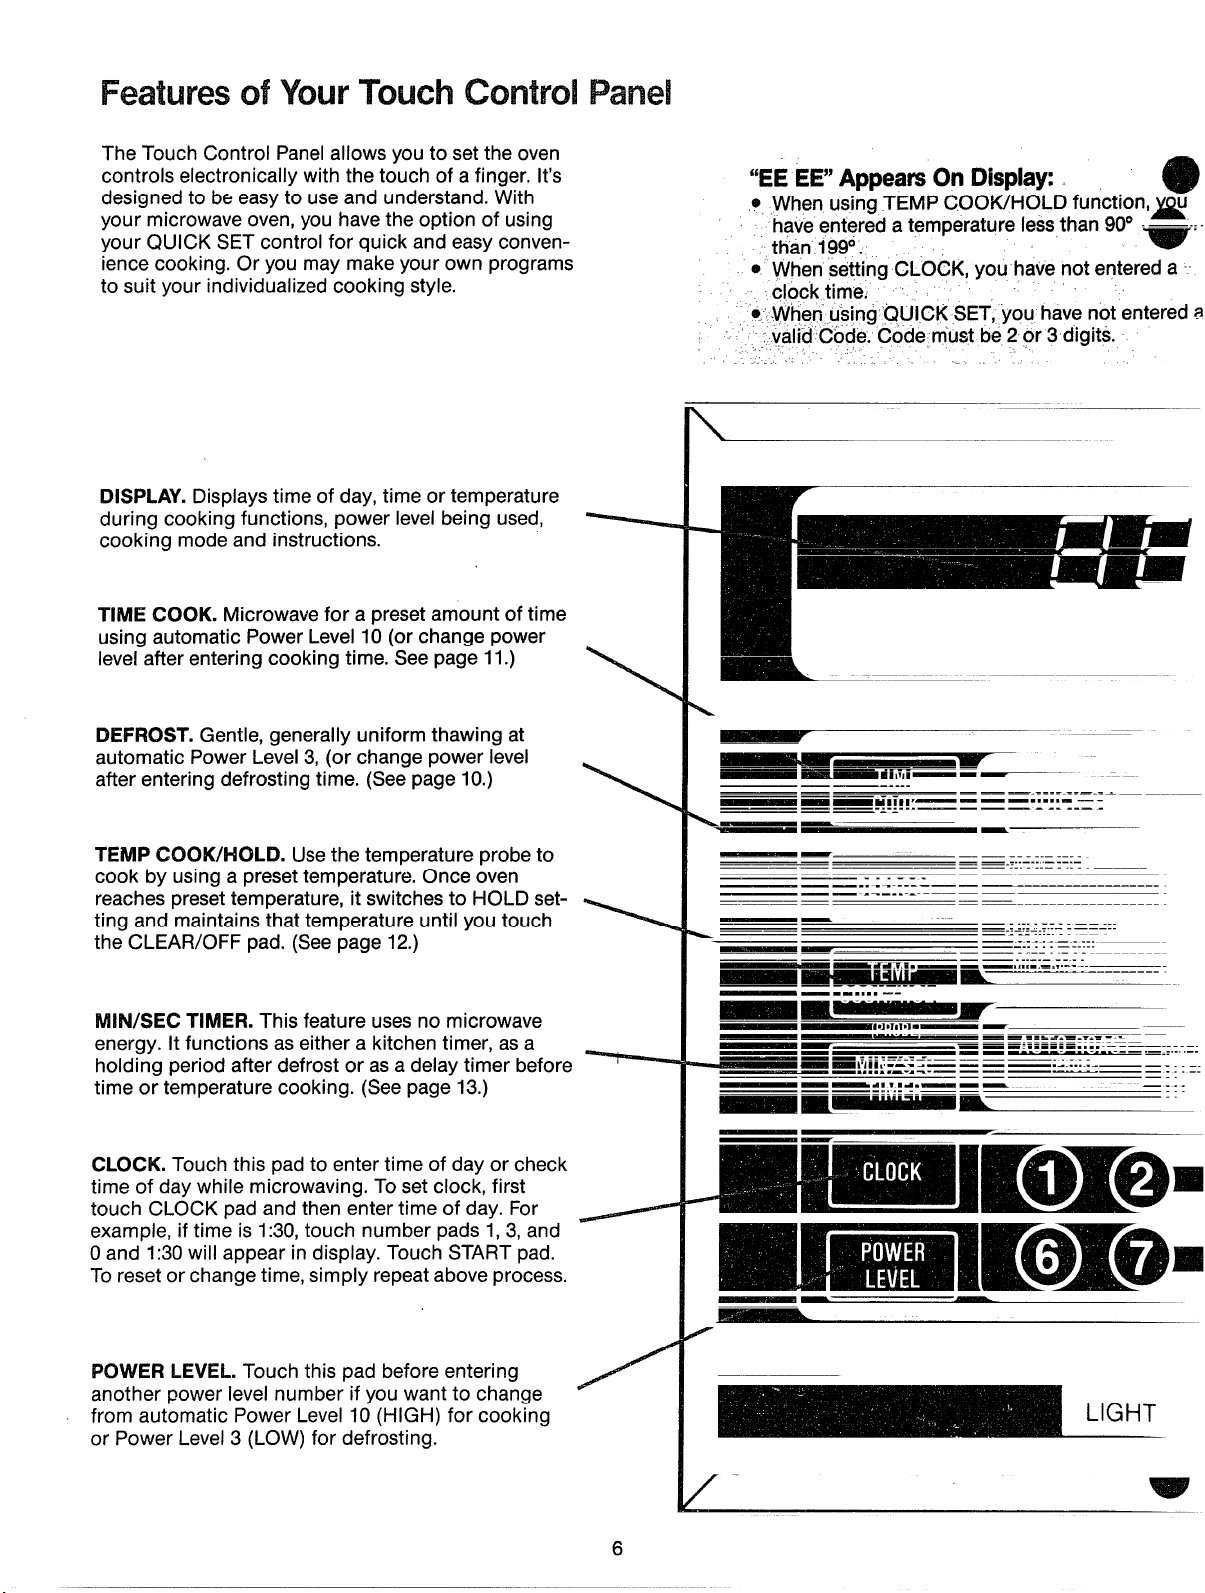
The Touch Control Panelallows you to set the oven
a
..—
-----
.——
controls electronically with the touch of a finger. It’s
designed to be easyto useand understand. With
your microwave oven, you have the option of using
your QUICK SET control for quick and easyconven-
ience cooking. Or you may make your own programs
to suit your individualized cooking style.
DISPLAY.Displays time of day, time or temperature
during cooking functions,
cookingmodeandinstructions.
TM/E
COOK. Microwave for a preset amount of time
using automatic Power Level 10 (or change power
level after enterinq cookinq time. See page 11.)
powerlevelbeing used,
.-
r-- ‘--
\ I
‘6EEEl? AppearsOn Display:
When using TEMP COOK/HOLD function, u
*
haveentered a temperature lessthan 90° -——
than 199°.
e WhensettingCLOCK,you havenotentereda--
clock time.
s,.whe~-usi~g QU[CK SET,
‘j valid Code. Code must be 2 or 3 digits.
h.
you have not entered
..
x
*-’-
DEFROST. Gentle, generally uniform thawing at
automatic Power Level3, (or change power level
after entering defrosting time. (Seepage 10.)
TEMP COOK/HOLD. Usethe temperature probe to
cook by using a preset temperature. Once oven
reaches presettemperature, it switches to HOLD setting and maintains that temperature until you touch
the CLEAR/OFF pad. (Seepage 12.)
NllN/SEC TINIER. This feature uses no microwave
energy. It functions as either a kitchen timer, asa
holding period after defrost or as a delay timer before
time or temperature cooking. (Seepage 13.)
CLOCK.Touch this padto enter time of day or check
time of day while microwaving. To set clock, first
touch CLOCK pad and then enter time of day. For
example, if time is 1:30,touch number pads 1,3, and
Oand 1:30will appear in display. Touch START pad.
To reset or change time, simply repeat above process.
-
~
~ -
— ——
4—--”
4
—-
——
—
~
— — . . . .. . —-
1-~~~-’-
~m~!!—
~ ~i*JoTil*l-— ——
— —-— — — . ..----=.= -..
~~
——
-- mI~lii:-=L-:=-= = — —:=.:-:-:-——- -- –—-
-m~-
——
~~mlirl~— - ———
—— . - —- - — ---- --— - -
——-......—— —— . . . --— .
—— - —
—— ... .-. --———
— —-.....-.-—————
— —--.-—..- --
-.. .
~MIIB1’— - — —=’=”” —-
- . ----
~mra.~.s.— — — ,,,, -.=..
—.s . . . ..-. .-— — — ——— — - - - --
—dI w1-.— - —
==
———---.—_—_-
—— ..... ..—----
——-.
—— .-. --—-.- —
— . ....--- .——---
— ... . -..—
—-.—.-—-.
—- .- . ..... ——
—....-—-.-.
—-.....—
-
——...-.—-.-.
— ——. ----.—
— —--.....-....-———
-—
——
-——----
-———--
.—
..--—-
—— --- :
--— =-, .. . .. .
----—.
—-.
— . . .
POWER LEVEL.Touch this pad before entering
another power level number if you want to change
from automatic Power Level 10 (HIGH) for cooking
or Power Level 3 (LOW) for defrosting.
LIGHT
—
1/
6
Page 7
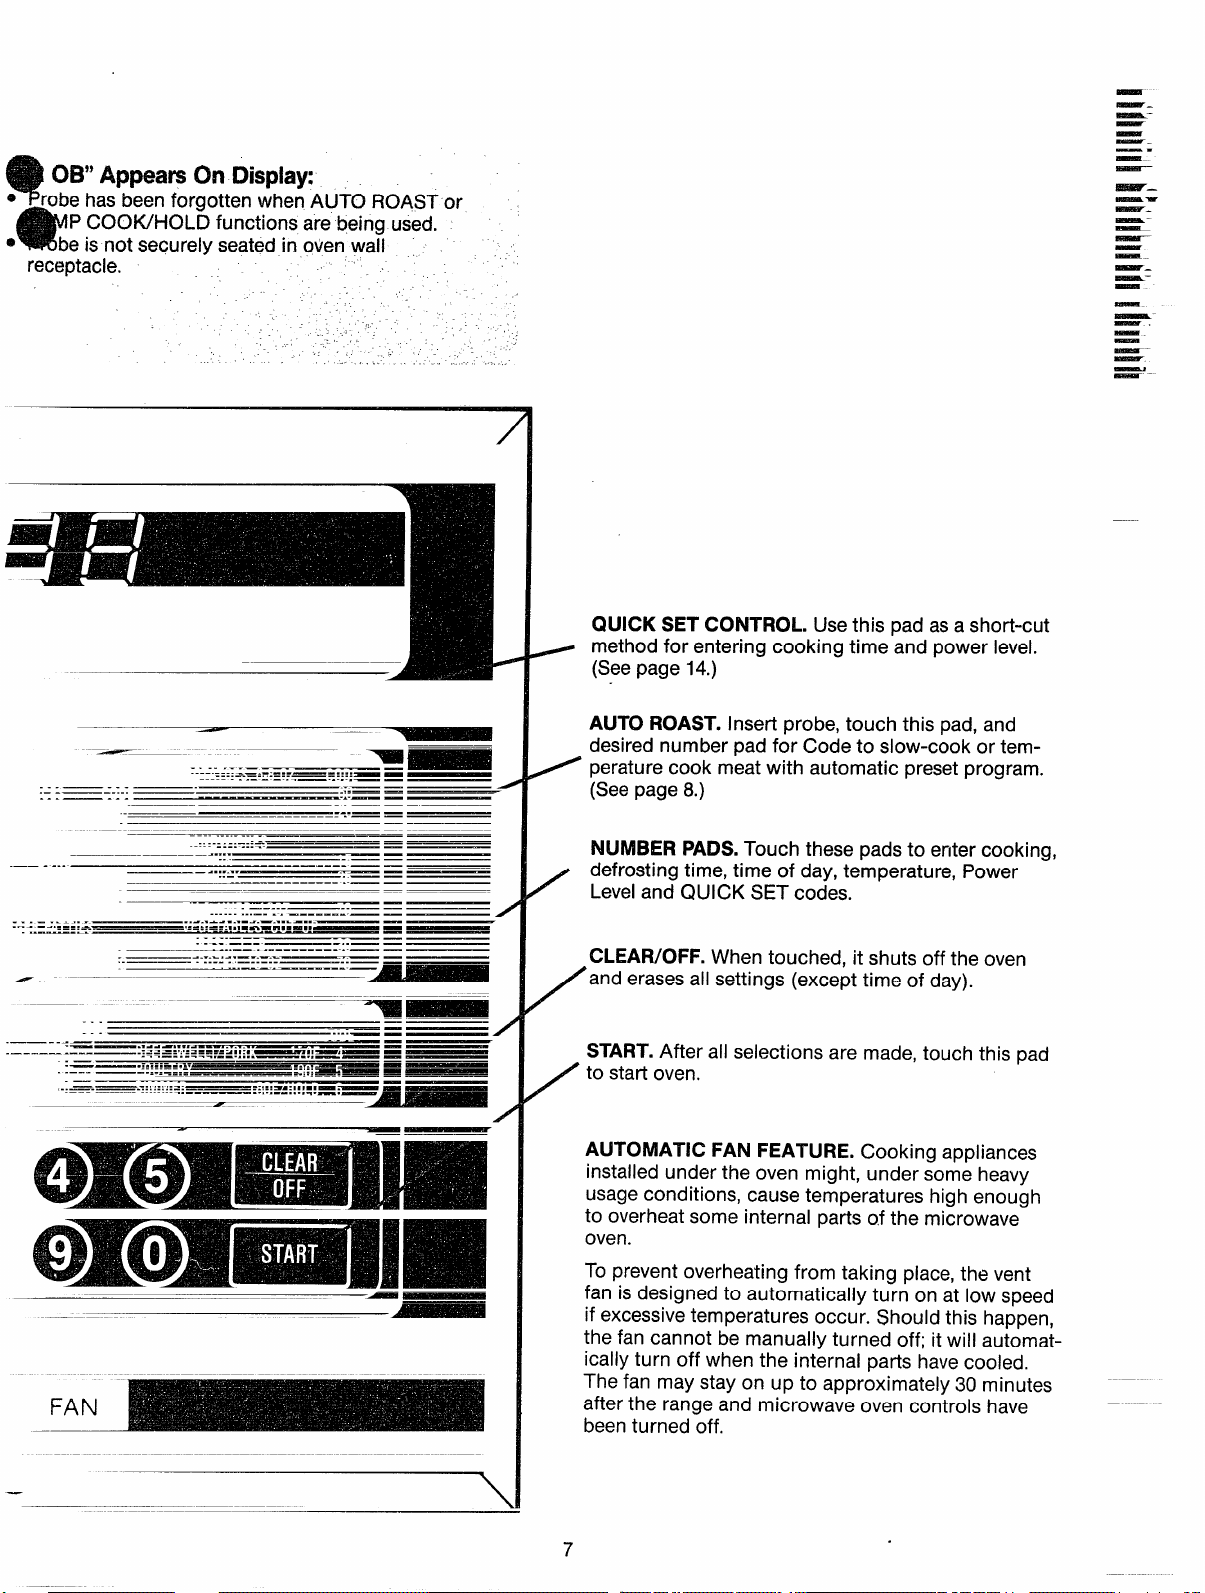
OB” Appears On Display:
obe hasbeen forgotten when AUTO ROAST or
e
PCOOIVHOLD functions are being used.
be is not securely seated in oven wall
receptacle.
“.
., ,
,..
—-
~–
—
—
—–
—.
—–
—
!siair.
—w
——–
—
—
—
—
——–
—
—-
—-
—.
—
—
—–
—
—
—-
/
QUICK SET CONTROL. Usethis pad asa short-cut
method for entering cooking time and power level.
(Seepage 14.)
... —-..
.- .— . . . ..
-.. —-. .
....
/ ——
—--.—
-——.,..-...
.—--——. -..—
.—
-——.:~~~~~g.~.
..—-- —-.=.,==,=—
. ———
..--.7 ::::: ..:=:—
FAN
–——–
.
.—— -........ ...
.-
‘“-”~~
-.
.:===:...:=====>
..- —.. . . . . .. . .. . . . .
- ---- ---
. . . . . . . . . . .
.. .. .-.— ;-
.---.---.-—
---------.. .=- ——
—
...-.——- —
.... —-- -..— —
—-..— ..-------- .-.-— —
.----. —-----
.--a.-
--. .——. .,. -.. —-....
. . .- - — . . . . . . . . . . —
------..-—
...--.-.—-.—
.... .
. .
A......
..-
------. .... ..—------ — —
H—
—.. ...—
.——
..—
.,.— -
-.-— —
...— —
.——
.-
—--—.--—-— —
——--————————— .-— —
——
-———
-. — =
.—---- -.— —
..
.—-——---. -—
—s1—,— - —
i,:’
=:4: :=-:1-1=1-.
—..——
——
...:— —
...—— —
—s—
. .. ..
:-:::-— - —
— -.,.,—.— —
-----’”---z
—— —
——
—
—
—
—
=
--
—A
—
AUTO ROAST.Insert probe, touch this pad, and
desired number pad for Code to slow-cook or temperature cook meat with automatic preset program.
(Seepage 8.)
NUMBER PADS.Touch these pads to enter cooking,
defrosting time, time of day, temperature, Power
/
Leveland QUICK SET codes.
/
CLEAR/OFF. When touched, it shuts off the oven
and erasesall settings (except time of day).
/
/
START.After all selections are made, touch
this pad
to stati oven.
/
AUTOMATIC FAN FEATURE. Cooking appliances
installed under the oven might, under some heavy
usageconditions, cause temperatures high enough
to overheat some internal parts of the microwave
oven.
To prevent overheating from taking place, the vent
fan is designed to automatically turn on at low speed
if excessivetemperatures occur. Should this happen,
the fan cannot be manually turned off; it will automatically turn off when the internal parts havecooled.
The fan may stay on up to approximately 30 minutes
after the range and microwave oven controls have
beenturned off.
—
7
.
Page 8

SeeAuto RoastCharton page
9.
AutoRoastusesthe temperature
probeto cookto thedesiredsewing
temperature.UnlikeTempCook/
Hold,whichusesa singlepower
level,Auto Roastisdesignedto use
upto 3 powersettingswhichautomaticallyswitchduring roasting,for
evenandtendercookingresults
withoutovercooking.
HANDLE
I
C’LIP
CABLE
END
Just as in conventional roasting,
only tender roasts should be Auto
Roasted until specified internal
temperatures are reached, Less
tender roastsshould bemicrowaved
by time, according to the Cookbook
which comes with your oven. Com-
plete information on preparing
roasts for microwaving is in your
Cookbook.
l-low to Prepare Roasts
for Auto Roasting
Placetender beef roasts on trivet in
microwave-safe dish. Insert probe
from the front horizontally into
center meaty area not touching
bone or fat. Cover with wax paper,
Poultry, pork or ham roasts need
no trivet. Add %cup water to roast
dish, cover with plastic wrap. (For
cooking bag method, see Cookbook,) Insert probe into center
meaty area.
I
How to Auto Roast
Beef to Medium
Step 1: Touch AUTO ROAST Pad.
Display flashes ENTERCODE.
Touch number pad 3. “START”
flashes. Touch START.
Step2: Display shows internal food
temperature counting up.
Step3: Oven monitors internal tem-
11
perature, automatically switching to
lower power as meat’stemperature
rises.This helps prevent toughening
or overcooking.
Place meat in oven with probe to
the right. Insert cable end of probe
firmly into receptacle on oven wall.
8
Step4: After temperature is
reached, oven switches to HOLD
for 1 hr., then shuts off. Hold prevents overcooking while keeping
meat warm.
Step 5: Display will show “End”.
Step 6: Open door or touch
CLEAR/OFF pad.
Page 9

Food
t5eer
Tender Roast
—
Rare 2
Medium 3
Well
Meatloaf 4 170° 15-20 5-1o
(loaf or round)
Pork
Loin Roast
Precooked Ham
Pouitry
Whole Chicken 5
(3 lb,)
Whole Turkey
(Up to 12Ibs.)
(Insert probe into meatiest area of inner thigh from below end and parallel to leg.)
Turkey Breast 170°
(Insert probe horizontally into meatiest ar~a.)
*Recommended standing time before
Code Temp (Min. per lb.) Minutes
4 170° 17-18
4
1
5
serving.
Final Approx.Time Hold’
125° 12-14
140”
170° 18-20 20
115°
190° 13-15
190°
14-16
11-14 5-1o
13-15 20
13-15 20
QuestionsandAnswers
Q. Why wasn’tmy roastfully
cookedeventhoughthe tempera-
tureon the displaywascorrectand
AutoRoastwascompleted.
A. The temperature probe must be
properly inserted when you Auto
Roast.Check your Cookbook to see
what you might have done wrong.
Q. Do sometypesof trivetswork
better than others?
.
Yes.Flat glass trivets generally
rovide more browning to the
bottom of meatsthan plastic trivets.
Also, ceramic ridge-bottomed
roasting dishes usually work well.
Plastic trivets may require meat to
beturned over more often than
glasstrivets do becausethe grid
design and legs let the bottom of
the meat stay cooler than glass
trivets do.
Q. When I’m cookingwithAuto
Roast,whydoesn’tmy roastcon-
tinueto cookduringthe holding
time?
A. When your food reachesfinished
temperature, the oven automatically
switches to a lower heat level.The
eventemperature that’s maintained
in the food during this holding
period keeps it warm without
overcooking.
5-10
10-15
30
20
Sirnrner
(Auto RoastCode6)
Here’show to Automatic Simmer a
few popular foods. Seeyour Cookbook for more cooking charts,
recipes and techniques.
Set Auto Simmer like you do Auto
Roastexcept touch number pad 6.
STARTflashes.Touch STARTand
display shows temperature until
food reaches180°.
Oven switches to HOLD when
food’s internal temperature reaches
180° and maintains that temperature
until food isdone. Ifstirring isrecommended, you can resetthe oven by
retouching START.Touch CLEAR/
OFF when cooking is finished.
AutomaticSimmerChart
Approximate
Food
Beef
Pot Roast* 6-8
Stew
Chili
Chicken*
Stewing
Broiler/Frver
Ham or Pork
Roast
soup
Stock/Vegetable
Solit Pea
‘For frozen, add 2 to 3 hours.
Time/Hrs.
6-8
11-13
11-12
4-6
4-6
3-6
13-15
-
—
—-
—–
—
—
-—
—.:
—
—
—
~—
-.
—–
~.-
~—
—–
—.
-
—r
—
—
—
—
—
-=
-.
—
—
—
——
—–
—
—–
—
-..
—
— -—
—–
—.
mmK—
—v
—.
—–
~-
‘iiiiix
—
—
——
—
~.
—.
—–
—–
—
—
—
—
—-
—
FalwA.
—la—–
—–
--—
—
—.
—
—
Page 10

The Defrostsettingis designedfor
eventhawingnecessaryfor large~
amountsof foodand isoneof the
mostimportantadvantagesofa
microwaveoven.
@Power Level3 is automatically set
for defrosting, but you may change
this for more flexibility.
~Seeyour Cookbook for defrosting
help.
Whenthe oven completes Defrosting, it automatically shuts off. It will
then display “End” and beep once a
minute until you either open the
door or touch the CLEAR/OFF pad.
To become better acquainted with
the defrost functions, defrost frozen
pork chops using the following
steps.
Step 1:Place package of frozen
chops in the oven and close door.
Step 2: Touch DEFROST. Display
reads :0 and Power Level3 is automatically set in the oven but does
not appear on display. ENTER DEF.
TIME flashes.
%ep 3:Touch 8, 0 and Ofor 8 minutes. DEF. TIME and 8:00are displayed. If you wish to change
Power Level, touch POWER LEVEL
pad and then new number.
Step4: Touch START.Time counts
down on display. When cycle is
completed, the oven signals and
automatically shuts off.
Step5:Turn package over,close
door and repeat Steps 2,3 and 4.
Step6: When oven signals and
shuts off, display will show “End”.
Step7:Open door or touch CLEAR/
OFF pad. Removepackage and
separatechops to finish defrosting.
DefrostingTips
@
Foodsfrozen in paper or plastic
can be defrosted in the package.
@For even defrosting, many foods
needto be broken up or separated
part of the way through the defrosting time.
@Homemade dinners can befrozen
in shallow foil trays and heated for
later use.Select foods which micro-
wave well.
@Pre-packaged frozen dinners can
be defrosted and microwaved.
~Check your Cookbook for other
defrosting tips.
QuestionsandAnswers
Q. When I pressSTART,I hear a
dullthumpingnoise.What is it?
A. This sound is normal. It is letting
you know the oven is using a Power
Level lower than HIGH.
Q. Can I Defrostsmallitemsin a
hurry?
A. Yes,but they will need more fre-
quent attention than usual. Raise
the Power Levelafter entering the
time by touching POWERLEVEL
and 7 or 10. Power Level7 cuts the
time about in %; PowerLevel 10
cuts the time to approximately %.
During either, rotate or stir food
frequently.
Q. Can i open the doorduring
DEFROSTto checkon the progress
of myfood?
A. Yes.Youmay open the door at
any time during microwaving. To
resumedefrosting, close the door
and press START.
Q. Why don’tthedefrostingtimes
inthe Cookbookseemrightfor
my food?
A. Cookbook times are average.
Defrosting time canvary according
to the temperature in your freezer.
Set your oven for the time indicated
in your Cookbook. If your food is
still not completely thawed at the
end of that time, re-setyour oven
and adjust the time accordingly.
Q. Can I selecta PowerLevelother
thanautomaticPowerLevel3 for
defrosting.?
A. Yes.Some smaller foods may be
defrosted quicker on higher Power
Levelsbut for even,carefree defrosting, Power Level3 is suggested.
Check the chart in the Cookbook
for specific times and Power Levels.
10
Page 11

by
iiii
_ The Time Cookfeatureallowsyou
presetthe cookingtime.
ower Level 10 is automatically set
r time cooking, but you may
change this for more flexibility.
Seeyour Cookbook.
When the ovencompletes Time
Cooking, it automatically shuts off.
It will then display “End” and beep
once a minute until you either open
the door or touch the CLEAR/OFF
pad.
To become better acquainted with
Time Cook function, make a cup of
coffee by using the following steps.
r
-4+’ 9’
- Step 1:Fill a cup 2/3 full of water
nd add 1teaspoon of freeze dried
offee. Usea cup that has no metal
decoration. Placecup in oven and
close door.
Step2:Touch TIME COOK. The
display shows :0. ENTER COOK
TIME flashes. Power Level 10 is
automatically set, but does not
appear on display.
\
Step3:Select your time. Touch 1,2,
and Ofor a minute and 20seconds.
TIME COOK and 1:20are
displayed.
If another Power Level is desired,
touch POWER LEVEL and the
number although Power Level 10
(HIGH) is preferred for this cup of
coffee.
I
Step4:Touch START. Time
counting down shows on display.
Step5:When time is up, the oven
sounds, oven light and fan shut off.
The display will show “End”.
Step6: Open the door or touch
CLEAR/OFF pad.
Questionsand Answers
Q. 1setmyovenfor thetimecalled
forin the recipe but attheend of
thetimeallowed,my dishwasn’t
done.Whathappened?
A. Since house power variesdue to
time or location, many Time Cook
recipes give you a time rangeto
prevent overcooking. Set the oven
for minimum time, test the food for
doneness,and cook your dish a
little longer, if necessary.
Q. I wantto cook on a PowerLevel
otherthan HIGH, whatdo I needto
do?
A. To change-the Power Level,
touch the POWER LEVEL pad after
entering desired cooking time.
E,nterthe desired number and then
touch START.
Q. Can I interruptmy Time Cook
functionto checkthefood?
A. Yes.To resume cooking, simply
close the door and touch START.
NOTE: Microwave power will not
come on until you are ready. You
must touch START for cooking to
begin.
Q. I touchedthe numberpadsand
selectedmy powerlevel.When I
touchedSTART,however,my oven
didn’tcomeon. Whynot?
A. The TIME COOK pad must be
touched before setting the number
pads or else your oven will not
begin cooking.
Q. 1triedto change PowerLevel
butthe displaychangedbackto
cookingtime. Why?
A. After touching Power Level pad
you only have4 seconds to enter
the number. Try setting controls
again.
—
Ia%tsf&”
—
—
—
—
~–
~-
—r
——
—
—
~
Smsl?-r.
—
—
—
—
—
—
—
—
E?EEr—.
—.
—–
—–
—
—
——
—
—
11
—
Page 12

by
Formanyfoods,internaltempera-
tureisthebesttestof doneness.
Roastsor poultryarecookedto
yourpreferencewhentemperature
cooking.Heatingor reheatingfoods
accuratelytoa servingtemperature
youdesireissimpleand easy.
TempCook/Holdtakestheguess-
workoutofcookingbecausethe
ovenautomaticallyswitchesto
HOLD settingafterreachingthe
presetfoodtemperatureand maintainsthattemperatureuntilyou
touchtheCLEAR/OFF pad.
The Temperature Probe
The temperature probe isa food
thermometer that gauges the
internal temperature of your food;
it must be usedwhen using Temp
Cook/Hold.
!+(IW tO Temp Cook
a !?dled Beef Rib Roast
to Medium
Step1:Inserttemperature probe as
directed in Cookbook and attach
probe securely in oven wall. Close
the door.
Step2:Touch TEMP COOK/HOLD.
ENTER TEMP COOK flashes and
the digit portion of the display is
blank.
Step3:Touch 1,3, 0for 130°. 130
shows on display. Power Level 10is
automatically set in oven but does
not appear on display.
Step4:Touch POWERLEVEL pad.
P-10shows on display. Touch 5 for
MEDIUM power. P-5shows on display and then display reverts back
to set finished temperature.
Step5:Touch START.After food
reaches90°, display shows temperature of food counting up.
Step6:When 130° is reached,the
oven will sound and display HOLD.
The oven will then hold the
temperature.
Step7:Touch the CLEAFVOFFpad
to stop the cycle.
Step8:Remove probe and food
from the oven.
CookingTips
Usea lower power levelsetting;
e
it will heat evenly eventhough
requiring more time.
~ Be sure frozen food has been
completely defrosted before inserting probe. Probe may break off if
used in frozen foods.
@Always insert probe into the
center of meaty areas;take care
not to touch the fat or the bone.
* Insert probe as horizontally as
possible into foods asdirected in
the recipes. Make surethe handle
does not touch the food.
@Usethe clip to keepthe probe in
place while heating.
@Cover foods asdirected in Cook-
book for moisture control and quick
heating.
QuestionsandAnswers
Q. After1followedthe stepsand
touchedSTAR?’,a signalsounded
andovendid not start.Whatis
wrong?
A. If you set the temperature either
below 90° or greater than 199° the
oven will not start. To re-enter,
touch CLEAR/OFF pad and begin
steps again.
Q. Are thereanyfoodsI can’tTemp
Cook?
A. Yes.Delicate butter icings, ice
cream, frozen whipped toppings,
etc., soften rapidly at warm temperatures. Batters and doughs aswell
asfrozen foods are also difficult to
cook precisely with the probe. It is
bestto Time Cook these foods.
Q. Why did ‘LPROB”flashon the
displayafterI touchedStart? ‘
A. “PR OB” will flash on the display
if you havenot securely seatedthe
end of the probe into the receptacle
in the oven wall or if you touch
TEMP COOK/HOLD and haveforgotten to use the probe.
Q. Can I leavemy probein theoven
ifit’snotinsertedin the food?
A. No. If the probe is left inside the
oven,touching the oven wall, and
not inserted in food, you may
damagethe oven,
Q. Can 1Temp Cook different
portionsoffoodat different
temperatures?
A. Yes.The temperature probe
givesyou the freedom to cook different portions of food at different
temperatures to suit individual
eating styles. Simply place the
probe in the food and change the
temperature setting as needed.
12
Page 13

The NllN/SECTIMER hasthree
timingfunctions:
* It operatesasa minutetimer.
It canbe setto
~ It canbe usedas a hold setting
afterdefrosting.
The MIN/SEC TIMER operates
without microwave energy.
to ~iime a S-hllinute
l-lcwv
Phone call
1.Touch MIN/SEC TIMER pad.The
display shows :0 and ENTER TIME
flashes.
2.Touch number pads 3,0 and O
(for 3 minutes and no seconds).
Display shows 3:00.
3.Touch START. Display shows
time counting down.
4.When time is up, oven signals
and display shows time of day.
delaycooking.
The display shows:0 and ENTER
DEF.TIME flashes.
Step 3: Touch pads 1,5,0 and Ofor
15 minutes defrosting time. 15:00
appearson display. (Defrosting is
automatically seton Power Level
3 but can be changed by touching
POWERLEVEL pad and the new
Power Level.)
Step8: Touch START. 15:00count-
ing down shows on display. As each
function isautomatically performed
oven display shows instructions
entered and the function. While
cooking, you may touch appropriate pad to recall times you set.
Step9:Whentime is up, the oven
sounds, oven light and fan shut off.
The display will show “End”.
Step10:Open the door or touch
CLEAR/OFF pad.
-#
—-
—
—
—
—–
—,
-—
—.
—
—
—
—
—
—–
—–
—
—
—
—–
Programming a HOLD Time
The Minute/Second Timer can also
be usedto program “hold time”
* between microwave cooking func-
tions The time can range from one
.
second to 99 minutes and 99
econds. A HOLD, or “standing”
e
time may be found in some of your
own recipes or Cookbook.
To set the oven to delay cooking up
to 99 minutes follow Steps 1 and 2
to enter hold time. Then touch
TIME COOK pad and enter time .
before pressing START.
Howto Defrost,Hold and
Time cook
Let’ssay you want to defrost a
frozen casserolefor 15 minutes,
hold for 10 minutes and then Time
Cook for 25 minutes. Here’show
to do it:
Step 1:Take casserolefrom freezer
and place it in the oven.
Step 2: Touch DEFROST pad.
Step4: Set standing or hold time by
touchingMIN/SEC TIMER. :0 ~•ÿÿø
appears on display and ENTER
TIME flashes.
Step 5: Touch 1,0, 0 andOto hold
for ten minutes. 10:00appearson
display.
Step6: Touch TIME COOK pad.
The display shows:0 and ENTER
COOK TIME flashes.
Step7:Touch 2, 5, 0 and Ofor
twenty-five minutes of cooking
time. 25:00appears on display.
QuestionsandAnswers
Q. Whatwill happenif ! accidentally
reversemydefrost,holdand cook
instructions?
A. The oven automatically rear-
rangesyour program. Defrosting
always comes first, then hold, and
then the cooking function.
Q. Can I defrostand hold only?
A. Yes.Sometimes you may only
want to defrost a food, hold it, and
cook it later. All you need to do is
program in Defrost and amount of
time. Then program Hold and the
amount of time. Be sure to put the
thawed dish in the refrigerator
promptly.
NOTE: Letfoods remain at room
temperature only as long as safe.
Times will vary.
Q. 1programmedmy ovenfor a
specificdefrostingtimebut it
defrostedlongerthannecessary.
Whathappened?
A. When instructions conflict, the
oven carries out the last instruction.
Youmay have set the oven to
defrost for 4 minutes, hold for
2 minutes, and then defrost for
6 minutes. In this case,the oven
would defrost for 6 minutes and
hold for 2 minutes and ignore your
first defrost instruction.
—
—-
—
—
-
—
—
—
—
—
—.
—–
—–
—
—
~–
-–
-
-
—
—–
-–
—
—
—–
13
Page 14

to use SET
QUICK SET Control is a short-
cut method for entering time and
the Power Level on your microwave
oven. QUICK SET Codes are only
usedfor recipes which need little or
no atten~on, and which require no
change of power Ievel”during cooking. Recipeswhich require additional ingredients, attention or
change of power levelduring microwaving should be cooked in the
usual manner. Also, recipeswith
cooking time of lessthan one
minute or more than 99 minutes
can not use Codes.
To understand the QUICK SET
Code control, it is important to know
what the numbers mean and what
the sequence is.The first and second numbers, if setting a 3 digit
Code, indicate the amount of time
you desire; the last control entry
number is always the Power Level.
For example, 125 means 12minutes
at Power Level5. NOTE: Your oven
can only be programmed to 99 minuteswhen using the QUICK SET
control and the highest Power Level
is 10which is represented by “O”.
When setting a 2 digit QUICK SET
control entry,the first istime, the second is
powerlevel. For example, 50
means5 minutes at Power Level 10.
On the following page is shown
many frequently preparedfoods and
their codes. It’s easy,though, to
make Codes for manyother recipes.
Just select one or two digits representing the length of cooking time
desired,and a final digit for the
Power Levelrequired. The Codes
given on the chart are for the minimum time needed,to avoid over-
cooking which can dry out food and
make it tastelessand tough. If you
feel that more cooking is needed,
FcN’!EXanlple:
add additional time by changing the
first digit of the Code, You cannot
add secondsto the cycle time—
Codesare for whole minutes only.
If your recipe calls for Power Level
changesor different amounts of
time needed betweenaddition of
ingredients, you may setone Code
for the first part of the recipe, then
after completion, set another Code
for that period of time and Power
Level.
Rememberthat QUICK SET Codes
arefor microwaving by ilme only. If
you are microwaving by temperature, you must usethe Temp Cook
or Auto Roastfunction.
Whenthe oven completes QUICK
SET program, it automatically shuts
off. It will then display “End” and
beenonce a minute until you either
open the door or touch the CLEAR/
OFF pad.
QUICK SET
2-Digit
50
P=?
Time in
Minutes High (10)
How b set
QUICK $x-r control
Programming your oven for QUICK
SET Control operation is
Follow these simple steps.
Step 1:Touch QUICK SET, ENTER
CODE flashes.
Power Level
easy. .
Step2: Enter the proper code. For
example, a recipe calling for 12”
minutes cooking time at Power
Level 10would be 120.120 appears
on the display panel.
QUICK SET
3-Digit
5=!
Time in Power Level
Minutes
Step3:Touch START. Display will
show time counting down and
COOK TIME.
Med (5)
14
Page 15

--l
-1
Detachand Tapeto insideCabinetDoor or OtherProminentPlace
The QUICK SET Control feature givesyou an easy
automatic way to accurately set microwave time for
foods requiring only one power leveland little atten-
tion during cooking. The Chart below shows fre-
quently prepared foods and the suggested Codes to
use with each. For specific information on stirring,
turning or rotating, check the MicrowaveGuide and
I
Cookbook which comeswith your microwave oven.
I
Always use microwave-safe containers
I
I
I
Appetizers(Warming)
I
I
Dip (Cream Cheese)
I
‘/2 cup
I
1 cup
I
Dips (Sour Cream)
1
‘/2 cup
I
1 cup
Pastry Bites (Reheating)
2 Servings
4 Servings
Breadsand Desserts
w
z
i
a
u
F-
Apples
(2)
Bran Muffins
(5-6)
Brownies (Mix)
Cakes (Mix)
(16 cup fluted mold)
I
Cheese Bread, Yeast
I
(1 loaf)
Chocolate Chip Bars
Nut Bread (Mix)
(1 loaf)
Pudding Mix (3oz. pkg.)
I
I
Beverages
i
Coffee, Soup
I
(1 cup)
1
Milk Bases
I
I
I
I
I
I
I
I
I
I
I
I
I
I
I
I
I
I
I
cup)
(1
FrozenFoods(Defrost)
Note: Times given below arefor entire defrost cycle.
Usually food must be rotated, broken up or turned
over while defrosting. Check Cookbook for specific
information.
Cake, Whole Iced
Chicken, Cut-up
(2%-31/2tbs.)
Dessert Topping, Whipped 13
Doughnuts or Pastries
(2-4)
Fish Fillets
(1 lb.)
Hamburgers
(2 Ibs.)
Pie, Fruit Filling
(Whole)
Roast
(4-5 Ibs.)
Steak or Chops
(2 Ibs.)
I
1
25
45,
13
23
17
10
40
37
60
110
105
50
97
60
10
28
23
143
13
83
123
83
403
83
and microwavetechniques as described in the
Cookbook.
Toset Codes for many other foods or recipes refer to
page 14in this Useand Care E?ookQUICK SET
Codes given are for minimum time. Check and add
time if necessaryto complete cooking.
Meats/MainDishes
Bacon
2 Slices
4 Slices
Chicken
8-10 pieces
2 pieces
4 pieces
Chuck Roast
(3 Ibs.)
Eggs, Baked
2 Eggs
Eggs,Scrambled
2 Eggs
Entrees, Frozen
8
OZ.
OZ.
16
2 Ibs.
Fish Fillets
(1 lb.)
Franks (in bun)
2
4
Meat Loaf
(1’/2Ibs.)
Sausage (Raw)
4 Patties
4 Links
Swiss Steak
(2 Ibs.)
FrozenTV Dinner
(lo oz.)
Vegetables (Fresh)
Beans,Green
(1 lb.)
Broccoli
(11/4-1Y2Ibs.)
Spears
cut
Cauliflower, Head
Corn on Cob
(4)
Potatoes
(4)
Squash
(1 lb.)
Zucchini
(1 lb.)
Vegetables(Frozen)
OZ. pkg.
10
15
28
30
200
40
70
665
25
20
50
110
200
60
10
30
170
30
20
706
107
150
157
120
137
120
120
100
100
70
Page 16

YourNewMicrowaveOven isa
ValuableAppliance,ProtectIt From
MisuseByFoilowingTheseRules:
Keepyourovencleanand
sweet-smelling.Opening the oven
door a few minutes after cooking
helps“air-out” the interior. An
occasionalthorough wiping with a
solution of baking soda and water
keeps the interior fresh.
@ Don’tusesharp-edgedutensils
withyouroven.The interior and ex-
terior ovenwalls can be scratched.
The control panel can be damaged.
e Don’tremovethe modestirrer
at the top of the oven (microwave
feature 4 on page5). Youwill
damagethe oven.
A, 9
HOWto Clean the !lnside
Wails,floorand plasticcover.Be-
causethere is Iittie heat except in
the food, or sometimes in the uten-
spillsandspattersareeasyto
sils,
remove.Somespatterscanbere-
moved with a paper towel, others
may require a damp cloth. Remove
greasyspatters with a sudsy cloth,
then rinse and dry, Do not use
abrasivecleaners on oven walls.
NEVER USE A Commercial
OVEN CLEANER ON ANY PART
OF YOUR MICROWAVEOVEN.
Door-inside.Glass:Wipe up spatters
daily, wash when soiled, with a min-
imum of sudsy warm water. Rinse
thoroughly and dry.
Metal and plastic parts on door:
Wipe frequently with a damp cloth
to removeall soil. DO NOT USE
ABRASIVES, SUCH AS CLEANING
POWDERSOR STEEL AND PLASTiC PADS.THEY MAY MAR THE
SURFACE.
How to Clean the Outside
Case.Ciean the outside of your
oven with soap and damp cloth,
then rinse and dry. The outer pane
of the window is glass.Just wipe
clean with a damp cioth. Chrome
trim is best wiped with a damp cioth
and then with a dry towei.
ControlPanel.Wipe with a damp
cloth. Dry thoroughly. Do not use
abrasivesor sharp objects on the
panel. They can damage it.
DoorSurface.When cleaning surfaces of door and oven that come
together on ciosing the door, use
only mild, non-abrasive soaps or
detergents applied with a sponge
or soft cioth.
PowerCord. If the cord becomes
soiled, unplug and wash with damp
cloth. Forstubborn spots, sudsy
water may be used, but be certain
to rinse and dry thoroughly before
plugging cord into outlet.
!EIaw CLEANING ANY
ART OF THIS OVEN.
Specialnotewhen usingBrown‘N
SearDish:High heat generated on
bottom of Brown ‘N Sear Dish can
cause scorched appearing stains to
bake onto the oven floor if grease is
present..These may be removed
with Bar Keepers Friend@Cleanser
by SerVaasLaboratories, Inc.
After using Bar Keepers Friend@
Cleanser, rinse and dry thoroughly,
following instructions on can. Do
not use Bar Keepers Friend@
Cleanser on the painted surfaces
such as the walls. it may scratch the
paint.
Bar Keepers Friend@Cleanser is
sold in many grocery, hardware,
and department stores,
AutomaticTemperatureProbe.
Probe is sturdy, but care should be
taken in handling. Do not twist or
bend; avoid dropping temperature
probe.
Clean as soon after using as possible. To clean, wipe with sudsy
cloth, then rub Iightiy with plastic
scouring ball if necessary, Rinse
and dry. (Or wash in dishwasher.)
Page 17

.
—>.
(
\
To ret)lacehood lamp, first disconnectpowerat main
fuse or circuit breakerpanel or pull plug. Remove 2
screws from each side of lower panel and 3 screws
from front edge. Lower panel until it rests on range
n
o
To replace you oven lamp, first disconnectpower at
mainfuseor circuitbreakeror pull plug. Removethe
top grill by taking off 2 screws which hold it in place.
Next, remove the single screw on top left that secures
lamp housing. (On models so equipped.) Open oven
door for easier removalof the lamp housing assembly.
Then grasp tab and pull out and upto clear door hinge
and front lip of oven. To remove bulb, push it inward
gently and turn to left, then pull outward from socket.
Replacewith Lamp #25T8DC.
Do not attemptto operatethe ovenunlessthe grill is
in place.
00
u
below. Be sure bulb to be replaced is cool before removing. Remove bulb or bulbs and replace with 40
watt appliance bulbs. Raise lower panel and replace
screws. Connect electrical power to microwave oven.
\
\
Cleanoff the greaseand dust on hood surfaces often
using a warm detergent solution. To clean the glass,
add about 1 tablespoon of ammonia to the water.
Take care not to touch the filters and enameled surfaces with this solution because ammonia will tend to
darken metal.
I
18
Page 18

-
F
-_._J
r
~ The exhausthood feature on your microwave oven is
WE7
equipped with a metal filter which collects grease.
When”the fan is operated, air is drawn up through the
# /
‘I
I
filter and isthen discharged through provided venting
to the outside. The hood also has a light for illumi-
nating the counter surface.
.. .
. . . ..
—
~
—
—
m:
—
—.
—..
—
— -–
—
—r
——
—
—
—
—
—
—
—
—
-.
—
—
Toremovegreasefilter,grasp the “finger hold” on the
filter and push to the rear.The filter will drop out.
Toreplacegreasefilter,insertthe filter in the topframe
slot on the back of the opening. Push to the rear and
upward to snap into place.
—
Soak, then agitate filter in hot detergent solution.
Don’t use ammonia or other alkali because it will
darken metal. Light brushing can be used to remove
embedded dirt. Rinse, shake and remove moisture
before replacing. Filters should be cleaned at least
once a month.Never operateyour hood without the
filterin place.Insituatio-nswhere flaming might occur
on surfaces below hood, filter will retard entry of
flames into the unit.
19
Page 19

This appliance must be grounded.
In the event of an electrical short
circuit, grounding reduces the risk
of electric shock by,providing an
escape wire for the electric current.
This appliance is equipped with a
power cord having agrounding wire
with a grounding plug. The
mustbe pluggedintoanoutletthat
is properlyinstalledandgrounded.
(Fig. 1)
plug
Wherea standard two-prong wall
receptacle is encountered, it is your
personal responsibility and obligation to haveit replaced with a properly grounded three-prong wall
receptacle.
Do Not Under Any CircumstancesCut or Removethe
Third (Ground) ProngFrom
The Power Cord.
WARNING—improper useof the
grounding plug can result in a risk
of electric shock.
‘1
#
Q
;
IiiiJfn
Fig. 1
Consult a qualified electrician or
service technician if the grounding
instructions are not completely
understood, or if doubt exists as to
whether the appliance is properly
grounded.
\
INSURE PROPER GROUND
EXISTS BEFORE USE
Do Not Usean AdapterPhJg
WithThis Appliance.
Do Not Usean Extension
CordWifh ThisAppliance.
20
Page 20

‘The
To SaveTime and Money—
beforeyourequestservice,
check the ProblemSolver
If you havea problem, it may be
minor. Youmay be able to correct
it yourself. Just use this Problem
Solver
then follow the suggested
recommendations.
to locateyourproblem and
PROBLEM POSSIBLE CAUSE AND REMEDY
OVEN WILL NOT COME ON A fuse in your home may be blown or the circuit breaker tripped.
CONTROL PANEL LIGHTED, Door not securely closed.
YET OVEN WILL NOT START
AllTheseThingsAre Normal
on YourMicrowaveOven:
Steam or vapor escaping from
o
around the door.
@Light reflection around door or
outer case.
o Dimming oven light and change
in blower sound may occur while
operating at power levelsother than
hinh
I Ilyl 1.
Replacefuse or resetcircuit breaker.
Makesure 3-prong plug on oven is fully inserted into wall receptacle.
START must be touched after entering cooking selection,
Another selection entered already in ovenand CLEAR/OFF not touched
to cancel it.
Makesure you haveentered cooking time after touching TIME COOK.
CLEAR/OFF was touched accidentally. Reset cooking program and
touch START.
Makesureyou haveentered desiredfinished temperature after touching
TEMP COOK/HOLD.
Makesure you haveentered a code number after touching QUICK SET
or Auto Roast.
e Dull thumping sound while oper-
ating at power levelsother than
high.
@Some TV-Radio interference
might be noticed while using your
microwave oven. It’ssimilar to the
interference caused by other small
appliances and does not indicate a
problem with your oven.
—
FOODS ARE EITHER OverCOOKED OR UNDERCOOKED density or amount of foods in oven. Touch TIME COOK and additional
“EE EE” APPEARS When using Temp Cook/Hold, atemperature lessthan 90° or more than
ON DISPLAY 199° has beenentered.
“PR OB” APPEARS
ON DISPLAY
cooking times may vary because of starting food temperature, food
cooking time for completion.
Incorrect Power Level entered. Check Cookbook for recommended
Power Levelor changing levelsduring cooking if necessary.
Dish was not rotated, turned or stirred. Some dishes require specific
instructions. Check Cookbook or recipe for these instructions.
Too many dishes in ovenat sametime. Cooking time must be increased
when cooking more than one food item, Check Cookbook for recommendation on increasing time.
Probe not inserted properly into meat or dish when using Temp Cook/
Hold or Auto Roast functions. Check Cookbook for specific
instructions.
Incorrect QUICK SET numbers entered.
When using Clock, you have not entered a valid clock time.
When using QUICK SET, you havenot entered avalid Code. Code must
be 2 or 3 digits.
Probe has been forgotten or not seated properly in oven wall when
using Auto Roast or Temp Cook/Hold functions.
21
Page 21

— —. — —-—=-—
Hotpointwe’recommittedto providingyouwith thebestapplianceswe knowhow
At
to buildand we knowthatyouwant yourappliancesto giveyoumanyyearsof dependable
service.
OurConsumerServicesaredesignedwith your needsand wants in mind.
WarrantyProtection
Yournewapplianceis a welldesignedandengineered Seethe warrantyon the backpageof this bookfor
product.Beforeit left the factory,it wentthrough details.
rigoroustests to detectmanufacturingdefects.And
you havea written warrantyto protectyou.
PromptService at yourConvenience
Whetheryourapplianceis in orout of warranty,
you’rejust a phonecall awayfrom ournationwide
networkof FactoryTrainedServiceprofessionals.
Simplycall ourHotpointserviceorganization.
You’llfindthem in the White,Pagesunder“Hotpoint
FactoryService:’andin the YellowPagesunder
“Hotpoint CustomerCaremService:’
Serviceis scheduledat yourconvenienceandthe
techniciandrivesa fully-stockedparts servicetruck
so that, in most cases,the repaircan becompleted
in onevisit.
We’reproudof ourserviceandwantyouto be
pleased,but if for somereasonyouare not happy
with the serviceyoureceive,herearethreestepsto
follow for further help.
ServiceContracts
Fortrouble=freeservicebeyond
thewrittenwarrantyperiod.
If you preferto budgetyourrepairexpenditure month,a year,orseveralyearsfrom now.
insteadof beingsurprisedbythem,Hotpoint
offers servicecontractsfor varyinglengthsof trainedservicetechniciansusingonly
time on all Hotpoint majorappliances.With a
FIRST,contact the peoplewhoservicedyour
appliance.Explainwhyyouarenot pleased.In most
cases,this will solvethe problem.
NEXT,if youarestill not pIeasedwriteall the details
—
includingyourphonenumberto:
Manager,ConsumerRelations
Hotpoint
AppliancePark
Louisville,Kentucky40225
FINALLY,if your problemisstill not resolved,write:
MajorApplianceConsumerAction Panel
20NorthWackerDrive
Chicago,Illinois 60606
tract we’ll keepyourappliancein good
crating condition duringthe contract period
noadditional charge.Servicecontracts
letyou paytoday’s pricesfor servicea
And,you’ll receiveservicefrom Hotpoint
GenuineHotpoint parts.
TheQuickFix@System
You can savemoneyand time
by doingit yourself.
Fordo-it-yourselferswhowouldprefer
to fix Hotpointmajorappliances
themselves...Hotpointoffers an
industryfirst, the QuickFix@System.
HelpforYouByPhone
Shouldyouneedhelpin the selectionand :
-
purchaseof newappliances,or have consumerinformationserviceis open24
questionsaboutthe operationof the Hotpoint ~ hoursaday,sevendaysa week.
appliancesyou nowown—or haveanyother ‘~”
questionsaboutourconsumerproductsor
servicesyouareonlya TOLL-FREEcall away.
~— ~
~
The GE AnswerCen~ey
800.626.2000 ‘ouanytime’
23
A programfor do-it-yourselfappliancerepair,
thesystem includesstep-by-steprepair
manua/sfor refrigerators,most non-microwave
electricranges,dishwashers,andstandard
andlargecapacity washersanddryers,plus
speciallypackagedreplacementparts, and
technicalhelpwith a to// tree800numbez
TheGEAnswerCenterTM800.626.2000
Ourstaff of expertsstands readyto assist
Page 22

Saveproofof originalpurchasedatesuchasyoursalessliporcancelledcheckto establishwarrantyperiod.
W..
,,lg
,,$:
lp%l&
IIk–<-
e
II
1sC’X)VERED
Is NOT’
Somestatesdo notallowtheexclusionor limitationof incidentalorconsequentialdamages,so the abovelimitation or exclusion
maynotapplyto you.This warranty givesyouspecificlegalrights,andyoumayalsohaveotherrightswhichvaryfromstateto state.
To knowwhatyourlegalrightsarein yourstate,consultyourlocalorstateconsumeraffairsoffice or yourstate’sAttorneyGeneral.
+
FULLONE=YEARWARRANTY
For one year from date of original
purchase,we will provide,free of
charge, parts and service labor in
your home to repair or replaceany
partof themicrowaveoven/range
that fails because of a manufac-
turing defect.
LIMITEDADDITIONAL
FOUR-YEARWARRANTY
For the second through fifth year
from date of original purchase,
we will provide,free of charge, a
replacement magnetrontube if the
magnetron tube fails because of a
manufacturing defect. Youpay for
the service trip to your home and
service labor charges.
eService trips to your home to
teach you how to use the product.
ReadyourUseand Care material.
If you then haveany questions
about operating the product,
please contact your dealer or our
Consumer Affairs office at the
address below,or call, toll free:
The GEAnswer CenterTM
800.626.2000
consumer information service
~ Improper installation.
If you havean installation problem,
contact your dealer or installer.
Youare responsible for providing
adequate electrical, exhausting
and other connecting facilities.
Warrantor:General Electric Company
This warranty is extended to the
original purchaserand anysucceeding owner for products purchased
for ordinary home use in the 48
mainland states, Hawaii and
Washington, D.C.In Alaska the
warranty is the same except that it
is LIMITED because you must pay
to ship the product to the service
shop or for the service technician’s
travel costs to your home.
All warranty servicewill be provided
by our Factory Service Centers or
by our authorized Customer Care@
servicers during normal working
hours.
Look in the White or Yellow Pages
of your telephone directory for
HOTPOINTFACTORYSERVICE,
GENERALELECTRIC-HOTPOINT
FACTORYSERVICEor HOTPOINT
CUSTOMERCARE” SERVICE.
e Replacement of house fuses
or resetting of circuit breakers.
. Failure of the product if it is
used for other than its intended
purpose or used commercially.
. Damage to product caused
by accident, fire, floods or acts
of God.
WARRANTORISNOT RESPON-
SIBLE FORCONSEQUENTIAL
DAMAGES.
Iffurther help is neededconcerning this warranty,contact:
Manager–Consumer Affairs, General Electric Company,Appliance Park, Louisville, KY 40225
Ilg:
IIp;
IiXg
1-,,g:’
~~i
—
I
11=:-
II-
IIXX
Part No. 862A724 PI 15
NO. 39-4529
Pub.
6/84
*
+
A QUALIIY PW1’)UC.T of
LEN RAL E LLC T W cOMPANY
 Loading...