

Page 1
How to get
the best from
Yom
Mcrowave~en
Conten@
Adapter Plugs
Aluminum Foil
Appliance Registration
Care and Cleaning
Control Panel
Convenience Food Guide
Cooking Guide
Cooktop
Defrosting
Defrosting Guide
i’
Exhaust Fan
Extension Cords
Light
12, 13,20-27
29
4
2
11,28
6, 7
18,
19
6,29
10
16, 17
6,28
29
Precautions
Problem Solver
Repair Service
Safety Instructions
Temp
Control
Temperature Probe
Time Control
Warranty
30
31
3,4
6,9
6,9
6,8
Back Cover
3
Use and Care 01
Countersavel
model
RVM11OG
Features
Grease Filter
Grounding Instructions
Heating or Reheating Guide 14, 15
Light Bulb Replacement
Microwaving Tips
Mode]
and Serial Numbers
Power Levels
28
29
29
6,8
5
The electric output
of this microwave oven
is 625 watts.
2
2
GE Answer
800.626.2000
Center@
Page 2

Help us help you...
Before using your oven,
read this book carefully.
It is intended to help you operate
and maintain your new microwave
oven properly.
Keep it handy for answers to your
questions.
If you don’t understand something
or need more help, write (include
your phone number):
Consumer Affairs
Hotpoint
Appliance Park
Louisville, KY40225
Write down the model
and serial numbers.
You’ll find them on a label inside
the oven on the upper left side.
These numbers are also on the
Consumer Product Ownership
Registration Card that came with
your microwave oven. Before
sending in this card, please write
these numbers here:
Model Number
Serial Number
Use these numbers in any
correspondence or service calls
concerning your microwave oven.
Be sure your microwave
oven is registered.
It is important that we know the
location of your microwave oven
should a
ned
occur for adjustments.
Your supplier is responsible for
registering you as the owner.
Please check with your supplier
to be sure he has done so; also send
in your Consumer Product
Ownemhip
Registration Card. If you move, or
if you are not the original purchaser,
please write to us, stating model
and serial numbers.
This appliance must be registered.
Please be
certiin
that it is.
Write to:
Hotpoint
Range Product Service
Appliance Park
Louisville,
KY40225
If you received a
damaged oven . . .
Immediately contact the dealer
(or builder) that sold you the oven.
Save time and money.
Before you request service . . .
check the Problem Solver on
page 30. It lists causes of minor
operating problems that you can
correct yourself.
Microwaving
● Make sure all cookware used in
~ps
your microwave oven is suitable for
microwaving. Most glass casseroles,
cooking dishes, measuring cups,
custard cups, pottery or china
dinnerware which does not have
metilic
trim or glme with a
metilic
sheen can be used. Some cookware
is labeled “suitable for microwaving?’
If you are unsure, use this dish test:
Measure 1 cup water in a glass cup.
Place in oven on or beside dish.
Microwave 1 minute at High (10).
If water becomes hot, dish is
microwave safe. If dish heats, it
should not be used for microwaving.
●
Paper towels, wax paper and
plastic wrap can be used to cover
dishes in order to retain moisture
and prevent spattering.
●
Some microwaved foods require
stirring, rotating or rearranging.
Check the cooking guide for
specific instructions.
●
Steam builds up pressure in foods
which are tightly covered by a skin
or membrane. Pierce potatoes, egg
yolks and chicken livers to prevent
bursting.
Optional Accessory
available at extra cost from
your
Hotpoint supplier.
J=l
Charcoal Filter Kit for
non-vented instillation.
Ml
these things are normal with your microwave oven:
●
Dull
● Steam or vapor escaping from
thumping sound
around the door. oven is operating.
● Light reflection around door or
●
Some TV-Radio interference
outer case. might be noticed while using your
●
Dimming oven light and change
in blower sound may
occur while
operating at power levels other
than high.
microwave oven. It’s similar to the
interference caused by other small
appliances and does not indicate a
problem with your oven.
while
2
Page 3

PRECAUTIONS
IMPORTANT SAFETY INSTRUCTIONS
TO AVOID
POSSIBLE
EXPOSURE TO
EXCESSIVE
MICROWAVE
ENERGY
(a) Do Not Attempt
this oven with the door open since
open-door operation can result in
harmful exposure to microwave
energy. It is important not to
defeat or tamper with the safety
interlocks.
(b) Do Not Place
between the oven front face and
the door or allow soil or cleaner
residue to accumulate on sealing
surfaces.
(c)
Do Not Operate
if it is damaged. It is particularly
important that the oven door close
properly and that there is no
damage to the:
(1) door (bent)
(2) hinges and latches (broken or
loosened)
(3)
door seals and sealing surfaces.
(d) The Oven Should Not
adjusted or repaired by anyone
except properly qualified service
personnel.
This microwave oven is
for installation over electric
and gas ranges.
to operate
any object
the oven
UL
be
I
isted
Read all instructions before using this appliance.
●
When using electrical appliances,
basic safety precautions should be
followed, including the following:
WARNING–TO reduce
the risk of burns, electric shock,
fire, injury to persons or exposure
to excessive microwave energy:
●
Use this appliance only for its
intended use as described in this
manual.
●
Read and follow the specific
“PRECAUTIONS TO AVOID
POSSIBLE EXPOSURE TO
EXCESSIVE MICROWAVE
ENERGY” at left.
●
This appliance must be
grounded. Connect only to
properly grounded outlet. See
“GROUND~G ~STRUffIONS”
found on page 29.
●
This microwave oven is
specifically designed to heat or
cook food, and is not intended
for laboratory or industrial use.
●
For best operation, plug this
appliance into its own electrical
outlet, to prevent flickering of
lights, blowing of fuse or tripping
of circuit breaker.
●
Install or locate this appliance
only in accordance with the
provided installation instructions.
●
Do not cover or block any
openings on the appliance.
●
Do not use outdoors.
●
Do not immerse power cord
or plug in water.
●
Keep power cord away from
heated surfaces.
●
Do not let power cord hang
over edge of table or counter.
●
Do not operate this appliance
if it has a damaged power cord
or
plug,
if it is not working
properly, or if it has been
damaged or dropped.
●
See door surface cleaning
instructions on page 11.
3
This appliance should be
serviced ody by qualified service
personnel. Contact nearest
authorized service facility for
examination, repair or adjustment.
●
As
with any appliance,
close
supervision is necessary when
used by children.
●
To reduce the risk of
~lre
in
the oven cavity:
–Do not overcook food.
Carefully attend appliance if
paper, plastic, or other combustible
materials are placed inside the
oven to facilitate cooking.
–Remove wire twist-ties from
paper or plastic bags before
placing bags in oven.
–Do not use your microwave
oven to dry newspapers.
–Do not use recycled paper
products. Recycled paper towels,
napkins and wax paper can contain
metal flecks which may cause
arcing or ignite. Paper products
containing nylon or nylon
filaments should be avoided, as
they may also ignite.
–Do not operate the oven while
empty to avoid damage to the
oven and the danger of
fire.
If
by accident the oven should run
empty a minute or two, no harm
is done. However, try to avoid
operating the oven empty at all
times—it saves energy and
prolongs the life of the oven.
—Do not pop popcorn in your
microwave oven unless in a
special microwave popcorn
accessory or unless you use
popcorn labeled for use in
microwave ovens.
–Do not overcook
pohtoes.
They could dehydrate and catch
fire, causing damage to your
oven.
●
If materials inside oven should
ignite, keep oven door closed,
turn oven off, and disconnect
power cord, or shutoff power at
the fuse or circuit breaker panel.
Page 4

IMPORTANT SAFETY INSTRUCTIONS
●
Some
eggs and sealed containers-for
example,
explode and should not be heated
in this oven.
●
Avoid heating baby food in
glass jars, even without their lids;
especially meat and egg mixtures.
●
Don’t defrost frozen beverages
in narrow necked
carbonated beverages). Even if
the container is opened, pressure
can build up. This can cause the
container to burst, resulting in
injury.
●
Use metil only as directed in
this book. TV dinners maybe
microwaved in foil trays less than
3/4” high; remove top foil cover
and return tray to box. When
using
keep metal at least 1 inch away
from sides of oven.
s
Cooking
hot because of heat transferred
from the heated food, Pot holders
may be
●
Sometimes, the oven floor
can become too hot to touch. Be
careful touching the floor during
and after cooking.
●
Foods cooked in liquids (such
as pasta)
rapidly than foods containing less
moisture. Should this occur, refer
to page 11 for instructions on how
to clean the inside of the oven.
●
Thermometer—Do not use
a thermometer in food you are
microwaving unless the
thermometer is designed or
recommended for use in the
microwave oven.
●
Remove the temperature probe
from the oven when not using it
to cook with. If you leave the
probe inside the oven without
inserting it in food or liquid, and
turn on microwave energy, it can
create electrical arcing in the
oven and damage oven walls.
producti
such as whole
closed glass jars—may
bodes (especitiy
meti
in the microwave oven,
utenstis
needed
may
tend to
to
may
hande
bod
become
the
over more
utensd.
●
Plastic utensils—Plastic
utensils designed for microwave
cooking are very useful, but
should be used carefully. Even
microwave-safe plastic may not
be as tolerant of overcooking
conditions as are glass or ceramic
materials and may
sofien
or char
if subjected to short periods of
overcooking. In longer exposures
to overcooking, the food and
utensils could ignite. For these
reasons: 1) Use microwave-safe
plastics only and use them in
strict compliance with the utensil
manufacturer’s recommendations.
2) Do not subject empty utensils
to microwaving. 3) Do not permit
children to use plastic utensils
without complete supervision.
●
When
cooking pork,
follow
the directions exactly and always
cook the meat to an internal
temperature of at least
170°F.
This assures that, in the remote
possibility that trichina may be
present in the meat, it will be
killed and meat will be safe to eat.
●
Boiling eggs is not
recommended
oven.
Pressure can build up
in a microwave
inside egg yolk and may cause it
to burst, resulting in injury.
●
Foods with unbroken outer
‘%kin”
such as potatoes, sausages,
tomatoes, apples, chicken livers
and other giblets, and egg yolks
(see previous caution) should be
pierced to allow steam to escape
during cooking.
●
~~Boilable”
cooking
pouches
and tightly closed plastic bags
should be slit, pierced or vented
as directed in cookbook. If they
are not, plastic could burst during
afier
or immediately
cooking,
possibly resulting in injury. Also,
plastic storage containers should
beat least partially uncovered
because they form a tight seal,
When cooking with containers
tightly covered with plastic wrap,
4
(continued)
remove covering carefully and
direct steam away from hands
and face.
●
Spontaneous boiling—Under
certain special circumstances,
liquids
may start to boil during
or shortly after removal from the
microwave oven. To prevent burns
from splashing liquid, stir the
liquid briefly before removing the
container from
the
microwave oven.
THE EXHAUST HOOD:
●
Have it instilled and properly
grounded by a
See the
special initiation
qutified ins~er.
bootiet
packed with the microwave oven.
●
The exhaust fan in your
CountersaverTMoven
will operate
automatically under certain
conditions (see Automatic Fan
Feature, page 6). While the fan
is operating, caution is required
to prevent the
s@ting and
spreading of accidental cooking
fires while the exhaust fan is
in use. For this reason:
–Never leave surface units
unattended at high
Boilover
greasy
causes smoking and
spillovers
hut
settings.
that may ignite
and spread if exhaust fan is
operating. To minimize automatic
fan operation, use adequate sized
utensils and use high heat settings
ordy
when necessary.
—In the event of a grease fire,
smother flaming pan on surface
unit by covering pan completely
with well-fitting lid, cookie sheet
or flat tray.
–Never flame foods under the
oven with exhaust fan operating
because it may spread the flames,
–Keep hood and grease filters
clean, according to instructions on
page 28, to maintain good venting
and avoid grease fires.
SAVE THESE
INSTRUCTIONS
Page 5
Features of Your Microwave Oven
7
T?
T7
T77T
1.0 Cubic Foot
Oven Interior
7
r
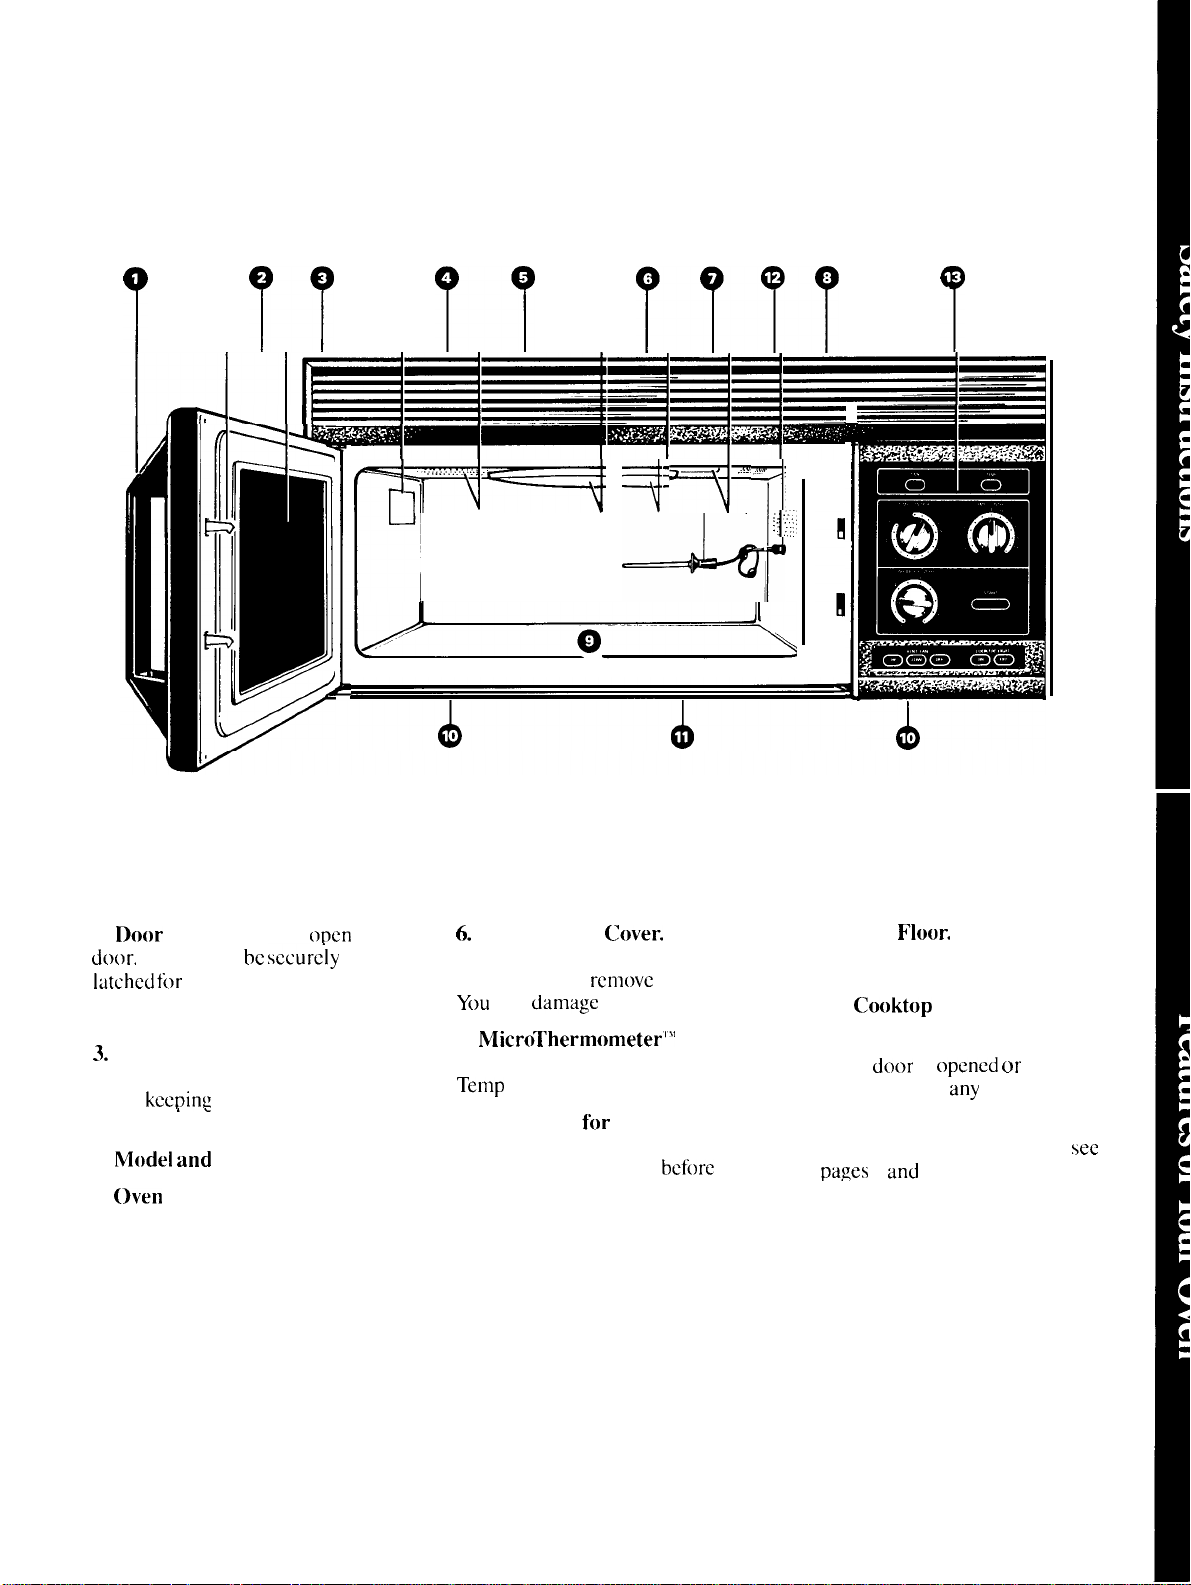
1.
Door
Handle. Pull to
door,
Door must be
latched for
2. Door Latches.
3.
Window with Metal Shield.
Screen allows cooking to be viewed
while
in oven.
4.
Model and
5. oven Vent.
oven to operate.
kcc~inx
microwaves confined
.-
Serial Numbers.
open
sccurc.ly
-:’’:”””’7
r
6.
Mode Stirrer
the microwave energy distributing
system. Do not
You
will damage the oven.
MicroThermometer’””
7.
Temperature Probe.
Temp
Cook function only.
8.
Receptacle
Probe.
inserted into receptacle
will start temperature cooking.
Probe must be securely
m“”-
4
Cover.
Protects
rcmove
fi)r
the cover.
Use with
Temperature
before
oven
:
;
9. Oven
10.
11.
12. Oven Light.
when
is operating in
13. Control Panel.
information on each feature.
pages
.-
Floor.
Grease Filters.
Cooktop
6
door is
and
7.
Light.
opened or
any
Light comes on
when oven
function.
For detailed
sec
5
Page 6

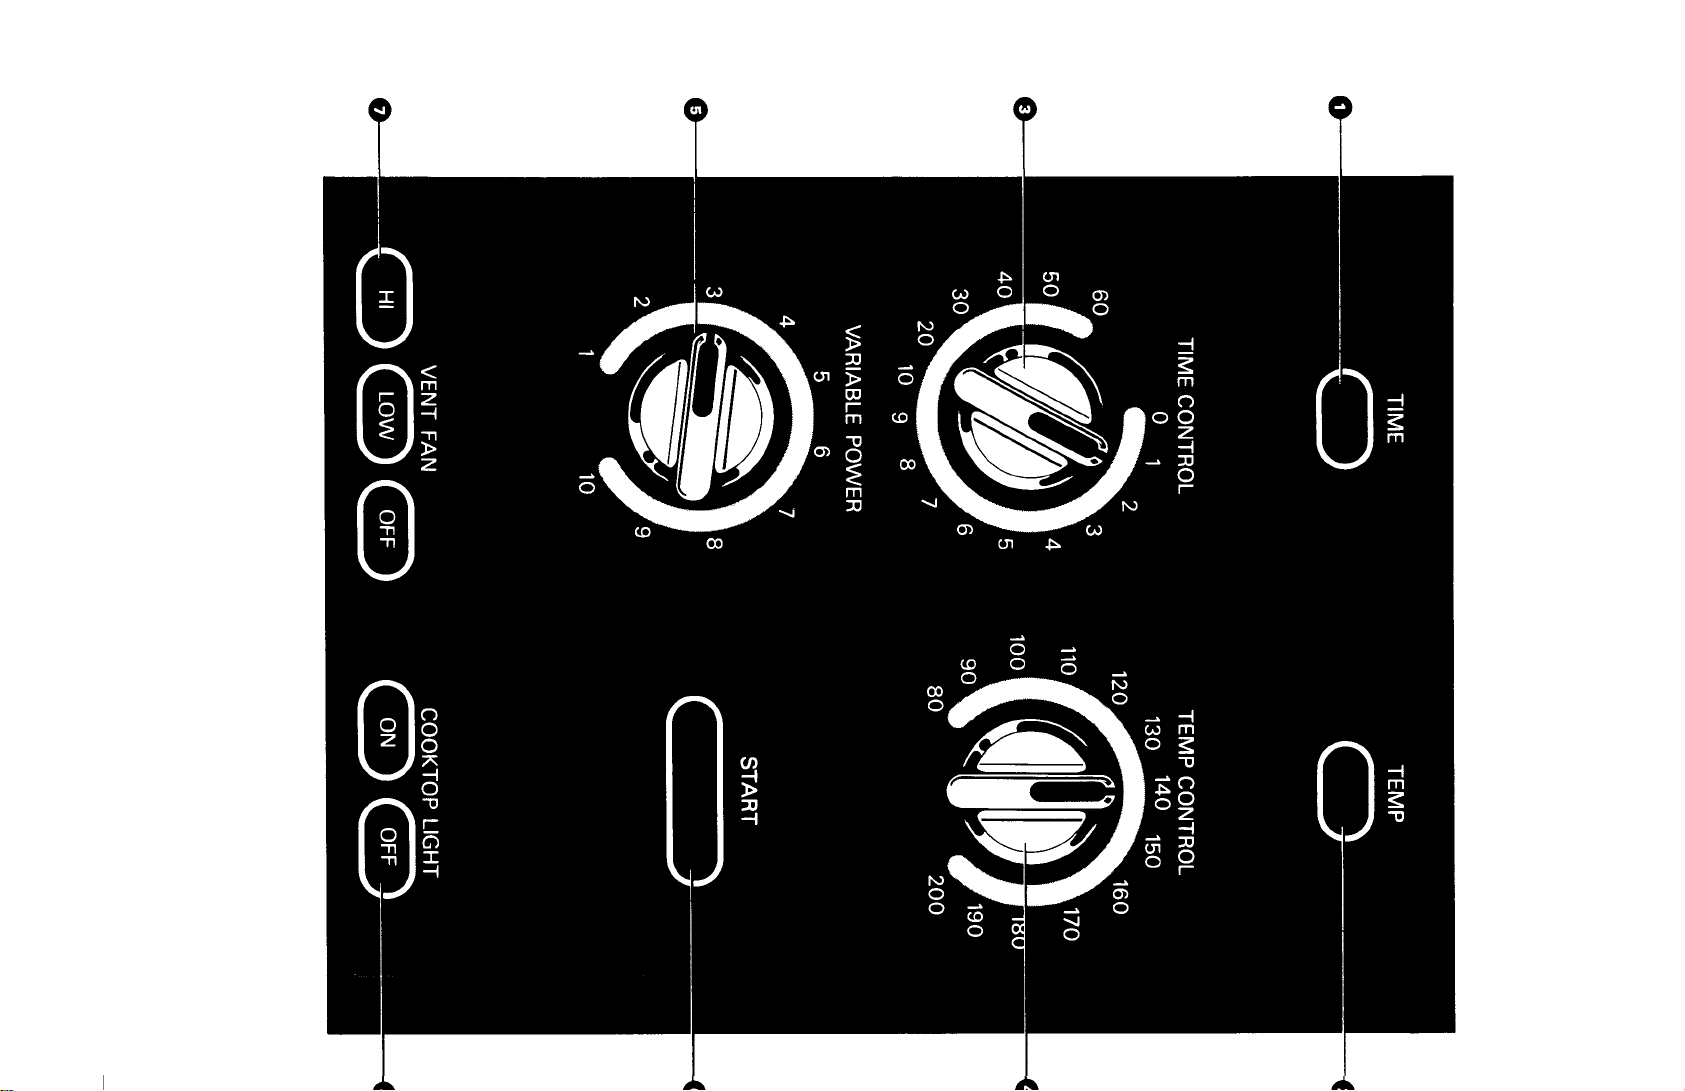
Features of Your Microwave Control Panel
1. Time Button
Push this button to cook by time.
2.
Temp
Button
Push this button to
3.
Time Control
Your microwave oven has a circular timer than can be
rotated manually. The timer indicator moves toward
“0”
only when the oven is cooking or defrosting with
microwave energy.
When the timer reaches
you that cooking is completed and the power, interior
light and fan are shut off automatically.
Remember, if you open the door before the timer
reaches
you
again where you left off.
4. Temperature Control
Insert temperature probe into food and place into oven.
Insert cable end into receptacle on oven wall. If oven
will not start when START is pushed, recheck to make
sure the
Dial the finished temperature following the recipe
directions. NOTE: If the actual temperature of the
food in the oven is higher than the temperature you
dial, the oven will not start. Check temperature again
to
reset. If so, the food in the oven has already reached
the desired finished temperature and no more heating
is needed.
When preset internal temperature is reached, oven
automatically turns off to signal that cooking has
stopped. Remove the cable end of the probe from
receptacle, take food and probe out together.
NOTE: The actual temperature of the food during
cooking may be determined by turning the
CONTROL to a lower setting until the oven turns off.
(Before restarting, open and close oven door to reset
control. )
“O;’
cooking or defrosting
close the door and push START, cooking starts
probe is securely attached.
make sure you’ve set the control correctly. If not,
cook
by temperature.
“O;’
a
bell will
will
sound to tell
stop. When
TEMP
5.
Variable Power Control
Your new microwave oven allows you a complete
selection of microwave power levels from which
choose. Always check with the Cooking Guide to find
out which power
you’re cooking.
The VARIABLE POWER control is marked with 10
settings. However, you can adjust the power level
to select settings between the numbers marked on
control, to fit the type, amount and kind of food you
are cooking. In this way, you have complete control
over the amount of microwave power used for cooking
your food,
types, because power can be adjusted.
6. Start Button
Must push this pad for oven to begin any function.
7.
Exhaust Fan Buttons
Push HI, LOW or OFF for desired fan speed.
8.
Cooktop
Push ON to illuminate counter.
level
is recommended for the food
and
you have flexibility to cook
Light Buttons
all
to
food
Automatic Fan Feature
Cooking appliances installed under the oven might,
under some heavy usage conditions, cause temperatures
high enough to overheat some internal parts of the
microwave oven.
To prevent overheating from taking place, the exhaust
fan is designed to automatically turn on at
if excessive temperatures occur. Should this happen,
the fan cannot be manually turned off. but it will
automatically turn off when the internal parts have
cooled. The fan may stay on up to approximately
minutes after the range and microwave oven controls
have been turned off.
low
speed
30
6
Page 7
Page 8

Cooking by
~me
The time cooking feature allows
you to preset the cooking time.
The
oven
shuts off automatically.
Power level 10 (High) is
recommended
but you may change this for more
flexibility. See the cooking guide.
To become better acquainted with
time cooking, make a cup of coffee
by following the steps below.
Step 1:
add
stir to dissolve. Use a cup that has
no
safe (refer to Microwaving Tips on
page
close door.
Fill a cup
1
teaspoon of instant coffee and
meti
decoration and is microwave
2).
for
most cooking,
2/3
full of water,
Place cup in oven and
Step 3: Set TIME CONTROL. For
coffee, set at
seconds. Timer may be reset during
cooking if needed.
Note: To set timer less than 2
minutes, turn the TIME CONTROL
past 2 and then back to the desired
time.
Step
4: Power level 10 (High) is
preferred for this cup of coffee.
Turn VARIABLE POWER control
to 10 (High).
How to Change Power
Turn VARIABLE POWER
control to desired setting.
1
minute and 20 to 30
hvel
Questions and Answers
Q. I set my oven for the time
called for in the recipe, but at the
end of the time allowed, my food
wasn’t done. What happened?
A. Since house power varies
time or location, many Time Cook
recipes give you a time range to
prevent overcooking, Set the oven
for minimum time, test the food for
doneness, and cook your food a
little
longer, if necessary.
Q.
I want to cook on a power
level
other than High. What do
I need to do?
A. To change the power
turn VARIABLE POWER control
to desired power level number.
Q. Can I interrupt my Time
Cook function to check the food?
A. Yes.
simply close the door and push
START button.
reset for cooking to resume unless
time is remaining
To resume cooking
The
timer must
on
timer.
due to
Icvcl,
the
be
Step 2:
Cook function is set in your oven,
Push TIME button. Time
Step 5:
CONTROL moves back toward O
while oven runs.
Step 6:
signals and oven, light and fan
shut off.
Step
Push START. TIME
When time is up, the oven
7: Open the door.
Q.
I push START and the oven
does not operate. Why?
A. Check to be sure the TIME
button is depressed and that you
have set the TIME CONTROL
to the desired cooking time.
Page 9
Cooking by Temperature
Internal temperature is
test of
doneness for
Temperature cooking” takes
~llesswork out (~f’ cook” ing
the oven aut(~mii[ically
after reaching
the preset food”
many
because
turns
the
foods.
the
best
c~ff
[cmpcraturc.
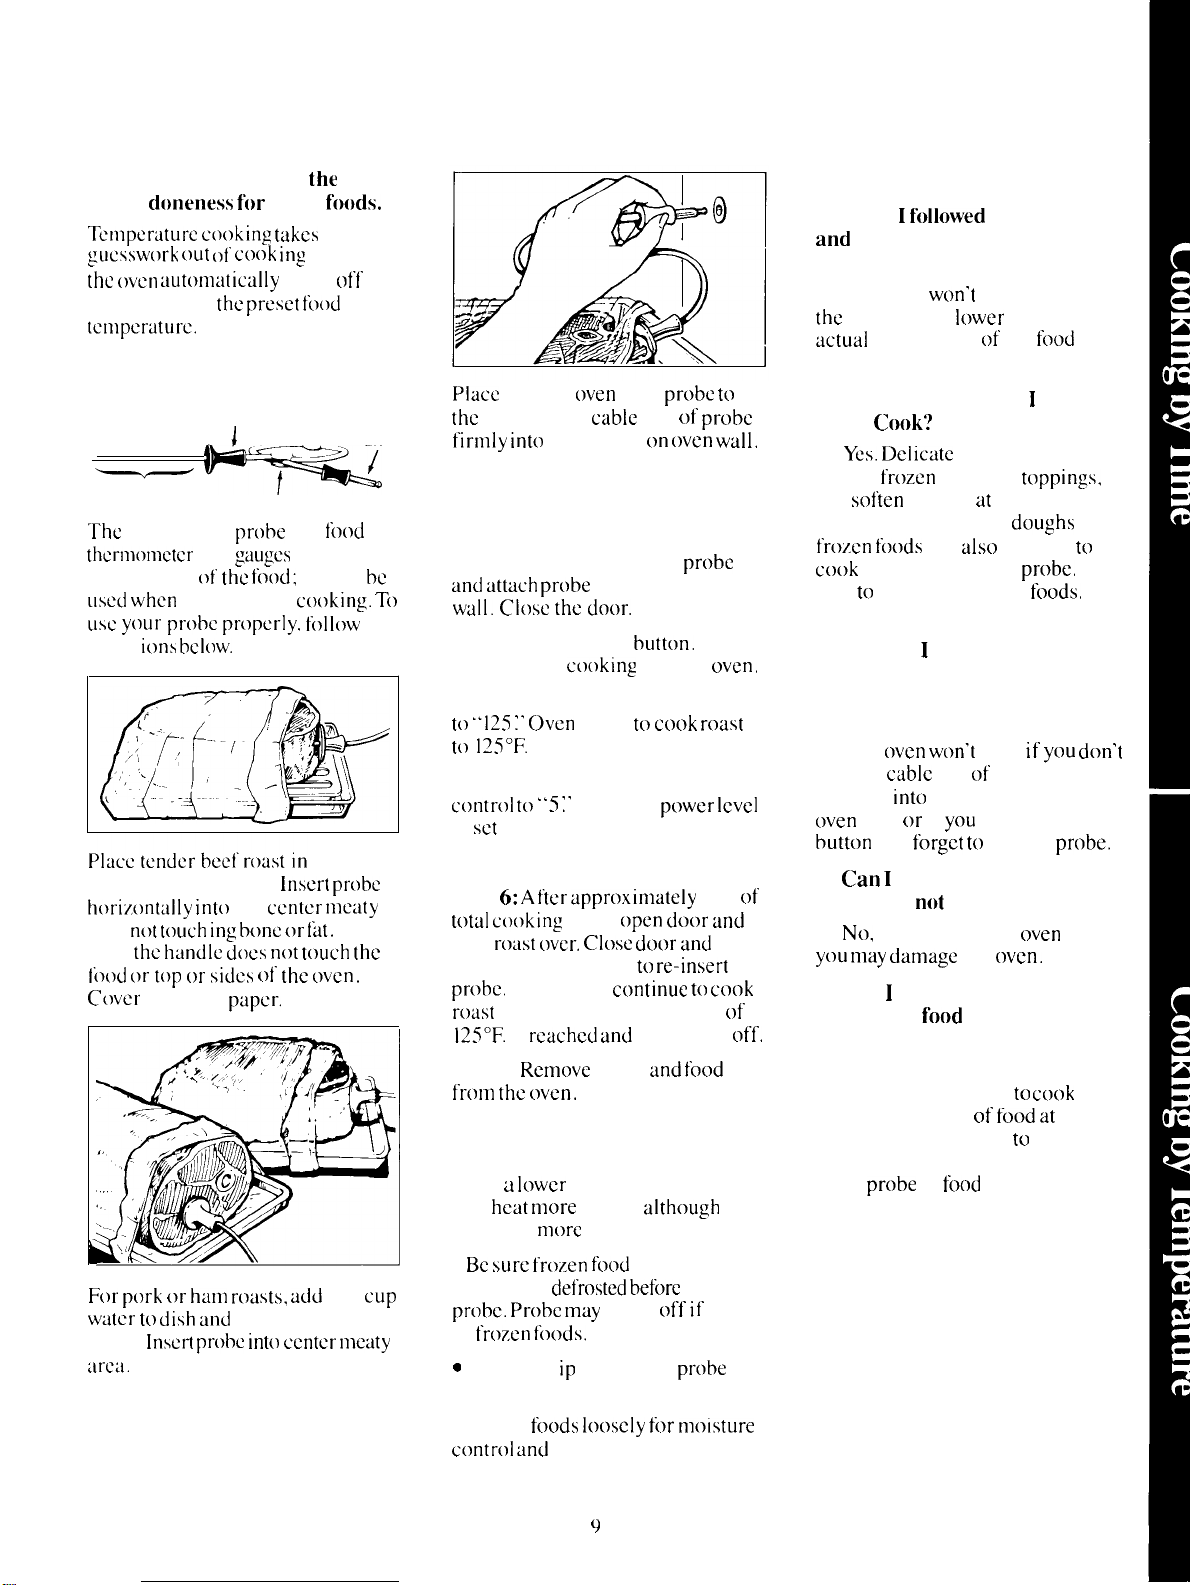
The Temperature Probe
HANDLE
~1
SENSOR
The
temperature
thcrnl(~nlctcr
temperature
used when
usc y(~ur pr(}bc prc~perly. follow”
direct
it)ns bcl(~w.
nlicr(~wavc-sate dish.
horizontally” into
area
not touch ing bone or I.at.
sure
the handle does not touch the
ti~~)d or top or sides ~)f’ the (~ven.
Cc~ver
with wax
v
CLIP
probe
(hat
gauges
(~t the fn(~d;
temperature
the
center me:ity
paper.
is:1
f(~(~d
the internal
it must
cooking.” T()
Insert pr(~bc
Make
CABLE
END
be
Place
meat in
the
right. Insert
firmly into
oven
with
cable
end of
receptacle on
probe t[>
prc~bc
oven watl.
How to Temp Cook a Rolled
Beef Rib Roast to Medium
Step 1:
and uttach probe
watl. Close the d(~c)r.
Step 2: Push TEMP
Temperature
Step 3: Turn TEMP CONTROL
to “125 ~. Oven
to 125°F.
Step 4:
control” to .’5 ~’
is set in oven.
Step
Step 6:
t(~tat cooking”
turn
START. (Remember to re-insert
pr(~be.
roast
125°F.
Step 7:
fr(~nl the t~ven.
Insert temperature
pr(~be
securely in oven
butt(m.
cooking”
is set to
is set in
c~~~~k roast
~)ven.
Turn VARIABLE POWER
Medium
p~~wer Icvel
5: Push START button.
After appr(~xirnately
time,
open door” and
roast c)vcr. Close d(~c)r and
) Oven wilt continue to
half
push
c(~(]k
until internal temperature of
is
reached and
Rem(>ve
then shuts
probe
and food
of
off.
Cooking Tips
● Use
u lc~wcr
will
heat more
requiring more time.
power level; it
evenly
although
Questions and Answers
Q. After I
and
pushed START, nothing
happened. What’s wrong?
A.
The oven
the
temperature
actual
the oven.
Q.
Are there any foods I can’t
Temp
A.
Yes. Deticate
cream,
etc.
temperatures. Batters,
frozen foods”
cook
best
Q.
Why didn’t my oven Temp
Cook after I pushed the TEMP
button, set the TEMP
CONTROL and inserted the
probe’?
A. The
seat the cable end of the probe
securely
c)ven
button
Q.
Can I
oven if it’s
A.
No,
you may damage
Q. Can I Temp Cook different
portions of
temperatures?
A. Yes.
gives you the freedom
different portions of
different temperatures to suit
individual eating styles. Simply
place
temperature setting as needed.
followed
the steps
won’t
start if you set
lower
than the
temperature of the
Cook?
butter icings, ice
frozen
whipped
s(>ften
rapidly at warm
are also difficult
precisely with the
to
Time Cook these
oven won’t
into
wall or if
and
forget to
start if
the receptacle in the
you
push the TEMP
use the
leave my probe in the
not
inserted in food?
if it touches the
the
(~vcn.
food
at different
The temperature probe
food at
probe in
f(~(~d
and change
f(>c)d
in
tc>ppings,
doughs
and
to
probe.
It’s
f(>ods.
y(>u don’t
probe.
(>ven
wall,
to cook
For pork {Jr ham rc}asts, add
wa(cr tc~ dish and
wrap.
Insert probe into ccntcr meaty
cover with plastic
arcii.
1/2
cup
●
Be sure frozen food
completely
defr(>sted before
pr(~bc. Probe may
in
frozen ti~(~ds.
s
Use the c1 ip to keep the
has been
break
place while heating.
● Cover
control” and
foods” loosely” for rn(>isture
quick. even heating.
9
inserting
off if
used
probe
in
Page 10
Defrosting
Defrosting is designed
for
speedy
thawing of frozen food and is one
of the most important advantages
of a microwave oven.
●
Power level 3 should be set
for
defrosting, but you may change this
for
more flexibility.
s
See the defrosting guide for
defrosting help.
To become better acquainted with
the defrost function, defrost frozen
pork chops by following the steps
below,
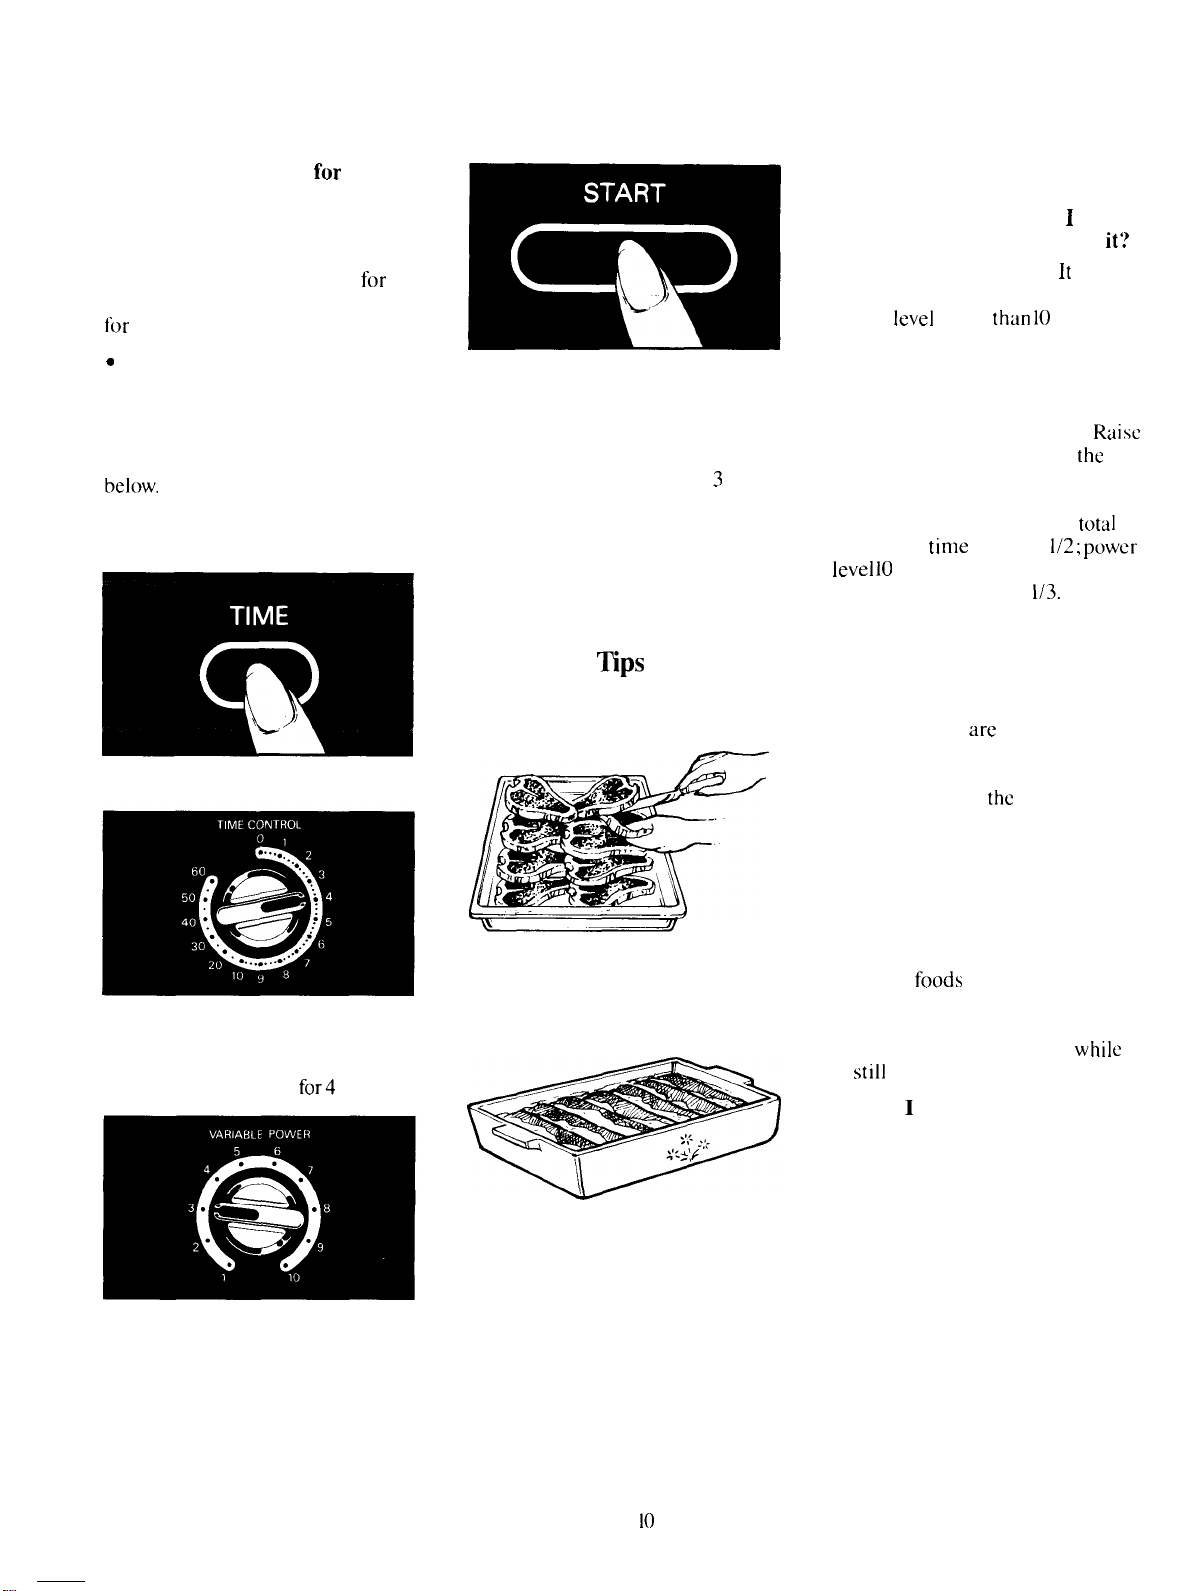
Step 1:
Place package of frozen
chops in the oven and close door.
Step 2:
Push TIME button,
Step 5:
Push START button. When
cycle is completed, the oven signals.
then automatically shuts off.
Step
6: Turn package over, close
door and repeat Steps 2 and
3
to set
remaining half of defrosting time
and push START button.
Step
7: When oven signals, open
door, remove package and separate
chops to finish defrosting.
Defrosting
● Foods frozen in paper or plastic
~ps
can be defrosted in the package.
Questions and Answers
Q. When I push START, I hear a
dull thumping noise. What is
A. This sound is normal. 1( is
letting you know the oven is using a
power
level
lower
Q.
Can I defrost small items in
than 10
a hurry?
A. Yes.
but they will need more
frequent attention than usual.
the power level after setting
time by turning the VARIABLE
POWER control to desired power
level. Power level 7 cuts the
defrosting
level 10
time to approximately
time
about in
cuts the total defrosting
1/3.
either, rotate or stir food frequently.
Q. Why don’t the defrosting
times in the defrosting guide seem
right for my food?
A. These times
are
averages.
Defrosting time can vary according
to the temperature in your freezer.
Set your oven for
the
time indicated
in the defrosting guide. If your food
is still not completely thawed at the
end of that time, reset your oven
and adjust the time accordingly.
it’?
(High).
Raise
the
total
1)2; power
During
Step
3: Select one half of the total
defrosting time recommended in the
defrosting guide. For example, turn
TIME CONTROL to 4
Step 4:
Turn VARIABLE POWER
for4 minutes.
control to 3.
● For even defrosting, some foods
need to be broken up or separated
part of the way through the
defrosting time.
. Family-size, pre-packaged
frozen entrees can be defrosted
and microwaved. If the food is in
a foil container, transfer it to a
microwave-safe dish.
● Check the defrosting guide for
other defrosting tips.
Q. Should all foods be completely
thawed before cooking?
A. Some
foods
should not be
completely thawed before cooking.
For example, fish cooks so quickly
it is better to begin cooking
is
still
slightly frozen.
while
it
Q. Can I open the door during
defrosting to check on the
progress of my food?
A. Yes.
You may open the door at
any time during microwaving. To
resume defrosting, close the door
and push START button. The oven
begins operating if time is left on
timer. If not, reset timer.
10
Page 11

Care and Cleaning
Your new nlicrnwave
a
valuable appliance.
it
f’ronl nlisuse by following”
riven is
Protect
these rutes:
●
Keep your oven ctean and
sweet-snlelling.
cloor”:1 t’cw nl
helps
:iir-~)ut
OCC:IS
ional
sol ut i(ln c~t’ h:ik ing s(Jd:I iincl
the interior
keeps
●
l)on’t
use sharp-edged
with ~>our {}ven.
outsiclc
oven walls
‘rb~
control” p:incl c:in
.
IJ(~n’t renlove the nlode
cnver iit
(nlicr(lw;ive
You
Bk;
the top
will
Ck;RTAIN POW1;R
Rk;FORE: CI,E;ANIN(;
PART OF THIS
opening
inutcs after
the interior. An
thorc~ugh
The inside and
cook”
wiping w itb
t’rcsh.
c:ul be
scratched.
bc
dtinl:igcct.
stirrer
ot”
the oven
ttiaturc 6 on page 5).
ct:inl:lgc
the oven.
IS OFF
ANY
OVk;N.
[hc (~vcn
i
ng
water
utensits
How to Clean the Inside
Watls, fl(}or and nlode
cover.
Sonic
a
with
require ii
sp~ittcrs
rinse with
tibrusivc
NEVER USE A COMMERCIAL
OVEN CLEANER ON ANY
PART
OVEN
t)n(~r
(inside).
up spatters
s(~i ICCI
with ii danlp cloth. Rinse
th~)roughly :ind dry.
Mc(~il Linct
Wipe t’rcqucntly with ii
u
cloth to rcnlovc
USE ABRASIVES.
CLEANING POWDERS OR
STEEL AND PLASTIC PADS.
THEY WILL MAR THE
SURFACE
spiittcrs ciin bc
ptiper
t(~wcl. (~thcrs nl:iy
cl:ullp
cloth.
w itb a
OF YOUR MICROWAVE
suctsy cl~)th.
ii ctunlp cl~)tb. Dc) n(~(
clc:inet-s on oven wilt
Winct(~w:
d:ii Iy iind w:ish
plastic p:irts on
Speciat note when
Brown ‘N
is present. high
bott(~nl ()[~i
n]ay c:iLisc
(he oven tlt)or.
with L clc:inscr such
brand cle:inscr.
After
tinct clry thoroughly,” ti)i
instructions on can.
on the
walls—it
Sear
Brown N Sc:ir dish
the gre:isc to burn
This
using this clc:Inscr. rinse
piiintcct
surtticcs such as the
nlay scr:itch
stirrer
Rcnl(Jvc gre:lsy
Wipe
when
cto[~r:
ctiullp
:ill
soil. D() NOT
SUCH AS
using
I)ish:
It’
grease
hc:it
gcner:itcd
nltiy bc rcnlovcct
~is Bon Anli’R’
lowing
D{) nc~t
[hc
ptiint.
rcnloved
then
usc
Is.
on
on(()
LISe
it
How to
Case. Clc~in
c)vcn
rinse with a
dry. Wipe the
danlp cloth. Chrolllc trinl is best
wiped with
with
Contrnt Panet.
cloth. Dry
clc~ining
soap
objects
d:lnl:lgc it.
I)()()r Surfbce.
surt;iccs
conic
usc
(Jtor soii cloth.
Power Cord.
soil
cloth. For
wtitcr
to
rinse with :i d:ullp cloth
thor(~ughly
into outlet.
Clean the Outside
the
(~utsicte
with sotip and d:ullp cloth.
cianlp
windc)w
:1
danlp cloth
u (try
towel.
Wipe with d ddnlp
[horc)ughly. D()
sprays,
;inct
water.
on
c)t’ ~t~)~)r :lnd t~vcn
toge(hcr on
t)nly nlilct. n(~n-abr:lsivc
detergents
c(t, LInp]ug ;inct
nliiy
:Ibr:ls
the p~]ncl-they
When cletining
:tppl icct
It’
the
s(ubb(~rn
bc used. but bc ccrtai n
bcti)rc plugging
of your
cloth and then
clean with
liirgc :Inlc)un(s (~1’
ivcs. or sh:irp
cl~>sing
with ii
cor~i
wash with d:ullp
spots, sudsy
:in~t
then
not usc
~1111
that
the
do~)r.
so:tps
spc~ngc
bcconlcs
~lnd
dry
corct
:]
Autonlatic Tenlperat ure Probe.
Probe is
t:ikcn
bcnct: :Ivoict
probe.
Clciin :is soon”
T() cletin.
rub I
ball it’
(or w:ish
Sturcty.
but c:ire should bc
in
h~inctl ing. D() not
ctropping tenlpcraturc
attcr
using ;is
wipe with
ightly with
ncccssiu-y.
in
pl:ist ic sc(~uring
Rinse
ctishw:lsbcr.
11
>uctsy
:Incl ciry.
)
twist or
possible.
cloth. then
Page 12

Microwave Adapting
Cooking Techniques for
Microwaving
Covering.
cooking, covers hold in moisture and speed heating.
Conventionally, partial covering allows excess steam to
escape. Venting plastic wrap or covering with wax paper
serves the same purpose when microwaving.
Arranging Food in Oven.
position foods, such as cake layers or potatoes, so that
hot air can flow around them. When microwaving, you
arrange foods in a ring, so that all sides are exposed to
microwave energy.
Stirring.
the bottom to help them heat evenly. When
microwaving, you stir cooked portions from the outside
to the center. Foods which require constant stirring
conventionally will need only occasional stirring.
Turning Over.
foods such as hamburgers, so both sides can directly
contact the hot pan. When microwaving, turning is often
needed during defrosting, or when cooking foods such
as hamburgers from the frozen state.
Standing Time.
roasts or cakes are allowed to stand to finish cooking or
set. Standing time is especially important in microwave
cooking. Note that the microwaved cake is not placed on
a cooling rack.
Shielding.
breasts or baked foods to prevent over-browning. When
defrosting, you use small strips of foil to shield thin
parts, such as the tips of wings and legs on poultry,
which would cook before larger parts were defrosted.
Prick Foods to Release Pressure.
pressure in foods which are tightly covered by a skin or
membrane. Prick potatoes (as you do conventionally),
egg yolks and chicken livers to prevent bursting.
In both conventional and microwave
In conventional baking, you
In range top cooking, you stir foods up from
In range top cooking, you turn over
In conventional cooking, foods such as
In a conventional oven, you shield chicken
Steam builds up
Effects of Food Characteristics on
Microwaving
Density of Food.
cooking, dense foods, such as a potato, take longer to
cook or heat than light, porous foods, such as a piece
cake, bread or a roll.
Round Shapes.
about l-in. from top, bottom and sides, round shapes
and rings cook more evenly. Corners receive more
energy and may overcook. This may also happen when
cooking conventionally.
Delicacy.
are best cooked at lower power settings
toughening.
Natural Moisture
moist foods cook
attracted to water molecules. Food uneven in moisture
should be covered
disperse evenly.
Piece Size.
Pieces which are similar in size and shape cook more
evenly. With large pieces of food, reduce the power
setting for even cooking.
Shape of Food.
cook faster than thick ones. This can be controlled in
microwaving by placing thick pieces near the outside
edge, and thin pieces in the center.
Starting Temperature.
refrigerator take longer to cook than foods at room
temperature. Timings in our recipes are based on the
temperatures at which you normally store the foods.
Quantity of Food.
amounts usually take less time than large ones. This is
most apparent in microwave cooking, where time is
directly related to the number of servings.
Foods with a delicate texture such as custards
In both conventional and microwave
Since microwaves penetrate foods to
to
avoid
of food affects how it cooks. Very
evenly
because microwave energy is
or
allowed to stand so heat
Small
pieces cook faster than
In both types
In both types of cooking,
of’cooking,
Foods taken from the freezer or
large
thin areas
of
can
ones.
small
Rotating.
helps food cook evenly. To rotate
until the side which was to the back of the oven is to the
front. To rotate 114 turn, turn the dish until the side
which was to the back of the oven is to the side.
Occasionally, repositioning a dish in the oven
112
turn, turn the dish
Page 13

Adapting Your Favorite Recipes
Once
YOU begin
.
soon be able to adapt most of your conventional cooking
quite
easily (o
you use your microwave oven, the more you will enjoy
using it. Not only will you save the time, trouble and
energy ncccssary in conventional cooking, you will
to use
microwave cooking techniques. The more
vour
microwave oven.
. .
vou
will
have more flavorful food and fewer dishes to wash.
Simply cook, or reheat and serve foods in the same dish.
Before
using your microwave oven, we suggest you
carefully read through this guide book, then practice
with our suggested recipe.
How to Adapt Conventional Recipes for Microwaving.
Beft~re
converting a conventional recipe for microwaving.
study it in terms of microwaving. Is it one
foods
which microwave well’? Look
techniques which are similar to microwaving techniques,
such
as
covering. steaming or cooking in sauce or liquid.
If the food requires a crisp, fried crust or very dry
surface, you
recipes
others
candies and meat loaves are examples. )
may
prefer to cook it conventionally. Some
may
not bc exactly the same when microwaved,
wili .ot
need changing. (Moist, rich cakes.
for
cooking
of the many
Since liquids do not evaporate when microwaved,
reduce the amount in saucy casseroles. Add more
thickening to sauces and gravies. Reduce some
seasonings also; they
microwaving times. Salt meats and vegetables
cooking. If an ingredient takes longer to microwave than
others in the same dish, precook that ingredient before
adding
to
the others.
Favorite Stuffed Peppers
6 medium green peppers
n/2
Ibs. ground
1/2
cup chopped onion
I cup cooked rice
1 teaspoon salt
‘~
teaspoon pepper
1 clove garlic, minced
1 can (lO%-oz. ) condensed tomato soup
1/2
cup water
1 to 2 cups
chuck beef
grated
cheese
Makes 6 servings
will
not lose intensity in short
after
Conventional Method
Cut off tops of green peppers:
membrane. Cook peppers 5 minutes in enough boiling
wtitcr
to cover; drain. In medium skillet on range top.
cook and stir ground beef and onion until onion is
tender. Drain off fat. Stir in rice, salt, pepper and garlic.
Divide evenly into peppers. Arrange peppers upright in
8-in. square dish.
Blend soup and water until smooth; pour over peppers.
Cover.
with cheese,
melt
Bake at 350° for 45 minutes to 1 hour.
rccovcr
checsc.
and let
rcmove
stand
seeds and
5 to 10 minutes to
Sprinkle
Microwave Method
Cut off tops of green peppers; remove seeds and
membrane. Mix raw beef with onion, rice, salt, pepper
and garlic. Divide evenly into peppers. Arrange peppers
upright snugly around edge
Blend soup and water until smooth. Pour over peppers.
Cover.
rotating
recover and
13
Microwave at High (10) for 25 to 30 minutes,
1/2
turn after 15 minutes. Sprinkle with cheese,
let
stand 5 to 10 minutes before serving.
of 3-qt.
casserole.
Page 14

Heating or Reheating Guide
1.
Directions
refrigerator or room temperature. Use microwave oven safe
containers.
2. Cover most foods (see tips) for fastest heating. Exceptions
rare or medium meats, some sandwiches, griddle foods like
pancakes and baked foods.
3. Where appropriate. use the automatic food temperature control
for accurate heating, Place probe horizontally so tip is in center
food. Bubbling around edges of dish is normal, since center is last
below are for reheating already-cooked foods at
are
to heat. Suggested serving temperatures are given for most
Young children usually prefer cooler food, generally about 20°
lower. Adjust temperatures to your personal taste. Stir foods
before serving.
4. Be sure foods are heated through before serving. Steaming or
bubbling around edges does not necessarily mean food is heated
throughout. As a general rule, hot foods produce an area warm to
of
the touch in center of underside of dish,
foods.
Item
Amount
Suggested
Serving Temp.
Power Approximate
bvel
Time, Min.
Appetizers
Saucy
such as meatballs,
cocktail franks. etc.
(k cup/serving)
Dips: cream or process cheese
Pastry bites: small pizzas.
Tip:
Cover saucy appetizers with wax paper. Cover dips with
Plate of
Meat plus 2 vegetables
Tip:
Cover plate of
Mea6
Saucy Main Dishes: chop
creamed chicken, chili, stew, macaroni
and cheese, etc.
(%-l cup/serving)
Thinly sliced roasted meat:
Rare beef roast, minimum
medium rare, maximum time
3
to
Well done; beef, pork. ham. poultry, etc.
Steaks, chops, ribs, other meat pieces;
Rare beef
Well done beef. chops. ribs, etc. I to 2 servings
Hamburgers or meat loaf
(4-oz./serving)
Chicken pieces
Hot Dogs and sausages
Rice and pasta 1 to 2 servings
(2A-%
Topped or mixed with sauce
(2A-%
Tip: Cover saucy main dishes with plastic wrap. Cover other main dishes and meats with wax paper. Do not cover rare or medium rare
When heating or reheating 3 to 4 servings of meat slices or pieces, rotate dish
Uftovers
Probe works well in saucy dishes or vegetables (use in largest serving) but not in meat slices,
food
with wax paper or plastic wrap.
and Main Dishes
4-oz.
serving
steak 3 to 4 servings
cup/serving)
cup/serving)
riblets,
cgg
rolls, etc.
suey,
time;
spaghetti,
I to 2 servings
3
to 4 servings
1A
cup
I
cup
2 to 4 servings
pltistic
wrap, Do not cover pastry bites. so that they will crisp.
1 plate
I to 2 servings
3
to 4 servings
1 can
16-oz. 150°-1600
1
to 2
scrvin&s
3
to 4 servings Meal-High (7)
I
to 2 servings
3 to 4 servings Meal-High (7)
1
to 2 servings
3
to 4 servings
1 to 2 servings High
3 to 4 servings
1
to 2 pieces
3 to 4 picccs
I
to
2
3
to 4
1 to 2 servings
3 to 4 servings
150°
150°
130°
130°
150°-1600
150°-1600
150°-1600
130°
130°
150°
150°
150°
150°-1600
150°-1600
1/2
turn after half of time.
High (10)
High (10)
Medium (5) 2 M to 3
Medium (5)
High (10)
High (10)
High (10)
High (10)
High (10) 4 to 5
Meal-High (7)
Meal-High (7)
Meal-High (7) 2 k to 4
Meal-High (7)
Mcd-High
Meal-High (7)
High (10)
High (10)
High (10)
High (10)
High (10)
High (10)
High (10)
High (10)
(7)
(10)
1 k
4 to 6
3
to 5
1
to 2
2 to 4
3
to 7
8 [0
1 to 2
2 to 3
1 fi
3 to 5
5 to 9
2 to 3
4 to 7
%
to 2
1 M
%
to 2
2 to 3
1 to 1
2 to 3
I to 2
3 to 6
8 to
to 4
14
to 3
to 3
%
12
meats.
x
k
M
%
M
%
Sandwiches
Moist filling: Sloppy
etc. in bun (
Thick meat-checsc filling with firm
Tip:
Use paper towel or napkin to cover sandwiches.
11~
Joes.
cup/serving) 3 to 4 servings
barbecue, ham salad,
bread I to 2 servings
1 to 2 servings
3
to 4 servings Meal-High (7)
Meal-High (7)
Meal-High (7)
Meal-High (7)
14
i
to 2
%
to 4
2
2 to
4 to 5
%
3
Page 15

Item
soups
Water based
1 cup/serving
Milk based
1
cup/serving
Tip:
Cover soups with wax paper or plastic wrap,
Vegetables
Small pieces: peas, beans, corn,
(M cup/serving)
Large pieces or whole: asparagus spears.
corn on the cob, etc.
Mashed
(‘~ Cuplserving)
Tip:
Cover vegetables
for
most even heating.
etc
Sauces & Gravies
Dessert: chocolate, butterscotch
Meat or main dish. chunky type;
giblet gravy. spaghetti sauce, etc.
Creamy type
Tip:
Cover food to prevent spatter.
—
Amount
1 to 2 servings
to
4 servings
3
I
can
(lO-oz.
)
1 to 2 servings
3
to 4 servings
1
can
(lO-oz,
reconstituted
I
to 2 servings
3 to 4 servings
1 can (16-oz. )
1
to 2 servings
3 to 4 servings
I can (16-oz. )
1
to 2 servings
3 to 4 servings
1/2
cup
1 cup
1/2
cup
I
cup
1 can (16-oz. )
1/2
cup
1
cup
)
Suggested
Serving Temp.
150°-1700
150°-1700
150°-1700
140°
140°
140°
150°-1600
150°-1600
150°-1600
150°-1600
150°-1600
125°
125°
150°-1600
150°-1600
150°-1600
140°-1500
140°-1500
Power
hvel
High (10) 2 to 6
High (10)
High (10)
Meal-High (7)
Meal-High (7)
Meal-High (7)
High (10)
High (10)
High (10)
High (10)
High
(10)
High (10)
High (10)
High
(10)
High (10)
High
(10)
High (10)
High (10)
High
(10)
High (10)
High (10)
Approximate
Time, Min.
7 to
6 to 7
3 to 8
8 to 12
6 to 7
I
to 3
3 to
3 S to 4
1 k
to 3
3 to 4
4 to
1
to 3
3 to 6
I
to
I %
to 2
I %
to
2% to 4
4 to 6
1 to 1
2 to
II
4%
%
Ih
4%
1%
M
2fi
%
2%
Bakery Foods
Cake, coffee cake, doughnuts, sweet rolls,
nut or fruit bread
Dinner rolls, muffins
Pie: fruit, nut or custard
%
of9-in. pie=]
(use minimum time for custard)
slice
1
piece
2 pieces Low (3)
4 pieces
9-in. cake or
12 rolls or
doughnuts
I
2
4
6
to
8
1
slice
2
slices
4 slices
9-in. pie
Griddle Foods
Pancakes, French toast or waffles
Plain, no topping
Syrup & butter
With 2 sausage patties (cooked)
Beverages
Coffee, tea, cider
Other water based
Cocoa,
other milk based
Tip:
Do not cover bakery foods, griddle foods (pancakes, etc. ) or beverages.
(3’’x4”)
2 or 3 pieces
2 or 3 pieces
2 or 3 pieces
1 to 2 cups
3 to 4 cups
I to 2 cups
3
to 4 cups
160°-1700
160°-1700
140°
140°
Low (3)
Low (3)
Low (3)
Medium (5)
Medium (5)
Medium (5)
Medium (5)
High (10)
High (10)
Meal-High (7)
Meal-High (7)
High (10)
High (10)
High (10)
High
(10)
High (10)
Meal-High (7)
Meal-High (7)
1/2
to 1
1
to 2
I
%
to 2
2 to 4
IA
to
~/2
to
1/2
to 1
%
to 1
Y2
to
1 to I
2
fi to 3
5 to 7
1
to 1
1
to 1
I ‘A
to I
1 M to 3
6 to 7
2
% to
7
7 to
10
M
Y2
%
1/2
1
%
M
%
M
k
15
Page 16

Defrosting Guide
1.
F()()d p~ck:iged
without
unwrapping.
pl:]cc fi)od
2. Alter
first
fi)tld.
Turn
possihlc.
thin
On
wing or leg tirciis nltiy he ncccssary.
Food
in
~11-p:lpcr (]r pl:istic pack:igcs nlay he dcf’rostcci 3.
If’ ti~od
is
toil
in
cooking”
dish
hall’
ot’dclr~)sting tinle, unwr~p p~ckagc and check
Ii)od
over.
ii’ ncccss~ry; brc~tk tip~r[ or scp:n:itc Ii)ocl
very l:irgc ti~ods such as
wrapped,
Ii)r dclrosting.
turkey.
First Half Second Half
Time, Min. Time, Min.
rcnl(wc ti)il :ind
sor~lc
shielding
of”
it’
Bc
sure
cxtr:i Ill icr(~w~lv ing [inle). TuI.
I:irgc mctI[s arc conlplctcly clcl’rc)stcii (or.
w:itcr
4. When
until giblets
d~f’rost~[[. ti)~)ci stloLll[j bc ct)ol
c:in hc rcnl(wccl.
keys
nl:ij, hc
hut
on
pliiLccl unLlc
Soi’tcrlcci
I-(IiI\tS iil
I-
runn
in
LIII ;Ir”c:ls. [t”
still SI ightly iL.y. rctu[-n to I]licrt)w:l\c twcrl \cI.} hric,ll}. or- ICI s[iln(i
:1
I’L.
w
nlinutcs.
Comments
in:
low
Meat [Power Level: Defrost
B:icon
Fr:]nks
(l-lb. )
(;round:
heel’&
(l-lh.
)
pork
(2-lbs. )
(5-lbs.
)
Roust.
beet’ &
pork
Sp:lrcribs. pork
steaks,
cht)ps &
(1
pkg)
cutlets:
beef’, l~inlb. pork & vcdl
sausti~c. hulk
(
I-lh. tr:iy)
(l-lb.
roll)
Saus;Igc. link
Stiustigc,
(1 to 1
patties
(I?-oz. pkg. )
‘1~-lbs.
3 Y2
to 4
4 to
4
6
t?
4 to 5 pcr lb.
5 to 6 pcr lb.
2 to
2 to
41/~ per
~ 1/2
7
)
2
I
(3)1
5
4 pcr Ih.
Ih
1
None
4
to
6
6
to
x
12 [() 14
4 to 5 per lb.
5 to
6 per Ih.
2 tc) 4
pcr Ih.
~
l/, to 4
1/2
-.
3
to
4
1
‘/2 102 ‘/2
1 to 2
PltIcc urlopcncd piickiigc in ()~cn. Rot:itc p:ick;igc 14
Iinlc.
[Jet
stilncl
Ii)r 5
nlinutcs.
Place
UnopCrlC[i
p:lck:lgc
Ill
()\cn. M
icrc)w’:ti’c lust
scp:ir:ilcd.
TLlrn (Wcr :Ittcr first ~ nlinutcs.
Turn
n]c:it (wcr :ittcr t’irst hill 1’ [~f’
seconcl hill 1’ t)l’ tin]c.
Set
t
inlc. ScrtIpc (~f’f’ st)l’tcnc(l r]lc:i[ ill’[cI-
;Isidc. B1-c:ih
up
rcnl:iirling hlo~k. nl icrI)w:l\’c
5 to 6 rrlinulcs rllorc.
Turn
nlc[]t ()~cr ;if’tcr first hal
scc(~ncl hill 1’ t)f” tinlc.
Scrape :Ind
set
:]sidc. Brcuk
Set
1“ 01”
i{siclc.
up
tinlc. Sur;ipc t~l’f’ sof’tcnc~l rllc:i[ :ll’[c
M
icrow:i~,c
I t
[() 12
111
rcn]:iinin: hlock ilrl(l nliLr(]wtivc 3 tt) 5
nlinutcs nlorc.
Pl;icc unwr:ippc~l r(~:lst
Dct’rest
fi)r SCCOIICI hiil t’ [)t’ tin]c. 1,ct st:tncl ti)r 30 m inutcs.
Pl:lcc wr:ippccl p:ick:lgc
After” scct)nci htilf’
to Conlplctc
ctcf’resting.
‘I-urn okcr :11’tcr f’il-st 2
Turn
(WCI :it”tcr I“irst tl:ill’ot” tinlc. l.ct st:inc{
R(~t;ltc p~icktigc 1/4
N()
ILll”ll llCCLiCLi
in
[wcn.
A
f’tcr- htil
f“
(~t”
t
inlc.
in
01”
(lkcrl. ‘Iurn (wer til”tcl- I’irst h:il
tinlc. Scp;ir:ltc picccs with tilhlc knifti. 1.CI i[ilrl(t
‘/z
nlinrrtcs.
turn
:It’tcr hiilt’ of” tinlc. [,ct st:lncl ti)r 5 nlinutcs
5
nlinutcs.
turn
until
inutcs il]orc.
turn
t’
~if’tcr h:ilf t~f
I“r:irlks c’:In he
I():ISI ()\cr-.
of”
t
inlc.
I
POU]trY [Power Level: Defrost (3)]
Chicken,
cut Up (~ ‘/z
hroilcr-trycr.
t{)
3-fhs.
)
Whole (2 ‘/z to 3 ‘/, -tbs. )
Cornish hcn
Duckt ing
Turkc}
7108
9
to t
1
4 to 6
pcr th.
2 to 3
pcr Ih.
4 Y, to 5 Y, per lb.4 ~, to 5 1/, per- th
7 to
x
~) to
I
1
4 to 5 pcr lb.
2 to 3
pcr lb.
Pt:icc wr:ippcc] chicken
in
(wcrl. After hiilt
’
of” tinlc urlk~ r:ip :Irl[t
tWCI-. At’tcr scct)nd holf” (~f” tin]e. scp~lr:itc picccs :~n(l pl:]uc
[lish.
M
icrow;wc 2 to 4 nl inutcs n]orc,
nlinutcs to
Pt2Lcc w’r:ippcd
(wcr”
until giblets
Pl:Icc wr:ipped p:ick:igc
:11’tcr f’irst hill
pt:lcc w’r:lppcd
turn
w:Lter
I’in isb
dcl’resting.
chicken.
chicken in
Shictd w:irnl :Irc:is
(WCII. Al”tcr tl:ill” of” tinlc. unw r:lp :Ir][t Iul-rl
can he rcnl(wccl.
in
f’
ot”
t
inlc.
cluckting in
(WCII hr-c:ist sitic
()~’cn. At’rcr I’ir-st tl:llf” ()(”
(wcr into cooking” ctish. Shiclct W:IIII1 :IIC:IS with ti)il.
in
CLIV ity unt
it
gihtcts c:in be r-cnnwccl.
Ptucc unwrtippc(l turkey hrc:ist sictc down.
if’
rlcccsstir-~. I,ct st:in(l ii IL.w
with
li~il. RLII1 coot” w:itcl-
up rum
Attcr
r“cr]]n~c wriippcr iirld shiclci wi]rnl :irc;]s with ti)il.
sic]c
up
for SCCOIIC} h:il
~l[>lcts :Irl’i neck ctlrl hc rcn](wcci.
t
~~t tinlc. Run co(l) Wtttcr” irltf) c;i~’ity’ untit
[cl
s(~:ik
in
cool”
hour-s ol” I“ct’t”igcriltc ()~’cl”nigtlt to conlp]ctc ctcl’rosr ing.
16
turn
in
ct>(~kin~
in
c:I\ it>
p:lL’k:lg~ ()\’cr”
rinlc, LInW
Run
r:lp
ct)ot
f“irst hilt f’ of” tinlc.
Turn turkc)
w:
Ilc
I.
brciist
ti)l- I 10 ?
:IIIL[
Page 17

Food
First Half Second Half
Time, Min. Time, Min.
Comments
Fish & Seafood
Fillets (l-lb. )
Stctiks (6-OZ.
Whole fish
Shclllish,
Shellfish.
Cmb mc:it (6-OZ. puck~gc)
oysters
sca[h~ps (1-lb.
Shellfish,
Crab legs.
(x to
Lohstcr tails,
(6 to Y-OZ.
Whole Iohstcr or cmb
(l-lb. )
)
(8 to 1()-()z.
smtill
blocks:
(10-07.” can)
large:
1 to
1()-()z.
)
)
pieces (l-lb. )
package)
2
I
([)2
Breads, Cakes
Bread or buns (l-lb. )
Hetit &
serve
(7-07..
Cof”ftc
Cotfcc
Sweet
Doughnuts
Doughnuts, g]:izcd
(1
box of” 12)
French
Cake. frosted. 2 to 3 Itiycr
( 17-01. )
Cake.
I
ltiycr
pound
Chccsccakc.
!ruit
top
Crunch
Fruit
Creom or custdrd
rolls
package)
Cake (1 1 to 14 M -oz. )
ring
(lo-oz.” package)
rolls (8X to 12-nz.
(1
t<) 3)
Toiist (2 SI
f’illcd
(12
c~]ke (1 I ‘~-nz.
(I7 to
cakes & cupcakes
or
nut
or
‘/2
pie
to
plain
lY-(lz.
ices)
t(~ppccl.
16-OZ.
)
)
or
)
(8-in. )
pie (14-t)z.
[Power Level:
6 6
2103
)
?
.
7 to 8
4 to 5
3 ‘h
5 to 7
4 to
3 to
8
to Y x to Y
[Power Level:
3
to 4
2
t04
3 Y2 to
3
Y2 to 4
2
)
l/2 to
1 to
3 to
5
‘/2 to 6’/2
2 to
2 to
2
5 to 7
1/2
to
7
to
5 to
)
Defrost (3)]
to 4
6
4
Def’rest (3)]
5
4
3
‘/2
4
3
3
%
c~]ch
Y
6
2 (()4
n(mc
none
3 ‘h
to 4
none
nnnc
3 to
4
n(mc
none
none
n(~nc
none
none
none
none
none
none
n(~nc
n(mc
none
n(mc
Place unopened package in
cn(~king
dish. )
nttime,
Let
stond a few
Place
fish
second
halfoftime,
dctrnsting.
Sprcaci
shellfish in
PI:ICC block
Place
blnck
Place unopened package in
Arrange in
Armngc in conking dish, with meaty
tl:ilf’oftimc.
Place in
oft
imc.
Rcmovc nlctal twist tic
Place (m
Place (m micrnwavc safb plate. Rottitc
Let pie sttind
Rotate 1/2
hnld
under
minutes to
in
cooking”
in casserole.
in casscrnlc.
cnoking
cooking”
dish with light underside up. Turn
microwave safb plate.
5 minutes. Slice
oven.
(It fish is
turn after
cnld water to scpamtc.
finish dclrosting.
dish. Turn
rinse cavity
single layer
dish.
Brctik
(wcn.
in
up with
:md
(wer alter I’irst
with
baking
serve
frozen
in
first hulf’of’time.
cnld water to cnmplcte
dish.
fork ~ficr f’irst
side down.
plate
1/2
water,
Alter
half’ of ’time. Aficr
halfnttime.
Turn
(wcr for scc(md
nvcr :iftcr
turn alter halfoftime.
place in
secnnd hal I
first
half”
Fruit
[Power Level:
Fresh
(lo to
16-{)/.. )
Pl:istic pouch-l to 2
(lo-oz.”
package)
Defrost (3)]
6 to
Y
5 to
8
none
n(mc
pliicc P:ick:ige
brciik
Place package in
17
up with
in ~)vcn.
RCMOVC
fork.
Repeat ilncccss:iry.
oven.
Flex package
fi)it
or
mctdl.
nncc.
Alter
minirnunl time.
Page 18

Convenience Food Guide
1.
Most c(~rrvcnicncc ti)~)dscarrbc rchc~itcd by n~icr{)w~wc only,
they
are
already
(gl~ss
or plastic).
cnnvcrrti(~rral baking
cnokcd,
Always
For ii)ods ncccling browning or
is
rcc[)nlnlcndcd.
usc Ill icrt)wavc s~il~ cookwurc”
crisping,
since
Rcn~(wc ii)ocl Ironl ti)il
2.
nlicrow:ilc st(lk cont:iincr.
3
. .
Arllounts can hc incrc~iscd. T() cook” nlul(iplc p~ic.ki!gcs, :Icicl
tiulcs
together. Check
con[;lincrs
;It tnininlunl
over X -in. high
t
inlc,
:inci pl:icc
in
Food
Appetizers &
Pastry
Bites
Frozen prcp:irell
s~]ndwichcs
Popcorn”
E~s
& Cheese
Scrarrlblcd egg
substitute
(8-OL. c:trton)
Cheese
SOLlt
(
I?-oz.
Brctikl:ist (6 ‘A -oz.
Scr;u~lblcd c~s
sausfige iirrcl hiish
brown potiit(]cs
Welsh
’tlC
)
riirchit
Snach
)
with
(10-( )/..)
Fish & Shellfish
Crab nr shrinlp
ncwburg (61/~-oz.)
Fish &
chips
(5 to 14-oz.
Deviled
(6-OZ.
Brcadcci fish
(5 to 1()-()z.
(I4 to 16-04. )
(23 to
)
cr;ib
)
)
25-OX. )
Conhiner
Micrnwave
s:Ifi c1 ish
Pilper towel
M
icrow:ivc h;ig
Microw:ivc
s:ift dish
Microwave
8-in.
arr(l custard ~.ups
Pilckagc
p:lpcr tr;]y
M
icrow:ivc
s:]tk
Ptlck~lgc
pouch
Ptick:tgc tr:iy
M
icrow;]vc
s:itc clish
M
icrow~wc
siift
S;I!C
pic pl~tc
dish
(fish
Cover
N()
N()
N()
N()
N()
P:]ck;igc
covcl
-
Yts
Nc)
N[~
N()
N{)
Power
High (10) l/j to 2 l/z n] in.
High (10)
High (lo)
High ( 10)
Defrost (3)
Mccl-Hi~h
High (to)
Dcf”rost (3)
High (
High
High (lo)
High (10)
High
I())
(lo)
(lo)
hvel
& Time Comments
2 to 3 nlin.
pcr s:int]wich
3 to 5 n)
in.
3
l/z to 4 ‘/J
c, to 13 tn
(7) ~) to t I
2 to 4 nl
5 nlin,
5 to (~ Illin.
4 tc) 5 nliu.
4 (tl 6 nlin,
3 to 4 Ill
4
[() 5 nlill.
J
to ‘)
10
in.
l]~in.
in.
in.
nlir).
tt) 12 nlill.
ulin
Rcm()\c f’ronl ti)ii p:ickiigc :uld wrap
p:ipcr towel. Rntjttc dish 1/2 turn :it”tcr h;ilf
(~t’ tinlc.
Fc)ltow
p;
Ick:Igc (Ii rcctitlns.
Microw;ike ;Ibout I nlinutc per
Ill ixturc. Stir :it”tcl- h:il t’ of”
con~pletc cf)t~king.
T() Dct”r(lst: Pl~Icc
T() C()()k: Di\i~lc bctwccn 3 or
custiird cups, 6 or 7-OZ. Rc:irr:irrgc tif’tcl-
n]inutcs. Sf)uttlcs }irc [It)nc
Rcm()\c p:ipcr tr~y t’r(n~l c.:irton.
oven t’ilnl tn cxp(~sc pot:itncs.
Stir
or- bre:ik
S[i[ bcti)rc
Purrcturc pouch 3 C)I 4 tinlcs
Distribute
in 8-in. pie
up
:ll’tcr- ~icf’rosl
serliug.
c~cnly on nlicrow:ile s:llc c]ish
t
when c.enter is set.
with
in
l/~ cup
inlc. I,c[ st:]ntl to
plate.
Stir twice.
4
bultcrc~l
5
turn
h:ick
t
iulc.
Ii)rk to
\cnt.
Meat
Frozen nleats
(5
to 8-OZ.
(lo to
(16 to 32-07.)
Dry
(hanlburgcr iiddcci)
T.V. dinners
(6 to II
(12
Wsta,
Cannccl sp:ighc[ti, etc.
Frozen
(10-07 ..” )
Frozen nl:iciironi &
chccsc,
(8 to
Frozen Las;ign:i
(21-OZ.
)
16-OZ.
)
nlixcs
72-07. )
to 20-OZ.
)
Rice
rice in
spiighctti
14-(17.. )
)
pt)uch
M
icrnw:ivc
s:itc cl
ish
or
pouch
Microw~ivc
s:lt~ cdsscrolc
P:ickagc tr:ly
and carton
M
icrow:ikc
s:iti
clish
Pouch
M
icr(~wtive
s:Ifk dish
icrow~ivc W:ix
M
safti (1
ish
High
N()
C:irtc)rl
Licl c)lpllisl ic w r:ip
I,i(l or High (lo) 7 to 10
pl:istic wr~ip
paper
plastic
t)r
wriip
( 10)
High (lo) I 1 to 20
High (lo)
High (
10)
High (lo)
High ( 10)
4 Y2 to 7
5 to
I 1
12 It) 20 n]iu.
6 to
X
J
to 10
3 to 5 ]Ilin.
6 to
J
15 to 20 nlin.
nlin.
IIlin.
nlin.
nlin.
uli[l.
n]in.
nlirl.
It’
pouch pack:igc
ti)rk to
vent.
Ac](I c[)okcd. dr~iincd h:tnlburgcr
RCUICWC ti~il
1/4 lurn iiticr h:ill’ ot” tiu]c.
Stir
bcfilr-c
Puncture
Stir
bclilrc scrv ing.
Rot:itc
dish
cover.
scr\ing.
pouch
1/2
turn
is
LISCCI.
puncture
rcpl:icc
in
c:Lrton. R(]t;ttc
with
fork [() \’cn[.
iittcr halt’ot”cooking tirnc.
wilh
Page 19

Food
Conhiner
Cover
Power
Poultry
M
Ciinncd
(7
‘/2 to
10’/2-01.” )
(14 to
24-OZ.
)
Frozen
pouch High (I())
(5 to
61/, -07..)
M;]in
dish
( 1~ to
17-(Jz. p~Lck~gc)
Fried
Chicken.
2 picccs
( l-lb. ) 6 pieces High (10)
(2-lbs.
) 8 to 10
pieces
icrnw;tve
s~ifk dish
M
icrowtive
sale clish
M
icrow:ivc
s:IIL [Iish
I.id or
pliistic wrap
N(]
N()
High (lo)
High (lo)
High (10)
High (lo)
High (I()) X
Sauces, Gravies
Canned
(lo
to 16-OZ.
(32-07.. )
Microwave
)
s~Ltc dish
Lid
or
plastic
wrap
High (10)
High
Vegetables
M
Frozen brc:iciccl
(7-OX.
)
Canned
(x
to 9-OL.
(I5 to 17-OZ.
(2X to
Instiint tn:lshcci
potatoes”
2 to 6 scr~ings
X to 12 servings
)
)
32-07.)
icrowavc
s~lc
dish
M
icrnwave
s;Lfc
dish
M
icrowiivc
sali
dish
N()
Lici or
pliistic wr~lp
Lid n{
pl:]stic wr:ip
High (lo)
High (lo)
High
High (lo)
High (lo)
High
(10)
(lo)
(lo)
hvel
& Time
2
l/z
tt) 4
tnin. Place
4 to 6
nlin.
3
‘/z to
4]/~ nlin.
7 to 14 min.
2 tn
4 tnin.
(> to
7 tnin.
tc)
10
nlin.
3 to 6 nlin.
6 to 9
tnin.
3 [() 5
tnin
I
‘/z to
2 ‘/z
to
5
nlin.
4
5 to 6
min.
4 tt) 6 nlin.
X to 14
nlin
Commenk
:Iftcr
Slit
Stir
1[’ label does not state
for dnncncss.
Pl:icc on nlicrowavc
Place vcgctablcs
nlin
Add 1/2
(Or
Usc
container size
milk, butter
After
:Idding cxtr~L
in
rnicruwavc
hull
()( ti[ne.
pouch bctorc nlicrnwaving
af’tcr
5
cup liquid or liquid
usc tcrnpcraturc prnble set tn 1500F.
heating, briskly stir in
safe dish. Cover:
rninutcs
‘fully
trivet or dish
in
rnicrnwtive sate
and
and salt nn
I tn 2
amounts of
package.
tablespnnns dry n]ix.
stil
cooked:’” check
dish.
trorn can. Cnvcr
water.
C(wcr.
potatncs.
)
Souffle. Irnzen
(12-OZ. pack:ige)
Potatnes: b;ikcd.
stuf’lbc!. lroxcn
I
to
2
3 (()4
M
icr(~wavc
safe
pie
plate
and cust~rd
M
icrowavc
sate dish
cups
Nn
Detrnst (3)
Mccl-High
High (10)
High (lo)
(7) 9
9 [(l 13
tc)
11
4 to 7
710 10
min.
nlin.
Inin.
nlin
Tn Defrnst: Place snuffle
pie
plate.
T<> Conk: Divide
Souffles arc done
Check
to
Place on nlicr(~wavc sate
between 4 custard cups.
when centers arc set.
SCC
that ~>mt(~s
upside
dnwn
drC
N~ IN FOIL.
dish.
in
Page 20

Mea@
1.
Always use microwave-safe cookware, plastic or glass,
2. Standing time:
roasts before carving.
Allow
about 10 minutes standing time for most
Power
Food
Contiiner
Cover
(or Internal Temp.)
Beef
Ground, crumbled Casserole
(for casseroles
or soup)
(l-lb.)
(1%
Ibs.
)
Meatballs
(1 lb.)
(2
Ibs.
)
Patties
(4 patties/lb. ) dish (with trivet
I
to 2 patties
3 to 4 patties
Tip: For
1
or 2 patties usc paper plate
Meat loaf
(Round
loa~ loaf dish
(Loaf shape)
Round or
oblong dish
Oblong glass
if desired)
or ceramic
dinner plate
Pie plate or
li~cd
No High (10)
Wax paper
Wax paper
with double thickness paper towels.
Plastic wrap
High (10)
High (10)
Meal-High (7) Let stand 10 minutes after cooking.
or cook
to
170°
Roash
Pot roasts
Simmered beef Casserole
(corned beef or
brisket)
Tender roasts (rib, Oblong dish Wax paper Medium (5)
high quality rump,
sirloin tip)
Oblong dish Lid or
or casserole plastic wrap min./lb. water to 3 to 5-lb, roast. Turn over after half
Lid or Medium (5)
plastic wrap
and trivet
Medium (5)
Rare
Medium
Well
bvel
& Time
Commenk
Stir after half of time. Add sauce or
casserole ingredients and finish. To cook
4 to 6 min. breaking up and stirring every 5 minutes.
6 to 8 min. Let stand 5 minutes,
7 to 9 min.
10
to 13 min.
2 to 4 min. browning sauce or agent. Rotate dish 1/2
4 to 6 min. turn after half of time.
21
to 23 min.
25 to 30 min.
18
to 21
120 to 130 min. Add 1 cup water per pound of meat. Turn
Min. Internal
per lb.
11
to 13
14 to
16
17 to
19
Temp.
115°
125°
145°
frozen block, microwave 10 to
Round dish: arrange
circle around edge of dish,
Oblong dish: arrange 3/4 to l-in. apart.
Rotate dish 1/2 turn after half of time.
Cover with wax paper or cook uncovered
and
turn patties over. If desired,
Brush with browning sauce
of time. Add vegetables if desired after half
of time.
Rccovcr
over after half of time. Let meat stand in
broth at least 10 minutes after cooking. For
boiled dinner, remove meat, cook vegetables
in broth.
Temperature probe cooking yields most
accurate results. Turn roasts over when
temperature reaches 90° or after about hall
of time. Let meat stand
bef(~rc
carving. If desired, brush with
browning sauce or agent
3/4
to l-in. apart in
and finish.
10
bcf(>re
15
minutes.
add
and
add 1/2 cup
to 15 minutes
cooking.
Pork
Bacon
(Per slice)
(l-lb.)
Pork sausage (raw)
( %-lb.: 4 patties)
Pork link sausage
(raw)
Canadian bacon
2 slices
4 slices
6 slices
Pork chops
?
L
3
4
6
Microwave
safe plate or
oblong dish
Microwave
safe dish
Microwave
safe dish
Microwave
safe dish
Microwave
safe dish
Paper towel
Wax paper
Wax paper
Wax paper
Plastic wrap
High (10)
High (10)
High (10)
High (10)
Medium (5)
20
%
to 1 min.
15
to 17 min
total
3 M to
4Y2
min.
‘/2 to % min.
per link
3A
to I ‘A min
1 M
to 2 min.
2 to 2
Y2
min.
14 to 18 min.
19
to 24 min.
26 to 32 min.
33 to
37
min.
layer
Arrange in single
trivet set in dish. Layer many slices
Iaycrs
of paper towels in oblong dish.
Arrange in single layer.
Arrange in single layer. If cooking 6 or more
links, rotate dish 1/2 turn
Arrange in single
Brush with barbecue sauce or browning
agent, if desired. Let stand covered 5 to 10
minutes before serving.
on paper towels or on
after
half of time.
Iaycr.
bctwccn
Page 21

Food
Pork roast
Spare
ribs
Ham
(precooked
or canned)
Ham loaf
Ham slices
&
steaks
Contiiner
13
microwave
safe dish
13 x9x2-in,
dish or
casserole
Oblong dish
Pie plate
12X8
dish
Lamb
Chops (4)
Roast
(leg or shoulder) and trivet
Brown ‘N No
Sear dish
(preheated
for 8 min. )
Oblong dish
Cover
X9X2-in.
3-qt.
X2-in. Wax paper
Cooking bag Medium (5) 15 to 19 min.
method
Plastic
or cover per lb.
Plastic wrap
Plastic wrap
Wax
Power
bvel
& Time
(or Internal Temp.)
per lb. Or
microwave to
170° internal
temp.
wrap Medium (5) 20 to 25 min.
paper
Medium (5)
Medium (5)
High (10)
High
(10)
Medium (5)
Medium
Well
1
I to 13 min.
per lb. Or
microwave
115° internal
temp.
22 to 25 min.
Or microwave
to 170°
internal temp.
18
to 27 min.
5 to 7 min.
Min.
per lb.
13 to 15 150°
16
to
18
to
Internal
Temp.
170°
Commenk
Tie end of bag securely, Do not use metal
twist
ties.
Or place bone side upon trivet in
dish. Add water to dish and cover with wax
paper. Microwave at Medium (5)
minutes per pound.
Add
2/3
cup
ribs. Turn over
minimum time.
liquid and add barbecue sauce; microwave
a few minutes to finish,
Shield top edge of ham with lfi-in. strip of
foil. After cooking period.
minutes before carving.
Let stand 5 minutes before serving. If a
glaze
preserves over cooked
stand a few minutes before serving.
Turn over after
Brush chops lightly with oil. Place in
preheated dish. Turn meat over after half
of time.
Place roast on trivet fat side down. Turn
over after half of cooking time. Let roast
stand 10 minutes before carving, When
using temperature probe, insert so tip is not
in bone or fat.
water per pound of spare
or rearrange after half of
After minimum time, drain
is desired, spoon pineapple or apricot
half
ham
of time.
13
to 15
let
ham stand 10
loaf and let
Veal
Chops See
Roast
(shoulder) and
lamb
chops above.
Oblong dish
trivet
Wax paper Medium (5)
21
15
to 17 min.
pcr lb. Or
microwave to
155° internal
temp.
Place on trivet fat or cut side down. Turn
over after half of cooking time. Let roast
stand 10 minutes before carving. Slice thinly
Page 22

Poultry
1.
Use microwave trivet for chicken and other small poultry, but do
not use trivet for cooking turkey breast.
2. Let chicken and other small poultry stand after microwaving
up to 10 minutes.
~rkey
should be allowed to stand 20 minutes.
f(>r
Food
Chicken
Pieces
(per piece)
Whole chicken
(8 pieces)
Whole, uncut
(stuffed or
unstuffed)
Cornish
Whole (stuffed or
unstuffed) oblong
Halves
Hens
DucUing
~rkey
Breast Oblong dish
Contiiner
Plate or
oblong dish
Oblong
dish
Square or
dish
and trivet
Square or
oblong dish
Oblong dish
and trivet
Cover
Wax paper
Oven-proof
cooking bag
or wax paper microwave to
Wax paper
Wax paper
Wax paper
Cooking bag Medium (5)
Power
High
Meal-High (7) 9 to 12 min.
High (10)
High (10)
High (10)
(10)
bvel
&
~me
k
to 3 min.
2
15 to 20 min.
total
per lb. Or
190° internal
temp.
6 to 8 min.
per lb.
9 to 10 min. Arrange skin side up in dish, on bed of stuffing
per
lb.
6 to 8 min.
per lb.
14 to 16 min.
per lb.
Commenk
Brush with browning agent if desired. Arrange
in single layer in cooking dish so thickest
meaty pieces are to outside edges of dish.
Brush with browning agent if desired. Add l/3
cup water to cooking bag.
to
vent. Do not use
side up. Or, place chicken on trivet in dish and
cover with wax paper. Rotate dish 1/2 turn
after half of cooking time.
Place breast side down in dish,
half
of time.
if desired.
Shield bottom of legs, wings and
Microwave breast side down for first half of
time. Brush with browning sauce or broil top
surface of cooked bird until brown and crisp.
Brush with browning agent if desired. Add
cup water to cooking bag. Slit bag near closure
to vent. Do not use metal tic on bag. Cook
breast side up. Or, place breast up in dish and
cover with plastic
(5) 21 to 23 minutes per pound. Remove
plastic wrap, baste and rotate dish 1/2 turn
after half of time.
wrap.
Slit
meti
bag near closure
tie on bag. Cook breast
~rn
over after
tail.
Microwave at Medium
1/2
Brea&
Crust on breads
color of batter (outsides will not brown). If desired, sprinkle top of
batter with cinnamon-sugar mixture, chopped nuts or other topping
Food
Coffee Cakes
(from refrigerated
biscuits)
Corn Bread 8 to 9-in.
Muffins Paper-lined
(1 Muffin) muffin cups
(2 to 4 Muffins) (Do not use
(3 to 6 Muffins)
Quick Breads,
loaf
*If tube dish is unavailable, microwave in 8-in. round dish with drinking
will
be soft, outside color of foods
Conbiner
8-in. tube dish*
tube dish*
foil liners.)
Glass loaf
dish
will
be same as
Cover
No
No
No
No
Power
Medium (5) 6 to 8 min.
Meal-High (7) 9 to 11 min.
Meal-High (7)
Meal-High (7) 9 to 12 min.
glass placed open-side-up in center.
22
for brown color. Or, increase brown color on upside down breads by
lining dish before microwaving with brown sugar caramel mixture.
or savory topping like crushed canned French fried onion rings.
bvel
&
~me
1 to I
fi
min.
I to 2 min.
21/2 tO 4’/2
min.
Commenk
Arrange biscuits over brown sugar-butter
topping before microwaving. Invert to serve
For flavorful browned topping, sprinkle
cooking dish
French fried onions before microwaving.
~rn
out of pan upside down to serve.
Use microwave muffin container or homemade
muffin cups made by cutting down hot drink
paper cups.
Rotate dish 1/4 turn after half of cooking time.
When done, toothpick inserted in center will
come out clean. Let stand 15 min. before
turning out of dish. Cool.
witb finely
chopped
canned
Page 23

~s
1. Prepare eggs many ways in the microwave oven (see
2. Never
and Cheese
Always pierce whole
hard couk eggs
conkcd
C~~S.
They
could exph)dc.
yolks bcti)rc microwaving to
in the shell, and do
n(>t
reheat in-shell
prevent bursting.
below).
hard
3. C()()k
eggs
it ovcrc(>uked.
lust until set. They arc
delicate
and can toughen
Food
~s
Scrambled Glass
Basic
eggs Buttered
Poached
onlclct
Quiche M
C~~S
Cheese
F(~rrdue
Basic White Sauce:
2 minutes, stirring
bubbly.
Contiiner
measuring cup
or
casscroic
custard cup
1
‘/2-qt
casscr[lle cover
Y-in.
pie pldte
icrowavc
Suic
l-qt
measure
quiche dish
M
safe
dish
after 1
find
icr(~wavc
~-qt
Cmnhinc 2 tablcspnons (~lbuttcr. 2 tablcsp(~ons Ilour ~nd 1/2 tcaspo(m
rninutc.
Gradually stir in I cup
Cover
N()
Plastic wrap
Casscrt)lc
N(J
N()
C(~vcr or
plastic wrap
Power
High (lo)
Mcd-High
High (lo)
High (lo) Melt butter
Mcdiurn
Mcd-High
Mcd-High
High (10)
Medium
(JI
milk. Microwave
bvel
& Time Comments
% to
per cgg
(7) i to I ‘/i min.
pcr
5 to 6 min.
Boil 2
water.
% to
pcr
(5)
(5)
1 min.
6 to
(7) Filling:
2 to 3
(7) Quiche:
6 tt) 8
T() [n;ikc
sauce—6
Y to 10 min.
;it
High (lo) 4 to 5 minutes, stirring every minute until thick and
1
cgg
cups
I min.
egg
Y min.
min.
min.
min
rnin.
Place
1
tetispo(m
Micr(~wavc at
the eggs
with the butter and 1
per egg.
Place in
t(~tal
time. Stir set
the
ccntcr. Allow to
Puncture
Heat 2 cups
(10). Break eggs
Swirl
huiling
gently.
C(wcr.
Sprinkle
1 minute until checsc is slightly
dish
1/2
turn after half nf time.
Cmnbinc
2 minutes.
Microwave
dish
1/2
turn after hall’ of
Make Basic
substituting wine
chccsc
and rnicrowavc
minutes, whisking every I
salt in l-qt.
butter pcr
High (10) until melted. Scramble
(~vcn and micruwavc fnr
p{~rtinns fr(~m
stand 1 or 2 minutes tu
mcmbranc
chccsc
and
Pour Illling into precuuked
glass
of yolk tn prevent bursting
hot
tap water 5 to 6 minutes on High
(~nt(>
plate, puncture
water with
Let stand in water a
uver
omelet.
micruwavc
additi(>nal
White Sauce (see
time shown at left.
for
milk. Add 1 cup Swiss
at Medium (5)
measure.
cgg
in dish.
tablespoon”
spnon.
slip in eggs
Micruwavc k tu
filling, stirring every
time.
recipe below).
IIz
minutes.
Micr(~wavc at
milk
half’
the outside
rncltcd. Rt>tate
mcmbranc.
fcw
minutes.
shell.
for
Y to 10
High (lo)
set e~s.
Rutatc
(~f’
t~~
Fish and Seafood
1. Fish isd(mc when it Ilakcscasily with a
slightly translucent, but will
minutes alter
Food
cnoking.
Conbiner
Fish
Fillets or
steaks (1 lb. )
Wh(~lc fish
Clams
(6)
Shrinlp-1 lb.
(pcclcd) shallow dish
Shrinlp-2-lbs.
(unpcclcd)
Obl(~rrg
Obl(mg dish
Pic
shallow
Pie
2-qt.
CasseI-olc
c(mtinuc c(>(~king
dish
plate
(lr
dish
plate
or
li~rk.
Centcrmay still
as
fish
standsa
Cover
Wax paper or High (lo)
plastic wrap
Plastic
wrap
Plastic
wrdp
Plastic wrap
Lid
or
plastic wrdp
Power
High (10)
High (lo)
High (lo)
High (10)
bc
fcw
2.
C()()k t’ish
J
3. I)() not (wcrcook” fish.
bvel
& Time
6 to 8
5 to 7 min. Shield head and thin tail with aluminum
per
microwave
1500 internal
tcnlp.
3 to 4
3 to 6
6 to
with or
I
ightcr c(wcr of
withuut sauce.
wax paper or paper
Check at minimum
Comments
min.
lb. or
min. Place in
min.
to min. Stir al[cr 5
Micr(~wavc
to
A tight covcrstcanls
towel F(]r
until fish
dish
with
rninutcs.
flakes easily.
hinged
tirnc.
side
less steaming.
fish,
foil.
out.
orusc
Page 24

Vegetables
1. Always
2. Do
3. Cooking time for vegetables affects finished taste and texture.
usc
not
salt tops
microwave
most vegetables with tight cover to steam thcm. Exceptions are
potatoes cooked in their skins
no water added
salt to water in dish before
cause brown spots on vegetables during microwaving.
Minimum time on guide gives fresh taste and crisp-tender texture.
For soft texture with well-developed flavor.
or
Inngcr.
safe
cookware,
k]r
steam.
ofvegctab]es
adding vegetables. Salt can sometimes
glass
or plastic.
and
watery vegetables which
before
microwaving.
co(}k
Cook
need
Ifdesircd.
maximum time
add
Vegetables Con@iner Cover
Slices, pieces
(l-lb. )
(2-lbs. )
Wbolc, halves
starchy vcgctablcs
(Potatoes. winter squash.
caul itlowcr, etc.
(1-lb.,
(2-fbs.
Watery (Tomatoes,
summer squash)
(l-lb. .3 to 4)
(2-lbs., 6 to
Vegetable Casseroles
(With raw vcgctablcs)
(With
vegetables)
Stir-Fry Vcgctablcs
(6 to 8 servings)
Blanching
vegetables
f’reczing
or large.
3
to 4)
, 6 to
8)
8)
precooked
frcsb
f{}r
)
Casserole
Potatoes:
oven tlonr (no
container) Other
vegetables: Square
or
(lr
Glass
casserole
obl~)ng
casserole
Cook (m
dish
—
Ycs
Potatoes: No
Winter
squash,
CUUI iflowcr,
etc.
:
Ycs
Yes
Ycs
Yes
Yes
Power
High (10)
High (10)
High (lo)
High (lo)
High (lo)
High (10)
4.
Size of pieces affects cooking time.
Iongcr
than small uniform pieces.
Just
5.
as
when cooking conventionally.
have similar densities or degrees of
t[)gctbcr
successfully. Firm, crisp vegetables
caulitlowcr and broccoli microwave together well. If microwaving
a firm vegetable with a soft one (carrots and peas.
cut the carrots in
peas. Or, start
during last few
hvel
& Time
1 I to 14 min.
14 to 18
12 to 20 min.
16 to 20 min.
4 to 5 min.
6 to
18
to 20 min.
10 to 12 min.
10 to 12 min.
3
to 5
jul
c(}oking Iargcr
rninutcs.
min.
8
min.
min
icnnc
strips so they will cook as list as
Commenk
Add 1/4
rcducc
vcgct~blcs
Prick skin of potatoes before
Cut
in pieces or halves. No additional
water nccdcd.
Use
boiling in dish.
Tn
stir-fry
substitute 1
and
Blanch only 1
vc~etables at
caiscrole with
Blanched vegetables will have bright. even
colnr and will be slightly
drained blanched vegetables immediately
by plunging in
Large
pieces generally take
vcgctablc
firrnncss
carrot pieces first, and
to 1/2 cup water. If
time 3 to 5 minutes
arc blanched.
large enough c~sscmlc to
one
type
tablcspo(m
fi)llow
times in
pound or I quart prepared
a time.
mixtures
in order to
Iikc
carrnts.
for
I’rozcn.
bccausc
of”
vegetable,
oil
for
cooking”
guide.
Place
1/4 to
c(>ntaincr of icc water.
in 1 to
1/2 cup water.
snftcncd. C()()I
example)
add
cooking.
allow Ii)r
water
should
cook
tbe
peas
2-qt.
Gravies & Sauces
1.
Because microwaved sauces evaporate
they
arc
thinner than conventionally cooked sauces
same amount of thickening.
extra teaspoon to 1 tablespoon flour or cornstarch for each cup
of
1
iquid.
Food
Gravies and sauces
thickcncd
or cornstarch (1 cup)
Thin, liquid sauces
(aujus.
(1 cup)
Melted butter sauces,
clarified butter
( % cup)
Thick spaghetti.
barbecue or sweet/sour
sauces (2 cups)
with flour
clam, etc. )
Incrcasc
Contiiner
Glass measure
bowl
or
Casserole
Glass
Casserole,
large bowl
Icss
than (m the range top,
thickening by adding an
Cover
No High (10)
N()
rncasurc
No
Yes
rnadc
—
with
the
High (lo)
High (lo)
Higb
2. Microwaved sauces do
should be
while microwaving.
3. Vary basic white
cream or dry milk solids. Add
Power
(10)
24
hvel
& Time
4 to 5 min.
2 to 3
5 to 7 min.
whisked
min.
1/2
to
I
min.
nut
need to bc stirred
vigorously
sauce (SCC
with wire whisk
page
23)
by
flour
with mayonnaise or
adding
Commenk
Microwave fat, flour
to melt and
finish. Increase
additi(mal
Add cornstarch-water
ingredients. Stir well
finish,
Microwave butter just to melt. For
clarified butter, bring to
stand until
and usc
Stir ingredients together
stirring after half of
10 minutes to develop
blcrrd.
time
cup of’ sauce.
Iaycrs
clear
separate.
tnp layer.
Whisk in liquid and
ccmstantly
and
1 to 2 minutes
tirnc.
but
once
or twice
chcesc.
egg yolks.
wind.
salt together
rnixturc
to
boil then
Pt)ur of’f”
microwave.
Let
stand
hctitcd
let
:ind nlicrowavc tn
then
flav(lr.
most
per
5
to
Page 25

1.
Always use microwave safe cookware, glass or plastic.
For pasta, use about half the amount of water needed for
2.
conventional boiling; there is less evaporation in a microwave
oven.
Add regular amount of salt and 1 teaspoon oil (optional. to
prevent sticking).
For rice or minute rice, use the same amount of water and salt as
3.
with conventional boil
ing.
4.
Cover pasta and rice tightly while microwaving. When using
plastic wrap, turn back one corner to vent.
Stir or rearrange after half of cooking
5.
immediately after microwaving.
Microwaving time is about the same as conventional boiling.
6.
time.
Drain pasta
Food
Macaroni
Spaghetti
Egg
Lasagna (8 to
Manicotti
Rice, regular
long grain (1 cup)
Rice, minute
(1% cups)
(8-oz,
)
(16-oz.
Noodles (8-oz. )
16-oz.
(5-oz. )
Contiiner
2-qt.
casserole
)
13 X9X2-in.
oblong dish
3-qt. casserole
)
13
oblong dish
12X8X2-in.
oblong dish
3-qt. casserole
2-qt.
X9X2-in.
casserole
Cover
Lid or
plastic wrap
Plastic wrap
Lid or
plastic wrap
Plastic wrap
Plastic wrap
Lid or
plastic wrap
Lid or
plastic wrap
Power
High (10)
High
High (10)
High (10)
High (10)
High (10)
High (10)
Cereal
1. Always usc microwave safe containers, glass or plastic. Use large
enough container to avoid
2. Start with hottest tap water to shorten cooking time.
Food
spillover.
Contiiner Cover
Power
hvel
&
~me
15
to 18 min.
(10)
16 to 19 min.
21 to 23 min.
11 to 16 min.
22 to 25 min.
18 to 21 min.
4 to 6 min.
3. Do not cover (prevents
4. Stir halfway through cooking time
hvel
&
~me
Commenk
Add 3 cups water. Stir after 10 minutes. For
rotini
Add 6 to 7 cups
Add 8 cups water. Stir after 10 minutes. Time
is the same for spinach or regular noodles.
Cover with water in dish. Rearrange after
7 minutes.
Brush with oil, then cover with water in dish.
Using fork, turn over every 5 minutes while
microwaving.
Add 2 M cups water. Stir after 10 minutes.
Add
Commenk
type, check for doneness after 10 minutes.
water.
10 minutes.
1 k
cups water. Stir after 2 minutes.
spillover).
Rearrange after
Oatmeal, Quick
Note:
T()
for amount of water and microwave at High (10) for % to 1 minute.
Note: To
for amount of water and microwave at High (10) for
microwave single-serving packet of instant oatmeal,
Oatmeal,
old fashioned or bowl
Grits, Quick
microwave single-serving packet of instant grits, follow package directions
Cream of Wheat
Cream of Rice
China or
pottery
bowl,
paper bowl
I-qt.
casserole No
China or
pottery bowl,
paper bowl
l-qt.
casserole No
or bowl
China or
pottery bowl,
paper bowl
No High (10)
f(>llow
High (10)
No High (10)
k
to 1 minute.
High (10)
No
High
2
to 2
per serving
package directions
3
to 5 min.
ft)r 1
serving
3
to 4 min.
for 1
serving
3 to
4 min.
for 1 serving
1 k
(10)
to 2 min.
for
‘/2 min.
serving
Mix cereal,
microwaving. Stir before serving. For 6 servings,
use 3-qt. casserole.
Increase casserole size
serving. Increase time about 2 minutes for each
additional serving you are cooking. Stir after
half of cooking time.
Mix cereal with hottest tap water. Increase
casserole size and microwave time by 2 minutes
per additional serving.
Increase time 1 minute per additional serving
Increase time about
serving.
salt
and hottest tap water before
for
more than one
1
minute per additional
25
Page 26

Cakes and Desserh
1.
Always use microwave safe cookware, glass or plastic.
2. Before adding
removal, line dish with wax paper or paper towel.
batter, grease dishes, but do not flour. Or, for easy
3. Crust on cakes will be soft. Refrigerate cake if firm exterior is
desirable for frosting.
4. Fruit desserts will be fresh looking and tasting.
Food
Contiiner
Cakes
Commercial mix
(18 to 20-oz.)
Basic butter or
chocolate cake
Pineapple
upside-down cake
Cupcakes—6 Paper lined
Bar cookies
Baked apples
or pears
8-in. round or
square dishes
Fluted tube
cake pan
Greased 8-in.
round dish
8-in. round
dish
cupcaker
8-in. square
dish
12 X8
dish
Microwave
safe dish or
casserole
X2-irr.
Cover
Lid or
plastic wrap per piece
Power
Meal-High (7) 8 to 9 min.
Meal-High (7) 17 to 19 min
High (10)
High (10)
High
High (10)
High (10)
(10)
hvel
&
~me
8 to 9 min.
9 to 11 min.
3 % to 4 min
6 to 8 min.
8 to 14 min.
3 to 4 min.
Commenk
Grease dishes before adding batter. Remove
an egg when preparing batter. Rotate dish
1/4 turn every 3 minutes. Let
minutes before inverting to cool.
Use number
package. Rotate pan 1/4 turn every 6
minutes. Let tube cake stand 15 to 20
minutes before inverting to cool.
Rotate dish
stand on heat-proof counter or wooden
board to cool 15 minutes.
When done, toothpick stuck in cake comes
out clean. Invert cake onto plate; let dish
stand over cake a few minutes.
When cooking several cupcakes, you may
notice some will be done before others. If
so, remove cupcakes as they are done and
continue cooking the rest a few seconds
more.
Grease dish before adding batter. Rotate dish
1/2 turn after half of time. Cut when cool.
Pierce fruit or peel to prevent bursting.
of eggs recommended on
1/4
turn every 3 minutes. Let
s~nd
5 to 10
Candies
1. Always
use microwave safe
melt chocolate in paper wrappers seam side up, or place
chocolate in paper bowl to
Food
S’Mores Paper napkin
Caramel Apples
Marshmallow Crisp 12x8X2-in.
Chocolate Bark
glass
containers. For easy cleanup, 2. Candies which are boiled become very hot; be sure to handle
melt.
Contiiner
or paper plate
1 pint (2-cup)
measure
dish
1
ti-qt.
casserole
or bowl
Cover
No
No
Yes
Yes
Power
High (10)
High (10)
High (10)
High (10)
cooking containers carefully.
hvel
15 to 20
seconds
3 min.
1 M
melt
3
to melt
marshmallows
3 to 5 min.
&
min. to
butter
K
min.
~me
Commenk
Cover graham cracker with chocolate and
marshmallow. Microwave.
Unwrap a 14 oz. package of caramels into
measuring cup. Add 1 tablespoon inter.
Micmve,
apples into mixture.
In 12X8X2-in. container, melt 1/4 cup
butter. Add 1O-OZ. package marshmallows.
Cover with wax paper and microwave to
melt.
Press firmly into dish.
Place
container. Microwave to
whole toasted almonds. Spread over wax
paper on cookie sheet. Chill
stirring every minute. Dip 4
Stir in 5 cups crispy rice cereal.
12-oz.
semi-sweet chocolate pieces in
melt.
Add 1 cup
until
firm.
26
Page 27

Microwave
Utemil/Cookware
Guide
~pe of
Foil-1ined Paper Bags, Boxes and
Baking
Metal or part metal Pots, Pans,
Thermometers, Skewers and Foil
Trays
Boilable Hard and Soft Plastics,
such as:
Glass jars, such as
vegetables, entrees. syrups.
salad
dressing
Handmade Pottery, Porcelain,
Stoneware
Microwave Plastics such as:
Anchor Hocking
Plastics, Mister Microwave, Nordic
Ware, Republic.
Paper or Styrofoam Plates
and Cups
Oven Glass such as:
Fire King,
Pyrex
Utensil/Cookware
Trays
Rubbermaid
for
baby foods.
Microware,
Tara, Wearever Nupac
Anchor Hocking,
Glassbake, Heller, Jena,
Bangor
Microwave Uses
Avoid. Use only foil trays
microwaves, thus preventing even heating. Arcing can occur if foil is closer
than
l-in.
to oven walls.
Cooking ground beef (colander).
Defrosting. Heating.
Avoid heating baby food in-jars, especially meat and egg mixtures. Remove
metal caps to warm syrup.
Cooking and heating.
Cooking.
Heating and serving foods and beverages. Styrofoam should be used for
short-term heating to low temperatures and for serving.
Cooking and heating.
3j4-in.
deep or less. Foil or metal will reflect
Regular Dinnerware, such as:
Corelle
by Corning,
Denby.
El
Carnino,
International Stoneware,
Temperwarc,
Pfaltzgraff
Unsuitable Dinnerware,
Corning Centura,
Oven-to-table Ware, Melamine,
Dishes with
Paper Towels and Napkins,
Wax Paper
Glass-Ceramic
such as:
Progression G. by
Plastic Wrap, Cooking Bags,
Boil-in-bags, Storage Bags
Specialty Glass-Ceramic and
Porcelain, such as: El
F.B.
Rogers,
Pfaltzgraff, Shafford
Marsh,
rnctal
Corning Ware,
Dansk
Franciscan.
Mikasa.
Fitz
and Floyd
(rim
(Pyroceram),
Noritake
Heller,
Marsh Industries,
Generation,
Lenox
such as:
Carnino,
Heating and some cooking. Avoid metal rings or decorations on dinnerware
None.
Cooking bacon. Absorbing moisture and preventing spatters. Heating and
serving sandwiches or appetizers. Use wax paper as light covering to hold
in steam.
Cooking and heating.
Covering to hold in steam (wrap). Cooking (cooking and boil-in bags).
Heating (storage bags).
Recommended for microwave oven-to-table cooking of special foods.
Paperboard Trays
entrees and dinners
Plastic trays and plates
frozen entrees and
used for frozen
dinners
used
for
Cooking and heating.
Cooking and heating.
n
Page 28

The Exhaust Feature
MEiAL
FILTER
COOKTOP LIGHT
The exhaust hood
microwave oven is equipped with
two metal filters which collect
grease. When the fan is operated,
air is drawn up through the filters
and is then discharged through the
provided venting to the outside.
The hood also has a light for
illuminating the counter space.
m
\
MiTAL
FILTER
I
feature on your
Then pull filter downward and to
the front. The
To replace grease filter,
filter in the frame slot on the back
of the opening.
filter
will drop out.
slide the
To clean grease filter, soak,
agihte
filter in hot detergent
solution. Don’t use ammonia or
other alkali because it will darken
metal. Light brushing can be used
to remove embedded dirt. Rinse,
shake and remove moisture before
replacing.
cleaned at least once a month.
Never operate your hood without
the filter in place.
where flaming might occur on
surfaces below hood, filter will
retard entry of flames into the unit.
Filters should be
In situations
then
To remove grease filter,
“finger hold” on the filter and slide
to the rear.
grasp the
Pull filter upward and to the front
to lock into place.
Clean
off the grease and dust on
hood surfaces often. Use a warm
detergent solution. About 1
tablespoon of ammonia may be
added to the water. Take care not
to
touch
the filters and enameled
surfaces with this. Ammonia will
tend to darken metal.
28
Page 29

Light Bulb Replacement
Cooktop
To replace
first
fuse or circuit breaker panel or
pull plug.
side of light compartment cover
and lower cover until it stops.
Light in Hood
REMOVE SCREW
cooktop
disconnect power at main
Remove screw on right
light in hood,
Oven Light
To replace
disconnect power at main fuse or
circuit breaker or pull plug.
Remove the top
3 screws which hold it in place.
your oven light, first
grill
by taking off
Grounding
Imtructiom
This appliance must be grounded.
In the event of an electrical short
circuit, grounding reduces the risk
of electric shock by providing an
escape wire for the electric current.
This appliance is equipped with a
power cord having a grounding
wire with a grounding plug. The
plug must be plugged into an outlet
that is properly installed and
grounded. (Fig. 1)
WARNING–improper
use of the grounding
in a risk of electric shock.
plug can result
Be sure
cool before removing. Break the
adhesive seal by gently unscrewing
the bulbs. Replace with 40-watt
incandescent bulbs
available from
High
(40SllN/1)
supermarkets and hardware stores
may also be used for replacements.
Raise light compartment cover and
replace screw. Connect electrical
power to microwave oven.
bulbs
to be replaced are
(WB2X4253)
your
Ho~int su~~lier.
intensit~40-watt’bulbs
which are available in
‘‘
Next, remove the single screw
located above door near center of
oven that secures light housing.
Remove bulb and replace with 30
watt incandescent bulb available
from your
(Part No.
light housing with screw.
Hotpoint
WB2X4235).
supplier
Secure
I
Consult a qualified electrician or
service technician if the grounding
instructions are not completely
understood, or if doubt exists as to
whether the appliance is properly
grounded.
Where a standard two-prong wall
receptacle is encountered, it is
your personal responsibility and
obligation to have it replaced with
a properly grounded three-prong
wall receptacle.
Do
not under
cut or remove the third
any
circumstance
@round)
prong from the power cord.
Do not use an adapter plug
with this appliance.
Do not use an extension cord
with this appliance.
29
Page 30

m
~.
-—
—
Use This Problem Solver
Questiom?
PROBLEM
OVEN WILL NOT
COME ON
OVEN WILL NOT
START
FOODS ARE EITHER
OVERCOOKED OR
UNDERCOOKED
POSSIBLE CAUSE AND REMEDY
●
A fuse in your home may be blown or the circuit breaker tripped. Replace fuse or
reset circuit breaker.
●
Unplug your microwave oven, then plug it back in.
●
Make sure 3-prong plug on oven is fully inserted into wall receptacle.
● Door not securely closed.
●
START must be pushed after entering cooking selection.
●
Make sure you have set cooking time after pushing the TIME button.
●
Temperature probe not inserted properly or not being used during temperature
cooking.
●
Make sure you have set a desired finished temperature after pushing
. Cooking times may vary because of starting food temperature, food density
or amount of foods in oven. Push TIME button and set additional cooking time for
completion.
●
Incorrect power level entered. Check cooking guide for recommended power level or
changing levels during cooking if necessary.
● Dish was not rotated, turned or stirred. Some dishes require specific instructions.
Check cooking guide or recipe for these instructions.
TEMP
button.
c
Too many dishes in oven at same time. Cooking time must be increased when cooking
more than one food item. Check cooking guide for recommendation on increasing time.
●
Probe not inserted properly into meat or food when using temperature cooking.
Check cooking guide for specific instructions.
All these things are normal with your microwave oven:
●
Steam or vapor escaping from
around the door.
● Light reflection around door or
outer case.
If you need more help.. call, toll free:
GE Answer Center”
800.626.2000
consumer information service
● Dull, thumping sound while
oven is operating.
. Dimming oven light and change
in blower sound may occur while
operating at power levels other
than high.
s
Some TV-Radio interference
might be noticed while using your
microwave oven. It’s similar to the
interference caused by other
appliances and does not indicate a
problem with your oven.
small
30
Page 31

If You Need Service
To obtain
on
We’re proud of our service and
want you to be pleased. If for some
reason you arc not happy with the
service you receive, here are three
steps to follow for further help.
FIRST, contact the people who
serviced your appliance. Explain
why you
cases, this will solve the problem.
NEXT, ilyou
write all the details—including
your phone number—to:
FINALLY, if your problem is still
not resolved. write:
service. see your warranty
the back
Manager, Consumer Relations
Hotpoint
Appliance Park
Louisville, Kentucky 40225
Major Appliance
Consumer Action
20 North
Chicago, Illinois 60606
page
of this
are
not pleased. In most
are
Wacker
still
Drive
book.
not
Panel
pleased,
3]
Page 32

Save proof of
YOUR HOTPOINT MICROWAVE OVEN
WARRANTY
orlglnal
purchase date such as your sales slip or cancel led check to
establlsh
warranty period
WHAT IS COVERED
WHAT IS NOT COVERED
FULL ONE-YEAR WARRANTY
For one year from date of original
purchase, we will provide,
free of
charge, parts and service labor
in your home to repair or replace
any part of the microwave oven
that fails because of a manufacturing
defect.
LIMITED ADDITIONAL
FOUR-YEAR WARRANTY
For the second through fifth year
from date of original purchase,
we will provide, free of charge, a
replacement magnetron tube if
the magnetron tube fails because
of a manufacturing defect. You pay
for the service trip to your
home
and service labor charges.
● Service trips to your home to
teach you how to use the product.
Read your Use and Care material.
If you then have any questions
about operating the product,
please contact your dealer or our
Consumer Affairs office at the
address below, or call, toll free:
GE Answer Center
(R)
800.626.2000
consumer information service
● Improper installation.
If you have an installation problem,
contact your dealer or installer.
You are responsible for providing
adequate electrical, exhausting
and other connecting facilities.
This warranty is extended to
the original purchaser and any
succeeding owner for products
purchased for ordinary home use
in the 48 mainland states, Hawaii
and Washington,
D.C.
In Alaska the
warranty is the same except that it is
LIMITED because you must pay to
ship the product to the service shop
or for the service technician’s travel
costs to your home.
All
warranty service will be provided
by our Factory Service Centers or
by our authorized Customer Care
(’)
servicers during normal working
hours.
Look in the White or Yellow Pages
of your telephone directory for
HOTPOINT FACTORY SERVICE,
GENERAL
ELECTRIC-HOTPOINT
FACTORY SERVICE or HOTPOINT
CUSTOMER
● Replacement of house fuses or
CARE(”
SERVICE.
resetting of circuit breakers.
●
Failure of the product if it is used
for other than its intended purpose
or used commercially.
● Damage to product caused
by accident, fire, floods or acts
of God.
WARRANTOR IS
NOT
RESPONSIBLE
FOR CONSEQUENTIAL DAMAGES.
Some states do not allow the exclusion or limitation of incidental or consequential damages, so the above limitation or exclusion
may not apply to you. This warranty gives you specific legal rights, and you may also have other rights which vary from state to state.
To know what your legal rights are in your state, consult your local or state consumer affairs office or your state’s Attorney General.
Part No. 164
D2092PO09
Pub. No. 39-4633
5-89
Warrantor: General Electric Company
If further help is needed concerning this warranty, write:
Manager—Consumer Affairs, GE Appliances, Louisville, KY 40225
RVMllb\
Printed
‘“’l
~Im
)n Kor(
 Loading...