

Page 1
RM24945
Set
Universal Remote
Instruction Manual
R24945 Remote
K24945
Locator
Keyfob
Page 2

Table of Contents
Setup
Introduction ........................................................... 3
Setup .................................................................... 3
Battery Installation ........................................... 3
Battery Saver ................................................... 3
Code Saver ...................................................... 3
Code Setup ...................................................... 3
Button Functions ............................................. 4
Audio Functions ............................................... 6
AM/FM Tuner and Home Theater Functions ..... 7
Surround Sound Feature .................................. 8
Direct Code Entry ............................................ 9
Code Search .................................................. 10
Using Your Remote ..............................................11
Code Identification .......................................... 11
Sleep Function............................................... 12
Controlling Devices with Power On and Off .... 13
Controlling Combo Devices ............................ 13
VCR/DVD/DVR Punch-Through ..................... 13
Volume/Mute Control and Punch-Through ...... 14
All Volume/Mute Control to any one Mode ..... 14
Setting any Mode for its own Volume/Mute .... 15
FIND IT Operation ............................................... 16
Troubleshooting .................................................. 21
Congratulations on your purchase of this 6 function
FIND IT ™ Universal Remote Control. This remote is
one of the most easy to use remote controls available
today. Now juggling multiple remote controls is a thing
of the past! Your Universal Remote controls up to six
devices, including the most popular brands of TV, VCR,
DVD, CBL, and SAT. It is easy to use, easy to program,
and it gives you total control—at the touch of your
fingertips! And, when used with the Locator Keyfob you
can easily find your misplaced Remote or any item
attached to the Keyfob.
Note: Some functions from your original Remote may
not be controlled by this remote. Use the original
remote, if available, to control such functions.
Sometimes buttons other than described in these
instructions may actually perform the function. For
example, the CHAN and VOL buttons might be used to
navigate through menu choices. We recommend you
experiment with the remote to identify if such situations
pertain to your equipment.
Battery Installation for Remote Control
1. On the back of the remote, push down on the
tab and lift the cover off.
2. Match the batteries to the + and - marks inside
the battery case, then insert 2 AAA Alkaline
batteries (not included).
3. Press the battery cover back into place.
Battery Saver
Your remote automatically turns off if the buttons
are depressed more than 30 seconds. This will save
your batteries should your remote get stuck in a
place where the buttons remain depressed (e.g.,
between the sofa cushions).
Code Saver
You will have up to 10 minutes to change the
batteries in your remote without losing codes you
have programmed. However, do not press any
buttons until batteries are installed in the remote. If
buttons are pressed without batteries in the remote,
all codes will be lost.
Code Setup
The CODE SEARCH button is used to set up the
remote. You can either set up the remote using the
code tables (on separate sheet), or you can search
through the library of codes until you find a code
that works for your product. Please refer to “ Code
Search” on page 10 for more information on using
the code search feature to learn how to search
through the library of codes for your products.
NOTE: You can store any kind of code under any
mode (except TV). I.E. you can store a VCR code
under the CBL button, or a Cable code under the
DVD button, etc. However, you can only store TV
codes under the TV button.
32
Page 3
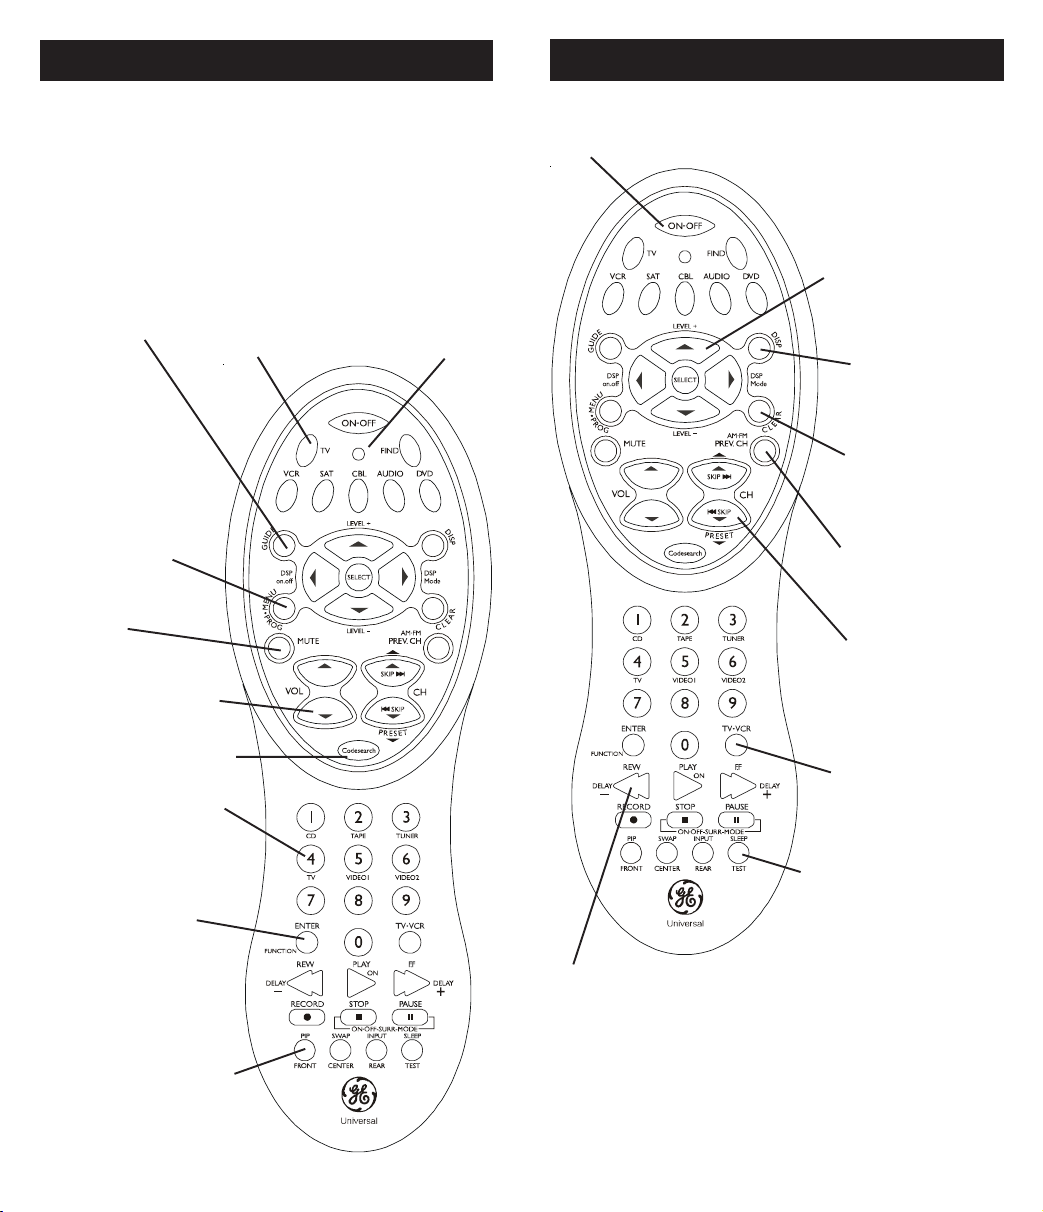
Button Functions
Button Functions, cont.
Some buttons on the remote might have functions that
are referred to by different names on the device you are
controlling. E.G. PREV.CH may be called RECALL, or
CLEAR may be called EXIT. These differences depend
on the brand and model of your product. Also, this
remote can only operate features that exist on your
product. E.G., your product must have previous channel
ability for the PREV.CH button to operate this feature.
GUIDE displays
satellite or cable
on-screen
program guide.
MENU-PROG
Brings up the main
menu. If you are ready
in the menu system,
press SELECT to select
a highlighted choice.
Use the arrow buttons
to move through the
menu selections.
MUTE Turns off the TV
sound while the picture
remains.
VOLUME UP/DOWN
Changes the volume level
of the product, normally
the TV.
CODE SEARCH For setup.
0-9
Enter numbers for direct
channel selection. Some
products require ENTER to be
pressed after channel
selection.
ENTER For some TV
models, used after
direct channel number
entry to immediately
change to the selected
channel.
PIP, SWAP, INPUT. PIP and
SWAP operate your TV’s
Picture-in-Picture features.
INPUT selects the video input
of your TV.
TV, VCR, etc.
Selects product to
be operated.
Red Indicator
Lights when any
button is pressed.
ON•OFF Turns
product On or Off.
RECORD, PLAY, STOP, REW, FF, PAUSE VCR control buttons
operate your VCR even when the remote is set to operate the
TV. Also operates DVD Scan -/+. Note the VCR keys also
control similar functions of your DVD player when in DVD
Mode.
Note: The REC button must be pressed TWICE to record from
your VCR. For some brands of VCRs, you might need to press
the REC button once, then press it again for three seconds.
Navigation buttons and
SELECT used to move
through on-screen
menuing and guides. With
some DBS models the DISP
button should be used to
select the highlighted item.
Use the navigation buttons
to move the highlighted
choice up, down, left, or
right.
DISP Display button
shows date and time if
your TV or VCR has
that feature.
CLEAR Removes the
on screen display to
return to normal
viewing.
PREV.CH Returns to
the previously selected
channel.
CHANNEL Up/Down
Changes the channels
TRACK +/- controls DVD/
CD track selection i.e. DVD/
CD Track Skip Up/Down (in
DVD and CD modes).
TV/VCR Operates the
same as the TV/VCR or
antenna keys on your
original remotes.
SLEEP enables the remote
to turn off your TV after a
period of 1 to 99 minutes.
54
Page 4

Audio Button Descriptions
Audio Functions, cont.
Press the AUDIO device button to enable the AUDIO
MODE. Audio functions are indicated by the blue button
descriptions.
LEVEL+/LEVEL- Sets the level of the speakers during
test tone mode.
DSP
ON•OFF Enables the receiver’s Digital Sound
Processing mode.
DSP MODE When the DSP mode is enabled, pressing
this button lets you toggle through the various DSP
modes.
CD, TAPE, TUNER, TV, VIDEO Used to directly select the
device you want to control. (Works in AUDIO mode).
AM/FM Lets you select the AM/FM band on your audio
receiver.
FUNCTION Toggles the different audio input devices.
The number buttons also select the function labels
below the buttons when in AUDIO mode.
DELAY-, ON, DELAY+ Increases or decreases the delay
between the surround and main speakers when the
receiver is in surround sound mode.
ON•OFF, SURR. MODE Toggles the surround modes
on and off. SURR MODE toggles through the receiver’s
various surround sound mode settings.
FRONT, CENTER, REAR, TEST Adjusts the levels of the
front, center, and rear speakers respectively. The test
tone must be enabled first by pressing the TEST
button.
PRESET Used to operate preset channels while in the
AUDIO mode.
Operating Audio Functions
Using the number buttons to change audio inputs
To select a device, press the number button (1-6) that
corresponds to the device you want to operate (CD,
TAPE, TUNER, TV, or VIDEO).
Using the function buttons to change audio devices
To select a device, press the FUNCTION button until
the input you want to operate appears on your system.
Operating a CD player or Tape Deck
Use the Play, Forward, Reverse, Record, Stop, and
Pause buttons for CD Players and Tape Decks. In
some case the Preset buttons (CHAN+/CHAN-) may
change tracks on CD Players.
AM/FM Tuner Functions
1. Press the AUDIO button.
2. Press the TUNER (3) button.
3. Press the AM/FM button to toggle between AM
and FM.
4. Use the preset (CHAN+ or CHAN- buttons to
move up and down channel presets.
Home Theater Systems
With GE receivers, a second press of the TV button
turns the receiver on.
Note: Not all functions work for all brands.
Turning on the Receiver or Mini-System
Point the remote control at the receiver and press the
AUDIO button. The receiver should turn on. In some
cases you might need to press the AUDIO button and
then the
Selecting a device Input
Device inputs such as CD Player or Tape Deck may be
selected depending on the features of your receiver or
mini-system. Input selection may be made either by
pressing the labeled number function, or by pressing
the FUNCTION button to toggle through the inputs
available on your system.
ON•OFF button to turn the system on.
1. Turn the TV on.
2. Press the AUDIO button.
3. Select the audio input either by using the labeled
number buttons, or the FUNCTION button.
4. Press the VOL+ or VOL- buttons to control
volume.
NOTE: The volume buttons may operate both the TV
and the receiver volume at the same time. If this
presents a problem, it may be resolved by disabling
the TV speakers by going into the TV menu.
76
Page 5

Surround Sound Feature
Direct Code Entry
The surround sound feature may be turned ON/OFF
by pressing the SURR ON•OFF button.
1. Press the SURR MODE button
until the desired mode is found.
2. Press DELAY+ or DELAY- to achieve the desired
delay affect.
3. Press the DSP ON•OFF button to
turn DSP (Digital Sound Processor)
ON or OFF.
4. Press the DSP mode button until the
desired effect is achieved.
5. Press the TEST button to listen to
speaker levels.
6. Press FRONT, CENTER,
or REAR buttons to
select speakers.
1. Press and hold the CODE SEARCH
button until the red indicator stays on,
then release the CODE SEARCH button.
2. Press and release the desired device
button (TV, VCR, etc.). The red indicator
blinks, then stays lit.
3. Enter the 3 digit code
from the code tables
(on separate sheet).
Note: after a valid code
entry, the red indicator
turns off. For an invalid
code, the red indicator
flashes.
4. With your device on, press
ON•OFF. If the device turns off, no
further programming is required.
Note: If some buttons do not
operate your equipment, try one of
the other codes for your brand.
Write your codes down here for easy reference
later.
Type Type stored Code
7. Press the LEVEL+ or LEVELbuttons to adjust speaker levels.
TV TV
VCR
SAT
CBL
AUDIO
DVD
98
Page 6

Code Search
Using Y our Remote
If your device does not respond after you have tried
all the codes for your brand, or if your brand is not
listed, try searching for your code by following these
steps.
1. Manually turn on the device (TV, VCR, etc.) to be
controlled.
2. Press and hold the CODE SEARCH
button until the red indicator stays on,
then release the CODE SEARCH button.
3. Press and quickly release the desired
device button (TV, VCR, etc.). The red
indicator blinks off once.
4. Press the ON•OFF button
repeatedly (up to 300 times) until
the device to be controlled turns off.
The red indicator blinks off with each
button press.
5. Press and release ENTER to install the
code.
Most users will store VCR codes under the VCR button,
Cable codes under CABLE, etc. If (for example) you
want to store a VCR code under CABLE, first follow the
procedure for Direct Code Entry (previous page) and
press CABLE in step 2 of Direct Code Entry, then enter
ANY VCR code in step 3 of Direct Code Entry. Then
follow the steps above for Code Search.
Code Identification
The Code Identification Feature allows you to
identify the three digit library code stored under your
device button. For example, if you want to find out
what three digit code is stored under your TV device
button, follow the six steps below:
1. Press and hold the CODE SEARCH
button until the red indicator stays on.
Release the CODE SEARCH button.
2. Press and release the desired device
button (TV, VCR, etc.). The red
indicator blinks, then stays lit.
3. Press and release the CODE SEARCH
button. The red indicator blinks once
and remains lit.
4. To find the first digit for
the code stored under
the device button
pressed in step 2,
press each numeric
button from 0-9 in
turn. The number that
causes the indicator
light to blink is the
first digit in your code.
5. To find the second digit, repeat step 4.
Note: Code Search starts from the currently stored
three digit number under that mode. Sometimes the
first code that “works” with your device may only allow
limited functionality (e.g. the MENU button might not
work). There may be a code that performs more
functions. Continue the code search process until the
best code is found.
6. Repeat step 4 again to find the third digit. This
time the red indicator turns off and stays off.
1110
Page 7

Using Y our Remote, cont.
Using Your Remote, cont.
Sleep Function
The Sleep button enables the remote to turn off
your TV after a period of 1 to 99 minutes as shown
below. The remote must be in TV mode to set a
Sleep Timer. This feature works even if your TV
does not have a sleep feature.
1. Press and release the TV device button.
2. Press and hold the Sleep button until the
LED remains lit (about 2-3 seconds).
3. Release the Sleep button.
4. Press and release the
numeric buttons (01-
99) for the time
required. The LED will
blink off to indicate
button press acceptance.
5. TV Sleep Timer is set.
6. Leave the Remote pointing towards the TV
with an unobstructed path.
Controlling Devices with Separate
Power On and Off Buttons
Some GE, RCA and ProScan models require you to
press the device button for more than one second
to turn the device on and the ON•OFF button to turn
the device off.
Controlling Combo Devices
Some Combo devices (e.g. TV/VCR, TV/DVD,
DVD/VCR, etc.) will require you to set up two
different Mode buttons to control both parts of the
Combo device. For example, if you have a TV/DVD
Combo, you might need to set up one code under
the TV button to control the TV part AND a
separate code (under any other Mode button) to
control the DVD part.
VCR/DVD Punch-Through
This remote allows the 6 VCR transport buttons
(i.e. PLAY, PAUSE, STOP, FF, REWIND, and REC)
to Punch-Through control from any Mode
programmed with TV, SAT or Cable codes to the
last VCR, or DVD programmed Mode you used.
This feature will not operate if the programmed TV,
SAT or Cable code has its own VCR transport
button control e.g. a TV Combo, SAT/PVR, etc.
To cancel the Sleep Timer, press and hold the
Sleep button until the LED blinks, or press and
release the Power button in TV mode.
1312
Page 8

Using Y our Remote, cont.
Using Your Remote, cont.
Volume/Mute Control and PunchThrough
This remote lets you select which device Mode
controls your Volume/Mute buttons. The remote is
initially set for all device Modes to use their own
Volume/Mute control if present. If the programmed
code has no Volume/Mute operation of its own then
those buttons will punch-through control to the TV
Mode device without needing to change to TV
Mode.
Any Mode chosen for Volume/Mute control
MUST have its own Volume/Mute function or
the Volume/Mute buttons will do nothing.
Setting ALL Volume/Mute Control to
any one Mode
This routine can set all Modes to “punch-through” to
any one chosen Mode for Volume/Mute button
control without the needing to change to that Mode.
1. Press and hold the CODE SEARCH
button until the red indicator turns on,
then release the button.
2. Press and hold the MUTE button until
the red indicator blinks off, then
release the button.
3. Press and release the desired Mode button
(TV, VCR, etc.) for Volume/Mute control,
the red indicator blinks then stays on.
Setting any Mode to use its own
Volume/Mute Control
This routine can set any Mode to use only its own
Volume/Mute control. Note - If your chosen Mode
has no Volume/Mute functions of its own then the
Volume/Mute buttons will do nothing.
1. Press and hold the CODE SEARCH
button until the red indicator turns on,
then release the button.
2. Press and hold the MUTE button until
the red indicator blinks off, then
release the button.
3. Press and release the desired Mode
button (TV, VCR, etc.), the red indicator
blinks then stays on.
4. Press and release the VOLUME-
(Down) button, the red indicator
blinks then stays on.
5. Press and release the MUTE button
and the red indicator turns off.
Your chosen Mode will now use its own Volume/
Mute control.
4. Press and release the MUTE button
and the red indicator turns off. The red
indicator will blink rapidly for three
seconds if the Mode you have selected
has no Volume/Mute control.
All other Modes will now punch-through to your
chosen Mode for Volume/Mute control.
1514
Page 9

Using the FIND IT Locator Functions FIND IT Locator Functions, cont.
You can use the FIND IT remote to find the Keyfob,
whether it has keys attached, or if it’s attached to
something else. Or you can use the Keyfob to find
your misplaced Remote. The Keyfob and the
Remote are a “set” and need to be programmed to
find each other. Here are the simple steps.
1. Insert the Batteries in the Remote
Insert 2 AAA alkaline batteries in the battery
compartment on the back of the Remote. Observe
the + and – notations.
FIND
2. Set the ITEM # for the Remote
NOTE: The remote is automatically set as #1.
This means to find the lost Remote, just press
#1 on the Keyfob and the Remote should start
beeping. Wait about 20 seconds after inserting
the batteries before testing it. Should the
Remote not automatically default to #1 or if you
wish to change the Remote to Item #2, 3, 4, 5,
or 6, then follow the steps below.
To change the setting:
a. Press and hold the FIND button, and then press
and release the #1 button on the Remote. The
Remote beeps and the LED continues to blink.
b. While holding the FIND button, press the #1, 2,
3, 4, 5, or 6 on the Remote’s keypad (whatever
number you wish to assign to the Remote) and
release both buttons. The LED blinks and the
Remote beeps the number of times corresponding to the number you pressed on the Remote.
The Remote is now assigned as that number.
c. Test it by pressing (on the Keyfob) the number
that you just set the Remote to. For example, if
you pressed the #6 in step “b” above then press
#6 on the Keyfob. The Remote should start
beeping.
For setup and
for finding up
to 6 items.
Notes:
A Keyfob or a Remote cannot find a Remote or a
Keyfob that is set to the same code as itself.
After setting the ITEM #, wait about 20 seconds
before testing the FIND IT Remote.
Removing the batteries will cause your Remote to
lose its setting (it will revert to ITEM # 1). If you want
to change its settings, you will need to reprogram it
using the steps above.
1716
Page 10

FIND IT Locator Functions, cont. FIND IT Locator Functions, cont.
3. Set the ITEM # for the Keyfob
a. Remove the plastic tab from the
battery compartment. The
Keyfob beeps and immediately
goes into setup mode. The LED
blinks continuously to indicate
that the Keyfob is ready to be
set up. To enter the setup
mode at any other time, press
and hold the 1 and 3 buttons
simultaneously for about 3
seconds. A warble beep is
emitted and the LED flashes
continuously.
To Replace the Battery:
• Open the battery compartment on the back.
• Insert the battery with the “+” (positive) side up.
• Close the battery compartment.
To set the ITEM # for the Keyfob:
b. Enter setup mode as on the previous page (LED
flashing continuously).
c. Press a button (1 thru 6) to program the ITEM #.
The Keyfob beeps the number of times
corresponding to the ITEM #.
Important, if you used the default code of #1 for your
Remote’s item #, then you will need to set your
Keyfobs to something other than #1, i.e. 2 thru 6.
If you purchase additional keyfobs then simply
follow the steps above to set them up.
Using the FIND IT Remote to Find
Misplaced Items
To find an object with a missing FIND IT Locator
Keyfob attached, simply press FIND on your FIND
IT Remote, the Remote warbles and the LED lights
up, release FIND, then press the # key (1 thru 6)
corresponding to the missing unit.
The Keyfob beeps and immediately goes into setup
mode. The LED flashes continuously to indicate that
the Keyfob is ready to be set up. Please see
Setting the ITEM # on the next page.
If the object is in range, the FIND IT Locator Keyfob
on the missing object will begin to flash and beep.
You can use any Keyfob or Remote to locate any
other Keyfob or Remote.
The maximum distance the lost item can be from
the Remote is about 30 ft. Therefore, it may be
necessary to walk to various points in your home in
order for it to function.
1918
Page 11

FIND IT Locator Functions, cont.
Troubleshooting
Using a FIND IT Keyfob to find a
misplaced FIND IT Remote
To find a misplaced FIND IT Remote, simply press
the button on one of your FIND IT Keyfobs
corresponding to the item # you set your FIND IT
Remote to (1 thru 6). If the Remote is in range, it will
begin to flash its LED and beep.
The maximum distance the lost Remote can be
from the Keyfob is about 30 ft. Therefore, it may be
necessary to walk to various points in your home in
order for it to function.
Occasionally it may be necessary to press the
number on the Keyfob more than once even when
the Remote is within range due to interference or
other factors.
Checking Your Setup
To verify the ITEM # of a Remote:
Press and hold the FIND button on the Remote,
then press and release button # 2, then release the
FIND button. The LED flashes and beeps to indicate
the ITEM #. For example, if the Remote you are
checking is defined as ITEM # 4, you would hear 4
beeps.
If the Remote does not operate your device,
TV, VCR, Cable Box, etc.
• Press the device button of the product you want
to control.
• Program the remote with a new code.
• Install new batteries. (You might have to
reprogram your remote after installing new
batteries.)
• Remote may not be compatible with your
product.
If the Remote does not operate some features
of your device.
• Sometimes a particular code might operate
some features but not all. Try programing
remote with a new code.
• Remote may not be able to operate all features
of your product or button names might be
different than your product.
If the Red Indicator blinks after you program a
product code.
• Remote did not accept the code.
• Try to program the code again or try a different
code.
Tips on using the FIND IT feature
To verify the ITEM # of a Keyfob:
Press and hold the 5 and 6 buttons on the Keyfob
simultaneously, until the LED lights up, then
release. The LED flashes and beeps to indicate the
ITEM #. For example, if the Keyfob you are
checking is defined as ITEM # 5, you would hear 5
beeps.
For best results, hold the Remote with the LED
pointing away from you. Walk around while trying to
find the item you’re looking for while repeatedly
pressing the appropriate button on the Remote.
Reduce or eliminate noises so you can hear the
beeping unit you are looking for.
Keep the Remote away from large metal objects
and other radios sources that might reduce its
range, as do weak batteries also.
2120
Page 12

90 Day Limited Warranty
FCC Statement
Jasco Products Company warrants this product to
be free from manufacturing defects for a period of
ninety days from the original date of consumer
purchase. This warranty is limited to the repair or
replacement of this product only and does not
extend to consequential or incidental damage to
other products that may be used with this unit. This
warranty is in lieu of all other warranties express or
implied. Some states do not allow limitations on
how long an implied warranty lasts or permit the
exclusion or limitation of incidental or consequential
damages, so the above limitations may not apply to
you. This warranty gives you specific rights, and
you may also have other rights which vary from
state to state. If unit should prove defective within
the warranty period, return prepaid with dated proof
of purchase to:
Jasco Products Company
311 N.W. 122nd
Oklahoma City, OK 73114
Lost Your Codes?
Enclosed with this remote is a sticker on which you
should write the codes for each device you
programmed. Apply the sticker to the back of the
remote or somewhere convenient for future
reference.
Also on the sticker is our website address which,
should you lose your codes or programming
instructions, you can find available on our website:
www.jascoproducts.com
The FCC wants you to know
This device complies with Part 15 of the FCC Rules.
Operation is subject to the following conditions: 1.
This device may not cause harmful interference; 2.
This device must accept any interference received,
including interference that may cause undesired
operation. This equipment generates and uses radio
frequency energy, and if not installed and used
properly, that is, in strict accordance with the
manufacturers instructions, it may cause
interference to radio and television reception. It has
been type tested and found to comply with the limits
for remote control devices in accordance with the
specifications in Sub-Parts B and C of Part 15 of
FCC Rules, which are designed to provide
reasonable protection against such interference in a
residential installation. However, there is no
guarantee that interference will not occur in a
particular installation. If this equipment does cause
interference to radio or television reception, which
can be determined by unplugging the equipment, try
to correct the interference by one or more of the
following measures.
• Reorient the antenna of the radio/TV experiencing
the interference.
• Relocate the equipment with respect to the radio/
TV.
• Move the equipment away from the radio/TV.
• Plug the equipment into an outlet on a different
electrical circuit from the radio/TV experiencing the
interference.
• If necessary, consult your local dealer for additional
suggestions.
The manufacturer is not responsible for any radio or
TV interference caused by unauthorized modifications to this equipment. Such modifications could
void the user’s authority to operate the equipment.
2322
Page 13

RM24945
Set
Universal Remote
Instruction Manual
Jasco Products Company
311 N.W. 122nd
Oklahoma City, OK 73114
Made in China RM24945-09/05
 Loading...