

Page 1
V6&heBirowave
Coohg
Conkn@
Aluminum Foil
Appliance Registration
Care and Cleaning 29-32 Control Panel
Consumer Services
Energy-Saving Tips
Features
Lower Oven
Baking, Baking Guide
Broiling, Broiling Guide 25,26 Time Cook
Control Settings
Delay Stop/Start
Door Removal
Light; Bulb Replacement 19, 30
Roasting, Roasting Guide 23,24
Self-Cleaning Instructions 27,28
Shelves
Thermostat Adjustment
Timer
25,29,31
2
35
6
7
19-28
20-22 Temperature Probe
19
21
31
19
30
19
Auto Roast
Auto Simmer
Defrosting
Double DutyT” Shelf 16, 17,29
Microwaving Tips
Temperature Cook
Timer
Model and Serial Numbers 2
Problem Solver
Safety Instructions
Warranty
Cenkr
1213
Use and Care of
13
8
9
6
14
12-14,29
15
18
33,34
3-5
Back Cover
built-in model
RK962G
The electric output
of the microwave oven
in this appliance
is 700 watts.
Vent Duct
Microwave Oven
Auto Defrost
Auto Defrost Guide
30
9-18
10
11
GE Answer Center”
800.626.2000
Page 2

Help us help you..
Before using your cooking
center, read this book
carefully.
It is intended to help you operate
and maintain your new cooking
center properly.
Keep it handy for answers to your
questions.
If you don’t understand something
or need more help, write (include
your phone number):
Consumer Affairs
Hotpoint
Appliance Park
Louisville, KY40225
Write down the model
and serial numbers.
You’ll find them on a label on the
front of the lower oven behind the
door.
These numbers are also on the
Consumer Product Ownership
Registration Card that came with
your cooking center. Before
sending in this card, please write
these numbers here:
Model Number
Serial Number
Use these numbers in any
correspondence or service
concerning your cooking center.
All these things are normal
with your microwave oven:
● Steam or vapor escaping from
around the door.
. Light reflection around door or
outer case.
●
Dimming oven
in blower sound may occur while
operating at power levels other
than high.
. Dull, thumping sound while oven
is operating.
●
Some TV-Radio interference
might be noticed while using your
microwave oven. It’s similar to the
interference caused by other small
appliances and does not indicate a
problem with your oven.
light
calls
and change
Be sure your cooking
center is registered.
It
is important that we, the
manufacturer, know the location
your cooking center should a need
occur for adjustments.
Your supplier is responsible for
registering
Please check with your supplier to
be sure he has done so; also send in
your Consumer Product Ownership
Registration Card. If
if you are not the original purchaser
please write to us, stating model
and serial numbers.
must be registered.
that it is.
Write to:
Hotpoint
Range Product Service
Appliance Park
Louisville,
you
as the owner.
This appliance
Pl@e
KY40225
you
move, or
be certain
of
If you received a damaged
cooking center . . .
Immediately contact the dealer
(or builder) that sold you the
cooking center.
Save time and money.
Before you request service . . .
check the Problem Solver on pages
33 and 34. It lists causes of minor
operating problems that you can
correct yourself.
If you need service...
To obtain service, see the
Consumer Services page in the
back of this book.
We’re proud of our service and
want you to be pleased. If for some
reason you are not happy with the
service you receive, here are three
steps to follow for further help.
FIRST, contact the people who
serviced your appliance. Explain
why you are not pleased. In most
cases, this will
SOIVC
the problem.
NEXT, if you are still not pleased,
write all the details—including
your phone number—to:
Manager, Consumer Relations
Hotpoint
Appliance Park
Louisville, Kentucky 40225
FINALLY, if your problem is still
not resolved, write:
Major Appliance
Consumer Action Panel
20 North
Chicago, Illinois 60606
Wacker
Drive
PRECAUTIONS
TO AVOID
POSSIBLE
EXPOSURE TO
EXCESSIVE
MICROWAVE
ENERGY
(a)
Do Not Attempt to operate
this oven with the door open since
open-door operation can result in
harmful exposure to microwave
energy. It is important not to
defeat or tamper with the safety
interlocks.
(b) Do Not Place
between the oven front face and
the door or
residue to accumulate on sealing
surfaces.
(c) Do
Not Operate
if
it is damaged. It is particularly
important that the oven door close
properly
damage to the:
(1) door (bent)
(2) hinges
(3)
(d) The Oven Should Not
adjusted or repaired by anyone
except properly qualified service
personnel.
and
loosened)
door
seals and
and
any object
allow
soil or cleaner
the oven
that there is no
latches (broken or
sealing surfaces.
be
2
Page 3
~PO~ANT
SAFETY INSTRUCTIONS
Read all instructions before using this appliance.
~PORTMT
S~TY
N~I~
The California Safe Drinking
Water and Toxic Enforcement
Act requires the Governor of
California to publish a list of
substances known to the state to
cause birth defects or other
reproductive harm, and requires
businesses to warn customers of
potential exposure to such
substances.
The fiberglass insulation in
self-clean ovens gives off a very
small amount of carbon monoxide
during the cleaning cycle.
Exposure can be minimized by
venting with an open window or
using a ventilation fan or hood.
When using electrical appliances
basic safety precautions should be
followed, including the following:
WARNING–TO
reduce
the risk of burns, electric shock,
fire, injury to persons or exposure
to excessive microwave energy:
. Use
this appliance
intended use
as described in this
only
for ik
manual.
. Be sure
your appliance
is
properly installed and grounded
by a qualified technician in
accordance with the provided
Installation Instructions.
. This appliance must be
connected to a grounded, metallic
permanent wiring system, or an
equipment grounding conductor
should be run with the circuit
conductors and connected to the
equipment grounding terminal or
lead on the appliance.
. This
cooking
center
is
specifically designed to heat or
cook food, and is not intended
for laboratory or industrial use.
●
This appliance should be
serviced
personnel.
ofly
by
quaMled
Contact nearest
service
authorized service facility for
examination, repair or adjustment.
.
Before
performing any
service?
DISCONNECT THE OVEN
POWER SUPPLY AT THE
HOUSEHOLD
PANEL
BY REMOVING THE
DI~B~ON
FUSE OR SWITCHING OFF
THE CIRCUIT BREAKER.
Q
Do not cover or block any
openings on the appliance.
●
Do not use outdoors.
. Do not operate this appliance if
it is not working properly, or if
it has been damaged or dropped.
c
As with any appliance, close
supervision is necessary when
used by children.
. Do not leave children
alone—
children should not be left alone or
unattended in area where appliance
is in use. They should never be
allowed to sit or stand on any part
of the appliance.
Q
Don’t allow anyone to climb,
stand or hang on the door. They
could
damage the oven.
●
CAUTION: ITEMS OF
INTEREST TO CHILDREN
SHOULD NOT BE
S~RED
IN CABINETS ABOVE AN
OVEN~DREN CM~G
ON THE OVEN TO REACH
_
COULD BE
SWOUSLY
INWRED.
.
Wear
proper clothing.
Loose
fitting or hanging garments should
never be worn while using the
appliance. Flammable material
could be ignited if brought in
contact with hot heating elements
and may cause severe burns.
.
moist or damp potholders on hot
surfaces may result in burns from
steam. Do not let pot
hot heating elements. Do not use
a towel or other bulky cloth.
c
your appliance for warming or
heating the room.
. Do not store or use
combustible materials, gasoline
or other flammable vapors and
liquids in the vicinity of this or
any other appliance.
c
clean
and to avoid grease fires.
.
other flammable materials
accumulate in the oven or
near it.
●
fires. Smother flaming pan by
covering completely with well
fitting lid, cookie sheet or flat
tray. Flaming grease outside a
pan can be put out by covering
wi~h
al
chemical or foam type fire
extinguisher.
●
or interior surface of oven.
surfaces may be hot enough to
burn even though they are dark in
color. During and after use, do
not touch, or let clothing or other
flammable materials contact any
interior area of the oven; allow
sufficient time for cooling, first.
Potentially hot surfaces include
oven vent openings and surfaces
near the openings, crevices
around the oven door and the
edges of the door window.
Remember:
of the oven maybe hot when the
door is opened.
Use
only dry pot
holders—
holdem
touch
For your safety, never use
Keep hood and grease filters
to maintain good venting
DO
not
let cooking grease or
Do not use water on grease
baking soda or, if
~ilable,
a multi-purpose dry
Do not touch heating elements
These
The inside surface
(continued next page)
3
Page 4
IMPORTANT
●
When cooking pork,
SAFETY
follow
the directions exactly and always
cook the meat to an internal
temperature of at least
170°F.
This assures that, in the remote
possibility that trichina may be
present in the meat, it will be
killed and the meat will be safe
to eat.
Microwave Oven:
●
Read and follow the specific
“PRECAUTIONS TO AVOID
POSSIBLE EXPOSURE
~
EXCESSIVE MICROWAVE
ENERGY” found on page 2.
s
To reduce the risk of fire in
the oven cavity:
–Do not overcook food.
Carefully
attend appliance if paper, plastic
or other combustible materials
are placed inside the oven to
facilitate cooking.
—Remove wire twist-ties
from
paper or plastic bags before
placing bags in oven.
–Do not use your microwave
oven to dry newspapers.
–Do not use recycled paper
products.
Recycled paper towels,
napkins and wax paper can
contain metal flecks which may
cause arcing or ignite. Paper
products containing nylon or
nylon filaments should be
avoided, as they may also ignite.
–Do not pop popcorn in your
microwave oven
unless in a special
microwave popcorn accessory or
unless you use popcorn labeled
for use in microwave ovens.
–Do not overcook potatoes.
They could dehydrate and catch
fire, causing damage to your oven.
–Do not operate the oven while
empty to avoid damage to the
oven and the danger of fire.
If
by accident the oven should run
INSTRUCTIONS (continued)
●
Do
empty a minute or two, no harm
is done. However, try to avoid
operating the oven empty at
dl
times—it saves energy and
prolongs the life of the oven.
●
If materials inside the oven
should ignite,
keep the oven door
closed, turn the oven off, and
disconnect the power cord, or
shut off power at the fuse or
circuit breaker panel.
Q
Some products such as whole
eggs and sealed containers-for
example, closed glass jars—may
explode
and should not be heated
in the oven.
●
See door surface cleaning
instructions on page 30.
Q Don’t
in narrow-necked
defrost
frown
beverages
botdes (especifly
carbonated beverages). Even if
the container is open, pressure
can build up. This can cause the
container to burst, possibly
resulting in injury.
c Use
metal
only
as directed in
cookbook.
Foil strips as used on
meat roasts are helpful when used
as shown in cookbook.
TV dinners maybe microwaved
in foil trays less than 3/4” high;
remove top foil cover and return
tray to box. When using metal in
microwave oven,
for DOUBLE DUTY*
keepmeti
M
shel~
(inept
at least 1 inch away from sides
of oven.
. Cookware may become hot
because of heat transferred from
the heated food. Pot holders may
be needed to handle the cookware.
Q
Sometimes, the oven
can become
too
hot to touch.
floor
Be
careful touching the oven floor
during and after cooking.
not
food you are microwaving
the thermometer is designed or
recommended for use in the
microwave oven.
.
Remove
probe from the oven when not
in use.
inside the oven without inserting
it in food or liquid, and turn on
microwave energy, it can create
electrical arcing in the oven, and
damage oven walls.
. Avoid
glass jars, even without their lids;
especially meat and egg mixtures.
●
Do not boti
oven.
Pressure
the egg yolk and will cause it to
burst, possibly resulting in injury.
.
F~ds with
“skin”
such as potatoes, sausages,
tomatoes, apples, chicken livers
and other giblets, and egg yolks
(see previous caution) should be
pierced to allow steam to escape
during cooking,
.
~~ic
cookware designed for microwave
cooking is very useful, but should
be used carefully. Even
microwave-safe plastic may not be
as tolerant of overcooking
conditions as are glass or ceramic
materials and may
if subjected to short periods of
overcooking. In longer exposures
to overcooking, the food and
cookware could ignite. For these
reasons: 1) Use microwave-safe
plastics only and use them in strict
compliance
manufacturer’s recommendations.
2) Do not subject empty cookware
to microwaving. 3) Do not permit
children to use plastic cookware
without complete supervision.
use a thermometer
in
utiess
the temperature
If you leave the probe
heating baby food in
eggs
in a microwave
wfil bufld
unbroken
up inside
outer
c~kw~e—plastic
sotin
or char
witi
the cookware
4
Page 5
.
Not
all
plastic wrap
for use in microwave ovens.
Check the package for proper
use.
.
~~Boilable”
cooking pouches
and tightly closed plastic bags
should be slit, pierced or vented
as directed in cookbook. If they
are not, plastic could burst during
or immediately
possibly resulting in injury. Also,
plastic storage
beat least partially uncovered
because they form a tight seal.
When cooking with containers
tightly covered with plastic wrap,
remove covering carefully and direct
steam away from hands and face.
. Foods
cooked
as pasta) may tend to boil over
more rapidly than foods containing
less moisture, Should this occur,
refer to pages
Z
instructions on how to clean the
inside of the oven.
.
Sponmneous
boiling—Under
certain special circumstances,
liquids may start to boil during
or shortly
afier
removal from the
microwave oven. To prevent burns
is suitable
afier
cooking,
conainers
should
in liquids
and 28 for
(such
Self-Cleaning
●
when opening oven door. The
hot air or steam which escapes
can cause burns to hands, face
and/or eyes.
●
containers in the oven. Pressure
could
could burst, causing an injury.
●
unobstructed.
●
buildup.
c
position while oven is cool.
racks must be handled when hot,
do not let potholder contact
heating units in the oven.
. W]ing
stop is a convenience in lifting
heavy foods. It is
precaution against burns from
touching hot surfaces of the
door or oven walls.
. When using cooking or
roasting bags in oven,
the manufacturer’s directions.
from splashing liquid, stir the
liquid briefly before removing the
container from the microwave oven.
Q
newspapers.
can catch fire,
.
Use
of the
shelf accessory.
–Remove the shelf from oven
when not in use.
DOUBLE DUTYTM
s
door gasket is essential for a good
seal. Care should be
rub, damage or move the gasket.
–Do not store or cook with
shelf on floor of oven. Product
damage may result.
–Use pot holders when
handing
the shelf and cookware. They
may be hot.
—Do not use microwave
browning dish on shelf.
The
shelf could overheat.
hwer
Oven:
Stand away from the oven
Don’t heat unopened food
bdd
up and the container
Keep oven vent ducts
Keep oven free from grease
Place oven rack in desired
If
out
shelf to the
also
sheti
a
follow
Do not use your oven to dry
If overheated, they
Do not clean door gasket.
tiken
The
not to
c
Do not use oven cleaners. No
commercial oven cleaner or oven
liner protective coating of any kind
should be used in or around any
part of the
●
Clean only
oven.
parts listed in this
Use and Care Book.
●
Before self-cleaning the oven,
remove broiler pan and other
cookware.
●
Listen for fan—a
fan noise
should be heard sometime during
the cleaning
cycle.
If not, call for
service before self-cleaning again.
SAVE THESE
~STRUCTIONS
5
Page 6
Microwaving
~ps
When Power
is
Microwave Oven
●
Use proper power level as
recommended and DO NOT
OVERCOOK.
●
Do not operate the oven while
empty. If by accident the oven
should run empty a minute or two,
no harm is done. However, try to
avoid operating the oven empty at all
times-saves energy and also
ensures good, long-term life of oven.
I
. Preheat the oven only when
necessary. Most foods will cook
satisfactorily without preheating.
If you find preheating is necessary,
keep an eye on the indicator light,
and put food in the oven promptly
after the light goes out.
●
Always turn oven OFF before
removing food.
● During baking, avoid frequent
door openings. Keep door open as
short a time as possible if it is
opened.
●
For self-cleaning oven, be sure
to wipe up excess spillage before
self-cleaning operation.
●
Cook complete oven meals
instead of just one food item.
Potatoes, other vegetables, and
some desserts will cook together
with a main-dish casserole, meat
loaf, chicken or roast. Choose
foods that cook at the same
temperature in approximately
the same time.
●
Use residual heat in oven
whenever possible to finish
cooking casseroles, oven meals,
etc. Also add rolls or precooked
desserts to warm oven, using
residual heat to warm them.
Lower Oven
●
Make sure all cookware used in
your microwave oven is suitable
for microwaving.
casseroles, cooking dishes,
measuring cups, custard cups,
pottery or china dinnerware which
does not have metallic trim or glaze
with a metallic sheen can be used.
Some cookware is labeled “suitable
for microwaving.”
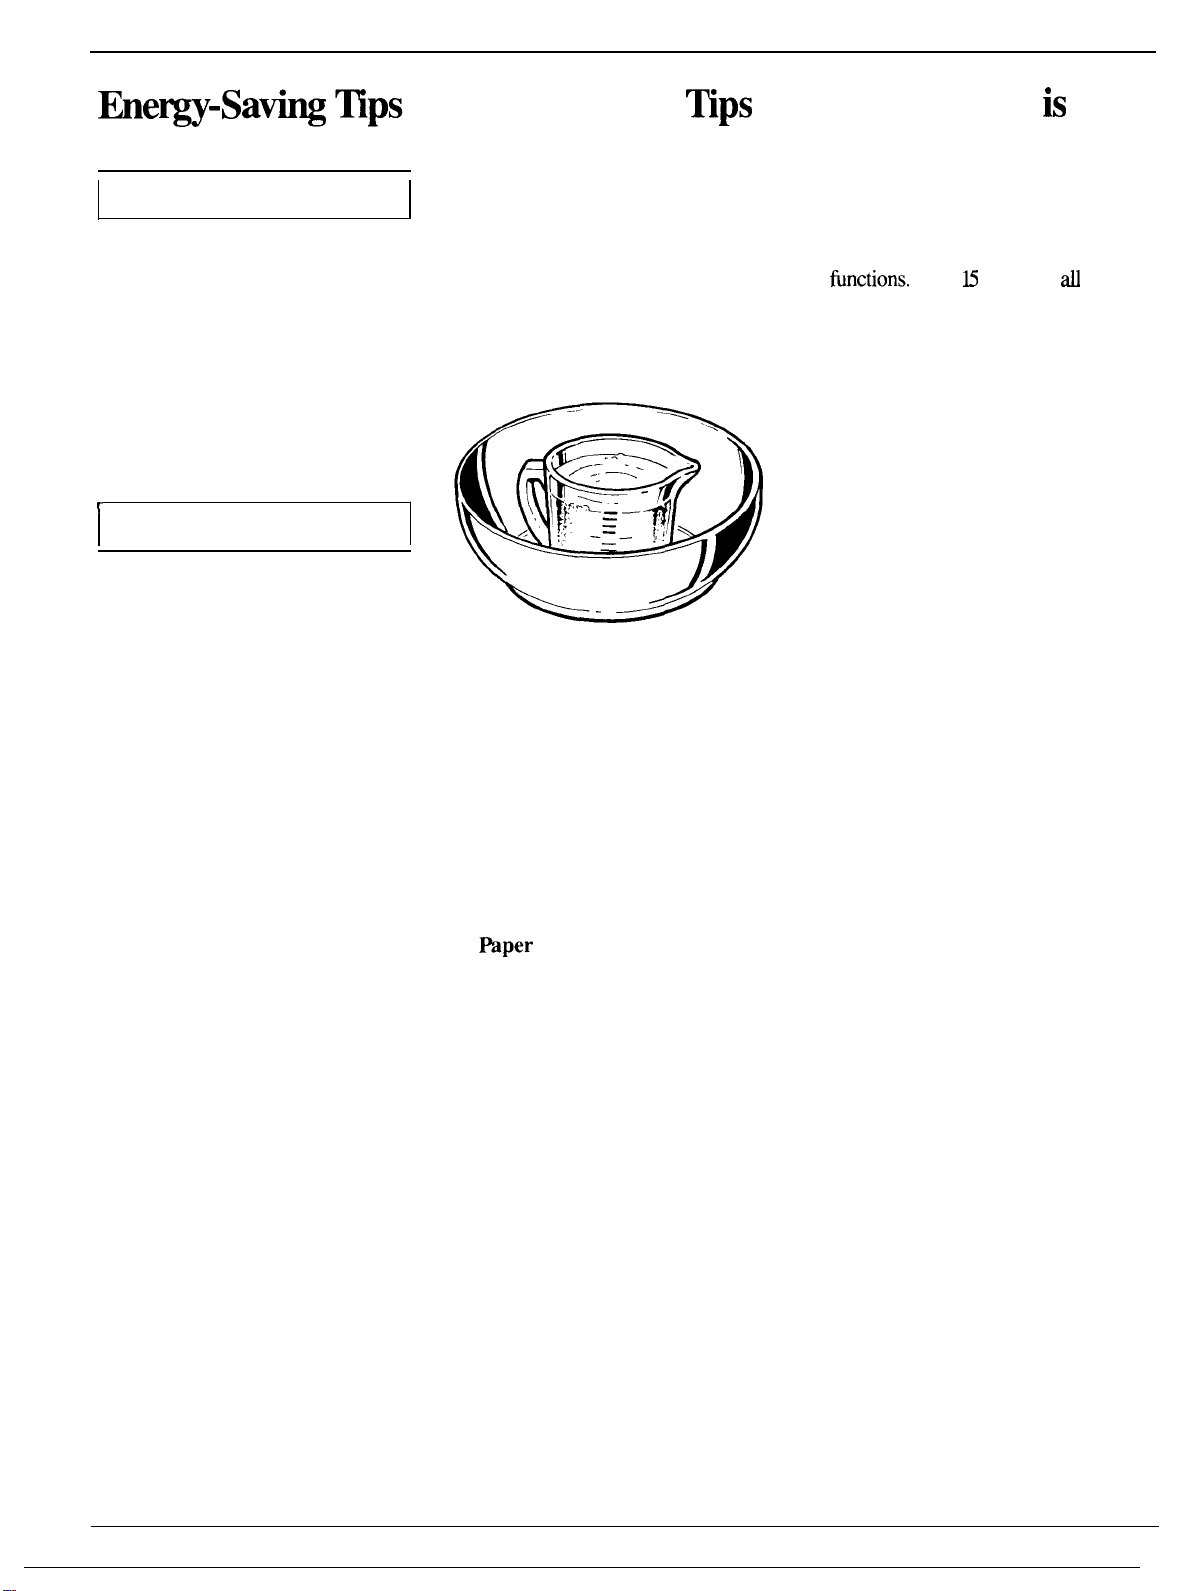
If you are not sure if a dish is
microwave-safe, use this test:
Place in the oven both the dish you
are testing and a glass measuring
cup filled with one cup water—set
the measuring cup either in or next
to the dish. Microwave 1 minute at
high. If the dish heats, it should not
be used for microwaving. If the dish
remains cool and only the water in
the cup heats, then the dish is
microwave-safe.
● Mper towels, wax paper and
plastic wrap
dishes in order to retain moisture
and prevent spattering. Be sure to
vent plastic wrap so steam can
escape.
●
Some microwaved foods
require stirring, rotating or
rearranging.
Cookbook.
● Steam builds up pressure in
foods which are tightly covered
by a skin or membrane. Pierce
potatoes, egg yolks and chicken
livers to prevent bursting.
Most glass
can be used to cover
Check the
Connected to
the Oven
The panel displays all of the oven
finctions.
disappear and “RESET” appears
in the display. Touch CLOCK pad
and set the clock and then touch
START pad.
If power is disrupted at any time,
the above sequence reoccurs and
you must reset the clock after
touching CLEAR/OFF.
After K seconds, M lights
6
Page 7
Features of Your
Cooting
Center
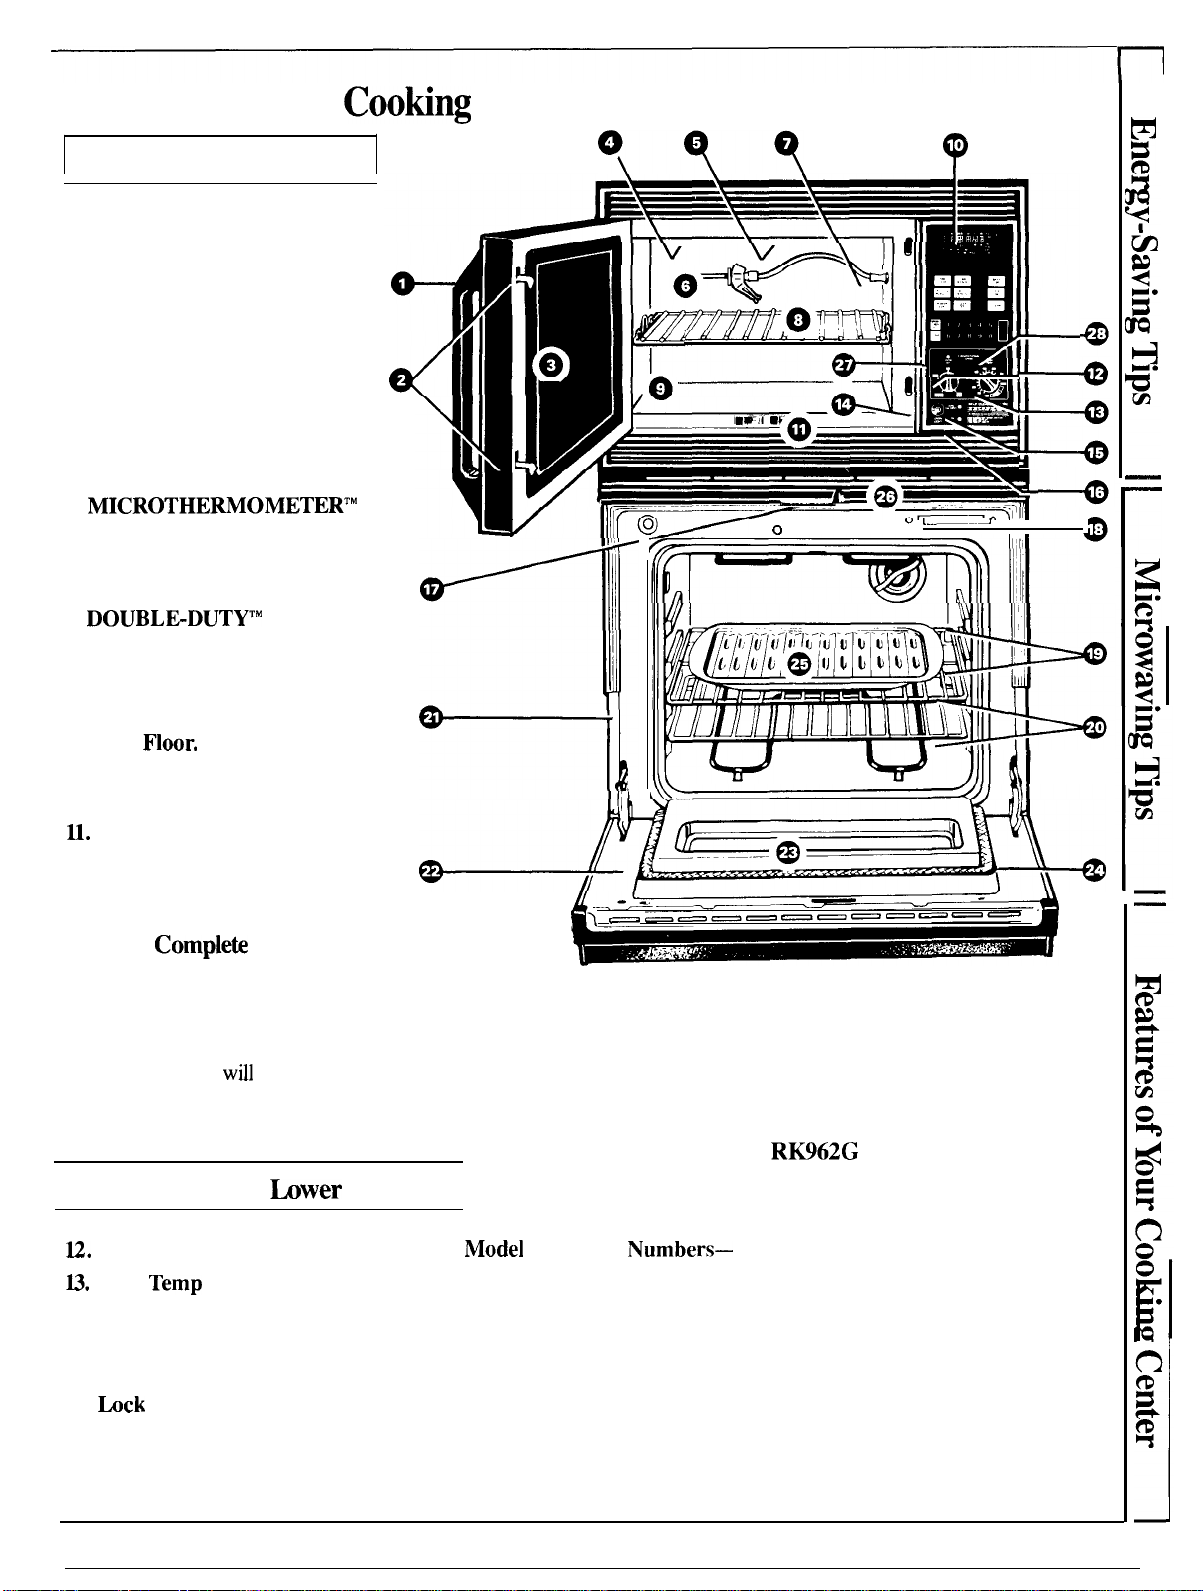
Microwave Oven
1. Door Handle. Pull handle to
open. Door must be securely
latched for oven to operate.
2. Inside Door Latches.
3. Window with Metal Shield.
Allows cooking to be viewed while
keeping microwaves confined in
oven.
4. Light.
5. Oven Vent.
6.
MICROTHERMOMETERTM
Temperature Probe.
7. Receptacle for Temperature
Probe.
8.
DOUBLE-DUTYTM
you microwave several foods at
once. (See Safety Tips for special
instructions. ) When this shelf is not
in use, please remove from the oven.
9. Oven
10. Display and Touch Control
Pads.
U. Auto Roast and Auto Defrost
Guides.
for many frequently prepared
foods.
Cooking Comple& Reminder
(For all AUTO ROAST codes
except codes 6 and 7, TIME
COOK and DEFROST cycles.)
To remind you that you have food in
the oven, the oven
minute until you either open the door
or touch the CLEAR/OFF pad.
Floor.
Quick reference for codes
Shelf. Lets
wfll
beep once a
‘,??
w~
— —-—————————
Model
o
R~62G
—o
U L..—..A
?
.
I
F
4
Self-Cleaning
I
U.
Oven Set (Clean) Knob.
U. Oven
14. Oven Interior Light Button.
15. Self-Cleaning Oven
Clean Light.
16.
17. Latch.
hck
Temp
(Clean) Knob.
Light.
bwer
Oven
I
18.
Model
and Serial
located at right side of lower oven
frame.
19. Shelf Support.
20. Oven Shelves.
21. Oven Frame.
22. Door Gasket.
Numbers—
23. Window.
24. Door Liner.
25. Broiler Pan and Rack.
26. Oven Vent.
27. Oven “ON” Light.
28. Oven Cycling Light.
7
Page 8
B~H OWNS
Features of Your Touch Control Panel
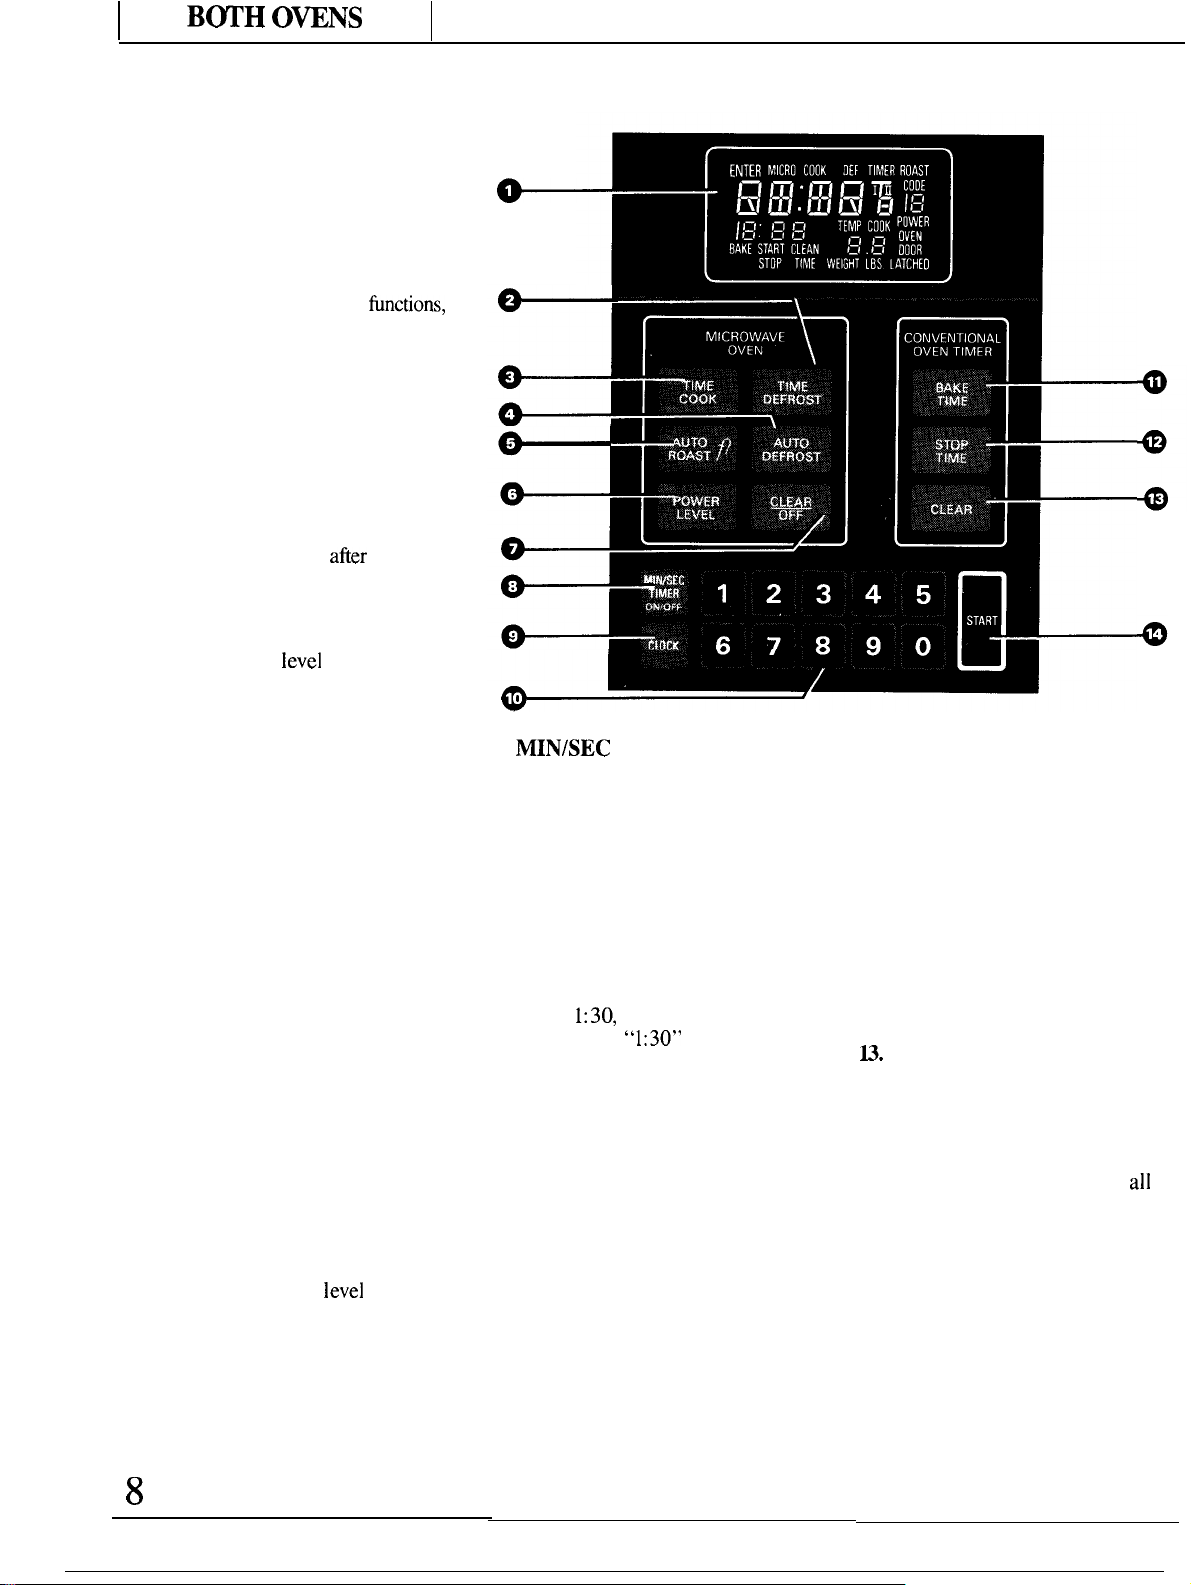
1. DISPLAY.
Microwave oven:
temperature during cooking
power level being used, Auto
codes, Auto Defrost food weights,
cooking mode and instructions.
Conventional oven:
Bake start and stop times, SelfClean oven clean time, oven door
latched message and instructions.
2. TIME DEFROST. Gentle
thawing at automatic power level 3,
(or change power level
defrosting time). (See page 9.)
3. TIME COOK. Microwave for
a preset amount of time using
automatic power
change power level after entering
cooking time). (See page 15. )
4. AUTO DEFROST. Touch this
pad, then enter code number and
food weight. The oven automatically
sets power levels and defrosting
time. (See page 10. )
5.
AUTO ROAST.
then touch this pad and desired
number pad for code to slow cook
or temperature cook meat with
automatic preset program. (See
page 12.)
Touch AUTO ROAST code 7 and
cook by temperature with the
temperature probe. Auto Roast
code 7 lets you choose the food
temperature and power level and
even holds your food at that
temperature when cooking is
completed.
6. POWER LEVEL. Touch this
pad before entering another power
level number if you want to change
from automatic power
(High) for cooking or power level 3
(Low) for defrosting.
7. CLEAR/OFF. When touched,
it shuts off the microwave oven and
erases all microwave settings
(except time of day).
Displays time of day.
Displays time or
finctions,
Displays Time
afier
entering
level
10 (or
Insert probe,
level
10
8. MIN/SEC TIMER. This
feature uses no microwave energy.
It functions as a kitchen timer, a
hold timer after defrost or as a delay
timer before microwave time or
temperature cooking. (See page 18.)
9.
CLOCK.
enter time of day or check time of
day while cooking. To set clock,
first touch CLOCK pad and then
enter time of day. For example, if
time was
1, 3 and O and
on display.
display directing you to touch the
START pad, thus setting the clock.
To reset or change time, simply
repeat above process.
Clock must be set before any
Conventional Oven Timer function
will operate.
10. NUMBER PADS.
pads to enter cooking, defrosting
time, time of day, temperature,
power level, Auto codes, food
weights for Auto Defrost,
conventional oven Bake start and
stop times and to change cleaning
time on self-cleaning oven.
Touch this pad to
1:30,
touch number pads
“1:30”
will appear
“START” will flash on
Touch these
11. BAKE TIME.
and then number pads to enter
baking or roasting time. The oven
turns off automatically at the end of
that time if OVEN SET knob is on
TIME BAKE.
12. STOP TIME. Touch this
pad and then number pads to enter
the time you want oven to finish
baking or cleaning. The oven will
automatically calculate the correct
start time for you.
U. CLEAR. Touch this pad to stop
conventional oven timer and self-clean
operation or enter a new clean time.
14. START. After all selections are
made, touch this pad to start the
microwave oven, the clock and
Conventional Oven Timer functions.
Touch this pad
all
8
Page 9
]
MICROWAVE OVEN
]
Defrosting by
The Time Defrost setting is
designed for speedy thawing of
frozen food and is one of the great
advantages of a microwave oven.
Use the Time Defrost setting to
quickly thaw foods such as bread,
rolls, vegetables, fruits and frozen
dinners. The Auto Defrost setting
is preferred for meat and poultry
because the oven sets the defrosting
time and power levels for you.
●
Power level 3 is automatically set
for defrosting, but you may change
this for more flexibility.
●
See
the cookbook for defrosting
help.
To become better acquainted with
the defrost function, defrost a 1O-OZ.
package of frozen strawberries by
following the steps below.
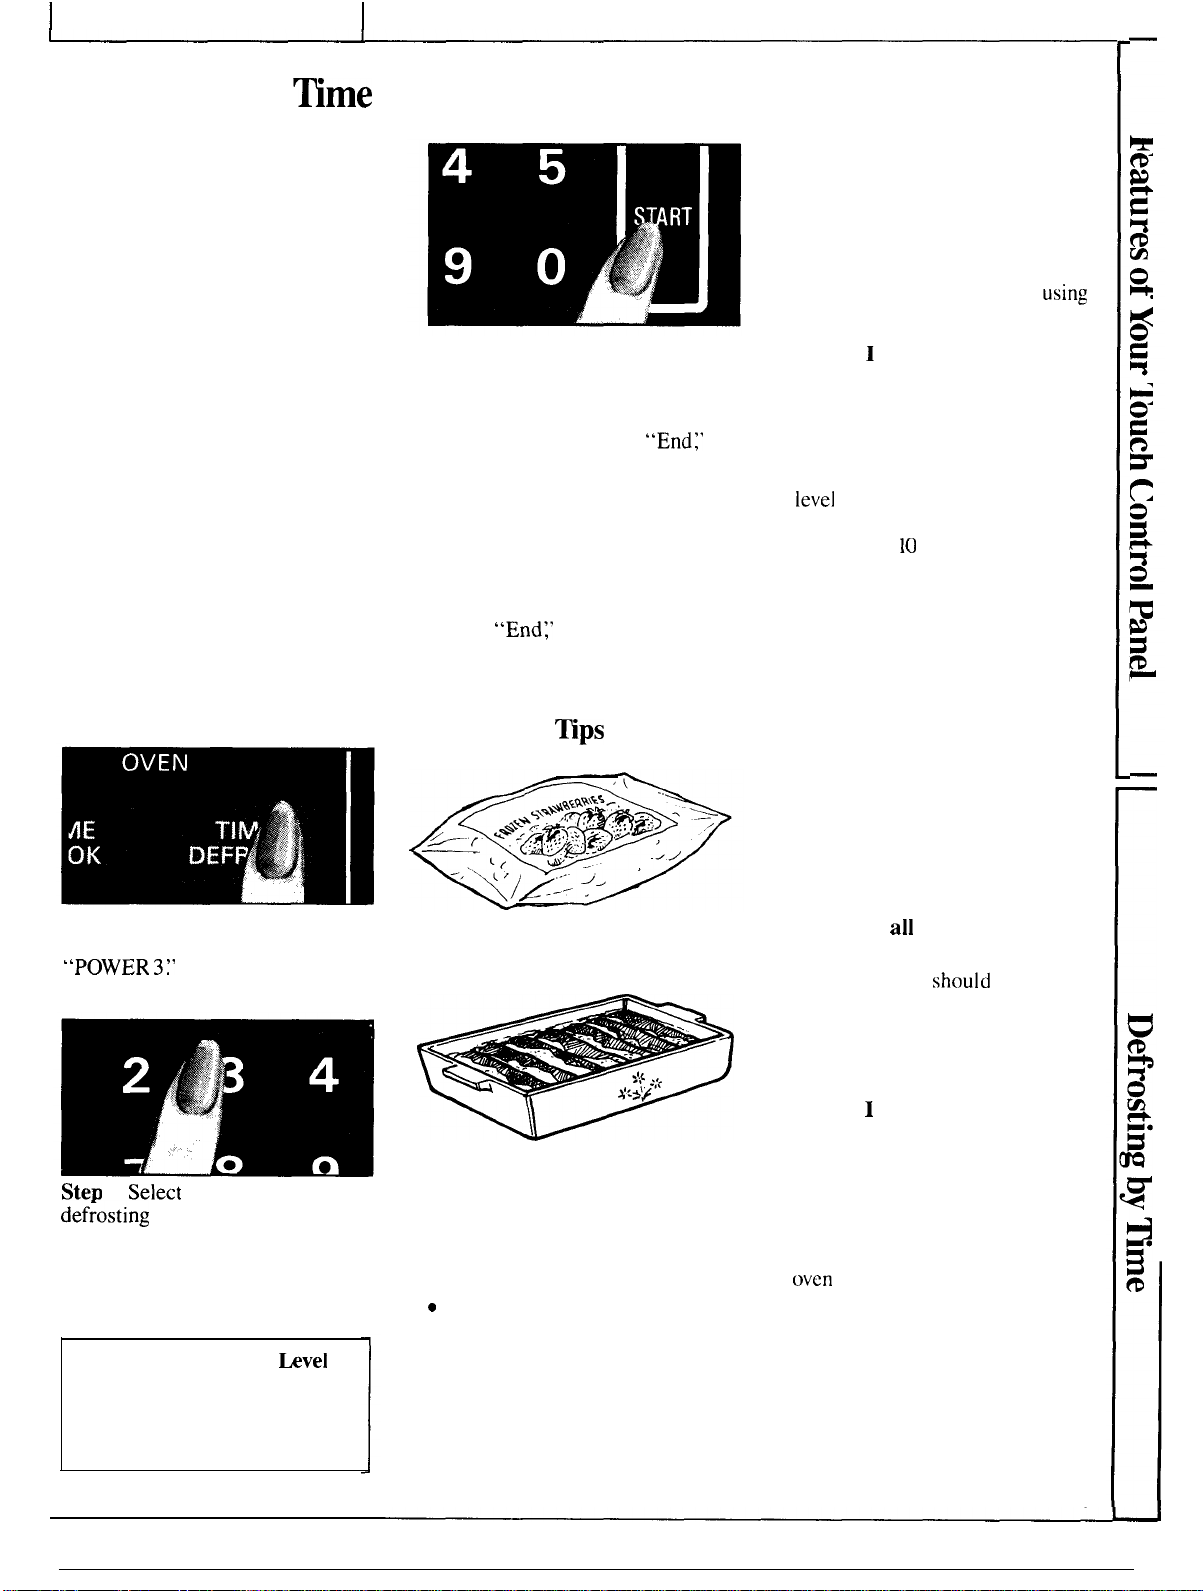
Step
1:
Place package of frozen
strawberries in the oven and close
door. Be sure package contains
no metal.
Step 2:
pad. Display shows “: O“ and
“POWER
DEF TIME” flashes.
Touch the TIME DEFROST
3?’
“ENTER MICRO
~me
Step 4:
“MICRO DEF TIME” and time,
counting down, show on the
display. When cycle is completed,
the oven signals, flashes
then automatically shuts off,
Step 5:
door and repeat Steps 2 and 3 to set
remaining half of defrosting time.
Touch the START pad.
Step
flashes
package and separate strawberries
to finish defrosting.
Defrosting
●
can be defrosted in the package.
Touch the START pad.
“End:’
Turn package over, close
6: When oven signals and
“End~’
open door, remove
~ps
Foods frozen in paper or plastic
Questions and Answers
Q. When I press the START pad,
I hear a dull thumping noise.
What is it?
A. This sound is normal. It is
letting you know the oven is
power level lower than 10 (HIGH).
Q. Can I defrost small items in
a hurry?
A. Yes, but they will need more
frequent attention than usual. Raise
the power level after entering the
time by touching the desired power
level
pad. Power level 7 cuts the
total defrosting time about in 1/2;
power level
defrosting time to approximately
1/3. During either, rotate or stir
food frequently.
Q. Why don’t the defrosting
times in the cookbook seem right
for my food?
A. Defrosting times are averages.
Defrosting time can vary according
to the temperature in your freezer.
Set your oven for the time indicated
in the cookbook. If your food is
still not completely thawed at the
end of that time, reset your oven
and adjust the time accordingly.
Q. Should
thawed before cooking?
A. Some foods
completely thawed before cooking.
For example, fish cooks so quickly
it is better to begin cooking it while
it is still slightly frozen.
10
cuts the total
all
foods be completely
should
not be
using
a
SteD
3:
Select
one half of the total
def~osting
the cookbook. For example, touch
3,0 and O for 3 minutes. Display
shows “3:00” and “POWER 3.”
“MICRO DEF TIME” flashes.
How to change Power
After setting defrosting time,
touch POWER LEVEL pad, then
touch desired number for new
power level.
time recommended in
Level
● Family-size, prepackaged
frozen entrees can be defrosted
and microwaved. If the food is in
a foil container, transfer it to a
microwave-safe dish.
c
For even defrosting, some foods
need to be broken up or separated
part of the way through the
defrosting time.
● Check the cookbook for other
defrosting tips.
Q. Can I open the door during
defrosting to check on the
progress of my food?
A. Yes.
any time during microwaving. To
resume defrosting, close the door
and press the START pad. The
oven
on the timer. If not, reset timer.
You may open the door at
begins operating if time is left
9
Page 10
MICROWAVE OVEN
I
I
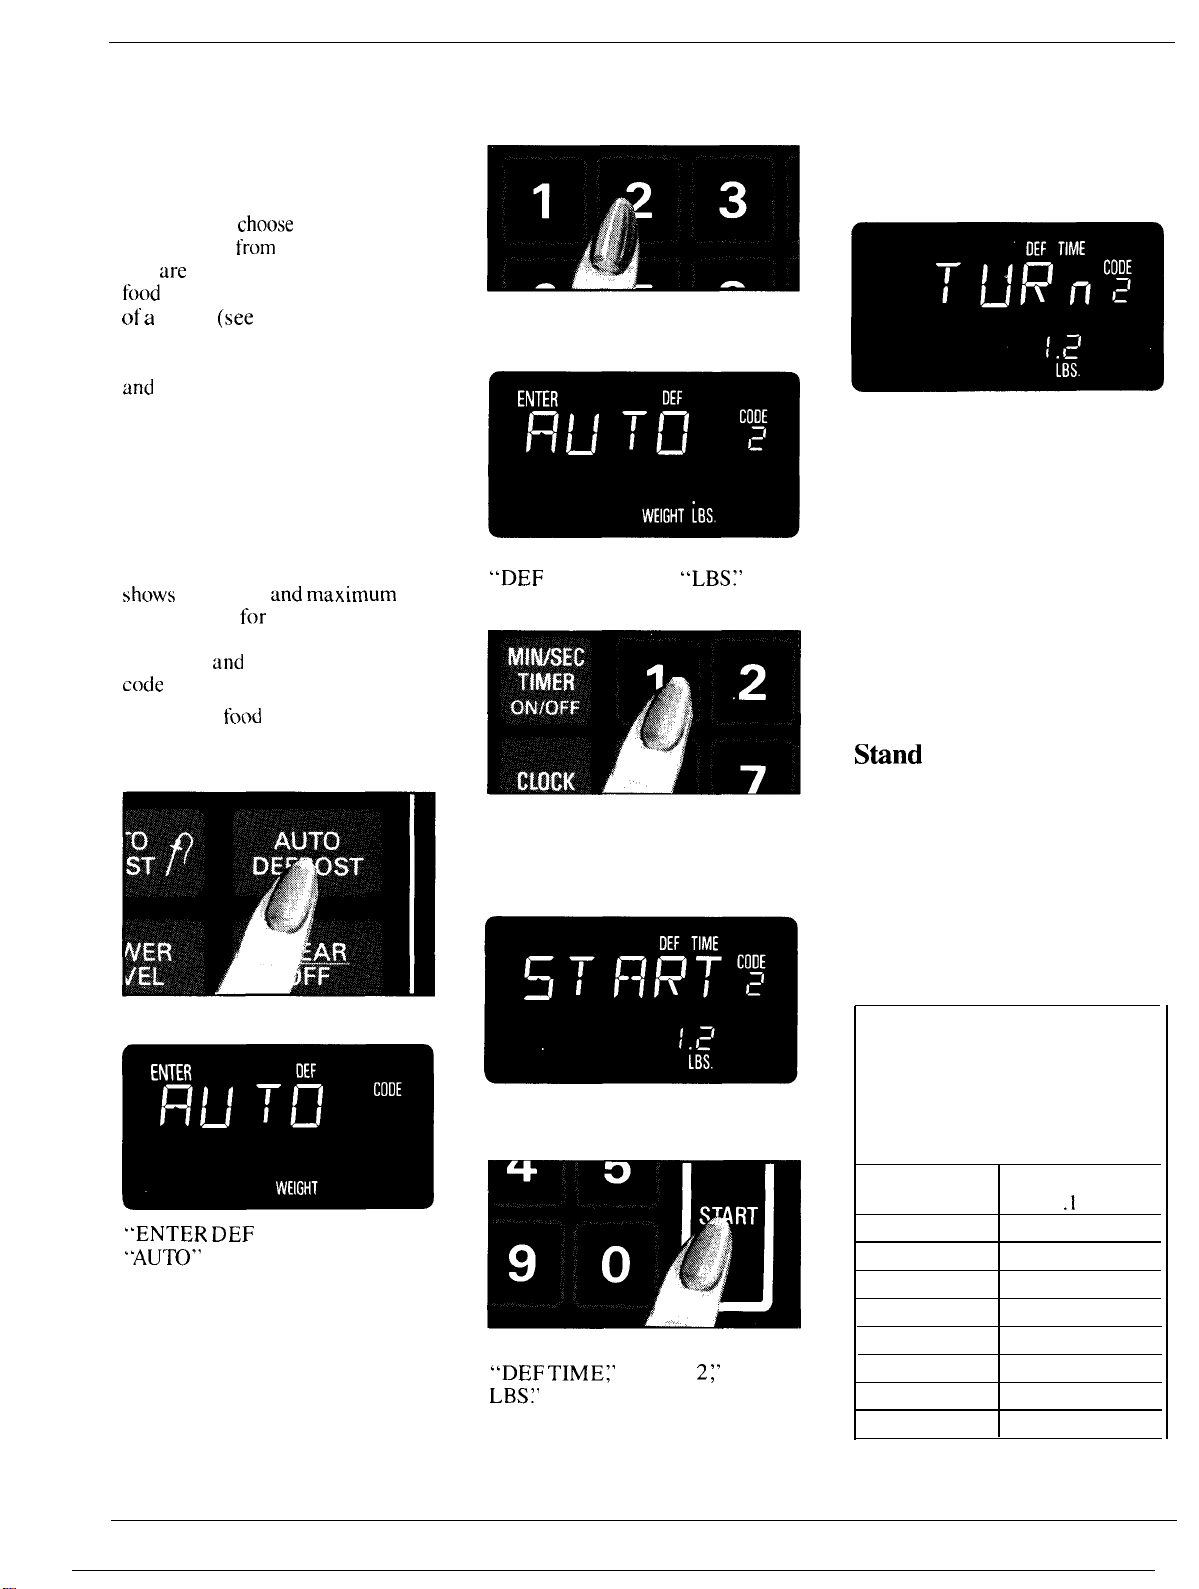
Automatic Defrosting
With the Auto Defrost feature,
the oven automatically sets the
defrosting time and power levels
for you.
code number
you
food
of a
below) and touch the START pad.
The oven calculates defrosting time
and
defrosting to give even defrosting
results.
You
choose
the appropriate
from
1 to 3 for the food
are
defrosting, then enter the
weight in pounds and tenths
pound (see Conversion
changes power levels during
Guide
How to set Auto Defrost
Before you begin, check the
guide located at the bottom of the
oven when you open the door.
sh~lws
minimum
food weights
You will need to know the weight of
your food
code
before setting Auto Defrost.
1. Remove
place in oven on microwave-safe
dish and close the door.
and maximum
for each code number.
and
its corresponding
food
from package,
It
3. Enter selected code from guide.
For example, poultry calls for code 2.
“ENTER WEIGHT” flashes.
“DEF CODE 2“ and
appear on display.
4. Enter weight. For example, touch
number pads 1 and 2 for weight of
1.2 pounds (1 pound, 3 ounces—see
Conversion Guide at right).
“LBS?’
Note: If “ERROR” appears on display,
check the Code Guide. Make sure
weight corresponds to code Number.
Twice
during defrosting, the oven
beeps 3 times,
and oven shuts off. “TURN”
continues to flash until you open
the door. After turning the food,
close the oven door and touch the
START pad.
When defrosting time is completed,
“End” flashes and oven beeps 3
times. “End” remains on display
and oven beeps every minute until
the door is opened or the
CLEAR/OFF pad is touched.
Stind
When using the Auto Defrost
feature, it is necessary to allow food
to stand in order to finish defrosting
the food’s interior. You may take the
food out of the oven if you wish; in
some cases, it should stand in your
refrigerator. Recommendations for
standing time are given in the guide
on the next page.
Time
“TURN” flashes
2. Touch AUTO DEFROST pad.
“ENTER DEF CODE” flashes.
“AUTO”
on display.
and “WEIGHT” appear
10
Display shows “AUTO” for 4
seconds and then “START” flashes.
5. Touch START pad. Display shows
“DEF TIME;’ “CODE
LBS?’
and defrosting time,
counting down.
2;’
“1.2
Conversion Guide
If weight of food is stated in
pounds and ounces, the ounces
must be converted to tenths (.1)
of a pound.
Ounces
1-2
3
4-5
6-7
8
9-1o
11
12-13
14-15
Pounds
.1
.2
.3
.4
.5
.6
.7
.8
.9
Page 11
MICROWAVE OVEN
I I
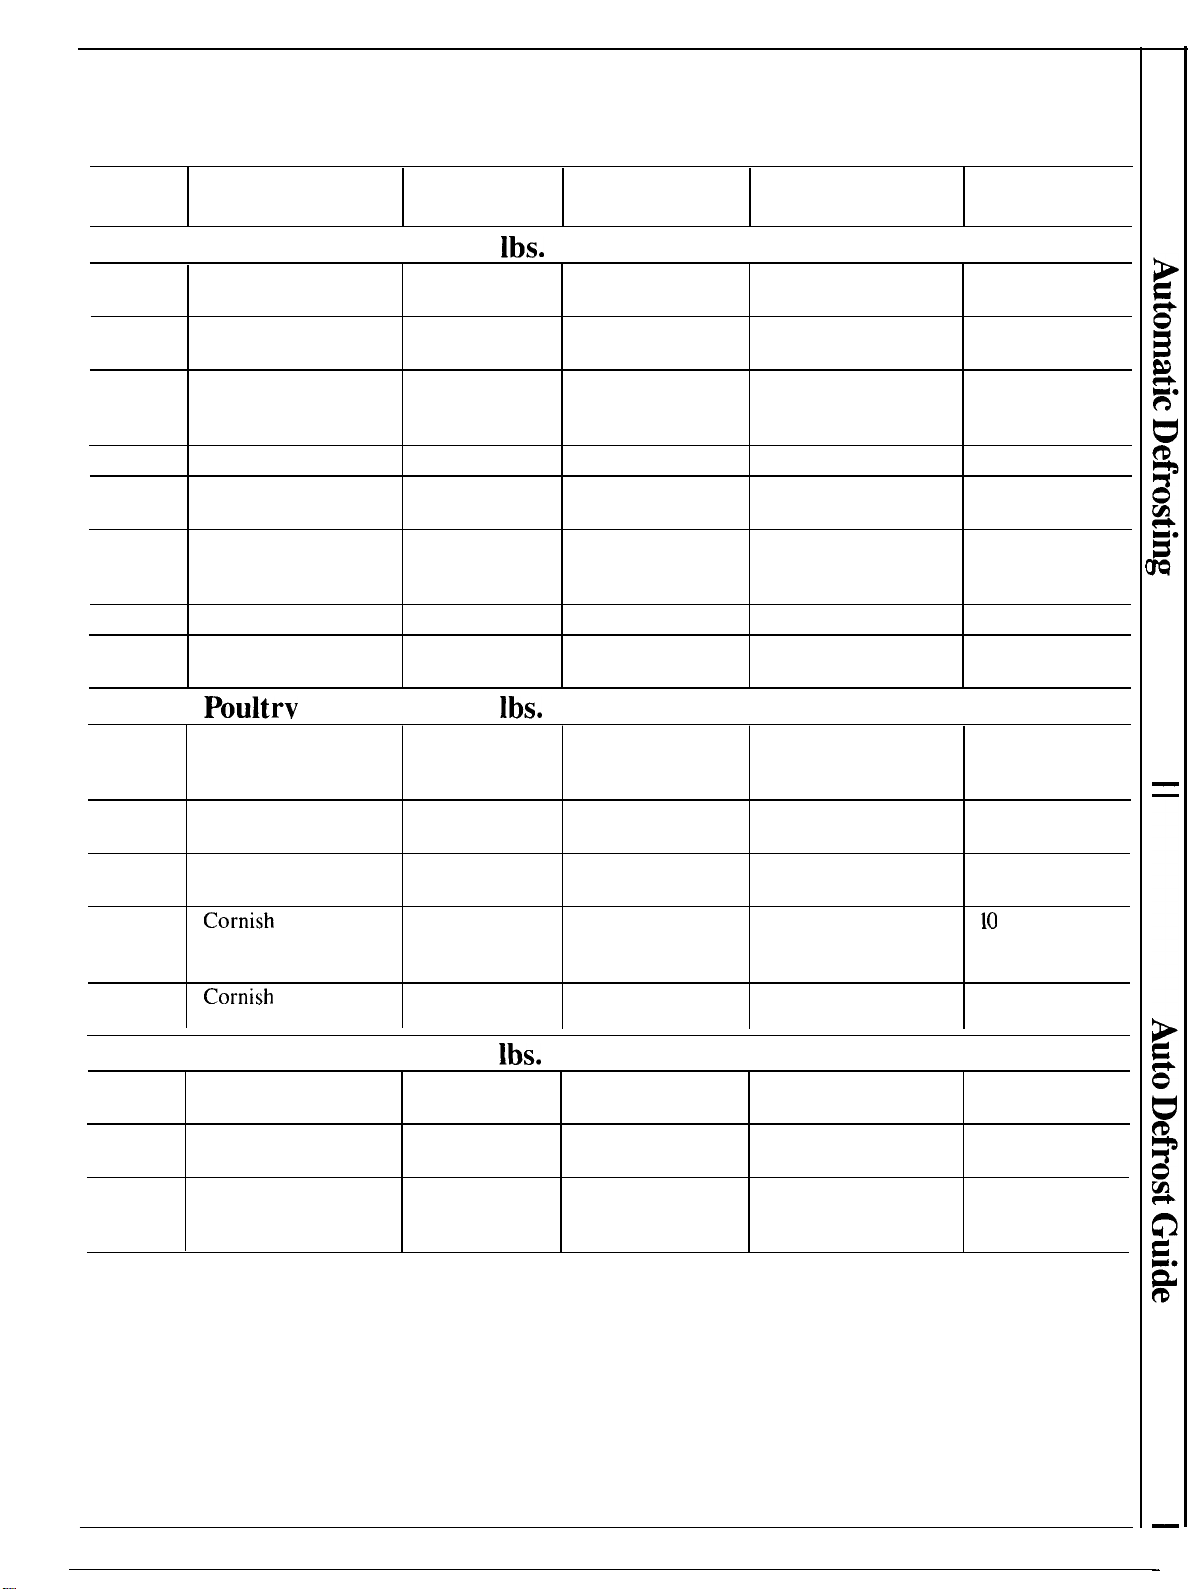
Auto Defrost Guide
RECOMMENDED MIN.-MAX.
CODE FOODS
WEIGHT
FIRST SIGNAL
SECOND SIGNAL
STAND TIME
2
1
Meat
Chops
Frankfurters,
Sausage
Ground Meat
Beef Patties
Roast
Ribs
Steak Turn over.
Stew
Poultrv
Whole Chicken
Turkey Breast
(breast-side-up)
Chicken Pieces
Cornish Hens
(whole)
Cornish
Hens (split)
0.1-6.0
0.1-6.0
lbs.
Turn over.
Separate. Remove defrosted
Turn over.
Turn over.
Turn over and 30 minutes in
shield. refrigerator
Turn over.
Turn over and
separate.
lbs.
Turn over and
shield.
Turn over.
Turn over.
Remove wrapper
and turn over. run cold water
Turn over.
Separate and shield
where necessary.
pieces.
Remove defrosted
areas and break
apart.
Separate patties.
Remove defrosted
pieces. Shield if
necessary.
Separate and remove
defrosted pieces.
Shield where
necessary. refrigerator
Separate and remove
defrosted pieces.
5 minutes
2 minutes
5 minutes
5 minutes
10 minutes
5 minutes
5 minutes
10 minutes;
run cold water
in cavity.
20 minutes in
5 minutes
10
minutes;
in cavity.
5 minutes
—
3
Edges or thin areas of meat will defrost more rapidly than other areas. After first or second signal, feel meat for warm
spots and shield these areas with small pieces of foil.
Seafood 0.1-3.0
Fish Fillets
Shrimp, Scallops
Whole Fish
lbs.
Turn over.
Separate. Separate and remove 5 minutes
Turn over and
shield tail and cold running
head.
Separate and remove
defrosted pieces.
defrosted pieces.
5 minutes
Hold under
water.
11
—
—
Page 12

MICROWAVE OVEN
I
I
Automatic Roasting
Auto Roast uses the temperature
probe to cook to the desired
serving temperature. Auto Roast
uses up to 3 power settings which
automatically switch during
roasting, thus providing even,
tender cooking results without
overcooking.
Just as in conventional roasting,
only tender roasts should be Auto
Roasted
temperatures are reached. Less
tender roasts should be microwaved
by time, according to the cookbook
which came with your oven.
Preparing Roasts for
Auto Roasting
Place tender beef roast on trivet in
microwave-safe dish. Insert probe
horizontally into the center meaty
area not touching bone or fat. Make
sure the handle does not touch the
food or the top or sides of the oven.
Cover with wax paper.
until
specified internal
Pork or ham roasts need no trivet.
Add 1/2 cup water to roast dish,
and cover with wax paper. Allow
room for the probe when covering.
Place meat in oven with probe to
the right. Insert cable end of probe
firmly into receptacle on oven wall.
How to Auto Roast
Beef to Medium
2. At
80°F.,
display switches to
show meat’s internal temperature.
3. When you select Auto Roast
codes 1, 2, 3 or 4, and it’s time to
turn the roast over, the oven signals
with 3 beeps and “TURN” flashes
on the display. After you turn the
roast, close the door and touch the
START pad. The display will show
the meat’s internal temperature.
(Note: The oven continues to cook
after the
not the roast is turned over. )
signal
is heard whether or
12
1.
Touch
“AUTO” appears on display and
“ENTER ROAST CODE” flashes.
Touch number pad 2. “ROAST
CODE 2“ appears on display and
“START” flashes. Touch START
pad. Display shows “COOL” and
“ROAST CODE 2“ until food
temperature reaches
AU~
ROAST pad,
80°F.
4. After a preprogrammed food
temperature is reached, the oven
beeps 3 times and “End” appears
on the display.
Page 13

Auto Roast Guide
● Use containers and coverings as directed at
roast before cooking.
●
Recommended codes are also shown inside oven on Auto Roast guide.
Food
Beef
Tender Roast
Rare
Medium
Well
Pork
Loin Roast
Precooked Ham
Poultry
Whole Chicken (3
Whole Turkey (up to 12
(Insert probe into meatiest
area of inner thigh from
below end and
Turkey Breast
(Insert probe horizontally
into meatiest area. )
*Recommended standing time before serving.
lbs.)
pamllel
lbs.)
to leg.)
remperatur(
1
2
3
4
1
5
5
4
Final
1 15°
125°
145°
175°
1
15°
190°
190°
175°
left.
Place probe correctly in
Approximate Time
minutes per pound
10-13
13-15
1s-17
14-17
12-1s
10-12
10-12
10-12
Hold*
fiinutes
o
0
5-1o
10
0
10
10-1s
10-1s
Automatic Simmer
(Auto Roast code 6)
The cookbook has information on
automatic simmering, including
guides and recipes.
Total time includes time to bring
food to 180°F., and hold at that
temperature until done.
Set Automatic Simmer like Auto
Roast as explained on page 12.
Display shows “COOL” until food is
80°F., then shows food
temperature, counting up to 180°F.
Automatic Simmer Guide
Approx.
Food
Beef
Pot Roast 5-7
Chili
Chicken
Stewing
Broiler/Frver
Ham or Pork
Roast
soup
StocklVegetable
Split Pea
Time/Hours
S-8
I
4-6
I
3-4
I
4-6
7-1o
5-7
I
I
(Auto
Roast code 6)
Comments
Add enough liquid to just cover meat.
If adding vegetables, make sure they are
completely covered by liquid,
Precook meat. Place probe 1 inch from
top surface. Stir after 3 hours, if possible,
Add 4 cups liquid. Insert probe into
meatiest area of inner thigh from below
end and parallel to leg. Turn over after
1/2 of time.
Same procedure as above.
Add 4 cups liquid.
Make sure that vegetables and meat are
covered by liquid. Stir every 3 hours.
Add enough liquid to cover peas at least
2 inches. Stir after 3 hours.
The oven switches to Hold at
180°F., until you remove food and
turn the oven off. If stirring is
recommended, you can reset the
oven by retouching the START pad.
Touch the CLEAR/OFF pad after
cooking.
13
Page 14

MICROWAVE OVEN
I
I
Cooking by Temperature
Temp Cook/Hold
(Auto Roast Code 7)
Internal temperature is the best
test of doneness for many foods.
Use Auto Roast code 7 and
the temperature probe to Temp
Cook/Hold. This takes the
guesswork out of cooking because
the oven automatically switches to
the “Hold” setting after reaching
the preset food temperature and
maintains that temperature for up
to one hour or until you touch the
CLEAR/OFF pad.
You might prefer to use Auto Roast
code 7 to enter a desired food
temperature, power
temperature for up to twelve hours
after food is done.
level
or Hold
The Temperature Probe
SENSOR
TWO POSITION CABLE
CLIP
The temperature probe is a food
thermometer that gauges the
internal temperature of your food;
it must be used when using Auto
Roast codes 1 through 7.
A two-position clip attaches to
the side of a dish to help keep the
probe in position when temperature
cooking foods such as chili or soup.
To use your probe properly in a
roast, follow the directions on
page 12.
HANDLE
END
Howto
Temp Cook a Rolled
Beef Rib Roast to Medium
Step 1:
in roast and attach the probe securely
in oven wall. Close the door.
Step
pad. “AUTO” appears on the
display and “ENTER ROAST
CODE” flashes.
Step 3:
“ROAST CODE 7“ appears on the
display and “ENTER MICRO
TEMP” flashes.
Step 4: Touch 1,2 and 5 for
“MICRO TEMP
and “POWER 10” show on display.
Step 5:
pad.
Touch 5 for medium power.
“MICRO TEMP
and “POWER 5“ show on display.
Step 6:
the internal temperature of the roast
is less than
show “COOL”; if the internal
temperature of the roast is
above, the display will show the
roast’s internal temperature,
counting up.
Step 7: When
the oven will sound and display
“HOLD?’ The oven will then hold
the temperature.
Step 8: Touch the CLEAR/OFF
pad to stop the cycle.
Step 9:
from the oven.
Insert the temperature probe
2: Touch the AUTO ROAST
Touch the number pad 7.
125°F.
COOK:’ “125F”
Touch the POWER LEVEL
“ENTER POWER” flashes.
COOK:’ “125F”
Touch the START pad. If
80°F.,
the display will
80°F.
or
125°F.
is reached,
Remove probe and food
Questions and Answers
Q. Are there
Temp Cook?
A. Yes. Delicate butter icings, ice
cream, frozen whipped toppings,
etc. soften rapidly at warm
temperatures. Batters, doughs and
frozen foods are also difficult to
cook precisely with the probe. It’s
best to Time Cook these foods.
Q. Why did “PROBE” flash
after I touched the START pad?
A. “PROBE” will flash if you
don’t seat the cable end of the probe
securely into the receptacle in the
oven wall or if you touch the AUTO
ROAST pad and forget to use the
probe.
Q.
Can I leave the probe in the
oven if it’s not inserted in food?
A. No, if the probe touches the
oven wall, it may damage the oven.
any foods I can’t
14
Cooking Tips
●
Use a lower power level; it will
heat food more evenly though
requiring more time.
● Be sure frozen food has been
completely defrosted before inserting
probe. Probe may break off if used
in frozen foods.
. Cover foods loosely for moisture
control and quick, even heating.
Page 15

MICROWAVE OVEN
I I
Cooking by
The time cooking feature allows
you to preset the cooking time.
The oven shuts off automatically.
Power level 10 (High) is
recommended for most cooking,
but you may change this for more
flexibility. See the cookbook.
To become better acquainted with
time cooking, make a cup
by following the steps below:
Step 1:
add 1 teaspoon
stir to dissolve. Use a cup that has no
metal decoration and is microwave-
safe (refer to Microwaving Tips
on page 6). Place cup in the oven
and close the door.
Step 2:
Display shows
10:’
TIME” flashes.
Step 3:
Touch 1, 2 and O for one minute
and 20 seconds. “MICRO COOK
TIME” flashes and “POWER 10”
and
Because automatic power level 10
is recommended for
Fill a cup
of
Touch the TIME COOK pad.
“: O“ and “POWER
“ENTER MICRO COOK
Select your cooking time.
“1:20”
appear on display.
~me
of
coffee
2/3
full of water,
instant coffee and
this
cup of
coffee, there is no need to change
the power level. (If power level 10
is not appropriate, see “How to
Change Power Level” below.)
Step 4:
“MiCRO
10” and time, counting down, show
on display.
Step 5: When time is up, the oven
signals and flashes
shuts off.
Step 6:
Using the
Touch START pad.
COOK
Open the door.
~me
TIME;’
“End~’
Cook II
“POWER
Oven
Feature
The Time Cook 11 feature lets
you set two time cooking functions
within one program. This is ideal
when you want to change power
levels during your cooking operations.
Here’s how to do it.
Step 1:
microwave-safe container and close
the door.
Step 2: Touch TIME COOK pad.
Display shows “:
10:’
TIME” flashes.
Step 3:
For example, touch 2, 1 and 5 for
two minutes and 15 seconds.
Display shows
“POWER
TIME” flashes.
Step 4: Touch TIME COOK pad.
Display shows “:
10!’
TIME” flashes.
Step 5:
Place food in oven in
O“ and “POWER
“ENTER MICRO COOK
Select your cooking time.
“2:15”
and
10?’
“MICRO COOK
O“ and “POWER
“ENTER MICRO COOK
Set your cooking time.
How to Change Power
After setting the cooking time,
touch the POWER LEVEL
pad, then touch desired number
for new power
level.
hvel
Step
6: Touch the START pad.
Step 7: “MICRO COOK TIME
the first power level and the first
programmed cook time, counting
down, show on the display.
Step
8: At the end of the first
programmed cook time, the second
power level,
II” and the second programmed
cook time, counting down, show
on the display.
Step
9: When time is up, the
oven signals and flashes
The oven shuts off.
Step 10:
“MICRO COOK TIME
“End~’
Open the door.
1:’
Questions and Answers
Q.
I set my oven for the time
called for in the recipe, but at the
end of the time allowed, my food
wasn’t done. What happened?
A.
Since house power varies due to
time or location, many recipes give
you a time range to prevent
overcooking. Set the oven for the
minimum time given, test the food
for doneness, and cook your food a
little longer, if necessary.
Q. I touched the number pads
and selected my power level.
When I touched the START pad,
however, my oven didn’t come on.
Why not?
A.
Before setting the time on the
number pads, touch the TIME
COOK pad. Otherwise your oven
will not begin cooking.
Q.
I want to cook on a power
level
other than 10 (High). What
do I need to do?
A.
To cook on a power level other
than High, first touch the TIME
COOK pad and set the desired
cooking time. Touch the POWER
LEVEL pad. “POWER 10” appears
on the display. Enter new power level
number and touch
Q. Can I interrupt my Time
Cook function to check the food?
A. Yes.
simply close the door and press
the START pad. The timer must be
reset for cooking to resume unless
. .
‘lmelsremainingontimer
To resume cooking,
the
START pad.
15
Page 16

]
MICROWAVE OVEN
I
How to Use the Double Duty
TM
s
Do not store or cook with
shelf on floor of oven. Product
damage may result.
● Use pot holders when
handling metal shelf and
cookware. They may be hot.
. Do not store microwave
browning dish on metal shelf.
The wire shelf is specifically
designed for added capacity heating
and reheating in the microwave
oven. More than one food may be
heated or reheated and ready to
serve at the same time.
When microwaving with the oven
shelf, some
from the cookbook which came
with your oven. It is important to
arrange foods properly, as shown
on the next page. Cookware size is
also important; select from among
the suggestions below. Also, food
size should be considered; foods
over 4 inches high, or 3
are not recommended for shelf
cooking.
Do not use the oven shelf to cook
batters and dough foods, and
uncooked foods which need to be
prepared from scratch. Follow the
cookbook’s directions in cooking
these foods.
techni~ues
will differ
Y2
pounds
Cookware for Shelf
Heating and Reheating
Before placing food in the dishes,
ch~k
to w that they WN
on or under the shelf. Also, be sure
cookware is microwave-safe.
Cookware for heating or reheating
include a 1 cup measuring cup,
9x5x3-inch loaf dishes or 9-inch
pie plates.
Leftovers may be placed in small,
individual ceramic or plastic bowls
or divided plates. ‘
Shelf
fit
together
~sitioning
l\l
To position the DOUBLE DUTY
shelf, tip the back slightly and fit
the shelf support guides
support guides located on each side
of the oven in the rear.
Next, lower the front until the shelf
support guides fit
guides located at each side of the
oven in the front.
When properly positioned, the
shelf should fit snugly in place, be
level and not touch the back wall of
the oven.
the Shelf
onto
onto
the support
I
TM
the
I
Use pot holders when handling
foods heated together with the oven
shelf,
especially when heating
larger amounts of food. The extra
steam generated from cooking
multiple foods may make cookware
hotter than with regular microwaving.
16
I
Use wax paper or plastic wrap
instead of lids on casseroles. Lids
may add too much height to dish.
Turn the oven off if arcing occurs
when using the shelf to cook
more than one food at the same
time. Make sure the shelf is
positioned right-side-up on
four shelf supports, and not
touching oven walls.
all
Page 17

How to Heat or Reheat
Similar~pes
of Food
I
I
I
J
Two plates of leftovers
reheated together. Arrange thick
or dense foods to outside edges of
plate and cover with plastic wrap.
Microwave at High (10) for 2 to 3
minutes. Reverse position of plates
(top to bottom) and rotate 1/2 turn.
Continue microwaving at High (10)
for 2 to 3 minutes, Continue
heating, if necessary, until hot.
maybe
How to Reheat Several Different
When heating several different
types of food together, foods which
must be served hot should be placed
on the oven floor, while foods which
are only warmed should be placed on
the shelf. This is because microwave
energy enters the oven from the
bottom only. Also, it is important
to remember that foods absorb
microwave energy at different rates.
Rates can be aff~ted by the size of the
food and its starting temperature.
Because of the varying rates, you
may need to start reheating a large
or dense food a few minutes ahead
of time, then add smaller or less
dense foods. Alternately, if one of
the foods you are heating seems
undercooked but the others are
heated satisfactorily, let the
underheated food continue cooking.
Reheating two casseroles
should be less than 4 inches) is
possible. Cover with plastic wrap.
Use staggered arrangements of
food, placing food on right side
of shelf and left side of floor. Refer
to Heating or Reheating Guide in
cookbook for suggested microwave
time per casserole and add the times
together. Microwave at High (10),
reversing position of foods (top to
bottom) after half of time. Also,
heat several small bowls of leftovers
this way, stirring and reversing
positions after half of time.
~pes
Heat or reheat different types of
food at High (10). To determine
heating times, add times for all
foods together. (See Heating Guide
in cookbook. ) After half of time,
stir or rearrange foods (do not
reverse positions). Check foods
(floor especially) after 3/4 of total
time and remove any which are
done. Continue cooking others.
of Foods Together
(height
Two
frozen individual entrees
(5 to 7 oz. each) or two TV dinners
(10
to U oz. each)
serve at the same time. Remove trays
of food from their boxes. If there are
any foil covers, remove them and
return the trays of food to their boxes.
(Batter foods should be removed from
the trays and cooked conventionally.)
Place in oven with one TV dinner on
right side of shelf and the second
dinner on left side of floor.
Microwave at High (10) for 6
minutes. Reverse positions (top to
bottom) and rotate foods 1/2 turn.
Continue microwaving at High (10)
for 6 minutes. Check dinners for
doneness. If one dinner seems
done than desired, return it to the
box and continue heating on floor 1
to 2 more minutes.
I
Place on floor
which need the most heating, such
as leftover fried chicken, casseroles
of canned or leftover vegetables,
rice or pasta. Place on shelf those
foods which need only to be
warmed, such as bakery pies, rolls,
muffins or breads.
are both ready to
large
or dense foods
iess
I
17
Page 18

MICROWAVE OVEN
[
How to Use the Minute/Second
The Minute/Second Timer has
three timing functions:
● It operates as a minute timer.
Q
It can be set to delay cooking.
● It can be used as a hold setting
after defrosting.
The Minute/Second Timer operates
without microwave energy.
How to
~me
a 3-Minute
How to Defrost, Hold and
~me
Cook
Let’s say you want to defrost a frozen
casserole for 15 minutes, hold for
10 minutes and then Time Cook for
25 minutes. Here’s how to do it:
Step 1:
and place in oven.
Take casserole from freezer
~mer
Phone Call
1. Touch the MIN/SEC TIMER
pad. The display shows “: 0’
“ENTER TIME” flashes.
2. Touch number pads 3,0 and O
(for 3 minutes and no seconds).
Display shows
3. Touch START pad. Display
shows time counting down.
“3:00” and “TIMER:’
7
and
Step 2: Touch TIME DEFROST.
Step 6: Touch the TIME COOK
pad. The display shows “: O“ and
“POWER
COOK TIME” flashes.
Step
minutes of cooking time. “MICRO
COOK TIME” flashes and
“25:00” and “POWER
on display.
10?’
“ENTER MICRO
7: Touch 2,5,0 and O for 25
10”
appear
4. When time is up, oven signals,
flashes
5. Touch the
reset the display to
microwave cook or defrost programs.
Using a Hold
The Minute/Second Timer can also
be used to program a “holding
time” between microwave cooking
functions. The time can range from
one second to 99 minutes and 99
seconds. A holding, or standing
time may be found in some of your
own recipes or in the cookbook.
“TIMER:’ and displays”:
M~/SEC
TIMER pad to
,he
clock or the
~me
O:’
Programming Delayed
Cooking
To delay cooking up to 99 minutes
and 99 seconds, touch TIME COOK
or AUTO ROAST and enter cook
time or code. If you enter Auto Roast
code 7 to temp cook, you must also
enter a food temperature. Touch
MIN/SEC TIMER pad and enter
number of minutes to delay
cooking. Touch START. Timer
counts down to zero and cooking
begins. When using Auto Roast
pad, be sure probe is in food before
pressing START pad.
The display shows “: O“ and
“POWER 3
DEF TIME” flashes.
Step
3: Touch pads 1, 5,0 and O for
15 minutes defrosting time.
appears on display. (Defrosting is
automatically set on power
but can be changed by touching the
POWER LEVEL pad and the
desired power level.)
Step
4: Set standing or holding
time by touching the
TIMER pad. The display shows
“: O“ and “ENTER TIME” flashes.
Step
for ten minutes.
on the display and “TIME” flashes.
:’
“ENTER MICRO
“ti:OO”
level
3
MIN/SEC
5: Touch 1,0,0 and O to hold
“10:00”
appears
Step
8: Touch the START pad.
“MICRO DEF TIME” and
counting down, show on display.
As each function is automatically
performed, the oven display shows
instructions entered and the function.
Step
9: When time is up, the oven
signals, flashes “End” and shuts
off.
“15:001’
Questions and Answers
Q.
What will happen if I
accidentally reverse my defrost,
hold and cook instructions?
A. The oven will automatically
rearrange your program. Defrosting
will always come first, then hold,
and then the cooking function.
Q.
Can I defrost and hold only?
A. Yes.
want to defrost a food, hold it, and
cook it later. All you need to do is
program in Defrost and amount of
time. Then program Hold and the
amount of time. Be sure to put the
thawed dish in the refrigerator
promptly.
NOTE: Let foods remain at room
temperature only as long as safe.
Times will vary.
Sometimes you may only
18
Page 19

LOWER OVEN
Using Your Oven
Your oven is designed to give
you the best results in baking,
broiling and roasting when used
as recommended. Before using
your oven, read the directions
for setting and using
controls and the timer.
all
of the
Oven Light
The light comes on automatically
when the door is opened. When the
oven door is closed, you can use the
switch to turn the light on and off.
The switch is located on the lower
left of the control panel under the
OVEN SET knob.
Oven Shelves
The shelves are designed with
locks which
from coming out of the oven or
tilting when food is placed on
them. The shelves must be placed
correctly on the shelf supports.
To remove,
pull forward with stop-locks along
top of shelf support.
To replace,
locks resting on shelf supports and
push toward rear of oven until it
falls into correct position under
shelf supports.
prevent~he
lift up rear of shelf and
insert shelf with
stop-
shelves
stop-
-
Shelf Positions
Oven Controls
The controls for the oven are
marked OVEN SET and OVEN
TEMP. The OVEN SET control
has settings for BAKE, TIME
BAKE, BROIL, CLEAN (for
lower oven) and OFF. When you
turn the knob to the desired setting,
the proper heating units are then
activated for that operation.
The OVEN
the temperature you set, from
WARM
and also at CLEAN
lower oven.
TEMP control maintains
(150°F.)
to BROIL (550°F.),
(880°F.
) for
Conventional Oven
The Conventional Oven Timer is
designed to automatically start and
stop certain oven functions (TIME
BAKE or CLEAN). Clock must
set before Conventional Oven Timer
will operate.
To set Clock, first touch CLOCK
pad and then number pads to enter
time of day. For example, if time is
1:30,
touch number pads 1,3 and O
and
“1:30”
will appear in display.
Touch START pad and clock will
be set.
~mer
be
The oven has four shelf supports
marked A (bottom), B, C and D
(top). Shelf positions for cooking
food are suggested on Baking,
Roasting and Broiling pages.
19
Page 20

I
LOWER
OWN
Bating
See Baking Guide on page 22.
I
When cooking a food for the first
time in your new oven, use the time
given on recipes as a guide. Oven
thermostats, over a period of years,
may
“drifi” from the factory setting
and
a
difference in timing of 5 to 10
minutes between an old and a new
oven is not unusual. You may be
inclined to think that the new oven
is not performing correctly;
however, your new oven has been
set correctly at the factory and is
apt to be more accurate than the
oven it replaced.
How to Set Your Range
for Baking
Step 1:
certain to leave about 1 inch of
space between pans and walls of
oven for good circulation of heat.
Close oven door. During baking,
avoid frequent door openings to
prevent undesirable results.
Place food in oven, being
Examples of Immediate Start (oven
turns on now and you set it to turn
off automatically) or Delay Start
and Stop (setting the oven to turn
on automatically at a later time and
turn off at a preset stop time) will
be described.
How to Set
tiediate
Start and Automatic Stop
N~E:
sure the oven clock shows the
correct time of day.
Immediate Start is simply setting the
oven to start baking now and turn off
at a later time automatically.
Remember, foods continue cooting
afier
Before beginning, make
controls are off.
Step
3: Touch number pads to enter
desired baking time. For example,
touch 3, 0 and O for 3 hours baking
time. “Bake Time” and “3:00” are
displayed.
Step
4: Touch the START pad.
“Bake Time” and the baking time,
counting down, are displayed.
Step 2:
to BAKE and the OVEN
knob to temperature given on your
recipe or in the Baking Guide.
Step
at minimum time given on recipe.
Cook longer if necessary. Switch
off heat and remove food.
How to
The Conventional Oven Timer
control allows you to set the oven
to turn on or off automatically
at specific times that you set.
Turn the OVEN SET knob
TEMP
3: Check food for doneness
~me
Bake
Step 1:
to TIME BAKE. Turn OVEN
TEMP knob to oven temperature,
for example
stirt immediately and will stop at
time you have set.
Step
pad. Time of day remains on the
display and “Enter Bake Time” and
“: O“ appear.
Turn the OVEN SET knob
250”F.
The oven will
2: Touch the BAKE TIME
tie
Step
5: When baking is
oven signals,
displayed and oven shuts off.
Step
6: Touch the CLEAR pad, open
the oven door and remove food.
“End” and “Bake” are
completd,
20
Page 21

How to Set Delay
Stirt
and Stop
Delay Start and Stop is setting the
oven timer to turn the oven on and
off automatically at a later time than
the present time of day.
For example: Let’s say it’s
dinner time is shortly after
The recipe suggests 3 hours baking
time at
250°F.
Here’s how:
2:00 and
7:00.
“Bake Time” and “3:00” are
displayed.
Step 6:
oven automatically figures the start
time so oven will turn off when you
want baking to be completed.
Touch the START pad. The
Step 1:
to TIME BAKE. Turn the OVEN
TEMP
recommended temperature.
Step 2:
Time of day remains on display and
“Enter Bake Time” and “: O“ appear.
Step 3:
O for 3 hours baking time.
Turn the OVEN SET knob
knob to
Touch the BAKE TIME pad.
Touch number pads 3,0 and
250°F.
or
Step 4:
“Enter Bake Stop Time” and “: O“
appear on display.
Step 5:
O to enter
the oven to turn off.
“7:00” and “Bake Stop Time” are
displayed.
Touch the
Touch number pads 7,0 and
7:00
S~P
TIME pad.
for the time you want
“4:00” and “Bake Start Time” are
displayed. In this example, baking
will begin at 4:00 and oven will turn
off at
7:00.
men
baking time is completed, oven
signals, displays “End Bake” and
shuts off.
Step
7: Touch the CLEAR pad,
open door and remove food from
oven.
Remember, food will continue to
cook in a hot oven even after oven is
turned off.
Note: “E EE” appears on display
when you touch the START pad if
you have set a stop time that is less
than the time of day plus the bake
time. Touch the CLEAR pad and
begin again.
I
21
Page 22

I I
LOWER OVEN
Baking Guide
1.
Aluminum pans conduct heat
quic~y.
For most conventional glass cookware generally absorb
baking, light, shiny finishes
generally give best results because crusts. Reduce oven heat
they help prevent
overbrowning.
For best browning results, we
recommend dull bottom surfaces achieved by preheating cast-iron
for cake pans and pie plates. cookware.
2. Dark or non-shiny finishes and
heat, which may result in dry, crisp
25°F.
lighter crusts are desired. Rapid
browning of some foods can be
if
3. Preheating the oven is not
always
necessary, especially for foods
which cook longer than 30 to 40
minutes. For foods with short
cooking times, preheating gives
best appearance and crispness.
4. To prevent uneven heating and to
save energy, open the oven door as
little as possible when checking food.
Fond
Bread
Biscuits (
Coffee
Corn
Gingerbread
Muffins
Popovers
Quick loaf bread
Yeast bread
Plain rolls
Sweet rolls
Cakes
(without shortening)
Angel
Jelly roll
Sponge
Cakes
Bundt cakes
Cupcakes
Fruit
Layer
Layer,
Loaf
Cookies
Brownies
Drop
Refrigerator
Rolled or sliced
Fruits,
Other Desserts
Baked
Custard
Puddings, Rice
and
Pies
Frozen
Meringue
One crust
Two
Pastry
Miscellaneous
Baked potatoes
Scalloped dishes
Souffles
cake
bread
food
cakes
chocoldte
apples
Custard
crust
shell
k-in.
thick)
or muffins
(2 loaves)
COrsfainer
Shiny
Cookie Sheet
Shiny Metal
satin-finish bottom
Cast
Shiny Metal
satin-finish bottom
Shiny Metal Muffin Pans
Deep Glass or Cast-Iron Cups
Metal or Glass
Metal or
Shiny Oblong
Shinv
Aluminum Tube
Metal Jelly Roll Pan
Metal
Metal or Ceramic
Shiny
Metal or Glass Loaf or
Tube
Shiny Metal
satin-finish bottom
Shiny
satin-finish bottom
Metal
Metal or Glass
Cookie
Cookie Sheet
Cc~okie
Glass
Glass Custard Cups
(set in pan
Glass Custard Cups
CasserOk
Foil Pan on Cookie Sheet
Spread
Glass or Satin-finish Metal
Glass or
Glass or Satin-finish Metal
Set on Oven
Glass or Metal Pan
Glass
Pan
with
Irmr or Glass
Pdn
with
Lnaf P~ns
Glass
Loaf Pans
or
Muffin
Pan
with
Pans
Pan
Pdn
or
Casserole
or
Metal
Pans
Oblonr or Muffin pans
or
Ceramic
Metil
Muffin Pans
Pan
Pan
Metal
Pan with
or Glass
Loaf Puns
Sheet
Sheet
or
Metal Parr
ofhnt water)
tocrustedges
Satin-f’inish
Shelf
Shelf
Position
B, C
B, A
B
B
A, B
B
B
A. B
A, B
B. A
A
B
A
A, B
B
A, B
B
B
B
B, C
B. C
B, C
B, C
A, B, C
B
B
A
B, A
A, B
B
B
A, B, C
A, B, C
B
Oven
Temperature
-
4750
4000
350°-4000
400°-4500
350°
400°-4250
375”
3500-375°
375°-4250
375” -425°
3500-375”
325°-3750
375°-400”
325°-350”
325°-3500
350°-3750
275°-3000
3500-375°
350” -375°
350°
325°-350”
350°-4000
400°-4250
375”-4000
350°-4w0
300”-350”
325°
400°-4250
325°-3500
400°-4250
400”-425°
450°
325°-4000
325°-3750
300°-3500
Time,
Minutes
15-20
20-30
20-40
45-55
20-30
45-60
45-60
45-60
10-25
20-30
30-55
10-15
45-60
45-65
20-25
hrs,
2-4
20-35
25-30
40-60
25-35
10-20
6-12
7-12
30-60
30-60
50-90
45-70
15-25
40-60
40-60
12-15
60-90
30-60
30-75
Comments
Canned, refrigerated biscuits take
to4
minutes less time.
2
Preheat cast-iron pan
Decrease about 5 minutes for muffin
or
bake at
mix,
350°F.
then at
metal
Dark
browning.
Fortbin rolls, Shelf B may be used.
For thin rolls. Shelf B mav be used.
Two-piece pan is convenient,
Line pan with wax paper.
Paper liners produce moister crusts.
Use
individual cakes.
Bar cookies from mix use same time
Use
25°F.
Reduce temp.
custard.
Cook bread or rice pudding with
custard base 80
Large
time.
To quickly brown meringue, use
4t30°F.
Cus@rd
temperature, longer time.
[rrcrease
:]r
or glass give deepest
300°F.
and Shelf B for small or
ShelfC and increase temp.
to50°F. for more browning.
pies
use40t3°F.
for 8 to 10 minutes.
fillings require lower
time for Iargeramounts
sizes.
forcrispcrust
450°F.
for 25 minutes,
for 10 to 15 minutes.
to 300°F. for
to
large
90 minutes.
and increased
22
Page 23

Roasting
Roasting is cooking by dry heat.
Tender meat or poultry can be
roasted uncovered in your oven.
Roasting temperatures, which
should be low and steady, keep
spattering to a minimum. When
roasting, it is not necessary to
sear, baste, cover or add water
to your meat.
Roasting is really a baking
procedure used
oven controls are set to BAKE or
TIME BAKE. (You may hear a
slight
ci,cking sound, indicating the
oven is working properly. ) Roasting
is easy; just follow these steps:
Step 1:
place, fat-side-up, on roasting rack
in a shallow pan. (Broiler pan with
rack is a good pan for this. ) Line
broiler pan with aluminum foil when
using pan for marinating, cooking
with fruits, cooking heavily cured
meats, or for basting food during
cooking. Avoid spilling these
materials on oven liner or door.
Step 2:
A or B position. No preheating is
necessary.
Check weight of meat, and
Place in oven with shelf in
for
meats. Therefore,
Step
4: Most meats continue to cook
slightly while standing after being
removed from the oven. Standing
time recommended for roasts is 10
to 20 minutes. This allows roasts to
firm up and makes them easier to
carve. Internal temperature will rise
about 5° to
the temperature increase, if desired,
remove the roast from the oven when
its internal temperature is 5° to
less than temperature shown in the
Roasting Guide.
N~E:
BAKE, as described on pages 20
and 21, to set oven to turn on and off
automatically.
Remember that food will continue
to cook in the hot oven and therefore
should be removed when the desired
internal temperature has been
reached.
For Frozen
Q
Frozen roasts of beef, pork, lamb,
etc., can be started without thawing,
but allow 10 to 25 minutes additiond
time per pound (10 minutes additional
time per pound for roasts under 5
pounds, more time for larger roasts).
. Thaw most frozen poultry before
roasting to ensure even doneness.
Some commercial frozen poultry can
be cooked successfully without
thawing. Follow directions given
on packer’s label.
10°F;
to compensate for
10°F
You may wish to use TIME
Roask
Que4ions
Q.
h
it necessary to check
for doneness with a meat
thermometer?
A.
It is recommended that you check
the meat’s internal temperature
at the completion of cooking.
Temperatures are shown in Roasting
Guide on next page. For roasts over
8
Ibs.,
time, check meat thermometer at
half-hour intervals after half the
cooking time has passed.
Q.
Why is my roast crumbling
when I try to carve it?
A. Roasts are easier to slice if
allowed to cool 10 to 20 minutes
after removing from oven. Be sure
to cut across the grain of the meat.
Q.
Do I need to preheat my
oven each time I cook a roast
or poultry?
A. It is rarely necessary to preheat
your oven; only for very small
roasts, which cook a short length
of time.
Q. When buying a roast, are
there any special tips that would
help it cook more evenly?
A. Yes.
thickness as possible, or buy rolled
roasts.
Q.
Can I seal the sides of my foil
“tent” when roasting a turkey?
A.
Sealing the foil will steam the
meat. Leaving it unsealed allows the
air to circulate and brown the meat.
and
Awers
cooked at
Buy a roast as even in
300°F.
for reduced
(<ontinued
next page)
Step
3: Turn OVEN SET knob to
BAKE and OVEN
325°F.
Small poultry maybe cooked
at
375°F.
for best browning.
TEMP
knob to
23
Page 24

~WER OWN
Roasting Guide
Roasting
1.
Position oven shelf at B for small
roasts (3 to 7 pounds) and at A for
larger roasts.
2.
Place meat fat-side-up, or poultry
breast-side-up, on broiler pan or
other shallow pan with trivet. Do
not cover. Do not stuff poultry until
just before roasting. Use meat
thermometer for more accurate
doneness. (Do not place
thermometer in stuffing. )
3. Remove fat
and
drippings as
necessary. Baste as desired.
4.
Standing
for roasts
time recommended
i~10
to 20 minutes. This
allows roasts to firm up and makes
them easier to carve. Internal
temperature will rise about 5° to
10°F.;
to compensate for the
increase in temperature, if desired,
remove the roast from the oven
when its internal temperature is 5°
to
10°F.
less than temperature
shown on the Roasting Guide.
5. Frozen roasts can be
conventionally roasted
10 to 25
minu~es addition~l time~er
bv adding
pound to times given in guide for
refrigerated roasts (10 minutes
additional time per pound for
roasts under 5 pounds, more time
for larger roasts. ) Defrost poultry
before roasting.
Type
Meat
Tender cuts; rib, high quality sirloin tip.
rump or top round*
leg
or bone-in shoulder*
Lamb
leg
Veal shoulder,
Pork h~in,
Ham,
precnoked
Ham, raw
*For boneless rolled roasts over 6-inches
thick. add 5
times given
POultry
Chicken
Chicken pieces
Turkey
or loin*
rib or
shrrulder*
to
10 minutes per pound to
ab(]ve.
or Duck
Oven
Temperature
325°
325°
325°
325°
325”
325”
325°
350°
325°
Doneness
Rare:
Medium:
Done:
Well
Rare:
Medium:
Well Done:
Well Done:
Well Done:
To Warm:
Well Done:
Well Done:
Well Done:
Well Done:
Approximate Roasting Time
in Minutes
3
to 5 Ibs.
24-30
30-35
35-45
21-25 20-23
25-30
30-35
35-45
35-45
10 minutes per pound
Under 10 lbs.
20-30
3
to 5 Ibs.
35-40
35-40
10 to 15 lbs.
20-25
oer
Pound
(any
6 to 8 Ibs.
18-22
22-25
28-33
24-28
28-33
30-40
30-40
weight)
10
to 15 Ibs.
17-20
Over 5 lbs.
30-35
Over 15 Ibs.
15-20
Internal
Temmrature ‘F
1300-140”
150°- 160°
170°-1850
130°-1400
150°- 160°
170°-1850
170°-1800
170°- 180°
125°-
130°
1700
185”- 190°
185°- 190°
In thigh:
185°-1900
24
Page 25

I
~WER
Broiling
OVEN
I
Broiling is cooking food by intense
radiant heat from the upper unit in
the oven. Most fish and tender cuts
of meat can be broiled. Follow
these steps to keep spattering and
smoking to a minimum.
Step
1:
If meat has fat or gristle near
edge,
cut vertical slashes through
bo~h
about 2“ apart. If
. . . . . .
may be trimmed,
about 1/8” thick.
Step 2:
in broiler pan which comes with
range. Always use rack so fat drips
into broiler pan; otherwise juices
may become hot enough to catch fire.
Step3: hsition
shelf position as su~ested in
Guid~
is done on shelf position C, but if
your range is connected to 208
volts, you may wish to use a higher
position.
Place meat on broiler rack
shelf on recommended
on next
pag~
desired,-fat
Ieavlng
Most
a layer
Broiling
broilingw
Step 6: Turn food only once during
cooking. Time foods for first side
per Broiling Guide.
Turn food, then use times given for
second side as a guide to preferred
doneness. (Where two thicknesses
and times are given together, use
first times given for thinnest food.)
Step 7:
to OFF. Serve food immediately,
and leave pan outside oven to cool
during
Turn OVEN SET knob
m~al
for easiest cleaning.
Use of Aluminum Foil
Questions & Answers
Q.
Why should I leave the door
closed when broiling chicken?
A. Chicken is the only food
recommended for closed-door
broiling. This is because chicken is
relatively thicker than other foods
you broil. Closing the door holds
more heat in the oven which allows
chicken to cook evenly throughout.
Q.
When broiling, is it necessary
to always use a rack in the pan?
A. Yes.
the meat over the pan. As the meat
cooks, the juices fall into the pan,
thus keeping meat drier. Juices
are protected by the rack and stay
cooler, thus preventing excessive
spatter and smoking.
Q. Should I salt the meat before
broiling?
A. No.
and allows them to evaporate.
Always salt after cooking. Turn
meat with tongs; piercing meat
with a fork allows juices to escape.
When broiling poultry or fish,
brush each side often with butter.
Using the rack suspends
Salt draws out the juices
—
Step 4:
(except when broiling chicken).
The door stays open by itself, yet
the proper temperature is maintained
in the oven.
Step 5:
OVEN
Preheating units is not necessary.
(See notes in Broiling Guide.)
Leave door ajar a few inches
Turn both OVEN SET and
TEMP
knobs to BROIL.
1.
If desired, broiler pan may be
lined with foil and broiler rack may
be covered with foil for broiling.
ALWAYS BE CERTAIN TO MOLD
FOIL THOROUGHLY TO
BROILER RACK, AND SLIT
FOIL~
SLITS IN RACK. Broiler rack is
designed to minimize smoking and
spattering, and to keep drippings
cool during broiling. Do not stop fat
and meat juices from draining into
the broiler pan. This prevents the
broiler rack from serving its
purpose and allows juices to
become hot enough to catch fire.
2. DO
aluminum foil on shelf. To do so
may result in improperly cooked
foods, damage to oven finish and
increase in heat on outside surfaces
of the oven.
CONFORM WITH
N~
placea sheet of
Q.
Why are my meats not turning
out as brown as they should?
A. In some areas, the power
(voltage) to the range maybe low.
In these cases, preheat the broil
unit for 10 minutes before placing
broiler pan with food in oven.
Check to see if you are using the
recommended shelf position. Broil
for longest period of time indicated
in the Broiling Guide. Turn food
onlv
once
.
Q. Do I need to grease my broiler
rack to prevent meat from sticking?
A. No. The broiler rack is designed
to reflect broiler heat, thus keeping
the surface cool enough to prevent
meat from sticking to the surface.
However, spraying the broiler rack
lightly with a vegetable cooking
spray before cooking will make
cleanup easier.
durin~ broiling.
(c[~ntinucd
-
next page)
25
Page 26

Broiling
Guide
Broiling
1.
Always use broiler pan and rack
that comes with your oven. It is
designed to minimize smoking and
spattering by trapping juices in the
shielded lower part of the pan.
2. Oven door should be ajar for all
foods except chicken; there is a
special position on door which
holds door
3. For steaks and chops, slash fat
evenly around outside edges of meat.
k.ood
Bacon
Grmrnd
Well Done
Beef Steaks
Rare
Medium
Well Done
Rare
Medium
Well Done
Chicken
Bakery Products
Bread (Toast) or
Toaster Pastries
English Muffins
b)hster
to
8 oz.
(6
Ham Slices
(precooked)
Pork Chops
Well Done
hmh
Medium
Well Done
Medium
Well Done
Wieners
precooked sausages,
bratwurst
Beef
Tails
each)
Chops
and similar
oDen
.
correctlv.
.
Quantity and/or
Thickness
1/2
lb. (about 8
tbin slices)
I lb.
(4
patties)
%-in.
to I k
21A Ibs.),
Ibs,
thick
Ibs,)
thick
)
l/z- to
l-inch thick
(1
I%-in.
(2 to 2fi
1 whole
(2 to
split lengthwise
1 lb. fillets %-to
l/z-in. thick
l-in, thick
2 (% inch) c
2 (1-in, thick)
about 1 lb.
2(1 inch)
about 10 to 12 oz.
(Ifi inch) c
2
about 1 lb.
l-lb. pkg. (10)
I
I
I
I
I
To slash, cut crosswise through 6. Broiler does not need to be
outer fat surface just to the edge of preheated. However, for very thin
the meat. Use tongs to turn meat foods, or to increase browning,
over to prevent piercing meat and
losing juices.
4. If desired, marinate meats or
preheat if desired.
7.
Frozen
steak
can be
conventionally broiled by
chicken before broiling, or brush positioning the oven shelf at next
with barbecue sauce last 5 to 10 lowest shelf position and increasing
minutes only.
5. When arranging food on pan,
do not let fatty edges hang over
sides, which could soil oven with
fat dripping.
cooking time given in this guide
172
times per side.
8. If your oven is connected to 208
volts, rare steaks may be broiled by
preheating broil heater and
positioni~g
the oven shelf one
position higher.
Shelf
Position
c
k-irst
Side Second Side
Time, Minutes Time, Minutes
3
‘/2
I
3 E
Comments
Arrange in single
layer.
I
c
c
c
c
c
c
c
A
1
7
7
9
13
10
15
25
35
%-2
I
4-5
7
9
13
7-8
14-16
20-25
IO-15
1/2
1
3-4
13-16
c
B
5 5
8 8
Do not
turn over.
I
B
c
c
B
c
13
8
10
10
17
6
10
10
13
4-7
10
4-6
12-14
1-2
Space evenly.
Up to 8 patties
Steaks less than 1 inch cook through
before browning. Pan frying is
recommended.
Slash fat.
Reduce times about 5 to 10 minutes per
side for cut-up chicken. Brush each side
with melted butter, Broil
down first and broil with door closed.
Space evenly. Place English muffins
cut-side-up and brush with butter, if
desired.
Cut through back of shell. Spread
open. Brush with melted butter
before broiling and after half
Handle and turn very carefully.
Brush with lemon butter before and
during cooking if desired. Preheat
broiler
Increase times 5 to 10 minutes per side
for lfi-inch thick or home cured.
Slash fat.
Slash fat
If desired, split sausages in half
lengthwise; cut into 5 to 6 inch pieces
tike
about same time
to
increase browning.
skin-side-
of
time.
26
Page 27

~WER
OVEN
Opemting
Before Setting Oven
Controls, Check These
Things:
Step 1:
Remove broiler pan, broiler rack
and other cookware from the oven.
(Oven shelves may be left in oven.
Note: Shelves will discolor during
the self-clean cycle. )
Step
2:
Wipe up heavy soil on oven bottom.
If you use soap, rinse thoroughly
before self-cleaning to prevent
staining.
-!,
A. Oven Front Frame
B. Oven Door Gasket
C. Openings in Door
D. Oven Light
Step
●
Clean spatters or spills on oven
front frame (A) and oven door
outside gasket (B) with a dampened
cloth. Polish with a dry cloth. Do
not clean gasket (B). Do not allow
water to run down through openings
in top of door (C). Never use a
commercial oven cleaner in or
around self-cleaning oven.
●
Clean top, sides and outside front
of oven door with soap and water.
Do not use abrasives or oven
cleaners.
. . . . . . . . .
—
3:
the Self-Cleaning Oven
\
—
——
-—
—-—
c
0
How to Set Oven
for Cleaning
Step 1:
Tttrn
OVEN SET and OVEN
TEMP knobs to CLEAN.
will snap into final position when
the CLEAN location is reached.
Step
2:
Slide Latch Handle to the right as
far as it will go.
“3:00~’
appear on display.
The oven is programmed to clean
for 3 hours, but you may change the
cleaning time to
first touching the CLEAR pad and
then the number pads.
enter a clean time less than 1 Y2 or
more than 41/2 hours.
“CLEAN TIME” and
“OVEN DOOR LATCHED”
1Y2
to
“E EE” appears on display if you
Controls
4~2
hours by
Step
3:
To begin cleaning immediately,
touch START. Display shows stop
time-in this example, 3 hours from
the time cleaning operation starts.
No other function of the Conventional
Oven can be used until the
cleaning cycle is over and the oven
door is unlatched. You may use
the Microwave Oven during
cleaning time.
N~E:
The fan in Microwave Oven
comes on when lower oven door is
latched and
W
know clwning h= started when
Cleaning light glows. The fan will
stop when the cleaning cycle ends.
To delay start of cleaning:
Step 1:
Repeat steps 1 and 2.
Step 2:
Touch STOP TIME pad and number
pads for the time of day you want
cleaning to be finished.
ST~T
is pressed. You
self-
Step
4:
Close oven door and make sure
oven light (D) is off.
Display shows the time you
programmed oven to stop cleaning,
“STOP CLEAN TIME” and
“OVEN DOOR
LATCHED:’
(c’[~ntinued rlext p<lg(’)
n
Page 28

I
LOWER OVEN
I
Operating the
Step
3:
Touch START pad. Display shows
the time of day the oven will begin
cleaning,
“OVEN DOOR LATCHED” and
the current time of day.
NOTE: Oven automatically figures
the starting time so cleaning will
end when you want it to.
FO11
“START CLEAN
OW
These Steps after
self-cleaning Oven
TIME;’
Self-Cleaning
After cleaning is complete, the
oven door will stay locked until the
oven cools and the LOCKED light
goes off. This takes about 30
minutes.
Step 1:
When the LOCKED light is off,
slide the Latch Handle to the left as
far as it will go and open the door.
Step
2:
Turn OVEN SET knob to OFF.
Step
3:
Turn OVEN
Step 4:
Touch CLEAR pad.
TEMP
knob to WARM.
(continued)
Questions and Answers
Q. If
the oven clock is
can I still self-clean my oven?
A. No. The Automatic Oven Timer
uses the oven clock to help start and
stop the self-cleaning cycle.
Q. Can I use commercial oven
cleaners on any part of my
self-cleaning oven?
A. No cleaners or coatings should
be used around any part of this
oven. If you do use them and do not
thoroughly rinse the oven with
water, wiping it absolutely clean
afterwards, the residue can scar the
oven surface and damage metal
parts the next time the oven is
automatically cleaned.
Q.
Can
I clean the Woven Gasket
around the oven door?
A. No,
a good oven seal and care must be
taken not to rub, damage or move
this gasket.
Q. After having just used the
oven, the LOCKED light came
on and I could not move the
Latch Handle. Why?
A. After several continuous
temperature bakings or
the LOCKED light may come on.
The oven door can’t be latched for
self-cleaning while the LOCKED
light is on. If this happens, let the
oven cool until the LOCKED light
goes off. Then the oven door can
be latched for self-cleaning,
Q. What should I do if excessive
smoking occurs during cleaning?
A.
and you should switch the OVEN
SET knob to OFF. Open windows
to rid room of smoke. Allow the
oven to cool for
before opening the door. Wipe up
the excess soil and reset the clean
cycle.
this gasket is essential for
This is caused by excessive soil,
at least one hour
not
working,
high-
broilings,
Q. Is the “crackling” sound I
hear during cleaning normal?
A. Yes.
and cooling during both the
cooking and cleaning functions.
Q. Should there be any odor
during the
A. Yes, there maybe a
during the first few cleanings.
Failure to wipe out excessive soil
might also cause an odor when
cleaning.
Q.
on the enamel surface of my oven?
A. This is a normal condition
resulting from heating and cooling
during cleaning. These lines do not
affect how your oven performs.
Q.
oven after cleaning?
A.
a deposit which is ash. It can be
removed with a damp sponge or
cloth.
Q.
easily. What is the matter?
A.
shelves may become so clean they
do not slide easily. If you wish
shelves to slide more easily, after
each self-clean cycle, dampen
fingers with a small amount of
free cooking oil and rub lightly
over sides of shelf where they
contact shelf supports.
Q.
gray after the self-clean cycle. Is
this normal?
A. Yes.
the shelves may lose some luster
and discolor to a deep gray color.
This is the metal heating
clean cycle?
slight
odor
What causes the hair-like lines
Why do I have ash left in my
Some types of soil will leave
My oven shelves do not slide
After many cleanings, oven
salt-
My oven shelves have become
After the self-clean cycle,
28
Page 29

I
GE~ML
I
Care and Cleaning of Your Cooking Center
Proper care and cleaning
are important so your cooking
center will give you efficient and
satisfactory service. Follow these
directions carefully in caring for
it to help assure safe and proper
maintenance.
BE SURE ELECTRIC POWER
IS OFF BEFORE CLEANING
ANY PART OF YOUR
COOKING CENTER.
Control Panel
Don’t use sharp-edged utensils
around the control panel. They
might damage it.
Clean the panels with a lightly
dampened cloth. DO NOT USE
cleaning sprays or large amounts of
soap and water. These can cause
problems with the control
mechanisms.
Microwave Oven
Oven Lamp
To replace
first disconnect power at main
fuse or circuit breaker
Remove the grille by removing the
3 screws on top and
the bottom of the grille, using
blade-type screwdriver.
Microwave Oven lamp,
panel.
the
3 screws on
a
DOUBLE
DUTYTM
Shelf Accessory
Your shelf accessory is designed
for use in a microwave oven only;
do not use in a conventional oven.
Do not use a browning dish with
the shelf. Arcing could occur.
Clean shelf with mild soap and
water or in the dishwasher.
clean in self-cleaning oven.
Do not
Precautions for Use of Metal
Use metal only as directed in the
cookbook. Metal trays no more
than 3/4” deep may be used for TV
dinners, and the metal temperature
probe is designed for microwave
oven use. Always keep metal at
least one inch away from sides
of oven.
Cleaning—Outside
Temperature Probe
The probe is sturdy, but care
should be taken in handling it. Do
not twist it. Avoid dropping it.
Clean as soon as possible after use.
Wipe it with a
metal parts with a plastic scouring
pad if necessary. Rinse and dry.
(You may also wash the probe in an
automatic dishwasher. )
Muminum
sudsy
cloth, then rub
Foil on
Shelves—
why you shouldn’t we it
DO N~ place a sheet of aluminum
foil on any shelf in either your
Microwave or Conventional Oven.
If you do, your foods may not cook
properly. The oven finish may be
damaged, and there may bean
increase in heat on the outside
surfaces of the oven.
The lamp is located on the
behind the grille.
Gently twist the
white silicone adhesive attached
to the bulb
prevent
Unscrew the bulb
a bulb of
available from your
supplier.
Screw
and
power to cooking center.
damage during shipping.
the
replacement bulb in socket
replace grille.
bulb to break the
and
socket. present to
and
same
type and
Re-connect
Icft
replace with
wattage,
Hotpoint
side
Clean the outside of your microwave
oven with soap and a damp cloth,
then rinse with a damp cloth and
dry. Wipe the window clean with a
damp cloth. Chrome is best wiped
with a damp cloth and then with a
dry
towel.
Cleaning—Inside
Keep your microwave oven clean
and sweet-smelling.
oven door a few minutes after
cooking helps air out the interior.
An occasional thorough wiping
with
a
solution of baking soda and
water keeps the interior fresh.
Opening the
29
Page 30

I
I
Care
Spills and spatters are easy to
remove from walls and floor.
That’s because there’s little heat
except in the food, or sometimes in
the cookware. Some spatters wipe
up with a paper towel, some may
require a damp cloth. Remove
greasy spatters with a
then rinse and dry.
NEVER USE A COMMERCIAL
OVEN CLEANER ON ANY PART
OF YOUR MICROWAVE OVEN.
Wipe up spatters on the window
on the inside of the door daily.
Wash window, when it’s soiled,
with a damp cloth. Rinse
thoroughly and dry.
Wipe metal and plastic parts on
the inside of the door frequently.
Use a damp cloth to remove all
soil. DO NOT USE ABRASIVES,
such as cleaning powders or steel
and plastic pads. They may mar the
surface.
Door Surface. When cleaning
surfaces of door and oven that
come together on closing the door,
use only mild, non-abrasive soaps
or detergents applied with a sponge
or soft cloth.
Using a Brown ‘N Sear Dish? Use
Bon
heat generated on the bottom of
the Brown ‘N Sear dish can cause
scorched appearing stains to bake
onto the floor if grease is present.
These may be removed with Bon
Ami@
After using this cleaner, rinse and
dry thoroughly, following instructions
on can. Do not use it on the painted
surfaces such as the walls—it may
scratch the paint.
and
Ami@
brand cleanser. High
brand cleanser.
Cleaning
sudsy
of
cloth,
Your
Cooking
Conventional Oven
I
Center
Adjusting Oven
Thermostat
I;dented
Area
The temperature on your new oven
has been accurately set at the
factory. However, if your food
consistently browns too much or
too little, you may make a simple
adjustment behind your OVEN
TEMP
knob. To readjust your
thermostat:
●
Rotate OVEN
CLEAN position and pull knob off
the shaft, revealing area behind
knob.
. Insert the tip of a 3/16” standard
screwdriver into the indented area
directly under the notch and turn in
the desired direction. Be careful
not to scratch glass control panel.
●
To increase oven temperature, move
dial
one notch counterclockwise.
To lower oven temperature, move
dial one notch clockwise. (Each
notch represents approximately
●
Return knob to the range by
matching the flat area of the knob
to the shaft.
● Recheck oven performance
before making an additional
adjustment.
TEMP
knob to
(continued)
I
15°F.)
Oven Vent Duct
The oven is vented through a duct
that’s located on the right side of
the oven just above the door handle
(see page 7). Moisture and vapors
from the oven are vented through it
when oven is in use. Never cover the
hole in the duct. Doing so prevents
it from functioning properly during
cooking and cleaning.
Lamp Replacement
CAUTION: Before replacing
your oven lamp bulb, disconnect
the electric power for your
cooking center at the main fuse
or circuit breaker panel.
to let the lamp cover and bulb cool
completely before removing or
replacing them.
The oven lamp (bulb) is covered
with a glass removable cover which
is held in place with a bail-shaped
wire. Remove oven door, if desired,
to reach cover easily.
To remove:
● Hold hand under cover so it
doesn’t fall when released. With
fingers of same hand, firmly push
back wire bail until it clears cover.
Lift off cover. DO NOT REMOVE
ANY SCREWS TO REMOVE
COVER.
. Replace bulb with 40-watt home
appliance bulb.
To replace cover:
●
Place it into groove of lamp
receptacle. Pull wire bail forward
to center of cover until it snaps into
place. When in place, wire holds
cover firmly. Be certain wire bail is
in depression in center of cover.
●
Connect electric power to oven.
Be sure
30
Page 31

Use of Aluminum Foil
in Broiling
If you wish, you may line the
broiler pan with aluminum foil and
cover the rack with it for broiling.
ALWAYS BE SURE TO MOLD
THE FOIL THOROUGHLY TO
THE BROILER RACK AND SLIT
THE FOIL TO CONFORM WITH
SLITS IN THE RACK.
fat and meat juices from
into the broiler pan prevents the
rack from serving its purpose and
MAY LET JUICES BECOME
HOT ENOUGH TO CATCH FIRE.
/,
Stopping
dr~inin~
Removable Oven Door
To remove door,
position, or where you feel hinges
catch slightly. Grasp door at sides;
lift door up and away from hinges.
To replace door,
sides. Line up door with hinges
and push door firmly into place,
open to BROIL
grasp door at
31
Page 32

GENERAL
Cleaning Guide—Conventional Oven
(Microwave Oven cleaning instructions are on pages 27 and 28.)
N~E: ht
oven parts cool before touching or handling.
PART
Bake
Unit
Broil
Broiler Pan
Oven Control Knobs
Outside Glass Finish
Metal, including
Chrornc Side Trims
and Trim Strips
Porcelain Enamel
Surface*
Inside Oven Door*
Oven Gasket*
Oven Liner*
Shelves
(See Self-Cleaning
Oven Directions.)
*Spi]tage {Jf
immediately,
tind
Unit
and
Rack
n]arlnadcs, fruit juices,
with care being taken not to touch any hot portion 01” the oven. When the surface is cool, clean and rinse,
MATERIALS TO USE
● Soap
and
StJap
Water
and
Water
and W~tcl
iind
Water
and
Water
tirrd Watct
and
Water
t(lllluto
Sct>uring Pad
Pod
WatcI
SaUccS and basting
● Soap-Filled
● Plastic Scouring
● Dishwasher-Satb
Q
Mild Soap and
● Soap
● Soap
● Paper Towel
● Dry Cloth
●
● Soap
● Soap
● Soap
(;
ENERAL DIRECTIONS
Do not cietirr [he
NOTE: The
residue
Drain
lit and cool” pan and
coo}. ) Sprinkle (m dctcrgcnt. Fill
the
over
O~ION:
{~fl
Pull
to match Ilut arcu
sure
Wash all
bake
unit
bokc
or ash
accumukitcs ~ruurrd (he bake
or broil unit. Any soil will burn off when the unit is heated.
unit is
nol
rack slightly. (Do not let soiled pan and rack stand in oven
rack. Let
knobs.
both
The broiler
Wash
stand
pan
gently. but do not soak. Dry and return control knobs to oven, making
on the knob
glass with cloth
dti[npencd
hinged and cannot be lifted to clean the oven floor. If spillover,
unit, gently wipe around the unit with warm water.
pan
with warm water and spread damp cloth or paper towel
Ii)r a I&w
and rack
minutes. Wash; scour if necessary. Rinse and dry,
may tilsn be
and
cleaned in a dishwasher.
shaft.
in soapy water. Rinse and polish with a dry cloth. If
to
knohs (m the c,mtrol panel arc removed. do not allow water to run down inside the surface of
glass while
DO
abrasives, ammonia,
NorI”
clc~rrin~.
USE
steel
wnol,
acids
or
Wash, rinse,
and
then polish with a dry cloth,
commercial oven cleaners.
Tbcsc
might
damage the
t“inish.
DO
NOT
pnwders nr
‘rhcsc might
USF; cleaning
harsh abrasives.
scratch the
enamel.
(wcrr.
On this
clcancd if the
cooking
getting soap
clean ONLY
c)vcn
is in the
function. wipe the door with soap
~nd wotcr on
tbc gasket
Avoid getting ANY cleaning materials
Cool
bcfi)re
nl~ilot
soil
cleaning. Frcqucn[ wiping with soap
clcani
rrgs. Be
inc.
usc vou]- scli’-clcani nu cvclc
sure to rinse thoroughly to avoid additional stains. For very heavy
1)0 NOT clean microwave
o}en shelf in
self~clcanirrg
oven.
materials containing acids
If acids should spill on the oven while it is hot, use a dry
towel
paper
surface
or cloth to wipe up right away. When the
has cooled, wash and rinse.
For other spills, such as fat smatterings, etc., wash with soap
and
water when cooled and then rinse. Polish with a dry cloth.
the
dunr liner outside the gasket. The door is automatically
scll~clctirring
cycle. If spillover or spattering should occur in
and
f)r
in the rectangular flanges on the door.
water. DO NOT rub or damage gasket, Avoid
on
the gasket.
and
water will prolong the time between
often.
Your shelves can be cleaned with the self-cleaning function
in the oven. For heavy soil, clean by hand, using any and all
mentioned materials, Rinse thoroughly to remove all
materials
may
cause discoloration. Spillovers should be wiped Up
after cleaning.
32
Page 33

=
m
_
-
Questiom?
Use This Problem Solver
I
Microwave Oven
PROBLEM
CONTROL PANEL
ON, YET OVEN WILL
N~
OPERATE
FOODS
OVERCOOKED
OR UNDERCOOKED
MICROWAVE OVEN
FAN COMES ON
WHEN OVEN IS OFF
I
POSSIBLE CAUSE AND REMEDY
Q
START pad not touched.
● Door not securely closed.
● Another function was touched. Touch CLEAR/OFF pad to cancel.
● Numbers not entered after touching TIME COOK pad.
. Finished temperature not entered afier entering Auto Roast code 7.
● CLEAR/OFF pad touched accidentally.
. No code number entered after touching
●
Not
enough time set when using Time Cook function because starting temperatures
of foods varied widely.
●
Varying density and amount of foods will sometimes require more cooking time.
● Probe not inserted properly into meat or dish. Check cookbook or Auto Roast section
of this book.
. Incorrect power level entered.
● Dish not rotated, turned or stirred as called for in recipe.
●
Too many
●
Food not thoroughly defrosted.
●
Improper use of coverings. Check cookbook and this book for instructions.
●
Microwave Oven fan is used during self-cleaning of Conventional Oven to keep
dishes in oven at same time.
AU~
ROAST or
AU~
DEFROST pad.
components cool. Microwave power is not on.
“PROBE” APPEARS
ON DISPLAY
“ERROR” APPEARS
ON DISPLAY
I
Conventional Oven
I
PROBLEM
OVEN WILL
N~
OPERATE
OVEN LIGHT
N~
DOES
WORK
ELE~RONIC
TOUCH PADS
WILL NOT WORK
. Probe not inserted properly into oven receptacle or food.
●
Probe not used, although
c
When using Auto Roast code 7 to
of less than
80°F.
or more than
AU~
ROAST pad has been touched.
Temp
Cook/Hold, you have entered a temperature
199°F.
1
POSSIBLE CAUSE AND REMEDY
●
Difficulty may be in the main distribution panel of your house by a blown oven
circuit fuse, a tripped oven circuit breaker, the main fuse or the main circuit breaker,
depending on the nature of the power supply. If a circuit breaker is involved, reset it. If
the control box uses fuses, the oven fuse (a cartridge-type) should be changed BUT
ONLY BY SOMEONE FAMILIAR WITH
one of these procedures, the fuse blows or circuit breaker trips again, call for service.
NOTE: Apartment tenants or condominium owners should request their building
management perform this check before calling for service.
●
Oven controls not properly set.
●
Door left in locked position after cleaning.
●
Light bulb is loose or burned out.
●
Button operating oven light is defective.
●
Clock not set. Touch CLOCK pad and enter time.
ELE~~CAL
CIRCUITS. If, after doing
(continued next page)
33
—
Page 34

The Problem
Conventional Oven
I I
Solver
(continued)
PROBLEM
ELE~RONIC
DISPLAY PANEL
GOES BLANK
OR BLINKS
FOOD DOES
N~
BROIL PROPERLY
FOOD DOES
N~
ROAST OR BAKE
PROPERLY
OVEN WILL
N~
SELF-CLEAN
POSSIBLE CAUSE AND REMEDY
●
If the display panel cannot be reset by touching pads, then electrical
service to your
residence has caused interference signals on the main power line. Disconnect your
cooking center at the main fuse or circuit breaker panel. Wait one minute and
reconnect power. Reset the clock.
●
OVEN SET knob not set at BROIL.
TEMP
. OVEN
●
Door not left ajar as recommended.
knob not set correctly.
. Improper shelf position is being used. Check Broiling Guide.
●
Necessary preheating was not done.
●
Food is being cooked on a hot pan.
●
Cookware is not suitable for broiling.
●
Aluminum foil used on the broiler rack has not been fitted properly and
●
OVEN SET knob not set on BAKE.
●
OVEN
●
Shelf position is incorrect. Check Roasting or Baking Guide.
●
Oven
●
Roasting pan is too small.
Q
Improper cookware is being used.
c
A foil tent
s
Oven too hot to accept cleaning instructions.
●
Latch Handle is not moved all the way to the right.
●
Excessive spills, spatters and soil deposits are not being cleaned up prior to
TEMP
knob not set correctly.
shelf is not level.
was not used when needed to slow down browning.
slit.
self-cleaning.
●
START pad not touched.
OVEN DOOR
WON’T LATCH
●
indicates oven is too hot from previous use and door won’t
door wide, then Latch Handle can be moved.
●
●
OVEN DOOR
. Oven hasn’t cooled to a safe temperature.
WON’T UNLOCK
FAN STAYS ON WHEN
DOOR IS OPENED
●
Microwave power is not on unless Microwave Oven is in operation.
All these things are normal with your Microwave Oven:
.
Steam or vapor escaping from
around the door.
●
Light reflection around door or
outer case.
If vou need more
hel~..
call, toll free: GE Answer
Turn OVEN SET knob to CLEAN. Glowing Locked Light after knob is turned
latch.
To cool oven, open
OVEN SET knob must be at CLEAN or OFF before Latch Handle can be moved.
Latch Handle not moved all the way to the right.
Self-cleaning lower oven uses Microwave Oven fan to keep components cool.
●
Dull
thumping sound while oven
is operating.
●
Dimming oven
in blower sound may occur
fight
and change
while
operating at power levels other than
High.
Center@
/ 800.6262000/ consumer information service
● Some TV-Radio interference
might be noticed
while using your
Microwave Oven. It’s similar to the
interference caused by other small
appliances and does not indicate a
problem with your oven.
34
Page 35

Wdll
Be There
With the purchase of your new Hotpoint appliance, receive
the assurance that if
~nce,
we’ll be there. Al you have to do is
you ever need information or
cdl—toll-free!
assis-
GEAnswer Centera
80~626.2000
In-Home Repair
Service
800-GE-CARES
f100-432-273~
our consumer service
,–
will provide expert repair service on
your Hotpoint appliance, scheduled
al a time
Many ~;k; (J~)usumer
operated
today
ven
days, !):()()
our
youI appliaucc inside and out-so
most repairs can be handled in
one
that’s c(mven
Iocatiolls oflkr
or tomorrow, or at your
ieuce
(7:()()
a.m. to
a.m. to
f~~(:tory-tr:li]leri (echn
visit.
ieut for you.
Service company.
7:()()
2:()()
pm. Saturdays).
professionals
you
service
con-
p.m.
week.
icians know
just
Service Contracts
800-626-2224
You
can have the secure feeling that
GE ~onsumer
after your Hotpoint product
there
warranty expires. Purchase a
contract while your warranty is still in
effect and you’ll receive a substantial
discount. With a multiple-year con-
tract, you’re assured of future service
at today’s prices.
Service will still be
GE
Whatever your question about
Hotpoint major appliance,
~ente@ information service is avail-
able to help. Your cdl—and your
question-will be answered
and courteously. And you can
time.
C;E
Answer Cente@ service is
open 24 hours a day,
Telecommunication Device for the
7 days a week.
any
(Jkl
Answer
prornpdy
call any
Deti
Parts
andAccessories
800-626-2002
Individuds
ow
parts or accessories sent
their home, free of’ shipping charge!
Our parts system provides access
over 47,000” Genuine Renewal Parts . . .
and dl are fully warranted.
Mastercard and Discover cards are
accepted.
User maintenance instructions
contained in this
dures intended to be
any user. Other servicing
should be referred to qualified ser-
vice personnel. Caution must be
exercised, since improper
may cause unsafe operation.
qualified to service their
appliances can have needed
direcdy to
WSA,
boo~et
cover proce-
pefiormed by
genedy
semicing
to
,,,
sm!m . .
‘
-—
— . . . .
..-. —.
..-
,.,
---- --
“ -—... ~. .
“
For Customers With
Special
80~62E2000
Upon request, we will provide
controls for a variety of’ Hotpoint
appliances, and a brochure to
planning a
persons with limited mobility
rain these items, free of charge, call
800.626.2000.
Consumers with impaired hearing
or speech who have access
or a conventional teletypewriter may
Cd] 800-TDD-G~C
to request information or
Meeds...
13raille
assist
barrier.free kitchen for
~i) oh
to
a TDD
(800-833-4322)
sellrice.
in
,
Page 36

YOUR HOTPOINT MICROWAVE COOKING CENTER
Save
proof of original purchase date
WARRANTY
such as
your sales slip or
cancelled
check to establish warranty period.
WHAT IS COVERED
WHAT IS N~ COVERED
FULL ONE-YEAR WARRANTY
For one year from date of original
purchase, we will provide, free of
charge, parts and service labor
in your home to repair or replace
any
part of
cooking center that fails because
of a manufacturing defect.
LIMITED ADDITIONAL
FOUR-YEAR WARRANTY
For the second through fifth year
from date of original purchase,
we will provide, free of charge, a
replacement magnetron
the magnetron tube fails because
of a manufacturing defect. You pay
for the service trip to your home
and service labor charges.
● Service trips to your home to
teach you how to use the product.
Read your Use and Care material.
If you then have any questions
about operating the product,
please contact your dealer or our
Consumer Affairs office at the
address below, or call, toll free:
The GE Answer Center”
800.626.2000
consumer information service
Q
Improper installation.
If you have an installation problem,
contact your dealer or installer.
You are responsible for providing
adequate electrical, gas, exhausting
and other connecting facilities.
the
microwave
tube
if
This warranty is extended to
the original purchaser and any
succeeding owner for products
purchased for ordinary home use
in the 48 mainland states, Hawaii
and Washington,
warranty is the same except that it is
LIMITED because you must pay to
ship the product to the service shop
or for the service technician’s travel
costs to your home.
All warranty service will be provided
by our Factory Service Centers or
by our authorized Customer
servicers during normal working
hours.
Look in the White or Yellow Pages
of your telephone directory for
HOTPOINT FACTORY SERVICE,
GENERAL
FACTORY SERVICE or HOTPOINT
CUSTOMER CARE@ SERVICE.
. Replacement of house fuses or
resetting of circuit breakers.
. Failure of the product if it is used
for other than its intended purpose
or used commercially.
● Damage to product caused
by accident, fire, floods or acts
of God.
WARRANTOR IS
FOR CONSEQUENTIAL DAMAGES.
D.C.
In Alaska the
Care@)
ELECTRIC-HOTPOINT
NOT
RESPONSIBLE
Some
may not apply to you. This warranty gives you specific legal rights, and you may also have other rights which vary from state to state.
To know what your legal rights are in your state, consult your local or state consumer affairs office or your state’s Attorney General,
Manager—Consumer Affairs, General Electric Company, Appliance Park, Louisville, KY 40225
Part No. 164
Pub.
No.
39-4673
7-90
CG
states
do not
D2092P174
allow
the exclusion or limitation of incidental or consequential damages, so the above limitation or exclusion
Warrantor: General Electric Company
If further help is needed concerning this warranty, write:
I
RK962
 Loading...