

Page 1
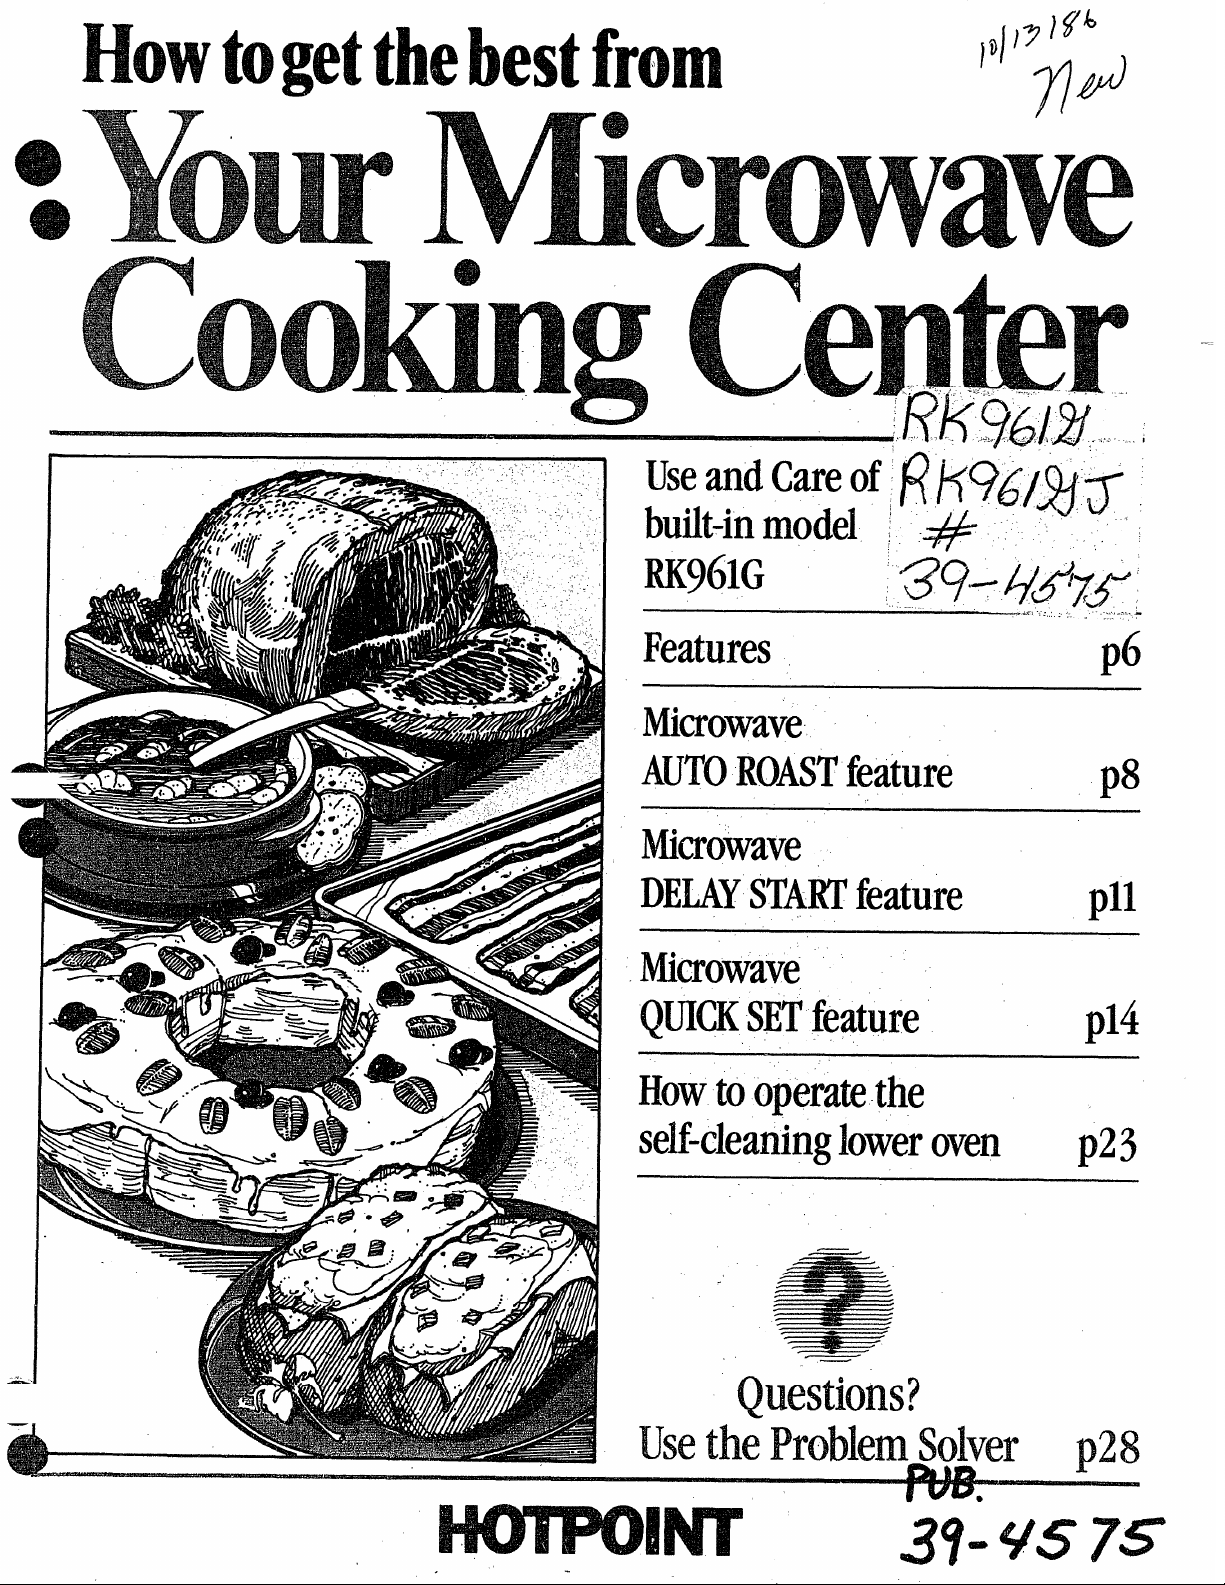
Howtogetthebestfrom
.
#
Features
Microwave
AUTOROASTfeature
Microwave
DELAYSTARTfeature
Microwave
QUICK
SETfeature
Howtooperatethe
self-cleaningloweroven
p6
p8
pll
p14
p23
-
Questions?
UsetheProblemSolver D28
Page 2
Read this book carefully.
Itwillhelp youoperateandmaintain
yournewCookingCenterproperly.
Keepit handyfor answerstoyour
questions.
If youdon’tunderstandsomething
or needmorehelp,write:(include
yourphonenumber)
ConsumerAffairs
Hotpoint
AppliancePark
Louisville,KY40225
WritedOm the nmdel and
serial nwmbers.
Youll find them on a label on the
front of the lower oven behind the
door.
These numbers are also on the
Consumer Product Ownership
Registration Card that came with
your Cooking Center. Before
sending in this card, please write
these numbers here:
ModelNo.
SerialNo.
Use these numbers in any correspondence or service calls concerning your Cooking Center.
Be sum! yourovenis registered.
It is important that we, the manu-
facturer, know the location of your
Cooking Center should a need
occur for adjustments.
Yoursupplier is responsiblefor
registering you as the owner.
Please check with your supplier to
be sure he has done so; also send in
your Consumer Product Ownership
Registration Card. If you move, or
if you are not the original purchaser
please write to us, stating model
and serial numbers. This appliance
mustbe registered.Pleasebe certain that it is.
Write to:
Hotpoint
Range Product Service
Appliance Park
Louisville, KY 40225
Myou received a damaged
oven. . .
immediately contact the dealer (or
builder) that sold you the Cooking
Center.
Save time
and money.
Beforeyourequestservice,check
the ProblemSolver
lists minor causes of operating
problems that you can correct
yourself.
on page 28. It
(a) Do Not Attempt to operate this
oven with the door open since open
door o~eration can result in harmful
expostire to microwave energy. It is
important not to defeat or tamper
with the safetyinterlocks.
(b) Do Not Place any object
between the oven front face and
the door or allow soil or cleaner
residue to accumulate on sealing
surfaces.
(c) Do
damaged. It is particularly important that the oven door close properly and that there is no damage to
the:
‘(l) door (bent),
(2) hingesand latches (broken or
(3) door seals and sealing surfaces.
(d) The Oven $ficm!dNot be
adjusted or repaired by anyone
except properly qualified service
personnel.
Not operate the oven if it is
,, loosened), ‘ ~
The electric output of this
microwave oven is 625Watts.
I
WhenPower is Ccmnected
to the Oven
The panel displays four 8’sand all
of the oven functions on the lower
portion. After 15seconds, all lights
disappear and “PF” appears in the
upper portion. Touch the CLEAR/
OFF pad and oven is ready for use
and the clock can be set.
If power is disrupted at any time,
the above sequence reoccurs, and
you must reset CLOCK after
touching CLEAR/ OFF.
2
@ Make sure all utensilsused in
your microwave oven are labeled
“suitable for microwaving”. Check
your Cookbook for specifictest
to determine “microwave-safe”
utensils.
@ Paper towels, wax paper, and
plastic wrap can be used to cover
dishes in order to retain moisture
and prevent spattering.
@ Some microwaved foods require
stirring, rotating, or rearranging.
Check-your Cookbook for specific
instructions.
@ Some foods such as unshelled ~ eggsand hot dogs must be pierced
to allow steam to escapeduring
cooking.
Page 3
SafetyInstructions . . . . . . . ...3-5
,
FeaturesofYourOven
TouchControlPanel . . . . . . . ....7
AutomaticRoasting&
Chart . . . . . . . . . . . . . . . . ...8.9
Defrosting. . . . . . . . . . . . . . . ...10
TimeCook . . . . . . . . . . . . . . . ..ll
DelayStart . . . . . . . . . . . . . . . ..ll
TempCook/Hold . . . . . . . . . . ..l2
Minute/SecondTlmer . . . . . . ...13
QUICKSETControl . . . . . . ...14
QUICK SET ControlGuide . ...15
SafetyInstructions . . . . . . . ...3-5
Features . . . . . . . . . . . . . . . . . . . .6
Oven Controls . . . . . . . . . . . . ...6
OvenLight . . . . . . . . . . . . . . . ..l7
ven Shelves . . . . . . . . . . . . . ..17
inuteTimer, Clock,
m
AutomaticOvenTimer . . . ...17
acing . . . . . . . . . . . . . . . . . . ..18
Baking Chart . . . . . . . . . . . . . ..l9
Roasting . . . . . . . . . . . . . . . . . ..2O
Broiling . . . . . . . . . . . . . . . . . ..2O
RoastingChart . . . . . . . . . . . . ..2l
BroilingChart . . . . . . . . . . . ...22
Self-Clean Operation . . . . . . ...23
BeforeUsing Your
Cooking Center . . . . . . . . . ...2
Energy-SavingTips . . . . . . . . ...5
Model &SerialNumber
Location . . . . . . . . . . . . . . . ...6
CareofYourCooking Center. ..24
LampReplacement . . . . . . . ...24
Oven VentDuct . . . . . . . . . . ...25
OvenThermostat
Adjustment . . . . . . . . . . . . ...25
Cleaning Chart . . . . . . . . . . . ...26
&
neProblemSolver . . . . ...28.29
~lr YOuNeedService . . , . . . , , , ,31
arranty . . . . . . . . . ..BackCover
. . . . . . ...6
IMPORTANT
SAFETY INSTRUCTIONS
Readallinstructionsbeforeusingthis appliance.
When using electrical appliances
basic safety precautions should
be followed, including the
following:
WARNING—Toredu~ the risk
of bums, electricshock,fire,
injuryto personsor exposureto
excessivemicrowaveenergy
69Usethis applianceonlyfor its
intendeduseas describedin this
manual.
~ Be sure yourapplianceis prop-
erlyinstalledand grounded by a
qualiiledtechnicianin accordance
with the providedinstallation
instructions.
This appliancemust be con-.
o
netted to a grounded, metallic,
permanent wiringsystem,or an’
equipmentgroundingconductor
should be run.with the circuit
conductorsand connectedto the
equipmentgrounding terminalor
lead on the appliance.
Q This appliand should be servicedonly by qua~led serviceperso~el. Contact nearest authorized
servicefacilityfor examination,
repair or adjustment.
@ Beforeperformingany
service,DISCONNECT THE
OVEN POWER SUPPLY AT
THE HOUSEHOLD DISTRIBUTION PANEL BY RE- .
MOVING THE FUSE OR
SWITCHING OFF THE (XRCUIT,BREAKER.
s bo not coveror block any
openingson the appliance.
Do’not useoutdoors.
s
Do not operate this appliance
@
ifit is not workingproperly,or if
it has been damaged or dropped. “ ., ~ ~efi cQo~g pork followOW @ As with any appliance,close
supervisionisnecessary‘whenused
by children.
~ Donl allowanyoneto climb,
standorhangonthedoor.They
coulddamagethe oven.
ISDo notleavechildrenalone-
childrenshould not be leftalone
or unattendedin area where
appliance is in use.They should
neverbe allowedto sitor stand on
any part of the appliance.
@ CAUTION:DO NOTSTORE
ITEMSOF INTERESTIX)
CHILDRENIN CABINETS
ABOVEAN OVENCHILDRENCLIMBINGON
THEOVENTOREACHITEMS
COULDBE SERIOUSLY ~ -INJURED.
@ Wearproperclothing.Loose
fittingor hanghg garmentsshould ~.
neverbe’worn whileusing the” =
,appliance.Flammablematerial - =.
cod,d be ignitedif brought in con- =
tact withhot heatingelementsand
may causeseverebprni.
* “Use&ly drypotholders-
moist or @amppotholders on hot “- ~
surfacesmay resultin bums from
steam. Do not let“potholders -touch hot heating,elements.Do “‘“
not usea towel or otherbulky
cloth.’ ‘f ~ ~
@ Neveruseyoti app@ncefor
warmihgor,~eatingtheroom.
@,Do notstoreflammablemate-
rids in the oven.
@Keep h~”od,and-greasefiiters
cleanto rna@@i goodventing
“ and to avoi,dgreasefires. ~ ,
~ ..D6-notletcookinggreaseor I _
otherflammablematerialsaccu- =mulafeintheovenornearit. =.
@ Dp motusewaterongrease
fires. Flametinoveticanbesmoth- . Z‘
eredby completelyclosingdoor =
andtouchingCLEAR/OFF.
directionsexactlyand alwayscook =;the meat to at least 170°. This ._
assuresthat,,in the remote possibilitythat trichina maybe present =,_
inthe meat, it willbe killedand ~
meat willbe safeto eat.
,.
,,
-.
~
—.
—
—
—
-
=U
~.
——
a$#lf-
1-
m–:
—
-
F?
&.
-
—“—
-
m
-
(continuednextpage) = ‘
=6.
3
Page 4
INmORTANTSAFETY INSTRUCTIONS(co~tinued)
@ Do nottouchheatingelements
or interior surfaceof oven.These
surfacesmaybehotenoughtoburn
eventhoughtheyaredarkincolor.
Duringandafteruse,donottouch,
or letclothingor otherflammable
materialscontactanyinteriorarea
oftheoven;allowsufilcienttime
forcooling,first.
Otherpotentiallyhotsurfaces
includetheoven.vent openings
andsurfacesneartheopenings,
crevicesaroundtheovendoorand
theedgesofthedoorwindow.
Remember:
the ovenmay be hot when thedoor
is opened.
The inside surfaceof
Microwaveoven:
@
Read and followthe specific
“PRECAUTIONS ~ AVOID
POSSIBLE EXPOSURE ’10
EXCESSIVE MICROWAVE
ENERGY” foundon page 2.
@ Toreduce the risk offirein the
ovencavity:
–Do not overcookfood. Carefully
attend appliance if paper, plastic,
or other combustiblematerialsare
placed inside the oventofacilitate
cooking.
—Removewire twist-ties from
paper orplasticbagsbeforeplacing
bag in oven.
—Donotuse yourmicrowaveoven
to dry newspapers.
—Papertowels,napkins and wax
paper. Recycledpaperproductscan
containmetalfleckswhichmay
causearcingorignite.Paper
productscontaining
filaments should be avoided,as
they may also ignite.
—Do
not pop popcorn in your
microwaveoven
microwavepopcorn accessory or
unless you use popcorn labeled for
use in microwaveovens.
nylonor nylon
unless in a special
–Do notoperatetheovenwhile
emptyto avoiddamageto the
ovenand the danger offire. Ifby
accidentthe ovenshouldrun empty
aminuteortwo,noharmisdone.
However,tryto avoidoperatingthe
ovenemptyataIltimes—itsaves
energyandprolongslifeofthe
oven.
–If materialsinsidetheovenshould
ignite,keepovendoorclosed,turn
ovenoff,anddisconnectthepower
cord,or shutoffpoweratthefhseor
circuitbreakerpanel.
@ $omeproductssuchaswhole
eggsand sealedcontainers-for
example,closedglassjars—may
explodeandshouldnotbe heatedin
thisoven.
@ Aroidheatingbaby foodin
glassjars, evenwithouttheirlids;
especiallymeatandeggmixtures.
@ Seedoorsurfacecleaning
instructionsonpage24.
@ Don>tdefrostfrozen
beveragesinnarrowneckedbottles
(especiallycarbonatedbeverages).
Evenif thecontaineris opened,
pressurecanbufidup.Thiscan
causethecontainertoburst,
resultingininjury.
@ Usemetalonlyas directedin
Cookbook.Foilstripsasusedon
meat,roastsarehelpfulwhenused
asshowninCookbook.
TVdinnersmaybemicrowavedin
foiltrayslessthan3/4’!high.When
usingmetalinmicrowaveoven,
keepmetal (exceptfor DOUBLE
DUTYTMshelf)at Ieast1inch
awayfromsidesofoven.
@ Cookingutensilsmay become
hot becauseofheattransferred
fromtheheatedfood.Potholders
maybeneededtohandlethe
utensil.
@ Sometimes9theovenfloor
can becometoohotto touch. Be
carefidtouchingthefloorduring
and after cooking.
@ Foodscookedin liquids (such
as pasta)may tend to boil over
more rapidly than foods containing
lessmoisture. Should this occur,
refertopage 24 for instructions on
howto clean the inside of the oven.
s 1)0notUSea thermometer in
foodyou are microwavingunless
thatthermometer is designed or
recommended for use in the
microwaveoven.
@ Removethe temperature
probefrom the ovenwhen not
usingit to cookwith.If youleave
theprobeinsidetheovenwithout
insertingit infoodorliquid,and
turnonmicrowaveenergy,itcan
createelectricalarcingintheoven
anddamageovenwalls.
@ Boiling eggsisnot
recommendedina microwave
oven. Pressurecanbuildup inside
eggyolkandmaycauseit toburst,
resultingininjury.
@ Foodswith unbroken
outer “skin” suchaspotatoes,
sausages,tomatoes,apples,
chickenliversandothergiblets,
andeggyolks(seeprevious
caution) shouldbepierced to allow
steamto escape during cooking.
I@PlasticUtensils—Plastic
utensilsdesignedfor microwave
cookingareveryusefi.d,butshould
beusedcarefully.Evenmicrowave
plasticmaynotbeastolerantof
overcookingconditionsasareglass
orceramicmaterialsandmay
softenor charif subjectedtoshort
periodsofovercooking.In longer
exposurestoovercooking,thefood
andutensilscouldignite.Forthese
reasons:1)Usemicrowaveplastics
onlyanduse themin strict
compliancewiththeutensil
manufacturer’srecommendations.
2)Do notsubjectemptyutensilsto
microwaving.3)Do notpermit
childrentouseplasticutensils
withoutcompletesupervision.
o
e
e
e
4
Page 5
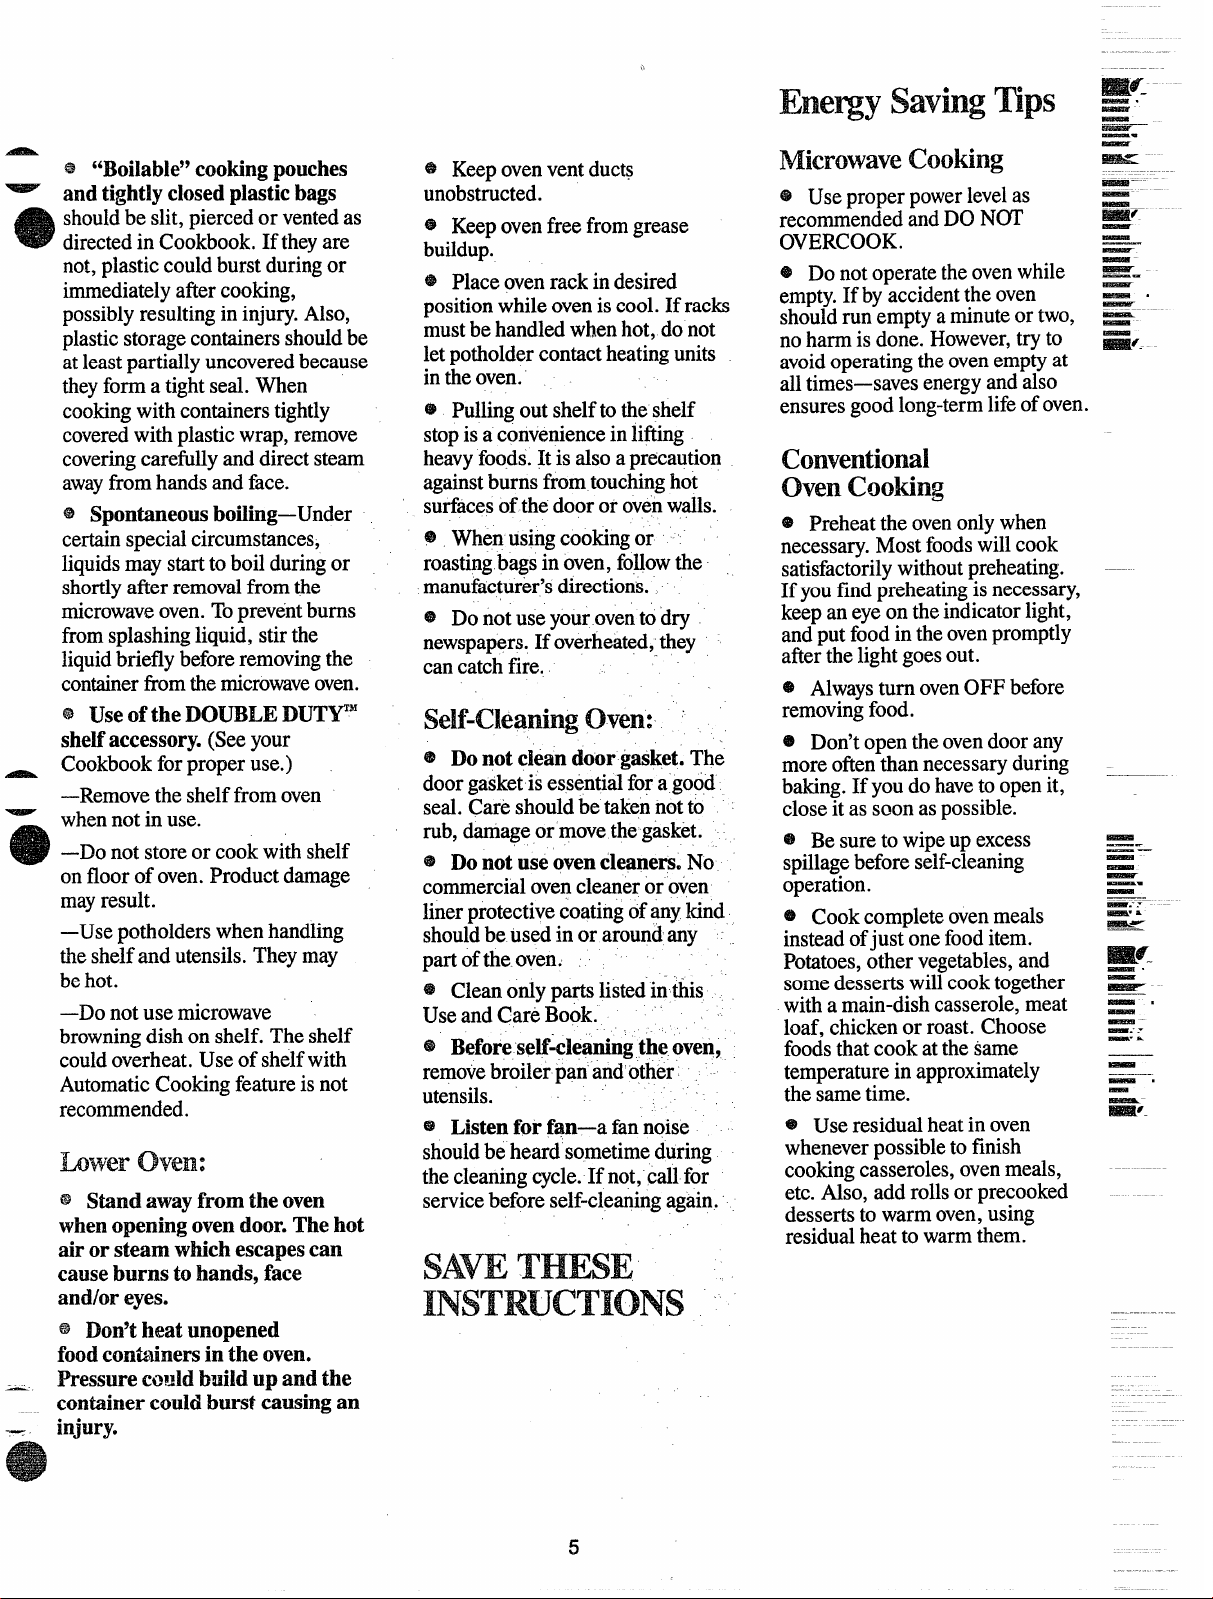
s 66Boi1able”cookingpouches
- andtightlyclosedplasticbags
shouldbe slit,piercedor ventedas
directedin Cookbook.
not, plastic could burst duringor
immediatelyaftercooking,
possiblyresultingin injury. Also,
plastic storagecontainers shouldbe
at leastpartially uncoveredbecause
theyform a tightseal. When
cookingwith containerstightly
coveredwith plastic wrap, remove
coveringcarefully and direct steam
awayfi-omhands and face.
If theyare
@ Spontaneous boiIing-Under
certainspecialcircumstances,
liquidsmaystartto boilduringor
shortlyafterremovalfromthe
microwaveoven.Topreventbums
hornsplashingliquid,stirthe
liquidbrieflybeforeremovingthe
containertiomthemicrowaveoven.
@ UseoftheDOUBLEIWTJ?M
shelfaccessory.(Seeyour
~ Cookbookforproperuse.)
—Removethe shelf from oven
~
when not in use.
–Do not store or cook with shelf
on floor of oven. Product damage
mayresult.
—Usepotholders when handling
the shelfand utensils. They may
be hot.
—Donot use microwave
browningdish on shelf. The shelf
couldoverheat. Use ofshelfwith
AutomaticCookingfeature is not
recommended.
Lmw3r‘own:
~ Stand awayfrom the oven
whenopeningovendoor.The hot
air orsteam whichescapescan
causeburns to hands, face
and/or eyes.
~ Don’theat unopened
foodcontainersintheoven.
Pressurecouldbuildupandthe
_—_
containercouldburstcausingan
-—
injury.
@ Keep ovenvent ducts
unobstructed.
@ Keepovenfreefromgrease
buildup.
$SPlaceovenrackindesired
positionwhileoveniscool.Ifracks
mustbehandledwhenhot,donot
letpotholdercontactheatingunits
intheoven.
@ Pullingoutshelftotheshelf
stopisaconvenienceinlifting
heavyfoods.Itis alsoaprecaution
againstburnsfromtouchinghot
surfacesofthe dooror ovenwalls.
@ Whenusingcookingor
roastingbagsin oven,followthe
manufacturer’sdirections.
@ Donotuseyouroventodry
newspapers.If overheated,they
cancatchfire.
@ Do
notcleandoorgasket.The
door gasketisessential for a good
seal. Care should be takennotto
rub, damage or move thegasket.
@ Donotuseovencleaners.No
commercial ovencleaner or oven
liner protectivecoatingofany kind
shouldbe used in or around any
part ofthe oven.
@ Clean onlyparts listed inthis
Use and Care Book.
@
Beforeself-cleaningtheoven,
removebroiler pan and’other
utensils.
@
Listenfor fan—afannoise
shouldbe heardsometimeduring
thecleaningcycle.If not,callfor
servicebeforeself-cleaningagain.
SAVETHESE
INSTRUCTIONS
Enemy
SavingTips
Microwavecooking
@ Use proper powerlevelas
recommended andDO NOT
OVERCOOK.
* Do notoperatetheovenwhile
empty.If by accidentthe oven
shouldrun empty a minuteor two,
no harm is done. However,try to
avoidoperating theoven emptyat
alltimes—savesenergyandalso
ensures good long-termlifeof oven.
Conventional
OvenChoking
@ Preheat theovenonlywhen
necessary. Most foodswill cook
satisfactorilywithoutpreheating.
If you find preheatingisnecessary,
keep an eyeontheindicator light,
and put foodintheovenpromptly
after the lightgoesout.
@ Alwaysturn ovenOFF before
removingfood.
@ Don’topen theovendoor any
more oftenthan necessary during
baking. If you do have to open it,
close it as soon aspossible.
@ Be sure to wipe up excess
spillagebefore self-cleaning
operation.
@ Cook completeovenmeals
insteadofjust one fooditem.
Potatoes,other vegetables,and
somedesserts will cooktogether
with a main-dish casserole, meat
loaf, chicken or roast. Choose
foodsthat cook atthe same
temperature inapproximately
the same time.
@ Use residual heatin oven
whenever possibleto finish
cooking casseroles, ovenmeals,
etc. Also, add rolls or precooked
desserts to warm oven,using
residual heat to warm them.
mf.
—.
—
—
—
—.
—
EIEas?-
&––
—
-—-
mt
—
—
—
—-
~
—.
—
—.
—
—
—
E{.--
—.
—
—–
-----
k
-.
~
————
—.
-
5
Page 6
Featuresof’Yow cooking center
—----49
—----@
“’%!3
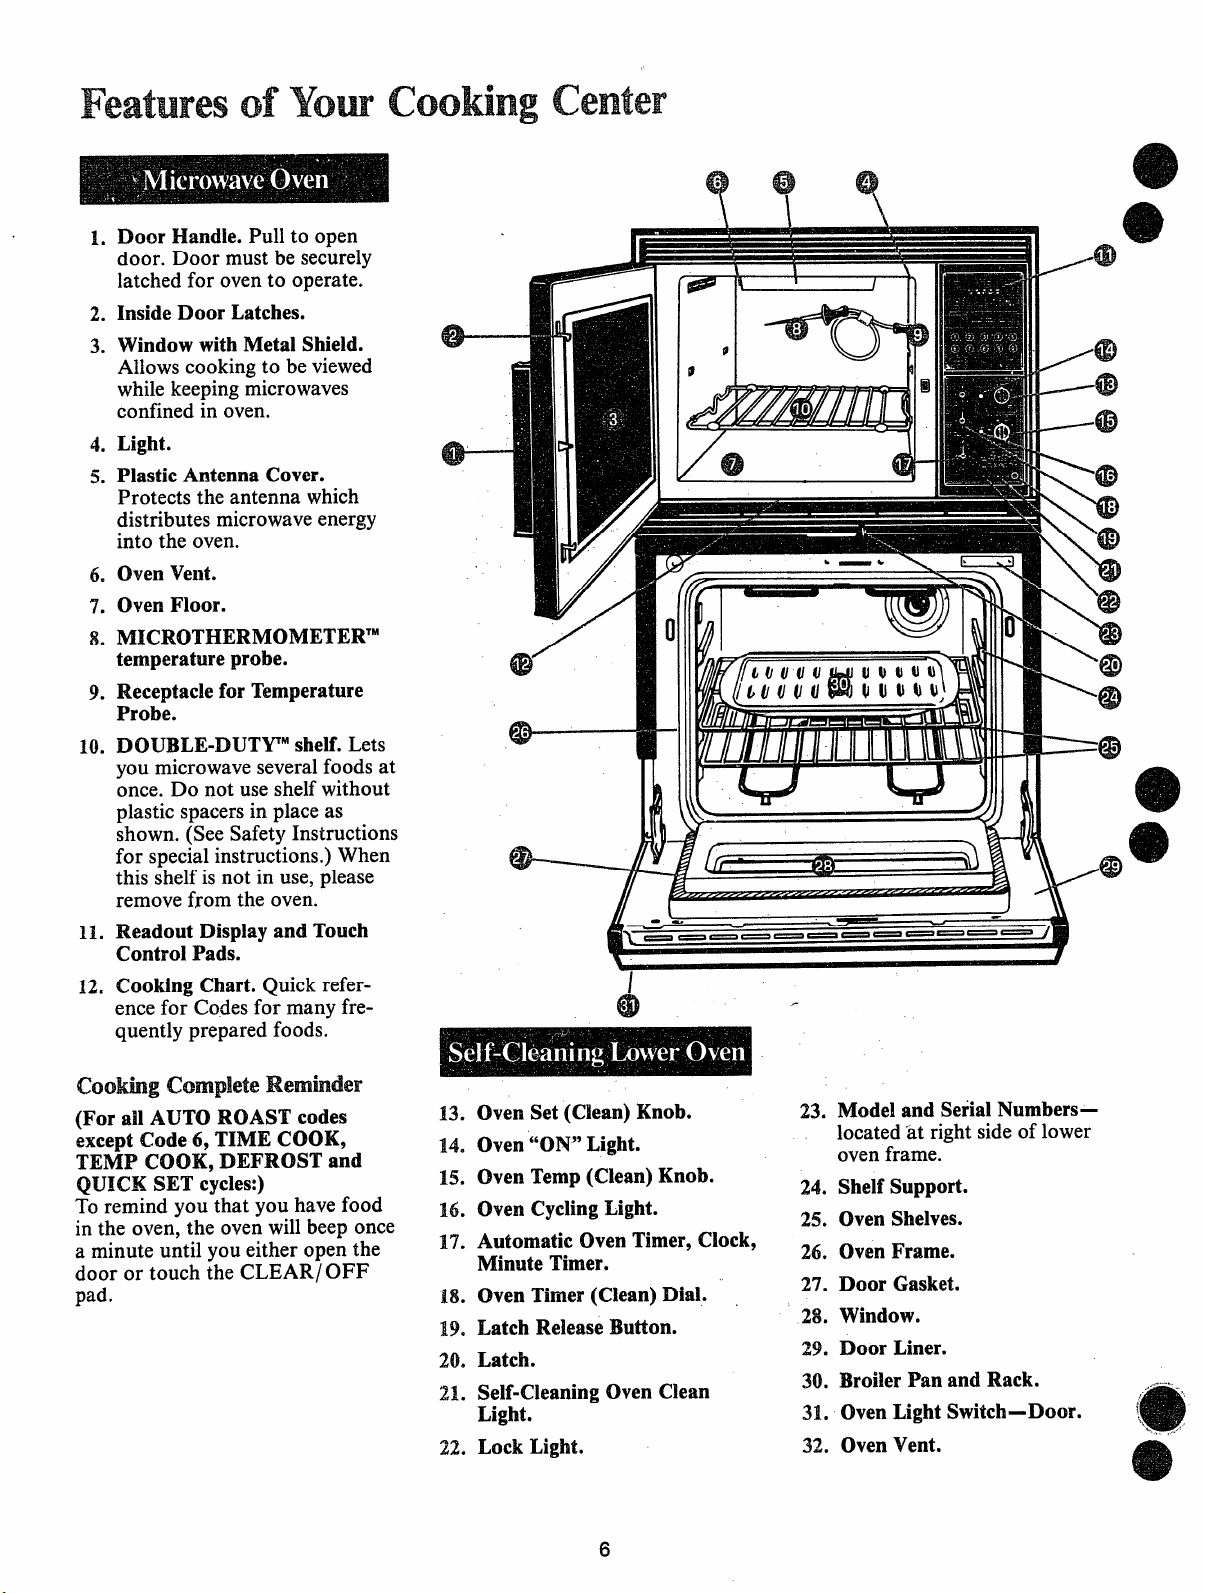
Door Handie. Pull to open
1.
door. Door must be securely
latched for oven to operate.
InsideDoor Latches.
2.
Windowwith Metal Shield.
3.
Allows cooking to be viewed
while keeping microwaves
confined in oven.
Light.
4.
Plastic AntennaCover.
5.
Protects the antenna which
distributes microwave energy
into the oven.
OvenVent.
6.
OvenFloor.
7.
NIICROTHERMOMETER’M
8.
temperatureprobe.
Receptaclefor Temperature
9.
Probe.
DOUBLE-DUTY” shelf. Lets
10.
you microwave severalfoods at
once. Do not use shelf without
plastic spacers in place as
shown. (See Safety Instructions
for special instructions.) When
this shelf is not in use, please
remove from the oven.
Readout Display and Touch
11.
ControlPads.
Cooking Chart.Quick refer-
12=
ence for”Codesfor many frequently prepared foods.
Ill
11111
/@
‘-@
“’-w)
\
:
●
@
\
\
642
\;
—-%?
e
o
●
62
k’
Coohg complete Remkder
(For all AUTO ROAST codes
except Code 6, TIME COOK,
TEMP’COOK,DEFROST
QUICK
To remind you that you have food
in the oven, the oven will beep once
a minute until you either open the
door or touch the CLEARI OFF
pad.
SET cycles:)
and
Oven Set (Clean)Knob.
13.
Oven“ON”Light.
14.
OvenTemp(Clean) Knob.
15.
Oven CyclingLight.
16.
Automatic OvenTimer,Clock,
1’7.
Minute Timer.
Oven Timer(Clean) Dial.
18.
Latch ReleaseButton.
19.
Latch.
20.
21.
Self-CleaningOven Clean
Light.
Lock Light.
22.
6
Model andSerialNumbers-
23.
located at right side of lower
oven frame.
Shelf Support.
24.
OvenShelves.
25.
26.
OvenFrame.
Door Gasket.
27.
Window.
28.
29a
Door Liner.
BroilerPanand Rack.
30.
31.
OvenLightSwitch-Door.
’32*
OvenVent.
Page 7
FeaturesofYomTouchcontrol Panei
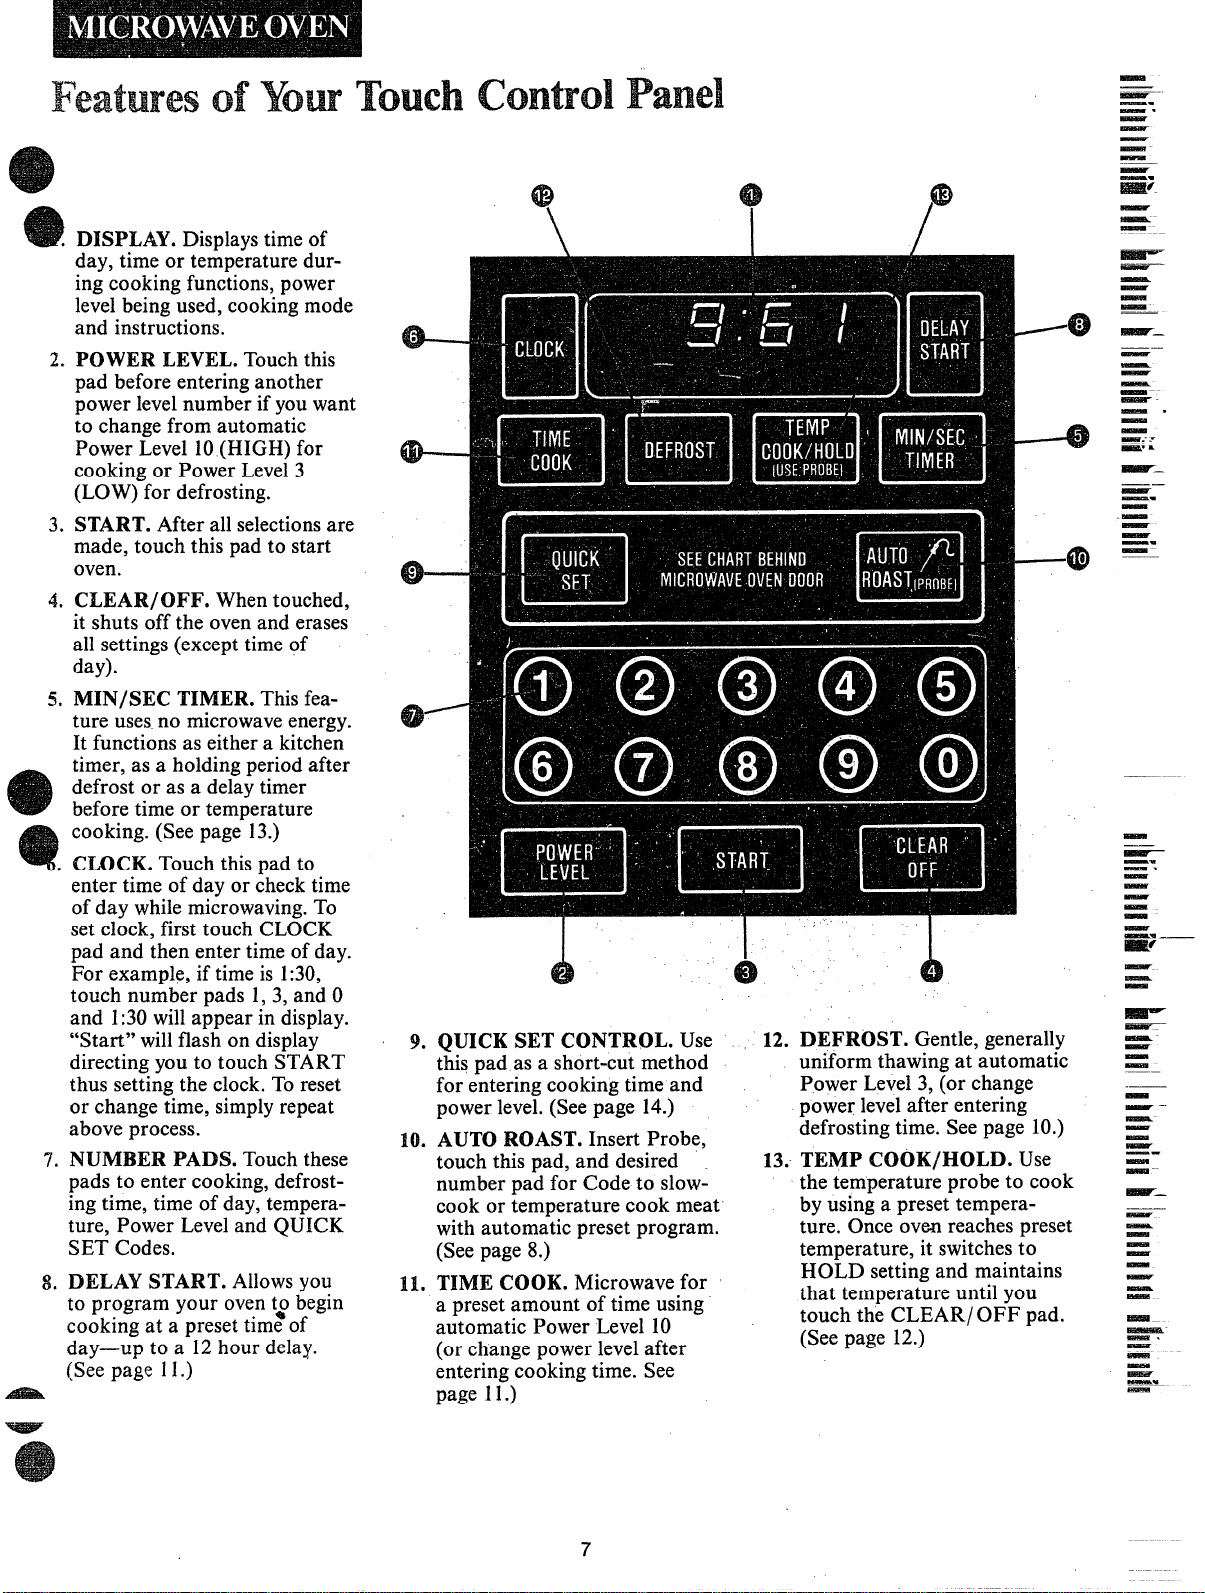
@
DISPLAY. Displays time of
day, time or temperature during cooking functions, power
levelbeing used, cooking mode
and instructions.
POWER LEVEL.Touchthis
2.
pad beforeenteringanother
powerlevelnumberifyouwant
to change from automatic
PowerLevel10(HIGH)for
cookingor PowerLevel3
(LOW)for defrosting.
3*
START.Afterall selectionsare
made,touchthis pad to start
oven.
4*
CLEAR/OFF. Whentouched,
it shutsoffthe ovenanderases
allsettings(excepttimeof
day).
MIN/SEC TIMER. This
5.
ture usesno microwaveenergy.
It functionsas eithera kitchen
timer,as a holdingperiodafter
defrostor asa delaytimer
beforetimeor temperature
cooking.(Seepage 13.)
CLOCK.Touchthispad to
entertime ofdayor checktime
ofday whilemicrowaving.To
setclock,first touch CLOCK
pad and thenentertimeofday.
For example,if timeis 1:30,
touch numberpads 1,3, andO
and 1:30willappearindisplay.
“Start” willflash on display
directingyouto touch START
thus settingtheclock.Toreset
or changetime,simplyrepeat
aboveprocess.
NUMBERPADS. Touchthese
‘7.
padsto entercooking,defrostingtime,timeof day,temperature, Power LevelandQUICK
SET Codes.
DELAYSTART.Allows
8.
to program your oven t$ begin
cooking at a preset time of
day—up to a 12 hour delay.
‘Seepage 11.)
fea-
YOU
@“
QUICKSET CONTROL. Use 12.
this pad as a short-cut method
for entering cooking time and
power level.(See page 14.)
AUTO ROAST. Insert Probe,
touch this pad, and desired
number pad for Code to slowcook or temperature cook meat
with automatic preset program.
(See page 8.)
TIME COOK. Microwave for
a preset amount of time using
automatic Power Level 10
(or change power level after
entering cooking time. See
page 1 1.)
\
J!)
.1
e
A
J9
DEFROST. Gentle, generally
uniform thawing at automatic
Power Level 3, (or change
power levelafter entering
defrosting time. See page 10.)
TEMP COOK/HOLD. Use
13.
the temperature probe to cook
by using a preset temperature. Once oven reaches preset
temperature, it switchesto
HOLD setting and maintains
that temperature until you
touch the CL13AR/OFF pad.
(See page 12.)
.
● .
0
49
.0
d)
~
--
—.
—.
—
—
—
—
—
=;
—
—-
—
—
—
—
—
-~—
——
—
—
—
—–-
~-
—.
—
—
g.-
-~ =
~.
——
—
—.
—
—
—
—
—.
—
-
—.
—.
—
—
—
-
—
—w —
-c
—
—
—.
—-
—
-
-
——
—
—
-
-
—.
-
-
w—
k
—
-
—
—
—
-
i!sxm -~
-.
-
—
-
----
-
T
7
Page 8
AutomaticRoasting
— —
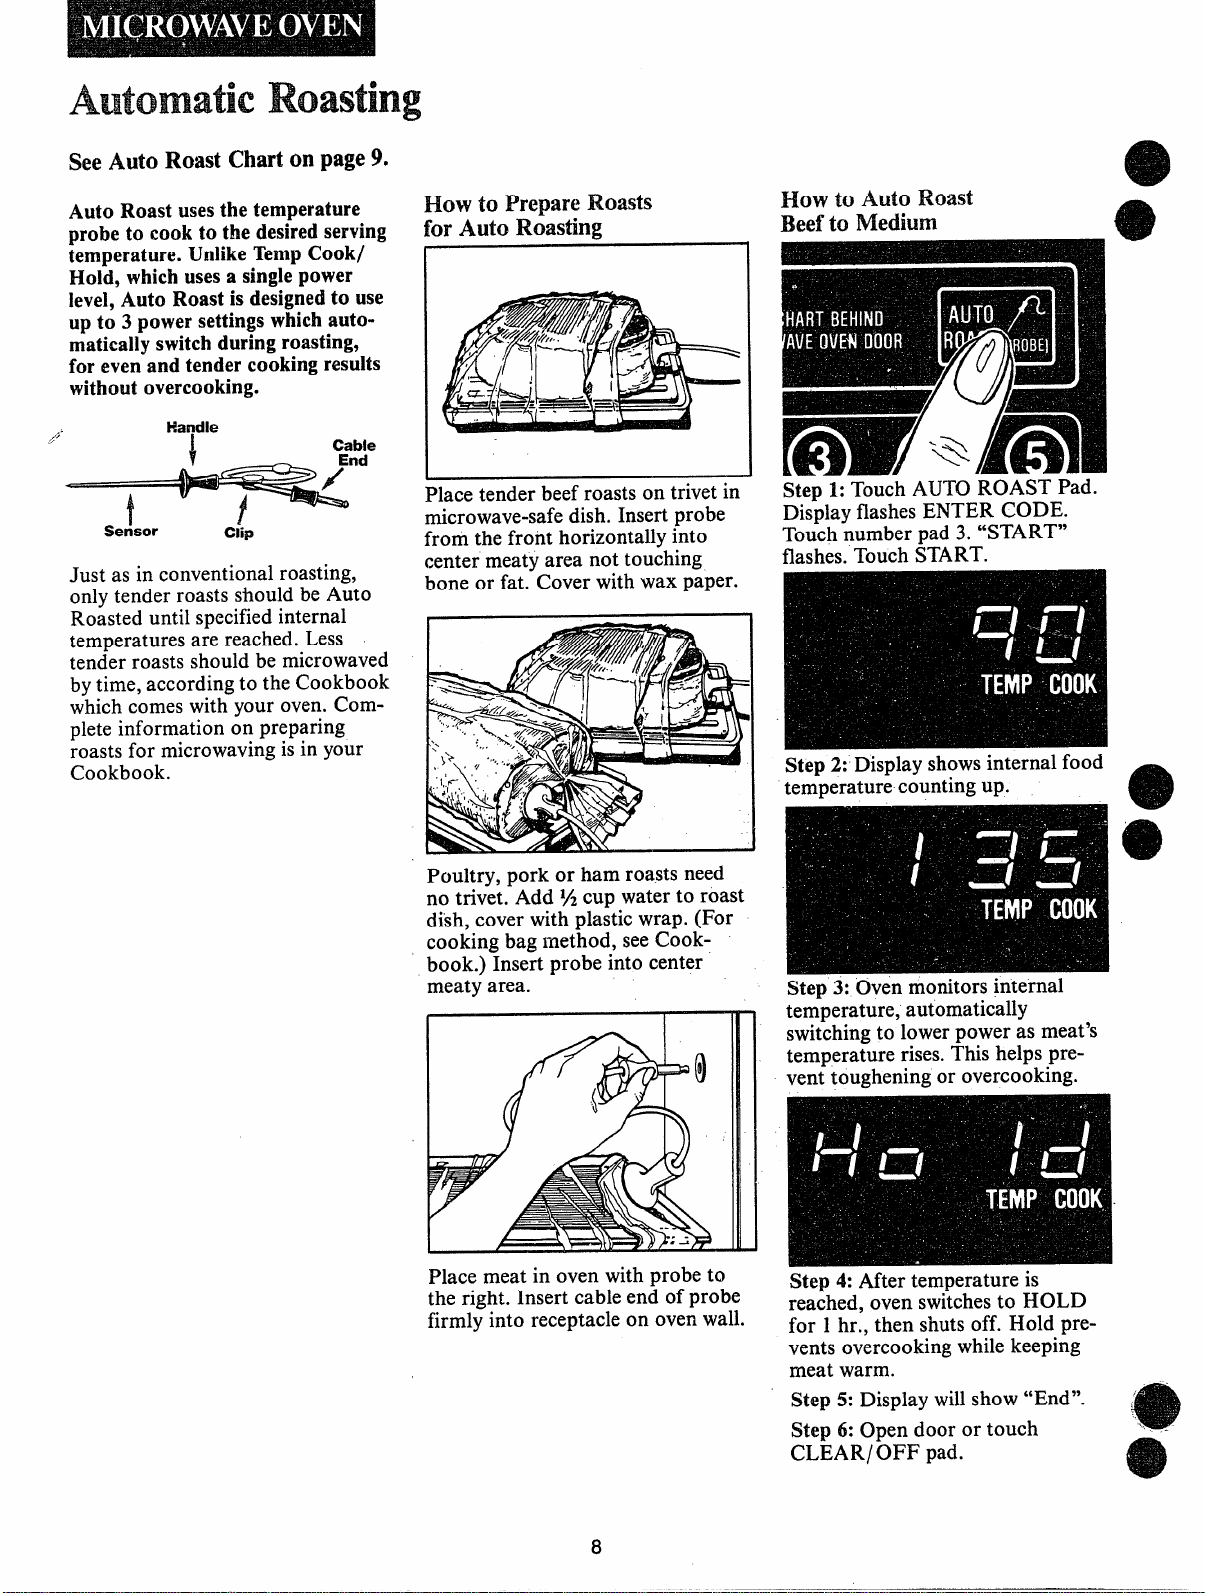
See Auto Roast Charton page9.
Auto Roast usesthe temperature
probeto cook to the desiredserving
temperature.UnlikeTempCook/
Hold, whichusesa singlepower
level, Auto Roastis designedto use
upto 3 powersettingswhichautomaticallyswitchduringroasting,
for evenandtendercookingresults
without overcooking.
.-
Setkor
Just as in conventional roasting,
only tender roasts should be Auto
Roasted until specifiedinternal
temperatures are reached. Less
tender roasts should be microwaved
by time, according to the Cookbook
which comes with your oven. Complete information on preparing
roasts for microwaving is in your
Cookbook.
14andle
Ciip
How toPrepareRoasts
for Auto Roasting
Place tender beef roasts on trivet in
microwave-safe dish. Insert probe
from the front horizontally into
center meaty area not touching
bone or fat. Cover with wax paper.
HOW to Auto ~oast
Beefto Nledium
Step 1:Touch AUTO ROAST Pad.
Display flashes ENTER CODE.
Touch number pad 3. “START”
flashes. Touch START.
Step 2: Display showsinternal food
temperature counting up.
Poultry, pork or ham roasts need
no trivet. Add % cup water to roast
dish, cover with plastic wrap. (For
cooking bag method, seeCookbook.) Insert probe into center
meaty area.
Place meat in oven with probe to
the right. Insert cable end of probe
firmly into receptacle on oven wall.
Step 3:
temperature, automatically
switching to lower power as meat’s
temperature rises. This helps prevent toughening or overcooking.
Step 4: After temperature is
reached, oven switchesto HOLD
for 1hr., then shuts off. Hold pre-
vents overcooking while keeping
meat warm.
Step 5: Display willshow “End”. ;
Step 6: Open door or touch
CLEARI OFF pad.
Ovenmonitors internal
@
. .
8
Page 9
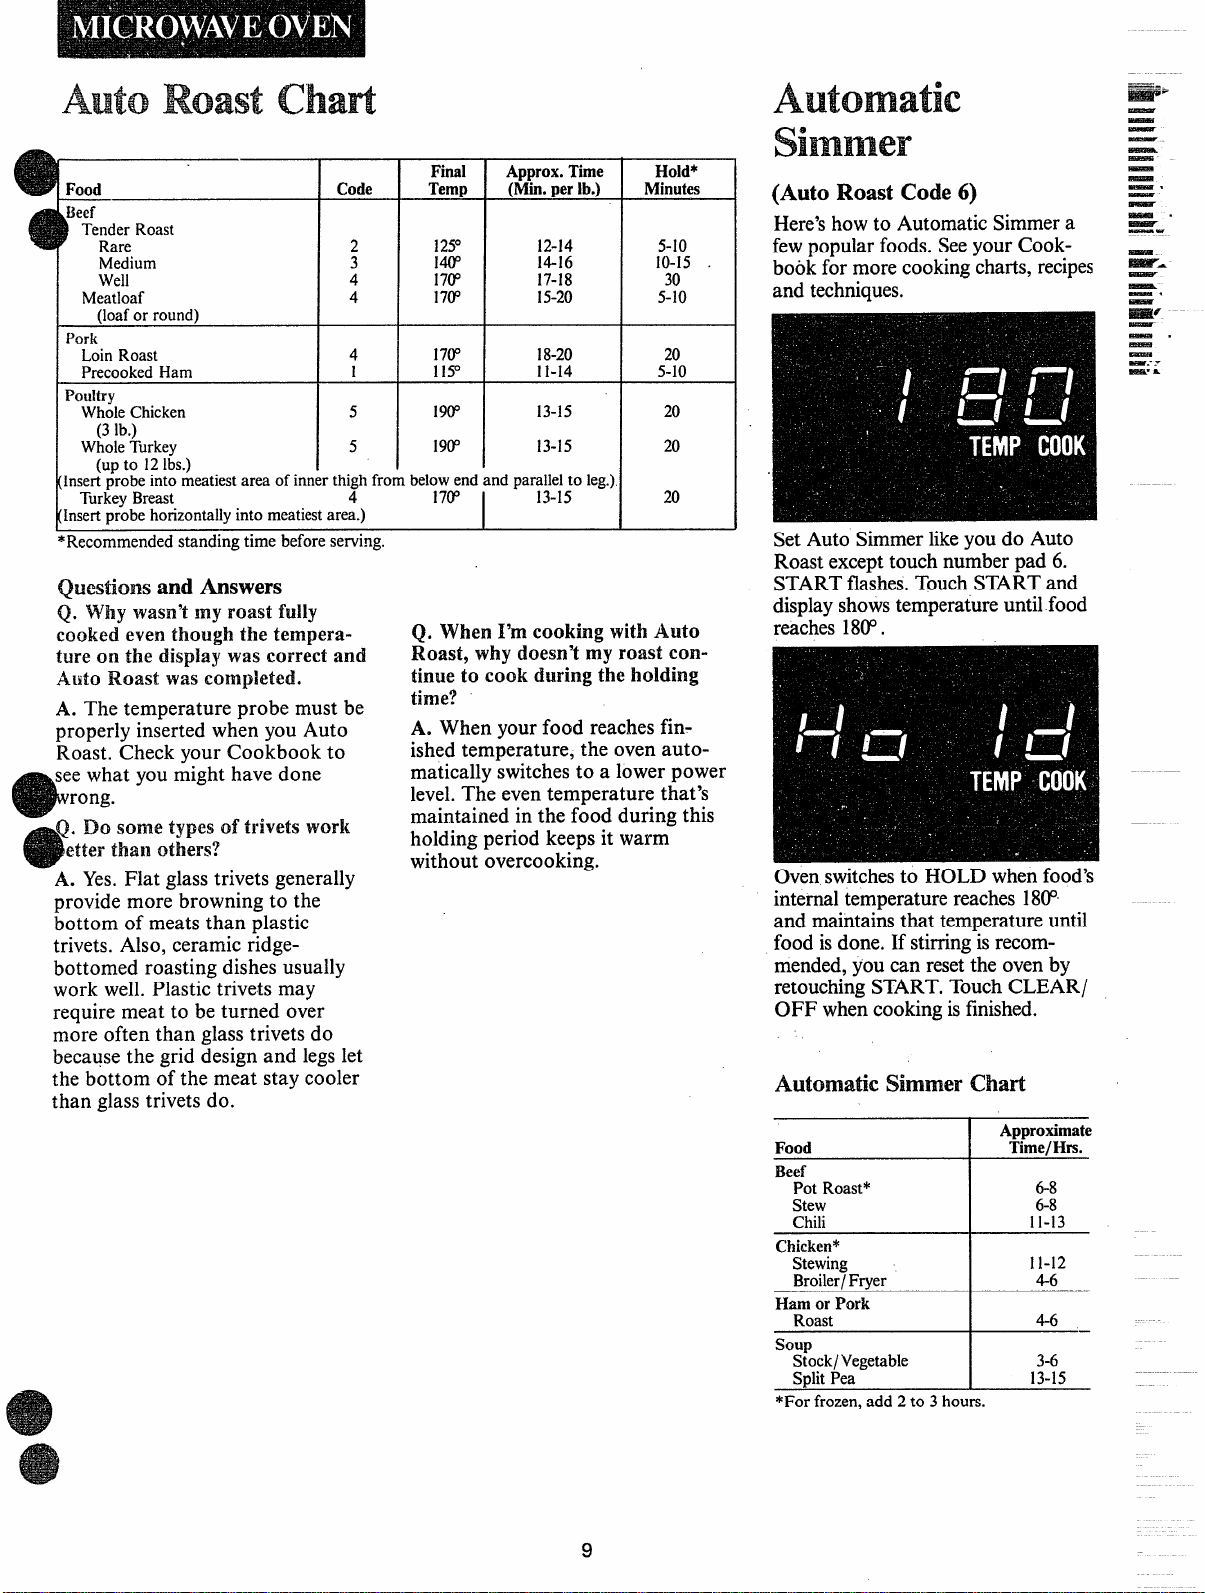
AutoRoast Chati
Food Code
TenderRoast
Rare
Medium
Well
Meatloaf
(loaforround)
Pork
LoinRoast
PrecookedHam
Ponltry
WholeChicken 5
(3lb.)
WholeTurkey
(Up to 12Ibs.)
Insertprobeintomeatiestareaofinnerth$h frombel;:;d
TurkeyBreast
Insertprobehorizontallyintomeatiestarea.)
*Recommendedstandingtimebeforeserving,
Quf3s~io~2s
why wasn’tmy roastfully
Q.
cooked eventhoughthe temperatureon the displaywascorrectand
Auto Roastwascompleted.
A. The temperature probe must be
properly inserted when you Auto
Roast. Check your Cookbook to
seewhat you might have done
rong.
e
Q. Do some types of
etterthan others?
A. Yes.Flat glass trivets generally
provide more browning to the
bottom of meats than plastic
trivets. Also, ceramic ridgebottomed roasting dishes usually
work well. Plastic trivets may
require meat to be turned over
more often than glasstrivets do
because the grid design and legslet
the bottom ofthe meat stay cooler
than glass trivets do.
and Amswers
trivetswork
Final Approx.‘rime
Temp (Min.perlb.)
2 125° 12-14
3
4 17(P 17-18
4
4 17@ 18-20
1 115” 11-14
5
140’ 14-16
17CP 15-20
19(P
19V 13-15
13-15
and par;le~;o leg.)
Q. WhenI’mcooking withAuto
Roast, why doesn’tmy roastcontinueto cook duringtheholding
time?
A. When your food reachesfin-
ished temperature, the oven automatically switchesto a lower power
level.The even temperature that’s
maintained in the food during this
holding period keeps it warm
without overcooking.
Hold*
Minutes
5-1o
10-15 .
30
5-10
20
5-1o
20
20
20
Automatic
Simmer
(Auto Roast Code 6)
Here’show to AutomaticSimmer a
fewpopular foods. Seeyour Cookbook for more cookingcharts, recipes
and techniques.
Set Auto Simmerlikeyou do Auto
Roast excepttouch number pad 6.
START flashes.TouchSTART and
displayshowstemperature untilfood
reaches 180’.
Ovenswitchesto HOLD when food’s
internaltemperaturereaches18(P
and maintainsthat temperature until
food isdone. If stirringis recom-
mended,youcan resetthe ovenby
retouchingSTART. Touch CLEAR/
OFF when cooking isfinished.
Automatic SimmerChart
Approximate
Food Time/Hrs.
Beef
PotRoast* 6-8
Stew
Chili
Chicken*
Stewing
Broiler/Frver
HamorPork
Roast
soup
Stock/Vegetable
!%litPea
*Forfrozen,add2to 3 hours.
I
6-8
11-13
11-12
4-6
I
4-6
I 1::5
—-
-“
—
—
—
—
—
——
—
—.
—
—
-.
~
—.
~
-.
—
—
—.
=f
—
-.
-
-
-----
msi~ A
9
Page 10

Defrosting
The Defrostsettingisdesignedfor
eventhawingnecessaryforlarge
amountsof food andis one of the
most importantadvantagesof a
microwaveoven.
e power Level3
set for defrosting, but you may
change thisfor more flexibility.
e See your Cookbook for
defrosting help.
When the oven completes defrosting, it automatically shuts off. It
wfilthen display “End” and beep
once a minute until you either open
“thedoor or touch the CLEAR/OFF
pad.
To become better acquainted with
the defrost functions, defrost frozen
pork chops using the following
steps.
Step 1:Place package of frozen
chops in the oven and closedoor,
is automatically
Step 2:Touch DEFROST. Display
reads :0and Power Level 3 is automatically set in the oven but does
not appear on display. ENTER
DEF. TIME flashes.
Step 3: Touch 8,0 and Ofor 8 minutes. DEF. TIME and 8:00 are
displayed. If you wish to change
Power Level,touch POWER
LEVEL pad and then new number.
Step 4:Touch START. Time counts
down on display. When cycleis
completed, the oven signalsand
automatically shuts off.
Step
5:Turnpackageover,close
doorandrepeatSteps2, 3and 4.
Step 6:When oven signalsand
shuts off, display will show “End”.
Step 7:Open door or touch
CLEAR/ OFF pad. Remove
package and separate chops to
finish defrosting.
DefrostingTips
e Foods frozen in paper or plastic
can be defrosted in the package.
e For even defrosting, many foods
need to be broken up or separated
part of the way through the defrosting time.
e Homemade
in shallowfoiltrays and heated for
later use.(Do not heat on DOUBLE
DUTYMshelf.) TV dinners can be
microwaved using wire shelf if
metal tray is returned to box before
placing on wire shelf. Select foods
which microwave well.
a Pre-packaged frozen dinners can
be defrosted and microwaved.
e Check your Cookbook for other
defrosting tips.
clinners can be frozen
Questionsand Answers
Q. When1pressSTART,I hem a
d-ullthumpingnoise. Whatis it?
A. This sound isnormal. It is let-
ting you know the oven is using a
Power Levellowerthan HIGH.
Q. CanI Defrostsmallitemsin a
hurry?
A. Yes,but they willneed more
frequent attention than usual. Raise
the Power Levelafter entering the
time by touching POWER LEVEL
and 7 or 10.Power Level7 cuts the
time about in Yz;Power Level 10
cuts the time to approximately
During either, rotate or stir food
frequently.
Q. CanI open thedoorduring
DEFROST to checkontheprogressof my food?
A. Yes.You may open the door at
any time during microwaving. To
resume defrosting, closethe door
and press START.
Q. Why don’tthedefrostingtimes
in the Cookbookseemrightfor
my food?
A. Cookbook times are average.
Defrosting time can vary according
to the temperature in Yourfreezer.
Set your o~en for the ~imeindicated
in your Cookbook. If yourfood is
still not completely thawed at the
end of that time, re-set your oven
and adjust the time accordingly.
Q. CanI selecta Power Levelother
than automaticPowerLevel3 for
defrosting.?
A. Yes.Some smaller foods maybe
defrosted quicker on higher Power
Levelsbut for even, carefree defrost-
ing, Power Level3 is suggested.
Check the chart in the Cookbook
for specifictimes and Power Levels.
1/3.
e
e
e
a
10
Page 11

Cooting by Time
The TinreCookfeatureallowsyou
to presetthe cookingtime.
ower Level 10is automatically set
or time cooking, but you may
change this for more flexibility.
See your Cookbook.
When the oven completes Time
Cooking, it automatically shuts off.
It willthen display “End” and beep
once a minute until you either open
the door or touch the CLEAR/
OFF pad.
To become better acquainted with
Time Cook function, make a cup of
coffeeby using the following steps.
H
Ill
‘Step 10Filla cup2/3fullofwater
ndad~1teaspoonofinstantcoffee.
sea cupthathasnometaldecoration.
Placecu~in ovenandclosedoor.
Step 2: Touch TIME COOK. The
display shows :0. ENTER COOK
TIME flashes. Power Level 10is
automatically set, but does not
appear on display.
Step 3:Select your time. Touch 1,
2, and Ofor a minute and 20sec-
onds. TIME COOK and 1:20are
displayed.
If another Power Levelisdesired,
touch POWER LEVEL and the
number although Power Level 10
(HIGH) is preferred for this cup
of coffee.
1
I
Step5: When time is up, the oven
sounds, oven light and fan shut off.
The display willshow “End”.
Step 6: Open the door or touch
CLEAR/ OFF pad.
How toUse Delay Start
TheDelay Startfeatureallowsyou
to programyouroven to begin
cookingata presettime of day-
upto a 12hourdelay.
‘lb Use Delay Start
Step 1:Enter your desired cooking
program.
Step 2:Touch DELAY START pad
(instead of START pad).
Step3: Enter the time you want the
oven to start. (Be sure your microwave oven clock shows the correct
time of day).
Step 4: Touch START pad.
The oven will automatically start at
the desired time.
Questionsand Amswers
set my ovenforthe timecalled
Q.I
for in the recipebutat the endof
thetime allowed,my dishwasn’t
done.Whathappened?
A. Since house power varies due to
time or location, many Time Cook
recipesgive you a time range to
prevent overcooking. Set the oven
for minimum time, test the food for
doneness, and cook your dish a
little longer, if necessary.
Q. I want to cook on a Power
Levelotherthan HIGH, what do I
need to do?
A. To change the Power Level,
touch the POWER LEVEL pad
after entering desired cooking time.
Enter the desired number and then
touch START.
Q. CanI interruptmy Time Cook
functionto checkthe food?
A. Yes.To resume cooking, simply
closethe door and touch START.
NOTE: Microwave power will not
come on until you are ready. You
must touch START for cooking to
begin.
Q. I touched the numberpads and
selectedmy powerlevel. WhenI
touched START,however,my oven
didn’tcome on. Whynot?
A. The TIME COOK pad must be
touched before setting the number
pads or elseyour oven will not
begin cooking.
Q. I triedto changePower Level
but the displaychangedbackto
cooking time. Why?
A. After touching Power Level pad
you only have 4 seconds to enter the
number. Try setting controls again.
~ -—
EsssK”
—.
—
—
=F
—
—.
—
—
---
-* .
~
—.
—
—
—
—
—.
-
—
—.
—
-—
—
11
Page 12

Cookingby Temperature
For manyfoods, interredtempera-
tureis the best test of doneness.
Roasts or poultryare cookedto
yourpreferencewhentemperature
cooking. Heatingorreheating
foods accuratelyto a servingtemperatureyoudesireis simpleand
easy.
TempCook/Hold takestheguessworkout of cooking becausethe
ovenautomaticallyswitchesto
HOLD setting afterreachingthe
presetfood temperatureand maintainsthat temperatureuntilyou
touch the CLEAR/OFF pad.
TheTemperatureProbe
The temperature probe isa food
thermometer that gauges the
internal temperature of your food;
it must be used when using Temp
Cook/ Hold or Auto Roast. Follow
the directions for use and insertion
on page 8.
How
to Tempcook
a Rolled Beef Rib Roast
to Medium
Step 1:
directed in Cookbook and attach
probe securely in oven wall. Close
the door.
Step 2: Touch TEMP COOK/
HOLD. ENTER TEMP COOK
flashes and the digit portion of
the display isblank.
Step 3: Touch 1,3,0 for 130°.130
shows on display. Power Level 10is
automatically set in oven but does
not appear on display.
Insert temperature probe as
Step4: Touch POWER LEVEL
pad. P-10 shows on display. Touch
5 for MEDIUM power. P-5 shows
on display and then display reverts
back to set finished temperature.
Step 5:Touch START. After food
reaches 90°, display showstemper-
ature of food counting up.
Step 6: When 130°is reached, the
oven willsound and display HOLD.
The oven will then hold the
temperature.
Step 7:Touch the CLEAR/OFF
pad to stop the cycle.
Step 8: Remove probe and food
from the oven.
cooking Tips
@Usea lower power levelsetting;
it will heat evenly even though
requiring more time.
@Be surefrozen food has been
completely defrosted before inserting probe. Probe may break off if
used in frozen foods.
e Alwaysinsert probe into the
center of meaty areas; take care not
to touch the fat or the bone.
e Insert probe as horizontally as
possible into foods as directed in
the recipes. Make sure the handle
does not touch the food.
@ Usethe clip to keep the probe in
place while heating.
@Coverfoods as directed in Cook-
book for moisture control and
quick heating.
Questions and Answers
Q.After1followedthe stepsand
touchedSTART,a signalsounded
@
and owmdid not start. Whatis
wrong?
A. If you set the temperature either
below 90° or greater than 199 the
oven will not start. To re-enter,
touch CLEAR/ OFF pad and begin
steps again.
e
Q. Arethere anyfoodsI can’t
TempCook?
A. Yes.Delicate butter icings, ice
cream, frozen whipped toppings,
etc., soften rapidly at warm temperatures. Batters and doughs as
wellas frozen foods are also difficult to cook precisely with the
probe. It is best to Time Cook these
foods.
Q. Whydid“PI?OB”flash on the
displayafterI touched Start?
A. “PR OB” willflash on the dis-
play ifyou have not securely seated
the end of the probe into the receptacle in the oven wall or if You
touch TEMP COOK/HOLD and
have forgotten to use the probe.
Q. CanI leave myprobeinthe –
oven if it’snot insertedin the food?
A. No. If the probe is left inside the
oven, touching the oven wall,and
not inserted in food, youmay
damage the oven.
Q. Can I TernpCook different
portionsof food at different
temperatures?
A. Yes.The temperature probe
givesyou the freedom to cook dif-
ferent portions of food at different
temperatures to suit individual
eating styles. Simply place the
probe in the food and change the
temperature setting as needed.
a
e
12
.
Page 13

Howto UsetheMinute/SecondTimer
TheMIN/SEC TIMER hasthree
imingfunctions:
U operatesasa minutetimer.
a
It canbeset to delaycooking.
@It can be usedas a holdsetting
afterdefrosting.
The MIN/ SEC TIMER operates
without microwave energy.
How tomma 3“Minute M-Km
call
Touch MIN/ SEC TIMER pad.
1.
The display shows :0and ENTER
TIME flashes.
2. Touch number pads 3,0 and O
(for 3 minutes and.no seconds).
Display shows3:00.
3. Touch START. Display shows
time counting down.
4. When time is up, oven signals
and display shows time of day.
The display shows :0and ENTER
DEF. TIME flashes.
Step3:Touch pads 1, 5,0 and Ofor
15minutes defrosting time. 15:00
appears on display. (Defrosting is
automatically set on Power Level
3 but can be changed bytouching
POWER LEVEL pad and the new
Power Level.)
-
—
—
—
—
—.
--——
—
—–
-
—=
Step 8: Touch START. 15:00
counting down shows on display. ~-~
As each function is automatically
performed oven display shows
instructions entered and the function. While cooking, you may
touch appropriate pad to recall
times you set.
Step 9:When time isup, the oven sounds, oven lightand fan shut off.
The display will show “End”.
Step 10:Open the door or touch
CLEAR/ OFF pad.
-
Rogrammhg a llOLll Time
The Minute/ Second Timer can also
be used to program “hold time”
etween microwave cooking func-
tions. The time can range from one
cond to 99 minutes and 99 sec-
@
nds. A HOLD, or “standing” time
may be found in some of your own
recipes or Cookbook.
To set the oven to delay cooking up
to 99 minutes follow Steps I and 2
to enter hold time. Then touch
TIME COOK pad and enter time
before pressing START.
How toDefrost,Hold and Time
C(MA
Let’ssay you want to defrost a
frozen casserole for 15minutes,
hold for 10 minutes and then Time
Cook for 25 minutes. Here’show
to do it:
Step 1: Take casserole from freezer
and place it in the oven.
~%ep 2: Touch DEFROST pad.
Step 4: Set standing or hold time
by touching MIN/ SEC TIMER.
:0appears on display and ENTER
TIME flashes.
Step5:Touch 1,0,0 and Oto hold
for ten minutes. 10:00appears on
display.
Step 6: Touch TIME COOK pad.
The display shows :0 and ENTER
COOK TIME flashes.
Step 7: Touch 2, 5,0 and Ofor
twenty-five minutes of cooking
time. 25:00appears on display.
QuestionsandAnswers
Q. What willhappenif I accidentallyreversemy defrost,hold and
cook instructions?
A. The oven.automatically rear-
ranges your program. Defrosting —
always comes first, then hold, and =-–
then the cooking function.
Q. CanI defrostandhold only?
A. Yes. Sometimes you may only
want to defrost a food, hold it, and
cook it later. All you need to do is
program in Defrost and amount of
time. Then program Hold and the
amount of time. Besure to put the
thawed dish in the refrigerator
promptly.
NOTE: Let foods remain at room - =
temperature only as long as safe. ~Times willvary.
Q. I programmedmy oven for a = ‘
specificdefrostingtimebutit
defrostedlongerthan necessary. .
Whathappened?
A. When instructions conflict, the
oven carries out the last instruction.
Youmay have set the oven to defrost
for 4 minutes, hold for 2 minutes,
and then defrost for 6 minutes. In
this case, the oven would defrost
for 6 minutes and hold for 2 minutes and ignore your first defrost
instruction.
—-
-
-
—.
—.
--
Page 14

How to Use QUICKSETContiol
The QUICK SET Control provides
a short-cut method for entering
time and the Power Level on your
microwave oven. QUICK SET
Codes are only usedfor recipes
which need little or no attention,
and whichrequire no change of
power levelduring cooking.
Recipes which require additional
ingredients, attention or change of
power level during microwaving
should be cooked in the usual
manner. Also, recipeswith cooking
time of lessthan one minute or
more than 99 minutes cannot use
Codes.
To understand the QUICK SET
Code control, it is important to
know what the numbers mean and
what the sequenceis. The first and
second numbers, ifsettinga 3 digit
Code, indicate the amount of time
you desire;the last control entry
number is always the Power Level.
For example, 125means 12minutes
at Power Level5. NOTE: Your
oven can only be programmed to
99 minutes when using the QUICK
SET control and the highest Power
Levelis 10which is represented by
“O”.When setting a 2 digit QUICK
SET control entry, the first istime,
the second is power level. For
example, 50 means 5 minutes at
Power Level 10.
On the following page is shown
many frequently prepared foods
and their codes. It’seasy, though,
to make Codes for many other
recipes. Just selectone or two digits
representing the length of cooking
time desired, and a final digit for
the Power Level required. The
Codes given on the chart are for the
minimum time needed, to avoid
overcooking which can dry out food
and make it tasteless and tough.
If you feel that more cooking is
needed, add additional time by
changing the first digit of the Code.
You cannot add secondsto the
cycletime—
minutes only. If your recipe calls
for Power Levelchanges or different amounts oftime needed
between addition of ingredients,
you may set one Code for the first
part of the recipe, then after completion, set another Code for that
period of time and Power Level.
Remember that QUICK SET
Codes are for microwaving by time
only. If you are microwaving by
temperature, you must use the Temp
Cook or Auto Roast function.
When the oven completes QUICK
SET program, it automatically
shuts off. It willthen display“End”
and beep once a minute until you
either open the door or touch the
CLEAR/ OFF pad.
Codes are for whole
QUICKSET
2-Digit
Time in Power Level
Minutes High (10)
law
toset
QUICK SET Control
Programming your oven for
QUICK SET Control operation is
easy. Follow these simplesteps.
For Example:
QUICK SET
3-Digit
125
5’=!
Time in Power Level
Minutes Med (5)
Step 1:Touch QUICK SET.
ENTER CODE flashes.
Step2:Enter the proper code. For
example, a recipecallingfor 12minutes cooking time at Power Level
10would be 120. 120appears on
the display panel.
14
Step 3:Touch START. Display will
show time counting down and
COOK TIME.
a
Page 15

i
I
I
I
I
I
I
I
i
I
e
I
I
I
I
I
i
i
1
i
1
I
i
I
I
I
I
i
I
w
q
RI
gl
QI
gi
{
@
I
-1
I
I
I
I
I
1
I
1
I
I
I
I
I
i
I
1
I
I
I
I
I
1
I
I
I
I
I
I
I
I
I
I
m
-1
Wfi#lirl
QUICK SET ControlGuide
DetachandTapeto InsideCabinetDoor or OtherProminentPlace
The QUICK SET Control feature givesyouan easy
automatic way to accurately set microwave time for
foods requiring only one power leveland littleattention during cooking. The Chart below shows frequently prepared foods and the suggested Codes to
use with each. For specificinformation on stirring,
turning or rotating, check the Microwave Guide and
Cookbook which comes with yourmicrowave oven.
Appetizers(Warming)
Dip(CreamCheese)
%cup
1cup
Dips(SourCream)
1/2cup
1cup
PastryBites(Reheating)
2 Servings
4 Servings
BreadsandDesserts
Apples
(2)
Bran Muffins
(5-6)
Brownies(Mix)
Cakes(Mix)
(16cup flutedmold)
CheeseBread,Yeast
(1loaf)
ChocolateChip Bars
Nut Bread(Mix)
(1loaf)
Pudding Mix (3 oz.pkg.)
Beverages
Coffee,Soup
(1 cup)
Milk Bases
(1 cup)
FrozenFoods(Defrost)
Note:Times givenbeloware for entiredefrostcycle.Usuallyfood must berotated, broken up or turned overwhile
defrosting.CheckCookbook for speciilcinformation.
Cake, WholeIced
Chicken,Cut-up
(2%-3%lbs.)
DessertTopping, Whipped
Doughnuts or Pastries
(24)
Fish Fillets
(1lb.)
Hamburgers
@lbs.)
Pie, Fruit Filling
(Whole)
Roast
(4-5lbs.)
Steak or Chops
(2lbs.)
i
25
45
13
23
17
10
40
37
60
110
105
50
97
60
10
28
23
143
13
13
83
123
83
403
83
15
Always use microwave-safecontainers and microwave techniques as described in the Cookbook.
To set Codesfor many other foods or recipesrefer to
page 14in this
Codes given are for minimum time. Check and add
time if necessaryto complete cooking.
Meats/MainDishes
Bacon
2 Slices
4 Slices
Chicken
8-10pieces
2 pieces
4 pieces
Chuck Roast
(3lbs.)
Eggs,Baked
2 Eggs
Eggs,Scrambled
2 Eggs
Entrees,Frozen
8 OZ.
16OZ.
2lbs.
Fish Fillets
(1lb.)
Franks (in bun)
2
4
Meat Loaf
(1%lbs.)
Sausage(Raw)
4 Patties
4 Links
SwissSteak
(2lbs.)
Frozen TV Dinner
(lo oz.)
Vegetables(Fresh)
Beans,Green
(1lb.)
Broccoli
(1%-1%Ibs.)
Spears
cut
Cauliflower,Head
Corn cmCob
(4)
Potatoes
(4)
Squash
(1lb.)
Zucchini
(1 lb.)
Vegetables(Frozen)
10OZ.pkg.
Useand CareBook. QUICK SET
200
665
110
200
170
706
107
150
157
120
137
120
28
30
40
70
25
20
50
60
10
30
30
20
120
100
100
70
Page 16

usingYour oven
- Youroven is designedto giveYOU
-.
WEWVthebest resultsin baking,broiling,
androastingwhenusedasrecom-
mended.Before usingyouroven,
readthe directionsfor settingand
usingall of the controlsandtimer.
Wm Light
Light comes on automatically when
door is opened or use switch on
window door to turn it on when
door isclosed.
flwri Shelves
When the shelvesare correctly
placed on shelf supports they are
designed with stop-locks to prevent
them from coming out of the oven
or tilting when food is placed on
them.
TO REMOVE, lift up rear of shelf
and pull forward with stop-locks
along top of shelf support.
TO
REPLACE,insertshelfwith
stop-locksrestingon shelfsupports
andpushtoward rear of ovenuntil
~ it fallsinto correctpositionunder
shelfsupports.
~
shelf Positions
The oven has four shelf supports
marked A (bottom), B, C and D
(top). Shelf positions for cooking
food are suggestedon Baking,
Roasting and Broiling pages.
Automatic Oven Tirner9
mute Timer’
0
Oven Timer Controls are designed
to automatically start and stop certain oven functions (TIME BAKE
or CLEAN). Dials are timed by a
special Clock with index marks
(denoting numerals) and hands.
(For location seepage 6.)
3X)SET CLOCK,push in the
center knob of Minute Timer and
turn the Clock hands to correct
time, then let knob out.
TOSETMINUTETIMER, turn
knobto desiredminutes.(Knob
mustbe out to setMinuteTimer.)
MinuteTimerwillbuzzwhentime
hasfinishedand mustbeturned off
manually.
Usethe MicrowaveOvenClockfor
easyreferenceto timeofday.
——
—
~.
—“
—
—
~
~
—.
—
——
—.
—–
—
—
—.
—
—
—
—
Page 17

How to Bakeand TimeBake
How’toset
Your (hum forBaking
Baking Charton page19.
See
Step 1:Place shelf on embossed
shelf support “B” or as indicated
on Baking Chart, page 19.
Step 2: After making sure that the
oven door is closed, turn the OVEN
SET Knob to BAKE. Oven “On”
Light will come on and remain on
as long as OVEN SET Knob is
on BAKE.
Step
3:Turn OVENTEMP Knob
to the temperaturecalledfor in
recipe.OvenCyclingLightcomes
on and remainson until presetoven
temperatureisreached.It reappears
eachtime oventemperaturedrops
belowpresettemperature.
Step 4: You may set your Minute
Timer to the desired cooking time
as indicated in your recipe. If your
cooking time is longer than sixty
minutes, Minute Timer must be
reset.
Most foods cook satisfactorilywithout preheating. If preheating is
required, put your dish promptly in
the range after Oven CyclingLight
goes out.
Step 5: Place food insidethe oven.
Make sure at least 1“of space is left
between the cooking container and
the oven wall for proper heat circulation. Close the oven door.
NOTE: Avoidopeningyour oven
door frequently. This could cause
undesirable results in your baking.
Only check foods at the minimum
time of the recipe. Then cook
longer if necessary.
Step 6: When the BAKE cycleis
complete, turn offheat. When
cooking food for the first time in
your oven, use the time on your
recipe as a guide. Besure foods are
done before removing from oven.
How to TimeBake
YourAutomatic Oven Timer controls your Time Bakefeature.
When you Time Bake, your oven
can be preset to start and stop
automatically if you are not home.
Step 1:Be sure the range Clock
showscorrect time of day since
Clock controls the Oven Timers.
Start dial pointer must indicate
same time of day as on Clock. If
you want the oven to turn on at a
later time, set that time by pushing
in knob on Start dial and turn
pointer to time that you want oven
to start. (There’sno need to set
Start dial when starting time isthe
present time of day.)
Step 2:To determine Stop time,
add the food’scooking time to time
set on Start dial. Push in knob on
Stop dial and turn pointer to time
oven is to turn off.
Step 3:Turn OVEN SET Knob to
TIME BAKE. Oven “On” Light
comes on immediately even if the
Start time islater.
Step 4: Turn OVEN TEMP Knob to
temperature setting. Oven Cycling
Light comes on even though heat is
not on in the oven if a later start
time is used. Your oven automati-
cally turns on and off at the times
you set.
Step
5:Removefoodandturn OVEN
SET Knobto OFF.
18
Page 18

tional bakinglightshinyfinishesgenerallygivebest results
becausetheypreventoverbrowninginthe time it takes for
heat to cookthe center areas, Dull(satin-finish)bottom surfacesof pansare recommendedfor cakepans and pieplates
to be surethose areasbrowncompletely.
2. Darkornon-shinyfinishes,alsoglassandpyroceram,
generallyabsorb heat whichmayresultin dry, crispcrusts.
Reduceovenheat
Food
Bread
Biscuits(%-in.thick)
Coffeecake
Corn bread or muffins
Gingerbread
Muffins
Popovers
QuickLoaf Bread
Yeastbread (2loaves)
Plain rolls
Sweetrolls
Cakes
(withoutshortening)
Angelfood
Jelly roll
Sponge
Cakes
Bundtcakes
Cupcakes
e
Fruit cakes
Layer
Layer,Chocolate
Loaf
Cookies
Brownies
Drop
Refrigerator
Rolledor sliced
Fruits,
Other Desserts
Bakedapples
Custard
Puddings,Rice and
Custard
Pies
Frozen
Meringue
One crust
Twocrust
—
—
Pastry Shell
Miscellaneous
Bakedpotatoes
Scallopeddishes
Soufflps
1. Aluminumpans conductheat quickly.For most conven-
25°iflightercrustsaredesired.Preheat
Shelf
Container
ShinyCookieSheet
ShinyMetal Pan with
Satin-finishbottom
Cast Iron or Glass
ShinyMetal Pan with
Satin-finishbottom
ShinyMetal MuffinPans
DeepGlassor Cast Iron Cup
Metal or GlassLoafPans
Metal or GlassLoafPans
ShinyOblongor MuffinPan
ShinyOblongor Muffin Pan
AluminumTube Pan
Metal JellyRoll Pan
Metal or CeramicPan
Metal or CeramicPan
ShinyMetal MuffinPans
Metalor Glass Loafor
rube Pan
ShinyMetal Pan with
Satin-finishbottom
ShinyMetal Pan with
Satin-finishbottom
Metalor Glass LoafPans
Metalor Glass Pans
CookieSheet
CookieSheet
CookieSheet
Glassor Metal
GlassCustard Cups or
Casserole(set in pan of
lot water)
GlassCustard Cups or
Casserole
FoilPan on Cookie Sheet
Spreadto crust edges
Glassor Satin-finishMetal
Slassor Satin-finishMetal
Wassor Satin-finishMetal
Set on OvenShelf
Glassor Metal
Glass
POsition
B, C
B, A
B
B
A, B
B
B
A, B
A, B
B, A
A
:
A,B
B
& B
B
B
B
B,C
B,C
B,C
B,C
A,B, C
B
B
A
B,A
A,B
B
B
A,B, C
A,B, C
B
castiron for bakingsomefoodsfor rapid browningwhen
foodis added.
3. Preheatingthe ovenis not alwaysnecessary,especiallyfor
foods whichcook longerthan
30or40minutes,For food
withshort cookingtimes,preheatinggivesbestappearance
and crispness.
4. Openthe ovendoor to checkfoodas littleas possibleto
preventunevenheatingand to saveenergy.
Oven
Temp.
400°-4750
Time,
Min.
15-20
Comments
Cannedrefrigeratedbiscuitstake
2-4min.lesstime.
350°-4000
400°-4500
350°
400°-4250
375°
20-30
20-40
45-55
20-30
45-60
Preheat panfor crispcrust.
Decreaseabout 5 min.for muffin
mix. Orbake at 450°for 25 min.,
then at 350°for 10-15min.
350°-3750
375°-4250
45-60
45-60
Dark metal orglassgivedeepest
browning.
375°-4250
350°-3750
325°-3750
375°-4000
325°-3500
325°-3500
350°-3750
10-25
20-30
30-55
10-15
45-60
45-65
20-25
For thin rolls.ShelfBmav beused.
For thin rolls;ShelfBma~be used.
Twopiece
pank convenient.
Linepanwithwaxedpaper.
Paper linersproducemoremoist
crusts.
275°-3000
2-4hrs.
Use300°and ShelfBfor smallor
individualcakes.
350°-3750
350°-3750
350°
325°-3500
350°-4000
20-35
25-30
40-60
25-35
10-20
Barcookiesfrommixusesametime.
UseShelfC and increasetemp.
25-50°for more browning.
400°-4250
375°4000
350°4000
300°-3500
6-12
7-12
30-60
30-60
Reducetemp. to 300°for largecustard. Cookbread or ricepudding
with custardbase 80to 90 minutes.
325°
400°+250
50-90
45-70
Largepiesuse 400°and
increasetime.
325°-3500
15-25
To quicklybrownmeringueuse
400°for 8-10min.
400°-4250
400°-4250
450°
325°-4000
325°-3750
300°-3500
45-60
40-60
12-15
60-90
30-60
30-75
Custard fillingsrequirelower
temp., longertime.
Increasetimefor largeamount
or size.
-
m“.
-.
-
-
-.
_–
-
---
-* ~
EMEfw.
—.——
—
——
—
—
~
~
—.
-
_—
-—
—
—
-
-.
—
—
~.
~—
——
—.
-
-
-
m-.
—.
-
-
-.
-
_–
-. .-
W. A
-.
- ‘“
-
-.
-
—
19
Page 19

Elowto setYour
Oven
See Roasting Charton page21.
Step 1: Check the weight of the
meat and place, fat side up, on
the rack in the broiler pan that
came with your range. This helps
the meat to baste itself.
Step 2:Useshelfposition “A” or
“B”;or the one indicated on
Roasting Chart, page 21. Place
Oven Shelf on correct embossed
shelfsupport. For very tall roasts, “
remove second oven shelf.
Step 3: Turn the OVEN TEMP
Knob to 325°.(The exception is
small poultry which is roasted at
3750.)
Step 4: Close the oven door and
turn the OVEN SET Knob to
BAKE. Oven “On” Light comes
on and stays on until OVEN SET
Knob is turned to OFF. Oven
Cycling Light comes on and
remains on until temperature is
reached.
Step 5: Place your meat insidethe
oven, making sure the pan is not
touching the oven wallsor door.
Step 6: Turn off the heat when the
roasting cycle is complete.
forRoasting
CookingTips
Besure meat iscooked to your
~
satisfaction. Most meats continue
to cook slightlywhile standing after
being removed from the oven. This
should be taken into consideration
when determining your cooking
time.
@Always use a roasting pan that
fits the sizeof your meat. A roast
placed in a pan too small for its size
willdrip over the edge.
* You may cook frozen meat roasts
without thawing. However, you
m’ustallow more cooking time. For
large roasts, add 10-25minutes per
pound. For roasts under 5 pounds,
add 10minutes per pound.
s To slow down surfacebrowning
onturkeys, you can usea foil“tent”.
The tent-shaped foil should be laid
loosely over the poultry so the heat
can circulate under the foil.
@Most frozen poultry should be
thawed before cooking to ensure it
is done evenly. Some, however, can
be cooked successfullywithout
thawing. Check the packer’s label
for specificdirections.
Howto setYom
ovenforBroiting
See BroilingCharton page220
Step 1:Place the meat on the
broiler rack in the broiler pan.
Always usethe rack so fat drips
into the broiler pan.
Step 2: Position oven shelf as indicated on Broiling Chart, page 22.
Step 3: Turn the OVEN SET Knob
and OVEN TEMP Knob to BROIL.
Both Oven Indicator Lights
come on.
Step 4: Leave oven door ajar about
3 inches(except chicken, seebelow).
The door will stay open itselfyet
the proper tempe~atfire willbe
maintained in the oven. During
cooking, turn the food only once.
Step 5: Turn OVEN SET Knob to
OFF and serve food immediately.
Leave the pan outside the oven to
cool during the meal for easy
cleaning.
(hoking Tips
/?
@Foil may be used to line the
broiler pa~ and rack. However, be
sure to cut openings in the foil to
correspond with the slits in the
broile~rack so fat drips into the
pan below.
@For all weights of chicken, broil
with door clo~ed.
@Placing food closer to the top of
the oven increases smoking, spattering, exterior browning on the
meat and the possibility of food fat
catching on fire. Always keep rack
3-5 inches from the broiling unit.
@
@
e
Page 20

1. Positionovenshelfat Bfor small-sizeroasts(3to 7 lbs.)
and at Afor largerroasts.
2. Placemeat fat sideup or poultrybreast-sideup on broiler
pan or other shallowpan withtrivet. Do notcover. Donot
stuffpoultry untiljust beforeroasting.Usemeat thermometer, for moreaccuratedoneness.(Do not placethermometer
in stuffing.)
3. Removefat anddrippingsasnecessary.Basteas desired.
4. Standingtime recommendedfor roastsis 10to 20 min. to
allowroast to firmup and makeit easierto carve. It willrise
about 5° to 10”internaltemperature;to compensatefor temperaturerise,if desired,removeroast fromovenat 5° to 10°
lessthan temperatureonchart.
5. Frozenroastscan be conventionallyroastedbyadding 10
to 25min. perpoundmoretime than givenin chart forrefrigerated. (10min. perlb. forroasts under5-lbs.)Defrost
poultrybeforeroasting.
—
—.
EC
—
—-
—
—
—.--
-~.L
Oven
Type
Temp.
Doneness
Meat
Tendercuts:rib, highquality
sirlointip, rump or top round*
325°
Rare:
Medium:
WellDone:
Lamb Legor bone-inshoulder*
325°
Rare:
Medium:
WellDone:
Vealshoulder,legor loin*
Pork loin, ribor shoulder*
Ham, pre-cooked
Ham, raw
325°
325°
325°
325°
WellDone:
WellDone:
ToWarm:
WellDone:
*Forbonelessrolled roastsover6-in.thick, add 5to 10min.
Poultry
Chickenor Duck
Chickenpieces
Turkey
325°
375°
325°
WellDone:
WellDone:
WellDone:
per lb. to t
ApproximateRoastingTime,
in Minutesper Pound
3 to 5-lbs.
24-30
30-35
35-45
21-25
25-30
30-35
35-45
35-45
10reins.per lb
Under10 lbs.
20-30
iesgivenabove.
3 to 5-lbs.
35-40
6to 8-lbs.
18-22
22-25
28-33
20-23
24-28
28-33
30-40
30-40
any weight)
10
17-20
!
Over5lbs.
30-35
35-40
10 to 15Ibs.
20-25
Over15 Ibs.
15-20
tO 15Ibs.
Internal
Temp.0F
130°-140°
150°-160°
170°-1850
130”-140°
150°-160°
170°-185°
170°-180°
170°-180°
125°-130°
160°
185°-190°
185°-190°
In thigh:
185°-1900
~–
E5WKA
—–
—
—.
21
———
—.
—
—.
Page 21

BroiEngChart
1. Alwaysusebroiler pan and rackthat comeswith your
oven. It isdesignedto minimizesmokingand spatteringby
trapping juicesin the shieldedlowerpart ofthe pan.
2. Ovendoor shouldbe ajar formostfoods;there is a special
position ondoor whichholdsdoor opencorrectly.
3. For steaksand chops, slashfat evenlyaround outsideedges
of meat. Toslash, cutcrosswisethroughouter fat surfacejust
to the edgeofthe meat. Usetongsto turn meat overto prevent piercingmeatand loosingjuices.
4. If desired,marinate meatsor chickenbeforebroiling.Or,
brush withbarbeque saucelast 5to 10minutesonly,
Quantity
Food
Bacon
Ground Beef,
Welldone
and/or
Thickness
~\2-lb.(about 8
thin slices)
l-lb. (4patties)
1Ato $&in.thick
w
c
I
BeefSteaks
Rare
Medium
WellDone
Rare
Medium
WellDone
Chicken
Bakery Products
Bread (Toast)or
Toaster Pastries
EmzlishMuffins
Lobster tails
(6to 8-oz.each)
Fish l-lb. fillets%to
Ham slices
(precooked)
Pork chops
WellDone
Lamb chops
Medium
WellDone
Medium
Well Done
Wienersand similar
precooked sausages,
bratwurst
1 inch thick
(1-1%lbs.)
c
c
c
c 101%-in.thick
(2-2%lbs.)
c 15
c 25
1 whole
(2to 2%-lbs.),
split lengthwise
2-4slices
1pkg.(2)
2-sdit
2-4 (Do not
A 35
c
c 3-4
B
c
1\2-in,thick
l-in. thick
2 (?/2inch)
2 (l-in. thick)
about 1 lb.
2(1 inch)
about 10-12oz.
2 (1!4inch)
about 1lb.
l-lb. pkg. (10)
B 8
c
B
c 8
c
c
B
LL--
5. When arrangingfood onpan, do not let fattyedgeshang
oversides,whichcouldsoil ovenwithfat dripping,
6, Broilerdoes not needto bepreheated, However,forvery
thin foodsor to increasebrowning,preheatif desired.
7. Frozen Steakscanbe conventionallybroiled bypositioning
the ovenshelfat next lowestshelfpositionand increasing
cookingtimegivenin this chart 11\2timesperside.
8. Ifyour rangeisconnectedto 208Voltsrare steaks maybe
broiledby preheatingthe broilheater and positioningthe
ovenshelfonepositionhigher.
SecondSide
Time,Min.
7 4-5
7
9
13
1%-2
13-16
5 5
10
13
10
10
17
7
_9
13
7-8
14-16
20-25
10-15 Reducetimesabout 5-10min. per
1/2
turn
over)
8
10
13
4-7
10
4-6
12-14
1-2
Comments
Arrangeinsinglelayer.
Spaceevenly.
Upto 8 patties takeabout same
time.
Steakslessthan l-in. cookthrough
beforebrowning.Pan fryingis
recommended.
Slashfat.
sideforcut-up chicken.Brusheach
sidewithmelted butter. Broilwith
skinsidedownfirst and broil with
door closed.
Spaceevenly.Place Englishmuffinscut-side-upand brush with
butter, ifdesired.
Cut throughback ofshell. Spread
open.Brushwith meltedbutter
beforeand after halftime.
Handleand turn verycarefully.
Brushwithlemonbutter before
and duringcookingifdesired. Preheat broilerto increasebrowning.
Increasetimes5-10min. per side
for 1!&in.thickor homecured.
Slashfat.
Slashfat,
If desired,split sausagesin half
lengthwiseinto 5to 6-in.pieces.
a
@
e
@
e
22
e
Page 22

Howto operateYourSelf=cieadng oven
- If doneproperly,it willtakeonly
_ a few momentsto startthe self-
cleaningcycleon youroven. After
ettingyour ovento self-clean,a
e
igh heattemperatureremovesthe
soil in the oven cavity.The dirtwill
then disappearbyturninginto an
ash wasteor evaporatinginto an
odorlessandcolorlessvapor. When
the cycleis complete, allowyour
rangeto COOL
WhileyouIarebecomingacquainted
withyourself-cleaningoven, we
recommend2 hoursfor the average
cleaningfunction,but in some cases
alonger cleaningtime, upto 3 hours
may be necessary.In order to judge
the degree of soil, look at the oven
floor and walls. Light spatter and
thinner spills would generally need
only 2 hours cleaning. Heavy greasy
spillsand spatter on the oven interior would need up to 3 hours.
Step 1:Remove all cookware and
food as wellas heavy soil deposits
from the oven. Clean spatters or
~ spillsaround the oven door, rec-
-..U=l=(flanges, and gasket. Then
=== close the door.
Step 3:Push and hold Latch
Release Button whileslidingthe
latch to CLEAN.
Step4: Set the Automatic
Oven Timer:
@Push in knob on Stop (Clean)
dial and turn to the time you wish
oven to stop cleaning. Add the
number of hours needed for cleaning to the present time of day.
@Cleaning Indicator Lights come
on when all stepsare setproperly.
@If you wishto clean at a later
time set Start dial to that time.
NOTE: A slightodor maybe
detected especiallyduring the first
few cleanings. Do not be alarmed.
This is normal during the selfcleaning cycle.
When cleaning temperature is
reached, Lock Light comeson and
door cannot be unlatched until
Lock Light goes off.
Step5:When Lock Light goes off,
push and hold the Latch Release
Button whileslidingLatch to OPEN.
—+ //–’ \
u
Step 2:Turn OVEN SET Knob and
OVEN TEMP Knob clockwiseto
CLEAN. The control willsnap into
final position when the CLEAN
position is reached.
—
_—-—.———
–~
Step 6:Turn OVEN SET Knob to
OFF.
Fan in microwaveovencomes on
when LockLightisglowingduring
self-cleaningoperation.Youmay
stilluseyourmicrowaveatthis
time.
Questionsand Answers
Whyis therestillsome black
Q.
soil leftaftercleaning?
A. Youdid not time the oven to
clean long enough. This deposit will
be removed in later cleanings.
Q. If my oven clockisnot working
canI stillself-cleanmy oven?
A. No. YourAutomatic Oven
Timer usesthe range clock to help
start and stop your self-cleaning
cycle.
Q. Whydidthe LockLightcome
on whenI firstset the ovenfor
CLEAN?
A. Lock Light glowingindicates
that oven is too hot. Turn OVEN
SET Knob to OFF and open oven
door to cool the internal cavity.
After a short period of time, reset
controls for cleaning.
Q. My oven shelveshavebecome
grayafterseveralcleanings.Is this
normal?
A. Yes. After many cleanings,the
shelvesmay lose some luster and
discolor to a deep gray color.
Q. Why do I haveash leftin my
oven aftercleaning.
A. Some types of soil willleave a
deposit which is ash. It can be removed with a damp sponge or
cloth.
Q. Whatshould I do if excessive
smoking occursduringcleaning?
A. This is caused by excessive
grease and you should switch the
OVEN SET Knob to OFF. Open
windows and doors to rid room of
smoke. Allow the oven to cool for
at least one hour before opening
the ‘door. Wipe up the excess grease
and reset the clean cycle.
~
—.
—
—=
—
—
-----
-“ ~
FsIsl=c..
—.
—
—
—.
RmaE?n_
—.
—
~
—.
—.
—
—
—
—=
—
—
-----
-“ K
_—.—.
23
..
—.———.
Page 23

careand cleating ofYourcooking center
Propercareandcleaningareimportantso yourCookingCenterwill
giveyou efficientandsatisfactory
service.Followthese directions
carefullyin caringfor it to help
assuresafeandpropermaintenance.
BE SURE ELECTRICPOWER IS
OFF BEFORE CLEANINGANY
PART OF YOURCOOKING
CENTER.
Cormdl%mds
Don’t use sharp-edged utensils
around the control panels. They
might darnage it.
Clean the panels with a lightly
dampened cloth. DO NOT USE
cleaning sprays or large amounts of
soap and water. These can cause
problems with the control
mechanisms.
TemperatureProbe
The probe is sturdy, but care
should be taken in handling it. Do
not twist it. Avoid dropping it.
Clean as soon as possible after use.
Wipe it with a sudsy cloth, then rub
metal parts with a plastic scouring
pad if necessary. Rinse and dry.
DO NOT wash the probe in an
automatic dishwasher.
.Mumhm Foil on shehw+-Why youShowldn?Wix?it
DO NOT place a sheet of alum-
inum foil on any shelf in either your
microwave or conventional oven. If
you do, your foods may not cook
properly. The oven finish may be
damaged. And there may be an
increase in heat on the outside surfaces of the oven.
OvenLamp
The oven lamp bulb is long-lasting.
Only a qualified servicetechnician
should replace it.
DOUBLE Dm’YTM
shelf AAxx?ssm.y
Yourshelfaccessoryisdesignedfor
usein a microwaveovenonly;do
not usein a conventionaloven.Do
not usea browningdishwiththe
shelf.Arcingcouldoccur.
Cleanshelfwithmildsoapand
wateror in thedishwasher.Do not
removeplasticspacersfromthe
shelfwhencleaning.Do not clean
in self-cleaningoven.
Pww.ltims for use
Use metal only as directed in the
Cookbook. Metal trays no more
than 3/4” deep may be used for TV
dinners, and the metal terriperature
probe is designed for microwave
oven use. Always keep metal at
least one inch away from sidesof
oven.
ofMetal
Ck!mring--outside
Clean the outside of your microwave oven with soap and water,
then rinse and dry. The outer pane
of the window is glass. Wipe it
clean with a damp towel. Chrome is
best wiped with a damp cloth and
then with a dry towel.
e!eatig-hside
it clean andsweet-smelling.
Keep
Opening the oven door a few min-
utes after cooking helps air out the
inside. An occasional thorough
wiping with a solution of baking
soda and water keeps the interior
fresh.
Spills and spattersareeasyto re-
movefrom walls,floorandantenna
cover. That’s because there’slittle
heat except in the food, or sometimes in the utensil. Some spatters
wipe up with a paper towel, some
may require a damp cloth. Remove
greasy spatters with a sudsy cloth,
then rinse and dry.
NEVER USE A COMMERCIAL
OVEN CLEANERON ANY
PART OF YOURMICROWAVE
OVEN.
Wipeupspatterson theglasson
the-insideof the doordaily.Wash
glass, when it’ssoiled, with a minimum of sudsy,warm water. Rinse
thoroughly and dry.
Wipemetalandplasticpartson the
insideof the doorfrequently.Use a
damp cloth to remove all soil. DO
NOT USE ABRASIVES, such as
cleaning powders or steel and
plastic pads. They may mar the
surface.
Door Surface.
Whencleaningsurfacesof doorand oventhat come
togetheron closingthedoor,use
onlymild,non-abrasivesoapsor
detergents applied with a sponge
or soft cloth.
Do not removethe plasticantenna
coveratthetop of the oven (see
page 6.) You willdamage the oven
if you do.
UsingaBrown‘NSearDish: Use
BarKeepersFriend@Cleanser.
High heat generated on the bottom
of the Brown ‘NSear Dish can
cause scorched appearing stains to
bake onto the floor if grease is
present. These may be removed
with Bar Keepers Friend@Cleanser
by SerVassLaboratories, Inc.
After usingthis cleaner, rinse and
dry thoroughly, following instructions on can. Do not use it on the
painted surfaces such as the walls—
it may scratch the paint.
Bar Keepers Friend@Cleanser is
sold in many grocery, hardware
and department stores.
o
e
24
Page 24

——------
.——-....-
--.-————_—-
—
Thermostat
!ten
IndentedArea
(Areaseenthroughglasscontrol
panelafterknob is removed.)
The temperature on your new oven
has been accurately set at the factory. However, if your food consistentlybrowns too much or too
little, you may make a simplead-
justment behind your OVEN
TEMP Knob. To readjust your
thermostat:
t) Rotate OVEN TEM~ Knob to
_ CLEAN position and pull knob off
~=-shaft revealing area behind
.L
—
Adluu.
Insert the tip of a 3/ 16”standard
crewdriver, into the indented area
e
directly under the notch and turn in
the desired direction. Be careful not
to scratch glasscontrol panel.
@ Toincrease oven temperature
movedial one notch counterclock-
wise.To lower oven temperature,
move dial one notch clockwise.
(Each notch represents approximately 150.)
@Return knob to the range by
matching the flat area ofthe knob
to the shaft.
%Recheck oven performance
before making an additional
adjustment.
oven ventDuct
The oven is vented through a duct
that’s located on the right side of
the ovenjust above the door handle
(seepage 6). Moisture and vapors
from the oven are vented through it
when oven isin use. Nevercover
the hole in the duct. To do so pre-
ventsit from functioningpropkrly
during cooking and cleaning.- -
l.lamp
Repkwmlent
CAUTION:Beforereplacing
yourovenlampbulb,disconnect
theelectricpowerforyour
CookingCenteratthemainfuse
orcircuitbreakerpanel.Besure
toIetthelampcoverandbulbcool
completelybeforeremovingor
replacingthem.
The ovenlamp(bulb)is covered
withaglassremovablecoverwhich
isheldinplacewithabail-shaped
wire.Removeovendoor,ifdesired,
toreachcovereasily.
Toremove:
*Hold hand undercover so it
doesn’t fall when released. With
fingersof same hand, firmly push
back wire bailuntilit clears cover.
Lift off cover. DO N(YI’REMOVE
ANY SCREWS TO REMOVE
COVER.
@Replacebulbwith40-watthome
appliancebulb.
the d Alumhum Foil
in Broiling
If youwish,youmaylinethe
broilerpan withaluminumfoiland
covertherack withit for broiling.
ALWAYSBESURETOMOLD
THE FOIL THOROUGHLYTO
THE BROILERRACKAND
SLITTHEFOIL TOCONFORM
WITH SLITSIN THE RACK.
Stoppingfat and meatjuicesfrom
draininginto the broilerpanpreventstherack fromservingits purposeand MAYLETJUICES
BECOMEHOTENOUGHTO
CA~H FIRE.
Emmc—
———
——
—
—.
—..
—
—
-
—
~.
—
—
=“.
-
-
—–
-.
-
—
-----
-V ~
—
E$w=–
—
—
-
~—
—“
—
—.
—
~
--
-
-
-.-7
-. fi
~.——
—
—.
—
—
—
—.
-
Toreplacecover:
@Placeit intogrooveoflamp
receptacle.Pullwirebailforward
tocenterof coveruntilitsnapsinto
place.Wheninplace,wireholds
.
coverfirmly.Becertainwirebailis
indepressionincenterofcover.
*Connectelectricpowertooven.
25
Page 25

NOTE:Letrangehm partscoolbeforetouchingorhandling.
PART
MATERIALSTO USE
GENERALDIRECTIONS
Donot cleanthe bakeunit orbroil unit. Anysoilwillburn
BakeUnit and BroilUnit
offwhenthe unitis heated.NOTE.The bake unit is not
hingedand cannot beliftedto cleanthe ovenfloor. If spillover,residue,orash accumulatesaround the bakeunit, gently
wipearound the unit withwarmwater.
Drainfat, cool panand rack slightly.(Do not let soiledpan
BroilerPan & Rack
Soap and Water
Soap-Filled
ScouringPad
Plastic ScouringPad
and rackstand in oven to cool).Sprinkleon detergent.Fill
pan withwarmwaterand spreadcloth or papertowel over
the rack. Letboth stand fora fewminutes.Wash;scour if
.necessary.Rinseand dry. OPTION:The broilerpan and rack
mayalso becleanedin a dishwasher.
Pulloffknobs. Washgentlybut do not soak. Dryand return
OvenControl Knobs
Mild Soapand Water
controlsto ovenmakingsureto match flat area onthe knob
and shaft.
Washall glasswithcloth dampenedin soapywater. Rinse
OutsideGlassFinish
Soap and Water
and polishwitha drycloth. If knobson the controlpanel are
removed,do not allowwaterto rundowninsidethe surface
ofglasswhilecleaning.
Metal, including
ChromeSide Trims
and Trim Strips
Soap and Water
Wash,rinse,and then polishwitha dry cloth. DONOT USE
steelwool,abrasives,ammonia,acids, or commercialoven
cleanerswhichmaydamagethe finish.
Avoidcleaningpowdersor harsh abrasiveswhichmay scratch
the enamel.
Ifacids shouldspillonthe ovenwhileit is hot, usea dry
papertowelor.cloth to wipeup rightaway.Whenthe surface
hascooled,washand rinse.
For otherspills,suchas fat smatterings,etc., washwithsoap
PorcelainEnamel*
Paper Towel
Dry Cloth
Soapand Water
and waterwhencooledand then rinse.Polish wkha dry
cloth.
Onthis oven,cleanONLYthe door liner outsidethe gasket.
Thedoor is automaticallycleanedif the ovenisin the self-
InsideOvenDoor*
Soap and Water
cleaningcycle.Ifspilloveror spatteringshouldoccur in
cookingfunction,wipethe door withsoap and water. DO
NOTrub or damagegasket.Avoidgettingsoap and water on
the gasketor in therectangular flangeson the door.
OvenGasket*
Avoid getting ANYcleaningmaterialson the gasket.
Coolbeforecleaning.Frequentwipingwith mild soap and
OvenLiner
Soap and Water
$;
Shelves
(SeeSelf-Cleaning
Soap and Water
OvenDirections)
*sDillaze of ~arinade~a fruit iuice.. and basting materials containing acids may cause discoloration. Spilloversshouldbewiped Up immediately,with
cihe b~ingtakentonottouc”hany’hot portion-oftheoven.Whenthesurfaceiscool,cleanandrinse.”
waterwillprolongthe time betweenmajor cleanings.Besure
to rinsethoroughly.For heavysoiling,use yourselfcleaningcycleoften.
Yourshelvescan becleanedwith the self-cleaningfunction in
the oven.For heavysoil,cleanby hand usinganyand all
mentionedmaterials.Rinsethoroughlyto removeall materialsafter cleaning.
26
Page 26

—.
-—..,—.-
.....—-.....
.-—-
---y=%
;~T~s_~+&
——-——---.—-
.._—-._.
--——-———-—
===
-—-
-—
-7=
.—.
-----=5
Qtlestions?
UseThisProblemSolver
-
PROBLEIM
OVEN WILL NOT WORK Difficultymaybe in the maindistributionpanel of yourhouse bya blown
OVEN LIGHT Lightbulb is loose.
DOES NOT WORK
FOOD DOES NOT OVEN SET Knob notsetat BROIL.
BROIL PROPERLY
FOOD DOES NOT ROAST
OR BAKE PROPERLY
I POSSIBLECAUSE AND REMEDY— —
ovencircuit fuse, a tripped ovencircuitbreaker, the main fuseor the main
circuit breaker, depending on nature of the power supply. If a circuit
breaker is involved,resetit. If the control box usesfuses,the oven fuse(a
cartridge-type) should be changed BUT ONLY BY- SOMEONE
FAMILIAR WITH ELECTRICAL CIRCUITS. If after doing one of
these procedures, the fuse blows or circuit breaker trips again, call for
service.
NOTE: Apartment tenants or condominiumowners should request their
buildingmanagementto perform thischeckbefore callingfor service.
Ovencontrolsare not properlyset.,
Door leftinlocked position after cleaning.
Bulbis defective.Replace.
Switchoperating ovenlightis broken. Callfor service.
OVENTEMP Knob not set at BROIL.
Door not leftajar as recommended:,
Improper shelfpositionisbeing used.Check BroilingChart.
Necessarypreheating wasnot done. ,
Food is beingcooked on hot pan.
.Utensilsare not suitedfor broiling.
Aluminumfoilused on the broil pan rack has not beenfitted
properlyand slitas recommended.
,
OVEN SET Knob not seton BAKE.
.OVENTEMP Knob not set correctly.
.Shelfpositionis incorrect.Check ~oasting or BakingCharts.
, Oven shelf is not level.
Wrong cookwareis beingused.When roasting, pan is too small. -‘
A foiltent wasnot usedwhen neededto slowdown browningduring
roasting.
,.
.,.
OVEN WILL NOT Automatictimer dial/dialsnot setor not set properly.The STOPdial must
SELF-CLEAN
3VEN DOOR WON’TLATCH Turn OVEN SET Knob to CLEAN. GlowingLocked Light after knob is
be setand advancedbeyondthe time noted on oven clock.
The STOP dial was not advancedfor long enough.
Both OVEN SET and OVENTEMP Knobsmustbe at CLEAN setting.
A thick pileof spilloverwhen cleaned leavesa-heavylayerof ash in spots
whichcould have insulatedthe area from further heat.
Latch not ina’’CLEAN”position.
turned indicatesovenistoo hotfrom previoususeand door won’tlatch. To
cool oven,open door wide,then latch can be moved.
OVEN SET Knob mustbeat CLEAN or OFF beforeLatch can bemoved.
Latch ReleaseButton not pushed whenmovingLatch.
28
Page 27

,PROBLEM
#!ivENWILL N~T’ ~oMJj ON
POSSIBLE CAUSE AND REMEDY
A fuse in your home may be blown or the circuit breaker tripped.
Replacefuseor resetcircuitbreaker.
Make sure 3-prong plug on oven isfully inserted into wall receptacle.
CONTROL PANEL
LIGHTED, YET OVEN
WILL NOT START
FOODS ARE EITHER
OVERCOOKED OR
UNDERCOOKED
CGEE~EWApPEAR~
ONDISPLAY
Door not securelyclosed.
STARTmustbetouchedafterenteringcookingselection.
Another selectionentered already in oven and CLEAR/OFF not.
touchedto cancelit.
Make sureyouhaveentered cookingtimeaftertouchingTIMECOOK.
,-,
CLEAR/OFF wastouchedaccidentally.Reset cookin~programand
touch START.
Make sure you have entered desired finished temperat~re after,
touching TEMP COOK/HOLD.
Make sure you have entered a code number after touching, QUICK
SET or AUTO ROAST.
.,
Cookingtimes may vary becauseof starting food temperature,food
density or amount of foods in oven.TouchTIME COOKand additionalcookingtimefor completion. .
Incorrect Power Level-entered. Check Cookbook’’for recommended
Power Level or changing levelsduring cooking if necessary. .
Dish was not rotated, turned or stirred. Some dishes require specific
instructions. Check Cookbook or recipe for,these inst~ctions. ~ ~
Too
manydishesin ovenat sametime.Cookingtime‘mustbeintireased
.. . .
.-
whencookingmorethan onefood item. CheckrCookbookfor recommendation on increasingtime.
Probe not inserted properly into meat or dish when using Temp Cook/
Hold or Auto Roast functions. Check Cookbook for specific
instructions.
Incorrect QUICK SET numbers entered. , ‘ ‘
Check Cookbook for food placement aid instructions when using
DOUBLE DUTVMShelf.
.,
, .-
,$
.,.
,.
WhenusingTempCook~Hold,a temperaturelessthan90°ormorethan
199°hasbeenentered.
,,
WhenusingDelay~$wt,youhavenotentereda validclocktime.
When usingClock,you have not entereda validclocktime.
When using QUICK SET, you have not entered’a valid QUICK SET.
QUICK SET mustbe 2 or 3digits.
$~pR~B*SAPPEARS
ONDISPLAY
I
AHThese ThingsAn?Nm-mdl
012 -Y&H’?%!kmw’a%’e@rim:
When Lock Light comes on
uring self-cleaning lower oven, a
an in the microwave oven comes
I to keep oven components cool.
@Steam or vapor escaping from
around the door.
Probe has been forgotten or not seated properly in ,oven wall when
using Auto Roast or Temp Cook/Hold functions.
@Light reflection around door or
outer case.
@Some TV-Radio interference
might be noticed while using your
microwave oven. It’ssimilar to the
interference caused by other small
appliances and does not indicate a
problem with your oven.
29
@Dimming oven light and change
in blower sound may occur while
operating at power levelsother
than high.
@Dull thumping sound while oper-
sting at power levelsother than
high.
Page 28

If YouNeedservice
Toobtainservice, seeyour warranty
on the back page ofthis book.
We’reproud ofour service and
wantyou to be pleased. If for some
reason youare not happywiththe
service youreceive, here are three
stepsto followforfurther help.
FIRST,contactthepeople who
serviced
whyyouarenotpleased.In most
cases,thiswi!lsolvetheproblem.
NEXT,ifyouarestillnotpleased,
writeallthedetails-including
yourphonenumber—to:
Hotpoint
AppliancePark
Louisville,Kentucky40225
FINALLY,if yourproblemisstill
notresolved,write:
MajorAppliance
ConsumerActionPanel
20NorthWackerDrive
Chicago,Illinois60606
yourappliance.Explain
Manager,ConsumerRelations
-
-
31
Page 29

i?!if!!ll
“a
M?dl
WHAT1sCOVERED
OWAVEOVENIRANGE ~ ‘ ‘
t
ANTY ~
Saveproofof originalpurchasedatesuchasyoursalesslipor cancelledcheckto establishwarrantyperiod.
FULLONE=YEARWARRANTY
For one year from dateof original
purchase,we will provide,free of
charge, parts and service labor in
your home to repairor replace any
part of the rnicfowave ovenhnge
that fails becauseof a manufacturing defect.
LIMITEDADDITIONAL
FOUR=YEARWARRANN
For the second through fifth year
from date of original purchase,
we will provide,freeof charge, a
replacement magr?etrontube if the
magnetron tube fails because of a
manufacturing defect.You payfor
the service trip to your home and
service laborcharges.
This warranty is extended to the
original purchaserandanysucceed-
ing owner for products purchased
for ordinary home use in the 48
mainland states, Hawaii and
Washington, IN. In Alaska the
warranty is the sameexcept that it
is LIMITEDbecauseyou must pay
to ship the product to the service
shop or for the service technician’s
travel costs to your home.
All warranty servicewill be provided
by our Factory Service Centers or
by our authorized Customer Care”
servicersduring normal working
hours.
Look in the White or Yellow Pages
of your telephone directory for
HOTPO!NTFACTORYSERVICE,
GENERALELECTRIC-HOTPOINT
FACTORYSERVICEor HOTPOINT
CUSTOMERCARE” SERVICE.
WHATisNOTCOVERED
Somestates do notallowthe exclusionor limitationof incidentalorconsequentialdamages,so theabovelimitation orexclusion
may notapplyto you.Thiswarrantygivesyouspecific legalrights,andyoumayalsohaveotherrightswhichvaryfrom stateto state.
To knowwhat yourlegalrightsarein your state,consultyour localor stateconsumeraffairsoffice or your state’sAttorneyGeneral.
@Service trips to your home to
teach you how to usethe product.
Readyour Use andCare materiaL
If you then haveany questions
about operating the product,
please contact your dealer or our
Consumer Affairs office at the
address below.
. Improper installation.
If you havean installation problem,
contact your dealeror installer.
Youare responsible for providing
adequate electrical, exhausting
and other connecting facilities.
Warrantor:General Electric Company
e Replacement of house fuses
or resetting of circuit breakers.
~ Failure of the product if it is
used for other than its intended
purpose or usedcommercially.
e Damageto product caused
by accident, fire, floods or acts
of God.
WARRANTORISNOTRESPON-
SIBLE FORCONSEQUENTIAL
DAMAGES.
.
Ii
●
PartNo.205CI026P121
Pub.No.39-4575
8/86
[f further help is needed concerningthis warranty,contact:
Nlanager-Consurner Affairs, Genera\ Electric Company,Appliance Park,Louisville, KY 40225
~[m
*
.————_
F!K961G
 Loading...