

Page 1

H togetthe best froti
UseandCareof
built-inmodel
RK960
Energysatig tips
Featuresof
yourCookingCenter
Howtouse themicrowave
AUTOROASTfeature
p12
Howtousethemicrowave
QUICKSETfeature
Howtooperatethe
self-cleaningoven
savetimeandmonev.
d
p5
p6
p14
p19
Beforeyourequestservice,
use theProblemSolver
The GE AnswerCent&
800,626.2000
w
D26
-.,
,
Page 2

Help us
PRECAUTIONS
HelpYou.
● m
Readthisbookcarefully.
It will help you operate and maintain your new Cooking Center
properly.
Keep it handy for answersto your
questions.
If you don’t understand something
or need more help. . .
Call, toll free:
The GE AnswerCenter’”
800.626.2000
consumer information service
or write: (include your phone
number);
Consumer Affairs
Hotpoint
Appliance Park
Louisville, KY 40225
Writedown the modeland
serialnumbers.
You’llfind them on a label on the
front of the lower oven behind the
door.
These numbers are also on the
Consumer Product Ownership
Registration Card that came with
your Cooking Center. Before
sending in this card, pleasewrite
these numbers here:
Model No.
Serial No.
Usethese numbers in any
correspondence or servicecalls
concerning your Cooking Center.
Be sureyourovenis
registered.
Itis important that we, the manufacturer, know the location of your
Cooking Center should a need
occur for adjustments.
Yoursupplier is responsible for
registering you asthe owner.
Pleasecheck with your supplier to
be sure he has done so; also send
in your Consumer Product Ownership Registration Card. If you move,
or if you are not the original purchaser pleasewrite to us,stating
model and serial numbers. This
appliancemustbe registered.
Pleasebe certainthatit is.
Write to:
Hotpoint
Range Product Service
Appliance Park
Louisville, KY 40225
If you receiveda damaged
oven.. .
immediately contact the dealer (or
builder) that sold you the Cooking
Center.
Savetime and money.
Beforeyou requestservice,check
the ProblemSolveron pages 26-27.
It lists minor causes of operating
problems that you can correct
yourself.
TO AVOID
POSSIBLE
EXPOSURETO
EXCESSIVE
MICROWAVE
ENERGY
(a) Do Not Attemptto operate this
oven with the door open since open
door operation can result in harmful
exposure to microwaveenergy. It is
important not to defeat or tamper
with the safety interlocks.
(b) Do Not Placeany object
between the oven front face and the
door or allow soil or cleaner residue
to accumulate on sealing surfaces.
(c) Do Not Operatethe oven if it is
damaged. It is particularly important
that the oven door close properly
and that there is no damage to the:
(1) door (bent),
(2) hinges and latches (broken or
loosened),
(3) door sealsand sealing surfaces.
(d) The OvenShouldNot be
adjusted or repaired by anyone
except properly qualified service
personnel.
MicrowavingTips
@ Make sure all utensils used in
your microwave oven are labeled
“suitable for microwaving”. Check
your Cookbook for specific test
to determine “microwave-safe”
utensils.
e Papertowels, wax paper,and
plastic wrap can be used to cover
dishes in order to retain moisture
and prevent spattering.
e Some microwaved foods require
stirring, rotating, or rearranging.
Check your Cookbook for specific
instructions.
@ Some foods such as unshelled
eggs and hot dogs must be pierced
to allow steam to escape during
cooking.
m
o
o
2
Page 3

contents
...-.-
Microwave Oven
microwavingTips . . . . . . . . . . . . . . 2
Q
afety Instructions . . . . . . . . . ...3-5
eatures of YourOven . . . . . . . . . . 6
uch Control Panel . . . . . . . . . . . 7
6
‘Time Cook . . . . . . . . . . . . . . . . . . ..8
Defrost .. . . . . . . . . . . . . . . . . . .. . .9
Temperature Cook . . . . . . . . . . . . 10
Hold/Timer . . . . . . . . . . . . . . . . . . . 11
Auto Roast . . . . . . . . . . . . . ...12. 13
Quick SetControl &Chart .. 14,15
Conventional Oven
Safety Instructions .. . . . . . . . ...3-5
Features . . . . . . . . . . . . . . . . . . . . ..6
OvenControls . . . . . . . . . . . . . ....6
Oven Light . . . . . . . . . . . . . . . . .. . 17
OvenShelves . . . . . . . . . . . . . . . . . 17
Minute Timer, Clock,
Automatic Oven Timer . . . . . . . 17
Baking . . . . . . . . . . . . . . . . . . . . . ..17
Broiling . . . . . . . . . . . . . . . . . . . . . . 18
Roasting .. . . . . . . . . . . . . . . . . .. . 18
Baking Chart . . . . . . . . . . . . . . . . . 22
Broiling Chart . . . . . . . . . . . . . ...23
Roasting Chart
_Care of Your Cooking Center
J;-Clean Operation . . . . . . . . . . 19
‘Care of Your Cooking Center . . . 20
mp Replacement. . . . . . . . . . . . 21
venThermostat
Adjustment . . . . . . . . . . . . . . . . . 21
RemovableOven Door . . . . . . . . . 21
Cleaning Chart . . . . . . . . . . . . . . . 25
General
Before Using Your
Cooking Center . . . . . . . . . . . ...2
Energy Saving Tips . . . . . . . . . . ...5
Model &SerialNumber
Location .. . . . . . . . . . . . . . . . . . .6
The Problem Solver . . . . . . ...26-27
Consumer Services. . . . . . . . . . . . 31
Warranty . . . . . . . . . . . .. Back Cover
. . . . . . . . . . . . . . . 24
IMPORTANTSAFETYINSTRUCTIONS E
Red all instructionsbeforeusingthisappliance.
When using electrical appliances
basic safety precautions should
be followed, including the
following:
WARNING—TOreduce the risk
of burns, electric shock, fire,
injury to persons or exposure to
excessivemicrowave energy:
e Usethis appliance only for its
intended use as described in this
manual.
e
Be sure your appliance is
properly installed and grounded
by a qualified technician in
accordance with the provided
installation instructions.
e This appliance must be con-
nected to a grounded, metallic,
permanent wiring system,or an
equipment grounding conductor
should be run with the circuit
conductors and connected to
the equipment grounding terminal or lead on the appliance.
* This appliance should be serviced only by qualified service
personnel. Contact nearest
authorized service facility for
examination, repair or
adjustment.
e Before performing any
service, DISCONNECT THE
OVEN POWERSUPPLYAT THE
HOUSEHOLD DISTRIBUTION
PANEL BY REMOVING THE
FUSE OR SWITCHING OFF
THE CIRCUIT BREAKER.
e Do not cover or block any
openings on the appliance.
e Do not use outdoors.
@ Do not operate this appliance
if it is not working properly, or if
it has been damaged or dropped.
IS As with any appliance, close
supervision is necessarywhen
used by children.
e Do notleavechildrenalone—
children should not be left alone
or unattended in area where
appliance is in use.They should
never be allowed to sit or stand
on any part of the appliance.
e Don’t allow anyone to climb,
standorhangonthedoor.They
coulddamagethe oven.
~ CAUTION: DO NOT STORE
ITEMS OF INTEREST TO
CHILDREN IN CABINETS
ABOVE AN OVEN–CHILDREN
CLIMBING ON THE OVEN TO
REACH ITEMS COULD BE
SERIOUSLYINJURED.
@ Wear proper clothing. Loose
fitting or hanging garments
should never be worn while
using the appliance. Flammable
material could be ignited if
brought in contact with hot heating elements and may cause
severeburns.
@ Useonly drypotholders—
moist or damp potholders on
hot surfaces may result in burns
from steam. Do not let potholders touch hot heating elements. Do not use atowel or
other bulky cloth.
@ Neveruseyour appiiancefor
warmingor heatingthe room.
@ Do not storeflammablematerialsin the oven.
e Keephood and greasefilters
cleanto maintain good venting
and to avoid greasefires.
f.
@ Do not let cookinggreaseor
otherflammablematerialsaccumulatein the ovenor nearit.
@ Do not usewateron grease
fires.Flamein ovencan be
smotheredby completely
closingdoor and turningOven
Setto OFF.
e Whencookingporkfollow
our directions exactly and
always cook the meat to at least
170°. This assuresthat, in the
remote possibility that trichina
may be present in the meat, it
will be killed and meatwill be
safeto eat.
(continued next page)
3
Page 4

IMPORTANTSAFETYINSTRUCTIONS
(continued)
e Do not touch heating elements
or interiorsurfaceof oven.These
surfacesmay be hot enough to
burn eventhough they are dark
in color. During and after use,do
not touch, or let clothing or other
flammable materialscontact any
interior areaof the oven;allow
sufficient time for cooling, first.
Other potentially hot surfaces
include the ovenvent openings
and surfaces nearthe openings, crevicesaround the oven
door and the edgesof the door
window.
Remernbe~ The insidesurface of
the oven may be hot when the
door is opened.
Microwave CM?ri:
e Readand follow the specific
“PRECAUTIONS TO AVOID
POSSIBLE EXPOSURETO
EXCESSIVEMICROWAVE
ENERGY” found on page 2.
~ To reduce the risk of fire in
the oven cavity:
—Do not overcook food. Care-
fully attend appliance if paper,
plastic, or other combustible
materials are placed inside the
oven to facilitate cooking.
—Remove wire twist-ties from
paper or plastic bags before
placing bag in oven.
—Do not use your microwave
oven to dry newspapers.
—Paper towels and napkins,
wax paper.
products can contain metal
flecks which may cause arcing
or ignite. Paper products containing nylon or nylon filaments
should be avoided, as they may
also ignite.
—Do not pop popcornin your
microwaveovenunless in a
special microwave popcorn
accessory or unless
popcorn labeled for
microwave ovens.
Recycled paper
you use
use in
—Do not operatethe ovenwhile
emptyto avoiddamageto the
ovenand the dangerof fire. If by
accident the oven should run
empty a minute or two, no harm
is done. However, try to avoid
operating the oven empty at all
times—it savesenergy and pro-
longs life of the oven.
—If materials inside the oven
should ignite, keepoven door
closed,turn oven off, and disconnect the power cord, or shut
off power at the fuse or circuit
breaker panel.
e Some p~oductssuch as
whole eggs and sealed containers—for example, closed
glassjars—may explode and
should not be heated in this
oven.
~ Avoidheatingbabyfood in
glassjars, evenwithout their
lids; especially meat and egg
mixtures.
e Seedoor surface cleaning
instructions on page 20.
e Don’tdefrostfrozenbever-
agesin narrow necked bottles;
especially carbonated ones.
Evenif the container is opened,
pressure can build up. This can
causethe container to burst,
resulting in injury.
~ Use metalonly as directedin
Cookbook.Metal strips as used
on meat, roasts are helpful when
used as shown in Cookbook.
TV dinners may be cooked in
metal trays. However, when
using metal in microwave oven,
keep metal(exceptfor DOUBLE
DUTYTMshelf)at leastl-inch
awayfromsidesof oven.
~ Cookingutensilsmay
becomehot because of heat
transferred from the heated
food. This is especially true if
plastic wrap has been covering
the top and handles of the
utensil. Potholders may be
needed to handle the utensil.
s Sometimes,the ovenfloor
can becometoo hot to touch.
Be careful touching the floor
during and after cooking. o
s Do not useanythermometer
in food you are microwaving
unlessthat thermometer is
designed or recommended for
use in the microwave oven.
~ Removethe temperature
probefrom the ovenwhen not
~singit to cook with. If you leave
the probe inside the oven without
inserting it in food or liquid, and
turn on microwave energy, it can
create electrical arcing in the
oven, and damage oven walls.
~ Boilingeggs(in and out of
shell)isnot recommendedfor
microwave cooking. Pressure
can build up inside egg yolk and
may cause it to burst, resulting
in injury.
~ Foodswithunbrokenouter
“skin”such as potatoes, hot
dogs or sausages,tomatoes,
apples, chicken livers and other
giblets, and eggs (seeabove)
should be pierced to allow
steam to escape during cooking.
~ Plastic
utensils designed for microwave
cooking are very useful, but
should-be used‘carefully. Even
microwave plastic may not be as
tolerant of overcooking condi-
tions as are glass or ceramic
materials and may soften or
char if subjected to short periods
of overcooking. In longer exposures to overcooking, the food
and utensils could ignite. For
these reasons: 1) Use microwave plastics only “and use
them’; in strict co-mpliancewith
the utensil manufacturer’s
recommendations. 2) Do not
subject empty utensils to microwaving. 3) Do not permit children
to use plastic utensils without
complete supervision.
LJtensils-Plastic
@
@
e
a
4
Page 5

-.—..
m
“Boilable” cooking pouches
~and tightly closed plastic
bags
hould be slit, pierced or vented
s directed in Cookbook. If they
@
are not, plastic could burst during or immediately after cooking,
possibly resulting in injury. Also,
plastic storage containers should
beat least partially uncovered
because they form a tight seal.
When cooking with containers
tightly
remove covering carefully and
direct steam away from hands
and face.
covered with plastic wrap,
@ Useof the DOUBLE IXJTYIM
shelfaccessory.(Seeyour
Cookbook for proper use.)
—Removethe shelf from oven
when not in use.
—Do not store or cook with
shelf on floor of oven. Product
damage may result.
—Use potholders when handling
—the shelf and utensils. They may
“ hot.--
—
—Do not use microwave
—
.-~wi-lii-l~ dish on shelf. The
~i-l~if could overheat.
@ Stand awayfrom the oven
whenopeningoven door. The
hotair or steamwhichescapes
cancause burnsto hands,face
and/or eyes.
@ Don’t heat unopenedfood
containersin the oven. Pressure
couldbuildup and the container
couldburstcausingan injury.
@ Keep oven vent ducts
unobstructed.
@ Keep oven free from grease
build up.
@ Place oven rack in desired
position while oven is cool. If
racks must be handled when
hot, do not let potholder contact
heating units in the oven.
@ Pulling out shelf to the shelf
stop is a convenience in lifting
heavyfoods. It is also a precaution against burns from touching
hot surfaces of the door or oven
walls.
@ When using cooking or roasting bags in oven, follow the
manufacturer’s directions.
@ Do not use your oven to dry
newspapers. If overheated,they
can catch fire.
self-cleaning
@ IDo
not cleandoor gasket.
oven:
The door gasket is essential for
a good seal. Care should be
taken not to rub, damage, or
move the gasket.
@ Do not useovencleaners.
No commercial oven cleaner or
oven liner protective coating of
any kind should be used in or
around any part of the oven.
@ Clean only parts listed in this
Use and Care Book.
@ Beforeself-cleaningtheoven,
remove broiler pan and other
utensils.
@ Listenfor fan—a fan noise
should be heard sometime during the cleaning cycle. If not,
call for service before selfcleaning again.
SAVETHESE
INSTRUCTIONS
EnergySavingTips
Microwave choking
Useproper power levelas
@
recommended and DO NOT
OVERCOOK.
@ Do not operatethe oven while
empty. If by accident the oven
should run empty a minute or two,
no harm is done. However,try to
avoid operating the oven empty at
all times—savesenergy and also
ensures good long term life of oven.
Conventional
Oven Cooking
~ Preheatthe oven only when
necessary.Most foods will cook
satisfactorily without preheating.
If you find preheating is necessary,
keep an eye on the indicator light,
and put food in the oven promptly
after the light goes out.
@ Always turn oven OFF before
removing food.
@ Don’t open the oven door any
more often than necessary during
baking. If you do haveto open it,
close it as soon as possible.
@$Be sure to wipe up excess spillage before self-cleaning operation.
@ Cook complete oven meals
instead of just one food item.
Potatoes, other vegetables,and
some dessertswill cook together
with a main-dish casserole,meat
loaf, chicken or roast. Choose
foods that cook at the same temperature in approximately the same
time.
~ Use residual heat in oven whenever possible to finish cooking casseroles, oven meals, etc. Also add
rolls or precooked dessertsto warm
oven, using residual heat to warm
them.
5
Page 6
FeaturesofYour CookingCenter
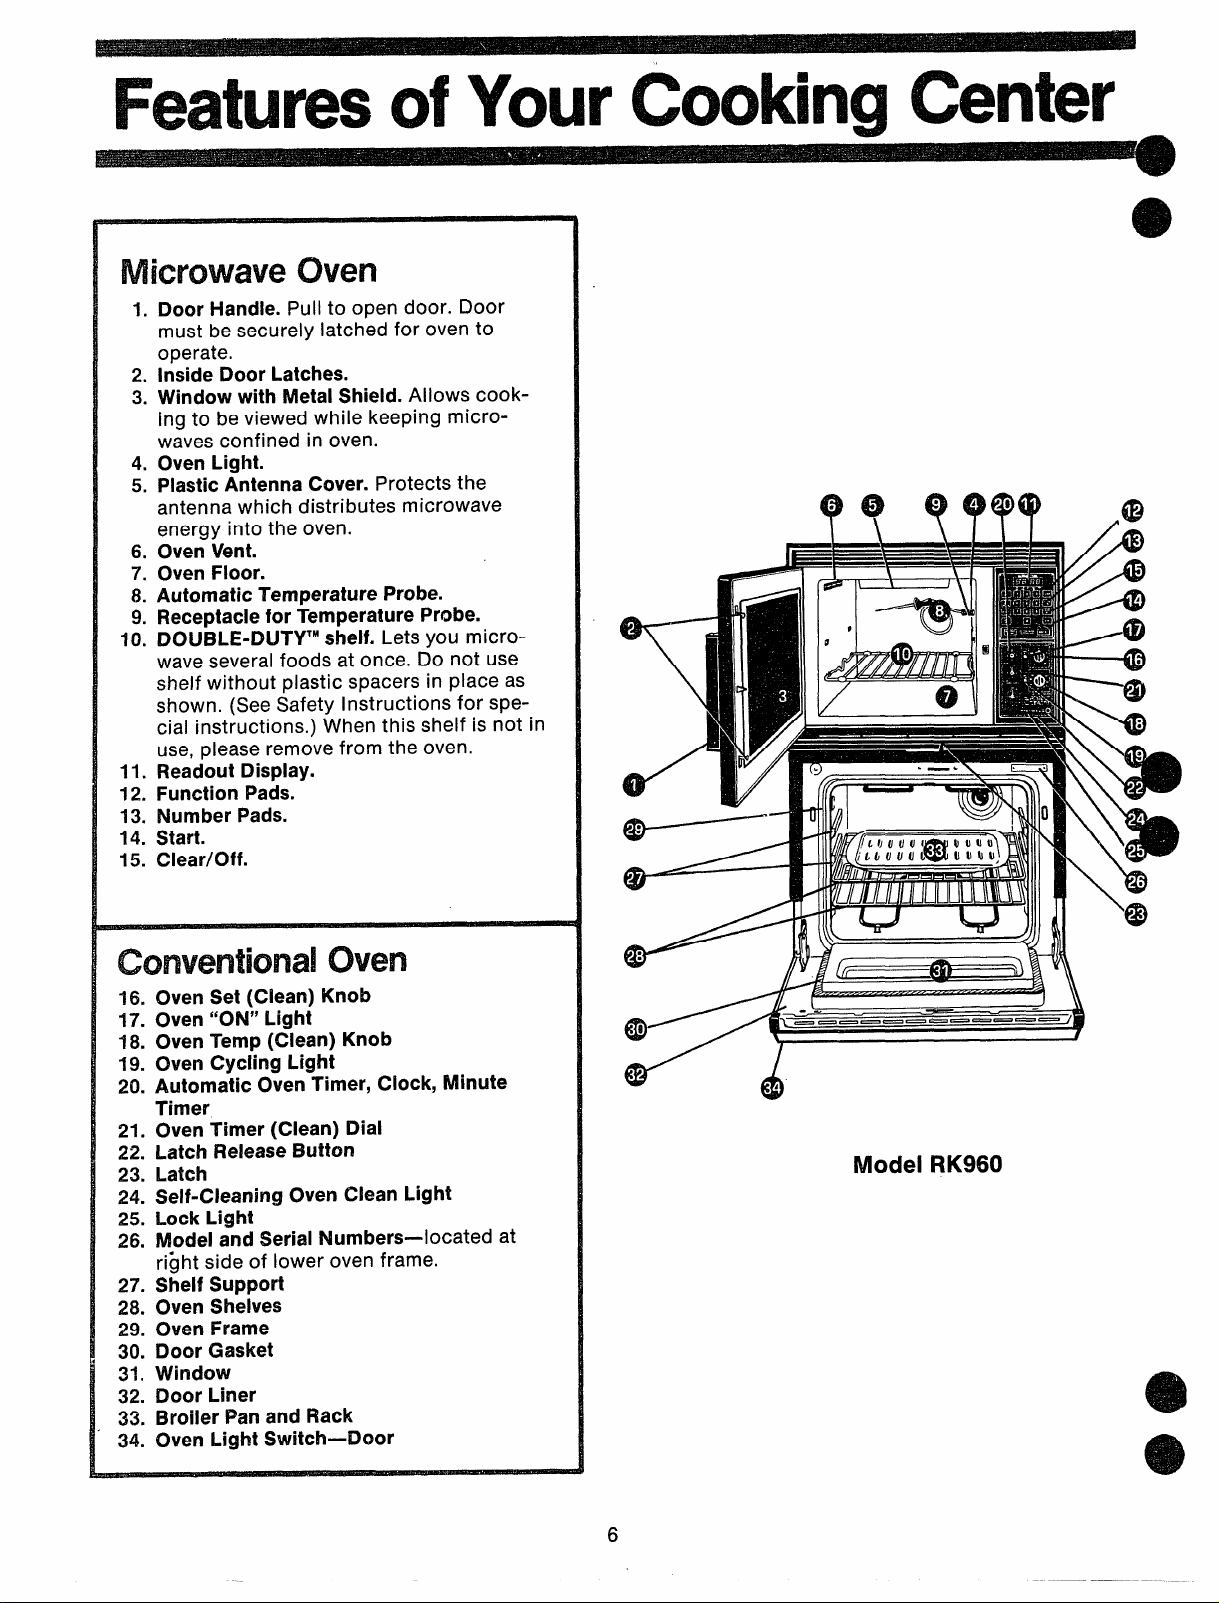
Microwavec)ven
1.Door Handle. Pull to open door. Door
must be securely latched for oven to
operate.
2. Inside Door Latches.
3. Window with Metal Shield. Allows cooking to be viewed while keeping microwaves confined in oven.
4. Oven Light.
5. PlasticAntenna Cover. Protects the
antenna which distributes microwave
energy into the oven.
6. Oven Vent.
7. Oven Floor.
8. Automatic Temperature Probe.
9. Receptaclefor Temperature Probe.
10. DOUBLE-DLJTYIMshelf. Lets you micro-
wave several foods at once. Do not use
shelf without plastic spacers in place as
shown. (See Safety Instructions for special instructions. ) When this shelf is not in
use, please remove from the oven.
11. Readout Display.
12. Function Pads.
13. Number Pads.
14. Start.
15. Clear/Off.
43
conventional oven
16. Oven Set (Clean) Knob
17. Oven “ON” Light
18, Oven Temp (Clean) Knob
19. Oven Cycling Light
20. Automatic OvenTimer, Clock, Minute
Timer
21. Oven Timer (Clean) Dial
22. Latch Release Button
23. Latch
24. Self-Cleaning Oven Clean Light
25. Lock Light
ModelandSerialNumbers—-locatedat
26.
ri~ht side of lower oven frame.
27. Shelf Support
28. Oven Shelves
29. Oven Frame
30. Door Gasket
31. Window
32. Door Liner
33. Broiler Pan and Rack
34. Oven Light Switch—Door
W’
6
-0000 — ----- —
A
d
Model RK960
Page 7

Microwave OvenTouchControlPanel ~
—
—
~
$2
6?
.
.
0
“—
63
_ ___
—-
—
—
k
-.
KY
K{;
—
—
—
—
.
1
i
0
1.
CLOCK. Touch this pad to enter time of day or
check time of day while microwaving. To set
clock, first touch CLOCK pad and then enter
time of day. For example, if time is 1:30, touch
number pads 1,3, and Oand 1:30 will appear in
display. Retouch CLOCK pad. To reset or
change time, simply repeat above process.
2.
TIME COOK. Microwave for a preset amount of
time using automatic Power Level 10(or change
power level after entering cooking time. See
page 8.)
TEMP COOK. Use the temperature probe to
3.
cook by using a preset temperature. Oven
shows temperature until preset temperature is
reached and then turns off. (See page 10.)
AUTO ROAST. Insert Probe, touch this pad,
4.
and desired number pad for Code to temperature cook meat with automatic preset program.
(See page 12.)
POWER LEVEL. Touch this pad before entering
50
another power level number if you want to
change from automatic Power Level 10 (HIGH)
for cooking or Power Level 3 (LOW) for
defrosting.
START.After all selections are made, touch this
6.
pad to start oven.
DISPLAY. Displaystime of day, time or temper-
7.
ature during cooking functions (or power level
when Power Level Pad is touched).
DEFROST. Gentle, generally uniform thawing at
8.
automaticPower Level3 (or change power level
after entering defrosting time. See page 9.)
liOLD/TIMER. This feature uses no microwave
9.
energy while it functions as both a kitchen timer
or asa holding period between defrost and time
or temperature cooking. (See page 11.)
10.
QUICK SET CONTROL. Use this pad as a
short-cut method for entering cooking time,
and power level. (See page 14.)
NUMBER PADS. Touch these pads to enter
11.
cooking/defrosting time, time of day, temperature, Power Level, Auto Roast Code or QUICK
SET digits.
CLEAR/OFF. When touched, it shuts off the
12.
oven and erases all settings (except time of day).
—
Page 8

CookingbyTime
The TIME COOK feature allows
you to preset the cooking time.
The oven shuts off automatically.
Power Level 10is automatically set
for time cooking, but you may
change this for more flexibility.
See your Cookbook.
To become better acquainted with
TIME COOK function, make a cup
of coffee by following the steps
below.
Step 1: Fill a cup 2/3 full of water
and add 1teaspoon of
coffee. Use a cupthat hasno metal
decoration. Place
freezedried
cup in oven and
closedoor.
Step 2: Touch TIME COOK. The
display shows :0. Signal light
aboveTIME COOKflashes.Power
Level 10 is automatically set in
oven, but does not appear in
display.
Questiohs
landAnswers
Q. I set my oven for the time called
for in -the recipe but at the end of
the time allowed, my dish wasn’t
done. What happened?
A. Since house power varies due
to time or location, many Time
Cook recipes give you a time range
to prevent overcooking.
oven for minimum time, test the
food for doneness, and cook your
dish a Ii.ttlelonger, if necessary.
Set the
Step 3: Select your time. Touch
1,2 and Ofor a minute and 20secends. 1:20 and signal light above
TIME COOK appear on display. If
another Power Level is desired
touch POWER LEVEL and the
number, although Power Level 10
(HIGH) is preferred for this cup of
coffee.
Q. I want to cook my dish on a ~
Power Level other than HIGH, what
do I need to do?
A. To change the Power Level,
touch the POWER LEVEL pad after
entering desired cooking time.
Enter the desired number and then
touch START.
Q. Can I interrupt my Time Cook
function to check the food?
A. Yes. To resume cooking, simply
close the door and touch START.
NOTE: Microwave power will not
come on until you are ready. You
must touch START for cooking to
begin.
Step 4: Touch START. Time
counting down shows on display.
Step 5: When time is up, oven
sounds and oven, light, and fan
shut off.
NOTE: When lower oven is cieaning, microwave fan will remain on
until Lock Light goes out,
Q. I touched the number pads and
selected my power level. When I
touched START, however, my oven
didn’t come on. Why not?
A. The TIME COOK pad must be
touched before setting the number
pads or else your oven will not begin cooking.
Q. I tried to change Power Level
but the display changed back to
cooking time. Why?
A. After touching Power Level pad
you only have 4 seconds to enter
the number. Try setting controls
again.
@
e
a
@
8
Page 9

—
6!9
K
Howtouse Defrost -
K
E:
Waarl
The Defrost setting is designed for
even thawing necessary for large
amounts of food and is one of the
most important advantages of a
microwave oven.
@ Power Level 3 is automatically
set for defrosting, but you may
change this for more flexibility.
@ See your Cookbook for the
complete defrosting chart.
To become better acquainted with
your Defrost function, defrost fro-
zen pork chops by following the
steps below.
Step 1: Place package of frozen
chops in the oven and close door.
—
s Step 2: Touch DEFROST. Display
reads :0. Power Level 3 is automatically set in oven. but does not
appear on readout. Signal Light
above DEF. flashes.
Step 3: Touch 8,0, and Ofor8 minutes. 8:00 and signal light above’
DEF. are displayed. If you wish to
change Power Level, touch Power
Level pad and then new number.
Step 4: Touch START, Time counts
down on display. When cycle is
completed, the oven signals and
automatically shuts off.
Step 5: Turn package over, close
door and repeat Steps 2, 3 and 4.
Step 6: When oven signals, remove
package and separate chops to
finish defrosting.
Defrosting Tips
e
Foods frozen in paper or
plastic can be defrosted in the
package.
e For even defrosting, many
foods need to be broken up or
separated part of the way through
the de
@ Homemade dinners can be
frozen in shallow foil trays and
heated for later use. (Do not heat
on metal shelf). Select foods
which microwave well.
@ Pre-packaged frozen dinners
can be defrosted and microwave
cooked, but foil tray must be
returned to box before cooking
on metal shelf.
@ Check your Cookbook for
other defrosting
tips.
F
C
K
—
——
r-
K
69
*
e
Questions
andAnswers
Q. When I press START, I hear a
dull thumping noise. What is it?
A. This sound is normal. It is letting
you know the oven is using a
Power Level lower than HIGH.
Q. Can I Defrost small items in a
hurry?
A. Yes, but they will need more
frequent attention than usual. Raise
the Power Level after entering the
time by touching POWER LEVEL
and 7 or 10. Power Level 7 cuts the
—
time about in %; Power Level 10
cuts the t~me to approximately I/s.
.
During either, rotate or stir food
frequently.
-
Q. Can I open the door during DEFROST to check on the progress
of my food?
A. Yes. You may open the door at
any time during microwaving. To
resume defrosting, close the door
and press START.
Q. Why don’t the defrosting times
in the Cookbook seem right for my
food?
A. Cookbook times are average.
Defrosting time can vary according
to the temperature in your freezer.
Set your oven for the time in-
dicated in your Cookbook. If your
food is still not completely thawed
at the end of that time, re-set your
oven and adjust the time accordingly.
9
1
Q. Can I select a-Power Level other
than automatic Power Level 3 for
defrosting?
A. Yes. Some smaller foods may be
defrosted quicker on higher Power
Levels but for even, carefree de- -m
frosting, Power Level 3 is suggested. Check the chart in the =;
Cookbook for specific times and =
Power Levels.
~rf
m
L
-f
E
B
m
6
Page 10

CookingbyTemperature
For many foods, internal temperature is the best
test of doneness.
Roasts or poultry are cooked to your preference
when temperature cooking. Heating or reheating
foods accurately to a serving temperature you
desire is simple and easy.
TEMP COOK takes the guesswork out of cooking
because the oven shuts off automatically when the
food is done.
T%e Temperature Probe
The temperature probe is a food thermometer that
gauges the internal temperature of your food; it
must be used when using TEMP COOK or AUTO
ROAST. Follow the directions for use and insertion
on page 12.
SENSOR
HANDLE
Howto TempCooka Rolld BeefRibRoastto M-ium
Step 1: Insert temperature probe
as directed in Cookbook and attach probe securely in oven wall.
Close the door.
Step 2: Touch TEMP COOK, The
readout display shows Oand signal
light above TEMP COOK flashes.
Step 3: Touch 1, 3, 0 or 130°.130
shows on display. Power Level 10
is automatically set in oven but
does not appear on readout.
Step 4: Touch POWER LEVEL pad.
Touch 5 for MEDIUM power. P-5
shows on display and then dis@lay
reverts back to set finished
temperature.
Step 5: Touch START. Display
shows temperature of food counting up.
Step 6: When 130° is reached, the
oven will signal. Remove probe and
food from the oven,
cooking
~ Usea lower power level setting;
it will heat more evenly even
though requiring more time.
e Be sure frozen food has been
completely defrosted before inserting probe. Probe may break off if
used in frozen foods.
@ Always insert probe into the
center of meaty areas; take care
not to touch the fat or the bone.
6+ Insert probe as horizontally as
Possible into foods as directed in
the recipes. Make sure the handle
does not touch the food.
@ Use the clip to keep the probe
in place while heating. - -
e Cover foods as directed in
Cookbook for moisture control and
quick, even heating.
e
o
CABLE
CLIP
-rips
e
@
Questions
andAnswers
Q. Are there any foods I can’t
TEMP COOK?
A. Yes. Delicate butter icings, ice
cream, frozen whipped toppings,
etc., soften rapidly at warm temperatures. Batters and doughs as
well as frozen foods are also difficult to cook precisely with the
probe. It is best to TIME COOK
these foods,
Q. After I followed the steps and
touched START, a signal sounded
and oven did not start. What is
wrong?
A. If you set the temperature either
below 80° or greater than 199° the
oven will not start. To re-enter,
touch CLEAR/OFF pad and begin
steps again.
Q, Oven sounded and would not
start although I entered the temperature correctly. What is wrong?
A. If you have not securely seated
the end of the probe into the
receptacle in the oven wall, if you
touch TEMP COOK and have forgotten to use the probe or if the
actual food temperature is higher
10
than set temperature, oven will
sound and not start.
Q. Can I leave my probe in the
oven if it’s not inserted in the food?
A. No. If the probe is left inside the
oven, touching the oven wall, and
not inserted in food, you may damage the oven.
Q. How do I know what temperature to set?
A. Your Cookbook contains sec-
tions on all types of foods showing
the temperatures needed to cook
the foods to different degrees of
doneness. For reheating, refer to
Reheating Charts in the front
of the Cookbook for specific
temperatures.
e
e
Page 11

Howto Usethe Hold/Timer
Your HOLD/TIMER, which oper-—
ates without microwave ene’rgy,
e
has three timing functions.
It operates as a Minute” Timer, it
can be set to delay cooking or may
be used as a hold setting after defrosting. Hold/Timer can be set up
to 99 minutes.
Step 1: Touch HOLD/TIMER pad.
The display shows :0. Signal light
above HOLD/TIMER flashes.
Step 2: Select the amount of time
you desire. Touch the appropriate
number pads. If, for example, you
are timing a three minute phone
call, touch 3, 0, and O.The display
shows 3:00.
Step 3: Touch START. The readout
display shows the time as it counts
down.
Step 4: When time is up, oven will
signal and display will show time
of day.
The HOLD/TIMER can also be
used to program “standing time”
between microwave cooking func-
tions. The time can range from one
second to 99 minutes and 99 sec-
onds. A HOLD, or “standing” time
may be found in some of your own
recipes or Cookbook.
To set the oven to delay cooking
up to 99 minutes follow Steps 1
and 2 to enter hold time, then set
Time Cook and time, or Temp
Cook and temperature desired
before pressing START. When
holding before temperature
cooking, be sure probe is in food
before pressing START.
Howto Defrost–Hold/Time–Time Cook
To help you become acquainted with the HOLD/TIMER feature as used with Time Cook or Temp Cook follow
steps below to defrost a frozen casserole for 15 minutes, then hold 10 minutes and then cook 25 minutes. If using
Temp Cook after Hold/Timer, be sure to insert probe correctly as shown on page 12.
Step 1: Remove casserole from the
freezer and place in oven. Touch
the DEFROST pad. The readout
panel shows :0 and signal light
above DEF, flashes.
1
I
!
Step 2: Touch 1, 5, 0 ‘and O for
defrosting time. 15:00 appears on
display panel, (Defrosting is auto-
matically set on Power Level 3 but
can be changed by touching
POWER LEVEL pad and the new
Power Level.)
Questions
andAnswers
Q. What will happen if I accidentally reverse the instructions?
A. If you accidentally reverse the
sequence of programming instructions, your oven automatically
rearranges your program. Defrosting always comes first, then hold,
and then the cooking function.
L
Step 3: Set standing or hold time
by touching HOLD/TIMER. :0 appears on display. Signal light above
HOLD/TIMER flashes.
Step 4: Touch 1,0, 0 and Oto hold
for ten minutes. 10:00 appears on
display.
Q. I programmed my oven for a
specific defrosting time but it defrosted longer than necessary.
What happened?
A. When instructions conflict, the
oven carries out the last instruction. You may have s,etthe oven to
Defrost for 4 minutes, Hold/Time
for 2 minutes, and then Defrost for
6 minutes. In this case, the oven
would Defrost for 6 minutes and
Hold/Time for 2 minutes.
Step 5: Touch the TIME COOK
pad. This display shows :0 and
signal light above TIME COOK
flashes.
Step & Touch 2, 5, 0 and O for
twenty-five minutes of cooking
time. 25:00 appearson display.
Step7: Touch START. 15:00 count-
ing down shows on display. As
each function is automatically performed oven display shows entered
information and light above that
function comes on. While cooking,
you may touch appropriate pad to
recall times you set.
Q. Can I Defrost-Hold only on my
oven?
A. Yes, for foods you don’t want
to cook, like frozen fruit, frozen
whipped topping, etc.—refer to
Cookbook.
NOTE: Allow foods to remain at
room temperature only as long as
safe. Times will vary.
11
Page 12

AutomaticRoasting
Auto Roastusesthe temperatureprobe to cook to
the desired serving temperature. Unlike Temp
Cook, which
is designed to use up to 3 power settings which
automatically switch during roasting, for even and
tender cooking results without overcooking.
usesa single power level,Auto Roast
Just
as in conventional roasting, only tender roasts
should be Auto Roasted until specified internal tem-
peraturesarereached.Lesstenderroasts
microwaved by time, according to the Cookbook
which comes with your oven. Complete information
on preparing
Cookbook.
roasts for microwaving is in your
should be
~~~~~~~~~
Place tender beef roasts on trivet in
microwave safe dish. Insert probe
horizontally into center meaty area
not touching bone or fat. Cover
with wax paper.
RoastsforAutoRoasting
Poultry, pork or ham roasts need
no trivet. Add % cup water to roast
dish, cover with plastic wrap. (For
cooking bag method, see cookbook.) Insert probe into center
meaty area.
Howto AutoRoastBwf to Mdium
Place meat in oven with probe to
the right. Insert cable end of probe
firmly into receptacle on oven wall.
1. Touch AUTO ROAST Pad. Cooking signal light
over Code flashes. Touch number pad 3. Touch
START.
3. Oven monitors internal temperature, automatically switching to lower power as meat’s temperature rises. This helps prevent toughening or
overcooking.
2. Light over Code shows on display. Readout displays internal food temperature.
4. After temperature is reached, oven signals.
12
Page 13

Use containers and coverings as directed at left. Place probe correctly in roast before cooking.
e
@Recommended Codes are also shown inside oven on
*
Beef tenderloin roast, because of its small size, should be turned over after 90° has been reached.
Beef
Tender Roast
Rare
Medium
Well
Meatloaf
(loaf or round)
Pork
Loin Roast
Precooked Ham
Poultry
Whole Chicken
(3 lb.)
Whole Turkey
(Up to 12 Ibs.)
—
(Insert probe into meatiest area of inner thigh from below end and parallel to leg.)
Turkey Breast
– (Insert probe horizontally into meatiest area.)
- ‘Fiecommended standing time before serving.
-
2 125°
3
4
4 170°
4 170°
1
5
5
4
Auto RoastChart.
12-14
140° 14-16 10-15
170°
115° 17-19 5-1o
190°
190°
170°
17-18
30-40
18-20
13-15
13-15
13-15
5-1o
30
5-1o
20
20
20
20
- -.
Questions
andAnswers
Q. Are there any particular trivets
that work better than others?
A. Yes,flat glass trivets such as lids
or dish covers generally give more
even cooking results than plastic
trivets. Also, ceramic ridge-
bottomed roasting dishes usually
work well. Plastic trivets generally
require meat to be turned over
more frequently because the grid
design and legs allow the bottom
of the meat to stay cooler as it
cooks, than glass trivets do.
.
—
Q. Why was my roast not fully Q. Is it necessary to always cover
cooked even though the tempera- foods during Auto Roast?
ture on the readout was correct
and Auto Roast completed?
A. When cooking with Auto Roast,
the temperature probe must be
inserted properly as fully described
in the Cookbook. Check to make
sure the probe hasn’t slipped or
changed position.
A. No, but a loose covering helps
prevent spattering and hold moisture in food.
13
Page 14

Howto use Quicksetcontrol
The Quick Set control provides a short-cut method
for entering time and the Power Level on your microwave oven. Cooking Codes are only used for
which need little or no attention, and which require
no change of power level during cooking. Recipes
which require additional ingredients, attention or
change in power !evel during microwaving should be
cooked in the usual manner. Also, recipes with cooking time of less than one minute or more than 99
minutes can not use Cooking Codes.
To understand the Quick Set control, it is important
to know what the numbers mean and what the
sequence ‘is. The first and second numbers, if set-
ting a3 digit Code, indicate the amount of time you
desire; the last control entry number is always the
Power Level. For example, 125 means 12 m“inutesat
Power Level 5. NOTE: Your oven can only be programmed to 99 minutes when using the Quick Set
control and the highest Power Level is 10 which is
represented by “O”. When setting a 2 digit Code
entry, the first is time, the second is power level.
example,
50 means 5 minutes at Power Level 10.
QUICK SET CODE
2-Digit
recipes
For
IIForExample
On the following page is shown many frequently
prepared foods and their codes. It’s easy, though,
to make Quick Set codes for many other recipes.
Just select one or two digits representing the length
of cooking time desired, and a final digit for the
Power Level required. The Codes given on the chart
are for the minimum time needed, to avoid overcooking which can dry out food and make it tasteless and tough. If you feel that more cooking is
needed, add additional time by changing the first
digit of the Code. You cannot add seconds to the
cycle time
your recipe calls for Power Level changes or different amounts of time needed between addition of
ingredients, you may set one Code for the first part
of the recipe, then after completion, set another
Code for that period of time and Power Level.
Remember that Quick Set codes are for microwaving by time only. If you are microwaving by
temperature, you must use the Temp Cook or Auto
Roast function.
—Codes are for whole minutes only. If
QUICK SET CODE
3-Digit
50
J=!
/
Time in
Minutes
Power
Howto SetQuickSet
Programming your oven for Quick Set control operation is easy. Follow the simple steps below.
~~~~ ~: Touch Quick Set. Signal
light above Code flashes.
High
Level
(lo)
control
~~~~ ~: Enter the proper code
into Quick Set control. For ex-
ample, a recipe calling for 12min-
utes cooking time at Power Level
10 would be 120. 120 appears on
the display panel.
R
Time in
Minutes Med (5)
Power Level
STEP 3: Touch START. Signal
light above TIME COOK shows as
well as time counting down on
display.
a
14
e
Page 15

... .
QuickSet Guide
Detach and Tape to Inside Cabinet Door or Other Prominent Place
The Quick Set control feature gives you an easy
automatic way to accurately set microwave time for
foods requiring only one power level and little attention during cooking. The Chart below shows frequently prepared foods and the suggested Cooking
Codes to use with each. For specific information on
stirring, turning or rotating, check the Microwave
Guide and Cookbook which comes with your microw-
ave oven. Always use microwave-safe containers
and microwave techniques as described in the
Cookbook.
To set Cooking Codes for many other foods or
recipes refer to page 14 in the Use and Care Book.
Quick Set control codes given are for minimum time.
Check and add time if necessary to complete
cooking.
Appetizers (Warming)
Dip (Cream Cheese)
‘/2 cup 25
1 cup 45
Dips (Sour Cream)
‘/2 cup
1 cup
Pastry Bites (Reheating)
2 Servings
4 Servings
Breads and Desserts
Apples
(2)
Bran Muffins
(5-6)
Brownies (Mix)
Cakes (Mix)
(16 cup fluted mold)
Gheese Bread, Yeast
(1 loaf) 105
Chocolate Chip Bars
Pudding Mix ( 3 oz. pkg.) 60
Beverages
Coffee, Soup
(1 cup)
Milk Bases
(1 cup)
Frozen Foods (Defrost)
Note: Times given below are for entire defrost
cycle. Usually food must be rotated, broken up or
turned over while defrosting. Check Cookbook for
specific information.
Cake, Whole Iced
Chicken, Cut-Up
(2M-31AIbs.) 143
Dessert Topping, Whipped
Doughuts or Pastries
(2-4)
Fish Fillets
(1 lb.) 83
Hamburgers
(2 Ibs.) 123
Pie, Fruit Filling
(Whole)
Roast
(4-5 Ibs.) 283
Steak or Chops
(2 Ibs.)
110
28
23
23
13
83
103
23
43
10
20
40
37
60
50
10
Meats/Main Dishes
Bacon
2 Slices
4 Slices
Chicken
8-10 pieces
2 pieces
4 pieces
Chuck Roast
(3 Ibs.)
Eggs, Baked
2 Eggs
Eggs, Scrambled
‘2Eggs
Entrees, Frozen
OZ.
8
16 OZ.
2 Ibs.
Fish Fillets
(1 lb.)
Franks (in bun)
2
4
Meat Loaf
(llA Ibs.)
Sausage (Raw)
4 Patties (% lb.)
4 Links
Swiss Steak
(2 Ibs.)
Frozen TV Dinner
(12 oz.)
Vegetables(Fresh)
Beans, Green
(1 lb.)
Broccoli
(1%1% Ibs.)
Speafs
cut
Cauliflower, Head
Corn on Cob
(4)
Potatoes
(4)
Squash
(1 lb,)
Zucchini
(1 lb.)
Vegetables (Frozen)
OZ. pkg. 70
10
28
48
200
50
100
665
27
20
50
120
200
30
10
30
170
30
40
705
70
150
157
120
137
120
120
100
100
I
Page 16

Your oven is designed to give you the best results in
I!i!K
baking, broiling, and roasting when used as recom-
mended. Before using your oven, look at the directions for setting and using all of the controls and
timer.
ovenLight
Light comes on automatically when door is opened
or use switch on window door to turn it on when
door is closed.
ovenshelves
When the shelves are correctly placed on shelf supports they are designed with stop-locks to prevent
them from coming out of the oven or tilting when
food is placed on them. TO REMOVE, lift up rear of
shelf and pull forward with stop-locks along top of
shelf support. TO REPLACE, insert shelf with stopIocks resting on shelf supports and push toward
rear of oven until it falls into correct position under
shelf support.
,
HowtosetYourRangeforBaking
(Also see Baking Chart, page 22.) -
Step 1: Place shelf on embossed
shelf support “B” or as indicated
}
on Baking Chart, page 22.
Step 2. After making sure that the
(
oven door is closed, turn the Oven
Set Knob to BAKE. Oven “On”
.ight comes on and remains on as
ong as Oven Set Knob ison BAKE.
4
step 3: Turn Oven Temp Knob to
i
he temperature called for in rec-
i
pe. Oven Cycling Light comes on
md remains on until preset oven
emperature is reached. It reap]ears each time oven temperature
jrops below preset temperature.
Hep 4: You may set your Minute
‘imertothedesired cooking time as
ldicated in your recipe. If your
ooking time is longer than sixty
linutes, Minute Timer must be
eset.
Most foods cook satisfactorily
without preheating, If preheating is
required, put your dish promptly in
the range after Oven Cycling Light
goes out.
Step 5: Place food inside the oven.
Make sure at least 1“ of space is
left between the cooking container
and the oven wall for proper heat
circulation. Close the oven door.
NOTE: Avoid opening your oven
door frequently. This could cause
undesirable results in your baking.
Only check foods at the minimum
time of the recipe. Then cook
longer if necessary.
Step 6: When the BAKE cycle is
complete, turn off heat. When
cooking food for the first time in
your oven, usethetime on your recipe as a guide. Be sure foods are
done before removing from oven.
HowtosetYcw Range
forTime Bake
Your Automatic Oven Timer controls your TIME BAKE feature.
When you TIME BAKE, your range
can be preset to start and stop
Automatic Oven Timer,
Minute Timer
Oven
Timer Controls aredesigned
to automatically startandstopcertain oven functions (TIME BAKE
or CLEAN). Dials are timed by a
special Clock with index marks
(denoting numerals) and hands.
(For location seepage6.) TO SET
THIS CLOCK,
knob of Minute Timer and turn the
Clock hands to correct time, then
let knob out. TO SET MINUTE
TIMER, turn knob to desired minutes. (Knob must be out to set
Minute Timer.) Minute Timer will
buzz when time has finished and
must be turned off manually.
Usethe Microwave Oven Clock for
easy reference to time of day.
automatically if you are not home.
Step 1: Be sure the range Clock
shows correct time of day since
Clock controls the Oven Timers.
Start dial pointer must indicate same time of day as on Clock. If
you want the oven to turn on at a
later time, set that time by pushing
in knob on Start dial and turn
pointer to time that you want oven
to start. (There’s no need to set
Start dial when starting time is the
present time of day.)
Step 2: To determine Stop time,
add the food’s cooking time to
time set on Start dial. Push in knob
on Stop dial and turn pointer to
time oven is to turn off.
Step3: Turn Oven Set Knob to TiME
BAKE. Oven “On” Light comes on
immediately even if the Start time is
later,
Step 4: Turn Qven Temp Knob to
temperature setting. Oven Cycling
Light comes on even though heat
is not on in the oven if a later start
time is used. Your oven automat-
ically turns on and off at the times
you set.
Step 5: Remove food and turn
Oven Set Knob to OFF.
push in the center
$s$
r
K*.
17
Page 17

.
Howto SetYourRangeforBroiling
(Alsosee Brolllng Chart,page23.)
Step 1: Place the meat on the
broiler rack in the broiler pan. Always use the rack ‘sofat drips into
the broiler pan.
Ste~ 2: Position Oven Shelf as indicat~d on Broiling Chart, page 23.
!iMep3: Turn the Oven Set Knob
and Oven Temp Knob to BROIL.
Both Oven Indicator Lights come on.
Step 4: Leave oven door ajar
about 3 inches (except chicken,
see below). The door will stay open
itself yet the proper temperature
will be maintained in the oven. Dur-
ing cooking, turn the food only
once.
Step 5: Turn Oven Set Knob to
OFF and serve food immediately.
Leave the pan outside the oven to
cool during the meal for easy
cleaning.
CookingTips
@ Foil may be used to line the
broiler pan and rack. However,
be sure to cut openings in the
foil to correspond with the slits
in the broiler rack so fat drips
into the pan below.
~ For all weights of chicken, broil
with door closed.
@ Placing food closer to the top
of the oven increases smoking,
spattering,
on the meat and the possibility
of food fat catching on fire. Always keep rack 3-5 inches
from the broiling unit.
exterior browning
HowtoSetYourRangefor Roasting
(Alsosee Roasting Chart, page 24=)
Step 1: Check the weight of the
meat and place, fat side up, on the
rack in the broiler pan that came
with your range. This helps the
meat to baste itself.
Step 2: Position oven shelf on
embossed shelf support “B” for
small roasts (3-5 Ibs.) and position
“A” for larger roasts. For very tall
roasts, remove second oven shelf.
Step 3: Turn the Oven Temp Knob
to 325°. (The exception is small
poultry which is roasted at 375°.)
Step 4: Close the oven door and
turn the Oven Set Knob to BAKE.
Oven “On” Light comes on and
stays on until Oven Set Knob is
turned to OFF. Oven Cycling Light
comes on and remains on until
temperature is reached.
St6p 5: Place your meat inside the
oven, making sure the pan is not
touching the oven walls or door.
Step & Turn off the heat when the
roasting cycle is complete.
18
CookingTips
Be sure meat is cooked to your
satisfaction. Most meats con-
tinue to cook slightly while
standing after being removed
from the oven. This should be
taken into consideration when
determining your cooking time.
Always use a roasting pan that
fits the size of your meat. A
roast placed in a pan too small
for its size will drip over the
edge.
You may cook frozen meat
roasts without thawing. How-
ever, you must allow more
cooking time. For large roasts,
add 10-25 minutes per pound.
For roasts under 5 pounds, add
10 minutes per pound.
To slow down surface browning
on turkeys, you can use a foil
“tent”.
should be laid loosely over the
poultry so the heat can circulate
under the foil.
Most frozen poultry should be
thawed before cooking to ensure it is done evenly. Some,
however, can be cooked successfully without thawing.
Check the packer’s label for
specific directions.
The tent-shaped foil
Page 18

Self-CleaningYourConventionalOven
If done properly, it will take only a few moments to
start the self-cleaning cycle on your range. After
setting your range to self-clean, a high heat temperature removes the soil in the oven cavity. The
dirt will then disappear byturning into anashwaste
orevaporatingintoan odorless and colorless vapor.
When the cycle is complete, allow your range to
cool. greasy spills and spatter on the oven interior would
~~~~ ~: Remove all cookware and food as well as heavy soil deposits from the oven. Clean spat-
ters or spills around the oven door,
rectangular flanges, Iand gasket.
Thenclose the door.
STEP 3: Push and hold Latch
ReleaseButton while latching door.
—
‘a
\\
k=
~~~p 4: Set The Automatic
OvenTimer:
Push in knob on Stop (Clean)
Dial and turn to the time you
wish oven to stop cleaning. Add
the number of hours needed for
cleaning to the present time of
day.
~~~~ ~: Turn Oven Set Knob
and Oven Temp Knob clockwiseto
CLEAN. The control will snap into
final position when the CLEAN position is reached.
Cleaning Indicator Lights come
on when all steps are set
properly.
If you wish to clean at a later
time set Start Dial to that time.
While you are becoming acquainted with your selfcleaning oven, we recommend 2 hoursfor the overage cleaning function, but in some cases a longer
cleaning time, up to 3 hours may be necessary. In
order to judge the degree of soil, look at the oven
floor and walls. Light spatter and thinner spills
would generally need only 2 hours cleaning. Heavy
need up to3 hours.
NOTE: A slight odor may
tected especially during the first
few cleanings. Do not be alarmed.
This is normal during the selfcleaning cycle.
When cleaning temperature is
reached, Lock Lightcomes on and
door cannot be unlatched ~ntil
Lock Light goes off.
.
\
~~~~ ~: When Lock Light goes
off, push and hold the Clean Lock
Button while sliding Latch to
OPEN. Turn Oven Set Knob to
OFF.
~~~~ 6: Turn.Oven Set Knob to
be de-
F.
Ii!
Questions
andAnswers
Q. Why is there still some black
soil left after cleaning?
A. You did not time the oven to
clean long enough. This deposit
will be removed in later cleanings.
Q. The fan in the mic;owave oven
runs during self-cleaning lower
oven. Is this normal?
A. Yes, the fan comes on when the
Lock Light glows, This fan helps
keep the components cool,
NOTE: Fan in microwave oven
comeson when Lock Light isglowing during cleaning lower oven.
Youmay useyour microwaveoven
during this time.
Q. Why did the Lock Light come
on when I first set the oven for
CLEAN?
A. Lock Light glowing indicates
that oven is too hot. Turn Oven Set
Knob to OFF and open Oven Doo[
to cool the internal cavity. After a
short period of time, reset controls
for cleaning.
Cl. My oven shelves have become
gray after several cleanings. Is this
normal?
A. Yes. After many cleanings, the
shelves may lose some luster and
discolor to a deep gray color.
19
Ct. Why do I have ash left in my
oven after cleaning?
A. Some types of soil will leave a
deposit which is ash. It can be removed with adamp sponge or cloth.
Q. What should I do if excessive
smoking occurs during cleaning?
A. This is caused by excessive
grease and you should switch the
Oven Set Knob to OFF. Open windows and doors to rid room of
smoke. Allow the oven to cool for
at /east one hour before opening
the door, Wipe up the excess
grease and reset the clean cycle.
Page 19

careandcleaningofYourcooking center
Propercareandcleaningare importantso yourCookingCenter will
giveyouefficientandsatisfactory
service.Followthesedirections
carefullyin caringforitto help
assuresafeandpropermaintenance.
BESURE ELECTRIC POWERIS
OFF BEFORECLEANING ANY
PARTOF YOURCOOKING
CENTER.
cxmwolPanels
Don’t usesharp-edged utensils
around the control panels. They
might damage it.
Clean the panels with a lightly
dampened cloth. DO NOT USE
cleaning sprays or large amounts of
soap and water. These can cause
problems with the control
mechanisms.
TemperatureProbe
The probe is sturdy, but care
should be taken in handling it. Do
not twist it. Avoid dropping it. Clean
assoon as possible after use.Wipe
it with a sudsy cloth, then rub metal
parts with a plastic scouring pad if
necessary.Rinseand dry. (Or wash
in dishwasher.)
Aluminumf%illcmShebm3Whyyou shouldn’tuseit
DO NOT place a sheet of aluminum
foil on any shelf ineither your microwaveor conventional oven. If you
do, your foods may not cook properly. The oven finish may be damaged. And there may be an increase
in heat on the outside surfaces of
the oven.
OvenLamp
The oven lampbulbislong-lasting.
Only a qualified servicetechnician
should replace it.
DOUBLE DUTYTM
ShelfAccessory
Yourshelf accessory is designed for
usein a microwave oven only; do
not use in a conventional oven. Do
not usea browning dish with the
shelf. Arcing could occur.
Clean shelf with mild soap and
water or in the dishwasher. Do not
removeplastic spacersfrom the
shelf when cleaning. Donot clean
in self-cleaningoven.
Precautionsfor Useof Meta!l
Usemetal only asdirected in the
Cookbook. Metal trays no more
than 3/4” deep may be usedfor TV
dinners, and the metaltemperature
probe is designed for microwave
oven use.Always keep metal at
leastone inch away from sides
of oven.
Cleaning—Outside
Cleanthe outside of your microwave
ovenwith soap and water, then
rinse and dry, The outer pane of the
window is glass. Wipe it clean with
a damp towel. Chrome is best
wiped with a damp cloth and then
with a dry towel.
t2teamhg-hside
Keepit cleanand sweet-smelling.
Openingthe oven door a few min-
utes after cooking helps air out the
inside. An occasional thorough wip-
ing with a solution of baking soda
and water keeps the interior fresh.
Spillsand spattersareeasyto removefromwalls,floorand antenna
cover.That’s becausethere’s little
heat except in the food, or sometimes in the utensil. Some spatters
wipe up with a paper towel, some
may require a damp cloth. Remove
greasyspatters with a sudsy cloth,
then rinse and dry.
NEVERUSEA COMMERCIAL “
OVEN CLEANERON ANY PART
OF YOURMICROWAVEOVEN.
Wipeupspattersonthe glasson
theinsideof the doordaily.Wash
glass,when it’s soiled, with a min-
imum of sudsy, warm water. Rinse
thoroughly and dry.
Wipe metalandplasticpartson the
insideofthe doorfrequently.Usea
damp cloth to removeall soil. DO
NOT USEABRASIVES, such as
cieaning powders or steel and plastic pads.They may mar the surface.
DoorSurface.When cleaning surfaces of door and oven that come
together on closing the door, use
only mild, non-abrasivesoaps or
detergents applied with a sponge
or soft cloth.
Do notremovetheplas~icantenna
coverat the topofthe oven(see
page6.) Youwill damage the oven
if you do.
Usinga Brown‘N SearDish?Use
BarKeepersFriend@Cleanser.
High heat generated on the bottom
of the Brown ‘N Sear Dish can cause
scorched appearing stains to bake
onto the floor if greaseis present.
These may be removedwith Bar
KeepersFriend@Cleanser by
SerVassLaboratories, Inc.
After using this cleaner, rinse and
dry thoroughly, following instructions on can. Do not useit on the
painted surfaces such asthe walls—
it may scratch the paint.
Bar Keepers Friend@Cleanser is
sold in many grocery, hardware and
department stores.
e
e
e
e
h
20
Page 20

OvenVentDuct
The oven is vented through a duct
that’s located on the right side of
the oven just above the door handle
(seepage 6). Moisture and vapors
from the oven are vented through it
when oven is in use. Nevercover
the hole in the duct. To do so prevents it from functioning properly
during cooking and cleaning.
Use of Aluminum Foil
in Broiling
/\
(Areaseenthrough glass control
panel after knob is removed.)
The temperature on your new Oven
has been accurately set at the factory. However,if your food consistently browns too much or too little,
you may make a simple adjustment
behind your Oven Temp Knob. To
readjust your thermostat:
@ Rotate OVEN TEMP Knob to
CLEAN position and pull knob off
the shaft revealing area behind
knob.
a.
-screwdriver, into the indented
Insert the tip of a 3/16” standard
directly under the notch and turn in
e desired direction. Be careful not
o scratch glass control panel.
@ To increase oven temperature
move dial one notch counterclockwise. To lower oven temperature, move dia! one notch
clockwise.
(Each notch represents approximately 15°.)
@ Return knob to the range by
matching the flat area of the knob
to the shaft.
@ Recheck oven performance
before making an additional
adjustment.
area
Lamp Replacement
CAUTION: Beforereplacingyour
ovenlamp bulb,disconnectthe
electricpowerforyourCooking
Centerat the main
breakerpanel.
fuseorcircuit
Be sureto letthe
lampcoverandbulbcoolcompletelybeforeremovingor
replacingthem.
Toremove:
@Take out 3 slotted screws as
shown in lamp diagram.
@Detach lamp cover and remove
bulb.
To replace:
put in a new 40-watt appliance
e+
bulb.
~ Install lamp cover. Replace3
screws and tighten them, making
sure cover fits flush with oven wall.
@Reconnect electric power to the
Cooking Center.
If you wish, you may line the broiler
pan with aluminum foil and cover
the rack with it for broiling. ALWAYS
BE SURE T@MOLD THE FOIL
THOROUGHLYTO THE BROILER
RACK AND SLIT THE FOIL TO
CONFORM WITH SLITS IN THE
RACK. Stopping fat and meat juices
from draining into the broiler pan
preventsthe rack from serving its
purpose and MAY LET JUICES
BECOME HOT ENOUGH TO
CATCHFIRE.
Removable Oven Door
TO REMOVE door, open to BROIL
position, or where you feel hinge
catch slightly. Grasp door at sides;
lift door up and away from hinges.
TO REPLACE, grasp door at sides.
Line up door with hinges and push
door firmly into place.
6%
F
pEJ
—
—
—
21
Page 21

BakingChart
1. Aluminum pans conduct heat quickly. For most conventional
baking light shiny finishes generally give best results because
they prevent overbrowning in the time it takes for heat to cook
the center areas. Dull (satin-finish) bottom surfaces of pans are
recommended for cake pans and pie plates to be sure those
areas brown completely.
2. Dark or non-shiny finishes, also glass and pyroceram, generally absorb heat which may result in dry, crisp crusts. Reduce
Food Container
Bread
Biscuits (%-in. thick)
Coffee cake
Corn bread or muffins
Gingerbread
Muffins
Popovers
Quick Loaf B~ead
Yeast bread (2 loaves)
Plain rolls
Sweet rolls
cakes
(without shortening)
Angel food
Jelly roil
Sponge
cakes
Bundt cakes
Cupcakes
Fruit cakes
Layer
Layer, Chocolate
Loaf
Cookies
Brownies
Drop
Refrigerator
Rolled or sliced
F%’uits,
CWllKsri+%m$?var’ts
Baked apples
Custard
Puddings, Rice and
Custard
Pies
Frozen
Meringue
One crust
Two crust
Pastry Shell
MisceSUaneous
Baked potatoes
Scalloped dishes
Souffles
Shiny Cookie Sheet
Shiny Metal Pan with
Satin-finish bottom
Cast Iron or Glass
Shiny Metal Pan with
Satin-finish bottom
Shiny Metal Muffin Pans
Deep Glass or Cast Iron Cup:
or Glass Loaf Pans
Metal
Metal or Glass Loaf Pans
Shiny Oblong or Muffin Pans
Shiny Oblong ot Muffin Pans
Aluminum Tube Pan
Metal Jelly Roll Pan
Metal or Ceramic Pan
Metal or Ceramic Pan
Shiny Metal Muffin Pans
Metal or Glass Loaf or
Tube Pan
Shiny Metal Pan with
Satin-finish bottom
Shiny Metal Pan with
Satin-finish bottom
Metal or Glass Loaf Pans
Metal or Glass Pans
Cookie Sheet
Cookie Sheet
Cookie Sheet
Glass or Metal
Glass Custard Cups or
Casserole (set in pan of
hot water)
Glass Custard Cups or
Casserole
Foil Pan on Cookie Sheet
Spread to crust edges
Glass or Satin-finish Metal
Glass or Satin-finish Metal
Glass or Satin-finish Metal
Set on Oven Shelf
Glass or Metal
Glass
Shelf
Position
B, C
B, A
B
B
A, B
B
B
A, B
A, B
B, A
A
B
A
A, B
B
A, B
B
B
B
B, C
B, c
B, C
B, C
A, B, C
B
B
A
B,A
4, B
B
B
A, B, C
A, B, C
3
oven heat 25° if lighter crusts are desired. Preheat cast iron for
baking some foods for rapid browning when food is added.
3. Preheating the oven is not always necessary, especially for
foods which cook longer than 30 or 40 minutes. For food with
short cooking times, preheating gives best appearance and
crispness.
4. Open the oven door to check food as little as possible to
prevent uneven heating and to save energy.
Oven
Temp.
400°-4750
350°-4000
400°-4500
350°
400°-4250
375°
350°-375°
375°-4250
375°-4250
350°-3750
325°-3750
375°-4000
325°-3500
325°-350°
350°-3750
275°-3000
350°-3750
350°-3750
350°
325°-3500
350°-4000
400°-4250
375°-4000
350°-4000
300°-3500
325°
400°-4250
325°-3500
400°-4250
400°-4250
450°
325°-4000
325°-3750
300°-350°
Time,
Min. Comments
15-20
20-30
20-40
45-55
20-30
45-60
45-60
45-60
10-25
20-30
30-55
10-15
45-60
45-65
20-25
2-4 hrs
20-35
25-30
40-60
25-35
10-20
6-12
7-12
30-60
30-60
50-90
45-70
15-25
45-60
40-60
12-15
60-90
30-60
30-75
Canned refrigerated biscuits take
2-4 min. less time.
Preheat pan for crisp crust.
Decrease about 5 min. for muffin
mix. Or bake at 450° for 25 min.,
then at 350° for 10-15 min.
Dark metal or glass give deepest
browning,
For thin rolls, Shelf B may be used.
For thin roils, Shelf B may be used.
Two piece pan is convenient.
Line pan with waxed paper.
Paper liners produce more moist
crusts.
Use 300° and SheIf B for small or
individual cakes.
Bar cookies from mix use same
time. Use Shelf C and increase
temp. 25-50° for more browning.
Reduce temp. to 300° for large
custard. Cook bread or rice pudding
with custard base 80 to 90 minutes.
Large pies use 400° and increase
time.
To quickly brown meringue use
400° for 8-10 min.
Custard fillings require lower temp.,
longer time.
Increase time for large amount or
size.
22
Page 22

BroilingChart
m~
1. Always use broiler pan and rack that comes with your oven. It
is designed to minimize smoking and spattering by trapping
juices in the shielded lower part of the pan.
~. oven door should be ajar for most foods; there is a special
position on door which holds door open correctly,
3. For steaks and chops, slash fat evenly around outside edges
of meat. Toslash, cut crosswise through outer fat surface just to
the edge of the meat. Use tongs to turn meat over to prevent
piercing meat and loosing juices.
~. If desired, marinate meats or chicken before broiling. Or,
brush with barbecue sauce last 5 to 10 minutes only. -
Quantity
Food
E3scon
Ground fi3eef,
Well done
Beef St’tr$nks
Rare
Medium
Well Done
Rare
Medium
—
Well Done
—
chicken
Ehkery Products
Bread (Toast) or
Toaster Pastries
English Muffins
Lobster tails
(6 to 8-oz. each)
Fish
Ham fs$iux?i%
(precooked)
Pork chops
Well Done
Lamb chops
Medium
Well Done
Medium
Well Done
—
Wieners and similar
—
~recooked sausages,
I
I
3ratwurst
—
and/or
Thickness
%lb. (about 8
thin slices
l-lb. (4 patties)
%to 3/~-in.thick
1 inch thick
(1-11/2Ibs.)
1%-irt. thick
(2-21/2Ibs.)
1 whole
(2 to 2%-lbs.),
split lengthwise
2-4 slices
1 pkg. (2)
2-split
2-4
l-lb. fillets %to
%-in. thick
l-in. thick
2 (%inch)
2 (l-in. thick)
about 1 lb.
2 (1 inch)
about 10-12 oz.
2 (1% inch)
about 1 lb,
“1-!b.pkg. (10)
5. When arranging food on pan, do not let fatty edges hang over
sides, which could soil oven with fat dripping.
6. Broiler does not need to be preheated. However, for very thin
foods or to increase browning, preheat if desired,
7. Frozen ste~lts can be conventionally broiled by positioning the oven shelf at next lowest shelf position and
increasing cooking time given in this chart 1%times per side.
8. If your range is connected to 208 Volts rare steaks may be
broiled by preheating the broil heater and positioning the oven
shelf one position higher.
Shelf
Position
c
c 7 4-5
c
c
c
c
c
c
A
c
c
B
c 5 Handle and turn very carefully.
B
c
B
c
c
c
B
c 6
First Side
Time, Min.
3%
7
9
13
10
15
25
35
1/2-2
1
3-4
13-16
5
8 8
10
13
8
10
10
17
Second Side
Time, Min.
3%
7
9
13
7-8
14-16
20-25
10-15
’12
(Do not
turn
over)
10
13
4-7
10
4-6
12-14
1-2
Comments
Arrange in single layer.
Space evenly.
Up to 8 patties take about same
time.
Steaks less than l-in. cook through
before browning. Pan frying is
recommended.
Slash fat.
Reduce times about 5-10 min. per
side for cut-up chicken. Brush each
side with melted butter. Broil with
skin side down first and broil with
door closed.
Space evenly. Place English muffins
cut-side-up and brush with butter, if
desired.
Cut through back of shell. Spread
open. Brush with melted butter
before and after half time.
Brush with lemon butter before and
during cooking if desired. Preheat
broiler to increase browning.
Increase times 5-10 min. per side
for 1%-in. thick or home cured.
Slash fat,
Slash fat,
If desired, split sausages in half
lengthwise into 5 to 6-in, pieces.
—
23
Page 23

RoastingChati
1. Position oven shelf at B for small-size roasts (3 to 7 lbs.) and
at A for larger roasts.
2. Place meat fat side up or poultry breast-side up on broiler
pan or other shallow pan with trivet. Do not cover. Do not stuff
poultry until just before roasting. Use meat probe, for more
accurate doneness. Control signals when food has reached set
temperature. (Do not place probe in stuff ing.)
3. Remove fat and drippings as necessary. Baste as desired.
-e
4. Standing time recommended for roasts is 10 to 20 min. to
allow roast to firm up and make it easier to carve. It will rise
about 5° to 10° internal temperature; to compensate for temperature rise, if desired, remove roast from oven at 5° to 10° less
than temperature on chart.
5. Frozen roasts can be conventionally roasted by adding 10
to 25 min. per pound more time then given in chart for refrigerated. (10 min. per lb. for roasts under 5-lbs.) Defrost poultry
before roasting.
@
Type
Meat
Tendercuts: rib, high quality
sirloin tip, rump or top round*
Lamb Leg or bone-in shoulder*
Veal shoulder, leg or loin*
Pork loin, nb or shoulder’
Ham, pre-cooked
Ham, raw
●For boneless rolled roasts over 6-in.
Poultry
Chicken or Duck
Chicken pieces
Turkey
Oven
Temp.
325°
325°
325°
32S’
325°
325°
;k, add5to10m
325°
375°
325°
Doneness
Rare:
Medium:
Well Done:
Rare:
Medium:
Well Done:
Well Done:
Well Done:
ToWarm:
Well Done:
}erlb. to times gi
Well Done:
Well Done:
Well Done:
ApproximateRoastingTime,
in Minutesper Pound
3 to 54bs. 6 to 8=lbs.
24-30 18-22
30-35
35-45
21-25 20-23
25-30 24-28
30-35
35-45 30-40
35-45 30-40
10 reins.per lb. (any weight)
Under 104bs.
20-30
above.
3 to 5=lbs. Over 5=lbs.
35-40
35-40
10to15-Ibs. Over 1S=lbs.
20-25
22-25
28-33
28-33
10to 15-lbs.
17-20
30-35
15-20
#nternal
Temp.‘F
130°-140°
150’’-160
170°-185°
130°-140°
150’-160°
170°-18S’
170°-180°
170°-180°
125°-130°
160°
185°:190°
185°-190°
inthigh:
185°-190°
m
@
24
—
Page 24

cleaning Chati
~ Your Cooking Center is cleaned two ways: manually
and by using the automatic self-cleaning function.
directions for cleaning. Be sure to follow these direc-
tions carefully to assure maximum use of your cookThis chart describes parts of your cooking center, ing center. NOTE: Let oven parts COOIbefore cleaning
cleaning materials to use on each part, and general
Bake Unit and
Broil Unit
@
Soap and Water
Broiler Pan & Rack
Oven Control Knobs
OutsideGlassFinish
o Soap-Filled
Scouring Pad
@ Plastic Scouring,
Pad
Mild Soap and Water
Soap andWater
~
—
Metal, including
Chrome Side Trims
and Trim Strips
Porcelain Enamel:<
Soap andWater
@ Paper Towel
aDDry Cloth
@ Soap and Water
manually.
Do not clean the bake unit or broil unit. Any soil will burn off
when the unit is heated. NOTE:
canbe lifted to cleantheovenfloor. If spillover,residue,orash
accumulatesaroundthebakeunit,gentlywipe aroundtheunit
with warmwater.
Drain fat, cool pan and rack slightly. (Do not let soiled pan and
rack stand in oven to cool). Sprinkle on detergent. Fill pan with
warm water and spread cloth or paper towel over the rack. Let
both stand for a few minutes. Wash; scour if necessary. Rinse
and dry. OPTION: The broiler pan and rack may also be cleaned
in a dishwasher.
Pull off knobs. Wash gently but do not soak. Dry and return controls to range making sure to match flat area on the knob and
shaft.
Wash all glass with cloth dampened in soapy water. Rinse and
polish with a dry cloth. If knobs on the control panel are removed, do not allow water to run down inside the surface of
glass while cleaning.
Wash, rinse, and then polish with a dry cloth. DO NOT USE steel
wool, abrasives, ammonia, acids, or commercial oven cleaners
which may damage the finish.
Avoid cleaning powders or harsh abrasives which may scratch
the enamel.
If acids should spill on the range while it is hot, use a dry paper
towel or cloth to wipe up right away. When the surface has
cooled, wash and rinse.
For other spills, such as fat smatterings, etc., wash with soap
and water when cooled and then rinse. Polish with a dry cloth.
The bakeunit is hingedand
On this oven, clean ONLY the door liner outside the gasket. The
door is automatically cleaned if the oven is in the self-cleaning
Inside Oven Door’:
Oven Gasket::
Liner
Oven
Shelves
(See Self-Cleaning
Oven Directions)
Soap andWater
Soap and Water
Soap
andWater
cycle. If spillover or spattering should occur in cooking function, wipe the door with soap and water. DO NOT rub or dam-
age gasket. Avoid getting soap and water on the gasket or in the
rectangular flanges on the door.
Avoid getting ANY cleaning materials on the gasket.
Cool before cleaning. Frequent wiping with mild soap and water
will prolong the time between major cleanings, Be sure to rinse
thoroughly. For heavy soiling, use your self-cleaning cycle often.
Your shelves can be cleaned with the self-cleaning function in
the oven. For heavy soil, clean by hand using any and all men-
tioned materials. Rinse thoroughly to remove all materials after
cleaning.
.*Spillage of marinades, fruit iuices, and basting materials containing acids may cause discoloration. Spillovers should
be wiped up immediately,
-
clean and rinse.
w-ithcare being taken to not touch any hot portion of the oven. When the surface is cool,
25
Page 25

TIM?Problemsolver
TOSaveTime and Mone,y—
beforeyourequestservice,
checkthe ProblemSolver
If you have a problem, it may be
minor. You may be able to correct
it yourself. Just usethis Problem
Solverto locate your problem and
then follow the suggested
recommendations.
MicrowaveOven
PROBLEM
CONTROL PANELLIGHTED,
YET OVEN WILL NOT START
AllTheseThingsAre Normalon YourBtkrowaveOven:
@When Lock Light comes on
during self-cleaning lower oven, a
fan in the microwave oven comes
on to keep oven components cool.
@Dull thumping sound while opersting at power levels other than
high.
~ Dimming oven light and change
in blower sound may occur while
operating at power ievelsother than
high.
POSSIBLE CAUSE AND REMEDY
Door not securely closed,
START must be touched afte’rentering cooking selection.
Another selection entered already in ovenand CLEAR/OFF not touched
to cancel it.
Make sure you haveentered cooking time after touching TIME COOK.
CLEAR/OFF was touched accidentally. Reset cooking program and
touch START.
Temperature probe not inserted properly or not being used during Auto
Roast or Temp Cook.
Makesureyou haveentered desiredfinished temperature after touching
TEMP COOK.
Make sure you entered a code number after touching AUTO ROAST or
QUICK SET.
~ Light reflection around door or
outer case.
* Steam or vapor escaping from
around the door.
Some TV-RacJiointerference
~
might be noticed while using your
microwave oven. It’s similar to the
interference caused by other small
appliances and does not indicate a
problem with your oven.
“ERROR” APPEARS
ON READOUT
“PROBE” APPEARS
ON READOUT
FOODS ARE EITHER Over-
COOKED OR UNDERCOOKED
When using Temp Cook, atemperature lessthan 90° or more than 199°
has been entered.
Probe has been forgotten or not seated properly in oven wall when
using Auto Roast or Temp Cook functions.
cooking times may vary because of starting food temperature, food
density or amount of foods in oven. Touch TIME COOK and additional
cooking time for completion.
Incorrect Power Level entered. Check Cookbook for recommended
Power Level or changing levelsduring cooking if necessary.
Dish was not rotated, turned or stirred. Some dishes require specific
instructions. Check Cookbook or recipe for these instructions.
Too many dishes in oven atsametime. Cooking time must beincreased
when cooking more than one food item. Check Cookbook for recom-
mendation on increasing time.
Probe not inserted properly into meat or dish when using Temp Cook or
Auto Roast functions. Check Cookbook or Auto Roast section of this
book for specific instructions.
Check Cookbook for food placement and instructions when using
Double Duty’” Shelf.
26
Page 26

ConventionalOven
PROBLEM
OVEN WILL NOTWORK
OVEN LIGHT
DOES NOT WORK
FOOD DOES NOT
BROIL PROPERLY
I POSSIBLE CAUSE AND REMEDY
Difficulty may be in the main distribution panel of your house by a blown
oven circuit fuse, a tripped oven circuit breaker, the main fuse or the
main circuit breaker, depending on nature of the power supply. If a
circuit breakeris involved,reset it. If the control box usesfuses,the oven
fuse (a cartridge-type) should be changed BUT ONLY BY SOMEONE
FAMILIAR WITH ELECTRICAL CIRCUITS. If after doing one of these
procedures,the fuse blows or circuit breakertrips again,call for service.
NOTE: Apartment tenants or condominium owners should requesttheir
building management to perform this check before calling for service.
Oven controls are not properly set.
Door left in locked position after cleaning.
Light bulb is loose.
Bulb is defective. Replace.
Switch operating oven light is broken. Call for service.
OVEN SET Knob not set at BROIL.
OVEN TEMP Knob not set at BROIL.
Door not left ajar as recommended.
Improper shelf position is being used. Check Broiling Chart.
Necessarypreheating was not done.
Food is being cooked on hot pan.
Utensils are not suited for broiling.
Aluminum foil used on the broil pan rack has not been fitted
properly and slit as recommended.
FOOD DOES NOT ROAST
OR BAKE PROPERLY
3VEN WILL NOT
SELF-CLEAN
3VEN DOOR WON’T LATCH
OVEN SET Knob not set on BAKE.
OVEN TEMP Knob not set correctly.
Shelf position is incorrect.
CheckRoastingor BakingCharts.
Ovenshelfisnot level.
Wrongcookwareisbeingused.Whenroasting,panistoo small.
A foil tent was not used when neededto slow down browning during
roasting.
Automatic timer dial/dials not set or not set properly. The STOP dial
must be set and advanced beyond the time noted on oven clock.
The STOP dial was not advanced for long enough.
Both OVEN SET and OVEN TEMP Knobs must beat CLEAN setting.
A thick pile of spillover when cleaned leaves a heavy layer of ash in
spots which could have insulated the area from further heat.
Latch not in “CLEAN” position.
Turn OVEN SET Knob to CLEAN._Glowing Locked Light after knob is
turned indicates oven istoo hot from previous useand door won’t latch.
To cool oven, open door wide, then latch can be moved.
OVEN SET Knob must beat CLEAN or OFF before Latch can be moved.
Latch ReleaseButton not pushed when moving Latch.
27
Page 27

-1 ConsumerServices
@
v~
At Hotpointwe’recommittedto providingyouwith the bestapplianceswe know how
to buildandwe knowthat youwant yourappliancesto giveyou manyyearsof dependable
service.
OurConsumerServicesaredesignedwith your needsandwants in mind.
WarrantyProtection
Yournewapplianceis a well designedandengineered Seethewarrantyonthe backpageof this bookfor
product.Beforeit left the factory,it went through
rigorousteststo detectmanufacturingdefects.And
youhaveawrittenwarrantyto protectyou.
PromptServiceat yourConvenience
Whetheryourapplianceis in orout of warranty,
you’rejust a phonecall awayfrom ournationwide
networkof FactoryTrainedServiceprofessionals.
Simplycall our Hotpointserviceorganization.
You’llfind them in theWhite Pagesunder“Hotpoint
FactoryService;’andin the YellowPagesunder
“HotpointCustomerCaremService.”
Serviceisscheduledatyourconvenienceandthe
techniciandrivesafully-stockedpartsservicetruck
sothat, in mostcases,the repaircanbecompleted
in onevisit.
We’reproudof ourserviceandwant youto be
pleased,but if for somereasonyouare
with the serviceyoureceive,herearethreestepsto
follow for further help.
notlw~py
details.
FIRST,contact the peoplewhoservicedyour
appliance.Explainwhyyou arenot pleased.In most
cases,this will solvethe problem.
NEXT,if youarestill not pleasedwrite all the details
—
includingyourphonenumberto
Manager,ConsumerRelations
Hotpoint
AppliancePark
Louisville,Kentucky40225
FINALLY,if yourproblemis still not resolved,write:
MajorApplianceConsumerAction Panel
20NorthWackerDrive
Chicago,Illinois60606
e
m
ServiceContracts
Fortrouble=freeservicebeyond
thewrittenwarrantyperiod.
If youpreferto budgetyourrepairexpenditure
insteadof beingsurprisedbythem,Hotpoint
offersservicecontractsfor varyinglengthsof
time onall Hotpointmajorappliances.With a
tract we’ll keep yourappliancein good
crating condition duringthe contract period
noadditionalcharge.Servicecontracts
let you paytoday’s pricesfor servicea
month,a year,orseveralyearsfrom now.
And,you’ll receiveservicefrom Hotpoint
trainedservicetechniciansusingonly
GenuineHotpoint parts.
TheQuickFix@System
Youcansavemoneyand time
bydoingit yourself.
Fordo-it-yourselferswho wouldprefer
to fix Hotpointmajorappliances
themselves...Hotpointoffers an
industryfirst, the QuickFix@System.
HelpforYouByPhone
Shouldyouneedhelpin the selectionand
purchaseof newappliances,or have consumerinformationserviceis open24
questionsabout the operationof the Hotpoint ~~appliano?syou nowown—or haveanyother ‘~
questionsabout our consumerproductsor
servicesyouareonly a TOLL-FREEcall away.
~— ~
m
~
The GE AnswerCen/e~
800.626.2000 youanytime-
A programfor do-it-yourselfappliancerepair,
the system includesstep-by-steprepair
rnanua/sfor refrigerators,most non-microwave
electric ranges,dishwashers,andstandard
and largecapacity washers and dryers,plus
speciallypackagedreplacementparts, and
technicalhelpwith a to// free800numbe~
TheGEAnswerCenterTM800.626.2000
hoursa day,sevendaysa week.
Ourstaff of expertsstands readyto assist
Page 28

31iisJlI
EEiaE15,84‘-~
“Iqqll
Saveproofof originalpurchasedatesuch asyoursalesslipor cancelledcheck to establish warranty period.
1#fC--
. ..—
I:&;.
WHATISCOVERED
FULLONE-YEARWARRANTY
For one year from date of original
purchase,we will provide,free of
charge, parts and service labor in
your home to repair or replaceany
part of themicrowaveoven/range
that fails becauseof a manufacturing defect.
LIMITED ADDITIONAL
FOUR-YEARWARRANTY
For the second through fifth year
from date of original purchase,
we will provide,free of charge, a
replacement magnetron tubeif the
magnetron tube fails because of a
manufacturing defect. You pay for
the service trip to your home and
service labor charges.
WHATIS NOTICOVERED eservicetripstoYourhometo
teach you how to use the product.
ReadyourUse and Care material.
If you then have any questions
about operating the product,
please contact your dealer or our
Consumer Affairs office at the
address below, or call, toll free:
The GE Answer CenterTM
800.626.2000
consumer information service
~ Improper installation.
If you have an installation problem,
contact your dealer or installer.
Youare responsible for providing
adequate electrical, exhausting
...
y~-
r m
IL II
=_=jll
iS*
..==
ma‘-I
s>:11
“9
I
& ,,
i)fi
...==
.a I
B>:11
-=1
D$ ,,
IBfi
:“73
-1
~= <11
.“=?J
Some states do not allow the exclusion or limitation of incidental or consequential damages, so the above limitation or exclusion
may not apply to you. This warranty gives you specific legal rights, and you may also have other rights which vary from state to state.
To know what your legal rights are in your state, consult your local or state consumer affairs office or your state’s Attorney General.
If further help is neededconcerningthis warranty,contact:
Manager–Consumer Affairs, General Electric Company,Appliance Park, Louisville,KY 40225
and other connecting facilities.
Warrantor:General Electric Company
This warranty is extended to the
original purchaser and any succeeding owner for products purchased
for ordinary home use in the 48
mainland states, Hawaii and
Washington, D.C.In Alaska the
warranty is the sameexcept that it
is LIMITEDbecauseyou must pay
to ship the product to the service
shop or for the service technician’s
travel costs to your home.
All warrantyservice will be provided
by our Factory ServiceCenters or
by our authorized Customer Care”
servicers during normal working
hours.
Look in the White or Yellow Pages
of your telephone directory for
HOTPOINTFACTORYSERVICE,
GENERALELECTRIC-HOTPOINT
FACTORYSERVICEor HOTPOINT
CUSTOMERCARE’ SERVICE.
e Replacement of house fuses
or resetting of circuit breakers.
. Failure of the product if it is
used for other than its intended
purpose or used commercially.
o Damageto product caused
by accident, fire, floods or acts
of God.
WARRANTORIS NOTRESPON-
SIBLE FORCONSEQUENTIAL
DAMAGES.
llsi-
11=.
11-=
11?%
lIL–
Mm
.— .
.,-.
I=r
1~=-
—.
~:
,...
,,g:
~!g:.
il;:<~
c:-
%?’.
I
11:=
w
.=?
I
Ii;<c
C___
I
w.
11:=
i%<”
I
&’
k’,
w..__———
●K.,-.
J&Ww
n
—
AQUALITYPRODUCTOF
+
GENERALELECTRICCOMPANY
 Loading...