

Page 1
Page 2
ReadThisBookCarefully
Itis designed to help you operate and maintain your
new Cooking Center properly.
Keep it handy for answers to your questions.
If you don’t understand something or need more
help. . .Call, toll free:
The GE Answer Center’”
800.626.2000
consumer information service
or write: (include your phone numbet’);
Consumer Affairs
t-iotpoint
Appliance Park
Louisville, KY 40225
WriteDownthe Model
and SerialNumbers
You’ll find them on a label on the front of the lower
oven behind the door.
These numbers are also on the Consumer Product
Registration Card that came with your Cooking
Center. Before sending in this card, please write
these numbers here:
Model No.
Serial No.
Use these numbers in any correspondence or ser-
vice calls concerning your Cooking Center.
BeSureYourOvenisRegistered
Itis important that we, the manufacturer, know the
location of your Microwave Oven should a need
occur for adjustments.
You’re supplier is responsible for registering you as
the owner.
Please check with your supplier to be sure he has
done so; also send in your Purchase Record Card. If
you move, or if you are not the original purchaser
please write to us, stating model and serial numbers. This appliance must be registered. Please be
certain that it is.
Write to:
I-iotpoint
Range Product Service
AP2-210
Appliance Park
Louisville, KY 40225
IF YOU RECEIVED A DAMAGED OVEN, immediately contact the dealer (or builder) that sold you
the Microwave Oven.
SaveTime and Money.. .
BeforeYouCallforService
See “The Problem Solver” section. (See page 23.) It
lists many minor causes of operating problems that
you can correct yourself and may save you an
unnecessary service call.
@
e
e
@~982General Electric Co., U.S.A. All rights reserved.
2
Page 3

TableofContents
-.1
6--
MICROWAVE OVEN
Precautions for Safe Use . .. .. .. .. ... . . 3
Safety Tips eo. .. .. .. .. .. ..o .. .. .. ... 4,5
Features of Your Oven .. .. .. .. .. .. .. ...6
Touch Control Panel . .. .. .. .. .. .. .. ...7
Auto Roast .. .. . ... .. .. .. . .. ... . ....8.9
TimeCook . .. .. .. .. .. .. .. .. . . .. .. ...10
Defrost . .. .. .. .. .. .. .. .. .. . .. .. .. . ...11
Quick Set . .. .. .. .. .. .. .. .. .. .. .. .. .. 11
Temperature Cook . .. .. .. .. .. .. .. ....12
Hold/Timer . . .. .. .. .. .. .. .. .. .. .. ....13
CONVENTIONAL OVEN
Safety Tips . .. .. .. . ... .. . .. .. .. .......4.5
Features .. .. .. .. .. . .. .. . .. .. .. .. .. ....6
Oven Controls . .. .. .. .. .. . .. .. ..’. .....6
Oven Light . ... .. . ... .. . .. .. .. .. .. .. . 14
Oven SheIves . .. .. .. .. .. .. .. .. .. .. ...14
Minute Timer, Clock,
Automatic Oven Timer . .. .. .. .. .. .. 14
Baking . .. . .. .. .. .. .. .. . .. .. .. .. .. ...14
Broiling . .. . ... .. .. .. .. .. .. .. .. . . . ...15
Roasting . .. .. ... .. .. .. .. .. .. .. .. ....15
Baking Chart . .. .. .. .. .. .. .. ... .. ....19
Broiling Chart .. .. .. .. .. .. .. .. .. .....20
Roasting Chart .. .. .. . . . . .. . . .. .. ....21
CARE OF YOUR COOKING CENTER
Self-Clean Operation . .. .. .. .. .. ... ...16
Lamp Replacement . .. .. .. .. .. .. .. ...17
Oven Thermostat Adjustment.. .. .. . .. 17
Care of Microwave Oven&
Temperature Probe . .. .. .. .. ...;. ..17
Cleaning Chart (Ail Parts) . .. .. .. .. .. . 18
GENERAL
Before Using Your Range. .. . .. .. .. . ... 2
Energy Conservation Tips.... .. .. .. .. . 3
Model &Serial Number Location . .. .. .. 6
The Problem Solver . .. .. .. .. .. .. .. ...22
If You Need Service . . .. ... . .
. . . . . . ...23
Quick Set Chart . .. .. .. Inside Back Cover
Warranty . .. .. .. .. .. .. .. .. ...Back Cover
EnergyConsewatlonTips
A. Microwave Cooking
1. Use proper power level as recommended and
DO NOT OVERCOOK.
2. Do not operate the oven while empty. If by acci-
dent the oven should run empty a minute or two,
no harm is done. However, try to avoid operating
the oven empty at all times–saves energy and
also ensures good long term life of oven.
B. Ov~~ cooking
1.Preheat the oven only when necessary. Most
foods will cook satisfactorily without preheating.
If you find preheating is necessary, keep an eye
on the indicator light, and put food in the oven
promptly after the light goes out.
2. Always turn oven OFF before removing food.
During baking, avoid frequent door openings.
3.
Keep door open as short a time as possible
when it is opened.
For self-cleaning oven, be sure to wipe up ex-
4.
cess spillage before self-cleaning operation.
5.
Cook complete oven meals instead of just one
food item. Potatoes, other vegetables, and some
desserts will cook together with a main-dish casserole, meat loaf, chicken or roast. Choose
foods that cook at the same temperature in approximately the sametime.
Use residual heat in oven’ whenever possi~i~ to
6.
finish cooking casseroles, oven meals, etc. Also
add rolls or precooked desserts to warm dven,
using residual heat to warm them.
—
.
Page 4
SafevTips
When youCM Ycw chokingCenter
@Havetheinstallershow
circuit breaker or fuse, and mark it for easy
reference.
@$Have it installed and properly grounded by a ~
qualified installer.
using Your Range
Ilori’t leavechildien aloneorunattended wher~a ~
rango is hot or in operation. They could be
seriouslyburn~d.
Ilon’t allow anyoneto climb,standor hangonthe
dooror drawer. Theycoulddamagetherange. ~
Donottouchheatingelementsor interior surface
ofoven.Thesesurfaces may be hot enough to
burn even though they are dark in color. ~
During and after use, do not touch, or let
clothing or other flammable materials con- ~
tact any heating elements or any interior
area of the oven; allow sufficient time for
cooling first. Other potentially hot surfaces
include oven vent openings and surfaces
near the openings, crevices around the oven
door and the edges of the door window.
Wearproper clottiing, Loose fitting or
aarments should never be worn while uskw
~heappliance.
Never use your appliance for warming or
heating the room.
Besure oven vent ducts are unobstructed.
Do not use your oven to dry newspapers. If *
overheated, they can catch fire.
CAUTION:DONOTSTOREITEMSOFINTERESTTO
CHILDRENIN CABINETSABOVEA fiANGE–
CHILDRENCLIMBINGONTHERANGETOREACH ~
ITEMSCOULDBESERIOUSLYINJURED.
Ilo notstoreflammablematerialsin theovens.
@#J,J$eonly dry potholders—moist or damp
“Potholders on hot surfaces may result in *
burns from steam. Do not let ‘potholders W
touch hot heating elements. Do not use a
towel or other bulky cloth.
69
Don’tusealuminumfoil anywhere in the oven
except as described in this book. Misuse ~
could result in a shock, fire hazard, or
damage to the range.
@
Donotusewaterongreasefires. Whencookingin
the oven,flamecanbesmotheredby completely
closingdoorandturning OVENSETto OFF.
you the Iccation of the
hanging ~icrowave ~ven
e
Standaway from the rangewhen openingoven
door. The hot air or steamwhich escapescan
causeburnstothehands,faceand/or eyes.
6$
Keepoven free from grease build up.
Place oven rack in desired position while
oven is COOLIf racks must be handled when
hot, do not let potholder contact heat units in
the oven.
Pulling out shelf to the shelf stop isaconven-
ience in lifting heavy foods. H is also a precaution against burns from touching hot
surfaces of the door or oven walls.
Don’theatunopenedfoodcontainersin theoven.
Pressurecouldbuild up andthecontainercould
burstcausinganinjury.
When using cooking or roasting bags in
oven, follow the manufacturer’s directions.
Whencookingporkeither conventionally or in
the microwave oven, follow our directions
exactly and always cook the meat to at least
170°.This assures that, in the remote possi-
bility that trichina may be present in the
meat, it will bekilled and meat will besafet~
eat.
e
Don’theatunonenedfoodcontainersor nonvented
plastic-covereddishesin the oven.Pressurecan
build upcausingthecontainerorplasticcovering
toexplodeandresult in injury.
Don’tdefrostfrozenbeveragesin narrow necked
bottles especially carbonated ones. Even if
the container is opened, pressure can build
up. This can cause the container to burst,
resulting in injury.
Boiling eggsin or out ofthe shell is not recommendedfor microwavecooking.Pressure can
build up inside the yolk and cause it to burst,
resulting in injury.
Foodswith unbrokenouter“skin” such as potatoes, hot dogs or sausages, tomatoes,
apples, chicken livers and other giblets, and
eggs (see above) should be pierced to allow
steam to escape during cooking.
Removewire twist-ties on pa er and plastic
bags before ~lacina in oven. wist-ties sometim-escause’bag to”heat and may cause fire.
f
@
4
Page 5
Do not pop popcorn in your microwave oven *
unless in a special microwave popcorn
accessory or unless you use popcorn in a
package labeled for microwave ovens.
Because of heat generated, without these
precautions, the container could catch fire.
@oo not use
any thermometer in food you are ~
microwavingunlessthatthermometerisdesigned
or recommendedfor usein themicrowaveoven.
@DOnot
operate the oven while empty to avoid @
damageto the ovenandthe dangerof fire. If by
accident the oven should run empty a minute
or two, no harm done. However, try to avoid
operating the oven empty at all times—it
saves energy and prolongs life of the oven.
cooking utensils may become hot because of @
61
heat transferred from the heatedfood. This is
especially true if plastic wrap has been covering the top and handles of the utensil. Pot
holders may be neededto handle the utensiL e
e “Boilable” cooking pouchesand tightly closed
plastic bags should beslit, pricked or vented
as directed in Cookbook. If they are not,
e
plastic could burst during or immediately o
m.,
after cooking, possibly resulting in injury.
Also, plastic storage containers should beat ~
least partially uncovered because they form
a tight seal. When cooking with containers,
tightly covered with plastic wrap, remove
covering carefully and direct steam away ~
from hands and face.
Don’tover cook.Excessovercookingdehydrates ~
potatoes,andmaycausethemtocatchfirecausing
damage.
Plastic utensils designed for microwave
cooking are very useful, but should be used ~
carefully. Even microwave plastic may not
be as tolerant of overcooking conditions as
are glass or ceramic materials and may
soften or char if subject to short periods of ‘f
overcooking, In longer exposures to over- o
cooking, the food and containers may
eVMT ~
ignite. For these reasons: 1) Use microwave
plastics only and use them in strict com-
pliance with the container manufacturer’s
recommendations. 2) Do not subject empty ~
containers to microwaving. 3) Donot permit
Ochildren to use
plastic containers without
complete supervision.
Usemetalonlyasdirectedin theCookbook.Metal
strips as used on meat roasts are helpful in
cooking food when used as directed, Metal
trays may be used for TV dinners, However,
when using metal in the oven, keepmetalat
least1-inchawayfromsidesoftheoven.
Sometimes,the ovenshelf canbecometoo hotto
touch. Be careful touching the shelf during
and after cooking.
Removethe temperature probe from the-oven
whennotusingitto cook with. If you leave the
probe inside the oven without inserting it in
food or liquid, and turn on microwave
energy, it can create electrical arcing in the
oven, and damage oven walls.
If food should ever ignite: Keepthe oven door
closed.Turnoff the power immediately. Touch
CLEAR/OFFor disconnect power cord or shut
off power at thefuse/circuit breaker panel.
DOnot use your microwave ovento dry newspapers.If overheated, they can catch fire.
Waning YourRange
Clean only parts listed in this Use and Care
Book.
Donot clean door gasket. The door gasket is
essential for a good seaL Care should be
taken not to rub, damage or move the
gasket.
Before self-cleaning the oven, remove broiler
pan and other containers.
Do not use oven cleaners. No commercial
oven cleaner or oven liner protective coating
of any kind should be used in or around any
part of the oven.
Listenfor Fan–A fannoiseshouldbeheardsometime during the cleaningcycle.If not,call aservicemanbeforeself-cleaningagain.
YOUIf$@2cfService
Read“The ProblemSolver” on page22.
Don’t attempt to repair or replace any part of
your range unless it is specifically recom-
mended in this book. All other servicing
should be referred to a qualified technician. ~~-
Disconnect range at range circuit breaker or
main fuse before performing any service.
-
5
Page 6
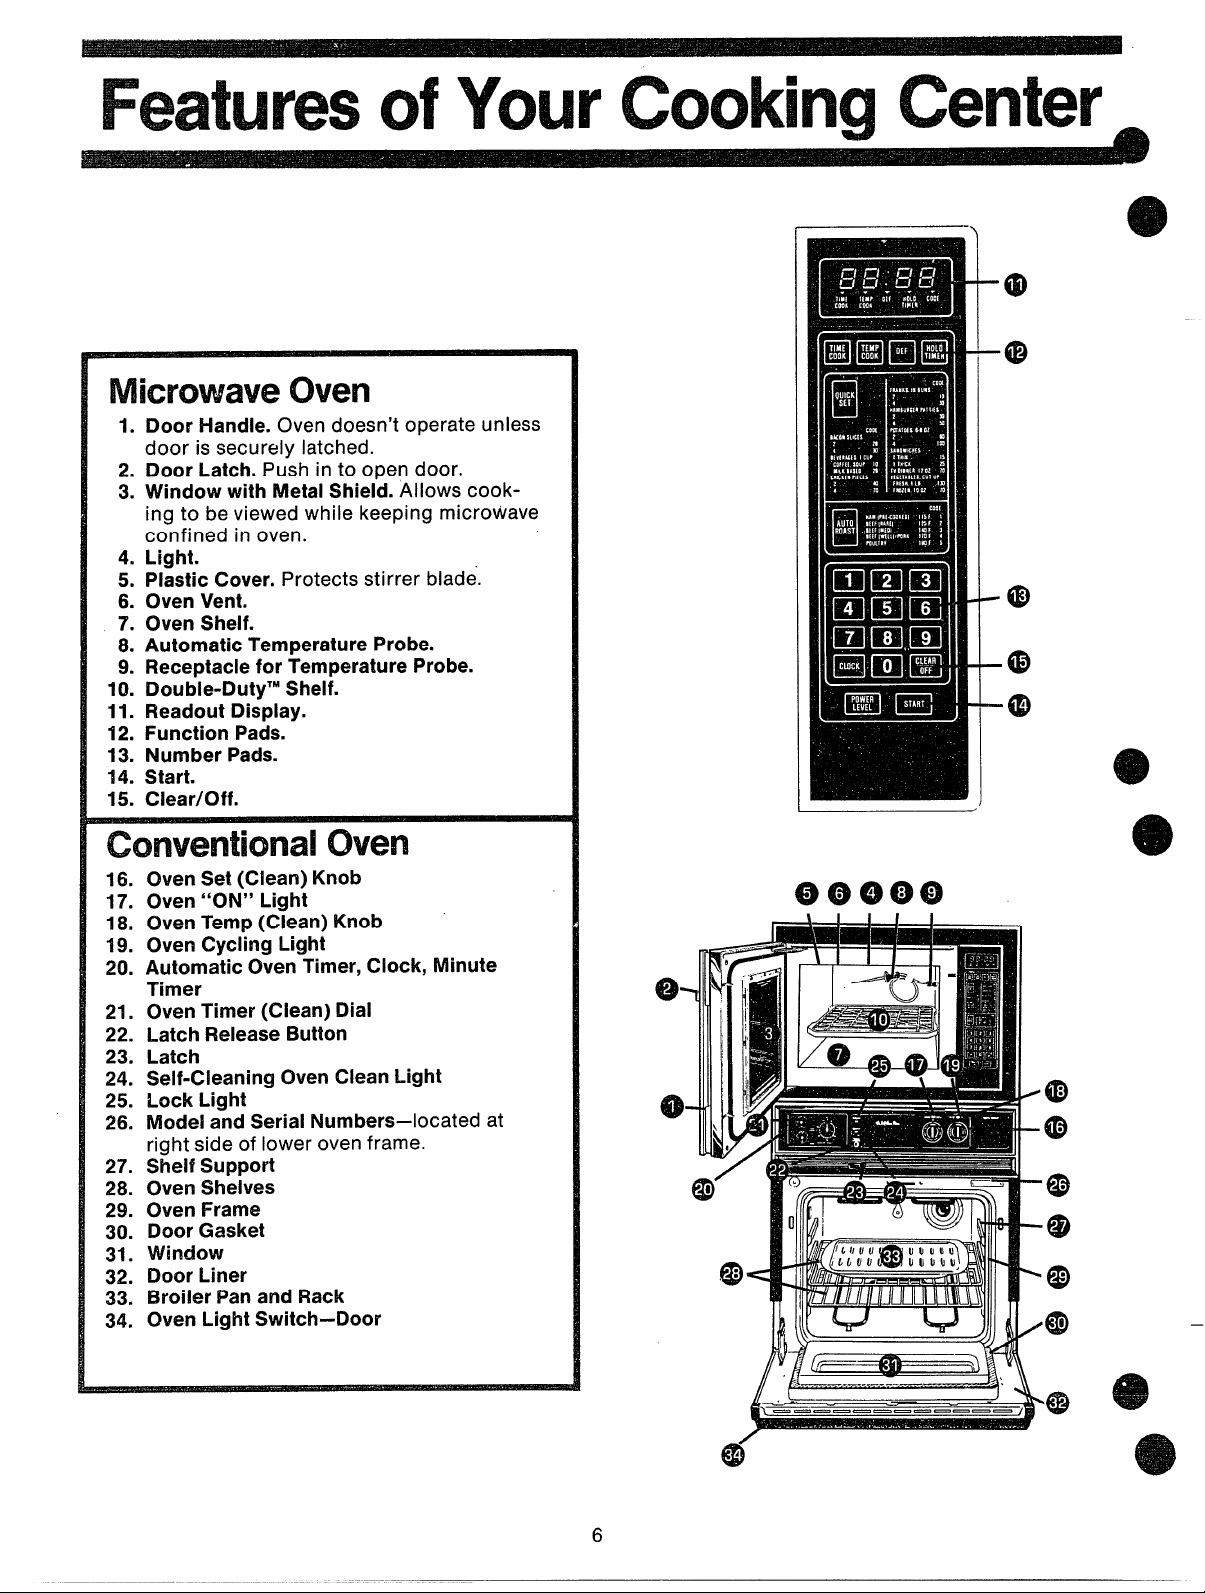
FeaturesofYourCookingCenter
Microwave oven
1. Door Handle. Oven doesn’t operate unless
door is securely latched.
2. Door Latch. Push in to open door.
3. Window with Metal Shield. Allows cooking to be viewed while keeping microwave
confined in oven.
4. Light.
5. Plastic Cover. Protects stirrer blade.
6. Oven Vent.
7’. Oven Shelf.
8. Automatic Temperature Probe.
9. Receptacle for Temperature Probe.
10. Double-DutyTMShelf.
11. Readout Display.
t2. Function Pads.
13. Number Pads.
14. Start.
15. Clear/Off.
-.
-4D
-@
-@
-(I3
-J
a)
@
conventional
16.
Oven Set (Clean) Knob
17. Oven “ON” Light
18. Oven Temp (Clean) Knob
19. Oven Cycling Light
20. Automatic Oven Timer, Clock, Minute
Timer
21, Oven Timer (Clean) Dial
22. Latch Release Button
23. Latch
24. Self-Cleaning Oven Clean Light
25. Lock Light
26. Model and Serial Numbers–located at
rightside of lower oven frame.
27. Shelf Support
28. Oven Shelves
29. Oven Frame
30. Door Gasket
31. Window
32. Door Liner
33. Broiler Panand Rack
34. Oven Light Switch–Door
Owen
@4Mbiim
/
A
$?2
6
Page 7

MicrowaveOvenTouchControlPanel
—
\
Readout Display. Displays time of
day, time or temperature during
cooking functions, and power level
(when PowerLevel Padistouched).
zDefrost. Gentle, more uniform
thawing with little or no attention
at automatic Power Level 3, or
change power level after entering
time. (See page 11.)
Time Cook. Microwave for a preset
amount of time using automatic
Power Level 10 or change power
level after setting time. (See page
lo.)
Quick Set. Usethis pad as a shortcut method for entering cookirm
e,and power level. (Se=page 11~
Auto Roast. Insert Probe, touch
this pad, and desired number pad
for Code to temperature cook meat
with automatic preset program.
Clock. Touch this pad to enter
time of day or check time of day
while microwaving. To set clock,
first touch CLOCK pad and then
enter time of day. For example, if
time is 1:30, touch number pads 1,
3, and O and 1:30 will appear in
readout display. Touch START pad
thus setting the clock. If you wish
to reset or change time, simply
repeat above process.
Hold/Timer. This feature uses no
microwave energy while it func-
tions as both a kitchen timer or as
a holding period between defrost
and time or temperature cooking.
(See page 13.)
Temp Cook. Use the temperature
probe to cook by using a preset
temperature. Oven shows temperature until preset temperature is
reached and then turns off. (See
page 12.)
Number Pads.Touch these pads to
enter Time, Temperature, Power
Level, Quick Set digits or Auto
Roast Code.
Clear/Off. When touched, it stops
the oven and erases all settings
except time of day.
Start. Must touch this pad for oven
to begin any function.
Power Level. Touch this pad before entering another power level
number if you want to change
from automatic Power Level 10
(HIGH) for cooking or Power Level
LOW) for defrosting.
7
Page 8

AutomaticRoasting
—
e
Auto Roast uses thetemperature probe to cook to
the desired serving temperature. Unlike Temp Cook,
which uses a single power level, Auto Roast uses
up to 3 power settings which automatically switch
during roasting, thus providing even tender cooking
results without overcooking.
PreparingRoastsforAutoRoasting
Place tender beef roasts on trivet
in microwave safe dish. Insert
probe from front horizontally into
center meaty area not touching
bone or fat. Cover with wax paper.
Poultry, pork or ham roasts need
no trivet. Add % cup water to roast
dish, cover with plastic wrap. (For
cooking bag method, see cookbook.) Insert probe into center
meaty area.
Just as in conventional roasting, only tender roasts
should be Auto Roasted until specified internal temperatures are reached. Less tender roasts should
be microwaved by time, according to the Cookbook
which comes with your oven. Complete information
on preparing roasts for microwaving is in your
Cookbook.
Place meat with probe in oven. insert cable end of probe firmly into
receptacle on oven wall.
e
I
—
e
HowtoAutoRoastBeefto Mdium
/..
Touch AUTO ROAST Pad.
over Code flashes. Touch number pad 3. Touch
START.
Oven monitors internal temperature, automatically
switching to lower power as meat’s temperature
rises. This prevents toughening or overcooking.
Cooking signal light
Light over Code shows on display. Readout displays internal food temperature.
After temperature is reached, oven signals and then
shuts off.
@
e
.
8
Page 9

AutoRoast chart
a- Use containers and coverings as directed at left. Place probe correctly in roast before cooking.
‘a Turn over when 80° (except pork) has been reached.
Beef
Tender Roast
Rare 2
Medium 3
Well 4
Meatlcaf 4
(loaf or round)
Pork
Loin Roast 4 120°
Precooked Ham 1 80° 115° 17-19 5-10
Poultry
Whole Chicken 5 80°
(31b.)
Whole Turkey 5 80°
(Up tO 12 Ibs.)
Asert probe into meatiest area of inner thigh from below end and parallel to leg.)
-Turkey Breast
(Insert probe horizontally into meatiest area.)
Recommended standing time before serving.
-
4 80°
80°
80°
80°
No Turn
Over
125° 12-14
140° 14-16
170° 17-18
170°
170°
190°
190° 13-15
170° 13-15
30-40
18-20
13-15
5-10
10-15
30
5-10
20
20
20
20 ‘
Questions
m“ldAnswers
Q. Are there any particular trivets
that work better than others?
A. Yes, flat glass trivets such as
lids or dish covers give more even
cooking results than plastic trivets.
Also, ceramic ridge-bottomed roasting dishes work well. Plastic trivets
require meat to be turned over
more frequently because the grid
design and legs allow the bottom
of the meat to stay cooler as it
cooks, than glass trivets do.
—
Q. Is it necessary to always cover
foods during Auto Roast?
A. No, but a loose covering helps
prevent spattering and hold mois-
ture in food.
Q. Why was my roast not fully
cooked even though the temperature on the readout was correct
and Auto’ Roast completed?
A. When cooking with Auto Roast,
the temperature probe must be
inserted properly as fully described
in the Cookbook. After turning meat
over or rotating, the probe should
be checked to make sure it hasn’t
slipped or changed position.
9
Q. Last time I used Auto Roast
I removed the roast from the oven
to turn it over. When I replaced
roast in oven and reconnected the
meat probe, a lower temperature
appeared. Why?
A. The oven and roast may have
cooled to below the temperature
when you removed it, or probe
may have been repositioned. Continue roasting and numbers will
soon count upward again.
.
Page 10

HowtoTime Cook
e
Time Cooking, or cooking your food according to a predetermined amount of time, is probably familiar to you from
conventional cooking. With your microwave oven, however,
you preset the time and the oven turns off automatically.
UsingYourOventoTimeCook
Follow the cooking steps below to
help you learn to Time Cook
properly.
I
I
Step 3: Select your time. Touch
1, 2 and Ofor a minute and 20 seconds. 1:20 and signal light above
Step 1: Fill a cup 2/3 full of water
and 1 teaspoon of freeze dried
coffee. Use a cup that hasno metal
decoration. Place cup in oven and
close door.
.
Step 2: Touch TIME COOK. The
display shows :0. Signal light
above TIME COOK flashes. Power
Level 10 @ automatically set in
oven, but does not appear in
display.
TIME COOK appear on display. If
another Power Level is desired
touch POWER LEVEL and the
number, although Power Level 10
(HIGH) is preferred for this cup of
coffee.
Step 4 Touch START. Time
counting down shows on display.
Step 5: When time is up, oven
sounds and oven, light, and fan
shut off.
MicrowavingTips
@ Make sure all utensils used in
your microwave oven are labeled
“suitable for microwaving”. Check
your Cookbook for specific test to
determine “microwave-safe” utensils.
o Paper towels, wax paper, and
plastic wrap can be used to cover
dishes in order to retain moisture
and prevent spattering.
e Most microwaved foods require
stirring, rotating, or rearranging.
Check your Cookbook for specific
instructions for the food you are
microwaving.
@Some foods such as unshelled
eggs and hot dogs must be
pricked to allow steam to escape
during cooking.
e
*
e
Questions
andAnswers
Q. I set my oven for the time called
for in the recipe but at the end of
the time allowed, my dish wasn’t
done. What happened?
A. Since house power varies due
to time or location, many Time
Cook recipes give you a time range
to prevent overcooking. Set the
oven for minimum time, test the
food for doneness, and cook your
dish a little longer, if necessary.
Q. I want to cook my dish on a
Power Level other than HIGH, what
do I need to do?
A. To change the Power Level,
touch the POWER LEVEL pad after
entering desired cooking time.
Enter the desired number and then
touch START.
Q. Can I interrupt my Time Cook
function to check the food?
A. Yes. To resume cooking, simply
close the door and touch START.
NOTE: Microwave power will not
come on until you are ready. You
must touch START for cooking to
begin.
10
Q. I touched the number pads and
selected my power level. When I
touched START, however, my oven
didn’t come on. Why not?
A. The TIME COOK pad must be
touched before setting the number
pads or else your oven will not begin cooking.
Q. I tried to change Power Level
but the display changed back to
cooking time. Why?
A. After touching Power Level pad
you only have 4 seconds to enter
the number. Try setting controls
again.
e
e
Page 11

QuickSet& DefrostControls
Hc)vvtouse
Quick Set Control
Quick Set is a short-cut control for entering time
and the Power Level on your microwave oven.
Check your control panel or Quick Set Chart in this
book for specific codes for specific recipes.
To understand the Quick Set control, it is important to know what the numbers mean and what the
sequence is. The first and second numbers, if setting a three digit Code, indicate t,he amount of time
you desire; the last control entry number is always
the Power Level. For example, 125 means 12 min-
HowtoDefrost
The Defrost setting is designed for
even thawing necessary for large
amounts of food and is one of the
most important advantages of a
microwave oven, making defrost-
g quick and easy with little atten-
@
on. Power Level 3 is automatically
set for defrosting, but you may
change this for more flexibility. See
your Cookbook for the complete
defrosting chart.
To become better acquainted with
your Defrost function, defrost frozen pork chops by following the
steps below.
Step 1: Place package of frozen
chops in the oven and close door.
Step 2: Touch DEFROST. Display
reads :0. Power Level3 isautomatically set in oven but does not
appear on readout. Signal Light
above DEF. flashes.
w /u*
LAv
Step 3:Touch 8,0, and Ofor 8 min-
utes. 8:00 and signal light above
DEF. are displayed. If YOUwish to
change Power Level, touch Power
Level pad and then new number.
Step 4: Touch START. Time counts
down on display. When cycle is
completed, the oven signals and
automatically shuts off.
Step 5: Turn package over, close
door and repeat Steps 2, 3 and 4.
mm
utes at Power Level 5. NOTE: Your oven can only be
programmed to 99 minutes when using the Quick
Set control and the highest Power Level is 10 which
is represented by “O”. When setting a two digit
Code control entry, the first is time, the second is
power level.
Step I: Touch QUICK SET. Signal light above Code
flashes.
Step 2: Enter the proper code into Quick Set control. For example, a recipe calling for 12 minutes
cooking time at Power Level 10 would be 120.120
appears on the display.
Step3:Touch START. Signal light aboveTIME COOK
shows as well as time counting down on display.
Step 6: When oven signals and
shuts off, remove package and separate chops to finish defrosting.
DefrostingTips
Foods frozen in paper or plastic
@
can be defrosted in the package.
o For even defrosting, many foods
need to be turned over, rotated, or
broken up part of the way through
the defrosting time.
o Pre-packpged frozen dinners
can be defrosted and microwave
cooked.
e Check your Cookbook for other
defrosting tips.
QuestIons
andAnswers
Q. When I press START, I hear a
dull thumping noise. What is it?
A. This sound is normal. It is letting
you know the oven is using a
Power Level lower than HIGH.
Q. Can I Defrost small items in a
hurry?
A. Yes, but they will need more fre-
quent attention than usual. Raise
he Power Level after entering the
&_ me by touching POWER LEVEL
*
‘and 7 or 10. Power Level 7 cuts the
time in %; Power Level 10 cuts the
time to k. During either, rotate or
stir food frequently.
Q. Can I open the door during DEFROST to check on the progress
of my food?
A. Yes. You may open the door at
any time during microwaving. To
resume defrosting, close the door
and press START.
Q. Why don’t the defrosting times
in the Cookbook seem right for my
food?
A. Cookbook times are average.
Defrosting time can vary according
to the temperature in your freezer,
Set your oven for the time indicated in your Cookbook. If your
food is still not completely thawed
at the end of that time, re-set your
oven and adjust the time accordingly.
11
Q. When I enter a fourth digit
using Quick Set control, nothing
happens. What went wrong?
A.The oven will take only 2 or 3
numbers. If more are pressed, oven
does not respond. Touch Clear/Off
and begin again.
Q. Can Iselect a Power Level other
than automatic Power Level 3 for
defrosting?
A. Yes. Some smaller foods may be
defrosted quicker on higher Power
Levels but for even, carefree defrosting, Power Level 3 is suggested. Check the chart in the
Cookbook for specific times and
Power Levels.
—
—
.- ——
Page 12

HowtoTempCook
For many foods, internal temperature is the best
test of doneness.
Roasts or poultry are cooked to perfection when
temperature cooking. Heating or reheating foods
accurately to a serving temperature you desire is
simple and easy.
TElvlP COOK takes the guesswork out of cooking
because the oven shuts off automatically when the
food is done.
TemperatureProbe
l%e
The temperature probe is a food thermometer that
gauges the internal temperature of your food; it
must be used when using TEMP COOK or AUTO
ROAST. To utilize your temperature probe properly,
follow the directions for use and insertion in this
book in the section entitled “Automatic Roasting”.
HANDLE
SENSOR
ciw
HowtoTernpCooka RolledBeefRibRoastto Mecliurn
Step 1: insert temperature probe
as directed in Cookbook and at-
tach probe securely in oven wall.
Close the door.
Step 2: Touch TEMP COOK. The
readout display shows Oand signal
light above TEMP COOK flashes.
k~
1
/
I
mm~
step3:Touch1,
shows on display. Power Level 10
is automatically set in oven but
does not appear on readout.
3, 0 or 130°.130
Step 4: Touch pOWER LEVEL pad.
Touch 5 for MEDIUM power. P-5
shows on display and then display
reverts back to set finished
temperature.
step 5: Touch START. Display
shows temperature of food counting up.
Step 6: When 130° is reached, the
oven will sound and automatically
shut off. Remove probe and food
f,rom the oven.
CookingTips
~ Where you have a choice of
Power Levels, use a lower setting;
it will heat more evenly even
though requiring more time.
e Be sure frozen food has been
completely defrosted before in-
serting probe. Probe may break off
if used in frozen foods.
e Always insert probe into the
center of meaty areas; take care
not to touch the fat or the bone.
e Insert probe as horizontally as
possible into foods as directed in
the recipes, Make sure the handle
does not touch the food. The probe
is easiest to use when inserted
from the front.
e Use the clip to keep the probe in
place while heating.
o Cover foods as directed in
Cookbook for moisture control and
quick, even heating.
Quest!ons
andAnswers
Q. Are there any foods I can’t
TEMP COOK?
A. Yes. Delicate butter icings, ice
cream, frozen whipped toppings,
etc., soften rapidly at warm temperatures. Batters and doughs as
well as frozen foods are also difficult to cook precisely with the
probe. It
these foods.
is best to TIME COOK
Q. After I followed the steps and
touched START, a signal sounded
and oven did not start. What is
wrong?
A. If you set the temperature either
below 80° or greater than 199° the
oven will not start. To re-enter,
touch CLEAR/OFF pad and begin
steps again.
Q. Oven sounded and would not
start although I entered the temperature correctly. What is wrong?
A. If you have not securely seated
the end of the probe into the
receptacle in the oven wall, if you
touch TEMP COOK and have forgotten to use the probe or if the
actual food temperature is higher
12
than set temperature, oven will
sound and not start.
Q. Can I leave my probe in the
oven if it’s not inserted in the food?
A. No. If the probe is left inside the
oven, touching the oven wall, and
not inserted in food, you may damage the oven.
Q. How do I know what temperature to set?
A. Your Cookbook contains sections on all types of foods showing
the temperatures needed to cook
the foods to different degrees of
doneness. For reheating, refer to
Reheating Charts in the front
of the Cookbook for specific
temperatures.
Page 13

Howto UsetheHold/Timer
Your HOLD/TIMER, which oper-
ates without microwave energy,
has three timing functions.
It operates as a Minute Timer, it
can be set to delay cooking or may
be used as a hold setting after defrosting. Hold/Timer can be set up
to 99 minutes,
Step 1: Touch HOLD/TIMER pad.
The display shows :0. Signal light
above HOLD/TIMER flashes.
Step 2: Select the amollnt of time
you desire. Touch the appropriate
number pads. If, for example, you
are timing a three minute phone
call, touch 3, 0, and O.The display
shows 3:00.
Step 3: Touch START. The readout
display shows the time as it counts
down.
Step 4: When time is up, a signal
sounds and the timer turns off.
The HOLD/TIMER can also be
used to program “standing time”
between microwave cooking func-
tions. The time can range from one
second to 99 minutes and 99 seconds. A HOLD, or “standing” time
may be found in some of your own
recipes or Cookbook.
To set the oven to delay cooking
up to 99 minutes follow Steps 1
and 2 to enter hold time, then set
Time Cook and time, or Temp
Cook and temperature desired
before pressing START. When
holding before temperature
cooking, be sure probe is in food
before pressing START.
HowtoDefrost–Hold/Time–Time Cook
To help you become acquainted with the HOLD/TIMER feature as used with Time Cook or Temp Cook’ follow
Steps below to defrost a frozen casserole for 15 minutes, then hold 10minutes and then cook 25minutes. If using
Temp Cook after Hold/Timer, besure to insert probe correctly as shown in Temp Cook section of this book, after
HOLD time.
Step 1: Remove casserole from the
freezer and place in oven, Touch
the DEFROST pad. The readout
Panel shows :0 and signal light
Step 2: Touch 1, 5, 0 and O for
defrosting time. 15:00 appears on
display panel. (Defrosting is auto-
matically set on Power Level 3 but
can be changed by touching
POWER LEVEL pad and the new
Power Level.)
Questions
andAnswers
Q. What will happen if I accidentally reverse the instructions?
A. If you accidentally reverse the
equence of programming instruc-
‘ ens, your oven automatically
a
‘rearranges your program. Defrost-
ing always comes first, then hold,
m
and then the cooking function.
Step 3: Set standing Or hold time
by touching HOLD/TIMER. :0 appears on display. Signal light above
HOLD/TIMER flashes.
Step 4: Touch 1, 0, 0 and Oto hold
for ten minutes. 10:00 appears on
display.
Q. I programmed my oven for a
specific defrosting time but it defrosted longer than necessary.
What happened?
A. When instructions conflict, the
oven carries out the last instruction. You may have set the oven to
Defrost for 4 minutes, Hold/Time
for 2 minutes, and then Defrost for
6 minutes. In this case, the oven
would Defrost for 6 minutes and
Hold/Time for 2 minutes.
Step 5: Touch the TIME COOK
pad. This display shows :0 and
signal light above TIME COOK
flashes.
Step 6: Touch 2, 5, 0 and O for
twenty-five minutes of cooking
time. 25:00 appears on display.
Step 7: Touch START. 15:00count-
ing down shows on display. As
each function is automatically performed oven display shows entered
information and light above that
function comes on, While cooking,
you may touch appropriate pad to
recall times you set.
Q. Can I Defrost-Hold only on my
oven?
A. Yes, for foods you don’t want
to cook, like frozen fruit, frozen
whipped topping, etc.—refer to
Cookbook.
NOTE: Allow foods to remain at
room temperature only as long as
safe. Times will vary.
13
Page 14

UsingYourConv&ntionalOven
Your oven is designed to give you the best results in
baking, broiling, and roasting when used as recommended. Before using your oven, look at the directions for setting and using all of the controls and
timer.
OvenLight
Light comes on automatically when door is opened
or use switch on window door to turn it on when
door is closed.
OvenShelves
When the shelves are correctly placed on shelf sup-
ports they are designed with stop-locks to prevent
them from coming out of the oven or tilting when
food is placed on them. TO REMOVE, lift up “rearof
shelf and pull forward with stop-locks along top of
shelf support. TO REPLACE, insert shelf with stop-
Iocks resting on shelf supports and push toward
rear of oven until it falls into correct position under
shelf support.
Howto SetYourflangefor Baking
(JMSO SCM?f3WdfI~ch81?, page 19.) -
Step 1: Place shelf on embossed
shelf support “B” or as indicated
on Baking Chart, page 19.
Step 2 After making sure that the
oven door is closed: turn the Oven
Set Knob to BAKE. Oven “On”
Light comes on and remains on as
long as Oven Set Knob ison BAKE.
Step 3: Turn Oven Temp Knob to
the temperature called for in rec-
ipe. Oven Cycling Light comes on
and remains on until preset oven
temperature is reached. It reappears each time oven temperature
drops below preset temperature.
Step 4: You may set your Minute
Timer tothedesired cooking time as
indicated in your recipe. If your
cooking time is longer than sixty
minutes, Minute Timer must be
reset.
NOTE: Your Cookbook discusses
preheating and cooking results.
Most foods cook satisfactorily
without preheating. If preheating is
required, put your dish promptly in
the range after Oven Cycling Light
goes out.
Step 5: Place food inside the oven.
Make sure at least 1“ of space is
left between the cooking container
and the oven wall for proper heat
circulation. Close the oven door.
NOTE: Avoid opening your oven
door frequently. This could cause
undesirable results in your baking.
Only check foods at the minimum
time of the recipe. Then cook
longer if necessary.
Step 6: When the BAKE cycle is
complete, turn off heat. When
cooking food for the first time in
your oven, usethetime on your recipe as a guide. Be sure foods are
done before removing from oven.
How to set Your Range
for Time Bake
Your Automatic Oven Timer con-
trols your TIME BAKE feature
When you TIME BAKE, your range
can be preset to start and stop
Automatic ovenTimer,
Minute Timer
Oven Timer Controls are designed to automatically
start and stop certain oven functions. (TIME BAKE
or CLEAN). Dials are timed by aspecial Clock with
light grey squares (denoting numerals) and hands.
(For location see page 6) TO SET THIS CLOCK,
push in the center knob of Minute Timer and turn
the Clock hands to correct time, then let knob out.
TO SET MINUTE TIME, turn knob to desired min-
utes. (Knob must be out to set Minute Timer). —
Minute Timer will buzz when time has finished and
must be turned off manually.
Use the Microwave Oven Clock for easy reference
to time of day.
—
automatically if you are not home.
Step 1: Be sure the range Clock
shows correct time of day since
Clock controls the Oven Timers.
Start dial pointer must indicate
same time of day as on Clock. If
you want the oven to turn on at a
later time, set that time by pushing
in knob on Start dial and turn
pointer to time that you want oven
to start. (There’s no need to set
Start dial when starting time is the
present time of day.)
Step 2: To determine Stop time,
add the. food’s cooking time to
time set on Start dial. Push in knob
on Stop dial and turn pointer to
time oven isto turn off.
Step3: Turn Oven Set Knob to TIME
BAKE. Oven “On” Light comes on
immediately even if the Start time is
later.
Step 4: Turn Oven Temp Knob to
temperature setting. Oven Cycling
Light comes on even though heat
is not on in the oven if a later start
time is used. Your oven autorna
icaliy turns on and off at the times
you set.
Step 5: Remove food and turn
Oven Set Knob to OFF.
e
e
e
14
Page 15

HowtoSetYourIiFh3ngeforBroiling
(AlsoseeBroi//ng Chiwf,page 20,)
Step 1: Place the meat on the
broiler rack in the broiler pan. Al-
*YS use the rack so fat d~ips into
-e broiler pan.
Step 2: Position Oven Shelf as indicated on Broiling Chart, page 20.
d“
-,2
K3”
/“
c’
P
B
L!.
/
—
C&’
$ie$cP
Step 3: Turn the Oven Set Knob
and Oven Temp Knob to BROIL.
Both Oven Indicator Lights come on
Step 4: Leave oven door ajar
about 3 inches (except chicken,
see below). The door will stay open
itself yet the proper temperature
will be maintained in the oven. During cooking, turn the food only
once.
Step 5 Turn Oven Set Knob to
OFF and serve food immediately.
Leave the pan outside the oven to
cool during the meal for easy
cleaning.
CookingTips
Foil may be used to line the
broiler pan and rack. However,
be sure to cut openings in the
foil to correspond with the slits
in the broiler rack so fat drips
into the pan below.
For all weights of chicken, broil
with door closed.
Placing food closer to the top
of the oven increases smoking,
spattering,
on the meat and the possibility
of food fat catching on fire. Always keep rack 3-5 inches
from the broiling unit.
exterior browning
~ow toSet YourRange forRoasting
so see Roasting Chart,page 21,)
m
_
Step 1: Check the weight of the
..-—.
‘=? and place, fat side up, on the
—
iack in the broiler pan that came
with your range. This helps the
meat to baste itself.
Step 2: Position oven shelf on
embossed shelf support “B” for
small roasts (3-5 Ibs.) and position
“A” for larger roasts. For very tall
roasts, remove second oven shelf.
Step 3: Turn the Oven Temp Knob
to 325°. (The exception is small
poultry which is roasted at 375°.)
p 4: Close the oven door and
_turrl the Oven Set Knob to BAKE.
Oven “On” Light comes on and
stays on until Oven Set Knob is
turned to OFF. Oven Cycling Light
comes on and remains on until
temperature is reached.
Step 5: Place your meat inside the
oven, n~aking sure the pan is not
touching the oven walls or door.
Step 6: Turn off the heat when the
roasting cycle is complete.
15
CookingTips
Be sure meat is cooked to your
satisfaction. Most meats continue to cook slightly while
standing after being removed
from the oven. This should be
taken into consideration when
determining your cooking time.
Always use a roasting pan that
fits the size of your meat. A
roast placed in a pan too small
for its size will drip over the
edge.
You may cook frozen meat
roasts without thawing. How-
ever, you must allow more
cooking time for large roasts,
add 10-25 minutes per pound,
For roasts under 5 pounds, add
10minutes per pound.
To slow down surface browning
on turkeys, you can use a foil
“tent”.
should be laid loosely over the
poultry so the heat can circulate
under the foil.
Most frozen poultry should be
thawed before cooking to ensure it is done evenly. Some,
however, can be cooked successfully without thawing.
Check the packer’s label for
specific directions.
The tent-shaped foil
Page 16

Self-CleaningYourConventionalOven
If done properly, it will take only a few moments to
start the self-cleaning cycle on your range. After
setting your range to self-clean, a high heat tempera-
ture removes the soil in the oven cavity. The dirt
will then disappear by turning into an ash waste or
evaporating into an odorless and colorless vapor.
When the cycle is complete, allow your range to
cool and enjoy combination cooking in a sparkling
clean oven.
STEP 1: Remove all cookware
and food as well as heavy soil cleposits from the oven. Clean spat-
ters or spills around the oven door,
rectangular flanges, Iand gasket.
Then close the door.
STEP 3: Push and hold Clean
Button while sliding the Latch to
CLEAN.
T\*
STEP 4: Set The Automatic
OvenTimer:
Push in knob on Stop (Clean)
Dial and turn to the time you
wish oven to stop cleaning. Add
the number of hours needed for
cleaning to the present time of
day.
~~~~ ~: Turn Oven Set Knob
and OvenTemp Knob clockwise to
CLEAN. The control will snap into
final position when the CLEAN position is reached.
Cleaning Indicator Lights come
on when all steps are set
properly.
If you wish to clean at a later
time set Start Dial to that time.
While you are becoming acquainted with your selfcleaning oven,we recommend 2 hours forthe average cleaning Mction, but in some cases a longer
cleaning time, up to 3 hours may be necessary. In
order to judge the degree of soil, look at the oven
floor and walls. Light spatter and thinner spills
would generally need o~ly 2 hours cleaning. Heavy
greasy spills and spatter on the oven interior would
need up to3 hours.
NOTE: A slight odor may be detected especially during the first
few cleanings. Do not be alarmed.
This is normal during the selfcleaning cycle.
When cleaning temperature is
reached, Lock Light comes G+and
door cannot be unlatched until
Lock Lightgoesoff.
STEP 5: When Lock Light goes
off, push and hold the Clean Lock
Button while sliding Latch to
OPEN. Turn Oven Set Knob to
OFF.
STEP 6: Turn Oven Set Knob to
OFF.
1
@
~
~uestions
and Answers
Q. What should I do if excessive
smoking occurs during cleaning?
A. This is caused by excessive
grease and you should switch the
Oven Set Knob to OFF. Open windows and doors to rid room of
smoke. Allow the oven to cool for
at ;sast one hour before opening
the door. Wipe up the excess
grease and reset the clean cycle.
Q. Why did the Lock Light come
on when I first set the oven for
CLEAN?
A. Lock Light glowing indicates
that oven is too hot. Turn Oven Set
Knob to OFF and open Oven Doo$
to cool the internal cavity. After a
short period of time, reset controls
for cleaning.
Q. My oven shelves have become
gray after several cleanings. Is this
normal?
A. Yes. After many cleanings, the
shelves may lose some luster and
discolor to a deep gray color.
Q. Why do I have ash left in my
oven after cleaning?
A. Some types of soil will leave a
deposit which is ash. It can be removed with adamp sponge or cloth.
Q. Why is there still some black
soil left after cleaning?
A. You did not time the oven to
clean long enough. This deposit
will be removed in later cleanings.
Q. If my oven clock is not worki
can Istill self-clean my oven?
A. No. Your Automatic Oven Timer
uses the range clock to help start
and stop your self-cleaning cycle.
@
e
Page 17

Careof Your CotikingCenter ~
-
MicrowaveChm’lJ
—
Walls,Floor and Plastic Cover. Be-
cause there is little heat except in
the food, or sometimes in the utensils, spills and spatters are easy to
remove. Some spatter can be removed with a paper towel, others
may require a damp cloth. Remove
greasy spatters with a sudsy cloth,
then rinse, and dry. Do not use
abrasive cleaners on oven walls.
NEVER USE A COMMERCIAL
OVEN CLEANER ON ANY PART
OF THE MICROWAVEOVEN.
SPECIAL NOTE WHEN USING
BROWN ‘N SEAR DISH: High heat
generated on bottom of Brown ‘N
Sear Dish can cause scorched appearing stains to bake onto the
oven shelf if grease is present.
These may be removed with
Deletep Polishing Cleanser by the
Drackett Products Co.
Onventionaloven
&
‘Oven Thermostat
—
The temperature on your range
has been accurately set at the fac-
—
tory. However, if your food consistently browns too much or too
little, you may make a simple ad-
justment on your Oven Temp
Knob. To readjust your thermostat:
@Pull Oven Temp Knob off of the
shaft. Look at the back of knob
and note the current setting before making any adjustment.
@Loosen both screws on the back
of the knob.
@Lift the pointer and move it one
notch in the desired direction—
toward HI to increase or toward
LO to decrease temperature.
NOTE: Oven temperatures can be
raised by 20° or lowered by 30°.
@Tighten
knob to range by matching the
flat area of the knob to the shaft.
LAMP REPLACEMENT
% AIJTION: BEFORE REPLACING
@
ANY LAMP, DISCONNECT
– ELEC-IRIC POWER TO RANGE
_ AT THE MAIN FUSE OF CIRCUIT
BREAKER PANEL. LET LAMP (OR
BULB) AND LAMP COVER COOL
COMPLETELY.
screws and return the
After using Delete, rinse and dry
thoroughly, following instructions
on can. Do not use Delete on the
painted surfaces such asthe walls.
It will scratch the paint.
Delete may be purchased from
your local dealer or from your GE
Authorized Service Center. Check
the “yellow pages” for location
and phone number.
Delete is sold in grocery, hardware
stores, or in the housewares section of some department stores.
Door-inside. Wipe up spatters
daily, wash when soiled with a min-
imum of sudsy warm water. Rinse
thoroughly and dry.
Door-outside.Wipe frequently with
a damp cloth to remove all soil. DO
NOT USE ABRASIVES, SUCH AS
CLEANING POWDERS OR STEEL
AND PLASTIC PADS. THEY WILL
MARTHE SURFACE.
OvenLamp(Self-Cleaning
(henj
*-3
e
Q
b-
a. Remove the three slotted screws
in lamp cover; see diagram. Re-
move cover; replace lamp with 40
watt appliance lamp.
b. Replace lamp cover with three
screws.
c. Connect electric power to range.
‘-=0
pl
!9
)
We of Aluminum Foil
MICROWAVE OVEN:
Use metal only as directed in the
Cookbook. Metal strips as used on
meat roasts are helpful in cooking
food when used as directed. Metal
trays may be used for TV dinners
and, of course, the metal tempera-
ture probe is designed for micro-
wave oven use. However, when
using any metal in the microwave
oven, keep metal at least l-inch
away from sides of microwave
cwen,
17
r=
E
~[*
Temperature Probe. Probe IS .=
sturdv, but care should be taken in ~
handfing. Do not twist, bend or _drop. Clean after using. To clean,
wipe with sudsy cloth, then rub
lightly with plastic scouring ball if ~:
necessary.
wash in dishwasher.)
DO NOT USE TEMPERATURE
PROBE IN OVEN UNLESS IT IS lN-
SERTED INTO FOOD.
Accessory Shelf. Use in micro- o
wave oven only. Shelf must have *
food on it when microwave oven is =
in use. Do not use browning dish ~~
on shelf.
Clean shelf in dishwasher or hot -I
water and mild detergent only.
Oven Lamp. Microwave oven lamp -
should last almost as long as the =.k
appliance lasts. To replace it re- --
qulres a Product Service call.
Rinse and dry. (Or r=}
/r’
CONVENTIONAL OVEN:
If desired, broiler pan may be lined
with foil and broiler rack may be
covered with foil for broiling.
ALWAYS BE CERTAIN TO MOLD
FOIL THOROUGHLY TO BROILER
RACK AND SLIT FOIL TO CON-
FORM WITH SLITS IN RACK.
Broiler rack is designed to minimize smoking and spattering, and
to keep drippings cool during
broiling. Stopping fat and meat
juices from draining to the broiler
pan prevents rack from serving its
purpose, and may let juices become
hot enough to catch fire.
DO NOT place a sheet of alum-
inum foil on shelf of either conventional or microwave oven. To do so
may result in improperly cooked
foods, damage to oven finish, and
increase in heat on outside surfaces of the range.
K
K*
~ ——–
w
~Q
c
F
E
Kii
EL
w
*
@
-.
.
Page 18

cleaning Chati
Your Cooking Center is cleaned two ways: manually
and by using the automatic self-cleaning function.
This chart describes parts of your cooking center,
cleaning materials to use on each part, and general
Bake Unit and
Broil Unit
o Soap and Water
Broiler Pan & Rack
Oven Control Knobs
OutsideGlassFinish
@Soap-Filled
Scouring Pad
e Plastic Scouring
Pad
Mild Soap and Water
Soap and Water
directions for cleaning. Be sure to follow these direc-–
tions carefully to assure maximum use of your cooking center. NOTE: Let oven parts cool before cleaning
manually.
Do not clean the bakeunit or broil unit. Anysoil will burnoff
when the unit is heated. NOTE:The bakeunit is hingedand
canbeliftedto cleanthe
accumulates around the bake unit, gently wipe around the unit
with warm water.
Drain fat, cool pan and rack slightly, (Do not let soiled pan and
rack stand in oven to cool). Sprinkle on detergent. Fill pan with
warm water and spread cloth or paper towel ove~the rack. Let
both stand for a few minutes. Wash; scour if necessary. Rinse
and dry. OPTION: The broiler pan and rack may also be cleaned
in a dishwasher.
Pull off knobs, Wash gently but do not soak. Dry and return con-
trols to range making sure to match flat area on the knob and
shaft.
Wash all glass with cloth dampened in soapy water. Rinse and
polish with a dry cloth. If knobs on the control panel are removed, do not allow water to run down inside the surface of
glass while cleaning.
oven floor. If spillover, residue, or ash
*
Metal, including
Chrome Side Trims
and Trim Strips
Porcelain Enamel:k
Inside Oven Door:<
Oven Gasket::
Oven Liner
Shelves
(SeeSelf-Cleaning
OvenDirections)
Soap and Water
@Paper Towel
@
Dry.Cloth
@Soap and Water
Soap and Water
Soap and Water
Soap andWater
Wash, rinse, and then polish with a dry cloth. DO NOT USEsteel wool. abrasives. ammonia. acids. or commercial oven cleaners
which may damage the finish.
Avoid cleaning powders or harsh abrasives which may scratch
the enamel,
If acids should spill on the range while it is hot, use a dry paper
towel or cioth to wipe up right away. When the surface has
cooled, wash and rinse.
For other spills, such as fat smatterings, etc., wash with soap
and water when cooled and then rinse. Polish with a dry cloth.
On this oven, clean ONLY the door liner outside the gasket. The
door is automatically cleaned if the oven is in the self-cleaning
cycle. If spillover or spattering should occur in cooking func-
tion, wipe the door with soap and water. DO NOT rub or dam-
age gasket. Avoid getting soap and water on the gasket or in the
rectangular flanges on the door.
Avoid getting ANY cleaning materials on the gasket.
Cool befxxe cleaning. Frequent wiping with mild soap and water
will prolong the time between major cleanings. Be sure to rinse
thoroughly. For heavy soiling, use your self-cleaning cycle of-
ten.
Your shelves can be cleaned with the self-cleaning function in
the oven. For.heavy soil, clean by hand using any and all mentioned materials. Rinse thoroughly to remove all materials after
cleaning.
‘2Spillage of marinades, fruit juices, and basting materials containing acids may cause discoloration. Spillovers should be
wiped-up immediately with a paper towel. When the surface is cool, clean and rinse.
@
Page 19

ConventionalBakingChati
1. Aluminum pans conduct heatquickly.For most conventional baking light shiny finishesgwe bestresults because they preventoverbrowmng
in the time ittakes for heattocookthe center areas. Dull (satin-finish) bottom surfaces of pans are recommended forcake pans andpie plates to
be sure those areas brown completely.
2. Dark or non-shiny finishes, alsoglass and pyroceram, absorb heat which may result in dry,crisp crusts. Reduce oven heat 29 if Iightercrusts
are desired. Preheat cast iron for baking some foods for rapid browning when food is added.
3. Preheating the oven is notalways necessary,especially for foods which cooklonger than 30 or40 minutes. Forfoods with shortcooking times,
preheating gives best appearance and crispness.
4. Clpenthe oven door to check food as little as possible to prevent uneven heating and to save energy.
Food
Bread
Biscuits (Vz-in.thick)
Coffee cake
(See layer cake)
Corn bread or muffins
Muffins
Popovers
Nut bread or fruit bread
Yeast-bread (2 loaves)
Plain or sweet rolls
Cupcakes
Fruit cake
Jelly roll
Layer cake, coffee cake
and gingerbread
Fluted tube cake
Container
Shiny Cookie Sheet
Cast Iron or Glass
Shiny Metal Muffin Pans
Deep Glass or Cast Iron
cups
Metal or Glass Loaf Pan
Metal or Glass Loaf Pan
Shiny Oblong or Muffin
Pans
Aluminum Tube Pan
ShinyMetal Muffin Pans
Metalor Glass Loaf or
rube Pan
bletal Jelly Roll Pan
ShinyMetal Pan with
;atin-finish bottom
Metalor Ceramic Pan
Shelf
Position
B
B
A
B
B
A
A
A
3
4or B
3
3
4
Oven
Temp.
40W’-45V
425°-450’
400°
400°
350°
375°
375°
350°
350°
275°-300”
375°
350°
350°
Time,
Min.
10-14
20-30
20-25
40-50
45-55
40-55
10-20
30-40
15-20
2-4 hrs.
10-15
20-30
40-50
Comments
Canned refrigerated biscuits take 2-4
min. less time.
Preheat pan for crisp crust.
Decreasetime about 5minutes for muffin
mix.
Or bake at 45(Y for 25 min., then at 350°
for 10-15 min.
Testwith toothpick in center.
Dark metal or glass give deepest
browning.
For thin rolls, Shelf B may be used.
Twopiece pan is convenient.
Paper liners produce more moist crusts.
Use 300° and Shelf B for small or
individual cakes.
Line pan with waxed paper.
White and yeHowcakes may cook faster
than chocolate.
Reduce time 5 to 10 minutes for cakes
from mix.
Cookies
Bar
Drop or sliced
Fruits, Other Dessert
Baked apples
Custard
Pies
Frozen
Meringue jpread to crust edges
One or two-crust, quiche SIassor Satin-finish
Oven stew
Baked potatoes
Scalloped or saucy
casseroles
Metalor Glass Pans
OookieSheet
;Iass or Metal
SIassCustard Cups or
;asserole (set in pan of
lot water)
‘oil Pan on Cookie Shee
fletal
Jetal; Pyroceram
let on Oven Shelf
;Iass or Metal
3
3
\or B
3
350°
375°
375°
350°
425°
350°
375°
3om
375°-4000
350°
19
25-35
10-15
30-40
40-50
50-60
15-20
55-65
2-3 hrs.
60-70
55-65
Use same time for barcookies from mix.
Use Shelf C and increase temp. 25-50°
for more browning.
Can also use in oven meals on Shelf C.
Reduce temp. to 300 for large custard.
Cook bread or rice pudding with custard
base 80 to 90 minutes.
For large pies use 400° and increase
time,
Toquickly brown meringue use 400° for
8-10 min.
Custard fillings require lower temp.,
longer time.
Or cook at 250° for 5-6 hrs.
Increase time for large amount or size
Move to Shelf B or C for oven meals.
Page 20

ConventionalBroilingChati c
1.
Always use broiler pan and rack that comes withyour oven. Itisdesigned tominimize smokingand spattering bytrapping juices in the shielded
lower part of the pan.
2. C)vendoor should be ajar for most foods; there is a special position on door which holds door open correctly.
3. Forsteaks andchops, slashfat evenly around outside edges ofmeat. Toslash,cutcrosswise through outer fat surface just to the edge of the
meat. Use tongs to turn meat over to prevent piercing meat and loosing juices.
4. If desired, marinate meats or chicken before broiling. Or,brush with barbecue sauce last 5 to 10minutes only.
5. When arranging food on pan, do not let fatty edges hang over sides, which could soil oven with f?t dripping.
6. Broiler does not need to be preheated. However, for very thin foods or to increase browning, preheat if desired.
7. FrozenSteaks can beconventionally broiled bypositioning the oven shelf atnextlowest shelf position andincreasing cookingtime given in
this chart IVZtimes per side.
—.
Food
Quantity
and/or
Thickness
Shelf
Position ~omments
Oven
Door
Ajar
First Side
Time, Min
Second Side
Time, Min.
e
Bacon
Ground Beef,
Well done
Beef Steaks
Tender Cuts
such as T-bone, rib-eye,
filet mignon, loin or strip,
etc.
Beef Steaks
Chicken 1 whole (2to 2VAbs.),
~reads and pastries
Fruit
Lobster taiis
(6 to 8-oz. each)
Vz-lb.(about 8 thin
slices)
1-lb. (4 patties)
% to %-in. thick
l-in. thick
1M-in, thick
split lengthwise
2-8 pieces
2-4
c
Yes
c Yes
c Yes
B
A No.
D Yes 2 1-2
Yes
Close
door
5
7
Rare: 14
Medium: 16
Well
Done: 18
Rare: 20
Medium: 25
Well
Done: 30
40
c Yes 5-10 total
B
Yes
13-16
2-3
4-5
10-12
10-12
11-13
18-20
20-25
23-27
10-15
—
(Donot turn
over)
Vrange in single layer.
Spaceevenly.
Jp to 8 patties
ake about sametime.
Steaksless than 1-in.cook
hrough before browning. Panfry
]r broil on Shelf D. Cook first side
ust to turn meat color then finish
~therside to doneness desired.
Nash fat.
Reduce times about
5-10 min. per side for
cut-up chicken.
Spaceevenly. Place English
~uffins cut-side-up and brush with
butter,if desired.
Brush with butterand sprinkle with
brownsugar if desired. Turnover,if
desired,
only whole or sliced fruit,
not halves.
Cut through back of shell. Spread
open. Brush with melted butter
~efore and after half time.
@
e
Fish
Ham slices
(precooked)
Pork chops l-in. thick
Lamb chops 10-12
precooked sausages,
bratwurst
l-lb. fillets V4to Vz-in.
thick
l-in. thick
1-in. thick
2 to 4 chops
1Vz-in.thick
1-lb.
c
B
B
c
B
c
Yes
Yes
Yes
Yes
Yes
Yes
8 3-5 Handle and turn very carefully.
12 9 Increase times 5-10
Well
Done: 20
Medium: 12
Well
Done: 15
Medium: 20
Well
Done: 25
6 2-4Wieners and similar
15-17
11-13
13-15
17-20
20
Brushwith lemon butter before and
during cooking ifdesired. Preheat
broiler to increase browning.
min. per side for IYz-in. thick
or home cured.
Slash fat.
Slash fat.
e
If desired, split sausages in half
lengthwise into 5to 6-in. pieces.
Page 21

‘ConventionalRoastingChati
t. Position oven shelf at Bfor small-sizeroasts (3 to 5-lbs.) and at A for larger roasts.
2. Place meat or poultry fatside up on broiler pan or other shallowpan with trivet. Do not cover, Do not stuff poultry untiljust before roasting.
a
Use meat thermometer if your ovenhas one, for most accurate doneness. Thermometer signals when food has reached set temperature.
3. Remove fat and drippings as necessary.Baste as desired.
4. Standingtime recommendedfor roastsis 10to 20 min. to allow roasttofirm up and makeiteasierto carve. Itwill rise about 5°to 10°in internal
temperature; to compensate for temperature rise, if desired, remove roast from oven at 5° to 10”less than temperature on chart.
5. Frozenroastscan beconventionally roasted byadding 10to25min.per poundmore timethan givenin chart for refrigerated. (10min.per lb. for
roasts under 5-lbs.). Defrost poultry before roasting.
Type
Meat
Tendercuts: rib, high quality
sirloin tip, rump or top round*
Lamb Leg or bone-in shoulder’
Veal shoulder, leg or loin*
Pork loin, rib or shoulder*
Ham, pre-cooked
Ham, raw
●For boneless rolled.roasts over 6-in
Poultry
hicken or Duck
e
Turkey
Oven
Temp.
32!Y
325°
325°
325°
325°
325°
ck, add5to10n
325°
325°
Doneness
Rare:
Medium:
Well Done:
Rare:
Medium:
Well Done:
Well Done:
Well Done:
ToWarm:
Well Done:
per lb. to times gil
Well Done:
Well Done:
Approximate Roasting Time,
in Minutesper Pound
3 to S=lbs.
24-30
30-35
35-45 28-33
21-25 20-23
25-30
30-35 28-33
35-45
35-45 30-40
10 reins. per lb, (any weight)
Under 10=lbs.
20-30
above.
3 to $=lbs.
35-40
10 to 15.lbs.
20-25
6 to 84bs.
18-22
22-25
24-28
30-40
10to 15=lbs.
17-20
Over 5=lbs.
30-35
Over 15=lbs.
15-20
Interns’1
Temp.“F
1 30-14W’
150°-160°
170-185°
130’-140°
1500-160°
170’-185°
17@-180°
170°-180°
1250-130’
In thigh:
185°-1900
21
Page 22

The ProblemSolver
.=
Savetimeandmoney...
beforeyoucallforsewice,checkthefollowing:
Microwave~VW’i
Control Panel On, Yet Oven Will Not Start:
Make sure you touched START pad.
Door is not securely closed.
Another function entered. Touch CLEAR/OFF to
cancel.
You have not entered numbers after Time Cook.
Finished temperature not entered after Temp Cook.
CLEAR/OFF was touched accidentally.
After touching Quick Set or Auto Roast pads, no code
number was entered.
Start Pad not pressed after setting oven controls.
FoodsAre Either Overcooked or
Undercooked:
Not enough time set when using Time Cooking
because of variance of starting food temperatures.
The density and amount of foods will vary and thus may
need more time for completion.
Probe not inserted properly into meat or dish. Check
Cookbook for specific probe placement.
Incorrect Power Level set.
Dish was not rotated, turned or stirred if these instruc-
tions were given in recipe.
Too many dishes in oven at same time.
You did not enter a different Power Level as suggested
in recipe.
Incorrect Quick Set numbers entered,
ConventionalOven
Oven Will Not Work:
The circuit breaker tripped in your house.
@
e A fuse has blown.
63 Oven controls are not properly set.
Oven Light Does Not Work:
e Light bulb is loose.
e Bulb is defective.
e Switch operating oven light is broken.
FoodsAre Not Cooking Properly During
Baking, Roasting or Broiling:
Make sure Oven Control knobs are properly set.
Improper shelf position is being used.
Thermostat needs adjustment.
Meat thermometer is not positioned correctly in meat.
Not preheating oven when suggested.
Improper size container is being used.
Not enough cooking time allowed for meat’s poundage.
e
Oven shelf not level.
e
Too many utensils or foods in the oven.
Aluminum foil not slit when used over broiler rack.
e
Food being baked on hot pan.
“e
e
In TIME BAKE, Automatic Oven Timers not set properly.
Self-CleaningOperation:
Oven Won$tLatch:
Oven is too hot from prior use, so let cool slightly.
~
e Not holding in Latch Release while moving Latch.
o Oven Set Knob not on CLEAN.
oven Will Not Self-Clean:
e Door is improperly locked and latched.
e Oven Set Knob is not in CLEAN position.
o Oven Temp Knob is not positioned on CLEAN.
e Start time)stop time dials are improperly set.
e Excessive spills, spatters, and soil deposits are not
being cleaned up prior to self-cleaning.
Oven Won’t Unlock:
e Range hasn’t cooled to a safe temperature.
e Not holding down Latch Release Button while moving
Latch.
e
e
1. Steam or vapor escaping from around the door. 4.. Dull thumping sound while operating at power
2. Light reflection around door or outer case.
3, Dimming oven iight and change in blower sound
may occtir whi!e operating at power levels other
high,
than
levels other than high.
5. Some TV-Radio interference might be noticed
while using your microwave oven. It’s similar to the
interference caused by other small ap’piiances and
d’oesnot indicate a problem with your oven.
22
,
Page 23

‘—-% ** #&%4n*&#ns*–#< *& X*
=’”
---
. v=. .
~ YOURHOTPOIIUTMICROWAVEOVEIWRANGE~“=
*al wit? ~
XZu!z?---—----
1Z.-xff”-----
A–:411
~>-:lj
-.-,.
.—---
1’q?li
lz~l:
m-a1[
~:>~
I /====.--=-.==-------
7A-
c,%
~,a [j
-–-2.1
)>:II
::=3 ]
Z,g ,1
1S*
–?
-.
ZXll
--11
a
WHATISCOVEFED
F:$j~~
“*
.—
?-.
>Xll
—_qi1
;~!~
---
‘-m
.—
?—.
SXII
—q!!
I1
.=-
+y!f
“61]
——!II
==11
—-——,: !
=—-II
‘3%II
.:* I
—511
SXll
_.!!
7$!!
+: II
XXII
.,,
II
=—-
-,%?11
=~~1 WHATIS NOT’COVERED . Service trips to your home to
Sx II
!!
_.
11
——-
.yf
=11
-=<11
Dxll
_.:!
—-[1
d II
.=11
X.1!
-=11
II
_m
=%1}
~x II
--J !!
~$ ~~
--YII
Bxll
—.
–,,,
:3 ~~
-=11
y ~/
Sx II Youare responsible for providing
~ !!
:$ II
‘::11
72 II
752II
.:<II
=2 ~~
- .,
i
=%
~~
I
-=:II
_~[1
.%II
-:: ~~
Some statesdo not allow theexclusionor limitationof incidentalor consequentialdamages,so the abovelimitation or exclusion
may not applyto you.ThiswarrantygivesYOUspecific legalrights, and
To knowwhat your legalrights arein your state,consultyourlocal or stateconsumeraffairsoffice or your state’sAttorneyGeneral.
,0
c
‘----
J
WARRANTY
Saveproofof originalpurchasedatesuchas your sales slip or cancelled check to establish warranty period.
~
——
FULL ONE-YEAR WARRANTY
Forone yearfrom dateof original
purchase, we will provide,free of
charge, parts and servicelabor in
your home to repair or replaceany
part of the mkrowave ovenlrange
that fails becauseof a manufacturing defect.
—
————.—.—.-———
This warranty is extended to the
original purchaserand any succeeding owner for products purchased
fo~ordinary home use in the 48
mainland states,Hawaii and
Washington, D.C. InAlaskathe
warranty is the same except that it
is LIMITED becauseyou must pay
to ship the product to the service
L!MITED ADDITIONAL
FOUR-YEARWARRANTY
Forthe second through fifth year
from date of original purchase,
we will provide, free of charge, a
replacement magnetron tube if the
magnetron tube fails becauseof a
manufacturing defect. Youpay for
the service trip to your home and
service labor charges.
shop or for-the servicetechnician’s
travel costs to your home.
All warranty service will be provided
by our Factory ServiceCenters or
by our franchised Customer Care@
servicersduring normal working
hours. Checkthe White Pagesfor
HOTPOINT FACTORYSERVICE.
Look in the Yellow Pagesfor
HOTPOINT CUSTOMERCARE@
SERVICEor GENERAL ELECTRICHOTPOINT CUSTOMER CARE@
SERVICE.
o Replacementof housefuses
teach you how to use the product.
Readyour Useand Care material.
If you then haveany questions
about operating the product,
pleasecontact your dealer or our
Consumer Affairs office at the’
address below, or call, toll free;
The GE Answer Center’”
800.626.2000
consumer information service
e improper installation.
or resetting of circuit breakers.
o Failure of the product if it is
usedfor other than its intended
purpose or usedcommercially.
@Damage to product caused
by accident, fire, floods or acts
of God.
WARRANTOR IS NOT RESPONSIBLE FOR CONSEQUENTIAL
DAMAGES.
If you havean installation problem,
contact your dealer or installer.
adequate electrical, exhausting
and other connecting facilities.
YOUmay also have otherrights which varyfrom stateto state.
MfarrantonGeneral ElectricCompany
If furtherheipis neededconcerningthiswarranty,contact
Manager—ConsumerAffairs,Generai EiectricCompany,AppiiancePark,Louisviiie,KY40225
U)....flw----=
>,,.
_-
-+ :
-
.
1=
~:s_
..—
,,r
,,<,
,l&
1.
1-
,,-
,,~
!!.
“=
lb
I.
1}:
Ii&
II*
,, =
,, ~!~=
II=
,,,
11:
Ilk
II*
II –
,, II =
1,m
II –
,;r—
11:
Il&
H‘
1[ =
,, -
II =
~: ._
..—
r
,,
Ilk
Il.
II=
,,,
IIn
::ll_
,ir—
II a
II=
xi :
II =
;:m_
,.—
,,.
!! =
,,,
Ii:=
Ii:
II=
~g>
11:
Ilk
11’
IIz
!1z
II=
~:111
,i,—
111-
Il&
11’
II =
in :
!1 =
::._
..—
,,,
11:-
Il&
Il.
11=
11-
11x
~:ri
IIF
11:-
 Loading...