

Page 1
H
3%-’54/’4?/-
thebes
I
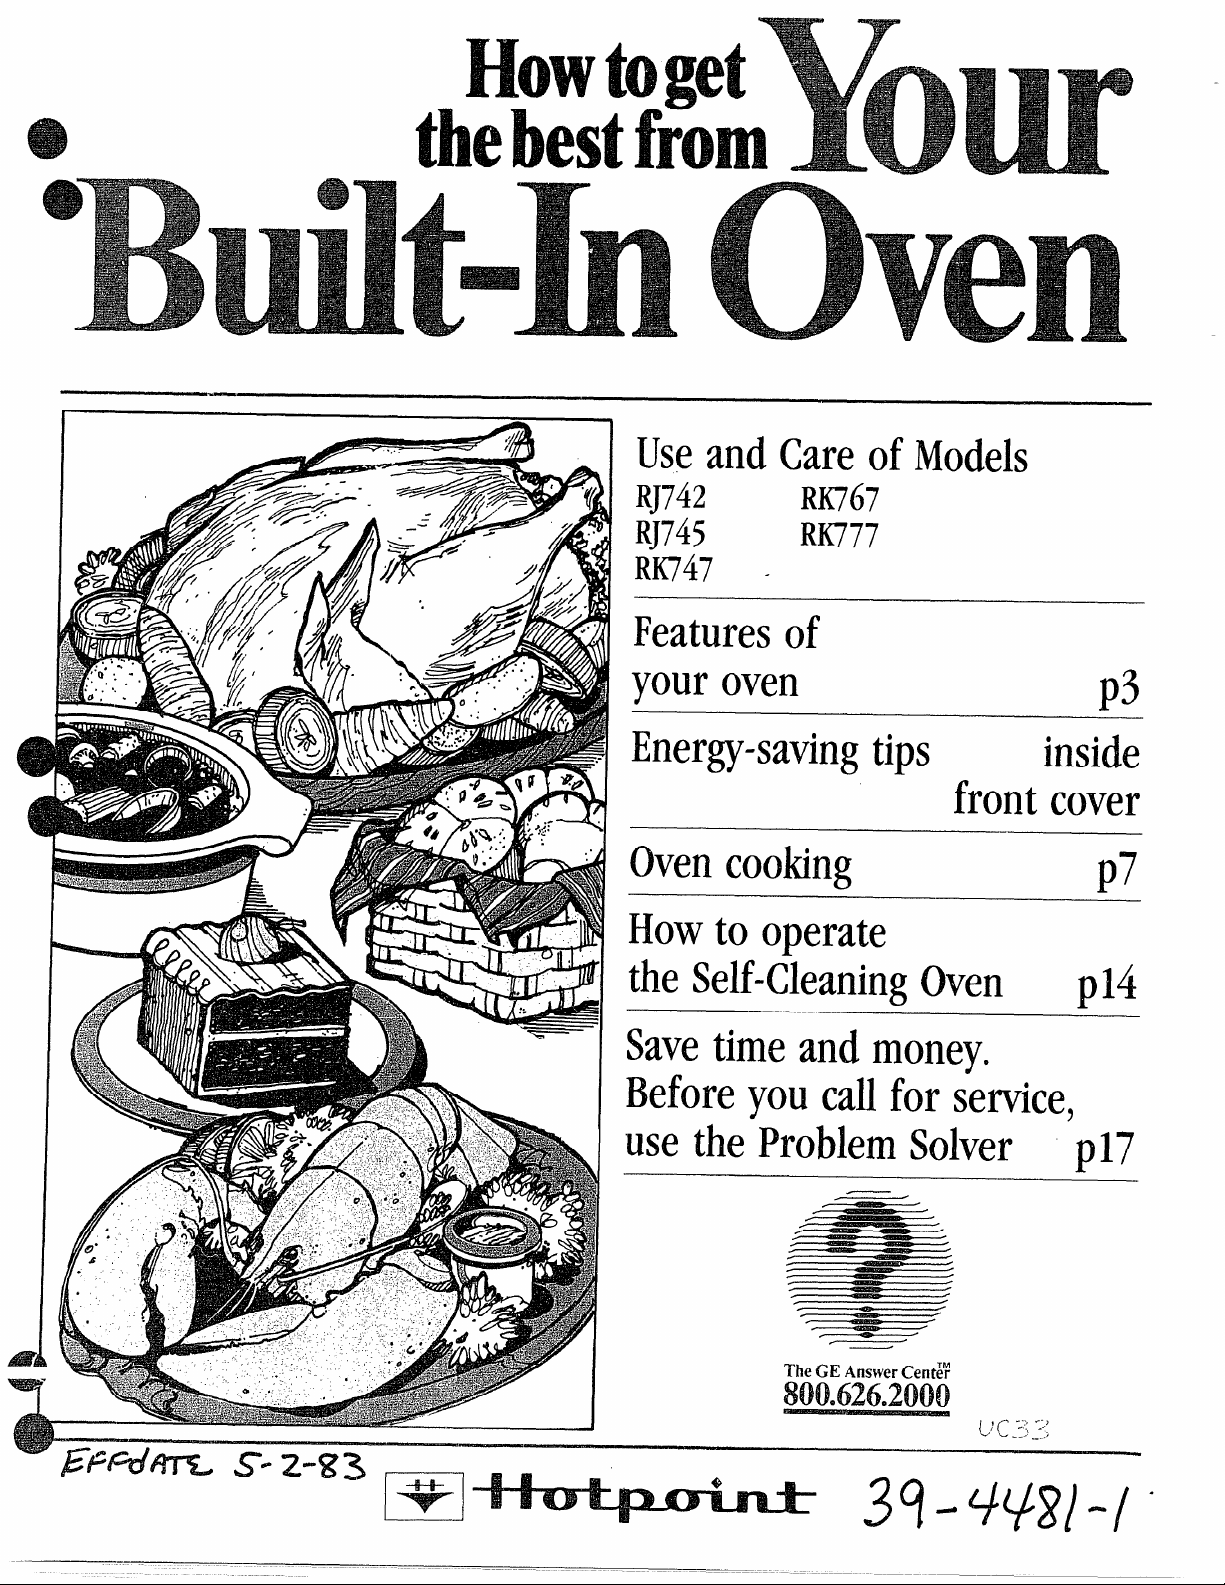
UseandCareofModels
RJ742
RJ745
RK747 -
RK767
RK777
Featuresof
youroven
Energy-savingtips
frontcover
Ovencooking
Howto operate
theSelf-CleaningOven
Savetimeandmoney.
p3
inside
pi’
p14
Beforeyoucallforservice,
usetheProblemSolver
The GE AnswerCent%
800.626.2000
p17
.
Page 2
HelpUsHelpYou.. ❑
ReadThis Bookcarefully
It is designed to help you operate and maintain your
new Oven properly.
Keep it handy for answers to your questions,
If you don’t understand something or need more
help. . .Call, toll free:
The GE Answer CenterTM
800.626.2000
consumer information service
or write: (include your phone number);
Consumer Affairs
Hotpoint
Appliance Park
Louisville, KY 40225
writeDown the Model
and
said Numbers
You’ll find them on a label on the front of the Range
behind the oven door.
These numbers are also on the Consumer Product
Ownership Registration Card that came with your
Oven. Before sending in this card, please write
these numbers here:
Model No.
Serial No..
Use these numbers in any correspondence or ser-
vice calls concerning your Oven.
HYouReceiveda DamagedRange
Immediately contact the dealer (or builder) that
sold you the Range.
SaveTime and Money.=.
BeforeYouCall for Service
Check the Problem Solver (page 17). It lists minor
causes of operating problems that you can correct
yourself.
it could save you an unnecessary service call.
o
EnergysavingTips
1. Preheat the oven only when necessary. Most
foods will cook satisfactorily without preheating. If
you find preheating is necessary, keep an eye on
the indicator light, and put food in the oven
promptly after the light goes out,
2. Always turn oven OFF before removing food.
3. During baking, avoid frequent door openings.
Keep door open as short a time as possible when it
is opened.
4. Be sure to wipe up excess spillage before selfcleaning operation.
5. Cook complete oven meals instead of just one
food item. Potatoes, other vegetables, and some
desserts will cook together with a main-dish casserole, meat loaf, chicken or roast. Choose foods that
cook at the same temperature and in approximately
the same time.
6. Use residual heat in oven whenever possible to
finish cooking casseroles, oven meals, etc. Also
add rolls or precooked desserts to warm oven,
using residual heat to warm them.
Page 3
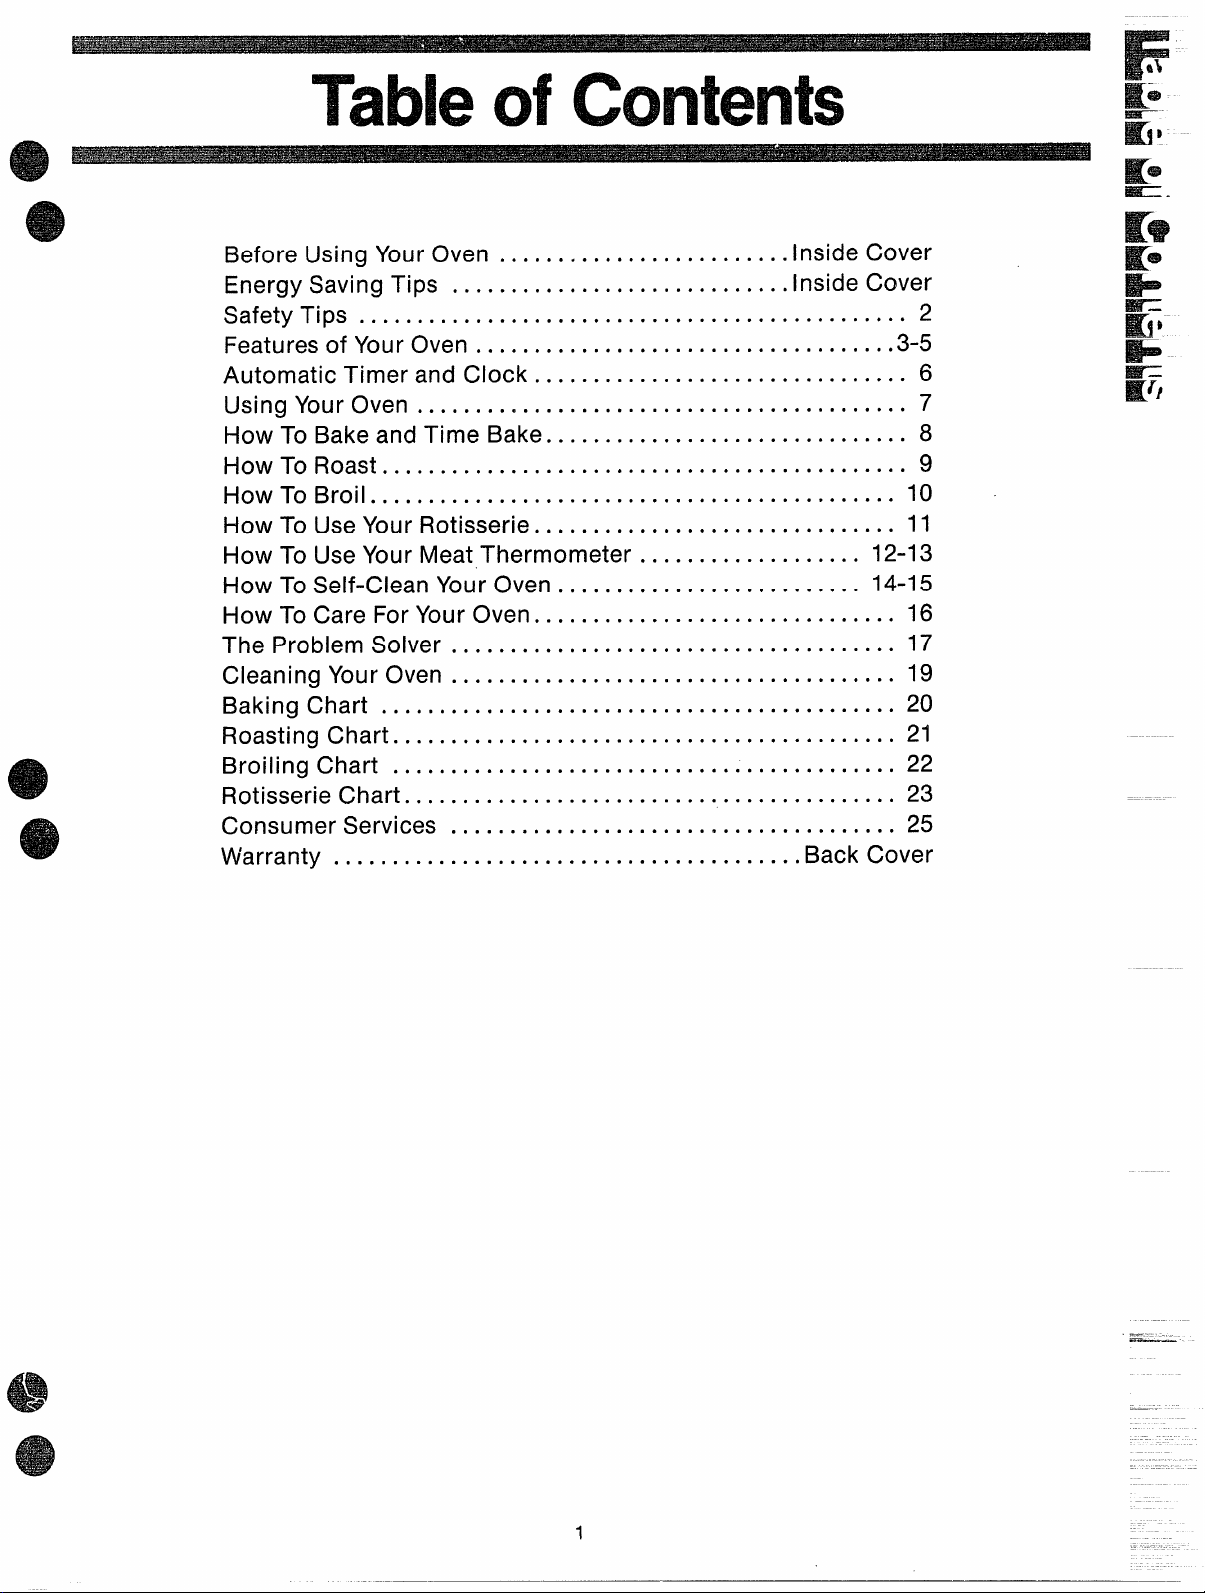
TableofContents
w-
e
K
SEC.
@
BeforeUsingY ourOven . .. . . . . .. .e.. . . . .. . . ..o. .lns
Energy Saving Tips
● ***.**** ● .*.***.. .. . . . . . . . .*
Safety Tips . . . .. . . . . . . . . . . . .. . . . . . . . . . . . . . . . . . . . . . .
Features of Your Oven
.. 0.0.0. .* *.**.. . . . . . . . . ● **.*..* ..00
de Cover
Ins
de Cover
I*...**
3-5
Automatic Timer and Clock... . . . . . .. . . . . . . . . . . . . .. . . . . . . . . 6
Using Your Oven .. . . . . . . . . . .. . . . . . . . . . . . . . . . .. . . . . . . . . . ..O 7
How To Bake and Time Bake.. . . . . . . . . . . . . . . .. . . . . . . . . . .. . . 8
How To Roast . . . . . . . . . . . . .. . . . . . . .. . . . . . . . . . . . . . . .. . . . . . . . 9
How To Broil . . . .. . . .. . . . . . . . . . . .. . . .. . . . . . . .. . . . . . .. . . ...10
How To Use Your Rotisserie.. . . . . . .. . . . . . . . . . . . . . . .. . . . . . .11
How To Use Your Meat Thermometer . . . . .. . . . . . . . . . . . . . 12-13
How To Self-Clean Your Oven .. . . . .. . . . . . . . . . . .. .. . . ...14-1 5
How To Care For Your Oven
.* **...* . .. . . . . .
● .***.*. ● .*.*.*
The Problem Solver .. . . . . . .. . . . . . . . . . . . .. . . . . . . . . .. . . .. . .
Cleaning Your Oven . . . . .. . ..o . . . . . . .. . . . . . . . . . . . . . . .. . . . .
Baking Chart . . ...0..
.0000, . . .0 .000.. ● 0..*O.O .. 0...0. ● ***
Roasting Chart . . . . . . . . . .. . . . . . . . . . . . . . . . . . . . . . . . . . . .. . . . .
Broiling Chart . .. . . . .. **.... . ...**** . ...*.*.
Rotisserie Chart. . . . .,00 ..00 . ..0....
● . ...**. ● ..0..0. . .. . . .
● .***... ..**,
Consumer Services . .. . . . . . . . . . . .. . . . . . . . . . . . . . . . . . ..OO..
16
17
19
20
21
22
23
25
Warranty. . . . . . . . . . . .. . . . . . . . . .. . . . . . . . . . . . . . . . ..Back Cover
2
@
1
Page 4
Safe&Tips
SAVE THESE INSTRUCTIONS
whenYouGet Youroven
* Havethe installer show you the location of
the oven circuit breaker or fuse, and mark
it for easy reference.
@ Have it installed and properly grounded by
a qualified installer.
UsingYourOven
ijon’t kave children aloneor unattendedwhere
an oven is hoi or in operation. They could be
seriously burned.
Don’tallow anyoneto climb, stand or hang on
the door.Theycould damagethe oven.
CAUTION:DONOTSTOREITEMSOFINTEREST
TOCHILDRENINCABINETSABOVEANOVEN–
CHILDRENCLIMBINGONTHEOVENTOREACH
ITEMSCOULDBESERIOUSLYINJURED.
Donottouchheatingelementsorinterior surface
ofoven.These surfaces may behot enough
to burn even though they are dark in color.
During and after use, do not touch, or let
clothing or other flammable materials
contact any interior area of the oven;
allow sufficient time for cooking first.
Other potentially hot surfaces include
oven vent openings and surfaces near the
openings, crevices around the oven door
and the edges of the door window.
Wearproperclothing. Loose fitting or hanging
garments should never be worn while
using the appliance. Flammable material
could be ignited if brought in contact with
hot heating elements and may cause severe
burns.
Never use your appliance for warming or
heating the room.
Besure oven vents are unobstructed.
Standawayfrom the oven when opening oven
door.The hot air or steamwhich escapescan
causeburns tothe hands,faceand/or eyes.
Keep oven free from grease build up,
Place oven rack in desired position while
oven is COOLIf racks must be handled
when hot, do not let potholder contact
heating units in the oven.
Pulling out shelf to the shdf stop is a con-
venience in lifting heavy foods. It is also a
precaution against burns from touching
hot surfaces of the dooror oven walls.
Don’t heat unopenedfood containers in the
oven. Pressure could build up and the container couldburst causingan injury.
When using cooking or roasting bags in
oven, follow the manufacturer’s directions.
When cooking pork, follow our directions
exactly and-always cook the meat to at
least 170°. This assures that, in the
remote possibility that trichina may be
present in the meat, it will be killed and
meat will be safe to eat.
cleaningYourRange
Clean only parts listed in this Use & Care
Book.
Do not clean door gasket. The door gasket
is essential for a good seal. Care should be
taken not to rub, damage, or move the
gasket..
Before self-cleaning the oven, remove
broiler pan and other containers.
Do not use oven cleaners. No commercial
oven cleaner or oven liner protective coating of any kind should be used in or
around any part of the oven.
e
o
e
e
Donotusewater ongreasefires. Flamein oven
can be smothered by completely closing door
andturning OVENSETto OFF.
Donot use your oven to dry newspapers. If
overheated, they can catch fire.
Donot storefiammabk materials in the ovon.
Use only dry pothold~rs–moist or damp
potholders on hot surfaces may result in
burns from steam. Do not let potholders
touch hot heating elements. Do not use a
towel or other bulky cloth.
You Need Sewice ~
Read “The Problem Solver” on page 17 of
this book.
Don’tattempt to repair or replaceany part of
your oven unless it is specifically recommended in this book. All other servicing
should be referred to a qualified technician.
Disconnect oven at oven circuit breaker or
main fuse before performing any service.
9
e
e
Page 5
o
.
.
3
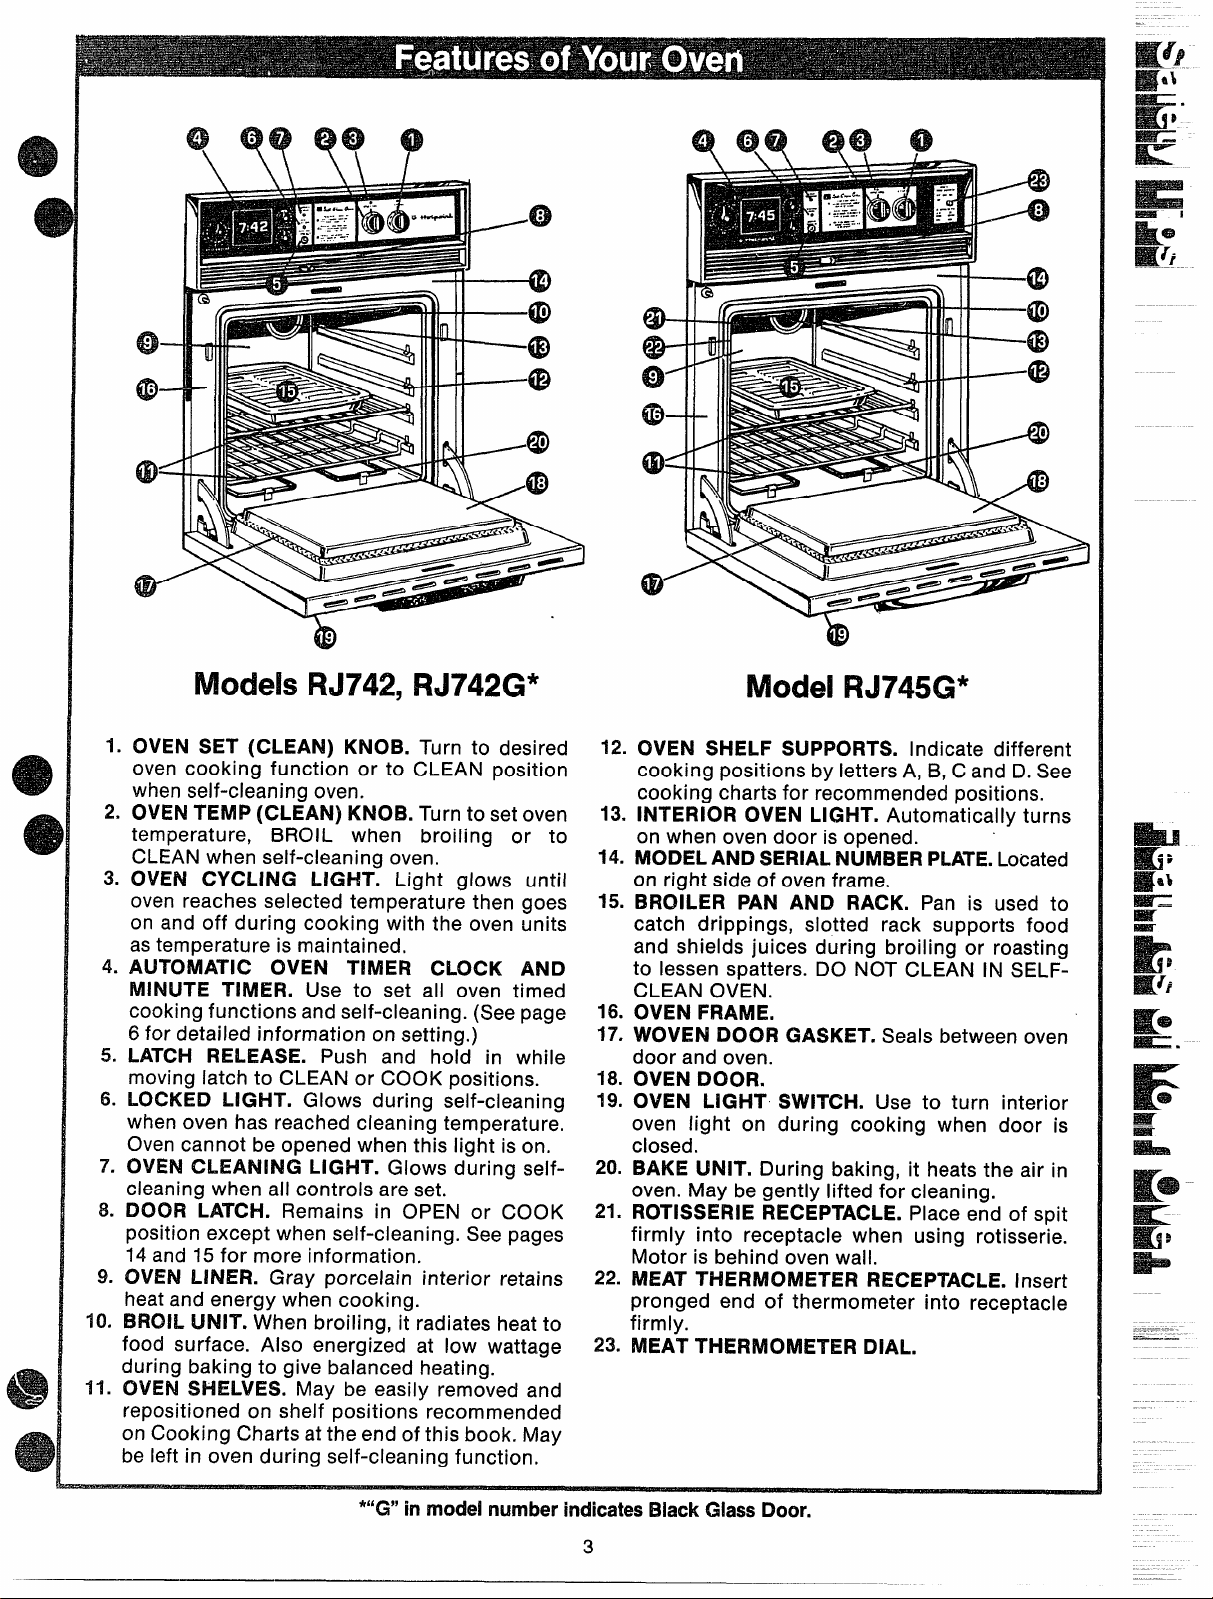
M(xkb FU742,FIJ742G*
1.
OVEN SET (CLEAN) KNOB. Turn to desired
oven cooking function or to CLEAN position
when self-cleaning oven.
2.
OVEN TEMP (CLEAN) KNOB. Turn to set oven
temperature,
CLEAN when self-cleaning oven.
3.
OVEN CYCLING LIGHT. Light glows until
oven reaches selected temperature then goes
on and off during cooking with the oven units
as temperature is maintained,
4.
AUTOMATIC OVEN TIMER CLOCK AND
MINUTE TiMER. Use to set all oven timed
cooking functions and self-cleaning. (See page
6 for detailed information on setting.)
LATCH RELEASE. Push and hold in while
5.
moving latch to CLEAN or COOK positions.
6.
LOCKED LIGHT. Glows during self-cleaning
when oven has reached cleaning temperature.
Oven cannot be opened when this light is on.
7.
OVEN CLEANING LIGHT. Glows during selfcleaning when all controls are set.
8.
DOOR LATCH. Remains in OPEN or COOK
position except when self-cleaning. See pages
14 and 15for more information.
9.
OVEN LINER. Gray porcelain interior retains
heat and energy when cooking.
BROIL UNIT. When broiling, it radiates heat to
10.
food surface. Also energized at low wattage
during baking to give balanced heating.
11.
OVEN SHELVES. May be easily removed and
repositioned on shelf positions recommended
on Cooking Charts at the end of this book. May
be left in oven during self-cleaning function,
BROIL when broiling or to
ModelF?J745G*
42.
OVEN SHELF SUPPORTS. Indicate different
cooking positions by letters A, B, C and D.See
cooking charts for recommended positions.
13.
INTERIOR OVEN LIGHT. Automatically turns
on when oven door is opened.
14.
MODEL AND SERIAL NUMBER PLATE.Located
on right side of oven frame.
15.
BROILER PAN AND RACK. Pan is used to
catch drippings, slotted rack supports food
and shields juices during broiling or roasting
to lessen spatters. DO NOT CLEAN IN SELFCLEAN OVEN,
16.
OVEN FRAME,
17.
WOVEN DOOR GASKET. Seals between oven
door and oven.
18.
OVEN DOOR.
19.
OVEN LIGHT SWITCH. Use to turn interior
oven light on during cooking when door is
closed.
20.
BAKE UNIT. During baking, it heats the air in
oven. May be gently lifted for cleaning.
21.
ROTISSERIE RECEPTACLE. Place end of spit
firmly into receptacle when using rotisserie.
Motor is behind oven wall.
22.
MEAT THERMOMETER RECEPTACLE. Insert
pronged end of thermometer into receptacle
firmly.
23.
MEAT THERMOMETER DIAL.
——
*“G”‘inmodel numberindicatesBlackGlassDoor.
3
Page 6

ModelsIIW(747D,
RK747GD*
Model RK777GD*
*“~”hIWW
w
ModelsRK767D,RK767GD*
numberindicatesBlackGlassiDoor.
4
Page 7
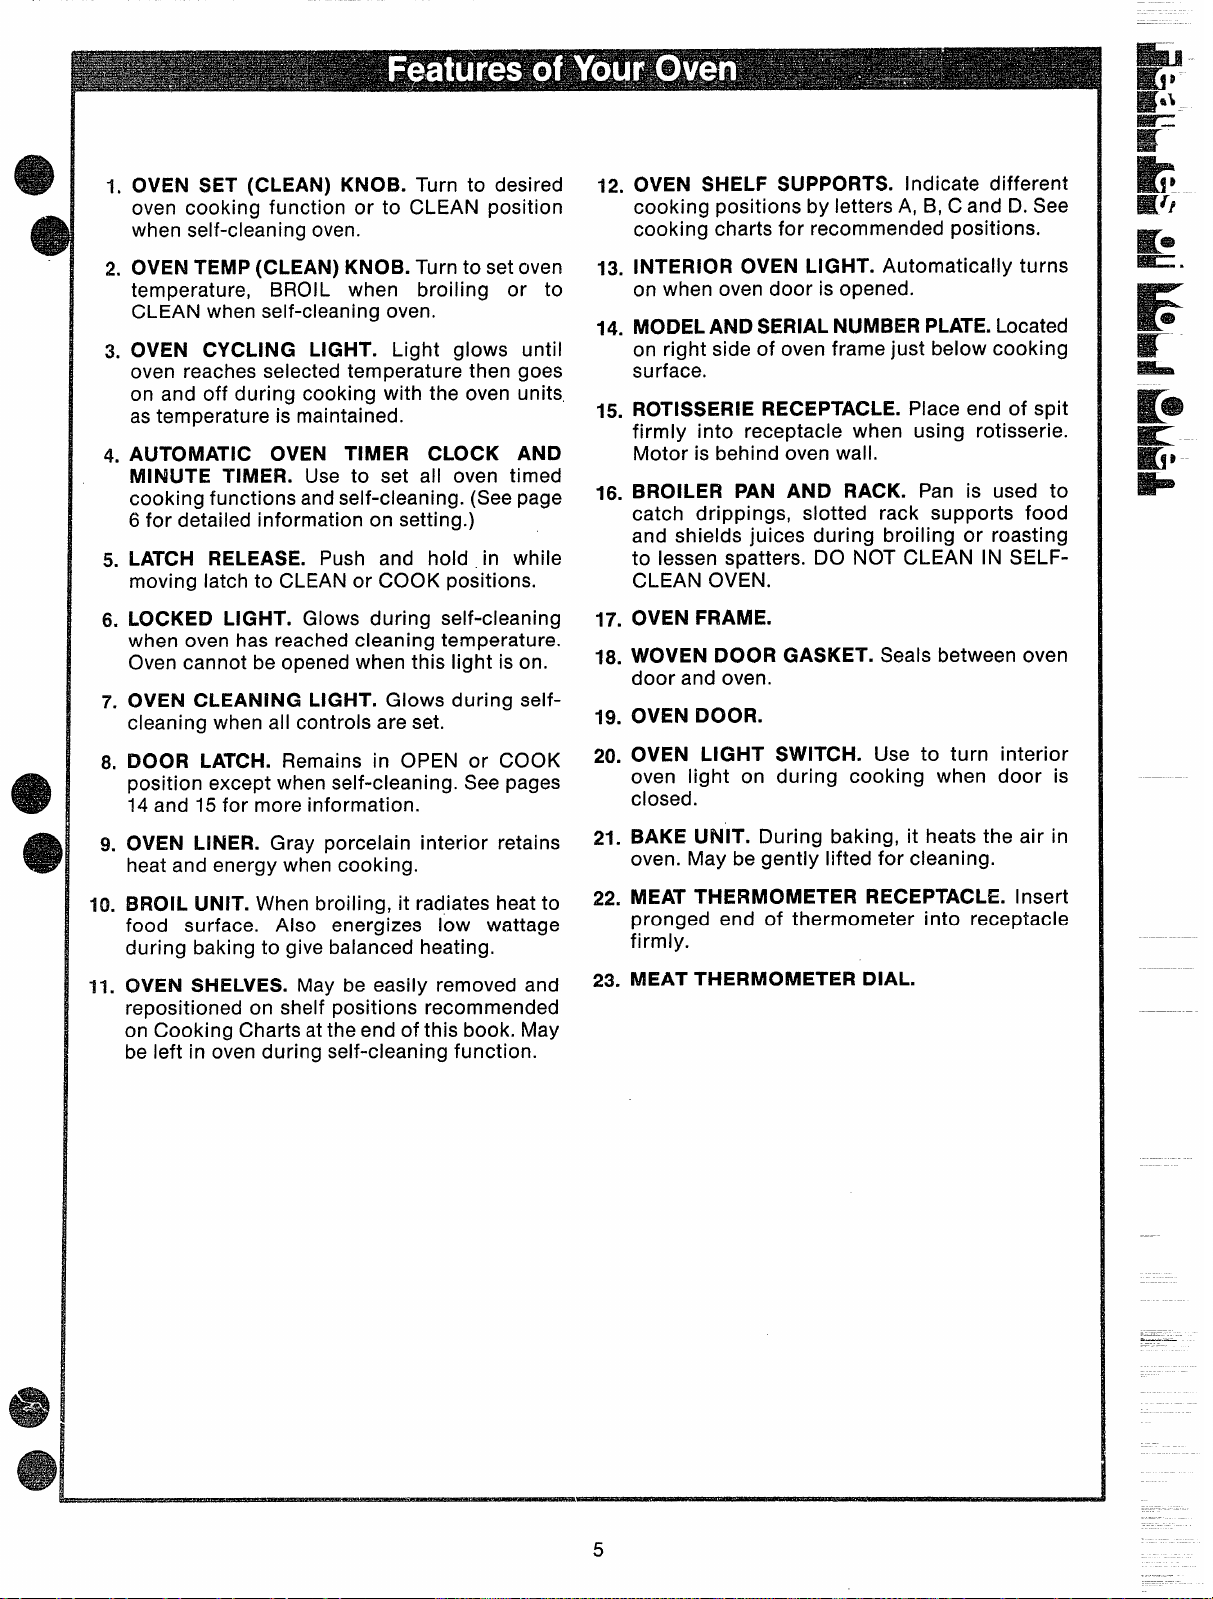
OVEN SET (CLEAN) KNOB. Turn to desired
1.
oven cooking function or to CLEAN position
when self-cleaning oven.
OVEN SHELF SUPPORTS. Indicate different
12.
cooking positions by letters A, B, C and D. See
cooking charts for recommended positions.
OVEN TEMP (CLEAN) KNOB. Turn to set oven
2.
temperature, BROIL when broiling or to
CLEAN when self-cleaning oven.
OVEN CYCLING LIGHT. Light glows until
3.
oven reaches selected temperature then goes
on and off during cooking with the oven units,
as temperature is maintained.
AUTOMATIC OVEN TIMER CLOCK AND
4.
MINUTE TIMER. Use to set all oven timed
cooking functions and self-cleaning. (See page
6 for detailed information on setting.)
LATCH RELEASE. Push and hold in while
5.
moving latch to CLEAN or COOK positions.
LOCKED LIGHT. Glows during self-cleaning
6.
when oven has reached cleaning temperature.
Oven cannot be opened when this light is on.
OVEN CLEANING LIGHT. Glows during self-
7.
cleaning when all controls are set.
DOOR LATCH. Remains in OPEN or COOK
8.
position except when self-cleaning. See pages
14and 15for more information.
OVEN LINER. Gray porcelain interior retains
9.
heat and energy when cooking.
BROIL UNIT. When broiling, it radiates heat to
10.
food surface. Also energizes low wattage
during baking to give balanced heating.
OVEN SHELVES. May be easily removed and
11.
repositioned on shelf-positions- recommended
on Cooking Charts at the end of this book. May
be left in oven during self-cleaning function.
INTERIOR OVEN LIGHT. Automatically turns
13.
on when oven door is opened.
MODEL AND SERIAL NUMBER PLATE.Located
14.
on right side of oven frame just below cooking
surface.
ROTISSERIE RECEPTACLE. Place end of spit
15.
firmly into receptacle when using rotisserie.
Motor is behind oven wall.
BROILER PAN AND RACK. Pan is used to
16.
catch drippings, slotted rack supports food
and shields juices during broiling or roasting
to lessen spatters. DO NOT CLEAN IN SELF-
CLEAN OVEN.
OVEN FRAME.
17.
WOVEN DOOR GASKET. Seals between oven
18.
door and oven.
OVEN DOOR.
19.
OVEN LIGHT SWITCH. Use to turn interior
20.
oven light on during cooking when door is
closed.
BAKE UNIT. During baking, it heats the air in
21.
oven. May be gently lifted for cleaning.
MEAT THERMOMETER RECEPTACLE. Insert
22.
pronged end of thermometer into receptacle
firmly.
MEAT THERMOMETER DIAL.
23.
5
Page 8
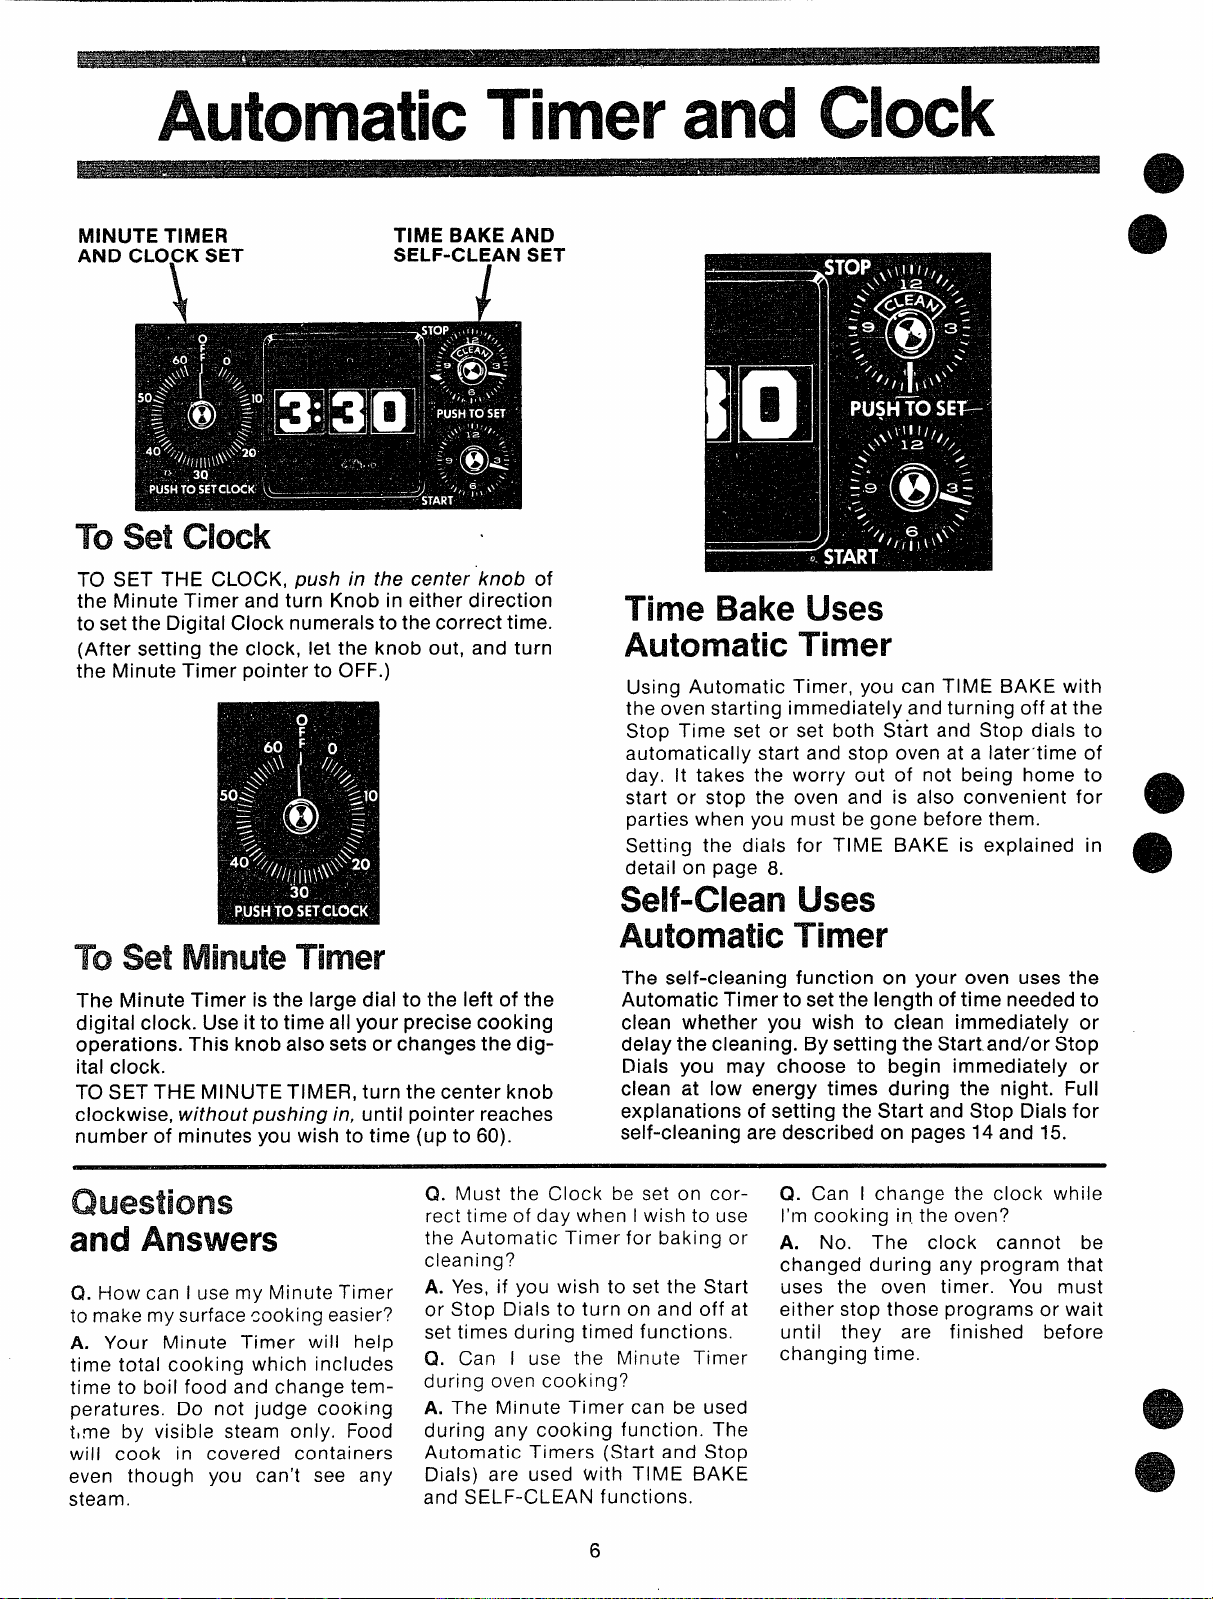
AutomaticTimerandClock
MINUTE TIMER
AND CLOCK SET
\ 1
TIME BAKE AND
SELF-CLEAN SET
TOsetclock
TO SET THE CLOCK, push in the center knob of
the Minute Timer and turn Knob in either direction
to set the Digital Clock numerals to the correct time.
(After setting the clock, let the knob out, and turn
the Minute Timer pointer to OFF.)
mm?Bakeuses
Automatic Timer
Using Automatic Timer, you can TIME BAKE with
the oven starting immediately and turning off at the
Stop Time set or set both Start and Stop dials to
automatically start and stop oven at a later-time of
day. It takes the worry out of not being home to
start or stop the oven and is also convenient for
parties when you must be gone before them.
Setting the dials for TIME BAKE is explained in
detail on page 8.
@
ToSetMinuteTimer
The Minute Timer is the large dial to the left of the
digital clock. Use it to time all your precise cooking
operations. This knob also sets or changes the digital clock.
TO SET THE MINUTE TIMER, turn the center knob
clockwise,
number of minutes you wish to time (up to 60).
Questions
and Answers
Cl.How can I use my Minute Timer
to make my surface cooking easier?
A. Your Minute Timer will help
time total cooking which includes
time to boil food and change tem-
peratures. Do not judge cooking
t,.me by visible steam only. Food
will cook in covered containers
even though you can’t see any
steam.
without pushing in, until pointer reaches
Q. Must the Clock be set on correct time of day when I wish to use
the Automatic Timer for baking or
cleaning?
A. Yes, if you wish to set the Start
or Stop Dials to turn on and off at
set times during timed functions.
(3. Can I use the Minute Timer
during oven cooking?
A. The Minute Timer can be used
during any cooking function. The
Automatic Timers (Start and Stop
Dials) are used with TIME BAKE
and SELF-CLEAN functions.
self-clean Lk?s
Automatic‘Timer
The self-cleaning function on your oven uses the
Automatic Timer to set the length of time needed to
clean whether you wish to clean immediately or
delay the cleaning. By setting the Start and/or Stop
Dials you may choose to begin immediately or
clean at low energy times during the night. Full
explanations of setting the Start and Stop Dials for
self-cleaning are described on pages 14 and 15.
Q. Can I change the clock while
I’fmcooking in.the oven?
A. No. The clock cannot be
changed during any program that
uses the oven timer. You must
either stop those programs or wait
until they are finished before
changing time.
6
Page 9
UsingYourOven
Beforeusing
Youroven
1. Look at the controls. Be sure you
understand how to set them prop-
erly. Readover the directions for the
Automatic Oven Timer so you
understand its use with the controls.
2. Check oven interior. Look at the
shelves. Take a practice run at removing and replacing them prop-
erly, to give sure sturdy support.
3. Read over information and tips
that follow.
4. Keep this book handy so you can
refer to it, especially during the first
weeks of getting acquainted with
your oven.
ovencontrols
The controls for the oven(s) are
marked OVEN SET and OVEN
TEMP. OVEN SET has settings for
BAKE, TIME BAKE, BROIL, CLEAN
(and on ovens so equipped, ROTIS-
SERIE), and OFF. When you turn
the knob to the desired setting, the
proper heating units are then acti-
vated for that operation.
OVEN TEMP maintains the temperature you set from WARM
(150° ) to BROIL (550°) and also at
CLEAN (880° ). The Oven Cycling
Light glows until oven reaches the
selected temperature, then goes
off and on with the oven unit(s)
during cooking. PRE-HEATING the
oven, even to ,high temperature
settings, is speedy—rarely more
than about 10 minutes. Preheat the
oven only when necessary. Most
foods will cook satisfactorily without preheating. If you find preheating is necessary, keep an eye
on the indicator light and put food
in the oven promptly after light
goes out.
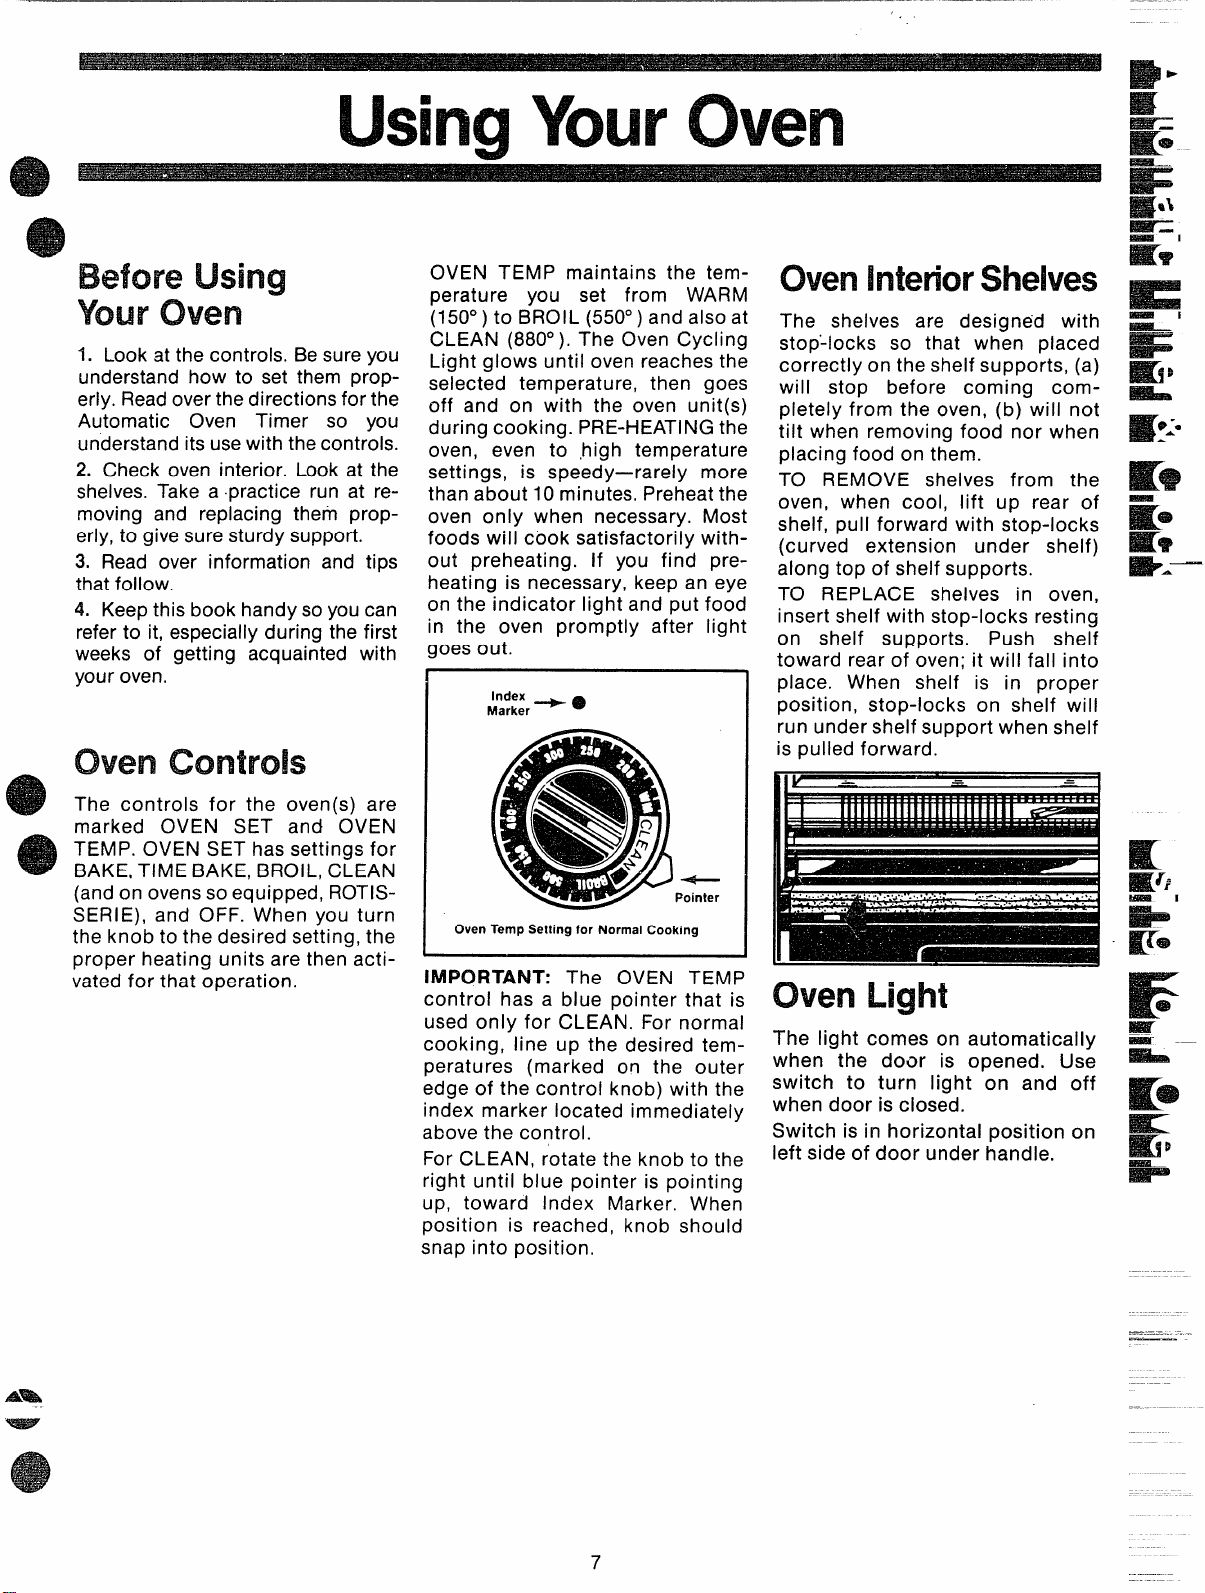
OvenTempSettingfor NormalCooking
IMPORTANT: The OVEN TEMP
control has a blue pointer that is
used only for CLEAN. For normal
cooking, line up the desired temperatures (marked on the outer
edge of the control knob) with the
index marker located immediately
above the control.
For CLEAN, rotate the knob to the
right until blue pointer is pointing
up, toward Index Marker. When
position is reached, knob should
snap into position.
C9verIIlntetiorShelves
The shelves are designed with
stop~locks so that when placed
correctly on the shelf supports, (a)
will stop before coming com-
pletely from the oven, (b) will not
tilt when removing food nor when
placing food on them.
TO REMOVE shelves from the
oven, when cool, lift up rear of
shelf, pull forward with stop-locks
(curved extension under shelf)
along top of shelf supports.
TO REPLACE shelves in oven,
insert shelf with stop-locks resting
on shelf supports. Push shelf
toward rear of oven; it will fall into
place. When shelf is in proper
position, stop-locks on shelf will
run under shelf support when shelf
is pulled forward.
OvenLight
The light comes on automatically
when the door is opened. Use
switch to turn light on and off
when door is closed.
Switch is in horizontal position on
left side of door under handle.
Axita
—---
-.
7
Page 10

Howto BakeandTime Bake
See Baking chart m page 20.
e
When cooking a food for the first
time in your new oven, use time
given on recipes as a guide. Oven
thermostats,
years, may “drift” from the factory
setting and differences in timing
between an old and a new oven of
5 to 10 minutes are not unusual
and you may be inclined to think
that the new oven is not performing correctly. However, your
new oven has been set coirectly at
the factory and is more apt to be
accurate than the oven it replaced,
over a period of
How to setYour
Range
forBaking
you set it to turn off automatically)
or Delay Start and Stop (setting
the oven to turn on automatically
at a later time and turn off at a
preset stop time) will be described.
Howto set
Immediate Stati
NOTE: Before beginning make
sure the oven clock shows the cor-
rect time of day.
Immediate Start is simply setting
oven “to start baking now and
turning off at a later time automatically. Remember, foods continue
cooking after controls are off.
How to set
DelayStati and Sop -
Delay Start and Stop is setting the
oven timer to turn the oven on and
off automatically at a later time
than the present time of day.
Step 1: To set start time, push in
knob on START dial and turn
pointer to time you want oven to
turn on, for example 3:30.
Step 1: Place food in oven, being
certain to leave about l-inch of
space between pans and walls of
oven for good circulation of heat.
Close oven door, During baking,
avoid frequent door openings to
prevent undesirable results.
Step 2: Turn OVEN SET Knob to
BAKE and OVEN TEMP Knob to
temperature on recipe or on Baking
Chart.
Step 3: Check food for doneness
at minimum time on recipe. Cook
longer if necessary. Switch off
heat and remove foods.
How toTimeBake
The automatic oven timer controls
are designed to turn the oven on or
off automatically at specific times
that you set, Examples of immediate Start (oven turns on now and
Step 1: To set Stop Time, push in
knob on STOP dial and turn
pointer to time you want oven to
turn off, for example 6:00. The
Start Dial should be at the same
position as the time of day on
clock.
Step 2: Turn OVEN SET Knob to
TIME BAKE. Turn OVEN TEMP
Knob to oven temperature, for
example 250°
Step 2: To set Stop Time, push in
knob on STOP dial and turn
pointer to time you want oven to
turn off, for example 6:00. This
means your recipe called for two
and one-half hours of baking time,
NOTE: Time on Stop Dial must be
later than time shown on range
clock and Start Dial.
Step 3: Turn OVEN SET Knob to
TIME BAKE. Turn OVEN TEMP
Knob to 250° or recommended
temperature.
Place food in oven, close the door
and automatically the oven will be
turned on and off at the times you
have set. Turn OVEN SET to OFF
and remove food from oven.
@
Page 11

Amh.
=Sw-
HowToRoast
See Roasting Chart on page 21.
Roasting is cooking by dry heat. Tender meat or
poultry can be roasted uncovered in your oven.
Roasting temperatures, which should be low and
steady, keep spattering to a minimum. When
roasting, it is not necessary to sear, baste, cover, or
add water to your meat.
Siep t: Check weight of meat, and
place, fat side up, on roasting rack
in a shallow pan. (Broiler pan with
rack is a good pan for this. ) Line
broiler pan with aluminum foil
when using pan for marinating,
cooking with fruits, cooking heavily
cured meats, or for basting food
—
—
during cooking. Avoid spiiling
these materials on oven liner or
door.
Step 2: Place in oven on shelf in A
@
or B position.
necessary.
No preheating is
Roasting is really a baking procedure used for
meats. Therefore, oven controls are set to BAKE.
(You may heara slight clicking noise to indicate the
oven is working properly. ) Roasting is easy, just
follow these steps:
Step 3: Turn OVEN SET to BAKE
and OVEN TEMP to 325°. Small
poultry may be cooked at 375° for
best browning.
Step 4: Most meats continue to
cook slightly while standing after
being removed from the oven. For
rare or medium internal doneness,
if meat is to stand 10-20 minutes
while making gravy or for easier
carving, you may wish to remove
meat from oven when internal
temperature is 5-10° F below temperature suggested on chart. If no
standing is planned, cook meat to
suggested temperature on chart
on page 21.
NOTE: You may wish to use TIME
BAKE as described on preceding
page to turn oven on and off
automatically. Also, if your oven is
equipped with special meat thermometer, see page 12 for usage.
ForFrozenRoasts
Frozen roasts of beef, pork,
iamb, etc., can be started without
thawing, but allow 10-25 minutes per pound additional time
(10 min. per pound for roasts
under 5 pounds, more time for
larger roasts).
Thaw most frozen poultry before
roasting to ensure even doneness. Some commercial frozen
poultry can be cooked successfully without thawing. Follow
directions give on packer’s label.
Questionsand Answers
Q. Is it necessary to check for
doneness with a meatthermometer?
A. Checking the finished internal
temperature at the completion of
cooking time is recommended.
4.
Temperatures are shown on Roast-
T ing Chart on page 21. For roasts
—
over 8 Ibs., cooked at 3000 with
- reduced time. check with ther_ mometer at half-hour intervals
after % of time has passed
Q. Why is my roast crumbling
when I try to carve it?
A. Roasts are easier to slice if
allowed to cool 10 to 20 minutes
after removing from oven. Be sure
to cut across the grain of the meat.
Q. Do I need to preheat my oven
each time I cook a roast or
poultry?
A. It is rarely necessary to preheat
your oven, only for very small
roasts, which cook a short length
of time.
9
Q. When buying a roast are there
any special tips that would help
me cook it more evenly?
A. Yes. Buy a roast as even in
thickness as possible, or buy
rolled roasts.
Q. Can I seal the sides of my foil
“tent” when roasting a turkey?
A. Sealing the foii will steam the
meat. Leaving it unsealed allows
the air to circulate and brown the
meat.
—.
———
Page 12

Howto Broil
See Broiling Chart cmpage 22.
Broiling is cooking food by intense
radiant heat from the upper unit in
the oven. Most fish and tender cuts
of meat can be broiled. Follow
these steps to keep spattering and
smoking to a minimum.
Step 1: If meat has fat or gristle
near edge, cut vertical slashes
through both about 2-in. apart, If
desired fat may be trimmed, leaving
layer about %-in. thick.
Step 2: Place meat on broiler rack
in broiler pan which comes with
range. Always use rack so fat drips
into broiler pan; otherwise juices
may become hot enough to catch
fire. Aluminum foil may be used to
line broiler pan and rack. But, be
CERTAIN to cut opening in foil, to
correspond with rack so fat drips
into pan below.
Step 3: Position shelf on recommended shelf position as suggested on Broiling Chart on page
22. Most broiling is done on C
position, but if your range is connected to 208 volts, you may wish
to use a higher position.
Step 4: Leave door ajar about {
inches. The door stays open by
itself, yet the proper temperature
is maintained in the oven.
Step 5: Turn OVEN SET Knob and
OVEN TEMP Knob to BROIL. Preheating unit is not necessary. (See
notes on Broiling Chart
page 22.)
I
Sten 6: Turn food only once during
cooking. Time foods- for first side
as on Broiling Chart page 22. Turn
food, then use times given for
second side as a guide to preferred doneness. (Where two thicknessesand times are given together,
use first times given for thinnest
food.)
Step 7: Turn OVEN SET Knob to
OFF. Servefood immediately, leave
pan outside oven to cool during
meal for easiest cleaning.
Questions andAnswers
Q. Should I leave the door ajar
when broiling chicken?
A. No. The door should be closed
when cooking chicken and shelf
position “A” is recommended.
Q. May I use aluminum foil to line
the broiler pan and rack?
A. Yes, if you mold foil thoroughly
to broiler rack, slitting it to conform to slits in rack. Slits permit
proper drainage of meat juices
into broiler pan, minimizing smoking and spattering and preventing
possibility of fire from overheated
drippings. Do not place sheet of
foil on oven shelf. To do so may
result in improperly cooked food
and possible damage to oven finish.
Q. Should I salt the meat before
broiling?
A. No. Salt draws out the juices
and allows them to evaporate.
Always salt after cooking. Turn
meat with tongs; piercing meat
with a fork also allows juice~ to
escape. When broiling poultry or
fish, brush each side often with
butter.
Q. When broiling, is it necessary to
always use a rack in the pan?
A. Yes. Using the rack suspends
the meat over the pan. As the meat
cooks, the juices fall into the pan
thus keeping meat dryer. Juices
are protected by the rack and stay
cooler, thus preventing excessive
spatter and smoking.
10
Q. Do I need to grease my broiler
rack to prevent meat from sticking?
A. No. The broiler rack isdesigned
to reflect broiler heat thus keeping
the surface cool enough to prevent
meat sticking to the surface.
Q. Why are my meats not turning
out as brown as they should?
A. In some areas, the power (volt-
age) to the oven may be low. In
these cases, preheat the broil unit.
for 10 minutes before placing
broiler pan with food in oven.
Check to see if you are using the
recommended shelf position. Broil
for the longest period of time indi-
cated in the Broil Chart in this
book. Turn food only once during
broiling.
e
Page 13

HowToUseYourRotisserie‘:::::Ls
.
See RotisserieTime & Temperature Chart on page 23.
RK777G12
Food is cooked by revolving on a spit under the
(upper) broil unit. As food turns, it bastes itself to
produce a succulent brown and tender roast. Meat
tender enough for roasting may be rotissed.
1.Assemble rotisserie.
Insert curved ends of
frame into large holes
of broiler pan handles.
Lock frame in place by
fitting straight ends of
support into holes in
center handles.
2. Secure food on spit. When secured correctly,
food will be located in center area of spit leaving 4
inches free at the pointed end (this part goes into
motor).
3. To secure food on spit: Push on 2-pronged fork
onto spit near handle end. Tighten with screw. Push
spit through food (tie food securely and compactly),
distributing weight evenly on each side of spit.
To check weight distribution on spit, hold spit (and
food) between hands, palms up; spit should roll
smoothly from palms to fingertips when palms are
tipped forward.
RotissingtheFood:
1. Put oven shelf in lowest position in oven. With
food on spit, place spit on oven shelf.
2. Set OVEN TEMP Knob as suggested on Rotisserie Time and Temperature Chart on page 23. Settings are 300-400 to get foods juicy and done
without overbrowning.
3. Turn OVEN SET Knob to ROTISSERIE. This
starts broil unit and rotisserie motor operating. Spit
can be inserted and removed easier when motor is
operating. NOTE: Make certain when touching spit
that no part of body or pot holder touches coils of
broil unit.
4. Insert spit into motor: Grasp handle on spit.
Using point of spit, move to one side the cover over
motor outlet in rear of oven; push spit firmly into
motor outlet as far as it will go. Remove handle.
5. Check rotation of food. Tighten or adjust forks if
necessary. During cooking, forks may need tightening due to normal meat shrinkage.
6. AS FOOD COOKS LEAVE DOOR AJAR IN
“BROIL” POSITION; door stays open by itself.
7. Baste food if desired. With pot holders, pull out
pan and shelf together to shelf stop. Attach handle
to spit to revolve food by hand while basting. To
continue cooking push shelf and broiler pan into
oven, insert spit into motor, remove handle.
Am
WEi9’
Finish securing food
on spit by gliding
second 2-pronged fork
onto spit with prongs
toward food. Tighten
screws to a flat surface
on spit.
4. Place spit on frame
so handle end is in
narrow support, and
pointed end is in wide
U-shaped support.
RotisserieNotes
Do not useelectric meat thermometer, on models
so equipped, while operating the rotisserie. A
regular, non-electric meat thermometer may be
used while rotissing providing it doesn’t touch
the oven, frame or pan while meat revolves. (Or, if
desired, cook to estimated doneness then pull
meat from oven to insert meat thermometer. Wait
about 2 minutes for temperature to register. If
meat is not done, remove thermometer and continue cooking if necessary.)
If rotissing turkey, let stand in warm oven 10to 20
minutes after cooking to assure juicy meat and
complete doneness,
At end of cooking pull out pan and shelf together,
using pot holders. Turn OVEN SET to OFF. Remove food from spit. Cool pan outside oven; soak
forks and screws for easiest clean up.
NOTE: See Rotisserie Chart on page 23 for times
and temperatures.
11
Page 14

HowToUseMeatThermometer
Models RJ745G, RK777G13-See Roasting Chart on page 21.
For many foods, especially roasts
and poultry, internal food temperature is the best test for doneness,
The meat thermometer takes ‘the
guesswork out of roasting by
cooking foods to the exact doneness you want. The meat thermometer has a skewer-like probe
at one end of the cable and a tvvopronged plug at the other. Use
handle of plug and probe,. rather
than cable, when inserting and
removing these parts from meat
and/or oven wall receptacle. After
preparing meat and placing in
roasting pan on rack, follow the
steps below for proper use of meat
thermometer.
Step 3: Plug cable into receptacle
on oven wall. The prongs are
especially designed to only plug in
one way. Be certain to insert plug
into receptacle all the way. Close
oven door.
Step 6: When internal temperature
of roast reaches number you have
set, a buzzer sounds. To stop
buzzer turn pointer to SIGNAL
OFF. Internal temperature of meat
can be determined at any time
during cooking by turning pointer
down until buzzer sounds.
@
Step 1: To gauge placement of
probe, lay probe on outside of
meat along top or side and mark
with finger where edge of meat
comes on probe. Probe should be
placed so points rests in center of
the thickest part of roast.
/
Step 2: Insert p~obe into meat up
to point marked off with fingers.
Point should not touch bone, fat or
gristle. Not more than 2“ of probe,
not counting handle should be left
exposed outside of meat. NOTE:
To obtain best results with poultry,
piace point of probe in center of
stuffing; see Roasting Chart for
doneness temperature of stuffing.
Step 4: Turn OVEN SET Knob to
BAKEand OVENTEMP Knob to recommended oven temperature, for
example 350°. See Roasting Chart
on page 21 for oven temperature.
Step 5: Refer to chart near Meat
Thermometer Dial to determine at
what internal temperature meat
will be done. Then turn knob next
to dial to move pointer to correct
number (internal temperature) on
dial.
Step 7: When roast is done, use
care in removing plug from recep-
tacle. DO NOT USE CABLE. Re-
move meat from oven. Since most
meat continues cooking, you may
wish to remove 5°-10c sooner.
Step & Remove probe from meat,
using handle of probe not cable.
Most meats carve easier if let stand
10 to 20 minutes. Let thermometer
cool and clean as directed in
Cleaning Chart on page 19. Do not
leave in oven.
12
Page 15

HowToBroilWithMeatThermometerE
Youmay usethe meat thermometer
for broiling, such as steak or ham
slices. Prepare meat on broiler
rack and pan as explained on page
10, “How to Broil”. Set both OVEN
SET and OVEN TEMP Knobs to
BROIL and leave door ajar as
recommended, after placing probe
in meat and oven as directed below:
Step 1: Use steak at least 1-1%
inches thick. Lay probe on top of
-
steak to determine the position
probe is to be inserted. Gauge dis-
tance from edge to center of
iargest muscle; mark with thumb
where eaqe of meat or fat meets
probe.
THAN 2 inches of probe, not
counting handle, is left exposed
outside of meat.
B; certain NOT MORE
Step 2: Lift probe from meat
keeping thumb in place on probe.
Insert probe as near as possible to
center of thickness of steak. Push
probe into steak to where thumb
meets fat or meat.
Step 3: For rare steaks cook first
side to 90 on meat thermometer
dial; for medium to 100; for welldone 110. Set Meat Thermometer
Dial to preferred doneness.
Step 4: At sound of buzzer, turn
steak; check probe to be certain it
has not moved out of position. K(F
Reset pointer on Meat Thermometer and cook second side. See
chart on range near Meat Ther- _
mometer Dial.
NOTES:
@ If there is a question about
whether probe has moved out of
position during cooking, turn
knob so pointer moves down on
dial until buzzer sounds. Note
indicated temperature and reset
pointer to SIGNAL OFF. Push
probe farther down into roast,
about 1 inch, then after a few
minutes redetermine internal
temperature as above. If new
temperature is lower, the probe
was probably out of position. If
SO,allow meat to cook to proper
internal temperature.
Let meat thaw enough to allow
inserting probe. The probe is
sturdy but take care not to force
it too hard into roast.
Do not disconnect probe during
cooking. Use hotpads when re-
moving probe at end of cooking.
Do not use tongs to pull on
cable since they may damage it.
I NOTE: DO NOT USE MEAT THER- I
I MOMETER WITH ROTISSERIE.
I
me
K
z.
m.
4.
B
P
Questions
and Answers
Q. Can the meat thermometer
remain in the oven if it’s not
inserted in food?
A. No. Remove probe from receptacle when not in use. You could
damage the probe by leaving it in
~ during cooking operations that do
__ not require the probe.
(2. May I insert the meat thermometer into frozen foods?
A. No. Foods must be completely
defrosted before inserting probe.
Q. Should I line broiler pan with
aluminum foil when roasting?
A. Yes, when using pan for marinating, cooking with fruits or
heavily cured meats, or for basting
during cooking. Avoid spilling
these materials on oven liner or
door.
13
Q. How may I be sure that my roast
will cook the same each time?
A. When using the meat ther-
mometer in roasting, the probe
must be inserted properly. Check
the position of the probe during
cooking. Sometimes the probe
slips or is touching bone, fat or
gristle. Reposition probe correctly
and. set oven again to finish
roasting.
Page 16

OperatingtheSelf-CleaningOven
=s?s
While you are becoming acquainted with your selfcleaning oven, we recommend 2 hoursforthe modcrate soil condition, but in some cases a longer greasyspills and spatter on the oven interior would
cleaning time, up to 3 hours may be necessary. In
order to judge the degree of soil, look at the oven
BeforeSetiingoven
controls,Chwk
These Things:
STEP 1:
Remove broiler pan, rack and
other cookware from the oven.
(Oven shelves may be left in oven.)
STEP 2:
Wipe up heavy soil on oven
bottom.
~e
floor and walls. Light spatter and thinner spills
would generally need only 2 hours cleaning. Heavy
need up to 3 hours.
STEP 4:
Close rotisserie receptacle (D) on
models so equipped.
STEP 5:
Close oven door and make sure
oven light (E) is off.
Howto setoven
cleaning
for
STEP 2:
Pushand hold in LATCH RELEASE
BUTTON while sliding LATCH
HANDLE to the right until it is in
CLEAN position.
e
c
0’
A. Oven Front Frame
B. Oven Door Gasket
C. Open!ngs in Door
D. Rotisserie Receptacle
E. Oven Light
STEP 3:
Clean spatters or spills on oven
front frame (A) and oven door outside gasket (B) with a dampened
cloth. Polish with a dry cloth. Do
not clean gasket (B). Do not allow
water to run down through openings in top of door (C). Never use a
commercial oven cleaner in and
around self-cleaning oven,
STEP 1:
Turn OVEN SET and OVEN TEMP
knobs clockwise to CLEAN. Con-
trols will snap into final position
when the CLEAN location is
reached.
14
STEP 3:
Set the automatic oven timer:
Make sure both the oven clock
and the START dial show the
correct time of day.
Decide on cleaning hours necessary—two hours for moderate
soil or three hours for heavy soil.
Add these hours to present time
of day, then push in and turn
STOP (CLEAN) dial clockwise
to desired time. CLEANING
Light glows showing cleaning is.
starting.
In about 30 minutes the LOCKED –
Light glows and fan turns on
indicating oven is hot and door
cannot be opened. Oven door
and window get hot during self-
cleaning. DO NOT TOUCH.
Page 17

FollowTheseStepsAtierSelf-Cleaning:
STEP 2:
Turn OVEN SET Knob to OFF.
STEP 3:
Turn OVEN TEMP Knob to WARM.
NOTE: If you wish to “start” and
“stop” cleaning at a Iater time than
shown on clock, push in and turn
START dial to time you wish to
STEP1:
When LOCKED Light is off, push
and hold in LATCH RELEASE
Button while sliding LATCH
HANDLE to the left until it is in
COOK position.
“start”. Add the hours needed for
cleaning to this “start” time, then
push in and turn STOP (CLEAN)
dial to the desired time. Oven will
automatically turn on and off at
the set times.
QuestionsandAnswers
Q. After having just used the oven,
the LOCKED Light came on and I
e
could not move the LATCH
AN131_E.Why?
A. LOCKED Light glowing indi-
cates that oven is hot. Open oven
door to cool the internal cavity.
After a short period of time, set up
controls for cleaning again.
Q. What should I do if excessive
smoking occurs during cleaning?
A. This is caused by excessive soil
and you should switch the OVEN
SET Knob to OFF. Open windows
to rid room of smoke. Allow the
oven to cool for at least one hour
before opening the door. Wipe up
the excess soil and reset the clean
cycled
Q. Is the “crackling” sound I hear
during cleaning normal?
A. Yes. This is the metal heating
and cooling during both the cook:
ing and cleaning functions.
Q. Why won’t my oven clean
immediately even though I have
set all the time and clean knobs
correctly?
(B
A. Check to be sure your START
‘is! is set to the same time as
VEN CLOCK. Also check to be
sure LATCH HANDLE is in CLEAN
position.
Q. If my oven clock is not working
can I still self-clean my oven?
A. No. Your Automatic Oven Timer
uses the oven clock to help start
and stop your self-cleaning cycle.
Q. Can I clean the Woven Gasket
around the oven door?
A. No, this gasket is essential for a
good oven seal and care must be
taken not to rub, damage or move
this gasket.
Q. What causes the hair-like lines
on the enameled surface of my
oven?
A. This is a normal condition
resulting from heating and cooling
during cleaning. They do not
affect how your oven performs.
Q. Should there be any odor
during the cleaning?
A. Yes, there may be a slight odor
during the first few cleanings.
Failure to wipe out excessive soil
might also cause an odor when
cleaning.
Q. My oven shelves have become
gray after several cleanings. Is this
normal?
A. Yes. After many cleanings, the
shelves may lose some luster and
discolor to a deep gray color.
15
C?.Can I use commercial oven
cleaners on any part of my selfcleaning oven?
A. No cleaners or coatings should
be used around any part of this
oven. If you do use them and do
not wipe the oven absolutely
clean, the residue can scar the
oven surface and damage metal
parts the next time the oven is
automatically cleaned.
Ct. Why do I have ash left in my
oven after cleaning?
A. Some types of soil will leave a
deposit which is ash. It can be re-
moved with a damp sponge or
cloth.
Q. My oven shelves do not slide
easily. What is the matter?
A. After many cleanings, oven
shelves may become so clean they
do not slide easily. If you wish
shelves to slide more easily,
dampen fingertips with a small
amount of cooking oil and rub
lightly over sides of shelf where
they contact shelf supports.
—
Page 18

CareofYourOven[s)
PorcelainEnamel
Finish
The porcelain enamel finish is
essentially glass fused on steel at
high temperature and is breakable
if misused. This finish is acid resistant. However,
spilled (such as lemon or other
citrus fruit juices, or mixtures con-
taining tomato or vinegar) should
be wiped up immediately. See
chart for cleaning suggestions.
Removable oven
Door on Non
Se!f”cleaning oven
.
TO REMOVE door, open to BROIL
position, or where you feel hinge
catch slightly. Grasp door at sides;
lift door up and away from hinges.
TO REPLACE, grasp door at sides.
Line up door with hinges and push
door firmly into place.
Oven door on SELF-CLEANING
OVEN is not removable.
LampReplacement
CAUTION: BEFORE REPLACING
ANY LAMP, DISCONNECT ELECTRIC POWER TO OVEN AT THE
MAIN FUSE OR CIRCUIT BREAKER PANEL. LET LAMP (OR BULB)
AND LAMP COVER COOL
COMPLETELY.
1. &W-C1eaning Oven
a. Remove the three slotted screws
in lamp cover. Remove cover;
replace lamp with 40-watt appliance
lamp,
any acid foods
time in your new oven, use time
given on recipe as a guide. Oven
thermostats, over a period of
years, may “drift” from the factory
setting and differences in timing
5 to 10 minutes are not unusual.
Your new oven has been set correctly at the factory and is more
apt to be accurate than the oven
which it replaced. However, if you
find that your foods consistently
brown too little or too much, you
may make a simple adjustment in
the thermostat (Oven Temp) knob.
PULL KNOB OFF OF SHAFT,
LOOK AT BACK OF KNOB AND
b. Replace lamp cover, being certain to replace washers with three
screws.
c. Connect electric power to oven.
2. Non Self-Cleaning Oven
The oven lamp (bulb) is covered
with a glass removable cover
which is held in place with a bailshaped wire. Remove oven door, if
desired to reach cover easily.
a. TO REMOVE, hold hand under
cover so it doesn’t fall when
released. With fingers of same
hand, firmly push back wire bail
until it clears cover. Lift off cover.
DO NOT REMOVE ANY SCREWS.
b. Replace lamp with 40-watt home
appliance bulb.
c. TO REPLACE cover, place it
into groove of lamp receptacle.
Pull wire bail forward to center of
cover until it snaps into place.
When in place, wire holds cover
firmly; be certain wire bail is in
depression in center of cover.
d. Connect electric power to oven.
AdjustingOven
Thermostat
When cooking a food for the first
between an old and a new oven of
NOTE CURRENT SETTING, BEFORE MAKING ANY ADJUST-
MENT. To increase oven temperature, adjust toward HI or RAISE; to
decreasetemperature adjust toward
LOor LOWER. Each notch changes
oven temperature 10degrees. Oven
temperature can be raised by 20
degrees or lowered by 30 degrees.
See sketches below. One of the
three knob types shown will be on
your range. To adjust, follow directions under the applicable sketch.
1. Remove knob, and hold so
pointer is at top of knob. Using a
pot holder or similar material, hold
“skirt” of knob firmly in one hand.
Grasp handle of knob in other
hand. Note position of pointer and
turn handle to move pointer toward
Raiseor Lower. Pointer is designed
not to move easily. If it is seated so
it is difficult to move, pointer may
be loosened slightly. Insert a thin
screwdriver, knife blade or similar
instrument and lift up end of
pointer slightly. 2. After adjustment is made, press pointer firmly
against knob. Return knob to
oven, matching flat area on knob
and shaft. Recheck oven perfor-
mance before making an additional adjustment.
1. Pull off knob, loosen both screws
on back of knob. 2. Lift pointer
and move one notch in desired
direction. Tighten screws. 3. Return
knob to oven, matching flat area of
knob to shaft. Recheck oven performance before making an additional adjustment,
@
@
o
16
Page 19

The ProblemSolver
TOSaveThe and fVloney—
beforeyoucdl for swwice,checkthe ProblemSolver
-
If you have a problem, it may be minor. You may be able to correct it yourself. Just usethis Problem Solver to
locate your problem and then follow the suggested recommendations.
PROBLEM
OVEN WILL NOT WORK .. .
r
@
The Problem !%Xver (continued)
17
Page 20

The ProblemSolvercontinue,
PROBLEM
OVEN WILL NOT Automatic time dial/dials not set or not set properly. The STOP dial
SELF-CLEAN
OVEN DOOR WON’T”LATCH Turn OVEI$ -SET Knob to CLEAN. Glowin”g ,Locked Light after knob
POSSIBLE CAUSE AND REMEDY
must be set’and advanced beyond the time noted on oven clock.
The STOP dial”was not advanced for long enough.
Both OVEN SET and OVEN TEMP Knobs must be at CLEAN setting.
A thick pile,of.spillover when cleaned leaves a heavy layer of ash in
spots which-could have insulated the area from further heat.
Latch not i,n’’GLEAN” position.
is turned indicates oven is too hot from p~evious-use”anddoor-won’t
latch. To cool, oven,.open door wide, then latch-can-be-moved.
~ OVEN SET KN@kLrnustbe at CLEAN or OFF’ b’efore Latch can be
moved. “.’:, -. . . ~ ,; ‘.’-,:- ‘,
Latch RelGaSe’Button not pushed when,moving:katch. , . -.
Page 21

CleaninaChart
———
Your Oven is cleaned two ways; manually and by
sing the automatic self-cleaning function. This
chart describes parts of your oven, cleaning mate-
cleaning. Be sure to follow these directions carefully
to assure maximum use of your oven. NOTE: Let
oven parts cool before cleaning manually.
rials to use on each part, and general directions for
Part
Bake Unit andlBroil Unit
@ Soap and Water
. Soap-Filled Scouring Pad
● Plastic Scouring Pad
OwenControl Knobs: @ Mild Soap and Water Pull off knobs. Wash gently but do not soak. Dry and return con-
Outside Finish
Glass
Metal, including Brushed
Chrome
Porcelain Enamel*
inside OwenlDoor* =+Soap and Water On self-cleaning oven, clean ONLY the door liner outside the
c$weraGasket’
OwerdLiner @ Soap and Water
MeaIt Thermometer o Soap and Water
Shelves
(See Self-Cleaning Oven
Directions)
Rotisserie
Spit, Forks
Screws, Frame
@Soap and Water
. Soap and Water
. Paper Towel
. Dry Cloth
e Soap and Water
o Soapy Scouring Pad
~ Soap and Water Your shelves can be cleaned with the self-cleaning function in the
g Soap and Water
~ Commercial Oven Cleaner
GerieralDirections
Do not cleanthebakeunitor broil unit. Anysoilwillburnoff
whentheunitisheated.NOTE:
be lifted gently to clean the oven floor. If spillover, residue, or ash
accumulates around the bake unit, gently wipe around the unit
with warm water.
Drain fat, cool pan and rack slightly. (Do not let soiled pan and
rack stand in oven to cool). Sprinkle on detergent. Fill the pan
with warm water and spread cloth or paper towel over the rack.
Let pan and rack stand for a few minutes, Wash; scour if necessary. Rinse and dry. OPTION: The broiler pan and rack may also
be cleaned in a dishwasher.
trols to oven making sure to match flat area on the knob and
shaft.
Wash ail glass with cloth dampened in soapy water. Rinse and
polish with a dry cloth. If knobs are removed, do not let water run
down inside surface of glass.
Wash, rinse then polish with dry cloth. DO NOT USE steel wool,
abrasives, ammonia, acids or commercial oven cleaners which
may damage finish.
if acids should spill in the oven while it is hot, usea dry paper
towel or cloth to wipe up right away. When the surface has
cooled, wash and rinse.
gasket. The door is automatically cleaned if the oven is in the selfcleaning cycle. If spillover or spattering should occur in cooking
function, wipe the door with soap and water. DO NOT rub or
damage gasket. ,Ivoid getting soap and water on the gasket or in
the slots on the door.
On non-self-cleaning ovens, wipe doors with soap and water.
Avoid getting ANY cleaning materials on the gasket.
Cool before cleaning. Frequent wiping with mild soap and water
will prolong the time between major cleanings. Be sure to rinse
thoroughly. For heavy soiling, use your self-cleaning cycle often.
Cool before cleaning. DO NOT IMMERSE IN WATER. Scour stub-
born spots with soapy scouring pad, rinse and dry. DO NOT
STORE IN OVEN.
oven. For heavy soil, clean by hand using any and all mentioned
materials. Rinse thoroughly to remove all materials after cleaning.
Soak in hot sudsy water: scour to remove cooked-on food or
sauces; wash.
The bake unit is hinged and can
t
●Spillage of marinades, fruit juices, and basting materials containing acids may cause discoloration. Spil!overs should be cleaned up
immediately with a paper towel. When the surface is cool, clean and rinse.
A-
19
Page 22

BakingChart
1. Aluminum pans conduct heat quickly. For most conventional
baking light shiny finishes give best results because they prevent overbrowning in the time it takes for heat to cook the center
areas. Dull (satin-finish) bottom surfaces of pans are recommended for cake pans and pie plates to be sure those areas
brown completely.
2. Dark or non-shiny finishes, also glass and pyroceram, absorb
heat which may result in dry, crjsp crusts. Reduce oven heat 25°
Container
Bread
Biscuits (%-in. thick)
Coffee cake Shiny Metal Pan with
Corn bread or muffins
Gingerbread
Muffins
Popovers
Quick Loaf Bread
Yeast bread (2 loaves)
Plain rolls
Sweet rolls
cakes
(without shortening)
Angel food Aluminum Tube Pan
Jelly roll Metal Jelly Roll Pan
Sponge Metal or Ceramic Pan
cakes
Bundt cakes Metal or Ceramic Pan
Cupcakes Shiny Metai Muffin Pans
Fruit cakes
Layer
Layer, Chocolate
Loaf
Cookies
Brownies Metal or Glass Pans
Drop Cookie Sheet
Refrigerator
Rolled or sliced
Shiny Cookie Sheet
Satin-finish bottom
Cast Iron or Glass
Shiny Metal Pan with
Satin-finish bottom
Shiny Metal Muffin Pans
Deep Glass or Cast Iron Cups
Metal or Glass Loaf Pans
Metal or Glass Loaf Pans
Shiny Oblong or Muffin Pans
Shiny Oblong or Muffin Pans
Metal or Glass Loaf or
Tube Pan
Shiny Metal Pan with
Satin-finish bottom
Shiny Metal Pan with
Satin-finish bottom
Metal or Glass Loaf Pans
Cookie Sheet
Cookie Sheet
Fruits,
Other Desserts
Baked apples
Custard Glass Custard Cups or
Puddings, Rice and
Custard Casserole
Glass or Metal
Casserole (set in pan of
hot water)
Glass Custard Cups or
!PieS
Frozen Foil Pan on Cookie Sheet
Meringue Spread to crust edges
One crust Glass or Satin-finish Metal
Two crust Glass or Satin-finish Metal
Pastry Shell Glass or Satin-finish Metal
.Wi!isceilarwows
Baked potatoes
Scalloped dishes Glass or Metal
Souffles Glass
Set on Oven Shelf
Shelf
Position
B, C
B, A
B
B
A, B
B
B
A, B
A, B
B, A
A
B
A
A, B
B
A, B
B
B
B
B, C
B, C
B, C
B, C
A, B, C
B
B
A
B, A
A, B
B
B
A, B, C
A, B, C
B
if lighter crusts are desired. Preheat cast iron for baking some
foods for rapid browning when food is added.
3. Preheating the oven is not always necessary, especially for
foods which cook longer than 30 or 40 minutes, For food with
short cooking times, preheating gives best appearance and
crispness.
4. Open the oven door to check food as little as possible to
prevent uneven heating and to save energy.
Owen
Temp.
400°-4750
350°-4000
400°-4500
350°
400°-4250
3750
350°-3750
375°-4250
375°-4250
350°-3750
325°-3750
375°-4000
325°-3500
325°-3500
350°-3750
275°-3000
350°-3750
350°-3750
350°
325°-3500
350°-4000
400°-425°
375°-4000
350°-4000
300°-3500
325°
400°-4250
325°-3500
400°-4250
400°-4250
450°
325°-4000
325°-3750
300°-3500
Time,
Min.Food
15-20
20-30
20-40
45-55
20-30
45-60
45-60
45-60
10-25
20-30
30-55
10-15
45-60
45:65
20-25
2-4 hrs.
20-35
25-30
40-60
25-35
10-20
6-12
7-12
30-60
30-60
50-90
45-70
15-25
45-60
40-60
12-15
60-90
30-60
30-75
Comments
Canned refrigerated biscuits take
2-4 min. less time.
Preheat pan for crisp crust.
Decrease about 5 min. for muffin
mix. Or bake at 450° for 25 min.,
then at 350° for 10-15 min.
Dark metal or glass give deepest
browning.
For thin rolls, Shelf B may be used.
For thin rolls, Shelf B mav be used.
Two piece pan is convenient.
Line pan with waxed paper.
Paper liners produce more moist
crusts.
Use 300° and Shelf B for small or
individual cakes.
Bar cookies from mix use same
time. Use Shelf C and increase
temp. 25-50° for more browning.
Reduce temp. to 300° for large
custard. Cook bread or rice pudding
with custard base 80 to 90 minutes.
Large pies use 400° and increase
time.
To quickly brown meringue use
400° for 8-10 min.
Custard fillings require lower temp.,
longer time.
Increase time for large amount or
size.
20
Page 23

RoastinaChati
‘1. Position oven shelf at B for small-size roasts (3 to 7 Ibs.) and
at A for larger roasts.
m
—
2?.Place meat fat side up or poultry breast-side up on broiler
pan or other shallow pan with trivet. Do not cover. Do not stuff
poultry until just before roasting, Use meat probe, for most than temperature on chart.
accurate doneness. Control signals when food has reached set
temperature. (Do not place probe in stuff ing.)
3. Remove fat and drippings as necessary. Baste as desired.
Type
Meat
Tendercuts: rib, high quality
sirloin tip, rump or top round*
La”mbLeg or bone-in shoulder*
Veal shoulder,leg or loin*
Pork loin, rib or shoulder*
Ham, pre-cooked
Ham, raw
●For boneless rolled roasts over 6-in. th
Poultry
Chicken or Duck
Chicken pieces
Oven
Temp.
325°
329
325°
325°
32!Y
325°
,add5to10mil
325°
375°
Doneness
Rare:
Medium:
Well Done:
Rare:
Medium:
Well Done:
Well Done:
Well Done:
ToWarm:
Well Done:
~erlb. to times giv[
Well Done:
Well Done:
4. Standing time recommended for roasts is 10 to 20 min. to
allow roast to firm up and make it easier to carve. It will rise
about 5° to 10° internal temperature; to compensate for temperature rise, if desired, remove roast from oven at 5° to 10° less
5. Frozen roasts
to 25 min. per pound more time then given in chart for refrigerated. (10 min. per lb. for roasts under 5-lbs. ) Defrost poultry
before roasting.
Approximate RoastingTime,
in Minutes per Pound
3 to 5-lbs. 6 to 84bs.
24-30 18-22
30-35 22-25
35-45 28-33
21-25 20-23
25-30
30-35 28-33
35-45
35-45
10reins. per lb. (any weight)
Under $O=lbs. 10 to 15-Ibs.
20-30 17-20
above.
3to 5=lbs. OverS.lbs.
35-40
35-40
10to15-lbs. Over45=lbs.
Turkey
325°
Well Done:
20-25
can be conventionally roasted by adding 10
Internal
Temp. W
13@- 14(Y’
1500-16(Y’
1700-185°
24-28
30-40
30-40
30-35
15-20
130°-140°
150°-160°
170°-1850
1700-18(Y
17U-180°
1250-13CP
160°
185°-190°
185°-190°
Inthigh:
185°-190°
21
--.—.——..—
—..-.
———
Page 24

...,.
——
BroilingChart
...-—
1. Always use broiler pan and rack that comes with your oven, It
is designed to minimize smoking and spattering by trapping
juices in the shielded lower part of the pan.
oven door should be ajar for most foods; there is a special
2.
position on door which holds door open correctly,
3. For steaks and chops, slash fat evenly around outside edges
of meat. To slash, cut crosswise through outer fat surface just to
the edge of the meat. Use tongs to turn meat over to prevent
piercing meat and loosing juices.
4. If desired, marinate meats or chicken before broiling. or,
brush with barbecue sauce last 5 to 10 minutes only.
Quantity
Food
E3acon
Ground Beef,
Well done
Med
Med Rare
Beef Steaks
Rare
Medium
Well Done
Rare
Medium
Well Done
Chicken
Bakery Products
Bread (Toast) or
Toaster Pastries
English Muffins
Lobster tails
(6 to 8-oz. each)
Fish
Ham sliGes
(precooked)
Pork ctmps
Well Done
Lamb chops
Medium
Well Done
Medium
Well Done
Wieners and similar
precooked sausages,
bratwurst
and/or
Thickness
‘/z-lb. (about 8
thin slices
l-lb. (4 patties)
%to ‘1~-in.thick
1 inch thick
(1-1’/2Ibs.)
1%-in. thick
(2-2’/2Ibs.)
1whole
(2 to 2%-lbs.),
split lengthwise
2-4 slices
1 pkg. (2)
2-split
2-4
l-lb. fillets %to
%in, thick
l-in. thick
2 (% inch)
2 (1-in, thick)
about 1 lb.
2 (1 inch)
about 10-12 oz.
2 (1Minch)
about 1 lb,
l-lb. pkg. (10)
Shelf
Position
c 3%
c
c
c
c
c
c
c
c
c
A 35
c
c
B
c 5
B
c
B
c
c
c
B
c 6
5. When arranging food on pan, do not let fatty edges hang over
sides, which could soil oven with fat dripping.
f3. Broiler does not need to be preheated. However, for very thin
foods or to increase browning, preheat if desired.
7. Frozen Steaks can be conventionally broiled by positioning the oven shelf at next lowest shelf position and
increasing cooking time given in this chart 1%times per side.
8. If your oven is connected to 208 Volts rare steaks may be
broiled by preheating the broil heater and positioning the oven
shelf one position higher.
First Side
Time, Min. Comments
7
6
5
7
9
13
10
15
25
1V2-2
3-4
13-16
8
10
13
8
10
10
17
Second Side
Time, Min.
B%
4-5
6
5
7
9
13
7-8
14-16
20-25
10-15
‘/2
(Do not
turn
over)
5 Handle and turn v’erycarefully.
8 Increase times 5-10 min. per side
10
13
4-7
Arrange in single layer.
Space evenly.
Up to 8 patties take about same
time.
Steaks less than l-in. cook through
before browning. Pan frying is
recommended.
Slash fat.
Reduce times about 5-10 min. per
side for cut-up chicken. Brush each
side with melted butter. Broil with
skin side down first and broil with
door closed.
Space evenly. Place English muffins
cut-side-up and brush with butter, if
desired.
Cut through back of shell. Spread
open. Brush with melted butter
before and after half time.
Brush with lemon butter before and
during cooking if desired. Preheat
broiler to increase browning.
for 1%-in. thick or home cured.
Slash fat,
Slash fat,
10
4-6
12-14
1-2
If desired, split sausages in half
lengthwise into 5 to 6-in. pieces.
22
Page 25

RotisserieTimeandTemperatureChart
BEEF
Rolled rib
Rare
Medium
Well done
LAMB
Leg, boned and rolled
POJfRK,fresh
Loin
Spareribs (barbecued)
Spareribs (Plain)
PORK, cured
Ham
Cook-Before-Eating
bone in
Fully Cooked
POULTRY
Capon* (6-8 tbs.)
Chicken* (2-3 Ibs.)
Chickent (1%-2 Ibs.)
Cornish Hen* (1 lb.)
Duckling* (4-5 Ibs.)
Turkey* (8-12 Ibs.)
VEAL,
Shoulder, boned & rolled
BOLOGNA
cAMADiAN IBACON
LUNCHEON MEAT
(12-ounce can)
WBEF4ERS,large
325
325
325
350
350
350
400
325
325
375
22-29
27-31
32-42
24-27 175-185
25-34
%-1 Vz’hrs.(total time)
3A-1hr.
17-20
14-18
26-30
# 400 33-42
400
400
350
350
350
350
350
350
48-62
,bout 1hr. (total time)
31-35
17-27
30-33
23-25
23-27
23-32 (total time)
350 23-32 (total time)
130-140
150-160
170-185
170-195 Buy ribs split down center.
160
130
185-190 Brush with melted butter or marga-
t
t
t
185-190
180-185 Cook without brushing with fat, or
180
180
160
NOTE:1.For roasts OVER 10 pounds
cook about Mestimated time, then
check at %hour intervals with meat
thermometer for internal doneness.
2. Thin roasts, 3-4 pounds, may
require slightly longer times per
pound than those given on chart.
175 for medium
185 for well done
Thread on spit.
To barbeque, brush with sauce every
15 minutes.
rine, basting or barbecue sauce several times during cooking.
Same as above,
!f desired, thread 4-5 of this size
chicken crosswise on spit. Let revolve
to within %hour of doneness time,
then brush every 10 minutes with barbeque sauce.
Brush with butter, or butter and
lemon juice mixed. Thread hens on
spit either lengthwise or crosswise.
Do not brush with fat.
brush with butter or margarine as
desired, When cooked, switch OVEN
SET to OFF, close door, let turkey
stand 10-20 minutes IN OVEN. Remove from oven and carve.
Brush with sauce if desired.
Brush with sauce if desired.
Brush with sauce if desired.
tOn small poultry test doneness by moving leg gently back and forth. and Dresslea muscle to be certain it is soft.
*Ready-to-cook weight. IMPORTA-NT:tie l~gs~~d wings close to body to m’akedon~ness of bird as-uniform as possible. All times given are
for unstuffed birds.
Aff&iA
:
NOTE: Spillage of marinades, fruit juices and basting materials containing acids may cause discoloration on oven Iinerordoorso should
be wiped up immediately with a paper towel. When surface is cool, clean and rinse.
23
Page 26

ConsumerServices
At Hotpoint we’re committed to providing you with the best appliances we know how
to build and we know that you want your appliances to give you many years of dependable
service.
w
H
Our Consumer Services are designed with your needs and wants in mind.
Warranty Protection
Yournewapplianceisawelldesignedandengineered Seethe warrantyonthe backpageof this bookfor
product.Beforeit left the factory,it went through
rigoroustests to detectmanufacturingdefects.And
youhaveawritten warrantyto protectyou.
Prompt%rvice at your Convenience
Whetheryourapplianceis in or out of warranty,
you’rejust a phonecall awayfromournationwide
networkof FactoryServiceprofessionals.
Simplycall our Hotpointserviceorganization.
You’llfind them in the White Pagesunder “Hotpoint
FactoryService;’andintheYellowPagesunder
“Hotpoint CustomerCaremService.”
Serviceis scheduledat yourconvenienceandthe
techniciandrives-afully-stockedpartsservicetruck
sothat, in mostcases,the repair can becompleted
inonevisit.
We’reproudof ourserviceandwantyouto be
pleased,but if for somereasonyouarenot happy
with the serviceyoureceive,herearethreestepsto
follow for further help.
details.
FIRST,contactthe peoplewhoservicedyour
appliance.Explainwhyyouarenot pleased.Inmost
cases,this will solvethe problem.
NEXT,if youarestill notpleasedwrite all the details
— includingyourphonenumberto:
Manager,ConsumerRelations
Hotpoint
AppliancePark
Louisville,Kentucky40225
FINALLY,if yourproblemis still notresolved,write:
MajorApplianceConsumerAction Panel
20NorthWackerDrive
Chicago,Illinois 60606
—
ServiceContracts
Fortrouble=freeservice beyond
the written warrantyperiod.
If you preferto budgetyourrepaire
insteadof beingsurprisedbythem,
offersservicecontractsfor varying
time on ail Hotpoint majorapplianc
TheQuick Fix’” System
Youcan save time and money
by doing it yourself.
TheQuickFix’” Systemis designedto
meetthe needsof both experiencedor
beginningdo-it-yourselfersandtakesa
of mysteryout of homeappliancerepai
Step-by-StepManualscoveringthe repairof @
standardand largecapacitywashers,standardand
largecapacitydryers,refrigerators,dishwashers
andranges (non-microwave),includeinstructive
Hdp for You By Phone
Shouldyouneed help in the selectionand ;--,
purchaseof newappliances,orhave
questionsabouttheoperationof the Hotpoint ‘~
appliancesYounowown—orhave
questionsaboutourconsumerprodu;ts or
servicesyouareonlya TOU-FFIEEcall away,
anv other
TheGEAnswerCent’ey
800.626.2000
Mostof the repairscanbemadewith the kitchen
drawervarietyof tools you alreadyhave at home.In
fact, the screwdriveris calledfor most often in Quick
Fix’” Systemprocedures.
~— ~
~
TheGEAnswerCenterT”800.626.2000
consumerinformationserviceis open24
hours a day,sevendaysa week.
-~
Ourstaff of expertsstandsreadyto assist
-..
youanytime.
d
25
Page 27

Pc)lbrrRANGE
RANTY
Saveproof of original purchase date such as yoursalessliporcancelledcheck to establish warranty period.
R‘a 1
WHAT
~~~~ !~ ~~~ ~~~~~~~ ‘ Servicetrips to your hometo
E COVERED
FULLONE-YEARWARRANTY This warranty is extendedto the
Forone yearfrom date of original
Durchase,we will Provide,freeof
charge,partsandservice“laborin
your home to repair or replaceany ‘ainland ‘tatesI ‘awaii and
Dartof the ranae that fails because
‘ofa manufact~ring defect.
teach you how to usethe product.
Readyour Useand Care material.
If you then haveanyquestions
about operating the product,
pleasecontact your dealeror our
ConsumerAffairs office at the
addressbelow, or call, toll free;
The GE Answer CenterT”
800.626.2000
consumer information service
o Improper installation.
If you havean installation problem,
contact your dealeror installer.
Youare responsiblefor providing
adequateelectrical, exhausting
and other connecting facilities.
original purchaserand anysucceed- I
ing owner for products purchased
for ordinary home usein the
Washington,D.C. In Alaskathe
warrantyisthe sameexceptthat it
is LIMITED becauseyou must pay
to ship the product to the service
shopor for the servicetechnician’s
travelcosts to your home.
All warranty service will beprovided
by our FactoryServiceCentersor
by our franchised CustomerCare@
servicersduring normalworking
hours.Checkthe White Pagesfor
HOTPOINTFACTORYSERVICE.
Lookin the YellowPagesfor
HOTPOINTCUSTOMERCARE@
SERVICEor GENERALELECTRICHOTPOINTCUSTOMERCARE@
SERVICE.
o Replacementof housefuses
or resetting of circuit breakers.
● Failureof the product if it is
usedfor other than its intended
purposeor usedcommercially.
o Damageto product caused
byaccident,fire, floods or acts
of God.
WARRANTORISNOT RESPON-
SIBLE FOR CONSEQUENTIAL
DAMAGES.
48
d
Some statesdo not UIIOWtheexclusionor limitation of incidentalor consequentialdamages,so the abovelimitation or exclusion
maynot apply to you.ThiswarrantygivesYouspecificlegal rights,and Youmayalso haveotherrightswhich varyfrom stateto state.
To
know what your legal rightsarein your state,consultyour local or stateconsumeraffairsoffice or yourstate’sAttorney Genera!.
--
1
Manager—ConsumerAffairs,GeneralElectricCompany,AppliancePark,Louisville,KY40225
r
Part No. 862A724 P57 Rev. 1
Pub. No, 39-4481-1
WarrantorGeneralElectricCompany
[ffurtherhelpis neededconcerningthiswarranty,contact:
+
I-J
2/83
AQUALITYPRODUCTOF
GENERALELECTRICCOMPANY
 Loading...