

Page 1
How
thebes
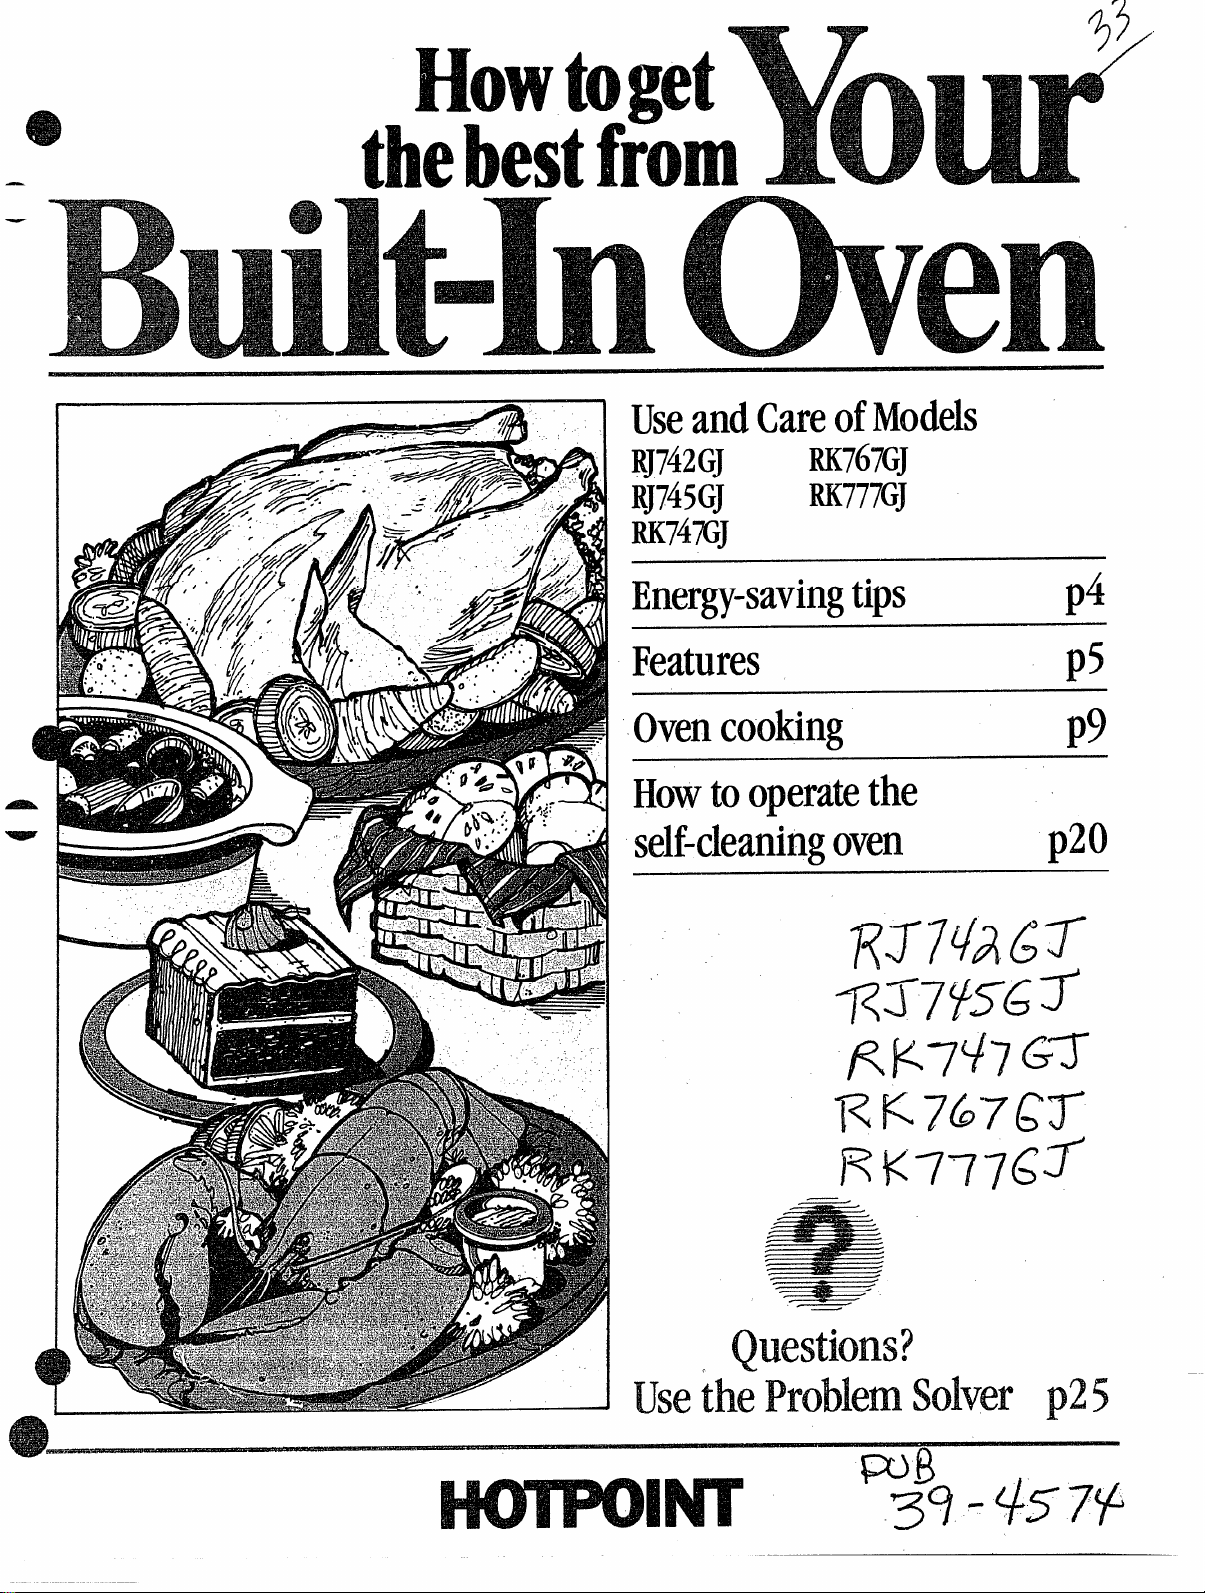
UseandCareofModels
I
RJ742GJ
RJ745GJ
RK747GJ
Energy-savingtips
Features
Ovencooking
Howtooperatethe
self-cleaningoven
RK767GJ
RU777GJ
p4
p5
p9
p20
Questions?
use’the Problemsolverp25
Page 2
Helpw
BeforeUsingYourOven . . . . ...2
SafetyInstructions. . . .. . . ...3.4
Energy-SavingTips . . . . . . . . ...4
Features. . . . . . . . . . . . . ... . ...5-7
AutomaticTimerandClock.;...8 ~
UsingYourOven . . . . . ..fl .. ...9
Baking .. . . . . . . . . . . . ..~. ...10
BakingGuide, . . . . . . . ..i . . ..ll
Roa@ing. . . . . . . . . . . . . .
Mea~Thermometer. . . ...~....l3
RoastingGuide. . ..<...”.~. ...14. ~
Broiling.,. . . . . . . . . . . . ..~-i ...15
Broil.ingwith ‘~:, , .
MeatThermometer..;.. .:..16
BroilirigGuide .-...~./..:..117:117:
Rotisserie. . . . . . . . . ..~.. ii.’.
RotisserieTime~d ‘,,” ,
TemperatureGuide. . . . . . ...l9
Operatingthe - ~ ‘‘;
Self-CleaningOven. . . -.’.~Q21. ”
Care&d Cleaning. ~.., . . . .~
CleaningGuide . . . . . . . ..~”. ..2....
TheProblemSolvez... . . “..25,26. ~~
IfYouNeedService. . . ...’....
Warranty. . . . . ...’.’. .BackCover ,.
.. . ...12 ~ ,
,18, ;
,.
“’””22,23’(
.,.
.26”
helpyou.
*o
Beforewing youroven,
readthisbookcarefully.
Risintendedtohelpyouoperate
andmaintainyournewoven
properly.
Keepithandyforanswerstoyour
questions.
Ifyoudon’tunderstandsomething
or needmorehelp,write(include
yourphonenumber):
ConsumerAfftirs
Hotpoint
AppliancePark
Louisville,KY40225
Writedownthemodel
andserialmunbers.
You’llfindthem ona labelonthe
fio.ntoftheovenbehindthedoor(on
thelowerovenontwo-ovenmodels).
Thesenumbemarealsoonthe
ConsumerProductOwnership
RegistrationCardthatcamewith
youroven.Beforesendinginthis
card,pleasewritethesenumbers
here:
Ifyoureceived
adamagedoven...
Immediatelycontactthedealer(or
builder)thatsoldyouthe oven.
Savetimeandmoney.
Beforeyourequest
service...
ChecktheProblemSolveron
pages25 and26. It listsminor
causesofoperatingproblemsthat
youcancorrectyourself.
~
~
ModelNumber
SerialNumber
Usethesenumbersinany
correspondenceor servicecalls
concerningyouroven.
2
Page 3
fNIPoRTANT SAFETYINSTRUCTIONS
eadallinstructionsbeforeusimgthisappliance.
Whenusingelectricalappliances,
basicsafetyprecautions should
be followed,includingthe
following:
~?Jsethisapplianceonlyforits
intendeduse
manual.
as described in this
eBesureyourapplianceis
properlyinstalledandgrounded
bya qualifiedtechnicianin
accordancewith the provided
InstallationInstructions.
~Don’tattempttorepair
orreplaceanypartofyour
ovenunlessitisspecifically
recommendedinthisbook.All
otherservicingshouldbe referred
toa qualifiedtechnician.
Beforeperforminganyservice,
SCONNECTTHEOVEN
&
POWER
SUPPLYATTHE
— HOUSEHOLDDISTIWU’HON
_
P~L BYREMOVINGTHE
FUSEORSWIIX2HINGOFF
THECIRCUITBREAKER.
~Donotleavechildrenalone—
Children should not be left alone
or unattended in an area where
applianceis in use. They should
neverbe allowedto sit or stand
on any part of the appliance.
uDon9tallowanyonetoclimb,
standorhangonthedoor.
Theycoulddamagetheoven.
@CA~ION: ITEMSOF
INTERESTTOCHILDREN
SHOULDN(YI’BESTXX?ED
INCABINE!C3ABOVE
ANOVEN.GDLDREN
CLIM131NGONTHEOWN
TOREACHITEMSCOULD
SERIOKJSLYIN-D.
everwear?kose-fittingor
hanginggarmentswhileusing
-+~n app~i~ce.
w“”””
material could be ignited if
Flammable
broughtin contactwith hot
heatingelementsand maycause
severeburns.
~Useonlydrypotholders—
Moistor damp potholderson hot
surfkcesmay result in burns
fromsteam.Do notlet potholders
touchhot heatingelements. Do
notuse a towelor other bulky
cloth.
oNeveruseyourappliancefor
warmingorheatingtheroom.
oStorageinoronappliance—
Do not store flammablematerials
in the oven.
● Keephoodandgreasefilters
clean
to maintaingood venting
and to avoidgrease fires.
eDonotletcookinggrease
orotherflammablematerials
accumulateinorneartheoven.
oDonotusewaterongrease
fires.Flameinovencanbe
smotheredbycompletely
closingdoorandturning
OVENSETtoOFF.
oDonottouchheatingelements
orinteriorsurfaceofoven.
These surfaces may be hot
enoughto burn eventhough they
are dark in color. During and
after use, do not touch, or let
clothingor other flammable
materials contactany interior
area of the oven; allow sufficient
time for cooling, first.
Potentiallyhot surfaces include
the ovenvent openingsand
surfacesnear the openings,
crevicesaround the ovendoor
andtheedgesofthe door window.
Remember:The inside surface
of the oven maybe hot when the
door is opened.
~When COOtingpork,follow
our directionsexactlyand always
cookthe meat to at least 170°F.
This assures that, in the remote
possibilitythat trichina maybe
presentin the meat, it will be
killedand the meatwill be safe
to eat.
Oven
eStandawayfromovenwhen
openingovendoor.Thehotair
orsteamwhichescapescan
burnhands,faceand/oreyes.
eDon’theatunopenedfood
containersintheoven.Pressure
couldbuildupandthecontainer
couldburst9causinganinjury.
● Keepovenventducts
unobstructed.
eKeepovenfreefromgrease
buildup.
oplaceovenshelfindes~d
positionwhileoveniscod.
shelvesmust be handledwhen
hot, do not let potholder contact
heatingunits in the oven.
If
@Pullingoutshelftoshelfstop
isaconvenienceinliftii heavy
finds.Uisalsoaprecaution
againstburnsfrom
tOUChiUg
hotsurfacesofdoororoven
walls.
eWhenusingcookingor
roastingbagsinoven,
manufacturer’sdirections.
followthe
eDonotuseyouroventodry
newspapers.
can catch fwe.
If overheated,they
3
Page 4
-——
—
mPoRTmT SMETY
INS~RUC~IONS (continued)
Self-CleaningOven
eDo notcleandoorgasket.
The door gasketis essentialfor a
good seal. Care shouldbe taken
notto rub, damageor movethe
gasket.
ISDonotuseovencleaners.No
commercial ovencleaner or oven
liner protectivecoating ofany
kind shouldbe used in or around
anypart of the oven.
@Cleanmly partslistedinthis
UseandCareBook.
~ Beforeself=cleaningtheoven,
removebroilerpanandother
utensils.
@Listen for fro-a fan noise
shouldbe heard sometimeduring
the cleaningcycle.If not, call for
servicebeforeself-cleaningagain.
SAVETmE
INSTRUCTIONS
~Preheatthe ovenonlywhen
necessary.Mostfoodswillcook
satisfactorilywithoutpreheating.
Ifyoufindpreheatingisnecessary,
keepan eyeontheindicatorlight,
andput foodintheovenpromptly
afterthe lightgoesout.
@AlwaysturnovenOFFbefore
removingfood.
@Duringbaking,avoidfrequent
dooropenings.Keepdooropenas
shortatimeaspossible.
● Besuretowipeup excessspillage
beforeself-cleaningoperation.
@Cookcompleteovenmealsinstead
ofjust onefooditem.Potatoes,
othervegetablesandsomedesserts
willcooktogetherwithamain-dish
casserole,meatloaf,chickenor
roast.Choosefoodsthatcookat
thesametemperatureandin
approximatelythesametime.
e Useresidualheatin oven
wheneverpossibleto finish
cookingcasseroles,ovenmeals,
etc.Alsoaddrollsor precooked
dessertstowarmoven,using
residualheattowarmthem.
e
@
e
4
Page 5
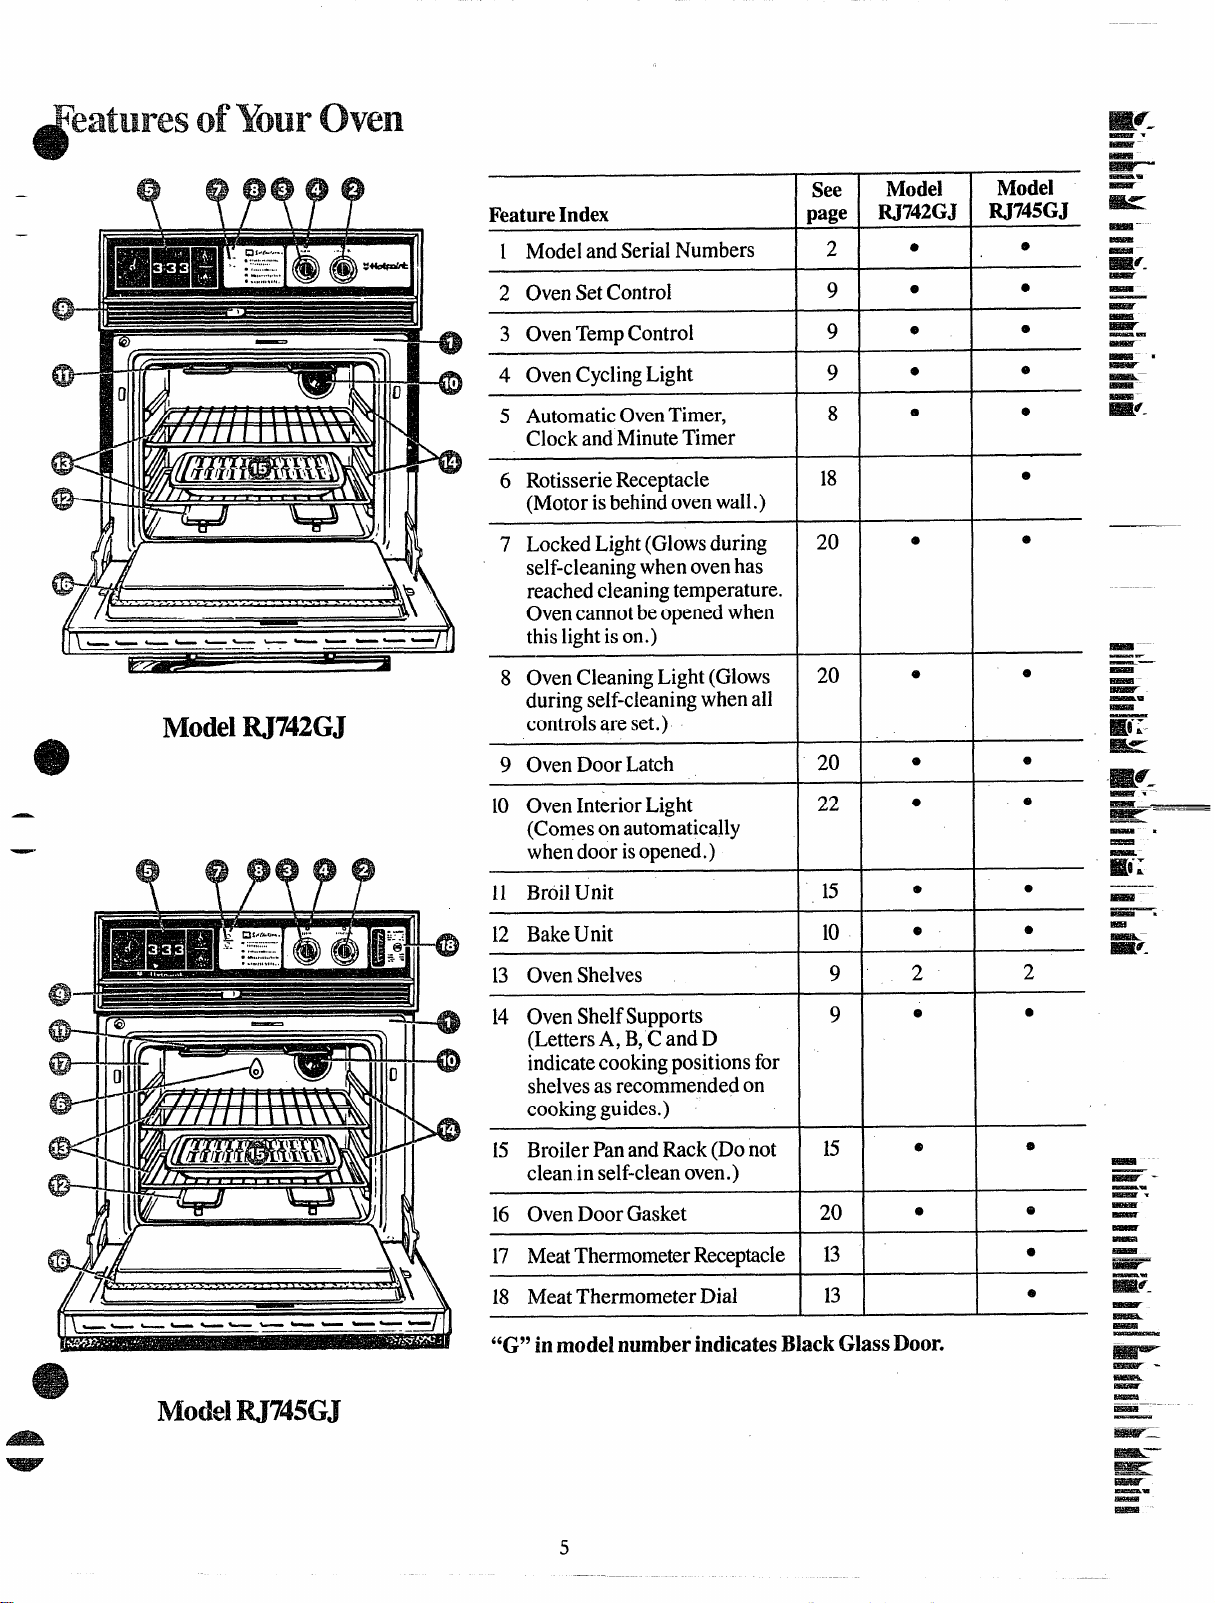
FeatureIndex
1 ModelandSerialNumbers
See
page
2
Model
RJ742GJ
●
Model
RJ745GJ
9
—
—
~
*- +-* ---- —*-
ModelRJ74XJ
2 OvenSetControl
3 OvenTempControl
4 OvenCyclingLight
5 AutomaticOvenTimer,
ClockandMinuteTimer
6 RotisserieReceptacle
(Motorisbehindovenwall.)
7 LockedLight(Glowsduring
self-cleaningwhenovenhas
reachedcleaningtemperature.
Ovencannotbeopenedwhen
thislightison.)
8 OvenCleaningLight(Glows
duringself-cleaningwhenall
controlsareset.)
9 OvenDoorLatch
10 OvenInteriorLight
(Comesonautomatically
whendoorisopened.)
9
9
9
8
18
20
20
20
22
@
e
-
o
0
0
e
*
&=___
Y ?????
+---- ---- ---
e
ModelRJ745GJ
11 BroilUnit
12 BakeUnit
13 OvenShelves
14 OvenShelfSupports
15
10
9
9
e
a
2
(LettersA, B,CandD
indicatecookingpositionsfor
shelvesasrecommendedon
cookingguides.)
15 BroilerPanandRack(Donot
15
cleaninself-cleanoven.)
16 OvenDoorGasket
17 MeatThermometerReceptacle
20
13
@
18 MeatThermometerDial
“G” inmodelnumber indicatesBlackGlassDoor.
*
o
2
●
@
E&Hr—
5
Page 6
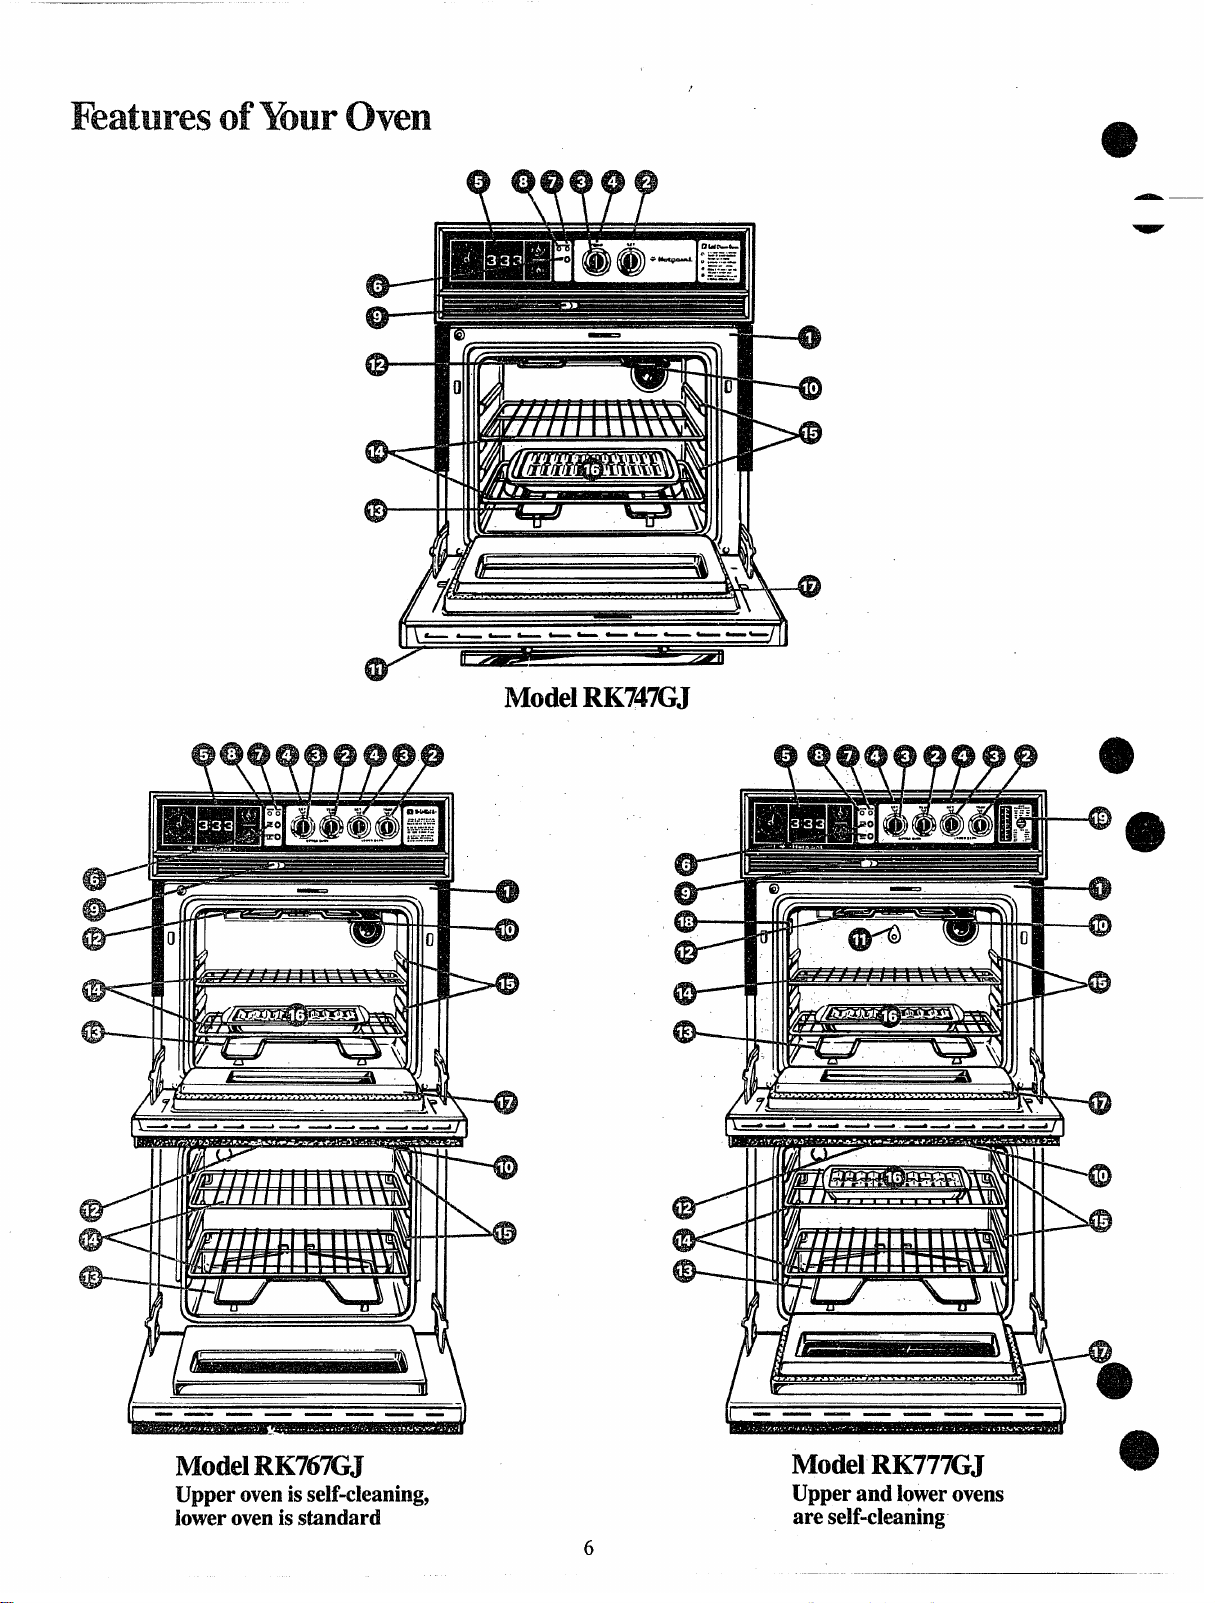
FeaturesofYouroven
i~~
-ti-~ti
h-k
ModelRK747GJ
-—— ——— —.
ModelRK767GJ
Upper ovenisself-cleaning,
~owerovenisstandard
II-——————–I
1
ModelRK777GJ
Upperandlowerovens
are self-cleaning
6
Page 7
Explained
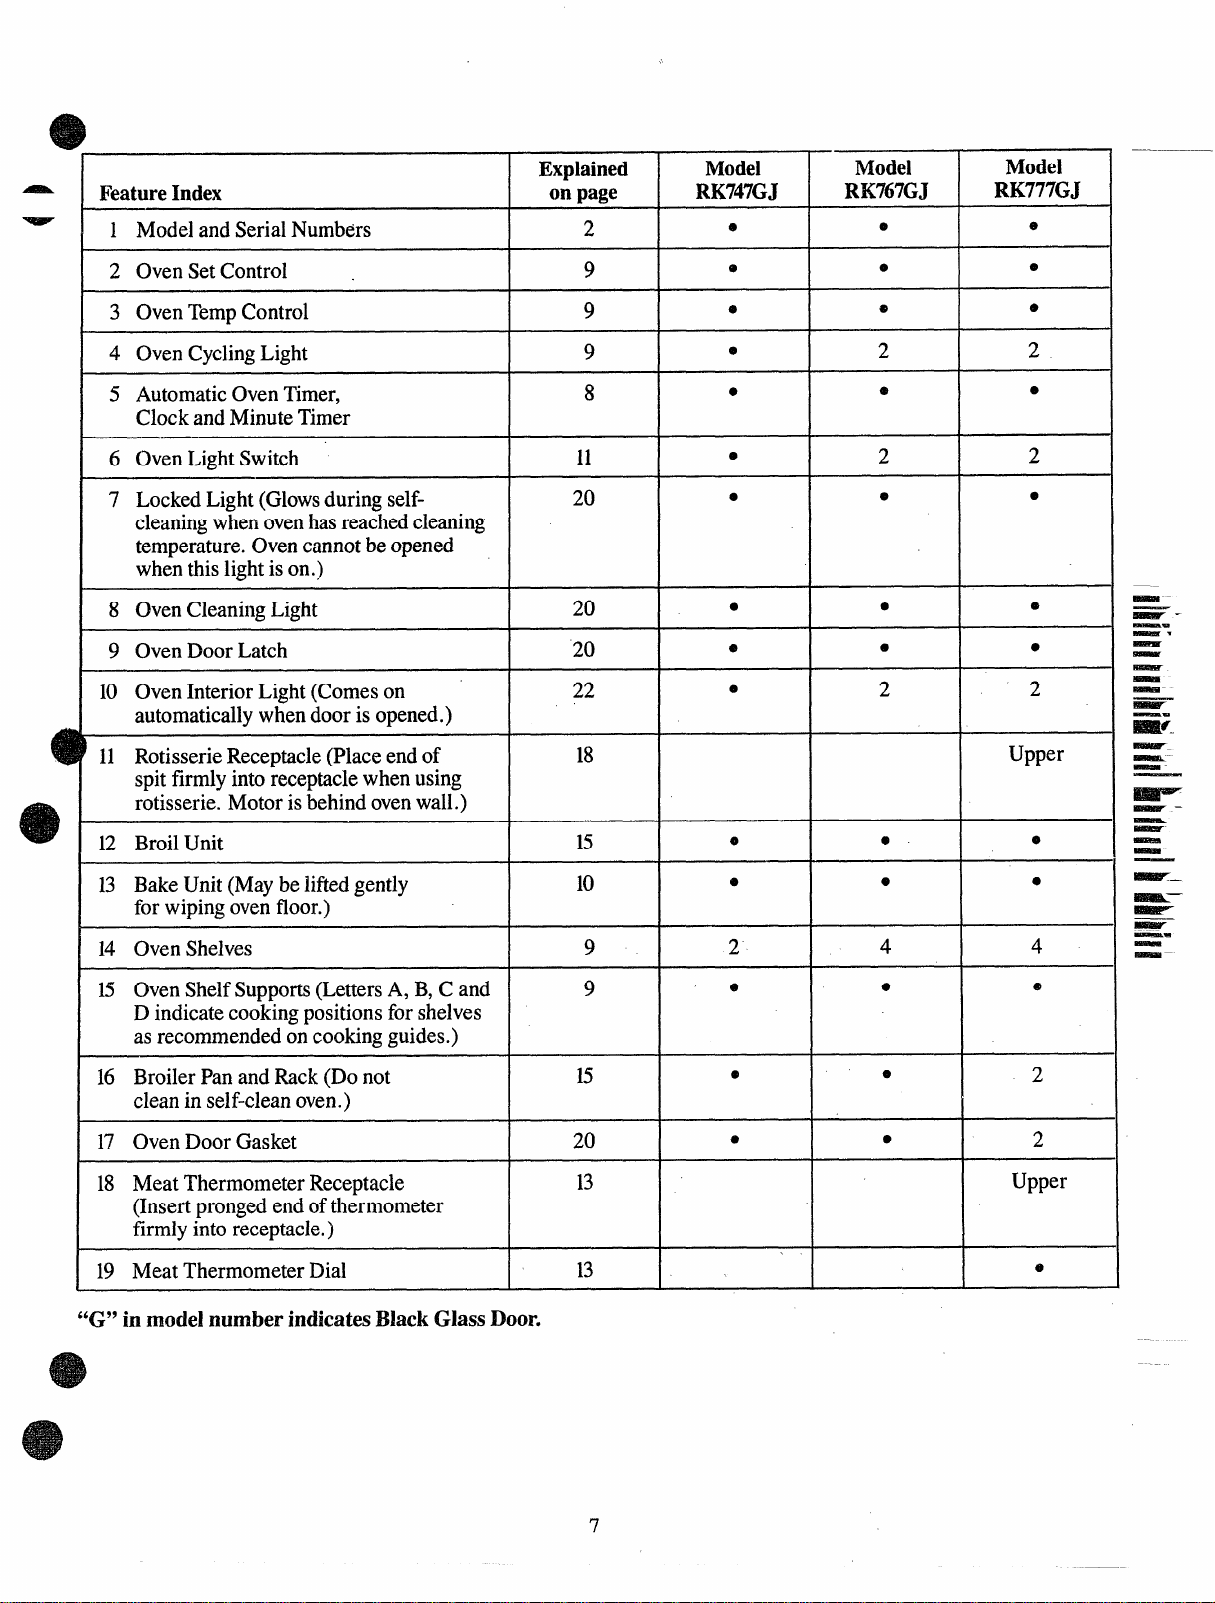
FeatureIndex on page
1 ModelandSerialNumbers 2
I
Model
RK747GJ
Model
RK767GJ
0 0
Model
RK777GJ
2 OvenSetControl .
3 OvenTempControl 9
4 OvenCyclingLight 9
5 AutomaticOvenTimer,
ClockandMinuteTimer
6 OvenLightSwitch
7 LockedLight(Glowsduringself-
cleaningwhenovenhasreachedcleaning
temperature.Ovencannotbeopened
whenthislightis on.)
8 OvenCleaningLight
9 OvenDoorLatch
10 OvenInteriorLight(Comeson
automaticallywhendooris opened.)
11 RotisserieReceptacle(Placeendof
spitfirmlyintoreceptaclewhenusing
rotisserie.Motorisbehindovenwall.)
12 BroilUnit 15
13 BakeUnit(Maybeliftedgently
forwipingovenfloor.)
I
9
8
11
20
20
20
22
18
10
0
0
10
I
I
I
-H--
o
0
0
o
-1--
0
*
2
0
2 2
Upper
0
0
0
0
2
2
0
6
●
0
●
14 OvenShelves 9
D indicatecookingpositionsforshelves
asrecommendedoncookingguides.)
16 BroilerPanandRack(Donot
cleanin self-cleanoven.)
17 OvenDoorGasket
18 MeatThermometerReceptacle
(Insertprongedendofthermometer
firmlyintoreceptacle.)
19 MeatThermometerDial
%“ in modelnumber indicatesBlackGlassDoor.
915 OvenShelfSupports(LettersA, B,C and
15
20
13
13
4
--H-+-
0
=t=
I
I
7
2
2
Upper
e
Page 8
...
..
Automatic~mer andClock
TheAutomaticTimerandClockon
yourovenarehelpfuldevicesthat
serveseveralpurposes.
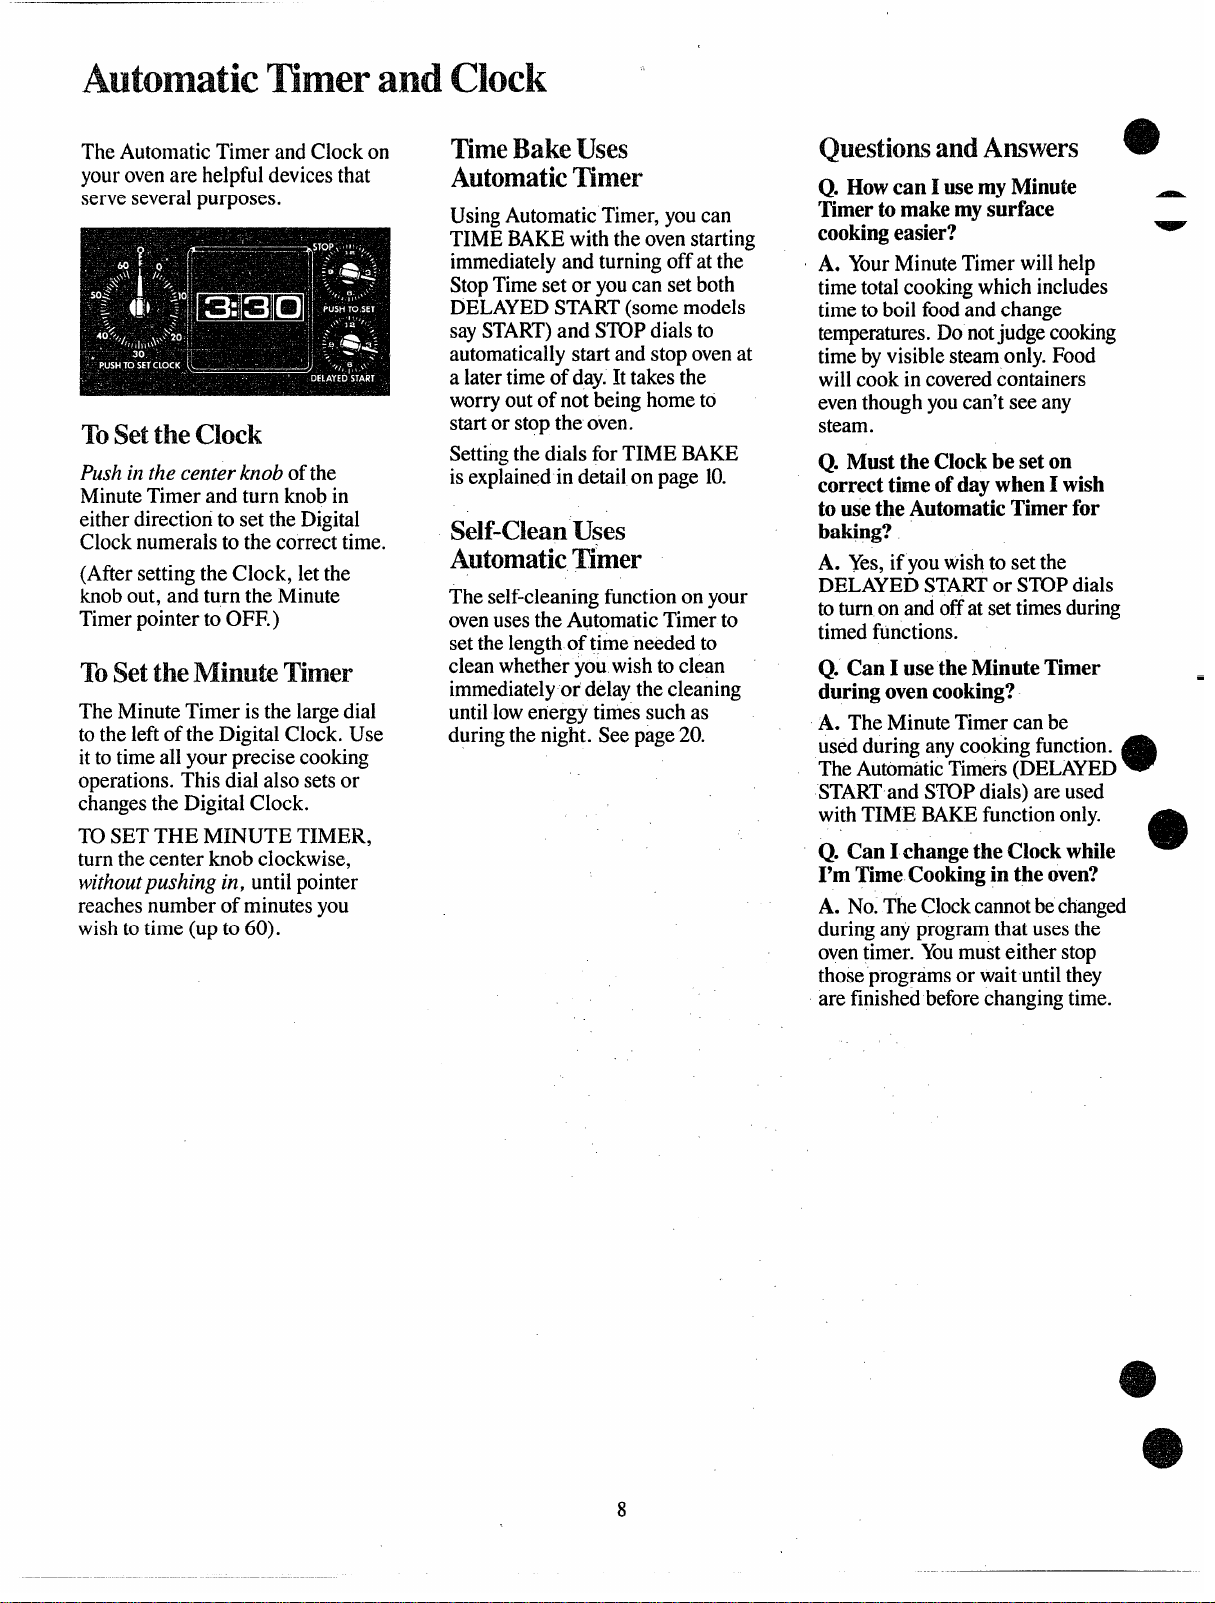
‘lbsettheclock
Pushinthecenterknobofthe
MinuteTimerandturnknobin
eitherdirectiontoset theDigital
Clocknumeralsto thecorrecttime.
(AftersettingtheClock,letthe
knobout,andturn the Minute
TimerpointertoOFF.)
TosettheA4im.wTimer
TheMinuteTimeristhelargedial
totheleftoftheDigitalClock.Use
ittotimeallyour precisecooking
operations.Thisdialalsosetsor
changesthe DigitalClock.
ID SETTHEMINUTETIMER,
turnthecenterknobclockwise,
withoutpushingin, untilpointer
reachesnumberofminutesyou
wishtotime(upto 60).
TimeBakeuses
Automatic Timer
UsingAutomaticTimer,youcan
TIMEBAKEwiththeovenstarting
immediatelyandturningoffatthe
StopTimesetoryoucansetboth
DELAYEDSTART(somemodels
saySTART)and Sl_OPdialsto
automaticallystartandstopovenat
a latertimeofday.Ittakesthe
worryout of notbeinghometo
startor stoptheoven.
SettingthedialsforTIMEBAKE
isexplainedindetailon page10.
Self-CleanUses
AutomaticTimer
Theself-cleaningfunctiononyour
ovenusestheAutomaticTimerto
setthelengthoftimeneededto
cleanwhetheryouwishtoclean
immediatelyor delaythecleaning
untillowenergytimessuchas
duringthenight.Seepage20.
QuestionsimdAnswers
Q. Howcan I usemyMinute
Timerto makemysurface
cookingeasier?
A. YourMinuteTimerwillhelp
timetotalcookingwhichincludes
timeto boilfoodandchange
temperatures.Donotjudgecooking
timebyvisiblesteamonly.Food
willcookincoveredcontainers
eventhoughyoucan’tseeany
steam.
Q. Must the Clockbe seton
c&rect time ofdaywhen1wish
to usethe AutomaticTimerfor
baking?
A. Yes,ifyouwishto setthe
DELAYEDSTARTor STOPdials
toturnonandoffatsettimesduring
timedfunctions.
Q. Can I use the Minute Timer
during ovencooking?
A. TheMinuteTimercanbe
usedduringanycookingfimction.
The AutomaticTimers(DELAYED
STARTandSTOPdials)areused
withTIMEBAKEfunctiononly.
Q. Can I changethe Clockwhile
I’mThneCookingin the oven?
A. No.TheClockcannotbechanged
duringanyprogramthatusesthe
oventimer.Youmusteitherstop
thoseprogramsor waituntilthey
arefinishedbeforechangingtime.
—
e
e
m
e
8
Page 9

oven Light
Er
1. Lookatthecontrols.Besure
youunderstandhowto setthem
properly.Readoverthedirections
forthe AutomaticOvenTimerso
youunderstanditsusewiththe
controls.
2. Checkoveninterior.Lookat
theshelves.Takeapracticerunat
removingandreplacingthemproperly,
togivesure,sturdysupport.
3. Readoverinformationandtips
that fo~low.
4. Keepthisbookhandysoyoucan
refertoit, especiallyduringthe
firstweeksofgettingacquainted
withyouroven.
oven controls
PREHEATINGtheoven,evento
hightemperaturesettings,isspedy
—rarelymorethanabout10minutes.
Preheattheovenonlywhen
necessary.Most foodswillcook
satisfactorilywithoutpreheating.
Ifyoufindpreheatingisnecessary,
keepaneyeontheindicatorlight
andputfoodintheovenpromptly
afterlightgoesout.
ovenInteriorShehk%i
Theshelvesaredesignedwith
stop-lockssothat whenplaced
correctlyontheshelfsupports,
they(a)willstopbeforecoming
completelyfromtheoven,and(b)
willnot tilt whenremovingfood
fromor placingfoodonthem.
‘IOREMOVEshelvesfromthe
oven,liftuprear ofshelf,pull
forwardwithstop-locksalongtop
ofshelfsupports.Becertainthat
shelfiscoolbeforetouching.
Thelightcomesonautomatically =whenthedoorisopened.Onmodels =.
withovenwindowusetheswitchto S
turnthelighton andoffwhenthe ~~
doorisclosed.
~
-.
Onsomemodels,theswitchis =-
locatedonthefrontofthedoor. =
Onothermodels,it’sonthe —
a=
controlpanel.
w.-
—.
.
--
BmT
Immk
—.
~–
w-
Thecontrolsfortheoven(s)are
markedOVENSETandOVEN
TEMROVEN SEThassettingsfor
BAKE,TIMEBAKE(onmodelsso
quipp@, BRIE, CLEANandOFF.
Whenyouturntheknobtothedesired
setting,theproperheatingunitsare
thenactivatedforthatoperation.
OVEN TEMPmaintainsthe
temperatureyouset,fromWARM
(150°F.)toBROIL(550”F.)and
alsoatCLEAN(880°F.).
The OvenCyclingLight glows
untiltheovenreachesyourselected
temperature,thengoesoffandonwith
the ovenunit(s)duringcooking.
TOREPLACEshelvesinoven,
insertshelfwithstop-locksresting
onshelfsupports.Pushshelftoward
rearofoven;itwill fdl into place.
Whenshelfisinproperposition,
stop-lockson shelfwillrununder
shelfsupportwhenshelfispulled
forward.
sheifPotitiolM
Theovenhasfourshelfsupports
markedA (bottom),B,C andD
(top).Shelfpositionsforcooking
foodaresuggestedon Baking,
RoastingandBroilingpages.
_-
-——-
9,
—.—
Page 10

Whencookinga foodforthe first
timeinyournewoven,usetime
givenonrecipesasa guide.Oven
thermostats,overa periodofyears,
may“drift”fromthefactorysetting
anddifferencesintimingbetween
anoldanda newovenof5 to 10
minutesarenotunusualandyou
maybe inclinedtothinkthatthenew
ovenisnot performingcorrectly.
However,yournewovenhasbeen
setcorrectlyatthefactoryandis
moreapttobeaccuratethanthe
ovenit replaced.
toBake!
How
thatyouset.E~ples ofImmediate
Start(oventurnsonnowandyou
setittoturnoffautomatically)or
DelayedStartandStop(settingthe
oventoturnonautomaticallyata
latertimeandturnoffata preset
stoptime)willbe described.
HowtosetImnlediate
start
NOTE:Beforebeginningmake
suretherangeclockshowsthe
correcttimeofday.
ImmediateStartissimplysetting
oventostartbakingnowandturning
offatalatertimeautomatically.
Remember,foodscontinuecooking
aftercontrolsareoff.
HowtosetDdaydi start
a
and stop
DelayedStartandStopis setting
theoventimertoturnthe ovenon andoffautomaticallyata latertime
thanthepresenttimeofday.
Step 1:Tosetstarttime,pushin
knobonDELAYEDSTARTdial
(somemodelsmaysaySTART)and
turnpointertotimeyouwantoven
toturnon, forexample3:30.
Step1:Placefoodinoven,being
certaintoleaveabout 1inchof
spacebetweenpansandwallsof
ovenforgoodcirculationofheat.
Closeovendoor.Duringbaking,
avoidfrequentdooropeningsto
preventundesirableresults,
Step2: TurnOVENSETknobto
BAKEandOVENTEMPknobto
temperatureonrecipeor onBaking
Guide.
Step3: Checkfoodfordoneness
atminimumtimeonrecipe.Cook
longerif necessary.Switchoffheat
andremovefoods.
Howto TimeBake
Theautomaticoventimercontrols
aredesignedtoturn theovenonor
offautomaticallyat specifictimes
Step1:TosetStopTime,pushin
knobonSTOPdialandturnpointer
totimeyouwantoventoturnoffi
forexample6:00.TheDELAYED
STARTdialshouldbeat thesame
positionas thetime ofdayon
clock.
Step2: TbrnOVEN SETknobto
TIMEBAKE.TurnOVENTEMP
knobtooventemperature,for
example250”F.
Step2: TosetStopTime,pushin
knobon STOPdial andturnpointer
totimeyouwantoventoturnoff,
forexample6:00.Thismeansyour
recipecalledfortwoandone-half
hoursofbakingtime.
N~E: Timeon SIUP dialmust
belaterthantimeshownonrange
clockandDELAYEDSTARTdial.
Step3: TurnOVENSETknobto
TIMEBAKE.ThrnOVENTEMP
knobto 250”F.or recommended
temperature.
Placefoodinoven,closethedoor
andautomaticallytheovenwillbe
turnedonandoffatthetimesyou
haveset. lhrn OVENSETtoOFF
andremovefoodfromoven.
a
m
10
Page 11

BakingGuide
e
1.Aluminumpansconductheat
quickly.Formostconventional
- baking,light,shinyfinishesgenerally
_ givebestresults.Theyprevent
overbrowninginthe timeittakes
forheattocookthecenterareas.
Dull(satin-finish)bottomsurfaces
ofpansarerecommendedforcake
pansandpieplatestobesurethose
areasbrowncompletely.
Food Container Ik#tion
Bread
Biscuits(Win. thick) ShinyCookieSheet
Coffeecake ShinyMetalPanwith
Cornbreadormuffins CastIronorGlass
Gingerbread ShinyMetall% with
Muffins ShinyMetalMuffinPans A,B
Popovers DeepGlassorCastIronCups
Quickloafbread
Yeastbread(2loaves) MetalorGlass LoafPans
Plainrolls ShinyOblongor MuffinPans
Sweetrolls
cakes
(withoutshortening)
Angelfood
Jellyroll MetalJellyRollPan
Sponge
Cakes
Bundtcakes
Cupcakes ShinyMetalMuffinPans
Fruitcakes
Layer
Layer,chocolate
Loaf
Cookies
3rownies MetalorGlassPans
Drop CookieSheet
!tefrigerator CookieSheet
lolledorsliced CookieSheet
Fruits,
3ther Desserts
3akedapples
Wtard GlassCustardCupsor Casserole
%ddings,Rice GlassCustardCupsor
mdCustard Casserole
?ies
‘rozen FoilI% onCookieSheet
Meringue Spreadtocrustedges
)necrust GlassorSatin-finishMetal
Pwocrust GlassorSatin-finishMetal
+wtryshell
tiiscellaneous
lakedpotatoes SetonOvenShelf A,B,C
Icallopeddishes
~ouffles
satin-finishbottom
satin-finishbottom
MetalorGlassLoafPans
ShinyOblongorMuffinPans
Aluminumllbe Pan
MetalorCeramicPan A
MetalorCeramicPan A,B
MetalorGlassLoafor
l’hbePan
ShinyMetalPanwith B
satin-finishbottom
ShinyMetalPanwith B’
satin-finishbottom
MetalorGlassLoafPans
GlassorMetalPan
(setin panofhotwater)
GlassorSatin-finishMetal
GlassorMetalPan
Glass
2. Darkor non-shinyfinishes,
glassandl?yrocera@utensilsoften
absorbheat,whichmayresultin
dry,crispcrusts.Reduceovenheat
25”F.iflightercrustsaredesired.
Preheatcastironforbakingsome
foodsforrapidbrowningwhen
foodisadded.
3.Preheatingtheovenisnot always
necessary,especiallyforfoods
Shelf Oven
B,C
B,A
B 400°-450” 20-40
B
B
B 350°-3750 45-60
A, B
A,B
B,A 350°-3750 20-30
A
B
B
A,B
B
B,C 325°-3500 25-35 Barcookiesfrommixusesametime.
B,C 350°-4000 10-20 UseShelfCandincrease temp.
B,C 400°-4250 6-12 25”F.to50°F.formorebrowning. .
B,C 375°-4000 7-12
A,B,C 350°-4000 30-60
B 300°-3500
B 325°
A 400°-4250 45-70
B,A 325°-3500 15-25 Toquicklybrownmeringue,use
A, B 400°-4250 45-60 Custardfillingsrequirelower
B 400°-4250
B 450° 12-15
A,B,C 325°-3750 30-60 or size.
B 300°-3500 30-75
Temperature Minutes
400°-4750
350°-4000 20-30
350° 45-55
400°-4250 20-30 Decreaseabout5 minutesformuffin
375° 45-60 mix,orbakeat4WF. for25minutes,
375°-4250 “45-60
375°-4250
325°-3750 30-55 Two-piezepanis convenient.
375°-4000
325°-3500 45-60
325”-350°
350°-3750
275°-3000
350°-375”
350°-3750 25-30
350°
325°-4000
whichcooklongerthan30to40
minutes.Forfoodwithshort
cookingtimes,preheatinggives
bestappearanceandcrispness.
4. Opentheovendoortocheck
foodaslittleaspossibletoprevent
unevenheatingandto saveenergy.
.
Time,
15-20
10-25
10-15 Linepanwithwaxedpaper.
45-65
20-25 Paperlinersproducemoremoist
24 hrs.
20-35
40-60
30-60
50-90
40-60 temperate, longertime.
60-90 Increasetimeforlarge amount
Comments
Canned,refrigeratedbiscuitstake
2to4 minuteslesstime.
Preheatcastironpanforcrispcrust.
thenat350°F.for10to 15minutes.
Darkmetalorglassgivedeepest
browning.
Forthinrolls,ShelfBmaybeused.
Forthinrolls,ShelfBmaybeused.
crusts.
Use300”F.andShelfBforsmall or
individualcakes.
.,
Reducetemp.to300”F.forlarge
custard.Cookbreador ricepudding
withcustardbase80to90minutes.
Largepiesuse400% andincrease
time.
400”F.for8 to 10minutes. ‘
..
11
.
Page 12

Roasting
Roastingiscookingbydryheat.
Tendermeatorpoultrycanbe
roasteduncoveredinyouroven.
Roastingtemperatures,which
shouldbelowandsteady,keep
spatteringtoaminimum.When
roasting,itisnot necessaryto
sear,baste,coveroraddwater
toyourmeat.
Roastingisreallyabaking
procedureusedformeats.Therefore,
ovencontrolsaresettoBAKE.(You
mayhearaslightclickingsound,
indicatingtheovenisworking
properly.)Roastingiseasy;just
followthesesteps:
Step1:Checkweightofmeat,and
place,fatsideup,onroastingrack
inashallowpan. (Broilerpanwith
rackisagoodpanforthis.)Line
broilerpanwithaluminumfoilwhen
usingpanformarinating,cooking
withfruits,cookingheavilycured
meats,orforbastingfoodduring
cooking.Avoidspillingthese
materialsonovenlinerordoor.
Step2: Placeinovenonshelfin
AorB position.Nopreheatingis
Step4:Mostmeatscontinueto
cookslightlywhilestanding,after
beingremovedfromtheoven.For
rareormediuminternaldoneness,
ifmeatistostand10to20minutes
whilemakinggravy,orforeasier
carving,youmaywishtoremove
meatfromovenwheninternal
temperatureis5to 10”F.below
temperaturesuggestedinguide.
Ifnostandingisplanned,cook
meattosuggestedtemperature
inguideonpage14.
IWiX: YoumaywishtouseTIME
BAKE,asdescribedonpage10,to
turnovenonandoffautomatically.
Rememberthatfoodwillcontinue
tocookinthehot ovenandtherefore
shouldberemovedwhenthedesired
internaltemperaturehasbeen
reached.
ForEk-’ozetiRoasts
@Frozenroastsofbeef,pork,
lamb,etc.,canbestartedwithout
tiawing,butallow10to25minutes
perpoundadditionaltime(10
minutesperpoundforroastsunder
5pounds,moretimeforlarger
roasts).
Q.Isitnecessarytocheckfor _
donenesswithameatthermometer?
A. Checkingthefinishedinternal
temperatureatthecompletionof
cookingtimeisrecommended.
TemperaturesareshowninRoasting
Guideonoppositepage. Forroasts
over8pounds,cookedat300°F.
withreducedtime,checkwith
thermometerathalf-hourintervals
afterhalfthetimehaspassed.
Q.Whyismyroastcrumbling
whenI try tocarveit?
Roastsareeasierto sliceif
A.
allowedtocool10to20minutes
afterremovingfromoven.Besure
tocutacrossthegrainofthemeat.
Q.DoI needtopreheatmy
oveneachtimeIcookaroast
orpoultry?
Itis rarelynecessarytopreheat
A.
youroven,onlyforverysmall
~oasts,w~ich~ookashortlength
oftime.
*
Q.Whenbuyingaroast,are
thereanyspecialtipsthatwould
helpmecookitmoreevenly?
A.Yes.
thicknessaspossible,orbuyrolled
roasts.
Buyaroastasevenin
a
Q.CanI sealthesidesofmyfoil
“tent”whenroastingaturkey?
A.
Sealingthefoilwillsteamthe
meat.Leavingitunsealedallowsthe
airto circulateandbrownthe meat.
Step3:ThrnOVENSETtoBAKE
andOVENTEMPto325”F.Small
poultrymaybe cookedat375”F.
forbestbrowning.
@Thawmostfrozenpoultrybefore
roastingtoensureevendoneness.
Somecommercialfrozenpoultry
canbecookedsuccessfullywithout
thawing.Followdirectionsgiven
onpacker’slabel.
12
—
Page 13

. .
MeatThermometer
Formanyfoods,especially
roastsandpoultry,internalfood
temperatu~eis th~besttestfor
doneness.Themeatthermometer
takestheguessworkoutofroasting
bycookingfoodstotheexact
donenessyouwant.Themeat
thermometerhas a skewer-like
probeatoneendofthecableanda
two-prongedplugattheother.Use
handleofplugandprobe,rather
thancable,wheninsertingand
removingthesepartsfrommeat
and/orovenwallreceptacle.After
preparingmeatandplacingin
roastingpanonrack, followthe
stepsbelowforproperuseofmeat
thermometer.
ModelsW7453andRK777GJ
Step3: Plugcable intoreceptacle
onovenwall.Theprongsare
especiallydesignedto onlyplugin
one way.Becertainto insertplug
intoreceptaclealltheway.Close
ovendoor.
●
1
o
0
Step6:Wheninternaltemperature
ofroastreachesnumberyouhave ~ z
set,abuzzer sounds.Tostop
buzzer,turnpointerto SIGNAL
OFF.Internaltemperatureofmeat
canbedeterminedatanytime
duringcookingbyturningpointer
downuntilbuzzersounds.
~:
I
—
Step1:Togaugeplacement.of
—
probe,layprobeonoutsideofmeat
alongtopor sideandmarkwith
fingerwhereedgeofmeatcomes
onprobe.Probeshouldbeplaced
sopointrestsincenterofthe
thickestpartofroast.
Step2:Insertprobeintomeatup
topointmarkedoffwithfingers.
Pointshouldnot touchbone,fator
gristle.Notmorethan2”ofprobe,
‘ot countinghandle,shouldbe left
xposedoutsideofmeat.
mu
1
Step4: TurnOVENSETknobto
BAKEandOVENTEMPknobto
recommendedoventemperature.
forexample350”F.SeeRoasting’
Guideonpage 14foroven
temperature.
Step5:RefertoguidenearMeat
ThermometerDialto determine
atwhatinternaltemperaturemeat
willbedone.Thenturnknobnext
todial to movepointertocorrect
number(internaltemperature)
ondial.
Step’1Whenroastisdone,
usecarein removingplugfrom
receptacle.DON(Yi’USECABLE.
Removemeatfromoven.Since
mostmeatcontinuescooking,you
maywishtoremove5°to 10°sooner.
Step8:Removeprobefrommeat,
usinghandleofprobenotcable.
Mostmeatscarveeasierifletstand =
5to10minutes.Letthermometercool =
and clean as directed in Cleaning =
Guideonpage24.Donotleave ~“
inoven.
SeeRoastingGuideonpage14.
13
Page 14

RoastingGuide
Roasting
1.PositionovenshelfatBfor
small-sizeroasts(3to7 Ibs.)and
atA for largerroasts.
2. Placemeatfat-sideup,orpoultry
breast-sideup,onbroilerpanor
othershallowpanwithtrivet.Do
not cover.Do notstuffpoultryuntil
justbeforeroasting.Usemeat
probe formoreaccuratedoneness.
Controlsignalswhenfoodhas
3.Removefatand.drippingsas
necessary.Basteasdesired. conventionallyroastedbyadding
4. Standingtimerecommendedfor
roastsis10to20minutestoallowroast
tofirmupandmakeiteasierto
carve.Internaltemperaturewillrise
about5° to 10°F.;tocompensatefor
temperaturerise, ifdesir&$remove
roastfromovenat5°to 10°F.less
thantemperatureon guide.
reachedsettemperature.(Donot
placeprobeinstuffimg.)
Oven
TYP
Meat
Tendercuts;rib,highqualitysirlointip,
rumportopround*
LambLegorbone-inshoulder*
Vealshoulder,legor loin*
Porkloin,ribor shoulder*
Ham,precooked
Ham,raw
*Forbonelessrolledroastsover6-inchesthick,add5 to 10minutesperpoundtotimesgivenabove.
lkmperature Doneness
325° Rare:
325° Rare:
325°
325° WellDone:
325° ToWarm:
325° WellDone:
Medium: 30-35
WellDone:
Medium:
Well Done:
WellDone: 35-45 30-40
ApproximateRoastingTime,
inMinutesperPound
3to 5-lbs. 6 to 8-lbs.
24-30 18-22
35-45 28-33
21-25 20-23
25-30 24-28 150°-1600
30-35 28-33
35-45 304’0 170°-1800
10minutesperpound(anyweight)
Under10-lbs. 10to 15-lbs.
20-30
5.Frozenroastscanbe
10to25 minutesperpoundmore
timethangiveninguidefor
refrigeratedroasts.(10minutes
perpoundforroastsunder5pounds.)
Defrostpoultrybeforeroasting.
Internal
TemperatureW
22-25 150°-160”
17-20
130°-1400
170°-1850
130°-1400
170°-1850
170°-1800
125°-1300
160°
Pbultry
ChickenorDuck
Chickenpieces
‘1’brkey
325°
3’75°
325°
3to5-lbs. Over5-lbs.
Well Done: 35-40 30-35 185°-1900
WellDone:
WellDone: 20-25 15-20 185°-1900
35-40 185°-1900
10toE5-lbs. Over15-lbs.
In thigh:
-.
*
14
—
Page 15

SeeBroilingGuideonpage17.
@
Broilingiscookingfoodbyintense
—
radiantheatfromtheupperunitin
theoven.Mostfishandtendercuts
—
ofmeatcanbe broiled.Follow
thesestepsto keepspatteringand
smokingtoaminimum.
Step1:Ifmeathasfatorgristlenear
edge,cutverticalslashesthrough
bothabout2“apart.If desired,fat
maybetrimmed,leavinglayer
about1/8”thick.
Step2: Placemeatonbroilerrack
inbroilerpanwhichcomeswith
range.Alwaysuseracksofatdrips
intobroilerpan; otherwisejuices
maybecomehotenoughto catchfire.
Step3:I%sitionshelfonrecommended
shelfpositionassuggestedinBroiling
Guideonpage17.Mostbroilingis
doneonCposition,but if your
rangeisconnectedto 208volts,you
maywishtousehigherposition.
-
-uF-
Step6: Turnfoodonlyonceduring
coo-king.Timefoodsforfirstside
perBroilingGuide.
Turnfood,thenusetimesgivenfor
secondsideasaguidetopreferred
doneness.(Wheretwothicknesses
andtimesaregiventogether,use
firsttimesgivenforthinnestfood.)
StepZ lbrn OVEN SETknob
toOFF.Servefoodimmediately,
andleavepanoutsideoventocool
duringmealforeasiestcleaning.
QwidhIs &lb.SWf2%
Q. WhyshouldIleavethedoor
ajarwhenbroilingchicken?
A. Chickenistheonlyfood
recommendedforclosed-door
broiling.Thisis becausechickenis
relativelythickerthanotherfoods
youbroil.Closingthedoorholds
moreheatintheovenwhichallows
chickento cookevenlythroughout.
Whenbroiling,isitnecessary
Q.
toalwaysusearackinthepan?
A.Yes.
themeatoverthepan.Asthemeat
cooks,thejuicesfallintothepan,
thus keepingmeatdrier.Juices
areprotectedbytherackandstay
cooler,thus preventingexcessive
spatterandsmoking.
Q. ShouldIsaltthemeatbefore
broiling?
A. No.Saltdrawsoutthejuices
andallowsthemtoevaporate.
Alwayssaltaftercooking.Turn
meatwithtongs;piercingmeat
witha forkalsoallowsjuices to
escape.Whenbroilingpoultry
or fish,”brusheachsideoften
withbutter.
Usingtheracksuspends
.1
Step4: Leavedoorajara&winches
(exceptwhenbroilingchicken).
Thedoorstaysopenbyitself,yet
theproperternpeti~- is maintained
intheoven.
tep5:TurnbothOVENSETand
VENTEMPknobstoBROIL.
Preheatingunits is nutnecessary.
(SeenotesinBroilingGuide.)
1. Ifdesired,broilerpanmaybe
linedwithfoilandbroilerrackmay
becoveredwithfoilforbroiling. ALWAYSBECERTNNTOMOLD
FOILTHOROUGHLYTO
BROILERRACK,ANDSLIT
FOILTOCONFORMWITH
SLITSINRACK.Broilerrackis
designedtominimizesmokingand
spattering,andtokeepdrippings
coolduringbroiling.Stoppingfat
andmeatjuicesfromdrainingto
thebroilerpanpreventsrackfrom
servingitspurpose,andjuicesmay
becomehotenoughtocatchfire.
2. DONOI’ placeasheetof
aluminumfoilonshelf.To doso
mayresultinimproperlycooked
foods,damagetoovenfinishand
increaseinheatonoutsidesurfaces
oftheoven.
Q.Whyaremymeatsnotturning
outasbrownastheyshould?
A.
In someareas,thepower
(voltage)totherangemaybelow.
Inthese cases,preheatthebroil
unitfor 10minutesbeforeplacing
broilerpanwithfoodinoven.
Checkto seeif youareusingthe
recommendedshelfposition.Broil
forlongestperiodoftimeindicated
intheBroilingGuide.Turnfood
onlyonceduringbroiling.
Q.DoI
needtogreasemybroiler
racktopreventmeatfromsticking?
A.No.
toreflectbroilerheat,thuskeeping
thesurfacecoolenoughtoprevent
meatstickingtothesurfhce.However,
sprayingthebroilerracklightlywith
avegetablecookingspraybefore
cookingwillmakecleanupeasier.
Thebroilerrackisdesigned
—
15
—
Page 16

B~Oiii~~ With the M~~t Th~~~O~~t~~ (onmodelssoequipped)
Youmayusethemeatthermometer
forbroiling,suchassteakor ham
slices.Preparemeatonbroilerrack
andpanasexplainedon page15,
“HowtoBroil:’SetbothOVEN
SETandOVEN TEMPknobsto
BROILandleavedoorajaras
recommended,afterplacingprobe
inmeatandovenasdirectedbelow.
or-=%
Step 1:Use steakat least1to 1%
inchesthick.Layprobeontopof
steaktodeterminetheposition
probeis tobeinserted.Gauge
distancefromedgetocenterof
largestmuscle;markwiththumb
whereedgeofmeator fatmeets
probe.Be certainNOTMORE
THAN2 inchesofprobe,not
countinghandle,isleftexposed
outsideofmeat.
Step3:Forrare steakscookfirst
sideto 90onmeatthermometer
dial;formediumto 100;forwelldone110.SetMeatThermometer
Dialtopreferreddoneness.
Step4: Atsoundofbuzzer,turn
steak;checkprobeto becertainit
hasnotmovedoutofposition.
ResetpointeronMeatThermometer
andcooksecondside.Seeguideon
ovennearMeatThermometerDial.
NO!lXIS:
~Ifthereis a questionabout
whetherprobehasmovedoutof
positionduringcooking,turnknob
sopointermovesdownondial until
buzzersounds.Noteindicated
temperatureandresetpointerto
SIGNALOFF.Pushprobefarther
downintoroast,about1inch,then
afterafewminutesredetermine
internaltemperatureasabove.If
newtemperatureislower,theprobe
wasprobablyoutofposition.If so,
allowmeatto cookto proper
internaltemperature.
QuestiomsandAnswers
Q.Canthemeatthermometer _
remainintheovenif it’snot
insertedinfood?
A. No.Removeprobefrom
receptaclewhennot in use.You
coulddamagetheprobebyleaving
itinduringcookingoperationsthat
donotrequirethe probe.
Q.MayIinsertthemeat
thermometerintofrozenfoods?
A. No.Foodsmustbecompletely
defrostedbeforeinsertingprobe.
Q. ShouldI linebroilerpanwith
aluminumfoilwhenroasting?
A. Yes,whenusingpanfor
marinating,cookingwithfruitsor
heavilycuredmeats,orforbasting
duringcooking.Avoidspillingthese
materialson ovenlineror door.
Q.HowmayIbesurethatmy
roastwillcookthesameeachtime?
A. Whenusingthemeat
thermometerinroasting,theprobe
mustbeinsertedprope;ly.Check
thepositionoftheprobeduring
cooking.Sometimestheprobeslips
or istouchingbone,fator gristle.
Repositionprobecorrectlyandset
ovenagaintofinishroasting.
m
*
Step2: Liftprobefrommeat
keepingthumbin placeonprobe.
Insertprobeasnearaspossibleto
centerofthicknessofsteak.Push
probeintosteakto wherethumb
meetsfator meat.
*Letmeatthawenoughto allow
insertingprobe.Theprobeis
sturdybuttake carenottoforce it
toohardintoroast.
@Do notdisconnectprobeduring
cooking.Usehotpadswhen
removingprobeatendofcooking.
Donotusetongsto pulloncable
sincetheymaydamageit.
w
16
.
Page 17

—
--A-
em a
-
8%
e
Broiling
- 1. Alwaysusebroilerpanandrack
thatcomeswithyouroven.It is
‘- designedtominimizesmokingand
spatteringbytrappingjuices inthe
shieldedlowerpartofthepan.
2. Ovendoorshouldbeajarfor
mostfoods;thereisa special
positionondoorwhichholdsdoor
opencorrectly.
3. Forsteaksandchops,slashfat
evenlyaroundoutsideedgesofmeat.
Quantityandlor Shelf FirstSide
Food
Bacon
GroundBeef
WellDone
BeefSteaks
Rare
Medium
WellDone
Rare
Medium
Well Done
Chicken
BakeryProducts
Bread(Toast)or
ToasterPastries
EnglishMuffIns
hbster ~Ils
(6to8-oz.each)
Fish
HamSlices
(precooked)
PorkChops
Well Done
hmb Chops
Medium
WellDone
Medium
Well Done
—.
Wienemandsimilar
precookedsausages,
bratwurst
Thickness
Yz-lb.(about8
thinslices)
l-lb.(4patties)
Y2 to %-in.thick c’
l-inchthick
(1to 1%-lbs,)
I%-in.thick
(2to2fi-lbs.)
1whole A
(2to2fi-lbs.),
splitlengthwise
2to4 slices
1pkg.(2)
2(split)
2-4 B
l-lb.filletsMto
Yz-in.thick
l-in.thick
2(%inch)
2(l-in.thick) B 13
about1 lb.
2(1 inch)
about10to 12oz.
2(1%inch)
about1 lb. B
l-lb. pkg. (10)
Toslash,cut crosswisethrough
outerfatsurfacejusttotheedgeof
the meat.Usetongstoturnmeat
overtopreventpiercingmeatand
losingjuices.
4. Ifdesired,marinatemeatsor
chickenbeforebroiling.Orbrush
withbarbecuesaucelast5 to 10
minutesonly.
5. Whenarrangingfoodonpan,
donotletfattyedgeshangover
sides,whichcouldsoilovenwith
fatdripping.
SecondSide
Position
c
c
c
c
c
Time,Minutes
3%
7
7
9 9
13
10
Time,Minutes Comments
c H
c
c
c
c
B 8
c
25 20-25
35
1~-z
3-4
13-16 Do not Cutthroughbackofshell.Spread
5
10
c 8
c
c
c
10 10
10
17
6 1-2
6. Broilerdoesnotneedtobe
preheated.However,forverythin
foods,orto increasebrowning,
preheatif desired.
7. FrozenSteakscanbe
conventionallybroiledby
positioningtheovenshelfatnext
lowestshelfpositionandincreasing
cookingtimegiveninthisguide
1%timesper side.
8. Ifyourovenisconnectedto
208volts,raresteaksmaybebroiled
bypreheatingbroilheaterand
positioningtheovenshelfone
positionhigher.
3% Arrangeinsinglelayer.
Spaceevenly.
4-5
7 Steakslessthan1inchcookthrough
13 recommended.
7-8 Slashfat.
14-16
10-15 Reducetimesabout5 to 10minutesper
‘/2
mmover. open.Brushwithmeltedbutter
5 Handleand turnverycarefilly.
8 Increasetimes5to10minutesperside
Upto8pattiestakeaboutsametime.
beforebrowning.Panfryingis
sideforcut-upchicken.Bmsheachside
withmeltedbutter,Broilwithskin
downfirstandbroilwithdoorclosed.
Spaceevenly.PlaceEnglishmuffins
cut-side-upandbmshwithbutter,if
desired.
beforeandafterhalftime.
Brushwithlemonbutterbeforeand
duringcookingifdesired.Preheat
broilertoincreasebrowning.
forlti-inch thickorhomecured.
10 Slashfat.
13
4-7 Slashfat.
4-6
12-14
Ifdesired,splitsausagesinhalf
lengthwiseinto5 to6-inchpieces.
_–
-–
-—
—
Page 18

Rotkserie
ModelsRJ745GJandRK777GJ
Foodiscookedbyrevolvingon
aspitunder the(upper)broilunit.
Asfoodturns,itbastesitselfto
produceasucculentbrownand
tenderroast.Meattenderenough
forroastingmayberotissed.
1. Assemblerotisserie.Insert
curvedendsofframeintolarge
holes ofbroilerpanhandles.Lock
frameinplace byfittingstraight
endsof supportintoholesincenter
handles.
2. Securefoodonspit.When
securedcorrectly,foodwillbe
locatedincenterareaofspit
leaving4 inches freeatthepointed
end(thispartgoesintomotor).
3. Tosecurefoodonspit:Push
2-prongedforkontospitnear
handleend.Tightenwithscrew.
Pushspitthroughfood(tiefood
securelyandcompactly),distributing
weightevenlyoneachsideofspit.
Tocheckweightdistributionon
spit,holdspit(andfood)between
hands,palmsup; spitshouldroll
smoothlyfrompalmstofingertips
whenpalmsaretippedforward.
Finishsecuringfoodon spitby
glidingsecond2-prongedforkonto
spitwithprongstowardfd. Tighten
screwstoa flatsurfaceonspit.
4. Placespitontie sohandleend
isinnarrowsupport,andpointed
endisin wideU-shapedsupport.
RotissingtheFood
1.Putovenshelfinlowestposition
inoven.Withfoodon spit,place
spitonovenshelf.
2. SetOVENTEMPknobas
suggestedonRotisserieTimeand
TemperatureGuideatright.Settings
are300-400°F.togetfoodsjuicy
anddonewithoutoverbrowning.
3. SwitchOVEN SETknobto
ROTISSERIE.Thisstartsbroilunit
androtisseriemotoroperating.Spit
canbeinsertedandremovedmore
easilywhenmotorisoperating.
NOIX:Makecertainwhentouching
spitthatnopartofbodyor pot
holdertouchescoilsofbroilunit.
4. Insertspitintomotor:Grasp
handleonspit.Usingpointofspit,
movetoonesidethecoverover
motoroutletinrearofoven;push
spitfirmlyintomotoroutletasfar
asitwillgo. Removehandle.
5. Checkrotationoffood.Tighten
oradjustforksifnecessary.During
cooking,forksmayneedtightening
due tonormalmeatshrinkage.
6. Asfoodcooks,leavedoorajarin
“Broil”position;doorstaysopen
byitself.
‘7.Bastefoodifdesired.Withpot
holders,pulloutpanandshelf
togetherto shelfstop.Attach
handleto spittorevolvefoodby
handwhilebasting.Tocontinue
cookingpushshelfandbroilerpan
intooven,insertspitintomotor,
removehandle.
Rotkserie Notes
~Donotuseelectricmeat
thermometer,onmodelsso
equipped,whileoperatingthe
rotisserie.Aregular,non-electric
meatthermometermaybeused
whilerotissingprovidingitdoesn’t
touchtheoven,frameorpanwhile
meatrevolves.(Or,if desired,cook
toestimateddonenessthenpull
meatfromoventoinsertmeat
thermometer.Waitabout2 minutes
fortemperaturetoregister.Ifmeat
isnot done,removethermometer
andcontinuecookingifnecessary.)
@If rotissingturkey,letstandin
warmoven10to20minutesafter
cookingtoassurejuicymeatand
completedoneness.
● Atendofcookingpullout pan
andshelftogether,usingpot
holders.‘lhmOVENSETtoOFF.
Removefoodfromspit. Cool pan
outsideoven;soakforksandscrews
foreasiestcleanup.
e
e
18
Page 19

Rotksel*ie~meandTemperatureGuide
Approximate
OvenTemp.
Food
Beef
RolledRib
Rare
Medium
WellDone
Lamb
Leg,bonedandrolled
E%rk,fresh
Loin
Spareribs(barbecued)
Spareribs(plain)
Pbrk,cured
Ham
Cook-Before-Eating
bonein
FullyCooked
Pbldtry
CaporF(6-8lbs.)
Chicken*(2-3Ibs.)
ChickenT(1%-2lbs.)
CornishHen*(1lb.)
Duckling*(4-5lbs.)
Turkey*(8-12Ibs.)
Veal
Shoulder,bonedandrolled
Bologna
CanadianBacon
LuncheonMeat
(12-02.can)
Wieners,large
ton smallpoultry,testdonenessbymovingleggentlybackandforth,andpresslegmuscletobecertainit issoft.
*Ready.to-cookweight.IMpORTANT.Tielegsandwingsclosetobodytom~e donenessofbirdasuniformaspossible.AlltimesgivenarefOrunstuffedbirds.
N~E: Spillageofmarinades,fruitjuicesandbastingmaterials containingacidsmaycausediscolorationon ovenlineror doorso shouldbewipedupimmediately = -
withapapertowel.Whensurfaceiscool,cleanandrinse.
Setting
350
350
F--
I
+
I
J
350
350
325
325
325
350
350
350
400
325
325
375
400 400
400
350 31-35
350
l--+%-
I
J
RotissingTime
MinutesPer Lb.
22-29
m-31
32-42
24-27
25-34
1~-1~hrs.(to~ time)
?4-1hr.
17-20
14-18
26-30 185-190
33-42
48-62
About1 hr. (totaltime)
17-27
23-27
23-32(total time)
23-32(total time)
K
Meat
Thermometer
Temperatures
130-140
150-160
170-185
175-185
170-195
160
130
t
f’
t
185-190
180-185
180
180
160
GeneralDirections
N(YI’E1.ForroastsOVER10pounds,
cookabout1/2estimatedtime,then
checkat l/2 hourintervalswithmeat
thermometerforinternaldoneness.
2. Thinroasts, 3to4 pounds,mayrequire
slightlylongertimesperpoundthan
thosegivenonwide.
175formedium.
185forwelldone.
Buyribssplitdowncenter. Threadon
spit.Tobarbecue,brushwithsauce
everv15minutes.
Brushwithmeltedbutterormargarine,
bastingorbarbecuesauceseveraltimes
duringcooking.
Sameasabove.
Ifdesimd,thread4 to 5ofthissizechicken
crosswiseonspit.Letrevolvetowithin
1/2hourofdonenesstime,thenbrush
every10minuteswithbarbecuesauce.
Brushwithbutter,orbutterandlemon
juicemixed.Threadhensonspiteither
lengthwiseor crosswise.
Donotbrushwithfat.
Cookwithoutbrushingwithfat,orbrush
withbutterormargarineasdesiml.When
cooked,switchOVENSETtoOFF,close
door,letturkeystand10to20minutesIN
OVEN.Removefromovenandcarve.
Brushwithsauce ifdesired.
Brushwithsauceifdesired,
Brushwithsauceifdesired.
I
B?l!s#a
~x
~—
m
—“
19
Page 20

OperatingtheSelf-CleaningOven
Beforesettingoven
Controls, CheckThese
Things:
Step1:
Removebroilerpan,broilerrack
andothercookwarefromtheoven.
(Ovenshelvesmaybeleftinoven.
Note:Shelvesmaybecomegray
afterseveralcleanings.)
Step2:
Wipeupheavysoilonoven
bottom.
ma
HowtoSet (hen
forCleaning
Step1:
TurnOVENSETandOVEN
TEMPknobstoCLEAN.
willsnapintofinalpositionwhen
theCLEANlocationisreached.
Controls
Step3:
Settheautomaticoventimer:
● Makesureboththerangeclock
andtheDELAYEDSTARTdial
showthecorrecttimeofday.When
theDELAYEDSTARTknobis
pushedinandturned,itwill“pop”
intoplacewhenthetimeshownon
therangeclockisreached.
. DWideoncleaninghoursnecessary.
RecommendedCleaningTime:
ModerateSoil—2hours
(thinspillsandlightspatter)
HeavySoil—3hours
(heavy,greasyspillsand spatter)
@
c
o
A. OvenFront Frame
B. OvenDoorGasket
C. Openingsin Door
D. RotisserieReceptacle
E. OvenLight
Step3:
Cleanspattersor spillsonoven
frontframe(A)andovendoor
outsidegasket(B)witha dampened
cloth.Polishwithadrycloth.Do
not cleangasket(B).Donotallow
waterto rundownthroughopenings
intopofdoor(C). Neverusea
commercialovencleanerinor
aroundself-cleaningoven.
Step4:
Closerotisseriereceptacle(D)on
modelssoequipped.
Step5:
C30seovendoor andmakesure
ovenlight(E)isoff.
Step2:
SlidetheLATCHHANDLEtothe
rightasfaras it willgo.
● Addthesehourstopresenttime
ofday,thenpushinandturn STOP
dialclockwisetothisdesiredstop
time.CLEANING lightglows,
showingcleaningisstarting.
TheLOCKE”Dlightwillglow,
indicatingovenishotanddoor
cannotbeopened.Ovendoorand
windowgethotduringself-cleaning.
DON(YI’‘17)UCH. -
Note:Onallmodelsexcept
RK777GJ,theCLEANINGlight
glowswhenallthreestepsare
completed,showingcleaninghas
started. On-modelRK777GJ,the
CLEANINGlightglowsassoonas
@eOWN SETorOVENTEMP
knobisturnedtoCLEANorthe
ovendoorislatched.
OnmodelRK777GJwithtwoselfcleaningovens,onlyoneovenata
timecanbeself-cleaned.
I
e
e
20
Page 21

&.ll.wThesestepsafter
Self-cleaning
Aftercleaningiscomplete,the
- doorwillstaylockeduntiltheoven
coolsandtheLOCKEDlightgoes
off.Thistakesabout30minutes.
Step1:
WhenLOCKEDlightisoff,slide
theLATCHHANDLEtothe lefias
farasitwillgoandopenthe door.
Step2:
TurnOVENSETknobtoOFF.
Step3:
TurnOVENTEMPknobtoWM.
NOTE:If youwishto startand
stopcleaningata latertimethan
shownonclock,pushinandturn
DELAYEDSTARTdialtotime
youwishto start.Addthehours
neededforcleaningtothis“start”
time,thenpushin andturnSTOP
dial to thisdesiredstoptime.Oven
willautomaticallyturnonandoff
atthesettimes.
QuestionsandAnswers
Q.Whywon’tmyovenclean
immediatelyeventhoughIset
allthetimeandcleanknobs
correctly?
A. Checktobesureyour
DELAYEDSTARTdialisset to
thesametimeastherangeclock.
Alsocheckto besureLATCH
HANDLEismovedto theright.
Q.Ifmyovenclockisnotworking,
canIstillself-cleanmyoven?
A. No.YourAutomaticOven
Timerusesthe rangeclocktohelp
startandstopyourself-cleaning
cycle.
Q. Can1usecommercial.oven
cleanersonanypart ofmy
self-cleaningoven?
A. Nocleanersor coatingsshould
beusedaroundanypartofthis
oven.Ifyoudousethemanddonot
wipetheovenabsolutelyclean,the
residuecanscartheovensurface
anddamagemetalpartsthenext
timetheovenisautomatically
cleaned.
Q. CanIcleantheWovenGasket
aroundtheovendoor?
A. No,thisgasketisessentialfor
agoodovenseal,andcaremustbe
takennot to rub,damageor move
thisgasket.
Q. Afterhavingjust usedthe
oven,theLOCKEDlightcame
onandIcouldnotmovethe
LATCHHANDLE.Why?
A. Afterseveralcontinuoushigh-
temperaturebakingsor broilings,
theLOCKEDlightmaycomeon.
Theovendoorcan’tbe latchedfor
self-cleaningwhiletheLOCKED
lightison. Ifthis happens,letthe
ovencooluntiltheLOCKEDlight
goesoff.Thentheovendoorcan
belatchedforself-cleaning.
Q. WhatshouldIdoif excessive
smokingoccursduringcleaning?
A. Thisiscausedbyexcessivesoil,
andyoushouldswitchtheOVEN
SETknobtoOFF.Openwindows
torid roomofsmoke.Allowthe
ovento coolforat least onehour
beforeopeningthedoor.Wipeup
theexcesssoilandresettheclean
cycle.
Q. Is the “crackling”sound1
hear during cleaningnormai?
A. Yes.Thisisthemetalheating
andcoolingduringboththe
cookingandcleaningfunctions.
Q. Shouldthere be any odor
during the cleaning?
A. Yes,theremaybeaslightodor
duringthefirstfewcleanings.
Failureto wipeout excessivesoil
mightalsocauseanodorwhen
cleaning.
Q. What causesthe hair-like
lines on the enameledsurface
ofmyoven?
A. Thisis a normalcondition
resultingfromheatingandcooling
duringcleaning.Theydonotaffect
howyourovenperforms.
Q. Why doI haveashleftinmy
ovenaftercleaning?
A. Sometypesofsoilwillleavea
depositwhichisash.It canbe
removedwithadampspongeor
cloth.
Q. My ovenshelvesdo not siide
easily.What isthe matter?
A. Aftermanycleanings,oven
shelvesmaybecomesocleanthey
donotslideeasily.If youwish
shelvestoslidemoreeasily,
dampenfingerswitha small ~
amountofcookingoilandrub
lightlyoversidesofshelfwhere
theycontactshelfsupports.
Q. Myovenshelveshavebecome
gray after severalcleanings.Is
this normal?
A. Yes.Aftermanycleanings,the
shelvesmaylosesomelusterand
discolortoa deepgraycolor.
21
—
Page 22

careandc~eaning
Propercareandcleaning
proceduresareessentialfora
longandsatisfactorylifeforyour
oven(s).Includedinthissectionare
directionsanda CleaningGuide
(seepage24)forcleaningallparts
oftheoven.Whencleaninganoven
manually,wearingofrubbergloves
isrecommendedtoprotectthehands.
PorcelainElm’nd Fini$h
The porcelainenamelfinishis
essentiallyglassfhsedon steelat
hightemperatureandisbreakable
ifmisused.Thisfinishisacidresistant.However,anyacidfoods
spilled(suchaslemonor other
citrusfruitjuices, or mixtures
containingtomatoor vinegar)
shouldbe wipedupimmediately.
Seeguide for cleaningsuggestions.
LampRepkmnent
CAUTION:BEFORE
REPLACINGANYLAMP,
DISCONNECT’ELECTRIC
POWERTOOVENATTHE
MAINFUSEORCIRCUIT
BREAKERPANEL.LETLAMP
(ORBULB)ANDLAMPCOVER
COOLCOMPLETELY.
Afterreplacinglamp(bulb),
recomectelectricalpowerto the
range.
OvenLamp
Iftheovenlamp(buib)hasa
removableglasscoverwhichis
heldinplacewitha bail-shaped
wire...
Iflampcoverisheldin placewithe
three slottedscrews...
@Removethescrews,removecover,
andreplacebulbwith40-watt
appliancebulb.
@Replacelampcoverwiththree
screws.
Toremove:
@Holdhandundercoverso it
doesn’tfallwhenreleased.With
fingersofsamehand,firmlypush
downwirebailuntilitclearscover.
Liftoffcover,DONOTREMOVE
ANYSCREWSTOREMOVE
THISTYPEOFCOVER.
e Replacebulbwitha40-watt
homeappliancebulb.
Toreplacecover: -
~Placecoverintogrooveoflamp
receptacle.Liftwirebail upto
centerofcoveruntilit snapsinto
place.Whenin place,wireholds
coverfirmly,but be certainwire
bailisnotbelowdepressionin
centerofcover.
22
Page 23

Usetimegivenonrecipewhen
.
cookingforfirsttime.Oven
thermostatsmay“drift”fromthe
factorysettingovertheyears,and
5to 10-minutedifferencesintiming
betweenanoldanda newovenare
notunusual.Yourovenhasbeenset
correctlyat thefactoryandismore
apt to beaccuratethantheoven
whichitreplaced.However,ifyou
findthatyourfoodsconsistently
browntoolittleortoomuch,you
maymakea simpleadjustmentin
theOVEN TEMPthermostatknob.
PULLKNOBOFFSHAFT.LOOK
ATBACKOFKNOBANDNOTE
CURRENTSETTINGBEFORE
MAKING ANYADJUSTMENT.
Toincreasetemperature,turn
towardHI; todecrease,turntoward
LO.Eachnotchchangestemperature
10”F.
ollowappropriateinstructionsat
@
righttoadjustyouroventhermostat.
—
—
L Removeknob,andholdso
pointerisattopofknob.Usinga
potholderorsimilarmaterial,hold
%irt” ofknobfirmlyinonehand.
Grasphandleofknobinother
hand.Notepositionofpointerand
turnhandletomovepointertoward
wordRAISEor LOWER.Pointer
isdesignednottomoveeasily.Ifit
isseatedsoitisdifficulttomove,
pointermaybeloosenedslightly.
Insertathinscrewdriver,knife
bladeor similarinstrumentandlift
upendofpointerslightly.
2. Afteradjustmentismade,press
pointerfirmlyagainstknob.Return
knobto range,matchingflatarea
onknobandshaft.
Recheckovenperformancebefore
makingan additionaladjustment.
Self-cleaningloweroven,
ModelRK777GJ
Non-self-cleaningloweroven
ModelRK767GJ
1.Pulloffknob.Loosenboth
screwsonbackofknob.
2-.Movepointeronenotchin
desireddk-ection.Tightenscrews. =
3. Returnknobtooven,matching = ,
flatareaofknobtoshaft.
NCYIW:On double-ovenmodel,be
certainknobsarereturnedtoshafts
fromwhichtheywereremoved.
Recheckovenperformancebefore --makingan additionaladjustment.
Es#a
-
mK:
.
—
23
Page 24

cleaningGuide
Note:Letovenpartscoolbeforetouchingorhandling.
I%rt
Balm Unit and Do not clean the bake unit or broil unit. Any soil will burn off when the unit is
Broil Unit
Materials to Use General Directions
heated. NCYTE:
Thebakeunitishingedandcanbeliftedgentlytocleantheoven
floor.Ifspillover,residue,or ashaccumulatesaroundthebakeunit,gentlywipe
aroundtheunitwithwarmwater.
Broiler Pan and Rack e Soap and Water Drain fat, cool pan and rack slightly. (Do not let soiled pan and rack stand in ovento
Oven Control Knobs ~Mild Soap and Water
e Soap-Filled Scouring Pad cool.) Sprinkle on detergent. Fill the pan with warm water and spread cloth or paper
● Plastic ScouringPad towel over the rack. Let pan and rack stand for a few minutes. Wash; scour if
necessary. Rinse and dry. OPTION: The broiler pan and rack mayalso be cleaned in
a dishwasher.
Pull off knobs. Washgently but do not soak. Dry and return controls to oven,
making sure to match flat area on the knob and shaft.
OutsideFinish
Glass ~Soapand Water
Washallglasswithclothdampenedinsoapywater.Rinseandpolishwithadry
cloth.If knobsareremoved,donotallowwatertorundowninsidethesurfaceof
glasswhilecleaning.
Metal,including
● Soapand Water
Chrome
PorcelainEnamel* @PaperTowel
Wash,rinse,andthenpolishwithadry cloth.DON(YI’USEsteelwool,abrasives,
ammonia,acids,or commercialovencleanerswhichmaydamagethefinish.
Avoidcleaningpowdersor harshabrasiveswhichmayscratchtheenamel.Ifacids
@DryCloth shouldspillintheovenwhileitis hot,useadrypapertowelorclothtowipeupright
~Soapand Water away.Whenthesurfacehascooled,washandrinse.Forotherspills,suchasfat
smatterings,etc.,washwithsoapandwaterwhencooledandthenrinse.Polishwith
adrycloth.
InsideOvenIh@ @SoapandWater
On self-cleaningoven,cleanONLYthedoorlineroutsidethegasket.Dooris
automaticallycleanedwhenovenis in self-cleaningcycle.Ifspilloverorspattering
occurswhencooking,wipedoorwithsoapandwater.DON(JI’rubordamage
gasket.Avoidgettingsoapandwaterongasketorinslotsondoor.
On non-self-cleaningovens,wipedoorswithsoapandwater.
OvenGasket*
AvoidgettingANYcleaningmaterialsonthegasket.
OvenLiner*
For Self-Cleaning Oven @Soapand Water
For Non-Self-Cleaning e Soap and Water Cool before cleaning.
Oven (lower oven on @Soap-Filled Scouring Pad FOR LIGHT SOIL: Frequent wiping with mild soap and water (especially after
Model RK767) e Commercial OvenCleaner cookingmeat) will prolong the time between major cleaning. Rinse thoroughly.
CAUTION: When in use, light bulbs can become warm enough to break if touched with moist cloth
or towel. When cleaning, avoid warm lamps with cleaning cloths if lamp cover is removed.
Shelves
oSoapandWater Yourshelvescanbe cleanedwiththeself-cleaningfunctionintheoven.Forheavy
[SeeSelf-Cleaning
Cool before cleaning. Frequent wiping with mild soap and water will prolongthe
time between major cleanings. Be sure to rinse thorough]y. For heavy soiling, use
your self-cleaning cycle often.
NOTE: Soap left on linercauses additional stains when ovenis reheated.
FOR HEAVY SOIL: Choose anon-abrasive cleaner and followlabel instructions,
using thin layer of cleaner. Use of rubber gloves is recommended. Wipe or rub
lightly on stubborn spots. Rinse well. Wipe off apy ovencleaner that gets on
thermostat bulb. When rinsing oven after cleaning also wipe thermostat bulb.
soil,cleanbyhandandrinsethoroughly.
DvenDirections)
MeatThermometer ~SoapandWater
Coolbeforecleaning.DONCWIMMERSEINWATER.Scourstubbornspotswith
~Soap-FilledScouringPad soap-filledscouringpad,rinseanddry.DONOI’S’IOREIN OVEN.
Rotisswie
spit,Forks
;crews,Frame
@SoapandWater Soakinhot,sudsywater;scourtoremovecooked-onfoodorsauces;wash.
oCommercialOvenCleaner
*Spillageofmarinades,fruitjuices,andbastingmaterialscontainingacidsmaycausediscoloration.Spilloversshouldbewipedupimmediately,
withcarebeingtakentonottouchanyhotportionoftheoven.Whenthesurfaceiscool,cleanandrinse.
-—
24
Page 25

.——
. ....—
,>-
.--—
;—...
.—.
........--
=!!!!J5:::Qllestiom?
...——-
-..-...—
e
‘=$s$$=:useThk Problemsolver
—-_
-—
/——.————
—.
PROBLEM
OVENDOESNUI’
POSSIBLECAUSEANDREMEDY
Difficultymaybeinthemaindistributionpanelofyourhousecausedbyablownoven
WORK circuitfhse,atrippedovencircuitbreaker,themainfuseorthemaincircuitbreaker,
dependingonnatureofthe powersupply.If acircuitbreakerisinvoIved,resetit. Ifthe
controlboxusesfises, theovenfuse(acartridge-type)shouIdbe changedBUTONLY
BYSOMEONEFAMILIARINITHELECTljUCALCIRCUITS.If, afttxperforming
Cm forservice.
,,
. . ,.
,..
,,. .
..:, .,. . .:
,. .,. I
~.
..-. -.’:
,.
.-.
AUTOMATI~OVEN
TIMERDOESNOT
WORKPROPERLY
FOODDOESNOI’ ‘ ‘
BROILPROPERLY
..
one oftheseprocedures,thefuseblowsor chcuitbreakertripsagain,
N~E: Apartmentteiknts &rcondo&iurn,owne&shoul~r@est thei~building
managementtoperforrn-th~scheckbeforecallingforsetiice.
Ovencontrolswe notprbpeilyset. ..’ ‘. ; j ~~..; ,, .,, ~ .- . ,
Onself-cleaningoven,doo{l&in’loc!i@po~tionaflercleanl~g:,,:,,; - -., .
“Checktobe cer@ step-~y-stepdirectio~s”werefol\owedcor~ectly~$R@ewpages:on --””
‘usegftimer, ‘. ,“. ., .<,~,- .,,-’-...,: .::” . “<”:,:~[j~. :, “ . ~+.,, ~.:.:,
~ ‘“:,-, - ;.. :“,--, .“ ‘:..’:~~ .,’;’,;. “ . .,” , ..... “.., .-
,OVENS13T.@obnotset,at@’RO+..~,, ~ ~.’ ~~,:;’, ‘ .‘{’ “:,~~,~ ‘-, ‘ ~.’}:,~~’ .,,.....
,
,OVE~@MP knobno~,set;at’@~. ‘“‘~;:,:,- ~-.”~;,,’ ..7,:, -i ,~:’-.-... :,,
Doornot Iefiajarasre&&hkn&& ,.+’‘-” “-‘- “.},.’~”;j”.:, .“::,..:.; ‘-:,, .,,,,,.
~mirop:rshelfp6sitiori!J~beiri~.USed:~CheckBroi~irig:Gui~&0.:L~`.-:’”~~-~”;: -,:~ .;
Whenusingspecid mea@iA&@A~Wri rno@l<,$o’&i$fPP$).~’?rid.’~o~nse:ed’fillyi:”
.. intoovenreceptacleor probe
~ecess~:preheating wasnot,.d~n~;, ~~‘ ~‘~~:,~. . , \ .‘ :.,.; ,;~ ~ ~.’,-,:.’,,, ~” ~---- ~. .:
l?ood is
Coo-are isnotsuitedforbroi~ing. - -‘;“’;.“ -,:. ~‘~:;., -.,-~~,. . ~~. ,, ~
<.
,.
.,, ,-
I@irigcooked onhot”~~l ,“,,~C’‘ ~:.{,-, . ~ .~~~.; .,:, . ;,,’,_, ‘. ,
-“f
,.. .. .
qq~,pltice~,iri fOO@prop?rly~ ‘:;.j,~:.-~, .,;,: ~~,~,,,~ .-, :
. . .. . . .
,-, ,.
,-~
,-. ..) ,“
,,, .
,.- ,.,
.. . .. .
.,
.,. - J., -
.,-
.
,,
!.’” .. ..... .,-’
;> ,1.’
,., . . ....
,,
,..
,-
,.-
.
FOODDOESN(YI’ “.
ROASTORBAKE
I?ROPERLY
OVENWILLNOT
SELF-CLEAN
Aluminumfoilusedonthebroilpaniack-has.not
recommended.
OVEN-SET@obnotsetonB@~... ,:. j;’;~’ .~.’,~“-~,,:~:::~~.“: .:..’ ~ .._., -
OVENTEMPknobnotsetcmrectly.,“’,~ ..;- ‘;:’- ,‘,,,~.: ~,:,;,;.’.~,,’.:“ ., -... .,, .
Shelfpositionisincorrect:,Check;ROastiqg~iip~fig~~Tdi.’”-;, -‘ ‘ ~~
o~enshelfi~not~evel. ,. ‘ ‘,.,, ‘). ‘ -j’.,,. ,, “-’..,:’.,- ,, ~,,:,, , ‘
Whenysingmeatthermometer(onrnodels&,&q~ipp@;.indfitit fullysiited in.oveno ‘
receptacleorprobeendnotinmeatcorrectly , , ,.~‘”:.- ., , .. .
Wrongcookwareisbeingpse~.W’henroast&g,:p&is.~oosinall. :
A foil tentwasnotusedwhenneeded,toslowdownbrov@@gduringroasting.
Automatictimerdial/dialsiot setor notset~roperly~The,S~P di~’kust be setand
advancedbeyondthetime,notedonovenclock., ‘ ~,~ “~ ~“
TheSTOPdialwasnot advancedfoflongeri@igh;’,, ‘, ‘._,j,”~,,-..,”
BothOVENSETandOVENTEMPknobsmustbeatCLEA”Nsepiqg. “’
A thickpileofspilloverwhencleanedleavesaheavylayerofashin spotswhichcould
haveinsulatedthe areahorn furtherheat. ~ ‘ “-
Latchnotmovedtotheright.
.-
,.,
--,
‘,..-’ ,-,,.,’
;,, ,....,, ,:, ,.-,,,..,,,-.,’...&. ,,
,, ’.,
,,
>.
been.fi@d~roherly.aqd-ditas
... ,.- .’
,l,,.). .. ...
.!-,,
!,
‘.,
, ,1.
..~,
:..,..., -.., ,,.-
,,!.../l-””,..: ‘,
,..’-,!.
.’. ”
..:,.,,::-’,.‘
,,, ~,,.
,.
,,
,-
,,
,,
-;.,
,“.
Page 26

PROBLEM
POSSIBLECAUSEANDREMEDY
OVENDOORWON’T
LATCH
OVENLIGHT
DOESNOI’WORK
ThrnOVENSETknobtoCLEAN.GlowingLockedLightafterknobisturned
indicatesovenistoohot fromprevioususeanddoorwon’tlatch.Tocooloven,open
doorwide,thenLatchcanbemoved.
OVENSETknobmustbeat CLEANor OFF beforelatchcanbemoved.
Lightbulbisloose.
Bulbisdefective.Replace.
[ Switchoperatingovenlightisbroken.Callforservice.
Uf’You.13kedservice
Toobtainservice,seeyourwarranty
onthebackpageofthisbook.
We’reproudofourserviceand
wantyoutobepleased.Ifforsome
reasonyouarenothappywiththe
serviceyoureceive,herearethree
stepstofollowforfurtherhelp.
FIRST,contactthepeoplewho
servicedyourappliance.Explain
whyyouarenotpleased.Inmost
cases,thiswillsolvetheproblem.
NEXT,ifyouarestillnotpleased,
writeall thedetails-including
yourphone number—to:
Manager,ConsumerRelations
Hotpoint
AppliancePark
Louisville,Kentucky40225
FINALLY,if yourproblemisstill
notresolved,write:
MajorAppliance
ConsumerActionPanel
20NorthWackerDrive
Chicago,Illinois60606
w
.-
26
Page 27

OTPOINTRANGE
RRANTY ~
.
Illl!#~
Saveproof of origktal purchase date such as your sales slip or canceiled check to establish warrantyperiod,
WHATisCOVERED
FULLONE-YEARWARRANTY
For one year from date of original
purchase, we will provide,
charge,parts and service labor
in your home to repair or replace
anypartof the rangethat fails
becauseof a manufacturing defect.
freeof
This warranty is extended to
the original purchaser and any
succeeding
purchased for ordinary home use
inthe 48 mainland states, Hawaii
andWashington, D.C.In Alaska the
warranty is the sameexcept that it is
LIMITED because you must pay to
ship the product to the service shop
or for the service technician’s travel
coststo your home.
All warranty service will be provided
byour FactoryService Centersor
byour authorized Customer Care@
servicersduring normal working
hours.
Lookin the White or Yellow Pages
ofyour telephone directory for
HOTPOINTFACTORYSERVICE,
GENERAL ELECTRIC-HOTPOINT
FACTORYSERVICEor HOTPOINT
CUSTOMERCARE@SERVICE.
owner for products
(
● Replacement of house fuses or
teach you how to fise the product.
ReadyourUseandCarematerial.
If youthen have any questions
about operating the product,
Dleasecontact vour dealer or our
Consumer Affairs office at the
addressbe!ow.
. Improper installation.
If you have an installation problem,
contact your dealer or installer.
Youare responsible for providing
adequateelectrical, gas,exhausting
and other connecting facilities.
Some statesdo not allow the exclusionorlimitationofincidentalorconsequentialdamages,sothe abovelimitationorexclusion
maynotapplytoyou.Thiswarrantygivesyouspecificlegalrights,andyoumayalsohaveotherrightswhichvaryfromstatetostate.
To
know what your legal rights are in your state,consult your local or state consumer affairs office or your state’s Attorney General.
Warrantor:GeneralElectricCompany
IJffurtherheb isneededconcernirmthiswarrantv,contact:
resetting of circuit breakers.
e Failureof the product if it is used
for otherthan its intended purpose
or usedcommercially.
s Damage to product caused
bvaccident, fire, floods or acts
OfGod.
WARRANTORISNOTRESPONSIBLE
FORCONSEQUENTIAL DAMAGES.
4
1046
—
RJ742GJ RK767GJ
RJ745GJ RK777GJ
RK747GJ
—
 Loading...