

Page 1
3-13+6 Oncr
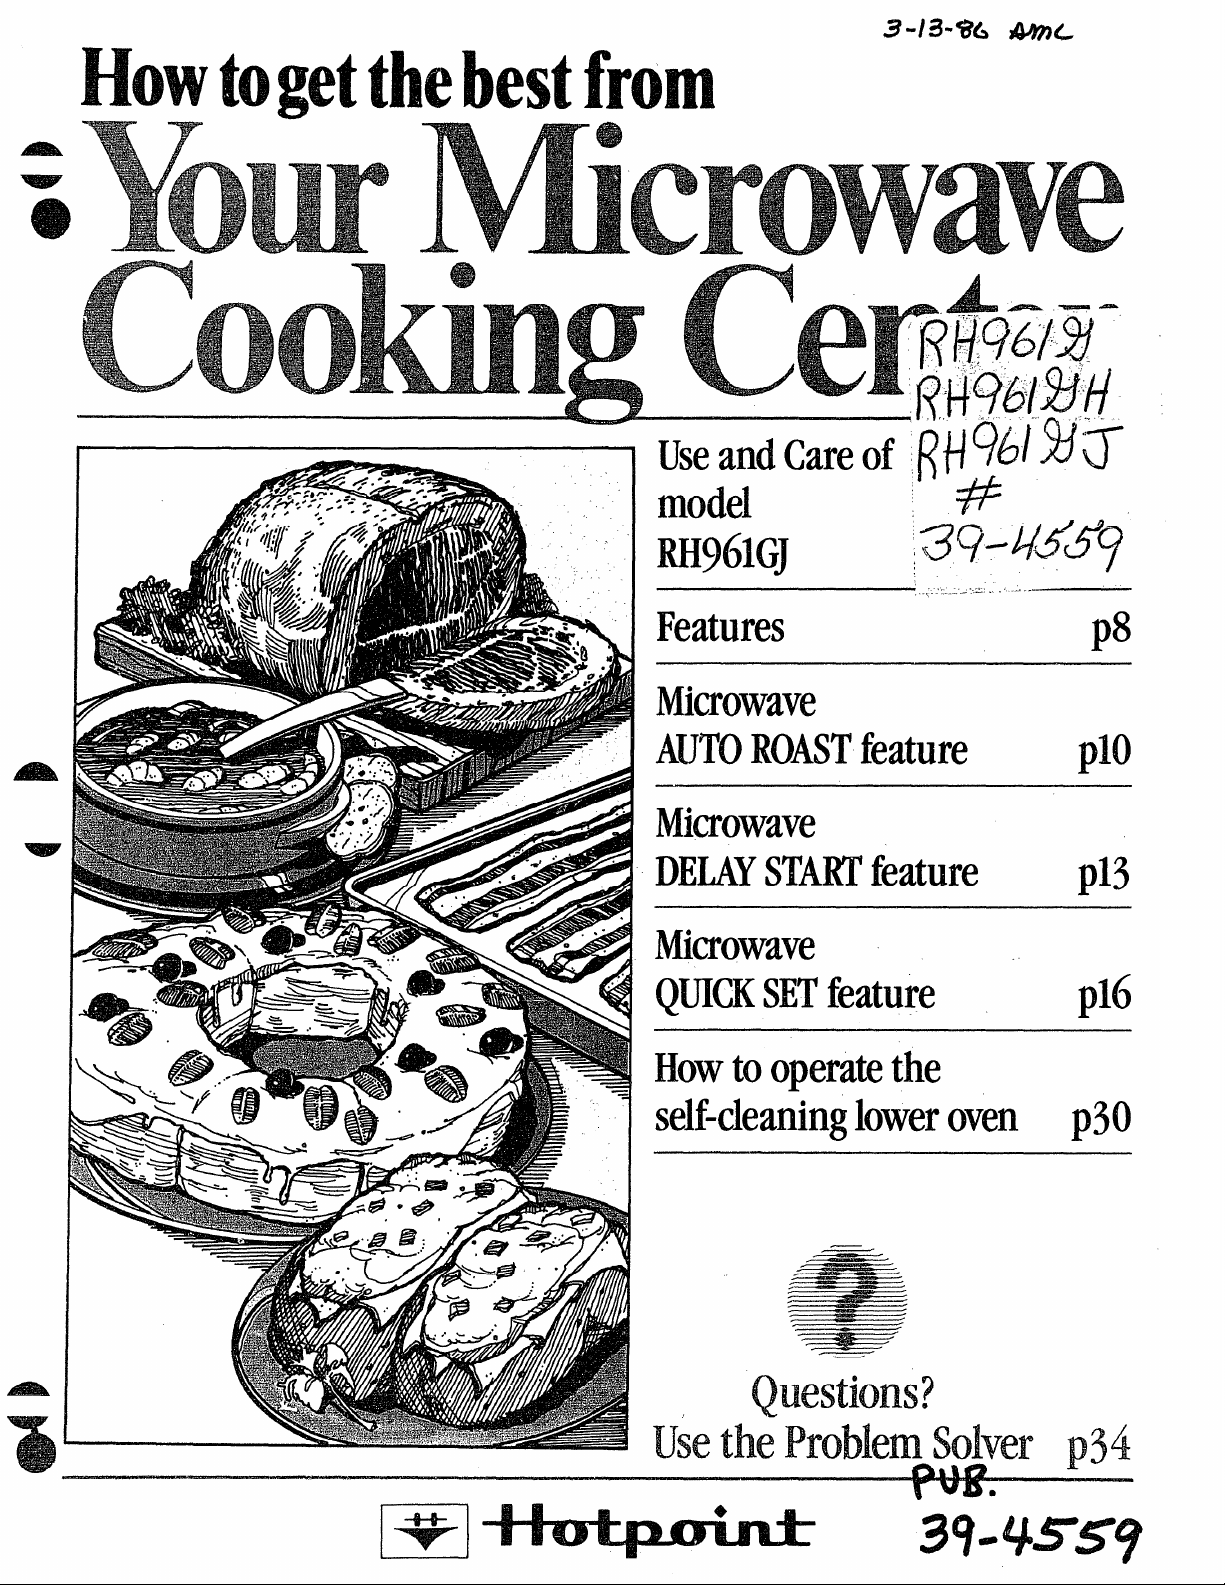
Hotoget thebestfrom
—
model
RI061GJ
Features
.
#$--
:;c+qfgy
.,--’ - -“=- .~-,- -
p8
Microwave
AUTOROASTfeature
Microwave
DELAYSTARTfeature
Microwave
QUICKSETfeature
Howtooperatethe
self-cleaningloweroven
pm
p13
p16
p30
Questions?
.
usetheProblemsolverpyi
a
Page 2
contents
MicrowavingTips. . . . . . . . . . ...3
StietyInstructions . . . . . . . ...4-6
FeaturesofYour
CookingCenter .. . . . . . . . ...8
TouchControlPanel. . . . . . . . ...9
AutomaticRoasting&
Guide. . . . ... . . ..- ... . ..l O.ll
AutomaticSimmer,-...........11
Defrosting. . . . . . . . . . . . . . . . ..l2
TimeCook ..: . . . . . . . . . . . . ..l3
DelayStart ... . . . . . . . . ..’. . ..l3
TempCook/Hold . . . . . . . . . ...14
Minute/SecondTimer. . . . . . ...15
QuickSetFeature . . . . ..~..l6.l7
Safe&Instructions. . . . . . . ...4-6
Howto Use. . . . . . . . . . . . . .
HomeCanningTips . . . ... . . .....19
CookingGuide. ..20 .21. ..2O,2l
SafetyInstructions. . . . ..’. ...4-6
Features . . . . . . . . . . . ..’. . . . ...8
OvenControls . . . . . . . . . . . . ...8
OvenLight. . . . . . . . . . . . . . ...22
OvenShelies . . . . . . . . . . . . ...22
MinuteTimer,Clock,
AutomaticOvenTimer. . . ...22
Baking&Guide . . . . . . ..’. .22.23
Roasting&Guide. . . . . . ...24.25
Broiling&Guide . . . . . . ...26.27
Operatingthe
Self-CleaningOven. . . ...30.31
.. .
. ...18 ‘
Readthisbookcarefully.
Itisintendedtohelpyouoperate
andmaintainyournewCooking
Centerproperly.
Keepithandyforanswerstoyour
questions.
Ifyoudon’tunderstandsomething
orneedmorehelp,write(include
yourphonenumber):
ConsumerAffairs
Hotpoint
AppliancePark
Louisville,KY40225
Writedownthemodel
andserialnumbers.
You’llfindthemona labelinside
theupperovenontheleftside.
Thesenumbersarealsoonthe
ConsumerProductOwnership
RegistrationCardthatcamewith
yourCookingCenter.Before
sendinginthiscard,pleasewrite
thesenumbershere:
Model Number
Serial Number
Usethesenumbersinany
correspondenceor servicecalls
concerningyourCookingCenter.
Theelectricoutputofthis
microwaveovenis625watts.
Besureyourovenis
registered.
Itisimportantthat we,the @
manufacturer,knowtie locationof
yourCookingCentershouldaneed
occurfor adjustments.
Yoursupplierisresponsiblefor
registeringyouastheowner.
Pleasecheckwithyoursupplierto
besurehehasdoneso;alsosendin
yourConsumerProductOwnership
RegistrationCard.If youmove,or
ifyouarenot theoriginalpurchaser
pleasewritetous, statingmodel
andserialnumbers.Thisappliance
mustberegistered.Pleasebecertain
thatitis.
Writeto:
Hotpoint
RangeProductService
AppliancePark
Louisville,KY40225
Ifyoureceiveda
damagedoven...
Immediatelycontactthedealer
(orbuilder)thatsoldyouthe
CookingCenter.
Savetimeandmoney.
Beforeyourequestservice...
checktheProblemSolveronpages
34and35.It listsminorcausesof
operatingproblemsthatyoucan
correctyourself.
OptionalAccessory
availableatextracostfromyour
Hotpointsupplier.
JX79 CharcoalFilterKit.
Addfornon-ventedinstallation.
BeforeUsingYour
CookingCenter . . . . . . . . . ...2
Energy-SavingTips . . . ..1.....7
Model& SerialNumber
Location. . . . . . . . . . . . . ...2.8
Careand Cleaning . . . . . ...28-33
TheProblemSolver. . . . ...34. 35
ExhaustSystem . . . . . . . . . . ...36
If YouNeedService. . . . . . . ...37
Warranty. . . . . . . . . .. BackCover
AH‘TheseThings-AreNorlnalwittiYourI@cr6waveOven:
Steamorvaporescapingfrom
@
aroundthedoor.~., ~. .
~Lightreflectionaro~nddoor‘or ~‘SomeTV-I@dro,~nte’~erence~”
outercase. ->‘ ~ ‘,
~Dimmingovenlightand,change
inblowersoundmayoccurwhile
operatingat powerlevelsother
thanhigh.
,’-. ‘,
2
,4
,’.
.
~bull thurnpjngsoundwhile”.
. ~‘Wen.~s;Qp++~
——
---
_——
gMakesureallcookwareusedin
yourmicrowaveovenissuitablefor
microwaving.Mostglasscasseroles,
cookingdishes,measuringcups,
custardcups,potteryor china
dinnerwarewhichdoesnothave
metallictrimorglazewithametallic
sheencanbeused.Somecookware
islabeled“suitableforMicrowaving;’
Ifyouareunsure,usethisdishtest:
Measure1cupwaterina glasscup.
Placeinovenonor besidedish.
Microwave1-1%minutesat HIGH.If
waterbecomeshot,dishismicrowave
safe.If dishheats,itshouldnotbe
usedformicrowaving.
@Papertowels,waxpaper,and
plasticwrapcanbeusedtocover
dishesinorderto retainmoisture
andpreventspattering.
PWCAUTIONS ‘---‘-
ToAVOID ~ ‘-
PossmLE
EXPOSW
EXCESSIVE
m -
mcRowAm ‘:
EmRGY .- =Z
,
&3m--
● Somemicrowavedfoodsrequire
stirring,rotating,or rearranging.
CheckyourCookbookforspecific
instructions.
~Steambuildsuppressureinfoods
whicharetightlycoveredbya skin
ormembrane.Piercepotatoes,egg
yolksandchickenliverstoprevent
bursting.
whenPower’is
connectedto
theoven
The paneldisplaysfour8’sand
alloftheovenfunctionsonthe
lowerportion.After15seconds,all
lightsdisappearand“PF” appears
intheupperportion.Touchthe
CLEAR/OFFpadandtheovenis
thenreadyforuseandtheclock
canbeset.
Ifpowerisdisruptedatanytime,
theabovesequencereoccursand
youmustresettheclockafier
touchingCLEAR/OFF.
Page 4

Readallinstmctimsbeforeusingthisappliance.
Whenusingelectricalappliances
basicsafetyprecautionsshouldbe
followed,includingthefollowing:
WARNING–TOreduce
theriskofburns,electricshock,
fire,injurytopersonsor
exposuretoexcessivemicrowave
energy:
@Usethisapplianceonlyforits
intendeduseasdescribedinthis
manual.
@Besureyourapplianceis
properlyinstalledandgroundedby
aqualifiedtechnicianinaccordance
withtheprovidedInstallation
Instructions.
@Thisappliancemustbe
connectedtoa grounded,metallic,
permanentwiringsystem,oran
equipmentgroundingconductor
shouldberunwiththecircuit
conductorsandconnectedtothe
equipmentgroundingterminalor
leadontheappliance.
eThisapplianceshouldbeserviced
onlybyqualifiedservicepersonnel.
Contactnearestauthorizedservice
facilityforexamination,repairor
adjustment.
@Beforeperforminganyservice,
DISCONNECT’THERANGE
POWERSUPPLYATTHE
HOUSEHOLDDISTRIBUTION
PANELBYREMOVINGTHE
FUSEORSWITCHINGOFF
THECIRCUITBREAKER.
@Donotcoverorblockany
openingsontheappliance.
~Donotuseoutdoors.
@Donotoperatethisapplianceif
itisnotworkingproperly,orifit
hasbeendamagedordropped.
@Aswithanyappliance,close
supervisionisnecessarywhen
usedbychildren,
e D()notleavechildren alone—
childrenshouldnotbelefialoneor
unattendedinareawhereappliance
isinuse.Theyshouldneverbe
allowedtositorstandonanypart
oftheappliance.
@Don’tallowanyonetoclimb,
standorhangonthedoor,
drawerorrangetop.Theycould
damagetherangeandeventip
itovercausingseverepersonal
injury.
e(_JA~T~QN:ITEMSOF
INTERESTTOCHILDREN
SHOULDNOTBESTORED
INCABINETSABOVEA
RANGEORONTHE
BACKSPLASHOFARANGE–
CHILDRENCLIMBINGON
THERANGETOREACH
H’EM$COULDBESERIOUSLY
INJURED.
~Wearproperclothing.Loose
fittingorhanginggarmentsshould
neverbewornwhileusingthe
appliance.Flammablematerial
couldbeignitedifbroughtin
contactwithhotheatingelements
andmaycausesevereburns.
oUse onlydrypotholders—
moistordamppotholdersonhot
surfacesmayresultinburnsfrom
steam.Donotletpotholderstouch
hotheatingelements.Donotuse
atowelorotherbulkycloth.
~Neveruseyourappliancefor
warmingorheatingtheroom.
@Storageinoronappliance—
Flammablematerialsshouldnot
bestoredinanovenornear
surfaceunits.
~Keephoodandgreasefilters
cleantomaintaingoodventing
andtoavoidgreasefires.
* Donotletcookinggrease
orotherflammablematerials
accumulateintherangeor
e
nearit.
DO not usewaterongrease
~
fires.Neverpickupaflaming
pan.Smotherflamingpanon
surfaceunitbycoveringpan
completelywithwellfittinglid,
cookiesheetorflattray.Flaming
greaseoutsideapancanbeput
outbycoveringwithbakingsoda
or,ifavailable,amulti-purpose
drychemicalorfoam.
c Donottouchheatingelements
orinteriorsurfaceofoven.These
surfacesmaybehotenoughto
burneventhoughtheyaredarkin
color.Duringandafteruse,do
nottouch,orletclothingorother
flammablematerialscontact
surfaceunits,areasnearbysurface
unitsoranyinteriorareaofthe ~
oven;allowsufficienttimefor
cooling,first.
Potentiallyhotsurfacesinclude -}
thecooktopandareasfacingthe
cooktop,ovenventopeningand
surfacesneartheopenings,and
crevicesaroundtheovendoor.
Remember:Theinsidesurface
oftheovenmaybehotwhenthe
doorisopened.
. When
cookingporkfollowour
directionsexactlyandalwayscook
themeattoatleast170”F.This
assuresthat,intheremote
possibilitythattrichinamaybe
presentinthemeat,itwillbekilled
andmeatwillbesafetoeat.
e
)
4
Page 5

- Microwave(hen:
Readandfollowthespecific
o
“PRECAUTIONSTOAVOID
POSSIBLEEXPOSURETO
EXCESSIVEMICROWAVE
ENERGY”foundonpage3.
~Toreducetheriskoffireinthe
ovencavity:
–Do notovercookfood.Carefully
attendapplianceifpaper,plastic
orothercombustiblematerials
areplacedinsidetheovento
facilitatecooking.
–Removewiretwist-tiesfrom
paperorplasticbagsbefore
placingbagsinoven.
—Donotuseyourmicrowave
oventodrynewspapers.
–Papertowels,napkinsand
wax~aper.Recycledpaper
_ productscancontainmetalflecks
whichmaycausearcingorignite.
—
Paperproductscontainingnylon
or-nylonfilamentsshouldbe
o
avoided,astheymayalsoignite.
–Do notpoppopcorninyour
microwaveovenunlessinaspecial
microwavepopcornaccessoryor
unlessyouusepopcornlabeled
foruseinmicrowaveovens.
–Do notoperatetheovenwhile
emptytoavoiddamagetothe
ovenandthedangeroffire.If
byaccidenttheovenshouldrun
emptyaminuteortwo,noharm
isdone.However,trytoavoid
operatingtheovenemptyatall
times—itsavesenergyand
prolongslifeoftheoven.
–If materialsinsidetheoven
shouldignite,keepovendoor
closed,turnovenoff,and
disconnectthepowercord,or
shutoffpoweratthefuseor
—
circuitbreakerpanel.
~Someproductssuchaswhole
‘A eggsandsealedcontainers—for
=- example,closedglassjars—may
explodeandshouldnotbeheated
inthisoven.
@Seedoorsurfacecleaning
instructionsonpage28.
0Don’tdefrostfrozenbeverages
innarrow-neckedbottles(especially
carbonatedbeverages).Evenif
thecontainerisopened,pressure
canbuildup.Thiscancausethe
containertoburst,resultingin
injury.
~Usemetalonlyasdirectedin
Cookbook.Foilstripsasusedon
meatroastsarehelpfulwhenused
asshowninCookbook.
TVdinnersmaybemicrowaved
infoiltrayslessthan3/4”high;
removetopfoilcoverandreturn
traytobox.Whenusingmetalin
microwaveoven,keepmetal
(exceptforDOUBLEIXHTM
shelf)at~east1inchawayfrom
sidesofoven.
@Cookingutensilsmaybecome
hotbecauseofheattransferred
fromtheheatedfood.Thisis
especiallytrueifplasticwraphas
beencoveringthetopandhandles
oftheutensil.Potholdersmaybe
neededtohandletheutensil.
@Sometimes,theovenfloor
canbecometoohottotouch.Be
carefultouchingthefloorduring
andaftercooking.
@Donotuseanythermometer
infoodyouaremicrowaving
unlessthethermometerisdesigned
orrecommendedforuseinthe
microwaveoven.
@Removethetemperature
probefromtheovenwhennot
usingittocookwith.Ifyouleave
theprobeinsidetheovenwithout
insertingitinfoodorliquid,and
turnonmicrowaveenergy,itcan
createelectricalarcinginthe
oven,anddamageovenwalls.
~Avoidheatingbabyfoodin
glassjars,evenwithouttheirlids;
especiallymeatandeggmixtures.
5
e Boilingeggs isnot
recommendedinamicrowave
oven.Pressurecanbuildup
insideeggyolkandmaycauseit
toburst,resultingininjury.
e Foodswithunbrokenouter
~~skin>’suchaspotatoes,sausages,
tomatoes,apples,chickenlivers
andothergiblets,andeggyolks
(seepreviouscaution)shouldbe
piercedtoallowsteamtoescape
duringcooking.
o ~~~ticute~flf+plastic utensils
designedformicrowavecookingare
veryuseful,butshouldbeused
carefidly.Evenmicrowaveplastic
maynotbeastolerantof
overcookingconditionsasare
glassorceramicmaterialsand
maysoftenorcharifsubjectedto
shortperiodsofovercooking.In
longerexposurestoovercooking,
thefoodandutensilscouldignite.
Forthesereasons:1)Use
microwaveplasticsonlyanduse
theminstrictcompliancewith
theutensilmanufacturer’s
recommendations.2)Donot
subjectemptyutensilsto
microwaving.3)Donotpermit
childrentouseplasticutensils
withoutcompletesupervision.
~ 46130ilable99cookingpouches
andtightlyclosedplasticbags
shouldbeslit,piercedorvented
asdirectedinCookbook.Ifthey
arenot,plasticcouldburstduring
orimmediatelyaftercooking,
possiblyresultingininjury.Also,
plasticstoragecontainersshould
beat leastpartiallyuncovered
becausetheyforma tightseal.
Whencookingwithcontainers
tightlycoveredwithplasticwrap,
removecoveringcarefi.dlyanddirect
steamawayfromhandsandface.
Page 6
ouseofthe ~Qu~~E ~u~yTh~
shelfaccessory.(Seeyour
Cookbookforproperuse.)
–Removetheshelffromoven
whennotinuse.
–Do notstoreorcookwithshelf
onfloorofoven.Productdamage
mayresult.
–Use potholderswhenhandling
theshelfandutensils.Theymay
behot.
–Do notusemicrowavebrowning
dishonshelf.Theshelfcould
overheat.
SeHNxming Loweroven:
s~hn~
whenopeningovendoor.The
hotairorsteamwhichescapes
cancauseburnstohands,face
and/oreyes.
@Don9theatunopenedfood
containersintheoven,Pressure
couldbuildupandthecontainer
couldburstYcausinganinjury.
Keepovenventducts
~
unobstructed.
@Keepovenfreefromgrease
buildup.
@Placeovenrackindesired
positionwhileoveniscool.If
racksmustbehandledwhenhot,
donotletpotholdercontact
heatingunitsintheoven.
ePullingoutshelftotheshelfstop
isaconvenienceinliftingheavy
foods.Itisalsoaprecaution
againstburnsfromtouchinghot
surfacesofthedoororovenwalls.
~Whenusingcookingor
roastingbagsinoven,follow
themanufacturer’sdirections.
@Donotuseyouroventodry
newspapers.Ifoverheated,they
cancatchfire.
awayfromtherange
eDonotcleandoorgasket.Itis
essentialfora goodseal.Becarefid
nottorub,damageormoveit.
e Do not use oven cleaners. No
commercialovencleaneroroven
linerprotectivecoatingofanykind
shouldbeusedinoraroundany
partoftheoven.
@Cleanonlypartslistedinthis
UseandCareBook.
@Beforeself-cleaningtheoven,
removebroilerpanandother
utensils.
SurfaceCookinghits:
oUsemoper PanSize—This
applianceisequippedwithoneor
moresurfaceunitsofdifferentsize.
Selectutensilshavingflatbottoms
largeenoughtocoverthesurface
unitheatingelement.Theuseof
undersizedutensilswillexposea
portionoftheheatingelementto
directcontactandmayresultin
ignitionofclothing.Proper
relationshipofutensiltoburner
willalsoimproveefficiency.
@Never ]e~vesurfaceuni~
unattendedathighheatsettings.
130ilovercausessmokingandgreasy
spilloversthatmaycatchonfire.
~Besuredrippansandventducts
arenotcoveredandareinplace.
Theirabsenceduringcookingcould
damagerangepartsandwiring.
e ~o~~t~fj~~inum foi]toline
drippansoranywhereintheoven
exceptasdescribedinthisbook.
Misusecouldresultinashock,fire
hazard,ordamagetotherange.
0Onlycertaintypesofglass,
glasskxa.mic,ceramic,earthenwm
orotherglazedcontainersare
suitableforrange-topservice;
othersmaybreakbecauseofthe
suddenchangeintemperature.
(Seepage19forsuggestions.)
eTOminimiuburns,ignitionof
flammablematerialsandspillage,
thehandleofacontainershould
beturnedtowardthecenterofthe
rangewithoutextendingover
nearbysurfaceunits.
o DOn3t immerse Or soak
removablesurfaceunits.Don’t
puttheminadishwasher.
● Alwaysturn surfaceunit to
OFFbeforeremovingutensil.
cKeepaneyeonfoodsbeing
friedatHIGHorMEDIUM
HIGHheats.
@Toavoidthepossibilityofa
burnorelectricshock,always
becertainthatthecontrolsfor
allsurfaceunitsareatOFF
positionandallcoilsarecool
beforeattemptingtoremove
theunit.
. When
flamingfoodsunderthe
hood,turnthefmoff.Thefan,if
operating,mayspreadtheflame.
oFoodsfor
fryingshouldbem
dryaspossible.Frostonfrozen
foodsormoistureonfreshfoods
cancausehotfit tobubbleupand
oversidesofpan.
~Uselittletit foreffkctiveshallow
ordeep-fatfrying.Fillingthepan
toofhlloffatcancausespillovers
whenfoodisadded.
oIfacombinationofoilsor
fatswillbeusedinfrying,stir
togetherbeforeheating,oras
fatsmeltslowly.
@Alwaysheatfatslowly,and
watchasitheats.
~Usedeepfatthermometer
wheneverpossibletoprevent
overheatingfatbeyondthe
smokingpoint.
sAvE~ms~
INSTRUCTIONS
6
Page 7
- YourRange
Yourrange,likemanyother
householditems,isheavyand
m
cansettleintosoftfloorcoverings
suchascushionedvinylor
carpeting.Whenmovingtherange
onthistypeofflooring,usecare,
andit is recommendedthatthese
simpleandinexpensiveinstructions
befollowed.
Therangeshouldbeinstalledon
asheetofplywood(orsimilar
material)as follows:Whenthe
floorcoveringendsatthefrontof
therange,theareathattherange
willrestonshouldbebuiltupwith
plywoodtothesamelevelorhigher
thanthefloorcovering.Thiswill
thenallowtherangetobemoved
forcleaningor servicing.
bvelingthe
Range
—
—
Levelingscrewsarelocatedon
eachcornerofthebase ofthe
range.lilyremovingthebottom
draweryoucanleveltherangeto
anunevenfloorwiththeuseofa
nutdriver.
Toremovedrawer,pulldrawerout
alltheway,tiltupthefrontand
removeit. Toreplace,insertglides
atbackofdrawerbeyondstopon
rangeglides.Liftdrawerifnecessary
toinserteasily.Letfrontofdrawer
down,thenpushinto close.
OUseproperpowerlevelas
recommendedand
OVERCOOK. , ~
@Donot operatetheovenwhile
empty,If byac~identtheoven
shouldrunemptyaminuteortwo,
noharmisdone.However,tryto
avbidop~ratingthe ovenernp~at - .,, - - - ,
a- . . .
all
times—savesenergyand,also
ensuresgood,lo-rig-termlifeofoven.
..
,)”.
eUse cook@gutensilsofmedium .-
we~ght-aluminum,tight-fitting ~
covers,andflatbottoms-which
completelycovertheheated
portionofthesurfaceunit. . .. ~
@“Cookfresh-vegetableswitha
minimuma’mountofwaterina
coveredpan. ,
@Watchfoodswhen.bring@gthem,
quicklytocookingtemperaturesat -. foo~sthat.cookatthesame -- _
highheat.Whenfoodreaches
cookingtemperature,reduceheat
immed~ately-tolowestsettingthat ~ ‘iuse~esidualheatin oven
willkeepitcooking. , ..’,~ ,
~Useresidualheatwithsurface ,
cookingwhenever.possible.For ~,” ~
example,whencookingeggsinthe,
shell,bringwatertoboil,thenturn - ‘ risidtial hezitto W- them:.
toOFFpositiontocompletethe’ ~
cooking.
e AlwaysturnsurfaceunitOFF .
beforeremovingutensil. . ,
@Usecorrectheat forcqokingtask... ‘
highheatstostartcooking(iftime’
allows,donotusehighheattostart),
mediumhigh—quickbrownings,med~um—slowfrying,low—finish ~
cookingmostquantities,simmer—
doubleboilerheat,finishcooking,
andspecialforsmallquantities.
o Whenboilingwaterforteaor
coffee,heatonlytheamount
needed.Itis noteconomicalto
boil a containerfullofwaterfor ,
onlyoneor twocups.
.’
i,
,.
..’ -
,.’
DONOT
,( ’”.
!.
,-
~Preheattheovenonlywhen
necessary.Mostfds willcook
satisfactorilywithoutpreheating:
1fyoufindpreheatingisnecessary,
keepaneyeontheindicatorlight,
and-put
foodintheovenpromptly
afterthelightgoesout;
*AlwaysturnovenOFFbefore - =
removingfood. - = :
e
Duringbkng, avoidfrequent
dooropenirigs.Keepdooropefias
shorta timeaspossible.whenitis
opened. . -
‘.‘Forself-cleaningoven,be sure
~towipeupexcessspillagebefore
self-cleaningoperation. ‘
● Cookcompleteoven.meals.,
instead.ofjustone fooditem. ~-=
<Pokit6es,other-vegetables;and
,sornedessertswillcooktogether
‘with,amain-dishcasserole,meat
lqaf,chickenorroast,Choose ==::-:‘temperaturem approximately
the sametime.
--:,wheneverpossibleto finish’
cookingcasseroles,ovenmeals, - ____
etc.~ls~add rollsor precooked- ‘‘ ,~__
‘@essertstowafrn,oven,using
,,
.,
!.
,-
,
.-
—
=N
_ -.
BEzw_
====–
-
Ea%ar
~
—.
4
~-
. ..
~
- -–
-~:
‘-
—-
.——-
-
-
lz#X$-
.–=.
--
*-
me-..
~~va
&-_
...——
g~=
...—-
—.—...
-x
~–
s..
~- s
ZW*-.=—
n=~
.—---=...
-—___
=____
&Y~_::
.-
7
.
--
Page 8
VeaturesofYolBrCootingcenter
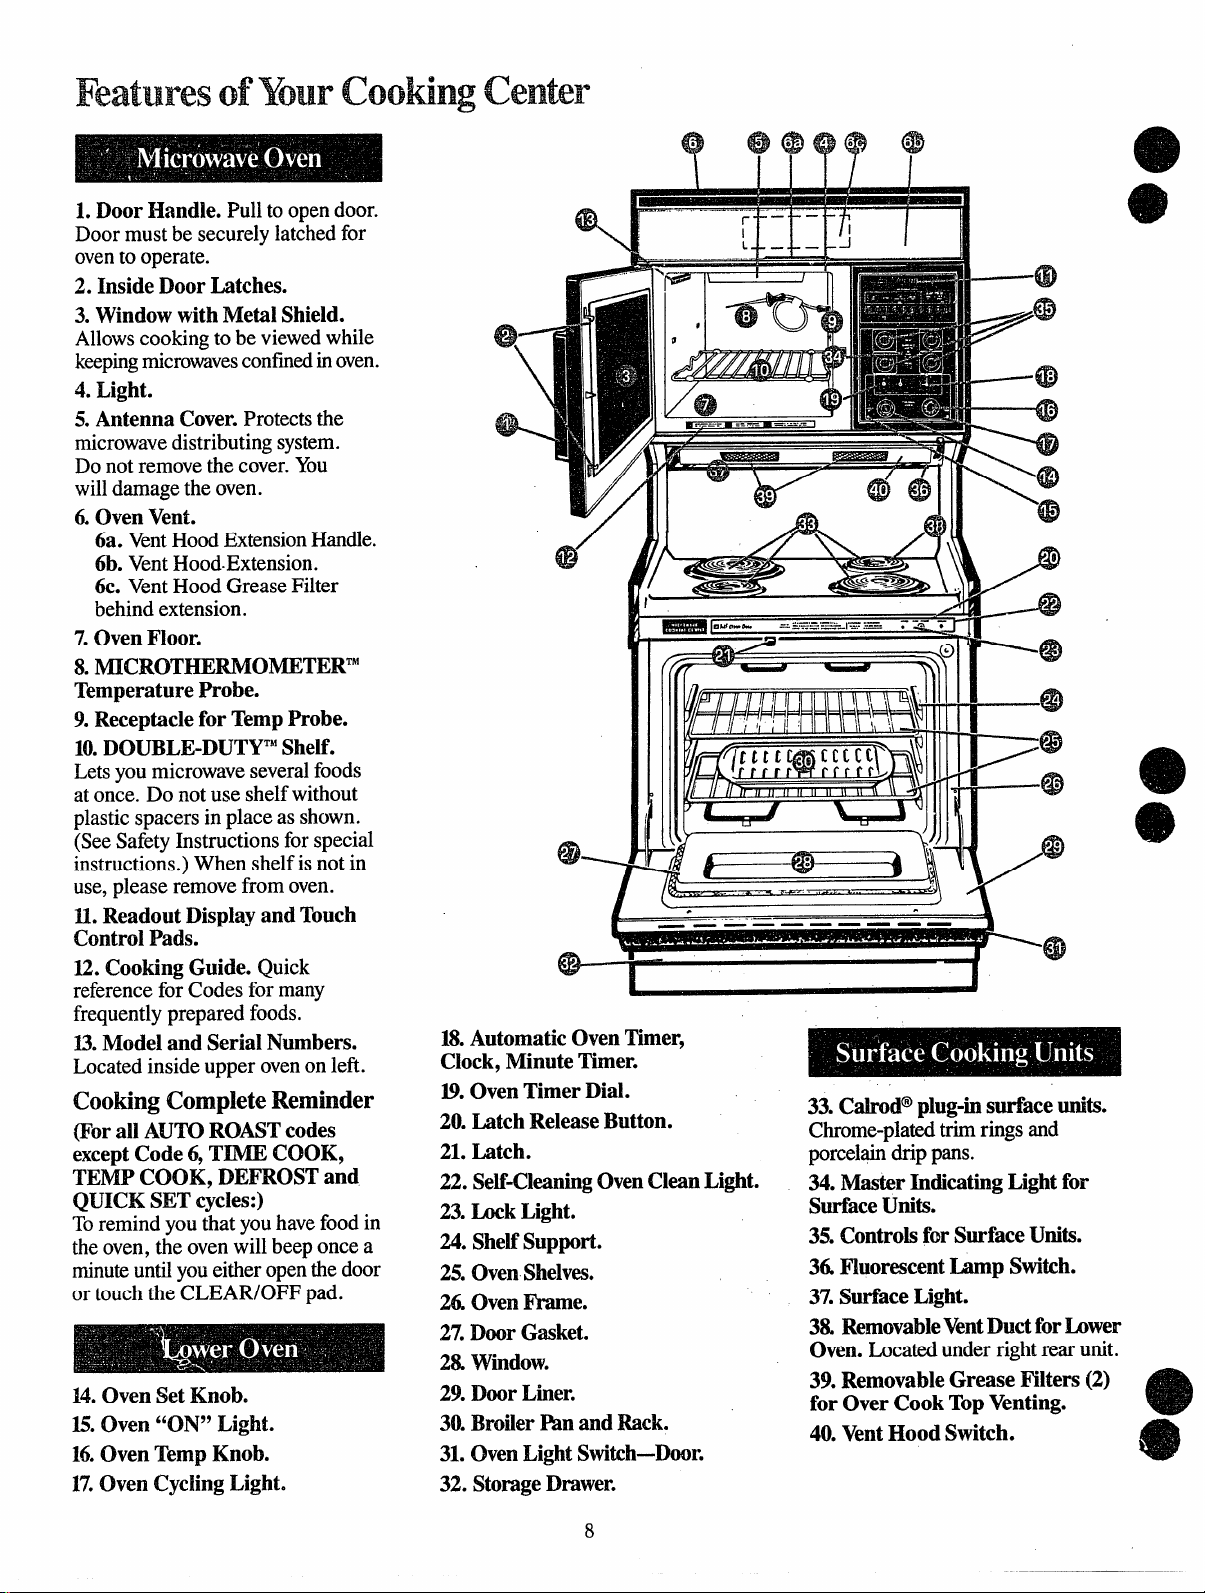
LDoorHandle.Pulltoopendoor.
Doormustbesecurelylatchedfor
oventooperate.
2. InsideDoorLatches.
3.WindowwithMetalShield.
Allowscookingtobeviewedwhile
keepingmicrowavesconfinedinoven.
4. Light.
5.AntennaCover.Protectsthe
microwavedistributingsystem.
Donotremovethecover.You
willdamagetheoven.
&OvenVent.
6a.VentHoodExtensionHandle.
6b.VentHood-Extension.
6c. VentHoodGreaseFilter
behindextension.
7.OvenFloor.
8.MICROTHERMOMETERTM
TemperatureProbe.
9.ReceptacleforTermpProbe.
10.DOUBLE-IXJTY~Shelf.
Letsyoumicrowaveseveralfoods
atonce.Do notuseshelfwithout
plasticspacersinplaceas shown.
(SeeSafetyInstructionsforspecial
instructions.)Whenshelfisnotin
use,pleaseremovefromoven.
IL ReadoutDisplayandTouch
ControlPads.
12. CookingGuide.Quick
referenceforCodesformany
frequentlypreparedfoods.
IA ModelandSerialNumbers.
Locatedinsideupperovenonleft.
fhokkg CompleteReminder
(ForallAUTOROASTcodes
exceptCode6,TIMECOOK,
TEMPCOOK,DEFROSTand
QUICK SETcycIes:)
Toremindyouthatyouhavefoodin
theoven,theovenwillbeep oncea
minuteuntilyoueitheropenthedoor
ortouchtheCLEAR/OFFpad.
14.OvenSetKnob.
15.Oven“ON”Light.
16.OvenTempKnob.
17.OvenCyclingLight.
18.AutomaticOvenTimer,
Clock,MinuteTimer.
19.OvenTimerDial.
20.LatchReleaseButton.
21. Latch.
22.Self-CleaningOvenCleanLight.
23. LockLight.
24.ShelfSupport.
25.OvenShelves.
26 OvenFrame.
27.DoorGasket.
2&Window.
29. DoorLiner.
30. Broilerl% andRack.
31. OvenLightSwitch-Door.
32.StorageDrawer.
===..=,
=--1=.
~:
II Ili(
———. . ..— ——
—
33. Calrod@plug-insurfaceunits.
Chrome-platedtrimringsand
porcelaindrippans.
34.Master
SurfaceUnits.
35.ControlsforSurfaceUnits.
36 FluorescentLampSwitch.
37.SurfaceLight.
3&RemovableVentDuctforLower
Oven.Locatedunderrightrearunit.
39.RemovableGreaseFilters(2)
forOverCookTopVenting.
40.VentHoodSwitch.
@
@
E
\@
\
@
0
P
.)lllllm
m
f
IndicatingL~ghtfor
W&
a
8
Page 9
0
.
.
@
@
e
@
@
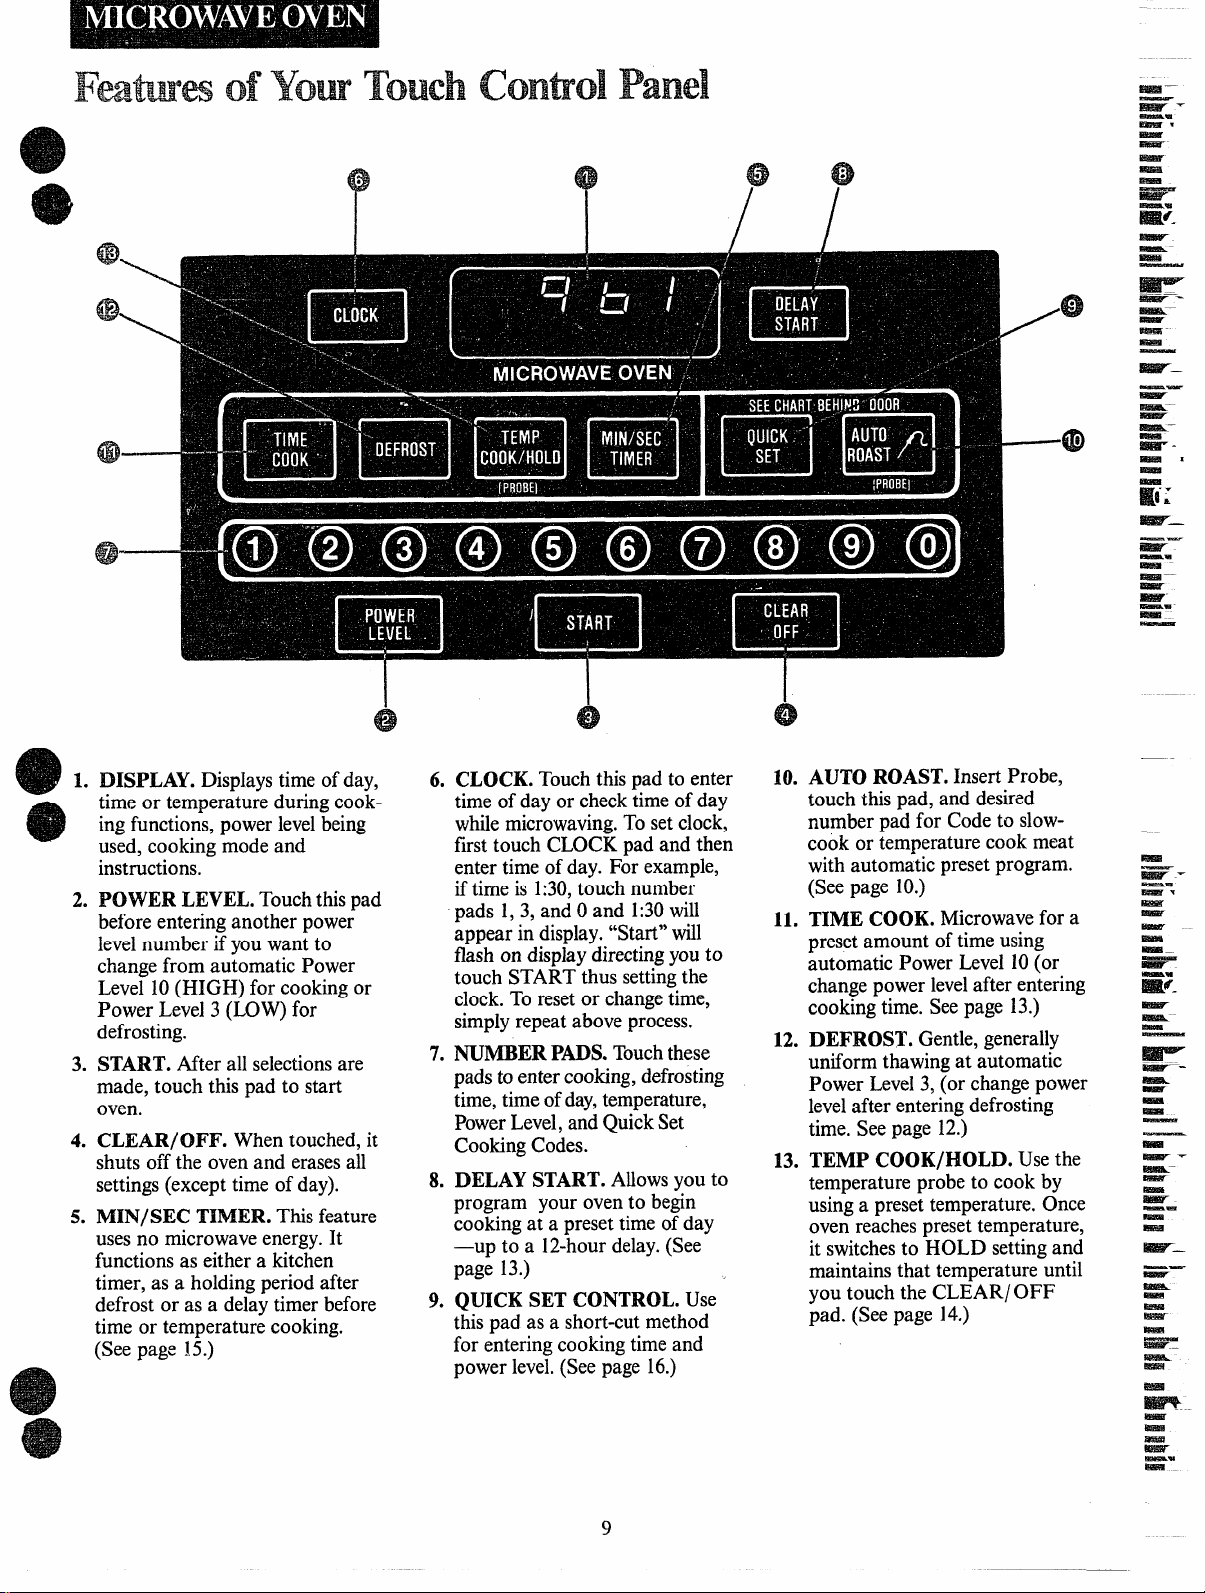
DISPLAY.Displaystimeofday,
L
timeortemperatureduringcookingfunctions,powerlevelbeing
used,cookingmodeand
instructions.
2.
POWER LEVEL.Touchthispad
beforeenteringanotherpower
levelnumberifyouwantto
changefromautomaticPower
Level10(HIGH)for cookingor
PowerLevel3 (LOW)
defrosting.
START. After all selectionsare
3.
made, touch this pad to start
oven.
CLEAR/OFF. Whentouched,it
4.
shuts off the ovenand erasesall
settings(excepttime of day).
IVHN/SECTIMER. Thisfeature
5.
usesno microwaveenergy.It
functionsas either a kitchen
timer, as a holdingperiodafter
defrost or as a delay timer before
time or temperature cooking.
(Seepage 1.5.)
for
7
6.
CLOCK. Touchthispad to enter
time of day or checktime of day
whilemicrowaving.
firsttouch CLOCKpad and then
entertime of day. For example,
iftimeis 1:30,touchnumber
pads 1,3, and Oand 1:30will
appear in display.“Start”will
flashon displaydirectingyou to
touch START thus settingthe
clock.To resetor changetime,
simplyrepeat above process.
7.
NUMBER PADS.Touchthese
padsto entercooking,defrosting
time,timeofday,temperature,
PowerLevel,andQuickSet
CookingCodes.
DELAY START.
8.
program your ovento begin
cookingat a preset time of day
—up to a 12-hourdelay.(See
page 13.)
9.
QUICK SET CONTROL. Use
thispad as a short-cutmethod
for enteringcookingtime and
powerlevel.(Seepage 16.)
Tosetclock,
Allows YOU to
/
I
A
o
AUTOROAST.Insert Probe,
10.
touch this pad, and desired
number pad for Codeto slowcook or temperaturecook meat
withautomatic presetprogram.
(Seepage 10.)
11.
TIMECOOK.Microwavefor a
presetamount of time using
automatic Power Level10(or
changepower levelafter entering
cookingtime. Seepage 13.)
12.
DEFROST.Gentle,generally
uniformthawingat automatic
Power Level3, (or changepower
levelafter enteringdefrosting
time. See page 12.)
TEMPCOOK/HOLD.Usethe
13.
temperatureprobe to cook by
usinga preset temperature.Once
ovenreachespresettemperature,
it switchesto HOLD settingand
maintainsthat temperatureuntil
you touch the CLEARI OFF
pad. (Seepage 14.)
●
43
.8
a)
Page 10
AutomaticRomtig
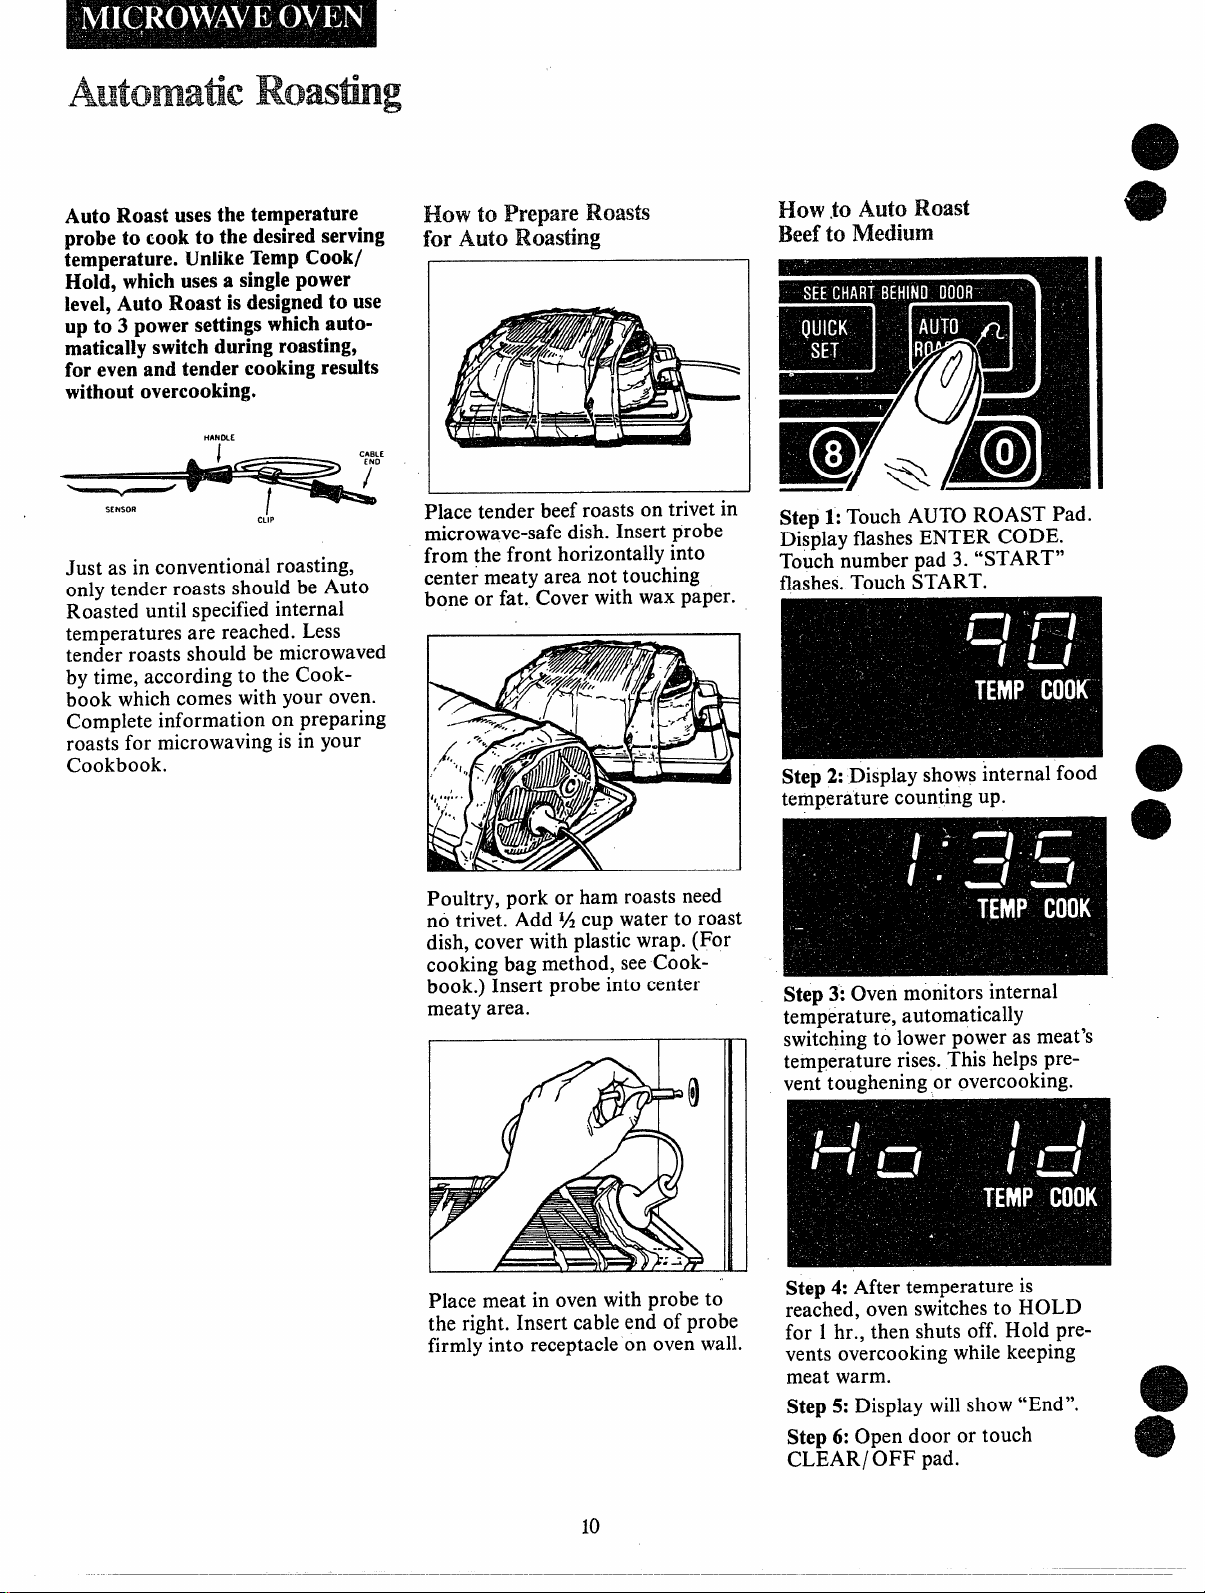
Auto Roast usesthe temperature
probeto cook to the desiredserving
temperature.UnlikeTempCook/
Hold, whichusesa singlepower
level,Auto Roast is designedto use
up to 3 powersettingswhichautomaticallyswitchduringroasting,
for even andtendercookingresults
withoutovercooking.
How’toPrepareRoiwts
for Auto Roasting
How
.tOAutoRoast
Beefto Medium
Just as in conventional roasting,
only tender roasts should be Auto
Roasted until specified internal
temperatures are reached. Less
tender roasts should be microwaved
by time, according to the Cookbook which comes with your oven.
Complete information on preparing
roasts for microwaving is in your
Cookbook.
Placetenderbeefroastson trivetin
microwave-safedish.Insertprobe
from the front horizontallyinto
centermeatyarea not touching
boneor fat. Coverwithwaxpaper.
Poultry, pork or ham roasts need
no trivet. Add %
dish, cover with plastic wrap. (For
cooking bag method, see Cookbook.) Insert probe into center
meaty area.
CUPwater to roast
Step 1:Touch AUTO ROAST Pad.
Display flashes ENTER CODE.
Touch number pad 3. “START”
flashes. Touch START.
Step 2: Display shows internal food
temperature counting up.
Step 3: Oven monitors internal
temperature, automatically
switching to lower power as meat’s
temperature rises. This helps prevent toughening or overcooking.
Place meat in oven with probe to
the right. Insert cable end of probe
firmly into receptacle on oven wall.
10
Step4:
Aftertemperatureis
reached,ovenswitchesto HOLD
for 1hr., then shutsoff. Hold preventsovercookingwhilekeeping
meatwarm.
Step !5:Display will show “End”.
Step 6: Open door or touch
CLEARI OFF pad.
Page 11
Automtic
Swer
Food Code
Beef
Tender Roast
Rare 2 125°
Medium 3
Well
Meatloaf
(loaforround)
Pork
LoinRoast
PrecookedHam
Poldtry
WholeChicken 5 190°
(3lb.)
WholeTurkey 5 190°
(Up to 12lbs.)
Insertprobeintomeatiestareaofinnerthighfrombelowend
TurkeyBreast
Inserturobehorizontallyintomeatiestarea.)
*Recommendedstandingtimebeforeserving.
Questionsand!Answers
(). Whywasn~my roastfullycooked
eventhoughthetemperatureon the
displaywascorrectandAuto Roast
wascompleted.
A. The temperature probe mustbe
properlyinsertedwhen you Auto
Roast. Checkyour Cookbook to see
whatyou might have done wrong.
e
Q. Do sometypesoftrivetswork
betterthanothers?
e
A. Yes.
providemorebrowningto the
bottomofmeatsthanplastictrivets.
Also,ceramicridge-bottomed
roastingdishesusuallyworkwell.
Plastictrivetsmayrequiremeatto be
turnedovermoreoftenthanglass
trivetsdobecausethegriddesignand
legsletthebottomofthemeatstay
coolerthanglasstrivetsdo.
Flatglasstrivetsgenerally
Final
Temp (Min.perlb.)
4 170°
4 170°
4
1
4
140°
170°
115°
170°
I
Q. WhenIirrcookingwithAuto
Roast,whydoesnl myroastcontinue
to cookduringtheholdingtime?
A.
Whenyourfoodreachesfinished
temperature,theovenautomatically
switchesto a lowerpowerlevel.The
eventemperaturethat’smaintainedin
thefoodduringthisholdingperiod
keepsit warmwithoutovercooking.
Approx.Time
12-14
14-16
17-18
15-20
13-15
13-15
.ndparalleltoleg.)
13-15
Minutes
I
I
I
Hold*
5-1o
10-15
30
5-1o
20
20
20
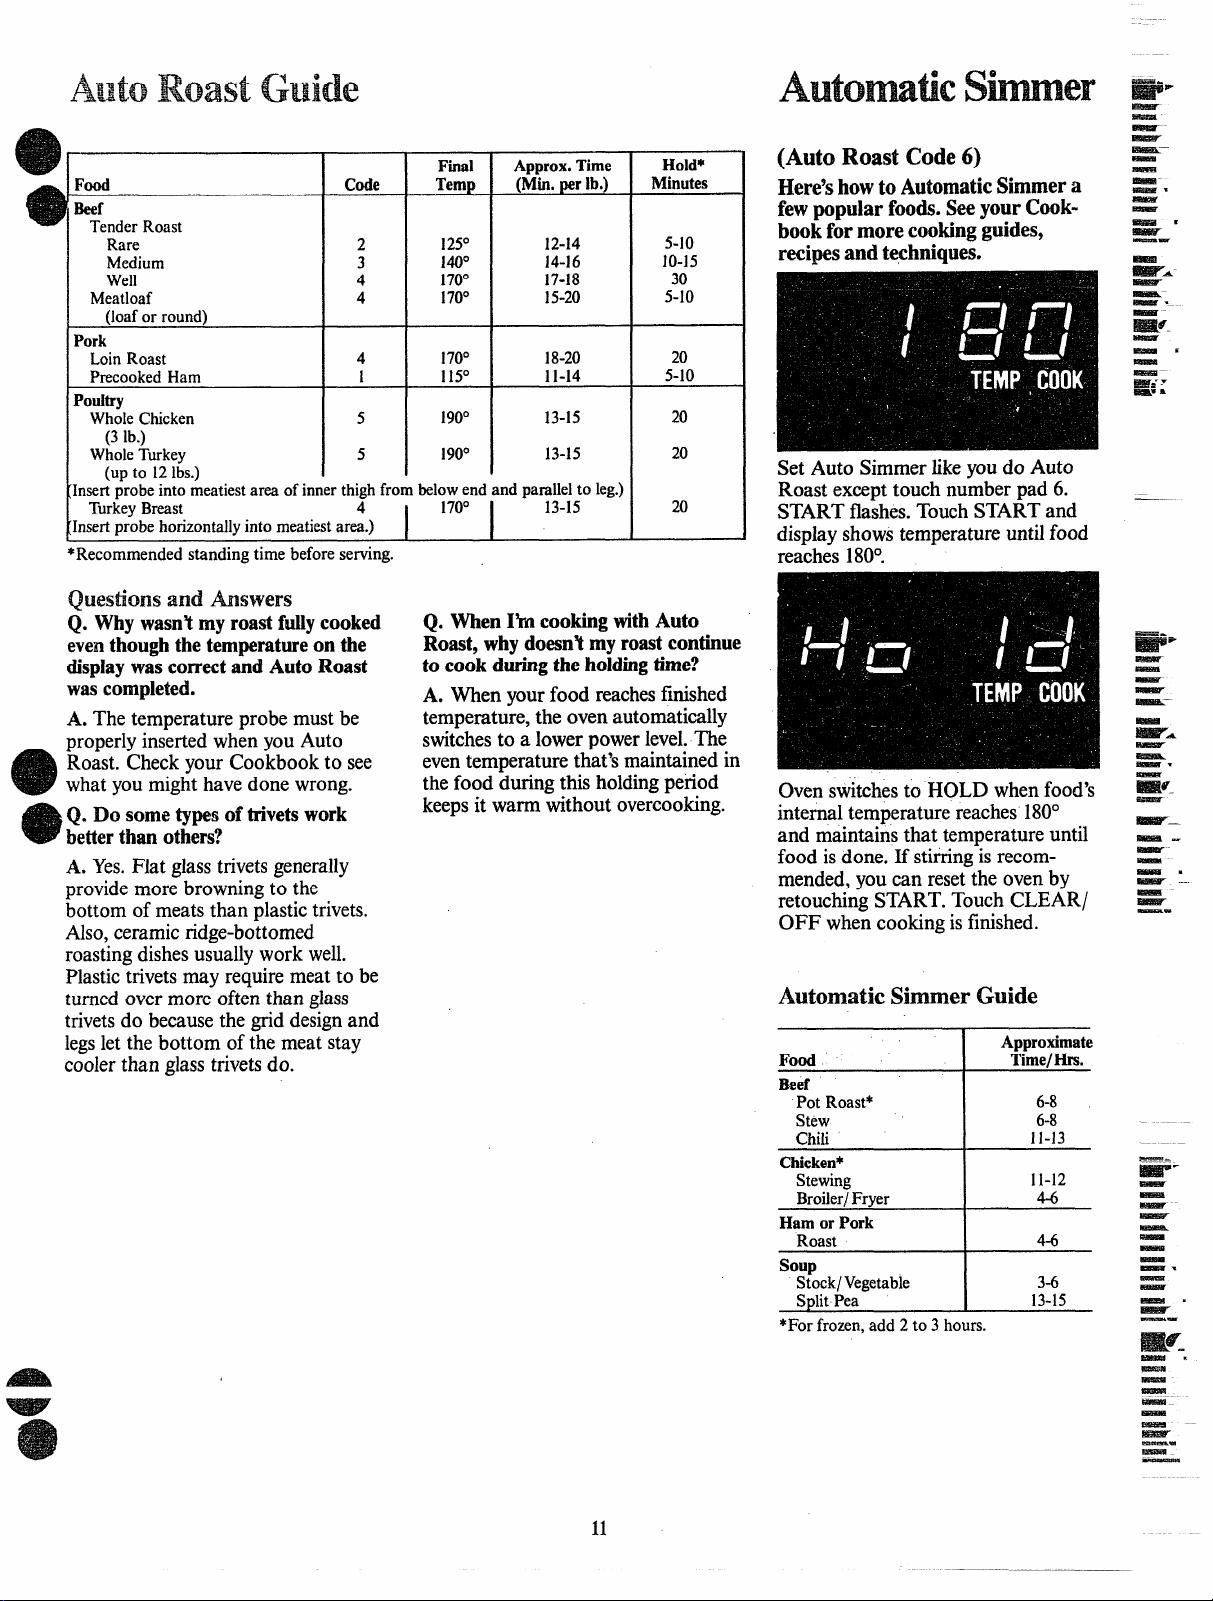
(Auto Roast Code
Here’showtoAutomaticSimmera
fewpopularfoods.SeeyourCook-
bookformorecookingguides,
recipesandt~hniques.
SetAuto Simmer likeyou do Auto
Roast excepttouch numberpad 6.
STARTflashes.TouchSTART and
displayshowstemperatureuntilfood
reaches180°.
Oven
switchesto HOLDwhenfood’s
internaltemperaturereaches180°
andmaintainsthat temperatureuntil
foodisdone.Ifstirringisrecommended,youcanresettheovenby
retouchingSTART.TouchCLEARI
OFF whencookingisfinished.
6)
AutomaticSimmerGuide
Food Time/Hrs.
Beef
PotRoast* 6-8
Stew
Chili 11-13
Chicken*
Stewing
Broiler/Frver
HamorPork
Roast
soup
Stock/Vegetable
SplitPea
*Forfrozen,add2to3hours.
Approximate
I
I
I
6-8
11-12
4-6
4-6
3-6
13-15
11
Page 12
Defrosting
TheDefrostsettingis designedfor
speedythawingof frozenfoodsand
isoneofthe greatadvantagesofa
microwaveoven.
S Power Level3 is automatically
set for defrosting, but you may
change this for more flexibility.
e See your Cookbook
for
defrostinghelp.
When the oven completes
defrosting, it automatically shuts
off. It willthen display “End” and
beep once a minute until you either
open the door or touch the CLEAR/
OFF pad.
To become better acquainted with
the defrost functions, defrost frozen
pork chops by using the following
steps.
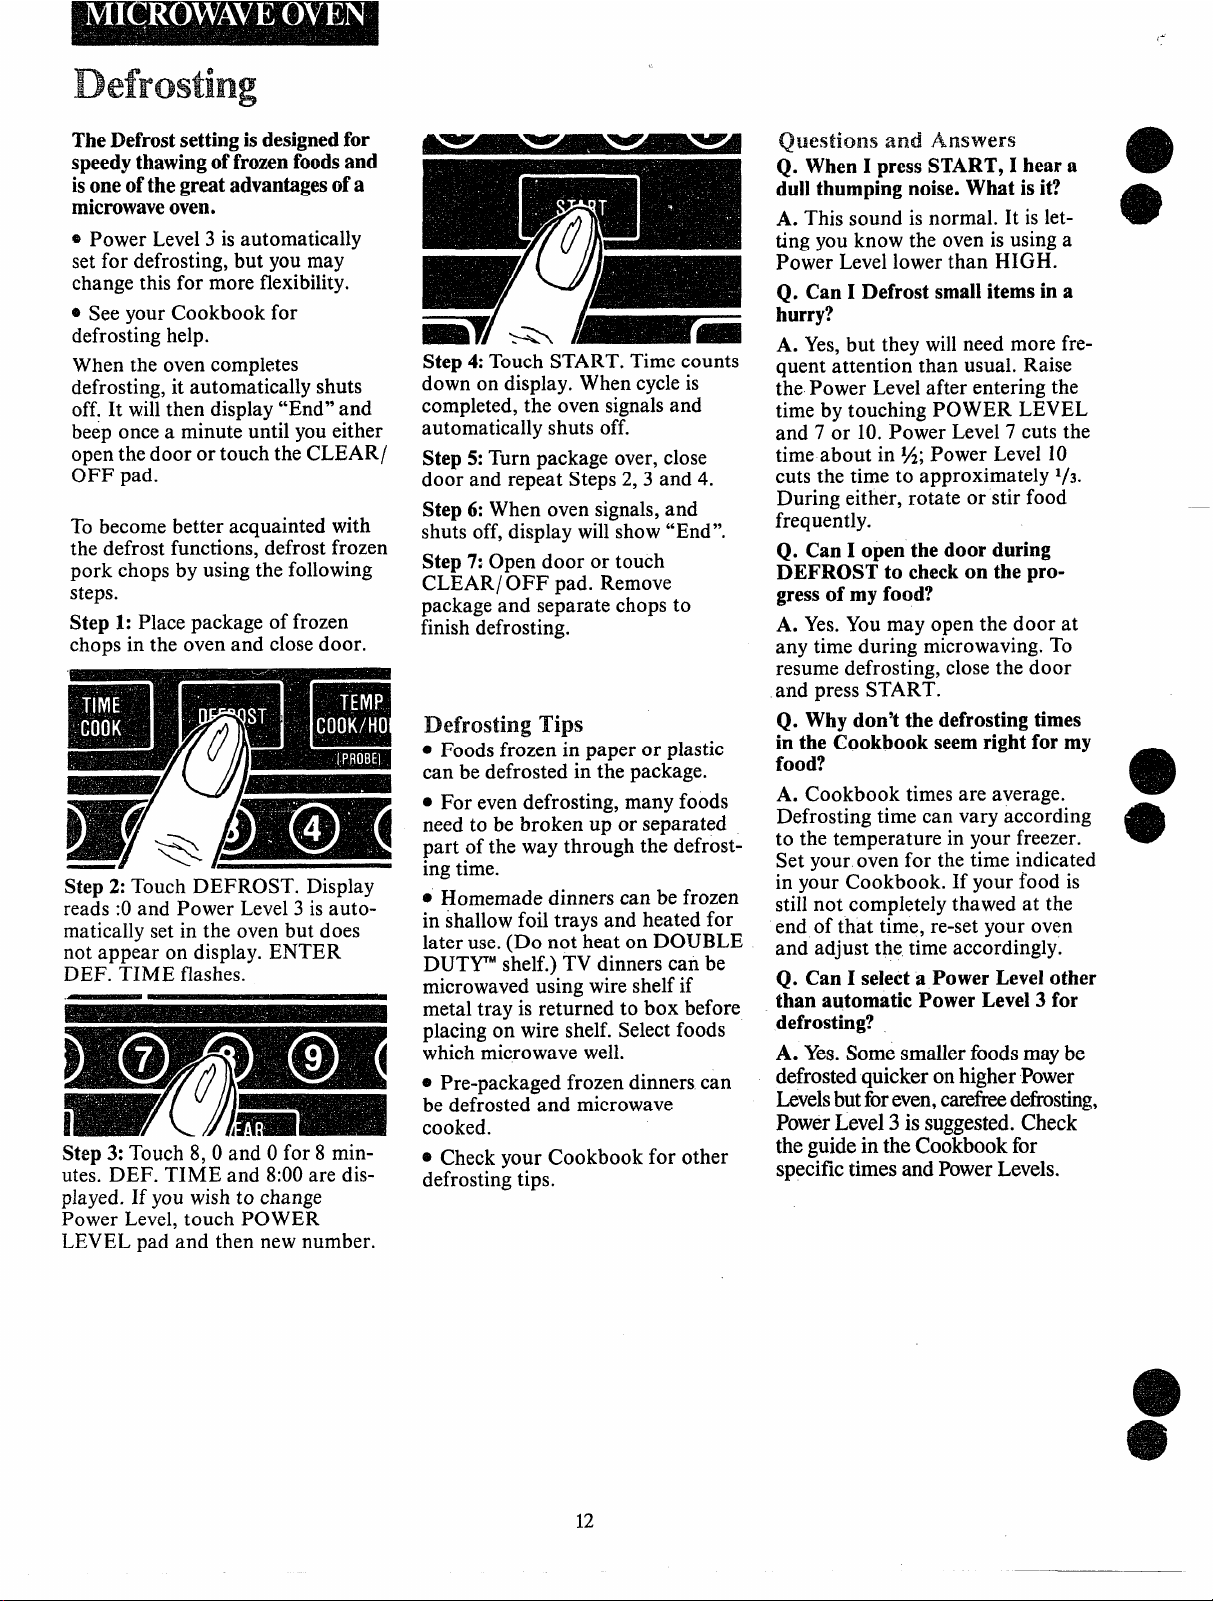
Step 1: Place package of frozen
chops in the oven and closedoor.
)rf*]m
Step2:Touch DEFROST. Display
reads:0
matically set in the oven but does
not appear on display. ENTER
DEF. TIME flashes.
Step 3: Touch 8, 0 and Ofor 8 min-
utes. DEF. TIME and 8:00are displayed. If you wish to change
Power Level, touch POWER
LEVEL pad and then new number.
and Power Level3 is auto-
Step4:
TouchSTART.Timecounts
downon display.Whencycleis
completed,the ovensignalsand
automaticallyshutsoff.
Step 5:Turn package over, close
door and repeat Steps 2,3 and 4.
Step 6: When oven signals,and
shuts off, display will show “End”.
Step 7:
Opendoor or touch
CLEARIOFF pad. Remove
packageand separatechopsto
finishdefrosting.
Defrosting
o Foods frozen in paper or plastic
can be defrosted in the package.
. For even defrosting,
Tips
manyfoods
needto be broken up or separated
part ofthe waythroughthe defrostingtime.
a Homemade dinners can be frozen
in shallow foil trays and heated for
later use. (Do not heat on DOUBLE
DUTVMshelf.) TV dinners can be
microwaved using wire shelf if
metal tray is returned to box before
placing on wire shelf. Select foods
which microwave well.
o pi-e-packagedfrozen dinners can
be defrosted and microwave
cooked.
e check your Cookbookfor other
defrostingtips.
(@x4ims and Amiwers
Q. WhenI pressSTART, 1heara
dullthumpingnoise. Whatis it?
A. This sound is normal. It is let-
ting you know the oven is using a
Power Level lower than HIGH.
Q. Can I Defrost smallitemsin a
hurry?
A. Yes,but they will need more fre-
quent attention than usual. Raise
the Power Levelafter entering the
time by touching POWER LEVEL
and 7 or 10. Power Level7 cuts the
time about in 1A;Power Level 10
cuts the time to
During either, rotate or stir food
frequently.
Q. CanI open the door during
DEFROST to checkon the progress of my food?
A. Yes.You may open the door at
any time during microwaving. To
resume defrosting, close the door
and press START.
Q. Whydon’tthe defrostingtimes
in the Cookbook seemrightfor my
food?
A. Cookbook times are average.
Defrosting time can vary according
to the temperature in your freezer.
Set your oven for the time indicated
in your Cookbook. If your food is
still not completely thawed at the
end of that time, re-set your oven
and adjust the time accordingly.
Q. CanI selecta Power Level other
than automatic Power Level3 for
defrosting?
A. Yes.Somesmallerfoodsmaybe
defrostedquickeronhigherPower
Levelsbutforeven,carefreedefrosting,
PowerLevel3 is suggested.Check
theguidein theCookbookfor
specifictimesandPowerLevels.
approximately1/3.
12
Page 13

Cookingby Time
_ 1he Time Cook featureallowsyou
to presetthe cooking time.
ower Level 10 is automatically set
*
for time cooking, but you may
change this for more flexibility. See
your Cookbook.
When the oven completes Time
Cooking, it automatically shuts off.
It willthen display “End” and beep
once a minute until you either open
the door or touch the CLEAR/OFF
pad.
To become better acquainted with
Time Cook function, make a cup of
coffeeby using the following steps.
I I
\
/
Step1:Fillacup2/3fullofwater
_ andadd1teaspoonofinstint
Useacup
thathasnometaldecoration.
COffee.
Placecupinovenandclosedoor.
Step 2: Touch TIME COOK. The
display shows :0. ENTER COOK
TIME flashes. Power level 10 is
automatically set, but does not
appear on display.
3:Selectyourtime.Touch1,
Step
2,and Ofor a minuteand20
seconds.TIME COOK,and 1:20
are displayed.
If anotherPowerLevelisdesired,
touchPOWERLEVELand the
I
numberalthoughPowerLevel10
(HIGH)is preferredforthiscup
ofcoffee.
~
J
Step 4:Touch START. Time
counting down shows on display.
Step 5: When time is up, the oven
sounds, oven light and fan shut off.
The display will show “End”.
Step 6:
Openthedoor or touch
CLEARIOFF pad.
How to Use Delay Start
TheDelayStartfeatureallowsyou
to programyouroventobegin
cookingata presettimeofday-
upto a 12hourdelay.
To tke IX4ay$i%art
Step 1:Enter your desired cooking
program.
Step
2:Touch DELAY START pad
(instead of START pad).
Step
3:Enterthe timeyouwant the
ovento start. (Besureyourmicrowaveovenclockshowsthe correct
timeofday).
Step 4:Touch START pad.
The oven will automatically start at
the desired time.
Questionsand Answers
Q. Isetmyovenfor the time called
for in therecipebut at the end of
the time allowed, my dish wasn’t
done. Whathappened?
A. Since house power varies due to
time or location, many Time Cook
recipesgive you a time range to
prevent overcooking. Set the oven
for minimum time, test the food for
doneness, and cook your dish a
little longer, if necessary.
Q.
I wantto cookmydishona
PowerLevelotherthanHIGH,
whatdoI needto do?
To changethe PowerLevel,
A.
touchthePOWER LEVELpad
afterenteringdesiredcookingtime.
Enterthedesirednumberand then
touchSTART.
CanI interruptmyTimeCook
Q.
functionto checkthefood?
Yes.To resumecooking,simply
A.
closethedoorand touch START.
NOTE:Microwavepowerwillnot
comeonuntilyouare ready.You
musttouch STARTfor cookingto
begin.
touchedthe numberpads and
Q. I
selectedmy powerlevel. When I
touchedSTART,however,my oven
didn’tcome on. Whynot?
A.
TheTIME COOKpad mustbe
touchedbeforesettingthe number
padsor elseyourovenwillnot
begincooking.
triedto changePower Level
Q. I
but the displaychangedback to
cookingtime. Why?
A After touching Power Level pad
you only have 4 seconds to enter
the number. Try setting controls
again.
E21E#x”
-.
-
-
-–
13
Page 14

Cookingby Temperature
Formanyfoods, internaltemperatureis the besttest of doneness.
Roasts or poultryarecooked to
yourpreferencewhentemperature
cooking. Heating or reheating
foods accurate~yto a servingtemperatureyoudesireis simpleand
easy.
Temp Cook/Hold takesthe guessworkout of cooking becausethe
ovenshuts off automaticallywhen
the food is done and holdsthat
temperatureuntilyoutouch the
CLEAR/OFF pad.
me
TemperaturePAM
The temperature probe is a food
thermometer that gauges the
internal temperature of your food;
it must be used when using Temp
Cook/ Hold or Auto Roast. Follow
the directions for use and insertion
on page 10.
How to Temp cook
a Rolled Beef Rib Roast
toMedium
Step 1:Insert temperature probe as
directed in Cookbook and attach
probe securely in oven wall. Close
the door.
Step 2:Touch TEMP’ ~OOK/
HOLD. ENTER TEMP ~OOK
flashes and the digit portion of the
display is blank.
Step 3:Touch 1,3,0 for 130°.130
sho-wson display. Power Level iOis
automatically set in oven but does
not appear on display.
mmzf.~
Step4:Touch POWER LEVEL
pad. P-10 shows on display. Touch
5 for MEDIUM power. P-5 shows
on display and then display reverts
back to set finished temperature.
Step5:Touch START. After food
reaches 90°, display shows temperature of food counting up.
Step6: When 130°is reached, the
oven will sound and flash “HOLD”.
The oven will then hold the
temperature.
Step7:Touch the CLEAR/OFF
pad to stop the cycle.
Step8: Remove probe and food
from the oven.
Cooking ‘rips
e Usea lower power levelsetting;
it willheat evenly even though
requiring more time.
e 13esure frozen food has been
completely defrosted before
inserting probe. Probe may break
off if used in frozen foods.
e
Always insert probe into the
center of meaty areas; take care
not to touch the fat or the bone.
e Insert probe as horizontally as
possibleinto foods as directed in
the recipes. Make sure the handle
does not touch the food. .
e Use the clip to keep the probe in
place while heating.
o coverfoods as directed in cOOk-
book for moisture control and
quick heating.
QtrMions and Answers
AfterI followedthe stepsand
Q.
touchedSTART, a signal;ounded
andoven did not start.Whatis
wrong?
A. If you set the temperature either
below 90° or greater than 199°the
oven willnot start. To re-enter,
touch CLEAR/ OFF pad and begin
stepsagain.
Q. Are thereanyfoods I“can’t
TempCook?
A. Yes.Delicate butter icings, ice
cream, frozen whipped toppings,
etc., soften rapidly at warm tem-
peratures. Batters and doughs as
wellas frozen foods are also diffi-
cult to cook preciselywith the
probe. It is best to Time Cook
these foods.
Q. Why did“PR 013°flash on the
displayafterI touchedStart?
A. “PR OB” willflash on the dis-
play if you have not securely seated
the end of the probe into the recep-
tacle in the oven wall or if you
touch TEMP COOKI HOLD and
have forgotten to use the probe.
Q. CanI leavemy probein the
oven if it’snot insertedin the food?
A. No. If the probe is left inside the
oven, touching the oven wall, and
not inserted in food, you may
damage the oven.
Q. CanI Temp Cook different
portionsof food at different
temperatures?
A. Yes.The temperature probe
givesyou the freedom to cook different portions of food at different.
temperatures to suit individual
eating styles. Simply place the
probe in the food and change the
temperature setting as needed.
e
,:.
f
m
e
14
Page 15

How-toUsethe Minute/SecondTimer
The MIN/SEC TIMER, hasthree
timingfunctions:
o It operatesas a minutetimer.
e
@It canbe set to delaycooking.
~ It can be usedas a hold setting
afterdefrosting.
The MIN/ SEC TIMER operates
without microwave energy.
HOW$0 Tim? a 3“.Minute
Phone Gaii!
1. Touch MIN/ SEC TIMER pad.
The display shows :0 and ENTER
TIME flashes.
2. Touch number pads 3,0 and O
(for 3 minutes and no seconds).
Display shows 3:00.
3. Touch START. Display shows
time counting down.
4. When time is up, oven signals
and display shows time of day.
The display shows :0 and Enter
DEF. TIME flashes.
Step 3: Touch pads 1, 5,0 and Ofor
15minutes defrosting time. 15:00
appears on display. (Defrosting is
automatically set on Power Level3
but can be changed by touching
POWER LEVEL pad and the new
Power Level.)
Step 8:Touch START. 15:00
counting down shows on display.
As each function is automatically
performed oven display shows
instructions entered and the function. While cooking, you may
touch appropriate pad to recall
times you set.
Step
9:Whentimeis up,the oven
sounds,ovenlightand fan shutoff.
Thedisplaywillshow“End”.
Step 10. Open the door or touch
CLEAR/ OFF pad.
Programmhg a HOLD Time
The Minute/ Second Timer can also
be used to program “hold time”
— between microwave cooking func-
tions. The time can range from one
~ second to 99 minutes and 99 sec-
ends. A HOLD, or “standing” time
a
may be found in some of your own
recipes or Cookbook.
To set the oven to delay cooking up
to 99 minutes follow Steps 1 and 2
to enter hold time. Then touch
TIME COOK pad and enter time
before pressing START.
HGWto Defrost, Hold and
Time cook
Let’ssay you want to defrost a
frozen casserole for 15minutes,
hold for 10minutes and then Time
Cook for 25 minutes. Here’s how
to do it:
Step 1:Take casserole from freezer
and place it in the oven.
— Step 2:Touch DEFROST pad.
a
Step 4:Set standing or hold time
by touching MIN/ SEC TIMER.
:0 appears on display and ENTER
TIME flashes.
Step 5:Touch 1,0,0 and Oto hold
for ten minutes. 10:00appears on
display.
Step 6:Touch TIME COOK pad.
The display shows :0, ENTER
COOK TIME flashes.
Step 7:Touch 2, 5,0 and Ofor
twenty-five minutes of cooking
time. 25:00 appears on display.
Qwstions and Answers
Q. Whatwillhappenif I acciden-
tallyreversemydefrost,holdand
cook instructions?
A. The oven automatically rearranges your program. Defrosting
always comes first, then hold, and
then the cooking function.
Q. CanI defrostandhold only?
A. Yes.Sometimes you may only
want to defrost a food, hold it, and
cook it later. All you need to do is
program in Defrost and amount of
time. Then program Hold and the
amount of time. Be sure to put the
thawed dish in the refrigerator
promptly.
NOTE: Let foods remain at room
temperature only as long as safe. -
Times will vary.
Q. I programmedmy ovenfor
a specificdefrostingtime but it
defrostedlongerthan necessary.
Whathappened?
A. When instructions conflict, ~he
oven carries out the last instruc!i!ion.
Youmay have set the oven to defrost
for 4 minutes, hold for 2 minutes,
and then defrost for 6 minutes. In
this case, the oven would defrost
for 6 minutes and hold for 2 min-
utes and ignore your first defrost
instruction.
15
Page 16

HowtoUse QUICKSET Control
The QUICK SET Control provides
a shortcut method for entering time
and the Power Level on your microwave oven. QUICK SET Codes are
only used for recipes which need
little or no attention, and which
require no change of power level
during cooking. Recipes which
require additional ingredients,
attention or change of power level
during microwaving should be
cooked in the usual manner. Also,
recipes with cooking time of less
than one minute or more than
99 minutes cannot use Codes.
To understand the QUICK SET
Code control, it is important to
know what the numbers mean and
what the sequence is. The first and
second numbers, if setting a 3 digit
Code, indicate the amount of time
you desire; the last control entry
number is always the Power Level.
For example, 125means 12minutes
at Power Level5. NOTE: Your
oven can only be programmed to
99 minutes when using the QUICK
SET control and the highest Power
Levelis 10which is represented by
“O”.When setting a 2 digit QUICK
SET control entry, the first is time,
the second is power level. For
example, 50 means 5 minutes at
Power Level 10.
On the followingpage is shown
many frequently prepared foods
and their Codes. It’seasy,though,
to make Codes for many other
recipes. Just select oneor twodigits
representing the lengthof cooking
time desired, and a final digitfor
the PowerLevel required. The
Codes given on the guide are for the
minimum time needed to avoid
overcookingwhich can dry out
foodand make ittastelessand
tough. If you feelthat more
cookingis needed, add additional
time bychanging the first digitof
the Code. Youcannot add seconds
to the cycle
wholeminutesonly.If yourrecipe
callsfor Power Levelchanges or
different amounts of time needed
between addition of ingredients,
you may set one Code for the first
part of the recipe, then after completion, set another Code for that
period of time and Power Level.
Remember that QUICK SET
Codes are for microwaving by time
only. If you are microwaving by
temperature, you must use the
Temp Cook or Auto Roast
function.
When the oven completes QUICK
SET program, it automatically
shuts off. It willthen display “End”
and beep once a minute until you
either open the door or touch the
CLEAR/ OFF pad.
time—Codesarefor
e
e
QUICK SET
2-Digit
50
R
Time in
Minutes High (10)
How to set
QUICK SET Control
Programming your oven for
QUICK SET Control operation is
easy. Follow these simple steps.
PowerLevel
ForExample:
R
Time in
Minutes
------- --—
QUICK sJi”l’
3-Digit
125
Power Level
Med (5)
Step 1:Tcuch QUICK SET.
ENTER CODE flashes.
Step 2: Enter the proper code. For
example, a recipe calling for 12minutes cooking time at Power Level
10would be 120.120 appears on
the display panel.
16
Step 3:Touch START. Display will
show time counting down and
COOK TIME.
m)
*
Page 17

QIJICK SET ControlGuide
e
e
e
e
e
TheQUICKSETControlfeaturegivesyouaneasy
automaticwaytoaccuratelysetmicrowavetimefor
foodsrequiringonlyonePowerLevelandlittleattentionduringcooking.TheGuidebelowshowsfrequentlypreparedfoodsandthesuggestedCodesto
usewitheach.Forspecificinformationonstirring,
turningorrotating,checktheMicrowaveGuide
andCookbookwhichcomeswithyourmicrowave
Appetizers(Warming)
Dip (Cream Cheese)
1/2cup
1cup
Dips(Sour Cream)
% cup
1cup
Pastry Bites(Reheating)
2 Servings
4 Servinm
BreadsandDesserts
Apples
(2)
Bran Muffins
(5-6)
Brownies(Mix)
Cakes(Mix)
(16cup fluted mold)
CheeseBread,Yeast
(1 loaf)
ChocolateChip Bars
Nut Bread (Mix)
(1 loaf)
Pudding”M!x(3 oz. pkg.)
Beverages
Coffee,Soup
(1 cup)
Milk Bases
(1 cup)
FrozenFoods(Defrost)
Note:Timesgivenbeloware for entiredefrostcycle.Usuallyfood must be rotated, broken up or turned over
whiledefrosting.Check Cookbook for specific
information. -
‘Cake,WholeIced
Chicken,Cut-up
(2~-3% lbs.)
DessertTopping, Whipped
Doughnutsor Pastries
(24)
Fish Fillets
(1 lb.)
Hamburgers
(2 Ills.)
Pie, Fruit Filling
(Whole)
Roast
(4-5lbs.)
Steak or Chops
(2Ibs.) -
25
45
13
23
17
10
40
37
60
110
105
50
97
60
10
28
23
143
13
13
83
123
83
403
83
oven.Alwaysusemicrowave-safecontainersand
microwavetechniquesasdescribedinthe
Cookbook.
TosetCodesformanyotherfoodsor recipesreferto
page 16inthis UseandCareBook.QUICKSET
Codesgivenareforminimumtime.Checkandadd
timeifnecessarytocompletecooking.
Meats/MainDishes
Bacon
2 Slices
4 Slices
Chicken
8-10pieces
2 pieces
4 pieces
Chuck Roast
(3 lbs.)
Eggs,Baked
2 Eggs
Eggs,Scrambled
2 Eggs
Entrees,Frozen
8
OZ.
16
OZ.
2 Ibs.
Fish Fillets
(1 lb.)
Franks (in bun)
2
4
Meat Loaf
(1%Ibs.)
Sausage(Raw)
4 Patties
4 Links
SwissSteak
(2 lbs.)
Frozen TV Dinner
(10oz.)
Vegetables(Fresh)
Beans,Green
(1 lb.)
Broccoli
(1~-1~ lbs.)
Spears
cut
Cauliflower,Head
Corn on Cob
(4) ,
Potatoes
(4)
Squash
(1 lb.)
Zucchini
(1 lb.)
Vegetables(Frozen)
10
OZ.~k~.
28
30
200
40
70
665
25
20
50
110
200
60
10
30
170
30
20
706
107
150
157
120
137
120
120
100
100
70
—.
Page 18

surfaceCooung
SeeSurfaceCookingGuideonpages20and21.
stmfaeecookingwith
Iilfinite
Yoursurfaceunitsandcontrols
aredesignedtogiveyouaninfinite
choiceofheatsettingsforsurface
unitcooking.
AtbothOFFandHIGHpositions,
thereisaslightnichesocontrol
“clicks”atthosepositions;“click”
onHIGHmarksthehighestsetting;
thelowestsettingisbetweenthe
wordsLOWandOFF.Inaquiet
kitchen,youmayhearslight
“clicking”soundsduringcooking,
indicatingheatsettingsselected
arebeingmaintained.
Switchingheatstohighersettings
alwaysshowaquickerchangethan
switchingtolowersettings.
matControk
Howtosetthecontrols
pi
Step1:Graspcontrolknoband
pushin.
Step2:Turneitherclockwiseor
counterclockwisetodesiredheat
setting.
CookhgGuide
forusingHeats
HI
Mm
HI
Mm
Low
N(YrR
fd unattended.Boiloverscause
smoking;greasyspilloversmaycatch
fire.
2. AtW~M, LOW,meltchocolate,
butteronsmallunit.
Quickstartforcooking;bring
watertoboil.
Fastfry,panbroil;maintain
E@boilonlargeamountof
fd.
Sauteandbrown;maintain
slowboilonkwgeamount
offood.
CookafterstartingatHIGH;
cookwithlittlewaterin
coveredpan.
Steamrice,cereal;maintain
servingtemperatureofmost
foods.
1.AtHIGH,MEDHI, neverleave
@
Controlmustbepushedintoset
onlyfromOFFposition.When
controlisinanypositionother
thanOFF,itmayberotated
withoutpushing in.
sureyouturncontroltoOFF
Be
whenyoufinishcooking.An
indicatorlightwillglow when
ANYheatonanysurfaceunitison.
Page 19

Qt~estiom&Awwers
e
@
Q. MayI canfoodsandpreserves
onmysurfaceunits?
A. Yes,butonlyuseutensils
designdforcanningpurposes.Check
themanufacturer’sinstructionsand
recipesforpreservingfoods.13e
surecanneris’flat-bottomedand
fitsoverthecenterofyourCalrod@
unit.Sincecanninggenerateslarge
amountsofsteam,becarefulto
avoidburns”fromsteamorheat.
Canningshouldonlybedoneon
surfaceunits.
Q. Can1covermydrippanswith
foil?
A. No.
CleaningGuide.
Clean as recommendedin
HomeCanning~ps
Q.CanIusespecialcooking
equipment,likeanorientalwok,
onanysurfaceunits?
A. Utensilswithoutflatsurfaces
arenotrecommended.Thelifeof
yoursurfaceunitcanbeshortened
andtherangetopcanbedamaged
fromthehighheatneededforthis
typeofcooking.
Q. Whyam1notgettingtheheat
Ineedfrommyunitseventhough
1havetheknobsontheright
setting?
A. Afterturningsurfaceunitoff
andmakingsureitiscool,checkto
makesurethatyourplug-inunits
aresecurelyfastenedintothe
surfaceconnection.
Q.WhydomyutensilstiltwhenI
placethemonthesurfaceunit?
A. Becausethesurfaceunitis
notflat.Makesurethatthe “feet”
onyourCalrod”unitsaresitting
tightlyin therangetopindentation
andthereflectorringis flatonthe
rangesurface.
Q.Whyistheporcelainfinishon
mycontainerscomingoff?
A.
If you set yourCalrod@unit
higherthan required for the
containermaterial, and leaveit, the
finishmay smoke,crack, pop, or
bum depending on the pot or pan.
Also,a too highheat for long
periods, and smallamounts of dry
food,maydamagethefinish.
--
-
ii#Yw
e
Canningshouldbedoneon
cooktoponly.
In surface cooking of foodsother
than canning, the use oflargcdiameter utensils (extendingmore
than l-inchbeyondedgeoftrimring)
is not recommended. However,
when canning with water-bath or
pressure canner, large-diameter
utensils may be used. This is
because boiling water temperatures
(evenunder pressure) are not
harmful to cooktop surfaces
surrounding heating unit.
HOWEVER, DO NOT USE
LARGE DIAMETER CANNERS
OR OTHER LARGE DIAMETER
UTENSILS FOR FRYING OR
BOILING FOODS Ol?HER
THAN WATER. Most syrup or
sauce mixtures—and all types of
frying—cookat temperatures much
higher than boiling water. Such
-temperatures could eventually
harm cooktop surfaces surrounding
heating units.
observe FollowingPoints
canning
h
L Bring water to boil on HIGH
heat, then after boiling has begun,
adjustheat to lowest settingto
maintainboil (savesenergy and
best uses surface unit.)
2. Besurecannerfits overcenter
ofsurfaceunit.If yourrangedoes
notallowcannertobecenteredon
surfaceunit, usesmaller-diameter
containersforgoodcanningresults.
3. Flat-bottomedcannersgivebest
canningresults.Besurebottomof
cannerisflator slightindentation
fitssnuglyoversurfaceunit.
Cannerswithflangedor rippled
bottoms(oftenfoundinenamelware)
arenotrecommended.
RIGHT WRONG
4. Whencanning,userecipesfrom
reputablesources.Reliablerecipes
areavailablefromthemanufacturer
ofyourcanner;manufacturersof
glassjars forcanning,suchasBall
andKerr; andtheUnitedStates
DepartmentofAgriculture
ExtensionService.
5. Remember,infollowingthe
recipes,that canningisa process
thatgenerateslargeamountsof
steam.Becarefulwhilecanningto
preventburnsfromsteamorheat.
N~E: If yourrangeisbeing
operatedonlowpower(voltage),
canningmaytakelongerthan
expected,eventhoughdirections
havebeencarefi.dlyfollowed.The
processmaybeimprovedby:
(1)usingapressurecanner,and
(2)forfastestheatingoflarge
waterquantities,beginwith
HCYT.tapwater.
19
Page 20

SllrfaceCookingGuide
cookwareTips
1.Use medium-orheavy-weight
cookware.Aluminumcookware
conductsheatfasterthanother
metals.Castironandcoatedcast
ironcookwareisslowtoabsorb
heat,butgenerallycooksevenlyat
LOWor MEDIUMsettings.Steel
pansmaycookunevenlyif not
combinedwithothermetals.
Cookware
Cereal
Cornmeal,grits,
oatmeal
Cocoa
coffee Percolator
Eggs
Cookedinshell
Friedsunny-side-up
Friedovereasy
Poached
Scrambledoromelets
Fruits
Meats,Poultry
Braised:Potroastsof
beef,lamborveal;
porksteaksand
chops
Pan-fried:Tender
chops;thinsteaksup
to3/4-inch;minute
steaks;hamburgers;
franksandsausage;
thinfishfillets
Covered
Saucepan
Uncovered
Saucepan
Covered
Saucepan
Covered
Skillet
Uncovered
Skillet
Covered
Skillet
Uncovered
Skillet
Covered
Saucepan
Covered
Skillet
Uncovered
Skillet
Usenon-stickorcoatedmetal
cookware.Flat groundPyroceram@
saucepansorskilletscoatedonthe
bottomwithaluminumgenerally
cookevenly.Useglasssaucepans
withheat-spreadingtrivets
availableforthatPurpose.
.-
2. Toconservethemostcooking
energy,pansshouldbefiatonthe
bott6rn,-havestraightsidesandtight
DirectionsandSetting
toStartCooking
HI.Incoveredpanbring
watertoboilbeforeadding
cereal.
HI.Stirtogetherwateror
milk,cocoaingredients.
Bringjusttoaboil.
HI.Atfirstperk,switch
heattoLOW.
HI.Covereggswithcool
water. Coverpan,cook
untilsteaming.
MEDHI. Meltbutter,add
eggsandcoverskillet.
HI.Meltbutter.
HI.In coveredpanbring
watertoa boil.
HI.Heatbutteruntillight
goldenincolor.
HI,Incoveredpanbring
fruitandwatertoboil.
HI.Meltfat,thenaddmeat.
SwitchtoMEDHIto
brownmeat.Addwateror
otherliquid.
HI. Preheatskillet,then
greaselightly.
SettingtoComplete
CookingFood
LOWorWM,thenaddcereal.
Finishtimingaccording
topackagedirections.
MED,tocook1or2 minutes
tocompletelyblendingredients.
LOWtomaintaingentlebut
steadyperk.
LOW.Cookonly3to4
minutesforsoftcooked;
15minutesforhardcooked.
Continuecookingat MEDHI
untilwhitesarejustset, about
3 to5 moreminutes.
LOW,thenadd eggs.When
bottomsofeggshavejustset,
carefullyturnovertocook
otherside.
LOW,Carefullyadd eggs.
Cookuncoveredabout5
minutesatMEDHI.
MED.Addeggmixture.
Cook,stirringtodesired
doneness.
LOW.Stiroccasionallyand
checkforsticking.
LOW.Simmeruntilfork
tender.
MEDHIorMED.Brownand
cooktodesireddoneness,
turningoverasneeded.
fittinglids.Matchthesizeofthe
saucepantothesizeofthesurface
unit.Apanthatextendsmorethan
aninchbeyondtheedgeofthetrim
ringtrapsheatwhichcauses
“crazing”(finehairlinecracks)on
porcelain,anddiscoloration
;angingfrombluetodarkgrayon
chrometrimrings.
Comments
Cerealsbubbleandexpandas
theycook;uselarge enough
saucepantopreventboilover.
Milkboilsoverrapidly.Watchas
boilingpointapproaches.
Percolate8to 10minutesfor
8cups,lessforfewercups.
Ifyoudonotcoverskillet,baste
eggswithfattocooktopsevenly.
Removecookedeggswithslotted
spoonor pancaketurner.
Eggscontinuetosetslightlyafter
cooking.Foromeletdonotstir
lastfewminutes.Whenset,fold
inhalf.
Freshfruit:Use 1/4to 1/2cup
water perpoundoffruit.
Driedfruit:Usewateraspackage
directs.Timedependson whether
fruithasbeenpresoaked.Ifnot,
allowmorecookingtime.
Meatcanbeseasonedandfloured
beforeit isbrowned,ifdesired.
Liquidvariationsforflavorcould
bewine,fruitor tomatojuiceor
meatbroth.
Timing:Steaks1to2-inches:1 to
2hours.BeefStew:2to3 hours.
PotRoast:2%to4hours.
Panfryingisbestforthinsteaks
andchops.Ifrareisdesired,preheatskilletbeforeaddingmeat.
20
Page 21

3.DeepFatFrying.Do notoverfill
kettlewithfatthatmayspillover
whenaddingfood.Frostyfoods
bubblevigorously.Watchfoods
fryingatHIGHtemperaturesand
keeprangeandhoodcleanfrom
accumulatedgrease.
RIGHT
n
OVER1“
m
WRONG
Food
FriedChicken
Panbroiledbacon
Sauteed:Lesstender
thinsteaks(chuck,
round,etc.);liver;
thickorwholefish
Simmeredorstewed
meat;chicken;corned
beefismokedpork;
stewingbeet tongue;
etc.
Meltingchocolate,
butter,marshmallows
Pancakesor
Frenchtoast
R@””
Noodlesorspaghetti
.,
,
PressureCooking Pressure
Puddings,Sauces,
Candies,Frostings
Vegetables
Fresh
Frozen
Sauteed:Onions;
greenpeppers;
mushrooms;celery;etc.
RiceandGrits Covered
Cookware
Covered
Skillet
Uncovered
Skillet
Covered
Skillet
Covered
DutchOven,
Kettleor
Large
Saucepan
Small
Covered
Saucepan.
Usesmall
surfaceunit
Skilletor
Griddle
Covered
Largekettle
orPot
Cookeror
Canner
Uncovered
Saucepan
Covered
Saucepan
Covered
Saucepan
Uncovered
Skillet
Saucepan
DirectionsandSetting
toStartCooking
HI.Meltfat.SwitchtoMED
HItobrownchicken.
HI.Incoldskillet,arrange
baconslices.Cookjust
untilstartingtosizzle.
HI. Meltfat.Switchto MED
tobrownslowly.
HI. Covermeatwithwater
andcoverpanorkettle.
Cookuntilsteaming.
WM. Allow
meltthrough.Stirtosmooth.
MEDHI. Heatskillet8to
10minutes.Greaselightly.
HI.Incoveredkettle,bring
saltedwatertoa boil,uncover
andaddpastaslowlyso
boilingdoesnotstop.
HI.Heatuntilfirstjiggleis
heard.
HI. Bringjusttoboil.
HI. Measure1/2to 1 inch
waterinsaucepan.Add
saltandpreparedvegetable.
Incoveredsaucepanbring
toboil.
HI. Measurewaterandsalt
asabove.Addfrozenblock
ofvegetable.Incovered
saucepanbringtoboil.
HI.Inskilletmeltfat.
HI.Bringsaltedwatertoa
boil.
10to15minutesto
SettingtoComplete
Cooking Comments
LOW.Coverskilletand
cookuntiltender.
Uncoverlastfewminutes.
MEDHI.Cook,turning
overasneeded.
LOW.Coverandcook
untiItender.
LOW.Cookuntilfork
tender.(Watershould
slowlyboil).Forverylarge
loads,mediumheatmay
beneeded.
Cook2to3 minutesperside.
MEDHI.Cookuncovered
untiltender.Forlarge
amounts,HImaybe
neededtokeepwaterat
rollingboilthroughout
entirecookingtime.
MEDHIforfoodscooking
10minutesorless.MEDfor
foodsover10minutes.
LOW.Tofinishcooking. Stirfrequentlytoprevent
MED.Cook1pound10‘
to30or moreminutes,
dependingon tenderness
ofvegetable.
LOW.Cookaccordingto
timeonpackage.
MED.Addvegetable.
Cookuntildesired
tendernessisreached,
WM.Coverandcook
accordingtotime.
Forcrispdrychicken,coveronly
afterswitchingtoLOWfor 10
minutes.Uncoverandcook,turning
occasionally10to20minutes.
Amoreattention-freemethod
istostartandcookatMED.
Meatmaybebreadedor
marinatedinsaucebeforefrying.
Addsaltorotherseasoning
beforecookingifmeathasnot
beensmokedorotherwise
cured.
Whenmeltingmarshmallows,add
milkorwater.
Thickbattertakes slightlylonger
time.‘Ibrnoverpancakeswhen
bubblesrisetosurface.
Uselargeenoughkettleto
preventboilover.Pastadoubles
insizewhencooked.
Cookershouldjiggle2to3times
perminute.
sticking.
Uncoveredpan requiresmore
waterandlongertime.
Breakuporstiras neededwhile
cooking.
Turnoverorstirvegetableas
necessary forevenbrowning.
Tripleinvolumeaftercooking.
TimeatWM.Rice:1cupriceand
2cupswater–25minutes.Grits:
1cupgritsand4cupswater—
40minutes.
—.
21
Page 22

UsingYouroven
.AutomaticOwn Timer,
.MinuteTimer
OvenTimer Controls are designed
toautomatically start and stop
certain ovenfunctions (TIME
BAKEor CLEAN). Dials are
timedby a special Clock with index
marks (denoting numerals) and
hands. (For location, see page 8.)
To;et
Clock,pushinthecenter
knobofMinuteTimerandturnthe
Clockhandstocorrecttime,then
let knobout.
set Minute Timer, turn knob to
To
desired minutes. (Knob must be out
to set Minute Timer.) MinuteTimer
willbuzz when time has finished
and must be turned off manually.
Usethe MicrowaveOven Clock for
easyreference to time of day.
oven shelves
The shelves are designed with stop-
Iocks.When placed correctly on
shelfsupports, shelveswill stop
beforecoming completely from the
oven,and will not tilt when
removingfood nor when placing
foodon’them.
Toremove, lift up rear of shelf and
pullforward with stop-locksalong
topof shelf support.
Toreplace, insert shelf with stop-
Iocksresting on shelf supportsand
pushtoward rear ofoven until it
falls into correct position under
shelfsupports.
oven Light
The lightcomesonautomatically
whenthedoorisopened.Use
switchin upper right corner of
windowdoor to
dooris closed.
ttil-il lightonwhen
sheIfPositions
Theovenhasfourshelfsupports
markedA (bottom),B,C andD
(top).Shelfpositionsforcooking
foodaresuggestedonBaking,
RoastingandBroilingpages.
Baking
How toBake
Step L Place shelf on embossed
shelf support “B” or as indicated
on BakingGuide on nextpage.
Step
2:Aftermakingsuretheoven
doorisclosed,turn OVENSET
knobtoBAKE.Oven“On” Light
comesonandremainsonaslongas
OVENSETknobis onBAKE.
Step3: Turn OVEN TEMP knob to
the temperaturecalled for in recipe.
Oven CyclingLight comes on and
remains on until preset oven
temperatureis reached. It reappears
each time oventemperature drops
belowpreset temperature.
Step
4:SetyourMinuteTimerto
the desiredcookingtimeasindicated
inyourrecipe.If yourcookingtime
islongerthansixtyminutes,Minute
Timermustbereset.
Most foodscooksatisfactorily
withoutpreheating.Ifpreheatingis
required,putyourfoodin therange
promptlyafterOvenCyclingLight
goesout.
Step5:Placefoodinsidetheoven.
Makesureatleast1“ofspaceisleft
betweenthecookingcontainerand
theovenwallforproperheat
circulation.Closethe ovendoor.
NOTE:Avoidopeningyouroven
door frequently.Thiscould cause
undesirableresultsinyourbaking.
Checkfoodsonlyattheminimum
timeoftherecipe;thencooklonger
ifnecessary.
Step6: WhentheBAKEcycleis
complete,turnoffheat.When
cookingfoodforthefirsttimein
youroven,usethetimeonyour
recipeasa guide.Besurefoods are
donebeforeremovingfromoven.
Howto‘JkKReBake
YourAutomatic OvenTimer
controlsyour TimeBake feature.
When you Time Bake, your range
can be preset to start and stop
automaticallyifyouare not at home.
Step
1:BesuretheRangeClock
showsthecorrecttimeofday,since
theClockcontrolstheOven
Timers.TheStartDialpointer
mustindicatesametimeofdayas
onClock.If youwanttheovento
turnonata latertime,setthattime
bypushinginknobon StartDial
andturningpointerto timethatyou
wantovento start.(There’snoneed
tosetStartDialwhenstartingtime
isthepresenttimeofday.)
Step2: Todeterminestoptime,
addthefood’scookingtimetotime
setonStartDial.Pushin knobon
StopDialandturnpointertotime
ovenistoturnoff.
Step3:‘lhrnOVENSETknobto
TIMEBAKE.Oven“On” Light
comesonimmediately,evenifthe
starttimeis later.
Step4: TurnOVENTEMPknobto
temperaturesetting.OvenCycling
Lightwillcomeoneven though
heatisnoton intheoven,ifa later
starttimeisused.Youroven
automaticallyturnson andoffat
thetimesyouset,
Step5:Removefoodandturn
OVEN SETknobtoOFF.
Page 23

BaIKingGuide
1.Aluminum pans conductheat
quickly.For most conventional
baking,light,shinyfinishesgenerally absorb heat, which mayresult in
givebest results. They prevent
overbrowningin the time ittakes 25”F.if lighter crusts are desired.
for heatto cook the center areas.
Dull (satin-finish)bottomsurfaces
ofpans are recommended forcake food is added.
pans and pie platesto be sure those
areas browncompletely.
2. Dark or non-shinyfinishes,
glassand Pyroceram@utensilsoften minutes. For food with short
dry, crisp crusts. Reduce ovenheat best appearance and crispness. ~
Preheat cast iron forbaking some
foodsfor rapid browningwhen
3. Preheating the ovenis notalways
necessary,especially for foods
.. . .
-a- ..
—-
-w
which cook longer than 30 to40 _
cooking times, preheating gives
~~–
~
-
4. Open the ovendoor to check
foodas little as possible to prevent =
unevenheating and to saveenergy. =—
—.
~
k
Food Container Position Temperature Minutes
Bread
Biscuits(!~-in.thick) ShinyCookieSheet B,C 400°-4750 15-20 Canned,refrigeratedbiscuitstake
Coffeecake ShinyMetalPanwith
Cornbreadormuffins CastIronorGlass
Gingerbread ShinyMetalPanwith B 350° 45-55
Muffins ShinyMetalMuffinPans A,B 400°-4250 20-30 Decrease about5minutesformuffin
Popovers DeepGlassorCastIronCups
Quickloafbread
Yeastbread(2loaves)
Plainrolls ShinyOblongor MuffinPans A, B 375°-4250 10-25 Forthinrolls,ShelfBmaybeused.
Sweetrolls
Cakes
(withoutshortening)
Angelfood
Jellyroll
Sponge
Cakes
Bundtcakes MetalorCeramicPan
Cupcakes
Fruitcakes
Layer ShinyMetalPanwith
Layer,chocolate ShinyMetalPanwith
Loaf
Cookies
Brownies
Drop CookieSheet B,C 350°-4000 10-20 Use ShelfCandincreasetemp.
Refrigerator CookieSheet
Rolledorsliced CookieSheet
Fruits,
OtherDesserts
Bakedapples GlassorMetalPan
Custard
R.iddings,Rice
mdCustard
Pies
?rozen
Meringue Spreadtocrustedges
)riecrust GlassorSatin-finishMetal A,B
rwO crust
‘astryshell
Miscellaneous
lakedpotatoes SetonOvenShelf
;callopeddishes GlassorMetalPan A, B,C 325°-3750
;ouffies Glass
satin-finishbottom
satin-finishbottom
MetalorGlassLoafPans
MetalorGlassLoafPans
ShinyOblongorMuffinPans B,A 350°-3750
AluminumTubePan
MetalJellyRollPan B 375°-4000
MetalorCeramicPan
ShinyMetalMuffinPans
MetalorGlassLoafor A,B
TubePan individualcakes.
satin-finishbottom
satin-finishbottom
MetalorGlassLoafPans B
MetalorGlassPans B,C
Glass CustardCupsorCasserole B 300°-3500
(setinpanofhotwater)
GlassCustardCupsor B
Casserole
FoilPanonCookieSheet
GlassorSatin-finishMetal B 400°-4250
GlassorSatin-finishMetal
Shelf Oven Time,
B,A
B
B 375°
B
A, B 375°-4250
A 325”-375° 30-55 Two-piecepanisconvenient.
A 325°-3500 45-60
A,B
B
B
B
B,C
B,C
A,B,C
A 400°-4250 45-70 Largepiesuse400”F.andincrease
B,A
B
A, B,C
B
350°-4000
400°-4500 20-40 Preheatcastironpanforcrispcrust.
350°-3750 45-60
325°-3500
350°-3750
275°-3000
350°-3750
350”-375”
350°
325°-3500 25-35 Barcookiesfrommixusesametime.
400°-4250
375°-4000
350°-4000 30-60
325° 50-90
325°-3500
400°-4250
450°
325°-400” 60-90 ‘ Increasetimefor largeamount
300°-3500
20-30
45-60 mix,or bakeat450”F.for25 minutes,
45-60
20-30
10-15 Linepanwithwaxedpaper.
45-65
20-25
2-4hrs.
20-35
25-30
40-60
6-12 25”F.to50”F.formorebrowning.
7-12
30-60 Reducetemp.to300”F.forlarge
15-25
45-60 Custardfillingsrequirelower
40-60 temperature,longertime,
12-15
30-60
30-75
Comments
2 to4 minuteslesstime.
thenat 350”F.for10to15minutes.
Darkmetalorglassgivedeepest
browning.
Forthinrolls,ShelfBmaybeused.
Paperlinersproducemoremoist
crusts.
Use300°F.andShelfBforsmallor
custard.Cookbreadorricepudding
withcustardbase80to90minutes.
time.
Toquicklybrownmeringue,use
400”F.for8to 10minutes.
or size.
23
Page 24

RoastiIIg
—
Roastingiscookingbydryheat.
Tendermeatorpoultrycanbe
roasteduncoveredinyouroven.
Roastingtemperatures,which
shouldbelowandsteady,keep
spatteringtoaminimum.When
roasting,itisnotnecessaryto
sear,baste,coveroraddwater
toyourmeat.
Roastingisreallyabaking
procedureusedformeats.Therefore,
ovencontrolsaresettoBAKE.(You
mayhearaslightclickingsound,
indicatingtheovenisworking
properly.)Roastingiseasy;just
followthesesteps:
Step1:Checkweightofmeat,and
place,fatsideup,onroastingrack
inashallowpan.(Broilerpanwith
rackisagoodpanforthis.)Line
broilerpanwithaluminumfoilwhen
usingpanformarinating,cooking
withfruits,cookingheavilycured
meats,orforbastingfoodduring
cooking.Avoidspillingthese
materialsonovenlinerordoor.
Step2:Placeinovenonshelfin
Aor Bposition.Nopreheatingis
necessary.
Step4:Mostmeatscontinueto
cookslightlywhilestanding,after
beingremovedfromtheoven.For
rareormediuminternaldoneness,
ifmeatistostand10to20minutes
whilemakinggravy,orforeasier
carving,youmaywishtoremove
meatfromovenwheninternal
temperatureis5to 10”F.below
temperaturesuggestedinguide.
Ifnostandingisplanned,cook
meattosuggestedtemperaturein
guideonoppositepage.
N(Y17E:Youmaywishtouse TIME
BAKE,asdescribedonpage22,to
turnovenonandoffautomatically.
Rememberthatfoodwillcontinue
tocookinthehotovenandtherefore
shouldberemovedwhenthedesired
internaltemperaturehasbeen
reached.
~0~ fioz~~
Frozenroastsofbeef,pork,
o
lamb,etc.,canbestartedwithout
thawing,butallow10to25minutes
perpoundadditionaltime(10
minutesperpoundforroastsunder
5pounds,moretimeforlarger
roasts).
Roasts
Questiomandhsvwixs
Q.Isitnecessarytocheckfor
donenesswithameatthermometer?
A. Checkingthefinishedinternal
temperatureatthecompletionof
cookingtimeisrecommended.
TemperaturesareshowninRoasting
Guideonoppositepage.Forroasts
over8pounds,cookedat300°F.
withreducedtime,checkwith
thermometerathalf-hourintervals
afterhalfthetimehaspassed.
Q.Whyismyroastcrumbling
whenItrytocarveit?
A. Roastsareeasiertosliceif
allowedto cool10to20minutes
afterremovingfromoven.Besure
tocut acrossthe grainofthemeat.
Q.DoI needtopreheatmy
oveneachtimeIcookaroast
orpoultry?
A. It israrelynecessarytopreheat
youroven,onlyforverysmall
roasts,whichcookashortlength
oftime.
Q.Whenbuyingaroast,are
thereanyspecialtipsthatwould
helpmeioik itmoreevenly?
A. Yes.Buyaroastas evenin
thicknessaspossible,orbuyrolled
roasts.
Q.CanI sealthesidesofmyfoil
“tent”whenroastingaturkey?
A. Sealingthefoilwillsteamthe
meat.Leavingitunsealedallowsthe
airtocirculateandbrownthemeat.
e
e
e
Step3:‘lhrnOVENSETtoBAKE
andOVENTEMPto325”F.Small
poultrymaybe cookedat375°F.
forbestbrowning.
o Thawmostfrozenpoultrybefore
roastingtoensureevendoneness.
Somecommercialfrozenpoultry
canbecookedsuccessfullywithout
thawing.Followdirectionsgiven
onpacker’slabel.
24
Page 25

RoastingGuide
1.PositionovenshelfatBfor
@
small-sizeroasts(3to 7 lbs.)and
atAforlargerroasts. ‘
2. Placemeatfat-sideup,orpoultry
breast-sideup,onbroilerpanor
othershallowpanwithtrivet.Do
notcover.Donotstuffpoultryuntil
justbeforeroasting.Usemeat
probeformoreaccuratedoneness.
Controlsignalswhenfoodhas
reachedsettemperature.(Donot
placeprobein stuffing.)
NW
Meat
Tendercuts;rib,highqualitysirlointip,
rumportopround*
LambLegorbone-inshoulder*
Vealshoulder,legorloin*
Porkloin,riborshoulder*
Ham,precooked
Ham,raw
*Forbonelessrolledroastsover6-inchesthick,add5to 10minutesperpoundtotimesgivenabove.
3.Removefatanddrippingsas
necessary.Basteasdesired.
4.Standingtimerecommendedfor
roastsis10to20minutestoallowroast
tofirmup andmakeiteasierto
carve.Internaltemperaturewillrise
about5° to 10°F.;tocompensatefor
5.Frozenroastscanbe
conventionallyroastedbyadding
10to25minutesperpoundmore
timethangiveninguidefor
refrigeratedroasts.(10minutes
perpoundforroastsunder5pounds.)
Defrostpoultrybeforeroasting.
temperaturerise,ifdesired,remove
roastfromovenat5°to 10°F.less
thantemperatureonguide.
Oven
Temperature Doneness
325°
325°
325° WellDone:
325° WellDone:
325° ToWarm:
325° WellDone: 20-30 17-20
h-e:
Medium: 30-35 22-25
WellDone:
Rare:
Medium:
WellDone:
ApproximateRoastingTime, Internal
inMinutesperPound Temperature“F
3to5-lbs.
24-30
35-45 28-33 170°-1850
21-25
25-30 24-28
30-35
35-45
3545
10minutesperpound(anyweight)
Under10-lbs. 10to15-lbs.
6to8-lbs.
18-22
20-23 130°-1400
28-33
30-40
30-40
130°-1400
150°-1600
150°-1600
170°-1850
170°-180°
170°-1800
125°-1300
160°
Rmltry
flhickenorDuck 325°
~hickenpieces
llrkey
375°
325° WellDone:
WellDone:
WellDone:
3 to5-lbs.
35-40 30-35 185°-190°
35-40
10tolS-lbs.
20-25 15-20
Over5-lbs.
185°-1900
Over15-lbs. Inthigh:
185°-1900
25
Page 26

Broiling
Broilingis cookingfoodbyintense
radiantheatfromtheupperunitin
theoven.Mostfishandtendercuts
ofmeatcanbebroiled.Follow
thesestepstokeepspatteringand
smokingtoa minimum.
Step 1:Ifmeathasfator gristlenear
edge,cutverticalslashesthrough
bothabout2“apart.If desired,fat
maybetrimmed,leavinglayer
about1/8”thick.
Step 2: Placemeatonbroilerrack
inbroilerpan whichcomeswith
range.Alwaysuseracksofatdrips
intobroilerpan;otherwisejuices
maybecomehotenoughtocatch
fire.Aluminumfoilmaybeusedto
linebroilerpanandrack. But,be
CERTAINto cutopeningin foil,to
correspondwithslitsin therack,
sofatdripsintopanbelow.
Step3:
shelf positionassu~ested inBroiling
Guideonoppositepage.Most
broilingisdoneonCposition,but
ifyourrangeisconnectedto208
volts,youmaywishtousehigher
position.
I
I%sitionshelfon-remended
--— 1
Step5: TurnbothOVENSETand
OVEN TEMPknobstoBROIL.
Preheatingunitsisnotnecessary.
(Seenotes inBroilingGuide.)
I
IIII
Step 6:Turnfoodonlyonceduring
cooking.Timefoodsforfirstside
perBr~ilingGuide.
Turnfood,thenusetimes givenfor
secondsideasa guidetopreferred
doneness.(Wheretwothicknesses
andtimesaregiventogether,use
firsttimesgivenforthinnestfood.)
Step Z TurnOVENSETknobto
OFF.Servefoodimmediately,and
leavepanoutsideoventocool
duringmealforeasiestcleaning.
Questiom&Answers
Q.WhyshouldIEeavethedoor
closedwhenbroilingchicken?
A. Chickenistheonlyfood
recommendedforclosed-door
broiling.Thisisbecausechickenis
relativelythickerthanotherfoods
youbroil.Closeddoorholdsmore
heatin oven, sochickenmaybe
broiledbutwell-doneinside.
Q.Whenbroiling,is itnecessary
toalwaysusea rackinthepan?
A. Yes.Usingtherack suspends
the meatoverthepan.Asthemeat
cooks,thejuicesfallintothepan,
thuskeepingmeatdryer.Juices
areprotectedbytherackandstay
cooler,thuspreventingexcessive
spatterandsmoking.
Q.ShouldIsaltthemeatbefore
broiling?
A. No.Saltdrawsoutthejuices
andallowsthemto evaporate.
Alwayssaltaftercooking.Turn
meatwithtongs;piercingmeat
withaforkalsoallowsjuicesto
escape.Whenbroilingpoultry
or fish,brusheachsideoften
withbutter.
Q.Whyaremymeatsnotturning
outasbrownastheyshould?
In some areas, the power
A.
(voltage)to the range maybe low.
In these cases, preheat the broil
unitfor 10minutesbefore placing
broiler pan with food in oven.
Check to see if youare using the
recommended shelf position. Broil
forlongestperiod of time indicated
in the Broiling Guide. Turn food
only once during broiling.
Step4:
Th~ door staysopen-byitself, yet
the proper temperatureis maintained
intheoven.
Leavedoor ajarafewinches.
26
Q.
DoIneedtogreasemybroiler
rackto preventmeatfrom
sticking?
A. No.Thebroilerrackisdesigned
toreflectbroilerheat,thus keeping
thesurfacecoolenoughtoprevent
meatstickingtothesurface.However,
sprayingthebroilerracklightlywith
avegetablecookingspraybefore
cookingwillmakeclean-upeasier.
Page 27

L Alwaysuse broiler pan and rack
———
that comes with
youroven.It is
designedto min~mizesmokingand
spatteringby trappingjuices in the
shieldedlower part of the pan.
2. Ovendoor shouldbeajar for
most foods; there is a special
positionon door which holds door
open correctly.
3. For steaks’andchops,slashfat
evenlyaroundoutsideedgesof meat.
Toslash,cutcrosswisethrough
outerfatsurfacejustto theedgeof
themeat.Usetongstoturnmeat
overtopreventpiercingmeatand
losingjuices.
4. If desired,marinatemeatsor
chickenbeforebroiling.Or brush
withbarbecuesaucelast5to 10
minutesonly.
5. Whenarrangingfoodonpan,
donotletfattyedgeshangover
sides,whichcouldsoilovenwith
fatdripping.
6. Broilerdoesnotneedtobe
preheated.However,forverythin
foods,ortoincreasebrowning,
preheatifdesired.
7.
FrozenSteakscanbe
conventional~ybroiledby
-
-“A
~
——
~
-=
-
--
positioningtheovenshelfatnext =.
lowestshelfpositionandincreasing =
cookingtimegiveninthisguide
1%timesper side.
-
-
8. If your rangeisconnectedto =:
208Volts,raresteaksmaybebroiled =“
bypreheatingbroilheaterand
positioningtheovenshelfone
positionhigher.
Food
Bacon M-lb.(about8
GroundBeef l-lb.(4patties) Spaceevenly.
WellDone %to%-in.thick
BeefSteaks
Rare l-inchthick
Medium (1to 1%-lbs.) c 9 9 beforebrowning.Panfryingis
WellDone
Rare 1%-in.thick c 10 7-8 Slashfat.
Medium (2to2%4bs.)
Well Done
Chicken
BakeryProducts
Bread(Toast)or 2 to4slices
ToasterPastries 1 pkg.(2)
EnglishMuffins 2(split)
LobsterTails 2-4 B
(6to8-02.each)
Fish l-lb.fillets%to
RamS1ices l-in.thick B 8
‘precooked)
—
?orkChops 2(% inch) c 10
NellDone 2 (l-in.thick) B 13
mmbChops
dedium
VeilDone about10to 12oz.
Vledium 2(1%inch)
WellDone about1 lb. B 17
Wienersandsimilar l-lb. pkg.(10)
)recookedsausages,
)ratwurst
Quantjtyandlor
Thickness
thinslices)
1 whole
(2to2%4bs.),
splitlengthwise withmeltedbutter.Broilwithskin
%-in.thick
about1lb.
2(1 inch)
Shelf
Position Time,Minutes
c
c
c
c 13
c
c
A
c 1%-2
c
c
c 8
c 10
c
c 6
FirstSide
3%
7
7 7
15
25
35
3-4
SecondSide
Time,Minutes
20-25
13-16 Donot
turnover. open.Brushwithmeltedbutter
5
10
12-14
Comments
31/.4
4-5 Upto8pattiestakeaboutsametime.
13
14-16
10-15 Reducetimes about5to 10minutesper
‘/2 Spaceevenly.PlaceEnglishmuffins
5 Handleandturnverycarefidly.
8
10 Slashfat.
13
4-7
10
4-6
1-2
Arrangeinsinglelayer.
Steakslessthan1inchcookthrough
recommended.
sideforcut-upchicken.Brusheachside
downfirstandbroilwithdoorclosed.
cut-side-upand brushwithbutter,if
desired.
Cutthroughbackofshell.Spread
beforeandafterhalftime.
Brushwithlemonbutterbeforeand
duringcookingifdesired.Preheat
broilertoincreasebrowning.
Increasetimes5to 10minutesperside
for1%-inchthickorhomecured.
Slashfat.
Ifdesired,splitsausagesinhalf
lengthwiseinto5to6-inchpieces.
27
Page 28

careandcleaning
Propercareand cleaningareimportantso yourCooking Centerwill
giveyouefficientandsatisfactory
service.Follow thesedirections
carefullyincaringfor it to help
assuresafeandpropermaintenance.
BE SURE ELECTRICPOWERIS
OFF BEFORE CLEANINGANY
PART OF YOURCOOKING
CENTER.
ControlPanels
Don’t use sharp-edged utensils
around the control panels. They
might damage it.
Clean the panels with a lightly
dampened cloth. DO NOT USE
cleaning sprays or large amounts of
soap and water. These can cause
problems with the control
mechanisms.
TemperatureProbe
The probe is sturdy, but care
should be taken in handling it.
Do not twist it. Avoid dropping it.
Clean as soon as possibleafter use.
Wipeit with a sudsy cloth, then rub
metal parts with a plastic scouring
pad if necessary. Rinse and dry.
DO NOT wash the probe in an
automatic dishwasher.
AJurninum l?oii cm She]vesWilyJ’OLII
DO NOT place a sheet of aluminum foil on any shelfin either your
microwave or conventional oven. If
youdo, your foods may not cook
properly. The oven finish may be
damaged. And there may be an
increase in heat on the outside
surfaces of the oven.
shouldn’tUseit
OvenLamp
The oven lamp bulb is long-lasting.
Only a qualified servicetechnician
should replace it.
DOUBLEDUTY*M
ShelfAccessory
Your shelfaccessory is designed for
use in a microwave oven only; do
not use in a conventional oven. Do
not use a browning dish with the
shelf.Arcing could occur.
Clean shelf with mild soap and
water or in the dishwasher. Do not
remove plastic spacers from the
shelfwhen cleaning. Do not clean
in self-cleaningoven.
PrecautionsforUseof Metal
Use metal only as directed in the
Cookbook. Metal trays no more
than 3/4” deep may be used for TV
dinners, and the metal temperature
probe is designed for microwave
oven use. Always keep metal at
least one inch away from sides
of oven.
Cleaning-Outside
Clean the outside of your microwave oven with soap and water,
then rinse and dry. The outer pane
of the window is glass. Wipe it
clean with a damp towel. Chrome is
best wiped with a damp cloth and
then with a dry towel.
Cleaning-Inside
Keepit cleanandsweet-smelling.
Opening the oven door a few minutes after cooking helps air out the
inside. An occasional thorough wiping with a solution of baking soda
and water keeps the interior fresh.
Spillsand spattersareeasy to removefromwalls,floor and antenna
cover.That’s because there’s little
heat except in the food, or sometimes in the utensil. Some spatters
wipe up with a paper towel, some
may require a damp cloth. Remove
greasy spatters with a sudsy cloth,
then rinse and dry.
NEVER USE A COMMERCIAL
OVEN CLEANER ON ANY
PART OF YOURMICROWAVE
OVEN.
Wipeup spatterson the glasson
the insideof the door daily.Wash
glass, when it’ssoiled, with a minimum of sudsy, warm water. Rinse
thoroughly a~d dry.
Wipemetalandplasticpartson the
insideof the door freq~ently.
damp cloth to remove all soil. DO
NOT USE ABRASIVES, such as
cleaning powders or steel and
plastic pads. They may mar the
surface.
Door Surface.When cleaning sur-
faces of door and oven that come
together on closing the door, use
only mild, non-abrasive soaps or
detergents applied with a sponge
or soft cloth.
Do not removethe plasticantenna
coverat the top of the oven (see
page
8.)Youwilldamagethe oven
Usea
ifyoudo.
Using a Brown‘NSear Dish? Use
BarKeepersFriend@Cleanser.
High heat generated on the bottom
of the Brown ‘N Sear Dish can
cause scorched appearing stains to
bake onto the oven floor if grease is
present. These may be removed
with Bar Keepers Friend@Cleanser
by SerVaas Laboratories, Inc.
After using this cleaner, rinse and
dry thoroughly, following instruc-
tions on can. Do not use it on the
painted surfaces such as the walls—
it may scratch the paint.
Bar Keepers Friend@Cleanser is
sold in many grocery, hardware
and department stores.
28
Page 29

AdjustingOvenThermostat
—-—.
When cooking a food for the first
i
ime in your new oven, use time
m
given on recipe as a guide. Oven
thermostats, over a period of years,
may “drift” from the factory setting
and differences in timing between
an old and a new oven of 5 to 10
minutes are not unusual. Yournew
oven has been set correctly at the
factory and is more apt to be accurate than the oven which it replaced.
However, if you find that your
foods consistently brown too little
or too much, you may make a
simple adjustment in the thermostat
(Oven Temp) knob.
PULL KNOB OFF OF SHAFT,
LOOK AT BACK OF KNOB AND
NOTE CURRENT SETTING,
BEFORE MAKING ANY
DJUSTMENT.
LampReplacement
CAUTION:Beforereplacingyour
ovenlampbulb,disconnectthe
electricpowerfor yourCooking
Centerat themainfuseor circuit
breakerpanel.Be sure to let the
lamp cover and bulb cool completely before removing or
replacing them.
-’0
Toremove:
@Take out 3 slotted screwsas
shown in lamp diagram.
. Detach lamp cover and remove
bulb.
Toreplace:
@Put in a new 40-watt appliance
bulb.
~ Install lamp cover. Replace 3
screwsand tighten them, making
sure cover fits flush with oven wall.
UIReconnect electric power to the
Cooking Center.
UseofAluminumFoilin
Broiiing
If you wish, you may line the
broiler pan with aluminum foil and
cover the rack with it for broiling.
ALWAYSBE SURE TO MOLD
THE FOIL THOROUGHLY TO
THE BROILER RACK AND
SLIT THE FOIL TO CONFORM
WITH SLITS IN THE RACK.
Stopping fat and meat juices from
draining into the broiler pan prevents the rack from serving its purpose and MAY LET JUICES
BECOME HOT ENOUGH TO
CATCH FIRE.
I?emovableOvenDoor
/1
\\
Pull off knob. Movepointer one
notch in desired direction. RAISE
to increase, LOWER to decrease.
Each notch changestemperature
10degrees.
~Return knob to the range by
matching the flat area of the knob
to the shaft.
~Recheckovenperformancebefore
making an additional adjustment.
OvenVentDuct
Oven is vented through a duct
located under the right rear
Calrod@unit. To clean duct: re-
move Calrod@unit and drip pan/
ring. Lift out vent duct. In replacing, make sure the duct opening is
under the opening in drip pan.
Correct positioning is important to
allow moisture and vapors to be
released from oven. Never cover
the hole.
TO REMOVE door, open to
BROIL position, or where you feel
hinge catch slightly. Grasp door at
sides;lift door up and away from
hinges.
TO REPLACE, grasp door at sides,
Line up door with hinges and push
door firmly into place.
29
..-.-...
--
Page 30

operatingtheself-cleaningoven
Before
Settingoven
Contr(lls,checkThese
Step 1:
,+..
..
Removebroilerpan,broilerrack
andothercookwarefromtheoven.
(Ovenshelvesmaybeleftinoven.
Note:Shelvesmaybecomegray
afterseveralcleanings.)
Step2:
Wipeup heavy soilon oven
bottom.
A. OvenFrontFrame
B. OvenDoorGasket
C. OpeningsinDoor
D. OvenLight
step3:
Cleanspattersor spillsonoven
frontframe(A)andovendoor
outsidegasket(B)witha dampened
cloth. Polishwithadrycloth.Do
notcleangasket(B).Donotallow
waterto run downthroughopenings
intopofdoor(C). Neverusea
commercialovencleanerinor
aroundself-cleaningoven.
Step5:
The porcelain-enameleddrippans
thatcamewithyourrangecanbe
cleanedautomaticallyintheselfcleaningoven.Wipeoffboilovers
that arenotstuckonbeforeplacing
twopans,upsidedown,oneach
ovenshelf.
Caution:Chrometrimringsaround
the surfaceunitsshouldneverbe
cleanedin theself-cleaningoven.
Neithershouldreflectorpansoffoil
orshinychrome.
How to set oven
for cleating
Step1:
‘km OVENSETandOVEN
TEMPknobstoCLEAN.Controls
willsnapintofinalpositionwhen
the CLEANlocationisreached.
Step2:
and hold in LATCH
Fush
RELEASEBUTTON
slidingLA~H HANDLEtothe
rightasfaras itwillgo.
while
LOCKED LATCHRELEASE
e
-.
/
P
I
/ t
Step3:
Setthe
@Makesureboththerangeclock
andtheSTARI’dialshowthecorrect
timeofday.Whenthe STARTknob
ispushedinandturned,itwill“pop”
intoplacewhenthetimeshownon
therangeclockisreached.
~Decideoncleaninghours
necessary.
RecommendedCleaningTime:
ModerateSoil—2hours
(thinspillsandlightspatter)
HeavySoil—3hours
(heavy,greasyspillsandspatter)
oAddthesehourstopresenttime
ofday,thenpushinandturnSlOP
dial clockwisetothisdesiredstop
time.CLEANINGlightglows,
showingcleaningisstarting.
TheLOCKEDlightwillglow,
indicatingovenishotanddoor ~
cannotbeopened.Ovendoorand
windowgethotduringself-cleaning.
DON(YTTOUCH.
automaticoventimer:
step4:
Closeovendoorandmakesure
ovenlight(D)isoff.
30
Page 31

FM(NVThesestepsafter
self-cleaning
Aftercleaningiscomplete,the
door willstaylockeduntiltheoven
coolsandtheLOCKEDlightgoes
off.Thistakesabout30minutes.
LOCKED LATCHRELEASE
I
step 1:
WhenLOCKEDlightisoff,push
andholdinLATCHRELEASE
BUTTONwhileslidingLATCH
HANDLEto theleftasfaras it
willgoandopenthedoor.
Step2:
TurnOVENSETknobto OFF.
Step 3:
TurnOWN TEMP knob to W-.
NOTE:If youwishto startand
stopcleaningatalatertimethan
shownonclock,pushinandturn
ST~ dialtotimeyouwishtostart.
Addthehoursneededforcleaning
tothis“start”time,thenpushin
andturnSTOPdialtothisdesired
stoptime.Ovenwillautomatically
turnonandoff at thesettimes.
QuestionsandAmwers
Q.Whywon’tmyovenclean
immediatelyeventhoughIset
allthetimeandcleanknobs
correctly?
A. Checktobe sureyourSTART
dialissettothesametimeasthe
rangeclock.Alsochecktobesure
I
LA~H HANDLEismovedtothe
right.
Q. Ifmyoven
can 1still self-dean my oven?
A. No.YourAutomaticOven
Timerusestherangeclocktohelp
startandstopyourself-cleaning
cycle.
Q. CanI usecommercialoven
cleanersonanypartofmy
self-cleaningoven?
A. Nocleanersorcoatingsshould
beusedaroundanypartofthis
oven.Ifyoudousethemanddonot
wipetheovenabsolutelyclean,the
residuecanscartheovensurface
anddamagemetalpartsthenext
timetheovenisautomatically
cleaned.
Q. CanIcleantheWovenGasket
aroundtheovendoor?
A. No,thisgasketisessentialfor
agoodovenseal,andcaremustbe
takennot to rub,damageormove
thisgasket.
Q. Afterhavingjust usedthe
theLOCKEDlightcame
oven,
onandIcouldnotmovethe
LATCHHANDLE.Why?
A. Afterseveralcontinuoushigh-
temperature+xdcingsor broilings,
theLOCKEDlightmaycomeon.
Theovendoorcan’tbelatchedfor
self-cleaningwhiletheLOCKED
lightison. If thishappens,letthe
ovencooluntil theLOCKEDlight
goesoff. Thentheovendoorcan
belatchedfor self-cleaning.
Q. WhatshouldIdoif excessive
smokingoccursduringcleaning?
A. Thisis causedbyexcessivesoil,
andyoushouldswitchtheOVEN
clockisnotworking,
SETknobtoOFF.Openwindows
toridroomofsmoke.Allowthe
oventocoolforatleastonehour
beforeopeningthe door.Wipeup
theexcesssoilandresettheclean
cycle.
Q. Is the “crackling”soundI
hearduringcleaningnormal?
A. Yes.Thisisthemetalheating
andcoolingduringboththe
cookingandcleaningfi.mctions.
Q. Shouldtherebeanyodor
duringthecleaning?
A. Yes,theremaybea slightodor
duringthe firstfewcleanings.
Faiiuretowipeoutexcessivesoil
mightalsocauseanodorwhen
cleaning.
Q. Whatcausesthehair-like
linesontheenameledsurface
ofmyoven?
A. Thisisanormalcondition
resultingfromheatingandcooling
duringcleaning.Theydonotaffect
howyourovenperforms.
Q. WhydoI haveashleftinmy
ovenaftercleaning?
A. Sometypesofsoilwillleavea
depositwhichisash.It canbe
removedwithadampspongeor
cloth.
Q. Myovenshelvesdonotslide
easily.Whatisthematter?
A. Aftermanycleanings,oven
shelvesmaybecomesocleanthey
donotslideeasily.Ifyouwish
shelvestoslidemoreeasily,
dampenfingerswitha small
amountofcookingoilandrub
lightlyoversidesofshelfwhere
theycontactshelfsupports.
Q. Nlyovenshelveshavebecome
grayafterseveralcleanings.Is
thisnormal?
A. Yes.Aftermanycleanings,the
shelvesmaylosesomelusterand
discolortoa deepgraycolor.
31
Page 32

Phg-h surfaceU-&$
.—— ——.——.-
e
‘e
Cleantheareaunderthedrippans
oilen.Built-upsoil,especially
grease,maycatchfire. Tomake
cleaningeasier,theplug-insurface
unitsareremovable.
Terminals
Toremove:
sure the control for the surface
eBe
unitis on OFF and the coilsare cool
before removing the Calrod@unit.
~Raise the unit coil oppositethe
receptacle. Lift about one inch
abovethe trim ring and pull away
from the receptacle.
Note: The drip pan must
thetrimring.
beunder
TOclean:
oWipearoundtheedgesofthe
surfaceunitopeningin the~ange
top.Cleantheareabelow.Rinse
allwashedareaswithadampcloth
or sponge.
Toreplace:
ePlacedrippaninthesurfaceunit
cavityfoundontopoftherange.
Line upthedrippansotheunit
receptaclecanbeseen.
. Inserttheterminalsoftheplug-in
unitthroughtheopeninginthedrip
I
panandintothereceptacle.
oGuidethesurfaceunitintoplace
soitfitsevenlyandlockssnugly
intothereceptacleortrim ring.
Note:Thedrippan
thetrimring.
Donotattempttoclean,adjust,
orinanywayrepairtheplug-in
receptacle.Ifliquidshouldspill
andcollectinsidethereceptacle,
callforservice.
must beunder
32
Page 33

cleaningGuide
NOTE:Letrange/ovenpartscoolbeforetouchingorhandling.
PMT
BakeUnitandBroil
Unit
Broiler Pan and Rack oSoapandWater
Control Knobs:
RangeTopand Oven
Outside Glass Finish
Metal,including
ChromeSideTrims
andTrimStrips
PorcelainEnamel
Surface*
InsideOvenDoor* g SoapandWater
OvenGasket*
OvenLiner*
Shelves
~SeeSelf-Cleaning
OvenDirections.)
2alrod” Surface
UnitCoils
~hrome-Plated
kimRings
‘orcelainDrip Pans
.
*Spillageofmarinades,fruitjuices,andbastingmaterialscontainingacidsmaycausediscoloration.Spilloversshouldbewipedupimmediately,
withcarebeingtaksntonottouchanyhotportionof the oven.Whenthesurfaceis cool,cleanandrinse.
IMATERIALS‘IllUSE I GENERALDIRECTIONS
Do notcleanthebakeunitorbroilunit.Anysoilwillburn offwhentheunitis
heated.Fd~E: Thebakeunitis nothingedandcannotbeliftedtocleantheoven
floor.Ifspillover,residueorashaccumulatesaroundthebakeunit,gentlywipe
aroundtheunitwithwarmwater.
eSoap-FilledScouringPad
~PlasticScouringPad
@MildSoap and Water Pull off knobs. Washgently butdo not soak. Dry and return controls to range,
● SoapandWater
*SoapandWater Wash,rinse,andthenpolishwithadrycloth.DONOI’USEsteelwool,abrasives,
@PaperTowel I Avoidcleaningpowdersorharshabrasiveswhichmayscratchtheenamel.
~DryCloth
~SoapandWater
eSoapandWater
eSoapand Water
e-Soapand Water
e Stiff-BristledBrush
~Soap-FilledScouringPad
(Non-metallic)
~SoapandWater
e Soap-FilledScouringPad
@PlasticScouringPad
@Dishwasher
Drainfat,coolpanandrackslightly.(Donotletsoiledpanandrackstandinovento
cool.)Sprinkleondetergent.Fillpanwithwarmwaterandspreadclothorpapertowel
overtherack.Letbothstandfora fewminutes.Wash;scourifnecessary.Rinseand
dry.OIWION:Thebroilerpanandrackmayalsobe cleanedinadishwasher.
makingsuretomatchflatareaontheknobandshaft.
Washallglasswithclothdampenedinsoapywater.Rinseandpolishwithadry
cloth.Ifknobsonthecontrolpanelareremoved,donotallowwatertorundown
insidethe surikceofglasswhilecleaning.
ammonia,acids,orcommercialovencleanerswhichmaydamagethefinish.
Ifacidsshouldspillontherangewhileitis hot,usea drypapertowelorclothto
wipeuprightaway.Whenthesurfticehascooled,washandrinse.
Forotherspills,suchasfatsmatterings,etc., washwithsoapandwaterwhencooled
andthenrinse.Polishwithdrycloth.
Onthisoven,cleanONLYthedoorlineroutsidethegasket.Thedoorisautomatically
cleanediftheovenisintheself-cleaningcycle.Ifspilloverorspatteringshould
occurincookingfunction,wipethedoorwithsoap andwater.DON~ rubor
damagegasket.Avoidgettingsoapandwateronthegasketorintherectangular
flangesonthedoor.
AvoidgettingANYcleaningmaterialson thegasket.
Coolbeforecleaning.Frequentwipingwithsoapandwaterwillprolongthetime
betweenmajorcleanings.Besuretorinsethoroughly.Forveryheavysoiling,use
yourself-cleaningcycleofien.
Yourshelvescanbecleanedwiththeself-cleaningfunctionintheoven.Forheavy
soil,cleanbyhand,usinganyandall mentionedmaterials.Rinsethoroughlyto
removeall materialsaftercleaning.
Spattersandspillsburnawaywhenthecoilsareheated.Attheend ofa meal,
removeall utensils from the Calrod@unit and heat the soiled units at HI. Let the
soil bum off about a minute and switch the
materialsonthecoils.Wipeoffanycleaningmaterialswitha damppapertowel
beforeheatingtheCalrod@unit.
I DONOThandletheunitbeforecompletelycooled.
DON~ self-cleanplug-inunits,
I
I DONOI’immerseplug-inunitsinanykindofliquid.
Cleanasdescribedbeloworinthedishwasher.DO
SELF-CLEANINGFUNCTION.Ringswilldiscolor.
Wipeallringsaftereachcookingsounnoticedspatterwillnot“burnon” nexttime
youcook.Toremove“burned-on”spatters,useanyor allcleaningmaterials
mentioned.Rublightly withscouringpadtopreventscratchingofthesuri%ce.
Coolpan slightly.Sprinkleondetergentandwashorscourpanwithwarmwater.Rinse
anddry.Inaddition,panmaybecleanedinthedishwasheror inself-cleaningoven.
unitstoOFF.Avoidgettingcleaning
NOTCLEANONTHE
33
Page 34

...
...-.—.—.
.m.&+&=-=
-=
---
—-lz” ‘- ---
-.=%==-.A%==
---
.. .
.-.
“—~-a:-.=.
----:..QThj...—..
~:=
----&.;:z2;;
_.—-.Q.&h_&__. .- _-. . .
-- —.—--..2w ------..—.—_..+im-,,*_.
-. -..-—-
. . . . .. . . . . .-. -_. —-
_ ..-. -.+. -—-.—.— y
“-%=%=%%=’
Qllestiolu?
UseThis
ProblemSolver
PROBLEM
OVEN WILLN(YI’
WORK
OVENLIGHTDOES
NOI’WORK
FOODDOESNOI’
BROILPROPERLY
FOODDOESNCYr
ROASTORBAKE
PROPERLY
POSSIBLECAUSEANDREMEDY
~Plugonrangeisnotcompletelyinsertedintotheoutletreceptacle.
@Thecircuitbreakerinyourhousehasbeentripped,ora fise hasbeenblown.
s Ovencontrolsarenotproperlyset.
*Doorlefiinlockedpositionaftercleaning.r
@Lightbulbisloose.
~ Bulbisdefective.Replace.’
o Switchwhichoperatesovenlightisbroken.Callforservice.
~OVENSETknobnotsetatBROIL.
~ OVENTEMPknob not”setatBROIL.
gDoornotleftajarasrecommended.
@Impropershelfpositionisbeingused.CheckBroilingGuide.
~ Necessarypreheatingwasnotdone.
@Foodisbeingcookedonhotpan.
o Utensilsarenotsuitedforbroiling.
oAluminumfoilusedonthebroil
panrackhasnotbeenfikedor slitproperly.
oOVENSETknobnotsetonBAKE.
o OVENTEMPknobnotsetcorrectly.
@Shelfpositionisincorrect.CheckRoastingor BakingGuides.~
o Ovenshelfis not level.
o Wrongcookwareisbeingused.”Whenroasting;panistoosmall.
@A foiltent wasnotusedwhenneededtoslowdownbrowriingduringroasting.
MOISTUREINSIDE
ANDOUTSIDE OVEN
OVENWILLNOT
SELF-CLEAN
OVENDOORWON’T
LATCH
o Be sureovenventductisnotcoveredwithsomematerial. ~
@Besureovenventductispositionedprop-erly.~
oAutomatictimedial/dialsnotsetor notsetproperly.TheSTOPdialmustbesetand
advancedbeyondthetimenotedonovenclock.
~TheSTOPdialwasnotadvancedforlongenoughtime.
o BothOVENSETandOVENTEMPknobsmustbesetatCLEANsetting.
eA thickpileofspilloverwhencleanedleavesaheavylayerofashin spotswhich
couldhaveinsulatedtheareafromfurtherheat.
o Latchnotmovedto theright.
oTurnOVENSETknobtoCLEAN.GlowingLOCKEDlightafterknobisturned
indicatesovenistoohotfromprevioususeanddoorwon’tlatch.Tocooloven,open
doorwide;thenlatchcanbemoved.
OVEN SET knob must be at CLEAN or OFF before latch can be moved.
*
e Latch Release Button not pushed when moving latch.
34
Page 35

I PROBLEM
I POSSIBLE CAUSEAND REMEDY
I
CALROD”SURFACE
UNITSNOI’
FUNCTIONING
PROPERLY
PROBLEM
CONTROLPANEL
e Surfaceunitsarenotpluggedinsolidly.
@Trimrings/drippansarenotsetsecurelyintherangetop.
@Surfaceunitcontrolsarenot properlyset.
POSSIBLE CAUSEAND
REMEDY
a Doornot securelyclosed.
LIGHTED,YETOVEN oSTARTmustbetouchedafter
WILLNOTSTART
@Anotherselectionalreadyenteredforoven,andCLEAIUOFFnottouchedtocancelit.
@MakesureyouhaveenteredcookingtimeaftertouchingTIMECOOK.
- CLEAR/OFFwastouchedaccidentally.ResetcookingprogramandtouchSTART.
*ProbenotinsertedproperlyornotusedduringAutoRoastor TempCook..
@MakesureyouhaveentereddesiredfinishedtemperatureaftertouchingT.EMP
COOK/HOLD. ‘
@MakesureyouenteredacodenumberaftertouchingAU’10ROASTor
“EEEE” APPEARS
QUICKSET.
. When
UsingTempCook,lessthan90°F.ormorethan199°F.hasbeenentered.
!-’
ONREADOUT
uPROB”
ON READOUT
APPEARS
~Probe has been forgottenor notseated properly in ovenwallwhen using Auto Roast
or TempCook fimctions.
@Probe maybe defective.
enteringcoofingselection.
FOODS ARE EITHER ~ Cooking times may vary becauseof startingfood temperature, fooddensity or
OVERCOOKED OR amountof food in oven. Touch TIME COOK and add cooking time for completion.
UNDERCOOKED
AMThese ThingsAreNorrnal
withYourMicrowaveOven:
*Steamorvaporescapingfrom
aroundthedoor.
@Light reflectionarounddooror
outercase.
*Incorrect power levelentered. Check Cookbook for recommended power level or
changinglevels during cooking if necessary.
~Dish wasnot rotated, turned or stirred. Some dishes require specific instructions.
Check Cookbook or recipe for these instructions.
@Toomanydishes in oven. Cookingtime must be increased when cooking more than
one fooditem. Check Cookbook for recommendation on increasing time.
~Probe not inserted properly intomeat or other foodwhen using Temp Cook or Auto
Roastfunctions. See Cookbook or Auto Roast section of this book for instructions.
@CheckCookbookfor foodplacementand instructionswhenusingDouble
Dimmingovenlightandchange
~
inblowersoundmayoccurwhile
operatingatpowerlevelsother
thanhigh.
*Dullthumpingsoundwhile
operatingatpowerlevelsother
@SomeTV-Radiointerference
mightbenoticedwhileusingyour
microwaveoven.It’ssimilartothe
interferencecausedbyothersmall
appliancesanddoesnotindicatea
problemwithyouroven.
DutyTMShelf.
thanhigh.
35
Page 36

—
——-
ThisCookingCenterhasa built-in
exhaustsystemequippedwitha
damper,atwo-speedexhaust
blowerandremovablefilters.
Exhaustopeningsarelocatedover
cookingtopandin hoodoveroven.
The exhaustsystemfunctionsonly
whentheblowerisoperating.The
switchforthe exhaustsystemis
beneaththecontrolpanel.Forhigh
speed,pushswitchonce; forlow
speed,pushswitchtwice;andto
stopblower,pushswitchonce
insequence.
Whenbloweris operatingandhood
overovenisclosed,itexhaustsover
surfaceunitsonly.Whenblower
operateswithhoodinopenposition,
itexhauststhroughopeningsover
surfaceunitsandoverovenatthe
sametime.
THEEXHAUSTSYSTEM
SHOULDBEOPERATED
WHENEVERODORS,VAPORS
ORSMOKEAREEXPE~ED
‘IOBETHE RESULTOFA
COOKINGOPERATION.
STARTFANATBEGINNING
OFCOOKING.
Toopenhoodabovetheoven,lift
uphandleatcenterofhood;to
close,pushdownonhandle.Use
hoodin itsfullyextendedposition
whenevervaporor smokeresuks
fromcooking,suchaswhenpan
broilingor fryingonthesurface
units.Seeinformationonuseof
surfaceunits.
Elters
Twofiltersarelocatedovercooking
topandonebehindhoodextension.
Filtersareremovableforcleaning.
Filtersbecomesoiledoveraperiod
oftime.Theefficiencyofyour
exhaustsystemdependsonhow
cleanthefiltersare.Frequencyof
cleaning,or replacing,dependson
thetypeofcookingyoudo,but
ffltersshouldbecleanedATLEAST
ONCEAMONTH.Also,frequently
cleanthegrease-ladensurfaces
adjacenttothefilters.
TOclean, agitateinhotdetergent
solution.Lightbrushingmaybe
usedtohelpremoveimbeddedsoil
anddust.Withcarefiduseand
handling,filterswilllastforyears.
However,if replacementbecomes
necessary,obtainafilterfrom
yourdealer.
Remove and Repklw Filters
1. Cookingtop:Placefingerin
recessatfrontedgeoffilter;push
filtertorearuntilfrontedgeclears
theexhaustopening;lowerthe
frontandremove.Whenclean,
replace.Placeedgeoffilteragainst
springatrear ofexhaustopening.
Pushto rear,lififrontedge,andlet
springpushfilterforwardintoplace
underedgeofexhaustopening.
2. Hood:Extendhoodas faras
possible,or removehood extension
ifdesired;seeillustrationbelow.
Placefingersoneachsideat
bottomd filter.Pressfiltertoleft
untilitclearstheholderon right
side,thenremove.Whenclean,
replace.Pushfilteragainstclipat
leftandpressleftuntilfilterclears
holderatrightside.Pushfilter
towardopeningandreleasesoit
slipsbehindholder.
Motor
Theblowermotorispermanently
lubricated;itdoesnotneedoiling.
e
m
e
TbIRemoveandRepiaceHoodEtiemion
1. Toremove,extendhoodasfar
asit willopen.
Withthumbscurvedaroundedge
ofhoodextension,hooka finger
betweenspringandbracketateach
sideandpushtowardcenterofhood.
Thismovespinsoutofholesin
bracketandhoodextensioncan
beremoved.
2. Tochxm,washwithhot
detergentsolution. Rinseanddry
withsoftcloth.
3. Toreplace,
circleflangesintosideofhood.
Secureonesideata time.Align
pinwithholesinbracketandhood
extension,thenpushpinthrough
holes.Thissecureshoodextension
soitcannotberemovedbymistake.
fitbottomofhalf-
36
HOOD EXTENSION
v-w /
I Ip
DOOR .
Page 37

To obtainservice, see your warranty
onthe back page of this book.
We’reproud of our service and
wantyou to be pleased. If for some
reason you are not happy withthe
service you receive, here are three
stepsto followfor further help.
FIRST, contact the people who
servicedyour appliance. Explain
whyyouare not pleased. Inmost
cases, this will solvethe problem.
NEXT, if you are still not pleased,
write all the details-including
yourphone number—to:
Manager, Consumer Relations
Hotpoint
Appliance Park
Louisville, Kentucky 40225
FINALLY,if your problem is still
notresolved, write:
Major Appliance
Consumer Action Panel
20 North Wacker Drive
Chica~o.Illinois 60606
~
—.
-
-
-
37
—.
fsmw
—u
Page 38

8
I!@&
-m
~~g=
11>–=
imi?
~?-=
m*~
+
WHAT1sCOVERED
WHAT1sNOTCOVERED
FULLONE+EARWARRANTY
Foroneyearfromdateoforiginal
purchase,wewillprovide,freeof
charge,partsandservicelabor
inyourhometorepairor replace
anypart of the microwave
oven/range
ofamanufacturingdefect.
LIMITEDADDITIONAL
FOURYEARWARRANTY
Forthesecondthroughfifthyear
fromdateoforiginalpurchase,
wewillprovide,freeof charge,a
replacement
themagnetrontubefailsbecause
ofa manufacturingdefect.Youpay
fortheservicetriptoyourhome
andservicelaborcharges.
@Servicetripstoyourhometo
teachyouhowtousethe product.
Readyour Useand CaremateriaL
Ifyouthenhaveanyquestions
aboutoperatingtheproduct,
pleasecontactyourdealerorour
ConsumerAffairsofficeatthe
addressbelow.
● Improperinstallation.
Ifyouhaveaninstallationproblem,
contactyourdealeror installer.
Youareresponsiblefor providing
adequateelectrical,gas,
exhaustingandotherconnecting
facilities.
thatfailsbecause
magnetron tube if
Thiswarrantyisextendedto
theoriginalpurchas[
succeedingownerfc
purchasedforordin~
inthe48mainlandS1
andWashington,D,C
warrantyisthesame
LIMITEDbecauseyc
shiptheproducttottl===1
orfortheservicetechnician’stravel
coststoyourhome.
Allwarrantyservicewillbeprovided
byourFactoryServiceCentersor
byourauthorizedCustomerCare@
servicersdurinanormalworkina
hours. LookintheWhiteorYellowPages
ofyourtelephonedirectoryfor
HOTPOINTFACTORYSERVICE,
GENERALELECTRIC-HOTPOINT
FACTORYSERVICEor HOTPOINT I_
CUSTOMERCARE@SERVICE.
● Replacementofhousefusesor
resettingofcircuitbreakers.
@Failureoftheproductifit is used
forotherthan itsintendedpurpose
orusedcommercially.
~Damagetoproductcaused
byaccident,fire,floodsor acts
ofGod.
WARRAN~R ISNOTRESPONSIBLE
FORCONSEQUENTIALDAMAGES.
erandany
x products
~ry homeuse
tates,Hawaii
2 InAlaskathe
?exceptthatitis
XJmustpayto
manA*#:AAfikA-
VJUG w IUP
w
I
Iiw
II-
Ii~=’
l@J
..—
!!~r-
~:&x
Iir=..
11~
II>K
IIe
!!~--”
,,~_-
it~%
11~
Ilw
,-~~
,,=–
II
11~
11-.
Iw
Im
I
Some states do not allow the exclusion or limitation of incidental or consequential damages, so the above limitation or exclusion
may not apply to you. This warranty gives you specific legal rights, and you may also have other rights which vary from state to state.
Toknow what your legal rights are in your state, consult your local or state consumer affairs office or your state’sAttorney General.
Warrantor: General Eiectric Company
Mfurther help is needed concerning this warranty, contact:
Manager—Consumer Affairs, General Electric Company, Appliance Park, Louisville, KY 40225
+
2-86
A QUALITY PRODUCT OF
GENERAL ELECTRIC COMPANY
I
RH961GJ
 Loading...