

Page 1
o
*owtogetYour
Oven
RGJ534GEP
0
the best from
Bu~t-In
Contents
Aluminum Foil
Appliance Registration
Baking, Baking Guide
Broiling, Broiling Guide
Care and
Clock/Timer
Consumer Services
Control
Door Removal
Energy-Saving Tips
Features
Ligh(; Bulb
Minor Adjustments
Model and
Cleaning
Panel
Repluwment
Serial Numbers
14
9–1
1
14, 15
1
6–I
23
6,7
17,
18
8,
17
lg
2
8
7
4
5
2
Use and Care
of-Model
0
Preheating
Problem Solver
Roasting, Roasting Guide
Safety
Instructions
8,
Shelves
Thermostat Adjustment
Warranty
GE
Answer Center”
800.626.2000
12, 17,
Back Cover
II
20
12, 13
2-4
18
lg
HcnPollw
Page 2
Help us help you...
Read this book carefully.
It
is intended (o help you operate
and mtiintdin
properly.
Keep i[
questions.
It’
you
or need more help. write (include
your
phorw
Consumer Affairs
Hotpoint
Appliance Park
Louisville, KY
your new oven
handy
clon
for
answers to your
’( understand something
number):
40225
Write down the model and
serial numbers.
YoLI’11
find them on a label on the
frotlt
frame behind the broiler
drawer.
These numbers are
consumer
Registration
with your oven.
in this card,
numbers here:
See
Features Section.
UISO
pl”oduct
Ownership
Card tha[
Before sending
please
write these
on the
came
If you need service...
To obtain service, see the
Consumer Services page in the
back of this book.
We’re proud of our service and
want you to be pIeased. If for some
reason you are not happy with the
service you receive, here are three
steps to follow for further help.
FIRST, contact the people who
serviced your appliance. Explain
why you are not pleased. In most
cases, this will solve the problem.
NEXT, if you are still not pleased,
write
all
the details—including
your phone number—to:
Manager, Consumer Relations
Hotpoint
Appliance Park
Louisville, KY 40225
FINALLY, if your problem is still
not resolved, write:
Major Appliance Consumer
Action Panel
20 North Wacker Drive
Chicago, IL 60606
WARNING:
If the
information in this
manual is not followed
exactly, a fire or explosion
may result causing
property damage,
personal injury or death.
— Do not store or use
gasoline or other
flammable vapors and
liquids in the vicinity
of this or any other
appliance.
— WHAT TO DO IF
Y()[J
SMELL GAS
●
Do not try to light any
appliance.
●
Do not touch any
electrical switch; do not
use any phone in your
building.
Model Number
Serial Number
Use these
correspondence or service
concerning your oven.
numbers in any
calls
If you received
a damaged oven...
Immediately contact the dealer (or
builder)
that sold
you the oven.
Save time and money.
Before you request
service...
Check dw Problem Solver in
this book.
operating
correc( yourscl f.
It lis(s causes
problems
that you
of minor
can
●
Immediately
gas supplier from
call
your
a
neighbor’s phone.
Follow the gas supplier’
instructions.
●
If you cannot reach
,youl
gas supplier, call the fire
department.
—Installation and service
must be performed by
a
qualified installer, service
agency or the gas
suppliel
2
Page 3
IMPORTANT SAFETY INSTRUCTIONS
Read
all instructions before using this appliance.
c
IMPORTANT
SAFETY NOTICE
The California Safe Drinking
Wuter
and Toxic Enforcement Act
requires the
to
publish a list of substances
cJovemor of
known to the state to cause cancer,
birth
defects or other reproductive
harm,
find
requires businesses
to warn
customers of potential
exposure to such substances.
(M
Appliances can
exposure to four of these
substances, namely benzene,
carbon
monoxide, formaldehyde
and soot, caused primarily by the
incomplete combustion of natural
~M
01-
[.P
fuels.
Properly adjusted
burners, indicated by a bluish
rather than a yellow flame,
will minimize incomplete
combustion. Exposure to these
can
substances
be minimized
further by venting with an open
window
or using a ventilation
fan or hood.
When You
●
Have
the installer show you
Get
the location of the oven gas cut-
off valve and how to shut it off
if necessary.
●
Have your oven installed and
properly grounded by a
qualified installer,
with the Installation Instructions.
Any adjustment and service
be
should
qualified gas
service
performed only by
range
technicians.
California
cause
minor
Your Oven
in accordance
installers or
Plug your oven into a 120-volt
grounded outlet only.
remove the round grounding
prong from the plug. If in doubt
about the grounding of your
home electrical system, it is
your personal responsibility and
obligation to have an ungrounded
outlet replaced with a
grounded, three-prong outlet in
accordance with the National
Electrical Code. Do not use an
extension cord with this
appliance.
●
Be sure
all
packing materials
Do not
properly-
are removed from the oven
before operating it, to prevent
fire or smoke damage should the
packing material ignite.
●
Be sure your oven is correctly
adjusted by a qualified service
technician or installer for the
type of gas (Natural or LP) on
which it is to be used.
can be converted for use on either
type of gas. See the Installation
Instructions.
Your oven
Using Your Oven
●
Don’t leave children alone or
unattended where an oven
hot or in operation.
be seriously burned.
●
Don’t allow anyone to
stand or hang on the door or
broiler compartment. They
could damage the oven.
●
CAUTION: ITEMS OF
INTEREST TO CHILDREN
SHOULD NOT BE STORED
IN CABINETS ABOVE AN
OVEN—CHILDREN
CLIMBING ON THE OVEN
TO REACH ITEMS COULD
BE SERIOUSLY INJURED.
They could
is
climb!
●
Never wear loose fitting or
hanging garments while using
the appliance.
when reaching for items stored
in cabinets over the oven.
Flammable material could be
ignited if brought in contact with
flame or hot oven surfaces and
may cause severe burns.
●
For your safety, never use
Be careful
your appliance for warming or
heating the room.
●
Do not use water on grease
fires. Never pick up a flaming
pan,
Turn off burner, then
smother flaming pan by covering
pan completely with well-fitting
lid, cookie sheet or flat tray.
Flaming grease outside a pan
can be put out by covering with
baking soda or, if available, a
multi-purpose dry chemical or
foam-type fire extinguisher.
●
Do not leave paper products,
cooking utensils, or food in the
oven when not in use. Do not
store flammable materials in an
oven.
or other flammable vapors and
liquids in the vicinity of this or
any other appliance.
●
Do not store or use gasoline
Do not let cooking grease or
other flammable materials
accumulate in or near the oven.
●
Do not use oven as a storage
area.
●
When cooking pork,
the directions exactly and always
cook the meat to an internal
tem~erature
Thi; assures that, in the remote
possibility that trichina may
be present in the meat, it will
be killed and meat will be
safe to eat.
of at least
(continued
follow
170”F.
ne.rl p~ige)
3
Page 4
IMPORTANT SAFETY INSTRUCTIONS
(Conllllllcd
●
Stand
opening oven door. The hot air
steam
or
burn hands,
●
Don’t heal unopened food
containers in the oven.
Pressure
the container could burst,
causing an injury.
●
Keep oven vent
unobstructed.
●
Keep
buildup.
●
Place
position while oven is cool.
It’
shcl\ M
lint.
heatin:
●
Pulliug
is a convenience in lifting heavy
foods. It is also
against burns from touching
hot
walls.
●
Whtm
roasting bags in oven, follow
[hc lll:llllll’LIct
●
Do
newspapers.
can Ldtch fire.
● Don ‘t use aluminum foil
anywhere in the oven except as
described in this book.
could rmu [( in
LiWI~t? [()
● Use only
is recommended
olcns.
)
away
f’rom
oven when
which escapes can
f’ace
and/or eyes.
could
build up and
ducts
oven
f’ree
from grease
oven shelf in desired
musI be
dO
no{ IcI pot holder
unils in the oven.
htindltxf when
cmtact
out shelf to shelf stop
a
precaution
surfaces
of’ door or oven
using cooking or
LII’cI”s
dit”ections.
not use your oven to dry
If’
o~ferheated, they
Misuse
a
[’i rc
hazard or
(he ()\JCl].
glass
cookware that
for LISe
in
gas
●
Always remove broiler pan
from the broiler compartment
as soon as you finish broiling.
Grease left in the pan can catch
fire if oven is used without
removing the grease from the
broiler pan.
●
When broiling, if meat is too
close to the flame, the fat may
ignite.
excessive flare-ups.
●
Make sure broiler pan is in
place correctly
possibility of grease fires.
●
If you should have a grease
fire in the broiler pan,
oven, and keep broiler door
closed to contain fire until it
burns out.
Clean only
Use and Care Book.
Trim excess fat to prevent
to reduce the
turn off
parts listed in this
If You Need Service
S
Read “The Problem
this book.
in
●
Don’t attempt to repair
or replace any part
Solver”
of your
range unless it is specifically
recommended in this book.
other servicing should be referred
to a qualified technician.
All
SAVE THESE
INSTRUCTIONS
Energy-Saving Tips
● Preheat the oven only when
necessary. Most foods will cook
satisfactorily without preheating.
If you find preheating is
listen for the beep and put food in
the oven promptly after the oven is
preheated.
● Always turn oven OFF before
removing food.
● During baking, avoid frequent
door openings. Keep door open
as short a time as possible
is opened.
● Cook complete oven meals
instead of just one food item.
Potatoes, other vegetables and
some desserts will cook together
with a main-dish casserole, meat
loaf, chicken or roast. Choose
foods that cook at the same
temperature and in approximately
the same time.
● Use residual heat in oven
whenever possible to finish
cooking casseroles, oven meals,
etc. Also add rolls or precooked
desserts to warm oven, using
residual heat to warm them.
necesstiry,
if
it
4
—
Page 5
4
\
\
‘k-iii
,’
m
I
i
(’J-Q
-7
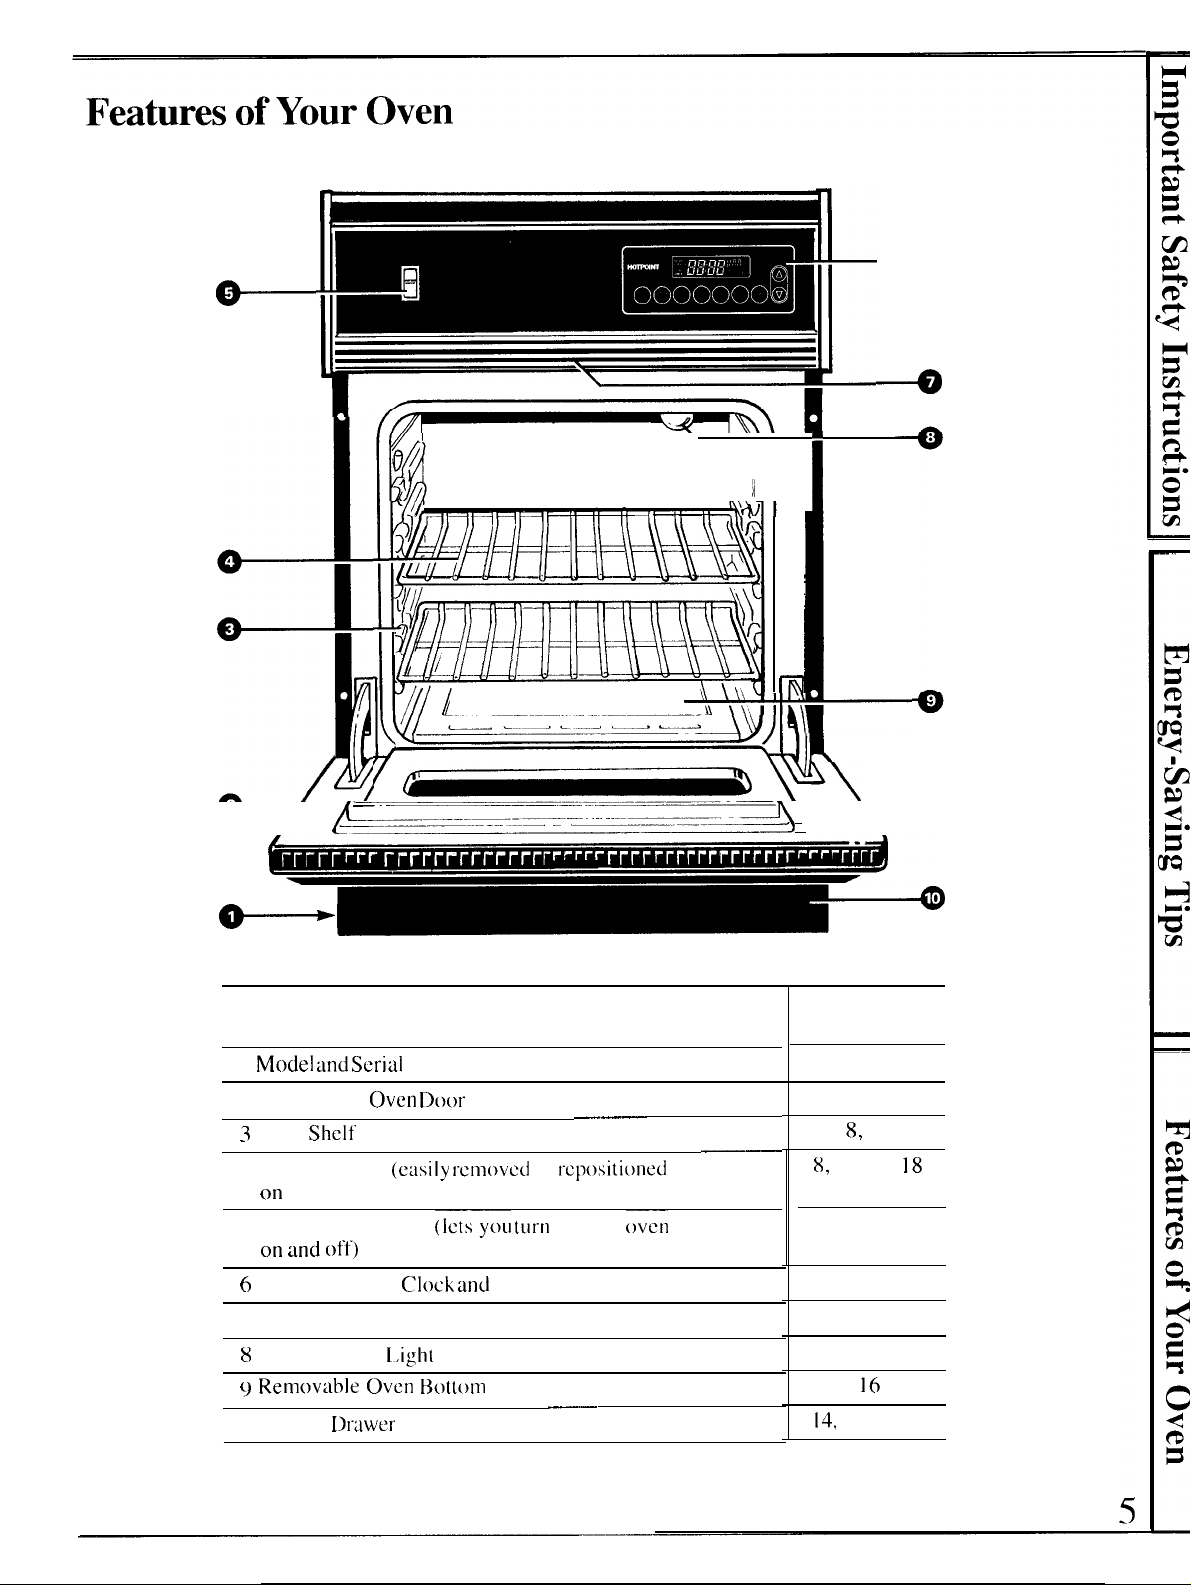
Feature Index
I
Mode] and ,%rial
2 Removable
3
Oven Shelf Supports
4 Oven Shelves
on
5 Oven Light Switch
on and oft)
6
Oven Controls,
7 Oven Vent
8
Oven Interior
~ RemovLlb]e Oven Bt)ttonl
1 () Broiler
F=========”-”’-
Numbers (behind broiler drawer)
Oven Door
(eusily rcmovcd
shelf supports)
Clock and
I..igh[
Drawer
or
(Icts-you (urn
Timer
———
rcpositiomxl
interior
—
—.—
OVL;l
light
—.
\w\
\
See
page
2
17, 18
8,
12
8,
12, 17,
8
7,8
8
8, 17
16
14,
15, 17, 18
18
Page 6
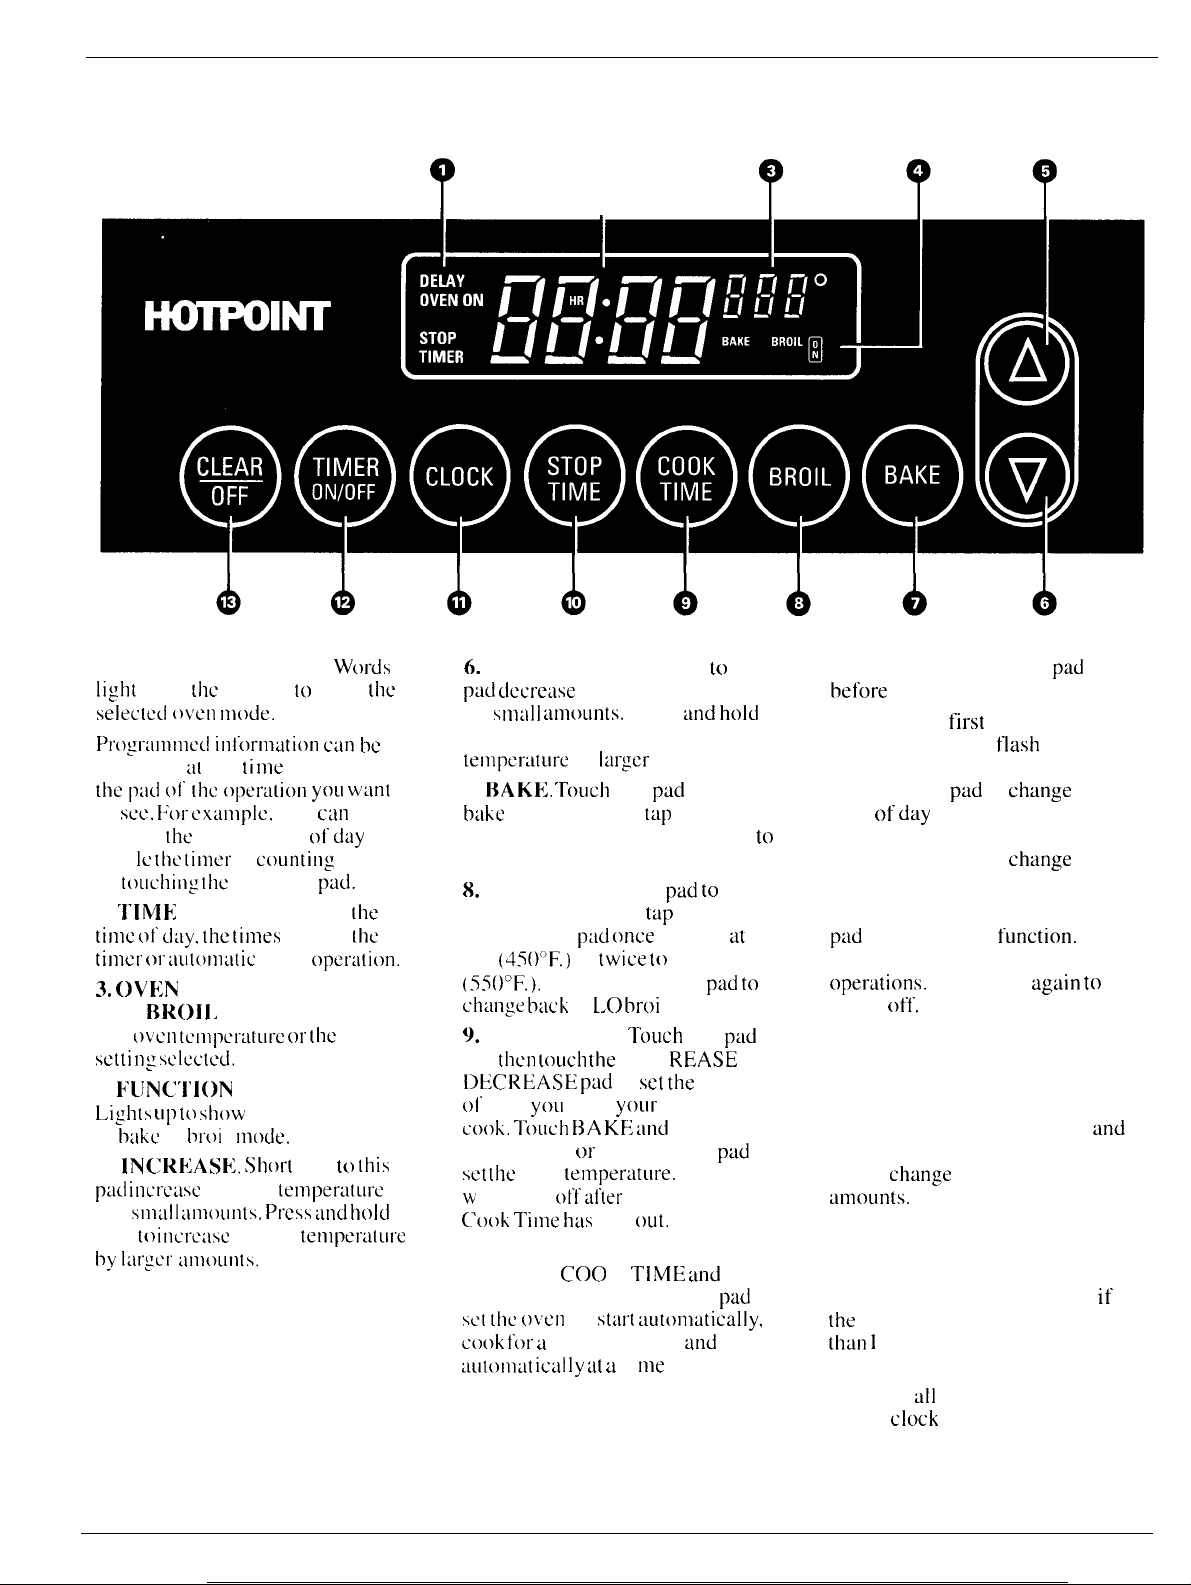
Features of Your Oven Control
1. PROGRAM STATUS.
light
up in tilt display [o show
Words
the
Seleclcd ()\’ell mode.
Progr:llllmcd int’t)rmation can be
displayed al any [i me by touching
the pad
to
display
whi Ie
by
2.
time c~t d:ly, the limes
timer or :Iu(olno(ic
3. OVk:N
AND
the
sc[ti n: selected.
4.
Lights
in
5.
pad incrc:lw
by
pad
h~
of
[he opel”ulion
S(2C. 1:01”
CXdlllp]C. yell
[he
current time of
[he [imcr
toLdling
‘l’IME:
the CLOCK
DISPLAY. Shows
is
yoLI w’mt
counting
CLII1
day
down
pad.
set for
oven
operation.”
TEMPERATURE
BROII,
OYcll
IWJNCT1ON
tmkc or
INCREASE;, Short
SIIIL1!I
to incrcme time or tenlperdlLlrc
@!U’ tlIlloLllltS.
DISPLAY. Shows
tClll]3Cl”U[Lll”C 01”
INDICATORS.
LIp (() show
whether oven is
hroi
I mode.
[i me or
llll)OLIIltS. press
[he broil
taps to (his
[emperaturc
lllld
(be
(he
hold
?
6.
DECREASE. Short taps to this
pd decrease
by
small :unounts.
?
time or temperature
Press md
pad to decrease time or
tenlperatllre
7.
BAKE.
bake
function. Then
INCREASE
by
Ial”gcr
amounts.
‘rOLICh
this
pad
tap
or press
or DECREASE pad
to select
display desired temperature.
8.
BROIL. Touch this
broil function. Then
INCREASE pxl
LO
(450(’F.)
(5500F.).
chmge
9. COOK TIME.
and
then touch [he
or
twice to
Tap DECREASE
hack to LO broi 1.
DEJCREASE ptid
~)!’
time
you
want
c(mk. Touch BA KF1 ~lnd
INCREASE
set [he
oven
w
i 11 shut off
Cook Tirrre has
or
DECREASE
(emperatLu-e.
Jter
run
pad to
tap
once
to broil
broil at HI
Touch
this
1 NC REASE or
to
set the
your
food to
the
The oven
the selected
out.
10. STOP TIME. Usc this pad
along with
INCREASE or DECREASE pad to
SC(
the ()\erl to stwl
cook
:mtomut ical Iy ut a t i me you select.
COO
for a
specified time
K TIME
wrtomtitica]ly,
and
and
hold
select
at
pad to
pad
amount
pad
to
stop
???
to
11. CLOCK.
bef’ore
setting the clock.
To set clock,
pad.
“TIME” will
Touch this
first
touch CLOCK
flash
pad
in the
display. Tap INCREASE or
DECREASE
time
of
pad
to
change
day
by small amounts.
the
Press & hold INCREASE or
DECREASE pad to
change
the
time of day by larger amounts.
12.
TIMER ON/OFF.
pad
to select timer
Touch this
f’unction.
The
timer does not control oven
opertitions.
turn it
Touch pad
off.
again to
To set timer, first touch TIMER
pad. “TIMER” will flash in the
display. Tap INCREASE or
DECREASE pad to change the
time by small amounts. Press
and
hold INCREASE or DECREASE
pad to
change
the time by larger
tirnounts.
Hours and minutes will be
displayed if the time set on the
timer is more than 1 hour. Minutes
and seconds will be displayed
the
time set on the timer is less
thun 1
hour.
13. CLEAR/OFF. Touch this
to cancel
all
oven operations “
if
pad
except clock and timer.
6
Page 7
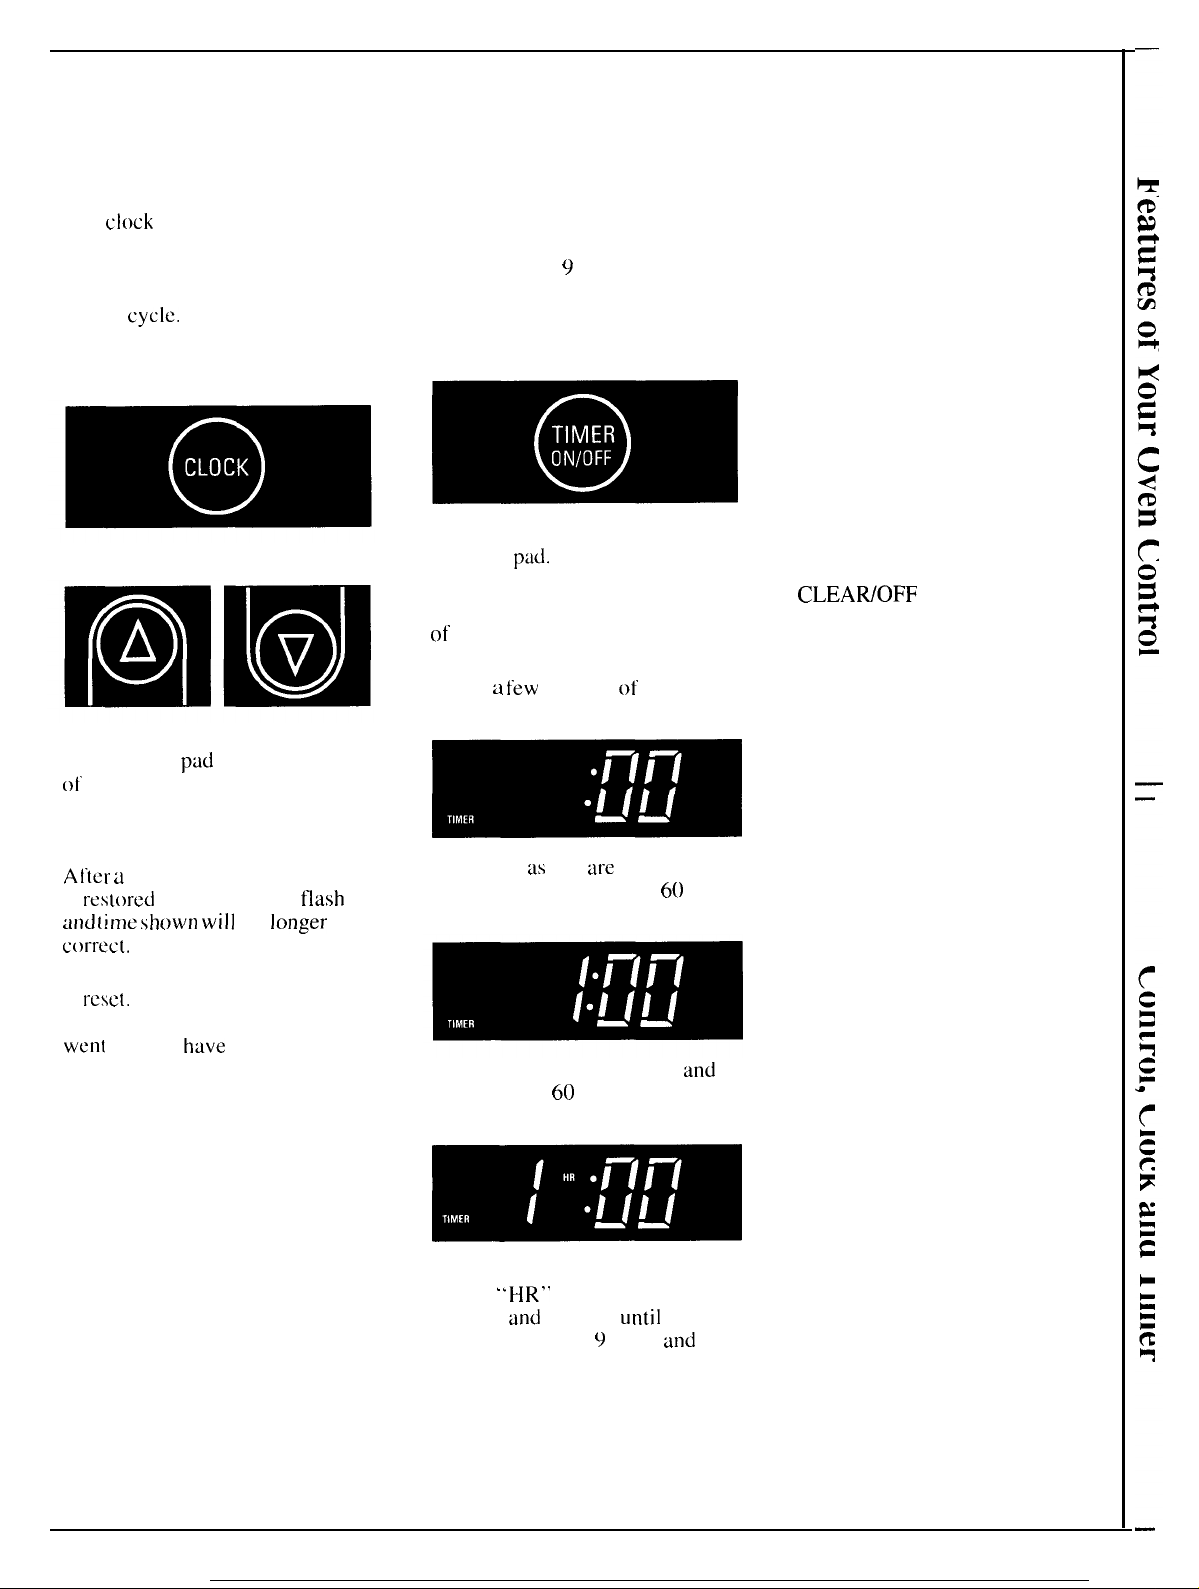
Control, Clock and Timer
Clock
The
clock
must be set for the
automatic oven timing functions
work properly. The time of day
to
cannot be changed during a TIME
BAKE
To Set the Clock
Step 1. Touch the CLOCK pad.
Step 2. Press INCREASE or
DECREASE
ot”
Power Outage?
At’tcr a
is
and
correc[.
The display flashes until the clock
is
were in operation when the power
went
programmed again.
~yde.
ptid
to set the time
day.
power outage, when power
resl(mxl
reset.
the display will
(iITw shown
All other functions that
out will
wi]]
have
no
to be
flash
longer
be
Timer
The timer does not control oven
operations. The maximum setting
on the timer is
minutes.
9
hours and 55
To Set The Timer
Step 1.
ON/OFF
Step 2. Press INCREASE or
DECREASE pad to set the amount
of
The timer will start automatically
within
the pad.
Touch the TIMER
ptid.
time on the timer.
a few
seconds of releasing
mllm
The timer, as you
will display seconds until
seconds is reached.
Then it will display minutes
seconds until 60 minutes is
reached.
are
setting it,
60
and
To Reset Timer
Touch TIMER pad and then press
INCREASE or DECREASE pad
until the time you want shows on
the display.
To Cancel Timer
Press & hold TIMER pad until the
word “TIMER” quits flashing on
the display (about 4 seconds).
Timer Tones
The timer tone is 3 beeps followed
by 1 beep every 6 seconds. If you
would like to remove the one beep
every 6 seconds, press & hold
CLEAWOFF for 10 seconds.
To return the tone of 1 beep every
6 seconds, press & hold
CLEAR/OFF for 10 seconds.
Error Message
If “F” and a number flash on
display, this indicates a function
error code. Touch CLEAR/OFF
pad. If function error code does not
clear, disconnect power to the oven
and call for service.
After 60 minutes, it will display
hours (
display)
maximum time of
minutes is reached.
“HR”
now appears in
and
minutes
until
9
hours
the
and
55
7
Page 8
Using Your Oven
Automatic Ignition
The oven burner is lighted by
electric ignition.
To light the burner,
for the desired function and press
lNCREASE or DECREASE pad
until the desired temperature is
displayed. The burner should
ignite within 60 seconds.
After the oven reaches the selected
temperature, the oven burner
cycles—off completely, then on
with a full flame—to keep the
oven temperature controlled.
Power outage?
The oven burner will not light in
the event of an electrical power
outage. Do not attempt to light it
manually with a match.
touch the pad
Oven Light
Use the switch on the control panel
to turn
the light on and off.
Oven Vent
When the oven is on, heated air
moves through a vent below the
control panel.
The vent area could get hot during
oven use.
The vent is needed for proper air
flow in the oven and good baking
results.
Doing so may cause failure, fire
or damage to the oven.
Do
not block this vent.
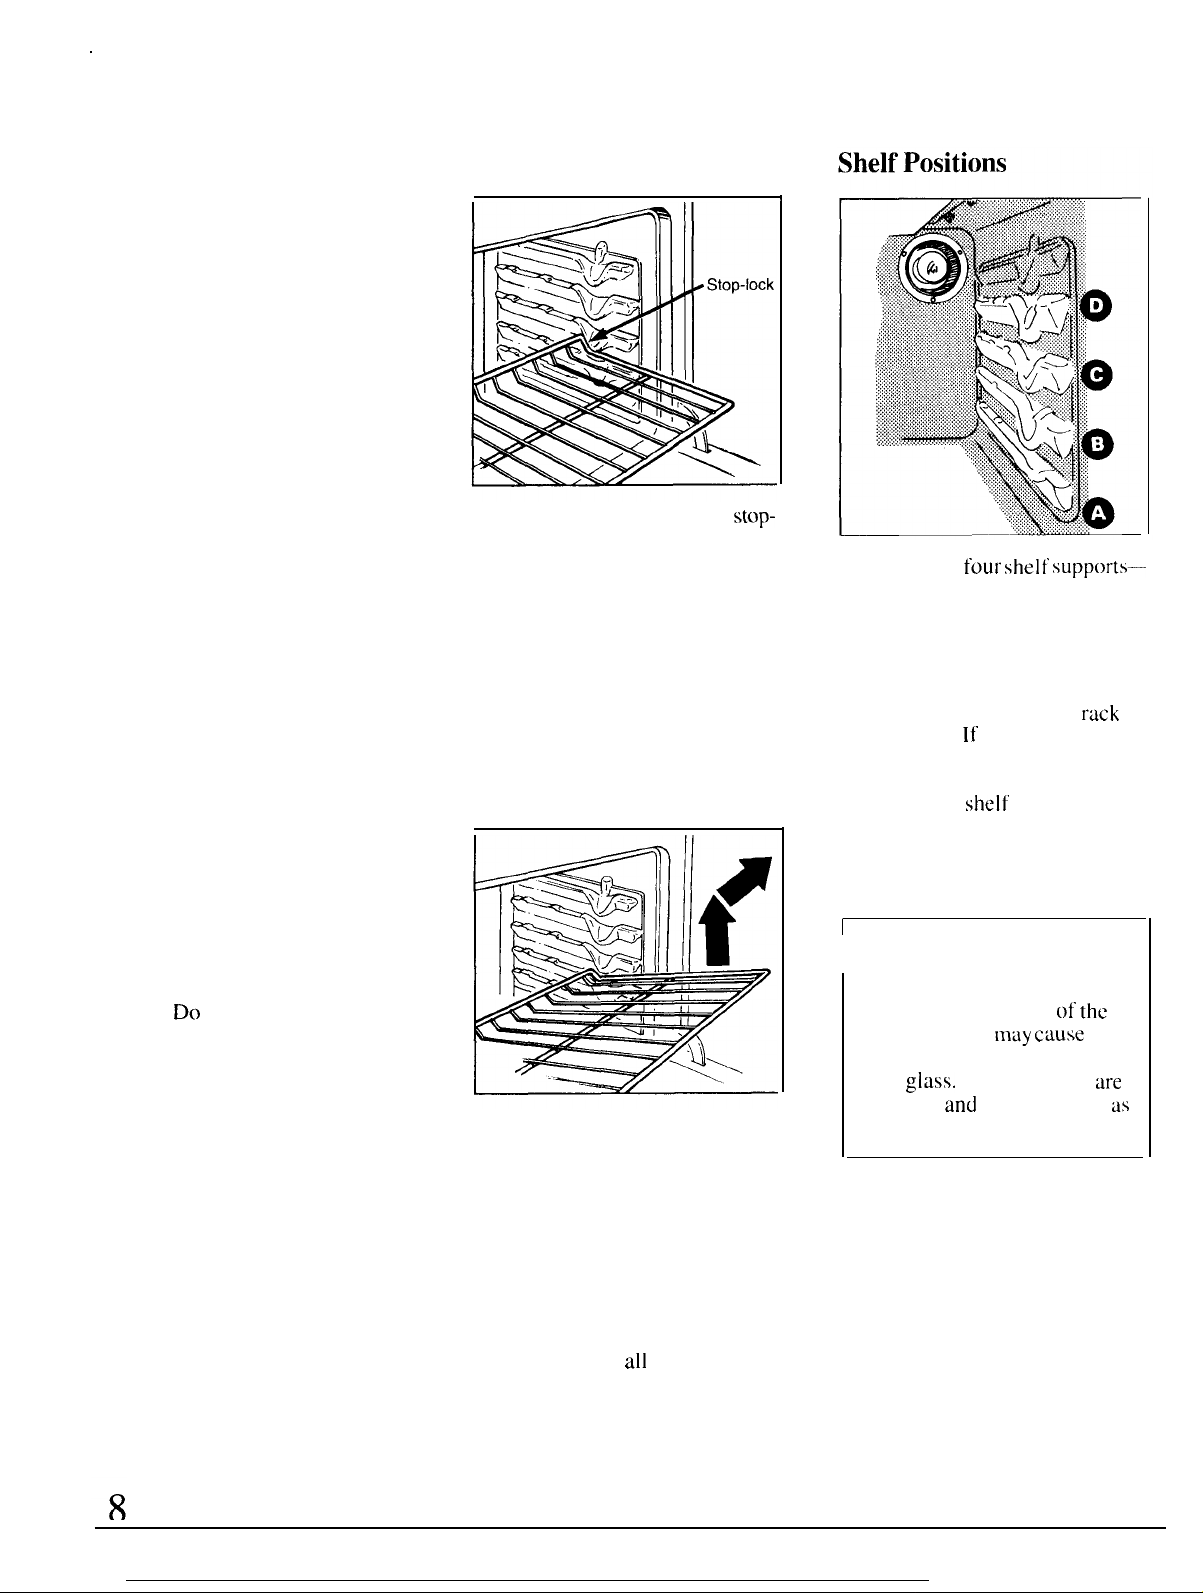
Oven Shelves
,
The shelves are designed with
locks so when placed correctly on
the shelf supports, they will stop
before coming completely out of
the oven and will not tilt when you
are removing food from them or
placing food on them.
When placing cookware on a shelf,
pull the shelf out to the “stop”
position. Place the cookware on
the shelf, then slide the shelf back
into the oven. This will eliminate
reaching into the hot oven.
To remove a shelf from the oven,
pull it toward you, tilt front end
upward and pull shelf out.
To replace, place shelf on shelf
support with stop-locks (curved
extension of shelf) facing up and
toward rear of oven. Tilt up front
and push shelf toward back of
oven until it goes past “stop” on
oven wall. Then lower front of
shelf and push it
all
the way back.
stop-
I
four
The oven has
A (bottom), B, C and D (top).
Shelf positions for cooking are
suggested on Baking and Roasting
pages.
For best results, we recommend
that you use only one oven
when baking. If you are baking
multiple items and choose to use
both oven racks for baking, place
oven racks on shelf positions B
and D. When baking several items
stagger pans so that no pan is
directly above another.
Oven Moisture
I
As your oven heats up, the
changing temperature
air in the oven
water droplets to form on the
door
glass.
harmless
the oven continues to heat Lip.
shelf
may cause
These droplets
and
will evaporate
supports-
rack
of’ the
are
as
Page 9

Baking
You1- fwcn (emperalure
very
ticcuratciy
control
(hat
number of
(,
i
.+
lxct)lll~, I’anl
t)\cil pcrl’ormuncc.
an a(l<j ust mcn[
A(.ljus( ing (“)ven
Yt)LIl nmv
km)[m”atures ilS ]OW as
(hcsc
(() be Llswi
hot food warm. Low temperatures
wi II
[hcrchw
usc
by
sys[em. We
you operate
weeks
V~Il on
recipes as a
i liar
is
Thermostat section.
range
low temperatures are intended
after cooking to keep
tlo(
ki II all bacteria and
are
not recommended
unl il bactcriti have been
higher
lcmperaturcs.
is controlled
using an electronic
recommend
(he range for a
using the time
guide tO
wilh
your new
If you think
nccesstiry,
UI1OWS
see
you to set
150° but
the
for
killed
How to Set Your Range for
Baking
step
I:
Posi[ion”
sIIc
I vcs i n the oven.
[ w()
shelves at the
shelves on alternate shelf’ supports
and
s(aggcr
Step
2: Close the oven door.
the shelf or
If’
cooking on
same
time, place
food on them.
To change
during BAKE cycle, touch BAKE
pad and then INCREASE or
DECREASE pad to get new
temperature.
Step 6: Touch CLEAR/OFF when
baking is finished and then remove
food from oven.
oven temperature
How to Time Bake
The oven control allows you to
turn the oven on or oft’
automatically at specific times
that
YOU
set.
NOTE: Before beginning make
sure the oven clock shows the
correct time of day. To set the
clock, first touch the CLOCK pad.
“TIME” will
Press INCREASE or DECREASE
pad until correct time of day
is displayed.
flash
in the display.
01
-
Step 3: Touch COOK TIME p:d.
A
~
Step 4: Press INCREASE pad
until the desired
time appears in the display.
-
Step 5: Touch BAKE pad.
Attention
is not done.
lellg(h of
:A
tone wi]]
bilking
occLIr it’ s[cp
f
How to Set Immediate
:A
-
Step 3:
Touch
BAKE pad,
I!BNml
f$kp ~:
Dli(”’R
sI1OW (he
thd[
Step 5:
DH(”’REASE
{ciupcra[ure
‘[’he w(Nd
lc]npcra(ure
(I]c OVC1l hc:lts
l’L21chCS ltlc Set tClllpel”LLtUl”e. a tOIIC
wi
‘[’OLICh [NcREAS~ (M
EASE pad. The display will
last
Bake
temperature
WLIS LISC!Li.
Press
INCREASE or
pad until desired
is
Liisplayed.
“ON” and the changing
will be displayed
Lip.
WhCll
the oven
I I sound.
as
Start and Automatic Stop
(Oven turns on right away, cooks
for preset
turns off automatically. )
Note: Foods that are highly
perishable such as milk, eggs, fish,
stuffings, poultry
not be allowed to sit out for more
than one hour before or after
cooking. Room temperature
promotes the growth
bacteria.
Step 1: Position the shelf or
shelves in the oven. If cooking on
two shelves
shelves on alternate
and stagger food on
Step 2:
length
at
the same time,
Close
the oven door.
of time, and
and
pork should
of harmful
shelf
supports
them.
place
❑ m
Step 6: Press INCREASE or
DECREASE
temperature is
The word “ON”
oven temperature will be
as the oven heats
oven
reaches the
tone wiii
continue to cook
ixwgrammui
shut off automatically.
Step 7:
oven.
Remember,
oven shuts off automatically.
foods continue cooking” af(er
controis are off’.
pad
soun(i,
amount
Remove
until
dcsirc~i
Lfispiayed.
and the
The
food
rising
ciisi~iaycci
Lip.
When the
set [cmpcra(urc,
oven
wiii
for the
01’ (imc. t iwn
from (iw
even
timu:il
(( ’()))
/;/1/{1,(/
){(,
\/ /)(/,? (,)
a
—.
9
Page 10

Bating
(continued)
How to Set Delay Start
and Stop
Quick Reminder:
1. Touch COOK TIME pad.
2. Touch INCREASE/
DECREASE pad to set
cooking time.
3. Touch STOP TIME pad.
4. Touch INCREASE/
DECREASE pad until desired
Stop Time appears in display.
5. Touch BAKE pad.
6.
Touch INCREASE/
DECREASE pad to select
oven temperature.
Delay Start and Stop is setting the
oven timer to turn the oven on and
off automatically at a later time
than the present time of day.
For example: Let’s say it’s
and
dinner time is shortly after
7:()().
The recipe suggests 3 hours
baking time at
Step 1: Position the shelf or
shelves in the oven. If cooking on
two shelves at the same time,
stagger the pans for best heat
circulation.
Step
2:
Close the oven door.
325”F.
2:00
Here’s how:
Step 4: For 3 hours of cooking
time, press INCREASE
“3:00’”
appears in
-
Step 5: Touch STOP TIME
“5:()()”
control
Time by
the time
the
Cook Time is 3
hours to
appears on the display and
“STOP TIME”
alltonlaticatly Se(s S(op
adding the
of day. In this example,
time
of day is
the
time
flashes.
houl”s. Adding
ot’
ptid
until
Ihe
display.
1“
pad
The
Cook Time to
2:()() anLI [he
day
equals 5:()().
3
Step 8: Touch DECREASE pad.
“350°” appears in the display.
Press DECREASE pad until
“325°” is displayed.
At
4:00,
the oven will turn on
automatically. The word “ON”
and the changing oven temperature
will be displayed as the oven heats
up. The oven will continue to
for the programmed 3 hours and
will shut off automatically
Step 9: Remove food from the
oven. Remember, even though
oven shuts off automatically,
foods continue cooking
controls are off.
When setting your oven
start, never let foods such as dairy
products, fish, meat, poultry, etc.
stand for more than 1 hour before
actual cooking begins. Room
temperature promotes the growth
of
harmful bacteria.
at 7:()().
after
for
a
cook
delay
Step 3: Touch COOK TIME pad
10
Step 6: Change Stop Time from
5:()()
to
7:00
by pressing
INCREASE
appears in the
-
Step 7: Touch BAKE pad.
pad
until
displtiy.
:A
“7:()()”
Page 11

Baking Guide
1. Preheating is very important
when baking foods such as
biscuits, cookies, cakes and other
pastries. Preheat the oven for at
least
10 minutes. Preheating is not
necessary when roasting or for
long-time cooking of whole meals.
Food
“Bread
13iscui(s
(
Y-in.
thick)
Cott’ec ciikc
Corn
bred
loaf
bl”ewl
rolls
cakes
ch(xmlatc
or sliced
JPP!CS
Cl”usl
shell
f)otiLtOfX
or muffins
hreiut
(2 loaves)
t-ice
Gingerbread
Mu[”fins
Popovel”s
Quick
Yeast
Plain rolls
Swec[
Cakes
(without shortening)
Angel k)od
lclly roll
SrxmXe
Cakes
Bund[
Cupcakes
Fruitcakes
Laycl”
layer,
Loaf
Cookies
Brownies
[hop
Refrigerator
RollcLI
Fruits,
other Desserts
Baked
~’LIStiH”d
Puddings,
and custard
Pies
F’rozcn
Meringue
one
I’wo crust
PMIry
Miscellaneous
Ba!d
Scalh)pcd dishes
soLlfflM
Container
Shiny Cookie Sheet
Shiny
Metal Pan with
satin-finish
Cast
Iron or Glass Pan
Shiny Metal Pan with
sfitin-finish
Shiny Metal Muffin Pans
Deep Glass
Metal or Glass
Metal or Glass Loaf Pans
Shiny Oblong or Muffin Pans
bottom
bottom
or
Shinv Oblong
Aluminum Tube Pan
Metal Jelly Roll Pan
Metal or Ceramic Pan
Metal
or Ceramic Pan
Shiny Metal Muffin Pans
Metal or Glass Loaf or Tube Pan
Shiny Metal Pan with
satin-finish bottom
Shiny Metal Pan with
satin-finish bottom
Metal or Glass
Metal or Glass Pans
Cookie Sheet
Cookie Sheet
Cookie Sheet
Glass or Metal Pans
Glass Custard Cups or Casserole
(set in pan of hot water)
Glass Custard Cups or Casserole
Foil Pan on Cookie Sheet
Spread to crust edges
Glass or Satin-finish Metal Pan
Glass or Satin-finish Metal Pan
Glass or Satin-finish Metal Pan
Set on Oven Shelf
Olass or
Glass Pan
Mettil
2. Aluminum pans conduct heat
quickly. For most conventional
baking, light, shiny finishes give
best results because they help
prevent overbrowning. We
recommend
for cake pans and pie plates.
Cast Iron Cups
Loaf Pans
or
Muffin Pans
Loat’
Pans
Pan
dull
bottom surfaces
Shelf
Position
B, C
B
B
B
B
B
B
B
B
B
A
B
B
A, B
ABB
B
B
B
B, C
B, C
B, C
B, C
B, C
B
B
B
B, C
B
B
B
B, C
B, C
B
Oven
Temperature
40004750
4
3500
000
4
4000
500
350°
400°4250
375°
3500-3750
375°J1250
375°4250
-
3500
3750
325°–3750
375°4000
325°–3500
325°-3500
-
3750
3500
275°–3000
350°–3750
350°–3750
350°
325°–3500
350°4000”
40()”J1250
375°4000
35004000
300°–3500
325°
40004250”
325°–3500
400°4250
4000+250
4500
325°4000”
325°–375”
3000-350””
Time,
Minutes
{5-20
20-30
2040
45-55
20-30
45-60
45-60
45-60
IO-25
20-30
30-55
IO-15
45–60
45–65
20–25
2A
hrs.
20-35
25-30
40-60
25–35
10–20
6-12
7-12
30–60
30-60
50-90”
45-70
15–25
40-60
40-60”
III
6
60-90”
30-60”
30-75
3. Dark or non-shiny finishes and
glass cookware generally absorb
heat, which may result in dry, crisp
crusts. Reduce oven heat 25”F. if
lighter crusts are desired. Rapid
browning of some foods can be
achieved by preheating cast iron
cookware.
Comments
Canned, refrigerated biscuits take 2 to
4 minutes less
Preheat cast-iron pan for crisp crust
Decrease about 5 minutes
mix, or bake at
then at
Dark
metal
browning.
For thin rolls, Shelf B may be used.
For thin rolls, Shelf B may be used.
Two-piece pan is convenient.
Line pan with waxed paper.
Paper liners produce moister crusts,
Use 300”F. and Shelf B for small or
individual cakes.
Bar cookies from mix use same time.
Use Shelf C and increase temp. 25”F.
to
50”F.
Reduce temp. to 300”F.
custard.
Cook bread or rice pudding with
custard base 80 to 90 minutes.
Large pies use
To quickly brown meringue. use 40001
f~w 8
to 10 minutes.
Custard fillings require lower
temperature, longer time.
Increase time for larger amount or
size.
time.
450°F.
350°F.
or glass give deepest
for more browning.
for 25 minutes,
for 10 to 15 minutes.
for
4000F.
and more time.
for muffin
large
:.”
11
Page 12

Roasting
Roasting is cooking by dry
Tender meat or poultry
can
beat.
be
roasted uncovered in your oven.
Roasting temperatures, which
should be
spattering to
low
and steady, keep
a
minimum. When
roasting, it is not necessary to
sear, baste, cover or
add
water
to your meat.
Roasting is
easy;
just
follow (hese
steps:
Step 1: Position oven shelf at (B)
position for
lbs.
) and at (A) position for
small
size roast (.? to 5
larger
roasts.
Step
2:
Check weight
of’
roast.
Place meat fat-side-up or poultry
breast-side-up on roasting rack in
a
shallow
will baste the meat.
pan as close to the size of meat
as possible.
Do not cover. Do not
until
meat thermometer
accurate doneness (do not
thermometer in stuffing) or
pan.
The melting
just
before roasting. Use
for
fat
Select a
stuff poLlltry
more
place
refer
to
“Approximate Rousting Time” in
the Roasting Guide in this section.
Step 6:
Most
cook SI ightly
:A
being removed trt)m
S(mding time recommended
-
Step 3:
Touch
BAKE
pad.
I“(MS(S
is I () to Z()
allows roasts
(hem easier to carve.
Remember that food will continue
10 cook” in the hot oven
shoLl]d hc rcmoved when the
desired internal tcmperatLlre has
been
reached.
Im!llm
Step 4: Touch
DECREASE
temperature is displdyed.
The word “ON” and
oven [cmpcrtiturc
as
(hc
oven
oven reaches the set tcmpcra[Llrc
L1 (one
will SOLllld.
T()
chimgc oven temperatLlrc LILlring
Bake cycle.
[hen INCREASE
pad
(() get
Rem(Jve I’at
necessary.
lN(~REASE or
paLI
unlil
desired
the clumging
wi II be
hctits
up. When
toU~b
BAKE
or DJ”:(’l<l;ASI”;
new
tClllpCl”UILll”C.
and drippings as
Baste
LLS
desired.
displ~yed
(he
@
atld
Internal temperature will rise
about
5 c’ (o I ()
compensate
rcmove the roast from oven
s(mncr
than
for
(at 5° to I
[he In(ernal Tcmpcrature
rcctmlmended
Guide in this section).
NOTE: YOLI may wish to Time
Bake,
as described in Baking
sec(ion 10
turn
au(onla( ical Iy.
Frozen Roasts
●
l;rozcn
roasts
lamb, etc., can
Step
baking
food
5:
Touch
is
I’inished
l’rom o~cn.
(’1., EAR/OFF” when
and
[hen remove
(hawing,
pcr pound
lllin
Llncler
larger
●
Thaw
roasting
Stlme
can l-w
thtiwing.
on packer’s label.
but
additional
Lltcs
pcl-
pound
5
poLInds, more
txxists
).
ITNMt
f]”ozen poultry before
to
ensure
commercial
cooked
Follow directions given
meats continue to
whi Ie
sttinding, after
the oven.
min
Lltes. This
to
firm
up and makes
and
therefore
’>[;.:
i
f
yoLI
wish to
temperature rise,
OOF. less
in the Roasting
oven on
ol’
be
allow
successfLllly
and
oft’
heel’, pork,
roasted without
15 to 25 minutes
time
(
i
5
1’01- l“oasts
time
for
even
doneness.
frozen
poLdtry
without
for
12
Page 13

Roasting Guide
Type
Must
‘1’cndercuis: rih,
si[loin [ip. ItIIIIp{)I-tOl~It)UIId*
Veal
sll~)uldcr. leg or lrrin*
R)rh It)in, trill III
}[211).
pn-cooked”
Ham,
rilw
‘*[:(x
txmclcss rolled r~)mts
() inches
pcl
lb. II)
Poultry
(’hiL’kC1]
(’hickcn picccs
high
shoulder*
thick, AI
[inks given
01-
I)
LIc’k
qwdily
OVCI
5 (o 1 () minutes
Jbovc.
(hen
Temperature
3~5.
315.
325°
3~5~
325°
-
325°
Doneness
Rare:
Medium:
Well Done:
Rare:
Medium:
Well Done:
Well Done:
Well Done:
To Warm:
Well Done:
Approximate Roasting Time
in Minutes per Pound
to
8 Ibs.
3
to 5 Ibs.
6
24-33 18-22
35-39
40-45
22-29
30-35
21-25 20-23
25-30 24-28
30-35 28-33
35-45
35-45
17-20
minutes per
Under 10 Ibs.
30-40
30-40
lb.
(any weight)
10 to 15 Ibs.
27-35 24-27
Internal
I’emperature
150°-160”
170°-[85”
130”- 140”
150”- 160°
170”-
1700-1
170°-
115°-125”
“F
140°
I 85°
80°
1 80°
1700
3 to 5 Ibs. Over 5 Ibs.
325°
350”
325°
Well Done:
Well Dune:
Well Done:
35-40
35-40
10 to 15 Ibs. Over 15 Ibs.
18-25
30-35
15-20
185°-1900
185°-1900
In
tbigb:
185°-1900
13
Page 14

Broiling
Broiling is cooking
heat
frotm
tibove
oven has
oven
a
compartment below the
for
broiling. A specially
designed broiler pan
allows dripping
t’rom
the foods wd be kept away
fhm
the high heat of the gas
Distance
be
broiler pan
three
from the heat source may
chtinged
by positioning the
and
shelf positions in the broiler
compartment-A (bottom
food
by
direct
the food. Your
and
rack
fat
to drain away
rack on one of
o!’
flame.
broiler compartment), B (middle)
and C (top).
Both the oven and broiler
compartment doors should be
closed during broiling.
Step 1:
It
meat has
fat
or gristle
near the edge, cut vertical slashes
through both about 2 inches apart,
but don’t cut into
recommend that you trim
prevent
leaving a
.L :,.1,
LIIIL-K.
excessive smoking,
Iuyer
meat.
We
fat
about l/8-inch
to
Step 2: Remove broiler pan and
rack from broiler compartment
and
place food
Step 3:
pos~ti~)n
on rack.
Pull out drawer
broiler
pun
in
and
compartment. Placing food
closer
to
[’lame
increases exterior
browning
increases spattering
possibility
of
food,
but also
of’
fats and meat
tind
the
juices igniting.
Step 5: Select LO
by tapping INCREASE
Broil
(4500 F.)
pacl
once.
Select HI Broil (5500 F.) by tapping
INCREASE
Most
HI broil setting.
browning
may
select 1.0 Broil.
Step 6: Turn
pad
twice.
foods can be
and
slower cooking, you
food
broiled at the
If’
you prefer less
only once
during cooking. Time foods for
first side per
Turn
second side as a
doneness.
Broiling Guide.
food,
then
(Where
LISC
time given
guide
to preferred
two thicknesses
Ior
and times are given together, use
first
times given for thinnest
Step 7:
When
Broiling is
food.)
completed touch CLEAR/OFF.
Serve
food
immediately,
and
leave
pan outside compartm&rt to cool
during
meal for etisiest
cleaning.
Use of Aluminum Foil
Questions & Answers
Q. When broiling, is it necessary
to
always use a rack in the pan?
A. Yes. Using the rack suspends
the meat over the pan. As the meat
cooks, the
thus keeping meat drier. Juices
protected by the rack and stay
cooler, thus preventing excessive
spatter and smoking.
Q. Should I salt the meat before
broiling?
A. No.
and allows them to evaporate.
Always salt after cooking. Turn
meat with tongs; piercing meat
with
escape. When broiling poultry
or fish, brush each side often
with butter.
Q. Why are my meats not
turning out as brown as
they should?
A. Check to see
the recommended shelf position.
Broil
indicated in the Broiling Guide.
Turn
broiling.
juices
full
into the pan,
Salt
draws out the juices
a fork
also allows juices to
if you
for
longest period of time
food
only once during
arc
w-e
using
-
Step
4: C!ose
touch BROIL
14
● .
.0
broiler door and
pad.
Y(lucilnllscilluminLlln
your broiler pan
However, you
must
foil
and
broiler
mold the foil
toline
rtick.
tightly to the rack and cut slits in it
iust like the rack.
.,
Without
the
slits, the
toil will
prevent fat and nwrt juices from
&-aining
juices
catch on
si
its,
to
the
broiler pan. The
could become
tire.
11’ you do not
yoLI
arc
fl”yi n,g,
hot enough to
cut the
not broi ]
ing.
Page 15

Broiling
[J{)()(I
I{;ICOI1
(;l”ound
Ik’t’
~~’(1
I I
h)rl~,
Guide
QuantitJ
Thickness
——
I/2
11). I :1110[1[ x
III i II \l ice\)
;IIId/tJr
1{1 or
[.()
Brwil
}{1
HI
Shelf
Position
c
[’
F’irst
rime,
Side
Minute:
3Y,
9-10
Second Side
rime,
Minute
7-x
Comments
Ammge in single Iiiyer.
Spx’e
Wellly.
Up [o X
p:itties
t:lkc tibnrrt swnc (imc.
(’hirkcn
l{;]kw~ l)l-II(IULIS
I\l’c:l[l [ ‘t’( 1;1.1
‘[’(
l;l\(L>l’ ]
I;II:I i.h \t{ll
I,obstcr
(()
to s i 1/.
) (
‘;l\\
I i
‘1’uils
L:l(’11 )
II’
1
lL\
II,
I:isb
l’orh
(’bops
\vLl I I )(1[1,
I
i
Il. llllL’k
(
I 10 I lb..
]
ill
thiL’~
( : 102
11)..)
.?
-1
I 11). Ii
I
lL,I\
t/2
ill. (tli Lk
I I), [
Ilicl.
I
.;
(
l/2
ill. (hick)
.? I
I i
II.
t h
,II)(ILII
I
‘
I
I i II.
111 ick
,Ihtl(ll
I ( )
:( Ii
II. 111 ick ).
:11)(
)111 t I
!
I
l).
pk:, I I ()
I/4
i~k
11).
1()
I ? ()/..
l).
J
III
A
A
/4
A
A
A
1+1
A
9
12-13
13
10
15
15
30-35
5-6
8-9
6-7
I?-
1(’- I
7
14
x
Stctiks Icss [him
lh!”ougtl ht?fnrc
l“ecomm(!n4k!d.
SIM}l
1’:1[.
ReLtLICC
f’or
cLlt-Llp
me[(cd bultcr. Bmi ]
f’irst and tx”oi]
HI
(’
2-3
Spxc
evenly. Place English
sick-up
3-4
13- I 6
Do
nnl
tLll”ll OVCI.
Cut
through
Bl”L!sh wilh melted
1{1
c
B
I inch thick conk
browning.
time
about
5
to 10
chicken. Brush each
with skin-side-down
with dnor closed.
:ind
brush with
bxk
bulter, it’
of shell,
butler
P~Ln
frying is
minutes per side
side wilh
mut’t’ins cu[-
dcsiwd.
spread
open
bei’orc brni I ing
:Ind :Ltict” bdlt’ 0(’ hroiling time.
10
).
).
HI
Ill
HI
[’
B
A
A
f?l
t?
B
B
)
HI
(’
5
x
I
13
8
t ()
I ()
17
6
()
5
8
4-5
I ()-l
4-7
10
4-6
I?-
I -~
14
Hmdle d turn very
km(m
butter
desired.
Prcha[
Incre;tse
time 5 to 10 min. per side
]
Y in. I hick
slash
f’a(
cwelully,
before imd
(M
during cooking. it”
brniler to
hnme-cul”ect ham.
increxse
Brush with
browning
l’ilr
2
Sliish f’a(.
It desired, spli[ sausages in
letlglhwisc: cut into 5- to
tiin.
hdt
pieces
Broiling Tips
Ic;lsl I i[)cll
resu I Is. I
● A 1
[iliIl
LOIIIL’S ii i [i)
~icsiy llc(l It) III I 11
spill Ic
si]
ic Idc’(i 1 (~wL’1-
m
LI> \ LI w’
[i I)
tllicl. lot
‘;II) 1>1-( )i
hro i
!.: 1>1 1 t
. .
:tllj> i
l)L\l
I
11)
i
tl
I Icr
Ic’r p:i]) aI)d r~lck
joLII 01 CI1. il
i
Ill
i/c
>Illoi;
Ily i (i
i
j):t rt ( )
1“ 1
llc p:ltl.
hroil in:
OI]CS.
i
i ng
L_.cs
i n
5
tinci
[ilc
● A
ttcr
plxing
pan. put the
compartment in
The
rccomnwndeci
:dong
with cooking
f~)LInd
in the
●
I 1’
cicsircd, mtirinate
chicken
food
ptm
in the broiler
the
shelf positions,
,gLlide
above.
before
broiling, or brush
on
the broi Im
proper position.
times, can
be
meats or
with barbecue sauce last 5 or I ()
minutes
●
Wiwn mrangi ng
do
sicics.
the
not
The
broiicr
oniy.
food on pan,
ict
fatty edges
f[~t
hang over
drippings
compartment when
LX)LIid
soi i
food is broiled,
the
●
13roi Ier
preheated. However,
i’oods,
does not need to be
for
very thin
or to increase browning,
preheat if desired.
● Frozen steaks can be
conventionally broiled by
positioning the broiler
rack tit
next lowest position and
p~m and
increasing cooking time given i n
this
guide I X
times per side.
15
Page 16

Care and Cleaning
(See Cleaning Guide)
Proper
important so
yoLI efficient
service. FOI1
carefully in caring for your oven to
assure
care
und cleaning are
your oven will give
and
satisfactory
OW
these directions
safe
and proper maintenance.
Porcelain Oven Interior
With proper care, the porcelain
enamel
oven-top, bottom, sides, back and
inside of’ the door-will stay
Iooking
Let
recommend that you wear rubber
~IOVeS
Soap and water will normally do
the
spillovers may require cleaning
with a mild abrasive cleanser.
Soapy, wet metal pads may also be
used.
a
as m i I k, tomatoes, sauerkraut, fruit
.juiccs
the surftice.
spot
Household ammonia may make the
cleuning
d
in
ammonia fumes will help loosen
the
If necessury,
commercial oven cleaner. Follow
package directions.
t“inish
on the inside of the
new-
for years.
oven cool before cleaning. We
when
cleaning the oven.
job. Heavy spattering or
Do
not
allow
food spills with
high sugw- or acid content (such
or pie filling) to remain on
They may cause a dull
even
after
cieani]yg.
job easier. Place 1/2 cup in
shallow
u cold oven
burned-on grease and food.
glass
or pottery container
overnight. The
you may use a
Removable Oven Bottom
The oven bottom can be removed
to make cleaning easier after heavy
spillovers and to enable you to
reach the oven burner.
-
To remove:
1. Slide the tab at the center front
of the oven bottom to the left.
2. Lift the oven bottom up and out.
To replace:
1.
Slip the oven bottom into the
oven so the tabs in the rear of the
oven bottom fit into the slots in the
oven back.
2. Lower the front of the oven
bottom into place and slide the
front tab to the right to lock the
oven bottom into place.
——
The oven bottom has a porcelain
enamel finish. To make cleaning
easier, protect the oven bottom
from excessive spillovers. This is
particularly important when baking
a fruit pie or other
acid content. Hot
foods that are acid in content such
as milk, tomato or sauerkraut, and
sauces with vinegar or lemon juice,
may cause pitting and
the porcelain enamel surface.
To protect the oven bottom
surface, place a piece of’ aluminum
foil slightly larger than
dish or a small cookie sheet on a
lower shelf or under the baking
dish to catch any spillovers. It
should not completely cover the
shelf as this would cause uneven
heat in the oven. Aluminum
foil should not be placed on
oven bottom.
If a
spillover
bottom allow the oven to cool first.
You
can
clean the bottom with soap
and water,
or soap-filled abrasive
a
mild abrasive cleanser
f’oods
with high
f-ruit f’illings
damage
the
baking
the
does occur on the
pads.
or
to
oven
16
Page 17

Oven Shelves
oven
Shcl}’cs
with
a mild abrasive
following
A1’tcr
cleaning. ri nw
wi(h clc:ln
CIcan cloth.
~“~) l’Clllo\’C
may he Cleaned
clcamser
label
instructions.
the
shelves
water and dry with a
hCU\;J’.
t~lll’lltd 011
Soi
],
Soilpy Illctal pads nl;ly be Llscd.
A1’lcr scrubbi
water.
(Mm I.ight
n:, wash with
rinst-’
aI]d
Bulb
s(Mpy
dry.
Replacement
Bef-ore
replacing
disconnect
range at the
breaker
complc[eiy
not
clotll--(he bu
Reach in
[aking
abo~’c.
[empcI”a[LII”c appliance 40-watt bulb.
panel.
touch a
and
precautions
Rcplacc
110( hul
any
light bulb,
electric power
main
Let
f’use
rcmov
h with a damp
cl”ew’ blllh
Illcnli{)ned
i t w
i~h
(he
a
Ixl’orc
I h wi I I break.
(Ills
to
the
or circuit
bulb cool
in:
it. D()
aftcl”
higtl
-
Lift-Off Oven Door
The oven door is removable
make
the
interior
dLlrin.g
replacement
hlp
bulb.
To
remove the door, open it a few
inches to
that will
the special stop position
hold the
firmly on each side
door straight up and
Note: Be
be(ween
oven door
snap
careful not to place hands
the spring hinge and the
frame as the hinge could
back
and pinch fingers.
more
of’
door open. Grasp
and
off
To replace the door, make sure
the hinges
position.
bottom
the hinges. Then lower the door
slowly and
w-e
in the special stop
Position
the slots in the
of the door squarely over
evenly
over both
hinges at the same time.
snap
hack
against the oven frame,
pull them
back
out.
to
accessible
the
lift the
the hinges.
If
hinges
Broiler Pan & Rack
After broiling, remove the broiler
pan and rack and carefully pour off
the grease. Wash and rinse the pan
and rack in hot, soapy water.
If food has burned on, sprinkle the
rack while hot with detergent
cover with wet paper towels or a
dish cloth. That way, burned-on
foods will soak loose while the
meal is being served.
Do not store a soiled broiler pan
and rack in the broiler compartment
or in the oven.
and
17
Page 18

Cleaning Guide
Note: Let oven parts cool before cleaning.
PART
Broiler Pan and Rack
Control Panel
outside Class Finish
Metal, including
Side Trims and
Trim Strips
Porcelain Enamel
and Painted
surthces*
oven
Dom-*
oven
Interinr*
(( ’A CATION: When in
LISL!, I
igh(
hLIlbS ctin
become warm
(o
break if touched with
nx)is( clo[h
When
cleaning. avoid
toLlchirrg
with
cleaning cloths it’
lamp
cover
or towel.
warm
is
removed.)
enough
Itimps
Removable Oven
Bottom
Shelves
MATERIALS TO
● Soap and Water
● Soap-Filled Scouring Pad
● Commercial Oven Cleaner
● Dishwasher-
● Mild Soap and Water
● Soap and Water
● Soap and Water
● Paper Towel
● Dry Cloth
● Soap and Water
● Soap and Water
● Soap and Water
● Soap-Filled Scouring Pad
● Commercial Oven Cleaner
● Soap and Water
● Soap-Filled Scouring Pad
● Commercial Oven Cleaner
● Mild Abrasives
● Soapy Metal Pads
USE
Sat’e
GENERAL DIRECTIONS
Drain fat and cool pan and rack slightly. (Do not
compartment to cool. ) Sprinkle on detergent. Fill the pan with warm water
damp cloth or paper towel over the rack. Let pan and rack stand
scour if necessary. Rinse and dry. OPTION: The broiler pan and rack
Ict
soiled pan and rack stand in
for
a few
nrinutcs.
nury
~ncl
also
cleaned in a dishwasher.
Wash control panel with soap and water, using a soft
cloth.
Do
not use
idmsivc
cleaners. Rinse and drv with a soft cloth.
Wash all glass with cloth
DO
NOT USE
steel wool,
dampt
d in soapy water. Rinse and polish
wi[h a
Wash, rinse, and then polish with ~ dry
dry
clo[h.
abrasives, ammonia, acids or
commercial oven cleaners.
DO
NOT
USE
oven
cleaners,
cleansing powders or harsh
abrasives.
Tbese might
scratch the surface.
If acids should spill on the oven
a @paper
towel orckrth
to wipe up
surface has cooled, wash and rinse. For
such as
fat
smatterings, etc., wash with soap md waler
while
right
it is hot.
away,
(nhcr spi 11s,
when cooled and then rinse. Polish with dry
DO
NOT
USE oven cleaners,
cleansing powders or harsh
abrasives.
Remove oven door following instructions in Care
and Cleaning section. Use soap
and
water
thoroughly clean both the inside and outside 01’
door. Be careful not to let any water
gel
into any
openings in the door. Rinse well. NOTE: Soap
on door liner causes additional stains when the
oven is reheated.
Cool before cleaning.
FOR LIGHT SOIL: Frequent wiping with mild soap and
cooking meat) will prolong the time between major cleanings. Rinse
NOTE:
Soap left on
liner
causes additional stains when oven is rebeated.
FOR HEAVY SOIL: Choose a commercial oven cleaner
Use of rubber gloves is recommended. Rinse well. Wipe off any
on thermostat bulb. When rinsing oven after cleaning, wipe
The oven bottom panel can be removed for easy cleaning (see Care
water (especially aticr
thoroughly.
and Iollow
label
oven
thermos(a[
ins(ruc[i(ms.
clcanct
bulb also.
and Clewring
section). Use the same directions for cleaning as explained above for Porcelain
Enamel and Painted Surfaces.
Shelves can be washed in dishwasher or cleaned by hand, using a mild
cleanser. After cleaning, rinse the shelves with
To remove heavy, burned-on soil, soapy metal pads may be used.
wasb with
soaw water. rinse and drv.
clean
water and dry
wi[h
Altel-
abrasive
a
clean cI(JII1.
scrubbing.
broilet-
spread
Wash:
he
cloth.
When
cloth.
to
[hat :C[S
use
the
(Iw
left
‘l’ Spillage
UI;
ot
mtirinades, fruit juices, tomato sauces and basting materials containing acids may cause discoloration. Spillovers should be wiped
imt;cdia(ely, with care being taken not to touch any hot portion of the oven. W-hen the surface is cool, clean and rinse.
18
Page 19

Minor Adjustments You Can Make
Adjusting Oven Thermostat
When
time
oiven
*
thermostats, over a
may
setting,
bet wcen an OILI
5 to 10 minutes
YoLl
the
correctly;
has
and is
than
11’ yoLI think the oven should be
hotter or cxx)lcr.
yoLtrscll ’.
change the
wmperaturc 25°F.
[han the tcmpera(ure
recipe, then hake.
this “test”
ol’
be
ccx)king a food
in
yoLlr new t)vcn, Llse
on recipes as a guide. Oven
“driti” from the factory
and di
may be inclined to think that
new oven
twcn set
tmwe likely
[he ovcm
how much
changed.
I’fcrcnces
is not performing
however,
correctly at the factory
it
T() decide
thermostat, set the oven
should
the
for the first
time
period
of years,
in timing
anLI
a new oven
are
not unusual.
your new oven
to be accurate
rcphrced.
yoLI
can
adjust it
how much to
higher or lower
in your
The results of
give you an idea
thermostat should
of
Broil
and Oven Burner Air
Adjustment Shutters
Air adjustment shutters for the
burner regulate the flow of air to
the flames.
To adjust the air shutter, remove
the oven bottom (see Care and
Cleaning section). Turn burner full
on and check the flames. Burner
flames should not flutter or blow
away from the burner. They should
be blue in color with no trace of
yellow. Foreign particles in the gas
line may cause an orange flame at
first, but this will soon disappear.
If the flames are yellow or flutter,
open the air shutter more. If they
blow away from the burner, close
the air shutter more.
T
\
To adjust the orifice hoods, check
the inner cone of the
WARNING:
measure the inner cone of the
flame, please use caution. Burns
could result.
‘he inner cone of the flames
adjustable Joint phers to
If you attempt to
flame.
adjust
!!!’’!!!!i!i!!!?i::;:a
To
adjust
thermostat:
1.
Pllsh
BAKE pad.
2.
Select
an oven temperature
between 500”E”
,Ilessillg
imlncdia(cly press
and hold
3. [’on[inuc I() bold
preset OVCI1 tcnlperalLlrc
adjLlsllnellt shows
I’acmry
adj
4.
Llp
35
the
pads.
5.
display.
This
the
remembered by
wi 11
tcnlpcl”:ltul”c hy dlat anlOLLnt
(imc
This
Broil
the
set
LIStlllCllt is
Change
to 35 degrees
degrees
lNCREASf~ or
[>ush
(’LEAWOFF to clear
acijustment
oven
au(on~a(ical Iy adjust
joLI SC[
a(]justnlcnt will
(Clll})Cl”ilt Lll”CS.
and
IN(.’REASE
BAKE again
I’(w 4
seconds.
BAKE until
in display. The
()\Jcn
temperature
“00.”
‘
(~i]l]~~tiittlr~
ho((er (+35°F.
c(x)lcr (-35°F.
DECREASE
you have made to
(cmpcra(ure
the
control and
a
hake
5500F.
by
pad and
adjustment
) by using
will be
the oven
each
temperatur-e.
not afft3Ct
) or
If necessary, use a screwdriver to
loosen the air shutter screw. Then
adjust the air shutter and, when the
flames
are right, retighten the air
shutter screw.
To shorten the cones, tighten the
orifice hood by turning in the “LP”
direction. To lengthen the cones,
loosen the orifice hood by turning
in the “Nat.” direction.
Page 20

-=:Questions?
,c-<:.=~
:=~~UseT hisProblem
–.. . . . . . . . . . . . . .
.=---
Solver
PROBLEM
OVEN DOES NOT
COOK PROPERLY
CLOCK AND
MINUTE/SECOND
TIMER DO NOT WORK
OVEN LIGHT DOES
NOT COME ON
OVEN IS BEEPING
“F” AND A NUMBER
FLASH ON THE
DISPLAY
STRONG ODOR
POSSIBLE CAUSE AND REMEDY
● Incorrect cookware being used. Check each cooking section for cookware tips.
● Oven bottom not securely seated in position.
● Controls set incorrectly. Review instructions in the Controls section of this book.
“
Check common problems listed in Baking, Roasting and Broiling sections.
● Check for power outage.
● Bulb may be loose or burned out.
● Switch is bad.
● Timer has finished timing.
● If beeping is accompanied by an “F” and a number flashing on the display, this
indicates a function error code. Touch CLEAR/OFF pad. If the function error code
does not clear, disconnect power to the oven and call for service.
● This indicates a function error code. Touch CLEAWOFF pad. If function error code
does not clear, disconnect power to the oven and call for service.
●
Improper air/gas ratio in oven.
Adjust oven burner air shutters—see Minor
Adjustments You Can Make.
If you need more
GE
Answer Center’k’
help...call, toll free:
800.626.2000
consumer information service
● An odor from the insulation around the oven liner is normal for the first few times
the oven
is
used. This is temporary.
20
Page 21

Notes
21
Page 22

Notes
22
Page 23

Wdll
With the purchase of
Be There
your
new
Hotpoint
appliance, receive
the assurance that if you ever need information or assistance, we’ll be there. All you have to do is call-toll-free!
In-Home Repair
Service
800-GE-CARES
(8MM32-2W7
Service Contracts
8/70-626-2224
GEAnswer
Center
800.626.2000
\$’lliIl(wl
I
[ol[)(,itl[
(ctl([’t<’;
;11)1(’ 10 II(I]). }1)(11”
(Ilt(’st
illl(l (’()(11
lil]lt’. (;1 ltts\\;t- (kvll’c+’] scvlic( is
0])(’11 21
Telecommunication Device for the Deaf
}(NII
(l~lcwlio]l :ilx)(]{
]ll:lj(}]
:I[)])li:ul(e,
itlli)ltll:lliotl s(l-\icc.
(’:111—all(l
iot)--\\
ill 1)(
;uIs\\c>rc’(1
lc’OLld\:
.\tl(l }’011
110111’s
ii (I;IK 7 (la}’s ii w’[’ek.
(;1 \tls\w
is
pro II
(’:111
:ttl)
w)lll
;i\:iil-
’
(’:111 :lll\
m
Il)ll)
Parts
andAccessories
800-626-2002
Individuals qualified to service their
own appliances
parts (w
their
(
( )\cr
:md it]]
klaster( Ml
X’(’{!ptc?d.
access(n_ies
h(mlc,
)t]r lmrts
47,()()() (
are fhlly
User maintenance instructions
contained in this booklet cover procedures intended to be performed by
any user. Other servicing generally
should be referred to
vice personnel. Caution must be
exercised, since improper servicing
may cause unsafe operation.
free of”
system
;enu
warrwlttxi.
;u]d
can have
sent directfy
shipping
pr(widcs
ine
Rellew’al Par[s.
I)isc(wer
qualitled ser-
neecfc’d
charge!
access to
VISA,
cards
to
arc’
.
.
.
,“... . . . . .
. -. ,-
.
. . .
. . .
—,, .- . .-..”. ..! -. .
For Customers With
Special /Keels...
800.626.2WMJ
Page 24

YOUR HOTPOINT GAS RANGE
WARRANTY
Save proof of original purchase date such as your sales slip or
cancelled
,
I
check to establish warranty period.
WHAT IS COVERED
WHAT IS NOT COVERED
FULL ONE-YEAR WARRANTY
For one year from date of original
purchase, we will provide,
charge, parts and service labor in
your home to repair or replace
any part
because of a manufacturing defect.
● Service trips to your home to
teach you how to use the product.
Read your Use and Care material.
If you then have any questions
about operating the product please
contact your dealer or our
Consumer Affairs office at the
address below, or call, toll free:
GE Answer
800.626.2000
consumer information service
● Improper installation.
If you have an installation problem,
contact your dealer or installer.
You are responsible for providing
adequate electrical, gas, exhausting
and other connecting facilities.
of
the range that fails
Center’’”
free of
This warranty is
original
the
succeeding owner for products
purchased for ordinary home use
in the 48 mainland states, Hawaii
and Washington,
warranty is the same except that it
is LIMITED because you must pay
to ship the product to the service
shop or for the service technician’s
travel costs to your home.
All warranty service will be
provided by our Factory Service
Centers or by our authorized
Customer Care” servicers during
normal working hours.
Look in the White or Yellow Pages
of your telephone directory for
HOTPOINT FACTORY SERVICE,
GENERAL ELECTRIC-HOTPOINT
FACTORY SERVICE or HOTPOINT
CUSTOMER CARE “ SERVICE.
● Replacement of house fuses or
resetting of circuit breakers.
● Failure of the product if it is used
for other than its intended purpose
or used commercially.
● Damage to product caused
by accident, fire, floods or acts
of God.
WARRANTOFf IS NOT
RESPONSIBLE FOR
CONSEQUENTIAL DAMAGES
extended to
purchaser and any
D.C.
In Alaska the
391
Some states do not allow the exclusion or limitation of incidental or consequential damages, so the above limitation or exclusion
may not apply to you. This warranty gives you specific legal rights, and you may also have other rights which vary from state to state.
To know what your legal rights
Manager—Consumer Affairs, GE Appliances, Louisville, KY 40225
are in your state, consult your local or state consumer affairs office or your state’s Attorney General.
Warrantor: General Electric Company
If further help is needed concerning this warranty, write:
HcnPollur
CG
I
I
RGJ534GEP
 Loading...