

Page 1

,
. .
I
gmmodel
RGHy46GEH
Features
p7
Miaowavedefrosting p$$
Miaowave
Swhx!Cooting
ovenCooting
cooting
I@o
p14
Howtousethe
self-cleaningbveroven. pizi
-’
~,
.).’-:
i,_.{
,.-
-,,
,1.!l
! ,-.:’
Page 2
MicrowavingTips. . . . . . . . . . . . 3
SafetyInstructions . . . . . . . ...4-6
FeaturesofYour
CookingCenter . . . . . . . . ...7
TouchControlPanel. . . . . . . . . . 8
Defrosting . . . . . . . . . . . . . . . . ..9
CookingbyTime . . . . . . . . . ...10
CookingbyTemperature . . . . ...11
SafetyInstructions . . . . . . . ...4-6
BurnersandControls . . . ...12.13
SafetyInstructions . . . . . . . ...4-6
ovenControls . . . . . . . . . . . . . . .14
OvenShelves . . . . . . . . . . . . . . . 14
~OvenLight . . . . . . . . . . . . . . . . . 15
AutomaticOven Timer,
ClockandMinute Timer . . ...15
13aking. . . . . . . . . . . . . . . . . . ..l6
BakingChart. . . . . . . . . . . . . . . . 17
Roasting,Chart . . . . . . . . . . . . . . 18
Broiling,Chart . . . . . . . . . . . . . . 19
HowtoOperateYour
Self-CleaningOven . . . ...24.25
CleaningChart . . . . . . . . . . . ...27
YiOummagi?,
household
winsew?intosoftfkborcoverings
such asCwihimedvinylor
carpeting. When movingtherange
on thistype offlooring,use care.
Do
notinstall the rangeover
kitchen carpeting unlessyou
placean insulatingpad or sheet of
l/4-inch-thickplywoodbetween
the rangeand carpeting.
Whenthefloor cowing ends
the~ront of the range, the area that
the rangewill reston shouldbe
builtup with plywoodor similar
materialto the samelevelor higher
than thefloor covering.This will
allowtherange tobe movedfor
cleaningor servicing.
mesomanyother
item,isheavy and
at
@Makesureall utensils used in
yourmicrowaveovenare labeled
“suitablefor microwaving:’Check
yourCookbookfor specifictestto
determine“microwave-safe”
utensils.
@Papertowels,wax paper and
plasticwrap can be usedto cover
dishesin order toretain moisture
andpreventspattering.
* Somemicrowavedfoodsrequire
stirring, rotatingor rearranging.
Checkyour Cookbookfor specific
instructions.
@Somefoodssuch as unshelled
eggsand hotdogsmust be pierced
to allowsteam toescape during
cooking.
(3d!&-&ck%xk%i”
Yourrangemust be levelin order to
produce proper cooking and baking
results. After it is in itsfinal
location, place a levelhorizontally
on an ovenshelf and check the
levelnessfront to back and side to
side. Levelthe rangeby adjusting
the levelinglegs or byplacing
shimsunder the corners as needed.
—..-.—..
Model&Serial Number
Location . . . . . . . . . . . . . . . ...2
InstallingYourCooking Center ..3
Leve]ingthe Cooking Center . ...3
Care andCleaning of Your
Cooking Center . . . . . . ...20-26
The~rob~em So~ver . . . . ...28.29
IfYiouNeed Service . . . . . ...0.31
Warranty . . . . . . . . . .. BackCover
,.--,
( }
..... -
3
Page 3
When usingthisappliance, basic
.$@
+$$,
P-
safetyprecautionsshouldbe
followed,includingthefollowing:
@Havetheillst.der’show
kation oftherangegascut-off
valveandhowtoshutitm if
mxes?xwy.
~~ave yourrangeinstakxi
youthe
and
pm~rly groundedbyaqualified
insWller9
inaccordancewiththe
InstallationInstructions.Any
adjustmentandserviceshouldbe
performedonlybyqualifiedgas
rangeinstallersorservice
technicians.
~l%g yourrange
groundedoutletdye Donot
intoa 120-vcM
removetheroundgroundingprong
fromtheplug.Ifindoubtaboutthe
groundingofthehomeelectrical
system,itisyourpersonal
responsibilityandobligationto
haveanungroundedoutletreplaced
withaproperly-groundedthreeprongoutletinaccordancewiththe
NationalElectricalCode.Donot
useanextensioncordwiththis
appliance.
@BesureMlpackingJQ_latelids
areremovedfromtherange
beforeoperatingit,topreventfireor
smokedamageshouldthepacking
materialignite.
@Besureyourrangeiscorrectly
adjustedbya qualified
teehnieiamorhmtdkxforthe
typeOf’gas(NaturalorIF) on
whichit istobeused.
service
Gascanbe
convertedfromonetypetothe
other.SeeInstallationInstructions.
oAfterprolongedW$eofa range9
high+floorte]nperaturesmay
EW%lWandmanyfi(xwcowlings
‘w’illm Witllstanti‘thiskid d’
we. iNeverinstalltherangeover
viny]tile01linoleumthatcannot
withstandsuchtypeofuse,Never
installitdifectlyoverinterior
ki~~~~e~~~arpeti~~g,
@~~~~~~~~~~~~~~~~~~~~(j~fj~~
unattendedwherearangeishot
orh operation,
Theycouldbe
seriouslyburned.
@Do119tallowanyoneto&nb9
W.mldor’Wg onthedwr orrange
top.Theycoulddamagetherange
andeventipitovercausingsevere
personalinjury.
@~~~~~(-Jp+J:W p?J~$~m
ITEMSOFINTEmsT m
cm~m~ INCABINETS
ABOVEA RAYWEORONTHE
BACWPLMHOFARANGE–
-DREN amm~ or4m
RANGEm REACHH’EMS
COULDBE SENOUSLY
mmD.
eht burner
gratesandother
surfacescod MOWtouching
themor
childrencanreachthem.
~NeverwearIloosefittingor
hanginggarmentswhileusing
the
leavingthemwhere
appkmce.Flammablematerial
couldbeignitedifbroughtincontact
withflameorhotovensurfacesand
maycausesevereburns.
~Neveruseyour
warmingor
appliancefor
heatingtheroom.
Prolongeduseoftherangewithout
adequateventilationcanbe
hazardous.
@DonotUnsewaterongrease
fires.Neverpickupaflamingpan.
Turnoffburner,thensmother
flamingpanbycoveringpan
completelywithwellfittinglid,
cookingsheetorflattray.Flaming
greaseoutsideapancanbeputout
bycoveringwithbakingsodaor,if
available,amulti-purposedry
chemicalorfoam.
eDOnotstoreflmlnlab!ematRrials
in21?4ovenor neartheC(mktop.
GDonotM Coo!iillggreaseor
(M%m.’fkMH.mdN.ema&?&3h3
a.4%np~7Tg73]qt-FCl;.2
G,&~,,434.~
L,&.I’,& ,,$JI ~! i~&~i” tk ~d~fj%
@WheIRcookingpmr!k9followour
directionsexactlyandalwayscook
themeattoatleastM)”F.This
assuresthat,intheremotepossibility
thattrichinamaybepresentinthe
meat,itwillbekilledandmeatwill
besafetoeat.
Microwave oven:
@Readandfollowthespecific
“PRECAUTIONS‘K)AVOID
POSSIBLE
EXPOSLJREm
EXCESSIVEMICROWAVE
ENERGY”foundonpage2.
@Seedoorsurfacecleaning
instructionsonpage20.
@To~ed~~et~~ri~~offirein~~e
cavity:
oven
notovercookfood.Carefidly
–Do
attendapplianceifpaper,plasticor
othercombustiblematerialsare
placedinsidetheoventofacilitate
cooking.
–Removewiretwist-tiesfrom
paperorplasticbagsbeforeplacing
baginoven.
o
–Do notuseyourmicrowaveoven
todrynewspapers.
–Paper towelsandnapkins,wax
paper.Recycledpaperproducts
cancontainmetalfleckswhichmay
causearcingorignite.Paper
productscontainingnylonornylon
filamentsshouldbeavoided,as
theymayalsoignite.
–Do notoperatethe‘ovenwhile
empty to avoid (kMnage to the
OVf%?iand the danfyr of fire.
Ifby
accidenttheovenshouldrunempiy
aminuteortwo,noharmisdone.
However,trytoavoidoperatingthe
ovenemptyataHtimes—-itsaves
energyandprolongslifeoftheoven.
–Do notpoppopcmwlillym.w
microwaveovenunlessina special
microwavepopcornaccessoryor
unlessyouusepopcornlabeledfor \
useinmicrowaveovens,
c
(...
Page 4
~+~shoukiignite,keepovendoor
:%%=3
~= closed,turnovenoff,anddisconnect
thepowercord,orshutoffpowerat
thefuseorcircuitbreakerpanel.
someipIwMSsuchaswhole
e
eggsandsealedcontainers-for
example,closedglassjars—may
explodeandshouldnotbeheated
inthisoven.
~Avoidheating
babyfoodinglass
jars,evenwithouttheirlids;
especiallymeatandeggmixtures.
~Don%defrostfrozenbeverages—
especiallycarbonatedones—in
narrowneckedbottles.Evenifthe
containerisopened,pressurecan
buildup.Thiscancausethe
containertoburst,resultingin
injury.
0Usemetilonlyas
directedin
Cookbook..Foi~stripsasusedon
-,&
@
J!g$’.
meatroastsarehelpfulwhenused
...*
asshowninCookbook.
TVdinnersmaybemicrowavedin
‘~~’foiltrays;removetopfoilcoverand
e
returntraytobox.Whenusing
metalinmicrowaveoven,keep
metalatk!ast1inchawayfrom
sidesofoven.
@Cookingutensils
becauseofheattransferred
hot
maybecome
fromtheheatedfood.Thisis
especiallytrueifplasticwraphas
beencoveringthetopandhandles
oftheutensil.Potholdersmaybe
neededtohandletheutensil.
eSollletilnlesytheCookingfray
canbecomekmhot@kmchoBe
carefultouchingthecookingtray
duringandaftercooking.
~Tllerlnoillet8~+—Donotusea
thermometerinfoodyouare
microwavingunlessthethermometer
isdesignedorrecommendedfor
...5..
usein[hemicrowaveoven.
)
~.:’
0y~g~~~~v~f~~~temperatilreprobe
%----
i’n?!!!ltM?ovenWhennotinLlsoeIf
.,------
‘!youleave[heprobeinsidetheoven
i
\
--k...’
without insertingitin foodor
liquid,andturn on microwave
energy,itcancreateelectrical
arcingintheoven,anddamage
ovenwalls.
Plasticutensik+Plasticutensils
~
designedformicrowavecooking
areveryuseful,butshouldbeused
carefully.Evenmicrowaveplastic
maynotbeastolerantofovercooking
conditionsasareglassorceramic
materialsandmaysoftenorchar
ifsubjectedtoshortperiodsof
overcooking.Inlongerexposures
toovercooking,thefoodandutensils
couldignite.Forthesereasons:
1)Usemicrowaveplasticsonlyand
usetheminstrictcompliance
withtheutensilmanufacturer’s
recommendations.2)Donotsubject
emptyutensilstomicrowaving.
3)Donotpermitchildrentouse
plasticutensilswithoutcomplete
supervision.
@Boilingeggs(inandoutof
shell)isnotrecommended
for
microwavecooking.Pressurecan
buildupinsideeggyolkandmay
causeittoburst,resultingininjury.
9 ~o~& w~~~~~~~o~e~~~~e~
%kin?’suchaspotatoes,sausages,
tomatoes,apples,chickenlivers
andothergiblets,andeggyolks
(seepreviouscaution)shouldbe
piercedtoallowsteamtoescape
duringcooking.
~66B0iiable79cookingpouches
landtightlyclosedplasticbags
shouldbeslit,piercedorventedas
directedinCookbook.Iftheyare
not,plasticcouldburstduringor
immediatelyaftercooking,possibly
resultingininjury.Also,plastic
storagecontainersshouldbeat
leastpartiallyuncoveredbecause
theyformatightseal,When
cookingwithccmtainerstightly
cowed withplasticwrap,remove
coveringcarefullyanddirectsteam
awayfromhandsandface.
Coobp
f$A&vaysusetheLITEposition
whenignitingtopburners
makesuretheburnershaveignited.
.$l~eve~~ea~e~~rfa~e~~~~e~~
unattendedatHIGHflame
settings.
Boilovercausessmoking
andgreasyspilloversthatmay
catchonfire.
@
~~just top burner flameSk!SO
itdoesnotextendbeyondtheedge
ofthecookingutensil.
flameishazardous.
~UseOIIlydrypothokkrs-moist
ordamppotholdersonhotsurfaces
mayresultinburnsfromsteam.Do
notletpotholderscomenearopen
flameswhenliftingutensils.Donot
useatowelorotherbulkyclothin
placeofapotholder.
@Tominimize
burns,ignitionof
flammablematerials,andspillage,
turnthehandleofacontainertoward
thesideorbackoftherangewithout
extendingoveradjacent‘burner.
~Alwaysturn surfaceburner
toOFF
@Carefullywatchfoodsbeing
friedatHIGHfkim
beforeremovingtntensiL
63~e~e~~~~&the~e~@(@~
openings)oftherange.They
providetheairinletandoutlet
whichisnecessaryfortherange
tooperateproperlywithcorrect
combustion.
@Donotusea wokonthecooking
surfacetithewokhasarm.mdmetal
ringwhichispklced!overthe
burnergrate$0supportthewok..
Thisringactsasaheattrapwhich
maydamagetheburnergrateand
burnerhead.Also,itmaycausethe
burnertoworkimproperly.This
maycauseacarbonmonoxidelevel
abovecurrentstandards,resulting
inahealthhazard.
and
Excessive
setting.
Page 5

.ReadM!.imstructiombeforeusingthis appliance.
/-”–-”
@ljj’@-J&fopfryingshouldbeas
dry aspossibk?.Frostonfrozen
foodsormoistureonfreshfoods
cancausehotfattobubbleupand
oversidesofpan.
Q~$eleastpossibleamount
for‘effective
Shailowordeep-fat
offat
frying.Fillingthepantoofillof
fatcancausespilloverswhenfood
isadded.
@~f’~~~~~~~~~~~~of‘o~]~~~fa~
willheusedinfrying,stirtogether
befo~heating,orasflitsmeltsiowly.
@Alwaysheatfatslowly,and
watchasitheats.
@use deepfatthermometer
wheneverpossibletoprevent
overheatingfatbeyondthesmoking
point.
oUSep~QperF%mSize—Avoid
pansthatareunstableoreasily
tipped.Selectutensilshavingflat
bottomslargeenoughtoproperly
containfoodavoidingboilovers
andspiHovers,andlargeenoughto
coverburnergrate.Thiswillboth
savecleaningandpreventhazardous
accumulationsoffood,sinceheavy
spatteringorspilloverslefton
rangecanignite.Usepanswith
handlesthatcanbeeasilygrasped
andremaincool,
Q~~~onlyglasscookwarethat is
recomnlendedforuseongas
burners.
QKeepal!plasticsawayfromtop
burners.
eTOavoidthepossibilityofa
burn,alwaysbecertainthat the
controlsfor311burnersall!at
‘OFFpositionlandM gratesare
~~~~~~fareattelllptingtoremove
the?$@e.
@‘$y~(j~namingfoodsUmh”the
hood,mmthe!&moff,‘mefan,if’
operatingnmy spm?adthe i%me.
enrangek locatedI-Mmra
window9donotuselongcurtains
whichcouldblowoverthetop
burnersandcreateafirehazard.
@Myousmellgm+turnoffthe
gastotherangeandcallaqualified
servicetechnician.Neverusean
openflametolocatealeak.
self-cleani~ LOweroven
@Donot
Thedoorgasketisessentialfora
goodseal.Becarefulnottorub,
damageormoveit.
69Do~~~~~eo~e~~~eanerseNo
commercialovencleaneroroven
linerprotectivecoatingofanykind
shouldbeusedinoraroundany
partoftheoven.
9RemO-Vethebroiler
othercookware
theoven.
QDonotuseovenfor
area.
~Standawayfromtherange
whenopeningovendoor.me
hotairorsteamwhich
cancausebums tohad+ face
amh+ eyes.
QK&povenfreefromgrease
buildup.
@~ia~e~~e~~~e~~esin&si~e~
position‘whileovenk em].
@Pdhg ‘outshelf’totheshelf
stopisa convenienceinlifting
heavyfeds. Mis
againstMms fromtouchinghot
~~g~f~~~~of&~&JQ~!fJ~~~~~~~~~~e
oDm’B9tIM%Mu~lopenedfood
~Qfl@~~~~~~~~fJ~!~(Jl~~~, p~~$~~r~
(XJMMbuildupandthe Coutailler
fxwkdIMWWmusinganIhljmy,
deanthedoorgasket.
panand
beforeself-cleaning
astorage
escapes
alsoa pr~aution
e ~~~9~~s~ a~~~~~~~f~~~
anywhereh thewwm
describedinthisbook.
exceptas
Misuse
couldresultinafirehazardor
damagetotherange.
eWhenusingcookingor
roastingbagsinoven9follow
themanufacturer’sdirection.
~Useonlyglasscookware
r~ommended
foruseingasovens.
@Alwaysremovebroiler
fromtheovenassoonasyou
finishbroiling.
Greaselefiinthe
thatis
pan
pancancatchfireifovenisused
withoutremovingthegreasefrom
thebroilerpan.
@When19roiling9if
dosetotheflarne9thefat
meatistoo
may
ignite.Trimexcessfattoprevent
excessiveflare-ups.
Makesurebroilerpanisin
~
placeumxdy
toreducethe
possibilityofgreasefires.
~Nyoushouldhaveagreasefire
andkeepovendoorclosedtocontain
fireuntilitburnsout.
@Keeprangedean andfree
ofaccumulationsof greaseor
spihvers whichmayignite.
Imkm.Needservice
onpages28and29ofMSbook.
@~()~9~attempttorepair
orIrepk!cemy partofp-w
range
amkssitisspecifically
recommendedinthis
otherservicingshouldbe
toaqualifiedtechnician.
book” Ail
referred
{,_,)
Page 6
:-i
-s’
...
.,
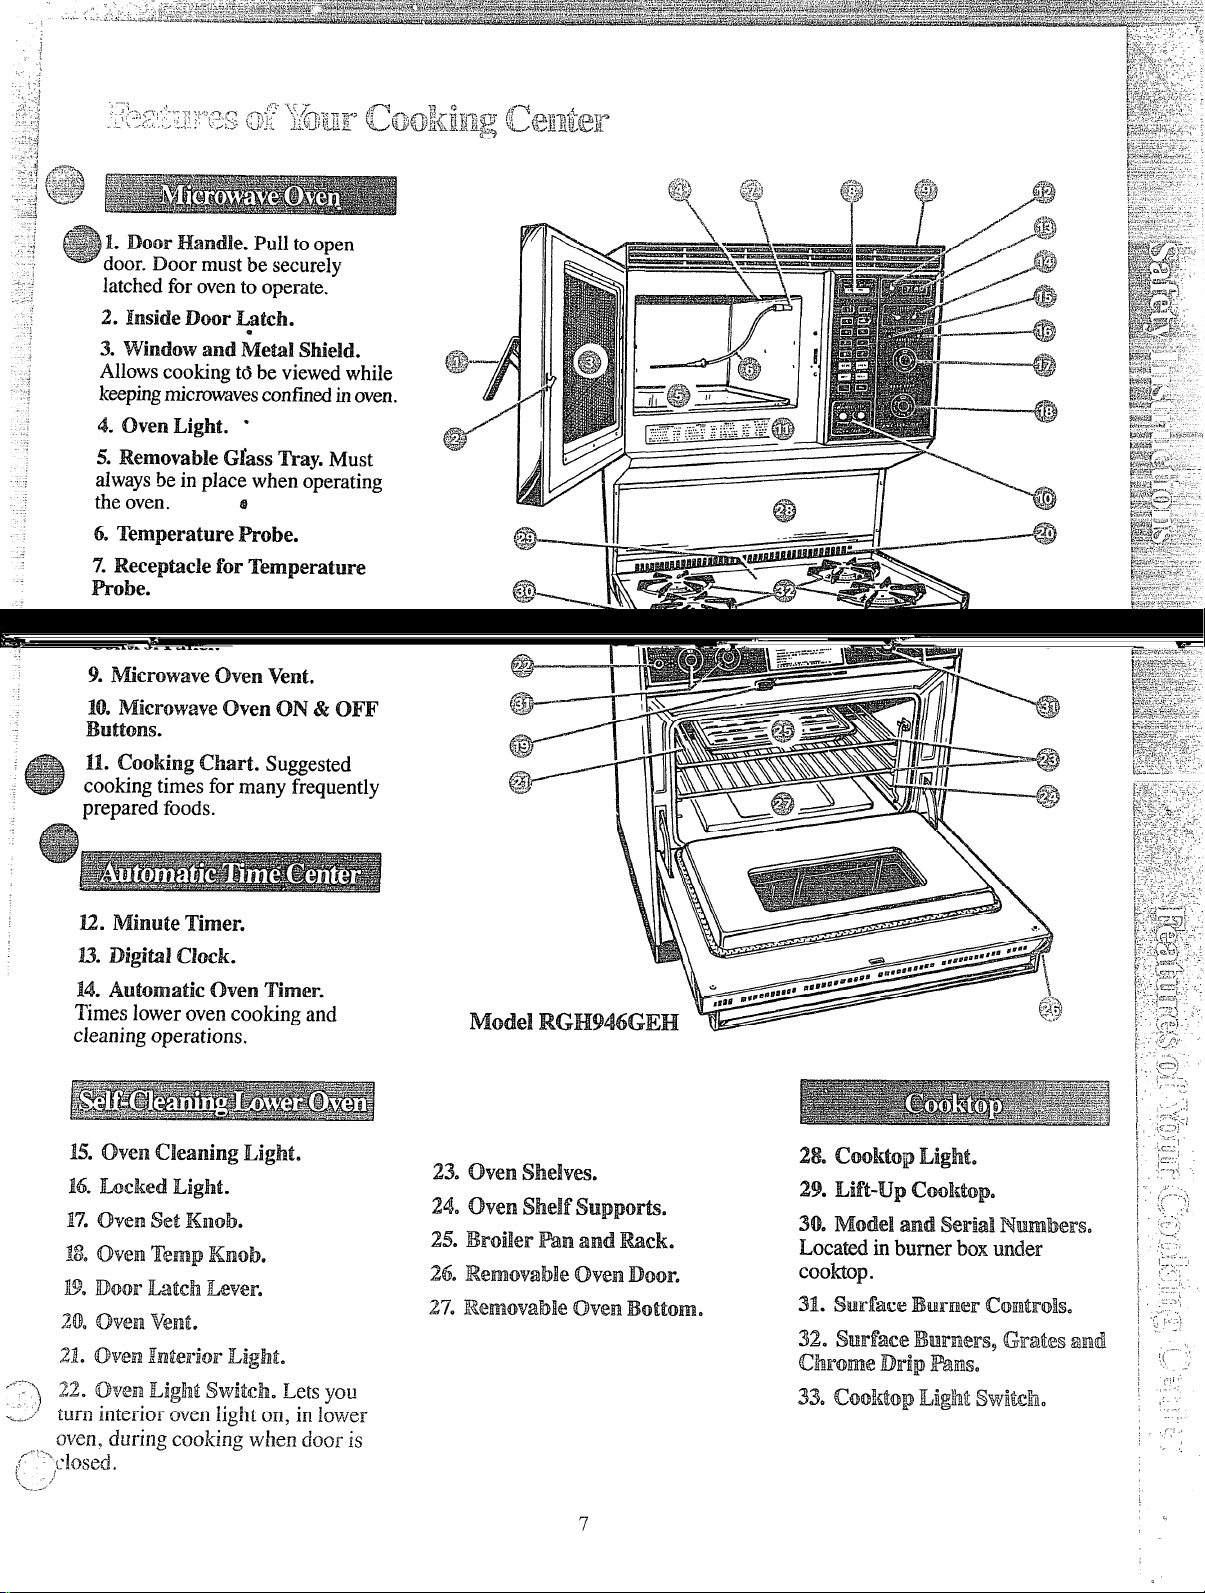
+iE#$L DOOI’IHhNRdk.h]] toopen
,.>
;0
- = door.Door mustbe securelv
-—
latchedfor ovento operate.’
2. Inside Door’Latch.
3. Window and &e$a!lShield.
Mows cookingtdbe viewedwhile
keepingmicrowavesconfinedinoven.
4. oven Light. *
5. RemovableGlassTray.Must
alwaysbein place when operating
theoven.
6. TemperatureProbe.
‘7.Receptaclefor Ikrnperatm-e
Probe.
8.Readout
control Panel.
&
Displayand Touch
9.MicrowaveOvenlvent.
100
MicrowaveOven ON& OFF
Buttons.
11. CookingChart. Suggested
cookingtimes for many frequently
preparedfoods.
U.-J
U. Minute Timer.
13.Digital clock.
M ffhlhmatk
Timeslower ovencooking and
cleaningoperations,
15
ovenaeaningLight.
16.IL4Nkd!Light.
H’.OwR
oven‘1’.imer.
setKnob.
18.Cw%-RTkmp Knob.
IweIDwMrLatdh Kk?veE-’e
20soven
21. Cxw’Rhikwi(m Lighte
22 Oven LightSwitch Letsyou
‘---:’)
turninterior oven light on, in lower
~—
-“
oven,during cooking when door
.-
-“’’:”’-:;.ose~.
,
>7
,>,
\
m“.-.
vent.
is
23 ovenslaves,
24.
ovenshelfSR.qlport$a
2X 13mika-Pm and Rack.
26.Removable GwenDoore
27. I&.wmwab]e
ovenB(MOXI-I.
28.‘cOdmqpLight.
29.Lift-up Cooktopa
lMkd.eF!and serial Nilmberso
30.
Locatedin burner box under
Cooktop.
M. surfaceBwmflxChIltds.
32. Swrfam?IhRmm%,Glmtfmtmd
Chxme DripIPiMTis.
33.Cddx)p LightSwitdho
Page 7
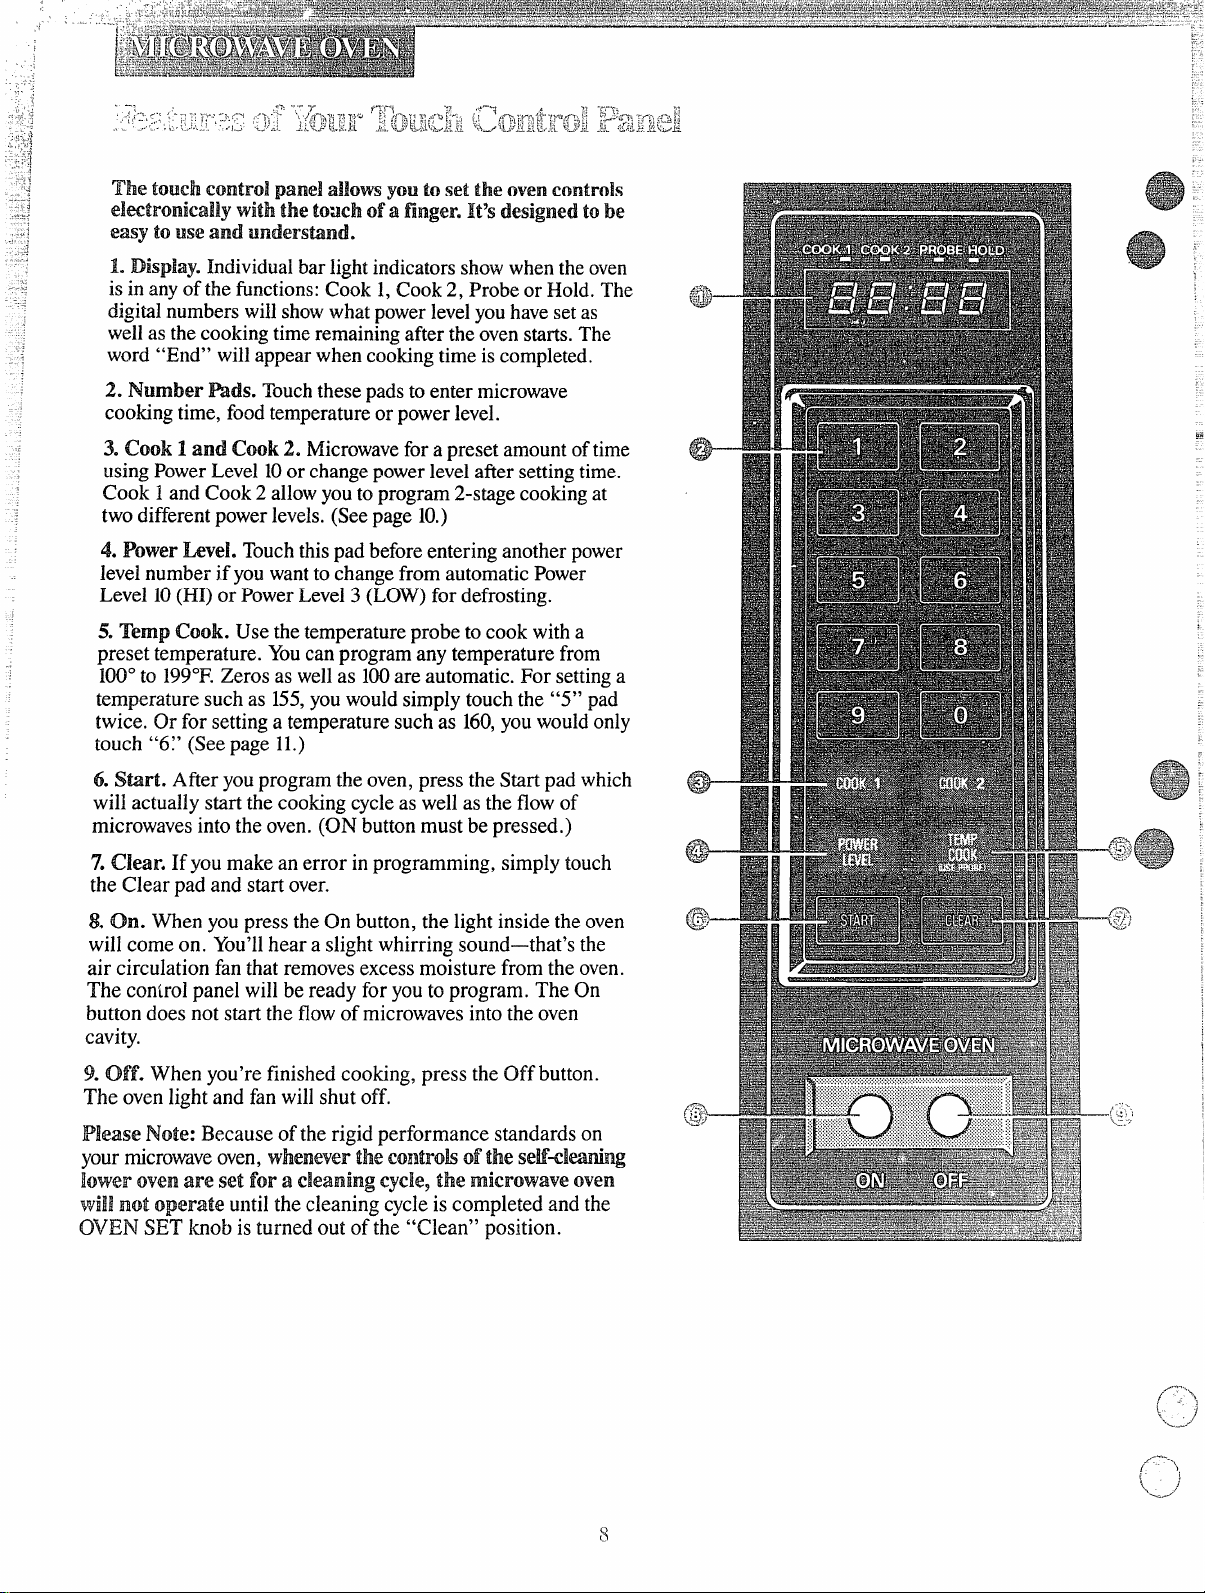
The touch amtrd panel mowsyou tosettheoven(xmtrds
—
elwtronically with the towh d’ a
easy
toWM?and tmk?m.and
L Display.Individual bar lightindicatorsshowwhen theoven
isin anyofthe fimctions:Cook 1,Cook2, Probe or Hold. The
digital numbers willshowwhat powerlevelyouhavesetas
wellasthe cookingtimeremainingafter theovenstarts. The
word “End” will appearwhen cookingtime is completed.
2. Number Pads. Touchthesepadsto entermicrowave
cookingtime, foodtemperatureor powerlevel.
3. Cook 1and Cook2. Microwavefora preset amountoftime
usingPowerLevel 10or changepowerlevelafter settingtime.
Cook 1and Cook2 allowyouto program 2-stagecookingat
twodifferentpowerlevels.(Seepage 10.)
4. Power Level. Touchthispad beforeentering anotherpower
levelnumberif youwantto changefrom automaticPower
Level 10(I-H)or PowerLevel3 (LOW)for defrosting.
5. ‘Emp Cook. Usethe temperatureprobe tocook with a
preset temperature. Youcan program any temperature from
100°to 199°F.Zeros as wellas 100are automatic. For settinga
temperature suchas 155,youwould simplytouchthe “5” pad
twice. Or for settinga temperaturesuchas 160,youwouldonly
touch “6:’ (Seepage 11.)
finger,Itgsdesigm?dtobe
6. Wart. After youprogram theoven, pressthe Start pad which
will actuallystart the cookingcycleas well asthe flow of
microwavesintothe oven. (ON buttonmust bepressed,)
7.War. Ifyou make an error inprogramming, simply touch
the Clear pad and startover.
8. On. When you press theOn button, the lightinside the oven
will comeon. You’llhear a slightwhirring sound—that’sthe
air circulation fanthat removesexcessmoisture from the oven.
The controlpanel will be ready for youto program. The On
buttondoes not start the flowofmicrowavesinto the oven
cavity.
9. CMf.When you’refinished cooking, press the Off button.
The oven lightand fan will shut off.
Please Note: Because ofthe rigid performance standards on
yourmicrowaveoven,whenever the Controlsofthe self-cleaning
b+%’eroven are set for a cleaning cyck?9the micrmww? oven
will not operate untilthe cleaning cycleis completed and the
IOVEN SET knob is turned out of the “Clean” position.
.
—.--@
Page 8
,,
,
,’
InicrewaveW$?xl.
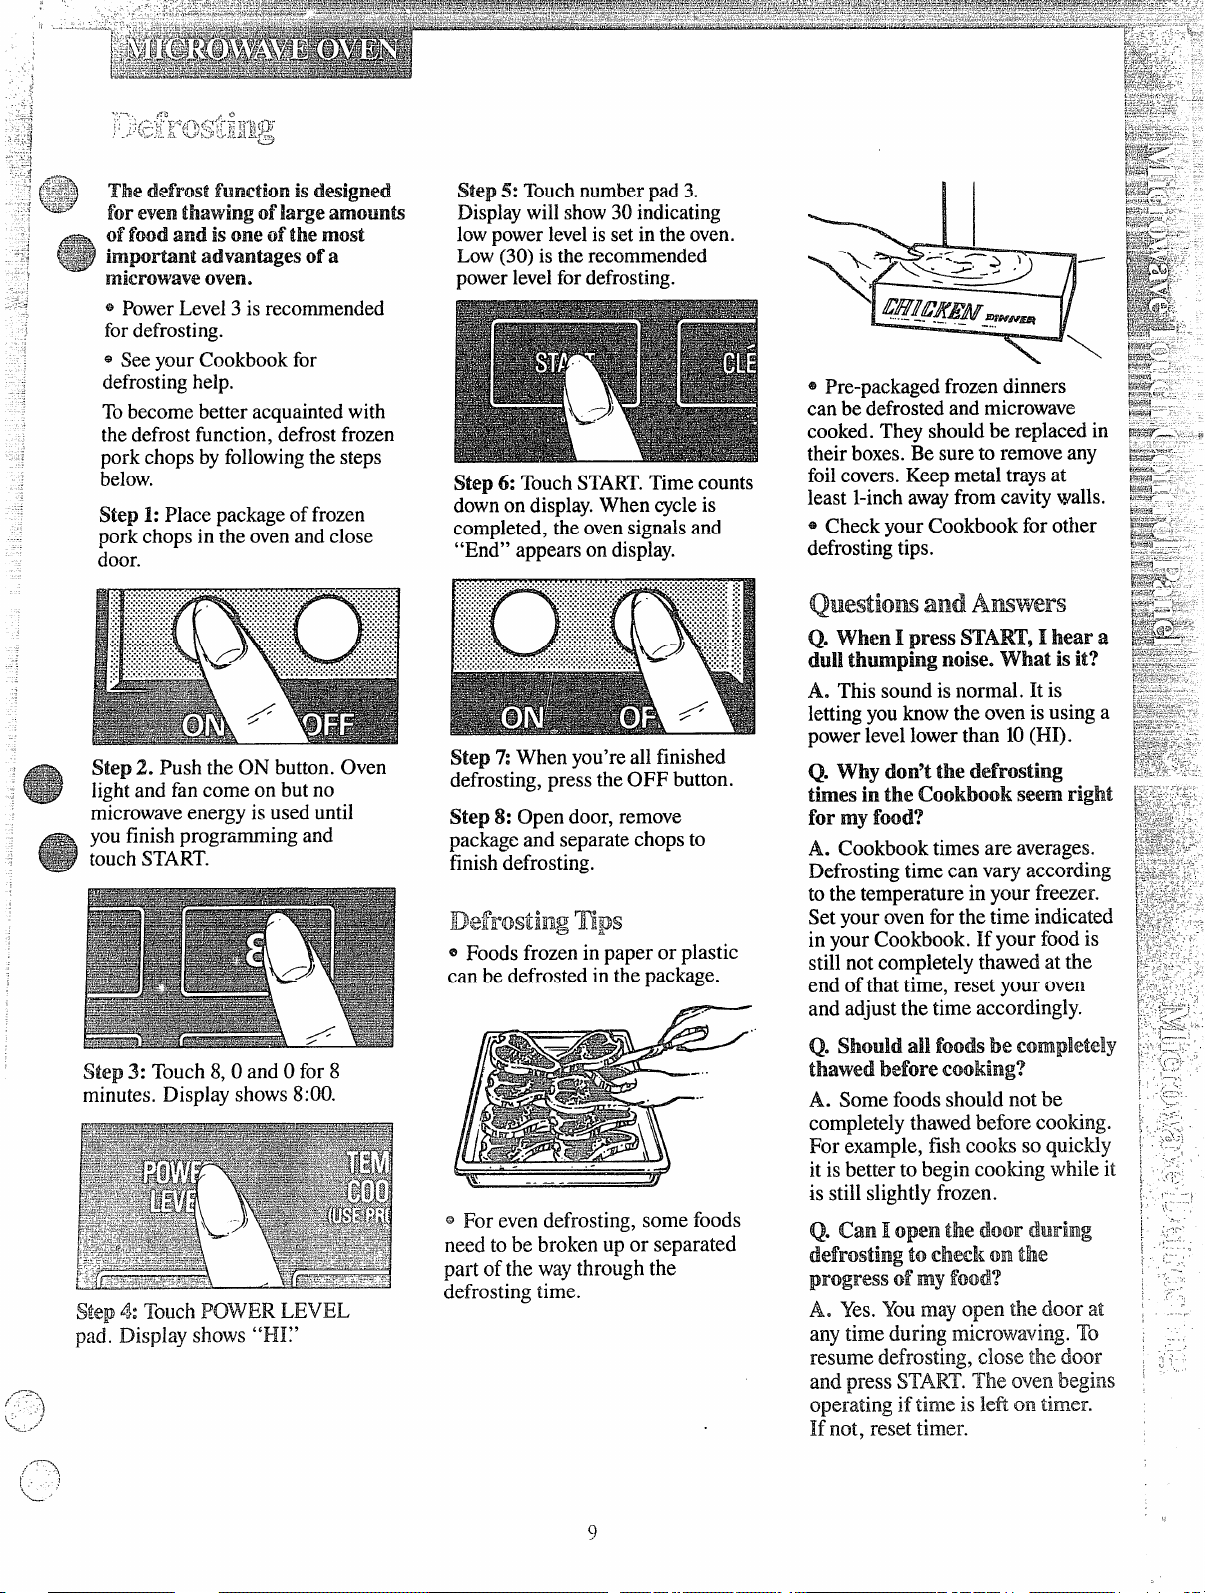
@PowerLevel3 is recommended
fordefrosting.
~ Seeyour Cookbookfor
defrostinghelp.
Tobecomebetter acquaintedwith
thedefrostfunction,defrostfrozen
porkchops byfollowingthesteps
below.
Step 1:Place packageof frozen
pork chopsin the ovenand close
door.
Step 2. Push the ON button. Oven
lightand fan comeon but no
microwaveenergy is
youfinishprogrammingand
touchSTART’.
SteV3: Touch8, 0 and Ofor 8
minutes. Display shows8:00.
Step4:
pad. Display shows“I-H:’
TouchPOWERLEVEL
useduntil
Step 5: Touchnumberpad 3.
Displaywillshow30 indicating
lowpowerlevel is setin theoven.
Low(30)isthe recommended
powerlevelfor defrosting.
Step 6: TouchSTART.Timecounts
downon display.When cycleis
completed,theovensignalsand
“End” appears ondisplay.
Step %When you’reall finished
defrosting,pressthe OFF button.
Step 8: Open door, remove
packageand separatechopsto
finishdefrosting.
Defrosting Tips
~ Foodsfrozen in paper or plastic
can be defrostedin the package.
/“”
@ Foreven defrosting, some foods
need to be broken up or separated
part of the waythrough the
defrosting time.
i+a.r%.–
@R-e-packagedfrozendinners
canbe defrostedand microwave
cooked.They shouldbe replacedin M+&- .
theirboxes.Be sureto removeany
foilcovers.Keepmetal traysat
~:~~.
$,.-&5,,,.-
#zKti__
iti%s:-
kw++.?,-=*r.
6$.%?+--.
?+%=?:;<:-.
.--L%*z .
least Pinch awayfrom cavitywalls. ~~Z=~ Check yourCookbookfor other
defrostingtips.
Q. WhenI press START’,I hear a
dullthumping noise. what
isit?
A. This sound isnormal. It is
lettingyouknowthe ovenis usinga
powerlevellowerthan 10(HI).
Q. why don’tthe defrosting
timesintheCklokbookseKm’Rright
formy food?
A. Cookbook timesare averages.
Defrostingtime can vary according
to thetemperature in your freezer.
Setyour ovenforthe time indicated
in yourCookbook. If your foodis
still notcompletelythawed at the
end of thattime, reset your oven
and adjustthe time accordingly.
Q.
s!nddall foods be UmRpktdy ~,,E;’‘
thawedbefore emking?
A. Somefoods should notbe ~ ~~-~
completelythawedbefore cooking. \- j;
For example, fish cooks so quickly ~ ~~:,
it isbetter to begin cooking while it ; ,;~ ‘
is still slightlyfrozen.
‘Q.can I open the door during 1‘‘:’
‘defrostingtocheek ‘GHRthe
progressofm-yfood?
lie Yes.‘Youmay open the door at ~ .-r
any time during microwaving. To ,-..,
resume defrosting, close the door , , ‘i‘
and.press START.“fheoven begins ‘ ‘
operating
If not, resettimer.
iftime is left on timer.
J .,.: J
~.
>.
~.-., .
1
:.
~...,
[
1
Ii.
L ~-- .,-
1 :.,
1,-,
,,—-
!..
,
Page 9
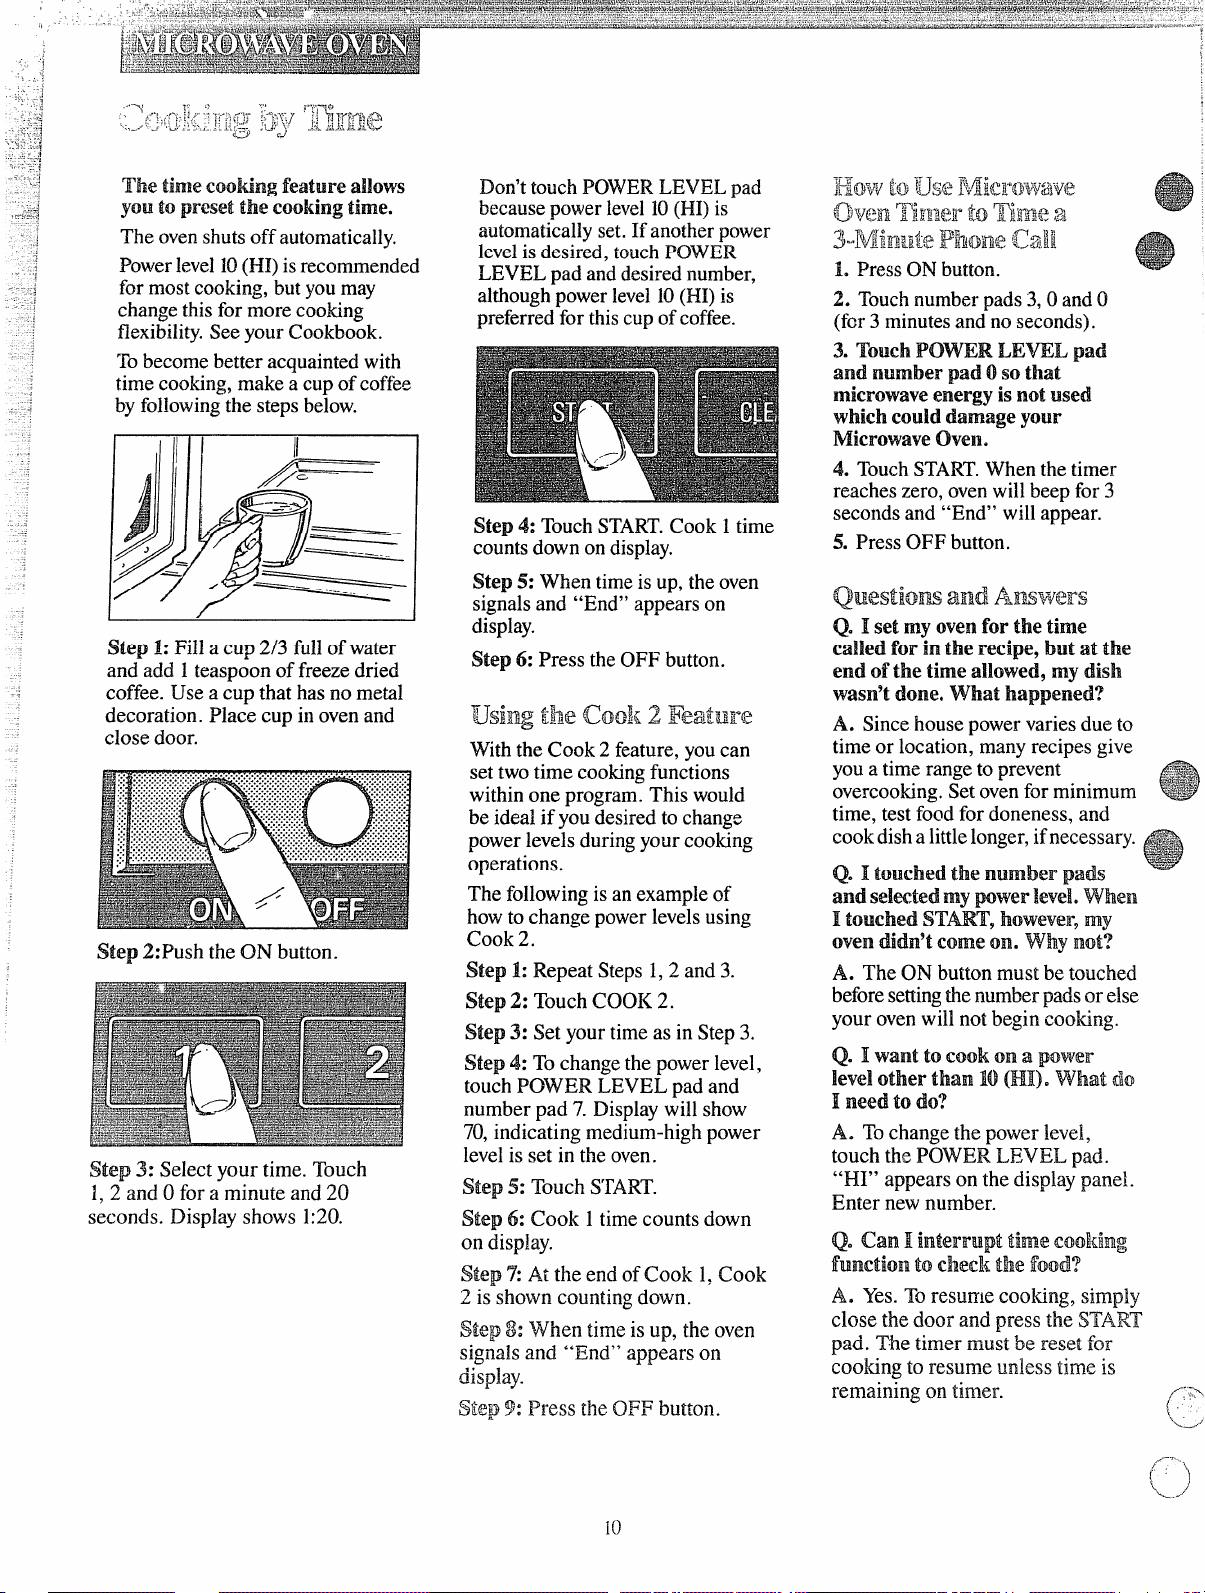
Th timeUNIkhg featureallows
youto pmw?tthe Umkingthin?.
The ovenshutsoff automaticaHy,
Powerlevel10(I-H)isrecommended
formostcooking, but you may
changethis formore cooking
flexibility.SeeyourCookbook.
Tobecomebetteracquaintedwith
timecooking,make a cupof coffee
byfollowingthe stepsbejow.
Step 1:Fill a cup 2/3 fullof water
and add 1teaspoon offreezedried
coffee. Use a cup that hasno metal
decoration. Place cup in ovenand
close door.
Step 2:Push theON button.
Step 3: Selectyour time. Touch
1,2 and Ofor a minute and 20
seconds. Display shows 1:20.
Don’ttouchIWVVERLEVEL pad
becausepowerlevel10(I-H)is
automaticallyset. Ifanotherpower
level is desired, touchPOWER
LEVEL pad anddesirednumber,
althoughpowerlevel10(I-H)is
preferredfor thiscup ofcoffee.
$&p 4: TouchSTART.Cook 1time
countsdown ondisplay.
Step 5: When timeis up,the oven
signalsand “End” appears on
display.
Step 6: Press the OFF button.
Usiw tl%eG& 2 Featui”e
Withthe Cook 2 feature, youcan
settwo time cookingfunctions
withinone program. This would
be idealif you desiredto change
powerlevelsduringyour cooking
operations.
The followingis an exampleof
howto change powerlevelsusing
Cook 2.
Step 1: Repeat Steps1,2 and 3.
Step 2: TouchCOOK 2.
Step 3: Set yourtime as in Step 3.
Step 4: Tochangethe power level,
touch POWER LEVEL pad and
number pad 7. Displaywill show
70,indicating medium-highpower
levelis set in the oven.
Step 5: Touch S’EM?T.
Step 6: Cook 1timecounts down
on display.
Step %At the end of Cook 1,Cook
2 is shown countingdown.
Step8:When timeis up, the oven
signalsand “End” appears on
display.
Step 9: Press theOFF button.
?~
TMr
mif!wv!$3I-k! Mkr6Y*liav&
(-jy~~yj~‘I-jff-~~~,~
3aAm”R&Ph$me‘L’d:..t.
1. Press ON button.
2. Touchnumberpads3,0 andO
(far 3 minutesand no seconds).
3. Touch POWER LEVEL pad
and number pad o so that
microwaveenergy isnot Used
which could damage your
Microwaveoven.
4. TouchSTART.Whenthetimer
reacheszero,ovenwillbeep for 3
secondsand “End” will appear.
5. Press OFF button.
Q@estiom and lfN1.&twH.-s
Q. Iiset my oven for the time
Cdkd
forh-nthe recipe,but atthe
end d’ the
wasn9tdone. What happened?
A. Since housepowervariesdue to
time or location,many recipesgive
youa time rangeto prevent
overcooking.Setovenfor minimum
time, testfood fordoneness, and
cookdishalittlelonger,ifnecessary.
Q. I
Uod-mi the.!dmmk pads
andselectedmypower143A When
I trenchedSTART,however,my
WVendi&-B9tO131meon. why Irmt’?
A. The ON buttonmust be touched
beforesettingthenumberpads or else
your ovenwill not begincooking.
Q. Iiwant
k-d other than 10+(I-n). what do
I need
A. Tochangethe power level,
touch the l?OWERLEVEL pad.
“HI” appears on the displaypanel.
Enter newnumber.
todo?
‘@~~~F~fl~~j ~j
flc~]]
timeaNowed9my dish
tocook on a power
Q.‘canIIimm’upttimecooking
fmctkm todledii the find?’
A. Yes.Toresume cooking, simply
close the door and press the START
pad. The timer must be reset for
cooking 10resume unless time is
remaining on timer.
iO
Page 10

1,
,,
Cimkh-kg‘I&3’s
d% Temperaturecookingtakesthe
.-,
“;o
‘% guessworkoutof cooking.The
i
ovenautomaticallyswitchesto
HOLD settingafter reachingthe
preset foodtemperature, if 140”F.
or above,and maintainsthat
temperaturefor up to 12hoursor
untilyoutouch the OFF button.
HANDLE
SENSOR
The temperature probe isa food
thermometer thatgaugesthe
internaltemperature ofyour food;
it mustbe used when usingTemp
Cook. Toutilize yourprobe
properly,followdirectionsbelow.
I 1
Mace tender beef roast on trivet in
microwave-safedish. Insert probe
from the front horizontally into the
center meaty area not touchingbone
or fat. Make sure the handle does
not touchthe food or top or sidesof
the oven. Cover with wax paper.
CABLE
Placemeat in ovenwithprobeto
theright. Insert cableend ofprobe
firmlyinto receptacleon ovenwall.
Ekw’toT4mmcm:a Rolled
E&#~~ ~&&to~$&&~gg~
Step 1: Insert temperatureprobe
and attachprobe securelyinoven
wall. Closethe door.
Step 2: TouchTEMP COOK.
Indicatorlightappears under
PR013Eand 100shows on display.
Step 3: Touch2 and 5 for 125”F.
125showson display.
Step 4: TouchPOWER LEVEL
pad. “HI” appearson display.
Step .5:Touchnumber pad 5.
Displaywill show50 indicating
mediumpower levelis set inthe
oven.
Step 6: Touch START.
Temperature ofthe roastappears
on display.Tocheck original
temperature settingtouch TEMP
COOK pad and temperature will
reappear on the displayfor a few
seconds.
Step 73When 125”F.is reached,
the ovenwill sound and “End” will
appear on display.
Step & Remove probe and food
from the oven.
Note: Oven automatically switches
to HOLD setting and PROBE and
HOLD indicator lights remain on
when
presetfood temperature is
140”F.or above.
~Usea lowerpowerlevel;it will
heatmoreevenlyeventhough
requiringmore time.
@Besure frozenfoodhasbeen
completelydefkostedbeforeinserting
probe. Probemaybreak off ifused
in frozenfoods.
@Coverfoodslooselyfor moisture
controland quick, evenheating.
Questiom and Aimvdel%
=.
‘Q.Are there any fuDodsI can’t
‘&mp cook?
A. Yes.Delicatebutter icings,ice
cream, frozenwhippedtoppings,
etc., softenrapidlyat warm
temperatures.Batters, doughsand
frozen foods are also difficultto
cook preciselywith theprobe. It’s
bestto use time cookingfor these
foods.
Q. can aleave my probe in the
oven if it9snot inserted in fwd?
A. No, if ittouchesthe ovenwall,
you maydamagethe oven.
Qe can IItempemtl.me Cmk
difl%relntpm=tiomof food at
difierent temperatures?
A. Yes.The temperature probe
givesyouthe freedom to cook
differentportions of foodat
differenttemperatures to suit
individualeatingpreferences.
Simplyplace probe in foodand
changetemperature settingas
needed.
Poultry,pork or ham roasts need no
trivet. Add 1/2cup water to roast
..—
““-\
# dish, coverwith plastic wrap. Insert
%_---
probe into center meaty area.
Page 11

1;{:A,7’-,‘;;“-r
=+_
.=~y-s
.m$<~
---
,
‘>!:-:,
,Ji,..
‘ .:,“_j\],”i‘ :---~’”;;;::
J-, :
,,. -,
. . . . . . . . . ..,--, ,. . :..,
Yoursurfaceburners arelightedby
-electricignition,eliminatingthe
needfor standingpilotlightswith
constantlyburning flame.
In ease of a power outage, youcan
lightthe surfaceburnerson your
rangewith a match. Hold alighted
matchtothe burner, thenturn the
knobto the MIX position.Use
extremecaution whenlighting
burnersthis way.
;sW%l%:’ell%RTR~ Col%trills
Knobsthat turn the surfaceburners
on andoff are locatedorithe lower
frontpanel and are marked asto
whichburners they control.
r
—
Pushthe controlknob in and turn it
toLITE. Youwill hear a little
clickingnoise—thesoundofthe
burner lighting.
I
After the burner ignites, turn the
knobto adjust the flame size.
Note:
~Alwayshavea cooking utensilon
thegra~ebeforeturningon a burner.
The finish on the grate may chip
withouta utensil to absorb the heat.
@Check to be sure the burner you
turned on isthe oneyou wantto use.
~13esure the burners and grates are
cool beforeyou place your hand, a
potholder, cleaning cloths or other
materials on them.
The flamesizeon a gas burner
shouldmatchthe cookwareyou.
are using.
I
NEVERLETTHEFLAME
EXTEND UP THESIDESOF
THE COOKWARE.@y flame
larger thanthe bottomofthe
cookwareis wastedheat and only
servesto heat thel~andles.
when using aluminum or
a~uminum-clad stainless steeI
pots and pans, adjustthe flame so
the circle itmakes is about 1/2inch
smaller than the bottomof the
cookware.
When boiling, use thissame flame
size—1/2inch smaller than the
bottom ofthe cookware—nomatter
whatthecookwm is made of. Foods
cookjust as quickly at a gentleboil’
as they do at a fbrious rolling boil.
A high boil,creates steamand
cooks awaymoisture, flavor
nutrition. Avoidit exceptfor the
few cookingprocesses which need
a vigorousboil.
when !&yitigor warming foods
in stainless stee19cast iron or
enamelware~ keepthe flame down
lower—toabout 1/2the diameter
ofthe pan.
and
e
,$,.
.
e
@
when frying in!glass Orceramic
cookware~ lQwerthe flame even.
more.
(
i.
-._
/---”‘“2
\
‘L .-’
-.
)
Page 12

>,*
.
A.zlr Adjasf:.mellt
An air adjustmentshutterfor each
surfaceburner regulatestheflowof
air to theflame.
when the right amount ofair
flowsinto the burner, theflame
willbe steady, relativelyquietand
haveapproximately3/4” sharpblue
cones. Thisusuallyresultswhen
the shutterisabout halfwayopen.
With too much air, theflame will
be unsteady,possiblywon’tburn all
the wayaround, and willbe noisy,
soundinglikea blowtorch. ‘
Withnotenough air,youwon’t
seeany sharp bluecones inthe
flame, youmaysee yellowtips, and
sootmayaccumulate on cookware.
Loosen , /
Top-of-RangeCwikwfwe
Ahnminum: Medium-weight
cookwareis recommendedbecauseit
heatsquicklyandevenly.Mostfbods
brownevenlyinan aluminumskillet.
Mineralsin fbodandwaterwillstain
butwill not harm aluminum.A
quick scourwith a soap-filledwool
pad after each usekeepsaluminum
cookwarelookingshinynew.Use
saucepanswith tight-fittinglidsfor
cookingwith minimumamountsof
water.
Cast Iron: If heatedslowly, most
skillets will give satisfactory
results.
. .. .
+;.:-+<-.-!.,-
--
. ..
...
m
--
I
Air Adjustment Shutter /
I
The air adjustmentshutters set on
the hoodof the valveand are either
locked in place with Phillips head
screwsor positioned on the burner
tubes by friction fit.
To adjust the flow of air to the
btnmers,
screwsand ro[atethe shutters (or
apply a blade-type screwdriver
against the friction-fit shutters and
push) to allow more or less air into
the burner tubes as needed.
1
7
..:’
..-..,
.
.)
-----
loosenthe Phillips head
Enamelware:Under some
conditions,the enamel ofsome
cookwaremaymek. Followcookware
manufacturer’srecommendations
for cookingmethods.
Glass: There are two types of glass
utensils—thosefor ovenuse only
/
and those for top-of-rangecooking
(saucepans,coffeeand teapots).
Glassconducts heat very slowly.
Heatproof Gbss
Cemk: Can
be usedforeither sutiaceor oven
cooking, It conductsheatvery
slowlyand coolsvery slowly.Check
cookwaremanufacturer’sdirections
to besure itcan be used on gas
ranges.
Stainless Steel: This metal
alonehas poor heating properties,
and isusually combined with
copper, aluminumor other metals
for improvedheat distribution.
Combinationmetalskilletsgenerally
work satisfactorily if used at
medium heat as the manufacturer
recon2mends.
1.3
I
Page 13

.. .-
.
‘-’
f-J~ ~,-.-:3:~
~<
I.J.,,:L !!!c-.,
“J
‘-“Ei-?na-nf-i=Fa~n~~&7~~
~’.~kil-,~+k . }(d.~~u Aa L.m
~; ?.
c,
@c4 ~,~,y.s j/--$Y’T
;:O.J.[Q:j?. ~~
c)’
J #pJf&
‘me O’Vtmbw’merand broil
burner on your
bydectrk
I%mge are lighted
@l~~fOIle
CAUTION:DO NOTMAKE ANY
ATTEMPTTOOPERATETHE
ELECHUC IGNITION OVEN
DURING AN ELECITUCAL
POWERFAILURE. Resumption
ofelectricalpower when OVEN
TEMP and OVEN SET controls
are in anypositionotherthan OFF
willresult in automatic ignitionof
theovenor broiler burner and
couldcause severeburnsif, at the
timeyouwere attempting to light
theburner with a match.
Before llJsi~ Your oven
L Look at thecontrols. Be sure
youunderstandhowto set them
properly.
2. Check the insideofthe oven.
Look at the shelves.Practice
removingand replacingthem
while theoven iscool.
3. Read the information and tips
on the followingpages.
4. Keep thisbook handy where you
can refer to it—especiallyduring
the first fewweeks ofgetting
acquainted with your oven.
~~]~~ ~QntrQIs
The controls for your ovenare
marked OVEN TEMP and OVEN
SET.
PREHEAT-Use thissettingto
preheatthe ovenforcakes and
delicatefoodswhere recipescall
forpreheatingthe oven. The
top@roil)burner comeson first.
In about8 minutesit shutsoff
automatically.Then the bottom
ovenburner comeson and
maintainsthe temperatureset
on theOVENTENIPcontrol.
Do not place food in the oven
during the first 10minutes when
preheatingbecausethe broiler
burneris on duringpreheat.
BAKE-Use this settingforall
normalovenoperationswhere
preheatingtheovenisnotrequired—
forexample, forcooking roastsor
casseroles. Onlythe bottomoven
burner operates duringbaking.
BRO1&Use this setting for
broiling.Only the top (broil)
burner will operate.
TINWD
BAKE-Use this setting
toturn the ovenon and offat
specifiedtimes when you want
cookingto start and stop. See
AutomaticOven Timer on next
page.
CLEAN—Use this setting for the
self-cleaningfunction only.
Ol?E’-Shuts offpower to the oven
controlsand ovenwill not operate.
The OVEN TEMP and OVEN SET
controlsshould be turned to OFF
wheneverthe ovenis not in use.
The OVEN TEMP control
maintainsthe temperature you set
for normal oven operation as well
as for broiling and self-cleaning
the oven.
For normal oven OpemUtiOIn9turn
the knob to the desired temperature
which is marked in 250 increments.
It will normally take30 to 60
seconds before the flame comes on.
Afler the oven reaches the selected
temperature. the ovenburner cycles
—offCOIIqIletely,then on with a
fLdl ilame-to keep the oven
temperature contmlied.
‘caution:Do
notturnthe knob
‘pastBROIL whenbroiling. If
youdo, the broilburner will not
operate.
IForself-cleaningoperation, turn
the knobpast thetemperature
markingsall the wayto the
CLEAN position. Alwaysturn the
OVENTEMP and OVEN SET
controlsto OFF when oven
operationis completed.
oven
I!i3M4Ws
The shelvesare designedwith
stop-locksso when placed correctly
on the shelf supports, they will stop
before comingcompletely out of
the ovenand willnot tilt when you
are removing foodor placing food
on them.
When placing cookware on a shelf,
pull the shelf outto the “stop”
position. Place the cookware on
the shelf, then slide the shelf back
intothe oven. This will eliminate
reaching into the hot oven.
Toremove the shelves from the
ovenfor cleaning, pull out to smp
position, lift up the front of the
shelvesand pull them out.
$%@i.fI!!osit:.tlrls
The oven has four shelf supports—
A
(bottom),B,CandD(top).Shelf
positions for cooking are suggested
on Baking and Roasting pages. To
remove the shelf supports, merely
lift them off the “U’~shaped
brackets at -thetop of the oven.
c
,/-”-,
(
\
.....’
-....
.
j
)
Page 14

Note: Somevery largeroasting
pans withlids willnot fit in the
oven,evenwith the shelf on the
lowestposition. Do not placethe
pan directlyon the ovenbottom—
air cannotcirculateunderneathit.
Instead, removethe ovenshelf
supports,set them on theoven
bottom, and placethe pan ontop.
The lightcomes on automatically
when the ovendoor isopened. Use
switchon control panelto turn light
on and off when the loweroven
door isclosed.
Yourovenis ventedthrougha duct
at the center rear of therange (see
page7). Do not block thisduct
when cooking in the oven—itis
importantthat the flowof fresh air
totheoven burners beuninterrupted.
Avoidtouching the ventopenings
or nearby surfaces during oven
cooking-they may become hot.
The MinuteTimeris thelargedial
tothe left of thedigitalclock. Use
itto time all yourprecisecooking
operations.This dialalso changes
thedigitalclock.
Toset the MinuteTimer,turn the
centerknob clockwise,without
pushing in, untilthepointer
reachesthe numberofminutesyou
wantto time (upto 60),
At the end of theset time, a
buzzersoundsto tellyoutime
Turnthe knob, withoutpushing
up.
is
in, untilthe pointerreaches OFF
and thebuzzer stops.
Autornatie OwelmTim-%$x
ThisTimer willautomaticallystart
andstopyourovenfor you. Here’s
whatyoudo:
1. Makesure bothyour rangeclock
andtheSTARTdialshowthecorrect
timeofday.When the STARTknob
ispushedin andturned, it will
“pop’’intoplacewhen the time
shownonthe rangeclockisreached.
2.
Set the START’control. Push in
andturnthe STARTknobtothetime
youwantthe ovento turn itselfon.
(Ifyou want itto start operating
immediately,do notset theStart
time.)
3. Set the STOPcontrol. Push in
andturn the STOPknob to the time
youwantthe ovento turn itselfoff.
Note: There mustbeat leasta half-
hour differencebetweenthe START
and S7X3Pdialsfor the automatic
controlto work.
The flowof air to the ovenburners
isadjusted in the same manner as it
is for the surface burners (see page
13).The air adjustment shutter for
the top (broil) burner ison the back
wallof the oven; the shutter for the
bottom burner is behind the base
panel below the ovendoor.
The burner flame for the top oven
burner should be steady with
approximately l-inch blue cones
M](cIshould not ex~endout overthe
‘) baffle edges. The flame for the
.,”’
‘
bottom burner shodd be steady
md Amp, with no yellow or
‘“’---’-)~I~:~HgC;fjaIIMtips, and ShOIJld
\
%
.—-
bum clean wilimut soot.
.
Toset the Clock, pushin the center
knob ofthe MinuteTimer and turn
the knobin either direction to set
the digitalclock numerals tothe
correct time. (Aftersetting the
clock, letthe knob out and turn the
MinuteTimer pointer to OFF.)
4. Set the OVEN SET knob to
TIMEBAKE.
5.
Set the OVEN TEIW? knob to
the desired oventemperature.
Now the ovenwill turn itself on
immediately or at a later Starttime
that youset, operateatthetempsmture
you selected and turn itself off at
the Stop time you selected.
After
OWII o~eration iScOm@eted,
be sure to turn the OVEN TEMP
and OVEN S13Tknobs to OFF.
Page 15

.!
—.-
—.
.
,.
:,
\
L
}
k
1. Positiontheshelfor shelvesin
the oven.
2. Close ovendoorolkrn OVEN
SET knobtoBAKEor TIMEBAKE
and OVENTEMP knobtodesired
temperature. Preheatovenfor at
Ieast 10minutesif preheatingis
necessary.SeePREHEATonpage14.
3. Place foodin ovenon centerof
shelf.Allowat leastan inchbetween
edgeofbakewareand oven wall
or adjacent utensils.
If cooking ontwo shelves at the
same time, place shelvesabout4
inches apart and staggerfoodon
them.
4. Check foodfordonenessat
minimum timeon recipe. Cook
longer if necessary.Switchoff
heat and removefood.
Preheating is important when using
temperaturesbelow225”F.andwhen
baking foodssuch as biscuits,
cookies, cakes and other pastries.
Preheating is not necessary when
roasting or long-timecookingof
whole meals.
Most baking is done on the second
shelf position (B) from the bottom.
When baking three or four items,
use two shelvespositioned on the
second and fourth sets of supports
@ &D) from bottom ofoven.
Bake angel foodcakes on first shelf
position (A) from bottom of oven.
o
Follow a tested recipe and
measure the ingredients carefully.
~fyGilare using a package mix,
follow label directions.
* Ifmoistureisnoticeableon the
frontofthe ovenor on theoven
windowwhen firstturningon the
oven,leavetheovendoor ajar fora
fewminutesor untilthe ovenis
warm.
~Do notopen theovendoor during
a bakingoperation—heatwillbe
lostand thebakingtime might need
tobe extended.This could cause
poor bakingresults.
~Do not disturb theheat
circulationin theovenwith theuse
ofaluminumfoil.If foilis used,
placea small sheetof it, about 10
by 12inchesat themost, on a lower
shelfseveralinchesbelowthe food.
Do not placefoilon the oven
bottom.
CommonBakingIPld3km
PossRMeSdl.ltims
ad
Pm
Burningaroundedges
~Oventoo full; avoid
overcrowding.
@Edgesof crust too thin.
@Incorrect bakingtemperature.
Bottom crust soggyand unbaked
@Allowcrust and/or fillingto cool
sufficientlybefore fillingpie shell.
@Filling maybe too thin orjuicy.
~Fillingallowedtostandin pie shell
beforebaking. (Fillpie shellsand
bake immediately.)
a Ingredients and proper measuring
affect the qualityof the crust. Use a
tested recipe and good technique.
Make sure there are no tiny holes or
tears in a bottom crust.
a pie crust could cause soaking.
Pie filling rums over
GTopand bottom crust not well
sealed together.
QEdges ofpie crust not built up
high enough.
@Toomuch filling.
QCheck size of pie plate.
Pastry is &w@];$ItWstnot flaky
QToomuch handling.
~Fat too soft or cut in too fhe.
Rolldough lightly and handle as
little as possible.
“Patching”
CAKXS
fcakerises’higheron oneside
@Batterspread unevenlyinpan,
@Ovenshelvesnotlevel.
@Usingwarpedpans.
@Incorrectpan size.
Cwes mckiryg
~Checkoventemperature.
@Battertoo thick,followrecipe
or exactpackagedirections.
~Check forproper shelfposition.
@Checkpansize calledforinrecipe.
@Improper mixingof cake.
Cakefalls
@Toomuch shortening,sugaror
liquid.
@Check leaveningagent, baking
powderor baking-sodatoassure
freshness. Makea habitto note
expirationdatesofpackaged
ingredients.
@Cake notbakedlong enough or at
correct temperature.
@If addingoil to a cake mix, make
certain theoil isthe type and
amountspecified.
@l’1top
crustishard
@Check temperature.
@Check shelfposition.
Cakehas soggylayer or streaks
at bottom
~ Underminingingredients.
@Shorteningtoo softfor proper
creaming.
~Toomuch liquid.
moms amwmrs
Dcmghycenter;Mwy awlst an
surface
~Check temperature.
~Check shelf position.
@Followbaking instructions
carefully as given in reliable recipe
or on conveniencefood package.
~Flat cookie sheetswill givemore
evenbakingresults.Don’t overcrowd
foodson a baking sheet.
@Convenience foodsused.beyond
their expirationdate.
EWwning RR+(N%3BWticeab]eon
one side
~Oven door not closed properly,
check gas}cetseal.
~Check shelfposition.
,---
(“ )
‘L/’
-->,
(
\ ,’
~------
...-
-.
m
i
!
i
;
.
I
Page 16

---2W
._J
.
.J...-
converttionaibaking,light, shinyfinish& givebest results
,=: becausethey help preventover-browningin the time it takes for
&&~Fheattocook the center areas.
3
Werecommenddull (satin-finish)
= bottomsurfacesofpans forcake pans andpie plates
.....
thoseareas browncompletely.
tobesure
2. Darkornon-shinyfiriishes,alsoglassandpyroceram,
generallyabsorbheatwhichmayresuhindry,crispcrusts.
Reduceovenheat25”F.if lightercrusts are desired. Preheat
cast ironfor baking some foodsfor rapidbrowningwhenfd
isadded.
Food
Bred
Biscuits(%-in. thick)
Coffeecake
Corn breador muffins
Gingerbread
Muffins
Popovers
Quickloafbread
Yeastbread(2 loaves)
Plainrolls
Sweetrolls
hkes
withoutshortening)
~ngelfood
elly roll
;ponge
:akes
lundtcakes
:upcakes
Fruitcakes
Layer
Layer,chocolate ShinyMetal Pan with
Loaf Metalor Glass Loaf l%ms
Cookies
Brownies Metalor Glass Pans
Drop Cookie Sheet
Refrigerator Cookie Sheet
Rolledor sliced CookieSheet
Fruits,
Other De,sserk
Baked apples Glass or Metal Pans
Custard Glass Custard Cups or
Puddings, rice Glass Custard Cups or
and custard Casserole
P’&
Frozen
Meringue Spread to crust edges
One crust
Twocrust
Pastry shell
Mi.scehleous
Bakedpotatoes
Scalioped ciishes
I Souffis
cookware
ShinyCookieSheet
ShinyMetalPanwith
satin-finishbottom
Cast Ironor Glass Pan
ShinyMetalPanwith
satin-finishbottom
ShinyMetalMuffinPans
DeepGlassor Cast Iron Cups
Metalor GlassLoafPans
Metalor GlassLoaf Pans
ShinyOblong or Muffin l%ans
ShinyObioiwor MuffinPans
AluminumTubePan
MetalJelly RollPan
Metalor Ceramic Em
Metalor Ceramic Pan
ShinyMetalMuffin Pans
Metalor Glass Loaf or
rube Pan
;hiny MetalPanwith
satin-finishbottom
I
satin-finishbottom
Casserole (set in pan of hot water)
Foil Panon Cookie Sheet
Glass or Satin-finish Metal
Glass or Satin-finish MetA
Glass or Satin-finish Metal
Set on Oven Shelf
Glass or Metal
Glass
I
I
Shelf
Positions
B,C
B,A
B
B
A, B
B
B
A, B
A, B
B,A
A
B
A
A, B
B
A, B
B
B
B
B,C
B,C
B, C
B.C
A, B, C
B
B
A
B,A
A,13
B
B
A, B, C
A, B, C
B
oven
Tenmeratures
400°-4750
350°-4000
400°-4500
350°
400°-4250
375°
350°-3750
375°-4250
375”-425°
350°-3750
325°-3750
375°-4000
325°-3500
325°-3500
350°-3750
275°-3000
350°-3750
350°-3750
350°
325°-3500
350°-4000
400°-4250
375°-4000
350°-4000
300°-3500
325°
400°-4250
325°-3500
400°-4250
400°-4250
450°
325°-4000
325°-3750
300°-3500
Time,
Minutes
15-20
20-30
20-40
45-55
20-30
45-60
45-60
45-60
10-25
20-30
30-55
1o-15
45-60
45-65
20-25
2-4 hrs.
20-35
25-30
40-60
25-35
10-20
6-12
7-12
30-60
30-60
50-90
45-70
15-25
45-60
40-60
12-15
60-90
30-60
30-75
Comments
Canned, refrigeratedbiscuits take2 to 4
minuteslesstime.
Preheatcast iron pan for crisp crust.
Decreaseabout5 minutesfor muffinmix.
Or bake at450°E for 25 minutes,tlmnat
350”E for 10to 15minutes.
Dark metalor glassgivesdeepest
browning.
For thin rolls, Shelf B maybe used.
For thin rolls, Shelf B maybe used.
Twopiecepanis convenient.
Line pan with waxedpaper.
Paper linersproducemore moistcrusts.
Use 300”F. and Shelf B for smallor
individualcakes.
Bar cookies from mix use same time.
Use Shelf C andincrease temperature
25° to 50”F.for more browning.
Reducetemperatureto 300°F.for large
custard.
Cook bread or rice puddingwith custard
base 80 to 90 minutes.
Large pies use 400”F.and increase time.
Toquickly brownmeringueuse400°F.for
8to 10minutes.
Custardfillings requirelowertemperature,
longertime.
Increasetime forlarge amountor size.
._—..,
,f”’
[.<,
,)
Page 17

Roastingiscookingbydry kat.
—
Tendermeat orpoultry cartbe
roasteduncoveredin youroven.
l?oasti~]gtemperatures,which
should be lowand steady,keep
spatteringto a minimum.When
roasting,itis notnecessaryto sear,
baste,cover,or add waterto your
meat. Roastingiseasy,just follow
thesesteps:
Step L Positionovenshelfat
secondfrombottomposition(B)for
smallsizeroast(3 to 5 lbs.) and at
bottomposition(A)forlargerroasts.
Step 2: Checkweight of roast.
Plats meatfat-side-upor poultry
breast-side-upon roastingrack in a
shallowpan. The meltingfatwill
bastethemeat. Selecta pan as
closeto the size of meatas possible.
(Broilerpan with rackis a good
pan forthis.)
Step 3: TurnOVENSET to BAKE
and OVENTEMP to desired
temperature.Checkthe Roasting
Chart fortemperaturesand
approximatecookingtimes.
Step 4: Mostmeatscontinueto
cookslightlywhilestmding after
beingremovedfromthe oven, For
rareor mediuminternaldoneness,
ifmeat is to stand 10to20 minutes
whilemakinggravyor foreasier
carving,youmaywish to remove
meatfrom ovenjust beforeit is
done.If no standingis planned,
cookmeat tosuggested
temperature.
Fmzm Jit’oasts
Frozenroastsofbeef, pork,
lamb,etc., can be startedwithout
thawing,but allow10to 25 minutes
per poundadditional time (10
minutes per poundfor roastsunder
5 pounds,more timefor larger
roasts).
Thawmost frozenpoultry before
roastingto ensureeven doneness.
Somecommercialfrozen poultry
can be cookedsuccessfullywithout
thawing.Followdirectionsgiven
on packer’slabel.
‘rypc Temperature
Meat
Tender cuts: rib, highquality 325°
sirloin tip, rumpor top round*
Lamb legor bone-ioshoulder*
1
Vetilshoulder, legor loin*
Pork loin, rib or shoulclcr’k
Ham, prc-cookxl
I-fro, raw
*~orb[)llcICSSr-ollcdroasts over 6-incfws
thick, add5 [o 10minutespcr lb. totimes
given obovc.
Poultry
Chiclwnor Duck
Chicken pieces
Turlwy
Oven
325°
I
325°
325°
325°
32S0
325°
3750
I 325°
Doneness
Rare:
Medium:
WellDone:
Rare:
Medium:
WellDone:
WellDone:
WellDone:
ToWarm:
WellDone:
WellDone:
WellDone:
\VellDone:
ApproximateRoastingTime
in Minutesper Pound
3 to 5-lbs. 6 to
24-30 18-22
30-35
$-lbs.
~2_25
35-45 28-33
2I-25
25-30 24-28
30-35
zo_23
28-33
35-45 30-40
35-45
10
minutes per lb. (anyweight)
Under 10Ibs.
20-30 17-20
30-40
10to 154bs.
3to5-Ibs. Over5lbs.
35-40
30-35
35-40
10
to 15-HE, over 15Ibs.
20-25
15-20
Internal
Temperature“F
130°-140°
150°-1600
170°-1850
130°-{40°
150°-1600
170°-185°
170°-1800
170°-180°
lp50-1300
160°
185°-1900
185°-190°
In
thigh:
185°-1900
Page 18

rangeisdesignedfir waist-high
broiling.A speciallydesigned
broilerpanand rackallowsdripping
fatto drainawayfrom the foods and
be keptawayfrom thehighheatof
thegasflame.
1. If meathas fator gristlenear the
edge,cutvertical slashes throughit
about2 inchesapart, butdon’t cut
intomeat. Werecommendthatyou
trimfattopreventexcessivesmoking,
leavinga layerabout l/8-inchthick.
~. Arrangefoodonrackandposition
the broilerpan on the appropriate
shelf inthe oven.Placing food
closerto flame increasesexterior
browningof food, butalso
increasesspatteringand the
possibilityof fatsand meatjuices
igniting.
~. Closeovendoor and turn OVEN
SET knobto BROIL. For most
foods,turn OVEN TEMP knobto
BROIL.Do not turn OVEN TEMP
knob pastBROIL position or
broilerburner will notoperate.
Note: Chicken and ham are broiled
at a lowersetting in order to cook
foodthrough beforeover-browning
it.
~. Turn most foodsonce during
cooking (theexception isthin fillets
of fish; oilone side, place that side
downonbroiler rackandcookwithout
turning untildone). Time foodsfor
about one-half the totalcooking
time, turn food, then continue to
cook to preferred doneness.
5. Turn OVEN SET and OVEN
TEMP knobs to OFF. ReImove
broiIer pan from oven and serve
food immediately. Leavepan
outside the ovento cool.
Emihng ‘-rips
Broihg isusually(km!with oven
~
—
door closed. However,ifyoulike
yoursteaksvery rare insideand
charred on theoutside,leavethe .
ovendoor slightlyajar.
Bacon Y~-lb.(about8 c 3YZ
GroundBeef
WellDone
BeefSteaks
Rare
Medium
WelI Done
Rare
Medium
WellDone
Chicken(450°)
BakeryProducts
Bread(Toast)or 2-4slices
ToasterPastries 1pkg. (2)
EnglishMuffins 2-split
—
Lobstertails 2-4 B 13-16
(6 to 8-oz. each)
Fish l-lb. fillets U to
Hamslices (450”) l-in. thick
Precooked
Porkchops 2( Yzin.) A
Well Done 2 (l-in. thick), A 13
Lambchops
Medium
WellDone
Medium 2 (1Y2 in.).
WcliDone
Wieners, l-lb. pkg. (10)
similarprccookcd
sausages.
bratwurst
thin slices)
l-lb. (4 patties)
IAto %-in. thick
l-in. thick
(1 to 1%-]bs.)
lfi-in. thick
(2to2 Y~-lbs.)
1 whole
to 2Yz-lbs.),
(2
split lengthwise
%-in. thick
about l-lb.
2 (1 in.)
about 10-1
about 1lb.
~-OZ.
c
9-1o 7-8
A
A
A
A
A
A
A
c
c 3-4
13
10
25
30-35
2-3
,
c
B 8
B
B
B
B
c
usetongstom-l-lmeato’ver—
~
piercingnleat losesjuices.
@steaks and chopsshould be at
least 1 inch thick forbest broiling
results.Pan broilthinner ones.
2ndSide
Time,
Minutes Cmnrner9ts
3%
Arrangein singlelayer.
Spaceevenly.Up to 8 patties
takeaboutsame time.
9
12
15
5
10
10
10
17
6
12-14
16-18
25-30
Do not
10-12
8
12-14
Steakslessthan l-inchcook
7
throughbeforebrowning.
5-6
Panfrying is recommended.
8-9
6-7
Slash fat.
Reduce times about5 to 10
minutesper side for cut-up
chicken. Brusheach side with
meltedbutter.Broilwithskin
sidedownfirstandbroilwith
door closed.
‘/2-1
Spaceevenly. Place English
muffinscut-side-upand brush
with butter if desired.
Cutthroughback of shell,spread
turn
open. Brushwith melted butter
beforeand after half time.
over.
5
Handle andturn very carefully.
Brush with lemonbutter before
andduring cookingif desired.
Preheat broiler to increase
browning.
8
Increasetimes5-10minutesper
side for 1%-incllthick or home
cured.
4-5
Slash fat.
Slash fat.
4-7
10
4-6
1-2
If desired, split sausages in half
lengthwiseinto5 to6-inchpieces.
—
Page 19

Propercare andcleaningare
importmt soyourCookingCenter
willgiveyouefficient and
satisfactoryservice.Followthese
directionscarefullyin caringfor it
tohelp assure safeand proper
maintenance.
BE sum ELECTRIC POWER
1s OFF BEFORE CLEANING
m
PmmYOURcoom~
aENTER.(Exceptfor
operating
theSelf-CBeaningCycle)
Cmtrd IRmek
Don’tusesharp-edgedutensils
aroundthe controlpanels. They
mightdamageit.
Cleanthe panelswith a lightly
dampenedcloth. DO NOTUSE
cleaningsprays or largeamounts
ofsoap and water.These can cause
problemswith the control
mechanisms.
Ten2per&3&kFe.F%%lbe
The probe issturdy,but care
shouldbe takenin handlingit. Do
nottwist it. Avoiddroppingit.
Clean it as soonas possibleafter
use. The entire probe is immersible
and can be washedin warm, soapy
water.Youcan wipe it with a sudsy
cloth, then rub metal parts with a
plastic scouringpad if necessary.
Rinse with clean water and dry
witha softcloth or paper towel.
Youcan also washthe probe in the
top rack of a dishwasher.
l!::l~ll~~w?lll’~J@fiAS—..,..
.
~ *P
DO NOT place a sheet ofaluminum
foilin either your microwaveor
on the bottom ofthe loweroven. If
youdo,yourfoodsmay not cook
properly. The ovenfinish may be
damaged. And there may bean
increase in heat on the outside
surfaces of the oven.
Ch%YilLamp
I Ill r==
Toreplacea burned-outbulb,
unplugyour CookingCenter.
Unscrewthe accesspanelin the
upper leftcorner onthe back ofthe
oven.Replacewith a samesize
appliancebulb. Plug theovenin,
pushthe ON buttonto testthe light,
and replacethe access panel.
Rec&titiom for
use
of’Metal
Use metalonly as directedin the
Cookbook. Metal traysno more
than 3/4”deep maybe used forTV
dinners, and the metal temperature
probe isdesigned for microwave
ovenuse. Alwayskeep metalat
leastone inch awayfrom sidesof
oven.
Cleaning—otltside
Clean the outsideof your
microwaveoven with soap and
water,then rinse and dry. The outer
pane ofthe windowis glass. Wipe
it clean with a damp towel. Chrome
is bestwiped with a damp cloth and
then with a dry towel.
Keep it dean and Sweetm’udhng.
Openingthe ovendoor a few
minutesafter cookinghelpsair out
theinside.An occasionalthorough
wipingwith a solutionofbaking
sodaandw~terkeeps the interior
fresh.
spills and
spattersan?WBsy
toremovefromwalls and fhm
That’sbecausethere’slittleheat
exceptinthe food,or sometimesin
theutensil. Somespatterswipeup
witha paper towel,somemay
requirea damp cloth. Remove
greasyspatterswitha sudsycloth,
then rinseand dry.
NEVER USE AcoMmRcIAL
OVEN aLEANER 0?4 Ma’
IPAR?rOF MN-JRMICROWAVE
OVEN.
Wipe up spatterson the gkss m
the insideof the doordaily.Wash
glass, when it’ssoiled, with a
minimumof sudsy,warm water.
Rinsethoroughlyand dry.
Wipe metal and plasticpartsm
the insideof the door frequently.
Use adamp clothto removeall
soil. DO NOI’USE ABRASIVES,
suchas cleaning powdersor steel
and plasticpads. They may mar the
surface.
The glass traycan be washedby
hand or in a dishwasher.
Door Surface. When cleaning
surfaces ofdoor and oventhat
come togetheron closing thedoor,
useonly mild, non-abrasivesoaps
or detergents appliedwith a sponge
or softcloth.
.-
—
.. ...
‘aj:
—..
—.-
->-..
.-—..
-.
/.
I
1-
1
F
Page 20

,,;
.....
~,...
..
‘G‘““tv’-
<J.+ : ;: Q. ,. ],
m 3
~:
,>p’) 1:~~,,r.~~>.~~~
.L?”3~. .LifksiiAiL)L .>
Theholes in the burners of your
rangemustbe keptclean at all
timesforproper ignition and an
even,unhamperedflame.
Cleanthe burnersroutinelyand
especiallyafter bad spillovers
whichcouldclog these holes.
Burnersliftrigh{out for cleaning.
I
Note: A screw holdseach of the
burners in place to keepthem from
wobblingaround during shipment.
Tagsindicatetheir location.Remove
theshippingscrew with a Phillips
headscrewdriver,lift theburner;tilt
itto one side at theend closestto
the igniter and moveit towardthe
back ofthe range. This disengages
it from thegas valvesat the frontof
the range, and it liftsouteasily.
Toremoveburned-on food, soak
the burner in a solutionof a product
usedfor cleaningthe insideof coffee
makers. Soak the burner for 20 to
30 minutes. If the fooddoesn’t
rinse off completely,scrub it with
soap and water or a mild abrasive
cleanser and a damp cloth.
Beforeputting the burner back, dry
it thoroughly bysetting it in a warm
oven for 30 minutes. Then place it
back in the range, making sure it is
properly seated and level.
;:;s, ,,7 -.,,-* .—L] .
:.!;;.Jj:f~,:;
._:
;[;:f;.> f
,..$,.. h ,
;& G;
Gratesshouldbe washedregularly
and, ofcourse, afterspillovers.
Washthem inhot, soapywaterand
rinsewith cleanwater,Dry the
grateswitha cloth—don’tput them
backon therangewet. When
replacingthegrates, be surethey’re
lockedintopositionovertheburners.
Toget rid ofburned-onfood, soak
thegratesin a slightly diluted
liquidcleanser.
Althoughthey’redurable, the
grateswillgraduallylose their
shine, regardlessofthe care you
takeofthem. This is dueto their
exposureto hightemperatures.
Topreserve thegrates’porcelain
finishas long as possible, havea
panon the grate beforeyouturn on
theburner,andlowertheflamewhen
foodreachesthedesiredtemperature.
Removethe gratesand liftoutthe
chromedrip pans. Washthemin
hot, soapywater.Rinsethem with
clean hotwaterandpolish them dry
with acloth. Neveruseabrasive
cleaneror steelwool-they’llscratch
the surface.Instead, soakthe drip
pansfor about20 minutesinslightly
dilutedliquid cleanseror mild
solutionof ammoniaand water (U2
cup ofammoniato one gallonof
water). After soaking,washthem
in hot, soapy water.Rinse with
clean waterand polishwith a cloth.
Do not putin self-cleaningoven.
Page 21

I?ek%lovableowehTI.kMNT
CJwmshelves
Cleanthearea under thecooktop
often.Built-up soil, especially
grease, maycatch fire.
Tomake cleanir~geasier, theentire
cooktopmaybe liftedup andheld up
bylockingarms that catchand hold
thetop up when it’s ali the wayup.
Be
sure all bummersare turned
off beforeraisingthe moktop.
Then removethe grates, grasp the
frontsides ofthe cooktop aridlift.
Aftercleaning under the cooktop
withhot, mild soapy waterand a
cieancloth, put the cooktopback in
place. Lift up a little to release the
lockingarms and push them in
whileguiding the topback down.
Becarefulnotto pinchyourfingers.
The ovendoor is removableto
makecleaningthe oven easier.
Toremovethe door, open it a few
inchesto the special stopposition
that will hold thedoor open. Grasp
firmlycmeach sideand liftthedoor
straightup and off the hinges.(Due
to the largeamount of insulation
and the construction of the door,
it isheavy.)
Note: Becareful notto place hands
between the spring hinge and the
ovendoo~frame. The hingecould
snap back and pinch fingers.
Washwith hot, soapywater. For
stubborn spots, use a solution of
ammonia and water. Do not
immerse the door in water.
Ovenshelves and shelfsupports
maybe cleanedwitha mild
abrasivecleanser following
manufacturer’sdirections.After
cleaning,rinsetheshelveswith
cleanwateranddry with a dry
cloth. Toremoveheavy,burned-on
soil, soapymetalpads maybe used
followingmanufacturer’sdirections.
After scrubbing,washwith soapy
water,rinse anddry.
Broiler P%m& Rack
After broiling,removethebroiler
rack andcarefullypour offthe
grease. Washand rinse thepan
and rack in hot, soapywater.
If foodhas burnedon, sprinkle the
broilerrack whilehotwithdetergent
and coverwith wetpaper towels or
a dishcloth. That way,burned-on
foodswill soak loosewhile the
meal isbeing served.
Do notstore a soiledb~oilerpan
and rack in theoven.
To replace the door, position slots
in bottom ofdoor over the hinges
that are in the “out” position. Then
lower thedoor slowlyand evenly
over both hinges at the same time.
If hinges snap back against the oven
frame, pullthem back out.
22
Page 22

..
#&%E&
%%%+
Youcan removethe raisedsection
ofthe ovenbottomto cleanany
excessivespilloversbeforestarting
theself-cleaningcycle.
Toremove -theovenbottom:
1. Removethe ovenshelves.
~. Lift upon the clip inthe center
ofthe panel at theback side, and
slidethe panel towardthe frontof
the range. This willdisengagethe
twolocking tabson the frontand
rear edges. Youmaynow liftthe
panelup and out.
Toreplace thepanel, insert thetwo
lockingtabson the back sideinto
the slotsat the rear first, then slide
thepanel towardsthe back ofthe
rangeto engagethe front tabs.
Then push downon the clip to lock
thepanel in place.
Note: Youmust holdthe ciip up
whileslidingthe panel.
The lightbulb is locatedin the
upperleft corner ofthe oven,Before
replacingthebulb,disconnect
electricpowertothe rangeat the
mainfuse or circuitbreakerpanel.
Letthe bulbcoolcompletelybefore
removingit. Do notto-ucha-hot
bulbwith a dampcloth as thgbulb
willbreak.
Replacewith a hightemperature
appliancebulb ofthe samewattage.
I
YourSelf-CleaningOven has a
specialprotectiveshield overthe
ovenlig-htbulb. Tochange thebulb,
removethe fourscrewson the metal
ring around the light. Lift off the
ring, the glass shield and the gasket
behind it.
After replacingthebulb, reassemble
the parts in this order: gasket first,
then glass and finally the metal
ring. It’simportant that the gasket
seals tightly; otherwise, heat from
the ovenduring a self-cleaning
cyclecould break the bulb.
(contimwd nextpage)
I
TJ
Page 23

Rwommended IC.kaningTime:
__..E ~. ... .. . ._-._. . ..>===
ModerateSoil—2hours
(thinspiih
ExcessivelyHeavySoi&$ hour-s
(heavygreasespillsand spatter)
Note: Themicrowaveovenwillnot
operatewhilethe controlsofthe
lowerovenare setfor self-cleaning.
and iight spatter)
E%epmwthe ownR%&%?
setting-thecmhds
Step 1:
Removethe broilerpan, broiler
rack, other cookware and any
aluminumfoilfrom theoven—they
can’twithstandthe highcleaning
temperatures.
step2:
Removethe raised sectionof the
ovenbottom (seepage 23). If it is
excessive~ysoiled, clean it and
replace it.
Step 3:
Clean spattersor soilon the oven
frontframe (A), the ovendoor
outsidethe gasket (B)and the small
area at the front center ofthe oven
bottom. These areas heat enough
to burn soil on. Polishthese areas
with a dry cloth. Do notclean the
gasket (B). Do not let water run
downthrough openings inthe
topof the door (C). Never use a
commercial ovencleaner in or
around the self-cleaning oven.
step4:
Closetheovendoorand makesure
theovenlight(D) is off.
Caution:(home drip pansfrom
the topofyourrange should
never be cleanedinthe selfdeaning oven.
How $9 set the
oven for !mxmhg
Step 1:
Set theautomaticoventimer:
~Make sure both the rangeclock
and the STARTdialshowthe
correct time ofday.When the
STARTknob is pushedin and
turned, it will “pop” into place
when the time shownon the range
clock isreached.
@Decide on cleaninghours
necessary—twohours for moderate
soilor three to fourhours for
heavy soil.
@Addthese hours to presenttime
of day,then push in and turn STOP
dial clockwise to desired time.
step 2:
‘I’urnthe OWENTEMP and
OMENSET knobs to ICIJEAN.
TheCLEANING lightwillcomeon,
step 3:
Push the Self-Clean Latch Lever
to the right to lock the oven door.
In about 30 minutesthe LOCKED
lightwill come on, indicatingoven
ishot and door cannot be opened.
Oven door and window gethot
during self-cleaning. DO NOT
T-OUCH.
After cleaning is complete, the
ovendoor will staylocked untilthe
ovencools and the LOCKED light
goes off. This takesabout 30
minutes.
—
,,,
!,,,,,,, tlU Lk, L, L,l L,t,l k,,, +,, .,. . . . . . . . . . . ... . . .
(,_____&.+
—.-....~.-*.._
,k.s?iT--
.
.
---v”—---”d
m
.!4.OwYl!Front IFmme
lBO
~ownDmw Gask’et
D. (&Am
LMM
U3
!.-—
‘1
step1:
When the LOCKED light is off,
leavethe OVEN SET and OVEN
TEMP knobs in the CLEAN
position aridmovethe latch lever to
the left to unlock the door.
step2:
Turn OVEN SET and OVEN
TEMP knobs ‘mOFF.
Page 24

Hyouwishtostartandstopcleaning
ata latertimethanshownonclock,
pushinandturn STARTdialtotime
youwishto start.Addthehours
neededforcleaningto this“start”
time,thenpush in and turnSTOP
dialtothisdesiredtime, Ovenwill
automaticallyturnonandoffat the
set times.
H YmEHave toIntemlpt the
Ckanilqgcycle
Step L Turn theSl_OPdialuntilthe
pointerisatthecorrect timeofday.
(Thedialwill be inthe outposition
whenthepointer is at the time of
day.)
Step 2. Leavethe OVENSETand
OVENTEMP knobsattheCLEAN
settings. If the “Lock” lightison,
waituntilthe lightgoesoffbefore
movingthe latchlever.
Step 3. Pushtheself-cleanlatch
levertothe left. This willunlockthe
ovendoor so itcan beopened.
Step 4. Turn theOVENSET and
OVENTEMP knobsfromCLEAN
toOFF after thedoor hasbeen
opened.
hnportant: Any
h! self-dean latch !kw?rtolock or
mhk the door without
pm’w?r appk’d tothe ovenor with
the Owm
TEI$4Wknob
but CLEAN, ‘can result in‘damage
1
!0
the doorhking mechanism.
attempttoforce
ektrk
SETamvol- OVEN
inmy Otherposition
tfl%‘$GQ$~~”lj~~fj~~(jA&r$&?b:~KS
I=il%d.a..i
~<
Q why won’tmy ovendean
ihmnediatdyeventhough I
all the timeand dean knobs
fmmdy?
A. Check tobe sureyourSTART
dialis”setto the sametime as the
rangeclock. Also checktobe sure
LATCHLEVER is inthe CLEAN
position.
Q. If my oven clock isnot
workirlg9can I still self-clean
my oven?
A. No. YourAutomaticOven
Timer usesthe rangeclock tohelp
stintand stopyour self-cleaning
cycle.
Q. can I use Commercial oven
cleanerson any partof my
self-cleaningmm?
A. No cleanersor coatingsshould
be used around anypart ofthis
oven.If you do usethem and do not
wipe theovenabsolutelyclean, the
residuecan scar the ovensurface
and damagemetal partsthe next
time theoven isautomatically
cleaned.
Q. Can I clean the WovenGasket
around the ovendoor?
A. No, this gasketis essentialfor
a good ovenseal and care must be
taken notto rub, damage or move
this gasket.
Q. what should I do if excessive
smoking O’ccllmsduring ‘ck%ming?
A. This iscaused byexcessivesoil,
and you should switchthe OVEN
SET knob to OFF. Open windows
to rid room of smoke. Allow the
ovento cool for at Beastone hour
before opening the door. Wipe up
the excess soiland reset the clean
cycle.
set
Q.
SBm!Mthaw’be any dbr
during the Ckaning?
A. Yes,there maybe a slightodor
duringthefirst fewcleanings.
Failuretowipe out excessivesoil
mightalso causeanodor when
cleaning.
Q Whatcausesthe hair-like
Ihes on the enameledsurfaceof
myoven?
A. This isa normalcondition,
resultingfrom heatingandcooling
duringcleaning.These linesdo not
affecthowyourovenperforms.
Q. Why do I haveashM in my
ovenafter deming?
A. Sometypesof soil willleave
a depositwhich isash. It can be
removedwith adamp sponge or
cloth.
Q. My oven shelvesdo not slide
easily.What is the matter?
A. After many cleanings,oven
shelves may become so clean they
do not slideeasily.If youwish
shelvesto slidemore easily,
dampen fingerswith a small
amountof cookingoil and rub
lightlyoversidesof shelf where
they contactshelf supports.
Q. My oven shelves and.shelf
supports have become dull looking
after several cleanings. ISthis
normal?
A. Yes.After many cleanings, the
shelvesand shelf supports maylose
some lusterand discolor.
Q. 1sthe “m%dikqg” sound I
hear during cleaning normal’?
A. Yes.This isthe metal heating
and cooling during both the
cooking and cleaning functions.
(continued nexf page)
[
1
Page 25

adjusting the
yffa~~
i;:j
~~fy~~Q$y&~
(-J@y ~,~~~~~~f:~~~~~$$~
Thetemperaturecontrol in your
newovenhas beencarefullyadjusted
toprovideaccuratetemperatures.
However,if thisovenhasreplaced
oneyouhaveusedfor severalyears,
youmay noticea difference in the
degreeofbrowningor the length
oftimerequired when usingyour
favoriterecipes.Oven temperature
controlshavea tendencyto “drift”
overa period ofyears and since
thisdrift is very gradual, itis not
readilynoticed. Therefore, you
mayhavebecome accustomedto
yourprevious ovenwhich may
haveprovideda higher or lower
temperaturethanyou selected.
Beforeattemptingto havethe
temperatureofyour new oven
changed, be sureyou havefollowed
thebaking timeand temperature of
therecipe carefully.Then, after
youhave used theoven a fewtimes
and youfeel theoven is toohot
or toocool, thereis a simple
adjustmentyou can make yourself
on theOVEN TEMP knob.
Pullthe knob off the control shaft
and look at the back side. There is
adisc in the center of the knobskirt
witha seriesof notcheson theinner
edgenext to the knob shaft. One of
these notches ispositioned overa
pointer on the side of the knobshaft.
r
Note position of
pointer to notches
\sE-LO~
~+b
/’
‘ =?’-.
,(=+?J \
/
[!]
“, .+O
‘\ PER~()
\
@
k
before adjustment
%%
;
+
/
Loosen only the
locking screws
Notewhich notchthe pointeris
locatedin. Tomakean adjustment,
carefullyloosen(approximately
one turn), butdo notcompletely
removethetwo screwsthatholdthe
skirtto theknob. Holdthe knobin
onehand and withtheother hand
carefullytilttheskirtuntilthe notch
in thediscclears thepointeron the
knob shafi.
Toraisethe oventemperature,turn
the dial in thedirectionofthe
arrow for “Raise~’Tolowerthe
temperature, turn thedial in the
directionof arrow for “Lower~’
Each notch willchangetheoven
temperatureapproximately25°F.
Wesuggestthat youmakethe
adjustmentone notchfrom the
originalsetting and checkoven
performance before makingany
additionaladjustments.
After the adjustmentis made, make
sure the pointeron the knob shaft
isalignedwith the notch inthedisc.
Press skirt and knob togetherand
retightenscrews sothey are snug,
but be careful notto overtighten.
Re-installknob on rangeand
check performance. Note: After
an adjustment has been made the
“Off” and “Broil” positionswill
not line up with the indicator mark
on the control panel as they
1
previously did. This condition
is normal and will notcreate
a problem.
Whenthe rangeiscool, washthe
enamelfinishwithmild soapand
wateror a mildabrasivecleanser
appliedwith a dampcloth. Rinse
the surfacewithclean waterand
dry with a soft cloth. If youwish,
occasionallyapplyathin coatof
mildcleaningwaxtohelp protect
the finish,
There are a numberof precautions
youcan take to avoidmarring the
surfaceofthe rangeand to prevent
itfrom becomingdull. Don’tslide
heavypansacross it. If youspill
foodswitha lotof acid (tomatoes,
sauerkraut, fruitjuices, etc.) or
foodswith highsugarcontent,
clean themup as soonas possible.
If allowedto set, these foodscould
cause adul]spot. Also, no matter
howstubborn thefoodstain, never
useharsh abrasivecleansers. They
could permanentlydarnagethe
enamel surface.
26
//--,
i
1’
‘\
‘.-
/-=\
t.%>)
“1
)’
Page 26

OW.sic!eGkss Finish
Metal, including
Side Trims and
TrimStrips
OuterPorcelain
EnamelSurface*
L
PaintedSurfaces
I
MA’I’ERIALS TO USE
~ @Soapand Water
I e Soa~-Filled Scouring Pad
@ Plastic Scouring Pad
~ Mild Soap and Water
e Soap and Water
Soapand Water
~
e Paper Towel
~ Dry Cloth
~ Soap and Water
~ Soapand Water
I
Soapand Water
~
GENERALIXRECTIONS
Drainfat,coolpanandrackslightly.(Donotletsoiledpanandrackstandin
oventocool.)Sprinkleondetergent,Fillpanwhhwarmwaterandspreadcloth
orpapertoweloverrack.Letpanandrackstand
if necessary. Rinse and dry. OPTION: Clean pan and rack indishwasher.DO
NOT CLEANIN SEIM’-CLEAIWNGOVEN.
Pull off knobs. Washgentlybut do not soak, Dry and returncontrols to range,
Clean outside ofcooled blackglass door with a glass cleaner thatdoes not
contain ammonia. Washother glass withcloth dampened in soapywater. Rinse
and polish with a dry cloth. If knobsare removed,do not allow waterto run
downinsidesurface ofglass while cleaning.
Wash, rinse, and then polish with a dry cloth. DO N~ USEsteel wool,
abrasives, ammonia, acids. or commercial ovencleaners whichmaydamage
the finish.
Avoidcleaningpowdersor harsh abrasives which may scratch the enamel.
If acids shouldspil~onthe range while it is hot, use a dry paper towelor cloth
to wipeup right away.When the surface has cooled, washandrinse.
For other spills, such as fat smatterings,etc., wash with soap andwater when
cooled andthen rinse. Polish with a dry cloth.
Use a mild solution of soap and water. Do not use any harsh abrasives or
cleaning powderswhich mayscratch or mar surface.
Removeovendoor byopeninga few inches, grasping it at sides, andliftingup
and awayfromhinges. Clean with soap andwater. Replacebygraspingdoor at
sides, lining up door with hinges, and pushingdoor firmly intoplace.
fora fewminutes. Wash;scour
AvoidgettingANY cleaning materials on the gasket.
Soapand Water
~
shelves
(See Self-Cleaning
Oven Directions)
I
Chrome-Plated
Drip Pans
Burner Grates
1
Surface Burners
I
~SpilIagcofmw-inades. fruitjuices, and bastingmaterials containingacids may cause discoloration. Spillovers shouldbe wiped
care being taken to not touch any hot portion of the oven. When the surface is cool, clean and rinse.
Soapand Water
@
Soapand Water
e
e Stiff-Bristled Brush
~ Soap-Filled Scouring Pad
(Non-metallic)
Soapand Water
@
e Soap-Filled Scouring Pad
(Non-metallic)
QSolution
Inside of Coffee Makers
e Soapand Water
~Mild Abrasive Cleanser
~Damp Cloth
for Cleaning
Coolbeforecleaning. Frequent wiping with mild soap and water willprolong
thetime betweenmajor cleanings. Be sure to rinse thoroughly.
Shelvescan be cleaned in Self-Cleaning Oven, dishwasher, or byhand, using
;oap and water. Rinse thoroughly to removesoap after cleaning,
~lean as described below or in dishwasher. DO NOT CLEANINSELW-
XEAT+UNGOVENas they will discolor. Wipe all chrome drip pans after each
:ookingso unnoticed spatter will not burn on next time youcook. Toremove
mrned-on spatters, use anyor all cleaning materials mentioned. Rub lightly
vith scouring pad to prevent scratching of the surface.
.ift out when cool. Soak 5-10minutes if desired in warm solution of dishwasher
letergent. Scour with materials mentioned hereto removeburned-on food
)articles. IDONOT CLEAN H’+/SELF-CLEANDJIGOVEN.
Wipe off burner heads. If heavy spillover occurs, remove burners from range
(see page 21)and soak them for 20 to 30minutes in solution of hot water and
product for cleaning inside of coffee makers, such as Dip-It brand. If soil does
not rinse off completely, scrub burners with soap and water or a mild abrasive
cleanser anda damp cloth, Dry burners in a warm ovenfor 30 minutes before
returning them to the range. DO NOT’CLEAN IN SELF-CLEANINGIWEN,
. .
—
up immediately,with
Page 27

PROBLEM
POSSIBLE
CAUSE ANDREMEDY
CONTROLPANEL
LIGHTED, YET OVEN
WILL NOTSTART
FOODSARE EITHER
OVERCOOKEDOR
UNDERCOOKED
~Doornotsecurelyclosed.
@ON buttonmustbe pressedbeforeovencan beprogrammed.
~TemperatureprobenotinsertedproperlyduringTempCook functions.
@STARTmustbetouchedafterenteringcookingselection.
~Anotherselectionentered
@Makesureyouhaveenteredcookingtimeor temperature.
~Clearwastouched
@Microwaveovenwillnot operateif theselectorcontrolforthelowerovenisin “Clean”
position.
@Cookingtimesmayvary becauseof startingfoodtemperature, fooddensityor amount
offoodsinoven.Enter additionalcookingtime for completion.
eIncorrectpowerlevelentered, Check Cookbookforrecommendedpowerlevel
changinglevelsduringcookingifnecessary.
~Dish~~asnotro~ted, turned or stirred. Somedishesrequire specific instructions.
CheckCookbookorrecipe forthese instructions.
@Toomanydishesin ovenat sametime. Cookingtime mustbe increasedwhencooking
morethanone food item. Check Cookbook forrecommendationon increasingtime.
AuThese Things AmINmnd
with Your Microwave oven:
@Steamor vaporescapingfrom
aroundthe door.
@Lightreflectionaround dooror
outercase.
&-~ady in Ovenand cL~AR not touchedtocancelit.
acci~en~lly. Reset cooking program and touchSTART.
@Dimmingovenlightandchange
inblowersound mayoccur while
operatingat power
thanhigh.
~Dullthumping sound while
operatingat powerlevelsother
thanhigh.
ievekother
Or
@SomeTV-Radiointerference
mightbe noticedwhileusingyour
microwaveoven.It’ssimiia~~othe
interferencecausedbyother small
appliancesanddoesnot indicate a
problemwith youroven.
TOP13LJRNERSm @Makesure electrical plug ispluggedintoa livepower outlet.
film LIGHT
I
I I
J
~Burner holes onsideof burner maybe clogged. Removeand clean them.
G Burnersmay notbe fittedcorrectly onto thegas valves.Reinstallthem properly,
I
Page 28

PROBLEM
OVENWILL N~
WORK
POSSWLE G4JUSE
~Plug on
Circuitbreaker inhousehas been tripped, or fuse has been blown.
~
rangeis not completely inserted into the outlet receptacle.
AND REMEDY
~Ovencontrolsare notproperly set.
~Door leftin lockedpositionaftercleaning.
I
OVENLIGHT DOES
NOTWORK
FOOD DOES N(YI’
BROILPROPERLY
MOISTURE INSIDE
AND OUTSIDE OVEN
OVEN WILL NOT
SELF-CLEAN
@Lightbulbis loose.
@Bulbisdefective.Replace.
@Switchwhich operates oven light is broken. Call for service.
@OVENSET knobnot set at BROIL.
@OVENTEMP knob notset atBROIL. Broilerwill not operate if OVEN TEMI?knob
isturned past BROIL.
@Improper shelfpositionis being used. Check BroilingChart.
@Necessary preheatingwas notdone.
@Food isbeing cooked on hot pan.
@Utensilsare not suitedfor broiling.
~OVEN SET knobnotset on BAKEor TIME BAKE.
@OVENTEMP knobnot set correctly.
~Shelf position is incorrect. Check Roasting,Baking and Broilingpages.
@Oven shelfis not level.
~Wrongcookwareis being used. When roasting, pan is too small,
*Foil tent was notused when needed to slowdown browningduring roasting,
~Be sureoven ventduct is not blocked or covered,
~Automatictime dial/dials not setor not set properly. The SNIP’ dial must be set and
idvancedbeyondthe time notedon the RangeClock.
~The STOP dial wasnot advancedfor long enough time. There must be at least a half]ourdifference from the Start timeto the Stoptime for the Automatic Timer to work.
~ BothIOVENSET and OVEN TEMP knobsmust be set at CLEAN setting.
OVEN
DOORWILL
NOTLATCH FOR
SELF-CLEANING
‘CYCLE
~ Latch not in CLEAN position.
@OVEN SET and OVEN TEMP knobs must be at CLEAN before the latch lever
can be moved.
-)q
L
Page 29

-,; ~~ii.~gToobtainservice,see yourwarranty
onthe backpageof this book.
---.
-+
We’reproudofour
want you to be pleased. If for some
..;
reason you are not happy with the
service you receive, here are three
steps to follow for further help.
service and
FIRST,contact the people who
serviced your appliance. Explain
why you are not pleased. In most
cases, this will solve the problem.
NEXT, ifyou are stillnotpleased,
writeall thedetails-including
yourphonenumber—to:
Manager,Consumer Relations
Hotpoint
AppliancePark
Louisville,Kentucky40225
FINALLY,ifyour problem isstill
notresolved, write:
Major Appliance ~
ConsumerAction Panel
20 North WackerDrive
Chicago,Illinois60606
......
/.- \
\ .,
~k.._-
/..” ---.\
[___ ,-
‘1
,;
2
Page 30

IFULLONE”YEAHWARRANTY
%3
F-J
!&J
+’~(
;$J
~~
m
++.
~>.
l% oneyear from date Of Mginal
purchase, we will prcwide,
charge,partsand service labor
inyour hometo repairor replace
freeof
anypart d the microwave
cwenhmge thatfails because
of amanufacturing defect.
LWW?H2ADDITIONAL
F-OUR-YEARWARRANTY
Forthe secondthrough fifth year
from dateof original purchase,
wewill provide,freeof charge,a
replacement
the magnetrontube fails because
of amanufacturing defect. Youpay
for theservice trip to yourhome
and servicelaborcharges.
magnetrontube if
Thiswarrantyis extendedto
the original purchaserandany
succeedingownerfor products
purchasedfor ordinaryhomeuse
inthe
48 mainlandstates,Hawaii
andWashington,D.C.h Alaskathe
warrantyisthe sameexceptthat it is
LIMITEDbecauseyou mustpayto
shipthe product tothe serviceshop
or forthe servicetechnician’stravel
coststo your home.
All warrantyservicewill be provided
byour FactoryServiceCentersor
byourauthorized CustomerCare”
servicersduring normalworking
hours.
Lookinthe White or YellowPages
of yourtelephone directory for
I+OTPOINTFACTORYSERVICE,
GENERAL ELECTRIC-HOTPOINT
FACTORYSERVICEor HOTPOINT
CUSTOMERCARE” SERVICE.
>.-
WJ*!AT !s NOT COVERED
Some states do not allow the exclusion or limitation of incidental or consequential damages, sothe above limitation orexclusion
may not apply to you. This warranty gives you specific legal rights, and you may also have other rights which vary from state to state.
Toknow what your legal rights are in your state,consult your local or state consumer affairs office or your state’sAttorney General.
M further Mp is needed QXWKX?rning this warranty, contact:
Manager—c(>ns~Jnler Affairs, (%)nevai Electric company, Appliance Park, I-XX! isviiie, KY MK?25
~ Servicetrips to yourhome to
teach you howto usethe product.
yourWe andCammaterial.
Read
If youthen haveanyquestions
about operating the product,
pleasecontact your dealer or our
Consumer Affairs office atthe
address below.
@Improper installation.
If you havean installation problem,
contact your dealer or installer.
Youare responsible for providing
adequate electrical, gas,
exhausting and other connecting
.
facilities.
warrantor: General Electric CXMTlpany
~~-$s
X-R’’””
e Replacement of housefuses or
resettingof circuit breakers.
@Failureof the product if it is used
for otherthan itsintended purpose
or used commercially.
~ Damageto product caused
byaccident, fire, floods or acts
of God.
WARRANTORISNOTRESPC.NNBLE
FORCONSEQUENTIAL DAMAGES.
. -—..
-h kLywj 2J!&&Y9J%&LRXz5%&?t&,_
;
‘
{~
;@
‘}:’
~[g
\
@
$&
@
&
-’ . . . . .- ,-.>-
-’-’.
x. .
\
,,.
I.J–-L.r-rL:!TFLr!a.=wl?a”Ttir
n._..in
A QUALITY PRODUCT OF U GENERAL ELECTRIC COMPANY
—
,/—’=.
(
‘\L“
-----
:)
-
 Loading...