

Page 1
!fiiioGhei!Mliiiirowave
Cooking Center
Contents
Aluminum Foil
Anti-Tip Bracket
Appliance Registration
Care and Cleaning
Features
Installation
Leveling
Lift-Up Cooktop
Lower Oven
Air Adjustment
Baking, Baking Guide
Broiling, Broiling Guide 20
Continuous-Cleaning Care 22
Control Settings
Door Removal
Light; Bulb Replacement 15, 25
Lighting Instructions
Oven Bottom Removal
Preheating
Roasting, Roasting Guide 19
5,7,25
3,8,9
21-27
25
28
17, 18
15, 16
23
24
17, 18
15
15
Microwave Oven
Control Panel
2
9
8
8
Cooking by Temperature 13
Cooking by Time
Defrosting
Light Bulb
Temperature Probe
Microwaving Tips
Model and Serial Numbers 2
Precautions
Problem Solver 30,31
Repair Service
Safety Instructions
Surface Cooking
Burners, Burner Grates 26,27
Control Settings
Cookware Tips
Drip Pans
Flame Size
Lighting Instructions
IO-13
Use and Care of
10
gas model
12
11
21
13,21
8
3
31
3-7
14
14
14
26,27
14
14
RGH846GEJ
The electric output
of the microwave oven
in this cooking center
is 650 watts.
Shelves
Thermostat Adjustment
Timer and Clock
Vent Duct
15,24,27
29
16
16
Warranty
GE Answer Center”
800.626.2000
Back Cover
HmPolNT
Page 2
Help us help you...
Before using your cooking
center, read this book
carefully.
It is intended to help you operate
and maintain your new cooking
center properly.
Keep it handy for answers to your
questions.
If you don’t understand something
or need more help, write (include
your phone number):
Consumer Affairs
Hotpoint
Appliance Park
Louisville, KY40225
Write down the model and
serial numbers.
You’ll find them on a label located
in the burner box under the
cooktop.
These numbers are also on the
Consumer Product Ownership
Registration Card that came with
your
sending in this card, please write
these numbers here:
Model Number
~erfil
Use these numbers in any
correspondence or service calls
concerning your cooking center.
See page 9.
cooking center. Before
Number
Be sure your cooking
center is registered.
It
is important that we, the
manufacturer, know the location of
your cooking center should a need
occur for adjustments.
Your supplier is responsible for
registering you as the owner.
Please check with your supplier to
be sure he has done so; also send in
your Consumer Product Ownership
Registration Card. If you move, or
if you are not the original purchaser
please write to us, stating model
and serial numbers.
must be registered. Please be certain
that it is.
Write to:
Hotpoint
Range Product Service
Appliance Park
Louisville, KY40225
This appliance
If you received a damaged
cooking center . . .
Immediately contact the dealer
(or builder) that sold you the
cooking center.
Save time and money.
Before you request service . . .
check the Problem Solver on pages
30 and 31. It lists causes of minor
operating problems that you can
correct yourself.
.
.
FOR YOUR SAFETY
If you smell gas:
1. Open windows.
2. Don’t touch
electrical switches:
Extinguish any
3*
I
open flame.
4.
Immediately call
your gas supplier.
●
Don’t turn electric switches
on or off because sparks may
ignite the gas.
I
FOR YOUR SAFETY
Do not store or use
gasoline or other
flammable vapors and
liquids in the vicinity
of this or any other
appliance.
I
All these things are normal with your microwave oven:
.
Steam or vapor escaping from
around the door. oven is operating.
● Light reflection around door or
outer case. might be noticed while using your
●
Dimming oven light and change
in blower sound may occur while
operating at power levels other
than high.
. Dull thumping sound while
●
Some TV-Radio interference
microwave oven. It’s similar to the
interference caused by other small
appliances and does not indicate a
problem with your oven.
2
Page 3
PRECAUTIONS
IMPORTANT SAFETY INSTRUCTIONS
TO AVOID
POSSIBLE
EXPOSURE TO
EXCESSIVE
MICROWAVE
ENERGY
(a) Do Not Attempt
this oven with the door open since
open-door operation can result in
harmful exposure to microwave
energy. It is important not to
defeat or tamper with the safety
interlocks.
(b) Do Not Place
between the oven front face and
the
door or allow soil or cleaner
residue to accumulate on sealing
surfaces.
(c) Do Not Operate
if
it is damaged. It is particularly
important that the oven door close
properly and that there is no
damage to the:
(1) door (bent)
(2)
hinges and latches (broken or
loosened)
(3)
door seals and sealing surfaces.
(d) The oven Should Not be
adjusted or repaired by anyone except
properly qualified service personnel.
to
operate
any object
the oven
Read all instructions before using this appliance.
s
IMPORTANT
SAFETY NOTICE
The California Safe Drinking
Water and Toxic Enforcement
Act requires the Governor of
California to publish a list of
substances known to the state
to cause cancer and requires
businesses to warn customers
of potential exposure to such
substances.
Gas appliances can cause
minor exposure to three of these
substances, namely benzene,
formaldehyde and soot, caused
primarily by the incomplete
combustion of natural gas or LP
fuels. Properly adjusted burners,
indicated by a bluish rather than
a yellow flame, will minimize
incomplete combustion. Exposure
to these substances can be
minimized further by venting
with an open window or using
a ventilation fan or hood.
When You Get Your
Cooking Center
●
Have the installer show you
the location of the cooking center
gas cut-off valve and how to shut
it off if necessary.
●
Have your cooking center
installed and properly grounded
by a qualified installer,
accordance with the Installation
Instructions. Any adjustment and
service should be performed only
by qualified gas range installers
or service technicians.
in
Plug your cooking center into
a 120-volt grounded outlet only.
Do not remove the round
grounding prong from the plug. If
in doubt about the grounding of
the home electrical system, it is
your personal responsibility and
obligation to have an ungrounded
outlet replaced with a
grounded three-prong
accordance with the National
Electrical Code. Do not use an
extension cord with this appliance.
properly-
outlet
in
centers can
tip and injury
could result.
To prevent
accidental
tipping of the
cooking center,
attach it to
the floor by
installing
ANTI-TIP bracket
check if the bracket is installed
and engaged properly, carefully
tip the cooking center forward to
check if the ANTI-TIP bracket is
engaged with the leveling legs.
If you pull the cooking center out
from the wall for any reason, make
sure the rear legs are returned to
their positions in the bracket when
you push the cooking center back.
supplied:
the
To
3
Page 4

IMPORTANT SAFETY INSTRUCTIONS
●
Be sure all packing materials
are removed from the cooking
center
prevent fire or smoke damage
should the packing material ignite
●
before operating it, to
Be sure your cooking center is
correctly adjusted by a qualified
service technician or installer
for the type of gas (Natural or
LP) on which it is to be used.
Your cooking center can be
converted for use on either type of
gas. See Installation Instructions.
●
This cooking center is
specifically designed to heat or
cook food, and is not intended
for laboratory or industrial use.
●
After prolonged use of
the lower oven, high floor
temperatures may result and
many floor coverings will not
withstand this kind of use.
Never install the cooking center
over vinyl tile or linoleum that
cannot withstand such type of
use. Never install it directly over
interior kitchen carpeting.
Using Your Cooking Center
●
Don’t leave children alone or
unattended where a cooking
center is hot or in operation.
They could be seriously burned.
s
Don’t
stand or hang on the door,
drawer or cooktop.
damage the cooking center and
even tip it over causing severe
personal injury.
allow
anyone to climb,
They could
c
CAUTION: ITEMS OF
INTEREST TO CHILDREN
SHOULD NOT BE STORED
IN CABINETS ABOVE A
COOKING CENTER OR ON
THE COOKTOP-CHILDREN
CLIMBING ON THE COOKING
CENTER TO REACH ITEMS
COULD BE SERIOUSLY
INJURED.
●
Let
burner grates and other
surfaces cool before touching
them or leaving them where
children can reach them.
●
Never wear loose fitting or
hanging garments while using
the appliance.
material could be ignited if
brought in contact with flame or
hot oven surfaces and may cause
severe burns.
●
Never use your appliance for
Flammable
warming or heating the room.
Prolonged use of the cooking
center without adequate ventilation
can be hazardous.
●
Do not use water on grease
fires.
Never pick up a flaming
pan. Turn off burner, then
smother flaming pan by covering
pan completely with well fitting
lid, cookie sheet or flat tray.
Flaming grease outside a pan can
be put out by covering with
baking soda or, if available, with
a multi-purpose dry chemical or
foam type fire extinguisher.
●
Do not store flammable
materials in an oven or near the
cooktop.
(continued)
c
When cooking pork,
directions exactly and always cook
the meat to an internal temperature
of at least
in the remote possibility that
trichina may be present in the
meat, it will be
will be safe to eat.
170”F.
This assures that,
killed
follow
and meat
the
Microwave Oven:
●
Read and follow the specific
“PRECAUTIONS TO AVOID
POSSIBLE EXPOSURE TO
EXCESSIVE MICROWAVE
ENERGY” found on page 3.
●
See door surface cleaning
instructions on page 21.
c
To reduce the risk of fire in
the oven cavity:
–Do not overcook food.
Carefully attend appliance if
paper, plastic or other combustible
materials are placed inside the
oven to facilitate cooking.
—Remove wire twist-ties
paper or plastic bags before
placing bags in oven.
—Do not use your microwave
oven to dry newspapers.
–Do not use recycled paper
products.
napkins and wax paper can contain
metal flecks which may cause
arcing or ignite. Paper products
containing nylon or nylon
filaments should be avoided,
they may also ignite.
Recycled paper towels,
from
as
●
Do not let cooking grease or
other flammable materials
accumulate in or near the
cooking center.
4
Page 5

–Do not pop popcorn in your
microwave oven
special microwave popcorn
accessory or unless you use
popcorn labeled for use in
microwave ovens,
–Do
not overcook potatoes.
They could dehydrate and catch
fire, causing damage to your oven,
unless in a
–Do not operate the oven while
empty to avoid damage to the
oven and the danger of fire.
by accident the oven should run
cmpty
a minute or two, no harm
is done. However, try to avoid
operating the oven empty
times-it saves energy and
prolongs I ife of the oven,
●
If materials inside the oven
should ignite,
closed, turn oven off, and
disconnect the power cord, or
oft’
shut
circuit breaker panel.
●
power at the fuse or
Some products such as whole
keep oven door
If
at all
eggs and sealed containers—for
example, closed glass jars—may
explode and should not be heated
in this oven.
●
Don’t defrost frozen
beverages
bottles (especially carbonated
beverages). Even if the container
is opened, pressure can build up.
This can cause the container to
burst, resulting in injury.
●
Use metal only as directed in
cookbook.
meat roasts are helpful when used
as shown in cookbook.
in narrow necked
Foil strips as used on
TV dinners maybe microwaved
in foil trays less than 3/4” high;
retnove
top foil cover and return
tray to box. When using metal in
microwave oven,
keep metal at
least 1 inch away from sides of
oven.
●
Cooking utensils may become
hot
because of heat transferred
from the heated food. Pot holders
may be needed to handle the
utensil.
●
Sometimes, the cooking tray
can become too hot to touch.
Be
careful touching the cooking tray
during and after cooking.
●
Foods cooked in liquids
(such
as pasta) may tend to boil over
more rapidly than foods
containing less moisture. Should
this occur, refer to page 21 for
instructions on how to clean the
inside of the oven.
●
Thermometer—Do not use a
thermometer in food you are
microwaving unless the
thermometer is designed or
recommended for use in the
microwave oven.
●
Remove the temperature
probe from the oven when not
in use.
inside the oven without inserting
it in food or liquid, and turn on
microwave energy, it can create
electrical arcing in the oven, and
damage oven
If you leave the probe
walls.
. Plastic utensils—Plastic
utensils designed
cooking are very useful, but
should be used carefully. Even
microwave plastic may not be as
tolerant of overcooking conditions
as are glass or ceramic materials
and may soften or char if subjected
to short periods of overcooking.
In longer exposures to overcooking,
the fbod and utensils could ignite.
For these reasons: 1) Use microwave
plastics only and use them in
strict compliance with the utensil
manufacturer’s recommendations.
2) Do not subject empty utensils
to microwaving. 3) Do not permit
children to use plastic utensils
without complete supervision.
●
Boiling eggs is not
for microwave
J
recommended in a microwave
oven. Pressure can build
inside egg yolk and may cause it
to burst, resulting in injury.
●
Foods with unbroken outer
“skin”
sausages, tomatoes, apples,
chicken livers and other giblets,
and egg yolks (see previous
caution) should be pierced to
allow steam to escape during
cooking.
●
such as potatoes,
~~Boilable”
cooking pouches
up
and tightly closed plastic bags
should be slit, pierced or vented
as directed in cookbook. If they
are not, plastic could burst during
or immediately after cooking,
possibly resulting in injury. Also,
plastic storage containers should
beat least partially uncovered
because they form a tight seal.
When cooking with containers
tightly covered with plastic wrap,
remove covering carefully and
direct steam away from hands and
face.
5
Page 6

IMPOmmT
●
Avoid heating baby food in
SAFETY INSTRUCTIONS
glass jars, even without their lids;
especially meat and egg mixtures.
●
Spontaneous boiling—Under
certain special circumstances,
liquids may start to boil during or
shortly after removal from the
microwave oven. To prevent burns
from splashing liquid, stir the
liquid briefly before removing the
container from the microwave
oven.
Surface Cooking
●
Always use the LITE position
when igniting top burners and
sure the burners have ignited.
make
●
Never leave surface burners
unattended at HI flame settings,
Boilover
greasy spillovers that may catch
on fire.
●
so it does not extend beyond the
edge of the cooking utensil.
Excessive flame is hazardous.
●
moist or damp pot holders on hot
surfaces may result in burns from
steam. Do not let pot
near open flames when lifting
utensils. Do not use a towel or
other bulky cloth in place of a
pot holder.
●
burns,
materials, and spillage, turn the
cookware handles toward the side
or back of the cooktop without
extending over adjacent burners.
causes smoking and
Adjust top burner flame size
Use only dry pot
holders—
holdFrs
come
To minimize the possibility of
ignition of flammable
●
Always turn surface burner
to OFF before removing utensil.
●
Carefully watch foods being
fried at HI flame setting.
●
Never
block
the vents (air
openings) of the cooking center.
They provide the air inlet and
outlet which is necessary for the
cooking center to operate
properly with correct combustion.
●
Do not use a wok on the
cooking surface if the wok has a
round metal ring which is placed
over the burner grate to support
the wok.
trap which may damage the
burner grate and burner head.
Also, it may cause the burner to
work improperly. This may cause
a carbon monoxide level above
that allowed by current standards,
resulting in a health hazard.
●
Foods for frying should be as
dry as possible.
foods or moisture on fresh foods
can cause hot fat to bubble up and
over sides of pan.
●
Use least possible amount of
fat for effective shallow or
fat frying.
of fat can cause spillovers when
food is added.
●
If a combination of oils or
fats will be used in frying,
together before heating, or as
fats melt slowly.
●
Always heat fat slowly,
watch as it heats.
●
Use deep fat thermometer
whenever possible
overheating fat beyond the
smoking point.
This ring acts as a heat
Frost on frozen
deep-
Filling the pan too
to prevent
full
stir
and
(continued)
●
Use proper pan
size—Avoid
pans that are unstable or easily
tipped. Select utensils having flat
bottoms large enough to properly
contain food avoiding
boilovers
and spillovers, and large enough
to cover burner grate. This will
both save cleaning and prevent
hazardous accumulations of food,
since heavy spattering or spillovers
left on cooktop can ignite. Use
pans with handles that can be
easily grasped and remain cool.
●
Use only glass cookware that
is recommended
for use on gas
burners.
●
Keep all plastics away from
top burners.
. To avoid the possibility of a
burn, always be certain that the
all
controls for
OFF position and
burners are at
all
grates are
cool before attempting to
remove a grate.
●
When flaming foods under
the hood, turn the fan off. The
fan, if operating, may spread
the flame.
●
If cooking center is located
near a window, do not
curtains which could blow over
the top burners and create a fire
hazard.
●
If you smell gas,
gas to the range and call a qualified
service technician. Never use an
open flame to locate a leak.
use long
turn off the
6
Page 7

Baking, Broiling and
Roasting
●
Do not use oven for a storage
area.
●
Stand away from the cooking
center when opening the door
of a hot oven. The hot air or
steam which escapes can cause
burns to hands, face and/or eyes.
c
Keep oven free from grease
buildup.
●
Place oven shelves in desired
position while oven is cool.
●
Pulling out shelf to the shelf
stop is a convenience in lifting
heavy foods. It is also a
precaution against burns from
touching hot surfaces of the
oven door or walls.
●
Don’t heat unopened food
containers in the oven. Pressure
could build up and the container
could burst causing an injury.
●
When using cooking or
roasting bags in oven,
follow
the manufacturer’s direction.
●
Use only glass cookware that
is recommended
for use in gas
ovens.
●
Always remove broiler pan
from the oven as soon as you
finish broiling.
pan can catch fire if oven is used
without removing the grease from
the broiler pan.
●
When broiling, if meat is too
Grease left in the
close to the flame, the fat may
ignite.
excessive flare-ups.
●
place correctly
possibility of grease fires.
●
fire in the broiler pan,
oven, and keep oven door closed
to contain fire until it burns out.
Trim excess fat to prevent
Make sure broiler pan is in
to reduce the
If you should have a grease
turn off
Cleaning Your Cooking
Center
●
Clean only parts listed in this
Use and Care Book.
●
Keep cooking center clean and
/
free of accumulations of grease
or
spillovers
which may ignite.
If You Need Service
●
Read “The Problem Solver”
on pages 30 and 31 of this book.
●
Don’t attempt to repair
or replace any part of your
cooking center unless it is
specifically recommended in
this book.
should be referred to a qualified
technician.
All
other servicing
SAVE THESE
INSTRUCTIONS
●
Don’t use aluminum foil
anywhere in the oven except as
described in this book.
could result in a fire hazard or
damage to the cooking center.
Misuse
7
Page 8

Installing the
Leveling the
Microwaving Tips
. Make sure
your microwave oven is suitable
microwaving. Most
cooking dishes, measuring cups,
custard cups, pottery
dinnerware which does not have
metallic trim
sheen can
labeled
It’ you
Measure 1 cup water in a glass cup.
Place
in oven on or beside dish.
Microwave 1-1 M minutes at High
(10). If water becomes hot, dish is
microwave safe. If dish heats, it
should not be used for microwaving.
●
Paper towels, wax paper, and
plastic wrap can be used to cover
dishes in order to retain moisture
and prevent spattering.
●
Some microwaved foods require
stirring, rotating, or rearranging.
Check your cookbook for specific
instructions.
all
cookware
or
glaze with a metallic
be used.
“suitable for
are
unsure, use this dish test:
SOme
used
glass
casseroles,
or china
cookware is
microwaving:’
in
tbr
Cooking Center
Your cooking center, like so many
other
household items, is heavy
can settle into soft floor coverings
such as cushioned vinyl or carpeting.
When moving the cooking center
on this type of flooring, use care.
Do
not install the cooking center
over kitchen carpeting
place
an
insulating pad or sheet of
l/4-inch-thick plywood between
the cooking center and carpeting.
When the floor covering ends at
the front of the cooking
area that the cooking center will
rest on should be built up with
plywood
same level or higher than the
covering. This will allow the
cooking center to be moved for
cleaning or servicing.
or similar material to the
unless you
cente~
floor
iind
the
Cooking Center
Leveling legs are located on each
corner of the base
center.
Your cooking center must be
in order to produce proper cooking
and baking results. After it is in
its final location, place a level
horizontally on
check the
and side to side. Level the cooking
center by adjusting the leveling legs
Both of the rear leveling legs will
engage the ANTI-TIP bracket (allow
for some side to side adjustment).
Allow a minimum clearance of 1/8”
between the cooking center and the
leveling legs to permit installation
into the ANTI-TIP bracket.
Ievelncss
of
the cooking
an
oven shelf
front to
Icvcl
and
back
●
Steam builds up pressure in foods
which are tightly covered by a skin
or membrane. Pierce potatoes, egg
yolks and chicken livers to prevent
bursting.
8
Page 9
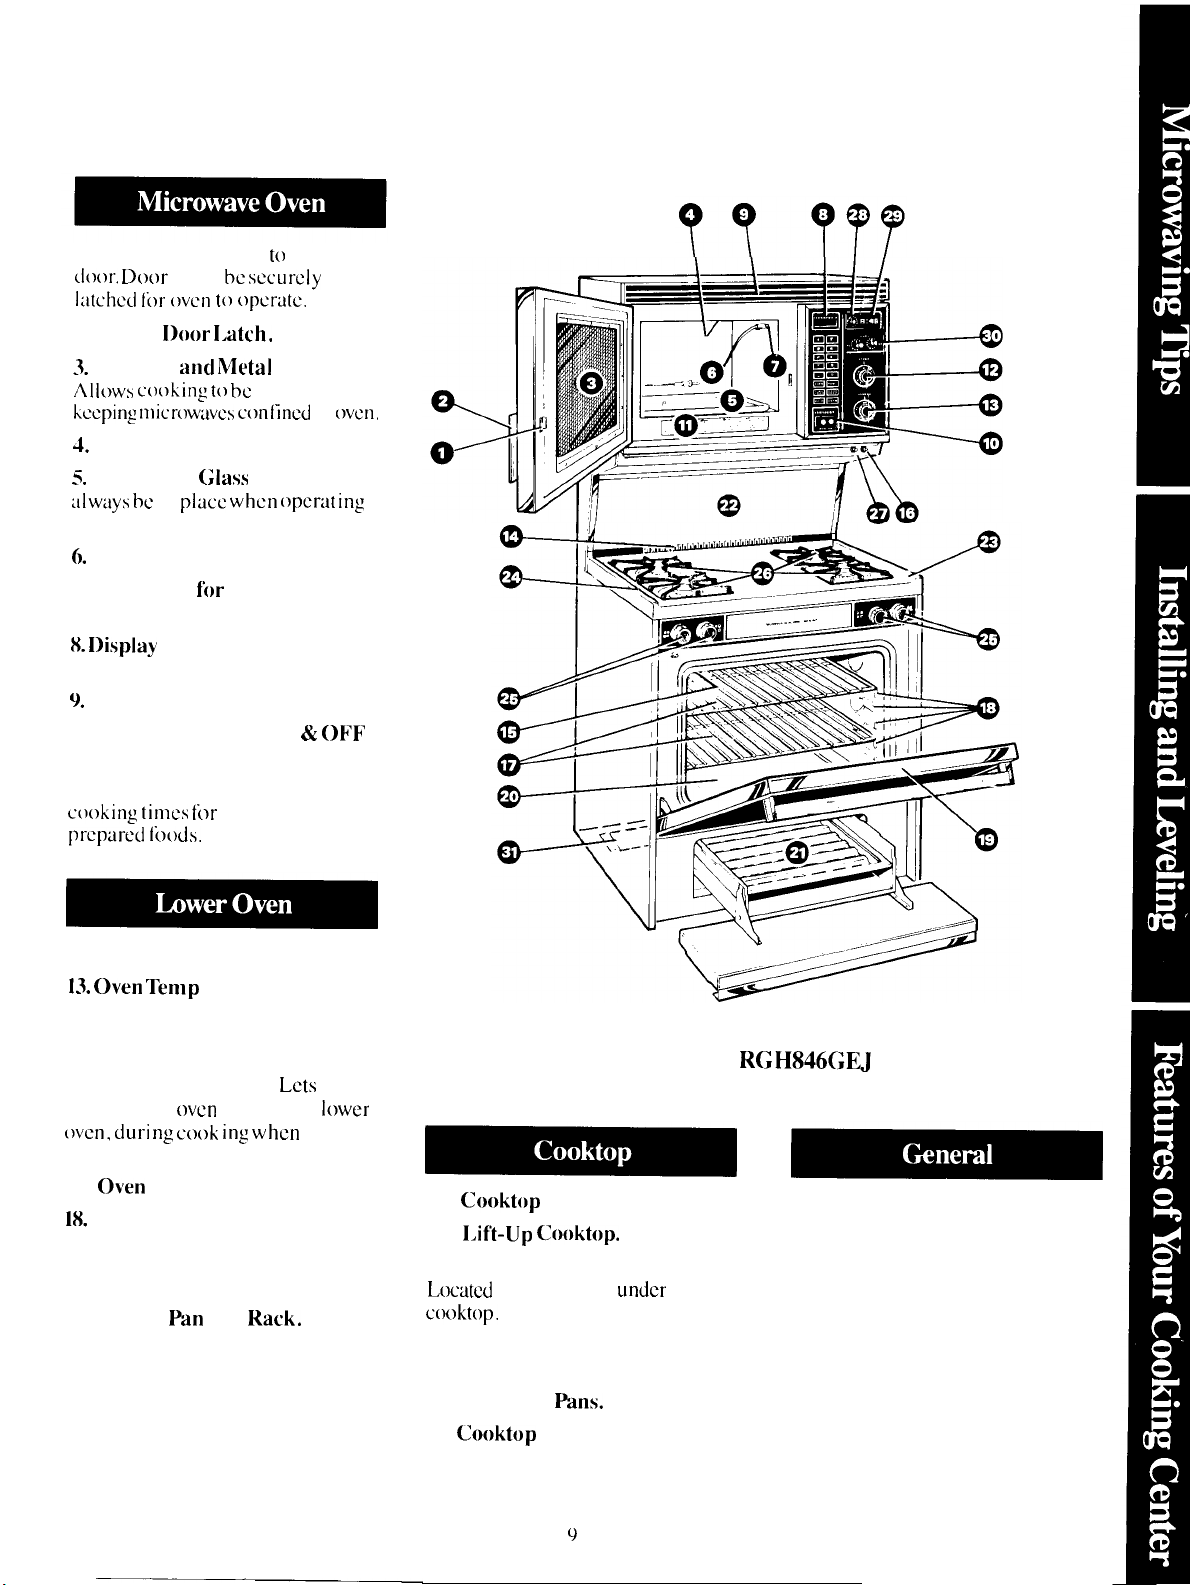
Features of Your Cooking Center
1. Door Handle.
d(x)r. E)(X)Ilatched Ii)r (wcn to opcrtitc,
2. Inside
3.
Window
Allows cooking” to bc
kping microwaves c(mlinul
4.
oven light.
5.
Removable
:Ilways bc
the oven.
6.
Temperature Probe.
7. Receptacle
Probe.
K I)isplay
Panel.
9.
Microwave oven Vent.
lo. Microwave Oven ON
Buttons.
Il. Cooking Guide. Suggested
cooking times for
prepared foods.
must be
I)oor I,atch.
in
and Touch Control
Pull to open
securely
and Metal
Glass
place when opcrat ing
fl)r
Shield.
viewed while
in
Tray.
Temperature
many frequently
Must
& OIW
[wcn.
12. Oven Set Knob.
13.
oven
Temp
Knob.
14. Oven Vent.
15. oven Interior Light.
16. oven Light Switch.
turn interior
(wcn, dur-i ng cook ing when
Closed.
17.
oven
18.
Oven Shelf Supports.
Removable oven Door.
19.
20.
Removable oven Bottom.
21.
Broiler
oven
Shelves.
Pan
and
light on, in
I&k.
Lets
door is
you
tower
Model RGH846GEJ
22.
Cooktop
23.
Lif’t-Up
24. Model and Serial Numbers.
Located
cooktop.
25. Surface Burner Controls.
26. Surface Burners, Grates and
Chrome Drip
27. (hoktop Light Switch.
Light.
(lmktop.
in burner box
Pans.
under
28. Minute Timer.
29. Digital Clock.
30. Automatic Oven Timer.
Times lower oven cooking
operations.
31. Anti-Tip Bracket.
(See
Installation Instructions)
Page 10
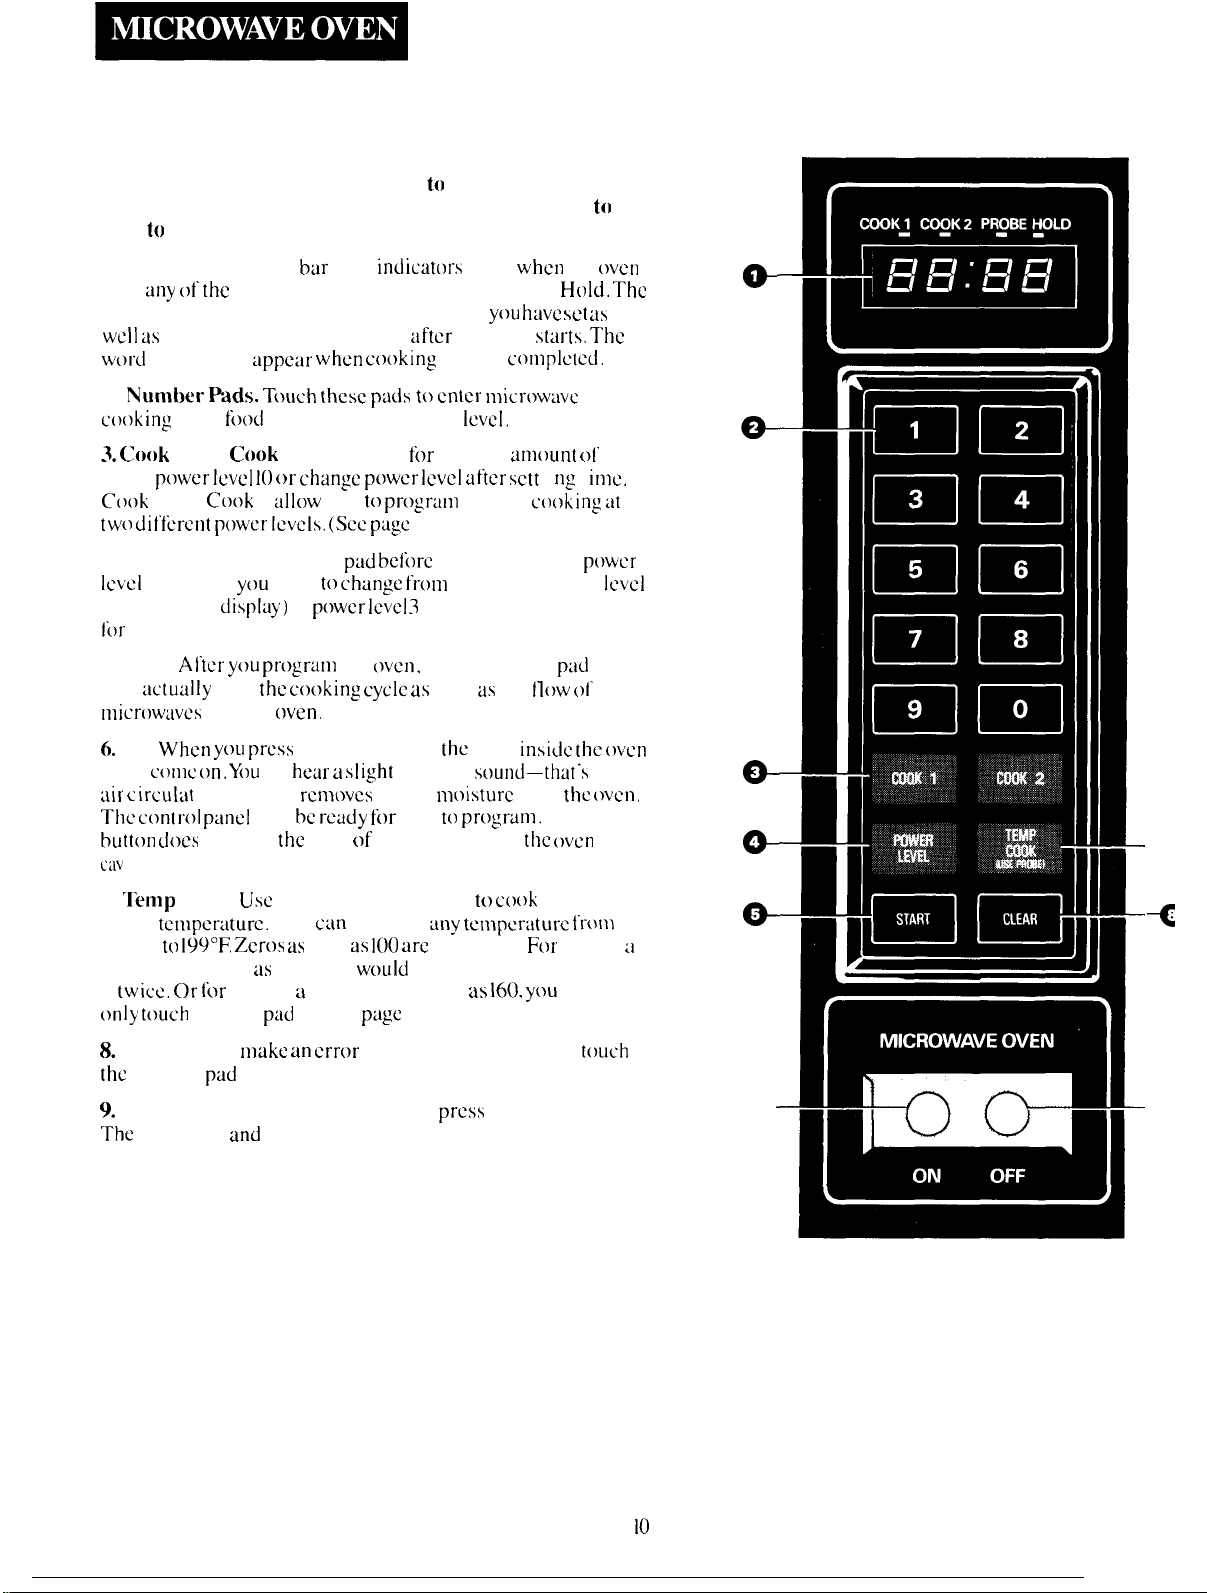
Features of Your Touch Control Panel
The touch control panel allows you to set the oven controls
electronically with the touch of a finger. It’s designed
easy
to
use and understand.
to
be
1. Display.
is in
any of” the
digital numbers will show what power level
WCII as
word
“End” will
2.
Numher Fads. T(mch these ptids to enter n~icr(~wavc
cooking”
3. (hok
using
C(lok
two different power levels. (See page
4. Power Level.
Iwel
number if
10 (“HI” 011
Ii)r
defrosting.
S. Start.
will
:ictually
nlicrowavcs
6.
On.
w i II
air c irculut
The c(~ntrol panel
button d(ms
cm it y.
Individual
functions: Cook 1, Cook 2, Probe or
the cooking time remaining after the oven
time,
fomi
1 and (Xok 2. Microwave
power Ievcl 10
1 and
C(x)k
you
displuy)
After you progrtim
start
into the
When yc)u press
CX)IIIC on. Ybu
ion fan that
not start
bur
light
indicators
appeur when c(mking
temperature or power
for
or
change power level after sctt
2
iIllow
you to
Touch this
want to
or
power ICVCI 3
the cooking cycle as
(wen.
(ON button must be pressed. )
the ON button.
’1]
hear a SI ight
rcmovcs
will be
ready for
the
flow of microwaves into
prcyram
12. )
ptid before
change from
the
~wcn,
whirring
excess
you to
show
y(w have set us
time is
lCVCI.
a preset
2-stage
entering another
automatic power
(Low, “30” 011 display)
press the Start
well as the
the
light
sound-that”s
mt)isturc
progrum.
when
c(~n]plctcd.
amount of’
inside the (wcn
from
the
Hold. The
s(~irts. The
i ng t
ctx)kin: at
p(~wcr
pad
which
flow 01”
the
the twcn.
The ON
the (wcn
twcn
time
imc,
level
9-
0-
Q--
o--
--6
7.
lemp
Cook.
preset
tcnlpcrature.
1000” to
temperature such as 155, you
5
twice.
Or
(~nly t(mch
8.
Clear. If you
the
CLEAR
9.
Off. When you’re finished cooking.
The
oven light
Use
the temperature probe to
You cm program
199°F.
Zeros as well as
k~r
setting a temperature such as
number
pad
make an mm
pad
and start over.
and
fan will shut off.
6. (See
100 arc
would
page
in programming. simply
cook
with a
any tcmpcrtiturc frt~nl
automatic.
simply touch number pad
13. )
press
For
setting
160. ytm
the OFF button.
would
t(mch
43--
ii
-c
0---
Page 11

Defrosting
The defrost function is designed
fiw
speedy thawing of’
and is one of the
great
advantages
f’rozen f’ood
of” a nlicrowake (Nen.
●
llnvcr Icvci 3
is
rccon]nwrlclccl
Ii)r dcfrt~sl ing.
●
SW
\’OLl
1’ L’()()kb()()k
-
help.
‘l-t) Iwct)lllc bctlel
the dcl’rest
t’unct ion, dcfrosl t’r(mn
p(lrk ch(~ps h) ti)lltlwing
h)l” dCfl”OSt 111~
acquainted
the steps
With
below’.
step
1:
~]acc
:1
l-lb.
ptick:igc of
I’rozen cht)ps
in the
(wcn and
~’l{)sc door.”
Step 2.
I
]1] icrowalw cncr-gy
ynr finish prtyrwmnirlg
toLICh
ighl and
START.
Jlish
tin
the ON
colnc on
is used until
button.
but
and
oven
no
Step 5: Touch number
Display will show
low power
level is
pad 3,
“30’” indictiting
set
in the oven.
Low (30) is the recommended
power
level for
Step 6:
clown
Tbuch
on display. When
completed, the
“End”
:ippcars
CI.EAR
Step 7: Turn package
door
und repeat steps 3 through
set remaining
time
and torr~h
Step 8:
When you’re ail
defrosting, press the
Step 9:
Open
pack~igc
finish
md
defrosting.
defrosting.
START, Time
oven signuls and
on
pd.
ha] f’ of
START.
d(x~r, remove
scpar:itc
cycle
Lfispltiy. Tbuch
(wer, close
defrosting
finished
OF’F
button.
chops
to
cxmnts
is
5
to
●
F’am
i
1>-s izc, prc-piickagcd
fr(xn
dinner-s
microw:iw c(NJkcd.
ti ti~i 1 ct)nt:l iner, transl ’er
can hc dcl’rostcd
1 t’
(he to(xl is
it to
nlicrowmc-sut~ dish.
●
Check
your
cookbook Ii)r
dcf’resting tips.
Questions
Q. k$’hen
dull, thumping noist.
A.
‘1’his sound
Ictting you knt)w (IIC twen
p(wcr
Q.
Why don’t
times in the cookbook
and Answers
I press START, I
is
norlnai. [t
level
lower
th:in
the
defrosting
10 (HI).
M’hat
is
seem
fbr my; fhod?
A.
C(mkbook
Dcf’resting time
[o the tcmpcraturc
Set your
times
oven fi)r
arc
avcra:es.
c:m wrry ticcording
in
y(mr freezer.
the time
in your cookbook. If’ your
still not completely
cnci
of’ that time,
und ticijust
the time accordingly.
thawed tit
reset
your
and
in
a
other
hear
a
is it’?
is
using u
right
indicute(f
ftmd
is
the
{wcn
Step 3: Schxt
defrosting time
em-half of the
rcconlmcndcd in
)r)Llr ~()(~kb()()k. For
t(mch
4, ()
and () for
Display shows
Step
4:
Tbuch
pad.
Display shows
“4:0()~’
POWER LEVEL
cxarnplc,
4 minutes.
“HI:’
tmrl
Defrosting Tips
●
Foods frozen
can bc
defrosted in
● For even defrosting,
need to
be broken up or separated
part
of
the way through the
defrosting time.
in
11
puper or
the px-kage.
plastic
some t’oods
Q.
Should
thawed
A.
Some f’oods
completely
For example, fish
it is better
is still SI
Q.
Can 1 open the door during
all
foods be completely
before
cooking?
should not
thawed befime
cooks so
to
begin cooking while it
ightly f%zen.
cooking.
quickly
-
be
defrosting to check on the
progress of my food?
A. Yes. You
any time during microwaving.
may
open
the door
To
resume defrosting, close the door
tind
press START. The oven begins
operating if time is
If
rmt,
reset timer.
left
on timer.
at
Page 12

Cooking by Time
The time cooking
you to
preset the cooking time.
The oven shuts off automatically.
Power
t(w
change this fbr more
[lcxibili[y.
T() become
time c(x)king. make a cup
by
Step 1:
add
stir to
110
microwave safe (see “M icmwav ing
Tips” on
Step
1, 2 and O
seconds. Display shows “1:20:’
level 10
most cooking, but you
Scc
better acquainted with
ti)llc~wing the
Fill a cup 2/3 full of
I
tcasmmn of
diss’olvc.
metal
decoration
page
3: Select your time. Touch
for a
f“eature
(HI) is
your cookbook,
steps
instant
Use a cup that has
8.) Place
minute
allows
recornmencf(
may
cooking
of
coffee
below.
water.
coffee
and
is
cup
in oven
and 20
and
:d
Because
is recommended
coffee. there is no need to
the power level. (It’ power level 10
is
Change Power Level” below. )
Step
counts
Step
signals and “End” appears on
display.
Step 6:
automatic
no(
appropriate, sce
4: Touch START.
clown
on display.
5:
When
time is up,
Press the
OFF
power level 10
[br this
cup
change
“HOW to
Cook
the
button.
of’
I time
oven
Using the Cook 2 Feature
With the Cook 2
SC
( two
time cxmking
within
be
power
opcrat
The
how to change power
Cook 2.
Step 1:
Step 2:
Step
Step
on display.
Step 6: At the
programmed
selected
programmed
&)~n, show on the display.
Step
signals
display.
Step 8:
oven,
one
idail
it”
you desired to
levels
ions
following
Repeat Stem
Thuch
3:
Set your
How to Change Power Level
A1’tcr
setting
POWER LEVEL
touch desired number hr ncw
power
level.
tep
4:
Tbuch
5: Cook 1 time
power
7: When time is up, the oven
and
Press the
light
and
tkaturc,
program. This
during your
is
tin exwnp]c of
COOK 2.
time as
cook
START.
end
cook
level
cook
“End” appears on
OFF button.
fan
you can
functions
would
change
c(x)king
levels
1, 2
and 3.
in Step
time,
touch
pad, then
counts down
of
the first
time, the next
and the
time, counting
shut off.
using
3,
second
-
The
How to Use Microwave
Oven Timer to Time a
3-Minute Phone Call
1.
Press ON button.
2. Touch number pads
(for 3
minutes
3.
Touch
pad and number pad O so that
microwave energy is not used
which
4. ‘huch START.
5.
could damage your
microwave oven.
reaches zero, oven
scc(mds and
Press
OFF button.
and no seconds).
POWER
“End” will appear.
3,
() and ()
1.
EVf3L
When the
will beep
timer
for 3
Questions and Answers
Q. 1
set my oven
called for in the recipe, but
end of the time allowed, my food
wasn’t done. What happened’?
A. Since
[0 tirnc
give you a time range
(wercooking.
minimum time,
dorwness. :ind cook
little ]ongcr, if ncccssary.
Q.
I touched the number pads
and selected my power level. When
I touched START, however, my
oven didn’t come on. Why not?
A. The ON button must be touched
befbre
your oven will not begin cooking.
Q I
level other than 10 (HI). What do
I need
A. Tb
touch the
“HI” appears on the display
Enter new number.
Q. Can I interrupt time cooking
function to check the food?
A. Yes. To resume cooking, simply
close the door
pad. The timer must be reset
cooking to resume unless time is
remaining on timer.
house power varies due
or location. many
setting the number pads or
want to cook on a power
to
do?
change
POWER LEVEL
fhr
the time
to prevent
Set the oven
test
the
kmd for
your fired a
the power
and
press
level,
the
at
the
recipes
for
else
pad
.
panel.
START
for
Page 13

Cooking by Temperature
Internal temperature is the best
test
of’ doneness
Use TEM P
larict
y
of” l’()()ds to
f’or
C(X3K
your
many
(() cook” a
desired
f’oods.
I’inisbcd Ii)od tcmpcruturc. The
C’()()k
I
:Ind C()()k 2 (imc
I’unctions arc prcf~rrcd
doughs.
which
prccisel}
‘Ikll)pcraturc
(~ll~sswor-k ollt of cook”
.-
I’rxvcn Ii)(ds and tixxls
:irc di 11’icult [() cook”
with the
cooking” takes the
ovcn automat ical Iy
FfOLD
setting
til’tcr rcachi ng the
cooking”
Ii)r
halters,
prohc.
i rig.
switches
The
to
pr-csct li)od tcrnperaturc, il’ 1400F.
or above. and
Icrnpcraturc fi)r”
un(il you
mrinttii ns
up to i~ hours
touch the
that
(11-
OFF button.
The Temperature Probe
Handle
Sensor
The
ternpcra[ut-c probe
-
is a
thcrmornctcr thiit gauges the
internal tcrnpcraturc
it
mus( be
[-(N)k. Tc)
properly,
Pl:lcc
LIscd
utilize
Ii)llow
tender
bccl’ roast
rnicrow:wc-su[k
horizontally”
:Irea
not touching
into the center
sure the handle CIC)CS
Ii)od
or top or
Cover
with
sides
W:IX
01”
your
when using
yoLll” protw
directions below.
on trivet in
dish. Insert
bone
or
not touch
of” the oven.
paper.
Cable
End
Ii)od
ti)od:
Tcrnp
probe
meaty
ttit. Make
the
Pork or
Add
cover
Place
the
firmly
Il:inl I-(MS(S
[/~
CLIp
with plastic wrap.
rmxt
in oven with probe
right.
Insert ctible end of
into
rcccptaclc
need no
wutcr to roast
on
trivet
dish,
probe
oven
to
wall.
How to Temp Cook a Rolled
Beef Rib Roast to Medium
Step 1:
and attach
wall.
Step 2:
Indicator I
PROBE and 100” shows on display,
Step 3:
125
Step
pad. “HI”
Step 5:
Display will
nmtium
oven.
Step
Tcmpcraturc
on
temperature setting
COOK
reappear on
seconds.
lnscrt tcmpcraturc probe
probe securely in
Close
the
door.
Touch
TEMP COOK.
ight :ippear-s
Touch
2
and
under
5
tbr 125°F.
shows on ciisphiy.
4: Touch POWER LEVEL
appears
Touch number
power
6:
Touch
display. Tb
on
displziy.
pad
show
50
indicatirlg
level
is set in the
START.
of
the roast appears
check
original
touch
pad
and
tcmperatur-c
the
display
ti)r a few
oven
5.
TEMP
will
Step 7: When
the oven will
125°F.
is
rcachwi,
sound and “Erld”
will
appear on display.
Step 8:
t’rom
Remove probe
the oven.
and
ti)od
Note: Oven autonutic:illy swi(chcs
to
HOLD setting
and
PROBE
:md
HOLD indicator lights rcrlltiin on
when
preset
1400F.
or
Ii)ocl
above.
tcrnpcr-~lturc is
Cooking Tips
●
Use a lower
heat more evenly
rcqu
i ri ng more t
●
Be su rc f’r(mn Iixxt has
completely
probe.
in
t’romn ti)ods.
●
Cover ti)ocls
control”
power
even
Icvel:
though
it will
imc.
been
dct”rosted bcfi)rc
inserting
Probe may break ot’t” it’ used
and
loosely
qLI
ick, even
[i)r
moisture
heating.
Questions and Answers
().
Are
there any
Temp Cook’?
A.
Yes. Dclicatc
crcm, i“rozcn
etc.,
sotlcn
rapidly at warm
tcmpcruturcs.
t’rozcn foods” arc
cook precisely with
best to
use
time cooking”
Ii)ods.
Q. (h
1
leave
oven if’ it’s not inserted in fired?
A.
N().
it’ it touches
you may damage the oven.
fimds
I can’t
butter icings.
wh
ippcd
toppings.
icc
Batters. doughs md
also
ditlicult
the probe.
ti)r
to
It’s
these
my probe in the
the
oven
wall.
13
——
—.—.—.
Page 14

Surface Cooking
Automatic Ignition
Your surface burners
by electric ignition, eliminating
need for
constantly burning flames.
In case of a power outage,
I
ight the
range
match
knob to the LITE position. Use
extreme
burners this way.
Surface burners in use when
electrical power failure occurs will
continue to operate normally.
stunciing
surface burners on your
with a match. Hold a 1
to the burner, then turn the
caution
are
lighted
pilot lights with
you
ighted
when 1
ighting
an
the
can
Surface Burner Controls
Knobs that turn the surface burners
on and off tire located on the lower
control
which burners they control.
punel and
are marked as to
To Light a Surface Burner
Push the control knob in
it to LITE.
c1 icking
electric spark igniting the burner.
After the burner ignites, turn the
knob to
Y(JLI
will hear a
noise-the sound of’ the
adjust
the
flame
and
size.
turn
Iittlc
●
Check to bc sure the burner you
turned on is the one you want to use.
● Do not operate
cxtendeci
cookware
on the grate
cookware to absorb the heat.
● Be sure the burners
cool
potholder, cleaning cloths or other
materials on them.
period of time without
on the
bcfbre you
a
burner
grate. The finish
may
chip without
and
grates
place your hand,
for an
~ire
a
How to Select Flame Size
The flame size on a
should
are
I
NEVER LET THE FLAME
EXTEND UP THE SIDES OF
THE COOKWARE. Any
Iargcr
cookware is
to heat the handles.
When using aluminum or
aluminum-clad stainless steel
pots and pans,
the circle it
smal]cr
cookware.
When boiling,
size—1/2 inch
bottom of’ the cookware-no matter
what the cookware is made of. Foods
cook just as quickly at a gentle boil
as
A high boil creates steam
away moisture,
Avoid it except for the few cooking
processes which need a vigorous boil.
When frying or warming foods
in stainless steel, cast iron or
enamelware,
lower—to about 1/2 the diameter
of
When frying in glass or ceramic
cookware,
match
using.
than the bottom of
wasted and
makes
than the bottom of the
they do at a furious rolling boil.
the pan.
lower the
gus
burner
the cookware you
flame
the
only serves
adjust
the
flame
is about 1/2 inch
usc this same flame
srnallcr
keep the
than the
flavor and
flame
flame
and
cooks
nutrition.
down
even more.
I
so
Cooktop Light
A full-width fluorescent light in
backsplash illuminates the
Press
and
momentarily
SURFACE LIGHT switch
upper
control
light on
panel
und oft.
hold the
to turn
the
cooktop.
under the
the
Top-of-Range Cookware
Aluminum:
cookware is recommended because it
heats quickly and evenly. Most
brown evenly in an aluminum skillet.
Minerals in
but will not harm aluminum. A
quick scour with a
pad
aflcr each use keeps aluminum
cookware looking shiny
saucepans with tight-fitting 1 ids
cooking with minimum
of water.
Cast Iron: If heated slowly, mmt
skillets
Enamelware:
conditions, the
cookware
manuiticturer’s recorlllllcndati(Jns
for
cooking methods.
(jlass: There
cookware-those for oven usc only
and those
(saucepans, coffee
Glass conducts heat very slowly.
Heatproof Glass Ceramic:
be used
cooking. It conducts heat very
slowly and cools very slowly.
Check cookware manufacturer’s
directions to bc sure it
on
gas
ranges.
Stainless Steel:
has poor heating properties,
usually combined with copper,
aluminum or other metals for
improved heat distribution.
Combination metal skillets usually
work satisfactorily
used with medium heat as the
manufacturer recommends.
Mediunl-weight
tixxis
food and
wil
I give satisfactory results.
may melt. Follow cookware
for
top-of-range
for
either surface or
water will
soap-f’illcd w(ml
new. Use
amounts
Under some
enamel
of
some
arc
two types of
c(x)k
and
teapots).
can be
This metal alone
if they arc
stain
glass
i
Can
(wcn
USCd
and
for
ng
is
14
Page 15

Using Your Oven
Automatic Ignition
The oven burner and broil
burner on vour range are lighted
by
electric
broiler cannot be operated in the
event
‘Ii)
light the burners, turn
OVEN TE3M
kmlpcratL]rc.
ignltc
CAUTION: DO NOT MAKE ANY
ATTEMET
ELECTRIC IGNITION OVEN
DURING AN ELECTRICAL
POWER FAILURE. Resumption
of’ electrical power when OVEN
TEMP control is in any position
t)ther
automat
broiler
severe burns if,
were attempting to light the burner
with
An
oven
electrical
continue
ignition.
of a power
P
within 60 seconds,
than OFF w il I result in
a
match.
The
TO OPERATE THE
ic
ignition of the oven or
burner
burner in use when
power
to
operate normally.
The oven and
f’ailure.
knob
to
the
desired
burner
and could cause
at the
failure occurs will
should
time, you
the
an
Before Using Your Oven
1.
Look at the controls. Bc sure
you understand how to set them
properly.
2. Check the inside of the oven.
Look
at
the shelves. Practice
rcmoving and
while the oven is coo].
3.
Read the information
on
the following pages.
replacing them
and
tips
Oven Temperature Control
The OVEN TEMP control is
located to the right of the
Microwave
The
OVEN
maintains the temperature you
set for normal
WCII us
For normal oven operation,
the knob to the desired temperature
which is marked in 25° increments.
It will normally
seconds
After the oven reaches
temperature, the oven burner cycles
—off completely, then cm with
full
tlanle—to
temperature controlled.
Tbuch
TEMP control
oven
for broiling.
tuke 30
before
the flame comes on.
keep the oven
Control panel.
operation
to
60
the
selected
as
turn
a
Oven Light
The light comes on automatically
when the oven door is opened. Use
the switch under the upper control
panel to turn the light
when the door is closed.
on
and off
Oven Shelves
The shelves
stop-locks so when
on the shelf supports, they will stop
bcf(~re
the
oven
are removing food from them or
placing fired on them.
When placing cookware on
pull the shelf out to the “stop”
position. Place the cookware on
the shelf, then
into the oven. This will eliminate
reaching into the hot oven.
To remove
pull it out to the stop position, lift
up on front and pull out.
are desigmxl
coming completely out
and
will not tilt when you
s]
ide the shelf back
a
shelf from the oven,
placed
with
correctly
a
of
shelf’,
Shelf Positions
The oven has five shelf
A (bottom), B, C, D and E (top). Shelf
positions for cooking are suggested
on Baking and Roasting pages.
supports-
4. Keep this book handy where you
can refer to it—especially during
the first few weeks of getting
acquainted with your oven.
Page 16

Automatic Oven Timer and Clock
Oven Vent
Your
oven is
at
the rear 01’
9). DO
c(mking
th:it
the flow of hot air km
and I’rcsh
uninterrupted. Avoid
vent openings or nearby
during oven or broiler
they lll~y
●
Vent openings and nearby
surfaces may become hot. Do not
touch them.
●
Handles of pots and pans on the
cooktop may become hot if left
too close to
vented
through
the cooktop (SCC ptigc
not block
in
these
ducts
the
oven-it is important
air to the oven burner
touch ing
surfaces
opcration-
bcxwmc
hot.
the vent.
ducts
when
the
oven
the
be
Clock
To
set the
knob of the Minute Timer
the
knob in either direction to set
the digitul clock
CIock,
push in the
numerals to the
ccntcr
and
correct time. (After setting the
c-lock, let
M inutc Timer pointer
the
knob out
and
to
OFF. )
turn the
Minute Timer
The Minute Timer is the
to the left of
it to
time all
operations, The
the
digittil
your precise cooking
Minute Timer knob
also changes the digital clock.
To
set the Minute Timer,
center knob clockwise,
pushi}?,~ it?,
retiches the
you want
until the pointer
number of minutes
to
time (up to 60).
Iargc dial
clock.
turn
)t’irhouf
turn
CJSC
the
3.
Set the STOP control, Push in
and
turn
the
STOP
you
wtint
the
Note: There must be
hour
dit’lkmncc
and
STOP
dials for’ the uutomat ic
knob to
oven to
turn
tit
least a
the
itself’ (if.
between the START
control to work.
4. Set the OVEN SET
knob to
AUTOMATIC.
time
hall;
●
Do
not leave plastic items on
the
cooktop-they may melt
left
too close to
the vent.
Oven Moisture
As your
temperature
in the oven may
droplets to
glass. Tb
oven door
of oven
air
oven heats
form on
prcwmt
for
heat-up to let
out.
up,
change of
cause water
the
this, open
the first m inutc
the
the
the
air
door
moist
if’
the
At the end
of’
the set time,
a
buzzer sounds to tell you time is
up. Turn the knob,
ill, until the pointer reaches OFF
and
the buzzer stops.
}t’ith(n~t
pushitlg
Automatic Oven Timer
(for
lower
oven only)
This Timer will automatically
and
stop your lower oven
Here’s
what you
1.
Make sure both your range clock
and
the START dial show the correct
do:
time of day.
2. Set the START control. Push in
and turn the START knob to the time
you want the
oven to
turn itself on.
(If you want it to start operating
immediately,
do
not set the Start
time. )
16
for
start
you.
5. Set the OVEN TEMP knob to
the
desired oven temperature.
The oven will turn itself on
irnmcdiatcly
time that you set
START control, operate
temperature you selected
or at a later START
if
you
SC(
the
at the
and
turn itself’ off at the STOP time
YOU
have set.
After oven operation is completed,
be sure
knob
knob
where it should be
oven
to
turn the OVEN TEMP
to
OFF and the OVEN SET
to
the MANUAL setting
kept for nornud
Use.
Page 17

Baking
How to Set Your Range
for Baking
2.
Close
own
door.
Turn OVEN
TEM P knob to desired tcmpcrtiturc.
Preheat
ii’ preheat
3.
(JI’ shcl
bet
wal
11’
same time,
inches
ttlclll.
4.
minimum
longer
heat and
Place
f. A
fwcn h~r
tixxl
at
least
ing
is necessary.
in
oven
IIOW tit
least 2
15 minutes
on
ccntcr
inches
ween cd,gc of bakewtire and oven
I or ad
jaccnt
c(x)king
cookware.
on two shelves at
the
place shelves atx)u( 4
apart and
Check
lid
stagger iimd
for doneness
time
on
recipe.
on
at
Cook
if’ ntxmsury. Switch off
rcmovc fbod.
Preheating
Preheat
using temperatures below
and when baking
biscuits. cookies,
p:ist rics.
P1-chc[ltlllg
roasting or
whole
ing is very important when
225°F.
hods
such
as
is
for
lllGll S.
cakts and
not
ncccssary when
long-time cooking of’
other
Shelf Positions
Most
baking
is done on the second
shclt’
position (B) from the bottom.
When
baking
usc
two shelves positioned on the
second and [burth
(B
&
D)
Bake tmgcl food cakes
position
three
or
fbur itcms,
sets of supports
from
bottom ofmwn.
on
first shelf
(A) from bottom of oven.
Baking Tips
●
Follow a
measure the ingredients
If’ you
Ii)llow label
tested rcc
ipe
and
cw-cfull
are
using a package mix.
directions.
y.
●
If’
moisture is noticeable on the
front
of the oven or on
the black glass
door when first turning on the oven,
Ieove
the oven
door ajur f~n- a
few
minutes or until the oven is warm.
●
Do not open the
a baking operation-heat will
and the
baking time might
bc extended.
oven door
during
be
lost
need t{)
This coLIld cause poor”
baking results. If you must open the
door,
open it
inches—and
parlially—only 3
CIOSC
it as quickly
or 4
as
possible.
●
Do
not disturb the
in
the
oven with the usc of aluminum
foil. Iffoil
sheet
the
most, on a lower shelf several
of it,
is
about
inches below
fi)il
on the
(wen bot[om.
heat c irculat
used,
place u small
10 by 12 inches
the fbod. Do
not
ion
at
pltice
Common Baking Problems
and Possible Solutions
PIES
Burning around
●
Oven too full; avoid overcrowding.
●
Edges
of crust
. Incorrect
Bottom crust soggy and unbaked
s Allow
crust and/or filling to
sufficiently before filling pic shell.
●
Filling may be
●
F’illing
allowed to stand in pie
before baking.
buke
immediately.)
●
Ingredients and proper measuring
affect the quality of the crust. Use a
tested
recipe
Make
sure there arc no tiny holes or
tears in a bottom crust. “Patching”
a pie crust
could cause
Pie filling runs over
●
Top and bottom crust not
sealed together.
●
Edges of pic crust not built up
high enough.
●
Tbo
much filling.
●
Check size
Pastry is tough; crust not flaky
c Too
much handling.
. Fat
too
soft or cut in
Roll dough
little
lightly and
as possible.
too
baking
(Fill
and
ofpie
edges
thin.
temperature.
too
thin or juicy.
pie shells and
good
technique.
soaking.
plate.
too fine.
handle
COOI
shell
well
as
CAKES
Cake rises higher on one side
.
Batter spread unevenly in pan.
●
Oven shelves not level.
●
Using warped pans.
● Incorrect pans
im.
Cakes cracking on top
●
Oven temperature
●
Batter
too
thick, follow
too
high.
rccipc
or exact package directions.
●
Check for proper
●
Check
pan size called
●
Improper m i x ing ofcake.
Cake
falls
●
Too
much shortening, sugar or
she] f’
position.
[br
in recipe.
liquid.
●
Check Icavming agent, baking
powder
or baking soda to assure
freshness. Make a habit
expiration dates of
to note
puck[iged
in,gredicnts.
●
Cake not baked
:it
incorrect temperature.
●
If adding oi I to a
certain the
long enough
c[ike
oil
is the type
mix,
and
or
make
amount specified.
Crust is hard
●
Check temperatu
●
Check
shelf’
r-e.
position
Cake has soggy layer or streaks
at bottom
●
Underm ix ing ingredients.
●
Shortening
too
soft
for
proper
creaming.
●
Too
much liquicf.
COOKIES & BISCUITS
Doughy center; heavy crust on
surface
●
Check temperature.
●
Check she] f position.
●
Follow
baking instructions
carefully as given in reliable recipe
or cm convenience
. Flat cookie sheets will give
even baking results. Don’t overcrowd
foods on ii baking sheet.
●
Convenience
their expiration date.
Browning more noticeable on
one side
.
Oven door not closed properly.
check gasket seal.
●
Check shelf position.
food
foods
package.
used
more
beyond
17
—-
Page 18

Baking Guide
1. Preheating is very important
when using temperatures
225°F’.
and when baking foods
such
as
biscuits, cookies,
and other pastries.
fncn [i)r :i[ Iemt IS
Pr-chcuting
is
r(mst ing or- li)r
of”
whole rucals.
pi~fjd
IIrc:]d
1;1..(111s
( ‘!
Ill.
(Inch) Shit)! (“(x)hic Sheet B.
(’(II
Icc cahc
(’11!11
brc:d
(
iingcrhtc.d
hlul’lins
Pop(wrs
Qui ’.h lcM1’ l>rc:Id
}’c:lsl Ill-cod [2 l(lo\’c\)
Pl:iin rolls
Sv.
ccl
(’ilkc%
wi(ht)ul
(
Angci
.rCll}
Sp(mgc
(’akcs
1]111111( L:lkCs
(’upc:lkcs
I;rtli[c:lhc,
I
.tly L.1
r
.2i)cr. C+{
1.();11’
{“ookies
Bl~wnics
r)l(lp
Rcl’lri:cr:ltol
k)llcd
F’ruits,
other
B;lkcd
(’us(:ircl
Puddings. rice
ond cust:ird
Pies
F’ltvcn R)il
Meringue
[)nc crusl
rWr(l ~IuN
Pas(ry
Misceliauwus
Baked p(w(m
$cIII{)PccI
S(lut’flcs
{)1 t])ul’1’ins
rolls
sh{>l-ltning)
Iixd
roll Mcl:ll Jell} Roll
XIIILIIC
{)1 s]
icccl
Desserts
apples Glass (w Mctd Pans
shell
dishes
Preheat
minutes,
not ncccsstiry when
long-t
inlc
below.
cakes
the
c()()~ i
ng
(’t){kwnrc. Pmirions
ShIII! hfc{d
w(lt]-t ’inish IM)I1(IIII
(:IM
Shin>
x![it]-t”inish
Shin>
I)ccp (i
MCMI or (;1:1ss [.041” l’:ln\
Mckd ~)1 (;]:lSS
Shiny.
Shiny,
Alu]]]inul]l ‘[’uhc [Jan
Mc(:il
MCUII t>r
Shin! MWII
Metal 01-
rllk Poll
Shin) Mc(;
w[iml ’inish btll(lni
Shin>
wtimt”inish
Metal or Glass
MC(LI1
C’(101.ic
(’t)~lkic
C’ot}kic Sheet
Glass
Caswrt)lc (set in pm
Gluss C’ustard
Camcrolc
Spread I(I
Glass
Glass tlr Satimt”inish
Glass m
Set {m Own Shelf’ A, B,
Glass
Glass Pan
Pim
rl-till 01
(;ki~~ P:lrl B
Mc(; II
rzltl w
ht~(({ln]
Metal
Mul’1’in l~:(n~
I:lSS ~11- C:IM
ohltIng {II Mu
ohlt)ng or
t)r ~-cr:]l]]ic
(’cr:l[)]ic
Mu[’1’in
(il:Iss
II
PLIII with
MWII
P:in
bt)ttt~n]
or (ilass
Sheet
Shccl
CusLLrd Cups
C’Lips
Pan (m C’tx)kic Shcc[
crusl
or Satin-finish Mct:Il
Satin-t’inish
or Metal
2.
Aluminunl
quickly. For
bilking,
hcst
prevent over-browning.”
light. shiny
results because
browning results,
dLIll
bottom surfaces fi~r cake ptins
:inci pic pldtcs.
u
ith
ill]
rloll
(
w
r.():lt P:LII~ ,A.
I’I’111
I) ZItI\
Mull
in
P:IIIS
rwl
P: III
Pun
Pans
L(uIt’ (11-
with
LtM1’ P;IIIS
Pans
or
of” hot WIICI)
or
edges
P~in
MWII
P~in
Mctd
Pm
Pan
pans
conduct
most cwnvcntional
tinishcs
they
WC rccotnnwnd
Shelr
(’
B,
:1
1)
.A [)
H
B
B
A B
B. A
A
II
A
A.
B
A.
H
11
II
r~. c
B.
(“
B. c’
B. [’
A, n, [’
B
B
A
B
A,
B
B
Lr
A, B,
B
B
11
C“
C’
‘Ik,[lll)cl.:itllrc.s
heat
give
help
For best
()\l!Il
400’”
-475’
350” -400”
400’” .450
350
400’’425’”
375
350’’ -375”
375’ ’.425’
375” 425”
350 ‘-375
325’ -375”
375’’-400’”
3?5’’-350’”
.325’’-350
350’’.375’” 20-25
275’
-300’’”
350’’-375’”
350’’-375”
350’”
325”-350’”
350’’-400’’
400’’-425’”
375’’-400’’”
350’’-400’’
300( ’-350’’
325”
4000-425”” 45-70
325”-350”
4000-4250
4000-4250”
450”
3~50-4000°
325” -375”
300”-350’’
‘1’inlc.
Nlinut{,s
15.20
20 30
20 40
45 55
2030”
45-(,()
45 ()()
45-()()
10-25
20 30
30.55
1015
45
.(,()
45.(,5
2-4 1)1.s.
20-.35
25-30
40-60”
25-35
K)20
()- 12
7-12
30-60”
30-60”
50-90”
15-25
45-60
40-(,()
13-16
60-90”
30-60”
30-75
.3. D:irk or
gl:rss
non-shiny” t’inishcs. also
dn(j py
rx)cc!rdnl”” cookwrc,”
~cncl-:ll I y absorh heat which
result
in dry, crisp crusts. I&lucc
(wcn hc~lt 25°F.
dcsir-cd.
ti)ods cm k
cmt
i r-on cookware.”
(’OUIIIICIIIS
~.:l,,,,,.cl ,.,.l,.lY,.,.:,lC,I
nlinutc~
[’lLhL:l[ Cd\[ 111)11 1):111
[)
CC
I-L.:IW ithc>ut 3
01
hilhL :1[ ~~()’’t;.
350’’
l)ark IIICLII (II
llr(I\\
ning.
]“,11
(hill
1+}1
(hin
‘[
’W’(I piL’L’L’
r.illL.
p:lll M
[?ipct I
lJ\c 300’’1’.”
indiiidu:ll
I t“
Ixlh in: Iimt Id>cts USL
A.I\c~
Bar c{)okics I“r(llll tllix usc sumc [ill],.
lISC
Shell C’
25 ((1
500 F’. Ii)t- more
Wlucc
cus[arcl.
C(){A tmwl
tmsc
X() ((190
[.:lrgc pies
‘ri)
quickly hr(wn mclinguc
c, tcl
I I
CrLS(LIrd I“ill ings
longer time.
rncrcdw (imc Ii)r
if’ I
igh(cr
Rapid browning
xhicvd
lc~~
IIltlc.
1:. li}I 10 to [.$ l]linul~.s.
:I:Is,
I,ll]\. ShClf’ [) 111:1> hL (lSLCi
trt}lls, Shcl
p;lll ih
I(h Wild p:lpl.
incrs
ptnducc
:11)(1
c: Ikcs.
B
d
r).
:Ind
lcmpcralurc
01- rice pudding with
minub
usc .!()()”F. and increase
minu[c,
i.
by pr-chc~ltin:
lhi.~{li(> t:ikc ? t!) J
!ill
L’li.
[1
]Ilinutcs
1<~1
[ill ?f
1“ B n)+ hc uxcl.
C’(lll\L.IliCI)[.
SIIL’11’
inctcdw
requite I(mcr tclllpct-alur,.
Iargc ammrnt
Illtll’t in
[ll!I]UtCS. (hL.11 ;1(
git cs dL.cpL.\l
lll,llc ]ll~)is[
B
till \lll:lll (11
Iclllpcliltuw
hltwniny.
t{) 300’’}:.”
use 400’’1;.”
crusts
of
Llll\[.
cru.ls.
Ii)r
or si/c.
nlay)
arc
some
tlli\.
Iiitgc
CUS1:II-LI
linw.
Ii)r
18
Page 19

Roasting
Rtmstirtg
Tcncfcr nlcat or poultry can be
r[)astccl
Roasting
should be low
spattering to a minimum.
roasting. it is
bwte,
mc:tt.
these
Step 1.
scc(~nd from
ti}r sm:lll
at b(~ttonl
is cooking” by
uncovered in your oven.
tempertiturcs,
dry
which
and steady.
not ncccssary to scar,
cover,
or add
water t{)
Roasting is easy, just
Steps :
Position (wcn shelf’~it
bottom position (B)
size
roast (3 to
position ( A )
5
for larger
heat.
keep
When
your
ibllow
Ibs.
I“():ists.
) and
Step 2:
Place
breast-side-up on roasting
shallow
haste the
close to the size of
(Broiler p:m with rack is a go(xf
pan
Step
knob to
Check the Roasting Guicfc
tenlpcraturcs
cook”
Check
weight of’
meat
fat-side-up or poultry
pan.
The
melting
meat. Select a pan
meat as possible,
k)r
this. )
3:
Turn the OVEN TEMP
desired
i ng t
tcmpcra(urc.
dnd approx itnatc
inles.
roast.
rack
fat will
as
fi)r
in
Step 4:
cook SI ightly
a
being
rare or
you may wish
the
to
make
If’
Most meats continue
rcmovcd l-mm
meci
ium internal doneness,
oven
just
while standing
the oven.
to
remove
bef’m-c
it is done if it is
ufter
meat from
stand 10 to 20 minutes while
grwy
or attend to other kinds.
no
standing is planned.
cook
to
For
yoLI
meat to suggested temperature.
Frozen Roasts
Frozen masts of’
Iumb,
etc..
thawing, but allow 15 to 25 minutes
pcr
pound additionu]
minutes per pound
5 pounds, more
r(msts).
Thaw
nl(~st f’rozcn
roast ing to
ensure even doneness.
Some commercial
can bc cooked
thawinx. Follow
on
pac~cr’s
beef,
pork,
can
be started without
time (I5
for roasts
time for Iargcr
poultry bet’orc
frozen
poultry
successfully without
directions given
label.
under
Roasting Guide
‘r}
pc
(hen
‘lkmpcraturc
I)onc’nws
U: Ii-L:
Nlcdiut]l:
Wll
I)(lnc:
RiIIc:
Mcdiul]l:
Well
[)
OIIL”
Well Done:
Well
[h)nc:
‘Ii)
W:lrnll:
well IX]nc:
Well
lh)nc:
Wcil
[l)nc:
Well
l)~)nc:
,ipproximatt l-hasting Time
in
}linutm
per l)ound
3
to
5-11)s.
~.~.jo
~().j~
35.45
2
I-25
25.30
30-35
35-45
35-45
18-?3
n]inu[cs pet- Ih. (011) wci~ht )
[ndcr
1011)s. 10 to 15-lhs.
27-35
3 to
S-ll)s.
35-40
30-35
10 to
I$lt)s.
I
6-22
6
to
I
8-22
‘l?.
--
2X-3.?
20-23
24-2X
2X-33
30-40”
30-40”
24-27
owr
30-35
owr
13-19
X-lhs.
?y
-.
5
Ibs.
1511)s.
Intcrml
Ikmpcraturc
1 30”-
I.$()”
I 5(1”- 160
‘
I 700-1 X5”
I
30”-
140’”
1
50”- I (,()”
170 ‘- I 85”
I 70”- I
X()’
I
70”- I X()”
I 1
5“- 1
25”
I
70’”
I X5”-
190(
185”-
190’”
III thigh:
I X5”- I 90°
“b’
19
——.. .— —— —... ._
Page 20

Broiling
Broiling is cooking
hetit from above the t(md.
range
has u
convenient compartment
below the
oven li)r
fbod
by
direct
Your
broiling. It
also
has a specially designed broiler pan
and ruck
drain away from
kept
that
allow
the kmis
uway from the
dripping
fat to
and bc
high heat of’
the gas flame.
Distance
bc
changed by positioning
pan
positions
A (bottom of’ broiler
B
(middle)
from
and rack
on
in the broiler
and
the
heat source may
one
of
three
compartment-
compitrtmcnt),
C (top).
the
broiler
shelf’
Both the oven and broiler
compartment doors should be
closed during broiling.
How to Broil
1. If
meat
has fit or gristle near the
edge,
cut vertical slashes through
both
about
2 inches apart, but don’t
cut into meat. Wc recommend that
you trim fat
smoking, leaving a layer about
l/8-inch thick.
2.
Rcmove
from broiler compartment
place
3. Pull out
broiler pan in
fi)Od
closer to flame increases exterior
browning
spattering
tind
meat
4. Close broiler
foods,
BROIL. Note: Chicken and ham
are bmilcd at a
order
ovcrbrowning
5. Turn most
cooking; (the exception is thin fillets
of fish; oil one side, place that side
down on broiler rack and cook without
turning until done). Time
about
one-half’ the
time, turn
cook to
6.
Turn OVEN TEMP knob
OFF.
compartment
immediately. Leave pan outside
compartment to cool.
to
prevent
broiler
exccssivc
pun and rack
and
food
on
rack.
drawer and
compartrncnt.
of food,”
and
the possibility of fits
juices
igniting.
position
Placing
but also increases
door
and,
for
turn OVEN TEMP knob
lower setting in
to cook food
through without
it.
foods
once during
foods fbr
total
cooking
fbod,
then continue
preferred doneness.
[o
Rcmove
broiler pan from
and
serve
food
most
to
to
Broiling Tips
●
LJse
tongs to turn meat
piercd
k’()()d
nacon
(;rnund
Well
tk’d’slcaks
fcllc
Mcdiunl
Well
K:irc
Mcdiul]l
Wtll
(’hicken 1450)
l,ohstcr
(6 (()
k’ish
lhrm
Prccc)clkd
Pork chops
Wll
lamh
blcdiunl
Well l)t)nc
Mdiunl
Well
lx)nc
lh)nc
I)onc
X-(l/..
slices
Ix)nc
chops
IX)nc
meat
11A’
tails
LWll)
(450<’)
loses
“? 11>.
Ihln \l
Ilh. (4 [MIIL,
‘? l{) ‘/a in.
l-in.
( 1- I
1 ‘Y-ill.
(2-2 ‘/2 Ills. )
?-4
I
‘X
I-III. (hick
2
(
2 ( l-itl.
ahou[
I
juices.
(iihou( x
ices)
S)
thiuh
lllick
‘Y? Ihs.
)
thick
-Ih. I“illc(s Ii [(1
-in. (hick
‘i
in.
J
thlch).
1
lh.
Ih. pkg.
( lo)
20
over-
Position
Brnil
II
B
B,
c’
● Steaks and chops should be
least 1 inch thick
Pan broil thinner
results.
!nd
1s1
Side
‘1’inw,
,Iinutv
31,,
~)
10
1)
10
I 3
10
1.$
25
30-35
L?
3.5
5
x
10
13
8
10
10
17
.Sidt
‘1’imc,
Ilinutw
3
78
7
5.(,
8.()
()-7
12-1-1
I (V
1 x
25-30
1)() mll
lurn
~)kcr.
x
4-5
().1?
J-7
10
4-6
1?- 14
chmnlents
Sp:icc LYcnl>. Llp
l:ikc :Ih[lul \illllL, [1[1 IL,.
StciIks Icss
(hltn!gh hctilrc hnm
Pun I’t-ying
Slilhtl I:lt
Incrcxe
Ii)r 1 ‘Y-ire
Slxsh
Sl:lsh I’:11
It’dcsitml. \plil samwgcs
Icnglhwisc: (uI
picccs.
[hilt]
is rccoln[ncndcd
Iilnes 5-I()
ttlick t)]-
fill.
for
best broiling
ones.
1( I x
[MIIL’,
I.ir. c~)ok
nin:.
nlirl. WI
Il{mlc
in 11:111
]ntc) 5 ([) 6
at
side
Lrltcd
in.
Page 21

Care and Cleaning
Proper care and
inlpc~rtant so
will
give
s:it isi~ctory
directions carefully in
to
help
assure s:itic
cleaning
tire
your Cooking Center
you
cfficicnt and
service. Follow these
caring
and
proper
k}r
it
mtiintcnancc.
Bt+)re cleaning
r:mgc,
DISCONNECT ELECTRIC
POWER
fLIsc
box or circuit breaker panel,
or
pull
the power cord
any
part
of’ your
TO THE RANGE at
plug from
the
the electric outlet.
oven
Lamp
To replace a burned-out bulb:
1. Disconnect the venting on the
h~xd if ncccssary.
2. Pull
.3. Move
out and
unplug the
the
Cooking Center
cordsct.
trom
the wall to gain access to the back
t)l” the uppl
%
Remove the top
loosen
Limp access panel
i:ince.
screw :ind
the bottom screw of the
which is
Iocuted
on the upper left corner on the back
ot’
the Cooking Center.
5.
Replace
the burned-out bulb
with an appliance bulb of the same
size and
wattage.
After replacing a burned-out bulb,
refasten the
in the
oven ON button
new’
bulb works. Then reposition the
Cooking Center against the wall
rccxmncct
access panel
and
plug
cordsct. Push the microwave
to
make sure the
and
the vent
hood
if necessary.
Precautions for Use
of Metal
Use metal only as directed in the
cookbook. Metal trays
than 3/4”
dinners,
deep
may bc used
and
the metal temperature
probe is designed
oven
USC
. Always keep
~~nc
inch
away
from sides of oven.
no
more
hr
microwave
metal at least
tbr
Temperature Probe
The
probe
is sturdy, but
carefully.
Clean
Do
not twist or drop it.
it m soon us possible after
use. The entire probe
washed
can
with
in
wtirm,
soapy water. You
rub metal parts with a plastic
scouring
clean
pad
if necessary.
water
and dry
cloth or paper towel. You
wtish
the probe in the top rack
handle
can be
Rinse
with a soft
can
also
it
of’ a
dishwasher.
Cleaning—Outside
Clean
the outside of your
microwave oven with soap
damp cloth.
cloth
clean
then rinse with a
and
dry. Wipe the window
with a damp cloth. Chrome is
best wiped with a damp cloth
then with a dry towel.
and
damp
and
TV
Cleaning—Inside
Keep your microwave oven clean
and sweet-smelling.
oven
door a few minutes after
cooking helps air out the interior.
An occasional thorough wiping
with
a
solution
water keeps
the
Spills and spatters
to
remove from walls and floor.
That’s because there’s little
except
in the
food,
the utensil. Some spatters wipe up
with
a
paper towel, some may
require
greasy
then rinse
a
damp cloth. Remove
spatters with a sudsy cloth,
and
dry.
NEVER USE A COMMERCIAL
OVEN CLEANER ON ANY
OF YOUR MICROWAVE OVEN.
Wipe up spatters on the window
on the inside of the door daily.
Wash window, when it’s soiled,
with
a
minimum of sudsy, warm
water. Rinse thoroughly
Wipe metal and plastic parts on
the inside of the door frequently.
Usc a damp cloth to remove
soil.
DO NOT USE ABRASIVES,
such as cleaning powders or steel
and
plastic pads. They may mar
the
surt’acc.
Ghiss
Cooking Tray.
it is necessary to remove the
tray. To prevent breakage, do not
trtiy
into water just after cooking.
Wash it carefully in warm, sudsy
water or in the dishwasher. The tray
can
be broken if dropped.
Rcmcmbcr, do not operate the oven
without the cooking tray in
Door Surfkce.
surfaces of door and oven that
come together on closing the door,
usc only mild, nonabrasive
or detergents applied with a sponge
or soft cloth.
Opening the
of’ baking
interior
are
soda
f’resh.
easy
hetit
or sometimes in
and
dry.
all
Occasionally
cxx~king
place.
When cleaning
sotips
and
Pm
place
———-
—. —
—
Page 22

Care and Cleaning
(contimted,
Special Care of the
Clmtinuous-Cleaning
Oven Interior
Y{mr
range has a ContinuousCleaning lower oven that cleans
itself while cooking.
the
oven-top, sides
Sinished
which
usual
steel
cleaners.
coarse
tind/or
with
a
cannot
be cleaned in the
rmmner
with
wool pads, commercial oven
coarse
brushes.
the usc of oven sprays will
cause permanent damage.
The special coating is a porous
ceramic material
color
and
ikclss]
touch. If magnified, the surface
would appear as peaks, valleys,
sub-surface
“tunnels:’
finish tends to prevent grease
spatters
from
forming I
or droplets which run down the
side
walls of a hard-surface
liner
leaving unsightly streaks that
require hand cleaning. Instead,
when spatter hits
it is dispersed
and
absorbed. This spreading
increases the exposure of oven
soil
to
heated air, and
somewhat less noticeable.
Soil may not disappear completely
and at
some time after extended
usage, stains may appear which
cannot be
removed.
The inside
and
back—is
.~pe~i~ll
coating
soap.
detergents,
abrasive pads or
Usc of
such cleansers
which is dark in
ightly
rough to the
This rough
ittle
beads
oven
the
porous finish
is partially
action
makes
it
of”
and
The special coating works best on
small amounts of’ spatter.
not work well with
especially sugars,
larger
egg or
It does
spills,
dairy
mixtures.
The special coating is not used
on oven shelves.
clcancd
damage
inside the
oi{[.~idc
to the special coating
oven.
Shel\m
the
should be
{)\rII to
avoid
To Clean the
Continuous-Cleaning
Oven:
1. Let range parts
handling. It is
rubber
cleaning
2.
3.
opcr-ating
the
knob
hours.
necessary
gloves be
range
RenNwc slwlvcs and
%il visibility
the oven at
door iind
to 4000F.
Rcpcotcd cycles
before
appearance is apparent.
REMENIBE:~:
OPERATION”
LX) OR, WI
RANGii SURFACES
ENOUGH
‘rouw.
BEFORE Rt3PI.ACING OVEN SHF;I.VF3.
NI)OW
T() CAUSE:
L!i’r
cool before
rec(~nlnlended
worn
that
when
parts.
cookware.
may bc reduced
400°F.
C1
turn OVEN TEMP
Tirnc
ti]r tit least
may
be
improvement in
DLJRING
O1; THF OV13N. THE
THE RANGki cooL”
THE
AN I)
OTHER
WILL
BURNS.
GET HOT
1)()
by
OSC
4
NOT
4.
lfa spillover
occurs on
soon as the
as
much
a small amount 01’
bristle nylon brush.
sparingly and
keeping it as
be
sure to blot it up with paper
towels,
ruh
01
set-ub
or heavy soiling
the
porous surface, as
(wcn
has cooled,
of’
the soil as possible using
rcnl(~~c
water and a stitl’
Use
water
change
it frequently,
clean as pc)ssiblc, and
cloths,
or sponges.
with
paper towels,
D(~ )lot
cloths or sponges, since they will
leave
unsightly lint on the
finish. If water
on
the
finish as it dries,
again and
sponge, starting at
ring
and working toward the ccn[ci-.
Do
not use soap, detergent,
/~/~jI
it with u
Ietives
the edge of the
(wen
a white
apply
clean
ring
water
steel
wool pads, commercial oven cleaner,
silicone oven sprays, coarse pads
or coarse brushes on the porous
surface.
clog.
und reduce
I)o
These
and mar
products will
the por~ws surikc
spo[.
its ability to work.
not scrape the porous surface
with a knife or spatula—they
could
pcrm:inently damage
it.
The oven bottom and the inside
of the oven door have a porcelain
enamel finish.
and the
bottom comes out
clcaning away from
The door Iil’ts ott’
for
the
continuous-
cleaning oven.
Page 23

,.
J
“o”
Control Panels
l)on’[
USC sh:trp-ccigcd
dI”(Md th~
m
igh[ d:il llagc
Clean
dmplmxl
[horougb” c]caning,
Anobs
(I]cnl
[JSE cleaning sprdys or I:trgc
:Illlounls
cdn
control”
~olmd
them.
[hc panels
Clottl Fol”
can hc
I“cnlowxl by pulling
()[’1’
the knob stcnls.
of”
soap
c:Iuw
p
roblcms
mcchitn isms. D() II()[
dbrasivc clc:inscrs. s[rong
L’lcdnct”s 01”
w i 11
CI:IIM:I:C
()\’cn
[hc f’i
outer Enamel Finish
When the
enamel
wd(cr (JI d In
appl id
the surface
d r) will] :1
(lcc:isional
tlli Id c’le:lni
[he I’in isb.
Tllcl”c dl”c a lllllllh~t’ 01”
j)ou can Like to :woid
surfjicc
it
l’rtml btxx)nl
hcdvy pans dcross
Ii)(xls
sduerkruut. f’ru
I(NKIS with
clean thcm
It’allowed to Set, these
C:ILISC
how stubborn
LISe
could
CIllmlel
r:ingc
l’in
ish W
i Id
w i[ h a
with
sol’1 clolb.
l)
:ipply ii [bin ctxi[ t)l”
ng W:IX to help
01” the
i ng
with :1
lot 01”
it j u ices, etc. )
high
up
a
dLl I ]
spot.
the t(xd
harsh
abrasive
pmmmmtly
SU1”
LILY.
abr:lsi vc Cl Can Se
damp c loll].
r-angc
tIs S(X)I1 as
utensils
PLIIKIs. ‘rh~~’
with :1
Und
Iiyh(lj
a
Illol”c
(he c(~ntrol
IX)
Will Cl”.
w i
(II [he
I iqu id
CIC:IIICI”S--
n i
sh.
is
c(x)l,
wash the
i(b
m i Id
s(KIp
clc:In wa(cr
1 f
you
prumrt
marring the
and
(()
dul
i.
Don’t SI ide
it.
1[’
yoLI
acid
(tomatoes,
sugur c~)rltent,
possible.
foods”
Aiso,
110 matter’
st;lin.
clctinscrs.
dumage the
NOT
Ttlcsc
LISC
the)’
and
-
I
Rinse
and
wish,
prolcct
i(lns
prevent
spill
t~r
could
never
They
Removable Oven Door
The (WCI1 door”
Iluikc the intcrit)r III(JI”C dcccssihlc
during
@Hl
I“CII1OVC (he IW()
rcpl;iccmcnt (J[’
(hC
h(~ld [hc d(K)r (() (he
Close the
position” (lit
:ind
I i
Ii
the hinges. (
()( imsu lat ion :IIKI the construc( ion
01” (I1c d(x)t-. il
is
rcnl(wablc to
the
Iwllp bulb.
()\’Cll dool’” t’Lll]y :llld
Phil I
ips
screws
hinges. Then
do(lt” to (IIc autt)nult ic s[~)p
a130LIl 3 inches
the
dt)t)r strdight
DLic to the
is
bcavy.
c)pcn).
Lip and
]ilrgc anl(~unl
)
th:it
01’1”
N(~tc:
Care
sh(mld bc takn nt~t to
place hands
binge
the hinge
pinch
‘ro
I“CplX’C lhC door,”
hinges
Position (I1c
between
und
t hc
(wcn
door
c(luld sndp buck :ind
I’in,gew.
Ill&!
arc
in
the “out’” positi(~n.
slots in the
tbc
[bc d(x)r squarcty (wcr the
Then
lower
the
do(~r slowly :Ind
mcn Iy
(WCI” both
time. It’
hinges snap
cwm I’r-:m]e,
lhc d~)or
is in
dnd insert (he two Phi
N()’rE: EX)
TO
REMOV1:
h
ingcs at
buck qminst
pull
thcrn bxk out. When
position,” open it fully
I 1 ips screws.
NOT
ATTEMPT
THE U
Pf)ER
ovIiiN mmR.
spring
i’rarnc us
SUI-C thC
bottom” of”
hinges.
the
s:irl]c
the
23
Page 24

Care and Cleaning
(continued)
Removable Oven Bottom
You
can rcrnove
t<)
clean
To
remove
1.
Rcmovc the oven
2.
Rcnl(nw the
clown screws Lit
If they arc too
hand. usc a
the oven bottom
any cxccssive spillovcrs.
the oven bottom:
shelves.
two knurled
the
r-car of the
tight to
remove
hold-
oven.
by
coin or screwdriver.
4. Then
To
the oven with the
6 to 8
the
lift
the bottom up
replace the bottom,
buck
inches or until you
front
of the
(wcn bottom
and
place
raised
can
under
out.
it in
about
insert
the hold-down lip at the front.
Then push the back
bottom down
metal
down screws.
tkmgcs
of
the
fully
into place on the
and
insert
the
oven
hold-
Oven Shelves
Oven shelves may bc cleaned with
mild abrasive cleanser following
nlanuthcturcr’s
cleaning, rinse the
clean
water
cloth. To
soil, soapy metal
and
remove
directions.
shcivcs
dry with a
After
with
clean
heavy, burned-on
pads may bc
following manufacturer’s directions.
Aflcr
scrubbing, wash with soapy
water, rinse
and
dry.
a
used
Broiler Pan & Rack
After
broiling,
rock
and
(7 rcasc. Wt~sh and
.%
rack in hot. soapy water.
It’
ikxl has
the bmilcr
detergent
towels or
k)ods
will then soak
the
rncal
is being served.
Do not
store a
and
rack in the oven.
rcmovc
carefully pour
the broiler
t)ft’ the
rinse the
burned on, sprinkle
rack
while hot with
and
cover with wet paper
a
dish cloth. Burned-on
IOOSC while
soiled
broiler
pun and
pan
3.
To lift
out the oven bottom,
place
your fingers in the slots in the
bottom
bottom up
bottom is
and
lift the rear of the
and back
clear
until the oven
ofthc lip at the front.
oven
Page 25

. .
Oven Light Bulb
The
light bulb is located in the
upper
left corner of the oven.
Before
replacing the bulb,
disconnect electric power to
range at
the main
fuse
or circuit
breaker panel or unplug the range
fr(~m
the electric outlet.
bulb cool completely before
rcmov ing
it. Do not touch a hot
bulb with a damp cloth
will break.
Replucc a
h
i,gh
the
burned-out bulb with
temperature appliance bulb of
sfimc
wattage.
Removing the oven door (see
23) will make it easier for you to
rcm(we
and replace the bulb.
the
Let
the
as
the bulb
a
page
Aluminum Foil in Ovens
DO NOT
foil in either your microwave
the bottom of the lower oven. If you
do, your foods may not cook
properly. The oven finish may be
damaged. And there may bean
increase in
surfaces of the oven.
place a
sheet of aluminum
heat on
the
outside
or
on
Lift-Up Cooktop
Clean the area under the cooktop
often. Built-up soil, especially
grease, may catch fire.
To make cleaning easier, the entire
cooktop may be lifted up and
supported by locking arms that
catch
and hold the top when it’s
the way
Be sure
up.
all
burners are turned off
before raising the cooktop.
remove the grates and drip pans,
grasp the front sides of the cooktop
and lift.
After cleaning under the cooktop
with hot, mild soapy water and a
clean cloth, put the cooktop back in
place. Lift up a little to release the
locking arms and push them in
while guiding the top back down.
Be careful not to pinch your
all
Then
tlngers.
25
—.
—
Page 26

Care and Cleaning
(continued,
Range Top Burners
The
hc)lcs
in the burners must
Iwpt clean at all times for
ign
it ion
and fin even,
flare.
Clean
the burners
especially
which
Burners I
Note: Two screws hold each burner
pair
in
wobb] ing
Rcmove tind
screws
out.
This c1
mounting bracket under
burner pair.
To
remove burned-on
the
burner in a solution of a product
used tbr
makers. Soak the burner
30
minutes. It’the
rinse
s(Mp and
cleanser
Do
not attempt to clean burners in
an automatic dishwasher. Loosened
timi soil
and
the caustic
dishwasher detergent
the burner heads.
Bcfbre
it thoroughly by setting it in a warm
oven
back in the
properly seated on the mounting
bracket and is level.
after had spillovers
coLIld
clog
ift out fbr cletining.
place to keep thcm from
around during shipment.
discard the shipping
and lift the
isengagcs
cleaning the inside of
off
completely, scrub it with
water or u mild abrasive
and a
damp
can clog
putting the burner back, dry
for 30 rminutcs.
range,
unhampered
routinely und
these
burners up
them
fbod,
fbocl
doesn’t
cloth,
burner holes,
tiction of
the
can
Then
making sure it is
proper
holes,
from the
euch
soak
for 20 to
damage
place
bc
and
cotfec
it
Burner Grates
Grates should bc
:md, of’ cx)u rsc, af’ter
Wash them in hot,
rinse with clean water. Dry the
gl”iit~s
with
back on the
‘Ii) get
rid
the
gra(es
in ii SI
liquid
cleitnscr.
Alth(mgh [hey-rc durub]c.
:rutcs
w i I I gradual Iy
sh inc, rcga rcilcss of the
yt)u can
their
tcmperuturcs.
I>L) n(~t c)pcrutc a
cxtcndcd pcri(ld
cookware on the
on
c(x)kwar-c to abs(~rh
When replacing
p:iir 01”
the
sides should
interlock i n
the
shown ut
give
cx)nt inual cxposu r-c to
the
gra(c
grates,
irregul:lr
middle
right.
washed
a
cloth-dc)n’t put thenl
rimgc
wet.
of” hurncd-on Iixxi, soak
ightly diluted
them.
burner
oft irnc w ithou(
grate.
may chip
a
as
+
regularly
spi 1
I(wcrs.
soapy wuter tind
the
1(MC
their
best
care
This is
the heat.
due to
high
Ii)r on
The finish
without
m
M
Drip Pans
I
I
Rcmow (hc gr:ttcs
chrome drip pans.
hot, soapy
clcun. hot
dry with u
abrasive clcancr or
they ’1 I scratch
soak
the
minutes in s]
cleanser or mild solution
amm(}n ia
ammonia to
A1’tcr s(xikin~, wash thcm
so:ipy
water.
and polish with
When
rcplticing
drip
pans. the
notch on the r-cur
pan and
on
should
the
the
micidlc. +
the
front
nwct
/-----’”
and
Wush them
water.
water
cloth.
dr”ip
and
Rinse [hem with
and pot
Never
steel
(I1c surl’act. lnste:id.
pans
ti)r about Z()
ightly
d i I
utcd i iquid
water-
(l/2 cup
onc gtillon ot” w:itcr).
LRinse
with
u clc)th.
notcb
pan
i n
Iiti out
the
in
ish them
usc
wool”--
t)t’
of”
in
hot.
clctin
water
Page 27

Cleaning Guide
Microwave
N(J(c:
oven cleaning instructions are on page 21.
Let
range
parts cool bcfbre
touching or handling.
27
.—. --- ..—— —-
Page 28

Minor Adjustments
You Can Make
Oven Door Height
Adjustment
Rcpcuted
can
itscl 1“ out 01’ ad,justmcnt. Onc
tntiy close
and
To
1.
2. With a
turn the screw in the opening at
the to~
clockwise
to rtiise
openings and closings
cause
the o~’en
door (o work
side
h
i,ghcr
than the other,
the
door may
not seal properly
adjust the height of the door:
Rcnl(we ttlc door”
thin-bladcd
of’ each door
to lower,
(See page 23).
screwdriver,
hin~e.
Turn
counterclockwise
each side of’ the door.
Oven Burner
Air Adjustment Shutter
The air
oven burner
air to
The shutter
nctir
behind the broiler drawer.
To
the oven bottom
burner
‘R)
burner,
screw and
allow
burner tube as
acljustmcn(
rcgul:ites
the
flame,
fi)r
the oven burner is
the
back wal
reach
the shutter, remove
battle.
adjust the
flow
Iooscn
the Phillips head
rotate
mm-c (m
ICSS
nccdcd.
Loosen screw
and rotate shutter
shutter
the
tlow of
I
ol’ the oven
(page 24) and
of air to the
the shutter
air into the
~
“
~
for the
the
to
3.
Replace the
check al
ignmcnt and door
door, C1OSC
it,
seal.
and
To determine if the burner flame
is proper,
flame should have 1/2”
light the burner. The
to
3/4”
blue
cones with no yellow tipping. When
the
bafllc
flame
will resettle.
is back in
‘)8
pkwc,
the
.—.—.
.- . . .—
.——.——.
Page 29

Oven Thermostat
Adjustment
The tcmpcruture
new oven h:is
to pr(widc uccurutc
Howmcr, it’ this
(lnc ytju have
you nmy
notice u
dcgrcc L)I’ brc)wning or
t
imc
required when using
I’moritc
controls”
(wet. a period of
this dri Ii is very gradLlul, it is not
I“C:IC1
may Ilw’c
your previous
rccipcs.
i Iy noticed.
control in
been m-dully
temperatures.
(wcn has repl:iccd
used
li~r several years,
dit’tkrencc
the length
oven temperature
h:ivc a
tendency
ycurs
to “dri
und
Thcrcti~rc,
IIXX)I1lC XYustonlcd
oven
which
your
udjustcd
in
the
y(mr
since
you
to
may
ol’
II”
hmc pr(widcd a higher or It)wcr
tClllpCI”:ltLII-C
Beli)rc
ICmpcl”atllrc
changed,
the
baking
(Iw rccipc ciircfully.
yoLI
tlilvc Llscd
:ind
yoLI
or
too” cool”, there is
than
yoU
SC] L!
attempting to have
01” youl”
he
SLI
t
imc and tcmpcratum 01’
new (Wcn
rc yoLI have lb] [owed
Then,
the
(NC1l a ftiw
Itc [
the oven is too” hot
ii
simple
CtLXi.
the
tlf’tcr
t
inlcs
adj Ustnlcnt you can make youI”scl 1“
on
the OVEN TEMP
pL1]l the knob (Jff
and I(x)k
a
disc
at the
in
the
center of the knob skirt
with :i series of
knob.
the
control shaft
back
side. There is
m:irks opposite” a
pointer.
,SL
L
%eo
,*P
\
Loosen only the
locking screws
Note to which
pointing. T() make an
carefully
t)nc
turn), hut do
1“C1110V12
the
skirt
k) the knc~b. Hold
blade
in
skirt in
T()
raise the
nl(wc
the pointer in
the wow ibr
tcmpcraturc. move
the direction of arrow Ii)r
Each
mark will
temperature
We
suggest
adjustment
origin:Li
pcrlimnance
mark
the pointer is
adjustment,
Iooscn
(approximately
not completely
two
SC1-CWS
that hold the
one
hand
und the outer
the
other
h:ind.
(wcn tcmpcraturc,
the d ircction o(’
RAISE. To
the
change
tipproximtitcly 200F.
thut
YOU
nl:ike the
one
mark from
sctt
ing and
check
before muking :iny
the knob
Iowcr
pointer in
LOWER.
the
oven
:tdditi{~nal adjustnlcnts.
Atter the
press
ret
but be
ud,justmcnt
skirt
~nd knob
igbtcn sc rcws M)
caret”ul
not to
is
nmdc,
t(ycthcr
they
art
(wcrtighten.
Re-install km)b on r:mgc und
check
performance.
Note:
Attcr an
been made to the l(~wer
TEMP
knob,
positions
indicator mark 011
M they prcv i(wsly
condition is
crcatt a
adjustment has
the OFF
will
nt~t line u~
m)rnml und
problcnl.
OVEN
and
with
the
control
did. This
will
BROIL
the
oven
the
and
snug,
the
panel
not
~,.?
&
P
I
Nole
position of
to marks
pointer
before adjustment
Page 30

:~:
Que,~iom?
~’~>”
—.
Use This Problem Solver
.
PROBI,MVl
CONTROL PANEL
LIGHTED, YET OVEN
WILL NOT START
FOODS ARE EITHER
OVERCOOKED OR
UNDERCOOKED
POSSIBLK CAUSE
s
Door not securely closed.
●
ON button must be pressed
●
Temperature probe not inserted properly during Temp
●
START must be touched after
●
Another selection entered
●
Make sure you
●
Clear was touched accidentally. Reset cooking
●
Cooking times
of
hods
in oven. Enter additional cooking time
●
Incorrect power level entered. Check cookbook ibr recommended power
changing levels during
●
Dish was not rotated, turned or stirred. Some dishes requ i rc spcc i
Check cookbook or recipe
AND
REMEDY
before
oven
can
be programmed.
entcri ng
already
have
entered cooking time or temperature.
cooking selection.
in oven
and
CLEAR not touched to cancel it.
program and
may
vary because of starting food temperature.
for complet
cook ing if
necessary.
for
these instructions.
Cook
functions.
touch START.
food
ion.
density
fic
instruct
(Jr amount
level
or
ic~ns.
All these things are normal
with your microwave oven:
●
Steam or vapor escaping from
around the door.
●
Light reflection around door or
outer case.
TOP BURNERS DO
NOT LIGHT
I
I
●
Too
many dishes in oven at
more
than
one
food
item. Check cookbook
●
Dimming oven I ight and change
in blower sound may occur while
operating at power levels other
than
hitzh.
c
Dull thumping sound while oven
stime
time. Cooking time must be
for rec(>r]l[l~end:ition
incrc:iscd
on increasing
c %me
TV-Radio interference
might
bc
noticed while using your
when
cx~oking
tinw.
microwave oven. It’s similar to the
interference caused by other
appliances and does not indicate a
problem with your oven.
is operating.
●
Make sure electrical plug is plugged into a live, properly grounded power outlet.
●
Burner holes on side of burner may be clogged. Remove and clean thcm.
●
Burners not fitted correctly onto mounting brackets.
Remove
and reinstall burners
properly.
smtill
I
..... _—.——
30
—.— ——
Page 31

I
PROBLENI
POSSIBLE
CAUSE
AND/OR WHAT T() 1)()
OVEN DOES NOT
COOK PROPERLY
CLOCK DOES
NOT WORK
OVEN LIGHT DOES
NOT COME ON
1------
STRONG ODOR
If you
GE
need
more help.. call, toll free:
Answer Center”
●
Make
sure
thermostat
by
the
mounting
c
Aluminum
. Oven vent
●
I
ncwrrcct
. Oven bottom not securely seated in position.
●
OVEN TEM P knob set incorrectly or not turned on.
.
Check cx)mmon
●
Range
electrical plug must bc sccurcly
fuse
or tripped circuit
●
Bulb may be loose or burned out.
●
Electrical plug must be plugged into a I
. Improper air/gas ratio in oven. Adjust oven burner air shutters-see
clip,
fbi
I being used improperly in oven.
blocked
cookware being used.
on top of
baking, roasting
800.626.2000
consumer information
service
ctipillary
is not
brctikcr.
bulb (located in upper portion ofoven) is securely
t(wching
oven sides,
range.
.Check each
and
and
is not
coated
with anything.
cooking section for cookwwe tips.
broiling problems on pages 17-20.
seated
in a
live
power outlet. Check for blown
ive power
outlet.
page
held
28.
If You Need Service
To obtain service, see your warranty
on the back page
We’re proud
want you to be pleased. If for some
reason you are not happy with the
service you receive, here are three
steps to follow for further help.
FIRST, contact the people who
serviced your appliance. Explain
why you are not pleased. In most
cases, this will solve the problem.
of this book.
of
our service and
NEXT,
write
your phone number—to:
if
you are still not pleased,
all
the details—including
Manager, Consumer Relations
Hotpoint
Appliance Park
Louisville, Kentucky 40225
31
FINALLY, if your problem is still
not resolved, write:
Major Appliance
Consumer Action Panel
20 North
Chicago, Illinois 60606
Wacker
Drive
.
Page 32

Save proof of
YOUR HOTPOINT MICROWAVE COOKING CENTER
WARRANTY
onglnal
purchase date such as your sales slip or
cancelled
check to establish warranty period
I
WHAT IS COVERED
WHAT IS NOT COVERED ●
FULL ONE-YEAR WARRANTY
For one year from date of original
purchase, we will provide, free of
charge, parts and service labor
in your
home to repair or replace
any part of the microwave
cooking center
of a manufacturing defect.
LIMITED ADDITIONAL
FOUR-YEAR WARRANTY
For the second through fifth year
from date of original purchase,
we will provide, free of charge, a
replacement magnetron tube if
the magnetron tube fails because
of a manufacturing defect. You pay
for the service trip to your home
and service labor charges.
Servicetripstoyourhometo
teach you how to use the product.
Read your Use and Care material.
If you then have any questions
about operating the product,
please contact your dealer or
Consumer Affairs office at the
address below, or call, toll free:
GE Answer Center
800.626.2000
consumer information service
● Improper installation.
If you have an installation problem,
contact your dealer or installer.
You are responsible for providing
adequate electrical, gas, exhausting
and other connecting facilities.
that fails because
our
(’)
This warranty is extended to
the original purchaser and any
succeeding owner for products
purchased for ordinary home use
in the 48 mainland states, Hawaii
and Washington,
D.C.
In Alaska the
warranty is the same except that it is
LIMITED because you must pay to
ship the product to the service shop
or for the service technician’s travel
costs to your home.
All warranty service will be provided
by our Factory Service Centers or
by our authorized Customer Care”’
servicers during normal working
hours.
Look in the White or Yellow Pages
of your telephone directory for
HOTPOINT FACTORY SERVICE.
GENERAL
FACTORY SERVICE or HOTPOINT
CUSTOMER CARE
● Replacement of house fuses or
ELECTRIC-HOTPOINT
(R)
SERVICE.
resetting of circuit breakers.
● Failure of the product if it is used
for other than its intended purpose
or used commercially.
. Damage to product caused
by accident, fire, floods or acts
of God.
WARRANTOR IS NOT RESPONSIBLE
FOR CONSEQUENTIAL DAMAGES
.—.
d-89
Some states do not allow the exclusion or limitation of incidental or consequential damages, so the above limitation or exclusion
may not apply to you. This warranty gives you specific legal rights, and you may also have other
To know what your legal
rights
are in your state, consult your local or state consumer affairs office or your state’s Attorney General.
rights
which vary from state to state.
Warrantor: General Electric Company
If further
Manager—Consumer Affairs, GE Appliances, Louisville, KY 40225
help is needed concerning this warranty, write:
ttmPolNT
560S 1 18P 10
RGH846GE
 Loading...