

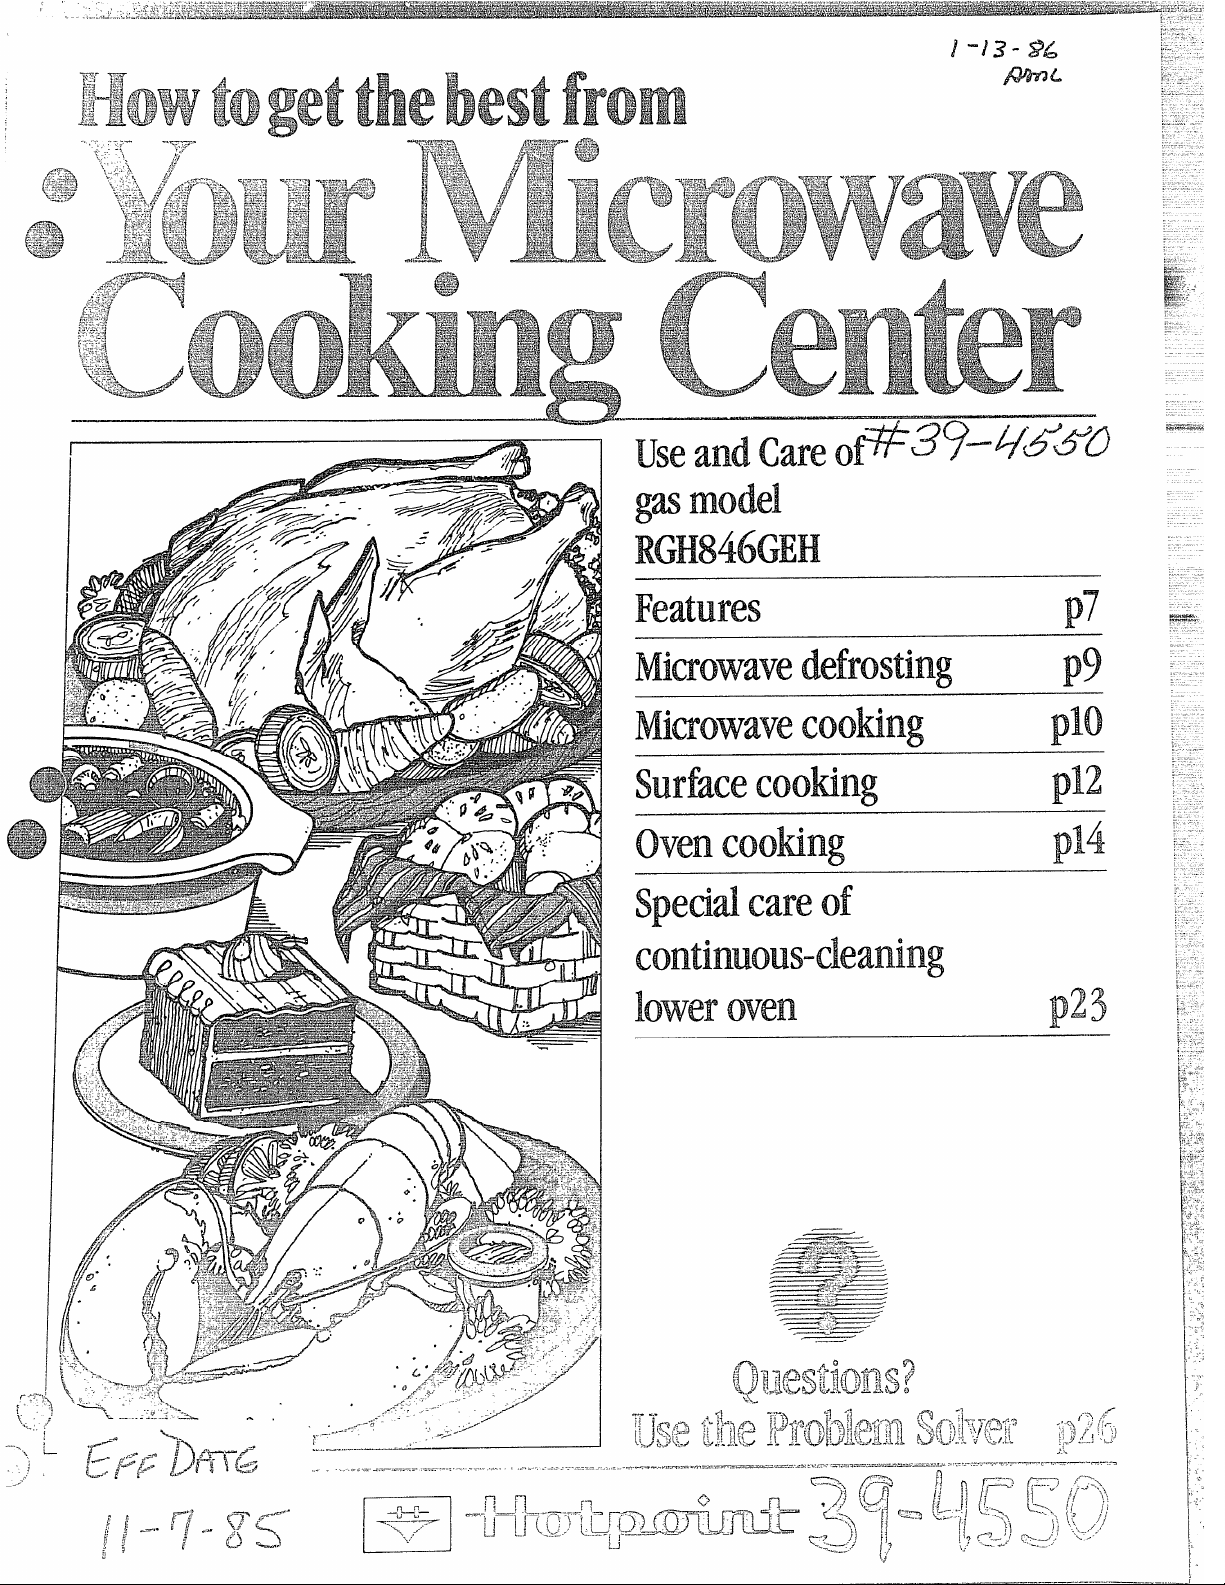
Page 1
g model
RGH846GEH
Features
Miaowavedefrosting
MiaowaveCooting
ovenCooting
p7
p9
pm
pri!
p14
Speddcareof
continuous-cleaning
bweroven
pz!$
..“,
Page 2
Read this book Carefully.
Itisintendedto help youoperate
andmaintainyournew Cooking
Centerproperly.
Keepit handy for answerstoyour
questions.
Ifyoudon’t understand something
or need more help, write (include
yourphone number):
ConsumerAfftirs
Hotpoint
AppliancePark
Louisville,KY40225
Write do- the model
and serial nmbeme
You’llfiid themunder the cooktop
on the surface burner support.
Seepage 7.
These numbers are also on the
Consumer Product Ownership
RegistrationCard that came with
yourCooking Center. Before
sendingin this card, please write
thesenumbers here:
ModelNumber
Serial Number
Use these numbers in any
correspondence or service calls
concerning your Cooking Center.
Be sure your fllwen is
registered.
It is importantthatwe know
thelocationofyourCooking
Center shoulda need occur for
adjustments.
Yoursupplierisresponsiblefor
registeringyouastheowner.
Pleasecheck with yoursupplierto
be sure he hasdoneso; also send in
yourConsumer ProductOwnership
RegistrationCard. If youmove,or
if youare not the originalpurchaser
pleasewriteto us, statingmodel
and serialnumbers.This appliance
mustbe registered. Pkase be
certainthat itis.
Writeto:
Hotpoint
RangeProduct Service
AppliancePark
Louisville,KY40225
M-you received a
dmaged oven. ee
Immediately contactthe dealer
(or builder) that soldyouthe
Cooking Center.
(!%F43~ti~
Beforeyourequest
service.e
Check the Problem Solver on
page 26. It listsminor causes of
operating problems that youcan
correct yourself.
md mmey.
●
(a) Do Not Attempt
thisovenwith thedoor open since
opendoor operationcan resultin
hmmfd exposureto microwave
energy.It is importantnotto
defeator tamper with the safety
interlocks.
@)Do Not Place any object
betweenthe ovenfront faceand
the door or aHowsoilor cleaner
residueto accumulate on sealing
surfaces.
(e)Do Not Operate the oven
if it isdamaged. It is particularly
importantthat theovendoor close
properly and that there is no
damageto the:
(1)door (bent)
(2)hingesand latches (brokenor
loosened)
(3)door seals and sealing surfaces.
tooperate
(d)The(km. $hmddNotbe
adjustedor repaired by anyone
exceptproperly qualified service
personnel.
The power output of the
microwaveovenin this
Cooking Center is 650 watts.
Page 3
‘!
——. .... ..-.----
“:
MicrowavingTips . . . . . . . . . ...3
SafetyInstructions . . ... . . ...4-6
FeaturesofYour
CookingCenter . . . . . . . . . ...7
TouchControlPanel . . . . . . . . ...8
Defrosting . . . . . . . . . . . . . . . . ..9
CookingbyT’irne. . . . . . . . . . . . 10
CookingbyTernperature . . . ...11
SafetyInstructions . . . . . . . ...4-6
Burnersand Controls . . . ...12.13
SafetyInstructions . . . . . . . ...4-6
OvenControls . . . . . . . . . . . . . .14
pen light . . . . . . . . . . . . . . . ..14
Oven Shelves . . . . . . . . . . . . . . . 14
“= AutomaticOven Timer,
ClockandMinute Timer . . . ..l5
13aking . . . . . . . . . . . . . . . . . . ..l6
BakingChart . . . . ..o . . . . . ...17
Roasting,Chart . . . . . . . . . . . . ..l8
Broiling, Chart . . . . . . . . . . . . . . 19
Special Care of
Continuous-Cleaning Oven ..23
Your.mnge,mesomany other
household
camsettle
iwns,isheavy mild
intosoftfloor Ctmrings
such as Culshim.edviny~or
carpeting. When movingthe
rangeon this type offlooring,
use care.
Do
notimuau‘therange over
kitchen carpeting unlessyou
place an insulatingpador sheetof
l/4-inch-thickplywoodbetween
the rangeand carpeting.
Whenthe
floorcoveringendsat
the~ront o~the range, the area that
the rangewill rest onshouldbe
builtup with plywoodor similar
materialto the samelevelor higher
than the floor covering.This will
allowthe range tobemovedfor
cleaningor servicing.
Yourrangemust be levelin order to
produce proper cookingand baking
results. After it is in its final
location, place a levelhorizontally
on an ovenshelf and check the
levelnessfront to back and sideto
side. Levelthe rangebyadjusting
the levelinglegs or byplacing
shims under the corners as needed.
@Makesure allutensilsused in
yourmicrowaveovenare labeled
“suitablefor microwaving’Check
yourCookbookforspecifictestto
determine“microwave-safe”
utensils.
~Papertowels,waxpaper and
plasticwrap can be usedto cover
dishesin order to retain moisture
andpreventspattering.
@Somemicrowavedfoodsrequire
stirring,rotatingor rearranging,
CheckyourCookbookfor specific
instructions.
@Somefoodssuchas unshelled
eggsandhot dogsmustbe pierced
to allowsteam toescape during
cooking.
ra=-.=q -----, ......-=-c.m
mew.., .....
:,
ModeI& Serial Number
Location . . . . . . . . . . . . . . . ...2
InstallingYourCooking
Centerc.3
LevelingtheC.ooking Center . ...3
Careand Cleaning ofYiour
Cooking Center..
.. . ....20-25
CleaningChart. .. .. . . . . . ....25
TheI?robkmSolver. ... ...26.27
IfYouNeedService. ... . . ....27
fyrrant~ ~~~~~“~-~~~‘ac~’cover
-!.
-x,
,<f-
[~
k..
---,--”
Page 4
.,
*
W2.’
t.
., . ...’ .. ’., .
‘:-: ‘“”, ~--- “ ‘“:; ’,T--L ‘ -’,-- J“ ‘ -’,” “- ‘-’!/”::’, - > ‘-”;, “, ., “
,,
~tl,
: ,.-.< ;
J.. -. . . .. .! ---,. ---- ..4 ‘~.!-..-..,: .- -- - - ..- --. -, !.-, ----- - ----- ..
.-
,,,
:.
,,
~’..!’-. ;, ;.,’ j ,,> : : .,i;;:
;
Rm%d!auinstructionbeforeusingthis appliance.
Whenusingthis appliance,basic
safetyprecautionsshouldbe
foHmved,includingthefollowing:
oHavetheiHshllershowyou
h+ lwationd therangegas
‘cut-offvalveandk)wtoshutit
offifnecessary.
@~~~g?yourrangeinsmliedad
pmprly pmd# byaq-d
inshller$inaccordancewiththe
InstallationInstructions.Any
adjustmentandserviceshould
beperformedonlybyqualified
gasrangeinstalkmorservice
technicians.
@Plugyourrangeintoa l.2Ul-
‘vmgroundedoutletOn!yeDo
notremovetheroundgrounding
prongfromtheplug.Ifin doubt
aboutthegroundingofthehome
electricalsystem,itisyourpersonal
responsibilityandobligationto
haveanungroundedoutletreplaced
witha.properly-groundedthree-
p-ongoutletinaccordancewith
theNationalElectricalCode.Do
notuseanextensioncordwith
thisappliance.
eBeSW%?allpatting materials
m%?removedfromthe range
beforeoperatingit,toprevent
fireor smokedamageshould
thepackingmaterialignite.
~BesureyourrangeismTectly
adjustedbya qualifiedservice
technicianorinstiIIerforthe
typeOfgas@MM%d0!?UP)OH~
whichitisb beused,Gascanbe
converted
other. See
f~OIllone type tOthe
InstallationInstructions.
Q/!M&rprolo%edEWx?ofa mgyl+
highJfKMwtemperaturesmay
H%SMMand manyf!klorUIWfwings
willRiotRvi$hshndthis M1-ldoff
use.Neverinstalltherangeover
viny]tileorlinoleumthatcannot
Wihxmilsuchtypeofuse.Never
ins’tillitdirectlyoverinterior
Icitchel-1cqxxing.
@Don%!kwwchildrendone w
unattendedwherearange
inopration.Theycouklbe
m
ishot
seriouslyburned.
@mm%allowanyonetoclimb?
Stmdorhangonthedooq
broilerCompatimentorrange
top.Theycoulddamagetherange
andeventipitovercausingsevere
personalinjury.
eCAUTION:Do INm STm.E
rmw$OFINTEWSTm
CHILDWNINcABImm
ABOVEAWGE‘ORON
~mBAcwPLAsHmii
wG&cmLDmN
cLmINGONTHE!I?.A?JNGE
mMACHITEMSUNJm
BESEMOUSLYINWWD.
eLetburner
surfacescd beforetouching
tbemlOFkfwingthemwhere
Children‘canreachWm.a
~NeverwearIkmefittingor
hanginggarmenb whileUlsing
theappliance.Flammable
materialcouldbeignitedif
broughtincontactwithflameor
hotovensurfacesandmaycause
severebum.
@Neveruseyourappliance
forwarmingor
mm.
withoutadequateventilationcan
behazardous.
s DoIM9tWM?waterongrease
fires.Neverpickupaflaming
pan.Turnoffburner,then.smother
flamingpanbycoveringpan
completelywithwellfittinglid,
cookiesheetorflattray.I?kuning
greaseoutsideapancanbeput
outbycoveringwithbakcngsoda
or,ifavailable,a multi-purpose
drychemicalorfem.
Q~0RO~am fl-le mfnids
fintall-lovenor MMi%3HrEheCool&tope
Prolongeduseoftherange
gratesandother
heatingthe’
@DoBmtM cQoMnggrease UM’
otherflammablematerials
accwulak h or!m%wtherange.
@when Cookingpork9follow
ourdirectionsexactlyandalways
cookthemeattoatleastHO*F.
Thisassuresthat,intheremote
possibilitythattrichinamaybe
presentinther-neat,itwil~be
killedandmeatwillbesafetoeat.
Microwave oven:
@IReadandfollowthespecific
“IRKYUHONSm AVOID
POSSIBLE
EXPOSURETQ
ExcEssruEiMKX.OWAVE
ENERGY”
@Seedoorsurfacecleaning
instructionsonpage20.
mredmx?theriskoffirein
e
thewell fcavity:
–Do notovercookfood.Carefully.
attendapplianceifpaper,plastic-%
orothercombustiblematerials .,.
areplacedinsidetheovento
facilitatecooking.
—Removewiretwist-tiesfron3
paperorplasticbagsbefore
placingbaginoven.
—Donotuseyourmicrowave
oventodrynewspapers.
–I%per towelsandRaptins,
waxpaper.Recycledpaper
productscancontainmetalflecks
whichmaycausearcingor ignite.
Paperproductscontainingnylon
ornylonfdarnentsshouldbe
avoided,astheymayalsoignite=
—Do
emptytoavoid dammge$0tk
m’$BRand thi?danger fofffi%f%Ifby
accident the ovenslmdd.nm.
emptyaminuteortwo,noham
isdone.However,tryto’avoid
operatingtheovenemptyatall
times—itsavesenergyand
prolongslifeOfti-ie‘oven. ~
foundonpage2.
notOpwm?theown while
~“&.
Q
“2’‘%
@
/“-’’-:,
(J
Page 5
,
—Do l-lotpop pqwm inyowl”
-$!#5ticlwwaveovenunlessinaspecial
-.
Q
microwavepopcornaccessoryor
unlessyouusepopcornlabeled
foruseinmicrowaveovens.
—Ifmaterialsinsidetheoven
shouldignite,keepovendoor
closed,turnovenoff,and
discormectthepowercord,or
shutoffpoweratthefuseor
circuitbreakerpanel.
~someproductisuchaswhole
eggsandsealedcontainers-for
example,closedglassjars—may
explodeandshouldnotbeheated
in thisoven.
@Avoid!heatingbabyfoodin
glassjars,evenwithouttheirlids;
especiaHymeatandeggmixtures.
oDon9tdehst frozenbevel%BgeS—
espeekdlyCarbonatedones—in
narrowneckedbottles.Evenifthe
containerisopened,pressurecan
buildUP.Thiscancausethecontainer
tobur~t,resultingininjury.
@use metalonlyasdirectedin
Cookbook.Foilstripsasusedon
meatroastsarehelpfulwhenused
asshowninCookbook.
TVdinnersmaybemicrowaved
infoiltrays;removetopfoilcover
andreturntraytobox.Whenusing
metalinmicrowaveoven,keep
metalat least1inchawayfrom
sidesofoven.
~cookingutensilsmaybUMBw
M becauseofheattransferred
fromtheheatedfood.Thisis
especiallytrueifplasticwraphas
beencoveringthetopandhandles
oftheutensil.Pothohkrsmaybe
mxdedtohandletheutensil.
osmm%imes9thecookingtmly
f4’x3nbecom@$00hot MlUN.Idl.Be
carefultouchingthecookingtray
:qilring a~ldaftercooking.
‘K.Jo ‘jp;~@~~@.~~f@F—DonotW3e
-s..=..\
{
‘,,
, a ther~klolneterinfoodyouare
... ,’
L.,..,.
microwavingunlessthethermometer
isdesignedorrecommendedfor
useinthemicrowaveoven.
eRemove‘thetemperature
probefromtheoven‘whennot
inuse.M’youleavetheprobe
insidetheovenwithoutinsertingitinfoodorliquid,andturnon
microwaveenergy,itcancreate
electricalarcingintheoven,and
damageovenwalls.
@Plasticutensik+l?lasticutensils
designedformicrowavecooking
areveryusefil,butshouldbe
usedcarefully.Evenmicrowave
plasticmaynotbeastolerantof
overcookingconditionsasglass
orceramicmaterialsandmay
softenorcharifsubjectedtoshort
periodsofovercooking.Inlonger
exposurestoovercooking,the
foodandutensilscouldignite.For
thesereasons:1)Usemicrowave
plasticsonlyandusethemin
strictcompliancewiththeutensil
manufacturer’srecommendations.
2)Donotsubjectemptyutensils
tomicrowaving.3)Donotpermit
childrentouseplasticutensils
withoutcompletesupervision.
eBoiling‘eggs(inandoutof
shell)isnot recommendedfor
microwavecooking.Pressurecan
buildupinsideeggyolkandmay
causeittoburst,resultingininjury.
@likmdswithunbroken
66AM9
suchaspotatoes,sausages,
(Mm
tomatoes,apples,chickenlivers
andothergiblets,andeggyolks
(seepreviouscaution)shouldbe
piercedtoallowsteamtoescape
duringcooking.
Q66BQilabl@99Coolsingpouches
andttiglltlydkNXlplasticbags
shouldbeslit,p~ercedorvented
asdirectedinCookbo&.Ifthey
arermt~plasticcouldburstduring
orirnmdiatdy
possiloly resulting in.
after cooking,
injury.A&w,
plasticstoragecontainersshould
beatleastpartiallyuncovered
becausetheyforma tightseal.
Whencookingwithcontainers
tightlycoveredwithplasticwrap,
removecoveringcarefid.lyanddirect
steamawayfromhandsandface.
Cookhp
@~hvaysusetheLITE
when igniting top hmers
~OSitiO~
and
makesuretheburnershaveignited.
ep$~~~~~~~~~~~~f~~~~~~~~~~
unattended at HIGH fkme
●
settings.Boilovercauses
smokingandgreasyspillovers
thatmaycatchonfire.
@Adjusttopburnerflamesize
soit doesnotextendbeyondthe
edgeofthecookingutensil.
Excessiveflameishazardous.
@use onlydrypothoMemmoistordamppothoklersonhot
surfacesmayresultinburnsfrom
steam.Donotletpotholders
comenearopenflameswhen
liftingutensils.Donotuseatowel
orotherbulkyclothinplaceofa
potholder.
eTominimize‘blwBRs9ignitionof
fimable materials,andspillage,
turn.thehandleofacontainertoward
thesideorbackoftherangewithout
extendingoveradjacentbmme~.
@AA%%aysturn surfaceblmnerto
‘OF%’beforeremovingutensil.
@carefully watchfoodsbeing
friedat HIGHfkmnesetting.
@~~~~~~~()$]{‘&&!l$r~~@(~~~
openings)dftheI’2mg&J‘They
providetheairinletandoutlet
whichisnecessaryforthemnge
tooperateproperlywkhcorrect
combustion.
5
Page 6
Q D() ~Q~ ~$~ ~ wok lj’j~ ~~~
i
CooungSWfiMxifthewokhas
aIwMRdmetalB@gwhich
is
jpkwdmm” the!N.mM!rgrateto
suppti thewok.Thisringacts
asaheattrapwhichmaydamage
theburnergrateandburnerhead.
Also,itmaycausetheburnerto
workimproperly.Thismaycause
acarbonmonoxidelevelabove
currentstandards,resultingin
ahealthhazard.
=’FoodsforfryingShoi.ddbeas
dryaspssible. Frostonfrozen
foodsormoistureonfreshfoods
cancausehotfattobubbleupand
oversidesofpan.
euse!JeaStpossibleamountof
fatforefk?ctiveshallowor&!epfatfrying.Fillingthepantootill
offatcancausespilloverswhen
foodisadded.
e~f~~Q~~~~~~~~~~f~~~~Qrf~~
mb~~di~-
stirtogether
“ ~
beforeheating,orasfatsmelt
slowly.
~AIW~ySheatfatSIOWIY9and
watchasitheats.
eusedeepfatthermometer
wheneverpossibletoprevent
overheatingtit beyondthesmoking
pointr
~USeProperPanSize—Avoid
pansthatareunstableoreasily
tipped.Selectutensilshavingflat
bottomslargeenoughtoproperly
containfoodavoidingboilovers
andspillovers,andlargeenoughto
cover‘burnergrate.Thiswillboth
savecleaningandprevent
hazardousaccumulationsoffood,
sinceheavyspa~tingorspibers
Mlonrangecan.ignite.Usepans
withhandlesthatcanbeeasily
onqxd.andremaincool.
CJA
=~~~Qmlyglass~Q@l<w~~”~‘<
isrecomn~endedforuseongas
~~rn~r~.
LJ.
Q Keepd! plwticsawayfmm
topburnem.
@
~o$wf-Jidthe possibility d a
hm, ahwysbeCer$ailrlthatthe
controls
OFFpositionandamgmtesare
‘cd Mm!
IIwniMm thegrate.
~hfjn flaming foodsunder‘the
@
hod,
opmti~9 mayspreadthet’lme.
@
If rangeisbcatedImem’a
window,donotuselongcurtains
whichcouldblowoverthetop
burnersandcreateafirehazard.
QIfyousme~lgas+turnoffthegas
totherangeandcallaqualified
servicetechnician.Neverusean
openflametolocatealeak.
LOweroven
@DonotuseOvenforalstorage
area,
@M&@awayfromtherange
whenopeningovendoor.The
M air or stem whichescaps
canCaweburnstokd$, faux
landheyes.
eKeepovenfreefromgl%wx?
buildup.
@Placeovenshelvesindesked
psitionwhileovenisad.
@hllingoutshelf‘totheshelf
stopisaconvenienceinlifting
hew-yf&Hk.Mkalsoapmution
againsthm$ fromtoucu hot
SWfacesofthedoororOVe!nwalk.
QDolftheatuno~ned food
Conhinersintheoven.PE%SSW%
Gdd btid Upad theContier
couldbull%%causingaminjury.
QDon9tawealuminumfoil
anywherehn
de!wxibd in this bwk Misuse
couldresult in afire
damagetotherange.
forau!imrnersareat
attemptingto
‘tuRmmefan.off.mefan,if
tEIEovenexceptas
hazard.or
@whenusingcookingO’r
roastingIMRgsinOveny fouow
themanufacturer’sdirection.
e useOnlygkR?MCmbare thatis
r~omended foruseingasovens.
~Alwaysremovebroilerpan
frombroiiercompartmentas
So’onasyoufinishbroiling.
Greaseleftinthepancancatch
fireifovenisusedwithout
removingthegreasefromthe
broilerpan.
~~hen broiling9ifmeatistoo
Uhsetothefkame9the fatmay
ignite.Trimexcessfattoprevent
excessiveflare-ups.
@~~ke $Urebroilerpan isin
placecorrectlytoreducethe
possibilityofgreasefires.
@Ifyou shouldhaveagrea$e
fireinthebroilerpm,turnoff
oven,andkeepdoorclosedto
containfireuntilitburnsout.
.
(MXMRonly pm.s!&&d.inthis ~
~
use
ad. can-?IRmk.
~KeeprangeCk%mad. free
of
accumulationsof$y!i%%se(w
S~iIIOV@H WhiCh 11’BW%
Mri?iXRNeed.i%i%wike
e ~~~~ 66~~~ fi~~~~m$@y~F99
fcmipages2(9am’d27ofthisbook.
e!Don9tattemptto Irepair
or ‘q3kweanypart ofyow$
rangeUnkssit isspecificall$~
recommendedh thisbook.All
otherservicingshouldbereferred.
toaqualifiedtechnician.
i&Ilit@e
>$;
+s-.
0
,/-—\
>
Page 7
—-.
.—
—..——. -
.—.
.,$=*-;
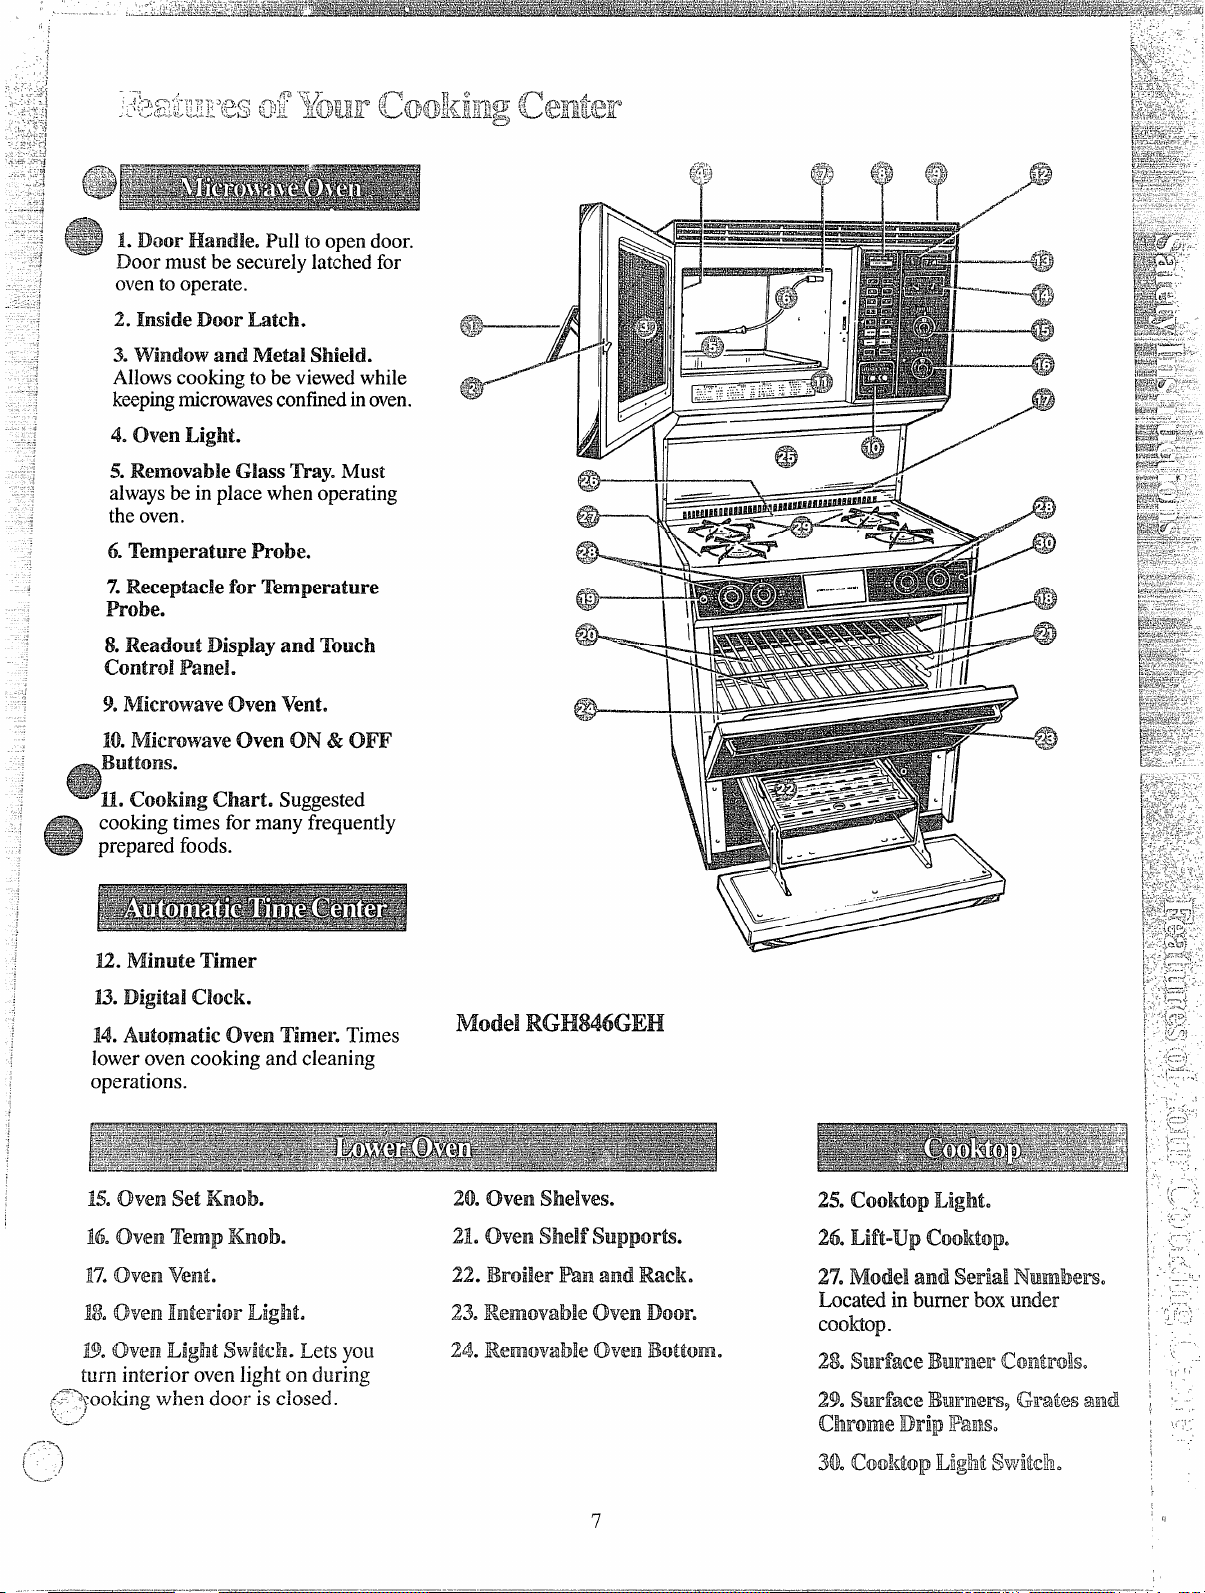
%~~ 1. Door Handle. I?uHto opendoor.
0
Door mustbe securelylatchedfor
ovento
2. Inside Door hatch.
3. window and Metal shield.
Mows cookingto be viewedwhile
keepingmicrowavesconfiiedinoven.
4. oven Light.
5.Removable(3ass Tray.Must
alwaysbe in placewhen operating
the oven.
6.Temperature Probe.
7.Receptzwk!for Temperature
Probe.
8.ReadoutDispIayand Touch
ControlPanel.
9.MicrowaveOwn Vent.
10.Microwaveoven ON& Om?
operate.
Il. Cooking ICha% Suggested
cookingtimes for many frequently
prepared foods.
n.Minute TimeR-
13.Digital clock.
M. Auto~atic Oven TimereTimes
loweroven cooking and cleaning
operations.
,
15.‘ovenset Kmb.
160oven! mmpWd3.
1’7.Owen -W?mt.
M.
ownEmdor JLi@Rt* 25. Removable ovenDoor.
Model
20. O%?nl
21. Owenshelf Salppolt$.
22. E%’dk?iTRm and Rack.
RGH846GEH
shekw?s.
25. Gddop Light.
26. Lift==upCOditop
27.Model a)nd
Locatedin burnerboxunder
Cooktop.
SWidNumbers.
.-—-~
/----
.
\
/’
.’!
\
--.,.=.-
.29.Sld’am Ekmrnm, GH3tfwmill
CX-mmeDrip Rms.
300CIMMopLight
7
Swikk
Page 8
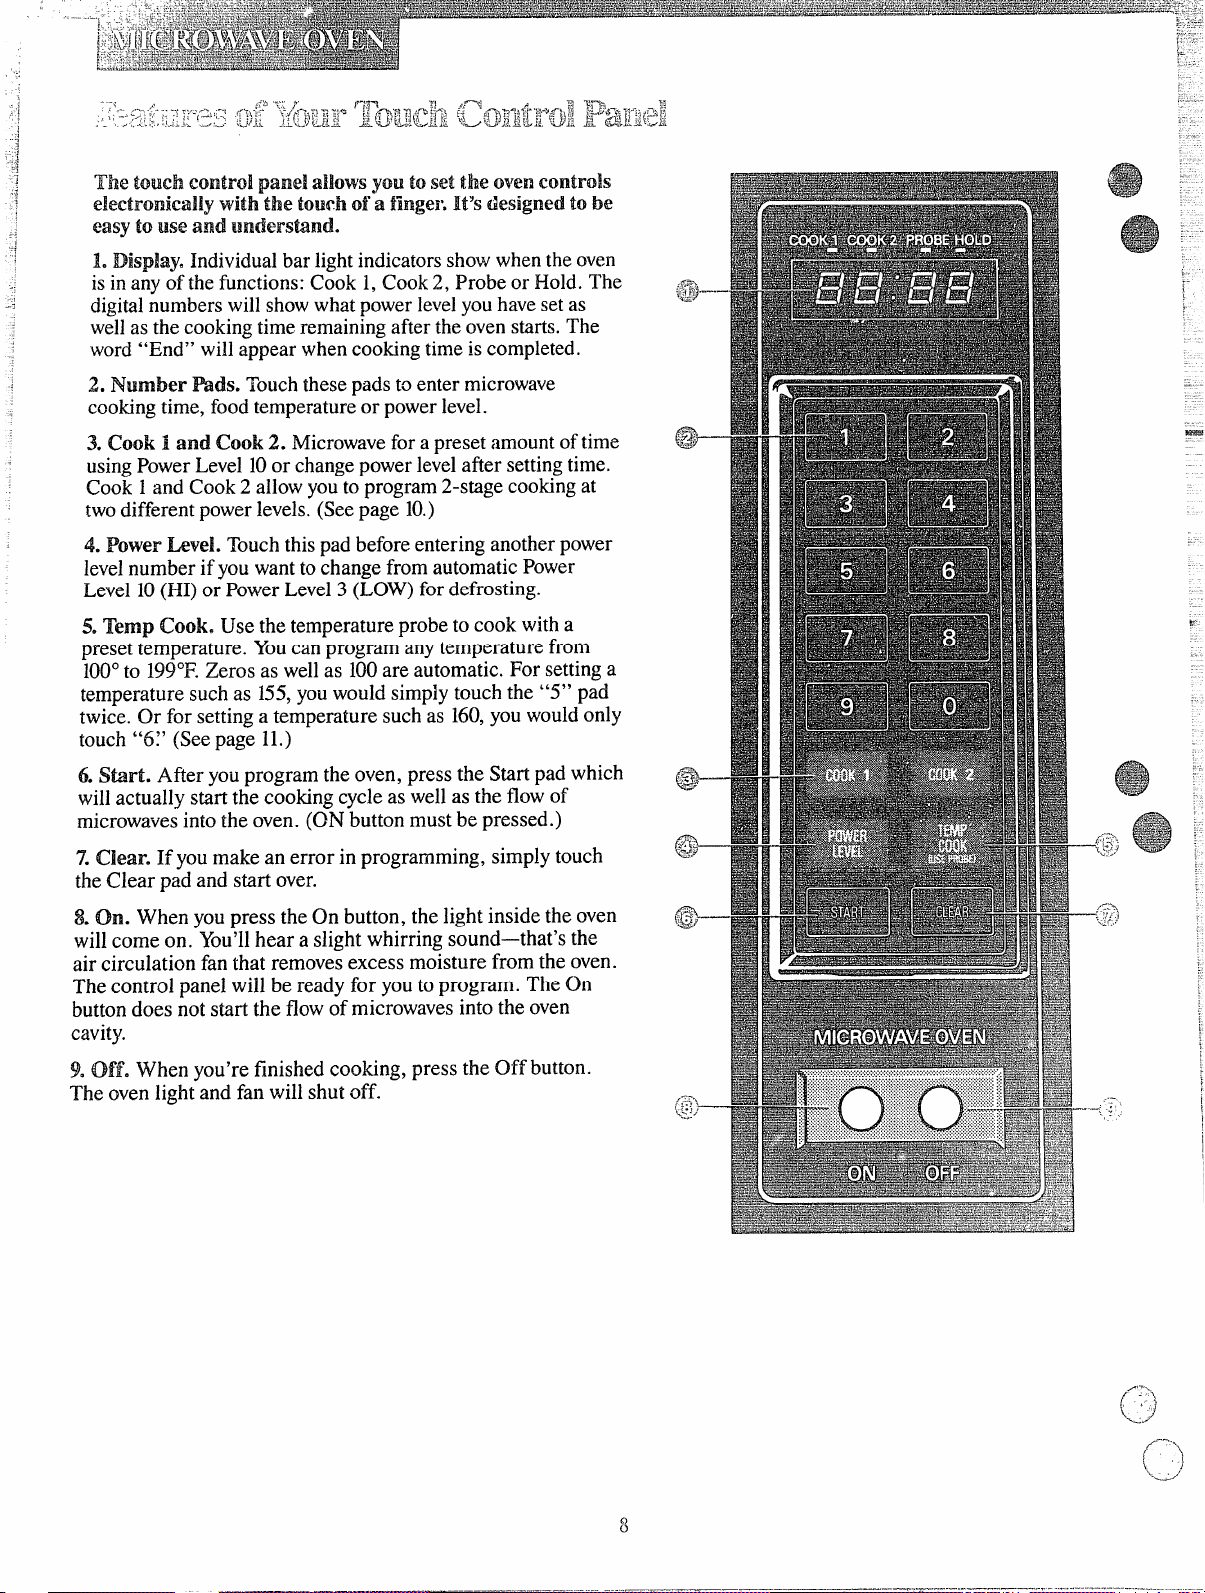
The !$U3WBIcontrol panel mow’syouto set the Gwen controls
ektmnicdy
withthe touch ofa mlger, lit%dwigrled m be
easytome and Ilndersmnd.
L Display. Individualbar lightindicatorsshowwhen the oven
isin any of the functions:Cook 1,Cook 2, Probe or Hold. The
digital numbers will showwhatpower levelyou haveset as
wellas the cookingtimeremainingafter the ovenstarts.The
word “End” willappear when cookingtime is completed.
2. Number I%@. Touchthesepads to enter microwave
cookingtime, foodtemperature or powerlevel.
3. Cook 1 and Cook 2. Microwave for a preset amount oftime
usingPowerLevel 10or changepowerlevelafter settingtime.
Cook 1and Cook 2 allow youto program 2-stagecookingat
twodifferent powerlevels. (See page 10.)
4. Power Level. Touchthispad before entering another power
level number if you wantto change from automaticPower
Level 10(HI) or Power Level3 (LOW) for defrosting.
5. Temp Cook. Use the temperatureprobe to cook with a
presettemperature. Youcanprogram anytemperature from
100°to 199”F.Zeros as wellas 100are automatic. For settinga
temperature such as 155,youwould simplytouch the “5” pad
twice. Or for settinga temperature such as 160,you wouldonly
touch ‘%:’(Seepage 11.)
Ems!
-.
6. Start. After youprogram the oven, press the Start pad which
willactually start the cookingcycleas wellas the flow of
microwavesinto the oven. (ON button must be pressed.)
7.Clear. If you make an error inprogramming, simply touch
the Clear pad and start over.
&On. When you press the On button, the light inside the oven
will come on. You’llhear a slight whirring sound—that’sthe
air circulation fan that removesexcess moisture from the oven.
The control panel will be ready for youto program. The On
buttondoes not start the flow of microwavesinto the oven
cavity.
9.Off.Whenyou’refinishedcooking,presstheOffbutton.
Theovenlightandfanwillshutoff.
Page 9
J
ii
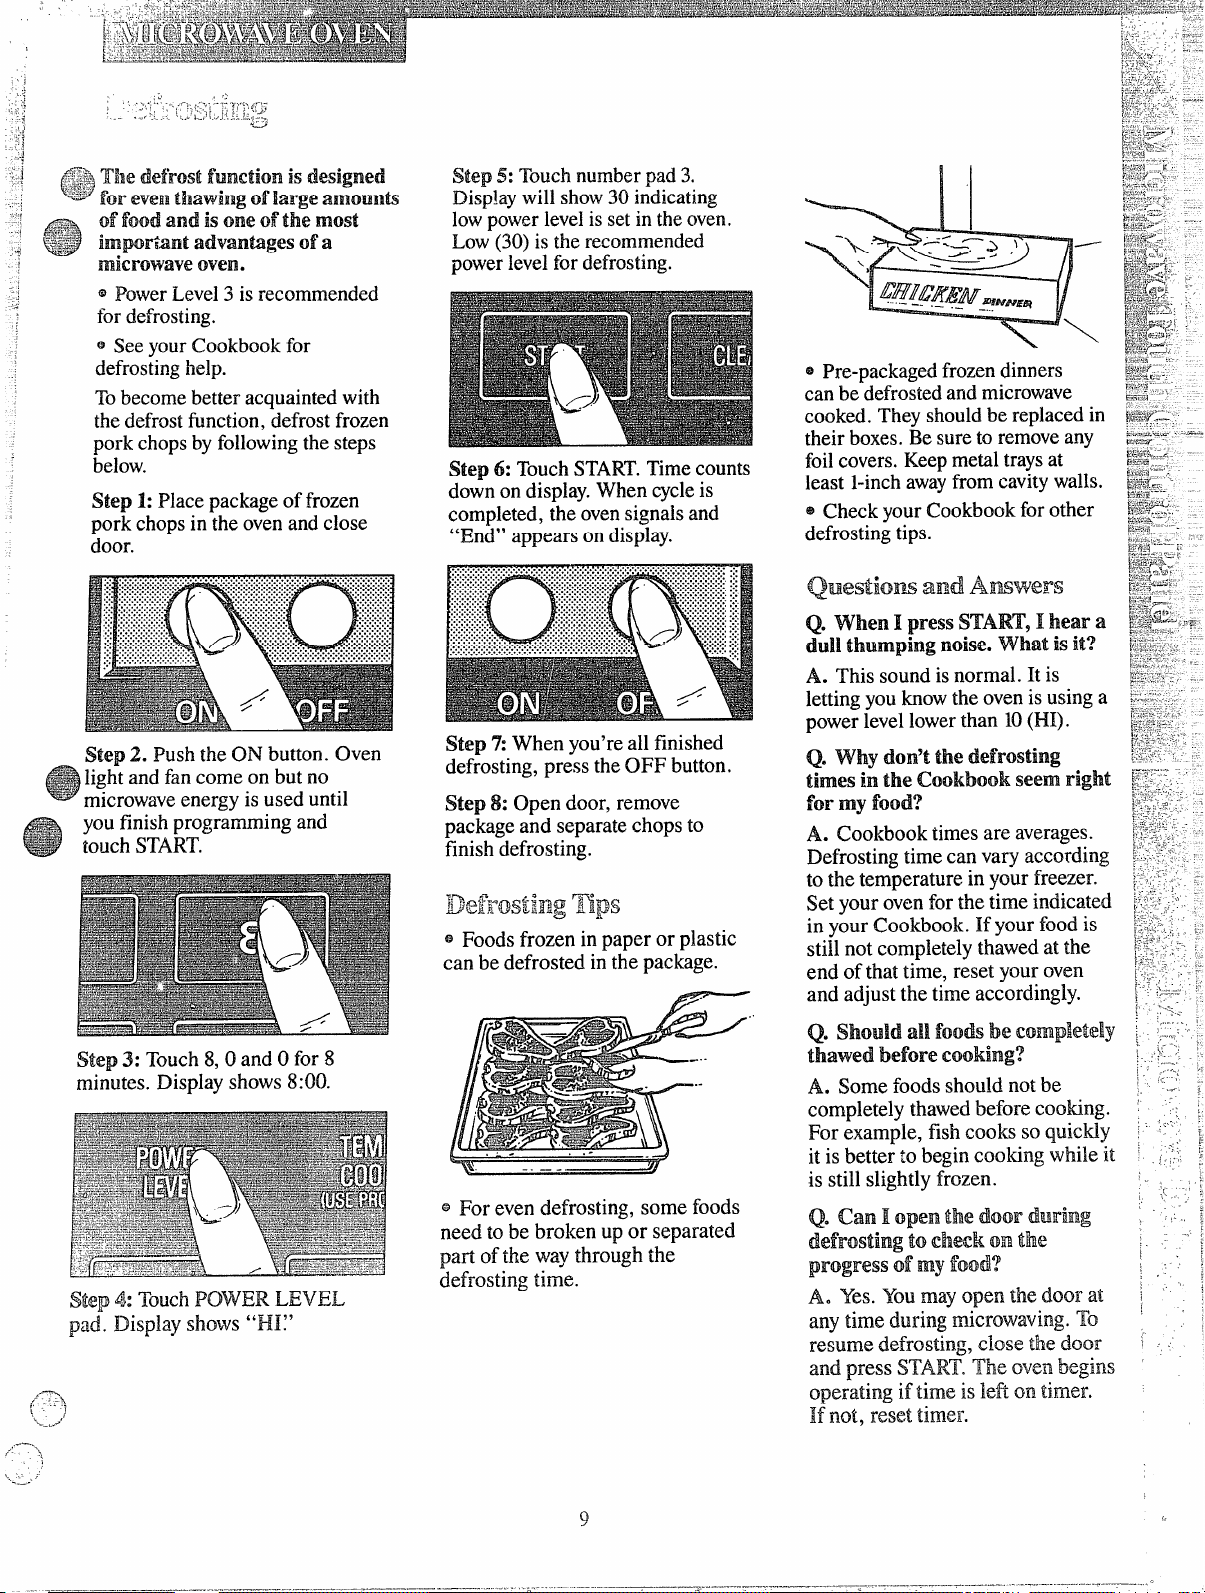
-$$$The defrost f~nctiomisdesigned
..
L
.,:
““ for e-venl thawing OfikwgeWnotmt$
d’ food and isOm! d’the most
‘“:@ imp%mt advantages da
~-,=*,:
.:
-.
=
miawwaw
@PowerLevel3 isrecommended
fordefrosting.
QSeeyourCookbookfor
defrostinghelp.
Tobecomebetter acquaintedwith
thedefrostfunction,defrost frozen
pork chopsby followingthesteps
below.
Step 1:Place packageoffrozen
pork chopsin the ovenand close
door.
Step 2. Pushthe ON button. Oven
_$ lightand fan come on but no
microwaveenergy is used until
youfinishprogramming and
touch START.
UY$’m●
Step 5: Touchnumberpad 3.
Disp!aywill show30indicating
lowpowerlevelissetin theoven.
Low(30)is the recommended
powerlevelfor defrosting.
Step 6: TouchSTART.Timecounts
downon display. When cycleis
completed, the ovensignals and
“End” appears on display.
Step’1 When you’reall finished
defrosting, press the OFI?button.
Step 8: Open door, remove
packageand separate chopsto
finishdefrosting.
@Foodsfrozen in paper or plastic
can be defrosted in the package.
@R-e-packagedfrozendinners
can be defrostedand microwave
cooked. They shouldbe replacedin
their boxes.Be sureto removeany
foilcovers.Keepmetaltraysat
least l-inch awayfromcavitywalls.
@Check yourCookbookfor other
defrostingtips.
QuestioDs and L4m$wers
Q.when I pressSTART’,I hear a
dun thumpingrmise.what isit.’?
A. This soundisnormal. It is
lettingyou knowthe ovenis using a
powerlevellowerthan 10(HI).
Q. why don’t the defrosting
times in the cookbook seem right
for my food?
A.. Cookbook times are averages.
Defrostingtimecan vary according
to the temperature in yourfreezer.
Set your oven forthe time indicated
in your Cookbook. If your foodis
still not completely thawed at the
end of that time, reset youroven
and adjustthe time accordingly.
Step 3: Touch8,0 and Ofor 8
minutes. Display shows 8:00.
Step 4: TouchPOWER LEVEL
pd. Display shows “l%:’
@For even defrosting, some foods
need to be broken up or separated
part ofthe way through the
defrosting time.
Q. should all foods be CompBeteRy
thawed before cooking?
A. Some foodsshould not be
completely thawedbefore cooking.
For example, fish cooks so quickly
it is better to begin cooking while
still slightly frozen.
is
Q. can Eopen the door ‘&wing
defrosting to Cheekon the
progress of my food.?
A. Yes.Youmay open the door
any time during-microwaving.To
it
at
resumedefrosting,closethedoor
andpressSTART.Theovenbegins
operatingiftimeisleftontimer.
Ifnot,reset
timer.
Page 10

The‘time$mokhgfeaturea.hw
you
to‘p”esetthe 030kingtime.
Theovenshutsoffautomatically.
Powerlevel10(HI)isrecommended
formostcooking,but youmay
changethisfor more cooking
flexibility.SeeyourCookbook.
Tobecomebetter acquaintedwith
timecooking,makea cupofcoffee
byfollowingthe stepsbelow.
.
I 11’11
J7
~
Don’ttouchPOWERLEVEL pad
becausepowerlevel10(J-H)is
automaticallyset. Hanotherpower
levelisdesired, touchPOWER
LEVEL pad anddesired number,
althoughpowerlevel10(I-U)is
preferredforthiscup ofcoffee.
Step 4: TouchSTART.Cook 1time
countsdownon display.
HI(WV‘touseT)3i{:To-wa~le
ovenThm3r ‘b‘Ihm! a
3.h4i.E&tEtePhone Ckm
1. Press ON button,
2. Touchnumber pads 3,0 andO
(for3 minutesand no seconds).
3. Touch POWER LEVEL pad
and number pad Oso that
microwave energy is not used
which could damageyour
MicrowaveCkrL
4. TouchSTART,When the timer
reacheszero, ovenwillbeep for 3
secondsand “End” willappear.
5. Press OFF button.
Step 1:FiHa cup 2/3 fullof water
and add 1teaspoon of freezedried
coffee. Use a cup that has no metal
decoration. Place cup in ovenand
closedoor.
Step 3: Selectyour time. Touch
1,2 and Ofora minute and 20
seconds. Display shows 1:20.
Step 5: When time is up, the oven
signalsand “End” appearson
display.
Step 6: Press the OFF button.
-using-mecook 2 IFeatwe
Withthe Cook 2 feature,youcan
settwotime cookingfunctions
within one program. This would
be ideal if youdesired to change
powerlevelsduringyour cooking
operations.
The followingisan exampleof
howto changepowerlevelsusing
Cook 2.
Step 1: Repeat Steps 1,2 and 3.
Step 2: Touch COOK 2.
Step 3: Set your time as in Step 3.
Step 4: To change the power level,
touch POWER LEVEL pad and
number pad 7. Display will show
70,indicating medium-high power
levelis set in the oven.
Step 5: TouchSTART.
Step 6: Cook 1timecountsdown
on display.
Step T At the end of Cook 1,Cook
2 is shown counting down.
Step 8: When time is up, the oven
signals and “End” appears on
display.
Step 9: Press the OFF button.
Questiom and AIEW%%X-S
Q. 1set my ovenfor the time
called for‘intherecipe, but at the
end d the
wasdt done. Whathappened?
A. Sincehousepowervaries due to
time or location, many recipes give
youa time rangeto prevent -.3=
overcooking.Setovenfor minimum%
time, test food for doneness, and
cookdisha littlelonger,ifnecessary.
Q. I touched.the number pads
andselectedmypowerhe!. When
Iitouched START,M9W%!W,my
ovendidn’tComeon. why not?
A. The ON button must be touched
beforesettingthenumberpads or else
your oven wiHnotbegin cooking.
Q. I want b cook on a poweKkwd other than 10(HI), What de
I BMxxlto do’?
A. To change the power level,
touch the POWER LEVEL pad.
“HI” appears on the display panel.
Enter new number.
timeallowed, my dish
@
Q.Cm I h’mmwpttimeWd’King
fmetiontodad{ the ‘find?’
A. Yes.To resume cooking, simply
close the door and press the START
pad. The timer must be reset for
cooking to resume unless time is
remaining on timer.
~,-----
t,,.:
t.
\..j-”
“i
Page 11

k=:m?md Wqx?ram’e isthe best
-J
testd’ doneness forii-mm-gfoods.
.-:,~+~
‘15=:+Temperaturecookingtakesthe
~
‘%%”guessworkoutof cooking.The
ovenautomaticallyswitchesto
HOLD settingafter reachingthe
presetfoodtemperature,if 140°F.
or above,and maintainsthat
temperatureforup to 12hoursor
untilyoutouchtheOFF button.
~:~R
2:Re ‘lGNR:bRer&XllI%A
HANDLE
SENSOR
The temperatureprobe is a food
thermometerthatgaugesthe
internaltemperatureofyourfood;
itmustbe usedwhen usingTemp
Cook. Toutilizeyourprobe
properly,followdirectionsbelow.
Place tender beefroaston trivet in
microwave-safedish. Insertprobe
fromthe fronthorizontallyintothe
center meatyarea not touchingbone
or fat. Make sure the handledoes
nottouch the foodor top or sides of
the oven. Cover with wax paper.
~y~~~
CABLE
Place meat in ovenwith probeto
the right. Insert cable end of probe
firmlyintoreceptacleon ovenwdll.
How’‘hTkm-Bpcook aRolled
BeefRib IRwx toNiediumi
Step 1:Insert temperatureprobe
andattachprobesecurely inoven
wall. Close the door.
Step 2: TouchTEMP COOK.
Indicatorlightappearsunder
PFtOBEand 100showson display.
Step 3: Touch2 and5 for 125°F.
125showsondisplay.
$@ 4: TouchPOWER LEVEL
pad. “HI” appearson display.
Step 5: Touch number pad 5.
Displaywill show50 indicating
mediumpower levelisset in the
oven.
Step 6: Touch START.
Temperatureof the roast appears
on display.Tocheck original
temperature settingtouch TEMP
COOK pad and temperature will
reappear on the display for a few
seconds.
Step ‘ZWhen 125°F.is reached,
the ovenwill sound and “End” wil
appear on display.
Step 8: Removeprobe and food
from the oven.
Note: Oven automatically switches
to HOLD settingand l?ROBEand
HOLD indicator lights remain on
when preset food temperature is
140°F.or above.
ChokingTips
.
@Use a lowerpowerlevel;itwill
heatmoreevenlyeventhough
requiringmoretime.
*Besurefrozenfoodhasbeen
completelydefrostedbeforeinserting
probe. Probe maybreak offif used
in frozenfoods.
@Coverfoodslooselyformoisture
controland quick, evenheating.
Questiom and
Q.Arethere
L4mwvers
any foods I can’t
Temp cook?
A. Yes.Delicatebutter icings,ice
cream, frozenwhippedtoppings,
etc., softenrapidlyat warm
temperatures. Batters, doughsand
frozen foodsare alsodifficultto
cook precisely with the probe. It’s
bestto use time cooking for these
foods.
Q. Can I leave my probe in the
ovenif it%not insertedin food?
A. No, if ittouches the ovenwall,
youmay damage the oven.
Q. can I temperature Cook
different portions of food at
different temperatures?
A. Yes.The temperature probe
givesyouthe freedom to cook
differentportions of food at
differenttemperatures to suit
individualeating preferences.
Simply place probe in food and
changetemperature setting as
needed.
Poultry,pork or ham roastsneed no
trivet. Add 1/2cup water to roast
--=~ish,coverwithplasticwrap. knsert
,r<..$.
,
i-ok into center meaty area.
....
1,
“
Page 12

!’
--
“
:
~
{
k
t
~
~
I
-.
pi.i.j@-Jj-p&#~~qy~~&j~]
Yoursurfaceburners arelightedby
electricignition,eliminatingthe
needfor standingpilotlightswith
constantlyburning flame.
In case of a power outage, youcan
lightthesurfaceburners on your
rangewith a match. Hold a lighted
matchto the burner, then turn the
knobto the LITE position. Use
extremecaution when lighting
burners this way.
surface lRBrner Controk
Knobsthat turn the surfaceburners
on and offare located on the lower
frontpanel and are marked as to
which burners theycontrol.
‘JR}Light al Sm’’face BWTM4
Pushthecontrolknobin andturn it
to LITE. Youwillhear a little
clickingnoise—thesoundofthe
burner lighting.
After the burner ignites,turn the
knob to adjust the flamesize.
Note:
@Alwayshavea cookingutensil on
the gratebeforeturningon a burner.
The finishon the grate may chip
withouta utensilto absorb the heat.
@Check to be sure the burner you
turned on is the one youwantto use.
=Be surethe burners and grates are
cool beforeyou place your hand, a
potholder,cleaning clothsor other
materials on them.
The flamesizeona gasburner
shouldmatchthecookwareyou
are using.
NEVER LET THE FLAME
EXTEND IX THE SIDESOF
THE COOKWARE.Any flame
largerthan thebottomof the
cookwareis wastedheatandonly
servesto heat thehandles.
when using aluminum ‘or
aluminum<lad stainless steel
pots and pans, adjusttheflame so
the circle it makesis about 1/2inch
smallerthan the bottomofthe
cookware.
When boiling, usethissame flame
size—1/2inch smallerthan the
bottomof the cookware—nomatter ‘
whatthecookwareismadeof. Foods
cookjust as quicklyat a gentle boil
as theydo at a furious rollingboil.
A highboil createssteamand cooks ,
awaymoisture, flavorandnutrition.
Avoidit exceptfor the fewcooking
processeswhichneedavigorousboil.
VWWBfrying or Warning fo’dk
inSU3idesssteel?casti?r’om‘or
enamdwwq keep the flame down
lower—toabout 1/2thediameter
ofthe pan.
when fryinginglassor ‘m%3rnic
cdkwtuq lowerthe flame even
more.
.
Page 13

-.
An air adjustmentshutterforeach
surfaceburner regulates the flowof
@
%Z& air to the flame.
when the right
amount d’ air
flowsintothe burner,the flame
willbe steady,relativelyquietand
haveapproximately3/4” sharp blue
cones. This usuallyresultswhen
the shutterisabouthalfwayopen.
With too much air, the flame will
be unsteady,possiblywon’tburn all
thewayaround, and willbenoisy,
soundinglikea blowtorch.
VVM
not enough air,youwon’t
see any sharp blue cones in the
flame, youmaysee yellowtips, and
sootmayaccuirmlateon cookware.
Cmktop Light
A fill-width fluorescentlightin the
backsplashilluminatesthecooktop.
Pressthe PanelLightswitchonthe
lowerfrontpaneltoturn the light
on and off.
Aluminum:’Medium-weight
cookwareis recommendedbecauseit
heatsquicklyandevenly.Mostfds
brownevenlyinan aluminumskillet.
Mineralsin fbodandwaterwillstain
but willnotharm aluminum.A
quick scour with a soap-filledwool
pad after each use keepsaluminum
cookwarelookingshinynew.Use
saucepanswith tight-fittinglidsfor
cookingwith n-iinimumamountsof
water.
Cast Iron: If heatedslowly,most
skilletswillgivesatisfactory
results.
!hanwhvanx LTndersome
:
conditions,the enamelof some
cookwaremaymelt.Followcookware
manufacturer’srecommendations
for cooking methods.
The air adjustment shutters set on
the hood of the valveand are either
locked in place with Phillips head
screws or positioned on the burner
tubes by friction fit.
‘1-”adjust the flow’of air to the
burmers9 loosen the Phillips head
screws and rotate the shutters (or
apply a blade-type screwdriver
against the friction-fit shutters and
push) to allow more or less air into
the burner tubes as needed.
Glass: There are twotypes of glass
utensils—thoseforoven use only
and those for top-of-rangecooking
(saucepans,coffinandteapots).
Glassconductsheatvery slowly.
HeatproofGhss Cemic Can
beused for either surfiiceor oven
cooking.Itconductsheatvery
slowlyand coolsveryslowly.Check
cookwaremanufacturer’sdirections
to be sure it can be used on gas
ranges.
Sthdess Wee!:Thismetal
alonehaspoor heatingproperties,
and is usually combinedwith
copper, aluminum or other metals
for improvedheatdistribution.
Combinationmetalskilletsgenerally
work satisfactorily if used at
medium heat as the manufacturer
recommends.
i%
Page 14

.1.
(:-”)
/“’
— ———.———.—-....——..
.—....”,“---.-——.
&&@--~@~~‘&&~~Qg~
E&effl”e“usingYOwr43%422%
CiwelnShldvt%
Theovenburner on yourrange
islightedbyelectric ignition
eliminatingthe need forstanding
pilotlight.
ONJTKIN: DO NOT NUKE ANY
ATTEMPTTOOPERATE THE
ELECTRIC IGNH’ION OVEN
DLJRINCJAN ELECTRICAL
POWERFAILURE. Resumption
of’electricalpower when OVEN
TENWcontrol is in anyposition
otherthan OFF will result in
automaticignitionoftheoven
burnerand could cause severe
burnsif, at thetime, you were
attemptingtolight the burner
witha match.
T’ LighttheOwimBwm.w
Turnthe OVEN TEMP knobto the
desiredtemperature. Theburner
shouldignite within 60 seconds.
B& ~QJ &&
~,
The flowof air to the ovenburner is
adjustedin the same manner as it is
forthesurfaceburners (seepage B).
Whenthe air flow is properly
adjusted, the ovenburner flame
shouldbe steady,with approximate]y
l-inchblue cones and should not
extendout overthe baffle edges.
Y;.-&$ ,q~~t
1. Lookat the control.Besureyou
understandhowtoset it properly.
2. Checkthe insideofthe oven.
Look at the shelves.Practice
removingandreplacingthem
whilethe ovenis cool.
3. Readthe informationandtips
on the followingpages.
4. Keepthisbook handywhere you
can referto it—especiallyduring
the tirst fewweeksofgetting
acquaintedwith youroven.
oven Tempemture control
The OVENTEIvWcontrolis
locatedon the upperoventothe
right ofthe MicrowaveTouch
Controlpanel.
Simply turn the knob to the desired
cooking temperatures, which are
marked in 25“F.incrementson the
dial. It will normally take 30 to 60
seconds before the flame comes on.
After the oven reaches the selected
temperature, the ovenburner cycles
off completely, then on with a full
flame to keep the oventemperature
controlled.
The shelvesare designedwith
stop-locksso whenp~acedcorrectly
onthe shelfsupports,they will stop
beforecomingcompletelyoutof
theovenand willnottilt whenyou
are removingfoodor placingfood
on them.
When placingcookwareon a shelf,
pullthe shelfoutto the “stop”
position.Place the cookware on
the shelf, then slidethe shelfback
intothe oven. This willeliminate
reaching intothehot oven.
Toremovethe shelvesfromthe oven
forcleaning,pushthemback, liftthe .:%
rearoftheshelvesandpullthemout. “~%
Q
The ovenhas fourshelf supports—
A (bottom),B, C and D (top). Shelf
positionsfor cookingare suggested
on Baking and Roastingpages.
QwfmLight
Use switch on control panel to tum
lighton and off.
Yourovenis vented through a duct
at the center rear of the range (see
page7). Do not block the opening
ofthis duct when cooking in the
oven—--itis important that the flow
of fresh air to
uninterrupted. Avoidtouchingthe
ventopenings
during oven Cooking-tiwy may
become hot.
theovenburnerbe
or nearby surfaces
/=--.,
1’
},’ ~
</”
~q
..-
Page 15

.*.
-S#’heClockand Timersonyour
c
‘@rangearehelpfuldevicesthat
The Ckwk
3. Setthe STOPamid. Pushin
andturnthe S?.QPknobto
thetime
youwanttheoventoturnitselfoff.
Note:‘I’heremustbeatleastahalf-
hourdifferencebetweenthe START
and STOPdialsforthe automatic
controlto work.
TheMinute Timer is the largedial
totheleftofthe digitalclock. Use
itto time aHyourprecise cooking
operations.This dial also changes
thedigitalclock.
‘b set the Minute ‘Timer,turn the
centerknobclockwise, without
pushingin, until the pointerreaches
thenumber ofminutes youwantto
time (up to 60).
the end of the set time, a bwzzer
nds to tell you time isup. Turn
theknob, withoutpushing in, until
thepointer reaches OFF and the
— buzzerstops.
TOsetthe Clock, pushin the
centerknobof’the MinuteTimer
and turn the knob in either
directionto setthedigitalclock
numeralsto the correct time. (After
settingthe clock, let the knob out
and turn the Minute Timer pointer
to OFF.)
AubmatiaCh%mIriiier
This Timer will automaticallystart
and stopyour ovenforyou. Here’s
what youdo:
1. Make sure both your range clock
andthe STARTdialshowthecorrect
time of day.When the STARTknob
is pushed in and turned, it will
“pop” intoplace when the time
shownonthe rangeclockis reached.
4. Setthe OVEN SET knob to
AU7XlCW13N.
5. Setthe OVENTEMP knob to
the desired cookingtemperature.
Nowtheovenwillturn itselfon
immediatelyor at a later Starttime
thatyouset, cookatthe temperature
youselected and turn itselfoff at
the Stoptime you selected.
After you take yourfoodoutofthe
oven,be sure toturn the 0W3N
TEMP controltooffand the OVEN
SET knob to the MAN. OVEN
settingwhere it shouldbe kept for
normal ovenuse.
2. Set STARTcontrol. Push in and
turn STARTknob to the time you
wantthe ovento turn itself on.
(If you vvantit to start cooking
immediately,do not set Start time.)
Page 16

?-T-..
~“ ~i
-. . .
.
, ~ .’_>
?1 ~~s
-,1
..- ,.
“’)$3!~j~i!!}VWji_
--,-
‘-:=
~; ~
[In.: ~;?+,~.?#;@ ~.>~
$?%p >~n ~:R.2p
.G-lt 3..%3‘ dk+g
‘a -$‘i”?~a~yElqge
!
1. Positiontheshelfor shelvesin
theoven.
2. Closeovendoor,turn OVEN
TEMP knobto desiredtemperature
andpreheatovenforabout10minutes
ifpreheatingis necessary.
3. Place foodin ovenoncenterof
shelf.Allowatleastan inchbetween
edgeof bakewareandovenwall
or adjacent utensils.
If cookingon twoshelvesat the
sametime, placeshelves about4
inchesapart and stagger foodon
them.
4. Check food fordcnenessat
minimumtime on recipe. Cook
longerif necessary.Switchoff
heat and removefood.
p%.z~“pcd=-=+:-.3~-
gJj&a&Q&a
A
Preheatingisimportantwhenusing
temperaturesbelow225°F.and
when bakingfoods such asbiscuits,
cookies, cakesandotherpastries.
Preheating isnotnecessary when
roastingor for long-timecookingof
whole meals.
HI(+MLR13srtio.m
Most baking is done on the second
shelf position (B) from the bottom.
When baking three or four items,
use two shelvespositionedon the
second and fourth setsof supports
(B& D) from bottomof oven.
Bakeangel foodcakes on first shelf
position (A) from bottom of oven.
-m “ ‘
:.-,-,,
,_,:;.:<W@m.:=-a
,.*Tn5m
L$ :.
QFollow a tested recipe and
measure the ingredientscarefuHy.
Ifyouare usinga package mix,
followlabel directions.
@Ifmoistureisnoticeableonthe
front oftheovenoron theoven
windowwhenfirstturningonthe
oven,leavetheovendoorajarfora
fewminutesor untilthe ovenis
warm.
@Do notopenthe ovendoor during
abakingoperation—heatwillbelost
andthebakingtimemight needto
beextended.Thiscouldcausepoor
bakingresults.
@Do notdisturbthe heat circulation
intheovenwiththe useofaluminum
foil.Iffoilis used,placeasmall
sheet ofit, about 10by 12inchesat
themost,ona lowershelfseveral
inchesbelowthefood.Do notplace
foil on theovenbottom.
~0~~0~ B~ltiw
Problem
andPossibleSoIutiom
PIEM
Burning
Oventoofull;avoidovercrowding.
~
@Edgesofcrust toothin.
~Incorrectbakingtemperature.
Bottom ‘crustsoggyand Unbaked
@A11owcrustand/orfillingtocool
sufficientlybeforefillingpie shell.
~Fillingmaybe toothin orjuicy.
@Fillingallowedtostandin pie shell
beforebaking.(Fillpie shellsand
bakeimmediately.)
@Ingredientsandproper measuring
affectthequalityofthecrust. Use a
testedrecipeand goodtechnique.
Makesurethere arenotiny holesor
tearsina bottomcrust. “Patching”
apiecrust couldcausesoaking.
Pie filling HRnsOWer
~
Top and bottomcrust notwell
sealedtogether.
Q Edgesofpiecrust not built up
highenough.
oToomuch filling.
Q Checksize ofpie plate.
I?astry’istm.Egh;W%l$tnot flaky
oToomuchhandling.
Q Fattoosoftor cutin too fine.
Rolldoughlightlyand handle as
littleas possible.
aroundedges
fcAm
cake rises !@ghwon ‘one side
@Batterspreadunevenlyinpan.
eO\fenshelvesnotlevel.
~Usingwarpedpans.
~Incorrectpansize.
‘Cl&escracking on top
@Checkoventemperature.
*Battertoothick,followrecipe
orexactpackagedirections.
@Checkforpropershelfposition.
@Checkpansizecalledforinrecipe.
@Improper mixingofcake.
cake falls
~Toomuch shortening?sugaror
liquid.
@Checkleaveningagent,baking
powderor bakingsodatoassure
freshness.Makeahabittonote
expirationdatesofpackaged
ingredients.
@Cake notbakedlongenoughor at
correct temperature.
~Ifaddingoiltoacake mix, make
certaintheoilisthetype and
amountspecified.
crust ishard
@Checktemperature.
@Checkshelfposition.
cake has soggy layer or streaks at
bottom
@LJndermixingingredients.
~Shorteningtoosoftfor proper
creaming.
@Toomuch liquid.
COOMES & BR3cmm
Doughy
Suwfaee
Check temperature.
@
@Check shelfposition.
@Followbaking instructions
carefully as givenin reliable recipe
or on conveniencefoodpackage.
@Flatcookie sheetswill givemore
evenbakingresults.Don’tovercrowd
foodson abaking sheet.
@Conveniencefoodsusedbeyond
their expiration date.
Browning Rno.lmnatiaeab!e on
one side
o Oven door notclosed properiy, p.-
check gasket
Q(3-w%shelf position.
fixnter;kavy crust on
seal.
()
,“
2’
----
(:- ‘)
-....~’
16
Page 17

-.
,.
:.
ii
~%jl..Aluminumpansconductheatquickly.For most
+
&&&
,,
--.:
..
Q
j
conventionalbaking,light,shiny finishesgivebestresults
- becausetheyhelp preverttover-browningin thetimeit
.+SAQ*
“-%~?takes for heat to cook the centerareas.Werecommend
ddl (satin-finish)bottomsurfacesof’pansforcakepans
andpieplatesto be sure thoseareas browncompletely.
2. Darkor non-shinyfinishes,also glassand pymce.rarn,
generallyabsorb heat whichmay resultindry, crisp
crusts.Reduceovenheat25”F.if lightercrustsare
desired.Preheat castiron forbakingsomefoodsfor rapid
browningwhenfoodisadded.
Bread
Biscuits(M-in.thick)
Coffeecake
Corn breador muffins
Gingerbread
Muffins
Popovers
Quickloafbread
Yeastbread (2 loaves)
Plainrolls
Sweetrolls
Cakes
I
without shortening)
Angelfood
Jelly roll
Sponge
Cakes
Bundt cakes
k
Layer
Layer,chocolate
Loaf
Cookies
Brownies
Drop
r
Refrigerator
Rolledor sliced
I
Fruits,
Other Desserts
Bakedapples
Custard
Puddings, rice
and custard
I
Pies
Frozen
Meringue
C)necrust
Twocrust
Pastry shell
Miscellaneous
Bakedpotatoes
Scalloped dishes
Souftles
I
ShinyCookieSheet B,C
ShinyMetalPanwith
satin-finishbottom
Cast Ironor GlassPan
ShinyMetalPanwith
satin-finishbottom
ShinyMetal MuffinPans
Deep Glassor CastIronCups
Metalor Glass Loaf Pans
Metalor GlassLoafPans
ShinyOblongor Muffin Pans
ShinyOblongor MuffinPans
AluminumTubePan
MetalJelly Roll Pan
Metalor Ceramic%
Metalor Ceramic Pan
$hinyMetalMuffinPans
UetalorGlass Loafor
rubePan
;hinyMetalPanwith
atin-finishbottom
ihinyMetalPanwith
atin-finish bottom
detal or Glass LoafPans
Ietal or Glass Pans
;ookie Sheet
:ookieSheet
‘ookieSheet
Glass or Metal Pans
Glass Custard Cups or
Casserole (set inpan of hot water)
Glass Custard Cups or
Casserole
Foil Panon Cookie Sheet
Spreadtocrust edges
GlassorSatin-finish Metal
Glassor Satin-finish Metal
Xass or Satin-finish Metal
let onOven Shelf
;Iass or Metal
Yass
SheIf oven
Positions
B,A
B
B
A, B
B
B
A, B
A, B
B, A
A
B
A
A, B
B
A, B
B
!3
B
B,C
B,C
B, C
B, C
A, B,C
B
B
A
B,A
A, B
B 400°-4250
B 450°
A, B, C
A, B, C
B 300°-3500
Temperatures
400”-475°
350°-4000
400°-4500
400°-4250
350°-3750
375°-425”
375°-4250
350°-3750
325°-3750
375°-4000
325°-3500
325°-3500
350°-3750
275°-3000
350°-3750
350°-3750
350°
325°-3500
350°-4000
400°-4250
375°-4000
350°-4000
300°-3500
I
325°
I
400°-4250
325°-3500
400°-4250
325°-4000
3~5°-3750
350°
375°
Thne,
MinutesFood Cookware
15-20
20-30
20-40
45-55
20-30
45-60
45-60
45-60
10-25
20-30
30-55
10-15
45-60
45-65
20-25
2-4 hrs.
20-35
25-30
40-60
25-35
10-20
6-12
7-12
30-60
30-60
50-90
45-70
15-25
45-60
40-60
12-15
60-90
30-60
30-75
Comments
Canned, refrigeratedbiscuitstake2 to 4
minutesless time.
Preheatcastironpanforcrispcrust.
Decreaseabout5 minutesformuffin mix.
Or bakeat 450”F. for 25 minutes,thenat
350”F.for 10to U minutes.
Dark metalorglassgives deepest
browning.
For thin rolls, ShelfBmaybe used.
Forthin rolls, ShelfB maybe used.
Twopiece panisconvenient.
Line pan with waxed paper.
Paper linersproducemoremoistcrusts.
Use 300°F.andShelfBfor smallor
individualcakes.
Bar cookies from mixuse sametime.
Use Shelf C and increasetemperature
25 to 50°F.formorebrowning.
Reducetemperatureto300”F. for large
custard.
Cook bread or rice pudding with custard
base 80 to90 minutes.
Large pies use400°F.and increasetime.
Toquicklybrownmeringueuse400°F. for
8to 10minutes.
Custard fillingsrequire lowertemperature,
longer time.
Increase time for large amount or size.
Page 18

Roastingiscookingbydry heat.
Tendermeator poultry can be
roasteduncoveredin youroven.
Roastingtemperatures,which
shouldbelowand steady,keep
spatteringtoa minimum.When
roasting,it is not necessaryto sear,
baste,cover,or add watertoyour
meat. Roastingiseasy,just f;llow -
thesesteps:
Step 2: Check weightof roast.
Placemeatfat-side-upor poultry
breast-side-upon roastingrack in a
shallowpan. The meltingfatwill
bastethemeat. Selecta pan as
closeto thesizeofmeataspossible.
(Broilerpan with rack is a good
Panforthis.)
Step 3: Turn0’VENTEMP control
to desiredtem~erature.Check the
Step L Positionovenshelfat RoastingCha~ fortemperatures
secondfrombottomposition(B) for and approximatecookingtimes.
smallsize roast (3 to 5 lbs.) and at
bottomposition(A) forlargerroasts.
Step 4: Mostmeatscontinueto
cookslightlywhilestandingafter
beingremovedfromtheoven.Fol}
rareor mediuminternaldoneness,
ifmeatis to stand10to20 minutes
whilemakinggravyor foreasier
carving,youmaywish to remove
meatfromovenjust beforeit is
done.If no standingis planned,
cookmeat to suggested
temperature.
E?lwm$3lF?mM?3ts
Frozenroasts ofbeef, pork,
lamb,etc., can be started without
thawing,butallow 10to 25 minutes
per pound additional time (10
minutesper pound for roastsunder
5 pounds, more time for larger
roasts).
Thawmost frozenpoultry before
roastingto ensure evendoneness.
Somecommercial frozen poultry
can be cooked successfullywithout
thawing.Followdirectionsgiven
on packer’slabel.
Oven
TYw
Meat 3toS-lbs. 6to$-lbs.
Tendercuts; rib, highquality 325° Rare: 24-30 18-22 130°-1400 .
sirloin tip, rump or top round*
Lamb leg or bone-inshoulder* 325°
Vealshoulder, leg or loin*
Pork loin, rib or shoulder* 325°
Ham, pre-cooked
Ham, raw
*Forbone]ess rolled roasts over6-inches
hick, add 5 to 10minutes per lb. to times
;iven above.
%NAtry 3 to !Nbso Ower5 Ibs.
;hicken or Duck 325°
~hickcnpieces
‘urkey 325°
Temperature
325°
325°
325° WellDone: 20-30 17-20 160°
375° Well Done: 35-40
Doneness in Minutesper Pound
Medium: 30-35
WellDone:
Rare: 21-25 20-23 130°-1400
Medium:
WellDone: 30-35 28-33 170°-185°
WellDone:
WellDone: 35-45 30-40 170°-1800
ToWarm: 10minutes per lb. (anyweight) 125”-130°
WellDone: 35-40 30-35
Well Done: 20-25 15-20
ApproximateRoastingTime
35-45 28-33 170°-1850
25-30 24-28 150°-160°
35-45 30-40
Under 10 lbs.
10 to Edbs. Over B ‘h. h thigh:
22-25 150°-160°
tO KUbs.
lo
Internal
Temperature‘F
170°-180°
185”-190°
185°-I90°
185°-1!200
/-’,
Page 19

.%%i&oilingiscookingfoodbydirect
.
e~’ f
wg]eat rornabovethe food. Your
rangehasa convenientcompartment
&&#.belowthe ovenfor broiling.It also
3
hasa speciallydesignedbroiler part
and rack thatallow&ipping fat to
drain awayfrom the foodsand be
keptawayfrom the high heatof
thegas flame.
Distancefrom theheat sourcemay
bechangedbypositioningthebroiler
pan and rack on one ofthree shelf
positionsinthebroilercompartment—
A (bottomof broiler compartment),
B(middle)and C (top).
1. If meat has fator gristle near the
edge, cut vertical slashes through
both about2 inches apart, but don’t
cut into meat. Werecommend that
youtrim fatto preventexcessive
smoking, leavinga layerabout
l/8-inch thick.
2. Removebroiler pan and rack
om broiler compartment and
ace foodon rack.
3. Pull out drawer and position
broilerpan in compartment.Placing
fwd closertoflameincreasesexterior
browningof food, butalso increases
spattering and the possibility of fats
and meatjuices igniting.
4. Close broiler door and, for most
foods, turn OVEN TEMP knob to
13R01L. Exceptions are chicken
and ham which are broiled at a
lowersetting in order to cook food
through before over-browning it.
5. Turn most foodsonce during
cooking;(the exceptionisthinfillets
of fish; oil one side, place that side
downonbroilerrackandcookwithout
turning until done). Time foodsfor
about one-half the total cooking
time, turn food, then continue to
cook to prefiirred doneness.
6. Turn OVEN TEMP bob to
OFF. Remove broiler pan from
-~<{m~pai-tmentand serve food
.. -,
)mediately. Leave pan outside
i
‘--c”bmpal”tmenlto cool.
,.—..
F
“]
(..-,;
@usetongs to turn meat ovel’—
and broiler doomdosed. However,
ifyoulikeyoursteaksvery rare
inside and charred on the outside,
leavethe ovendoor slightlyajar.
I
Quantity
andlor
Food
Bacon Arrangeinsinglelayer.3% 3%
GroundBeef
WellDone
Bed Steaks
Rare
Medium
WellDone
Rare
Medium
WellDone
Chicken(450°)
BakeryProduct
Bread(Toast)or
ToasterPastries
English Muffins
Lobstertails
(6to 8-oz. each)
Fish l-lb. fillets H to
Hamslices (450°
Precooked
Porkchops
WellDone
ChO~S
Lamb
Medium
WellDone
Medium
WellDone
tViemws,
similar precooked
SaUSii %X,
L
bratwurst
‘I%ick.ness
%-lb. (about8
thin slices)
l-lb. (4patties)
Y2 to 34-in.thick c
l-in. thick
(1-l %lbs.)
Iti-in. thick
(2-2M Ibs.)
1 whole
(2to 2%-lbs.),
split lengthwise
2-4slices
1pkg. (2)
2-split
2-4 B 13-16
%-in. thick
l-in. thick B 8
2 (Y’in.)
2 (l-in. thick), A
about 1lb.)
=1=
2(1 inch)
about 10-12oz.
2 (1%inch),
abo~t 1lb.
l-lb. pkg. (10) If desired, split sausages in half
Broil
Pbsition
c
A
A
A
A
A
A
A
1
c
c
c
A
B
B
B
B
c
1
piercingmeatloses juices.
@steaks am! chops Shodd be at
Ieast 1inch thick for bestbroiling
resuks. Pan broilthinnerones.
INSide
‘rime,
Minutes
9-1o 7-8
9
12
13
10
15
e 25
30-35
2-3
3-4
5
8
10
13
8
10
10
17
6
~n~~i&
Time,
Minutes
12-14
16-18
Do not
10-12
12-14
Comments
Spaceevenly.Upto 8patties
takeaboutsame time.
Steakslessthan l-in. cook
7
through beforebrowning.
5-6
Pan fryingis recommended.
8-9
Slashfat.
6-7
Reduce times about 5 to 10min.
per side forcut-upchicken.
Brusheach sidewith melted
butter.Broilwitl?skin sidedown
first andbroilwithdoorclosed.
‘/2-1 Spaceevenly, Place English
muffinscut-side-upandbrush
with butter if desired.
Cut throughbackof shell,spread
turn
over.
open. Brush with meltedbutter
beforeandailer halftime.
5
Handle and turn very carefully.
Brush with lemonbutter before
and during cooking if desired.
Preheat broiler to increase
browning.
lnc~se times5-10min. per side
for I%-in. thickor homecured.
Slash fat.
4-5
4-7
Slash fat.
10
4-6
1-2
lengthwiseinto 5 to 6-in. pieces.
Page 20

Propercare and cleaningare
importantso yourCookingCenter
willgiveyouefficientand
satisfactoryservice.Followthese
directionscarefidlyin caring for it
tohelp assure safeandproper
maintenance.
BE SURE ELECTRIC POWER
1SOIFFBEFORE
pm mYomt.coom~
ANY
C3LEANliNIG
CENTER.
Ckwrd Piands
Don’tuse sharp-edgedutensils
aroundthe controlpanels. They
mightdamageit.
Cleanthepanels with alightly
dampenedcloth. DO N~ USE
cleaningsprays or large amounts
ofsoapand water.These can cause
problemswith thecontrol
mechanisms.
r-p
~f~=lw~~T:~Q~,’~”>s’,..,
L .4.4.J*1.~. ..,/,,.../.,r,+A&x.
The probe issturdy,butcare
shouldbe taken in handlingit. Do
nottwistit. Avoiddroppingit.
Clean itas soon aspossible after
use. The entire probe is immersible
and can be washedin warm, soapy
water. Youcan wipe it with a sudsy
cloth, then rub metalparts with a
plastic scouringpad if necessary.
Rinsewith clean water and dry
with a softcloth or paper towel.
Youcan also wash the probe in the
top rack of a dishwasher.
l~~.1“’1“i~’i~”~”~l’”m!!T+?[+~>’~!
Li!LL,.s..,.A..:.>.ltiL.~’.--.22
i....
Ex2NOT
foilin either your microwaveor
on the bottom of the lower oven. If
youdo, your foods may not cook
properly. The oven finish may be
damaged. And there may bean
increase in heat on the outside
surfaces ofthe oven.
-+:xq.pw~.~~~
A
.
-T-l*q
place a sheet of aluminum
Toreplacea burned-outbulb,
unplugyourCookingCenter.
Unscrewthe accesspanel in the
upper leftcorner on the back of the
oven.Replace with a same size
appliancebulb. Plugthe ovenin,
push the ON buttonto testthe light,
and replace the access panel.
Use metal only asdirected in the
Cookbook. Metaltraysno more
than 3/4” deep maybe used for TV
dinners, and the metaltemperature
probe is designed for microwave
ovenuse. Alwayskeep metal at
least one inch awayfrom sides of
oven.
Clean the outside ofyour
microwaveovenwith soap and
water, then rinse and dry. The outer
pane ofthe windowis glass. Wipe
itclean with a damp towel. Chrome
is best wiped with a damp cloth and
then with a dry towel.
Keep it dean and sweet-smelling.
Openingtheovendoora few
minutes after cookinghelpsair out
theinside.An occasionalthorough
wipingwith a solution of baking
sodaand waterkeepsthe interior
fresh.
spik.andSpattt?mareeasy
to remove from Wallsand floor.
That’sbecausethere’slittle heat
exceptinthe food, or sometimesin
theutensil. Somespatterswipeup
with a paper towel,somemay
require a damp cloth. Remove
greasyspatterswitha sudsycloth,
then rinse and dry.
~VER
wmAco~m~cl~~
OWEINCLEANERcmANY
PARTOFYOUR
OVEN*
Wipe up spatterson the glasson
the insideof the door ILMy.Wash
glass, when it’ssoiled, with a
minimumof sudsy,warmwater.
Rinsethoroughlyand dry.
Vv@ metal and I@3stk
the inside ‘ofthe dumr!b?2qwmtly.
Use a damp cloth to removeall
soil. DO N~ USE ABRASIVES,
such as cleaning powdersor steel
and plastic pads. They may mar the
surface.
The glass tmy can be washedby
hand or in a dishwasher.
Door Surface. When cleaning
surfaces of door and oventhat
come together cmclosingthe door,
use only mild, non-abrasive soaps
or detergentsapplied with a sponge
or sofi cloth.
MICROWAVE
parts‘otil
20
Page 21

‘q+ .,
1:4IJrjl$~r !l@=
firq~-J&~A
Theholes intheburners ofyour
rangemustbe keptcleanatall
timesfor proper ignitionand an
even,unhamperedflame.
Cleanthe burners routinelyand
especiallyafter bad spillovers
whichcould clog these holes.
Burnerslift right out forcleaning.
I
ok A screw holdseach of the
burners in date to keer) them from
wobblinga~ounddurin~ shipment.
Tagsindicatetheir location. Remove
the shipping screw with a Phillips
head screwdriver,lifithe burner, tilt
itto one side at the end closestto
the igniter and moveit towardthe
back of the range. This disengages
itfrom the gas valvesat the front of
the range, and it lifts out easily.
Toremove burned-on food, soak
the burner in a solution of’a product
usedforc~eaningthe inside of coffke
makers. Soak the burner for 20 to
30 minutes. If the food doesn’t
rinse off completely, scrub it with
soap and water or a mild abrasive
cleanser and a damp cloth.
Beforeputting the burner back, dry
itthoroughly by setting it in a warm
ovenfor 30 minutes. Then place it
backintherange, making sure it is
properly
seated ~~d l~v~l.
Gratesshouldbewashedregularly
and, ofcourse, after spillovers.
Washthem in hot, soapywaterand
rinsewithclean water.Dry the
grateswitha cloth–don’t put them
backonthe rangewet.When
replacingthe grates, be sure they’re
lockedintopositionovertheburners.
‘Eogetrid ofburned-onfood, soak
thegratesin a slightlydiluted
liquidcleanser.
Althoughthey’redurable, the
grateswill graduallylosetheir
shine, regardlessofthe care you
takeofthem. This isdueto their
exposuretohightemperatures.
Topreservethe grates’porcelain
finishas longas possible,havea
pan on the grate beforeyouturn on
theburner,andlowertheflamewhen
foodreachesthedesiredtemperature.
I
Removethegrates and lift out the
chrome drip pans. Washthem in
hot, soapywater. Rinse them with
clean hot water and polishthem dry
with a cloth. Never use
abrasive
cleanerorsteelwool-they’llscratch
thesurface.Instead,soakthedrip
pansforabout20minutesinslightly
dilutedliquidcleanserormild
solutionofamonia andwater(1/2
cupofammoniatoonegallonof
water).Aftersoaking,washthem
inhot,soapywater.Rinsewith
water a~~ ~Oliskt wN2 a ~lo~~.
clean
Cleanthe area underthe cooktop
often.Built-upsoil, especially
grease,maycatch fire.
Tomakecleaningeasier, the entire
cooktopmaybe liftedup andheldup
bylocfing arms thatcatch and hold
thetop up when it’s all the wayup.
Be sure ail burners are turned
off before raising the Cooktope
Then removethegrates, grasp the
front sidesofthe cooktop and lift.
After cleaning under the cooktop
with hot, mild soapywaterand a
clean cloth, put the cooktop back in
place. Lift up a littleto release the
lockingarms andpush them in
while guidingthetop back down.
Becareful to notpinch yourfingers.
r
$
,,
t
\
,
,,
Page 22

~:-lp.
(.._
Uwm 5%4&5Aves
Ovenshelves may be cleanedwith
a mild abrasivecleanserfollowing
manufacturer’sdirections.After
ckaning,rinsethe shelveswithclean
wateranddry with a dry cloth. To
removeheavy,burned-onsoil,soapy
metalpadsmay be usedfollowing
manufacturer’sdirections.After
scrubbing, wash with soapywater,
rinseanddry.
Broiler F%. & llacl~
Afler broiling, removethebroiler
rack and carefullypour offthe
grease. Washand rinse the pan
and rack in hot, soapywater.
If food has burned on, sprinkle
the broiler rack while hot with
detergentand coverwith wetpaper
towelsora dish cloth. That way,
burned-on foodswill soak loose
whilethemeal is beingserved.
Do not storea soiledbroiler pan
and rack in the ovenor broiler
compartment.
.p&;;lMlW&3ieClWeE3Door
The ove[ldoor is removableto
make cleaning the oveneasier.
--]30E
(Dueto the largeamountof
insulationand theconstructionof
thedoor, it isheavy.)
Note: Be carefulnotto placehands
betweenthespringhingeandthe
ovendoorframe. The hingecould
snapback and pinch fingers.
Washwithhot, soapywater.For
stubbornspots,usea solutionof
ammoniaand water.Do not
immersethe door in water.
Torepke the door, positionslots
inbottomofdooroverthehinges
that are inthe “out” position.Then
lowerthe door slowlyandevenly
overbothhingesatthe same time.
If hingessnapback againsttheoven
frame, pull them back out.
Removableoven.Ehttw-n
The ovenbottomcan be removedto
makecleaning easier.
mlimrnove the ovenbottm-n:
L Removethe ovenshelves.
2. Removethe two knurled holddown screws at each front corner.
If screwsare too tightto removeby
hand, use a screwdriver.
I
3. Pullthe bottom forwardand out
oftheoven,keepingthe rear ofthe
ovenbottomglidingonthebottom
ofthe lowestshelfglide. This keeps
itfromcatchingontheburnerigniter
shield.Toreplacethe bottom,just
reversethisprocedure,makingsure
thetwotabson the rear ofthe oven
bottomgointotheslotsat the rear.
The ovenbottom has a porcelain
enamelfinish. Tomakecleaning
easier, protecttheovenbottom
from excessivespillovers.This is
particularly importantwhenbaking
a fruit pie or otherfoodswithhigh
acidcontent. Hot fruit fillingsor
foodsthatare acid in contentsuch
as milk, tomatoor sauerkraut, and
sauceswith vinegaror lemon
juice, maycausepittinganddamage
tothe porcelainenamelsurface.
Toprotectthe ovenbottomsurface,
place a pieceofaluminumfoil
slightlylargerthanthebaking dish
or smallcookie sheeton a lower
rack or under thebakingdish to .
catch anyboilovers.It shouldnot .“#
conmletelvcoverthe rack as this
wouidcau~eunevenheat in the
oven.Aluminumfoilshould not
be placed on the ovenbottom.
If a spilloverdoesoccur on the
ovenbottomallowthe ovento cool
first. Youcan clean the bottom with
soap and water,a mild abrasive
cleanser, soap-filledabrasivepads,
or causticovencleaner following
manufacturer’sdirections.
When applyingovencleaner, be
carefulnottogetitonthe countertop,
floor, continuous-cleaningoven
liner or any other surface.
Note: Porcelain ovendoor liner and
ovenbottom maybe cleaned with a
commercial ovencleaner. They
must be removed and cleaned.away
from the ovento prevent damage to
the continuous cleaning oven liner.
I
e
Toremovethe door, open it a few
inches @the special stop position
that will hold the door open. Grasp
firmly on each sideand M-ilhe
door straighl up and off the hinges.
Place your fingers in the slots in the
bottom and lift up the front edge of
the oven bottom until it is clear of
the ovenfront frame.
(’_
.:)
.-.
)
Page 23

w
&f:;:<.x.,-‘ ;p L;.>,.::0..J??$ o
2,
\::e~=~ ..-.,..=..iLMk.J,.+&
--K...=
,-,.
‘& .~--+~’gp.p
.,-m~i?
{,
J .
‘..
t.:
$&:ky
1 i.lL~L2 IIw-i-
*
.4. &-&.
@clJ;~q ~~;~>
._..l.@
(:~jwmE%3ngehasa continuous-
$aeaning(Yw2nt‘thatdeansitself
whilecooking. The insideofthe
oven—top,sides, and back—is
finishedwithaspecialcoating
which cannotbe cleaned inthe
usualmannerwithsoap,detergents,
commercialovencleaners, coarse
abrasivepadsor coarse brushes.
Their useand/ortheuse of oven
sprays will cause permanent
damage.
The special coating isa porous
ceramicrmaterialwhich is dark in
color and feelsslightlyrough to the
touch. If magnified, the surface
wouldappear as peaks, valleys,and
sub-surface “tunnels~’ Thisrough
finishtends to preventgrease
spattersfrom forming little beads
or droplets which run downthe
sidewaHsofa hard-surface oven
liner leavingunsightlystreaksthat
=quire hand cleaning. Instead,
“~-~en spatter hitsthe porous finish
.=-
4
_ it is dispersed and is partially
‘<~~~t~li-bed.This spreading action
‘-- increases the exposure ofoven
soilto heated air, and makes it
somewhat less noticeable.
S-oilmay not disappear completely
and at some time after extended
usage, stains may appear which
cannot be removed.
The!qx3cidcoating Wmtksbeston
smallamounts d spatter.It does
notworkwellwithlargerspills,
especiallysugars,eggordairy
mixtures.
‘His special coating is not Used
on ovenSheives,Ovenbottom or
door liner. Removethesetoclean
witha commercialovencleanerto
preventdamagingthecontinuous
cleancoating.
To clean tile
colltinuom-cleanil~
Q~@n:
L Let rangepartscoolbefore
handling.Ris recommendedthat
rubberglovesbe worn when
cleaningrangeparts manually.
2. Removeshelvesandcookware.
3. Soilvisibilitymaybe reduced by
operatingthe ovenat450°F.Close
thedoor and turn OVEN TEMP
knobto450°F.Time for at least4
hours. Repeatedcyclesmaybe
necessarybeforeimprovementin
appearanceisapparent.
mMEMBER:
OPERATION OF THE OVEN, THE
DOOR,WINDOWANDOTHER
RANGESURFACESWILL GET HOT
ENOUGHTOCAUSEBURNS.DO NOT
TOUCH.LET THERANGECOOL
BEFOREREPLACINGOVENSHELVES.
DUWNG THE
4. If aspilloverorheavysoiling
occursonthe poroussurface,as
soonas practicalaftertheovenhas
cooled, removeasmuchofthesoil
aspossible using a smallamountof
wateranda stiffbristlenylon
brush. When usingwater,useit
sparinglyandchangeit frequently,
keepingitas clean aspossible,and
be suretoblotitup with paper
towels,cloths,or sponges.Do nol
rub orscrubwith papertowels,
clothsor sponges,sincetheywill
leaveunsightlylinton the oven
finish. If water leavesa whitering
on the finishas itdries, apply water
againand blot
itwithaclean
sponge,startingattheedgeofthe
ring and workingtowardthe center.
Do not use soap, detergent,
eonnnerciaiovendeaner9silicone
oven
sprays,coarsesteelpadsor
4xximebruxhesonthe porous
surface. These productswill spot,
clog, and mar the porous surface
and reduce its abilityto work.
Do not sempe the porous surface
with a knife or
couldpermanently damagethe
finish.
The!ovenbottom and.the inside
of the oven door have a pm=cdain
enamel finish. The door lifl.soff
and the ovenbottom comes out for
cleaningawayfromtheContinuousCleaning oven.
spatula—they
23
,-
1
0
Page 24

~+\L<”;’a3i-7j@$-J’g~~~
‘+&g.
— ——.——
- — .———-—... ......... ...
“~1,.@G4J.@ d.& ,,a
G
g:y~~~
‘rjlw”EFl$-Jls$at
.
‘Thetemperaturecontrolin your
newovenhasbeencarefidlyadjusted
toprovideaccuratetemperatures.
However,if this ovenhasreplaced
oneyouhaveused for severalyears,
youmay notice a differenceinthe
degreeofbrowningor the length
oftime required whenusingyour
favoriterecipes. Oventemperature
controlshavea tendencyto “drift”
overa period of years and since
thisdrift is very gradual, it is not
readily noticed. Therefore, you
mayhavebecome accustomed to
yourpreviousovenwhichmay
haveprovideda higher or lower
temperature than youselected.
Beforeattemptingto havethe
temperature of your new oven
changed, be sureyouhavefollowed
the baking time and temperature of
the recipe carefully.Then, after
you haveused the ovena fewtimes
and you feelthe oven is too hot
or too cool, there isa simple
adjustment you can make yourself
on the OVEN TEMP knob.
Pull the knob off the control shaft
and look at the back side. There is
a disc in the center of the knob skirt
with a seriesof notches on the inner
edge nextto the knob shaft. One of
these notches is positioned over a
pointeron the side oftheknob shaft.
Note position of
pointerto notches
before adjustment
Notewhichnotchthe pointeris
locatedin. Tomakean adjustment,
carefi.dlyloosen(approximately
oneturn), butdo not completely
removethe twoscrewsthatholdthe
skirttothe knob.Hold the knob in
onehand and withthe other hand
carefullytiltthe skirtuntilthenotch
inthediscclearsthepointeronthe
knobshaft.
Toraisethe oventemperature,turn
thedialin the direction ofthe
arrowfor “Raise7 Tolowerthe
temperature, turn the diallin the
directionofarrow for “Lower~’
Each notch willchangethe oven
temperatureapproximately25”F.
Wesuggest that you make the
adjustmentone notch from the
originalsetting and check oven
performance beforemaking any
additionaladjustments.
After the adjustmentis made, make
sure the pointer on the knob shaft
isalignedwith the notch in the disc.
Press skirt and knobtogether and
retightenscrewsso they are snug,
butbe careful notto overtighten.
Re-installknob on range and
check performance. Note: After
an adjustment has been made the
“Off” and “Broil” positions will
not line up with the indicator mark
on the control panel as they
previously did. This condition
is normal and will not create
a problem.
f(-j”dfxwEhwQmelm!nisb
When therangeiscool, washthe
enamelfinishwith mild soap and
wateror a mild abrasivecleanser
appliedwithadampcloth. Rinse
the surfacewith clean waterand
dry witha soft cloth. If you wish,
occasionallyapplyathincoatof
mildcleaningwaxtohelp protect
the finish.
There are a numberofprecautions
youcan taketo avoidmarring the
surfaceofthe rangeand to prevent
it from becomingdull. Don’tslide
heavypans acrossit. If you spiH
foodswith a lotofacid (tomatoes,
sauerkraut, fruitjuices, etc.) or
foodswith highsugarcontent,
clean them up as soon as possible.
If allowedtoset, thesefoodscould
cause a dull spot. Also, no matter
how stubbornthe foodstain, neve
use harsh abrasivecleansers. Th
could permanently damage the - --
enamel surface.
3%%
@
locking screws
24
Page 25

-.!..
.A.
‘ .,. ..,- . ,,,:{-,..
,,, ,
. .. ..
‘.1; :.j“. iL
.,, ..-”. .. +:.
,!, .!
,.
Note:Let rangepartscoolbeforecleaning.
kARI’
BroilerPanandRack
ControlKnobs
MATERIALSW ELSE
~ -–
I ~ SoaparidWater
e Soap-FilledScouringPad
@CommercialOvenCleaner
~MildSoapandWater
OutsideGlassFinish e SoapandWater
Metal,including
SideTrimsand
TrimStrips
CMerPorcelain
EnamelFinish
PaintedSurfaces
[nsirieOvenDoor*
OvenInterior*—
Top,Sidesand
Back
(CAUTION:When in
use, lightbulbs can
becomewarmenoughto
. break if touched with
)
moistclothor towel.
Whencleaning,avoid
warmlampswithcleaning
DSoapandWater
ePaperTowel
QDryCloth
*Soap and Water
oSoapand Water
oSoap and Water
~Soap-FilledScouring Pad
~CommercialOven Cleaner
~StiffBristleNylonBrush
Drainfat,cool pan and rackslightly.(Do notlet soiledpanandrackstandinbroiler
compartmenttocool.)Sprinkleon detergent.Fillthepanwithwarm waterandspread
clothorpapertoweloverthe rack. Let pan and rack standforafewminutes.Wash;scour
ifnecessary.Rinseanddry.OPITON:Thebroilerpanandrackmayalsobecleanedin a
dishwasher.
Pulloffknobs. Washgentlybutdonotsoak.Dry and return controlsto rangemakingsure
tomatchflatareaon the knob and shaft.
Cleanoutsideofcooledblackglassdoor witha glasscleanerthatdoesnotcontain
ammonia.Washother glass withclothdampenedin soapywater.Rinseandpolishwitha
dry cloth. If knobs are removed,do not allowwaterto run downinsidesurfaceofglass
whilecleaning,
Wash,rinse,andthenpolishwith a dry cloth.DO NOT USEsteelwool,abrasives,
ammonia,acids,orcommercial ovencleanerswhichmaydamagethefinish.
Avoidcleaningpowdersor harshabrasiveswhichmay scratchtheenamel. If acidsshould
spill onthe rangewhileit is hot, useadry paper towelorclothto wipeup rightaway.
Whenthesurface has cooled, washand rinse. For other spills, such as fat smatterings,etc.,
wash with soap and waterwhencooledandthen rinse. Polishwithdry cloth.
Usea mild solutionof soap and water.Donotuseanyharshabrasivesor cleaningpowders
whichmayscratchor mar surface.
Toclean oven door; removeby openingafewinchesand graspingdoorat sides. Lift door
up andawayfromhinges.Cleanwithanyand all mentionedmaterials.Replaceby
grasping door at sides and liningupdoor with hinges. Push doorfirmly intoplace.
Cool before cleaning.
Ifheavysoilinghas occuredontheporoussurjace, removeas muchofthe soil as possible
usingasmallamountofwater and a stiff bristle nylonbrush. Use watersparinglyand
change it frequently,keepingit as cleanas possible, and be sure to blot it up withpaper
towels,cloths,or sponges.Do not ruborscrubwithpaper towels,clothsor sponges, since
theywill leave unsightlylint on the ovenfinish. H waterleavesa whiteringonthe finish as
it dries, applywateragain and blot
andworking towardthe center.
Forspecialcleaninginstructions,see page 23.
GENERALDERECTK3NS
itwithaclean sponge,startingattheedgeofthering
cloths.)
RemovableOven
Bottom
Surface Burner
Grates
Chrome-Plated
Drip Pans
Burners
shelves
0SoapandWater
e Soap-FilledScouringPad
(Non-metallic)
*SoapandWater
e Soap-FilledScouringPad
(Non-metallic)
~Soap and Water
~StiffBristled Brush
e Soap-FilledScouringPad
(Non-metallic)
QSolutionfor Cleaning
InsideofCoffeeMakers
~SoapandWater
@Mild Abrasive Cleanser
oDamp Cloth
~Soapand Water
*Soap-Filled ScouringPad
@Commercial Oven Cleaner
—
The ovenbottom panel can be removedforeasycleaning (see page22). Use the same
directions forcleaningasexplained aboveforPorcelain Enamel Finish.
Lift out whencoo!. Soak 5 to 10minutesifdesiredin warm solution of dishwasher
detergent. Scour with materials mentioned here to removeburned-onfoodparticles.
Washafter each cookingsounnoticedspatterwill not “bum on” nexttime Youcook. TO
remove“burned-on” spatters, use anyor all cleaning materialsmentioned. Rublightly
with scouringpad toprevent scratching of the surface.
Wipe offburner heads. If heavyspilloveroccurs, removeburners from range(seepage
andsoakthem
ofcoffeemakers, such as Dip-It brand. If soil does not rinse off completely, scrub burners
with soap andwateror a mildabrasive cleanser and adampcloth. Dryburners in a warm
for20 to 30 minutes in solutionof hot water and product for cleaning inside
ovenfor30 minutes beforereturning themtothe range.
Removeshelvesand clean themoutside of the oventoavoid damagingthe specially coated
oventop,sides andback. Useanyand all mentioned materials. Rinse thoroughly to
removeall materials after cleaning. N(XE: Somecommercial ovencleaners cause
darkening anddiscoloration. Whenusing for first time, test cleaner on small part of shelf
and check for discoloration beforecompletelycleaning.
?%ilkwe of marin:~des.fruit iuices, and basting materials containing acids maycausediscoloration. Spillovers shouldbe blotted up immediately,with care
b~ing”nkennot to touchany-hotportionofthe-oven.Whenthe surface iscool, clean and rinse.
21)
f
I
I
I
I
25
Page 26

-.,,F..
.—
-...——-.——.—————. —— ..-..—y,-—-.=-—— ..——
——:—..........
—.
PROBLEM
CONTROLPANEL
LIGHTED,YETOVEN
WILLNOTSTART
FOODSAREEITHER
OVERCOOKEDOR
UNDERCOOKED
I
AMTheseThings ‘h? Normai
tith YQurMcrowave oven:
@Steamor vaporescapingfrom
aroundthedoor.
@Light reflection arounddoor or
outercase.
POSSU%ILECAUSEAND REMEDY
@Doornotsecurelyclosed.
eONbu~onmust bePressedbeforeovencanbeprogrammed.
~Temperature
eSTARTmustbetouchedafier
~Anotherselectionentered
eMakesureyouhaveentered
@Clear wastouchedaccidentally.Resetcookingprogramandtouch START.
s Cookingtimesmayvarybecauseofs~rting foodtemperature, fooddensityoramount
offoods in oven.TouchCOOK 1andadditionalcookingtimeforcompletion.
~Incorrectpowerlevelentered. Check Cookbookforrecommended powerkwelor
changinglevelsduringcookingif necessary.
@Dish wasnotro~ted, turned or stirred. Somedishesrequire specificinstructions.
CheckCookbookorrecipefortheseinstructions.
~ToomanYdishesinovenatsametime.
morethanonefooditem. CheckCookbookforrecommendation on increasingtime.
probenotinsertedproperly during TempCOOk functions.
~ntering cooking selection.
already in oven ~rlcjCLEAR nottouchedtocancelit.
cooking time afier touching COOK 1or COOK2.
Cooking timemustbeincreasedwhencooking
@Dimmingovenlightandchangein
blowersoundmayoccur while
operatingatpowerlevelsother
than high.
~Dullthumpingsoundwhile
operatingatpowerlevelsother
@Some TV-Radiointerference
mightbenoticed whileusingyour
microwaveoven.It’ssimilartothe.
interferencecausedby other small
appliancesand doesnot indicatea
problemwithyouroven.
t~anhigfi.
ml? BURNERS Do
NOT LIGHT
I
@Makesure electrical plug is pluggedintoa livepoweroutlet.
~Burner holes on sideofburner maybe clogged. Removeandclean them.
Q Burnersmay notbe fitted correctly onto thegas valves. Reinstallthem proper}y
26
--L__.J
,/----,
{
.._/-
(’-->
)
)
.-.. ..
Page 27

,!
——
.—...——....———. -..-——-.----..—
PROBLEM
1
Owm
WORK
WILLNOT
Ovmd LIGHT DOES
NOT WORK
FOOD D(ES Nm
BROILPROPERLY
FOOD DOES N~
ROASTOR BAKE
PROPERLY
)
lMoEnTJREINSIDE
AND OI_JTSIDEOVEN
I
POSSIBLE G4ufw AND um~~
e~l~gonl-ang~isnot
completely insertedinto the outlet receptacle.
@Circuitbreaker in househasbeen tripped, or fusehas been blown.
@Ovencontrolsare notproperly set.
@Lightbulb is loose.
@Bulbis defective.Replace.
@Switchwhich operatesovenlightisbroken. Call for service.
@OVEN‘IXMPknob not set at BROIL. Broiler will notoperateif OVENTEMP
isturned past BROIL.
e ~mpropershelf
position is being used. Check BroilingChart.
@Necessary preheating wasnot done.
*Food is being cookedon hot pan.
@Utensilsare not suited for broiling.
@OVENTEMP knobnot set correctly.
@Shelfposition is incorrect. Check Roasting,Bakingand Broilingpages.
~Oven shelfis not level.
@Wrongcookware is being used. When roasting, pan is too small.
~Foiltentnot used when needed to slow downbrowning during roasting.
@Be sure oven ventduct is not blocked or covered.
knob
,..
,.
<+; ,
‘1[{:’..:...:-:’:“”:;”:’.;‘- ,-:’-1-
.L, . .
.’ .,/ . ..-/. ~---- --,-~-
Toobtain service, seeyourwarranty
onthe back pageofthis book.
We’reproud ofour service and
wantyoutobepleased. If forsome
reasonyou are nothappy withthe
serviceyou receive, here are three
stepstofoIIowforfurther help.
FIRST,contact the people who
serviced your appliance. Explain
.—.
/
)
‘
“L.
k.— --’-
.--=-%.
/
)
(
..-.
,
,1
whyyouare notpleased. Inmost
cases, thiswill solvetheproblem.
NEXT, if youare stillnotpleased,
write allthe details (includingyour
phonenumber) to:
ManagerjConsumer Relations
Hotpoint
Appliance Park
FINALLY, ifyourproblem isstill
notresolved, write:
Major Appliance
Consumer ActionPanel
20North WackerDrive
Chicago,Illinois60606
-,
Louisville,Kentucky40225
,.
27
Page 28

‘a
+
~~~
--
&&%34
Il$j
~l~
----
-w
itii?$ll
‘-
%
VWHAT1sNOTCOVERED
.
i
Foroneyearfrom dateoforiginal
~ur~hase, we will provide,freeof
charge,partsandservicelabor
inyour hometo repairor replace
anypart of the mk%lwvave
oven/range that fails because
of a manufacturing defect.
LIMITED
ADDITIONAL
FOUR-YEARWARRANTY
Forthe secondthrough fifth year
from date of original purchase,
wewill provide,freeof charge,a
replacementmagnetron tube if
the magnetrontube fails because
of a manufacturing defect. Youpay
for the servicetrip to your home
and service laborcharges.
@Service trips to your home to
teach you how to usethe product.
Readyour Use and Care
rnaterid.
if youthen have anyquestions
about operating the product,
please contact yourdealer or our
Consumer Affairs office atthe
address below.
~ improper installation.
If you havean installation problem,
contact your dealer or installer.
Youare responsible for providing
adequate electrical, gas,
exhausting and other connecting
facilities.
Thiswarrantyisextendedto
the original purchaserandany
succeedingownerforproducts
purchasedfor ordinaryhomeuse
inthe 48 mainlandstates,Hawaii
andWashington,DC.In Alaskathe
warrantyisthe sameexceptthat it is
LIMITEDbecauseyoumust payto
shipthe producttothe serviceshop
or forthe servicetechnician’stravel
coststoyourhome.
All warrantyservicewill be provided
byour FactoryServiceCentersor
byour authorizedCustomerCare@
servicersduring normalworking
hours.
Lookinthe White or YellowPages
of yourtelephone directoryfor
l+OTPOiNT FACTORYSERVICE,
GENERALELECTRIC-HOTPOiNT
FACTORYSERVICEor HOTPOINT
CUSTOMERCARE@SERVICE.
Replacementof housefuses or
@
resettingof circuit breakers.
Failureofthe product if it is used
~
for other than its intended purpose
or usedcommercially.
~ Damageto product caused
byaccident. fire. floods or acts
of God. ‘ ‘
WARRANTORIS NOTRESPONSIBLE
FORCONSEQUENTIAL DAMAGES.
!! =
,,r _
I I -–—
Iir - l!:>--
&--
!!
II ZIG
II X_
II =.:
Ii~=
11’%11‘I-L
+1 L
~7gG:
I
gig
\
-;
I
@
$&....J
Y’-
($$#
g~s I
FM NO.205(3026PO14]
.—
E
Some states do not allow the exclusion or limitation of incidental or consequential damages, so the above limitation or exclusion
may not apply to you, This warranty gives you specific legal rights, and you may also have other rights which varyfrom state to state.
Toknowwhat
-.——————
yourlegal rights are in your state, consult your local or state consumer affairs office or your state’sAttorney General.
L.---L---.J
A QUALITY PRODUCT OF [-d GENERAL ELECTRIC COMPANY
———
,,~:
!!;
N
IQ
1-
 Loading...