

Page 1

stfrom
RGB746GEN
Anti-Tip Device
Appliance Registration
Care and C1eaning 19-25
Clock and Timer
Consumer Services
Features
Flooring Under Range
InstallationInstructions
Leveling
Model and Serial Numbers 2,6,31
Power Outage?
Set the C1ock
Set the Timer
oven 11 Warranty Back Cover
Air Adjustment
Baking, Baking Guide
Broiler Pan and Rack 17,23,25
Broiling, Broiling Guide 17, 18
Control Settings
1
Door Removal
3,6,36 Roasting,RoastingGuide 15, 16
2
9
39 Problem Solver 27,28
6,7 Safety Instructions
Self-CleaningInstructions
Shelves
ThermostatAdjustment
11, 15, 19,25
30,31 Surface Cooking 10
29-38
36
9 Cookware Tips
9
9
26
12-14
8,9
23
Burner Grates
Burners
Control Settings
Flame Size 10,27
Lighting Instructions 10
Installation
19-21
24
2-5
22, 25
22,25
10
10
29-38
~S~
& mtiuation
andCare
of Model
-----.,
,..
f
;
\
.-Q ---
i
~
...-..,,
..,’
..
‘> J
‘t
Light; Bulb Replacement 11,24
Oven Bottom Removal
1
Oven Vents
Preheating
I
~6, 35
4,5, 11,23 GE Answer Center”
14
800.626.2000
Page 2

.-,
..:
It is intendedto help youoperale
and maintainyour new range
properly.
I<eepithandy for answersto your
questions.
If you don’tunderstand something
or need morehelp, write (include
your phonenumber):
ConsumerAffairs
Hotpoint
AppliancePark
Louisville,KY 40225
.,,
writedownthe mode]
serialnumbers.
and
You’llfind them on a label located
eitl~eron the front frame when you
open the oven door or on the front
frame behind the storage drawer.
These numbers are also on the
Consumer Product Ownership
Registration Card that came with
your range. Before sending in this
card, piease write these numbers
here:
Model Number
Serial Number
Use these numbers in any
correspondence or service calls
concerning your range.
If youneed Service.e.
To obtainservice,see the
ConsumerServicespage inthe
back of(hisbook.
To obtainreplacementparts,
contactGE~otpoint Appliance
Parts Martsor FactoryService
Centers.
We’reproud of ourservice and
want you tobe pleased. Iffor some
reason you are nothappy withthe
serviceyou receive, here arethree
stepsto follow for furtherhelp.
FIRST, contactthepeople who
serviced yourappliance.Explain
why you are not pleased,In most
cases, this willsolve theproblem.
NEXT, if you are stillnot pleased,
write all the details—including
your phone number—to:
Manager, ConsumerRelations
Hotpoint
Appliance Park
Louisville, Kentucky 40225
FINALLY,if your problem is still
not resolved, write:
Major Appliance Consumer
Action Panel
20 North WackerDrive
Chicago, Illinois 60606
0
2
0
3
4a
FORYOURSAFETY ~
WARNING
IfyotB received
a damagedrange..,
Immediately contact the dealer (or
l>ui]der)that sold you the range.
Page 3

IMPQRFANT
SAFETY NOTICE
California Safe Drinking
The
Watel and Toxic Enforcement
Act requires the Governor of
California to p~~b~isha list of
substances known to the state to
cause cancer, birth defects or
other reproductive harm, and
requires businesses to warn
customers of potential exposure
to such substances.
Gas appliances can cause minor
exposure to four of these
substances, namely benzene,
carbon monoxide, ‘formaldehyde
and soot, caused primarily by
the incomplete combustion of
natural gas or LF’fuels. Properly
adjusted burners, indicated by a
bluish rather than a yellow
flame, will minimize incomp~ete
combustion. Exposure to these
substances can be minimized by
venting with all open window or
using a ventilation fan or hood.
grounded, three-prong outlet in
accordance wi~hthe Natio~~al
Electrical Code. Do not use
an extension cord with
this appliance.
@Be sure all packing materials
are removed from the range
before operating it to prevent
fire or smoke damage should
the packing material ignite.
oLocate range out of kitchen
tra~~e
path and out of drafty
locationsto prevent poor air
Circulation.
~Besureyourrangeiscorrectly
adjusted by a qualified service
technician or instaIierfor the
type of gas (natural or LP)
that is to be used.
can be converted for use with
either type
Installation Instructions.
eAfter prolonged use of a
range~ high floor temperatures
may result and many floor
coverings w~ll not withstand
this kind of UseeNever install
the range over vinyl tile or
Iinoleurn that cannot withstand
such type of’use. Never install it
directly over interior kitchen
carpeting.
of gas. See
Your range
INTERESTTo CHIKJDREN
SHOULDNOTBE STORED
CABINETSABOVEA.
IN
RANGE(JR ONT14E
BACILSPLASHOFA
RANGE—cEmDREN
CLIMBING ON THE RANGE
TO REACH ITENISCOULD
BE SERIOUSLYINJUWD.
Can tip and
injury Could
result. To
prevent
accidental
tipping of
the range9
attach the
supplied
Anti-Tip
device to
the wall. (See Installation
Instructions.) To check if the
device is installed and engaged
properly, carefully tip the range
forward. The Anti-Tip device
should engage a bracket on the
back wall of the range that will
prevent it from tipping over.
If you pull the range out from
the wall for any reason, make
sure the Anti-Tip device is
engaged with the bracket when
you push the range back agai~~st
the wall.
..——-----—————..-
——.-——
Page 4

“ Neverwear loosefittiilgor
~
;
k
‘
.i~.;<$~
:*g2*
>..-.—
>
llang~ng
the .app[iance. Be careful when
reaching for items stored in
cabinets over the cooktop.
Flammable material could be
ignited if brought in contact
with flame or hot oven surfaces
and may cause severe bums.
eFor yotnr safety? never use
your appliance for warming
or heating the H*oom.
~Do not use water on grease
fires. Never pick up a flaming
pan. Turn off burner, then
smother flaming pan by
covering pan completely with
well-fitting lid, cookie sheet or
flat [ray. Flaming grease outside
a pa~ican be put out
covering with baking soda or, if
available, a multi-purpose dry
chemical or foam-type fire
extinguisher.
oDo Hot store flammable
materials in
garmentswhileIlsing
by
an oven or near
‘theCooktop.
“Do not store or use
Colmbustib]ematerials9
gasoiine or Otherflammable
vapors and Iiquidsin the
vicinityofthis or
appliance.
eDo not jet cooking grease or
other fla~llmablelllaterials
aeculllulate in or near tile
YaBlgeo
ewhe~l Cling ]Iorl{,follow
[he directions exactly ancl
ttiwayscook the nle;~ito an
internal temperature of at least
170°F.This assures lhat,
renloie p(Jssi~3i1i1ythat trichina
nlay [?eprescllt in the meat, it
will Iockilled a~}dthe meai will
bc Salk {()Cal.
any other
in the
surface(;ool{ing
Q Always use theI.ITE
positionwhen ignitingtop
burnersand make surethe
burnershave ignited.
eNever leave surface burners
unattended
settings.
smokingand greasy spillovers
that may catch onfire.
Adjusttop burner Ralnesize
o
soit doesnot extendbeyond
the edgeofthe cookware.
Excessive flame ishazardous.
“use only
moist or damp pot holderson
hot surfaces may result in bums
from steam. Do not let pot
holders come near open flames
when lifting cookware. Do not
use a towel or other bulky cloth
in place of a pot holder.
~To minimizethe possibility
of burns,
materials, and spillage, tum
cookware handles toward the
side or back of the range
without extending over adjacent
burners.
Q
Always turn surface burner
to OFF before removing
Cool<ware.
“carefully watch foods being
fried at a high
~Neverblock the vents(air
openings)of the range.
provide the air inlet and outlet
that are necessary for the range
to operate properly with correct
combustion. Air openings are
locatedat the rear ofthe cooktop,
ai the top and bottom of the
oven cloor and under the storage
drawer.
at highflame
Boilovercauses
dry pot holders—
ignition of flammable
flameSettiIIge
They
e Donotusea wokon the
cooking
surfaceiftilewokhas
a round metalringthat is
piaced over the burner grate
to support the wok. This ring
acts as a heat trap, which may
damage theburner grate and
burnerhead. Also, it may cause
the burner to work improperly.
This may cause a carbon
monoxidelevel above that
allowed by cu~~entstandards,
resulting in a health hazard.
~Foods for frying shou~dbe
as dry as possible.Frost 013
frozen foods or moisture 011
fresh foods can cause hot fat to
bubble up and over sides of pan.
~Use least possible amount of
fat for effective shallow or
deep-fat frying. Pilling the pan
too full of fat can cause
spillovers when food is added.
a combination of oils or
~If
fats wiii be used in f~.ying, stir ,g~a.
together before heating or as -..
watch as it heats.
~Use a deep fat thermometer
whenever possible to prevent
overheating fat beyond the
smoking point.
~use proper pan size—
pans that are unstable
Avoid
oreasily
tippecl.Select cookware havi~lg
flat bottoms large enough to
properly contain food and.avoid
boilovers and spillovers and
large enough to cover burner
grate. This will both save
cleaning time and prevent
hazardous acct~mulationsof
food, since heavy spattering or
spillovers left 0]2range can
ignite. Use pa~3swith handles
that can be easily grasped a~~d
remain cool.
o
fy
t
\
~.._.
.’
,<’;,
1,
.. ...——— .———
——..—.
.—.———
‘“-
(
L.. ,.’
Page 5

,*% of-range cooking.
...-”.- . . . . . . . . . . . . . . . . . . . . . . . .. . . . . . . . .
. . . ..— -—,..———
.——— .—...— ,—...—.—.—.—
—.
—
hot Oven. The hot air and
steam
that escapeCan Cause
burns tohands, face and eyes.
CleaningYour Range
~
Cleanonly partslistedin
this use and care Book.
“ Keeprange cleanand freeOf
accumulationsof greaseor
spiilovers9Wlliehmay ignite.
,
QDonotleave plasticitemson
the eooktop—they may melt if
left too close to the vent.
0Do not leave any items on
the cooktop. The hot air from
the vent may ignite flammable
iterns aricl.will increasepressure
in closed containers, which may
cause them to burst.
eTo avoid the possibility of a
burn, always be Certain that
the controls for all burners
are at the OFF position and
al~grates are coo] before
attelnpting to remove them.
oWhen flaming foods are
under the hood9turn the fan
OffqThe fa119if Operatingymay
spread the flamese
QIf range is Iocated near a
window9CIOnot hang long
curtains that could blow over
tl]e top burflcrs and create a fire
hazard.
oIf yo~l Slllei] gas, turn off the
gas io tile range arid call a
q~l:]lified service techilician.
Never t~sean open
ioctl[e a leak.
flame to
e Placeoven shelves indesired
position whileoven is Coole
ePuIiingoutshelftothesheif-
Stop is a convenience inIifting
heavy foods. It isalso a
precautionagainst burns from
tauching hot surfaces of the
door or oven walls.
e Don’theat unopenedfood
containers
Pressure
the
containerCouidburst,
inthe oven.
Couldbuildup and
causingan i~ljury.
s Don’tuse aluminum foil
anywhere in the oven except
as described in this book.
Nfisusecould result in a fire
hazard or damage to the range.
o when using cookingor
roasting bags in oven9follow
the manufacturer’s directions.
@useonlyglassCookwarethat
is reeomlnended for use in gas
ovens.
e AIways remove broiler pa~l
fromoven as soon as you
finis~~broiling.Grease left in
the pan can catch fire if oven is
used without removing the
grease from the broiler pan.
ewhen broiiingy if meat is too
close to the flame~the
~g~~~eo ~riln excess
prevent excessive flare-tips.
fat may
fat to
self=c~eaningoven
~Donotclean doorgasket.
The door gasketis essentialfor
a good seal. Careshould be
taken not torub, damageor
move the gasket.
eDonotuse oven Cleanerse No
commercial oven cleaner or
oven liner protective coating of
any kind should be used in or
around any part of the oven.
“ Before
oven9removebroiler pan
self-cleaning the
and
other Cookwaree
IfY’uNeedservice
QRead 66The Problem Solver99
on pages 27
bOOke
@Don9tattempttorepairor
replace any partofyotli”
range unless it is specifically
recommended
and 28of this
inthis book.
All other servicing should be
referred to a qualified
technician.
SAVETHESE
INSTRUCTIONIS
‘..
.’
——.-.—.——— ——.-............ ....... ..
Page 6

Page 7

Feature Index
1 Grates, Drip Pans (onmodels soequipped) and Sutiace Burners
See page
I
22,25
2 Oven Lamp On/Off Switch 11
_____
-
_L?~
...-.-.
.. . .-
@
3 ElectronicOven Control, Clock and Timer
8,9
I
4 Oven Vents I 4,5, 11,22
m
I
11,23,25
22
11,24
11
23
23
23
23
2
3,36
5 Lift-Up Cooktop (Locks in up position to simplifycleaning underneath.)
9 Oven Shelves (Easily removed or repositioned on shelf supports.)
10 Oven Shelf Supports
-J.
11 Air Ventin Oven Door (Top of Oven Door.)
12 Removable Oven Door (Easily removed for oven cleaning.)
13 Air Intake (Under Storage Drawer.)
14 Storage Drawer
15 Model and Serial Numbers
16 Anti-Tip Device (Lower right rear corner on range back.
See Installation Instructions.)
17 Oven Bottom
18 Oven Interior Light
19 Broiler Pan and Rack
24,35
I
~~,~4
, 17,23,25
f
I
t
1
J
c
,,
\
It
..
Page 8

.
--s
*
1. INCREASE.Short ~apsto this
pad increasetime or temperature
by small amounts.Press& hold
pad to increasetime or temperature
by largeramounts.
2. DECREASE. Short taps to this
pad decrease timeor temperature
by small amounts.Press & hold
pad to decrease time or
temperatureby largeramounts.
3. BAKE. Touchthis pad to select
bake function.Then tap or press
INCREASE or DECREASE pad to
display desired ~emperature.
4. BROIL. Touchthis pad to select
broil function.Then tap
INCREASE pad once to broil at
LO (450°F.) or twice to broil at HI
(550”F.).Tap DECREASE pad to
change back to LO broil.
5. CLEAN. Touch tl]ispad to
select self-cleaning function. See
Self-Cleaning Instructions on
pages 19 and 20.
6. COOK TIME. Touch this pad
and then touch Ihe INCREASE or
DECREASE pad to set the amount
of time you want your food to
cook. Touch BAKE and the
ir’CREASE or DECREASE pad to
SC[the oven temperature. The oven
wil~shut off after the selected
~200JcTime has run oLIt.
6
B
.
b
:
&bb
7. STOP TIME. Usethis pad
along with COOK TIME and
INCREASE or DECREASE pad to
set the ui’ento start automatically,
cook for a specified time and stop
automatically at a time you select.
8. CLOCK. Touchthispad before
settingtheclock.To setclock,first
touchCLOCKpad. “TIME” will
flashin thedisplay.TapINCREASE
or DECREASEpad tochangethe
timeof dayby smallamounts.Press
& holdINCREASE orDECREASE
pad tochangethe timeof dayby
largeramounts.
9. TIMER. Touch this pad to
select timer function. The timer
does not control oven operations.
Touch pad again to turn it off.
To set timer, first touch TIMER
pad. “TIMER” will flash in the
display. Tap INCREASE or
DECREASE pad to change the
time by small amounts. Press &
hold INCREASE or DECREASE
pad to change the time by larger
amounts.
Hours and minutes will be
displayed if the time set on the
timer is more than 1hour. Minutes
and seconds will be displayed if
the time set on the timer is less
Lh:in1hour.
.
o
b
10.CLEAR/OFF. Touchthis pad
to cancel alloven operations
except clock andtimer.
11.PROGRAM STATUS.Words
lightup in the display to showthe
selectedoven mode.
12.TIME DISPLAY. Shows the
time of day,the times set for the
timer or a~tomaticoven operation.
13. OVEN TEMPERATURE
A“NDBROIL DISPLAY.Shows
the oven temperature or the broil
setting selected.
14.
FUNCTIONINDICATORS. :
Lights up to show whether oven is
in bake, broil or self-cleaning
mode.
—. :
/~-.
t
\
x.~~
.....
~fl=
“[
..
*
f.
~it,
j
i.
f
\
t
(
\
[
\
[
1
*
‘i
i
\
\
1
i?
.. \
..-”
.
.——. .-.......—.—
.————
.——— —-
—.———.——--.—— -----
1
I
Page 9

,.!>
—.—....——
The clock mustbe setfor the
automaticoven timingfunctionsto
work properly,The time ofday
cannotbe changed duringa TIME
BAKE or CLEAN cycle.
To set the clock
Step 1. Touchthe
CLOCK
pad.
The word “TIME” willflash in
the display.
Step 2. Press& hold or tap
INCREASE or DECREASE pad
to set the time of day. (Tapto
change time 1 minute a tap. Press
& hold to change time 10minutes
at a time.)
Example: Try setting the time for
3:00. Use a combination of presses
and taps to get fiamiliarwith the
control. Since this is a 12-hour
clock, there is no need to worry
about AM or PM.
Displayflashesuntilclock isreset.
All otherfunctionsthat werein
operationwhen thepower wentout
willhave tobe programmedagain.
Timer
The timerdoes notcontroloven
operations.The maximumsetting
on thetimer is 9 hoursand 55
minutes.
To setThe Timer
Step 1.Touch theTIMER pad.
The word “TIMER” will flash in
the display.
Step2.Press& hold or tap
INCREASE or DECREASE pad
to set the amountof time on timer.
(Pressing &holding thepad
changes time in largeamounts.
Short tapschange time in smaller
amounts.)
Thetimer willstal automatically
withina few secondsofreleasingthe
INCREASEorDECREASEpad.
The timer, as yOLIare setting it,
will display seconds until 60
seconds is reached.
Then it will displayminutes and
secondsuntil 60 n~inutesis reached.
To ResetTimer
TouchTIMER pad and then press
& holdor tap INCR.EASEor
DECREAS~ pad until desired time
isreached.
To cancel Timer
Press & holdTIMER pad until the
word “TIMER” quits flashingon
the display(about4 seconds).
Tones
The end-of-cycletone will sound
at the end of timeoven functions.
The end-of-cycle toneis a steady
signalthat repeatsevery 6 seconds
until you touchany operation. If
you would liketo change the tone
to a set of 3 shortbeeps, press &
hold CLEAR/0~ for 10 seconds.
Toreturn the end-of-cycle toneto a
steady repeating signal,press &
hold CLEAR/0~ for 10seconds.
Dispiay
Programmed information can be
displayed at any time by touching
the pad of the operation you want
to see. For example, you can
display the current time of day
while the timer is counting down
by touching the CLOCK.pad.
“door” appears on display. The
oven door-is in the locked position.
BAKE, BROIL and COOK TIME
cannot be set if the door is in the
locked position.
“F-” and a number nash on
display. This is the function
error code. If function error code
appears during the self-cleaning
function, check oven door
latch—the latch handle may have
been moved, even if only slightly,
from the latched position. Make
sure handle is to the rigi~tas far as
it will go. Touch CLEAR/OFFpad,
If function error code does Ilot
clear, disconnect pov4erto the
range and call for-service.
— .—
——.-..— . . . ..——””-. .—
———.—
-,<
.———..
d
Page 10

Electric Ignition
..”.-....
-.. . . . . . . . .
.
- —.—
Yoursurfaceburnersare lighted
by electricignition,eliminatingthe
need forstandingpilotlights with
constantlyburningflames.
In case ofa power failure,you
can lightthe surfaceburnerson
your rangewith a match.Hold a
lightedmatch to theburner,then
turn theknob to theLITE position.
Use extreme caution when
lighting
Surface burnersin use when an
electricalpower failure occurswill
continueto operatenormally.
surface Burner
Knobs thatturn the surfaceburners
~riand off are marked asto which
burners theycontrol. The two
knobs on theleft control theleft
front and leftrear burners. The two
knobs on theright control the right
front and rightrear burners.
To Light a surface Burner
burnersthisway.
controls
AfterLightingaBurner
*Check tobe sure theburneryou
turnedon is theone youwantto
use.
*Do not operatea burnerfor an
extendedperiodof timewithout
cookwareon thegrate.The finish
on thegrate may chipwithout
cookwareto absorbthe heat.
sBe sure theburnersand gratesare
coolbefore youplace yourhand, a
pot holder,cleaningclothsor other
materialson them.
How toselectFlamesize
Watchthe flame, nottheknob, as
you reduceheat.
The flame size ona gas burner
shouldmatch the cookwareyou
are using.
FOR SAFE HANDLING OF
COOKWARE NEVER LET THE
FLAME EXTEND UP THE
SIDES OF THE COOKWARE.
Any flame larger than thebottom
of the cookware is wasted and only
serves to heat the handle.
pots and pans? adjustthe flame so
the circle it makes is about 1/2
inch smaller than the bottomof the
cookware.
Wghem
size—1/2 inch smaller than the
bottom of the cookware—no
matter what the cookware is made
of. Foods cook just as quickly at a
gentle boil as they do at a furious,
rolling boil. A high boil creates
steam and cooks away moisture,
flavor and nutrition. Avoid it
except for tile few cooking
processes tl~atneed=
boil.
boiling,use this same flame
a vigorous
when frying or warmingfoods
instainless steelycastironor
enamelware lieepthe frame
down lower—toabout 1/2 the
diameter of the pan.
when frying in glassor ceramic
cool{ware,lower the flameeven
more.
Top”of”Range cookware
Aiuminum: Medium-weight
cookware isrecommended because
it heatsquickly and evenly.Most
foods brownevenly in an
aluminumskillet. Mineralsin food
and water will stainbut will not
harm aluminum.A quick scour
with a soap-filled steelwool pad
after each use keepsaluminum
cookware lookingshiny and new.
Use saucepans withtight-fitting
lids when cookingwith minimum
amounts of water.
Cast Iron: If heated slowly,most
skilletswill give satisfactory
results.
Enamelware: Under some
conditions, the enamel of some
cookware may melt. Follow
cookware manufacturer’s
recommendations for cooking
methods.
Glass: There are two types of glass
cookware—those for oven use
only and those for top-of-range
cooking (saucepans, coffee and
teapots). Glass conducts heat very
slowly.
Heatproof Glass Ceramic: Can
be used for either surface or oven
cooking. It conducts heat very
slowly and cools very slowly.
Cb.eckcookware manufiacturer’s
directions to be sure it can be used
on gas ranges.
$tainless Steel: This metal alone
has poor heating properties and is
usually combined with copper,
aluminum or other metals for
im~roved heat distriblltion.
“’’w’”
mu_.. ____ .__-.._ .__. _..= =..=...._ - . .
.
Page 11

.....—. .—.—,.——
.
ElectricIgnition
‘Fheovenburner and broil burner
are lighted by electric ignition.
Tolighteitherburner,touchthe
padforthedesiredfunctionand
press& holdor tapINCREASEor
DECREASEpad untilthe desired
[temperatureis displayed.The burner
sho~ldignite within60 seconds.
After the ovenreaches the selected
temperature,the oven burner
cycles-off completely,then on
with a full flame-to keep the
oven temperaturecontrolled.
CAUTION: DO NOT MAKE
ANY ATTEMPT TO OPERATE
THE ELECTRIC IGNITION
OVEN DURING AN
ELECTRICAL POWER
FAIL~JRE.The oven or broiler
cannot be litduring a power
failure. Gas will not flow unless
the glow bar is hot.
If the oven is in use when a power
failure occurs, the oven burner
shuts off and cannot be re-lit until
power is restored.
“ The ventopeningsand nearby
surfacesmay become not.Do not
touch them.
“ Handles ofpotsand pans on
the Cooktopmay become hot if
left
tooclosetothe vents
~Do notleave plasticitems on
the cooktop—they may melt if
left too close to the vent.
~Metal items will become very
hot if they are left on the cooktop
and could cause burns.
~Do not leave any items on the
cooktop. The hot air from the vent
may ignite flammable items and
will increase pressure in closed
containers, which may cause them
to burst.
I I
1111
Toremove a shelf from theoven
pull ittoward you,tilt front end
upward and pull shelfout.
To replace, place shelf on shelf
supportwith stop-locks(curved
extensionunder shelfl facingup
and toward rear ofoven. Tiltup
front and push shelftoward back
of oven untilit goes past” stop”
on oven wall. Then lower front oi
shelf andpush it all the way back
shelfPositions
oven Light
The oven I.ightcomes on
automatically when the door is
opened. Use the switch on the
lower controlpanel to turn the light
on and off when the door is closed.
.,._.-----~
&+Light .,<~
(~n moti%~ equip~ed)
f
use the switg~o< ~e upper
—-.>
,
‘j
—.-
.,-
-.
. .,
.,
oven shelves
The oven hasfive shelf supports
for normalbaking and roasting-—
A (bottom),B, C, D and E (top).
It also has a speciallow shelf
position (R)for roastingextra Itige
items, such as alarge turkey.Shelf
positionsfor cookingare suggested
h
on Baking and Roastingpages.
The shelves are designed with stoplocks so when placed correctly on
the shelf supports, they will stop
before coming completely out of
the oven and will not tiltwhen you
are removing food from them or
piacing food on them.
Wheil placing cookware on a shelf,
pu!i the shelf out to [he “stop”
position. Place t!lecookware on
As your oven heats up, the
temperature change of the air
in the oven may cause water
droplets to form on the door
glass. These droplets are
l~armlessand.will evapo]:ateas
the oven continues to heat up.
I
tl~eshelf, then slide the shelf back
into the oven. This will e~irninaie
I“etl(’hillginio th< hoi oven.
.,.+.....—.—
——.”...— ------ ,--- —-=-. -,, ~.- —-— —-—-—--—-. -———..-—.
.—— -
Page 12

,._-.____..._-_ .__. ..___..
$
:
.
..
..
Youroventemperatureiscontrolled
very accuratelyusing an electronic
controlsystem.lt is recommended
thatyou operatethe rangefor a
numberof weeks usingthetime
.
givenon recipesas aguideto
becomefamiliar withyouI-new
oven’s performance. If youthink
an adjustment is necessary,see
AdjustingOven Thermostaton
page 24.
How to set Your Range
for Baking
Step 6: Touch CLEAR/OFF when
baking isfinished and thenremove
food fromoven.
How toTime Bake
The electronicoven controlallows
you to turn the oven onor off
Step 4: Press& holdor tap
INCREASE pad untilthe desired
lengthof bakingtime appears in
the display, (Tapto change time on
display5 minutesa tap. Press&
hold to changethe time 10minutes
at a time.)
automaticallyat specifictimes that
Step 1: Position the shelfor
shelves in the oven. If cookingon
two shelves at the same time, place
shelves on alternate shelf supports
and stagger food on them.
Step 2: Close the oven door.
you set. Examples ofImmediate
Start (oven turnson now and you
set it to turn offautomatically)and
Delay Start and Stop (settingthe
oven to turn on automatically at a
later time and turn offat a preset
Stop Time) willbe described.
NOTE: Before beginning,make
Step 5: Touch BAKE pad. “-– –“
appears in displayand “BAKE”
flashes.
sure the oven clock shows the
correct time of day.
Step 3: Touch BAKE pad. “-– –“
appears in display and “BAKE”
flashes.
Step 4: Touch INCREASE or
DECREASE pad. “350°” appears
in the display.
Step 5: Press & hold or tap
INCREASE or DECREASE pad
un[ildesired temperature is
displayed. (Tap to change
[temperature5 degrees a tap. Press
& hold to change temperature 25
(iegrees i~ta tinle.)
“rileword “ON*’ and the changing
temperature wi1!be displayed as
(he oven he;~isup. When lhc OVCII
reac:heslilt set [cI?lpci”a[urL2,a [one
will sound.
To chan:c oven [emperaturc during
!]}~,;<Ec’ycje,/ot[ch~lAi{Epad :lII<i
ihcil1Ni:~?EAs)FJOi-DE.cIlzG}~\sE
pad 10gel new icmpci”a[urc.
.. >.-\
~;‘/7
- . ...
.... ..——.-.—.-—-...-—.-.——
.,..
..-.—— ——
To set the c~ock,first touch the
CLOCK pad. “TIME” will flash
in the display. Press & bold or
tap INCREASE or DECREASE
pad until correct time of day is
disp~ayed.(Tapto change the
time 1 minute a tap. Press &
hold to change the time 10
minutes at a time.)
How to Set Immediate Start and
Automatic Stop. (Oven turns on
right away, cooks for preset length
of time, and turns off automatically
at the preset Stop Time.)
Step 1: Position the shelf or
shelves in the oven. If cooking on
two shelves at the same time, place
shelves on alternate shelf supports
and stagger food on them.
Step ‘2:Close the oven door.
r--:-’$:~?~?”?_-._’-7z2+:&5z+$+5$s%$+’$s%’
~;,. .-
[. “;;:::<:’::i~@qs?$B-@$_-i”
~ ; ::,,.,-:--:“4L ‘++~f::i ‘2:~z?3:;?;:-;+-~-
~
f. ;- ‘“-
t
r.
SteFj 3:
“0 ‘-JR.0{)”:~upearson disp[a}~and---
L~i>~,7}2[\J‘~]~/~-E’l f]:lSheS.
ti<d
-:<>:>+.-=>L:?:x<9?32’:=3::-??<~<Z
.-..
‘-=~\y~ols~;>s!-:z:?~$z?’
-’y<:>5~’’::_:?7:::~;i..;~:””;j;j
)1 ----=--::j
—.
--.-_.:,.-,-..
-.
-A~.-~--.M_
Touch COO1<TIME pad.
1
———
Step 6: Press& hold or tap
INCREASE or DECREASE pad
until desired temperature is
displayed. (Tap to change
temperature 5 degrees a tap. Press
& hold to change temperature 25
degrees at a time.)
The word “ON” and therising
oven temperaturewill bedisplayed
as theoven heats up.When the
oven reaches theset temperature,a
tone will sound.Oven willcontinue
to cook for theprogrammed amouni
of time, then s?lutoff automatically.
Step 7: Remove food from ove~],
Remember, even though oven
shuts off automatically, foods
continue cooking after controls
are off.
—
Page 13

—————
Delay Startand Stopis settingthe
oven timerto t~jrnthe ovenon and
off automaticallyat a latertime
than thepresenttime ofday.
For example:Let’s sayit’s2:00
and dinnertime isshortlyafter
7:00.The recipe suggests3 hours
bakingtime at 325°F.I-Iere’show:
HowtosetDelay start
andstop
Step 1: Position the shelfor
shelves~nthe oven.If cooking on
two shelvesat Thesametime,
staggerthe pansfor bestheat
. . .
c~rculatlon.
Step 2: Closethe oven door.
..,-=--
-=:~g
_.- ..
-%.
@
Step 3: Touch COOK TIME pad.
.-.
“OHR:OO”appears on display and
“OVEN TIME” flashes.
Step4: Press & hold or tap
INCREASE pad until “3:00”
appears in the display. (Tapto
change time on display 5 minutes a
tap. Press ~Qhold to change the
time 10 minutes at a time,)
——
Ste])5: Touch STOPTIME pad.
“5:00” appears on displayand
“STOP TIME” flashes.The
controlautomatically setsStop
Time by adding theCook Time to
the time of day.In thisexample,
the time of day is 2:00and the
Cook Time is 3 hours.Adding 3
hours to the time ofday equals
5:00.
Step 6: Change Stop Time from
5:00 to 7:00 by tapping or pressing
& holding INC~ASE pad until
“7:00” appears in the display.
Step 7: TouchBAKEpad.
66
———.
*L~A~~” flashes.
“ appears in the display and
1
Step8: TouchINCREASE pad.
“350°” appearsin the display.
Press &hold or tap DECREASE
pad until “325°” is displayed.(Tap
to changetemperature 5 degreesa
tap. Press &hold to change
temperature25 degrees at atime.)
Oven temperatureof “325°”
appears in thedisplay.
I
At 4:00,the oven will turn on
automatically.The word “ON”
and the changingoven temperature
will be displayedas the oven heats
up. Oven will continue to cook for
the programmed 3 hours and will
shut offautomatically at ‘7:00.
Step 9: Remove food from oven.
Remember, even though oven
shuts off automatically,foods
continue cooking after controls are
off.
Note: The low temperature zone of
this range (between 150°F.and
200”F.)is available to keep hot
cooked foods warm. Food kept in
the oven longer than two hours at
these low temperatures may spoil.
When setting your oven for a delay
start, never let foods such as dairy
products, fish, meat, poultry, etc.
sit for more than 2 hours before
actual cooking begins. Room
temperature.promotes the growth
of harmful bacteria. Be s~lrethe
oven light is off because heat f~oin
the bulb will speed bacteria
growth.
CoolcTime of’3 hours now appears
/..--.,= in display.
‘... .
.-
.-.
...
(- ‘
.. .
—-
.-—-— .,——
Page 14
.-
@
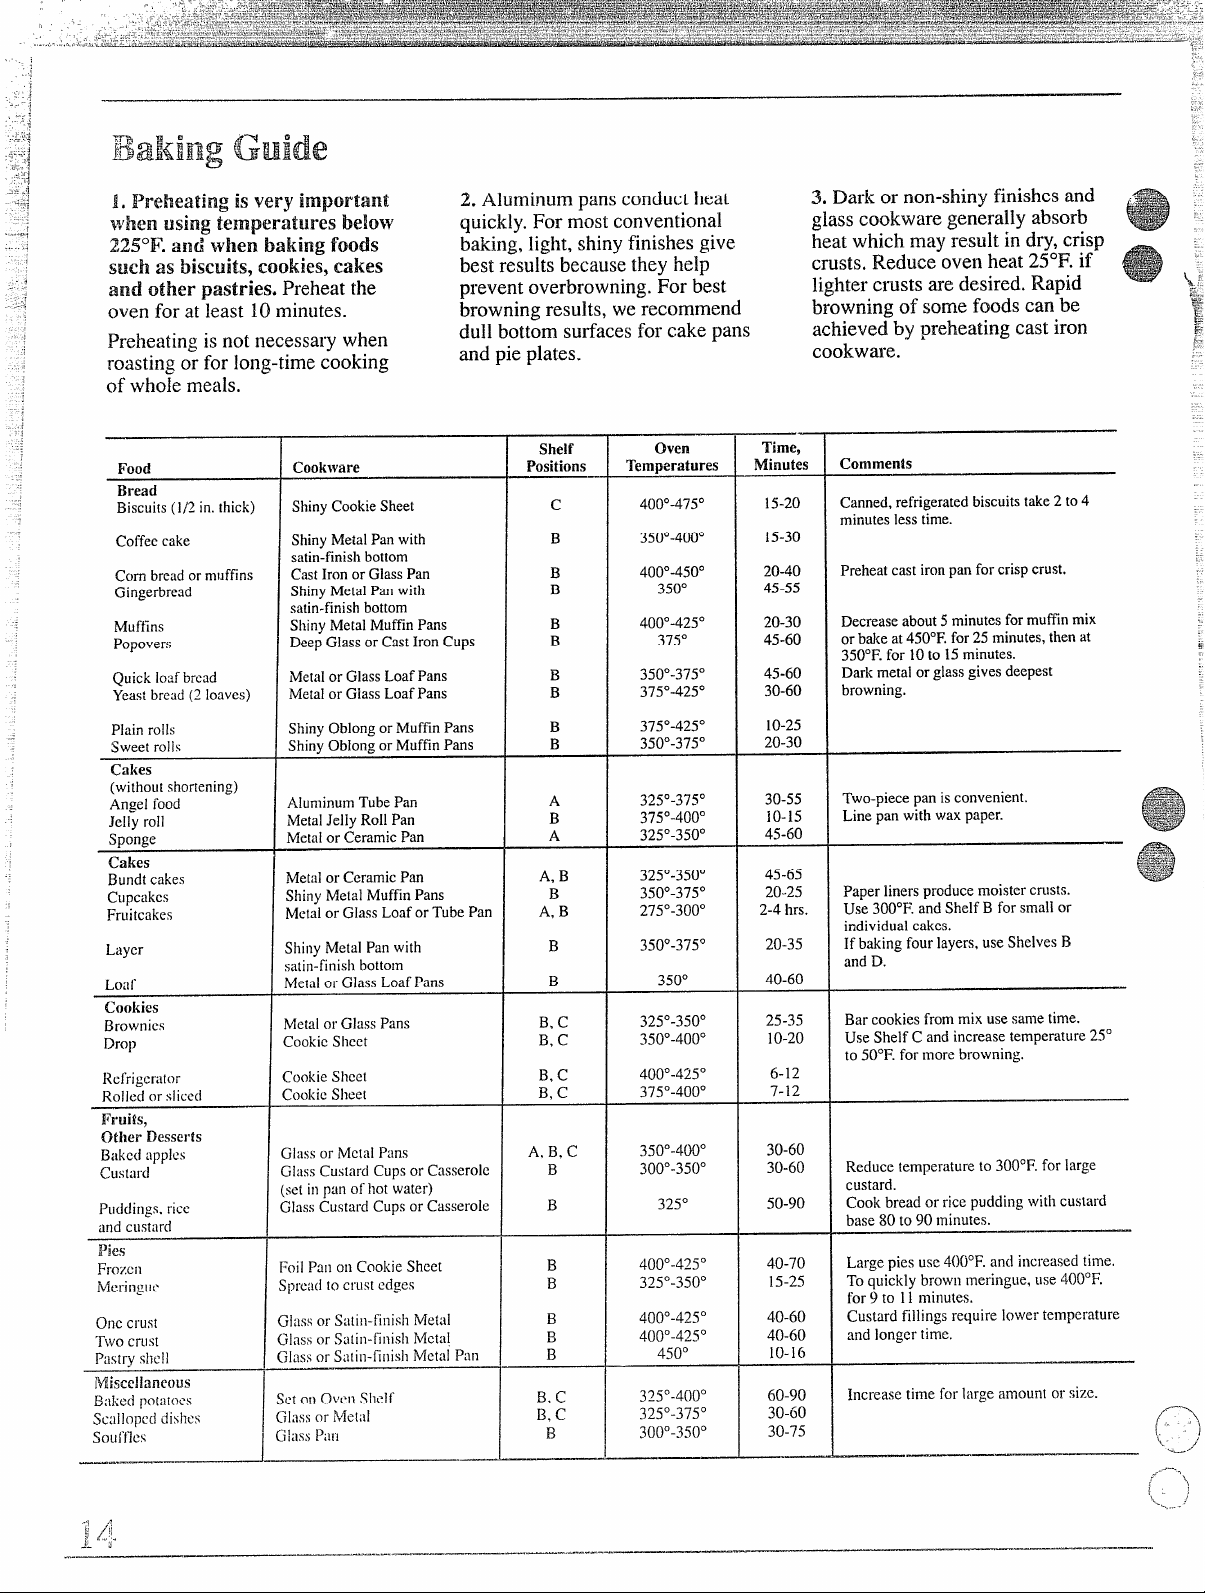
1aI>reheatingisvery important 2.Aluminumpansconductheat
W’benusing te~mperatilresbelow
225°F.a~~dwhen baking foods
Suell as biscuits, cookies,cakes
quickly. For mostconventional
baking,light,shinyfinishesgive
best resultsbecausethey help crusts.Reduce ovenheat 25°F.if
3. Dark or non-shinyfinishesand
glasscookwaregenerally absorb
heatwhich may resultin dry,crisp
and other pastries.Preheatthe preventoverbrowning.For best lighter c~wstsare desired. Rapid
oven forat least 10minutes.
Preheatingis notnecessary when
roastingor forlong-timecooking
browningresults,we recommend browningof some foods canbe
dull bott6msurfacesfor cakepans achieved-bypreheatingcast iron
and pieplates. cookware.
of whoiemeals. “
—.
Minutes
2-4 hrs.
—.—
Time,
15-20
15-30
20-40
45-55
20-30
45-60
45-60
30-60
10-25
20-30
30-55
10-15
45-60
45-65
20-25
20-35
40-60
25-35
10-20
6-12
7-12
30-60
30-60
50-90
40-70
15-25
40-60
40-60
10-16
60-90
30-60
30-75
Canned,refrigeratedbiscuitstake2 to4
minutes less time.
Preheat cast ironpan for crisp crust.Corn breador rnaffins
Decreaseabout5 minutesfor muffin mix
or bake at 450”F.for 25 minutes,then at
350”F.for 10to 15minutes.
Dark metal orglassgives deepest
browning.
Two-piecepan isconvenient.
Line pan with wax paper.
Paper linersproduce moister crusts.
Use 300”F.and Shelf B for small or
individual cakes.
If baking fourlayers, use ShelvesB
and D.
Bar cookies from mix use same time.
Use Shelf C andincrease temperature 25°
to 50°F. formore browning.
Reduce temperature to 300”F.for large
custard.
Cook bread or rice pudding with custard
base 80to 90 minutes.
Large piesuse4000F.and increased time,
To quickly brown mering~ie,use 400”F.
for 9 to 11minutes.
Custard fillings require lower temperature
and ionger time.
Increase time for large amount or size.
——.
Food
Bread
Biscuits (1/2in.thick)
Coffeecake
Gingerbread
Muffins
Popovers
Quick Iozfbread
Yeastbread(2 loaves)
Plain rolls
Sweet rolls
Cakes
(without shortening)
Angel food
Jelly roll
Sponge
Cakes
Bundt cakes
Cupcakes
Fruitcakes
Layer
Loaf
Cookies
Brownies
Drop
Refrigerator
Rolled or slice(i
~ruits,
Other Desserts
[lp[l]~S
Bakc(i
CUStilr(i
Puciciings,rice
and cu.star(i
Pies
Frozen
Mcringlie
Onccrust
Two crus(
PilSt~YShell Glass or Satin-finish Metal Pan
IWiscellarteous
Baked potatoes
~~iiilop~d dishes
Soufllcs
——....——
Cook\vare
ShinyCookieSheet
ShinyMetal Pan with
satin-finishbottom
CastIron or GlassParr
ShinyMetal Pan with
satin-finishbottom
ShinyMetal MuffinPans
DeepGlass or CastIron Cups
lMetalor GlassLoaf Pans
Metalor GiassLoafPans
ShinyOblong or Muffin Pans
Shiny Oblongor Muffin Pans
AluminumTubePan
MetalJelly Roll Pan
Metal or Ceramic Pan
Metalor CeramicPan
Shiny Metal Muffin Pans
Metal or Glass Loaf or Tube Par
Shiny Metal Panwith
satin-finish bottom
Me(alor Glass Loaf Pans
Metal or Glass Pans
Cookie Sheet
Cookie Silcet
Cookie Shee[
Giass or Mciai Pans
Glass Cuslard Cupsor Casserole
(set in pun of hot water)
Glass Custard Cupsor Casserole
Foil Pan on Cookie Sheet
Sprca(i10crust edges
Giass or Satin-finish Metai
Gii]ssor Sa[in-finish Mct:d
set onOven
Glass or
G!ilSS PilIi
shelf
Me(i\]
—. —
Shelf
Positions Comments
c
B
B
B
B
B
B
B
B
B
A
B
A
A, B
B
A, B
B
B
B, C
B, C
B, C
B, C
A, B, C
B
B
B
B
B
B
B
B, C
B, c
B
Oven
TernDeratures
400°-4750
350°-4000
400°-4500
350°
400°-4250
375°
350°-3750
375°-4250
375°-4250
350°-3750
325°-3750
375°-4000
325°-3500
325°-3500
350°-3750
275°-3000
350°-3750
350°
325°-3500
350°-4000
400°-4250
375°-4000
350°-4000
300°-3500
325°
400°-4250
325°-3500
400°-4250
400°-4250
450°
325°-4000
325°-3750
300”-350°
—
..->—-.
(,. /
-..,.
-
‘?
.’
.-—
—— ...———.—.—..— ..
..=e -----
———
.————.
Page 15

Roasting
——..—”.
.————..—- —-—.—.—.. =..... . . . . . . . . . . . . .
——.
. —-...
!E--’)
{,1
.,%
..,,. -
.-
t
‘,
<
;
.
Roastingis cookingby dry heat.
Te~~dermeat or poultrycan be
roasteduncovered in youroven.
Roastingtemperatures,which
shouldbe low and steady,keep
spatteringto a minimum.When
roasting,it is notnecessary to sear,
baste,cover or add water toyour
meat.
The oven has a special low shelf
(Rj positionjust above the oven
bottom. Use it when extra cooking
space is needed, for example,
when roasting a large turkey.
Roasting is easy;just fo~lowthese
steps:
Step 1: Position oven shelf at (B)
position for small size roast (3 to 5
lbs.) and at (A) position for larger
roasts.
Step 2: Check weight of roast.
Place meat fat-side-up or poultry
breast-side-up on roasting rack in a
shallow pan. The melting fat will
basfe the-meat. Select a pan as
close to the size of meat as
possible. (Broiler pan with rack is
a good pan for this.)
Step 3: TouchBAKE pad.”- – –“
appearsin displayand “BAKE”
flashes.
Step 4: Touch INCREASEpad.
“350°F.” appearsin the display.
Step 5: Press& hold or tap
INCREASE or DECREASE pad
until desiredtemperatureis
displayed.
(Tapto change temperature5
degrees a tap.Press & hold to
change temperature25 degrees at a
time.)
The word “ON” andthe changing
oven temperature willbe displayed
as the oven heats up.When the
oven reaches the settemperature, a
tone will sound.
To change oven temperature
during BAKE cycle, touch BAKE
pad and then INCREASE or
DECREASE pad to get new
temperature.
Step 6: Touch CLEAR/OFF when
baking is finished and then remove
food from oven.
Step 7: Mostmeats continueto
cook slightlywhile stmding, after
beingremoved fromthe oven.
Standingtime recomme~~dedfor
roasts is 10to 20 minutes.This
allowsroasts tofirm up and makes
them easierto carve.Internal
temperaturewillrise about 5°to
10°F.;to compensatefor
temperaturerise, if desired,
remove theroast fromoven sooner
(at 5° to 10”F,less than
temperaturein the guide).
NOTE: Youmay wish to TI~
BAKE, as describedon pages 12
and 13,to turn oven on and off
automatically.
Remember thatfood will continue
to cook in thehot oven and
therefore shouldbe removed when
the desired internaltemperature
has been reached.
Frozen Roasts
~Frozen roasts of beef, pork, lamb,
etc., can be roasted without
thawing, but allow 15to 25
minutes per pound additionaltime
(15 minutesper pound for roasts
under 5 pounds, more time for
larger roasts).
~Thaw most frozen poult~ybefore
roasting to ensure even doneness.
Some commercial frozen poultry
can be cooked successfully without
thawing. Follow directions given
on packer’s label.
Dual shelf cooking
This allows more than one food.to
be cooked at tl~esame time. For
example: While roasting a 20 lb.
turkey on shelf (R) a second shelf
may be added on positio~~D so tl~at
scalloped potatoes can be cooked
at the same time. Calculate the
total cooking time to enable both
dishes to complete cooking at the
same time. Allow 15-20 ~minutesof
additional cooktime for the
potatoes.
-mu-...-,. -e. . . .
. ,- . . .. .../ .—=.
Page 16

RioastillgGuide
.
—
-
1.Positionoven shelf atB for
small-sizeroasts (3 to 5 lbs.)and at
A for largerroasts.
2. Check weightof roast.Place
meat fat-sideup, or poultrybreastsideup, on roastingrack in a
shallowpan. The meltingfat will
baste themeat. Select a panas
close tothe size of the meatas
possible. (Broilerpan withrack is
a good pan for this.)
Type
Meat
Tendercuts; rib, high quality sirlointip,
rump or top round*
Lamb leg or bone-in shoulder*
Vealshoulder,leg or loin*
Pork loin,rib orshoulder*
Ham, precooked
*For boneiessrolled roasts over 6 inches
thick, add 5 to 10minutes per poundto
times givenabove.
Poultry
Chickenor Duck
chicken pieces
rurkey
3. Removefat and drippingsas
necessary.Baste asdesired.
4. Standing ti~~erecommended
for roastsis 10to 20 minutes. This
allowsroasts to firmup and makes
themeasier tocarve. Internal
temperaturewill riseabout5° to
10”F.;tocompensatefortemperature
rise,
if desired,removethe roast
from oven sooner(at 5°to 10°F.
less thantemperaturein guide).
Oven
Temperature
325°
325°
325°
325°
325”
325°
350°
325°
Doneness
Rare:
Medium:
Well Done:
Rare:
Medium:
Well Done:
WellDone:
WellDone:
To Warm:
Well Done:
Well Done:
Well Done:
5. Vrozenroastscan be
conventionallyroastedby adding
15to 25 minutesper poundmore
timethan givenin guidefor
refrigeratedroasts3(15 minutes
perpound forroastsunder 5
pounds.)Defrostpoultrybefore
roasting.
Approximate Roasting Time
in Minutes per Pound
3 to 5 lbs.
24-35
35-39
39-45
21-25
25-30
30-35
35-45
35-45 30-40
18-23minutesper pound(any weight)
3 to 5lbs.
35-40
35-40
10to 15 Ibs.
16-22 12-19
6 to 8 Hbs.
18-25
25-31
31-33
20-23
24-28
28-33
30-40
Over 5 Ibs.
30-35
Over 15ibs.
Knternal
Temperature “F
130°-140°
150°-160°
170°-1850
130°-140°
150°-160°
1700-185°
170°-180°
170°-1800
115”-125°
-d ,7A
,,
f<y
J
r ‘Lb
. .
—————- -
.<....-—.. --—.-.---.-.= .-.--- —-------------
-— .
—
Page 17

.—...—.——
——
4
Broiiingis cookingfoodby direct
heat from abovethe food.Most
fish and tendercuts of meatcan be
broiled. Followthese stepsto keep
spatteringand smoking toa
minimum.
The oven door should be closed
duriklg broiling.
Step 1: If meat has fat orgristle
near edge, cut verticalslashes
through both about2“ apart.If
desired, fat may be trimmed,
leaving layer about 1/8”thick.
Step 2: Place meat on broiler rack
in broiler pan which comes with
range. Always use rack so fat
drips into broiler pan;otherwise
juices may become hot enough
to catch fire.
Step 3: Position shelf on
recommended shelf position as
suggested in Broiling Guide on
page 18.
Step4:Touch BROIL pad. “-–-“
appears in display and “BROIL”
flashes.
Step 5: SelectLO Broil (450*F.)
by tappingINCREASE pad once.
SelectHI Broii (550”F.)by tapping
INCREASE pad twice.
To changefrom HI Broilto LO
Broil,tap DECREASE pad once.
Step 6: Turn food only once
during cooking.Time foods for
first sideper Broiling Guide.
Turn food, then use times given for
second side as a guideto preferred
doneness. (Where two thicknesses
and times are given together, use
first times given for thinnestfood.)
Step 7: When Broiling is
completed touch CLEAR/OFF.
Serve food immediately, and leave
pan outside oven to cool during
meal for easiest cleaning. -
Questions&Answers
Q. when broiling,isitnecessary
toalways usea rack inthe pan?
A. Yes.Usingthe rack suspends
the meatover thepan. As themeat
cooks,thejuices fall intothe pan,
thuskeeping meatdrier..Juicesm-e
protectedby the rack and stay
cooler,thuspreventingexcessive
spatterand smoking.
Q. Should 1 sa~tthe
broiling?
A. No. Saltdrawsoutthejuices and
allowsthemto evaporate.Always
saltafter cooking.Turnmeat with
tongs;piercingmeat witha fork
also allowsjuices to escape.When
broilingpoultryor fish,brush each
sideoften withbutter.
Q. why are my meats not
turning out as brown
should?
Check to see ifyou are using the
A.
recommended shelfposition.Broil
for longestperiod oftime indicated
in the BroilingGuide. Turnfood
only once duringbroiling.
Q. Do I need to grease my broiler
rack to prevent meat from
Sticking?
A. No. The broiler rack is designed
to reflect broiler heat, thus keeping
the surface cool e~loughto prevent
meat from sticking to the surface.
However, spraying the broiler rack
lightly with a vegetable cooking
spray before cooking will make
cleanup easier.
meatbefore
asthey
.
‘--’-)
----‘
.—.
‘..
,
.,,
,,
Page 18

..——.— —
\.’..
“-— ——-——..—..—... -...——
.——
—. ——
———
edge ofthe meat. Usetongsto turn
meat overto preventpiercingmeat
1. Alwaysuse broilerpan and rack
thatcomes with youroven.It is
designedto minimizesmokingand
spatteringby trappingjuices in the
shieidedlowerpart of thepan.
2. For steaksand chops,slashfat
evenIyaround outsideedges of
meat. Toslash, cutcrosswise
throughouter fat surfacejust to the
r
Food Thickness Position LO Broil Time, Nfinutes Time, Minutes
Bacon
Ground Beef I lb. (4patties)
WellDone Xto% in. thick
Beef Steaks
Rare
Medium
WellDone
Rare
Medium
WellDone
Chicken (450°)
(2 to2X lbs.),
split lengthwise
Quantity andlor Shelf HI or First Side SecondSide
%lb. (about8 c HI 3% 3
thin slices)
1 in. thick
(1 to 1X ibs.)
1Xin. thick
(2 to 2X Ibs.)
1whole
I
and losingjuices.
3. If desired,n~arinate~neatsor
chickenbeforebroiling.Or brush
with barbecuesaucelast 5 to 10
minutesonly.
4. When arrangingfood on pan,do
not letfatty edgeshang over sides,
which couldsoiloven with Fat
dripping.
c HI
B
B
B
B
B
B
B
HI
LO
10-11 4-5
9
12
13
10
12-15
25
30-35
7
5-6
8-9
6-7
10-12
16-18
25-30 Reduce time about5 to 10 min. per side for
I
Bakery ProducLs
Bread (Toast)or
ToasterPastries
English Muffins
Lobster taiis
(6 to 8oz. each)
Fish l-lb. fillets Mto
‘recooked
‘ork chops
McllDone
.amb chops
4cdiunl
VellDone
4edium
dellDone
Vieners,
rnilar precooked
lusages, bratwurst
2104 slices
1
1pkg. (2)
2, split
2-4
Xin. thick
1in. thick
2(1 in. thick),
about 1lb.
2 (1in. thick),
about 10 to 12
2 ( I X
in. thick).
about 1lb.
1-lb. pkg. ( 10)
OZ.
c
c
c
B HI
I
c
B
B
B
B
B
B
c
HI 2-3 Space evenly.Place Englishmufilns cut-side-
3-5
HI 13-16
5
LO 8 8tiam slices (450°)
HI
HI
HI 6
10
13
8
10
10
17
Do not
turn
over.
5
4-5
9-12
4-7
10
4-6
12-14
1-~
5. Broilerdoesnot need tobe
preheated.However,for very thin
foods,or to increasebrowning,
preheatif desired.
6. WrozenSteakscan be
conventionallybroiled by
positioningthe ovenshelf atnext
lowestshelf positionarid
increasingcooking timegiven in
this guide 1Z timesper side.
Comments
Arrangein singlelayer.
Spaceevenly.
Up to 8 patties takeabout same time.
Steaks less than 1in. thick cook through
beforebrowning. Pan frying is recommended.
Slash fat.
cut-up chicken.Brusheach side with melted
butter.Broil with skin-side-downfirst and
broil with doorclosed.
up and brush with butter if desired.
Cut throughback of shell, spreadopen. Brush
with melted butterbeforebroilingand after
half of broiling time.
Handleandturnverycarefully.Blushwith
lemonbutter before and duringcookingif
desired.Preheatbroilerto increasebrowning.
Increase time 5 to 10min. per side for 1X in.thick or home-curedham. -
Slash fat.2 (X in.)
Slash fat.
If desired, split sausages in half lengthwise;
cut into 5-6 in. pieces.
n,
.,?
., ,.,#
;,-:3
-..—.- .——.. ——. ———..——— -
[’”>
.,--....
( ]
..—
Page 19
.
I
-. ----~-.=‘..
4....
___
The rangemust be completelycool
~~%
,,-+>.%w&-
in orderto set the self-cleaning
a~.gg%
L)
*
cycle.
Step 1: Remove the broilerpan,
broilerrack, all cookwareand any
aluminumfoil fromthe oven—
they can’twithstandthe high
cleaningtemperatures.(Oven
shelvesmay be left in oven.Note:
Shelveswill discolorafter the selfcleaningcycle.)
Step 2: Wipeup heavy soil onthe
oven bottom.
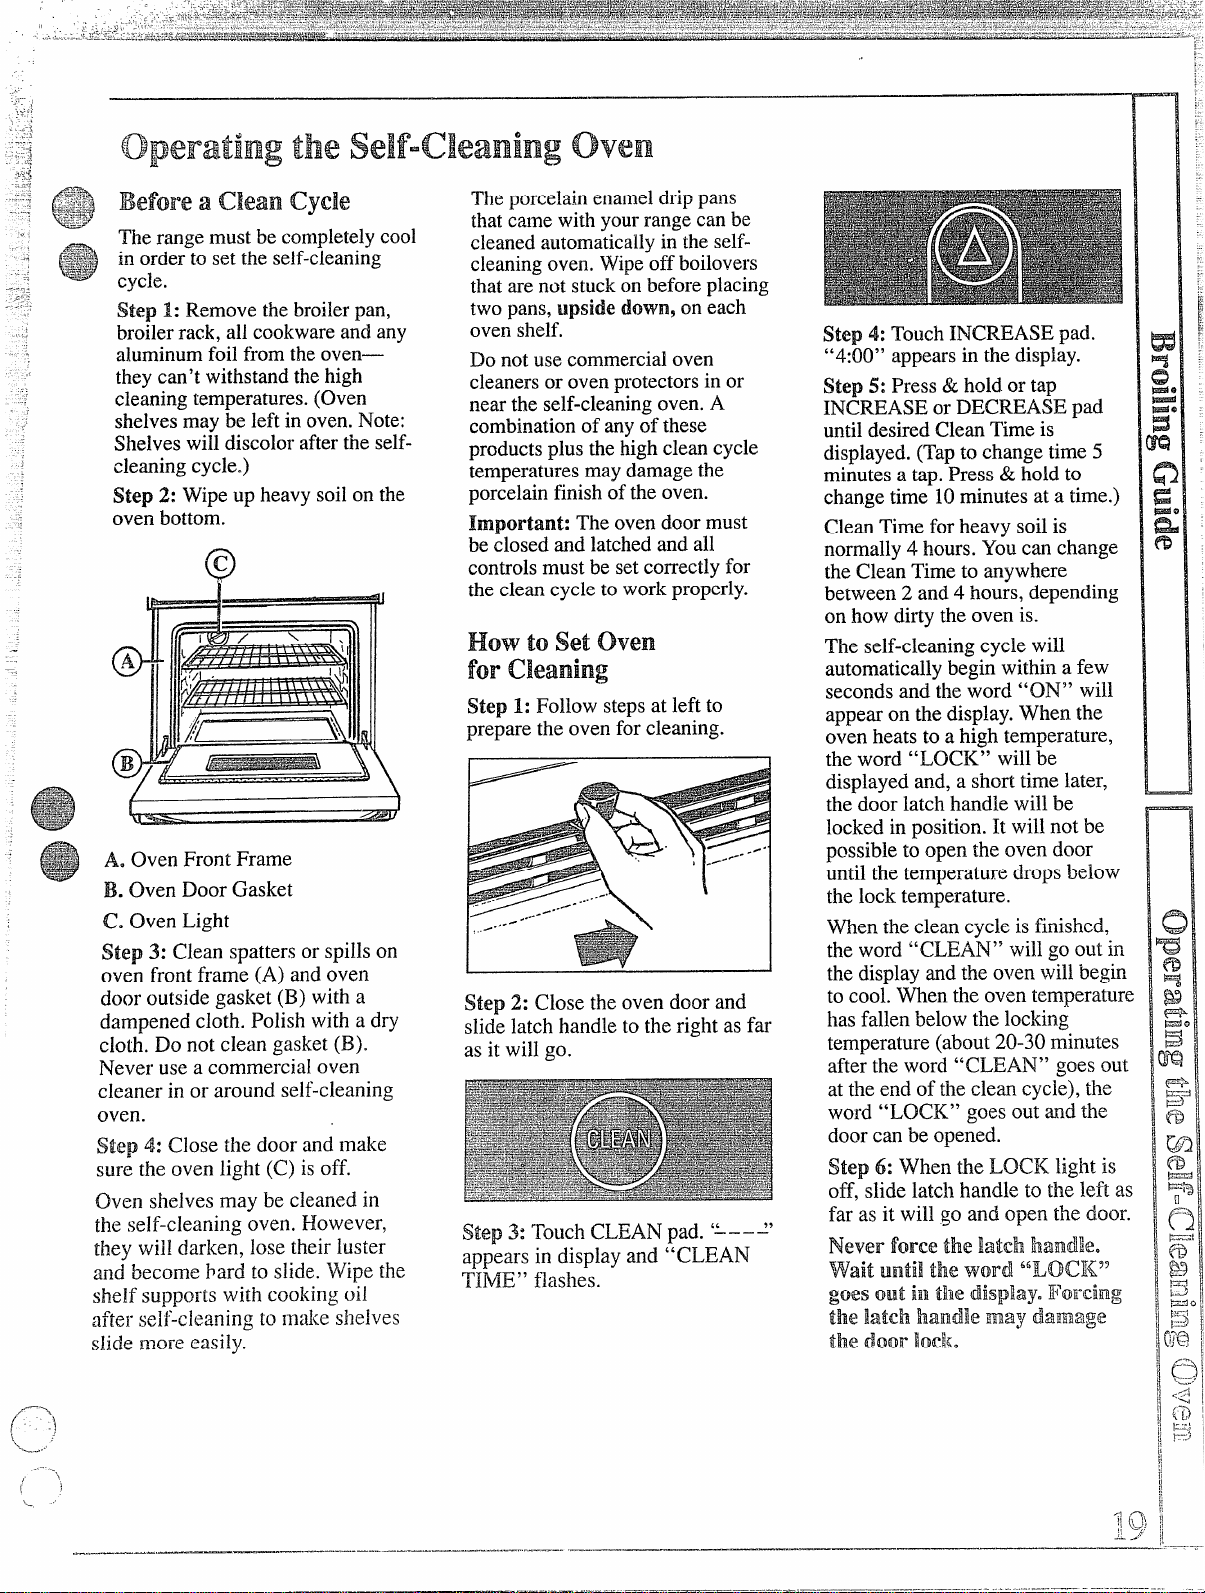
A. Oven Front Frame
B. Oven Door Gasket
C. Oven Light
Step 3: Clean spatters or spills on
oven front frame (A) and oven
door outside gasket (B) with a
dampened cloth. Polish with a dry
cloth. Do not clean gasket (B).
Never use a commercial oven
cleaner in or around self-cleaning
oven.
Step 4: Close the door and make
sure the oven light (C) is off.
Oven shelves may be cleaned in
the self-cleaning oven. However,
they will darken, lose their luster
and become bard to slide. Wipe the
shelf suppo~tswith cooking oil
:Ifterseif-cleaning to nl:lkeshe]ves
slide more easily.
The porcelainenameldrip pans
that camewith yourrange can be
cleanedautomaticallyin the selfcleaningoven.Wipeoff boilovers
that arenot stuckon beforeplacing
two pans,k~psidedown9on each oven shelf,
Do not usecommercialoven
cleanersor ovenprotectorsin or
near theself-cleaningoven. A
combinationof any of these
productsplus thehigh cleancycle
temperaturesmay damage the
porcelainfinish of theoven.
Important: The oven doormust
be closed and latchedand all
controlsmust be setcorrectly for
the clean cycleto work properly.
Howtosetoven
cleaning
for
Step 1: Follow stepsat left to
prepare the oven forcleaning.
.-
../.’”9
.
SteD2: Close the oven door and
slid~latch handle to the right as far
Step 4: TouchINCREASE pad.
“4:00” appearsin the display.
Step 5: Press& hold or tap
INCREASE or DECREASE pad
untildesired CleanTime is
displayed.(Tapto change time 5
minutesa tap. Press & holdto
change time 10minutes ata time.)
Clean Timefor heavy soil is
normally4 hours. Youcan change
the CleanTime to anywhere
between 2 and 4 hours, depending
on how dirty theoven is.
The self-cleaningcycle will
automaticallybegin within a few
secondsand the word “ON” will
appear on thedisplay.When the
oven heats to ahigh temperature,
the word “LOCK” willbe
displayed and, a shorttime later,
the door latchhandle will be
locked in position.It will not be
possible to open the oven door
until the temperature drops below
the lock temperature.
When the cleancycle is finished,
the word “CLEAN” will go out in
the displayand the oven willbegin
to cooi.fien the oven temperature
has fallenbelow the locking
temperature (about20-30 minutes
afte~the word “CLEAN” goes out
at theend of the clean cycle), the
word “LOCK” goes out md the
door can be opened.
Step 6: When the LOCI< light is
off, slide latch handle to the left as
far as it will go and open the door.
Never force the latch llamdEe.
wait until the word “LOCI<”
goes
outiBRthedisplay.~~orcing
thelatchilandlema~~daEmalg@
thedoor]Oc!<.
.=,,... ..-.-”----
—.—
—————..-.”. ———.—..— ..—.—.——.. ------- -,-- .--”
. ..—.—.—-.
.——.
Page 20

-.
..———”.—
.
,
;
“
;
‘L__
a w
How’ $0 Delav start of
DelayStwl issetting theoventimer
to startthecleancycleautomatically
ata latertime than thepresenttime
ofday.NOTE: Beforebeginning,
makesurethe ovenclockshowsthe
col-recttimeof
day.
Tosetthe Clock,firsttouch
the CLOCK pad. “TIME”
Yvi]lflash
inthe display.
Press &hold or tap
INCREASE or
until correcttime of day
pad
DECREASE
is displayed.Tapto change
the time 1 minute a tap.
Yress& hold to change the
time 10 minutes at a time.
For example:Let’s say it’s7:00
and you want theoven to begin
self-cleaningat 9:00 after you‘re
finished inthe kitchen. The oven is
just soiled a normal amountso the
normal Clean Time of 3 hours is
preferred.
Step1:Followstepsonpage 19
(“Before a Clean Cycle”) to
prepare the oven for cleaning.
u
$te~]4: TouchINCREASEpad.
“3:00” appearsin thedisplay.
Step 5: If a longeror shorterClean
Time isdesired, press& holdor
tap INCREASE orDECREASE
pad untildesired cleantime is
displayed.(Tapto change time5
minutesa tap. Press& hold to
change time 10minutesat a time.)
Youcan changethe Clean Timeto
anywhere between2 and 4 hours
dependingon how dirtythe oven
is. In thisexample, 3 hoursis
already setfor the cleaning time.
Step 6: Touch STOPTIME pad.
“10:00” appears on display and
“STOP TIME” flashes.The
control automatically setsStop
Time by adding the Clean Time to
the time of day.In thisexample,
the time of day is 7:00 and the
Clean Time is 3 hours. Adding 3
hours to the time of day equals
10:00.
When theovenheats to ahigh
temperature,the word “LOCK”
willbe displayedand, a shorttime
later,thedoor latchhandlewill be
lockedin position,It will notbe
possibleto open theoven door
untilthe temperaturedropsbelow
the locktemperature.
When the cleancycle isfinished,
the word “CLEAN” will go out in
the displayand theoven will begin
to cool. Whenthe oven temperature
has fallenbelow the locking
temperature(about20-30 minutes
after theword “CLEAN” goes out
at theend of the cleancycle), the
word “LOCK” goesout and the
door can be opened.
Step 8: When the LOCK light is
off, slide latchhandle to the left as ‘‘
far as it will go and open the door.
Never fol-eethe latch Ilandle.
Wait until the word ‘6L0CK”
goes okatin tile display.Forcing
the latch handle may dalmagethe
door Ioeke
:
.
-———. .—
Step ‘7:Change Stop Time from
10:00to 12:00by tapping or
pressing & holding INCREASE
pad ur~til“ 12:00” appears in the
display.The words “DELAY
CLEAN” will also appear in the
display.
The self-clean cycle will
automatically begin at 9:00 and
finish at 12:00.T12eword “ON”
v~iilappear on [he display at 9:00.
After a clean cycle, you may
notice some white ash in tl~eoven.
Just wipe it up with a damp cloth.
If white spots remain, remove
them with a soap-filled steel wool
pad. Be sure to rinse thoroughly
with a vinegar and water mixture.
These deposi~sare usually a sa}i
residue that cannot be removed by
the clean cycle.
If the oven is not clean after o~~e
c~eancycle, the cycle may be
repeated.
——
/—,
(
~..
Page 21
Questionsand Answ’ers
.
Q. lf my oven clock is not
Working,can I St;llself-clean my
oven?
A. No. YourE1ectro~]icControls
use therange clock tohelp start
and stop yourself-cleaningcycle.
Q. Can I use commercialoven
cleanerson any partof nly self”
cleaning oven?
A. No cleaners orcoatings should
be used around anypart of this
oven. If you do use themand do
not thorough~yrinse the oven with
water, wiping itabsolutelyclean
afterward, the residuecan scar the
oven surface and damage metal
parts the next time theoven is
automatically cleaned.
Q. Can I ilean the Woven
Gasket around the oven door?
A. No, this gasket is essentialfor a
good oven seal, and care must be
taken not to rub, damage or move
this gasket.
Q. What should I do if excessive
smoking occurs during cleaning?
A. This is caused by excessive soii.
Touch the CLEAR/OFF pad. Open
windows to rid room of smoke.
Wait until the oven has cooled
(about 20-30 minutes) and the
word “LOCK”’ is of’fin the
display.Wipe Liptheexcess soi]
(
antireset the clean cycle.
Q. Is the “crnck]illg” sound I
hear during elei%RliIlgll(lrlnai:~
Q. Whatcauses t!lehair-like
lineson the enameledsurfaceof
my oven?
A. This isa normalcondition,
resultingfrom heatingand cooling
duringcleaning.These linesdo not
affecthow your overtperforms.
Q. Why do I haveash left in my
oven aftercleaning?
A. Some typesof soil willleave a
deposi~,which is ash. Itcan be
removed with a damp spongeor
cloth.
Q. My oven shelves do
notslide
easily.What is the matter?
A. After many cleanings,oven
shelvesmay become so clean they
do not slideeasily.To make
shelvesslide more easily,after
each self-cleaningcycle dampen
fingers with a small amountof
cooking oil andrub lightlyover
sides of shelfwhere they contact
shelf supports.
Q. My oven shelves have beconle
gray after the self-cleaning Cycle.
Is this normal?
A. ~esaAfter the self-cleaning
cycle, the shelves may lose some
luster and discolor to a deep gray.
Q.The word “door” appeared
on the
the C[ean Cycle. What’s wrong?
A. The door latch handle must be
moved all the way to the right.
Move the latch handle and
cleaning will start.
displaywhenI selected
.,
‘.-. _
~. Yes. This is the sound of the
netal heating and cooling during
~oth~hecooking and cleaning
i[nctions.
}. Sllokti(iihere ;Ie agRy(){]{Jr
IklE+iTigIlle LsL<.n
keY(3s,~l]cremay be :]
“:on’}~]lg~
sli~h{ {)dOu
Llringthe first few clc:lnings.
‘ail~lreto wipe out excessi~.’esoil
lig[lt:Iisc)Clluse:1Stron: (ldor
‘hell Clc;lnillg.
———
.-—. —
f 1)“j
1
.—.
——.-——.——...—.—. .. .
.<:2_J..
.
Page 22

l>t-operc~ireand cleaningare
impor~aritso your
~~n~~ will ~i~e
youefficientand satisfactory
service.Followthesedirections
carefullyi~~caringfor itto help
assuresafe andpropermaintenance.
BE SURE ELECTRIC POWER
IS DISCONNECTED BEFORE
CLEANING ANY PART OF
YOUR RANGE.
Burner Grates
Grates should be washed regularly
and, ofcourse, after spillovers.
Washthem in hot, soapy water and
rinse with clean water. Dry the
grates with a cloth-don’t put
themback on the range wet. When
replacing the grates, be sure
they’re positioned securelyover
theburners.
To getrid of burned-on food,soak
the grates in a slightly diluted
liquid detergent.
Although they’re durable, the
grates will gradually lose their
shine, regardless of the best care
you can give t~lem.This isdue to
their continual exposure to high
temperatures.
Do not operate a burner for an
extended period of time without
cookware on the grate. The finish
on the grate may chip without
cookware to absorb the heat.
DR-ipPans
(On modelsso equipped)
~<emovethe grates. Tflen Iiftout
the porcelain drip pans. Drip pans
can be cleaned in dishwasher or by
hand-—afterpans cool slightly,
sprinkle on detergent, wash or
scour with hot water, rinse and dry.
.RangeTQ~3Burners
The holesin the burnersof your
range mustbe keptclean at all
times forproper ignition and an
even, unhamperedflame.
Youshouldclean the burners
routineiy,especiallyafter bad
spillovers,which could clogthese
holes. Burnerslift rightout for
cleaning.
Theburnerscanbe takenoutofthe
rangeforeasiercleaning.Ifshipping
screwisin place,removeanddiscard
it,Burnerc~nbeliftedstraightup
andremoved.
Toremove burned-onfood,soak the
burnerin a solutionof mild liquid
detergentand water.Soak theburner
for 20 to30 minutes.If thefood
doesn’trinse offcompletely,scrubit
with soapand water and abrush or
plasticpad. Do not usesteelwool or
abrasivecleaners becausethey will
clog theburner openings and
scratchthe burners.If theholes
becomeclogged, clean themwith
a toothpick.
Before putting the burner back,
shake out excess water and dry it
thoroughly by setting it in a warm
oven for 30 minutes. Then place it
back in the range, making sure it is
properly seated and level.
Lift-up Cooktop
There area numberof precautions
you can taketo avoidmarringthe
porcelainenamel surfaceof the
cooktopand to preventit from
becomingdull. Don’tslideheavy
pans acrossit. If youspillfoods
with a lotof acid (tomatoes,
sauerkraut,fruitjuices, etc.) or
foodswith high sugarcontent,
clean themup as soonas possible.
If allowedto set,these foodscould
cause a dullspot.Also, no matter
how stubbornthe food stain,never
use harsh abrasivecleansers.They
could permanentlydamage the
enamel surface.Werecommend
a cleanser such asSoft Scrub@
brand cleanserx ora similar
cleaning product.
Clean the area underthe cooktop
often. Built-upsoil, especially
grease, may catch fire.
To make cleaningeasier, the
cooktop may be lifted up.
To raise the Cooktop:
1. Be sure burners are turned off.
2. Remove the grates.
3. Grasp the two front burner wells
and lift-up.
Dual support rods will hold the
cooktop up while you clean
underneath it.
After cleaning under the cooktop
I
with hot, soapy water and a clea]~
cloth, lower the cooktop. Be
careful not to pincil yo~lrfingers.
...—
_-— .....--..
..”.-..-. . -.. -.,.-.” ---- .———— —--- -------- , .’-—— —.— —.
‘zSoftScrll\>@is u regis[ereli Iradcmar!< of tile
Clorox COIIIPIIIIY.
.—
.—
Page 23

Lift”off ovenDoor
..”+- . . . . . . . . ..—-. . . . . . . . . ..- .-. .--. — . . ..- . . ..— — ..-.—— ——.—-——. -.
—— ,....—. . . . .. . .. . ..-
..——
The ovendoor is removableto
makeihe interiormore accessible,
if desired.
INote:The oven dooris heavy.
Youmay need helpremoving and
replacingthe door.
ovenshelves
Youmay cleantheoven shelves
witha mildabrasivecleanser,
followingmanufacturer’sdirections.
Aftercleaning,rinsetheshelves
withcleanwaterand drywitha dry
cloth.Toremoveheavy,burned-on
soil,youmay usesoapymetalpads,
followingmanufacturer’sdirections.
Afterscrubbing,wash withsoapy
water,rinseand dry.
C1eanup any spills or spatterswith
a damp cloth.Remove heaviersoil
with warm, soapywater,
Cleantouchpadswithmild liquid
dishdetergentand a softcloth.Rub
touchpadslightly.CAUTION:DO
NOT USE ABRASIVESOF ANY
KIND ONTHE CONTROL “
PANEL.The letteringon thepadsis
sensitiveto abrasivesand pressure.
To remove-the door’,open it a few
inches to the special “stop”
position that willhold the door
open. Grasp firmly on each side
and lift the door straightup and off
the hinges.
Note: Be careful not to place
hands between the spring hinge
and the oven frame as the spring
hinge coulclsnap back and pinch
your fingers.
Wash with hot, soapy water.For
stubborn spots, use a solution of
vinegar and water. Do not immerse
the door in water.
To replace the door, make sure
the hinges are in the “out”
position. Position the slots in the
bottom of the door squarely over
the hinges. Then lower the door
siowly and evenly over both
hinges at the same time.
oven
The ovenbottomhas
enamel finish. Tomake cleaning
easier, protectthe oven bottom
from excessive spillovers.This is
particularly importantwhen baking
a fruit pie orother foods with high
acid content. Hot fruitfillingsor
foods that are acidic(such as milk,
tomatoes or sauerkraut, and sauces
with vinegar or lemonjuice) may
cause pitting and damage to the
porcelain enamel surface.
If a spilloverdoes occuron the
oven bottom,allow theoven tocool
first. Youcan then clean theoven
bottomwith soap and water,a mild
abrasivecleanser orsoap-filled
abrasivepads. Rinsewell to remove
any soap before self-cleaning.
Broiler Pan & Rack
After broiling, remove the broiler
pan and rack and carefully pour off
the grease. Walshand rinse the
broiler pan and rack in hot, soapy
water.
If food has bu~medon, sprinkle the
rack with detergent while hot and
cover with wet paper towels or a
dishcloth. That way, burned-on
foods will soak loose whiie the
meal is being served.
Do not store a soiled broiler pan
a~~drack in the oven.
Bottom
a porcelain
Knobs
The controlknobs maybe
removed for easier cleaning.To
remove knob,pull it straightoff
the stem. If knobis difficultto
remove, place a towelor dishcloth
between the knob andcontrol
panel and pull gently.Wash knobs
in soap and water but do notsoak.
cleaning under the Range
The area under the range can be
reached easily for cleaning by
removing the bottom drawer.To
remove, pull.drawer out all the
way, tiltup the froni andremove it.
To replace, insert glidesat back of
drawer beyond stop on range
glides. Lift drawer if necessary to
insert easily.Let front of drawer
down, then push in to close.
ovenAirvents
Never block the vents (air
openings)
providethe airinletand outlet
that arenecessaryfor the range
to operateproperlywith correct
combustion.Air openingsare
locatedat the rearof the
cooktop,at the topand bottom
of the ovendoor and underthe
storagedrawer.
oftlRerange.They
.——.—..—..—.-....— ——— —.-.
.
Page 24

OvenLaImpReplace~ment
CAUTION:Before replacing
yourovenbulb,disconnect
electrical
the mainfuseor circuitbreaker
panel.Be sureto let thelamp
Coverand bulbcool completely.
The oven lamp(bulb) iscovered
with a removableglass coverthat
is heldin place with a bail-shaped
wire. Removeoven door,if
desired,to reach cover easily.
Toremove:
1. Hold handunder cover so it
doesn’tfall when released.With
fingers ofsame hand, firmlypush
back wire bailuntil it clearscover.
Lift off cover.DO NOT REMOVE
ANY SCREWS TO REMOVE
COVER.
2. Replace bulb with a 40-watt
household appliancebulb.
Toreplace
1. Place itinto grooveof lamp
receptacle.Pull wire bail forwarcl
to center ofcover until it snapsinto
place. When in place, wire holds
cover firmly.Be certain wire bail is
in depressionin center of cover.
2. Connect electrical power to
therange.
potvertothe rangeat
cover:
AUTION: Do ottOUC~l the
ulb with wet h ds or when
b lb is hot.Ne
a ea with a we cl th. Electrical
p wer must b sh off if you
h veto replae a b Ib.
T replace bu b:
\ /\
1.Flipfrontof thehing d canopyu
2. Remove fl orescent “ghtbulb.
R place the bulb with o e of the ,
1 \
sa e length nciwattage.
3. ower th canopy.
To eplace tarter:
1. pen ca opy and remov bul
\/ /
as xplain d above.
+
2. @rasp arter, turn it coun r-~
CIOkwis about one-quarter urp
it
and lift o t. Replace with one o‘
~J
the am~wattage.
3. e+U~
f
the canopy.
wipe the ligh
\
\l
\
\
[
!
AdjustingovenThermostat
Whencookinga food forthe first
timein your newoven, usetime
givenon recipesas a guide.Oven
thermostats,overa periodof years,
may “drift” fromthe factory
settingand differencesin timing
between an oldand a newoven of
5 to 10minutesare not unusualand
you may beinclinedto thinkthat
the newoven is notperforming
correctly,However,yournew oven
has been setcorrectlyat thefactory
and ismore apt tobe accuratethan
the ovenit replaced.
If you think theoven should be
hotter or cooler,you can adjustit
yourself.To decide how much to
change the thermostat,set the oven
temperature 25°F.higher or lower
than the temperature in your
recipe, then bake. The results of
this “test” shouldgive you an idea
of how much the thermostat should
be changed.
To adjust thermostat:
1. TouchBAKE pad.
2. Select an oven temperature
between 500°F.and 550°F.
3. Immediately,before BAKE
indicator stops flashing, press and
hold the BAKE pad for about 4
seconds. The red display will
change to the oven adjustment
display.
4. The oven thermostat can be
adjusted up to (+) 35°F. hotter
or (–) 35°F. cooler.Use the
INCREASE or DECREASE pads
to select the desired change in
the red display.
/....i/j
f
.“:~
,
..-—...——.
[.;;2
.-... -—..——— .———--—————
5. When you have made the
adjustme~t, press the CLEAR/OFF
pad to go back to the time of day
display. Use your oven as you
would normally.
...———.—
Page 25

=-.:..’-
L . .
,
~
-------
PAKr
I NIATERIALSTO USE
● Dishwasher-Sa~e
GENERAL DIRECTIONS
Drain fatandcool panand rackslightly.(Do not let soiled pan andrack standinovento cool,)
Sprinkleon detergent. Fill thepan with warmwater and spreada dampcloth
the rack,Letpan and rack standfor a few minutes.Wash;scourif necessary.Rinseanddry.
OPTION:The broilerpan andrack may also be cleaned in a dishwasher.
or paper towel over
Control Panel
Control Knobs ~Mild Soap andWater
Metal Parts DO NOT USE steel \vool,
Porceiain Enamel anc
Pairrted Surfaces*
Oven Door’K
Oven Gasket Avoid getting ANYcleaning materials on the gasket.
Oven Liner ~Soapand Water Allowto cool before cleaning. Frequentwiping with mild soap and waterwill prolongthe time
● Damp Cloth
● Paper Towel
~Soap andWater
wSoap andWaterOutside Glass Finish
DSoapandW7ater
*PaperTowel
‘Dry Cloth
ISoap and Water
Soapand Water
DO NOT USE abrasives,
cleaning powfders,steel wool
or plastic balls. They will mar
the surface.
Pull off knobs.Washgently,but do not soak. Dryand return controlknobs to range.
Washall glass with cloth dampenedin soapywater.Rinse and polish with a dry cloth. If knobs
are removed,do not allow water to rundown inside openingsin theglass while cleaning.
abrasives, ammonia, acids or
commercial oven cleaners.
DO NOT USE oven cleaners,
cleansing powders or harsh
abrasives. These might scratch
the surface.
DO NOT USE ovencleaners,
cleansing powders or harsh
abrasives.
between m~jorcleanings. Be sure to rinse thoroughly to avoid additional stains.
Wipe witha dampcloth toremovesoil. Donot wipe when
oven is in use.
To safelycleansurfaces: wash, rinse, and thendry witha
soft cloth.
If acids should spill on the range whileit is hot, use a dry
paper towel or cloth towipe themup right away.When the
surface hascooled, wash andrinse. For otherspills, such as
fat smatterings,etc., wash with soap and water when they
have cooled and then rinse. Polish with dry cloth.
INSIDE OF DOOR: Clean ONLYthe door liner outside the
gasket. The dooris automaticallycleaned if the oven isin
the self-cleancycle. DO NOT rubor damagethe gasket.
Avoidgetting soapand water on thegasket or in any
openings onthe door.
OUTSIDE OFDOOR: Use soap and water to thoroughly
clean the top,sides and front of theoven door.
Shelves
(See Self-Cleaning
Oven Directions)
Surface Burner Grate: Soupand Wtter
Surf;ice Burners
I>orceirtinEnamel
Drip I)alls (on models
so ucjuippcd)
*Soapand Water
~Dishwasher-Safe
Plastic Scouring Pad
Solution of MildLiquid
Detergentand Water
Soap and Water
Mild AbrasiveCleanser
Damp Clot!l
Soap and
Soap-Filled Scouring Pad
Plastic Scouring Pad
Water
soapand Water
/-
=..,
“-Spillageof’marinades, i~ui[juices. [L>mat{)sauces and [>astingn~atcrialscontaining ticidsmay cause discoloration ~nclshouIdbe wiped up immediately.
“)
‘!-illLC(Dilrct110/[0IOIIC1lIl(ltporii~)nOt’{n\’~11.Y:)ilcn surface is COOI, CICan iilldrinse.
Shelves can becleaned in adishwasher or by hand, using soapand water.Rinse thoroug!llyto
remove any soap after cleaning. Shelves may also be cleaned in self-cleaning oven, but will
discolor and 10SCsome luster.
DO NOT clean in selfcleaning oven.
DO NOT clean in selfcleaning oven.
DO NOT USE steel wool or
abrasive cleaners because
they will ciog the burner.
]penings and scratch the
Yurrrers.
‘orcelain drippans can be cleaned in self-cleaning oven, dishwasher or by hand—after pans
:001slighlly, sprinkle with detergent, wasil or scour with hot water,rinse and dry.
\llow oven tocool. then clean with soap and water or with soap-filled scouring pad. Rinse well
o remove any soap before self-cleaning.
‘orcleaning. remove drawer by pulling it all the w~yopen, tilting up the front and ihen liftin~ it
I
out. Wipe the drawer with a damp cloth or sponge and then replace it.~Neveruse h~rshabrasives
or scouring pads.
I
Lift outwhencool. Soak 5 to 10minutes, ifdesired, in a
warm soiutionof mild liquid detergent. Scour withmaterials
mentioned at left to removeburned-on food particles.
Wipe offburner ileads.If heavyspiiloveroccurs, remove
burners from range (see page 22)and soak them for 20 to 30
minutes in solution of mild liquid detergent andwater. If soil
does not rinse off completely, scrub burnerswith soap and
water and a brush or plastic pad. If tile hoies become
clogged, cieanthem witil a toothpick.Before putting the
burners back, shakeout excess water and then dry burners in
a warm oven for 30mirrutcs.
f-j ;
/
.—.du
--
Page 26

.
.,”— . .
.
QualityofFlan$es
The combustionq~~alityof burner
flamesneeds tobe determined
visually.See instructionson pages
10and 27.
Broil and Bottom Burner
Adjustmentshutters
Air
Air adjustmentshuttersfor thetop
and bottomburnersregulatethe
fIOWof air to the flames.
—.
The flames
forthe top(broil)
burner shouldburn steadywith
approximately 1“blue conesand
shouldnot extendout overthe
edges ofthe burnerbaffle.
To deternline if tBlebottom
burner flames are proper,
remove theoven bottomand the
burner baffle.
To remove the burner ba~e, use
a nutdriver to removethe 1/4”
hex head screwshown inthe
illustrationabove.Do not remove
any otherscrews.Pull baffle
straightout untilit isfree from the
slotthat holdsit atrear of oven.
The air adjustment shutterfor the
top (broil) burneris in thecenter of
therear wall of the oven.
The shut~erfor the bot~ombur~~er
is near the back wall behind the
storage drawer,
To remove the oven bottom:
1. Remove knurled screwsholding
down rear of oven bottom.
2. Grasp oven bottomat finger
slotson each side.
3. Lift rear of oven bottom enough
to clear the lip of range frame, then
pull out.
The flames shouldhave 1/2”to
3/4”blue cones withno yellow
tipping. When theba~e is back in
place, the flameswill resettle.
To replace the oven bottom:
1. Slideoven bottom into oven so
front fits underlip of range frame.
2. Grasp oven bottom at finger
slots and push itback and then
down to rest on supports at rear
of oven.
3. Replace knurled screws.
:$$~
Q
,:. -=.
‘ /, ~._.-,-,>L:l
.— ...—..—
— .... .. . ...
. .. . ..—. --—-—--——— ——-—
.,-~.
..,,
[
\
\> ,/
\
,,
——
.—
Page 27

POSSIBLECAUSEAND/ORWHAT TO Do
-.. -.- -.--.——.—
OVENWILL
NOT WORK
TOP BURNERS
DO NOT LIGHT
OR DO NOT
BURN EVENLY
BURNERS HAVE
YELLOW OR
YELLOW-TIPPED
FLAMES
BURNER FLAMES
VERY LARGE
OR YELLOW
*Plug onrange isnot completelyinsertedin the electricaloutlet.
~The circuit breakerin yourhouse hasbeen tripped, or afuse has beenblown.
~Oven controlsnot properlyset. .
eDoor left in locked positionafter cleaning.
“Make sureelectrical plug isplugged into a livepower outlet.
~Burner holes on the sideor aroundthe top of burner maybe clogged.Remove burners
and clean !hemwith a safety pin or paper clip. Make sure you do not enlargethe ho~es.
o Burnersmay not be fitted correctly ontothe mountingbrackets. Remove and reinstall
themproperly.
(A) Yellow~ameS—
Call for service
(B) Yellowtips on outer
cones—Normal for LP gas
[c) soft blue flames—
No~malfor naturalgas
*If burner flames look like (A), call for service. Normal burner flames should look like
~B)or (C), depending on the type of gas you use.
~With LP gas, some yellow tippingon outer cones is normal.
~If range is connected to LP gas, check all steps in the Installation Instructions.
OVEN DOES NOT
COOK PROPERLY
OVENWILLNOT
SELF-CLEAN
..-.-,
..
i
._..
—.
‘..-
.......—. ...—-------
__——
Aluminum foil being used improperly in oven.
Oven vent blocked on top of range.
Incorrect cookware being used. Check each cooking section for cookware tips or
ecomrnendations.
Oven bottom not securely seated in position.
Oven temperature is too high to set self-cleaning operation. Allow the range to cooi to
JOmtemperature and reset the controls.
Door latch handle not moved all the way to the right.
Ra~~geelectrical plug must be securely seated in a live power outlet, Check for blown
~seor tripped circuit breaker.
Review i~~structionson page 9.
..-...—,..—...—.———
cEt![fomay IJU
‘G loose or bu~~edout.
oElectrical piug mi]st be plugged into a live power outlet.
.—...—...—-—...—.—.-————....-.———
———
—
.
—.— ——...-.—...—-
—
,-:j-=:
“[., :!
Page 28

PROBLEM
‘@%+
“%”~
..=:~:.;
.:;?~k~
+<.T;=
POSSIBLECAUSEAND/ORWHATTODO
SURFACELIGHT
DOESNOTV~C)RK
STRONG ODOR
OVEN WILL NOT
SELF-CLEAN
OVENDOORWILL
NOTUNLOCK
OVENNOTCLEAN
A~ER CLEAN
CYCLE
“door” APPEARS
ONDISPLAY
CONTROLBEEPS
AFTERENTERING
OVENTIMEOR
STOPTIME
Fiuoresc.erItlamp islooseor defective.Adjustor replace.
o
Switch operatinglightis broken.Call for service.
~
*Improper air/gasratio in oven.Adjust ovenburner air shutters.
MIAn odor fromthe insulationaround theoven liner isnormal for thef~rstfew times
oven is used.This is temporary.
eOven temperature istoo high toset self-cleaningoperation.Allow therange to cool
to room temperatureand reset thecontrols.
eDoor latch handlenot moved allthe way to the right.
oOven must cool below lockingtemperature (approximately30 minutesafter the
cIean cycle iscomplete).
eOven controlsnot set properly.Review pages 19and 20.
~14eavilysoiled ovensrequire 3YZto 4-hour Clean Time.
oHeavy spilloversshould be cleanedup before starting clean cycie.
eSeIf-cleaning cycle hasbeen selected but latch handle was not xnovedall the way to
the right. Move latch handle.
~Latch handle was moved to theright but another program other than self-cleaning
was selected. Move latch handle to theright only when setting self-cleaningcycle.
~This is reminding you to enter a bake temperature (Step 7 on page 13).
c
,-c
“>?-.k,
‘-
@
“F-” AND A
NUMBERFLASH
ON DISPLAY
.,,,->~::>
,~$<>
.—.
~This is the function error code. If function error code appears during the selfcleaning function, check oven door latch—the latch hancilemay have been moved,
even if only slightly, from the latched position. Make sure latch is moved to the right
as far as it will go. Touch CLEAR/OFF pad. If function error code does not clear,
unplug the range and then plug it back in. If function error still appears, unplug the
range and call for service.
——..— ------- . ..——..- .- ——
—
Page 29

FORYOURSAFETY
Do not store or use combustible
matefials9 gasotine or otier flammable
VapOrSand liquids in tie ticti@ of fiis
or my otier applimee.
1
Provideadequate clearances betweenthe range
and adjacentcombustiblesurfaces.
Depth including
Handle and ‘Oven Door Closed
28%”
BEFOREYou BEGEH
Read these
Caetiily.
IIMPoRTm:
local electical hspectors uses
tie
INWM.LER: have
M& ‘&e appliance Wer instigation is
completed.
coNsmER: Keep mis use md care
Guide and tie Instillation Ins&uctions for
fitire use.
instructionscompletely and
savetieseinstructionsfor
tieseinstructions
Product Height
46%”
L-
\
Oven Door O~en ‘\ “\
46%’” \\
Mlnlmum!O
cabinelson
oltherside
of range
belolv cooktop and at
range back
\ \
u’”’’”’”
;
‘,
---
Page 30

~
::’3m.~ 1$.
flfiFa&’@RFA}iTSAFETYif#sFRucTloMs
IHstillatio13ofthis range Inust conformtiti
local Codes, or intile absence oflocal codes,
tieNational Fl!.elGas code, NSI
titi
2223.1, latest edition.
This range has been design-certifiedbythe
AmericanGasAssociationaccordingto ANSI
Z21.1,latestedition.Aswithany applianceusing
gas and generating heat,there are certain safety
precautio~syou shouldfollow.Youwillfindthese
precautionson pages 2-5.Readthem carefully.
~Haveyour range installedby a qualifiedinstaller
or service technician.
@Yourrange must be electricallygrounded in
accordancewithlocalcodes or,in the absence of
localcodes, in accordancewith the National
ElectricalCode (LNSI/NFPA 70,latest edition).
See Groundingon page 33.
@Before~nstallingyour range on linoleumor any
other-syntheticfloor covering,make sure the floor
coveringcan withstand 180°F.without shrinking,
warpingor discoloring.Do notinstallthe range
overcarpeting unless a sheet of l/4-inch thick
plywoodor similar insulatoris placedbetween the
range and carpeting.
~Make sure the wallcoveringsaround the range
can withstandheat generated by the range up to
200°E
Avoidplacingcabinets abovethe range. To
@
reduce the hazard caused by reaching over the
openflames ofoperating burners, installa
ventilationhood over the range that projects
Forwardat least 5 inches beyond the front ofthe
:abinets.
BThe ventilating hood must be constructed of
;heet metal not less than 0.0122inch thick (No.28
J.S.Standard gage). install abovethe cooking top
vitha clearance of not less than 1/4 inch between
he hood and the underside of the combustible
naterial or metal cabinet.The hooclmust be at
Eastas wide as the applianceand centered over
IICappliance.Clearance between the cooking
urface and the ventilationhood surface MU=
J~~~~ ~~ ~~~~ ~~~J ~~
If cabineis are placed above the range, allow a
]inimumclearance of30 inches between the
ookingsurface and the bottom of unprotected
~~j~n~~~.
~pJ~~~~e
~If
a 3Uinchclearancebetweencookingsurface
and overheat]combustiblematerialor metal
cabinetscannotbe maintained,protectthe
undersideofthe cabinetsabovethe cookingtop
withnot less than l/4-inch insulatingmillboard
coveredwith sheet metalnotless than 0.0122inch
thick (No.28U.S.Standard gage).
* Clearancebetweenthe cookingsurface and
protected cabinetsm= NEVER BE ~SS
H 24 INCHES. The verticaldistancefrom
the planeofthe cookingsurface to the bottomof
adjacent overhead cabinetsextendingcloserthan
1inch to the planeofthe range sides must notbe
less than 18inches. (Seediagramon page 29.)
~ Caution: Items ofinterest to children should
not be stored in cabinetsabovea range or on the
backsplash ofa range--children climbingon the
range to reach items couldbe seriouslyinjured.
Allranges can tip and injury
+4
--
range out from the wallfor any reason, make sure
the Anti-Tipdeviceis engaged with the bracket
when you push the range back against the wall.
@For your safety,never use your range for
warming or heating the room. Youroven and
range top are not designed to heat your kltche~~.
Top burners should not be operated without
cookware on the grate. Such abuse could result in
fire and damage to your range and willvoidyour
warranty.
GDo not store or use combustible materials,
gasoline or other flammab~evapors and liquids in
the vicinityofthis or any other appliance.
Explosions or fires could result.
~ Do not use oven for a storage area. Items stored
in the oven can ignite.
~ Do not let cooking grease or other flammable
materials accumulate i~~or near tile range,
could result.To prevent
accidental tippingofthe
range, attach the supplied
Anti-Tipdeviceto the wall.
(SeePage36.)To check if
~hediv;ce is installedand
engaged properly,carefully
tip the range forward. The
Anti-Tipdeviceshould
engage a bracket on the
back wallofthe range. This
willprevent the range tiom
tipping over.Hyou pullthe
D
I
(
Page 31

(~~}#~~~&
@See Dimensions anclClearances on page 29 for
all rough-in and spacing dimensions. These
dimensions must be met for safe use ofyour
range, The location of the electrical outlet and
pipe opening shown on page 32 may be adjusted
to meet spectic requirements.
~ The range may be placed with Ottclearance
(flush) at the back wall and side walls of the
range.
.
Do notlocatethe range where itmaybe subjectto
strong drafts.Anyopeningsin the flooror wall
behind the range shou~dbe sealed. Makesure the
openingsaround the base ofthe range that supply
fresh airfor combustionandventilationare not
obstructed by carpetingor woodwork.
Yourrange, likemany other household items, is
heavyand can settle into softfloorcoverings such
as cushioned vinylor carpeting.Use care when
movingthe range on this typeofflooring.It is
recommended that the followingsimpleand
inexpensiveinstructions be followedto protect
your floor.
The range should be installed on a sheet of
plywood(or similarmaterial) as follows:~en the
floor cove~iflge?ldsat titefio~itof theYange,the
area that the range willrest on should be built up
with plywoodto the same levelor higher than the
floorcovering.This will allowthe range to be
moved forcleaning or servicing.
Tooks You
@Phillips and flat-blade screwdrivers
@Pencil and ruler
@Two pipe wrenches (one for backup)
~ l;%llopen-end or adjustable wrench
@3/16’1open-end or socket wrench
~ Nut driver
In addition, for LP gas conversion, you will need:
@5/1611open-end wrench
~ 1/21’open-end wrench
WILLMEEU
~ Gaslineshut-offvalve
@Pipejointsealant orpipethread tape with
Teflon* that resists action of natural and LP gases
~ Flexible metal appliance connector (1/2” I.D.).
A 5-footlength is recommended for ease of
installation but other lengths are acceptable.
Never use an old connector when installing a new
range.
~ Flare unionadapterfor connectionto gas supply
line (3/4” or 1/2” NFTx 1/211I.D.)
@Flare union adapterfor connectionto pressure
regulator on range (1/2’1N~ x 1/21’I.D.)
Weflon: Registered trademark of DuPont
@Removealltape and packaging.Be sure to
remove plasticfilmthat covers some chrome parts
(around oven doors, sidetrim).
~Take the accessory pack out ofthe oven.
~ Cheek to be sure that no range parts have come
loose during shipping.
Ffi@DEkAMB SERBALRiwFfiBERL@&3THoB$
The model and serial numbers are on a label
located on the (rent frame behincleither the oven
door or the storage drawer.
Page 32

❑FR@w#BEA9&Qw&TEGM s&P@&Y.
Yourrange
of4 inches ofwater columnon naturalgas or,if
designed forLPgas @ropaneor butane), 10
inches ofwater column.Make sure you are
supplyingyourrange withthe we ofgas for
which itis designed.If,at anytime inthe future,
youdecide to use this range on a differenttype of
gas, conversionadjustmentsmust be made bya
qualfied service technicianbefore attemptingto
operate the range on thatgas.
For proper operation,the pressure of naturalgas
suppliedto the regulator must be between 4 and
13inches ofwater column.For LPgas, the
pressure suppliedmust be between 10and 13
inches ofwater column.When checking for
proper operationofthe regulator, the inlet
pressure must be at least 1 inch greater than the
operating (manifold)pressure as givenabove.The
pressure regulator located atthe inlet ofthe range
manifoldmust remain inthe supplyline
regardlessofw]lether
used.A fIexiblemetal applianceconnector used to
connect t-herange to the gas supplyline should
have an I.D.of 1/2!1and be 5feet in length
(shorter and longer lengths are acceptable) for
ease ofinstallation.
is designedto operate at a pressure
natural or LP gas is being
Recommendedarea ~ ,
for120Voutleton
rearwallandareafor
thruthewall
connectionof
pipestuband
shut-offvalve.
Recommendedarea
forthruthefloor
connectionof
pipestuband
shut-offvalve.
II Vll)ih
I
/
Y-
\
\
\
2
\
Shut off the main gas supplyvalvebefore
disconnectingthe old range and leaveit offuntil
newhook-uphas been completed.
Because hard pipingrestricts ~movementofthe
range, the use
Of an A,C~.A.-certKledflexible metal
~pplianceconnector is recommended unless local
:odes require a hard-pipedconnection. Never use
In old connector when installinga new range.
ro prevent gas leaks, put pipejoint compound on,
)r wrap pipe thread tape with Teflon*around, all
nale (external) pipe threac[s.
Adapter
+
Gasshut-offvalve ~
Installer: Inform the consumer
of the location of the gas shutoff valve.
1
l/2ffo
w
Gas
1. Installa manual gas line shut-offvalvein tl~e
gas line in an easily accessed location outside of
the range. Make sure everyone operating the
range knows where and how to shut offthe gas
supplyto the range.
2. Install male 1/2’1flare union adapter to the
1/211N~ internal thread at inlet ofpressure
regulator.
3. InstaIlmale 1/2” or 3/4” flare union adapter to
the N~ interfial thread ofthe manual shut-off
valve,taking care to back-upthe shut-off~~alveto
keep it from turning.
4. Connect flexiblemetal appliance coil.nectorto
the adapter on the range. Position I-angeto pel”lmit
connection at tl~eshut-offvalve.
—. .——- -
--\>,
---
-.
\
[
j
,“=
\
”
. . . .,.
Page 33

5. When allconnections have been made, make
sure all range coi]trols are in the off position and
turn on the main gas supply valve. Use a liquid
leak detector at alljoints and connections to check
for leaks in the system.
c~mo~: Do NOT USE A FWE To
CHECK FOR GAS Lmse
I
When using test pressures greater than 1/2 psig to
pressure test the gas supply system of the
residence, disconnect the range and individual
shut-off valve from the gas supply piping. When
using test pressures of 1/2 psig or less to test the
gas supply system, simply isolate the range from
the gas supply system by closing the individual
shut-off valve.
❑ELEcTRlakCOHHECT!OMS
Electical
120-volt,60Hertz, properlygrounded branch
circuitprotected by a 15-ampor 20-arnpcircuit
breaker or time delayfuse.
Etiension CordCautions
Because ofpotentialsafetyhazards associated
with certain conditions,we stronglyrecommend
againstthe use ofan extension cord. However, if
you stillelect to use an extension cord, it is
absolutelynecessary that it be a U’L-listed,3-wire
grounding-typeapplianceextension cord and that
the current carrying rating ofthe cord in amperes
be equivalentto, or greater than, the branch
circuitrating.
Gr@uHdimg
IMPORTm—(Please read carefilly~
FORPERSONALSA..PETY,THISAPPLIANCE
MUSTBE PROPEWY GROUNDED.
The power cord of this applianceis equipped with
a three-prong @rounding)plug which mates with
a standard three-prong grounding wallreceptacle
to minimizethe Possibilityofelectric shock
hazard from thi;
Ippliance.
me customer should
Iave the wall
-eceptacleand circuit
;hecked by a qualified
]Iectricianto make
~urethe receptacle is
}roperlygrounded.
Requirement@
\Vhere a standarcl two-prong wall receptacle is
encountered, it is the personal responsibility and
obligation ofthe customer to have it replaced with
a properly gro~]nded three-prong wall receptacle.
Do NOT, UNDER m cIRcuMsTmcEs,
Cm OR ~MOW
m~~~~m(GRouND)
PRONGEROMm~POWERtom.
Anadapter maybe used onlyon a 15-ampcircuit.
Do notuse an adapter on a 20-ampcircuit.Where
local codes permit, a~MPOWY
cONNE~ION maybe made to a properly
grounded two-prongwallreceptacleby the use of
a UL-listedadapter,availableat mosthardware
stores. The larger slotin the adapter must be
alignedwith the larger slot inthe wallreceptacle
to provideproper polarityin the connectionofthe
powercord.
TEMPORARYMETHOD
(ADAPTER PLUGS NOT
PERMiTTED iN CANADA)
ALiGN LARGE
PPONGS/SLOTS
CA~ON: Attachingthe adapter ground
terminal tothe wallreceptacle coverscrew
does not ground the applianceunless the cover
screw is metal,and not insulated,and the wall
receptacle isgrounded through the house
wiring.me customer should havethe circuit
checked by a qualifiedelectricianto make sure
the receptacle is properlygrounded.
When disconnecting the Powercord froI~ the
adapter, alwayshol~ the adapter with one hand. If
this is not done, the adapter ground terminal is
very likelyto break with repeated use. Should this
happen, DO NOT USE the applianceuntil a
proper ground has again been established.
Do not use an adapter plug in these situations
because disconnecting ofthe power cord places
undue strain
failure ofthe adapter ground terminal. me
customer should have the two-prong
receptacle replaced with a three-pro~~g
(grounding) receptacle by a qualifiedelectricia~~
before using the appliance.
oil the adapter and leads to eventual
&@? 1
@ GROUNDAND
v
l-~,.
!mml
n
‘~ ENSURE PROPER
FIRM CONNECTiC)N
BEFORE USE
wal~
..--..
8“ ‘.
..”
Page 34

~ SLEtV%l@kCOMNECFIOMS(cent’d)
The instillationofappliancesdesignedfor mobile
Ilomeinstallationmustconformwiththe
ManufacturedHomeConstructionand Safety
Standard,Title24 CFR,Part 3280(formerlythe
Federal Standardfor Mobile Home Construction
and Safety,Title24,HUD,Part 280) or,when such
standard is notapplicable,the Standardfor
ManufacturedHome Installations,latest edition
(ManufacturedHome Sites,Communitiesand Set-
Ups),ANSIAZ25.1,latestedition,orwith local
codes.
QuaIi&
The combustionaualitvofburner flamesneeds to
be determinedvi;uall~
ofVlames
(A.)Yellow
Callfor service
(B) Yeuow tipson
flames—
outercones—
Normalfor L? gas
[
1. hcate disconnectplug at leftrear ofburner
box on the range back.
2. Pinch sides ofconnector andpullout ofrange
back.
I
Sealany openings in the wallbehind the range
and in the floor under the range when hookups
are completed.
❑CMECB{SUREACESURNEBiGM!T!@M
Operation ofallcooktop and oven burners should
be checked after range and gas supplylines have
been carefullychecked for leaks.
Push in one ofthe surface burner controls and
turn it to the LITEposition.Youwillhear a
snapping sound indicatingproper operation ofthe
spark module. Once the air has bee~lpurged from
the supply li~les,burner should light within 4
seconds. After burner lights, rotate knob out of
the LI’TEposition.Try each burner in succession
unti]all bur~~ershave bee~~checked.
i I
(c) Sofi blue flmeNormalfornaturalgas
Ifburner flames looklike (A),callfor service.
Normal burner flames should looklike (B) or (C),
depending on the type ofgas you use.
With LP gas, some yellowtippingon outer cones
is normal.
The ovenis designed to operate quietlyand
automatically.To operate the oven,touch BN=
pad and then touch INC~ASE pad until“350°”
appears in the display.After 30-60seconds, the
oven burner willignite and burn untilthe set
temperature is reached. The ovenburner will
continue to cycle on and off as necessary to
maintain the oven at the temperature indicated by
the display.
me oven requires electrical powerto operate. In
the case ofa power outage, the oven burners on
these models cannot be lit manuallywit-hamatcl~.
Gas willnot flowunless the glowbar is hot.
Ifthe oven is in use when a -poweroutage occurs,
the oven burner shuts off and cannot be re-litu~~til
power is restored.
.
Page 35

.-
.- .... ......
&r adjustment shutters for the top and bottom
~ burners regulat etheflo wofairtotheflames.
The flamesfor the top (broil)burner shouldbe
steadywithapproximatelyI’fblue cones and
shouldnot extend outoverthe edges ofthe
burner baffle.
To determine ifthe bottomburner flames are
burning properly,remove the ovenbottom and the
burner baffle (see below).Flames should have
approximately1’1blue cones and, ifrange is
suppliedwith naturalgas, shouldburn with no
The air adjtistmentshutter for the top burner is in
the center ofthe rear wallof the oven.
yellowtipping. (Withmost LPgas, smallyellow
tips atthe end ofi~lnerblue cones are normal.)
With the bafflein place,the flamesshould burn
steady and should not extend past the edges ofthe
burner baffle. Flames shouldnot liftoffburner
ports. Hlifdngis observed, graduallyreduce air
shutter opening untilflames are stabilked.
%eshutter for the bottom burner is near the back
~allbehind the storage drawer. Removethe
torage clrawerby pullingthe drawer allthe way
ut and tiltingup at the front.
o adjust the flowofair to either burner, loosen
]e Phillipshead screw a~ldrotate the shutter
~wardopen
or closed position as needed.
To remove the oven bottom:
1.Removeknurled screws holding down rear of
ovenbottom.
2. Grasp oven bottom at finger slots on each side.
3. Ui rear of ovenbottom enough to clear the lip
ofrange frame, then pullout.
Remove Screw “-
~<~
r
~~&~~
~~w
To remove the burner baffle:
~.Use a nut driver to remove the ~/~11hex-head
screw shown in the illustration above. Do ~~ot
remove any other screws.
2.Pullbaffie straight out until k is free fio]~ttl~e
slot that ho~ds it at rear of oveu.
==.—...-—...--—...—------------------. —_—
.—...——..——.—...——.-.............. .“-........
—.—.—, —-—.,.
Page 36

5. Checkfor levelnessby placinga spirit levelor a
cup,partiallyfilledwithwater,on one ofthe oven
racks. Husing a spiritlevel,take two readings—
withthe levelplaced diagonallyfirst in one
directionand then the other.
~. Adjustthe levelinglegs untilthe range is level.
7. Afterthe range is level,slidethe range away
from the wallso that the Anti-Tipdevicecan be
installed.
1. Mark thewallwhere the RIGHTEDGEofthe
rangeis to belocated.Be sure to allowfor the
countertopoverhangifyot~intend toinsta]~the (
rangenext tocabinets.
-
Slotted
Head
Approx.
2. Iacate the outside edge ofthe device2%’1
towardthe center ofthe range fromthe marked
edge ofthe range.
3. Usingthe deviceas a template,mark tie
positionofthe holefor the screw.
4. For woodconstruction, drilla pilothole at an
angleof20degrees from the horizontal.Anailor
awlmaybe used ifa drillis not available.
Mountthe Anti-Tipdevicewith the screwprovided.
For cement or concrete construction,you will
need a 1/41’x 1%”lagbolt and a 1/21’O.D.sleeve
anchor,which are not provided.Drillthe
recommended sizehole for the hardware.
Installthe sleeveanchor into the drilledhole and
then installthe lag boltthrough the device.The
boltsmust be properlytightened as
recommended for the hardware.
“...
i
b
I
W~ING:
~ hnge must be secured with the Anti-Tip
devicesupplied.
~ Unless properly installed,the range could
be tipped by you or a child standing, sitting or
leani~~gon an open door.
~After installingthe Anti-Tipdevice, verify
that it is inplace by carefullyattempting to tilt
the range forward.
~This range has been designed to meet all
recognized i~~dustrytip standards for all
normal conditions.
QThe use ofthis devicedoes notpreclude
tippingofthe rangewhen notproperlyinstalled.
GIf the Anti-Tipdevice supplied with the
range does not fit this application,use the
~~niversalAnti-Tipdevice W02X7909.
——
~, Slidethe range against the wall,and check for
proper installationby grasping the front edges of
the rear surface unit openings a~d carefully
attempting to tiltthe range forward.
I
Page 37

WARNING:Do not removetilepressureregulatorfromtherange.
2. Determine whichfigure,
is appropriate for your regulator type.
❑, ❑or ❑,
Ifit is regulator M :
1. Use a cointo removethe cap fromthe pressure
regulator.
2. Turn the cap overand engage itin the slots. L?
should nowbe visible on the top ofthe cap.
If itis regulator :
M
1. Unscrew the plastic-protectedhex-nutcap
assemblyfrom the top center ofthe regulator.
2. Carefullypry the protectiveplasticcap offthe
threaded metal cap.Gentlypullthe plasticwasher
offthe other threads.
~. Replacethe plasticcap ontothe threaded end
displayingthe gas typeyou desire. Press the plastic
washer ontothe remaining threads.
4. Reinsert the cap assembly intothe regulator. Do
not overtighten, but ensure the seating ofthe
washer.
11it is regulator :
1. Remove
M
cap and forciblysnap out plasticplunger
~frombottom ofcap. - - -
2. Turn plunger over andforciblysnap back in
originallocation.Note: Plunger must snap into
position;the gas typeyou are converting to must be
visibleon lower side ofplunger.
3. Reinsert the assembly into the regulator.
Gas
F;
low
..-
inlu
Range
—
N
.AT “i
.
@>
4
//. ...
-
OR
=Donot remove this protective cap=
except for cotlversion ,
PULL OPEN.
OR
A
..->
‘\ _..’
Q
m
LP –
R
B g@siwERTSURFACEBuR#iERsFORLPGM
1. Liftcool<top.
2. Liftburner assemblies straight up anclset aside to gain access to
SL[?”filCe bur]ler S~UC~S.
3. With
[he surface burner gas inlet tubes, and replace them withthe red-
(in[ed LP gas spuds mounted in a holclerat the right rear of the
range abovethe regulator. (hflountthe brass nat~ral gas spuds in
this holder.) ‘~opreve12tleal<age,make sure spuds are securely
screwed i]][ogas inlet tubes.
z]-.
‘H}<eepthe natural gas spuds with your range so you have them if<u,.
y~l~~~lov~or get a natural
a 5/161’wrench, remove each of the four brass spuds on
I<eplace the burner assen~blies.
gaS hOOl<Up.
1
1
1
I
I
‘.
~
Page 38

FOR&PGM
❑OwenSUwfler
1. Removeoven door,storage drawer,oven
bottomand burner baffle(see page 35).The oven
burner orificespud islocated behinda metal
shield atcenter bot~ornofrange.
2. Removethe metal shield and use a 1/2’1
wrench to turn the ovenburner orificespud
clockwise.Tighten the spud onlyuntilit is snug
withthe base. To prevent leakage, donot
overtighten the spud or loosen the spud after
itis snug.
ma9JusT fl!RADJUSTMENT$MMYWERS
F@RLP@.&
me airadjustmentshutter forthe topburner is “’.;
locatedat the backwallofthe oven.The air
adjustmentshutter for the bottomburner is
locatedonthe backwallbehinclthe storage
drawer.The air adjustmentshutter for either
burner sits onthe hood ofthe valve
and islocated atthe open end of
the venturitube.
To adjusteither shutter,
loosenthe Phillipshead
screw androtate the
shutter to the fullopen
position.
Observe the top burner flamesto see ifthey are
burning properly.The flamesfor the top burner ,
should burn steadywith approximately11’blue ‘
cones and should not extend out overthe edges of
the baffle.
To determine ifthe bottom burner flames are
burning properly,remove the oven bottom and
the burner baffle (see page 35).The flames
should have approximately11’blue cones.When
the baffleis back in place,the flameswill resettle.
screvJ
Air Shutter
4
4
c
(
.Z
.=
~1
Jsea 1/2!1wrench to furn i-heupper burner
rificespud c~ockwise,Tighten spud only untilit
Is snug with the base. To prevent leakage, do not
ol~ertightenS1jUdor
100S~II sp[ld after itis snug.
Page 39

Whateveryourquestionaboutany
,. -
,---.—-
_.-_.—-—.._—..—...-.—...----.—-..—- .“— - .
.- .--.-— ___
Hotpointm~or appliance,
CenteP informationserviceis availabletohelp.Yourcall-and your
question—willbe answeredpromptly
andcourteously.Andyoucan cdl any
time.GE AnswerCente~@serviceis
open 24 hoursa clay7 daysa week.
GEAnswe
Youcan havethe
secure feelingthat
-..
GEConsumerServicewillstillbe
there afteryourHotpointproduct
Our consumerserviceprofessionals
.
willprovide expert repair serviceon
yourHotpoint appliance,scheduled
at a tilmethat’sconvenientfor you.
XfanyGE ConsumerServicecompany-
operatecllocationsofferyouservice
todayor tomorrow,or at yoLlrcon-
warrantyexpires.purchasea GE
contractwhileyourwarrantyisstillin
effectand you’llreceivea substantial
discount.With a multiple-yearcontract,you’reassuredoffiture service
at today’sprices.
Telecommunication Device for the Deti
venience(7:00a.m.to 700 p.m.weekc[ays,9:00a.m.to 2:00p.m.Saturdays).
Our factory-trainedtechniciansknow
sour appIiance insideand out—so
mostrepairscan be handledinjust
C)nevisit.
,-.—— .....,“, .--= -.
.!.. -. .Lw 00 -P-... ~. ,
,/.--.,,
~.
[
Upon request,wewillprovideBraille
controlsfor a varietyof Hotpoint
appliances,anda brochure to assisti]~
planninga barrier-freeIcitchenfor
personswith limited mobility.TCJobtiin these items,free of charge,ca.1]
800.626.2000.
Coilsumers[vitilimpaired hea~-ing
or speechwhohave access to a T.DD
or a convcrltionalteletypewriteri-II;.y
call 8(?o.-rI)D-c7KAc(80-0-833-4322)
LI~s: infil~nl~li(}n Or se~~’ice.
10re
~
I
Page 40

YOURHOTPO!ITGAS RANGE
-e
—
WARRANTY
Saveproof of original purchase date such as your sales slip orcancelledcheck to establish warranty period.
——
.
Q
WHATISCOVERED
WHATHSNOTCOVERED
FULLONE-YEARWARRANTY
Foroneyearfromdateof original
purchase,wewillprovide,freeof
charge,partsandservice laborin
yourhometo repairor replaceany
pati of the
of a manufacturingdefect.
oServicetrips toyour hometo teach
you howto usethe product.
Readyour Use and Carematerial.
Ifyou then haveanyquestions
aboutoperatingthe product,please
contactyourdealeror our
ConsumerAffairsoffice atthe
addressbelow,or call,toll free:
GE AnswerCenter”
800.626.2000
consumer informationservice
oImproper installation.
Ifyou have an installationproblem,
contactyour dealeror installer.
Youare responsiblefor providing
adequateelectrical,gas, exhausting
and other connecting facilities.
rangettlat failsbecause
Thiswarrantyisextendedto
theoriginalpurchaserandany
succeedingowner for products
purchasedforordinaryhomeusein
the48 mainlandstates,Hawaiiand
Washington,D.C.InAlaskathe
warrantyisthe sameexceptthat itis
LIMITEDbecauseyou mustpayto
shipthe productto the serviceshop
orfor theservicetechnician’stravel
coststo yourhome.
Allwarrantyservicewill beprovided
byour FactoryServiceCentersor
byourauthorizedCustomerCare@)
servicersduringnormalworking
hours.
Lookin theWhite orYellowPages
of your telephonedirectory for
GENERALELECTRICCOMPANY,
GENERALELECTRICFACTORY
SERVICE,GENERAL ELECTRIC-
HOTPOINTFACTORYSERVICEor
GENERALELECTRICCUSTOMER
CA=” SERVICE.
* Replacementof housefusesor $
resettingof circuitbreakers.
e
Failureof theproduct ifit is used
for otherthan its intendedpurpose
or usedcommercially.
oDamageto productcausedby
accident,fire, floodsor actsof God.
WARRANTORISNOTRESPONSIBLE
FORCONSEQUENTIALDAMAGES.
<
6
Some states do not allow the exclusion or limitation of incidental or consequential damages, so the above limitation or exclusion
may not apply to you. This warranty gives you specific legal rights, and you may also have other rights which vary from state to state.
To I(nowwhat your legal rights are in your state, consult your local or state consumer affairs office or your state’s Attorney General.
ITtlarrantor: General Electric company
1“;f~!rt!?er lTQl~3is needed Caneefning this Wfarranty, write:
pIt
- .?-3~=. _,ti
;Ud~i~Ci~j-.
ci~igsujrnsr gj’tiairs, [GE i$pp!iances, Louis’li!!e, K}’ 40225
{
 Loading...