

Page 1
“[togetthebestfmm-’-A‘
X-a%
,..
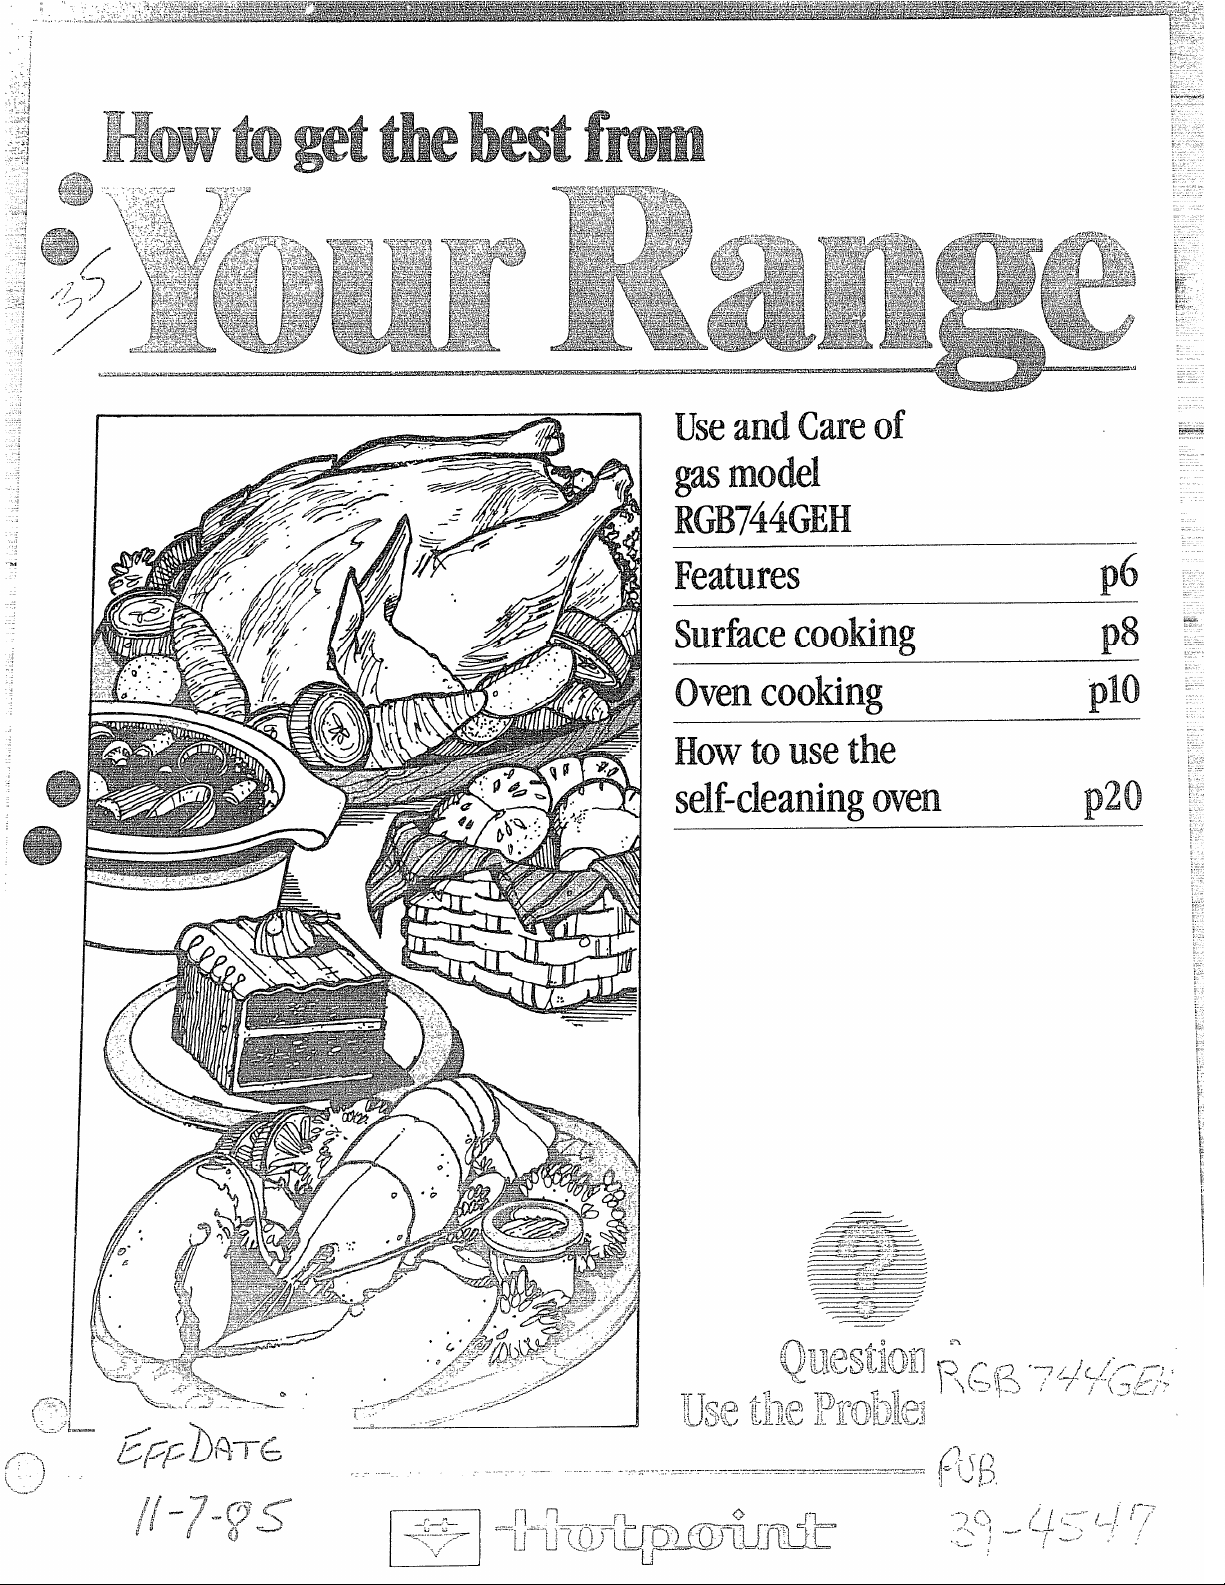
use’andcareOf
‘gasmodel
RGB744GEH
Features–
surfaceCooting
ovenCooting
Howtousethe
self-cleaningoven
——
p(i
plill
plo
p20
Page 2
BeforeUsingYourRange. . . . ...2
hwtaHingtheRange . . . . . . . . ...3
LevelingtheRmge . . . . . . . . . ...3
SafetyInstructions. . . . . . . ...3-5
FeaturesofYourRange . . . ...6.7
SurfaceCooking. . . . . . . . . ...8.9
UsingYourOven . . . . . . . . . ...10
Clockand Timers . . . . . . . . . . . .11
Baking . . . . . . . . . . . . . . . . . . ..l2
13akingChart . .. . . . . . . . . . . ..l3
Roasting,Chart. . . . . . . . . . . . ..l4
Broiling,Chart . . . . . . . . . . . . . .15
CareandCleaning . . . . . . ...16-21
Operatingthe
Self-CleaningOven . . . ...20.21
CleaningChart . . .. . . . . . . . ...22
Problem Solver . . . . . . . . . . ...23
IfYouNeedService. . . . . . . ...23
Warranty
. . . . . . . . . ..13ackCover
Read this book Carefully.
Itisintendedtohelp youoperateand
maintainyournew rangeproperly.
Keepithandyfor answerstoyour
questions.
]fyoudon’tunderstand something
orneedmorehelp, write(include
yourphonenurnber):
ConsumerAffairs
Hotpoint
AppliancePark
Louisville,KY40225
writedown the model
‘andsaid numbers.
You’llfindthem on a labellocated in
theburner boxunderthe cooktop.
Seepage6.
These numbers are alsoonthe
Consumer Product Ownership
RegistrationCardthatcame with
yourrange.Beforesendingin this
card, please writethesenumbers
here:
Model Number
Serial Number
Use these numbers inany
correspondenceorservicecalls
concerningyourrange.
IMyou!rweived
a damagedrange. e *
Immediatelycontactthedealer(or
builder)thatsoldyouthe range.
Sin%’timeamd.money.
Beforeyaw. request
service.a e
Check the ProblemSolveron
23. It listsminor causes of
page
operating problems that you can
correct yourself.
Page 3
YourEmqy?, like so many other
~“l~:.
..-z..l-y~L*=
-
g:*&--
{(-)h
0W4KIMitems,isheavyand can
‘&9-
settle intosoftfloor coverings
such ascushionedvinyl or
carpeting. Whenmoving therange
onthistypeofflooring,usecare.
Do
not install the rangeover
kitchen carpeting unlessyou
placean insulatingpador sheetof
l/4-inch-thickplywoodbetween
therangeand carpeting.
Whenthefloor coven”ngends
Jwzt oftherange, the area thatthe
rangewillrestonshouldbebuiltup
withplywoodorsimilarmaterialto
thesame levelor higherthanthe
floorcovering. This will allowthe
rangetobe movedfor cleaningor
servicing.
,.
-_....C>.-. ..: -.< — . L...
produce~roper cookingandbaking
results.Afteritisinitsfinal
location,placea Ievelhorizontally
onan eve; shelfandcheck the
Ievelnessfronttobackand sideto
side.Levelthe rangebyadjusting
thelevelinglegsor byplacingshims
underthecorners as needed.
.--J
urrangemustbelevelinorder to
at the
when lih..lGet Your Range
@
Havethe installer showyou
the kwtkm of’the
B%mgegas
cut-offvalveand howtoshut it
offifnecessary.
@Haveyour range instdkd and
properly
ins~i]er~in accordancewiththe
InstallationInstructions.Any
adjustmentand serviceshouldbe
performedonlybyqualifiedgas
rangeinstallersor service
technicians.
@Plug your rangeintoa
KM-voltgmmk!d outletdye
Donotremovetheround
groundingprongfromthe plug.If
indoubt aboutthegroundingof
thehomeelectricalsystem,itis
yourpersonalresponsibilityand
obligationtohavean ungrounded
outletreplacedwithaproperlygroundedthree-prongoutletin
accordancewith the National
ElectricalCode. Do notusean
extensioncordwiththisappliance.
@Be sure
am?
beforeoperatingit, to prevent
fire or smokedamageshould
thepacking material ignite.
@Be sure your
adjustedbyaquaiifiedservice
technicianor installerfor the
typeofgas(Natlmdor W) ‘on
whichit isto be used.Gascan
beconvertedfrom one type to the
other.SeeInstallationInstructions.
~After prolonged WWof a
!r&3nge9high floor temperatures
may EWNRltand many floor
coverings willmotwithstand
this kind of use. Never installthe
rangeovervinyltileor linoleum
thatcarmo[withstand such typeof
grounded bya qualified
all packing nmteriak
removed fromthe range
rangeiscorrectly
use. Never
installitdirectlyover
interiorkitchencarpeting.
using YOtl!rRange
@Dm19tleavechildren aloml or
unattended where a range is hot
or in operation, Theycouldbe
seriouslyburned.
e Don’tallowanyoneto Chrdb,
stand or hang on the door or
range top. Theycoulddamage
therange and eventip itover
causingseverepersonalinjury.’
~CAUTION:DO N~
smm
rTEMsOFINTEWSTlo
cHILDmNINcABINEm
ABOVEARANGEatONTm
BACKSPLASH‘a?ARANGE–
CHILDRENCLIMBINGON
THE RANGE TOREACH
ITEMSCOULDBE
SERIOUSLYHW?JRED
@M burner
surfaces cod. ibefon? touching
them or leaving them where
Chikhn Uvilt reach them.
e Never wear hxse fitting or
i!-mginggm’mmt$Whileising
the appliance. Flammable
materialcouldbe ignitedif
broughtin contactwith flameor
hotoven surfacesandmaycause
severeburns.
e Neveruse your appliance for
warming or heating the room.
Prolongeduse ofthe range
withoutadequateventilationcan
behazardous.
@Do Kmtwsewater on gM%3se
fires. Neverpickup a flaming
pan. Turn offburner, then
smother flamingpan by covering
pan completelywith wellfitting
lid,cookiesheetorM tray.
grates and other
1
!.
3
Page 4

Flaminggreaseoutsidea pancan
be putoutbycoveringwithbaking
sodaor,ifavailable,amulti-purpose
drychemica~or foam,
notstoreflammable
@Do
materials in an oven or near the
Cooktop.
@ Do not M cooking grease
or other
flammablematerials
accwdak inorMheali’h? range.
@when cookingpork9follow
ourdirectionsexactlyandalways
cookthemeattoatleast 170°E
Thisassuresthat, intheremote
possibilitythattrichina maybe
presentinthemeat,itwillbekilled
andmeatwillbe safeto eat.
surface cooMng
9A~~aysusethe MIX pOSitiOll!
when igniting top burners and
makesuretheburnershaveignited.
~ Never ~ea~e~@’~e b~~~e~~
unattended at HIGH flame
settings. Boilovercauses
smokingand greasyspillovers
thatmaycatchon fire.
s Adjust top burnerfkme size
soit does not
(?Xkd beyondthe
edgeofthecookingutensil.
Excessiveflameishazardous.
e use only
moistor damppotholders on hot
surfacesmayresultin burns from
steam.Do notletpotholderscome
nearopen flameswhenlifting
utensils.Donotuseatowelorother
bulkycloth in placeofpotholder.
s TOm~~imizebUFnS9ignitionof
flammablematerials,andspillage,
turn the handle of a container
towardthe sideor back ofthe
rangewithoutextending over
adjacentburner.
.~]w&Jys~~yn Swface h.mm’ $0
~
OIFFbefore
o CIM%fidly VYimk fiwds being
iMi?d at EUGH fkme Smhge
dry .pothoMers—
renloviElg IM%lisilo
‘@Neverblockthe vents(air
openi~~gs)
ofthe range. They
providetheairinletandoutlet
whichisnecessaryfortherange
tooperateproperlywithcorrect
combustion.
@~~ ~~~~~~~~()~~~~~~
Cclokingsurfaceif’thewokhas
arolmdmetalringwhichis
placedovertheburnergrateto
supportthewok.Thisringacts
asaheattrapwhichmaydamage
theburnergrateandburnerhead.
Also,itmaycausetheburnerto
workimproperly.Thismaycause
acarbonmonoxidelevelabove
currentstandards,resultingina
healthhazard.
~OOdS for hyillf!j $h(ldd bea$
~
dry as
possible.Frostonfrozen
foodsormoistureonfreshfoods
cancausehotfattobubbleupand
oversidesofpan.
@Useleastpossible
fat for effective shallow or deepfat frying.
Fillingthepantoofull
amount of
offatcancausespilloverswhen
foodisadded.
@M’acombinationofoilsor
fatsVWbewwdinfrying,stir
togetherbeforeheating,oras
fatsmeltslowly.
@Alwaysheatfatslowly9and
watchasitheats.
0use deepfat thermometer
wheneverpossibletoprevent
overheatingfatbeyondthe
smokingpoint.
@UseProperPanSize—Avoid
pansthatareunstableoreasily
tipped.Selectutensilshavingflat
bottomslargeenough.toproperly
contain
foodavoidingboi~overs
andspillovers,butlargeenough
tocoverburner+grate.Thiswill
bothsavecleaningandprevent
hazardousaccumulationsoffood,
simxheavyspatteringorspikwers
lefton
rangecanignite.Usepans
withhandlesthatcanbeeasily
graspedandremaincool.
@Useonlygkasscookware
is recommended
Cooktops.
~Keepall plastics away from
top Ilmnwrs.
@TO avoidthepossibilityd a
always be certain that the
burn,
controls for ail burners are w
OFF position and all grates
coolbeforeattemptingto
removea grate.
@VWWIIflamingfoodsunder
thehood,?h.wnthefanoff. The
fan, if operating,may
the flame.
@If rangeiskited neara
wirdow9
donotuseIongcurtains
foruse on gas
that
are
spread
whichcouldblowoverthetop
burnersandcreateafirehazard.
@If yousmeilgas9turnoffthe ‘:.=
-=,-
@
gastotherangeandcallaqualified
servicetechnician.Neverusean
openflametolocatealeak.
Baking,
Broilingand
Roasting
eDo notUlw Owen for‘astorage
area.
Stand awayfromthe range
@
when openingoven.door. IIW
airor st&mRwhidh escapes
hot
can cause hums @ kmds~ fmx
amhr eyes.
e Keep ‘oven fm. fromg!r%%ase
buildup.
QPlace Qwen skhms indksbt?d.
positionwhile (fNw41 is(xd!o
““.
Page 5
g$pD?fJ#theat unopened food
Umtainws in!the
f$f= CotBidbuildUp am!‘thecontainer
(Nw?l e Pressure
Qwhen broiling9ifmew istoo
dose to the’flame, the fatE-BMW
ignite.Trimexcessfattoprev&t
excessiveflare-ups. -
@Removethe broiler pan ‘and
other fxdware
before self-
cleaningtheoven.
* mrit l.lse ahmimm foil
anywhere in the oven except as
described in this book.
COLM
resultina firehazardor
Misuse
damagetotherange.
~~~eonlygkwscookwarethat is
recommended for useingas
ovens.
~ when Usingcookingor
roasting bags in oven,follow
themanufacturer’sdirection.
~ Aiwaysremovebroilerpan
fromtheovenm soonasyou
finishbro;ling.Greaseleftin the
pancan catchfireifovenisused
withoutremovingthegreasefrom
thebroilerpan.
@Make sure broiler pan is in
place correctly
toreducethe
possibilityofgreasefires.
@if’you should haveagrease
firein the broilerpan,
turnoff
oven,andkeepovendoorclosed
tocontainfireuntilitburnsout.
self-cleani~ oven
~DO notdean thedoorgasket.
Thedoorgasketisessentialfora
goodseal. Becarefulnotto rub,
damageor move it.
~Donotuse oven ckaners. No
commercialovencleaneror oven
linerprotectivecoatingof any
kindshouldbe used
anypartoftheoven.
inoraround
@ckm onlypartswed inthis
and Cam llook.e
Use
@Keeprangedean andfree
ofaccumulationsofgreaseor
Spih%?rswhichmay ignite.
Iflibu Need service
@Read TM! Pdh’n soh’er99
m page 23 ofthis bock
~Don’tattempttorepair
or replace anypartof your
rangeunlessitisspecifically
recommendedinthishmkcAH
otherservicingshouldbereferred
toaqualifiedtechnician.
5
Page 6
@$_
,.-.%
j
;
i
;
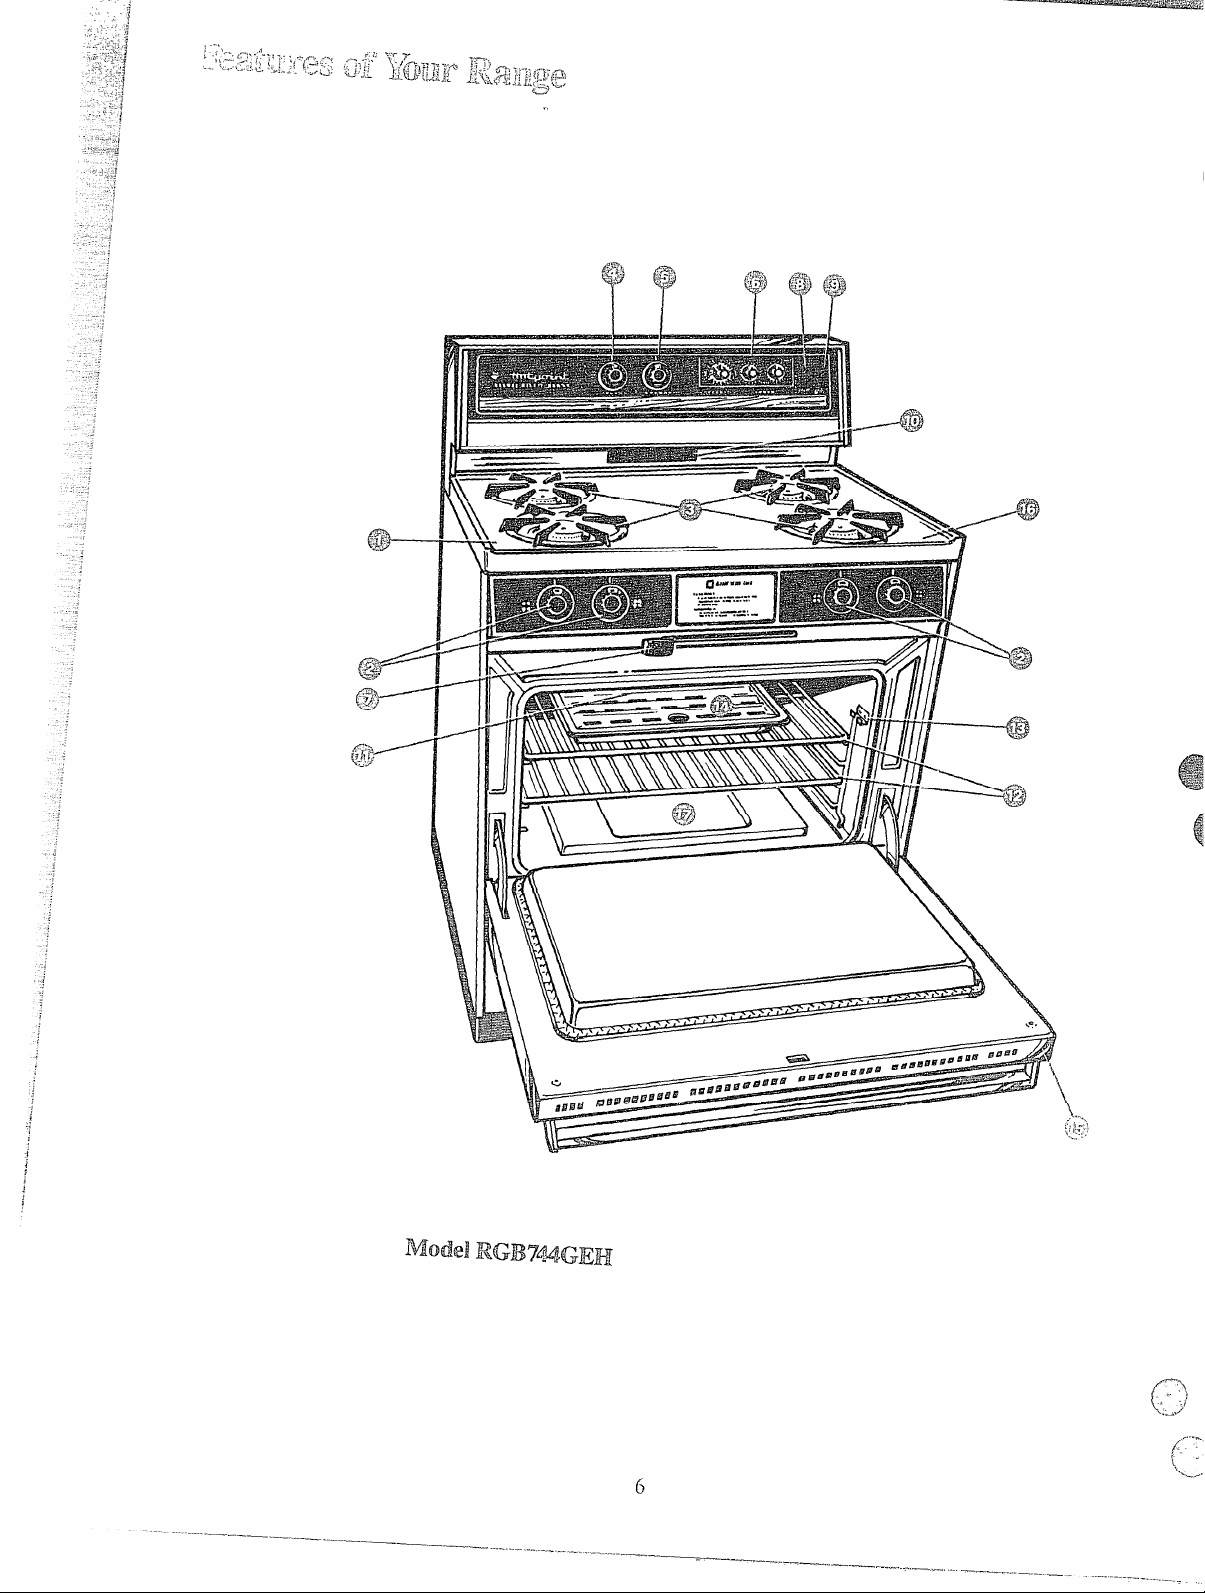
Modd RGB7@.GEH
,)
(T
)’
......
[’
6
(’j
Page 7
.-.,
h...
,,
,
‘!
\
-.
.
.,
ExpMmd
Fk!at$meIndex
on page
RGB74GEH
1 Modeland SerialNumbers
(inburner box undercooktop)
2 SurfaceBurner Controls
3 SurfaceBurners, Gratesand Chrome
Drip Pans
4 OVEN TEMP Control
5 OVEN SET Control
6 Automatic OvenTimer,
Clock and MinuteTimer
7 Door I.atch
Door Locked Light
8
9 Oven CleaningLight
Oven Vent
0
1 OvenInterior Light
2 Oven Shelves
(easdy removedor repositionedon
shelf
SU~pWtS)
2
8
16, 17
10
10
11
20
20
20
11
11
10, 17
*
4
4
e
@
@
0
@
63
e
e
2
13 Oven ShelfSupports
14 Broiler Pan and Rack
15 RemovableOvenDoor
(easily removed forovencleaning)
16 Lift-Up Cooktop
(locksin up position to simplifi cleaning
underneath)
7 RemovableOven Bottom
10
15
17
16
18
e
e
@
e
e
.r,
7
Page 8
-) ~ .
~
1
:
1
,:7!‘i:.:.:L’
.. ~
* ,.r
.
.x, :.:. ;+: ,.->:-.
kl+,-~.vi<%
2.,,.. ,? 3a ,...
.. .?
*L f
,l.LU>’F’,’
.- ...
:’ . . -,.. ~
. ~
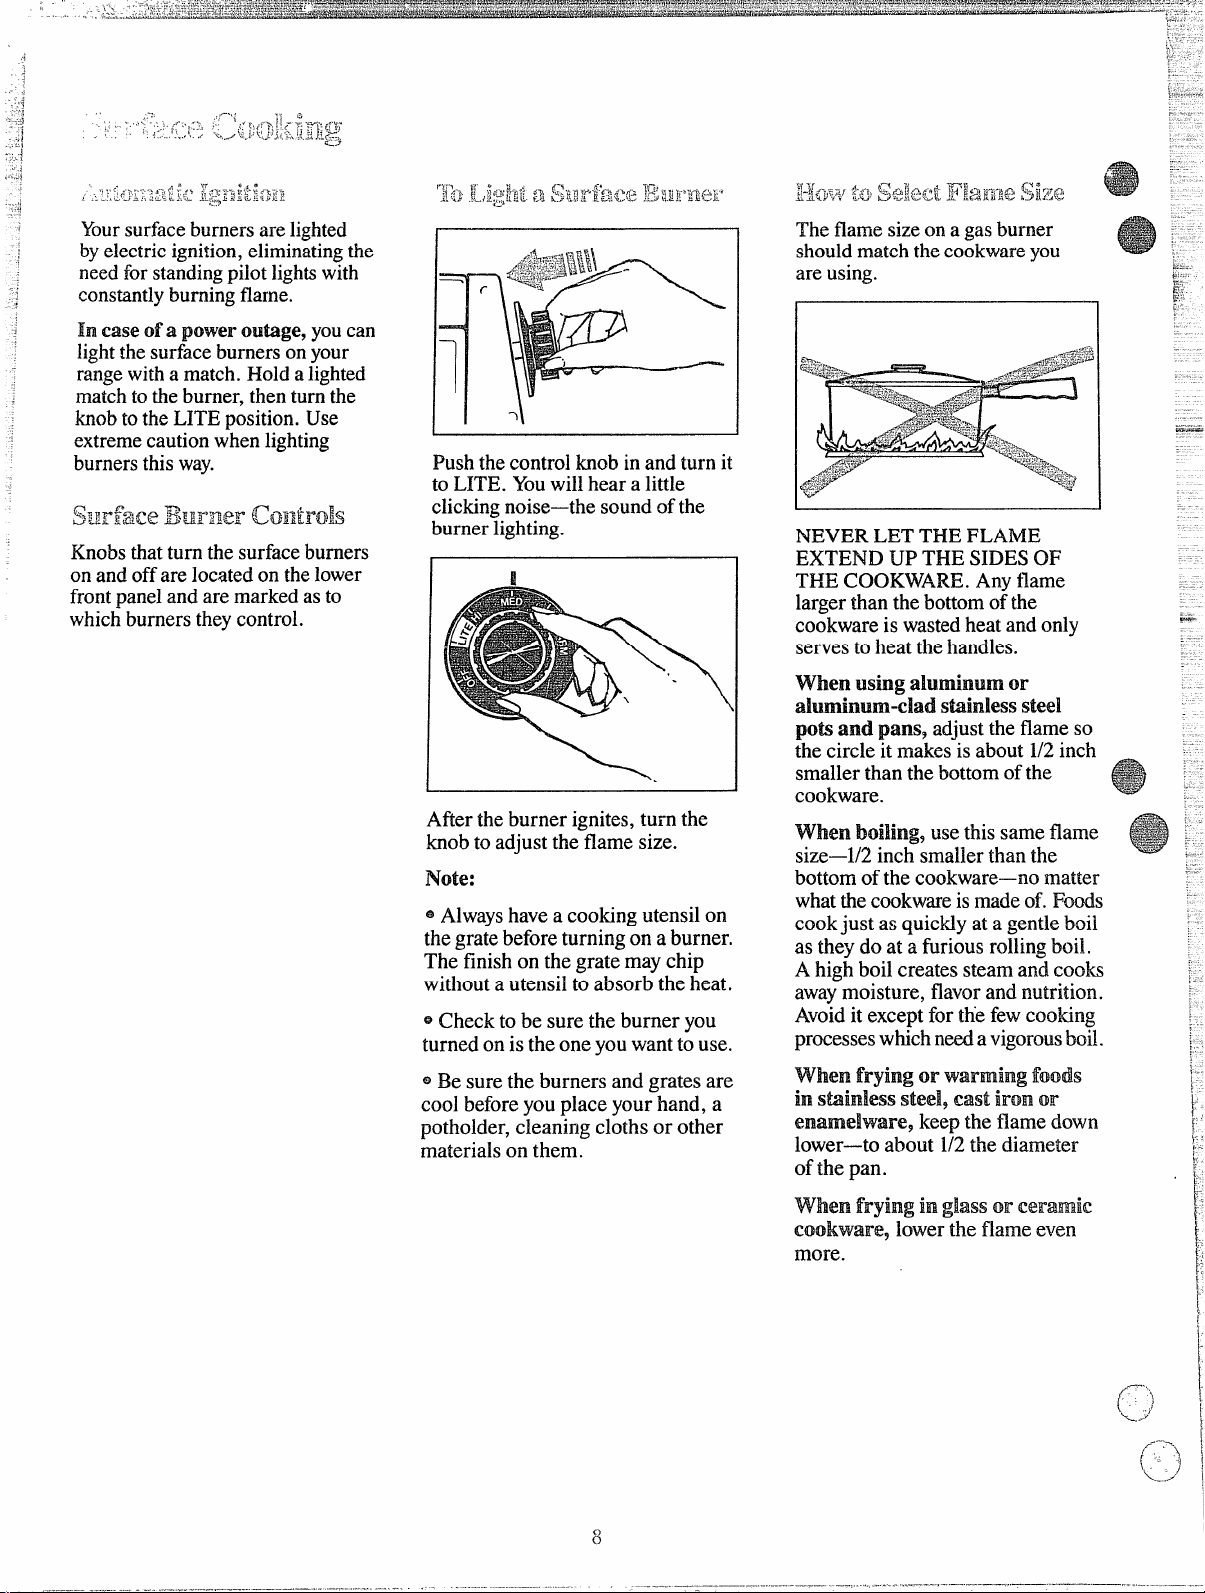
Yoursurfaceburnersarelighted
byelectric ignition,eliminatingthe
needforstandingpilotlightswith
constantlyburningflame.
In case of a power outage, youcan
lightthe surfaceburnersonyour
rangewith a match.Hold alighted
matchto the burner, then turnthe
knobtotheLITE position. Use
extremecautionwhen lighting
burnersthisway.
SWf’%ceBuimeiv Gmtmk
Knobsthatturn the surfaceburners
on and off are located on the lower
frontpanel and are marked as to
whichburners theycontrol.
Push the controlknob in and turn it
to LITE. Youwill hear a little
clickingnoise—the sound of the
burner lighting.
I
After theburner ignites, turn the
knobto adjust the flame size.
Note:
~Alwayshave a cooking utensilon
thegrate
The-finishon the grate may chip
without a utensiltoabsorb the heat.
~Check to be sure the burner you
turned on is the one you wantto use.
@Be surethe burners and grates are
cool
potholder,cleaningcloths or other
materialsonthem.
beforeturningonaburner.
beforeyouplaceyour hand, a
The flame sizeon a gasburner
shouldmatch thecookwareyou
are using.
NEVER LET THE FLAME
EXTEND UP THE SIDES OF
THE COOKWARE. Any flame
larger than thebottomof the
cookware is wastedheat andonly
servesto heat the handles.
whenIllsingahmimnm or
.ah.miimrn-dad staink?sssteel
pots and pans, adjust the flame so
the circle it makesis about 1/2inch
smaller than thebottomofthe
cookware.
When boiling9use this sameflame
size—1/2inch smallerthan the
bottomofthe cookware—nomatter
whatthecookwareis madeof. I&&
cookjust as quickly at a gentk boil
as they do at a furious rollingboil.
A high boilcreates steam and.cocks
awaymoisture, flavorand nutrition.
Avoidit except for the fewcooking
processeswhichneeda vigorousboil.
whenfryingor warmingfoods
instainless !WN?!19castironOJr
enamekware~keepthe flame down
lower—toabout 1/2the diameter
ofthe pan.
when frying h ‘@assor =m%wmk
CCBOBLVWW7lowerthe flame even
more.
i
8
Page 9

-,==r Anair adjustmentshutterfor each
.+)
-—
~:.:.:-:;:~;
_...=
..—
-
~t;.::.:.~.!
gm
-:-
;,><$>?:
~:!$>i-!
-:,\JQ.:-
~:,,;....<
&“,.’_
;.—-”.
.Gr.a>
-
--
,.
.
:
>
~
!
~&# surfaceburner regulatesthe flowof
~
2
air tothe flame.
when the right mw.Hllntofair
flowsinto the burner, theflame
willbe steady,relativelyquietand
haveapproximately3/4”sharpblue
cones. This usuallyresultswhen
theshutteris about haMwayopen.
With too much air=,the flame will
beunsteady,possiblywon’tburn all
thewayaround, and will be noisy,
soundinglikeablowtorch.
With not enoughah-,youwon’t
seeanysharp blue cones in the
flame,youmayseeyellowtips,and
sootmay accumulate on cookware.
Air adjustm&t shutter
Air Adjustment Shutter
U
f I
U I
The air adjustment shuttersset on
thehood of the valveand areeither
lockedin placewith Phillipshead
screwsor positioned on theburner
tubesby friction fit.
Toadjust the flow of air to the
burners, ~oosenthe Phillips head
screwsand rotatethe shutters (or
apply a blade-type screwdriver
againstthe friction-fit shuttersand
push)to allowmore or lessair into
ihe burner tubesas needed.
:-;p,*...
.:i,f:..
~ :
,:;x’l <- ,:., ,.
*
.:L,.~~;.T: i? f~=, ~j; :]]:: ~,-+i~:’ “~)
--i.yz
e-; .
d “b
Muminum: Medium-weight
cookwm isrecommendedbecauseit
heatsquicklyandevenly.Mostfds
brownevenlyinan aluminumskillet.
Mineralsinfoodandwaterwillstain
butwillnotharm aluminum.A
quickscourwith a soap-filledwool
pad aftereachusekeepsaluminum
cookwarelooking shinynew.Use
saucepanswithtight-fittinglidsfor
cookingwithminimum amountsof
water.
Cast Iron: If heatedslowly,most
killets willgive satisfactory
results.
Enamelware: Under some
conditions,the enamelofsome
cookwaremaymelt.Followcookware
manufacturer’srecommendations
forcookingmethods.
GkRss:There are twotypesof glass
utensils—thoseforovenuse only
and thosefortop-of-rangecooking
(saucepans,coffeeandteapots).
Glassconductsheat very slowly.
Heatproof Glass Ceramic: Can
be used foreithersurfaceor oven
cooking.It conductsheat very
slowlyandcoolsveryslowly.
Check cookwaremanufacturer’s
directionsto be sure itcanbe used
on gas ranges.
Stiinless Steel: This metalalone
has poor heating properties, and
is usuallycombined with copper,
aluminumor other metalsfor
improvedheat distribution.
Combinationmetalskilletsgenerally
worksatisfactorilyif usedatmedium
heatasthemanufacturerrecommends.
,.
‘:i~
: -; ~,, ~,
f--
1.’’’...
~,,,,,
r :.
:.j=j
:. .-,,
, ,,. ,
(:-:;,:;::..:-
[L,:,,,:;‘-~“__
~~. ;---– :
$.-. -<
,’.,..-‘.,
F!-.;-.,!-
~;:=------
!!~--.s;
~:”::..,.
f...:..-.,._,,~,:.
;.;-y-::,
p:j.’;:::-~.
;;--;’:i’* :7
F...,.-.A,e?-
;.+;::,~.,-;-
E-3$:+’:-
~~.,..
~;i..;-..-..1,.
~f=.-.,~,,.-=
~..—.
;,.,.3:-:.
,.1.<,:..
!+:... ---.
!-.
,/..:,!,
r.B~. --
:.-,..1,.
:,...,
r-
,-.
i<!’%:>-
,~....’
: ‘.:- ‘-s-
!7-:J*.1.-.:\
;,--.
:.,-.-..-.-,.’, .
h:-+..- -
:r..+,-
;,, -
,,* -
“
;_
.
.
~?..?:,-----
.... .. ..-
~.~,—,,,
~..>..,<.2..
;--.
~--t,:..,-”,
~j:+-~L::7~
.-.....
~.,;{-<s.-:..
~-..-.t,,
P,-’.’”.-
F.[;:[q---,
A.
~‘.::?v-._,[.g:<;!
f:
}:-_.2::_::
$:;.
~$3~:
~~
;:>q;p:?;
r~..’
.-,-7- ..
,
..-
~..-:-./,.-. :
:~:.-.?.~,.~:
f.
\,~’(f::;. -
..
;,‘:(cc:,;
!..,-
; .._-,
_<-:...::;
..
.
k
.; ;. ‘::.:3/
~-++
f::f @ .
;.-’.
i-”:”-
~.,::
.,-. .
i,”~’.’-
i, ..’
l,-
}!.
I
I
/
_
Page 10

.,
.=
~
~
(
.
I
i
i;~’~:~n$llf-ifm
‘ ‘~
--\*_..\
..-..~i.-..,-.
!.r. ..x :. !.’:,. : .. ’=.,...& L
1,
,,y}
*,*
f!%:?fi-;a
The Ow’enlE9REH?M3’and broil
burner on ymmrange
are liginted
byekctrncignition.
CAUTION:DONm MAKEANY
ATTENHTTOOPERATETHE
ELECTRXCIGNITION OVEN
DURING AN ELECTRICAL
POWERFAILURE, Resumption
of.electricalpowerwhen OVEN
TEMP and OVEN SET controls
are in any positionother thanOFF
willresultin automaticignitionof
theovenor broilerburner and
couldcause severeburns if, at the
timeyouwereattemptingto light
theburner witha match.
Before Usiag l’ur oven
L Look at the controls. Besure
youunderstandhow to setthem
properly.
2. Check the insideof the oven.
Look at theshelves.Practice
removingandreplacing them
whilethe oveniscool.
3. Read the information and tips
on the followingpages.
4. Keep thisbookhandy whereyou
can refer to it—especiallyduring
the first fewweeksof getting
acquainted withyour oven.
,-.
‘~$’:j~;~$:tdrLk:,L.p,,~
The controls foryour ovenare
marked OVEN T’EMPand OVEN
SET.
<Tl:;--..kZ*{J<:
PR.EHEAT-Use thissettingto
prel-wattheovenforcakesand
delicatefoodswhere recipescall
forpreheatingtheoven.The
top (broil)burner comeson first.
In about 8 minutesit shutsoff
automatically.Thenthebottom
ovenburner comes orIand
maintains the temperatureset
on the OVENTEMP control.
Do not place food in the oven
during the first 10‘minuteswhen
preheating because the broiler
burner is on during preheat.
BAKE-Use thissettingfor all
normal ovenoperationswhere
preheatingtheovenisnotrequired—
for example,for cookingroastsor
casseroles. Only thebottomoven
burner operatesduring baking.
BllOI&Use this settingfor
broiling. Only the top (broil)
burner will operate.
TllMllD BAKE-Use this setting
to turn the ovenonand off at
specifiedtimeswhen you want
cookingto start and stop. See
AutomaticOvenTimer on next
page.
CLEAN—Use this settingfor the
self-cleaningfunctiononly.
Ol?F’-Shuts off power to the oven
controls and ovenwillnotoperate.
The OVEN TEMP and OVENSET
controls should be turned toOFF
whenever the ovenis not inuse.
The OVEN TE2WPcontrol
maintainsthe temperature youset
for normal ovenoperation as well
as forbroiling and self-cleaning
the oven.
Caution:DOInotturn the‘knob
pastBROILwhenbroiling.If
youdo, the broilburner willnot .
operate.
o
B&rself-cleaningoperation,turn
theknobpast the temperature
markingsall thewayto the
CLEAN position.Alwavsturnthe
OVENT~MP and OVENSET
controlsto OFF when oven
operationiscompleted.
OWEIshdws
The shelvesare designedwith
stop-locks so whenplaced correctl
on the shelfsupports,they willsto
beforecomingcompletelyout of
the ovenand will not tilt when
are removingfoodorplacingfood
on them.
When placingcookwareona shelf,
pullthe shelf out to the “stop”
position. Place the cookware on
the shelf, then slidethe shelfback
intothe oven. This will eliminate
reaching into the hot oven.
Toremovethe shelvesfrom the
ovenfor cleaning, pull outto stop
position, lifl.upon front and pull
them out.
you
I
j
r
‘H’!kCWET4SET ixmtird
hassettings
forPREW54T,EM&m,BROIL,
‘H~ED BAKE,
%Yhenyou turn the knob to the
desired setting, the proper bu.1-mms
are activated for that opemtion.
CLEAN and OFF.
For normal oven ofperatima9turn
the knob to the desired temperature
which is marked in 250 increments.
It will normally take 30 to 60
seconds before the flame comes on.
Afier the ovenreaches the selected
temperature, the oven burner cycles
—offcompletely,then cmwith a
full flame—-tokeep the oven
temperature controHed.
The ovenhas four shelf supports—
A (bottom), B, C and D (top). Shelf
positions for cooking are suggested
on Baking and Roastingpages. To
removethe shelf supports, merely
lift them offthe “U’%haped
brackets atthe top ofthe oven.
()
/..
.>,
J
Page 11

Note: Some very large roasting
.—.- -r._..—.—-—F ———— .—- —-—
panswithlids will not fit in the
oven,evenwith theshelfonthe
lowestposition. Do notplacethe
pan directly on the ovenbottom—
air cannotcirculate underneathit.
Instead, removetheovenshelf
supports, set them on theoven
bottom, and placethe pan on top.
(fJ$7g3pA ~@~~~
The lightcomes onautomatically
when the ovendoor isopened.
g-jjyl~~yi~~y;
Yourovenis ventedthroughaduct
t the center rear of the range(see
age6). Do not block thisduct
when cookingin the oven—itis
importantthat the flowoffreshair
totheovenburners be uninterrupted.
Avoidtouchingthe vent openings
or nearby surfaces during oven
cooking-they may become hot.
L. .,,;
:
~i,.~)fA@;U$jfw.= . .-~,,Lw*+~&
4
.+Q~-. A).
;x,:~~[ ~JJp~Ep gp~”~
The flow ofair to the ovenburners
isadjusted in the samemanner as it
is for the surface burners (see page
9). The air adjustment shutter for
the top (broil) burner is on the back
wallof the oven;the shutter for the
bottom burner is behind the base
panel below the oven door.
The burner flame for the top oven
burner shou~dbe steady with
approximately l-inch Muecones
and should not extend out over the
baffle edges. The flame for the
bottom burner should be steady
and sharp, with no yellow or
~:-:~rangeflame tips, and shouM
<
...JWI clean without soot.
..-.
--)
.-.,--
TheClock aridTimerscmyour
rangeare helpfuldevicesthat serve
severalpurposes.
“IkeC%md&
Toset the Clock, pwshthe knobin
andturn the clock handstothe
rightto the correcttime.Thenlet
theknoboutandcontinueturning
to OFI?.
The Minute Timerhasbeen
combinedwith the rangeclock.
Use it to time all your precise
cookingoperations. You’ll
recognizeitas the pointer which
isdifferentin color fromthe
clock hands.
Minutesare marked up to60on the
center ring ofthe clock.
Toset the F41irmteTimer, turn
theknobto the left, withoutpushing
in, until the pointer reaches the
numberofminutesyouwanttotime.
At the end
bwzi?er
ofthe set the, a
sounds to tell you time is
up. Turn the knob, withoutpushing
in, until the pointer reaches OFF
and the buzzer stops.
L&.?tmmi!icOYaniThl-mr
This Timer will automatically start
and stopyour ovenfor you. Here’s
what youdo:
il. Make sure both your rangeclock
and
theSTART dial showthe correct
time ofday.When the STARTknob
is pushed in and turned, it will
“pop’’intoplace when the time
sho-wnon the rangeclock is reached.
2. Set the STARTcontrol. Push in
andturn theSTARTknobtothetime
youwanttheovento turn itselfon.
(Ifyouwant it to startoperating
immediately,do notsettheStart
time.)
3. Setthe STOPcontrol.Push in.
andturn theSTOPknobtothetime
youwantthe ovento turn itselfoff.
Note: There mustbeat leasta
half-hourdifferencebetweenthe
STARTandSTOPdialsforthe
automaticcontrol to work.
4. Set the OVEN NH’ knob to
TIME BAKE.
5. Setthe OVENTEI’W?knobto
the desired oventemperature.
Nowthe ovenwill turn itselfon
immediatelyor ata later Starttime
thatyouset,operateatthetemperature
youselected and turn itselfoff at
the Stop time youselected.
After ovenoperation is completed,
be sureto turn the OVEN TEMP
and OVEN SET knobs to OFF.
Page 12

...
.-
;.
f-
-
~
~
i:
1
[
~
I
.
1
]
I
t
1
L.:;~y.~u) +<;.
:;. ,.> * ~
$3
,f{)~ -&&j~2p
:;> fi,
$.-I
(y:
‘a
“+,’fq+~
.=- -.> .-= A,
;’ g.;:;~qy
1. Positiontheshelf orshelvesin
theoven.
2. Closeovendoor. TurnOVEN
SET knobtoBAKEor TIME
BAKEand OVENTEMP knobto
desiredtemperature.Preheatoven
foratleast 10minutesifpreheating
isnecessary.SeePREHEAT setting
on page 10.
3. Place foodin ovenon centerof
shelf.Allowat leastan inchbetween
edgeof bakewareand ovenwail
or adjacent utensils.
If cookingontwoshelvesat the
sametime, place shelvesabout4
inchesapart and staggerfood on
them.
4. Check food for donenessat
minimumtimeon recipe, Cook
longerifnecessary.Switchoff
heat and removefood.
p~&g3~@gj
u
Preheatingisimportantwhenusing
temperaturesbelow225”E and
whenbakingfoodssuch as, biscuits,
cookies,cakesand other pastries.
Preheatingisnotnecessary when
roastingor forlong-timecookingof
wholemeals.
f:~&d-f~L“ &-:.PTv,Q
~+,zy. ;3 (TP.>kk:=%j)!lfi.>
$.,.J
Most baking isdone on the second
shelf position (B)from the bottom.
When bakingthree or four items,
use two shelvespositioned on the
second and fourth sets of supports
(B& D) from bottom of oven.
Bakeangel foodcakes on first shelf
position (A) from bottom of oven.
-..
.“.:.. ,.:,. ~~.: .
,~..,-
.. .. . ..
“. !. . .
-,, .
..3 ‘- “$--”
QFOHOWatestedrecipe and
measure the ingredientscarefully.
lfyou are using a package mix,
followiabei directions,
o ~fmoistureisnoticeable on the
frontoftheovenor ontheblack
glassdoorwhenfirstturningon the
oven,leave the ovendoorajar for
afewminutesor untiltheovenis
warm.
@Do notopen theovendoor during
abakingoperation—heatwillbelost
andthebakingtimemightneedto
beextended.Thiscouldcausepoor
bakingresults.
@Do notdisturb theheatcirculation
inthe ovenwiththeuseofaluminum
foil.Iffoilisused,placeasmall
sheetofit, about 10by 12inchesat
themost, onalowershelfseveral
inchesbelowthefood.Do notplace
foilon theovenbottom.
Cbmmm Baking Pdilkms
and I?’ossibk?SOh.rti(ms
PIES
Burningaroundedges
Oventoo full;avoidovercrowding.
~
@Edgesof crust toothin.
@Incorrect bakingtemperature.
Bottomcrustsoggyand unbaked
~Allow crust and/or f~llingto cool
sufficientlybeforefillingpie shell.
~Filling maybe toothinorjuicy.
@Filling allowedto standinpieshell
beforebaking. (Fillpie shellsand
bakeimmediately.)
~Ingredientsandproper measuring
affectthequalityofthecrust. Use a
testedrecipe and goodtechnique.
Make sure there arenotiny holesor
tears in a bottomcrust. “Patching”
a piecrust could cause soaking.
Pie filling rumsover
Q Topand bottom crust notwell
sealed together.
oEdgesofpiecrust notbuiltup
highenough.
~Too much filling.
~Check size ofpieplate.
Pastry istough; crust not flaky
QToomuch handllng.
QFattoo soft or cut intoofine.
Rolldough lightly and handle as
Jittie as possible.
GMKEs
cake riseshigher on oneside
~Batterspreadunevenlyinpan.
@Ovenshelvesnotlevel.
@Usingwarpedpans.
@Incorrectpansize.
Cakescrackingontop
eC!heckoventemperature.
~Battertoothick, foHowrecipe
orexactpackagedirections.
~Check-forpropershelfposition.
@Checkpansizecalledforinrecipe.
~Impropermixingofcake.
Cakefalls
~Toomuchshortening,sugaror
liquid.
~Checkleaveningagent,baking
powderor bakingsodatoassure
freshness.Makeahabitto note
expirationdates ofpackaged
ingredients.
~Cakenotbakedlongenoughor at
correcttemperature.
@Ifaddingoiltoa cake mix, make
certaintheoil isthe typeand
amountspecified. --
Crustishard
~Check temperature.
@Check shelfposition.
Cakehas soggylayerw streaksat
bottom
@Undermining ingredients.
Q Shorteningtoosoftforproper
creaming.
~Toomuch liquid.
am’EaEs & BIscuIm
Ih@y center;heavy CmMston
surface
e~heck temperature.
Q Checkshelfposition. [
@Followbakinginstructions
carefully as giveninreliable recipe
or on conveniencefoodpackage.
Q Flatcookie sheetswill givemore
evenbakingresults.Don’tovercrowd
foodson a baking sheet.
~Convenience foodsusedbeyond
their expiration date.
Bm’wningmom not’keaibkwin
‘one side
oOvendoor notclosed properly, ~fl
check gasketseal.
oCheck shelfposition.
/
.-J
;{
,,----
/
i
$,>
%.-”
.
;
i
)
Page 13

fi~=-L Aluminumpans conductheat quickly.Formost
: &.)
: /:s
conventionalbaking,light,shinyfinishesgivebestresults
becausetheyhelppreventover-browninginthetimeittakesfor
d,+.:%
-~~ heattoCOOKthecenterareas.Werecommenddull(satin-finish)
~,*:y,:=2.
)
“Y bottomsurfacesofpans forcakepansandpie plates to be sure
thoseareas browncompletely. - - -
2. Darkor non-shinyfinishes, also
glassandpyrocerarn,
generallyabsorbheatwhichmay rest.tltindry,crispcrusts.
Reduceovenheat25°F.iflightercrustsaredesired.Preheat
castironforbakingsomefoodsforrapidbrowningwhenfood
is added.
Ihemt
Biscuits(Yz-in.thick)
Coffeecake
Corn breador muffins
Gingerbread
Muffins
Popovers
Quickloaf bread
Yeastbread (2 loaves)
Plainrolls
Sweetrolls
Cakes
‘withoutshortening)
ingel food
elly roll
$onge
;akes
lundtcakes
lqxakes
=4
‘ruitcakes
6
A4%a
-w%=
Layer
.ayer, chocolate
cookies
Brownies
Drop
Refrigerator
Rolledor sliced
Fruits,
other Desserts
Baked apples
Custard
Puddings, rice
and custard
Pies
Frozen
Meringue
One crust
TWO CIWSi
Pastry shcll ~
Mi!llekxwmls
Bakedpotatoes
Moped dishes
cookware Comments
ShinyCookieSheet
ShinyMetalPanwith
satin-finishbottom
Cast Ironor GlassPan
ShinyMetalPanwith
satin-finishbottom
ShinyMetalMuffinPans
DeepGlassor Cast IronCups
Metal or Glass LoafPans
Metal or Glass LoafPans
ShinyOblongor Muffin Pans
ShinyOblongor Muffin Pans
Aluminumllbe Pan
kletalJellyRoll Pan
Vletalor CeramicI%
Metalor CeramicPan
lhinyMetal Muffin Pans
vletalor GlassLoaf or
!ube Pan
;hinyMetalPan with
atin-finishbottom
;hinyMetal Panwith
atin-finishbottom
or GlassLoaf Pans
4eta1
fetal or Glass Pans
:ookieSheet
ookie Sheet
Cookie Sheet
Glass or Metai Pans
Glass CustardCups or
Casserole (setin pan of hotwater)
GlassCustard Cups or
Casserole
FoilPanon Cookie Sheet
$preadto crust edges
31assor Satin-finishMetal
Yass or Satin-finish Metal
llass or Satin-finish Metal
leton OvenShelf
llass or Metal
I
Shelf
Fositions
B,C
B,A
B
B
A, B
B
B
A, B
A, B
B, A
A
B
A
A, B
B
A, B
B
B
B
B,C
B,C
B,.C
B, C
A, B, C
B
B
A
B, A
A, B
B
B
A, B,C
A, B,C
B
Oven
Tkmpfmtmes
400°-4750
350°-4000
400°-4500
350°
400°-4250
375°
350°-3750
375°-4250
375°-4250
350°-3750
325°-3750
375°-4000
325°-3500
325°-3500
350°-3750
275°-3000
350°--v50
350°-37s0
350°
325°-3500
350°-4000
400°-4250
375°-4000
350°-4000
300°-3500
325°
400°-4250
325°-3500
400°-4250
400°-4250
450°
325”-400°
325°-3750
300°-3500
Time,
MinutesFood
15-20
20-30
20-40
45-55
20-30
45-60
45-60
45-60
10-25
20-30
30-55
10-15
45-60
45-65
20-25
2-4 hrs.
20-35
25-30
40-60
25-35
10-20
6-12
7-12
30-60
30-60
50-90
45-70
15-25
45-60
40-60
12-15
60-90
30-60
30-75
Canned, refrigeratedbiscuitstake2 to4
minuteslesstime.
Preheat cast ironpan forcrispcrust.
Decreaseabout5 minutesformuffinmix.
Or bakeat 450”F.for25 minutes,then at
350”F.for 10to 15minutes.
Dark metal or glass givesdeepest
browning,
Forthin rolls, Shelf Bmaybe used.
Forthin rolls, Shelf Bmaybe used.
Twopiecepan isconvenient.
Line panwithwaxedpaper.
Paper liners producemore moistcrusts.
Use 300”F.and ShelfB forsmall or
individualcakes.
Bar cookies from mixuse sametime.
Use ShelfC and increasetemperature
25 to50”F.for more browning.
Reducetemperature to300”F.for large
custard.
Cook breador rice pudding withcustard
base 80to 90 minutes.
Large piesuse 400°F. andincrease time.
Toquickly brown meringueuse 400”F.for
8to 10minutes.
Custard fillings requirelower temperature,
longer time.
Increase time for largeamount or size.
L
i
I
I
,
I
I
[
r
I
I
L3
1,
Page 14

Roastingiscooking by dry heat.
Tendermeatorpoultrycan ‘be
roasteduncoveredin youroven.
Roastingtemperatures,which
shouldbe lowandsteady,keep
spatteringto aminimum.?Vhen
roasting,it is not necessaryto sear,
baste,cover,or add watertoyour
meat. Roastingis easy,just follow
thesesteps:
Step 1. Positionovenshelfat
secondfrombottomposition(B)
forsmallsizeroast (3 to5lbs.) and
atbottomposition (A) forlarger
roasts.
Step 2: Checkweightofroast.
Placemeatfat-side-upor poultry
breast-side--uponroastingrack in a
shallowpan. Themeltingfat will
bastethe meat. Select a pan as
closeto thesizeofmeatas possible.
(W-oilerpan withrackis a ~ood
pan forthis.)
Step 3: IS.n-nOVENSET to BAKE
and OVENTEMP todesired
temperature.Checkthe Roasting
Chart fortemperatures and
approximatecookingtimes.
Step 4:Mostmeatscontinueto
cookslightlywhilestanding after
beingremovedfrom the oven.For
rare or mediuminternaldoneness,
ifmeatisto stand 10to 20 minutes
whilemakinggravyor foreasier
carving,youmaywish to remove
meatfrom ovenjust beforeitis
done. If no standingis planned,
cookmeatto suggested
temperature.
Frozenroastsof beef, pork,
lamb,etc., can be startedwithout
thawing,but allow10to 25 minutes
per pound additionaltime (10
minutesper poundfor roastsunder
5 pounds, more time for larger
roasts).
Thawmostfrozenpoultry before
roastingtoensureevendoneness.
Somecommercial frozen poultry
can be cooked successfullywithout
thawing.Followdirections given
on packer’slabel.
TYF
I I
Meat
Tendercuts; rib, high quality
sirloin tip, rump or topround*
Lamb legor bone-inshoulder*
I
Vealshoulder, legor loird
Pork loin, rib or shoulder*
Ham, pre-cooked
Hum, raw
*Forboneless rolled roastsover 6-inches
thick, add 5 to 10minutes per lb. totimes
given above.
E%dmy
Chicken or Duck
Chiclccnpieces
I
Wrkey
I
Oven
Temperature
325°
325°
325°
325°
325°
325°
325°
375°
325°
I
Doneness
Rare:
Medium:
WellDone:
Rare:
Medium:
WellDone:
WellDone:
WellDone:
ToWarm:
WellDone:
WellDone:
WellDone:
Well Done:
ApproximateRoastingTime
in Minutesper Pound
3 to5-lhs.
24-30
30-35 22-25
35-45
21-25
25-30 24-28
30-35
35-45
35-45 30-40
10minutesper lb. (anyweight)
Under 10 b. 10to 15-RN.
20-30 17-20
3 to5-lbs.
35-40 30-35
35-40
m to M-lb. Over X51$3s<
20-25 15-20
6 to$-b.
18-22
28-33
20-23
28-33
30-40
Over5 NM.
Internal
Temperature‘1?
130°-1400
150°-1600
170°-185°
130”-140°
150°-160°
170°-1850
170°-180°
170°-1800
125°-1300
160°
185°-190°
185°-1900
h thigh:
185°-1900
Page 15

I
.4
.:
;
. . . . .
~~https://manualmachine.com/3roilingis cookingfoodbydirect
- ,:
j %&]eatfromabovethe food.Your
—.
:...
.....
.,
-..“J
.
. L9
range is
.~&. broiling.A specially designed
‘:%’Ybroilerpan and rack allows
designedforwaist-high
drippingfat to drain awayfromthe
-.
..
foodsand be keptawayfromthe
highheat of the gas flame.
&TQ~~J@ Broil
. ..A
L If meathas fator gristlenear the
edge,cut verticalslashesthroughit
about2 inchesapart, butdon’tcut
intomeat. Werecommend thatyou
trim fatto preventexcessive
smoking,leavinga layerabout
l/8-inchthick.
2. Arrange foodon rack and
positionthebroilerpan on the
appropriateshelfinthe oven.
Placingfoodcloser to flame
increasesexteriorbrowningof
food,but also increases spattering
andthe possibilityoffatsand meat
juices igniting.
Close ovendoor and turn OVEN
T knobto BROIL. For most
foods,turn OVENTEMP knob to
13ROIL.Do not turn OWENT’EIWP
knob past Broii positionorbroiler
bum&VW nothperate.Note:
Chicken and ham are broiled at a
lowersetting inorder to cook food
through beforeover-browningit.
4. Turn most foodsonce during
cooking (the exception is thin fillets
offish; oil one side, place thatside
downonbroilerrackandcookwithout
turning until done). Time foods for
aboutone-half thetotalcooking
time, turn food, then continue to
cook topreferred doneness.
5. Turn OVEN SET and OVEN
TEMP knobs to OFF, Remove
broiler pan from oven and serve
food immediately. Leavepan
~wtsidethe oven to cool.
@Blmng k l.mauy donewith m“en
door closed. However,if youlike
yoursteaksveryrare insideand
charred on the outside,leavethe
ovendoor slightlyajar.
Quantity
Food Thickness position
Bacon
GroundBeef
WellDone
Beef Steaks
Rare
Medium
WellDone
Rare
Medium
WellDone
Chicken(450°) 1whole A
BakeryProducts
Bread(Toast)or 2-4 slices c
ToasterPastries 1pkg. (2)
English Muffins 2-split
Lobstertails 2-4
(6to 8-02. each)
Fish l-lb, fillets % to
Hamslices (450°)
Precooked
Porkchops
WellDone 2 (l-in. thick), A
ChO~S
Lamb
Medium 2(1 in.)
WellDone
Medium
WellDone
Wieners,
similarprecooked
sausages,
bratwurst
andlor Shelf
%-lb.(about8
thinslices)
I
l-lb. (4patties)
Y2 to %-in,thick
I
l-in. thick
(1to 1%-lbs.)
l~-in. thick
(2to 2%-lbs.)
(2to 2%-lbs.),
split lengthwise
%-in. thick
l-in. thick
2 (’Ain.)
about 1lb.
about 10to 12-oz.
2 (1%in.),
about 1lb.
l-lb. pkg.(10)
I
I
A
B
B
B
B
c
@Usetongstoturnmeatwer-
piercingmeat losesjuices.
@steaks and chops should be at.
Beast1inch thick forbestbroiling
results.Pan broilthinnerones.
Comments
3I/!!
c
3%
c
9-1o
A
A
A
A
A
A
c
B
c
B
9 7
12 5-6
13 8-9
10
15 12-14
25 16-1.S
30-35
2-3
I
3-4
13-16
i=
5 5
8
10
13
8
25-30
Do not
10
10
l~_14
17
6
Arrange in singlelayer.
Space evenly.Upto 8 patties
takeaboutsametime.
7-8
Steakslessthan l-inch cook
throughbeforebrowning.
Panfryingis recommended,
Slash fat.
6-7
Reducetimesabout5 to 10
minutesperside forcut-up
chicken. Brusheach sidewith
meltedbutter.Broilwithskin
sidedownfirstandbroilwith
door closed.
Y2-1 Spaceevenly.PlaceEnglish
muffinscut-side-upandbrush
with butterifdesired.
Cut throughbackofshell,spread
open. Brush with meltedbutter
turn
beforeandafter half time.
over.
Handle and turnvery carefully.
Brush with lemonbutter before
and duringcooking ifdesired.
Preheat broiler to increase
browning.
Increasetimes5-10minutesper
8
side for 1Winch thickor home
cured.
Slash fat,
4-5
10-12
4-7
Slash fat.
10
4-6
1-2 If desired, split sausagesin half
lengthwiseinto5 to6-irichpieces.
,--..+
‘.-. . -“
)
Page 16

Proper care andcleaningare
important so yourrange willgive
youefficientand satisfactory
service. Followthese directions
carefiliy in caring for it tohelp
assuresafeand proper
maintenance.
BE SUIR.EELEC’K’IUICPCNVER
1s OFF BEFOB CLEANING
M PmT Cm YOUR lRAJ$lGE.
(13Xceptfor operating the self-
cleaning cycle).
Chu’twIEmmid Finifk
When the rangeis cool, washthe
enamelfinish with mild soapand
wateror a mild abrasivecleanser
appliedwith a damp cloth. Rinse
the sufiace withclean waterand
dry with a softcloth. If youwish,
occasionallyapply a thincoatof
mildcleaning wax to help protect
the finish.
There are a number of precautions
youcan take to avoidmarring the
surface of the range and to prevent
it from becoming‘dull.Do~’tslide
heavypans across it. H youspill
foodswith a lotofacid (tomatoes,
sauerkraut, fruitjuices, etc.) or
foodswith high sugarcontent,
clean them up as soon as possible.
If allowed to set, these foodscould
cause a dull spot. Also, nomatter
howstubborn the food stain, never
use harsh abrasive cleansers. They
could permanently damage the
enamel surface.
.:..,
[:
..,g:~j;;;~(,:,<~<.:,,~[,i.,~
It’sa good ideato wipe the control
panel clean afler each use of the
oven.For amore thorough cleaning,
the knobs can be removed by
pulling them off the knob stems.
Clean with mild soap and water,
rinse with clean water-and polish
dry with a softcloth.
Do not use abrasive cleansers,
strong liquid cleaners or oven
cleaners on the Corlti’olpane}as
they wiHdamage the finish.
-A.--l(>.\j
“jnl=n,p,(aj
v-n --i ,* .L.
.), : y p..? -->p
u ..1<J a1:&,.&
iJ
Qj ~- ~-l j fJ+<:
.>,*_{i.,.,
Gratesshouldbe washedregularly
and, ofcourse, afterspillovers.
Washtheminhot, soapywaterand
rinse withcleanwater.Dry the
grateswith a cloth—don’tputthem
back on the rangewet.When
replacingthe grates, be sure they’re
lockedintopositionovertheburners.
Toget rid ofburned-on food, soak
thegratesin a slightlydiluted
liquidcleanser.
Althoughthey’redurable,the
grateswillgraduallylose their
shine, regardlessofthe care you
takeofthem. This is due to their
exposureto high temperatures.
Topreserve the grates’porcelain
finishaslong as possible,havea
pan on thegratebeforeyouturn on
theburner,andlowertheflamewhen
foodreachesthedesiredtemperature.
Drip Pa-B$
Removethe grates and lift out the
chrome drip pans. Washthem in
hot, soapy water. Rinse them with
clean hot water and polish them dry
with a cloth. Never use abrasive
cleaneror steel wool-they’ll scratch
the surface. Instead, soak the drip
pans for about20 minutesin slightly
diluted liquid cleanser ~r mild
solution of amonia and water (1/2
cup ofammonia to one gallon of
water). Afier soakting,wash them
in hot, soapy water. Rinse with
clean water and.-polishwith a cloth.
Do not attempt to clean the drip
pans in the self-cleaning oven.
Cleantheareaunderthe cooktop
often.Built-upsoil, especially
grease,maycatchfire.
Tomake cleaningeasier, the entire
cooktopmaybeliftedupandheldup
bylockingarms that catch and hold
the top up when it’sallthe wayup.
Be sure all bulmem are turned
off bef’re raising the ‘cOoktope
Then removethegrates, graspthe
front sidesofthecooktopand lift.
After cleaning underthe cooktop
with hot, mild soapywaterand a
clean cloth, putthecooktopback in
place. Lift up a littleto releasethe
lockingarms andpushthem in
I
while guidingthetopback down.
Becarefulnotto pinch your fingers.
,-
,&
, ,,
~?
L
‘-L--’
Page 17

heholesin the burners ofyour
————
——.
————.— -----.-
.. .. ..... ..—.—-—--—--——————
—————.—.-..—-...——.—-.—————-—————
&$&
+&
-.
e
angemustbekeptclean at all
timesforproper ignitionand an
even,unhamperedflame.
Cleanthe burners routinelyand
especiallyafter badspillovers
whichcould clogtheseholes.
Burnerslift rightoutforcleaning.
Note: A screw holdseach ofthe
burnersinplace to keep themfrom
obblingaround during shipment.
s indicatetheirlocation,Remove
shippingscrewwith a Phillips
ead screwdriver,liftthe burner, tilt
Itto one sideatthe end closestto
theigniter andmoveit towardthe
backof’the range. This disengages
itfromthe gas valvesat the front of
therange, andit liftsout easily.
Toremoveburned-on food, soak
theburner ina solutionofaproduct
usedfor cleaningthe insideofcofke
makers. Soak the burner for20 to
30 minutes. If the fooddoesn’t
rinseoffcompletely,scrub itwith
soapand wateror a mild abrasive
cieanser and a damp cloth.
Beforeputting the burner back, dry
it thoroughly by setting it in a warm
ovenfor 30 minutes. Then place it
[~[]ckin the range, making sure it is
properly seated and level.
The ovendoor isremovableto
makecleaningthe oveneasier.
Toremovethe door, openita few
inchesto the special stopposition
that will holdthe door open. Grasp
firmly on each sideandliftthe door
straightup and offthehinges.(Due
to the largeamountof insulation
and the constructionofthedoor,
it is heavy.)
Note: Be careful nottoplacehands
between the spring hingeandthe
ovendoor frame. The hinge could
snap back and pinch fingers.
Washwith hot, soapywater. For
stubborn spots, use a solutionof
ammonia and water. Do not
immerse the door in water.
%3rephwe the door, position slots
in bottom ofdoor overthe hinges
that are in the “out” position. Then
lower the door slowlyand evenly
over both hingesat the sametime.
If hinges snap back against the oven
frame, pull them back out.
Ovenshelvesand shelf supports
maybe cleanedwitha mild
abrasivecleanser following
manufacturer’sdirections.After
cleaning,rinse theshelveswith
cleanwaterand dry with adry
cloth.Toremoveheavy,burned-on
soil, soapymetalpadsmaybe used
followingmanufacturer’sdirections.
Afterscrubbing,wash with soapy
water,rinse anddry.
Afterbroiling,removethe broiler
rack and carefullypour offthe
grease. Washand rinse thepan
andrack inhot, soapywater.
If foodhasburned on, sprinklethe
broilerrack whilehotwithdetergent
andcoverwith wetpaper towels or
a dish cloth. That way,burned-on
foodswill soak loosewhile the
mealisbeing served.
Do notstorea soiledbroiler pan
and rack in the oven.
Page 18

The lightbulb islocatedinthe
upper~eftcorner of the oven.
Beforereplacingthe bulb,
disconnectelectric powertothe
rangeat the main fuse or circuit
breakerpanel. Letthe bulbcool
completelybeforeremovingit.
Do not touch a hotbulb witha
dampclothasthebulb willbreak.
Replacewith a hightemperature
appliancebulb ofthe same wattage.
2. Lift upon the clip inthecenter
ofthepanelat the back side,and
slidethe paneltowardthe front of
therange. This will disengagethe
twolockingtabs on thefrontand
rear edges. Youmay nowliftthe
panel up andout.
Toreplace the panel, insert the two
lockingtabs on the back side into
the slots at the rear first, then slide
the panel towardsthe back of the
rangeto engage the front tabs.
Then push down on the clip to lock
the panel in place.
Note: Youmust hold the clip up
while slidingthe panel.
I
YourSelf-CleaningOven has a
specialprotectiveshield overthe
o~enlightbulb. Tochangethe bulb,
removethe four screwson themetal
ring around the light. Lift offthe
ring, theglass shield and the gasket
behindit.
After replacingthebulb, reassemble
the parts inthis order: gasket first,
then glass and finally the metal
ring. It’simportant that the gasket
seals tightly; otherwise, heat from
the ovenduring a self-cleaning
cyclecould break the bulb.
18
Page 19

$@.The tempemturecontrolinyour
,
o
newovenhasbeencarefullyadjusted
toprovideaccurate temperatures.
However,if thisovenhasreplaced
oneyouhaveusedfor severalyears,
youmay noticea differencein the
degreeofbrowningor thelength
oftime required when usingyour
favoriterecipes.Oventemperature
controlshavea tendencyto “drift”
overa period ofyears and since
thisdrifi isverygradual, it is not
readilynoticed.Therefore,you
mayhavebecomeaccustomedto
yourpreviousovenwhich may
haveprovidedahigher or lower
temperaturethanyou selected.
Beforeattemptingto havethe
temperatureofyour new oven
changed,be sure you havefollowed
thebakingtime and temperatureof
therecipe carefully.Then, after
youhave used the ovena fewtimes
ndyou feeltheovenistoohot
too cool, there is a simple
iustmentYoucan makeyourself
on-theOVE-NTEMP knob.
Pullthe knob off the control shaft
and look attheback side. There is
a disc in thecenter of the knobskirt
witha seriesof notcheson the inner
edgenexttothe knob shaft. One of
these notches ispositioned overa
pointer on thesideof the knobshaft.
Noteposition of
pointer to notches
before adjustment
Notewhichnotchthepointeris
locatedin. Tomakeanadjustment,
carefhllyloosen(approximately
oneturn), but do notcompletely
removethe two screwsthat holdthe
skirttotheknob. Holdthe knob in
one handandwiththeotherhand
carefullytilttheskirt untilthe notch
inthe discclears thepointeronthe
knobshaft.
Toraise the oventemperature,turn
the dial inthedirectionof the
arrow for “Raise~’Tolowerthe
temperature,turn the dial in the
directionofarrowfor “Lower;’
Each notchwill changethe oven
temperatureapproximately25°F.
Wesuggest that you makethe
adjustmentone notch from the
originalsettingand check oven
performancebeforemaking any
additionaladjustments.
After the adjustmentismade, make
sure the pointer on the knobshaft
is alignedwith the notchinthedisc.
Press skirtand knob togetherand
retightenscrewssotheyare snug,
but be carefulnotto overtighten.
Re-installknob on rangeand
check performance. Note: After
an adjustmenthas beenmadethe
“Off” and “Broil” positionswill
not line up with the indicator mark
on thecontrol panel as they
previouslydid. This condition
is normal and will notcreate
a problem.
-..,
...
;\,,
.
‘k_, .“:
only the
locking screws
,
(continued next page) y
-/’
I
I
Page 20

RecommendedCMmingTime:
R“bfkmtesoi!—2’hours
[thinspills and light spatter)
Exm%?ivelyHeavySOW-4kmrs
@i?wygreasespillsand spatter)
step1:
Removethebroiler pan, broiler
rack, other cookware and any
aluminumfoilfrom theoven—they
can’twithstandthe high cleaning
temperatures.
step 2:
Removethe raised sectionofthe
ovenbottom(see page 18).If it is
excessivelysoiled, clean itand
replace it.
step3:
Clean spattersor soilon the oven
front frame (A), the ovendoor
outsidethegasket @) and the small
area at the front center ofthe oven
bottom. These areas heat enough
to burn soil on. Polishthese areas
with a dry cloth. Do not clean the
gasket (B). Do not let water run
down through openingsinthe
top of thedoor (C). Never use a
commercial oven cleaner in or
around the self-cleaningoven.
@Make sure
and the STARTdial showthe
correct time ofday.When the
STARTknob is pushed in and
turned, it will “pop” intoplace
when the time shownon the range
clock is reached.
@Decide on cleaning hours
necessary-two hours formoderate
soiior three to fourhours for
heavy soil.
@Add these hoursto present time
ofday,then push inand turn STOP
dial clockwise to desired time.
step 2:
11.wnthe OVEl$iTEMP and
O$%iT+JSET knobs to CLEAN.
boththe rangeclock
TheCLEANINGlightwillcomeon.
step 3:
Rush the Self-CleanLatch Lever
to the righttoikk the ovendoor.
;.- .-..-, .
;.-,
In about30 minutesthe LOCKED
lightwillcome on, indicatingoven
ishot and door cannot be opened.
Oven door and window (on models
so equipped) get hot during selfcleaning. DO NOT TOUCH.
After cleaning is complete, the
ovendoor will.staylocked.untilthe
ovencoolsand the LOCKED light
goes off. This takes about 30
minutes.
t,lil L,, L, L,,,,, L,, L,L ,,,,. LI. LL. L L.,.,,. LLL
,,tt,,,,,,
f’..~~
c
0
AieOWI!Front IFra!me
IBo
ownDoor Gasket
c.openingsh! Dom-
D.
awnILi?zht
step1:
V/hen the LOCKED light is off,
1
leavethe OVEN SET and.OVEN
THVH?
position and movethe latch lever
to the left to unlock the door.
knobsintheCLEAN
step2:
Turn OVENSETandOVEN
TEMP knobsto OFF.
20
Page 21

3,%3. Later ‘The
Ifyouwishtostartandstopcleaning
ata latertimethanshownon clock,
pushinandturnSTARTdialtotime
youwishto start. Add thehours
neededforcleaningto this “start”
time,thenpushinand turn STOP
dialtothisdesiredtime.Ovenwill
automaticallyturnonandoff at the
settimes.
If YOUHa%’eto Interrupt the
cleGk&Hg cycle
Step L TurntheSTOPdialuntilthe
pointerisatthecorrect timeofday.
(Thedial willbeinthe outposition
whenthe pointerisat the timeof
day.)
Step 2. LeavetheOVEN SET and
OVENTEMP knobsattheCLEAN
ttings.If the “Lock” lightis on,
ituntilthelightgoesoffbefore
movingthe late%lever.
SteP3. Pushtheself-cleanlatch
lev&-totheleft. This will unlockthe
ovendoor so itcan beopened.
Step 4. Turn theOVEN SET and
OVENTEMP knobsfrom CLEAN
toOFF after thedoor hasbeen
opened.
Impm’t-ant:Any attempt to force
the Seif%h%mlatch lever to lock or
unlock the door without electric
power applied to the ovenor with
the OVEN SET wmhr OVEN
‘1’EMPknob in any other position
but CLEAN, can result in damage
to the door locking mechanism.
.t<~-o
iQ@~&&~Ql~~.,]$j~g~~~y&$~~
Q“why won’t
immediately eventhmqghl1set
my Ovwil dean
all the timeand dean knobs
correctly?
A. Check to besureyourSTART
dialis setto the sametimeasthe
rangeclock. Also check to be sure
LAI12HLEVER is in the CLEAN
position.
Q. Mmy ovenclock is not
working~can Istillself-clean
my oven?
A. No. YourAutomaticOven
Timer uses the rangeclock to help
startand stop yourself-cleaning
cycle.
Q. CanIuse emnmerchdoven
cleanerson any part of my
self-cleaningoven’?
A. No cleaners or coatingsshould
be usedaround anypart ofthis
oven.If you do usethem and do not
wipethe oven absolutelyclean, the
residuecan scar the oven surface
and damage metalpartsthe next
time the ovenisautomatically
cleaned.
Q. Can 1clean the Woven Gasket
around the ovendoor?
A. No, thisgasketisessentialfor
a good oven seal and care mustbe
taken not to rub, damage or move
this gasket.
Q. what should 1do if excessive
smoking occurs during
This iscaused byexcessivesoil,
A.
cleaning?
and youshould switchthe OVEN
SET knob to OFF. Open windows
to rid room of smoke. Allow the
ovento cool for at Ieast one bow
before opening the door. Wipe up
the excess soiland reset the clean
cycle.
Q.Should therebe anyodor
duringtheCkxmimg?
A. Yes,there maybe a slightodor
duringthefirst fewcleanings.
Failureto wipe outexcessivesoil
mightalso causeanodorwhen
cleaning.
Q. What causesthehair-like
lineson the enameled.surface of
my oven?
A. This is a normalcondition,
resultingfrom heatingand cooling
duringcleaning.These linesdo not
affecthowyourovenperforms.
Q. Why do 1haveash!k4tinmy
oven
afterdefining?
Sometypesof soil willleave
A.
a depositwhichisash. It canbe
removedwith a damp spongeor
cloth.
Q. My oven shelvesdo not slide
easily.What is the matter?
A. After manycleanings,oven
shelvesmaybecome so clean they
do notslideeasily.If youwish
shelvesto slidemore easily,
dampen fingerswith a small
amountofcookingoil and.rub
lightlyoversides of shelf where
theycontact shelfsupports.
Q. My oven shelvesand shelf
suppmls
after severalcleanings. 1s this
normal?
A. Yes.After manycleanings,the
shelvesand shelf supports may lose
some luster anddiscolor.
haveB3ecwmI&Wkmkhg
ii
,”
;:,
I
,,,
Q. Is the “m%lckling”sound I
hear dullrimgek%mingERormal?
A. Yes.This isthe metal.heating
and cooling during both the
cooking and.cleaning flmctionso
21
Page 22

?=@
PART MATERIALSTOUSE GENERALDMUNT!HOFJS
BroilerPzulandRack
Metal,including ~ Soap
SideTrims and
TrimStrips
DuterPorcelain
EnamelSurface*
~ Soapand Whter
@Soap-Filled Scouring Pad
~ Plastic Scouring Pad
and Water
~ Paper Towel
~ Dry Cloth
~ Soapand Water
Drain fat,cool pan andrackslightly. (Do not let soiled panand rackstand in
ovento cool.) Sprinkle on detergent. Fill pan with warm waterand spreadcloth
or papertowel over rack. Let panandrack stand
if necessary. Rinse and dry. OP’HON:Clean panandrack indishwasher.DO
NOT CLEANIN SELF-CLEANING
Pull offknobs.Washgentlybut do notsoak. Dry and returncontrols torange.
Clean outsideof cooled blackglass door with a glass cleaner that doesnot
containammonia.
and polishwitha dry cloth. If knobsare removed,do notallow waterto run
downinsidesurface of glass whilecleaning.
Wash,rinse, and then polishwitha dry cloth. DO N(YfUSEsteel wool,
abrasives, ammonia, acids, or commercial ovencleaners whichmaydamage
the finish.
Avoidcleaningpowdersor harsh abrasives which mayscratch the enamel.
If acids shouldspill on the rangewhileit is hot, use a dry paper towelor cloth
to wipe upright away,Whenthe surface hascooled, washand rinse.
For other spills, suchas fatsmatterings,etc., wash with soapand water when
cooledand then rinse. Polish with adry cloth.
Wash other glass with cloth dampened insoapywater.Rinse
B
fora fewminutes.Wash; scour
OVEN.
%inted Surfaces
nside Oven Door* @Soap and Water
)ven Gasket
lven ~jner
Shelves
(See Self-Cleaning
Oven Directions)
Chrome-Plated
Drip Pans
Burner Grates @Soap and Wmcr
o Soap and Water
QSoapand Water
~ Soap and Water
oSoapand MMcr
QStiff-Bristled Brush
~ Soap-Filled Scouring Pad
(Non-metallic)
@Soap-Filled Scouring Pad
(Non-metallic)
9 Solution for Cleaning Wipeoff burner heads. If heavy spilloveroccurs, removeburners from range
Inside of Coffee Makers
~Soap and Water
@Mild Abrasive Cleanser
@Damp Cloth
Use a mildsolution of soapand water. Do not use anyharshabrasives or
cleaning powderswhich mayscratch or mar surface.
Removeovendoor by opening a few inches, grasping it at sides, and lifting up
and awayfrom hinges. Clean with soap andwater. Replaceby graspingdoor at
sides, liningup door with hinges, and pushingdoor firmly intoplace.
AvoidgettingANY cleaning materials on the gasket.
Cool beforecleaning. Frequent wipingwith mild soap and water will prolong
the time betweenmajor cleanings. Be sure to rinse thoroughly.
Shelves canbe cleaned inSelf-CleaningOven, dishwasher,or byhand, using
soap and water.Rinse thoroughlyto removesoap after cleaning.
Clean as described below or indishwasher. DO NOT GLEANUNSEILF-
CLEMWW OVENas they will discolor. Wipeall chrome drip pans after each
cookingso unnoticed spatter will notburnon nexttime you cook. Toremove
burned-onspatters, use any or all cleaning materials mentioned. Rubfigh?ly
withscouring pad to prevent scratching of the surface.
Liftout whencool. Soak 5 to 10minutes ifdesired inwarmsolution of
~ishwasherdetergent. Scour with materials mentioned hereto removeburned.mfood particles. DO NOT ICLEAN!H’4SELF-CLEANING
(SCCpage 17)and soak them for 20 to30minutes in solution of hot water and
product for cleanii~ginside of coffee inakers, such as Dip-It brand. If soil dots
not rinse off coinpletely, scrub burners with soap aild water or a inild abrasive
cleanser anda damp cloth. Dry burners in a warm oven for 30 minutes before
returi~ingthein to the range. DO NOT’CLEANUNSELF-ICLEAIWNGOVENI
OVEN.
g&&
2
~Spillagcof marinades, fruitjuices, aid basting ina{crialscontaining acids inaycause discoloration.
care bciilg[Aci] to imttouchany ho{portion of the oven. When the surface is cool, clean and rinse.
Spillowrsshouldbewipedup imm~diately,with
Page 23

1T-0P BURNERSDo NOT
..-
—
LIGHT
I
I
OVENDOES NOTCOOK
I
PROPERLY
e ~ak~ sure e~~ctri~a]p~~gisph.gged intoalive power C)Uth3.
~Burnerholesonsideofburner
@Burnersmaynotbefittedcorrectly ontothe gaswolves.Removeand
reinstallthemproperly.
I
Makesure thermostatcapillary bulb(locatedinupperportion of oven)isin
*
I
correctposition,nottouchingovensidesandnotcoatedwithanything.
@Aluminumfoilbeingusedimproperly in oven.
~Ovenventblockedon topofrange.
~Incorrectutensil
@Ovenbottomnotsecurely seatedinposition.
-SOVENT13MPknob setincorrectlyor notturned on.
oCheck common
being used. check each cookingsectionfor utensiltips.
&~ing, Roasting and Broiling problems onpages12-15.
~~y be clogged. Remove and c]ean them.
CLOCKDOESNOTWORK
I
OVENLIGHT DOES NOT @Bulbmay belooseor burned out.
_l
‘OVENWILL NOT
OVENDOOR WILL
3JCWLATCH FOR
SELF-CLEANING CYCLE
73obtain service, seeyourwarranty
on the back pageofthis book.
W_c”reproud of our service and
vxt}tyouto bepleased. If for some
rc:]sonyou are not happy with the
scm’iceyou receive, here are three
sicpsto follow for further help.
FIRST,contact thepeople who
smiced your appliance. Explain
@Rangeelectricalplugmust be securely seatedinalive poweroutlet.Check
forblown fuseor tripped circuitbreaker.
@Electricalplugmust be pluggedintoalivepoweroutlet.
I @Automatic Timer not setor not set properly.The STOPdial mustbesetand
advancedbeyondthe timenotedon the &nge Clock.
@STOPdial notadvancedforlongenough time. There mustbeatleastahalf-
hourdifferencefrom StarttimetoStoptime for Timer towork.
~BothOVENSET and OVEN TEMP knobsmustbe setat CLEAN setting.
@Latch not in CLEAN position.
@OVENSET andOVENTEMP knobs mustbeat CLEAN beforethe~at&
levercan be moved.
why you are not pleased. In most
cases, this wiHsolve the problem. not resolved, write:
NEXT, ifyou are still notpleased, Major Appliance
write all the details—including Consumer Action Panel
your phone number—to:
Manager, Consumer Relations
Hotpoint
Appliance Park
Louisville, Kentucky 40225
FINALLY, if your problem is still
20 North Wacker Drive
Chicago, Illinois 60606
.-..
.1--
,..
.-.-
,..
.-..
.-.-
,.-,
\
---
.———.\
,.
..-_J .. .
.
~,
Page 24

EIl
,@=&mL.
z~–-
=
..=—.
‘:
@J;:-
@.::%
C+b;‘.;
.
@<’;
!-
.-
!$4—
1~~~jll-ij= ~t?2J~~
w
..
.
I
-1,
‘k
ya
I
-.
B
@&
@&
%?%.3
cmeol~ERED
Foroneyearfrom dateoforiginal
purchase,we will provide,freeof
charge,parts andservicelabor
in yourhometorepairor replace
anypm?of the
becauseof a manufacturing defect.
@Servicetrips toyourhometo
teach youhowto usethe product.
Readyour Use and (Me material.
If youthen haveanyquestions
about operating the product,
please contact yourdealer or our
Consumer Affairs office at the
address below.
@Improper installation.
If you have an installation problem,
contact your dealeror installer.
Youare responsible for providing
adequateelectrical, gas, exhausting
and other connecting facilities.
range that fails
theoriginal giurchaserand any
succeedingownerfor products
purchasedfor ordinary homeuse
inthe48mainlandstates,Hawaii
andWashington,13.C.InAlaskathe
warrantyisthe sameexceptthat it is
LIMITEDbecauseyou must payto
shipthe product tothe serviceshop
orforthe servicetechnician’stravel
coststo your home.
All warrantyservicewill be provided
byour FactoryServiceCentersor
byourauthorizedCustomerCare@
servicersduring normalworking
hours.
Lookin the White or YellowPages
ofyourtelephonedirectoryfor
HOTPOINTFACTORYSERVICE,
GENERAL ELECTRIC-HOTPOINT
FACTORYSERVICEor HOTPOINT
CUSTOMERCARE@SERVICE.
II
~} 6_:-- -
I!
iz. =
@Replacementof house fuses or
resettingof circuit breakers.
~ Failureofthe product if it isused
for other than itsintended purpose
or usedcommercially.
Damageto product caused
~
byaccident, fire, floods or acts
of God.
WARRAhlTORISNOTRESPONSIBLE i~~ :
FORCONSEQUENTIAL DAMAGES.
[ize:-
,,L—
II~.
~~:-
----
1, -
~~K=-;
.-.5$++lgr_.--
&%?&a
y: 2:--
I!:_
,iT -
iit=
1,r-.–
,,:==
,!\::-
Ii;<
11:–’-
1! :.=
,, .,--
ii5–-
~~$}:
l~:;
llEn
,,c..
.-
II=.
1[~-.
,[w..
g.f<~_
k&y@+
w~
$-lJ%
@;&
~~t=~
;:<$J44
I
$%-tNo 205(3026 Poll
Some states do not allow the exclusion or limitation of incidental or consequential damages, sothe above limitation or exclusion
may not apply to you. This warranty gives you specific legal rights,and you mayalso have other rights which varyfrom statetostate.
Toknow what your legal rights are in your state, consult your local or state consumer affairs office or your state’sAttorney General.
_l~ :=2, ~
1if+’
~v;..
L%
 Loading...