

Page 1
Feature
useandcareof
gasmodelswith
surfaceCooting
Ekixk Iglmm
StindingPilot
ovencooking
pxi!
continuous-cleaningovenpu?l
RGB524EJ
RCA525GEJ
RGB528q
RGB528GEJ
RGB628GEJ
RGB524PJ
RGB528PJ
-“
Page 2
BeforeUsing YourRange., . . ...2
ii
Safetyhshmio!ls . . .+. . . ...3-5
Installingthellange . . . . . . . ...5
Levelingthel?ang e.. o........ .5
FeamresofYourRmge .. . . . . .6-9
SurfaceCooking . . . . . . . ...10.11
ClockandT’ime r . . . . . . . . . . . .11
UsingMmrOven . . . . . . ...12.13
B&ing. . . . . . . . . . . . . . . . . . ..l4
Bakhg Guide . . . . . . . . . . . . . ..15
Roasting . . . =. . . . . . . . . . . . . . .16
RoastingGuide . . . . . . . . . . . . . . 16
13roiiing. . . . . . . . . . . . . . . . . . ..l7
BroilingGuide . . . . . . . . . . . . . .17
Continuous-Cleaning
OvenCare. . . . . . . . . . . . . . . . . .18
CarezuzdCkxming. . . . . . ...18-21
Ckming@kJe . ., . . . . . . . ...22
Thel?roblem%lver . . . . . . . ...23
~f~ou~~eed~ervi~e. . . . . . . ...23
Warranty . . . . . . . . . ..I3ackCover
E&ad.this bad< Giw%2fl.dly
Itisintendedtohelpyouoperateand
maintainyour newrange properly.
Keepithandyforanswerstoyour
questions.
Ifyoudon’tunderstandsomething
orneedmorehelp,write(include
your phonenumber):
ConsumerAffairs
Hotpoint
AppliancePark
Louisville,KY40225
write‘dmm.the !mldd
andserial
You’llfindthemonalabellocatedin
theburner boxunderthecooktop.
Seepages6and8.
Thesenumbersarealsoonthe
ConsumerProductOwnership
RegistrationCard thatcamewith
yo~rrange. Beforesendinginthis
card, please writethesenumbers
here:
I’Rlmberse
Model Number
Serial Number
Usethese numbers in any
correspondenceor service calls
concerningyourrange.
If’ym r’e@wefd
.23$lk-EMBgedT’ange. .e
Immediately contactthe dealer (or
builder)that soldyouthe range.
Page 3
Page 4
-1, ..-. ,. . .. .
dam h’the !&me?the fatmay
.--
ignite. ‘Rimexcess fatK)prexmt
excessiveflare-ups,
aiwfdke WMw bmikr pm is in
place IComdy to reduce
the
possibilityofgreasefires.
@If you should havea gwuw!
&=ein the broiler pan, turnoff
oven,and keepthebroilerdrawer
closedtocontainthe fireuntilit
burnsout.
@Keep X%mge dean and free
d’aceu~flulationsd’grease or
$pmwws which may ignite..
[f !iiibmNtx@.EkTYkx?
Flooringunder
theRange
Yourrange, Me so Emmyother
householdM?m,
cansettle
such as CW3hi(m?dvinylor
carpeting. When movingtherange
onthistypeofflooring,usecare.
Do
kitchen carpeting unlessyou
placean insulatingpad or sheetof
l/4-inch-thickplywoodbetween
therangeandcarpeting.
Whenthejlow coveringends
the~ront o~the range, the area that
therangewillrest onshouldbe
builtupwith plywoodor similar
materialtothe samelevelor higher
than the floorcovering.This will
allowthe rangeto bemovedfor
cleaningor servicing.
into softfloorcoverings
notinstall the rangeover
isheavy and
d
~Red “NW Pmbkm solver”
B.npage 23 ofthis book.
‘ mm%attemptto repair
wlrepkm any part d your
ange mh?ss it isSpeeifiealiy
ecom.mended
in‘thisbd’i. AH
otherservicingshouldbereferred
to a qualified technician.
~~~i T~=~~
ERISTrJRUCTIO~4S
bveling the
Range
Yourrangemustbe levelin order to
produceproper cookingand baking
results.Afterit is in itsfinal
location,place a levelhorizontally
on an ovenshelf and check the
levelnessfront toback and sideto
side. Levelthe rangeby adjusting
the levelinglegs or by placing
shimsunder thecorners as needed.
Page 5

RGA!!U2PJwith
standing PM Ignition
RGB524PJ with
standing PM Ignition
%N?i
RGB524EJ with
Automatic Pikltles$Ignition
Page 6
IL, : ---- -
1“
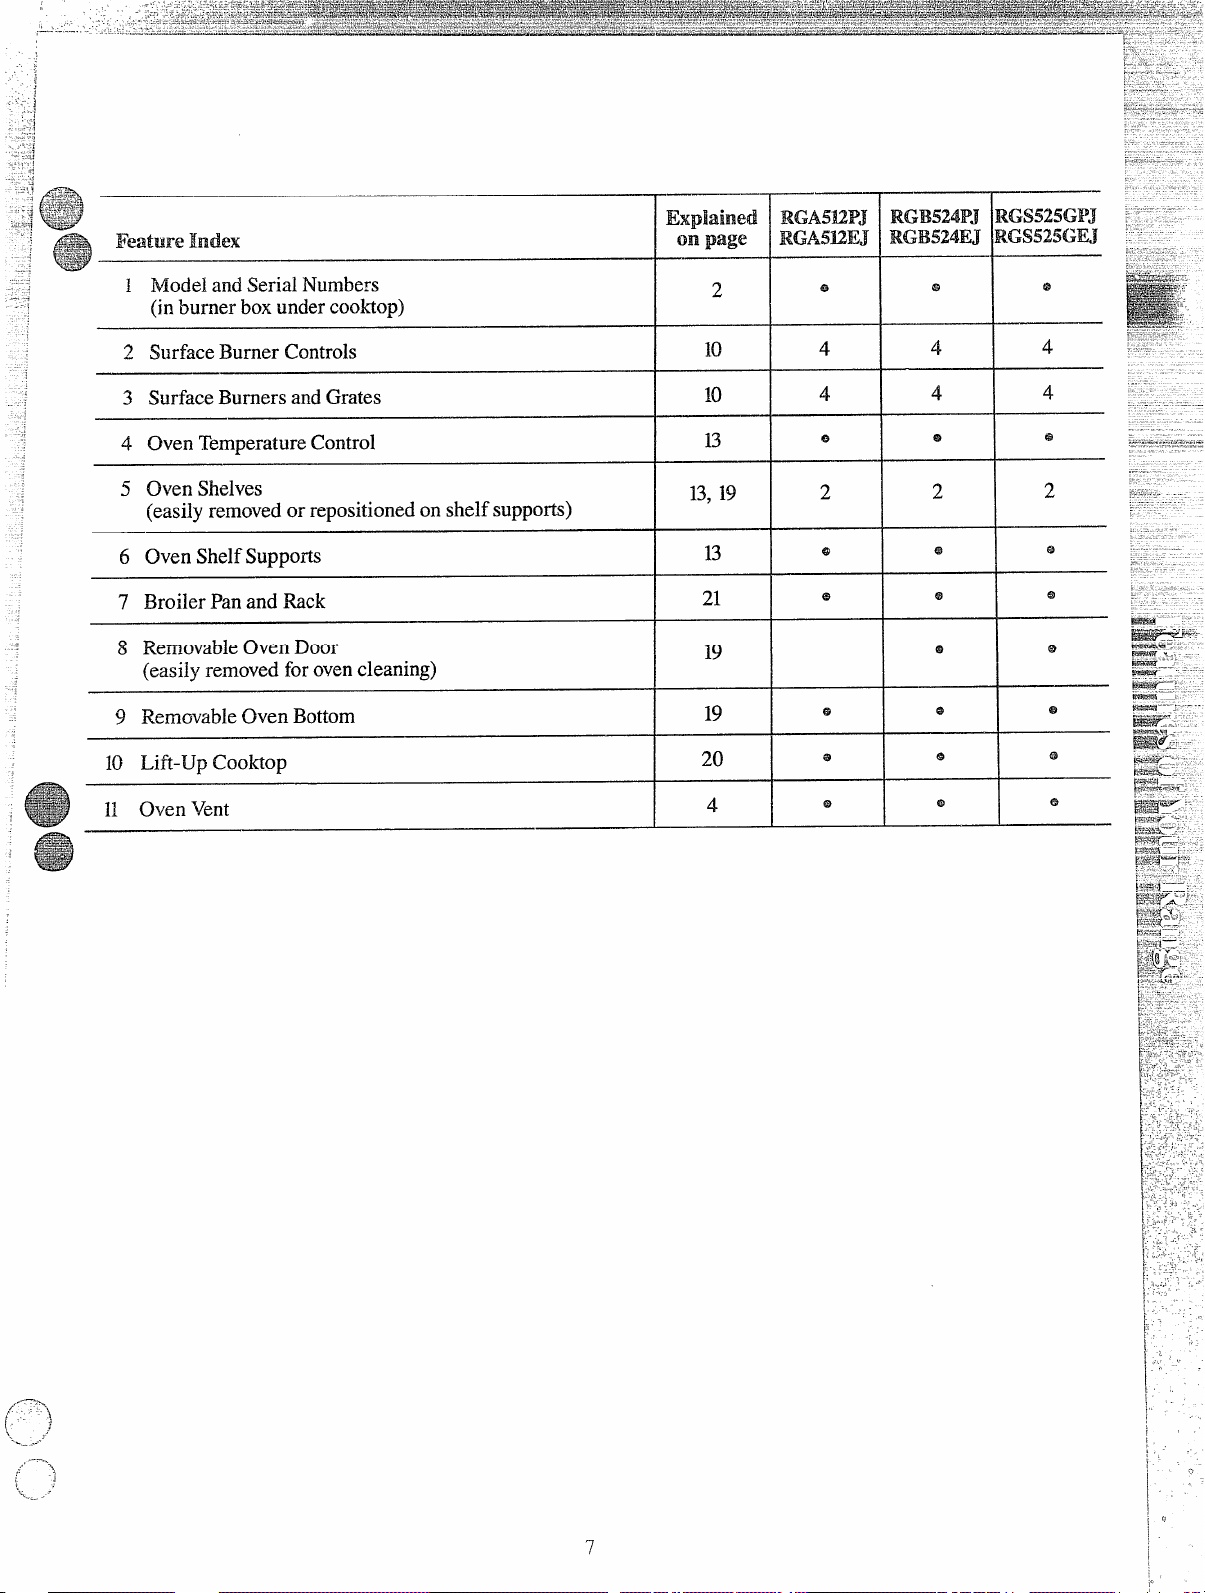
FeatureIndex
Explained
on page
RGA5UP3
RGA5KUU
—
iGs525GPJ
lmxm.wEJ
1 Modeland SerialNumbers
(inburner boxundercooktop)
2 Surface.BurnerControls
3 SurfaceBurners and Grates
4 Oven TemperatureControl
5 Oven Shelves
(easilyremovedor repositionedon shelf supports)
6 Oven ShelfSupports
7 Broiler Panand Rack
8 RemovableOven Door
(easily removedforovencleaning)
9 RemovableOven Bottom
10 Lift-Up Coolctop
H Oven Vent
2
m
10
5$
4
4
@
4
13
13,
19
13
21
19
!
20
4
63
0
@
e
1
I
!,
lo
“
7
i
Page 7
,/
,
,
..
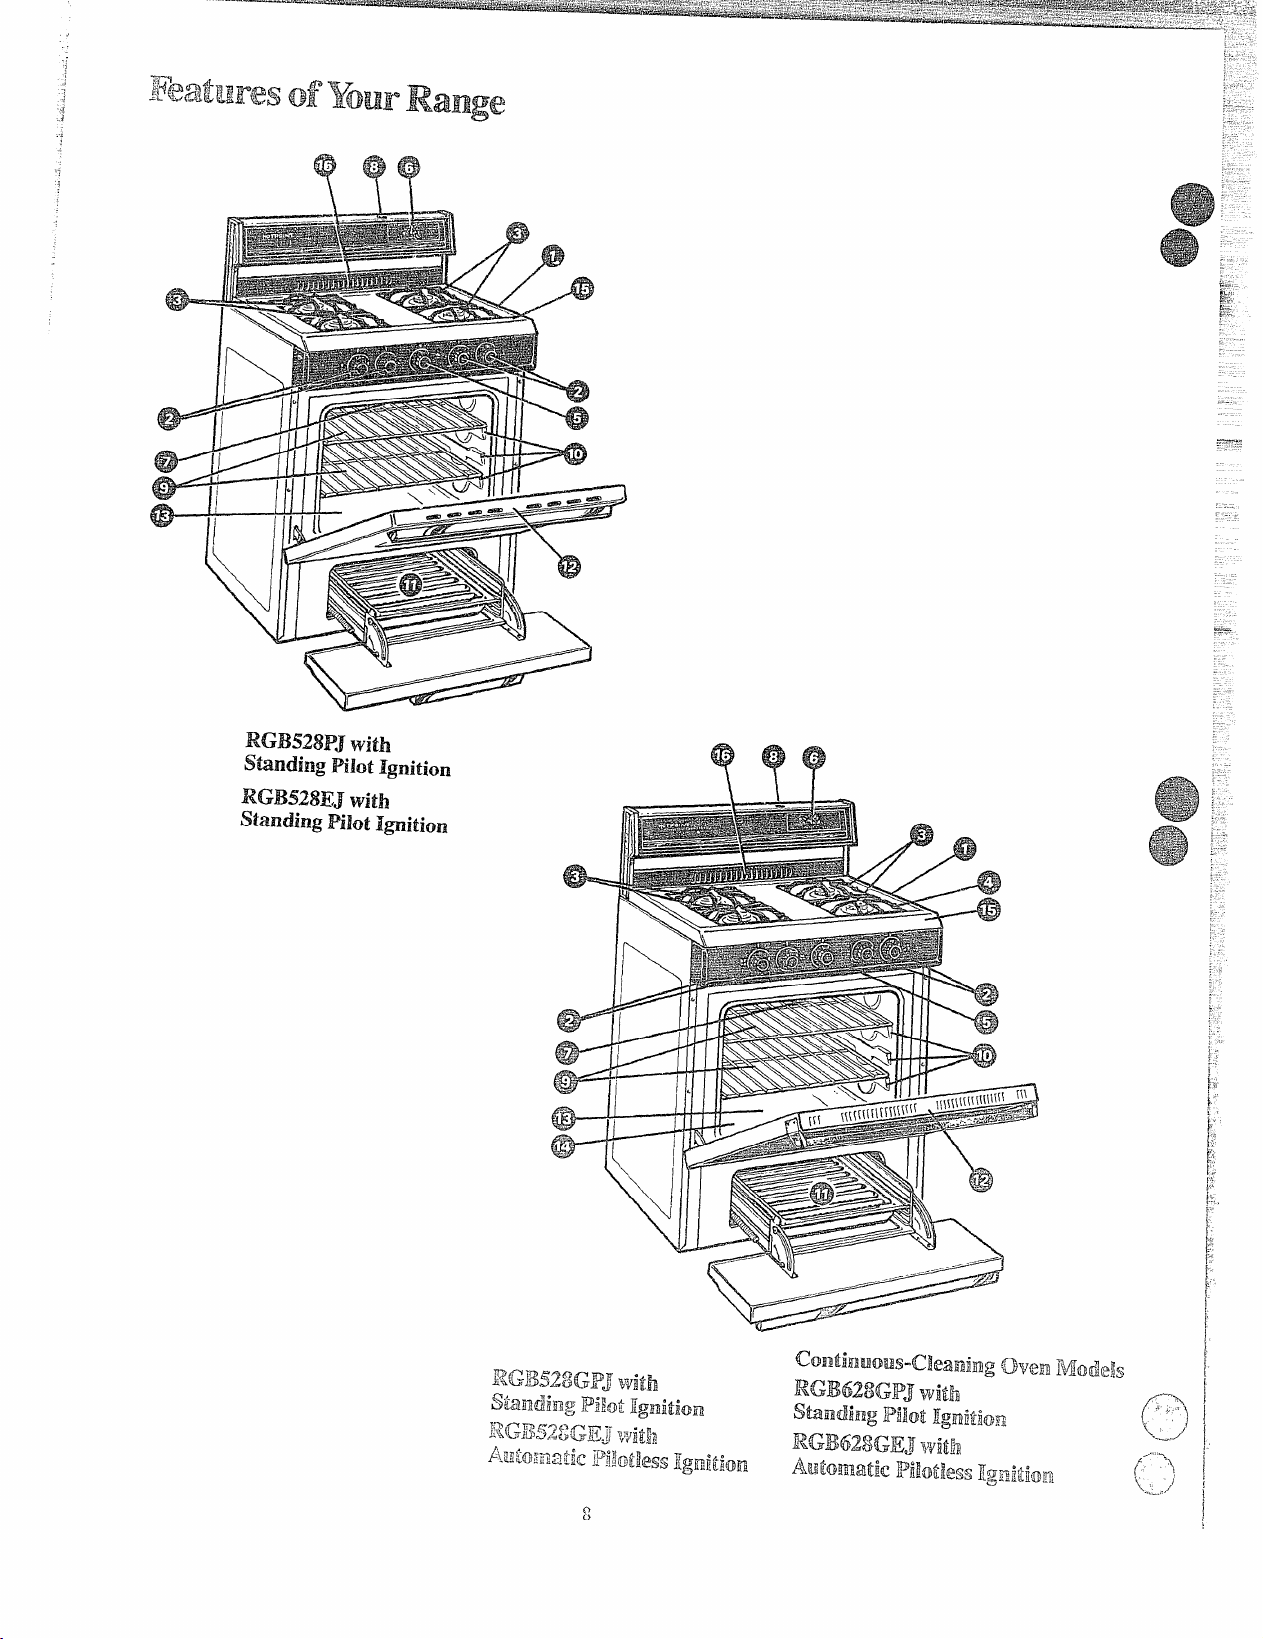
RGB528P’ with
standing PM Ignition
RGB528EJwith
standing E%k)tIgnition
RGB528GEI ?MR
Page 8

Expkiined
on page
RGW92M?J RGB52$GPJ
RGB528U
RGRYMWXLJ
1 Model and Serial Numbers
(inburnerboxundercooktop)
2 SurfaceBurner Controls
3 SurfaceBurnersandGrates
4 ChromeDrip Pans
m
10
20
5 OvenTemperatureControl
6 Clockand Timer
7 OvenInteriorLight
8 OvenLightSwitch
(letsyouturninteriorovenlighton and off)
9 Oven W&es
(easilyremovedor repositioned
H
13
13
13,19
on shelfsupports)
10 Oven ShelfSupports
H Broiler l% and Rack
21
I
12 RemovableOven Door 19
(easily removedforovencleaning)
2
4
4
4’
4
2 2
e
e @
I
63
e
4
4
e
63
$3
2
e+
13 RemovabIeOvenBottom 19
14 Continuous-CleaningOven Interior
I
15 Lifi-Up Cooktop
Oven Vent
M
N
.20
4
-+--i+-
+3
~L .
!rr”-
,“
Page 9

standing l%kxMolds
RG4.5E2PJ
RGB524PJ
XGS!525GPJ
Theserangeshavestandingsurface
burnerpilotsthat
initially.Tolightthem:
1. Be sure surfaceburner control
knobsare in the OFF position.
2. Removethegrates and liftthe
cooktopup or off(seepage20).
RGB528PJ
RGB528GPJ
RGB628GP.]
must be lit
t+hlrfaceBurner controls
Theknobsthatturn thesurface
burnersorIand offare locatedon
the lowercontrolpanelin frontof
theburners.
Thetwoon theleftcontroltheleft
frontandleftrear burners.The two
onthe rightcontroltherightfront
and rightrear burners.
To Li@t a surface BuFner
.
Howto!EikkctFkme size
The flame sizeona gas burner
should matchthecookware you
,0---
~
‘J,+=S-E
q
——!- <._...
3. Locate thetwopilot ports and
lighteach of them with a match.
\@ )!!”s
Manifold
panel I
4. If pi]otsneedadjusting, turn
adjustingscrew on pilot filter.
5, Loweror replacecooktop.N.uthce
burners are now ready for
--=%”c ‘“ ‘t’/=-
1y~>
adjustment
‘\
x
‘\
(
‘ /---
fe
Pilot
screw
\\
Manifold
,.
,,,,,,.,...
Pilot
Pilot filter
pipe
use.
I
I
Push thecontrolknob inand turn it
toI.JTE. Onelectricignitionmodels,
youwillhear alittleclickingnoise—
thesoundof the burner lighting.
After the burner ignites,turn the
knobto adjusttheflamesize.
Note:
~Do notoperatea burner for
extendedperiodsoftimewithout
havingcookwareon the grate. The
finishon the gratemaychipwithout
cookwareto absorbtheheat.
o Checkto be suretheburneryou
turned on is the cmeyouwantto use.
NEVER LET THE FLAME
EXTEND W?‘THESIDESOF
THE COOKWARE.Any flame
largerthan the bottomofthe
cookwareis wastedand only serves
toheatthe handles.
whenusingaluminumor
alminum-clad stainlesssteel
potsad. pans, adjusttheflameso
the circleitmakesis about 1/2inch
smallerthan thebottomof the
cookware.
Whenboiling,usethis same
flame size—1/2inch sm.aHertixm
the bottomof the cookware—no
matter what the cookware is made
of. Foodscookjust as quickly at a
gentleboil as theydo at a furious,
roHingboil. A highboil creates
steamand cooks awaymoisture,
flavorand nutrition, Avoidit except
forthe fewcookingprocesses
which need a vigorous boil.
whenh-yingOK’Wmllingfamds
in Stainks$ sttq castimn or
emnMWMW9keep the flame down
lower—toabout 1/2the diameter
ofthe pan.
when. frying illglass or Cm%mlic
Cookwareylowerthe flame even
more.
~ ,
!’;i
~::;
~.-
1
;7;;
\t,::
;.
rk
~,..‘
1,.;
~,;
f -:
L=IBe sure the burners and grates are
cool beforeyou pkuceyourhand, a
pothokier, cleaning cloths or other
materials on them.
I
Page 10

.. ...
,
With too much air, the flamewill
be unsteady,possiblywon’tburn all
the wayaround, andwill benoisy,
sounding like a blowtorch.
With not enough air, youwon’tsee
anysharp blueconesin theflame,
youmaysee yellowtips, and soot
mayaccumulateonpotsandpans.
AiaE?A
~
-’
‘1-oadjusttheflowof ail-to the
b+urnem~rotatethe shuttersto
~IIowmore or less air intothe
w-mzn-tubes as needed.
AiFAdjustment
.4rIairadjustment shutterforeach
surfaceburner regulatestheflowof
air totheflame.
Vvherltherightamountd’air
flowsintothebwner9the tlame
will be steady,relativelyquietand
haveapproximately1/2”sharpblue
cones. This isusuallythecasewith
factorypresetshuttersettings.
Air adjustment shutter
.—._
u
?
AitBnlinunIk:Medium-weight
cookwareis recommendedbecause
itheatsquicklyandevenly.Most
foods brown evenlyin an aluminum
skillet.Mineralsin foodandwater
willstainbut willnot harm
aluminum.A quickscourwitha
soap-filledsteelwoolpad after
eachusekeepsaluminumcookware
lookingshinynew.Use saucepans
withtight-fittinglidsfor cooking
with minimumamountsofwater.
Cast Iron: Ifheatedslowly,most
skilletswillgivesatisfactoryresults.
Enamelware: Under some
conditions, the enamel of some
cookwaremaymelt.Followcookware
manufacturer’srecommendations
forcookingmethods.
Glass:There aretwo typesofglass
utensils—thoseforovenuseonly
andthose for top-of-rangecooking
(saucepans,coffeeand teapots).
Glassconductsheatvery slowly.
Heatproof
GBass(Marnk: Can
beused for either surface or oven
cooking.It conductsheat very
slowlyandcoolsveryslowly.Check
cookwaremanufacturer’sdirections
tobesureitcanbe usedongasranges.
StainlessSteel: Thismetalalonehas
poorheatingproperties,andisusually
combined with copper, aluminum
or other metals for improvedheat
distribution. Combination metal
slcilletsgenerallywork satisfactorily
if used at medium heat as the
manufacturer recommends.
The Clock and Timer (onmodels
soequipped) are helpfuldevices
thatserveseveralpurposes.
The clock
Toset the Clock, pushinthe knob
andturnthe clockhandstothe
righttothecorrecttime. Then let
theknoboutandcontinueturning
toOFF.
‘mmr
The Timerhas beencombinedwith
therangeclock. Use it to time all
yourprecise cookingoperations.
You’Hrecognizethe Timeras the
pointerwhich is differen~in color
than the clock hands.
Minutesare marked up to 60 on the
center ring oftheclock.
Toset the Timer, turn theknob to
theleft, without pushingin, until
the pointer reaches the number of
minutesyou wantto time.
Attheendof tksettimt27a
M2YXWsoundstotellyouthe is
Turn the knob,without pushing
up.
in, until the pointer reaches OFF
and the buzzer stops.
---q
----
-------
-,
\
,!
Page 11

Li@atiwb~FuC~iOm
+3
%%y
Ekctrie Ignition Mod&
Air Adjus$mellt
Stinding mot MkMk%
RGA.5L?PJ
RGBS24P.J
RGS52$XX’J
RGB528PJ
RGB528GPJ
RGB628GPJ
Theserangeshavea standingoven
pilotport thatmustbelitinitiaHy.
Tolightit:
1. Be sureOVENT’EMPknobisin
the OIT position.
2. Remove the oven bottom (see
page 19) and the oven baffle.
3. Locate the pi~otport onthe side
oftheburnerat thebackoftheoven.
Usinga longmatchor matchholder,
reach in andlightthe ovenpilot.
4. Replacethe burner baffle and
ovenbottomand close thedoor.
Yourovenand broiler are now
ready for use.
RGA51.2EJ RGB528U
RGB524EJ
RGB528GEJ
RGS525GEJ RGB628GEJ
The oven pilot on these ranges is
lighted by electric ignition. ‘I’he
oven and broiler cannot be operated
in the event of a power failure.
Tolight the burners, turn the
OVENTEMP knob to thedesired
temperature. Theburner should
lightwithin45 seconds.Youwill
hear a little clickingnoise—the
soundof the electric spark igniting
the burner.
CA~ION: DO I’WYI’
AT~m
m LIGHT THEELECTMC
IGNITION‘OVENlDmmG AN
-m~mm
Resumption of electrical power
when OVEN
anyposition other than OFF will
resultin automaticignitionof the
ovenburner and could cause severe
burns if at the sametime you were
attemptingto lightthe burner with
a match.
An ovenburner in use when an
electrical power failure occurs will
continueto operatenormally.
I&#&%?.using Your oven
TEMP contro~is in
~mww.
An air adjustmentshutterforthe
ovenburner regulatestheflowof air
to the flame.%u’Hfindtheshutter
nearthebackwallofthebroiler
compartmentbehindthe broiler
drawer.Toreach it, removetheoven
bottom(page19)andthe burner
baffle,or removethebroiler drawer
(page21).
I
‘lbadjusttheflow d air, loosen
the Phillipshead screwand rotate
the shutterto allowmore or less air ‘;I
intotheburnertube as needed.
When the right mount of air
flowsinto the kmmer, the flame
shouldbe steady,withapproximately
l/2-inch blue cones, and shouldnot
extendout overthe baffle edges.
?=r%.
@
1. Look at the OVEN TEMP
control. Be sure you understand
howto set it properly,
2. Check the inside ofthe oven.
Look at the shelves. Practice
removingand replacing them while
the ovenis cool.
.3.Read the information and tips on
the foHowingpages.
4. Keep this book handy where you
can refer to it—especiallyduring
the first few weeksof getting
acquainted with your oven.
. .
Page 12

g?jgpeOVENT’HVW(x?mr”i k
~ %%~locatedatthecentero fthecontrol
panel on the frontofthe range.
—
r
1
Elec[rieigttitionfnodcls
Simply turn the knobto thedesired
cookingtcrnperatures, which are
nmrkcd in25°F. incrementson the
dial. It will normally take30 to 60
secondsbeforethe flame
ftcrihe ovenreaches theselected
~i
tmpmture, the oven hurim cycles—
01’(u)mplete]y, then on with a full
fkHIIc----to
Lwnm)llfxl.
keepthe oven temperature
1
comes on.
The shelvesaredesignedwithstop-
locksso whenplacedcorrectlyon
theshelfsupports,theywdl stop
beforecomingcompletelyOUIof
the ovenand willnottiltwhen you
are removingfood from them or
placingfoodon them.
When placingcookwareon a shelf,
pullthe shelf out to the “stop”
position.Place the cookwareon
theshelf, then slidethe shelfback
intotheoven.This willeliminate
reachingintothehot oven,
Toremovethe shelvesfromthe
oven,pullthem towardyou,tilt
frontend upwardandpullthemout.
Toreplace, place shelf on shelf
supportwith stop-locks(curved
extensionunder shelf) facingup
andtowardrear of oven. Tilt up
front and push shelftowardback of
ovenuntil it goespast “stop”on
ovenwall. Then lowerfromof shelf
and push it all the wayback.
The ovenhas fourshelfsupports—
A (bottom),B, C and D (top). Shelf
positionsfor cookingare suggested
on BakingandRoastingpages.
ovenLight
?-Jsethe switch on the backguardto
turn thelighton and off.
ovenvent
Yourovenisventedthrougha duct
atthe rear ofthe range. Do not
block theopeningofthisduct—itis
importantthat the flowof hot air
from theovenand fresh air to the
ovenburner be uninterrupted.
Avoidtouchingthe vent openings
or nearby surfaces during oven
or broiler operation—theymay
become hot.
,,--.,.
/“
i
,___
\
:
Page 13

How h SktYawRange
!&wBaking
1. Positionthe shelf or shelvesin
theoven.
2. Closeovendoor, turnOVEN
T?2JMPknob to desiredtemperature
andpreheat ovenfor at least 15
minutesif preheatingis necessary.
3. Place foodin ovenoncenter
ofshelf. AHOWatleast2 inches
betweenedge of bakewareandoven
wallor adjacentcookware.
If cookingon twoshelvesat the
sametime, place shelvesabout4
inchesapart and staggerfoodon
them.
4. Check foodfordonenessat
minimumtime on recipe. Cook
longerif necessary.Switchoff
heatand removefood.
R%3’K!mlg
Preheatingisimportantwhenusing
temperaturesbelow225°F.and
whenbakingfoodssuchasbiscuits,
cookies,cakesand otherpastries.
Preheatingisnotnecessary when
roastingor forlong-timecookingof
Who]emeals.
Most baking is done on the second
shelf’position (B)from the bottom.
?.Vhen
baking three or four items,
use two shelves positioned on the
second w2d fourth
(B& D) from bottom of oven.
Ehkeangd food cakes m? firs~ shelf
position(A) from bottomofoven.
sets of supporis
turningcmtheown, leavethe oven
doorqjarforafewminutesoruntii
theoveniswarm,
~Donot open theovendoorduring
abakingoperation--heatwillbelost
andthe bakingtimemightneedto
beextended.Thiscouldcausepoor
bakingresults.Hyou mustopenthe
door,openitpartially-only 3or
4inches-and closeitasquickly
aspossible.
~Donotdisturbtheheatcirc~~ation
intheovenwiththeuseof aluminum
foil.Iffoilisused,placeasmall
sheet ofit, about10by 12inchesat
themost,onalowershelfseveral
inches belowthefood.Do notplace
foilon the ovenbottom.
~O~lDOm B2J&2~
and Possible solutions
PEE-$
B1.11-ningaround edges
Oventoofull;avoidovercrowding.
Q
~
Edges of crust toothin.
~Incorrectbakingtemperature.
Bottom crust soggyand unbaked
oAHOWcrustand/orfillingtocool
sufficientlybeforefiilingpieshell.
QFilling maybe toothin orjuicy.
~FillingallowedtostandinpiesheH
beforebalcing.(Fillpieshellsand
bakeimmediately.)
Q Ingredientsand p~opermeasuring
affectthequality ofthecrust. Use a
testedrecipe andgoodtechnique.
Nlakesurethele are110tinyholesor
tearsina bottommust.
apiecrust could causesoaking.
p;~ fijiiqg ~~~~&J~~
~Toparidbottomcrustnotwell
sealedtogether.
G Edgesd pie crust not buiRup
highenough.
~Toomuch filling.
+0Ch~~k~~~eQfpiep]ate+
I%si).”j’istcmgh;2THS$Imtflaky
...
‘iRxomuch hall.3iing.
0pat too softor
cutintoofine.
~.o!]dmzh iightiyxxi handleaS
littleas&ssible.
Pmbkm
“Patching”
C!dKEcs
cake risesMghw on oneside
@Batter spread unevenly in pan.
63(_Jvens~~e]vesnot level,
s Using warped pans.
@Incorrect pan size.
cakes Cracking011top
@Check oven temperature.
@Batter too thick, follow recipe
or exact package directions.
@Check for proper shelf position.
~ Check pan size called for in recipe,
~ Improper mixing of cake.
cake MS
@Toomuch shortening, sugar or
liquid,
@Check leavening agent, baking
powder or baking soda to assure
freshness. Make ahabit to note
expiration dates of packaged
ingredients.
@Cake not baked long enough or at
correcttemperature.
~Ifaddingoil to a cake mix, make
certaintheoilisthetypeand
amount specified.
crust is hard
=Checktemperature.
~Check shelfposition.
cakeJ!-Rassoggylayer or Sm!ak.sat
bottcm
Q und~rmi~ing @ye&ents.
~ shortening too soft for proper
creaming.
~
TOO much liquid.
COOKIES &BIEx3JIm
IhL@Rycenter;Ihwwytmllston
surface
Q ~heck temperature.
@Check shelfposition.
~ Follow baking instructions
carefully as given in reliable recipe
or on convenience food package.
0 ~~at cookie sheets will giVt3mOIT
even.baking results. Don’t overcrowd
foods on a.
a ~onvenience foodsLlsedsbqmrld
their expirationdate,
bakingsheet.
@
&&=
.;.%-,
@
T
Page 14

.EhkiKBg(hiKfi!e
~~..p.
G+;? L %-ehaing isvery inlportant
%$& W’lwnusing tmrqx!ratl.lres!&?hwv
.4.:. ~~~”~.~~~‘$~~~~~~kingibodsSucil
1+,3’$&
3
%3; =
b~=u~@9 ~Q~~~~$5 @J~~~ ~~~
otherpastries.Preheatttteovenfor
a[~eas~15~~in~tes.
Preheatingisnotnecessarywhen
roastingorforlong-timecookingof
whole meals.
2. Aluminumpartsconductheat
quickly.Rx mostconventionalbaking,
3. Darkornon-shinyfinishes,also
glassandPyroceratn~generally
light,shinyfinishesgivebestresults absorbheatwhichmayresultindry,
becausetheyhelppreventoverbrowninginthe timeittakesforheatto
crispcrusts.Reduceovenheat25°Eit’
lightercrustsaredesired.Preheatcast
cookthecenterareas.Werecommend ironforbakingsomefoodsforrapid
dull(satin-finish)bottomsurfacesof
browningwhenfoodisadded. -
pansforcakepansandpieplatestobe
surethoseareasbrowncompletely.
Yood
Bread
Biscuits(%-in.thick)
Coffee cake
Corn breador muffins
Gingerbread
Muffins
Popovers
Quickloaf bread
Yeastbread(2 loaves)
Plainrolls
$weetrolls
Zakes
without shortening)
lngel food
elly roll
q-mngc
lakes
lundtcakes
:upcakes
‘kuitcakes
ayer
Layer.chocolate
I
I
Loaf
cookies
Brownies Metal orGlass Pans
Drop Cookie Sheet
Rcf’ri~eriltor
Rolledor sliced
y~,~~@,
Other Desserfs
apples
Baked
(lstard
1---
Puddings, rice
WI cusmrd
fi’ies
Frozen
Meringtic
I
onc Cl”ust
i‘iv{)crust GlassorWin-finish Metal F~n
-[
.\ Wstrvshul]
Cookwme
ShinyCookie Sheet
Shiny MetalPanwith
satin-finishbottom
Cast Ironor GlassPan
ShinyMetal Panwith
satin-finishbottom
ShinyMetal Mr.rffinPans
Deep Glassor CastIron Cups
Metal or GlassLoaf Pans
Metal or GlassLoafPans
ShinyOblongor Muffin Pans
ShinyOblongor MuffinPans
AluminumTubePan
Metal JellyRoll Pm
Metal or Ceramic Pan
or Ceramic Pan
Metal
ShinyMetal Muffin Pans
Metalor Glass Loaf or
rube Pan
ShinyMetal Panwith
/ satin-finishbottom
I Shiny Metal Pan with
] satin-finish bottom
Metal or Glass Loaf Pans
Cookie Sheet
Cookie Sheet
Glass or Nle!alPans
Glass CustardCups or
Casserole (set in panofhotwater)
Glass Custard Cups or
Casscmlc
Foil Pan onCookie Sheet
Sprcw.itocrust edges
Glass or Satin--iii~ishNleti~lPan
Glassor Salin-liriish ?vlelalPan
Shelf
Positions
B,C
B, A
B
A, B
B
B
A, B
A, B
B. A
A
B
A 325°-3500
A, B
B
A, B
B
B
B
B, C
B,C
B,C
B,C
A, B.C
B
B
I
A 400°-4250
B
A. B
B
B
owl
Ternoeratures
400°-4750
350°-4000
400°-4500
350°
400°-4250
375”
350°-3750
375°-4250
375°-4250
350°-375”
325°-3750
375°-4000
325°-3500
350°-3750
275°-3000
350°-375”
I
350°-3750
I
350°
[
325°-3500
350°-4000
400°-4250
375°-4000
350°-4000
300°-3500
325”
I
I
3~5”-350°
400°-4250
4000_4~50
450°
‘rim,
Minutes
15-20
20-30
20-40
45-55
20-30
45-60
45-60
45-60
10-25
20-30
30-55
10-15
45-60
45-65
20-25
2-4hrs.
20-35
25-30
40-60
25-35
10-20
6-12
7-12
30-60
30-60
50-90
45-70
15-25
45-60
40-60
13-16
Comments
Canned,refrigeratedbiscuitstake2to4
minuteslesstime.
Preheatcast ironpan forcrisp crust.B
Decrease about5 minutesfor muffinmix.
Orbake at450”F.for25 minutes, thenat
350”F.for IOto 15minutes.
Dark metalor glassgivesdeepest
browning.
Forthin rolls,ShelfBmaybe used.
Forthin rolls,ShelfB maybe used.
Twopiece pan isconvenient.
Line panwithwaxedpaper.
Paper linersproducemore moist crusts.
Use 300°F.andShelf Bfor small or
individualcakes.
If bakingfourlayersuse
shelvesB andD.
—
Barcookies from mixusesame time.
Use Shelf C andincrease temperature
25 to 50”F.for morebrowning.
Reducetemperature to 300°F.forlarge
custard.
Cook breador rice puddingwith custard
base 80 to90 minutes.
Large pies use400”F.and increase time.
Toquickly brownmeringueuse40(Y’F.for
8 to 11minutes.
Custard fillings require lowerteiilperature,
longer time.
60-90
30-60
30-75
Increase ti!mefor largeamountor size.
.—
Page 15

-.
l?oasthg iscookingbydry heat,
Tendermealor poultrycan be
roasteduncoveredin youroven.
Rom~ingtemperatures,which
shotddbe lowandsteady,keep
spatteringto a minimum. When
roasting,it isnot necessary to sear,
baste,cover,or addwatertoyour
meat. Roastingis easy,just follow
thesesteps:
Step L Positionovenshelfat
secondfrombottomposition(B)
forsmallsizeroast(3to 5 HM.)andat
bottomposition(A)forlargerroasts.
—.
Step
2:Checkweight of roast.
l%ce meat fat-side-uporpoultry
breast-side-upon roastingrack in a
shaHowpan. ThemeltingfatwiIl
bastethe meat. Selecta panas
closetothesizeofmeatas possible.
(Broilerpan withrack isagood
pan for this.)
Step 3: Turn OVENTEMP control
todesired temperature.Check the
RoastingGuide fortemperatures
aridapproximatecookingtimes,
St.f?p4: Mostmcxitscontinueto
cookslightlywhilestandingafter
beingremovedfromtheoven.For
rare or mediuminternaldoneness,
youmaywishtoremovemeatfrom
theovenjustbeforeit is doneifit is
to stand 10to20minuteswhileyou
makegravyor attendtoother fohds,
If nostandingis planned, cook
meattosuggestedtemperature.
RxMm!Roasts
Frozenroastsofbeef, pork,
lamb,etc., can bestarted without
thawing,but allow 10to25 minutes
per poundadditionaltime (10
minutes per pound for roastsunder
5 pounds, more timefor larger
roasts).
Thawmostfrozenpoultrybefore
roastingto ensureevendoneness.
Somecommercial frozen poultry
can be cookedsuccessfullywithout
thawing.Followdirectionsgiven
on packer’slabel.
M
RoastingGuide
‘I)fpe
Meat
Tendercuts; rib, high quality
sirloin tip, rump or topround*
Lamb leg or bone-in shouIder*
Vealshoulder, leg or loin*
Pork loin, rib or shoulder*
Ham, prc-cooked
lam. raw
For boneless rolledroasts over6-inches
hick, add 5 to 10minutes per lb. to times
ivcnabove.
‘Oultry
;hickenor Duck
‘hickenpieces
‘h rkcy
I
—.— .—. ——,.
——
I
Oven
Temperature
325°
325°
325°
325°
325°
325°
325°
37s0
Jjl.jo
..-.
Doneness
Rare:
Medium:
WellDone:
Rare:
Medium:
WellDone:
WellDone:
WellDone:
ToWarm:
WellDone:
WellDone:
WellDone:
WellDone:
—
ApproximateRoasting Time
in Minutes perPound
tO $-lbs.
3 to5-HX.
24-30
30-35
35-45 28-33
~I-.25
25-30 24-28
30-35
35-45
35-45 30-40
10minutesper lb. (anyweight)
Under 10k. 10to 15-III.%
20-30 17-20
3 to 5-MS.
35-40 30-35
35-40
10 to ZHbs.
20-25
6
18-22
22-25
20-23
28-33
30-40
(her 5 Ras.
Gwer15l,bs.
15-20
Internal
Temperature‘F
130°-1400
150°-1600
170°-1850
130°-1400
150°-1600
170°-1850
170°-180°
170°-1800
1~5°-1300
170°
185°-1900
185°-190°
In thigh:
185°-1900
Page 16

~~%rangeftas a convenientcompartment
[ ._
_
~-%
‘==
!N1OW the oven forbroiling.It a~~o
hasaspeciallydesignedbroilerpan
zmdrack thataHowdrippingfatto
drainawayfrom the foodsandbe
kept awayfromIhehighheatof
[hegasflame.
Distancefrom theheat sourcemay
bechangedbypositioningthe broiler
panand rack onone ofthreeshelf
positionsinthebroilercompartment—
A (bottomofbroilercompartment),
B(middle)and C (top).
L H meathas fator gristle near the
edge,cutverticalslashesthrough
bothabout 2 inchesapart, but don’t
cutintomeat. Werecommendthat
youtrim fattopreventexcessive
smoking,leavinga layer about
MS-inchthick.
2. Removebroilerpan andrack
frombroiler compartment and
place ~oo~ on rack.
3, Pullout drawerand position
—
broilerpan in compartfient. Placing
foodciosertoflameincreasesexterior
browningof food,but alsoincreases
spatterin–gand thepossibilityof fats
undmeatjuices igniting.
=4.Close broiler door and, formost
foods,turn OVEN TEMP knob to
BROIL. Note: Chicken and ham
arc broiled at a lower settingin
order to cook foodthrough without
over-browningit.
~, Turn most foodsonce during
cooking;
(theexceptionis thinfillets
Offish; oil one side, place that side
downonbroilerrackandcookwithout
t~irninguntildone). Time foodsfor
LIboutone-half the total cooking
Iimc, turn food, then continue “to
cook to preferred doneness.
.>,,.
-’sTurn O}~EhJTENIP knob tO
,_. LIF.F.I?emovebroiler pan from
,6””-i’
,’
) <wnpartmcnt and ser~~efood
i“.
\
.... .-
‘ ~Imnediateiy.Leave pan.outside
,--
-“--’)oill~?ar(!llclltlltto CGO1.
1
\t
--—-
Broiling%-’&w
‘$$Bmmg isIENMydoneV&%‘oven
ad broiier door’sclosed.However+
ifyoulikeyoursteaksveryrare
insideand charred ontheoutside,
leavetheovendoor slightlyajar.
Broi~ingGuide
Quantity
Food Thickness
GroundBeef
WellDone Mto %-in.thick
BeefSteaks
Rare
Medium
WellDone
Rare
Medium
WellDone
Chicken(450°)
andlor
thinslices)
l-lb. (4 patties)
l-in. thick
(1-l% lbs.)
~~-in. thick
(2-2?4Ibs.)
1whole
(2to2Yz-lbs.),
I split lengthwise
Broii
Position
—
1-
BakeryProducts
Bread(Toast)or 2-4 slices
ToasterPastries 1pkg. (2)
EnglishMuffins 2-split
Lobstertails
(6to8-02. each)
Fish
Hamslices(450°)
Precooked
ChO~S
Pork
WellDone
Lambchops
Medium
WellDone
Medium 2 (1%inch),
WellDone about 1lb.
Wieners, I-!b. pkg. (IO)
similarprecooked
sausages,
bratwurst
2-4
l-lb. fillets Xto
Y2-in.thick
l-in, thick
2(%in.)
2 (l-in. thick),
about 1 lb.)
2(1 inch)
about 10-12 oz.
-1-
T
ALE_
@
LJsetongstoturnm(?atwvwr—
piercedmeatlosesjuices.
@
SW&Sanddlops Shouldbeat
least 1 inch thick for bestbroiling
results.Panbroilthinnerones.
Id
Minutes
B
I
c
A 9
A 12
A
A
A 15
A 25
A 30-35
c
c 3-4
B 13-16
c 5
B 8
A
A 13
B 8
B
c 6 Ifdesired, splitsausagesin half
side
Time,
Yz
3
9-1o
13
10
2-3
10
10
2nd Side
Time,
Minutes
3
7-8
7
5-6
8-9
6-7
12-14
16-18
25-30
‘/2-1
Donot
turn
over.
5
8
4-5
10-12
10
4-6
12-14
1-2
Comments
Arrange in singlelayer.Bacon %-lb.(about8
Spaceevenly.Up to 8patties
take aboutsa.rnetime.
Steakslessthan l-in. cook
throughbeforebrowning.
Panfrying is recommended.
Slashfat.
Reducetimesabout 5 to 10min.
per sideforcut-upchicken.
Brusheachsidewithmelted
butter.Broilwithskinsidedown
firstandbroil withdoorclosed.
Spaceevenly.PlaceEnglish
muffinscut-side-upandbrush
withbutter ifdesired.
Cutthroughbackofshell,spread
open. Brushwithmeltedbutter
beforeand after halftime.
—
Handleandturn very carefully.
Brush withlemonbutter before
andduringcookingifdesired.
Preheat broilertoincrease
browning.
Increasetimes5-10min. perside
for 1%-in.thickor homecurd.
Slash fat.
Slash fat.4-7
lengthwiseinto5to6-in.pieces.
——.
’-..
Page 17

Propercm andcleaningare
important so your rangewillgive
youefficientand satisfactory
service,Followthesedirections
carefullyin caringforittohelp
assuresafeandpropermaintenance.
BE sm ELECTMC PomR
1~Ol?lFBEFORE CLEANING
ANY PARTOFYOURRANGE.
$i@i?cidcm-eof
Continuow”cleaning
ovenInterior
(McdelsEKWiMXW, RGB628GI?J)
These models have a ContinwIIIsCkaning oven.thatdeans itself
whilecooking. The insideof the
oven—top,bottom, sides, back and
insideofthedoor—isfinished with
aspecialcoatingwhichcannotbe
cleanedin theusualmanner with
soap,detergents,steel woolpads,
commercialovencleaners, coarse
abrasivepads or coarsebrushes.
Their use and/or the use ofoven
sprayswillcausepermanentdamage.
The special
ceramicmaterial which is dark in
color and feels slightlyroughto the
touch. If magnified, the surface
wouldappear aspeaks, valleys,and
sub-surface “tunnels~’This rough
finishtendsto preventgrease
spattersfrom forming little beads
or drop~etswhich run downthe
sidewallsof a hard--surfaceoven
liner leavingunsightlystreaksthat
wquire hand cleaning. Instead,
./hen spatter hitsthe porousfinish
i~isdispersed and ispartially
absorbed. This spreadingaction
increases the exposure ofoven
sod to heated air, and makes it
somewhat lessnoticeable.
W]
mayM disappear m@3My
and at some time after extended
wwge,stainsmay appear which
cannot be removed.
coatingisa porous
The special ‘coating
on ovenshelves. Shelvesshouldbe
cleanedcwt,~idetheown to avoid
damageto thespecialcoating
in$idetheoven.
TOc~eall the continuQm-
Cleating oven:
1. Letrangepartscoolbefore
handling. R is recommendedthat
rubber gloves be wornwhen
cleaningrangeparts.
2. Removeshelvesand cookware.
3. Soilvisibilitymaybe reduced by
operatingthe ovenat 400°F.Close
the door andturn 0Vl13~T13MP
knobto400”F.Timefor at least4
hours. Repeatedcyclesmay be
necessarybeforeimprovementin
appearanceis apparent.
REM331WBER:IXJMNGTHE
OPERATIONOFTHEOVEN,THE
DOOR,WINDOWANDOTHER
RANGESURFACESWILLGET HOT
ENOUGH~ CAUSEBURNS.DONOT
~UCH. LETTHERANGECOOL
BEFOREREPLACINGOVENSHELVES.
4. If a spilloveror heavysoiling
occurson the poroussurface, as
soonasthe ovenhas cooled, remove
as much ofthe soilas possibleusing
a smallamountofwaterand a stiff
brist~enylonbrush. IJse water
sparinglyand changeit frequently,
keepingit as cleanaspossible, and
be sureto blot itup withpaper
towels,cloths, or sponges.Do
rub or scrubwith papertowels,
c~othsor sponges, sincethey will
leaveunsightlylinton the oven
finish.If water leavesa white ring
on thefinish asit dries, apply water
againand
sponge,startingat the edgeofthe
ring and working towardthe center.
Do not Wsesoap, CiMWjy3nt,steel
V%%Mpad$yComimeFcialovenckxmer~
Silicxme0w3?!Splraysy42WWS63pads
93’eWWx!BMWSEWSon the pmxms
s3MM39,These products will spot,
clog, and mar the porous surface
and reduce its ability to work.
~,~~~-@~~~y~.pn~~]]i;QolWJIMsNMrface
.- .,.
~rF;l;~3a,@!n~
Vi.{t...
~Q~~,-:
blot it with a clean
G,.J,2;”3301:s&k%-tfiey
j.,
~.”i-~~ ~ *2 ~i~
~ ~x .L.a:.e $“~y
is!nOtWwd
..”
damageit.
not
.
PorcelainovenInterior
(onmmdds soequipped)
Withpropercare, the porcelain
enamd finishon the insideof the
oven—top, bottom, sides, back and
inside of the door—will staynewlooking for years.
Let rangecoolbefore cleaning. We
recommendthatyouwearrubber
gloveswhen cleaningtherange.
Soapand waterwillnormally
do thejob. FIeavyspatteringor
spilloversmayrequirecleaning
with a mild abrasivecleanser.
Soapy,wet metalpadsmay also be
used. Do notallowfoodspills with
ahigh sugaror acid content(such
asmilk, tomatoes,sauerkraut, fruit
juices or piefilling)to remainon
thesurface. Theymay cause a dull
spoteven after cleaning.
l+Iouseholdammoniamay make the
cleaningjob easier.Place 1/2cup in
a shallowglassor potterycontainer
in a cold ovenovernight.The
ammoniafumes will help loosen ~“’
theburned-on grease and food.
If necessary,youmayuse a caustic
cleaner. Followpackagedirections. ‘-
Cautions about using
spray-onoven
@Do not
controlsand switches(on models so
equipped) because itcould cause a
short circuitand result in sparking
or fire.
@Do not.allowa tlkn from the
cleanertobuildup onthetemperature
sensingbulb—itcould cause the
oventoheat improperly. (The bulb
is located.at thetop ofthe oven.)
CarefuHywipe the bulb
each ovencleaning, being careful
not to movethe bulb as a change
in itsposition could
the ovenbakes.
QDo motspray any oven
on the oven door, handles or any
exterior surfaceofthe oven,wood
or paintedsurfaces. The cleanwr
can damage these
cleaners:
sprayon the electrical
cleanafter
affect?m3w
cleaner
surfaces.
‘%$$
o
~fj
Page 18

~~a$t’sagoodidea to wipethecontrol
‘~=+=”anelscleanafter each useofthe
G
oven.Fora more thoroughcleaning,
disconnectpowerto therange.
Fh.mmvetheknobs bypullingthem
offiheknobstems.
I
I
Thenyoucan takeoutthe screwin
thetrim at eachendoftheglass
uppercontrolpanel(onmodelsso
equipped)andremovetheglass
pane~to cleanbothsides.Cleanwith
mildsoap
cleanwaterandpolishdry witha
softcloth.
CAUT’N3FJ:Do notuse abrasive
arid.water,rinsewith
Cleanthebrushedchrometopwith
warm,soapywateror an all-purpose
household cleaner and immediately
dry it witha clean, soft cloth. Take
careto dry the surfacefollowing
the “grain:’“Ilohelppreventfinger
marksaftercleaning,spreada thin
filmofbabyoil on the surface.
Wipeawayexcessoil witha clean,
sofi
cloth: ~ good appliance wax
willhelpprotectthis finish.
Removable oven Bottom
MI so “Models in This Book
.
\
42–”
J
\&@
—
?$0removetheOwm bottom:
Push the ovenbottomback, lift the
frontend up, and pulltowardyou
and out.
Toreplace.:
Positionthe backedgeofthe oven
bottomso thatit meetsthe locating
pin on the lowerrear wallofthe
oven.Push the ovenbottom back
against the leaf springto allowthe
frontedgetodrop behind the front
frame. The ovenbottomshould
nowbe held securelyin place.
Removable oven Door
n cleanerson glassor enamel
trolpanel surfaces-they will
Owr EnamelFitih
Iwhentherangeiscool, washthe
enamelfinishwith mild soap and
~~dateror ~mild abrasivecleanser
appliedwith a damp cloth. Rinsethe
surfacewith ckxmwateranddry
witha softcloth. If youwish,
occasionallyapplya thincoatof
mildcleaningwaxtohelp protectthe
finish.
To
wmovetheporcelaineriaml
oven‘bottompanel: Slidethe catch
at each rear corner of the oven
bottompanel towardyou.
—
TOE%.mtlve theown bomm?i
gxmd:
ovenbottompane] slightly,slide it
b~c]<~lnti~ho]~~in front edge of
panel ciear pins in ovenfront
frame: m’ldM{etimpale] out.
Lift the rear edge of the
‘Io
removethe ovendoor, open it
a fewinches to the special stop
positionthat willhold the door
open. Grasp firmly on each side
and lift the door straight up and off
the hinges.
Note:Becarefulnot to placehands
I
between the spring hinge and the
ovendoor frame. The hinge could
snap back and pinch fingers.
1.1onot immerse the door in water.
Page 19

—
Gratesshoi.ddbe washedregularly
and~ofcourse, afier spillovers.
Washthem inhot, so{pywater and
rime withclean water.Dry the
grateswitha cloth-don’t putthem
backorItherangewet.
TOget ridof-burned-cmfood, soak
thegrates in a slightlydiluted
liquidcleanser.
Althoughthey’redurable, the
g-rateswillgradual~ylosetheir
shine,regardlessof the bestcare
youcan~ivethem. This is dueto
~heircoitinual exposureto high
temperatures.
1%not operate a burner for an
extendedperiod oftimewithout
cookwareon the grate. The finish
on the gratemay chip without
cookwareto absorb the heat.
When replacinga
pair ofgrates,
the irregular
sidesshould
meet inthe
middleas shown
at right.
DlripPam
(on mows !30equipped)
Remove thegrates and lift out the
chrome drip pans. Y/ashthem in
hot, soapy water. Rinse them with
clean, hot water and polish them dry
~a~itha cloth. ~e~er use abrasive
cleaner or steel wooi-they’!l SC123tCh
the surface< Instead, soak the drip
pans for about
diluted liquid cleanser or mild
solution ofalrnmoniaand water
(1./2cup of’mmonia to one galion
of water). AREXsoaking, wash ~Jlem
in hot, soapy water. .Rinsewith
CIWI?Wah-?rand polish wiih :2Cioih.
20 minutesin slightly
I&& TopEh?mx’s
Theholesin theburnersofyour
rangemustbe keptcl~anatall
timesforproperignitionaridan
even, unhamperedflame.
Youshou]dcleantheburners
routinelyand especiallyafter?>ad
spilkwerswhich could clog these
holes.Burnersliftoutfor cleaning.
I
PJote:A Phillipsscrew holdseach
ofthe burners in placeto keep them
from wobblingaroundduring
shipment. Removeand discardthe
shippingscrew,liftthe burner, tilt
it to one side attheend closestto
the igniterand moveit towardthe
back of the range. This disengages
it from the gasvalveat thefront of
the range, and it liftsout easily.
Toremoveburned-on food, soak
the burner in a solutionof a product
usedforcleaningtheinside of cofke
makers. Soak theburner for20 to
30 minutes. If the food doesn’t
rinse off completely,scrub itwith
soap and water or a mild abrasive
cleanser and a damp cloth.
13eforeputtingtheburner back, dry
itthoroughly bysetting it in a warm
ovenfor 30 minutes. Then place it
back in the range, making sure it is
properly seated andlevel.
I.ift”up Cooktop
CleantheareaundertheCOOMOP
often.Built-upsoil,especiaHy
grease,maycatchfire.
———
Tomakecleaningeasier, the
cooktopmaybeliftedup and be
heldup, onmodelssoequipped,by
a supportrod that’sstoredunder
thecooktop.
Be sure all burners are turned
off. Then removethe grates, grasp
frontsidesofcooktopand lift.
I
Aftercleaningunderthe cooktop
withhot, soapywaterand aclean
cloth, lowerthe cookop, being
carefulnottopinchyour fingers.
ova-l.Shdw?s
Oven shelvesmaybe cleaned with
a mildabrasivecleanser following
packagedirections. After cleaning,
~inse&e shelveswith clean water
and dry with a dry cloth. To
removeheavy,burned-on soil,
soapymetalpadsmay be used
followingpackagedirections.
After scrubbing,wash with soapy
water,rinse anddry.
IB1’xmr’E?m& Rack
After broiling, remove the broiler
rack and carefullypour off the
grease.Washand rinse the pan
and rack in hot, soapy water.
If foodhas burned cm,sprinkle
thebroiler rack while hot with
detergentand coverwith wet
towelsor a dishcloth. That way,
burned-on foodswill soak loose
while the meal is being served.
Ilo not store
and rack in the ovenor broiler ,#.==
comptutmmt.
asoiledbroiler pain
—q
paper
Page 20

ihetmikr panandrack.
,ab
./
/
/“
;-
F-
Bulton
Locked
0
IM the twolockingtabsnear the
frontofthe drawer and movethem
aside. Pull thedrawer forwardto
unlockit from buttonson the
drawersiides, lift it and takeitout.
Replacethe drawer so the four
buttonson [hedrawer slidesextend
through the keyholeslotsin the
drawer. Push the drawer back until
—
the buttons are in the smaller holes.
Then movethe lockingtabsback
intoposition untilthey snap into
place.
chm Light Bum
Rheplaeement
(on modelsso quipped)
The temperaturecontrol in your
newovenhasbeencarefullyadjusted
toprovide accuratetemperatures.
However,if this ovenhas replaced
oneyouhave used for severalyears,
youmaynoticea differencein the
degreeofbrowningor the lengthof
time required whenusingyour
favoriterecipes.Oventemperature
controlshaveatendencyto “drift”
overaperiod of yearsand since
thisdrift is verygradual, itis not
readilynoticed. Therefore,you
mayhavebecome accustomedto
yourpreviousovenwhich may
haveprovideda higher or lower
temperaturethanyouselected.
13eforeattemptingto havethe
temperatureofyournewoven
changed,be sure you ha?~efollowed
the bakingtime andtemperatureof
the recipecarefully.Then, after
youhaveused the ovena fewtimes
and youfeel theovenis toohot
or too cool, there is asimple
adjustmentyou can make yourself
on the0W3FJT13MPknob.
Pull theknob offthecontrol shaft
and lookat the back side. There is
a disc in the center ofthe knob skirt
with a series of marksopposi~ea
pointer.
Noteposition of
pointer to marks
beforeadjustment
changethe oventemperature
approximately10”F.
Wesuggestthatyoumakethe
adjustmentone mark fromthe
originalsettingandcheckoven
performancebeforemakingany
additionaladjustments.
Afterthe adjustmentis made,
pressskirt and knobtogetherand
retightenscrewssotheyare snug,
butbe careful not to overtighten.
Re-instdl knobon range and
checkperformance.
PJote:The OFF and13R01L
positionswill not line upwith
the indicatormark on thecontrol
panelas they previouslydid. This
conditionis normaland willnot
createa problem.
-
1
I
I
‘Mclight bulbis ~ocatedin the
~lpperleftco14rwrof theoven.
1.3cforereplacing the bulb,
disccmncctelectric power tothe
rangeat the main fuse or circuil
breaker panel or pull the range
power cord plug from the electrical
outlet. Let the bulb COOIcompletely
Iwforeremoving it. Do not touch a
hot bulb with a damp cloth as the
bulb Willbreak.
Loosen only the
I
I
PJotetowhich mark the pointer is
pointing. Tomake
ca~efullyloosen (approximately
one turn), but do not completely
removethe two screwsthat hold the
skirt to the knob. l+oldthe knob
bkxlein one hand .zmdthe outer
skirt irIthe other hand.
locking screws
~i~ adjustment,
I
Page 21

$~~@~llingGuide
.-----,..
Note:Let rartge/cwenparts coolbeforetouchingor handling.
PART
Broiler Pan and Rack
Control Knobs
Outside Glass Finish
Metal, Mllding
SideTrimsand
‘Mm Strips
Enamel
Outei
Fh?isw
Shelves
SurfaceBurner
Grates
Drip Pans
Surface Burners
MATERIALS
@Soapand Warm-
~
Soap-Filled Scouring Pad
o Plastic Scouring Pad
~ N4ildSoap and Water
Soapand Water
~
Soapand Water
~
~ Paper Towel
~Dry Cloth
~Soap and Water
Soapand Water
~
Soapand Water
Soap-Filled Scouring Pad
Plastic Scouring Pad
Soap and Water
Soap-Filled Scouring Pad
Von-metallic)
Soapand Water
Stiff-Bristled Brush
0
~ Soap-FiIIed Scouring Pad
(Non-metallic)
@Solution for Cleaning
Inside of Coffee Makers
QSoap and Water
@Mild Abrasive Cleanser
e Damp Cloth
TO I_EX
GENERAL DIRECTIONS
—
Drain fat, cool pan and rack slightly. (Do not let soiled pan and rack stand in
broiler compartment to cool,) Sprinkle detergent on rack and pan. Fill pan
warm
for a fewminutes. V@h; scour if necessary.Rinse anddry, OPTION:Cleanpan
and rackindishwasher.
—
Pull off knobs.Washgentlybut do notsoak. Dry andreturn controls to range.
Clean outsideof cooledblack glass door with a glass cleaner thatdoesnot
containammonia. Washother glass with cloth dampenedin soapywater. Rinse
andpolishwith a dry cloth. If knobsare removed, donotailow waterto run
downinside surface ofglass whilecleaning,
Wash,rinse and then polishwitha dly cloth. DO NOTUSE steel wool,
abrasives, ammonia, acids, or commercial ovencleaners whichmaydamage
the finish,
Avoidcleaningpowdersor harsh abrasives which mayscratch the enamel.
If acids shouldspill on the range while it is hot, use a dry paper towelor cloth
to wipeup rightaway.Whenthe surface has cooled, washand rinse.
For other spills, such as fat smatterings,etc., washwith soap andwaterwhen
cooledandthen rinse. Polish with a dry cloth.
Use a mild solutionofsoap and water. Do not use anyharsh abrasives or
cleaning powderswhich mayscratch or mar surface.
Shelvescan be soaked in dishwasheror cleaned byhand using soap and water.
Rinse thoroughlyto removeany soap after cleaning.
Lift.out when cool. Soak5 to 10minutesif desired inwarm solution of
dishwasher detergent. Scourwith materials mentioned here to removeburnedon foodparticles.
Clean as described belowor in dishwasher.Wipedrip pans after each cooking
so unnoticed spatter will not “burn on” next time youcook. To remove “burnedon” spatters, use any or all cleaning materials mentioned. Rub
scouringpad to preventscratching ofthe surface.
Wipeoff burner heads. If heavy spilloveroccurs, removeburners from range
(see page20) and soak them for 20 to 30 minutes insolution ofhot water and
productfor cleaning inside of coffee makers, such as Dip-It brand. If soil dots
notrinse off completely, scrub burners with soap and water or a mild abrasive
~lcanserand a damp cloth. Dry burners in a warmovenfor 30 minutes before
returningthem tothe range.
————
#S3%
with ‘-
water and spread cloth or paper towel over rack. Let pan and rack stand
—— ‘“’-
lightlywith
USE flOLMNJVKYCYDH?ECTIONS FOR STANDARDP0RCELAIP4 ENAMEL 0VM4 ONLY. See page 18 for Continuous-Cleaning oven.
Inside Oven Door%: QSee below Removeovendoor—see page 19.DO NOTplace door under running water, or
immerse. Use same directions for cleaning as for Oven Liner, below.
o
CWen
Liner
Soap and Water Cool beforecleaning. Frequent wiping with mild soap and water (particularly
~ Commercial Oven Cleaner
after cooking meat) will prolong time between major cleanings. Rinse
~ Soap-Filled Scouring Pad thoroughly.Soap left on liner can cause stains, IF’r heavy soil, use non-abrasive
Q Plastic Scouring Pad
cleaner and follow label instructions, using thin layerof cleaner. Use of rubber
gloves is recommended. Wipe or rub lightly on stubborn spots. Wipe off any
cleaner that gets on thermostat bulb found in back or on side, near top ofoven.
Removable Porcelain ~JSee above
Enamel Oven MMMTF
———
‘KSpil]ageofmarinaclcs, fruit juiccs,
_!__———
aJIdbasting materials containing acids may cause discoloration, so should be wipedup immediately (b]ottcdup
The oven bottom panel can be removed for cleaning (see page 19).Use same
directions for cleaning as for Oven Liner above,
———. ,~”’\
ifin Continuous-Cleaning oven). Takecare not totouch hotportion of oven. When surface iscool, clean and rinse. CX.JTION: Lightbulbs can get
warm enough to break if toucl~edwith moist cloth. When c!caning, avoid warm lamp.
,-
;.
‘i:-,.
(.k>l
Page 22

——
IPOSS!DWJ!3C’AJUSEAIWYOR
WHAT TODC)
~Pilotsare notli~.Removeorlift cooktopand hold lightedmatch nextto pilot
openingbetweenfrontandrear burners. On modelswith electricignition,make
sureelectrical plugis pluggedinto a livepower outlet.
~Burner holes onsideofburner maybeclogged.Removeand cleanthem.
1
i
I
\ OVEN DOENNOT’COOK
PROPERLY
1
/
!
[
I
!
H’
you needmm help...cM9WI free:
The GE Answer Center@
800.626.2000
Cl)rlsumerinformationservice
~BurneIs maynot be fittedcorrectlyontothe gasvalves.Removeandreinstall
themproperly.
*Make sure thermostatcapillarybulb (locatedin upper portionofoven)
isin
correctposition, nottouchingovensidesand notcoated with anything.
oAluminumfoilbeing usedimproperlyin oven.
~Oven ventblockedon topofrange.
~Incorrect cookwarebeingused. Checkeach cookingsectionforcookware
tipsor recommendations.
~oven bottom not securelyseatedin position.
@OVENiT13MPknob set incorrectlyornot turned on.
~Check common13ating,Roastingand Broiling-problemson pages 14-17.
~Rangeelectrical piugmustbe securelyseated in a live poweroutlet. Check for
blownfuse or tripped circuitbreaker.
~Bulbmay be loose or burned out.
~Electrical plugmust bepluggedintoa livepower outlet.
NEXT, ifyou are still notpleased,
write all the details—including
your phone number—to:
Manager, Consumer Relations
I-lotpoint
Appliance Park
Louisville: Kentucky 40225
FIPJALLY,if your problem is still
not resolved, write:
Major Appliance
\
~OilSiiill~~ Adion l%dnel
Page 23

,.-.,.-* m—.~.,m,m..m.k.-k--
~ ,.- -—., -- —.. -.——-— —-—
!)
;;
SI
::
*i
~L_——
iir
~
,
/
1
i
—, ,
Save proof of original purchase date such as your sales slip or cancelled check to establish warranty period.
—..— -— —.—
—.—
——
Fwu ONE-YEARWARRANTY
For one year from date of ori~inai
purchase,wewil!provide,freeof
charge,partsandservicelabor
in yourhometo repairor replace
anypart of the range that fails
becauseof a manufacturingdefect.
.—.———
—— -———
Thiswarranty is ~x@nci@c6@
the original
succeedingownerfor.products
purchasedfor ordinary home use
inthe 43 mainlandstales,Hawaii
and Wast~ington$D.C.in
warrantyisthe sameexceptthat it is
I.JM!TEDbecauseyou must pavto
purchaserandany
Alaskathe
shipthe productto~heserviceshop
orfor the servicetechnician’stravel
coststoyour home.
Ail warrantyservicewill beprovided
Factory ServiceCentersor
byour
byourauthorizedCustomerCare@
s6rvicersduring normalworking
hours.
Lookinthe
yourtelephonedirectoryfor
of
White or Yellow pages
HOTPOINTFACTORYSERVICE,
GENERAL.ELECTRIC-I-K)TFTNNT
FACTORYSERVICEor HOTPOINT
CUSTOMERCARE@SERVICE.
——
——
.—-...
~f~~~
i!~~~~ COVERED “ SerViCetriPsto YourhometO
teach you how to usethe product.
Readycw
the and Carematerial.
Hyouthen haveanyquestions
about operatingthe product,
pleasecontactycur dealer or our
ConsumerAffairs office at the
address below,orcall, to!lfree:
The GEAnswerCenter@
800,626.2000
consumer information service
~ Replacementof housefuses or
resettingof circuit breakers.
@Failureof the product if it is used
for otherthan its intended purpose
or usedcommercially.
~ Damage to product caused
byaccident, fire, floods or acts
of God.
WARRANTOR1SNOTRESPONSIBLE
FORCONSEQUENTIAL DAMAGES.
Qimproper installation.
Hyou havean installation problem,
contact your deaier or installer.
Youare responsiblefor providing
adequateelectrical, gas,exhausting
and other connecting facilities.
Somestales do not allow the exclusion or limitation of incidental or consequential damages, so the above limitation or exclusion
may not apply to you. This warranty gives you specific legal rights, and you may also have other rights which vary from stateto state.
Toknowwhat your legal rights are in yourstate,consult your local or stateconsumer affairs office or your state’sAttorney General.
VW?m3ntor: Gerlerai !EHtwmk eornpaETy
~~;
i ~j
, 1!
,-,
,;
,>
,,
,,
,,
,:
{
,1
,,
~———
~?ub. h!O.39-4586 –
I ~:j~@p~A~~.~~
,.
..-
—
————.
.—.———.
.———
t :.$,
1
 Loading...