

Page 1
%
thebestfmm
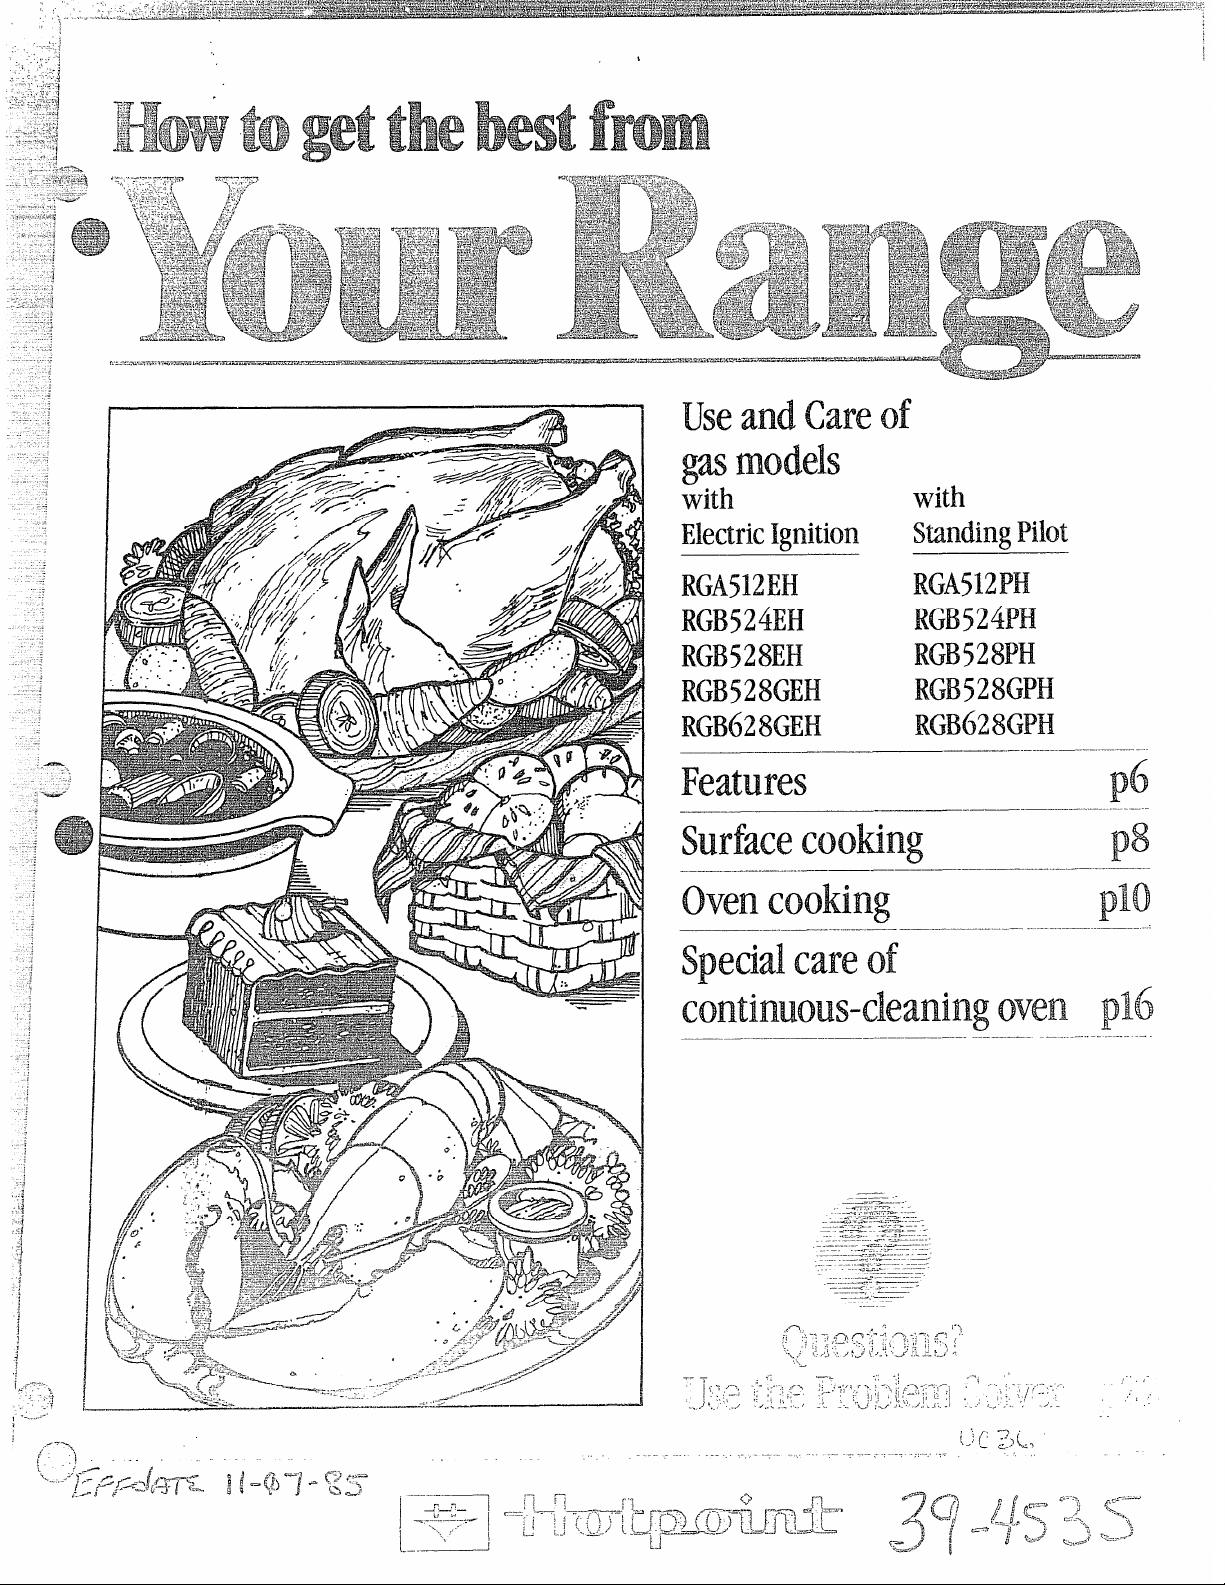
useandcareof’
gasmodels
iiitb.
with
ElectricIgn:
RGA5KMH
RGB52@H
RGB528EH
RGB528GEH
RGB628GEH
Falw’es
Surface tooting
ovencooking
— _.—.— ....—
tire. Stinding Pilot
RGA512PH
RGB524PH
RGB528PH
RGB528GPH
RGB628GPH
ptii
ptil
plo
______—-_.—-——
Spedalcare of
continuous-cleaningoven plti
—.. -—-
-%-..-
- ---
~.——-.”--=. ‘“’~-
-“-,-_
.s + ~q-
_,
I
-. -
II
.—
I
Page 2
BefofeUsi13gYoLlrR:lnge.. . . ...2
]nstai[ingthe Range . . . . . . . . ...3
Leve!ingtke Range. . . . . . . . . ...3
Safety~ns[ru~ti~ns. . . . . . . ...3-5
l%a~uresofllmrllzznge . . . ...6.7
SurfaceCooking. . . . . . . . . ...8. 9
ClockandTimer . . . . . . . . . . ...9
LJsingYourOven . . . . . . . ...10. 11
Baking . . . . . . . . . . . . . . ..-. ..12
13akingChart.. . . . . . . . . . . . . .i3
Roasting,Chart . . . . . . . . . . . . . .14
Broiling,Chart . . . . . . . . . . . . . .15
Continuous-Cleaning
@en cage . . . . . . . . . . . . . . . . . .16
CareandCleaning . . . . . . ...17-20
CleaningChart . . . . . . . . . . . . ..2l
T’heProblen~Solver . . . . . . . ...22
IfYou Need Service . . . . . . . ...23
Warranty . . . . . . . . . ..BackCover
,
Itisintendedtohelp youoperateand
maintainyournew rangcproperly.
Keepithandyfor answerstoyour
questions.
Ifyoudon’tunderstandsomething
or needmorehelp,write(include
yourphonenumber):
ConsumerAffairs
Hotpoint
AppliancePark
Louisville,KY40225
writedownthemodel
andserialm.mnbw’so
You’llfindthemona labellocatedin
theburner boxunderthecooktop.
Seepage6.
Thesenumbers arealso onthe
Consumer ProductOwnership
RegistrationCardthatcamewith
yourrange. Beforesendinginthis
card, pleasewritethese numbers
here:
if ycml smell gas:
❑ openwindows
1
2. Dcm’tta!udllelectrical
switches’
3. Extinguishany
‘q3alt
flame
4. lmmedlateiy call yow
gassupplier
*DoBI’t turnebhrk SWMW!S
on
orcm13emwx?sparks may
ignitethe gas.
FORYOURSAFETY ~
Keep the appliance ~
areadear and free
Combustible materials, ~
gasoline and CmMi%’
from
I
i
1
?
:
J
Model Number
Serial Number
Usethese numbersinany
correspondence or servicecalls
concerning yourrange.
n’you received
a damagedrange. e .
Immediatelycontactthe dealer (or
builder) that soldyouthe rarlge.
savetimeWRd.money.
Beforeyou.K’eql.mt
M3wice.*e
Ciwck [hcProblcm Wlveron
page22. It listsmiilorcausesof
opera[ing problemsthat youcan
corrtct yourself.
Page 3
-,. ......,.*i
-~;=Yourgas rangeisequippedwith
.<&&-:
. ...~
‘%+eithera StandingPilot or Electric
-,0
PilotIgnitionSystem.
RGA512PH RGB528GPH
RGB524PH RGB628GPH
RGB528PH
The StandingPilotSysteminthese
modelshas a continuousflame
glowingat all times.
R.GA512EH RGB52NMH-I
F?GB524EH RGB628GEHI
RGB528EH
The E1ectricPilot IgnitionSystem
inthese modelsuses an electric
spark to ignitethe burners anddoes
notrequire useof a match unless
electrical current to your rangeis
interrupted.
; .,;,3
h-ilstkz.‘2TR-2P =-:&i3“-%Ykge
Yomrange, like so many other
household
can
sad ascushioned vinylor
carpeting. When movingthe range
on this type of flooring, usecare.
Do
kitchen carpeting uniessyou
place an insulatingpad or sheet of
l/4-inch-thick plywood between
the range and carpeting.
Whenthefloor covering ends at
thcfront of the range, thearea that
the range will rest on should be
builtup with plywood or similar
material to the same levelor higher
than the floor covering. This will
:Illowthe range to be movedfor
cleaning or servicing.
‘:QLLfi&-&& &# & &fJ~ ,
items,is heavy and
settle intosoft floor coverings
notinstall the range over
YvhenYouGMYim.RrRange
@Havethe h-lstaner$hw you
the Iocationofthe range gas
cut-off’valve and hv toshut
it off’if’
@
necessary.
Mm ymr Irange instdkd
m-dproperly grwnded by a
qualified ins@ler9in accordance
withtheInstallationInstructions.
Anyadjustmentandserviceshould
beperformedonlybyqualified
gasrangeinstallersor service
technicians.
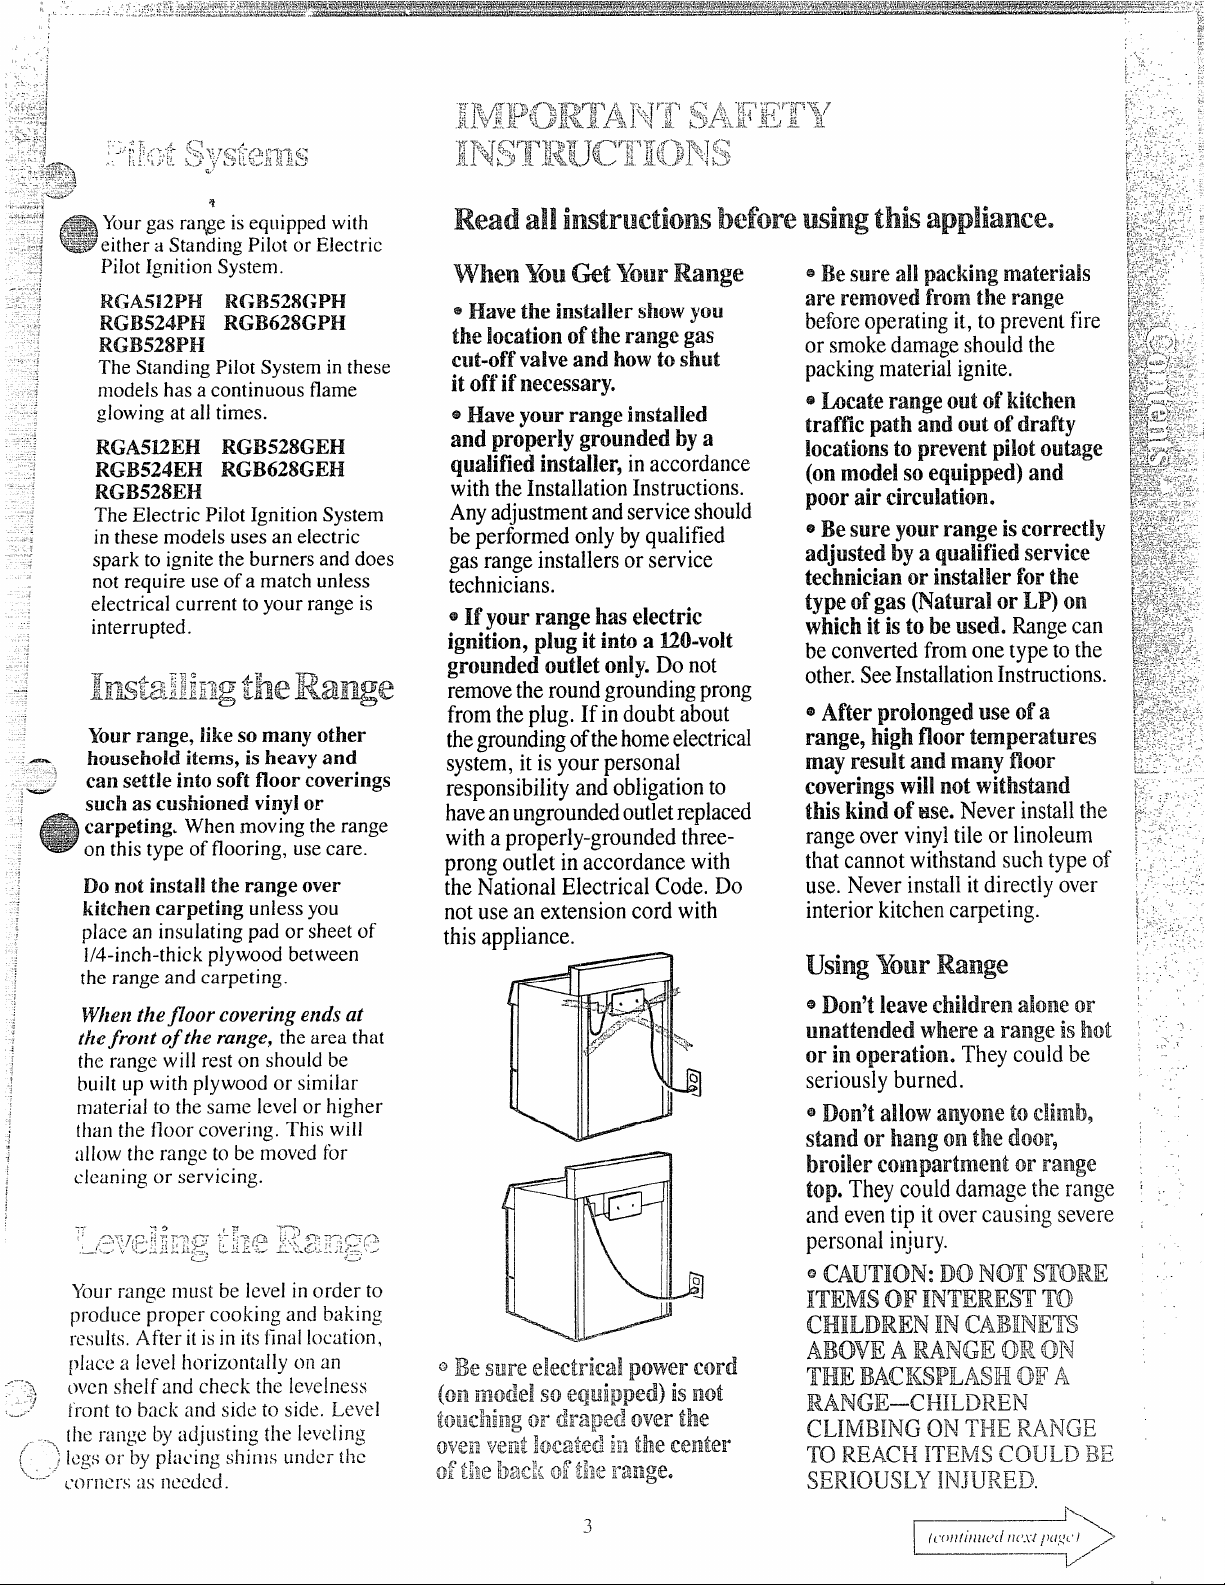
@U’your range has electric
ignition,plugit intoa 12bdt
grounded outlet
removetheroundgroundingprong
fromtheplug.If in doubtabout
thegroundingofthehomeelectrical
system,it is yourpersonal
responsibilityandobligationto
haveanungroundedoutletreplaced
witha properly-groundedthreeprongoutlet in accordancewith
the National ElectricalCode. Do
notusean extensioncord with
thisappliance.
only. Do not
~Besure d packingmaterials
are removed fromthe range
beforeoperatingit, to preventfire
or smokedamageshouldthe
packingmaterialignite.
@Locaterangeoutofkitchen
trafficpathandoutd’drafty
locationsto preventpiiotoutage
(OMImodelso equipped)and
pooraircirculation.
@Besureyourrangeiscorrectly
adjustedbya quaiifiedservice
technicianorinstallerforthe
typed gas (NaturalorH?)on
whichit is tobeused. Rangecan
beconvertedfromonetypetothe
other.SeeInstallationInstructions.
@Afterprolongeduseofa
rangeyhighfloortemperatures
mayresultand.manyf’hor
coveringswillnotwithshnd
thiskindof Hse.Neverinstallthe
rangeovervinyltile or linoleum
thatcannotwithstandsuchtypeof
use. Neverinstallitdirectlyover
interiorkitchencarpeting.
using YOU Range
@DOINleavedddmn domeor
unattendedwherea.rangeis M
orin operation.Theycouldbe
seriouslyburned.
@Donytallowanyoneto dinIb9
standorhang onthe dQOr9
broilerco]npartmentm range
top.Theycoulddamagethe range
andeventip it overcausingsevere
personalinjury.
Mur range must be levelin order to
produce proper cooking and baking
resu~ts,After itisin itsfinallocation,
.>----
~-. front to back and side to side. Level
pj:ice[~
3
ovenshe}fand check the leveIness
~J
*
the range by adjusting the leveling
., .-.
,’
L
j ICgsor by pk]~’ings!linls under the
‘-,._J
L’<}rnCI”S2Snccdcd.
level horizontally on an
~CAUTION: DO NOT STORE
HlwMs OF mwmREsT To
CHILDREN IN fCAE?mUETS
A.BOWEA RANGE OR ON
THE BACE{SPLASE1OF A
RMJ?JGE-CHUJDREN
‘Cm’’mmG ON THE R.APJGE
‘m REACHITEHMScowl) BE
SERIOUSLYINJURED.
3
(1’(1/1[11/1;(’(/}1(’.Y!/1(/,qL’/
e;>
Page 4
.. .
.
;
j
:
M bm-ner$@es andother
@
Swfwxs coo]bd’olwtouching
or Ming themwhere
them
Cilildrell
~Ivm”er
em-l l-eachthem.
W’eal’ i!oosefittingor
hallgillggmmmtswhileUsing
the appliance. Flammable
~lla(er~a~
brought in contact with flame
or
COUkj be ignited if
hotovensurfacesandr-nay
causesevereburns.
QNeveruseyour appliance for
warmingorheatingtheroom.
ProIonged use of the range
without adequate ventilation
can be hazardous.
~Do not use water on grease
fires. Never pick up a flaming
pan.
Turnoffburner, [hen
smother
pan completely with well fitting
lid. cookie
flaming pan by covering
sheetor flattray.
Flaminggreaseou~sidea pan
canbe putoutbycoveringwith
bakingsodaor, ifavailable,a
multi-purposedry chemical
or foamfireextinguisher.
*DOnot store fla~mmab!e
materialsinan ovenor near
thecooktf)~l.”
~DOM letcookinggreaseor
otherflalllnlabielnaterials
:~ccun]u!atein or nearthe
Hm&.
~when C(){)king!p{JrliJfollow
[)urdircc[ionsexactlyandalways
cook[hcIlwat(0a( least 170°E
Thisassures
that, in the remote
possibility[ha{[richinamaybe
prcsen{in [h,cmeat,itwillbe kilicd
and nl(!aiWl[lbc saf’c[0
cat.
@Neverkaw SW’facebw”mm
RInattexlded
atHIGHWN-n-ie
settings.Boilovercausessmoking
andgreasyspilloversthatmaycatch
on fire.
~Adjusttopburnerfhx size
!YOitdoesnotextendbeyondthe
edged’the cooking’utensil.
Excessiveflameis hazardous.
@use only‘drypothoM?’rs—
moistor damp potholdersonhot
surfacesmayresultin burnsfrom
steam.Do notletpotholderscome
near open flames when lifting
utensils.
other bulky cloth in place of a
potholder.
@To mi~~mize btmns~ignition
of flammable materials, and
spillage, turn the handle of a
container toward the side or back
of the range without extending
over adjacent burner.
@Mways tUF~SUrfaCe
OFF before removing
Do notusea towelor
Ibumer to
utensil.
@Carefullywatchfoodsking
friedat HIGH flamesetting.
C4~~e~er~~ockthe
vents (air
openings)of therange. They
providethe air inletandoutlet
whichis necessaryfor the range
to operateproperly with correct
combustion.
@Do not use
cooking SUM-faceif’the wok has
a mmd~ mehl
a wok m tk
ringwhichis
pkKedoverthe blmel- grateto
supportthe wok.Thisringacts
as a heattrap whichmaydamage
theburner grateanclburnerhead.
Also, itmay causethe burner to
work improperly.This maycause
:;~~ pf~~~ [~@!@~g~g
(2~~,]~~$]~’,$[~,$ff~~~~~,~~~, pmtm
lfi’j~flj~;~!j;fi]]~: fop i}mmer.s and
n]akc sure fhc burnm have
.+
i:nkcd.
a carbon monoxideMel above
current standards, resultingin a
healthhazard.
0 ~~()(j!~f~yfiijii;g $jIlollldI@2s
.
dry 2spassibk. Prost on trozen
@Useleastpossible
fatforeffective ski
fht frying. Fillingthe~antoofull
of fatcancausespilloverswhen
foodisadded.
~If a combi]~ationof’’oiksor
fats willbe used in !&ying,stir
togetherbeforeheating,or as fats
meltslowly.
*AlwaysheatfatSkNVky9and
watchas itheats. ‘
@Usedeep fat thermometer
wheneverpossibieto prevent
overheatingfatbeyondthe
smokingpoint.
@Use Proper Pan Size—Avoid
pansthatare unstableoreasily
tipped.Selectutensilshavingflat
bottomslargeenoughto properly
containfoodavoidingboilovers
andspillovers,butlargeenough
tocoverburnergrate. Thiswill
bothsavecleaningand orevent
hazardousaccumfilatio;soffood.
sinceheavvs~atterin~or s~illovers
lefton ran~e;an ign~e.U’sepans ~~--:.f
withhandlesthatcanbe easily ;:
araspedand remain
a
e use ‘only gkss (mkware that
is recom~nel~ded
burners.
@Keep 211plastics awayfrom
topburners.
@‘Toadd the possibilityd a
burn, alwaysbecertainthat the
Umtds for d!!Ibm’lersareat
ON? positionand augratesare
cod beforeattemptingtoremove
thegrate.
~When
the hood, -mm the fall! off. The
fan, if opeMing9 may spread
the flame.
~H R%Rngeis hW3tedM@lra
window9
which could blow ovef ,the top
burners and create a fire hazmi.
flaming foods umdm
do not use look curtains
/
out‘of
or
x
deep-
COO1.
for useon gas
.,
~*-.,
@
hods or moisture on fresh foods
can cawx hotfatto bubbleup and
(l!’crSidesof :1211.
Page 5
e }’~~~~1a pilot goes Out, (cm
.- .. -- .—.-.— ---—.... .-—.-—
—..-—.—... .—.—-. - .- .—
model so equipped), you will
detect a fiint odor of
gasasyour
signaltorelightpilot.When
relightingpilot, make sure burner
coiltrolsare in
OFF positionand
followinstructionsdescribedon
followingpages to relight.
*If’yONIsmell
already made sire pilot; are lit,
gas9andyouhave
turnoffthegastothe rangeand
call a qualifiedservicetechnician.
Neverusean openflameto locate
aleak.
Baking, Broiling and
Roasting
~ Do not use ovenfor a storage
area.
Stand awayfrom the range
~
whe~opening ovendoor. The
hot air or steam which escapes
can cause burns to hands, face
and/or eyes.
~Keepovenfree from grease
buildup.
~Pulling out she!f’to the shelf’
stop is a conveniencein Ming
heavy foods. It is also a
precautionagainstburnsfrom
touchinghotsurfacesofthe
dooror ovenwalk
@Dod heat kmopenedfood
cmn4&imT3‘h the oven. IPressiwe
could build up and the.container
could burst causing m
@Don% use
alumi]~umfoil
injury.
anywherein theovenexceptas
describedinthisbook.Misuse
couldresultin a firehazardor
darnagetotherange.
~VVhenusingcookingor
roastingbagsinoven9followthe
manufacturer’sdirections.
~Useonly glasscookware
thatisrecommendedforuse
ingasovens.
Always remove broiler pan
~
from broiler compartment as
soon asyoufinishbroiling.
Greaseleftin thepancan catch
fireif ovenis usedwithout
removingthegreasefromthe
broilerpan.
~When broihg9 if meatis too
dose to the flame,the fatmay
ignite.
excessive flare-ups.
@
Trim excess fat to prevent
Makesurebroilerpanisin
placecorrectlyto reducethe
possibilityof greasefires.
~U’you shouk!l
ihave a grease
fireinthe broilerpan, turn off
oven,and keepdrawerclosedto
containfire untilitburns out.
CleaniagYimrRange
@
Cleanonly parts ilistedh this
Use and
Keep range dean andfreed’
@
(A-e Book.
acemndatims ofgreaseor
spikwers whichmayignite.
IfYou Need service
@Read66ThePr@kmISoher99
onpage22 of this book.
~Don9tattempttorepair
orreplaceanypartof your
rangeunlessitis specifically
recommendedinthis book. All
otherservicingshouldbe referred
toa qualified~chnician.
FORYOURSAFETY
Keep the appliance
area dear andfree from
combustiblematerials,
gasoline and!other
flammablevaporsand
liquids,
5
Page 6
,/-
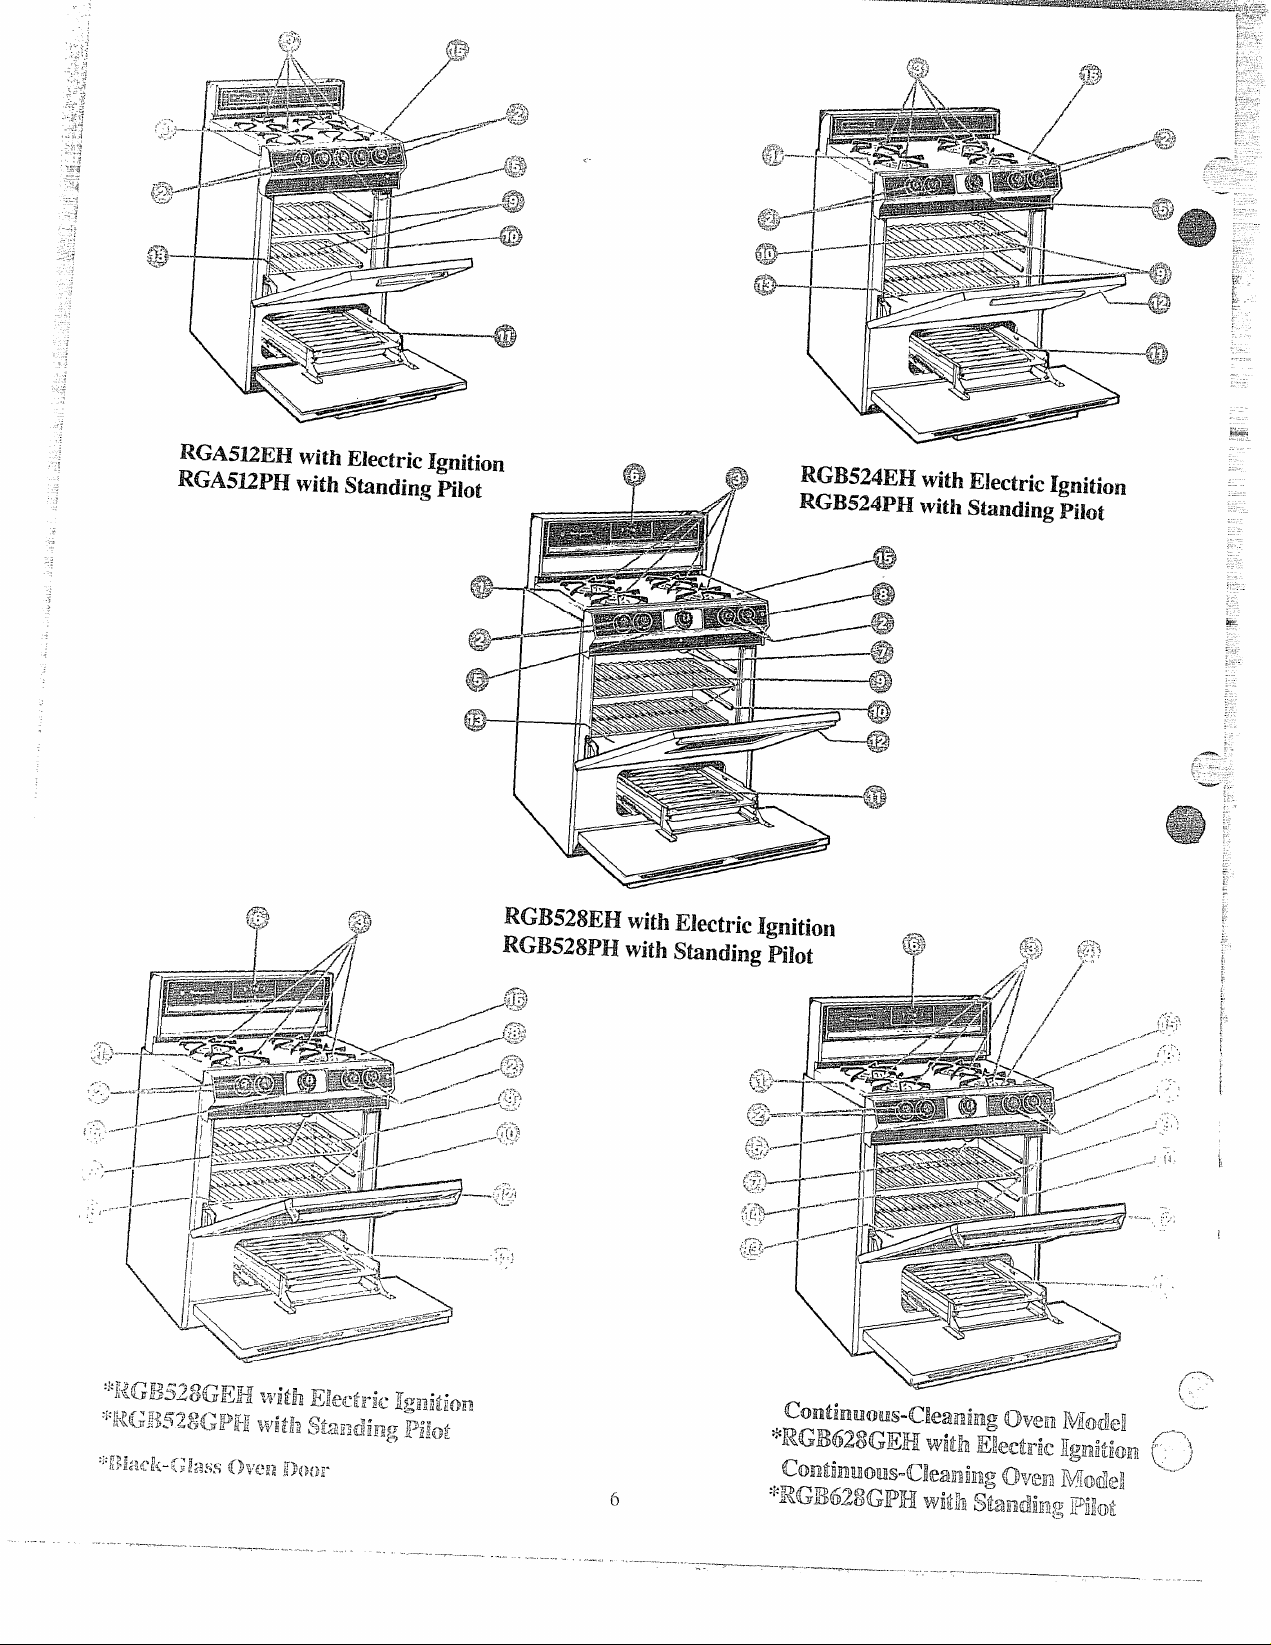
RGA5E2EI
RGAS2H
i-lwith
i
Ek!etricIgnition
with
standing Pilot
@.
with
with
RGB524PH
_---a?
>-&
with Ekctric Ignition
with standing mot
,>
;
Page 7
,,
..... ---
.—.-...-.— .. .-—.-....... .—..-.......--........ -.
.. ..-..-+..—.——.. ....
...- --
... ..-..,—.-...=-——
..-——.———..——--.-- ---
Explained
on page
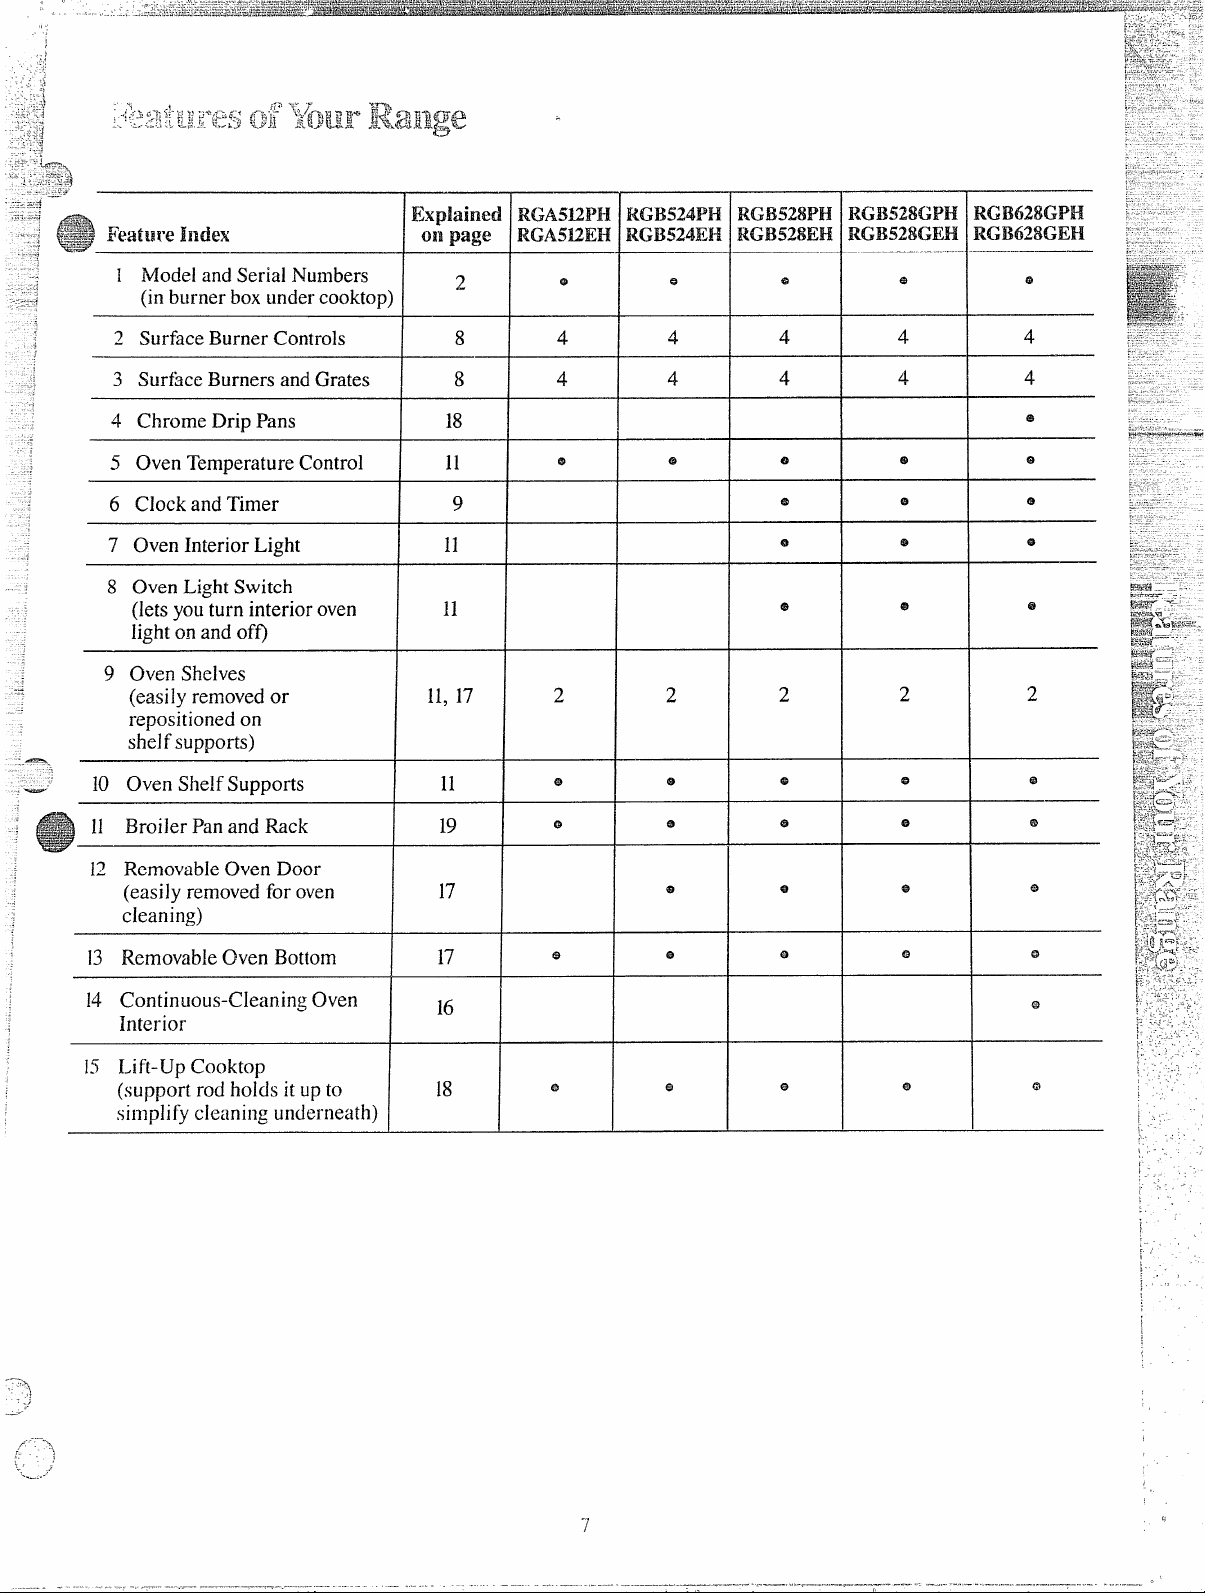
1 iModeland serial Numbers
(inburner box undercooktop
2 SurfaceBurner Controls 8
3 SurfaceBurners andGrates
4 Chrome Drip Pans
5 Oven TemperatureControl
18
11
6 Clock and Timer
7 Oven Interior Light
11
8 Oven LightSwitch
(letsyouturn interioroven
lighton and off)
9 Oven Shelves
(easily removedor
11,17
repositionedon
shelf supports)
10 Oven ShelfSupports 11
RGA5K2PH
RGA9.2EH
RGB524PH
RGIW24EH
e
4
8
4
4
RGB528PH
RGB528EH
e+
4
4
RG13528GPH
RGB528GEH
4
4
?GB628GPH
WB628GEH
4
4
9
69
2
2
2
2
e
2
H Broiler Panand Rack
12 Removab]eoven Door
(easily removedfor oven
cleaning)
13 RemovableOven Bot{om
14 Continuous-CleaningOven
Interior
15 Lift-Up Cooktop
(support rod holds it upto
simplify cieaning underneath)
19
17
17
18
I
63 eJ
al
e
*
1,
Page 8
~—
——.—. .-—..——..-.—.—---. . ,
standing Pilot Models
1R[;A512PH RGRY4M3GIW
j I?GB524PH RGB628GPH
; RGB528PH
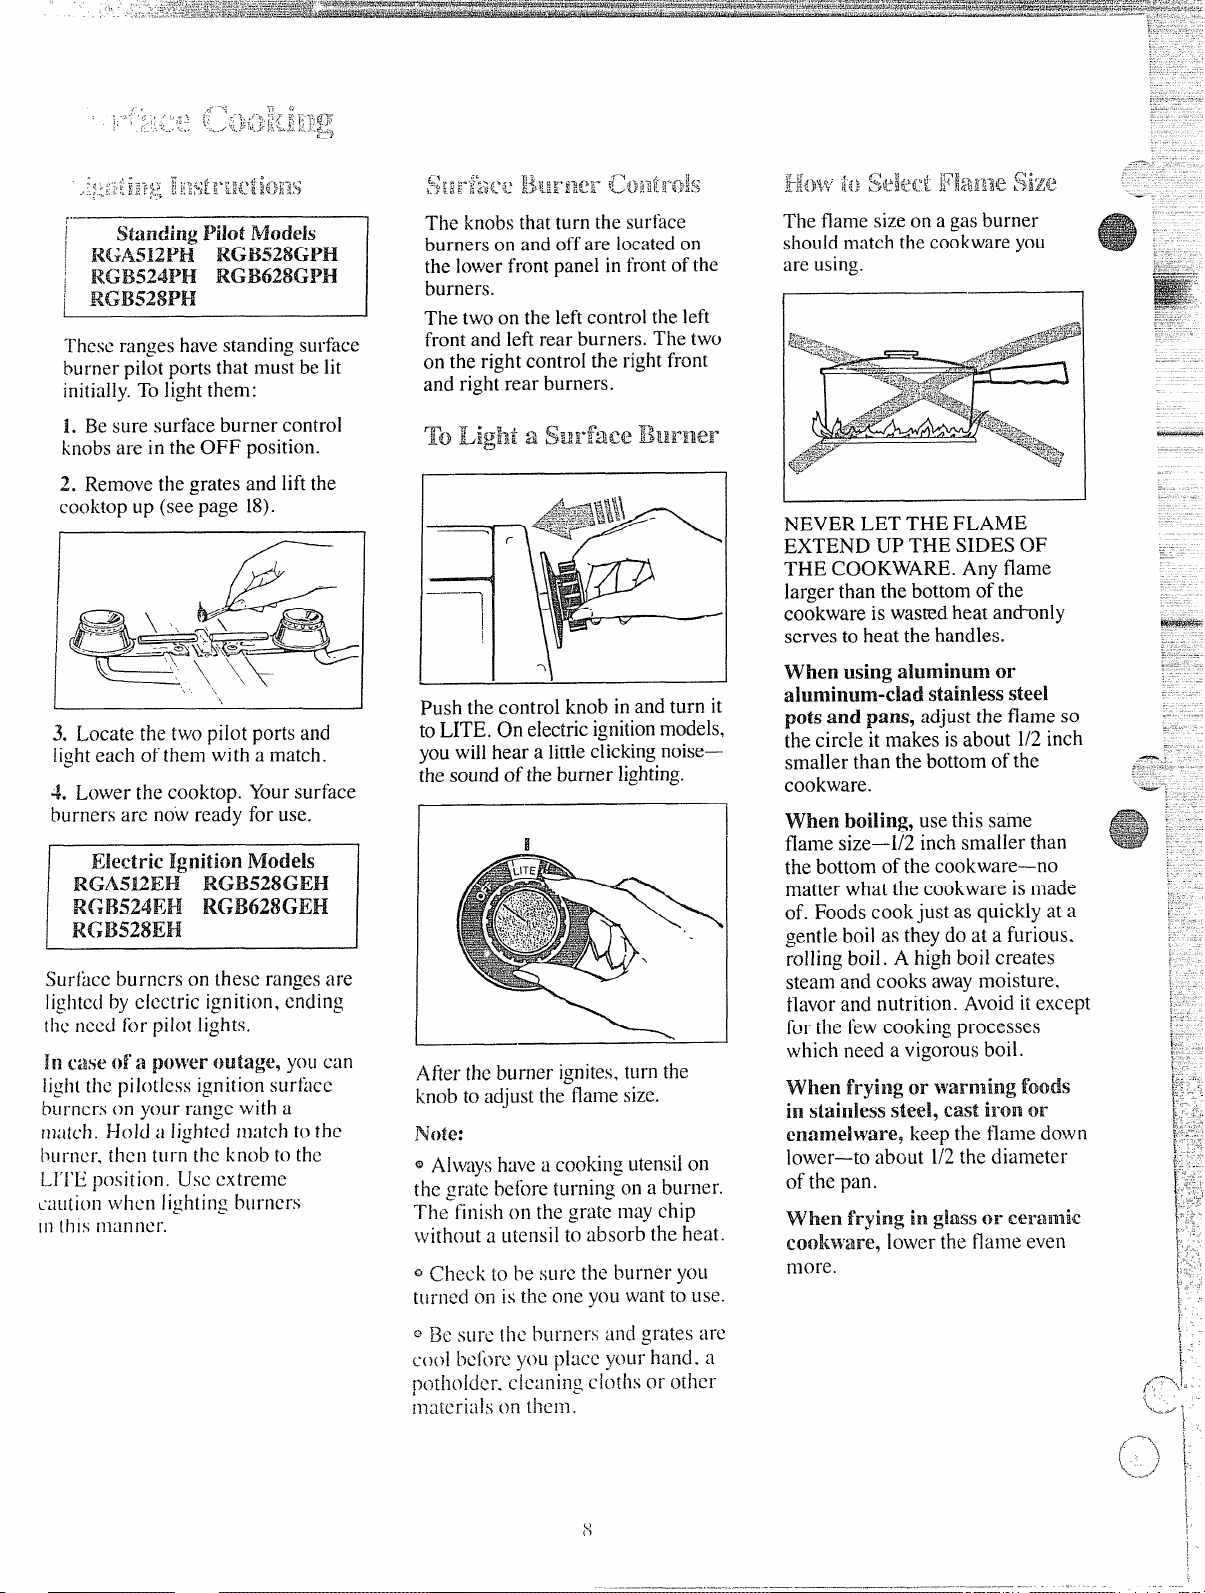
Theseranges havestandingsurface
burnerpilot portsthat mustbe lit
initially.Tolightthem:
1. Be sure surface burner control
knobs are in theOFF position.
2. Removethe grates and liftthe
cooktopup (seepage 18).
._@ , *&
.-.-.-.>
.
--r
.
*
L
3. Locate the two pilot ports and
light each of them with a match.
4. Lowerthe cooktop. Yoursurface
burners are nowready for use.
Electric Ignition Models
RGA512EH I?GB528GEH
RGB524EH RGB628GEH
RGB528EH
.Surfuccburners on these rangesare
lightedby electric ignition, ending
the nw.i for pilot ligh[s.
:11
Mse ofa power ot3tage9Y(Wcan
iight the pilotless ignition surface
burners on your range with a
ma{ch . Hold a hg}mxl match to ~hc
ilurncr,then (urn the knob to the
M’1’Uposition. Use extreme
~’au[ionwhen
iil {his nlanncr.
--,::.*
(“ ‘- ‘; \\\
Iightiil: btirnei-s
“1,\ -
\
‘,
The knobsthatturn the surface
burnerson andoff are locatedon
the lowerfront panel infrontofthe
burners.
The two on the leftcontrolthe left
frontand leftrear burners. The two
on the rightcontroIthe rightfront
and rightrear burners.
I
,
Push the control knob in and turn it
toLITE. On electricignitionmodels,
youwillhear a littleclickingnoisethesoundof theburner lighting.
After theburner ignites,ttirnthe
knobto adjustthe flamesize.
Note:
QAlwayshavea cook~ilgutensil on
the grate beftxe turning on a burner.
‘l%eilnish on the grate may chip
without a ulensil to absorb the heat.
Q
Check k) be stircthe burner yoti
mri~cdon is the one you wantto use.
The flamesizeon a gasburner
shouldmatchthecookwareyou
are using.
NEVER LET THE FLAME
EXTEND UP THE SIDES OF
THE COOKWARE.Any flame
largerthan the bottomOFthe
cookwareis wastedheat and-only
servesto heat the handles.
when
I
I
I
usingahlminml or
ahmim.m-;lad. stainlessski
pOtS tin~ ptms, adjustthe flame so
thecircle it makesisabout 1/2inch
smallerthan thebottomof the
cookware.
When boiling, use this same
flamesize—1/2inchsmal]erthan
thebottom ofthe cookware—no
matter what the cookwareis made
of. Foodscookjust as quickly at a
gentleboil as they do at a furious,
rollingboil. A highboil creates
steamand cooks awaymoisture,
flavorand nutrition. Avoidit except
forthe fewcookingprocesses
which need a vigorousboil.
‘Whenifrying or wamhg foods
in stainlessstee19cast km or
emmehum?~ keep the flame down
lower—toabout 1/2thediameter
of the pan.
When
CO010WNW9lowerthe flame even
more.
fryinginglassor ammic
~ Ek sure the ixiri~ers and grates arc
c(x)1 bck>re y(JLl place
]3(3tho[dcr. cicaniilg cloths or other
ina[ei-ialson them.
yotirhand. a
Page 9

-.,
.!’”
.- —
—.-..—-———
-;--; = Anairadjustrnen tshutterfo reach
.;
~a= surfaceburner regulatesthe flowof
W’henthe right amount ‘of-
t%wsinto
the hn-rm-,theflame
air
willbe steady,relativelyquietand
haveapproximately3/4”sharp blue
cones. This is usuallythecase with
factorypreset shuttersettings.
With too much air,the flamewill
be unsteady,possiblywon’tburn aH
the wayaround, and willbe noisy,
soundinglikea blowtorch.
With
notenough air,youwon’tsee
anysharp blue cones inthe flame,
youmaysee yellowtips, and soot
mayaccumulateon potsand pans.
Airadjustment shutter
I
1
lb adjlst the flow of
1
airto the
btmmws,rotatethe shuttersto
allowmore or less air intothe
burner tubes as needed.
Pilot
adjustment
\ >’Pilol filter
Jantfold
panel
\- ]/> Manifold
v
pipe
Al~minun~:Medium-weight
cookwareis recommendedbecause
itheatsquicklyandevenly.Most
foodsbrownevenlyinan aluminum
skillet.Mineralsin foodand water
willstainbut willnotharm
aluminum.A quickscourwith a
soap-filledsteel woolpad after ‘
eachusekeepsaluminumcookware
lookingshinynew.Use saucepans
with tight-fittinglidsfor cooking
with minimumamountsof water.
Cast Iron: If heatedslowly,most
skilletswillgivesatisfactoryresults.
Enamelware:Under some
conditions,the enamelof some
cookwaremaymeh.Followcookware
manufacturer’srecommendations
for cookingmethods.
Glass:There are twotypesof glass
utensils-those forovenuse only
and those fortop-of-rangecooking
I
(saucepans,coffeeand teapots).
Glass conductsheatvery slowly.
Heatproof’ Glass Ceramic Can
be used for either surfaceor oven
cooking. It conductsheat very
slowlyand coolsveryslowly.Check
cookwaremanufacturer’sdirections
tobesureitcanbeusedongasranges.
Stainless Steel: Thismetalalonehas
poorheatingproperties,andis usually
combined with copper, aluminum
or other metals for improvedheat
distribution. Combination metal
skilletsgenerally worksatisfactorily
if used at medium heat as the
manufacturer recommends.
The ClockandTimeron
yourrangeare helpful devices
that serveseveralpurposes.
Toset the Clock, push inthe knob
and turnthe clockhandsto the
righttothe correcttime. Thenlet
the knoboutand continue turning
to OFF.
Timer
The Timer has been c~mbinedwith
the rangeclock. Use it to time all
your precise cooking operations.
You’llrecognizetheTimer as the
pointerwhich isdifferent in color
than the clock hands.
Minutesare marked up to 60 on the
center ring of the clock.
To set& Timer, turn the knob to
the left, withoutpushing in, until
the pointer reaches the number of
minutesyou wantto time.
At the ed of
Lmzzersounds
up. Turn the knob, without pushing
in, until the pointer reaches OFF
and the buzzer stops.
thesettime,a
totenyou ‘timeis
..---%
,,
[
, .-
... . .. .—-=
If the pilot needs adjusting, simply
[urn [he adjusting screw located on
the piIot filter.
-’.
i
:..
. .
!,
Page 10

i
-i.=.
-.
—.
Eku.wk Ignition
i-wows
RGA512EH RGB528GEH
RGB524EH RGB628GEH
RG13528EH
Anair adjustmentshutterforthe
ovenburnerregulatestheflowofair
tothe flame. You’llfindtheshutter
againsttheback wall.
4
~.
[:
,.
?ilcsc rangeshavea standingoven
pilotport tha~mustbe litinitially.
Tblightit:
1. BesureOVEN TEMP knobis in
(heOFF position.
2. Removethebroilerdrawer.Todo
this,liftthe drawer slightlyuntilit
dislodges.Thengentlypullittoward
you and out of broiler compartment.
3. Locatethe pilotport on the side
ofthe burnerat thebackof theoven.
Usinga longmatchor matchholder,
reach in and lightthe ovenpilot.
4. Replacethe broiler compartment
drawerand closethe door. Youroven
;in(ibroiler are now ready foruse.
The ovenpiloton theserangesis
lightedby electricignition.
CAUHC)P+I:M FdOT ATTEMPT
TOOPERATETHEELECTRIC
IGNITIONOVENDURINGMN
ELmc& PmVE1-’tFmw.
Resumptionof electricalpower
when OVENTEMP controlis in
anypositionother thanOFF will
resultin automaticignitionofthe
ovenburner and couldcause severe
burns ifat thesame timeyou were
attemptingto lightthe burner with
a match.
Before USillg Yotlr oven
L Look at the OVEN TEMP
control. Be sure you understand
howto set it properly.
2. Check the insideof theoven.
Look at the shelves.Practice
removingand replacingthem while
theoven iscool.
3. Read the informationand tipson
the followingpages.
4. Keep this book handy where you
can refer to it—especiallyduring
the first few weeksof getting
acquainted with your oven.
Toadjust the flowof air,loosen
thePhillipshead screwand rotate
the shutterto allow more or lessair
intotheburner tubeas needed.
When the rightamountof air
flowsintothe burner,the flame
shouldbe steady,withapproximately
l-inch blue cones, and should not
extendout over the baffle edges.
T{) Light the Cl%WlllBUrKRer
Turnthe OVENTEMP knobto the
desiredtempemture.The burner
shouldignitewithin60 seconds.On
electric ignition models, you will
hear a little clicking noiseas the
burner ignites.
10
Page 11

-. W&i
—-
—.. -..”.----——.——... “--,
... .— .-—.— . —. .
.’
—
panelon thefrontofthe range.
Theovenhas fourshelf supports—
A (bottom),B, C andD (top).Shelf
positionsfor cookingare suggested
on BakingandRoastingpages.
CwtmIL@lt
(on KmMk4ssoeq@3ped)
Standingpilotmodels
Electricignitionmodels
Simplyturn the knob to thedesired
cookingtemperatures, which are
marked in 25°F. incrementson the
tiial. It will normally take 30to 60
secondsbefore the flame comes on.
After the oven reaches the selcctcd
temperature, the ovenburner cycles
offcompletely, then on with u full
Ihnc to keep the oven temperature
controlled.
The shelves are designedwith stopIockssowhenplacedcorrectlyonthe
shelfsupports,they willstopbefore
comingcompletelyoutoftheovenand
willnottiltwhen youare removing
foodor placingfoodon them.
Whenplacingcookwareon a shelf,
pulltheshelf outto the “stop”
position.Place thecookwareon
theshelf, thenslidethe shelfback
intothe oven. Thiswill eliminate
reachingintothehot oven.
Toremovethe shelvesfrom the
oven,pullthem towardyou, tilt
frontend upwardand pullthemout.
Toreplace,placeshelfon shelf
supportwith stop-locks(curved
extensionundershelf)facingdown
andtowardrear of oven.Tiltup
frontand push shelftowardback of
ovenuntilitgoespast “stop” on
ovenwall. Then lowerfrontof shelf
andpush it aHthe wayback.
Use theswitchonthe control panel
toturn the lightonandoff.
Chmvent
Yourovenis ventedthrougha duct
atthe rear ofthe range.Do not
block theopeningofthis duct—itis
importantthat theflowofair to the
ovenburner be uninterrupted.
11
(,
Page 12

,,
,
,“-[:-
. ~. . . ....
.. 4
L Positiontheshelfor shelvesin
theoven.
2. Closeovendoor, turn OVEN
TEMP knobto desired temperature
and preheatovenforabout 10
minutes if preheating is necessary.
3. Place food in ovenon center of
shelf. AHOWat least 1or 2 inches
betweenedgeof bakewareandoven
wallor adjacentutensils.
If cookingon two shelvesatthe
sametime, place shelvesabout4
inchesapart and staggerfoodon
them.
4. Check foodfor donenessat
minimumtime on recipe. Cook
longerif necessary. Switchoff
heat and removefood.
Preheating is importzmtwhenusing
ternpemturesbelow225”F.and
when baking foodssuch as biscuits,
cookies, cakes and other pastries.
Preheating is not necessary when
roastingor long-timecooking
whole meals.
Most baking is done cmthe second
shelf (B) position from the bottom.
When baking three or four items,
use two shelvespositioned on the
second and fourth sets of supports
(B& D) from bottom of oven.
Bakeangel foodcakes on first shelf
position (A) from bottom of oven.
: Follow a tested recipe and
measure the
ingredients carefully.
lfyou am using a package mix,
fbllowMc} directions.
~ If moisFLIrc is nOti(Xd3]e on the
front of
theovenwhen firstturning
on theoven, leavethe ovendoor
ajar fora fewminutes or untilthe
ovenis warm.
@Do notopenthe ovendoorduring
a baking operation—heatwiHbe
lostand thebakingtime mightneed
to beextended. Thiscouldcause
poor bakingresults.
@Do notdisturb theheat
circulationin theovenwiththeuse
ofaluminumfoil. If foilis used,
placea smallsheetof it, about 10
by 12inchesat themost, on a lower
shelfseveralinchesbelowthe food.
Do not placefoilon theoven
bottom.
~cmmmlliI13alih
‘g ppQb\tfmls
ad. Pixwibksolutions
PIES
Burning around edges
@Oventoo full;avoidovercrowding.
~Edgesof crust too thin.
~Incorrect bakingtemperature.
Bottom crust soggy and unbaked
~Allowcrust and/or fillingtocool
sufficientlybeforefilling pie shell.
~ Fillingmay be too thin orjuicy.
@Fillingallowedtostand inpieshel
beforebaking. (Fill pie shellsand
bake immediately.)
@Ingredientsand proper measuring
affect the quality ofthe crust. Use a
tested recipe and good technique.
Make sure there are no tiny holesor
tears in a bottomcrust.
a pie crust could cause soaking.
Pie filling runs over
~
Top andbott~nlcrust not We]l
sealed together.
o Edges of pie crust not built up
enough.
high
~Too much illling.
QCheck
Pam-y’ is tough; crust not flaky
o T(IO much
size of pie plate.
handling.
~Fat too soft or cut in too fine.
Rolldough iight[yand handle as
little as possible.
“Pdtching”
QUsingw~rpedpans.
@Incorrectpan size.
Cakescrackingon top
@Checkoventemperature.
@Battertoo thick, followrecipe
or exactpackagedirections.
@JCheckfor proper shelfposition.
~Checkpan size calledforinrecipe.
~Impropermixingof cake.
Cakefalls
~Toomuch shortening,sugaror
liquid.
@Check leaveningagent, baking
powderor bakingsodato assure
freshness.Makea habit to note
expirationdatesof packaged
ingredients.
* Cakenot baked longenoughor at
correct temperature.
@If adding oilto a cake mix, make
certain theoil isthetype and
amountspecified.
Crustis hard.
@Check temperature.
@Check shelf position.
Cakehassoggy layeror
bottom
Undermining ingredients.
s
streaks at
@Shorteningtoo softfor proper
creaming.
~Toomuch liquid.
COOKIES & BIscuIm
Doughy center; heavy ‘cruston
surface
o Check temperature.
@Check shelf position.
@Followbaking instructions
carefully as given in reliable recipe
or on conveniencefood package.
s Flat cookie sheetswil] give nK)re
evenbakingresults.Don’t-overcrowd
foodson a baking sheet.
QConveniencefoods used
their expiration date.
BNWming more noticeable on
one side
Q(Mm door not closwi
check gasket seal.
Q Check shelf position.
beyond
properly,
.-.
[p ~.
:,.
‘.
..—-.
... ‘“
.
-%>
f
1
i
f.<J }
.
~
~’
-.”, ‘
]
I
!
I
Page 13

.._.
,,;
2. Dark or non-shiny finishes, also glass and pyroccram,
becouse they help prmrcnt over-browning in the [irne it takes for
heat to cook the
center areas. We recommend ~uj j (satin-finish)
bottom suif~ces of pans !br cake pans and pie plates to be sure
those areas brown completely.
generally absorb heat which may result in dry, crisp crusts.
Reduce oven heat 2.5°F.if iigi~tercrusts are desired. Preheat
cast iron for baking some foods for rapi(i browning when food
is added.
F(d
Brexi
Biscui[s(Y,-in.thick)
F
cot-feeCake
I
Corn breador muf~ins
Gingerbread
Muffins
Popovers
Quickloafbread
Yeastbread(2 loaves)
Plainrolls
3WCC(rolls
:Ukes
witboulshortening)
Ingcl hod
elly roll
;ponflc
:dws
Iundtcirkcs
‘Upctikcs
ruit cdws
ayer
aycr,choc(datc
xlf
Cookware
ShinyCookieShce?
ShinyMetalPanwith
I sati;-firrishbottom
CastIron or GlassPan
ShinyMetalPanwith
s:itin-fjnishbotton~
ShinyMetalhfuffinPans
DeepGlassor Cast Iron Cups
Mettilor Glass Lo~fPans
Metalor GlassLoafPans
ShinyOblongor Muffin Pans
ShinyOblongor Muffin Pans
AluminumTubePan
MetalJelly RollPan
Metalor CeramicPan
Metalor Ceramic Pan
ShinyMetalMuffin Pans
Metalor GlassLoafor
rube Pan
;hiny Metal Pa,lwith
,at;n-finishbottom
;hinyMetal Panwith
atin-fraishbottom
dctal or GliIssLoaf Pans
Shelf
Positions
B.C
B
B
B
B
B
B
B
B
B
A
B
A
B
B
B
B
B
B
own
Temperatures
400°-4750 10-20
350°-4000
400°-4500
350°
400°-4250
3750
3500-3750
375°-4?50
375°-4250
350°-3750
325°-3750
375°-4000
325°-3500
325°-3500
350°-3750
275°-3000
350°-3750
350°-3750
350°
Minutes
~_4hrs.
Time,
Z()30
20-40
45-55
20-30
45-60
45-60
45-60
10-25
20-30
30-55
10-15
45-60
30-65
~()_~5
20-35
25-30
40-60
Canned, refrigeratedbiscuitstake2 to4
minuteslesstime.
Preheat panforcrispcrust.
Decreaseabout5 minutesformuffinmix.
Or bake at 450°F.for25 rnimitcs,thenat
350”F.for 10to 15minutes.
Dark metal or glassgivesdeepest
browning.
For thin rolls. Shelf B may be used.
Forthin rolls. Shelf B may bc used.
Two-piecepan is convenient.
Line pan withwaxedpaper.
PaperIiners produce more moist crusts.
Use 300°F.andShelfBfor small or
individualcakes.
-.
‘1
j
..-“-’ -.,
,, !
uits,
hel”I)ess(!l”ts
w applc!l
stard
k{ings. rice
i custard
s
Zcll
ringuc
OIICL’rus[
I-U’()L’1“11s[
P;istry51u211
I
GiiIssCustardCups or
Casscr(>lc(set inpanof hotWillcr)
Glass Cus[ard Cups or B
Casserole
FoilI}iinon C(xlkic Sheet
Simad m crust edges B,A
Glass [r Sa[in-linish Nflctal
GI:ISSor Satin-finish Me[al
Glass ~lr%tin-linlsh Metal B
Seton()\’C’nShtlf
GJ:ISSor I$lcta!
Gloss
A. B. C
,’\, [3,c
B, C
B, C
B, C
B, C
B
Et
B
B
B
3’77”-J500
350°-4000
400°-4250
375”-400°
3500-4000
300”-350”
325°
400”-425°
~~5°-~500 ,
400°-4250
400”-425”
450”
y)’jo-~()(]o
. -.
-+750_3750
. . . . .
300@-3500°
1
25-35
10-20
6-12
7-12
30-60
30-60
50-90
4’5-70
15-25
45-60
40-60
12-15
60-90
30-60
30-75
Bar cookies from mixusc sametime.
UsCShelf C iindincrei~sctemperature
25 to 50CF.formorebrowning.
Rcducctcnlpcrilturc10300°F.for large
custard.
Cook bread or rice puddingwith custard
base 80 to 90 minutes.
Large pies use 400°F.and increasetime.
Toquickly brownmeringue usc4041”F.for
8 to 10minu[es.
Custard lilIings require lowertemperature,
Iongcr time.
Incrwsc tinlc for Iargcamount or size.
Page 14

Roas[ingiscookingbydry heat.
“~cndcrmeator poultry canbe
roasteduncoveredinyouroven.
Roastingtemperatures,which
shouldbe lowand steady,keep
spatteringto a minimum. When
roasting,itis not necessaryto sear,
baste,cover,or add watertoyour
meat. Roastingiseasy,just follow
thesesteps:
Step 1. Position ovenshelfat
secondfrom bottompositionfor
smallsizeroast(3 to5 lbs.)and at
bottompositionfor larger roasts.
Step 2: Check weightofroast.
Placemeat fat-side-upor poultry
breast-side-upon roastingrack in a
shallowpan. The meltingfatwill
bastethe meat.
Selecta pan as closeto thesizeof
meatas possible.(Broilerpanwith
rack isa good panfor this.)
Step 3: Turn OVENTEMP control
todesiredtemperature. Check the
RoastingChart for temperatures
andapproximatecookingtimes.
Step 4: Mostmeatscontinueto
cook slightlywhilestandingafter
beingremovedfrom the oven.For
rare or medium internaldoneness,
ifmeat is to stand 10to20 minutes
whilemakinggravyor foreasier
carving,youmaywish to remove
meatfromovenj:st beforeitis
done. If no standingis planned,
cookmeattosuggestedtemperature.
Frozenroastsofbeef, pork, lamb,
etc., canbestartedwithoutthawing,
butallow10to25minutesper pound
additionaltime (10minutesper
poundforroastsunder 5 pounds,
moretime for largerroasts).
Thawmost frozenpoultry before
roastingto ensureevendoneness.
Somecommercialfrozenpoultry
can be cookedsuccessfullywithout
thawing.Followdirectionsgiven
on packer’slabel.
Type
Beef
Pork(Fresh)
Fresh Ham. Whole (10 m 14Ibs.)
Loin
Rib
sh~mldcr,Bull
Sh(ntldcr.Picnic
Chicken*
2 ‘/z[o3 ‘/Jlb>,
3x to4‘/?lb>.
l!ii~ll(Snl(Awl-Miki Cure)
[’lidcr 10Ilw.
10[() 12Ibh.
12to Is tbs.
15 Itw.and over
H;lll”Hall}(5to HIbs.)
Picnic Shtwklcr
(’[)[lil~~Roll
OvenTemperature
325°
325°
325°
325’
3~5”
3~5”
325°
3?5°
325°
325°
325”
3?5°
325°
325°
325°
325°
Doneness
Rare
Medium
Well Done
Rare
Medium
Well Done
Well Done
Well Done
Well Done
Well Done
Well Done
Well Done
Well Dorw
Weli Done
Well Done
We]IDone
Well Done
Well Done
Well Done
Well Done
Weli Done
Well Done
Well Done
Well Done
Well Done
WelI Done
I Approx. RoastingTime(MinutesperPound) I
~tO5 lbs. 6 to8 Ibs.
20-25
25-30
30-35
30-35
35-40
40-45
35-40
35-40
50-56
40
35-40
ltito2%hrs.
2U to 31Ahrs.
25-27
23-25
21-23
~o
25-29
30-35
35-40
2t03hrs.
3to4 hrs.
4 to 5 hrs.
5 to 6 hrs.
6 to 7 hrs.
2% to 3 hrs.
15-20
20-25
25-30
25-30
30-35
35-40
35
35
35-40
I
Well Done
~Y~to3 hrs.--
Page 15

-j
has a speciallydesignedb~oilerpan
and rackthat allowdrippingfatto
drtiinawayfrom the foodsand be
kept awayfrom the high heatof
the
@ t~zim~.
Distancefrom[heheat sourcemay
bechangedbypositioningthebroiler
panand-reckon one ofthree shelf
positionsinthebroilercompartment—
A (bottomof broilercompartment),
B (middle)and C (top).
H(FWtoERM
1. If meathas fator gristle near the
edge,cut ver[ica]slashes[hroughit
about2 inchesapart, butdon’tcut
intorncat. Werecommendthatyou
trimfat10preventexcessivesmoking,
leavinga layerabout l/8-inchthick.
2. Removebroilerpan and rack
frombroiler compartment and
place foodon rack.
3. Pull out drawerand position
broilerpan in compartment.
Placingfoodcloser to ffame
increasesexterior browningof
food, but also increases spattering
and the possibilityof fhtsand meat
juicesigniting.
4. C1OSCbroiler door and, for most
foods.turn OVEN TEMP knobto
BROIL. Exceptionsare chicken
and ham which arc broiled tita
lowersetting in order to cook food
through bcibrc over-browningit.
5. l’urn most fbodsonce during
cw{king:(theexceptionis thinfillets
~Jffish; oil one si(ie,place thatside
downonlx-oilerrackandcookwithout
turning uniil done). Time fbodsfor
dhouione-half’the total cooking
time, turn hod, then continue [0
cook to pref’cr-r-eddoneness.
& “hrn OVEN TEMP knobto
UFF’.Removebroiler pan from
:x)mpartmcnt, using hot pad, ancl
serve iiwd iinnmdiakly. Leavepan
(N!wid(?Compal”mcnito CW}i.
.=4.:{;7 ~- ,$
g>
S-Ji<.B&)iiilg ‘rips
@!&oilillgisusuallydone withoven
and broiler doorsclosed. However,
ifyoulikeyoursteaksveryrare
insideand charred on the outside,
@
use tongstoturnmeatow.?r—
piercingmeat losesjuices.
~steaks and Chopsshouldbe at
least l-inch thick for bestbroiling
results.Panbroilthinnerones.
leavethe ovendoor slightly ajar.
Quantity W Side 2nd Side
Food
GroundBeef
.MediurnRare
Medium
WellDone
BeefSteaks
Rare
Medium
WellDone
Rare
Medium
WellDone
Chicken(450°) Reducetimesabout5 to 10
BakeryProducts
Bread(Toast)or
ToasterPastries
~ng]ishMuffins
Lobster tails
(6to 8-oz. each)
Fish l-lb. fillets %to A 5 5
Hum slices (450°)
Precooked
Pork chops
WellDone
chops
Lamb
Medium
WellDone
Medium
WellDone
andlor Broil Time, Time,
Thickness Position Minutes Minutes
M-1b.(about8
thinslices)
l-lb. (4patties)
%to %-in. thick
l-in. thick
(1-l filbs. )
lYi-in.thick
(Z-27, ]bs.)
1whole A
(2t02M-lbs. ),
split lengthwise
Z-4slices
pkg. (2)
1
2-split B 2-3
2-4
Y~-in.thick
l-in. thick B 8 8
!(Yzin.) A 10 4-5
!(1-in.thick),
[bout1lb.
!(1 in,) B
bout 10-12
(lYzin.),
] about 1 lb. B 17
OZ. B
B 3% 3%
A 6-8
A 6-5 4-6
7-1o
A
A 6 3-5
A
A 9 6-7
A 8
A 9 8-10
A 11 8-12
B
A 10-14 Do not
1A 13
B
7 4-5
30-35
I,j-~
8
I
10 10
10 4-6
I
5
6-7
4-6
25-30
‘/2
turn
over.
10-12
4-7
12-14
Comments
Arrangeinsinglelayer.
Spaceevenly.Upto8patties
take about the sametime.
Steaks lessthan 1 inchcook
through beforebrowning.
Panfrying is recommended.
Trim offexcessfat.
minutesper side for cut-up
chicken. Brush eachside with
meltedbutter. Broilwith skin
sidedown first andbroil with
door closed.
Spaceevenly.PlaceEnglish
muffinscut-side-up and brush
withbutter, if desired.
Cutthroughbackof sheli,spread
open. Brushwithmeltedbutter
beforeand after half time.
Handle andturn verycarefully.
Brush with lemonbutter before
andduring cooking, ifdesired.
Preheat broiler to increase
browning.
Increasetimes 5 to 10minutes
per side for i%-inch thick or
homecured.
Trim off excess fat.
Trim off excess fat.
Ifdesired. split sausages in htiif
lengthwiseinto5 to6-inchpieces.
-.
Page 16

Propercare andcleaningare
‘--
c“)
important so your rangewillgive
youefficientand satisfactory
service.Followthesedirections
carefullyin caringfor itto help
assuresafeandpropermaintenance,
BE SURE ELECTIRIC POWER
ISOFF BEVOW CLEANING
ANYPARTOF YOU? RANGE.
Specialicare!of
$:oEntinERom=cIeaniing
ownM.el-ior
(MocWIWB628GH-1, KXM28GH-9
‘l%ese
models!&wea CoMmms-
Ckaning oventhatdeans itself’
whik cooking.The insideof the
oven—top,bottom, sides, back and
insideof thedoor—isfinishedwith
aspecial coatingwhich cannotbe
cleanedin theusualmannerwith
soap,detergents,steel woolpads,
commercialovencleaners, coarse
abrasivepads or coarse brushes.
Their useand/or the use ofoven
sprayswillcausepermanentdamage.
The special mating is a porous
ceramicmaterkd which is da~kin
color and feelsslightlyroughto the
touch. If magnified, the surface
wouldappear as peaks, valleys,and
sub-surface “tunne]s~’This rough
finishtendsto preventgrease
spatters;rom forming littlebeads
or droplets which run down the
sidewalls of a hard-surface oven
liner leavingunsightly streaksthat
require hamicleaning. Instead,
when spatter hitsthe porous finish
it isdispersed and ispartially
absorbed. This spreading action
increasesthe exposure of oven
soilto heated air, and makes it
somewhat less noticeable.
specialcoatingworks best on
‘me
small
.mmmts ofspatter.Itdoes
notworkwellwith largerspills,
especiallysugars,eggor dairy
mixtures.
The speciaicoatingis not used
onovenshelves.Shelvesshouldbe
cleanedoutsidetheown to avoid
damagetothe specialcoating
insidethe oven.
TOclean the
contiR2Mous”cleaRling
Q1’y@~:
1. Let range partscoolbefore
handling.It is recommendedthat
rubber gloves be worn when
cleaningrange parts.
2. Removeshelvesand cookware.
3. Soilvisibilitymaybe reduced by
operatingthe ovenat 400°F.Close
thedoor and turn OVEN TEMP
knobto 400°F.Timefor at least 4
hours. Repeatedcyclesmay be
necessary beforeimprovementin
appearance is apparent.
EWMEMBER:IXJRINGTHE
OPERATIONOFTHEOVEN,THE
DOOR,WINDOW
RANGESURFACESWILLGETH~
ENOUGHTOCAUSEBURNS.DONOT
TOUCH.LETTHE RANGECOOL
BEFOREREPLACINGOVENSHELVES.
AND OTHER
4. If a spilloveror heavysoiling
occursonthe poroussurface, as
soonaspracticalafterthe ovenhas
cooled, removeas much ofthe soil
aspossibleusinga smallamountof
waterand a stiffbristle nylon
brush..When usingwater,use it
sparinglyand changeit frequently,
keepingit as cleanas possible,and
be sureto blotit upwith paper
towels,cloths,or sponges. Do not
rubor scrubwithpaper towels,
clothsor sponges,sincethey will
leaveunsightlylinton the oven
finish.If water leaves a whitering
on the finishas itdries, apply water
againandblot
sponge,startingat the edgeof the
ring and workingtowardthe center.
Do not Usesoap, detergent, steel
woolpads+Comemial oven‘eIeaner,
siliconeoven sprays,coarse pads
or coarsebrushes on the porous
surface. These productswill spot,
clog, and mar the porous surface
and reduce itsabilityto work.
Rlonot
with a !iaMe w=
could permanentlydamage the
finish.
itwith a clean
sin-ape the porcw swfaw
spatula—they
soil may Rot disappear coDlpReteiy
and at some time after extended
usage, stains mayappear which
cannot bc removed.
{-”
w;
\
.._.’
.
Page 17

insideof the oven—top,bottom,
>
-—.————-—.....-. ..-——— -
sides.backand insideofthe
door—isessentiallyglass fused on
steelat hightemperature.With
propercare, theporcelainenamel
interiorwill retainits good-looking
finishfor manyyears.
Let rangecool beforecleaning.We
recommendthatyouwear rubber
gloveswhen cleaningtherange.
Soapand waterwillnormally
do thejob. I-Ieavyspatteringor
spilloversmayrequire cleaning
witha mild abrasivecleanser.
Soapy,wet metalpads mayalso be
used. Do notallowfood spillswith
a highsugar or acid content(such
as milk, tomatoes, sauerkraut, fruit
juices or pie filling)to remain on
the surface. They maycause a dull
spotevenafter cleaning.
.. .
Elouseholdammonia maymake the
cleaningjob easier. Place 1/2
.-“
a shallo-w-glass or pottery contai;er
in a cold ovenovernight.The
ammoniafumes will help loosen
the burned-on grease and food.
If necessary,you may use a caustic
cleaner. Followthe package
directions.
cupin
‘cautionsabout Rnsil-lg
spray-on ovencleaners:
Becarefulwherethe ovencleaner
issprayed.
@B@not sprayon theelectrical
controlsand switches(on modelsso
equipped)becauseit couldcausea
shortcircuitand resultin sparking
or fire.
~IIJonot allowa fihn fromthe
cleanertobuilduponthetemperature
sensingbulb—itcouldcausethe
oventoheat improperly.(Thebulb
islocatedat the topofthe oven.)
Carefullywipethe bulbclean after
each ovencleaning,beingcareful
notto movethe bulbas a change
in itspositioncouldaffecthow
the ovenbakes.
~W not spray anyovencleaner
on the ovendoor, handlesor any
exteriorsurfaceoftheoven,wood
or paintedsurfaces. The cleaner
can damagethese surfaces.
‘lbreplace the door9positionslots
inbottom of door overthe hinges
thatareinthe “out” position.Then
lowerthedoor slowlyand evenly
overbothhinges at the sametime. If
thehingesare not“out:’simplypull
thehingesto theopenpositionto
replacethe door.
..-
/cotllllllld Ilfa.f pm)
E.>’;> ~
!-
. .
i
Page 18

t~$’i.~a~lS?hClyw
I I
Toremove the ovenbottom:
Liftthefrontedgeoftheoven
bottomuntilitisclear oftheoven
frontframe. Then pullitforward
andoutoftheoven.
Ovenshelvesmaybe-cleanedwith
a mildabrasivecleanserfollowing
manufacturer’sdirections.After
cleaning,rinsetheshelveswithclean
wateranddry with adry cloth. To
removeheavy,burned-onsoil, soapy
metalpadsmaybe usedfollowing
manufacturer’sdirections.After
scrubbing,washwith soapywater,
rinseand dry.
control E%.tnel
R’sa goodidea to wipe thecontrol
panelclean after each use ofthe
oven.Fora more thoroughcleaning,
theknobs can be removedbypulling
themoffthe knob stems. Clean
with mildsoap and water, rinse
with clean waterand polishdry
with a softcloth.
Do notuse abrasivecleansers,
strongliquid cleanersor oven
cleanerson the controlpanel as
they will damagethe finish.
Whentherange iscool, washthe
enamelfinishwithmild soapand
wateror a mildabrasive cleanser
appliedwith a dampcloth. Rinse
thesurfacewith cleanwaterand
dry with a softcloth.If youwish,
occasionallyapplya thin coatof
mildcleaningwaxto help protect
thefinish.
There are a numberof precautions
youcan taketo avoidmarringthe
surfaceof the rangeand to prevent
itfrombecomingdull. Don’tslide
heavypans acrossit. If youspill
foodswith a lotofacid (tomatoes,
sauerkraut, fruitjuices, etc.) or
foodswith high sugarcontent,
cleanthem up assoon as possible.
If allowedto set, these foodscould
causea duHspot. Also, nomatter
howstubbornthe foodstain, never
useharsh abrasivecleansers. They
couldpermanently damagethe
enamelsurface.
Toreplace the mm bottom:
Placeovenbottomintoovenwith
rearedge liftedhighenoughtoallow
themetal brace onthe undersideof
theovenbottomtodrop behindthe
ovenfront frame. Then gent~ylower
the rear oftheovenbottominto place.
To
protectthe oven bottom from
.@owm, placea pieceofaluminum
foil slightly larger than thebaking
dishor a small cookiesheet ona
lowershelf under thebaking dishto
catchany boilovers.It shouldnot
completelycoverthe shelfas this
wouldcause unevenheat in the
oven.
Ilo not place aluminum foilon the
ovenbottom.
Page 19

Washthemin hot, soa~ywaterand
————
rinsewith clean water.Dry the
grateswitha cloth-—don’tputthem
backon the rangewet. When
replacingthe grates, be surethey’re
lockedintopositicmoverthe burners.
Togetrid ofburned-onfood, soak
thegratesin a slightly diluted
liquidcleanser.
Althoughthey’redurable, the
grateswillgradually losetheir
shine, regardlessofthe care you
takeofthem. This is dueto their
exposureto hightemperatures.
Topreserve thegrates’porcelain
finishas longas possible,havea
pan on thegrate beforeyouturn on
theburner,andlowertheflamewhen
foodreachesthedesiredtemperature.
YJ~~~fi‘n=-,-jJ
:- i. .-..>.13J/
(on&deIs soequipped)
Removethe grates and liftout the
chrome drip pans. Washthemin
hot, soapy water.Rinse them with
clean,hot waterand polishthemdry
with a cloth. Never use abrasive
cleaneror steel wool-they ’11scratch
the surface. Instead, soakthe drip
pansfor about20 minutes in slightly
diluted liquidcleanser or mild
so~utionof ammonia and water (1/2
cup of ammonia to one gallon of
water). After soaking, washthem
in hot, soapy water. Rinse with
clean wate;_andpolish with a cloth.
Cleanthearea underthe cooktop
often. Built-upsoil,especially -
grease,maycatchtire.-
I
Tomakecleaningeasier, the
cooktopmaybe liftedup and held
up bya supportrod that’sstored
underthe cooktop.
Be
sureall burnersare turned
off beforeraisingthe coddop.
Then removethe grates, grasp the
frontsides ofthe cooktopandlift.
After cleaningunderthe cooktop
with hot, mild, soapywaterand a
cIeancloth, return the support rod
to itsdownpositionand lowerthe
cooktop.Be carefulnot to pinch
your fingers.
Theholesin theburnersofyour
rangemustbe keptclean at all
timesfor properignitionand an
even,unhamperedflame.
Youshouldcleantheburners
routinelyand especiallyafterbad
spilloverswhichcouldclogthese
holes.Burnersliftright outfor
cleaning.
Note: A screw holdseach ofthe
burners in placeto keepthem from
wobblingaroundduring shipment.
Removethe shippingscrew with a
Phillipshead screwdriver,liftthe
burner, tilt it to one side atthe end
closestto the igniter and moveit
towardthe back ofthe range. This
disengages it from the gas valveat
the frontof the range, and it lifts
outeasily.
Toremoveburned-on food, soak
theburner in a solutionof a product
usedforcleaningtheinsideofcoffke
makers. Soak theburner for 20 to
30 minutes. If the fooddoesn’t
rinse off completely,scrub it with
soap and water or a mild abrasive
cleanser and a damp cloth.
Beforeputting the burner back, dry
it thoroughlyby setting it in a warm
ovenfor 30 minutes. Then place it
back in the range, making sure it is
properly seated and level.
,“
;,
Page 20

..
.-.
--
v
f~p
:;”<; ~ ~.~w*
-.
~
After broiling, renxxe thebroiler
rack and carefully
~~reosc.Washand rinse thepan
~-
p~a~-j,&
.
>~?,
L%.ac!1
pour offthe
an(irack in hot. soapywater.
If foodhas burnedon, sprinkle
~hebroilerrack while hotwith
detergentand coverwith wetpaper
towelsor a dish cloth. That way,
burned-onfoodswill soakloose
whilethe meal is beingserved.
Do notstorea soiledbroilerpan
and rack in theovenor broiler
compartment.
40W?nLigM BllIb
R.@aeer12el’it
{onmodelssoequipped)
The lightbulb islocated inthe
upperright
corner of the oven-
Beforereplacing the bulb.
disconnect eIectric power to the
range at the main fuse or circuit
breaker panel. Let the bulb cool
completely before removing it.
not
touch a hot bulb with a damp
cloth as the bulb will break.
Replace with a high temperature
appliance bulb of the same wattage.
Do
If yoususpectyouroven
temperaturedoes notcoincide
withthe temperatureseton the
CJVENTEMP control, use a
highqualitythermocoupletype
thermometerto check theoven
temperature.
Todetermine ifthe thermostat
settingiscorrect, placethe
thermometerthermocouple in the
center ofan ovenshelflocatedin
the centerof the ovenor on the
shelfsupports nearesttothe center
ofthe oven.
Turn theOVEN TEMP knob to
350°F.and allowtheovento heat
up for at least 20 minutes, After
the rangehas been on, watchthe
thermometer. When the burner
cycleson, the temperature may rise
to 375‘F. When it cycles off, it may
drop to 325”F,Addthe 375and 325
for a totalof 700°F. then divide by2
to gain the averagetemperature
which inthis case is350”F., and is
correct. Alwaysadd the high and
lowtemperatures and divide by 2 to
obtainthe final oventemperature.
If the averagetemperature is25°F.
more or less than the set dial
temperature, the thermostat should
be adjusted.
To
adjust, leave the OVEN TEMP
knob set for 350°F.Removet-he
knob, being careful notto movethe
thermostat shaft. Holdthe shaft
with a pair of pliers and insert a
small, flat blade screwdriver into
the center of the shaft to engagethe
adjustment screw. Turn the screw
approximately l/8-inch for a 25”F.
change. Turn the screw left
(counterclockwise) to raise the
temperature
to lower the temperature.
and right (clockwise)
F
-
Page 21

PART
Broiler ‘i% andRack
ControlKnobs:
RangeTopand (hen
OutsideGlass Finish
MATERMLS TO USE
Soapand Water
~
~ Soap-FilledScouringPad
~ Plastic ScouringPad
QMildSoap and Water Pulloff knobs.Washgentlybut do not soak. Dry and return controls to range,
e Soapand Water
GENERAL DRECYHONS
Drain
fat, cool pan and rack slightly.(Do not let soiled pan and rack stand in
broilercornpa]lmentto cool.) Sprinkleondetergent. Fill panwithwarm water
andspreadclothor paper toweloverrack, Let pan and rack standfor a few
minutes,Wash;scour if necessary.Rinseanddry. OIYHON:Cleanpan and rack
indishwasher.
makingsure to match flatarea on knoband shaft.
Cleanoutsideofcooled blackglass door witha glass cleaner that does not
containammonia Washother glass with cloth dampened in soapywater.Rinse
Metal, including
SideTrimsand
TrimShips
OuterEnamel
Finish*
Shelves e Soap and Water
SurfaceBurner
Grates
Chrome-Plated
DripPans
Burners ~Solutionfor Cleaning
{JSE
FOLLOWINGDIRECTIONSYORSTANDARDPORCELAINENAMELOVENONLY.See page 16for Continuow+Cleaningoven.
~ Soapand Water
~ PaperTowel
QDry Cloth
~ SoapandWater
~ Soapand Water
~ Soap-FilledScouringPad
@PlasticScouring Fad
~Soapand Water
e Soap-FilledScouringPad
(Non-metallic>
~ Soap and Water
@Stiff-BristledBrush
@Soap-FilledScouringPad
(Non-metallic)
Insideof Coffee Makers
@Soap and Water
@MildAbrasive Cleanser
~Damp Cloth
b=---
Wash,rinse andthen polish with a dry cloth. DO I’4~ USE steel wool,
abrasives, ammonia, acids, or commercial oven cleaners whichmay damage
the finish.
Avoidcleaningpowdersor harsh abrasives which mayscratch the enamel.
If acids shouldspill on the rangewhile it is hot, use a dry paper towel or cloth
to wipeup right away.When the surface has cooled, wash and rinse.
Forother spills, suchas fat smatterings,etc., washwith soap andwater when
cooledand then rinse. Polishwitha dry cloth.
Use a mild solutionof soap and water. Do notuse any harsh abrasives or
cleaning powderswhich mayscratch or mar surface.
SheIvescan becleaned in dishwasher,or byhand usingscouring pd. Rinse
thoroughlyafter cleaning.
Lift out whencool. Soak 5 to 10minutes if desired in warm solutionof
dishwasherdetergent. Scour with materials mentioned here to removeburnedon food particles.
Clean as described belowor in dishwasher.Wipe drip pans after each cooking
so unnoticed spatter will not “bum on” nexttime you cook. Toremove ‘%urnedon” spatters, use any or all cleaning materials mentioned. Rub
scouringpad to prevent scratching of the surface.
Wipeoffburner heads. If heavy spillover occurs, remove burners from range
(see page 19)and soak them for 20 to 30 minutes in solution of hot water and
product for cleaning inside of coffee makers, such as Dip-It brand. If soil does
not rinse off completely, scrub burners with soap and water or a mild abrasive
cleanser and a damp cloth. Dry burners in a warm oven for 30 minutes before
returning them to the range.
lightly with
hide Own Door*
Oven
Liner
‘}:Spiilagcofmurinadcs, fruitjuices. andbasting materials containing acids maycause discoloration, so should be wiped up immediately (blotted up
if-inC’ontinuous-Cleaning oven).
warm en(mgh to break if touched with moist cloth. When cleaning, avoid warm lamp.
@See below
e Soapand Water
* Commercial OvenCleaner
~ Soap-Filled Scouring Pad
~ Plastic Scouring Pad
Ta!wcare notto touch hot portion of oven. When surface is cool, clean and rinse. CAUTION: Light bulbs can get
Removeovendoor—see page 17.DO NOTplace door under running water. or
immerse. Use same directions for cleaning as for Oven Liner, below.
Cool before cleaning. Frequent wiping with mild soap and water (particularly
after cooking meat) wil] prolong time between major cleanings. Rinse
thoroughly,Soap left on liner can cause stains. For heavy soil, use non-abrasive
cleaner and followlabel instructions, using thin layer of cleaner. Use of rubber
gloves is recommended. Wipe or rub lightly on stubborn spots. Wipe off any
cleaner that gets on thermostat bulb found in back or on side, near top of oven.
The ovenbottompanel can be removed for cleaning (see page 18).Use same
directions for cleaning as for Oven Liner above.
Page 22

-<-...
.’.___
PROBLEM
TOP13URNERSDo NOT
LIGHT
OVENDOES NOT COOK
PROPERLY
I
CLOCK DOES NOT WORK
(on modelsso equipped)
POSSIBLECAUSEANDKIRWTMTTODO
*Pilotsare notlit. Removeor lift cooktopand holdlightedmatchnextto
pilotopeningbetweenfrontand rear burners. On modelswithelectric
ignition,make sureelectricalplug ispluggedintoa livepoweroutlet.
~Burnerholeson side ofburner maybe clogged.Removeandclean them.
~Burnersmaynot be fittedcorrectlyonto thegasvalves.Removeand
reinstallthemproperly.
@Make surethermostatcapillarybulb (located in upper portion ofoven)is
in correct position, nottouching ovensides and not coated with anything.
@Aluminumfoilbeingused improperlyin oven.
~Ovenventblockedon topof range.
s Incorrect utensil
beingused.checkeachcookingsection for utensiltips
or recommendations.
*Oven bottomnot securelyseated inposition.
*OVEN TEMP knob setincorrectly or not turned on.
@Check Baking,Roastingand Broilinginstructionson pages 12-15.
~Rangeelectrical plug mustbe securely seatedin a livepoweroutlet.
Check for blownfuse or tripped circuitbreaker.
_—
w-
OVEN LIGHT DOES NUT
COMEON
(on modelsso equipped)
@Bulb may be looseor burned out.
@Electrical plug must be pluggedintoa livepoweroutlet.
TJ
Page 23

--.;
--=”~.\
-. .,-. ,
..
i
- “.*,
‘3--=--
---
-h,
~
-...
Toobtainservice. seeyourwarranty
onthe back pageofthis book.
*F
<3~%~j.We’reproudofour serviceand
‘a%@
wantyou tobe pieased. If for some
—
reasonyouare nothappywith the
serviceyoureceive,here are three
stepsto followfor further help.
FIRST,contactthe peoplewho
servicedyour appliance,Explain
whyyou are notpleased. In most
cases, thiswillsol}’ethe problem.
NEXT, ifyouare still notpleased,
writeall thedetails-including
yourphonenumber—to:
Manager,Consumer Relations
Hotpoint
Appliance~drk
Louisville,Kentucky40225
FINALLY,ifyour problemis still
notresolved, write:
Major Appliance
ConsumerAction Panel
20 North WackerDrive
Chicago,Illinois60606
Page 24

\,.: yly= !
..” ..-..—— ———
s : .~_%+’~
+PJ=+j
. .. .
‘&”? a j
.-
$33 ;_----—-————--–––y-=–_____.=.-z______ .–.—.—-—
>@/ ‘———–
Save proof of original p~rchas~ date such as your sales slip or cancel led check to establish warranty period.
_———
—.. ... .._.—..———.—
__.——..
._—.——. _.—
FLU, ONE-YEARWARRANTY
For one year from date oforiginal
purchase,wewill provide,
charge, parts and service labor
in your home to repair or replace
my
part d the range that fails
free of
becauseof a manufacturing defect.
This warranty is extended to
the original
purchaserand any
succeedingownerfor products
purchasedfor ordinaryhomeuse
inthe 48 mainlandstates, Hawaii
andWashington,
DC. In Alaskathe
warrantyis the sameexceptthat it is
LIMITEDbecauseyou must payto
shipthe producttothe serviceshop
orfor the service technician’stravel
coststo your home.
All warrantyservice will be provided
byour FactoryService Centersor
byour authorizedCustomer Care(E)
servicersduring normal working
hours.
Lookinthe Whiteor YellowPages
ofyour telephone directoryfor
HOTPOINTFACTORYSERVICE,
GENERAL ELECTRIC-HOTPOINT
FACTORYSERVICEor HOTPOINT
CUSTOMERCARE@SERVICE.
.
r ,, ,.,. - . J- .- :, .:-a
.,7.. , .: ,: ,
>,~; ~,
;; .-,,: .-, -j;” ::~.
!?!!or CzNAE‘F?Em
~ Service trips to your home to
teach you howto usethe product.
Read your !Jseand C%remterid.
if youthen haveanyquestions
about operating the product,
please contact your dealer or our
Consumer Affairs office at the
address below.
~ Improper installation.
If you have an installation problem,
contact your dealer or installer.
@Replacementof
resetting of circuit breakers,
house fuses or
@Failureof the product if it is used
forother than its intended purpose
or usedcommercially.
@Damageto product caused
byaccident, fire, floods or acts
of God.
WARRANTORIS
NOTRESPONSIBLE
FORCONSEQUENTIAL DAMAGES.
Youare responsible for providing
adequateelectrical, gas,exhausting
and other connecting facilities.
.—.—.....
1ME
 Loading...