

Page 1
How toget
“----
f ,?
thebestfrom
useandcm-wofGasModels
with with
standing ElectricIgnition
Pilot
RGA512
lRGB52~
RGB528
RGB528G
RGA5121
IRGB5241
RGEH281
RGB528GI
RGB628GI
RGB628G RGH646GI
Featuresof’-yourrange
pti
Lightinginstructions p8-’=lo
surfaceCooting
ovencooking
pll
-pU!!
‘...--..,
-—
.. ........ ... .
‘.
...
—
Page 2
Betore LJsingYour Range . .. .. . 2
Safety Instructions .. .. .. . . ...4-5
Features of Your Range . . .. ...6-7
Lighting Instructions
—Standing Pilot .. . .. .. . . . ...8
Lighting Instructions
—Eiectric ignition Pilot . . . . . . 9
Air Shutter Adjustment . . . . . . . 10
Surface Cooking . . .. . . .. . . .. . 11
Using Your Oven . . . . . . . . . ..o .12
How To Bake.. . . . . . . . . . . . . . . . 13
How To Roast . . . . . . . . . . . . . . . .14
How To Broil .. . . .. . . . . . . . . . . . 15
How To Care For
Your Range . . . . . . . . .. . . . . ..l6
Continuous Cleaning
Oven Care . . . . . . . . . . . . . . . . . 17
Baking Chart . . . . . . . . .. . . . . . . .18
Roasting Chart . . . . . . . . . . . . . . .19
Broiling Chart .. . . . . . . . . . . . . . .20
Cleaning Chart .. . . . . . . . . . . . . . 21
The Problem Solver . . . . . . . . . . 22
if YouNeedSewice . . . . . . . . . . ..23
Warranty . .. . . . . . . . . ..Back Cover
Pilot Sys?e!ms
Yourgas rangeis equipped with
either a Standing Pilot or Electric
Pilot ignition System. Be familiar
with which type of system your
range is equipped.
McMHsRGB524, RGB528,
RGB528G, RGB628G, RGA532
Standing Pilot System has aeon-
tinuous flame glowing atall times.
Models RGB5241, F?GB5281,
RGE1528GI,RGB628GI,
13GH646GI, RGA5121
Electric Pilot Ignition System uses
an electric spark to ignite the
burners and does not require use
ofa match unless electrical current to your range is interrupted.
—
;
&
Page 3

..
3
0
$gi#yk!aid“mki Ehmk carefully
/rwili help youoperateand
maintainyournew Rangeproperly.
Keepit handyfor answersto your
questions.
Ifyoudon?understandsomething
orneed more help,write (include
yourphone number):
ConsumerAffairs
Hotpoint
Appliance Park
Louisville,W 40225
writeDown the Mow and
serial Numbers
if l?fx.1Received
a Damaged Range
Immediatelycontactthe dealer(or
builder)that soldyouthe Range.
save timeandnmm?y.
Before you request service,
check the Problem Solver on
page22. Hlistsminorcausesof
operating problemsthat you can
correctyourself.
FOR YOUR SAFETY
(mm OFF all range
controls)
ifyou smellgas:
1. open lwindows
2= Don’ttouch
electrical swmhi?s*
3. Extinguishany open
flame
4. Immediatelyfcal!
yourgas supplier
‘Don’t turn electric
SWvittmeson or off
because sparks may
ignitethe gas.
You’llfind them on a label located
underthe cooktop.
Thesenumbers are also onthe
Consumer ProductOwnership
RegistrationCardthat camewith
yourRange. Beforesending in this
card,please write these numbers
here:
.!odelNo.
SerialNo.
Usethese numbers in any
correspondence or service calls
concerning your Range.
/-“’.->
i..
._..
..
..J
j
1,
Page 4
~ !Hafe the irnstaikr dwnv you
the hxxtkm d the range gas
cut-off valve and how to shut
HGMif nfxx.?ssm’y.
~ Have N imstalkxiland prop”
edy grounded by a
ikwtakr,
the installation instructions.
Any adjustment and service
should be performed only by
qualified gas range installers
or service technicians.
@ Locate range out of “kitchen
traffic path” and out of drafty
locations to prevent pilot outage and poor air circulation.
~ Be sure your range is correctly adjusted by a qualified
service technician or installer
for the type of gas (Natural or
LP) on which it is to be used.
Gas can be converted from
one type to the other. See
Installation Instructions.
Q After prolonged use of a
range, high floor temperatures
may result and many floor
coverings will not withstand
this kind of use. Never install
the range over interior kitchen
carpeting, vinyl tile or linoleum
that cannot withstand such
type of use.
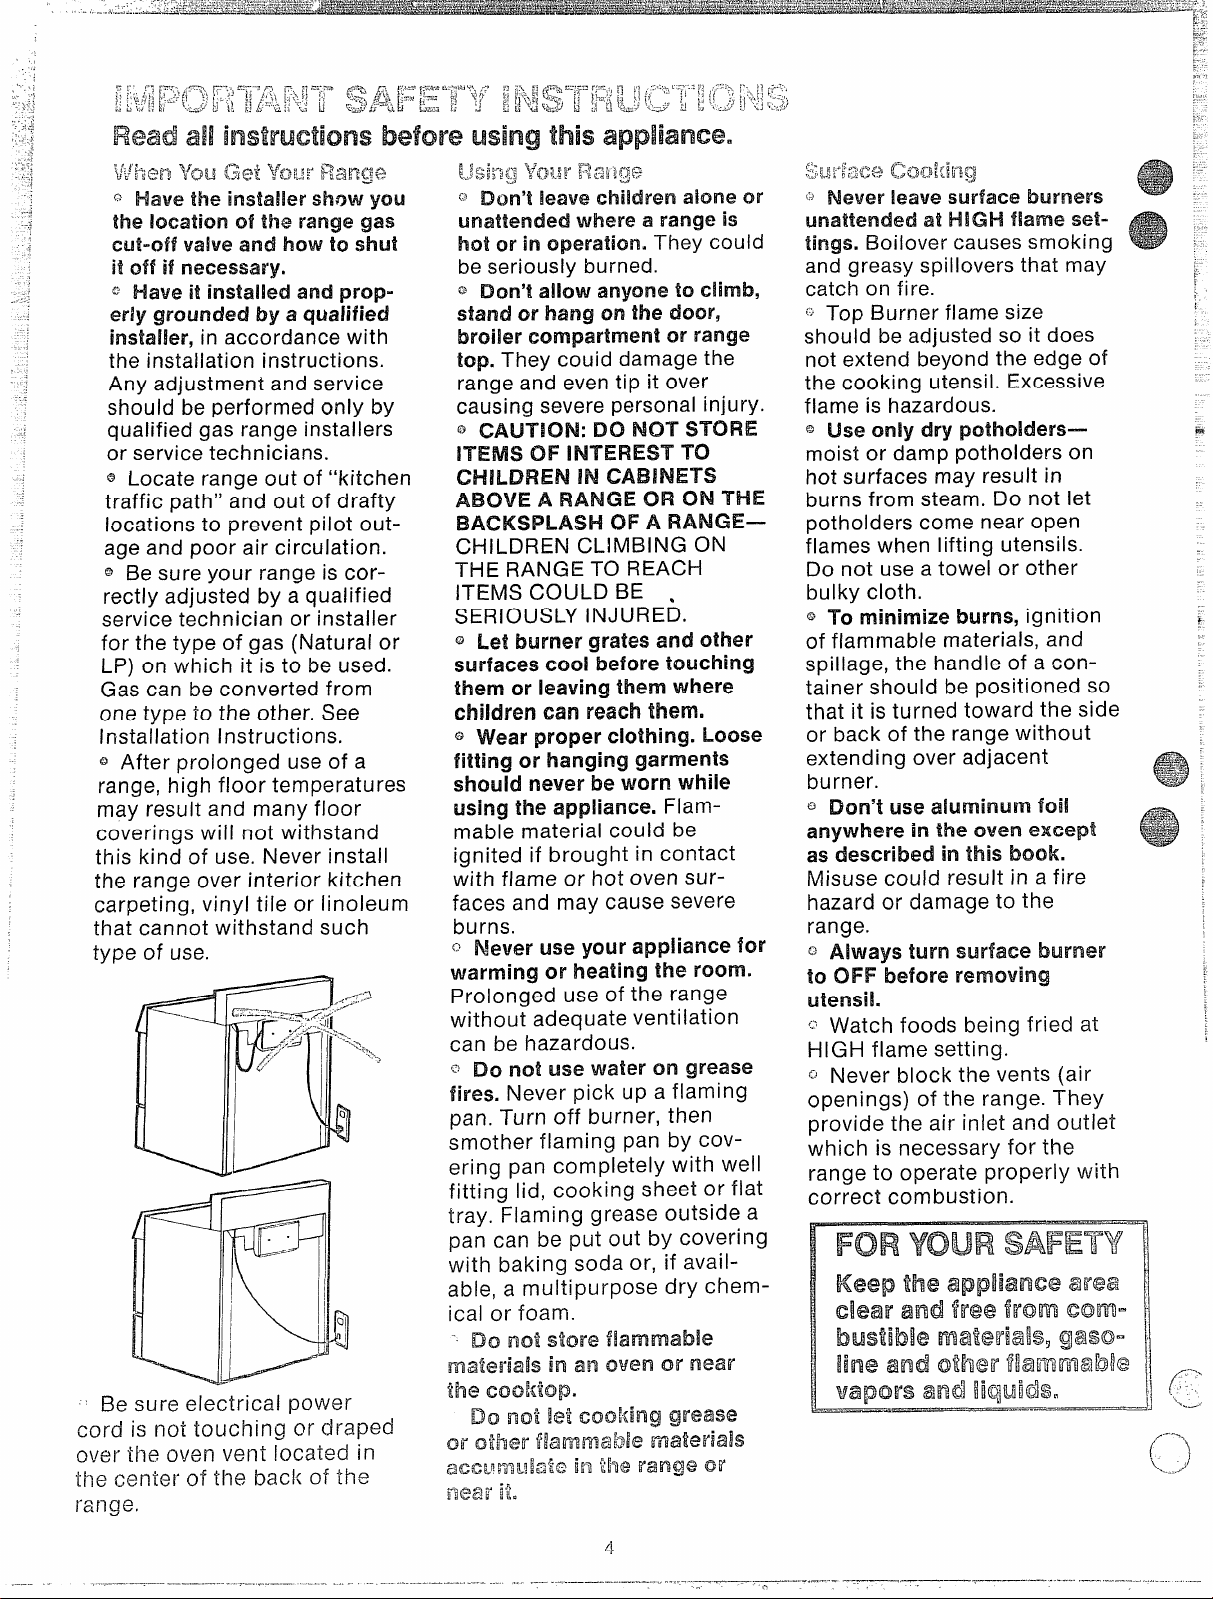
Be sure electrical power
cord is not touching or draped
over the oven vent located in
the center of the back of the
range.
in accordance with
qualified
.
r .“ ? ,..+ ~.,
!,.:$,jlij#g
“ Don’t k?aveCI-iikirem alone or
unattended where a range is
bat or in operation. They could
be seriously burned.
~~Don’t allow anyone !0 climb,
stand or hang on the door,
broiler compartment or range
top. They couid damage the
range and even tip it over
causing severe personal injury.
~ CAUTBON: Do NOT STORE
ITEMS OF INTEREST TO
CHILDREN IN CABINETS
ABOVE A RANGE OR ON THE
BACKSPLASH OF A RANGE—
CHILDREN CLIMBING ON
THE RANGE TO REACH
ITEMS COULD BE
SERIOUSLY lNJURE~.
Q Let burner grates and other
surfaces cod before touching
them or leaving them where
children
@
fitting or hanging garments
should never be worn while
using the appliance. Flam-
mable material could be
ignited if brought in contact
with flame or hot oven sur-
faces and may cause severe
burns.
c;’Never use your appliance for
warming or heating the morn.
Prolonged use of the range
without adequate ventilation
can be hazardous.
‘=’DO not use water on grease
fires. Never pick up a flaming
pan. Turn off burner, then
smother flaming pan by covering pan completely with well
fitting
tray. Flaming grease outside a
pan can be put out by covering
with baking soda or, if avail-
able, a multipurpose dry chem-
ical or foam.
“ Do nc$tstore f!ammab!e
materials in an oven or near
?he Cclokhclpm
or other W/ntmable Imaterials
$ffy.!! ;>Q .W,“ ~’‘~g::IE
can reach them
Wear proper clothing. Loose
lid, cooking sheet or flat
Do not let Coo!{ing grease
acxumu!eie in We range W
~j~~~~~m
unattended at I=+!(3HIflame w3ttings. Boilover causes smoking
and greasy spillovers that may
catch on fire.
~~Top Burner flame size
should be adjusted so it does
not extend beyond the edge of
the cooking utensil. Excessive
flame is hazardous.
G use only dry pclthohWrs—
moist or damp potholders on
hot surfaces may result in
burns from steam. Do not let
potholders come near open
flames when lifting utensils.
Do not use a towel or other
bulky cloth.
~ To minimize burns, ignition
of flammable materials, and
spillage, the handle of a container should be positioned so
that it is turned toward the side
or back of the range without
extending over adjacent
burner.
G ~~~’~ ~~~ ~~~~~~~~ f~~~
anywhere in Me oven except
as described in
Misuse could result in a fire
hazard or damage to the
range.
~ Always turn surface burner
to OFF before removing
utensil.
o Watch foods being fried at
HIGH flame setting.
r, Never block the vents (air
openings) of the range. They
provide the air inlet and outlet
which is necessary for the
range to operate properly with
correct combustion.
this book.
Keep meappmmaearea
1
1dear and ikwefrom‘corm” ,]
/--’”1
(.%
4
Page 5
,,
. .. ,
..J —.- .-.. -., ,,
.
f%;~ !!%xds forfryingS1’m.ild be
k%$jasc&y as possible. Frost on
-%$+{rozenfoods or moisture on
z!!’?
c>
~ esh foods can cause hot fat
to bubble up and over sides
of pan.
~ Use least possible amount
of fat for effective shallow or
deep-fat frying. Filling the pan
too full of fat can cause spillovers when food is added.
~~If a combination of oils or
fats will be used in frying, stir
together before heating, or as
fats melt slowly.
G Always heat fat slowly, and
watch as it heats.
‘; Use deep fat thermometer
whenever possible to prevent
over-heating fat beyond the
smoking point.
~~Use Proper Pan Size—Avoid
pans that are unstable or easily
tipped. Select utensils having
flat bottoms large enough to
properly contain food avoiding
boilovers and spiiiovers, but
arge enough to cover burner
rate. This will both save
cleaning and prevent hazardous accumulations of food,
since heavy spattering or spillovers left on range can ignite.
Use pans with handles that can
be easily grasped and remain
cool.
- Use only glass cookware that
is recommended for use on gas
cooktops or gas ovens.
LI If range is located near a
window, do not use long cur-tains which could blow over
the top burners and create
a fire hazard.
@ When a pilot goes out, you
will detect a faint odor of gas
as your signal to relight pilot.
When relighting pilot, make
sure burner controls are in
“OFF” position and follow
instructions described on following pages to relight.
~ If you smell gas and you
have already made sure pilots
are lit, turn off the gas to the
range and call a qualified service technician. Never use an
open flame to locate a leak.
E3ddng, BnmmJ and Rhxx?mwJ!
~ Do not use oven for a storage
area.
Q Wand away from the range
when opening cwen door. The
hot air or steam which escapes
can cause burns to hands, face
and/or eyes.
o Keep oven free from grease
build up.
~ Place oven rack in desired
position while oven is cool.
‘ Pulling out shelf to the shelf
stop is a convenience in lifting
heavy foods. It is also a precaution against burns from
touching hot surfaces of the
door or oven walls.
Don’t heat unopened food
containers in ‘ii-w oven. Pres”
sure could build up and the
container Could burst causing
an !k@N’y.
- When using cooking or
roastin~ bags in oven, follow
the manufacturer’s directions.
~~When cooking pc@Yfollow
our directions exactly and
always cook the meat to at
least 170°. This assures that,
in the remote possibility that
trichina may be present in the
meat, it will be killed and meat
will be safe to eat.
@ Always remove broiler pan
from broiler compartment as
soon as you finish broiling.
Grease left in the pan can
catch fire if oven is used
without removing the grease
from the broiler pan.
~ When broiling, if meat is too
close to the flame, the fat may
ignite. Trim excess fat to prevent excessive flare-ups.
G Make sure broiler grill pan is
in place correctly to reduce the
possibility of grease fires,
~ If you should have a grease
fire in the broiler grill pan, turn
off oven, keep drawer closed to
contain fire until it burns out.
Cx%mkag Ycw Range
Q Clean only parts listed in
this Use and Care Book.
Keep range clean and free
accumulations of grease
spillovers which may ignite.
You R!c?edservice!
Read “The Problem Solver”
on page 22 of this book.
o Don’t attempt to repair or
replace any part of your range
unless it is specifically recommended in this book, All other
servicing should be referred
to a qualified technician.
I
,
:0
,
I
!,
5
Page 6
film
12.
14.
15.
16.
17=
18.
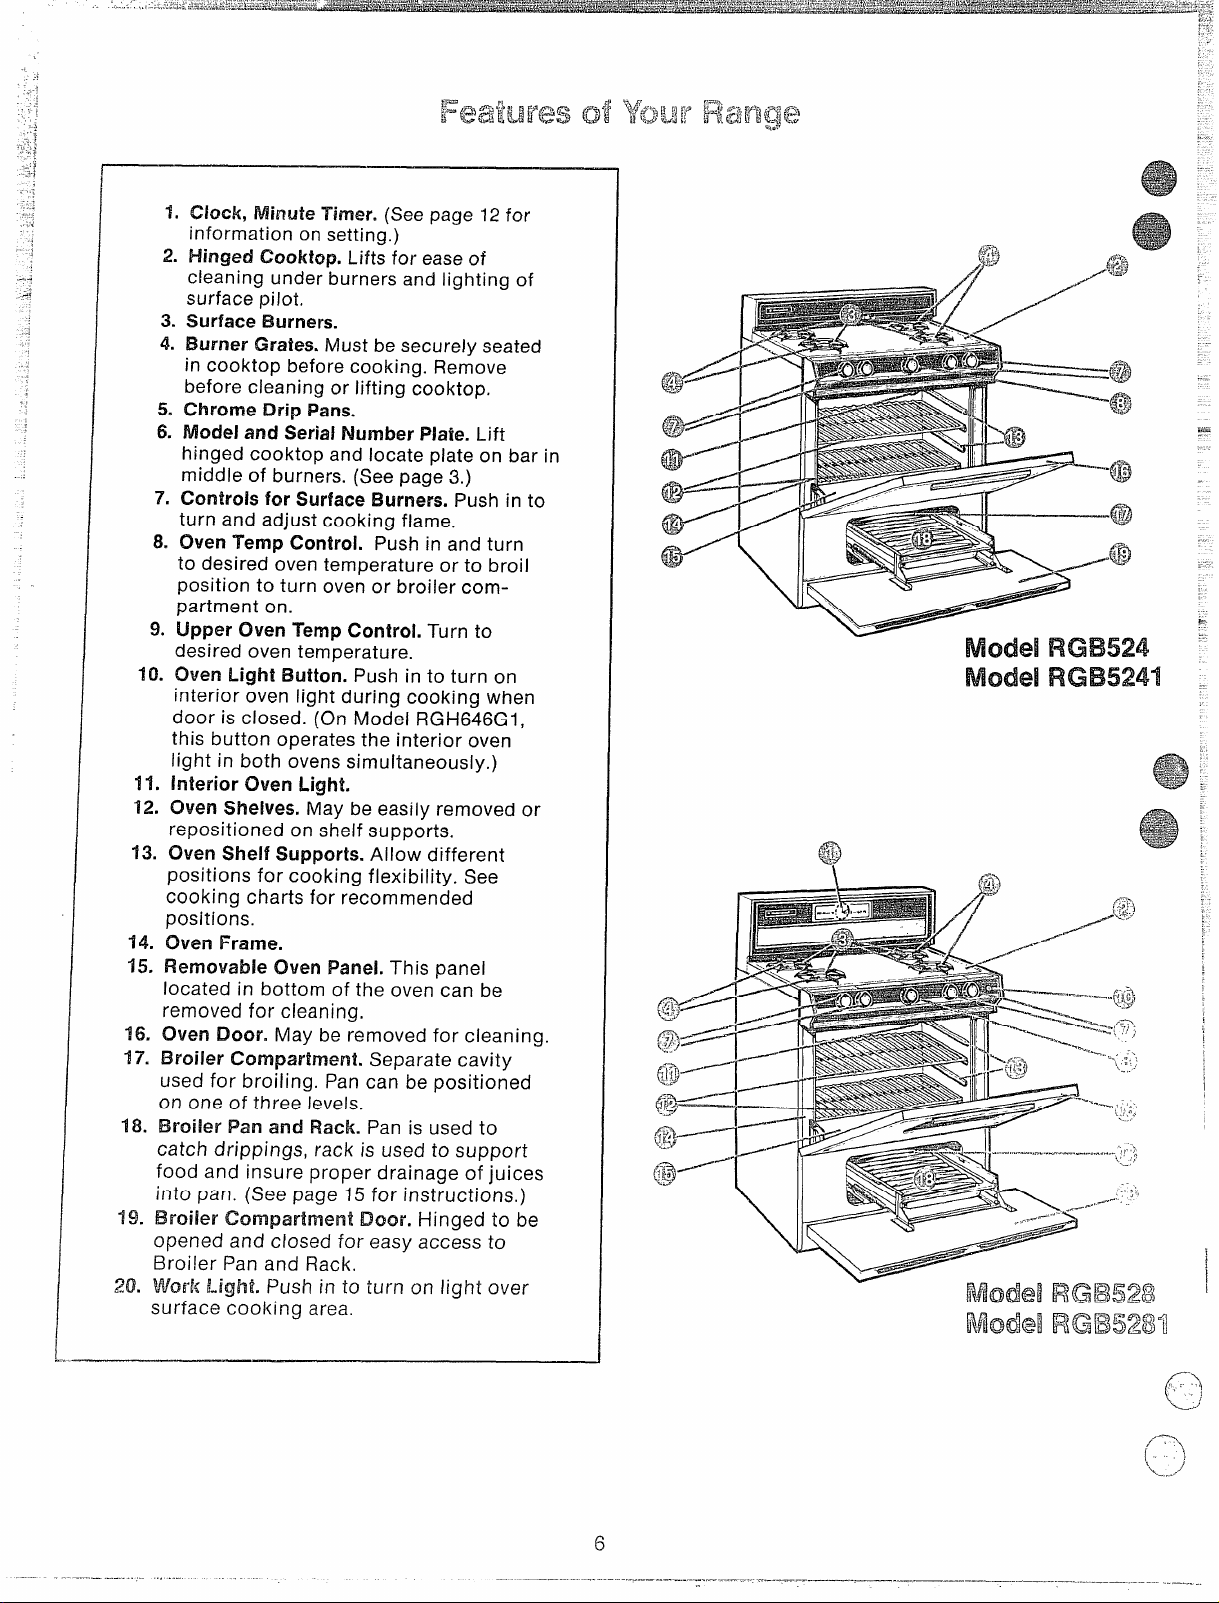
1.
Clock,
Minute Timer, (See page 12for
information on setting. )
2.
Hinged
Gmktop. Lifts for easeof
cleaning under burners and lighting of
surface pilot.
3.
Surface Burners.
4.
Burner
Grates. Must besecure~yseated
in cooktop before cooking. Remove
before cleaning or lifting cooktop.
?5?
Chrome
ModeJ and Serial Number Plate.
6.
Drip Pans.
Lift
hinged cooktop and locate plate on bar in
middle of burners. (See page 3.)
7.
Controls for Surface Burners. Push in to
turn and adjust cooking flame.
8.
OvenTemp
i
:0desired oven temperature or to broil
Control. Push in and turn
oosition to turn oven or broiler compartment on.
Jpper Oven Temp ControL Turn to
jesired oven temperature.
Light Button. Push in to turn on
Iwen
~terior oven light during cooking when
‘oor is closed. (On Model RGH646GI,
Iis button operates the interior oven
ght in both ovens simultaneously.)
Iterior Oven Light.
WenShelves. May be easily removed or
positioned on shelf supports.
re
o
ven Shelf
pc
]sitions for cooking flexibility. See
~okingcharts for recommended
cc
Supports. Allow different
)sitions.
fen Frame.
movable Oven !Panel.
This panel
;ated in bottom of the oven can be
moved for cleaning.
Door. May be removed for cleaning.
m
oihw Compartment. Separate cavity
Ust
adfor broiling. Pan can be positioned
on
one of three levels.
BN
>iier Pan and Rack. Pan is used to
cat
ch drippings, rack is used to support
foo
Idand insure proper drainage of juices
int[
] pan. (See page 15 for instructions. )
)iler Compartment Docw. Hinged to be
Brc
Opc
med and closed for easy access to
tiler Pan and Rack.
Bro
rk Light. Push in to turn on light over
Wol
suri
‘ace cooking area.
@
—
ModelRGB524
ModelRGB5241
.
—
Page 7
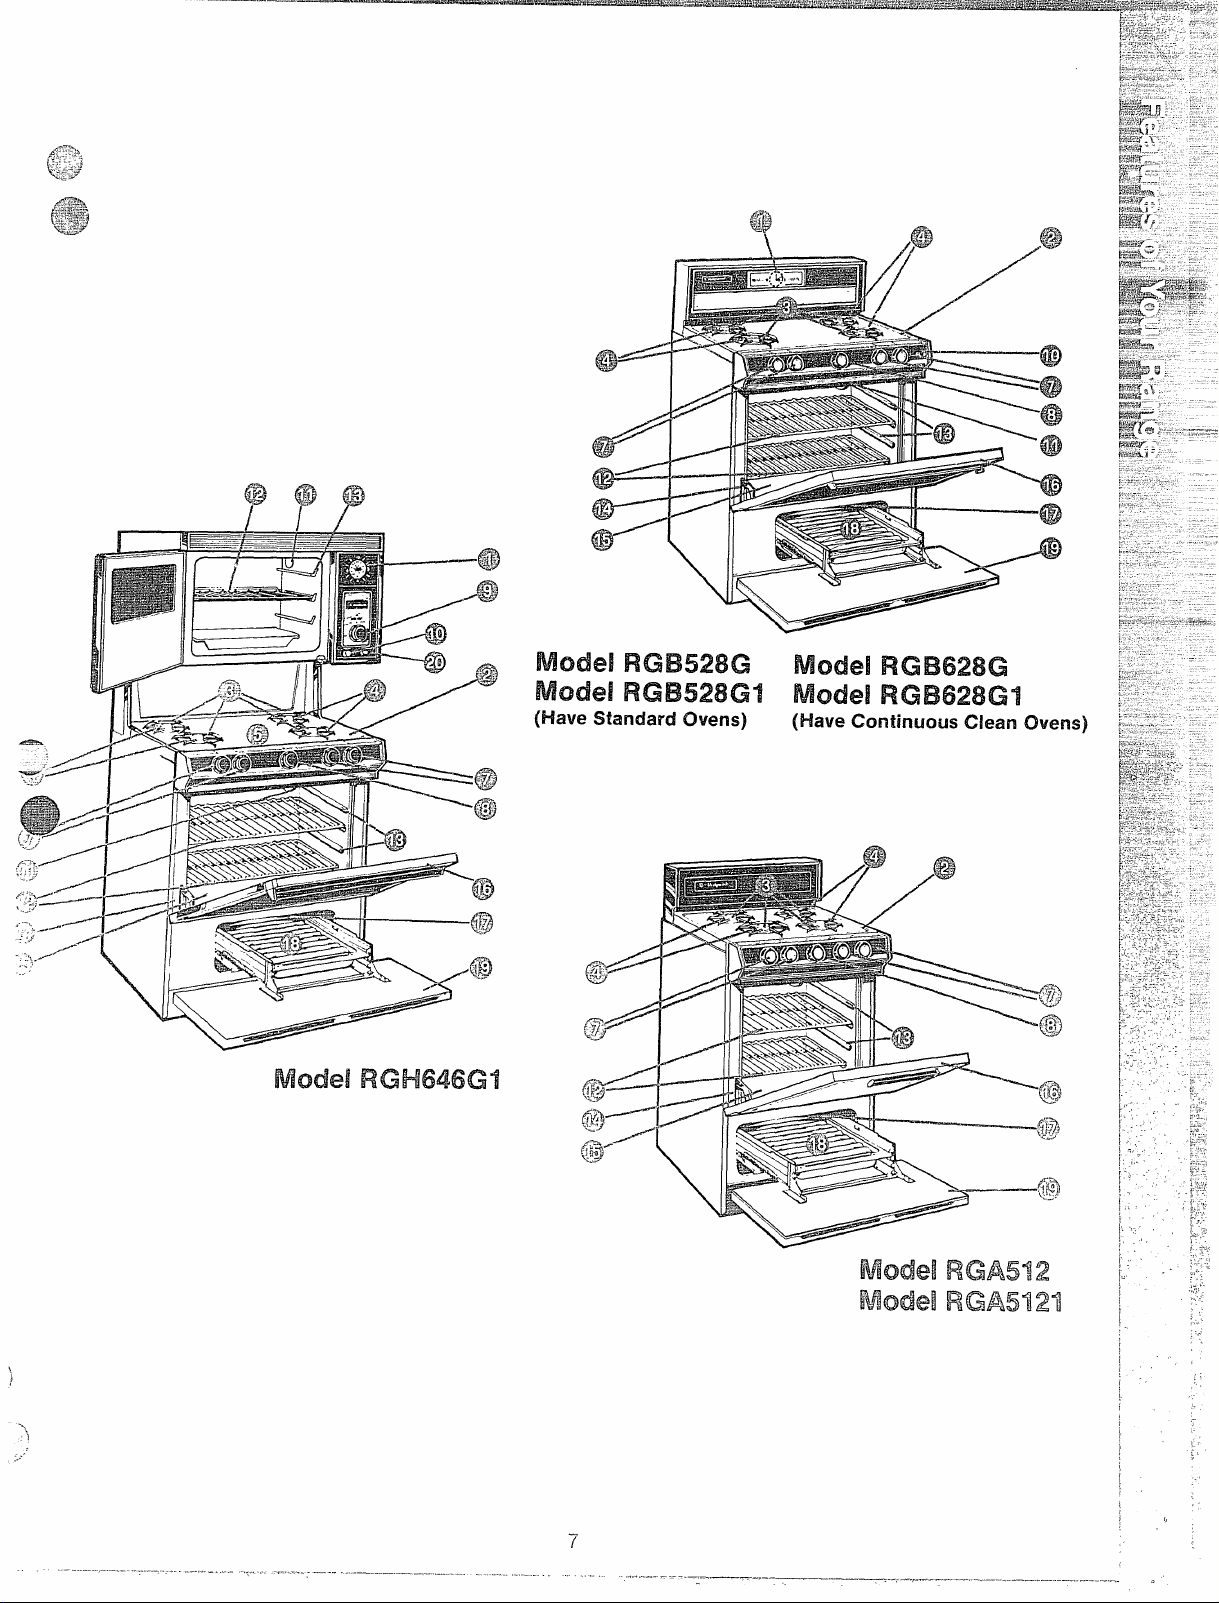
Model RGH646GI
ModelRGB528G
ModelRGB628G
ModelRGB528G4ModelRGB628GI
(Have Shmiard Ovens)
(Have Continuous Clean Ovens)
ModelIWEUW5%2
Mack4RGA5V!I
\
i
-..
3
.,.-
Page 8
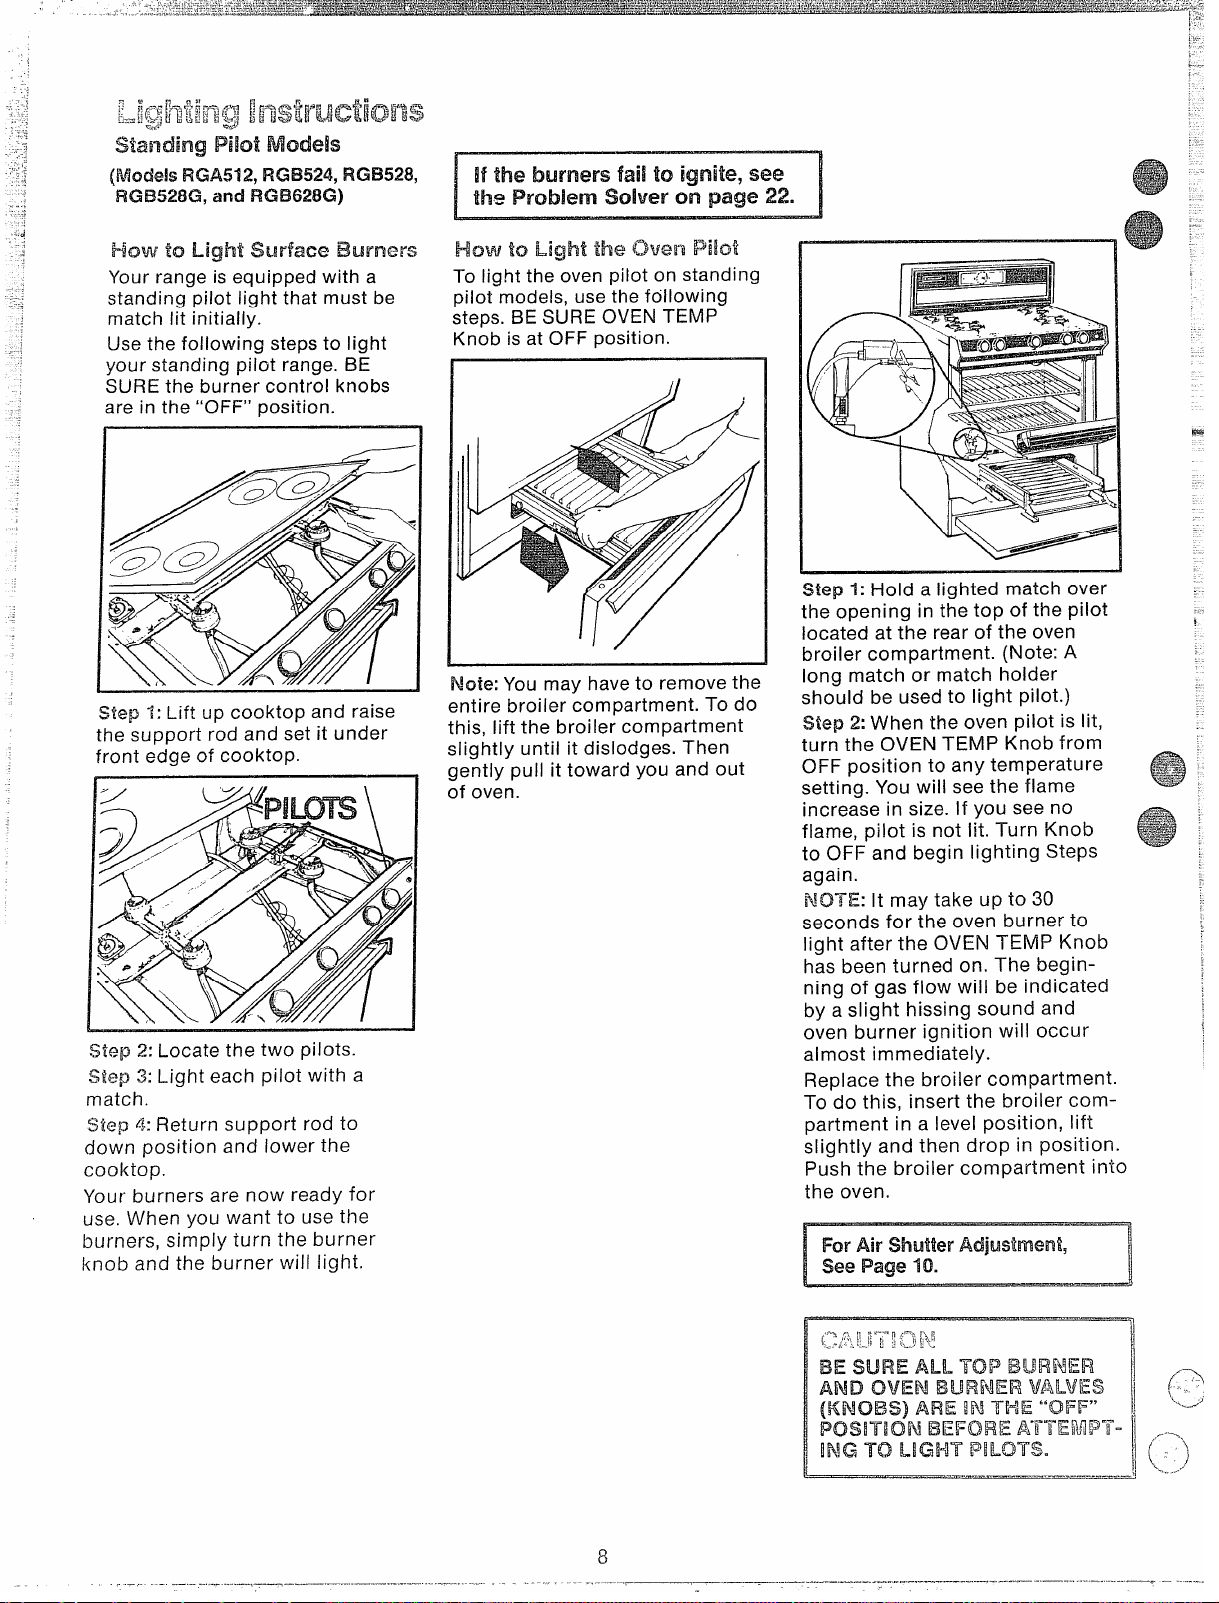
Sianding Pibt Models
@%x.teisRGA512,RGWXM,RGB528,
FiGB528G,and RGB628G)
if the
burnersfail toignite,see
hi? Problem solver cmpage22
i
HCnJ?f%3L@--it
Your range is equipped with a
standing pilot light that must be
match lit initially.
Usethe following steps to light
your standing pilot range. BE
SURE the burner control knobs
are in the “OFF” position.
Step 1:Lift up cooktop and raise
the support rod and set it under
Frontedge of cooktop.
Step 2: Locate the two pilots.
Step 3:
match.
Step 4: Return support rod to
down position and lower the
cooktop.
Your burners are now ready for
use. When you want to use the
burner-s,simply turn the burner
knob and the burner will light.
Light each pilot with a
st-l&Kx? E3urnef’s
HCw !0 LicJMthe OW?ITPilot
To light the oven pilot on standing
pilot models, use the following
steps. BE SURE OVEN TEMP
Knob is at OFF position.
Note: You may have to remove the
entire broiler compartment. To do
this, lift the broiler compartment
slightly until it dislodges. Then
gently pull it toward you and out
of oven.
Step 1:Hold a lighted match over
the opening in the top of the pilot
located at the rear of the oven
broiler compartment. (Note: A
long match or match holder
should be used to light pilot.)
Step 2: When the oven pilot is lit,
turn the OVEN TEMP Knob from
OFF position to any temperature
setting. You will see the flame
increase in size. If you see no
flame, pilot is not lit. Turn Knob
to OFF and begin lighting Steps
again.
NOTE: It may take up to 30
seconds for the oven burner to
light after the OVEN TENIP Knob
has been turned on. The beginning of gas flow will be indicated
by aslight hissing sound and
oven burner ignition will occur
almost immediately.
Replace the broiler compartment.
To do this, insert the broiler com-
partment in a level position, lift
slightly and then drop in position.
Push the broiler compartment into
the oven.
!/%x’Air shutter Adjustment,
Page 10.
See
I
I
.,-
—----=.=-=.--—! ‘“--
.-,
K
Page 9

(On Model RGH646G1 Only)
—.—.-—...-—...————-..—.—-----.. ..
.. .. ....- .-------
.————
——-
—- .. .. .._
.—.—————..—. ...—.-——-
—.-—.—
.
Pwwifm’ Light
we L@yw-w’Ch@n
!(mxkd RGH646GI)
The upper oven is equipped with
a glow bar igniter rather than a
pilot. To iight the glow bar igniter,
proceed asfollows.
Step 1: Depress the UPPER OVEN
TEMP CONTROL and turn to the
desired temperature setting. (This
will energize the glow bar igniter
and ignite the oven burner.)
Step 2: After a brief delay, the
oven burner will light.
Light!ng U’K?
CY#enBurner
During an electrical power failure,
usethe following steps to light the
oven pilot.
NOTE: You may haveto remove
the entire broiler compartment.
To do this, lift the broiler compart- ~
ment slightly until it dislodges.
Then gently pull it towards you
and out of the oven.
(On Model RGH646GI Only)
%
m
~ts
Ed
~fi:
*+
&-i
~b
~~
Es
k.
~
I
.
cJ~q-) j:
Turn the burner control
knob to the LITE position.
S~ep~: The burner will then light.
(You will hear a distinct popping
noise at surface burners and in
the oven. This is normal.)
~~:.,m,- ~
. Turn the burner control
~-’~’=”t~J“
knob to the desired setting or to
“OFF”. The noise will then stop.
-~+...~.~...~ ;,..,,;~.:>...
-,, ,4..
s,f:,:
k .- L.’
L. Lt””$i:, iiib .=. ‘,#,
!.* ,.=
f--=j~fp+
~=h.”
~
,)j:c~~
To light the oven pilot on electric
ignition models, use the following
steps.
Ste~ 1: Depress the OVEN TEMP
Kn; b and turn to the desired temperature setting. (You will hear a
ciistinct popping noise at all surface burners and in the oven.)
.-—a
SN?p2: The oven pilot will light in
‘“”’‘] ~~-~~ seconds+ (The noise at the
~...~’
‘-”” sUrffI~e
....
‘-’-%tq: 3:
ij
\
-L-=..,-”
!JLlrTIeIT5 will s~c)p.)
Your oven pilot is now lit.
If the burners fail to ignite, see
the Problem Solver on page 22.
1
operatingYCNJrF&N%geDuring
an Electrical Pcw?m”!Faik4E’e
NOTE: These instructions are for
electric ignition models only.
The upper oven on Model
RGH646GI will not operate
during a power failure.
Ligi%ting meSwface BUl”rw%
During an electrical power failure,
use the following steps to light
surface burners,
$$~~~“j:
the’desired burner head.
step 2: Turn the burner control
knob to LITE. (The burner will
then light. )
:~,~<+f?
desired position.
Hold a lighted match to
,.3: Adjust the flame to the
.,—.
!; r., ~ ...-..,~ .
-.~
–:,
:L+.”:”i L‘.=.”E‘:
When lighting pilots or top
burners be sure all controls are
in OFF position.
Strike match first and hold in
position before turning knobs
ON.
.-—
.,,.“..-
I
Step 1: Turn the OVEN TEMP
Knob past the 140degree setting.
Wep 2: Hold a lighted match to
the pilot and when lit, quickly re-
move your hand from the broiler
compartment. (A long match or
match holder should be used to
light pilot.)
NOTE: After the oven pilot is lit,
the oven burner will ignite in 30-
40 seconds. Therefore, you must
quickly remo~e your hand from
the broiler compartment.
Replace the broiler compartment.
To do this, insert the broiler compartment in a level position, lift
slightly and then drop in position.
Push the broiler compartment into
the oven.
For Air
seePage 10.
S13uma’AdjLMm2!rdi,
—1 ,
I
r
(
(<
g
Page 10

GxMclp Burners
The normal flame should be
steady, relatively quiet and have
approximately
mm. if this is
air shutter needs adjusting.
1/2”sharp blue
not the case, the
,.
..!!.. ,.,.,,$, c
l-foodOrific8hmerMm
To adjust air, lift hinged cooktop
and rest cooktop on support rod.
The air shutter adjustment for
each burner is located at the open
end of the venturi tube and rests
on the hood of the valve. Simply
rotate the air shutter to allow
more or less air into burner tube
as needed.
Pilol
Ad”uslment
crew~
!
A
lter
w pipe
If the pilot needs adjusting, simply
turn the adjusting screw located
on the pilot filter.
The oven burner flame should be
dear blue with distinct inner
a
cones 1/4to % inch long.
flame requires more air, a noisy
blowing flame requires less air. If
adjustment is needed,you must
remove broiler compartment.
Next, loosen the screw located at
the top of air shutter, then rotate
air shutter to correct setting.
Retighten screw asshown in
illustration.
A soft
Page 11

A
>.,..T?
p
I
—ls245Gf_”
Burner controls are located on
the control panel in front of the
burners. From left to right they
control: Left front, left rear, right
front,. right rear burners.
To light, push in knob and turn
the burner control to LITE, then
adjust to the desired flame height.
Turn off by turning the control all
the way to the OFF position.
~+::-J~=;::
utensil on grate before turning on
burner. The finish on the grate
may chip without a pan to absorb
the heat. (b) Check to be certain
that the burner turned on is the
one you desire to use. (c) Be certain burners and grates are cool
before placing hand, potholder,
cleaning cloths or other materials
on them.
Always (a) have a cooking
[-]()$%]
to.Seiect IFlawie !l-=kight
The height depends on the utensil
size and material, what you are
cooking andwhether you are cooking with liquid. Here are some
basic rules for selecting flame
height:
WRONG
t. The flame should never extend
beyond the bottom of the pan.
Any larger flame is wasted heat
and only servesto heat the pan
handles.
utensil Fflaterials and How To use Them
ALUMINUM: Medium-weight utensils are recommended because they
Cbw-rIRON:
ENAMELWARE: Under some conditions the enamel of some utensils may
GLASS: There are two types of glass utensils—those for oven use
HEATPROOF Can be used for either surface or oven cooking. It conGLASS ducts heat very slowly and cools slowly. Check with
CERANIIC: manufacturer to be sure it can be used on qas ranqes.
sT’AiFk!LEss This metal alone has poor heating properties, and is usu-
STEEL:
—
RIGHT
heat quickly and evenly. Most foods brown evenly in an
aluminum skillet. Minerals in food and water will stain
but will not harm it. A quick scour with a soap-filled steel
wool pad after each use keeps aluminum pans looking
shiny new. Use saucepans with tight fitting lids for
cookina with minimum amounts of water.
If heated slowly, most skillets will give satisfactory
results.
melt. Follow utensil manufacturer’s recommendations for
cooking methods.
only and those for top-of-the-range cooking (saucepans,
coffee and tea pots). The ovenware may break if used for
surface cooking; and both can break with abrupt temperature changes like setting a hot pan on a cold surface.
Glass conducts heat verv SIOWIV.
ally combined with copper, aluminum, or other metals for
improved heat distribution. Combination metal skillets
generally work satisfactorily if used at medium heat as
manufacturer recommends,
2. Use a full flame, just the size
of the bottom of the pan for fast
heating to cooking temperature
or to heat skillet. Never leave any
pan or food unattended, or for
long periods at this heat. 130ilovers or spillovers may cause
smoking or may become hot
enough to catch fire.
3. Foodscook just as quickly at a
gentle boil as at a furious rolling
boil—in both casesthe water
temperature is 212°. A high boil
only creates steam and cooks
away moisture, flavor and nutrients. Avoid it except for the few
cooking processes which need a
vigorous boil.
4. Reduce flame to MEDIUM (or a
low position) to keep foods gently
boiling in acovered utensil. Large
quantities of food, or smaller quantities of food in an uncovered pan,
may require a higher flame then at
MEDIUM (or a low position).
5. UseLOW setting (or a very low
position) to keep foods warm
without additional cooking.
I
)
Page 12

E3eft?lwL4!singYOiur cwe’n
1. Look at the control. E3esure you
understand how to set it properly.
~rcheck oven interior. Look at the
shelves. Take a practice run at
removing and replacing them properly, to give sure sturdy support.
3, Read over information and tips
that fol!ow.
4. Keep this book handy so you
can refer to it, especially during
the first weeks of getting acquainted with your oven.
Owm Temperature Control
The OVEN TEMP Control is located
in the middle of the control panel
on the front of the range. Simply
turn control to the left to desired
temperature setting and the pilot
immediately lights the oven
burner. After oven reaches the
selected temperature, the oven
burner cycles off completely, then
on with a full flame to keep oven
temperature controlled.
2. Always make sure OVEN TEMP
Control is set at KEEP-WARM
temperature,
3. Foods should not be kept warm
longer than 2 hours. Some foods
should only be kept Vato 1 hour.
4. Most meats, casseroles, potatoes, other vegetables and rice
can be kept warm. Avoid setting
for most cakes and breads,
5. KEEP-WARM works well for
thawing foods. Some foods must
be broken during thawing. Do not
refreeze foods after thawing. Use
155° for meats, 170° for frozen
baked goods.
upper oven
Temperature ffkmtrd
The UPPER OVEN TEMP CONTROL is located in the middle of
the control panel on the upper
oven. Simply turn the control to
the left to the desired temperature
setting and the glow bar igniter
will light the oven burner.
push shelf toward back of oven
until it goes past ridge on oven
liner; lower front of shelf and push
to back of oven.
Oweii Liglli
r
P
Use switch to turn light on and off
when door is closed or open.
clock and Minute Timer
The first marked area on the
OVEN TEMP Control is the KEEPWARM areawith temperature markings of 140to 200. This section of
the control is designed to allow
cooked foods to maintain their
serving temperature until ready
to serve.
The next area on the control is
marked from 250 to 500 in 25°
segments. This portion of the control is used to bake and roast. The
last mark on the control is BROIL
and is used for broiling foods.
.,, . . . .. .. .
:}“~‘.’:: j‘,:’-;:’
!
.,’! 0!..
‘! Always transfer food to oven-
,.
-->,...
.;:-?
,-,..---.},!~.....
..,-
“’’I’:::.:[-.,’” ‘. ;- ‘
......,
proof utensils before putting food
in the oven,
oven llnis?rior
Shelf position references as suggested
in Baking and Roasting Charts.
~
SIwhes
~k
The shelves are designed with
stop-locks so that when placed
correctly on the shelf supports,
the shelf will stop before coming
completely from the oven, and will
not tilt when removing food nor
when placing food on them.
TO REMOVE, pull shelf toward
you and tilt front end upward. TO
REPLACE, place shelf on shelf
support so curve on straight shelf
is pointing upward and toward
~lp front and
rear .jf oven.
Tilt
6
(On Model RGH646GI Only)
This timer is both a time of day
clock and minute timer that sig-nals when set time is finis hed.-To
set time of day, push in knob and
turn to set correct tilme. To set
minute timer, turn knob without
pushing it in to desired time. At
the end of set time, a signal will
sound. To turn signal off, turn
knob clockwise until pointer is
at “OFF”.
[’”7
[.,-,
,,.~.-,.,
(k )
.4.
..... .. .. . ... .. .........-”-..... .... .
.
.,,
. ..—..—.—..._.—...—..—.-————
———.—————————-_____.-.———-—........ . . —..
Page 13

,,
....
.—
<.
seeEhkhg Cm3rtCM’1Rage -f8.
~a+gatlge is equipped with a low
Q9)-
~emperaturethermostat. To ignite
,#>wer oven burner, t~irnOVEN
?$# EMPControl to desired tem-
Cg
perature. Wait approximately
40seconds. This delay isthe
safety mechanism in your oven.
To ignite the upper oven burner,
turn UPPEROVEN TEMP CON-
TROL to desired temperature.
In order to maintain the set oven
temperature, the oven burner
will cycle on and off. Do not be
alarmed if there are no flames on
the burner when opening the
door. This meansthe oven has
reached the set temperature. This
cycle of “on” and “off” continues
during baking.
Baking time is more accurate
with a pre-heated oven. Set OVEN
TEMP Control to correct temperature for about 10 minutes
before placing food in oven. Pre-
heating is especially important
when using temperatures below
225° and for biscuits, cookies,
cakes and other pastries. Preheating is not necessary for
roasting or whole meal cooking
-~~,.flong duration.
Q
J.Xing I%ange to Da!<e
Step t: Position shelf in oven
depending on what you are
baking. Most baking is done
on second shelf position from
bottom. If baking on two shelves
at the same time, place sheIves
at least 4“ apart for best results.
Giep 2: Close door. Turn OVEN
TEMP Control to desired temperature. If pre-heating is neces-
sary, wait about 10 minutes.
:tcp 3: Place food in oven on
center of shelf. Allow 1 or 2
inches between edge of utensil
and oven wall or adjacent utensils. If cooking on two shelves,
stagger foods on shelves.
-=!..:,=.
.. . [-;} NEVER place pans on
.“
ov~n bottom. (2] DO NOT cover
entire rack with aluminum foil or
place foil directly under utensil.
To catch spillovers, cut a piece of
‘-”$foil a little larger than the pan and
‘Jplace on another rack 3“ to 4“-------
below pan, dull side down. (2: DO
.=.-~
‘QT keep cooked foods at
:
~-~~rving temperature any longer
than approximately
11/2 to 2 hours.
lPiw3i3LEiv-1 POSSIBLE I%EASOR!%
CAKE UNDERSIZED
CAKE FALLS
CAKE HAS TUNNELS Not enough shortening.
CAKE HIGH IN MIDDLE
SPONGE CAKE FALLS
OUT OF PAN
CAKE IS UNEVEN
MUFFINS PEAKED
OR TUNNELED
PIE CRUST BURNS
ON EDGE
CAKE SOGGY OR
RUBBERY
PIE HAS SOAKED
CRUST
PIE SHELL SHRINKS
BROWNING PATTERN
UNEVEN
BISCUITS PALE
BISCUITS—LIGH”T TOPS
—BROWN BOTTOMS
COOKIES DARK
ONBOTTOM
.——.— .—,—, ..... .. .
Too little leavening.
Batter overeaten.
Pan too large.
Temperature too high.
Ingredients not at room temperature.
Too much shortening, liquid, or sugar.
Too much leavening.
Short bake or too slow.
Pan too small.
Stale bakina ~owder.
Overmixing after adding flour.
A1l-~ur~ose flour used.
Too much flour.
Temperature too high.
Pan greased.
Too much sugar.
Insufficient baking.
Pans not staggered.
Batter uneven in pans.
Warped pans.
Range not level.
Pans touching sides.
Overmixing.
Temperature too high.
Pans touching each other or oven wall.
Edge of crust too thin.
Batter undermined.
Too little leavening,
Too much liquid.
Temperature too low.
Egg yolks underbeaten.
Temperature too low at start of baking.
Filling too juicy.
Shiny pans—reflect heat away.
Aluminum foil under pan.
Pastry stretched in pan.
Too much water.
Shell not ~ierced enouah.
Utensils too large.
Utensils
Racks too close together or too close to
bottom.
Flue obstructed.
Temperature too low,
Too much flour.
‘an too deep, invert or use cookie sheet.
Dark or heavy pah
pan too deep or too large.
Cookie sheet too low.
Cookie sheet too wide or too long for oven.
I Uneven heat distribution in oven.
used together of different materia
—use shiny cookie sheet.
s.
Page 14

Roasting iscooking by dry heat.
Tender meat or poultry can be
roasted uncovered in your oven.
Roasting temperatures, which
should be low and steady, keep
spattering to a minimum. When
roasting, it is not necessary to
sear, baste, cover, or add water to
your meat. Roasting is easy, just
follow these steps:
step-i:Check weight of meat, and
place, fat side up, on roasting
rack in a shallow pan. Select a
pan as close to the size of meat as
possible. (Broiler pan with rack is
a good pan for this. )
step ~: place in oven on shelf in
lowest position in center of oven.
Do not place pan on oven bottom.
No preheating is necessary.
Step 3: Turn OVEN TEMP Control
to desired temperature. Check the
Roasting Chart for temperatures
and approximate cooking times.
Step 4: Most meats continue to
cook slightly while standing after
being removed from the oven. For
rare or medium internal doneness,
if meat is to stand 10-20 minutes
while making gravy or for easier
carving, you may wish to remove
meat from oven just before it is
done. If no standing is planned,
cook meat to suggested
temperature.
Frozen roasts of beef, pork,
lamb, etc., can be started
without thawing, but allow 1025 minutes per pound additional time (10 min. per pound
for roasts under 5 pounds,
more time for larger roasts).
Thaw most frozen poultry
before roasting to ensure even
doneness. Some commercial
frozen poultry can be cooked
successfully without thawing.
Follow directions given on
packer’s label.
eTYmcL--.---, —.,--- .-~---
Clwxmms arid &M-kwwers
Q. Why is my roast crumbling
when I try to carve it?
A. Roasts are easier to slice if
allowed to cool 10 to 20 minutes
after removing from oven. Be sure
to cut across the grain of the
meat.
G. Do I need to preheat
eac17 time 1cook a roast or
my oven
poLlltry?
A. It is rarely necessary to preheat
your oven, only for very small
~oasts,which cook a short length
of time.
G1.When buying a roast are there
any special tips that would help
me cook it more evenly?
A. Yes. Buy a roast as even in
thickness as possible, or buy
rolled roasts.
G. Can I seal the sides of my foil
“tent” when roasting a turkey?
A. Sealing the foil will steam the
meat. Leaving it unsealed allows
the air to circulate and brown the
meat.
Q. I.Sit necessary to check
for doneness with a meat
thermometer?
A. Checking the finished internal
temperature at the completion of
cooking time,is recommended.
Temperatures are shown on
Roasting Chart on page 18. For
roasts over 8 Ibs., cooked at 300°
with reduced time, check with
thermometer at half-hour intervals
after % of time has passed.
.’-.2
/
\
‘h......
(-
‘---
)
Page 15

.!
.’
.-. -.. ..-—
—--.....—..-—. ...—.-———.——..—..—
------.
—.
Broiling is cooking by direct heat
~$~$fromabove the food.
on your
-range there is a convenient
Broiler Compartment below the
oven. Broiling requires the use of
the Broiler
Panand Rack.The
correct position of the rack in the
pan is extremely important as
shown below. Many grease fires
are caused by improper use of
pan and rack. If aluminum foil is
used in bottom of pan, be abso-
lutely sure it does not block the
drain vents above edge of pan.
%le~]2: Remove broiler pan and
rack from broiler compartment
(cold food will stick if placed on
hot
broiler rack). Placefood on
broiler rack in broiler pan. Always
use rack so fat drips into broiler
pan; otherwise juices may
become hot enough to catch fire.
Step 3: Pull out drawer and position broiler pan in compartment.
Placing food closer to flame
increases exterior browning on
food, but also increases spattering and the possibility of fats
and meatjuices igniting. Close
broiler drawer.
Step 6: Turn oven to OFF. Remove
broiler pan from compartment
and serve food immediately.
Leavepan outside compartment
to cool.
Step 7: Broiled foods may be kept
ready to serve in the KEEP-WARM
oven after broi!ing. After broiling
is complete, turn the thermostat
dial to 170° (KEEP-WARM). Open
door for 10to 15 minutes to allow
excess heat to escape. Place the
broiled food on aserving platter,
cover loosely and place in the
oven.
REME~fiBER:DO NOT USE
PLASTIC PLATTERS OR SERVING TRAYS, PLATED SERVING
PLATES SUCH AS SILVER, OR
PLASTIC WRAP IN THE KEEP-
WARM OVEN.
Cooking times given are approxi-
mate; use them only as a guide.
For your personal safety always
follow above directions carefully.
Distance from the heat source
may be changed by positioning
the Broiler Pan and Rack on one
of three shelf positions in the
Broiler Compartment. Of course,
density and size of food are other
factors involved in position.
..... :—.. .
,--- [-i,,
.. .
r,!,
.- J..
!!
,-, .,,,
(
.~,:
,.
‘;: If meat has fat or gristle
near edge, cut vertical slashes
through both about 2-in. apart.
It is recommended that fat be
trim{med, leaving a layer about
%-in. thick, to prevent excessive
smoking.
Step 4: Set OVEN TEMP Control
to BROIL.
Step 5: Turn most foods once
during cooking; (the exception is
thin fillets of fish; oil one side,
place that side down on broiler
rack and cook without turning
until done). Time foods for about
one-half the total cooking time,
turn food, then continue to cook
to preferred doneness. Where two
thicknesses and times are given
together, use first times given for
thinnest food. NOTE: Foods generally broiled include steaks,
hamburgers, chicken, fish, lamb
chops, fruit ?nd vegetables. Pork
and veal should not be broiled
because these meats require
longer cooking at lower temperatures to develop their full flavor
and tenderness and to be eaten
safely.
.-”-—-\
J.
.. .. .
1
-/5
‘/
(,
Page 16

.——.
Care ofthe (%ri~im.nous
For
QCkanirtgChwn,See
Proper care and cleaning are
important so your
Page 17.
Rangewill give
you efficient and satisfactory service Follow these directions and
directions on the Cleaning Chart
page 21 carefully in caring for
your range.
Pm(x?kdn Enamel Finish
The porcelain enamel finish is
sturdy but breakable if misused.
This finish is acid resistant. However, any acid foods spilled (such
as fruit juices, tomato, or vinegar)
should not be permitted to remain
on the finish.
Plinged Top
Your range has a hinged “lift-up”
cooktop which makes cleaning
easy and fast. To lift, grasp
bottom of front edge of cooktop
just above control panel and lift
up. Raise the support rod and set
under front edge of top. To lower,
lift top slightly and return support
rod to its down position, then
gently lower top into position.
REMEMBER: Burner grates must
be removed prior to lifting
cooktop.
The oven door is removable for
cleaning. Be sure oven door is
fully cooled before removing. To
remove, open the door approximately 3“ to the “special” stop
position. Grasp the door on each
side and lift straight
hinges.
DO NOT IMMERSE THE
up and off the
OVEN DOOR IN WATER. Clean
as described in Cleaning Chart on
page 21.
To replace door, position slots in
bottom of door over the hinges
that are in the “out” position, then
lower door slowly and evenly over
both hinges at the same time. If
hinges are not “out”, simply
pull
the hinges to open position to
replace door.
The bottom panelof the oven may
be removedto clean. Be sure oven
isfully cooled, then lift front of panel
andgently removefrom oven.Clean
with mild soap and water.Drywith
soft cloth. When reinstalling, place
ovenbottom into ovencavitywith
rearedge lifted high enough to allow
the metal brace located onthe
undersideof the oven bottom to drop
behindthe edge ofthe front panel.
Then gently lowerrear of oven
bottom into place.
CM?n FLsigl”lt
When replacing oven interior light
bulb, be sure oven is completely
COOI.DISCONNECT POWER TO
RANGE by unplugging range, or
by removing fuse or throwing circuit breaker. Then make towel
into a ball and by applying pressure and turning, bulb should be
unscrewed easily. Always handle
bulb with a dry (never wet) cloth
to protect hands, Unscrew bulb
and replace.
Page 17

. . .
..—..-..-—...-,--.-.-—.-..—-..-——-——--—-——--—-----—
.—.—--..—..——.———.—......... .———.———_____—__—
These models are equipped with a
Continuous Cleaning Oven that
cleans itself while cooking. Care
must be taken to not scratch or
mar this special coating when
removing utensils or shelves. The
side and back of the oven are finished with a special coating which
cannot be cleaned in the usual
manner with soap, detergents,
commercial oven cleaners, coarse
abrasive pads or coarse brushes.
Their use and/or the use of oven
sprays will cause permanent
damage.
The special coating is a porous
ceramic material which is dark
in color and feels slightly rough
tOthe touch. If magnified, the
----:i surface would appear as peaks,
uaileys, and subsurface “tunnels”.
.;
-----
This rough finish tends to prevent
grease spatters from forming little
beads or droplets which run down
the side walls of a hard-surface
oven liner leaving unsightly
streaks that require hand cleaning. Instead, when spatter hits the
porous finish it spreads out and is
partially absorbed. This spreading
action increases the exposure of
oven soil to heated air, and makes
it somewhat less noticeable. It
may not disappear completely
and at some time after extended
usage, stains may appear which
cannot be removed.
The special coating works best on
small amounts of spatter. It does
not work well with larger spills,
especially sugar, egg, or dairy
mixtures.
“rff21C%3anChfw’”1
1.Letrangecoolbeforehandling.
2. Removeall cookingutensilsand
ovenshelves.
3.Soil visibility onsurfaceswith
the special porous-ceramicfinish
maybe reducedbyoperatingthe
ovenat400°F.Closedoorandturn
oventemperaturecontrolto 400°F.
for 3to 4 hours.(Longertimesor
repeatedcycleswill be necessary
for heavysoils.)
CAUTION: During the operation,
the oven, door, window, and other
range surfaces will get hot enough
to cause burns. DO NOT TOUCH.
Let the range cool before replacing oven shelves.
4. If aspillover or heavy soiling
occurs on the special coating, as
soon as practical after the oven
has cooled remove as much of the
soil as possible by using a small
amount d water and a stiff bristled nylon brush.
ingly and change frequently to
keep as clean as possible. Be sure
to blot surface with paper towels,
cloths, or sponges. Do not rub or
scrub with paper towels, cloths
or sponges, since these will leave
unsightly lint. If water leaves a
white ring on the finish as it dries,
use clean water and wipe surface
again, blotting with clean sponge
wipe from outer edge of ring
toward center.
Usewater spar-
17
Page 18

.
.-P:J-
)
shelf Positions are:A = knviist;D = highest, seepage12.
4. Aluminum pans generally conduct heat quickly. For most
conventional baking light shiny finishes give best results
because they help prevent overbrowning in the time it takes for 3, Preheating the oven is not always necessary, especially for
heat to cook the center areas.Dull (satin-finish) bottom surfaces of pans are recommended for cake pans and pie plates to
be sure those areas brown completely.
2. Dark or non-shiny finishes, also glass and pyroceram,
absorb heat which may result in dry, crisp crusts. Reduce oven
heat 25° if lighter crusts are desired. Preheat cast iron for
baking some foods for rapid browning when food is added.
foods which cook longer than 30 to 40 minutes. For food with
short cooking times, preheating helps give best appearance
and crispness.
4, Open the oven door to check food as little as possible to
prevent uneven heating and to saveenergy.
—
ti%d Container
L=read
Biscuits (Win. thick)
Coffee cake
Corn bread or muffins
Gingerbread
Muffins
Popovers
Quick Loaf Bread
Yeastbread (2 loaves)
Plain rolls
Sweet rolls
fakes
(without shortening)
Angel food
Jelly roll
Sponge
C%!:es
Bundt cakes
Cupcakes
Fruit cakes
Layer
Layer, Chocolate
Loaf
Shiny Cookie Sheet
Shiny Metal Pan with
Satin-finish bottom
Cast Iron or Glass
Shiny Metal Pan with
Satin-finish bottom
Shiny Metal Muffin Pans
Deep Glass or Cast Iron Cup
Metal or Glass Loaf Pans
Metal or Glass Loaf Pans
Shiny Oblong or Muffin Pans
Shiny Oblong or Muffin Pans
Aluminum Tube Pan
Metal Jelly Roll Pan
Metal or Ceramic Pan
Metal or Ceramic Pan
Shiny Metal Muffin Pans
Metal or Glass Loaf or
Tube Pan
Shiny Metal Panwith
Satin-finish bottom
Shiny Metal Pan with
Satin-finish bottom
Metal or Glass Loaf Pans
shelf
Position
B, C
B
B
B
B
B
B
B
B
B
A
B
A
B
B
B
B
B
B
%hmn
Temp.
400°-4750
350°-4000
400°-4500
350°
400°-4250
375°
350°-3750
375°-4250
375°-4250
350°-3750
325°-3750
375°-4000
325°-3500
325°-3500
350°-3750
275°-3000
350°-3750
350°-3750
350°
%’ime,
Mini.
10-20
20-30
20-40
45-55
20-30
45-60
45-60
45-60
10-25
20-30
30-55
10-15
45-60
30-65
20-25
2-4 hrs
20-35
25-30
40-60
Cmmmmts
Canned refrigerated biscuits take
2-4 min. lesstime.
Preheat pan for crisp crust.
Decrease about 5 min. for muffin
mix. Or bake at 450° for 25 min.,
then at 350° for 10-15 min.
Dark meta! or glass give deepest
browning.
For thin rolls, Shelf B may be used.
For thin rolls, Shelf B may be used.
Two piece pan is convenient.
Line pan with waxed paper.
Paper liners produce more moist
crusts.
Use 300° and Shelf B for small or
individual cakes.
=----
.-x-w.
“---
@
Metal or Glass Pans
Cookie Sheet
Cookie Sheet
Cookie Sheet
Glass or Metal
Glass Custard Cups or :
Casserole (set in pan of :
L
!
Puddings, Rice and : Glass Custard Cups or B
Custard
..
~r. .-.
Frozen
Meringue Spread to crust edges
One crust
Two crust ‘ Glass or Satin-finish Metal
Pastry Shell Glass or Satin-finish Metal B
.
. -----,-------.-,-
......,,.-.,.-.
Baked potatoes
Scalloped dishes
Sollffles
——...———....—
!. ’-[. L.-
——.—. — —— ....———.—.—
hot water)
; Casserole
, Foil Pan on Cookie Sheet , B
Glass or Satin-finish Metal
Set on Oven Shelf
Glass or Metal
Glass B 300°-3500 30-75
B, C
c
B,
B, C
B, C
A, B, C
B
B, A
B
B
A, B, C 325°-4000
A, B, C 325°-3750
325°-3500
350°-4000
400°-4250
375°-4000
350°-4000
300°-3500
325°
400°-425°
325°-3500
400°-4250
400°-4250
450°
‘18
25-35
10-20
6-12
7-12
30-60
30-60
50-90
45-70
15-25
45-60 ;, Custard fillings require Iower temp.,
40-60 :! longer time.
12-15 ‘
60-90
30-60
Bar cookies from mix use same
time. Use Shelf C and increase
temp. 25-50° for more browning
Reduce temp. to 300° for large
custard. Cook bread or rice pudding
with custard base 80 to 90 minutes.
Large pies use 400° and increase
time.
To quickly brown meringue use
400° for 8-10 min.
“ Increase time for large amount or
size.
,,., -.--,,
(.,
~--.’
(-
‘-.. . .
Page 19

3
.,
:
g?jj$
,
-..,
.;._
~k:-r,.,
, -—:,-.!-,=>.
::-->~t-$; ~-~
:&<:.
;~
.
‘i . Position oven shelf at center (B) position for small-size
roasts (3to 7 Ibs.) and at lowest (A) position for !arger roasts.
~ Place meat fat side up or poultry breast-side up on broiler
Danor other shallow pan with trivet. Do not cover. Do not stuff
poultry until just befo”reroasting.
3. Remove fat and drippings as necessary. Baste as desired.
&. SXandin9 ftirm? recommended for roasts is 10to 20 min.
to allow roast to firm up and make it easier to carve. It will rise
about 5° to 10° less than temperature; to compensate for temperature rise, if desired, remove roast from oven at 5° to 10°
lessthan temperature on chart.
3. F’tnaamnroasts%can be conventionally roasted by adding
‘1Oto 25 min. per pound more time than given in chart for
refrigerated. (10 min. per lb. for roasts under 5-lbs.) Defrost
poultry before roasting.
Approximate Roasting
Time
in Iw7ii?nuw’sper PoundB30mmess
20-25
25-30
30-35
30-35
35-40 30-35
40-45 35-40
35-40
35-40 35
35-40
50-56
40
1%to 2% hrs.
to 3’/4 hrs.
2%
Rolled Roasts
W3E3K(Fresh)
Fresh Ham, Whole (10 to 14 Ibs.)
Loin
Rib
Shoulder, Butt
Shoulder, Picnic
325°
325°
325°
325°
325°
325°
325°
Rare
Medium
Well Done
Rare
Medium
Well Done
Well Done
Well Done
Well Done
Well Done
Well Done
Well Done
Well Done
;.j~~&
(Smoked–Mild Cure)
Under 10 Ibs.
10-12 Ibs.
12-15 Ibs.
15 lbs. and over
Half Ham (5-8 Ibs.)
Picnic Shoulder
Cottage Roll
“.,”U!7$;E’<(Unstuffed)**
6 to 8 Ibs.
8 to 12 Ibs.
12to 16 Ibs.
16 to 20 Ibs,
325°
325°
;
325°
[
325°
~
325°
325°
1
325°
lj
f
!.
h
325°
~,
325°
ti
I
325°
I
:;
325°
20 to 22 Ibs. 325°
“i”’~r’~;’~(Unstuffed)**
..>-..- 325”
.=2~.....~-.-
. ,.LJLn~%;,:
/
3 to6 Ibs.
!’
/,
j:
325°
1’
Well Done
Well Done
$ Well Done
g
Well Done
~
Well Done
Well Done
Well Done
Well Done
Well Done
Well Done
Well Done
Well Done
Well Done
Well Done
“Small chickens can also be roasted at 400° for darker browning. If so, the cooking time should be shortened.
**For stuffed turkey or duck, increase the cooking time 15 to 20 minutes.
‘-”’-~u.Line broiler pan with aluminum foil when using pan for marinating, cooking with fruits, cooking heavily cured meats, or for
....! ,-.
basting food during cooking. Avoid spilling these materials on oven liner or door. See cleaning note, on charts, Care Section.
25-27
23-25
21-23
20
25-29
30-35
35-40
2 to 3 hrs.
3 to 4 hrs.
4t05hrs.
5t06hrs.
6to 7 hrs.
2%to 3 hrs.
21/2 to 3 tirs.
15-20
20-25
25-30
25-30
35
35-40
..
3
J
s-
-----
/ . -i
t.!
“=.-.->
Page 20

‘i . Always use broiler pan and rack that comes with your oven.
/=-+.
It is designed to minimize smoking and spattering by trapping
juices in the shielded lower part of the pan.
2?.Forsteaks and chops, trim off excessfat. Use tongs to turn
4. When arranging food on pan, do not let fatty edges hang
over sides, which could soil oven with fat dripping.
5. Broiler does not needto be preheated. However, for very
thin foods or to increase browning, preheat if desired.
meat over to prevent piercing meat and losing juices. 6. iFroze!n SteE&S can be conventionally broiled by posi-
3. If desired, marinate meatsbefore broiling. Or, brusil with
barbecue sauce last 5 to 10minutes only, -
tioning the oven shelf at lowest shelf position and increasing
cooki~g time given in this chart 1%times per side.
Well done
Med
Med Rare
Beef steaks
Rare
Medium
Well Done
Rare
Medium
Well Done
CE3akw’yFm$uzts
Bread (Toast) or
Toaster Pastries
English Muffins
Lobster tai!s
(6 to 8-oz. each)
Quantity
Emd/u3E’
Thickness
Pam
Position
First Side
The, Miia.
%-lb. (about 8
thin slices)
l-lb. (4 patties)
%to 3/d-in.thick
A
A
A
1 inch thick
(1-11/2Ibs.)
A
A
A
I’/z-in, thick
(2-21/2Ibs.)
A
A
A
2-4 slices
B
1 pkg. (2)
2-split
2-4
l-lb. fillets %to
B
A
A
%-in. thick
l-in. thick B 8
3%
7-1o
6-9
6-8
6
7
9
8
9
Ii
‘/2-1
2-3
10-14
5
Skxmd side
Time5 ‘iMin.
3V2
——
6-7
4-6
5
3-5
4-5
6-7
4-6
8-10
8-12
‘/2
(Do not
turn over)
5
8
mmmmnlfm
Arrange in single layer.B
Space evenly.
Up to 8 patties take about same
time.
Steaks lessthan l-in. cook through
before browning. Pan frying is
recommended.
Trim off excess fat.
Space evenly. Place English muffins
cut side-up and brush with butter, if
desired.
Cut through back of shell. Spread
open. Brush with melted butter
before and after half time.
Handle and turn very carefully.
Brush with lemon butter before and
during cooking if desired. Preheat
broiler to increase browning.
Increase times 5-10 min. per side for
1%-in. thick or home cured.
Well done
Medium
Well Done
-,;.;_:_
[;..,,:cw~and similar ~~
precooked sausages, ,!
bratwurst
I
I Trim off excess fat.
2 (%inch) ~
I
2 (1-in. thick) \
A
A
10
13
10
13
about 1 lb. i
2 (1 inch)
about 10-12 oz. ;
,:
2 (1% inch) B
,;
about 1 lb. ‘; A ;
I
,
:;
i: !
l-lb, pkg. (10) :; B ~...
B
B;
I
8
I
10
!
10
17
6
4-7
10
4-6
12-14
1-2
Trim off excess fat
If desired, split sausages in half
lengthwise into 5 to 6-in. pieces.
f’
,’
I
(-’-
,!
[
-)
t
‘L...-’
Page 21

,.
..
GamwaiDirections
@Soap and Water
~ Soap-Filled
Scouring Pad
@PlasticScouring
Pad
@Mild Soap and
Water
Drain fat, cool pan and rackslightly. (Do not let soiled pan and rack stand in ovento
cool). Sprinkle on detergent. Fill the pan with warmwater and spread cloth or paper
towel overthe rack. Let pan and‘rackstand for a few minutes, Wash;scour if necessary.
Rinseand dry. OPTlON: The broiler pan and rack mayalso be cleaned in a dishwasher.
—
Pull off knobs. Washgently but do not soak. Dty and return controls to range making
sureto match flat area on the knob and shaft.
@Soap and Water
Painted Metal Sides
Porcelain Enamel*
Cooktop, Door
& Drawer
“Spillage of marinades, fruit juices, and basting materials containing acids may cause discoloration, Spillovers should be wiped up imme-
diately, with care being taken to not touch any hot portion of the oven. When the surface iscool, clean and rinse.
~ Soap and Water
IXIPaperTowel
@Dry Cloth
~ Soap and Water
~ Soap and Water
IBSoap-Filled
Scouring Pad
~ Oven Cleaner
~ Soap and Water
IJSoap-Filled
Scouring Pad
(Non-Metallic)
o Soap and Water
@Soap-Filled
Scouring Pad
(Non-Metallic)
@Soap and Water
~ Soap-Filled
Scouring Pad
(Non-Metallic)
e Damp Cloth
~ Stiff-Wire Brush
,
!
~ Soap and Water
Washall glasswith cloth dampened in soapy water. Rinseand polish with a dry cloth.
Do not let water run down inside surface of glass.
Wash,rinse then polish with dry cloth. DO NOT USE steelwool, abrasives,ammonia,
acids or commercial ovencleanerswhich may damage finish.
Avoid cleaning powders or harsh abrasiveswhich may scratch the enamel.
If acids should spill on the range while it is hot, usea dry paper towel or cloth to wipe up
right away.When the surface has cooled, wash and rinse.
Forother spills, such asfat smatteringsetc., wash with soap and water when cooled and
then rinse. Polish with a dry cloth.
To clean oven door: remove by opening to special stop position (about 3 inches) and
grasping door at sides. Lift door up and awayfrom hinges. Do not immerse or place
under running water. Clean with soap and water. Replace by grasping door at sides and
lining up door with hinges. Push door firmly into place. Do not let oven cleaner drip
from door.
For Care of the Continuous Cleaning Oven,see page 17. Most spills and spatters gradu-
ally diminish while you cook. Removeexcessspills, soils and solid substanceswith a
damp cloth as soon asoven is cool to touch. Some stubborn spills may require use of a
damp sponge or synthetic mesh scouring pad, plus a mild solution of liquid soap. Rinse
immediately with clean water. Avoid harsh abrasive powders, liquid, aerosol cleaners,
scouring pads, oven cleaners and scraping tools.
The oven bottom panel can be removed for easycleaning. Usethe same directions for
cleaning asexplained abovefor Oven Inside Liner.
Lift out when cool. Soak 5-10 minutes if desired in warm solution of dishwasher deter-
gent. Scour with materials mentioned here to remove burned-on food particles.
Wipe off chrome burner head. If heavy spillover occurs, the burner can be lifted out so
burner holes can be cleaned with stiff wire brush. Turn burner slightly to release tab and
then lift up. When replacing, be sure tab is locked securely in position on burner
support.
Yourshelves can be cleaned by hand using any and all mentioned materials. Rinse thorwghly to remove all materials after cleaning,
—
21
,
Page 22

TOP BURNERS DO NOT
LIGHT
~ Pilots are not lit. Lift cooktop and hold lighted match next to pilot
opening between front and rear burners. On models so equipped,
sure electrical plug is plugged into a live power outlet.
make
OVEN DOES NOT HEAT
PROPERLY
OVEN DOES NOT COOK
PROPERLY
@Make sure that burner holes on side of burner are not
Check air shutters and make sure they are in correct position.
e
clogged.
@Pilot is not lit. Check pilot and light if necessary. On some
models, make sure electrical plug is plugged into live power outlet.
@Check air shutter for correct amount of air intake for flame.
@Make sure thermostat
oven) is in correct position, not touching oven
with anything.
e Aluminum foil
e Oven vent blocked on top of range.
e incorrect utensil
being used improperly in oven.
capillary bulb (located in upper portion of
sides and not coated
being used. check each cooking section for
utensil tips or recommendations.
@Oven bottom not securely seated in position.
~ incorrect
oven
then back on to desired oven temperature.
Check specific Baking problems on page 13.
e
temperature set on OVEN TEMIP Knob. When using the
for Broiling and then Baking, knob must be turned to OFF
CLOCK DOES NOT WORK
OVEN LIGHT DOES NOT
GOME ON
~ Range electrical
outlet.
breaker.
You may need to check for blown fuse or tripped circuit
plug must be securely seated in a live power
@Bulb may be loose or burned out.
@Electrical plug must be plugged into a live
22
power OUtlfX
Page 23

T:
——- . . . . . . . . . . . -. —— —--- -
.s-’?>
.;
; ~+?$ Toobt~in ~er~ice, see YOUrwarranty
:.,;
J
:
on the back page of this book.
$aWeJre ~~oud of our service Wld
>my.:;<>
b
want you to be pleased.
reason you are not happy with the
service
youreceive,herearethree
Iffor some
stepsto followfor further help.
FIRST contactthe people who
serviced
yourappliance. Explain
whyyou arenot pieased. Inmost
cases,this will solvethe problem.
NEXT if youarestill not pleased,
writeall the details—including your
phonenumber—to:
Manager,Consumer Relations
Hotpoint
Appliance Park
Louisville,Kentucky
40225
FINALLY,if yourproblem is still not
resolved, write:
Major Appliance
Consumer Action Panel
North WackerDrive
20
Chicago, Illinois 60606
23
,,
1
o
Page 24

‘ii % ‘ –—
11%
?#
:-,
_:~.-
~-,
.=,
——...——
j#.jy
~>~kj>
~g# mks Er-’i E
,1
$$jj
@“’l
*
$
:8
&l
‘%
b’
%
“~
@.
/
~
Y
F
h
,1
.+.::q
yj+f,.,.?
’11
jiT
is)CXFJEF:ED ‘FULLONE-YEARWARRANTY
Forone year
purchase, we will provide, free of
charge, parts and
your hotne to repair or replace
pad of the range
of a manufacturingdefect.
~Servicetrips to your hometo
teach you howto usethe product.
ReadyourW
yOLI then h:
If
-. ... .. ..Jve
It operating the product,
abou
nlea~
~..–se contact your dealeror our
ConsumerAffairs office at the
address below, or ca!i, toil free:
!.A”M.,
l-, A
I ne GE Answer Center@
--- .-. . . . .
twu.bzb.zuuu
consumer inf~
~ improper installation.
If you havean installation problem,
contact your dealer or installer.
Youare responsible for providing
adequate electrical, gas,exhausting and other connecting facilities.
from date of original
servicelabor in
that fails because
w
and Care material.
anyquestions
ormation service
any
This warranty is extendedto the
originalpurchaser and anysucceed-
ing owner for products purchased
for ordinary
mainland states, Hawaii and
Washington, D.C. In Alaska the
warranty is the same except that it
is
LIMITEDbecauseyou must pay
to ship the product to the service
shopor for the servicetechnician’s
travelcosts to your home.
All warrantyservicewill be provided
by our Factory Service Centers or
by our authorized Customer Care@
servicersduring normal working
hours.
Look in the White or Yellow Pages
of your telephone directory for
HOTPOINTFACTORYSERVICE,
GENERALELECTRIC-HOTPOINT
FACTORY SERVICE or HOTPO!NT
CUSTOMERCARE@SERVICE.
~ Replacementof house fuses
or resetting of circuit breakers.
s Failure of the product if it is
used for other than its intended
purpose or used commercially.
~ Damageto product caused
by accident, fire, floods or acts
of God.
WARRANTORIS NOT RESPONSIBLE FORCONSEQUENTIAL
DAMAGES.
home use in the 48
I
Some states do not allow the exclusion or limitation of incidental or consequential damages, so the above limitation or exclusion
may not apply to you. This warranty gives you specific legal rights, and you may also have other rights which vary from state to state.
To know what your legal rights are in your state, consult your local or state consumer affairs office or your state’s Attorney General.
Manager–Consumer Affairs, General Eieeiric Chmpany, Appliance Park,
pf!rt No. 862A724PI16
/
[+~
,0. ivo. 239’4530
l..arra~tcw:
Hfurther help is needed cxmxming this warranty,
—.,,..—
\
~..’
n
——
7-05
J---
-r ,L-=.-.
General Electric Company
ilL;
u L1tidi-)””u_. ‘d_L-:--
..~=
-=.7,..,
A QUALITY PRODUCT OF L/ GENERAL ELECTRIC COMPANY
p=y’) (-Q) rjJ--j-ju
contact:
Louisville, KY 40225
L
(3
...
 Loading...