

Page 1
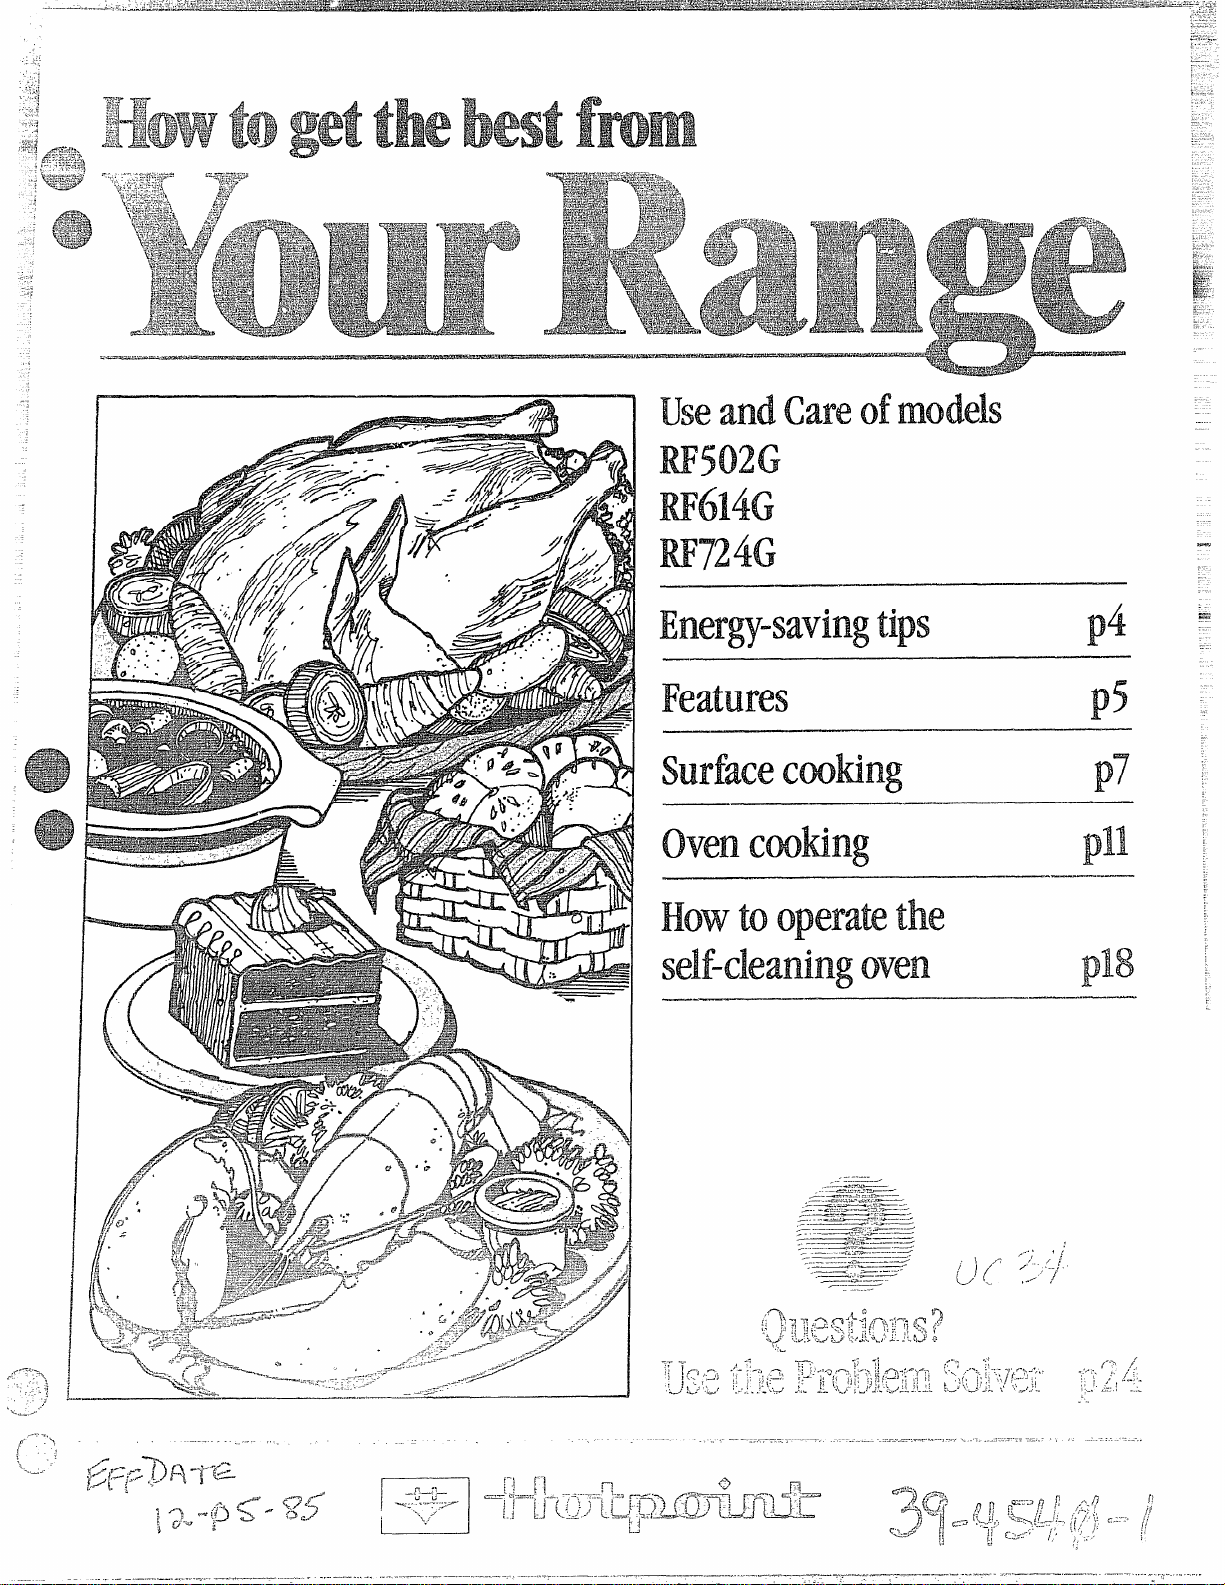
useandcareof
models
W502G
W614G
W724G
Energy-saving-tips
Features
surfaceCmting
ovenCmting
Howtooperatethe
self-cleaning
oven
—.
p4
p5
-p7
-j@
‘@3
———.
.-------
,-
‘.._ . .
-\
-,
$
j_
-’%=.+
-—-. —-
-“ -- J
.
,... /
Page 2
13eftm‘UsiIIgYourRange. .. . . ~Z
.—
.
$afetylmxructkms . . . . . . . ...3.4
Energy-SavingTips . . . . . . . . ...4
FeaturesofYourRange . . . ...5.6
SurfaceCooking . . . . . ...9....7
Home CanningTips . . ..~ . . . ..i7
~urfaceCookingCharts . . . ...8.9
Automaticl’imerand Clock . . ..lO
Using YourOven, . . .. O....... 11
HowtoWkeandTimeB&e . ..12
l+lowtol?o as t . . . . . . . . . . . . .
Bating Chafl . . . . . . . . . . . ..~4.l~
RoastingChart . . . . . . . . . . . . ..~5
Howto Broil . . . . . . . . . . . . . . . .16
13roilingChart. . . . . . . . . . . . . ..l7
Howto Operate the
Self-CleaningOven . . . . . ...18. 19
How to Care for
YourRange . . . . . . . . ..o. ..20-~2
Oven Care . . . . . . . . . . . . . ..2Q2l
Self-CleaningOven . . . . . ...20
Continuous-Cleaning
Oven . . . . . . . . . . . . . . . ..2Q2l
StandardOven . . . . . . . . . ...20
CkxmingYourRange . . . . . . ...23
TheProblem Solver . . . . . . . ...24
IfYouNeed Service . . . . . . . ...27
Warranty . . . . . . . . . ..BackCover
Readthis bookcarefully.
Risintendedto helpyouoperate
andmaintain your newrarlge
properly.
Keepit handy for answersto your
questions.
If Youdon’tunderstandsomething
or-needmorehelp, write (include
yourphone number):
ConsumerAffairs
Hotpoint
AppliancePark
Louisville,KY40225
writedownthemodel
andserial
You’llfind them on a label on
the front of the rangebehind the
ovendoor.
These numbers are also on the
Consumer Product Ownership
RegistrationCard that came with
your range. Beforesendingin this
card, please write these numbers
here:
ModelNumber
SerialNumber
numbers.
If youreceived
a damagedrangeo e e
Immediatelycontactthe dealer
(orbuilder)that soldyouthe range. ,>:
.
..
~~
-.
Savetimeand.money
Beforeyoureqm%t
service.m .
Checkthe Problem Solveron
page24. It listsminor causesof
operatingproblemsthat you can
correct yourself.
-.
.
.
Use these numbers in any
correspondence or service calls
concerning your range.
2
.
Page 3
,
—.. ....,..—
—..
When usingelectr.!calappliances
)b
i% asicsafetyprecautions shouldbe
~ fcilowed,including the following:
~ use this appliance onlyfor its
intended use as described in this
manual.
QBe sure your appliance is
‘properlyinstalled and grounded
bya qualifiedtechnicianin
accordancewiththeprovided
installationinstructions.
~ Don%attempt to repairor
replaceany partof yourrange
Unkssit is specifically
recommendedin this book. All
otherservicingshouldbe referred
toa qualifiedtechnician.
@Before performing anyservice?
DISCONNECTTHE RANGE
POWERSUPPLYA%’THE
HOUSEHOLDDIsTRmuTIoN
PANEL BYREMOVING THE
FUSE OR SWITCHING OFF
THE CIRCUIT BREAKER.
@Do not hi!avechildren akme-
children shouldnot be leftalone or
unattendedin area where appliance
isin use. They should neverbe
allowedto sit or stand on anypmt
ofthe appliance.
@Don’ta]io%v~nyO~e
standor hang on the dooror
rangetop. They could damage
the range or’cause severe
personalinjury.
~ o?&J’I’IoN:DO Nm’ STORE
H’EMS ‘OF’nwrEREsT TO
c%mLDREN IN C4JmJEm
ABOVE A R.ANGE. CHILDREN
~J~~~pJ~ ~p?/ ‘pi-lmRANGE
TO REACH
SEIWIJSLY ~~~~~~.
~ r’vewwwear
iE3@Fi~
&3HTEl@?EltSWhikKISiBl~
the appliance. Flammable
material could be ignited if brought
inconf’[wtwith hot heating elcrnents
:mdmaycause severe burns.
.
..-.
tO diznb~
ITEMS IWKJLDBE
kme-’fittingol-
@Useonly dryjpotldkw+-—rnoist
or damppotholderson hotsurfaces
mayresultinburnsfrom steam.Do
notletpotholderstouchhotheating
elements.Do notuse a towelor
other bulkycloth.
@Never Ulse‘yourappliance for
warming or heating the HMml.
@’storage in or on appliaHce—
Do notstoreflammablematerials
in an ovenor near surfaceunits.
~ Keep hood and grease fikws
clean.to maintaingoodventing
andto avoidgrease fires.
@DOInot M cooking greaseor
otherflammablematerials
accumulateh orneartherange.
~
DO not use wateron grease
fires. Neverpickupa flming
pan. Smother flaming panon
surfaceunit by coveringpan
completelywithwell-fittinglid,
cookiesheet or flat tray.Harning
greaseoutside a pancanbe put
out by coveringwithbaking soda
or9ifavaikibie3a ndti-pupse
dry cherniealorfoam.
@Do not touch heating ekrnents
or interiorsurfaceof oven. These
surfacesmaybe hot enoughto burn
eventhoughthey are dark in color.
During and after use, do not touch,
or let clothing or other flammable
materials contact surface units,
areas nearby surface unitsor any
interior area oftheoven;allow
sufficienttime for cooling, first.
Potentiallyhot surfaces include
the cooktop and areas facingthe
cooktop, ovenventopeningand
surfaces near the opening, and
crevicesaround the ovendoor.
Remember: The inside surface
ofthe oven maybe hot when the
door is opened.
QlJWhencooking perky followour
directions exact~yand alwayscook
the meatto at least 179?This assures
dint. in the remote possibility that
trichina may be present in the
meat, itwill be killed and the meat
will lx safe to eat.
@-when usingcookingor
roasting bagsin oven9follow the
manufacturer’sdirections.
~ Do notuseyour oventodry
newspapers. If overheated, they
can catch fire.
@Do notdean door gasket.The
door gasketisessentialfor a good
seal. Care shouldbe taken notto
rub, damage, or movethe gasket.
@D(.)M@tUS4?ovenCI&?~ll~IR3eNO
commercial ovencleaner or oven
liner protective coating of any kind
shouldbe used in or around any
part of the oven.
@‘man only’partslisted inthis
use and.can?EW9ke
Q Before self-ckaniqg the mwr19
Ewn-ww!
utensil%
brow panand other
3
Page 4
@Use proper pm size—+his
_&iEi%a
~+-
.:_-
.—
applianceis equippedwithone or
more surfaceunitsofdifferentsize.
Select utensilshavingflat bottoms
largeenoughtocoverthe surface
unitheatingelement. The use of
undersizedutensilswillexpose
~~fiion ofthe heatingelement
tod~~ectcontact and mayresult
in ignitionof clothing. Proper
relationshipof utensilto burner
will also improveefficiency.
~ Never leavesurface units
unattend& at high heat settings.
130ilovercauses smokingand
greasy spilloversthat maycatch
on fire.
@Be sure drip pans and vent
duets are not coveredand are
in place. Their absenceduring
cooking coulddamage rangeparts
and wiring.
@Don’t use aluminum foil to he
drip pansor anywhere in the oven
exceptas described in this book.
Misuse could result in a shock, fire
hazard, or damage to the range.
@Ody certain typesofghis9
gkwskeramie, earthenware, m
other gkazedwhiners are
suitable
forrange-topservice;
othersmay break becauseofthe
suddenchangeintemperature,(See
sectionon “SurfaceCoolchg” for
suggestions.)
@Tominimizeburnsyignitionof’
flammablematerials,and spillage,
thehandleof a containershouM
beturnedtowardthecenterofthe
rangewithoutextendingover
nearbysurfaceunits.
@Don’timmerse or soak
renm-dde surfaceunits.lhn%
putthem in a dishwasher.
~ Alwaysturn surfaceunit to
I(IFFbeforeremovingWensii.
~ Keep an eyeon foodsbeing
fried at HIGH or IMEDKJM
HIGH heats.
~ Toavoid the possibilityof
a burnor electric shock3always
be cert.airrithat the controlsfor
d surface units areatOFF
positionand allcoilsarecod
beforeattemptingto lift the unit.
@W-Mmfkmingjfi.N.NkLmderthe
hood,
turnthefanoff.The fan, if s-’-
operating9may spreadthe fkm.
* Foodsfor fryingshouldbeas
dryas possible.Frost on frozen
foods m moistureon fresh foods
cancausehotfattobubbleup and
oversidesofpan.
* Use littlefatfor effective
shallowor deep-fatfrying.Filling
thepan too fullof fatcan cause
spilloverswhenfood is added.
~ If a combinationof oilsor fats
wiilbe used infrying, stir together
beforeheating,or as fatsmelt
slowly.
~ Alwaysheat fatslowly, and
watchas itheats.
@Usedeepfatthermometer
wheneverpossibleto prevent
overheatingfatbeyondthe smoking
point.
-
—
..——----.
;.
2 ..
!!
&
.
w
~Usecookingutensilsofmedium
weightaluminum,withtight-fitting
covers,andflatbottomswhich
completelycoverheatedportionof
surfaceunit.
~Cook freshvegetableswitha
minimumamountof waterina
coveredpan.
Q~dtch foodswhenbringingthem
quicklytocookingtemperaturesat
HIGHheat.Whenfoodreaches
cookingtemperature.reduceheat
immediatelytolowestsettingthat
willkeep itcooking.
QUseresi~iualheatwithsurface
cookingwheneverpossible.For
example,whei~cookingeggsin the
sheli, bringwaterm boil,then[urn
toIO~FFpositiontocomplete
cooking.
Usecorrectheatforcookingtask:
HIGH—tostartcooking(iftime
allows,donotuseHIGHheatto
start),MEDIUMHI—quick
browning,MEDIUM—S1OWfrying,
LOW-finish cookingmost
quantities,simmer-double boiler
heat, finishcooking,andspecialfor
small quantities,WARM—maintain
servingtemperatureofmostfoods.
@Whenboiling waterforteaor
coffee,heatonlyamountneeded.It
isnot economicaltoboila container
fullofwaterforone or twocups.
~Preheatovenonly whennecessary.
Mostfoodswillcooksatisfactorily
witholl~preheating.If
you find
preheatingisnecessary,watchthe
indicatorlight,andputfoodinoven
promptlyafterthelightgoesout.
4’
@AlwaysturnovenOFF before
removingfood.
~Duringbaking,avoidfrequentdoor
openings.Keepdooropenasshorta
timeaspossiblewhenitisopened.
@Besuretowipe up excessspillage
beforestartingtheself-cleaning
operation.
~Cookcompleteovenmealsinstead
ofjust onefooditem.Potatoes,other
vegetables,andsomedessertswill
cooktogetherwitha main-dishcas-
serole,meatloaf,chickenor roast.
Choosefoodsthatcookatthesame
temperatureandin approximately
thesametime.
~Use residualheatintheoven
wheneverpossibletofinishcooking
casseroles,ovenmeals,etc.ALSO ~ )
addrolls or precookeddesserts
to ‘“-”
warmoven,usingresidualhealto
warmthem.
‘“’–”\
(
----.%=
()
\
.,
~=,--
Page 5
...
---- ,
I
e-
,..,,,“, -..
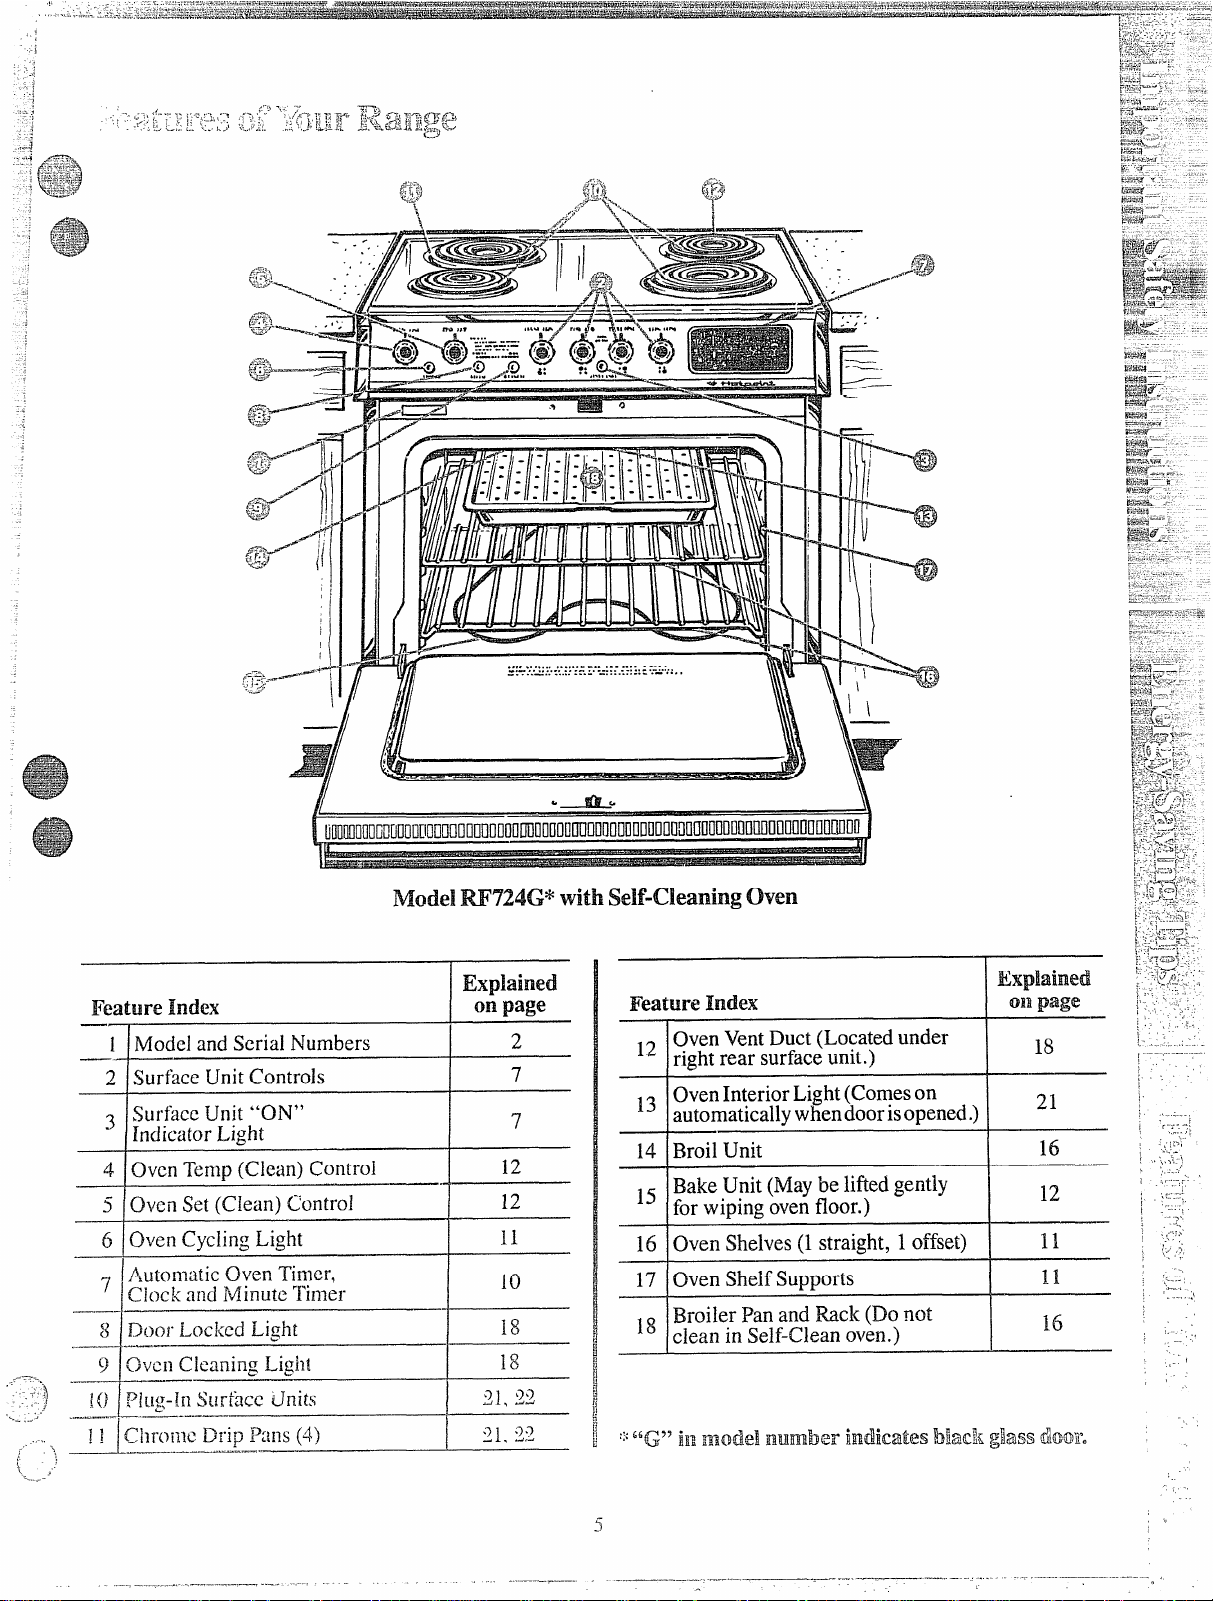
ModelRF724G*withSeW-CkmingChum
Feature hkx
1 IModel and Serial Numbers
2
ISurface Unit Controls
s Surface Unit “ON”
IridicatorLight
I
4 IOven Tem~ (Clean) Control
5
(ha Set(Clean) Control
6 Oven Cycling Light
Explained
on page
2
7
7
12
12
11
Exphimd
Feature Mk?x
Oven VentDuct (Located under
~~
right rear surface unit.)
~~ Oven Interior Light (Comeson
automaticallywhen doorisopened.)
14 Broil Unit
~~ Bake Unit (Maybe liiled gently
for wiping ovenfloor.)
Oven SheIves(1straight, 1 offset)
16
17 Oven Shelf Supports
~g Broiler Pan and Rack (Do not
clean in Self-Clean oven.)
‘:’“(G” inmodel Immbw ihdicatwblack gkass door.
‘m+page
18
21
16
,.
,=,
...!
..
,
-!
,
,-
.,
!,
Page 6
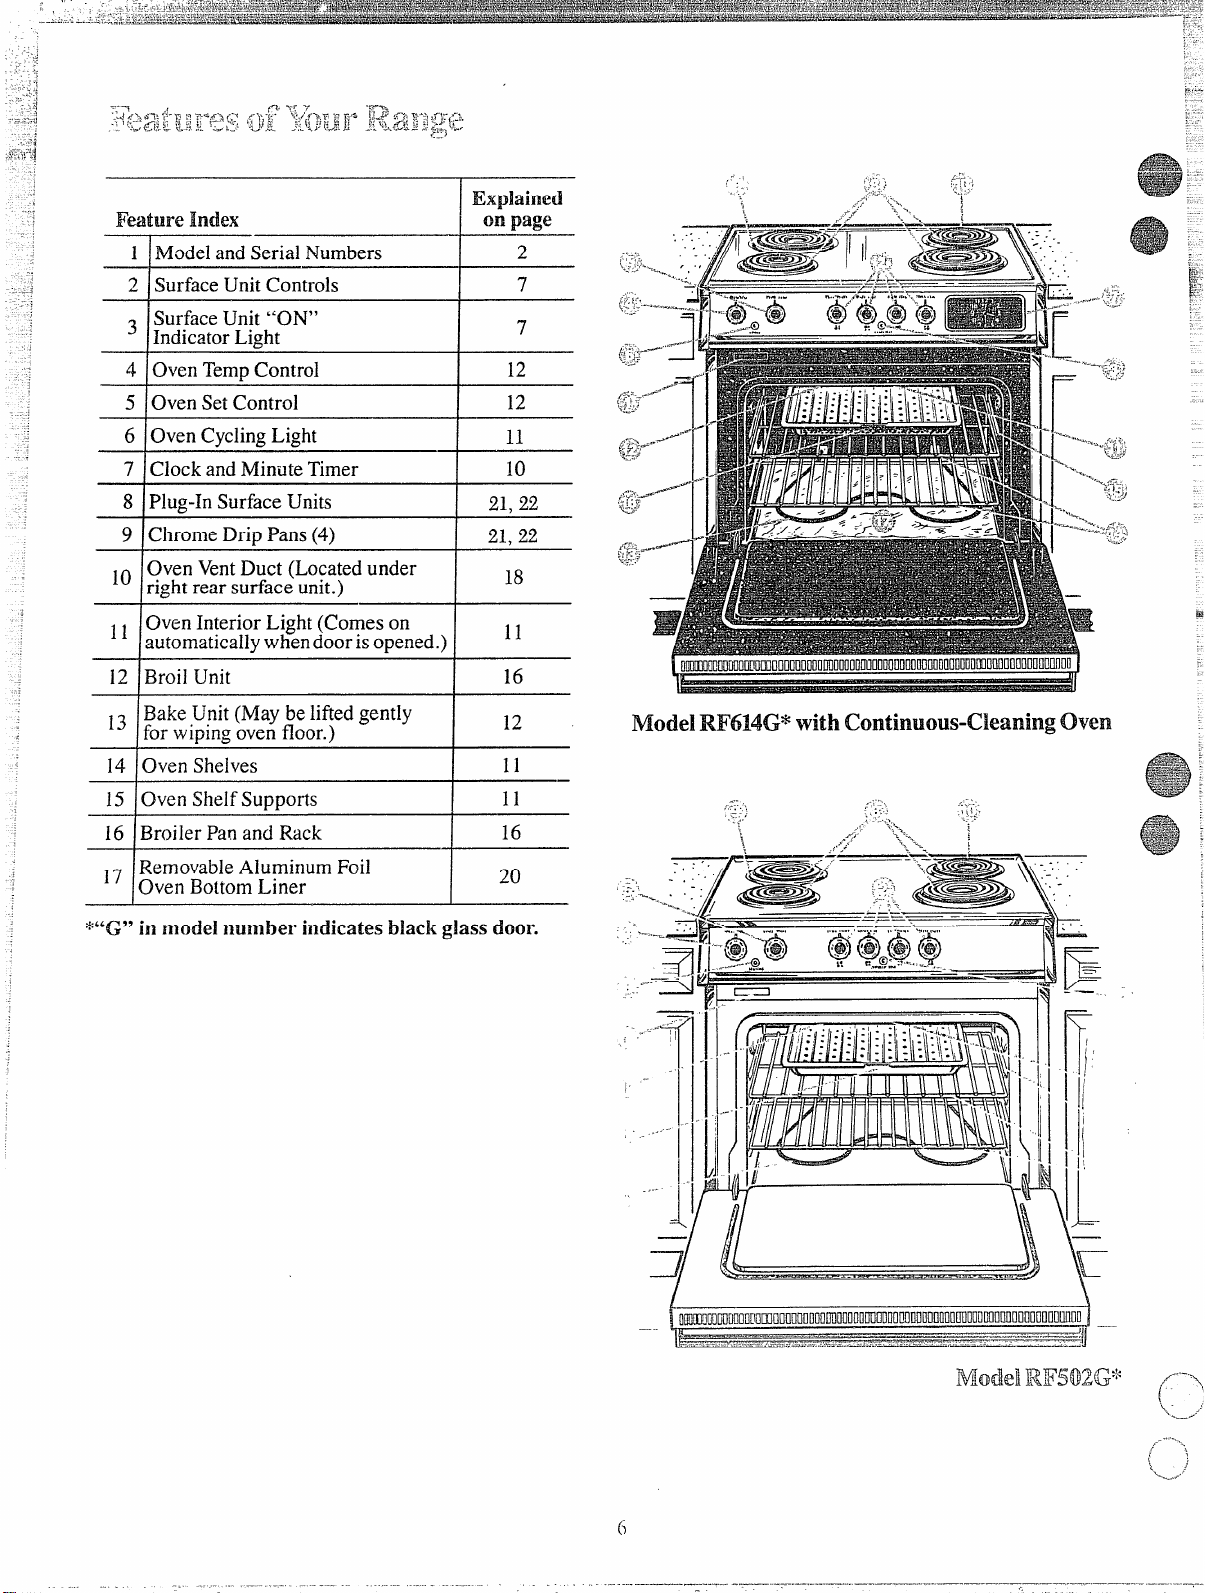
Explained
lmmooomuuoonomoomooooomooooommoowuoooooo
F’eatwe
2 ISurfaceUnit Controls 7’
~ Surface Unit “ON”
4 Oven TempControl 12
5 OvenSetControl 12
6 OvenCyclingLight
7 Clock and MinuteTimer
$
9 Chrome Drip Pans (4)
lo
~~ Oven Interior Light (Comes on
12 Broil Unit 16
hdex on page
1 IYIcdeland Serial Numbers
IndicatorLight
I
Plug-h SurfaceUnits
Oven VentDuct (Locatedunder
right rear surface unit.)
I
automaticallywhendoorisopened.)
I
I
*
21,22
21,22
18
11
2
7
~~ Rake Unit (Maybe liftedgently
for wipingovenfloor.)
I
14 10ven Shelves 11
15 10ven ShelfSupports
*W’7in model number indicatesMackglass door.
12
I
11
I
lw)dd
,.
.-
...
RI?6V$GPwith continwME+ckaningoven
———.“,,,“,,
.-,,- >.-....
=
—-
Modd
Page 7
..
(
:7,... : (.
J& :j: <; g: -
~>
FL+~>4?i$.
i.ii.QaL CW-mw.s
:
.,
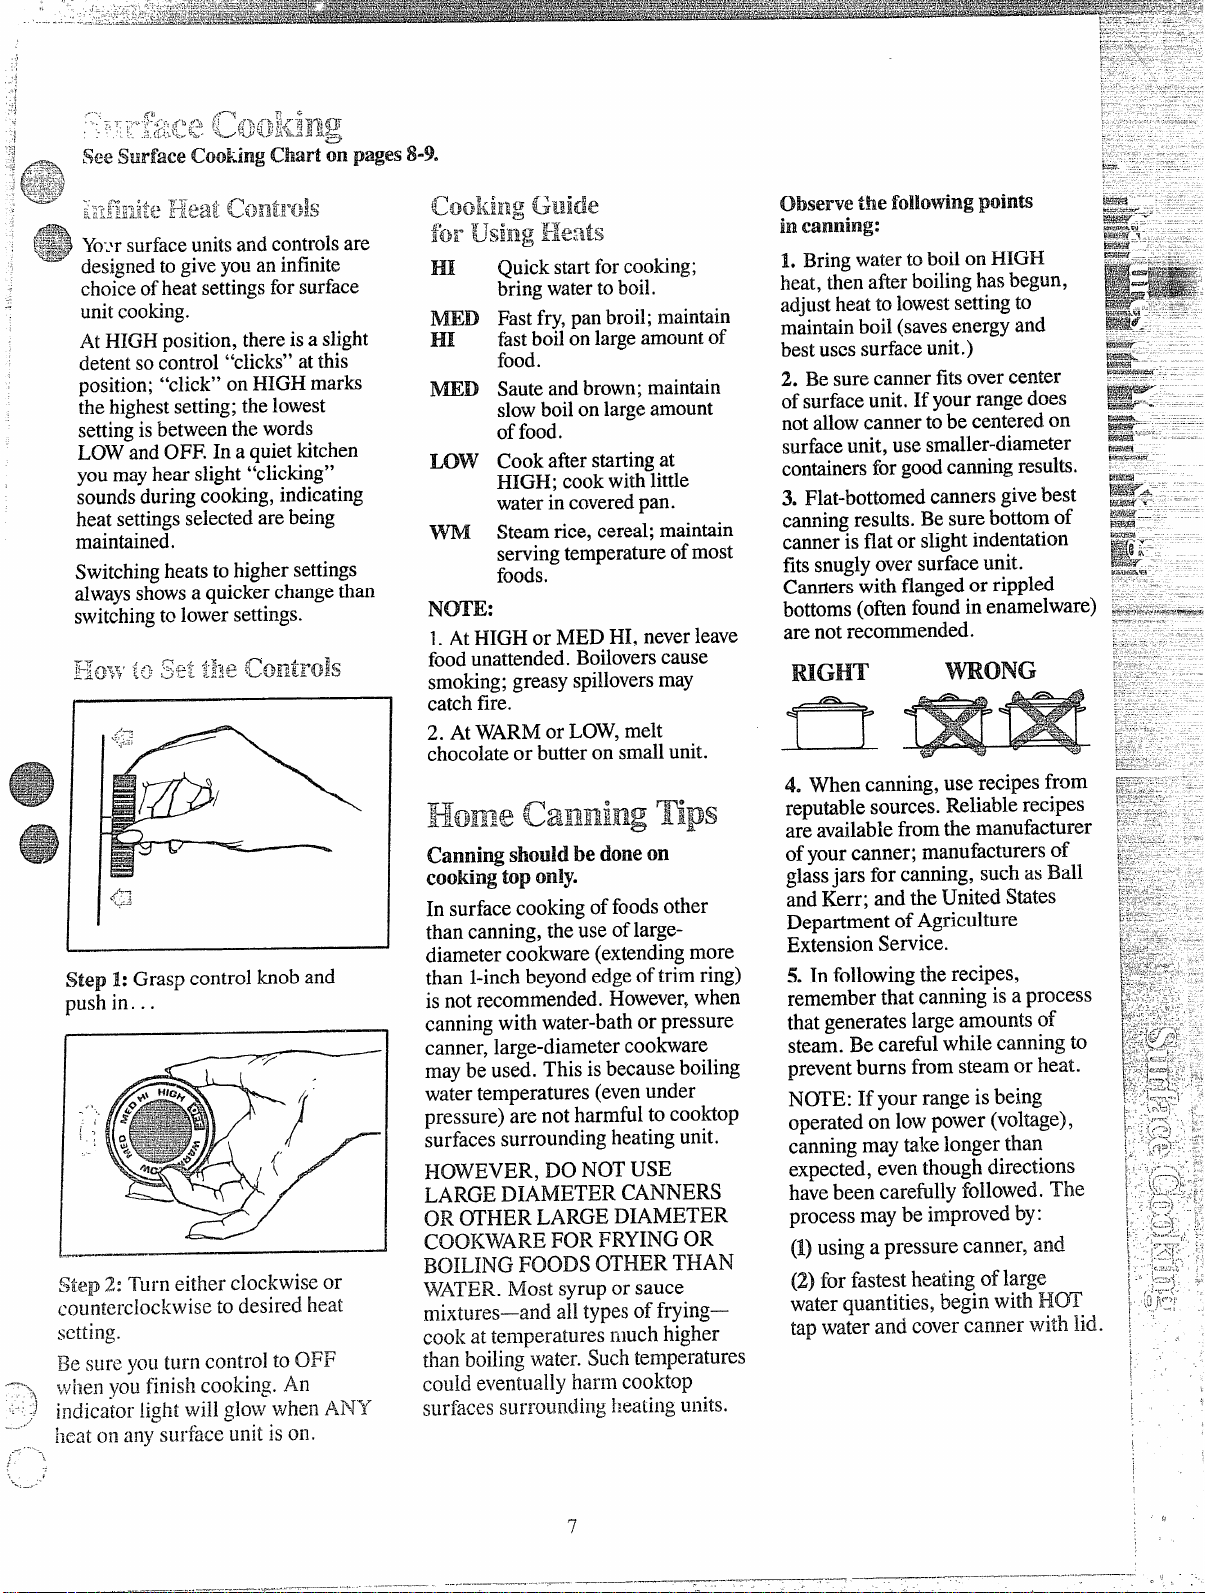
Ye-Jrsurfaceunitsand controlsare
designedto giveyou an infinite
choiceofheatsettingsfor surface
unitcooking.
AtHIGH position,thereis a slight
detentso control “clicks”atthis
position;“click” on HIGH marks
thehighestsetting;thelowest
settingisbetweenthe words
LOWand OFF. In a quiet kitchen
youmayhear slight‘~licking”
soundsduringcooking,indicating
heat settings ~electedare being
maintained.
Switchingheats tohigher settings
alwaysshowsa quickerchange than
switchingto lowersettings.
-..
!!-l~fl%’‘is’!S’?tf:ile ~cosil”ols
.f-
1
Step 1: Grasp control knob and
push in. . .
Step 2: Turn either clockwise or
counterclockwise to desired heat
setting.
Besureyouturn control to OBF
...--...
~IJ;~enyou finish cooking. Am
-3
.—
.)
,
indica~orlight will glow whe~lANY
..’
.
heat on any surface unit is on.
.--” -,
}.
.’
-. —”--
!
‘observe‘the
followingpaints
illWMnllinfg:
HI
Quickstartfor cooking;
bringwatertoboil.
mD
HI
Fastfry,panbroil;maintain
fastboilonlargeamountof
food.
NIED
Sauteand brown;maintain
slowboilonlarge amount
offood.
LOw
Cook after startingat
HIGH; cook with little
waterincoveredpan.
Steamrice, cereal; maintain
servingtetiperature ofmost
foods.
IVOTE:
1.AtHIGH or NED I-H,neverleave
foodunattended.Boiloverscause
smoking;greasy spilloversmay
1. Bringwaterto boilon HIGH
heat, then after boilinghas begun,
adjustheatto lowest settingto
maintainboil(savesenergy and
bestuscssurfaceunit.)
2. Besurecannerfitsovercenter
ofsurfaceunit. If yourrangedoes
notallowcannertobe centeredon
surfaceunit, use smaller-diameter
containersforgood canningresults.
3. Flat-bottomed canners givebest
canningresults.Be sure bottomof
canner is flat or slightindentation
fitssnuglyoversurfaceunit.
Cannerswithflangedor rippled
bottoms
(ofienfoundin en~rnelware)
are not recommended.
RIGHT
mo~~
catchfire.
2. At WARMor LOW,melt
chocolateor butteron smallunit.
4. When canning, use recipes from
reputablesources. Reliablerecipes
are availablefromthe manufacturer
canningshow be done on
cooking
In surfacecookingoffoodsother
than canning, the use of largediameter cookware (extending more
than l-inch beyondedgeof trim ring)
is notrecommend However,when
canningwith water-bath or pressure
canner, large-diameter cookware
maybe used. This is because boiling
water temperatures (evenunder
pressure) are not harmful to cooktop
surfaces surrounding heating unit.
HOWEVER, DO NOT USE
LARGE DIAMETER CANNERS
OR OTHER LARGE DIAMETER
COOKWAREFOR FRYING OR
BOILING FOODS OTHER THAN
WATER.IVlostsyrupor sauce
mixtures-—-andalltypesof frying—
cook at temperatures much higher
than boilingwater. Suchtemperatures
could eventuallyharm cooktop
surfaces surrounding heating units.
toponly.
ofyourcanner; manufacturers of
glass jars for canning, such as Ball
and Kerr; and the United States
Department of Agriculture
Extension Service.
5. In followingthe recipes,
remember that canning is a process
that generates large amounts of
steam. Be carefulwhile canning to
preventburns from steam or heat.
NOTE: If your range is being
operated on low power (voltage),
canning may take longer than
expected, eventhough directions
havebeen carefully followed. The
process may be improved by:
(1)using a pressure canner, and.
(2) for fastest heating of large
water quantities, begin with HGT
Papwa~erand coverZarmer with lid. ;
..
I
i
;,
r
,
)
I
I
7
Page 8
Gxikwwm fips
—
.. ... —.—.—.-._
—-——.—.... —..—
1. Use medium-or heavy-weight
cookware.Aluminumcookware
conductsheat fasterthanother
metals.Castironand coatedcast
ironcookwareis slowto absorb
heat, but generally cooksevenlyat
LOWor MEDIUM settings.Steel
pansmaycookevenlyif not
combinedwith other metals.
Use non-stickor coatedmetal
cookware.Flat groundpyroceram
saucepansor sk~lletscoatedonthe
bottomwith aluminum generally
cookevenly.Use glasssaucepans
with heat-spreadingtrivets
availableforthatmnmose.
m.
2. Toconservethe mostcooking
energy,pansshould be flat on the
bott~h,-have straightsidesandtight
fittinglids.Matchsizeofsaucepan
tosizeof surfaceunit. A panthat
extendsmorethan1“beyondtheedge
ofthetrim ring trapsheat which
causes“crazing”(finehairline
cracks)on the porcelaincooktops
anddiscolorationrangingfromblue
todark grayon thetr~m~ing/drip
pansandstainlesssteelcooktops.
Food
Cereal
Cornmeal, grits,
oatmeal
Cocoa
Coffee
Eggs
Cookedin shell
Fried sunny-side-up
Fried over easy
Poached
Scrambledor omelets
Meats, Poultry
Braised: Pot roastsof
beef, lamb or veal;
pork steaksand
chops
Pan-fried: Tender
ChOpS: thin st~iiks \Ip
-in.: nlinutc
to 11
Iwmburgers:
stuks;
franksami sausage:
thin fish iillc[s
Cookware
Covered
Saucepan
Uncovered
Saucepan
Percolator HI. At first perk, switch
Covered
Saucepan
Covered
Skillet
Skillet
Covered
Skillet
Uncovered
Skillet
:overed
saucepan
DirectionsandSetting
toStart Cookine
HI.In coveredpanbring
waterto boilbeforeadding
cereal.
HI. Stir togetherwateror
milk, cocoaingredients.
Bring justtoa boil.
heatto LOW.
HI. Cover eggswith cool
water.Coverpan, cook
until steaming.
MED HI. Melt butter, add
eggs and coverskillet.
HI. Melt butter.Uncovered
HI. In coveredpanbring
water to a boil.
HI. Heat butter until light
golden incolor.
HI. In coveredpan bring
fmit and water to boil.
—
l)vered
;killct
Incovered
killet
HI. Melt fat, thenadd meat.
Switch to MED HI to
brownme~t. Addwater or
other liquid.
W. Preheat skillet. then
Jrease ]ightiy.
Settingto Complete
Cooking
LOWorWM, thenadd
cereal, Finishtiming
accordingto package
directions.
MED, tocook 1or 2 min.
to completelyblend
ingredients.
LOWto maintaingentle
but steadyperk.
LOW.Cook only 3 to 4
min. for sotlcooked; 15
min. for hardcooked.
Continuecooking at MED
HI untilwhitesarejust set,
about 3 to5 min.
LOW,thenaddeggs.
When bottom of eggs
havejust set, carefully
turn overtocook other
side.
LOW.Carefullyaddeggs.
Cook uncoveredabout5
min. at MED HI.
MED. Addeggmixture.
Cook, stirring to desired
doneness.
LOW.Stir occasionally
and checkfor sticking.
LOW.Simmer until fork
tender.
MED HI or MED Brown
and cookto desired
doneness, turning over
as needed.
Corntnents
Cerealsbubbleandexpandas
theycook; uselargeenough
saucepanto prevent boilover.
Milkboils over rapidly.Watchas
boilingpoint approaches.
Percolate8 to 10min. for 8
cups, lessforfewercups.
If youdonotcoverskillet, baste
eggsw’ithfattocook tops evenly.
Removecooked eggs with slotted
spoonor pancaketurner.
Eggscontinue to set slightly after
cooking. For omelet donot stir
last fewminutes. When set fold
inhalf.
Fresh fruit: Use 1Ato Yzcup water
per poundoffruit,
Dried fruit: Use water as package
directs. Timedepends onwhether
fruit hasbeen presoaked. If not.
allowmore cookingtime.
Meat can be seasonedand floured
beforeit is browned, if desired.
Liquid variations for flavorcould
be wine. fruit or tomatojuice or
meat broth.
Timing: Steaks 1to 2-in.: 1to
2 hrs, BeefStew: 2 to 3 hrs.
Pot Roast: 2
Pan fryingis best for thin steaks
and chops. If rare is desired. preheat skilletbefore addingmeat. ‘ ‘~
Y2 to4 hrs.
(
(’”-{
i
\..LJ
/--7”
‘.<.
...--”
\
Page 9

whenaddingfood.Frostyfoods
bubblevigorously.Watchfoods
fryingat HIGH temperaturesand
keeprangeand hoodcieanfrom
accumulatedgrease.
RIGHT
OVER1“
.-
WRCM4G
.As.
Directionsand Setting
Food Cookware
Fried Chicken
Panbroiledbacon
Sauteed:Less tender
thinsteaks(chuck,
round, etc.); liver;
thickor wholefish
Simmered
meat; chicken; corned
beefi smokedpork;
stewingbeef;tongue;
etc.
MeltingchocoIate,
butter,
marshmallows
Pancakesor
Frenchtoast
orstewed
Covered
Skillet
Uncovered
Skillet
Covered
Skillet
Covered
DutchOven,
Kettleor
Large
Saucepan
Small
Covered
Saucepan.
Usesmall
surfaceunit
Skilletor
Griddle
toStartCooking
HI.Melt fat. Switchto MED
HI to brownchicken.
HI. Incold skillet arrange
baconslices. Cookjust
until starting to sizzle.
HI. Melt fat. SwitchtoMED
tobrownslowly.
H]. Covermeat withwater
andcoverpanor kettle.
Cookuntil steaming.
WM. A11ow10to 15min. to
meltthrough. Stirto
smooth,
MED HI. Heat skillet 8 to
10min. Grease lightly.
Pasta
Noodlesor spaghetti HI. In coveredkettle, bring
PressureCooking
Puddings, Sauces,
Cmdies, Frostings
Vegetables
Fresh
Frozen
Sautdcd: Onions;
green peppers; mushrooms; celery: etc(
Rice mld Grits
Covered
Largekettle
or Pot
Pressure HI. Heat until firstjiggle is
Cookeror
I
Canner
Uncovered
Saucepan
Covered
Saucepan
Covered
Saucepan
Uncovered
Skillet
Covered
Saucepan
saltedwater to aboil,
uncoverand addpasta
slowlyso boiling does not
stop.
heard.
HI. Bringjust to boil.
HI. Measure X to l-in.
waterinsaucepan. Add
saltand prepared vege~ble. In coveredsaucepan
)ring toboil.
HJ.Measure waterand salt
isabove. Addfrozenblock
)fvegetable. In covered
;aucepan bring to boil.
-iI. Inskillet melt fat.
-H.Bring salted waterto a
roil.
SettingtoComplete
Cooking
LOW.Coverskilletand
cookuntiltender.
Uncoverlast fewminutes.
MED HI. Cook, turning
over as needed.
LOW.Coverand cook
until tender.
LOW.Cook until fork
tender. (Watershould
slowlyboil). Forvery large
loadsmediumheat may
beneeded.
Cook 2 to 3min. per side.
MED HI. Cookuncovered
until tender.For large
amountsHI maybe
neededto keepwaterat
rollingboil throughout
entire cooking time.
MED HI for foodscooking
10min. or less. MED for
foodsover 10min.
LOW.Tofinish cooking.
MED. Cook l-lb. 10to30
more min., dependingon
tenderness of vegetable.
LOW.Cook accordingto
time on package.
MED. Add vegetable.
Cook until desired tenderness is reached.
W?vl.Cover andcook
according totime.
Comments
Forcrisp dry chicken,
afterswitchingtoLOWfor 10
min. Uncoverandcook turning
occasionally 10to20 min.
Amore attention-freemethod
isto startand cookat MED.
Meat maybebreadedor marinatedin saucebeforefrying.
Addsalt or otherseasoning
before cookingifmeat hasnot
been smoked or otherwise
cured.
When meltingmarshmallows,add
milkor water.
Thick batter takesslightlylonger
time. Turnoverpancakeswhen
bubbles rise to surface.
Use largeenoughkettle topreventboilover.Pastadoublesin
size when cooked.
Cooker shouldjiggle2 to 3times
per minute.
Stir frequentlyto prevent
sticking.
Uncoveredpan requires more
water and longertime.
Break upor stir as needed while
cooking.
‘hrn over or stir vegetableas
necessary for evenbrowning.
coveronly
—.
Triples involume after cooking.
Time at WNI. Rice: 1cup rice and
2 cupswater-25 rnins. Grits: 1
cup grits and4 cups water—40
min.
Page 10

The automatictimer and clockon
somemodelsarehelpfuldevices
thatserveseveral purposes.
mlsetthea$xk
(m models soequipped)
Push in the center knob of the
Minute Timer and turn the clock
hands to the correct time. (The
Minute Timer pointer will move
also, so after settingthe clock, let
the knob out and turn the pointer
to OFI?.)
The Minute Timer has been
combined with the conventional
clock. Use it to time all your
precise cooking operations. You’ll
recognize it as the pointer which is
different in color and shape than
the clock hands.
‘j?$]S@tthe Minute ‘mmx
(onmodelsso equipped)
~i]meBalm ixm
A*Ilto133atie“ll%mw
(on models soequipped)
UsingAutomaticTimer, youcan
TIME BAKEin Model RF724G
withtheovenstartingimmediately
andturningoffat the StopTime set
or youcan setboth Startand Stop
dialstoautomaticallystartandstop
ovenat a later time ofday.Ittakes
the worry out of notbeinghometo
startor stoptheoven.
Settingthe dials forTIME BAKE
is explainedindetailon page 12.
self”cleaa uses
Amtematie ‘llmer
[onmodelssoequipped)
The self-cleaningfunction usesthe
AutomaticTimerto set the length
oftime needed to clean, whether
youwish to clean immediately or
delaythe cleaning. By settingthe
Startand/or Stopdials, you may
chooseto begin immediately or
clean at low energy times during
the night. Full explanationsof
settingthe Start and Stop dials for
self-cleaningare described on
pages 18and 19.
(hwstims and.Am$wk?l
%“
Q. How Can Ifuse my Minute
‘inner
tomake my S’dhtw
CCddng
A. YourMinuteTimerwillhelp
timetotalcookingwhichincludes
timeto boilfoodandchange
temperatures.Do not judgecooking
timebyvisiblesteamonly.Food
willcookin coveredcontainers
eventhoughyoucan’tseeany
steam.
Q. Must the clock be set on
correct time of day when 1wish
to Usethe Automatic Timer for
baking?
A. Yes,ifyouwishto setthe Start
or Stopdials toturn on and off at
settimesduringtimedfunctions.
Q. CanI use the Minute TMer
during ovencooking?
A. The Minute Timer on Models
RF614Gand RF724Gcan be used
during any cooking function. The
AutomaticTimers (Startand Stop
dials) on Model RI?724Gare used
with TIME BAKEandSELFCLEAN functions.
Q. Can I change the dock whik
I’mTimecooking in the Oven?
A. No. The clock cannotbe changed
during any program that uses the
oventimer. Youmusteither stop
those programs or waituntilthey
are finished beforechangingtime.
easier?
Turn the center knob counterclockwise, withoutpushing
until pointer reaches number of
minutes you wish to time. (Minutes
are marked, up to 60, in the center
ring on the clock.) At the end of the
set time, a buzzer sounds to tell you
time is up. Turn knob, withoui
pushi}~gin. until pointer reaches
OFF and buzzer stops.
IW3W13:
clock and lMinuteTimer but not
automatic Start and Stop timers.
Model RF6MG has a
in,
Page 11

..,
.’
;~~:>:
!c_-.%
~<”:1
.—.—.-—.
ia~ 1.Lookat thecontrols.Besure
!$$#Iytiuunderstandhowto setthem
m-ouerlv.Readoverthedirections
~or~heAutomaticOven Timerso
youunderstanditsuse withthe
controls.
2. Check oveninterior.Lookat
theshelves.Takea practicerun
atremovingand replacing them
properly,togivesure, sturdy
support.
3. Readoverinformation and tips
thatfollow.
4. Keepthis bookhandysoyoucan
refertoit, especiallyduringthe
firstweeksofgettingacquainted
withyourrange.
.-.
$Jsir2g<1?<:$:3‘k~
flyypp ;. :?.9?% ~
T.?n
,--1
_ .. .J<#..Y.a=ia.
‘irl”ect]y j]]
“;;3G
Ifyouwish to use foiltocatch
possiblespillovers,cut a pieceof
foilslightlylargerthan thepan and
turn up the edges. Place the foilon
the ovenshelfbelowthepan.
NEVER COVERAN ENTIRE
OVEN SHELF WITH FOIL
AND, UNLESS YOUHAVEA
CONTINUOUS-CLEANING
OVEN, NEVER COVERTHE
ENTIRE OVEN BOTTOMWITH
FOIL. The foilcan obstruct normal
heat flow,cause cooking failures,
and even damagethe oveninterior.
..
!’~ ~J ~,J , ~ “-, .+<”‘7
:& ~:!, ,i=,{)~~~j.-[j;:;
,
.,.
The controls fortheovenare
marked OVEN TEMP andOVEN
SET. OVEN SET has settingsfor
BAKE, BROIL and OFF, and on
some models, TIME BAKE and
CLEAN. When youturn the knob
to ihe desired setting, the proper
heating units arc then activatedfor
that operation.
~1/~pJ ~~~~ maintains tk
~-,-+
,-
,.< :-
....-
kmpmmre you set from V’L4m”l
..-
7,.
.,
to BROIL.
,,.. ..,,
:-,
~.-.----
—
OvenCyclingL,ightglowsuntil
ovenreaches.Wlected temperature,
thengoesoffand on with &m unit
duringcooking.PREHEATING
oven,eventohightemperature
settings,isspeedy—rarelymore
than 10minutes.Preheatoven
onlywhen necessary.Mostfoods
willcooksatisfactorilywithout
preheating.If youfind preheating
isnecessary,keepan eyeon the
indicatorlightand put foodin the
ovenpromptlyafterlightgoesout.
Index
—+ ~
Marker
OvenTernpSetting for Normal Cooking
11!41P0RTANT:For normal
cooking,line up the desired
temperature (marked on the outer
edgeofthe control knob) with the
indexmarker locatedimmediately
abovethe control.
For CLEAN, rotatethe knob to the
right until “CLEAN” is pointing
up, towardIndex Marker. When
position is reached, knob should
snap intoposition.
The lightcomes on automatically
when the door is opened.
The shelvesare designed with stop
locks, so when placed correctly on
shelf supports, they (a) stop before
coming completely out of oven,
and (b) do not tilt when removing
or placing food on thenl. Models
RF502G and RF614-Ghavetwo
straight shelves: Model RF724G
has one straight shelf and one
offise~shelf.
TOREMOVEshelf from the oven,
pullitforwarduntilitstops;then
tiltupthe front edgeand pull the
shelfall the wayout.Be certain the
shelfis cool beforetouching.
TOREPLACE shelfin oven,guide
rear corners of shelfover shelf
supports,tiltingup front edge until
shelfclearsstoplocksabovesupports.
Then push shelf to rear ofoven.
...<
The ovenhas four shelf supports— ~~,~;j’~
A (bottom), B, C and D (tQP). ~~~-: ‘,
Shelfpositionsforcooking food
are suggestedon Baking, Roasting
and Broiling pages.
j.. ,, ,:
~;
‘.-,&-,
,-
,‘\C:::.
1-{’
~,.
,T.,.
~. ‘“-
~lH@: shelf (Model RF~~Q ; ~:::::::
I
......
This shelf is provided for use in i ~~~‘
shelf position A to Prevent ~on~ct ,
with deep Self-Clean Oven door ~,~~‘fin
). “~j;
i
when sliding in and out. It may also ~
be used in shelf positio~~D. Always :
installwith offsetplaced upwardand ~
shelf stop placed toward rear.
z
Cau$iom EnIV@de[R?E’724G’9IIQver L
use
E&@@ shelfinposittimA. ~
.
,
.(,
Page 12

,,
;Ek)w’-toset%himRange
L Place foodin oven, beingsure
toleaveabout 1“betweenpansand
ovenwallsforgoodcirculationof
heat. Closeovendoor,andavoid
frequentdooropenings during
bakingtopreventundesirable
results.
CWENSET
2. TurnOVENTEMPknob to
temperatureonrecipe or Baking
Chart, and turn OVEN SET knob
toBAKE.
3. Check food for doneness at
minimumtime on recipe. Cook
longerif necessary. Switch off
heatand removefoods.
tosetInlmediate start
Ii-m”
& Autolllatic stop
IMcm beginning, make sure the
Range dock SINmwthe CAMTect
timeof’thy.
1. TosetStopTime, push in knob
on Stopdialand turn pointerto
timeyouwantoven to turn offl for
exam~le,6:00.The Startdialshould
beat the same positionasthe time
ofdayonclock.
2. TurnOVENTEMP knob to
desiredoventemperature; for
example,250?TurnOVENSET
knob to TIME BAKE.
I“bv W
setD&y start& stop
L TosetStartTime, push in knob
on Startdial andturn-pointerto
timeyouwant ovento turn on; for
exdmple,3:30.
2. Toset Stop Time, push in knob
on Stopdial and turn pointer to
timeyouwantovento turn offi for
example,6:00. This means your
recipe called for 2% hours of
bakingtime.
NOTE: Time on Stopdial must be
laterthantime shownon rangeclock
mdStart dial.
WENT-mm
OVENWET
i
.A.w.-
1
310W to mime Bake
(Model RI?724G)
The oventimer controls are
designedto turn the oven on and
offautomatically at specific times
youwantbakingto start and stop.
YourTime Bakeoptions:
knndaw $&@& Automatic Stop.
Oventurns on right awayand turns
offautomatically at your preset
stoptime.
Delay Start & Stop. Oven
:]~~orna~i~ally turns on later at your
preset start time and turns off at
>ourpreset stop time.
Remember when setting stoptime
{hattime-baked foods will continue
cooking after the oven turns off.
3. Turn OVEN TEMI?knob to
desired temperature. Turn OVEN
SET knob to TIME BAKE.
Place food in oven, close the door
and the oven will be turned on and
off automatically at the times you
haveset. Turn OVEN SET to OFF
and removefood from oven.
Page 13

us
Roastingiscookingbydryheat.
Tendermeator poultry can be
roasteduncoveredinyouroven.
Roastingtemperatures, which
shouldbe lowand steady,keep
spatteringtoa minimum. When
roasting,itisnot necessary to
sear, baste, cover,or add water
toyourmeat.
RoastingisreaHya baking
procedureusedfor meats.
Therefore, ovencontrolsare set
toBAKEor TIME BAKE.
Roastingis easy,just followthese
steps:
Step 1:Check weightofmeat, and
place, fatsideup, on roastingrack
in a shallowpan. (Broilerpan with
rack is a good pan for this.) Line
broilerpanwith aluminum foilwhen
usingpan for marinating, cooking
with fruits, cookingheavilycured
meats, or for basting foodduring
cooking. Avoidspillingthese
materials on oven liner or door.
Step 2: Place in oven on shelf in
A or Bposition. No preheating is
necessary.
~
OVENSET
Step 4: Most meatscontinueto
cookslightlywhile standingafter
beingremovedfrom the oven.For
rare or medium internaldoneness,
if meatisto stand 10-20minutes
whilemakinggravyor for easier
carving,youmaywishto remove
meat from ovenwhen internal
temperatureis 5-10”F.below
temperaturesuggestedonchart.
If no standing is planned, cook
meatto suggestedtemperatureon
chart on page 15.
IN(IWE:Youmay wish to use TIME
BAKEas described orI prece~ing
pagetoturn ovenon and off
automatically.
Rememberthatfoodwill
continueto cook in the hot oven
andthereforeshouldbe removed
when the desired internal
temperaturehas been reached.
For Frozen Roasts
~ Frozen roasts ofbeef, pork,
lamb, etc., can be started without
thawing,butallow 10-25minutes
per pound additionaltime (10min.
perpoundfor roastsunder5pounds,
more time for larger roasts).
@Thawmost frozen poultry before
roasting to ensure even doneness.
Some comme~cialfrozen poultry
can be cooked successfully without
thawing.Fol~owdirections given
on packer’s label.
Qllestiom& AdMwWrs
Q. 1sitnecessarytocheck
fordo!nemss withal meat
thermometer?
A. Checkingthefinishedinternal
temperatureatthecompletionof
cookingtime is recommended.
‘Temperaturesare shownon
RoastingChart onpage 15.For
roastsover8lbs., cooked at 300°
withreducedtime, checkwith
thermometerat half-hourintervals
afterhalf the time has passed.
Q. why is my roast crumbling
when 1try to
Roasts are easier to slice if
A.
allowedtocook 10to 20 minutes
afterremovingfromoven.Be sure
to cut acrossthegrain ofthemeat.
Q. Do 1need to preheat my
oveneach time 1 cook a
or pmmy?
Itis rarely necessary to preheat
A.
youroven, only for very small
roasts,which cook a short length
oftime.
Q. when buying a roast al%?
there any special tips that wmldd
help me cook it more evenly?
A. Yes.Buya roast as evenin
thicknessaspossibleor buy rolled
roasts.
Q. Can 1
“tent” when roasting a tmimy?
Sealingthe foilwill steamthe
A.
carve it?
mast
seal the sides d my foil
/-..%
,,‘
%.
%.-----
.-.--.,
,.
(
‘.
Nep 3: Turn OVEN TEhN?to 325°
and OVEN SET to BAKE. (Small
poultry may be cooked at 375°for
best browning.) YOLImay hem a
.:}
d
sligi2t ciicking sound indicati12gti2e
1’
(3VCI-2k wQ14ki12gproperly.
“!.
-.~’-
Page 14

.,-
tid<k-ig
1.Aluminumpansconductheat
quickly.For mostconventional
baking,lightshinyfinishesgive
bestresultsbecausethey help
preventoverbrowningin thetime
ittakes for heat to cook the center
areas. DLIII(satin-finish)bottom
surfacesofbansare rec&mended
forcakepansandpieplatestobe
surethoseareasbrowncompletely.
Food
Bread
Biscuits(%-in. thick)
Gingerbread
.Muffins
Popovers
Quickloafbread
Yeastbread(2 loaves)
Plainrolls
Sweetrolls
Cakes
(withoutshortening)
Angel food
Jelly roll
Sponge
Cakes
Bundtcakes
Cupcakes
Cookware Comments
ShinyCookieSheet
ShinyMetalPanwith
satin-finishbottom
Cast Ironor Glass
ShinyMetalPanwith
satin-finishbottom
ShinyMetalMuffin Pans
Deep Glassor Cast IronCups
Metal orGlassLoaf Pans
Metal orGlassLoaf Pans
ShinyOblongor Muffin Pans
ShinyOblongor Muffin Pans
Afuminum TubePan
Metal JellyRollPan
Metal orCeramic Pan
Metal or Ceramic Pan
ShinyMetal Muffin Pans
2. Dark or non-shinyfinishes,also 3. Preheatingtheovenis notalways
glassandpyroceram, generally
absorbheatwhichmayresultin
necessary,especiallyfor foods
whichcock longerthan 30 to 40
dry,crisp crusts. Reduceovenheat minutes.For foodwith short
25°iflightercrustsare desired. cookingtimes, preheatinggives
Preheatcastiron for bakingsome bestappearanceandcrispness.
foodsforrapidbrowningwhen
foodis add~d.
4. Open the ovendoortocheck
foodaslitt~eas possibletoprevent
unevenheatingandto saveenergy.
Shelf
Positions*
B,c
B,A
B
B
A, B
B
B
A, B
A, B
B,A
A
B
A
A, B
B
oven
Tenmerature
400°-4750
350°-4000Coffeecake
400°-4500
350°
400°-4250
375°
350°-3750
375”-425°
375°-4250
350°-3750
325°-3750
375°-4000
325°-3500
325°-3500
350°-3750 Paper linersproducemore moistcrusts.
Time,
Minutes
15-20
20-30
20-40
45-55
20-30
45-60
45-60
45-60
10-25
20-30
30-55
10-15
45-60
45-65
20-25
Cannedrefrigeratedbiscuitstake2-4 min.
less time.
Preheatcast iron panfor crispcrust.Corn breador muffins
Decreaseabout5 min. formuffinmix.
Or bakeat450°for 25min., thenat 350°
for 10-15min.
Dark metalor glassgivedeepest
browning.
For thinrolls, Shelf B maybe used.
For thinrolls, Shelf B maybe used.
TWOpiecepan isconvenient.
Line panwith waxedpaper.
Fruit citkes
Layer
Layer,chocolate
Loaf
Cookies
Brownies
Drop
Rclrigcrfitor
Rolledor sliced
Fruits,
CXherDesserts
R]kcdapples
Custard
!>mldin}zs,riceand
~wstard
~lrlModel RF724G. shelf position A is recommended for offset shelf only.
Metal orGlass Loaf or
TubePan
ShinyMetal Panwith
satin-finishbottom
Shiny Metal Panwith
satin-finishbottom
Metal orGlass Loaf Pans
Metalor Glass Pans
CookieSheet
ZookieSheet
DookieSheet
Yassor Metal
IIass CustardCups or
;asserole (set inpan of
ot wzter)
Glass CustardCups or
Casserole
A, B
B
B
B
B,C
B, C
B, C
B.C
A, B, C
B
B
275°-3000
350°-3750
350°-3750
350°
325°-3500
350°-4000
400°-4250
375°-4000
350°-4000
300°-3500 Reduce temp. to 300° for largecustard.
325°
2-4 hrs.
20-35
25-30
40-60
25-35
10-20
6-12
7-12
30-60
30-60
50-90
Use 300°andShelf B for smallor
individualcakes.
Bar cookiesfrom mixuse sametime.
Use ShelfC and increasetemp. 25-50°
for morebrowning.
Cook breador rice pudding with
custard base 80to 90 minutes.
——
Page 15

I
I
Shelf
Posithms*
.
A
B,A
B
B
A, B, C
A,B, C
B
Food
Pies
Frozen
Meringue
Clnecrust
Twocrust
PastryShell
Miscellaneous
Bakedpotatoes
Scallopeddishes Glass or Metal
Souffles Glass
*In Model RF724G,shelfpositionA is recommendedfor offsetshelf only.
Cookware
FoilPanonCookieSheet
Spreadtocrust edges
I
Glassor Satin-finishMetal A, B
Glassor Satin-finishMetal
Glassor Satin-finishMetal
Seton OvenShelf
‘lkmpetmture
400°-4250
325°-3500
400°-4250
400°-4250
450°
I
325°-4000
325”-37.5°
300°-3500
oven
The,
Minutes
45-70
15-25
45-60
40-60
12-15
60-90
30-60 size,
30-75
comments
Largepiesuse400° and increase
lime.
Toquicklybrown meringueuse400°
for 8-10min.
Cuslardfillingsrequirelowertemp.,
longertime.
Increasetime forlargeamountor
1.Positionovenshelf at B for
small-sizeroasts(3 to 7 lbs.) and
at A.for larger roasts.
u
2. Place meat fat-side-upor poultry
breast-side-up on broiler pan or
other shallowpan with trivet. Do
not cover. Do not stuff poultry until
just before roasting. Use meat
thermometer for most accurate
doneness. (Do not place
thermometer in stuffing.)
Type
Meat
Tendercuts; rib, high quality
sirloin tip, rump or top rout@*
Lamb Legor bone-in shouldcr*
Vealshoulder, leg or hJin*
Pork loin, rib or shoulticr*
Ham, pre-cooked
Horn, raw
*’Forboneless rollcciroastsover 6-in.
thick. add 5 to 10min. pcr lb.
totimes given above.
3. Removefatand drippingsas
necessary.Basteasdesired.
.
4. Standing time recommended
for roasts is 10to 20 min. to allow
roastto firm up and make it easier
to carve. Internal temperature will
rise about 5° to 10°tocompensate
for temperature rise. If desired,
removeroast from ovenat 5° to 10°
less than temperature on chart.
Oven
Temperature
325°
325°
325°
325°
325°
325°
325°
375°
325”
Doneness
Rare:
Medium:
WellDone:
Rare:
Medium:
WellDone:
WellDone:
WellDone:
ToWarm:
Well Done:
WC1lDone:
5. Frozen roasts canbe conventiona~lyroastedbyadding 10to 25
min. per pound more tire-ethan
giveninchart for refrigerated. (10
min. per lb. for roastsunder5-lbs.)
Defrostpoultry beforeroasting.
ApproximateRoastingTime
in Niinutesper Pound
3 to5-lbs
24-30
30-35
35-45 28-33
21-25
25-30
30-35
35-45
35-45
10reins. per lb. (any weight)
Under N-lbs.
20-30 17-20
towk.
3
35-40
35-40
10to 15]bs.
zO-25
6 to$-lbs.
18-22
22-25
20-23
24-28
28-33
30-40
30-40
10to K-lbs.
Over5 Ms.
30-35
(her M 1!)s.
15-20
Internal
Temperature‘F
130°-140”
150°-160°
170°-185°
130°-1400
150°-160°
1700-185°
170°-180°
170°-180°
125°-1300
160°
185°-190”
1850-190°
In t!aigb:
185”-190°
---.. -—----- . . -- ~
5,
r
.— --- -----
Page 16

Broilingis cookingfoodbyintense
-
~,
i=
:4
~
F
~
1
radiantheat fromtheupper unitin
theoven.Mostfishand tendercuts
ofmeatcan be broiled. Foilow
thesestepsto keep spattering and
smokingtoa minimum.
Step 1:Ifmeathasfat or gristlenear
edge,cutverticalslashesthroughboth
about2”apart. If desired fatmaybe
trimmed, leavinglayerabout 1/8”
thick.
Step 2: Place meat on broiler rack
jn brojler pan which comes with
range. Alwaysuse rack so f~tdrips
intobroiler pan; otherwisejuices
maybecomehotenoughto catch
fire. Aluminumfoilmay be used to
linebroilerpan and rack, But, be
CERTAINto cut opening in foil, to
correspond with h;les i~the rack
so fat drips into pan below.
Step 3: Positionshelfon
recommended shelf position as
suggestedon Broiling Chart on
page 17.Most broiling is done on
C position, but if your range is
connected to 208 volts, youmay
wish to use higher position.
OVEN
TEMP
C)VENSET
Step 5: Turn OVENTEMP knob
andOVENSET knobtoBROIL.
Pre-heatingunitsis not necessary.
(Seenoteson BroilingChart.)
Step 6: Turn foodonly once during
cooking.Time foodsfor first side
as on Broiling Chart.
Turn food, then use times given for
second side as a guideto preferred
doneness. (Where two thicknesses
and times are given together,use
first times given for thinnest food.)
Step ‘RTurn OVEN SET knob to
OFF. Serve food immediately,
leavepan outsideovento cool
during meal for easiest cleaning.
Q.
shouldI km tiedoor ajar
when broiling chicken?
A. No. The door should be closed
when cooking chicken, and shelf
position “A”isrecommended.
Q vvhen -biding, k it necessary
.
toalways RMe arackinthe pan’?
A. Yes.Using the rack suspends
the meat overthe pan. Asthe meat
cooks, thejuices fall into the pan,
thus keeping meat dryer. Juices
MC
protected @ the rack and Stay
cooler. fhus
,s~;NC2r ~n~ smOkin~.
preventingexcessive
Q.Ma-yI a,nsealuminum foilto
limeitki?broiler panam.!raw’
A. Yes,i.fyoumoldfoil thoroughly
tobroilerrack, slittingittoconform
to holesin rack. Nits permitproper
drainageofmeatjuices intobroiler
pan, minimizingsmokingand
spatteringandpreventingpossibility
offirefromoverheateddrippings.
Do notplace a sheetof foilon the
ovenshelf. Todo somayresult
in improperlycookedfoodand
possibledamageto ovenfinish.
~. Shm.dd~Sa]tthe meat before
broiling?
A. No. Salt drawsoutthejuices
and allows them to evaporate.
Alwayssalt after cooking.Turn
meatwithtongs;piercingmeat
with a fork also allowsjuices to
escape. When broilingpoultry
or fish, brush each sideoften
with butter.
Q.Why are my mats not turning
out as brown as they should?
A. In some areas, the power
(voltage)to the rangemaybe low. d#~---
In these cases, preheat thebroil ‘=
@
unit for 10minutesbeforeplacing
broiler pan with food in oven.
Check to see if youare using the
recommended shelfposition.Broil
for longestperiod oftime indicated
in the Broil Chart in this book. Turn
food only once during broiling.
Q.Do I need togreasemy broiler ;
rack to prevent xneatfrom
sticking?
A. No. The broiler rack is designed
to reflect broiler heat, thus keeping
the surface cool enoughto prevent
meat sticking to the surface.
i
\
Page 17

Toslash,cutcrosswisethrough
——.- .-. ..-.-.—--——-.-—.. .-—
.-.......r
.---......—,.
.,—._——
....
L Alwaysuse broilerpan andrack
th:itcamewithyourrange. It is
designedtominimizesmokingand
spatteringby trappingjuices inthe
shieldedlowerpart ofthepan.
2. Ovendoor should be be ajar
formostfoods; there is a special
positionon door whichholdsdoor
---- . .
opencorrectly.
3. For steaksand chops, slash fat
evenlyaroundoutsideedgesofmeat..
Quantity
andlor
Food
Bacon
GroundBeef
Welldone
Beef Steaks
Rare
Medium (1-l filbs.) c
WellDone c 13
Rare 1%-in.thick
Medium
WellDone
L
Chicken
Thickness
%-lb.(about8
thin slices)
l-lb. (4patties)
%-in. thick c 7
1Ato
1 inch thick c 7 7 Steaksless than i-in. cook through
(2-2% llm.)
1 whole
(’2to2fi-lbs,),
I
split lengthwise
1’
BakeryProducts
Bread (Toast)or
ToasterPastries 1pkg. (2)
Englisi]Muffins
Lobstertails
(6 to8-oz. each)
2-4 slices c
2-split c 3-4
Z-4
7
Ham slices l-in. thick
(precooked)
(Y2 inch) c
I%% chops ‘
WC]]Done
+
2
2 (1-in. thick) B
about 1lb.
outerfatsurfacejust to the edgeof
themeat. Use tongsto turn meat
overtopreventpiercingmeat and
losingjuices.
4. If desired, marinatemeatsor
chickenbeforebroiling.Or, brush
withbarbecue saucelast5 to 10
minutes onlv.
5.Whenar~angingfoodon pan,
donotletfatty edgeshangover
sides.whichcouldsoilovenwith
drip~ingfat.
shelf FirstSide SecondSide
Position*
c
Time,Minutes Time,Minutes Comments
c
c 15
c
A 35
I I
B
c.5
B 8 8
3%
9 9
10
25 20-25
I
I
1l/5_2
13-16
10
13
Do not Cut through back ofshell. Spread
6,Broilerdoes notneedtobe
preheated. However,for very thin
foods or to increasebrowning,
preheatifdesired.
7.I?rozenSteaks can be
conventionallybroiledby
positioningovenshelfat next
lowestshelfpositionand increasing
cookingtime givenin this chart
1%tim~sper ~ide.
8.If yourrangeis connectedto208
volts,rare steaksmaybe broiledby
preheatingbroil heater and moving
ovenshelfonepositionhigher.
3%
4-5
13
7-8
14-16
10-15
‘/2
turn open. Brush withmelted butter
over
‘
10
13
Arrangein single layer.
Spaceevenly.
Up to 8 pattiestakeaboutsame time.
beforebrowning.Panfrying is
recommended.
Slash fat.
I
Reduce times about 5-10min. per side
for cut-up chicken.Brush eachside with
meltedbutter. Broilwith skin side downfirst
andbroil with doorclosed.
I
Spaceevenly.PlaceEnglish muffins
cut-side-upand brush with butter, if
desired.
beforeand afterhalf time.
Handle andturn very carefidly.
Brush with lemonbutter before and
during cookingif desired. Preheat
broiler to increasebrowning.
Increase times 5-10min. per side
for 1 %-in. thick or home cured.
Slash fat.
1ml!) chops
Iklcdium
WcliDone about 10-12oz.
{~~(ii(]~l)
Dorm abou[ 1lb. B
We]1
VWWWS and similar
;)rccoohd sallsdgcs,
bratwurs[
-,;—-
,\
--— In hiodd
RF724G,shdf position A is rcmnrnm.kxl for oflkt shcli’G,.]>,
L
i
1
2 (1inch)
2
(1% inch) c
1-lb. pkg.(10) c
“~.
1
c
c
I
8
10
10
17 12-14
6 1-2
I I
4-7
10
4-6
Slash fat.
If desired, split sausages in half
lengthwise into5 to 6-in. pieces.
—
17
—
—-
—-—---—-—--—-—-—----
Page 18

IhxNm-nemkd cleaning Time:
.-
ModerateL%M-2hours
(t!linspilk andlightspatter)
HeavySOW-—3hours
(heavy,greasyspillsandspatter)
Step &Removebroilerpan, broiler
rackandothercookwarefromthe
oven.(Ovenshelvesmaybeleftin
oven.However,theymaybecome
grayafterseveralcleanings.)Make
surethere’snothingontherightrear
surfaceunitovertheovenvent.
Step2: Wipeupheavysoilonoven
bottom.
Step 3: Cleanspatters or spillson
ovenfrontframe(A)andovendoor
outsidegasket(B)withadampened
cloth.Polishwithadry cloth. Do
notcleangasket(B).Do notallow
watertorundown throughopenings
intopof door (C). Neverusea
commercialovencleanerinand
aroundself-cleaningoven.
Step 4: Closeoven door andmake
sureovenlight(D)isoff.
Caution:Chromedrippansunder
thesurfaceunitsshouldneverbe
cleanedinthe self-cleaningoven.
l%3JvfO
SetOven
forawning
Step1:Tin-nOVENTEMPand
~~~ SET
preheatovenforfiveminutes.
OVENTEMP
kI’IObS to ~~~~~ and
OVENSET
H
Step3:SCttheautomaticoven
timer:
@Makesure
andtheSTARTdialshowthecorrect,
timeofday.
~Decideoncleaninghours
necessary—twohoursformoderate
soil or threehoursforheavysoil.
~Addthesehours topresenttime
ofday,thenpushinandturn STOP
(CLEAN)dialclockwisetodesired
time.Thisautomaticallylocksthe
door,andtheCLEANING light
willcomeon.
In about 20 minutestheLOCKED
Lightglows,indicatingovenis hot
anddoorcannot be opened.
Ovendoor andwindowgethot
duringself-cleaning.DO NOT
boththerangeclock
TOUCH.
II!llllllllllll 1111111llu!tlll ltll!!l!llllt UIIUIIIII tl[lllllllllllltlllllllllll[l
w=
c
o
A. (km FrontiFranw
B. oven Door Gasket
C. C@nhgs inDoor
D. oven Light
Step2:TurnOVENTEMPand
OVENSET
r===
kIIObS to~~E~~.
OVEN!SET
NOTE:Ifyouwishto startandstop
cleaningatalatertimethanshowil
onclock,pushinand turn START
dialto timeyouwishto start. Add
thehours neededforcleaningto this
“start” time, thenpushinand turn
STOP(CLEAN) dialtodesired
time. Cleaningwillautomatically
startand stopatthe settimes.
CAUTION: The ovenventis
locatedunder the right rear
surfaceunit. Do not usethis
unitduring the Self-Cleaning
cycle.However,youmayuse
theotherthree unitsfor
cook~ng.
-
Page 19

: (~=~ At theendof thecleaningtime,the
- CLEAN]l~G
heatturnsoff. The ovenisstilltoo
hottoopen. Astheoven
]ightgoes out andthe
cools, oven
temperaturedropsto approximately
550°F.(aboutanhour later);then
the LOCKED lightgoesout. The
~le~ningprocessisover.Youmay
nowopentheoven door.
FQiIo$v 21hese steps after
F,elf’-ciealliilg
OVENTEMP
I
OVENSET
Step 1: When LOCKED lightis
out, turn OVEN TEMP andOVEN
SET knobsto OFF.
Step 2: Open ovendoor, and when
ovenhas completely cooled, wipe
out any ash in oven. Also wipe any
slightsoilfrom the face of the oven
and around the inside door panel.
.
A. Thisiscausedbyexcessivesoil.
SwitchtheOVENSET knob to
OFF. Open windowsto rid room of
smoke.Allowtheovento coolfor
at least one hour beforeopening
thedoor.Wipe up theexcesssoil
andresetthe cleancycle.
Q.
Isthe“crackling”sound
I hear duringcleaningnormal?
A. Yes.This is the soundof metal
heatingand cooling.Itcan be heard
I
duringboththe cookingand clean-
ingfunctions.
Q.
Why won’tmy ovenclean
immediatelyeventhoughI set
all the knobs correctly?
A. Checkto be sureyourSTART
dialis setto the sametime as
RANGE CLOCK.
Q.
If my oven c~ockisnotworking,
still self-clean my oven?
can I
A. No. Yourautomaticoventimer
usestherange clock to help start
and stopyour self-cleaningcycle.
Q.CanI
aroundtheoven
A. No, this gasket is essential for
a good oven seal. Takecare not to
rub, damage or moveit.
cleantheWovenGasket
door?
My ovenshelveshavebecome
Q.
gray after several cleanings. Is
this nor]mal?
A. Yes.Afccrmanycleanings,the
shelvesmaylosesomelusterand
discolorto adeepgraycolor.
Q. CanIIlsecommercialoven
cIeanerson any~Iartofmyselfcleaningoven?
A. No cleanersor coatingsshould
be usedaroundanypart ofthis
oven.If youdousethem and do not
wipethe ovenabsolutely clean, the
residuecan scartheovensurface
anddamagemetalparts the next
timethe ovenisautomatically
cleaned.
Q. Why do I haveash leftinmy
ovenaftercleaning?
AdSometypesofsoilwillleave
adepositwhich is ash. It can be removedwitha damp spongeor cloth,
Q. My ovenshelvesdo not slide
easily.WThatis the matter?
A. Afier many cleanings,oven
shelvesmaybecomeso clean they
do not slide easily.If youwish
shelves to slide more easily,
dampenfingerswith a small
amountofcookingoil and rub
lightlyover sidesof shelfwhere
theycontactshelfsuppofis.
Q.What causes
lineson the enameled surface
my oven?
thehair-like
of
A. This is a normal condition
resulting from heating and cooling
during cleaning. These lines do not
affect how your ovenperforms.
.4. Yes.there may be a slightodor
during the first fewcleanings.
Failure
to wipe out excessivesoil
mightalso cause an odor when
cleaning.
)
Page 20

Propercare and cleaningare
importantsoyourrangewillgive
ycwefficientand satisfactory
seuvice.FO11OWthesedirections
carefullyin caring for yourrange
toassure safeandproper
maintenance.
,’.
POrce]aill Enamel 0%%211
.%lterior
Standard Oven IWodeERF5W2G
and Self-Cleaning(hen Model
R.F724G-The inside oftheoven—
top,bottom, sides, back and inside
ofthedoor—has a durable acidresistantporcelain enamel finish.
However,anyacid food spilled
(suchas fruitjuice, tomatoor
vinegar)shouldnot be permitted
to remain on the finish. Clean as
recommended in CleaningChart
onpage23. In addition, for Model
RF724G, see “Operating the SelfCleaningOven”on pages 18and 19.
i;o~ltillnous”c[efil%ing
o-ml Intw’im
NfodeiI?F6MG-The insideofthe
oven—top,bottom,sides,back and
insideofthe door—arefinished
with a specialcoatingwhich
cannotbe cleaned in the usual
manner with soap, detergents,
commercialovencleaners, coarse
abrasivepads or coarsebrushes.
Their useand/ortheuseof oven
sprays will cause permanent
damage.
The specialcoatingis a porous
ceramicmaterialwhich is dark in
color andfeelsslightlyrough to the
touch. If magnified, the surface
wouldappear as peaks, valleys,and
sub-surface “tunnels~’This rough
finishtendsto preventgrease
spattersfrom forminglittlebeads
or dropletswhich run down the
side wallsofa hard-surfaceoven
liner leavingunsightly streaksthat
require hand cleaning.Instead,
when spatter hitstheporousfinish
itis dispersed and is partially
absorbed. This dispersal action
increases the exposureof oven
soilto heated air, which results
in oxidationofsoil. This finish
also reduces the visualeffect
of residual soil.
Soilmay not disappearmnpletely
and at some time after extended
usage, stainsmay appear. See “To
Clean the Continuous-Cleaning
Oven” at right to minimizethis
effect.
The special coating worksbest WI
sndl amounts of spatter.
not work well with larger spills,
especially sugars and egg or dairy
mixtures. For this reason, the oven
is equipped with a removable,
replaceable aluminum foiloven
bottom liner which protects the
porous finish on the bottom of the
oven from s~illovers.
Itdoes
SpillsOninsidesurfaceofthe
ovendoorshouldbe avoided.
Thespecialcoatingis notused
onovenshelves,Shelvescanbe
takento the sinkforcleaning,and
can be cleanedwithabrasiveand
commercialovencleanersoulside
theovento avoiddamagetothe
specialcoding.
To Cleanthe
Continuous-CleaningOven:
L Let rangepartscool before
handling.It isrecommendedthat
rubber gloves be worn when
cleaningrangepartsmanually.
2. Removeall cookware,including
thebroiler pan andrack.
3. Takeshelvesoutofthe ovenand
cleanthem manuallywith scouring
pads, mild abrasivesor commercial
ovencleaners. (Followpackage
directionsregardinguse of gloves
andeyeprotectionwhen using oven
cleaners.)
4. Removeexcessspills and
boiloversfrom the aluminum foil
ovenbottom linerbeforetakingit
outofthe ovensoexcessliquids
won’tspill onto the porous finish.
Then removethealuminumfoil
liner. (When cleaning or removing
the aluminum foilliner, liftthe
bake unit up out of the way.)
If the aluminum foilliner is soiled
beyondcleaning with damp cloth,
replace it. Using the old sheet as
a pattern, cut anew liner from
regular heavy-weightaluminum foil
and place it on the ovenbottom.
Do not install aluminum foilon
or near bake element. Improper
installationof foilmay result in a
risk ofelectric shock or fire.
(c-’.,,
‘.._.,/j
,#-–’A)
[’ )
\
“k ...
Page 21

mildnon-scratchingcleanserand
~~~dmnp clo{h,Avoidspillingwateror
~.~t~*=
‘%==clea~erontheporoussuriace.
6. Soilvisibilitymaybe reduced by
operatingtheovenat400”F.Close
door; turn OVENSET knobto
bakeand OVENTEMP knobto
400°F.Timefor at least4 hours.
Repeatedcyclesmay be necessary
beforeimprovementin appearance
isapparent,particularly on oven
door. For moderateto heavysoiling
ofovendoor,usemethoddescribed
in item (7)belowbeforerunning
400°F.cycle.The oventimercan
beused to controlthe cycleautomaticallyatatime convenie~ltfor
you. Some slightsmokingmay
occur, similarto that which may
occur during other Time Bake
cooking.
R~Mmvm~~s
OPERATION OF THE OVEN. THE
DOOR. WINDOW AND OTHER
RANGE SURFACES WILL GET HOT
ENOUGH TO CAUSE BURNS. ~0 NOT
TOUCH. LET THE RANGE COOL
BEFORE REPLACING ALUMfNUM
FOIL OVEN BOTTOM LINER AND,
IF THEY WERE REMOVED. OVEN
SHELVES.
If a spilloveror heavy soiling
‘i’.
lXJRING THE
occurs on thepoi-oussurface, as
soon as practical after the ovenhas
cooled, removeas much of the soil
as possible using a small amount of
water and a stiff bristle nylon
brush. When using water, use it
sparingly and change it frequently,
keeping it as clean
as pmsble, and
be sure to blot it up with paper
towels.cloths, or sponges. Do
scrub with paper towels,
rubor
not
cloths or sponges. since they will
leaveUnsightlylinton the oven
finish. If ~vaim-leaves a white ring
on the finish as it dries, apply ~~atcr
~~~[linand h/0~
@Jn~~, staytin~ at
it with a cl~an
the edge O(the
ring and t{orkingtowardthe center,
Use care in removingandreplacing
the aluminumfoilovenbottom
liner and shelves,andinplacing
and removingcookwaretoavoid
scratching,rubbing or otherwise
damagingtheporousfinish on
the ovenwallsanddoor.
Do notusesoap,detergent,
commercialovencleaner,silicone
ovensprays,coarsesteelpadsor
coarsebrushescmtheporous
surface. These productswillspot,
clog and mar theporous surface
and reduceitsabilityto work.
T’oremove door, open to BROIL
position (about 4 inches). Grasp
door at sides near top and lift it up
untilhingearms on door come out
of slotson oven frame.
TOreplace, grasp door at sides
near top. Restingdoor against
knee, slip hinge arms on door into
slotson oven frame. Then push
door in at bottom until it snaps
into place.
Caution: Before replacing your
ovenbulb, disconnect the electrical
power for your range at the main
fuse or circuit breaker panel or pull
plug. Be sure to let the lamp cover
and bulb cool completely before
removing or replacing them.
1
To replace light bulb:
Whenoveniscool, holdlampcover
asyoucarefullysnapwire retainer
to the side. Use an oven mittor
gloveto protectyourhandagainst
possible bulb breakage.Remove
bulband replacewith40-watt
appliancebulb.Replacelamp
cover,secure itwiththe wire
retainerand reconnectpower
to range.
Hug-h SWfatxunits
Normal spillsburnofftheseselfcleaningsurface units.Tomake
cleaningeasier around and under
the rangetop openings,the plug-in
surfaceunitsare removable.
To remove plug-in
~ Raisethe unitcoilopposite the
receptacle. Lift about one inch
abovethe drip pan and pull away
from the receptacle. Caution: Be
surethe coils are cool before
removinga surfaceunit.
~ After removingthe plug-in
surfaceunit, youcan take out the
drip pan. Wipe around the edgesof
the surface unit opening, and clean
drip pan as recommended in
Cleaning Chart on page23.
Caution: Be sure all controls are
turned OFF beforeremovingthe
surhce units or attemptingto clean
under them.
units:
I
Page 22

Toirephweplug-in Units:
oPut drippan
~n pkiceandlineit
upso unit receptaclecan be seen,
@Y.mertterminalsof’plug-inunit
throughopeningindrip panand
intothereceptacle.
~Guidesurfaceunit into placeso
itfits evenlyand snuglyinopening.
~Do notattempttocleansurface
units in an automaticdishwasher.
~Do notimmerseplug-insurface
unitsinliquids of anykind.
~Do not bendthe plug-insurface
unitplugterminals.
~Do notattempt to clean, adjust
or in anywayrepairtheplug-in
receptacle.
Cleanunder drip pansofien.
Built-upsoil, especiallygrease,
maycatchfire. For easiercleaning,
theentirecooktopmaybe raised.
‘n)M the Codwp:
~Removeallcookwareandother
itemsthatmay slideoff.
~Grasp front edgeofcooktop
withbothhandsandliftit. Do not
forceordropcooktop.(On model
RF502G,theporcelain-enamelfinish
maychipor become otherwise
damaged.)
@Raisethe supportrod and letthe
cooktoprest on it.
After all ovenand surfaceareas are
cool, wipe theporcelain-enameled
surfaceandtheovenventductbelow
thecooktopwith adamp sudsy
cloth. Lightlyrub hard-to-remove
spillson theporcelain-enameled
surfacewitha soap-filledsteelwool
scouringpad and hot water.Rinse
with damp cloth or sponge.
To knw!rh! txditqx
~Lift thecooktopandlowerthe
supportrod. Then lowerthe
cooktopuntilitlocksintoposition.
,.#+’”-’n
(’ -)
.+-”
I
Page 23

F’kT
Bake unit
I NIATERIALSTOUSE ~EIWllA~DIRECTIONS
aridBroil unit
Broiitir Pan m:d Rack @Soapand Water
@Soap-FiIled Scouring Pad
@Plastic Scouring Pad
—
‘control Knolls:
llamze l’oDand Oven
(
e Mild Soap and Water
(hitshk GlassFinish ~ SoapandWater
Metal, including @Soapand Water
Stainless Steel
Cooktop, Side Trims
and Trim Stri~s
PorceIain Enamel @PaperTowel
surface+ o Dry Cloth
e Soap and Water
PaintedSurfaces
e
SoapandWater
I
(MenGasket
OvenVentDuct
SheIves
.#3=R%
(See Self’-Cleaning
Oven Directions) @ Soap-Filled Scouring Pad
-“
. . .
.=-. ~:..
“..+
@
Surface Unit
\ ~ Soap
Coils
Chrome-Plfiied o Soap
DripPam ~ Stiff’-Brisdcd Brush
—---
See pages 18 and 19 for
and Water
@Soapand Water
e Commercial Oven Cleaner
~ Plastic Scouring Pad
and V%ter
Soap-FilledScouringPad
@
(Non Metallic)
USE ‘lllHZ FOLLOWINGDIRE~T1ONSFORS1’AF4!DAIllDCIWEI’$J0NI_2i.
—.
Do
notclean the bakeunitor broil unit, Any soil will burnoff whentheunit is
heated. NUIW:Rakeunit is hingedand can be iiftedgentlvtoclean ovenfloor.
Drainfat, coolpan andrack slightly.(Do notlet soiledpan andrack standin
ovento cool). Sprinkleondetergent. Fill pan withwarm waterandspread cloth
or paper toweloverrack. Let panand rack standfor a fewminutes.
if necessary.Rinseand dry.OPTION: Broilerpan and rack mayalso be cleaned
ina dishwasher,
Pulloff knobs.Washgentlybutdo not soak. Dry andreturn controlsto range
makingsureto match flatarea on knobandshaft.
Cleanoutside ofcooledblack glass doorwith a glass cleaner thatdoes not —
containammonia,Washother glass withcloth dampenedin soapywater. Rinse
andpolish with adry cloth.
Wash,rinse, andthen polish witha dry cloth. DO NUTUSEsteel WQO1,
abrasives, ammonia, acids, or commercial ovencleaners whichmaydamage
the finish.
A\,oidC]eaningpowdersor harsh abrasives which
If acids shouldspill on the range while it is hot, use a dry papertowelor cloth
to wipeup right away.Whenthe surface has cooled, washand rinse.
For other spills, suchas fat smatterings,etc., washwith soap and waterwhen
cooled andthen rinse. Polish with a dry cloth.
Use a mild solutionof soapand water. Do notuse any harsh abrasivesor cleaning
powderswhichmay scratch or mar surface.
AvoidgettingANYcleaning materials on the gasket.
WipeOven VentDuct under right rear surface unit with a dampsudsycloth.
SheIvescan be cleanedin Self-Cleaning ovenor dishwasher,or byhand,
usingsoap andwateror commercial ovencleaner.Rinse thoroughlyafter
cleaning. NOTE: Somecommercia~ovencleaners cause discoloration. When
usingfor the first time, test cleaner on small part of shelf and checkfor
discoloration beforecompletely cleaning.
Spatters and spills burn awaywhenthe coils are heated. At theend of a meal.
removeall utensils from the surface unit and heat the soiled unitsat I-H.Let the
soilburn off abouta minute and switch the units to OFF.Avoidgettingcleaning
materials on thecoils. Wipe off anycleaning materials with a damp paper towel
bejforeheating the surface unit.
DO NOT handle the unit before completely cooled.
DO N~ attempt to clean plug-in surface units in Self-Cleaningoven.
DO NOT immerse plug-in units in any kindof liquid.
Wan as described below or in dishwasher. DO NOT
CLEAIWNGOVE1’+Jas they will discolor.
Wipe after each cooking so unnoticed spatter will not “burn on” next time you
;ook. To remove “burned-on” spatters use any or all cleaning materials
ncntioned, After pan cools slightly, sprinkle on detergent, wash or scour with
lot water, rinse and dry. Rub
he surface.
Self-Cleaning ovensand pages 20and21 for Contintaous-Cleaningovens.
.—
may scratch the ename!.
CLEAN1~SELF-
/ighf/y with scouring pad to prevent scratching of
—.——
Wash; scour
~E]sideoven
---Ww[l Liner
DOOd’
~ Sce
below
Q Soap and Wmcr
Q
C(>mnlercial Oven CIcuner
Removeovendoor—see page20. DO NOT place door under runningwater, or
immerse. Use same directions for cleaning as for Oven Liner, below.
COOI before cleaning. Frequent wipingwithmildsoapandwater(paflicularly
after cooking meat) will prolong time between major cleanings. Rinse
Q&xlp-Filicd Scouring Pad thoroughly.Soap left on liner can cause stains. For heavy soi13use non-abrasive
-..,
@pl:l~ticS~~\jrin: ~ad
\
.,‘
-.
-—~
:.!
——- .
-: ‘.Spill:]:c ofmarinades, frui[ juices, :~ndbaslil~gmo[crials containin: acids maycause discoloration,
I(>IN)(i(m~’h
..
:Inv 110[portion ofl!w oven.
_ ..-L
l$}[il~nthe sllrfi~~c
cleaner and followlabel instructions, using thin layer of cleaner. Use of rubber
(;[o~re$i$rcc~~nlmendcd.
cleaner that gets on thermostat
is cool. clean and rinse.
wipeor rub lightly on stubborn spots. Wipe off any
bulb found in back or on side, near top of oven.
so shouldbe wiped up immediately. Ikke care
Page 24

...=...
..,-.,.
‘)
‘“
PROBLEM
OVEN
OVENLIGHT
DOESNOTWORK
FOOD DOES NOT
BROILPROPERLY
FOOD DOES NOT ROAST
ORBAKEPROPERLY
wnLNOT WORK
POSSIBLECAUSEANDREMEDY
Thecircuit breakerinyourhousehas beentripped,or afusehasbeenblown.
Ovencontrols notproperlyset.
Lightbulbisloose.
Bulbisdefective.Replace.
Switchoperatingovenlightisbroken. Callforservice.
OVENTEMP knobnotsetatBROIL.
OVENSETknobnotsetatBROIL.
Door notleftajar asrecommended.
Improper shelfpositionbeingused. CheckBroilingChart.
Necessarypreheatingwasnotdone.
Foodisbeingcookedonhotpan.
Utensilsarenotsuitedforbroiling.
Aluminumfoilusedonthebroil pan rackhasnotbeenfittedproperlyand slit
asrecommended.
OVENTEMP knob notset correctly.
OVENSETknobnotsetonBAKE.
Shelfpositionis incorrect. CheckRoastingorBakingCharts.
Ovenshelfisnotlevel.
Incorrect cookwareor cookwareofimpropersizeisbeingused.
Afoiltentwasnotusedwhenneeded to slowdownbrowningduringroasting.
I
FUNCTIONING PROPERLY
OVEN‘A’ILLNOT Automatictimerdials notsetornotset properly.Clock must be setto time ofday
SELF-CLEAN
Drip pans are notset securely intherangetop.
Surfaceunitcontrolsare notproperly set.
Surfaceunits are not securely pluggedintoreceptacles.
andthe STOPdial mustbeset and advancedbeyondthetimenotedonovenclock.
The STOPdialwasnotadvancedfor longenough.
BothOVENSET and OVENTEMP knobsmustbesetat CLEAN setting.
A thickpileofspillover,when cleaned, leavesa heavylayerofash in spotswhich
could haveinsulatedthearea from further heat.
[
“-n
(
~...,_../
‘-—.
)
Page 25

>1,
. .—.
#s%%%
w
Toobtainservice,seeyourwarranty
orIiheback pageof thisbook.
We’reproudofour serviceand
wantvouto be Pleased. If for some
reasohyouare ;ot happywiththe
serviceyoureceive, herearethree
stepsto followfor further help.
FIRST,contactthe peoplewho
servicedyourappliance. Explain
whyyou are notpleased. In most
cases, this willsolvethe problem.
NEXT, if you are still not pleased,
write all the details-including
yourphonenumber—to:
Manager, Consumer Relations
Hotpoint
AppliancePark
Louisville,Kentucky40225
FINALLY,ifyourproblemis still
notresolved, write:
Major Appliance
Consumer ActionPanel
20 North WackerDrive
Chicago,Illinois60606
.. .
----
‘----
\.
,
.;
1.
Page 26

GENERALELECTRIC-HOTPOINT
G%&
%&/>
#?Q’&
k.%
FACTORY SERVICE or HOTPOINT
.
CUSTOMERCARE@SERVICE.
@Servicetripsto yourhometo
teachyou howto usethe product.
Readyour lJse and (law material.
Ifyouthen haveanyquestions
aboutoperatingthe product,please
contactyourdealeror our
ConsumerAffairsofficeatthe
address below.
Xp “
I Ifyouhavean insk
?$$j
~%
~,.k?f
@
$&J
; “%
qv
&j&
Q&&&
QImproperinstallation.
contactyourdealerormsiai!er.
Youareresponsiblefor providing
adequateelectrical,gas, exhausting
andotherconnecting facilities.
~llationproblem,
... , WARRANTORISIV(X RESPON-
@Replacementof housefuses
or resettingofcircuitbreakers.
@Failureofthe productif it is
usedforotherthan its intended
purposeor usedcommercially.
=1Damageto productcaused
byaccident,fire,floodsor acts
of God.
SIBLE FORCONSEQUENTIAL
DAMAGES.
.#$$ fja$f
g~~ ,
., F..
:#3%‘ l—-——--___ _=_m.T_-_-— ---
i
~’+$a
gjf~
$+~~
#.F+ ‘
&$:
~+Y&.::2
..!~,,~
b>,<
,$,:$;
!..,..<”.,
‘.~,’:-
/- ..-.,
*-H,, -~
(->~p~,>:1
1
Some statesCJOnot allowthe exclusionor limitation of incidentalor consequentialdamages, sothe abovelimitationorexclusion
may notapply to you.This warrantygivesyou specific legal rights,andyou may also haveother rightswhich varyfrom stateto state.
Toknowwhatyour legal rights are inyour state,consult your localor stateconsumer affairsoffice oryour state’sAttorneyGeneral.
.-..—
V@+t7i~@F: C%2rM2it31E@2&it2 ~~~~~~~
—
1
*
I{
b.:-
‘.’?
$
$?$
g~
1
“-$3
.+
A
c~l$j$
g$]$
~~p%
s?j~j
6b
 Loading...