

Page 1

---
I
. RANGE
I
RC ANDERSON - 1
AP2-21O
Page 2
,.-
--c
I
{
I
I
!E)ear !Homemaker:
This book was written to help you use and care for your range, and to help you enjoy
the many years of dependable, efficient performance and service for which it was
designed. Keep the book handy to refer to often.
Throughout the book are cautions for your comfort and safety.
ones are also listed below.
IMPORTANT
Read the DOS and DON*TS listed below carefully and frequently
range. Remember when cooking on the range, the part in use, especially oven doors and
windows, can be HOT enough to cause a burn. Some areas NEAR the part in use can
also become HOT enough to cause a burn, especially to sensitive skin. After use all
parts take a while to cool. DON’T leave children alone or unattended in area where
range is in use, turn pan handles inward to reduce tipping hazard and let ALL inside
and outside surfaces cool COMPLETELY before touching them.
Let us hear from you if you have any special questions. We will try to help.
Some important
for safe use of your
1.
Have your range installed and properly
grounded by a qualified installer.
2. Have the installer show you the location of
the main range circuit fuse or circuit breaker.
Mark them for easy reference.
3. Disconnect range at main range circuit fuse
or circuit breaker
Turning off controls and lights DOES NOT re-
move power to the electrical circuits.
4. Use proper heats, and large enough pans on
surface units to prevent spillovers which could
catch fire.
5. Use ONLY DRY POTHOLDERS on hot pans
and other surfaces to prevent burns from steam.
Never let potholder touch heating coils; they may
be hot even though they are dark in color.
6. Stand away from range when opening oven
door and let hot air or steam escape before removing or placing food.
7. Keep hood and grease filters clean according
to instructions for your model.
before servicing the range.
Consumers Institute
Appliance Park
Louisville, Kentucky
40225
DaN’T
1.
Don’t assume you know how to operate al]
parts of the range. Some features may work differently from those on your previous range.
2. Don’t use oven or surface units for heating
the home.
3. Don’t stand or sit on range drawer or oven
door; don’t let children do so.
4. Don’t use aluminum foil except as suggested
in this book. Improper use could cause damage
to the range or could cause a fire.
5. Don’t let ventilating hood operate when you
are “flaming”
unit foods. The hood. if operating, could spread
flames.
6. Don’t use water on grease fires: smother fire
or use dry chemical or foam type extinguisher.
7. Don’t allow anyone, especially children, to
CLIMB, STAND, SIT OR HANG ON an open
oven door so as to prevent damaging the door
and to eliminate the possibility of tipping over
the range or oven.
liquor or other spirits on surface
-J
Also see additional information on the Major
See Before You Call for Product Service at rear of
Appliance Consumer Action Panel adjacent to the
book.
service page.
2
Page 3
---
---
ABOUT THIS BOOK: This publication is intended to describe the use and care of all
the features of your range. It also covers other range models which may have features
different from your model. Each range should have this publication, plus one which pictures your model, identifies location of specific parts and tells the features of your model.
If you do not receive the second publication, drop a card to the following address and
ask for it: Publications Distribution Section, General Electric Co., P.O. Box
Concord, Ohio 43762. Include on the card the COMPLETE MODEL NUMBER of
your
range; see the page Before You Call for Product Service for location of the name
plate which includes the model number. Be CERTAIN to include your name, full address
and zip code. You will be sent the correct supplement for your model.
SURFACE COOKING
Calrod RSurface Units, Controls, Reflector Pans, Use of Aluminum Foil . . . . . . . .. 4-7
Cooking Guide and Information. . . . . . . . . . . . . . . . . . . . . . . . . . . . . , . . . . . . . . ...7-8
Cooking Heats– How to Use..,, . . . . . . . . . . . . . . . . . . . . . . . . . . . . . . . . . . . . . ...5
Cooking Utensils
Common Sense Rules . . . . . . . . . . . . . . . . . . . . . . . . . . . . . . . . . . . . . . . . . . . . . . ...6-7
—Materials and Sizes . . . . . . . . . . . . . . . . . . . . . . . . . . . . . . . . . . . . 5
111, New
<
G’
USING YOUR OVEN
Baking, Guide . . . . . . . . . . . . . . . . . . . . . . . . . . . . . . . . . . . . . . . . . . . . . . . . . . . . . ..I2
Broiling, Guide . . . . . . . . . . . . . . . . . . . . . . . . . . . . . . . . . . . . . . . . . . . . . . . . . ...14-15
Minute Timer, Clock, Automatic Oven Timer, Appliance Outlet(s) . . . . . . . . . ...10-11
Roasting, Guide . . . . . . . . . . . . . . . . . . . . . . . . . . . . . . . . . . . . . . . . . . ., . . . . . . . ...13
Using Your Oven, Aluminum Foil . . . . . . . . . . . . . . . . . . . . . . . . . . . . , . . . . . . . . ...9
HOW TO CARE FOR YOUR RANGE
Appliance Outlet(s) –Fuse, Mini-Breaker . . . . . . . . . . . . . . . . . . . . . . . . . . . . . . . ...17
Care of Your Range . . . . . . . . . . . . . . . . . . . . . . . . . . . . . . . . . . . . . . . . . . . . . ...16-19
Cleanin~Charts, Parts, All Finishes . . . . . . . . . . . . . . . . . . . . . . . . . . . . . . . . ...23-24
Cleaning Under the Range . . . . . . .. . . . . . . . . . . . . . . . . . . . . . . . . . . . . . . . . . . . ...19
Lamps, How to Replace . . . . . . . . . . . . . . . . . . . . . . . . . . . . . . . . . . . . . . . . . . ...18-19
Oven Thermostat, Adjusting . . . . . . . . . . . . . . . . . . . . . . . . . . . . . . . . . . . . . . . . . ...18
Oven Vent, Duct, Use of Aluminum Foil . . . . . . . . . . . . . . . . . . . . . . . . . . . . . . . ...17
Porcelain Enamel . . . . . . . . . . . . . . . . . . . . . . . . . . . . . . . . . . . . . . . . . . . . . . . . . . ...16
Removable Oven Door, Non Self-Clean Oven . . . . . . . . . . . . . . . . . . . . . . . . . . . . ...19
Surface Units, Plug-In Feature, Removable Trim Rings. . . . . . . . . . . . . . . . ...16-17
Self-Clean Oven . . . . . . . . . . . . . . . . . . . . . . . . . . . . . . . . . . . . . . . . . . . . . . . . . ...20-23
Useof Aluminum Foil . . . . . . . . . . . . . . . . . . . . . . . . ...4.9.13.14.15. 16,17,19,22,26
GENERAL
Before You Call For Service . . . . . . . . . . . . . . . . . . . . . . . . . . . . . . . . . . . . . . . . . ...26
MACAP Information . . . . . . . . . . . . . . . . . . . . . . . . . . . . . . . . . . . . . . . . . . . . . . . ...27
Model and Serial Number Location . . . . . . . . . . . . . . . . . . . . . . . . . . . . . . . . . . . . ...26
Warranty Information . . . . . . . . . . . . . . . . . . . . . . . . . . . . . . . . . . . . . . . . . . . . . . ...28
3
Page 4
....
I
--‘i
1
I
1
~uuface(hoking
WithTour%finite
SIFikat (?)ontrds
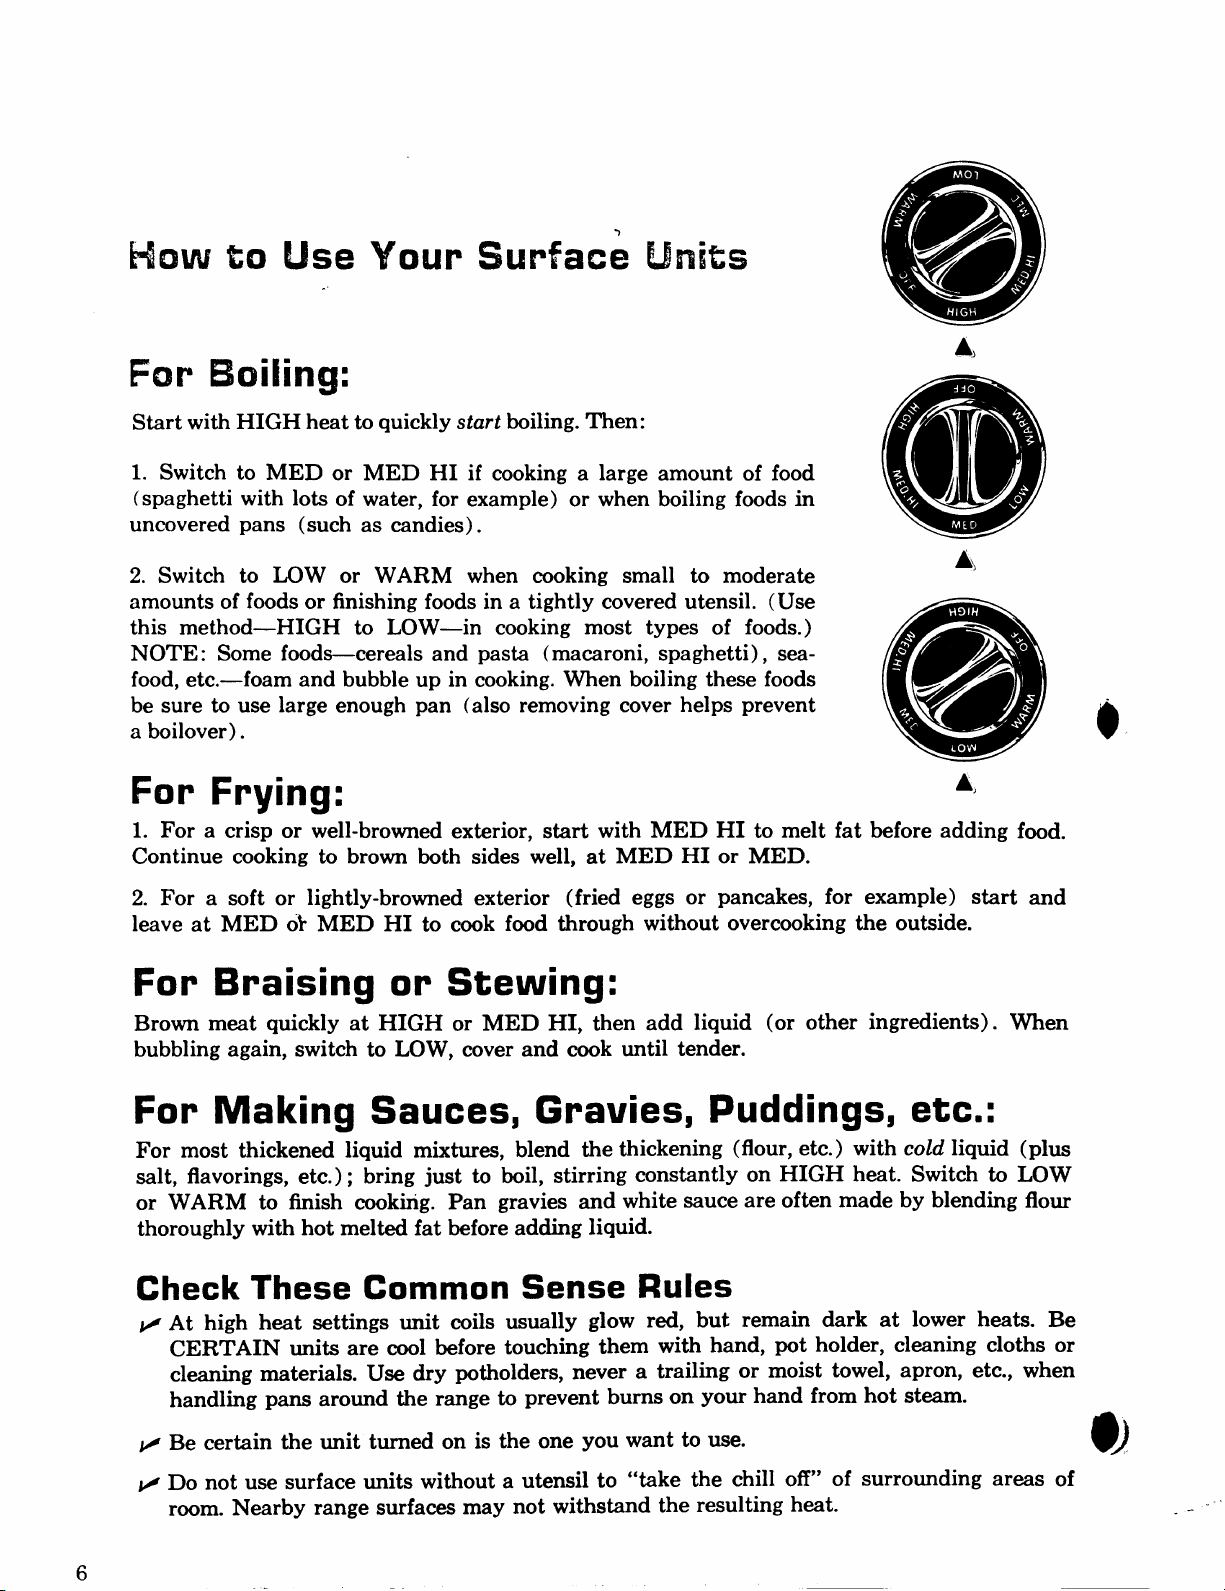
Your surface units and controls are designed so that you can select the amount of heat you
wish for your needs when cooking on top of the range. Five selections are spelled out on the
dial. But movement of the knob to settings between these selections gives you a different heat.
The slightest rotation of the knob gives you increased or decreased heat. There are an “infinite” number of heat selections for your cooking. WARM is the lowest heat and HIGH is the
highest heat. The control can be turned in either direction to OFF position.
Controls on ranges covered in this book may have different appearance than the one pictured
here, but they operate the same way as described here.
There is a slight niche at OFI? and HIGH, so a “click” is heard when control is turned to
these positions. If your kitchen is quiet, you may notice slight “clicking” sounds during
cooking, indicating heat settings selected are being maintained.
@
FOPBesz Results in Top-of-the-Range Cooking
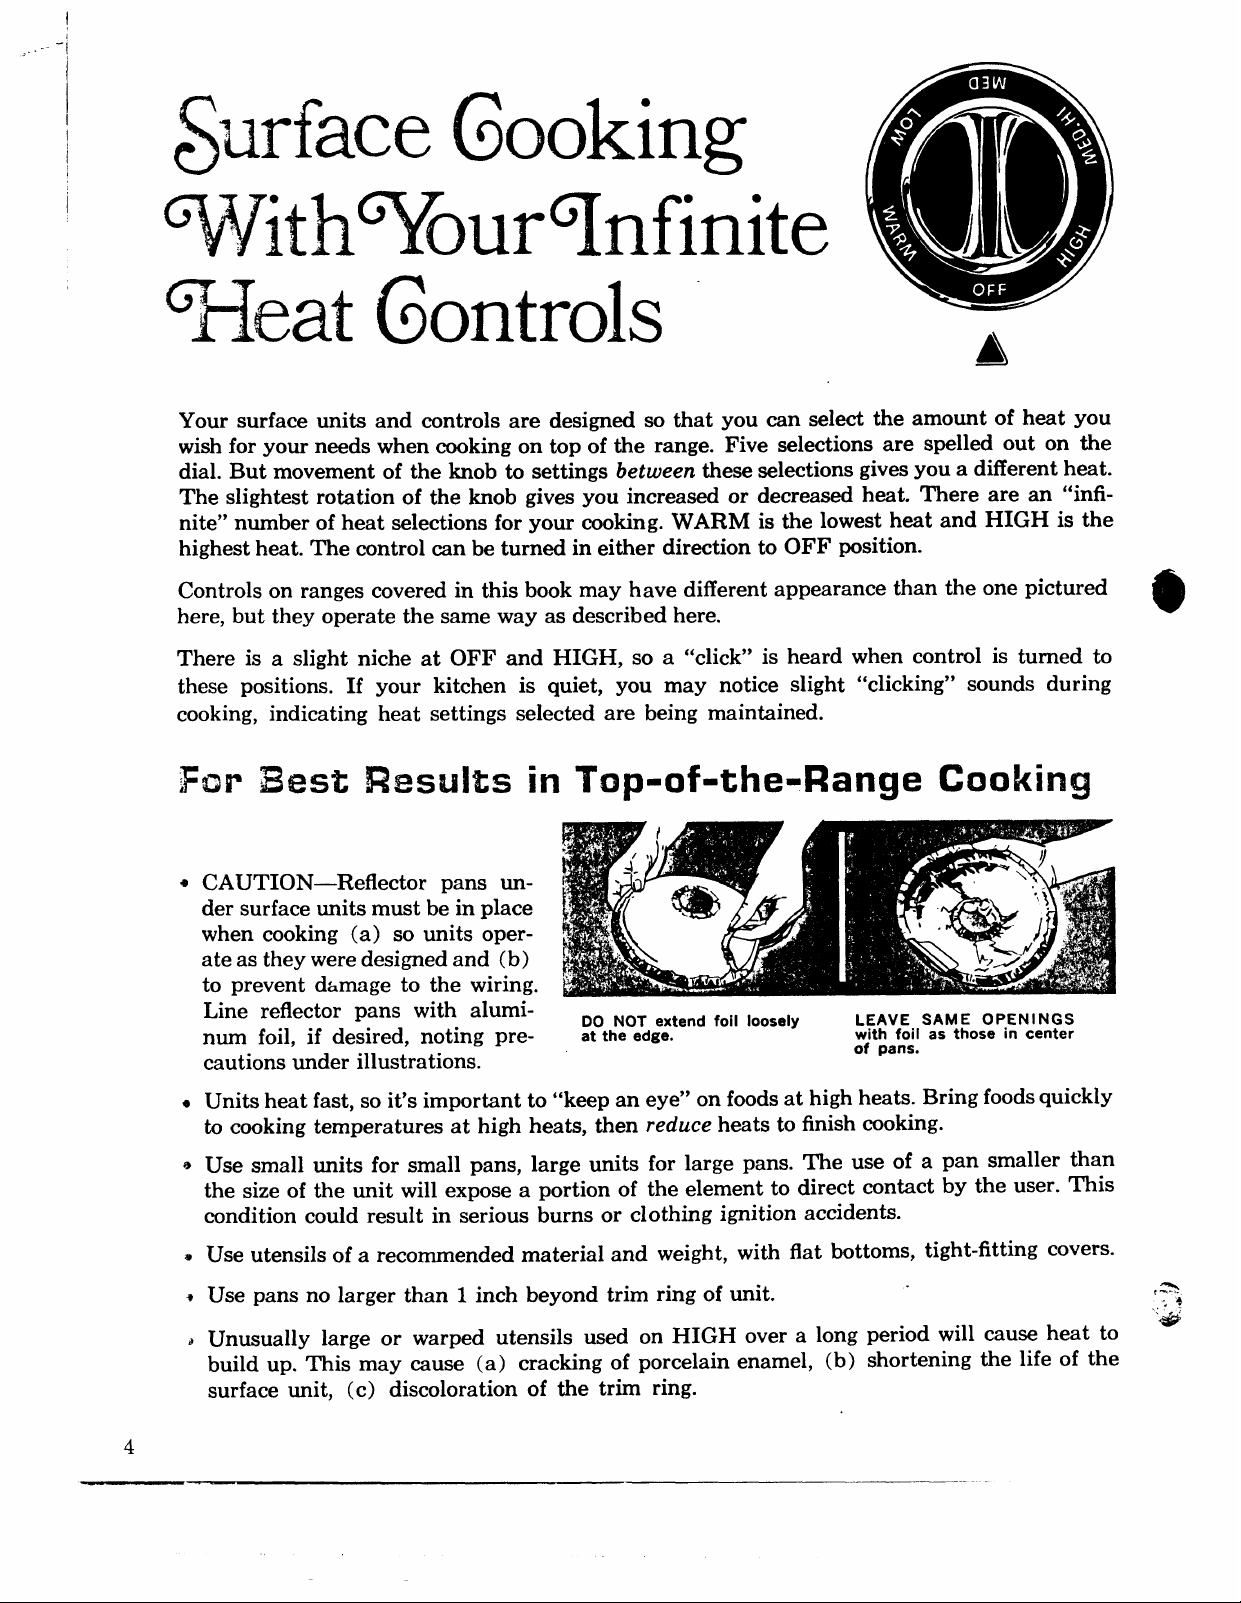
* CAUTION—Refiector pans un-
der surface units must be in place
when cooking (a) so units operate as they were designed and (b)
to prevent damage to the wiring.
Line reflector pans with alumi-
num foil, if desired, noting pre-
cautions under illustrations.
* Units heat fast, so it’s important to “keep an eye” on foods at high heats. Bring foods quickly
to cooking temperatures at high heats, then reduce heats to finish cooking.
* Use small units for small pans, large units for large pans. The use of a pan smaller than
the size of
condition could result in serious burns or clothing ignition accidents.
a
Use utensils of a recommended material and weight, with flat bottoms, tight-fitting covers.
* Use pans no larger than 1 inch beyond trim ring of unit.
)
Unusually large or warped utensils used on HIGH over a long period will cause heat to ‘~
build up. This may cause (a) cracking of porcelain enamel, (b) shortening the life of the
surface unit, (c) discoloration of the trim ring.
the unit will expose a portion of the element to direct contact by the user. This
DO NOT extend foil loosely
at the edge.
LEAVE SAME OPENINGS
with foil as those in center
of pans.
f-.,,
-.4
4
Page 5
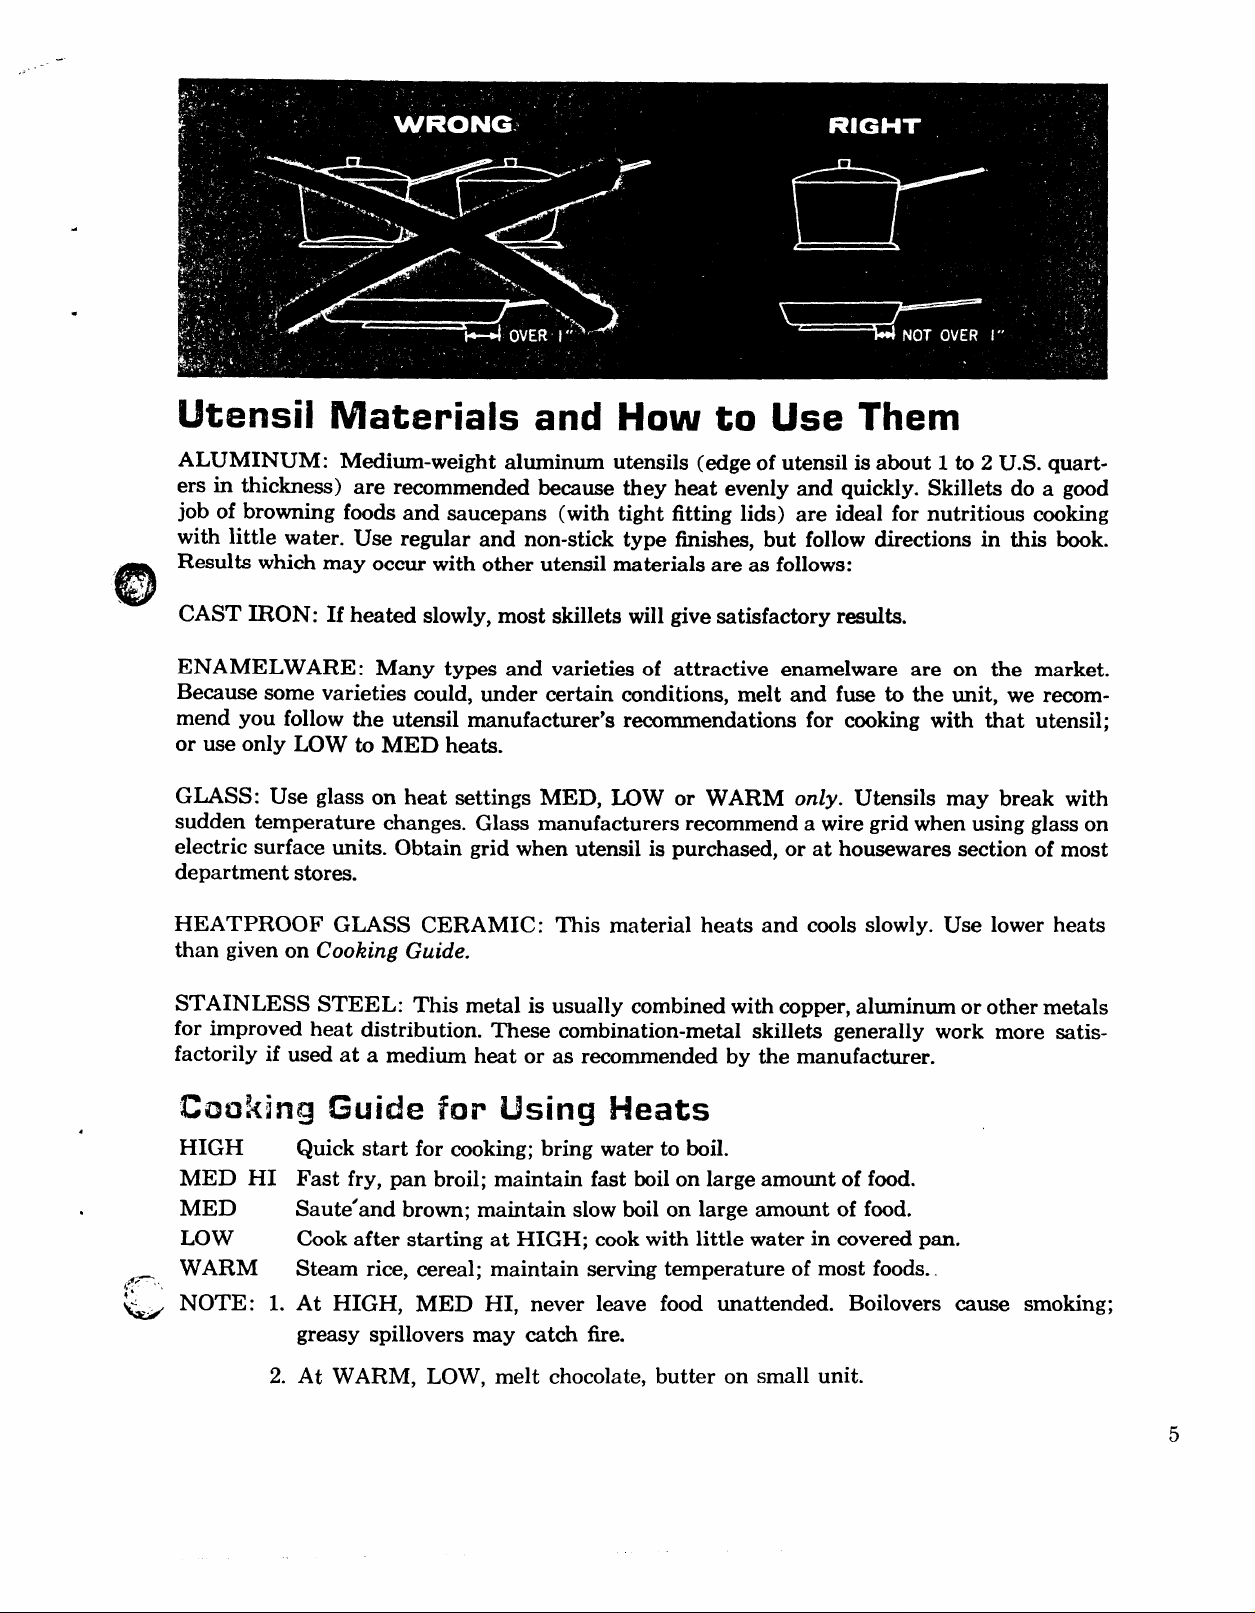
Utensil Materials and How to Use Them
ALUMINUM: Medium-weight aluminum utensils (edge of utensil is about 1 to 2 U.S. quarters in thickness) are recommended because they heat evenly and quickly. Skillets do a good
job of browning foods and saucepans (with tight fitting lids) are ideal for nutritious cooking
with little water. Use regular and non-stick type finishes, but follow directions in this book.
Results which may occur with other utensil materials are as follows:
CAST IRON: If heated slowly, most skillets will give satisfactory results.
ENAMELWARE: Many types and varieties of attractive enamelware are on the market.
Because some varieties could, under certain conditions, melt and fuse to the unit, we recommend you follow the utensil manufacturer’s recommendations for cooking with that utensil;
or use only LOW to MED heats.
GLASS: Use glass on heat settings MED, LOW or WARM only. Utensils may break with
sudden temperature changes. Glass manufacturers recommend a wire grid when using glass on
electric surface units. Obtain grid when utensil is purchased, or at housewares section of most
department stores.
HEATPROOF GLASS CERAMIC: This material heats and cools slowly. Use lower heats
than given on Cooking Guide.
STAINLESS STEEL: This metal is usually combined with copper, aluminum or other metals
for improved heat distribution. These combination-metal skillets generally work more satisfactorily if used at a medium heat or as recommended by the manufacturer.
lX30i<i~~
HIGH
MED HI
MED
LOW
WARM
& NOTE: 1.
Guide far liking Heats
Quick start for cooking; bring water to boil.
Fast fry, pan broil; maintain fast boil on large amount of food.
Saute’and brown; maintain slow boil on large amount of food.
Cook after starting at HIGH; cook with little water in covered pan.
Steam rice, cereal; maintain serving temperature of most foods..
At HIGH, MED HI, never leave food unattended. Boilovers cause smoking;
greasy spillovers may catch fire.
At WARM, LOW, melt chocolate, butter on small unit.
2.
Page 6
Ii+3wto Ike Your Surface Iihks
For Boiling:
Start with HIGH heat to quickly start boiling. Then:
1. Switch to MED or MED HI if cooking a large amount of food
(spaghetti with lots of water, for example) or when boiling foods in
uncovered pans (such as candies).
2. Switch to LOW or WARM when cooking small to moderate
amounts of foods or finishing foods in a tightly covered utensil. (Use
this method—HIGH to LOW—in cooking most types of foods. )
NOTE: Some foods-cereals and pasta (macaroni, spaghetti), sea-
food, etc.—foam and bubble up in cooking. When boiling these foods
be sure to use large enough pan (also removing cover helps prevent
a boilover).
A,
,“
o
For Frying:
1. For a crisp or well-browned exterior, start with MED HI to melt fat before adding food.
Continue cooking to brown both sides well, at MED HI or MED.
2. For a soft or lightly-browned exterior (fried eggs or pancakes, for example)
leave at MED ok MED HI to cook fmd through without overcooking the outside.
A,
start and
For Braising or Stewing:
Brown meat quickly at HIGH or MED HI, then add liquid (or other ingredients). When
bubbling again, switch to LOW, cover and cook until tender.
For Making Sauces, Gravies, Puddings, etc.:
For most thickened liquid mixtures, blend the thickening (flour, etc. ) with cold liquid (plus
salt, flavorings, etc. ); bring just to boil, stirring
or WARM to finish cooking. Pan gravies and white sauce are often made by blending flour
thoroughly with hot melted fat before adding liquid.
Check These Common Sense Rules
At high heat settings unit coils usually glow red, but remain dark at lower heats. Be
CERTAIN units are cool before touching them with hand, pot holder, cleaning cloths or
cleaning materials. Use dry potholders, never a trailing or moist towel, apron, etc., when
handling pans around the range to prevent burns on your hand from hot steam.
constantly on HIGH heat. Switch to LOW
Be certain the unit turned on is the one you want to use.
Do not use surface units without a utensil to “take the chill off” of surrounding areas of
room. Nearby range surfaces may not withstand the resulting heat.
6!!!!!!!
----
Page 7
‘---+Be sure you turn control all the way to OFF when you finish cooking. An indicator light
will glow when ANY heat on any surface unit is on.
~ A VENTILATING HOOD with a fan helps to draw in cooking vapors before they escape
to other rooms. Because the fan has such drawing power, special caution is needed
spillovers which can catch fire. The hood fan, in operation, couId cause flames to spread.
to avoid
NEVER operate the hood unattended when cooking at high heats.
Turn off fan and remove pan from range before intentionally “flaming” liquor or other spirits.
Push button marked I.AMP or PUSH-HOLD-RELEASE; hold a few seconds or until light
flickers, release, and lamp will turn on. If lamp doesn’t start the first time you push and hold
button, repeat operation twice more to be certain lamp is not burned out. To turn off, push
button and release. To replace lamp, see Care Section.
,..”””1
. . .
. . .. +.,<....
.......\
_- ..
- ..+ .: .. Cornmeal
‘~:. +
e“ ‘
&
—...
. . . . .. .. .... .. ..
,2.,>
45
.,. .
.- Fried, “Sunny Side
..
... J.. ”X.. . ........ .. .
*’
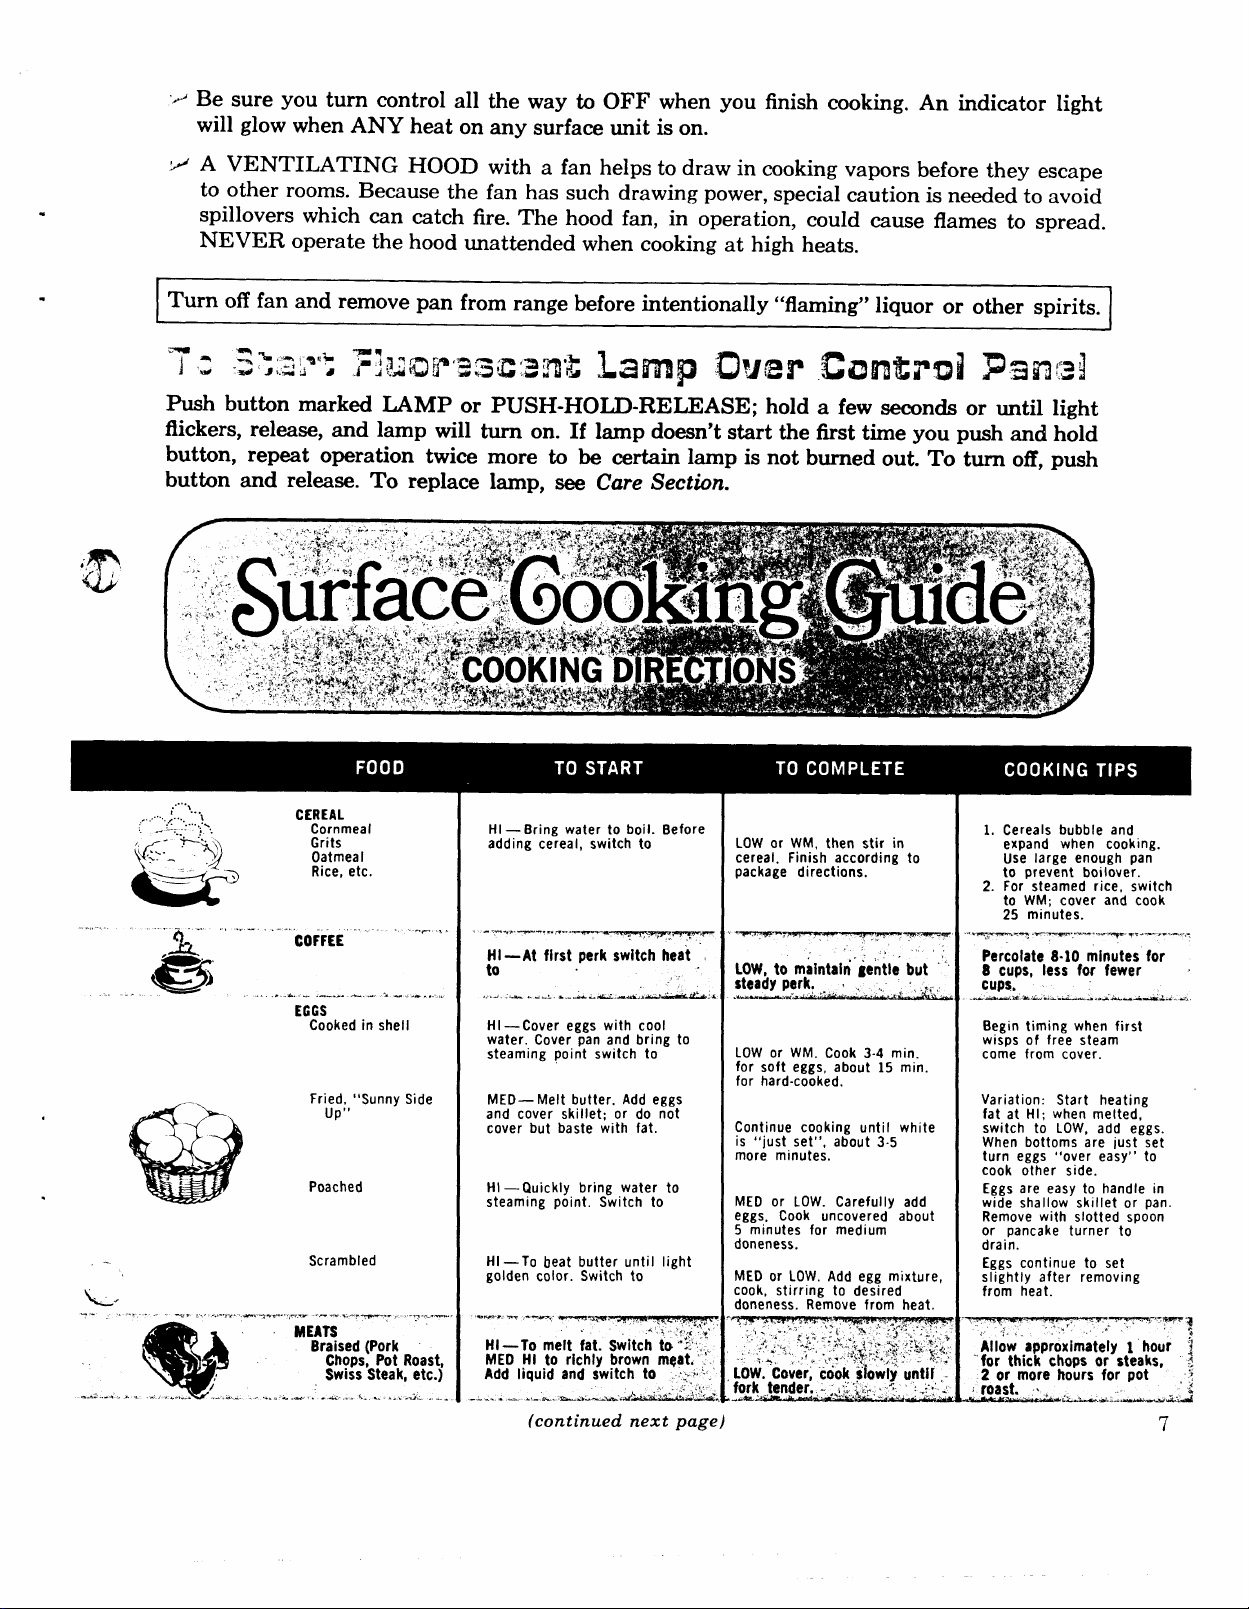
CEREAL
Grits
Oatmeal
Rice,etc.
COFFEE
)
;
.*---- ....>...... .. . .b.. .
EGGS
Cooked in shell
Poached
Scrambled
MEATS
Braised (Pork
. . . . ..,----- -,, ,4.-
..r ., .
up”
Chops, Pot Roast,
Swiss Steak, etc.)
.. >....J&, ...
HI —Bring water to boil. Before
adding cereal, switch to
.s-m. ,.y..., . . ..—
HI —At first perk switch heat
to
Hi—Cover eggs with cool
water. Cover pan and bring to
steaming point switch to
MED— Melt butter. Add eggs
and cover skillet; or do not
cover but baste with fat.
HI —Quickly bring water to
steaming point. Switch to
HI —To beat butter until light
golden color. Switch to
---’-w=wyry--
“.
.,,,
Hi —lo melt fat. Switch’to ‘!.~.
MED HI to richly brown m~at. ..
Add iiauid and switch to :.YX’.
(continued next page)
LOW or WM, then stir in
cereal. Finish according to
package directions.
LOW,to maintain‘gentle’ but ‘‘
LOW or WM. Cook 3-4 min.
for soft eggs, about 15 min.
for hard-cooked.
Continue cooking until white
is “just set”, about 3-5
more minutes.
MED or LOW. Carefully add
eggs. Cook uncovered about
5 minutes for medium
doneness.
MED or LOW. Add egg mixture,
cook, stirring to desired
doneness. Remove from heat.
1. Cereals bubble and
expand when cooking.
Use large enough pan
to prevent boilover.
2. For steamed rice, switch
to WM; cover and cook
25 minutes.
‘.
Percolate 8-10 minutes for
8 cups, less for fewer ~
cups.
.. . . ,—
---. s *-
Begin timing when first
wisps of free steam
come from cover.
Variation: Start heating
fat at Hl; when melted,
switch to LOW, add eggs.
When bottoms are just set
turn eggs “over easy” to
cook other side.
Eggs are easy to handle in
wide shallow skillet or pan.
Remove with slotted spoon
or pancake turner to
drain.
Eggs continue to set
slightly after removing
from heat.
Aliow approximately I hour ]
‘for thick chops or steaks, .
2 or more hours for pot .:
j roast. ‘,
~—i- .
..A”au.&4.A -&.. . .-,
....—
*
.
d
7’
Page 8

—
‘-
MEATS(cont.)
Pan Fried Lamb ~
Steaks (!+4to 34
Inch , Minute
Stea s, Hamburgers, Franks, etc)
Fried Chicken
-.*$.
,.
. . .
. . ..-
S!2!!i3
Pan Broiled Bacon
Water-Cooked
Chicken, Corned
L eef, Smoked
Pork Shoulder,
Tongue,Rtc.)
MELTING
ChocolateSquares,
Chocolate,
Butterscotch
Butter, etc.
PANCAKES
PASTA
Macaroni
Noodles
Spaghetti, etc.
PRESSURECOOK
...
SAUTE’
Breaded
or Fish,
Sliced Onions,
Green Pepper,
Mushrooms, etc.
i
Achops, in
Meat
Bits,
HI—Preheat skillet 1-2 min.
then grease lightly. Switch to
HI—To melt and
Switch to MED HI to brown pre.
pared chicken pieces. Then
cover skillet, and switch to
HI—Put sllces in single layer
in cold skillet. When just
sizzling, switch to
HI—Cover meat with water;
cover kettle. When steaming
freely, switch to
heatfat.
. . .........
WM— Put in small saucepan on
small surface unit. Cover for
semi-sweet chocolate or
butterscotch pieces.
MED HI—To heat skillet 8-10
minutes. Grease Ilghtly.
HI —To bring salted water to
boil in covered utensil.
pasta slowly so boiling doesn’t
stop. Switch to
HI—To brin to pressure,
When first “ iggle” is heard,
switch to
HI —To melt fat. Switch to
1
Add
MED HI or MED. Add meat,
brown and cook to desired
doneness.
LOW, cook until just tender.
Uncover skillet last few
minutes to crisp chicken.
MED HI or MED. Cook, turning
occasionally to desired
doneness.
LOW or MED, so water bolls
slowly. Cook until fork tender,
,,..,..
*----
-....4. . . . .
Allow about 10-15 min. to
melt through. Stir to smooth.
Cook pancakes 1-2 min. each
side. (Allow slightly longer
for thick batter,)
MEO HI or MED— Cook uncovered until tender.
MED
HI or MED. Be in timing
begin regularly again.
MED, add food. Cook
desired doneness.
ffood as soon as “j ggles”
to
1)Turn franks, sausage
often to cook evenly.
2) Cook minute steaks at
MED HI for 1-2 min. each
side.
Southern style chicken—
cook (after browning) 15
min. covered and 10-20
min. uncovered.
If desired,
beginning at MED heat.
Add salt or other season-
ings before cooking if
meat is uncured.
cookfrom
>.
1.) If desired, melt butter
unsweetened chocolate
squares about 5-10 min. a
LOW, watching carefully.
2.) Long, slow melting of
chocolate and butter gives
best results.
When bubbles In batter rise
to surface of pancakes turn
to second side.
1,) Heat should be high
enough so that water stays
at rolling boil throughout
cooking. 2.) Use large
enough pan to avoid
boil over.
1) Use MED HI for finishing
foods
which cook in short
times (about 10 min. or
less).
2) Time carefully to
avoid over-cooking.
NOTE:Some ressure
cooker manu acturers
recommendjiggling of
control at rate of 2-3 per
mini
Two—3 jiggles is an
approximate number; you
may find a few more or
less satisfactory.
Turn meat or stir
vegetables occasionally
to cook and brown evenly.
!
P
.-+4-- “ “
.-
‘.
“, . “.,
e
8
---- -— -- .-----
HI — Measure “with your eye”
about %-% inch water into
pan, then add salt and pre-
pared vegetable. Cover pan,
bring to boll, switch to
MED or LOW to
minutes, until just
cook 10-30
tender.
,-
.
HI — Measure %.?44 inch water
into pan,
block(s) of vegetables. Cover,
bring to steaming point.
Switch to
Add salt and frozen
LOW.Time as directed on
package.
1) Covered pan is best for
cooking; if uncovered,
more water. MED heat are
needed; timing is longer.
2) Vegetables
to “crisp tender”
most
nutritious.
Thick compact blocks of
vegetables may
breaking
stirring once during cook-
ing for even doneness.
cooked just
need
up and/or
are
.
)
——.-. —... —.—.—.— ....—..—— ———-
Page 9
Wsing Tour Oven
Your oven is designed to give you top results in
baking, roasting, and broiling when used as
recommended.
BEFORE USING YOUR OVEN
1.
Look at the controls. Be sure you understand how to set them properly. See directions
for the
derstand its use with the controls.
2. Check oven interior. Look at the shelves.
Practice removing and replacing them properly,
to give sure sturdy support.
3. Read over information and tips that follow.
4. Keep this book handy so you can refer to it,
especially during
acquainted with your oven.
ChnM’1Ccmtmh
The controls for the oven are marked OVEN
SET and OVEN TEMP. OVEN SET has
settings for BAKE-, TIME BAKE, BROIL
(and on oven so equipped, CLEAN), and OFF.
Setting the knob to the desired operation automatically activates the proper heating units.
Automatic Time Center so you will un-
the first weeks of getting
The oven has one straight and one reversible
shelf. Three shelf
ety and flexibility in locating shelves. The reversible shelf may be raised above or lowered
below the straight shelf level; turn the shelf
end-over-end and insert as instructed.
supports are offered for vari-
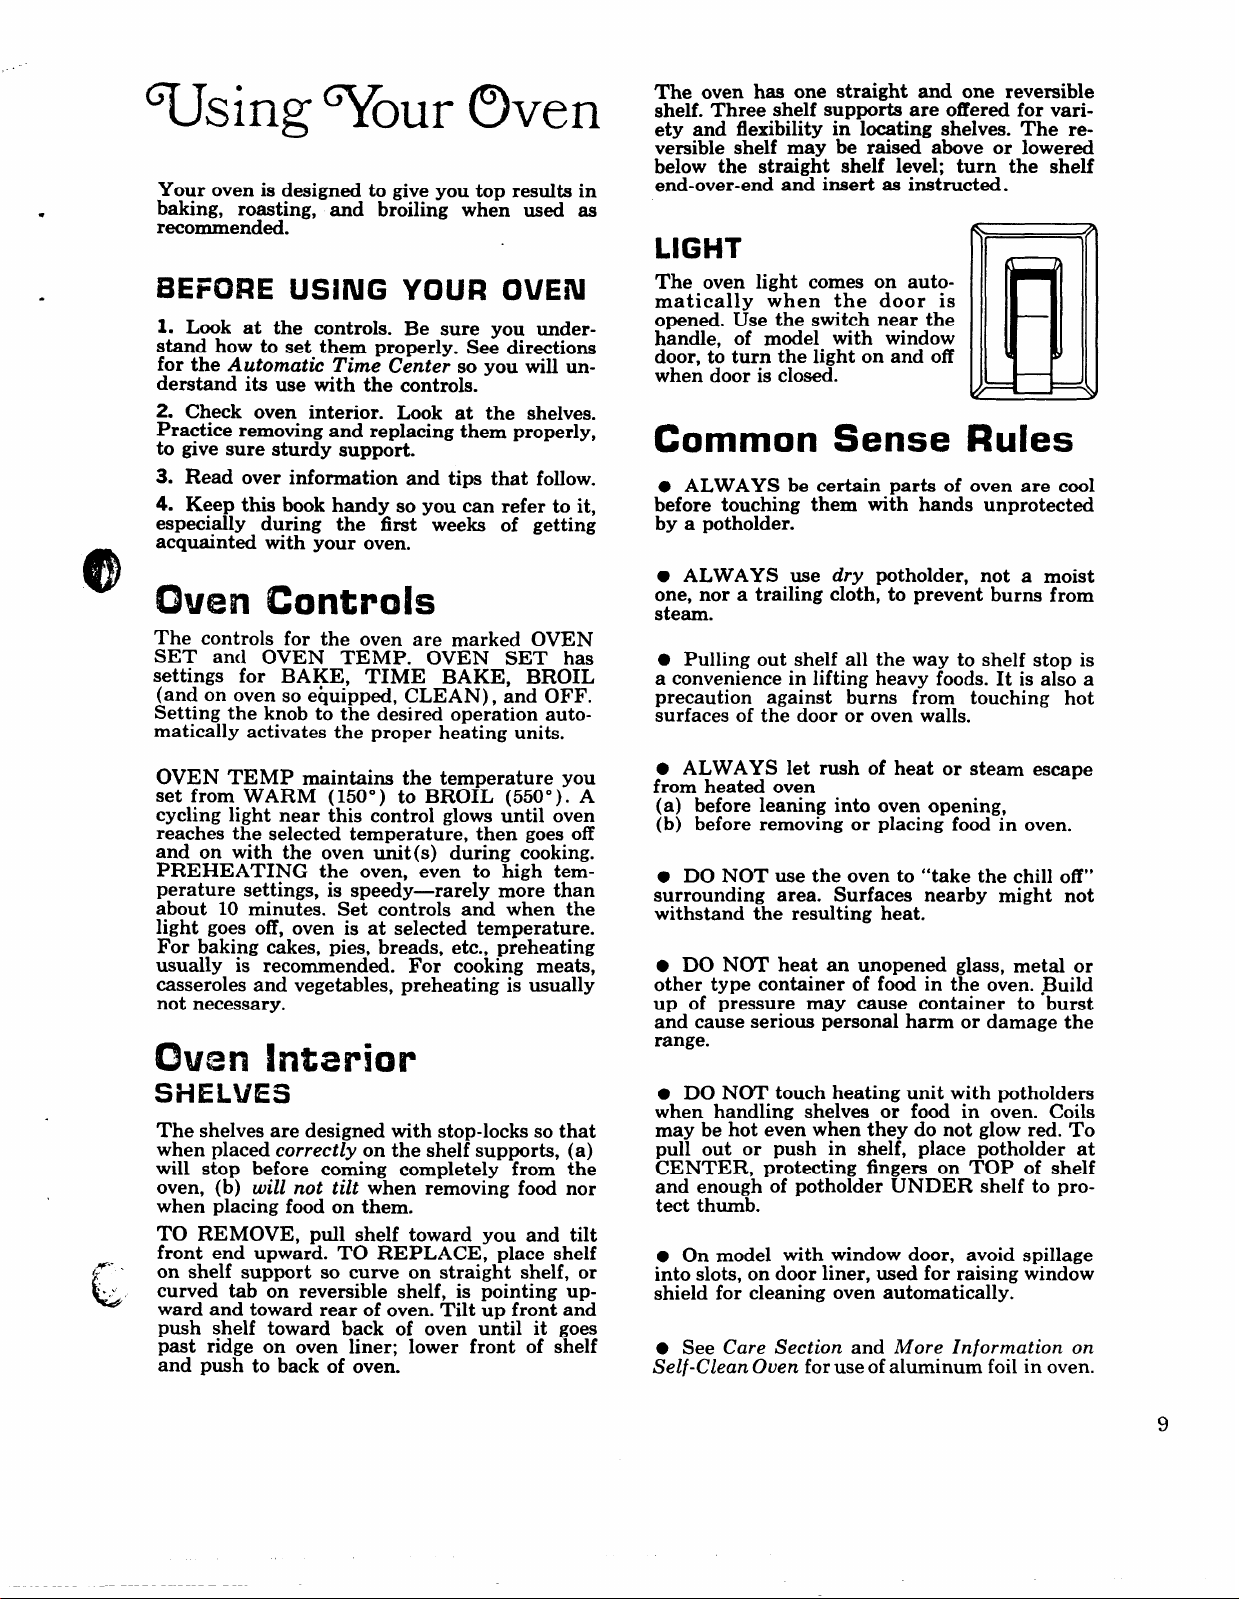
LIGHT
The oven light comes on automatically when the door is
opened. Use the switch near the
handle, of model with window
door, to turn the light on and off
when door is closed.
Common Sense Rules
. ALWAYS be certain parts of oven are cool
before touching them with hands unprotected
by a potholder.
. ALWAYS use
one, nor a trailing cloth, to prevent burns from
steam.
. Pulling out shelf all the way to shelf stop is
a convenience in lifting heavy foods. It is also a
precaution against burns from touching hot
surfaces of the door or oven walls.
dry potholder, not a moist
& .
...,
L
OVEN TEMP maintains the temperature you
set from
cycling light near this control glows until oven
reaches the selected temperature, then goes off
and on with the oven unit(s) during cooking.
PREHEATING the oven, even to high temperature settings, is speedy—rarely more than
about 10 minutes. Set controls and when the
light goes off, oven is at selected temperature.
For baking cakes, pies, breads, etc., preheating
usually is recommended. For cooking meats,
casseroles and vegetables, preheating is usually
not necessary.
WARM (150° ) to BROIL (550° ). A
SHELVES
The shelves are designed with stop-locks so that
when placed correctly
will stop before coming completely from the
oven, (b) will
when placing food on them.
TO REMOVE, pull shelf toward you and tilt
front end upward. TO REPLACE, place shelf
on shelf support so curve on straight shelf, or
curved tab on reversible shelf, is pointing up-
ward and toward rear of oven. Tilt up front and
push shelf toward back of oven until it goes
past ridge on oven liner; lower front of shelf
and push to back of oven.
not tilt when removing food nor
on the shelf supports, (a)
. ALWAYS let rush of heat or steam escape
from heated oven
(a) before leaning into oven opening,
(b) before removing or placing food in oven.
. DO NOT use the oven to “take the chill off”
surrounding area. Surfaces nearby might not
withstand the resulting heat.
. DO NOT heat an unopened glass, metal or
other type container of food in the oven.
up of pressure may cause container to burst
and cause serious personal harm or damage the
range.
DO NOT touch heating unit with potholders
.
when handling shelves or food in oven. Coils
may be hot even when they do not glow red. To
pull out or push in shelf, place potholder at
CENTER, protecting fingers on TOP of shelf
and enough of potholder UNDER shelf to pro-
tect thumb.
. On model with window door, avoid spillage
into slots, on door liner, used for raising window
shield for cleaning oven automatically.
. See
Self-Clean
Care Section and More Information on
Ouen for use of aluminum foil in oven.
●Build
9
Page 10

..-
1
i’!llinute Timer
The Minute Timer has been combined with
the range clock. Use it to time all your precise cooking operations. You’ll recognize the
Minute Timer as the pointer which is different in color and shape than the clock hands.
Minute Timer,
turn the center knob, without pushing in.
For precise timing, move pointer past desired time, then turn it back to number of
minutes needed. (Minutes are marked, up to
60, in the center ring on the clock. ) At the
end of the set time, a buzzer sounds. To stop
buzzer, turn knob without pushing in, until
pointer reaches OFF.
‘h set the 12:dc,
push in the center knob and turn the clock
hands to the correct time. (If the Minute
Timer pointer should move also, let knob
out, turn the Timer pointer to OFF. )
Automatic Oven Timer
The automatic oven controls are designed
for the homemaker who can’t be tied down
to being in the kitchen or at home at specific
times to turn an oven or appliance on or off.
These controls can be preset to start and
stop your oven or your timed appliance outlet (on models so equipped) for you. Or, if
you prefer to start the food yourself, the
timer will take over the job of turning the
oven or timed outlet off.
AUTOMATIC OVEN TIMER can be used
to time the oven and
the same time. When oven or TIMED outlet
are timed together,
and stop at the same time.
To set the automatic oven timer, use the two
dials next to the clock, marked START and
STOP. Each dial is marked off in 15 minute
segments and numbered by the hour. The
pointers on these dials can be moved only
when knob is pushed in. (When the pointers
are turned you can hear a “ratchety” sound. )
the TIMED outlet, at
both must be set to start
10
Page 11

f
If pointer can be turned it means knob has
been pushed in and pointer has been set. To
be certain knob is in out position, turn knob
so pointer is at time showing on the clock.
Knob will pop out and cannot then be
turned. (Note: Before you set these dials, be
sure the hands of the range clock show the
correct time of the day. )
A.
TO SET OVEN TO START AT A
LATER TIME, DO AS FOLLOWS:
Set START time. Push in knob on
1.
START dial and turn pointer to time
you want oven to turn on. The illustration shows START pointer at 3:30.
2.
Set STOP time. Push in knob on
STOP dial and turn pointer to time
)
o
you want oven to turn off. The illustration shows the STOP time at 6:00.
a.b.Turn OVEN SET* to TIME
3.
BAKE.
Turn OVEN TEMP* to proper
temperature for food to be cooked.
Place food in oven, close the door
and automatically the oven will be
turned on and ofl at the times you
have set.
they require the same temperature and time.
However, foods of a highly perishable nature,
such as milk, eggs, fish, stufiings, poultry,
and pork, should not be cooked automati-
cally unless standing time in the oven is not
more than 2 hours before and about 2 hours
after cooking of these foods. In all cases, no
matter what the nature of the food, unless
cooking is to start immediately, foods should
be thoroughly chilled in the refrigerator be-
fore placing in the oven.
Timed Appliance Outlet
The Automatic Oven Timer also controls the
appliance outlet marked TIMED (T). This
120-volt appliance outlet can be used separately or at the same time the oven is timed.
To have a hot waffle iron or hot coffee waiting as you walk into the kitchen in the morning, just plug the appliance into TIMED
outlet the night before, and follow only steps
A 1 and A 2 above. START and STOP settings for A. M. time must be at a number
BEFORE the P. M. time on range clock. As
with your alarm clock, the Automatic Timer
cannot be set for longer than 12 hours ahead
of the current time.
TO SET THE OVEN TO START IM-
B.
MEDIATELY AND TO TURN OFF
AUTOMATICALLY AT A LATER
TIME, follow only A 2 and A 3 above.
c.
When food is removed from oven turn
OVEN SET TO OFF.
*OVEN INDICATOR LIGHTS at TIME
BAKE setting work differently than they
do at BAKE setting. Light will illuminate
but oven will not begin to heat until preset
time.
choking nods Alm3-
imirticaily, Using ?/our
Chn3n Timer
Meats, fruits and vegetables generally take
well to automatic cooking. You can cook one
food, or several foods together as long as
To have TIMED outlet usable immediately
and turn off automatically later; be certain
START knob is in out position, then push in
STOP knob and advance the pointer to the
time you want the outlet to be shut off.
The appliance outlet not marked TIMED
is a standard 120-volt appliance outlet.
11
Page 12

..
I
.,=-%-.>
. *< ~
u.&~. ___ . ...*- ..-
4
---
-.
-.
—
1. Use tested recipes from reliable sources.
Measure ingredients accurately and combine
carefully. Use correct size baking utensil.
2. Place shelf at position suggested on Baking
Guide below; letters are marked on oven wall.
3. C1oseovendoor. TurnOVEN SET to BAKE
and OVEN TEMPto temperatureon recipeor
on Baking Guide. Preheat oven. The light near
OVEN TEMP goes out when oven has pre-
door. During baking, avoid frequent door openings to prevent undesirable results.
5. Check foods for doneness at minimum time
on recipe. Cook longer if necessary. Remove
foods and turn OVEN SET to OFF. When
cooking each food for first time in this oven,
use times on recipes as a guide. Be certain
foods are done before removing from oven. See
Baking, Before You Call for Product Service.
heated to set temperature.
4. Place food in oven being certain to leave
about 1-inch of space between pans and walls
of oven for good circulation of heat. Close oven
e
“9 s
m
.
•EI
*BREADS, QUICK
Biscuits
Coffee Cake
Corn Bread
Gingerbread
Plain Muffins
Popovers
Quick Loaf Bread
B
B
B
B
B
B
B
425-475
350-400
425-450
350
400-425
375
350-375
10-20
20-30
25-40
30-45
20-30
45-60
45-60
●BREADS, YEAST
2 loaves
Rolls, plain
Rolls, sweet
*CAKES
(without shortening)
Angel Food
Sponge
Jelly Roll
●CAKES
Cupcakes
Fruit Cakes
Uiyer
Layer, Chocolate
Loaf
B
B
B
A+
A~
B+
B
A, B4
B
B
B, A
375-42S
375-425
350-375
325-375
325-350
375-400
350-375
275-300
350-375
350-375
350
45-60
10-25
20-30
.. .
30-55
45-60
10-15
20-25
2-4 hrs.
20-35
25-30
40-60
NOTE: Information about baking at high altitudes can usually be obtained at your state
agricultural station.
t
m
*COOKIES : -‘
Brownies ,
Drop
Refrigerator
Rolled or Slicad
. -A. .?.. ..-&. *h*+...-&.
PIES
. .
Frozen
tMeringue
One Crust
Pastry Shell
Two Crust
-----.
-.z. -
MISCELLANEOUS
Apples, Baked
Custard, Cup
Potatoes, Baked
Puddings, Rice
and Custard
Scalloped Dishes
Souffles
For best resl
aluminum o
foil plate, on
-’F...,~-- . .
->”’
“9
Iql!!9
~,
B
B
B
B
.--d. +..a . .
ts use satin-
[lass utensil
aking sheet
Ab
A+
A+
A+
A+
—-.-G* ,. . ,.
A,
B
A, B, C
B
A, B
A
325-350
350-400
400-425
375-400
]ish (anodized)
place frozen pies, in
400-425
325-350
400-425
450
400-425
. . .. . . .
350-400
B
300-350
325-400
325
325-375
300-350
.+..
25-35
10-20
6-12
7-12
.,
45-70
15-25
45-60
12-15
40-60
. .
30-60
30-60
60-90
60-90
30-60
30-75
*For best results, use shiny aluminum utensils, with dull finish on bottom. TO RAISE YEAST DOUGHS, cover lightly
tTo brown meringue only, use 400, 8-10 min.; to cook meringue through, use lower temperatures for times given.
$ NOTE: Cook all pies and large cakes such as sponge and angel food on reversible shelf UP in A position.
12
—
—--.—.. — - --- -.—.-—
with cloth and place in your well insulated oven to keep away from drafts. Yeast doughs raise best at 85° to 110° so
oven lamp should be off durin~ risinz. FRUIT CAKES: Dlace lar~e ones on lower shelf Dosition; place small or loaf
pan type on shelf in center of 6ven. -
NOTE: When two shelf positions are listed,
different browning, use the second shelf position the next time you cook. Foods listed with three shelf positions
cook successfully on any position listed, alone or in an oven meal.
.. ——.—
—.
the first one gives well browned and cooked food. If you desire a
-—. —
-—-——
8
-,
Page 13

,>
e ‘-J’ - - -“ -.i .-, ,-,=
1
-A “’..... .
/<
e,..>-
,\
’.’Mi
W. A.* ..*
Roasting is oven cooking of tender meat or
poultry by dry heat. Roasting temperatures
should be steady and low. (Low temperatures
keep spattering to a minimum.) It is not neces-
●
?
sary to sear, cover, baste or add water.
,.=
3..-.+ *.- T
?4.
...-* i = “ V,,%
--- \
=,.
-ma.m~.+a
-.J4FJ >* J. i w’
.
1. Check weight of meat, and place, fat side up,
on roasting rack
in a shallow pan. (Broiler pan
with rack is a good pan for this.)**
2. Place in oven on shelf in center or bottom
position. No preheating is necessary.
3. Turn OVEN SET ti BAKE and OtiN
TEMP to 325. Small poultry maybe
at 375 for best browning.
... .. ... .. ... .. . -*.
cooked:
....>-...I
4. The Roasting Guide below gives approximate
time in minutes per pound. These times should
only be used as a guide. A meat thermometer,
inserted into the center of the thickest part of
the meat, is the only accurate test for doneness.
5. Most meats continue to cook slightly while
standing after being removed from the oven.
For rare or medium internal doneness, if meat
is to stand 10-20minutes while making gravy or
for easier carving, you may wish to remove
meat from oven when internal temperature is
5-10”F below temperature suggested on chart.
If no standing is planned, cook meat to suggested temperature on chart. When food
done, turn OVEN SET to OFF.
-=X? ?%XXZz>d 20 AS’73
4
Frozen roasts of beef, pork, lamb, etc., can
a.
be started without thawing, but allow 10-25
minutes per pound
additional time (10 min. per
pound for roastsunder 5 pounds, more time for
larger roasts).
b. Thaw most frozen poultry before roasting to
ensure even doneness. Some commercial frozen
poultry can be cooked successfully without
thawing. Follow directions given on packer’s
label.
is
BEEFt
Standing Rib
Rare
Medium
Well Done
Rolled Rib
Add 5-10 min./pound to times given for standing rib roasts.
LAMB
Leg
Shoulder
PORK: fresh ‘ ‘“”
Loin
Fresh Ham, Shoulder
PORK, cured
Ham; Precooked
Ham, Cook before
Eating
Shoulder, Picnic
POULTRY
Chicken
Ready-to-Cook wt.
Turkey
Ready-to-Cook wt.
For boned and rolled shoulder, add 10 min./ pound to times given.
. .. .. .
VEAL
Leg, Loin, Shoulder
,,%
,*
●For roasts over 8 ~ounds. roast at 300 and reduce time. Figure the estimated time from the above chart. After 1/2 that
@ time has passed, “check meat thermometer for internal temperature at half-hour intervals.
tA new kind of tendered beef, found in some markets, may require less cooking time than regular beef. When cooking
tendered beef, estimate cooking time using shortest time given in minutes/pound for desired doneness. Also this type
of beef is usually well-done at 170 internal temperature.
**NOTE: Line broiler pan with aluminum foil when using pan for marinating, cooking with fruits, cooking heavily cured
meats, or for basting food during cooking. Avoid spilling these materials on oven I!ner or door. See cleaning note, on
charts, Care Section.
3-5 tbs. 6-8 lbs.*
24-30 min. 18-22 min.
30-35 min. 22-26 min.
35-45 min. 28-33
.. .. . ... . .
3-5 Ibs. ‘“ ““‘“ “’”’ &8 Ibs.’” ‘–
30-35 min.
. .. . .. ..s ........ . ...... .. . - -
3-5 Ibs. 6-8 tbs.
35-40 min.
. ..
.— ..=-. .. . .
14-18 min. per lb.
Under 10 Ibs.
20-30 min.
25-35 min.
3-5 Ibs,
35-40 min.
Under 10 Ibs.
20-30 min.
. . . .
3-5 Ibs.
30-40 min.
. . . .... . . .. . . . .. .
20-25 min.
30-35 min.
30-35 min.
30-40 min.
17-20 min.
Over
30-35 min.
10-15 Ibs.
min.
. ,—
..*.- ._..=.-.
r---., --- -----
10-15 Ibs.
5 Ibs.
Over 15 Ibs.
15-20 min.
6-81bs. ‘“ -
25-35 min.
.,.. ... .
.-$.- ..,....
....4---- .U. -u . .
------- ,-
. . J----
T:&h
185-190 165
180-185 165
*
130-140
150-160
170-185
175-185
180-185
170-175
185-190
130
155-160
170
In
Stuffing
170-180
“,
13
Page 14

.
I
,
.
.
Broiling is cooking foods by
heat from the upper unit in
fish and tender cuts of meal
Follow these steps to keep
smoking to a minimum.
1. If meat has fat or gristle near edge, cut
vertical slashes through both about 2-in.
apart. If desired fat may be trimmed, leaving
a layer about I/S-in. thick.
2. Place meat on broiler rack in broiler pan
which comes with range. Always use rack so
fat drips into broiler pan; otherwise juices
may become hot enough to catch fire. Alumi-
num foil may be used to line broiler pan and
rack. But, be CERTAIN to cut openings in
foil, to correspond with rack so fat drips into
pan below. See note under Broiling Chart
on following page before marinating and using barbecue sauce.
3. lktters on oven wall, and chart on following page, indicate where to position shelf for
best browning while cooking inside of food
to desired doneness.
intense radiant
the oven. Most
can be broiled.
spattering and
P1acing food closer to top of oven increases
smoking, spattering, exterior brown on meat
and the possibility of fats on foods catching
fire.
4. LEAVE DOOR AJAR about 3 inches—
door stays open by itself, and keeps heating
unit at proper temperature for broiling.
5. SWITCH OVEN SET and OVEN
TEMP CONTROLS TO BROIL. Preheating unit is not
6. Turn food only once during cooking.
Time foods for first side as on chart. Turn
food, then use times given for second side as
a guide to preferred doneness. (Where two
thicknesses and times are given together, use
first times given for thinnest food. )
7. Turn oven off, serve food immediately,
leave pan
for easiest cleaning.
necessary.tt
outside oven to cool during meal
..
b
1. Follow directions given above for setting up the oven, preparing food, setting controls and
leaving door ajar.
2. Preheat the broil unit for 5 minutes with food and broiler pan outside the oven. The exception to this is thin sliced bacon which needs no preheat at any voltage.
3. Follow directions for timing first and second sides as follows: One figure indicates timing
is the same at high or low voltage. If timing shows two figures, use the shorter time if operating the range at high voltage, the longer time if operating the range at low voltage. Cooking
times are approximate and should be used only as a guide; they are based on meat at refrigerator tem~erature when nlaced in the oven.
14
---.. -.......-r— -———.
tt NOTE: If your range is being operated on low power (voltage), broiled foods
may be lighter brown than expected, even though directions have been carefully
followed. Browning can be improved as follows:
–*—
—
–A
--
9
,
Page 15

BACON
BEEF, ground
Well done
tBEEF STEAKS
Thin steaks l/2-3A inch thick cook throu~tl verv auicklv. For best outside browning, Dan frving is recom-
mended. See Surface Cooking Chart. IT oven- b~oiling is preferred use C Up she~f positi6n. To achieve
best browning on second side, cook first side just to change meat color then turn and cook to doneness
preferred.
Rare
Medium
Well done
Rare
Medium
Well done
1/2
lb. thin slices
1 inch patties
1 inch
1% inch
~. ..= ..”.
B Up
...+. ..... . . .. .
..
C Down
.++. .
C Str.
B Up
B Up
C Str.
B Up
A Str.
5
-w---
12
_- .,. .. .
8-10
10-15
15-20
10-11
15-16
24-25
3-6
7-1o
6-10
6-12
10-20
7-1o
10-15
12-20
CHICKEN**
FISH
cured
HAM,
Cook-before eating
LAMB CHOPS
Medium
Well done
Medium
Well done
Using Your Oven for positioning shelves.
*See
1%-2 Ibs. split
-----
1%1 inch
inch
%-l
1 inch
l% inch
A
Str.
,. . >..
Down
C
B Up
.-
B Up
B Up
B Up
B Up
35
. .... .. .
10
10
11
12
14
15
●*Brush each side with fat. Broil skin side down first. For all weights of chicken, BROIL WITH DOOR
‘?
J
CLOSED. For any weight over 2 Ibs. cook first side 5 minutes lon~er than time given on chart.
tSee note on roasting chart about tendered beef.
NOTE: Line broiler pan with aluminum foil when using pan for marinating, cooking with fruits, cooking
heavily cured meats, or for basting food during cooking. Avoid spilling these materials on oven liner
or door. If spilled, wipe up immediately with a paper towel; when surface is cool, clean and rinse.
15=20
5-1o
10-20
10-13
14-16
15
Page 16

Proper care and cleaning procedures are essential for a long and satisfactory life for
your range. Included in this section are
directions and Cleaning Charts for cleaning
all parts of the range. Directions for using
the Self-Clean oven also follow. When cleaning range manually, wearing of rubber gloves
is recommended to protect the hands.
Porcelain Enamel Finish
The porcelain enamel finish is essentially
glass fused on steel at high temperature and
is breakable if misused. This finish is acid
resistant. However, any acid foods spilled
(such as lemon or other citrus fruit juices,
or mixtures containing tomato or vinegar)
should be wiped up immediately. See chart
for cleaning suggestions.
Plug+ Units, Removable
Chrome Trim Rings
The surface units on this range are the PlugIn type and can be removed for cleaning. It
is recommended that the user clean the area
under reflector pans frequently to avoid accumulation of soil, especially grease, that
may catch fire.
TO REMOVE PLUG-IN UNIT: (a)
Always be certain that the control for that
surface unit is at OFF position and the unit
coils are cool before attempting to remove
the unit. (b) Raise the unit coil, at point
opposite receptacle, about one inch above
the trim ring and pull it away from the
receptacle. (c) Carefully pull the unit terminals through opening in reflector pan.
RECEPTACLE
\~
SPIDER TRIM RING
MEDALLION
\
UNIT COILS
After removing the surface unit, remove the
trim ring, then the reflector pan to clean
under the unit. Clean the reflector pan and
trim ring as directed in the Cleaning Chart.
If aluminum foil is used to line reflector pan,
follow the directions given on the Surface
Cooking pages for molding foil tightly to the
pans to prevent heat build-up and damage
to electrical connections. NEVER COVER
the center or side opening in the reflector
pan with foil. Wipe around edges of the surface unit opening in the cooktop, clean the
bowl-shaped area below the unit and rinse
with damp cloth or sponge.
CAUTION: DO NOT immerse Plug-In
surface units in liquid of any kind. See the
Cleaning Chart
coils.
If the spider or medallion are cleaned,
for cleaning of surface unit
be certain to wipe all cleaning materials
thoroughly from the unit coils before returning the unit to the range.
0)
DO NOT attempt to clean the Plug-In sur- c:
face units
oven. Reflector pans can be cleaned in the
or trim rings in the Self-Clean
.
16
Page 17

Self-Clean oven, see directions on How to
Operate the Self-Clean Oven.
DO NOT let the two electrical ends of the
Plug-In surface unit get damaged or bent.
The terminals are sturdy and will not be
.*
damaged if handled with reasonable care.
The Plug-In unit terminals and receptacle
are designed to line up automatically when
plugged together. If the terminals are badly
bent and cannot be plugged into the receptacle, the unit should be taken to a Hotpoint
product service center for replacement. =4
DO NOT attempt to clean, adjust or in any
way repair the Plug-In receptacle. If an
abundance of liquid should accidentally spill
and collect inside the receptacle, call your
Hotpoint product serviceman.
face unit, remove reflector pan and lift out
duct. To reposition, place solid part of duct
over round opening under the cooktop. Then
position hole in duct so it rests directly under
opening in reflector pan. Duct must be in
correct position so moisture and vapors from
oven can be vented during use.
NEVER COVER HOLE in oven vent duct
with aluminum foil or any other material. To
do so prevents the oven vent from functioning properly during cooking or cleaning.
On other models, the oven is vented in a
different way and a removable vent is not
necessary.
Fuse .Replacement or MiniBreaker For Appliance Outlet
TO REPLACE PLUG-IN UNIT: (a)
Place reflector pan into the unit recess in
the cooktop so the unit receptacle can be
seen through opening in reflector pan. (b)
Put the trim ring in place over reflector pan.
(c) Insert the terminals of Plug-In unit
through opening in reflector pan and into
receptacle. (d) Guide the surface unit into
place so it fits evenly into trim ring. Unless
the reflector pan is
face unit cannot be returned to proper hori-
under trim ring, the sur-
Appliance outlet is protected by a fuse, or
Mini-Breaker, which will burn out on an
electrical overload, or as a result of plugging
in a defective small appliance. If the appliance outlet seems not to be operating properly, proceed carefully as follows:
/{’
On some models, the oven is vented through
a duct which is located under a rear surface
unit. Clean this duct frequently; lift rear sur-
Fuse
CAUTION: DO NOT remove or replace
fuse with damp hands. ALWAYS have fuse
in place when operating and cleaning range.
1. DISCONNECT POWER TO RANGE
AT MAIN HOUSE FUSE OR CIRCUIT
BREAKER PANEL.
2. Locate fuse under rear surface unit. Replace fuse with 15-ampere type S fuse.
Screw in tightly.
3. Connect electric power to range.
Mini-Breaker
Imcate button for Mini-Breaker on control
panel of range. Push in and release, then try
the outlet again.
Page 18

Adjusting Oven Thermostat
When cooking a food for the first time in
your new oven, use time given on recipe as a
guide. Oven thermostats, over a period of
years, may
and differences in timing betweenan old and
a new oven of 5 to 10 minutes are not un-
usual. Your new oven has been set correctly
at the factory and is more apt to be accurate
than the oven which it replaced. However, if
you find that your foods consistently brown
too little or too much, you may make a
simple adjustment in the thermostat (Oven
Temp) knob.
PULL KNOB OFF OF SHAFT. NOTE
CURRENT SETI’ING ON BACK OF
KNOB BEFORE MAKING ANY
ADJUSTMENT. SEE SKETCH.
“drift” from the factory setting
1. Remove screws on top of lamp cover;
grasp top cover at back and lift off.
2. Place fingers at top, near each end of
lamp. Press down androll top of lamp toward
front of range until it stops; remove.
3. Check type and wattage of lamp; replace
with same kind. Hold lamp near each end
and insert prongs into sockets; roll top of
lamp toward rear of range until it stops. Replace top cover and screws.
4. Connect electric power to range. Start
lamp; see instructions in Surface Cooking
section.
Owen Lamp
SELF-CLEAN OVEN
o‘
1. Hold knob skirt, or tab, firmly in one
hand so pointer is at top.
2. With other hand, turn knob to move
pointer one notch in the desired direction.
Adjust toward RAISE to increase tempera-
ture; toward LOWER to decrease temperature. Each notch changes oven temperature
10degrees.
3. Return knob to range, matching flat area
on knob and shaft. Recheck oven performance before making an additional adjustment.
Lamp Replacement
CAUTION: BEFORE REPI.ACING ANY
LAMP, DISCONNECT ELECTRIC
POWER TO RANGE AT THE MAIN
FUSE OR CIRCUIT BREAKER PANEL.
LET IAMP (OR BULB) AND LAMP
COVER COOL COMPLETELY.
\ \~--
1. Remove only the three slotted screws in
lamp cover; leave other screws in place; see
diagram. Remove cover; replace lamp with
GE 40-watt home appliance bulb.
2. Replace lamp cover, being certain to replace washers with the three screws.
3. Connect electric power to range.
NEVER OPERATE THE CLEAN CYCLE
OF THE SELF-CLEAN OVEN WITHOUT
COVER IN PLACE.
NON SELF-CLEAN OVEN
● ✍✍✍
\
18
Fluorescent Surface Lamp
WHEN CHANGING A FLUORESCENT
LAMP, DO NOT TOUCH THE METAL
AT ENDS OF I.AMP.
The oven lamp (bulb) is covered with a
glass, removable cover which is held in place
with a bail-shaped wire. Remove oven door,
if desired, to reach cover easily.
Q)
Page 19

.“
1. TO REMOVE, hold hand under cover so
it doesn’t fall when released. With fingers
of same hand, firmly push down wire bail
until it clears cover. Lift off cover. DO NOT
REMOVE ANY SCREWS TO REMOVE
THIS TYPE OF COVER.
2. Replace lamp with 40-watt home appliance bulb.
3. TO REPLACE cover, place it into groove
of ~amp receptacle. Lift wire bail up to center of cover until it snaps into place. When
in place, wire holds cover firmly, but be
certain wire bail is not below depression in
center of cover.
4. Connect electric power to range.
Aluminum Foil in Broiling
If desired, broiler pan maybe lined with foil
and broiler rack may be covered with foil for
broiling. Always be CERTAIN TO MOLD
FOIL THOROUGHLY TO BROILER
RACK, AND SLIT FOIL TO CONFORM
WITH SLITS IN RACK. Broiler rack is
Removable Oven Door,
Non Self-Clean Oven
designed to minimize smoking and spattering, and to keep drippings cool during broiling. Stopping fat and meat juices from
draining to the broiler pan prevents rack
from serving its purpose, and may let juices
become hot enough to catch fire.
TO REMOVE, open door to Broil Stop
position. Grasp sides of door and lift off.
DO NOT place door under running water,
or immerse.
TO REPLACE, grasp sides of door, check
to see that hinges are in Broil Stop position
and rest door against knee. Align door over
hinges and push door firmly into place.
DOOR ON SELF-CLEAN OVEN IS NOT
REMOVABLE.
Cleaning Under the Range
The area under the range of models equipped
with a bottom drawer can be reached easily
for cleaning by removing the bottom drawer.
To remove, pull drawer out all the way, tilt
up the front and remove it. To replace, insert
glides at back of drawer beyond stop on
range glides. Lift drawer if necessary to insert easily. Let front of drawer down, then
push in to close.
Use of Aluminum Foil in Oven
SELF-CLEAN OVEN
Do not use aluminum foil on shelves or other
surfaces of the oven to catch spillovers or to
delay cleaning.
NON SELF-CLEAN OVEN
1. DO NOT attempt to place aluminum foil
in top of oven above broil unit. This could
cause damage to oven finish.
2. DO NOT place a sheet of aluminum foil
directly under a pie in oven because pie will
not bake or brown properly.
3. DO NOT place a sheet of aluminum foil
on shelf. To do so may result in improperly
cooked foods, damage to oven finish, and
increase in heat on outside surfaces of the
range.
4. If desired, a sheet of aluminum foil may
be used on floor of the oven under the bake
unit. BE CERTAIN FOIL DOES NOT
TOUCH BAKE UNIT. Aluminum foil used
in this way may affect slightly the browning
of some foods. Change foil when it becomes
soiled.
19
Page 20

—-- —
t
}
A.-o
T’W!EN!
Clean spatters or spills on oven door outside gasket and area around oven
opening. See OVEN FRAME, DOOR LINER following pages. NEVER
USE COMMERCIAL OVEN CLEANER
CLEAN OVEN.
TO PREVENT SMOKING:
(a)
Wipe up excess grease or boilovers on
remove foil from reflector pans, if it was used to line them.
(b)
Remove broiler pan and rack which came with the range and other cook-
ing utensils.
(c)
On models so equipped, avoid spillage into slots of door for window shield
handles. Spillage in these areas will result in odor during cleaning.
Add range parts under
Raise the window shield on models so equipped. Lift handles to fully raised
position, then push toward edge of door to lock. Shield on window door must
be up so door can be latched for oven to operate.
Additional Parts To Be Cleaned, following pages.
IN OR AROUND THE SELF-
oven bottom or reflector pans;
FOLLOW THESE EKKNr STEPS
o
i
1
m
7
4*
b
3
PUSH AND HOLD LATCH RELEASE BUTTON WHILE SLIDING
●
●
LATCH TO FAR RIGHT POSITION.
TURN OVEN SET TO CLEAN.
ON AUTOMATIC OVEN TIMER, SET POINTER AHEAD, ON THE
STOP DIAL MARKED CLEAN, FOR AS MANY HOURS AS NEEDED
TO CLEAN THE AMOUNT OF SOIL IN YOUR OVEN. SUGGESTED
TIMES FOR CLEANING ARE AS FOLLOWS:
*.
t!)
-’
..
Page 21

(a)
Self-Clean oven alone,
crate to heavily soiled
(b)
Self-Clean oven plus
depending on amount
f
2 hours for light soil, 2 to 3 hours or more for modoven.
aluminum reflector pans, 2 to 3 hours or more,
and type of soil.
,!,,
+“ z
*’
e
For example if range clock reads 7:00, set pointer on CLEAN dial at 9:00
for a lightly soiled oven.
NOTE : CHECK START DIAL TO BE CERTAIN POINTER IS AT THE
SAME TIME AS THE RANGE CLOCK. IF NOT, TURN START KNOB
UNTIL IT POPS OUT AND CANNOT BE TURNED.
OVEN CLEANING LIGHT will glow when all steps have been set up
properly.
LOCK LIGHT comes on when oven heats to temperatures above those usually used for cooking. The light stays on during cleaning time and until heat
decreases in temperature and Lock Light goes out. NOTE: Usually when
Lock Light is out, door can be unlatched as described below. However, if
Latch cannot be moved easily while Latch Release Button is being depressed,
wait 10 to 20 minutes and
try again to unlatch door. DOOR AND WINDOW
GET HOT DURING SELF-CLEAN CYCLE. DO NOT TOUCH.
~
—,-
3 BUTTON WHILE SLIDING LATCH TO FAR LEFT POSITION. (See
-.
WHEN LOCK LIGHT IS OFF, PUSH AND HOLD LATCH RELEASE
note above. ) Now, open the oven door to see your sparkling oven!
3
A
Turn OVEN SET to OFF.
See More Information On the Self-Clean Oven.
21
Page 22

~b~~, ~: ~jLfQpp~
Your oven is cleaned by heat (at temperatures
above usual cooking heats) which causes soil
to disappear from the oven. A device in the
oven further converts soil into an essentially
odorless and colorless vapor. A slight odor may
be detected, especially during the first few
cleanings.
Some other parts of your range may be cleaned
in your oven during automatic cleaning. Proper
placement of these parts in the oven is VERY
important for cleaning.
Lc;ore
Cleaning, Checl: the Foliowing:
OVEN FRAME AND DOOR LINER—Door
liner outside the woven gasket and the oven
frame, are sealed off from the oven during
cleaning, therefore, are not cleaned automati-
cally. However,
heat enough to
during cleaning these areas
“bake on” soil present so it
becomes harder to clean. If these areas are
soiled, remove before cleaning automatically,
using soap filled steel wool pad, if necessary.
Rinse thoroughly to remove soap before cleaning. DO NOT CLEAN GASKET. See Care of
Woven Gasket below.
CARE OF WOVEN GASKET—On oven door,
see sketch, the woven fiber glass gasket is essential for a good oven seal. CARE SHOULD BE
TAKEN NOT TO RUB, DAMAGE OR
MOVE THE GASKET. It is not necessary to
use any cleaning materials on the gasket and
to do so might damage it.
a. SELF-CLEAN OVEN SHELVES. Place
shelves in bottom and top positions in oven.
During cleaning shelves may become iridescent
and may lose some luster. Clean only shelves
from oven specified here. If you prefer NOT to
clean Self-Clean oven shelves automatically,
DO NOT use any abrasive materials for cleaning, such as scouring powders, steel wool or
other abrasive scouring pads, etc.
b. ALUMINUM REFLECTOR PANS found
under surface units. Wipe off boilovers not
stuck to pans. Place two pans, upside down, on
each Self-Clean oven shelf.
It is important to invert the pans when cleaning
to prevent distortion. Also see heat settings on
Surface Cooking pages to prevent boilovers. Reflector pans cleaned automatically may soften
and change in color over a period of time. Re-
placements can be purchased if desired from
your Hotpoint dealer.
m-~
1. NOTE: Only th~af~rn~=~n~s~~”~lied with your
range should be cleaned automatically. Reflector pans
: of foil, shiny chrome or other, materials should not be
‘ cleaned in the Self-Clean oven. See previous pages for
>.,
~“’ recommended cleaning times. ‘-: ,;
Z NOTE DO NOT CLEAN REMOVABLE CHROME’ TRlivl
,. ,
RINGS, FOUND AROUND SURFACE, UNITS, IN THE’;
.,
$;”, SELFCL~N, OVEN.:: ~; -J:.: “!. “ “ :-:< ,,;, ‘,
*
. $“..,..
,..., ,
,- ,T’ -d”’ *.:”-. .%, .:,
- ?,~ .--,-W-,.”.,.V*
DO NO+ CiII’ANPLtiG-IN UNITS ‘I”N
NO COMMERCIAL OVEN CLEANER OR
OVEN LINER PROTECTIVE COATING
OF ANY KIND SHOULD BE USED IN
OR AROUND ANY PART OF THE
SELF-CLEAN OVEN. ALSO DO NOT USE
PIECES OF FOIL TO CATCH SPILLOVERS
OR TO DELAY CLEANING OF SELF-
CLEAN OVEN.
Sights and Sounds Peculiar to
The Self-Clean Oven Include:
SIGHTS
ASH—Some types of soil, even though they
disintegrate, will leave a deposit in the oven.
This appears as a light film or a darker, heavier
0)
,/
4
Page 23

ash, depending upon the amount of soil which
was in the oven. This ash can be removed with
a wipe of a
moist sponge or cloth. IF PART
OF A DARK DEPOSIT REMAINS AFTER
WIPING WITH A MOIST SPONGE,
CLEANING TIME WAS NOT LONG
ENOUGH. The deposit will be removed in
subsequent cleanings.
HAIR-LIKE LINES may be noticed on the
gray enameled surfaces of the Self-Clean oven.
This is a common condition, resulting from
heating and cooling during cleaning. These
lines do not affect oven performance.
WHEN LOCK LIGHT GLOWS—If
at
high temperatures just before cleaning, the
Lock Light may glow during cooking or when
OVEN SET is switched to CLEAN. The glow
indicates that the oven is too hot for latch to be
moved to the far right and the oven must be
cooled first. See preceding pages for information on glowing Lock Light during cleaning.
SMOKE—IF SMOKING OCCURS DURING
CLEANING because of conditions mentioned
How To Operate Self-Clean Oven, DO NOT
in
YOU cook
TRY TO FORCE DOOR OPEN but follow
these steps:
a. TURN OVEN SET TO OFF.
b. Open windows and door to rid the room of
smoke.
c. Allow oven to cool AT LEAST ONE HOUR
before opening the oven door.
d. Correct the condition which caused smoking
and start the Self-Clean oven operating again.
~mmxi
HEATING AND COOLING of metal during
cleaning or during cooking result in “crackling”
sounds which are considered normal.
A FAN may be heard sometime during the
complete cleaning cycle (except on models
with an RF prefix which are cooled and vented
by a different method). On models equippe[l
with a fan, if the fan is not heard call for
Hotpoint service before cleaning the oven again.
The fan motor is permanently lubricated so
does not need oiling.
L’ATCH
should be at far left. If latch is at far right
and OVEN SET is at position for cooking, the
power to the oven goes off. , -
POSITION DURING COOKING
.. . .
L
It is recommended that rubber gloves be worn to protect the hands.
Bake Unit
(Heating Unit Near
Floor of Oven)
Broiler Pan
and Rack
. .
Control Knobs,
Surface and
Oven
Broil Unit
(Heating Unit At
Top of Oven)
. ..- ..
.
NOTE: Let range part(s) cool before cleaning manually.
Heating units do not require manual cleaning; soil burns off when un!t
is heated. The bake unit IS hinged so you can lift it to reach oven floor.
Soap and Water
Soap-Filled
Scouring Pad
Plastic Scouring Pad
Mild Soap and
Water
....--.”-.
. . ... -....s . . .. .
None
..-. ..-“, . . ..W =
On non self-clean
turned to down position. When lifting unit, a loud snap IS normal.
.-.. .... -.wm
(Do not let soiled
pan and rack slightly. Sprinkle on detergent; fill pan with warm water.
Spread cloth or paper towel over rack, let stand a few minutes. Wash,
scouring if necessary. Rinse and dry. (Or wash in dishwasher.)
.. . .....’& .&,&..,.*&. 4,.
Pull off knobs. Wash gently but do not immerse In water. Dry and
return knobs to same locations on range, matching flat, or grooved,
area on knob and shaft.
--- -*!%------ .
Unit
---- —-... .m—.-... ~ ..-— . ...— . . .. - ------
..-.-W!x..m ,-..= —.-. ~-
does not ~eed cleaning; soil burns off.wvhen unit is heated.
(continued next page)
oven ONLY, unit locks in raised position until re-
pan and rack stand in oven to cool.) Drain fat, cool
: -. ... .... ..’---k.-..”-:.<L -.-*.-A.%. . . ......- ---- !
“----~ = ~’.’ --’”’-”- -- “- .“ -
;*.*
&..$,
~q., ---, .
. .... .
Page 24

Metal
Porcelain
Enamel
Soap and Water
Soap and Water
Paper Towel or
Dry Cloth
Soap and Water
Wash all glass with cloth dampened in soapy water. Rinse and polish
with dry cloth. Knobs on control panel are removable, if desired.
If knobs are removed, do not allow water to run down inside surface
of glass while cleaning.
Wash, rinse, then polish with dry cloth. DO NOT USE
abrasives, ammonia, acids or commercial oven cleaners which may
damage finish.
Acids–wipe immediately if range is hot; use dry paper towel or cloth.
When surface is cool, wash and rinse. Other–such as fat smatterings,
etc., wash with soap and water when cooled, rinse. Polish with dry
cloth.
Avoid cleaning powders or harsh abrasives which may cause scratching of surface. See note on porcelain enamel, Care Secflon.
steel wool,
Oven Door
Inside*
See Column at
Right
. . ..
Oven Gasket
Sillcone Rubber
(Heat Resistant)
Woven Fiberglass
Oven Liner
Use on Non
Self-Clean
:::;:;IY.
Clean Oven
directions,
CareSection.
(CAUTION: When in use, light. bulbs =.n *come warm enough to break if touched with moist cloth or towel. When
cleaning, avoid warm lamps With cleaning cloths if lamp cover is removed. See Lamp
Oven Vent
.
(Duct)
Soap and Water
None
Soap and Water
Household Ammonia
Commercial
Soap-Filled
Soap and Water
. . .. . . ..
Oven Cleaner
Scouring Pad
...- ... .. .
Reflector Pans
Surface
Unit Coils
Soap-Filled
Scouring Pad
-.-.. .. . . -
. .
.
..
Trim Rings
~A:ou~d Surface
Soap and Water
Stiff-Bristled Brush
Soap-Filled
Scouring Pad
On Self-Clean oven, clean ONLY door liner outside the gasket. Do not
rub or damage gasket. Avoid getting ANY cleaning materials on gasket.
For NON Self-Clean oven see directions under Oven Liner, below. Remove door if desired, see directions
under running water or immerse.
Non Self-Clean oven only, locate when door is open. Clean off soil
with sudsy water; rinse thoroughly.
Self-Clean oven; avoid getting ANY cleaning materials on gasket.
. . . . . . .. ..
Cool
before cleaning.
FOR LIGHT SOIL: Frequent wiping with mild soap and water (par-
ticularly after cooking meat) will prolong the time between major
cleaning. Rinse thoroughly. NOTE: Soap left on liner causes addi-
tional stains when oven is reheated,
FOR STUBBORN OR BURNED-ON SPOTS: Wipe ammonia on stubborn spots to soften. Ammonia may be left in dish on
for several hours or overnight (door closed) to soften soil. Then wash
with soap and water. See NOTE above about use of soap.
FOR HEAVY SOIL: Choose a non-abrasive cleaner and follow label
instructions, using thin layer of cleaner. Use of rubber gloves is
recommended. Wipe or rub lightly on stubborn spots. Rinse well.
Wipe off any oven cleaner that gets on thermostat bulb. When rinsing
oven after cleaning, also wipe off thermostat bulb, found in back, or
on the side, near top of oven.
.—
Remove oven vent duct found under rear surface unit(s). Wash in hot
soapy water, dry and replace. See positioning directions, and, for cau-
tion in the use of aluminum foil, Care
... ----- ---- . . .
.-
See
information on Se/f-CleanOven, Care Section, for cleaning auto-
matically. Excessive spillovers pass through opening in pans and
collect in area
to prevent spillovers. If preferred,
with the dishes. Spillovers
require use of a scouring pad.
Let unit coils cool completely before handling.
Spatters and spills burn away when coils
heat soiled units at HIGH, let soil burn off “about a minute, ” switch
units OFF. Avoid getting cleaning materials on coils. Wipe off any
cleaning materials with damp paper towel
. . . ,
Clean as below or in dishwasher.
DO NOT CLEAN IN SELF-CLEAN OVEN. Wipe all rings after each cooking, so unnoticed spatter will not “burn on” next time you cook. To
remove “burned-on”
mentioned. Rub
sutiace. See picture on Surface Cooking pages for sizes of pans to
use to prevent permanent discoloration.
below. See Surface Cooking pages for cooking methods
allowed to cook onto reflector pans may
spatters use any or all cleaning materials
lightly with scouring pad to prevent scratching of
care Section. DO NOT place door
floor of oven
Replacement, CareSection.)
Section.
remove pans frequently and wash
are heated. At end of meal,
before heating unit.
,
,.
3
24
*Spillage or marinades, fruit juices and basting materials containing acids may cause discoloration, so should be wiped
up Immediately with a paper towel. When surface is cool, clean and rinse.
Page 25

25
...
-. . . . . .
Page 26

./
..-
~~
3
Read this book to be certain you understand how range features operate. Throughout the book, you
will find points to check on how to determine if you need service. Also check the listing below for
further hints of possible source of the problem.
~~11~~~~ l%i~q~
Appliance Outlet, Fuse, Mini-Breaker
If a portable appliance doesn’t operate when
plugged into an appliance outlet it may be
caused by one of the following: (a) The appliance is defective. Does it work when plugged
into a regular outlet? (b) The appliance outlet
is overloaded. One outlet (or both appliance
outlets used together on a range so equipped)
can handle a total of about 1500 watts. If the
wattage of the appliance(s) plugged into the
outlet (s) exceeds that, the fuse which protects
the outlets may fail. Check fuse replacement
and operation of Mini-Breaker, Care Section.
If it is the Timed Appliance Outlet, check di-
rections for use of same. The START and
STOP dials may be incorrectly set in relation
to the time on the range clock.
Automatic Oven Timer
Check to be certain step-by-step directions were
followed correctly. Review pages on use of
timer.
Baking
Check material and size of baking utensil; place-
ment of shelf and food in oven. If the oven was
used for broiling, just before it is preheated for
baking a food, turn the oven completely off and
open the door wide so it can cool (5 or 10
utes). Then close the oven door and preheat as
directed on
Broiling
Be sure OVEN TEMP is set at BROIL. If
there was excessive smoking and spattering:
Were shelf and broiler pan at position sug-
gested on broiling chart? If aluminum foil was
used on broil rack, were directions followed?
Lamp, Fluorescent
To start lamp over surface units, see Surface
Cooking section.
f’-
(=-?-lr~
-JA
ViiiI (Ml %iorTroduct service
is Working But Trouble is with Individual Features:
SMOKING
Cooking utensils and excessive amounts of spillovers and liquid grease not baked on were not
removed before starting Self-Clean Oven.
OVEN DOESNST CLEAN
Check directions to be sure ALL operations
where done correctly for starting cleaning cycle.
Possible causes of the problem: (a) Failure to
set proper Automatic Timer dial. STOP dial
must be set and advanced beyond time noted
on range clock. (b) STOP dial was not ad-
vanced for long enough time. (c) A thick pile of
spillover when cleaned leaves a heavy layer of
ash in spots which could have insulated the area
from further heat. See More Znfornmtion on
the Self-Clean Oven concerning ash.
UNITS
If lights on range are working but the oven or
Baking page.
min-
surface units do not
When None of the Parts of the
Range Are Working:
If oven and surface units do not heat, and lights
on the range are not working (except on models
with RF prefix), check first to see that the
three-pronged plug connected on back of range
is fully inserted in wall receptacle.
Range House Fuse
The difficulty might also be caused by a blown
range circuit fuse, or (depending on the nature
of fuse arrangement) a tripped main circuit
breaker. If circuit breaker is involved, reset it.
If the control box employs fuses, range fuse
(a cartridge-type) should be changed, BUT
ONLY BY SOMEONE FAMILIAR WITH
ELECTRICAL CIRCUITS. If after replacing
range circuit fuse or resetting circuit breaker,
fuse blows or circuit breaker trips open again,
call your Hotpoint serviceman.
heat, call serviceman.
Self-Clean Oven
CAN’T LATCH OR UNLATCH OOOR
Check step-by-step directions in Care Section.
(a) Did you push and hold in latch release
while moving latch? (b) Did the Lock Light
glow because oven was too hot from previous
oven use at high temperature? If so, open oven
door wide so oven can cool; then latch can be
moved. (c) On window door, is shield in up
position and locked in place? (d) If Lock Light
is off at end of cleaning but Latch cannot
moved easily, it may be necessary to let oven
stand 10-20 minutes more before trying to
latch door.
ODOR, SOUNDS
Check More Information on the Self-Clean
Oven, Care Section.
26
be
un-
‘$3
!
:
Notice to Owner
For Professional Maintenance, call Hotpoint
Authorized Service-it’s nearby. Get telephone
number from your dealer or the “yellow pages”
and write it here.
4PPLlAMCi PARR
II
‘w?
Page 27

- -“
“-
“
,.-.
Your Hotpoint range is outstanding in fwdures and has
!\
1
m
0- m
-’~ d
~
-H- \
●
❛
n,
‘\
-k
)
been well-designed, with the help of home economists,
with the homemaker in mind. You will find it dependable,
precision-built and reliable in performance.
Similarly, intensive efforts have established an efficient,
well trained, nationwide product service organization. No
matter where you liv~r move+the network of thousands of Hotpoint franchised distributors, dealers and
‘-‘ ‘~lCUSTOMER CARE
service technicians are happy to serve you and make
1
doubly sure your new range gives you continued, satisfactory performance.
rf~~~?
r. ‘1
r
J 111~1
‘i
/
i
1
For service after the warranty period:
Even the finest precision-built appliances may require service from time to time. In some areas, authorized customercare service organizations offer service contracts, beyond
the original warranty period, which enable you to budget
for such possible occurrences.
Contact your local authorized customer-care service organization to ascertain whether service contracts are available
in your area, and to learn the details of their plan and its
termsand conditions.
Hotpoint wants you to stay pleased with
your Hotpoint appliances. That’s why our
technicians are carefully trained to give
prompt, efficient repairs on all your major
appliances nationwide.
Should any problem with our service occur we want to know about it.
Please write all details to:
Manager–Customer Relations
Hotpoint
Major Appliance Business Group
General Electric Co.
315 Watterson City East
Appliance Park
Louisville, Kentucky 40225
L-
Should this contact not completely solve
‘
the situation, you may send full information to:
Major Appliance
Consumer Action Panel
20 North Wacker Drive
Chicago, Illinois 60606
This panel, known as MACAP, is a group
of independent consumer experts under
the sponsorship of the Association of
Home Appliance Manufacturers. Its pur-
pose is to study industry practices and
advise the industry of ways to improve
customer service.
Free of industry control and influence,
MACAP is able to make impartial recommendations, considering each case individually,
,}--
)7
)--
{-
,“
I
I
I
I
27
Page 28

HOTPOINT RANGE d
IF YOUR NEW HOTPOINT RANGE (INCLUDES FREE-STANDING
BUILT-IN OVENS, BUILT-IN COOKTOPS, AND HOODS) FAILS
MANUFACTURING DEFECT WITHIN ONE YEAR FROM THE
ORIGINAL PURCHASE, HOTPOINT WILL REPAIR THE PRODUCT AT NO CHARGE
TO YOU. BOTH PARTS AND SERVICE LABOR ARE INCLUDED.
THIS WARRANTY IS YOURS AS THE PURCHASER FOR YOUR HOME USE AND
IS FOR PRODUCTS PURCHASED AND RETAINED WITHIN THE FIFTY STATES
OF THE U.S.A. AND THE DISTRICT OF COLUMBIA, REGARDLESS OF WHETHER
OR NOT YOU MOVE. OF COURSE, IT DOES NOT COVER DAMAGE BY ACCIDENT
OR MISUSE. SERVICE WILL BE PROVIDED BY OUR FACTORY ORGANIZATION
OR OUR AUTHORIZED SERVICE ORGANIZATION IN YOUR AREA. ALL YOU
NEED DO IS LOOK US UP IN THE YELLOW PAGES, WE ARE NEARBY.
GENERAL ELECTRIC COMPANY
Range Products Marketing Department
Appliance Park . Loulsvllle, Kentucky 40225
AND BUILT-INS,
BECAUSE OF A
DATE OF THE
+
+
rl++-P--
A QUALITYPRODUCTOF
GENERALELECTRICCOMPANY
 Loading...