

Page 1
Howtoget
the bestfrom
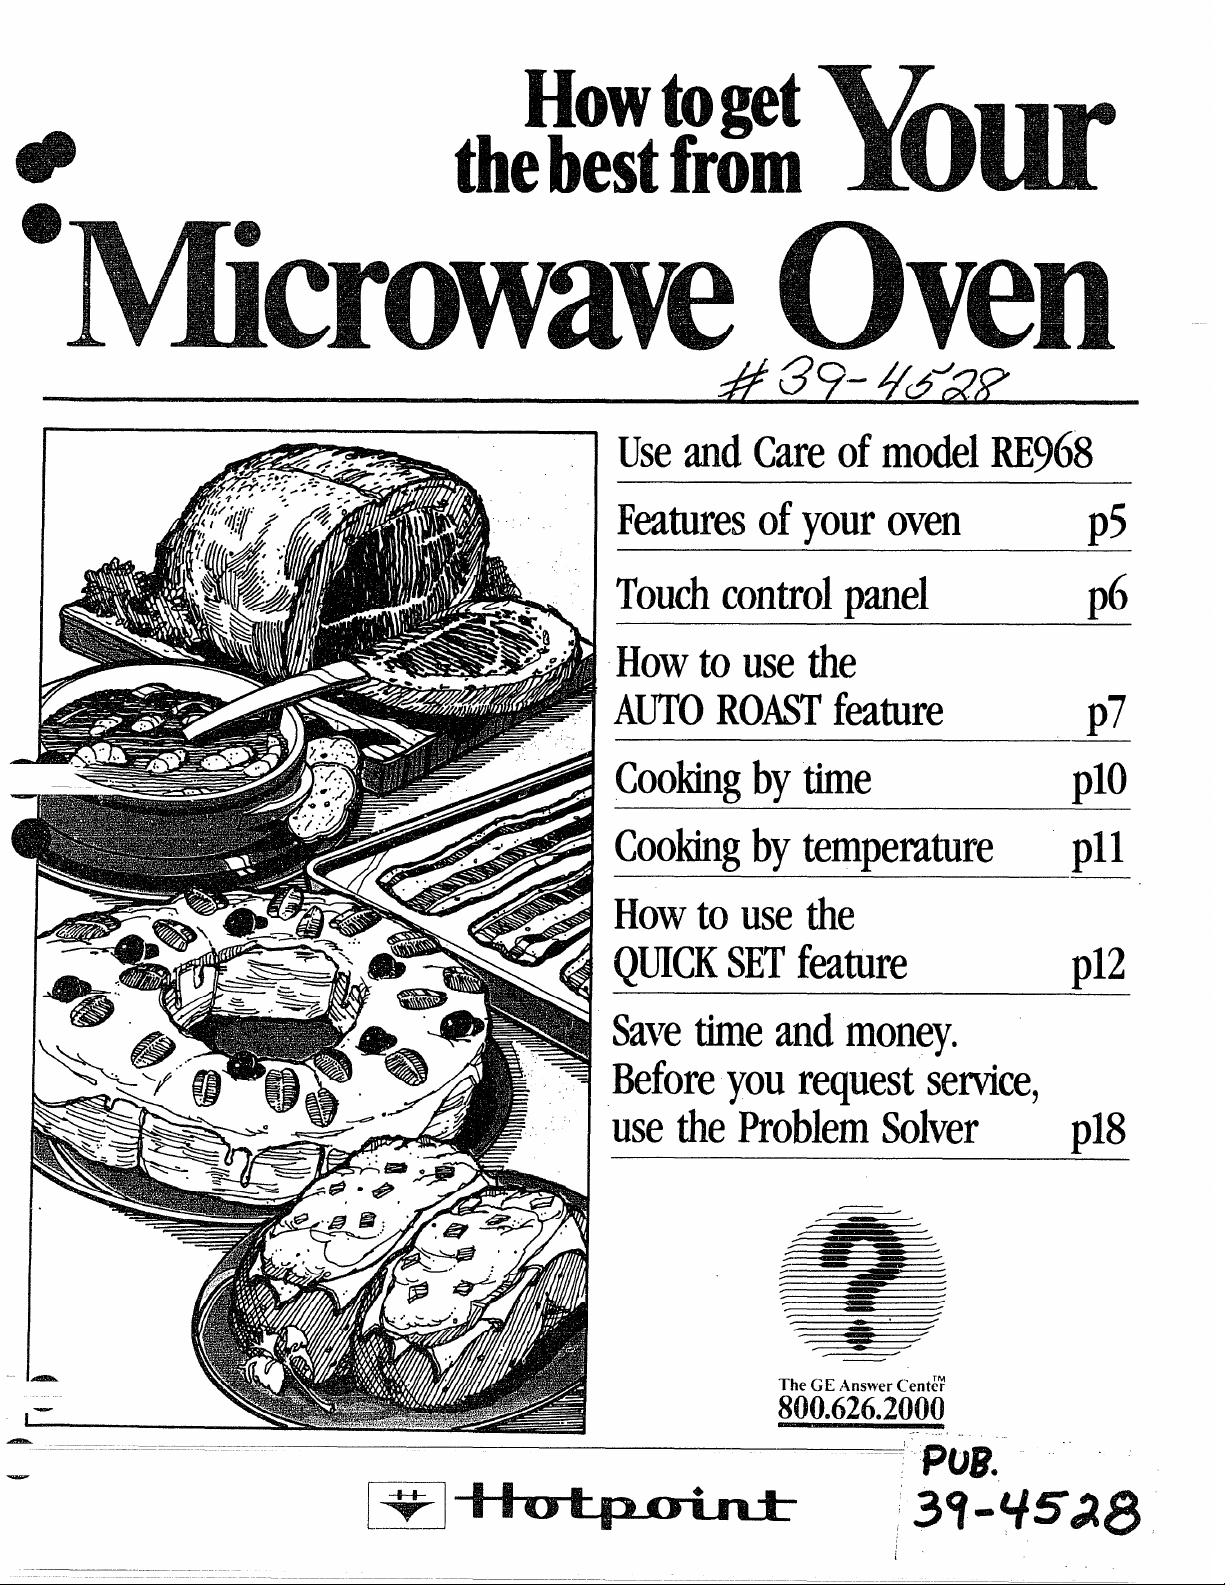
UseandCareofmodelRE968
Featuresofyouroven
Touchcontrolpanel
Howtouse the
AWOROASTfeature
Cookingbytime
Cookingbytemperature
Howtousethe
QUICKSETfeature
Sa~~etimeandmoney.
Beforeyourequestservice,
p5
p6
D7
plo
pll
p12
—
1.
usetheProblemSolver
/
/
-
The GE AnswerCSent~?
800.626.2000
,., .
p18
Page 2

HelpUS
PRECAUTIONS
TOAVOID
Readthisbookcarefully.
Itwill help you operate and maintain your new Microwave Oven
properly.
Keep it handy for answersto your
questions.
If you don’t understand something
or need more help. . .
Call, toll free:
The GE AnswerCenter’”
800.626.2000
consumer information service
or write: (include your phone
number);
Consumer Affairs
Hotpoint
Appliance Park
Louisville, KY 40225
Writedownthe modeland
serialnumbers.
You’llfind them on alabel ~nside
the oven on the upper left side.
These numbers are also on the
Consumer Product Ownership
Registration Card that camewith
your Microwave Oven. Before
sending in this card, pleasewrite
these numbers here:
ModelNo.
Besureyour Microwave
Ovenisregistered.
Itis important that we, the manufacturer, know the location of your
Microwave Ovenshould a need
occur for adjustments.
Your supplier isresponsible for
registering you as the owner.
Pleasecheck with your supplier to
besure he hasdone so; also send
in your Consumer Product Ownership Registration Card. If you move,
or if you are not the original purchaser pleasewrite to us,stating
model and serial numbers. This
appliancemustbe registered.
Pleasebecertainthatit is.
Write to:
Hotpoint
Range Product Service
Appliance Park
Louisville, KY 40225
[f you receiveda damaged
OVWtm ■ .
immediately contact the dealer (or
builder) that sold you the MicrowaveOven,
Savetimeand money.
Beforeyourequestservice,check
the ProblemSolveron page 18.It
lists minor causesof operating
problems that you can correct
yourself.
POSSIBLE
EXPOSURETO
EXCESSIVE
MICROWAVE
ENERGY
(a) Do NotAttemptto operate this
oven with the door open since open
door operation can result in harmful
exposure to microwaveenergy. It is
important not to defeat or tamper
with the safety interlocks.
(b) Do Not Placeany object
between the oven front face and the
door or allow soil or cleaner residue
to accumulate on sealing surfaces.
(c) Do Not Operatethe oven if it is
damaged. it “isparticularly important
that the oven door close propprly
and that there isno damage to the:
(1) door (bent)
(2) hinges and Iatches’(broken or
loosened)
(3) door sealsand sealing surfaces.
(d) The OvenShouldnot be
adjusted or repaired by anyone
except properly qualified setvice
personnel.
*
e
.*
@
SerialNo.
Usethese numbers in any
correspondence or servicecalls
concerning your MicrowaveOven.
OptionalAccessory
Available at extra-cost from your Hotpoint supplier.
JXM Ilnstal!ationKit
Converts your countertop oven to a built-in wall oven. This microwave
oven is UL listed for installation over Hotpoint wall ovens with black
glass doors.
2
Page 3
contents
!!!!S?
IMPORTANTSAFETY[INSTRUCTIONS
Before lvlicrOwaving . . .. . . . . .. . . 2
ety Instructions
aturesof Your Oven .. . . . . .. . . 5
Cooking Complete Reminder . .. . 5
uch Control Panel . . . . . . . ....6
e
‘Setthe Clock ... . . . . . . .. . . . ....6
Automatic Roasting &
Chart
. . . . . .. . . . . . . . . .. . . ...7-8
Defrosting . . . .. . . . . . . . . . . .. . . ..9
Time Cook . . . . . .. . . . . . . . . . . . . 10
TempCook/Hold . . . . . . .. . . ...l 1
QUICK SET Control . . .. . . . . .. . 12
QUICK SET Control Guide . . .. . 13
MIN/SECTimer . . . . . . .. . . . . .. . 15
CareofYour Oven . . . . . . . . .. . . 16
Grounding Instructions . . .. . . .. 17
Useof Extension Cords . . .. . . .. 17
The Probiem Solver . . . . . .. . . . . 18
Consumer Services. . . . . . . .. . . . 19
Warranty . . . . . . .. . . . .. Back Cover
. . . . .. . . . ...3-4
MicrowavingTips
@Makesure all utensils usedin
‘A--microwave oven are labeled
=Ulktbiefor microwaving”. Check
‘your Cookbook forsp~cifictest
determine ’’microwave-safe”
tensils.
@
@Papertowels, waxpaper, and
plastic wrap can be used to cover
dishes in order to retain moisture
and prevent spattering.
@Some microwaved foods require
stirring, rotating, or rearranging.
Check your Cookbook for specific
instructions,
@Some foods such as unshelled
eggs and hot dogs must be pierced
to allow steam to escape during
cooking.
-
Readall instructionsbeforeusingthisappliance. =
When usingelectricalappliances
basicsafetyprecautionsshould
befollowed,includingthe
following:
WARNING—TOreducethe risk
of burns,electricshock,fire,
injuryto personsor exposureto
excessivemicrowaveenergy:
e Usethisapplianceonly for its
intendeduseasdescribedinthis
manual.
e Readand followthe specific
“PRECAUTIONS TO AVOID
POSSIBLEEXPOSURETO
EXCESSIVEMICROWAVE
ENERGY”found on page2.
e This appliancemustbe
grounded.Connectonlyto
properlygroundedoutlet.See
“GROUNDING INSTRUCTIONS”
found on page 17.
e
For best operation, plugthis
applianceintoitsown electrical
outlet,to preventflickeringof
lights,blowingof fuseor trippingof circuitbreaker.
e Installor locatethisappliance
only inaccordancewiththe providedinstallationinstructions.
* Be certainto placethe
front
surfa”ceof the door threeinches
or more backfromthe countertop edge to avoidaccidentaltippingof the appliancein normal
usage.
@ Do not coveror blockany
openingson the appliance.
e Do not useoutdoors,
e Do not immersepowercord
or plug in water.
o Keep powercord awayfrom
heatedsurfaces.
* Do not let powercord hang
overedge of table or counter.
e Do not operatethisappliance
if it hasa damaged powercord
or plug, if itis notworkingproperly,or if it hasbeen damaged
or dropped.
@ See door surfacecleaning
instructionson page 16.
@ This applianceshouldbe servicedonly by qualifiedservice
personnel.Contact nearest
authorizedservicefacilityfor
examination,repairor
adjustment.
AS with anyappliance,close
e
supervisionisnecessarywhen
usedby children.
e
TO reducethe riskof fire in
the ovencavity:
—Do not overcookfood.Care-
fullyattendapplianceif paper,
plastic,or othercombustible
materialsare placedinsidethe
ovento facilitatecooking.
—Removewiretwist-tiesfrom
paperorplastic bagsbefore
placingbag inoven.
—Do not useyourmicrowave
ovento dry newspapers.
—Papertowelsand napkins,
wax paper.Recycledpaper
productscan contain‘metal ~ ~~ —fleckswhich maycausearcing
or ignite.Paperproductscontainingnylonor nylonfilaments
shouldbe avoided,asthey may
alsoignite.
—Do-not pop popcornin your
microwaveoven unlessina specialmicrowavepopcornaccessoryor unlessyou usepopcorn
labeledfor usein mjcrowave
—Do not operatethe ovenwhile
emptyto avoiddamageto the
ovenand the‘dangerof fire.If by
accidentthe ovenshouldrun
empty a minuteor two, no harm
isdone. However,tryto avoid
operatingthe ovenempty at all
times—itsavesenergyand prolongslifeof the oven.
—If materialsinsidethe oven
shouldignite,keepovendoor
closed,turn ovenoff, and disconnectthe power cord,or shut
off powerat the fuse or circuit
breakerpanel.
E
-–
_–
E
-.,
—
—
-–
~.
—,
—.
—.
=?.
-..
-
—
—
—
iiiiik
-—
-.
—
—r
—,
-
—
—
—
~—
-.
—
-
~—
—–
—
—.
-I. –
---
—
(continued next page)
~
Page 4
IMPORTANTSAFETYINSTRUCTIONS
(continued)
Some products suchas
~
wholeeggsand sealedcon-
tainers—forexample,closed
glassjars—mayexplodeand
shouldnot be heated inthis
oven.
e Avoidheatingbaby
glassjars,evenwithouttheir
lids;especiallymeatandegg
mixtures.
e Don’t defrostfrozenbever-
ages in narrowneckedbottles;
especiallycarbonatedones.
Evenifthe containerisopened,
pressurecan buildup.This can
causethe containerto burst,
resultingin injury.
~
Use metalonly asdirectedin
Cookbook. Metalstripsas used
on meat roastsare helpfulwhen
usedas shownin Cookbook.
TV dinnersmay be cookedin
metaltraysbut when usingshelf
they must be replacedintheir
box. However,when usingmetal
in microwaveoven,keep metal
(exceptfor DOUBLE DUTYIM
shelf)at least1-inch awayfrom
sidesof oven.
e Cooking utensilsmay
becomehot becauseof heat
transferredfromthe heated
food. This isespeciallytrue if
plasticwrap has beencovering
thetop and handlesof the utensil.Potholdersmay be needed
to handlethe utensil.
e Sometimes,the ovenfloor
can becometoo hot to touch.
Be carefultouchingthe floor
duringand aftercooking.
~ Do not useany thermometer
in food you a~emicrowaving
unlessthat thermometeris
designedor recommendedfor
usein the microwaveoven.
~ Removethe temperature
probefrom the oven whennot
usingit to cook with. Ifyou
Ieavetheprobeinsidetheovenwithout
insertingit in food or liquid,and
turn on microwaveenergy,it can
createelectricalarcing inthe
oven,and damage ovenwalls.
food in
e PlasticUtensils—Plastic
utensilsdesignedfor microwave
cookingare veryuseful,but
shouldbe usedcarefully.Even
microwaveplasticmay not beas
tolerantof overcookingconditionsas are glassor ceramic
materialsand maysoftenor
charifsubjectedto shortperiods
of overcooking.In longerexpo-
suresto overcooking,the food
and utensilscould ignite.For
thesereasons:1) Use micro-
waveplasticsonly“anduse
them”in strictcompliancewith
the utensilmanufacturer’s
recommendations.2) Do not
subject-emptyutensilsto microwaving.3) Do notpermitchildren
to useplasticutensilswithout
completesupervision.
a When cookingporkfollow
our directionsexactlyand
alwayscook the meatto at least
170°. This assuresthat, inthe
remotepossibilitythat trichina
may be presentinthe meat,it
will be killedand meatwill be
safeto eat.
e Boilingeggs (in and out of
shell)is not recommendedfor
microwavecooking.Pressure
can build up insideegg yolk and
maycauseit to burst,resulting
in injury.
o Foodswith unbrokenouter
“skin”such as potatoes,hot
dogsor sausages,tomatoes,
apples,chickenliversand other
giblets,and eggs (seeprevious
caution)should be piercedto
allowsteamto escapeduring
cooking.
e “Boilable”cookingpouches
and tightlyclosedplasticbags
shouldbe slit,piercedorvented
asdirectedin Cookbook.If they
are not,plasticcouldburstduringor immediatelyaftercooking,
possiblyresultingin injury.Also,
plastic storagecontainersshould
beat leastpartiallyuncovered
becausetheyforma tight seal.
When cookingwithcontainers
tightlycoveredwith plastic
wrap,removecoveringcarefully
and directsteamawayfrom
handsand face,
s Use ofthe DOUBLE DUTYIM
shelfaccessory.(SeeyourCookbookfor properuse.)
—Removethe shelffrom oven
when not in use.
—Do not storeor cookwith
shelfon floor of oven.Product
damagemay result.
—Use potholderswhen handlingthe shelfand utensils.They
maybe hot.
—Do notusemicrowavebrowningdishon shelf.The shelf
couldoverheat.
SAVETHESE
INSTRUCTIONS
*
e
-
4
Page 5
FeaturesofYourMicrowaveOven
ookingCompleteReminder
orall AUTO ROAST codesexcept
d
— Code6,TIME COOK, DEFROST
nd QUICK SET cycles:)
o remind you that you havefood in
the oven, the oven will beep once a
minute until you either open the
ovendoor or touch the CLEAR/
OFF pad.
‘o
‘@
—. .
—
-_
—
—1
—
—
—
—r
—
—
—
—
—
—.
—.
—–
—
—r
—.
w-
e
1.
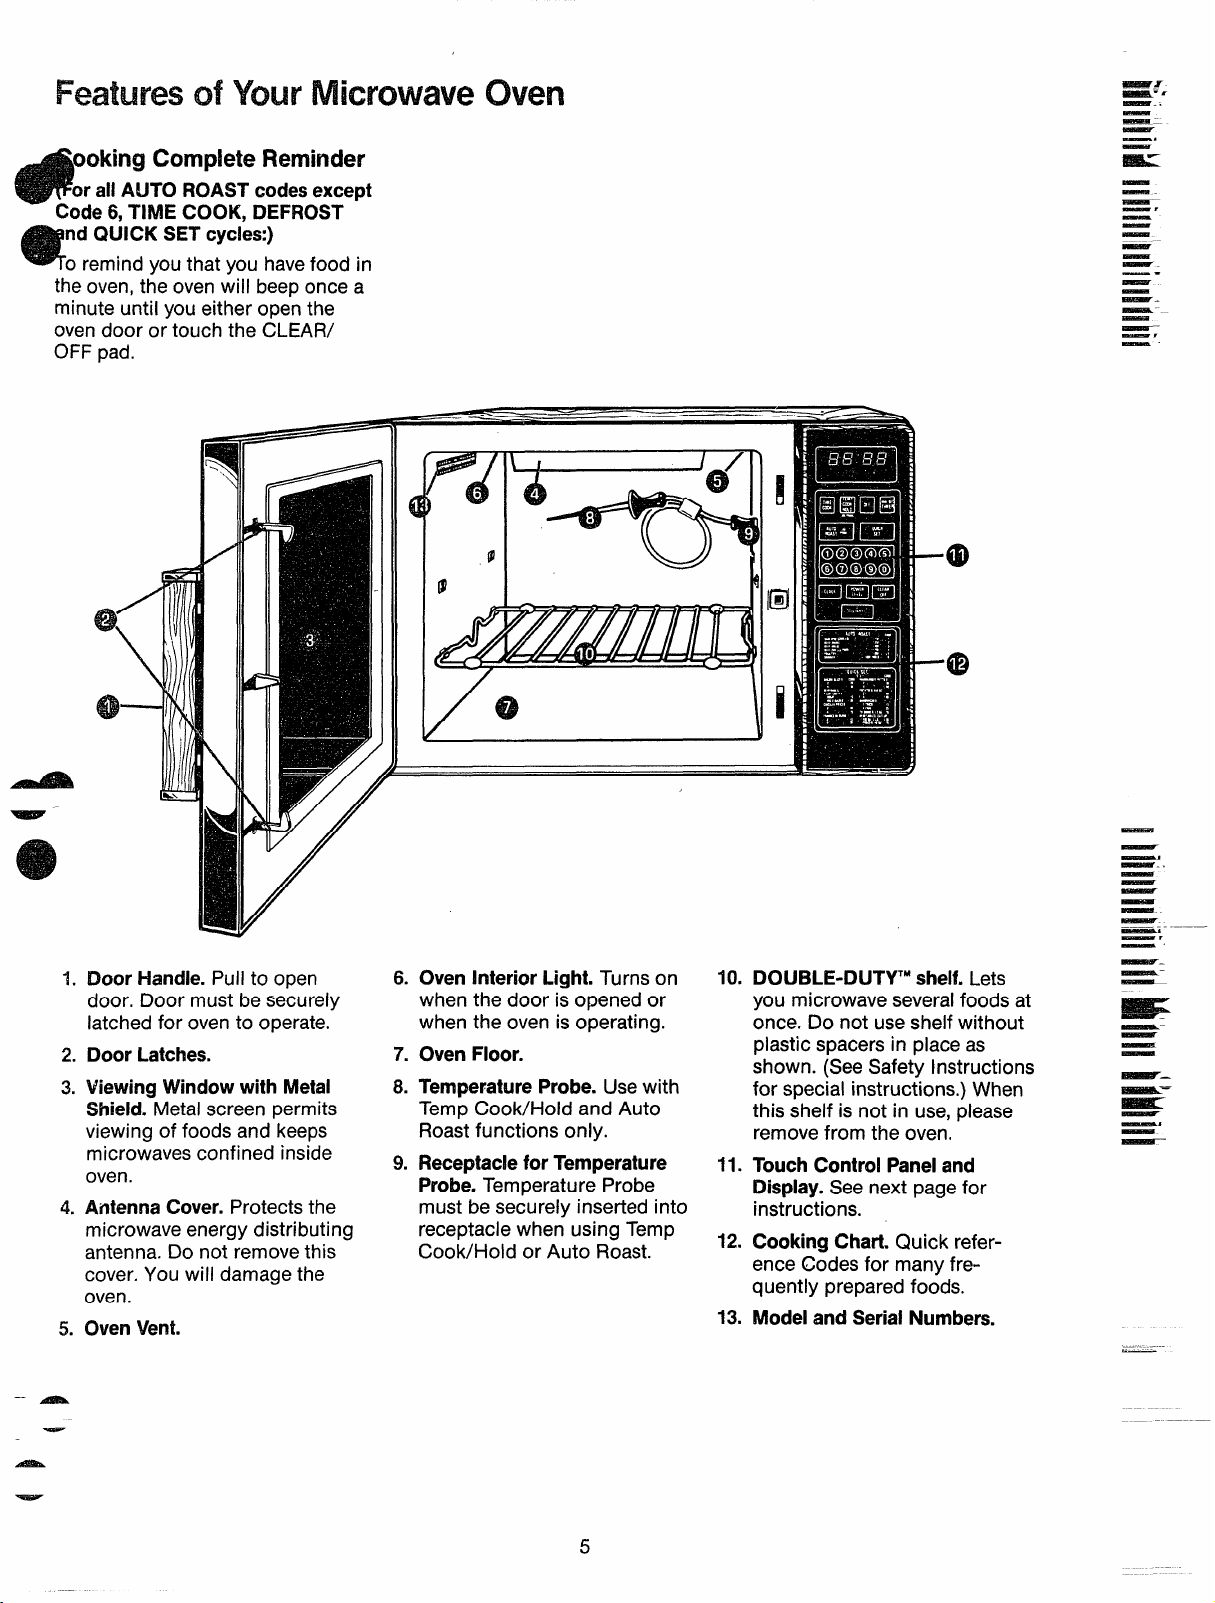
Door Handle.Pull to open
door. Door must be securely
latched for oven to operate.
2.
Door Latches.
ViewingWindowwith Metal
3.
Shield.Metal screen permits
viewing of foods and keeps
microwaves confined inside
oven.
AntennaCover.Protects the
4.
microwave energy distributing
antenna. Do not remove this
cover. You will damage the
oven.
OvenVent.
5.
/
6.
OvenInteriorLight.Turns on
69
when the door is opened or
when the oven is operating.
7.
OvenFloor.
TemperatureProbe. Usewith
8.
Temp Cook/Hold and Auto
Roast functions only.
9.
ReceptacleforTemperature
Probe.Temperature Probe
must be securely inserted into
receptacle when using Temp
Cook/Hold or Auto Roast.
v
,
—
—..
—
—
—
—
—r
—.
~.
—–
DOUBLE-DUTY’Mshelf.Lets
10.
—
you microwave severalfoods at
once. Do not useshelf without
plastic spacers in place as
—
shown. (SeeSafety Instructions
for special instructions.) When
this shelf is not in use, please
remove from the oven.
11.
TouchControlPaneland
Display.See next page for
instructions.
12.
CookingChart. Quick refer-
ence Codes for many fre-
quently prepared foods,
13.
Modeland SerialNumbers.
-
—A@aA
.asA
~
Page 6
FeaturesofYottIrTouchCcmtrdlPanel
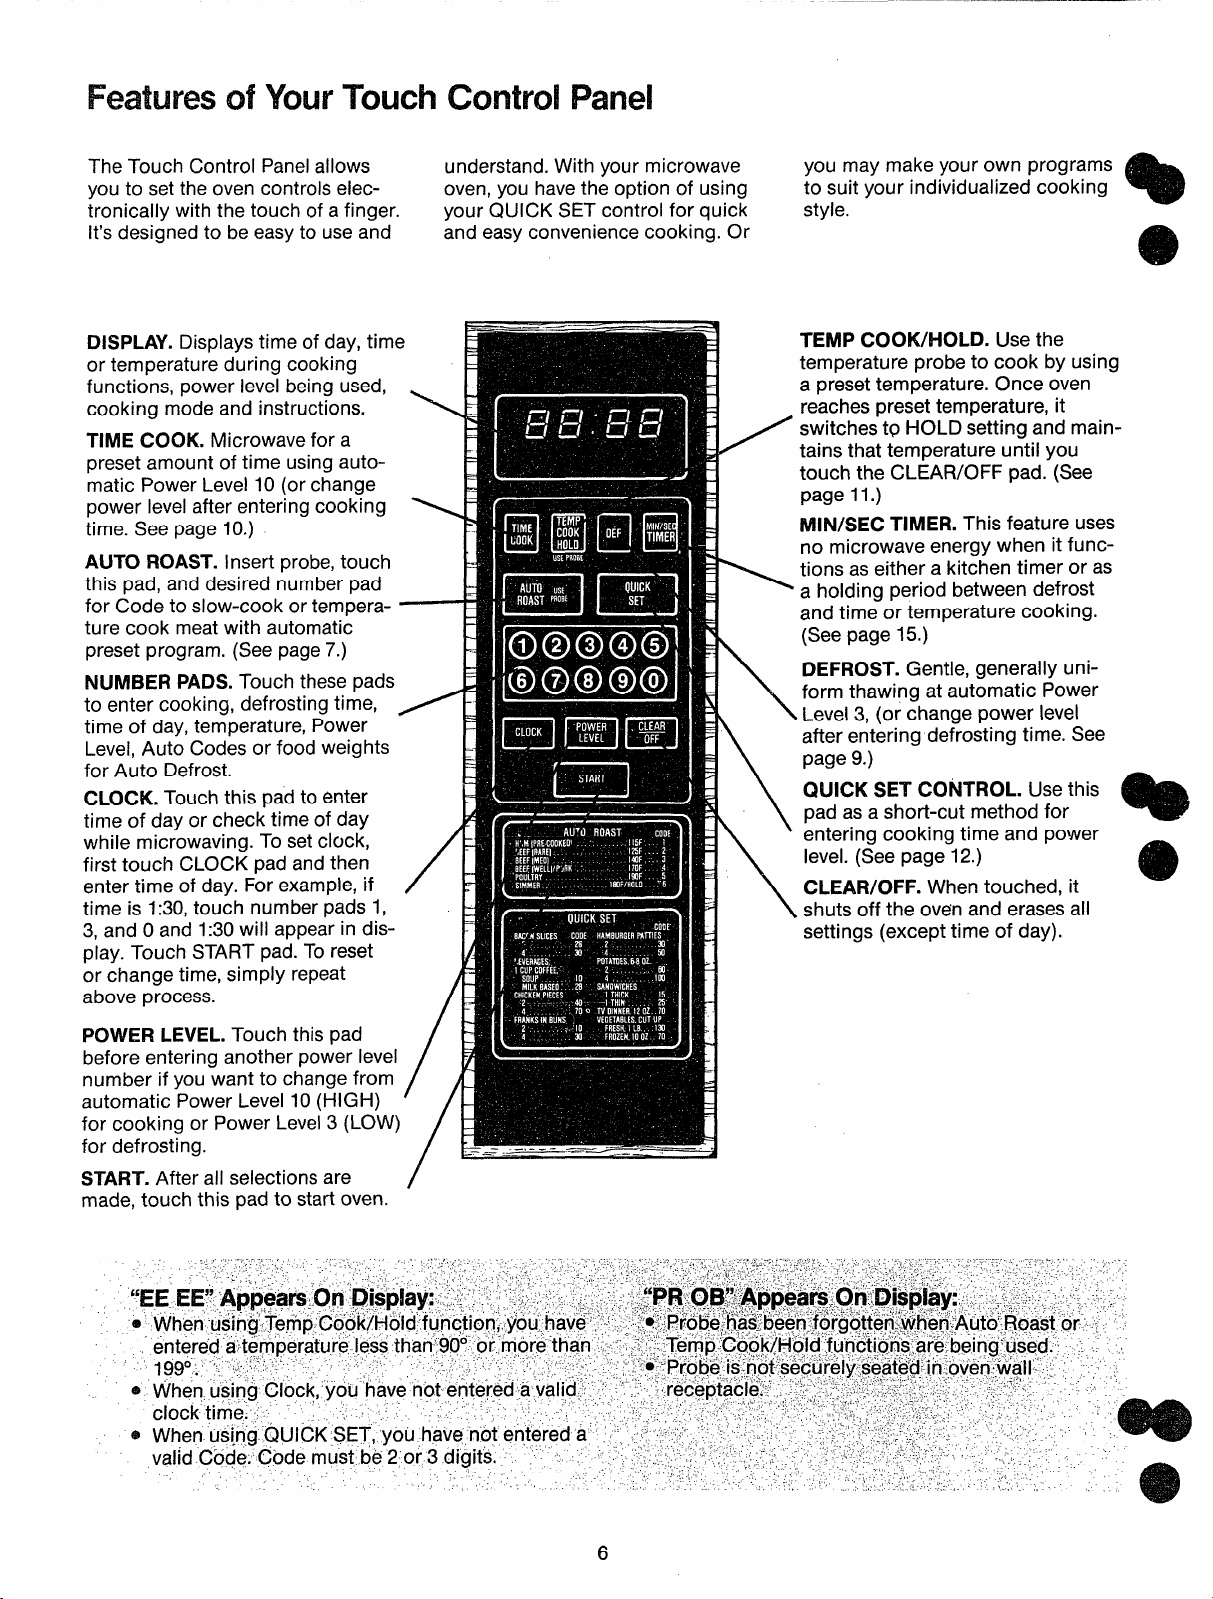
The Touch Control Panelallows
you to set the oven controls electonically with the touch of a finger.
It’s designed to be easyto useand
DISPLAY.Displays time of day, time
or temperature during cooking
functions, power level being used,
cooking mode and instructions.
TIME COOK. Microwave for a
preset amount of time using auto-
matic Power Level 10 (or change
power level after entering cooking
time. See page 10.)
AUTO ROAST. Insert probe, touch
this pad, and desired number pad
for Code to slow-cook or temperature cook meat with automatic
preset program. (Seepage7.)
NUMBER PADS.Touch these pads
to enter cooking, defrosting time,
time.of day,temperature, Power
Level,Auto Codes or food weights
for Auto Defrost.
CLOCK.Touch this pad to enter
time of day or check time of day
while microwaving. To set clock,
first touch CLOCK pad and then
enter time of day. For example, if
time is 1:30,touch number pads 1,
3, and Oand 1:30will appear in dis-
play. Touch START pad. Toreset
or change time, simply repeat
above process.
understand. With your microwave
oven, you havethe option of using
your QUICK SET control for quick
and easy conveniencecooking. Or
‘%
-f
you may make your own programs
to suit your individualized cooking
style.
TEMP COOW-IOLD. Use the
temperature probe to cook by using
a presettemperature. Once oven
reachespreset temperature, it
switches t~ HOLD setting and maintains that temperature until you
touch the CLEAR/OFF pad. (See
page 11.)
MIN/SEC TIMER. This feature uses
no microwave energy when it functions aseither a kitchen timer or as
a holding period between defrost
and time or temperature cooking.
(Seepage 15.)
DEFROST. Gentle, generally uni-
form thawing at automatic Power
Level 3, (or change power level
after entering defrosting time. See
page 9.)
QUICK SET CO~’’fROL. Use this
pad as a short-cut method for
entering cooking time and power
level. (See page 12.)
CLEAR/OFF. When touched, it
shuts off the ovenand erasesall
settings (except time of day).
*
POWER LEVEL.Touch this pad
before entering another power level
number if you want to change from
automatic Power Level 10(HIGH)
for cooking or Power Level3 (LOW)
for defrosting.
START.After all selections are
made, touch this pad to start oven.
/b
/
6
Page 7

Automatic
Roasting
e Auto RoastCharton page
AutoRoastusesthe temperature
probeto cookto the desiredserving
temperature.UnlikeTempCook/
Hold,which usesa singlepower
level,AutoRoastisdesignedto use
upto 3 powersettingswhichautomaticallyswitchduringroasting,for
evenan~ tendercookkg results
withoutovercooking.
HANDLE
8.
How to Prepare Roasts
for Auto Roasting
Placetender beef roastson trivet in
microwave-safedish. Insert probe
from the front horizontally into
center meaty area not touching
bone or fat. Cover with wax paper.
How to Auto Roast
Beefto Medium
Step1:Touch AUTO ROAST Pad.
Display flashes ENTERCODE.
Touch number pad3. “START”
flashes.Touch START.
1
-
—.
—–
—
—
~=
—.
-
—
-.
—=
~.
—–
—.
—
—
-
—–
—–
—
-
—-
—.
—
—-
—
—
—.
—
—
ciw
Just as in conventional roasting,
only tender roastsshould beAuto
---–----===-~~iat~re~are reached. Less
- ~erlderroasts should bemicrowaved
a
—- —
asted until specified internal
by time, according to the Cookbook
h!ch comes with your oven.Complete information on preparing
roastsfor microwaving is in your
Cookbook.
-
Poultry, pork or ham roastsneed
no trivet. Add %cup water to roast
dish, cover with plastic wrap. (For
cooking bag method, seeCookbook.) Insert probe into center
meaty area.
r-——————~
Place meat in oven with probe to
the right. Insert cable end of probe
firmly into receptacleon oven wall,
Step2: Display shows internal food
temperature counting up.
Step3: Oven monitors internal temperature, automatically switching to
lower power as meat’stemperature
rises.This helps prevent toughening
or overcooking.
Step4:After temperature is
reached,oven switches to HOLD
for 1 hr., then shuts off. Hold prevents overcooking while keeping
meat warm.
Step5: Display will show “End”.
Step6: Open door or touch
CLEAR/OFF pad.
!l!l@J”
—
—
—–
—
—
—–
—
—.
—
——
—
—.
—.
—
~.
—.
—–
—..
—
—.
—.
—-
—
—
—
-r–
-
7
Page 8

Auto Roast (Mart
—
Automatic
simmer
Fooci
Beef
Tender Roast
Rare
Medium
Well
Meatloaf
Final
Code
2
3
4
Temp
125°
140°
170°
4 170° 15-20
Approx.Time
(Min.perlb.)
12-14
14-16
17-18
(loaforround)
Pork
LoinRoast
PrecookedHam
Pouitry
Whole Chicken
ib.)
(3
Whole Turkey
(Up to 12Ibs.)
(Insert probe into meatiest area of inner thigh from b;;; end and p:::~l to leg.)
Turkey Breast
4 170° 18-20
1 115°
5
5
190°
190°
11-14
13-15
13-15
(Insertprobehorizontallyintomeatiestar~a.)
●Recommendedstandingtimebeforeserving.
QuestionsandAnswers
Why wasn’tmy roastfully
Q.
cookedeventhoughthe temperatureon the displaywascorrectand
Auto Roastwascompleted.
A. The temperature probe must be
properly inserted when you Auto
Roast. Check your Cookbook to see
what you might havedone wrong.
Q. Do sometypesof trivetswork
betterthanothers?
A. Yes.Flat glass trivets generally
provide more browning to the
bottom of meatsthan plastic trivets.
Also, ceramic ridge-bottomed
roasting dishes usually work well.
Plastic trivets may require meat to
be turned over more often than
glasstrivets do because the grid
design and legs let the bottom of
the meat stay cooler than glass
trivets do.
Q. When I’mcookingwithAuto
Roast,why doesn’tmy roastcontinueto cook duringthe holding
time?
A. When your food reachesfinished
temperature, the oven automatically
switches to a lower heatlevel.The
eventemperature that’s maintained
in the food during this holding
period keepsit warm without
overcooking.
Hoid*
Minutes
5-1o
10-15
30
5-1o
20
5-10
20
20
20
(Auto RoastCode 6)
Here’show to Automatic Simmer a
few popular foods. See your Cookbook for more cooking charts,
recipesand techniques.
Set Auto Simmer like you do Auto
Roastexcept touch number pad 6.
STARTflashes.Touch STARTand
display shows temperature until
food reaches180°.
Oven switches to HOLD when
food’s internal temperature reaches
180° and maintains that temperature
until food isdone. If stirring isrecom-
mended, you can reset the oven by
retouching START.Touch CLEAR/
OFF when cooking isfinished.
Automatic Simmer Chart
Approximate
Food
Beef
Pot Roast*
Stew
Chili
Chicken*
Stewing
i31roiler/Fryer
Ham or Pork
Roast
soup
Stock/Vegetable
Split Pea
*For frozen, add 2 to 3 hours.
Time/Hrs.
6-8
6-8
11-13
11-12
4-6
4-6
3-6
13-15
*
o
e
-
Page 9

Defrosting
e Defrostsettingis designedfor
en thawingnecessaryfor large
amountsoffoodand isone ofthe
ostimportantadvantagesof a
icrowaveoven.
~ Power Level 3 is automatically set
for defrosting, but you may change
this for more flexibility.
* Seeyour Cookbook for defrosting
help.
Whenthe ovencompletes
Defrosting, it automatically shuts
off. It will then display “End” and
beep once a minute until you either
open the door or touch the CLEAR/
OFF pad.
To become better acquainted with
the defrost functions, defrost frozen
pork chops using the following
steps.
Step !: Place package of frozen
chops in the oven and close door.
Step 2: Touch DEFROST. Display
reads:0 and Power Level 3 is auto-
matically set in the oven but does
not appear on display. ENTER DEF.
TIME flashes.
Step4: Touch START,Time counts
down on display. When cyc!e is
completed, the oven signals and
automatically shuts off.
Step 5: Turn package over, close
door and repeat Steps 2,3 and 4.
Step6:When oven signals and
shuts off, display will show “End”.
Step7:”Open door or touch CLEAR/
OFF pad. Remove packageand
separate chops to finish defrosting.
Defrosting Tips
~
Foodsfrozen in paperor plastic
can be defrosted in the package.
@Foreven defrosting, many foods
needto be broken up or separated
part of the way through the defrosting time.
@Homemade dinners can befrozen
in shallow foil trays and heated for
later use. Se!ectfoods which micro-
wavewell.
@Pre-packagedfrozen dinners can
be defrosted and microwaved.
@Check your Cookbook for other
defrosting tips.
QuestionsandAnswers
Q. Wheni pressSTART,I heara
dullthumpingnoise.Whatisit?
A. This sound is normal. It is letting
you know th-eoven is using a Power
Level lower than HIGH.
Q. Can I Defrostsmallitemsin a
hurry?
A. Yes,but they will need more fre-
quent attention than usual. Raise
the Power Level after entering the
time by touching POWERLEVEL
and 7 or 10.Power Level7 cuts the
time about in %;Power Level 10
cuts the time to approximately %.
During either, rotate or stir food
frequently.
Q. Can i openthe doorduring
DEFROSTto checkon theprogress
of myfood?
A. Yes.Youmay open the door at
any time during microwaving. To
resume defrosting, close the door
and pressSTART.
Q. Why don’tthe defrostingtimes
inthe Cookbookseemrightfor
my food?
A. Cookbook times are average.
Defrosting time canvary according
to the temperature in your freezer.
Set your oven for the time indicated
in your Cookbook. If your food is
still not completely thawed atthe
end of that time, re-set your oven
and adjust the time accordingly.
Q. Can I selecta PowerLevelother
thanautomaticPowerLevel3 for
defrosting.?
A. Yes.Some smaller foods may be
defrosted quicker on higher Power
Levelsbut for even,carefree defrosting, Power Level3 is suggested.
Check the chart in the Cookbook
for specific times and Power Levels.
m“
—
—
Es5Fa?r=
~-
—
~.-
~.
—-
—.
—
—r
—
—
--
rsE#Ek-f9
-—
—-
—.
—
-—
—
—
rRE3s&——
—.
—,
—
-
~z
—–
—r
—.
—–
—
—
~
nswrr—
Step 3: Touch 8, 0 and Ofor 8 min-
utes. DEF.TIME and 8:00 are displayed. If you wish to change
Power Level, touch POWER LEVEL
and then new number.
-“
-
Page 10

Cooking by Time
The Time Cookfeatureallowsyou
to presetthecookingtime.
Power Level 10is automatically set
for time cooking, but you may
change this for more flexibility.
See”yourCookbook.
When the oven completes Time
Cooking, it automatically shuts off.
It will then display “End” and beep
once a minute until you either open
the door or touch the CLEAR/OFF
pad.
To become better acquainted with
Time Cook function, makea cup of
coffee by using the following steps.
—
#t?!5
Step1:Fill a cup 2/3 full of water
and add 1teaspoon of freezedried
coffee. Use a cup that has no metal
decoration. Placecup in oven and
close door.
Step3:Select your time. Touch 1, 2,
and Ofor a minute and 20 seconds.
TIME COOK and 1:20are
displayed.
Step4: Touch START.Time
counting down shows on display.
Step5:When time is up, the oven
sounds, oven light and fan shut off.
The display will show “End”.
Step6: Open the door or touch
CLEAR/OFF pad.
QuestionsandAnswers
Q. I set my ovenfor thetime called
forin the recipebutat theend of
thetimeallowed,my dishwasn’t
done.What happened?
A. Since house power varies due to
time or location, many Time Cook
recipes give you atime rangetO
prevent overcooking. Set the oven
for minimum time, test the food for
doneness,and cook your dish a
little longer, if necessary.
Q. I want tocookon a PowerLevel
otherthan HIGH, whatdo I needto
do?
A. To change the Power Level,
touch the POWERLEVEL pad after
entering desiredcooking time.
Enterthe desired number and then
touch START.
Q. Can I interruptmy Time Cook
functionto checkthe food?
A. Yes.To resume cooking, simply
close the door andtouch START.
NOTE: Microwave power will not
come on until you are ready. You
must touch STARTfor cooking to
begin.
Q. I touchedthenumberpadsand
selectedmy powerievel.When I
touchedSTART,however,my oven
didn’tcome on. Whynot?
A. The TIME COOK pad must be
touched before setting the number
pads or elseyour oven will not
begin cooking.
Q. I triedto changePowerLevel
butthe displaychangedbackto
cookingtime. Why?
A. After touching Power Level pad
you only have4 seconds to enter
the number. Try setting controls
again.
e
-
o
Step 2: Touch TIME COOK. The
display shows :0. ENTER COOK
TIME flashes. Power Level 10 is
automatically set, but does not
appear on display.
10
Page 11

cooking by Temperature
r manyfoods,internaltempera-
reisthe besttestof doneness.
Roastsor poultryare cookedto
ourpreferencewhen temperature
ooking.Heatingor reheatingfoods
accuratelyto a servingtemperature
youdesireissimpleand easy.
T’empCook/l+oldtakestheguessworkout ofcookingbecausethe
ovenautomaticallyswitchesto
HOLD settingafterreachingthe
presetfoodtemperatureandmaintainsthattemperatureuntilyou
touchthe CLEAR/OFFpad.
The Temperature!Fhbe
The temperature probe isa focal
thermometer that gaugesthe
internal temperature of your food;
it must be usedwhen using Temp
Cook/Hold or Auto Roast. Follow
the directions for useand insertion
on page 7.
How to TempCook
a Rolled Beef F?H3Roast
to Medium
ep 1:Insert temperature probe as
ected in Cookbook and attach
probe securely in oven wall. Close
the door.
1
Step 2:Touch TEMP COOK/HOLD.
ENTERTEMP COOK flashesand
the digit portion of the display is
blank.
Step 3:Touch 1, 3, 0 for 130°.130
shows on display. Power Level 10is
automatically set in oven but does
not appear on display.
Step4: Touch POWERLEVEL pad.
P-10shows on display. Touch 5 for
MEDIUM power. P-5 shows on display and then display reverts back
to set finished temperature.
w/
Step5:Touch START. After food
reaches90°, display shows temper-
ature of food counting up.
Step6:When 130° is reached,the
oven will sound and display HOLD.
The oven will then hold the
temperature.
Step7:Touch the CLEAR/OFF pad
to stop the cycle.
Step8: Removeprobe and food
from the oven.
/li
cooking -rips
~ Usea lower power level setting;
it will heat evenly eventhough
requiring more time.
~ Be surefrozen food has been
completely defrosted before inserting probe. Probe may break off if
used in frozen foods.
~ Always insert probe into the
center of meaty areas;take care
not to touch the fat or the bone.
@Insert probe as horizontally as
possible into foods asdirected in
the recipes. Make sure the handle
does not touch the food,
@Use the clip to keepthe probe in
place while heating.
@Cover foods asdirected in Cookbook for moisture control and quick
heating.
Ch4estionsandAnswers
AfterI followedthestepsand
Q.
touchedSTART,a signalsounded
andovendid notstart.What is
wrong?
A. If you set the temperature either
below 90° or greater than 199° the
oven will not start. To re-enter,
touch CLEAR/OFF pad and begin
steps again.
Q. Are thereanyfoodsI can’tTemp
Cook?
A. Yes.Delicate butter icings, ice
cream, frozen whipped toppings,
etc., soften rapidly at warm temperatures. Batters and doughs aswell
asfrozen foods are also difficult to
cook precisely with the probe. It is
bestto Time Cook these foods.
Q. Why did “PROB”flashon the
displayafterI touchedStart?
A. “PR OB” will flash on the display
if you havenot securely seated the
end of the probe into the receptacle
in the oven wall or if you touch
TEMP COOK/HOLD and haveforgotten to usethe probe.
Q. Can I leavemy probein theoven
if it’snot insertedinthe food?
A. No. If the probe is left inside the
oven, touching the oven wall, and
not inserted in food, you may
damage the oven.
Q. Can I Temp Cook different
portionsoffood atdifferent
temperatures?
A. Yes.The temperature probe
givesyou the freedom to cook different portions of food at different
temperatures to suit individual
eating styles. Simply place the
probe in the food and change the
temperature setting as needed.
—
—
—
—
—
—
sEEgr—=
—–
=1
=.
—
~.
-
-.
—
—
—
—
—–
-.
——
—
—
—
-. .
—
—
—
—
—
—
~.
—Er
—–
—–
-—
—–
—
—
—
_—
—–
-
—
11
Page 12
How R)useQUICK SET control
The QUICK SET Control providesa
short-cut method for entering time
and the Power Levelon your microwave oven. QUICK SET Codes are
only usedfor recipeswhich need
little or no attention, and which
require no change of power level
during cooking. Recipeswhich
require additional ingredients,
attention or change of power level
during microwaving should be
cooked in the usual manner. Also,
recipes with cooking time of less
than one minute or morethan 99
minutes can not use Codes.
Tounderstand the QUICK SET
Code control, it is important to know
what the numbers mean and what
the sequence is. The first and second numbers, if setting a 3 digit
Code, indicate the amount of time
you desire;the last control entry
number is alwaysthe Power Level.
For example, 125means 12minutes
at Power Level5. NOTE: Your oven
can only be programmed to 99 min-
utes when using the QUICK SET
control and the highest Power Level
is 10which is representedby “O”.
When setting a 2 digit QUICK SET
control entry,the first istime, the second ispower level.For example, 50
means5 minutes at Power Level10.
On the following page is shown
many frequently preparedfoods and
their codes. It’s easy,though, to
make Codesfor many other recipes.
Just select one or two digits representing the length of cooking time
desired, and a final digit for the
Power.Levelrequired. The Codes
given on the chart arefor the min-
imum time needed,to avoidover-
cooking which can dry out food and
make it tastelessand tough. If you
feel that morecooking is needed,
add additional time by changing the
first digit of the Code.You cannot
add seconds to the cycle time—
Codes arefor whole minutes only.
If your recipe callsfor Power Level
changes or different amounts of
time neededbetweenaddition of
ingredients, you mayset one Code
for the first part of the recipe, then
after completion, set another Code
for that period of time and Power
Level.
Rememberthat QUICK SET Codes
arefor microwaving by time only. If
you are microwaving by temperature, you must usethe Temp Cook
or Auto Roastfunction.
When the oven completes QUICK
SET program, it automatically shuts
off. It will then display “End” and
beeponce a minute until you either
open the door or touch the CLEAR/
OFF pad.
*
0
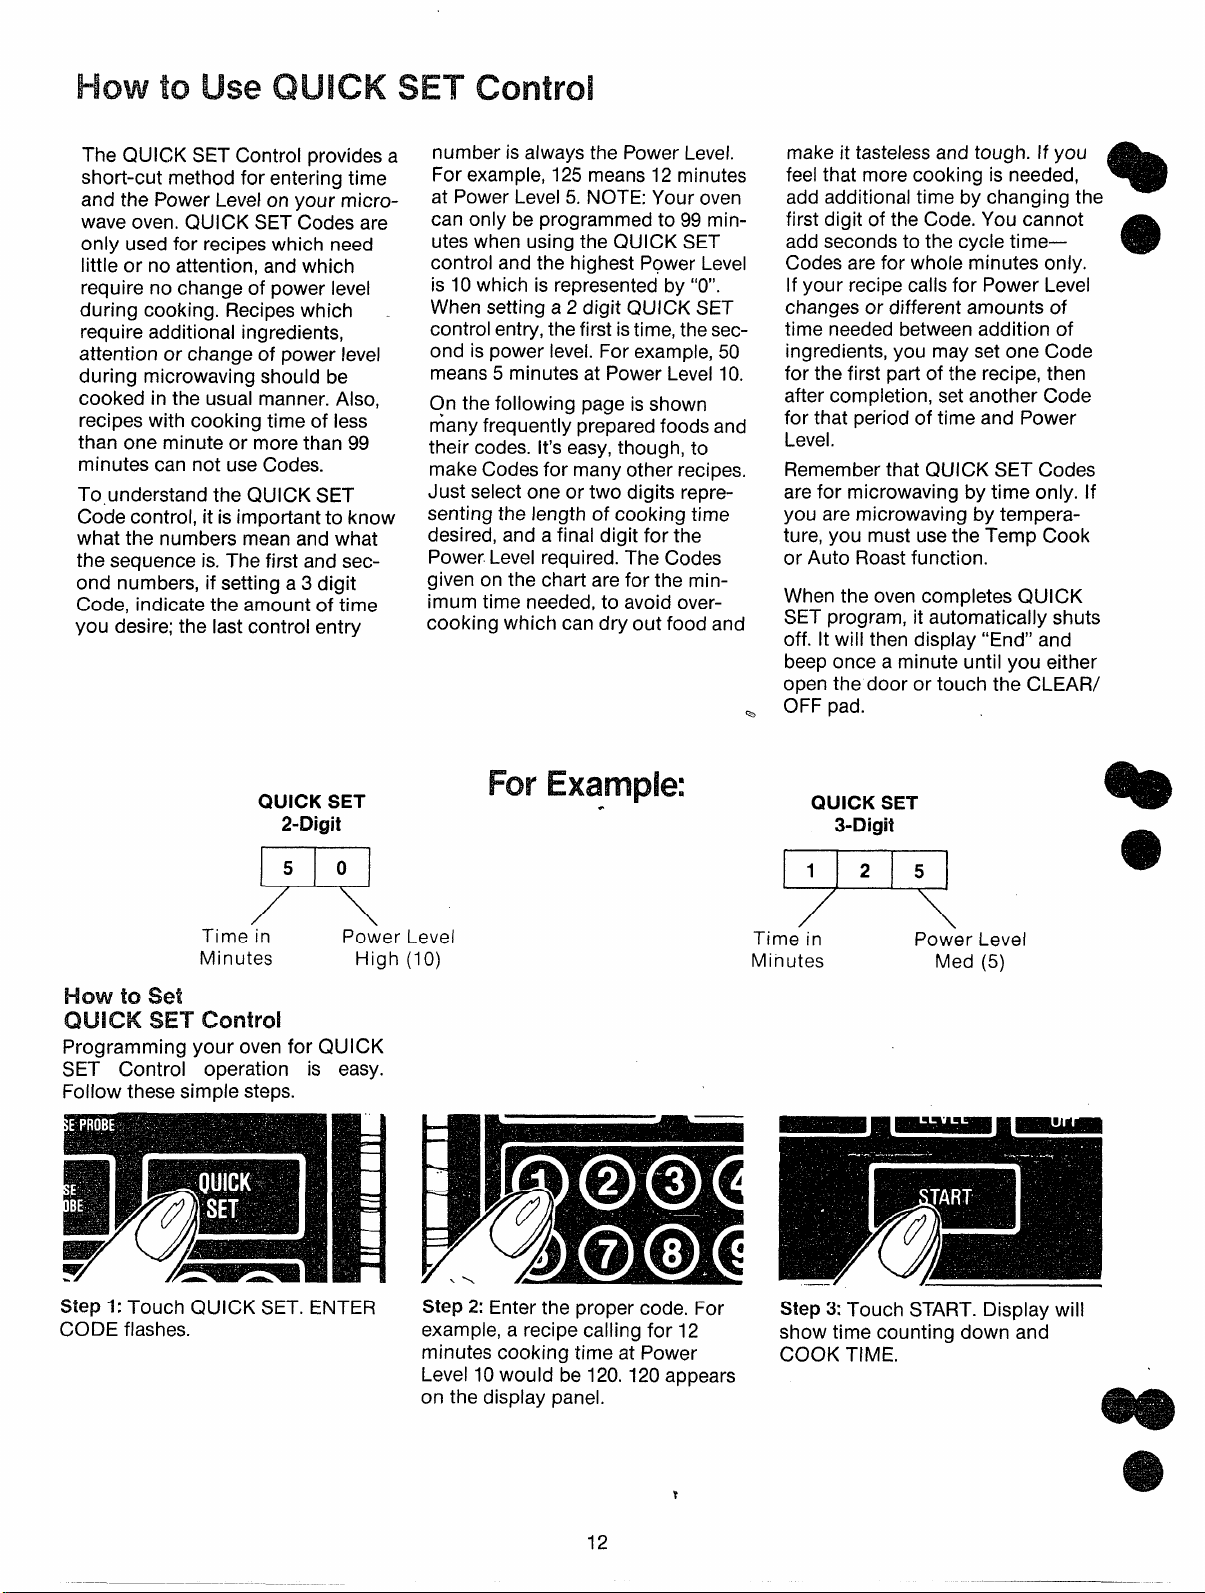
QUICK SET
2-Digit
50
R’
Time in Power Level
Minutes
Hclw toset
QUICK SE-rCkmwd
Programming your oven for QUICK
SET Control operation is easy.
Follow these simple steps.
Step 1:Touch QUICK SET. ENTER
CODE flashes.
High (10)
ForExample:
Step2:Enter the proper code. For
example, a recipe calling for 12
minutes cooking time at Power
Level 10would be 120.120 appears
on the display panel.
.
R
Time in
Minutes
QUICK SET
3-Digit
Power Level
Med (5)
12
t
Page 13

.
QUICK SET Control Guide
Detachand Tapeto InsideCabinetDoor or OtherProminentPlace
The QUICK SET Control feature gives you an easy
automatic way to accurately set microwave time for
foods requiring only one power level and little attention during cooking. The Chart below shows frequently prepared foods and the suggested Codes to
use with each. Forspecific information on stirring,
turning or rotating, check the Microwave Guide and
Cookbook which comeswith your microwave oven.
Always usemicrowave-safecontainers
and microwave techniques asdescribed in the
Cookbook.
Toset Codes for many other foods or recipes refer to
page 12in this Useand Care Book. QUICK SET
Codes given arefor minimum time. Checkand add
time if necessaryto complete cooking,
Appetizers(Warming)
Dip (Cream Cheese)
‘/2 cup
cup
1
Dips (Sour Cream)
‘/2 cup
cup
1
Pastry Bites (Reheating)
2 Servings
4 Servings
Breadsand Desserts
Apples
(2)
Bran Muffins
(5-6)
Brownies (Mix)
Cakes (Mix)
(16 cup fluted mold)
Cheese Bread, Yeast
(1 loaf)
Chocolate Chip Bars
Nut Bread (Mix)
(1 loaf) 97
Pudding Mix (3 oz. pkg.)
Beverages
Coffee, Soup
(1 cup)
Milk Bases
cup)
(1
FrozenFoods(Defrost)
Note: Times given below are for entire defrost cycle.
Usually food must be rotated, broken up or turned
over while defrosting. Check Cookbook for specific
information.
Cake, Whole Iced
Chicken, Cut-up
(2%31/2Ibs.) 143
Dessert Topping, Whipped
Doughnuts or Pastries
(2-4)
Fish Fillets
(1 lb.) 83
Hamburgers
(2 Ibs.) L
Pie, Fruit Filling
(Whole) 83
Roast
(4-5 Ibs.)
Steak or Chops
(2 !bs.)
1
i
I
110
105
50
60
10
28
23
13
13
123
403
83
25
45
13
23
17
10
40
37
60
13
Meats/MainDishes
Bacon
2 Slices
4 Slices
Chicken
8-10 pieces
2 pieces
4 pieces
Chuck Roast
(3 Ibs.)
Eggs, Baked
2 Eggs
Eggs, Scrambled
2 Eggs
Entrees,Frozen
OZ.
8
16OZ.
2 Ibs.
Fish Fillets
(1 lb.)
Franks (in bun)
2
4
Meat Loaf
(11/2Ibs.)
Sausage(Raw)
4 Patties
4 Links
Swiss Steak
(2 Ibs.)
FrozenTV Dinner
(lo oz.)
Vegetables(Fresh)
Beans, Green
(1 lb.)
Broccoli
(11/4-11/2 Ibs.)
Spears
cut
Cauliflower, Head
Corn on Cob
(4)
Potatoes
(4)
Squash
(1 lb,)
Zucchini
(1 lb.)
Vegetables(Frozen)
OZ. pkg.
10
28
30
200
40
70
665
25
20
50
110
200
60
10
30
170
30
20
706
150
157
120
137
120
120
100
100
70
Page 14

How to Use the Minute/Second Timer
MIN/SEC TIMER hasthree
@{toDeratesas a minutetimer.
.
It can besetto delaycooking.
@It canbe usedasa holdsetting
afterdefrosting.
The MIN/SEC TIMER operates
without microwave energy.
l+ow to
Phone Call
1.Touch MIN/SEC TIMER pad.The
display shows :0 and ENTER TIME
flashes.
2. Touch number pads 3,0 and O
(for 3 minutes and no seconds).
Display shows 3:00.
3. Touch START. Display shows
time counting down.
4. When time is up, oven signals
and display showstime of day.
Time a WWlinute
The display shows :0 and ENTER
DEF. TIME flashes.
Step3: Touch pads 1,5,0 and Ofor
15minutes defrosting time. 15:00
appears on display. (Defrosting is
automatically set on Power Level
3 but can be changed bytouching
POWERLEVEL pad and the new
Power Level.)
Step8: Touch START. 15:00count-
ing down shows on display. As each
function is automatically performed
oven display shows instructions
entered and the function. While
cooking, you may touch appropriate pad to recall times you set.
Step9: Whentime is up, the oven
sounds, oven light andfan shut off.
The display will show “End”.
Step10:Open the door or touch
CLEAR/OFF pad.
—-
—
—–
—–
—
—
—
—
—
—
—
Programming a HOLD Time
The Minute/Second Timer can also
usedto program “hold time”
een microwave cooking func-
ions. The time can range from one
econd to 99 minutes and 99
conds. A HOLD, or “standing”
*
ime may befound in some of your
own recipes or Cookbook.
To set the oven to delay cooking up
to 99 minutes follow Steps 1and 2
to enter hold time. Then touch
TIME COOK pad and enter time
before pressing START.
How to Defrost,Hold and
Time Cook
Let’ssay you want to defrost a
frozen casserole for 15minutes,
hold for 10 minutes and then Time
Cook for 25 minutes. Here’s how
to do it:
Step1: Take casserole from freezer
and place it in the oven.
~ -P 2: Touch DEFROST pad,
Step4: Set standing or hold time by
touching MIN/SEC TIMER. :0
appears on-display and ENTER
TIME flashes.
Step6: Touch TIME COOK pad.
The display shows:0 and ENTER
COOK TIME flashes.
Step7: Touch 2, 5, 0 and Ofor
twenty-five minutes of cooking
time. 25:00 appears on display.
C)uestionsand Answers
(1.
Whatwill happenif I accidentally
reversemydefrost,holdand cook
instructions?
A. The oven automatically rear-
ranges your program. Defrosting
always comes first, then hold, and
then the cooking function.
Q. Can ! defrostandhold only?
A. Yes.Sometimes you may only
want to defrost a food, hold it, and
cook it later.All you needto do is
program in Defrost and amount of
time. Then program Hold and the
amount of time. Be sureto put the
thawed dish in the refrigerator
promptly.
NOTE: Let foods remain at room
temperature on!y aslong assafe.
Times will vary.
Q. I programmedmyovenfor a
specificdefrostingtimebut it
defrostedlongerthan necessary.
Whathappened?
A. When instructions conflict, the
oven carries out the last instruction.
You may haveset the oven to
defrost for 4 minutes, hold for
2 minutes, and then defrost for
6 minutes. In this case,the oven
would defrost for 6 minutes and
hold for 2 minutes and ignore your
first defrost instruction.
15
Page 15

Care forYour Microwave Oven
YourNewMicrowaveOvenisa
ValuableAppliance,ProtectIt From
MisuseBy FollowingTheseRules:
e Keepyourovencleanand
sweet-smelling.Opening the oven
door a few minutes after
helps “air-out” the interior. An
occasional thorough wiping with a
solution of baking soda and water
keepsthe interior fresh.
@ Don’tusesharp-edgedutensils
withyouroven.The interior and ex-
terior ovenwalls can bescratched.
The control panel can be damaged.
@ Don’tremovethe antennacover
at the top of the oven (microwave
feature 4 on page 5). Youwill
damage the oven.
cooking
)%. -3
BE CERTAIN POWERIS OFF
BEFORECLEANING ANY
IFARTOF THIS OVEN.
How to(Hean the Inside
VValis,floorand plasticcover.Be-
cause there is little heat except in
the food, or sometimes inthe utensils, spills and spatters are easy to
remove. Some spatters can be removed with a paper towel, others
may require a damp cloth. Remove
greasy spatters with a sudsy cloth,
then rinse and dry. Do not use
abrasive cleaners on oven walls.
NEVER USEA COMMERCIAL
OVEN CLEANER ON ANY PART
OF YOUR MICROWAVEOVEN.
Door-inside.Glass: Wipe up spatters
daily, wash when soiled, with a minimum of sudsy warm water. Rinse
thoroughly and dry.
Metal and plastic parts on door:
Wipe frequently with a damp cloth
to removeall soil. DO NOT USE
ABRASIVES, SUCH AS CLEANING
POWDERSOR STEEL AND PLASTIC PADS,THEY MAY MAR THE
SURFACE.
SpecialnotewhenusingBrown‘N
SearDish:High heatgenerated on
bottom of Brown ‘N Sear Dish can
causescorched appearing stainsto
bake onto the oven floor if greaseis
present. These may be removed
with Bar KeepersFriend@Cleanser
by SerVaasLaboratories, Inc.
After using Bar Keepers Friend@
Cleanser, rinse and dry thoroughly,
following instructions on can. !30
not use Bar Keepers Friend@
Cieanser on the painted surfaces
such asthe waiis. it mayscratch the
paint.
Bar Keepers Friend@Cieanser is
soid in many grocery, hardware,
and department stores.
AutomaticTemperatureProbe.
Probe is sturdy, but care shouid be
taken in handiing. Do not twist or
bend; avoid dropping temperature
probe.
Ciean as soon after using as pos-
sibie. To ciean, wipe with sudsy
cioth, then rub iightiy with piastic
scouring baii if necessary.Rinse
and dry. (Or wash in dishwasher.)
DOUBLE DUTY’Mshelf.Your sheif
accessory is designed for usein a
microwave oven oniy; do not use in
a conventional oven. Do not usea
browning dish with the sheif. Arcing
couid occur.
Ciean sheif with miid soap and
water or in the dishwasher. Do not
remove piastic spacers from the
sheif when cieaning. Do not clean
in self-cleaningoven.
Howto (X2an the CX.dside
Case.
Ciean the outside of your
oven with soapand damp cioth,
then rinse and dry. The outer pane
of the window is giass.Just wipe
ciean with a damp cioth. Chrome
trim is best wiped with a damp cioth
and then with adry towei.
ControlPanel.Wipe with adamp
cioth. Dry thoroughly. Do not use
abrasivesor sharp objects on the
panei. They can damage it.
DoorSurface.When cieaning sur-
faces of door and oven that come
together on ciosing the door, use
oniy miid, non-abrasivesoaps or
detergents appiied with asponge
or soft cioth.
PowerCord.
soiied, unpiug andwash with damp
cioth. Forstubborn spots,sudsy
water may be used, but be certain
to rinse and dry thoroughly before
piugging cord into outiet.
OvenLampReplacement.First
unpiug the oven. Them remove
iamp compartment cover by removing screw which hoids cover in
piace. Cover is iocated at the rear
of outer case.
Repiacewith 40watt appiiance
buib. (it is avaiiabie in drug and
hardware stores.) Repiacecompartment cover. Piug in the oven.
if the cord becomes
*
e
-
@
16
Page 16

GROUNDINGINSTRUCTIONS
This appliance must be grounded.
the event of an electrical short
cuit, grounding reduces the risk
of electric shock by providing an
escapewire for the electric current.
his appliance is equipped with a
cord.having a grounding wire with
a grounding plug. The plug must be
plugged into anoutlet that is properly installed and grounded. (Fig. 1)
WARNING—lmproper use of the
grounding plug can result in a risk
of electric shock.
PREFERREO
~ETHOO
Vn
Fig.1
()
t
.
I
,
Q
;
\
INSURE PROPER GROUND
EXISTS BEFORE USE
Consult a qualified electrician or
serviceman if the grounding instructions are not completely understood, or if doubt existsas to
whether the appliance is properly
grounded.
ere a standard two-prong wall
ceptacle is encountered, it is your
personal responsibility and obliga-
“onto haveit replaced with aprop-
@
rly grounded three-prong wall
receptacle.
Do Not UnderAny CircumstancesCut or Removethe
Third (Ground) ProngFrom
The PowerCord.
Use
ofAdapter !FWgs
UsageSituationsWhere
Appliance’sPowerCord
WillBe Disconnected
Infrequently.
Becauseof potential safety hazards
under certain conditions, we
stronglyrecommend againstthe
useof anadapterplug.However,
if you still elect to usean adapter,
where local codes permit, a TEM-
PORARYCONNECTION may be
madeto aproperly grounded twoprong wall receptacle bythe useof
a UL listed adapter (Fig. 2) which is
availableat most local hardware
stores.
TEMPORARYMETHOO
(ADAPTER PLUGS NOT
PERMITTEO IN CANADA)
ALIGN LARGE
PRONGS/SLOTS- , -
Fig.2
.
i
@!? I
.
Q
/“
w
~’”- INSURE PROPERGROUND
+
~ AND FIRM CONNECTION
BEFOREUSE
The larger slot in the adapter must
be aligned with the larger slot in the
wall receptacle to provide proper
polarity in the connection of the
power cord.
Caution:Attaching the adapter
ground terminal to the wall receptacle cover screw does not ground
the appliance unlessthe cover
screw is metal, and not insulated,
and the wall receptacle is grounded
through the house wiring. You
should havethe circuit checked by
a qualified electrician to makesure
the receptacle is properly grounded.
II
q
●
~-*
J
t
UsageSituationsWhere
Appliance’sPowerCord
WillBe Disconnected
Frequently.
Do notusean adapterplug in these
situations becausedisconnecting of
the power cord placesundue strain
on the adapter and leadsto eventual failure of the adapter ground
terminal. You should havethe twoprong wall receptacle replaced with
a three-prong (grounding) receptacle by a qualified electrician
before using the appliance.
L&of ExtensionCords
Becauseof potential safety hazards
under certain conditions westrongly
recommend against the use of an
extension cord. However, if it is
necessaryto use an extension cord,
useonly a3-wire extension cord
that hasa 3-blade grounding plug,
and a 3-slot receptacle that will
accept the plug on the appliance.
The marked rating of the extension
cord shall beequal to or greater
than the electrical rating of the
appliance (15amperes.)
Such extensior] cords areobtainable
through Hotpoint service. If you do
usean extensioncordwith your
microwaveoven,the interior light
may flicker and the blower sound
may vary when oven is in use.
—
When disconnecting the power
cord from the adapter, always hold
the adapter with one hand. If this is
not done, the adapter ground terminal is very likely to break with
repeated use.Should this happen,
DO NOT USEthe appliance until
a proper ground has again been
established.
-—-
-
17
Page 17

~~~ ~~~~1~~ ~~1~~~ All ~~ese Things Are Normal
on YourMicrowaveOven:
ToSaveTime and Money—
beforeyourequestsemice,
checkthe ProblemSolver
If you havea problem, it may be
minor. You may be able to correct
it yourself. Just usethis Problem
Solver to locate your problem and
then follow the suggested
recommendations.
@Steamor vapor escaping from
around the door.
e Light reflection around door or
outer case.
. Dimming oven light and change
in blower sound may occur while
operating at power levelsother than
high.
Sound of rotating antenna may be
~
heardfor afew seconds after the
oven is turned off.
e Duli thumpingsoundwhile oper-
ating at power levelsother than
high.
@Some TV-Radio interference
might be noticed while using your
microwave oven. It’s similar to the
interference caused by other small
appliances and does not indicate a
problem with your oven.
*
e
PROBLEM
OVEN WILL NOT COME ON
CONTROL PANELLIGHTED,
YET OVEN WILL NOTSTART
FOODS ARE EITHER Over-
COOKED OR UNDERCOOKED
POSSIBLE CAUSE AND REMEDY
A fuse in your home may be blown or the circuit breaker tripped.
Replacefuse or resetcircuit breaker.
Make sure 3-prong plug on oven is fully inserted into wall receptacle.
Door not securely closed.
START must betouched after entering cooking selection.
Another selection entered already in ovenand CLEAR/OFF not touched
to cancel it.
Make sure you have entered cooking time after touching TIME COOK.
CLEAR/OFF was touched accidentally. Reset cooking program and
touch START.
Makesure you-haveentereddesired finished temperature after touching
TEMP COOK/HOLD.
Makesure you haveentered a code number after touching QUICK SET
or AUTO ROAST.
cooking times may vary because of starting food temperature, food
density or amount of foods in oven. Touch TIME COOK and additional
cooking time for completion.
Incorrect Power Level entered. Check Cookbook for recommended
Power Level or changing levelsduring cooking if necessary.
Dish was not rotated, turned or stirred. Some dishes require specific
instructions. Check Cookbook or recipe for these instructions.
Too many dishes in oven at sametime. Cooking time must be increased
when cooking more than one food item. Check Cookbook for recommendation on increasing time.
Probe not inserted properly into meat or dish when using Temp Cook/
Hold or Auto Roastfunctions. Check Cookbook for specific instructions.
Incorrect QUICK SET numbers entered.
Check Cookbook for food placement and instructions when using
DOUBLE DUTYT”shelf.
“EE EE” APPEARS
ON DISPLAY
‘PR OB” APPEARS
ON DISPLAY
When using Temp Cook/Hold, atemperature lessthan 90° or more than
199° has been entered.
When using Clock, you have not entered a valid clock time.
When using QUICK SET,you have not entered avalid Code. Code must
be 2 or 3 digits.
Probe has been forgotten or not seated properly in oven wall when
using Auto Roast or Temp Cook/Hold functions.
Page 18

Consumer Services
F
*~
J
❑
At Hotpointwe’recommittedto providingyouwiththe bestappliancesweknowhow
to buildandwe knowthat youwantyourappliancesto giveyoumanyyearsof dependable
service.
OurConsumerServicesaredesignedwith your needsandwants in mind.
w
-,
WarrantyProtection
Yournewapplianceis awell designedandengineered Seethe warrantyonthe backpageof this bookfor
product.Beforeit leftthe factory,it wentthrough
rigoroustests to detectmanufacturingdefects.And
youhaveawritten warrantyto protectyou.
PromptService atyourConvenience
Whetheryourapplianceis in or outof warranty,
you’rejust a phonecall awayfrom ournationwide
networkof FactoryTrainedServiceprofessionals.
Simplycall our Hotpointserviceorganization.
You’llfind them inthe White Pagesunder“Hotpoint
FactoryService;’andin the YellowPagesunder
“HotpointCustomerCare”Service.”
Serviceisscheduledat yourconvenienceandthe
techniciandrivesa fully-stockedpartsservicetruck
sothat, in mostcases,the repaircan becompleted
in onevisit.
We’reproudof ourserviceandwant youto be
pleased,but if for somereasonyouarenot happy
with the serviceyoureceive,herearethreestepsto
follow for furtherhelp.
details.
FIRST,contactthe peoplewhoservicedyour
appliance.Explainwhyyouarenot pleased.Inmost
cases,this will solvethe problem.
NEXT,if youarestill not pleasedwrite all the details
—
includingyourphonenumberto:
Manager,ConsumerRelations
Hotpoint
AppliancePark
Louisville,Kentucky40225
FINALLY,if yourproblemis still not resolved,write:
MajorApplianceConsumerAction Panel
20NorthWacker Drive
Chicago,Illinois 60606
e
—
.
.-~
❑
ServiceContracts
ForWxMe=freeservicebeyond
writtenwarrantyperiod=
the
If youpreferto budgetyourrepair expenditure
insteadof beingsurprisedbythem, Hotpoint
offersservicecontractsfor varyinglengthsof
time onall Hotpoint majorappliances.With a
tract we’ll keepyourappliancein good
cratingcondition duringthe contractperiod
noadditionalcharge.Servicecontracts
t youpaytoday’s pricesfor servicea
month,a year,orseveralyearsfrom now.
And,you’ll receiveservicefrom Hotpoint
trainedservicetechniciansusingonly
GenuineHotpoint parts.
TheQuickFix@System
YOUcansavemoneyand time
bydoingit yourself.
Fordo-it-yourselferswhowould prefer
to fix Hotpointmajorappliances
themselves...Hotpointoffers an
industryfirst, the Quick Fix@System. technicalhelpwith a toll free800numbefl
A programfor do-it-yourselfappliancerepair,
the systemincludesstep-by-steprepair
manua/sfor refrigerators,mostnon-microwave
electric ranges,dishwashers,andstandard
and largecapacitywashersanddryers,plus
speciallypackagedreplacementparts, and
HelpforYouByPhone
Shouldyouneedhelp inthe selectionand
purchaseof newappliances,or have
questionsaboutthe operationof the Hotpoint ~
appliancesyounowown—or haveanyother ‘Questions aboutour consumerproductsor
servicesyouareonlya TOLL-FREEcalIaway.
m
The GEAnswerCenter
800.626.2000 ‘ouanytime”
~ ,,M Ourstaff of expertsstandsreadyto assist
TheGEAnswerCenterTM800.626.2000
consumerinformationserviceis open24
hoursa day,sevendaysa week.
19
Page 19

 Loading...