

Page 1
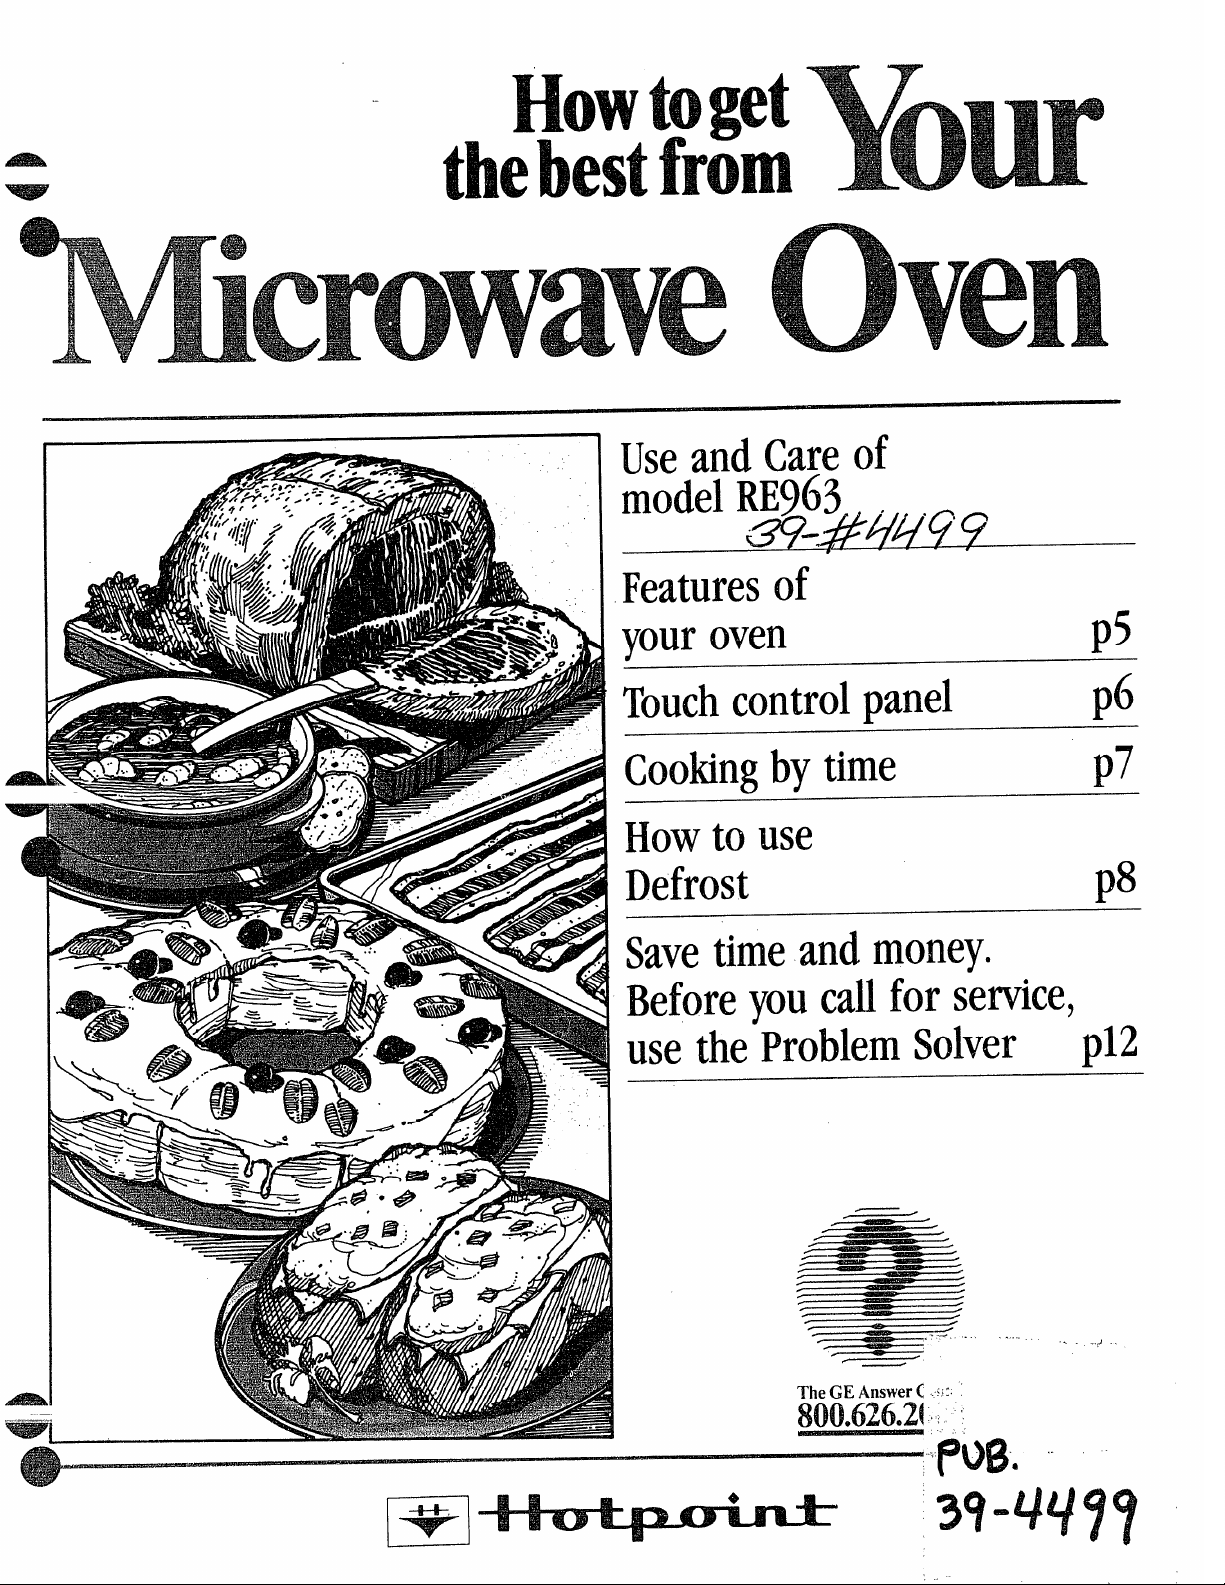
Howtoget
the
bestfrom
UseandCareof
Featuresof
vouroven
d
Touchcontrolpanel
Cookingbytime
p6
p7
How
to use
Defrost
Savetimeandmoney.
Beforeyoucallforservice,
usetheproblemSolver
p12
p8
..,J . .
.
Page 2
Readthis bookcarefully.
It is designed to help you operate
and maintain your new Microwave
C)venproperly.
Keep it handy for answersto your
questions.
If you don’t understand something
or need more help. . .
Call, toli free:
The GE Answer Center’”
800.626.2000
consumer information service
or write: (include your phone
number);
Consumer Affairs
I+otpoint
Appliance Park
Louisville, KY 40225
Keep proof of original purchase
date (such asyour sa!esslip or
cancelled check) with this book
to establish the warranty period.
writedownthe modaland
S’wialnumbers.
You’ll find them on a label inside
the oven on the upper left side.
These numbers are also on the
Consumer Product Ownership
Registration Card that came with
your Microwave Oven. Before
sending in this card, pleasewrite
these numbers here:
ModelNo,
Be sureycwrMicrowave
Owen
It is important that we,the manufacturer, know the location of your
Microwave Oven should a need
occur for adjustments.
Your supplier is responsible for
registering you asthe owner.
Pleasecheck with your supplier to
besure he has done so;also send
in your Consumer Product Ownership Registration Card. If you move,
or if you are not the original purchaser pleasewrite to us,stating
model and serial numbers. This
appliancemustbe registered.
Pleasebe certainthatiti%.
Write to:
Hotpoint
Range Product Service
Appliance Park
Louisville, KY 40225
isregistered.
Hyou !wAved a damaged
oven..
immediately contact the dealer (or
builder) that sold you the Micro-
wave Oven.
m
Savethe and money.
‘Beforeyoucallfor service,check
the ProblemSolveron page 12. It
lists minor causesof operating
problems that you can correct
yourself.
It could saveyou an unnecessary
service call.
4.Do Not Attempt to operate this
oven with the door open since open
door operation can result in harmful
exposure to microwave energy. His
important not to defeat or tamper
with the safety interlocks.
2. Do Not Placeany object between
the oven front face and the door or
allow soil or cleaner residueto
accumulate on sealing surfaces.
3. Do Not Operatethe oven if it is
damaged. It-is particularly important that the oven door close properly and that there is no damage to
the (1)door (bent), (2) hinges and
latches (broken or loosened),
(3) door sealsand sealing surfaces.
4. The OvenShould not be adjusted
or repaired by anyone except properly qualified-sew-icepersonnel. “
SerialNo,
Usethese numbers in any
correspondence or servicecalls
concerning your Microwave Oven.
Page 3
Before Microwaving . .. .. .. ... . 2
‘:-=!!~aroundingInstructions . .. ,. .. . . 3
-afety Tips . . . . . .. .. .. .. .. ...o.4
aturesof Your Oven . . . . . . .. . . 5
ntrol panel .. .. . . . . . . .. . . . . . . 6
Time Cook . . . . . .. .. . . .. .. .. ...7
Defrost . . . . .. . . . .. .. . . . . .. .. ..8
l-loid/Timer . .. .. . . . . . . .. .. . .. . 10
Careof Your Oven . . . .. . . . . . .. 11
The Probiem Solver . .. .. .. .. . . 12
Consumer Services. . . . .. .. . .. . 15
Warranty . .. .. .. .. .. .. Back Cover
~~,
Makesureall utensils usedin
your microwave oven are labeled
“suitableformicrowaving”. Check
your Cookbook for specific test
to determine ’’microwave-safe”
utensils.
L-
~ Papertowels, waxpaper, and
plastic wrap can be used to cover
dishes in order to retain moisture
-and prevent spattering.
= ~ Some microwaved foods require
stirring, rotating, or rearranging.
heck your Cookbook for specific
structions.
~:~Some foods such as unshelled
eggsand hot dogs must be pierced
to allow steam to escapeduring
cooking.
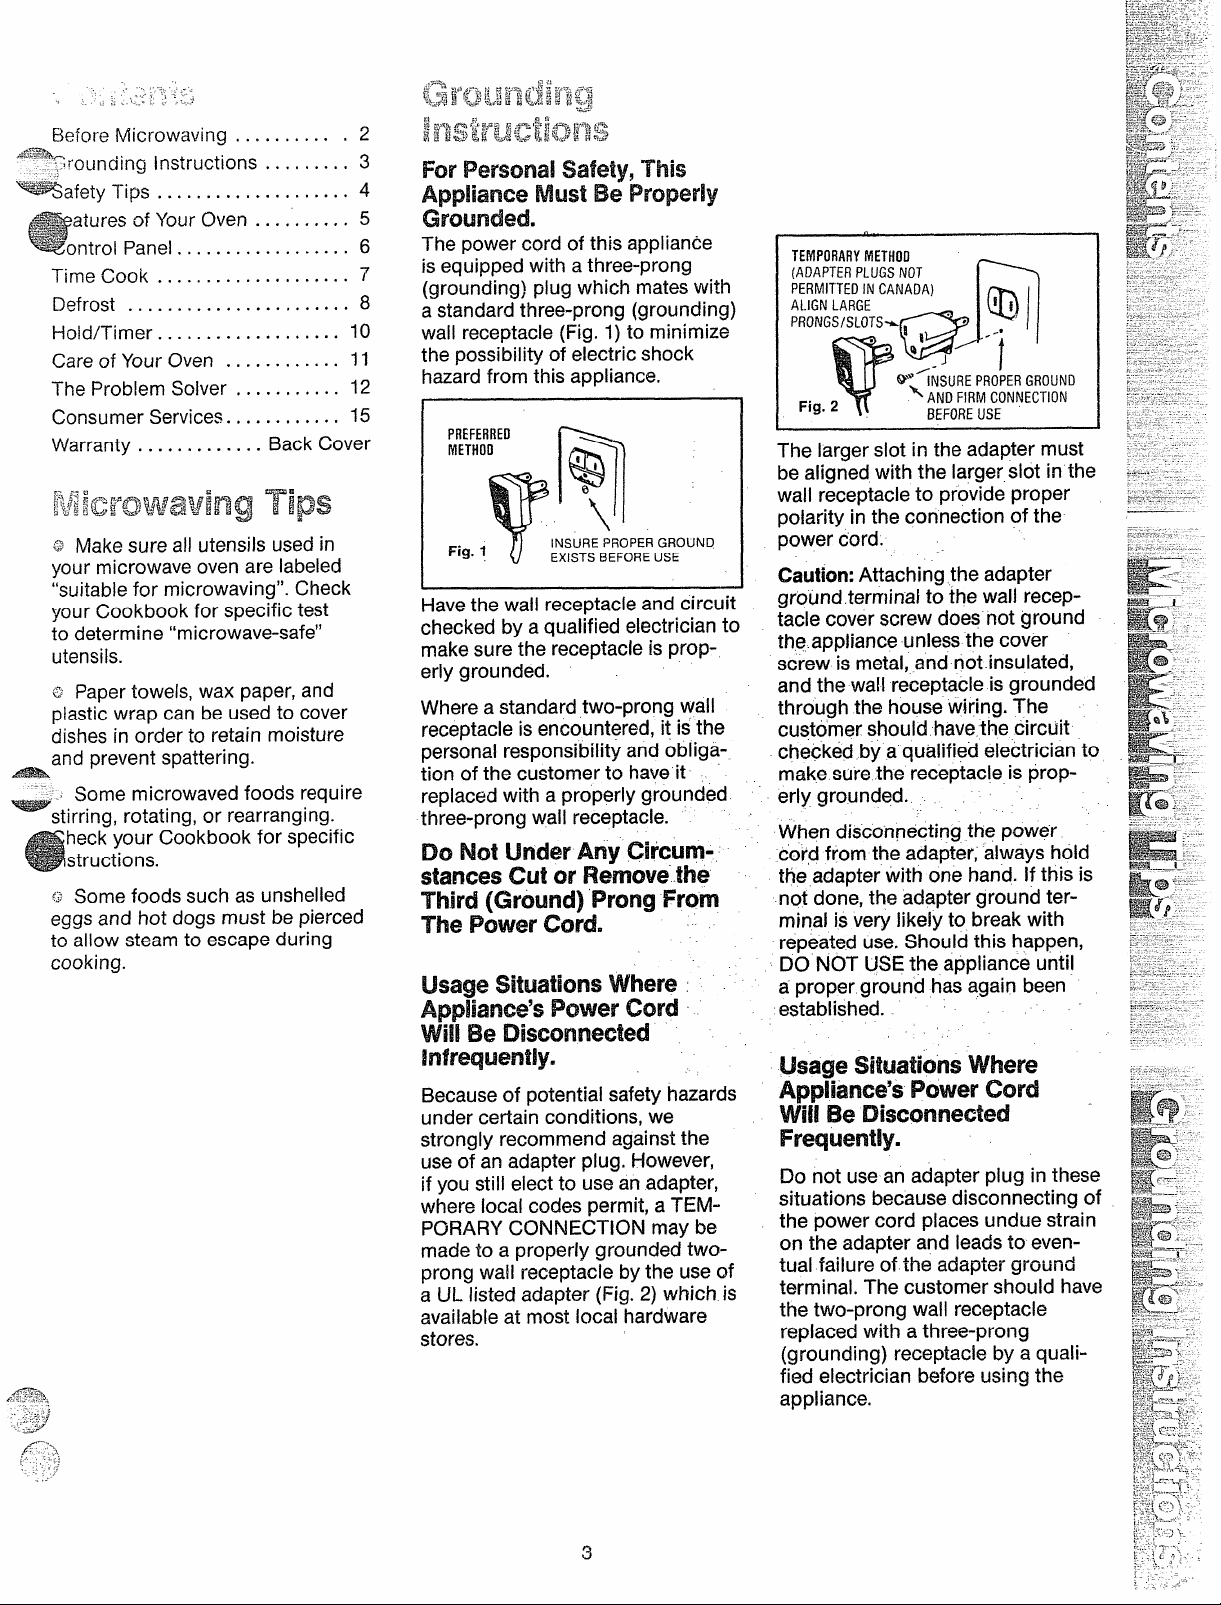
RN’Personalsafety,This
ApplianceMustEM?Properly
Grounded.
The power card of this appliance
is equipped with athree-prong
(grounding) plug which mateswith
astandard three-prong (grounding)
wall receptacle (Fig. 1)to minimize
the possibility of electric shock
hazardfrom this appliance.
PREFERRED
METHOO
Fig.1
Havethe wall receptacle and circuit
checked by a qualified electrician to
make sure the receptacle is properly grounded.
Where a standard two-prong wall
receptacle is encountered, it is the
personal responsibility and obligation of the customer to haveit
replaced with a properly grounded
three-prong wall receptacle.
51
Q
:
h
\
INSURE PROPER GROUND
EXISTS BEFORE USE
IDoNot Under Any Ciicwnstances
cut0?’Removeme
-i-hid [Ground) PrcmgFrom
-meRNwercord
usage
App!iance’sIPtwer (3rd
Will !&3Disconnected
Infrequently’
Becauseof potential safety hazards
under certain conditions, we
strongly recommend againstthe
use of an adapter plug. However,
if you still elect to use an adapter,
where local codes permit, a TEMPORARYCONNECTION may be
made to a properly grounded twaprong wall receptacle bythe use of
a UL listed adapter (Fig. 2) which is
available at most local hardware
stores.
situationswhere
TEMPORARYMETHOO
(ADAPTEFIPLUGSNOT
PERMITTEDINCANADA)
ALIGNLARGE
PRONGS/SLOTS+~ -
Fig.2
The larger slot in the adapter must
be alig~ed with the larger slot in the
wall receptacleto provide proper
polarity in the connection of the
power cord.
CaUtion:Attaching the adapter
ground .terrninalto the wall receptacle cover screw does not ground
the appliance unlessthe cover
screw is metal, and not insulated,
and the wall receptacle is grounded
through the house wiring. The
customer should havethe circuit
checked by a qualified electrician to
make surethe receptacle is prop-
erly grounded.
When disconnecting the power
cor~ from the adapter, always hold
the adapter with one hand. If this is
not done, the adapter ground ter-
minal is very likely to break with
repeated use.Should this happen,
DO NOT USEthe appliance until
a proper ground has again been
established. ~
.
t
●
Q
@
-J
IW’iNSUREpRopERGROUND
w
~ ANDFIRMcONNECTION
BEFOREUSE
Ef
Q/
●
~-*
n
1
L&tge SituationsWhere
Appliance’s!PCNva’cord
will IBeDisconnected -
Frquentiy.
Do not use an adapter plug in these
situations because disconnecting of
the power cord places undue strain
on the adapter and leads to eventual failure of the adapter ground
terminal. The customer should have
the two-prong wall receptacle
replaced with a three-prong
(grounding) receptacle by a qualified electrician before using the
appliance.
.. .... .-.
CJ
Page 4
!&lPORTANTSAFETYINSTRUCTIONS
Fkx3dall instructionsbeforeusingthisappliance,
1. For personal safety the oven must
be properly grounded. Seeground-
ing instructionson page3 of this
book. Forbest operation, plug this
appliance into its own electrical
outlet, to prevent flickering of lights,
blowing of fuse or tripping of circuit
breaker.
2. Useof extensioncords.Because
of potential safety hazardsunder
certain conditions we strongly
recommend against the use of an
extension cord. However,if you still
elect to usean extension cord, it is
absolutely necessarythat it be a
UL listed 3-wire grounding type
appliance extension cord and that
the current carrying rating of the
cord in amperes be 15amperes or
greater. Such extension cords are
obtainable through Hotpoint ser-
vice. if youdo usean extension
cordwithyourmicrowaveoven,the
interior light may flicker and the
blower sound may varywhen oven
is in use.
3. Be certainto placethefrontsur-
faceof the doorthreeinchesor
more backfromthecountertop
edgeto avoidaccidentaltipping
ofthe appliancein normalusage.
4. Use metalonly asdirectedin
cookbook.Metal strips as usedon
meat roasts are helpful in cooking
food when used asdirected. Metal
trays may be used for TV dinners.
However, when using metal in the
microwave oven, keepmetalat least
l-inch awayfromsidesof micro-
waveoven.
5. Do notoperatethe ovenwhile
emptyto avoiddarnageto theoven
andihe dangeroffire. If by acci-
dent the ovenshould run empty
a minute or two, no harm is done.
However, try to avoid operating the
oven empty at all times—it saves
energy and prolongs life of the
oven.
6. Cooking utensilsmaybecome
hotbecause of heat transferred
from the heatedfood. This is especially true if plastic wrap hasbeen
covering the top and handles of the
utensil. Pot holders may be needed
to handle the utensil.
7. Sometimes,the ovenfloorcan
becometoohotto touch.Be careful
touching the floor during and after
cooking.
8. Do notuseanythermometerin
food you aremicrowaving unless
that thermometer is designed or
recommended for usein the micro-
waveoven.
9. Removewiretwist-tieson paper
and plastic bags before placing in
oven.Twist-ties sometimes cause
bag to heat, and maycausefire.
10.Don’tdefrostfrozenbeverages
in narrow necked bottles especially
carbonated ones. Evenif the container isopened, pressurecan build
up. This can causethe container to
burst, resulting in injury.
11.Don’tovercook.Excessiveover-
cookingdehydratespotatoes,and
maycausethemto catchfire
causingdamage.
12. if foodshouldeverignite:Keep
the ovendoorclosed.Turnoffthe
powerimmediately:Touch CLEAR/
OFF or disconnect power cord or
shut off power at the fuse circuit
breaker panel.
13.Boilingeggs(inandoutofshell)
isnot recommendedfor microwave
cooking. Pressurecan build up
inside egg yolk and may causeit
to burst, resulting in injury.
14. Foodswithunbrokenouter
“skin”such as potatoes, hot dogs
or sausages,tomatoes, apples,
chicken livers and other giblets, and
eggs (seeabove)should be pierced
to allow steamto escapeduring
cooking.
15.“Boilable”cookingpouchesand
tightlyclosedplasticbagsshould
be slit, pierced or vented asdirected
in Cookbook. If they arenot, plastic
could burst during or immediately
after cooking, possibly resulting in
injury. Aiso, plastic storage containers should be at leastpartially
uncovered becausethey form atight
seal. When cooking with containers
tightly covered with plastic wrap,
remove covering carefully and direct
steam away from hands and face.
16.Do not pop popcornin your
microwaveovenunlessin a special
microwave popcorn accessory or
unless you usepopcorn labeled for
use in microwave ovens. Because
of the heatgenerated without these
precautions, the container could
catch fire.
17.PlasticLJtensils-Plasticutensils
designedfor microwave cooking
are very useful, but should be used
carefully. Even microwave plastic
may not be as tolerant of overcooking conditions as areglass or
ceramic materialsand maysoften
or char if subjected to short periods
of overcooking. In longer exposures
to overcooking, the food and titensils could ignite. Forthese reasons:
1) Use microwave plastics only
“and usethem” in strict compliance
with the utensil manufacturer’s
recommendations. 2) Do not sub-
ject empty utensils to microwaving.
3) Do not permit children to use
plastic utensils without complete
supervision.
18.Do notuseyourmicrowave
ovento drynewspapers.If overheated, they can catch fire.
19.Whencookingporkfollow our
directions exactly and alwayscook
the meatto at least 170°. This
assuresthat, in the remote possibility that trichina may be present in
the meat, it will be killed and meat
will be safeto eat.
20.Avoidheatingbabyfood in glass
jars even without their lids especially meat and egg mixtures.
SAVETHESE
INSTRUCTIONS
Page 5
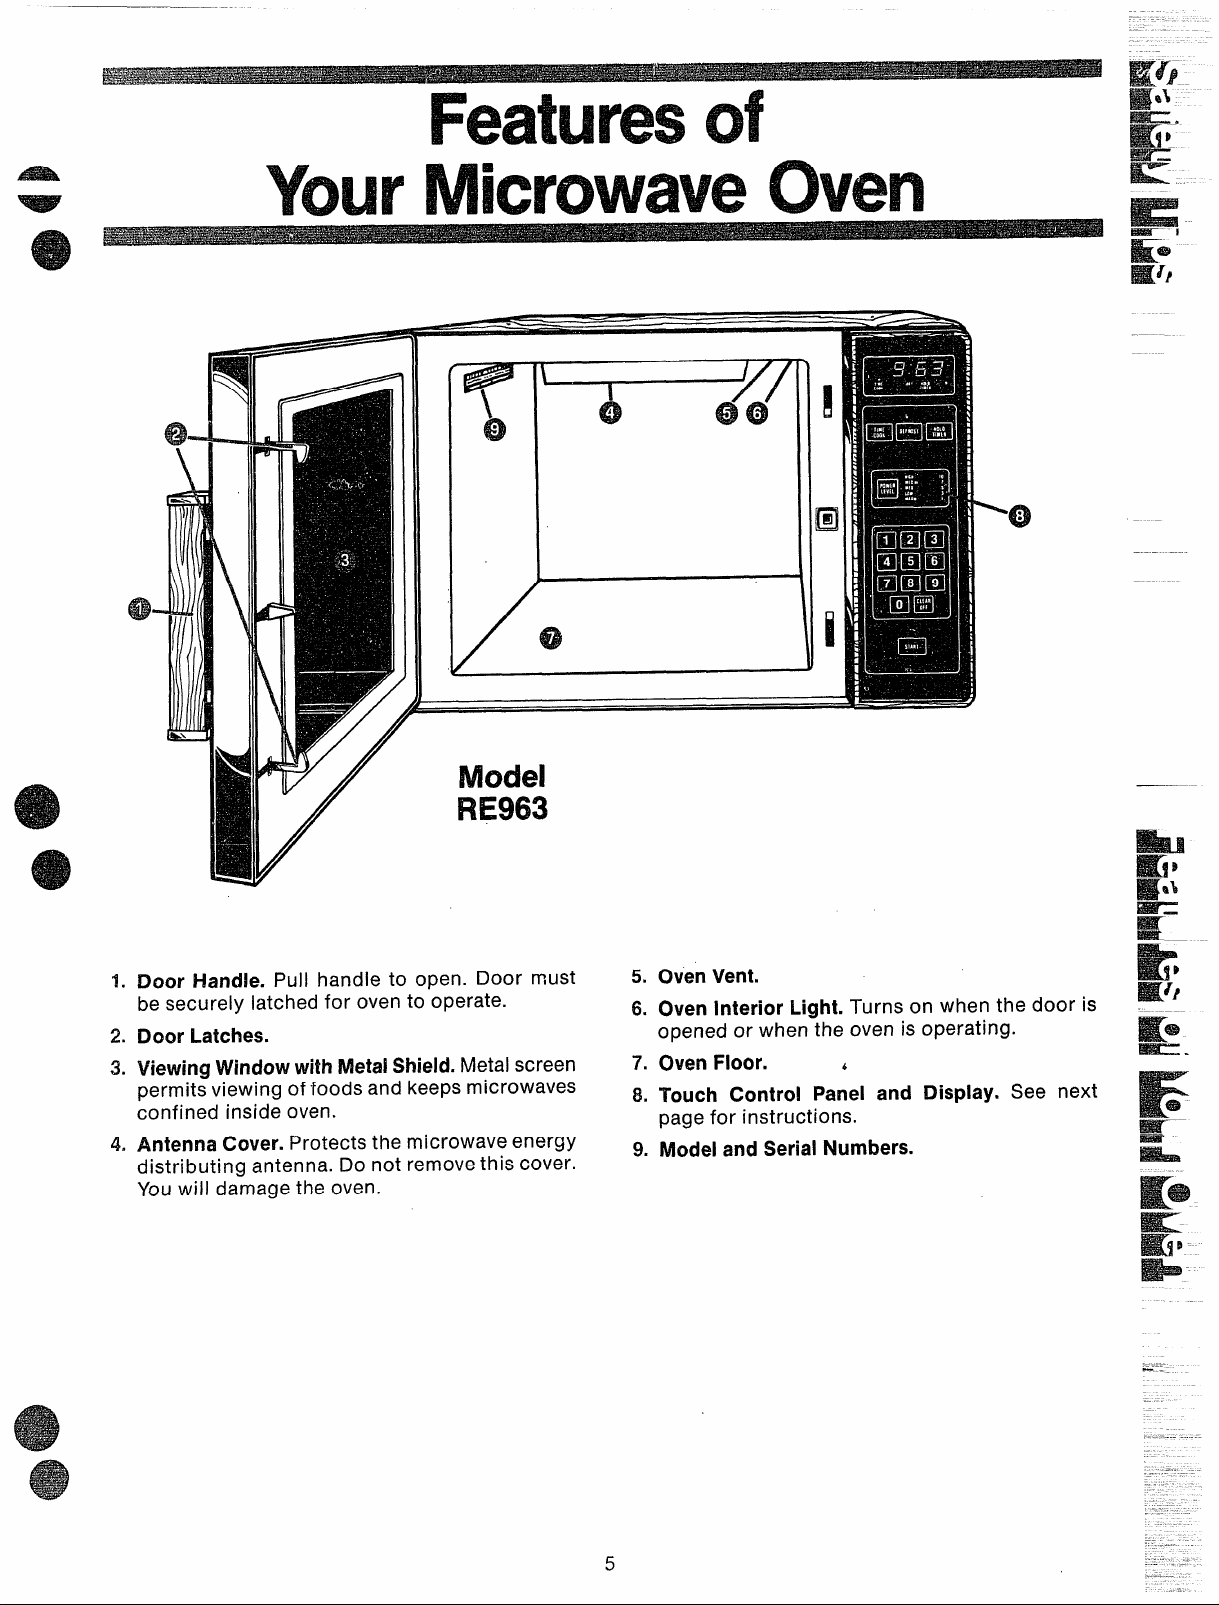
Featuresof
@-
YourMicrowave
Model
IRE963
Oven
1!
el
la
Ii
1.
Door Handle. Pull handle to open. Door must
be securely latched for oven to operate.
2.
Door Latches.
3.
ViewingWindow with MetalShield. Metal screen 7.
permit; viewing of foods and
confined inside oven.
4*
Antenna Cover. Protects the
distributing antenna. Do not
You will damage the oven.
keeps microwaves ~
microwave energy
remove this cover.
5.
Oven Vent.
&
Oven Interior Light. Turns on when the door is
opened or when the oven is operating.
Oven Floor.
.
Touch Control Panel and Display. See next
page for instructions.
9.
Model and Serial Numbers.
6
5
Page 6

YourTouchControlPanel
‘“DISPLAY. t)isplays cooking/de-
frosting time (or power level when
Power Level Pad is touched).
TIME COOK. Microwave for a
preset amount of time using auto-
matic Power Level 10 (or change
power level after entering cooking
time. See page 7.)
POWER LEVEL. Touch this pad
before entering another power
level number if you want to change
from automatic Power Level 10
(HIGH) for cooking or Power Level
3 (LOW) for defrosting.
DEFROST. Gentle, generally uni-
form thawing at automatic Power
Level 3 (or change power level
after entering defrosting time. See
page 8.)
HOLD/TIMER. This feature uses
no microwave energy while it func-
tions as both a kite-hen timer or as
a holding period between defrost
and time cooking. (See page 10.)
INllMBEFl PADS.Touch these pads
to enter cooking/defrosting Time
and Power Level.
@
e
START. After all selections are
made, touch this pad to start oven.
CLEAR/OFF. When touched, it
shuts off the oven and erases all
settings.
Page 7

CookingbyTime
!ig%iii_
-
~_..
__
l!i!@
The TIME COOK feature allows
you to preset the cooking time.
The oven shuts off automatically.
Power Level 10is automatically set
for time cooking, but you may
change this for more flexibility. See
your Cookbook.
To become better acquainted with
the TIME COOK function, make a
cup of coffee by following the steps
below.
——__
K*
ii
!lK
*:_
c.
=.
K
=-
EE3” -
m~
~
step 1: Fill a cup 2/3 full of water
and add 1teaspoon of freeze dried
coffee. Use aCUPthat has no metal
decoration. Place cup in oven and
close door.
.
Step .2: Touch TIME COOK. The
display shows :0.Signal light above
TIME COOK flashes. Power Level
10 is automatically set.
Quest!ons
andAnswers
Q. I set my oven for the time called
for in the recipe but at the end of
the time allowed, my dish wasn’t
“ done. What happened?
~. Since house power varies due
to time or location, many Time
Cook recipes give you a time range
to prevent overcooking. Set the
oven for minimum time, test the
food for doneness, and cook your
dish a little longer, if necessary.
Step 3: Select your time. Touch
1, 2 and Ofor a minute and 20 seconds. 1:20 and signal light above
TIME COOK appear on display. If
another Power Level is desired
touch POWER LEVEL and the
number, although Power Level 10
(HIGH) is preferred for this cup of
coffee.
Q. I want to cook my dish on a
Power Level other than HIGH, what
do I need to do?
A. To change the Power Level,
touch the POWER LEVEL pad after
entering desired cooking time.
Enter the desired number and then
touch START.
Q. Can I interrupt my Time Cook
function to check the food?
A. Yes. To resume cooking, simply
close the door and touch START.
NOTE: Microwave power will not
come on until you are ready. You
must touch START for cooking to
begin.
Step 4: Touch START, Time
counting down shows on display.
Step 5: When time is up, oven
sounds and oven, light, and fan
shut off.
Q. I touched the number pads and
selected my power level. When I
touched START, however, my oven
didn’t come on. Why not?
A. The TIME COOK pad must be
touched before setting the number
pads or else your oven will not begin cooking.
Page 8

HowtoUse Defrost
The Defrost setting is designed for
even thawing necessary for large
amounts of food and is one of the
most important advantages of a
microwave oven.
@ Power Level 3 is automatically
set for defrosting, but you may
change this for more flexibility.
@ See your Cookbook for the
complete defrosting chart.
To become better acquainted with
your Defrost function, defrost frozen pork chops by following the
steps below.
1:Place package of frozen chops
in the oven and close door.
2: Touch DEFROST. Display reads
:0. Power Level 3 is automatically
set in oven but does not appear on
readout. Signal Light above DEF.
flashes.
Defrosting Tips
@ Foods frozen in paper or plastic
can be defrosted in the package.
@ For even defrosting, many foods
need to be broken up or separated
part of the way through the defrosting time.
e Homemade dinners can be frozen in shallow foil trays and heated
for later use. Select foods which
microwave well.
@ Pre-packaged frozen dinners
can be defrosted and microwave
cooked.
3: Touch 8, 0, and Ofor 8 minutes.
8:00 and signal light above DEF.
are displayed. If you wish to
change Power Level,touch POWER
LEVEL pad and then new number.
4: Touch START. Time counts down
on display. When cycle is completed, the oven signals and automatically shuts off.
5: Turn package over, close door
and repeat Steps 2, 3 and 4.
& When oven signals and shuts
off, remove package and separate
chotx to finish defrosting.
,
u
@ Check your Cookbook for other
defrosting tips.
8
Page 9

Questions
E“-
andAnswers
Q. Can I open the door during
DEFROST to check on the pro-
gress of my food?
A. Yes. You may open the door at
any time during microwaving. To
resume defrosting, close the door
and press START.
Q. Why don’t the defrosting times
in the Cookbook seem right for my
food?
A. Cookbook times are average.
Defrosting time can vary according
to the temperature in your freezer.
Setyour oven for the time indicated
in your Cookbook. If your food is
still not completely thawed at the
end of that time, re-set your oven
nd adjust the time accordingly.
(2. When I press START, I hear a
dull thumping noise, What is it?
A. This sound is normal. It is letting
you know the oven is using a
Power Level lower than HIGH.
(2. Can i Defrost small items in a
hurry?
A. Yes, but they will need more frequent “attention than usual. Raise
the Power Level after entering the
time by touching POWER LEVEL
and 7or 10. Power Level 7 cuts the
time in %; Power Level 10 cuts the
time to %. During either, rotate or
stir food frequently.
Q. Can I select a Power Level other
than automatic Power Level 3 for
defrosting?
A. Yes.Some smaller foods maybe
defrosted quicker on higher Power
Levels but for even, carefree de-
frosting, Power Level 3 is sug-
gested. Check the chart in the
Cookbook for specific times and
Power Levels.
.-
~..
IillI.
EL
k-
@a:_
K..
Km
E-”-:
.
4s3–-
=Ji -
m.
9
Page 10

Howto Usethe Hold/Timer
Your HOLD/TlfvlEF?operates without microwave energy and has
three timing functions.
1. It operates as a Minute Timer.
2. It can be set to delay cooking.
3. it may be used as a hold set-
ting after defrosting. Hold/Timer
can be set up to 99 minutes and
99 seconds.
Siep 1: Touch HOLD/TIMER pad.
The display shows :0. Signal light
above HOLD/TIMER flashes.
Step ~: Select the desired time.
Touch the appropriate number
pads.If for example, you aretiming
a three minute phone call, touch 3,
0, and O.The display shows 3:00.
Step 3: Touch START. The display
shows the time as it counts down.
Step 4: When time is up, a signal
sounds and the timer turns off.
The HOLD/TIMER can also be
used to program “standing time”
between microwave cooking functions. The time can range from one
second to 99 minutes and 99 sec-
onds. A HOLD, or “standing” time
may be found in some of your own
recipes or Cookbook.
To set the oven to delay cooking
up to 99 minutes follow Steps 1
and 2 to enter hold time, then set
Time Cook and time, before press-
ing START.
HowtoDefrost–Hold/Time–Timecook
To help you become acquainted with the HOLD/TIMER feature as used with Time Cook follow Steps beiow to
defrost ~ frozen casserole for 15 minutes, then hold 10 minutes and ther
Step 1: Remove casserole from the
freezer and place in oven. Touch
the DEFROST pad. The display
shows :0 and signal light above
DEF. flashes.
cook 25 minutes.
o
Step 2: Touch 1, 5, 0 and O for
defrosting time 15:00 appears on
display, (Defrosting is automatically set on Power Level 3 but can
be changed by touching POWER
LEVEL pad and the new Power
Level.)
Questions
andAnswers
Q. What will happen if I acciden-
tally reverse the instructions?
A. If you accidentally reverse the
sequence of programming instructions, your oven automatically
rearranges your program. Defrosting always comes first, then hold,
and then the cooking function.
Step 3: Set standing or hold time
by touching HOLD/TIMER. :.0appears on display. Signal light above
HOLD/TIMER flashes.
Step 4: Touch 1,0,0 and Oto hold
for ten minutes. 10:00 appears on
display.
Q. I programmed my oven for a
specific defrosting time but it de-
frosted longer than necessary.
What happened?
A. When instructions conflict, the
oven carries out the last instruc-
tion. You may have set the oven to
Defrost for 4 minutes, Hold/Time
for 2 minutes, and then Defrost for
6 minutes. In this case, the oven
would Defrost for 6 minutes and
Hold/Time for 2 minutes.
pad. This display shows :0 and
signal light above TIME COOK
flashes.
Step & Touch 2, 5, 0 and O for
twenty-five minutes of cooking
time. 25:00 appears on display.
S:ep 7: Touch START. 15:00 counting down shows on display. As
each function isautomatically performed oven display shows entered
information and light above that
function comes on. While cooking,
you may touch appropriate pad to
recall times you set.
Q. Can I only Defrost-Hold on my
oven?
A. Yes, for foods you don’t want
to cook, like frozen fruit, frozen
whipped topping, etc.—refer to
Cookbook.
hlOTE: Allow foods to
room temperature only
safe. Times will vary.
remain at
as long as
Page 11

CareforYourMicrowave Oven
YourNew Microwave Oven is a ValuableAppliance,
Protect H From Misuse By FollowingThese Rules:
a Keep your oven clean and sweet-smelling.
Opening the oven door afew minutes after cooking
helps “air-out” the interior. An occasional thorough
wiping with a solution of baking soda and water
keeps the interior fresh.
a Don’t usesharp-edged utensils with your oven.
The interior and exterior oven walls can be
scratched. The control panel can be damaged.
@ Don’t removethe antennacover at the top of them
oven (microwave feature 4 on page 5). You will
damage the oven.
BE CERTAIN POWER IS OFF BEFORE CLEANING ANY PART OF THIS OVEN.
—
—
E-‘“-
6xf-
K -.
C
4%3-.
m
-
m
GD-
How ‘toclean the Inside
Walls,floor and plastic cover. Because there is little
heat except in the food, or sometimes in the utensils, spills and spatters are easy to remove. Some
spatters can be removed with a paper towel, others
may require a damp cloth. Remove greasy spatters
with a sudsy cloth, then rinse and dry. Do not use
abrasive cleaners on oven walls. NEVER USE A
COMMERCIAL OVEN CLEANER ON ANY PART
OF YOUR MICROWAVE OVEN.
Door-inside. Glass: Wipe up spatters daily, wash
when soiled, with a minimum of sudsy warm water.
Rinse thoroughly and dry.
Metal and plastic parts on door: Wipe frequently
with a damp cloth to remove all soil. DO NOT USE
ABRASIVES, SUCH AS CLEANING POWDERS OR
STEEL AND PLASTIC PADS. THEY MAY MAR THE
SURFACE.
Special note when using Brown ‘N Sear Dish: High
heat generated on bottom of Brown ‘N Sear Dish
can cause scorched appearing stains to bake onto
the oven floor if grease is present. These may be
removed with Bar Keepers Friend@ Cleanser by
SerVaas Laboratories, Inc.
After using Bar Keepers Friend@ Cleanser, rinse
and dry thoroughly, following instructions on can.
Do not use Bar Keepers Friend@ Cleanser on the
painted surfaces such as the walls. It may scratch
the paint.
Bar Keepers Friend@ Cleanser is sold in many
grocery, hardware, and department stores.
How toclean the outside
Case. Clean the outside of your oven with soap and
damp cloth, then rinse and dry. The outer pane of
the window is glass. Just wipe clean with a damp
cloth. Chrome trim is best wiped with a damp cloth
and then with a dry towel.
Control Panel. Wipe with a damp cloth. Dry thoroughly. Do not use abrasives or sharp objects on
the panel. They can damage it.
Cord. If the cord becomes soiled, unplug and wash
with damp cloth. For stubborn spots, sudsy water
may be used, but be certain to rinse and dry thoroughly before plugging cord into outlet.
Oven Lamp Replacement. First, unplug the oven.
Then remove lamp compartment cover by removing
screw which holds cover in place. Cover is located
at the rear of outer case.
Replace with 40 watt appliance bulb. (It is available
in drug and hardware stores.) Replace compartment cover. Plug in the oven.
________
~
—.
—-
wia, i–
Ke
&-
6?43
K
E-
ESW.K
“C
a2-
m...
—..—-:
-.—_=._
Km
K-
K3$
%sc-_
!$?5?’.
.—
.-
..
Page 12

The ProblemSolver
pms&$%W%%=&=~-.1g:.
-..?.gv~s~~
-z....,,’-.
@~.”::=”:,:‘.‘===%=.‘~~----‘“..‘?=“’-- --“.--
To SaveT’irneand Money—
beforeyoucallforservice,checkthe ProblemSolver
If you have a problem, it may be minor. You may be able to correct it yourself. Just use this Problem Solver to
locate your problem and then follow the suggested recommendations.
~
~&<:
PROBLEM
OVEN WILL NOT COME ON
CONTROL PANEL LIGHTED,
YET OVEN WILL NOT START
FOODS ARE EITHER OVERCOOKED ORUNDERCOOKED
POSSIBLE CAUSE AND REMEDY
A fuse in your home may be blown or the circuit breaker tripped.
Replace fuse or reset circuit breaker.
,Make sure 3-prong plug on oven is fully inserted into wall receptacle.
Doornot securely closed.
START must be touched after entering cooking selection.
Another selection entered already in oven and CLEAR/(3FFi not
touched to cancel it, “
Makesure you haveentered cooking time after touching’TIME COOK.
CLEAR/OFF was touched accidentally. Reset cooking prog~arn and
touch START.
Cooking times may vary becauseof starting food temperature,’ food
density or amount ‘of foods in oven. Touch TIMECOOK and addi-
tional cooking time, for completion. ‘ “ ~~‘ ~ ,
Incorrect Power Level entered. Check Cookbook for recommended
Power Level or changing levels during cooking if necessary:
Dish was not rotated, tu’rned or.stirred. Some di~hes,require specific
instructions. Check (200kbook.or recipe for these instructions: -
Too many dishes in oven at same time. Cooking time must be’
increased when cooking more than one food item. CheckCookbook
for recommendation on increasing time.
,.
1,
,,
“PF” APPEARS ON DISPLAY
f. Steam or vapor escaping ‘from around the door.
2. Light reflection around door or outer case.
~. Dimming oven light and change in blower sound
may occur while operating at power levels other
than high.
Appears when oven is first plugjged in, This isnormal. ~
Appears when powe{ to oven, has ‘been interrupted, and then
resumed. Touch CLEAR/OFF. to erase “pF”. -
4. Dull thumping sound while operating at power
levels other than high. ‘“,
5. Some TV-Radio interference might be noticed
while using your microwave oven. It’s similar to the
interference caused by other small appliances and
does not indicate a problem with your oven.
Page 13

At Hotpoint we’re committed to providing you with the best appliances we know how
to build and we know that you want your appliances to give you many years of dependable
service.
Our Consumer Services are designed with your needs and wants in mind.
Warranty Protection
Yournewapplianceis awelldesignedandengineered Seethe warrantyonthe backpageof this bookfor
product.Beforeit leftthe factory,it went through
rigoroustests todetectmanufacturingdefects.And
youhavea written warrantyto protectyou.
details.
Prompt Service at your Cbrwenleme
Whetheryourapplianceis inor out of warranty,
you’rejust a phonecall awayfrom ournationwide
networkof FactoryServiceprofessionals.
Simplycall our Hotpointserviceorganization.
You’llfind them in theWhitePagesunder“Hotpoint
FactoryService;’andin the YellowPagesunder
“Hotpoint CustomerCare@Service.”
Serviceis scheduledat yourconvenienceandthe
techniciandrivesa fully-stockedparts servicetruck
sothat, in mostcases,the repaircan becompleted
in onevisit.
We’reproudof ourserviceandwant youto be
pleased,but if forsomereasonyouarenot happy
with theserviceyoureceive,herearethreestepsto
follow for further help.
Service Contracts
% trouble=freeservicebeyond
thewrittenwarrantyperiod.
If youpreferto budgetyourrepaire
insteadof beingsurprisedbythem,
offersservicecontractsfor varying
time onall Hotpointmajorapplianc
FIRST,contactthe peoplewhoservicedyour
appliance.Explainwhyyouarenot pleased.Inmost
cases,this will solvethe problem.
NEXT,if youarestill not pleasedwrite all the details
—
includingyourphonenumberto:
Manager,ConsumerRelations
Hotpoint
AppliancePark
Louisville,Kentucky40225
FINALLY,if yourproblemis still notresolved,write:
MajorApplianceConsumerAction Panel
20NorthWackerDrive
Chicago,Illinois 60606
d
#.f.fj
@j~,>
.Wz=#-+~%&~7.
[
W&@- -+
%
@ =j%#$& p!jjjlj
~;~ ..+
..:-=-~~~--~.~~.F.
.@#At..
...L-
The ChickFixTMSystem
You cansavetime and money
bydoingit yourself.
TheQuick FixTMSystemisdesignedto
meetthe needsof bothexperiencedor
beginningdo-it-yourselfersandtakesa
of mysteryout of homeappliancerepai
Step-by-StepManualscoveringthe repairof ~
standardand largecapacitywashers,standardand
largecapacitydryers,refrigerators,dishwashers
andranges(non-microwave),includeinstructive
HelpforYouBy Phone
Shouldyou needhelpinthe selectionand
purchaseof newappliances,or have
questionsabouttheoperationof the Hotpoint
appliancesyounowown—or have
questionsaboutourconsumerproductsor ~
servicesyouareonlya TOLL-FREEcall away.
any other _
~
m
The GE AnswerCen/e!
800.626.2000 ‘ouanytime”
Mostof the repairscan be madewith the kitchen
drawervarietyof tools youalreadyhaveat home.In
fact, thescrewdriveris calledfor most often inQuick
Fix’MSystemprocedures.
TheGEAnswerCenterTM800.626.2000
consumerinformationserviceis open24
hoursa day,sevendaysa week.
Ourstaff of expertsstandsreadyto assist
Page 14

~
YOURHOTPOINTMICROWAVE OVENIRANGE
~-wARRANTy ~
Saveproofof originalpurchasedatesuch as yoursalessliporcancelledcheckto establishwarrantyperiod.
—..—. ...— -.. ..— -. -.-— ..- ——. . . ——...-——-----
WHAT1sCOVERED FULLONE-YEARWARRANTY
Forone year from date of original
purchase,we will provide,free of
charge, parts and servicelabor in
your home to repairor replaceany
part of the microwaveovenlrange
that fails becauseof amanufacturing defect.
LIMITED ADDITIONAL
FOUR-YEARWARRANTY
Forthe secondthrough fifth year
from dateof original purchase,
we will provide,free of charge,a
replacementmagnetron tube if the
magnetron tube fails becauseof a
manufacturing defect. Youpayfor
the servicetrip to your home and
servicelabor charges.
~~~~ ~$$~~~ ~~~~~~~ o Servicetrips to your home to
teach you howto usethe product.
Readyour Useand Carematerial.
If youthen have any questions
about operating the product,
pleasecontact your dealer or our
Consumer Affairs office at the
addressbelow, or call, toll free;
The GE Answer Center’”
800.626.2000
consumer information service
* Improper installation.
If you havean installation problem,
contact your dealer or installer.
Youare responsible for providing
adequateelectrical, exhausting
and other connecting facilities.
This warranty is extendedto the
original purchaserand anysucceeding owner for products purchased
for ordinary home usein the48
mainland states,Hawaiiand
Washington,D.C. in Alaskathe
warranty isthe sameexceptthat it
is LIMITED becauseyou must pay
to ship the product to the service
shop or for the servicetechnician’s
travel costs to your home,
All warrantyservicewill beprovided
by our FactoryServiceCentersor
by our authorizedCustomer Care@
servicers during normal working
hours.Check the White Pagesfor
HOTPOINT FACTORYSERVICE.
Look inthe Yellow pagesfor
HOTPOINT CUSTOMERCARE@
SERVICEor GENERALELECTRIC-
HOTPOINTCUSTOMERCARE@
SERVICE.
e Replacementof housefuses
or resetting of circuit breakers.
e Failureof the product if it is
usedfor other than its intended
purpose or usedcommercially.
Damage to product caused
@
by accident,fire, floods or acts
of God.
WARRANTORIS NOT RESPONSIBLE FORCONSEQUENTIAL
DAMAGES.
Somestatesdonotallowtheexclusionorlimitationofincidentalorconsequentialdamages,so
maynot apply to you.This
To knowwhatyour legalrightsarein your state,consultyour local or stateconsumeraffairsoffice or yourstate’sAttorney General.
Manager–ConsumerAffairs,GeneralElectricCompany,AppliancePark,Louisville,KY40225
Part No. 862A724 P82
pub. No. 39-4499
warrantygivesyouspecificlegalrights,andyoumayalsohaveotherrightswhichvaryfromstatetostate.
Warranto~GeneralElectricCompany
If furtherhelpisneededconcerningthiswarranty,contact:
1
+
0/83
,m
the abovelimitationor exclusion
 Loading...