

Page 1
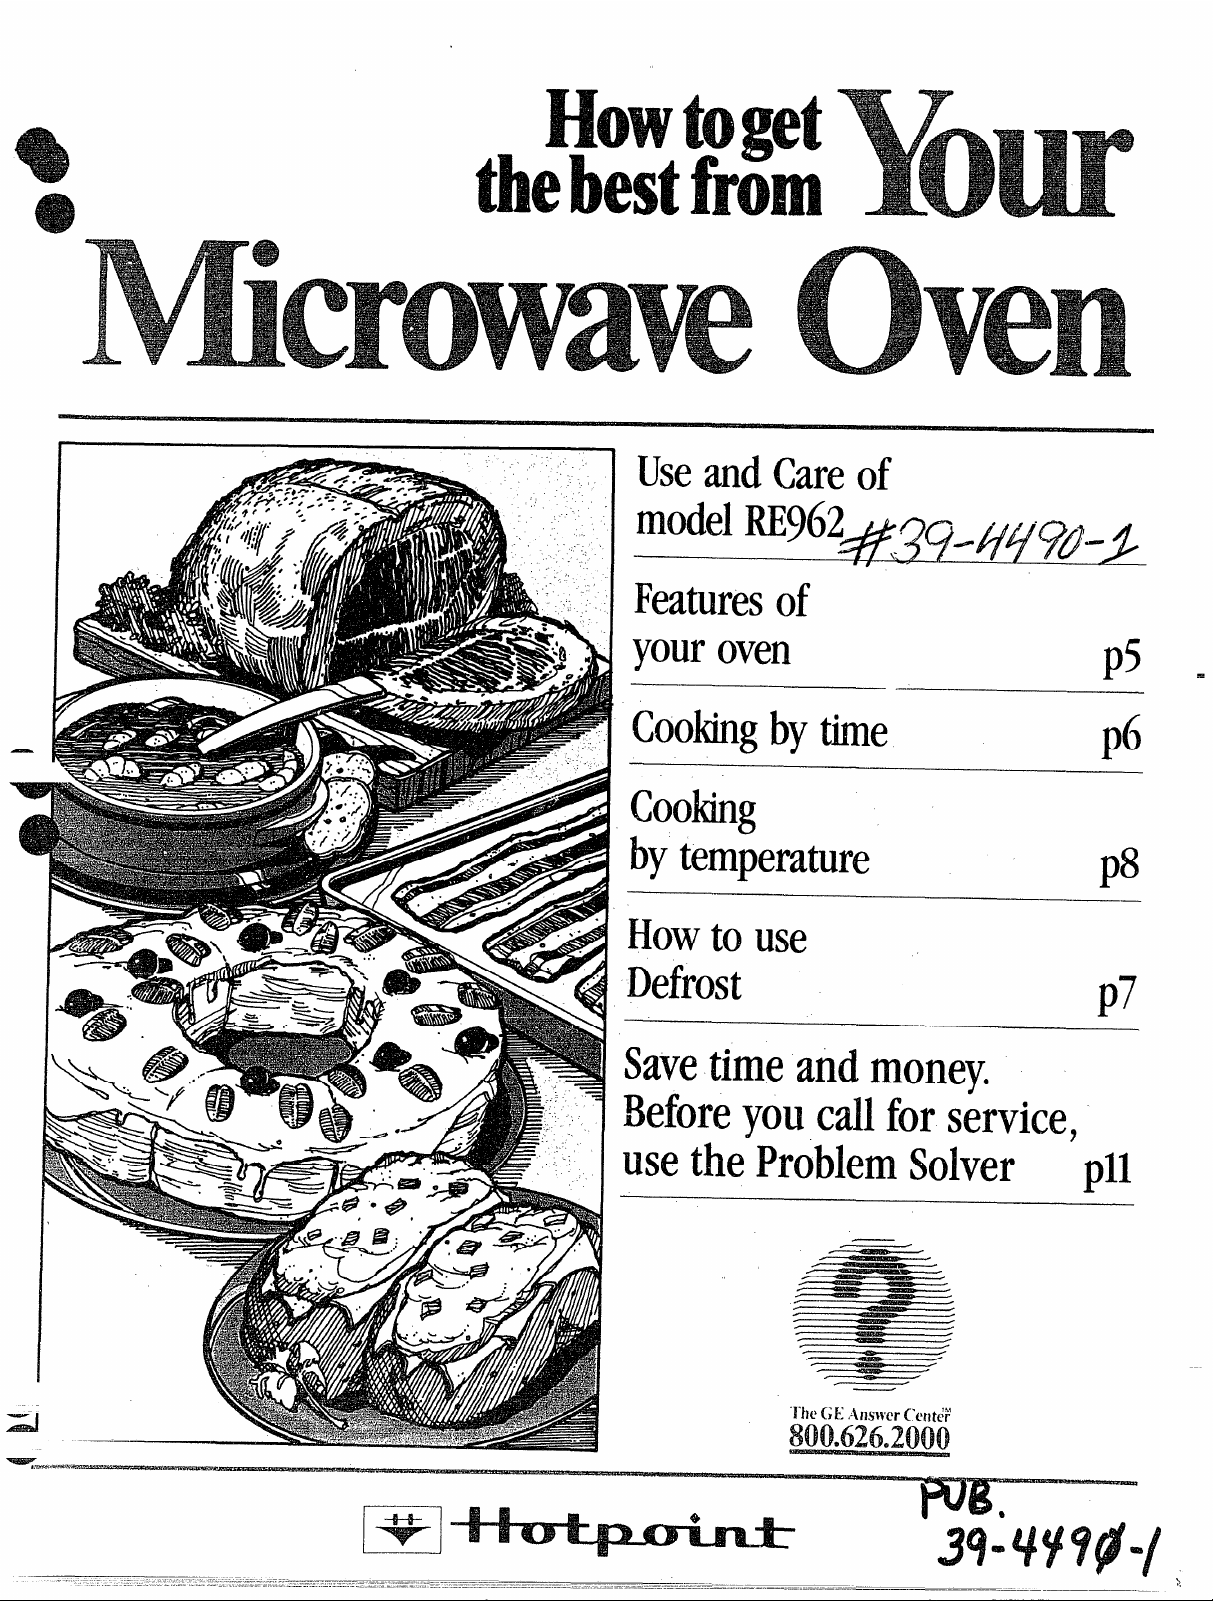
Howtoget
qc+$+?j?+!$j!j?
thebestfrom
UseandCareof
modelRE$X2~
K
●
t
Featuresof
youroven
.—
Cookingbytime
cooking
bytemperature
Howtouse
Defrost
Savetimeand!money.
p5
p6
p8
—
p7
Beforeyoucallforservice,
usetheProblemSolver
.
pll
Page 2
Readthisbookcarefully.
-.
-.
.—
~
—
.
.
it will help you operate and maintain your new Microwave Oven
properly.
Keep it handy for answersto your
questions.
If you don’t understand something
or need more help. . .
Call, toll free:
GEAnswerCenterTM
The
800.626.2000
consumer information service
or write: (include your phone
number);
Consumer Affairs
Hotpoint
Appliance Park
Louisville, KY 40225
V$ritedownthe ‘mode!and
said numbem.
You’ll find them on a label inside
the oven on the upper left side.
These numbers are also on the
Consumer Product Ownership
Registration Card that came with
your Microwave Oven. Before
sending in this card, pleasewrite
these numbers here:
Model No.
Serial No.
Be sureyourMicrowaveOwen
k registered.
it is important that we,the manufacturer, know the location of your
Microwave Oven should a need
occur for adjustments.
Your supplier is responsiblefor
registering you asthe owner.
Please
be sure he hasdone so; also send
in your Consumer Product Ownership Registration Card. [f you move,
or if you are not the originai purchaser pleasewrite to us, stating
model and serial numbers. This
appliancemustbe registered
IWeasebecertainthati~is.
Write to:
Hotpoint
RangeProduct Service
Appliance Park
Louisville, KY 40225
If you
Cwen.
immediately contact the dealer (or
builder) that sold you the Microwave Oven.
check with your supplier to
Rxx?h?d4?3damaged
❑ m
Savethe and money.
Before you request service, check
the Problem Solver on page11.It
listsminorcauses of operating
problemsthatyoucancorrect
yourself.
(a) DONot Attempt to operate this
ovenwith the door open since open
door operation can result in harmful
exposure to microwave energy. It is
important not to defeat or tamper
with the safety interlocks.
(b) Do Not IfUaceany object
betweenthe ovenfront face and the
door or allow soil or cleaner residue
to accumulate on sealing surfaces.
(c) DONot Operatethe oven if it is
damaged. it is particularly important
that the oven door close properly
and that there is no damage to the:
—
(1)door (bent)
(2)
hinges and latches (broken or
loosened)
(3) door seals and sealing surfaces.
(d) The Oven Shouldnot be
adjusted or repaired by anyone
except properly qualified service
personnel.
_a
—
-
Usethese numbers in any
correspondence or service calls
concerning your Microwave Oven.
Available at extra-cost from your Hotpoint supplier.
Jjf”~-j j~$~~~~~~~~~~~~
Gonverts your countertop oven to a built-in wall cwen.This rnicxowave
cwenis i.JLikted for installation over Hotpoint wall ovenswith black
g;assdoors,
The electric outputofthis
microwaveoven is 625 watts.
Page 3
=~’1 ReioreMicrowaving . . , . . . . . . ...2
“, ,-’:>.
.
‘-%~=--%afety]n@ru~~i~n~, , . . . , , , . . .~,4
Q::~’J
FeaturesofYourOven . . . . . . . . . .!5
.&m:-:7q3:_3
~$$ime Cook . . . . . . . . . . . . . . . . ...6
Dehst.... . . . . . . . . . . . . . . . . ..”7
T&npCuc)k . . . . . . . . . . . . . . . . ...8
Careof YourOven. . . . . . . . . . . ...9
GroundingInstructions. . . . . . ...10
(J~eof E~tensi*nCards . . . .
TheFVobiemSolver . . . . . . . . ...11
HYouNeedService. . . . . . . . . . ..ll
Warranty.. . . . . . . . . . .. BackCover
Q Make sure all utensils used in
your microwave oven are labeled
“suitable for microwaving”. Check
your Cookbook for specific test
to determine “microwave-safe”
utensils.
a Papertowels, wax paper, and
plastic wrap can be used to cover
dishes in order to retain moisture
- and prevent spattering.
—.-—-.—
a Some microwaved foods require
irring, rotating, or rearrangincj.
heck your Cookbook for specific
G Some foods such as unshelled
eggs and hot dogs must be pierced
to allow steam to escape during
cooking.
When
basic safety precautions should
be followed, including the
using electrical appliances
following:
WARNING—TOreducethe risk
of burns, electric shock, fire,
injury to persons or exposure to
excessivemicrowave energy:
@ Usethis appliance only for its
intended useas described in this
manual.
a Readand follow the specific
“PRECAUTIONS TO AVOID
POSSIBLE EXPOSURETO
EXCESSIVEMICROWAVE
ENERGY” found on page2.
@This appliance mustbe
grounded.Connectonlyto
properlygroundedoutlet.See
“GI%31JNDINGIINSTRUCTIONS”
foundonpage 10.
@ For best operation, plug this
appliance into its own electrical
outlet, to prevent flickering of
lights, blowing of fuse or tripping of circuii, breaker.
QI Install or locate this appliance
only in accordance with the pro-
vided installation instructions.
@ Be certain to place the front
surface of the door three inches
wr more back frcmlthe counter”
top edge to avoid accidental tip-
pingd !n’leappliance innormii
usage.
@Do not cover or block any
openings on the appliance.
@ Do not use outdoors.
Q
DO not immerse power cord
or plug in water.
QJKeep power cord away from
heated surfaces.
@ Do not [et power cord hang
over edge of table or counter.
01 Do not operate this appliance
if it has a damaged power cord
or plug, if it is not working properly, or if it has been damaged
or dropped.
o Seedoor surface cleaning
instructions orI page 9.
0 This appliance should be serviced only by qualified service
personnd. Contact nearest
authorized servicefacility for
examination, repair or
adjustment.
@As with
supervision is
any appliance, close
necessarywhen
used by children.
e To reduce the risk of fire in
the oven cavity:
—Do not overcook food. Care-
fully attend appliance if paper,
plastic, or other combustible
materials are placed inside the
oven to facilitate cooking.
—Removewire twist-ties from
paper or plastic bags before
placing bag in oven.
—Do not use your microwave
pven to dry newspapers.
=-Paper towels and napkins,
wax paper. Recycled paper
products can contain metal
flecks which may cause arcing
or ignite. Paperproducts containing nylon or nylon filaments
should be avoided, as they may
also ignite.
—Do not pop popcornh your
rmkmwmfeovenunless in a special microwave popcorn accessory or unless you use popcorn
Iab&ledfor use-in microwave
ovens.
—-Donot operate !N3eown w13M
empty to avoid damage to the
OVW’Bmc!i tht? ~~ng~r Of ‘h@. [f by
accident the oven should run
empty a minute or two, no harm
is done. However, try to avoid
operating the oven empty at all
times-it savesenergy and prolongs life of the oven.
—-Ifmaterials inside the oven
should ignite, keep oven door
closed, turn oven off, and disconnect the power cord, or shut
off power at the fuse or circuit
breaker panel.
(coritinuod next page)
3
Page 4

C.~%:~,??+!i $~~g-.
mmk%..-j
\%,LJd
Some
%!!’
products such as
whole eggs and sealed containers—for example, closed
glass jars—may explode and
should not be heated in this
o~en.
~~.Aw2idheating baby food in
~hss jars, even without their
lids; especially meat and egg
mixtures.
~‘ Don’t defrost frozen bever-
&es in narrow necked bottles;
especially carbonated ones.
Even if the container is opened,
pressure can build up.
cause the container to burst,
resulting
in injury.
This can
a Use metal only as directed in
Cookbook. Metal strips as used
on meat roasts are helpful when
used as shown in Cookbook.
TV dinners may be cooked in
metal trays. However, when
using metal in microwave oven,
keep metal at !easti-inch away
from sides of oven.
‘:: C%XMMJutensils may
become hot because of heat
transferred from the heated
food. This is especially true if
plastic wrap has been covering
the top and handles of the
utensil. Potholders may be
needed to handle the utensil.
-~ sometimes, the Owenfloor
&mJbecome too hot to touch.
Be carefui touching the floor
during and after cooking.
“:>i%lonot use any thermometer
in food you are microwaving
unless that thermometer is
designed or recommended for
use in the microwave oven.
~J Remove the temperature
$kM3efrcmthe ‘ovenwhen not
usingiii
Nic probe inside theoven without
inserting it in food or liquid, and
turn on microwave energy, it can
create electrical arcing in the
oven, and damage oven walls.
@ P[a~ti~Uten$j&.—P/astic
utensils designed for microwave
cooking are very useful, but
should be used carefully. Even
microwave plastic may not be as
tolerant of overcooking conditions as are glass or ceramic
materials and may soften or
char if subjected to short periods
of overcooking. In longer exposures to overcooking, the food
and utensils could ignite. For
these reasons:1) Use microwave plastics only “and use
them” in strict compliance with
the utensil manufacturer’s
recommendations. 2) Do not
subject empty utensils to micro-
waving. 3) Do not permit children
to use plastic utensils without
complete supervision.
@ when cooking pork follow
our directions exactly and
always cook the meat to at least
170°. This assuresthat, in the
remote possibility that trichina
may be present in the meat, it
will be killed and meat will be
safe to eat.
o Boiling eggs @ and out of
sheli) is not recommended for
microwave cooking. Pressure
can build up inside egg yolk and
may cause it to burst, resulting
in injury.
to cook with. If you leave
o Fcmds with unbroken CM.@x
“skin” such as potatoes, hot
dogs or sausages,tomatoes,
apples,chicken livers and other
giblets, and eggs (see previous
caution) should be pierced to
allow steam to escape during
cooking.
o “Boilable” ccddng pouches
and tightly dosed plastic bags
should be slit, pierced or vented
as directed in Cookbook. If they
are not, plastic could burst during or immediately after cooking,
possibly resulting in injury. Also,
plastic storage containers should
beat least partially uncovered
becausethey form a tight seal.
When cooking with containers
tightly covered with plastic wrap,
remove covering carefully and
direct steam away from hands
and face.
Page 5

Featuresof
YourMicrowaveOven
..
..
‘:’,M 111IIEEssY/ /4
w
.:
f,
Door Handle. Pull to open door. Door must be
securely latched for oven to operate.
k.
?
3.
Latches.
Door
ViewingVWnciowwith MetalShield.
permits viewing of foods and keeps microwaves
confined inside oven.
Antenna Cover. Protects the microwave energy
distributing antenna. Do not remove this cover.
You will damage the oven.
Owenvent.
Oven Interior Light. Turns on when the door is
opened or when the oven is operating.
Oven Floor.
Automatic Temperature Probe. Use with
perature Cook only. Remove from oven
not in use.
Receptacle for Temperature Probe. Temperature Probe must be securely inserted into
receptacle when cooking by temperature.
Time/’Temp Swi8ch. To cook by Time, push to
right, then set timer. To cook by Temperature,
push to left, then set dial.
Timer. Set timer to desired cooking or defrosting time for TIME COOK. (Up to 60 minutes).
Model RE962
Metal screen
Temwhen
32.
Temperature Control. Set desired finished
temperature by dialing knob. If actual internal
temperature of food is more than temperature
set, oven will not start.
-!3.
Variable Power Control. This control can be set
from levels 1 to 10. You can vary the amount of
microwave power in the oven as suggested for
recipes in the Cookbook. See Chart below.
What the Power Lewd Means
10—-HW=4Full power. Use it anytime speed
is important.
7—MED. HIGHIMedium-high power. About
3/4 the oven’s full power. Fast way of heating pre-cooked dishes without overcooking.
5—MED, Medium power. About 1/2 the
oven’s full power. Good for delicate foods
like ome!ets and cheese dishes.
3—LOW/DEFROST Low power. About 1/3
the oven’s full power. Handy for softening
butter, reheating delicate sauces.
fl-WARM About 1/10 of oven’s full power.
Hold leftovers or piates of food 1/2 hour to
1 hour,
14. Start Button. After all controls are set, push to
start oven.
‘~5. McM.Mand Serial Numbers.
Page 6

The time cooking feature allows
you to preset the cooking time.
The oven shuts off automatically.
Power Level 10 is recommended
for most time cooking, but you may
change this for more flexibility.
See your Cookbook.
To become better acquainted with
time cooking, make a cup of coffee
by following the steps below.
.
.
ekingbyT[ime
i,
[
)
====—====.
-—--’),
__<
‘):L
1
-“
S!ep ;: Fill a cup 2/3 full of water
and 1 teaspoon of freeze dried
coffee. Use a cup that has no metal
decoration. Place cup in oven and
close door.
Step 2: Turn Variable Power Coritrol to 10 (HIGH). For this cup of
coffee, this power level is recommended, but you will use other
levels as recipes call for their use.
Step 3: Push TiME/TEMP Switch
to TIME position.
Step 4: Set Time Control. For
coffee set at 1 minute and 20 to
30 seconds. Timer may be reset
during cooking if needed.
Step 5: Push START button. interior light and fan come on to tell
you oven is operating.
Step 6: When time is up, oven sig-
nals and shuts off automatically.
2, i set my
‘:j~-in the recipe but at the end of
;e tIwe allowed, my dish wasn’t
“J i-l(~. ‘!!‘J-c
Sirice house power varies due
A.
IO time or iocation many Time
Cook recipes give you atime range
:U prevent overcooking. Set the
jven for minimum time, test the
‘{]cjd for doneness, and cook your
:\iS?i a little longer, if necessary.
oven for the time called
‘IIhat happened?
Q. I want to cook my dish on a
Power Level other than HIGH,
what do I need to do?
A. To change the Power Level,
simply turn Variable Power Control to desired number setting.
Q. Can I interrupt my Time Cook
function to check the food?
A. Yes. To resume cooking, simply
ciose the door and push START.
NOTE: Microwave power will not
come on until you are ready. You
must push START for cooking to
begin.
6
Q. Must I change the Power Control every time I cook?
A. You must turn the Power Control to desired Power Level. If,
however, it is already on level
needed, it is not necessary to
change.
Page 7

Howto UseDefrost
How
The Defrost setting is designed for
even thawing necessary for large
amounts of food and is one of the
most important advantages of a
microwave oven.
@
@ See your Cookbook for the
To become better acquainted with
your Defrost function, defrost frozen pork chops by following the
steps below.
Step f: Place package of frozen
chops in the oven and close door.
toDefrost
Power Level 3 is recommended
for most defrosting, but you may
change this for more flexibility.
complete defrosting chart.
Step 3: Push
tOTIME.
Step 4:
TurnTimer to 8 minutes.
TIME/TEMP Switch
Defrosting Tips
@ Foods frozen in paperor plastic
canbedefrosted
@ For even defrosting, many foods
need to be broken up or separated
part of the way through the de-
frostingtime.
e Homemade dinners can be fro-
zen inshallowfoiltraysand heated
for later use. Select foods which
microwave well.
@Pre-packaged frozen dinners
can be defrosted and microwave
cooked.
in the package.
Step 2: Turn Variable Power Con-
trol to 3 (DEF).
Questions
and Answers
Q. Can I Defrost small items in a
hurry?
A. Yes, but they will need more
frequent attention than usual.
Raise the Power Level after
entering the time by turning Vari-
—
able Power Control to 7 or 10.
Power Level 7 cuts the time in 1/2;
“w
Power Level 10 cuts the time to
1/3.
Step 5: Push START button.
Step 6: When oven turns off, turn
package over, close door, and
repeat Steps 4 and 5.
Q. When I press START, I hear a
dull thumping noise. What is it?
A. This sound is normal. It is letting you know the oven is using a
Power Level lower than HIGH.
Q. Why don’t the defrosting times
in the Cookbook seem right for my
food?
A. Cookbook times are average.
Defrosting time can vary according
to the temperature in your freezer.
Set your oven for the time indicated in your Cookbook. If your
food is still not completely thawed
at the end of that time, re-set your
oven and adjust the time ac-
cordingly.
@ Check your Cookbook for other
defrosting tips.
Q. Can I open the door during
defrosting to check on the progress of my food?
A. Yes, You may open the door at
any time during microwaving. To
resume defrosting, close the door
and press START.
Q. Can I select a Power Level other
than Power Level 3 for defrosting?
A. Yes. Some smaller foods may be
defrosted quicker on higher Power
Levels but for even, carefree
defrosting, Power Level 3 is suggested. Check the chart in the
Cookbook for specific times and
Power Levels,
Page 8

Cookingby Temperature
For many foods, internal temperature is the best
test of doneness.
Roasts or poultry are cooked to perfection when
temperature cooking. Heating or reheating foods
accurately to a serving temperature you desire is
simple and easy.
Temperature Cooking takes the guesswork out of
cooking because the oven shuts off automatically
when the food is done.
The Temperature Probe
The temperature probe is a food thermometer that
gauges the internal temperature of your food; it
must be used when using Temperature Cooking.
Check with your Cookbook for proper placement of
probe in specific foods.
HANOLE
SENSOR
How~to Temp Cook a Roiled Beef Rib Roast to Medium
Step 3: Insert temperature probe
as directed in Cookbook and attach probe securely in oven wall.
Close the door.
Step 2: Turn Variable Power Control to 5 (MED).
Step 3: Push TIME/TEMP Switch
to TEMP position.
Step 4: Turn Temperature Knob
to 130.
Step !3: Push START button. interior light and fan come on to tell
you oven is operating.
Step 6: When 130 degrees is
reached, oven automatically turns
off. Remove probe and food from
the oven.
cooking Tips
@ Use a lower Power Leve{ set-
ting: it will heat more evenly even
though requiring more time.
sure frozen food has been
@ 13e
completely defrosted before in-
serting probe. Probe may break off
if used in frozen foods.
Always insert probe into the
@
center of meaty areas; take care
not to touch the fat or the bone.
@ Insert probe as horizontally as
possible into foods as directed in
the recipes. Make sure the handle
does not touch the food.
@ Usethe clip to keep the probe in
place while heating.
@ Cover foods as directed in
Cookbook for moisture control and
quick, even heating.
CLIP
I
Questions
and Answers
G. Is temperature cooking better
!han time
i~ftove~s7
A. Yes, this type of food is excel-
lent to heat with the probe because
often the amount of food is not
known, therefore cooking time is
only a guess. Cooking to a preset
temperature (usually 150°) eliminates the guesswork,
cooking for reheating
Q. After setting Power Level and
temperature, I pushed START but
the oven did not come on. Why?
A. You must push the TIME/TEMP
Switch to TEMP when temperature
cooking. Also if probe is not
securely seated or forgotten, oven
will not start. Make sure all controls are set properly.
Q. Are there
Temperature Cook?
A. Yes.
cream, frozen whipped toppings,
etc., soften rapidly at warm temperatures. Batters and doughs as
well as frozen foods are also difficult to cook precisely with the
probe. It is best to TIME COOK
these foods.
Delicate butter icings, ice
any foods I can’t
Q. Can I leave my pr~be in the
oven if it’s not inserted in the food?
A. No. if the probe is left inside the
oven, touching the oven wall, and
not inserted in food, you may
damage the oven.
Q. How do I know what temperature to set?
A. Your Cookbook contains sec-
tions on all types of foods showing
the temperatures needed to cook
the foods to different degrees of
doneness. For reheating, refer to
Reheating Charts in the front
of the Cookbook for specific
temperatures,
Page 9

w New MicrowaveOvenisa
habk Appliance,ProtectIt From
suseByFoliowingTheseRules:
Keep yourovendean and
weet-smelling.
door
a few minutes after cooking
helps “air-out” the interior. An
occasional thorough wiping with a
solution of baking soda and water
keepsthe interior fresh.
@ Don’tusesharp-edgedutensils
wth youroven.The interior and ex-
terior oven walls can be scratched.
The control panel can be damaged,
@ Don’tremovethe antennacover
atthe top of the oven (microwave
feature 4 on page 5). Youwill
damagethe oven.
Opening the oven
P4
u
-’
BE CERTAIN IPO?AEF?E OFT
EFOFIECLEANING NW’
ART OF THIS OVEN.
How
tock?anmeIF-wide?
Walk, floorand plasticcover.Becausethere is little heat except in
the food, or sometimes in the utensils, spills and spatters are easyto
remove,Some spatters can be removed with a paper towel, others
may require a damp cloth. Remove
greasyspatters with a sudsy cloth,
then rinse and dry. Do not use
abrasivecleaners on oven walls.
NEVERUSEA COMMERCIAL
OVEN CLEANER ON ANY PART
OF YOURMICROWAVEOVEN.
Door-inside.Glass:Wipeup spatters
daily, wash when soiled, with a minimum of sudsy warm water. Rinse
thoroughly and dry.
Metal and plastic parts on door:
Wipe frequently with a damp cloth
to remove all soil. DO NOT USE
ABRASIVES, SUCH AS CLEANING
POWDERSOR STEEL AND PLASTIC PADS.THEY MAY MAR THE
SURFACE.
SpecialnotewhenusingBrown‘N
SearDish:High heat generated on
bottom of Brown ‘N Sear Dish can
cause scorched appearing stains to
bake onto the oven floor if grease is
present. These may be removed
with Bar Keepers Friend@Cleanser
by SerVaasLaboratories, Inc.
After using Bar Keepers Friend@
Cleanser, rinse and dry thoroughly,
following instructions on can. Do
not use Bar Keepers Friend@
Cleanser on the painted surfaces
such asthe walls. It may scratch the
paint.
Bar Keepers Friend@Cleanser is
sold in many grocery, hardware,
and department stores.
iHwvtoCmm ‘m? outside
Case.Clean the outside of your
oven with soap and damp cloth,
then rinse and dry. The outer pane
of the window is glass.Just wjpe
clean with a damp cloth. Chrome
trim is best wiped with a damp cloth
and then with a dry towel,
ControlPaneLWipe with a damp
cloth. Dry thoroughly. Do not use
abrasivesor sharp objects on the
panel.They can damage it.
DoorSurface.When cleaning sur-
faces of door and oven that come
together on closing the door, use
only mild, non-abrasive soaps or
detergents applied with a sponge
or soft cloth.
PowerCord.If the cord becomes
soiled, unplug and wash with damp
cloth. Forstubborn spots, sudsy
water may be used,but be certain
to rinse and dry thoroughly before
plugging cord into outlet.
Oven!-ampReplacement.First
unplug the oven.Them remove
lamp compartment cover by removing screw which holds cover in
place. Cover is located at the rear
of outer case.
Replacewith 40watt appliance
bulb. (It is avai!ablein drug and
hardware stores,) Replace compartment cover. Plug in the oven.
AutomaticTemperatureProbe.
Probe is sturdy, but care should be
taken in handling. Do not twist or
bend; avoid dropping temperature
probe.
Clean as soon after using as pos-
sible. To clean, wipe with sudsy
cloth, then rub lightly with plastic
scouring ball if necessary. Rinse
and dry. (Or wash in dishwasher.)
Page 10

e
10
This appliance must be grounded.
In the event of an electrical short
circuit, grounding reducesthe risk
of electric shock by providing an
escapewire for the electric current.
This appliance is equipped with a
power cord having a grounding
wire with a grounding plug. The
plug must be plugged into an outlet
that is properly installed and
grounded. (Fig. 1)
WARNING—improper useof the
grounding plug can result in a risk
of eiectric shock.
PtlEFERflED
METHOD
\
Q
h
\
%
Q
0
-’$
n
7
INSUREPROPER
EXISTS
Fig. 1 BEFOREUSE
Consult a qualified electrician or
serviceman if the grounding instructions are not completely understood, or if doubt exists asto
whether the appliance is properly
grounded.
Where a standard two-prong wall
receptacle is encountered, it is your
personal responsibility and obligation to have it replaced with a properly grounded three-prong wall
receptacle.
Do Not under
GROUND
Any chum”
stancescut or Fhnove the
Third (Ground) P!’(NKJIFm??l
The Powercord.
used AdapterP!ugs
UsageSituatkm Where
Appliance’sPowerCord
willm?mwx’m?ded
Infrequently.
Becauseof potential safety hazards
under certain conditions, we
stronglyrecommendagainstthe
useof an adapterplug.However,
if you still elect to use an adapter,
where local codes permit, a TEMPORARYCONNECTION may be
made to a properly grounded twoprong wall receptacle by the use of
a UL listed adapter (Fig. 2) which is
available at most local hardware
stores.
TEMPOWIRYMETHOD
(ADAPTERPLUGSNOT
PERMITTEDINCANADA)
The larger slot in the adapter must
be aligned with the iar~er slot in the
wall receptacle to prov~deproper
polarity in the connection of the
power cord.
Caution:Attaching the adapter
ground terminal to the wall recep-
tacle cover screw does not ground
the appliance unlessthe cover
screw is metal, and not insulated,
and the wall receptacle is grounded
through the house wiring. You
should have the circuit checked by
a qualified electrician to make sure
the receptacle is properly grounded.
..
m
UsageSituationsWhere
Appliance’sPowerCord
VVillBe Disconnected
Frequently,
Do not usean adapterplugin these
situations becausedisconnecting of
the power cord places undue strain
on the adapter and leads to eventual failure of the adapter ground
terminal. Youshould havethe two-
prong wall receptacle replaced with
a three-prong (grounding) receptacle by a qualified electrician
before using the appliance.
!&wofExtension Cords
Becauseof potential safety hazards
under certain conditions we strongly
recommend against the useof an
extension cord. However, if it is
necessaryto use an extension cord,
useonly a 3-wire extension cord
that has a 3-blade grounding plug,
and a 3-slot receptacle that will
accept the plug on the appliance.
The marked rating of the extension
cord shall be equal to or greater
than the electrical rating ~f the
appliance (15amperes.)
Such extension cords are obtainable
through Hotpoint service. If youdo
useanextensioncordwithyour
microwaveoven,the interior light
may flicker and the blower sound
may vary when oven is in use.
e
e
When disconnecting the power
cord from the adapter, always hold
the adapter with one hand. If this is
not done, the adapter ground terminal is very likely to break with
repeated use. Should this happen,
DO NOT USE the appliance until
a proper ground has again been
established.
Page 11

‘1-clsaveTimeand Money—
!%@zz_-
_-_._—
before you
requestSewice,
check the ProblemSolver
If you havea problem, it may be
minor. You may be able to correct
it yourself. Just use this Problem
Solver to !ocate your problem and
then follow the suggested
recommendations.
@Steamor vapor escaping from
around the door.
@Light reflection around door
Or
outercase.
~ Dimming oven light and change in
blower sound may occur while oper~
sting at power levelsotherthan high.
@Duli thumping sound whiie Oper- - -
sting at power Jevelsother than high. ‘;?=---
~ Some T!/-Radio interference
might be noticed while using your
microwave oven, It’s similar to the
interference caused by other small
appliances and does not indicate a . problem with your oven.
E<??&
!##?p
p~;ir~;.
B#!*.”
& “
B-G:
,.s--
M** r
PROBLEM
OVEN WILL NOT COME ON
PC)SS!BLE CAUSE AND REMEDY’
A fuse in your home may be blown or the circuit breaker tripped.
Replace fuse or reset circuit breaker.
Make sure 3-prong plug on oven is fully inserted into wall
receptacle.
Door not securely closed.
WHEN USING TEMPERATU13EPROBE, OVEN WILL
NOT COME ON AFTER
“START” IS PRESSED
-
FOODS ARE EiTHER OverCOOKED OR UNDERCOOKED
TIME/TEMP switch must be set at TEMP position. If Switch is set on
TIME and there is time left on timer, rotate timer to “O”.
Check to be sure cable end of probe is securely “seated” into oven
receptacle
Temperature set on TEM-PERATLJREDial must be higher than actual
food temperature for oven to
Slxut.
cooking times may vary because of starting food temperature, food
density or amount of foods in oven. Set additional cooking time for
completion.
Incorrect Power Level set. Check Cookbook for recommended
Power Level or changing levels during cooking if necessary.
Dish was not rotated, turned or stirred. Some dishes require specific
instructions. Check Cookbook or recipe for these instructions.
Too many dishes, in oven at same time. Cooking time must be
increased when cooking more than one food item. Check Cookbook
for recommendation on increasing time,
Temperature probe must be inserted into food properly. Check
Cookbook for probe placement when cooking by temperature.
Toobtain service, see yourwarranty
cmthe back page of this book.
We’reproud of our service arid
want you to be pleased. If for some
reasonyou are not happy with the
service you receive,here arethree
stepsto fo!low for further hetp.
FIRST,contact the people who
f~twvicgdyour appliance. Explain
}fhy yo~i
:;~:;es, I.hjs will
are riot pleased. In most
$oli/e the problem.
NEXT,if you arestill not pleased,
write all the details—including your
phone number—to:
Manager,Consumer Relations
Hotpoint
Appliance Park
Louisville, Kentucky40225
1“1
FINALLY,if your problem is still not
resolved, write:
Major Appliance
Consumer Action Panel
20 North Wacker Drive
Chicago, Illinois 60606
Page 12

——
1
.-
-—
——.–.-
. .
. .
“.
Saveproof of original purchase date such as your sales slip or cancelled check to establish ‘warrantyperiod.
~
WHAT!sCXNERED
.
FULLONE-YEARWARRANTY
Forone year from date of original
purchase,we will provide,free of
charge, parts and service labor in
your home to repair or replaceany
part of themicrowaveoven/range
that fails because of a manufacturing defect.
LIMITEDADDITIONAL
FOUR-YEARWARRANTY
For the second through fifth year
from date of original purchase,
we will provide, free of charge,a
replacement magnetrontubeif the
magnetron tube fails because of a
manufacturing defect. Youpay for
the service trip to your home and
service labor charges.
This warranty is extended to the
original purchaser and any succeed-
ing owner for products purchased
for ordinary home use in the
mainland states, Hawaii and
Washington, D.C.In Alaska the
warranty is the same except that it
is LIMITEDbecauseyou must pay
to ship the product to the service
shop or for the service technician’s
travel costs to your home.
All warrantyservicewill be provided
by our Factory ServiceCenters or
by our authorized Customer Care@
servicers during normal working.
hours.
Look in the White or Yellow Pages
of your telephone directory for
HOTPOINT FACTORY SERVICE,
GENERAL ELECTRIC-HOTPOINT
FACTORY SERVICE or HOTPOINT
CUSTOMER CARE@SERVICE.
48
.—
. .
. .
WHATE NOTCOVERED
.
.
Some statesdo not allowtheexclusionor limitation of incidentalor consequentialdamages,sothe abovelimitationorexclusion
maynotapplyto you.Thiswarranty
To know what your legal rights are in your state, consult your local or state consumer affairs office or your state’s Attorney General.
I
oService trips to your home to
teach you how to use the product.
Readyour Use and Care material.
If you then haveany questions
about operating the product,
please contact your dealer or our
Consumer Affairs office at the
address below,or call, toll free:
The GE Answer CenterTM
800.626.2000
consumer information service
~ Improper installation.
. If you havean installation problem,
contact your dealer or installer.
Youare responsible for providing
adequate electrical, exhausting
and other connecting facilities.
gives you specific legal rights, and you may also have other rights which vary from state to state.
Warrantor:General Electric Company
. Replacement of house fuses
or resetting of circuit breakers.
@Failure of the product if it is
used for other than its intended
purpose or used commercially.
. Damage to product caused
by accident, fire, floods or acts
of God.
WARRANTORIS NOT RESPON-
SIBLE FORCONSEQUENTIAL
DAMAGES.
“.
‘.
I
~ :,
,.
,,
. .
Pub. No. 39-4490-id
[
,,
. . . ., . .
J. OULHIL+ruo ncv. L
If further help is needed concerning this warranty,contact:
Manager—ConsumerAffairs, General Electric Company,Appliance Park, Louisville, KY 40225
,.
,.
I
,’. . .
f,
—m m
~,
6-85
,1. . . .’. ,
A QUALI I Y 17WUUbl W - LYtlWKAL E!-ECTRIC COMPANY
. .
.’
-....-—.
#
{ ..~
.
 Loading...